

Page 1

PageScope Light
for Pi5500
Page 2

Foreword
Welcome
PageScope Light for Pi5500 is a device control utility program
provided by the HTTP server built into the Pi5500 (printer controller
for Di450/Di550). With a standard Web browser, this utility can be
used as an interface for remote control of the Di450/Di550.
Trademark Acknowledgements
Minolta i s a regis tered tr ademark of MINOLTA CO., LTD.
Apple and Macintosh are registered tr ad emarks of Apple Computer,
Inc.
Ethernet is a registered trade mar k of Xerox Corporation.
Fiery and the Fiery logo are registere d trade marks of Electronics for
Imaging, Inc. Fiery WebTools is a tradem ark of Elec tronics for
Imaging, Inc.
Linux is a registered trademark of Linus Torva lds.
Microsoft, Windows, and Windows NT are registered trademarks of
Microsoft Corporation.
Netscape Communications, the Netscape Communications logo,
Netscape Navigator, Netscape Communicator, and Netscape are
trademarks of Netscape Communications Corporation.
PCL is a regis tered tra dem ark of Hew le tt-P ack a rd Comp any L imi te d.
PostScript is a registered trademark of Adobe Systems, Inc.
Solaris is a trademark of Sun Microsystems, Inc.
All other product names are trademarks or registered trademarks of
their respective holders.
Copyright 2000 MINOLTA CO., LTD.
The information contained in this manual is subject to change
without notice to incorporate improvements made on the product
or products the manual covers.
i
Page 3

Contents
CONTENTS
1 System Req uirements
.......................................1
2 Access ....................................................................2
2.1 Operation ...........................................................2
3 Scre en Configuration ........................................3
4System Tab ............................................................5
4.1 Summary ............................................................5
4.2 Details ................................................................6
4.2.1 Input Tray ... ......... .......... ......... ......... .........6
4.2.2 Output Tray ..............................................7
4.2.3 Hard Disk Status ......................................8
4.2.4 ROM Version ............................................9
4.2.5 Interface Information .............................10
4.2.6 Consumable Status ...............................11
4.3 Preference .......................................................12
4.4 Online Assistance ...........................................13
ii
Page 4

Contents
5Printer Tab ...........................................................15
5.1 Printer Front Panel ..........................................15
5.2 Test Print ..........................................................16
5.3 Font Information .............................................17
5.3.1 PCL Font ................................................17
5.3.2 PostScript Font ......................................18
Appendix Status List ...................................19
iii
Page 5

Page 6
1 System Requirements
1 System Requirements
The following items are required to use this utility.
Computer
•Software
Operating System Web Browser
Windows 95/98/NT 4.0/2000 Internet Explorer 3.02 or higher
Netscape Navigator 3 or higher
Macintos h System 7 or higher Internet Explorer 4.5 or higher
Netscape Navigator 4 or higher
Solaris 2.5.1/2.6/7 (2.7) Netscape Navigator 4 or higher
Linux Netscape Navigator 4 or higher
• NIC (Network Interface Card)
•Ethernet
• TCP/IP Protocol
Di450/Di550
Pi5500 Printer Contr oller
1
Page 7

2 Access
2 Access
PageScope Light for Pi5500 can be accessed dir ectly from a Web
browser.
1. Start the Web browser .
2. In the URL fiel d, en ter the IP address of the printe r contro l ler as
shown below.
http://<IP address of printer controller>/
(Example) When the IP address of the printer controller is
192.9.200.200:
http://192.9.200.200/
3. This causes the PageScope Light for Pi5500 screen to appear.
2.1 Operation
PageScope Light for Pi5500 operation is identical to that for Internet
Web pages. Clicking a hot link jumps to the link destination, and the
Back and Forward buttons scroll thr ough pages backwards and
forward.
2
Page 8
3 Screen Configuration
3 Screen Configuration
The configuration of the PageScope Light f or Pi5500 screen is shown
below.
Note
• Screen images shown in this manua l may differ slightly from actual
ones. In addition, specifications are subject to change without prior
notice.
➁
➀
➃
➂
➄
➅
➀ Minolta PageScope Light Logo
Clicking the logo jumps to the Website shown below.
www.minolta.com
➁ Status Display
The current status of the Di450/ Di550 is indicated by both icons
and text. The message Ready appears in the top line of text
when the Di450/Di550 is operating nor mally. For full details
about screen c ontents, see Appendix – Status List.
3
Page 9

3 Screen Configuration
➂ Tabs
Use the tabs to select the category of items you want to display.
For full details about tab contents, see 4 – System Tab and
5 – Printer Tab.
➃ Menus
Use the menus to select information or setting items. The
menus that appear depend on the currently selected tab.
For full details about menu contents, see 4 – System T ab and
5 – Printer Tab.
➄ Information and Settings Display
This display shows information or settings in accordance with
the selected menu item.
➅ Fiery WebTools Logo
Clicking this logo displays the settings page for Fiery
WebTools, which is built in to the printer controller. For details
about Fiery WebTools, see the
Operator’s Guide
.
Printer Controller Pi5500
4
Page 10

4 System Tab
4 System Tab
The System tab shows information and settings about the Di450/
Di550 system configuration.
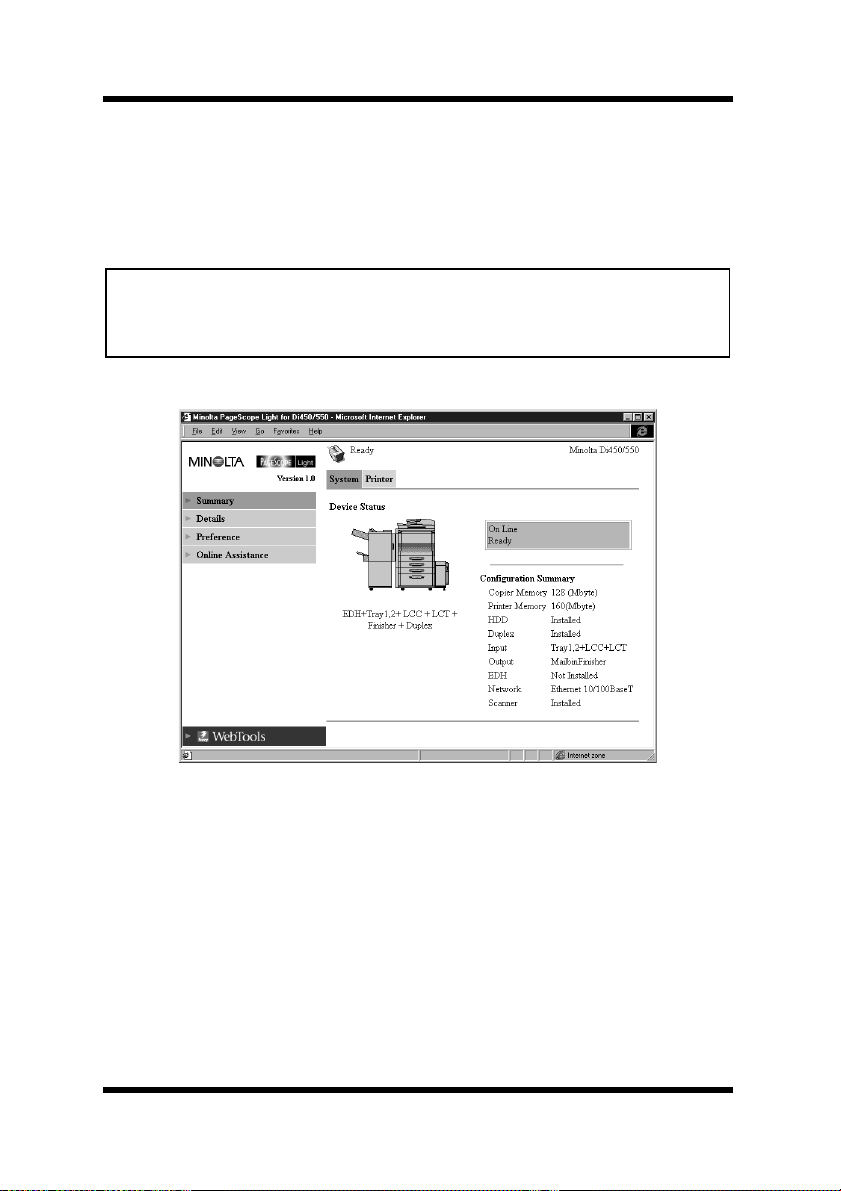
4.1 Summary
This screen is the initial screen when you access http://<IP address of
printer contr oller> with your Web browser. You can also display the
Summary screen by clicking the
The Summary screen shows the current Di450/Di550 syste m
configuration.
Summary menu on the System tab.
Device Status This area uses graphics and text to shows the
configuration of options insta lled on the Di450/
Di550.
Operational Panel Display
This area shows the printer controller message
display. Messages are the same as th e Status
Display messages that appear in the upper part of
the window.
5
Page 11

4 System Tab
Configuration Summary
This area shows an overvie w of the current Di450/
Di550 system configuration.
4.2 Details
This screen appears when you clic k the Details menu on the System
tab. It shows details about each of the Di450/Di550’s units. Clicking a
sub-menu under the
applicable unit.
4.2.1 Input Tray
This screen appears when you clic k t he Input Tray sub-menu under the
Details menu. It shows the configuration of all the Input Trays
installed on the Di450/Di550.
Details menu displays information about the
Tray Tray n ame
Pape r Size Size of paper loaded in the tray
Media Type T ype of media loaded in the tray
Orientation Orientation of paper loaded in the tra y
6
Page 12

4 System Tab
Capacity Maximum number of sheets that can be loaded in
the tray
Paper Amount of paper remaining in the tray (%)
4.2.2 Output Tray
This screen appears when you clic k the Outpu t Tray sub- menu under
the Details menu. It shows the configuration of all the Output Trays
installed on the Di450/Di550.
Tray Tray n ame
Capacity Maximum number of sheets the tray can hold
Bin Name When the mail bin finisher is installed, owner
name assigned to each bin
Paper Tray status (Shows
receive a ny more paper, and Ready when it is.)
Full when the tray is unable to
7
Page 13

4 System Tab
4.2.3 Hard Disk Status
This screen appe ars when you click the Hard Disk sub- menu under the
Details menu. It shows the status of the hard disk ins talled on the
printer controller. (This information is not displayed when there is no
hard disk installed on the printer cont roller .)
Usage Percent of hard disk space used (%)
Used Amount of hard disk space used (KB)
Free Amount of hard disk spa ce free (KB)
8
Page 14

4 System Tab
4.2.4 ROM Version
This screen appears when you click the ROM Versio n sub -menu under
the Details menu. It shows information about the on-board memory of
the Di450/Di550 and the printer c ontroller.
Copier Version of ROM installed on the Di450/Di550
Printer Co ntroller
Version of firmware installed on the printer
controller
PDL Info Version of printer control codes (PCL or
PostScript) used by the printer controller
9
Page 15

4 System Tab
4.2.5 Interface Info r mat ion
This screen appears when you click the Inte rfac e Info sub-menu under
the Details menu. It shows information about the printer controller
interface.
Network I/F Network interface type
Local I/F Local port type
10
Page 16

4 System Tab
4.2.6 Consumable Status
This screen appears when you clic k the Consumable sub-menu under
the Details menu. It shows the current status of Di450/Di550
consumables. For information about consumables, see the D i450/Di550
Operator’s Manual
.
Toner Remaining toner
Wast e Ton er Remaining waste toner bottle capacit y
Staple Remaining staples
Fuser W eb Remaining oil in fuser web unit
11
Page 17

4 System Tab
4.3 Preference
This screen appears when you click the Preference menu on the System
tab. It lets you make changes to the PageScope Light environment.
Password Type in the password here when a password is
defined . No te that the pas swo r d is ca se-s ens iti ve,
so be sure to type in upper-case and lower-case
characters correctl y. (The password you should
type in here is the same as the administrator
password you created for Fiery WebTools.)
Refresh Rate Type in a value to specify the number of seconds
between screen refreshes. You can input a value
from 30 to 300 seconds. The default setting is 60
seconds.
Language Select the screen language you want to use for
PageScope Light.
• English
• German
• French
• Italian
• Spanish
12
Page 18

4 System Tab
Apply Butto n Click this button to apply any settings you hav e
input or selected up to this point.
Clear Butto n Click this button to cancel any settings you have
input or selected up to this point.
Note
• The message Invalid Password appears on the scre en if you input the
wrong passw ord. If this happens, cl ick your Web browser’s
button to return to the previous page and configure your preferences
again.
Back
4.4 Online Assistance
This screen appears when you click the Online Assistance menu
on the
settings relat ed to product support.
System tab. It shows information and lets you make
Password Type in the password here when a password is
defined . No te that the pas swo r d is ca se-s ens iti ve,
so be sure to type in upper-case and lower-case
characters correctl y. (The password you should
13
Page 19

4 System Tab
type in here is the same as the administrator
password you created with Fiery WebTools.)
Contact Type in the name of your product support counter.
Contact Tel Number
T ype in the phone number of you r product supp ort
counter.
Product Help URL
T ype in the URL of your product information
W ebsite. Clicking the
to the Website you specify he re.
Minolta Corporate URL
T ype in the URL to the Minolta home page.
Clicking the
Minolta Corporate URL jumps to the
W ebsite you specify here.
Tel N um b er fo r Su ppl ies and A ccessories
Type in the telephone number of the support
counter you need to contact to order consumables
and accessories.
Product H elp URL jumps
Apply Butto n Click this button to apply any settings you hav e
input up to this point.
Clear Butto n Click this button to cancel any settings you have
input up to this point.
Note
• The message Invalid Password appears on the scree n if you input the
wrong password. If this ha ppens, click your Web browser’s
button to return to the previous page and configure your online
assistan c e s et t in g s ag ai n .
Back
14
Page 20

5Printer Tab
5Printer Tab
The Printer tab shows information and setti ngs for printing on the
Di450/Di550.
5.1 Printer Front Panel
This screen appears when you clic k the Operational Panel menu on
Printer tab. It provides on-screen emulation of the printe r
the
controllers operational panel.
Display This area shows the printer controller message
display. Messages are the same as th e Status
Display messages that appear in the upper part of
the window.
Online But to n Toggles the printer controller network connect ion
on line and off line
15
Page 21

5Printer Tab
5.2 Test Print
This screen appears when you c lick th e Test Print menu on the Printer
tab. It lets you select a test print page and execute a test pr int
operation.
Config Page Insert a che ck mark i nto the b ox t o prin t t he pr inter
controller setup page.
PCL Demo Page
Insert a chec k mark into the b ox to pri n t the PCL
demo page.
PostScri pt D emo Pag e
Insert a chec k mark into the b ox to pri n t the
PostScript demo page.
PCL Font ListInsert a check mark into the b ox t o prin t the PCL
font list.
PostScri pt F ont Li s t
Insert a chec k mark into the b ox to pri n t the
PostScript font list.
Print Button Click this button to execute a test print operation.
16
Page 22

5Printer Tab
5.3 Font Informatio n
This screen appears when you c lick the Font Info menu on the Printer
tab. It shows a list of f onts built into the printer controller. Clicking a
sub-menu under the
applicable printe r control code.
5.3.1 PCL Font
This screen appears when you cli ck the PCL Font sub-menu under the
Font In f o menu. It shows a list of PCL fonts built into the printer
controller. The names of fonts downloaded to the printer contr oller
from the computer are added to the bottom of the list.
Font In f o menu display s a list of fonts for each
Font Name Font name
Location Storage location of the font (ROM, RAM, HDD)
17
Page 23

5Printer Tab
5.3.2 PostScript Font
This screen appears when you clic k the PostS cript Fo nt sub-menu
under the Font Info menu. It shows a list of PostScript fonts built into
the printer controller. The names of fonts downloaded to the printer
controller from the computer are added to the bottom of the list.
Font Name Font name
Location Storage location of the font (ROM, RAM, HDD)
18
Page 24

Appendix Status List
Appendix Status List
The current Di450/Di550 sta tus is indicated by an icon in the upper
part of the window , and by text next to the icon in the upper text are a.
More detailed messages appear in the lower text area. The contents of
the list are arranged in order of importance (most critical first).
Icon
Status
(Upper Text)
Fatal Engine Malfunction
Details (Lower Text) Description
Controller Malfunction
19
Page 25

Appendix Status List
Icon
Status
(Upper Text)
Error Cover Open
Details (Lower Text) Description
Set Up Error Option or other
Paper Jam
Remainder Jam Appears when you
Remainder P aper Paper was left in
Paper Empty Paper tr ay is empty.
Paper Mismatch Error Specified paper size is
Paper Size Mismatch
Error
Life of Parts Consumable is depleted.
Paper Capacity Over Capacity of outpu t tray
Option Parts
Malfunction
(Blank ) Unide ntified error.
component is not
installed correctly.
close co ver after
cleari n g pa per jam to
indicate that paper is
still jammed
somewhere.
electr o nic docum en t
handle r or scanner af ter
comple ti on of job .
different from size of
paper in paper tray.
Specif ied paper size is
different from size of
paper in paper tray.
was exceeded.
20
Page 26

5Printer Tab
Icon
Status
(Upper Text)
Attention Off Line Connection to printer
Ready Waiting
Details (Lower Text) Description
controller network is
offline.
Initializing Printer controller is
initializing.
Adjusting The machine is making
internal adjustments.
Option Missing The machine cannot
find some option.
Image Lost Image data was lost.
Capacity Over Waste toner bottle is
full.
Option Parts
Malfunction
Life of Parts Consumable is
depleted.
Near Life of Parts Consumable is nearing
depletion.
Wa rming Up
Power Save The machine is in
power save mode.
Copying
Processing
Job Canceling
(Blank) The machine is ready.
21
Page 27

5Printer Tab
22
 Loading...