

Page 1

FK-116
F
a
x
o
p
e
r
a
t
i
o
n
User's Guide
Page 2

AGREEMENT
A
To the user options (Printer Controller, Twain Driver, RSD software and Network
utilities), please read End User License Agreement shown below before opening the package
END USER LICENSE AGREEMENT
PLEASE READ CAREFULLY THE LICENSE AGREEMENT BELOW BEFORE OPENING THIS PACKAGED SOFTWARE.
OPENING THIS PACKAGE INDICATES YOUR ACCEPTANCE OF THE TERMS AND CONDITIONS BELOW. IF YOU DO NOT
AGREE WITH THEM, YOU SHOULD PROMPTLY RETURN THE PACKAGE UNUSED.
1. SOFTWARE
"Software" means the computer program contained in this package (which may include digitally encoded, machine readable, scaleable outline
font data as encoded in a special format), together with all codes, techniques, software tools, format, design, concepts, methods and ideas
associated with the computer program and all documentation related thereto.
2. LICENSE AGREEMENT
This is a license agreement and not an agreement for sale. KONICA owns, or has been licensed from other owners, copyrights in the
Software. Except as stated in this Agreement, you are not granted any rights to patents, copyrights, trade names, trademarks (whether
registered or unregistered), or any other rights, franchises or licenses in respect of the Software. Title to the Software and any copy made from
it is retained by KONICA or such other owners.
3. LICENSE
KONICA, hereby grant to you, and you agree to accept a non-exclusive, non-transferable and limited license and you
may:
(1) install and use the Software on a single computer and one associated KONICA product.
(2) use the Software only for your own customary business or personal purposes.
(3) make a copy of the Software for backup or installation purposes only in support of the normal and intended use of the Software.
(4) transfer possession of copies of the Software to another party by transferring a copy of this Agreement and all other documentation along
with at least one complete unaltered copy of the Software, provided that (i) you must, at the same time, either transfer to such other party
or destroy all your other copies of the Software. (ii) such transfer of possession terminates your license from KONICA, and (iii) such
other party shall accept and be bound by these license terms by its initial use of the Software.
4. RESTRICTIONS
(1) You shall not without the written consent of KONICA:
(i) use, copy, modify, merge or transfer copies of the Software except as provided herein. (ii) reverse assemble or reverse compile the
Software except as permitted by law; or (iii) Sublicense, rent, lease or distribute the Software or any copy thereof.
(2) You shall not export or re-export the Software in any form under violation of export restrictions by the government of your country.
5. LIMITED WARRANTY
KONICA warrants the media on which the Software is recorded to be free from defects in materials and workmanship under normal use.
Warranty details and limitations for the Software are described in the Statement of Limited Warranty which was supplied with the hardware.
With the exception of the foregoing express warranties applicable to hardware and media only, the Software is not warranted and is provided.
SUCH WARRANTIES ARE IN LIEU OF ALL OTHER WARRANTIES, EXPRESS OR IMPLIED, INCLUDING, BUT NOT LIMITED
TO, THE IMPLIED WARRANTIES OF MERCHANTABILITY AND FITNESS FOR A PARTICULAR PURPOSE.
6. LIMITATION OF REMEDIES
IN NO EVENT WILL KONICA BE LIABLE FOR ANY LOST PROFITS, LOST DATA, OR ANY OTHER INCIDENTAL OR
CONSEQUENTIAL DAMAGES THAT RESULT FROM USE OR INABILITY TO USE THE SOFTWARE, EVEN IF KONICA OR
ITS AUTHORISED REMARKETERS HAVE BEEN ADVISED OF THE POSSIBILITY OF SUCH DAMAGES OR FOR ANY CLAIM
BY YOU BASED ON A THIRD PARTY CLAIM.
7. TERMINATION
You may terminate your license at any time by destroying the Software and all your copies of it or as otherwise described in these terms.
KONICA may terminate your license if you fail to comply with these terms. Upon such termination, you agree to destroy all your copies of
the Software.
8. GOVERNING LAW
This Agreement shall be governed by the laws of the country where the delivery is made to the original customer.
9. GOVERNMENT END USERS
If you are acquiring the Software on behalf of any unit or agency of the United States Government, the following provisions apply. Use,
duplication or disclosure by the Government is subject to restrictions as set forth in the Rights in Technical Data and Computer Software
clause at FAR 252.227-7013, subdivision (b)(3)(ii) or subparagraph (c)(1)(ii), as appropriate. Further use, duplication or disclosure is
subject to restrictions applicable to restricted rights software as set forth in FAR 52.227-19(c)(2).
YOU ACKNOWLEDGE THAT YOU HAVE READ THIS AGREEMENT, UNDERSTAND IT, AND AGREE TO BE
BOUND BY ITS TERMS AND CONDITIONS. NEITHER PARTY SHALL BE BOUND BY ANY STATEMENT OR
REPRESENTATION NOT CONTAINED IN THIS AGREEMENT. NO CHANGE IN THIS AGREEMENT IS
EFFECTIVE UNLESS WRITTEN AND SIGNED BY PROPERLY AUTHORISED REPRESENTATIVES OF EACH
PARTY. BY OPENING THE PACKAGE, YOU AGREE TO ACCEPT THE TERMS OF THIS AGREEMENT.
Page 3

AGREEMENT
B
2000 by Konica Business Technologies. Inc.
MAINTENANCE AGREEMENT
The KONICA FK116 Workgroup Document System
TM
will give you many years of trouble-free service to ensure high
quality copying performance and to prevent premature wear and failure of precision parts and components, periodic
cleaning and routine adjustments should be scheduled.
We recommend that you contact your service center to discuss the benefits and advantages of Konica’s Customer
Service Maintenance Agreement and to be shown how a maintenance plan can be tailored to your individual copying
needs.
NOTICE:
Konica Business Technologies, Inc. has made every effort to ensure that the information in this manual is complete and
accurate. However, constant efforts are also being made to improve and update the product.
Therefore, Konica Business Technologies, Inc. shall not be liable for errors in this manual or for any consequential
damages resulting from the use of this manual. The information contained herein is subject to change without notice.
FEDERAL OR STATE STATUTES MAY PROHIBIT THE COPYING OF CERTAIN DOCUMENTS OR
INFORMATION, RESULTING IN FINES OR IMPRISONMENT FOR VIOLATORS.
MANUAL PART NUMBER:
OP-FK116-01
WEB SITE ADDRESS
http://www. konicabt. com
CORRESPONDENCE:
Correspondence regarding this manual may be mailed to the address shown below.
KONICA BUSINESS TECHNOLOGIES, INC.
MARKETING DEPARTMENT
500 DAY HILL ROAD
WINDSOR, CT 06095
Page 4

EE Safety Information EE
I
FCC Part 15-Radio Frequency Devices
This device complies with Part 15 of the FCC Rules. Operation is subject to the following two
conditions:
(1) This device may not cause harmful interference, and (2) this device must accept any
interface received, including interface that may cause undesired operation.
WARNING
This equipment has been tested and found to comply with the limits for a Class A digital
device, pursuant to Part 15 of the FCC Rules. These limits are designed to provide reasonable
protection against harmful interference when the equipment is operated in a commercial
environment. This equipment generates, uses, and radiate radio frequency energy and, if not
installed and used in accordance with the instruction manual, may cause harmful interference
to radio communications.
Operation of this equipment in a residential area is likely to cause harmful interference in
which case the user will be required to correct the interference at his own expense.
The design and production of this unit conform to FCC regulations, and any changes or
modifications must be registered with the FCC and are subject to FCC control. Any changes
made by purchaser or user without first contacting the manufacturer will be subject to penalty
under FCC regulations.
WARNING
This device must be used with shielded interface cables. The use of non-shielded cable is likely
to result in interference with radio communications and is prohibited under FCC rules.
Interference-Causing Equipment Standard (ICES-003 Issue 3)
This Class A digital apparatus complies with Canadian ICES-003.
Cet appareil numérique de la classe A est conforme à la norme NMB-003 du Canada.
Page 5

EE Safety Information EE
II
FCC PART 68 – TELECOMUNICATION DEVICES
This equipment complies with Part 68 of the FCC rules. On the rear panel of this equipment is
a label that contains, among other information, the FCC registration number and Ringer
Equivalence Number (REN) for this equipment. If requested, provide this information to your
telephone company.
This equipment uses THE FOLLOWING USOC JACKS: RJ11C.
The REN is useful to determine the quantity of devices you may connect to your telephone
line and still have all of those devices ring when your number is called. In most, but not all
areas, the sum of the RENs of all devices should not exceed five (5.0). To be certain of the
number of devices you may connect to your line, as determined by the REN, you should call
your local telephone company to determine the maximum REN for your calling area.
If your telephone equipment causes harm to the telephone network, the Telephone Company
may discontinue your service temporarily. If possible, they will notify you in advance. But if
advance notice isn’t practical, you will be notified as soon as possible. You will be advised of
your right to file a complaint with the FCC.
Your telephone company may make changes to its facilities, equipment, operations, or
procedures that could affect the proper operation of your equipment. If they do, you will be
given advance notice so as to give you an opportunity to maintain uninterrupted service.
If you experience trouble with this equipment, please contact the Konica dealer where
you purchased this equipment.
The telephone company may ask you to disconnect this equipment from the network until the
problem has been corrected or until you are sure the equipment is not malfunctioning.
This equipment may not be used on coin service devices provided by the telephone company.
Connection to party lines is subject to state tariffs. (Contact your public utility commission or
corporation commission for information.)
CUSTOMER INFORMATION FOR PRIVATELY OWNED COIN PHONES
To comply with state tariffs, the telephone company must be given notification prior to
connection.
In some states, prior approval of connection must be obtained from the state Public Utility
Commission, Public Service Commission or state Corporation Commission.
WARNING FOR THE SETTING OF HEADER AND FOOTER
The Telephone Consumer Protection Act of 1991 makes it unlawful for any person to use a
computer or other electronic device to send any message via a telephone fax machine unless
such message clearly contains in a margin at the top or bottom of each transmitted page or on
the first page of the transmission, the date and time it is sent and an identification of the
business or other entity, or other individual sending the message and the telephone number of
the sending machine or such business, other entity, or individual.
To program this information into your fax machine, refer to instructions in “Initial User Data”
of chapter 1.
Page 6

EE Safety Information EE
III
IC CS-03-TELECOMUNICATION DEVICE
NOTICE:
Industry Canada (IC) label identifies equipment. This certification means that the equipment
meets certain telecommunications network protective, operational, and safety requirements.
IC does not guarantee the equipment will operate to user’s satisfaction.
Before installing this equipment, users should ensure that it is permissible to be connected to
the facilities of the local telecommunications company. The equipment must also be installed
using an acceptable method of connection. In some cases, the company’s inside wiring
associated with a single line individual service may be extended by means of a certified
connector assembly (telephone extension cord). The customer should be aware that
compliance with the above conditions may not prevent degradation of service in some
situations.
Repairs to certified equipment should be made by an authorized Canadian maintenance facility
designated by the supplier. Any repairs or alterations made by the user to this equipment, or
equipment malfunctions, may give the telecommunications company cause to request the user
to disconnect the equipment.
Users should ensure for their own protection that the electrical ground connections of the
power utility, telephone lines, and internal metallic water pipe system, if present, are
connected together. This precaution may be particularly important in rural areas.
CAUTION:
Users should not attempt to make such connections themselves, but should contact the
appropriate electric inspection authority, or electrician, as appropriate.
NOTICE:
The Ringer Equivalence Number (REN) assigned to each terminal device provides an
indication of the maximum number of terminals allowed to be connected to a telephone
interface. The termination on an interface may consist of any combination of devices subject
only to the requirement that the sum of the Ringer Equivalence Numbers of all the devices
does not exceed 5, REN=0.2 .
If you experience trouble with this equipment, please contact the Konica dealer where you purchased
this equipment.
Page 7

Table of contents
i
1. ABOUT YOUR MACHINE
Power ON & OFF ........................................................................................................1-1
Turning the Machine power ON..............................................................................1-1
Turning the Machine power OFF............................................................................ 1-2
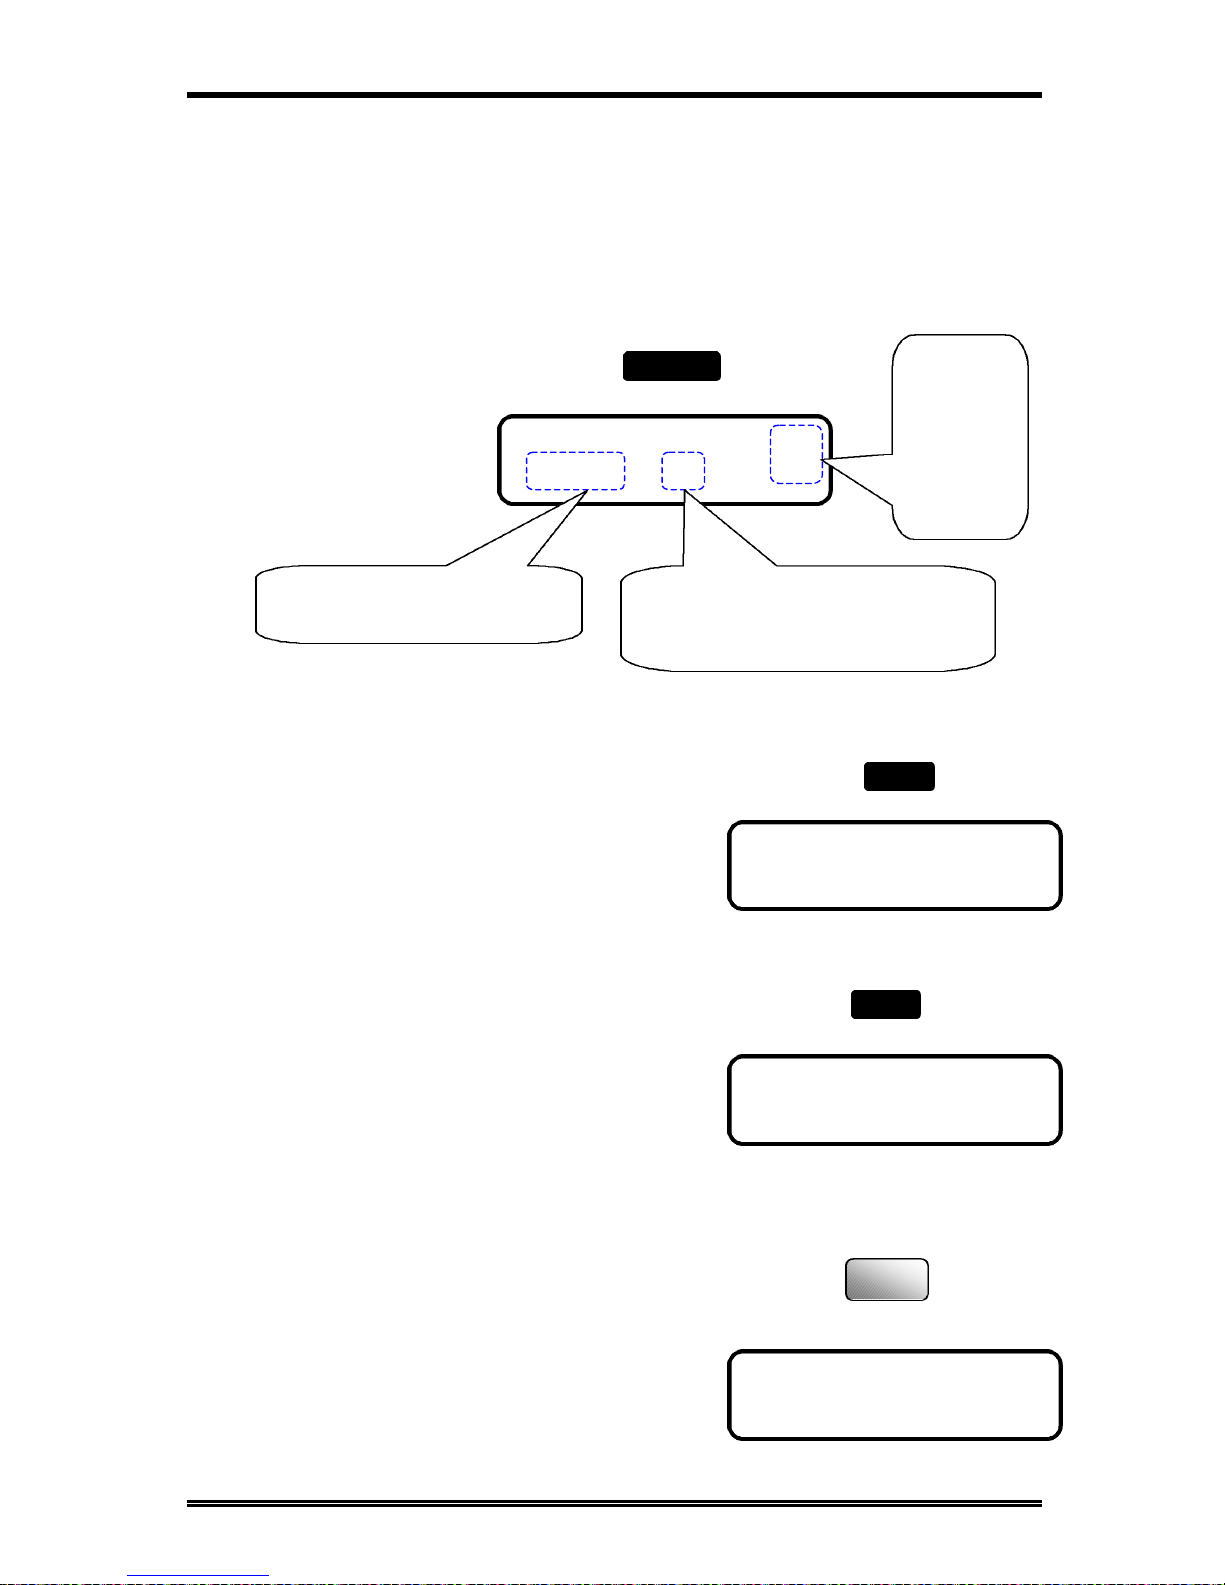
Control Panel layout....................................................................................................1-3
Keys on the panel .....................................................................................................1-3
LEDs on the panel....................................................................................................1-7
Message Display........................................................................................................... 1-8
Screen Organization................................................................................................. 1-8
Initial Screen......................................................................................................... 1-8
Selecting the screen’s function........................................................................... 1-11
Meaning of the symbol........................................................................................... 1-12
Initial User Data......................................................................................................... 1-15
Setting Date & Time............................................................................................... 1-16
Setting User Fax Number....................................................................................... 1-17
Setting User Name.................................................................................................. 1-18
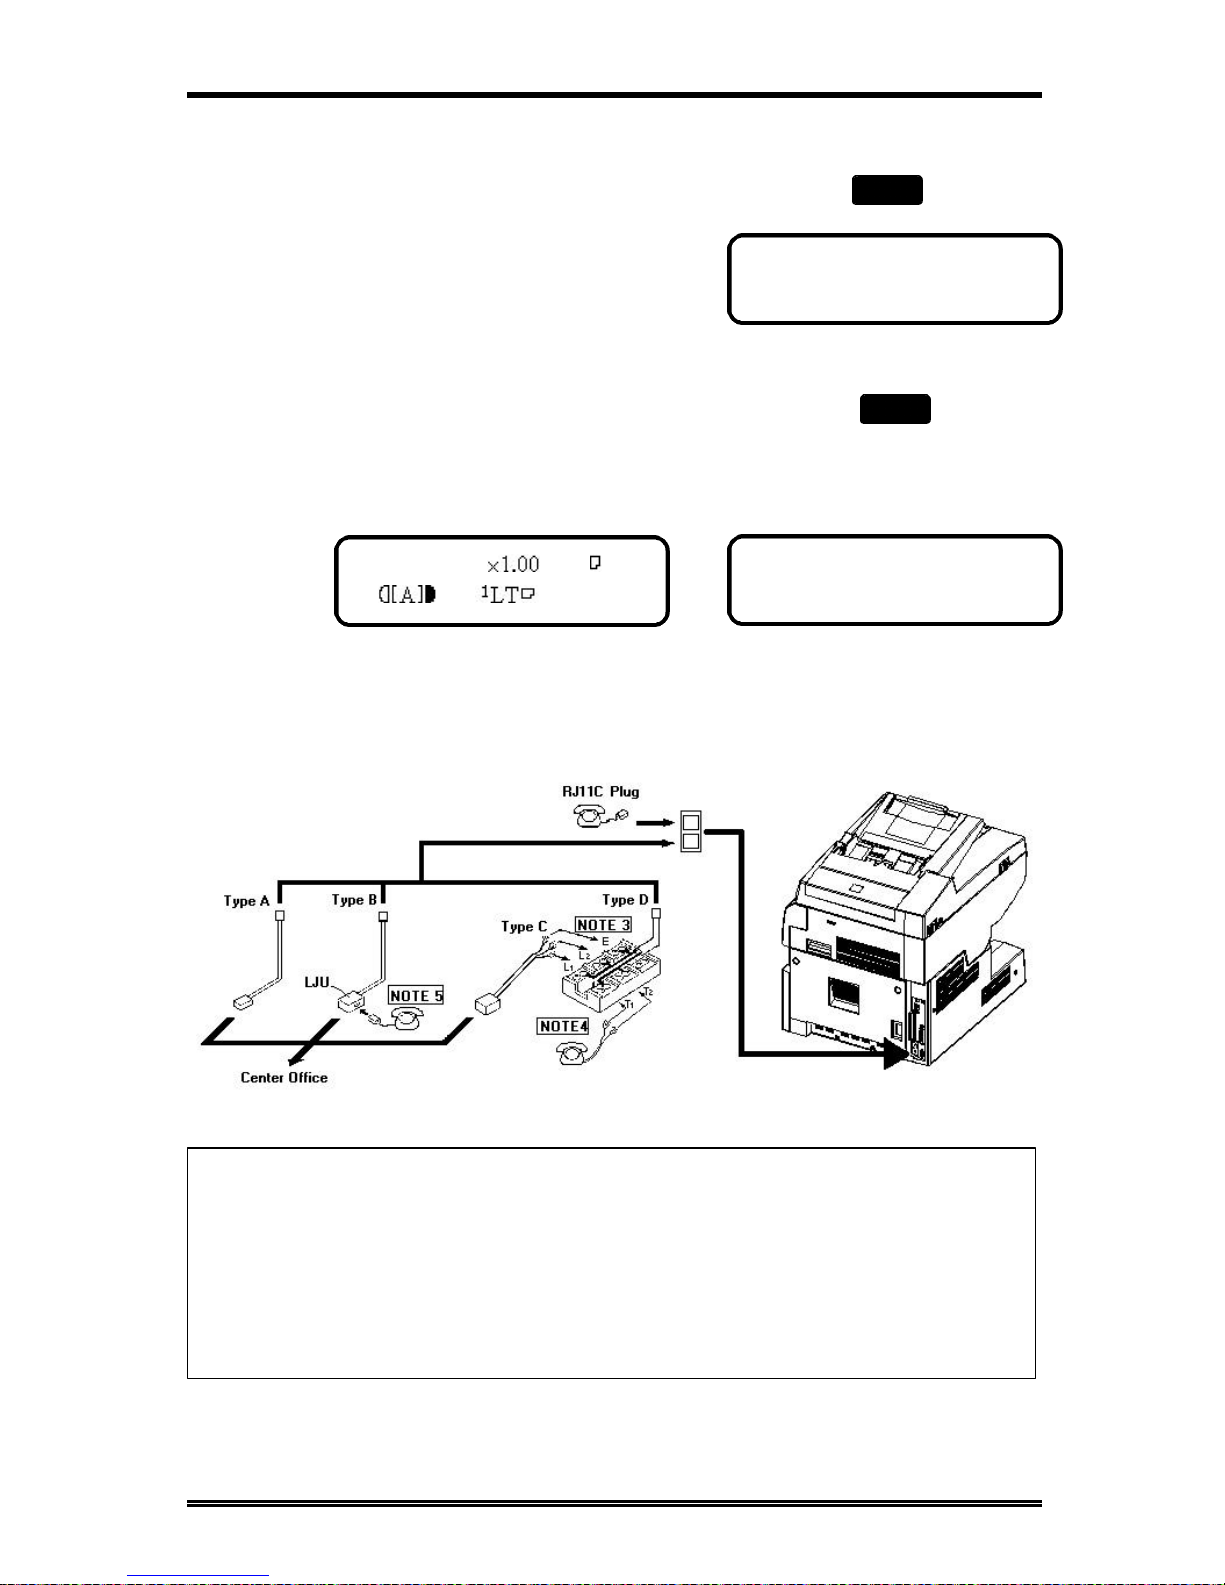
Connecting to the Telephone Line............................................................................. 1-19
Connect to Private Branch Exchange (PBX)............................................................ 1-20
2. BASIC FAX OPERATIONS
How to Transmit a Document - Basics........................................................................ 2-1
Selecting the Resolution........................................................................................... 2-1
Loading the Document............................................................................................. 2-4
Dialing the Number (Transmitting the Document).................................................2-6
Using the Numeric keys (Manual Dialing) ..........................................................2-6
Using the One Touch Dial Function ....................................................................2-9
Using the Speed Dial Function........................................................................... 2-10
Using the Combination Dial Function............................................................... 2-12
Using the Phone Book Function......................................................................... 2-15
How to Receive a Document - Basics ......................................................................... 2-18
Select the Printing Mode (Reduction RX)............................................................. 2-18
Selecting the Reception Mode (Setting RX Mode)................................................ 2-19
Operation at Reception.......................................................................................... 2-20
Receiving a Document in the Fax Mode (Auto RX mode)................................ 2-20
Receiving a Document in the Tel Mode (Manual RX mode)............................ 2-21
How to Use Your Fax as a Telephone........................................................................ 2-21
Making a Telephone Call....................................................................................... 2-21
Receiving a Telephone Call.................................................................................... 2-22
Settings of TX Operation........................................................................................... 2-22
Setting SCAN CONTRAST................................................................................... 2-22
Setting RESOLUTION .......................................................................................... 2-23
Setting PAGE COUNT TX.................................................................................... 2-24
Setting CLOSED NETWORK (TX)...................................................................... 2-26
Setting DEFAULT TX ........................................................................................... 2-26
Setting HEADER.................................................................................................... 2-27
Setting OT-DIAL IN COPY................................................................................... 2-28
Settings of RX Operation........................................................................................... 2-29
Setting MEMORY RX MODE.............................................................................. 2-29
Programming for Memory RX Mode ................................................................ 2-29
Printing the Document Received by Memory RX Mode .................................. 2-31
Memory Substitution Reception........................................................................ 2-32
Page 8

Table of contents
ii
Setting NO. of RINGS............................................................................................ 2-32
Setting TWO PAGE PRINT.................................................................................. 2-33
Setting CLOSED NETWORK (RX)...................................................................... 2-34
Setting FOOTER.................................................................................................... 2-35
Communication Settings............................................................................................ 2-36
Setting TONE/PULSE ............................................................................................ 2-36
Setting LINE MONITOR ...................................................................................... 2-38
Setting PSTN/PBX ................................................................................................. 2-39
3. ENHANCED FAX OPERATIONS
Transmitting a Document Using Memory (Memory TX)........................................... 3-1
Retrying the Same Destination (Redial TX)................................................................3-2
Verifying Audible Signal Before TX (Manual Communication)................................ 3-4
Manual Transmission............................................................................................... 3-4
Manual Reception.................................................................................................... 3-6
Transmit a special document (BOOK TX) .................................................................3-7
TWAIN Driver Option.................................................................................................3-9
Class 1 FAX/Modem.................................................................................................. 3-11
4. UTILITY FUNCTIONS
Overview of the [Function] Utilities ............................................................................4-1
Broadcast......................................................................................................................4-4
Timer TX.................................................................................................................... 4-11
Mailbox TX ................................................................................................................ 4-13
Print Mailbox RX....................................................................................................... 4-15
Polling TX................................................................................................................... 4-19
Polling RX .................................................................................................................. 4-21
Relay Initiate.............................................................................................................. 4-23
Cancel Reserve........................................................................................................... 4-26
5. ENHANCED UTILITY FUNCTIONS
Using the [Utility] key.................................................................................................. 5-1
List of the [Utility] functions.................................................................................... 5-1
Outline of major features.........................................................................................5-2
How to Select the [Utility] function .........................................................................5-4
Machine Settings.......................................................................................................... 5-5
Setting AUTO RESET .............................................................................................5-5
Setting POWER SAVE MODE ...............................................................................5-6
Setting POWER SAVE OFF.................................................................................... 5-7
Setting PRINT DENSITY........................................................................................5-7
Setting LCD CONTRAST........................................................................................ 5-8
Setting BUZZER VOLUME.................................................................................... 5-9
Setting REMOTE MONITOR...............................................................................5-10
Setting TRAY 1 PAPER SIZE............................................................................... 5-10
Setting PAPER SOURCE ......................................................................................5-11
Dial Registrations....................................................................................................... 5-13
One-Touch Dial and Speed Dial ............................................................................ 5-14
Set the Fax number ............................................................................................ 5-14
Set the Name....................................................................................................... 5-17
Set the Modem Speed......................................................................................... 5-18
Print the telephone Number List .......................................................................5-18
Group Dial.............................................................................................................. 5-19
Page 9

Table of contents
iii
Register the Group Dial .....................................................................................5-19
Using the Group Dial.......................................................................................... 5-23
Program Dial.......................................................................................................... 5-24
Program a registered Dial.................................................................................. 5-25
Using the Program Dial ...................................................................................... 5-26
Using Batch TX...................................................................................................... 5-27
6. HOW TO MAKE COPIES
How to Copy Documents -Basics................................................................................. 6-1
Setting The Original Document...................................................................................6-3
Using the Automatic Document Feeder(ADF)........................................................ 6-3
Using the Plate Scanning..........................................................................................6-4
Selecting Paper tray..................................................................................................... 6-5
Overview of the paper tray selection.......................................................................6-5
Specifying the Number of Copies .............................................................................. 6-12
Specifying the Zoom Ratio......................................................................................... 6-13
Specified the Preset Zoom Ratio ............................................................................ 6-13
Specified the Customer Zoom Ratio ...................................................................... 6-13
Specifying the Copy Image Density........................................................................... 6-14
Automatic/Manual density adjustment choice...................................................... 6-15
Manual density adjustment ................................................................................... 6-15
2in1 function............................................................................................................... 6-16
Sort function............................................................................................................... 6-18
Copy Setting............................................................................................................... 6-19
Setting DENSITY/PHOTO.................................................................................... 6-19
Setting AUTO DENSITY....................................................................................... 6-20
Setting MANUAL DENSITY................................................................................. 6-20
Setting DENSITY(ADF)......................................................................................... 6-21
Setting 2in1 MODE................................................................................................ 6-22
Setting SORT MODE............................................................................................. 6-22
7. USING THE CONFIRM UTILITIES
TX/RX RESULT.......................................................................................................... 7-1
MACHINE COUNTER............................................................................................... 7-2
PRINT REPORT..........................................................................................................7-3
8. PRINTING REPORTS
About the Reports........................................................................................................8-1
One Touch List.........................................................................................................8-2
Speed Dial List..........................................................................................................8-3
Key Setting List........................................................................................................ 8-4
Machine Status List.................................................................................................. 8-5
TX Result Report .....................................................................................................8-7
RX Result Report.....................................................................................................8-9
Activity Report....................................................................................................... 8-11
Reservation Reports............................................................................................... 8-12
Memory Image Print .............................................................................................. 8-14
Backup RAM Error Report ................................................................................... 8-17
Lost Report............................................................................................................. 8-18
Relay Broadcast Report......................................................................................... 8-19
Print a Report ............................................................................................................ 8-20
Automatic Print the report (Setting by Utility key).............................................. 8-20
Page 10

Table of contents
iv
Manual print report............................................................................................... 8-21
9. TROUBLESHOOTING
ERROR LED indicator ................................................................................................ 9-1
About the message........................................................................................................ 9-1
Improving image quality.............................................................................................. 9-3
How to replace the supply unit.................................................................................... 9-5
How to replenish the paper trays.................................................................................9-7
For Paper Tray (TRAY 1) .......................................................................................9-7
For Paper Feed Unit (TRAY 2) ...............................................................................9-8
Clearing paper misfeeds...............................................................................................9-9
Paper Tray misfeed.................................................................................................. 9-9
Paper Feed Unit misfeed........................................................................................ 9-11
Separator Jam/Fuser Jam...................................................................................... 9-12
Original Document Jam......................................................................................... 9-14
When PAPER SIZE ERROR occurs......................................................................... 9-15
How to reset the machine........................................................................................... 9-17
10. SPECIFICATIONS
Page 11

1. About Your Machine
Page 12
About Your Machine
1-1
Power ON & OFF
Keep the power switch in the" xx" (ON) position to maintain constant communication. If
it is in the "¡¡" (OFF) position, the machine is able neither to receive a document nor
store the contents of the document in its memory. Communication is also interrupted if
the power switch is pressed to the "¡¡" (OFF) position during communication.
Turning the Machine power ON
Press the power switch to the " xx" (ON) position.
When the machine is turned ON, the message "*PLEASE WAIT!*" appears on the
Message Display. The machine is ready for transmitting or receiving documents now.
Half Tone
Resolution
Super Fine
Standard
Auto RX
Memory TX
Confirm
PC
Utility
Error
Fine
Sort
2in1
Paper
Yes
Zoom
Delete
C
No
*PLEASE WAIT!*
Auto/
Photo
Space
The Resolution indicator lights when the message display changes.
The machine completes warming up approx. 34 sec. after the power turn on.
Half Tone
Resolution
Super Fine
Standard
Auto RX
Memory TX
Confirm
PC
Utility
Error
Fine
Sort
2in1
Paper
Yes
Zoom
Delete
C
No
TEXT x1.00 1
Auto/
Photo
Space
Power switch
turn to " xx"
Page 13
About Your Machine
1-2
JAN.01 15:38 100%
-SET DOC. FACE UP-
NOTE:
• While the machine is warming up, it can receive or transmit a document, but not print
a document received.
• After completing warm-up, the machine automatically enters the Power Save mode
when the machine is not used for a long time.
• You can set the time it takes to enter the Power Save mode, or turn the mode OFF
through the Utility key.
Turning the Machine power OFF
1. Check that the memory volume display on
the Message Display shows 100%.
If the percentage shown is less than 100%, it means that there are documents stored
in memory which have not been transmitted. In this case, perform the following
steps to retain these documents.
When the memory contains a document to be transmitted:
Output the Memory Image Print, and retransmit at another time.
When the memory contains a document received:
Let the machine print the document received according to the specific procedure as
follows.
Printing the Document Received by Memory RX Mode í P 2-31
Printing the Mailbox Document í P 4-15
2. Turn the power switch to "¡¡" (OFF) position.
Power switch
turn to "¡¡"
Page 14
About Your Machine
1-3
Control Panel layout
Keys on the panel
Paper
PCError
04030201
19
S T
20
10
JAK
11
B
U21V
22
L
12
C
M
13
D
Memory TX
Confirm
Utility
Half Tone
Resolution
Super Fine
Standard
Fine
0806 0705
23
W X
24
14
NEO
15
F
Y25Z
26
P
16
G
Q
17
H
Photo
Sort
Auto RX
2IN1
WXYZ
Panel Reset
Yes
No
09
&
27
R
18
I
Zoom
Space
Delete
C
* 0 #
Start
Stop
PQRS
GHI
4
7
1
65
OPER
8 9
TUV
2
JKL
3
ABC
Fax
Copy
MNO
DEF
Speed Dial Funtion
Phone Book Pause
Redial/
Book TX Speaker
Auto/
Key Functions
1
Start key
♦ Start copying.
♦ Start transmission or Reception.
♦ Others depending on LCD message.
2
Stop key
♦ Cancel copying.
♦ Cancel transmission or reception.
3
Panel Reset
key
♦ Return to the initial setting:
<copy screen >
Number of Copies : 1
Zoom ratio : Equal
Copy Function : Initial setting by user
Density : Initial setting by user
Copy screen : Initial setting by user
Paper source : Initial setting by user
4
Numeric keys
♦ Input the number of copies.
♦ Input zoom ratio.
♦ When setting custom size for bypass copy, input
paper size.
♦ Input Fax number.
♦ Input numbers in registration of name.
♦ Input speed dial number.
♦ Specify Fax function or utility item.
5
Q key
♦ Send tone signal.
♦ Input European font in registration of name.
6
# key
♦ External/Internal function.
1 32
4 65
7 98
0
#
8
13
10
14
111217
1518
16
21
22
20
19
23 24
25
26 29
28
27
1
2
3
5
6
4
9
7
2in1
Page 15
About Your Machine
1-4
Key Functions
7
Yes key
♦ Fix the selected item and inputted number or
character.
♦ Others: Depend on LCD message.
8
No/Clear key
♦ Clear inputted number or character.
♦ Back to the previous display.
♦ Others: Depend on LCD message.
9
Copy/Fax
Switching
key
♦ Switch to Fax screen from copy screen.
♦ Switch to Copy screen from Fax screen.
10 Zoom key
♦ Enter setting zoom ratio with numeric keys.
♦ Select the fixed zoom ratio.
11
Paper key
♦ Select paper source.
12
Auto/Photo
key
♦ Switch 3 density modes: Text-auto density / Photo-
manual density / Text-manual density .
13
up arrow
( )key
♦ When setting the zoom ratio, increase the ratio by
0.01.
♦ Display items or contents by rotation.
♦ When inputting numbers or characters, delete a
character at the cursor.
14
down arrow
( ) key
♦ When setting the zoom ratio, decrease the ratio by
0.01.
♦ Display items or contents by rotation.
♦ When inputting number or character, insert a space
at the cursor.
15
right arrow
( ) key
♦ When adjusting the manual density, change the
density into darker level.
♦ When inputting number or character, move the
cursor to the right.
♦ When selecting item, move the mark to the right.
16
left arrow
( ) key
♦ When adjusting the manual density, change the
density to a lighter level.
♦ When inputting numbers or characters, move the
cursor to the left.
♦ When selecting an item, move the mark to the left.
17
2in1 key
♦ Operate 2 in 1 copy.
18
Sort key
♦ Operate Sort copy.
♦ When ADF is not installed, this key is not effective.
19
Resolution
key
♦ Select the resolution and the image mode for
transmission.
20
Memory TX
key
♦ Switch memory TX/ADF TX.
21
Utility key
♦ Set machine status, initial setting for copy, Fax
operations and register dials.
Yes
C
No
Zoom
Paper
Auto/Photo
2in1
Sort
Resolution
Memory TX
Utility
Page 16
About Your Machine
1-5
Key Functions
22
Confirm key
♦ Display communication result.
♦ Display machine counter.
♦ Print report.
23
One-touch
keys
♦ One-touch dial 01 – 27.
♦ Group dial 01 – 27.
♦ Program dial 24 – 27.
♦ Input character and symbol in registration of name.
♦ Input +/- in registration dial number.
24
Speed Dial
key
♦ Call Speed Dial function.
25
Phone Book
key
♦ Retrieval and call registered number.
26
Book TX key
♦ Call Book TX function.
27
Function key
♦ Call Fax communication function.
28
Redial/Pause
key
♦ Call the previously dialed number.
♦ When inputting the dial number, insert pause at the
cursor.
29
Speaker key
♦ Off hook for manual TX/RX.
More about keys:
1) Numeric keys
The Numeric keys can be used to enter numerals and European symbols when
registering names for Initial User Data, One Touch Dial and Speed Dial.
For details on entering names, follow the procedure for each registration method.
Initial user Data í P 1-15
One Touch Dial í P 5-14
Speed Dial í P 5-14
Confirm
A
01
Speed Dial
Phone Book
Book TX
Function
Redial/
Pause
Speaker
1
2
ABC
3
DEF
4
GHI
5
JKL
6
MNO
8
TUV
0
OPER
TT
#
7
PQRS
9
WXYZ
Page 17

About Your Machine
1-6
2) One Touch Keys
The One Touch keys have the following two functions:
1. One Touch Dial function:
Press the key to dial the registered destination and start transmitting the document.
2. Input Characters
One Touch
Key
Char.
One Touch
Key
Char.
One Touch
Key
Char.
One Touch
Key
Char.
1
A
8
H
15
O
22
V
2
B
9
I
16
P
23
W
3
C
10
J
17
Q
24
X
4
D
11
K
18
R
25
Y
5
E
12
L
19
S
26
Z
6
F
13
M
20
T
27
(symbols)
7
G
14
N
21
U
(See below)
3) One Touch Key 27 (&)
Press the One Touch key 27 as many times to display the desired symbols.
x N times
N Symbol N Symbol N Symbol N Symbol
1
&
7
)
13
=
19
;
2
#
8
″″
14
<
20
@
3
*
9
.
15
>
21
%
4
-
10
,
16
?
22
[
5
/
11
!
17
$
23
]
6
(
12
+
18
:
24
′′
When the desired symbol appear, press the key to input this symbol.
&
27
Page 18
About Your Machine
1-7
EUROPEAN SYMBOLS
Press the Q key as many times to display the European symbols.
x N times
N symbol N symbol N symbol
1
Ä
9
é
17
ç
2
ä
10
í
18
Æ
3
Ö
11
ó
19
Ñ
4
ö
12
ú
20
¿
5
Ü
13
Å
21
Ø
6
ü
14
î
22
7
á
15
à
23
ß
8
É
16
When the desired symbol appear, press the key to input this symbol.
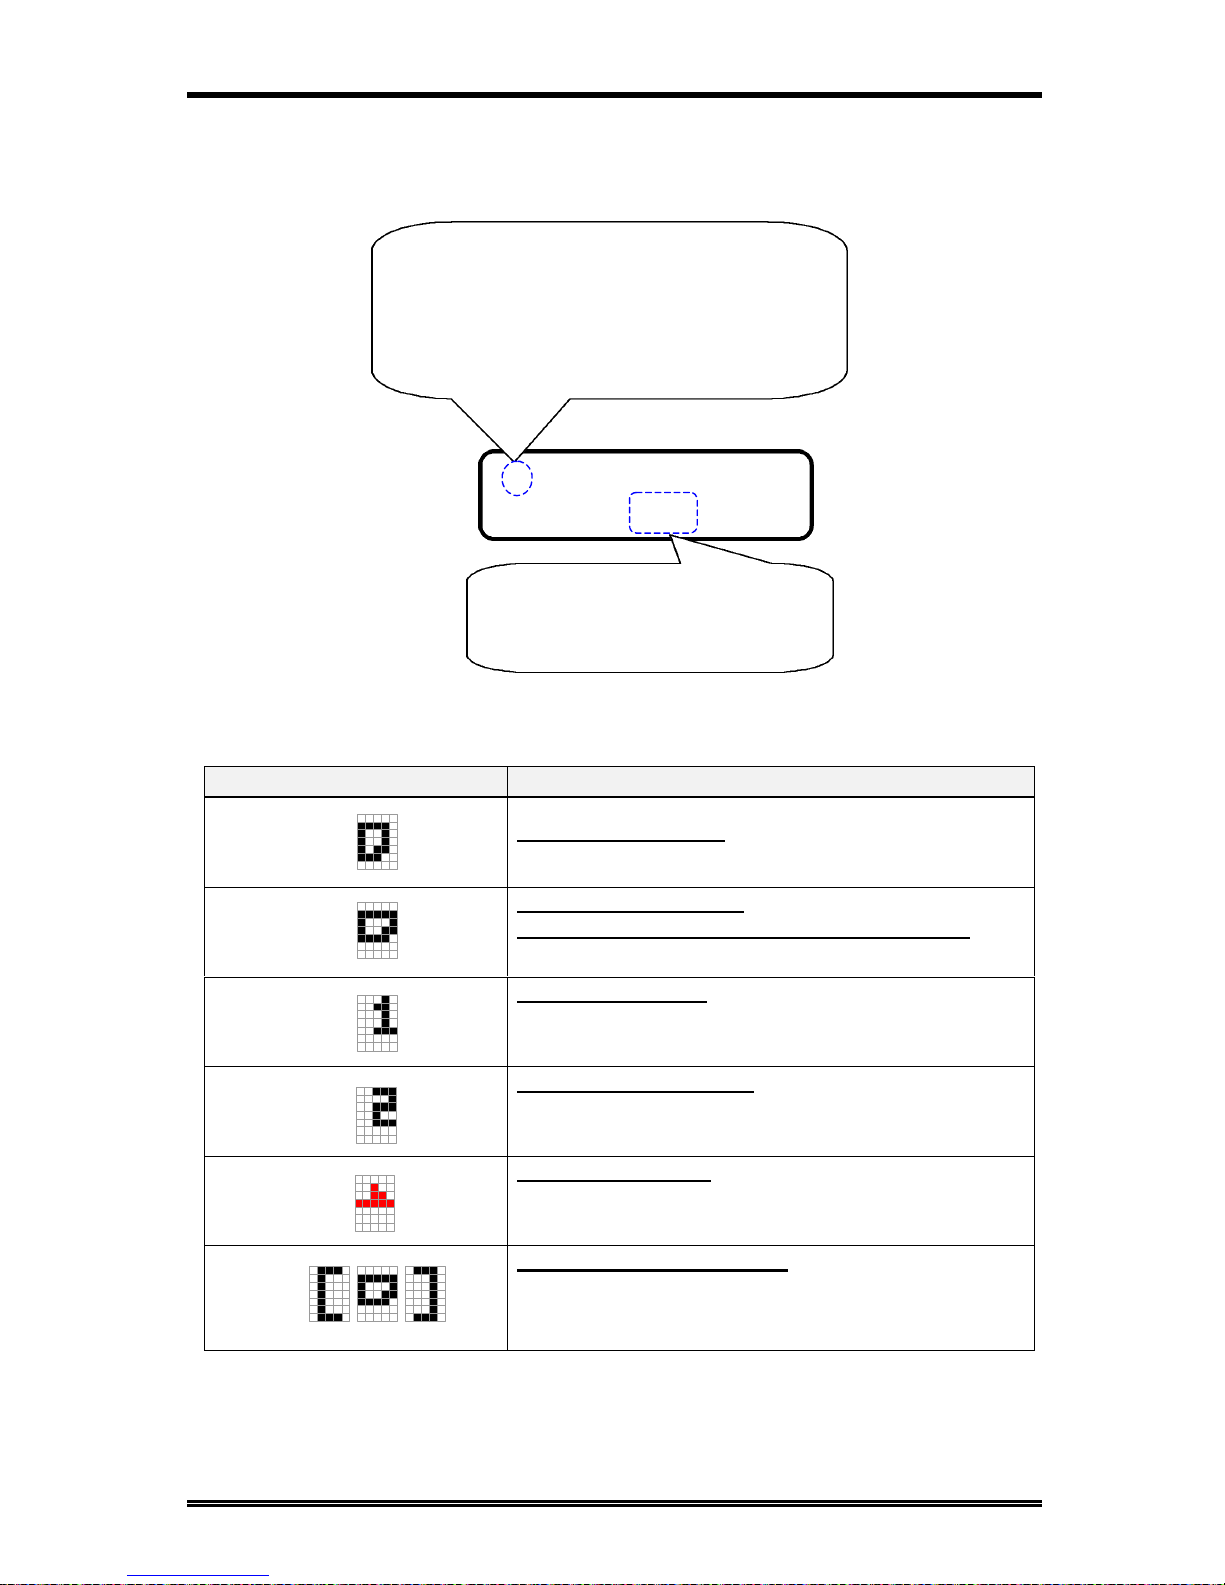
LEDs on the panel
LED Functions
A
Ready
♦ Copy screen : Lights green when the copying can be started or
scan is available. Lights orange when copying cannot be started
or scan is not available.
♦ Fax screen : Lights green when the transmission or reception
operation is available. Lights orange when the transmission
reservation is not available.
B
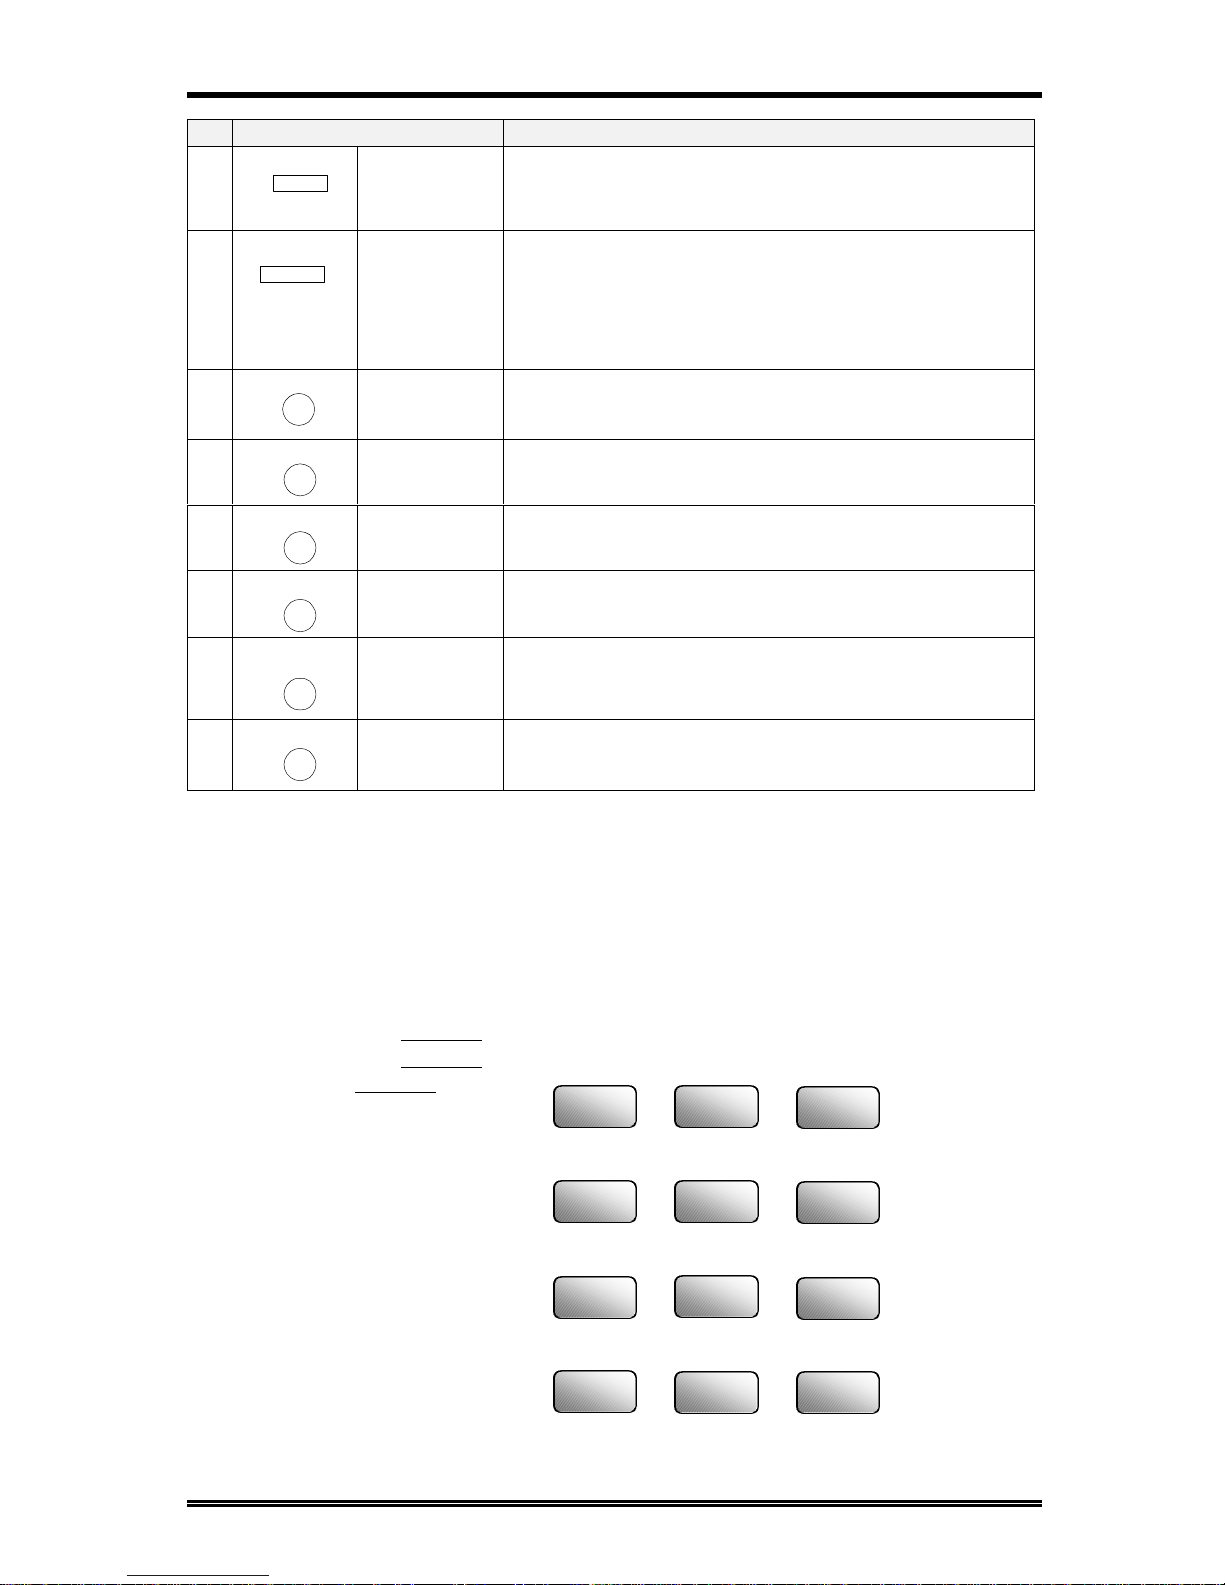
Copy
♦ Lights in Copy screen.
C
Fax
♦ Lights in Fax screen.
D
2in1 copy
♦ Lights when 2in1 Copy screen is selected.
Paper
PCError
04030201
19
S T
20
10
JAK
11
B
U21V
22
L
12
C
M
13
D
Memory TX
Confirm
Utility
Half Tone
Resolution
Super Fine
Standard
Fine
0806 0705
23
W X
24
14
NEO
15
F
Y25Z
26
P
16
G
Q
17
H
Photo
Sort
Auto RX
2IN1
WXYZ
Panel Reset
Yes
No
09
&
27
R
18
I
Zoom
Space
Delete
C
* 0 #
Start
Stop
PQRS
GHI
4
7
1
65
OPER
8 9
TUV
2
JKL
3
ABC
Fax
Copy
MNO
DEF
Speed Dial Funtion
Phone Book Pause
Redial/
Book TX Speaker
Auto/
DE B
C
A
K
M
F
G
H
J
I
L
2in1
TT
Page 19
About Your Machine
1-8
LED Functions
E
Sort copy
♦ Lights when Sort Copy screen is selected.
♦ When ADF is not installed, LED is always off.
F
Standard
♦ Lights when the document for transmission is scanned at
standard resolution.
G
Fine
♦ Lights when the document for transmission is scanned at fine
resolution.
H
Super Fine
♦ Lights when the document for transmission is scanned at super
fine resolution.
I
Half Tone
♦ Lights when the document for transmission is scanned in half
tone mode.
J
Memory TX
♦ Lights when memory TX is selected.
K
Auto RX
♦ Lights when auto RX is selected.
L
PC
♦ Blinks when the machine receives data from PC and prints PC
data.
M
Error
♦ Lights when any error occurs.
Message Display
When the power switch is turned to the ON position, the Message Display (LCD
screen) lights up.
Screen Organization
Initial Screen
COPY SCREEN
When the machine completes warming up, the initial screen appears on the
Message Display. This initial screen serves as the basis for all later operations.
TEXT 1
WARM UP
Message Area
(see below 3.)
Copy Mode
Zoom Ratio Copy Quantity
Density Level
Paper Source
(see below 1.)
Paper Size
(see below 2.)
Page 20

About Your Machine
1-9
FAX SCREEN
You can press the Copy/Fax key to switch to the Fax screen.
1) Paper source
Paper source Pictorial symbol
Paper tray (Tray 1)
Paper Feed Unit (Tray 2)
Manual Bypass tray
2) Paper size
Metric Inch
Paper source Paper type Paper Displays Paper Displays
A4
A4
Letter
LT
Legal
LG
Tray 1
Plain paper
A5
A5
Half letter
HL
A4
A4
Letter
LT
A5
A5
Legal
LG
B5
B5
Half letter
HL
B6
B6
Free size
[ ]
Plain paper
Free size
[ ]
OHP
A4
A4 OHP
Letter
LT OHP
A4
A4 CARD
Letter
LT CARD
A5
A5 CARD
Legal
LG CARD
B5
B5 CARD
Half
letter
HL CARD
B6
B6 CARD
Free size
[ ]CARD
Manual Bypass
tray
Card
Free size
[ ]CARD
Tray 2 Plain paper
A4
A4
Letter
LT
JAN.01 15:38 100%
-SET DOC. FACE UP-
Date Time Memory available
Message
Page 21
About Your Machine
1-10
Copy
Fax
Switch to Fax screen
TEXT 1
:EMPTY
*CAUTION!*
NO PAPER( )
3) Message area (In Copy screen)
message description
0%~100%
Memory remaining volume. This message appears
when the machine scans the original for the Sort copy
A4 ààA5
LG ààLT
Zoom ratio(examples)
Copy
function
::EMPTY
Chosen paper tray has no paper
Fax:: ((ðð
The machine respond for reception
Fax::
The machine calls the transmission
Fax::
The machine is sending the fax data
Fax::
The machine is receiving the fax data
Fax
functions
Fax Err
Some error which is concern with fax function happen.
If this message appears, to see the detail information in
fax screen
WARM UP
The machine is warming up
REPORT
The machine is printing the report
PC:PRN
The machine is printing the data received from PC
Other
functions
PC Err
No paper for PC printing
NOTE: For more details about the message appear on the copy screen, switch to FAX
screen. For example:
Page 22
About Your Machine
1-11
3 POWER SAVE OFF
COPY SETTING?
OK=YES / or 1-4
1 AUTO RESET?
OK=YES
Selecting the screen’s function
The following information explains the different components of the LCD
display, and shows how to scroll through the menus and select the desired
setting.
Example: Press Utility key, the display shows the message “MACHINE
SETTING”.
1) Using the or key to scroll through the function selection.
For example: Press the key scroll to the “COPY
SETTING”.
2) Press the Yes key into this item.
Press the Yes key, the display appears
the message “1 AUTO RESET”---a
sub-item of “MACHINE SETTING”.
3) Using the Numeric keys to select a
particular function.
For example: Press ‘3’ to select function
three of the “MACHINE SETTING”
MACHINE SETTING?
OK=YES / or 1-7
2) Press Yes key into
“MACHINE SETTING” item
3) Press Numeric keys(1 to 7) to
select a sub-item in “MACHINE
SETTING”
1) Press
the or
key to
scroll to
another
menu.
Utility
3
DEF
Yes
Page 23
About Your Machine
1-12
Another screen’s selection:
Select the choice by using the or key , then press the Yes key.
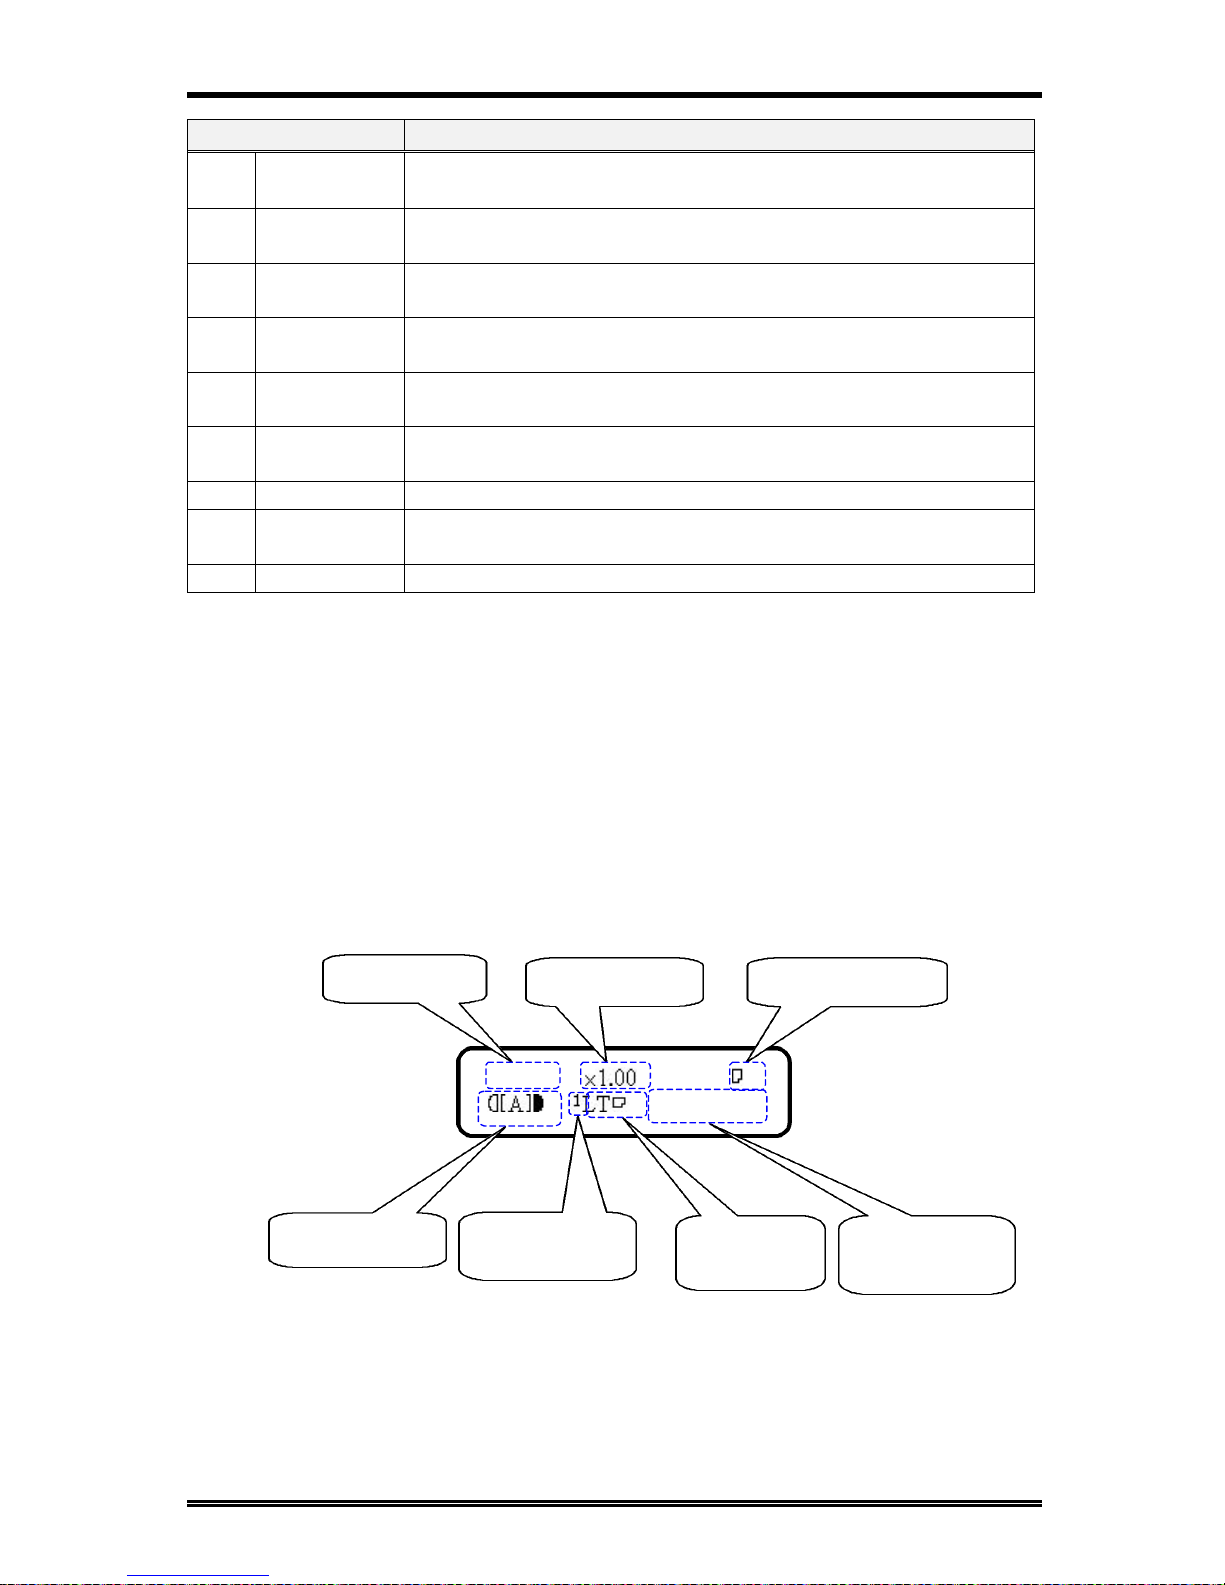
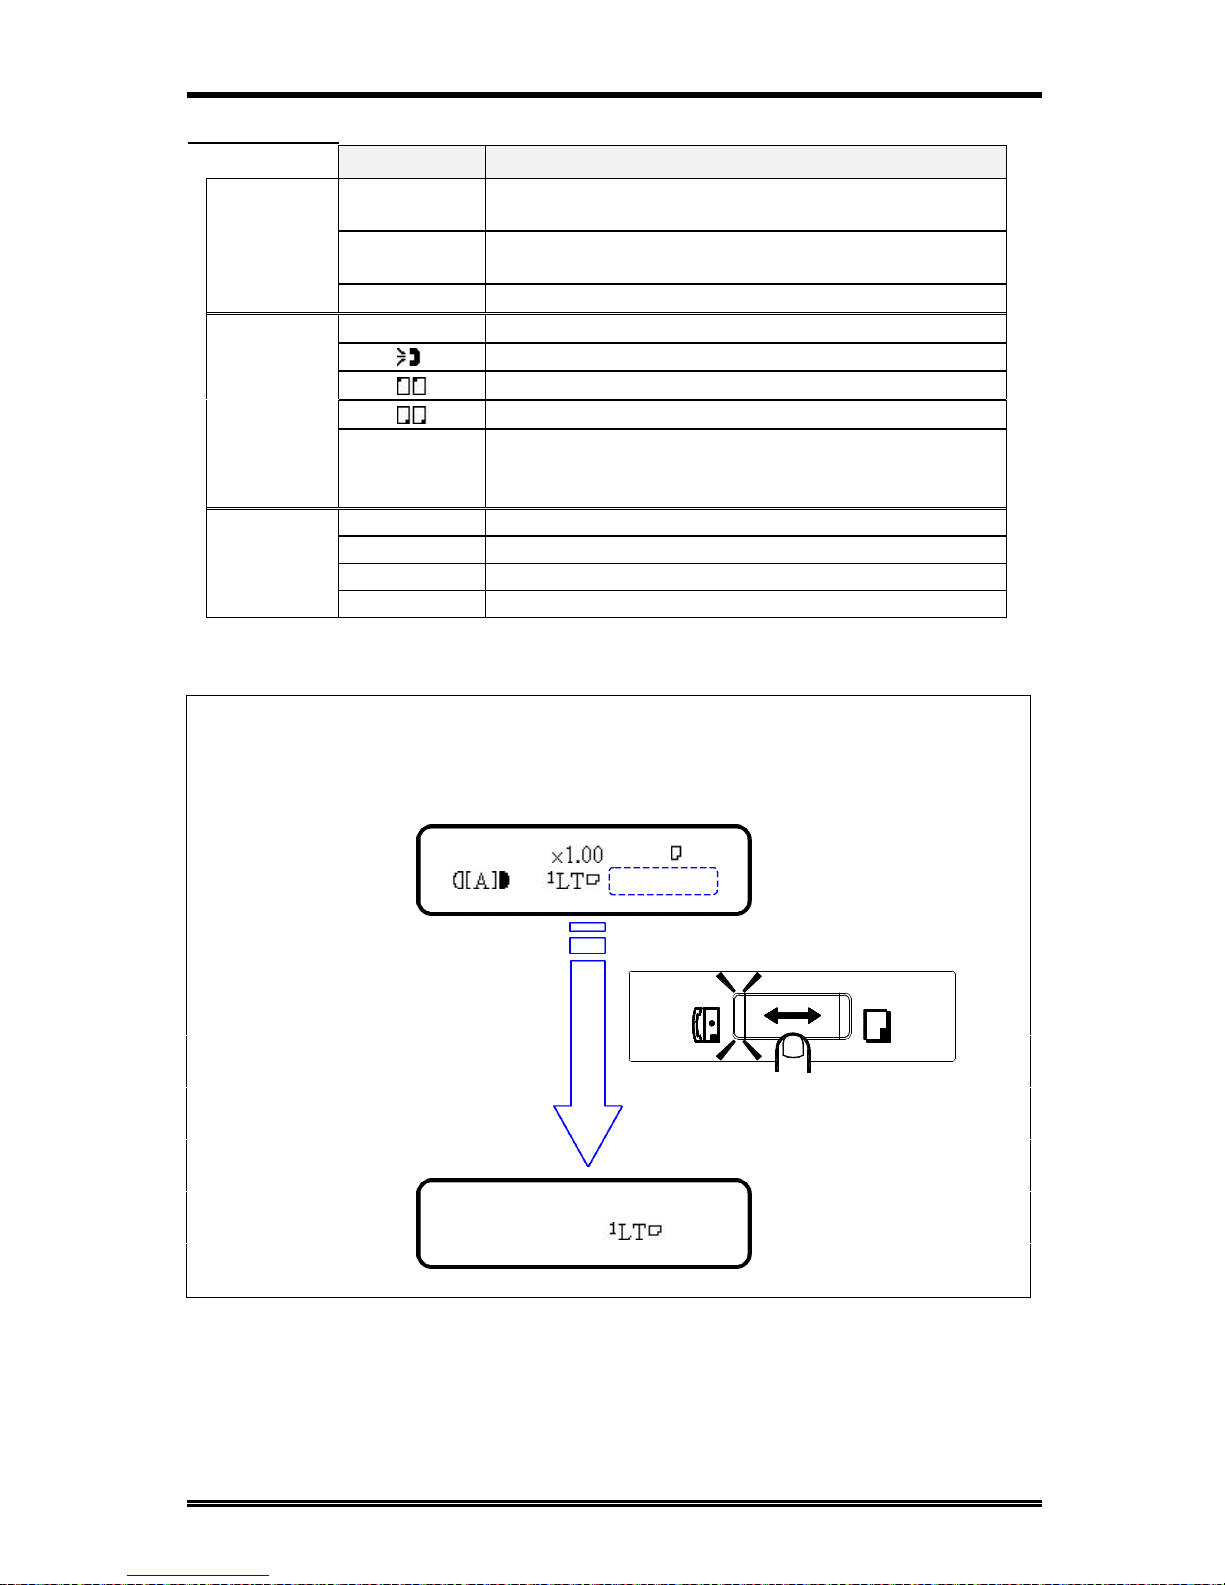
Meaning of the symbol
Symbol Contents
The number of copies
Direction of copy paper(Landscape)
Direction of the original document for machine
(Landscape)
Paper Tray(Tray 1)
When the Paper Tray is selected
Paper Feed Unit(Tray 2)
When the Paper Feed Unit is selected
Manual Bypass tray
When the Manual Bypass Tray is selected
Custom size for bypass copy
When the size of copy paper for the Manual Bypass
Tray is custom size (when size was set with the numeric
keys)
* TONE PULSE
, & YES
Press and keys to toggle between the two
selections. The item with an asterisk (*) is
currently selected.
Press the Yes key to validate the
selection of the item currently
marked with ‘*’.
Page 24
About Your Machine
1-13
Symbol Contents
Input custom size for bypass copy
The X and Y direction of copy paper is expressed.
Input Fax number
Number of scanning pages
Memory TX : during scanning and when the scanning
and TX are completed
ADF TX, Manual TX during TX
When TX is completed
Auto density
Manual density
The further left the line is placed, the lighter the density
becomes. The further right the line is placed, the darker
the density becomes.
Page 25
About Your Machine
1-14
Symbol Contents
Off hook in Dialing state (Transmission)
Receive calling in Dialing state (Reception)
Transmitting (Transmission)
Receiving (Reception)
Timer TX in memory
When Timer TX or Batch TX reservation is in Machine
memory.
Polling TX in memory
When Polling TX is in Machine memory.
SUB address
When key is pressed in inputting Fax number,
(followed “ (= ”)
External/Internal
When # key is pressed first when inputting Fax number,
(followed “ (= ”)
Tone
When * key is pressed first when inputting Fax number,
(followed “ (= ”)
Pause
When Pause key is pressed in inputting Fax number,
“P” is inputted in the place of cursor.
Combination dial, User Fax number
Press One-touch 27(Symbol) key an even number of
times while inputting the Fax number, ‘+’ is inputted in
the place of cursor.
Blink
1 2
Blink
1 2
Blink in
turn
1 2 3 4
Blink in
turn
1 2 3 4
Page 26
About Your Machine
1-15
JAN.01 15:38 100%
-SET DOC. FACE UP-
INITIAL USER DATA?
OK=YES / or 1-3
Symbol Contents
Dial registration, User Fax number
When One-touch 27 (Symbol) key is pressed an odd
number of times when inputting Fax number, ‘-’ is
inputted in the place of cursor.
Cursor : Left ( )
Move cursor to left.
Cursor : Right ( )
Move cursor to right
Cursor : Up ( )
Scroll the menu or job display.
Cursor : Down ( )
Scroll the menu or job display.
Sub-Address / Selective Polling
NOTE:
If the message display is too light or too dark, you can adjust it by using the
[Utility] functions to adjust it. Please refer “Setting LCD CONTRAST” í P 5-8
Initial User Data
The data recorded through these operations is printed as the header in a document
transmitted and footer in a document received (Header Print and Footer Print
functions). The data is also used for timer communications, reports, and password
communications.
Setting the Initial User Data
1. Check that the initial screen is shown.
Copy screen Fax screen
2. Press the Utility key 8 times to enter the
"INITIAL USER DATA" mode.
TEXT 1
Utility
x 8
Page 27
About Your Machine
1-16
1 DATE&TIME
08:00 ’00 01 01
SET YEAR (OK=YES)
INITIAL USER DATA?
OK=YES / or 1-3
01:00 ’00 01 01
SET TIME (OK=YES)
Setting Date & Time
1. Press "1" from the Numeric keys to show "1 DATE
& TIME" on the display.
2. Set the current time with the Numeric keys.
For example: 8:00 AM
If a wrong time has been entered, press the key, the
cursor position moves back one position. Enter the
correct time again.
3. In the same way, enter the current year, month and date.
For example: 2000/10/6
4. Check the settings you have made. If they
are correct, press the Yes key to validate the
date and time. (Pressing the Yes key to start
the built-in clock)
08:00 ’00 10 06
SET DATE (OK=YES)
1
8
TUV
0
OPER
0
OPER
0
OPER
0
OPER
0
OPER
0
OPER
0
OPER
1
6
MNO
Yes
Page 28
About Your Machine
1-17
2 USER FAX NO.
(=0354237801_
OK=YES
(=_
OK=YES
(=0354237801_
OK=YES
INITIAL USER DATA?
OK=YES / or 1-3
Setting User Fax Number
1. Press "2" from the Numeric keys to show "2 USER
FAX NO." on the display.
2. Using the Numeric keys, enter your fax number.
Up to 20 numbers can be entered for a fax number.
For example: 03-5423-7801
If a wrong number has been entered, press the
key. The cursor position moves back one position.
Enter the correct number again.
3. Check your setting and press Yes key if
it is correct. This validates the setting of
your fax number.
4. Before validating the User Fax No. setting, you may
press the NO/Clear key to make a correction. The
message display returns to the previous display to
enter the fax number.
2
ABC
1
2
ABC
3
DEF
4
GHI
5
JKL
8
TUV
7
PQRS
0
OPER
0
OPER
3
DEF
Yes
C
No
Page 29
About Your Machine
1-18
3 USER NAME
NAME= NEW YORK _
OK=YES
NAME=_
OK=YES
NAME=_
OK=YES
Setting User Name
1. Press "3" from the Numeric keys, it will
show "3 USER NAME" on the display.
2. Using the One Touch keys and some
function keys, enter your name. A name
can consist of up to 32 characters and
symbols. Selecting Characters and
Symbols using the following matrix, enter the characters of your name by
pressing the corresponding One Touch keys and some functions keys.
How to input characters:
I want…. Use which key?
Letters(ABCDEFGHIJ.…….XYZ) One Touch keys 1-26 íP 1-6
Symbols(&#*-/()”.,!……………..) One Touch key 27 íP 1-6
European symbols(Ä ä Ö ö Ü ü..)
*key íP 1-7
Numeral(1234567890) Numeric keys íP 1-5
<Pause> Redial/Pause key
Input
characters
<Space> key
Delete key
Move cursor to left key
Move cursor to right key
Accept the selection Yes key
Edit operation
Clear input data No/Clear key
3. For example: NEW YORK
If the wrong letter has been entered, press
the No/Clear key. Enter the correct name
again.
Delete
Space
Yes
C
No
C
No
Redial/
Pause
Page 30
About Your Machine
1-19
JAN.01 15:38 100%
-SET DOC. FACE UP-
INITIAL USER DATA?
OK=YES / or 1-3
4. Check your data entry and press the Yes key
to accept the name setting.
5. Press the No/Clear key to back the initial
screen.
Copy screen Fax screen
Connecting to the Telephone Line
Arrangement:
NOTE:
1. Connection should be done by a service technician.
2. Telephone cord accessories will vary: Type A, Type B, Type C, Type D,
depending on the requirements of the country.
3. The ground wire (E) is available in a version intended for a specific country.
(For example: Germany)
4. A standard telephone can be connected, if necessary.
TEXT 1
Yes
C
No
Page 31

About Your Machine
1-20
Basic Connection Procedure:
1. Connect the plug of the cord to the telephone
jack of the telephone line.
2. Connect the other plug of the cord to the line
connection on the backside of the machine.
3. Connect the currently used telephone
cord to the TEL connection on the
backside of the machine.
4. Connection is completed.
Connect to Private Branch Exchange (PBX)
When dialing an outside number via a PBX, it may take some time to be connected to
the outside line after dialing out. In such a case, if you enter all the numbers
consecutively, a connection may not be achieved after dialing (Dial Error).
To avoid such an error, enter a pause command after entering the outside line access
number and before entering. By entering a pause, you can avoid the dial error caused
by the PBX system.
The number you dial to access the outside line differs for different PBX systems
Page 32

About Your Machine
1-21
(=0_
(TX=START)
(=0P_
(TX=START)
(=0P54321_
(TX=START)
(=0P54321
(TX=START)
How to operate
1. Enter the access number used by your PBX.
For example: 0
2. Press the Redial/Pause key after ‘0’ for wait about
2.5 seconds when connect to the PSTN line.
3. Use the Numeric keys to input the number you want to dial.
For example: 54321
If you have entered the wrong number, press the
key. The cursor position moves back one position.
Enter the correct number again.
4. Press Start key to perform the transmitting.
NOTE:
About how to setting the PSTN/PBX for your machine please refer “Setting
PSTN/PBX”. í P 2-39
Redial/
Pause
0
OPER
1
2
ABC
3
DEF
4
GHI
5
JKL
Page 33

2. Basic FAX Operations
Page 34

Basic FAX Operations
2-1
How to Transmit a Document - Basics
1) Overview of the Basic Transmission Procedure
You can transmit a document in several different ways. This chapter explains how to
transmit a document directly from the document feeder.
Here are the basic steps when transmitting a document:
Select the resolution (transmission image quality).
Set the resolution for the transmission. í P 2-1
Load the document.
Ensure that the document is suitable for transmission.
Place the document in the feeder.
Dial the number. (Transmit the document.)
Use the Numeric keys to dial the number. (Manual Dialing) í P 2-6
Use the One Touch Dial function. í P 2-9
Use the Speed Dial function. íP 2-10
Use the Combination Dial function. í P 2-12
Use the Phone Book (List) function. í P 2-15
Use the Phone Book (Search) function. í P 2-16
When the number is dialed, the machine starts scanning and transmitting the document.
2) About the Direct Communication and Memory Communication
A document can be transmitted or received either through direct or memory
communication.
Features of direct communication
You can transmit long documents without being concerned about memory capacity.
(In memory communication, transmission or reception of a document is unavailable
when there is not enough memory for the document.)
Features of memory communication
Since the machine scans the contents of all pages of a document at high speed before
starting a transmission, you can bring that document back to your desk quickly. The
machine also allows you to make the necessary settings for the transmission of
another document even while transmitting or receiving the current document.
Memory substitute reception function:
The machine will automatically switch from printing or direct reception to memory
reception if the machine runs out of paper or misfeeds, ensuring reception of
important documents. The document received is printed as soon as paper is loaded or
the misfeed is cleared.
Selecting the Resolution
Overview of the Resolution
You can select the resolution for the transmission based on the characteristics of the
document to be transmitted so that the receiver gets a highly legible document. There
are 3 levels of resolution to choose. And they can be set in addition to Half-Tone mode.
1. Standard
Use this selection for transmitting a
standard document containing characters of a common
size, either handwritten or word-processed. Standard
resolution will result in the fastest transmission times.
Standard
Fine
Super Fine
Half Tone
Lighting Up
Page 35

Basic FAX Operations
2-2
2. Fine
Offering better resolution than Standard, Fine is
suitable for newspapers and similar documents which
have small type or detailed illustrations, or when there
is a willingness to trade speed for higher image
quality.
3. Super-Fine
Offering better resolution than fine, super fine is
suitable for smaller type and very detailed
illustrations, it take longer to transmit.
NOTE: The better resolution you select, the longer transmission time you cost.
About Half-Tone mode:
Suitable for documents with half-tone photo illustrations and for colored documents.
The Half-Tone setting is not mutually exclusive of Standard or Fine resolutions.
Resolution can be set in addition to Half-Tone.
4. Standard with Half-Tone mode
Standard resolution adds the Half-Tone mode.
5. Fine with Half-Tone mode
Fine resolution adds the Half-Tone mode.
6. Super-Fine with Half-Tone
Super-fine resolution adds the half-tone mode.
Note: Half-Tone mode significantly increases the transmission time.
Standard
Fine
Super Fine
Half Tone
Standard
Fine
Super Fine
Half Tone
Standard
Fine
Super Fine
Half Tone
Standard
Fine
Super Fine
Half Tone
Standard
Fine
Super Fine
Half Tone
Page 36

Basic FAX Operations
2-3
JAN.01 15:38 100%
-SET DOC. FACE UP-
How to select the Resolution
1. Check that the message display is in Fax screen.
If not, press the Copy/Fax key to switch.
2. Press the Resolution key to select the desired
resolution. Each time the key is pressed, a new
resolution is selected.
3. When the document has been transmitted, the initial setting
of Standard is automatically reset to the default resolution.
For example: Standard resolution
The Utilities function allows selection of another resolution type as the default
resolution.íP 2-23
Resolution
Standard
Fine
Super Fine
Half Tone
Standard
Fine
Super Fine
Half Tone
Page 37

Basic FAX Operations
2-4
NOTE:
For any of the following types of documents, make a copy prior to transmission or
use the Carrier Sheet for transmission.
• A page with a width or length smaller than the minimum permissible
dimensions.
Minimum permissible dimensions: Width ….…148 mm
Length …….100 mm
• A lightweight page weighing 50 g/m2 or less
• A creased, torn, wrinkled, or curled page
• OHP transparencies
• A page with a stamp on it, or a page with adhesive tape affixed to it
• Paper with a coated surface
• Heat- or pressure-sensitive paper
• Glossy paper
Loading the Document
Documents Suitable for Transmission:
Type Sheet (1-sided only)
Standard
♦ A4
♦ Letter
♦ Legal
♦ Government Legal
Width 148~216 mm
Size
Non-standard
Length 100~1000 mm
weight
50~110g/m
2
Loaded pages
Up to 50 sheets
Effective scanning
area
When preparing a document, allow a blank margin of this
width along the four sides.
Useful Tips
If your document is very important, confidential or for an emergency, it is
recommended that you make a phone call to tell the other party that you are
sending the document.
4mm 4mm 4mm 4mm
The scanning
width is fixed
to 208mm.
Letter
A4
Scanning
Page 38

Basic FAX Operations
2-5
JAN.01 15:38 100%
-SET DOC. FACE UP-
How to load the Document
This machine scans the data on the front side of the document. This means that you
should place the document face up on you.
You can transmit the document with the date printed at the top of the document by
the Header function. (íP 2-27) To use the Header function properly, load the
document with the top edge inserted. When sending a multi-page document, the
machine scans from the top down. A document placed in the feeder arranged in
sequential order of pagination will be sent in the same order. Document ejecting
style is straight-ahead ejection. The same rule applies when placing your document
for the copy or scanner function.
1. Check that the message display is in Fax
screen.
If not, press the Copy/Fax key to switch.
2. Adjust the Document Guide Plates to fit
the size of the document.
3. Place the document face up and turn the top
edge of the document into feeder.
(Slide the document along the Document
Feeding Tray into the feeder until it is
stops.)
Page 39

Basic FAX Operations
2-6
( = ENTER FAX. NO.
→ or FUNCTION
JAN.01 15:38 100%
-SET DOC. FACE UP-
NOTE:
Do not mix pages of assorted sizes together, as a paper misfeed or skewing
could result.
For multi-page documents, be sure to remove any staples, paper clips, tape
etc. Transmitting documents without removing these items can cause
misfeeds or damage to the machine.
4. The Message Display now prompts you to
enter the fax number.
Dialing the Number (Transmitting the Document)
Using the Numeric keys (Manual Dialing)
Using the Numeric keys to dial is the most basic method. Load your document, enter
the fax number of the destination with the Numeric keys, and press the Start key.
1. Check that the message display is shown
Fax screen.
1
2
ABC
3
DEF
4
GHI
5
JKL
6
MNO
8
TUV
0
OPER
TT
#
7
PQRS
9
WXYZ
Page 40

Basic FAX Operations
2-7
( =_
( =:_
(TX=START)
( =123456_
(TX=START)
If not, press the Copy/Fax key.
2. Place the document face up on the Document
Feeding Tray, and insert it into feeder until it
stops.
3. From the Numeric keys, enter the Fax
number of the other party. Up to 30
characters can be entered for a Fax number.
Example: 123456
If you want to correct the entered number, press the
No/Clear key, then it appears as below.
4. To access to a PC that is connected to the
destination PC.
Press the key once to select "Sub Address,"
when the display shows ":", the input of "Sub
Address" is ready.
If you have entered a wrong number, press the
key, to bring the cursor back one position, then
enter the correct number.
C
No
1
2
ABC
3
DEF
4
GHI
5
JKL
6
MNO
Page 41

Basic FAX Operations
2-8
( =0P065323276_
(TX=START)
* TX COMPLETE *
NEW YORK 1
* REDIAL WAITING *
NEW YORK
* COMM. ERROR*
(OODA)
5. Press the Start Key.
The machine automatically starts dialing the number
and starts feeding the document.
If you want to stop transmitting the document, press the Stop key,
and then the Yes key.
When a PBX is Being Used
When dialing a number to an outside line via a PBX, it may take some time waiting for
connection, you can use the Redial / Pause key.
For example: 0-06-532-3276(if access number=0)
When the transmission is completed, a buzzer
sounds and the message "TX COMPLETE" is
shown for 2 sec., indicating that the document
has been successfully transmitted to the other
party.
To obtain detailed results of a transmission, print the Activity Report. íP 8-11
If the Line is Busy
The Auto Redial function automatically redials
the line of the receiving party.
If the Transmission Fails
If the transmission fails, a buzzer sounds
intermittently for 2 sec. and the Error Indicator
lights up.
(The error code: OODA, may be slightly different
in some machines.)
Press the Redial/Pause
key and the ‘P’ appears.
Start
Redial/
Pause
Stop
Yes
Page 42

Basic FAX Operations
2-9
* REDIAL ALL FAILED *
NEW YORK
JAN.01 15:38 100%
-SET DOC. FACE UP-
The machine automatically prints a TX / RX
Result Report.
Press the Stop key.
The document exits and the Error Indicator light goes out, note the reason for failure on
the TX/RX Result Report and retry transmission or check to be sure the fax number is
correct.
Using the One Touch Dial Function
The One Touch Dial function allows you to transmit a document to a particular party
by pressing one of the One Touch Keys that has previously been programmed with
that party’s information.
To use this function, you must have previously programmed the One-Touch keys with
the appropriate fax NO. and other data.
For more detailed register procedures, see “Dial Registration” íP 5-13
1. Check that the message display is shown
Fax screen.
If not, press the Copy/Fax key to switch.
2. Place the document face up into the
Document Feeding Tray.
3. Press the One Touch key in which the desired party has been programmed.
For example: One Touch key 08 = BOSTON
The machine starts dialing the fax number and starts feeding the document.
Stop
H
Page 43

Basic FAX Operations
2-10
* TX COMPLETE*
NEW YORK 11
TX CANCEL?
YES / CONTINUE=NO
JAN.01 15:38 100%
-SET DOC. FACE UP-
If you want to stop the transmission, press the Stop key,
the display appears as below.
Then press the Yes key, the transmission now be
canceled.
4. When the transmission is completed, a
buzzer sounds and the message "TX
COMPLETE" is shown for 2 sec.,
indicating that the document has been
successfully transmitted to the other party.
Then, the initial screen reappears.
To obtain detailed results of the
transmission, print the Activity Report.
í P 8-11
Using the Speed Dial Function
The Speed Dial function allows you to transmit a document to a particular party by
just entering a 2-digit number assigned to that party. To use this function, however,
you must first program each Speed dial NO.(2-digits) with fax number and other
data .
Up to 100 different parties can be registered for Speed Dial.(Speed dial NO.: 00 to
99)
For more details of registering procedure, see “ Dial Registration” íP 5-13
Example:
1. Check that the Fax screen is shown.
If not, press the Copy/Fax key to switch.
Stop
Yes
TEXT 1
Page 44

Basic FAX Operations
2-11
SPEED DIAL=_
* TX COMPLETE*
BOSTON 9
SPEED DIAL=38
( =BOSTON
(TX=START)
2. Place the document face up into the
Document Feeding Tray.
3. Press the Speed Dial key to display the
Speed Dial prompt.
4. Using the Numeric keys, enter the Speed dial
NO. of the party to which you are going to
transmit a document.
Then, press the Start key.
Example: Speed dial NO.38 = BOSTON
5. The machine now starts dialing the fax number and starts feeding the document.
If you want to stop the transmission, press the Stop key
and then the Yes key.
6. When transmission is completed, a buzzer
sounds and the message "TX COMPLETE"
is shown for 2 sec., indicating that the
document has been successfully transmitted
to the other party.
Speed Dial
3
DEF
8
TUV
Start
Stop
Yes
Page 45

Basic FAX Operations
2-12
JAN.01 15:38 100%
-SET DOC. FACE UP-
SPEED DIAL=12
(=_
(=12345_
OK=YES (SUB=)
Then, the initial screen reappears.
To obtain detailed results of a transmission, print the TX Result Report. íP 8-7
Using the Combination Dial Function
When a dial registered as a Combination Dial is used, you can enter the dial number
following the Combination Dial.
How to set a Combination dial:
To register One Touch Dial No. or Speed Dial No. as a Combination Dial, enter the
‘+’ symbol (One Touch Dial key 27[&]) after One Touch Dial number or Speed Dial
number.
For example: register a Speed dial as a Combination Dial.
1. Press the Utility key 3 times.
2. Press ‘2’ from the
Numeric keys, then the
message “2 SPEED
DIAL” appears briefly.
3. Input the Speed Dial No.
For example: 12
4. Input the Fax number by press the Numeric keys.
For example: 12345
DIAL REGISTRATION?
OK=YES/or 1-5
Utility
x 3
SPEED DIAL=_
2
ABC
2 SPEED DIAL
1
2
ABC
3
DEF
4
GHI
5
JKL
1
2
ABC
Page 46

Basic FAX Operations
2-13
JAN.01 15:38 100%
-SET DOC. FACE UP-
Panel Reset
DIAL REGISTRATION?
OK=YES/or 1-5
Yes
*SPEED DIAL 12
REGISTERED*
5. Press the One Touch
Dial key 27(&) after the
Fax number, the display
would shows the ‘+’
symbol.
6. Press Yes key.
The display appears a message to confirm the
Speed Dial have registered as shown.
7. Press the Panel Reset key to resume the initial state.
For details about registering procedure, see “Dial Registration” íP 5-13
How to use Combination Dial
Example: Use a Combination Dial that registered in Speed Dial 12.
1. Place the document face up into the
Document Feeding Tray.
2. Check that the Fax screen is shown.
If not, press the Copy/Fax key to
switch.
(=12345+
OK=YES
&
Page 47

Basic FAX Operations
2-14
( =1234567890
(TX=START)
(=12345+
NOTE:
Calling only with the Combination Dial is possible.
• When a One Touch Dial or Speed Dial key is used after a Combination Dial, the
slower communication speed is applied.
• Batch processing is not available when Group Dial, Program Dial, Timer
Transmission or Communication Function is registered by using One Touch Dial
or Speed Dial as a Combination Dial.
• For any registered Dial No., when it is changed or deleted, it will be deleted from
the registration of Transmission (Calling) Stand-by job and Program key.
• An error occurs and transmission becomes impossible when combined numbers
are registered to the Combination Dial or when the total number of digits in a fax
number exceeds 30.
• If you use the combination dial, inputting SUB or SUB registers in One-touch dial
or Speed Dial will not be valid.
3. Press Speed Dial key. Enter the NO. which
registered as a Combination dial.
For example: 12
The display appears the number
registered in Speed Dial 12, flowed by
the symbol ‘+’, indicate that it is a
Combination Dial.
4. Enter the other numbers using the dialing as shown:
1) Dial No. (Numeric keys) + Start key
2) One Touch Dial (which has not yet been registered as a Combination Dial)
3) Speed Dial and Numeric keys
For example: Use the numeric keys to
input the other numbers(67890) to
complete this combination dial. (The
symbol ‘+’ will disappear
automatically)
Then press the Start key to perform the transmission.
SPEED DIAL=_
SPEED DIAL=12
1
2
ABC
Start
Speed Dial
Page 48

Basic FAX Operations
2-15
* LIST SEARCH
, & ”YES”
* NEW YORK
OK=START
JAN.01 15:38 100%
-SET DOC. FACE UP-
Using the Phone Book Function
Overview of Phone Book function
Phone Book is a list of locations you have programmed for One Touch Dial, Speed
Dial and Group Dial.
This function offers you a directory list for locating a destination by yourself or by
machine (Search) for transmission of a document to that party.
To use the Phone Book, you must first program the fax numbers and other data for
the destinations to which you will transmit a document by One Touch Dial or Speed
Dial. íP 5-14
Up to 27 different parties can be registered for One Touch Dial and up to 100 for
Speed Dial.
Phone Book (List)
1. Place the document face up into the document
feeding tray.
2. Check that the Fax screen is shown.
If not press the Copy/Fax key to switch.
3. Press the Phone Book key.
Make sure that “LIST” is selected then press the Yes key.
4. Press the or key to search for the party to whom
you are going to transmit a document.
Yes
Phone Book
Page 49

Basic FAX Operations
2-16
* TX COMPLETE*
BOSTON 14
JAN.01 15:38 100%
-SET DOC. FACE UP-
*BOSTON
OK=START
JAN.01 15:38 100%
-SET DOC. FACE UP-
5. Once the desired destination is displayed press the Start key.
The machine now starts dialing the fax number and it starts
feeding the document.
Press the Stop key if you want to stop the transmission.
6. When transmission is completed, a buzzer sounds
and the message "TX COMPLETE" is shown for 2
sec., indicating that the document has been
successfully transmitted to the other party.
Then, the initial screen reappears.
If you want to know the result of the transmission, check it either by using the Confirm
function or by printing the Activity Report. íP 8-11
ACTIVITY REPORT
NO. SESSION DATE TIME TX/RX
DESTINATION
STATION
PAGE DURATION MODE RESULT
01 0014 SEP.17 09:30 TX----
BOSTON
03 345 0987
1 00 H 01’25” ECM OK
TX ----------------- 1 00 H 01’25” ------ ------------
TOTAL
RX ----------------- 0 00 H 01’25” ------ ------------
Phone Book (Search)
1. Check that the Fax screen is shown.
If not, press the Copy/Fax key to switch.
2. Place the document face up into the Document Feeding
Tray.
Start
Stop
Page 50

Basic FAX Operations
2-17
* LIST SEARCH
, & YES
LIST *SEARCH
, & YES
SEARCH ->> NEW YORK _
OK=YES
NEW YORK (2)
SEARCH = YES (SEE= )
* NEW YORK 1
OK = START
3. Press the Phone Book Key.
4. Press the or key to select “SEARCH”, then,
press the Yes key.
5. Using the One Touch keys and Numeric keys, enter
the name or beginning portion of the name of the
party for which you want to search.
Example: Search for the destination name having “NEW YORK” at the beginning of the
name.
Selecting Characters:
Enter the characters of the name or beginning of the name by pressing the corresponding
One-Touch Key. Do the same for the destination you wish to locate.
6. Press the Yes key.
The machine now search for the exact name or possible names
beginning with the letters entered. Here you can find 2
destinations searched.
7. Press the or key to locate the party to whom you
are going to transmit a document.
Phone Book
Yes
Yes
Page 51

Basic FAX Operations
2-18
Each press of the arrow key shows the next party name on the Message Display.
Once the correct destination is displayed, press the Start key.
The machine now starts dialing the fax number and it starts feeding the document. Press the
Stop key if you want to stop the transmission.
When the transmission is completed, a buzzer sounds
and the message "TX COMPLETE" is shown for 2
sec., indicating that the document has been
successfully transmitted to the other party.
If you want to know the result of the transmission, check it either by using the [Confirm]
utilities íP 7-1 or by printing the Activity Report. íP 8-11
How to Receive a Document - Basics
Overview of the Basic Reception Procedure
A document can be received in several different ways. This section explain how to
receive a document and directly print it on your fax machine without using the memory
function. For the procedure using the memory function (memory reception), see "Printing
the Document of Received by Memory RX mode" íP 2-31
Before receiving a document, the following functions must be set:
Reception ModeíP 2-19
This determines the mode in which your machine should be set to receive a document
from the other party.
Print Mode (see below)
This determines the zoom ratio at which the document received from the other party is
to be printed through your machine printer.
Select the Printing Mode (Reduction RX)
Overview of the Printing mode
Your machine may be in either of the following three modes when printing a document
received from the other party. Select the appropriate mode according to your needs.
Reduction RX Description
ON
The machine will reduce the documents as needed to fit on
the record paper.
OFF
The machine will not reduce the document and instead will
print the remainder on a second page if the image size
exceeds the length of the paper.
CUT
The machine will automatically cut off the remainder of the
document if it is less than 18mm. If the remainder exceeds
18mm, it will be printed on a second page.
* TX COMPLETE *
NEW YORK 1
Start
Page 52

Basic FAX Operations
2-19
* ON OFF CUT
, & YES
RX OPERATION ?
YES / or 1-8
4 REDUCTION RX
TEXT 1
RX OPERATION?
OK=YES / or 1-8
How to select the Printing mode
1. Press the Utility key 5 times into the" RX
OPERATION" mode.
2. Press "4" from the Numeric keys to show "4
REDUCTION RX" on the Message Display.
3. Using the or key, select the desired
printing mode.
• Select ON, this selects the Reduction
Priority mode.
• Select OFF, this selects the Full Size Priority mode.
• Selects CUT, this selects the Cut mode.
4. Once the desired selection is made, press the
Yes key to validate it.
5. Press the No/Clear key to exit from the "RX
OPERATION" mode. Then the initial screen
reappears.
Selecting the Reception Mode (Setting RX Mode)
1) Overview of the Reception Mode
Your machine may be in either of the following two modes when receiving a document
from the other party. Select the appropriate mode according to how you are going to
receive the document.
Fax mode (Auto RX mode)
Select this mode when using your machine mainly as a fax machine. When a document
comes in, your machine rings several times before starting an automatic reception. The
number of rings can be set as required. See “Setting No. of Rings”íP 2-32
Utility
x 5
4
GHI
C
No
Page 53

Basic FAX Operations
2-20
7 RX MODE
*AUTO RX MANUAL RX
, & YES
RX OPERATION?
YES / or 1-8
TEXT 1
FAX:(ð
TEXT 1
FAX:
TEL mode (Manual RX mode)
Select this mode when you use your machine mainly as a telephone. To receive a fax
document, pick up the Handset, if you hear a fax tone, press the Start Key and hang-up to
receive it manually. Note that at this mode you cannot receive a document automatically.
2) How to select the reception mode
1. Press the Utility key 5 times into the "RX
OPERATION".
2. Press "7" from the Numeric keys to show "7 RX
Mode" on the Message Display.
3. Press the or key to select "AUTO RX "
or "MANUAL RX".
4. Then press the Yes key.
5. The machine is now ready to receive based on the mode selected through the above
steps.
Operation at Reception
Receiving a Document in the Fax Mode (Auto RX mode)
1. When using a telephone, the telephone also
rings indicating that a fax call is coming in.
2. The machine communication starts after the
preset number of rings is detected.
The number of rings occurring before the machine answers is programmable. íP 2-32
Utility
x 5
7
PQRS
Yes
Page 54

Basic FAX Operations
2-21
* RX COMPLETE*
12
* TALKING *
(NEW YORK 1 ) 95%
-SET DOC. FACE UP-
* RX COMPLETE*
12
JAN.01 15:38 100%
-SET DOC. FACE UP-
* TALKING *
TEXT 1
3. When all pages of the document are received,
a buzzer sounds, notifying that the
communication has been completed.
Receiving a Document in the Tel Mode (Manual RX mode)
1. When using a telephone unit, the telephone
also rings indicating that a fax call is coming
in.
2. Lift the telephone handset.
This stops the machine ringing.
3. If you hear a fax signal, press the Start key to
begin reception, then put down the telephone
handset.
4. The document is received and output.
When all pages of the document are received,
a buzzer sounds to notify you that the
communication is completed.
How to Use Your Fax as a Telephone
This machine can be used as a telephone, in addition to a fax machine.
Making a Telephone Call
1. Check that the display is shown the Fax
screen.
If not, press the Copy/Fax key to switch.
2. Lift the telephone handset and then the
display shown as right.
Page 55

Basic FAX Operations
2-22
NOTE:
When you pick up the telephone with the machine in the Tel mode
and find that the call received is a fax communication press the
Start key as described on the previous page.
JAN.01 15:44 100%
-SET DOC. FACE UP-
* TALKING *
1 SCAN CONSTRAST
3. Using the dial keys on the telephone unit or the Numeric keys on the FAX, enter
the telephone number of the receiving party.
4. The telephone unit now operates as a normal
telephone.
Once the voice call is completed, return the
telephone handset as usual.
Receiving a Telephone Call
1. When the telephone rings, indicating that a
call is coming in, lift the telephone. Start
talking the phone to the calling party.
2. Once a voice call has been completed, hang
up the telephone.
Settings of TX Operation
Setting SCAN CONTRAST
There are five contrast levels that you can select depending on your original
document. For documents with very fine or light characters, choose a lighter level.
1. Press the Utility key 4 times then the display
appears the message “TX OPERATION”.
2. Press "1" from the Numeric keys. The following
message appears briefly to confirm your
selection.
JAN. 01 15:38 100%
-SET DOC. FACE UP-
TX OPERATION?
OK=YES / or 1-7
1
Utility
x 4
Page 56

Basic FAX Operations
2-23
LIGHT DARK
, & YES
2 RESOLUTION
*STD F S/F H/T
, & YES
*STD FINE S/F
, & YES
3. Press or key to select the desired
contrast as the default setting.
Then press the Yes key.
4. Press the No/Clear key to restore the initial state.
Setting RESOLUTION
To assure the best quality document, please set the scanning resolution and contrast
according to the requirements of your original documents.
1. Press the Utility key 4 times then the display
appears the message “TX OPERATION”.
2. Press "2" from the Numeric keys. The
following message appears briefly to confirm
your selection.
3. Press or key to select the desired
resolution as the default setting (Standard
/Fine /Super Fine /Half Tone)and then
press the Yes key.
If you select “H/T” then the message
appears to ask the quality of Half tone,
PRESS or key to select the desired
setting, then press the Yes key to accept this selection.
4. Press the No/Clear key to restore the initial state.
No
C
No
C
TX OPERATION?
OK=YES / or 1-7
Yes
2
ABC
TX OPERATION?
OK=YES / or 1-7
Utility
x 4
Page 57

Basic FAX Operations
2-24
3 PAGE COUNT TX
*ON OFF
, & YES
TX PAGE=1
OK=YES
Setting PAGE COUNT TX
When Page Count TX is set to ON, it determines whether the page count is correct
before the original documents for transmission are scanned into memory. This function
helps to prevent the original documents from being misfed from Document Feeding
Tray.
1. Press the Utility key 4 times then the display
appears the message “TX OPERATION”.
2. Press "3" from the Numeric keys. The following
message appears briefly to confirm your
selection.
3. Press or key to select ON or OFF as
the default setting, then press the Yes key.
4. Press the No/Clear key to restore the initial state.
How to use PAGE COUNT TX
1. Place your document face up on the document
feeding tray.
2. Press the Copy/Fax key switch to the Fax screen.
Then the display would shows the message
”TX PAGE=”.
No
C
TX OPERATION?
OK=YES / or 1-7
3
DEF
Yes
Utility
x 4
Page 58

Basic FAX Operations
2-25
( =ENTER FAX NO.
→ or FUNCTION
*WRONG PAGE COUNT *
11/12
TX PAGE=12
OK=YES
Start
( =12345_
(TX=START)
3. Enter the page of the transmission document, then
press the Yes key.
For example: If you want to transmit 12 pages.
4. Then display prompt you to input the
remote Fax number.
5. Input the Fax number and then press the
Start key to perform transmitting. Before
dialing the number, the machine scanning
the documents into memory and counted
the pages.
For example: The remote Fax number is “12345”
If the page count is equal to the number
you entered, it starts to dial and transmit
them, otherwise, the message shown on the
right appears. In that case, press the Stop
key, go back to step 1 and transmit again.
Yes
1
2
ABC
1
2
ABC
3
DEF
4
GHI
5
JKL
It means that you want to transmit 12
pages of document, but the machine just
scanned 11 pages.
Page 59

Basic FAX Operations
2-26
4 CLOSED NETWORK
* ON OFF
, & YES
TX OPERATION?
OK=YES /or 1-7
Setting CLOSED NETWORK (TX)
If Closed Network TX is set to ON, you can only transmit a document to one of the
destinations registered in One Touch Dial, Speed Dial and Phone Book.
Closed Network TX provides a means of controlling machine communications and,
when transmitting an important document, avoiding transmission to the wrong
destination.
But this means you cannot dial the FAX NO. directly from the numeric panel.
1. Press the Utility key 4 times.
The display changes to the TX Operation
mode.
2. Press ‘4’ from the Numeric keys.
The display changes to the Closed Network
TX mode.
3. Press the or key to select ON or OFF for
the Closed Network, then press the Yes key.
4. This completes the setting for Closed
Network TX.
Press the Panel Reset key to return the initial
screen.
Setting DEFAULT TX
This function is used to set the default TX mode of the fax unit. Two operations are
available:
Choices Available Description
Memory TX
When set in this mode, documents are scanned into memory
for transmission and dialing starts after the first pages is
scanned (Quick TX).
ADF TX (Direct
Transmission)
When set in this mode, documents are scanned for
transmission after connection has been made to the
receiving unit. (When the available memory is insufficient,
please select ADF TX for a successful transmission)
TEXT 1
Utility
x 4
4
GHI
Page 60

Basic FAX Operations
2-27
5 DEFAULT TX
*MEM. TX ADF TX
, & YES
If line is not available, the message “LINE IS BUSY” will
be displayed. The facsimile will retry based on the number
of redial attempts and intervals that were preset.
1. Press the Utility key 4 times then the display
appears the message “TX OPERATION”.
2. Press "5" from the Numeric keys. The following
message appears briefly to confirm your
selection.
3. Press or key to select MEM. TX or
ADF TX as the default setting.
Then press the Yes key.
4. Press the No/Clear key to restore the initial state.
Setting HEADER
Header prints information on the paper at the receiving end to identify that you
transmitted the document. The header appears at the top of each page in a document,
showing the sender name, page number, and the time of transmission.
1. Date of Transmission
2. Time of Transmission
3. Transmitter Name
4. Session number
5. Page number
1 2 3 4 5
MAY.29’2000 07:58 ABC #0641 P.009
XXXXXXXXXXXXXXXXXXXXXXXXXXXXXXXXXXXXXXXXXXXX
XXXXXXXXXXXXXXXXXXXXXXXXXXXXXXXXXXXXXXXXXXXX
No
C
TX OPERATION?
OK=YES / or 1-7
5
JKL
Yes
Utility
x 4
Page 61

Basic FAX Operations
2-28
6 HEADER
* ON OFF
, & YES
NOTE:
• The header is printed on the area 4 mm from the leading edge of the paper.
Therefore, make sure that the area 4 mm from the leading edge is blank to allow
the contents of the document to be fully transmitted.
• For U.S.A. user, this function is always ON.
TX OPERATION?
OK=YES / or 1-7
1. Press the Utility key 4 times.
The display changes to the “TX
OPERATION”.
2. Press ‘6’ from the Numeric keys.
The display now changes to the Header
mode.
3. Press the or key to select ON or OFF for
the Header function, then press the Yes key.
4. This completes the Header setting.
Press the Panel Reset key to restore the initial state.
Setting OT-DIAL IN COPY
To prevent the copied original documents in Document Feeding Tray being
transmitted when one-touch key is pressed, this function should be set to "Disable".
1. Press the Utility key 4 times then the display
appears the message “TX OPERATION”.
TX OPERATION?
OK=YES / or 1-7
Utility
x 4
Utility
x 4
Panel Reset
6
MNO
Page 62

Basic FAX Operations
2-29
7 OT-DIAL IN COPY
*DISABLE ENABLE
, & YES
2. Press "3" from the Numeric keys. The following
message appears briefly to confirm your
selection.
3. Press or key to select Disable or
Enable as the default setting, then press the
Yes key.
4. Press the No/Clear key to restore the initial state.
Settings of RX Operation
NOTE: Some settings of the RX operation is mentioned in other chapter shown as
below:
REDUCTION RX ………..í P 2-18
MAILBOX RX ……………í P 4-15
RX MODE………………...í P 2-19
Setting MEMORY RX MODE
Memory RX Mode stores in memory the contents of a received document. The
document is not printed unless the machine receives a print out command. This feature
provides a means of controlling the documents received through fax. The print
command may be a timer or password.
The print timer command prompts the machine to start printing the document stored in
memory at the specified time. The password print command prompts the machine to
start printing when a password is input.
A print timer command can be used in combination with a password print command.
When a print timer command has been defined and you want a printout to occur before
the set time, you can enter the password to activate the earlier printout provided a
password print command has also been set.
Programming for Memory RX Mode
1. Press the Utility key 5 times.
Utility
x 5
No
C
3
DEF
Yes
Page 63

Basic FAX Operations
2-30
1 MEMORY RX MODE
ON *OFF
, & YES
*ON OFF
, & YES
ON TIME = 15:05
OK=YES
OFF TIME = 09 : 00
OK = YES
RX OPERATION ?
OK=YES / or 1-8
The display changes to the “RX
OPERATION”.
2. Press ‘1’ from the Numeric keys.
The display now changes to the Memory RX
Mode.
3. Press the or key to select the memory
reception mode “ON”.
4. Check that “ON” is selected and then press
the Yes key.
5. Setting print timer
Using the Numeric keys, enter the ON time
(24-hour system) at which you want to
receive into memory.
For example: 3:05 p.m.
NOTE: If you do not want to set the print timer, press the Yes key, and the
Memory RX mode will always be on.
To change the on time, press the No/Clear key. You will
be prompted to enter the on time.
6. Using the Numeric keys, enter the OFF time
(24-hour system) at which you want a
printout.
For example: 9:00 a.m.
Press the Yes key.
To change the off time, press the No/Clear key. Then,
the display prompts you to enter the OFF time.
Yes
No
C
1
Yes
No
C
Page 64

Basic FAX Operations
2-31
PASSWORD =6237
OK = YES
<<M-RX 5P >> 95%
-SET DOC.FACE UP-
NOTE:
How to change the Timer and Password
To change the Timer setting and the registered password, you need to turn OFF the
Memory Reception Mode. This will Print out the received document stored in
memory and cancel the Memory Reception Mode.
Turn OFF the Memory Reception Mode as shown below in “Printing the
Document Received by Memory RX Mode” and cancel the memory reception mode.
Reset the Memory Reception Mode, then enter the Timer and password again.
<< M-RX >> 100 %
-SET DOC.FACE UP-
RX OPERATION ?
OK=YES / or 1-8
7. Setting the password.
Using the Numeric keys, enter the password
for Memory RX printout. A password is a 4digit number ranging between 0000 and
9999.
For example: 6237
Note : If ON time is the same as OFF time, then this machine is always in
the MEM. RX mode.
8. Make sure the correct password has been set, and then press the Yes key.
If you want to change the password, press the No/Clear key, then enter the new
password.
The initial display is changed to the memory
reception display.
Printing the Document Received by Memory RX Mode
1. Your machine rings and receives the document. To check that the document has
been stored in memory,
Copy screen Fax screen
2. Press the Utility key 5 times.
The display changes to the “RX
OPERATION”.
TEXT 1
Mem.RX
Utility
x 5
Page 65

Basic FAX Operations
2-32
1 MEMORY RX MODE
PASSWORD = 6237
OK=YES
ON *OFF
, & YES
3. Press ‘1’ from the Numeric keys.
The display changes to the “MEMORY RX
MODE”.
4. Press the or key to select OFF, then
press the Yes key.
The document stored in memory will print
out, if no password has been set.
If a password has been set, enter that
password from the Numeric keys.
For example: 6237
5. To confirm that the valid password has been entered,
press the Yes key.
The machine now starts printing the document stored in memory.
Memory Substitution Reception
When printing out the document by direct reception, if a printing problem occurs
during reception, such as a paper empty or a paper jam, reception is automatically
changed from direct reception to memory reception.
This memory substitution reception function enables you to continue receiving the
document.
The document is automatically printed out once the printing trouble is corrected.
Setting NO. of RINGS
The unit will answer an incoming call after the number of rings set in this menu.
1. Press the Utility key 5 times then the display
appears the message “RX OPERATION”.
2. Press "2" from the Numeric keys. The
following message appears briefly to confirm
your selection.
1
Yes
RX OPERATION?
OK=YES / or 1-8
2
ABC
Utility
x 5
Page 66

Basic FAX Operations
2-33
3. Enter the desired number of rings as the
default, then press the Yes key.
4. Press the No/Clear key to restore the initial state.
NOTE:
No. of Rings is limited by country standard.
Setting TWO PAGE PRINT
Overview of the Two-page Print function.
Two-Page Print automatically prints two copies of a document received. If you
frequently make copies of documents received, it’s a good idea to turn this feature ON.
Two sub-features are available:
1. ON
2. ON(SORT)
Feature Description
ON
Received Copies of Print
ON(Sort)
Received Copies of Print
OFF
Received Copies of Print
3
2
11
3
3
2
2
1
1
3
2
1
3
2
1
3
2
1
3
2
1
3
2
1
2 NO. of RINGS
No
C
Yes
NO. of RINGS= 2 (1-16)
OK=YES
Page 67

Basic FAX Operations
2-34
3 TWO PAGE PRINT
ON ON(SORT) *OFF
, & YES
6 CLOSED NETWORK
* ON OFF
, & YES
RX OPERATION ?
OK=YES / or 1-8
RX OPERATION ?
OK=YES / or 1-8
How to setting this function
1. Press the Utility key 5 times.
The display changes to the “RX
OPERATION”.
2. Press ‘3’ from the Numeric keys.
3. Press the or key to select the desired
sub-feature or turn off Two Page Print
function.
4. Make sure that the correct setting has been made, then
press the Yes key.
Setting CLOSED NETWORK (RX)
If Closed Network RX is set to ON, you only can receive a document from a party
registered in One Touch Dial, Speed Dial and Phone Book.
Closed Network RX provides a means of controlling machine communications and
avoiding unnecessary direct mail.
1. Press the Utility key 5 times.
The display changes to the “RX
OPERATION”.
2. Press ‘6’ from the Numeric keys.
The display changes to Closed Network mode.
3. Press the or key to turn the CLOSED
NETWORK RX function ON or OFF.
Utility
x 5
Yes
Utility
x 5
6
MNO
Page 68

Basic FAX Operations
2-35
NOTE:
The footer is printed on the area 4mm from the trailing edge of the paper.
Any data on this area of the document will be covered.
RX OPERATION ?
OK=YES / or 1-8
RX OPERATION ?
OK=YES / or 1-8
4. Check that the setting has been made correctly, then press
the Yes key.
5. This completes the setting for “CLOSED
NETWORK RX”.
Press the Panel Reset key to restore
the initial screen.
Setting FOOTER
Overview of the Footer function
The footer prints the date, time, reception control number and page NO. of the received
document at the bottom of the printed page.
By printing an Activity Report using the session number you can identify the origin of
the document, when it came in, and how many pages it contained. The footer appears at
the bottom of each page in a document. Meaning of each item:
1. Date of Reception
2. Time of Reception
3. The fax number of the transmitter
4. Session number
5. Page number
XXXXXXXXXXXXXXXXXXXXXXXXXXXXXXXXXXXXXXXXXXXXXXX
XXXXXXXXXXXXXXXXXXXXXXXXXXXXXXXXXXXXXXXXXXXXXXX
XXXXXXXXXXXXXXXXXXXXXXXXXXXXXXXXXXXXXXXXXXXXXXX
XXXXXXXXXXXXXXXXXXXXXXXXXXXXXXXXXXXXXXXXXXXXXXX
MAY.29’2000 07:57 RECEIVED FROM: 1234567890 #0020-009
1 2 3 4 5
How to set up the Footer
1. Press the Utility key 5 times.
The display changes to the “RX
OPERATION”.
Yes
Utility
x 5
Panel Reset
Page 69

Basic FAX Operations
2-36
8 FOOTER
* ON OFF
, & YES
JAN.01 15:38 100%
-SET DOC. FACE UP-
COMM. SETTING?
OK=YES / or 1-3
2. Press ‘8’ from the Numeric keys.
The display now changes to the Footer
mode.
3. Press the or key to turn the Footer
function ON or OFF.
4. Check that the setting has been made correctly, then press
the Yes key.
5. This completes the setting for Footer.
Press the Panel Reset key to restore the initial screen .
Communication Settings
This section describes the choices available in the Comm. Setting menu.
Setting TONE/PULSE
1. Check that the initial screen is shown.
Copy screen Fax screen
2. Press the Utility key 6 times to enter the COMM.
SETTING.
Yes
TEXT 1
Panel Reset
TEXT 1
Utility
x 6
8
TUV
Page 70

Basic FAX Operations
2-37
STOP SETTING?
YES/CONTINUE=NO
COMM. SETTING?
OK=YES / or 1-3
COMM. SETTING?
OK=YES / or 1-3
*10pps 20pps
, & YES
3. Press "1" of the Numeric keys it will show "1
TONE/PULSE" on the display briefly.
4. Using the or key, select either TONE or PULSE
according to the telephone system connection to
your fax.
5. Check the settings you have made. If they are correct,
press Yes key to validate the settings, and the display of
Comm. Setting appears again.
IF PULSE IS SELECTED :
Using the or key to select 10 pps or 20 pps.
If you don’t want to change this setting, press the
No/Clear key.
Then press the Yes key to stop the setting, the message
“COMM. SETTING” appears again.
1
Yes
C
No
Yes
1 TONE / PULSE
* TONE PULSE
, & YES
Page 71

Basic FAX Operations
2-38
2 LINE MONITOR
HIGH *LOW OFF
, & YES
JAN.01 15:38 100%
-SET DOC. FACE UP-
6. Press the No/Clear key return to the initial screen.
Copy screen Fax screen
Setting LINE MONITOR
Use this feature to set the speaker volume while monitoring fax activity.
1. Press the Utility key 6 times the display shows
the message “COMM.SETTING”.
2. Press "2" from the Numeric keys. The following
message appears briefly to confirm your
selection.
3. Press or key to select either HIGH,
LOW or OFF.
Choices Available Description
HIGH
Speaker Volume is set at the loudest setting.
LOW
Speaker Volume is set at the lowest setting.
OFF
No sound will be heard.
Then press the Yes key.
COMM. SETTING?
OK=YES / or 1-3
2
ABC
Utility
x 6
Yes
COMM. SETTING?
OK=YES / or 1-3
TEXT 1
C
No
Page 72

Basic FAX Operations
2-39
PRE-FIX NO=0_
OK=YES
3 PSTN/PBX
* PSTN PBX
, & YES
COMM.SETTING?
OK=YES/or 1-3
4. Press the No/Clear key to restore the initial state.
NOTE: If the machine is in Copy screen, it wouldn’t sounds even the setting of
line monitor is “HIGH” or “LOW”. In the other hand, line monitor just
available in Fax screen.
Setting PSTN/PBX
1. Press Utility key 6 times.
2. Press "3" of the Numeric keys
The following message appears briefly to
confirm your selection.
3. Use the or key to select either PSTN
or PBX and press Yes key.
4. If you select PBX, you should enter the prefix number,
the prefix can be up to 4 digit length. For example:0
No
C
TEXT 1
3
DEF
Yes
0
Utility
x 6
Page 73

Basic FAX Operations
2-40
5. Then press Yes key.
When you are in the PBX mode, press # key causes the
machine to dial the programmed access number(s). If you
are dialing within a PBX then the "@" symbol is displayed.
Phone Line Telephone Number LCD Display/Dialing Access Line
PBX mode,
prefix=0
123 @123 PBX
PBX mode,
prefix=0
#123 0-123 PBX-PSTN
Yes
Page 74

3. Enhanced FAX Operations
Page 75

Enhanced FAX Operations
3-1
JAN. 04 02:30 100%
-SET DOC. FACE UP-
NOTE:
• In Memory Transmission Mode, you can retrieve your original
document sooner than you can do in ADF TX (Direct Transmission)
Mode.
Transmitting a Document Using Memory (Memory TX)
Memory TX scans the contents of the document into the built-in memory then
transmits it to the other party at a high Speed. (This procedure is different from “
Direct Transmission” in which you directly transmit the document without using
memory.)
1. Check that the message display is shown
Fax screen.
If not, press the Copy/Fax key to switch.
2. Press the Memory TX key.
The Memory TX indicator lights up to indicate that the
Memory TX function is selected; otherwise, the Direct
Transmission is selected.
This function is used to set the TX mode of the machine. Two options are available:
Choices Available Description
Memory TX
When this mode is set, documents are
scanned into memory for transmission and
dialing starts after the first page is scanned
(Quick TX).
ADF TX (Direct Transmission) When this mode is set, documents are
scanned for transmission after connection
has been made to the receiving unit. (When
the available memory is insufficient, please
select ADF TX for a successful
transmission)
If the line is not available, the message
“LINE IS BUSY” will be displayed and
redial attemps will be made according to
the intervals that were preset.
3. Make the necessary settings other than Memory TX, load the document, and then
dial the other party.
Memory TX
Memory TX
Press the key
Memory TX
Page 76

Enhanced FAX Operations
3-2
NOTE:
The following message appears if memory becomes full while the fax is scanning a
document.
Fax screen Copy screen
• If you would like to transmit the portion of the document stored in memory,
press the Start key to perform transmission. The machine transmits the portion
of the document that is store in memory.
• If you want to delete the portion of the document stored in memory, press the
Yes key to select CANCEL. This deletes the contents of the document.
• If you fail to make a choice within 1 min. after the above message has appeared,
the contents of the document will be automatically deleted.
NOTE:
• Auto Redial has been factory-set, so you needn’t to set it.
• The redial interval time and number of redials are depending on the
country in which the machine is used. Consult your Tech. Rep. for
more details.
NOTE:
• When transmitting a document using the Direct TX mode and the line is busy,
the LCD will display REDIAL WAITING and wait for the time interval to
redial; You can press the Stop key to cancel the transmission, but your machine
would not print out an error report.
• In Direct transmission mode, if all of the redials fail, to make a connection no
error report will be printed.
Retrying the Same Destination (Redial TX)
Redial TX would display the unsuccessful previously dialed destination. The following
two sub-features are available.
1) Auto Redial
If the line is busy, the machine temporarily stops dialing and dials the party again
several seconds later . This redialing sequence is repeated several times.
2) Manual Redial
The last dialed number is redialed by touching the Redial/Pause key.
*MEM.FULL/TX CANCEL*
0123456789
TEXT 1
Fax:Err
Page 77

Enhanced FAX Operations
3-3
*TX CANCELD*
012345678
Redial/
Pause
(=012345678
(TX=START)
Start
TX CANCLED?
YES / CONTINUE = NO
Example: Using the Manual Redial
1. Place the document into the document
feed tray.
2. Press the Redial/Pause key, and the display
appears the message as shown.
3. If the last dialed destination is what you want,
press the Start key to start transmission.
The machine starts to feed the documents, and redialing this fax number.
When the line is connected, the machine start the transmission. And the
message would show as below.
Feeding and scanning the documents.
Dialing the fax number.
Transmitting the documents.
If you want to stop the
transmission, press the
Stop key, and then the
Yes key.
*MEMORY* 98%
012345678 3
(012345678 )98%
-SET DOC. FACE UP-
(012345678 )98%
-SET DOC. FACE UP-
Stop
Yes
Page 78

Enhanced FAX Operations
3-4
NOTE:
Redialing is not possible if the last transmission was a
Broadcast or Group Transmission to multiple destinations.
NOTE:
Manual transmission cannot be used in combination with Memory TX,
Broadcast TX, or other enhanced utilities.
*TX COMPLETE*
01234567 3
JAN. 04 02:30 100%
-SET DOC. FACE UP-
TX RESULT REPORT
-SET DOC. FACE UP-
After you canceled a transmission, it
will print the “TX RESULT
REPORT’.
4. When the transmission is complete,
the display appears the message as
shown. And then appear the initial
screen.
Verifying Audible Signal Before TX (Manual Communication)
This function is available when a telephone is connected to the fax. Manual
Communication allows you to verify prior to communicating with the party that the line
is connected by the audible signals heard from the speaker of telephone.
The feature enables you to hear that the line has been properly connected.
Manual Transmission
1. Place the document face up into the
document feeding tray.
Page 79

Enhanced FAX Operations
3-5
*TX CANCELD*
012345678
TX CANCLED?
YES / CONTINUE = NO
TX RESULT REPORT
-SET DOC. FACE UP-
*TX COMPLETE*
01234567 3
*TALKING*
2. Pick up the telephone and listen
for the dial tone.
And the display appears “
*TALKING*” as shown.
3. Dial the other party.
When the line is connected, the dial tone changes to a calling tone.
4. When you hear a fax answer tone, press the
Start key. The fax then starts feeding the
document for transmission.
If you want to stop the transmission, press the Stop
key.
Then press the Yes key.
After you canceled a transmission, it
will print the “TX RESULT
REPORT’.
5. When the transmission is complete,
the display appears the message
briefly. And then return to the initial
screen.
Start
Yes
Stop
Pick up this phone
Page 80

Enhanced FAX Operations
3-6
NOTE:
If the line of the other party is busy, hang up the handset to
cancel the Manual Transmission mode.
JAN. 04 02:30 100%
-SET DOC. FACE UP-
Pick up this phone
Manual Reception
Example:
1. When using a telephone, the telephone rings indicating that a call has been
received.
2. Pick up the telephone and
listen for the answer tone.
3. Press the Start key and you can hang
up the handset now.
The machine starts the print out reception and the received documents.
(To stop the reception, press the Stop key and then the Yes key.)
NOTE: Before receiving a transmission make sure the document feeding
tray is empty.
(ð( NEW YORK ) 99%
-SET DOC. FACE UP-
Start
Page 81

Enhanced FAX Operations
3-7
(=ENTER FAX NO.
→ or FUNCTION
(=0123456_
OK=YES
*A4 A5
, & YES
*LT LG HL
, & YES
SCAN BOOK (LT )
SCAN=YES (SIZE=NO)
Transmit a special document (BOOK TX)
When the documents you want to transmit are not suitable for the ADF, for example: a
magazine. Then the transmission can be performed by the Book Transmission.
A combination with other fax functions:
It is possible to use BOOK TX in combination with each of several other functions, such as
Broadcast, Timer Transmission (expect Timer Polling Reception), Mailbox Transmission,
Polling and Relay Broadcast.
1. Press the Book TX key.
2. Input the remote destination number or use the
FUNCTION.
For example: One Touch key 01.
3. Here we use the numeric key to input the
destination fax number.
4. Press the Yes key.
5. Then the display prompt the message, it allows
you to indicate the original document size or start
scanning the original documents right now.
If you want to change the original document size press the
No/Clear key.
The display shows the selections.
Metric Inch
Press the or key to select the desired paper size.
Then press the Yes key to accept the selection, and the
display will show the selected paper size.
Book TX
Yes
Yes
Paper size
1
2
ABC
3
DEF
4
GHI
5
JKL
6
MNO
0
OPER
No
C
Page 82

Enhanced FAX Operations
3-8
NEXT PAGE? (LT ) 1
SCAN=YES (TX=START)
(0123456 )96%
-SET DOC FACE UP-
*MEMORY* 100%
01234567 1
6. Put the book on the scanning plate.
7. To begin scanning, press the Yes key.
8. After finish scanning the first page the display
appears the message as shown.
If you have other pages to be scanning
change the book page and press the Yes key.
If you want to change the original document size press
the No key.
Do this procedure until all pages you want to transmit are scanned.
9. After you scanned all the pages, press the Start key
to transmit these pages.
10. When the transmission is complete, the display
appears the message “*TX COMPLETE*” briefly.
And then appears the initial screen.
Yes
Start
*TX COMPLETE*
8
JAN.04 02:30 100%
-SET DOC. FACE UP-
Yes
C
No
SCAN BOOK (LT )
SCAN=YES (SIZE=NO)
Selected paper size
Page 83

Enhanced FAX Operations
3-9
TWAIN Driver Option
The TWAIN software enables your PC to import into your software application
images scanned from your machine. This powerful utility is for Windows 95/98
and Windows NT.
1) Twain Interface
A serial port (RS232C) connection is required. The auto baud rate between PC and
the machine is 19200 or 38400 bps.
-PC end: in conformance with your PC
-The machine end: 9-pin D-SUB male.
2) Installing the TWAIN Driver
Insert the driver disk in the disk drive then click setup.exe to start the installation.
Follow the step by step directions. When the driver installation is completed, restart
your PC.
3) Layout of the Scanning Control Window
The Scan Control Window includes the following setting:
Letter
A4
Paper size
Legal
200 dpi x 100 dpi
200 dpi x 200 dpi
Resolution
300 dpi x 300 dpi
Normal
Light
Brightness
Dark
B/W
For text documents
Scan Type
Photo
For gray scale images (photos)
Page 84

Enhanced FAX Operations
3-10
COM1
COM2
COM3
Setup
port
COM4
38,400 for high-speed communications
Setup
Baud
rate
19,200 for lower communication speed
Help
Click the help to display information about this product
and access the on-line help window.
About Click here to display the driver version.
Scan Click to start the scanning process.
Close Click this button to close the scanner control panel.
4)How to make scanning
1. In the PC software program ( Imaging, Photoshop, etc.), click File.
2. Click Select Source.
3. Choose KONICA 7415 Scanner from the dialog box and click OK.
4. Click File-Acquire.
5. Set the controls in the Scanning Control window.
6. Place the document you are scanning by one of the methods shown below.
• Open the cover and set the document face
down onto the glass.
• Place the document face up into the
Automatic Document Feeder.
7. Click SCAN button.
Page 85

Enhanced FAX Operations
3-11
Class 1 FAX/Modem
The Class 1 fax/modem interface enables your fax unit to function as a Class 1
fax/modem for any IBM-compatible computer, by sending and receiving fax
messages directly from your computer. You can also use the interface to scan and
print documents with fax resolution quality.
The interface works with the following fax software:
1. WinFax Pro
2. LaserFax Class 1
It is possible to user other Class 1 computer software, but there is no guarantee for
their operation.
1) Class 1 interface
A serial port (RS232C) connection is required for this to work.
-PC end: in conformance with your PC
- Machine end: 9-pin D-SUB male.
2) Setting up Class 1
To ensure your machine can work with the Class 1 software correctly, make sure
the No. of rings setting in your machine is greater then the setting in Class 1 soft
ware.
Most Class 1 software setting the number of rings=2, so you have to set your
machine a greater number of rings. For example: 6.
NOTE:
About how to setting the number of rings, please refer “Setting No. of
Rings” of [Utility] functions. í P 2-32
NOTE:
• For software installation and operation, refer to the PC fax software
vendor document.
• The maximum fax communication speed is 14,400 bps in Class 1 mode.
Page 86

4. Utility Functions
Page 87

Utility Functions
4-1
Overview of the [Function] Utilities
The Function utilities make your machine more convenient to use. The following eight
functions are available.
Function Description
1 BROADCAST
Transmits the same document to two or more parties with
a single operation. í P 4-4
2 TIMER TX
Scans a document into memory for transmission to the
destination at a specify time. í P 4-11
3 MAILBOX TX
Transmits a confidential document to a particular person
at the receiving party. The document is stored in the
memory at the receiving end. The entry of a password is
necessary before printing the document. í P 4-13
4 PRINT
MAILBOX RX
Receives a confidential document from a particular
person. The document will not be printed until a password
is entered. í P 4-15
5 POLLING TX
Scans the document into memory, and after the machine
upon receiving a polling transmission command from the
other party, the machine transmits the documents to them.
í P 4-19
6 POLLING RX
Gives a polling transmission command to another fax
which enables it to transmit a document previously stored
in memory. í P 4-21
7 RELAY
INITIATE
Relay TX allows the operator to make one long distance
call to a remote unit and the remote unit will relay the
message to one or more fax units in local area. With this
function, you can save valuable time and telephone
charges. This function can also instruct the remote fax
machine to send a TX Result report to one of its Speed
Dial location. í P 4-23
8 CANCEL
RESERV.
Cancels a job, which has been stored in memory for future
transmission, including: Broadcast, Timer TX, Polling TX
and deletes the document from memory. Only jobs that
have not in processing can be canceled. í P 4-26
Page 88

Utility Functions
4-2
FUNCTION
SEL. 1-8/or FUNCTION
3 MAILBOX TX
1 BROADCAST?
OK=YES
How to select the FUNCTION utilities
First press the Function key.
The Message Display now prompts you to
select the FUNCTION utilities.
Here are two method to select the Function utilities:
1) Press the Numeric keys
Key Function
BROADCAST
TIMER TX
MAILBOX TX
PRINT MAILBOX RX
POLLING TX
POLLING RX
RELAY INITIATE
CANCEL RESERV.
For example, when you press the ‘3’ from
the numeric keys, the display would show
“MAILBOX TX”.
2) Press the Function key
You can press the Function key again then the display shows the first Function
utility.
Function
1
2
ABC
3
DEF
4
GHI
5
JKL
6
MNO
8
TUV
7
PQRS
Page 89

Utility Functions
4-3
Now you can scroll the Function utilities either press the Function key or press
the and key.
Here is the procedure of these operations:
1 BROADCAST
2 TIMER TX
3 MAILBOX TX
4 PRINT MAILBOX RX
5 POLLING TX
6 POLLING RX
7 RELAY INITIATE
8 CANCEL RESERV.
Function
Function
Function
Function
Function
Function
Function
Function
Page 90

Utility Functions
4-4
1 BROADCAST
NO.001= CHICAGO
OK=YES (Fin.= START)
FUNCTION
SEL. 1-8/or FUNCTION
Broadcast
Overview of the Broadcast function
Broadcast enables the machine to scan the documents into memory and transmit it to
two or more destinations. The same document can be transmitted sequentially to up to
143 different destinations. This feature is convenient for transmitting the same document
to many different destinations.
It eliminates the need to repeat procedures when performing a fax distribution,
increasing productivity and reducing the amount of time required performing this
activity. It also can reduce the wear made by feeding the document since the machine
needs to scan it once only.
How to use the Broadcast function
1. Put the original document face up into the
document feeding tray.
2. Press the Function key.
3. Press ‘1’ from the Numeric keys to select
“BROADCAST”.
4. Specify the receiving destinations as these methods shown.
(1) One Touch Dial keys
(2) Speed Dial
(3) Combination Dial
(4) Phone Book(Search & List)
(5) Numeric keys
(1) Using the One Touch Keys to specify the destinations.
1. Press the One Touch key in which the receiving destination has been programmed.
For example: To select One Touch key 04 (CHICAGO) for Broadcast 001:
Press One Touch key 04. The Message
Display shows the party programmed in One
Touch key 04, indicating that it has been
selected for Broadcast 001.
Function
1
Page 91

Utility Functions
4-5
SPEED DIAL=_
NO.001= _
NO.002= _
(Fin.= START)
NO.001= DALLAS
OK=YES (Fin.= START)
SPEED DIAL=23
If you select an incorrect destination, pressing the
No/Clear key will cancel the inclusion of this
destination in the broadcast.
2. Press the Yes key if the party has been correctly
selected.
The Message Display now prompts you to
select the next receiving destination.
If you want to continue selecting the receiving destinations using the One Touch
keys, repeat steps 1 to 2.
(2) Using the Speed Dial to specify the destinations.
1. Press the Speed Dial key.
2. From the Numeric keys, enter the Speed Dial number in which the receiving party
has been registered.
For example: To select Speed Dial 23 (DALLAS) for Broadcast 001.
Press Speed Dial key, then press ‘2’ and ‘3’ of the
Numeric keys without pressing the YES key.
The Message Display shows the destination
registered in Speed Dial 23, indicating that it
has been selected for Broadcast 001.
No
C
Yes
Speed Dial
2
ABC
3
DEF
Page 92

Utility Functions
4-6
NO.002= _
(Fin.= START)
* LIST SEARCH
, & YES
NO.001= BOSTON
OK=YES (Fin.= START)
NO.002= _
(Fin.= START)
*BOSTON
OK=YES
3. Press the Yes key if the party has been correctly selected.
The Message Display now prompts you to
select the next receiving destination.
If you select an incorrect destination, pressing the
No/Clear key will cancel the inclusion of this destination
in the broadcast. The previous screen will reappear.
If you want to continue selecting receiving destinations using Speed Dial, repeat
steps 2 and 3.
(3) Using the Phone Book (List) to specify the destinations.
1. Press the Phone Book key.
2. Press the or key to select "LIST", then
press the Yes key.
3. Using the or key search for the receiving
destination you want to select.
For example: To select the receiving destination (BOSTON) listed in the Phone
Book for Broadcast 001.
4. When the desired destination is displayed, press the
Start key.
The Message Display now shows the
receiving party you chose, indicating that it
has been selected for Broadcast 001.
5. Press the Yes key if the party has been correctly selected.
The Message Display now prompts you to
select the next receiving destination.
Yes
No
C
Phone Book
Yes
Start
Page 93

Utility Functions
4-7
LIST * SEARCH
, & YES
SEARCH ->>USA_
OK=YES
* LIST SEARCH
, & YES
If you select an incorrect destination, pressing the
No/Clear key will cancel the inclusion of this
destination in the broadcast.
If you want to continue selecting the receiving destinations using Phone Book,
repeat steps 1 to 5.
(4) Using the Phone Book (Search) to specify the destinations.
1. Press the Phone Book key, the display appears as
below.
2. Press the key to select the “SEARCH”.
3. Press the Yes key.
4. Using the One Touch keys and Numeric keys,
enter the name or initial portion of the
destination you want to find.
For example: “USA”.
5. Press the Yes key.
The machine now searches for the exact name or names beginning with the letters
entered.
Search for the destination name having USA
at the beginning of the name.
Here it find 2 destinations.
USA (2)
SEARCH=YES (SEE =)
No
C
Phone Book
Yes
Yes
Page 94

Utility Functions
4-8
NO.001= USA(NEW YORK)
OK=YES (Fin.= START)
NO.002= _
(Fin.= START)
NO.001= 0354237801_
OK=YES (Fin.= START)
or
* USA(DALLAS)
OK=YES
* USA(NEW YORK)
OK=YES
6. Using the or key to select the destination
you want.
7. Press the Start key.
The Message Display now shows the
receiving destination you selected, indicating
that it has been specified for Broadcast 001.
8. Press the Yes key if the party has been correctly
selected.
The Message Display now prompts you to
select the next receiving destination.
If you select an incorrect destination, pressing the
No/Clear key will cancel the inclusion of this
destination in the broadcast. The previous screen
will reappear.
If you want to continue selecting the receiving destinations using Phone Book,
repeat step 1 to 8.
(5) Using the Numeric keys to specify the destinations.
1. Transmit a document to a destination which is not
registered in memory.
For example: Specify a destination (the fax number
is 0354237801) for Broadcast [001] which is not
registered in memory. Enter the fax number of the
destination with the Numeric keys.
Start
Yes
No
C
1
2
ABC
3
DEF
4
GHI
5
JKL
6
MNO
8
TUV
0
OPER
TT
#
7
PQRS
9
WXYZ
Page 95

Utility Functions
4-9
CHECK DESTINATIONS ?
OK = YES (TX= START)
NO.001= USA(NEW YORK)
OK = YES (DEL= NO)
NO.002= _
(Fin.= START)
NO.016= _
(Fin.= START)
2. If the specified destination is correct, press the Yes key.
The display is changes and specifies the next
destination.
To clear the specified destination, press the No/Clear key.
3. To continue specifying fax numbers with the Numeric keys, repeat the operation of
step 1 and 2.
4. When all the receiving parties have been
selected for a broadcast, press the Start key.
Checking the Selected Destinations
The receiving parties you have selected can now
be checked to ensure that the correct
destinations have been selected.
1. Press the Yes key.
Or you can skip checking the destinations selected by
pressing the Start key, which will begin the Broadcast
transmission procedure immediately.
2. To check selected destinations press the Yes key.
The Message Display first shows the
receiving party specified for 001.
Yes
No
C
Start
Yes
Yes
Start
Page 96

Utility Functions
4-10
* NO.001 DELETE *
NO.002= 012345678
OK = YES (DEL= NO)
NO.001= 012345678
OK = YES (DEL= NO)
3. If the party has been correctly specified, press the Yes
key.
Then, the Message Display shows the next
specified receiving party.
4. If you find that you have selected an incorrect
destination or if you want to delete a particular
destination, pressing the No/Clear key will delete that
destination.
The Message Display shows for several
seconds that the selected destination has
been deleted.
The Message Display will then show the
next receiving destination selected.
When one destination is deleted, the
Broadcast number is advanced by one.
Repeat steps 1 through 3 to continue checking destinations selected.
5. When you complete or have skipped checking the selected
destinations, press the Start key to begin the Broadcast
transmission.
6. The document in the document feeding Tray is scanned into the memory of the fax.
If the Reserv. Report available from the REPORTING utilities has been set to ON,
the machine prints a Broadcast Reservation Report before it executes the
transmission.í P 8-12
The machine now begins transmitting the document to the selected destinations,
beginning with broadcast 001.
7. After completing the transmission, the machine prints a TX Result Report. í P 8-7
The Report indicates which destinations did not receive the document. Retransmit
the document to those destinations if you need.
NOTE:
If the receiving party’s line is busy and the document is unable to be
transmitted, that receiving party is moved to the end of the transmission
sequence.
This receiving party will be redialed after fax transmission is completed
for the document all parties ahead of it in the redial sequence.
Yes
No
C
Start
Page 97

Utility Functions
4-11
TIMER= 23:30
OK = YES
FUNCTION
SEL. 1-8 / or FUNCTION
2 TIMER TX
TIMER=_ :
Timer TX
Overview of the Timer TX function
Timer TX lets the machine scan the document into memory and transmit it to a
destination at a specified time. This feature enables transmission of a document at a time
when special telephone discount rates may be applicable. This function can help reduce
communication costs.
The timer can be set for up to 24 hours in advance.
How to use the Timer TX function
1. Put the original document face up into the document
feeding tray.
2. Press the Function key.
3. Press ‘2’ from the Numeric keys to select
TIMER TX.
4. From the Numeric keys, enter the time (24-
hour system) at which to transmit the
document.
Example: 11:30 p.m. →Press 2, 3, 3, 0.
Press the Yes Key if it is correctly selected.
Press the No/Clear key if you want to change it.
5. Specify the receiving destination to which you want to transmit the document by
Timer TX.
2
ABC
Function
2
ABC
3
DEF
3
DEF
0
OPER
Yes
No
C
Page 98

Utility Functions
4-12
To specify the destination, see "Dialing the Number" í P 2-6
Speed Dial í P 2-10
Combination Dial í P 2-12
Phone Book í P 2-15
Numeric key Dialing í P 2-6
6. When the receiving destination has been specified, the document placed on the
Document Feeding Tray is fed in and the machine starts scanning it into memory.
After scanning the document, the machine
shows the initial screen on the Message
Display and entering the standby state for
Timer TX.
When the setting time arrives, the machine automatically transmits the document to
the specified destination(s).
NOTE:
• To use other FUNCTION utilities in combination with the Timer TX,
press the Function Key when the LCD displays: "ENTER FAX NO." ,
then press the Function key and select the function you want. Only the
following three features can be used together with Timer TX:
§ Broadcast íP 4-4
§ Mailbox TX íP 4-13
§ Polling RX íP 4-21
When using the FUNCTION utilities in combination with Timer TX, see
the relevant pages explaining those features in greater detail.
• All fax transmission functions can be used even while the machine is in
the standby state for Timer TX.
• If you change the destination registered under the One Touch Dial keys or
Speed Dial keys prior to starting the Timer transmission, the changed
information is effective for the destinations to which you want to perform
the Timer transmission.
To perform Timer transmission on One Touch or Speed Dial numbers
after their programmed information has been changed, you need to re-set
Timer TX again.
For example:
1. At time: 12:00 , you set the Timer transmission by the Broadcast.
§ Transmission time: 23:00
§ Transmission party: One Touch key 01, 02, 03
JAN.01 15:38 T 96%
-SET DOC. FACE UP-
Standby state for Timer TX
Page 99

Utility Functions
4-13
2. At time: 15:00 , if you change the setting of the One Touch key 01
Change the fax number of One Touch key 01, then One Touch key 01
is automatically deleted from the Timer and Broadcast transmission.
§ Transmission time: 23:00
§ Transmission party: One Touch key 02, 03
3. Add One Touch key 01 to the Timer transmission again, if you need
Add the new One Touch key 01 to the Timer transmission.
§ Transmission time: 23:00
§ Transmission party: One Touch key 01, 02, 03
Mailbox TX
Overview of the Mailbox TX function
Mailbox TX enables you to transmit a document, confidentially, to a particular person.
This convenient when you want to send a confidential or private document to a
particular person without allowing any other people to read it.
A mailbox transmission is initiated only after the ID entered on the transmitting end
matches the mailbox ID on the receiving end. This ensures that a confidential document
will not be transmitted to the wrong person.
The transmitted document is stored in the mailbox of the memory built into the receiving
fax machine.
Unless the receiving end reenters the previously programmed mailbox ID, it is unable to
print the data stored in the built-in memory. This means that only the particular person
or persons who know the mailbox ID at the receiving party can print the document.
NOTE:
The following conditions must be met for Mailbox TX:
• The machine on the receiving end is only Konica 7415.
• The receiving party must have programmed at least one mailbox ID for the
mailbox function before the transmitting party can use.
• The transmitting party knows the mailbox ID of the receiving fax machine.
How to use the Mailbox TX function
1. Put the original document face up into the
document feeding tray.
2. Press the Function key. The display appears as shown
below.
Function
Page 100

Utility Functions
4-14
FUNCTION
SEL. 1-8 / or FUNCTION
3 MAILBOX TX
MAILBOX ID = _
MAILBOX ID = 3850
OK = YES
MAILBOX ID = _
OK = YES
3. Press ‘3’ from the Numeric key to select "MAILBOX
TX".
4. Using the Numeric keys, enter the 4-digit
mailbox ID.
The mailbox ID is the number registered for
the mailbox of the receiving fax machine.
For example: Mailbox ID → Press 3, 8, 5,
and 0, in order.
If you have entered the wrong number, press the No/Clear
key.
The ID you inputted would be canceled, then
enters the correct number.
NOTE:
Contact the receiving party in advance to make sure of the correct
mailbox ID.
5. Check the mailbox ID setting and, if it is correct, press
the Yes key to validate the mailbox ID.
3
DEF
3
DEF
8
TUV
5
JKL
0
OPER
Yes
C
No
 Loading...