

Page 1
000_fk103_int.book i ページ 2004年2月6日 金曜日 午後7時4分
Contents
Introduction ................................................................................. xii
Getting Started (Internet FAX) ...........................................................xiv
Sending ..........................................................................................................................xiv
Getting Started (FAX) ..................................................................... xvii
Sending .........................................................................................................................xvii
Features of the Internet FAX / FAX ......................................................xix
How to Use This User’s Guide .......................................................... xxix
Manual Structure ......................................................................... xxx
Basics for Internet FAX
Chapter 1: Overview of Internet Fax
Precautions ................................................................................ 1-2
Features and System Configuration of Internet Fax ................................. 1-3
Internet Fax Operating Environment ................................................... 1-4
What You Can Do with Internet Fax .................................................... 1-5
Preparation for Operating Internet Fax Functions ................................... 1-7
Use of Control Panel ..................................................................... 1-8
Control Panel .................................................................................................................1-8
FAX Basic Screen ........................................................................1-10
Specification (Internet Fax) ............................................................1-12
Chapter 2: Transmitting Documents with Internet Fax
Simple Internet Fax Transmission ...................................................... 2-2
Transmitting Documents to Internet Fax/Computer ................................. 2-6
Transmitting to Both Conventional Fax and E-Mail ................................2-12
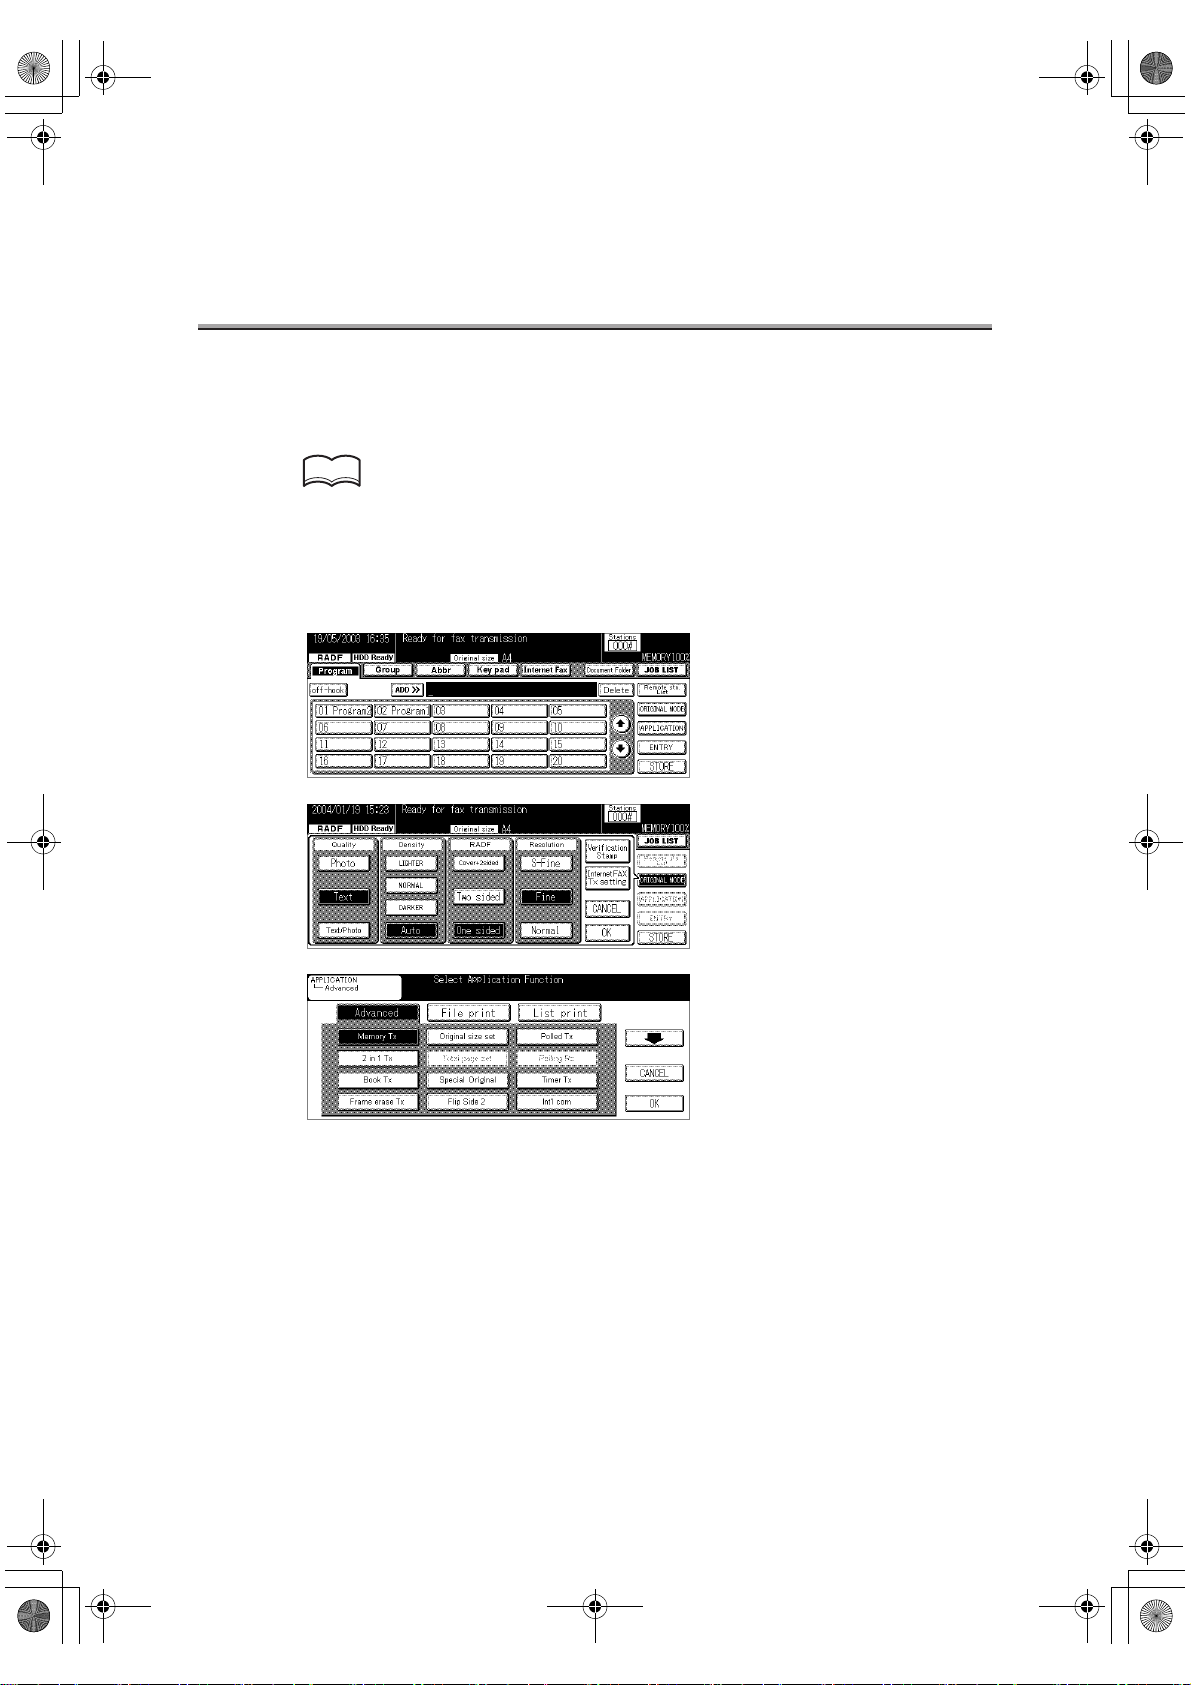
Placing the Original on the Machine .................................................2-17
Using the RADF ...........................................................................................................2-17
Placing Originals on the Platen Glass .........................................................................2-18
Sending Multiple Originals from the Platen Glass ....................................................... 2-19
Transmitting Originals by Using both the RADF and the Platen Glass ........................ 2-21
Appendix
Index
i
Page 2

000_fk103_int.book ii ページ 2004年2月6日 金曜日 午後7時4分
Contents (continued)
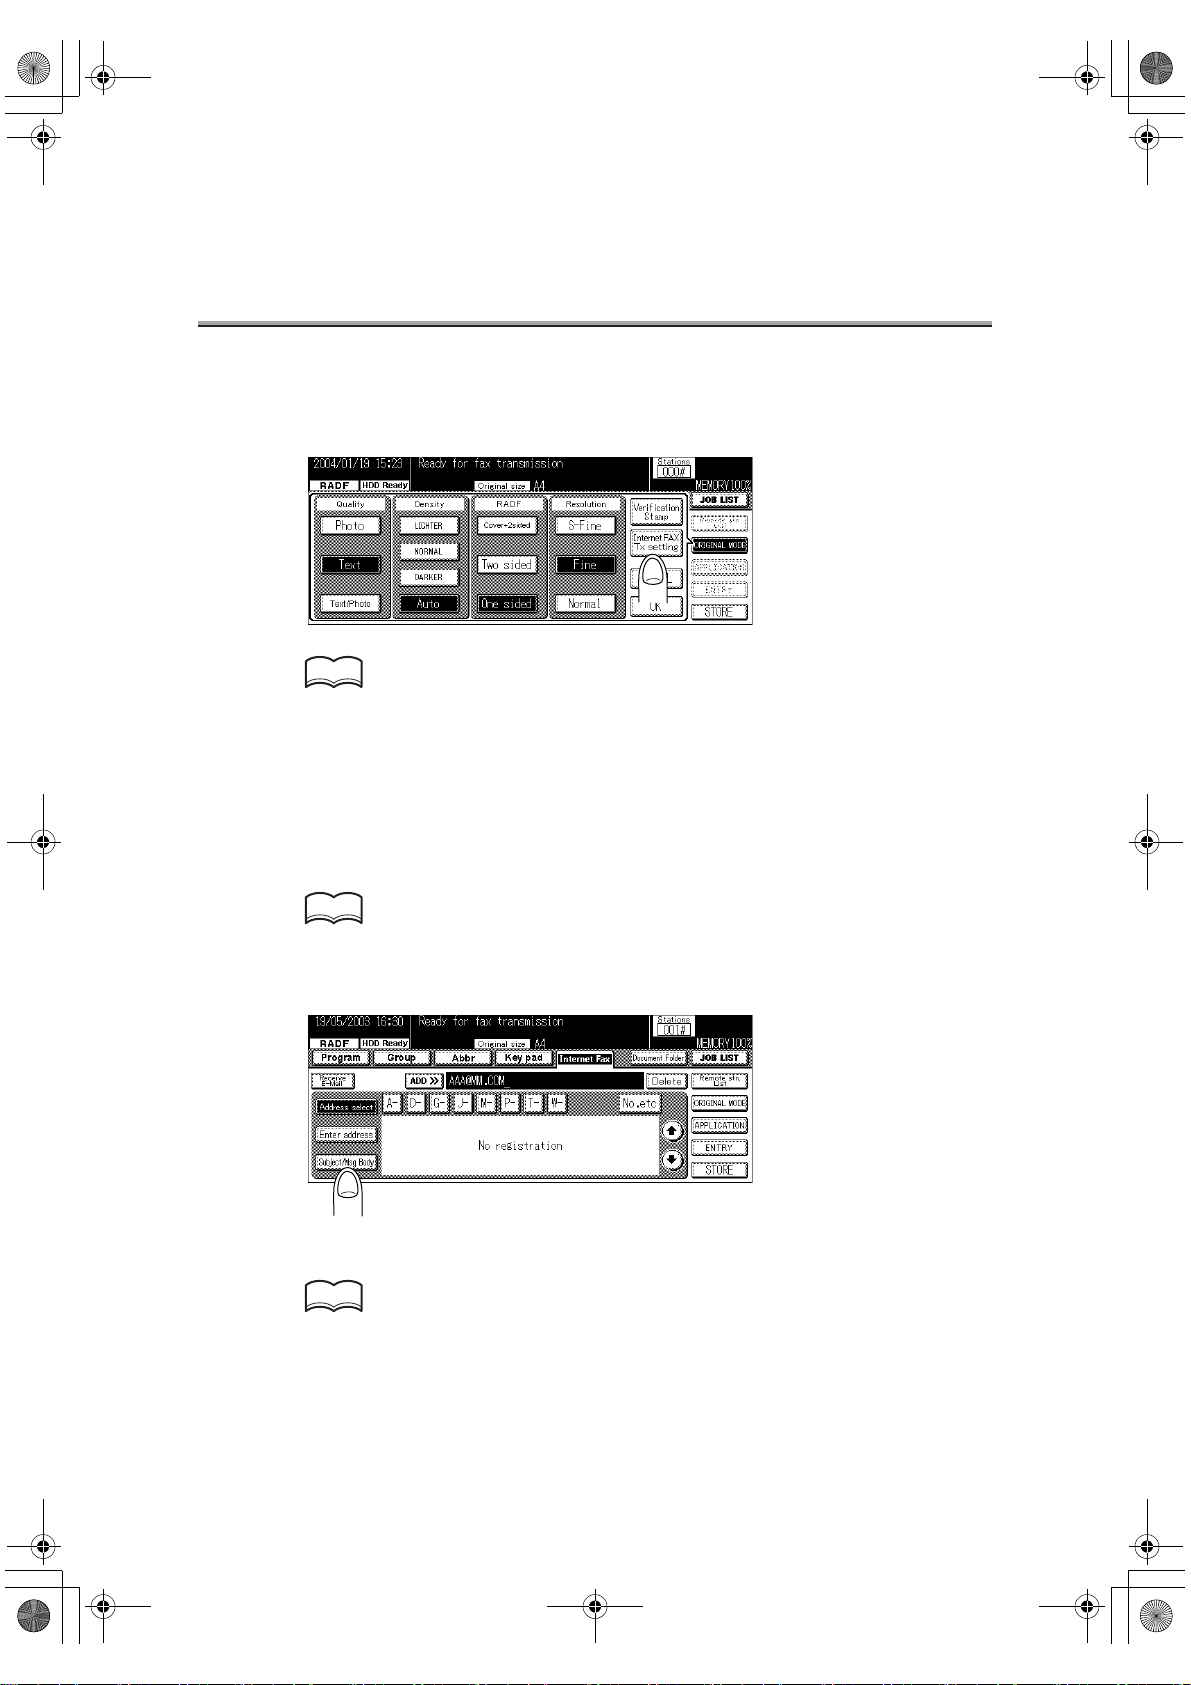
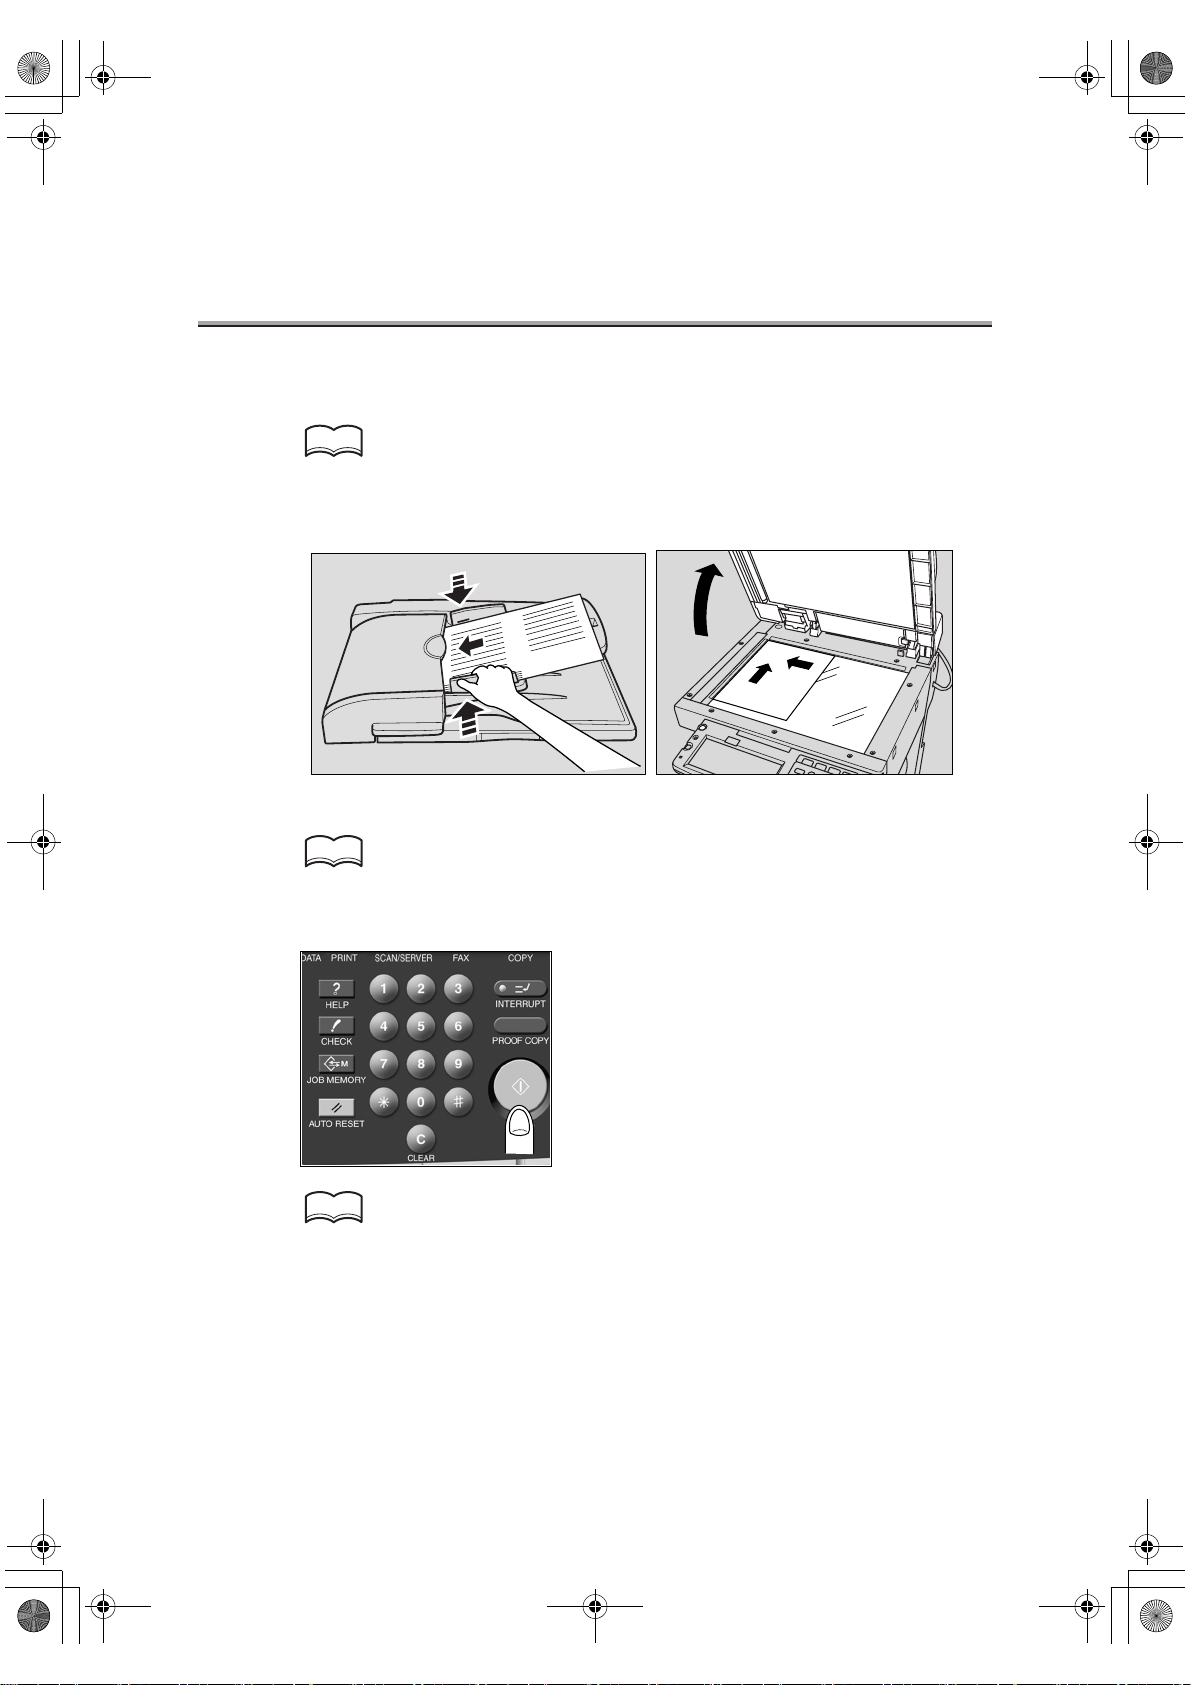
Setting Transmission Conditions ...................................................... 2-23
Quality .........................................................................................................................2-23
Density .........................................................................................................................2-23
RADF ...........................................................................................................................2-24
Resolution ....................................................................................................................2-24
Verification Stamp .......................................................................................................2-25
Confirming Settings and Communication Results .......................................................2-26
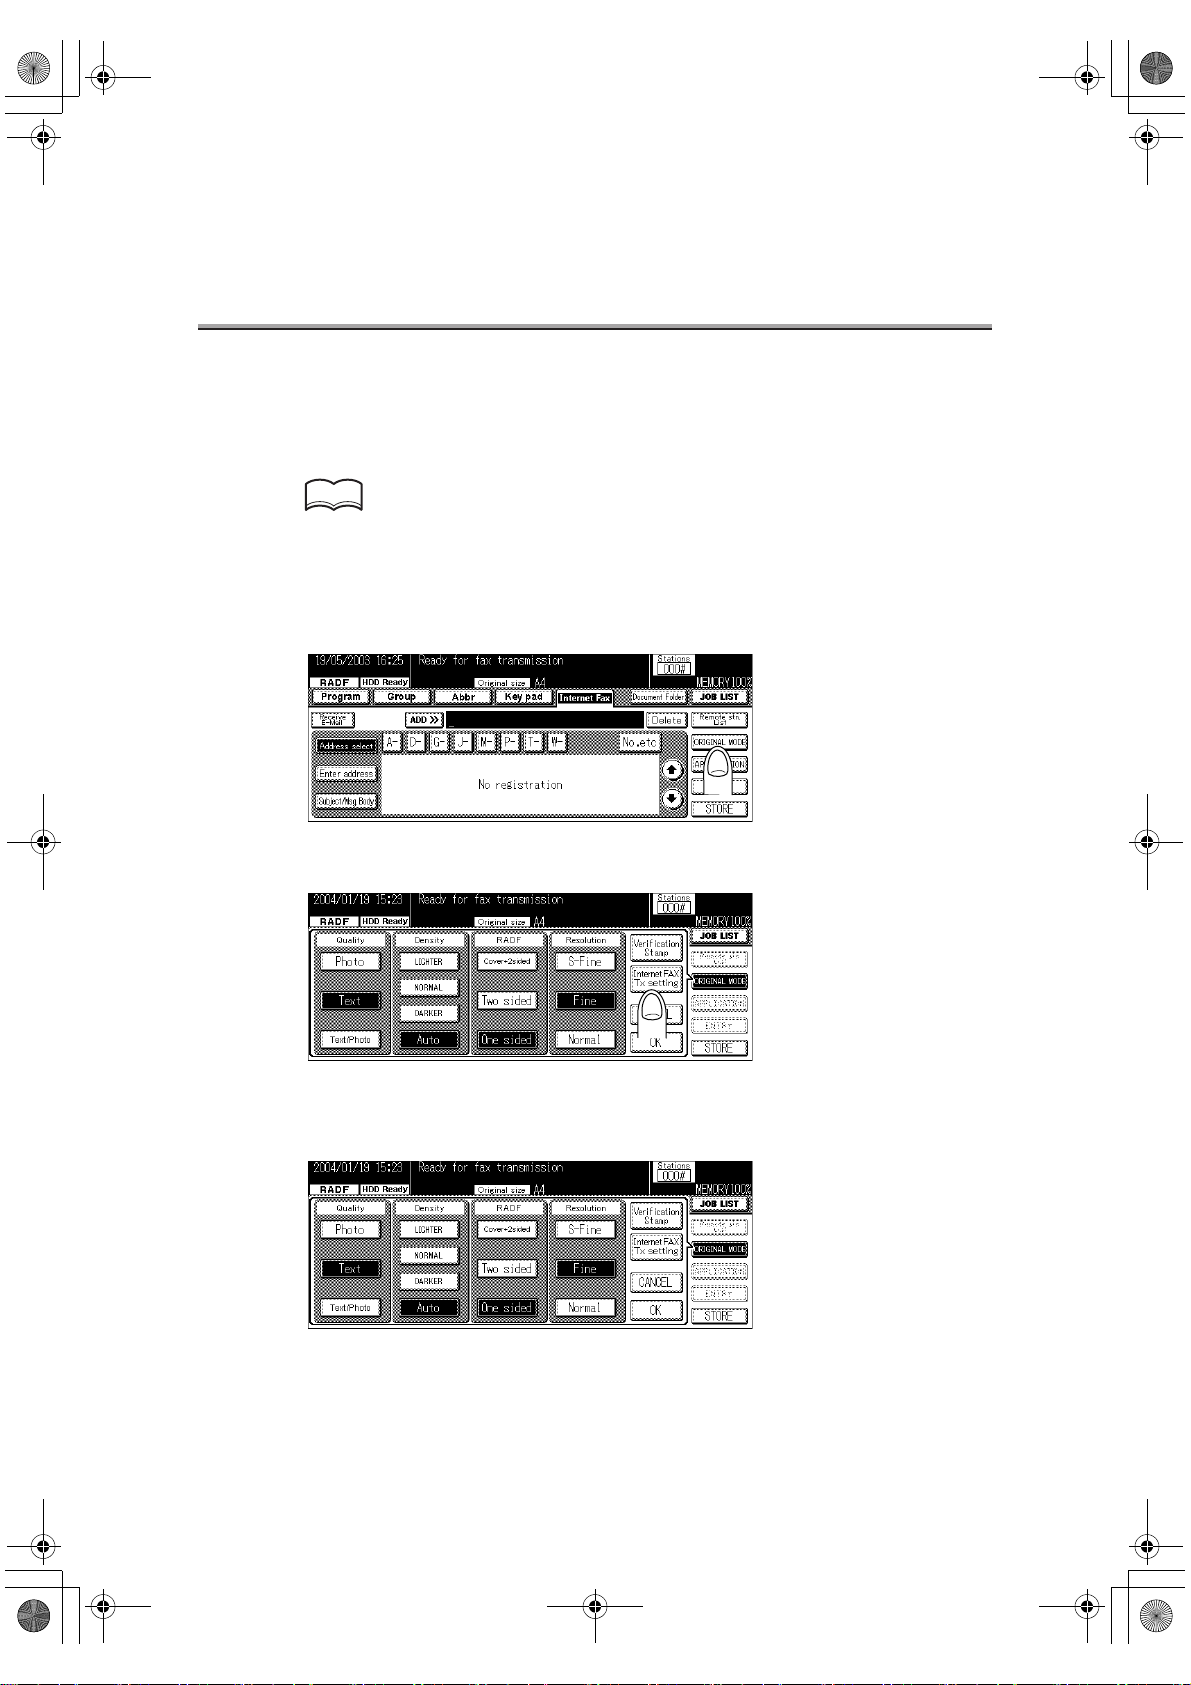
Method for Specifying Addresses .....................................................2-27
Scanning ..................................................................................2-31
When Original Size Cannot be Detected .....................................................................2-31
Canceling Transmission ................................................................2-32
Confirming Reserved Documents ...................................................... 2-33
Confirming Communication Results ..................................................2-34
Chapter 3: Receiving Documents via Internet Fax
Receiving Documents via Internet Fax ................................................ 3-2
Chapter 4: Troubleshooting for
Internet Fax
Cannot Send Message .................................................................... 4-2
Cannot Receive Message ................................................................ 4-3
Call for Service ............................................................................ 4-4
ii
Page 3

000_fk103_int.book iii ページ 2004年2月6日 金曜日 午後7時4分
Basics for FAX
Chapter 5: Before Use
Use of Control Panel ..................................................................... 5-2
Control Panel .................................................................................................................5-2
First-Use Settings ......................................................................... 5-4
Must-Set Items ..............................................................................................................5-4
Useful Functions .......................................................................... 5-5
Abbreviated Dial ............................................................................................................5-5
Program Dial ..................................................................................................................5-8
FAX Basic Screen ........................................................................5-11
Contents (continued)
Chapter 6: Transmission
Simple FAX Transmission ................................................................ 6-2
Placing the Original on the Machine .................................................. 6-5
Using the RADF .............................................................................................................6-5
Placing Originals on the Platen Glass ...........................................................................6-6
Sending Multiple Originals from the Platen Glass ......................................................... 6-6
Transmitting Originals by Using both the RADF and the Platen Glass .......................... 6-8
Setting Transmission Conditions ...................................................... 6-10
Quality .........................................................................................................................6-10
Density .........................................................................................................................6-10
RADF ...........................................................................................................................6-11
Resolution ....................................................................................................................6-11
Verification Stamp .......................................................................................................6-12
Confirming Settings and Communication Results .......................................................6-13
Selecting a Remote Station ............................................................6-14
Selecting a Remote Station ......................................................................................... 6-14
Selecting Multiple Remote Stations .............................................................................6-19
To Confirm/Delete a Remote Station ...........................................................................6-21
Manual Redialing .........................................................................................................6-22
Scanning ..................................................................................6-23
When Original Size Cannot be Detected .....................................................................6-23
Appendix
iii
Index
Page 4

000_fk103_int.book iv ページ 2004年2月6日 金曜日 午後7時4分
Contents (continued)
Transmitting ..............................................................................6-24
Transmission ...............................................................................................................6-24
When Unable to Send .................................................................................................6-25
Resending (Restored Transmission) ...........................................................................6-26
Reserving Transmission ................................................................6-29
Bundled Transmission .................................................................................................6-31
Manual Transmission ...................................................................6-32
Cancelling Transmission ............................................................... 6-34
Cancelling Communication in Progress ....................................................................... 6-34
Cancelling Reserved Jobs ........................................................................................... 6-35
Confirming Reserved Documents ...................................................... 6-36
Confirming Communication Results ..................................................6-37
Memory Transmissions .................................................................6-39
Quick Memory Transmission .......................................................................................6-40
Total Page Set ............................................................................6-42
Timer Transmission ......................................................................6-44
International Communication ..........................................................6-47
Sender Information ......................................................................6-49
Set to Inside Header ....................................................................................................6-49
Set to Outside Header ................................................................................................. 6-49
Set to Off .....................................................................................................................6-49
When Mixed Original is Selected .................................................................................6-50
Chapter 7: Reception
Reception Mode ........................................................................... 7-2
Auto Reception (FAX Only Mode) ....................................................... 7-3
Manual Reception (Telephone Only Mode) ........................................... 7-4
Unable to Receive ........................................................................ 7-5
Memory Substitute Reception .......................................................... 7-6
Reception Recording ..................................................................... 7-7
Recording after Reducing at the Minimum Reduction Rate ..........................................7-8
Recording after Reducing to Fit in Paper ...................................................................... 7-9
Recording at Full Scale ...............................................................................................7-13
iv
Page 5
000_fk103_int.book v ページ 2004年2月6日 金曜日 午後7時4分
Reception Information ..................................................................7-15
Set to Inside .................................................................................................................7-15
Set to Outside ..............................................................................................................7-15
Set to Off .....................................................................................................................7-15
Chapter 8: Troubleshooting
Cannot Send Messages .................................................................. 8-2
Cannot Receive Messages .............................................................. 8-3
Error Message Displayed ................................................................ 8-4
Call for Service ............................................................................ 8-5
Contents (continued)
Chapter 9: Specifications
Specifications ............................................................................. 9-2
v
Appendix
Index
Page 6

000_fk103_int.book vi ページ 2004年2月6日 金曜日 午後7時4分
Contents (continued)
Advanced
Chapter 11: Transmission Applications
Opening the Application Screen .......................................................11-2
Difference between Internet Fax and Fax Functions ...............................11-4
Application Functions Overview ....................................................... 11-5
2 in 1 Transmission ......................................................................11-8
Book Transmission .................................................................... 11-10
Frame Erase Transmission ........................................................... 11-13
Original Size Set ........................................................................ 11-16
Mixed Original .......................................................................... 11-19
Folded Original ......................................................................... 11-22
Long Original ........................................................................... 11-25
Flip Side 2 ............................................................................... 11-27
ECM Off .................................................................................. 11-30
Confidential Communication ......................................................... 11-32
Confiden.Transmission .............................................................................................. 11-33
Printing the Document Received in a Confidential Box .............................................11-35
Deleting Documents from a Confidential Box ............................................................11-37
V34 OFF .................................................................................. 11-39
ID Transmission ........................................................................ 11-41
Relay Transmission Request ......................................................... 11-43
Program Dial ............................................................................ 11-46
Chapter 12: Useful Functions for Reception
Compulsory mem. Reception ...........................................................12-2
Printing a Document Held in Memory .......................................................................... 12-2
Deleting a Document Held in Memory .........................................................................12-4
Substitute Transmission ................................................................12-6
Reception Information ..................................................................12-7
vi
Page 7

000_fk103_int.book vii ページ 2004年2月6日 金曜日 午後7時4分
Chapter 13: Polling
Polled Transmission .....................................................................13-2
Polling Reception ........................................................................13-4
Bulletin ....................................................................................13-6
Write a Document to the Bulletin Board ......................................................................13-7
Print a Document Written to the Bulletin Board ...........................................................13-9
Delete a Document Written to the Bulletin Board ......................................................13-10
Receive by Polling a Document Written to the Bulletin Board of a Remote Station (FAX)
Chapter 14: Destination Setup
Contents (continued)
......13-11
Setting Abbreviated Dial Numbers ....................................................14-2
Registering Abbreviated Dial Numbers .......................................................................14-3
Changing Set Abbreviated Dial Numbers ....................................................................14-7
Deleting Abbreviated Dial Numbers ............................................................................14-9
Setting Program Dial .................................................................. 14-11
Setting Remote Stations and FAX Functions as Program Dial ................................. 14-11
Changing Contents of Program Dial Operations .......................................................14-16
Deleting Program Dial Operations .............................................................................14-18
Setting Dial Groups .................................................................... 14-20
Registering Dial Groups ............................................................................................ 14-20
Changing Contents of Dial Groups ............................................................................ 14-23
Deleting Dial Groups .................................................................................................14-26
Setting Relayed Transmission ....................................................... 14-28
Scheme of Relayed Transmission to Multiple Stations .............................................14-28
Registering Relayed Transmission ............................................................................14-29
Changing Relayed Transmission ...............................................................................14-31
Deleting Relayed Transmission .................................................................................14-33
Setting the Confidential Boxes ...................................................... 14-35
Scheme of Confidential Communication ...................................................................14-36
Registering the Confidential Boxes ...........................................................................14-36
Changing the Confidential Boxes ..............................................................................14-38
Deleting Confidential Boxes ......................................................................................14-41
Setting the Bulletin Board ............................................................ 14-43
Registering the Bulletin Board ...................................................................................14-43
Changing a Bulletin Board ......................................................................................... 14-45
Deleting a Bulletin Board ...........................................................................................14-47
Appendix
Index
vii
Page 8

000_fk103_int.book viii ページ 2004年2月6日 金曜日 午後7時4分
Contents (continued)
Registering Internet Fax Mail Address ............................................. 14-49
Registering the Internet Fax Subject ............................................... 14-59
Registering the Internet Fax Mail Message ....................................... 14-67
Chapter 15: Key Operator Mode
Key Operator Screen .....................................................................15-2
FAX Key Operator Mode .................................................................15-6
FAX Screen Set ......................................................................... 15-15
Setting FAX ID/Name .................................................................. 15-18
Sender Information/Reception Time ................................................ 15-20
Line Parameter Set .................................................................... 15-23
Transmission/Reception Mode Options ............................................ 15-25
PBX (Private Branch Exchange) Connection Mode Options ..................... 15-28
Report Output Set ...................................................................... 15-30
Initializing the FAX Image Memory ................................................. 15-32
Function Set ............................................................................ 15-33
Setting a Special Parameter ......................................................... 15-62
Setting the Internet Fax Functions .................................................. 15-64
Chapter 16: Explanation of Reports and Lists
Types of Reports and Lists .............................................................16-2
Communication Journal .................................................................16-5
Transmission Reservation Report .....................................................16-9
Transmission Report .................................................................. 16-10
Manual Printout .........................................................................................................16-10
Automatic Printout .....................................................................................................16-10
Polled Transmit Reserve Report ..................................................... 16-12
Polling Transmission Result Report ................................................ 16-13
Sync Transmit Reservation Report .................................................. 16-14
Sync Transmit Result Report ......................................................... 16-15
Polled Reception Result Report ..................................................... 16-17
viii
Page 9

000_fk103_int.book ix ページ 2004年2月6日 金曜日 午後7時4分
Sequential Polling Reception Reservation Report ................................ 16-18
Sequential Polling Reception Result Report ...................................... 16-19
Confidential Reception Report ...................................................... 16-20
Bulletin Board Transmission Report ................................................ 16-21
PC-Fax Tx Error Report ................................................................ 16-22
Relay Request Reception Report .................................................... 16-23
Relay Sync Transmit Result Report ................................................. 16-24
Abbreviated Dialing List .............................................................. 16-25
Program Entry List ..................................................................... 16-27
Contents (continued)
Group Dial List .......................................................................... 16-29
FAX Setting List ........................................................................ 16-31
Internet FAX Tx Error Report ......................................................... 16-36
Internet FAX Rx Error Report ......................................................... 16-38
Internet FAX Rx Report (DSN) ........................................................ 16-39
Internet FAX Rx Report (MDN) ........................................................ 16-40
Internet FAX Entry List ................................................................ 16-41
Appendix
Number of Stored Pages to Memory ......................................... Appendix-2
Entering Names ................................................................. Appendix-3
To Enter Alphabetic Letters or Symbols ...........................................................Appendix-4
Entering with the Keyboard ..............................................................................Appendix-4
Replacing the Stamp ........................................................... Appendix-5
FAX Terms ........................................................................ Appendix-7
Internet Fax Terminology ..................................................... Appendix-14
Index
Index ................................................................................... Index-1
ix
Appendix
Index
Page 10
000_fk103_int.book x ページ 2004年2月6日 金曜日 午後7時4分
Contents (continued)
• Documents transmitted (files attached to E-mail) may be damaged due to network condition. Be sure to check the document transmitted for damage.
• Even though "----" is marked in the space for the transmission result screen or communication journal, the E-mail may not arrive at the receiver due to a trouble on the internet.
The "----" mark in the transmission result or communication journal result spaces signifies
that the transmission has successfully reached your server. When sending or receiving
important information, confirm the transmission result with the Message Disposition Notification (MDN) or some other means. When Message Disposition Notification (MDN) is
received, "OK" is marked in the space for the Transmit result screen or Communication
Journal.
WARNING/CAUTION Explained
WARNING
The exclamation point within an equilateral triangle followed by the word "Warning"
is intended to alert the user to the possibility that a disregard for the warning may
result in fatal hazards or critical injuries. Be sure to focus your attention on the
Warning headings when reading the Copier User’s Guide.
CAUTION
The exclamation point within an equilateral triangle followed by the word "Caution"
is intended to alert the user to the possibility that a disregard for the caution may
result in minor injuries or in physical damage. Be sure to focus your attention on the
Caution headings when reading the Copier User’s Guide.
x
Page 11
000_fk103_int.book xi ページ 2004年2月6日 金曜日 午後7時4分
For New Zealand
1. This device is equipped with pulse dialing while the Telecom standard is DTMF tone dial-
ing. There is no guarantee that Telecom lines will always continue to support pulse dialing.
2. Use of pulse dialing, when this equipment is connected to the same line as other equip-
ment, may give rise to bell tinkle or noise and may also cause a false answer condition.
Should such problems occur, the user should not contact the Telecom Fault Service.
3. This equipment may not provide for the effective hand-over of a call to another device
connected to the same line.
4. This equipment does not fully meet Telecom's impedance requirements. Performance
limitations may occur when used in conjunction with some parts of the network. Telecom
will accept no responsibility should difficulties arise in such circumstances.
Contents (continued)
xi
Appendix
Index
Page 12

000_fk103_int.book xii ページ 2004年2月6日 金曜日 午後7時4分
Introduction
Thank you for your purchase of the KONICA MINOLTA digital electronic photo-copying machine.
This User’s Guide describes operating procedures and precautions for use of the Internet Fax
and Fax functions. Please read this User’s Guide before starting operation of the machine.
After reading this User’s Guide, it is advisable to keep it close at hand to consult it any time when
necessary in order to operate the Internet Fax/Fax functions at their optimum condition.
For correct operation, also read the "User’s Guide (Copy Operations)" before starting operation.
ACKNOWLEDGEMENT:
Microsoft, MS and MS-DOS are registered trademarks of Microsoft Corporation in the
United States.
IBM is a registered trademark of International Business Machines, Inc. in the United
States.
R
Windows
HP and PCL are registered trademarks of Hewlett-Packard Company.
Agfa Microtype font is a registered trademark of Agfa Corporation.
PEERLESS is a registered trademark of PEERLESS SYSTEMS CORPORATION.
Apple, Macintosh and Mac are registered trademarks or trademarks of Apple Computer.Inc.
Adobe, Adobe Logo, Acrobat, Acrobat Logo, PostScript and PostScript Logo are registered
trademarks or trademarks of Adobe Systems, Inc.
Other company names and product names used in this User’s Guide are the registered
trademarks or trademarks of their respective companies.
is a trademark of Microsoft Corporation.
COPYRIGHT
EXEMPTION
xii
© 2004 by Konica Minolta Business Technologies, Inc.
• A part or this User’s Guide may be used or duplicated without permission.
• Konica Minolta Business Technologies, Inc. is not liable for any incidents caused by
using the Document Folder functions and this User’s Guide.
• Information written in this User’s Guide is subject to change without notice.
Page 13

000_fk103_int.book xiii ページ 2004年2月6日 金曜日 午後7時4分
Configuration of this User’s Guide
This User’s Guide comprises three sections as follows.
Basics of Internet FAX
Overview of the Internet Fax functions, basic operation to send or receive E-mail, and troubleshooting of the Internet Fax are described in this section. Before operating the Internet
Fax functions, read this section first.
Basics of FAX
Overview of the Fax functions, basic operation to send or receive Fax documents, and
troubleshooting for the Fax are described in this section. Before operating the Fax functions, read this section first.
Advanced Functions
Operation of application functions of the Internet Fax and Fax functions, program dial or
mail address registration operation, Key Operator Mode, how to see the report/list, etc. are
described in this section. Read this section for application operations, registration, or setting.
Introduction - (continued)
xiii
Page 14
000_fk103_int.book xiv ページ 2004年2月6日 金曜日 午後7時4分
Getting Started (Internet FAX)
Sending
When sending a document via the Internet Fax for the first time, follow the basic procedure
described below.
HINT
For details about normal Fax, see "Simple FAX Transmission" (p. 6-2).
1. Press [FAX] on the control panel to start the FAX mode.
2. Press ORIGINAL MODE.
3. Press Internet FAX Tx setting.
4. Select a Compress Type and Paper size according to the
capability of the remote station and press OK.
xiv
Page 15
000_fk103_int.book xv ページ 2004年2月6日 金曜日 午後7時4分
Getting Started (Internet FAX) - (continued)
5. Set the required items on the Fax Basic screen and Applica-
tion screen.
HINT
• See p.2-23 for the setting of ORIGINAL MODE on the Fax Basic screen.
• See p.11-5 for details on the Application screen.
6. Press OK.
7. Press Internet Fax.
8. Specify the mail address of the remote station.
HINT
See p.2-27 for the mail information about entering the addresses.
9. Press Subject/Msg.Body.
10.Specify the subject of the mail.
HINT
See p.2-9 for the information about entering the subjects.
xv
Page 16
000_fk103_int.book xvi ページ 2004年2月6日 金曜日 午後7時4分
Getting Started (Internet FAX) - (continued)
11. Specify the body of the mail.
HINT
See p.2-10 for the information about entering the body.
12.Place the original on the machine.
HINT
For detail, see "Placing the Original on the Machine" (p. 2-17).
13.Press [START] on the control panel.
HINT
See p.4-2 if the original document cannot be transmitted.
xvi
Page 17
000_fk103_int.book xvii ページ 2004年2月6日 金曜日 午後7時4分
Getting Started (FAX)
Sending
Perform the following basic procedure to send a FAX.
HINT
For the use of the Internet Fax, see p.2-6.
1. Press [FAX] on the control panel to start the FAX mode.
2. Set the functions as necessary.
xvii
Page 18
S
000_fk103_int.book xviii ページ 2004年2月6日 金曜日 午後7時4分
Getting Started (FAX) - (continued)
3. Use the keypad to enter the FAX number of the destination.
DETAIL
• If you make an incorrect entry, press DELETE to clear your entry.
• Press [CLEAR] or [STOP] to clear the whole entry.
4. Place the original on the machine.
5. Press [START] on the control panel.
xviii
Page 19
000_fk103_int.book xix ページ 2004年2月6日 金曜日 午後7時4分
Features of the Internet FAX / FAX
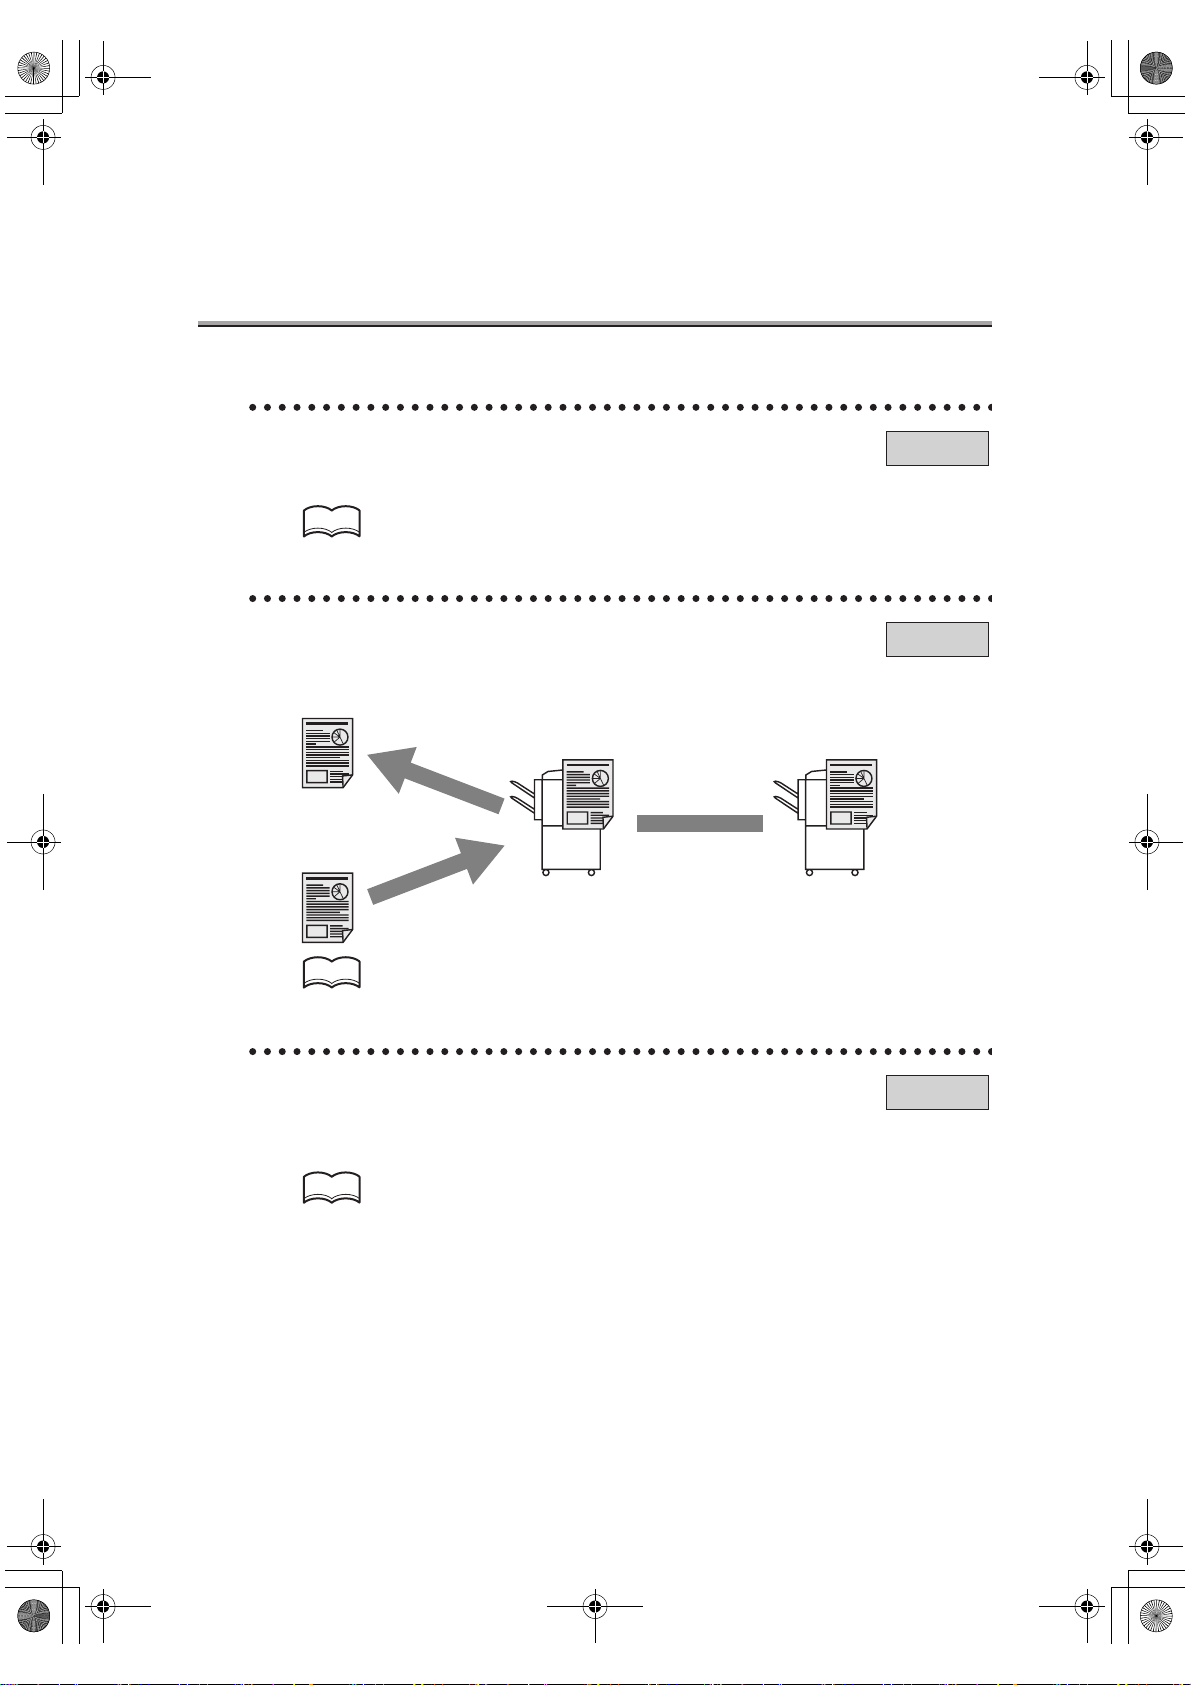
Sending/receiving Documents via Internet Fax
Internet-FAX
Scanned documents can be transmitted or received via E-mail through the internal network or internet.
Transferring Received Document to Computer
Fax documents received can be transferred as E-mail attached files.
Original
E-Mail +
HD-103
Type-A
attached file
(TIFF format)
Intranet/Internet
SMTP
POP
Mail-receiving
Internet Fax-receiving
HD-103
Type - A
HINT
For details, see Chapter 2, Chapter 3.
Input into memory before transmission.
FAX
When you send a FAX, you do not have to wait until a previous transmission is completed,
because the FK-103 can read all pages into memory. You can take away the original
before a transmission is completed.
HINT
For detail, see "Memory Transmissions" (p. 6-39).
xix
Page 20
000_fk103_int.book xx ページ 2004年2月6日 金曜日 午後7時4分
Features of the Internet FAX / FAX - (continued)
Imprint the total number of pages on the FAX.
You can place the total number of pages on each page of the FAX for quick memory transmission. It is useful for the recipient, so that they can make sure whether all pages of the
FAX have been received.
From : 01234567890123456 07/04/2003 01:23 # 012 P.005 / 010
HINT
For detail, see "Total Page Set" (p. 6-42).
Send a FAX at a specified time.
This function allows you to specify the time to start sending a fax. You can save money by
specifying a transmission to start during the night or early in the morning when telephone
charges are less.
FAX
FAX
HINT
For detail, see "Timer Transmission" (p. 6-44).
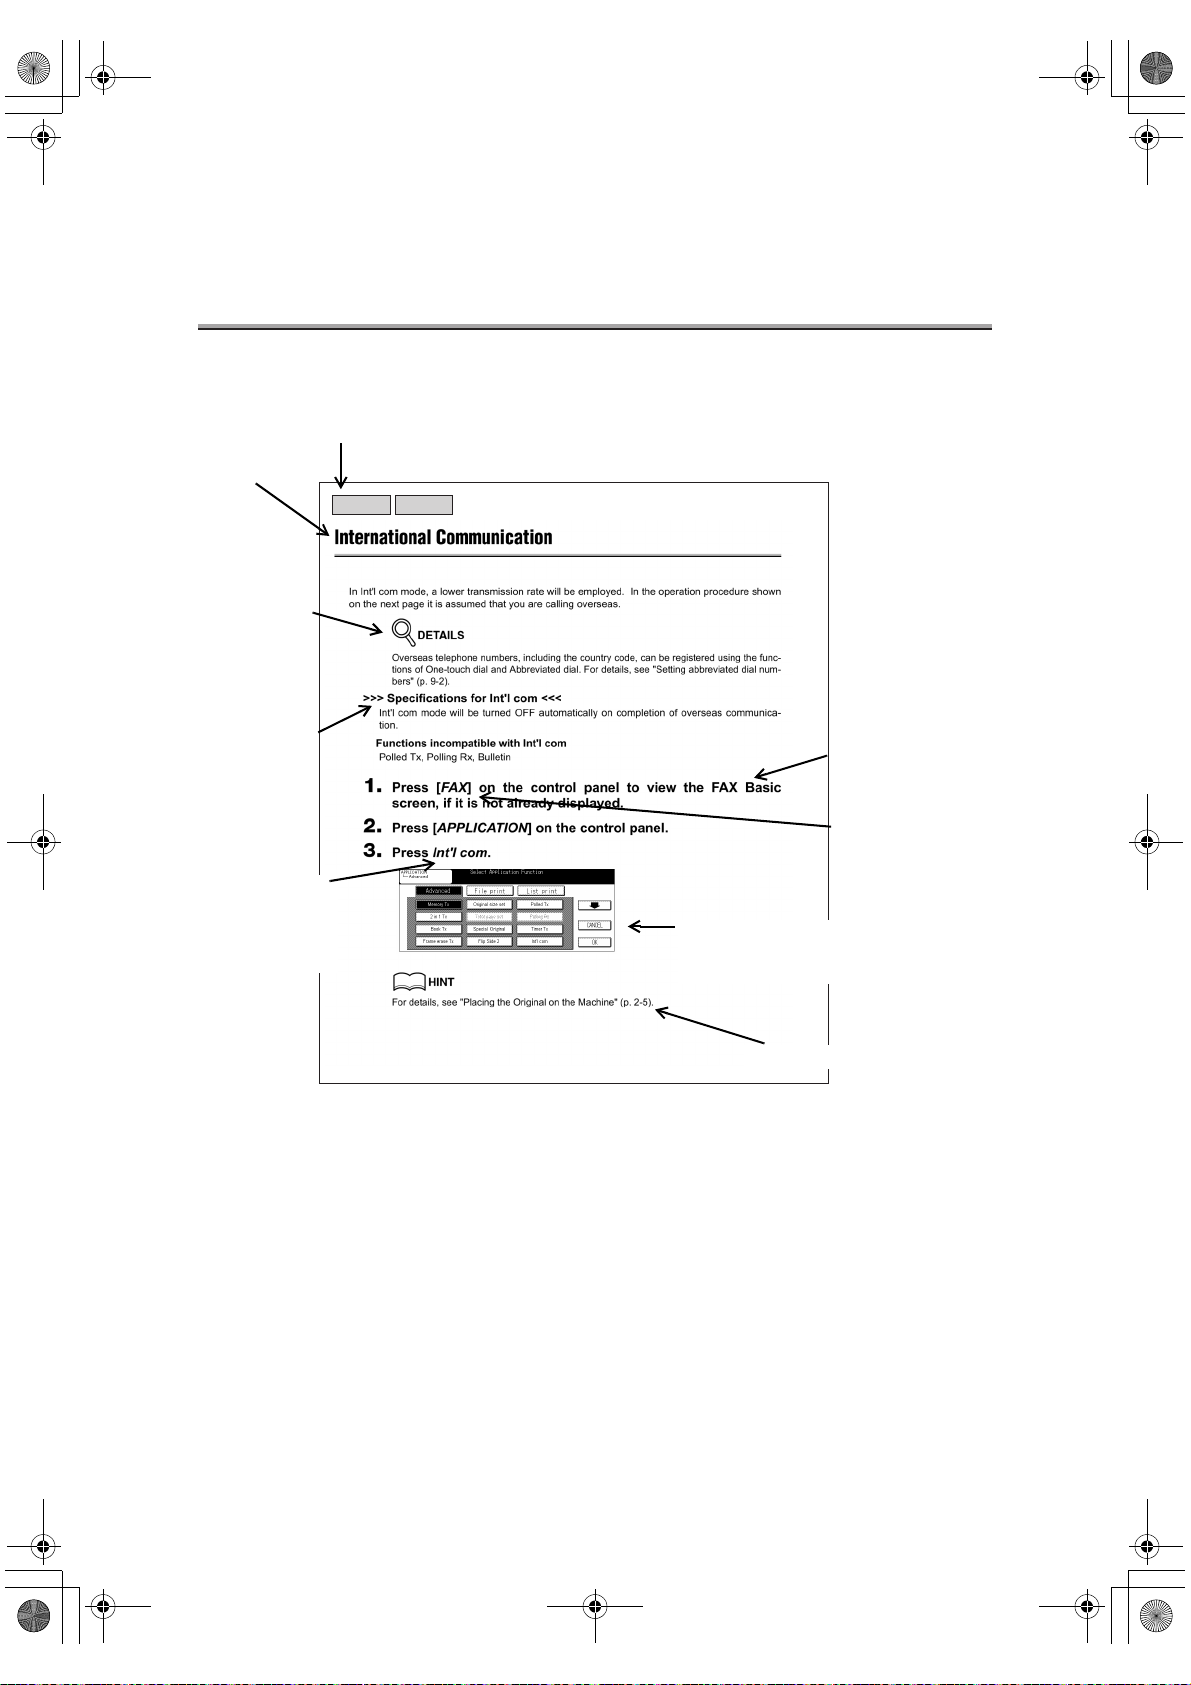
Sending faxes to a foreign country.
You can employ a lower transmission rate if you send a FAX to the location at which the
communication condition is poor.
HINT
For detail, see "International Communication" (p. 6-47).
xx
FAX
Page 21
000_fk103_int.book xxi ページ 2004年2月6日 金曜日 午後7時4分
Features of the Internet FAX / FAX - (continued)
Verification Stamp
Internet-FAX
FAX
When transmitting a fax via the copier’s RADF, a stamp can be affixed to the pages of the
document that have already been scanned, allowing you to confirm that these pages have
been scanned.
Front surface of
original document
Original document
transmitting direction
Stamp position
HINT
For details, see "Verification Stamp" (p. 6-12).
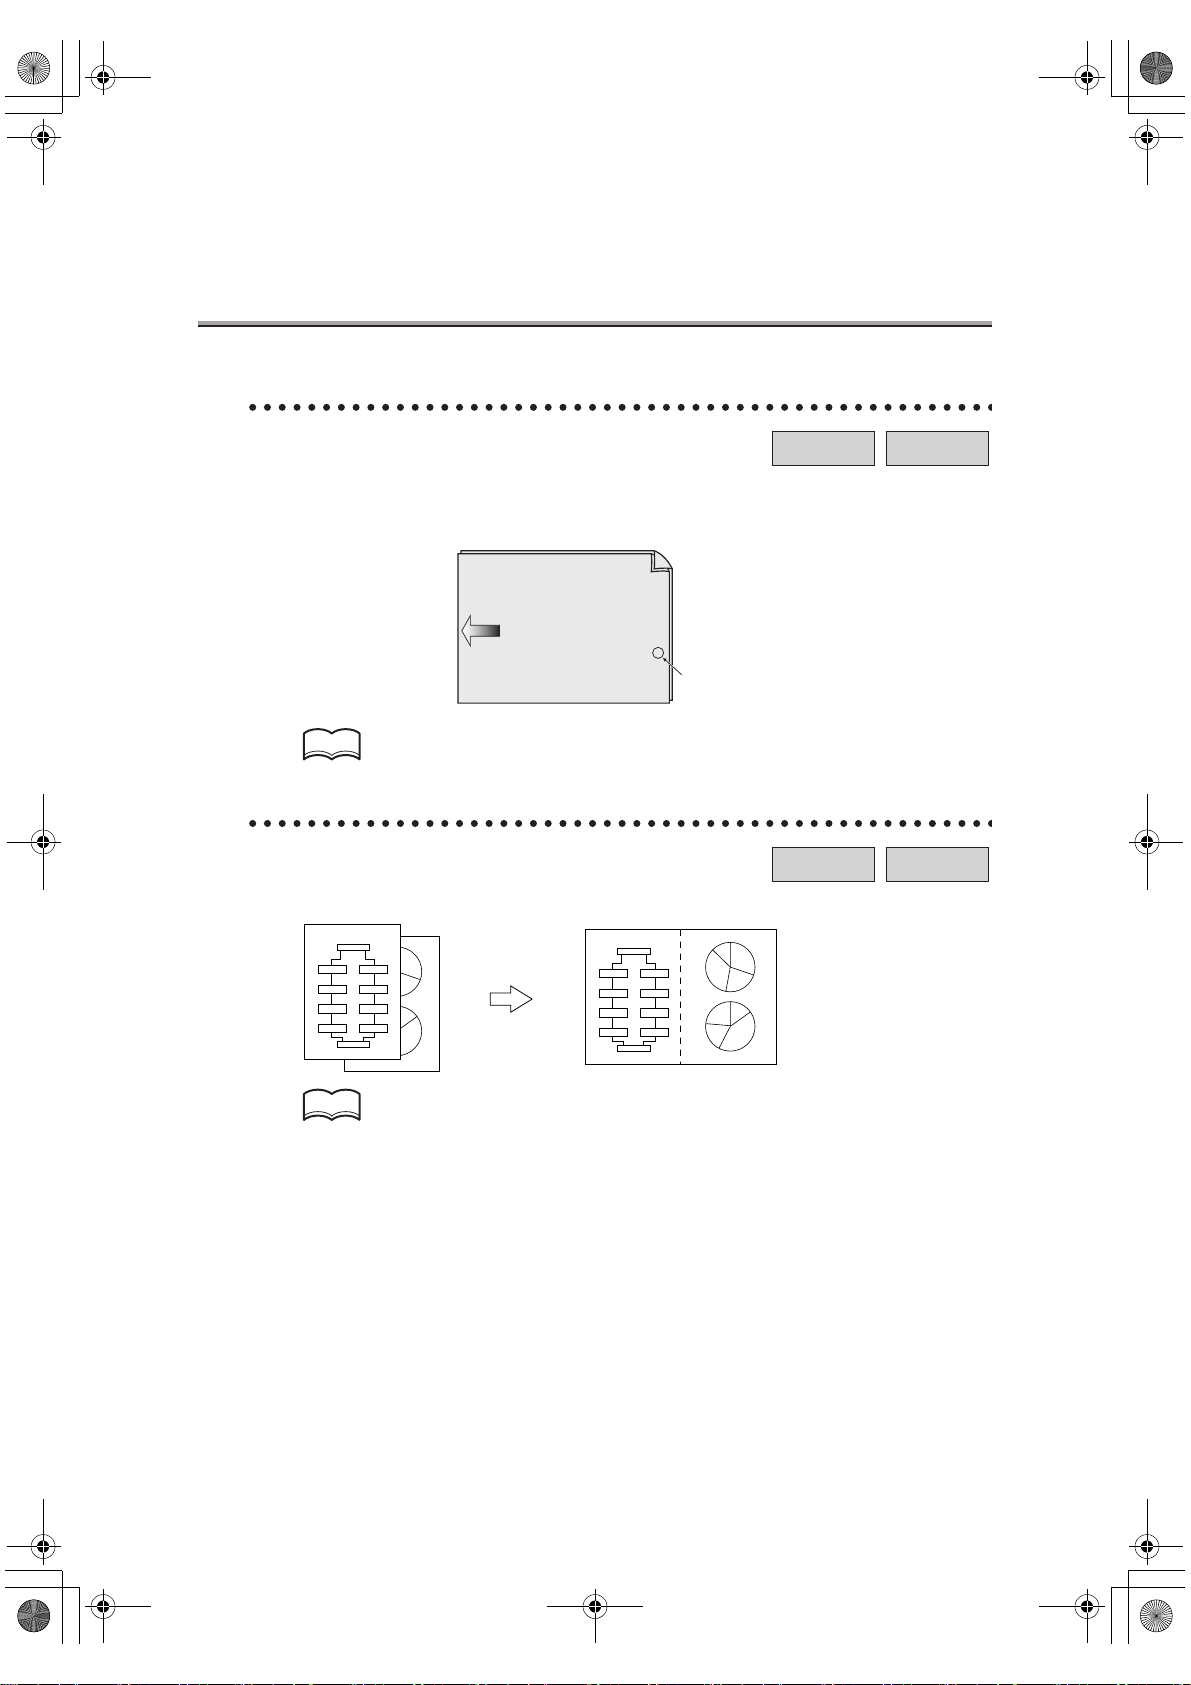
2 in 1 transmission mode.
You can send a FAX by combining two pages as a double-page spread.
Flow Chart
START
Step
4
FINISH
Step 1
Step 5
Step 3
Step 2
Step 6
Step 7
Step
5
Step 8
Step 8
Step 7
Step 6
1
2
Step 1
Step 2
Step 3
Step 4
Flow Chart
START
Step 1
Step 5
Step 2
Step 6
Step 3
Step 7
Step 4
Step 8
FINISH
12
Step 3
Step 8
Step 7
Step
4
Step 1
Step 2
Step 5
Step 6
Internet-FAX
FAX
HINT
For detail, see "2 in 1 Transmission" (p. 11-8).
xxi
Page 22
000_fk103_int.book xxii ページ 2004年2月6日 金曜日 午後7時4分
Features of the Internet FAX / FAX - (continued)
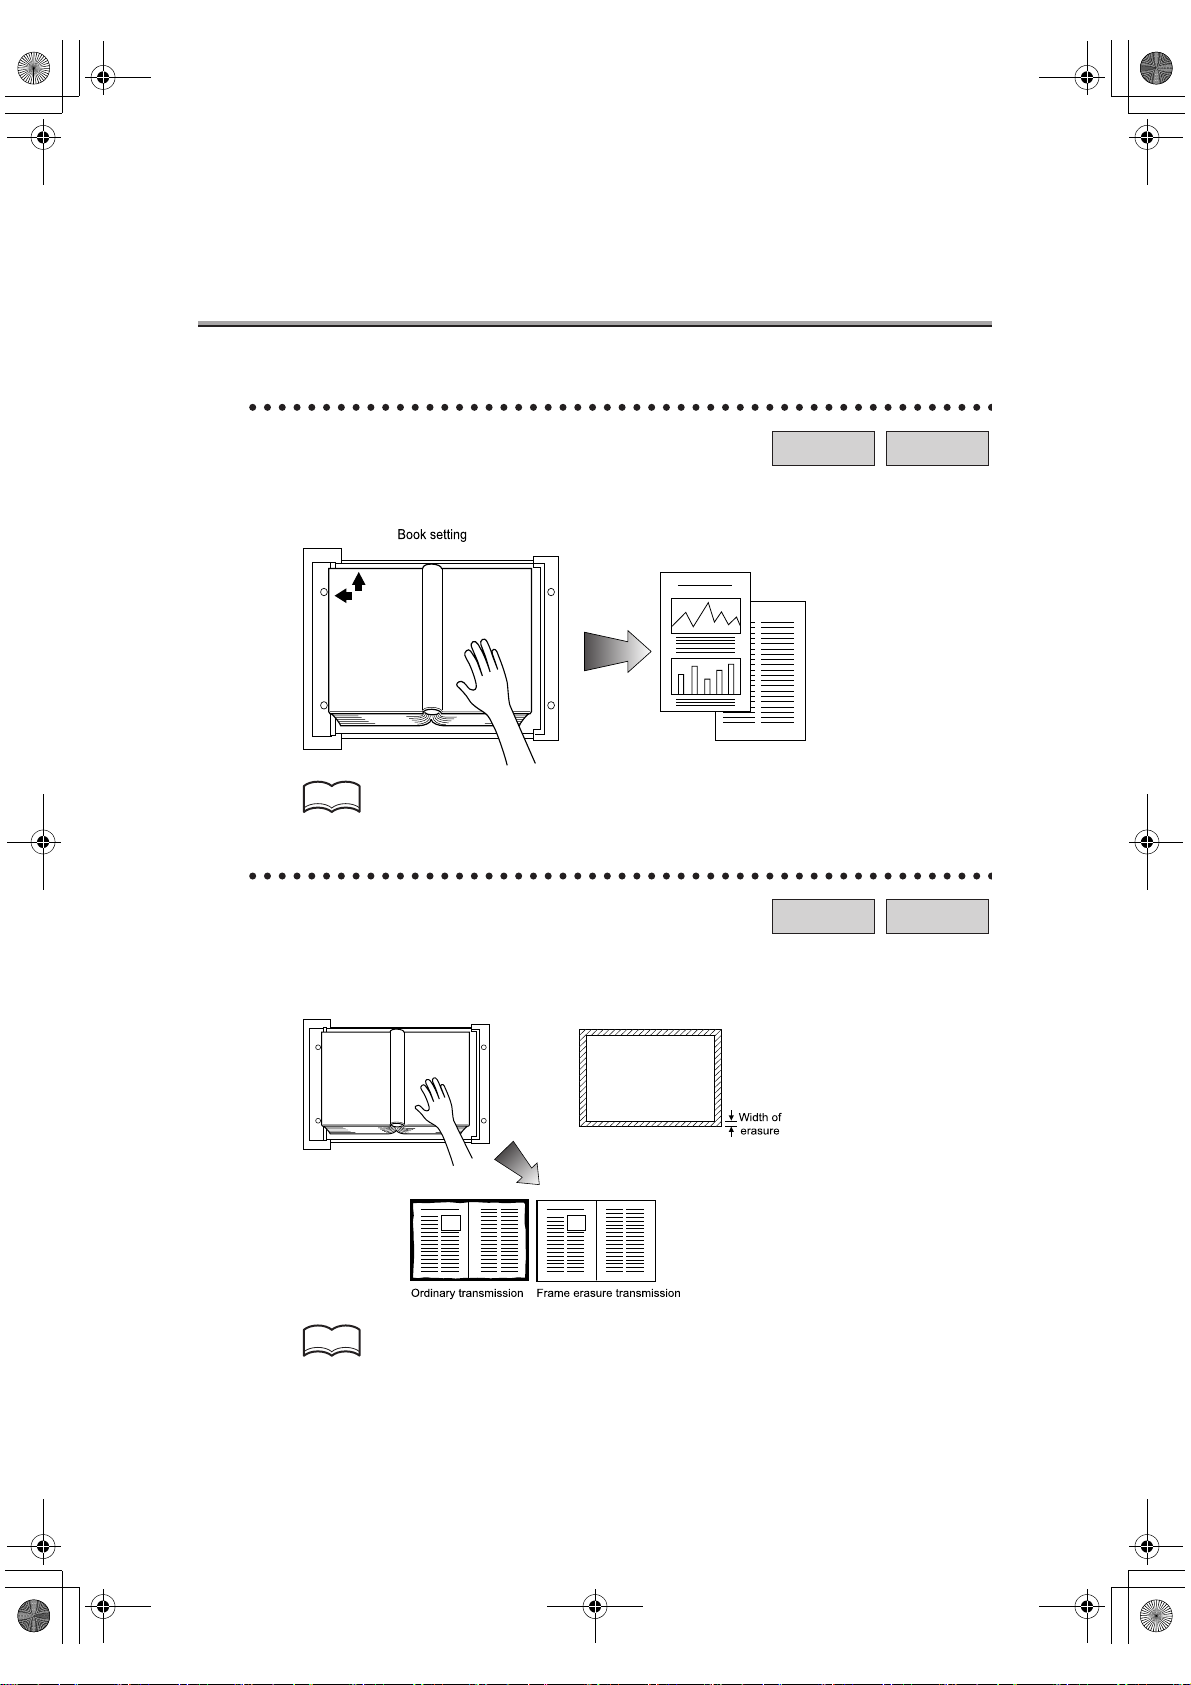
Book transmission mode.
You can send a FAX by producing two separate pages from the side-by-side pages of an
open book.
HINT
For detail, see "Book Transmission" (p. 11-10).
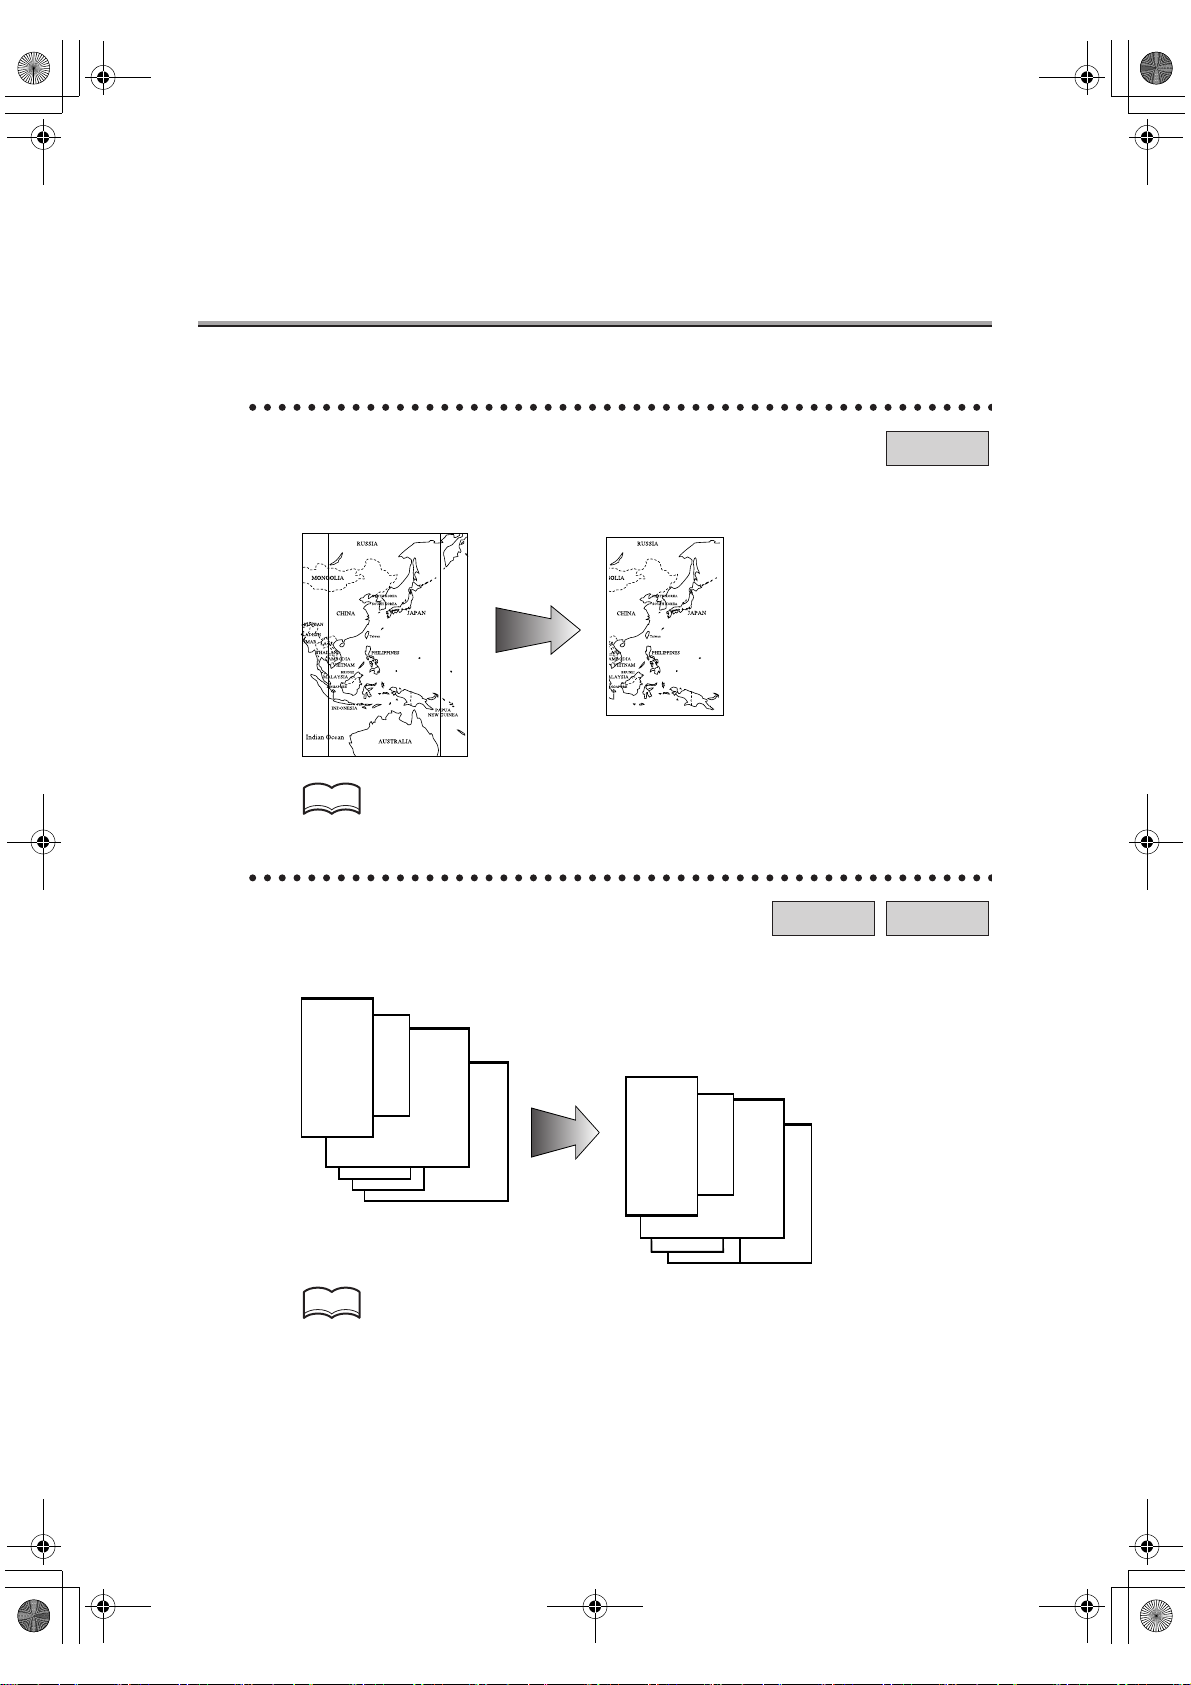
Frame erasure mode.
You can send a FAX by erasing dark bands sometimes created when transmitting a document bound in the form of book. You can also set the width of marginal erasure according
to your preference.
Internet-FAX
Internet-FAX
FAX
FAX
xxii
HINT
For detail, see "Frame Erase Transmission" (p. 11-13).
Page 23
000_fk103_int.book xxiii ページ 2004年2月6日 金曜日 午後7時4分
Features of the Internet FAX / FAX - (continued)
Send a FAX in original size select mode.
You can send a FAX by designating the paper size for the document to be sent. It is useful
if you want to send only a portion of the original.
HINT
For detail, see "Original Size Set" (p. 11-16).
Setting and sending document pages of mixed sizes in a single operation.
You can send pages of mixed sizes because the facsimile recognizes each page size and
sends pages properly when the mixed original feature is used.
Transmitted and reproduced in the
same sizes as the original pages at
the destination.
Internet-FAX
FAX
FAX
You set document pages of
mixed sizes on the RADF.
HINT
For detail, see "Mixed Original" (p. 11-19).
xxiii
Page 24
000_fk103_int.book xxiv ページ 2004年2月6日 金曜日 午後7時4分
Features of the Internet FAX / FAX - (continued)
Send Z folded original.
You can send Z folded original because the RADF can determine the document size.
Some facsimiles cannot detect the document size if it has been folded.
Z folded
original
Sensor
HINT
For detail, see "Folded Original" (p. 11-22).
Sending long originals.
You can send originals longer than A3 (420 mm).
Internet-FAX
Internet-FAX
FAX
FAX
xxiv
HINT
For detail, see "Long Original" (p. 11-25).
Page 25
000_fk103_int.book xxv ページ 2004年2月6日 金曜日 午後7時4分
Features of the Internet FAX / FAX - (continued)
Specify the binding style of a two-sided document.
You can specify the appropriate binding style when transmitting two-sided documents.
Binding style allows the pages of the document to be read appropriately by determining
right to left or top to bottom.
Top / Bottom bind
Remote station
Left / Right bind
HINT
For detail, see "Flip Side 2" (p. 11-27).
Internet-FAX
Sending a FAX when it receives a polling command from the recipient.
You can send a FAX that has been read and stored in memory in the facsimile when a polling command is sent from the recipient.
Receiver Sender
FAX
FAX
HINT
For detail, see "Polling Reception" (p. 13-4).
xxv
Page 26
000_fk103_int.book xxvi ページ 2004年2月6日 金曜日 午後7時4分
Features of the Internet FAX / FAX - (continued)
Sending a FAX with ECM disabled.
You can send a FAX with ECM disabled to shorten the transmission time.
FAX
HINT
For detail, see "ECM Off" (p. 11-30).
Polling specified document.
You can store documents that you want to poll in the bulletin board of the FAX machine’s
memory for polling transmission or polling reception.
Browse
Write
Bulletin board
Polling
FAX
HINT
For detail, see "Bulletin" (p. 13-6).
Sending a FAX with the Super G3 mode disabled.
You can send a FAX with the super G3 mode disabled if V34 protocol is not available
because of restrictions on the Private Branch Exchange (PBX).
HINT
For detail, see "V34 OFF" (p. 11-39).
xxvi
FAX
Page 27

000_fk103_int.book xxvii ページ 2004年2月6日 金曜日 午後7時4分
Features of the Internet FAX / FAX - (continued)
Relay Fax.
You can send a FAX to a recipient via an intermediate relay station.
Original station
Toll call
Intermediate relay station
Local call
FAX
Remote station
Remote station
HINT
For detail, see "Relay Transmission Request" (p. 11-43).
Use a confidential box.
You can use a confidential box (similar to an inbox) to exchange confidential information
with specific person.
Sender Receiver
Confidential box
FAX
HINT
For detail, see "Confidential Communication" (p. 11-32).
xxvii
Page 28
000_fk103_int.book xxviii ページ 2004年2月6日 金曜日 午後7時4分
Features of the Internet FAX / FAX - (continued)
Sending a FAX protected with a password.
You can send a FAX protected with a password if the closed communication is set at the
recipient.
HINT
For detail, see "ID Transmission" (p. 11-41).
FAX
xxviii
Page 29
000_fk103_int.book xxix ページ 2004年2月6日 金曜日 午後7時4分
How to Use This User's Guide
Which of the Internet Fax or normal Fax function is supported is indicated in the des cription about the Advanced functions.
Title
FAX
Internet-FAX
Detailed information on
operating procedures.
Describes
principles of
functions, and
highlights the
functions that
cannot be
used
together.
Italic is used to
signify the keys
on the touch
screen.
Describes operating
procedures.
[Italic] is used
to display the
buttons on the
control panel.
Shows the view of the touch
screen at the operation.
Shows a reference.
This page does not exist in the document.
xxix
Page 30

000_fk103_int.book xxx ページ 2004年2月6日 金曜日 午後7時4分
Manual Structure
The following manuals are included in the copier.
User's Guide (Copy Operations):
Describes the basic operation and the copy operation.
Refer to this User's Guide to see:
• Precautions for installation and handling
• How to turn the power on/off
• How to supply paper
• Troubleshooting for paper jam, etc.
User's Guide (Network/Scanner Operations)
Describes the setting method of the network function and operating method of the scanner
function, which are provided as the standard functions.
• Refer to this User's Guide if you want to know how to use the network, Scan to EMail, Scan to FTP and Scan to PC (SMB) functions.
User's Guide (Security Operations)
Describes the security function.
• Refer to this User's Guide if you want to know how to use the enhanced security function and operation of copier required to use this function.
User's Guide (Document Folder Operations)
Describes the operation of the Document Folder.
• Refer to this User's Guide if you want to know how to use the Document Folder when
the optional hard disk (HD-103 Type-A) is connected.
User's Guide (Internet Fax/Fax Operations) (this User's Guide)
Describes the internet Fax/Fax operations.
• Refer to this User's Guide if you want to know how to use the Internet Fax when the
optional hard disc (HD-103 Type-A) is connected and how to use the Fax function
when the Fax kit is connected.
User Software CD
Two manuals as follows are contained in this CD:
• Web Utilities User's Guide
• Adress Book User's Guide
xxx
Page 31

000_fk103_int.book 1 ページ 2004年2月6日 金曜日 午後7時4分
Basics for Internet FAX
Page 32

000_fk103_int.book 2 ページ 2004年2月6日 金曜日 午後7時4分
Page 33

000_fk103_int.book 1 ページ 2004年2月6日 金曜日 午後7時4分
Chapter
Overview of Internet Fax
1
Precautions .................................................................................1-2
Features and System Configuration of Internet Fax....................1-3
Internet Fax Operating Environment ...........................................1-4
What You Can Do with Internet Fax ............................................1-5
Preparation for Operating Internet Fax Functions.......................1-7
Use of Control Panel...................................................................1-8
FAX Basic Screen .....................................................................1-10
Specification (Internet Fax) .......................................................1-12
Precautions
Features and System
Configuration of Internet Fax
Internet Fax Operating
Environment
What You Can Do with
Internet Fax
Preparatio n for Operatin g
Internet Fax Functions
Use of Control
Panel
FAX Basic
Screen
Specification
(Internet Fax)
Page 34

000_fk103_int.book 2 ページ 2004年2月6日 金曜日 午後7時4分
Precautions
Operating Environment
The Internet Fax functions can be operated in the following environment:
• Optional hard disc (HD-103 Type A) has been installed.
• The copier is connected to the network and set up to allow the reception of E-mail.
Transmission and Reception of E-Mail
• Documents transmitted (files attached to E-mail) may be damaged due to network condition. Be sure to check the documents transmitted for damage.
• Even though "----" is marked on the transmission result screen or in the space for the
result of a communication control report, the E-mail may not arrive at the receiver due to
a trouble on the internet. The "----" mark on the transmission result screen or communication control report signifies that the transmission has successfully reached your
server. When sending or receiving important information, confirm the result with Message Disposition Notification (MDN) or by other means.When Message Disposition Notification (MDN) is received, "OK" is marked in the space for the Transmit result screen or
Communication Journal.
1-2
Page 35

000_fk103_int.book 3 ページ 2004年2月6日 金曜日 午後7時4分
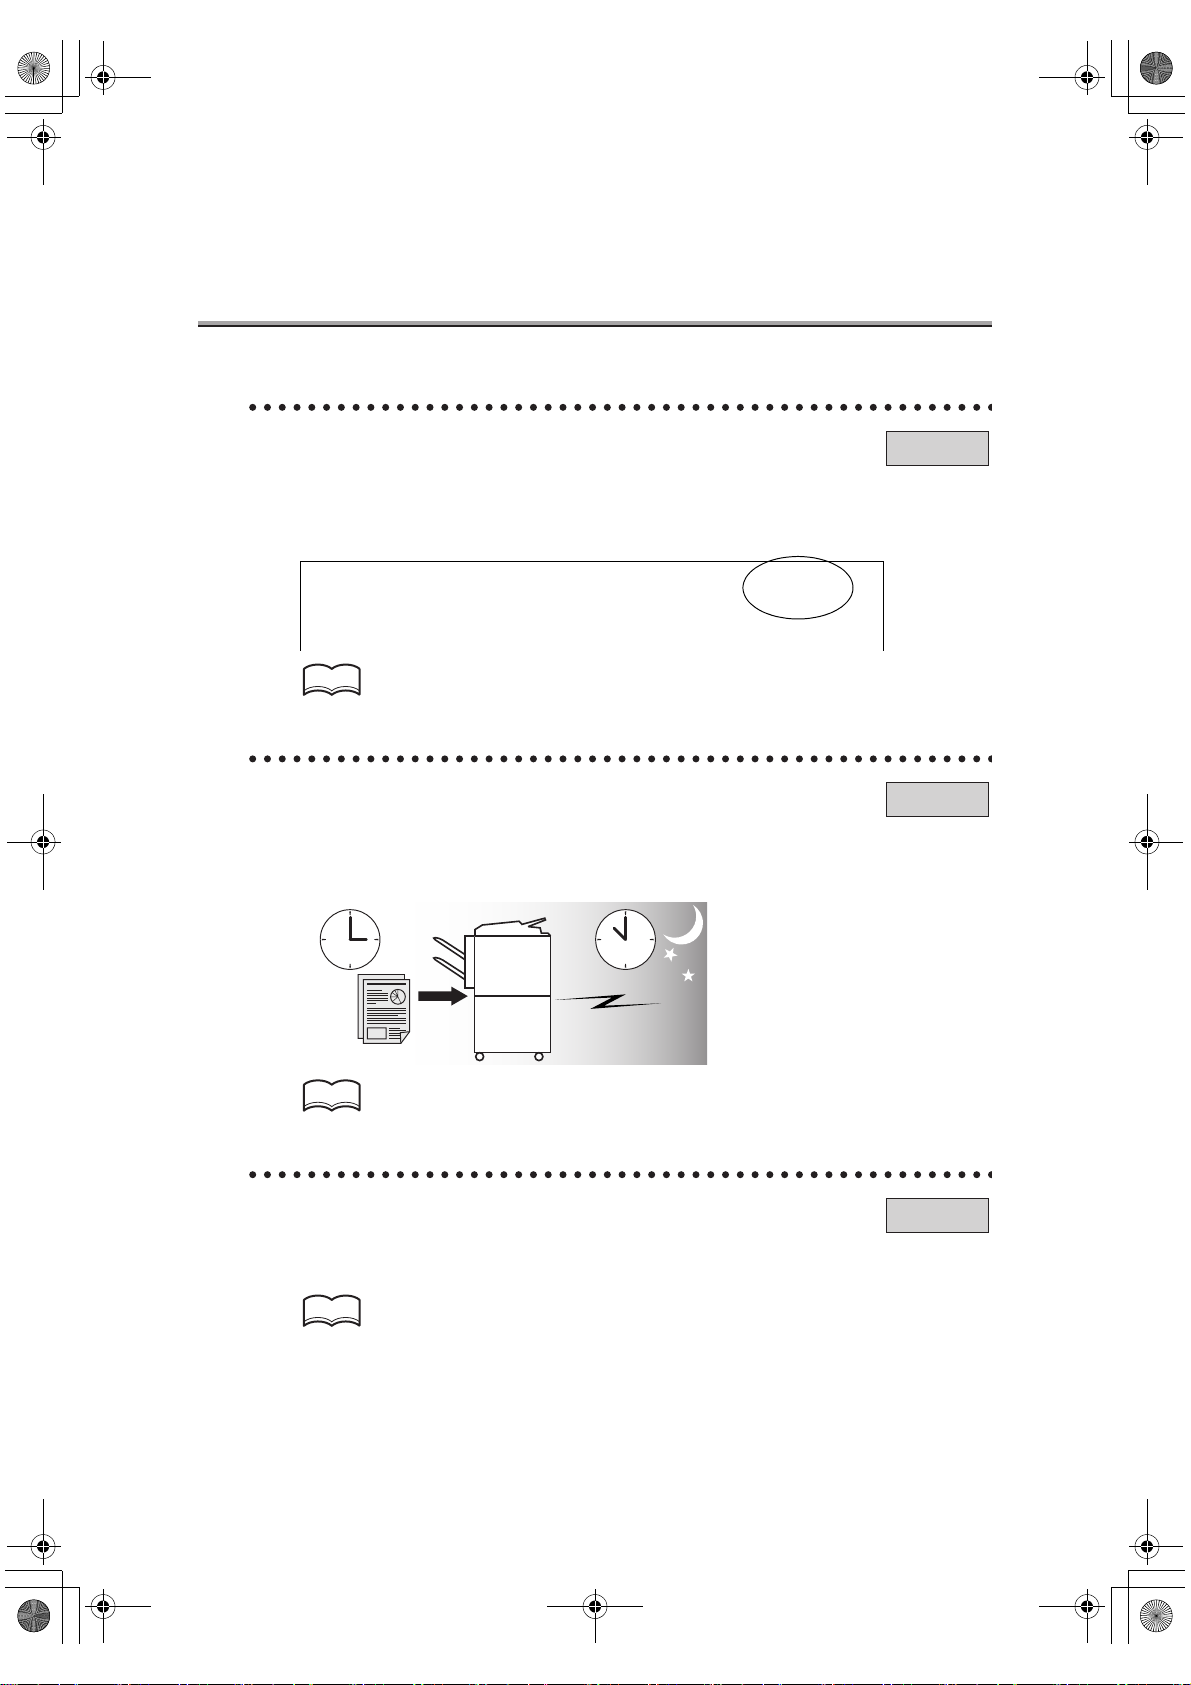
Features and System Configuration of Internet Fax
Original
E-Mail +
attached file
(TIFF format)
HD-103
Type-A
Intranet/Internet
Mail-receiving
Precautions
Features and System
Configuration of Internet Fax
Internet Fax Operating
Environment
What You Can Do
with Internet Fax
Preparatio n for Operatin g
Internet Fax Functions
Use of Control
Panel
FAX Basic
Screen
Specification
(Internet Fax)
SMTP
POP
Internet Fax-receiving
HD-103
Type-A
With the Internet Fax, documents can be transmitted or received between Internet Faxes or computers through the intranet (company internal network) or internet. Documents are transmitted as
E-mail-attached documents (TIFF format) without using the telephone lines (public telephone
lines or ISDN lines) and therefore cost of telephone transmission can be reduced.
1-3
Page 36

000_fk103_int.book 4 ページ 2004年2月6日 金曜日 午後7時4分
Internet Fax Operating Environment
Internet Fax functions can be operated in the environment as described below.
Hardware Environment
• Optional hard disk (HD-103 Type-A) should be installed.
Network Environment
• This machine should be connected to the network and set up to allow transmission and
reception of E-mail.
HINT
Refer to "User’s Guide (Network/Scanner Operations)".
1-4
Page 37

000_fk103_int.book 5 ページ 2004年2月6日 金曜日 午後7時4分
What You Can Do with Internet Fax
Internet Fax has following functions.
Transmitting E-Mail
• Documents scanned with this machine can be transmitted via E-mail to Internet Fax or
computers as attached documents (TIFF format). Since the documents can be sent or
received through the intranet (company internal network) or internet, charges for telephone
lines can be reduced.
Original
E-Mail +
attached file
(TIFF format)
HD-103
Type-A
Intranet/Internet
Mail-receiving
Precautions
Features and System
Configuration of Internet Fax
Internet Fax Operating
Environment
What You Can Do
with Internet Fax
Preparatio n for Operatin g
Internet Fax Functions
Use of Control
Panel
FAX Basic
Screen
Specification
(Internet Fax)
HINT
See p. 2-6 for details.
SMTP
POP
Internet Fax-receiving
HD-103
Type-A
1-5
Page 38

000_fk103_int.book 6 ページ 2004年2月6日 金曜日 午後7時4分
What You Can Do with Internet Fax - (continued)
Receiving E-Mail
• Mails are automatically acquired from the POP server at a specified interval. When a document from Internet Fax or computer is received, the message and attached documents of
E-mail are automatically printed.
E-Mail +
attached file
HD-103
Type - A
(TIFF format)
Intranet/Internet
Print
HD-103
Type-A
Memory
HINT
See p. 3-2 for details.
E-Mail +
attached file
(TIFF format)
SMTP
POP
E-Mail +
attached file
(TIFF format)
1-6
Page 39

000_fk103_int.book 7 ページ 2004年2月6日 金曜日 午後7時4分
Preparation for Operating Internet Fax Functions
In order to use the Internet Fax functions, you should make preparations as follows.
• Connect the copier to the network.
HINT
Refer to "User’s Guide (Network/Scanner Operations)" for the connection to the network.
• Set up the copier for the network.
HINT
Refer to "User’s Guide (Network/Scanner Operations)" for the connection to the network.
• Set up the reception ability of your machine.
Precautions
Features and System
Configuration of Internet Fax
Internet Fax Operating
Environment
What You Can Do
with Internet Fax
Preparatio n for Operatin g
Internet Fax Functions
Use of Control
Panel
FAX Basic
Screen
Specification
(Internet Fax)
HINT
See p. 15-67 for details.
• Register mail addresses used often.
HINT
See p. 14-49 for details.
• Register mail subjects used often.
HINT
See p. 14-59 for details.
• Register mail messages used often
HINT
See p. 14-67 for details.
1-7
Page 40

000_fk103_int.book 8 ページ 2004年2月6日 金曜日 午後7時4分
Use of Control Panel
Control Panel
1 45678 923
23
22
21
20
10
11
12
13
1819
17 16
15
14
No. Name Description
Touch Panel
1
(LCD Panel)
2 CHECK Button
These screens specify destinations and enable users to configure
settings. Messages that show the status of the machine are also displayed here.
Displays the setting confirmation menu and displays the machine settings.
3 HELP Button Displays the help menu.
4 DATA Light
Lights up when facsimile-transmitted/received data or report data is
present in the memory: blinks when print data is being processed.
5 PRINT Button/Light Switches the machine operation mode to printer mode.
SCAN/SERVER
6
Button/Light
Switches the machine operation mode to scanner mode.
7 FAX Button/Light Switches the machine operation mode to facsimile mode.
8 COPY Button/Light Switches the machine operation mode to copy mode.
POWER SAVER
9
ON/OFF Button
INTERRUPT
10
Button
PROOF COPY
11
Button
12 STOP Button
Press to activate the Low power/Auto shutoff mode.
Turns on when this mode is functioning.
Upon completion of reading a FAX original, the Copy Basic screen
will appear, indicating that the interrupt mode has been entered.
Not used for facsimile functions.
Stops an operation or cancels a setting when entering of a telephone
number or parameter setting.
13 START Button/Light Starts facsimile communication.
1-8
Page 41

000_fk103_int.book 9 ページ 2004年2月6日 金曜日 午後7時4分
No. Name Description
Transmits a "#" sign. Also used to switch the pulse dial line to the
14 # Button
push-button tone. (A "T" is displayed on the screen in push-button
tone mode).
15 CLEAR Button
Cancels a setting during entry of a telephone number or parameter
setting.
16 Key Pad Enters telephone numbers, passwords, etc.
Transmits an asterisk "*".
17 * Button
Also used to switch the pulse dial line to the push-button tone. (A "T"
is displayed on the screen in push-button tone mode).
AUTO RESET
18
Button
Returns all settings to their initial values.
19 JOB MEMORY Not used for facsimile functions.
MAIN POWER
20
Lamp
Contrast
21
Adjustment Dial
22 Counter Key
Lights up when the main power switch is turned ON.
Used to adjust the contrast of the touch panel (LCD).
Used for counting the copies, fax transmissions, receipts and scans.
Effective in Copy mode.
23 Power Switch Turns copier power On / Off when pressed.
Use of Control Panel - (continued)
Precautions
Features and System
Configuration of Internet Fax
Internet Fax Operating
Environment
What You Can Do
with Internet Fax
Preparatio n for Operatin g
Internet Fax Functions
Use of Control
Panel
FAX Basic
Screen
Specification
(Internet Fax)
1-9
Page 42

S
000_fk103_int.book 10 ページ 2004年2月6日 金曜日 午後7時4分
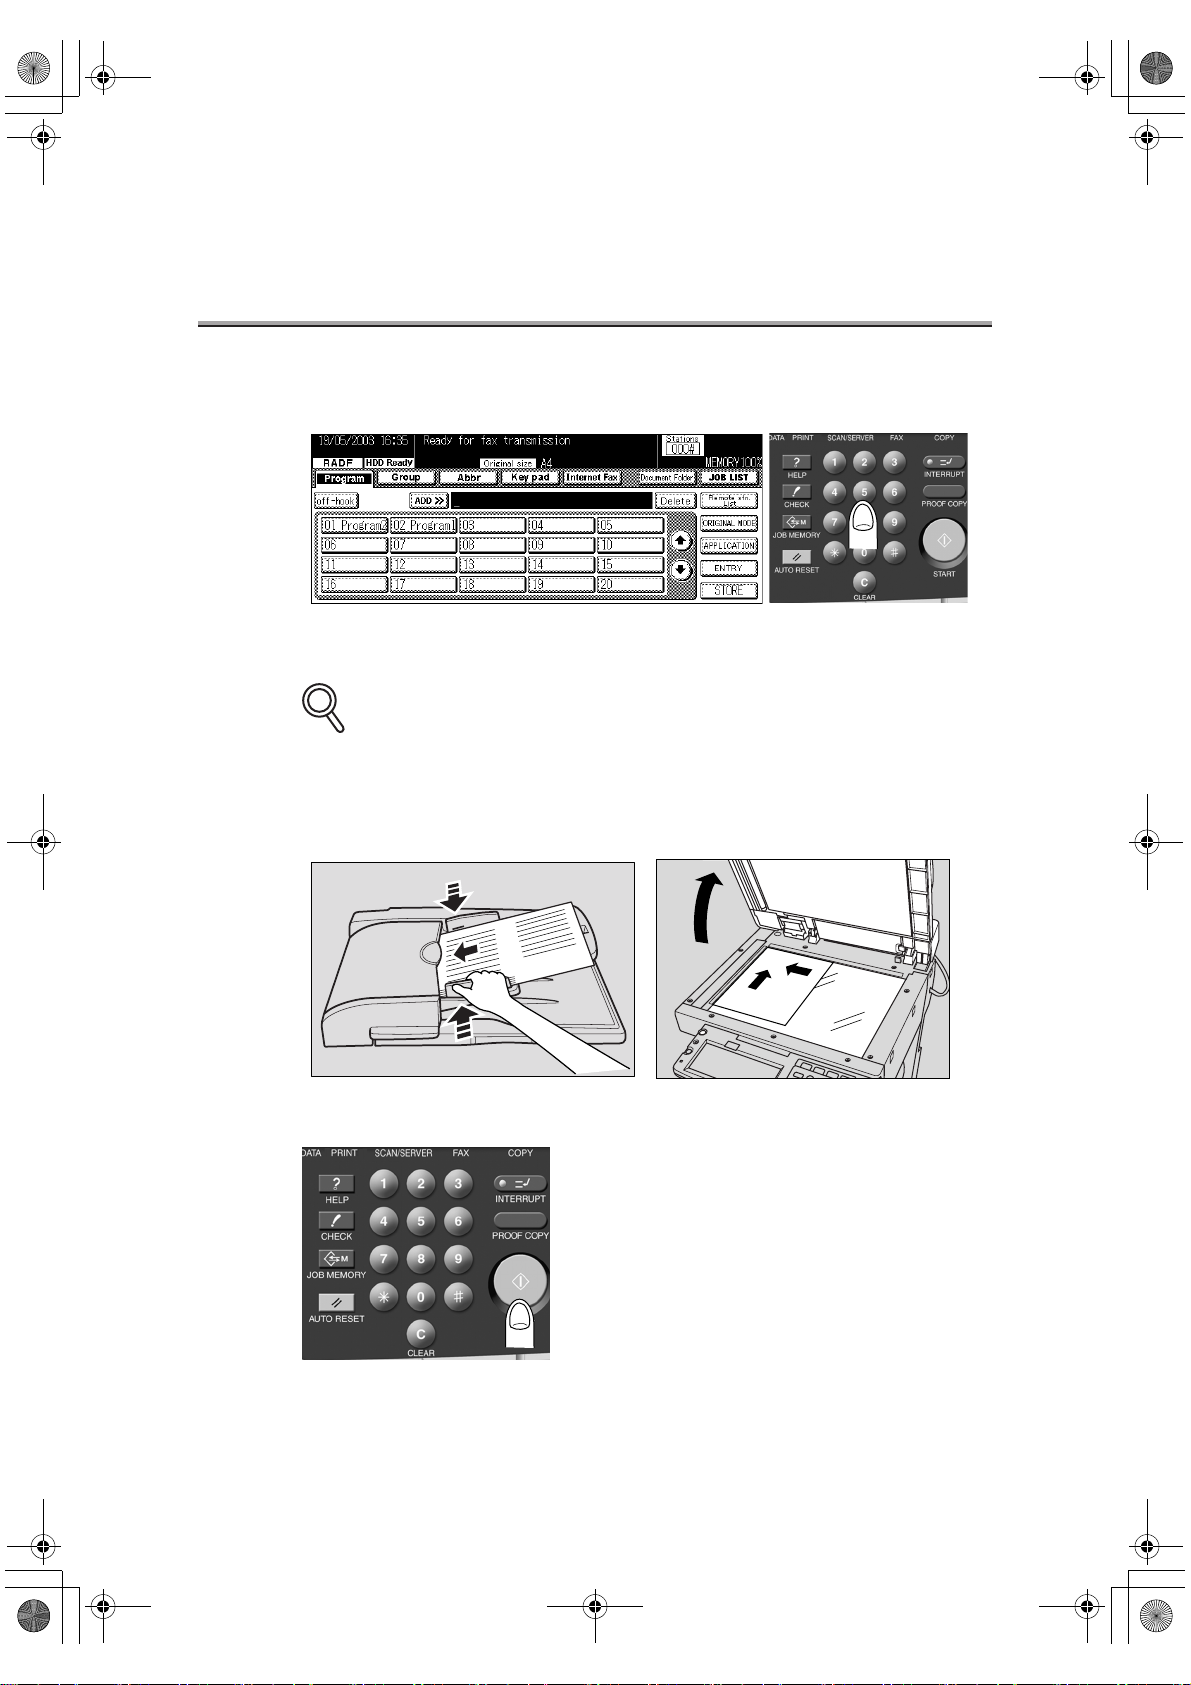
FAX Basic Screen
The FAX Basic screen is displayed when the FAX button is pressed on the control panel. The FAX
Basic screen contains Program, Group, Abbr, Key pad, Internet Fax and Document Folder-
Document Folder.
When the transmission is started after the document is scanned, COM is indicated on the right
above the screen.
DETAIL
When the ECM (Electronic Copy Monitor) is set to function with the FAX mode, “Enter E.C.M.
password” is displayed on the FAX basic screen. In this case, the ECM manages the number
of originals sent.
For details, refer to “Key Operator Mode ECM On/Off Setting” on copier User’s Guide.
12 43
8 9
11657 10
12
24
23
22
21
20
13
14
15
16
17
18
19
1 Clock/icon display unit...... Current time, need for preventive maintenance are indicated.
While RADF is working, "RADF" is indicated and when installing
HDD, “HDD Ready” is indicated.
2 Group............................... Displays Group select screen.
3 Message indicator............ Displays the condition of the copier or a message showing oper-
ating procedures.
4 Add................................... Press Add if you want to add a remote station.
5 Abbr ................................. Displays Abbr select screen.
6 Remote Station indicator.. Displays an input remote station.
7 Key pad............................ Displays the screen that allows dialing using special symbols
such as tone and pause. In addition, it also allows dialing by
combining previously registered abbr dialing, group dialing, and
redialing with the key pad.
8 Internet Fax...................... Internet Fax screen is displayed. Select the mail address of the
remote station, and the subject and body of the message.
9 Document Folder ............. Box List screen is displayed. For detail, refer to "User’s Guide
(Document Folder Operations)".
1-10
Page 43

000_fk103_int.book 11 ページ 2004年2月6日 金曜日 午後7時4分
10 Delete............................... All the contents in the remote-station display section are
deleted.
11 Stations ............................ Displays the number of input remote stations.
12 Reserve............................ The next transmission can be reserved during communication or
printing. Displayed during the transmission or printing process.
13 MEMORY......................... Displays remainder of memory used for the fax operation.
14 JOB LIST ......................... Displays a list of reserved documents. You can redial manually
from this screen.
15 Remote stn. list ................ Displays registered remote destination list screen.
16 ORIGINAL MODE............ Displays the scan configuration screen. Set the following items
corresponding to the original to be sent.
• RADF: Cover + 2 sided, Two sided, One sided*
• Resolution: S-Fine, Fine*, Normal
• Quality: Photo, Text/photo, Text*
• Density: Auto*, LIGHTER, NORMAL, DARKER
• Verification Stamp
*initial settings at the time of purchase.
17 APPLICATION.................. Displays APPLICATION screen.
18 ENTRY............................. A screen is displayed where Abbr dial, Program dial, and other
setup conditions are registered.
19 STORE............................. Pressed if:
• you want to scan a multi-page document using the platen
glass.
• you want to scan a document using both the RADF and the
platen glass.
• you want to scan large document or a mixed-original document.
20 Subject/Msg. Body........... Press this button when entering the body or subject of a mail.
You can select a mail body or subject from those which have
been registered in advance or enter any one by hand.
21 Enter Address .................. Press this button when entering a mail address by hand.
22 Address select ................. Press this key when specifying a mail address by selecting one
from those registered in advance.
23 Receive E-Mail................. Press this button when receiving an E-mail from the POP server
manually.
24 Program ........................... Displays Program select screen.
FAX Basic Screen - (continued)
Precautions
Features and System
Configuration of Internet Fax
Internet Fax Operating
Environment
What You Can Do
with Internet Fax
Preparatio n for Operatin g
Internet Fax Functions
Use of Control
Panel
FAX Basic
Screen
Specification
(Internet Fax)
1-11
Page 44

000_fk103_int.book 12 ページ 2004年2月6日 金曜日 午後7時4分
Specification (Internet Fax)
Specifications for the Internet Fax are as shown below. Product specifications may be modified
without notice for the purpose of improvement.
Item Specification
Regular form document:
A3, A4 (L/S), A5L, B4, B5 (L/S), 8.5" x 11" (L/S),
8.5" x 14", 14" x 17", B6L
Unfixed form documents:
Width: A4 width (196-236mm) /
Length: Max. 800mm
Long Original be selected from Special Original of
APPLICATION (max. 800mm)
Mixed Original should be selected from Special
Original of APPLICATION
Folded Original should be selected from Special
Original of APPLICATION
Same as Fax
Same as Fax
RADF :Max. 800mm
Platen glass :A3 (11" x 17")
Approx. 1 sec. (A4 LEF)
Same as Copier
Scanning
Recording
Document size
Long Original
Mixed Original
Folded Original
Max. scanning
width
Effective scanning
range
Max. scanning
length
Document
scanning speed
Max. recording size 420 x 297mm (A3 size)
Effective recording
area
B4 width (237 - 268mm) /
A3 width (269mm -)
(Long Original Mode)
1-12
Page 45

000_fk103_int.book 13 ページ 2004年2月6日 金曜日 午後7時4分
Item Specification
Internet Fax transmission
Transmitted
document size
Transmission
resolution
Long Original
transmission
Encoding system
Reduced
document
transmission
Rotation transmission
Limited attached
file
Divided file transmission
Preparation/
registration of mail
body
A4 / B4 / A3 / unfixed length
200 x 100 (normal) / 200 x 200 (fine) /
400 x 400dpi (s-fine)
Max. 800mm
TIFF-F (MH / MR / MMR).
MH fixed for multiple addresses
When ability of remote station is unknown, documents below A4 in width are transmitted in 1-to-1
size and those of B4/A3 in width are reduced to
width of A4
A4 LEF document only
Network setting in key operator mode or setting with
Web Utilities possible
Network setting in key operator mode or setting with
Web Utilities possible
Max. 10 types are registered in advance and
selected at the time of Internet Fax transmission.
Direct entry from control panel at the time of transmission is also possible
Max. 400 abbreviated mail addresses + max. 5 main
Internet FAX multistation transmission
addresses to be entered manually (multi-station
transmission to 405 addresses in total is possi-
ble)(Abbreviated mail addresses are not distin-
guished between Scan to E-mail and Internet Fax)
Mixed Internet Fax/
Fax multi-station
transmission
Mixed G3 Fax and Internet Fax can be specified for
transmission. Up to 405 Internet Fax addresses, up
to 600 G3 Fax addresses, 1050 addresses in total
Book transmission Document size of A3/B4 only is possible
Frame Erase trans-
mission
Possible
Possible
2 in 1 transmission
A4 x 2 sheets -- A3 / B4 / A4
B5 x 2 sheets -- B4 / A4
A5 x 2 sheets -- A4
Total page number
is indicated.
Automatically added to sender record
Specification (Internet Fax) - (continued)
Precautions
Features and System
Configuration of Internet Fax
Internet Fax Operating
Environment
What You Can Do
with Internet Fax
Preparatio n for Operatin g
Internet Fax Functions
Use of Control
Panel
FAX Basic
Screen
Specification
(Internet Fax)
1-13
Page 46

000_fk103_int.book 14 ページ 2004年2月6日 金曜日 午後7時4分
Specification (Internet Fax) - (continued)
Item Specification
None
Treatment of transmission error
Internet Fax timer
transmission
Internet Fax reception record
Mail transmitted
again.
Internet FAX Rx
Error Report
Impossible.
Record paper
selection
Pick-up tray
selection
Output destination
tray
OFF mode print set
Offset output for
each transmission
Rotation reception
Double-sided
record
2 in 1 record
Reception
information
record
Page division
record
When an error mail is received, reception error
report is printed and indicated on the transmission
control report (transmission side)
• When documents cannot be sent to the SMTP
server, transmission error report to be printed/not
printed can be set
• When MDN/DSN response is received, to be
printed/not to be printed can be set.
• When MDN/DSN response is received, transmission result is indicated on the transmission control
report
• MDN/DSN response monitoring time can be set in
the range from 0 to 99 hours
Can be selected from automatic selection / fixed
size / priority modes by key operator operation
Can be selected from automatic selection / fixed tray
by key operator operation
When FNS is installed, priority copy tray (tray 1 tray 4) can be set
Night-time reception mode ON/OFF and night time
reception time zone can be set
With FNS connected
Image is rotated by 90 degrees and recorded on the
recording paper placed in cross direction
Image direction cannot be specified
Possible
A4 x 2 sheets -- A3 / B4 / A4
B5 x 2 sheets -- B4 / A4
A5 x 2 sheets -- A4
After the reception and image rotation/2 in 1 composition, date/time/page No. are recorded on the lower
part
Not overlap at the time of page division
1-14
Page 47

000_fk103_int.book 15 ページ 2004年2月6日 金曜日 午後7時4分
Item Specification
Mail reception
Mail acquisition
interval
Manual POP reception
Reception by
specifying a box
Received document
size
Reception
resolution
Reception coding
system
Max. reception
length
Can be set to 1 - 60 minutes
Possible
Not Available
width : A4 / B4 / A3
length : Unfixed (800+alpha mm)
200 x 100 / 200 x 200 / 200 x 400 / 300 x 300 /
400 x 400 / 204 x 98 / 204 x 196 / 204 x 391 /
408 x 391
TIFF-F(MH / MR / MMR)
*1
see p. 1-17.
Received attached file size : Unlimited
Received file size
No. of pages : Max. 1000
Body size : Max. 20KB
Divided file reception
Multiple file
reception
Mail message print
Reception
not permitted
Exchange of ability
notice
Not Available
Max. 255 attached files
Mail message is printed but not printed when
received from WNET-FAX
None
• No function to register the ability of remote station
automatically when received MDN ability notice
• Ability to transmit MDN ability is provided
• ON/OFF of MDN transmission result demand and
DSN transmission result demand can be individually set
Transmission check
• MDN transmission result demand is impossible at
the time of Internet Fax multi-station transmission
• MDN/DSN response monitoring time can be set in
the range of 1 to 99 hours
Document received by G3 can be transferred to
addresses registered in advance (G3 Fax or E-mail)
Transfer
Automatic transfer
Manual transfer Manual transfer to E-mail address is unavailable
Specification (Internet Fax) - (continued)
Precautions
Features and System
Configuration of Internet Fax
Internet Fax Operating
Environment
What You Can Do
with Internet Fax
Preparatio n for Operatin g
Internet Fax Functions
Use of Control
Panel
FAX Basic
Screen
Specification
(Internet Fax)
1-15
Page 48

000_fk103_int.book 16 ページ 2004年2月6日 金曜日 午後7時4分
Specification (Internet Fax) - (continued)
Item Specification
Indication of
PC-Fax transmission
PC-Fax reception
Gateway function
Address registration
List/report
Received notification mail
E-Mail notice
Internet Fax
transmission from
printer driver
Reception to box at
sub-address
TSI routing Not Available
Onramp Not Available
Offramp Not Available
Abbreviated E-mail
address
Transmit report
Print DSN Message Possible
Print MDN
Message
Print E-Mail
message body
Internet FAX trans-
mission receipt
report
Internet FAX Sync
Transmit
Reservation Report
Internet FAX
Communication
Journal
Internet FAX Rx
Error Report
Alert E-mail Not Available
Transmission com-
pletion notice
Reception
notification mail
Not Available
Not Available
• Max. 400 addresses can be registered without distinguishing Scan To E-mail and Internet Fax
• Application functions (communication mode/document setting/others) can be registered to abbreviated E-mail address
• Possible (no report with figure)
• To be printed/not to be printed can be set individu-
ally to MDN/DSN message
Possible
Possible
Not Available
Not Available
Shared with Fax Communication Journal. Max. 110.
Subject/file name are described in the space of
remarks
Possible
Not Available
Not Available
Not Available
1-16
Page 49

000_fk103_int.book 17 ページ 2004年2月6日 金曜日 午後7時4分
*1
Max. Reception Length
A3 B4 A4
Normal
About 7800mm
(About 18 pages)
Specification (Internet Fax) - (continued)
Paper Size
About 9900mm
(About 27 pages)
About 11000mm
(About 37 pages)
Precautions
Features and System
Configuration of Internet Fax
Internet Fax Operating
Environment
What You Can Do
with Internet Fax
Preparatio n for Operatin g
Internet Fax Functions
Use of Control
Panel
FAX Basic
Screen
Specification
(Internet Fax)
Resolution
Fine
S-Fine
About 3900mm
(About 9 pages)
About 900mm
(About 2 pages)
About 4600mm
(About 12 pages)
About 1100mm
(About 3 pages)
About 5500mm
(About 18 pages)
About 1300mm
(About 4 pages)
1-17
Page 50

000_fk103_int.book 18 ページ 2004年2月6日 金曜日 午後7時4分
Page 51

000_fk103_int.book 1 ページ 2004年2月6日 金曜日 午後7時4分
Chapter
Transmitting Documents
2
with Internet Fax
Simple Internet Fax Transmission ...............................................2-2
Transmitting Documents to Internet Fax/Computer.....................2-6
Transmitting to Both Conventional Fax and E-Mail....................2-12
Placing the Original on the Machine .........................................2-17
Setting Transmission Conditions ...............................................2-23
Method for Specifying Addresses .............................................2-27
Scanning ...................................................................................2-31
Canceling Transmission ............................................................2-32
Confirming Reserved Documents .............................................2-33
Simple Internet
Fax Transmission
Transmitting Documents to
Internet Fax/Computer
Transmitting to Both
Conventional Fax and E-Mail
Placing the Original
on the Machine
Setting Transmission
Conditions
Method for Specifying
Addresses
Scanning
Canceling
Transmission
Confirming Reserved
Documents
Confirming
Communication Results
Confirming Communication Results..........................................2-34
Page 52

S
000_fk103_int.book 2 ページ 2004年2月6日 金曜日 午後7時4分
Simple Internet Fax Transmission
This Chapter describes the flow of E-mail transmission with the Internet Fax function.
DETAIL
Basic procedure to transmit one-sided document by simple operation is described in this
Chapter. This machine is provided with various other functions for convenient transmission.
Refer to "Chapter 11 Transmission Applications" for details.
1. Press [FAX] on the control panel to open the FAX Basic
screen.
2. Press ORIGINAL MODE.
3. Press Internet FAX Tx setting.
2-2
Page 53

000_fk103_int.book 3 ページ 2004年2月6日 金曜日 午後7時4分
Simple Internet Fax Transmission - (continued)
4. Select Compress Type and Paper sizes according to the
reception ability of the remote station and press OK.
When you purchase this machine, it has been set up as follows:
• Compress Type: MH
• Paper size: A4
5. Set the items on the FAX Basic screen as required and press
OK.
Simple Internet
Fax Transmission
Transmitting Documents to
Internet Fax/Computer
Transmitting to Both
Conventional Fax and E-Mail
Placing the Original
on the Machine
Setting Transmission
Conditions
Method for Specifying
Addresses
Scanning
Canceling
Transmission
Confirming Reserved
Documents
Confirming
Communication Results
HINT
• For the ORIGINAL MODE on the FAX Basic screen, see p. 2-23.
• For details about the Application screen, see p. 11-2.
6. Press Internet FAX.
2-3
Page 54

000_fk103_int.book 4 ページ 2004年2月6日 金曜日 午後7時4分
Simple Internet Fax Transmission - (continued)
7. Specify the mail address of the remote station.
HINT
For mail information about entering the addresses, see p. 2-27.
8. Press Subject/Msg. Body.
9. Specify the subject of the mail.
HINT
For the information about entering the subjects, see p. 2-9.
10.Specify the mail message.
HINT
For information about entering the body, see p. 2-10.
2-4
Page 55

000_fk103_int.book 5 ページ 2004年2月6日 金曜日 午後7時4分
Simple Internet Fax Transmission - (continued)
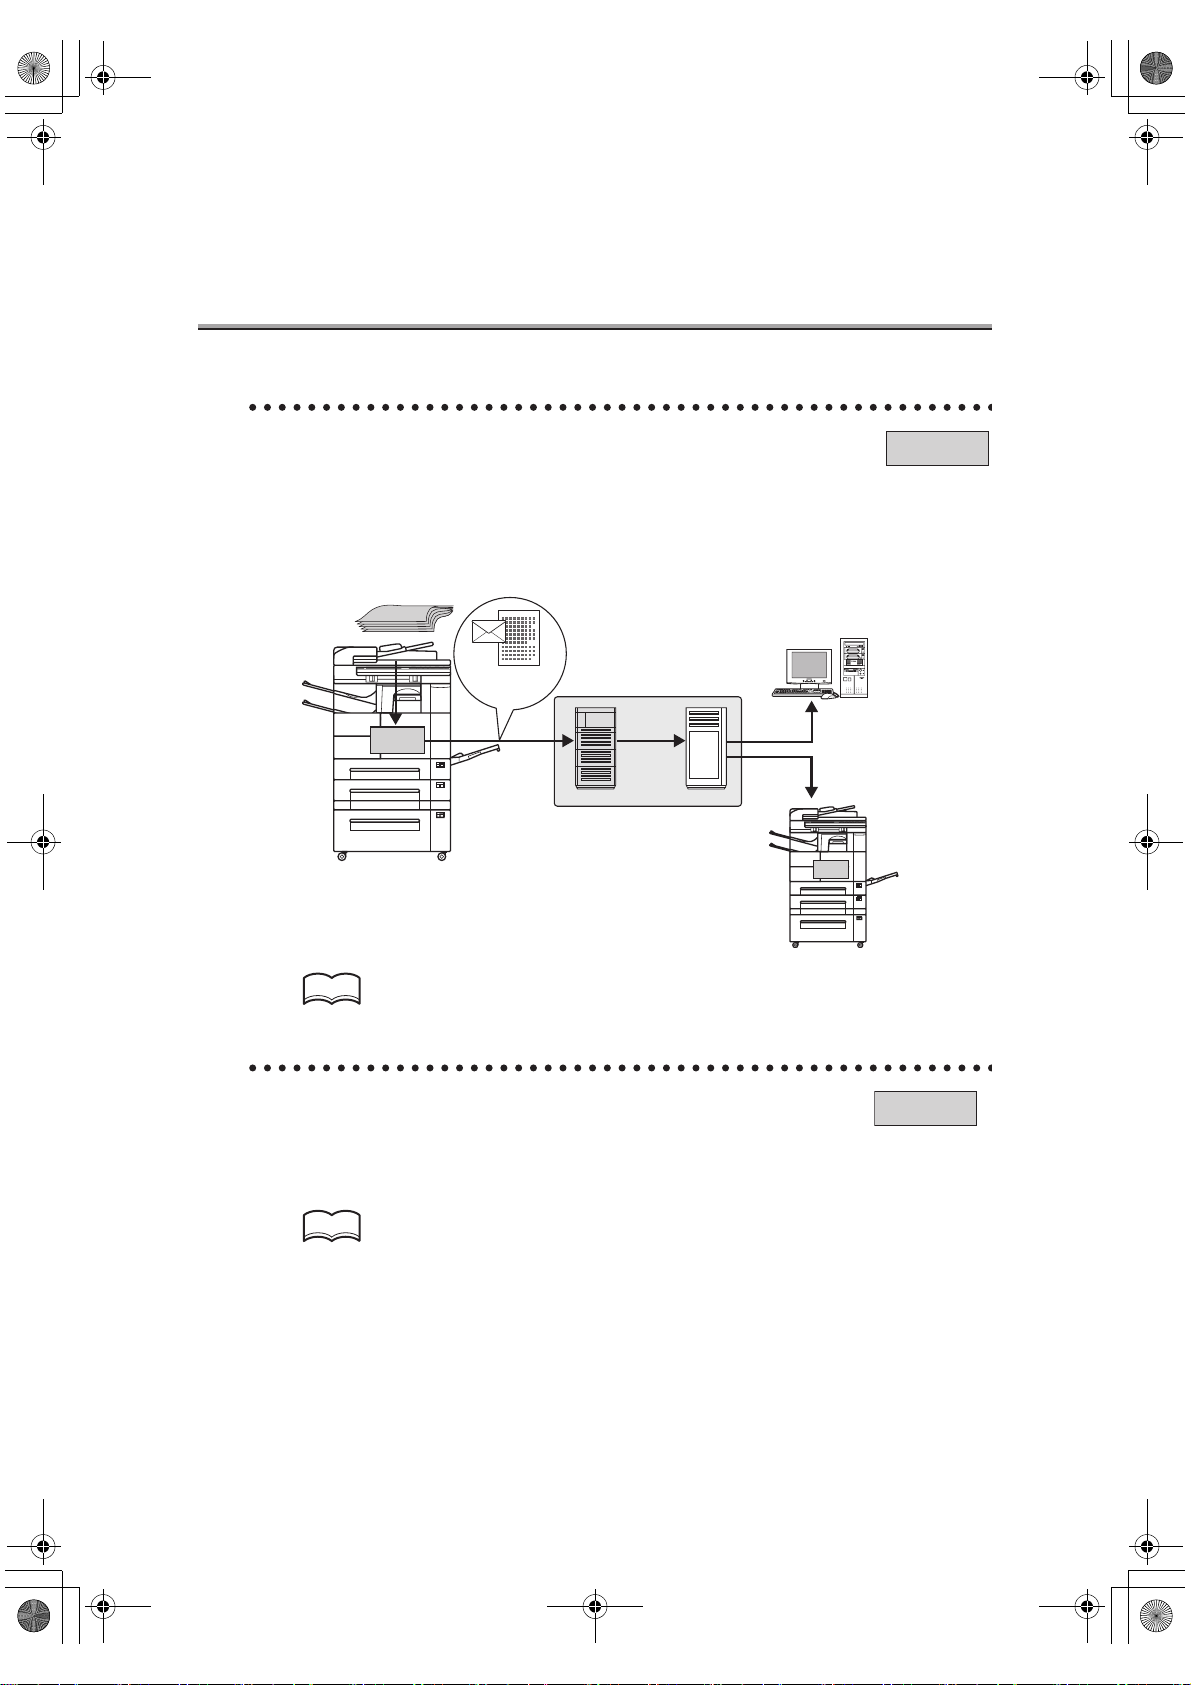
11. Place the original on the machine.
HINT
For detail, see "Placing the Original on the Machine" (p. 2-17).
12.Press [START].
HINT
If the document cannot be transmitted, see p. 4-2.
Simple Internet
Fax Transmission
Transmitting Documents to
Internet Fax/Computer
Transmitting to Both
Conventional Fax and E-Mail
Placing the Original
on the Machine
Setting Transmission
Conditions
Method for Specifying
Addresses
Scanning
Canceling
Transmission
Confirming Reserved
Documents
Confirming
Communication Results
2-5
Page 56

S
000_fk103_int.book 6 ページ 2004年2月6日 金曜日 午後7時4分
Transmitting Documents to Internet Fax/Computer
With the Internet Fax, documents attached to E-mail (TIFF format) are transmitted to the Internet
Fax or computers through intranet (company internal network) or internet. Multiple mail
addresses can be selected to send the documents. (Up to 400 registered mail addresses and up
to 5 addresses for manual entering, 405 in total can be specified.)
DETAIL
Even though "----" is marked on the transmission result screen or in the space for the result
of Communication Journal, the E-mail may not arrive at the receiver due to a trouble on the
internet. The "----" mark on the transmission result screen or Communication Journal signifies that the transmission has successfully reached your server. When Message Disposition
Notification (MDN) is received, "OK" is marked in the space for the Transmit result screen or
Communication Journal. When sending or receiving important information, confirm the
result.
1. Press [FAX] on the control panel to open the FAX Basic
screen.
2. Press ORIGINAL MODE.
3. Press Internet FAX Tx setting.
2-6
Page 57

000_fk103_int.book 7 ページ 2004年2月6日 金曜日 午後7時4分
Transmitting Documents to Internet Fax/Computer - (continued)
4. Select Compress Type and Paper sizes according to the
reception ability of the remote station and press OK.
When you purchase this machine, it has been set up as follows:
• Compress Type: MH
• Paper size: A4
5. Set the items on the FAX Basic screen as required and press
OK.
Simple Internet
Fax Transmission
Transmitting Documents to
Internet Fax/Computer
Transmitting to Both
Conventional Fax and E-Mail
Placing the Original
on the Machine
Setting Transmission
Conditions
Method for Specifying
Addresses
Scanning
Canceling
Transmission
Confirming Reserved
Documents
Confirming
Communication Results
HINT
For the ORIGINAL MODE on the FAX Basic screen, see p. 2-23.
2-7
Page 58

S
000_fk103_int.book 8 ページ 2004年2月6日 金曜日 午後7時4分
Transmitting Documents to Internet Fax/Computer - (continued)
6. Set the items as required on the Application screen.
HINT
See p. 11-2 for details of the Application screen.
7. Press Internet Fax.
8. Specify the mail address of the remote station.
DETAIL
All the mail addresses are specified as "to". CC and BCC functions are not available.
HINT
See p. 2-27 for the mail addresses specifying method.
9. Press Subject/Msg. Body.
2-8
Page 59

S
S
000_fk103_int.book 9 ページ 2004年2月6日 金曜日 午後7時4分
Transmitting Documents to Internet Fax/Computer - (continued)
10.Specify the subject of the mail.
When specifying the subject, you can select one from registered subjects or enter a
subject directly.
To select from registered subjects:
(1) Press Subject list.
(2) Select a desired subject with or and press SELECT.
DETAIL
• Initial value is indicated with a * mark.
• To display the next or previous screen, press the or .
• By pressing BACK, the previous screen appears.
To enter the subject directly:
(1) Press Subject.
Data Input screen is displayed.
(2) Press the characters to enter the subject and press OK.
Simple Internet
Fax Transmission
Transmitting Documents to
Internet Fax/Computer
Transmitting to Both
Conventional Fax and E-Mail
Placing the Original
on the Machine
Setting Transmission
Conditions
Method for Specifying
Addresses
Scanning
Canceling
Transmission
Confirming Reserved
Documents
Confirming
Communication Results
DETAIL
Up to 63 characters can be entered.
HINT
For character entering method, see p. Appendix-3.
2-9
Page 60

S
S
000_fk103_int.book 10 ページ 2004年2月6日 金曜日 午後7時4分
Transmitting Documents to Internet Fax/Computer - (continued)
11. Specify the message of the mail.
To specify the message, you can select one from registered messages or enter a message manually.
To select from registered messages:
(1) Press Msg. Body list.
(2) Select a desired message with or and press SELECT.
DETAIL
Default value is indicated with a * mark.
•
• To display the next or previous screen, press the or .
• By pressing BACK, the previous screen appears.
To enter the message manually:
(1) Press Msg.Body.
Data Input screen is displayed.
(2) Use the characters to enter the message and press OK.
DETAIL
Up to 254 characters can be entered.
HINT
For information about entering characters, see p. Appendix-3.
2-10
Page 61

S
000_fk103_int.book 11 ページ 2004年2月6日 金曜日 午後7時4分
Transmitting Documents to Internet Fax/Computer - (continued)
12.Place the original on the machine.
HINT
For detail, see "Placing the Original on the Machine" (p. 2-17).
13.Press [START].
DETAIL
Simple Internet
Fax Transmission
Transmitting Documents to
Internet Fax/Computer
Transmitting to Both
Conventional Fax and E-Mail
Placing the Original
on the Machine
Setting Transmission
Conditions
Method for Specifying
Addresses
Scanning
Canceling
Transmission
Confirming Reserved
Documents
Confirming
Communication Results
• If a message cannot be correctly transmitted to the server, a Transmit report is printed.
See p. 16-36 for the Transmit report.
• File name of the attached file is "i-FAXnnnn.tif". (nnnn is a transmission No.)
• When binary division has been set for the network E-mail (SMTP setting), attached files
are divided and transmitted according to the size setting. Refer to "User’s Guide (Network/
Scanner Operations)" for details.
• When the SMTP server capacity has been set for the network E-mail transmission (SMTP
setting) and the set size is exceeded, an error results and the mail cannot be transmitted.
• Refer to "User’s Guide (Network/Scanner Operations)" for details.
• To stop transmission, press STOP.
HINT
If the document cannot be transmitted, see p. 4-2.
2-11
Page 62

S
000_fk103_int.book 12 ページ 2004年2月6日 金曜日 午後7時4分
Transmitting to Both Conventional Fax and E-Mail
Documents can be transmitted simultaneously to general Fax and Internet Fax/computer.
A scanned document is transmitted to general Fax by G3 and to the Internet Fax and computers
as a file attached to E-mail. It can be transmitted to 600 general Fax addresses and 405 Internet
Fax addresses, 1050 addresses in total.
DETAIL
Even though "----" is marked on the transmission result screen or in the space for the result
of Communication Journal, the E-mail may not arrive at the receiver due to a trouble on the
internet. The "----" mark on the transmission result screen or Communication Journal signifies that the transmission has successfully reached your server. When Message Disposition
Notification (MDN) is received, "OK" is marked in the space for the Transmit result screen or
Communication Journal. When sending or receiving important information, confirm the
result.
1. Press [FAX] on the control panel to open the FAX Basic
screen.
2. Press ORIGINAL MODE.
3. Press Internet FAX Tx setting.
2-12
Page 63

000_fk103_int.book 13 ページ 2004年2月6日 金曜日 午後7時4分
Transmitting to Both Conventional Fax and E-Mail - (continued)
4. Select Compress Type and Paper sizes according to the
reception ability of the remote station and press OK.
When you purchase this machine, it has been set up as follows:
• Compress Type: MH
• Paper size: A4
5. Set the items on the FAX Basic screen as required and press
OK.
Simple Internet
Fax Transmission
Transmitting Documents to
Internet Fax/Computer
Transmitting to Both
Conventional Fax and E-Mail
Placing the Original
on the Machine
Setting Transmission
Conditions
Method for Specifying
Addresses
Scanning
Canceling
Transmission
Confirming Reserved
Documents
Confirming
Communication Results
HINT
For the ORIGINAL MODE on the FAX Basic screen, see p. 2-23.
2-13
Page 64

000_fk103_int.book 14 ページ 2004年2月6日 金曜日 午後7時4分
Transmitting to Both Conventional Fax and E-Mail - (continued)
6. Set the items as required on the Application screen.
HINT
For details of the Application screen, see p. 11-2.
7. Press Internet Fax.
8. Specify the mail address of the remote station such as the
Internet Fax or computer.
HINT
For the mail address specifying method, see p. 2-27.
2-14
Page 65

000_fk103_int.book 15 ページ 2004年2月6日 金曜日 午後7時4分
Transmitting to Both Conventional Fax and E-Mail - (continued)
9. Press Subject/Msg.Body.
10.Specify the subject of the mail.
HINT
For information about entering the subjects, see p. 2-9.
11. Specify the message of the mail.
HINT
For information about entering the body, see p. 2-10.
Simple Internet
Fax Transmission
Transmitting Documents to
Internet Fax/Computer
Transmitting to Both
Conventional Fax and E-Mail
Placing the Original
on the Machine
Setting Transmission
Conditions
Method for Specifying
Addresses
Scanning
Canceling
Transmission
Confirming Reserved
Documents
Confirming
Communication Results
12.Specify general Fax addresses.
HINT
See p. 6-14 for information about entering the fax address.
13.Place the original on the machine.
HINT
For details, see "Placing the Original on the Machine" (p. 2-17).
2-15
Page 66

S
000_fk103_int.book 16 ページ 2004年2月6日 金曜日 午後7時4分
Transmitting to Both Conventional Fax and E-Mail - (continued)
14.Press [START].
Scanning of the original is started. The scanned document is transmitted to the Internet
Fax and computers as a file attached to E-mail and to general Fax by G3.
DETAIL
If a message cannot be correctly transmitted to the server, a Transmit report is printed.
•
See p. 16-36 for the Transmit report is printed.
• File name of the attached file is "i-FAXnnnn.tif". (nnnn is a transmission No.)
• When binary division has been set for the network E-mail transmission (SMTP setting),
attached files are divided and transmitted according to the size setting.
• When the SMTP server capacity has been set for the network E-mail transmission (SMTP
setting) and the set size is exceeded, an error results and the mail cannot be transmitted.
Refer to "User’s Guide (Network/Scanner Operations) for details.
• To stop transmission, press STOP.
HINT
If the document cannot be transmitted during emailing, see p. 4-2. If the document cannot be
transmitted during conventional faxing, see p. 8-2.
2-16
Page 67

S
000_fk103_int.book 17 ページ 2004年2月6日 金曜日 午後7時4分
Placing the Original on the Machine
The RADF and platen glass can be used to scan originals with this machine. When an original is
placed in the RADF, the original is automatically fed through the RADF and scanned.
Using the RADF
When using the RADF, multiple originals can be scanned automatically. In addition, two-sided
originals can be sent.
1. Close the RADF.
2. Align the originals starting with the first page.
3. Place the originals in the RADF with the side to be scanned
facing up.
4. Adjust paper guides.
Simple Internet
Fax Transmission
Transmitting Documents to
Internet Fax/Computer
Transmitting to Both
Conventional Fax and E-Mail
Placing the Original
on the Machine
Setting Transmission
Conditions
Method for Specifying
Addresses
Scanning
Canceling
Transmission
Confirming Reserved
Documents
Confirming
Communication Results
DETAIL
In Mixed original mode, extend the paper guides to fit the largest paper size, and place the
remaining originals aligned in the top left corner.
2-17
Page 68

000_fk103_int.book 18 ページ 2004年2月6日 金曜日 午後7時4分
Placing the Original on the Machine - (continued)
Placing Originals on the Platen Glass
Use the platen glass for originals that cannot be placed in the RADF (such as a book or thick/
thin originals).
1. Open the RADF.
2. Place the original FACE DOWN in the left rear corner, align-
ing the edge with the left measuring guide.
3. Gently close the RADF.
2-18
Page 69

000_fk103_int.book 19 ページ 2004年2月6日 金曜日 午後7時4分
Placing the Original on the Machine - (continued)
Sending Multiple Originals from the Platen Glass
Originals that cannot be sent with the RADF can be sent by using the platen glass. In this
case, originals are sent by memory transmission.
1. If the FAX Basic screen is not displayed, press [FAX] on the
control panel to open the FAX Basic screen.
2. Select a remote station.
3. Set the desired functions as necessary.
4. Place the original on the platen glass and press STORE then
press [START].
Simple Internet
Fax Transmission
Transmitting Documents to
Internet Fax/Computer
Transmitting to Both
Conventional Fax and E-Mail
Placing the Original
on the Machine
Setting Transmission
Conditions
Method for Specifying
Addresses
Scanning
Canceling
Transmission
Confirming Reserved
Documents
Confirming
Communication Results
5. Place the next original on the platen glass and press
[START].
Repeat this procedure until all originals to be sent have been scanned.
The scanned originals are stored in memory.
2-19
Page 70

S
000_fk103_int.book 20 ページ 2004年2月6日 金曜日 午後7時4分
Placing the Original on the Machine - (continued)
6. Press STORE to reset the store mode and press [START].
Transmission begins.
DETAIL
Should Memory overflow occur when the original document is being scanned, you have two
options: Transmit the part of the original that has been read (scanned), or redo the procedure
from the beginning. If memory overflow happens frequently, install additional the memory.
For details, call your service representative.
2-20
Page 71

S
000_fk103_int.book 21 ページ 2004年2月6日 金曜日 午後7時4分
Placing the Original on the Machine - (continued)
Transmitting Originals by Using both the RADF and the Platen
Glass
You can scan originals by using both the RADF and the platen glass and you can also scan
the large amounts of originals by placing them on the RADF in several times. In such cases,
memory transmission will automatically be used.
1. If the FAX Basic screen is not displayed, press [FAX] on the
control panel to open the FAX Basic screen.
2. Select a remote station.
3. Set the desired functions as necessary.
4. Place the original on the RADF or the platen glass and press
STORE then press [START].
Simple Internet
Fax Transmission
Transmitting Documents to
Internet Fax/Computer
Transmitting to Both
Conventional Fax and E-Mail
Placing the Original
on the Machine
Setting Transmission
Conditions
Method for Specifying
Addresses
Scanning
Canceling
Transmission
Confirming Reserved
Documents
Confirming
Communication Results
DETAIL
Documents placed on the RADF take precedence over those on the platen glass.
5. Place the next original on the RADF or the platen glass and
press [START].
Repeat this procedure until all originals to be sent have been scanned.
The scanned originals are stored in memory.
2-21
Page 72

000_fk103_int.book 22 ページ 2004年2月6日 金曜日 午後7時4分
Placing the Original on the Machine - (continued)
6. Press STORE to reset the store mode and then press
[START].
Transmission begins.
2-22
Page 73

000_fk103_int.book 23 ページ 2004年2月6日 金曜日 午後7時4分
Setting Transmission Conditions
Quality, Density, RADF, Resolution, and Verification Stamp are displayed when ORIGINAL
MODE is pressed on the FAX Basic screen. These can be used to set transmission conditions
according to the type of original to be sent.
1. Press ORIGINAL MODE on the FAX Basic screen.
2. Press the key desired to be set.
HINT
Default values can be changed. For detail, see "FAX Screen Set" (p. 15-15).
Quality
Set Quality according to the contents of the original. There are three types of Quality settings. Text is initial value at the time of purchase.
• Photo ........................................Press this when scanning originals containing photo-
graphs only.
• Text ...........................................Press this when scanning originals containing text only.
• Text/Photo ................................Press this when scanning originals containing both text
and photographs.
Simple Internet
Fax Transmission
Transmitting Documents to
Internet Fax/Computer
Transmitting to Both
Conventional Fax and E-Mail
Placing the Original
on the Machine
Setting Transmission
Conditions
Method for Specifying
Addresses
Scanning
Canceling
Transmission
Confirming Reserved
Documents
Confirming
Communication Results
Density
Set Density according to the lightness or darkness of the original. There are four types of
Density settings. Auto is set at the time of purchase.
• LIGHTER...................................Press to scan originals so that they are lighter than the
density detected with Auto.
• NORMAL...................................Press to scan originals at a density that is between
DARKER and LIGHTER.
• DARKER ...................................Press to scan originals so that they are darker than the
density detected with Auto.
• Auto ..........................................This activates the automatic density adjustment function
so that density is automatically detected on the originally and set according to the detection.
2-23
Page 74

S
S
000_fk103_int.book 24 ページ 2004年2月6日 金曜日 午後7時4分
Setting Transmission Conditions - (continued)
DETAIL
This setting activates the automatic density adjustment function so that originals are
scanned at the detected density. Press LIGHTER or DARKER to select density that is lighter
or darker than density selected in Auto mode.
RADF
This is used to set the manner in which originals are scanned according to the type of original.
There are three types of RADF scanning methods. One sided is set at the time of purchase.
• Cover + 2 sided........................Press this when scanning two-sided originals having a
cover. Only the first page (cover) is scanned as a onesided document.
• Two sided .................................Press this when scanning two-sided originals.
• One sided .................................Press this when scanning one-sided originals.
Resolution
This is used to set the fineness at which originals are to be scanned. The following three settings are available for Resolution. Fine is set at the time of purchase.
• S-Fine .......................................Press this when scanning originals containing espe-
cially fine graphics or text.
• Fine ...........................................Press this when scanning originals containing small
graphics or text.
• Normal ......................................Press this when scanning normal originals.
DETAIL
As originals are scanned with increasing fineness, the amount of data that is sent also
•
increases, and more time is required for transmission.
• [S-Fine] cannot be selected when broadcasting to multiple addresses.
• When [S-Fine] is selected but the remote station has no function to receive the mail in the
[S-Fine] mode, the mail is not correctly printed on the remote station. If the reception
capability of the remote station is not known, select [Fine] or [Normal].
2-24
Page 75

S
000_fk103_int.book 25 ページ 2004年2月6日 金曜日 午後7時4分
Setting Transmission Conditions - (continued)
Verification Stamp
When transmitting a fax via the RADF, a stamp can be affixed to the pages of the document
that have already been scanned, allowing you to confirm that these pages have been
scanned. The stamp is a pink circle, 3mm in diameter and affixed at the rear edge on the front
side of the original document. When both sides of a sheet are transmitted, the stamp is affixed
on the front side.
Front surface of
original document
Original document
transmitting direction
Stamp position
DETAIL
The stamp ink must be replaced when it runs out. When color of the verification stamp
•
becomes light, contact your service representative for a replacement.
• When mixed original mode is selected, no stamp may be affixed to the above position.
• Even though the Verification Stamp function has been set, no Verification Stamp is put
though the document is transmitted through multi-feeding. In such a case, transmit the
document again.
• Check if the document was correctly transmitted by the Transmission Report or Transmit
Result of the CHECK MODE.
• For detail about replacing the stamp, refer to "Replacing the Stamp" (p. Appendix-5).
Simple Internet
Fax Transmission
Transmitting Documents to
Internet Fax/Computer
Transmitting to Both
Conventional Fax and E-Mail
Placing the Original
on the Machine
Setting Transmission
Conditions
Method for Specifying
Addresses
Scanning
Canceling
Transmission
Confirming Reserved
Documents
Confirming
Communication Results
2-25
Page 76

S
000_fk103_int.book 26 ページ 2004年2月6日 金曜日 午後7時4分
Setting Transmission Conditions - (continued)
Confirming Settings and Communication Results
The settings and communication results of the FAX Basic screen and FAX Application screen
can be confirmed by using [CHECK] on the control panel.
1. Press [CHECK] on the control panel.
2. Press Setting conf.
3. Confirm the settings.
DETAIL
• Press BACK to go back to the previous screen.
• To go to the next screen, press .
4. Press BACK twice after completion of confirmation.
The FAX Basic screen will be restored.
2-26
Page 77

000_fk103_int.book 27 ページ 2004年2月6日 金曜日 午後7時4分
Method for Specifying Addresses
Mail address can be specified either by selecting one from registered addresses or entering a
mail address manually. You can also specify multiple mail addresses for multi-station transmission.
Specifying only One Mail Address
Selecting from Registered Addresses
1. Press Address select.
2. Press a key of Character to search (A- - No.etc).
3. Press a key of address name for transmission.
Simple Internet
Fax Transmission
Transmitting Documents to
Internet Fax/Computer
Transmitting to Both
Conventional Fax and E-Mail
Placing the Original
on the Machine
Setting Transmission
Conditions
Method for Specifying
Addresses
Scanning
Canceling
Transmission
Confirming Reserved
Documents
Confirming
Communication Results
2-27
Page 78

S
000_fk103_int.book 28 ページ 2004年2月6日 金曜日 午後7時4分
Method for Specifying Addresses - (continued)
Entering Mail Address
1. Press Enter address.
Data Input screen is displayed.
2. Enter the mail address by pressing the character keys and
press OK.
DETAIL
Up to 60 characters and symbols can be entered as the mail address.
HINT
For character entering method, see p. Appendix-3.
2-28
Page 79

S
000_fk103_int.book 29 ページ 2004年2月6日 金曜日 午後7時4分
Method for Specifying Addresses - (continued)
Specifying Multiple Mail Addresses
Multiple mail addresses can be selected to send the documents. Up to 400 registered mail
addresses when using registered mail address and up to 5 addresses for manual entering,
405 in total, can be specified.
Selecting from Registered Addresses
1. Press Address select.
2. Press A- trough No.etc to find the email address that you are
looking for.
3. Press a key of address name for transmission.
Simple Internet
Fax Transmission
Transmitting Documents to
Internet Fax/Computer
Transmitting to Both
Conventional Fax and E-Mail
Placing the Original
on the Machine
Setting Transmission
Conditions
Method for Specifying
Addresses
Scanning
Canceling
Transmission
Confirming Reserved
Documents
Confirming
Communication Results
4. Repeat the steps 2 and 3 until all of the addresses are speci-
fied.
DETAIL
Up to 400 addresses can be selected.
2-29
Page 80

S
000_fk103_int.book 30 ページ 2004年2月6日 金曜日 午後7時4分
Method for Specifying Addresses - (continued)
Entering Mail Address
1. Press Enter address.
Data Input screen is displayed.
2. Enter the mail address by pressing the character keys and
press OK.
DETAIL
Up to 60 characters and symbols can be entered as the mail address.
HINT
For character entering method, see p. Appendix-3.
3. Press Add and repeat the step 1 and step 2.
Repeat this step until all of the addresses are specified.
HINT
Up to 5 addresses can be entered.
2-30
Page 81

S
000_fk103_int.book 31 ページ 2004年2月6日 金曜日 午後7時4分
Scanning
When Original Size Cannot be Detected
If the size of the original cannot be detected, the following screen is displayed. Set the original
size when this screen is displayed.
1. Press the original size key.
2. Press OK.
When Memory Capacity is Exceeded
Using memory transmission, if a large number of pages are sent of if the images on the
originals are especially detailed, memory capacity may be exceeded due to the amount of
data attempting to be stored in memory. When this happens, decrease the number of
pages of the documents transmitted at one time or increase the memory.
Simple Internet
Fax Transmission
Transmitting Documents to
Internet Fax/Computer
Transmitting to Both
Conventional Fax and E-Mail
Placing the Original
on the Machine
Setting Transmission
Conditions
Method for Specifying
Addresses
Scanning
Canceling
Transmission
Confirming Reserved
Documents
Confirming
Communication Results
DETAIL
Contact your service representative about increasing of memory.
2-31
Page 82

S
000_fk103_int.book 32 ページ 2004年2月6日 金曜日 午後7時4分
Canceling Transmission
With the FK-103, transmission instructions and images stored in memory are referred to as
reserved jobs. Jobs reserved for communication and jobs currently being processed are simultaneously displayed on the JOB LIST screen.
1. Press JOB LIST on the FAX Basic screen.
2. Press or to select the reserved document desired to
be canceled.
DETAIL
JOB LIST Screen
• Jobs currently in progress are simultaneously displayed on the JOB LIST screen.
• Pressing BACK returns the display to the FAX Basic screen.
• Press or to display the next or previous screen.
3. Press DELETE.
4. Press YES on the Job delete confirmation screen.
The reservation document is deleted.
5. Press BACK key.
The display returns to the FAX Basic screen.
2-32
Page 83

S
000_fk103_int.book 33 ページ 2004年2月6日 金曜日 午後7時4分
Confirming Reserved Documents
Transmission reservation documents stored in memory can be confirmed on the job list screen.
1. Press JOB LIST on the FAX Basic screen.
2. Press BACK when confirmation is completed.
The display returns to the FAX Basic screen.
Simple Internet
Fax Transmission
Transmitting Documents to
Internet Fax/Computer
Transmitting to Both
Conventional Fax and E-Mail
Placing the Original
on the Machine
Setting Transmission
Conditions
Method for Specifying
Addresses
Scanning
Canceling
Transmission
Confirming Reserved
Documents
Confirming
Communication Results
DETAIL
•
Jobs currently in progress are simultaneously displayed on the JOB LIST screen.
• Press or to display the next or previous screen.
• Press DETAIL to display detailed information on the job.
• Remaining capacity of the hard disk is indicated on the right above the Job List screen.
2-33
Page 84

000_fk103_int.book 34 ページ 2004年2月6日 金曜日 午後7時4分
Confirming Communication Results
The communication results of the FAX Basic screen and FAX Application screen can be confirmed by using the Check button on the control panel.
1. Press [Check] on the control panel.
2. Press Transmit result or Receipt result.
3. Confirm the results.
• Messages of Internet Fax communication are prefixed by "i".
• Time: The date and hour when the transmission or reception is performed.
• Remote name: The name of the remote station registered with the abbreviated dial or the
telephone number of the destination.
• Remote ID: Mail address is the FAX ID of the remote station.
• Page: The number of pages being transmitted/received.
• Result: OK.........The transmission/reception was successful.
S-OK .....The transmission/reception is canceled.
2-34
Page 85

S
000_fk103_int.book 35 ページ 2004年2月6日 金曜日 午後7時4分
Confirming Communication Results - (continued)
TEL .......A call from an external telephone.
---- .........MDN result response has not been transmitted.
NG.........Transmission was not correctly completed.
DETAIL
The mark "----" indicated on the transmit result screen in the Internet Fax mode denotes that
the message was transmitted to your server. "OK" indicates that the MDN result response
was received.
4. Press BACK twice after completion of confirmation.
The FAX Basic screen will be restored.
Simple Internet
Fax Transmission
Transmitting Documents to
Internet Fax/Computer
Transmitting to Both
Conventional Fax and E-Mail
Placing the Original
on the Machine
Setting Transmission
Conditions
Method for Specifying
Addresses
Scanning
Canceling
Transmission
Confirming Reserved
Documents
Confirming
Communication Results
2-35
Page 86

000_fk103_int.book 36 ページ 2004年2月6日 金曜日 午後7時4分
Page 87

000_fk103_int.book 1 ページ 2004年2月6日 金曜日 午後7時4分
Chapter
Receiving Documents via
3
Internet Fax
Receiving Documents via Internet Fax .......................................3-2
Receiving Documents
via Internet Fax
Page 88

S
S
000_fk103_int.book 2 ページ 2004年2月6日 金曜日 午後7時4分
Receiving Documents via Internet Fax
E-mail can be received either automatically or manually. When this machine receives E-mail, the
mail message and attached file are automatically printed.
DETAIL
E-mail received is printed by the same method as received Fax documents. For details,
•
see "Chapter 7 Reception".
• An attached file up to 1000 pages and a message of 20 KBytes at the maximum can be
received.
• E-mail attached with multiple files up to 255 can be received.
• When the “OFF mode print set”
printed with the power OFF as in the Fax documents.
*1
The setting of the OFF mode print set is available only when the fax kit is being
connected.
Automatic Reception
E-mails are automatically received at a fixed interval from the POP server.
*1
is set to YES, E-mail received during the night time is
DETAIL
• Mail reception interval can be changed in the range of 1 to 60 minutes. Refer to "User’s
Guide (Network/Scanner Operations)" for the setting method.
• This interval has been set to 15 minutes when you purchase the machine.
Manual Reception
E-mail can be manually received from the POP server.
1. Press Internet Fax and then press Receive E-Mail on the
screen displayed.
3-2
Page 89

000_fk103_int.book 1 ページ 2004年2月6日 金曜日 午後7時4分
Chapter
Troubleshooting for
4
Internet Fax
Cannot Send Message ...............................................................4-2
Cannot Receive Message...........................................................4-3
Call for Service............................................................................4-4
Cannot Send
Message
Cannot Receive
Message
Call for Service
Page 90

S
000_fk103_int.book 2 ページ 2004年2月6日 金曜日 午後7時4分
Cannot Send Message
When the E-mail cannot be sent, correct the trouble by referring to the table below. If the mail
cannot still be transmitted after the corrective procedures, contact your service representative.
HINT
• When the E-mail cannot be transmitted, Transmit report is printed. For details, see p. 16-
36.
• When an N-XX form error code (network error code) is indicated, refer to "User’s Guide
(Network/Scanner Operations)".
• For the troubles such as document jam, paper jam, inferior image quality, exhausted
toner, etc., refer to "User’s Guide (Copy Operations)".
Check Point Correction
When SMTP server has been set up and the set size is
Does the E-mail capacity to be transmitted exceed the SMTP server
capacity?
Is the transmission procedure correct?
Are the setting and connection of the
network correct?
Is the copier mail address setting correct?
exceeded, an error results and the E-mail cannot be
transmitted. Refer to "User’s Guide (Network/scanner
Operations)" for the SMTP server capacity setting
method.
Check the transmission procedure and transmit again.
See p. 2-6 for the transmission procedure.
Check the network for correct setting and connection.
Refer to "User’s Guide (Network/Scanner Operations)"
for the network setting method.
Set the copier mail address. See "User’s Guide (Copy
Operations)" for the copier mail address setting method.
4-2
DETAIL
Even though "----" is marked on the transmission result screen or in the space for the result
of Communication Journal, the E-mail may not arrive at the receiver due to a trouble on the
internet. The "----" mark on the transmission result screen or Communication Journal signifies that the transmission has successfully reached your server. When Message Disposition
Notification (MDN) is received, "OK" is marked in the space for the Transmit result screen or
Communication Journal. When sending or receiving important information, confirm the
result.
Page 91

000_fk103_int.book 3 ページ 2004年2月6日 金曜日 午後7時4分
Cannot Receive Message
When the E-mail cannot be received, correct the trouble by referring to the table below. If the mail
cannot still be received after the corrective procedures, contact your service representative.
HINT
• When an E-mail of file format which cannot be printed or an E-mail of too large capacity is
received, Internet FAX Rx Error Report is printed. For details of the report, see p. 16-39.
• When an N-XX form error code (network error code) is indicated, refer to "User’s Guide
(Network/Scanner Operations)".
• For the troubles such as document jam, paper jam, inferior image quality, exhausted
toner, etc., refer to "User’s Guide (Copy Operations)".
Check Point Correction
When attached files of any format other than TIFF-F are
received, they cannot be printed.
Is the attached file of the TIFF-F format?
Is the memory or hard disc capacity
sufficient?
Check the file format.
If FIL-ER, DC-ER, F-OVER or O-OVER is indicated in
the space of report result, the attached file is a file of a
format which cannot be printed with this machine. For
details, see p. 16-39.
Check the remaining memory and hard disc capacity.
If the remaining capacity is insufficient, E-mail may not
be received, or may not be printed even when received.
Cannot Send
Message
Cannot Receive
Message
Call for Service
4-3
Page 92

000_fk103_int.book 4 ページ 2004年2月6日 金曜日 午後7時4分
Call for Service
The call for service screen displays when it is necessary for you to contact your service representative. The call for service screen contains the telephone number and FAX number of your service
representative. This page shows the procedure for reporting an Internet Fax function problem to
your service representative by phone.
The report
code number
used to locate
the cause of
the trouble
Service rep
telephone number
Service rep
FAX n umber
CAUTION
To prevent the risk of serious accident, perform the following when the above
screen is displayed and the facsimile is no longer able to operate.
1. Write down the report code number in the second line of the message.
2. Turn off the auxiliary power switch and main power switch.
3. Disconnect the power cord from the outlet.
4. Contact your service representative and inform the representative of the
report code number.
4-4
Page 93

000_fk103_int.book 1 ページ 2004年2月6日 金曜日 午後7時4分
Basics for FAX
Page 94

000_fk103_int.book 2 ページ 2004年2月6日 金曜日 午後7時4分
Page 95

000_fk103_int.book 1 ページ 2004年2月6日 金曜日 午後7時4分
Chapter
Before Use
5
Use of Control Panel...................................................................5-2
First-Use Settings........................................................................5-4
Useful Functions .........................................................................5-5
FAX Basic Screen .....................................................................5-11
Use of Control
Panel
First-Use
Settings
Useful
Functions
FAX Basic
Screen
Page 96

000_fk103_int.book 2 ページ 2004年2月6日 金曜日 午後7時4分
Use of Control Panel
Control Panel
1 45678 923
23
22
21
20
10
11
12
13
1819
17 16
15
14
No. Name Description
Touch Panel
1
(LCD Panel)
2 CHECK Button
These screens specify destinations and enable users to configure
settings. Messages that show the status of the machine are also displayed here.
Displays the setting confirmation menu and displays the machine settings.
3 HELP Button Displays the help menu.
4 DATA Light
Lights up when facsimile-transmitted/received data or report data is
present in the memory: blinks when print data is being processed.
5 PRINT Button/Light Switches the machine operation mode to printer mode.
SCAN/SERVER
6
Button/Light
Switches the machine operation mode to scanner mode.
7 FAX Button/Light Switches the machine operation mode to facsimile mode.
8 COPY Button/Light Switches the machine operation mode to copy mode.
POWER SAVER
9
ON/OFF Button
INTERRUPT
10
Button
PROOF COPY
11
Button
12 STOP Button
Press to activate the Low power/Auto shut off mode.
Turns on when this mode is functioning.
Upon completion of reading a FAX original, the Copy Basic screen
will appear, indicating that the interrupt mode has been entered.
Not used for facsimile functions.
Stops an operation or cancels a setting when entering of a telephone
number or parameter setting.
13 START Button/Light Starts facsimile communication.
5-2
Page 97

000_fk103_int.book 3 ページ 2004年2月6日 金曜日 午後7時4分
No. Name Description
Transmits a "#" sign. Also used to switch the pulse dial line to the
14 # Button
push-button tone. (A "T" is displayed on the screen in push-button
tone mode).
15 CLEAR Button
Cancels a setting during entry of a telephone number or parameter
setting.
16 Key Pad Enters telephone numbers, passwords, etc.
Transmits an asterisk "*".
17 * Button
Also used to switch the pulse dial line to the push-button tone. (A "T"
is displayed on the screen in push-button tone mode).
AUTO RESET
18
Button
Returns all settings to their initial values.
19 JOB MEMORY Not used for facsimile functions.
MAIN POWER
20
Lamp
Contrast
21
Adjustment Dial
22 Counter Key
Lights up when the main power switch is turned ON.
Used to adjust the contrast of the touch panel (LCD).
Used for counting the copies, fax transmissions, receipts and scans.
Effective in Copy mode.
23 Power Switch Turns copier power On / Off when pressed.
Use of Control Panel - (continued)
Use of Control
Panel
First-Use
Settings
Useful
Functions
FAX Basic
Screen
5-3
Page 98

000_fk103_int.book 4 ページ 2004年2月6日 金曜日 午後7時4分
First-Use Settings
Must-Set Items
After installation, you must set the following items to use the facsimile functions. You will not be
able to execute the FAX communication if these items are not set properly.
• FAX ID/Sender Name
Registers the FAX number and name of this facsimile.
• Line parameter setting
Sets the telephone line and the receiving method.
See p. 1-7 for the setting of the Internet Fax.
FAX ID/Sender Name
For detail, see "Setting FAX ID/Name" (p. 15-18).
FAX ID ............................................... Set the FAX number of this machine. The FAX ID is
a number of up to 20 digits. The ID can contain any
number between 0 and 9, the + symbol, and spaces.
Name ................................................. Set the name of this machine. The name is a string
of up to 30 characters. The name can contain any
alphanumeric character and symbols.
Line parameter set
For detail, see "Line Parameter Set" (p. 15-23).
Dialing method................................... Select between tone dialing line and pulse dial line
(PB, Pulse).
Receive mode.................................... Select between automatic reception and manual
reception.
Select "Auto Rx" for automatic reception. Select
"Manual Rx" if you often receive calls to an external
handset connected to this machine.
5-4
Page 99

000_fk103_int.book 5 ページ 2004年2月6日 金曜日 午後7時4分
Useful Functions
Assigning Abbreviated Dial numbers for destinations that you dial frequently allows you to search
the destination’s fax number by name, rather than dialing that number each time you call. Using
the Program Dial feature, you can dial these number by pressing one button.
Abbreviated Dial
This section describes the procedures for setting the FAX number, destination name, and
retrieval character of an Abbreviated Dial number.
1. Press [FAX] on the control panel to open the FAX Basic
screen if it is not already open.
2. Press ENTRY.
3. Press Entry/Edit in the Abbr dial section.
Use of Control
Panel
First-Use
Settings
Useful
Functions
FAX Basic
Screen
HINT
The abbreviated dialing list screen appears when List has been pressed. If abbreviated dial
numbers are already registered, you can press EDIT in that screen to edit the contents of the
list. For detail, see "Changing Set Abbreviated Dial Numbers" (p. 14-7).
5-5
Page 100

S
S
S
000_fk103_int.book 6 ページ 2004年2月6日 金曜日 午後7時4分
Useful Functions - (continued)
4. Enter the FAX number of the remote station with the key pad.
DETAIL
• Numbers containing up to 38 digits can be entered.
• An unspecified abbreviated dial number appears in the Abbr No. screen. Press
. and input a new abbreviated dial number with the key pad to specify the number.
No
• Press
DELETE, [CLEAR] or [STOP] to clear the whole entry.
Abbr
5. Enter the name of the abbreviated dial number as required.
HINT
For detail, see "Entering Names" (p. Appendix-3).
DETAIL
The name can be a string of up to 24 characters.
6. A name or comment that can be searched later is set auto-
matically if a name is entered at step 5.
If you want to change the name, register the name again.
Use the keys Common through No.etc as described in step 5.
7. Press ENTRY.
A subsequent unregistered number appears. To register the next abbreviated dial number with the number, go to step 4.
DETAIL
•
You can register Original setting or Advanced func. For detail, see "Setting Abbreviated
Dial Numbers" (p. 14-2).
• To stop registering the abbreviated dial number, press BACK.
5-6
 Loading...