

Page 1

Instruction manual
Part - Facsimile
FK-101
Instruction manual
Part - Facsimile
FK-101
Be sure read and study this instruction manual
before using the device and k eep it in the pocket
provided on a side panel of the device for the
convenience of reference later.
Page 2

Thank you purchasing Konica FK-101 (facsimile).
This instruction manual describes the operating procedures and safety pre-
cautions of the Konica FK-101 so that you can handle it safely and make
the best of its capabilities. Usually k eep this manual in the poc ket pro vided
on a side panel of the device for the convenience of reference later.
Page 3

CONTENTS
Chapter 1 Before Use
1.1 Use of Control Panel................................................................1-2
1.2 Types of Screens .....................................................................1-3
1.3 Wake-up Screen ......................................................................1-4
1.4 Fax Basic Screen.....................................................................1-5
1.5 Fax Application Screen............................................................1-6
1.6 Remote Station Registration Screen .......................................1-8
1.7 Other Screens..........................................................................1-9
Setting Confirmation Mode Screen ...................................................1-9
Help Screen ....................................................................................1-10
Call for Service screen ....................................................................1-11
Key Operator Mode Screen.............................................................1-12
Chapter 2 Transmission
2.1 Quick Memory Transmission and Memory Transmission.........2-2
Quick Memory Transmission .............................................................2-2
Memory T ransmission .......................................................................2-2
2.2 Simple Fax Transmission .........................................................2-3
2.3 Placing the Original on the Machine ........................................2-5
When Using the RADF: Place the side of the original to be scanned facing up ..
When Placing an Original on the Original Tray:
Place the side of the original to be scanned facing down .................2-5
2.4 Setting Transmission Conditions..............................................2-6
2.5 Selecting a Remote Station .....................................................2-8
Selecting only 1 remote station .........................................................2-8
Selecting Multiple Remote Stations
(Sequential Multiple Station Transmission) ......................2-12
Redialing .........................................................................................2-13
2.6 Operation During Original Scanning ......................................2-14
2-5
Use of
Control Panel
Types of
screens
Wake-up
Screen
Fax
Basic screen
Fax
Application
screen
Remote
Station
Registration
screen
Other screens
Memory
Transmission
Simple Fax
Transmission
Placing the
Original on
the Machine
Setting
Transmission
Conditions
Selecting a
Remote
Station
Operation
During
Original
Scanning
Sending
Multiple
Originals
Operation
During
Transmission
Reserving
Transmissions
Manual
Transmission
Interrupting
Transmission
Confirmation of
Transmission
Reservation
Documents
Confirming
Setting and
Communication
Results
Intercepted
Transfer of
Received
Documents
Resending
(Restored
transmission
Sender
Information
Reception
Mode
Manual
Reception
Forced
Memory
Reception
When Unable
to Receive
Reception
Information
Application
Functions
Registration
/Setup
Reports and
Lists
)
Troubleshooting
i
Appendix
Page 4

CONTENTS
2.7 Sending Multiple Originals from the Original Tray..................2-15
2.8 Operation During Transmission..............................................2-16
2.9 Reserving T ransmissions.......................................................2-17
2.10 Manual Transmission .............................................................2-19
2.11 Interrupting Transmission.......................................................2-21
2.12 Confirmation of Transmission Reservation Documents .........2-23
2.13 Confirming Settings and Communication Results .................2-24
When Original Size Cannot be Detected ........................................2-14
When Memory Capacity is Exceeded .............................................2-14
When Unable to Send .....................................................................2-16
Reserving T ransmissions ................................................................2-17
Bundled Transmission .....................................................................2-18
Interrupting Communication in Progress.........................................2-21
Canceling Reserved Jobs ...............................................................2-21
2.14
Intercepted Transfer of Received Documents Waiting for Output ....
2.15 Resending (Restored transmission) ......................................2-27
2.16 Sender Information ................................................................2-30
When Sender Information is Set to Inside Header..........................2-30
When Sender Information is Set to Outside Header.......................2-30
When Sender Information is set to [OFF]........................................2-30
Chapter 3 Reception
3.1 Reception Mode.......................................................................3-2
Auto Reception (Fax Only Mode) ......................................................3-2
Manual Reception (Telephone Only Mode) .......................................3-2
3.2 Manual Reception....................................................................3-3
3.3 Forced Memory Reception ......................................................3-4
3.4 When Unable to Receive ...........................................................3-4
3.5 Reception Information..............................................................3-5
Size Reduction and Page Division....................................................3-5
When Recording after Reducing 96%...............................................3-5
When Recording after Reducing .......................................................3-6
When [RTI] is set to [ON] ..................................................................3-7
When [2 sided reception] is set to [ON].............................................3-7
2-26
ii
Page 5

When [ 2 in 1 print] is set to [ON] ......................................................3-8
Received Original Printing Method....................................................3-8
Chapter 4 Application Functions
4.1 Application functions overview.................................................4-2
4.2 Memory Tx...............................................................................4-5
4.3 2 in 1 Tx ...................................................................................4-8
4.4 Book Tx..................................................................................4-11
4.5 Frame erase Tx......................................................................4-14
4.6 Original size set .....................................................................4-17
4.7 Total page set ........................................................................4-21
4.8 Mixed original.........................................................................4-25
4.9 Folded original .......................................................................4-28
4.10 Long original ..........................................................................4-31
4.11 Flip Side 2..............................................................................4-34
4.12 P olled Tx ................................................................................4-37
4.13 Polling Rx...............................................................................4-40
4.14 Timer Tx.................................................................................4-42
4.15 Int’l com .................................................................................4-46
4.16 ECM off..................................................................................4-49
4.17 Bulletin...................................................................................4-51
To write a document on a Bulletin board.........................................4-52
To print the document written on a Bulletin board...........................4-54
To delete the document written on a Bulletin board ........................4-56
To transmit by polling the document written on a Bulletin board .....4-57
To receive by polling the document written
on a Bulletin board of a remote station.....4-59
F-code .............................................................................................4-60
4.18 V34 OFF ................................................................................4-61
Use of
Control Panel
Types of
screens
Wake-up
Screen
Fax
Basic screen
Fax
Application
screen
Remote
Station
Registration
screen
Other screens
Memory
Transmission
Simple Fax
Transmission
Placing the
Original on
the Machine
Setting
Transmission
Conditions
Selecting a
Remote
Station
Operation
During
Original
Scanning
Sending
Multiple
Originals
Operation
During
Transmission
Reserving
Transmissions
Manual
Transmission
Interrupting
Transmission
Confirmation of
Transmission
Reservation
Documents
Confirming
Setting and
Communication
Results
Intercepted
Transfer of
Received
Documents
Resending
(Restored
transmission
Sender
Information
Reception
Mode
Manual
Reception
Forced
Memory
Reception
When Unable
to Receive
Reception
Information
)
4.19 Relay Tx Req .........................................................................4-63
4.20 Confiden.Tx ...........................................................................4-66
Perform the following procedure to execute Restricted access transmission ....
4-67
iii
Application
Functions
Registration
/Setup
Reports and
Lists
Troubleshooting
Appendix
Page 6

CONTENTS
Printing the document received in a Confidential box.....................4-69
Deleting the document held in a Confidential box...........................4-70
4.21 ID Tx ......................................................................................4-72
4.22 Compulsory mem.Rx .............................................................4-75
Deleting the document held in memory ..........................................4-76
4.23 One-touch/Program ...............................................................4-78
Chapter 5 Registration/Setup
5.1 Registering abbreviated dial numbers .....................................5-2
Registering abbreviated dial numbers...............................................5-3
Changing abbreviated dial numbers registered.................................5-7
Deleting abbreviated dial numbers....................................................5-9
5.2 Registering One-touch/Program operations ..........................5-11
Registering remote stations and Fax functions as One-touch/Program.....
Changing contents of One-touch/Program operations....................5-16
Deleting One-touch/Program operations.........................................5-18
5-12
5.3 Registering dial groups..........................................................5-20
Registering dial groups ...................................................................5-20
Changing contents of dial groups....................................................5-23
Deleting dial groups ........................................................................5-25
5.4 Registering relayed transmission to multiple stations............5-26
Scheme of relayed transmission to multiple stations ......................5-26
Registering relayed transmission ....................................................5-27
Changing relayed transmission.......................................................5-28
Deleting relayed transmission .........................................................5-30
5.5 Registering the confidential box.............................................5-32
Scheme of Confidential communication..........................................5-32
Registering the confidential box......................................................5-33
Changing the confidential box.........................................................5-34
Deleting a confidential box ..............................................................5-37
5.6 Registering the bulletin board................................................5-39
Registering the bulletin board .........................................................5-39
Changing a bulletin board ...............................................................5-41
Deleting a bulletin board .................................................................5-43
5.7 Key operator operation ..........................................................5-45
iv
Page 7

Entering key operator mode............................................................5-45
Exiting from key operator mode ......................................................5-47
Fax Key Operator Mode ..................................................................5-49
5.8 Fax screen set .......................................................................5-51
5.9 Registering Fax ID/name.......................................................5-53
Use of
Control Panel
Types of
screens
Wake-up
Screen
Fax
Basic screen
Fax
Application
screen
Remote
Station
Registration
screen
Other screens
5.10 Sender information/reception time options ............................5-55
5.11 Line parameter options..........................................................5-57
5.12 Transmission/reception mode options ...................................5-59
5.13 PBX connection mode options...............................................5-61
5.14 Report output options ............................................................5-63
5.15 Initializing the FAX image memory ........................................5-65
5.16 Setting a special parameter...................................................5-66
5.17 Setting up transmission/reception functions ..........................5-68
Turning ON/OFF transmission/reception functions .........................5-68
Setting up compulsory memory reception.......................................5-70
Setting up closed area reception.....................................................5-72
Setting up Fax transfer ....................................................................5-74
File Re-Tx........................................................................................5-76
Confirming confidential access protect numbers ............................5-78
5.18 Entering character strings......................................................5-80
Chapter 6 Explanation of Reports and Lists
6.1 Types of Reports and Lists ......................................................6-2
6.2 Communication Journal...........................................................6-4
6.3 Transmission Reservation Report............................................6-7
6.4 Transmission Report................................................................6-8
6.5 Polling Transmission Reservation Report ................................6-9
6.6 Polling Transmission result Report.........................................6-10
6.7 Sync Transmit Reservation Report ........................................6-11
6.8 Sync Transmit result Report...................................................6-12
6.9 Polling Reception result Report .............................................6-13
6.10 Sequential Polling Reception Reservation Report.................6-14
Memory
Transmission
Simple Fax
Transmission
Placing the
Original on
the Machine
Setting
Transmission
Conditions
Selecting a
Remote
Station
Operation
During
Original
Scanning
Sending
Multiple
Originals
Operation
During
Transmission
Reserving
Transmissions
Manual
Transmission
Interrupting
Transmission
Confirmation of
Transmission
Reservation
Documents
Confirming
Setting and
Communication
Results
Intercepted
Transfer of
Received
Documents
Resending
(Restored
transmission
Sender
Information
Reception
Mode
Manual
Reception
Forced
Memory
Reception
When Unable
to Receive
Reception
Information
Application
Functions
Registration
/Setup
Reports and
Lists
)
v
Troubleshooting
Appendix
Page 8

CONTENTS
6.11 Sequential Polling Reception result Report ...........................6-15
6.12 Confidential Reception Report...............................................6-16
6.13 Bulletin Board Transmission Report.......................................6-17
6.14 Relay Request Reception Report ..........................................6-18
6.15 Relay Sync Transmit result Report.........................................6-19
6.16 Abbreviated Dialing List.........................................................6-20
6.17 Program Entry List.................................................................6-22
6.18 Group Dial List.......................................................................6-24
6.19 Fax Setting List......................................................................6-26
Chapter 7 Troubleshooting
7.1 Cannot Send............................................................................7-2
7.2 Cannot Receive .......................................................................7-3
7.3 Error Message Displayed.........................................................7-4
7.4 Call for Service ........................................................................7-5
Appendix-Specifications..............................................Appendix-1
Specifications.......................................................................Appendix-2
INDEX ..............................................................................................INDEX-1
vi
Page 9

For New Zealand
1. This device is equipped with pulse dialing while the Telecom standard is DTMF tone
dialing. There is no guarantee that Telecom lines will always continue to support pulse
dialing.
2. Use of pulse dialing, when this equipment is connected to the same line as other
equipment, may give rise to bell tinkle or noise and may also cause a false answer
condition. Should such problems occur, the user should not contact the Telecom Fault
Service.
3. This equipment may not provide for the effective hand-over of a call to another device
connected to the same line.
Use of
Control Panel
Types of
screens
Wake-up
Screen
Fax
Basic screen
Fax
Application
screen
Remote
Station
Registration
screen
Other screens
Memory
Transmission
Simple Fax
Transmission
Placing the
Original on
the Machine
Setting
Transmission
Conditions
Selecting a
Remote
Station
Operation
During
Original
Scanning
Sending
Multiple
Originals
Operation
During
Transmission
Reserving
Transmissions
Manual
Transmission
Interrupting
Transmission
Confirmation of
Transmission
Reservation
Documents
Confirming
Setting and
Communication
Results
Intercepted
Transfer of
Received
Documents
Resending
(Restored
transmission
Sender
Information
Reception
Mode
Manual
Reception
Forced
Memory
Reception
When Unable
to Receive
Reception
Information
Application
Functions
Registration
/Setup
Reports and
Lists
)
vii
Troubleshooting
Appendix
Page 10

Chapter 1 Before Use
1.1 Use of Control Panel
1.2 Types of Screens
1.3 Wake-up Screen
1.4 Fax Basic Screen
1.5 Fax Application Screen
1.6 Remote Station Registration Screen
1.7 Other Screens
Page 11
Chapter 1 Before Use
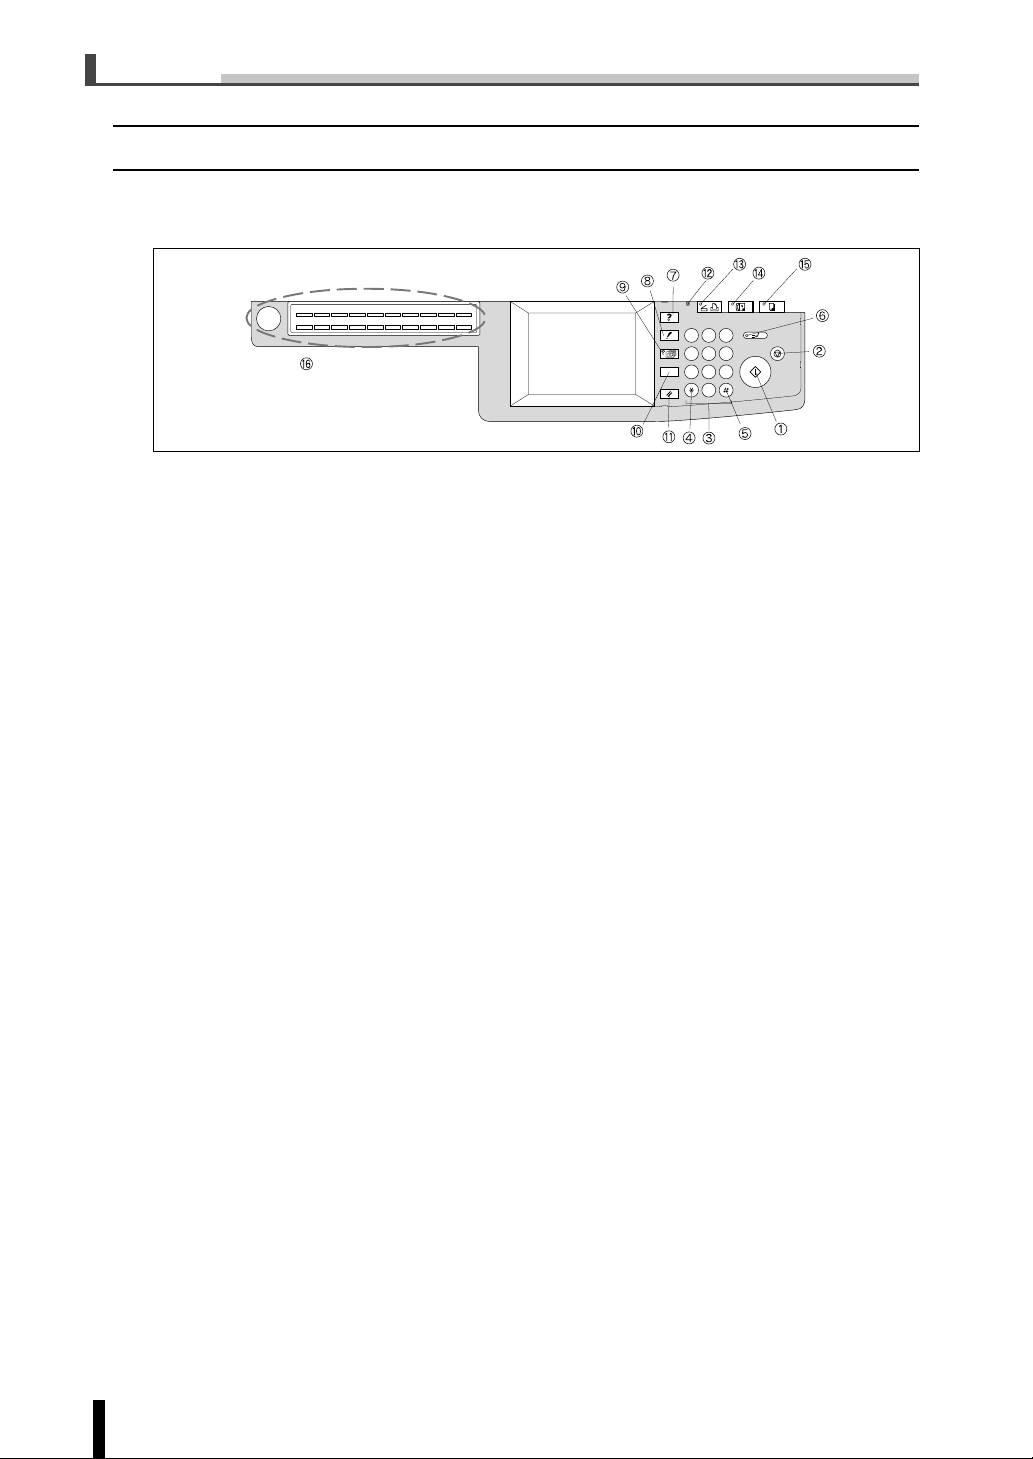
1.1 Use of Control Panel
Various buttons necessary for facsimile communication are centrally located on the control
panel. The following provides an explanation of the functions and uses of each button.
1.1 Use of Control Panel
One-touch Button
HELP
CHECK
APPLICATION
OUTPUT
AUTO RESET
DATA
SCANNER / PRINTER
COPY
FAX
2 31
INTERRUPT
564
897
0
CLEAR QTY.
STOP/CLEAR
START
1 START Button/Lamp......... Starts facsimile communication.
• Lights Red when waiting for processing.
• Lights Green when ready for an operation.
2 STOP/CLEAR Button...... Interrupts an operation or cancels a setting during entry of a
telephone number or parameter setting.
3 Key Pad .......................... Enters telephone numbers, passwords, etc.
4 * Button ........................... Transmits an asterisk “*” for a push-button tone telephone.
5 # Button........................... Transmits a “#” sign for a push-button telephone.
6 INTERRUPT Button........ Not used for facsimile functions.
7 HELP Button ................... Displays the help menu.
8 CHECK Button................ Displays the setting confirmation menu and checks the
contents of settings.
9 APPLICATION
Button/Lamp ................... Selects advanced functions. The lamp above and to the left
of the button lights when advanced functions have been set.
An icon indicating which function is selected is shown on the
screen.
10 OUTPUT Button.............. Not used for facsimile functions.
11 AUTO RESET Button .....Returns all settings to their initial values.
12 DATA Lamp .................... Indicates the accumulation in memory of transmission/
reception/printer data or reports.
13 SCANNER/PRINTER
Button/Lamp ................... Switches the FK-101 to scanner/printer mode/The scanner/
printer mode is indicated by the green lamp located above
and to the left of the SCANNER/PRINTER selection button.
14 FAX Button/Lamp ........... Switches the FK-101 to facsimile mode.
• The facsimile mode is indicated by the green lamp
located above and to the left of the FAX selection button.
15 COPY Button/Lamp ........ Switches the FK-101 to the copy mode/The copy mode is
indicated by the green lamp located above and to the left of
the COPY selection button.
16 One-touch Button............ Select the one-touch program mode.
1 - 2
Page 12
1. 2 Types of Screens
1.2 Types of Screens
The FK-101 uses a large liquid crystal display (LCD) located in the center of the control
panel.
• When setting facsimile functions, all necessary buttons and messages are displayed on
the liquid crystal display for each function. When making settings, simply touch the
display with your finger.
• When you do not understand an operation, you can refer to guidance regarding the
operation by displaying the Help screen.
• When the FK-101 runs out of paper, paper becomes jammed in the FK-101 or other
problem occurs, an icon lights and a message is displayed. Take corrective actions by
following the instructions shown on the display.
The following types of menus are displayed.
Wake-up screen
Fax Basic screen
[Telbook] key
[Key pad] key
[Setting] key
Fax application screen
[Advanced] key
[ File print ] key
[ List print ] key
Key operator mode screen Fax menu
Remote station registration menu
Memory Tx
2in1 Tx
Book Tx
Frame erase Tx
Original size set
Total page set
Original setting
Flip Side 2
Polled Tx
Polling Rx
Timer Tx
Int'l Com.
ECM off
Confiden. Tx
V34 OFF
Bulletin
ID Tx
Relay Tx Req
Compulsory mem. Rx
Confiden
Bulletin
Com. Journal
Tx report
Reception report
Fax setting list
Abbr dial list
Program entry list
Group dial list
Fax screen set
Fax ID No. / name entry
Send / Receipt info
Line parameter set
Tx / Rx mode set
PBX CN mode set
Report output set
Fax mem. Initialize
Special set
Function set
Abbr No. entry / edit
Abbr No. list / search
Program entry / edit
Program list
Group entry / edit
Relay Rx regi / edit
Confiden. Regi / edit
Confi / Bulletin list
Bulletin Regi / edit
Mixed original
Folded original
Long original
Function ON / OFF set
Compulsory mem. Rx
Closed area Rx
Forword Tx setting
File Re-Tx
Confiden access No.
Use of
Control Panel
Types of
screens
Wake-up
Screen
Fax
Basic screen
Fax
Application
screen
Remote
Station
Registration
screen
Other screens
Memory
Transmission
Simple Fax
Transmission
Placing the
Original on
the Machine
Setting
Transmission
Conditions
Selecting a
Remote
Station
Operation
During
Original
Scanning
Sending
Multiple
Originals
Operation
During
Transmission
Reserving
Transmissions
Manual
Transmission
Interrupting
Transmission
Confirmation of
Transmission
Reservation
Documents
Confirming
Setting and
Communication
Results
Intercepted
Transfer of
Received
Documents
Resending
(Restored
transmission
Sender
Information
Reception
Mode
Manual
Reception
Forced
Memory
Reception
When Unable
to Receive
Reception
Information
Application
Functions
Registration
/Setup
Reports and
Lists
Troubleshooting
)
1 - 3
Appendix
Page 13
Chapter 1 Before Use
1.3 Wake-up Screen
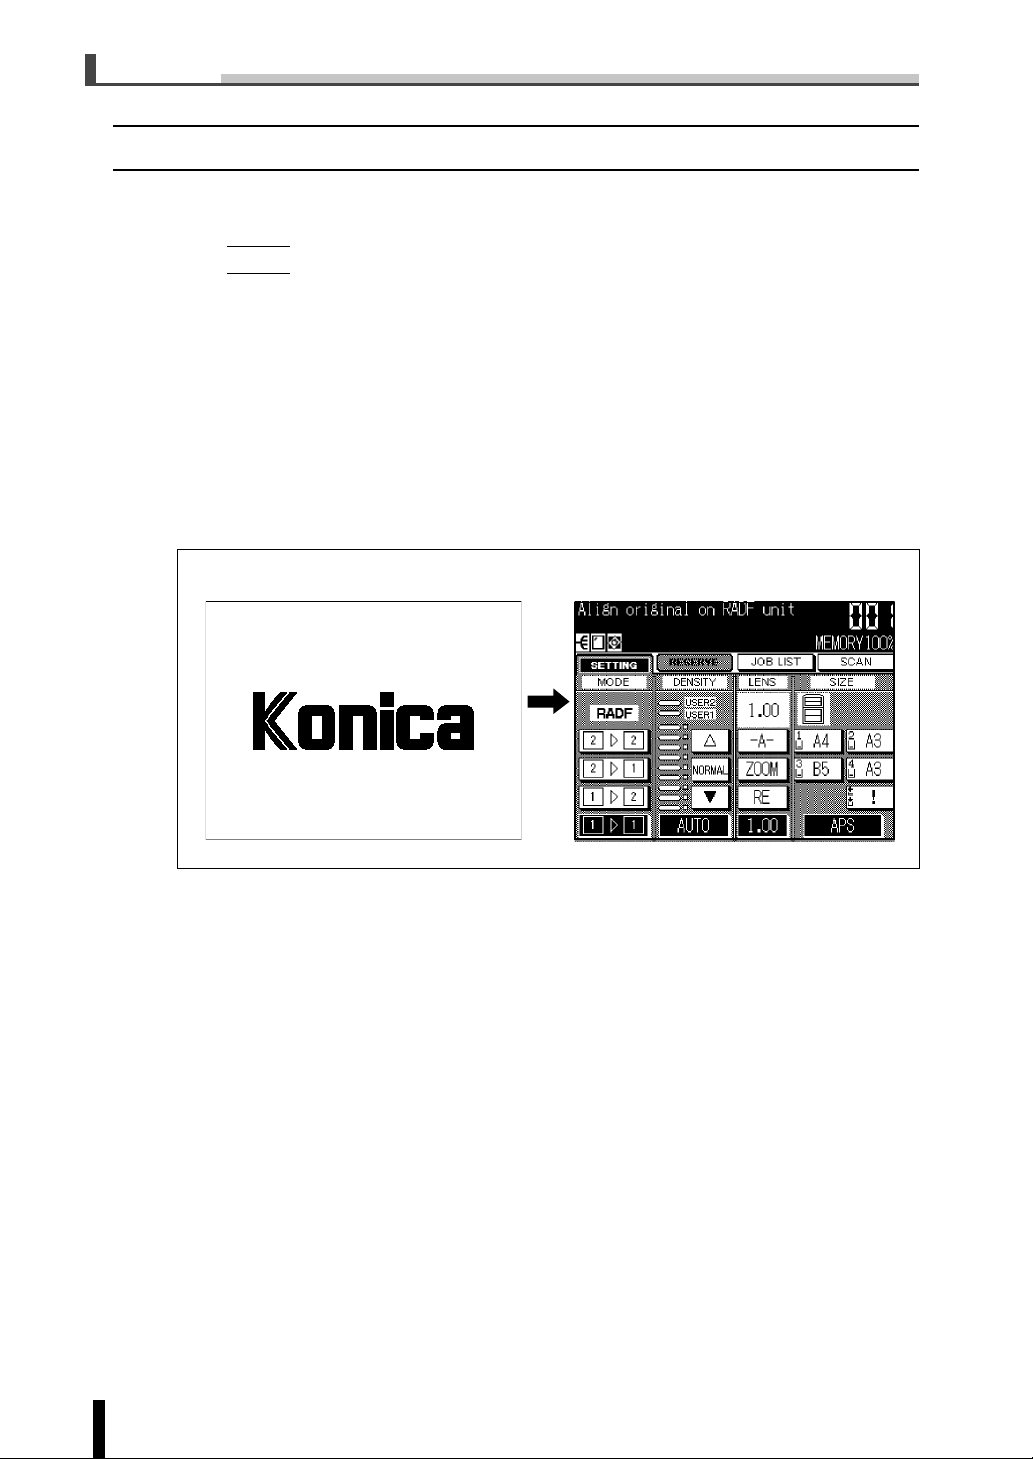
The wake-up screen shown below is displayed when the auxiliary power switch is turned on
after the main power switch has been turned on. The copy basic screen is displayed.
[NOTE]
• When returning from the low power mode, the screen is displayed that was displayed
prior to switching to the low power mode.
• When automatically returning from the auto shutoff mode, the Copy Basic screen is displayed.
• When returning to an operation by pressing a key on the control panel, the wake-up
screen is displayed.
• When the main power is turned OFF /ON, wait for 3 seconds or more after you turn it
OFF. Then, turn it ON. If you do not wait for the designated period of time, an abnormal
function may result.
• Since the copier’s memory is used for fax printing, the Copy Basic screen displays the
decreasing memory status during fax printing.
1.3 Wake-up Screen
Wake-up Screen
Copy Basic screen
1 - 4
Page 14
1.4 Fax Basic Screen
1.4 Fax Basic Screen
The FAX Basic screen is displayed when the FAX button is pressed on the control panel.
The FAX Basic screen contains the [Telbook] key, [Key pad] key and [Setting] key.
[NOTE]
Since the copier’s memory is used for fax printing, the Copy Basic screen displays the decreasing memory status during fax printing.
When the EKC is set to the FAX mode, “Enter E.K.C. password” is displayed on the Fax
basic screen. In this case, the EKC manages the number of originals sent.
For the details, refer to “section 10 Key Operator Mode EKC On/Off Setting” on copier Instruction Manual.
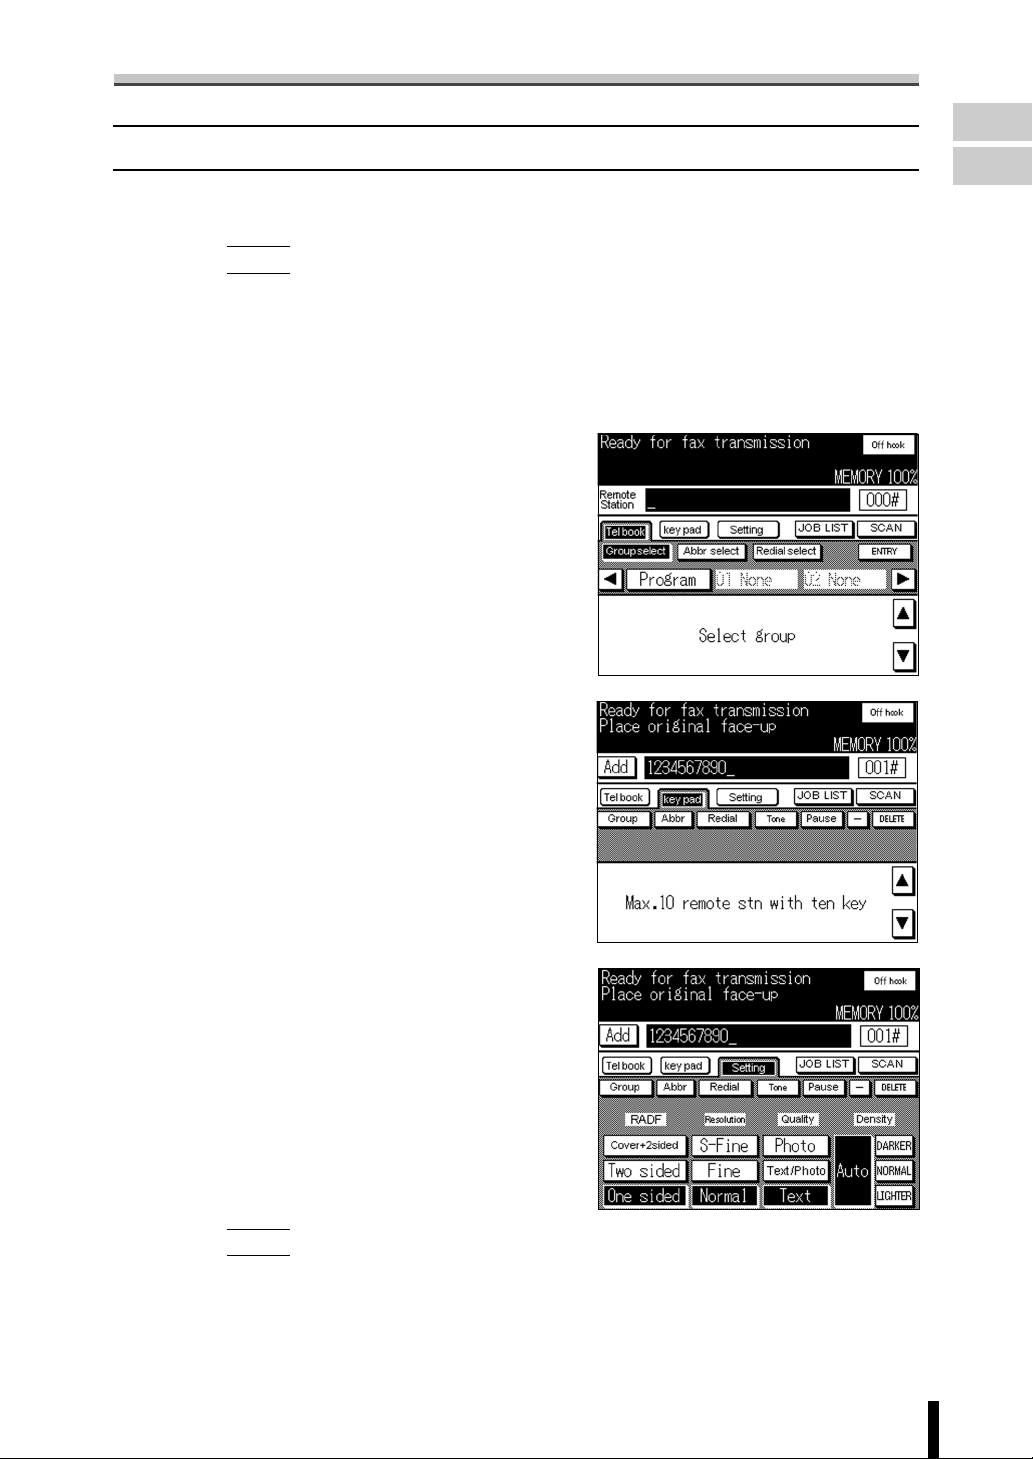
■ [Telbook] key
[Telbook] key is used to designate remote stations using the following methods.
• Key pad
• Abbr select
• Group select
• One-touch dialing
• Redial select
■ [Key pad] key
The [Key pad] key allows dialing using special
symbols such as tone and pause. In addition,
it also allows dialing by combining previously
registered abbr dialing, group dialing, and
redialing with the key pad.
■ [Setting] key
The [Setting] key is used to set the following
items corresponding to the original to be sent.
• RADF: Cover + 2 sided, Two
sided, One sided*
• Resolution: S-Fine, Fine, Normal*
• Image quality: Photo, Text/photo,Text*
• Density: Auto*, DARKER, NOR-
MAL, LIGHTER
Use of
Control Panel
Types of
screens
Wake-up
Screen
Fax
Basic screen
Fax
Application
screen
Remote
Station
Registration
screen
Other screens
Memory
Transmission
Simple Fax
Transmission
Placing the
Original on
the Machine
Setting
Transmission
Conditions
Selecting a
Remote
Station
Operation
During
Original
Scanning
Sending
Multiple
Originals
Operation
During
Transmission
Reserving
Transmissions
Manual
Transmission
Interrupting
Transmission
Confirmation of
Transmission
Reservation
Documents
Confirming
Setting and
Communication
Results
Intercepted
Transfer of
Received
Documents
Resending
(Restored
transmission
Sender
Information
Reception
Mode
Manual
Reception
Forced
Memory
Reception
When Unable
to Receive
Reception
Information
)
[NOTE]
Asterisks (*) indicate initial settings at the time of purchase.
Initial values can be changed using key operator mode. For more details, refer to “5.8 Fax
screen set.”
1 - 5
Application
Functions
Registration
/Setup
Reports and
Lists
Troubleshooting
Appendix
Page 15
Chapter 1 Before Use
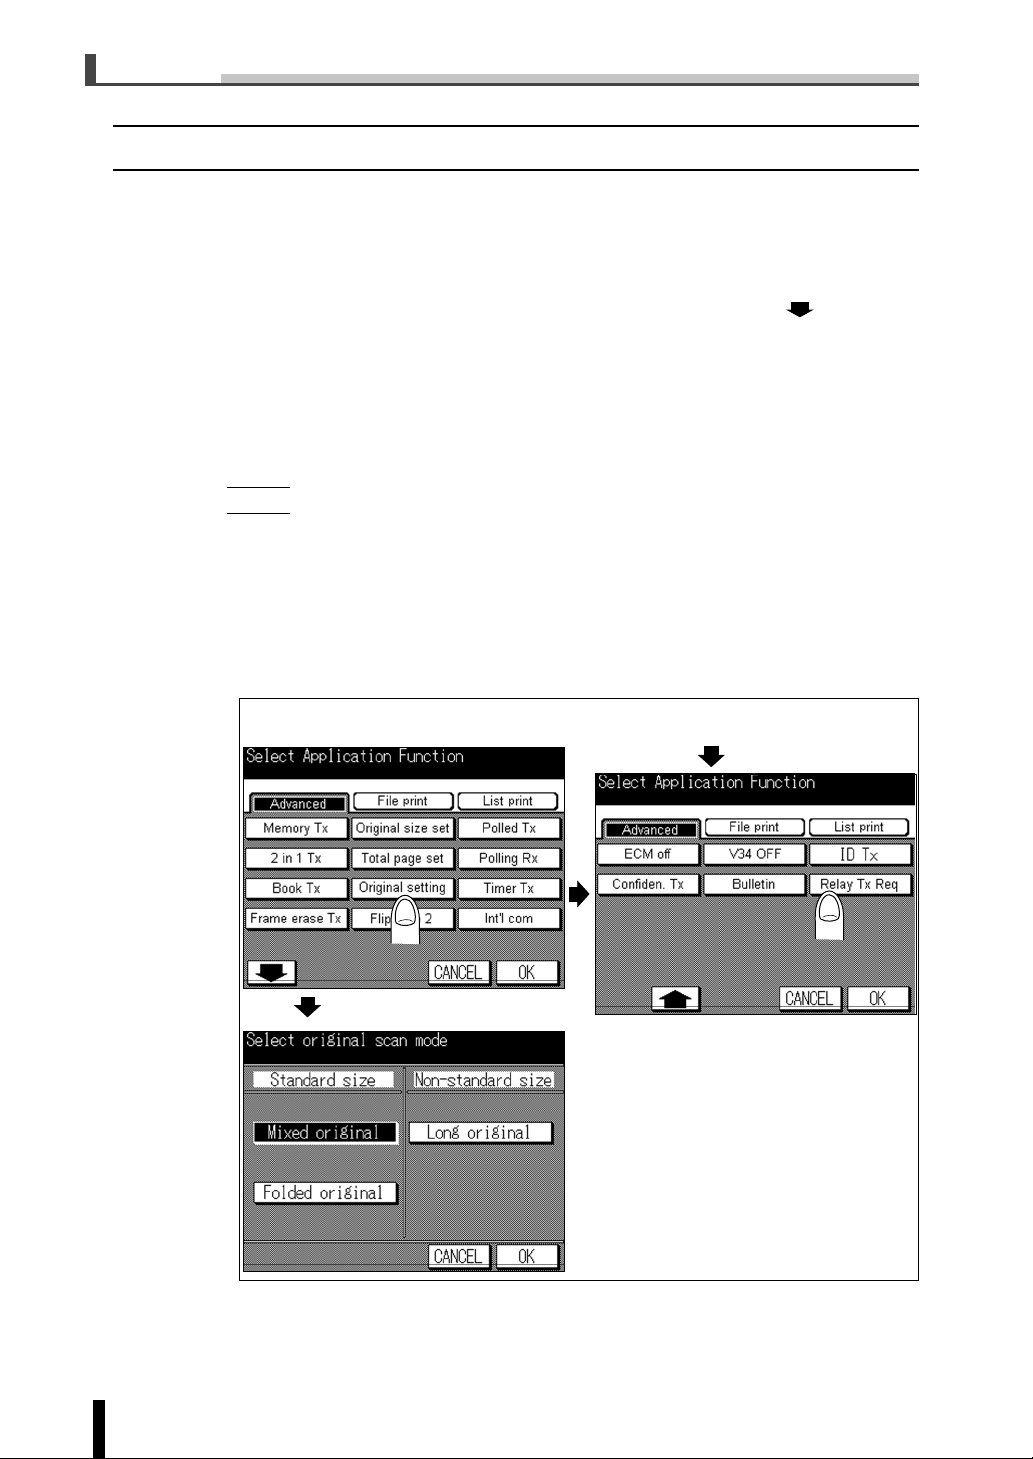
1.5 Fax Application Screen
When the Application button is pressed on the panel, the FAX Application Menu Screen
displays on the touch panel. The Fax Application screen contains three keys consisting of
[Advanced], [File print] and [List print].
■ [Advanced] key
Twelve keys are displayed when the [Advanced] key is pressed. Press the [ ] key to
display the next screen. In addition, when the [Setting] key is pressed, an additional three
keys are displayed. Press the key of the advanced function desired to be set.
• The functions of [Memory Tx], [2 in 1 Tx], [V34 OFF], [ECM off], [Int’l com], [Polled Tx]
and [Polling Rx] are set each time the key is pressed, and the key is highlighted after it is
pressed. When a key other than those indicated above is pressed, the setting menu
required for the respective advanced function is displayed.
[NOTE]
When the Original Setting button is pressed, three additional keys consisting of [Folded
original], [Long original] and [Mixed original] are displayed. When these keys are pressed,
they are set and highlighted.
• When the functions of [2 in 1 Tx], [Book Tx], [Frame erase Tx], [Original size set], [Timer
Tx], [Polled Tx] and [Mixed original] are set, they are automatically transmitted to memory
and the key is highlighted after it is pressed.
1.5 Fax Application Screen
Fax Application Menu screen
When [Original Setting] key is
Pressed
When [ ] key is Pressed
1 - 6
Page 16
1.5 Fax Application Screen(continued)
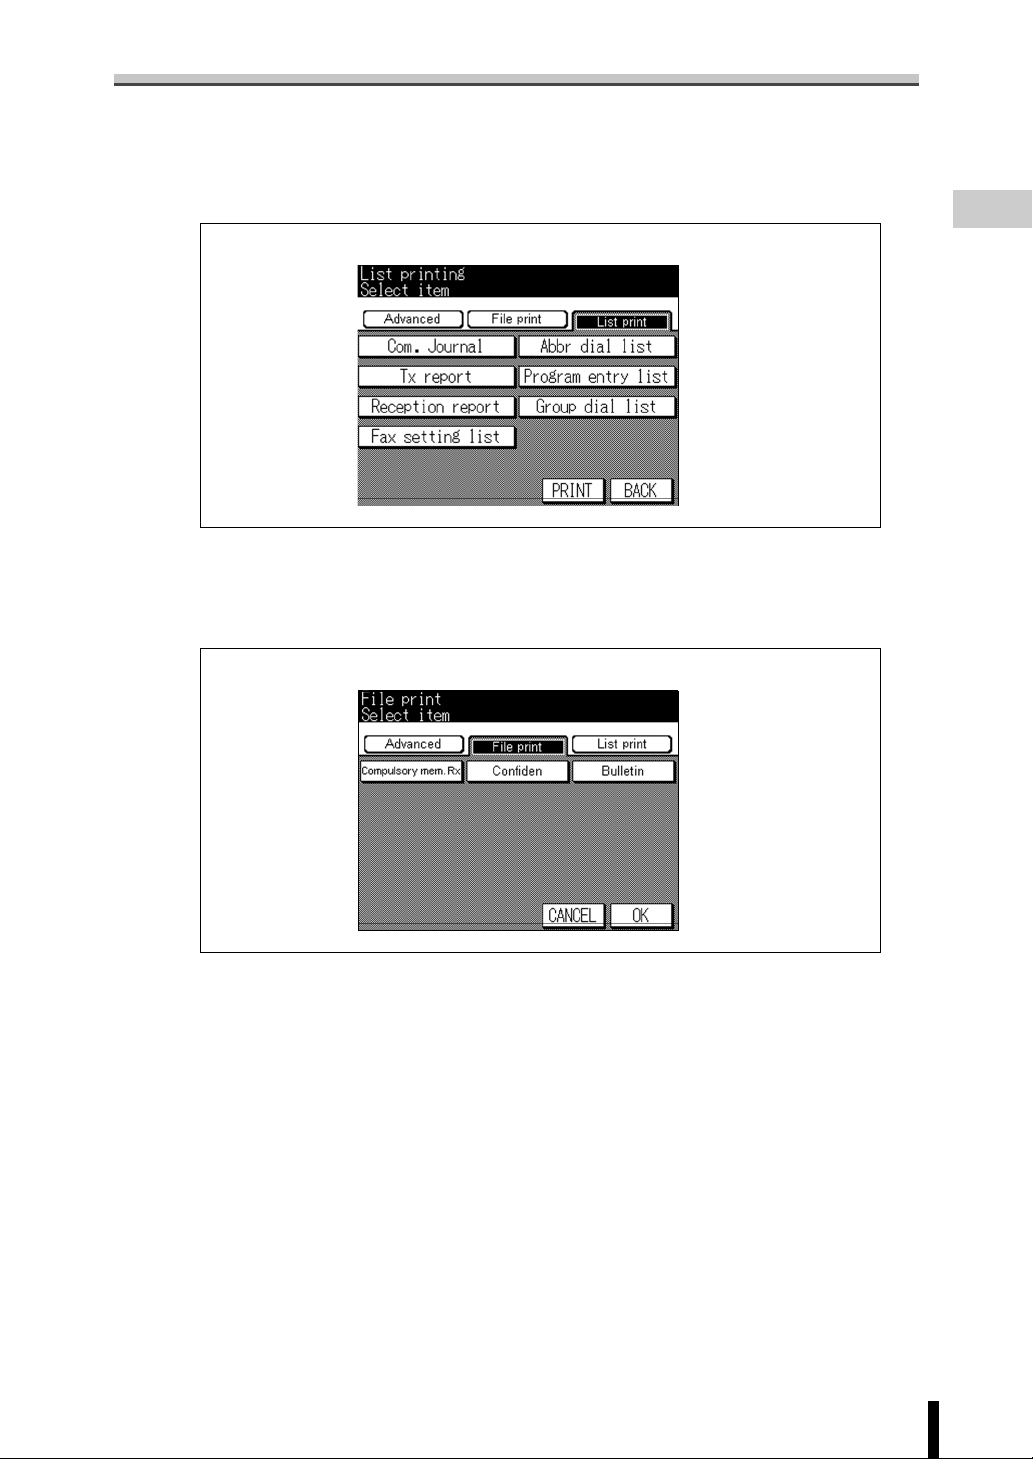
■ [List print] key
Seven keys are displayed when the [List print] key is pressed. Press the key of the list
desired to be printed out.
[List print] Key of Fax Application Menu screen
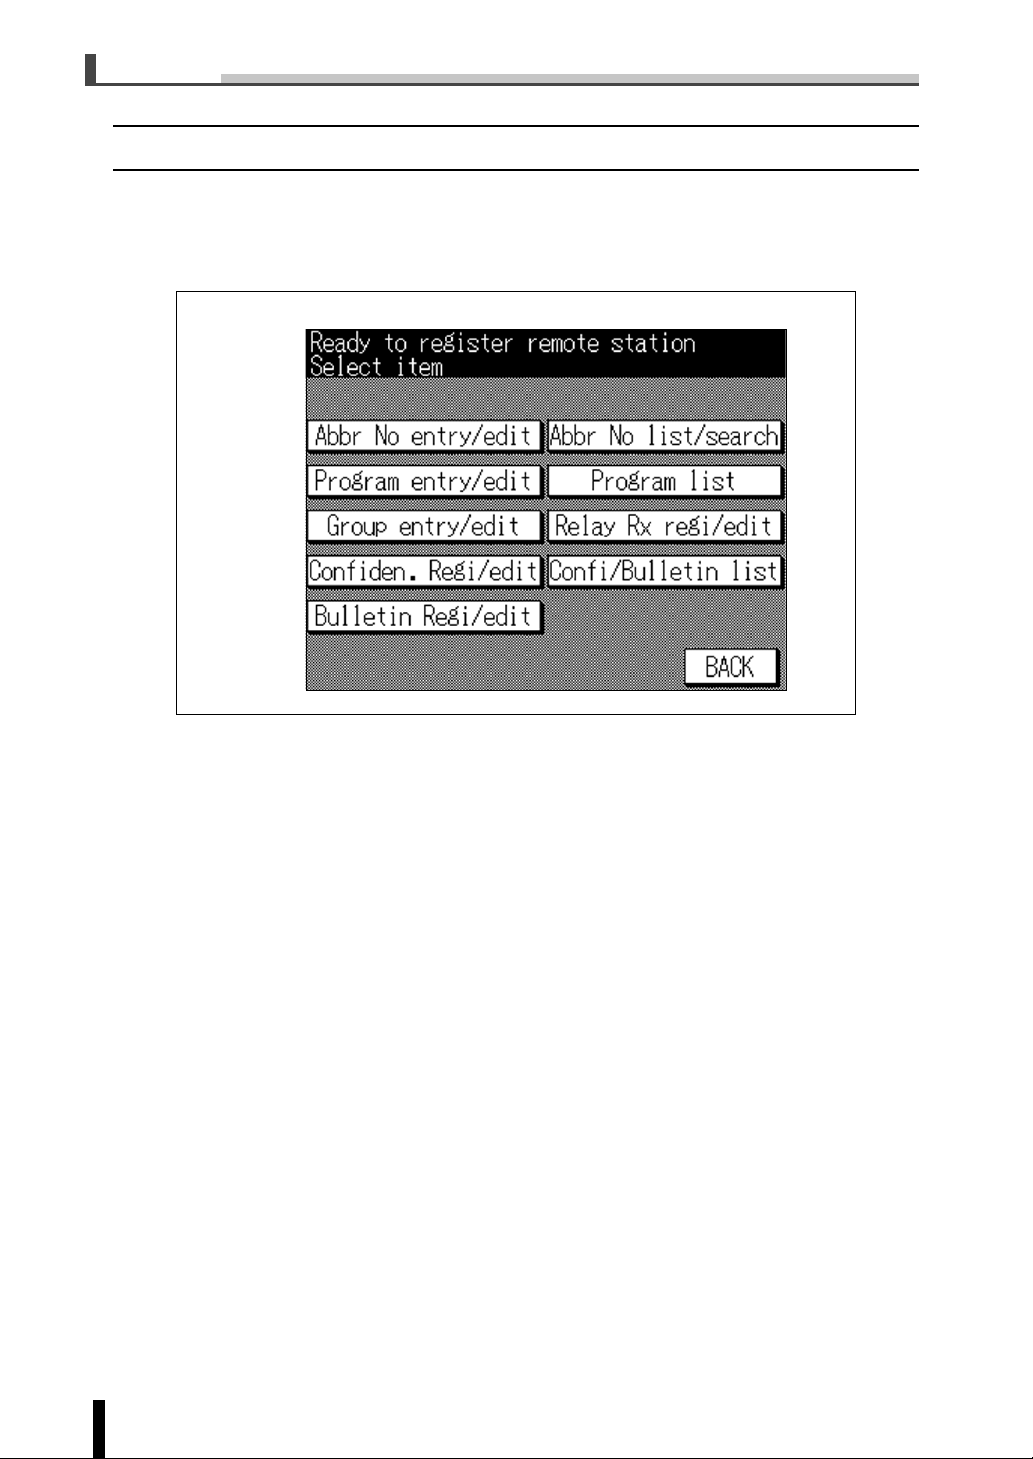
■ [File print] key
Three keys are displayed when the [File print] key is pressed. Press the key of the file
desired to be printed out.
[File print] Key of Fax Application Menu screen
Use of
Control Panel
Types of
screens
Wake-up
Screen
Fax
Basic screen
Fax
Application
screen
Remote
Station
Registration
screen
Other screens
Memory
Transmission
Simple Fax
Transmission
Placing the
Original on
the Machine
Setting
Transmission
Conditions
Selecting a
Remote
Station
Operation
During
Original
Scanning
Sending
Multiple
Originals
Operation
During
Transmission
Reserving
Transmissions
Manual
Transmission
Interrupting
Transmission
Confirmation of
Transmission
Reservation
Documents
Confirming
Setting and
Communication
Results
Intercepted
Transfer of
Received
Documents
Resending
(Restored
transmission
Sender
Information
Reception
Mode
Manual
Reception
Forced
Memory
Reception
When Unable
to Receive
Reception
Information
Application
Functions
Registration
/Setup
Reports and
Lists
)
1 - 7
Troubleshooting
Appendix
Page 17
Chapter 1 Before Use
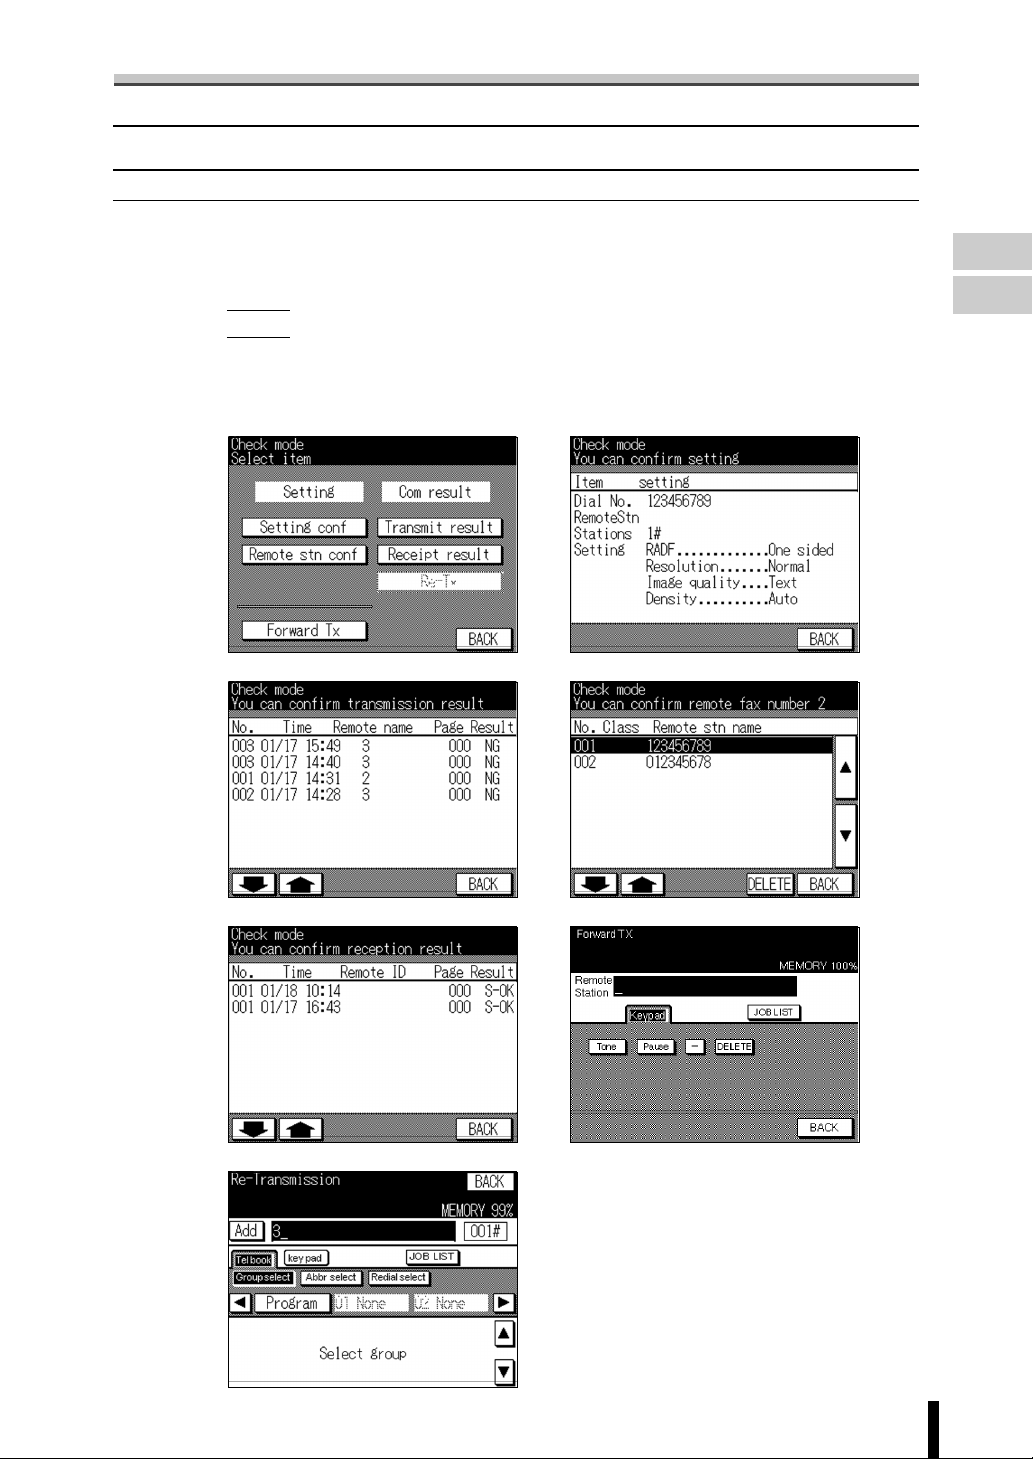
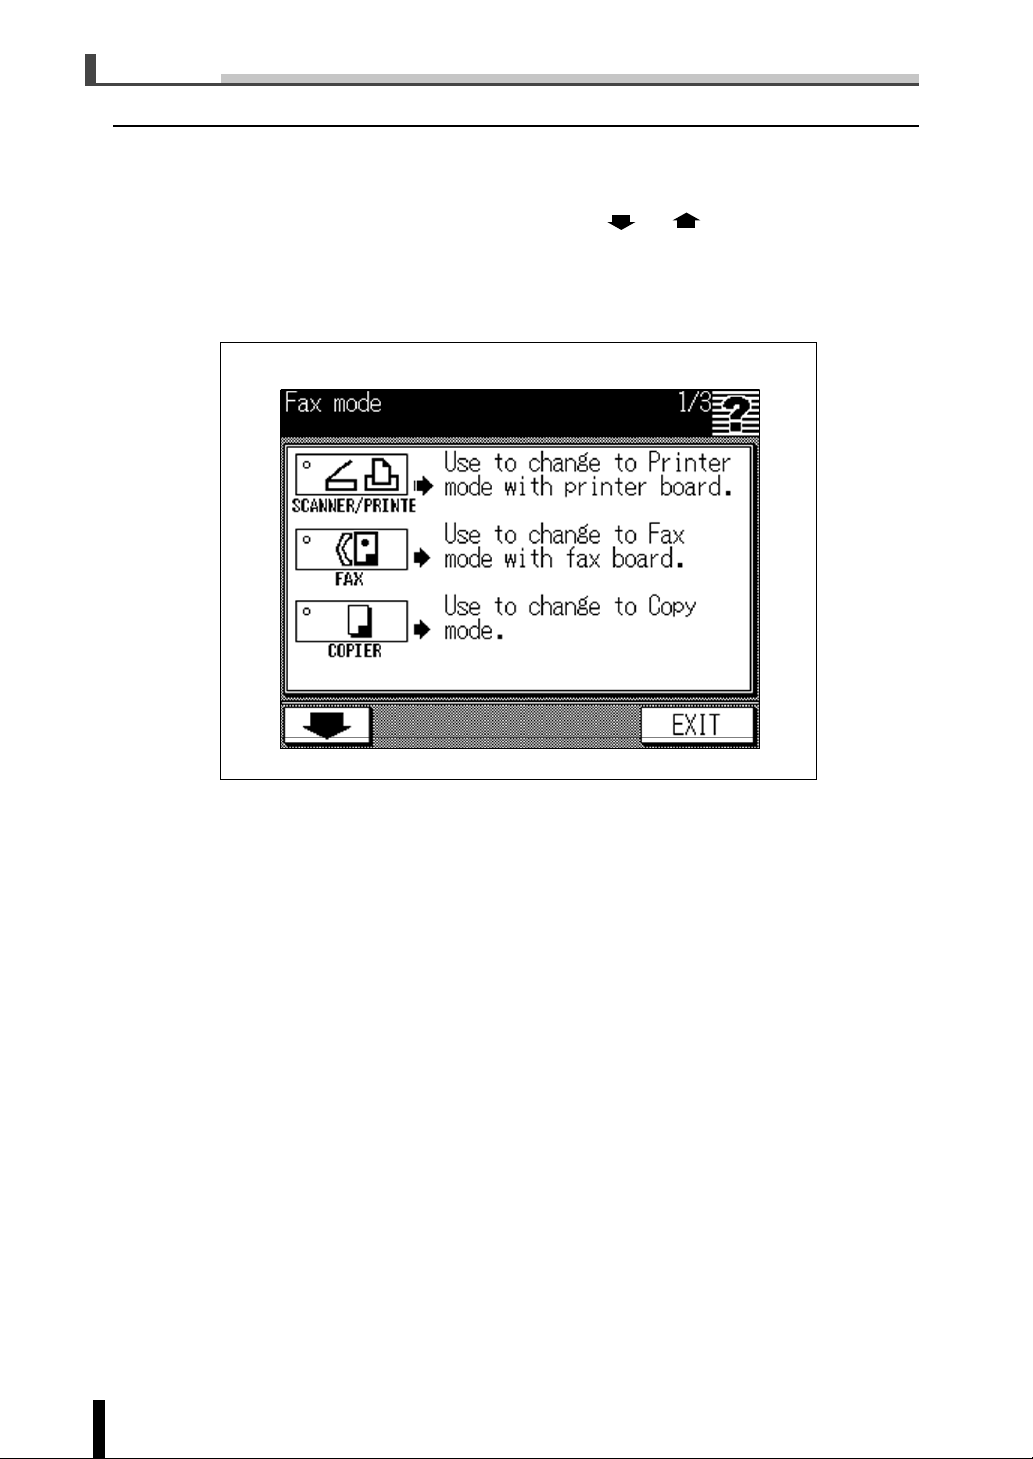
1.6 Remote Station Registration Screen
1.6 Remote Station Registration Screen
The remote station registration screen is displayed when the [ENTRY] key is pressed after
pressing the [Telbook] key on the Fax Basic screen. Nine keys are displayed on the remote
station registration screen. These keys can be used to register abbr dialing numbers, onetouch dialing numbers and programs. Press the key of the function desired to be set.
Remote station registration screen
1 - 8
Page 18
1.7 Other Screens
1.7 Other Screens
Setting Confirmation Mode Screen
When the CHECK button is pressed on the control panel, the Setting Confirmation mode
screen is displayed allowing settings and communication results to be confirmed in the form
of a list.
[NOTE]
This screen is not active when the jam location screen, jam processing screen or help
screen is displayed. It can be used to active the Forward transfer function only. Refer to
“2.14 Intercepted Transfer of Received Documents Waiting for Output”.
Setting Confirmation Mode screen
Transmission Results screen
Setting Confirmation screen
Remote Station Confirmation screen
Use of
Control Panel
Types of
screens
Wake-up
Screen
Fax
Basic screen
Fax
Application
screen
Remote
Station
Registration
screen
Other screens
Memory
Transmission
Simple Fax
Transmission
Placing the
Original on
the Machine
Setting
Transmission
Conditions
Selecting a
Remote
Station
Operation
During
Original
Scanning
Sending
Multiple
Originals
Operation
During
Transmission
Reserving
Transmissions
Manual
Transmission
Reception Results screen
Resending screen
Forward Transfer screen
Interrupting
Transmission
Confirmation of
Transmission
Reservation
Documents
Confirming
Setting and
Communication
Results
Intercepted
Transfer of
Received
Documents
Resending
(Restored
transmission
Sender
Information
Reception
Mode
Manual
Reception
Forced
Memory
Reception
When Unable
to Receive
Reception
Information
Application
Functions
Registration
/Setup
Reports and
Lists
)
1 - 9
Troubleshooting
Appendix
Page 19
Chapter 1 Before Use
Help Screen
When the Help button is pressed on either the Fax Basic Screen or Fax Application Screen,
the Help screen is displayed.
• The previous or next screen is displayed when the [ ] or [ ] key is pressed.
• The display returns to the original screen when the [EXIT] key is pressed.
When the Help button is pressed on the Fax Basic Screen, Help screen are displayed for
mode switching, reservation and jobs currently in progress.
Help (Fax Basic screen) screen
1.7 Other Screens (continued)
1 - 10
Page 20
1.7 Other Screens (continued)
When the Help button is pressed on the Fax Application Screen, Help screen are displayed
for each application function.
Help (Fax Application screen) screen
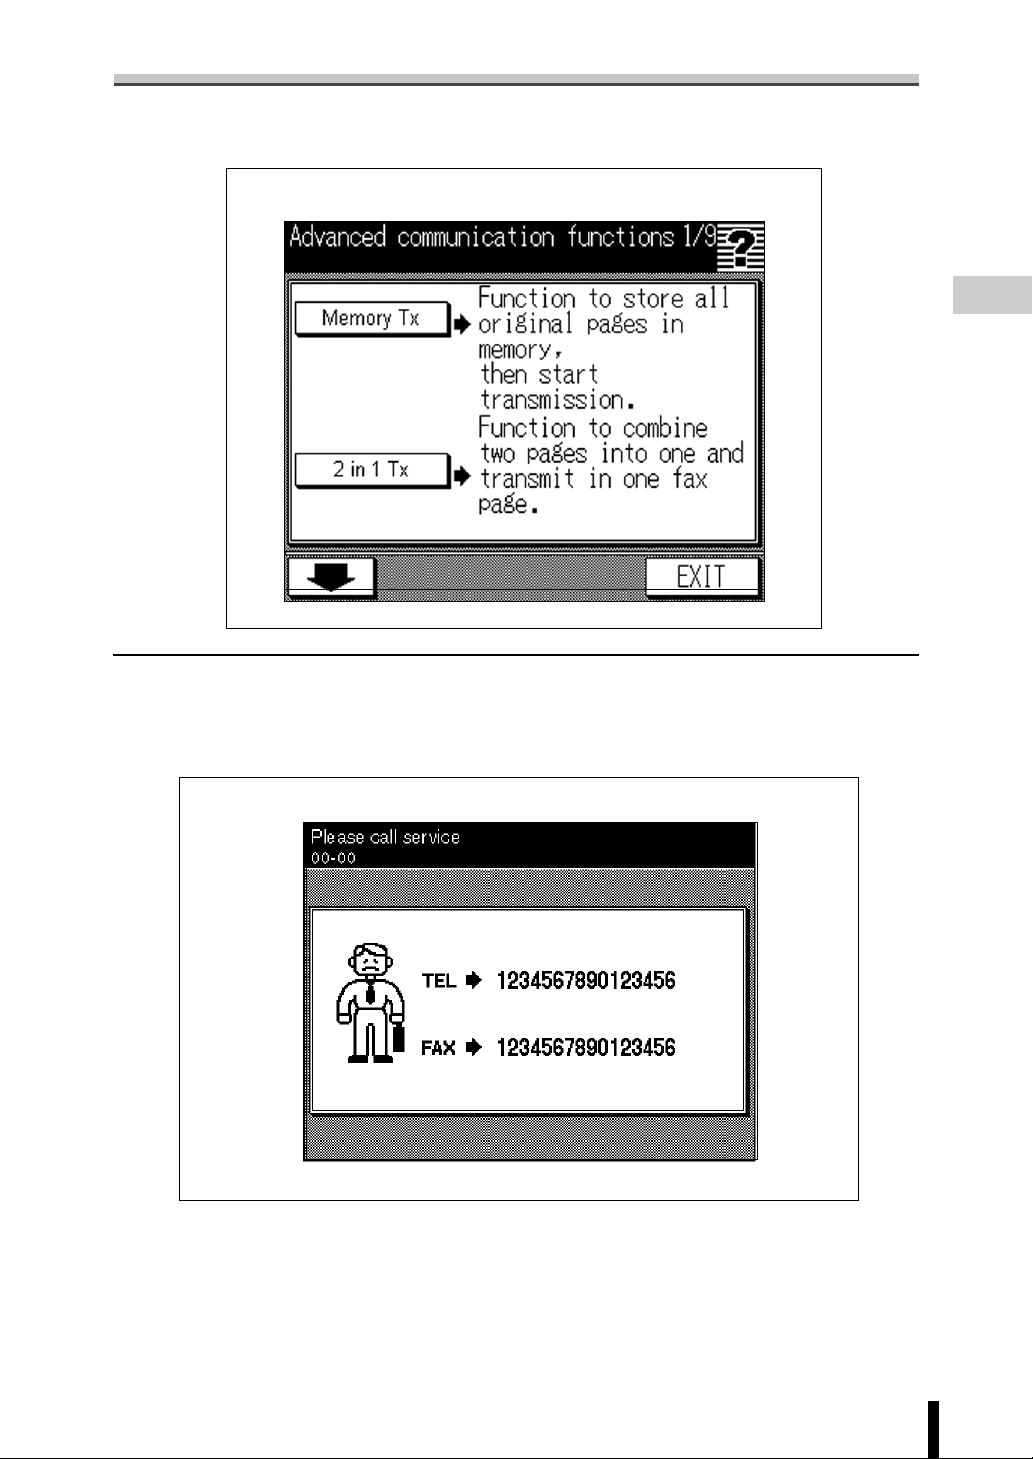
Call for Service screen
This is displayed when a problem has occurred that cannot be corrected by the user. Since
the telephone number and fax number of the service representative are displayed, take the
appropriate action by referring to “7.4 Call for Service”.
Call for Service Screen
Use of
Control Panel
Types of
screens
Wake-up
Screen
Fax
Basic screen
Fax
Application
screen
Remote
Station
Registration
screen
Other screens
Memory
Transmission
Simple Fax
Transmission
Placing the
Original on
the Machine
Setting
Transmission
Conditions
Selecting a
Remote
Station
Operation
During
Original
Scanning
Sending
Multiple
Originals
Operation
During
Transmission
Reserving
Transmissions
Manual
Transmission
Interrupting
Transmission
Confirmation of
Transmission
Reservation
Documents
Confirming
Setting and
Communication
Results
Intercepted
Transfer of
Received
Documents
Resending
(Restored
transmission
Sender
Information
Reception
Mode
Manual
Reception
Forced
Memory
Reception
When Unable
to Receive
Reception
Information
)
1 - 11
Application
Functions
Registration
/Setup
Reports and
Lists
Troubleshooting
Appendix
Page 21
Chapter 1 Before Use
Key Operator Mode Screen
This screen is for use by key operators responsible for changing the initial values of functions and managing the machine. The key operator mode screen can be displayed with the
procedure described below.
1. Press the copy button to display the Copy Basic screen.
2. Press the help button.
3. Press the [Key Ope mode] key.
4. When a password has been set, enter the key operator password.
5. Press the [OK] key.
The key operator mode screen is displayed.
6. Press the [2. Fax] key.
The FAX key operator mode screen is displayed.
For further details, refer to “5.7 Key Operator Operation” through “5.18 Entering character
strings”.
Fax Key Operator Mode Screen
1.7 Other Screens (continued)
1 - 12
Page 22

Chapter 2 Transmission
2.1 Quick Memory Transmission and Memory Transmission
2.2 Simple Fax Transmission
2.3 Placing the Original on the Machine
2.4 Setting Transmission Conditions
2.5 Selecting a Remote Station
2.6 Operation During Original Scanning
2.7 Sending Multiple Originals from the Original Tray
2.8 Operation During Transmission
2.9 Reserving Transmissions
2.10 Manual Transmission
2.11 Interrupting Transmission
2.12 Confirmation of Transmission Reservation Documents
2.13 Confirming Settings and Communication Results
2.14 Intercepted Transfer of Received Documents Waiting for Output
2.15 Resending(Restored transmission)
2.16 Sender Information
Page 23

Chapter 2 Transmission
2.1 Quick Memory Transmission and Memory Transmission
2.1
Quick Memory Transmission and Memory Transmission
There are two ways to send documents with this machine. These are quick memory
transmission and memory transmission.
This machine is set to quick memory transmission at the time of purchase and that setting
will remain in effect unless memory transmission is specified by setting [Memory Tx] on the
Fax application screen. Either of these transmission methods can be set as the initial value.
[NOTE]
Refer to “5.12 Transmission/Reception Mode options” for details regarding setting initial
values.
Quick Memory Transmission
In this transmission method, a facsimile is sent the instant when one page is scanned. This
allows documents to be sent without exceeding memory capacity in the case of sending a
large number of pages. Facsimiles are normally sent by this method.
Memory Transmission
In this transmission method, all pages being sent are first scanned and stored in memory
before transmission. This makes it possible to remove the paper from the facsimile without
having to wait until the transmission is completed. However, when a large number of pages
are sent or when the images on the originals are fine, memory capacity may be exceeded
due to the large amount of data stored in memory. When desiring to use memory transmission, set [Memory Tx] on the Fax Application Screen.
[NOTE]
Refer to “4.2 Storing in Memory Before Sending (Memory Tx)” for further details. The machine is automatically set to [Memory Tx] when any of the following procedures is performed.
• [Memory Tx] set on the Fax Application screen.
• The [SCAN] key has been pressed on the Fax Basic screen.
• When functions, such as [2 in 1 Tx], [Book Tx], [Frame erase Tx], [Original size set],
[Mixed original] in Original setting [Polled Tx] and [Timer Tx] are set on the Fax Application screen.
• Multiple remote stations have been designated.
2 - 2
Page 24
2.2 Simple Fax Transmission
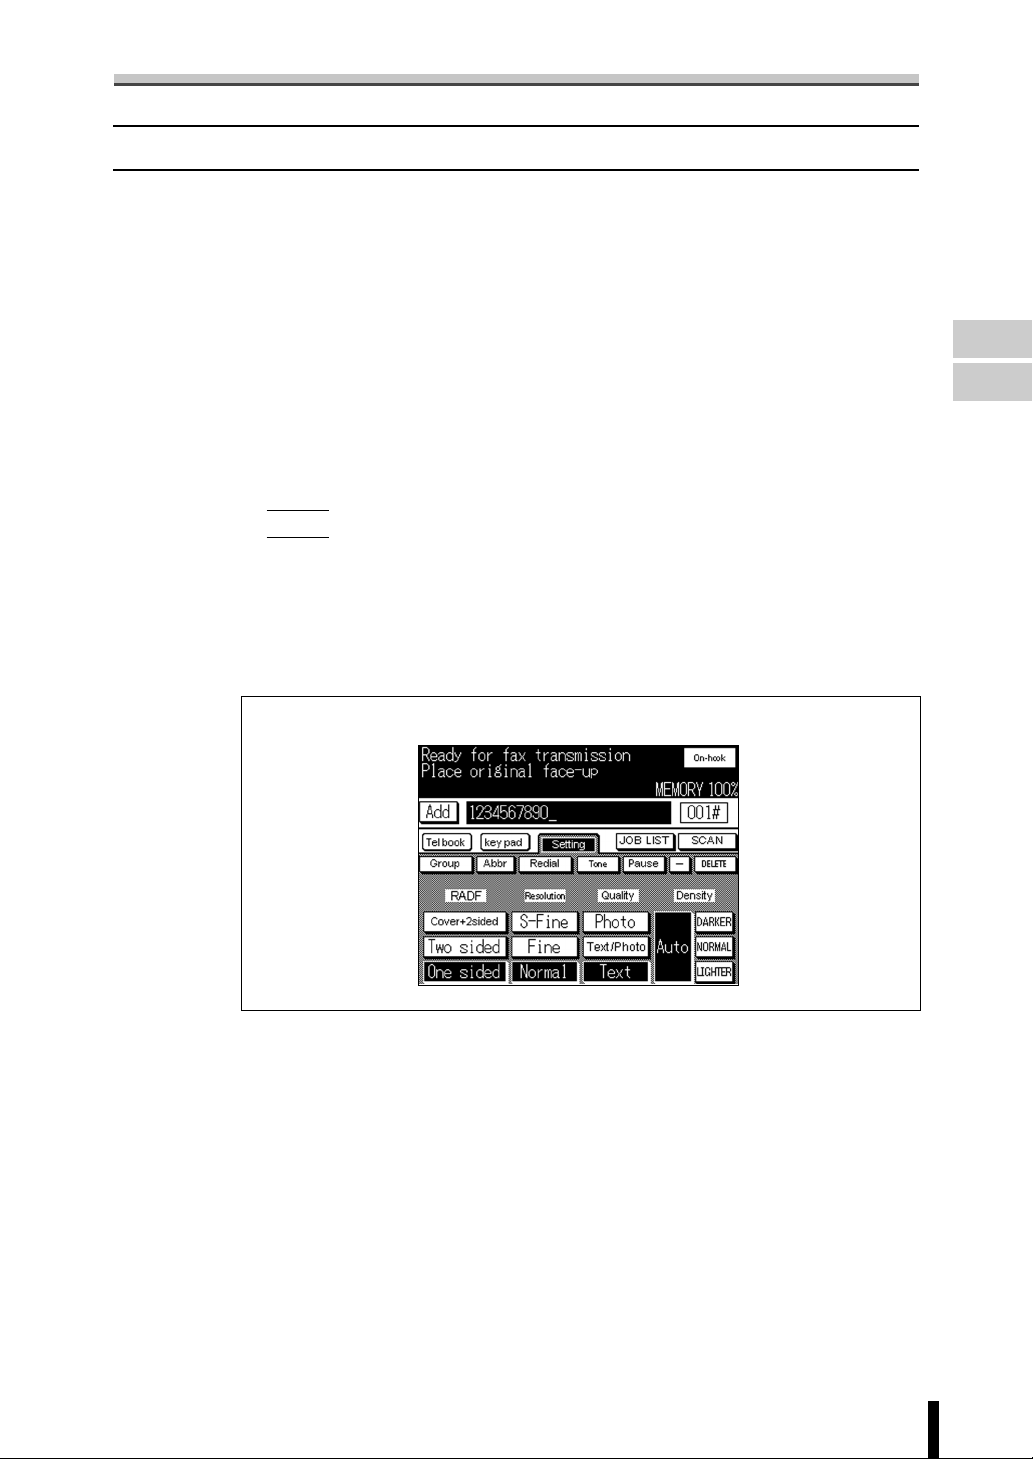
2.2 Simple Fax Transmission
The following provides an explanation of the procedure for simple fax transmission by quick
memory transmission.
Although the explanation here covers the procedure for sending a one-sided document
using the basic procedure, various functions are available for each step of the procedure to
make sending facsimiles even more convenient. Refer to the sections from “2.3 Placing the
Original on the Machine” to “2.5 Selecting a Remote Station” for further details.
[Procedure]
1. Switch the mode.
If the Fax Basic screen is not displayed, press the FAX button on the control
panel to display the Fax Basic screen.
2. Set the function.
Select the [Setting] key and press the [One sided] key.
[NOTE]
• The initial value is set to [One sided] at the time of purchase. This procedure is
not necessary if the initial value has not been changed.
• [RADF], [Resolution], [Quality] and [Density] can be set with the [Setting] key
according to the type of document to be sent. Refer to “2.4 Setting Transmission
Conditions” for further details regarding settings of the [Setting] key.
[Setting] key on the Fax Basic screen
Use of
Control Panel
Types of
screens
Wake-up
Screen
Fax
Basic screen
Fax
Application
screen
Remote
Station
Registration
screen
Other screens
Memory
Transmission
Simple Fax
Transmission
Placing the
Original on
the Machine
Setting
Transmission
Conditions
Selecting a
Remote
Station
Operation
During
Original
Scanning
Sending
Multiple
Originals
Operation
During
Transmission
Reserving
Transmissions
Manual
Transmission
Interrupting
Transmission
Confirmation of
Transmission
Reservation
Documents
Confirming
Setting and
Communication
Results
Intercepted
Transfer of
Received
Documents
Resending
(Restored
transmission
Sender
Information
Reception
Mode
Manual
Reception
Forced
Memory
Reception
When Unable
to Receive
Reception
Information
)
2 - 3
Application
Functions
Registration
/Setup
Reports and
Lists
Troubleshooting
Appendix
Page 25
Chapter 2 Transmission
C
C
2.2 Simple Fax Transmission (continued)
3. Select the remote station.
Use the key pad to enter the fax number of the
DATA
SCANNER / PRINTER
FAX
remote station, i.e., where the fax is to be sent.
[NOTE]
Registering the fax number of the remote station in
advance in one-touch dial or abbr dial makes it
simple to select the remote station. Refer to “2.5
Selecting a Remote Station” for details regarding
selecting a remote station.
K
ION
T
SET
2 31
564
897
0
CLEAR QTY.
4. Place the original on the machine.
• When placing the original on the original tray, open the RADF and place the
original on the original tray so that the side to be scanned is facing downward.
• When placing an original in the RADF, place the original with the side to be
scanned facing upward.
[NOTE]
Refer to “2.3 Placing the Original on the Machine” for details regarding the manner
in which originals should be placed on the machine.
COPY
INTERRUPT
STOP/
START
2 - 4
5. Press the START button.
When the START button is pressed, the machine begins to scan the original and transmission begins starting with the page that has been
scanned.
[NOTE]
• Press the STOP/CLEAR button to interrupt
transmission. Since the job currently in progress
is displayed, press the [CANCEL] key.
• In case the facsimile cannot be sent due to a
busy receiving machine or for some other
reason, the machine dials the same remote
station after the time set with key operator
control elapses. This function is referred to as
redial. Refer to “Redialing” of “2.5 Selecting a
Remote Station” for details regarding redialing.
• When the facsimile cannot be sent, refer to “7.1
Cannot Send”.
K
ION
T
SET
DATA
SCANNER / PRINTER
2 31
564
897
0
CLEAR QTY.
FAX
COPY
INTERRUPT
STOP/
START
Page 26
2.3 Placing the Original on the Machine
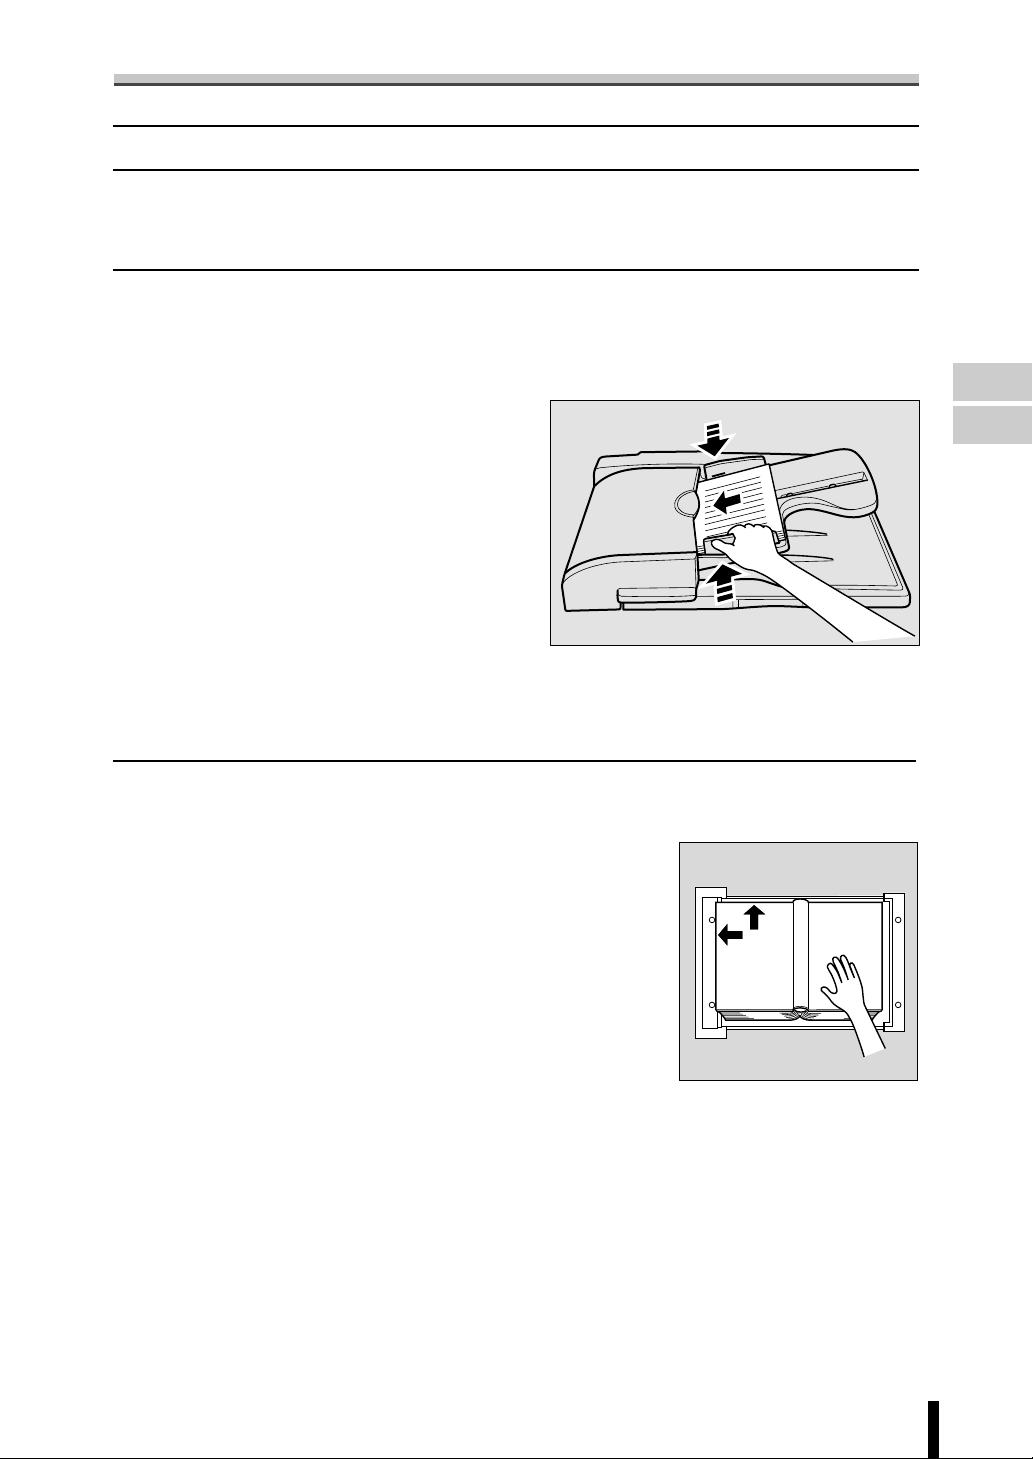
2.3 Placing the Original on the Machine
An RADF and original tray are available for scanning originals with this machine. When an
original is placed in the RADF, the original is scanned by moving through the RADF automatically.
When Using the RADF: Place the side of the original to be scanned facing up
When using the RADF, multiple originals can be scanned automatically. In addition, twosided originals can also be sent.
When using the RADF, multiple originals
can be scanned automatically. In addition,
two-sided originals can also be sent.
1. Close the RADF.
2. Align the edges of originals
starting with the first page.
3. Place the originals in the
RADF with the side to be
scanned facing up.
4. Align the original guide
plates with the width of the
originals.
Use of
Control Panel
Types of
screens
Wake-up
Screen
Fax
Basic screen
Fax
Application
screen
Remote
Station
Registration
screen
Other screens
Memory
Transmission
Simple Fax
Transmission
Placing the
Original on
the Machine
Setting
Transmission
Conditions
Selecting a
Remote
Station
Operation
During
Original
Scanning
Sending
Multiple
Originals
Operation
During
Transmission
Reserving
Transmissions
Manual
Transmission
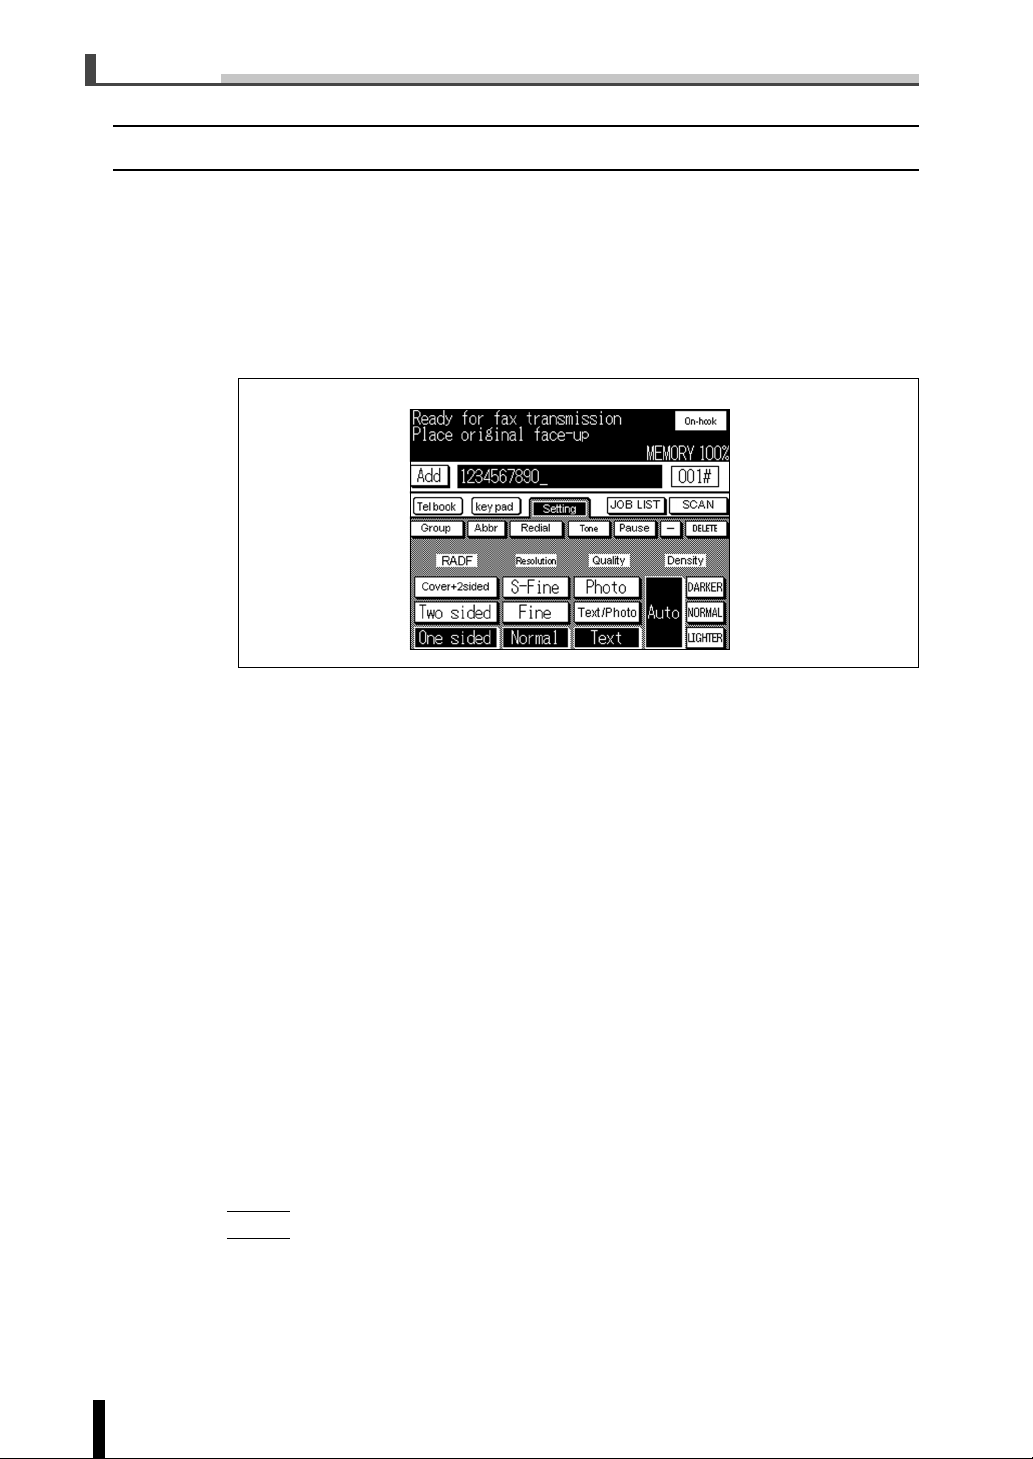
When Placing an Original on the Original Tray:
Place the side of the original to be scanned facing down
Use the original tray for originals that cannot be placed in
the RADF (such as a book or thick/thin originals).
1. Open the RADF.
2. Place the original against the left back
corner while aligning with the scale on the
left side and the side to be transmitted facing
down.
3. Gently close the RADF.
Interrupting
Transmission
Confirmation of
Transmission
Reservation
Documents
Confirming
Setting and
Communication
Results
Intercepted
Transfer of
Received
Documents
Resending
(Restored
transmission
Sender
Information
Reception
Mode
Manual
Reception
Forced
Memory
Reception
When Unable
to Receive
Reception
Information
Application
Functions
Registration
/Setup
Reports and
Lists
)
2 - 5
Troubleshooting
Appendix
Page 27
Chapter 2 Transmission
2.4 Setting Transmission Conditions
[RADF], [Resolution], [Quality] and [Density] are displayed when the [Setting] key is pressed
on the Fax Basic screen. These can be used to set transmission conditions according to the
type of original to be sent.
[Procedure]
1. Press the [Setting] key on the Fax Basic screen.
2. Press the key desired to be set.
Fax Basic screen
2.4 Setting Transmission Conditions
Asterisks indicate initial values at the time of purchase.
Initial values can be changed. Refer to “5.8 Fax screen set” for further details.
(1) [RADF]
This is used to set the manner in which originals are scanned according to the type of
original. There are three types of RADF scanning methods. The FK-101 is set to [One
sided] at the time of purchase.
• [Cover + 2 sided] ...... Press this when scanning two-sided originals having a cover.
Only the first page (cover) is scanned as a one-sided document.
• [Two sided] ...............Press this when scanning two-sided originals.
• [One sided] * ............. Press this when scanning one-sided originals.
(2) [Resolution]
This is used to set the fineness at which originals are to be scanned. The following three
settings are available for [Resolution]. The FK-101 is set to [Normal] at the time of
purchase.
• [S-Fine] ..................... Press this when scanning especially fine originals containing
fine graphics or text.
• [Fine] ......................... Press this when scanning originals containing small graphics or
text.
• [Normal] * .................. Press this when scanning normal originals.
[NOTE]
• As originals are scanned with increasing fineness, the amount of data that is sent also
increases, and more time is required for transmission.
• When [S-Fine] has been selected and the receiving machine is not equipped with an [SFine] mode, originals are sent at a resolution corresponding to the reception capability of
the receiving machine.
2 - 6
Page 28

2.4 Setting Transmission Conditions (continued)
(3) [Quality]
Set [Quality] according to the contents of the original. There are three types of [Quality]
settings. The FK-101 is set to [Text] at the time of purchase.
• [Photo]....................... Press this when scanning originals containing photographs only.
• [Text/Photo] ..............Press this when scanning originals containing both text and
photographs.
• [Text] *....................... Press this when scanning originals containing text only.
(4) [Density]
Set [Density] according to the density of the original. There are four types of [Density]
settings. The FK-101 is set to [Auto] at the time of purchase. This setting activates the
automatic density adjustment function so that originals are scanned at the proper
density. Press [LIGHTER] or [DARKER] to select density that is Lighter or Darker than
density selected in the [Auto] mode.
•[Auto] * ...................... This activates the automatic density adjustment function so that
density is set automatically.
•[DARKER] .................Press to scan originals so that they are darker than the density
set with [Auto].
•[NORMAL].................Press to scan originals at a density that is intermediate to
[DARKER] and [LIGHTER].
•[LIGHTER] ................ Press to scan originals so that they are lighter than the density
set with [Auto].
Use of
Control Panel
Types of
screens
Wake-up
Screen
Fax
Basic screen
Fax
Application
screen
Remote
Station
Registration
screen
Other screens
Memory
Transmission
Simple Fax
Transmission
Placing the
Original on
the Machine
Setting
Transmission
Conditions
Selecting a
Remote
Station
Operation
During
Original
Scanning
Sending
Multiple
Originals
Operation
During
Transmission
Reserving
Transmissions
Manual
Transmission
Interrupting
Transmission
Confirmation of
Transmission
Reservation
Documents
Confirming
Setting and
Communication
Results
Intercepted
Transfer of
Received
Documents
Resending
(Restored
transmission
Sender
Information
Reception
Mode
Manual
Reception
Forced
Memory
Reception
When Unable
to Receive
Reception
Information
Application
Functions
Registration
/Setup
Reports and
Lists
)
2 - 7
Troubleshooting
Appendix
Page 29
Chapter 2 Transmission
C
C
2.5 Selecting a Remote Station
Selecting only 1 remote station
The following methods are used when selecting only 1 remote station.
• Key pad
• One-touch dialing
• Use of the Telbook
• Use of abbr dialing
• Redialing
■ Using the Key Pad
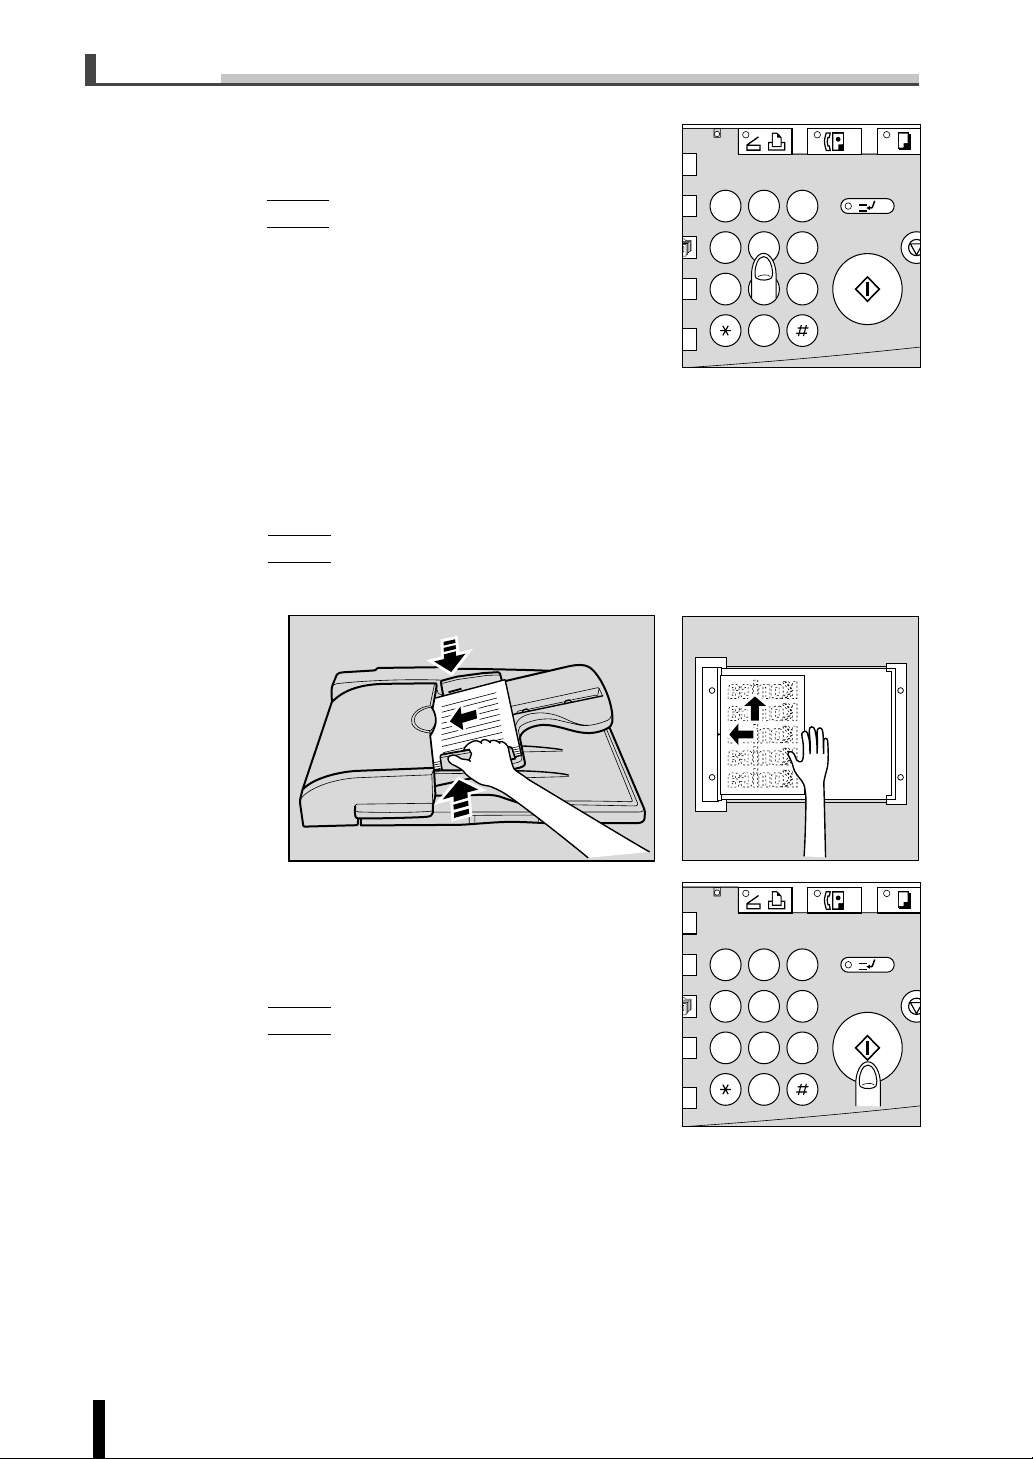
[Procedure]
2.5 Selecting a Remote Station
1. Enter the fax number of the remote
station where the fax is to be sent.
[NOTE]
• Numbers containing up to 38 digits can be
entered.
• Press the [DELETE] key if a mistake has been
made in entering the number.
• Pressing the STOP/CLEAR button erases all
numbers that have been entered.
2. Press the START button. Transmission
begins.
K
ION
T
SET
K
ION
T
SET
DATA
SCANNER / PRINTER
DATA
SCANNER / PRINTER
2 31
564
897
0
2 31
564
897
0
CLEAR QTY.
CLEAR QTY.
FAX
FAX
COPY
INTERRUPT
STOP/
START
COPY
INTERRUPT
STOP/
START
2 - 8
Page 30
2.5 Selecting a Remote Station (continued)
[NOTE]
Special dialing symbols can also be entered.
• [Tone]
When using a rotary dialing telephone line, press [Tone] to select push-button
tone mode. This is used when using a fax information service and so forth. A [T]
is displayed on the screen.
• [Pause]
Press [Pause] to insert a space in a dialed number. Pressing the [Pause] key
once creates an interval of one second between numbers. Multiple spaces can
also be entered. A [P] is displayed on the screen.
If the [Pause] key is pressed following a “0” and so forth in the case of calling to
an outside line from an extension, you can dial with reliability. A [P] is displayed
on the screen.
• [-]
This is entered as a separation symbol when dialing. It has not effect on dialing.
A [-] is displayed on the screen.
Fax Basic screen
Use of
Control Panel
Types of
screens
Wake-up
Screen
Fax
Basic screen
Fax
Application
screen
Remote
Station
Registration
screen
Other screens
Memory
Transmission
Simple Fax
Transmission
Placing the
Original on
the Machine
Setting
Transmission
Conditions
Selecting a
Remote
Station
Operation
During
Original
Scanning
Sending
Multiple
Originals
Operation
During
Transmission
Reserving
Transmissions
Manual
Transmission
Interrupting
Transmission
Confirmation of
Transmission
Reservation
Documents
Confirming
Setting and
Communication
Results
Intercepted
Transfer of
Received
Documents
Resending
(Restored
transmission
Sender
Information
Reception
Mode
Manual
Reception
Forced
Memory
Reception
When Unable
to Receive
Reception
Information
Application
Functions
Registration
/Setup
Reports and
Lists
)
2 - 9
Troubleshooting
Appendix
Page 31

Chapter 2 Transmission
■ Using One-touch/Program Dialing
When a remote station has been registered for one-touch/program dialing, it can be dialed
by pressing a one-touch/program key.
[Procedure]
1. Press the [Program] key of the [Telbook] key to press the One-touch/
program key registered for the remote station.
2. Press the START button. Transmission begins.
[NOTE]
Settings can be changed before pressing the START button.
2.5 Selecting a Remote Station (continued)
Fax Basic screen
■ Using the Remote Station List
A remote station can also be dialed by searching among the names in the remote station list
registered for abbr dialing.
[Procedure]
1. Press the [Telbook] key on the Fax Basic screen, and then press the [Abbr
select] key. Search characters and remote station names registered
during abbr dialing registration are displayed.
Fax Basic screen
2. Press the key of the search character desired to be used for searching.
3. Press the key of the remote station name where the facsimile is desired to
be sent.
2 - 10
4. Press the START button. Transmission begins.
Page 32

2.5 Selecting a Remote Station (continued)
C
■ Use of Abbr Dialing
A remote station can be dialed using an abbr dial number when a remote station has been
registered for abbr dialing.
[Procedure]
1. Press the [Key pad] key or [Setting] key on the Fax Basic screen.
2. Press the [Abbr] key and enter an abbr dial number with the key pad (200
numbers from 00-99 to *00-*99). The abbr number with an A prefix and
name of the remote station are displayed on the screen in the manner of
[A01: Konica].
Fax Basic screen
3. Press the START button. Transmission
begins.
K
ION
T
SET
DATA
SCANNER / PRINTER
2 31
564
897
0
FAX
INTERRUPT
START
CLEAR QTY.
■ Use of Redialing
Refer to “Manual Redialing” on p.2-13.
COPY
STOP/
Use of
Control Panel
Types of
screens
Wake-up
Screen
Fax
Basic screen
Fax
Application
screen
Remote
Station
Registration
screen
Other screens
Memory
Transmission
Simple Fax
Transmission
Placing the
Original on
the Machine
Setting
Transmission
Conditions
Selecting a
Remote
Station
Operation
During
Original
Scanning
Sending
Multiple
Originals
Operation
During
Transmission
Reserving
Transmissions
Manual
Transmission
Interrupting
Transmission
Confirmation of
Transmission
Reservation
Documents
Confirming
Setting and
Communication
Results
Intercepted
Transfer of
Received
Documents
Resending
(Restored
transmission
Sender
Information
Reception
Mode
Manual
Reception
Forced
Memory
Reception
When Unable
to Receive
Reception
Information
)
Application
Functions
Registration
/Setup
Reports and
Lists
2 - 11
Troubleshooting
Appendix
Page 33

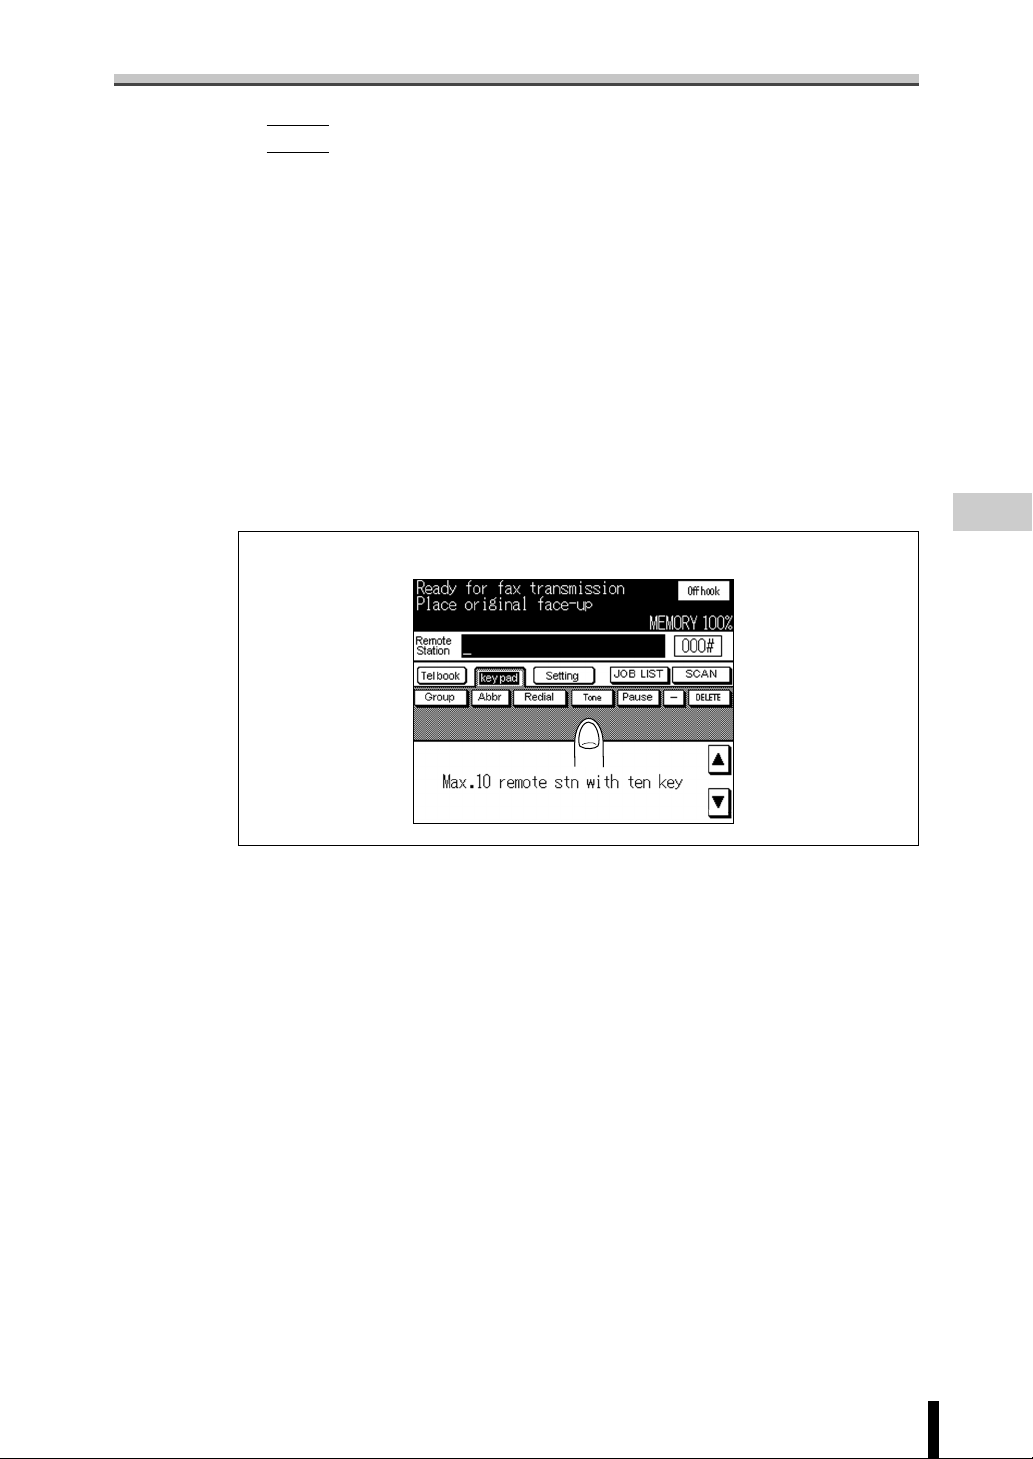
Chapter 2 Transmission
C
2.5 Selecting a Remote Station (continued)
Selecting Multiple Remote Stations (Sequential Multiple Station Transmission)
Documents can be sent to multiple remote stations in a single operation. This function is
referred to a sequential multiple station transmission. The following methods can be used to
select multiple remote stations. They can also be used in combination.
• Use of the key pad
• Use of the Telbook
• Use of abbr dialing
• Use of group dialing
[Procedure]
1. Select the fax number of the remote
station where the fax is to be sent
using any of the following methods.
Refer to “Selecting Only 1 Remote
Station” for the procedure.
• Use of the key pad
• Use of the Telbook
• Use of abbr dialing
• Use of group dialing
Press the [Group] key and then press
the key of the group number.
2. When using the key pad, press the
[Add] key to select the second
remote station. When using other
functions, continue to select the
second remote station. Repeat this
procedure until all remote stations
are selected.
3. Press the Start button.
[NOTE]
Documents can also be sent to registered remote
stations by sequential multiple station transmission
by registering group dialing for abbr dialing. Refer
to “5.3 Registering dial groups” for further details on
group dialing.
[NOTE]: Confirming remote stations]
When the Check button is pressed followed by
K
ION
T
SET
DATA
SCANNER / PRINTER
FAX
2 31
564
897
0
CLEAR QTY.
pressing the [Remote stn conf] key, a list of the
selected remote stations is displayed.
• Pressing the [
] or [ ] key displays the previous or next screen.
• Pressing the [BACK] key twice returns the display to the Fax Basic screen.
[NOTE: Deleting remote stations]
When the Check button key is pressed followed by pressing the [Remote stn conf]
key, a list of the selected remote stations is displayed. Select the remote stations to
be deleted and then press the [DELETE] key.
• Pressing the [
• Pressing the [BACK] key twice returns the display to the Fax Basic screen.
] or [ ] key displays the previous or next screen.
COPY
INTERRUPT
STOP/
START
2 - 12
Page 34

2.5 Selecting a Remote Station (continued)
Redialing
Redialing refers to dialing the number of the same remote station again. Redialing consists
of redialing in which dialing is performed automatically, and manual redialing in which
redialing is performed manually.
■ Redialing
In case the facsimile cannot be sent due to a busy receiving machine or for some other
reason, the machine redials the number after a predetermined amount of time has elapsed.
During that interval before the number is redialed, the transmission document is treated as a
reserved document waiting for dialing. At the time of purchase, the redialing function is set
to redial three times at three minute intervals. Furthermore, the number of redials and the
redialing interval can be changed with key operator control. For further details, refer to “5.11
Line parameter options”.
■ Manual Redialing
Redialing can also be performed manually while the machine is waiting to redial without
having to wait for the number to redialed automatically.
[Procedure]
1. Press the [JOB LIST] key on the Fax Basic screen.
A list of documents waiting to be redialed is displayed. Select the reserved
document desired to be redialed, and then press the [START] key.
JOB LIST Menu screen
Use of
Control Panel
Types of
screens
Wake-up
Screen
Fax
Basic screen
Fax
Application
screen
Remote
Station
Registration
screen
Other screens
Memory
Transmission
Simple Fax
Transmission
Placing the
Original on
the Machine
Setting
Transmission
Conditions
Selecting a
Remote
Station
Operation
During
Original
Scanning
Sending
Multiple
Originals
Operation
During
Transmission
Reserving
Transmissions
Manual
Transmission
Interrupting
Transmission
Confirmation of
Transmission
Reservation
Documents
Confirming
Setting and
Communication
Results
Intercepted
Transfer of
Received
Documents
Resending
(Restored
transmission
Sender
Information
Reception
Mode
Manual
Reception
Forced
Memory
Reception
When Unable
to Receive
Reception
Information
Application
Functions
Registration
/Setup
Reports and
Lists
)
2 - 13
Troubleshooting
Appendix
Page 35

Chapter 2 Transmission
2.6 Operation During Original Scanning
2.6 Operation During Original Scanning
When Original Size Cannot be Detected
In the case the size of the original cannot be detected, the following screen is displayed.
Set the original size when this screen is displayed.
[Procedure]
1. Press the original size key.
2. Press the [OK] key.
Original Size Selection screen
When Memory Capacity is Exceeded
In the case of memory transmission, when a large number of pages are sent or when the
images on the originals are fine, memory capacity may be exceeded due to the large
amount of data stored in memory. When this happens, perform any of the procedures
indicated below.
• Send the documents by quick memory transmission.
• Divide the documents up into smaller groups and then send.
• When there are other reserved documents, wait until transmission of those reserved
documents have been sent and then try sending the document again since there will be
more memory space available at this time.
• When in a hurry, perform the following procedure.
1. Press the [JOB LIST] key on the Fax Basic screen to display the JOB LIST.
2. Check the manner in which the reserved documents have been stored in memory, and
delete any documents that are unnecessary to free up more memory space.
3. Try sending the document again.
2 - 14
Page 36

C
2.7 Sending Multiple Originals from the Original Tray
2.7 Sending Multiple Originals from the Original Tray
Originals that cannot be sent with the RADF can be sent by using the original tray. In
addition, the RADF and original tray can be used in combination to scan originals, or a large
number of originals or originals of different size can be scanned by placing in the RADF in
several small groups. Furthermore, originals are sent by memory transmission in this case.
[Procedure]
1. Switch the mode.
If the Fax Basic screen is not displayed, press the Fax button on the control
panel to display the Fax Basic screen.
2. Select a remote station.
3. Set the desired functions as necessary.
4. Place the original on the original tray or RADF and press the [Scan] key.
Use of
Control Panel
Types of
screens
Wake-up
Screen
Fax
Basic screen
Fax
Application
screen
Remote
Station
Registration
screen
Other screens
Memory
Transmission
Simple Fax
Transmission
Placing the
Original on
the Machine
Setting
Transmission
Conditions
Selecting a
Remote
Station
Operation
During
Original
Scanning
Sending
Multiple
Originals
Operation
During
Transmission
Reserving
Transmissions
Manual
Transmission
[NOTE]
The RADF is given priority over the original tray.
5. Place the next original on the original tray or RADF and press the [Scan]
key. Repeat this procedure until all originals to be sent have been
scanned. The scanned originals are stored in
memory.
6. Press the START button. Transmission
DATA
SCANNER / PRINTER
FAX
begins when the START button is pressed.
K
ION
T
2 31
564
897
0
SET
CLEAR QTY.
INTERRUPT
START
COPY
STOP/
Interrupting
Transmission
Confirmation of
Transmission
Reservation
Documents
Confirming
Setting and
Communication
Results
Intercepted
Transfer of
Received
Documents
Resending
(Restored
transmission
Sender
Information
Reception
Mode
Manual
Reception
Forced
Memory
Reception
When Unable
to Receive
Reception
Information
Application
Functions
Registration
/Setup
Reports and
Lists
Troubleshooting
)
2 - 15
Appendix
Page 37

Chapter 2 Transmission
2.8 Operation During Transmission
When the number is dialed after documents are scanned, an icon indicating the FAX is
operational is displayed on the upper right corner of the screen.
Pressing the icon switches to the active screen.
[NOTE]
If the icon is blinked, the operation is interrupted as paper is jummed, out or so. Please
confirm the machine status.
Transmitting screen
2.8 Operation During Transmission
When Unable to Send
When a document is unable to be sent, an error message is displayed on the screen. Press
the STOP/CLEAR button on the control panel to clear the error message.
Error Message Corrective Action
Transmission error
Press the Check button on the control panel to display the
transmission reservation list and check the transmission status.
2 - 16
Page 38

2.9 Reserving Transmissions
2.9 Reserving Transmissions
Reserving Transmissions
The next transmission can be reserved during communication or printing. This function is
referred to as transmission reservation. Furthermore, the [On hook] key cannot be used for
transmission reservation.
Use of
Control Panel
Types of
screens
Wake-up
Screen
Fax
Basic screen
Fax
Application
screen
Remote
Station
Registration
screen
Other screens
[Procedure]
1. Switch the mode.
When the Fax Basic screen is not displayed, press the Fax button on the
control panel to display the Fax Basic screen.
2. When this function is operational, press the [Reserve] key.
Communicating screen
3. Place the original.
Memory
Transmission
Simple Fax
Transmission
Placing the
Original on
the Machine
Setting
Transmission
Conditions
Selecting a
Remote
Station
Operation
During
Original
Scanning
Sending
Multiple
Originals
Operation
During
Transmission
Reserving
Transmissions
Manual
Transmission
Interrupting
Transmission
Confirmation of
Transmission
Reservation
Documents
Confirming
Setting and
Communication
Results
Intercepted
Transfer of
Received
Documents
Resending
(Restored
transmission
Sender
Information
Reception
Mode
Manual
Reception
Forced
Memory
Reception
When Unable
to Receive
Reception
Information
)
2 - 17
Application
Functions
Registration
/Setup
Reports and
Lists
Troubleshooting
Appendix
Page 39

Chapter 2 Transmission
C
4. Set the desired functions as necessary.
5. Select a remote station.
2.9 Reserving Transmissions (continued)
6. Press the START button.
[NOTE]
To delete a transmission reservation, display
the reservation list and press the [DELETE]
key. Although the reservation list key on the
Fax Basic screen will flash when the machine
has run out of paper or paper has become
jammed in the machine while processing a job
prior to the transmission reservation, transmissions can still be reserved.
K
ION
T
SET
DATA
SCANNER / PRINTER
2 31
564
897
0
CLEAR QTY.
Bundled Transmission
When a transmission is reserved for a remote station that is the same as a transmission
reservation document stored in memory, the newly reserved document and the reserved
document are sent at the same time. A maximum of five documents can be sent continuously. In order for the Bundled transmission function to be activated, however, it is necessary that the following items of the transmission conditions for documents being transmitted
and transmission reservation documents be the same.
• Memory transmission, Resolution, International communication mode, ECM and V34.
• Restricted access transmission, relay transfer, closed area reception must not be desig-
nated.
[NOTE]
• Bundled transmission is available when the Bundled transmission function of key operator mode is set to ON. Refer to “Function ON/OFF Setting” of “5.17 Setting transmission/
reception functions” for information on setting. Furthermore, the Bundled transmission
function is set to OFF at the time of purchase.
• Documents for which relay multiple stations, transfer or polled transmission has been
designated are not transmitted continuously.
• The Bundled transmission function cannot be used for documents for which communication is already in progress.
FAX
COPY
INTERRUPT
STOP/
START
2 - 18
Page 40

2.10 Manual Transmission
2.10 Manual Transmission
This operation is performed in the case of sending documents while confirming the status of
the receiving machine. Furthermore, memory transmission cannot be used with manual
transmission.
[Procedure]
1. Switch the mode.
If the Fax Basic screen is not displayed, press the Fax button on the control
panel to display the Fax Basic screen.
2. Place the original.
• When placing the original on the original tray, open the RADF and place the
original on the original tray with the side of the original to be scanned facing
down.
• When placing the original in the RADF, place the original in the RADF with the
side of the original to be scanned facing up.
Use of
Control Panel
Types of
screens
Wake-up
Screen
Fax
Basic screen
Fax
Application
screen
Remote
Station
Registration
screen
Other screens
Memory
Transmission
Simple Fax
Transmission
Placing the
Original on
the Machine
Setting
Transmission
Conditions
Selecting a
Remote
Station
Operation
During
Original
Scanning
Sending
Multiple
Originals
Operation
During
Transmission
Reserving
Transmissions
Manual
Transmission
3. Press the [Off hook] key.
Check that the [Rx] key has not been selected. If the [Rx] key has been
selected, press the [Rx] key to switch to the transmission mode. Check that
the original is properly placed on the machine.
[NOTE]
• Pressing the [On hook] key returns the display to the Fax Basic screen.
• When an external telephone is connected, documents can also be sent by lifting
up the receiver of the external telephone.
Off-Hook screen
Interrupting
Transmission
Confirmation of
Transmission
Reservation
Documents
Confirming
Setting and
Communication
Results
Intercepted
Transfer of
Received
Documents
Resending
(Restored
transmission
Sender
Information
Reception
Mode
Manual
Reception
Forced
Memory
Reception
When Unable
to Receive
Reception
Information
Application
Functions
Registration
/Setup
Reports and
Lists
)
2 - 19
Troubleshooting
Appendix
Page 41

Chapter 2 Transmission
C
4. Set the functions of the [Setting] key as necessary.
2.10 Manual Transmission (continued)
5. Select the remote station with the key pad.
[NOTE]
When an external telephone is connected, the
number of the remote station can also be dialed
from the external telephone.
6. Once a signal noise is heard, press the
[START] key of the Off-hook screen. Transmission begins.
[NOTE]
When is external telephone is connected, put back
the receiver of the external telephone.
K
ION
T
SET
DATA
SCANNER / PRINTER
2 31
564
897
0
CLEAR QTY.
FAX
COPY
INTERRUPT
STOP/
START
2 - 20
Page 42

2.11 Interrupting Transmission
2.11 Interrupting Transmission
The specific procedure for interrupting transmission depends on whether communication is
in progress or a document to be sent has been reserved. In the FK-101, transmission
instructions and images stored in memory are referred to as reserved jobs. Jobs reserved
for communication and jobs currently being processed are simultaneously displayed on the
JOB LIST screen.
Use of
Control Panel
Types of
screens
Wake-up
Screen
Fax
Basic screen
Fax
Application
screen
Remote
Station
Registration
screen
Other screens
Interrupting Communication in Progress
When communication is in progress, transmission can be interrupted with the procedure
described below.
[Procedure]
1. Press the STOP/CLEAR button on the control panel. The jobs currently
being processed are displayed.
2. Select a job and press the [STOP] key. A confirming cancellation screen is
displayed.
3. Press the [YES] key. Transmission is interrupted.
Canceling Reserved Jobs
When desiring to cancel a reserved job, transmission can be canceled by deleting the
reservation document.
1. Press the [JOB LIST] key on the Fax Basic screen. The JOB LIST screen is
displayed.
Fax Basic screen
[NOTE: JOB LIST Screen]
Jobs currently in progress are simultaneously displayed on the JOB LIST screen.
Memory
Transmission
Simple Fax
Transmission
Placing the
Original on
the Machine
Setting
Transmission
Conditions
Selecting a
Remote
Station
Operation
During
Original
Scanning
Sending
Multiple
Originals
Operation
During
Transmission
Reserving
Transmissions
Manual
Transmission
Interrupting
Transmission
Confirmation of
Transmission
Reservation
Documents
Confirming
Setting and
Communication
Results
Intercepted
Transfer of
Received
Documents
Resending
(Restored
transmission
Sender
Information
Reception
Mode
Manual
Reception
Forced
Memory
Reception
When Unable
to Receive
Reception
Information
)
2 - 21
Application
Functions
Registration
/Setup
Reports and
Lists
Troubleshooting
Appendix
Page 43

Chapter 2 Transmission
2. Press the [FAX JOB] key.
3. Select the reservation document desired to be canceled.
• Press the [ ] or [ ] key to display the next or previous screen.
• Pressing the [BACK] key returns the display to the Fax Basic screen.
4. Press the [DELETE] key.
2.11 Interrupting Transmission (continued)
JOB LIST screen
5. Press the [YES] key. The reservation document is deleted.
6. Press the [BACK] key. The display returns to the Fax Basic screen.
2 - 22
Page 44

2.12 Confirmation of Transmission Reservation Documents
2.12 Confirmation of Transmission Reservation Documents
Transmission reservation documents stored in memory can be confirmed on the reservation
list displayed on the screen.
[NOTE]
Reservation document can also be deleted from the reservation list.
1. Press the [JOB LIST] key on the Fax Basic screen. The JOB LIST screen is
displayed.
Fax Basic screen
[NOTE: JOB LIST Screen]
• Jobs currently in progress are simultaneously displayed on the JOB LIST screen.
• Press the [
• Pressing the [BACK] key returns the display to the Fax Basic screen.
2. Press the [BACK] key when confirmation is completed. The display
returns to the Fax Basic screen.
] or [ ] when desiring to display the next or previous screen.
JOB LIST screen
Use of
Control Panel
Types of
screens
Wake-up
Screen
Fax
Basic screen
Fax
Application
screen
Remote
Station
Registration
screen
Other screens
Memory
Transmission
Simple Fax
Transmission
Placing the
Original on
the Machine
Setting
Transmission
Conditions
Selecting a
Remote
Station
Operation
During
Original
Scanning
Sending
Multiple
Originals
Operation
During
Transmission
Reserving
Transmissions
Manual
Transmission
Interrupting
Transmission
Confirmation of
Transmission
Reservation
Documents
Confirming
Setting and
Communication
Results
Intercepted
Transfer of
Received
Documents
Resending
(Restored
transmission
Sender
Information
Reception
Mode
Manual
Reception
Forced
Memory
Reception
When Unable
to Receive
Reception
Information
)
2 - 23
Application
Functions
Registration
/Setup
Reports and
Lists
Troubleshooting
Appendix
Page 45

Chapter 2 Transmission
2.13 Confirming Settings and Communication Results
2.13 Confirming Settings and Communication Results
The settings and communication results of the Fax Basic screen and Fax Application screen
can be confirmed by using the CHECK button on the control panel.
[Procedure]
1. Press the Check button on the control panel. The Setting Confirmation
Mode Screen is displayed.
2. Press the key of the parameter desired to be confirmed.
Setting Confirmation Mode screen
3. Confirm the settings.
[NOTE: Deleting a Remote Station]
• Open the remote station confirmation screen. Select the remote station desired
to be deleted with the [▼] or [▲] key and then press the [DELETE] key.
• Pressing the [BACK] key returns the display to the previous screen.
4. Press the [BACK] key several times after completion of confirmation.
[NOTE]
• Refer to “2.14 Intercepted Transfer of Received Documents Waiting for Output”
for information on intercepted transfer.
• Refer to “2.15 Resending” for information on resending.
2 - 24
Page 46

2.13 Confirming Settings and Communication Results (continued)
Setting Confirmation screen
Remote Station Confirmation screen
Use of
Control Panel
Types of
screens
Wake-up
Screen
Fax
Basic screen
Fax
Application
screen
Remote
Station
Registration
screen
Other screens
Memory
Transmission
Simple Fax
Transmission
Placing the
Original on
the Machine
Setting
Transmission
Conditions
Selecting a
Remote
Station
Operation
During
Original
Scanning
Sending
Multiple
Originals
Operation
During
Transmission
Reserving
Transmissions
Manual
Transmission
Transmission Results screen Reception Results screen
Interrupting
Transmission
Confirmation of
Transmission
Reservation
Documents
Confirming
Setting and
Communication
Results
Intercepted
Transfer of
Received
Documents
Resending
(Restored
transmission
Sender
Information
Reception
Mode
Manual
Reception
Forced
Memory
Reception
When Unable
to Receive
Reception
Information
Application
Functions
Registration
/Setup
Reports and
Lists
)
2 - 25
Troubleshooting
Appendix
Page 47

Chapter 2 Transmission
2.14 Intercepted Transfer of Received Documents Waiting for Output
2.14
Intercepted Transfer of Received Documents Waiting for Output
Received documents waiting for output can be transferred manually by using the CHECK
button on the control panel. The intercepted transfer can be set when the Fax Basic screen
is displayed, and operation has been interrupted as a result of the machine being out of
paper or paper being jammed in the machine.
[Procedure]
1. Press the Check button on the control panel. The setting confirmation
mode screen is displayed.
Setting Confirmation Mode screen
2. Press the [Forward Tx] key.
3. Enter the destination where the received document is to be transferred by
using the key pad on the control panel and the keys on the menu and then
press the START button. Pressing the [BACK] key returns the display to
the setting confirmation mode screen.
Forward transmission screen
[NOTE]
When desiring to cancel intercepted transfer, press the STOP/CLEAR button. Since
the job currently being processed will be displayed, select the processed job.
Press the [STOP] key and then the [YES] key to cancel the job.
2 - 26
Page 48

2.15 Resending (Restored transmission)
2.15 Resending (Restored transmission)
When memory transmission is selected, documents sent to a remote unit that is busy or
otherwise unavailable will be stored in memory for a fixed period of time, and the Re-Tx icon
will be indicated on the JOB LIST screen. Documents stored in memory can be selected
and sent again either to the same remote station or after changing to a different remote
station.
Re-Tx screen
[NOTE]
• Restored transmission is possible when memory transmission is set.
• Transmission documents are not stored in memory when a transmission has been can-
celed by pressing the STOP/CLEAR button during transmission.
• It is necessary for the restored transmission setting of key operator mode to be set to ON
in order to store documents that were unable to be sent for a fixed period of time in
memory. In addition, the amount of time documents are stored in memory can be selected among four levels of 12, 24, 48 and 72 hours. Refer to Restored Transmission
Setting” of “5.17 Setting up transmission/reception functions” for information on setting.
Furthermore, the restored transmission setting is set to OFF at the time of purchase.
[Procedure]
1. If the Fax Basic screen is not displayed, press the Fax button on the
control panel to display the Fax Basic screen.
2. Press the Check button on the control panel. The setting confirmation
mode screen is displayed.
Use of
Control Panel
Types of
screens
Wake-up
Screen
Fax
Basic screen
Fax
Application
screen
Remote
Station
Registration
screen
Other screens
Memory
Transmission
Simple Fax
Transmission
Placing the
Original on
the Machine
Setting
Transmission
Conditions
Selecting a
Remote
Station
Operation
During
Original
Scanning
Sending
Multiple
Originals
Operation
During
Transmission
Reserving
Transmissions
Manual
Transmission
Interrupting
Transmission
Confirmation of
Transmission
Reservation
Documents
Confirming
Setting and
Communication
Results
Intercepted
Transfer of
Received
Documents
Resending
(Restored
transmission
Sender
Information
Reception
Mode
Manual
Reception
Forced
Memory
Reception
When Unable
to Receive
Reception
Information
)
2 - 27
Application
Functions
Registration
/Setup
Reports and
Lists
Troubleshooting
Appendix
Page 49

Chapter 2 Transmission
3. Press the [Re-Tx] key. The Resending Menu screen is displayed.
4. Press the [▲] or [▼] key to select the document to be resent.
2.15 Resending (Restored transmission) (continued)
Setting Confirmation Mode screen
Resending Menu screen
2 - 28
[NOTE]
Press the [ ] or [ ] key when desiring to display the next or previous menu.
5. Press the [Re-Tx] key. The Re-Tx screen is displayed.
[NOTE]
• Press the [BACK] key to cancel the operation.
• When deleting a document from memory, select the document to be deleted and
then press the [DELETE] key.
Page 50

2.15 Resending (Restored transmission) (continued)
6. Select a remote station.
Re Tx screen
[NOTE]
Refer to “2.5 Selecting a Remote Station” for information on selecting a remote
station.
7. Press the START button. Transmission of the selected document starts.
[NOTE]
• Refer to “2.11 Interrupting Transmission” in the case of interrupting transmission.
• When the receiving machine is busy or a document cannot be sent for some other
reason, the number of the remote station is redialed. Refer to “Redialing” of “2.5
Selecting a Remote Station” for information on redialing.
• When unable to send a document, refer to “7.1 Cannot Send”.
Use of
Control Panel
Types of
screens
Wake-up
Screen
Fax
Basic screen
Fax
Application
screen
Remote
Station
Registration
screen
Other screens
Memory
Transmission
Simple Fax
Transmission
Placing the
Original on
the Machine
Setting
Transmission
Conditions
Selecting a
Remote
Station
Operation
During
Original
Scanning
Sending
Multiple
Originals
Operation
During
Transmission
Reserving
Transmissions
Manual
Transmission
Interrupting
Transmission
Confirmation of
Transmission
Reservation
Documents
Confirming
Setting and
Communication
Results
Intercepted
Transfer of
Received
Documents
Resending
(Restored
transmission
Sender
Information
Reception
Mode
Manual
Reception
Forced
Memory
Reception
When Unable
to Receive
Reception
Information
)
2 - 29
Application
Functions
Registration
/Setup
Reports and
Lists
Troubleshooting
Appendix
Page 51

Chapter 2 Transmission
2.16 Sender Information
Originals that have been sent are recorded in the following manner by the receiving machine.
When Sender Information is Set to Inside Header
FROM : 01234567890123456 2000/02/01: 23 # 012 P.5 /10
Original
[NOTE]
The Fax ID or sender name set with [FAX ID No/name entry] on the key operator mode Fax
setting menu is displayed in the FROM space of sender information.
When Sender Information is Set to Outside Header
2.16 Sender Information
FROM : 01234567890123456 2000/02/01: 23 # 012 P.5 /10
Original
When Sender Information is set to [OFF]
Original
2 - 30
Page 52

Chapter 3 Reception
3.1 Reception Mode
3.2 Manual Reception
3.3 Forced Memory Reception
3.4 When Unable to Receive
3.5 Reception Information
Page 53

Chapter 3
Reception
3.1 Reception Mode
There are two types of reception methods.
Auto Reception (Fax Only Mode)
This mode is set when using the telephone line for fax use only. The FK-101 begins to
receive incoming fax messages automatically when the set number of ring signals is detected. During reception, the word [Receiving] is displayed in the screen message area.
Auto reception (Fax only mode) is activated when [Receive mode (Auto/Man)] is set to [Auto
Rx] in fax initial settings of key operator mode.
[NOTE]
• Refer to “5.11 Line Parameter options” for further details.
• Refer to “5.11 Line Parameter options” for information regarding the number of incoming
ring signals.
Manual Reception (Telephone Only Mode)
It is convenient to set the FK-101 to this mode when an external telephone (including an
answering machine telephone) is connected and the majority of incoming calls are telephone calls. In this mode, the telephone continues to ring after an incoming call has been
received. Manual reception (Telephone Only Mode) is activated when [Receive mode
(Auto/Man)] is set to [Manual Rx] in fax initial settings of key operator control. Refer to “3.2
Manual Reception” for information regarding operation during manual reception.
3.1 Reception Mode
[NOTE]
Refer to “5.11 Line Parameter options” for more details.
3 - 2
Page 54

3.2 Manual Reception
3.2 Manual Reception
Fax messages can be received manually when [Receive mode (Auto/Man)] is set to [Manual
Rx] in Fax initial settings of key operator control. An external telephone must be connected
to receive fax messages manually.
[Procedure]
1. Press the [Off-hook] key when the external telephone rings.
2. Check that the display of [Rx] key is highlighted.
If an original is present in the RADF or original tray, the [Rx] key is not highlighted even if there is an incoming call. In this case, press the [Rx] key to
highlight the display.
3. Press the [START] key on the onhook menu. Reception begins when the
[START] key is pressed.
Use of
Control Panel
Types of
screens
Wake-up
Screen
Fax
Basic screen
Fax
Application
screen
Remote
Station
Registration
screen
Other screens
Memory
Transmission
Simple Fax
Transmission
Placing the
Original on
the Machine
Setting
Transmission
Conditions
Selecting a
Remote
Station
Operation
During
Original
Scanning
Sending
Multiple
Originals
Operation
During
Transmission
Reserving
Transmissions
Manual
Transmission
Interrupting
Transmission
Confirmation of
Transmission
Reservation
Documents
Confirming
Setting and
Communication
Results
Intercepted
Transfer of
Received
Documents
Resending
(Restored
transmission
Sender
Information
Reception
Mode
Manual
Reception
Forced
Memory
Reception
When Unable
to Receive
Reception
Information
Application
Functions
Registration
/Setup
Reports and
Lists
)
3 - 3
Troubleshooting
Appendix
Page 55

Chapter 3
Reception
3.3 Forced Memory Reception 3.4 When Unable to Receive
3.3 Forced Memory Reception
Received documents can be set with key operator control to be stored in memory without
being printed out immediately so that they can be printed out as necessary. This function is
referred to as forced memory reception.
[NOTE]
• Refer to “4.22 Compulsory mem. Rx” for information on the procedure for printing or
deleting documents received by forced memory reception.
• Forced memory reception is set to OFF at the time of purchase. Refer to “Forced
Memory Reception Setting” of “5.17 Setting up transmission/reception functions” for information on setting forced memory reception.
3.4 When Unable to Receive
When documents are unable to be received, the following error message is displayed. Take
corrective actions by referring to the following table. Press the STOP/CLEAR button to clear
the error message display.
In addition, if an external telephone continues to ring, [Receive mode (Auto/Man)] may be
set to [Manual Rx] in Fax initial settings of key operator control. This must be set to [Auto
Rx] to receive documents automatically. For more details, refer to “5.11 Line Parameter
option”.
Furthermore, documents may also not be able to be received because memory is full. In
addition, check that there is paper in the paper tray.
egasseMrorrE noitcAevitcerroC
rorrenoitpeceR tnemucodehtdna,noitpecergnirudderruccosahrorrenA
otnoitatsgnidnesehttseuqeR.deviecerebotelbanusaw
.niagatnemucodehtdnes
3 - 4
Page 56

3.5 Reception Information
3.5 Reception Information
Size Reduction and Page Division
When the original image of the transmitted document is too long or too wide for the paper
size loaded at the receiving end, two methods for handling the situation are available in the
key operator mode. Namely, the original image can be reduced to 96% or the image can be
divided and printed on two pages instead of one.
When Recording after Reducing 96%
In the case of receiving a document that is smaller or equal to the size of the paper set in
the paper tray, it is recorded after reducing 96% to the paper of the closest size.
[NOTE]
When paper of the closest size is not available as a result of the machine being out of that
paper or other reason, the received document is printed out onto a different size of paper. At
this time, a portion of the image may be missing.
Use of
Control Panel
Types of
screens
Wake-up
Screen
Fax
Basic screen
Fax
Application
screen
Remote
Station
Registration
screen
Other screens
Memory
Transmission
Simple Fax
Transmission
Placing the
Original on
the Machine
Setting
Transmission
Conditions
Selecting a
Remote
Station
Operation
During
Original
Scanning
Sending
Multiple
Originals
Operation
During
Transmission
Reserving
Transmissions
Manual
Transmission
Original
Received Document
Interrupting
Transmission
Confirmation of
Transmission
Reservation
Documents
Confirming
Setting and
Communication
Results
Intercepted
Transfer of
Received
Documents
Resending
(Restored
transmission
Sender
Information
Reception
Mode
Manual
Reception
Forced
Memory
Reception
When Unable
to Receive
Reception
Information
Application
Functions
Registration
/Setup
Reports and
Lists
)
3 - 5
Troubleshooting
Appendix
Page 57

Chapter 3
Reception
When Recording after Reducing
■ When recording after reducing with the FK-101
When the page division recording is set to OFF with the key operator control, if a document
that is longer than the paper placed in the paper tray is received, it is recorded after reduction so that it becomes within one piece of paper.
3.5 Reception Information (continued)
Original
Received Document
■ When recording after page division
When your page division recording is set to ON in the key operator mode, and the document
being received is longer than the paper loaded in your paper tray, the original image will be
divided and the image will print out on more than one page.
Original
Received Document
[NOTE]
• In the case of originals that are slightly longer than the regular size, the original may be
recorded after dividing only the bottom edge of the document into a separate page. In
such cases, this can be accommodated by changing the “Reduction for record” of
“Transmission/reception mode setting” so that the original is reduced to fit on a single
piece of paper without being divided into separate pages whenever possible. Refer to
“5.12 Transmission/reception mode options” for information regarding the procedure.
Furthermore, the recording reduction rate is set to 96% at the time of purchase.
• Originals can be received up to a maximum length of 840 mm.
• If the machine runs out of paper or paper becomes jammed in the machine during page
division, printing is resumed starting with the first divided page when these problems are
corrected.
3 - 6
Page 58

3.5 Reception Information (continued)
When [RTI] is set to [ON]
When [RTI] is set to [ON] with the Fax initial setting of the key operator control, the received
time, reception no., and no. of pages are recorded as a footer.
Refer to “5.10 Sender information/reception time options” for details.
Rx time: 2000/02/04 09:45 Rx No.: 002 P.001
When [2 sided reception] is set to [ON]
When [2 sided reception] is set to [ON] in transmission/reception mode setting of key
operator control, documents are recorded on both sides of the paper.
For further details, refer to “5.12 Transmission/reception mode options”.
Front
Back
Use of
Control Panel
Types of
screens
Wake-up
Screen
Fax
Basic screen
Fax
Application
screen
Remote
Station
Registration
screen
Other screens
Memory
Transmission
Simple Fax
Transmission
Placing the
Original on
the Machine
Setting
Transmission
Conditions
Selecting a
Remote
Station
Operation
During
Original
Scanning
Sending
Multiple
Originals
Operation
During
Transmission
Reserving
Transmissions
Manual
Transmission
Interrupting
Transmission
Confirmation of
Transmission
Reservation
Documents
Confirming
Setting and
Communication
Results
Intercepted
Transfer of
Received
Documents
Resending
(Restored
transmission
Sender
Information
Reception
Mode
Manual
Reception
Forced
Memory
Reception
When Unable
to Receive
Reception
Information
)
3 - 7
Application
Functions
Registration
/Setup
Reports and
Lists
Troubleshooting
Appendix
Page 59

Chapter 3
Reception
When [ 2 in 1 print] is set to [ON]
When [2 in 1 print] is set to [ON] in transmission/reception mode setting of key operator
control, two pages of received originals are recorded after combining into a single page. For
further details, refer to “5.12 Transmission/reception mode options”.
Received Original Printing Method
At the time of purchase, the FK-101 is set so that all received originals are first temporarily
stored in memory and then printed out after reception is completed. The FK-101 can also
be set to print out originals one page at a time as soon as that page is received.
3.5 Reception Information (continued)
[NOTE]
Refer to “5.12 Transmission/reception mode options” for information regarding the setting
procedure.
3 - 8
Page 60

Chapter 4 Application Functions
4.1 Application functions overview
4.2 Memory Tx
4.3 2 in 1 Tx
4.4 Book Tx
4.5 Frame erase Tx
4.6 Original size set
4.7 Total page set
4.8 Mixed original
4.9 Folded original
4.10 Long original
4.11 Flip Side 2
4.12 Polled Tx
4.13 Polling Rx
4.14 Timer Tx
4.15 Int’l com
4.16 ECM off
4.17 Bulletin
4.18 V34 OFF
4.19 Relay Tx Req
4.20 Confiden. Tx
4.21 ID Tx
4.22 Compulsory mem. Rx
4.23 One-touch/Program
Page 61

Chapter 4 Application Functions
A
4.1 Application functions overview
Press the Application button on the control panel of the Fax Basic screen, and the Fax
Application Menu screen appears.
Control panel
HELP
CHECK
APPLICATION
OUTPUT
AUTO RESET
DATA
SCANNER / PRINTER
2 31
564
897
0
F
CLEAR QTY.
4.1 Application functions overview
Fax Application Menu screenFax Basic screen
The Fax Application Menu screen consists of two screens. Use the [ ] and [ ] keys to
switch between the two screens.
• Memory Tx :The FK-101 can read and memorize in memory the document before it
actually starts transmission.
• 2 in 1 Tx :The FK-101 can gather two pages into one wide page and transmit the
composed wide page.
• Book Tx :The FK-101 can produce two successive pages from two opposite
pages in a book.
• Frame erase Tx :When transmitting pages in a book, it is possible to erase dark bands
that would otherwise be reproduced in the marginal areas of the transmitted pages.
• Original size set :This function allows you to designate the size of the document to be
transmitted. It is convenient when you intend to transmit part of a page
or pages.
• Total page set :In quick memory transmission, the number representing the total number
of pages transmitted can be attached to the page number information.
• Original setting : This includes three functions as follows.
• Mixed original :You can set and send document pages of mixed sizes by a single
•
Folded original
sequence of operations.
:The FK-101 can read and transmit a document having folds that would
hinder the machine from detecting the document size properly.
•Long original : This function allows transmitting pages longer than the length (420 mm)
of A3 size.
4 - 2
Page 62

4.1 Application functions overview (continued)
A
• Flip Side 2 :When reading a document that has pages printed on both faces, with
the aid of the RADF, this function allows specifying the manner of
document binding (whether you turn pages horizontally or vertically) to
make compensation for reading the overturned pages.
• Polled Tx :The FK-101 can read a document and store it in memory until the remote
station initiates transmission by sending a command to receive (polling).
• Polling Rx :The FK-101 can initiate reception by sending a command to a remote
station to receive a document that is set to be ready for transmission on
the remote station or kept reserved for polled transmission.
• Timer Tx :The time to start communication can be specified.
• Int’l com :A lower transmission rate will be employed.
• ECM off : Error Correction Mode (ECM) can be disabled.
• Bulletin
*1
:Bulletin boards can be used to browse documents, store documents to
be transmitted by polling.
It can be used to send a command to a remote station to send documents stored on its board.
• V34 OFF : When the V34 protocol can not be used due to restrictions of exchange
equipment, the V34 mode is disabled for transmission.
• Relay Tx Req
*1
:It is possible to simultaneously transmit to many remote stations via an
intermediate (relay) station. If the necessity of simultaneously transmitting to far stations occurs quite often, you can cut down the communication costs by organizing local groups of stations.
:You can use Restricted access boxes (like post-office boxes) to ex-
• Confiden.Tx
*1
change private information with specific persons. You can not only send
information to a restricted access box of a remote station (Restricted
access transmission) but receive in a restricted access box of the own
station (Restricted access reception).
:Transmission can be made with a password attached, as required when
• ID Tx
*2
the receiving station selects closed area communication mode.
[NOTE]
*1:F-code is used as communication code.
It is impossible to communicate with the FAX without F-code function.
Please confirm the remote FAX to communicate.
*2: It can be used in the case of transmission to the receiving station which is FK-101 set
closed area communication mode.
• The key representing the function you select will be indicated by reversing.
• Press the [CANCEL] key to return to the Fax Basic screen .
• V34 is a communication mode used in the super G3 FAX.
When you return to the Fax Basic screen after selecting a function on the Fax application
menu, the function you have selected lights in green, indicating your choice. [Application] is
indicated on the Fax Basic screen.
To know more details of the mode or status currently selected, press the Check button on
the control panel and look at the Check screen. For operation, see “2.13 Confirming
Settings and Communication Results”.
Check screenControl panel
DATA
SCANNER / PRINTER
HELP
CHECK
APPLICATION
OUTPUT
2 31
564
897
0
AUTO RESET
F
CLEAR QTY.
Use of
Control Panel
Types of
screens
Wake-up
Screen
Fax
Basic screen
Fax
Application
screen
Remote
Station
Registration
screen
Other screens
Memory
Transmission
Simple Fax
Transmission
Placing the
Original on
the Machine
Setting
Transmission
Conditions
Selecting a
Remote
Station
Operation
During
Original
Scanning
Sending
Multiple
Originals
Operation
During
Transmission
Reserving
Transmissions
Manual
Transmission
Interrupting
Transmission
Confirmation of
Transmission
Reservation
Documents
Confirming
Setting and
Communication
Results
Intercepted
Transfer of
Received
Documents
Resending
(Restored
transmission
Sender
Information
Reception
Mode
Manual
Reception
Forced
Memory
Reception
When Unable
to Receive
Reception
Information
Application
Functions
Registration
/Setup
Reports and
Lists
Troubleshooting
)
4 - 3
Appendix
Page 63

Chapter 4 Application Functions
[NOTE: Help screen]
• Press the Help button on the control panel when the Fax Application Menu screen
is displayed. You will see the Help screen for advanced functions.
• Press the [EXIT] key to return to the Fax Application Menu screen.
• Press the [
] or [ ] key to go to the next or previous screen, respectively.
Help screen for Application functions screen
4.1 Application functions overview (continued)
4 - 4
Page 64

4.2 Memory Tx
The memory transmission function enable the FK-101 to read and memorize all pages of the
original document before it actually starts transmission. You can take away your document
before transmission is completed. Unless memory transmission is selected, quick memory
transmission is used. In quick memory transmission, the FK-101 reads and transmits page
by page.
4.2 Memory Tx
Use of
Control Panel
Types of
screens
Wake-up
Screen
Fax
Basic screen
Fax
Application
screen
Remote
Station
Registration
screen
Other screens
[TROUBLE?]
Should Memory overflow occur when the original document is being read, you have two
options: Transmit the part of the original that has been read (scanned), or redo the procedure from the beginning. If memory overflow happens frequently, expanding the memory is
recommended. For details, call your service representative.
[Rules for Memory Tx]
Memory transmission will be selected automatically in the following cases.
• You have selected [Memory Tx] in the Fax Application Menu screen.
• You have pressed the [SCAN] key in the Fax Basic screen.
• You have selected [2 in 1 Tx], [Book Tx], [Frame erase Tx], [Original size set], [Polled Tx],
[Timer Tx] or [Mixed original] of [Original setting], in the Fax Application screen.
• You have designated more than one remote station.
[NOTE]
The FK-101 is set up for quick memory transmission initially. You can change the setting to
select memory transmission. To change settings, see “5.12. Transmission/reception mode
options”
[Functions incompatible with Memory Tx]
Total page set, Polling Rx
Memory
Transmission
Simple Fax
Transmission
Placing the
Original on
the Machine
Setting
Transmission
Conditions
Selecting a
Remote
Station
Operation
During
Original
Scanning
Sending
Multiple
Originals
Operation
During
Transmission
Reserving
Transmissions
Manual
Transmission
Interrupting
Transmission
Confirmation of
Transmission
Reservation
Documents
Confirming
Setting and
Communication
Results
Intercepted
Transfer of
Received
Documents
Resending
(Restored
transmission
Sender
Information
Reception
Mode
Manual
Reception
Forced
Memory
Reception
When Unable
to Receive
Reception
Information
)
4 - 5
Application
Functions
Registration
/Setup
Reports and
Lists
Troubleshooting
Appendix
Page 65

Chapter 4 Application Functions
[Procedure]
1. Press the Fax button on the control panel to view the Fax Basic screen, if
it is not already displayed.
2. Press the Application button on the control panel. The Fax Application
Menu screen appears.
3. Press the [Memory Tx] key. The [Memory Tx] key appears reversed.
[NOTE]
To release memory transmission mode, press the [CANCEL] key or the [Memory Tx]
key again.
4.2 Memory Tx (continued)
Fax Application Menu screen
4. Press the [OK] key. Memory Tx is selected and you return to the Fax Basic
screen.
5. Set other functions if necessary.
[NOTE]
• See “2.4 Setting Transmission Conditions” for setting functions on the Fax Basic
screen. See “Chapter 4 Application Functions” for setting functions on the Fax
Application Menu screen.
• You cannot select different options of the [Original setting] key from page to page.
4 - 6
Page 66

C
4.2 Memory Tx (continued)
6. Designate the remote station.
[NOTE]
See “2.5 Selecting a Remote Station” for designating the remote station.
7. Set the original document.
• To use the original document glass, open the RADF and place the document
on the glass with the imaged side down.
• To use the RADF, place the document with the imaged side up.
[NOTE]
See “2.3 Placing the Original on the Machine” for setting the document.
[NOTE]
In the following cases, repeat the steps of setting the document and pressing the
[SCAN] key until all pages are read. For details, see “2.7 Sending Multiple Originals
from the Original Tray”.
• The original document glass is used to read more than one page.
• Pages read with the original document glass mix with pages read with the RADF.
• You divide a document containing many pages into some parts and set them on
the RADF one after another.
[TROUBLE?]
Should Memory overflow occur when the original document is being read, you have
two options: Transmit the part of the original that has been read (scanned), or redo
the procedure from the beginning. If memory overflow happens frequently, expanding the memory is recommended. For details, call your service representative.
8. Press the START button. The FK-101 reads
the document and stores it in memory as a
DATA
SCANNER / PRINTER
FAX
reserved document before transmission
starts.
[NOTE]
• To suspend transmission, see “2.11 Interrupting
Transmission”.
• If the remote station is not ready to receive,
your call will be redialed. For redialing, see
“Redialing” in “2.5 Selecting a Remote Station”.
K
ION
T
SET
2 31
564
897
0
CLEAR QTY.
• If transmission fails, see “7.1 Cannot Send”.
INTERRUPT
START
COPY
STOP/
Use of
Control Panel
Types of
screens
Wake-up
Screen
Fax
Basic screen
Fax
Application
screen
Remote
Station
Registration
screen
Other screens
Memory
Transmission
Simple Fax
Transmission
Placing the
Original on
the Machine
Setting
Transmission
Conditions
Selecting a
Remote
Station
Operation
During
Original
Scanning
Sending
Multiple
Originals
Operation
During
Transmission
Reserving
Transmissions
Manual
Transmission
Interrupting
Transmission
Confirmation of
Transmission
Reservation
Documents
Confirming
Setting and
Communication
Results
Intercepted
Transfer of
Received
Documents
Resending
(Restored
transmission
Sender
Information
Reception
Mode
Manual
Reception
Forced
Memory
Reception
When Unable
to Receive
Reception
Information
Application
Functions
Registration
/Setup
Reports and
Lists
Troubleshooting
)
4 - 7
Appendix
Page 67

Chapter 4 Application Functions
4.3 2 in 1 Tx
The 2 in 1 transmission function enables the FK-101 to gather two pages into one wide page
and transmit the composed wide page. This function can be used only when the RADF is
used.
4.3 2 in 1 Tx
Flow Chart
START
Step 1
Step 2
Step 3
Step 4
FINISH
1
B5/A4
(2 pages each)
Step 5
Step 6
Step 7
Step 8
Step 3
Step 7
Step 8
Step
4
Step 1
Step 2
Step
5
Step 6
2
Flow Chart
START
Step 1
Step 5
Step 2
Step 6
Step 3
Step 7
Step 4
Step 8
FINISH
12
Step 3
Step 8
Step 7
Step
4
B4/A3
(1 page each)
Step 1
Step 2
Step 5
Step 6
[Rules for 2 in 1 Tx]
Memory Tx is selected automatically.
[NOTE]
Should Memory overflow occur when the original document is being read, you have two
options: Transmit the part of the original that has been read (scanned), or redo the procedure from the beginning. If memory overflow happens frequently, expanding the memory is
recommended. For details, call your service representative.
[Specifications of 2 in 1 Tx]
• RADF must be used. 2-in-1 transmission does not work with the original document
glass.
• Original size: A4, B5 (2 pages each)
• Reproduced size: A3, B4 (1 page each)
4 - 8
[NOTE]
• When the document comprises an odd number of pages, the right half of the last page
reproduced remains blank.
• Pages written on both faces cannot be read.
[Functions incompatible with 2 in 1 Tx]
Book Tx, Frame erase Tx, Mixed original, Total page set, Long original, Flip Side 2, Polling
Rx
Page 68

4.3 2 in 1 Tx (continued)
[Procedure]
1. Press the Fax button on the control panel to view the Fax Basic screen if it
is not already displayed.
2. Press the Application button on the control panel. The Fax Application
Menu screen appears.
3. Press the [2 in 1 Tx] key. The [2 in 1 Tx] key becomes reversed.
[NOTE]
To release the setting, press the [CANCEL] key or the [2 in 1 Tx] key again.
Fax Application Menu screen
4. Press the [OK] key. 2 in 1 Tx is selected and you return to the Fax Basic
screen.
5. Set other functions if necessary.
[NOTE]
See “2.4 Setting Transmission Conditions” for setting functions on the Fax Basic
screen. See “Chapter 4 Application Functions” for setting functions on the Fax
Application Menu screen.
6. Designate the remote station.
[NOTE]
See “2.5 Selecting a Remote Station” for designating the remote station
Use of
Control Panel
Types of
screens
Wake-up
Screen
Fax
Basic screen
Fax
Application
screen
Remote
Station
Registration
screen
Other screens
Memory
Transmission
Simple Fax
Transmission
Placing the
Original on
the Machine
Setting
Transmission
Conditions
Selecting a
Remote
Station
Operation
During
Original
Scanning
Sending
Multiple
Originals
Operation
During
Transmission
Reserving
Transmissions
Manual
Transmission
Interrupting
Transmission
Confirmation of
Transmission
Reservation
Documents
Confirming
Setting and
Communication
Results
Intercepted
Transfer of
Received
Documents
Resending
(Restored
transmission
Sender
Information
Reception
Mode
Manual
Reception
Forced
Memory
Reception
When Unable
to Receive
Reception
Information
)
4 - 9
Application
Functions
Registration
/Setup
Reports and
Lists
Troubleshooting
Appendix
Page 69

Chapter 4 Application Functions
C
7. Set the original document on
the RADF with the side to face
up.
[NOTE]
When the original document
comprises many pages, divide it to
several parts and set them on the
RADF one by one. After setting
the document, press the [SCAN]
key.
Repeat the steps until all pages
are read.
4.3 2 in 1 Tx (continued)
8. Press the START button. The FK-101
reads the document and stores it in
DATA
SCANNER / PRINTER
memory as a reserved document before
transmission starts.
[TROUBLE?]
Should Memory overflow occur when the
original document is being read, you have two
options: Transmit the part of the original that
has been read (scanned), or redo the procedure
from the beginning. If memory overflow hap-
K
ION
T
SET
2 31
564
897
0
CLEAR QTY.
pens frequently, expanding the memory is
recommended. For details, call your service
representative.
[NOTE]
• To suspend transmission, see “2.11 Interrupting Transmission”.
• If the remote station is not ready to receive, your call will be redialed. For
redialing, see “Redialing” in “2.5 Selecting a Remote Station”.
• If transmission fails, see “7.1 Cannot Send”.
FAX
COPY
INTERRUPT
STOP/
START
4 - 10
Page 70

4.4 Book Tx
The Book Transmission function enables the FK-101 to produce two separate pages from
the side-by-side pages of an open book.
Book setting
[Rules for Book Tx]
Memory Tx is selected automatically.
[NOTE]
Should Memory overflow occur when the original document is being read, you have two
options: Transmit the part of the original that has been read (scanned), or redo the procedure from the beginning. If memory overflow happens frequently, expanding the memory is
recommended. For details, call your service representative.
[Specifications of Book Tx]
• Both the original document glass and the RADF can be used.
• Original size: A3, B4
• Reproduced size: A4
[NOTE]
The B4 size book-transmitted will be reproduced in the A4 size.
[Functions incompatible with Book Tx]
2 in 1 Tx, Mixed original, Total page set, Long original, Flip Side 2, Polling Rx
4.4 Book Tx
Use of
Control Panel
Types of
screens
Wake-up
Screen
Fax
Basic screen
Fax
Application
screen
Remote
Station
Registration
screen
Other screens
Memory
Transmission
Simple Fax
Transmission
Placing the
Original on
the Machine
Setting
Transmission
Conditions
Selecting a
Remote
Station
Operation
During
Original
Scanning
Sending
Multiple
Originals
Operation
During
Transmission
Reserving
Transmissions
Manual
Transmission
Interrupting
Transmission
Confirmation of
Transmission
Reservation
Documents
Confirming
Setting and
Communication
Results
Intercepted
Transfer of
Received
Documents
Resending
(Restored
transmission
Sender
Information
Reception
Mode
Manual
Reception
Forced
Memory
Reception
When Unable
to Receive
Reception
Information
)
4 - 11
Application
Functions
Registration
/Setup
Reports and
Lists
Troubleshooting
Appendix
Page 71

Chapter 4 Application Functions
[Procedure]
1. Press the Fax button on the control panel to view the Fax Basic screen, if
it is not already displayed.
2. Press the Application button on the control panel. The Fax Application
Menu screen appears.
3. Press the [Book Tx] key. The Book Tx screen appears.
4.4 Book Tx (continued)
Fax Application Menu screen
4. Press the [Tx L to R] or [Tx R to L] key according to the original document.
Book Tx screen
5. Press the [OK] key. Memory Tx is selected automatically and you return
to the Fax Application Menu screen.
[NOTE]
To stop setting up Book Tx, press the [CANCEL] key.
6. Press the [OK] key. Book Tx is selected and you return to the Fax Basic
screen.
7. Set other functions if necessary.
[NOTE]
See “2.4 Setting Transmission Conditions” for setting functions on the Fax Basic
screen. See “Chapter 4 Application Functions” for setting functions on the Fax
Application Menu screen.
4 - 12
Page 72

4.4 Book Tx (continued)
C
8. Designate the remote station.
[NOTE]
See “2.5 Selecting a Remote Station” for designating the remote station.
9. Set the original document.
• To use the original document glass, open the RADF and set the document
on the glass with the side to face down.
• To set the document on the RADF, place the document with the side to face
up.
[NOTE]
See “2.3 Placing the Original on the Machine” for setting the document.
[NOTE]
In the following cases, repeat the steps of setting the document and pressing the
[SCAN] key until all pages are read. For the details, see “2.7 Sending Multiple
Originals from the Original Tray”.
• The original document glass is used to read more than one page.
• Pages read with the original document glass mix with pages read with the RADF.
• You divide a document containing many pages into some parts and set them on
the RADF one after another.
[TROUBLE?]
Should Memory overflow occur when the original document is being read, you have
two options: Transmit the part of the original that has been read (scanned), or redo
the procedure from the beginning. If memory overflow happens frequently, expanding the memory is recommended. For details, call your service representative.
10.Press the START button. The FK-101 reads
the document and stores in memory as a
DATA
SCANNER / PRINTER
FAX
reserved document before transmission
starts.
[NOTE]
• To suspend transmission, see “2.11 Interrupting
Transmission”.
• If the remote station is not ready to receive, your
call will be redialed. For redialing, see
“Redialing” in “2.5 Selecting a Remote Station”.
K
ION
T
SET
2 31
564
897
0
CLEAR QTY.
• If transmission fails, see “7.1 Cannot Send”.
INTERRUPT
START
COPY
STOP/
Use of
Control Panel
Types of
screens
Wake-up
Screen
Fax
Basic screen
Fax
Application
screen
Remote
Station
Registration
screen
Other screens
Memory
Transmission
Simple Fax
Transmission
Placing the
Original on
the Machine
Setting
Transmission
Conditions
Selecting a
Remote
Station
Operation
During
Original
Scanning
Sending
Multiple
Originals
Operation
During
Transmission
Reserving
Transmissions
Manual
Transmission
Interrupting
Transmission
Confirmation of
Transmission
Reservation
Documents
Confirming
Setting and
Communication
Results
Intercepted
Transfer of
Received
Documents
Resending
(Restored
transmission
Sender
Information
Reception
Mode
Manual
Reception
Forced
Memory
Reception
When Unable
to Receive
Reception
Information
Application
Functions
Registration
/Setup
Reports and
Lists
Troubleshooting
)
4 - 13
Appendix
Page 73

Chapter 4 Application Functions
4.5 Frame erase Tx
Frame erase Tx is a function that the FK-101, when transmitting a document bound in the
form of a book, does not allow transmission of dark bands that would otherwise be reproduced in the marginal areas of the transmitted pages. Such dark bands can be reproduced
when the original is a book or read with the RADF left open. Frame erasure transmission
prevents reproduction of redundant dark bands.
This function can be enabled only when the original document is placed on the original
document glass.
4.5 Frame erase Tx
Width of
erasure
Copy produced by
ordinary transmission
Copy produced by
Frame erasure transmission
[Rules for Frame erase Tx]
Memory Tx is selected automatically.
[NOTE]
Should Memory overflow occur when the original document is being read, you have two
options: Transmit the part of the original that has been read (scanned), or redo the procedure from the beginning. If memory overflow happens frequently, expanding the memory is
recommended. For details, call your service representative.
[Specifications of Frame erase Tx]
• The original document glass should be used.
• The width of erasure can be set in steps of 1 mm in the range of 1 to 15 mm.
• Initial setting of erasure width: 5 mm
• If Book Tx and Frame erase Tx are combined, the effect of frame erasure applies to the
original page format that is to be divided still.
[Functions incompatible with Frame erase Tx]
2 in 1 Tx, Total page set, Long original, Polling Rx
4 - 14
Page 74

4.5 Frame erase Tx (continued)
[Procedure]
1. Press the Fax button on the control panel to view the Fax Basic screen, if
it is not already displayed.
2. Press the Application button on the control panel. The Fax Application
Menu screen appears.
Fax Application Menu screen
3. Press the [Frame erase Tx] key. The Frame erase Tx screen appears.
4. Determine the width of erasure with the [▲], and [▼] keys.
[NOTE]
The initial setting of erasure width is 5 mm.
Frame erase Tx screen
5. Press the [OK] key. Memory Tx is selected automatically and you return to
the Fax Application Menu screen.
[NOTE]
To stop setting up Frame erase Tx, press the [CANCEL] key.
6. Press the [OK] key. Frame erase Tx is set up and you return to the Fax
Basic screen.
7. Set other functions if necessary.
[NOTE]
See “2.4 Setting Transmission Conditions” for setting functions on the Fax Basic
screen. See “Chapter 4 Application Functions” for setting functions on the Fax
Application Menu screen.
Use of
Control Panel
Types of
screens
Wake-up
Screen
Fax
Basic screen
Fax
Application
screen
Remote
Station
Registration
screen
Other screens
Memory
Transmission
Simple Fax
Transmission
Placing the
Original on
the Machine
Setting
Transmission
Conditions
Selecting a
Remote
Station
Operation
During
Original
Scanning
Sending
Multiple
Originals
Operation
During
Transmission
Reserving
Transmissions
Manual
Transmission
Interrupting
Transmission
Confirmation of
Transmission
Reservation
Documents
Confirming
Setting and
Communication
Results
Intercepted
Transfer of
Received
Documents
Resending
(Restored
transmission
Sender
Information
Reception
Mode
Manual
Reception
Forced
Memory
Reception
When Unable
to Receive
Reception
Information
Application
Functions
Registration
/Setup
Reports and
Lists
Troubleshooting
)
4 - 15
Appendix
Page 75

Chapter 4 Application Functions
C
8. Designate the remote station.
[NOTE]
See “2.5 Selecting a Remote Station” for designating the remote station.
9. Set the original document.
• To use the original document glass, open the RADF and place the docu-
ment on the glass with the imaged side down.
• To use the RADF, place the document with the imaged side up.
[NOTE]
See “2.3 Placing the Original on the Machine” for setting the document.
4.5 Frame erase Tx (continued)
When the document comprises more than one page, repeat the steps of setting
a page and pressing the [SCAN] key until all pages are read.
[TROUBLE?]
Should Memory overflow occur when the original document is being read, you have
two options: Transmit the part of the original that has been read (scanned), or redo
the procedure from the beginning. If memory overflow happens frequently, expanding the memory is recommended. For details, call your service representative.
10.Press the START button. The FK-101 reads
the document and stores it in memory as a
DATA
SCANNER / PRINTER
FAX
reserved document before transmission
starts.
[NOTE]
• To suspend transmission, see “2.11 Interrupting
Transmission”.
• If the remote station is not ready to receive, your
call will be redialed. For redialing, see
“Redialing” in “2.5 Selecting a Remote Station”.
K
ION
T
SET
2 31
564
897
0
INTERRUPT
CLEAR QTY.
• If transmission fails, see “7.1 Cannot Send”.
COPY
STOP/
START
4 - 16
Page 76

4.6 Original size set
4.6 Original size set
The Original size select function enables you to designate the paper size for the document
to be transmitted to be equal to the paper size loaded at the receiving end. This means that
the major portion of your original image will be printed without any reduction. Normally,
when the paper size loaded at the remote station is too small to accommodate the image
being transmitted, the original image will be reduced to fit the paper size. This feature gives
you the option printing a portion of the image with no reduction.
(Example)Original document
of A3 size
RUSSIA
MONGOLIA
NORTH KOREA
SOUTH KOREA
BHUTAN
LADESH
NMAR
LAOS
THAILAND
CAMBODIA
MALAYSIA
SINGAPORE
Indian Ocean
CHINA
VIETNAM
BRUNEI
INDONESIA
Taiwan
PHILIPPINES
AUSTRALIA
JAPAN
PAPUA
NEW GUINEA
You designate
A4 size.
[Rules for Original size set]
Memory Tx is selected automatically.
The location where originals are read from on the RADF differs from that on the platen
glass.
[NOTE]
Should Memory overflow occur when the original document is being read, you have two
options: Transmit the part of the original that has been read (scanned), or redo the procedure from the beginning. If memory overflow happens frequently, expanding the memory is
recommended. For details, call your service representative.
[Specifications of Original size set]
When Original size set and Mixed size original are specified simultaneously, the size
specified by Original size set is effective.
Portion of the original
to be transmitted
RUSSIA
MONGOLIA
NORTH KOREA
SOUTH KOREA
BHUTAN
LADESH
NMAR
LAOS
THAILAND
CAMBODIA
MALAYSIA
SINGAPORE
CHINA
VIETNAM
BRUNEI
JAPAN
Taiwan
PHILIPPINES
Use of
Control Panel
Types of
screens
Wake-up
Screen
Fax
Basic screen
Fax
Application
screen
Remote
Station
Registration
screen
Other screens
Memory
Transmission
Simple Fax
Transmission
Placing the
Original on
the Machine
Setting
Transmission
Conditions
Selecting a
Remote
Station
Operation
During
Original
Scanning
Sending
Multiple
Originals
Operation
During
Transmission
Reserving
Transmissions
Manual
Transmission
Interrupting
Transmission
Confirmation of
Transmission
Reservation
Documents
Confirming
Setting and
Communication
Results
Intercepted
Transfer of
Received
Documents
Resending
(Restored
transmission
Sender
Information
Reception
Mode
Manual
Reception
Forced
Memory
Reception
When Unable
to Receive
Reception
Information
)
4 - 17
Application
Functions
Registration
/Setup
Reports and
Lists
Troubleshooting
Appendix
Page 77

Chapter 4 Application Functions
[Functions incompatible with Original size set]
Polling Rx, Total page set, Book Tx
[NOTE]
When 2 in 1 Tx or Book Tx is set, paper sizes which are not be able to set are shown in gray.
[Procedure]
1. Press the Fax button on the control panel to view the Fax Basic screen if it
is not already displayed.
2. Press the Application button on the control panel. The Fax Application
Menu screen appears.
4.6 Original size set (continued)
Fax Application Menu screen
3. Press the [Original size set] key. The Original size set screen appears.
4. Press the key representing the size of the document to transmit.
Original size set screen
4 - 18
Page 78

4.6 Original size set (continued)
5. Press the [OK] key. Memory Tx is selected automatically and you return to
the Fax Application Menu screen.
6. Press the [OK] key. The original size has been selected and you return to
the Fax Basic screen.
[NOTE]
To stop setting up Original size set, press the [CANCEL] key.
7. Set other functions if necessary.
[NOTE]
See “2.4 Setting Transmission Conditions” for setting functions on the Fax Basic
screen. See “Chapter 4 Application Functions” for setting functions on the Fax
Application Menu screen.
8. Designate the remote station.
[NOTE]
See “2.5 Selecting a Remote Station” for designating the remote station.
9. Set the original document.
• To use the original document glass, open the RADF and place the document
on the glass with the imaged side down.
• To use the RADF, place the document with the imaged side up.
[NOTE]
See “2.3 Placing the Original on the Machine” for setting the document.
Use of
Control Panel
Types of
screens
Wake-up
Screen
Fax
Basic screen
Fax
Application
screen
Remote
Station
Registration
screen
Other screens
Memory
Transmission
Simple Fax
Transmission
Placing the
Original on
the Machine
Setting
Transmission
Conditions
Selecting a
Remote
Station
Operation
During
Original
Scanning
Sending
Multiple
Originals
Operation
During
Transmission
Reserving
Transmissions
Manual
Transmission
[NOTE]
In the following cases, repeat the steps of setting the document and pressing
the [SCAN] key until all pages are read.
• The original document glass is used to read more than one page.
• Pages read with the original document glass mix with pages read with the RADF.
• You divide a document containing many pages into some parts and set them on
the RADF one after another.
[TROUBLE?]
Should Memory overflow occur when the original document is being read, you have
two options: Transmit the part of the original that has been read (scanned), or redo
the procedure from the beginning. If memory overflow happens frequently, expanding
the memory is recommended. For details, call your service representative.
Interrupting
Transmission
Confirmation of
Transmission
Reservation
Documents
Confirming
Setting and
Communication
Results
Intercepted
Transfer of
Received
Documents
Resending
(Restored
transmission
Sender
Information
Reception
Mode
Manual
Reception
Forced
Memory
Reception
When Unable
to Receive
Reception
Information
Application
Functions
Registration
/Setup
Reports and
Lists
)
4 - 19
Troubleshooting
Appendix
Page 79

Chapter 4 Application Functions
C
4.6 Original size set (continued)
10.Press the START button. The FK-101 reads
the document and stores it in memory as a
reserved document before transmission
starts.
[NOTE]
• To suspend transmission, see “2.11 Interrupting
Transmission”.
• If the remote station is not ready to receive, your
call will be dialed again 3 minutes after the
specified time. This is performed by the
Redialing function. For redialing, see “Redialing”
in “2.5 Selecting a Remote Station”.
• If transmission fails, see “7.1 Cannot Send”.
K
ION
T
SET
DATA
SCANNER / PRINTER
2 31
564
897
0
CLEAR QTY.
FAX
COPY
INTERRUPT
STOP/
START
4 - 20
Page 80

4.7 Total page set
4.7 Total page set
Total page setting is a function that, in quick memory transmission, the information of the
total number of pages transmitted is placed following each page number on the line indicating the source of transmission.
From : 01234567890123456 2000 / 02 / 01 01 : 23 # 012 P.5 / 10
[NOTE]
In memory transmission, the total number of pages will be printed
automatically. So, you need not use this function.
[Specifications of Total page set]
• The total number of pages transmitted will be printed in the form of “P.page number/
Total page number”.
• If the total page number you designate is not equal to the number of pages actually
read, the total page number you have designated will be printed.
Use of
Control Panel
Types of
screens
Wake-up
Screen
Fax
Basic screen
Fax
Application
screen
Remote
Station
Registration
screen
Other screens
Memory
Transmission
Simple Fax
Transmission
Placing the
Original on
the Machine
Setting
Transmission
Conditions
Selecting a
Remote
Station
Operation
During
Original
Scanning
Sending
Multiple
Originals
Operation
During
Transmission
Reserving
Transmissions
Manual
Transmission
[Functions incompatible with Total page set]
*Memory Tx, *2 in 1 Tx, *Book Tx, *Frame erase Tx, *Original size set, *Timer Tx, *Mixed
original, Polled Tx, *Two sided (Cover+2sided), Polling Rx, Bulletin.
Total page set function is automatically cancelled when the asterisk mark (*) functions are
selected.
[NOTE]
In memory transmission, the total number of pages will be printed automatically.
Interrupting
Transmission
Confirmation of
Transmission
Reservation
Documents
Confirming
Setting and
Communication
Results
Intercepted
Transfer of
Received
Documents
Resending
(Restored
transmission
Sender
Information
Reception
Mode
Manual
Reception
Forced
Memory
Reception
When Unable
to Receive
Reception
Information
Application
Functions
Registration
/Setup
Reports and
Lists
)
4 - 21
Troubleshooting
Appendix
Page 81

Chapter 4 Application Functions
[Procedure]
1. Press the Fax button on the control panel to view the Fax Basic screen, if
it is not already displayed.
2. Press the Application button on the control panel. The Fax Application
Menu screen appears.
3. Press the [Total page set] key. The Total page set screen appears.
4.7 Total page set (continued)
Fax Application Menu screen
4. Enter the number of pages of the document from the key pad.
Total page set screen
[NOTE]
To stop Total page setting, press the [CANCEL] key.
5. Press the [OK] key. The total number of pages is registered and you
return to the Fax Application Menu screen.
4 - 22
Page 82

4.7 Total page set (continued)
6. Press the [OK] key. You return to the Fax Basic screen.
[NOTE]
To stop Total page setting, press the [CANCEL] key.
7. Set other functions if necessary.
[NOTE]
See “2.4 Setting Transmission Conditions” for setting functions on the Fax Basic
screen. See “Chapter 4 Application Functions” for setting functions on the Fax
Application Menu screen.
8. Designate the remote station.
[NOTE]
See “2.5 Selecting a Remote Station” for designating the remote station.
9. Set the original document.
• To use the original document glass, open the RADF and place the docu-
ment on the glass with the imaged side down.
• To use the RADF, place the document with the imaged side up.
[NOTE]
See “2.3 Placing the Original on the Machine” for setting the document.
Use of
Control Panel
Types of
screens
Wake-up
Screen
Fax
Basic screen
Fax
Application
screen
Remote
Station
Registration
screen
Other screens
Memory
Transmission
Simple Fax
Transmission
Placing the
Original on
the Machine
Setting
Transmission
Conditions
Selecting a
Remote
Station
Operation
During
Original
Scanning
Sending
Multiple
Originals
Operation
During
Transmission
Reserving
Transmissions
Manual
Transmission
[TROUBLE?]
Should Memory overflow occur when the original document is being read, you have
two options: Transmit the part of the original that has been read (scanned), or redo
the procedure from the beginning. If memory overflow happens frequently, expanding the memory is recommended. For details, call your service representative.
Interrupting
Transmission
Confirmation of
Transmission
Reservation
Documents
Confirming
Setting and
Communication
Results
Intercepted
Transfer of
Received
Documents
Resending
(Restored
transmission
Sender
Information
Reception
Mode
Manual
Reception
Forced
Memory
Reception
When Unable
to Receive
Reception
Information
Application
Functions
Registration
/Setup
Reports and
Lists
)
4 - 23
Troubleshooting
Appendix
Page 83

Chapter 4 Application Functions
C
4.7 Total page set (continued)
10.Press the START button. The FK-101 reads
the document and starts transmitting.
[NOTE]
• To suspend transmission, see “2.11 Interrupting
Transmission”.
• If the remote station is not ready to receive, your
call will be redialed. For redialing, see
“Redialing” in “2.5 Selecting a Remote Station”.
• If transmission fails, see “7.1 Cannot Send”.
K
ION
T
SET
DATA
SCANNER / PRINTER
2 31
564
897
0
CLEAR QTY.
FAX
COPY
INTERRUPT
STOP/
START
4 - 24
Page 84

4.8 Mixed original
Mixed size original is a function that allows you to set and send document pages of mixed
sizes by a single sequence of operations.
Transmitted and reproduced in the
same sizes as the original pages.
You set document pages of
mixed sizes on the RADF.
[Rules for Mixed size original]
Memory Tx is selected automatically.
[Specifications of Mixed original]
When Original size set and Mixed size original are specified simultaneously, the size
specified by Original size set is effective.
[NOTE]
Should Memory overflow occur when the original document is being read, you have two
options: Transmit the part of the original that has been read (scanned), or redo the procedure from the beginning. If memory overflow happens frequently, expanding the memory is
recommended. For details, call your service representative.
[Functions incompatible with Mixed original]
2 in 1 Tx, Book Tx, Total page set, Folded original, Long original, Flip Side 2, Polling Rx
4.8 Mixed original
Use of
Control Panel
Types of
screens
Wake-up
Screen
Fax
Basic screen
Fax
Application
screen
Remote
Station
Registration
screen
Other screens
Memory
Transmission
Simple Fax
Transmission
Placing the
Original on
the Machine
Setting
Transmission
Conditions
Selecting a
Remote
Station
Operation
During
Original
Scanning
Sending
Multiple
Originals
Operation
During
Transmission
Reserving
Transmissions
Manual
Transmission
Interrupting
Transmission
Confirmation of
Transmission
Reservation
Documents
Confirming
Setting and
Communication
Results
Intercepted
Transfer of
Received
Documents
Resending
(Restored
transmission
Sender
Information
Reception
Mode
Manual
Reception
Forced
Memory
Reception
When Unable
to Receive
Reception
Information
)
4 - 25
Application
Functions
Registration
/Setup
Reports and
Lists
Troubleshooting
Appendix
Page 85

Chapter 4 Application Functions
[Procedure]
1. Press the Fax button on the control panel to view the Fax Basic screen, if
it is not already displayed.
2. Press the Application button on the control panel. The Fax Application
Menu screen appears.
3. Press the [Original setting] key and then the [Mixed original] key. The
[Mixed original] key becomes reversed.
4.8 Mixed original (continued)
Fax Application Menu screen
Original setting menu screen
4. Press the [OK] key. Mixed size original is selected and you return to the
Fax Basic screen.
[NOTE]
To release the setting, press the [CANCEL] key.
5. Set other functions if necessary.
Press the [OK] key on the FAX Application Menu screen to return to the FAX
Basic screen.
[NOTE]
See “2.4 Setting Transmission Conditions” for setting functions on the Fax Application Menu screen. See “Chapter 4 Application Functions” for setting functions on the
Fax Application Menu screen.
4 - 26
Page 86

4.8 Mixed original (continued)
C
6. Designate the remote station.
[NOTE]
See “2.5 Selecting a Remote Station” for designating the remote station.
7. Set the original document.
• To use the original document glass, open the RADF and place the document
on the glass with the imaged side down.
• To use the RADF, place the document with the imaged side up.
[NOTE]
See “2.3 Placing the Original on the Machine” for setting the document.
[NOTE]
In the following cases, repeat the steps of setting the document and pressing the
[SCAN] key until all pages are read.
• The original document glass is used to read more than one page.
• Pages read with the original document glass mix with pages read with the RADF.
• You divide a document containing many pages into some parts and set them on
the RADF one after another.
8. Press the START button. The FK-101 reads
the document and stores in memory as a
DATA
SCANNER / PRINTER
FAX
reserved document before transmission
starts.
[TROUBLE?]
Should Memory overflow occur when the original
document is being read, you have two options:
Transmit the part of the original that has been read
(scanned), or redo the procedure from the beginning. If memory overflow happens frequently,
K
ION
T
SET
2 31
564
897
0
INTERRUPT
CLEAR QTY.
expanding the memory is recommended. For
details, call your service representative.
[NOTE]
• To suspend transmission, see “2.11 Interrupting
Transmission”.
• If the remote station is not ready to receive, your
call will be redialed. For redialing, see
“Redialing” in “2.5 Selecting a Remote Station”.
• If transmission fails, see “7.1 Cannot Send”.
START
COPY
STOP/
Use of
Control Panel
Types of
screens
Wake-up
Screen
Fax
Basic screen
Fax
Application
screen
Remote
Station
Registration
screen
Other screens
Memory
Transmission
Simple Fax
Transmission
Placing the
Original on
the Machine
Setting
Transmission
Conditions
Selecting a
Remote
Station
Operation
During
Original
Scanning
Sending
Multiple
Originals
Operation
During
Transmission
Reserving
Transmissions
Manual
Transmission
Interrupting
Transmission
Confirmation of
Transmission
Reservation
Documents
Confirming
Setting and
Communication
Results
Intercepted
Transfer of
Received
Documents
Resending
(Restored
transmission
Sender
Information
Reception
Mode
Manual
Reception
Forced
Memory
Reception
When Unable
to Receive
Reception
Information
Application
Functions
Registration
/Setup
Reports and
Lists
Troubleshooting
)
4 - 27
Appendix
Page 87

Chapter 4 Application Functions
4.9 Folded original
The document size may not be detected properly if it has folds. The FK-101 determines the
document size before reading such document and starting transmission. This function can
be used only when the original is read with the RADF.
4.9 Folded original
Folded original
[Specifications of Folded original]
• The RADF must be used. Folded original does not work with the original document
glass.
• The image reproduced in the remote station may have a dark band at around the trailing
edge.
• The pages following the first page will be assumed to be the same size as the first page.
If those pages have different sizes, select [Mixed original].
[Functions incompatible with Folded original]
Mixed original, Long original, Polling Rx
4 - 28
Page 88

4.9 Folded original (continued)
[Procedure]
1. Press the Fax button on the control panel to view the Fax Basic screen, if
it is not already displayed.
2. Press the Application button on the control panel. The Fax Application
Menu screen appears.
3. Press the [Original setting] key and then the [Folded original] key. The
[Folded original] key becomes reversed.
Fax Application Menu screen
Original setting menu screen
[NOTE]
To release the setting, press the [CANCEL] key.
4. Press the [OK] key. Folded original is selected and you return to the Fax
Application Menu screen.
5. Set other functions if necessary.
Press the [OK] key on the FAX Application Menu screen to return to the FAX
Basic screen.
[NOTE]
• If the document pages have different sizes, select [Mixed original].
• See “2.4 Setting Transmission Conditions” for setting functions on the Fax Basic
screen. See “Chapter 4 Application Functions” for setting functions on the Fax
application menu.
Use of
Control Panel
Types of
screens
Wake-up
Screen
Fax
Basic screen
Fax
Application
screen
Remote
Station
Registration
screen
Other screens
Memory
Transmission
Simple Fax
Transmission
Placing the
Original on
the Machine
Setting
Transmission
Conditions
Selecting a
Remote
Station
Operation
During
Original
Scanning
Sending
Multiple
Originals
Operation
During
Transmission
Reserving
Transmissions
Manual
Transmission
Interrupting
Transmission
Confirmation of
Transmission
Reservation
Documents
Confirming
Setting and
Communication
Results
Intercepted
Transfer of
Received
Documents
Resending
(Restored
transmission
Sender
Information
Reception
Mode
Manual
Reception
Forced
Memory
Reception
When Unable
to Receive
Reception
Information
)
4 - 29
Application
Functions
Registration
/Setup
Reports and
Lists
Troubleshooting
Appendix
Page 89

Chapter 4 Application Functions
6. Designate the remote station.
[NOTE]
See “2.5 Selecting a Remote Station” for designating the remote station.
7. To use the RADF, place the document with the imaged side up.
[NOTE]
When the document comprises more than one page, repeat the steps of setting a
page and pressing the [SCAN] key until all pages are read.
8. Press the START button. The FK-101 reads the document and stores in
memory as a reserved document before transmission starts.
[TROUBLE?]
Should Memory overflow occur when the original document is being read, you have
two options: Transmit the part of the original that has been read (scanned), or redo
the procedure from the beginning. If memory overflow happens frequently, expanding the memory is recommended. For details, call your service representative.
[NOTE]
• To suspend transmission, see “2.11 Interrupting Transmission”.
• If the remote station is not ready to receive, your call will be redialed. For
redialing, see “Redialing” in “2.5 Selecting a Remote Station”.
• If transmission fails, see “7.1 Cannot Send”.
4.9 Folded original (continued)
4 - 30
Page 90

4.10 Long original
4.10 Long original
The FK-101 is provided with a function that allows transmitting pages longer than the length
(420 mm/16.5 inch) of A3 size. If you attempt to send such a long document without
selecting Long original mode, paper misfeed will occur. When Long original mode is selected, pages of up to 800 mm can be transmitted. This function can be used only when the
original is read with the RADF.
[Specifications of Long original]
• RADF must be used. Long original does not work with the original document glass.
[Functions incompatible with Long original]
2 in 1 Tx, Book Tx, Frame erase Tx, Total page set, Mixed original, Folded original, Flip
Side 2, Two sided, Cover+2sided, Polling Rx
Use of
Control Panel
Types of
screens
Wake-up
Screen
Fax
Basic screen
Fax
Application
screen
Remote
Station
Registration
screen
Other screens
Memory
Transmission
Simple Fax
Transmission
Placing the
Original on
the Machine
Setting
Transmission
Conditions
Selecting a
Remote
Station
Operation
During
Original
Scanning
Sending
Multiple
Originals
Operation
During
Transmission
Reserving
Transmissions
Manual
Transmission
Interrupting
Transmission
Confirmation of
Transmission
Reservation
Documents
Confirming
Setting and
Communication
Results
Intercepted
Transfer of
Received
Documents
Resending
(Restored
transmission
Sender
Information
Reception
Mode
Manual
Reception
Forced
Memory
Reception
When Unable
to Receive
Reception
Information
)
4 - 31
Application
Functions
Registration
/Setup
Reports and
Lists
Troubleshooting
Appendix
Page 91

Chapter 4 Application Functions
[Procedure]
1. Press the Fax button on the control panel to view the Fax Basic screen, if
it is not already displayed.
2. Press the Application functions button on the control panel. The Fax
Application Menu screen appears.
3. Press the [Original setting] key and then the [Long original] key. The
[Long original] key becomes reversed.
4.10 Long original (continued)
Fax Application Menu screen
Original setting menu screen
[NOTE]
To release the setting, press the [CANCEL] key.
4. Press the [OK] key. Long original is selected and you return to the Fax
Application Menu screen.
5. Set other functions if necessary.
Press the [OK] key on the Application Menu screen to return to the FAX Basic
screen.
[NOTE]
See “2.4 Setting Transmission Conditions” for setting functions on the Fax Basic
screen. See “Chapter 4 Application Functions” for setting functions on the Fax
Application Menu screen.
4 - 32
6. Designate the remote station.
[NOTE]
See “2.5 Selecting a Remote Station” for designating the remote station.
7. To use the RADF, place the
document with the imaged
side up.
[NOTE]
When the document comprises
more than one page, repeat the
steps of setting a page and
pressing the [SCAN] key until all
pages are read.
Page 92

4.10 Long original (continued)
8. Press the START button. The FK-101 reads the document and stores in
memory as a reserved document before transmission starts.
[TROUBLE?]
Should Memory overflow occur when the original document is being read, you have
two options: Transmit the part of the original that has been read (scanned), or redo
the procedure from the beginning. If memory overflow happens frequently, expanding the memory is recommended. For details, call your service representative.
[NOTE]
• To suspend transmission, see “2.11 Interrupting Transmission”.
• If the remote station is not ready to receive, your call will be redialed. For
redialing, see “Redialing” in “2.5 Selecting a Remote Station”.
• If transmission fails, see “7.1 Cannot Send”.
Use of
Control Panel
Types of
screens
Wake-up
Screen
Fax
Basic screen
Fax
Application
screen
Remote
Station
Registration
screen
Other screens
Memory
Transmission
Simple Fax
Transmission
Placing the
Original on
the Machine
Setting
Transmission
Conditions
Selecting a
Remote
Station
Operation
During
Original
Scanning
Sending
Multiple
Originals
Operation
During
Transmission
Reserving
Transmissions
Manual
Transmission
Interrupting
Transmission
Confirmation of
Transmission
Reservation
Documents
Confirming
Setting and
Communication
Results
Intercepted
Transfer of
Received
Documents
Resending
(Restored
transmission
Sender
Information
Reception
Mode
Manual
Reception
Forced
Memory
Reception
When Unable
to Receive
Reception
Information
Application
Functions
Registration
/Setup
Reports and
Lists
)
4 - 33
Troubleshooting
Appendix
Page 93

Chapter 4 Application Functions
4.11 Flip Side 2
The Flip Side 2 function allows you to specify the appropriate binding style when transmitting a two-sided document (i.e., when pages are printed on both sides). The binding style
you select should allow the pages of a two-sided document to be read appropriately by
paging right to left or top to bottom.
Top / Bottom bind Left / Right bind
4.11 Flip Side 2
[NOTE]
Should Memory overflow occur when the original document is being read, you have two
options: Transmit the part of the original that has been read (scanned), or redo the procedure from the beginning. If memory overflow happens frequently, expanding the memory is
recommended. For details, call your service representative.
[Specifications of Flip Side 2]
The RADF must be used. The original document glass cannot be used for transmission in
Flip Side 2 mode.
[Functions incompatible with Flip Side 2]
2 in 1 Tx, Book Tx, Mixed original, Long original, Polling Rx
4 - 34
Page 94

4.11 Flip Side 2 (continued)
[Procedure]
1. Press the Fax button on the control panel to view the Fax Basic screen, if
it is not already displayed.
2. Press the Application button on the control panel. The Fax Application
Menu screen appears.
Fax Application Menu screen
3. Press the [Flip Side 2] key. The Flip Side 2 setting screen appears.
4. Press the [Top/bottom bind] or [Left/Right bind] key to specify the manner
of binding of the original document having both faces printed. The selected key becomes reversed.
Flip Side 2 setting screen
5. Press the [OK] key. The parameters of Flip Side 2 are determined and you
return to the Fax Application Menu screen.
[NOTE]
To release the setting, press the [CANCEL] key.
6. Set other functions if necessary.
Press the [OK] key on the Application Menu screen to return to the FAX Basic
screen.
[NOTE]
See “2.4 Setting Transmission Conditions” for setting functions on the Fax Basic
screen. See “Chapter 4 Application Functions” for setting functions on the Fax
Application Menu screen.
Use of
Control Panel
Types of
screens
Wake-up
Screen
Fax
Basic screen
Fax
Application
screen
Remote
Station
Registration
screen
Other screens
Memory
Transmission
Simple Fax
Transmission
Placing the
Original on
the Machine
Setting
Transmission
Conditions
Selecting a
Remote
Station
Operation
During
Original
Scanning
Sending
Multiple
Originals
Operation
During
Transmission
Reserving
Transmissions
Manual
Transmission
Interrupting
Transmission
Confirmation of
Transmission
Reservation
Documents
Confirming
Setting and
Communication
Results
Intercepted
Transfer of
Received
Documents
Resending
(Restored
transmission
Sender
Information
Reception
Mode
Manual
Reception
Forced
Memory
Reception
When Unable
to Receive
Reception
Information
Application
Functions
Registration
/Setup
Reports and
Lists
)
4 - 35
Troubleshooting
Appendix
Page 95

Chapter 4 Application Functions
7. Designate the remote station.
[NOTE]
See “2.5 Selecting a Remote Station” for designating the remote station.
8. To use the RADF, place the document with the imaged side up.
[NOTE]
When the document comprises more than one page, repeat the steps of setting a
page and pressing the [SCAN] key until all pages are read.
9. Press the START button. The FK-101 reads the document and stores it in
memory as a reserved document before transmission starts.
[TROUBLE?]
Should Memory overflow occur when the original document is being read, you have
two options: Transmit the part of the original that has been read (scanned), or redo
the procedure from the beginning. If memory overflow happens frequently, expanding the memory is recommended. For details, call your service representative.
[NOTE]
• To suspend transmission, see “2.11 Interrupting Transmission”.
• If the remote station is not ready to receive, your call will be redialed. For
redialing, see “Redialing” in “2.5 Selecting a Remote Station”.
• If transmission fails, see “7.1 Cannot Send”.
4.11 Flip Side 2 (continued)
4 - 36
Page 96

4.12 Polled Tx
The Polled transmission function enables the FK-101 to read a document and store it in
memory until the remote station sends a polling command, which action causes transmission of the stored document to start. Polled transmission provides two options: One option
uses Memory that is exclusively designated for storing polled transmission documents; the
other option uses the Bulletin board for the same purpose. The description below assumes
use of the former option, which uses exclusive memory. To use the Bulletin board option,
see “To transmit by polling the document written on a Bulletin board”.
[Rules for Polled Tx]
Only one document can be transmitted by Polled transmission.
The Memory Tx is automatically selected.
[Functions incompatible with Polled Tx]
Total page set, Polling Rx, Timer Tx, Int’l com, ECM off, Confiden. Tx, ID Tx, Bulletin,
Relay Tx Req
Perform the following procedure to use Polled Tx.
[Procedure]
1. Press the Fax button on the control panel to view the Fax Basic screen, if
it is not already displayed.
2. Press the Application button on the control panel. The Fax Application
Menu screen appears.
3. Press the [Polled Tx] key. The [Polled Tx] key becomes reversed.
Fax Application Menu screen
4.12 Polled Tx
Use of
Control Panel
Types of
screens
Wake-up
Screen
Fax
Basic screen
Fax
Application
screen
Remote
Station
Registration
screen
Other screens
Memory
Transmission
Simple Fax
Transmission
Placing the
Original on
the Machine
Setting
Transmission
Conditions
Selecting a
Remote
Station
Operation
During
Original
Scanning
Sending
Multiple
Originals
Operation
During
Transmission
Reserving
Transmissions
Manual
Transmission
Interrupting
Transmission
Confirmation of
Transmission
Reservation
Documents
Confirming
Setting and
Communication
Results
Intercepted
Transfer of
Received
Documents
Resending
(Restored
transmission
Sender
Information
Reception
Mode
Manual
Reception
Forced
Memory
Reception
When Unable
to Receive
Reception
Information
)
4 - 37
Application
Functions
Registration
/Setup
Reports and
Lists
Troubleshooting
Appendix
Page 97

Chapter 4 Application Functions
4. Press the [OK] key. Polled Tx is selected and you return to the Fax Basic
screen.
[NOTE]
To release the setting, press the [CANCEL] key.
5. Set other functions if necessary.
[NOTE]
See “2.4 Setting Transmission Conditions” for setting functions on the Fax Basic
screen. See “Chapter 4 Application Functions” for setting functions on the Fax
Application Menu.
6. Set the original document.
• To use the original document glass, open the RADF and place the document
on the glass with the imaged side down.
• To use the RADF, place the document with the imaged side up.
[NOTE]
See “2.3 Placing the Original on the Machine” for setting the document.
4.12 Polled Tx (continued)
4 - 38
[NOTE]
In the following cases, repeat the steps of setting the document and pressing the
[SCAN] key until all pages are read.
• The original document glass is used to read more than one page.
• Pages read with the original document glass mix with pages read with the RADF.
• You divide a document containing many pages into some parts and set them on
the RADF one after another.
Page 98

4.12 Polled Tx (continued)
7. Press the START button. The FK-101 reads the document and holds it in
memory until the remote station sends a polling command, which causes
transmission of the stored document to start.
[TROUBLE?]
Should Memory overflow occur when the original document is being read, you have
two options: Transmit the part of the original that has been read (scanned), or redo
the procedure from the beginning. If memory overflow happens frequently, expanding the memory is recommended. For details, call your service representative.
[NOTE]
• To cancel polled transmission, you have to delete the reserved document held in
memory. See “Canceling Reserved jobs”.
• If transmission fails, see “7.1 Cannot Send”.
Use of
Control Panel
Types of
screens
Wake-up
Screen
Fax
Basic screen
Fax
Application
screen
Remote
Station
Registration
screen
Other screens
Memory
Transmission
Simple Fax
Transmission
Placing the
Original on
the Machine
Setting
Transmission
Conditions
Selecting a
Remote
Station
Operation
During
Original
Scanning
Sending
Multiple
Originals
Operation
During
Transmission
Reserving
Transmissions
Manual
Transmission
Interrupting
Transmission
Confirmation of
Transmission
Reservation
Documents
Confirming
Setting and
Communication
Results
Intercepted
Transfer of
Received
Documents
Resending
(Restored
transmission
Sender
Information
Reception
Mode
Manual
Reception
Forced
Memory
Reception
When Unable
to Receive
Reception
Information
Application
Functions
Registration
/Setup
Reports and
Lists
)
4 - 39
Troubleshooting
Appendix
Page 99

Chapter 4 Application Functions
4.13 Polling Rx
The Polling reception function enables the FK-101 to send a command to a remote station
to receive the document that is either set for transmission on the remote machine or reserved for polled transmission. This function is convenient when you prefer to bear the
telephone charge in the place of the remote station.
You can designate two or more remote stations for polling reception by using sequential
polling reception. A sequential polling receive result report prints out on completion of
sequential polling reception.
And a sequential Polling Reservation Report prints out in case of Timer Tx used together.
[NOTE]
• This may not be able to be used depending on the remote station machine where the fax
is sent.
• Refer to “6.10 Sequential Polling Reception Reservation Report” and “6.11 Sequential
Polling Reception Result Report” for information on the Sequential Polling Reception
Reservation Report and Sequential Polling Reception Result Report.
[Functions incompatible with Polling Rx]
Memory Tx, 2 in 1 Tx, Book Tx, Frame erase Tx, Original size set, Total page set, Mixed
original, Folded original, Long original, Flip Side 2, Confiden. Tx, Relay Tx Req,
Cover+2sided, ECM off, Int’l com, Polled Tx, ID Tx
4.13 Polling Rx
Polling reception has two options: one is ordinary polling reception, and the other receives
the document reserved in the bulletin board of the remote station. The description below
assumes the ordinary polled reception. For the latter that receives from the bulletin board,
see “To receive by polling the document written on a Bulletin board of a remote station”.
4 - 40
Page 100

4.13 Polling Rx (continued)
C
[Procedure]
1. Press the Fax button on the control panel to view the Fax Basic screen, if
it is not already displayed.
2. Press the Application button on the control panel. The Fax Application
Menu screen appears.
3. Press the [Polling Rx] key. The [Polling Rx] key becomes reversed.
Use of
Control Panel
Types of
screens
Wake-up
Screen
Fax
Basic screen
Fax
Application
screen
Remote
Station
Registration
screen
Other screens
Fax Application Menu screen
[NOTE]
To release the setting, press the [CANCEL] key or press the [Polling Rx] key again.
4. Press the [OK] key. Polling reception is selected and you return to the Fax
Basic screen.
5. Designate the remote station(s).
Two or more remote stations can be designated.
[NOTE]
See “2.5 Selecting a Remote Station” for designating the remote station.
6. Press the START button. Your FK-101 starts
to receive the document(s) set to be ready for
DATA
SCANNER / PRINTER
FAX
COPY
transmission on the remote station(s) or kept
reserved for polled transmission.
[NOTE]
• To suspend polled reception before pressing the
START button, press the Stop/Clear button on
the control panel. If timer transmission is set up,
you have to delete the reserved document(s)
after pressing the START button. For more
K
ION
T
SET
2 31
564
897
0
INTERRUPT
START
CLEAR QTY.
detail, see “2.11 Interrupting Transmission”.
• If reception fails, see “3.4 When Unable to
Receive”.
STOP/
Memory
Transmission
Simple Fax
Transmission
Placing the
Original on
the Machine
Setting
Transmission
Conditions
Selecting a
Remote
Station
Operation
During
Original
Scanning
Sending
Multiple
Originals
Operation
During
Transmission
Reserving
Transmissions
Manual
Transmission
Interrupting
Transmission
Confirmation of
Transmission
Reservation
Documents
Confirming
Setting and
Communication
Results
Intercepted
Transfer of
Received
Documents
Resending
(Restored
transmission
Sender
Information
Reception
Mode
Manual
Reception
Forced
Memory
Reception
When Unable
to Receive
Reception
Information
Application
Functions
Registration
/Setup
Reports and
Lists
Troubleshooting
)
4 - 41
Appendix
 Loading...