

Page 1

Advanced Information
Di470
www.minoltaeurope.com
The essentials of imaging
Page 2

Page 3

Table of Contents
1Introduction
1.1 We Want You to Be a Satisfied Customer................................. 1-1
1.2 Preserving the Environment . . ................................................... 1-2
Takeback and Reutilisation.............................................................1-2
What is Energy Star®? ...................................................................1-2
Use of Recycled Paper ...................................................................1-2
1.3 Guide to this Manual.................................................................... 1-3
How Is this Manual Structured? .....................................................1-3
A Brief Explanation of the Conventions used in this Manual..........1-5
A Brief Explanation of Important Concepts and Symbols..............1-7
2 Getting to Know Your Copier
2.1 System Overview ......................................................................... 2-1
Copier Di470 (External)...................................................................2-1
Copier Di470 (Internal) ....................................................................2-3
2.2 Optional Equipment..................................................................... 2-4
Original Cover .................................................................................2-4
Electronic Document Handler EDH-3 .............................................2-5
Finisher FN-105 and Finisher FN-106.............................................2-6
Finisher FN-503 ..............................................................................2-7
Finisher FN-5 ..................................................................................2-8
Large Desk-Type Cabinet PF-115 ..................................................2-9
Duplex Cabinet PF-7D..................................................................2-10
Desk-type Cabinet PF-208 ...........................................................2-11
Large Capacity Cassette C-306 ...................................................2-12
Large Capacity Cassette C-306L .................................................2-13
Hard Disk HDD-1 ..........................................................................2-13
Memory Expansion Module M32-2...............................................2-13
Printer Controller Pi5500/Pi4700e ................................................2-13
2.3 The Safe Use of Your Copier .................................................... 2-14
Laser Safety..................................................................................2-17
Internal Laser Radiation................................................................2-18
Noise Emission .............................................................................2-19
Safety Label..................................................................................2-19
Data on the Manufacturer's Name Plate.......................................2-22
2.4 Transporting the Copier ............................................................ 2-23
Di470
Page 4

2.5 Setting up the Copier.................................................................2-23
Environmental Requirements .......................................................2-23
Installation Site.............................................................................2-23
Space Requirements for the Copier.............................................2-24
Storing Supplies........................................................................... 2-24
2.6 Connecting the Copier...............................................................2-25
2.7 Switching the Copier On and Off ..............................................2-25
Switching the Copier On .............................................................. 2-25
Switching the Copier Off..............................................................2-26
2.8 Control Panel Keys and Indicators ...........................................2-27
Control Panel Left Side ...............................................................2-27
Control Panel Right Side..............................................................2-29
Touch Screen ...............................................................................2-31
2.9 The Touch Screen ......................................................................2-32
Operating the Touch Screen ........................................................ 2-32
Structure of Touch Screen Menus ...............................................2-33
2.10 Adding Paper ..............................................................................2-35
1st and 2nd Paper Drawer (Basic Drawers) .................................2-35
3rd Paper Drawer – PF-115 (Optional Equipment).......................2-37
3rd and 4th Paper Drawer – PF-208 (Optional Equipment)..........2-39
Large Capacity Cassette – C-306 and C-306L (Optional Equipment)
2-40
Single Feed Tray...........................................................................2-42
2.11 Replacing the Toner Bottle........................................................2-44
2.12 Replacing the Staple Cartridge.................................................2-47
Finisher FN-5................................................................................2-47
Finisher FN-105............................................................................2-50
Finisher FN-106............................................................................2-53
Mailbin Finisher FN-503 ...............................................................2-55
2.13 Shutting Down the Copier .........................................................2-58
2.14 Please Observe these Precautions...........................................2-58
2.15 Proper Use of Your Copier ........................................................2-58
3 Initial Steps . . .
3.1 Step-by-Step Instructions on Copying Your Documents.........3-1
3.2 Entering the Administrator Number............................................3-4
3.3 Checking Copier Settings............................................................ 3-5
3.4 Entering the Number of Copies...................................................3-5
3.5 Starting the Copy Cycle ...............................................................3-6
Di470
Page 5

3.6 Interrupting the Copy Cycle........................................................ 3-6
3.7 Stopping the Copy Cycle............................................................. 3-7
3.8 Resetting Copier Settings ........................................................... 3-7
3.9 Using the Automatic Document Feeder .................................... 3-8
Feeding Originals of the Same Size................................................3-9
Feeding Originals of Different Sizes..............................................3-10
Using the Single Feed Tray...........................................................3-12
3.10 Placing Originals on the Glass.................................................. 3-13
Paper Originals and Transparent Originals...................................3-13
Books and Bound Originals..........................................................3-14
3.11 Scanning Stacks of Originals.................................................... 3-15
3.12 Using Memory Recall................................................................. 3-17
3.13 Setting Up Reserve Copy Jobs................................................. 3-18
3.14 Using the Job List ..................................................................... 3-19
Viewing the Job List......................................................................3-19
Viewing the Copier Settings for a Reserve Copy Job...................3-20
Changing the Number of Copies for a Reserve Copy Job ...........3-21
Deleting a Reserve Copy Job from the Job List...........................3-22
Deleting the Current Copy Job .....................................................3-23
Submitting a Print Job..................................................................3-24
3.15 Other Functions.......................................................................... 3-26
Automatic Drawer Switching ........................................................3-26
Automatic Reset of Copier Settings .............................................3-26
Energy Save Mode........................................................................3-26
Auto Shut Off ................................................................................3-26
Sleep Mode...................................................................................3-26
Auto Copy Start ............................................................................3-26
4 Customizing Your Copy
4.1 Basic Settings .............................................................................. 4-1
Enabling Auto Paper Select Mode..................................................4-2
Selecting the Paper Drawer Manually.............................................4-3
Setting the Paper Type for the Single Feed Tray............................4-4
Setting the Paper Size for the Single Feed Tray.............................4-6
Enabling Auto Size..........................................................................4-8
Selecting a Fixed Zoom Factor.......................................................4-9
Selecting a Zoom Factor using the Arrow Keys ...........................4-10
Specifying a Zoom Factor using the Numeric Keypad.................4-11
Saving Zoom Factors....................................................................4-13
Loading Saved Zoom Factors ......................................................4-15
Specifying an Unproportional Zoom Factor .................................4-17
Saving Unproportional Zoom Factors...........................................4-19
Di470
Page 6

Loading Stored Unproportional Zoom Factors............................4-22
Non-Sorted Copies ......................................................................4-24
Sort/Group Copies .......................................................................4-25
Stapling Copies – Overview ......................................................... 4-27
Stapling Copies – Corner Staple.................................................. 4-32
Stapling Copies – 2-Point Staple (Side)/Centre Staple................ 4-33
Stapling Copies – Manual Stapling ..............................................4-35
Punching Copies..........................................................................4-38
Folding Copies – Overview...........................................................4-40
Folding Copies – Crease..............................................................4-40
Folding Copies – Half-Fold...........................................................4-43
Folding Copies – Z-Fold...............................................................4-45
4.2 Original>Copy Functions ...........................................................4-48
Selecting a Copy Mode................................................................4-51
Copying Originals with File Margins.............................................4-53
Copying Books.............................................................................4-55
4.3 Density Settings..........................................................................4-60
Toggling Auto Exposure...............................................................4-61
Making Copies Lighter or Darker .................................................4-62
Changing the Density Mode.........................................................4-63
4.4 Auxiliary Functions.....................................................................4-64
Inserting a Cover Sheet................................................................4-65
Inserting Separator Pages............................................................ 4-68
OHP Interleaving ..........................................................................4-71
Adding a Margin to Your Copy.....................................................4-74
Erasing a Margin or Frame around Your Copy.............................4-76
Duplicating Images onto a Copy..................................................4-78
Creating Page Numbers...............................................................4-82
Creating Image Stamping.............................................................4-90
5 Combining Functions
5.1 Original: 1-sided, Copy: 1-sided..................................................5-3
5.2 Original: 1-sided, Copy: 2-sided..................................................5-6
5.3 Original: 2-sided (File Margin left), Copy: 1-sided .....................5-9
5.4 Original: 2-sided (File Margin left), Copy: 2-sided ...................5-12
5.5 Original: 2-sided (File Margin above), Copy: 1-sided .............. 5-15
5.6 Original: 2-sided (File Margin above), Copy: 2-sided .............. 5-18
Di470
Page 7

6 Utilities
6.1 Using the Copy Job Program Memory ...................................... 6-1
Saving a Copy Job Program...........................................................6-1
Checking the Settings of a Copy Job Program..............................6-4
Recalling a Stored Copy Job Program ...........................................6-6
Deleting a Stored Copy Job Program.............................................6-7
6.2 Using the Image Memory ............................................................ 6-9
Storing an Image.............................................................................6-9
Checking a Stored Image.............................................................6-13
Deleting a Stored Image...............................................................6-15
6.3 Checking Copier Meter Counts ................................................ 6-17
6.4 Starting the Toner Replenisher Function................................. 6-19
6.5 Configuring the User's Choice Settings .................................. 6-20
Configuring User's Choice Settings..............................................6-22
User's Choice [1/6] .......................................................................6-24
User's Choice [2/6] .......................................................................6-26
User's Choice [3/6] .......................................................................6-28
User's Choice [4/6] .......................................................................6-29
User's Choice [5/6] .......................................................................6-30
User's Choice [6/6] .......................................................................6-33
6.6 Using the Administrator Mode.................................................. 6-35
Making Settings in Administrator Mode .......................................6-35
Turning on the Copy Counter .......................................................6-37
Setting Access Numbers ..............................................................6-39
Setting Copy Limits for Access Numbers.....................................6-41
Printing Copy Track Data..............................................................6-43
Resetting Individual Access Numbers ..........................................6-44
Resetting All Counters ..................................................................6-46
6.7 Limiting the Number of Copies per Copy Cycle...................... 6-48
6.8 Locking the Auto Shut Off Mode .............................................. 6-49
6.9 Job Delete................................................................................... 6-50
7 Troubleshooting
7.1 If You are not Satisfied with Your Copy . . ................................ 7-1
7.2 If a Message Appears on the Touch Screen. . . ........................ 7-3
7.3 If Your Copier Is Not Working Correctly . . ............................... 7-4
7.4 If a Malfunction Code Appears . . .............................................. 7-5
Message Indicating a Fault.............................................................7-5
Message Indicating a Malfunction..................................................7-5
Di470
Page 8

7.5 How to Clear a Paper Misfeed ....................................................7-6
Main Unit .......................................................................................7-7
Single Feed Tray...........................................................................7-11
Electronic Document Handler EDH-3...........................................7-12
Duplex Unit PF-7D/PF-208 ..........................................................7-15
Finisher FN-5 – Overview .............................................................7-17
Finisher FN-5 – Paper Misfeed 1..................................................7-18
Finisher FN-5 – Paper Misfeed 2..................................................7-23
Finisher FN-5 – Paper Misfeed 3..................................................7-26
Finisher FN-5 – Paper Misfeed 4..................................................7-27
Finisher FN-105............................................................................7-35
Finisher FN-106............................................................................7-38
Mailbin Finisher FN-503 ...............................................................7-41
Desk Type Cabinet PF-208..........................................................7-44
Desk Type Cabinet PF-115..........................................................7-46
Large Capacity Cassette C-306/C-306L......................................7-48
7.6 How to Release a Staple Jam ...................................................7-50
Finisher FN-5................................................................................7-51
Finisher FN-105............................................................................7-53
Finisher FN-106............................................................................7-55
Mailbin Finisher FN-503 ...............................................................7-57
7.7 These Functions Cannot Be Combined!...................................7-60
Basic Settings ..............................................................................7-62
Orig.>Copy Settings.....................................................................7-66
Auxiliary Functions .......................................................................7-69
Other.............................................................................................7-71
8Appendix
8.1 Care of the Unit............................................................................. 8-1
Cleaning .........................................................................................8-1
Cleaning the Automatic Document Feeder....................................8-3
Cleaning the Corona Units .............................................................8-4
8.2 Copier Maintenance .....................................................................8-4
8.3 Specifications ...............................................................................8-5
Copier Di470...................................................................................8-5
Paper Feed Unit PF-208................................................................. 8-6
Paper Feed Unit PF-115................................................................. 8-7
Duplex Unit PF-7D .........................................................................8-7
Electronic Document Handler EDH-3.............................................8-8
Finisher FN-5..................................................................................8-9
Finisher FN-105............................................................................8-10
Finisher FN-106............................................................................8-11
Di470
Page 9

Mailbin Finisher FN-503................................................................8-12
Paper Feed Unit C-306 .................................................................8-13
Paper Feed Unit C-306L...............................................................8-13
8.4 Paper Size Tables ...................................................................... 8-14
Metric............................................................................................8-14
Inch ...............................................................................................8-14
8.5 Zoom Factor Tables................................................................... 8-15
Metric............................................................................................8-15
Inch ...............................................................................................8-15
8.6 CE Marking (Declaration of Conformity).................................. 8-17
8.7 Certifications on the Manufacturer's Name Plate .................. 8-18
8.8 Directory of Abbreviations ........................................................ 8-19
8.9 Index............................................................................................ 8-20
Di470
Page 10

Di470
Page 11

Introduction
1 Introduction
1.1 We Want You to Be a Satisfied Customer
Thank you for choosing a Minolta Copier System.
To ensure the best performance and effective use of your copier, this
manual will provide information on the following topics:
G Getting to Know Your Copier
G Initial Steps . . .
G Customizing Your Copy
G Combining Functions
G Utilities
G Troubleshooting
Please read this manual carefully before using your copier and keep it
handy at all times. Store the manual in the holder on the rear side of the
copier.
For further information and assistance, please contact:
G your Minolta Technical Representative;
G our Web site, http://www.minolta.com
Please keep the serial number (located on the copier's rating plate) and
the copier's date of purchase handy to ensure fast, accurate assistance
in the event of difficulties.
. . . because we want you to be a satisfied customer.
1
Di470 1-1
Page 12

1
1.2 Preserving the Environment . . .
Minolta supports the challenge of preserving the environment and does
all that it can to actively participate in preventing and resolving ecological
problems.
Our production is certified under ISO 9000 (quality management) and
ISO14001 (environment management).
Takeback and Reutilisation
Used devices, empty toner and drum units and used toner and drum
units are taken back by a local MINOLTA partner and processed for
recycling and reutilisation of materials.
What is Energy Star®?
Introduction
After long periods of idleness, Energy Star® copiers switch to Energy
Saver Mode or turn themselves off. This function can reduce the annual
energy costs for the unit by up to 60%.
Copiers with a high copying speed automatically switch to 2-sided
copying mode. This reduces the costs for copy media and the volume of
paper consumed.
Did you know that manufacturing a sheet of paper requires 10 times as
much energy as making a copy?
The conservation of paper thus also has a direct global effect on the
conservation of energy.
This copier complies with the Energy Star® energy efficiency criteria.
Use of Recycled Paper
This unit is suited for processing recycled paper that meets the
requirements of ENV 12281 or DIN 19309. For details, consult your local
MINOLTA partner.
1-2 Di470
Page 13

Introduction
1.3 Guide to this Manual
How Is this Manual Structured?
If you are not sure where to locate the information you need, please refer
to this section. The following table will help you. For detailed information
on specific issues, refer to the index at the end of the manual.
No. Chapter Description
1 Introduction This chapter contains introductory
2 Getting to Know Your
Copier
3 Initial Steps . . . This chapter provides you with the knowledge
4 Customizing Your Copy This chapter explains the effective use of the
5 Combining Functions This chapter includes tables that help you
6 Utilities This chapter shows you how to configure the
1
information pertaining to the effective use of
this manual.
This chapter is provided to familiarize you with
your copier and its features. It describes such
subjects as:
• System overview
• Safe and reliable use of the copier
• Setting up the copier
• Switching the copier on and off
• Filling the paper drawers
• Changing the toner cartridge
needed for using your copier, such as:
• Step-by-step Instructions on Copying Your
Documents
• Starting the copy cycle
• Stopping the copy cycle
• Loading originals
• Creating reserve copy jobs
copier's functions, for example:
• Basic settings
• Original>Copy settings
• Image density settings
• Auxiliary functions
achieve the copy results you aim for.
copier to meet your requirements. It provides
information on:
• Using the copy job program memory
• Checking the meter count
• Changing the User's Choice settings
• Using administrator mode
Di470 1-3
Page 14

1
Introduction
No. Chapter Description
7 Troubleshooting This chapter contains instructions to help you
recognize errors and resolve them:
• If you are not satisfied with your copy
• If a malfunction code is displayed
• How to clear a paper misfeed
• How to clear a staple jam
8 Appendix The appendix contains a collection of useful
supplementary information such as:
• Care of the unit
• Specifications
• Paper size tables
• Zoom factor tables
•Index
1-4 Di470
Page 15
Introduction
A Brief Explanation of the Conventions used in this Manual
A variety of conventions and types of illustrations are used for special
emphasis in this manual. The following examples show the most
important conventions and how to respond to them.
DANGER
This is a danger warning!
The danger warning points out a danger of potentially serious injury or
death. Neglecting the danger warning can lead to serious personal injury.
§ The arrow marks the precautionary measure required to avoid the
WARNING
This is a warning!
The warning points out a hazardous situation for persons and/or
products. Neglecting the warning can lead to personal injury and/or
serious damage to the unit.
§ The arrow marks the precautionary measure required to avoid the
1
danger.
danger.
CAUTION
This is a caution!
The caution points out a potential and dangerous situation. Neglecting
the caution can lead to personal injury and/or machine damage.
§ The arrow marks the precautionary measure required to avoid the
danger.
Di470 1-5
Page 16
1
Introduction
[START] key on touch screen
ERROR Touch screen message with the text ERROR
§ Single action to be performed
(followed by no other steps)
A list begins:
G These bullets indicate a list.
G Lists with bullets do not have any specific order.
H Where a list with white bullets follows a list with black bullets, the
white bullets are ranked below the black bullets.
G This is the end of the list
1 Step 1 of a sequence of actions
This illustrates what needs
2 Step 2 of a sequence of actions
This is additional assistance.
?
§ The action described here is
sure to achieve the results you
want.
to be done.
3 Step 3 of a sequence of actions
H This bullet indicates a list within
a sequence of actions.
This is a helpful hint
Texts highlighted in this manner contain useful little tips and tricks for
improving and simplifying the copy process.
1-6 Di470
Page 17

Introduction
A Brief Explanation of Important Concepts and Symbols
Terms such as original, copy, lengthwise and crosswise, which are used
to describe various items, have their own, clearly defined meanings. The
most important of these terms are defined below.
Original and copy
The original is the document being duplicated by the copy cycle.
1
Original
(document to be copied)
Copy cycle
enlarge,
,
shrink
Sort
Feeding direction
The feeding direction is the path the paper takes through the copier. The
feeding direction is shown by the arrows in the following illustration.
(copy of the original document)
Copy
Di470 1-7
Page 18
1
Introduction
Width and length
When paper sizes are given, the first value is always the width of the
paper (side A). The second value is the length of the paper (side B).
21 x 29.7 cm
Width of the paper
(side A)
Lengthwise and crosswise
If side A of the paper format is shorter than side B, this is referred to as
lengthwise.
If side A of the paper format is longer than side B, this is referred to as
crosswise.
Length of the paper
(side B)
21 x 29.7 cm 29.7 x 21 cm
Lengthwise Crosswise
Abbreviations are frequently placed after the paper sizes to indicate
lengthwise or crosswise more accurately:
G Lengthwise: L such as A4L
G Crosswise: C such as A4C
1-8 Di470
Page 19
Getting to Know Your Copier
2 Getting to Know Your Copier
2.1 System Overview
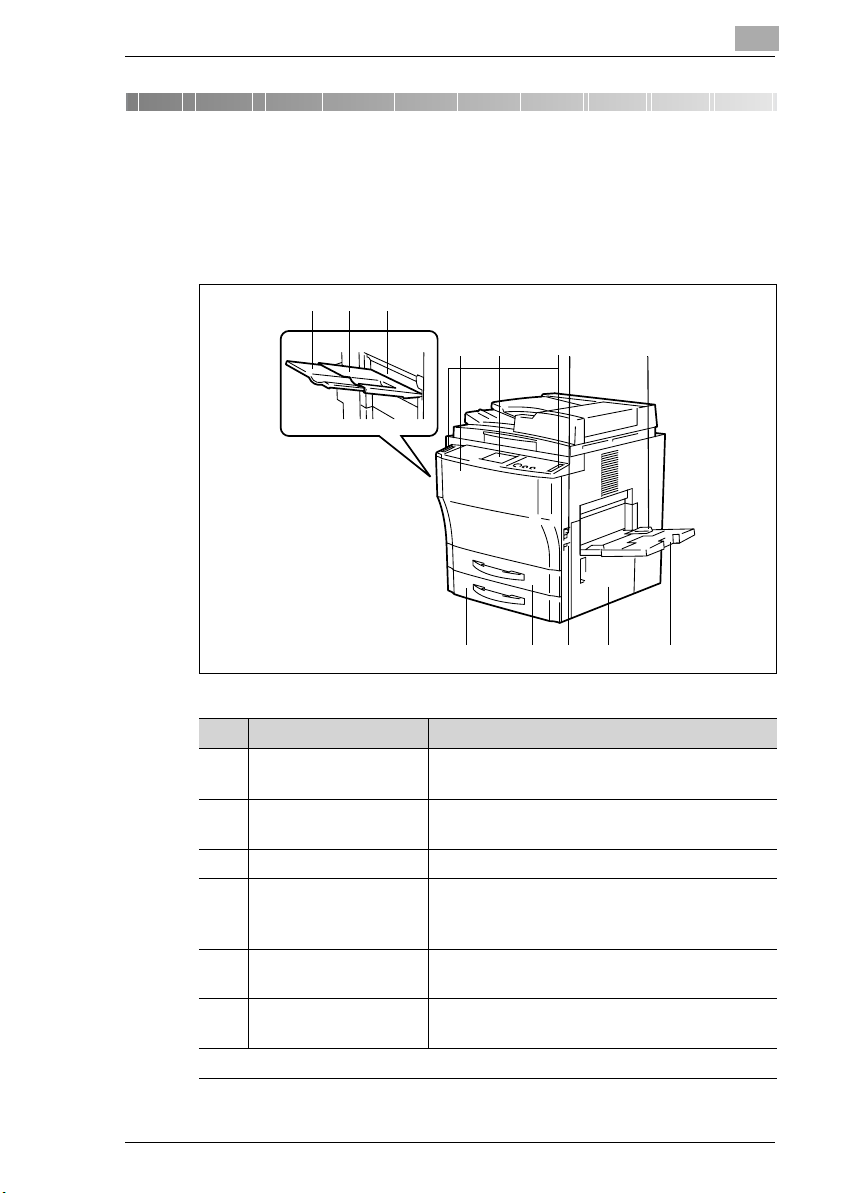
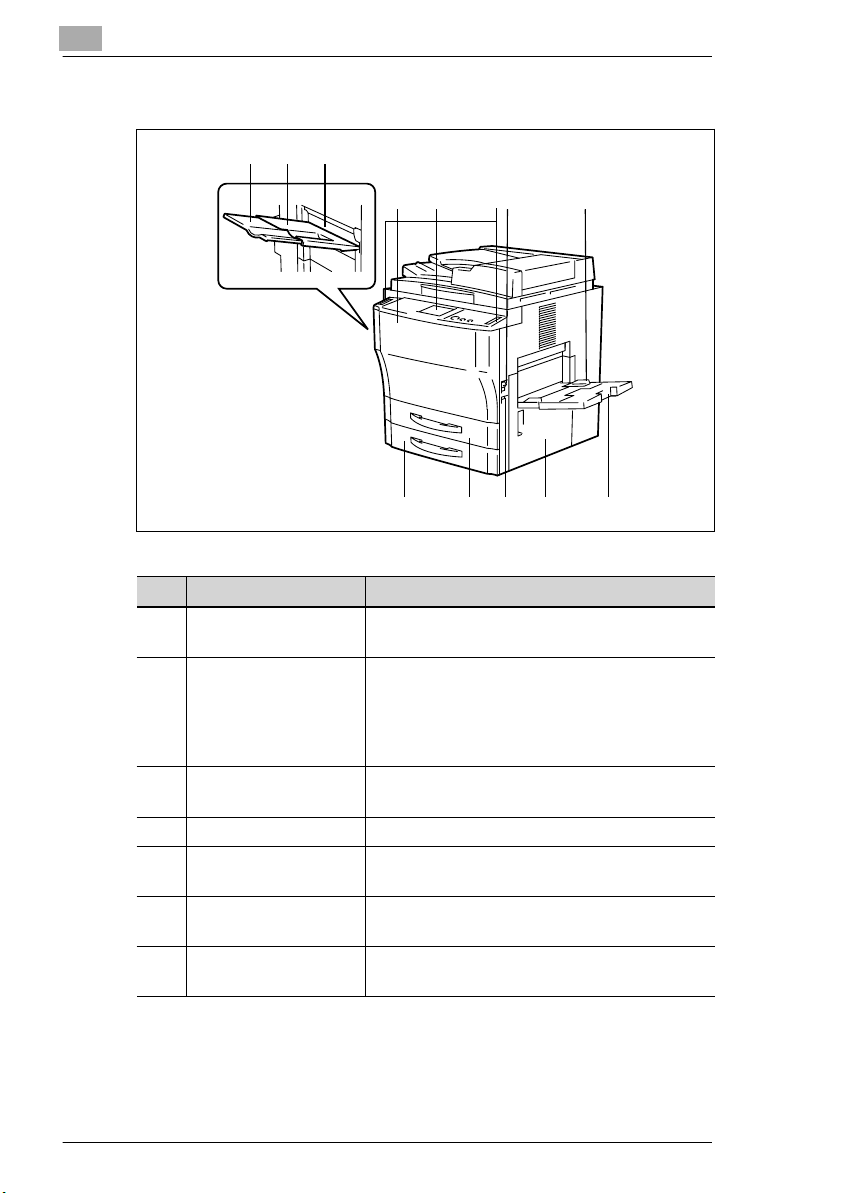
Copier Di470 (External)
2
13
6
4
5
7
2
8
910111213
Item Name Description
1 Copy Tray Receives the created copies
(maximum of 100 sheets of plain paper).
2 Copy Tray Extender Pull out the extender when making copies on
large-size paper.
3 Upper Left Cover (L1) Open this cover to clear a paper misfeed.
4 Front Door Open the front door:
5 Control Panel The control panel has keys and indicators for
6 Control Panel
Adjusting Dial
. . . continued on next page
• to replenish toner or
• to clear a paper misfeed.
operating the copier.
Allows the angle of the control panel to be
adjusted.
Di470 2-1
Page 20
2
Getting to Know Your Copier
Copier Di470 (external)
2
13
6
4
5
Item Name Description
7 Power Switch Switch the copier on and off with the power
switch.
8 Single Feed Tray
(also referred to as the
multi bypass tray)
9 Extending the Single
Feed Tray
10 Lower-Right Door (R1) Open this cover to clear a paper misfeed.
11 Total Counter The counter shows the number of copies made
12 1st Paper Drawer
(Universal drawer)*
13 2nd Paper Drawer
(Universal drawer)*
* Universal paper drawers are variable in size and the operator can set them to hold different
sizes of paper.
The single feed tray holds up to 50 sheets of
plain paper (80 g/m
Special paper (OHP transparencies, thick
paper) can also be used with the single feed
tray.
Pull the extender out when processing largesize copy paper using the single feed tray.
by the copier.
This paper drawer holds up to 500 sheets of
copy paper (80 g/m
This paper drawer holds up to 500 sheets of
copy paper (80 g/m
7
2
).
2
).
2
).
8
910111213
2-2 Di470
Page 21
Getting to Know Your Copier
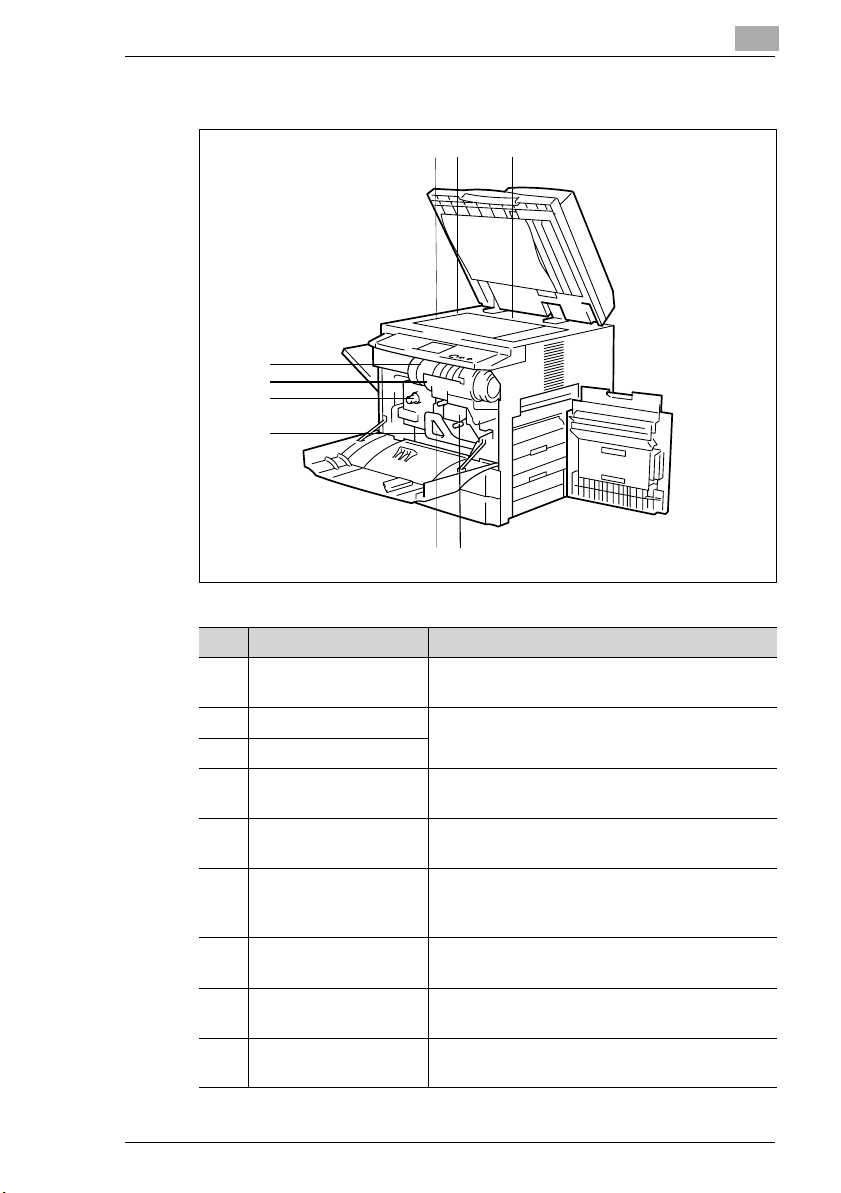
Copier Di470 (Internal)
9
8
7
6
2
2 31
5
4
Item Name Description
1 Original Glass Place the original face down on the original
2 Original Width Scale Align the originals to the original width and
3 Original Length Scale
4 Corona Cleaning Unit When necessary, clean the corona using the
5 Paper Dehumidifier
Switch
6 Transport Section
Lock Release Lever
(M3)
7 Paper Return Feed
Knob (M1)
8 Toner Bottle Holder Swing the toner bottle holder out to the right to
9 Toner Bottle Replace the toner bottle when the toner runs
glass.
original length scales.
corona cleaning unit.
(for technical service only)
Use the transport section lock release lever to
release a paper jam.
Use the paper return feed knob to release a
paper jam.
replace the toner bottle.
low.
Di470 2-3
Page 22
2
2.2 Optional Equipment
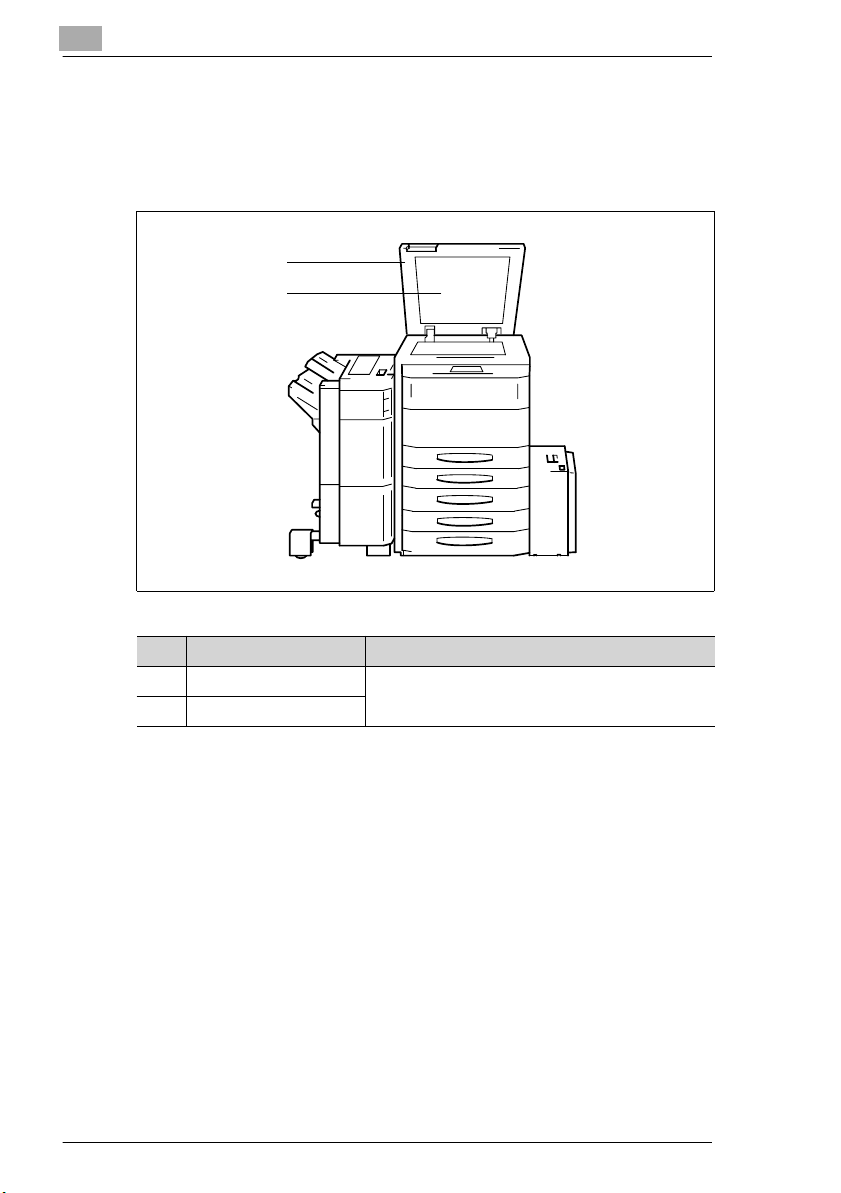
Original Cover
The original cover holds an original placed on the original glass.
1
2
Getting to Know Your Copier
Item Name Description
1 Original Cover The original cover holds an original placed on
2Original Pad
2-4 Di470
the original glass.
Page 23
Getting to Know Your Copier
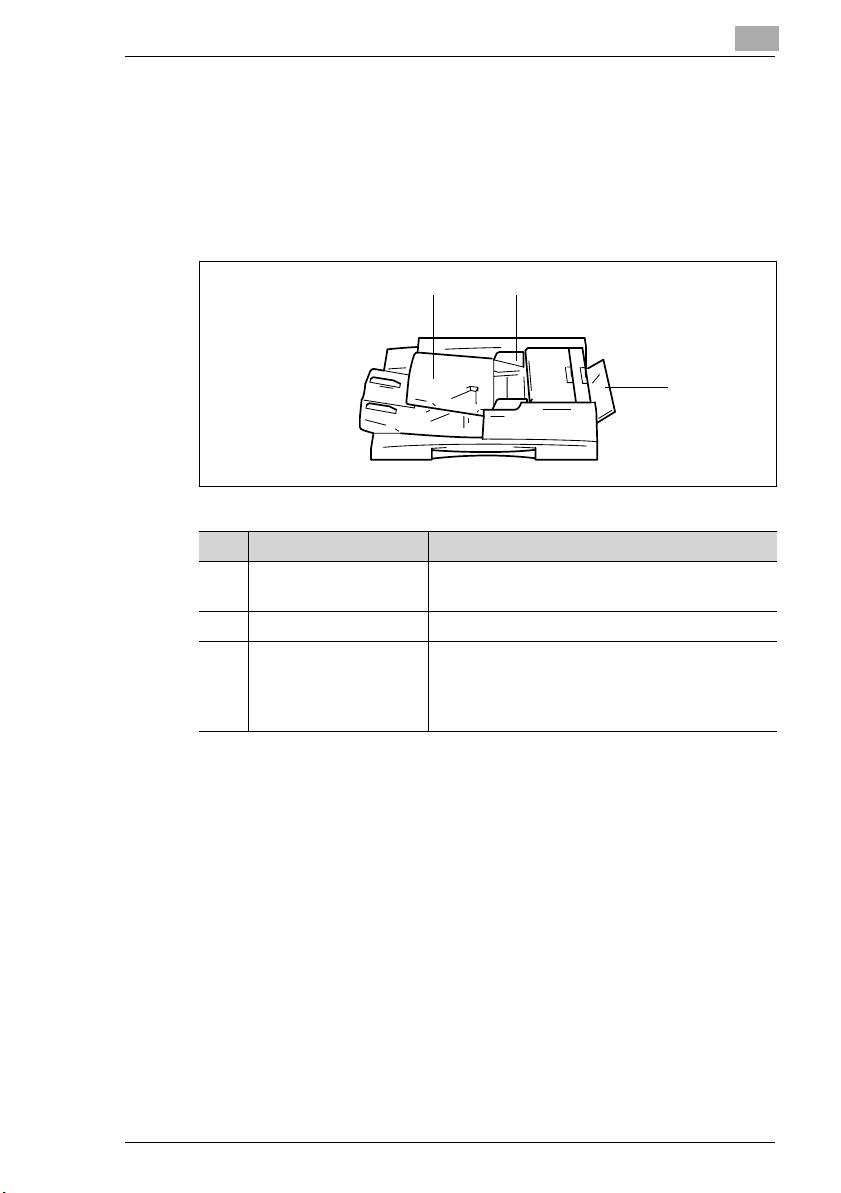
Electronic Document Handler EDH-3
The automatic document feeder can feed up to 100 originals in
succession automatically. If two-sided originals are being copied, the
Electronic Document Handler can also turn them over.
The single feed tray can be used for automatically feeding very thin or
heavy originals.
2
1
Item Name Description
1 Document Feeder Place the originals on the document feeder with
the side to be copied face up.
2 Document Guide Plate Set the document guides to the original size.
3 Single Feed Tray The single feed tray allows you to process
thinner or thicker originals than with the
document feeder. However, the originals must
be fed one by one.
2
3
Di470 2-5
Page 24
2
Getting to Know Your Copier
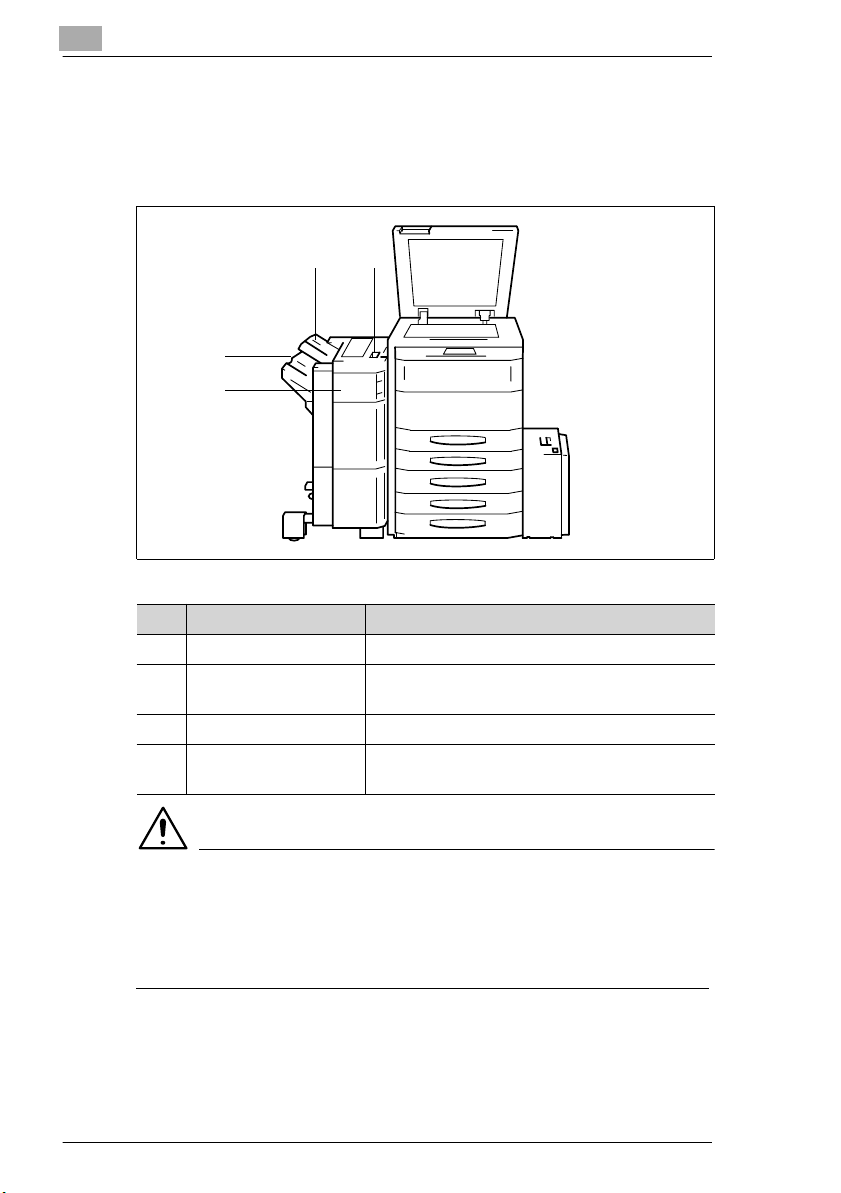
Finisher FN-105 and Finisher FN-106
The finishers enable controlled finishing and stacking of copies. The
finishers can sort, group and staple copies. The FN-105 finisher also
permits punching copies.
43
2
1
Item Name Description
1 Front Door (FN4) Open the front door to clear a paper misfeed.
2 Bottom Offset Tray The copies sorted with the offset function are
fed out here.
3 Top Offset Tray The copies are fed out here by default.
4 Recessed Grip Use the recessed grip to pull the finisher away
from the copier.
CAUTION
Damage to the device by improperly estimating the space required
The bottom offset tray of a finisher moves downward during copying.
Objects below the offset tray may seriously damage it.
§ Do not place any objects below the offset tray of a finisher.
2-6 Di470
Page 25
Getting to Know Your Copier
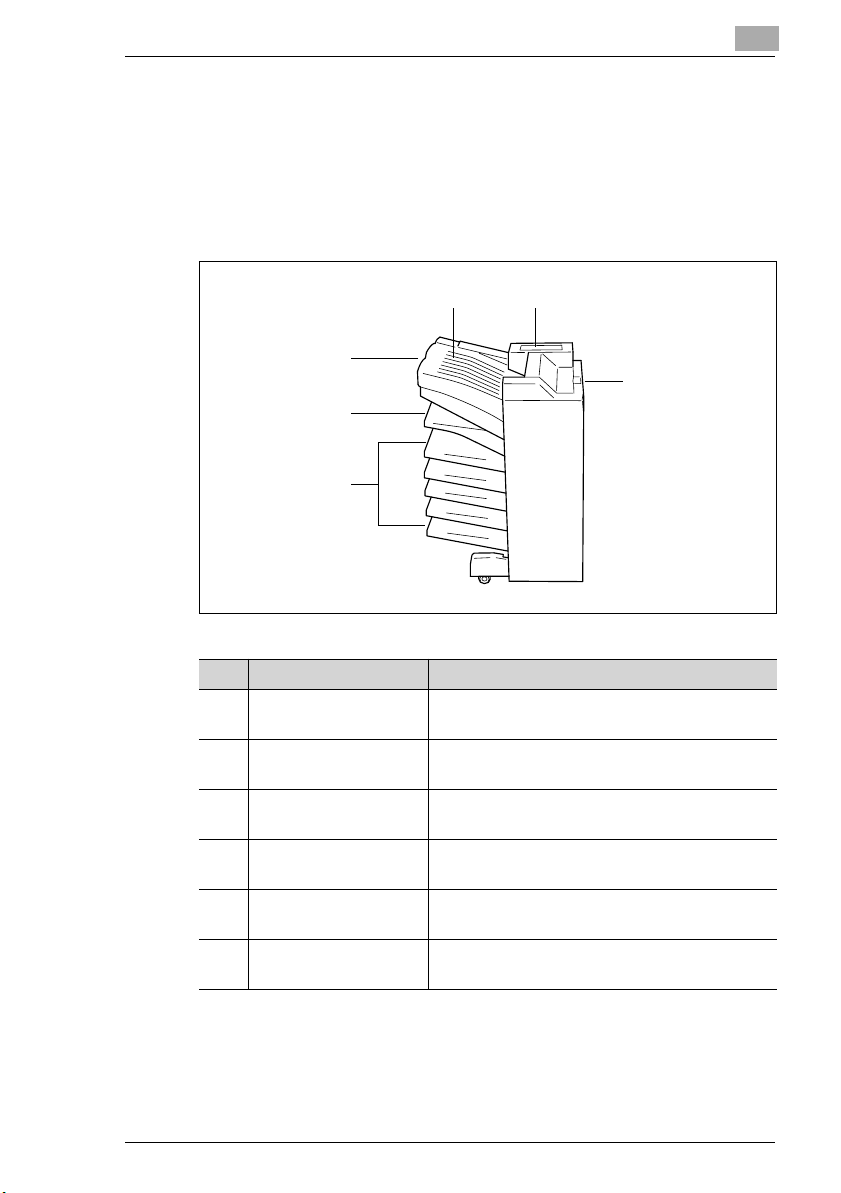
Finisher FN-503
The finisher enables controlled finishing and stacking of copies. Use the
finisher to sort, group, punch and staple copies.
(Only possible if a printer controller is installed.)
The printouts can be output to one of five trays assigned using a PC. The
printouts can be sorted, grouped or punched.
3
2
2
54
6
1
Item Name Description
1 Five Copy Trays These trays receive the printouts that are
2 Bottom Offset Tray The copies sorted with the offset function are
3 Top Offset Tray Receives copies made on standard or heavier
4 Cover Panel for the
Top Offset Tray
5 Cover for the Stapler
Unit
6 Recessed Grip Use the recessed grip to pull the finisher away
assigned to them.
fed out here.
paper.
Open this cover to clear a paper misfeed.
Open this panel to clear a staple jam or
replenish staples.
from the copier.
Di470 2-7
Page 26
2
Getting to Know Your Copier
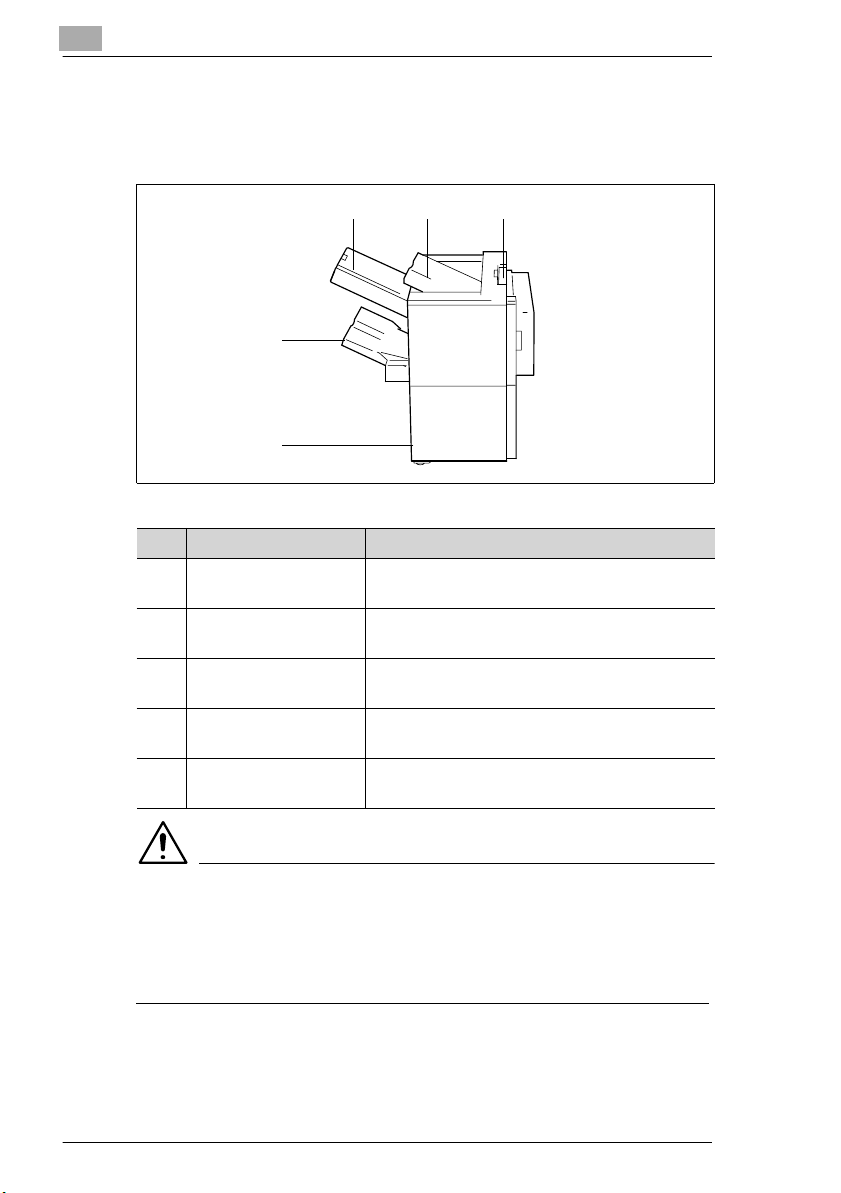
Finisher FN-5
The finisher enables controlled finishing and stacking of copies. Use the
finisher to sort, group, punch, staple and even fold copies.
43
2
1
Item Name Description
1 Front Door Open the front door to change the stapler unit
or clear a paper jam.
2 Bottom Offset Tray The sorted, stapled or grouped copies sets are
received here.
3 Staple Tray Open this tray to load paper manually for
stapling or to or clear a paper jam.
3 Top Offset Tray Receives copies made on standard or heavier
paper.
5 Recessed Grip Use the recessed grip to pull the finisher away
from the copier.
5
CAUTION
Damage to the device by improperly estimating the space required
The bottom offset tray of a finisher moves downward during copying.
Objects below the tray may seriously damage it.
§ Do not place any objects below the exit tray of a finisher.
2-8 Di470
Page 27

Getting to Know Your Copier
Large Desk-Type Cabinet PF-115
The large desk-type cabinet increases the paper capacity of the copier.
The 3rd paper drawer of the large desk-type cabinet holds up to
2,500 sheets of copy paper (80g/m2). The paper drawer is designed to
hold A4 C paper.
There is also a duplex unit integrated into the large desk-type cabinet.
The duplex unit can turn copy paper over for double-sided printing. A3L
to A5 L paper can be processed using the duplex unit.
Item Name Description
1 Duplex Unit The duplex unit automatically turns copy paper
2 Release Button for the
3rd Paper Drawer
3 3rd Drawer This paper drawer holds up to 2.500 sheets of
2
1
2
3
over to enable double-sided copying.
Press the release button to open the 3rd paper
drawer.
• The release button indicator lights up
The paper drawer is empty. The copy paper
is drawn from another paper drawer.
• The release button indicator flashes:
The paper drawer is empty. Copying is
stopped because the copy paper was being
drawn from this paper drawer.
copy paper (80 g/m
2
).
Di470 2-9
Page 28
2
Getting to Know Your Copier
Duplex Cabinet PF-7D
A duplex unit is integrated into the duplex cabinet. The duplex unit can
turn copy paper over for double-sided printing. A3L to A5L paper can be
processed using the duplex unit.
The duplex cabinet also has a storage space. Copy paper and other
accessories can be kept in the storage space.
1
2
Item Name Description
1 Duplex Unit The duplex unit automatically turns copy paper
over to enable double-sided copying.
2 Storage Space Use the storage space for items such as copy
paper and other accessories.
2-10 Di470
Page 29
Getting to Know Your Copier
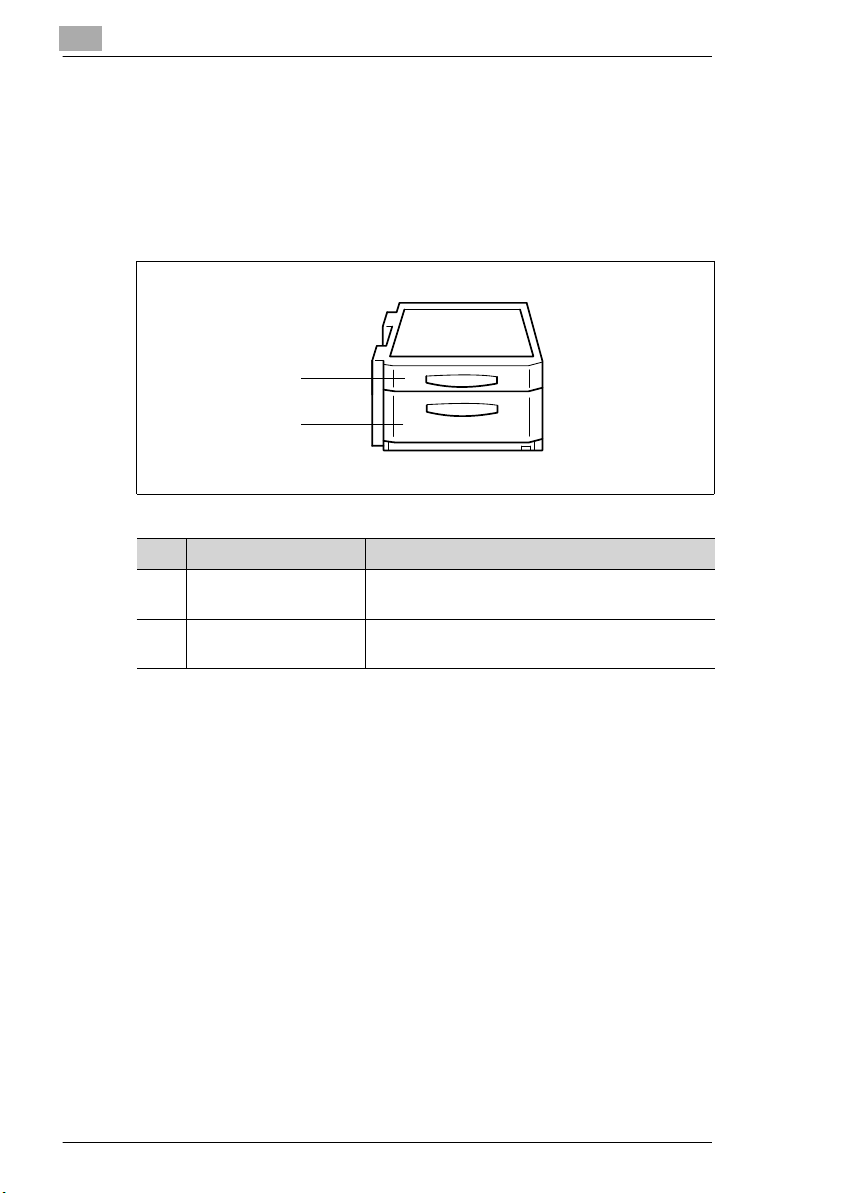
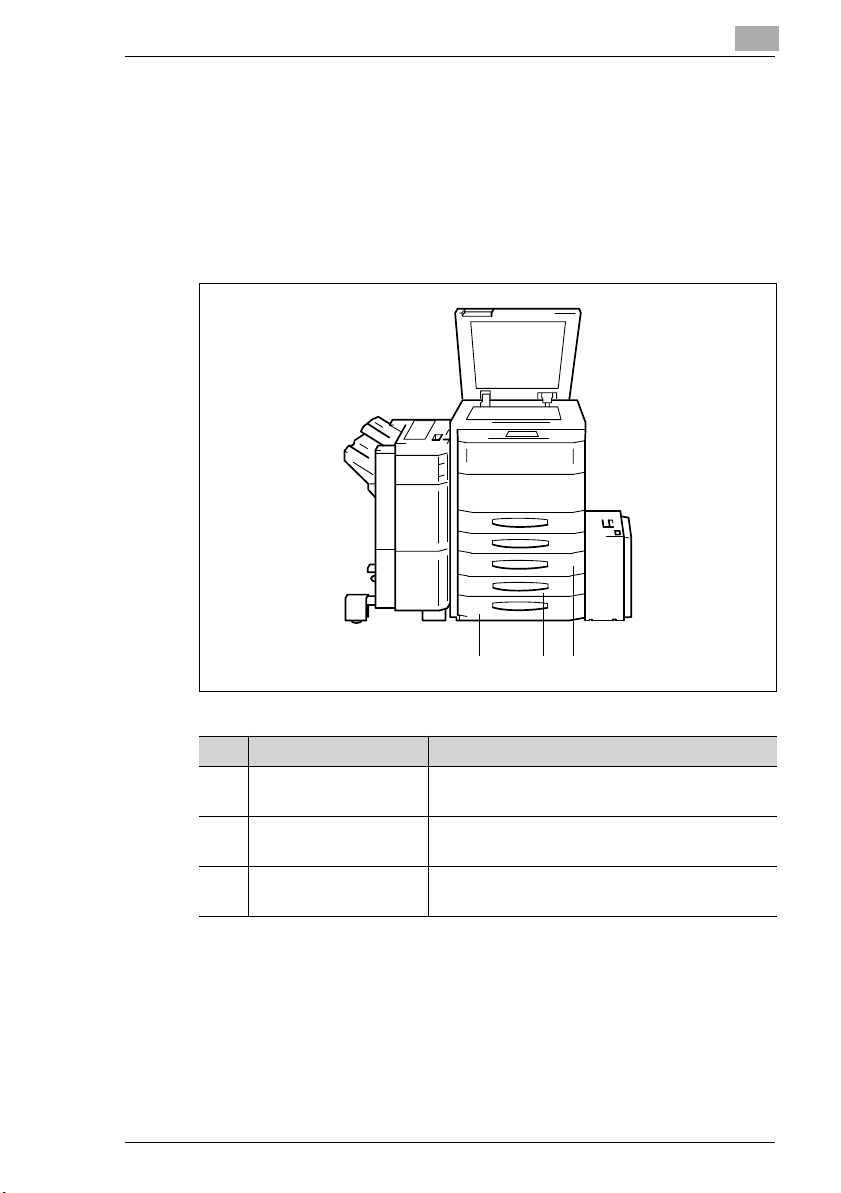
Desk-type Cabinet PF-208
The desk-type cabinet increases the paper capacity of the copier. The
3rd and 4th paper drawers of the desk-type cabinet each hold up to
500 sheets of copy paper (80g/m2).
A duplex unit is also integrated into the desk-type cabinet. The duplex
unit can turn copy paper over for double-sided printing. A3L to A5L
paper can be processed using the duplex unit.
2
123
Item Name Description
1 Duplex Unit The duplex unit automatically turns copy paper
over to enable double-sided copying.
2 3rd Drawer This paper drawer holds up to 500 sheets of
copy paper (80 g/m
3 4th Drawer This paper drawer holds up to 500 sheets of
copy paper (80 g/m
2
).
2
).
Di470 2-11
Page 30
2
Getting to Know Your Copier
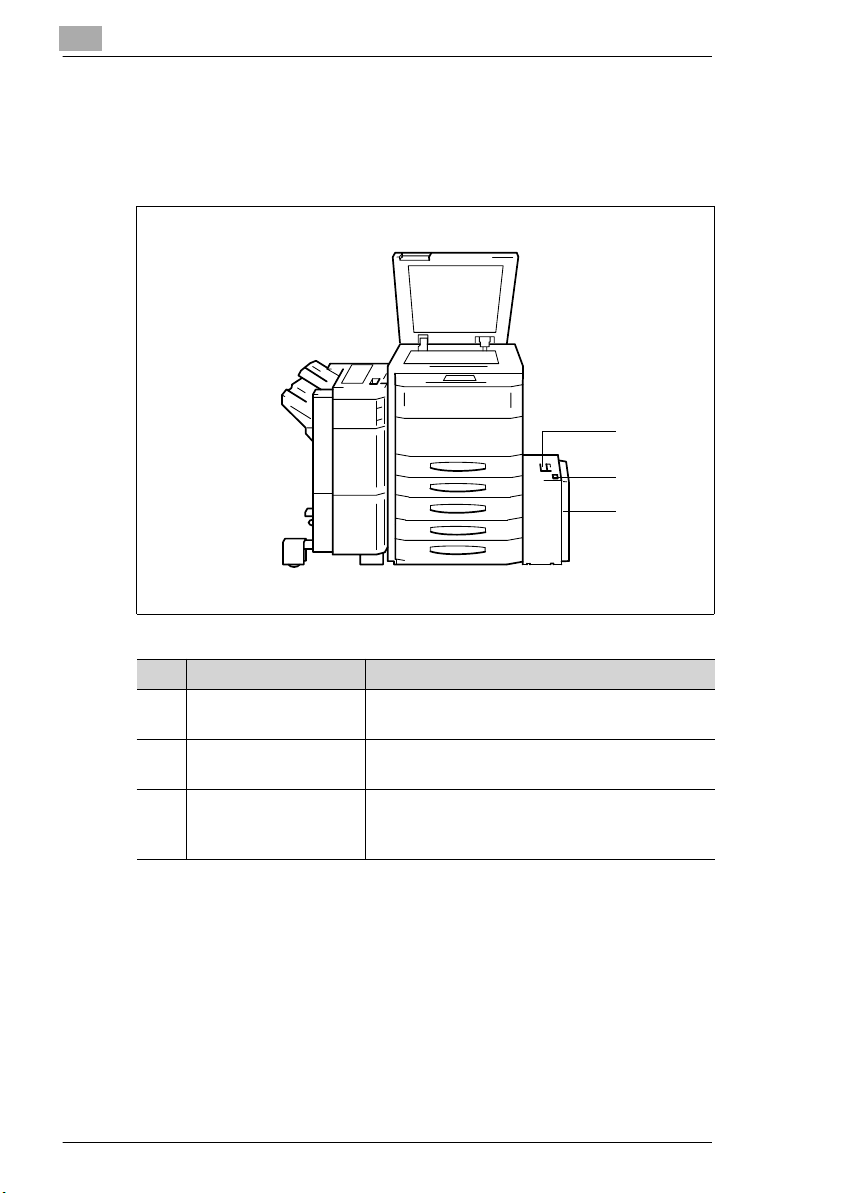
Large Capacity Cassette C-306
The large capacity cassette increases the paper capacity of the copier.
The large capacity cassette holds up to 3,000 sheets of copy paper
(80 g/m2).
1
2
3
Item Name Description
1 Lock Release Lever Pull and hold the lock release lever to slide the
2 Key for lowering the
Paper Plate
3 Cassette Door Open the cassette door:
large capacity cassette away from the copier
Press the key to lower the paper plate.
• to add paper or
• to clear a paper misfeed.
2-12 Di470
Page 31

Getting to Know Your Copier
Large Capacity Cassette C-306L
The large capacity cassette increases the paper capacity of the copier.
The large capacity cassette holds up to 3,000 sheets of copy paper
(80 g/m2).
Item Name Description
1 Lock Release Lever Pull and hold the lock release lever to slide the
2 Key for lowering the
Paper Plate
3 Cassette Door Open the cassette door:
2
1
2
3
large capacity cassette away from the copier
Press the key to lower the paper plate.
• to add paper or
• to clear a paper misfeed.
Hard Disk HDD-1
The hard disk enables you to save copy information.
Some functions, such as setting up reserve copy jobs, can only be used
if the hard disk HDD-1 is installed.
Memory Expansion Module M32-2
The memory expansion module can increase the copier system memory
by 32MB.
If you copy material that requires a large amount of system memory, you
may want to increase the system memory of the copier, which allows the
system to process more data continuously.
Printer Controller Pi5500/Pi4700e
The printer controller allows the copier to be used as a computer printer.
Di470 2-13
Page 32

2
2.3 The Safe Use of Your Copier
The improper use of your copier may result in health hazards, electrical
shock or even fires. Please observe the following precautions for the safe
use of your copier.
DANGER
Incorrect use of the copier can result in fire and/or electrical shock!
The copier is equipped with high-voltage components. Incorrect use of
the copier may result in fire or electrical shock. Observe the following
safety precautions to prevent injury and device damage.
§ Never use flammable sprays, liquids or gases near the copier.
§ Never remove any safety equipment.
§ Never make structural modifications to the copier.
§ Never unplug the copier with wet hands.
§ Ensure that the power supply provides the correct supply voltage for
the copier.
§ Never connect the copier to a multiple-socket extension cord.
§ Do not place coffee cups, bottles or other containers with liquids on
the copier. In the event that liquids are accidentally introduced into
the copier, switch the copier off immediately. Unplug the power cord.
Consult your technical representative.
§ Never insert paper clips, staples or other small pieces of metal into
the openings of the copier. If metal objects are accidentally
introduced into the copier in spite of all precautions, switch the copier
off immediately. Unplug the power cord. Consult your technical
representative.
Getting to Know Your Copier
2-14 Di470
Page 33

Getting to Know Your Copier
CAUTION
Incorrect handling of the power cable can result in fire and/or
electrical shock!
The copier is equipped with high-voltage components. Incorrect handling
of the copier's power cable may cause damage to the cable. This could
result in fire and/or cause electrical shock. Observe the following safety
precautions to prevent injury and device damage.
§ Be sure that the power cable is not damaged. If it becomes damaged,
switch off the copier immediately. Unplug the power cord. Consult
your technical representative.
§ Do not pull directly on the power cable itself when unplugging the
power cord from the power outlet.
§ Do not move the copier unless it is unplugged.
§ Never place heavy objects on the power cable.
§ Do not pull or bend the power cable.
§ Do not place the copier on cables belonging to other devices.
§ Ensure that no cables of other devices get pinched in the copier.
§ Be sure that the power cord sits correctly in the power outlet.
§ Be sure that the power outlet is visible and accessible at all times.
§ If an extension cable is needed, use one with a capacity that
corresponds to or exceeds the power consumption of the copier.
§ Never connect the copier to a multiple-socket extension cord.
2
Di470 2-15
Page 34

2
Getting to Know Your Copier
DANGER
Device overheating can result in fire and/or electrical shock!
The copier is equipped with high-voltage components. Incorrect use or
faulty operation of the copier may cause the unit to overheat. Observe the
following safety precautions to prevent injury and device damage.
§ Switch the copier off immediately if it becomes unusually hot. Unplug
the power cord. Consult your technical representative.
§ Switch the copier off immediately if smoke comes out of it. Unplug the
power cord. Consult your technical representative.
§ Switch the copier off immediately if it emits an unusual odor. Unplug
the power cord. Consult your technical representative.
§ Always unplug the power cord when the copier is not going to be
used for a long time.
CAUTION
External influences can cause damage to the copier!
External influences can cause damage to the copier. Observe the
following safety precautions to prevent device damage.
§ Do not subject the copier to vibrations.
§ Never bring any magnetised object near the copier.
§ Never place objects of more than 3 kg on the copier.
CAUTION
Incorrect handling can cause damage to the copier!
Incorrect handling can cause damage to the copier. Observe the
following safety precautions to prevent device damage.
§ Never place objects of more than 3 kg on the copier.
§ Never open any doors while the copier is making copies.
§ Never turn the copier off while it is making copies.
2-16 Di470
Page 35

Getting to Know Your Copier
CAUTION
A negligible amount of ozone is generated during normal operation
of this copier.
The ozone given off by the copier is not hazardous to health, but it may
smell unpleasant. For a comfortable, healthy and safe operating
environment, it is recommended that the room be well ventilated.
§ Locate the copier in a well-ventilated room.
Laser Safety
This machine is equipped with a laser. If the machine is operated in
accordance with the instructions in this manual, the laser poses no
possibility of danger.
The laser radiation is completely confined within the machine housing.
The laser beam cannot escape the housing at any time of operation.
This machine is certified as a Class 1 laser product. This means that the
unit does not generate any hazardous laser radiation.
2
Di470 2-17
Page 36

2
Getting to Know Your Copier
Internal Laser Radiation
Mean radiant power:
13.6 µW at the laser aperture of the print head unit.
Wavelength: 785 nm
This machine operates using a Class IIIb laser diode that emits an
invisible laser beam. The laser diode and scanning polygon mirror are
incorporated in the print head unit.
The print head unit is NOT A FIELD SERVICE ITEM. It may not be opened
under any circumstances.
Print head
The above illustrations indicates the location of the print head within the
copier.
DANGER
Hazardous laser radiation!
Operating the copier in a manner that does not conform to the
descriptions provided in this manual can lead to the release of hazardous
radiation.
§ Operate the copier only in accordance with the instructions provided
in this manual.
This is a semiconductor laser copier. The maximum radiation capacity of
the laser diode is 0.68mW. The wavelength is 785nm.
2-18 Di470
Page 37

Getting to Know Your Copier
Noise Emission
Device Noise Control Regulations 3 GSGV, 1/18/1991: The acoustic
noise at the operator's workplace is equal to or less than 70 dB (A),
according to EN 27779.
Safety Label
Safety labels indicate hazard areas.
§ Use this operating manual to familiarise yourself with the hazards
before carrying out any activity in a hazard area.
Safety label on the heating unit
The safety label is located inside the unit at the position marked below.
2
WARNING
Danger of burning from the heating unit!
The heating unit may reach temperatures of up to 120°C.
§ Never touch the heating unit.
§ Do not touch areas designated with this symbol : .
Di470 2-19
Page 38

2
Getting to Know Your Copier
Safety label on the corona unit
The safety label is located inside the unit at the positions marked below.
DANGER
Danger! High Voltage!
Improper operation of the copier can result in personal injury caused by
electric shock.
§ Operate the copier only in accordance with the instructions provided
in this manual.
2-20 Di470
Page 39

Getting to Know Your Copier
Safety label on the back of the unit
The safety label is located on the back of the unit at the position marked
below.
DANGER
Hazardous laser radiation!
Improper operation of the copier can result in release of dangerous
radiation.
§ Operate the copier only in accordance with the instructions provided
in this manual.
CLASS 1 LASER PRODUCT
LASER KLASSE 1
PRODUCT
2
Di470 2-21
Page 40

2
Getting to Know Your Copier
Data on the Manufacturer's Name Plate
The manufacturer's name plate for the copier is located on the rear-right
side of the unit at the position marked below.
Di470
Di470
220-240
1560-1700
MINOLTA CO.,LTD
N87/Z132
50-60
7,1
MADE IN CHINA
The following data is provided on the manufacturer's name plate:
Model name
Power requirement data
Max. power consumption Rated current data
Certifications
Serial number of the copier
Manufacturer Country where
manufactured
For further information on the certifications on the manufacturer's name
plate, see page 8-18.
Write down the model name and serial number, which are specified on
the type label, in the table below.
Model:
Serial No.:
2-22 Di470
Page 41

Getting to Know Your Copier
2.4 Transporting the Copier
If you need to transport the copier, please consult your technical
representative.
2.5 Setting up the Copier
Environmental Requirements
The optimal environmental requirements of the copier are as follows.
G Temperature from 10°C to 32°C
(maximum fluctuation of 10°C per hour)
G Humidity of 15% to 85%
(maximum fluctuation of 20% per hour)
Installation Site
The installation site must meet the following requirements:
G An area that is dry and free of dust
G A level surface free of undue vibrations
G Free from flammable gases such as ammonia
G Provision for good ventilation
G A location away from curtains or other easily ignited materials
G Away from personnel so that no one is subjected to the direct exhaust
air of the copier
The unit must be protected from the following influences:
G Splashing liquids
G Direct sunlight
G Strong temperature fluctuations
G Direct airflow from heating or air conditioning units
2
Di470 2-23
Page 42

2
Getting to Know Your Copier
Space Requirements for the Copier
Be sure to allow a clearance of 150 mm or more behind the copier. This
will ensure good ventilation.
Scale: mm
240
2857
2102
1031
Front view Side view
515
407664
1558
1171
1241
770471
1032
This information is applicable to the basic unit, including EDH-3, PF-115,
FN-5 and C-306L.
Storing Supplies
Ensure that supplies are stored:
G In their sealed original packaging materials
G Protected from direct sunlight and heat sources
G In a cool, dry, dust-free location
G Out of the reach of children
WARNING
Toner can be hazardous to your health!
Toner is harmful if swallowed.
§ If you get any toner on your hands, immediately wash them
thoroughly with soap and cold water.
2-24 Di470
Page 43

Getting to Know Your Copier
2.6 Connecting the Copier
The copier needs a reliable, consistent power supply. Please call your
in-house technical support if required.
The allowable values for the power supply and the frequency range can
be found in the technical information. For more information, see page 8-
5.
2.7 Switching the Copier On and Off
Switching the Copier On
§ Press the power switch to the ON
position.
The [START] indicator key on the
control panel is orange.
After a few seconds, the following
message is shown on the touch
screen: "Now warming up. Ready
to scan."
2
ON
OFF
After switching on the copier, all functions are at their default settings.
When the copier is shipped, the following default settings apply:
G Number of copies: 1
G Paper Feed: Auto Paper Mode
G Zoom Factor: × 1.000
G Exposure: Auto Exposure
G Finishing: Non-sort
G Copy mode: From 1-sided original to 1-sided copy
You can change the default settings in the User's Choice. For more
information, see page 6-20 and the following pages.
Di470 2-25
Page 44

2
Getting to Know Your Copier
Switching the Copier Off
§ Press the power switch to the OFF
position.
The touch screen indicator is no
longer lit up. The copier is turned
OFF.
Help save energy!
The copier has two energy save functions:
Energy save mode is automatically activated approximately
15 minutes after the last copy activity.
The copier is automatically shut off approximately 90 minutes after the
last copy activity.
The idle time before energy save mode is automatically activated can
be changed in the User's Choice settings. For more information, see
page 6-30 and the following pages.
ON
OFF
2-26 Di470
Page 45

Getting to Know Your Copier
2.8 Control Panel Keys and Indicators
Control Panel Left Side
2
8
7
6
1
2
3
45
Item Name Element Description
1 Utility Key Recall utilities
2 Job Recall Key Accessing stored copy job programs
3 Original Key Recall special original settings
4 Mode Check Key with
indicator
5 Contrast Dial Controls the Touch Screen contrast
6 Only active if a printer controller (option) is installed:
Ready Indicator • Indicator lights up:
. . . continued on next page
(Separate Scanning, Mixed Original
Detection)
Recall an overview of the current
copier settings
• Indicator lights up:
The current copier settings are
different from the default settings.
Ready for data transfer.
• Indicator flashes:
Print data being transferred.
Di470 2-27
Page 46

2
Getting to Know Your Copier
Control Panel Left Side (continued)
8
7
6
5
Item Name Element Description
7 Only active if a printer controller (option) is installed:
On Line Key with
indicator
8 Job List Key with
indicator
Switch from on-line to off-line mode
• Indicator lights up:
The copier is in on-line mode.
Recall Job List
• Indicator lights up:
Reserve copy job is pending.
1
2
3
4
2-28 Di470
Page 47

Getting to Know Your Copier
Control Panel Right Side
Item Name Element Description
1 Keypad Keys Setting values
2 C (Clear) Key Delete values and settings with the
3 Scanning mode Key with
4 Copy mode Key with
5 Control Panel
Adjusting Dial
6 Only active if Access numbers have been set up:
Access Key Confirm an input administration
7 Energy Saver Key Manual activation of energy save
8 Interruption Key with
. . . continued on next page
1234
91011
10-Key Pad
Activate scanning mode
indicator
indicator
Dial • Allows the angle of the control panel
indicator
• Indicator lights up:
Scanning mode is active.
Activate copy mode
• Indicator lights up:
Copy mode is active.
to be adjusted.
number
mode
Interruption of a copy cycle.
• Indicator lights up:
Copy cycle is interrupted.
2
5
6
7
8
Di470 2-29
Page 48

2
Getting to Know Your Copier
Control Panel Right Side (continued)
1234
91011
Item Name Element Description
9 Panel Reset Key Resets copier to default settings
Zoom and Job Memory settings are
not deleted. Settings in Interrupt mode
and for reserve copy jobs are also not
reset.
10 Stop Key Stops a copy or scan cycle
11 Start Key with
indicator
Starts a copy or scan cycle
• Indicator lights up green:
The copier is ready for operation.
• Indicator lights up orange:
The copier is not ready for
operation.
5
6
7
8
2-30 Di470
Page 49

Getting to Know Your Copier
Touch Screen
Item Name Element Description
1 Index Keys Opens an index card with specific
2 Display panel Indicator Shows messages and the number of
3 Basics menu Keys Calls up the basic copier settings
4 Current settings Indicator Indicates the current copier settings
5 Supplementary
display
2
1
2
3
4
5
copier settings.
copies.
Indicator Indicates the status of a reserve copy
job
Di470 2-31
Page 50

2
2.9 The Touch Screen
Operating the Touch Screen
CAUTION
Incorrect handling can cause damage to the copier!
The touch screen surface is glass. Incorrect handling can cause damage
to the touch screen.
§ Never place heavy objects on the touch screen.
§ Always touch the surface of the touch screen carefully.
§ Do not press hard on the surface.
§ Do not bring pointed objects into contact with the surface of the touch
screen.
The copier has a touch screen. A touch screen is a display that is
sensitive to the touch. You can use the touch screen to make settings on
the copier and control copy cycles.
§ You can select a function or make settings by lightly touching a key
on the touch screen.
Getting to Know Your Copier
Touch screen displays may be different!
The displays on the touch screen partly depend on the equipment of
the copier. The displays shown in this user manual may be slightly
different from the displays on your copier.
2-32 Di470
Page 51

Getting to Know Your Copier
Structure of Touch Screen Menus
The “Basics” index card is devided into three sections: Paper, Zoom and
Finishing. You can switch between the sections using the Basics menu
keys.
Sections Indicator on the Touch Screen
Paper
Zoom
2
Finishing
You can switch between the four settings screens using the index keys.
Di470 2-33
Page 52

2
Getting to Know Your Copier
Settings Screens Indicator on the Touch Screen
Basics
For additional
information,
see page 2-33.
Original > Copy
Density
Auxiliary
2-34 Di470
Page 53

Getting to Know Your Copier
2.10 Adding Paper
1st and 2nd Paper Drawer (Basic Drawers)
These paper drawers are universal drawers. The universal drawers can
be set for different paper sizes.
Note the following important information!
Capacity: 500 sheets of plain paper (80g/m
Paper sizes: A3 L to A5 L (variable setting)
1 Carefully pull the paper drawer out
as far as it will go.
2 Only if necessary
Press and hold the green keys on
the paper size limiters. Set the
paper size limiters to another paper
size.
2
) per drawer
2
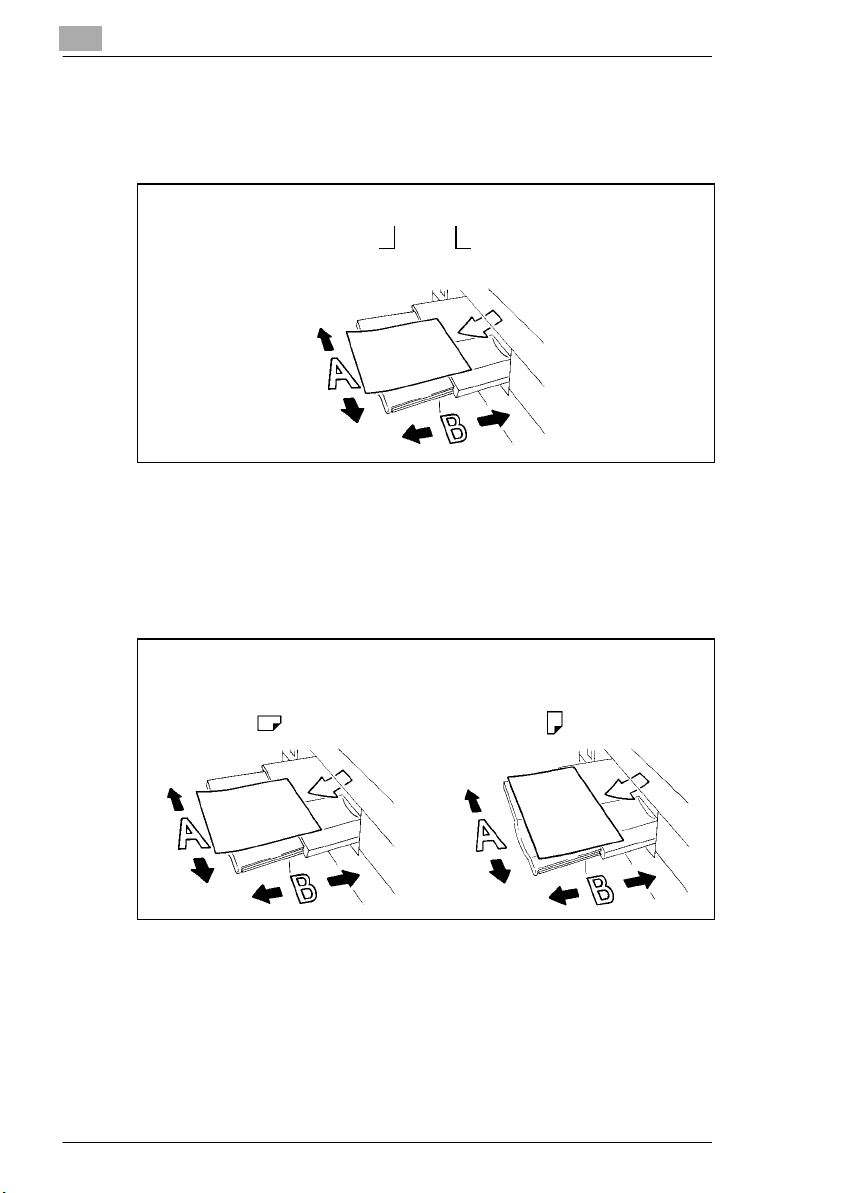
3 Position the copy paper between
the paper size limiters. The side that
is to be printed must be down.
Di470 2-35
Page 54

2
4 Ensure that the maximum paper
filling height is not exceeded (see
mark on inside of the paper
drawer).
5 Close the paper drawer carefully.
Getting to Know Your Copier
Max.
2-36 Di470
Page 55

Getting to Know Your Copier
3rd Paper Drawer – PF-115 (Optional Equipment)
This paper drawer is designed to hold one paper size.
Note the following important information!
Capacity: 2,500 sheets of plain paper (80 g/m
Paper sizes: A4 C
1 Press the release button on the
paper drawer.
The paper lifting plate of the drawer
is lowered.
2 Carefully pull the drawer out.
3 First insert copy paper into the right
half of the paper drawer. The side
that is to be printed must be down.
2
2
)
4 Position the long side of the paper
stack at the right-hand side of the
paper drawer.
5 Place another stack of paper into
the left half of the paper drawer.
The side that is to be printed must
be down.
6 Position the long side of the paper
stack at the left-hand side of the
paper drawer.
Di470 2-37
Page 56

2
Getting to Know Your Copier
7 Close the paper drawer carefully.
The paper plate of the drawer is
raised.
Is the indicator on the release button lit up or flashing?
The release button indicator lights up:
The paper drawer is empty. The copy paper is drawn from another
paper drawer.
The release button indicator is blinking:
The paper drawer is empty. Copying is stopped because the copy
paper was being drawn from this paper drawer.
2-38 Di470
Page 57

Getting to Know Your Copier
3rd and 4th Paper Drawer – PF-208 (Optional Equipment)
These paper drawers are designed to hold one paper size. The paper size
can be changed by a technical representative.
Note the following important information!
Capacity: 500 sheets of plain paper (80g/m
Paper sizes: A3L to A5L
1 Carefully pull the paper drawer out
as far as it will go.
2 Position the copy paper between
the paper size limiters. The side that
is to be printed must be down.
2
) per drawer
2
3 Ensure that the maximum paper
filling height is not exceeded (see
mark on inside of the paper
drawer).
Max.
4 Close the paper drawer carefully.
Di470 2-39
Page 58

2
Getting to Know Your Copier
Large Capacity Cassette – C-306 and C-306L (Optional Equipment)
These paper drawers are designed to hold one paper size. The paper size
can be changed by a technical representative.
Note the following important information!
Capacity: 3,000 sheets of plain paper (80g/m
Paper sizes: C-306
A4 C, Letter C
C-306L
A4 L, A4 C, LegalL, Letter L, Letter C
2
)
1 Press the key to lower the paper
plate.
The paper plate is lowered.
2 Pull and hold the release latch on
the front door of the large capacity
cassette. Open the front door of the
large capacity cassette.
3 Load the copy paper. The side that
is to be printed must be up.
4 Position the copy paper against the
rear side of the paper drawer.
2-40 Di470
Page 59

Getting to Know Your Copier
5 Ensure that the maximum paper
filling height is not exceeded (see
mark on inside of the paper
drawer).
6 Close the front door of the large
capacity cassette.
The paper plate of the drawer is
raised.
Always close the front door properly!
If the front door is not properly closed, the paper plate will not be
raised. Always make sure that the front door is properly closed.
2
Max.
Di470 2-41
Page 60

2
Getting to Know Your Copier
Single Feed Tray
Use the single feed tray to process special paper.
Paper cannot be fed in from the single feed tray for reserve copy jobs. For
more information, see page 3-18.
Note the following important information!
2
Capacity: 50 sheets of plain paper (80g/m
Types of paper: Plain paper, recycled paper (60 g/m
Paper sizes: max. size 297 × 432 mm
20 sheets of recycled paper or exclusive papers
Thick paper (91 g/m
OHP transparencies, transparent paper
min. size 100× 148 mm
2
up to 160g/m2)
)
2
up to 90g/m2)
1 Lower the single feed tray.
2 Slide the feed extender of the single
feed tray out.
3 Place the copy paper into the single
feed tray so that it is flush against
the document feeder. The side that
is to be printed must be up.
4 Only if you are using a
custom paper size:
Specify the paper types, the
paper width and length.
For more information, see
page 4-4.
5 Set the guide plates for the copy
paper width.
2-42 Di470
Page 61

Getting to Know Your Copier
6 Ensure that the maximum paper
filling height is not exceeded (see
mark on inside of the paper
drawer).
2
Max.
Di470 2-43
Page 62

2
2.11 Replacing the Toner Bottle
WARNING
Toner can be hazardous to your health!
Toner is harmful if swallowed.
§ If you get any toner on your hands, immediately wash them
thoroughly with soap and cold water.
§ Do not drop the toner bottle from a height of more than 1 m. This may
damage the toner bottle. Toner may escape from the bottle.
WARNING
Danger of burning from the heating unit!
The heating unit may reach temperatures of up to 120°C.
§ Never touch the heating unit.
§ Do not touch areas designated with this symbol: : .
Use only the toner bottles suitable for this copier. Original accessories
and materials guarantee the best output quality and minimum
maintenance. For further information, consult your technical
representative.
Getting to Know Your Copier
1 Take hold of the recessed grips in
the front door of the copier. Lower
the front door outwards and down.
2-44 Di470
Page 63

Getting to Know Your Copier
2 Swing the toner bottle holder out to
the right. Remove the used toner
bottle.
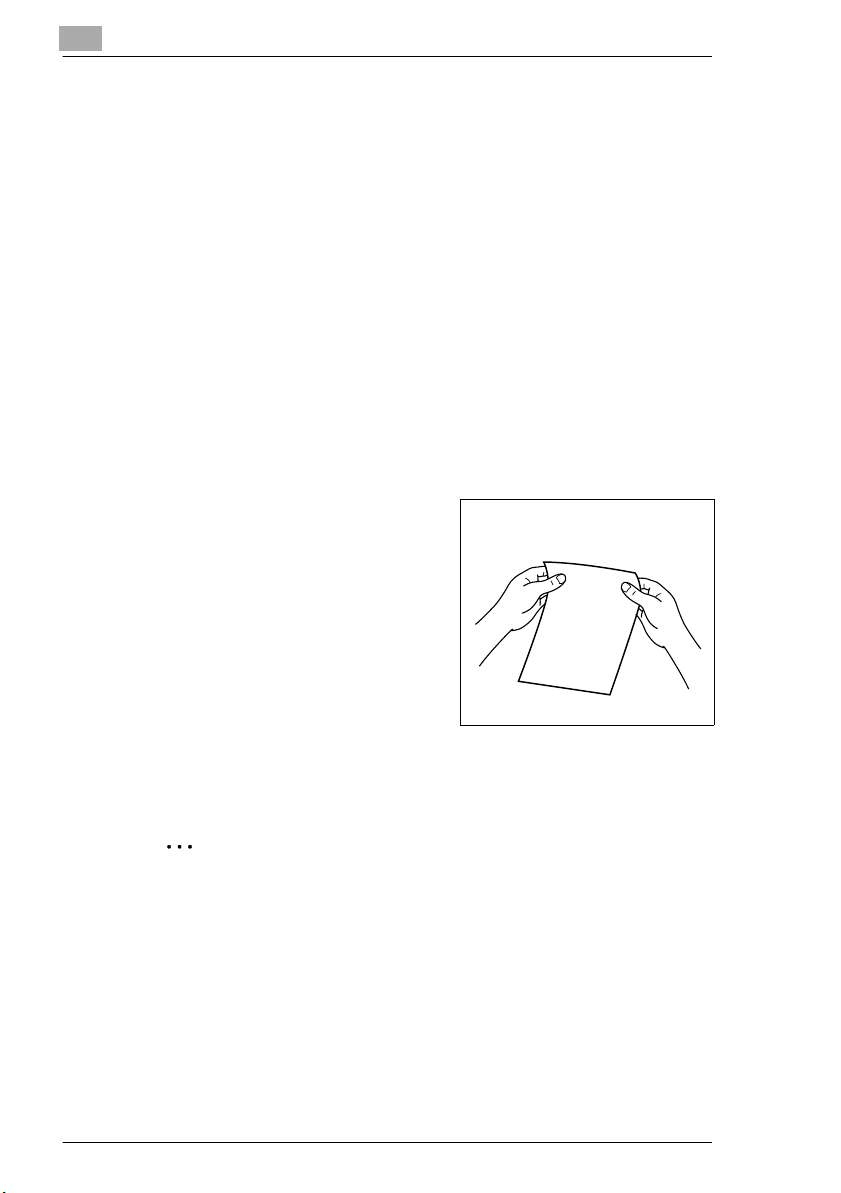
3 Tap the new toner bottle against a
hard surface
to loosen any clumps of toner.
4 Shake the new toner bottle a few
times.
2
5 Position the new toner bottle
in the toner bottle holder.
Be sure the side labelled "UP" on
the toner bottle is pointed upwards
when doing so.
6 Make sure that the indent in the
toner bottle points toward the mark
on the toner bottle holder.
The toner bottle is correctly
installed.
Di470 2-45
Page 64

2
Getting to Know Your Copier
7 Carefully remove the seal from the
toner bottle.
8 Swing the toner bottle holder back
into position. Close the front door.
The copier will begin to refill the
toner supply. Do not switch it off
during this period. Do not open the
front door.
Protecting the environment . . .
Dispose of the used toner bottle in an environmentally friendly
manner. For more information, see page 1-2.
Copies still too light?
If copies are still too light immediately after replacing the toner bottle,
you can activate the toner replenisher function. For more information,
see page 6-19.
2-46 Di470
Page 65

Getting to Know Your Copier
2.12 Replacing the Staple Cartridge
Change a stapler unit only if a message telling you to do so is displayed
on the touch screen.
Use only the staple cartridges suitable for this copier. Original
accessories and materials guarantee the best quality and minimum
maintenance. For further information, consult your technical
representative.
Finisher FN-5
The FN-5 finisher has one staple unit.
1 Reach into the recessed grip at the
top of the finisher. Pull the finisher
carefully from the copier.
2 Open the front door of the finisher.
2
3 Carefully pull the stapler unit out.
Di470 2-47
Page 66

2
Getting to Know Your Copier
4 Press the release button for the
staple cartridge. Remove the staple
cartridge from its holder.
5 Pull about 3 cm of the staple band
out of the new staple cartridge and
break it off. Make sure the staple
band does not stick out (see the
figure on the right).
6 Place the new staple cartridge into
the holder.
The staple cartridge locks into
place with an audible click.
7 Carefully push the stapler unit back
in. Close the front door of the
finisher.
2-48 Di470
Page 67

Getting to Know Your Copier
8 Slide the finisher carefully back to
the copier.
The touch screen now displays a
prompt to run a test staple cycle.
9 Press the [STAPLE] button to start a
staple cycle.
The copier pulls in a sheet of paper
and runs a test staple cycle.
Was the copy not stapled
?
correctly?
The staple unit is not correctly
installed.
§ Ensure that the staple unit is
correctly positioned.
§ If any staples are jammed,
clear them. For more
information, see page 7-51.
2
Di470 2-49
Page 68

2
1
Getting to Know Your Copier
Finisher FN-105
The FN-105 finisher has two staple units.
1 Hold the recessed grip at the top of
the finisher. Pull the finisher
carefully from the copier.
2 Open the cover at the right of the
finisher (FN7).
3 Rotate the green dial to the left to
move the staple units to the centre
position.
4 Pull the empty staple unit carefully
from the holder.
Staple unit 2
2-50 Di470
Stapleunit
Page 69

Getting to Know Your Copier
5 Press the correspondingly marked
position on the stapler unit.
This releases the upper part of the
stapler unit. You can now remove
the empty staple cartridge.
6 Position a new staple cartridge.
Carefully remove the seal from the
staples.
7 Position the staple unit back in the
holder.
The staple cartridge locks into
place with an audible click.
2
8 Close the right cover (FN7) of the
finisher. Slide the finisher carefully
back to the copier.
The touch screen now displays a
prompt to run a test staple cycle.
Di470 2-51
Page 70

2
9 Press the [STAPLE] button to start a
staple cycle.
The copier pulls in a sheet of paper
and runs a test staple cycle.
Was the copy not stapled
?
correctly?
The staple unit is not correctly
installed.
§ Ensure that the staple unit is
correctly positioned.
§ If any staples are jammed,
clear them. For more
information, see page 7-53.
Getting to Know Your Copier
2-52 Di470
Page 71

Getting to Know Your Copier
Finisher FN-106
The FN-106 finisher has one staple unit.
1 Hold the recessed grip at the top of
the finisher. Pull the finisher
carefully from the copier.
2 There is a green dial on the right of
the finisher. Rotate the green dial to
the left to move the staple unit to
the centre position.
3 Pull the staple unit carefully from
the holder.
2
Stapleunit1
4 Remove the empty staple cartridge
from the staple unit. Position a new
staple cartridge. Then carefully
remove the seal on the staple
cartridge.
Di470 2-53
Page 72

2
Getting to Know Your Copier
5 Position the staple unit back in the
holder.
The staple cartridge locks into
place with an audible click.
6 Slide the finisher carefully back to
the copier.
The touch screen now displays a
prompt to run a test staple cycle.
7 Press the [STAPLE] button to start a
staple cycle.
The copier pulls in a sheet of paper
and runs a test staple cycle.
Was the copy not stapled
?
correctly?
The staple unit is not correctly
installed.
§ Ensure that the staple unit is
correctly positioned.
§ If any staples are jammed,
clear them. For more
information, see page 7-55.
2-54 Di470
Page 73

Getting to Know Your Copier
Mailbin Finisher FN-503
The mailbin finisher is equipped with a stapler unit.
1 Push and hold the button. While
holding it, turn it counterclockwise
to open the cover of the stapler
unit.
2 Pull the stapler unit out of its bay.
3 Press the green lever down. Pull the
stapler unit out.
2
4 Remove the empty staple cartridge
from the staple unit.
Di470 2-55
Page 74

2
Getting to Know Your Copier
5 Position a new staple cartridge.
Carefully remove the seal from the
staples.
6 Position the staple cartridge into
the staple unit.
The staple cartridge locks into
place with an audible click.
7 Align the arrows on the stapler unit
to those on the finisher. Position the
staple unit back in the holder bay.
8 Push and hold the button. While
holding it, turn it clockwise to close
the cover of the stapler unit.
The touch screen now displays a
prompt to run a test staple cycle.
2-56 Di470
Page 75

Getting to Know Your Copier
9 Press the [STAPLE] button to start a
staple cycle.
The copier pulls in a sheet of paper
and runs a test staple cycle.
Was the copy not stapled
?
correctly?
The staple unit is not correctly
installed.
§ Ensure that the staple unit is
correctly positioned.
§ If any staples are jammed,
clear them. For more
information, see page 7-57.
2
Di470 2-57
Page 76

2
Getting to Know Your Copier
2.13 Shutting Down the Copier
When shutting down the copier for long periods of time, follow these
instructions:
G Remove the power plug from the outlet.
G Store the unit in a dry, dust-free room.
G Ensure that the unit is not subject to vibrations
Protect the machine from:
G Splashing liquids
G Direct sunlight
G Strong temperature fluctuations
G Direct airflow from heating or air conditioning units
2.14 Please Observe these Precautions
. . . when using your copier:
G Never place objects of more than 3 kg on the copier.
G Never open any doors or turn the copier off while making copies.
G Never bring magnetised objects or use flammable sprays near the
copier.
G Never use sharp objects inside the open copier
2.15 Proper Use of Your Copier
The copier may only be used for the tasks described in this manual. Any
other applications are considered inappropriate.
Using the copier incorrectly can lead to serious personal injury and/or
damage to products and articles. Claims and liability and/or guarantees
are voided by damage incurred through incorrect use.
Certain types of documents may not be copied for further use or with the
intent to pass copies of such documents off as the original.
These include:
G Money
G Stamps (cancelled or uncancelled)
G Personal identification cards
G Vehicle registration documents
G Copyrighted materials (without the permission of the copyright
holder)
If you are not sure whether a certain document may be copied, please
consult the relevant public authorities.
2-58 Di470
Page 77

Initial Steps . . .
3 Initial Steps . . .
3.1 Step-by-Step Instructions on Copying Your Documents
This copier gives you a wide range of options for making copies. Always
maintain a specific sequence when selecting the modes. You can then be
certain that you have not forgotten anything.
1 Press [COPY MODE] on the control
panel to activate copy mode.
2 Load the originals:
H Load the originals face-up into
the automatic document feeder.
Or
H Lift the original cover. Place the
original face down on the
original glass.
3
Di470 3-1
Page 78

3
Initial Steps . . .
3 Change any one of the basic
settings, if necessary:
H Paper
H Zoom
H Finishing
For more information, see
page 4-1.
4 If necessary, change the
Original>Copy settings, e.g.:
H 1>1
H 2>1
H Book>2
For more information, see
page 4-48.
5 If necessary, change the Density
settings, e.g.:
H Auto Exposure
H Manual Exposure
H Density Mode
For more information, see
page 4-60.
6 If necessary, select an Auxiliary
function, e.g.:
H Cover
H Number Stamping
H File Margin
For more information, see
page 4-64.
3-2 Di470
Page 79

Initial Steps . . .
7 From the numeric keypad, set the
desired number of copies to be
made.
?
§ Press [C] on the control panel.
8 Start the copy cycle by pushing
[START].
?
§ Press [STOP] on the control
Did you enter an incorrect
number?
Enter the number of copies
again.
Do you want to cancel the copy
cycle?
panel.
3
123
456
789
0C
Di470 3-3
Page 80

3
3.2 Entering the Administrator Number
Administrator numbers can be set up to manage copy data. Copying is
possible only after the copier has been enabled using a valid
administrator number.
The following touch screen indicator prompts you for a valid
administrator number.
Enter your administrator number to enable the copier.
1 Enter a valid 4-digit administrator
code on the keypad.
Did you enter an incorrect
?
number?
§ Press [C] on the control panel.
Input the Access number again.
123
456
789
Initial Steps . . .
0C
2 Press [KEY] on the control panel to
confirm your input.
The basic settings are displayed on
the touch screen. The copier is
enabled. You may now make
copies.
§ Press [KEY] before leaving the
copier. This secures the copier again.
3-4 Di470
Page 81

Initial Steps . . .
3.3 Checking Copier Settings
Check the copier settings before starting a complex copy cycle.
1 Press [MODE CHECK] on the
control panel.
An overview of the current copier
settings is shown.
2 Only if necessary
Press a key to change the
corresponding setting.
3 Press [EXIT] to confirm
the copier settings.
The basic settings are shown again.
3.4 Entering the Number of Copies
Input the number of copy sets that you wish to make from your original.
§ Touch the corresponding keys on
the numeric keypad.
The number of copies is shown on
the touch screen in the upper righthand corner.
3
123
456
789
Did you enter an incorrect
?
number?
§ Press [C] on the control panel.
Enter the number of copies
again.
Di470 3-5
0C
Page 82

3
3.5 Starting the Copy Cycle
Start a copy cycle.
§ Press [START].
The copy cycle starts.
3.6 Interrupting the Copy Cycle
Interrupt a time-consuming copy cycle to create a different copy set.
1 Touch the [INTERRUPT] key on the
control panel.
The current copy cycle is
interrupted. The [INTERRUPT] key
on the control panel lights up. The
copier is in interrupt mode.
Initial Steps . . .
2 Make the settings for the different
copy cycle.
3 Press [START] to start the printout of the different copy cycle.
The copies are printed.
4 Once the interim copy cycle has finished, touch [INTERRUPT].
The interrupted copy cycle is continued.
Not all functions are available!
When you are working in interrupt mode, not all functions are
available. For more information, see page 7-60.
3-6 Di470
Page 83

Initial Steps . . .
3.7 Stopping the Copy Cycle
Stop a copy cycle to prevent further output of faulty copies.
§ Press [STOP].
The copy cycle stops. The number
of copies shown on the display is
set to 1. The other settings remain
unchanged.
3.8 Resetting Copier Settings
Reset the copier to the default settings.
§ Press [RESET] on the control panel
of the copier.
The copier is reset to the default
settings.
3
Changing the default settings
You can change the default settings of the copier. For more
information, see page 6-20.
Di470 3-7
Page 84

3
3.9 Using the Automatic Document Feeder
WARNING
Improper operation can damage the automatic document feeder!
Not all originals are suitable for use with the automatic document feeder.
Processing unsuitable originals with the automatic document feeder can
damage it.
§ Use only suitable originals in the automatic document feeder.
Complex copying of single pages can be done quickly and easily using
the automatic document feeder. You do not need to place the originals
manually. The automatic document feeder can feed up to 100 originals in
succession automatically.
Not all originals are suitable for use in the automatic document feeder.
The following types of originals are not suitable:
G Carbon paper, paraffin paper and other very thin originals
G Thick paper
G Originals larger than A3L or smaller than A5 L
G Translucent paper, OHP transparencies (overhead projector films)
G Folded, curled originals
G Punched, stapled originals
G Carbon-backed originals
Initial Steps . . .
§ Process unsuitable originals with the single feed tray. For more
information, see page 3-12.
or
Load unsuitable originals on the original glass. For more information,
see page 3-13.
3-8 Di470
Page 85

Initial Steps . . .
Feeding Originals of the Same Size
Feed originals of the same size using the automatic document feeder.
Note the following important information!
Suitable originals for the automatic document feeder are:
Type of originals: • Single sheets of smooth standard paper
Original size: • 1/2-sided originals A3 L to A5 L
1 Set the document guide to the size
of the original.
• 1-sided originals 50 to 110 g/m
• 2-sided originals 60 to 90 g/m
• with mixed original detection 60 to 90 g/m
• with Mixed Original Detection A3 L to A4
3
2
2
2
2 Place up to 100 originals (80g/m
2
)
in the automatic document feeder.
The side that is to be copied must
be up.
3 Ensure that the stack of originals
does not exceed the maximum fill
height (see Ä mark on the
document feeder)
4 Push the originals tight against the feed chamber of the automatic
document feeder.
5 Start the copy cycle.
The originals are fed in automatically one after the other.
Di470 3-9
Page 86

3
Initial Steps . . .
Feeding Originals of Different Sizes
Feed originals of the different sizes using the automatic document feeder.
Note the following important information!
Suitable originals for the automatic document feeder are:
Type of originals: • Single sheets of smooth standard paper
• 1-sided originals 50 to 110 g/m
• 2-sided originals 60 to 90 g/m
• with mixed original detection 60 to 90 g/m
Original size: • 1/2-sided originals A3 L to A5 L
• with mixed original detection A3 L to A4
2
2
2
1 Place up to 100 originals (80g/m
in the automatic document feeder.
The side that is to be copied must
be up.
2
)
Without Finisher
2 Align the originals in the right rear
corner of the document feeder.
3 Ensure that the stack of originals
does not exceed the maximum fill
height (see Ä mark on the
document feeder).
With Finisher
4 Push the originals tight against the
feed chamber of the document
feeder.
5 Set the document guide to the
largest original.
6 Change any other necessary copier settings.
7 Press the [ORIGINAL] button on the
control panel.
Original
3-10 Di470
Page 87

Initial Steps . . .
8 Touch [MIXED ORIG DETECTION].
9 Start the copy cycle.
The originals are fed in
automatically one after the other.
The combination is the secret!
Just combine mixed original detection with the “Auto Paper” “or Auto
Size” functions.
3
Originals Copies
Automatic
Paper Select Mode
Automatic
Size Mode
Di470 3-11
Page 88

3
Initial Steps . . .
Using the Single Feed Tray
The single feed tray can be used to feed originals that cannot be
processed using the automatic document feeder. The originals must be
loaded one at a time. Once placed, the original is automatically fed in.
Note the following important information!
Originals suitable for the single feed tray:
Type of originals: • Single sheets of smooth standard paper
• 35 to 160 g/m
Original size: • A3L to A5L
2
1 Change any other necessary copier settings.
2 Lower the single feed tray cover.
3 Set the document guide to the size
of the largest original.
4 Manually select a paper tray.
For more information, see page 4-
3.
5 Place the original on the single feed
tray. The side that is to be copied
must be down.
The original is automatically taken
in and copied.
Not all functions are available!
When working with the single feed tray, not all functions are available.
For more information, see page 7-60.
3-12 Di470
Page 89

Initial Steps . . .
3.10 Placing Originals on the Glass
Place individual originals on the original glass.
Paper Originals and Transparent Originals
1 Raise the original cover by at least
15°.
If the original cover is not open wide
enough, the original size will not be
detected automatically.
2 Place the original on the glass. The
side that is to be copied must be
down.
3
15°
3 Slide the original to the upper left
corner of the original glass.
OriginalScales
4 Align the original with the Original
Scales.
Is the original transparent?
?
§ Place a sheet of white paper of
the same size on top of the
original.
5 Close the original cover.
For transparent originalsonly
6 Change any other necessary copier
settings.
7 Start the copy cycle.
Di470 3-13
Page 90

3
Initial Steps . . .
Books and Bound Originals
WARNING
Improper operation can damage the original glass!
Books weighing more than 3 kg or pressing the book firmly can damage
the original glass.
§ Never place books weighing more than 3 kg onto the original glass.
§ Do not press an open book onto the original glass.
1 Raise the original cover to at least
15°.
If the original cover is not open wide
enough, the original size will not be
detected automatically.
15°
2 Position the book on the glass. The
side that is to be copied must be
down.
3 Push the book up to the back
Original Scale.
4 Align the centre of the book with the
Book Marker.
5 Close the original cover.
Is it impossible to close the
?
original cover?
§ Leave the original cover open.
§ Do not look at the original glass
during the copy process to
avoid being dazzled by the
extremely bright light.
3-14 Di470
Book Marker
Back
Original
Scale
Page 91

Initial Steps . . .
3.11 Scanning Stacks of Originals
Scan originals in stacks. This will enable you to process more than
100 originals in one copy cycle. You can scan the originals with the
automatic document feeder or place them on the original glass one by
one.
100 originals 50 originals 150 originals
Note the following important information!
Maximum number of A4 originals that can be scanned and stored:
Standard copier:
with 32 MB memory expansion module
(optional):
with hard disk (optional):
3
• 100 originals
• 260 originals
• 2000 originals
1 Load the originals.
What should you consider when copying several, sequential
?
originals using the original glass?
§ Scan the originals from front to back.
2 Change any other necessary copier settings.
3 Press the [ORIGINAL] button on the
control panel.
Original
Di470 3-15
Page 92

3
Initial Steps . . .
4 Press the [SEPARATE SCAN]
button.
5 Press the [START] key on the
control panel to start the scanning
cycle.
The originals are scanned. The
display will change.
6 Place the next originals. Touch
[START] to start the next scan
cycle.
The originals are scanned.
7 Repeat step 6 until all originals have
been scanned.
8 Touch [FINISH] to stop the scan
cycle.
9 Start the copy cycle by touching
[START].
3-16 Di470
Page 93

Initial Steps . . .
3.12 Using Memory Recall
Print the copy job again after the end of a copy cycle. Use memory recall
for this. The “Memory Recall” function must be enabled in the User's
Choice settings. Only if it is enabled is the key shown on the touch
screen. For more information, see page 6-24 and the following pages.
Memory recall is not available if:
G The copier has been switched OFF.
G New originals have been scanned.
G The [START], [KEY], [C] or [INTERRUPT] key has been pushed.
G The [RESERVE] key has been touched
1 Press [MEMORY RECALL].
The display will change.
3
2 Press [C]on the control panel. Set a
different number of copies with the
numeric keypad.
or
Touch [MODE CHECK] to change
copier settings.
or
Press [START] to start printing.
Delete the data before leaving the copier!
Before leaving the copier, for security reasons you should touch
[RESET] to delete the data in memory.
Di470 3-17
Page 94

3
3.13 Setting Up Reserve Copy Jobs
(Only possible if a hard disk is installed.)
When the originals of a copy job have been scanned, the originals of the
next job (reserve copy job) can be scanned immediately after. The
reserve copy job will start printing automatically when the previous job
has been printed.
You can create up to five reserve copy jobs or scan up to
2,000 A4 originals. The reserve copy jobs are output in the same order in
which they were scanned.
1 Touch [RESERVE].
2 Place the originals of the reserve
copy job.
3 Make the copier settings for the
reserve copy job.
Initial Steps . . .
4 Touch [START] to start scanning
the originals.
The reserve copy job will start
printing automatically when the
previous job is complete.
Use the job list!
The job list shows the pending reserve copy jobs. You can also delete
reserve copy jobs in the job list. For more information, see page 3-19.
3-18 Di470
Page 95

Initial Steps . . .
3.14 Using the Job List
The job list shows an overview of the current pending reserve copy jobs.
The job list can also be used for:
G Changing copy job settings.
G Deleting copy jobs
Viewing the Job List
§ Touch [JOB LIST] on the control
panel.
The job list is shown.
§ To exit the Job List, touch [EXIT].
3
Di470 3-19
Page 96

3
Initial Steps . . .
Viewing the Copier Settings for a Reserve Copy Job
View the copier settings of a reserve copy job.
1 Touch [JOB LIST] on the control
panel.
The job list is shown.
2 Touch [MODE CHECK].
3 Select the reserve copy job whose
copier settings you wish to view.
The copier settings are shown.
4 Check the copier settings.
5 Touch [EXIT] to close the view.
The job list is displayed again.
6 Touch [JOB LIST] again to
show the basic settings
again.
3-20 Di470
Page 97

Initial Steps . . .
Changing the Number of Copies for a Reserve Copy Job
Change the number of copies for a reserve copy job.
1 Touch [JOB LIST] on the control
panel.
The job list is shown.
2 Touch [CHANGE].
3 Select the reserve copy job that you
wish to change.
3
4 From the numeric keypad, set the
desired number of copies to be
made.
123
456
789
0C
5 Confirm your changes with
[ENTER].
The job list is displayed again.
6 Touch [JOB LIST] again to
show the basic settings
again.
Di470 3-21
Page 98

3
Initial Steps . . .
Deleting a Reserve Copy Job from the Job List
Delete a reserve copy job from the job list.
1 Touch [JOB LIST] on the control
panel.
The job list is shown.
2 Press [DELETE].
3 Select the reserve copy job that you
wish to delete.
A prompt window appears.
4 <If the job is not locked>
Touch [YES].
<If the job is locked>
Enter a 4-digit password from the
10-Key Pad.
3-22 Di470
Page 99

Initial Steps . . .
5 Touch [EXIT] to close the Job List.
6 Touch [JOB LIST] again to
show the basic settings
again.
Deleting the Current Copy Job
Delete a current job or scan cycle.
1 Touch [STOP] while the job is being
scanned or printed.
A prompt window appears.
2 Touch [DELETE PRINTING JOB].
The current printing job is deleted.
or
Touch [DELETE SCANNING JOB].
The current scanning job is deleted.
3
3 Press [START].
Di470 3-23
Page 100

3
Initial Steps . . .
Submitting a Print Job
Submit a saved print job. The print job is then transferred from the source
PC and placed in the job queue.
1 Touch [JOB LIST] on the control
panel.
The job list is shown.
2 Press the [NEXT] button until the
saved print job is displayed.
3 Press the [UNLOCK] button.
The display will change.
4 Input a valid 4-digit password using
the keypad.
Have you used the same
?
password for more than one
print job?
§ All print jobs assigned the same
password are submitted for
processing.
§ The status of the submitted
print job is changed to “Wait”.
3-24 Di470
 Loading...