

Page 1

Contents
1 Quick Guide
1.1 Supplying Paper..........................................................................1 - 3
Supplying Standard Paper................................ ..... .......................1 - 3
Multi Purpose Tray for Special Papers .........................................1 - 4
1.2 Placing the Documents ..............................................................1 - 5
Placing the Documents in the Duplex Feeder...............................1 - 5
Using the Automatic Document Feeder........................................1 - 5
Using the Flatbed Scanner............................................................1 - 5
1.3 Sending............................................................ ..... ...... .................1 - 6
Sending Documents (Fax Display)................................................1 - 6
1.4 Copying....................................................................... ...... ...........1 - 7
Copying Documents (Copy Display).............................................1 - 7
1.5 Copying or Transmitting Documents........................................1 - 9
Copying or Transmitting Documents (Fax and Copy Display)......1 - 9
Di250f............................................... ..... ...... ...... ..... ...... .................1 - 9
Setting....................... ........................................ ............................1 - 9
Di350f..........................................................................................1 - 10
Setting.........................................................................................1 - 10
1.6 Removing Paper Jams..............................................................1 - 11
Paper Jam in the Duplex Feeder................................................1 - 11
Paper Jam in the Automatic Document Feeder..........................1 - 12
Paper Jam in the Duplex Unit .....................................................1 - 13
Paper Jam in the Job Tray..........................................................1 - 14
Paper Jam in the Finisher...........................................................1 - 14
1.7 Cleaning.....................................................................................1 - 16
Switching to Cleaning Mode........................................................1 - 16
Cleaning the rollers.....................................................................1 - 17
Cleaning the Scanner..................................................................1 - 17
1.8 Important Icons in the Display.................................................1 - 18
Rev. 0.00/30.11.99 Di250f/Di350f -1
Page 2

-2 Di250f/Di350f Rev. 0.00/30.11.99
Page 3
Quick Guide
1 Quick Guide
1.1 Supplying Paper
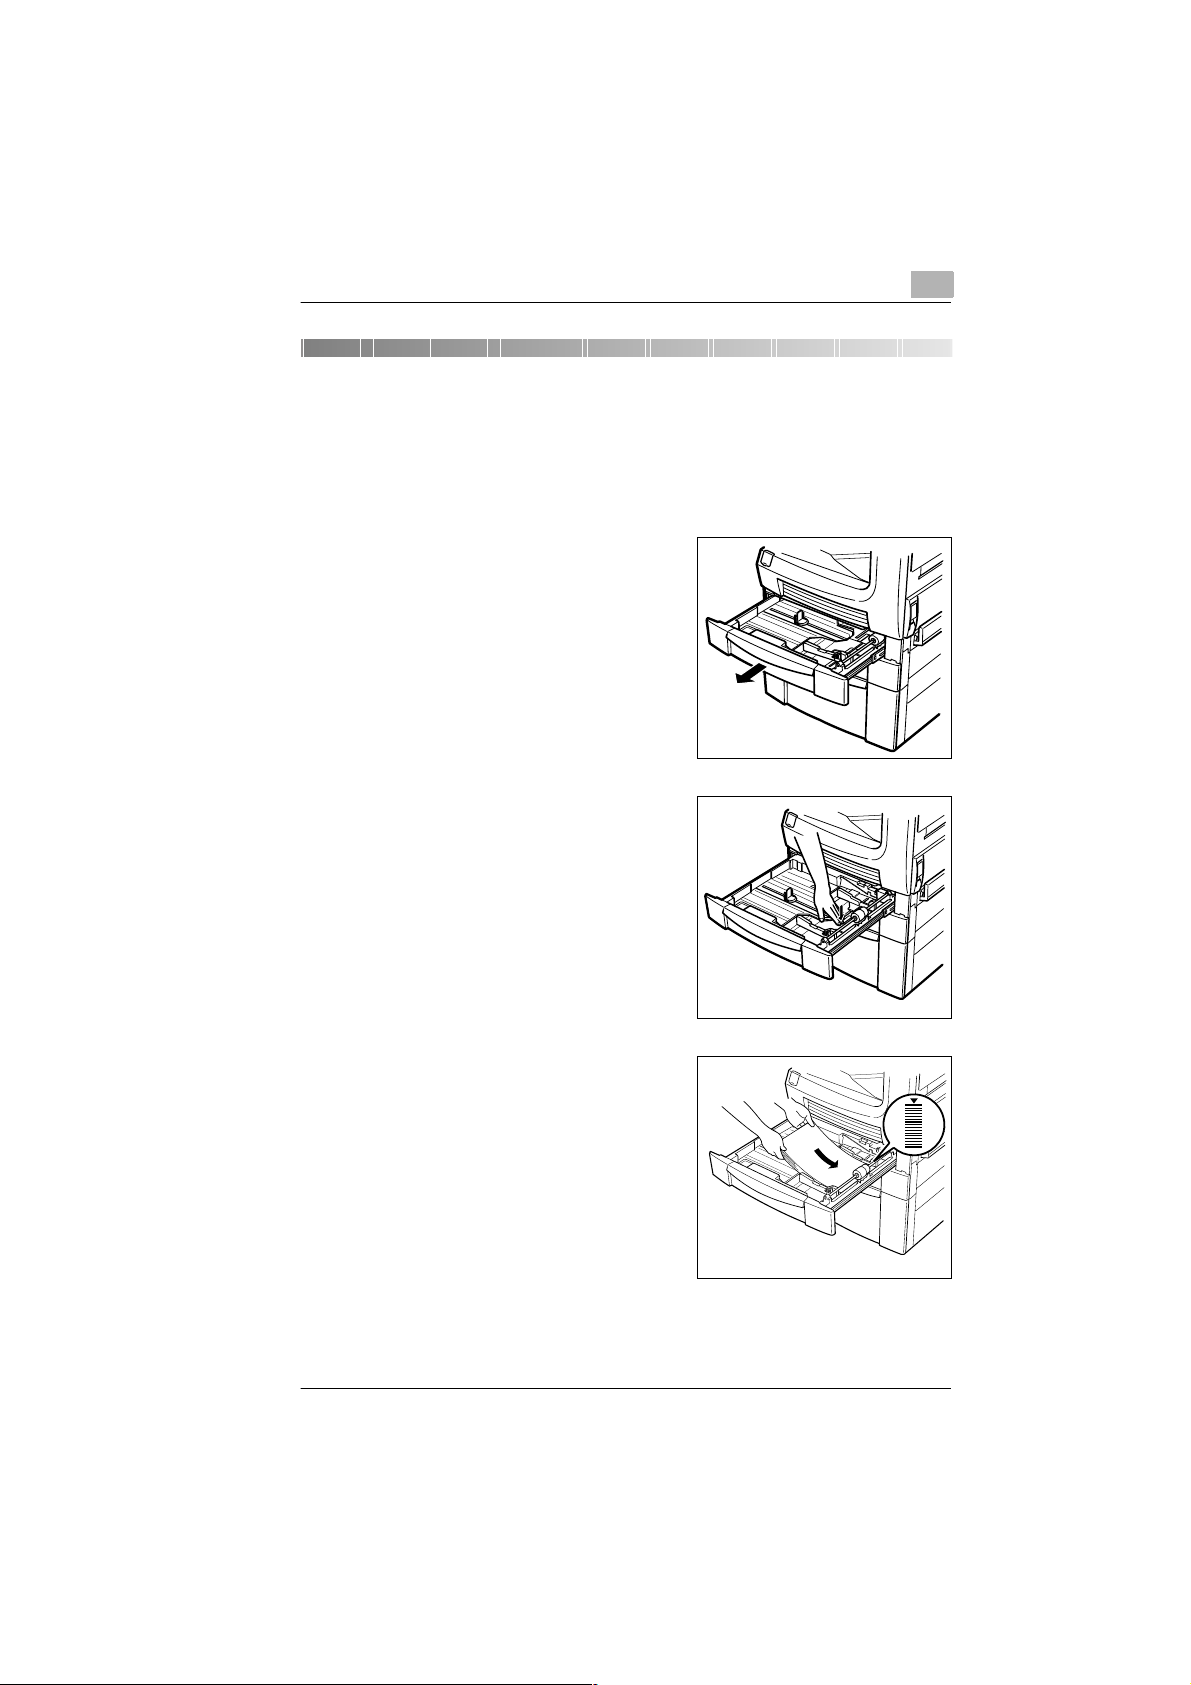
Supplying Standard Paper
Open the paper drawer.
1
Press the base plate down until it
2
locks.
1
Refill the paper and align the stack
3
with the guides.
❍ Make sure that the stack of pa-
per is not higher than the mark.
Rev. 0.00/30.11.99 Di250f/Di350f 1-3
Page 4
1
Quick Guide
✎
Using the large capacity drawer or the drawer for special sizes
If you want to use the large capacity drawer PF108 or the drawer for
special sizes PF110, please contact your technical service.
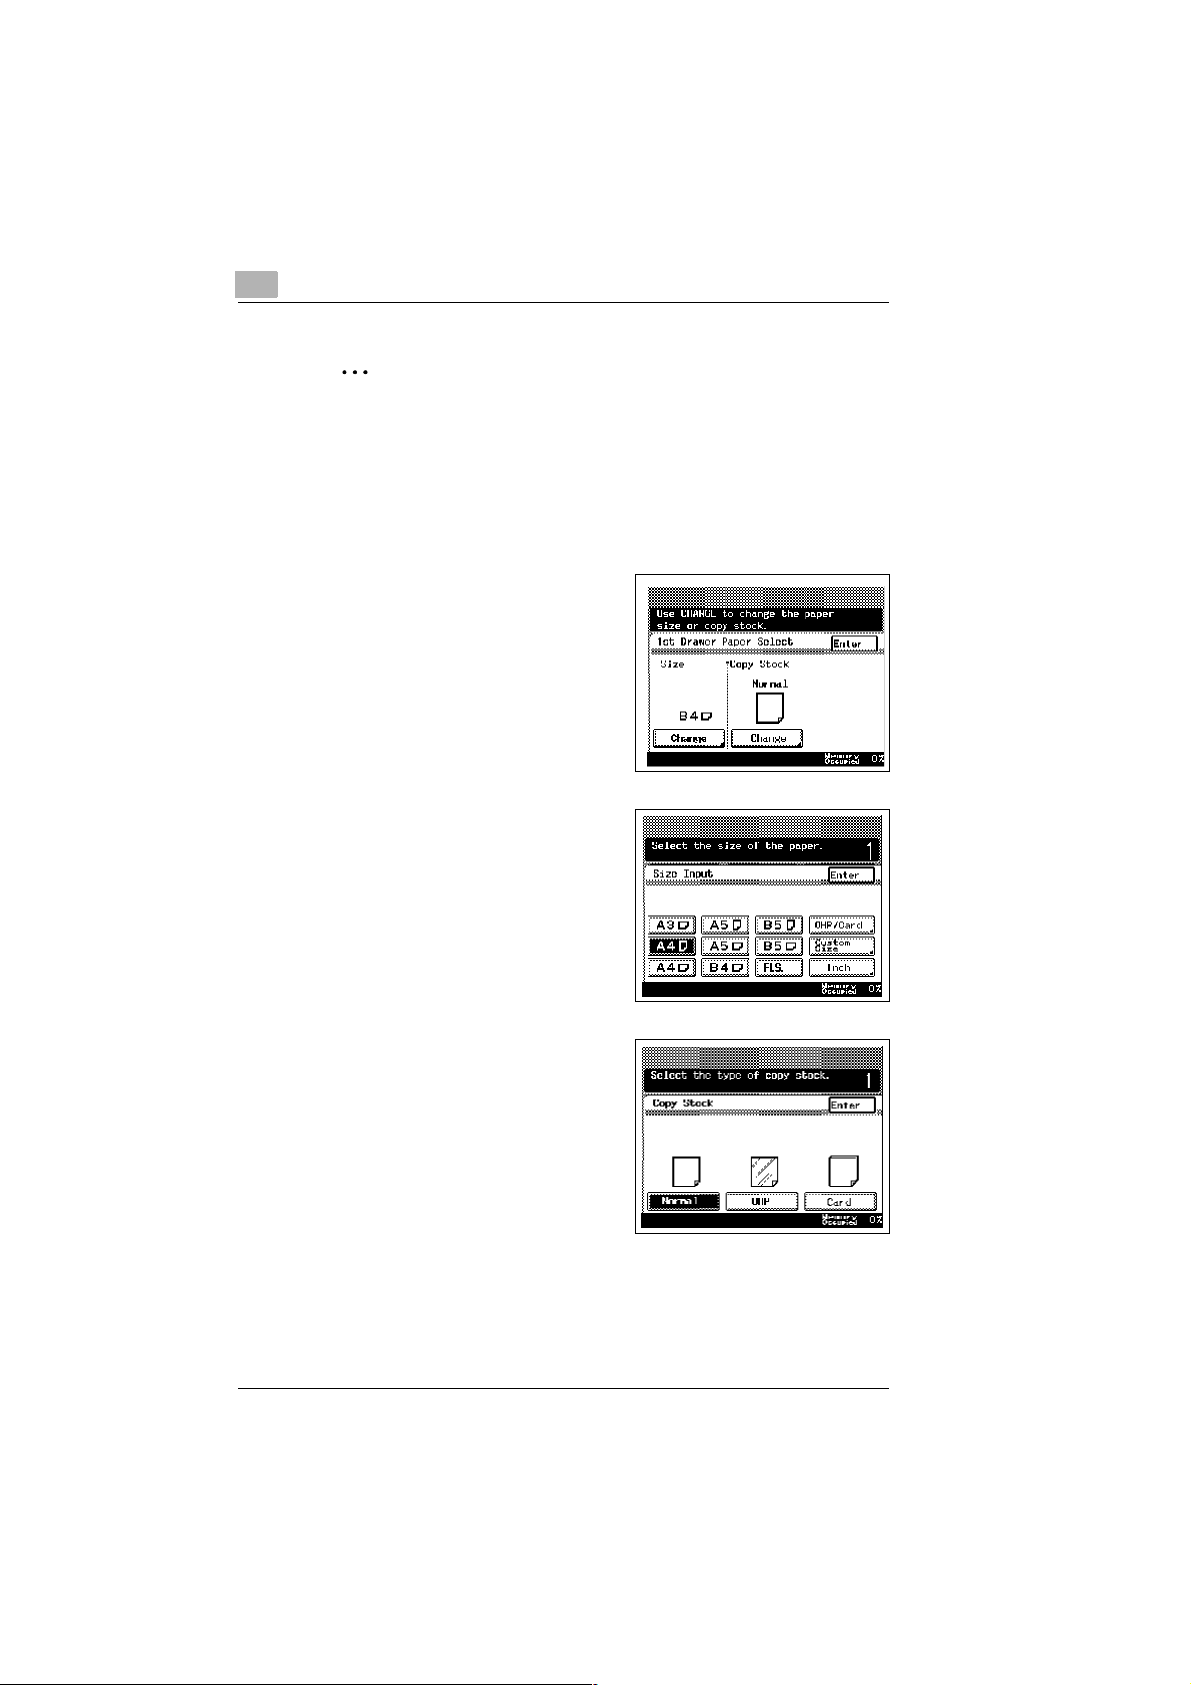
Multi Purpose Tray for Special Papers
To print on special papers such as OHP-film or cardboard use the multi
purpose tray.
Press [CHANGE] in the column
1
Copy Stock on the display.
Press [OHP/CARD].
2
Select the desired paper type and
3
press [ENTER].
1-4 Di250f/Di350f Rev. 0.00/30.11.99
Page 5
Quick Guide
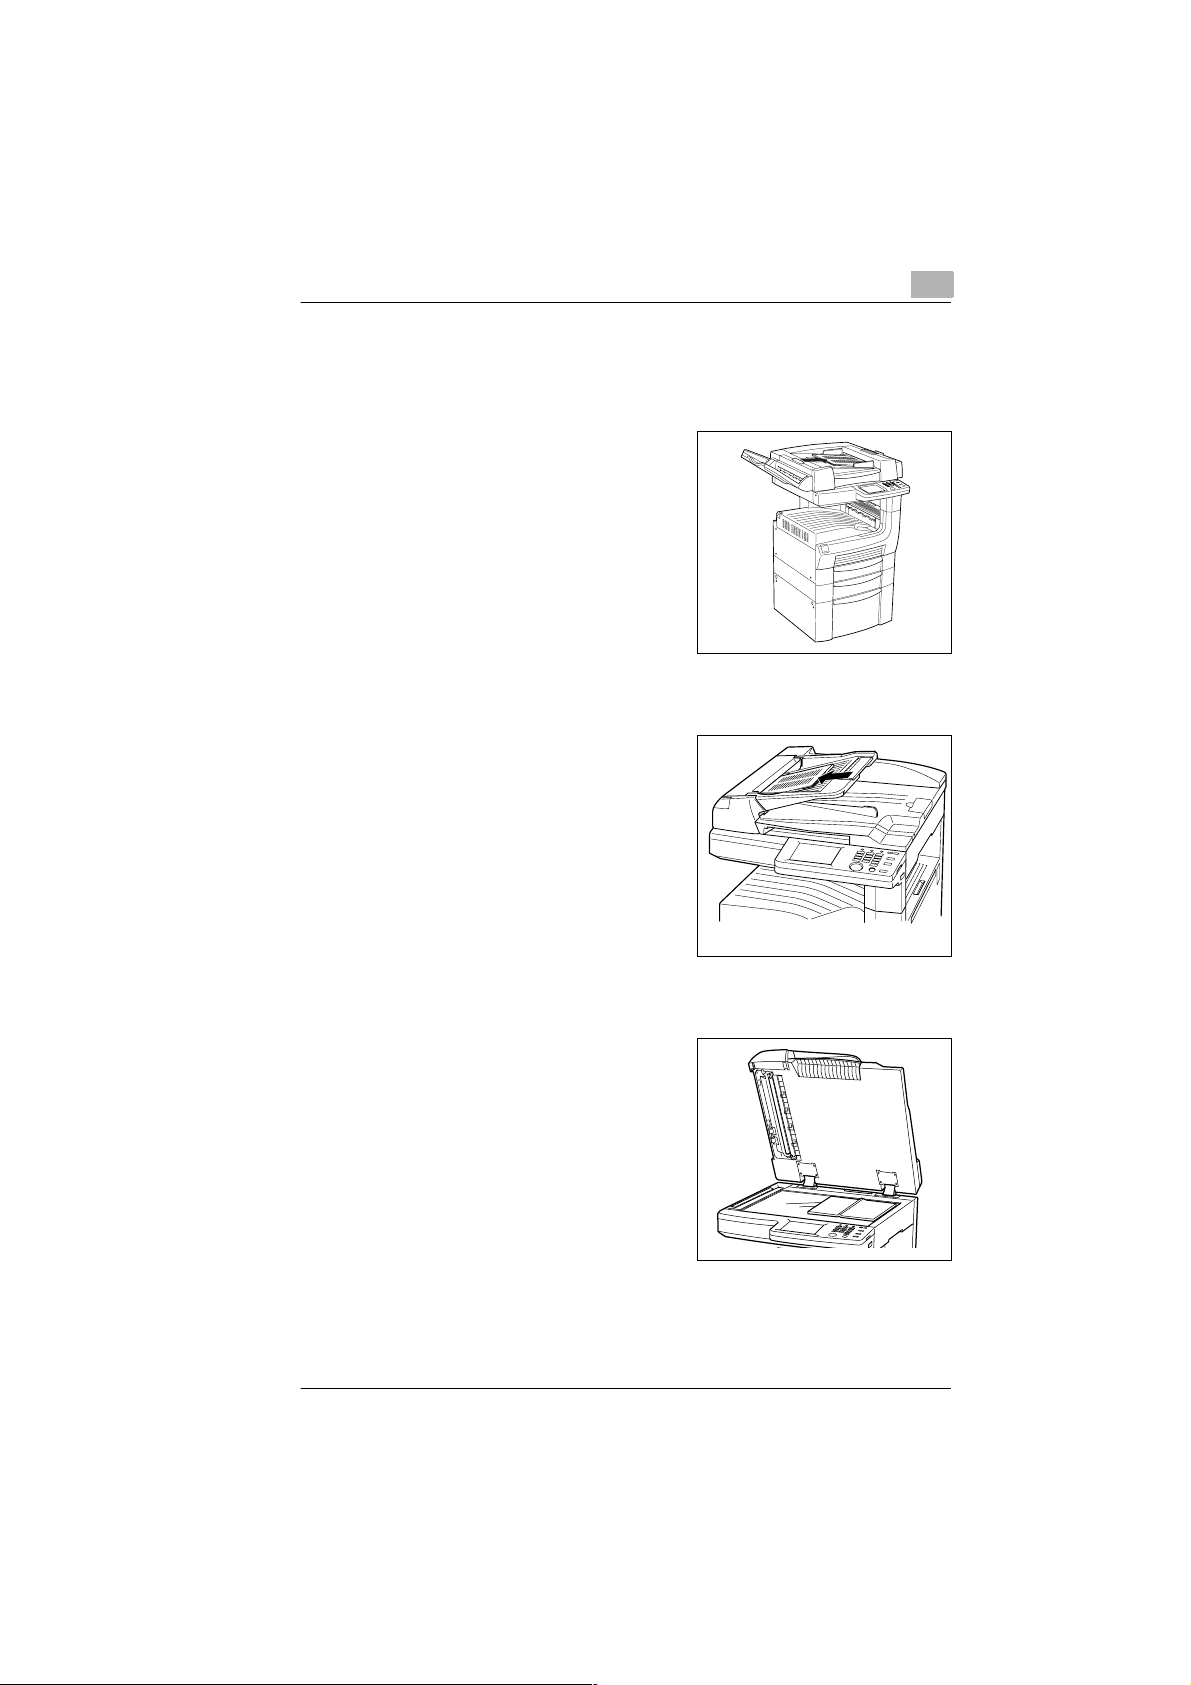
1.2 Placing the Documents
Placing the Documents in the Duplex Feeder
Place the document with the face up
1
and the first sheet up in the document feeder.
Using the Automatic Document Feeder
Place the document with the face up
1
and the first sheet up in the document feeder.
1
Using the Flatbed Scanner
Place the document face down on
1
the glass.
Rev. 0.00/30.11.99 Di250f/Di350f 1-5
Page 6
1
1.3 Sending
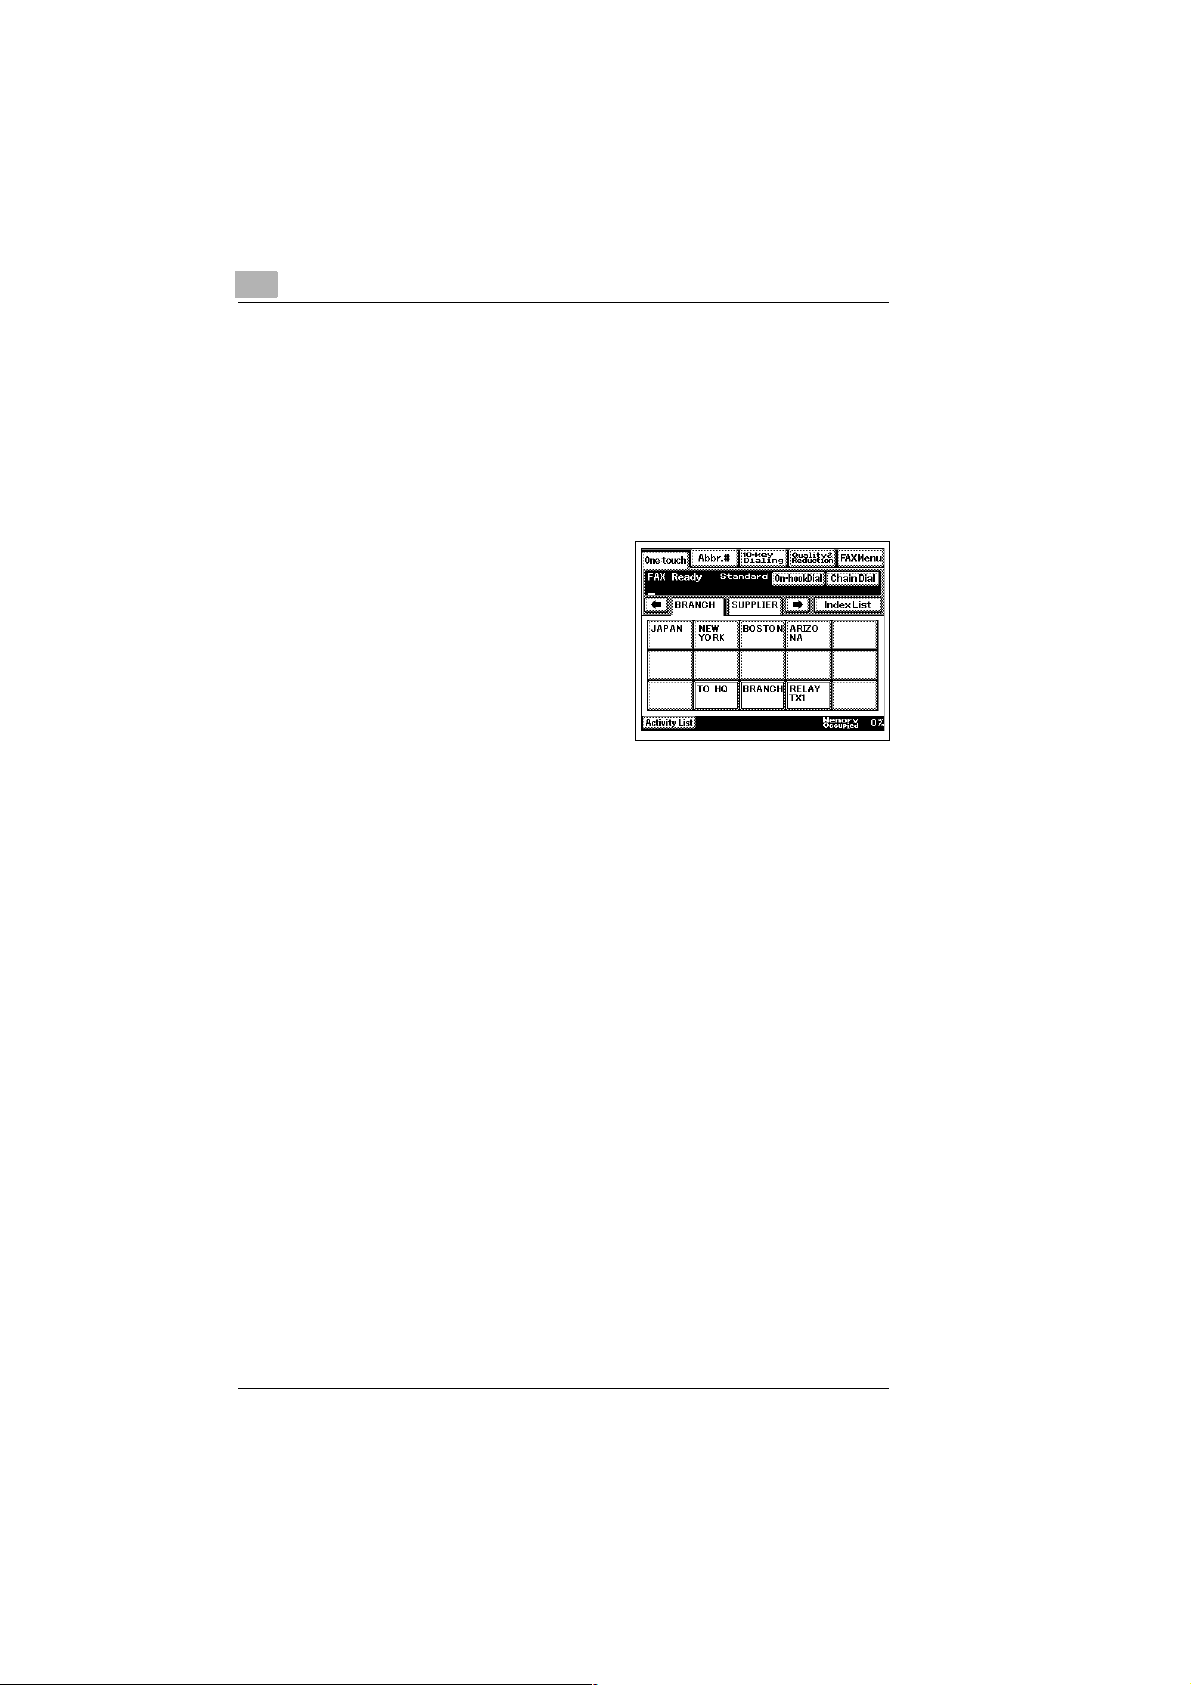
Sending Documents (Fax Display)
Place the document into the document feeder.
1
If necessary adj ust the settings for the transm ission (res olution, reduc -
2
tion, activity report etc.).
Dial using one o f the met hods listed
3
below:
❍ One-touch dial: Press [ONE-
TOUCH] and then the key programmed for the desired fax
number.
❍ Speed dial: Press [ABBR.#]
and then the abbreviated
number programmed for the desired fax number.
❍ Numeric keypad: Enter the desired numb er using the nume ric key
pad.
Press [START] to transmit the document.
4
Quick Guide
1-6 Di250f/Di350f Rev. 0.00/30.11.99
Page 7

Quick Guide
1.4 Copying
Copying Documents (Copy Display)
Place the document into the document feeder.
1
Press [BASICS] to set the finishing
2
of the copies.
Press [ZOOM] to change the zoom
3
setting.
Press [PAPER] to print on special
4
paper.
Set the document type
5
(if necessary).
1
Set the density (if necessary).
6
Rev. 0.00/30.11.99 Di250f/Di350f 1-7
Page 8

1
Set the further options (if require d).
7
Press [START] to make the copies.
8
Quick Guide
1-8 Di250f/Di350f Rev. 0.00/30.11.99
Page 9

Quick Guide
1.5 Copying or Transmitting Documents
Copying or Transmitting Documents (Fax and Copy Display)
Set the document.
1
Di250f
Setting
Enter the number of copies or the
1
desired fax number using the numeric keypad.
❍ Enter the number of copies
using not more than 2 digits.
❍ Enter the desired fax number
using at least 3 digits.
1
Press [START] to transmit the document or print the copies.
2
Rev. 0.00/30.11.99 Di250f/Di350f 1-9
Page 10

1
Di350f
Setting
Enter the number of copies or the
1
desired fax number using the
numeric keypad.
❍ Enter the number of copies
using not more than 3 digits.
❍ Enter the desired fax number
using at least 4 digits.
Press [START] to transmit the document or print the copies.
2
Quick Guide
1-10 Di250f/Di350f Rev. 0.00/30.11.99
Page 11

Quick Guide
1.6 Removing Paper Jams
Locate the paper jam.
1
Staple Unit
Finisher
Paper Jam in the Duplex Feeder
If the paper is no visible open the
1
cover of the unit.
Duplex Feeder/
Automatic
Document Feeder
Job Tray
Duplex Unit
Multi Purpose
Tray
Paper Drawers
Rev. 0.00/30.11.99 Di250f/Di350f 1-11
Page 12

1
Carefully remove the paper.
2
Carefully remove the paper.
3
Paper Jam in the Automatic Document Feeder
Quick Guide
Open the cover of the unit.
1
Carefully remove the paper.
2
1-12 Di250f/Di350f Rev. 0.00/30.11.99
Page 13

Quick Guide
Paper Jam in the Duplex Unit
1
2
3
1
Open the side cover.
Turn the roller if necessary .
Carefully remove the paper.
Rev. 0.00/30.11.99 Di250f/Di350f 1-13
Page 14

1
Paper Jam in the Job Tray
CAUTION
The fusing unit is hot.
Contact may lead to injury.
➜ Only touch the paper.
Open the side cover and carefully
1
remove the paper.
Paper Jam in the Finisher
Quick Guide
Open the covers and remove the
1
paper.
Carefully remove the paper.
2
1-14 Di250f/Di350f Rev. 0.00/30.11.99
Page 15

Quick Guide
3
4
5
1
Carefully remove the paper.
If the hole puncher is lowered turn
the wheel to lift the puncher.
If the paper is bl ocked in th e shown
places open the corresponding
locks to release the paper.
Rev. 0.00/30.11.99 Di250f/Di350f 1-15
Page 16

1
1.7 Cleaning
During operation dust from the origina l documents might soi l t he gla ss o f
the scanner and the feed rollers. If necessary clean the Di250f/ Di350f
using a damp cloth to achieve good results.
CAUTION
Danger of damage
➜ Never use alcohol or thinner!
➜ Switch to the cleaning mode before cleaning the machine.
Switching to Cleaning Mode
Press [UTILITY].
1
Press [MAINT.] and [PANEL
2
CLEANING].
Quick Guide
Clean the display and th e outer cov-
3
ers of the machine while the corresponding display is sh ow n.
Press [RESET] to return to stand-by mode.
4
1-16 Di250f/Di350f Rev. 0.00/30.11.99
Page 17

Quick Guide
Cleaning the rollers
1
2
1
Open the cover of the feeder and
clean the six rollers.
Lift the feeder and clean the four
rollers.
Cleaning the Scanner
Open the cover and clean the ma-
1
chine at the marked places.
Rev. 0.00/30.11.99 Di250f/Di350f 1-17
Page 18

1
1.8 Important Icons in the Display
Display Description
Scanning The document is scanned.
Wait for redial The machine is waiting for redial.
Quick Guide
Dialling The entered fax number is
Receiving The machine is receiving a fax.
Sending The machine is sending a fax.
Copying The machine is copying
Confident ial document A confiden tial docu ment is in the
Wait for polling The machine is waiting for a
Broadcast A document is registered for
Receiving PC data Data is loaded from the
Waiting for print A document is prepared for
Automatic reception OFF The machine is set to manual
No paper Refill the print paper.
dialled.
documents.
mailbox.
polling call.
broadcast.
connected computer.
printing.
reception.
No toner Replace the toner bottle.
Drum Replace the imaging unit.
Maintenance Call the technical service for
regular maintenance.
1-18 Di250f/Di350f Rev. 0.00/30.11.99
Page 19

1 Quick Guide
1.1 Supplying Paper..........................................................................1 - 3
Supplying Standard Paper................................ ..... .......................1 - 3
Multi Purpose Tray for Special Papers .........................................1 - 4
1.2 Placing the Documents ..............................................................1 - 5
Placing the Documents in the Duplex Feeder...............................1 - 5
Using the Automatic Document Feeder........................................1 - 5
Using the Flatbed Scanner............................................................1 - 5
1.3 Sending............................................................ ..... ...... .................1 - 6
Sending Documents (Fax Display)................................................1 - 6
1.4 Copying....................................................................... ...... ...........1 - 7
Copying Documents (Copy Display).............................................1 - 7
1.5 Copying or Transmitting Documents........................................1 - 9
Copying or Transmitting Documents (Fax and Copy Display)......1 - 9
Di250f............................................... ..... ...... ...... ..... ...... .................1 - 9
Setting....................... ........................................ ............................1 - 9
Di350f..........................................................................................1 - 10
Setting.........................................................................................1 - 10
1.6 Removing Paper Jams..............................................................1 - 11
Paper Jam in the Duplex Feeder................................................1 - 11
Paper Jam in the Automatic Document Feeder..........................1 - 12
Paper Jam in the Duplex Unit .....................................................1 - 13
Paper Jam in the Job Tray..........................................................1 - 14
Paper Jam in the Finisher...........................................................1 - 14
1.7 Cleaning.....................................................................................1 - 16
Switching to Cleaning Mode........................................................1 - 16
Cleaning the rollers.....................................................................1 - 17
Cleaning the Scanner..................................................................1 - 17
1.8 Important Icons in the Display.................................................1 - 18
Rev. /
 Loading...