

Page 1

Advanced Information
Di 200
www.minoltaeurope.com
The essentials of imaging
Page 2

Page 3

Table of Contents
1 Introduction
1.1 We Want You to Be a Satisfied Customer..................................1-1
1.2 Protecting the environment . . . ...................................................1-2
Takeback and Reutilisatio n................................................ ..... ...... ..1-2
What is Energy Star®.....................................................................1-2
Use of Recycled Paper...................................................................1-2
1.3 Guide to this Manual.....................................................................1-3
How Is this Manual Structured?......................................................1-3
A Brief Explanation of the Conventions Used in this Manual..........1-5
A Brief Explanation of Important Concepts and Symbols...............1-7
2 Getting to Know Your Copier
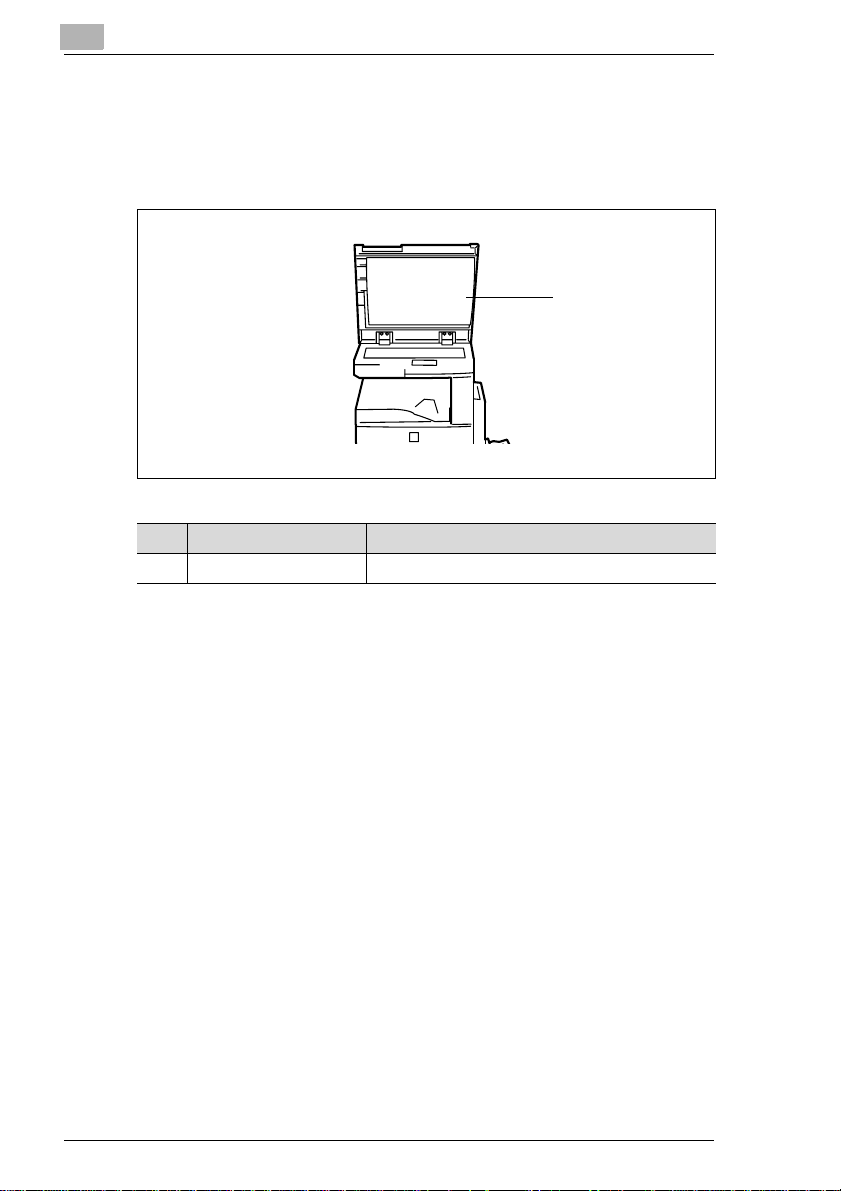
2.1 System overview...........................................................................2-1
Copier Di200 (External)...................................................................2-1
Copier Di200 (Internal)....................................................................2-3
2.2 Optional Equipment......................................................................2-4
Original Cover OC-3........................................................................2-4
Automatic Document Feeder AF-9..................................................2-5
Duplexing Document Feeder AFR-17.............................................2-6
Shift Tray OT-102............................................................................2-7
Sorter JS-201..................................................................................2-7
Duplex Unit AD-15..........................................................................2-8
Paper Tray PF-118/PF-119.............................................................2-9
Copy Table....................................................................................2-10
Paper Feed Cabinet......................................................................2-10
Memory Expansion Module...........................................................2-10
Printer Controller Pi3502...............................................................2-10
2.3 Safe and reliable use of the copier............................................2-11
Laser Safety..................................................................................2-16
Internal Laser Radiation................................................................2-16
Noise Emission.............................................................................2-17
Safety Label..................................................................................2-18
Data on the Manufacturer's Name Plate.......................................2-21
2.4 Transporting the Copier.............................................................2-22
Di200 IVZ-1
Page 4

2.5 Setting up the copier..................................................................2-22
Environmental Requirements.......................................................2-22
Installation Site.............................................................................2-22
Space Requirements for the Copier.............................................2-23
Storing Supplies...........................................................................2-23
2.6 Connecting the copier................................................................2-24
2.7 Switching the Copier On and Off..............................................2-24
Switching the Copier On...............................................................2-24
Switching the Copier Off...............................................................2-25
2.8 Control Panel Keys and Indicators...........................................2-26
Overview ......................................................................................2-26
Touch Screen...............................................................................2-28
2.9 The Touch Screen ......................................................................2-29
Operating the Touch Screen................................... ...... ..... ..........2-29
Structure of Touch Screen Menus................................................2-30
2.10 Filling the paper drawers...........................................................2-32
Filling the 1st Drawer....................................................................2-33
Filling the PF-119 Paper Drawer (Optional) .................................2-35
Placing Copy Paper onto the Single Feed Tray...........................2-37
2.11 Changing the toner cartridge....................................................2-38
2.12 Replacing the Imaging Unit .......................................................2-41
2.13 Shutting Down the Copier .........................................................2-44
2.14 Please observe these precautions............................................2-45
2.15 Proper Use of Your Copier ........................................................2-45
3 Initial Steps . . .
3.1 Step-by-step Instructions on Copying Your Documents.......... 3-1
3.2 Entering the Access Code...........................................................3-4
3.3 Checking Copier Settings ............................................................3-5
3.4 Entering the Number of Copies.................................. .................3-5
3.5 Starting the copy cycle................................................................3-6
3.6 Interrupting the Copy Cycle ........................................................3-6
3.7 Stopping the copy cycle..............................................................3-7
3.8 Resetting Copier Settings............................................................3-7
IVZ-2 Di200
Page 5

3.9 Using the Document Feeders ......................................................3-8
Copying Originals using the Automatic Document Feeder.............3-9
Processing Originals using the Duplexing Document Feeder.......3-10
Feeding Originals of Different Sizes..............................................3-12
Loading 2in1 Originals for Page Separation.................................3-14
3.10 Placing Originals on the Glass..................................................3-15
Paper Originals and Transparent Originals...................................3-15
Books and Bound Originals...........................................................3-16
3.11 Using the Job List ......................................................................3-17
3.12 Other Functions .................................. ...... ...... ..... ...... ...... ...........3-18
Automatic Drawer Switching.........................................................3-18
Automatic Reset of Copier Settings..............................................3-18
Energy Save Mode........................................................................3-18
Auto Shut Off.................................................................................3-18
Sleep Mode ...................................................................................3-18
Automatic Shut-off for the Background LCD Light........................3-19
Auto Copy Start.............................................................................3-19
4 Customizing Your Copy
4.1 Basic settings................................................................................4-1
Enabling Auto Paper Select Mode..................................................4-2
Selecting a Paper Drawer Manually................................................4-3
Specifying the Paper Type for the 1st Drawer................................4-4
Defining a Custom Paper Size for the 1st Drawer..........................4-6
Storing a Custom Paper Size for the 1st Drawer............................4-8
Loading a Saved Paper Size for the 1st Drawer...........................4-11
Specifying the Paper Type for the Single Feed Tray ....................4-13
Specifying the Paper Size for the Single Feed Tray .....................4-14
Storing a Custom Paper Size for the Single Feed Tray................4-15
Loading a Saved Paper Size for the Single Feed Tray.................4-17
Enabling Auto Size........................................................................4-18
Selecting a Fixed Zoom Factor.....................................................4-19
Selecting a Zoom Factor using the Arrow Keys............................4-20
Specifying a Proportional Zoom Factor.........................................4-21
Specifying an Unproportional Zoom Factor. ...... ..... ...... .................4-23
Saving Proportional Zoom Factors................................................4-25
Loading Saved Zoom Factors.......................................................4-27
Non-sorted Copies........................................................................4-28
Sort/Group Copies........................................................................4-29
Di200 IVZ-3
Page 6

4.2 Original>Copy functions............................................................4-31
Selecting a Copy Mode................................................................4-34
Specifying the Alignment of the Original.......................................4-35
Copying Originals with File Margins.............................................4-36
Copying Books .................................................. ...... ...... ...............4-38
Copying 2in1 Originals................................. ..... ...... ...... ..... ..........4-41
4.3 Density settings..........................................................................4-43
Enable or disable Auto Exposure.................................................4-44
Make copies lighter or darker.......................................................4-45
Changing the Density Mode.........................................................4-46
4.4 Auxiliary functions.....................................................................4-47
Adding a Margin to Your Copy .....................................................4-48
Erasing a Margin or Frame around Your Copy.............................4-50
Duplicating Images onto a Copy...................................................4-52
Separate Scan..............................................................................4-56
5 Utility
5.1 Customizing User's Choice Settings..........................................5-2
Configuring User's Choice Settings................................................5-3
User's Choice [1/6].........................................................................5-5
User's Choice [2/6].........................................................................5-6
User's Choice [3/6].........................................................................5-8
User's Choice [4/6].......................................................................5-10
User's Choice [5/6].......................................................................5-12
User's Choice [6/6].......................................................................5-14
5.2 Counter........................................................................................5-15
5.3 Job Recall.................................................................................... 5-16
Recalling a Stored Copy Job Program.........................................5-16
Saving a Copy Job Program.........................................................5-18
Checking the Settings of a Copy Job Program.............................5-20
Deleting a Stored Copy Job Program...........................................5-22
5.4 User Management.......................................................................5-24
Confirmation Beep........................................................................5-24
Alarm Beep...................................................................................5-26
The Drying Procedure..................................................................5-27
Adding Toner................................................................................5-28
Cleaning the Control Panel...........................................................5-29
IVZ-4 Di200
Page 7

5.5 Using Administrative Management Functions.........................5-30
Limiting the Number of Copies......................................................5-31
Locking Auto Shut Off Mode.........................................................5-33
Turning on the Copy Counter........................................................5-35
Calling up Copy Track Data..........................................................5-37
Setting up Administrator Numbers................................................5-39
Setting up Access Numbers..........................................................5-41
Setting Copy Limits for Access Numbers......................................5-43
Printing Copy Track Data..............................................................5-45
Resetting Individual Access Numbers...........................................5-46
Resetting All Access Numbers......................................................5-47
Network Configuration........... ..... ...... .................................. ..... ......5-48
5.6 On Line.........................................................................................5-49
5.7 Test Print......................................................................................5-49
6 Troubleshooting
6.1 If you are not satisfied with your copy.. .....................................6-1
6.2 If a Message Appears on the Touch Screen . . ..........................6-3
6.3 If an icon appears on the touch screen . . . ................................6-4
6.4 How to Clear a Paper Misfeed......................................................6-5
Main Unit.........................................................................................6-6
Single Feed Tray.............................................................................6-9
Duplex Unit....................................................................................6-11
Duplexing Document Feeder AFR-17...........................................6-13
Automatic Document Feeder AF-9 .............................................6-15
Shift Tray/Sorter JS-201................................................................6-17
6.5 How to Resolve a Paper Size Error...........................................6-20
6.6 These functions cannot be combined.......................................6-23
Basic settings................................................................................6-24
Orig.>Copy settings......................................................................6-27
Density..........................................................................................6-30
Auxiliary functions.........................................................................6-30
Other.............................................................................................6-31
Di200 IVZ-5
Page 8

7 Appendix
7.1 Care of the unit.............................................................................7-1
Cleaning .........................................................................................7-1
Cleaning the Touch Screen............................................................7-3
Cleaning the Automatic Document Feeder.....................................7-5
7.2 Copier Maintenance .....................................................................7-6
7.3 Specifications...............................................................................7-7
Copier Di200 ..................................................................................7-7
Duplexing Document Feeder AFR-17 ............................................7-9
Automatic Document Feeder AF-9...............................................7-10
Paper Tray PF-118/PF-119..........................................................7-10
Duplex Unit AD-15........................................................................7-11
Sorter JS-201 ...............................................................................7-12
Shift Tray OT-102.........................................................................7-13
7.4 Paper size tables ........................................................................7-14
Metric Areas .................................................................................7-14
Inch...............................................................................................7-14
7.5 Zoom factor tables .....................................................................7-15
Metric Areas .................................................................................7-15
Inch...............................................................................................7-16
7.6 CE Mark (Declaration of Conformity)........................................7-17
7.7 Certifications on the Manufacturer's Name Plate....................7-18
7.8 Directory of Abbreviations ................................... ...... ..... ...... ....7-19
7.9 Index............................................................................................7-20
IVZ-6 Di200
Page 9

Introduction
1 Introduction
1.1 We Want You to Be a Satisfied Customer
Thank you for choosing a Minolta Copier System.
To ensure the best performance and effective use of your copier, this
manual will provide information on the following topics:
G Getting to Know Your Copier
G Initial Steps . . .
G Customizing Your Copy
G Combining Functions
G Using Utility
G Troubleshooting.
Please read this manual carefully before using your copier and keep it
handy at all times.
For further information and assistance, please contact:
G your Minolta Technical Representative;
G the Minolta Hotline, Tel.: 0800/646 6582 (free of charge) and
G our Web site, http://www.minolta.com.
Please keep the serial number (located on the copier's rating plate) and
the copier's date of purc hase handy to ensure fast, accurate assista nce in
the event of difficulties.
. . . because we want you to be a satisfied customer.
1
Di200 1-1
Page 10
1
1.2 Protecting the environment . . .
Minolta supports the c hallenge of preserv ing the environment a nd does all
that it can to actively participate in preventing and resolving ecological
problems.
Our production is certified under ISO 9000 (quality management) and
ISO14001 (environment management).
Takeback and Reutilisation
Used devices, empty toner and drum units and use d toner and drum units
are taken back by a local MINOLTA partner and processed for recycling
and reutilisation of materials. For more info rm atio n, c al l 0 800/6466582
(toll free).
Introduction
What is Energy Star
After long periods of idleness, Energy Star® copiers switch to Energy
Saver Mode or turn themselves off. This function can reduce the annual
energy costs for the unit by up to 60%.
Copiers with a h igh copying spe ed automatically s witch to 2-sided co pying
mode. This reduces the costs for copy media and the volume of paper
consumed.
Did you know t hat manufacturing a sheet of paper requires 10 times as
much energy as making a copy?
The conservation of paper thus also has a direct global effect on the
conservation of energy.
This copier complies with the Energy Star
Use of Recycled Paper
This unit is suited for processing recycled paper that meets the
requirements of ENV 122 81 or D I N 19 309 . Fo r details, consult your local
MINOLTA partner.
®
®
energy efficiency criteria.
1-2 Di200
Page 11

Introduction
1.3 Guide to this Manual
How Is this Manual Structured?
If you are not sure whe re to locat e the in formation y ou ne ed, ple ase refe r
to this section. The following table will help you. For detailed information
on specific issues, refer to the index at the end of the manua l.
No. Chapter Description
1 Introduction This chapter contains introductory information
2 Getting to Know Your
Copier
3 Initial Steps . . . This chapter provides you with the knowledge
4 Customizing Your Copy This chapter explains the effective use of the
5 Utility This chapter shows you how to configure the
6 Troubleshooting This chapter contains instructions to help you
1
pertaining to the effective use of this manual.
This chapter is provided to familiarize you with
your copier and its features. It describes such
subjects as:
• System overview
• Safe and reliable use of the copier
• Setting up the copier
• Switching the Copier On and Off
• Filling the paper drawers
• Changing the toner cartridge
needed for using your copier, such as:
• Step-by-step Instructions on Copying Your
Documents
• Starting the copy cycle
• Stopping the copy cycle
• Loading originals
copier's functions, for example:
• Basic settings
• Original>Copy settings
• Image density settings
• Auxiliary functions
copier to meet your requirements. It provides
information on:
• Changing the User's Choice settings
• Checking the meter count
• Carrying out administrative tasks
recognize errors and resolve them:
• If you are not satisfied with your copy
• Error codes
• Clearing a paper misfeed
Di200 1-3
Page 12

1
Introduction
No. Chapter Description
7 Appendix The appendix contains a collection of useful
supplementary information such as:
• Care of the unit
• Specifications
• Paper size tables
• Zoom factor tables
• Index
1-4 Di200
Page 13
Introduction
A Brief Explanation of the Conventions Used in this Manual
A variety of conventions and types of illustrations are used for special
emphasis in this manual. The following examples show the most
important conventions and how to respond to them.
DANGER
This is a danger warning!
The danger warning points out a danger of potentially serious injury or
death. Neglecting th e danger warning can l ead to s eri ous p ers ona l inj ury .
§ The arrow marks the precautionary measure required to avoid the
WARNING
This is a warning!
The warning poin ts out a hazardo us situation for persons and/o r products.
Neglecting the warning can lead to personal injury and/or serious damage
to the unit.
§ The arrow marks the precautionary measure required to avoid the
1
danger.
danger.
CAUTION
This is a caution!
The caution poin ts out a potentia l and dangerous situation. Ne glecting the
caution can lead to personal injury and/or machine damage.
§ The arrow marks the precautionary measure required to avoid the
danger.
Di200 1-5
Page 14
1
Introduction
[START] Such as the [START] button on the control panel
or the [START] key on touch screen
ERROR
§ Individual action to be performed
A list begins:
G These bullets indicate a list.
G Lists with bullets do not have any specific order.
H Where a list with white bullets follows a list with black bul lets, the white
bullets are ranked below the black bullets.
H
This is the end of the list.
G
Step 1 of a sequence of actions
1
Step 2 of a sequence of actions
2
?
§ The action described here is
Step 3 of a sequence of actions
3
H This bullet indicates a list w i thi n
H
Touch scre en message with the text ERROR
(followed by no other steps)
This illustrates what
needs to be done.
This is additional assistance.
sure to achieve the results you
want.
a sequence of actions.
This is a helpful hint
Texts highlighte d in thi s m an ner con tain useful little tips and tricks for
improving and simplifying the copy process.
1-6 Di200
Page 15
Introduction
A Brief Explanation of Important Concepts and Symbols
Terms such as original, copy, lengthwise and crosswise, which are used
to describe variou s i tem s, hav e th ei r ow n, c le arl y de fin ed m ea nings. The
most important of these terms are defined below.
Original and copy
The original is the document being duplicated by the copy cycle.
1
Original
(document to be copied)
Copy Cycle
enlarge,
,
shrink
sort,
staple,
punch
Feeding direction
The feeding direction i s th e pa th the paper takes throug h th e co pi er. Th e
feeding direction is shown by the arrows in the following illustration.
(copy of the original document)
Copy
Di200 1-7
Page 16
1
Introduction
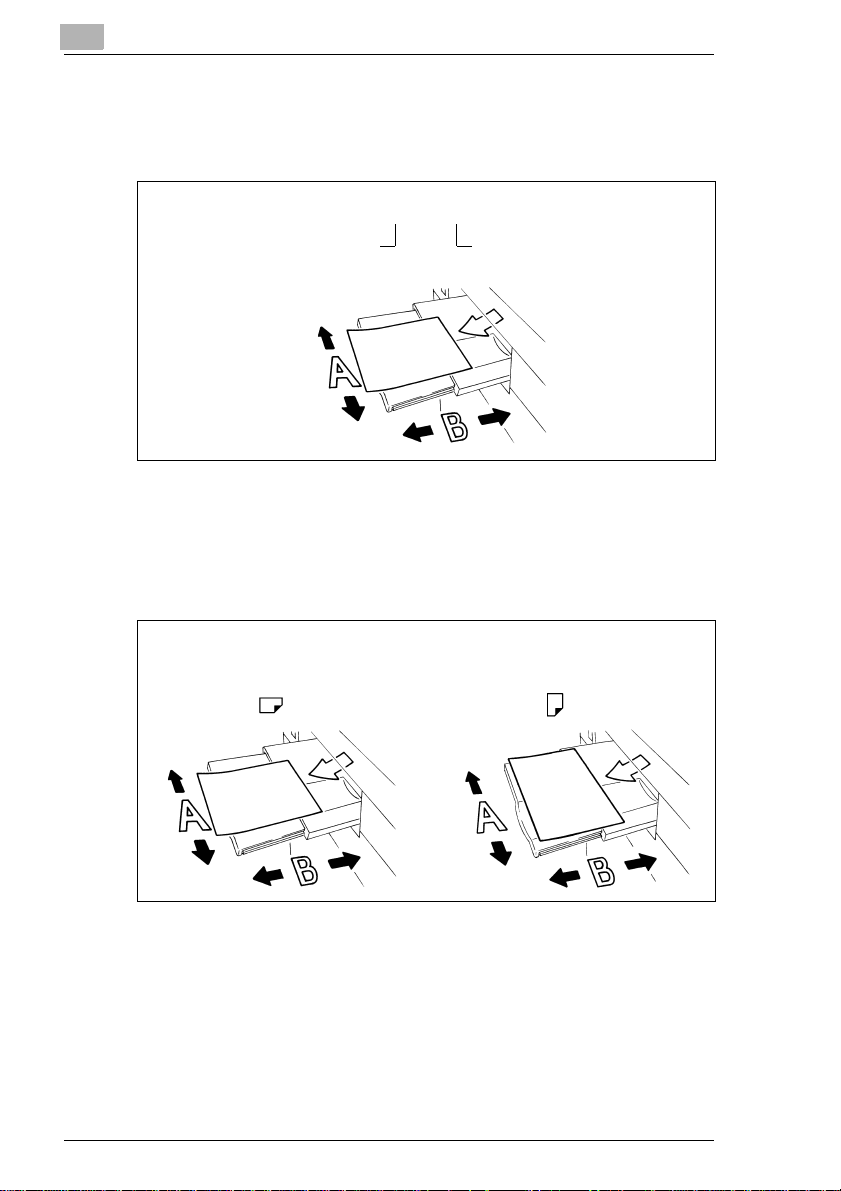
Width and length
When paper size s are given, the f irst value is al ways the width of the paper
(side A). The second value is the length of the paper (side B).
21 x 29.7 cm
Width of the paper
(side A)
Lengthwise and crosswise
If side A of the paper format is shorter than side B, this is referred to as
lengthwise.
If side A of the paper format is longer than side B, this is referred to as
crosswise.
Length of the paper
(side B)
21 x 29.7 cm 29.7 x 21 cm
Lengthwise Crosswise
Abbreviations are frequently placed after the paper sizes to indicate
lengthwise or crosswise more accurately:
G Lengthwise: L such as A4L
G Crosswise: C such as A4 C.
1-8 Di200
Page 17
Getting to Know Your Copier
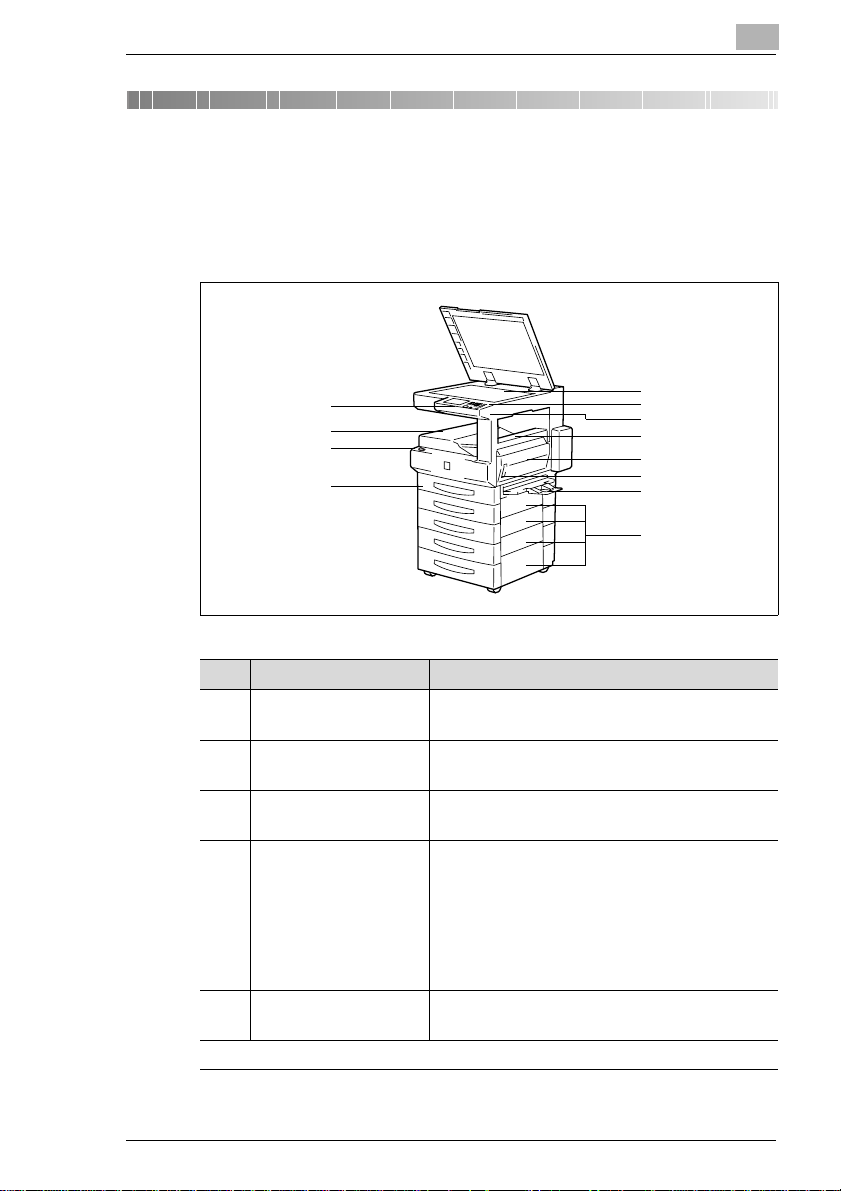
2 Getting to Know Your Copier
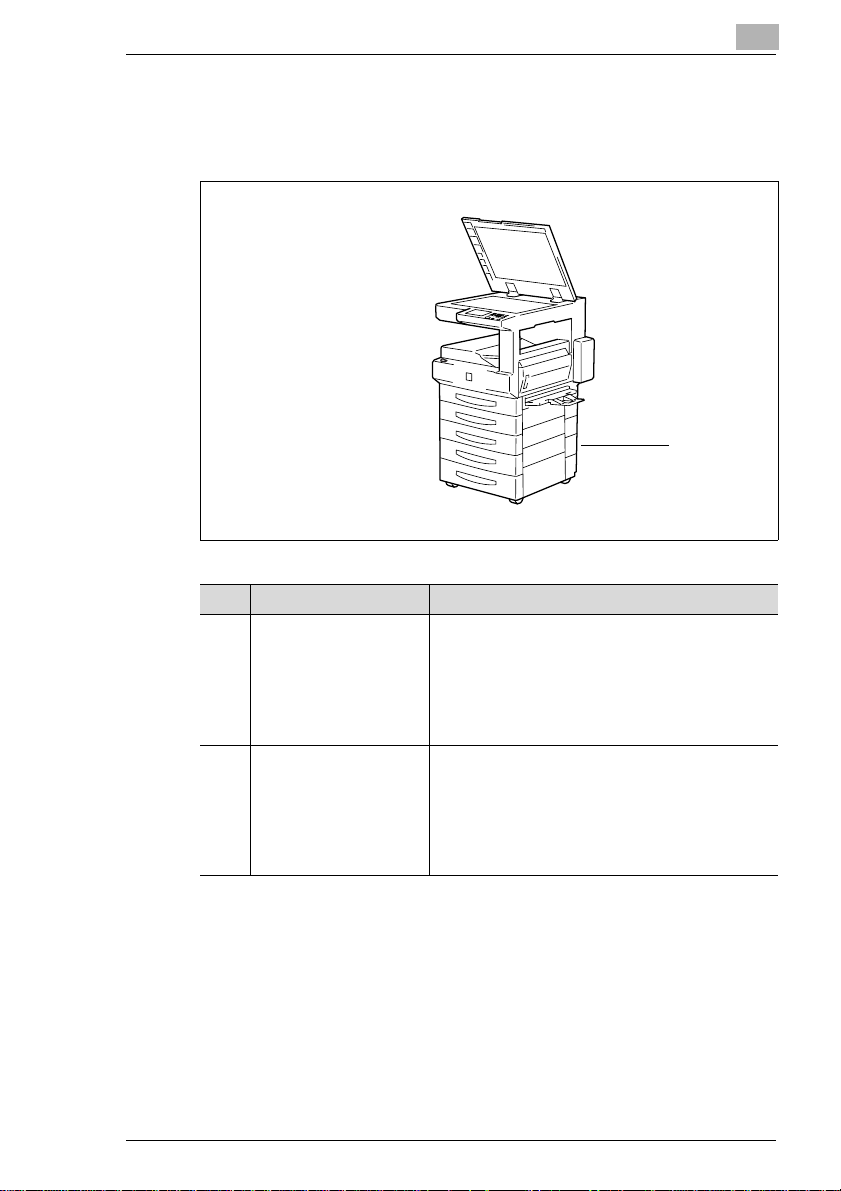
2.1 System overview
Copier Di200 (External)
1
2
3
4
10
11
12
2
5
6
7
8
9
Item Name Description
1 Control Panel The control panel has keys and indicators for
operating the copier.
2 Standard Copy Output Copies are output here by default
3 Power Switch Switch the copier on and off with the power
4 1st Drawer
(Universal drawer)*
5 Original Glass Place the original face down on the original
. . . continued on next page
* Universal paper drawers are variable in size and the operator can set them to hold different
sizes of paper.
(max. 100 sheets of standard paper).
switch.
This paper drawer holds up to 250 sheets of
copy paper (80g/m
cial paper.
• The LED blinks:
The paper drawer is almost empty.
• The LED is on, not blinking:
The paper drawer is empty.
glass.
2
) or up to 50 sheets of spe-
Di200 2-1
Page 18
2
Getting to Know Your Copier
Copier Di200 (External)
5
10
11
12
6
7
8
9
1
2
3
4
Item Name Description
6 Contrast Control Knob Use the contrast control knob to change the
7 Total Counter The counter shows the number of copies made
8 Upper Right Door Open this cover to clear a paper misfeed.
9 Right Door (R1) Open this door to change the imaging unit or
10 Latch for the Right
Door (R1)
11 Single Feed Tray Use the single document feed tray to manually
12 Lower Right Doors Open these covers to clear paper misfeeds.
contrast on the touch screen.
by the copier.
clear a paper jam.
Pull this latch to open the right door (R1).
feed individual sheets, such as special paper
(OHP films, thick paper, etc.) into the copier.
2-2 Di200
Page 19
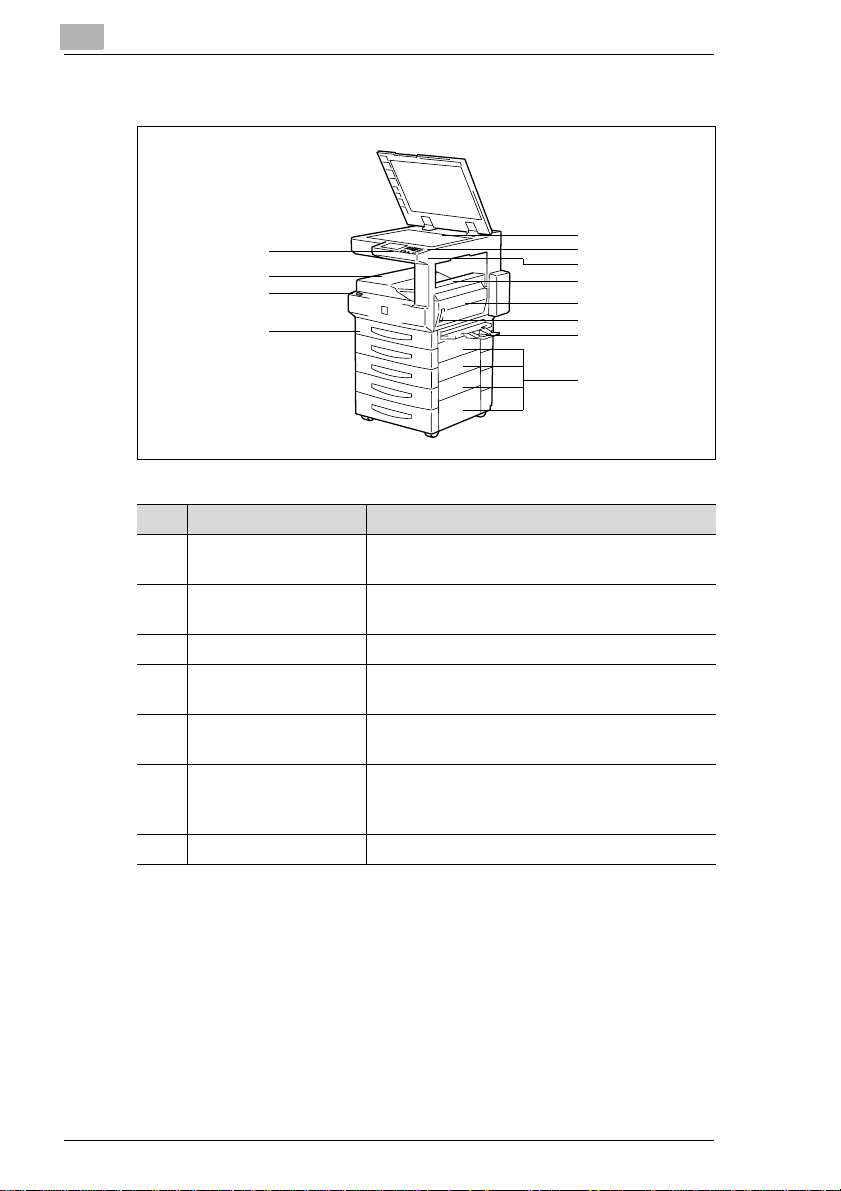
Getting to Know Your Copier
Copier Di200 (Internal)
1
Item Name Description
1 Opening Button for the
Upper Right Door
2 Green Hooks Pull these hooks to remove the imaging unit
2
2
Push this button to open the upper right door.
when you need to change it.
CAUTION
Improper handling can affect the function of the copier.
When the right door is open, the image transfer roller is accessible. If
touched, the function of this roller can be impaired.
§ Never touch the image transfer
roller.
Image
transfer
roller
Di200 2-3
Page 20
2
2.2 Optional Equipment
Original Cover OC-3
The original cover holds an original placed on the original glass.
Item Name Description
1 Original Pad Holds an original placed on the original glass.
Getting to Know Your Copier
1
2-4 Di200
Page 21
Getting to Know Your Copier
Automatic Document Feeder AF-9
The automatic d ocument feeder ca n feed up to 7 0 origina ls in s uccessi on
automatically.
Item Name Description
1 Status Indicator Lights green while an original is being scanned.
2 Original Misfeed Door Open this cover to clear a paper misfeed.
3 Document Feeder Place the originals on the document feeder with
4 Document Guide Plate Set the document guides to the original size.
5 Document Feed Tray
Extender
6 Document Exit Unit Receives the originals after they have been
7 Original Stopper Pull up the stopper when processing large-size
2
21 3 5 74 6
Lights red if a malfunction has occurred.
the side to be copied face up.
Pull out this extender when processing largesize originals.
scanned.
originals.
Di200 2-5
Page 22
2
Getting to Know Your Copier
Duplexing Document Feeder AFR-17
The automatic d ocument feeder ca n feed u p to 5 0 origina ls in s uccession
automatically. If two-sided originals are being copied, the duplexing
document feeder can also turn them over.
The single feed tray can be used for automatically feeding very thin or
heavy originals.
21 2 3 4 5
Item Name Description
1 Document Exit Unit Receives the originals after they have been
scanned.
2 Original Misfeed Doors Open these covers to clear paper misfeeds.
3 Document Feeder Place the originals on the document feeder with
the side to be copied face up.
4 Document Guide Plate Set the document guides to the original size.
5 Single Feed Tray T he single feed tray allows you to process
thinner or thicker originals than with the
document feeder. However, the originals must
be fed one by one.
2-6 Di200
Page 23
Getting to Know Your Copier
Shift Tray OT-102
This copy tray allows copies to be output sorted or grouped.
Sorter JS-201
The sorter allows copies to be output sorted or grouped.
2
Di200 2-7
Page 24

2
Getting to Know Your Copier
Duplex Unit AD-15
The duplex unit can turn copy paper over for double-sided printing. A3L
to A5 paper can be processed with the duplex unit.
2
1
Item Name Description
1 Duplex Unit The duplex unit automatically turns copy paper
over to enable double-sided copying.
2 Latch Pull this latch to open the duplex unit and clear
a paper misfeed.
2-8 Di200
Page 25
Getting to Know Your Copier
Paper Tray PF-118/PF-119
With an additional paper drawer, you can increase the capacity of your
copier.
Item Name Description
1 PF-118
Paper Drawer*
(Universal drawer)
1 PF-119
Paper Feed Unit
* Universal paper drawers are variable in size and the operator can set them to hold different
sizes of paper.
1
This paper drawer holds up to 500 sheets of
copy paper (80 g/m
• The LED blinks:
The paper drawer is almost empty.
• The LED is on, not blinking:
The paper drawer is empty.
This paper drawer holds up to 500 sheets of
copy paper (80 g/m
• The LED blinks:
The paper drawer is almost empty.
• The LED is on, not blinking:
The paper drawer is empty.
2
).
2
).
2
Di200 2-9
Page 26
2
Getting to Know Your Copier
Copy Table
Use the table to adjust the height of the copier, for example to connect a
finisher.
Paper Feed Cabinet
Use the paper feed cabi net to adjus t the height of the copi er, for exam ple
to connect a finisher.
Memory Expansion Module
The memory expans ion mod ule can inc r eas e th e co pie r system memory
by 8MB, 16MB or 32 MB.
If you copy material that requires a lar ge amount of syste m me mo ry, you
may want to increase the system memory of the copier, which allows the
system to process more data continuously.
Printer Controller Pi3502
The printer controller allows the copier to be used as a computer printer.
2-10 Di200
Page 27

Getting to Know Your Copier
2.3 Safe and reliable use of the copier
The improper use of your copier may result in health hazards, electrical
shock or even fires. Please observ e the following precau tions for the safe
use of your copier.
DANGER
Incorrect use of the copier can result in fire and/or electrical shock!
The copier is equippe d with high-voltage com ponents. Incorrect use of th e
copier may result in fire or electrical shock. Observe the following safety
precautions to prevent injury and device damage.
§ Never use flammable sprays, liquids or gases near the copier.
§ Never remove any safety equipment.
§ Never make structural modifications to the copier.
§ Connect the copier to the power supply using only the power cord
provided.
§ Ensure that the power supply provides the correct supply voltage for
the copier.
§ Never unplug the copier with wet hands.
§ Do not place coffee cups, bottles or ot her containers with li quids on the
copier. In the event that liquids are accidentally introduced into the
copier, switch the copier off imme dia tel y. U npl ug the power cord.
Consult your technical representative.
§ Never insert paper cli ps, staples or othe r small pieces of metal in to the
openings of the co pier. If metal objec ts are accidentally i ntroduced into
the copier in spite o f all prec autions, swit ch the co pier off immedi ately.
Unplug the power cord. Consult your technical representative.
§ Do not dispose of empty toner bottles into an open fire.
§ Do not touch areas designated with safe ty lab els .
§ Store supplies, such as toner, out of the reach of children.
§ Make sure the copier has a stable base and cannot tip over.
2
Di200 2-11
Page 28

2
Getting to Know Your Copier
DANGER
Incorrect handling of the power cable can result in fire and/or
electrical shock!
The copier is equ ipped with hig h-volt age co mpone nts. In co rrect ha ndling
of the copier's power cable may cause damage to the cable. This could
result in fire and/or cause electrical shock. Observe the following safety
precautions to prevent injury and device damage.
§ Be sure that the powe r cable is not damage d. If it be comes da maged,
switch off the copier immedia tely. Unplug the power cord. Consul t your
technical representative.
§ Do not pull directly on the power cable itself when unplugging the
power cord from the power outlet.
§ Do not move the copier unless it is unplugged.
§ Never place heavy objects on the power cable.
§ Do not pull or bend the power cable.
§ Do not place the copier on cables belonging to other devices.
§ Ensure that no cables of other devices get pinched in the copier.
§ Be sure that the power cord sits correctly in the power outlet.
§ Be sure that the power outlet is visible and accessible at all times.
§ Do not use any extension cords. If you require an extension cord to
connect the copier to a power supply, contact your technical
representative.
§ Never connect the copier to a multiple-socket extension cord.
§ Unplug the power cord at least once a year. Clean off any dust that
may have accumulated on or around the contacts.
2-12 Di200
Page 29

Getting to Know Your Copier
DANGER
Device overheating can result in fire and/or electrical shock!
The copier is equipped with high-voltage components. Incorrect use or
faulty operation o f the copier may cause the unit to overh eat. Observe the
following safety precautions to prevent injury and device damage.
§ Switch the copier off imm ed iat ely if it becomes unusual ly hot. Unplug
the power co rd. Consult yo ur technical representative.
§ Switch the copier off im mediatel y if smok e comes out o f it. Unplu g the
power cord. Consult your technical representative.
§ Switch the copier off immediately if it emits an unusual odor. Unplug
the power co rd. Consult yo ur technical representative.
§ Switch the copier off immediately if it is damaged in any way. Unplug
the power co rd. Consult yo ur technical representative.
§ Always unplug the pow er cord when the copier is not going to be u sed
for a long time.
§ Make sure the ventilation slots on the copier are not covered.
2
Di200 2-13
Page 30
2
Getting to Know Your Copier
CAUTION
Incorrect handling can cause damage to the copier!
Incorrect handlin g can cause dama ge to the copier . Observe the fo llowing
safety precautions to prevent device damage.
§ Never place objects of more than 3 kg on the copier.
§ Do not copy clipped or stapled paper, carbon-backed originals or
aluminum-coated paper.
§ Never open any doors while the copier is making copies.
§ Never turn the copier off while it is making copies.
§ Do not drop the toner unit or imaging drum.
§ Do not throw the toner unit or imaging drum.
§ Use the copier only for the tasks described in this manual.
CAUTION
A negligible amount of ozone is generated du ring norma l opera tion
of this copier.
The ozone given off by the copier is not hazardous to health, but it may
smell unpleasant. For a comfortable, healthy and safe operating
environment, it is recommended that the room be well ventilated.
§ Locate the copier in a wel l-ventilated room.
2-14 Di200
Page 31

Getting to Know Your Copier
CAUTION
External influences can cause damage to the copier and copier
supplies!
Observe the following safety precautions to prevent device damage.
§ Do not subject the copier to vibrati ons .
§ Do not subject the copier to extrem e chan ge s in temp erat ure or
humidity.
§ Be sure to maintain the ambient conditions required for copier
operation.
§ Be sure the enviro nm ent in w hi ch the c opi er and its supplies are kept
is free of dust, soot, steam, sprayed water or any other potentially
damaging influences.
§ Never bring any magnetised object near the copier.
§ Never place objects of more than 3 kg on the copier.
§ Do not place toner units or imaging drums near floppy disks,
timepieces or other objects that are sensitive to magnetism.
§ Always store toner units in a horizontal position.
§ Do not subject toner units, imaging drums or other copier supplies to
direct sunlight, high temperatures or dampness.
§ Do not remove the p rotective pac kaging from co pier suppli es until you
use them.
2
Di200 2-15
Page 32

2
Getting to Know Your Copier
Laser Safety
This machine is equipped with a laser. If the machine is operated in
accordance with the instructions in this manual, the laser poses no
possibility of danger.
The laser radiation is completely confined within the machine housing.
The laser beam cannot escape the housing at any time of operation.
This machine is certified as a Class 1 laser product. This means that the
unit does not generate any hazardous laser radiation.
Internal Laser Radiation
Mean radiant power at the laser aperture of the print head unit:
19.5 µW
Wavelength: 770 - 795 nm
This machine operates using a Class IIIb laser diode that emits an
invisible laser beam. The laser diode and scanning polygon mirror are
incorporated in the print head unit.
The print head unit is NOT A FIELD SERVICE ITEM. It m ay not be opened
under any circumstances.
Print head
The illustration to the left shows the location of the print head within the
copier.
The illustration to the right shows the laser aperture on the print head.
(Illustrated here with the right door open and the imaging unit removed.)
2-16 Di200
Laser Aperture
Page 33

Getting to Know Your Copier
DANGER
Hazardous laser radiation!
Operating the co pier in a manner that does not conform to the descriptio ns
provided in this manual can lead to the release of hazardous radiation.
§ Operate the copier only in accordance with the instructions provided
in this manual.
This is a semiconductor laser copier.
The maximum radiation capacity of the laser diode is: 5mW.
The wavelength is 770 - 795 nm.
Noise Emission
Device Noise Control Regulations 3 GSGV, 1/18/1991: The acoustic
noise at the operator's workplace is equal to or less than 70dB(A),
according to EN 27779.
2
Di200 2-17
Page 34

2
Getting to Know Your Copier
Safety Label
Safety labels indicate hazard areas.
§ Use this operating manual to familiarise yourself with the hazards
before carrying out any activity in a hazard area.
Safety label on the heating unit
The safety label is located inside the unit at the position marked below.
WARNING
Danger of burning from the heating unit!
The heating unit may reach temperatures of up to 120°C.
§ Never touch the heating unit.
§ Do not touch areas designated with this symbol :.
2-18 Di200
Page 35

Getting to Know Your Copier
Safety label inside the copier
The safety label is located inside the unit at the position marked below.
2
DANGER
Danger! High Voltage!
Improper operation of the copier can result in personal injury caused by
electric shock.
§ Operate the copier only in accordance with the instructions provided
in this manual.
Di200 2-19
Page 36

2
Getting to Know Your Copier
Safety label on the back of the unit
The safety label is located on the back of the unit at the position marked
below.
CLASS 1 LASER PRODUCT
LASER KLASSE 1
PRODUCT
DANGER
Hazardous laser radiation!
Improper operation of the copier can result in release of dangerous
radiation.
§ Operate the copier only in accordance with the instructions provided
in this manual.
2-20 Di200
Page 37

Getting to Know Your Copier
Data on the Manufacturer's Name Plate
The manufacturer's name plate for the cop ier is loca ted on the ba ck of the
unit at the position marked below.
Di200
Di200
220-240
1250-1400
N87
0000003
MINOLTA CO.,LTD
MADE IN CHINA
The following data is provided on the ma nufa ct urer' s name pla te:
50-60
2
6
Model name
Power requirement data
max. power consumption Rated current data
Certifications
Serial number of the copier
Manufacturer Country where
manufactured
For further information on the certifications on the manufacturer's name
plate, see page 18.
Write down the model nam e and serial number, which are specified on the
type label, in the table below.
Model:
Serial No.:
Di200 2-21
Page 38

2
2.4 Transporting the Copier
If you need to transport the copier, please consult your technical
representative.
2.5 Setting up the copier
Environmental Requirements
The optimal environmental requirements of the copier are as follows.
G Temperature from 10°C to 32°C
(maximum fluctuation of 10°C per hour)
G Humidity of 15% to 85%
(maximum fluctuation of 10% per hour).
Installation Site
The installation site must meet the following requirements:
G An area that is dry and free of dust
G A level surface free of undue vibrations
G Free from flammable gases such as ammonia
G Provision for good ventilation
G A location away from curtains or other easily ignited materials
G Away from personne l so that no one is subjected to the direct exha ust
air of the c opier.
The unit must be protected from the following influences:
G Splashing liquids
G Direct sunlight
G Strong temperature fluctuations
G Direct airflow from heating or air conditioning units.
Getting to Know Your Copier
2-22 Di200
Page 39

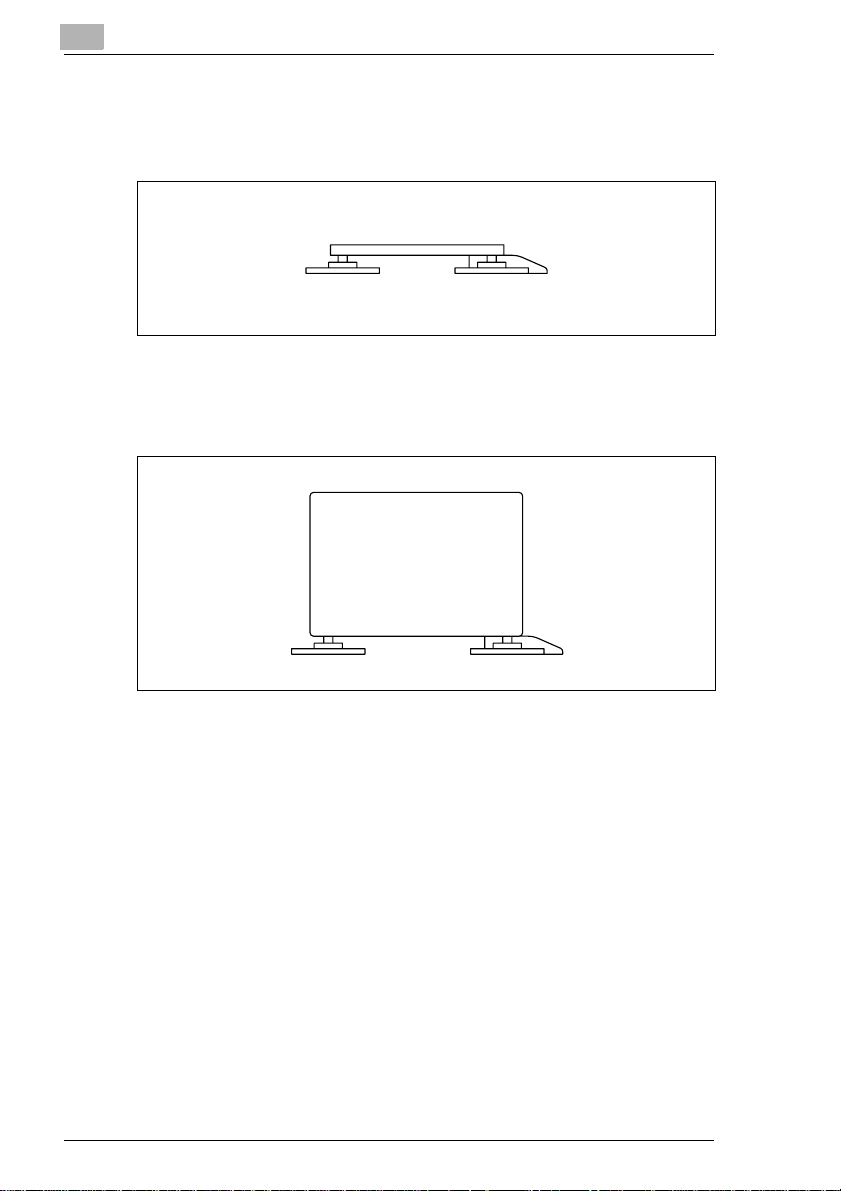
Getting to Know Your Copier
Space Requirements for the Copier
Be sure to allow a clearance of 150 mm or more behind the copier. This
will ensure good ventilation. Furthermore, allow a clearance of about
310mm between the right side of the cabinet and the wall to provide
sufficient access for changing the toner bottle.
Scale: mm
991,3
Front view Side view
2
1058
1484
This information is applicab le to the ba sic unit, i ncluding AFR -17, PF-118,
PF-119, and AD-15.
Storing Supplies
Ensure that supplies are stored:
G In their sealed original packaging materials
G Protected from direct sunlight and heat sources
G In a cool, dry, dust-free location
G Out of the reach of children.
WARNING
Toner can be hazardous to your health!
Toner is harmful if swallowed.
§ If you get any toner o n your hands, i mmediately wash them thoroughly
with soap and cold water.
Di200 2-23
Page 40

2
Getting to Know Your Copier
2.6 Connecting the copier
The copier needs a reli ab le, con si ste nt p ower s up ply . Pl eas e c all yo ur i nhouse technical support if required.
The allowable values for the power supply and the frequency range can
be found in the technic al informa tion. For mo re information, see pag e 7-7.
2.7 Switching the Copier On and Off
Switching the Copier On
§ Press the power switch to the ON
position.
The [START] indicator key on the
control panel is red.
After a few seconds the following
message is shown on the touch
screen:
scan.
Now warming up. Ready to
ON
OFF
After switching on the copier, all functions are at their default settings.
When the copier is shipped, the following default settings apply:
G Number of copies: 1
G Paper Feed: Auto Paper Mode
G Zoom Factor: ×1.000
G Exposure: Auto Exposure Mode (Text Mode)
G Finishing: Non-sort
G Copy mode: From 1-sided original to 1-sided copy.
You can change the default settings in the User's Choice. For more
information, see page 5-1 and the following pages.
2-24 Di200
Page 41

Getting to Know Your Copier
Switching the Copier Off
§ Press the power switch to the OFF
position.
The touch screen indicator is no
longer lit up. The copier is turned
OFF.
Help save energy!
The copier has several energy-saving functions:
Energy Save Mode:
Energy save mode is automatically activated approximately 15
minutes after the last copy activity.
Auto Shut Off:
(Only if no printer controller is installed.)
The copier is automati cally shut off ap proximately 30 min utes after the
last copy activity.
2
ON
OFF
Auto Shut Off (Sleep Mode):
(Only when a printer controller is installed.)
The copier is switche d to s lee p mo de approximately 30 minutes after
the last copy activity. In sleep mode, the copier uses less power than
in Energy Save mode.
The idle time be fore en ergy s ave mod e is automa tical ly ac tivated c an
be changed in the User's Choice settings. For more information, see
page 5-8 and the following page.
Di200 2-25
Page 42

2
Getting to Know Your Copier
2.8 Control Panel Keys and Indicators
Overview
1234
Item Name Element Description
1 Touch Screen – Touch-sensitive control panel
2 Utility Key Use this to call up various utilities.
3 Mode Check Key with
4 Copy mode Key with
5 Scanning mode Key with
6 Keypad Keys Setting values
7 Only active if administrator numbers have been set up:
Access
(Access Mode Key)
8 Interruption Key with
. . . continued on next page
indicator
indicator
indicator
Key Use to confirm a specified access
indicator
Calls up an overview of the current
copier settings and calls up the copy
program functions.
Activate copy mode.
• Indicator lights up:
Copy mode is active.
Activate scanning mode.
• Indicator lights up:
Scanning mode is active.
code.
Interruption of a copy cycle.
• Indicator lights up:
Copy cycle is interrupted.
5
6
7
8
9
10
1112
2-26 Di200
Page 43

Getting to Know Your Copier
Item Name Element Description
9 C (Clear) Key Delete values and settings with using
10 Panel Reset Key Resets copier to default settings.
11 Stop Key Stops a copy or scan cycle.
12 Start Key with
2
1234
5
6
7
8
9
10
1112
the numeric keypad.
Starts a copy or scan cycle.
indicator
• Indicator lights up green:
The copier is ready for operation.
• Indicator lights up red:
The copier is not ready for
operation.
Di200 2-27
Page 44

2
Getting to Know Your Copier
Touch Screen
Item Name Element Description
1 Index Keys Opens an index card with specific
copier settings.
•Basics
• Original > Copy
• Density
• Auxiliary functions
2 Display Panel Indicator Shows messages and the number of
3 Basics menu Keys Recalls the basic copier settings.
4 Current settings Indicator Indicates current copier settings.
5 Supplementary
display
Indicator Displays free system memory.
copies.
• Paper
•Zoom
• Finishing
Key for calling up the job list.
Displays icons pertaining to the current
copier status.
1
2
3
4
5
2-28 Di200
Page 45

Getting to Know Your Copier
2.9 The Touch Screen
Operating the Touch Screen
CAUTION
Incorrect handling can cause damage to the copier!
The touch screen sur face is glass. Incorrect ha ndl ing ca n caus e damag e
to the touch screen.
§ Never place heavy objects on the touch screen.
§ Always touch the surface of the touch screen carefully.
§ Do not press hard on the surface.
§ Do not bring pointed ob jects into c ontact with the s urface of the to uch
screen.
The copier has a touch screen. A touch screen is a d isplay that is sensitiv e
to the touch. You can use th e touch screen to make settin gs on the copier
and control copy cycles.
§ You can select a fun ction or mak e settings by lightly touc hing a key on
the touch screen.
2
Touch screen displays may be different!
The displays on the touch screen partly depend on the equipment of
the copier. The displays shown in this user manual may be slightly
different from the displays on your copier.
Di200 2-29
Page 46

2
Getting to Know Your Copier
Structure of Touch Screen Menus
The “Basics“ index card is divided into three sections: Paper, Zoom and
Finishing. You can switch between the sections using the Basics menu
keys.
Sections Indicator on the Touch Screen
Paper
Zoom
Finishing
2-30 Di200
Page 47

Getting to Know Your Copier
You can switch between the four settings screens using the index keys.
Settings Screens Indicator on the Touch Screen
Basics
For more information,
see page 4-1.
Original > Copy
For more information,
see page 4-31.
Density
2
For more information,
see page 4-43.
Auxiliary functions
For more information,
see page 4-47.
Di200 2-31
Page 48

2
2.10 Filling the paper drawers
If the currently selected paper draw er is empty. . .
G A message is displayed on the touch screen .
G The current copy process is interrupted.
G The empty drawer blinks.
§ Add copy paper to the empty paper drawer. Then you can continue
running the copy job.
Getting to Know Your Copier
2-32 Di200
Page 49

Getting to Know Your Copier
Filling the 1st Drawer
The 1st drawer is a universal drawer.
The universal drawers can be set for different paper sizes.
Note the following important information!
Capacity: 250 sheets of plain paper (80g/m
Types of paper: Plain Paper, Recyc led Paper (60 g/m
Paper sizes: A3 L to A5 (fixed setting)
CAUTION
Incorrect use can cause the copier to malfunction!
Touching the fee d rollers in the p aper drawers can soil their surf aces. This
can cause incorrect feeding.
§ Never touch the feed roller.
50 sheets of special paper
Thick paper (91g/m
OHP transparencies, labels
2
up to 160 g/m2)
2
)
2
up to 90g/m2)
2
Carefully pull the paper drawer out
1
as far as it will go.
Press the paper lifting plate down
2
until it locks.
Di200 2-33
Feed roller
Page 50

2
Position the copy paper between
3
the paper size limiter s. The side that
is to be printed must be up.
Did you load special paper
?
(OHP films, labels, etc.)?
§ Before starting the copy job,
be sure to set the correct paper
type.
For more information, see page 4-4.
Ensure that the maximum paper
4
filling height is not exceeded (see
mark on inside of the paper drawe r).
Adjust the paper guides to fit the
5
size of the loaded paper exactly.
Did you load a custom paper
?
size?
§ Before starting the copy job,
be sure to set the paper size.
For more information, see page
4-6.
Getting to Know Your Copier
Close the paper drawer carefully.
6
2-34 Di200
Page 51

Getting to Know Your Copier
Filling the PF-119 Paper Drawer (Optional)
This paper drawer is designed to hold one paper size.
This drawer can be modified by a technical representative to hold a
different paper size.
Note the following important information!
Capacity: 500 sheets of standard paper
Types of paper: Plain Paper, Recyc led Paper (60 g/m
Paper sizes: A3 L to A4 (fixed setting)
CAUTION
Incorrect use can cause the copier to malfunction!
Touching the fee d rollers in the p aper drawers can soil their surf aces. This
can cause incorrect feeding.
§ Never touch the feed roller.
Carefully pull the paper drawer out
1
as far as it will go.
2
up to 90g/m2)
Feed roller
2
Press the paper lifting plate down
2
until it locks.
Di200 2-35
Page 52

2
Position the copy paper between
3
the paper size limiter s. The side that
is to be printed must be up.
Ensure that the maximum paper
4
filling height is not exceeded (see
mark on inside of the paper drawe r).
Close the paper drawer carefully.
5
Getting to Know Your Copier
2-36 Di200
Page 53

Getting to Know Your Copier
Placing Copy Paper onto the Single Feed Tray
Use the single document feed tray to feed individual copy sheets, for
example of special paper, into the copier.
Note the following important information!
Capacity: 1 sheet
Types of paper: Plain Paper, Recyc led Paper (60 g/m
Paper sizes: max. size 297× 432 mm
Load the original into the document feeder. If necessary,
1
make additional copier settings.
Lower the single feed tray.
2
Set the guide plates for the copy
3
paper width.
2
Thick paper (91g/m
OHP transparencies, labels
min. size 90 ×140 mm
up to 160 g/m2)
2
up to 90g/m2)
2
Place the copy paper directly onto
4
the tray. The side that is to be
printed must be down.
Specify the paper size for type.
5
For more information, see page 4-
13.
Start the copy cycle by pressing
6
the [START] key on the control panel.
Does each co py cycle have to be restarted for multiple copies?
?
§ No. The copy cycle needs to be started only once. The subsequent
copy paper is fed in as it was loaded.
Di200 2-37
Page 54

2
2.11 Changing the toner cartridge
Use only the toner bottles suitable for thi s copier. Original accessories and
materials guarantee the best output quality and minimum maintenance.
For further information, consult your technical representative.
Toner bottle almost empty Toner bottle empty
When the toner bottle is almost empty . . .
G A message is displayed on the touch screen .
G You can still make copies, but they will become lighter and lighter.
§ When this occurs, replace the toner bottle as soon as possible.
Getting to Know Your Copier
When the toner bottle is empty . . .
G A message is displayed on the touch screen .
G The current copy process is interrupted.
§ When this occurs, replace the toner bottle. Then you can continue
running the copy job.
Protecti ng the enviro nment . . .
Dispose of the used toner bottle in an environmentally friendly
manner. For more information, see page 1-2.
2-38 Di200
Page 55

Getting to Know Your Copier
WARNING
Toner can be hazardous to your health!
Toner is harmful if swallowed.
§ If you get any toner o n your hands, i mmediately wash them thoroughly
with soap and cold water.
§ Do not drop the toner bottle from a heigh t of more tha n 1m. This may
damage the toner bottle. Toner may escape from the bottle.
Swing the cover for the toner unit
1
down.
Carefully pull the toner bottle out.
2
Is the bottle stuck or ha rd to pull
?
out?
The cover for the toner unit
opened while the toner bottle
was turning.
§ Close the cover. Wait until the
toner bottle stops turning. Then
you should be able to remove the bottle.
2
Tap the new toner bottle against a
3
hard surface to loosen any clumps
of toner.
Di200 2-39
Page 56

2
Shake the new toner bottle a few
4
times back and forth.
Carefully remove the seal from the
5
toner bottle.
Place the new toner bottle into the
6
toner bottle holder . Be sure the s ide
labelled "UP" on the toner bottle is
pointed upwards when doing so.
Getting to Know Your Copier
Close the cover of the toner bottle.
7
The copier will begin to refill the
toner supply. Do not switch it off
during this period. Do not open any
doors on the copier.
Copies still too light?
If copies are still too ligh t im me dia tely after replacing the to ner bottl e,
you can activate the toner re pleni sher funct ion. Fo r more i nformat ion,
see page 5-28.
2-40 Di200
Page 57

Getting to Know Your Copier
2.12 Replacing the Imaging Unit
When the service life of the imaging unit has run out . . .
G A message is displayed on the touch screen.
G You can still make copies, but the quality of them cannot be
guaranteed.
§ Replace the imaging unit as soon as possible.
2
Protecting the environment . . .
Dispose of the used imaging unit in an environmentally friendly
manner. For more information, see page 1-2.
Di200 2-41
Page 58

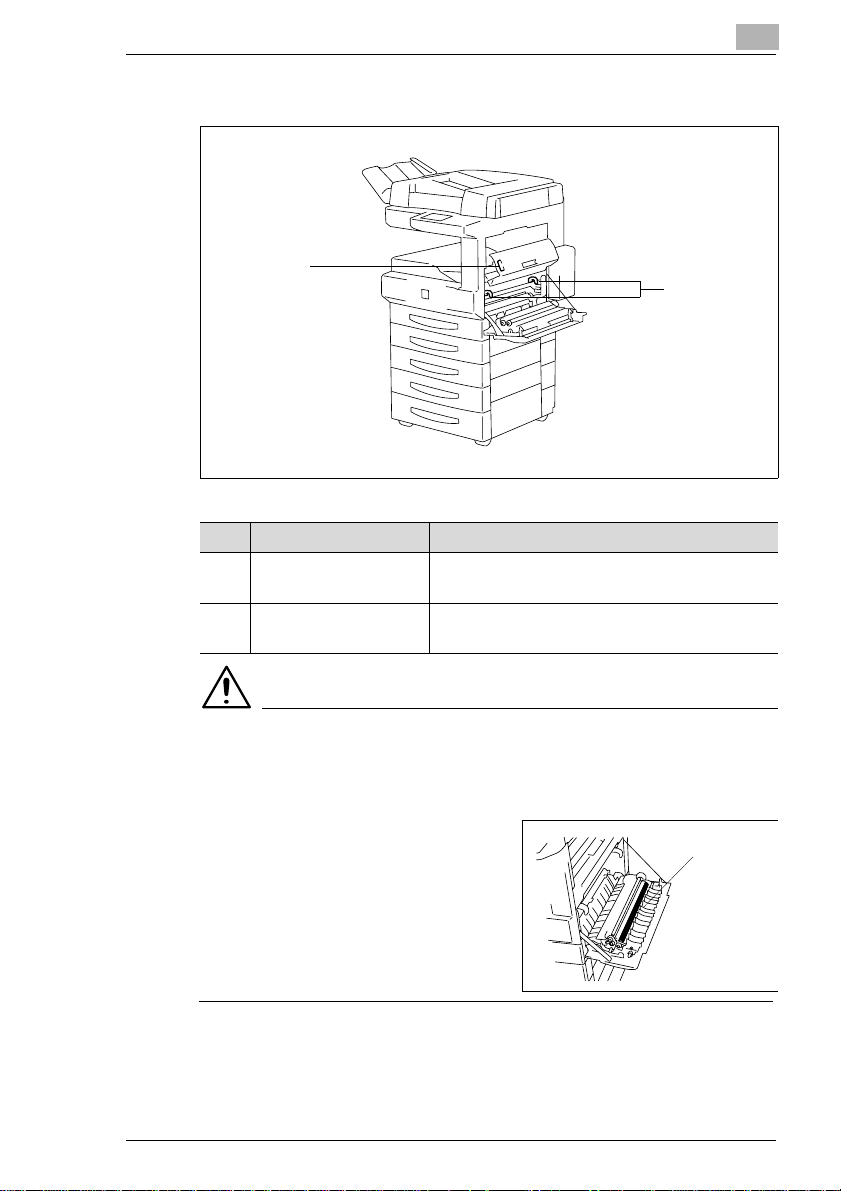
2
Getting to Know Your Copier
Incorrect handling can cause damage to the copier!
When the right door (R1) is open, electrical contacts are within reach.
Touching the contacts can cause an electrostatic discharge, resulting in
damage to the unit.
§ Do not touch the electrical contacts.
Open the right door (R1).
1
electrical contacts
Carefully pull th e us ed imaging unit
2
out by the green hooks.
Take hold of the handle of the used
3
imaging unit and lift i t carefully out of
its holder .
Shake the new imaging unit back
4
and forth horizontal ly a few times.
Align the green marks on the
5
imaging unit with the marks on the
copier. Put the new imaging unit into
the holder.
2-42 Di200
Page 59

Getting to Know Your Copier
Take the imaging unit by the green
6
hooks. Push the imaging unit into
the holder until it clicks into place.
Close the right door (R1 ).
7
2
Di200 2-43
Page 60

2
2.13 Shutting Down the Copier
When shutting down the copier for long periods of time, follow these
instructions:
G Remove the power plug from the outlet.
G Store the unit in a dry, dust-free room.
G Ensure that the unit is not subject to vibrations.
Protect the machine from:
G Splashing liquids
G Direct sunlight
G Strong temperature fluctuations
G Direct airflow from heating or air conditioning units.
Getting to Know Your Copier
2-44 Di200
Page 61

Getting to Know Your Copier
2.14 Please observe these precautions
. . . when using your copier:
G Never place objects of more than 3 kg on the copier.
G Never open any doors or turn the copier off while making copies.
G Never bring magnetised objects or use flammable sprays near the
copier.
G Never use sharp objects inside the open copier.
2.15 Proper Use of Your Copier
The copier may only be used for the tasks described in this manual. Any
other applications are considered inappropriate.
Using the copier incorrectly can lead to serious personal injury and/or
damage to products and articles. Claims and liability and/or guarantees
are voided by damage incurred through incorrect use.
Certain types of docu men t s may not be c opi ed fo r furth er us e o r with th e
intent to pass copies of such documents off as the original.
These include:
G Money
G Stamps (cancelled or uncancelled)
G Personal identification cards
G Vehicle registration documents
G Copyrighted material s (without the permi ssion of the copyright ho lder).
If you are not sure whether a certain document may be copied, please
consult the relevant public authorities.
2
Di200 2-45
Page 62

2
Getting to Know Your Copier
2-46 Di200
Page 63

Initial Steps . . .
3 Initial Steps . . .
3.1 Step-by-step Instructions on Copying Your Documents
This copier gives you a wide range of options for making copies. Always
maintain a specific sequence wh en selectin g the modes. You can then be
certain that you have not forgotten anything.
Press the [COPY MODE] key on the
1
control panel to activate copy mode.
Load the originals:
2
H Load the originals face-up into
the automatic document feeder.
or
H Lift the original cover. Place the
original face down on the
original glass.
3
Di200 3-1
Page 64

3
Change any one of the basic
3
settings, if necessary:
H Paper
H Zoom
H Finishing
For more information, see page 1.
If necessary, change the
4
Original>Copy settings, e.g.:
H 1-sided > 1-sided
H 2-sided > 1-sided
H Book > 2-sided
For more information, see page 31.
If necessary, change the Density
5
settings, e.g.:
H Auto Exposure
H Manual Exposure
H Density Mode
For more information, see page 4-
43.
Initial Steps . . .
If necessary, select an Auxiliary
6
function, e.g.:
H File Margin
H Image Repeat
For more information, see page 4-
47.
3-2 Di200
Page 65

Initial Steps . . .
From the numeric keypad, set the
7
desired number of copies to be
made.
?
§ Press the [C] key on the co ntro l
Start the copy cycle by touching
8
[START].
?
§ Press the [STOP] key on the
3
Did you enter an incorrect
number?
panel. Enter the number of
copies again.
Do you want to cancel the copy
cycle?
control panel.
Di200 3-3
Page 66

3
3.2 Entering the Access Code
Access numbers c an be s et up to manage copy data. Copyi ng is p ossible
only after the copier has been enabled using a valid access number.
The following touch screen ind icator prompts you for yo ur access number.
Enter the access code using the
1
numeric keypad.
Did you enter an incorrect
?
number?
§ Press the [C] key on the control
panel. Enter the access numb er
again.
Initial Steps . . .
Press the [ACCESS] key on the
2
control panel to confirm your input.
The basic setting s are displ ayed on
the touch screen. The copier is
enabled. You may now make
copies.
§ Press the [ACCESS] key on the
control panel befo re leav ing th e copi er. This secu res the copie r again .
3-4 Di200
Page 67

Initial Steps . . .
3.3 Checking Copier Settings
Check the copier settings before starting a complex copy cycle.
Press the [MODE CHECK] key on
1
the control panel.
An overview of the current copier
settings is shown.
only if necessary
2
Touch a key to change the
corresponding setting.
Press [EXIT] to confirm the copier
3
settings.
The basic settings are
shown again.
3.4 Entering the Number of Copie s
Input the number of copy sets that you wish to make from your original.
§ Touch the corresponding keys on
the numeric ke ypad.
The number of copies is shown on
the touch screen in the upper righthand corner.
3
Did you enter an incorrect
?
number?
§ Press the [C] key on the co ntro l
panel. Enter the number of
copies again.
Di200 3-5
Page 68

3
3.5 Starting the copy cycle
Start a copy cycle.
§ Press the [START] key on the
control panel.
The copy cycle starts.
3.6 Interrupting the Copy Cycle
Interrupt a time-consuming copy cycle to create a different copy set.
Press the [INTERRUPT] key on the
1
control panel.
The current co py cycle is
interrupted. The [INTERRUPT] key
on the control panel lights up. The
copier is in interrupt mode.
Initial Steps . . .
Make the settings for the different
2
copy cycle.
Press [START] to start the printout of the different copy cycle.
3
The copies are printed.
Once the interim copy cycle has finished, touch [INTERRUPT].
4
The interrupted copy cycle can be continued.
Not all functions are available!
When you are working in interrupt mode, not all functions are
available. For more information, see page 31.
3-6 Di200
Page 69

Initial Steps . . .
3.7 Stopping the copy cycle
Stop a copy cycle to prevent further output of faulty copies.
Press the [STOP] key on the control
1
panel.
The copy cycle stops.
Press the [C] key on the control
2
panel.
The printing job is deleted. The
copier settings are left unchanged.
3.8 Resetting Copier Settings
Reset the copier to the default settings.
§ Press the [PANEL RESET] key on
the control panel.
The copier is reset to the default
settings.
3
Changing the default settings
You can change the default settings of the copier. For more
informati on, see page 5-2.
Di200 3-7
Page 70

3
3.9 Using the Document Feeders
WARNING
Incorrect operation may damage document feeders!
Not all originals a re suitable for use with documen t feeders. If you p rocess
unsuitable originals using a document feeder, you may damage it.
§ Use only suitable originals in document feeders.
Complex copyin g o f si ng le pages can be done qu ick ly and easily using a
document feeder. You do not need to place the originals manually.
Not all originals are suitable for use in document feeders. The following
types of originals are not suitable:
G Carbon paper, paraffin paper and other very thin originals
G Thick paper
G Originals larger than A3L or smaller than A5
G Translucent paper, OHP transparencies (overhead projector films)
G Folded, curled originals
G Punched, stapled originals
G Carbon-backed originals.
Initial Steps . . .
§ Process unsuitable originals with the single feed tray. For more
information, see page 3-10.
or
Place unsuitable orig inals on the origin al glass. For mo re informati on,
see page 3-15.
3-8 Di200
Page 71

Initial Steps . . .
Copying Originals using the Automatic Document Feeder
Feed originals with the automatic document feeder.
Note the following important information!
Suitable originals for the automatic document feeder are:
Type of originals: • Single sheets of smooth standard paper
Original size: • 1-/2-sided originals A3L to A5
Set the document guide to the size
1
of the original.
?
§ Pull out the document feed tray
Load up to 70 originals ( 80g/m2) in
2
the automatic document feeder.
The side that is to be copied must
be up.
?
§ Define the original document
• Multiple Page Feed 52.5 up to 81.4 g/m
• with Mixed Original Detection A3L to A5 C
Are you copying originals that
are larger than A4?
extender and the original
stopper.
Do you have to load the origi nals
differently than illustrated here?
alignment. For more
information, see page 4-35.
3
2
Extender
Original Stopper
Make sure that the sta ck of originals
3
does not exceed the maximum fill
height (see Ä mark on the document feeder).
Push the originals flush up against the fee d chambe r.
4
Start the copy cycle.
5
The originals are pulled in starting with the top sheet.
Di200 3-9
Page 72

3
Initial Steps . . .
Processing Originals using the Duplexing Document Feeder
Feed originals with the duplexing document feeder.
Note the following important information!
Suitable originals for the duplexing document feeder are:
Type of originals: • Single sheets of smooth standard paper
Original size: • 1-/2-sided originals A3L to A5L
Set the document guide to the size
1
of the original.
• Single Feed Tray 40.1 up to 81.4 g/m
• 1-sided originals 50 up to 110 g/m
• 2-sided originals 60 up to 90 g/m
• with Mixed Original Detection 60 up to 90 g/m
• with Mixed Original Detection A3 L to A4
2
2
2
2
Load up to 50 originals (80g/m2) in
2
the automatic document feeder.
The side that is to be copied must
be up.
Do you have to load the origi nals
?
differently than illustrated here ?
§ Define the original document
alignment. For more
information, see page 4-35.
Make sure that the st ack of originals
3
does not exceed the maximum fill
height (see Ä mark on the document feeder).
Push the originals flush up against the feed chamber.
4
Start the copy cycle.
5
The originals are pulled in starting with the top sheet.
3-10 Di200
P
P
Page 73

Initial Steps . . .
Using the Single Feed Tray (SADF)
The single feed tray can be used to feed originals that cannot be
processed using the duplexing document feeder. To use it, you have to
place the originals on the single feed tray one at a time.
Note the following important information!
Originals suitable for the single feed tray:
Type of originals: • Single sheets of level, plain paper35g/m
Original size: • A3L to A5L
Lower the single feed tray cover.
1
Set the document guide to the size
2
of the largest original .
Place the origina l on the si ngle feed
3
tray. The side that is to be copied
must be down.
The original is automatically taken
in and copied.
2
up to 200 g/m
3
2
When can I load the next
?
document?
§ Do not load the next orig inal until the [START] butt on on the control
panel lights green.
Not all functions are available!
When working with the single feed tray, not all functions are available.
For more information, see page 6-23.
Di200 3-11
Page 74

3
Feeding Originals of Different Sizes
Feed originals of different sizes using a document feeder.
Load up to 50 originals into the
1
document feeder. The si de that is to
be copied must be up.
Align the originals to the back guide
2
plate.
Make sure that the st ack of originals
3
does not exceed the maximum
fill height (see Ä mark on the
document feeder).
Push the originals flush up against
4
the feed chamber.
Set the document guide to the
5
largest original.
Press [MIXED ORIG DETECTION].
6
Start the copy cycle.
7
The originals are fed in
automatically one after the other.
Duplexing Document Feeder
Automatic
Document Handler
Initial Steps . . .
Many different sizes!
You can set mixed original detection as the default mode using the
User's Choice settings. For more information, see page 5-5.
The combination is the secret!
Just combine Mi xed Ori ginal Dete ction with the “Auto Paper “ or “ Auto
Size“ functions.
3-12 Di200
Page 75
Initial Steps . . .
Combining Mixed Ori gin al Detec tio n with the “Auto Paper“ or “Auto Size “
results in the following:
3
Originals Copies
Automatic
Paper Select Mode
Automatic
Size Mode
Di200 3-13
Page 76

3
Initial Steps . . .
Loading 2in1 Originals for Page Separation
Load the 2in1 o rig inals for page se par atio n onto the duplex in g d oc um ent
feeder or the automatic document feeder.
Set the document guide to the size
1
of the original.
Load the originals into the
2
document feeder. The si de that is to
be copied must be up.
Be to load the originals lengthwise
3
on the automatic document feeder.
Make sure that the st ack of originals
4
does not exceed the maximum fill
height (see Ä mark on the
document feeder).
Push the originals flush up against
5
the feed chamber.
Start the copy cycle.
6
3-14 Di200
Page 77

Initial Steps . . .
3.10 Placing Originals on the Glass
Place originals that cannot be processed by a document feeder onto the
original glass.
Paper Originals and Transparent Originals
Raise the original cover by at least
1
15°.
If the original cover is no t open wide
enough, the origi nal s ize wil l not be
detected automatically.
Place the original on the glass. The
2
side that is to be copied must be
down.
Do you have to load the origi nals
?
differently than illustrated here?
§ Define the original document
alignment. For more
information, see page 4-35.
3
15°
Slide the original to the upper right
3
corner of the original glass.
Align the original with the Original
4
Scales.
Is the original transparent?
?
§ Place a shee t of white paper of
the same size on top of the
original.
Close the original cover.
5
Di200 3-15
Original Scales
Page 78

3
Initial Steps . . .
Books and Bound Originals
WARNING
Improper operation can damage the original glass!
Books weighing more than 3 kg or pressing the book firmly can damage
the origin al glass.
§ Never place books weighing more than 3 kg onto the original glass.
§ Do not press an open book onto the original glass.
Raise the original cover by at least
1
15°.
If the original cover i s not open wide
enough, the origi nal size will not be
detected automatically.
Position the book o n the gla ss. Th e
2
side that is to be copied must be
down.
15°
Push the book up to the back
3
Original Scale.
Align the centre of the book with the
4
Book Marker.
Close the original cover .
5
Is it impossible to close the
?
original cover?
§ Leave the original cover open.
§ Do not look at the or igi nal gl ass
during the copy proces s. Its light
is extremely bright.
3-16 Di200
Book Marker
Back
Original
Scale
Page 79

Initial Steps . . .
3.11 Using the Job List
(Only active if a printer controller is installed.)
The job list shows an overview of the currently pending print jobs. Use it
to submit print jobs for printing and delete print jobs from the job queue.
For further instructions and more information, see Chapter 4 of the User
kit Pi3502.
3
Di200 3-17
Page 80

3
3.12 Other Functions
Automatic Drawer Switching
The copier switches automatically to a suitable paper drawer when the
current paper drawer is empty. Suitable paper drawers must have the
same paper size and the same paper alignment as the current paper
drawer.
For example, if your c opier is equ ipped with a 250-sheet tray an d two 500sheet trays, you can produce up to 2,250 copies without interruption.
Automatic Reset of Copier Settings
The copier is automa tically reset to the default se ttings abo ut 60 second s
after the last copy cycle.
The time before activation of automatic reset can be changed. For more
information, see page 8.
Energy Save Mode
Energy Save mode is automatically activated approximately 15 minutes
after the last copy cyc le. When in energy save mode, th e copier uses less
energy.
The time before Energy Save mode is activated can be changed. For
more information, see page 5-8.
Initial Steps . . .
Auto Shut Off
(Only possible if no printer controller is installed.)
The copier is automatically shut off about 30 minutes after the last copy
cycle. In this m od e, the copier use s eve n les s po w er t han in energy save
mode.
The time before activation of automatic Shut Off can be changed. For
more information, see page 5-8.
Sleep Mode
(Only possible if a printer controller is installed.)
The copier is switched to sleep mode approximately 30 minutes after the
last copy cycle com plete s. In thi s mode, the copier u ses even less po wer
than in energy save mode.
The time before sleep mode is activated can be changed. For more
information, see page 5-8.
3-18 Di200
Page 81

Initial Steps . . .
Automatic Shut-off for the Background LCD Light
The background LCD il lu mi nati on can be shut off automatical ly to f urthe r
save energy.
The time before activation of automatic Shut Off can be changed. For
more information, see page 5-8.
Auto Copy Start
A copy cycle can be s tarted even du ring warm-up . The copi es are printed
automatically after warm-up is co mp lete .
3
Di200 3-19
Page 82

3
Initial Steps . . .
3-20 Di200
Page 83

Customizing Your Copy
4 Customizing Your Copy
4.1 Basic settings
You can make settings in the following areas in the basic settings:
G
Paper
For more information, see page 2.
G
Zoom
For more information, see page 4-18.
G
Finishing
For more information, see page 4-28.
4
Di200 4-1
Page 84

4
Customizing Your Copy
Enabling Auto Paper Select Mode
Allow the copier to select the appr opri ate pap er s iz e for y ou r co pi es. The
copier calculates the appropriate paper size according to the size of the
original and the zoom factor.
Note the following important information!
Original sizes that can be
automatically recognised:
Plus, with additional equipment:
(To take advantage of this
feature, contact your technical
representative.)
Touch the Basics menu key [Pape r].
1
The paper settings are shown.
A3L, B4 L, A4L, A4C, LetterL, A5L
11× 17L, LegalL, LetterC, FLS
Press the [AUTO PAPER] key.
2
The background of the key turns
black. "Auto Paper" mode is
enabled.
Touch the [BASICS] index key to
3
show the Basics menu keys again.
§ To disable “Auto Paper“ mode again, select a paper d rawer manu ally.
For more information, see page 4-3.
Wrinkled, curled and dog-eared?
Wrinkled, curled or dog-eared originals are not always identifi ed
correctly in this mode. Use only smooth originals.
4-2 Di200
Page 85

Customizing Your Copy
Selecting a Paper Drawer Manually
Specify the drawer from which the copy paper is to be fed.
Note the following important information!
The following symbols are used:
1st Drawer 4th Drawer
1 4
2nd Drawer 5th Drawer
2 5
3rd Drawer Single Feed Tray
3
Touch the Basics me nu key [Paper ].
1
The display will change.
Touch the desired paper drawer
2
key.
4
Touch the [BASICS] index key, to
3
show the Basics menu keys again.
Not all drawers are always available!
Which paper drawers are a vailable dep ends on the equi pment of your
copier. The touch screen will only show the available drawers.
Di200 4-3
Page 86

4
Customizing Your Copy
Specifying the Paper Type for the 1st Drawer
Set the paper types that you wish to process with the 1st drawer.
Load the copy paper into the 1st drawer.
1
Touch the Basics menu key [Pape r].
2
The paper settings are shown.
Press the key for the 1st d rawer.
3
Press [MODE CHANGE].
4
The display will change.
Press [COPY STOCK].
5
The display will change.
4-4 Di200
Page 87

Customizing Your Copy
Select the paper type.
6
H [NORMAL]
for plain paper
H [OHP]
for overhead projector films
H [CARD]
for card paper and labels
Confirm your selection with
7
[ENTER].
Not all modes are always available!
If you select the [OHP] or [CARD] paper type, some copier functions
are disabled. For more information, see page 6-23.
4
Di200 4-5
Page 88

4
Customizing Your Copy
Defining a Custom Paper Size for the 1st Drawer
Define a custom paper size for the 1st drawer.
Note the following important information!
Not all dimensions are possible.
• If 432 mm is set for [X],a maximum of 279 mm can be set for [Y].
• If 297 mm is set for [Y],a maximum of 420 mm can be set for [X].
Touch the Basics menu key [Pape r].
1
The paper settings are shown.
Press the key for the 1st d rawer.
2
Press [MODE CHANGE].
3
The display will change.
4-6 Di200
Page 89

Customizing Your Copy
Press [CUSTOM SIZE].
4
The display will change.
Press [X] or [Y]. Press the [C] key on
5
the control panel to delete a value
that you no longer need. Use the
numeric keypad to set the desired
size. Confirm your entries by
pressing [ENTER].
Confirm each of your settings by
6
pressing [ENTER].
4
Di200 4-7
Page 90
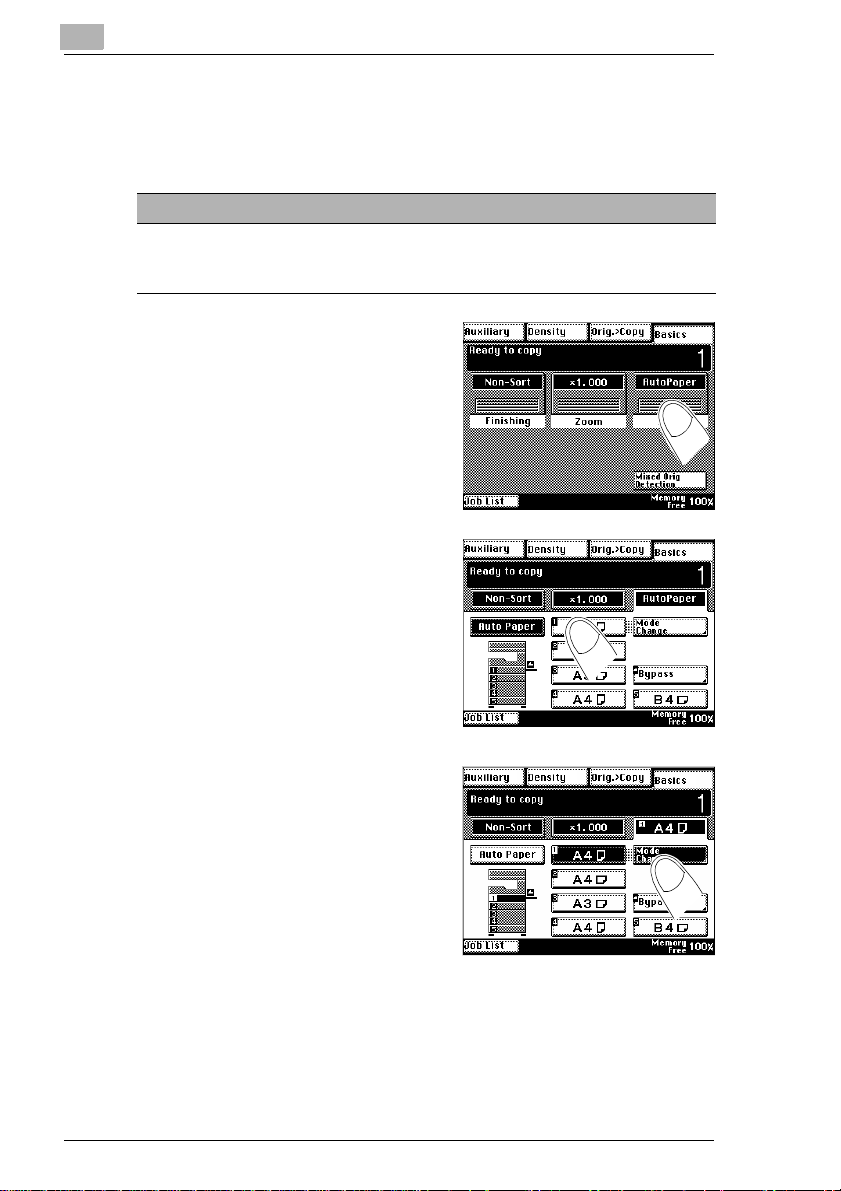
4
Customizing Your Copy
Storing a Custom Paper Size for the 1st Drawer
You can store up to two custom pa per sizes that you use frequen tly for the
1st drawer.
Note the following important information!
Not all dimensions are possible.
• If 432 mm is set for [X],a maximum of 279 mm can be set for [Y].
• If 297 mm is set for [Y],a maximum of 420 mm can be set for [X].
Touch the Basics menu key [Pape r].
1
The paper settings are shown.
Press the key for the 1st d rawer.
2
Press [MODE CHANGE].
3
The display will change.
4-8 Di200
Page 91

Customizing Your Copy
Press [CUSTOM SIZE].
4
The display will change.
Press [MEMORIZE PAPER SIZE].
5
The display will change.
Press [X] or [Y]. Press the [C] key on
6
the control panel to delete a value
that you no longer need. Use the
numeric keypad to set the desired
size. Confirm your values wit h
[ENTER].
4
Select the memory position, either
7
[1] or [2], where you want to store
the paper size.
What if both memory positions
?
are occupied?
§ You can overwrite the memory
positions with new values. T his
deletes the old values.
Di200 4-9
Page 92

4
Confirm each of your settings by
8
pressing [ENTER].
Customizing Your Copy
4-10 Di200
Page 93

Customizing Your Copy
Loading a Saved Paper Size for the 1st Drawer
Call up a stored paper size for the 1st drawer.
Touch the Basics me nu key [Paper ].
1
The paper settings are shown.
Press the key for the 1st drawer.
2
Press [MODE CHANGE].
3
The display will change.
4
Press [CUSTOM SIZE].
4
The display will change.
Di200 4-11
Page 94

4
Select the memory position key,
5
either [1] or [2] wh ere the paper si ze
has been saved.
Confirm your selection with
6
[ENTER].
Customizing Your Copy
4-12 Di200
Page 95

Customizing Your Copy
Specifying the Paper Type for the Single Feed Tray
Set the paper types that you wish to process with the single feed tray.
Load the copy paper on the single feed tray.
1
Press [OHP/CARD].
2
The display will change.
Select the paper type.
3
H [NORMAL]
for plain paper
H [OHP]
for overhead projector films
H [CARD]
for card paper and labels
4
Confirm your selection with
4
[ENTER].
Not all modes are always available!
If you select the [OHP] or [CARD] paper type, some copier functions
are disabled. For more information, see page 6-23.
Di200 4-13
Page 96

4
Customizing Your Copy
Specifying the Paper Size for the Single Feed Tray
Specify the size of the paper you wi sh to proc ess with t he singl e feed tray.
Load the copy paper on the single feed tray.
1
Select a standard size.
2
or
Press [INCH] to select a a size in
inches.
or
Press [CUSTOM SIZE] to define a
custom paper size.
The display will change.
only if [Custom Size] is touched
3
Press [X] or [Y]. Press the [C] ke y on
the control panel to delete a value
that you no longer need. Use the
numeric keypad to set the desired
size. Confirm your values with
[ENTER].
4-14 Di200
Page 97

Customizing Your Copy
Storing a Custom Paper Size for the Single Feed Tray
You can store up t o two custom pa per sizes that you use frequently for the
single feed tray.
Load the copy paper on the single feed tray.
1
Press [CUSTOM SIZE].
2
The display will change.
Press [MEMORIZE PAPER SIZE].
3
The display will change.
4
Press [X] or [Y]. Press the [C] key on
4
the control panel to delete a value
that you no longer need. Use the
numeric keypad to set the desired
size. Confirm your values wit h
[ENTER].
Di200 4-15
Page 98

4
Select the memory position, either
5
[1] or [2], where you want to store
the paper size.
What if both memory positions
?
are occupied?
§ You can overwrite the memory
positions with new values. This
deletes the old values.
Confirm your settings wit h [ENTER].
6
Customizing Your Copy
4-16 Di200
Page 99

Customizing Your Copy
Loading a Saved Paper Size for the Single Feed Tray
Call up a stored paper size for the single feed tray.
Load the copy paper on the single feed tray.
1
Press [CUSTOM SIZE].
2
The display will change.
Select the memory position key,
3
either [1] or [2], where the paper
size has been saved.
4
Confirm your selection with
4
[ENTER].
Di200 4-17
Page 100

4
Customizing Your Copy
Enabling Auto Size
Allow the copier to selec t the appropriate zoo m factor for your copie s. The
copier calculates t he appro priate z oom fact or acco rding to the si ze of th e
original and the desired copy paper size.
Touch the Basics menu key [Zo om].
1
The zoom settings are shown.
Press [AUTO SIZE].
2
The background of the key turns
black. "Auto Size" m ode is enab led .
Call up the paper settings.
3
The paper settings are shown.
Select the paper drawer that
4
contains the copy paper.
4-18 Di200
 Loading...