

Page 1

p
User Manual
Di181f
www.minoltaeuro
e.com
The essentials of imaging
Page 2

Page 3

Contents
1 General Information
1.1 Introduction......................................................................................5
1.2 How Does a Fax Machine Work?....................................................5
1.3 Certificate for Machines with CE Marking.....................................6
CTR 21 Approval.............................. .................................. ..... ...... .....6
1.4 Safety Precautions........................................................................... 7
Laser Safety.......................................................................................7
Internal Laser Radiation.....................................................................7
Ozone Release Warning.................................................................... 7
1.5 Characteristics.................................................................................8
1.6 Multi Operation Table ......................................................................8
2 Installation
2.1 Control Panel, Displays and Keys..................................................9
Programmable one-touch keys........................................................11
2.2 Connect the telephone line cable.................................................13
2.3 Initiating the fax option..................................................................13
3Data Entry
3.1 Preparation.....................................................................................15
3.2 Typing Conventions in this Manual..............................................15
3.3 Enter Text........................................................................................15
Entering Numbers and Characters...................................................15
Special Characters...........................................................................16
3.4 Entering your Fax Number............................................................16
3.5 Entering your Company Name........... ...... ...... ..... ...... ...... ..............17
3.6 Entering Date and Time................. .................................. ..... ...... ...17
3.7 Storing Numbers ........................................................................... 18
Entering One-Touch Numbers............................... ...... ...... ..... .........18
Entering Speed Dial Numbers..........................................................20
Changing One-Touch- or Speed Dial Numbers...............................22
Erasing One-Touch- or Speed Dial Numbers..................................24
Entering Call Groups......................................... ..... ...... ...... ..... .........25
Changing Group Dials......................................................................26
Rev. / Di181f
Page 4

Erasing Call Groups........................................................................ 27
Phone Book.....................................................................................27
3.8 Advanced Settings ........................................................................ 28
Buzzer Volume................................................................................28
Header............................................................................................. 28
Set relay boxes................................................................................29
Erasing Relay Boxes.......................................................................30
4Send
4.1 Transmission................................................................................. 31
Notes on Original Documents.......................................................... 31
Photocopy or Carrying Film.............................................................32
Placing the Documents.................................................................... 32
Placing Documents on the Glass .................................................... 32
4.2 Settings for Sending a Fax...........................................................34
Resolution........................................................................................34
Contrast...........................................................................................34
4.3 Dialling Methods............................................................................ 35
Manual Dialling Using the Numeric Keypad.................................... 35
One-Touch Dialling.......................................................................... 35
Speed Dialling.................................................................................35
Automatic Call Groups..................................................................... 36
Telephone Directory........................................................................ 36
Manual Redial..................................................................................36
4.4 Memory Transmission .................................................................. 37
4.5 Direct Transmission (1 Page TX) ................................................ 38
4.6 Book TX ......................................................................................... 39
4.7 Delayed Transmission (Timer)..................................................... 40
4.8 Relay Broadcast Initiation..................................................... ...... . 41
4.9 Polling Transmission................................. ..... ...... ...... ..... ............. 43
Standard Polling.............................................................................. 43
Selective polling...............................................................................43
Deleting Polling Documents................... ...... ..... ...... ...... .................. 44
4.10 Mailbox Transmission................................................. ..... ...... ....... 45
4.11 Deleting Data.................................................................................. 46
Di181f Rev. /
Page 5

5 Reception
5.1 Manual Reception..........................................................................47
Default Reception Setting ................................................................47
5.2 Automatic Reception.....................................................................47
5.3 Memory Reception.........................................................................48
5.4 Mailbox Reception............................................... ...... ...... ..... ...... ...48
Setting up a Mailbox.........................................................................48
Delete Mailbox.................................................................................49
Printing the content of a mailbox......................................................50
5.5 Polling Reception...........................................................................50
Standard Polling.................................... ...... ...... ..... ...... ....................50
Selective polling............................... ..... ...... ...... ..... ..........................51
Continuous Polling................................ .................................. ...... ...52
5.6 Settings for Receiving a Fax.........................................................53
Setting the Paper Size.....................................................................53
Setting Number of Rings..................................................................53
6 Reports and Lists
6.1 Basic Report Settings....................................................................56
6.2 Printing Reports............ .................................. ..... ...... ...... ..... .........57
6.3 Printing a One-touch/Group Dial List...........................................58
6.4 Printing a Memory Report.............................................................58
7 Troubleshooting
7.1 Error Messages on the LCD..........................................................59
7.2 Error Codes....................................................................................61
8 Appendix
8.1 Specifications.................................................................................63
8.2 Index................................................................................................64
8.3 CE marking (declaration of conformity).......................................67
Rev. / Di181f
Page 6

Di181f Rev. /
Page 7

General Information
1 General Information
1.1 Introduction
Thank you for c hoosing the Di18 1f and showing c onfidence in our pro duct.
This machine has a modern design and fulfils today’s requirements of a
fax machine. It combines advanced technology with a contemporary
appearance.
The machine is authorised for use in the public telephone network and is
compatible to other fax machines of the communication standard 3.
The Di181f was manufactured to the same high quality standards as is
common for all other precision instruments made by Minolta.
This manual will assist you in becoming familiar with the machine. It
contains all the necessary information for the start-up, its functions and
the replacement of the consumables.
Please, always keep this manual to hand when using the machine.
1.2 How Does a Fax Machine Work?
A fax machine can be connected to a normal telephone system without
taking any special precautions, just like a normal telephone set. The
function of a fax machine is quite similar to that of a telephone.
The way a fax machine works is simple: Documents that are to be
transmitted are at first scanned. The machine does not recognise the
letters but reads the picture, dot by dot, and marks each dot as black or
white. That is why you can not only transmit texts but also pictures and
photos. The information is then digitised and compressed so that the fax
machine can send it quickly over the telephone line to another fax
machine which reverses the process, reading and marking each dot as
black or white on a sheet of paper.
When you are "cal led" b y a fax mach ine, y our tele phone ring s as normal.
Therefore you cannot know whether your are receiving a fax call or a
telephone call before picking up the receiver. Those sounds are the so
called "hand shaking " and function as an introdu ction sequence before the
actual transmissio n, just as i nterlocuto rs - often - introduce them selves at
the beginning of a telephone call. In the introductory sequence the
technical features of both machines are matched to make sure the
transmission and the reception are conducted to a high standard.
With your Di181f you do not need to listen to the introductory sequence.
How to program the machine accordingly will be explained later in this
manual. Furthermore you will als o find infor mation abou t the settin gs th at
1
Rev. / Di181f 1-5
Page 8

1
come with the machine, that have to be made when instal-ling, or the
settings that can be made at a later stage. Most of the features of the fax
machine work independently, so that you can program only the settings
you need for the moment and ignore all others.
By the way, the word "fax" is a combination of the Latin "facere" (to make)
and "simile" (similar) describing the process of making a copy which is
similar to the original. This artificial word "fax" has nowadays become
widely accepted i n everyday lang uage, replaci ng the older term facsimile.
A copy is therefore to be made similar to the original. Fax machines are
also called facsimile machines.
Now, enjoy your new fax machine.
General Information
1.3 Certificate for Machines with CE Marking
CTR 21 Approval
Annex II
The equipment has been approved in accordance with Council Decision
98/482/EC for pan-European single terminal connection to the public
switched telephone network (PSTN). However, due to differences
between the individ ual PSTNs provided in differe nt countries, the approval
does not, or itself, give an unconditional assurance of successful
operation on every PSTN network termination point.
In cases of problems, you should contact your equipment supplier in the
first instance.
1-6 Di181f Rev. /
Page 9

General Information
1.4 Safety Precautions
Follow the safety advice to ensure safe operation of the machine.
G Connect the machine o nly to a 200 - 240 V/ 5 0 Hz earthed po wer point.
G Make sure the power is not turned off over night.
G Always pull at the plug, never at the wire, when you want disconnect
the machine from the p ower s upp ly . If pos s ibl e, c onn ect the m ac hin e
directly to a wall outlet.
G To facilitate comm unication always k eep the machine switched on and
program the correct user data. Make sure to enter the correct user
names.
G Do not unscrew any p arts, if not speci fical ly requ ested in thi s manual .
If necessary contact your technical service.
G Never open the machine while it is transmitting or printing.
G Take care not to let humidity into the machine.
G Make sure no objects fall into the machine.
G If any problem occurs that can not be solved by the procedures
described in thi s manual make sure yo u c on t act the technical se rvi ce .
G Follow the recommended maintenance procedures regularly..
Used cartridges may be taken bac k by the tec hni ca l serv ic e stat ion as a
part of the maintenance procedures.
1
Laser Safety
This fax machine contains a page printer which operates by means of a
laser. This fax mach ine co ntains a p age printer which opera tes by me ans
of a laser. Th is machin e does n ot impos e any da nger as long as it is us ed
according to the proce dures descri bed in this m anual. The laser is lim ited
to the interior of the machine. The environmen t is protected from the laser
emission by the covers of the machine.
Internal Laser Radiation
-3
Maximum radiation: 1,3 x 10
(mW) Wavelength: 770-810 (nm)
The machine works w ith an inv isible cla ss IIIb la ser. The pr inter head unit
is not field service item.
Ozone Release Warning
During printer operation, a small quantity of ozone is released. This
amount is not large enough to ha rm anyone. However, be sur e the roo m
where the fax mach ine is being used has adequate ventilat ion,. especiall y
if you are printin g a hi gh volume of material o r if the fa x m ac hi ne is being
used continuously over a long period.
Rev. / Di181f 1-7
Page 10

1
1.5 Characteristics
Your new fax machine is a compact multi-functional device facilitating
your work and reducing your fax communication times. The features of the
Di181f include scanning of originals into the memory for delayed
transmission, allowing simultaneous reception of fax messages and vice
versa.
Type
G A6 - A3 format, Super G3 mode, Desktop Laser Fax1
G up to 33.600 bps transmission speed
G MH / MR / MMR / JBIG, ECM coding
G Automatic document feeder up to 50 pages (A4)
G Document capacity up to 300 sheets
G 20 digit double-spaced LCD display
G 64 level grey scale.
Dialling Functions
G Delayed transmissi on
G Relay broadcast initiation
G Multi-functional operation interface
G Polling RX / TX
G Confidential reception / mailbox transmission
G Confidential transmission.
General Information
1.6 Multi Operation Table
All jobs are dispatched sequentially. No further interference is required.
1. Function Simultaneous Operations
Copy Sending Receiving Printing (only with GDI printer option)
Scan Printing (only with GDI printer option)
Send Copying Printing (only with GDI printer option)
Receive Copying Printing (only with GDI printer option)
Print fax Copying Printing (only with GDI printer option)
1-8 Di181f Rev. /
Page 11
Installation
2 Installation
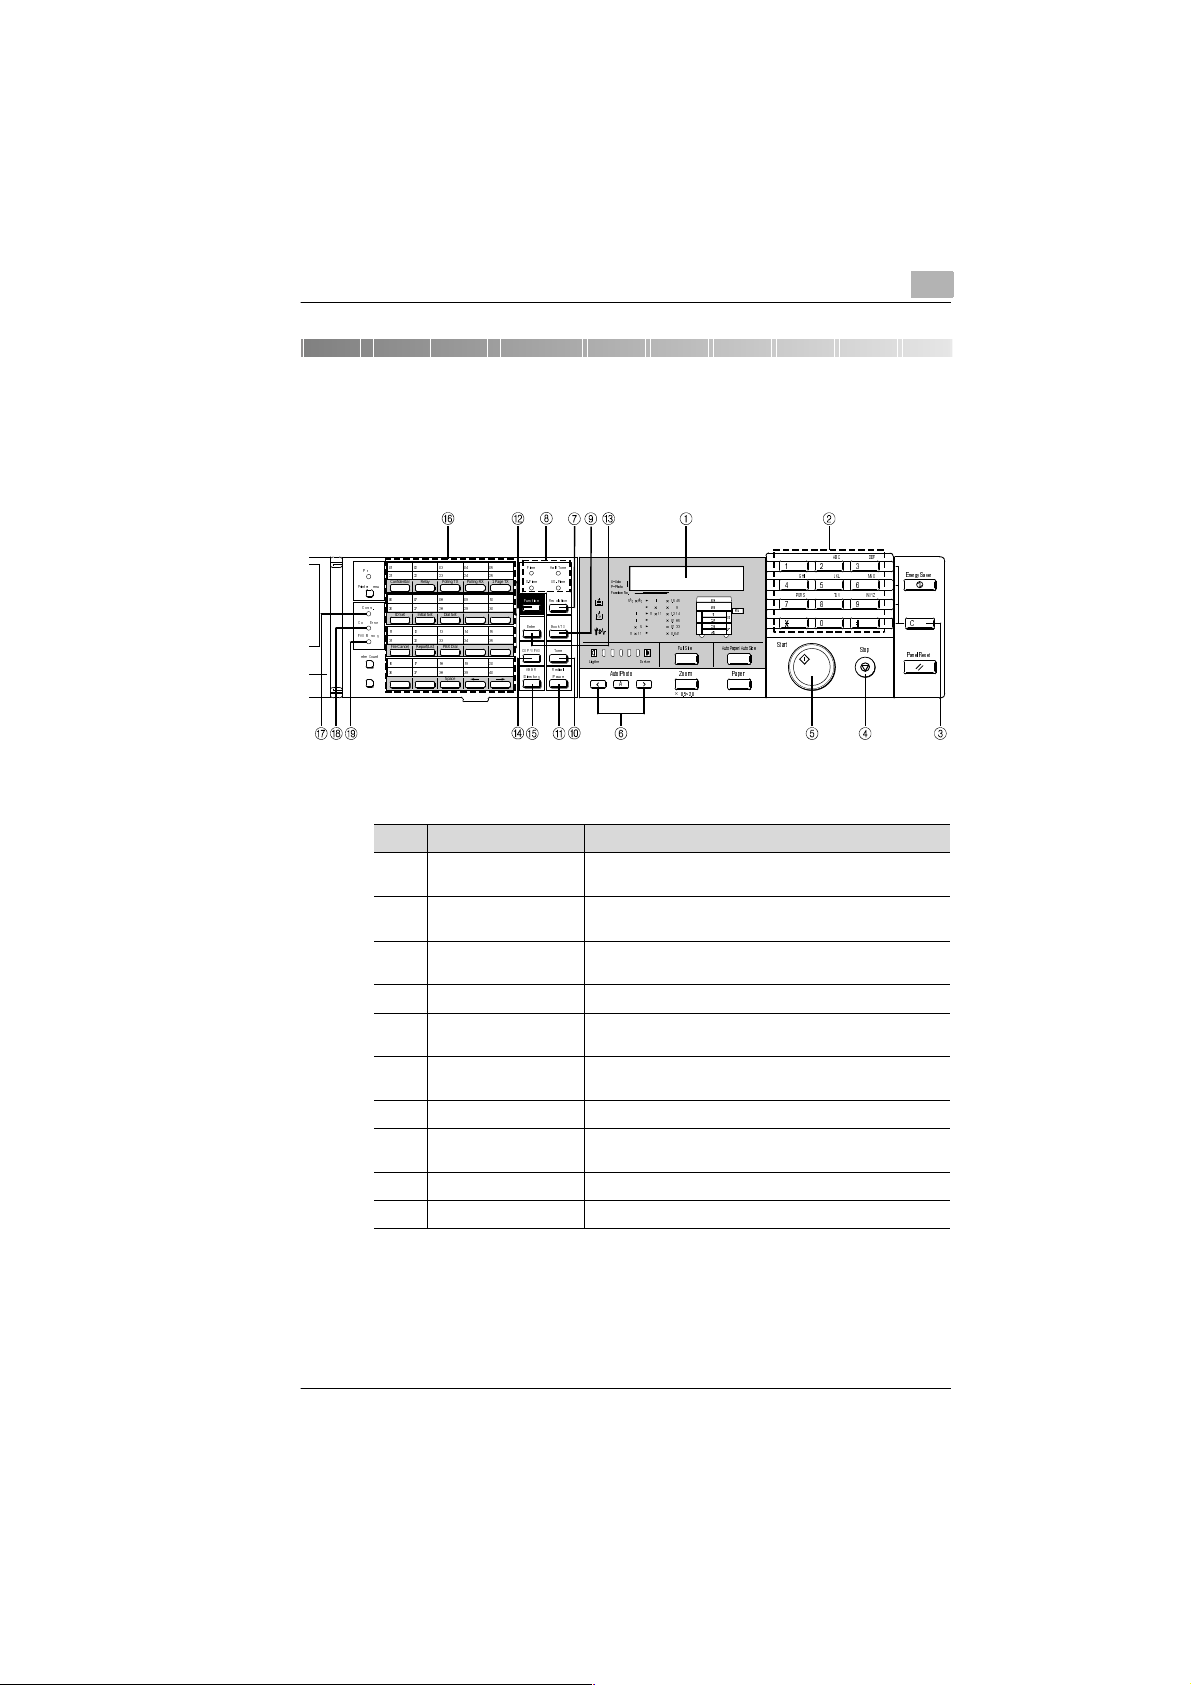
2.1 Control Panel, Displays and Keys
2
3Q
Confidential Relay Polling TX Polling RX 1 Page TX
3ULQWHU HQX
&RPP
ID Set Initial Se t Dial Set
&R (UURU
)$;0 PR\
File Cancel Report/ List PBX Dial
HWHU&RXQW
)LQH +DOI7RQH
6)LQH 86)LQ H
5HVROX WLRQ)XQFWLRQ
Space
'LUHFWR U\
%RRN7;(QWHU
$%%5
3DXVH
7RQH&23<)$;
5HGLDO
$ $XWR
3 3KRWR
)XQFWLR Q1R
/LJKWHU 'DUNHU
$XWR3KRWR
$
O
O
O
)XOO6L]H $XWR3DSHU$XWR6L ]H
×
a
3DSHU=RRP
$%& '()
-./*+, 012
7893456 :;<=
6WDUW
6WRS
Num Display/Key Function
1 LCD (Liquid Crystal
Display)
2 Numeric keypad Use these keys to enter numbers and letters, e.g. fax
Shows the status of the machine and contains information
about the operation modes.
numbers and destination names.
3 CLEAR (C) Press this key to change numbers or characters entered
using the numeric keyp ad.
4 STOP Stops the current operation.
5 START Starts all functions of the machine such as transmission,
receiving, copying etc..
6 CONTRAST KEYS Press these keys to manually change the contrast
settings.
7 RESOLUTION Press this key to change the resolution settings.
8 RESOLUTION LEDs Enter the current resolution (fine, S-fine, US-fine, half
tone).
9 BOOK TX Press this key to transmit a book.
10 TONE Use this key to switch from pulse dialling to tone dialling.
(QHUJ\6DYHU
&
3DQHO5HVHW
Rev. / Di181f 2-9
Page 12

2
Installation
3ULQWHU
Confidential Relay Polling TX Polling RX 1 Page TX
3ULQWHU HQX
&R
ID Set Initial Se t Dial Set
&R (UURU
)$; H RU\
File Cancel Report/ List PBX Dial
HWHU&RXQW
)LQH +DOI7RQH
6)LQH 86)LQ H
5HVROX WLRQ)XQFWLRQ
Space
'LUHFWR U\
%RRN7;(QWHU
7RQH&23<)$;
5HGLDO
$%%5
3DXVH
HDO
LWHU 'DUNHU
$XWR3KRWR
$
HDO
HWWHU
HDO
HWWHU
HWWHU
HWWHU
)6 $3 $6
×
a
3DSHU=RRP
$%& '()
-./*+, 012
7893456 :;<=
6WDUW
6WRS
Num Display/Key Function
11 REDIAL/PAUSE Use this key to either redial or to generate a pause.
12 FUNCTION Press this key to open the menu. Select the desired
function with either the one-touch keys or the arrow keys..
13 ENTER Press this key to confirm the entry of numbers, letters and
menu selections.
14 COPY/FAX Press this key to choose between copy mode and fax
mode.
15 ABBR/DIRECTORY Use this key to enter a three-digit speed dial number. Also
press this key to search for a stored number.
16 ONE TOUCH Use this key to dial a stored number. Press this key in
conjunction with the function keys to select various fax
functions. For further information please refer to the next
section, "P rogrammed One-touch Keys".
17 COMMUNICATION
LED
This LED is on when a fax is being transmitted (sending,
receiving, etc).
18 ERROR LED This LED is on, if an error occurs.
19 MEMORY LED This LED is on if a document has been stored.
&
2-10 Di181f Rev. /
Page 13

Installation
2
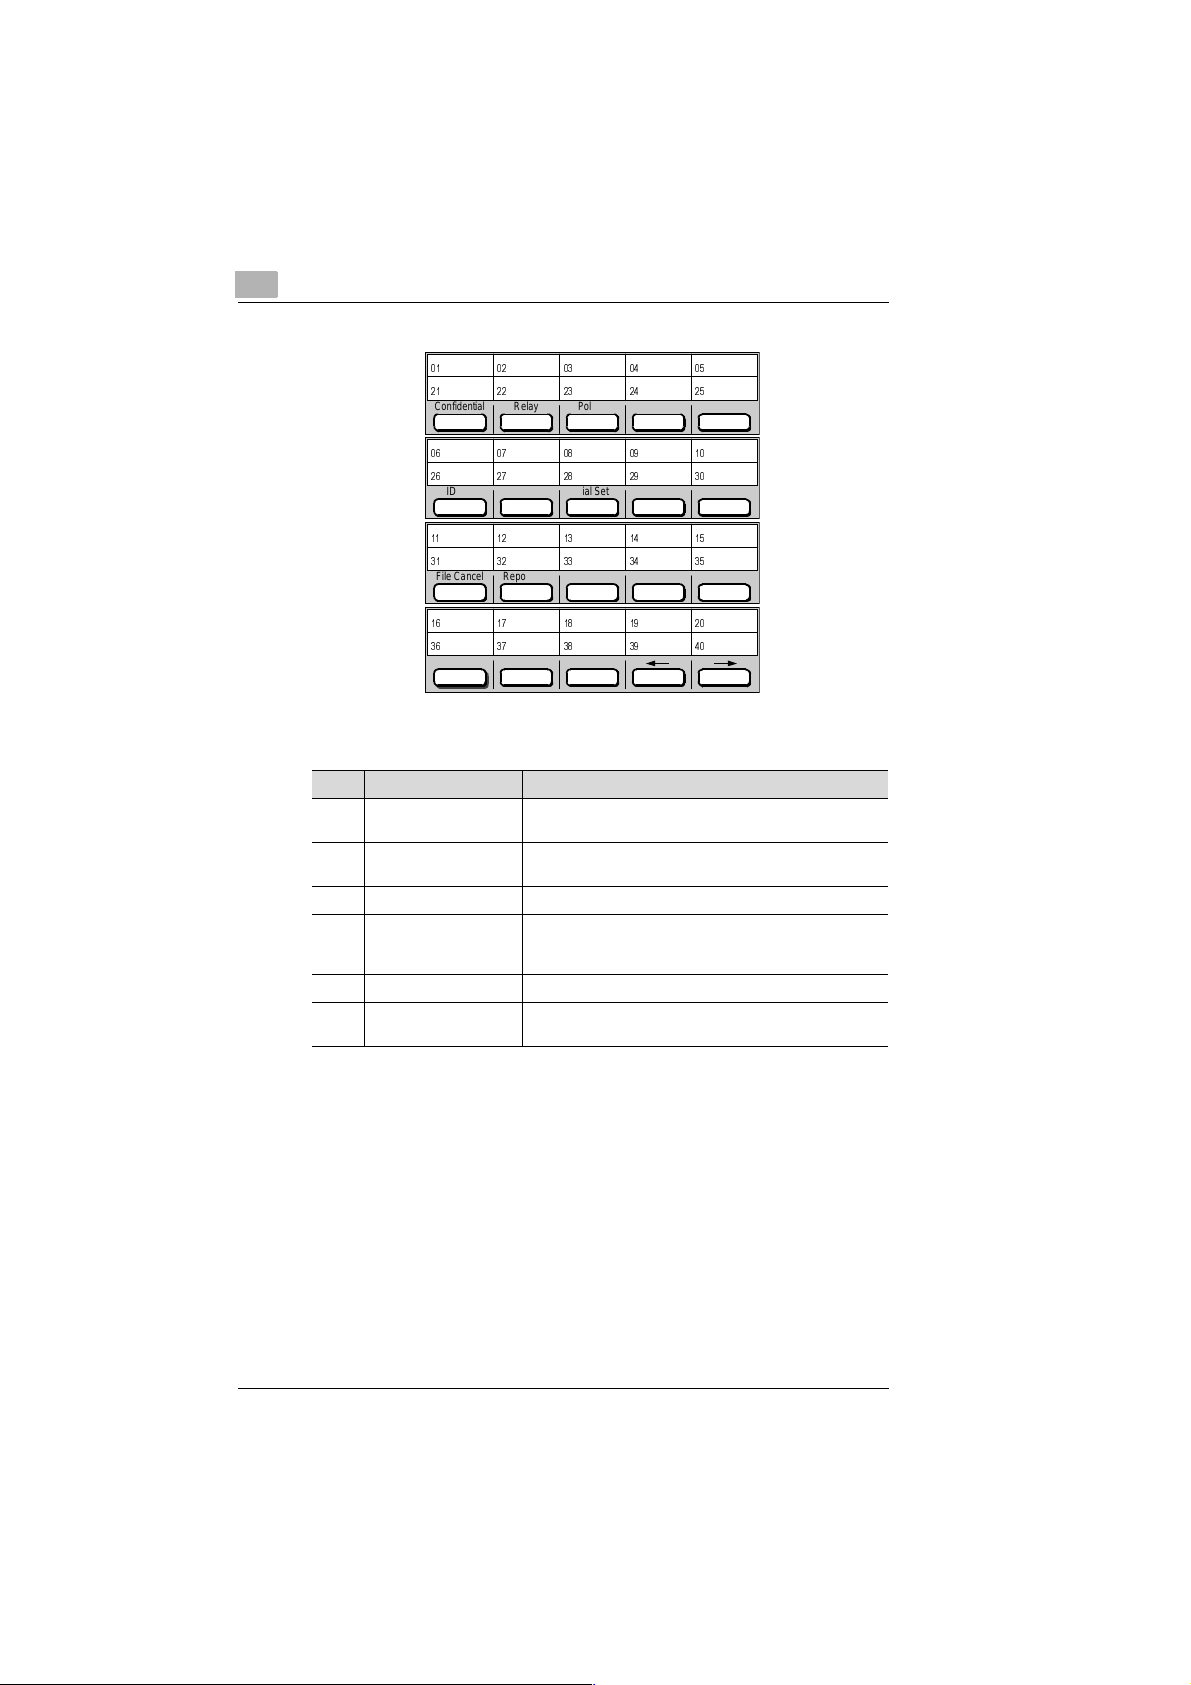
Programmable one-touch keys
Confidential Relay PollingTXPolling RX 1 Page
File Cancel Report/List PBX
ID Set Initial Set Dial Set
Dial
Spac
e
TX
Num Display/Key Function
1 CONFIDENTIAL Press this key for confidential transmission or reception
and to set up mailbox transmissions.
2 RELAY Press this key to set up relay transmissions or relay
boxes.
3 POLLING Press this key to select one of the transmission poll
functions.
4 POLLING RX Press this key to select one of the receiving poll functions.
5 1 PAGE Press this key to make a manual transmission.
6 ID SET Press this key to enter your company name, number, the
date and time.
7 INITIAL SET Press this key to set the line type and header.
Rev. / Di181f 2-11
Page 14
2
Installation
Confidential Relay PollingTXPolling RX 1 Page
File Cancel Report/List PBX
ID Set Initial Set Dial Set
Dial
Spac
e
TX
Num Display/Key Function
8 DIAL SET Press this key to store one-touch key, speed dial and
group dial numbers.
9 FILE CANCEL Press this key to delete transmission and reception
reservations.
10 REPORT/LIST Press this key to print reports and lists.
11 PBX Press this key to cancel the automatic line access
function. This enables you to call faxes within the same
PBX location.
12 SPACE Press this key to add a space when entering text.
13 ARROW KEYS Use these keys to move the cursor to the left or right, and
to call up the last or next menu item.
2-12 Di181f Rev. /
Page 15
Installation
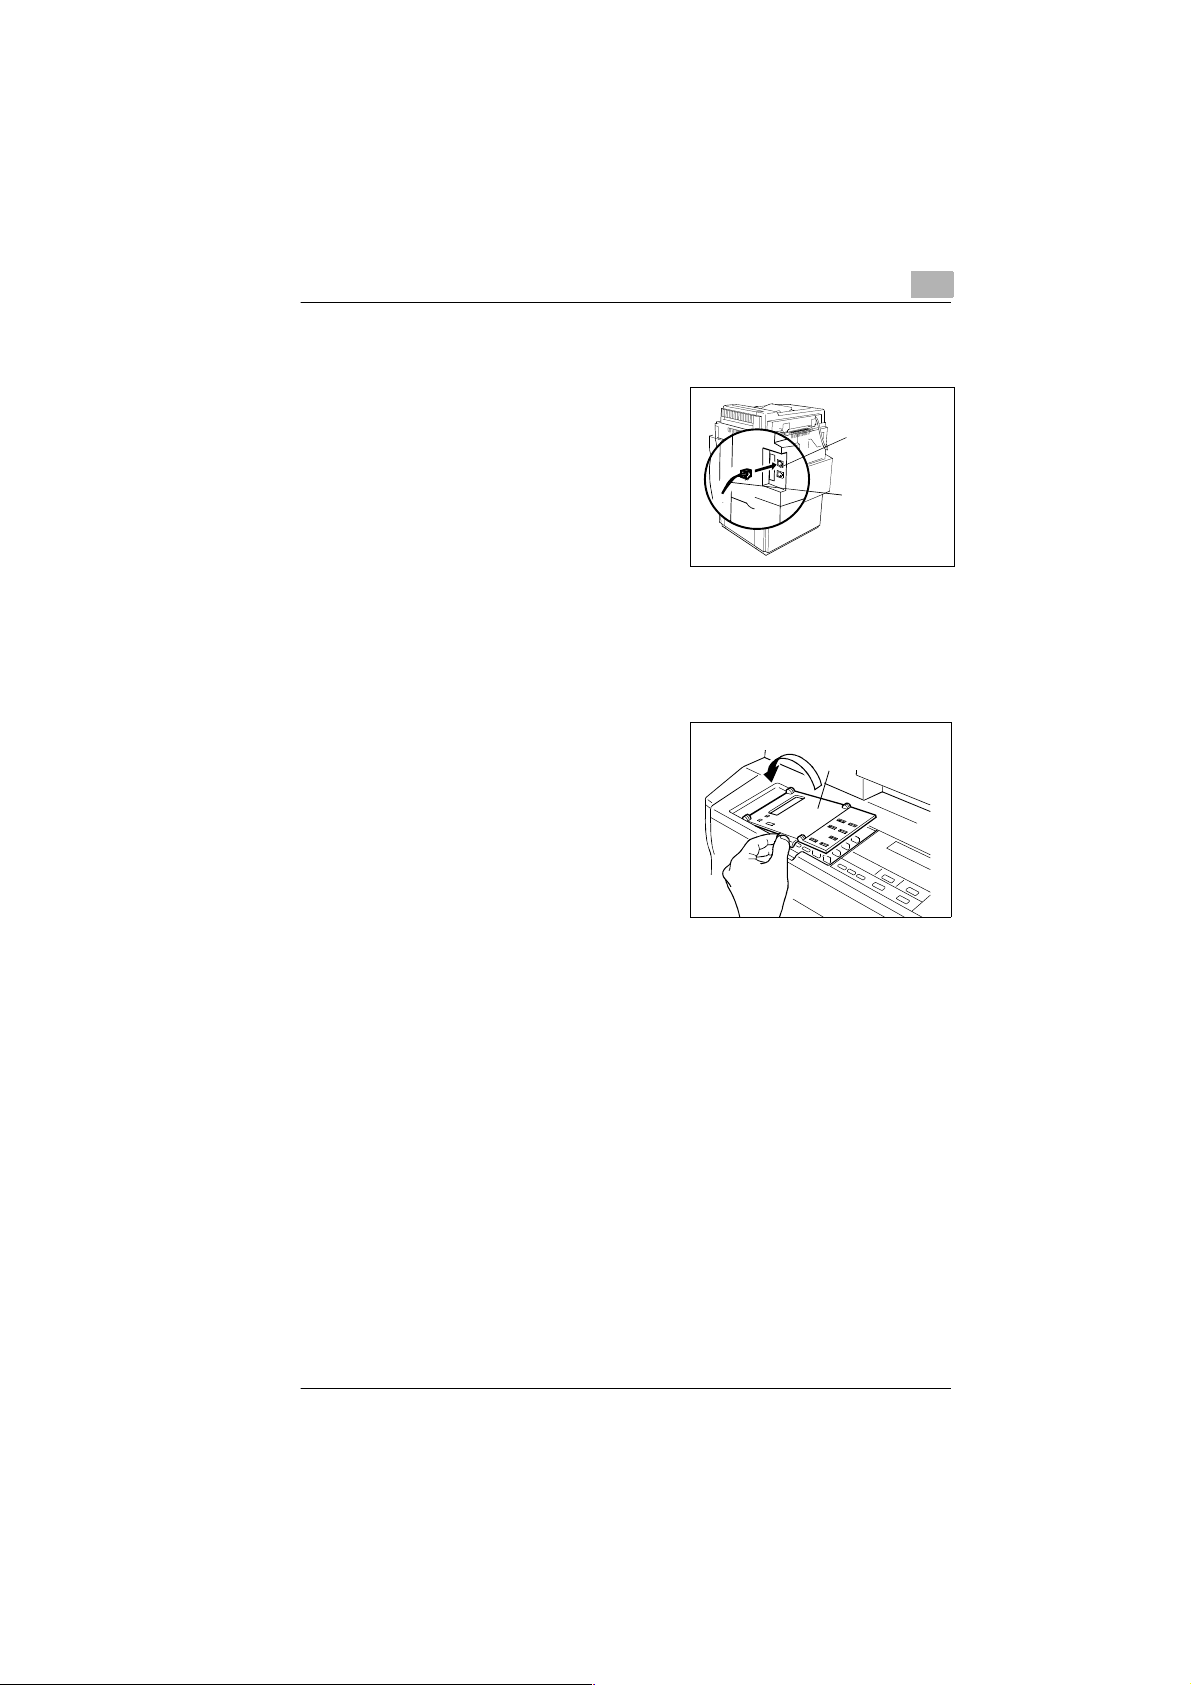
2.2 Connect the telephone line cable
Plug the other end of the telephone
1
cord into the terminal on the righthand side at the back of the
machine.
Connect the telephone cable to the wall outlet.
2
2.3 Initiating the fax option
Switch the machine on and Turn
1
the flip panel over. The Di181f fax
option is now ready for operation.
2
Telephone socket
Telephone cable
Open
cover
Rev. / Di181f 2-13
Page 16

2
Installation
2-14 Di181f Rev. /
Page 17

Data Entry
3Data Entry
3.1 Preparation
Before all features of your fax machine are available you are obliged to
enter several settings. This chapter explains how to set your name, your
line type and the remote locations with which you may wish to
communicate.
You can cancel the setting anytime by pressing [STOP]. The setting will
then not be saved. If you do not press any key wi thin 30 sec onds you r fax
machine will return to standby mode.
3.2 Typing Conventions in this Manual
If nothing else is reques ted, all keys are to be presse d one after the othe r.
This is also the case if they are co nnect ed by a "+" to facil itate t he l ayout .
"Press [0] + [5] + [ENTER]" means: Press the numeric key [0], then the
numeric key [5] and then the key named [ENTER].
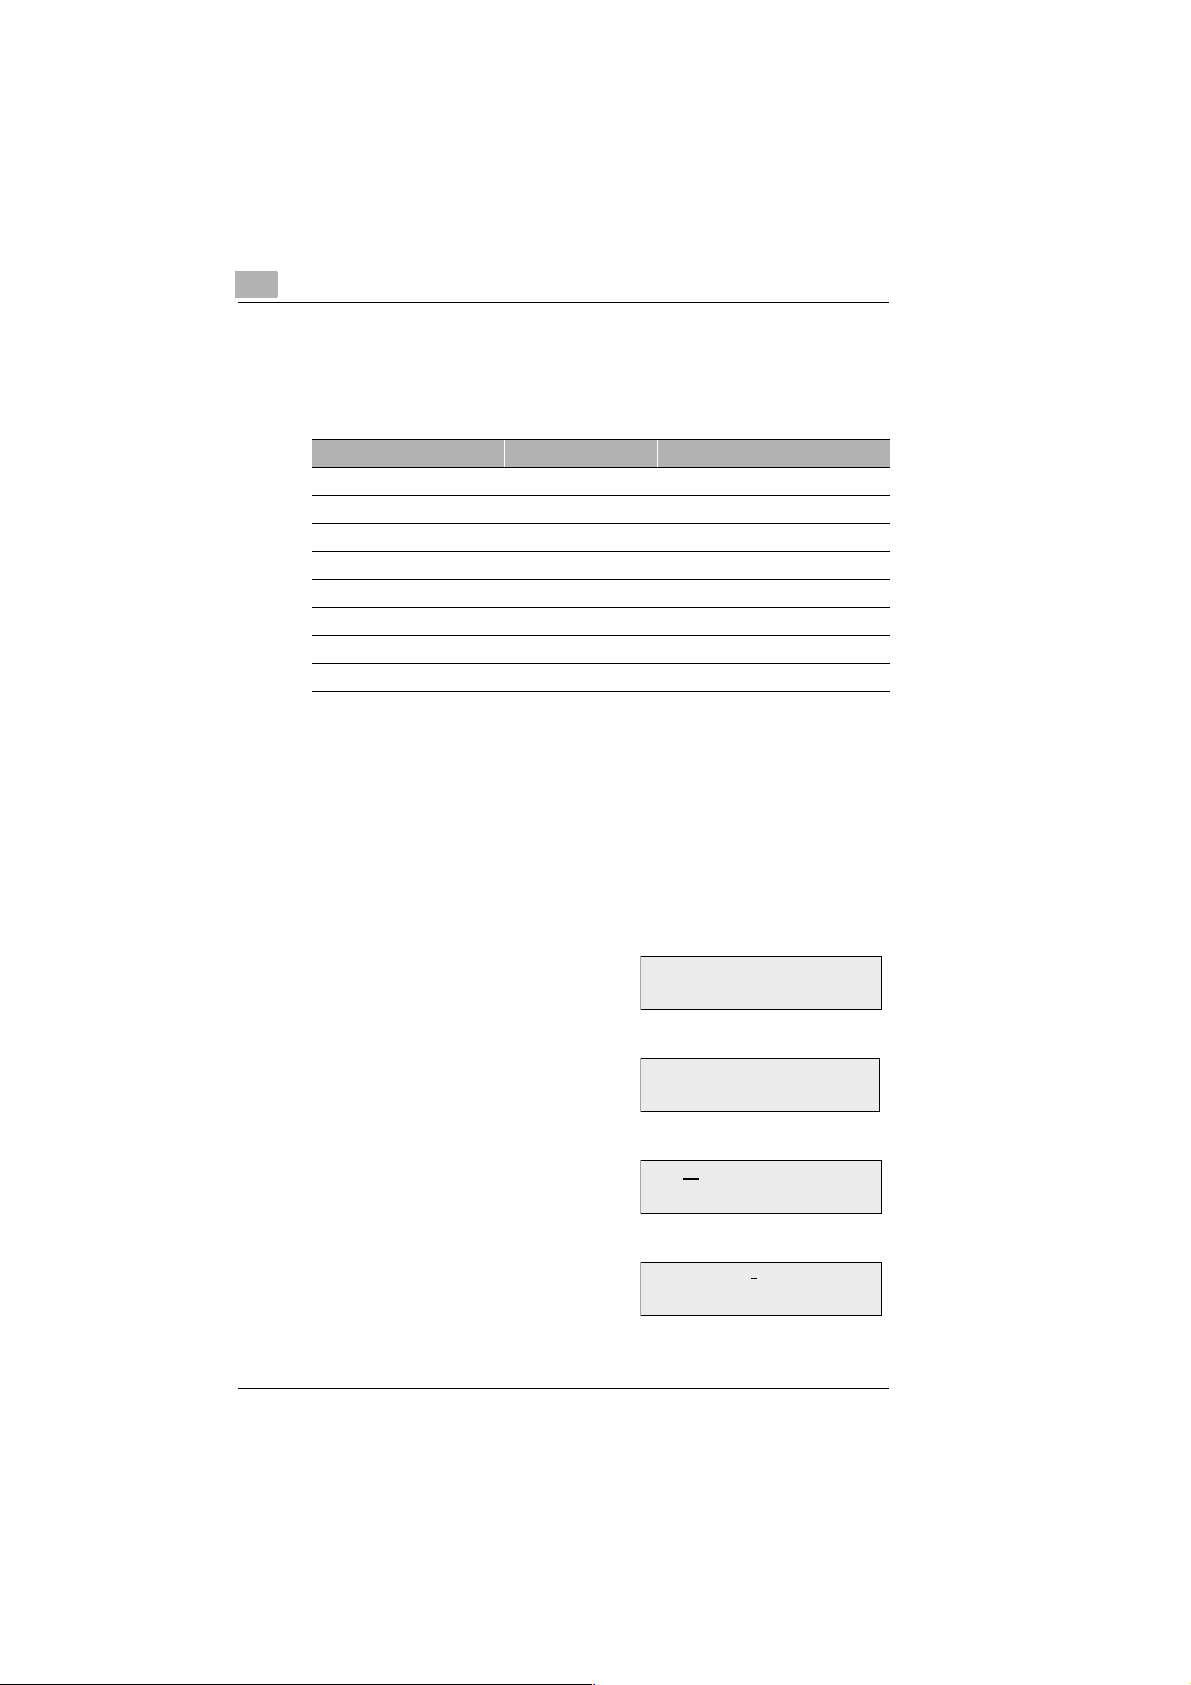
3.3 Enter Text
Use the numeric keypad to enter letters and special characters. For
details refer to the following tables. Press [ENTER] to save the relevant
setting. To add a space, press [SPACE]. If you have made a mistake,
press the [DELETE] key to correc t the mista ke. Press t he arrow right ke y
(OT 40) to move the cursor onc e letters and speci al characters have bee n
entered.
3
Entering Numbers and Characters
To enter characters press the following keys:
Numeric key 1 2 3 4 5 6 7 8 9 0
1 time 1234567890
2 times A D G J M P T W
3 times BEHKNQUX
4 times C F I L O R V Y
5 times S Z
Rev. / Di181f 3-15
Page 18
3
Special Characters
Press [*] as many times as shown in the table.
Numeric key * Numeric key * Numeric key *
1 time * * 9 times * , 17 times * :
2 times * & 10 times * ! 18 times * ;
3 times * - 11 times * + 19 times * @
4 times * / 12 times * = 20 times * %
5 times * ( 13 times * < 21 times * [
6 times * ) 14 times * > 22 times * ]
7 times * " 15 times * ? 23 times * ’
8 times * . 16 times * $
3.4 Entering your Fax Number
You can place your na me and fax num ber in th e hea de r. The header will
appear at the top of the faxes you send. Up to 20 characters can be
entered.
The information in the header help the receiving station to identify the
sender.
Press [*] 10 times to enter "+".
Press [SPACE] to add blanks.
Data Entry
Press [FUNCTION].
1
Press [ID SET].
2
Press [ENTER].
3
Enter your fax number and press
4
[ENTER]. Then enter your name
3-16 Di181f Rev. /
SELECT FUNCTION
OT
FAX NUMBER
<-->/ENTER
FAX=
KEYPAD/EN TER
FAX=012 3456 7
KEYPAD/EN TER
Page 19

Data Entry
3.5 Entering your Company Name
You can enter either your company name, your name or both. Up to 24
characters can be entered.
Refer to 3.3 for instructions on how to make the entries.
Press [ENTER].
1
Enter your name and press
2
[ENTER].
Then enter date and time.
3.6 Entering Date and Time
Date and time appear on the d isp la y, th e ac tiv ity rep ort an d th e oth er fax
machine’ s prin tou ts.
Press [ENTER].
1
3
NAME=
K EYPAD/ENTER
NAME=ABCDEF
KEYPAD/ENTER
10/21 ’98 13:35
0-9/ENTER
Enter the date (DDMMYY) and the
2
time (24-hr. format).
Press [ENTER] and [STOP].
3
Rev. / Di181f 3-17
10/21 ’98 12:00
0 - 9/ENTER
10/21 ’98 12:00
FAX Ready.
Page 20
3
3.7 Storing Numbers
Entering One-Touch Numbers
Use this function to store your most frequently called fax numbers for
instant recall or to arrange call groups ( for more information refer to
"Entering Call Groups").
Press [FUNCTION] and
1
[DIAL SET].
Press the arrow left key ( OT 39)
2
and [ENTER].
Press the desired one-touch key.
3
Press the one-touch keys [1] to
[20] twice to set the one-touch
keys [21] to [40].
Press [ENTER] and enter the
4
relevant call number.
Data Entry
AUTO DIAL
<-->/ENTER
SELECT OT KEY
OT
OT 06 :NEW D I AL
O T/ENTER
06 :7654321
KEYPAD/ENTER
Press [ENTER].
5
Use the numeric keypad to enter
6
the sub-address or the num ber for
selective polli ng. If you do not wish
to enter a sub-address, continue
with step 9.
Press [ENTER].
7
Use the numeric keypad to enter
8
the sub-address ID or password
for selective polling.
3-18 Di181f Rev. /
SUB:
KEYPAD/ENTER
SUB:99999999
KEYP AD/ENTER
SID:
KEYPAD/ENTER
SID:123456
KEYP AD/ENTER
Page 21

Data Entry
Press [ENTER].
9
Use the numeric keypad to enter the name and press [ENTER].
10
Use the numeric keypad to select
11
the modem speed.
[0] : High (33600 bps)
[1] : Average (14400 bps)
[2] : Low (9600 bps)
Press [ENTER].
12
Use the numeric keypad to ent er
13
another one-touch number and
press [ENTER].
[0] : Continue
[1] : End
06 -NAME:
KEYPAD/ENTER
MODEM 0:H/1:M/2:L
0-2/ENTER
0:CONTINUE/1:EN D
0 - 1/ENTER
0:CONTINUE/1:EN D
0 - 1/ENTER
3
Note
To fill in the one-touch labels facilitates later finding of the desired
telephone number.
Rev. / Di181f 3-19
Page 22

3
Data Entry
Entering Speed Dial Numbers
Similar to the one-touch keys you can store fax numbers as speed dial
numbers. You dia l a spee d dial num ber by enteri ng a t hree- digit identifie r
code. Up to 150 speed dial numbers can be stored (000- 149).
Press [FUNCTION] and
1
[DIAL SET].
Press [ENTER].
2
Enter the desired three -digit speed
3
dial number using the numeric
keypad and press [ENTER].
Enter the call number.
4
AUTO DIAL
<-->/ENTER
AD---:ENTER No.
0-9
122 :
KEYPAD/ENT ER
122 :08765432
K EYPAD/ENTER
Press [ENTER].
5
Using the numeric keypad, enter
6
the sub-address or the num ber for
selective polli ng. If you do not wish
to enter a sub-address, continue
with step 9.
Press [ENTER].
7
Using the numeric keypad, enter
8
the sub-address ID or password
for selective polling.
3-20 Di181f Rev. /
SUB:
KEYPAD/ENTER
SUB:99999999
KEYP AD/ENTER
SID:
KEYPAD/ENTER
SID:123456
KEYP AD/ENTER
Page 23

Data Entry
Press [ENTER].
9
Use the numeric keypad to ent er
10
the name and press [ENTER].
Use the numeric keypad to select
11
the modem speed.
[0] : High (33600 bps)
[1] : Average (14400 bps)
[2] : Low (9600 bps)
Press [ENTER].
12
Use the numeric keypad to ent er
13
another speed dial number and
press [ENTER].
[0] : Continue
[1] : End
3
122 -NAME:
KEYPAD/EN TER
MODEM 0:H/1:M/2:L
0-2/ENTER
MODEM 0:H/1:M/2:L
0-2/ENTER
0:CONTINUE/1:EN D
0 - 1/ENTER
0:CONTINUE/1:EN D
0 - 1/ENTER
Rev. / Di181f 3-21
Page 24

3
Data Entry
Changing One-Touch- or Speed Dial Numbers
You can change one-touch- or speed dial numbers by following the
procedure below.
Press [FUNCTION] and
1
[DIAL SET].
Press the arrow left key ( OT 39)
2
and [ENTER].
Press the desired one-touch key.
3
Press the one-touch keys [1] to
[20] twice to change t he one-touch
keys [21] to [40].
Press [ENTER] and enter th e new
4
call number.
AUTO DIAL
<-->/ENTER
SELECT OT KEY
OT
OT 06 :DD D
OT/ENTER/CLEAR
06 :7654321
KEYPAD/ENTER
Press [ENTER].
5
Using the numeric keypad, enter
6
the new sub-address or number
for selective polling. If no subaddress has been store d, continue
with step 9.
Press [ENTER].
7
Using the numeric keypad, enter
8
the new sub-address ID or
password for selective polling.
3-22 Di181f Rev. /
SUB:
KEYPAD/ENTER
SUB:99999999
KEYP AD/ENTER
SID:11234
K EYPAD/ENTER
SID:123456
KEYP AD/ENTER
Page 25

Data Entry
Press [ENTER].
9
Use the numeric keypad to ent er
10
the name and press [ENTER].
Use the numeric keypad to select
11
the modem speed.
[0] : High (33600 bps)
[1] : Average (14400 bps)
[2] : Low (9600 bps)
Press [ENTER].
12
Use the numeric keypad to
13
change another one-touch
number and press [ENTER].
[0] : Continue
[1] : End
3
06 -NAME:DDD
KEYP AD/ENTER
MODEM 0:H/1:M/2:L
0-2/ENTER
0:CONTINUE/1:EN D
0 - 1/ENTER
Rev. / Di181f 3-23
Page 26

3
Data Entry
Erasing One-Touch- or Speed Dial Numbers
You can erase one-touch- or speed dial numbers by following the
procedure below.
Press [FUNCTION] and
1
[DIAL SET].
Press the arrow left key and
2
[ENTER].
Press the desired one-touch key.
3
Press the one-touch keys [1] to
[20] twice to delete the one-touch
keys [21] to [40].
Press [CLEAR] to the far right on
4
your control panel.
AUTO DIAL
<-->/ENTER
SELECT OT KEY
OT
OT 06 :INFO
OT/E NTER/CLEAR
OT 06 :CL E A R
Use the numeric ke ypad to delete
5
another one-touch number and
press [ENTER].
[0] : Next
[1] : End
3-24 Di181f Rev. /
0:CONTINUE/1:EN D
0 - 1/ENTER
Page 27

Data Entry
3
Entering Call Groups
Your fax machine can scan the same do cu me nt o nc e and then send it to
numerous other fax machines (call groups). Use this function, if you
frequently send to the same group. You can program up to 40 groups,
each having up to 99 destinations.
Press [FUNCTION] and
1
[DIAL SET].
Press the arrow left key (OT 39)
2
twice and then [ENTER].
Press the desired one-touch key.
3
Press the one-touch keys [1] to
[20] twice to set the one-touch
keys [21] to [40].
Press [ENTER] and enter the
4
relevant call number.
AUTO DIAL
<-->/ENTER
SELECT GROUP KEY
OT
GR02 :NEW D IAL
O T/ENTER
0584644590
KEYPAD/EN TER
Press [ENTER] twice and enter
5
the name of the group.
Press [ENTER].
6
Use the numeric keypad to
7
change another call group and
press [ENTER].
[0] : Continue
[1] : End
Note
From the call group menu, you can also store a sub-address or a
selective polling number.
Rev. / Di181f 3-25
02-NAME:MINOL TA
K EYPAD/ENTER
0:CONTINUE/1:EN D
0 - 1/ENTER
0:CONTINUE/1:EN D
0 - 1/ENTER
Page 28

3
Changing Group Dials
You can change group dials by following the procedure below.
Press [FUNCTION] and
1
[DIAL SET].
Press the arrow left key ( OT 39)
2
twice and then [ENTER].
Press the desired one-touch key.
3
Press the one-touch keys [1] to
[20] twice to change t he one-touch
keys [21] to [40].
Continue to press [ENTER] until
4
you have found the required
number and then enter the new
call number.
Press [ENTER] twice and enter
5
the new name of the group.
AUTO DIAL
<-->/ENTER
SELECT GROUP KEY
OT
GR02 :MINO LTA
OT/ENTER/CLEAR
0584647000
E NTE R / C LEAR
02 -NAME:TOKYO
K EYPAD/ENTER
Data Entry
Press [ENTER].
6
Use the numeric keypad to
7
change another call group and
press [ENTER].
[0] : Continue
[1] : End
Note
You can delete individual numbers from within a group by pressing
[CLEAR].
3-26 Di181f Rev. /
0:CONTINUE/1:EN D
0 - 1/ENTER
0:CONTINUE/1:EN D
0 - 1/ENTER
Page 29

Data Entry
Erasing Call Groups
You can erase group dials by following the procedure below.
Press [FUNCTION] and
1
[DIAL SET].
Press the arrow left key (OT 39)
2
twice and then [ENTER].
Press the desired one-touch key.
3
Press the one-touch keys [1] to
[20] twice to delete the one-touch
keys [21] to [40].
Press [CLEAR].
4
Use the numeric keypad to
5
change another call group and
press [ENTER].
[0] : Continue
[1] : End
AUTO DIAL
<-->/ENTER
SELECT GROUP KEY
OT
GR02 :NEW D IAL
O T/ENTER
GR02 :CLEAR
0:CONTINUE/1:EN D
0 - 1/ENTER
3
Phone Book
You do not need to enter any data into the phone book. All one-touch
numbers, speed dial numb ers and call groups are au tomati cally store d in
the phone book. How to dial with the telephone book will be explained in
the "Sending faxes" chapter.
Rev. / Di181f 3-27
Page 30

3
3.8 Advanced Settings
You can adjust the machine to your personal requirements with the
following settings.
Buzzer Volume
Use this function to set the buzzer tone, for example, when an error
occurs. Fol low the procedure below:
Press [FUNCTION] and
1
[INITIAL SET].
Press the arrow left key ( OT 39)
2
five times and then [ENTER].
Use the numeric keypad to select
3
the required setting, then press
[ENTER] and [STOP].
Data Entry
HEADER
<-->/ENTER
0:OFF/1:ON
0-1/ENTER
10/21 ’98 12:00
FAX Ready.
Header
Your fax number, your name, the numb er of pages to be transmitted, date
and time appear in the header. This information i s transmitted to the other
fax machine. The machine uses the data already entered in the machine.
Use this function to print a header on the transmitted pages. Follow the
procedure below:
Press [FUNCTION] and
1
[INITIAL SET].
Press [ENTER].
2
Use the numeric keypad to select
3
the required setting, then press
[ENTER] and [STOP].
3-28 Di181f Rev. /
HEADER
<-->/ENT ER
0:OFF/1:ON
0-1/ENTER
10/21 ’98 12:00
FAX Ready.
Page 31

Data Entry
Set relay boxes
This function is used to set up your Di181f as a hub for relay
transmissions. You can configure up to 10 relay boxes.
Press [FUNCTION] and [RELAY].
1
Press the arrow right key (OT 40)
2
and [ENTER].
Use the numeric keypad to ent er
3
the four-digit relay box number
and press [ENTER].
Use the numeric keypad to ent er
4
the four-digit relay box ID and
press [ENTER][. ]
Use the numeric keypad to select
5
the required call number(s), onetouch dial or s pe ed di al an d pres s
[ENTER].
RELAY TX
<-->/ENT ER
RELAY BOX No. : ----
0-9/ENTER
RELAY BOX ID : ----
0-9/ENTER
SELECT OT or AD
OT/ABB R
NAME=
K EYPAD/ENTER
3
Use the numeric keypad to ent er
6
the name of the relay box.
Press [ENTER] and use the
7
numeric keypad to select the
required setting.
[0] : Do not print
[1] : Print
Press [ENTER] and use the
8
numeric keypad to select the
required setting.
[0] : No relay report to sender
[1] : Relay report to sender
Rev. / Di181f 3-29
NAME=ABCDEF
KEYPAD/E N TER
PRINT 0:OFF/1:O N
0-1/ENTER
REPORT TX 0:OFF/1:O N
0 - 1/ENTER
Page 32

3
Press [ENTER] and enter the
9
sender’s call number.
Press [ENTER] and use the
10
numeric keypad to select the
required setting.
[0] : Continue
[1] : End
Press [ENTER] to end the process.
11
Erasing Relay Boxes
Press [FUNCTION] and [RELAY].
1
Press the arrow right key (OT 40)
2
and [ENTER].
Data Entry
FAX=012 3456 7
KEYPAD/EN TER
0:CONTINUE/1:EN D
0 - 1/ENTER
RELAY TX
<-->/ENT ER
RELAY BOX No. : ----
0-9/ENTER
Use the numeric keypad to enter
3
the four-digit relay box number to
be deleted and press [ENTER].
Press [CLEAR] and use the
4
numeric keypad to select the
required setting.
[0] : Continue erasing boxes
[1] : End
Press [ENTER] to end the process.
5
3-30 Di181f Rev. /
RELAY BOX N o. : 000 4
C LEAR
0:CONTINUE/1:EN D
0 - 1/ENTER
Page 33

Send
4Send
4.1 Transmission
Notes on Original Documents
Your fax machine is capable of transmitting the document sizes below.
You can place up to 50 sh eet s of pap er in the A4 -format in the Aut omatic
Document Feeder (A3 and B4: 30 pages).
4
Maximum
document size
297 mm
420 mm
Feeding
direction
Minimum
document size
148 mm
Feeding
direction
106 mm
Effective
text width
max. 291 mm
Feeding
direction
If the document is longer than 420 mm, t he machine recogn ises document
jam and stops scanning the document.
Use yellow, green-yellow or light blue colours for information you do not
want to be transmitted.
Make sure ink, glue, correction fluid etc. are completely dry before you
send a fax.
CAUTION
Risk of damage
Always remove staples, paper-clips etc. before you send a fax.
Rev. / Di181f 4-31
Page 34

4
Send
Photocopy or Carrying Film
Documents that meet the follow ing characteristi cs must be photoc opied or
placed in a carrying film before they can be sent:
G paper sizes less than 148 mm width or less than 100 mm length;
G paper lighter than 50g/m2;
G folded, torn, wrinkled, damp, rough or curled papercoated or
G coated or pressure sensitive paper.
Placing the Documents
Insert the document face up in the
1
document feeder.
Place the docume nt in the c entre of
2
the ADF and adjust the paper
guides so that they light ly touc h the
edges of the document.
Placing Documents on the Glass
Place the document face down on
1
the glass.
4-32 Di181f Rev. /
Page 35

Send
4
Place the document in the top left-
2
hand corner and close the cover.
You can insert up to 50 p ages of A4 i nto the doc ument fee der. Make sure
the pages are well placed and aligned before starting the transmission.
If the paper is curl ed or pages stick tog ether more than one page a t a time
could be drawn into the machine. This might lead to paper jams or faulty
transmissions. In this case you should insert the pages one by one to
ensure a correct feeding of the documents.
The standard memory holds approx. 45 pages of the ITU-T Test
Document 1 (standard resolution). Take care that the indicated memory
capacity does not drop to 0 (%) during sc anning, since th e process will be
cancelled in this case.
Rev. / Di181f 4-33
Page 36

4
4.2 Settings for Sending a Fax
Resolution
Insert the document into the ADF.
1
If you send d ocuments with normal print o r typed docum ents, adjustm ents
are not necessary. To change the resolution, press RESOLUTION.
RESOLUTION has five settings:
Send
Standard This is the normal resolution for most typed documents and
Fine Fine resolution is suitable for maps, newspaper articles etc.
S. Fine This resolution is suitable for fine print e.g. illustrations.
US-Fine This is the finest resolution.
Half Tone Half tone mode captures shades in photographs.
Note
If you are using the HALF TO NE setting, make sure th at the document
is scanned vertically.
Contrast
Use the contrast keys to adjust the setting. If you raise the contrast fine
differences in tone on the document are enhan ced and transmitted mo re
clearly. However, information may be lost during this process.
simple drawings.
4-34 Di181f Rev. /
Page 37

Send
4.3 Dialling Methods
There are five different dialling methods available.
Insert the document face down into the ADF and dial with the dialling
method of your choice.
Manual Dialling Using the Numeric Keypad
Dial the fax number using the
1
numeric keypad and press
[START]. You can check the
number on the display and, if
necessary, delete it an d then enter the new number. A maximum of 3 0
digits can be entered using the numeric keypad.
One-Touch Dialling
Press one of the programmed one-
1
touch keys [01]- [40]. The machine
automatically d ials the number aft er
scanning the document.
Speed Dialling
4
058464
KEYPAD/ENTER/START
OT01 : OSAKA
OT/E NTER/ START
Press [ABBR/DIRECTORY] and
1
enter the three-digit identifie r code
(001-149).
The name of the remote side
2
appears on the display. Press
[START]. After scanning the
document the machine will dial
automatically.
Rev. / Di181f 4-35
SELEC T AD N o . ---
0-9/Directory
AD001 :OSAKA
0-9/ENTER/START
Page 38

4
Automatic Call Groups
Press one of the one-touch keys
1
[01] - [40]. If a group is stored, its
name will appear on the display.
After scanning the document the
Di181f will dial automatically.
Telephone Directory
The phone book lists all numbers stored in your Di181f.
Press [ABBR/DIRECTORY] twice.
1
Press the numeric key showing the
2
first letter of the other fax machine.
Press [ENTER].
3
GR01 :OSAKA
OT/ENTER/STAR T
SELECT KEYPAD
KEYPAD/ABBR
TEL DIRECTORY : T
<-->/ K EYPAD/ENTER
AD025 :TA
<--> /ENTER/STA RT
Send
Select the desired entry using t he
4
arrow keys and press [START.]
Manual Redial
Insert the document fac e up into the ADF and pr ess [REDIAL/PAUSE]
1
and [START].
Note
No further settings are required for the automatic redial function.
4-36 Di181f Rev. /
AD001 :TOKYO
<-->/ENTER /START
Page 39

Send
4.4 Memory Transmission
Memory transmission is set as default. Since your fax machine is a multifunctional dev ice it is pos sible to scan docu ments wh ile y our f ax machi ne
is sending from memory, receiving or printing. As soon as the current
operation is fini shed the new docu ment will be sen t. Memory trans mission
offers several advan tages: As soon as the current operation is finished the
new document will be sent.
Insert the document fac e up into the
1
ADF.
Dial the telephone number
2
manually or use one of the onetouch key a speed dial number.
Press [START] to scan the
3
document into the memory. It will be
automatically sent from memory.
4
10/21 ’98 12:00
FAX Ready.
1 PAGE TX
SELECT LOCATION
058464
KEYPAD/ENTER/START
Note
Your Di181f comes with an ECM (Error Correction Mode). In th is mode
data that may be lost due to poor line quality is sent repeatedly. This
procedure reduces the number of errors considerably.
Rev. / Di181f 4-37
Page 40

4
4.5 Direct Transmission (1 Page TX)
You can send directly from th e ADF, if not enough m emory is avail able to
scan all documen ts you w ant to tran smit. Thi s mode w ill onl y let yo u send
1 page.
Insert the document fac e up into the
1
ADF. Adjust resolution and
contrast, if necessary.
Press [FUNCTION] and [1 PAGE].
2
Dial the number m anually, using the
3
one-touch keys or by speed dial
numbers and press [START].
10/21 ’98 12:00
FAX Ready .
1 PAGE TX
SELECT LOCATION
058464
Send
KEYP AD/ENTER/START
4-38 Di181f Rev. /
Page 41

Send
4.6 Book TX
Use this function to send pages from books directly from the glass top
without having to first photocopy the pages.
Place the book face down on the
1
glass. Adjust resolution and
contrast, if necessary.
Press [BOOK TX] and use the arrow
2
keys to select the document format.
Press [ENTER].
3
Use the numeric keypad to select
4
further pages and press [ENTER].
[0] :Continue
[1] : End
4
10/21 ’98 12:00
FAX Ready.
DOCUMENT:A3
<-->/ENTER
FILE-001
MEM ORIZED 60%
0:CONTINUE/1:EN D
0 - 1/ENTER
Dial the number manually , using the
5
one-touch keys or by speed dial
numbers and press [START].
Rev. / Di181f 4-39
058464
KEYPAD/ENTER/START
Page 42

4
4.7 Delayed Transmission (Timer)
You can use this function to take advantage of lower evening and
weekend long-distance rates. You can program up to 20 delayed
transmissions.
You can only use this function if date and time are stored in the machine.
Insert the document face up into the ADF.
Adjust contrast and resolution if necessary.
Dial the number manually, using the
1
one-touch keys or by speed dial
numbers and press [ENTER] twice.
Enter the time when you want to
2
send the fax using the numeric
keypad (24-hour format) and press
[START].
The machine scans the document into memory.
If not enough memory is available duri ng scanning, the mac hine will return
to standby mode. In this case repeat the procedure when enough mem ory
is available again.
Send
SET TIME --:--
0-9/ENTE R/S TART
FILE-001
MEM ORIZED 60%
4-40 Di181f Rev. /
Page 43

Send
4.8 Relay Broadcast Initiation
This function enables you to use your Di181f as a transmission station.
You send a document to one or several fax machines and they send the
document to several destinations in turn. If you use several identical
machines in your organisation, you can use a tree structured distribution.
If, e.g. the hub and the final destinations are abroad you reach all
destinations with only one long-distance call.
Insert the document face down in the document feeder. Adjust contrast
and resolution if necessary.
Press [FUNCTION] and [RELAY].
1
Press [ENTER] and use the
2
numeric keypad to enter the hub
number.
Press [ENTER] and use the
3
numeric keypad to enter the fourdigit relay box number.
4
RELAY TX
<-->/ENT ER
058464
KEYPAD/ENTER/START
SUB: 4444
KEYPAD/ENTER/ST AR T
Press [ENTER] and use the
4
numeric keypad to enter the fourdigit relay box ID.
Press [START].
5
This function enables you to transmit the document to a recipient and
inform that fax machine to forward the document to the number(s)
preprogrammed in its relay box.
Rev. / Di181f 4-41
SID: 3333
KEYPAD/ENTER/ST AR T
FILE-001
MEM ORIZED 60%
Page 44

4
Machine C
Machine D
Document
Machine A
Report
Machine B
one-touch/
speed dial
Machine E
Machine F
Note
To stagger a relay transmissi on, pre ss [ENTE R] twice aft er you have
entered the relay box number, then enter the required time and
continue as shown above.
Send
4-42 Di181f Rev. /
Page 45

Send
4.9 Polling Transmission
The Di181f enables you to transmit documents automatically which the
recipient can retrieve when required. The document can even consist of
several pages.
The polling transmissi on function enables you to select between st andard
polling and sele ctive polling. In standard poll ing mode, any m achine of the
same type can poll stored documents. In selective polling mode, the
receiver must know the passwords before polling documents. After the
polling the document remains in memory so that several pollings are
possible. To delete the document, select "Delete polling documents".
Insert the document into the ADF in order to scan it. Adjust contrast and
resolution if necessary.
Standard Polling
Press [FUNCTION] and
1
[POLLING].
Press [ENTER] and [START].
2
4
POLLING TX
<-->/ENT ER
FILE-001
MEM ORIZED 60%
The machine scans the document into memory.
Selective polling
Press [FUNCTION] and
1
[POLLING].
Press the arrow left key (OT 39) and
2
[ENTER].
Use the numeric key pad to enter the
3
four-digit selective number and
press [ENTER].
Use the numeric key pad to enter the
4
password and press [ENTER].
Rev. / Di181f 4-43
POLLING TX
<-->/ENT ER
SEP:
0 - 9/ENTER
SEP:
0 - 9/ENTER
SELE CTIVE P O L LING TX
PRESS START
Page 46

4
Press [START].
5
The machine scans the document into memory.
Deleting Polling Documents
Press [FUNCTION] and
1
[INITIAL SET].
Press the arrow left key (OT 39)
2
three times and [ENTER].
Use the numeric keypad to select
3
the required setting and press
[ENTER].
[0] : Clear
[1] : Do not clear
FILE-001
MEM ORIZED 60%
LINE SET
0:OFF/1:ON
BULLETIN BOARD
Send
<-->/ENTER
0-1/ENTER
<-->/ENTER
Press [STOP].
4
4-44 Di181f Rev. /
10/21 ’98 12:00
FAX Ready.
Page 47

Send
4.10 Mailbox Transmission
Use this function to transmit a document to a mailbox. This is helpful, if
only a specific person may read th e doc um en t. Ho wev er, bo th ma ch ine s
must be the same model.
The transmission i s onl y ex ecuted , if b oth mailb ox ID codes are id entic al.
This prevents the document from being transmitted to a wrong mailbox.
The document is sc anned into the remote fax mac hine’ s memory and ca n
only be printed if the recipie nt enters the corre ct 4-digit mailbox passcode.
Press [FUNCTION] and
1
[CONFIDENTIAL].
Press [ENTER] and use the
2
numeric keypad to enter the
number.
Press [ENTER] and use the
3
numeric keypad to enter the
mailbox number (sub-address) of
the recipient.
4
CONFIDENTIAL TX
<-->/ENTER
0584644590
KEYPAD/ENTER /STAR T
SUB:123456
KEYPAD/ENTER /STAR T
Press [ENTER] and use the
4
numeric keypad to enter the
mailbox ID numbe r (sub-address) of
the recipient.
Press [START].
5
Note
To stagger a mailbox transmission, press [ENTER] twice after you
have entered the mai lbox ID nu mber, then ent er the required time and
repeat the previous steps.
Rev. / Di181f 4-45
SID:9876543
KEYPAD/ENTER/START
FILE-001
MEM ORIZED 60%
Page 48

4
4.11 Deleting Data
This function enabl es you to del ete programmed transmi ss io ns and da ta
stored in the memory.
Press [FUNCTION] and
1
[FILE CANCEL].
Press [EINGABE] and use the
2
arrow keys (OT 39 /40) to select the
required entry.
Press [ENTER].
3
The document is deleted and the memory data list is printed
automatically.
Send
FILE CANCEL
ENT ER
FILE-001 :OSAKA
-> /ENTER
FILE-001 :CLEAR
4-46 Di181f Rev. /
Page 49

Reception
5 Reception
5.1 Manual Reception
Basically manual reception only makes sense if you are expecting voice
calls on the same line. You should keep this in mind when you set the
reception mode. As the machine is not equipped with a telephone
receiver, a separate phone must be attached to the wall outlet of the
telephone line. On ly then the manual reception mode is ava ilable. Answer
the call and press [START].
Default Reception Setting
Press [FUNCTION] and [INITIAL
1
SET].
Press the arrow right key (OT 40)
2
twice and [ENTER].
5
LINE SET
< -->/EN TER
0:AUT O/1:MA N UAL
<-->/ENT ER
Use the numeric keypad to select
3
the required setting and press
[ENTER].
[0] : automatic reception
[1] : manual reception
Press [STOP] to terminate the
4
entry.
RX MODE
<-->/ENT ER
10/21 ’98 12:00
FAX Ready.
5.2 Automatic Reception
Automatic reception is set as default. No further settings are required.
Your fax machine will answer ca lls after a set number of rings. The Default
setting is 1.
Rev. / Di181f 5-47
Page 50

5
5.3 Memory Reception
Incoming data is store d in the memory as desc ribed below. As soon as th e
error has been eliminated, the data will be automatically printed.
G no paper
G paper jam
G toner low
G print cover open
G no toner cartridge.
5.4 Mailbox Reception
Use this function t o recei ve a do cume nt in yo ur mai lbox. T his is helpfu l, if
only a specific person may read th e doc um en t. How ev er, bo th ma ch ine s
must be the same model.
The transmissi on is only exec uted, i f both mail box ID co des ar e iden tical.
This prevents the document from being transmitted to a wrong mailbox.
The incoming document is stored in the Di181f memory and will only be
printed after the correct 4-digit mailbox number and the 4-digit password
have been entered. You can configure up to 10 mailboxes.
Setting up a Mailbox
Reception
Press [FUNCTION] and
1
[CONFIDENTIAL].
Press the arrow right key (OT 40)
2
once and [ENTER].
Enter a 4-digit mailbox number
3
using the numeric keypad (0000 -
9999) and press [ENTER]
Enter a 4-digit mailbox ID using the
4
numeric keypad (0000 -9999) and
press [ENTER.]
Enter a 4-digit password using the
5
numeric keypad (0000-9999) and
press [ENTER].
5-48 Di181f Rev. /
CONFIDENTIAL TX
<-->/ENTER
MAILBOX No. : ----
0 - 9/ENTER
MAILBOX ID : ----
0-9/ENTER
MAILBOX PASWRD : - - --
0 - 9/ENTER
NAME=
K EYPAD/ENTER
Page 51

Reception
Enter a nam e using the numeri c
6
keypad (up to 16 characters).
Press [ENTER] and use the
7
numeric keypad to select the
required setting.
[0] :Continue
[1] : End
Press [ENTER] to end the process.
8
Delete Mailbox
Press [FUNCTION] and
1
[CONFIDENTIAL].
Press the arrow right key (OT 40)
2
twice and [ENTER].
5
NAME=OSAKA
K EYPAD/ENTER
0:CONTINUE/1:EN D
0 - 1/ENTER
CONFIDENTIAL TX
<-->/ENTER
MAILBOX No. : ----
0 - 9/ENTER
Use the numeric key pad to enter the
3
four-digit mailbox to be deleted
(0000-9999) and press [ENTER].
Use the numeric key pad to enter the
4
four-digit password to th e mailbox to
be deleted (0000-9999) and press
[CLEAR].
Use the numeric keypad to select
5
the required setting.
[0] : Continue erasing boxes
[1] : End
Press [ENTER] to end the process.
6
MAILBOX PASWRD : * ***
0-9/CLEA R
MAILBOX CLEA R
0:CONTINUE/1:EN D
0 - 1/ENTER
✎
Note
Mailboxes which co ntain data cann ot be deleted . First delete the data
as described in chapter "Sending", under section "Deleting data".
Rev. / Di181f 5-49
Page 52

5
Printing the content of a mailbox
Press [FUNCTION] and
1
[CONFIDENTIAL].
Press the arrow right key (OT 40)
2
and [ENTER].
Use the numeric keypad to enter the
3
four-digit mailbox number (0000-
9999) and press [ENTER].
Use the numeric keypad to enter the
4
four-digit password (0000-9999)
and press [ENTER].
Your fax machine prints the message.
5.5 Polling Reception
You can use this function to poll documents from other fax machines.
Make sure the document has be en placed in the fee der of the remote fax
machine. You also have the option of polling documents from other fax
machines which have the selective polling function. To do this, you must
know the selective polling number and the password of the sender.
Reception
CONFIDENTIAL TX
<-->/ENTER
MAILBOX No. : ----
0 - 9/ENTER
MAILBOX PASWRD : * ***
0-9/CLEA R
PRINTING
Standard Polling
Press [FUNCTION] and [POLLING
1
RX].
Press [ENTER] and enter the
2
required number using one-touch
dialling, speed dialling, the
telephone directory or the numeric
keypad.
5-50 Di181f Rev. /
POLLING RX
<-->/ENT ER
0584644590
KEYPAD/ENTER /STAR T
Page 53

Reception
Press [START] to begin the polling
3
process.
The machine starts polling.
FILE-001
MEM ORY REMAIN 1 00%
✎
Note
To stagger standard polling, press [ENTER] twice after you have
entered the number, then enter the required time and continue as
described above.
Selective polling
Press [FUNCTION] and [POLLING
1
RX].
Press the arrow right key (OT 40)
2
and [ENTER].
POLLING RX
<-->/ENT ER
SELECTIVE POLLING RX
SELECT LOCATION
5
Enter the desired fax number using
3
one-touch dialling, speed dialling,
the telephone directory or the
numeric keypad.
Enter the selective polling number
4
and press [ENTER].
Enter the password for selective
5
polling and press [ST ART ] to beg in
the pollin g process.
SEP:
KEYPAD/ENTER/ST AR T
PWD:
KEYPAD/ENTER/START
FILE-001
MEM ORY REMAIN 1 00%
✎
Note
To stagger selective polling, press [ENTER] twice after you have
entered the number, then enter the required time and continue as
described above.
Rev. / Di181f 5-51
Page 54

5
Reception
Continuous Polling
This function enables you to poll documents from several fax machines
within a given period.
Press [FUNCTION] and [POLLING
1
RX].
Press the arrow right key (OT 40)
2
twice and [ENTER].
Enter the desired fax number using
3
either one-touch dialling, speeddialling, the telephone directory or
the numeric keypad.
Enter the next recipient(s) and
4
press [ENTER] twice.
POLLING RX
<-->/ENT ER
CONT INUOUS PO LLING
SELECT LOCATION
SELECT LOCATION
ENTER TO TIMER TX
SET TIME -- :--
0-9/ENTE R/ST ART
Enter the time when you want the
5
machine to start polling.
Press ENTER and enter the time
6
when you want the machi ne to stop
polling.
Press [START].
7
SET TI ME 09:00
0-9/ENTER/START
END TIME 1 7:00
0-9/ENTE R/ST ART
FILE-001
MEM ORY REMAIN 1 00%
✎
Note
If you do not enter a starting time for continuous polling, the machine
will start polling as soon as you have pressed [START]. If you do not
enter a stopping time fo r continu ous poll ing, the machine will continue
polling until you press [STO P].
5-52 Di181f Rev. /
Page 55

Reception
5.6 Settings for Receivi ng a Fax
Setting the Paper Size
This function enables you to select the desired paper format for printing.
You can choose between millimetres and inches.
Press [FUNCTION] and [INITIAL
1
SET].
Press the arrow left key (OT 39) and
2
[ENTER].
Use the numeric keypad to select
3
the required format and press
[ENTER].
[0] : Inches
[1] : Millimeter
Press [STOP].
4
5
LINE SET
<-->/ENTE R
PAP ER SET
<-->/ENTER
0:inch/1:mm
0 - 1/ENTER
10/21 ’98 12:00
FAX Ready.
Setting Number of Rings
This function enables you to set the number of rings before the machine
answers an incoming call. Follow the procedure below:
Press [FUNCTION] and [INITIAL
1
SET].
Press the arrow left key (OT 39) fo ur
2
times and [ENTER].
Set the number of rings (1-11) and
3
press [ENTER] and [STOP].
Rev. / Di181f 5-53
LINE SET
<-->/ENTER
# OF RINGS : 02
0-9/ENTER
10/21 ’98 12:00
FAX Ready.
Page 56

5
Reception
5-54 Di181f Rev. /
Page 57

Reports and Lists
6 Reports and Lists
Report/List Content
Activity Report Includes information such as: time of transmission,
Transmission Report Lists the numbers called and the starting time. The report is
Multi-report Includes information regarding all group transmissions, polling
Memory Data List Includes information such as: time stored in the memory,
Memory Report Includes information such as: time of transmission,
Mailbox List Lists the numbers and names of stored mailboxes.
Confident i al Data Li s t Includes inf o rm a tio n s uc h as : m ai l box n um b er , ma il b ox na m e,
Selective Polling List Includes information such as: polling box, transmission mode,
Relay Box List Lists the relay box number, name and recipients.
One-touch / Speed Dial
List
Group Dial List Lists all recipients stored as group dial numbers.
Status List Lists the current machine settings.
Relay Report Report of results for relay transmissions. The report is printed
Power Failure Report It contains a list of all documents which could not be
transmission mode, recipient, number of pages, transmission
time and transmission result (OK/error).
printed automatically after every transmission and
transmission error.
transmissions, relay transmissions and mailbox transmissions.
The report is printed automatically after every transmission.
transmission mode, recipient, number of pages and dialling
mode.
transmission mode, recipient, number of pages, modem
setting, dialling mode and a copy of the first page containing
the memory data.
time of reception, recipient, number of pages, transmission
time and transmission result.
time of transmission and number of pages.
Lists all recipients stored as one-touch and speed dial
numbers.
automatically after every transmission.
transmitted during the power failure i.e. data which was lost.
6
Rev. / Di181f 6-55
Page 58

6
6.1 Basic Report Settings
This function enables you to select whether an activity report, a
transmission re port and a memory report s hould be prin ted au tomati cally .
Press [FUNCTION] and [INITIAL
1
SET].
Press the arrow left key (OT 39)
2
once and [ENTER].
Use the arrow keys to select the
3
desired re port.
Press [ENTER] and use the
4
numeric keypad to select the
required setting.
[0] : Do not print report
[1] : Automatically print report
Reports and Lists
LINE SET
<-->/ENTER
ACTIVITY REPORT
<-->/ENTER
TRANSMISSION REPORT
<-->/ENT ER
0:CONTINUE/1:EN D
0 - 1/ENTER
Press [ENTER] and [STOP] to
5
terminate the entry.
6-56 Di181f Rev. /
10/21 ’98 12:00
FAX Ready.
Page 59

Reports and Lists
6.2 Printing Reports
This function enables you to print the following reports and lists:
G Activity report
G Memory data list
G Confidential data list
G Status list
G Mailbox list
G Selective polling list
G Relay box list .
Press [FUNCTION] and
1
[REPORT/LIST].
Use the arrow keys to select the
2
desired report (OT 39 /40).
Press [ENTER].
3
6
ACTIVITY REPORT
<-->/ENT ER
DIAL LIST
<-->/ENT ER
PRINTING
The selected report is printed.
Rev. / Di181f 6-57
Page 60

6
6.3 Printing a One-touch/Group Dial List
Press [FUNCTION] and
1
[REPORT/LIST].
Use the arrow keys to select the
2
"telephone directory".
Press [ENTER] and select the
3
desired list using the arrow keys.
Press [ENTER].
4
The desired list is printed.
6.4 Printing a Memory Report
ACTIVITY REPORT
<-->/ENT ER
DIAL LIST
<-->/ENT ER
GROUP DIAL LIST
<-->/ENT ER
PRINTING
Reports and Lists
Press [FUNCTION] and
1
[REPORT/LIST].
Use the arrow keys to select the
2
"memory report".
Press [ENTER] and select the
3
desired file usin g the arrow right key
(OT 40).
Press [ENTER].
4
The desired file is printed.
6-58 Di181f Rev. /
ACTIVITY REPORT
<-->/ENT ER
MEMORY ENTR Y REPO RT
<-->/ENTER
FILE-001 :OSAKA
->/ENTER
PRINTING
Page 61

Troubleshooting
7 Troubleshooting
7.1 Error Messages on the LCD
Message Problem Solution
INSERT DOCUMENT. There is no document i n the
Memory Overflow During sending / receiving in
TOO MANY RECIPIENTS. Too many locations have been
UNABLE TO FEED
DOCUMENT
MEMORY FULL You are trying to change or
Replace toner. FAX ready. The toner cartridge has run out
Document jam No.9 Document jam in ADF Clear the document jam.
Refill paper. FAX ready. The paper has run out. Refill paper supply.
Paper jam FAX ready. Print paper jam Clear the paper jam.
NO PRINT DATA No document can be printed
CALL GROUP KEY
ALLOCATED.
OT KEY ALLOCATED. A recipient has already been
CHECK DIAL SETTING A connection could not be
NO MEMORY FILE No file stored.
ADF.
memory mode the capacity of
the memory was exceeded.
called.
The maximum num ber of bo xes
has been exceeded.
delete a one-touch/speed dial
transmission which has already
been stored.
of toner.
because the memory is empty.
A group has already been
assigned to the one-touch key
which has been pressed.
assigned to the one-touch key
which has been pressed.
established because the
machine is set to PSTN and a
PBX was called. A connection
could not be established
because the machine is set to
PBX and a PSTN was called,
and the line ac cess numbe r has
not been stored.
Insert document.
Send the document
manually (1 Page TX). The
memory will hold up to 512
pages.
Reduce the number of
recipients t o t he ma x imu m
default number. Polling
Transmission: 200 Polling
RX: 200 Call groups: 99
Reduce the number of
boxes to 10.
Erase the memory data or
wait until the transmission
has finished.
Replace the toner
cartridge.
Printing is possible again
after a document has been
stored in the memory.
Select a different onetouch key.
Select a different onetouch key.
Set t h e mac h i n e to PB X .
Enter the line access
number.
7
Rev. / Di181f 7-59
Page 62

7
Troubleshooting
Message Problem Solution
SD : NOT STORED The speed dial key selected has
OT : NOT STORED The one-touch key selected has
FILE FULL 1 PAGE TX The maximum number of files
UNABLE TO ERASE Attempts were made to erase a
OT : NO SUB-ADDRESS The one-touch key selected has
CG : NO SUB-ADDRESS The call group key selected has
SD : NO SUB-ADDRESS The call group key selected has
ALREADY STORED The box number selected has
UNABLE TO ERASE
RELAY BOX OCCUPIED
Feeder open ADF open. Close the ADF.
Cover open Cover is open. Close the cover firmly.
Warming up FAX ready. The machine is warming up. Wait a moment.
Original document still on
glass
Tray setting The paper tray setting is
GTX: UNABLE TO FEED
DOCUMENT
1 0 / 3 0 ’99 1 3 : 4 5 F A X r e a dy MXMaintenance required. Call the technical service.
not been assigned a recipient.
not been assigned a recipient.
has been exceeded.
one-touch/speed dial number
which had been stored as a call
group.
not been assigned a subaddress.
not been assigned a subaddress.
not been assigned a subaddress.
already been allocat ed.
Attempts were made to erase a
one-touch/speed dial or call
group number which had been
stored in a relay box.
The document is still on the
glass.
incorrect.
Group transmissions are not
possible in 1 page TX mode.
Store a number.
Store a number.
Send manually or delete a
file.
Enter the correct paper
size.
Enter a sub-address.
Enter a sub-address.
Enter a sub-address.
Select a different box
number.
Delete each number
individually.
Remove the document.
Change the paper tray
setting.
Send from memory.
Holding. STOP was pressed during the
Please wait. The machine waits for the
Select BOOK TX. The selected function is not
STORE DOCUMENT
PRESS START.
scanning process.
printing process to finish.
available using the ADF.
The document is in the feeder. Press START.
Resend.
Wait a moment.
Send the document using
the book transmission.
7-60 Di181f Rev. /
Page 63

Troubleshooting
7.2 Error Codes
7
Error
code
10 No answer Check the telephone line. Ensure the
11 The number dialled is a standard
20 The transmission was interrupted by
21 Error during 1 page TX. Resend.
25 Memory error Ensure that enough memory is
26 ECM error Call the technical service.
29 The transmission was interrupted or
30 - 36 Poor print quality Reduce the modem speed to 9600 bps.
40 The receiving fax machine has run out
41 Polling reception failed because
44 ECM error Call the technical service.
45 No loop current. Check the telephone line.
46 Other location busy. Resend later.
47 Rings fail to be recognised. Check the telephone line.
48 The other location does not respond. Inform the recipient.
49 Engaged tone is heard before the
50 - 60 A connection cannot be established
71 Wrong password Check the sub-address ID and the
72 The receiving fax machine does not
75 A polling signal has been received, but
79 The receiving fax machine does not
FE, FF Switch the machine off and then on. If
Problem Solution
receiving fax is operational.
telephone number.
the recipient.
the machine was disconnected from
the mains.
of paper or has insufficient memory.
document had not been fed correctly
into the feeder.
number has been dialled.
due to the poor telephone line.
have the polling function.
the machine is not set to polling RX.
have the mailbox function.
Enter the fax number.
available. Delete files which are no
longer needed.
Inform the recipient.
Inform the recipient.
Check the telephone line. Resend later.
Reduce the modem speed to 9600 bps.
password for selective polling.
Set the machine to polling RX.
the problem persists, contact the
technical service.
Rev. / Di181f 7-61
Page 64

7
Troubleshooting
7-62 Di181f Rev. /
Page 65

Appendix
8Appendix
8.1 Specifications
General
Size of document Max. A3 (297 mm x 420 mm)
Compatibility G 3
Max. modem speed 33.600 bps
Transmission speed 2 seconds (ITU test document No.1)
Coding MR, MH, MMR, JBIG
ECM error correction yes
Scanning resolution Standard: 8 x 3.85 lines/mm Fine: 8 x 7.7 lines/mm S-Fine: 8 x
Printing resolution 600 dpi
Memory capacity 2 MB
optional accessories memory upgrade 8 MB
8
15.4 lines/mm US-Fine: 16 x 15.4 lines/mm
Rev. / Di181f 8-63
Page 66

8
8.2 Index
B
Book transmission ................................................................................39
Buzzer volume,setting .......................................................................... 28
C
Call groups,changing ........................................................................... 26
Call groups,entering
Call groups,erasing
Confidential transmission
Connecting ........................................................................................... 13
Contrast settings
D
Dailling methods ..................................................................................35
Date and time,entering
Display,error messages
Displays ................................................................................................. 9
Documents,placing
Documents,placi ng on gla s sca nne r ....................................................32
Appendix
............................................................................. 25
..............................................................................27
..................................................................... 45
.................................................................................. 34
.........................................................................17
....................................................................... 59
..............................................................................32
E
Entering data ........................................................................................ 15
Entering letters
Entering numbers ................................................................................. 15
Entering text
Entering your company name
Entering your fax number .....................................................................16
Erase polling documents
Erasing data .........................................................................................46
Error codes
..................................................................................... 15
......................................................................................... 15
.............................................................. 17
...................................................................... 44
.......................................................................................... 61
F
Features ................................................................................................. 8
8-64 Di181f Rev. /
Page 67

Appendix
8
H
Header,setting ......................................................................................28
L
Lists ......................................................................................................55
M
Mailbox,erasing ....................................................................................49
Mailbox,print
Mailbox,setting
Manual transmission
Memory report,print ..............................................................................58
.........................................................................................50
......................................................................................48
.............................................................................38
O
One-touch keys ....................................................................................11
One-touch keys and speed dial numbers,changing
One-touch keys and speed dial numbers,erasing
One-touch k eys,entering
One-touch list,print
Original documents
......................................................................18
...............................................................................58
...............................................................................31
.............................22
................................24
P
Paper size, setting ................................................................................ 53
Paper sizes
Polling transmission
Preparing the machine .........................................................................15
...........................................................................................32
..............................................................................43
R
Reception, manual ................................................................................47
Reception,automatic .............................................................................47
Reception,mailbox
Reception,memory
Reception,polling ..................................................................................50
Reception,selective polling
Relay boxes,erasing .............................................................................30
Relay boxes,setting
Rev. / Di181f 8-65
................................................................................48
...............................................................................48
...................................................................51
..............................................................................29
Page 68

8
Appendix
Relay transmission
Reports
Reports,print ........................................................................................57
Reports,settings
Resolution settings ............................................................................... 34
Rings (number of), setting
................................................................................................ 55
...............................................................................41
................................................................................... 56
.................................................................... 53
S
Sending ................................................................................................ 31
Specifications ....................................................................................... 63
Speed dial list,print
Speed dial numbers and one-touch keys,changing ............................. 22
Speed dial numbers and one-touch keys,erasing
Speed dial numbers,entering
...............................................................................58
................................ 24
............................................................... 20
T
Timer transmission ...............................................................................40
Transmission
Transmission from memory ..................................................................37
Transmission settings
........................................................................................ 31
.......................................................................... 34
U
Using the fax option ............................................................................. 13
8-66 Di181f Rev. /
Page 69

Appendix
8.3 CE marking (declaration of conformity)
We hereby guarantee that the printer and options covered by this
declaration comply with the information given below. This declaration
applies to countries within the European Union (EU)
Type of product Digital copier (multi-functional)
Product name Di181
Options PF-114, PF-207, AF-5, Pi1800, fax for Di181, 4623-161
Standards Safety
Notes • *1 EMV rating: This product has been developed for use
EC guidelines Safety: 72/23/EEC EMV: 89/336/EEC and 93/68/EEC
*1
*2
EMV
Telecommuni-
*3, *4
cation
• EN60 950/1992 (A1, A2, A3, A4 and A11)
safety of IT installations, including electrical parts
• EN60825-1/1994 (A11)
Protective measures for laser equipment, classification
of devices, requirements and operating standards
• EN 55022 (class B)/1994 (A1, A2)
Limiting values and measuring system for the
malfunctioning of IT appliances
• EN 55024/1998
Limiting values and test procedures for resistance in IT
appliances
• EN 61000-4-2/1995
Resistance to static discharges
• EN 61000-4-3/1995
Resistance to high frequency elect rom ag net ic fields
• EN61000-4-4/1995
Resistance to quick transient bursts
• EN61000-4-5/1995
Resistance to surge voltage
• EN61000-4-6/1996
Resistance to faulty wiring, caused by high frequency
fields of more than 9 kHz
• EN61000-4-8/1993
Resistance to magnetic fields with power frequencies
• EN61000-4-11/1994
Resistance to power cuts, momentary interruptions and
voltage fluctuations
TBR21/Jan. 1998
General technical regulations governing requirements of
additional devices with the approval for connections
throughout Europe to the public analogue
telecommunication network via terminal exchanges (with
the exception of terminal exchange, the telephone service
is supported), where networks are addressed (if available)
via compound signals.
in a typical office environment.
• *2 First year of marking as per EC directives 73 / 23 /
EEC and 93 / 68 / EEC: 98
• *3 EC test certificate, issued by TÜV-Rheinland
(recognised body ident-No. 0197)
• *4 The machine has also been checked and approved as
per ETSI guidelines 201 121/V1.1.2 (1998-07), as
described in table 1.
Telecommunication: 98/482/EC and 98/13/EC
8
Rev. / Di181f 8-67
Page 70

8
Appendix
8-68 Di181f Rev. /
 Loading...