

Konica Minolta 9830 User Manual

FAX
User’s Manual
9830

Maintenance 78
Replacing Toner Cartridge 78
Replacing Image Drum 82
Resetting the Drum Counter 84
Cleaning the Scanner Path 84
Obtaining Consumables & Replacement Parts 84
Consumables 84
Options 84
Problem Solving 85
Clearing a Document Jam 85
Clearing a Printer Paper Jam 85
Printing a Cleaning Page 87
Display Panel Messages 87
Error Messages 87
Reading the Print Counters 91
Problem Checklist 91
Shipping your Machine 95
Service and Support 96
Your Sales and Service Dealer 96
Customer Support Professionals 96
Customer Information System 97
Konica on the Internet 97
Index 98
able of Contents
viii | T

Installation
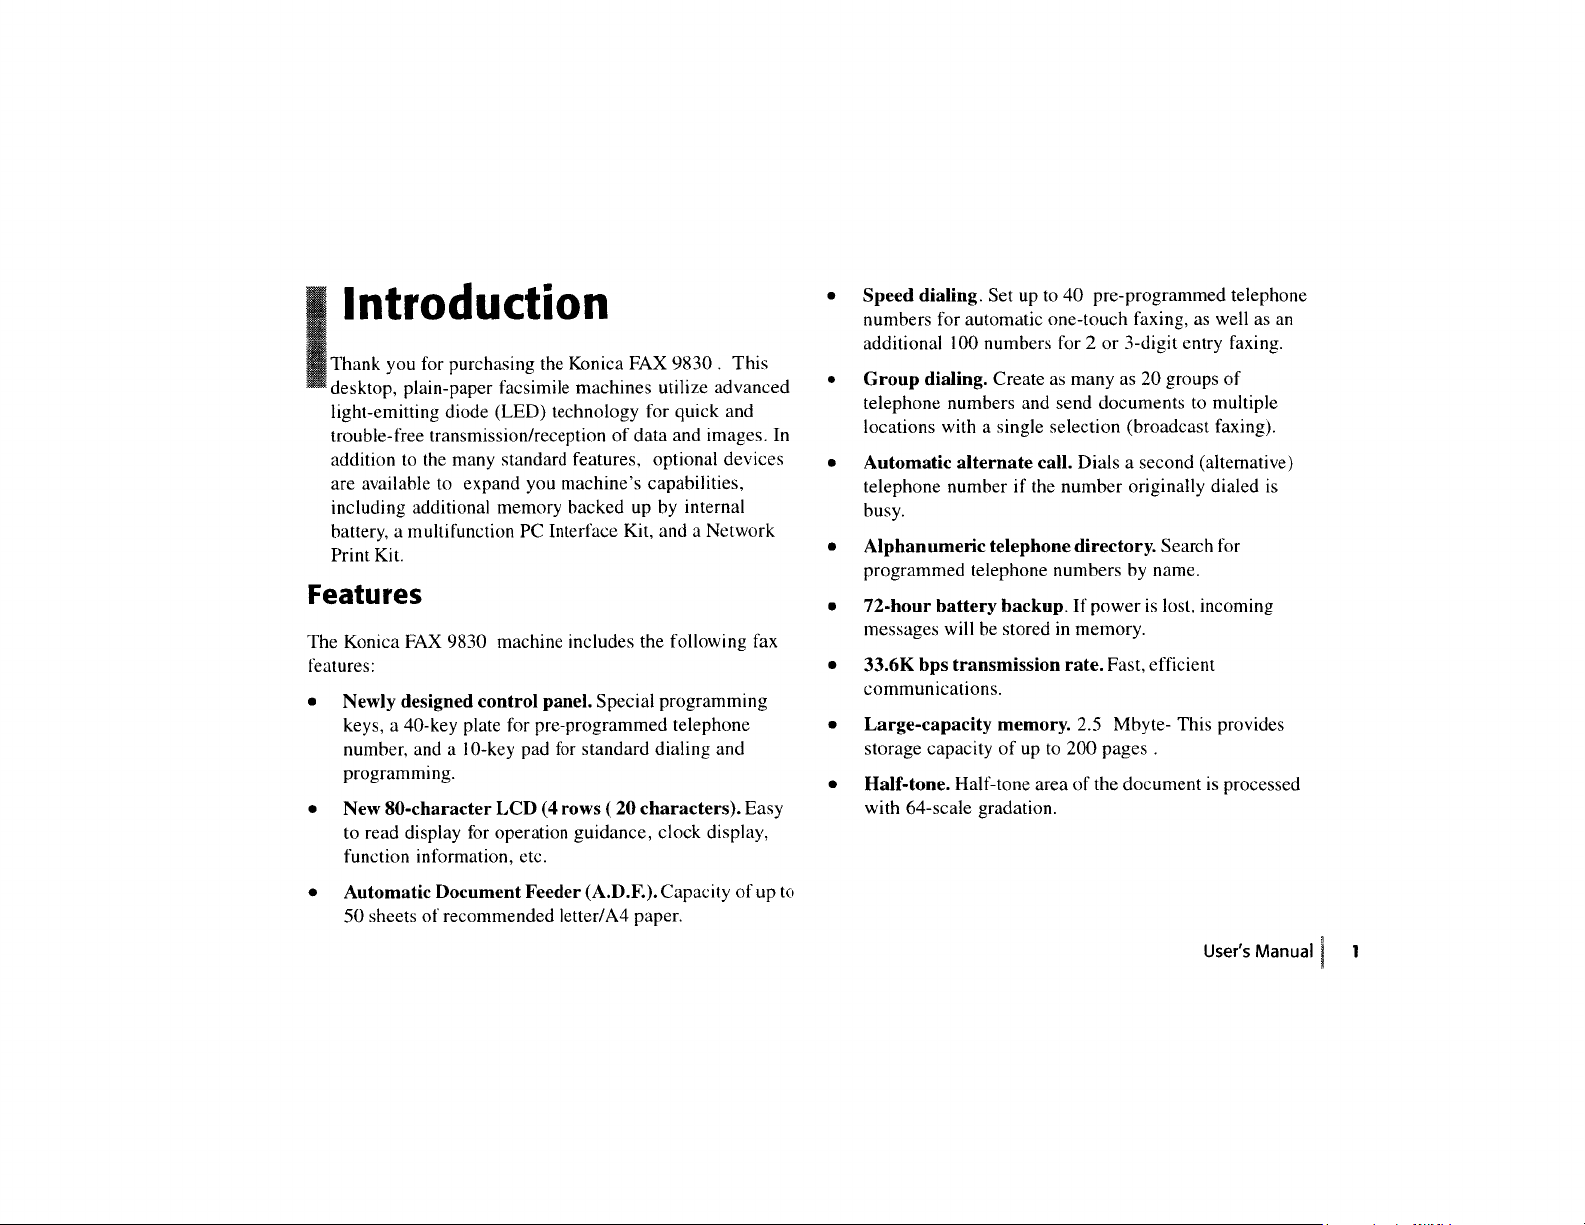
Overview
To install your new Konica FAX 9830, follow the steps in this
section.
• Safety
• Installation Hints
• Operation and Maintenance
• Toner and Image Drum Handling
• Emergency First Aid
• Getting Started
• Setting Up Your Fax Machine
• Loading Paper
Safety
Installation Hints
• Install your fax machine in a dust-free location away from
direct sunlight
• Do not plug your fax machine into a power source shared
by equipment that produces electrical noise (i.e., air
conditioners, etc)
• Leave electronic adjustments to authorized service
personnel
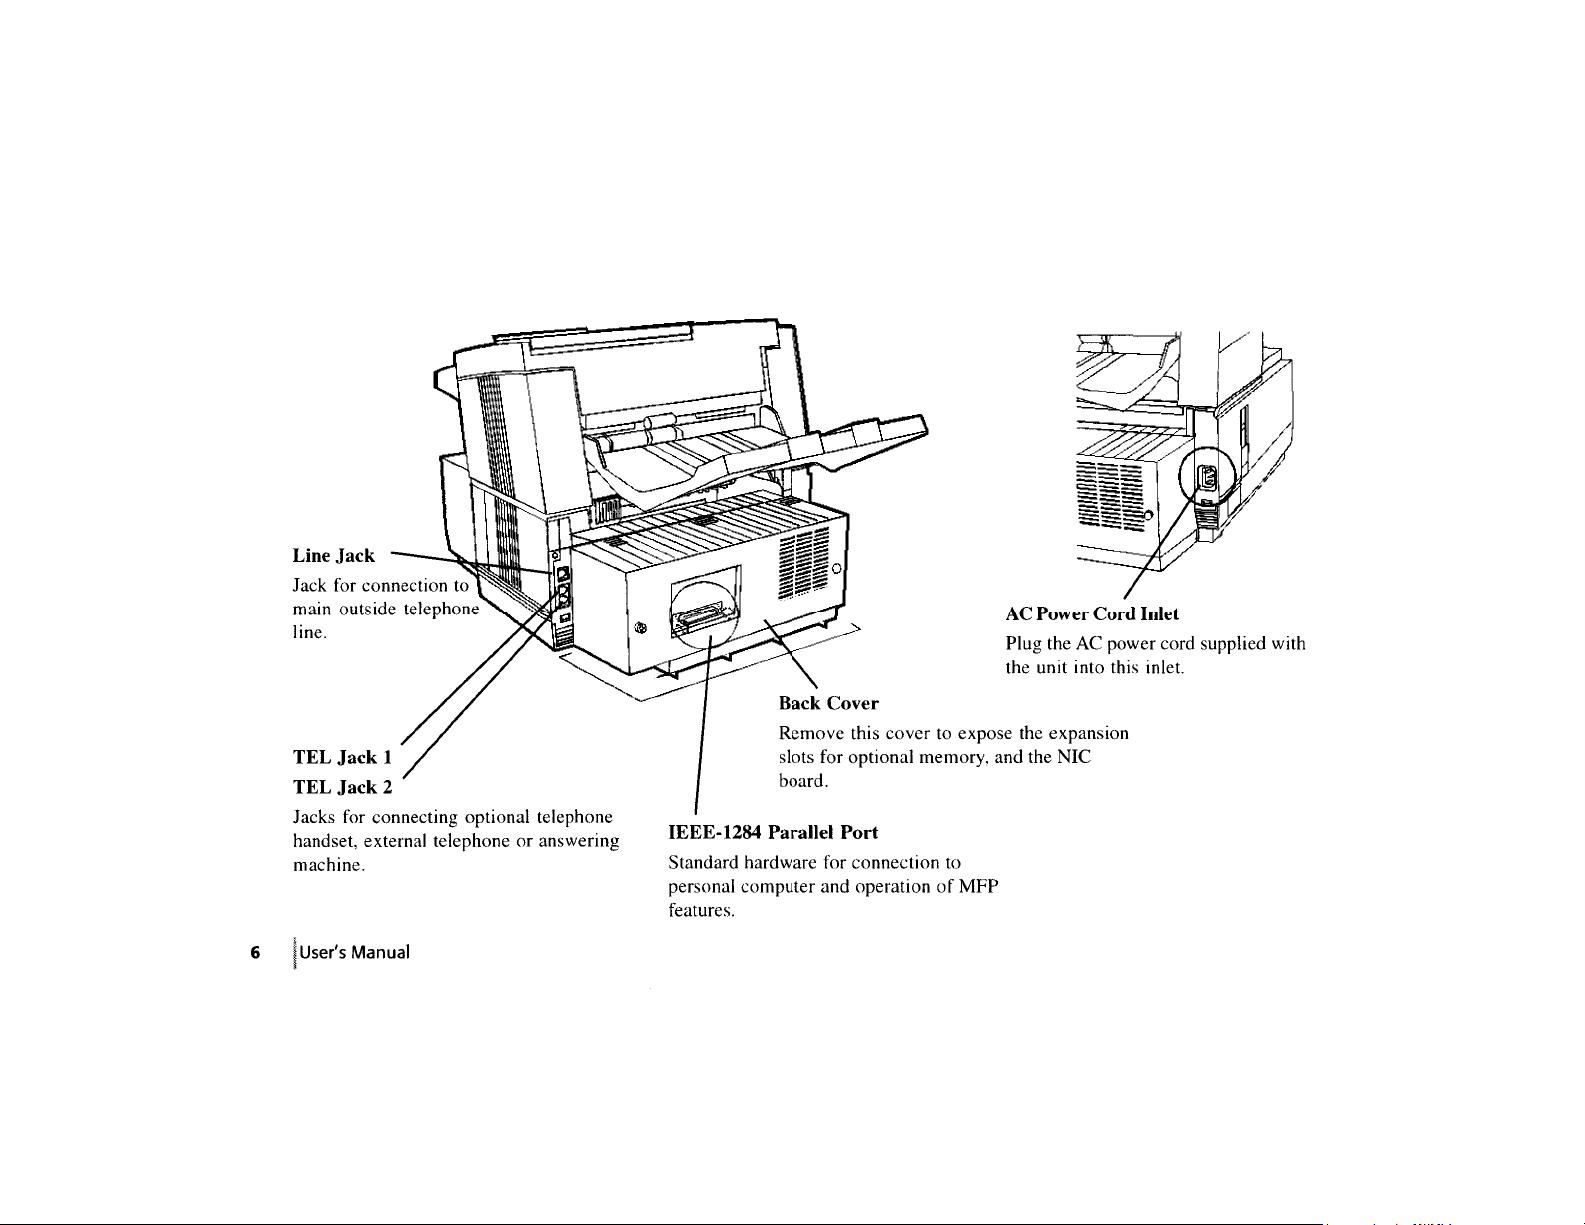
• The LINE terminal connects your fax machine to a
standard telephone line. To avoid damage to your
telephone system or to the fax machine, do not plug your
fax machine into anything other than a standard RJ-11C
jack.
• Your fax machine is intended to be grounded electrically
and is equipped with a three-wire grounded power cord.
For your safety, do not attempt to defeat your power cord’s
grounding plug.
• The electrical outlet and phone jack should be installed
near the equipment and should be easily accessible.
• The two TEL terminals on the back of the fax machine are
only suitable for 2 wire devices. Not all standard
telephones will respond to incoming calls when
connected to an extension jack.
• This equipment may not necessarily provide for the
effective hand-over of a call from a telephone connected
to the same line.
• The operation of this equipment on the same line as
telephone or other equipment with audible warning
devices, such as call waiting, or automatic ring detectors
may cause false tripping of the ring detector.
14|User’s Manual

Operation and Maintenance
• Use a dry cloth to clean the control panel and the main
body of the unit.
• Aside from the instructions specifically mentioned in this
handbook, your fax machine is not user serviceable. Do
not attempt to service the machine or lubricate moving
parts by yourself.
• Pull out the AC plug before t rying to remove any objects
that may have fallen into the machine.
• Immediately disconnect the fax machine if it becomes
physically damaged and arrange for its repair or disposal.
• When relocating your fax machine, always disconnect the
telephone line before disconnecting the power cord, then
reconnect the power cord first.
• This fax machine is not intended to be used in parallel
with any other telephone devices.
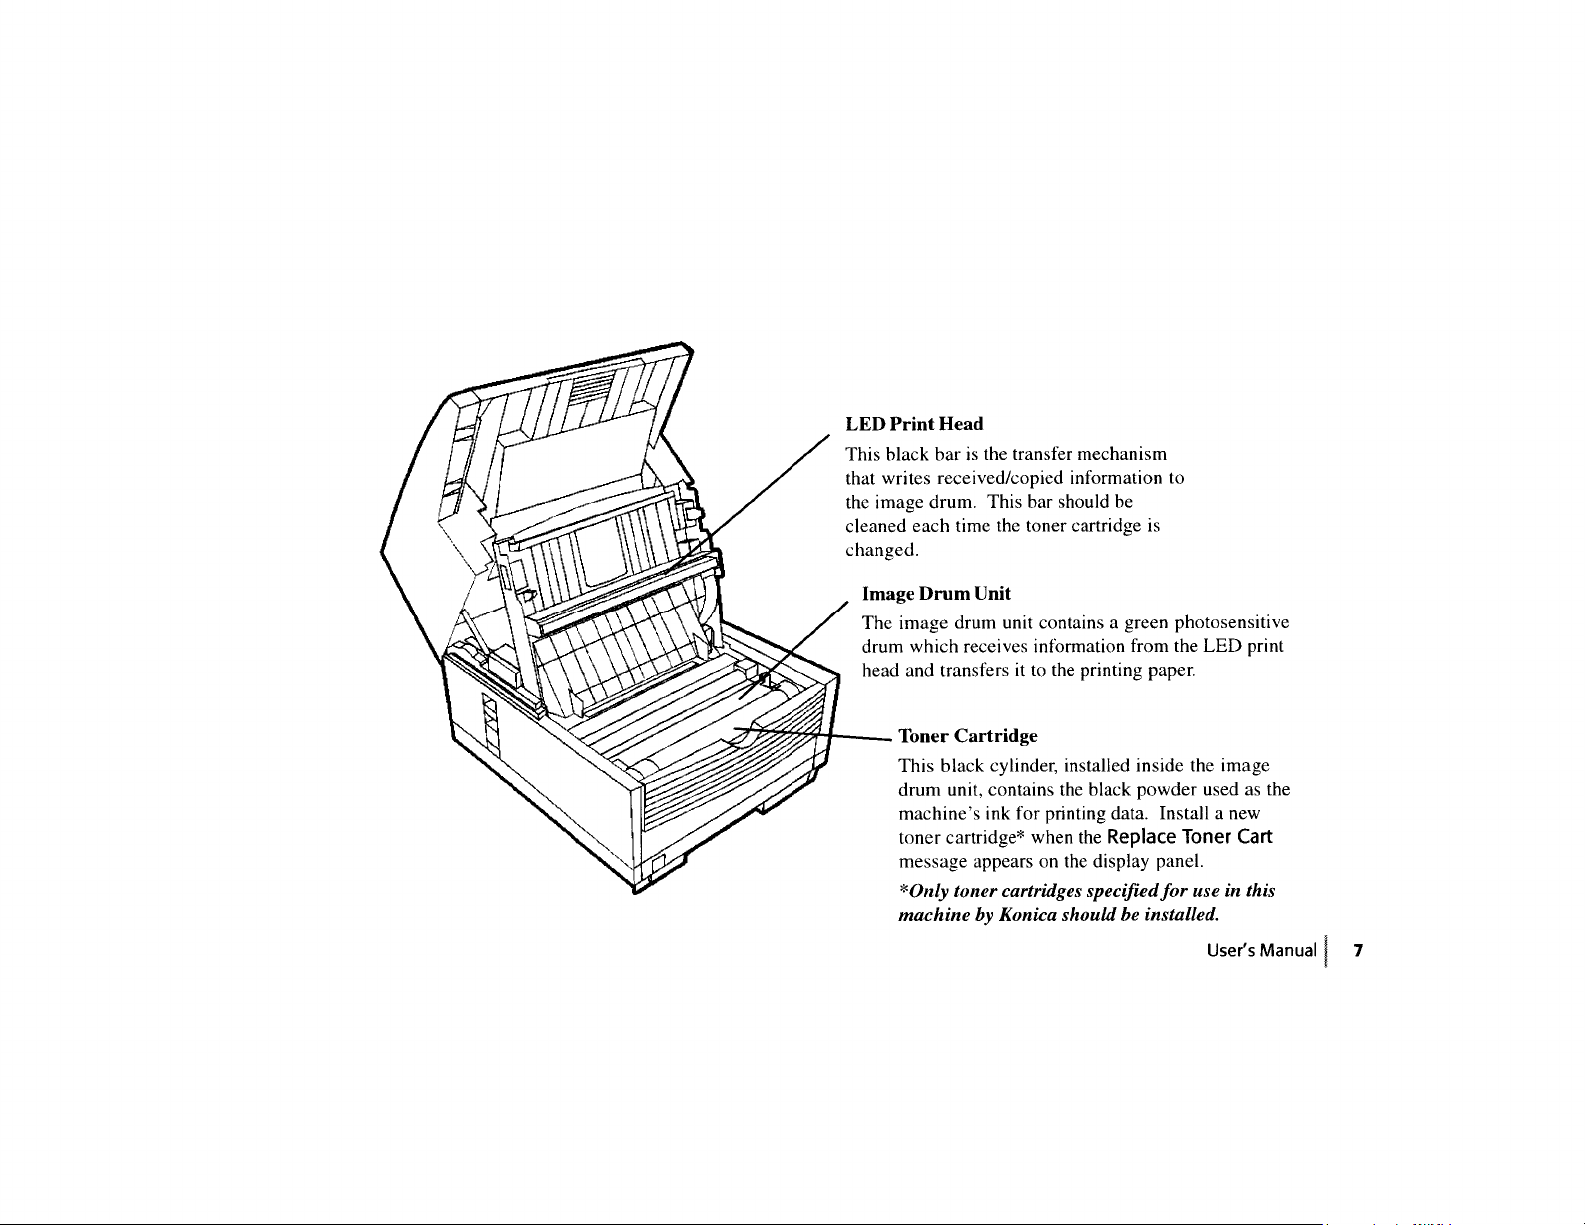
• Always hold the image drum by the ends—never by the
middle. Never touch the green drum inside the image
drum unit.
• Exercise care when removing the toner cartridge. Do not
let it touch your clothing or porous materials. The toner
powder causes permanent stains.
• Small amounts of toner spilled on skin or clothing can be
readily removed with soap and cold water. Using heated
water will make removing the stain much more difficult.
Emergency First Aid
Emergency First Aid
EYE: Flush eyes with plenty or water. If symptoms
occur, get medical attention
T oner Cartridge and Image Drum Handling
• Leave unused toner cartridges and image drums in their
packages until needed. When replacing a toner cartridge
or image drum, re-use the packaging to dispose of the old
toner cartridge or image drum.
• Do not expose these components to light for more than
five minutes. Never expose the green drum (inside the
image drum unit) to direct sunlight.
• SKIN: W ash with water and mild soap
• INGESTION: W ash out mouth with water. Drink one or
two glasses of water. If symptoms occur , get medical
attention.
• INHALATION: Remo ve victim to fresh air . If
symptoms occur, get medical attention.
User’s Manual|15
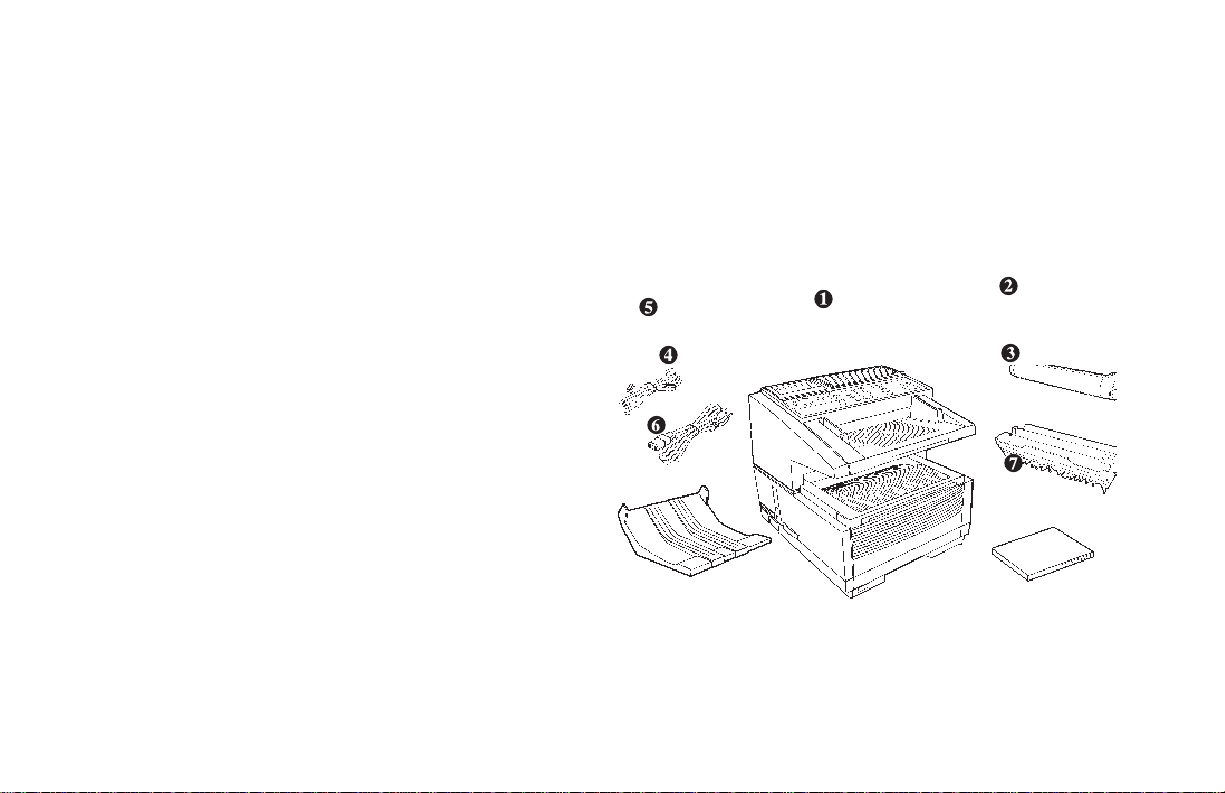
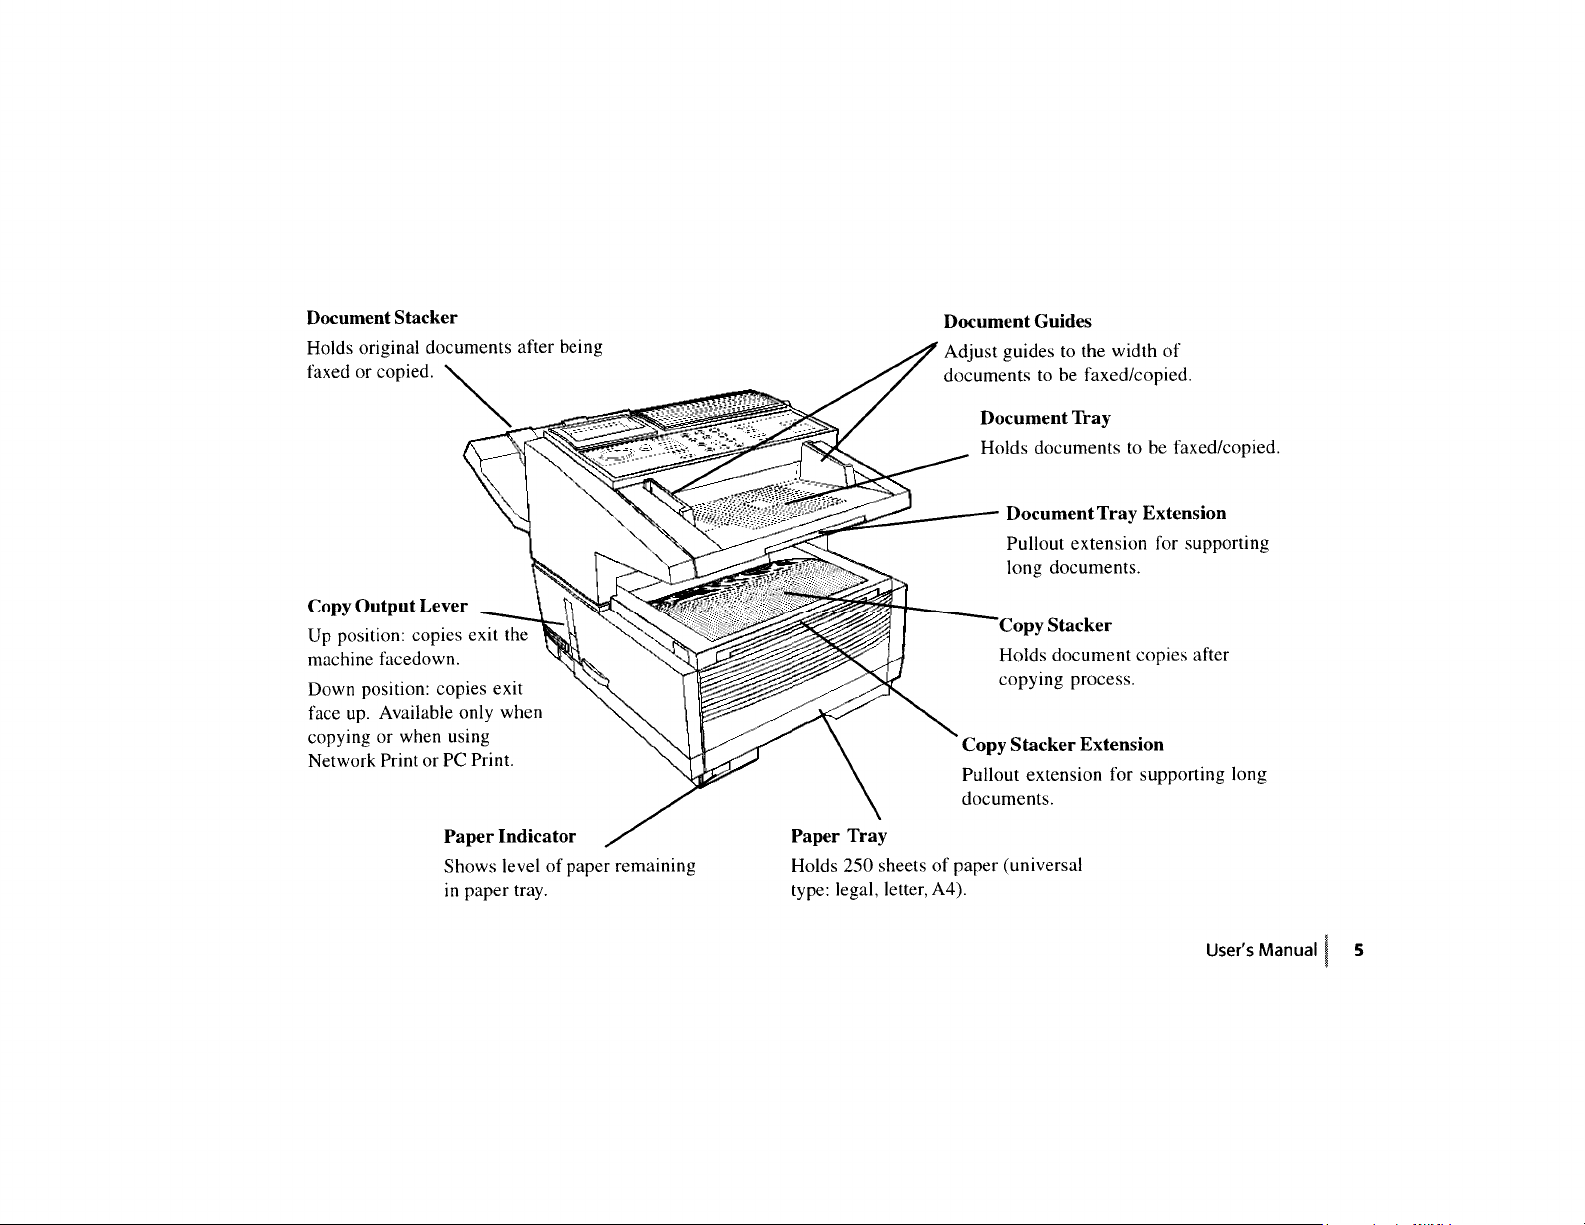
6 Document Stacker
Getting Started
Where to Install Your Fax Machine
Place your fax machine in a dust-free location away from
direct sunlight.
• Allow several inches on each side of the fax machine to
ensure adequate ventilation.
• Make sure that both power and telephone outlets are
available nearby.
• Choose a location where the relative humidity is between
20% and 80%, and where the temperature is between 50°F
(10°C) and 92°F (32°C).
Unpacking
Remove contents from the carton. Be sure that all the items
listed below are included.
1 Konica FAX 9830 Machine
2 Toner cartridge
3 Image drum (inside machine)
4 Power cord
5 Telephone line cord
7 Documentation
User’s Manual
Quick Reference
Warranty, Regulatory, Specification Inform ation
16|User’s Manual
If any items are missing, contact Konica immediately.
!
Keep your packing materials and carton in case you
need to ship or transport the unit.
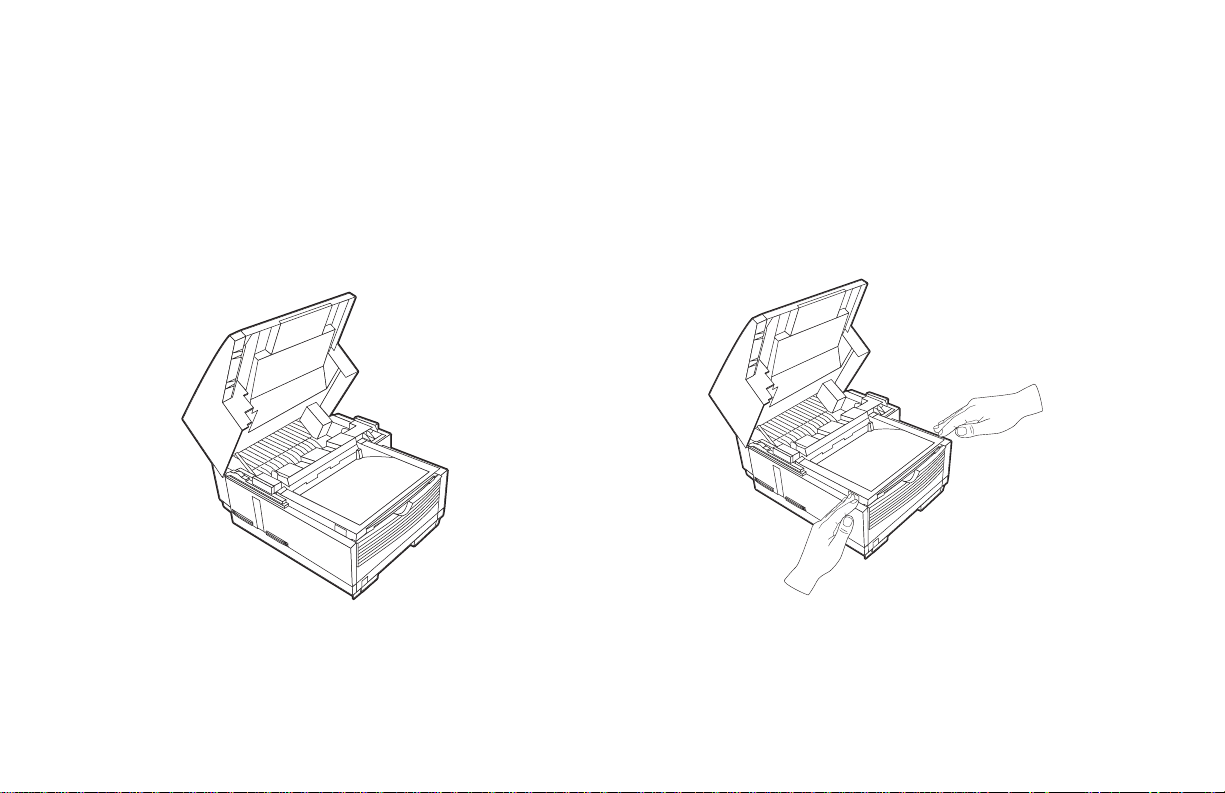
Setting Up Your Fax Machine
1 Lift up on the document tray and swing it up and out of
the way.
2 Press the release buttons located on both sides of the copy
stacker. Lift up the stacker.
User’s Manual|17
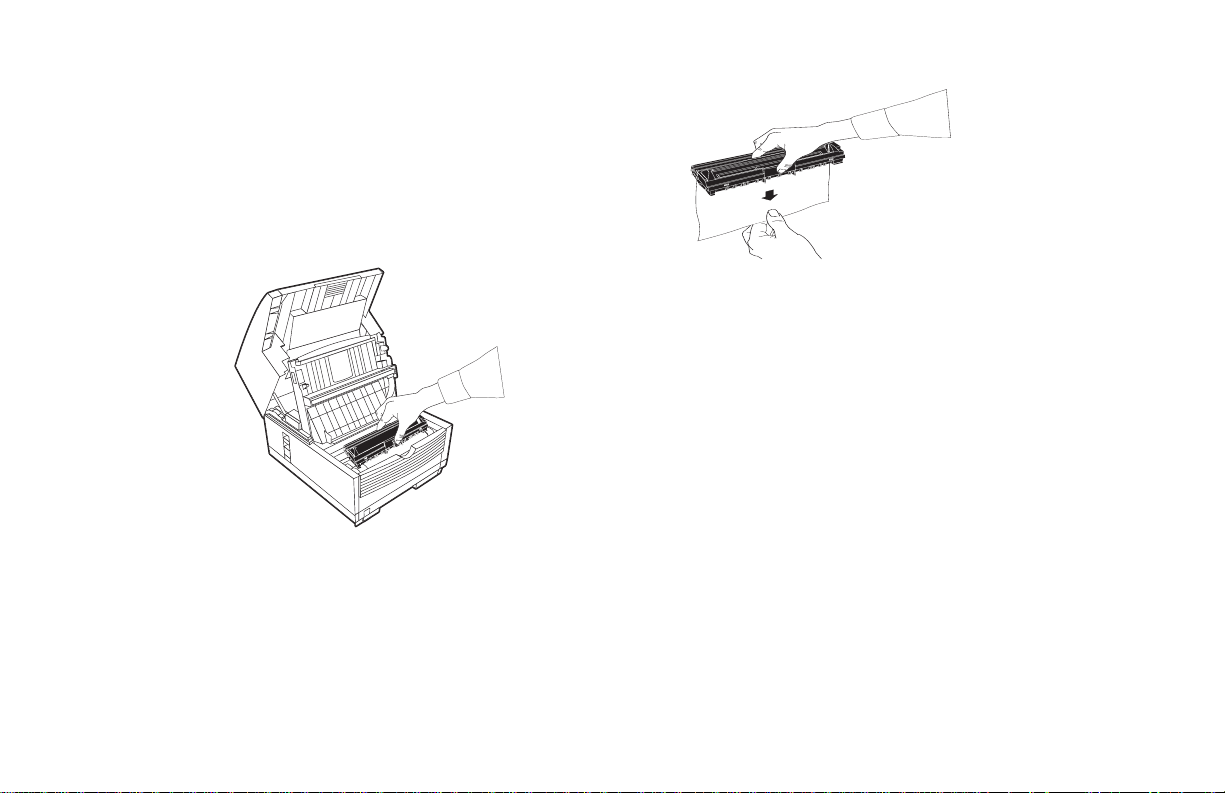
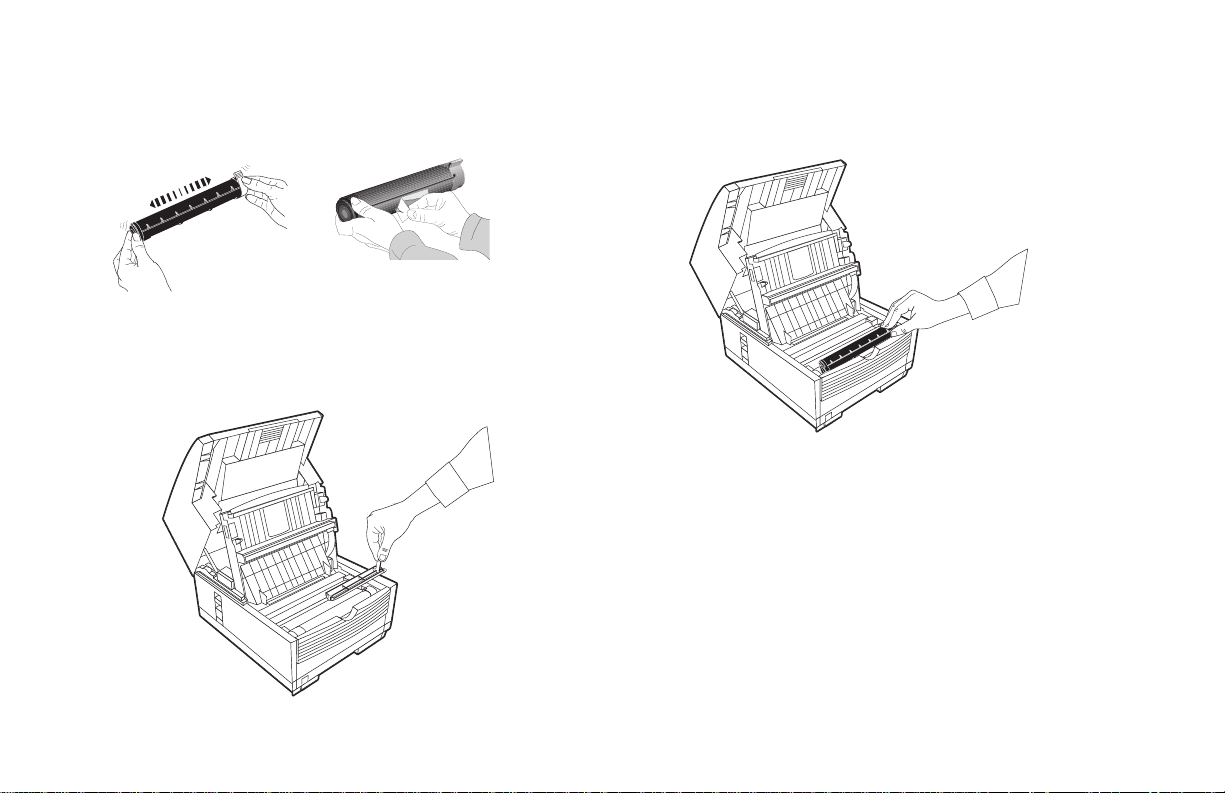
3 Move aside the protective sheet and grasp the image drum
cartridge, then lift it out.
Caution: Do not touch the green drum surface!
!
4 Grasp the protective sheet and pull it out.
18|User’s Manual
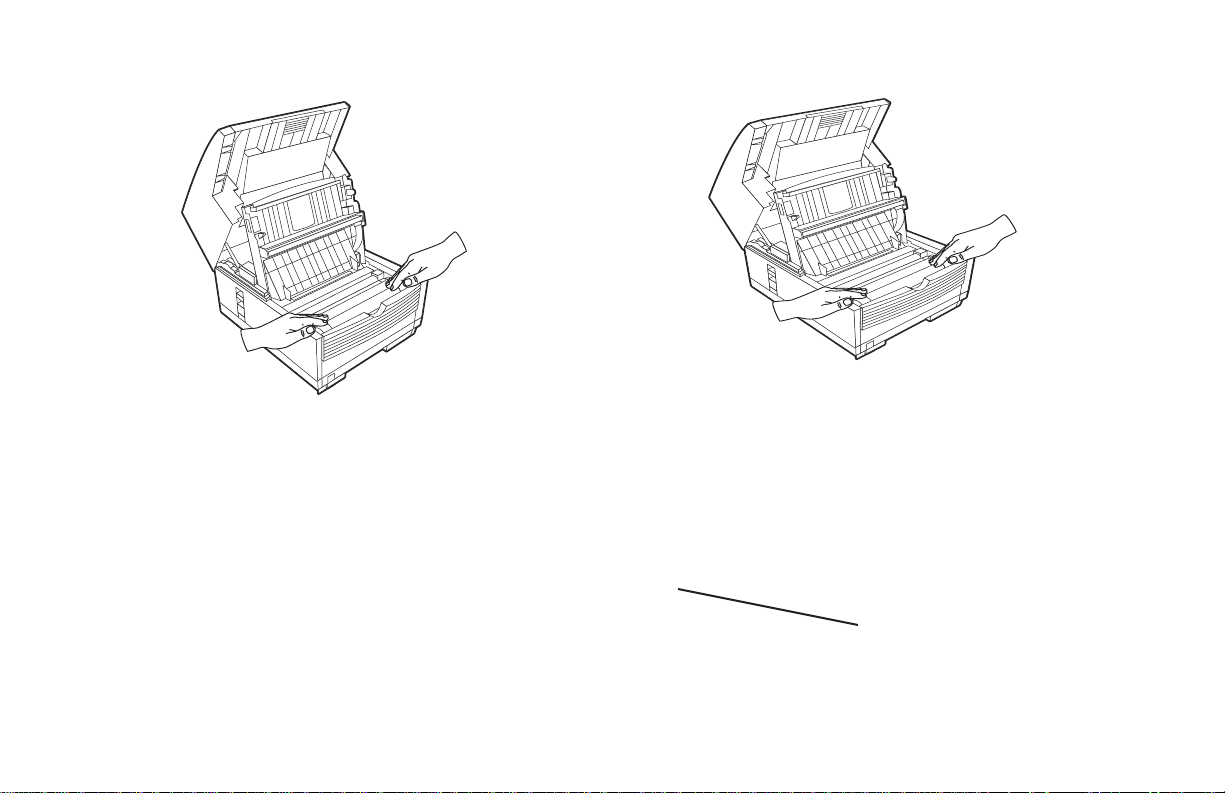
5 Put the image drum cartridge back into place.
6 Press down at each end of the image drum cartridge to
make sure it is installed correctly.
Installing the Toner Cartridge
1 Lift out the toner well cover and discard.
Warning: Be careful when handling the toner cartridge.
!
Do not let toner spill onto your clothing or other porous
materials. If you experience any problems with toner,
see the Safety guides at the beginning of this section.
Important: This machine will only operate using toner
!
cartridges specified by Konica for this facsimile
machine. The use of any other toner will result in the
a
display of an operation error and in machine
malfunction.
2 Unwrap the toner cartridge and gently shake it to
User’s Manual|19
distribute the toner. Then carefully peel the tape from the
bottom of the toner cartridge.
3 Holding the toner cartridge with the bottom down, insert
the left side into the toner well, placing it under the tab
(a).
4 Lower the right side down into the toner well.
5 Push the lock lever forward until it stops.
20|User’s Manual
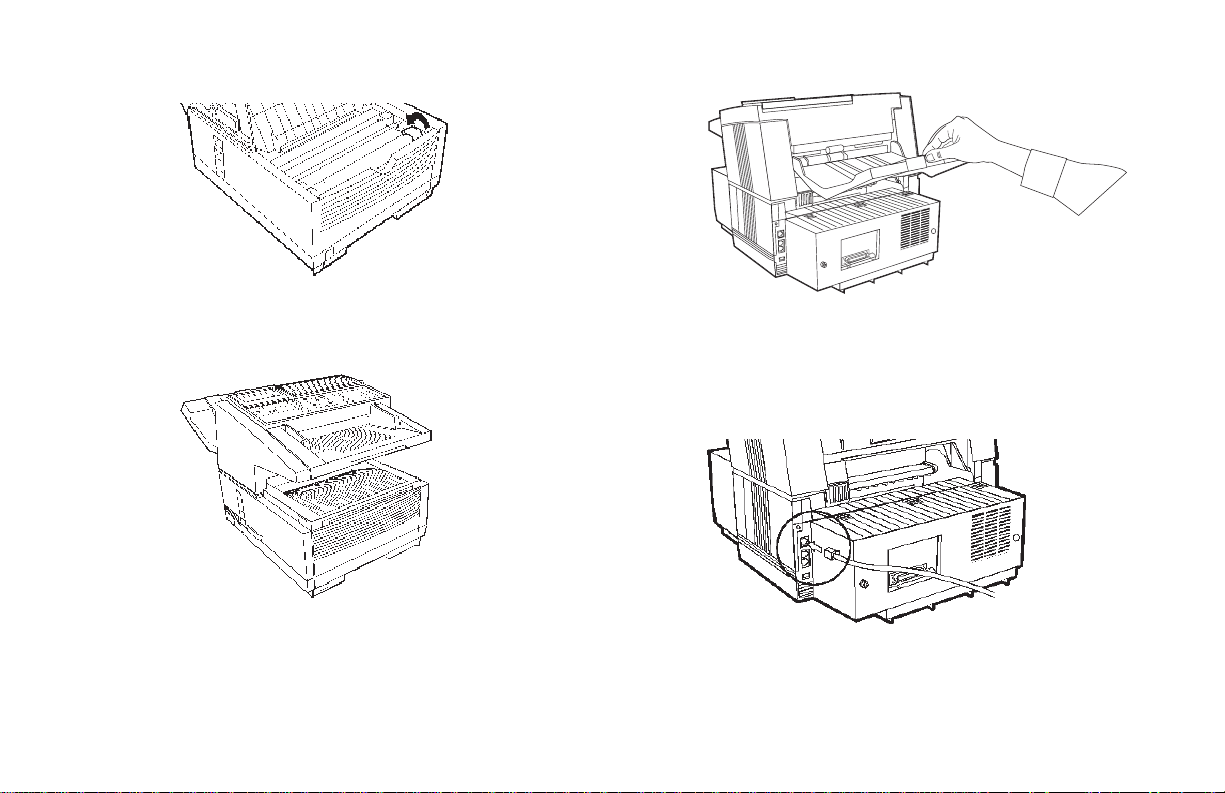
6 Close the copy stacker and document tray.
Attaching the Document Stacker
Attach the document exit stacker on the back of the machine
using the latching mechanism provided.
Connecting to the Telephone Line
1 Insert one end of the telephone cord into the LINE jack in
the back of the machine.
2 Insert the other end into your wall telephone jack.
Installing the External Optional Handset
User’s Manual|21
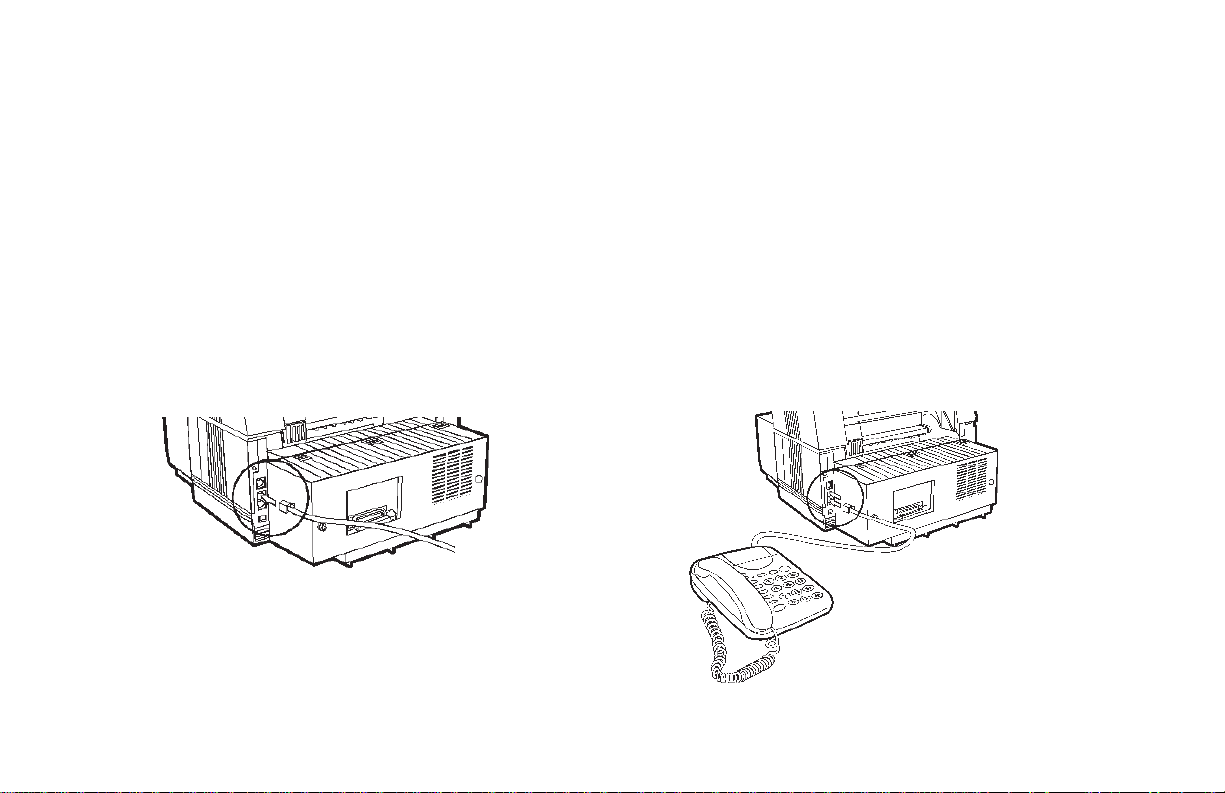
If you purchased an external handset option with your fax
machine, follow these instructions to install it.
1 Plug in one end of the handset cord into the handset and
the other end into the jack on the front of the cradle. Place
the handset in the cradle.
2 Insert the supplied telephone cord into the jack located on
the back of the cradle.
3 Insert the end of the cord into the TEL jack on the back of
the fax machine.
The two TEL jacks are provided to allow you to connect
!
both an external handset and an answering machine.
Connecting an External Telephone or
Answering Machine
Important: Any external telephone or answering
!
machine connected to Your fax machine must be FCC
(US) or CSA (Canada) approved.
1 Insert one end of the telephone cord into the TEL jack on
the back of the fax machine.
2 Insert the other end into the jack in your external device.
22|User’s Manual
T o connect both an answering machine and a telephone:
1 Connect your answering machine to your fax machine.
2 Plug your external telephone’s cord into the telephone
jack on your answering machine.
You must have the T AD mode feature turned on for an
!
answering machine to work with your fax machine. See
“Setting the Answering Mode.”
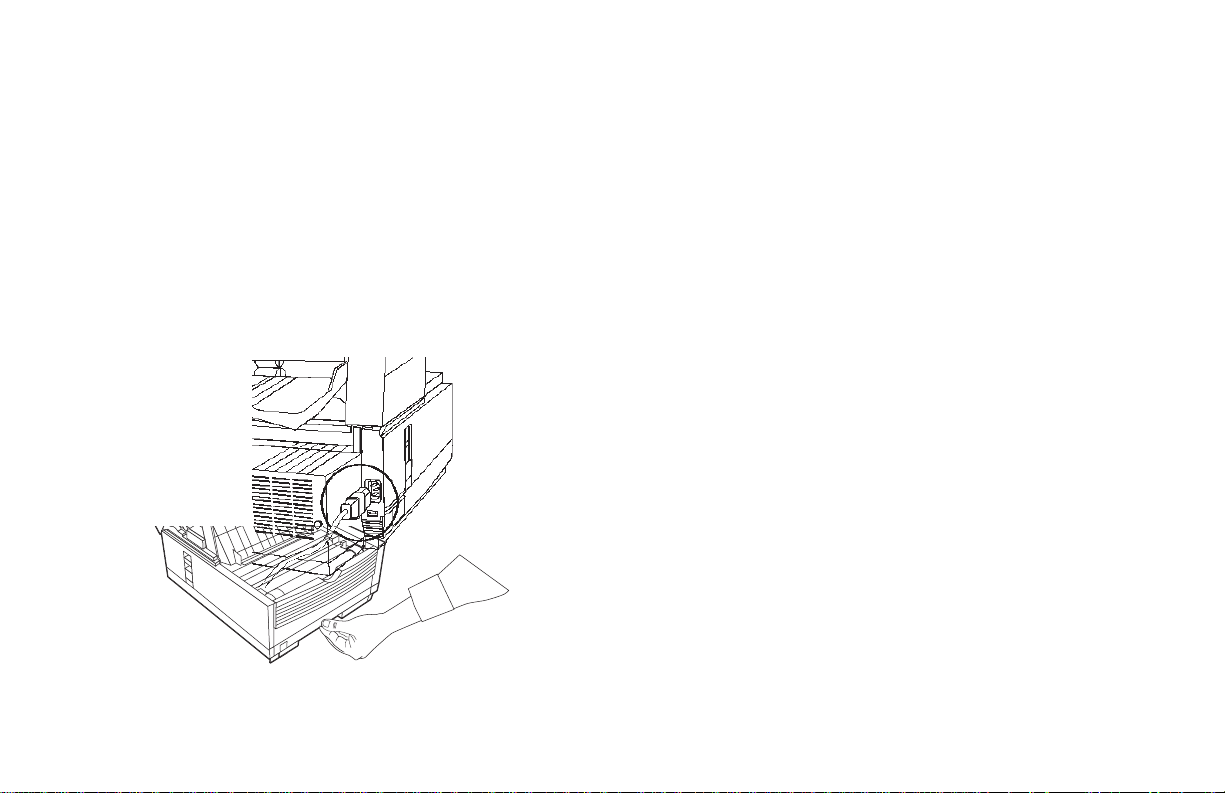
Connecting Power
1 Plug the power cord into the back of the unit.
2 Plug the other end into a grounded AC owner outlet.
Loading Paper
Your fax unit can hold up to 250 sheets of standard-weight
(20 lb.) p aper in letter, legal, and A 4 s izes. For best results, use
paper specially made for laser printers or photocopiers.
If you are receiving a document created on legal-size
!
paper, the document will be reduced to fit on letter size
paper. The vertical length of the received page image is
automatically reduced to fit on the paper loaded, down
to 75% of the original length.
Your fax machine is set at the factory to use letter size
!
paper. To use a different paper size, change the 1’ST
PAPER SIZE user function setting to matc h your new
paper size. See “Customizing Features and Operations.”
1 Pull out the paper tray.
b
a
a
3 Turn on the power switch.
2 Adjust the paper guides (a) to the width of your paper. Set
the left guide all the way to the left. Set the right guide to
the marker for the size you’re using.
User’s Manual|23

Selecting Functions
Navigating the Function Menu
and Settings
Overview
The navigating keys (a) and LCD display (b) on the control
panel simplify setting your machine’s functions.
The machine functions are organized in a menu structure. As
you navigate through the menu using the navigation keys,
functions are displayed in the LCD window. If a document is
loaded, menu functions for sending documents are displayed
first. If no document is loaded, other menu functions are
displayed.
b
a
The menu is set up in a multi-level structure of functions,
options, and settings. A function can include a number of
options and settings.
For example, Polling TX/RX includes 2 options—Polling
TX and Polling RX. Each of these options includes a number
of possible settings.
24|User’s Manual

Primary Menu Functions
Delayed TX
Delayed Batch TX
Priority TX
Confidential TX
Relay Initiate TX
Rolling TX.RX
Using the Help Key
To see how the menu is organized, press HELP.
Your machine will print out a Function List
with instructions for accessing menu items.
This can be helpful when you are setting your
machine’s features.
Print From Memory
Report Print
Location Program
Setup
Counter
Printer Cleaning
Setting Features
There are two ways to navigate through the functions:
1 The step access method moves through the function menu
step by step. It lets you see your choices at each level.
2 If you know exactly what settings you want to change, the
speed access method takes you directly to most points on
the menu. Speed access numbers are only assigned to Set
Up menu functions.
User’s Manual|25
 Loading...