

Page 1

Recycled paper is used for the inside pages of this book.
Konica Fax 9825
User’s Manual
Page 2

© 1998 by Konica Business Technologies, Inc.
MAINTENANCE AGREEMENT
The KONICA Fax 9825 will give you many years of trouble-free service. To ensure high quality
copying performance and to prevent premature wear and failure of precision parts. and
components, periodic cleaning and routine adjustments should be scheduled.
We recommend that you contact your service center to discuss the benefits and advantages of
Konica’s Customer Service Maintenance Agreement and to be shown how a maintenance plan
can be tailored to your individual copying needs.
NOTICE:
Konica Business Technologies, Inc. has made every effort to ensure that the information in this
manual is complete and accurate. However, constant efforts are also being made to improve and
update the product. Therefore, Konica Business Technologies shall not be liable for errors in this
manual or for any consequential damages resulting from the use of this manual. The information
contained herein is subject to changes without notice.
WEB SITE:
www.konicabt.com
FEDERAL OR STATE STATUTES MAY PROHIBIT THE COPYING OF CERTAIN
DOCUMENTS OR INFORMATION, RESULTING IN FINES OR IMPRISONMENT FOR
VIOLATORS.
MANUAL PART NUMBER:
OP-01-FAX9825
CORRESPONDENCE:
Correspondence regarding this manual may be mailed to the address shown below.
DIGITAL SYSTEMS SOLUTIONS GROUP & NEW PRODUCT DEVELOPMENT
KONICA BUSINESS TECHNOLOGIES, INC.
500 DAY HILL ROAD
WINDSOR, CT 06095
Page 3

Quick Table of Contents
g
g
g
g
g
g
g
g
g
g
g
g
g
g
Part 1: Getting Started 1
Operatin
Notices 1
How to Use the Manual 9
Chapter 1 Installing and Setting up the Machine 11
Chapter 2 Gettin
to Know the Machine 29
Chapter 3 Job Status and Memory 41
Co
tents
n
Part 2: Copyin
Chapter 4 Copyin
Part 3: Faxin
Chapter 5 Dialin
Chapter 6 Sendin
Chapter 7 Receivin
Chapter 8 Pro
Chapter 9 Pollin
47
a Document 47
53
Methods 53
a Fax 61
a Fax 77
ramming the Fax Phonebook 89
- Retrieving Remote Documents 101
Chapter 10 Mailbox 109
Chapter 11 Printing Reports 115
Part 4: PC Connectivity 129
Chapter 12 PC Connectivity Software 129
Chapter 13 Printin
Chapter 14 Usin
from the PC 137
the Machine on a Network 141
Part 5: Supervisor Functions 143
Chapter 15 Accessin
the Supervisor Menu 143
Part 6: Technical Information 159
Chapter 16 Troubleshootin
and Maintenance 159
Chapter 17 Specifications 183
Index 193
iii
Page 4

iv
Konica Fax 9825 User’s Manual
Page 5

Detailed Contents
g
Co
Contents
Operating Notices 1
Safety . . . . . . . . . . . . . . . . . . . . . . . . . . . . . . . . . . . . . . . . . . . . 6
How to Use the Manual 9
tents
n
Chapter 1: Installin
Where to Install. . . . . . . . . . . . . . . . . . . . . . . . . . . . . . . . . . . . 11
Unpacking. . . . . . . . . . . . . . . . . . . . . . . . . . . . . . . . . . . . . . . . 12
What You May Need To Install. . . . . . . . . . . . . . . . . . . . . . . . 13
Konica Fax 9825 Backup Batteries . . . . . . . . . . . . . . . . . . . . 13
Setting up the Konica Fax 9825 . . . . . . . . . . . . . . . . . . . . . . . 13
Loading Paper . . . . . . . . . . . . . . . . . . . . . . . . . . . . . . . . . . . .17
Telephone Line Connections . . . . . . . . . . . . . . . . . . . . . . . . . 21
Installing the Second Paper Cassette . . . . . . . . . . . . . . . . . . 23
and Setting up the Machine 11
Chapter 2: Getting to Know the Machine 29
Machine Overview . . . . . . . . . . . . . . . . . . . . . . . . . . . . . . . . . 29
Hardware Features. . . . . . . . . . . . . . . . . . . . . . . . . . . . . . . . . 30
Control Panel . . . . . . . . . . . . . . . . . . . . . . . . . . . . . . . . . . . . . 33
Konica Fax 9825 Control Panel Keys. . . . . . . . . . . . . . . . . . . 34
Using the Machine Menu . . . . . . . . . . . . . . . . . . . . . . . . . . . . 36
Help Using the Menus . . . . . . . . . . . . . . . . . . . . . . . . . . . . . .37
Konica Fax 9825 Menus. . . . . . . . . . . . . . . . . . . . . . . . . . . . . 38
Multi-Access. . . . . . . . . . . . . . . . . . . . . . . . . . . . . . . . . . . . . . 40
Chapter 3: Job Status and Memory 41
Document Memory. . . . . . . . . . . . . . . . . . . . . . . . . . . . . . . . . 41
Idle Status. . . . . . . . . . . . . . . . . . . . . . . . . . . . . . . . . . . . . . . . 41
Job Status. . . . . . . . . . . . . . . . . . . . . . . . . . . . . . . . . . . . . . . . 42
Printing the First Page of a Pending Job . . . . . . . . . . . . . . . . 43
Canceling a Pending Job . . . . . . . . . . . . . . . . . . . . . . . . . . . . 43
Clearing the Memory . . . . . . . . . . . . . . . . . . . . . . . . . . . . . . . 44
If Memory is Full. . . . . . . . . . . . . . . . . . . . . . . . . . . . . . . . . . . 44
Chapter 4: Copying a Document 47
Load a Document. . . . . . . . . . . . . . . . . . . . . . . . . . . . . . . . . .47
Copying Documents. . . . . . . . . . . . . . . . . . . . . . . . . . . . . . . . 47
Copy Features . . . . . . . . . . . . . . . . . . . . . . . . . . . . . . . . . . . . 48
v
Page 6

Co
ntent
Detailed Contents
s
Chapter 5: Dialing Methods 53
Keypad Dialing (Control Panel) . . . . . . . . . . . . . . . . . . . . . . . 53
One-Touch Dialing . . . . . . . . . . . . . . . . . . . . . . . . . . . . . . . . . 53
Speed Dialing. . . . . . . . . . . . . . . . . . . . . . . . . . . . . . . . . . . . .53
Manual Dialing . . . . . . . . . . . . . . . . . . . . . . . . . . . . . . . . . . . . 54
Redialing. . . . . . . . . . . . . . . . . . . . . . . . . . . . . . . . . . . . . . . . . 55
Last Number Redialing. . . . . . . . . . . . . . . . . . . . . . . . . . . . . . 55
Group Dial . . . . . . . . . . . . . . . . . . . . . . . . . . . . . . . . . . . . . . . 56
Linked Dialing. . . . . . . . . . . . . . . . . . . . . . . . . . . . . . . . . . . . . 57
Pauses and other Dial Options. . . . . . . . . . . . . . . . . . . . . . . . 57
Chapter 6: Sending a Fax 61
Loading a Document . . . . . . . . . . . . . . . . . . . . . . . . . . . . . . . 61
Automatic Send . . . . . . . . . . . . . . . . . . . . . . . . . . . . . . . . . . .62
Broadcast Send . . . . . . . . . . . . . . . . . . . . . . . . . . . . . . . . . . . 63
Scheduling Faxes for a Delayed Start . . . . . . . . . . . . . . . . . . 65
Sending Attachments . . . . . . . . . . . . . . . . . . . . . . . . . . . . . . . 66
Manual Send with Voice Contact . . . . . . . . . . . . . . . . . . . . . . 66
Canceling a Transmission . . . . . . . . . . . . . . . . . . . . . . . . . . . 67
Communication Features . . . . . . . . . . . . . . . . . . . . . . . . . . . . 68
Outgoing Faxes Menu . . . . . . . . . . . . . . . . . . . . . . . . . . . . . .71
vi
Chapter 7: Receiving a Fax 77
Answering Fax Calls. . . . . . . . . . . . . . . . . . . . . . . . . . . . . . . . 77
Receive To Memory . . . . . . . . . . . . . . . . . . . . . . . . . . . . . . . . 82
Confidential Receive. . . . . . . . . . . . . . . . . . . . . . . . . . . . . . . . 82
Reducing Faxes to Fit. . . . . . . . . . . . . . . . . . . . . . . . . . . . . . . 83
Fax Copies, Collation, and Paper Trays. . . . . . . . . . . . . . . . . 84
Pager Notification. . . . . . . . . . . . . . . . . . . . . . . . . . . . . . . . . .86
Chapter 8: Programming the Fax Phonebook 89
What is the Phonebook? . . . . . . . . . . . . . . . . . . . . . . . . . . . . 89
Creating Individual Cell Entries . . . . . . . . . . . . . . . . . . . . . . . 90
Groups . . . . . . . . . . . . . . . . . . . . . . . . . . . . . . . . . . . . . . . . . . 95
Programmable One-Touch Keys . . . . . . . . . . . . . . . . . . . . . . 97
Chapter 9: Polling - Retrieving Remote Documents 101
Preparing a Document to be Polled (Poll-Out). . . . . . . . . . . 101
Retrieving Remote Documents (Poll-In). . . . . . . . . . . . . . . . 103
Delayed Polling (Poll-In). . . . . . . . . . . . . . . . . . . . . . . . . . . . 104
Continuous Polling (Poll-In) . . . . . . . . . . . . . . . . . . . . . . . . . 105
Cancel a Polling Job. . . . . . . . . . . . . . . . . . . . . . . . . . . . . . . 106
Konica Fax 9825 User’s Manual
Page 7

Detailed Contents
Co
Retrieving Confidential Documents with DTMF . . . . . . . . . . 106
Chapter 10: Mailbox 109
Mailbox Setup. . . . . . . . . . . . . . . . . . . . . . . . . . . . . . . . . . . . 109
Store Document in Local Mailbox. . . . . . . . . . . . . . . . . . . . . 110
Print Mailbox Content. . . . . . . . . . . . . . . . . . . . . . . . . . . . . . 111
Erase Mailbox Content. . . . . . . . . . . . . . . . . . . . . . . . . . . . . 111
Mailboxes and DTMF . . . . . . . . . . . . . . . . . . . . . . . . . . . . . . 111
Chapter 11: Printing Reports 115
Report Overview. . . . . . . . . . . . . . . . . . . . . . . . . . . . . . . . . . 115
Report Header . . . . . . . . . . . . . . . . . . . . . . . . . . . . . . . . . . . 116
Fax Reports . . . . . . . . . . . . . . . . . . . . . . . . . . . . . . . . . . . . . 117
Usage Reports . . . . . . . . . . . . . . . . . . . . . . . . . . . . . . . . . . . 125
Machine Status Reports. . . . . . . . . . . . . . . . . . . . . . . . . . . . 127
Chapter 12: PC Connectivity Software 129
Hardware Requirements & Installation. . . . . . . . . . . . . . . . . 129
Software Requirements & Installation . . . . . . . . . . . . . . . . . 129
Konica Fax 9825 Configuration Program . . . . . . . . . . . . . . . 131
Scanning Documents Using Twain. . . . . . . . . . . . . . . . . . . . 134
Sending Faxes Via Class 1 or 2 Software . . . . . . . . . . . . . . 135
tents
n
Chapter 13: Printing from the PC 137
Parallel Cable. . . . . . . . . . . . . . . . . . . . . . . . . . . . . . . . . . . . 137
Installing the Konica Fax 9825 Print Driver . . . . . . . . . . . . . 137
Printing with the Konica Fax 9825 . . . . . . . . . . . . . . . . . . . . 137
Printer Menu. . . . . . . . . . . . . . . . . . . . . . . . . . . . . . . . . . . . . 137
Using the Manual Feeder. . . . . . . . . . . . . . . . . . . . . . . . . . . 140
Chapter 14: Using the Machine on a Network 141
Network Faxing. . . . . . . . . . . . . . . . . . . . . . . . . . . . . . . . . . . 141
Network Scanning . . . . . . . . . . . . . . . . . . . . . . . . . . . . . . . . 142
Chapter 15: Accessing the Supervisor Menu 143
Time and Date . . . . . . . . . . . . . . . . . . . . . . . . . . . . . . . . . . . 143
Setting the Machine ID. . . . . . . . . . . . . . . . . . . . . . . . . . . . . 144
Speed Dial Key. . . . . . . . . . . . . . . . . . . . . . . . . . . . . . . . . . . 145
Pause Key . . . . . . . . . . . . . . . . . . . . . . . . . . . . . . . . . . . . . .146
LCD Contrast . . . . . . . . . . . . . . . . . . . . . . . . . . . . . . . . . . . . 147
Listen to Dial. . . . . . . . . . . . . . . . . . . . . . . . . . . . . . . . . . . . . 147
Button Sound . . . . . . . . . . . . . . . . . . . . . . . . . . . . . . . . . . . . 148
Alarm Sound. . . . . . . . . . . . . . . . . . . . . . . . . . . . . . . . . . . . . 149
vii
Page 8

Co
ntent
Detailed Contents
s
Ring Sound. . . . . . . . . . . . . . . . . . . . . . . . . . . . . . . . . . . . . . 149
Mail/Poll/Relay Menu . . . . . . . . . . . . . . . . . . . . . . . . . . . . . . 150
Timestamp . . . . . . . . . . . . . . . . . . . . . . . . . . . . . . . . . . . . . . 150
Language . . . . . . . . . . . . . . . . . . . . . . . . . . . . . . . . . . . . . . . 151
Access Menu . . . . . . . . . . . . . . . . . . . . . . . . . . . . . . . . . . . . 151
Remote Test. . . . . . . . . . . . . . . . . . . . . . . . . . . . . . . . . . . . . 156
Chapter 16: Troubleshooting and Maintenance 159
Self Test . . . . . . . . . . . . . . . . . . . . . . . . . . . . . . . . . . . . . . . . 159
Solving Problems with Your Machine. . . . . . . . . . . . . . . . . . 160
Problem Checklist. . . . . . . . . . . . . . . . . . . . . . . . . . . . . . . . . 171
Messages. . . . . . . . . . . . . . . . . . . . . . . . . . . . . . . . . . . . . . . 176
Error Codes . . . . . . . . . . . . . . . . . . . . . . . . . . . . . . . . . . . . . 177
Maintaining Your Konica Fax 9825. . . . . . . . . . . . . . . . . . . . 178
Service Information. . . . . . . . . . . . . . . . . . . . . . . . . . . . . . . . 180
Shipping Your Konica Fax 9825. . . . . . . . . . . . . . . . . . . . . . 180
Consumables and Replacement Parts. . . . . . . . . . . . . . . . . 181
Chapter 17: Specifications 183
Index 193
viii
Konica Fax 9825 User’s Manual
Page 9

1Getting Started
Operating Notices
Your machine and supplies have been designed and tested to meet strict safety
requirements. These include safety agency examination and approval, and compliance
to established environmental standards. Please read the following instructions and refer
to them as needed to ensure the continued safe operation of your machine.
Follow all warnings and instructions marked on, or supplied with, the product.
Unplug this machine from the wall outlet before cleaning. Always use materials
specifically designated for this machine. Use of other materials may result in poor
performance and could create a hazardous situation.
Do not use this machine near water, wet locations, or outdoors.
Do not place this machine on an unstable cart, stand, or table. The machine may fall,
causing personal injury or serious damage to the machine.
This machine is equipped with a 3-wire, grounding type plug (that is, a plug having a
third grounding pin). This plug will only fit into a grounding type power outlet. This is a
safety feature. To avoid the risk of electric shock, contact your electrician to replace the
receptacle if you are unable to insert the plug into the outlet. Never use a ground
adapter plug to connect the machine to a power source receptacle that lacks a ground
connection terminal.
This machine should be operated from the type of power source indicated on the
marking label. If you are not sure of the type of power available, consult your local power
company.
Do not allow anything to rest on the power cord. Do not locate the machine where
persons will step on the cord.
Use of an extension cord with this machine is not recommend or authorized. Users
should check building codes and insurance requirements if an extension cord is to be
used. Ensure that the total of the ampere ratings does not exceed the extension cord
ampere rating. Make sure that the total of all products plugged into the wall outlet does
not exceed the outlet rating.
Slots and openings in the cabinet and in the back and bottom of the machine are
provided for ventilation. To ensure reliable operation of the machine and to protect it
from overheating, these openings must not be blocked or covered. The machine should
never be placed near or over a radiator or heat register. This machine should not be
placed in a built-in installation unless proper ventilation is provided.
Never spill liquid of any kind on the machine.
Never remove any covers or guards that require a tool for removal. There are no
operator serviceable areas within these covers.
1
Page 10

Never defeat interlock switches. Machines are designed to not allow operator access to
unsafe areas. Covers, guards, and interlock switches are provide to ensure that the
machine will not operate with covers opened.
WARNING: During normal operation, this machine will produce ozone gas. The amount
of ozone produced does not present a hazard to the operator. However, it is advisable
that the machine be operated in a well-ventilated area.
Data Coupler Information
The Konica Fax 9825 machine contains an internal data coupler. Its use is restricted by
the FCC (Federal Communication Commission). To comply with the FCC rules, you
must carefully read and follow the instructions listed below.
This equipment complies with Part 68 of the FCC rules. On the rear of this equipment
is a label that contains, among other information, the FCC registration number and the
Ringer Equivalence Number (REN). If requested, provide this information to your
telephone company.
The REN is useful to determine the quantity of devices you may connect to your
telephone line and still have all of those devices ring when your number is called. In
most, but not all areas, the sum of the RENs of all devices should not exceed five (5).
To be certain of the number of devices you may connect to your line, as determined by
the REN, you should call your local telephone company to determine the maximum
REN for your calling area.
WARNING: Ask your local telephone company for the modular jack type installed on
your line. Connecting this machine to an unauthorized jack can severely damage
telephone company equipment. You, not Konica, assume all responsibility and/or
liability for any damage caused by the connection of this machine to an unauthorized
jack.
You may safely connect the machine to the following standard modular jack: USOC RJ11C. Use the standard line cord (with modular plugs) provided with the installation kit to
connect it.
Do not connect this machine to a party or coin operated phone line.
Repairs to the machine should only be made by Konica or an authorized Konica service
agency or dealer. This applies at any time during or after the service warranty period. If
unauthorized repair is performed, the remainder of the warranty period is null and void.
If you find the telephone line is damaged or the telephone company notifies you that
your machine is causing damage, disconnect the machine from the telephone line and
call for service. Do not reconnect the machine until necessary repairs are made.
2
Konica Fax 9825 User’s Manual
Page 11

The telephone company, where practical, will notify you when they need to temporally
disconnect service. However, if action is reasonable and necessary, but prior notice is
not practical, they may still temporarily disconnect your service. In such cases they
must:
♦ Immediately notify you of their temporary action.
♦ Reconnect service when the source of damage is removed.
♦ Inform you of your rights to bring a complaint to the FCC under FCC rules.
The telephone company may make changes to its communications facilities,
equipment, operations, or procedures. Such action must be reasonable, required in the
operation of their business, and consistent with FCC rules. They must give your prior
written notification if the changes can:
♦ Make your machine incompatible with their equipment,
♦ Require modification or alteration of the machine,
♦ Otherwise physically affect performance of the machine.
Radio Frequency Interference Statement
This equipment has been tested and found to comply with the limits for a Class A digital
device, pursuant to Part 15, Subpart B of the FCC Rules. These limits are designed to
provide reasonable protection against harmful interference when the equipment is
operated in a residential environment. This equipment generates, uses, and can radiate
radio frequency energy. If not installed and used in accordance with the instruction
manual, it may cause harmful interference to radio communications. However, there is
no guarantee that interference will not occur in a particular installation. If this equipment
does cause harmful interference to radio or television reception, which can be
determined by turning the equipment off and on, the user is encouraged to try to correct
the interference by one or more of the following measures:
♦ Reorient or relocate receiving antenna.
♦ Increase the separation between the equipment and receiver.
♦ Connect the equipment into an outlet on a circuit different from that to which the
receiver is connected.
♦ Consult the dealer or an experienced radio/TV technician for help.
Operating Notices
Modifications
Changes or modifications not expressly approved by Konica Incorporated could void
the user’s authority to operate the equipment.
3
Page 12

Telephone Consumer Protection Act of 1991
The Telephone Consumer Protection Act of 1991 makes it unlawful for any person to
use a computer or other electronic device to send any message via a telephone fax
machine unless such message clearly contains, in a margin at the top or the bottom of
each transmitted page or on the first page of the transmission, the date and time it is
sent and an identification of the business or other entity, or other individual sending the
message, and the telephone number of the sending machine or such business, other
entity, or individual.
To comply with this law, you must enter the following information in your fax unit:
♦ Date and time
♦ Name and telephone number which identify the source of your fax transmission.
Canadian Certification
The Canadian Department of Communications Label on the machine identifies certified
equipment. This certification means the equipment meets certain telecommunications
networks protective, operational and safety requirements. The Department does not
guarantee the equipment will operate to the user’s satisfaction.
Before installing this equipment, users should ensure that it is permissible to be
connected to the facilities of the local telecommunications company. The equipment
must also be installed using an acceptable method of connection. In some cases, the
company’s inside wiring associated with a single line individual service may be
extended by means of a certified connector assembly (telephone extension cord).
The customer should be aware that compliance with the above conditions may not
prevent degradation of service in some situations.
Repairs to certified equipment should be made by an authorized Canadian
maintenance facility designated by the supplier. Any repairs or alterations made by the
user to this equipment, or equipment malfunctions, may give the telecommunications
company cause to request the user to disconnect the equipment.
Users should ensure for their own protection that the electrical ground connections of
the power utility, telephone lines and internal metallic water pipe system, if present, are
connected together. This precaution may be particularly important in rural areas.
WARNING:
should contact the appropriate electric inspection authority or electrician, as
appropriate.
The load number (LN) assigned to each machine device denotes the percentage of the
total load to be connected to a telephone loop which is used by the device, to prevent
over loading. The load number is 5. The termination on a loop may consist of any
combination of devices subject only to the requirement that the total of the load numbers
of all the devices does not exceed 100.
Users should not attempt to make such connections themselves, but
4
Konica Fax 9825 User’s Manual
Page 13

This digital apparatus does not exceed the Class A limits for radio noise emissions from
digital apparatus set out in the Radio Interference Regulations of the Canadian
Department of Communications.
Cet appareil numérique est conforme aux limites d’émission de bruits radioélectriques
pour les appareils de classe A stipulées dans le Règlement sur le brouillage
radioélectrique du ministère des Communications du Canada.
Australian Certification
♦ The CE will not cause harm or damage to a PTN if any of the following events
occurs, or a consequential event occurs:
(a) failure or partial failure of any mechanical or electrical component in the CE; or
(b) failure or partial failure of any power supplies to the CE (including both an AC
mains supply and a local battery supply); or
(c) incorrect manual operation of the CE; or
(d) operation of the CE outside the operating range of voltage and environmental
conditions specified by the manufacturer.
♦ The line cord and plug meet the requirements of TS008 [5].
♦ This device may be subject to ringing or bell tinkle when calls are made from another
device on the same line.
New Zealand Certification
Pursuant to PTC 200 clause 2.2, this equipment has been tested and found to comply
with PTC 101 Parts A & B. Software revision level 1.30, residing in U12, was used
during the testing and evaluation of the equipment.
Pursuant to PTC 200 clause 8.1.7, this equipment shall not be set up to make automatic
calls to the telecom “111” Emergency Service. Neither should this equipment, under
any circumstances, be used in any way that may constitute a nuisance to other Telecom
customers. Pursuant to clause 7.5.2(4), this device may be subject to ringing or bell
tinkle when calls are made from another device on the same line. If this occurs, the
problem SHOULD NOT be referred to the Telecom Faults Service. This equipment
does not perform LD dialling as Telecom now “strongly discourages decadic signalling”
(c5.4.1(1)).
Pursuant to PTC 200, clause 5.6.5(3), access to the PSTN from a Centrex extension
usually involves the use of a prefix digit ‘1’ in exactly the same way as that commonly
used on PABX extensions. Regarding Non-code Access, users should be aware that
the number displayed on the ‘header’ of the fax transmission may not be identical to that
of the originator due to the ‘non-code access’ facility provided by some carriers (see
also clause 5.6.3).
Operating Notices
5
Page 14

Safety
g
Installation Hints
Toner Cartridge and Image Drum Unit Handlin
Safety
♦
Install your Konica Fax 9825 in a dust-free location away from direct sunlight.
♦
Do not plug your Konica Fax 9825 into a power source shared by noise-producing
equipment (i.e., air conditioners, etc.).
♦
Leave electronic adjustments to authorized service personnel.
♦
Leave unused toner cartridges and image drum units in their packages until needed.
When replacing a cartridge or unit, re-use the packaging to dispose of the old
cartridge or unit.
♦
Do not expose these components to light for long periods of time. Never expose the
green drum (inside the electrophotographic image drum unit) to direct sunlight.
♦
Always hold the image drum unit by the ends - never by the middle. Never touch the
green drum inside the unit.
♦
Use care when removing the toner cartridge. Do not let it touch your clothing or
porous materials. The toner powder can cause permanent stains.
♦
Small amounts of toner can be readily removed with soap and cold water. Using
heated water will make removing the toner much more difficult.
Toner First Aid Measures
EYE: Flush eyes with plenty of water. If symtoms occur, get medical attention.
SKIN: Wash with water and mild soap.
INGESTION: Wash out mouth with water. Drink one or two glasses of water. If
symptoms occur, get medical attention.
INHALATION
: Remove victim to fresh air. If symptoms occur, get medical
attention.
Operation and Maintenance
♦
Use a dry cloth to clean the control panel and the main body of the unit.
♦
Do not lubricate moving parts yourself.
♦
Pull out the AC plug before trying to remove any objects that may have fallen into
the machine.
♦
Immediately disconnect the Konica Fax 9825 if it becomes physically damaged and
arrange for its repair or disposal.
6
Konica Fax 9825 User’s Manual
Page 15

♦
When relocating your Konica Fax 9825, always disconnect the telephone line before
disconnecting the power cord; then reconnect the power cord.
♦
This machine is not intended to be used in parallel with any other telephone devices.
European Safety Instructions
1
Carefully read all of these instructions.
2
Save instructions for later reference.
3
Follow all warnings and instructions which are marked on the product.
4
Unplug this product from the main power and telephone line socket before
cleaning. Use only a damp cloth for cleaning, no solvents or aerosols.
5
Do not use this product near water, wet locations or outdoors.
6
Do not place this product on an unsuitable stand or table. The product could fall
causing personal injury or serious damage to the machine.
7
Do not cover any slots or openings used for ventilation. Do not place the product
near a heater.
8
This product should be operated from the type of power source indicated on the
marking label. If you are not sure of the type of power available, consult your dealer
or local electricity board or power company.
9
This product is equipped with a 3-wire grounding plug (i.e. a plug having a third
grounding pin). This plug will only fit into a grounding (earth) type power outlet. This
is a safety feature. If you are unable to insert the plug into the outlet, contact your
electrician in order to replace your obsolete socket. You risk electric shock if you
attempt to defeat the purpose of an earthed plug.
10
Do not allow anything to rest on the power cord. Do not locate this product where
persons will walk on the cord.
11
If an extension cord is used with this product, make sure that the total ampere
ratings on the products plugged into the extension cord does not exceed the extension cord ampere rating. Also, make sure that the total current of all products
plugged into the wall or floor socket does not exceed the socket rating.
12
Never push objects of any kind into the product through cabinet slots as they may
touch dangerous voltage points or short out parts that could result in risk of fire or
electric shock. Never spill liquid of any kind on the product.
13
Do not attempt to service this product yourself, as opening or removing covers may
expose you to dangerous voltage points or other risks. Refer all machine maintenance to authorized service personnel.
14
Use of an extension cord with this machine is not recommended or authorized.
Users should check building codes and insurance requirements if an extension
cord is to be used.
15
Never remove any covers of guards that require a tool for removal. There are no
operator serviceable areas within these covers.
Safety
Operating Notices
7
Page 16

Safety
16
Unplug this product from the main power and telephone line sockets, and refer
servicing to qualified service personnel under the following conditions:
♦
When the main power cord is frayed or the plug is damaged.
♦
If liquid has been spilled into the product.
♦
If the product has been exposed to rain or water.
♦
If the product does not operate normally when the operating instructions are
followed. Adjust only those controls that are covered by the operating instructions
since improper adjustments of those controls may result in damage and will often
require extensive work by a qualified technician to restore the product to normal
operation.
♦
If the product has been dropped or the cabinet has been damaged.
♦
If the product exhibits a distinct change in performance, indicating a need for
service.
WARNING:
of ozone does not present a hazard to the operator. However, it is advisable that the
machine be operated in a well ventilated area.
CAUTION:
the manufacturer. Dispose of used batteries according to the manufacturer’s
instructions.
During normal operation, this machine will produce ozone gas. The amount
Replace batteries only with the same or equivalent type recommended by
CE Mark
The Konica Fax 9825 complies with the EU recommendations covering the CE mark.
More specifically it complied with the following standards:
EN55022 EN50082-1 EN60950 EN41003
following the provisions of Low Voltage Directive 73/23/EEC and EMC 91/263/EEC
8
Konica Fax 9825 User’s Manual
Page 17

How to Use the Manual
This manual describes how to set up, operate and maintain the Konica Fax
9825. To ensure proper operation, be sure to become familiar with the contents
of this manual before using the machine.
Information about the different functions of the Konica Fax 9825 are grouped
together in this manual. Some functions are covered by a single chapter,
others by a number of chapters.
Part 1: Getting Started covers installation and setup and provides an
overview of the Konica Fax 9825.
Part 2: Copying explains how to copy documents using the Konica Fax
9825.
Part 3: Faxing explains how to send and receive faxes. In addition, it
explains how to use the phonebook, polling, mailboxes, and reports about
faxing and machine status.
Part 4: PC Connectivity explains how to use the Konica Fax 9825 with a
PC as a printer, scanner, and PC fax machine.
Part 5: Supervisor Functions covers functions that can be made accessible only to a supervisor.
Part 6: Technical Information provides troubleshooting techniques and
technical information about the machine.
When procedures in this manual instruct you to enter data, press the keys on
the control panel keypad to enter the characters. When a procedure instructs
you to press a specific key, that key is called out in bold letters. For example,
a procedure step may instruct you to “Press Menu”.
Italic text
denotes references to sections of the manual.
All Special Information Notes will be in italics and will appear with the
checkmark symbol.
9
Page 18

The LCD panel displays information for the user. This manual presents
displayed information as a sample of what you may experience.
Here is an example of an LCD display:
_______Time________
Time display:
¾
12 Hour
Press Æ, then ENTER
When entering data into the LCD window you may be instructed to use the Å
or Æ keys which are located directly beneath the LCD window. You will use
these keys to toggle certain menu selections.
FastAccess
When a particular menu feature or option is described throughout the manual
it will be accompanied by a FastAccess code. This code simply represents the
sequential key actions needed to access that particular menu.
For example, the FastAccess code to access the Fax Phonebook menu to add
an Individual phone number is
this code you would press the
on the numeric keypad.
M231
. The M stands for the
Menu
key then enter the number sequence
Menu
key. To use
231
10
Konica Fax 9825 User’s Manual
Page 19

Chapter 1
Installing and Setting up
1
the Machine
This chapter includes the basic procedures for setting up the machine.
Where to Install
Factors to consider when selecting the area in which you wish to set up the
Konica Fax 9825 are shown below:
♦ Install your machine in a dust-free location away from direct sunlight.
♦ Be sure to allow several inches on each side of the fax machine to ensure
adequate ventilation.
♦ Make sure that both power and telephone outlets are available nearby.
♦ Make sure that the PC which will be connected is nearby.
♦ Choose an area where the humidity is between 20% and 80%, and where
the temperature is between 10C/50F and 32C/90F.
11
Page 20
Installing and Setting up the Machine
g
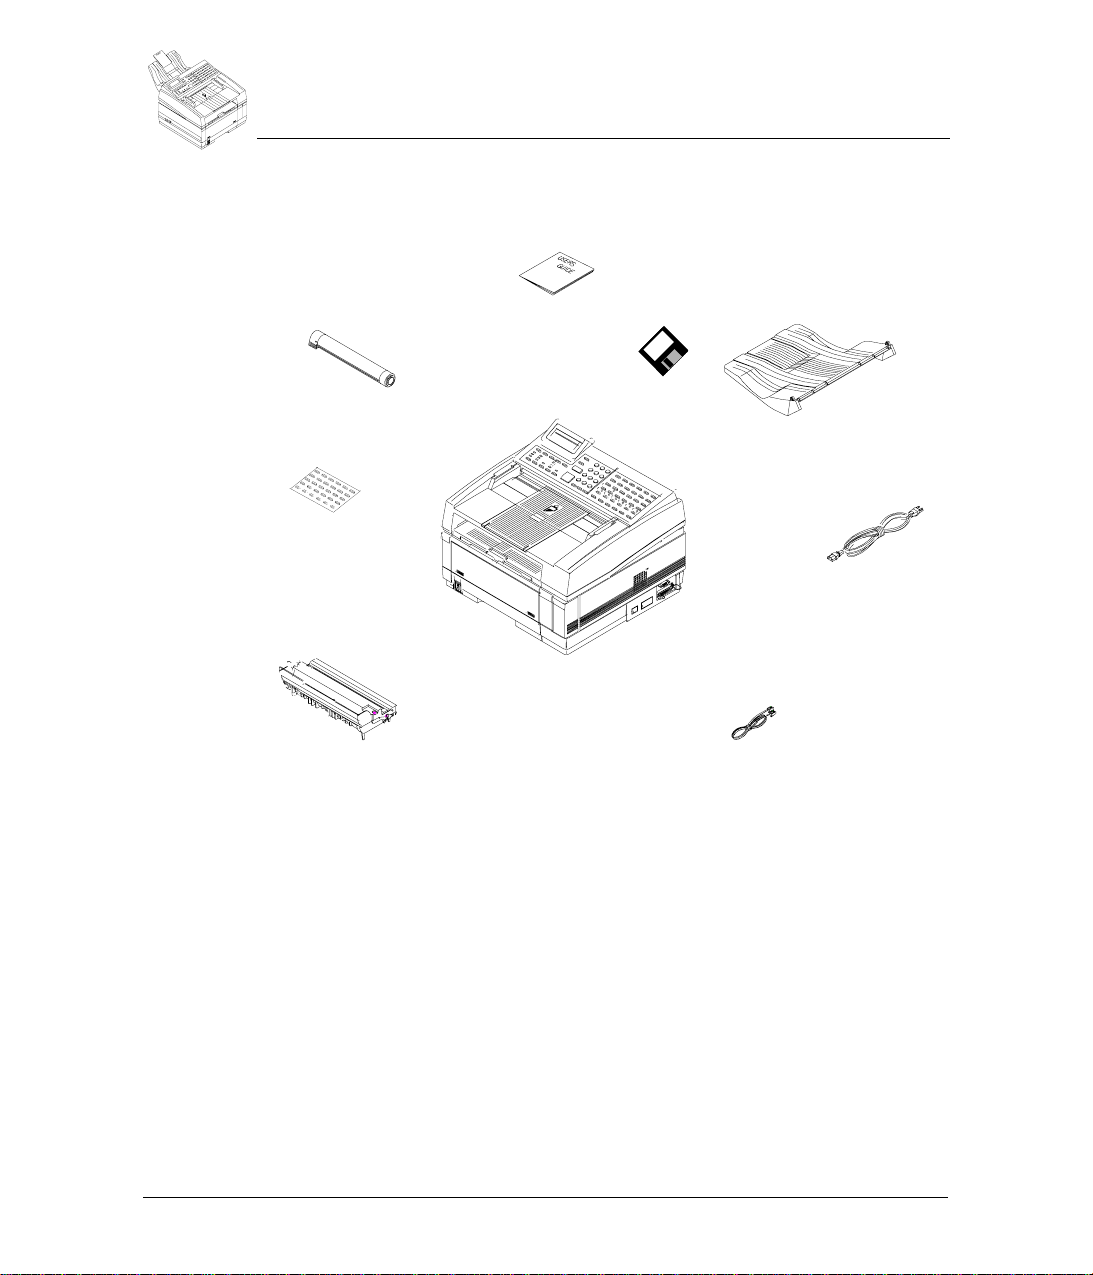
Unpacking
Unpackin
When unpacking the equipment, you should find the following items:
Konica Fax Toner
Cartridge
Konica Fax 9825 User Manual
(this manual)
2 Disks for PC
Connectivity
Document
Stacker
One-Touch
Labels (2)
Konica Fax 9825
Multifunction Machine
Image Drum Unit
(installed in machine)
♦ Konica Fax 9825 Multifunction Machine
♦ Konica Fax 9825 User Manual (this manual)
♦ Image Drum Unit (installed in machine)
♦ Konica Fax Toner Cartridge
♦ Document Stacker
♦ Power Cord
♦ Telephone Cord
♦ 2 Disks for PC Connectivity
♦ One-Touch Labels (2)
Power Cord
Telephone Cord
12
Konica Fax 9825 User’s Manual
Page 21

Installing and Setting up the Machine
What You May Need To Install
What You May Need To Install
If you wish to use the Konica Fax 9825 for PC printing, PC faxing, or scanning
to the PC, you will need to provide a parallel cable. This cable should be less
than 10 feet in length with a Centronics connector at one end (the Konica Fax
9825 end) and normally a 25-pin male connector at the other end (PC end).
Konica Fax 9825 Backup Batteries
One coin-cell battery (3 volts) backs up the user definable settings and is
known as the SRAM battery. This battery should last for the life of the machine.
The Konica Fax 9825 protects the document memory for up to one hour during
a power outage or if you need to turn off the machine for any reason. There is
an optional battery that protects the document memory for 72 hours. Contact
a service technician for assistance if you want the optional battery installed.
Setting up the Konica Fax 9825
Here is a checklist when setting up the Konica Fax 9825 for the first time.
Toner Cartridge Handling
Be careful when handling the toner cartridge. Toner is the black powder which
acts as ink for the Konica Fax 9825. Do not let toner spill onto your clothing or
other porous materials. If you do spill toner, small amounts can be removed
from skin or clothing with soap and cold water. Never try to remove toner with
hot water, as this may cause the toner to bond to clothing or skin. .
1
Ensure that the power switch is set to the OFF position (the 0 should be
pressed down.
2
Plug the power cord into the power outlet on the back of the unit. Then plug
the unattached end of the power cord into a grounded AC power outlet.
3
To install the fax phone line, insert one end of the telephone cord into the
LINE terminal located on the back of the unit. Then insert the unattached
end of the telephone cord into your wall telephone jack.
If you want to connect a telephone answering machine on the same line,
see the "
Telephone Line Connections
" section on page 21.
1
13
Page 22
Installing and Setting up the Machine
Setting up the Konica Fax 9825
4
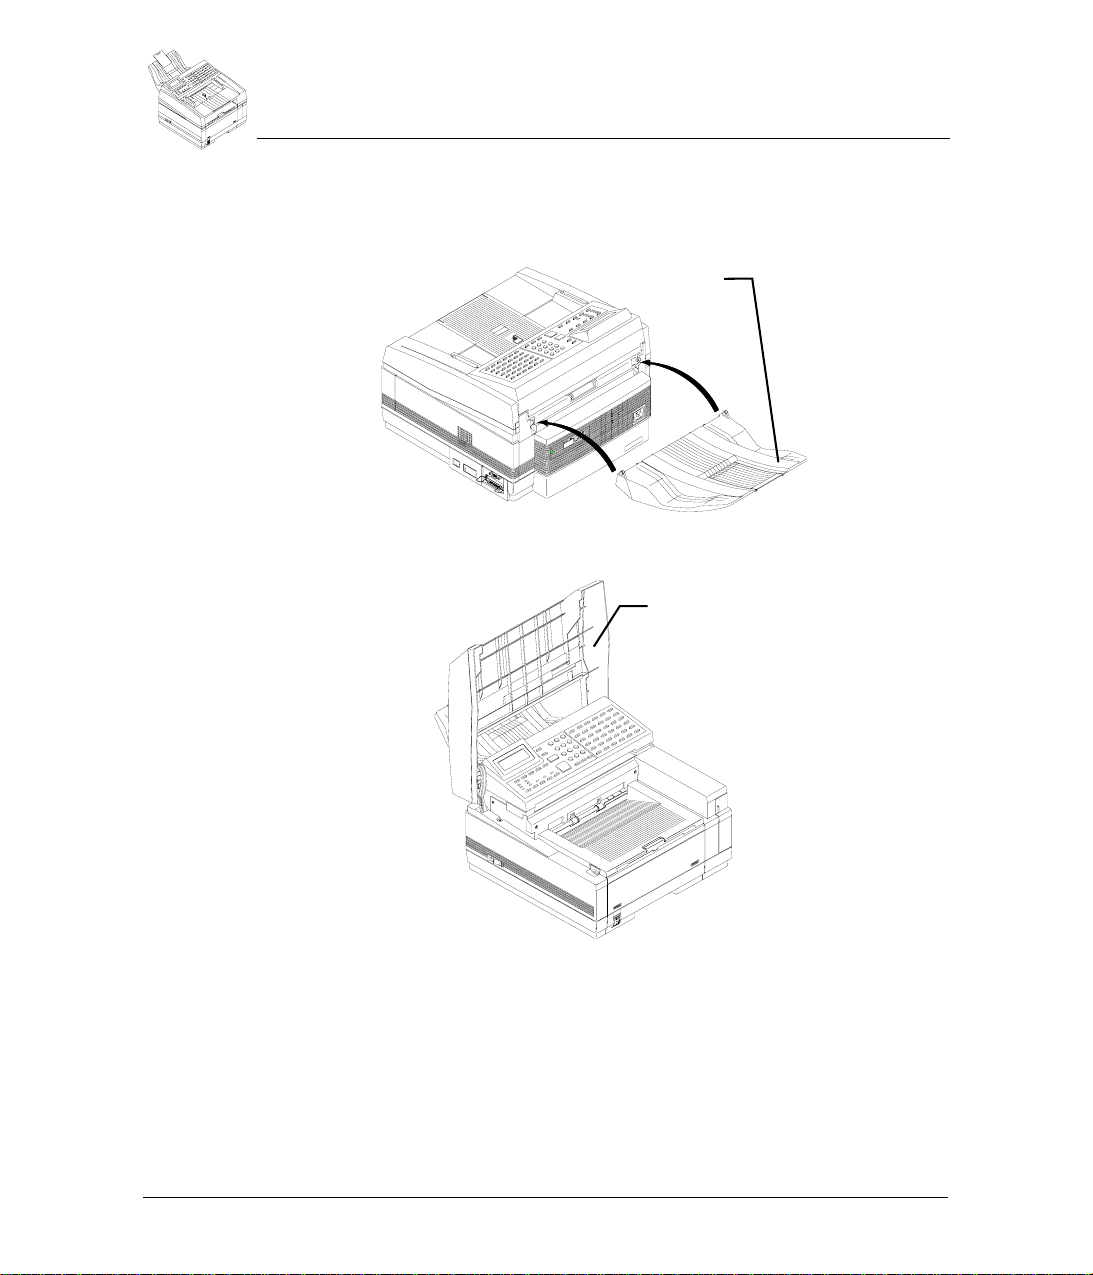
Attach the document stacker to the rear of the unit, above the LINE and
TEL jacks. Slip the document stacker indents over tabs on the unit. You
should feel the document stacker lock into place.
Document
Stacker
5
Lift the document table until it snaps into an upright position.
Document
table
14
Konica Fax 9825 User’s Manual
Page 23
Installing and Setting up the Machine
Setting up the Konica Fax 9825
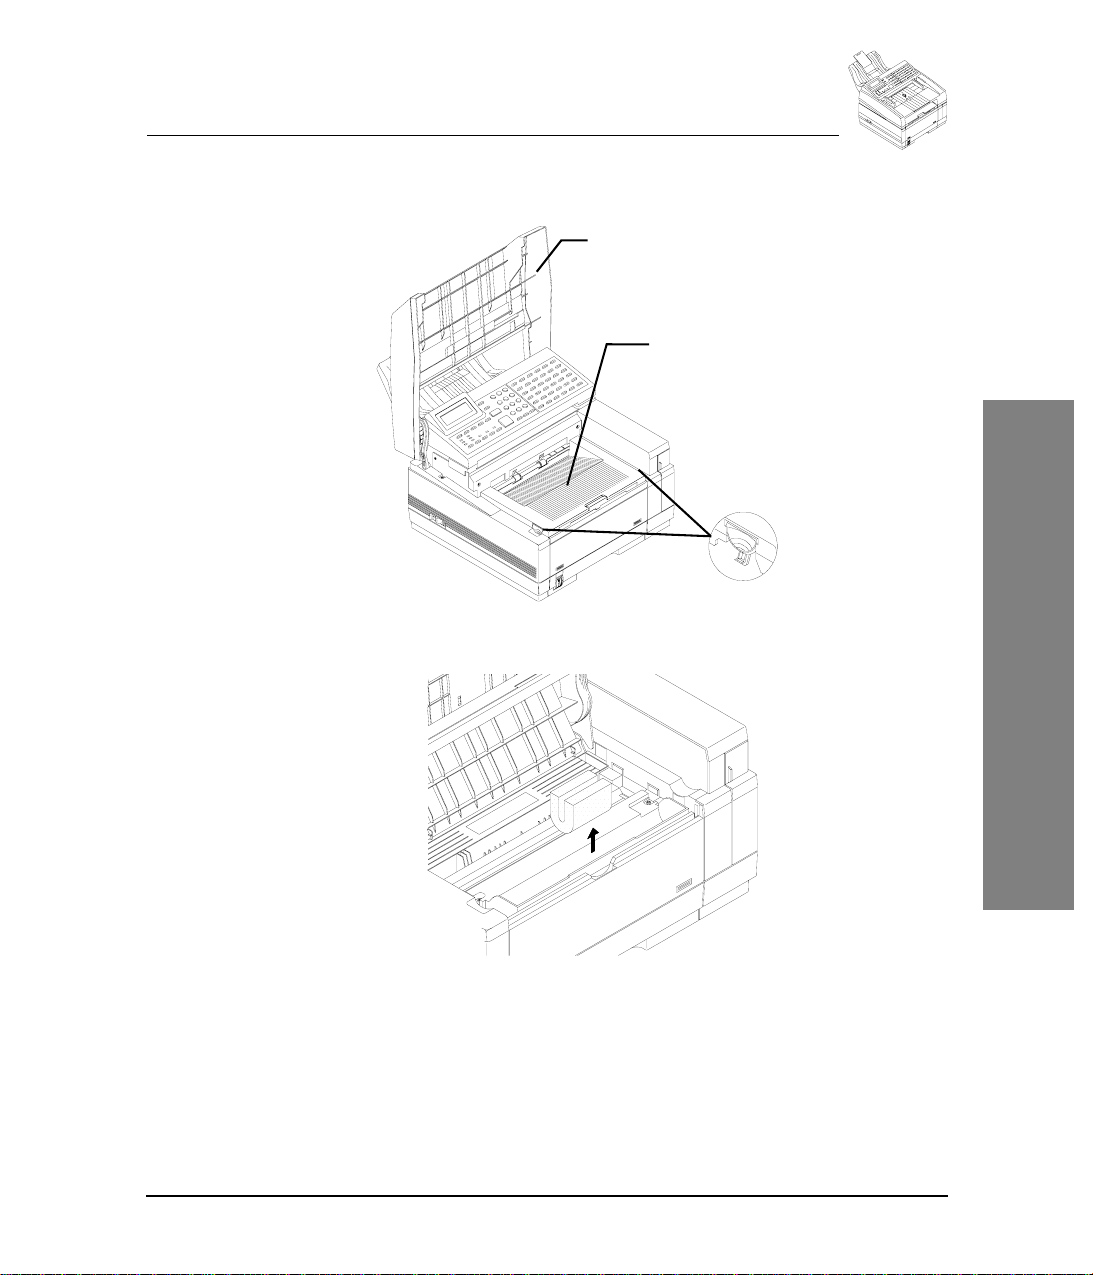
6
Using your index fingers, push in the cover release buttons on the side of
the copy stacker until you hear a click. Then lift the copy stacker.
Document
Table
Copy Stacker
Release
Buttons
7
Remove the protective foam cylinder from the toner well in the image drum
unit.
1
15
Page 24
Installing and Setting up the Machine
Setting up the Konica Fax 9825
8
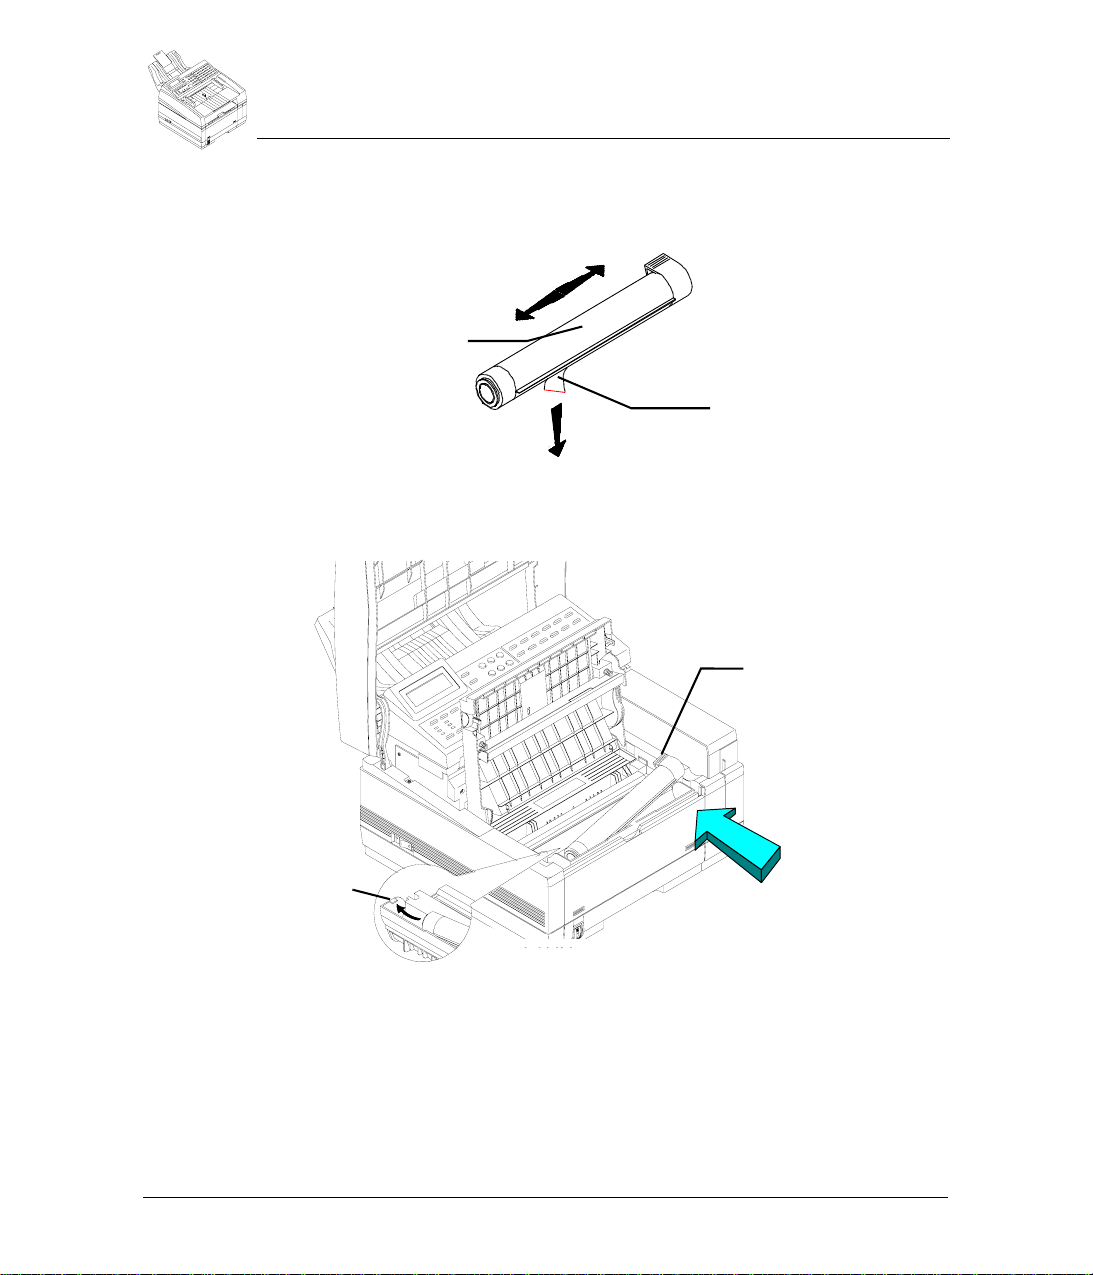
Remove the toner cartridge from its sealed pack and gently shake it from
side to side to ensure even distribution of the toner. Then carefully peel the
white plastic tape from the bottom of the toner cartridge.
Shake the
toner cartridge
from side to side
Remove the tape
9
With the ridged side facing up and the blue lever on your right, insert the
toner cartridge into the image drum unit. Slide the left end of the cartridge
in first, then lower the right end into place.
Push Blue
Lock Lever
in direction
of arrow
to lock in place
16
Tab
10
Once the toner cartridge is in place, push the blue lever all the way forward
(towards the control panel) until it stops to secure it and release the toner.
11
Close the copy stacker and push down until you hear the copy stacker click
into place. Be sure that the cover latches on both sides.
If the copy stacker does not close completely, check to make sure that the
blue lock lever is rotated all the way to the back so that the key on the
bottom of the copy stacker fits squarely in the notch of the blue lever.
Konica Fax 9825 User’s Manual
Page 25

12
Close the document table.
13
If you have the optional second paper cassette, see the "
Second Paper Cassette
14
If you want to use the Konica Fax 9825 with a PC for printing, faxing, or
scanning, using a parallel cable, connect an available parallel (LPT) port
on the PC to the parallel connector on the right side of the Konica Fax
9825. See the "
for more information.
15
Turn the power switch ON (the 1 should be pressed down). Your Konica
Fax 9825 will turn on and begin warming up.
After cycling through the startup routines the menu will display the standby
mode screen. If you encounter any error messages during the startup
routine, see the "
Loading Paper
Most types of paper will work well in your machine, although some variables in
paper composition may affect print quality. Most high-grade photocopying
papers produce good results. The majority of cotton bond papers also yield
excellent results. Test paper you plan to use in the Konica Fax 9825 before
purchasing it in large quantities.
Many papers have a correct side for printing. For the best print quality, check
the label on the end of the ream before removing the paper from the ream. The
correct side may be indicated by an arrow, symbol or wording. Insert the
number of sheets you wish to use with the correct side of the paper facing the
rear of the machine.
Installing and Setting up the Machine
Loading Paper
Installing the
" section on page 23.
Installing the software applications
Messages
" section on page 176.
" section on page 130
1
To load paper in the paper tray:
➙
1
Pull the paper cassette completely out of the Konica Fax 9825.
2
If needed, lift the top paper adjuster, while sliding it up or down, to adjust
the paper length. The paper should not have room to slide back and forth.
3
If necessary, move the side adjusters back and forth to adjust the paper
width. The paper should not have room to slide from side to side.
4
Place the paper in the cassette. Do not fill past the spring clip on the front
end of the cassette. Push the paper under the plastic tabs on the paper
width adjusters.
5
Slide the paper cassette all the way back into your Konica Fax 9825.
6
The red indicator on your paper cassette indicates how much paper you
have remaining.
17
Page 26

Installing and Setting up the Machine
Loading Paper
Programming the Machine ID
FastAccess: M52
The machine identification is printed at the top of each transmitted page and
identifies your machine to the remote fax machine.
The machine identification must be entered prior to transmitting a document.
The machine number must identify the telephone number of your machine or
company. The machine name must identify the person or company sending
the document. The ID number and name can contain up to 20 characters each.
To program the machine ID:
➙
1
2
3
4
5
Menu
Press
Press 5 to select the Supervisor menu.
Press 2 to select the Fax ID number menu option. You will first see the
following display:
Use the numeric keypad to enter the machine telephone number. Include
your local area code as part of the number. You may enter up to 20
characters.
Press
.
___Fax_ID_number___
Enter phone number:
¾
__________________
Include area code
Enter
when you have finished typing the number.
18
___Fax_ID_number__
Enter company name:
>_ _ _ _ _ _ _ _ _ _ _
Letters on ONE TOUCH
6
Use the One-Touch Alphanumeric keypad to enter your company name
(or the machine name if your company has multiple fax machines). You
may enter up to 32 characters. You can use the
case letters.
7
When all the characters have been selected for the name, press
8
You can select another option or press
Konica Fax 9825 User’s Manual
Stop
Shift
key to type lower-
to go to standby.
Enter
.
Page 27

Installing and Setting up the Machine
Setting the Date and Time
FastAccess: M51
The time can be displayed using a 12-hour or a 24-hour format. The date
format for North America is MM-DD-YY HH:MM; the format for Europe and
South America is DD-MM-YY HH:MM. Use the following procedure to set the
date and time:
1
2
3
4
5
Menu
Press
Press 5 to select the Supervisor menu.
Press 1 to select Time menu option.
Press Æ until the desired time format displays:
Press
.
_______Time_______
Time display
¾
12 Hour
Press Æ, then ENTER
Enter
.
Loading Paper
12 Hour or 24 Hour
.
_______Time_______
Date/time:
¾
00-00-00 00:00PM
Enter date and time
6
Use the numeric keypad to enter the date and time. Press Æ until AM or
PM
is selected.
7
8
Enter
Press
You can select another option or press
.
Stop
to go to standby.
1
19
Page 28

Installing and Setting up the Machine
Loading Paper
Setting the Receive Timestamp
FastAccess: M55
Default = ON
The local header is printed at the top of received faxes if the header option is
on. This header prints above the remote machine header. The local header
includes the date, time and page count of the received fax, plus the local and
remote machine identification. Use this procedure to set the receive header:
1
2
3
4
5
6
Menu
Press
Press 5 to select the Supervisor menu.
Press 5 to select the Timestamp menu option.
Press Æ until the desired setting displays:
Press
You can select another option or press
.
____Timestamp_____
Timestamp
¾
Yes
Press Æ, then ENTER
Enter
.
Yes or No.
Stop
to go to standby.
Selecting the Language
FastAccess: M56
This feature allows you to change the language for the display messages and
reports. Use the following procedure to select the desired language:
Menu
Press
Press 5 to select the Supervisor menu.
Press 6 to select the Language menu option. If your machine supports
more than one language then the following window will display. If your
machine supports only one language then pressing 6 will have no effect.
Press Æ
When the desired language displays, press
You can select another option or press
.
_____Language_____
Language
¾
English
Press Æ, then ENTER
repeatedly to select an alternate language.
20
1
2
3
4
5
6
Konica Fax 9825 User’s Manual
Enter
.
Stop
to go to standby.
Page 29
Installing and Setting up the Machine
Telephone Line Connections
Telephone Line Connections
The Konica Fax 9825 is intended to be used either as a stand-alone fax and
convenience copier, or with a personal computer running the Windows
operating system.
If you want to use the Konica Fax 9825 with a computer and an answering
machine, you should connect the devices as shown here (in the USA).
Shared Line
Parallel Cable
Line Tel
Konica Fax 9825
PC
Telephone/
Answering
Machine
In this configuration, set the telephone answering machine to answer on the
lowest number of rings. Set the Konica Fax 9825 to answer on the next highest
number of rings. For example, if your answering machine answers on 4 rings,
set the Konica Fax 9825 to answer on 5 rings. (See the "
Automatically
" section on page 77.)
Receiving Faxes
The Konica Fax 9825 will monitor all calls answered on the line. If it detects a
fax tone, the Konica Fax 9825 disconnects the answering machine and sends
the appropriate tones to receive the fax.
1
21
Page 30
Installing and Setting up the Machine
Telephone Line Connections
For regulatory reasons in some countries outside the US, the Konica Fax 9825
does not have a TEL connector. In these countries, connect the devices as
shown here: (You can also connect the devices this way in the US.)
Shared Line
Parallel Cable
Line
Konica Fax 9825
PC
Telephone/
Answering
Machine
With this setup, the Konica Fax 9825 monitors incoming calls. If it detects a fax
tone, it will try to receive the fax. However, if the answering device has already
answered the call, the Konica Fax 9825 cannot disconnect the answering
machine.
You can avoid this problem by using the distinctive ring capability and setting
the Konica Fax 9825 to answer on a lower number of rings than other devices.
The Konica Fax 9825 will answer only calls with the ring pattern for a fax and
answer those calls before other devices. Distinctive Ring Service is supported
in the United States only.
If you do not want to connect your answering machine to the Konica Fax 9825
and you do not have distinctive ring capability, you may connect separate voice
and data lines as shown here.
Separate Lines
Parallel Cable
Line Tel
22
Konica Fax 9825
Konica Fax 9825 User’s Manual
PC
Telephone/
Answering
Machine
Page 31

Installing and Setting up the Machine
Installing the Second Paper Cassette
Installing the Second Paper Cassette
These instructions describe how to install the optional Second Paper Cassette.
The Second Paper Cassette Unit comes with a Second Front Cover and a
Connector Cable.
1
Turn the Konica Fax 9825 power switch to the Off position and remove the
AC power cord. Unplug the AC power cord from the wall outlet first and
then from the Konica Fax 9825.
2
Remove the first paper cassette.
3
Open the manual feed guide, and remove it by gently bending it on the
right side. Observe the way the guide is removed, as it will be re-installed
in the same manner.
1
Manual Feed
Guide
First Paper
Cassette
23
Page 32

Installing and Setting up the Machine
Installing the Second Paper Cassette
4
Open the documentation table and copy stacker, install the second front
on the Konica Fax 9825 by inserting the hooks of the second front cover
into the slots of the Konica Fax 9825. Make sure that the second front
cover is secure by gently pushing the cover until it “clicks” into place.
Document Table
Copy Stacker
Second
Front Cover
Slot
24
Hook
Konica Fax 9825 User’s Manual
Page 33

Installing and Setting up the Machine
Installing the Second Paper Cassette
5
Insert the projection of the manual feed guide into the slot on the left side
of the second front cover. Lower the right side of the manual feed guide
gently and position it on the second front cover. Close the manual feed
guide.
Manual Feed Guide
Slot
Projection
1
Second Front Cover
25
Page 34

Installing and Setting up the Machine
Installing the Second Paper Cassette
6
Gently lower the Konica Fax 9825 on the second paper cassette unit.
Make sure that the positioning pins of the second paper cassette unit fit
into the 2 holes at the bottom of the Konica Fax 9825.
The Konica Fax 9825 unit weighs approximately 36 pounds. To avoid
injury, request assistance before attempting to lift the machine.
Positioning
Pins
7
Peel off the tape attached to the second paper cassette unit.
Holes
Second Paper Cassette
Tape
26
Konica Fax 9825 User’s Manual
Page 35

Installing and Setting up the Machine
Installing the Second Paper Cassette
8
Remove the connector cover on the right side of the Konica Fax 9825. The
cover to be removed is the smaller of the two covers and is the one closer
to the front of the Konica Fax 9825. Insert the tip of a flat screwdriver
between the connector cover and the machine cover, and gently remove
the linking portions of the connector cover on the right and left in order to
expose the connector. Be careful not to rotate the screwdriver, since this
can cause scratching on the cover.
Connector Cover
Connector Cover
(a)
9
Grasp the connector cover, and rotate it up and down until you are able to
easily remove it.
10
Connect the exposed connector to the second paper cassette unit using
the cable provided.
(b)
Flat Screwdriver (-)
1
27
Page 36

Installing and Setting up the Machine
Installing the Second Paper Cassette
11
Approximately 500 sheets of recording paper (20-pound bond) can be
loaded into the second paper cassette. Be sure to adjust the paper length
and width guides for the size paper you are using. Failure to do so may
result in paper jamming. Observe the icons in the paper cassette for proper
adjustment.
x
a
F
t
e
J
Paper can
be loaded
up to this line
Paperweight
Wire
28
Second Paper Cassette
12
Be sure to lower the paperweight wire down onto the recording paper
(closed position) before inserting the paper cassette.
13
Reconnect the power cord to the wall and the Konica Fax 9825 and turn
the power on. Your second paper cassette is now ready to use.
Konica Fax 9825 User’s Manual
Page 37

Chapter 2
Getting to Know the
2
Machine
This chapter provides an overview of the hardware features of the machine. It
also describes the control panel and the feature keys on the control panel.
Machine Overview
The Konica Fax 9825 is a powerful multifunction office product that combines
facsimile, copy and PC printer operations. The machine has standard settings
plus alternate settings which allow you to customize the machine for your
particular needs.
Printer -
♦
printer. A capable network printer, the Konica Fax 9825 delivers laserquality documents quickly from your Windows applications.
Fax -
♦
features such as a 33.6 Kbps modem with a powerful transmission speed
of 6 seconds per page, 180-page memory, 250 speed dials and a 50 page
document feeder. Featuring Class 1 and 2 PC fax modem emulation, the
Konica Fax 9825 can also be used to send and receive faxes directly from
your PC applications using your preferred fax software.
Copier -
♦
digital office copier. It is fast and provides 300 dpi copy resolution and
advanced error diffusion imaging.
Scanner -
♦
Konica Fax 9825. Using a TWAIN compatible Windows high-speed scan
driver and a standard PC bi-directional parallel port, you can scan documents into almost any Windows graphic application.
Phonebook and configuration settings can be stored in memory for up to 1 year
if the machine is powered down. Fax documents are stored in memory for one
hour if the machine loses power.
The following optional accessories are also available:
Memory upgrade:
♦
9825 a total of 8MB. This allows the memory to stores up to 720 pages.
The Konica Fax 9825 is a fast, high-quality 600 dpi Windows LED
As a fax machine, the Konica Fax 9825 offers advanced standard
The Konica Fax 9825 is both a black-and-white and half-tone
Scanning your documents to your PC is fast and easy with the
6MB add-on memory board giving the Konica Fax
29
Page 38

Getting to Know the Machine
Hardware Features
Optional Large Capacity Paper Tray:
♦
with 500 page capacity.
Battery upgrade:
♦
Stores documents in memory for up to 72 hours.
Hardware Features
This section describes the hardware features of the machine.
Document Stacker
Control Panel
Paper
Path Icon
Document Guides
LCD Display
Provides an additional paper tray
One-Touch Alphanumeric Keypad
Document Table
Document Table
Extension
Copy Stacker
Copy Stacker
Extension
Compartment for
Optional Battery
30
Power Switch
Konica Fax 9825 User’s Manual
Paper Indicator
Manual Paper Feeder
Paper Cassette
Page 39

Getting to Know the Machine
Hardware Features
Power Switch -
machine OFF.
Control Panel LCD Display
also for menu programming.
One-Touch Alphanumeric Keypad -
as a preprogrammed phonebook entry of as a preprogrammed one-touch
dial option. Also used to enter alphanumeric characters.
Document Table -
that are to be faxed, copied or scanned.
Document Table Extension -
are to be faxed, copied or scanned.
Paper Path Icon Document Guides -
ments that are to be faxed, copied or scanned.
Document Stacker -
or scanned.
Copy Stacker Copy Stacker Extension -
received faxes.
Paper Cassette Manual Paper Feeder -
paper directly into the machine. Use to feed envelopes, transparencies,
labels and special papers.
Press 1 to turn the machine ON. Press 0 to turn the
Contains the machine function and programming keys.
- 4 line display screen which shows machine status. Used
70 one-touch cells available for use
Covers the copy stacker and holds original documents
Flips out to support larger documents that
Load documents face down here.
Adjust these guides to the paper width of the docu-
Holds your original documents that are faxed, copied
Holds received faxes and copies.
Slide this tray out to help support copies or
Holds up to 250 sheets of paper.
Allows you to bypass the paper cassette and feed
2
31
Page 40

Getting to Know the Machine
Hardware Features
Back Panel and Right Panel
This diagram shows the items located on the rear of the machine and on the
right panel:
Line jack
Power receptacle
Optional Paper Tray
Connection
Back Panel
AC Power Receptacle:
Line Jack:
Tel:
Receptor for an optional telephone.
Line 2:
lation. Covered.
Tel 2:
Receptor for an optional telephone for optional 2 line installation.
Covered.
Right Panel
Bi-Directional Parallel Connector (25 pin):
parallel interface cable to the PC.
Optional connector:
paper tray. Large connector is unused. Covered.
Telephone jack
Parallel
connector
Optional Line 2 and second phone line jacks
Accepts a grounded AC cord.
Receptor for the facsimile phone line.
Receptor for second facsimile phone line for optional 2 line instal-
Connects bi-directional
Small connector may be used for optional second
32
Konica Fax 9825 User’s Manual
Page 41

Getting to Know the Machine
Control Panel
The control panel keys are used to program the machine settings and to
communicate with a remote machine. The control panel contains the OneTouch keys, fax and printer keys and an alphanumeric keypad.
One-Touch Alphanumeric Keypad
This section describes the One-Touch Alphanumeric Keypad. In addition to
being used with the one-touch dialing feature, the keypad is used to enter
alphabetic and special characters.
One-Touch Alphanumeric
Keypad
1QZ
7PQRS
*
2 ABC
8TUV
0 O PER
Dial O p tions
Speed DialRedial Pause
Menu Backspace
Exit
Superfine
Darken
Fine
Lighten
Normal
Standard
Contrast
Status
Manu al Dial
Stop
Enter
START/Copy
HalftoneResolution
PrioritySend Conf
Control Panel
3DEF
6MNO5JKL4GHI
9WXYZ
#
A
0101360202
07 G08 H09 I 10 J11 K12 L07 08 09 10 11 12
42
1313
48
19
19
54
25
60
31
31
66
03bB03
37
38
a
g
h 44
43
1414
15nN15
M
50
49m
21
20
20
S
21T
55
56
s
t
26
27
26
27zZ
Y
61
62
y
33 34
32
-
(33 )
32
68
67
&
!
D
0505400606
d
j
46
17
17
P
52
p
23
V
23
58
v
29
, 29
64
$
Space
35
=
70
;
+
E
F
41
e
f
47k
l
1818
Q
R
53q
r
24
24W
X
59
w
x
30
30
'
/
65
"
?
Shift
2
C
0404
39
c
i 45
1616
O
51
o
22
22U
57
u
28
28.
63
%
69
@
One-touch Keys (01-35) -
Keys (01-35) are used to initiate a one-touch dial
fax transmission. These keys are programmed under the Phonebook menu.
They may be programmed to send to either a single phone number or a group
of up to the total number of individual phone numbers programmed. These
keys may also be programmed to activate dial options such as delayed send.
One-touch Keys (36-70) -
fax transmission. To access these keys the
Keys (36-70) are used to initiate a one-touch dial
Shift
key must be pressed while
also pressing the one-touch key. These keys are programmed under the
Phonebook menu. They may be programmed to send to either a single phone
number or a group of up to the total number of individual phone numbers
programmed. These keys may also be programmed to activate dial options
such as delayed send.
Alphabetic keys (A-Z a-z . , / - ( ) = % $ “ ? & ! @ ; + space)
- These keys
are used to enter alphabetic characters when called for when programming the
Konica Fax 9825. Uppercase letters are entered by pressing the appropriate
key, lowercase letters are entered by pressing the
Shift
key and pressing the
appropriate key. In addition to alphabetic characters, a number of special
characters may also be entered shown above.
33
Page 42

Getting to Know the Machine
Konica Fax 9825 Control Panel Keys
Shift Key
- The Shift key is used in conjunction with the One-Touch
Alphanumeric Keypad to enter an additional set of characters. Each key within
the keypad has both an upper character and a lower character. To enter the
lower character, the
key. The
Shift
Shift
key must be pressed while also pressing the desired
key also allows the selecting of one-touch keys 36-70 in the
same manner.
Konica Fax 9825 Control Panel Keys
This section describes the keys on the Konica Fax 9825 control panel.
Control Panel
Keys
1QZ
2 ABC
*
8TUV
0 O PER
Dial O p tions
3DEF
6MNO5JKL4GHI
9WXYZ
#
Speed DialRedial Pause
A
0101360202
07 G08 H09 I 10 J11 K12 L07 08 09 10 11 12
42
1313
48
19
19
54
25
60
31
31
66
03bB03
37
38
a
g
h 44
43
1414
15nN15
M
50
49m
21
20
20
S
21T
55
56
s
t
26
27
26
27zZ
Y
61
62
y
33 34
32
-
(33 )
32
68
67
&
!
C
c
i 45
O
o
u
%
@
Status
Manu al Dial
Stop
7PQRS
Menu Backspace
Exit
Superfine
Darken
Fine
Lighten
Normal
Standard
Contrast
HalftoneResolution
Keypad (1- #) Redial -
Use to redial the last number dialed.
Pause / Dial Options -
Enter
START/Copy
PrioritySend Conf
Use to enter telephone numbers or to program the machine.
- Use to insert a pause in a telephone number and to
select other dialing features prior to dialing the telephone number or during
programming of a phonebook entry.
Under the Supervisor menu this key may be set to act in two different manners.
If the key is set to Pause Only, then the key is limited to inserting only a Pause
when pressed. If the key is set to Dial Options Menu then pressing this key will
display a menu of options in the LCD Window that may be useful when dialing
a number. The following choices are available:
1
Pause
2
Detect Dial Tone
3
Tone
4
ECM -- Error Correct
5
Fax Speed
E
D
0404
0505400606
39
d
j
46
17
1616
17
P
51
52
p
22
23
23
22U
V
57
58
v
29
28
28.
, 29
63
64
$
Space
35
=
69
70
;
+
F
41
e
f
47k
l
1818
Q
R
53q
r
24
24W
X
59
x
w
30
30
'
/
65
"
?
Shift
34
Konica Fax 9825 User’s Manual
Page 43

Getting to Know the Machine
Konica Fax 9825 Control Panel Keys
6
Charge Code
7
Cancel Auto Start
8
Hook Flash
9
Send From Memory
Speed Dial -
Index and Choose by Name. The Choose by Index function allows you to
select a phonebook cell of the party to whom to send a fax. The Choose by
Name function allows you to select the recipient from the phonebook by typing
in the first letter of the party to whom you wish to send a fax. The default
function for this key may be defined in the Supervisor menu . Pressing the
Speed Dial button the first time will display the default function. Subsequent
pressings of this button will toggle between the two different functions.
Status -
to cancel or view pending jobs or to initiate an immediate redial.
Manual Dial Stop Start/Copy Resolution -
transmitting or copying documents.
Contrast -
transmitting or copying documents.
Halftone Send Conf-
press this key to print a confirmation report for the current or next fax you send.
Priority-
you are sending jump to the top of the queue. Only one job at a time can be a
priority fax.
Menu / Exit -
to print reports, access setup information and to perform other fax options.
Pressing this key while accessing a menu will usually return the display to the
previous menu.
Backspace
backup the cursor in order to reenter data. This key works exactly like a
Backspace key on a PC keyboard. The character to the left of the cursor is
deleted and any characters to the right of the cursor are moved one space to
the left to fill in the space created by the deleted character.
Use to access the 2 different speed dial methods: Choose by
Displays the status of current, pending and completed jobs. Also use
Use to send a fax in manual dial mode.
Use to stop an operation or cancel programming.
Use to initiate an operation, such as copy and send.
Use to select the Standard, Fine or Superfine resolution mode for
Use to select the Normal, Lighten or Darken contrast mode for
Use to enhance photographs and figures with shading.
If Send Confirmation Report is not enabled for all calls, you may
If there are faxes pending, you may press this key to make the fax
Use this key to access the machine’s Menu. The Menu is used
- Used when entering programming information when you must
2
35
Page 44

Getting to Know the Machine
Using the Machine Menu
and
ÍÏ
or feature setting.
Enter -
feature setting.
ÐÎ - Use to move the display cursor in order to select a menu option
Used while accessing the menus; use to accept a menu option or
Using the Machine Menu
This section describes how to use the machine Menu display.
To access the machine Menu, press the
To select a menu, either:
➙
Press the desired menu number on the keypad
(or)
Press the arrow keys until the desired menu is highlighted, then press the
Enter
key.
To backup to the previous menu display:
➙
1
Press the
Menu
key.
Menu
key.
➙
1
FastAccess
Throughout the manual when a particular menu feature or option is described
it will be accompanied by a FastAccess code. This code is simply the
sequential key actions needed to access that particular menu.
For example, the FastAccess code to access the Fax Phonebook menu to add
an Individual phone number is
this code you would press the
on the numeric keypad.
36
Konica Fax 9825 User’s Manual
To quit and return the machine to its idle state display:
Press the
Stop
key.
M231
. The M stands for the
Menu
key then enter the number sequence
Menu
key. To use
231
Page 45

Help Using the Menus
You can print out a menu tree that you may find helpful which lists all the menu
displays. In addition, you can print out a single page Quick Reference sheet
which provides some helpful hints and information.
To print out the menu tree:
➙
1
2
3
4
5
➙
1
2
3
4
5
Menu
Press
Press 1 to select the Reports/Help menu.
Press 1 to select the Help menu option.
Press 2 to select the Menu menu option.
After a few moments a two-page list of the menu options will be printed.
To print the Quick Reference sheet:
Press
Press 1 to select the Reports/Help menu.
Press 1 to select the Help menu option.
Press 1 to select the Quick reference menu option.
After a few moments a one-page Quick Reference sheet will be printed.
Menu
.
.
Getting to Know the Machine
Help Using the Menus
2
To print the Control Panel help:
➙
1
2
3
4
5
Menu
Press
Press 1 to select the Reports/Help menu.
Press 1 to select the Help menu option.
Press 3 to select the Control Panel menu option.
After a few moments the one-page Control Panel help will be printed.
.
37
Page 46

Getting to Know the Machine
Konica Fax 9825 Menus
Konica Fax 9825 Menus
1
Reports/Help
-1-
Help
-1-
Quick reference page 37
-2-
Menu page 37
-3-
Control panel page 37
-2-
Fax activity page 117
-3-
Configuration page 127
-4-
Phonebook page 122
-5-
Self-test page 159
-6-
Print All page 126
-7-
Report options
-1-
Send confirmation page 119
-2-
Auto activity page 117
-3-
Broadcast page 121
-4-
Multi-poll page 123
-5-
Remote ID print page 118
2
Fax
-1-
Next document
-1-
Delayed start page 65, page 104
-2-
Send confirmation page 119
-2-
Phonebook setup
-1-
Individual page 90
-2-
Group page 95
-3-
Reorganize page 94
-3-
Fax options
-1-
0utgoing faxes
-1-
Number of redials page 71
-2-
Redial interval page 72
-3-
Tone/pulse dial page 72
-4-
Dial prefix page 73
-5-
Send from memory page 74
-6-
If memory fills page 75
-7-
Retry failed fax page 75
-8-
Group dial pause page 63
-2-
Incoming faxes
-1-
Reduce to fit page 83
-2-
Answer phone page 77
-3-
Voice/fax switch page 80
-4-
Receive to memory page 83
38
Konica Fax 9825 User’s Manual
Page 47

-4-
-5-
3
Printer
-1-
-2-
-3-
-4-
-5-
-6-
-7-
4
Scanner
-1-
-2-
-3-
-4-
-5-
5
Supervisor
-1-
-2-
-3-
Getting to Know the Machine
Konica Fax 9825 Menus
-5-
# of fax copies page 84
-6-
Distinctive ring page 79
-7-
Notify pager page 86
-8-
Forward faxes page 87
-3-
All Faxes
-1-
ECM - Error Correct page 83
-2-
Fax Speed page 77
Mailbox/Poll
-1-
Mailbox print page 111
-2-
Store document
-1-
Mailbox page 110
-2-
Poll-out box page 101
-3-
Continuous Poll page 105
ONE TOUCH keys page 97
Paper size page 138
Collation page 52, page 85, page 138
Fax/PC priority page 139
Fax/Copy tray page 85, page 139
First fax page page 86
Print density page 140
Clean the printer page 175
Fax resolution page 68
Contrast
-1-
Default page 48
-2-
Thresholds page 49
Halftone page 50
Auto background page 51
Allow long pages page 51, page 62
Date and time page 19, page 143
Fax ID number page 18, page 144
Control panel
-1-
SPEED DIAL key page 145
-2-
PAUSE key page 146
-3-
LCD contrast page 147
-4-
Listen to dial page 147
-5-
Button sound page 148
-6-
Alarm volume page 149
2
39
Page 48

Getting to Know the Machine
Multi-Access
-7-
Ring volume page 149
-4-
Mail/Poll/Relay
-1-
Mailbox setup page 109
-2-
Password report page 125
-3-
Secure polling page 101
-4-
Relay broadcast page 64
-5-
Post delivery page 102
-5-
Timestamp page 150
-6-
Language page 151
-7-
Access
-1-
Supervisor access page 152
-2-
Confidential rcv page 153
-1-
Print page 83
-2-
Activate page 153
-3-
Machine access page 153
-4-
Department codes
-1-
Enable/disable page 155
-2-
Billing report page 125
-5-
Remote test page 156
-6-
Remote setup
-1-
Receive setup page 156
-2-
Send setup page 157
-8-
Clear memory page 44
-9-
Scan Correction page 175
Multi-Access
Multi-access allows you to perform any set of tasks simultaneously which does
not require the same machine function. For example, the machine can function
as a fax machine at the same time it is being used as a PC printer.
In the multi-access mode, the operations are performed as background jobs.
When a background job is in progress, you can press the Status key to access
information for a background activity.
Examples of tasks you can perform simultaneously are:
♦ Scan to memory while printing from the PC
♦ Copy a document while transmitting from memory
♦ Scan a document to memory while sending a fax from the PC
♦ Receive a fax to memory while printing from the PC.
40
Konica Fax 9825 User’s Manual
Page 49

Chapter 3
Job Status and Memory
3
This chapter tells you how to store, view, print, and delete pending jobs stored
in memory.
Document Memory
The machine is equipped with 2MB of memory to store documents received,
as well as documents scanned into memory for transmission. This memory can
store approximately 180 average pages if you are using Standard resolution.
An option for 6MB of document memory is available. This memory can store
approximately 720 average pages using Standard resolution.
The percentage of document memory storage available is normally displayed
during idle, scanning, copying or receiving modes.
When a remote machine message contacts your machine, your machine can
print the document immediately or store the information in memory. See the
"
Receive To Memory
section on page 82 for details.
The Konica Fax 9825 protects the document memory for up to one hour during
a power outage or if you need to turn off the machine for any reason. There is
an optional battery that protects the document memory for 72 hours.
" section on page 82 and the "
Confidential Receive
"
Idle Status
During Idle status, the LCD will display the following:
Memory available Current time
95% free 4:15PM
Load pages facedown
MENU for options
41
Page 50

Job Status and Memory
Job Status
Job Status
Activation of the Status key provides the status of each active or pending job
in memory. You can press the Status key repeatedly to scroll through the
stored jobs. The active jobs display first, followed by the pending jobs and
completed jobs. The completed jobs remain listed until the jobs are reflected
on the Activity Report.
1
Press
Status
.
_Pending_fax_status_
Press STATUS again
For desired status.
2
Job type and status
The job status includes the following information:
♦ Status of each job type: sending, group send, polling jobs, receiving,
♦ Job number for pending jobs.
Status
Press
most recent job displayed first. Subsequent pressing of the Status key will
scroll through all the jobs stored in memory.
Job number
mailbox receive, delayed start, stored documents, waiting to dial or waiting
for initial dial due to line unavailability.
. If jobs are stored in memory they will be displayed with the
Job title
_Pending_fax_status_
5551212
Job 99 1 page
Send Pending
This Status job title changes
depending on what jobs are
in memory:
• Pending fax status
• Phone line status
• Printer status
• PC connect status
• Scanner status
• System status
Fax number or name
Number of pages
42
♦ Remote name or phone number.
♦ Number of pages scanned into memory for the displayed job or stored
document.
While using the Status key you may either cancel a pending job or print the first
page of the document. These options are described in the sections that follow.
Konica Fax 9825 User’s Manual
Page 51

Job Status and Memory
Printing the First Page of a Pending Job
Printing the First Page of a Pending Job
This feature allows you to print the first page of a pending job. You must know
the specified password to print mailbox or confidential receive jobs. Use the
following procedure to view the document.
1
2
3
4
5
For security, asterisks display in place of the password. To exit the mode,
press STATUS.
Status
Press
Status
Press
Start
Press
For confidential jobs, enter the appropriate password.
Enter
Press
.
_Pending_fax_status_
Press STATUS again
For desired status.
repeatedly until the desired job displays.
.
. The first page of the document prints.
Canceling a Pending Job
3
This feature cancels pending jobs stored in memory. You must know the
specified password to cancel mailbox or confidential receive jobs.
1
2
3
4
5
For security, asterisks display in place of the password. To exit the mode,
press Status.
Status
Press
Status
Press
Stop
Press
For confidential jobs, enter the appropriate password.
To confirm the cancellation of the pending job, press
.
_Pending_fax_status_
Press STATUS again
For desired status.
repeatedly until the desired job displays.
to cancel the pending job.
Enter
.
43
Page 52

Job Status and Memory
Clearing the Memory
Clearing the Memory
FastAccess: M58
You can clear the document, configuration, or phonebook memory.
1
2
3
4
5
6
Menu
Press
Press 5 to select the Supervisor menu.
Press 8 to select the Clear memory menu option.
Press Æ until the desired setting is displayed:
Phonebook,
Press
Press
selected. The machine will perform a self-test automatically.
.
__Clear_memory__
Clear:
¾
Documents (and log)
Æ
Press
Enter
Start
to confirm that you want to clear the part of memory you
, then ENTER
Configuration
or
.
If Memory is Full
Documents (and log),
.
44
The document memory in the machine may become full during the following
operations: multiple copy, broadcast, single destination send, store to the
general poll box, store for polling, and store to a mailbox. When the document
memory fills, the display says “Memory is Full, Job Canceled.”
If you are transmitting to single or multiple destinations, the machine will
continue transmitting the documents stored in memory. If you are transmitting
to a single destination when memory fills, the operation is aborted after the
documents are transmitted from memory.
The following operations may be performed when memory is full:
♦ Manual send to a single destination (excluding polling)
♦ Copying a single copy
♦ All PC operations that do not require memory (for example, send, receive,
upload and download)
♦ Incoming calls are answered if at least one of the following conditions
exists:
• Documents are stored for general poll in memory
• Documents are stored in a mailbox
Konica Fax 9825 User’s Manual
Page 53

Job Status and Memory
If Memory is Full
• Confidential receive documents are stored in memory
• PC is online for faxing and adequate machine buffer space is available
• Remote diagnostics are available
• Printer is available for printing incoming documents
♦ Remote retrieval (poll-out mode) of mailbox, confidential receive, or
general poll documents
♦ Remote diagnostics
♦ Receive to printer
The following operations cannot be performed when memory is full:
♦ Resend new jobs initiated from scanner (not pre-scanned to memory)
♦ Scan to memory, including delayed start
♦ Multiple copy
♦ Copy reduction
♦ Confirmation Report may not contain reduced image of first page
♦ Viewing of pending documents (print out of first page)
♦ Receive to mailbox (including polling)
♦ All receive operations when printer is not available (receive to memory)
♦ All receive operations when confidential receive is selected
3
45
Page 54

Job Status and Memory
If Memory is Full
46
Konica Fax 9825 User’s Manual
Page 55

2Copying
Chapter 4
4
Copying a Document
This chapter describes the procedure for making copies of a document.
Load a Document
Load the documents face-down in the automatic document feeder (ADF).
Adjust the paper guides to the width of the document so the pages do not skew
as they feed through the scanner.
To use the manual paper feeder, see the "
on page 140.
Copying Documents
The machine can be used as a convenience copier. You can make full size
copies and reduce or enlarge the image size by 1% increments from 50% to
200%. You can produce multiple copies of an original and collate multiple page
originals.
You can print up to 99 copies of each document. The machine first stores the
document in the memory then prints the copies. The machine defaults to 1
copy at 100% size after each copy operation.
You can also program the machine to sort the copies into collated sets. See
the "
Collated Copies
To print multiple or collated copies, the machine first stores the document in
memory then prints the copies. If the memory becomes full during the copy
operation, the machine stops scanning and copies the pages already stored in
memory. If the memory becomes full and the machine can not store the
document, you must make single copies or clear the documents from memory
and begin again.
1
Load up to 50 document pages face-down in the document feeder. Adjust
the paper guides to the width of the document.
2
3
Start/Copy
Press
If desired, select any special features such as a different
Contrast
.
" section on page 52.
.
Using the Manual Feeder
Resolution
" section
or
47
Page 56

Copying a Document
Copy Features
4
Use the numeric keypad to enter the desired number of copies (from 1 to
99). The default is 1. Press
5
Use the numeric keypad to enter the desired reduction percentage (from
50 to 200). The default is 100%.
Press
Press
Enter
Start/Copy
6
7
Copy Features
You can set the following options for copying documents:
Resolution
Contrast
Halftone
Auto Background
Long Documents
Collated Copies
These settings are also used when scanning a document to send it as a fax.
Resolution
Start/Copy
.
to begin the copy operation.
to continue.
Contrast
48
The resolution for copying is always
can set the resolution using the
You may wish to change the default resolution for faxing. See the "
section on page 68 to set the resolution default for faxes:
Documents can be copied or faxed with the normal contrast, light contrast or
dark contrast setting. For a normal document, set the contrast to Normal; for a
document with light, pencil or colored characters, select the Light setting; for a
document with dark characters, select the Dark setting.
You can change the contrast default and contrast threshold levels for copying
and faxing documents
Superfine
Resolution
. When faxing a document, you
button.
Resolution
Contrast Default
FastAccess: M421
(Default = Normal)
You may want to change the contrast default.
Press
Menu
.
1
Konica Fax 9825 User’s Manual
"
Page 57

Copying a Document
Copy Features
2
Press 4 to select the Scanner menu.
3
Press 2 to select the Contrast menu option.
4
Press 1 to select the Default menu option.
_____Default_____
Default contrast:
¾
Normal
Press Æ, then ENTER
5
Press Æ until the desired setting displays:
Press
Enter
.
6
Normal, Lighten or Darken.
Contrast Threshold Levels
FastAccess: M422
(Default = 8 for all 3 settings)
Use this feature for fine control over the contrast. Each of the contrast settings
can have a threshold level from 0 to 15. When you choose a contrast level for
copying or faxing, you are actually selecting the threshold level set for that
contrast level.
Lighten
Normal
Darken
4
0158 0158 0158
Lightest Darkest
To change threshold levels:
➙
1
2
3
4
5
Menu
Press
Press 4 to select the Scanner menu.
Press 2 to select the Contrast menu option.
Press 2 to select the Thresholds menu option.
Press Æ until the desired contrast type is flashing:
Darken.
.
___Thresholds___
1: Normal
2: Lighten
3: Darken
Normal, Lighten or
49
Page 58

Copying a Document
Copy Features
6
7
8
Halftone
FastAccess: M43
(Default = No)
Use the halftone mode to copy or fax photographs and figures with shading.
When you enable halftones, the machine automatically selects superfine for
the resolution.
You can enable halftones for a single fax or copy by pressing the
on the control panel. To use halftones for all faxes and copies by default,
change the Halftone setting to Yes.
➙
1
2
3
Enter
Press
selected in the previous step.
Use the keypad to enter the desired threshold number:
Press
. The display title bar will reflect the contrast setting you
_____Normal_____
Threshold:
¾
8
Enter number 0-15
Enter
.
To change the Halftone setting:
Menu
Press
Press 4 to select the Scanner menu.
Press 3 to select the Halftone menu option.
.
0-15
.
Halftone
key
50
_____Halftone_____
Default halftone:
¾
No
Press Æ, then ENTER
4
Press Æ until the desired setting displays:
Press
Enter
.
5
Konica Fax 9825 User’s Manual
No or Yes.
Page 59

Auto background
FastAccess: M44
Enable automatic background compensation if you are copying or faxing
documents printed on colored paper. The machine will lighten the background
shading so that the text is easier to read.
Use this feature only when scanning documents on dark colored paper.
To change the Auto Background setting:
➙
1
2
3
4
5
Menu
Press
Press 4 to select the Scanner menu.
Press 4 to select the Auto background menu option.
Press Æ until the desired setting displays:
Press
.
___Auto_background___
Compensation:
¾
Off
Press
Enter
.
Æ
, then ENTER
Copying a Document
Copy Features
Off
or
On.
4
Long Documents
FastAccess: M45
You can copy a document that is up to 279 mm (11 in) wide and up to 1 m
(39.37 in) long. If the document length exceeds this default limit, the machine
displays a document jam.
To extend the document length, set the
the allowable length. This allows documents up to 10 m (393.70 in) long to be
scanned and copied (subject to available memory).
To select Allow Long Pages for copies:
➙
1
2
Menu
Press
Press 4 to select the Scanner Menu.
.
Allow long pages
feature to increase
51
Page 60

Copying a Document
Copy Features
3
Press 5 to select the Allow long pages menu option.
_Allow_long_pages_
Allow long pages:
¾
No
Press Æ, then ENTER
4
Press Æ until
Press
Enter
5
Collated Copies
FastAccess: M32
You can program the machine to print the copied documents in reverse order.
Multiple copies are sorted in collated sets.
To select collation for copies:
➙
1
2
3
Menu
Press
Press 3 to select the Printer Menu.
Press 2 to select the Collation menu option.
Yes
is displayed.
.
.
52
_____Collation_____
Collation:
¾
None
Press Æ, then ENTER
4
Press Æ until the desired setting displays:
Copy
. For collated copies choose either
Press
Enter
.
5
Konica Fax 9825 User’s Manual
Off, Fax only, Copy only, Fax &
Copy only
Fax & Copy
or
.
Page 61

3Faxing
g
g
y
Chapter 5
5
Dialing Methods
This chapter describes various dialing methods for dialing telephone numbers
to complete a fax operation or to have voice contact.
Keypad Dialing (Control Panel)
With keypad dialing, you can dial the telephone number directly using the
control panel.
To dial, enter the telephone number using the numeric keypad on the control
panel.
One-Touch Dialin
The first 70 telephone numbers stored in the phonebook can be dialed using
the 35 One-Touch keys. If you do not know the desired One-Touch number,
print the phonebook by pressing
keypad.
Phonebook cells 1-35 can be dialed by pressing the corresponding One-Touch
key. Phonebook cells 36-70 can be dialed by holding down the
pressing the corresponding one-touch key. Each One-Touch key is labeled
with the two cell numbers it accesses.
See the "
setting up One-Touch keys.
Programming the Fax Phonebook
Menu
and then pressing 14 on the numeric
" section on page 89 for details on
Shift
key and
Speed Dialin
Speed Dial
The
have numbers from 1 to 250. The first 70 entries can also be dialed using the
One-Touch keys.
You can choose a phonebook entry by index (number) or by name.
You can program the machine to display the preferred dialing method when the
Speed Dial key is first pressed. See the "
to change the default. Subsequent presses of the Speed Dial key select the
alternate dialing method.
key lets you use any entry stored in the phonebook. Entries
Speed Dial Ke
" section on page 145
53
Page 62

Dialing Methods
g
Manual Dialing
If an invalid phonebook code or remote name is entered when dialing a
telephone number, the machine sounds an alarm and prompts you to validate
the number. If you cannot find the desired Speed Dial entry, print the
phonebook by pressing
See the "
setting up Speed Dial numbers.
Programming the Fax Phonebook
Choose by Index
Choose by Index allows you to send a fax by entering a Phonebook entry
number that has been programmed with the recipient’s fax machine phone
number.
1
2
3
For example, if you wish to send a fax to the fax machine programmed into
Entry #95, you simply press the Speed Dial key and enter the number 95.
Speed Dial
Press
Enter the phonebook cell (1-250) for the number you want to dial. The
leading zeros are not required.
Start
Press
.
Choose by Name
Choose by Name allows you to select a Phonebook Cell by entering the first
letter of the recipient’s name. When you enter the first letter of the name, the
first match will be displayed. To display other cells that may also match, press
the Æ key. To backup, press the Å key.
1
2
3
4
Speed Dial
Press
Press the keypad number corresponding to the first letter of the name you
desire. Press this key repeatedly until the LCD displays the correct letter
you wish to match.
Press Å or Æ to scroll through the names that have the same first
character.
Start
Press
to dial the displayed number.
Menu
and then pressing 14 on the numeric keypad.
" section on page 89 for details on
until Choose by index displays.
until Choose by name displays.
Manual Dialin
If you need to type numbers after the line is answered in order to send a fax,
you may want to dial the fax number manually. For example, some people
have an answering machine or voice mail system that tells you to “Press 1 to
send a fax now or wait for the tone to leave a voice message.”
54
Konica Fax 9825 User’s Manual
Page 63

Dialing Methods
g
g
Redialing
To dial manually, you can either use the Manual Dial button on the Konica Fax
9825 or a telephone connected to the TEL jack on the back of the Konica Fax
9825.
To dial with Manual Dial:
➙
1
2
3
➙
1
2
3
Manual Dial
Press
Dial the telephone number using the numeric keypad on the Konica Fax
9825.
After the call is answered, type any special numbers or codes required
using the numeric keypad. Or Press START to initiate normal fax
transmission.
To dial with a connected telephone:
Lift the handset and wait for a dial tone.
Dial the telephone number using the telephone keypad, one-touch or
speed dial.
After the call is answered, type any special numbers or codes required
using the numeric keypad. Or Press START to initiate normal fax
transmission.
. You will hear a dial tone.
5
Redialin
Redialing occurs automatically if the remote machine is busy. The machine
hangs up, then waits for the specified dialing interval and redials the number.
If the machine fails to connect after making the specified number of redial
attempts, the machine returns to the standby mode.
If an individual number in a group transmission is busy, the machine dials all
the destinations in the group before attempting to redial the busy number.
If the telephone rings while the machine is waiting to redial, the machine
automatically answers the telephone and receives the incoming document.
While the document is received, the machine returns to the pending redial.
You can select the number of redial attempts and the time interval between
each redial attempt. See the "
"
Redial Interval
" section on page 72.
Last Number Redialin
Redial
Press
on the control panel to redial the last dialed number.
Number of Redials
" section on page 71 and the
55
Page 64

Dialing Methods
Group Dial
Group Dial
Group dialing transmits a document from memory to several locations without
scanning the document for each location. There are two methods of initiating
a group dial operation. You may program a group into the phonebook. If a
group has been programmed then use the following steps to send to the group.
For more information on setting up a group see the "
section on page 95.
1
Load the documents face down in the document feeder.
2
If desired, select any special features for the operation.
3
Enter the desired group number using Speed Dial, Phonebook Dial, or
One-Touch Dial.
4
To begin dialing, press
The alternate group dial method is called Ad Hoc Broadcast Send. This
method allows you to enter the phone numbers “on the fly” without entering
them into the phonebook first.
To send an Ad Hoc group broadcast:
➙
1
Load the documents face down in the document feeder.
2
If desired, select any special features for the operation.
3
Enter the first telephone number using one of the dialing methods.
Start
Setting up a Group
.
"
56
If one-touch is used to dial the first number, you must disable automatic
start by pressing
Start feature. See the "Pauses and other Dial Options" section on page 57.
4
5
6
7
8
Konica Fax 9825 User’s Manual
Enter
Press
Enter the next telephone number using one of the dialing methods.
Press
Perform steps 5 and 6 to enter each additional telephone number.
When all numbers have been entered, press
Enter
.
.
within 3 seconds or by selecting the Cancel Auto
Enter
Start
.
Page 65

Linked Dialin
g
Linked dialing is a single dialing command that ties together keypad dialing and
phonebook locations for a single dialing operation.
One use of this feature is to link a long distance access code to a telephone
number. For example, you can program phonebook number 1 with the number
of a long distance carrier, phonebook number 2 as an access code, phonebook
number 3 with the number of a remote machine. Any special features stored
with the number (subaddress, delayed start; etc.) causes an error and an
invalid alarm sounds. Group phonebook numbers are not allowed in linked
dialing.
1
Enter the first number using the control panel keypad, one-touch or speed
dial.
2
3
4
Redial
Press
Enter the next number using one-touch, speed dial or the control panel
keypad. Up to 40 total digits may be included in the linked dialing
command.
Start
Press
.
to begin dialing.
Pauses and other Dial Options
Dialing Methods
Linked Dialing
5
FastAccess: M532
Pause/Dial Options
The
sequence or to access several dial options (including a single pause). The
default function for the
To set the function of the Pause key:
➙
1
2
3
4
5
Menu
Press
Press 5 to select the Supervisor menu.
Press 3 to select the Control panel menu option.
Press 2 to select the PAUSE key menu option.
Press Æ
menu
.
______Pause______
Pause key:
¾
Pause only
Press Æ, then ENTER
until the desired setting is displayed:
.
key is used either to add a pause to the dialing
Pause
key is defined in the Supervisor menu.
Pause only
or
Dial options
57
Page 66

Dialing Methods
Pauses and other Dial Options
Press
Enter
.
6
Pauses
When dialing a telephone number, you may enter a 2 second pause whenever
waiting is required before the next number can be dialed. You can add multiple
pauses as necessary to increase the pause time.
To enter a pause, if the Pause Key default is set to
Pause/Dial Options
the
menu
, press the
to insert a pause in the telephone number.
Pause/Dial Options
Dial Options Menu
If you wish to make use of any of the dial options other than pause, the Pause
Key default must be set to
You can use the Dial Options Menu prior to dialing the number for a single fax.
You can also set dial options in the phonebook for use each time a particular
phonebook number is dialed.
Options you select prior to dialing the telephone number override any
communication default settings or any special features programmed in the
phonebook.
To access the dial options using the
following procedure to select the various dial options:
1
Press the
2
Press Æ until the desired option blinks, or select #1-9 on the numeric
keypad (the character shown in parentheses is inserted into the number to
be dialed to show that the option is selected):
Pause (comma)
Detect Dial Tone (D)
attempts to dial the number.
Tone (T)
ECM (E)
not available when typing a number in the phonebook. Instead, you can
use the Phonebook Special Features to disable ECM.)
Fax Speed (S)
9600 BPS. (This dial option is not available when typing a number in the
phonebook. Instead, you can use the Phonebook Special Features to
control the fax speed.)
Charge Code (C)
Pause/Dial Options
- Use to select tone dialing.
- Use to deactivate the error correction mode. (This dial option is
- Use to select the communication speed: 14400, 4800, or
Pause only
key. If the Pause Key default is set to
key, then press 1 on the numeric keypad
Dial options menu
Pause/Dial Options
key.
- Use to enter a pause.
- Use to detect a dial tone before the machine
- Use to prompt for a charge code when sending the fax.
.
simply press
Dial options
key, use the
58
Konica Fax 9825 User’s Manual
Page 67

Dialing Methods
Pauses and other Dial Options
Cancel Auto Start (N)
Hook Flash (H)
start of the dialing operation.
Send from memory (M)
When setting up the phonebook, the ECM and Fax Speed dial options are
not available.
3
4
5
Enter
Press
If you selected
desired setting displays, then press
To enter other dial options, repeat the procedure.
.
ECM, Fax Speed
- Use to cancel the one-touch automatic start.
- Use to generate an automatic hook switch signal at the
- Use to disable sending the fax from memory.
, or
Send from memory
Enter
.
, press Æ until the
5
59
Page 68

Dialing Methods
Pauses and other Dial Options
60
Konica Fax 9825 User’s Manual
Page 69

Chapter 6
Sending a Fax
6
This chapter describes how to send a fax using various transmission methods.
Sending a fax involves loading the document, dialing a number, and
transmitting the document. Documents can be sent using several dialing
methods. See the "
information.
If you dial a group, the machine scans the document into the memory before
dialing. If the machine detects a busy signal, the machine automatically redials
the number or group of numbers.
If the document is stored in memory and a communication error occurs during
the transmission, the machine resends the document, beginning with the first
page of the fax, and then sends the first page that did not transmit successfully.
If completion of the communication is unsuccessful, the LCD displays an error
message until the STOP key is pressed or another call is processed.
If the Confirmation Report and Broadcast Report options are on, the machine
automatically prints a Confirmation Report after each transmission. The report
also prints if the jobs are canceled. To change these settings, see the "
Send Confirmation/Error Report
Loading a Document
Dialing Methods
" section on page 53 for detailed
Fax
" section on page 119.
The automatic document feeder holds up to 50 originals. If a document can not
feed through the scanner, create a copy on another copier using bond paper.
Use the copied image to transmit. The following types of originals should be
copied on bond paper:
♦ Undersized, lightweight, or heavy card stock.
♦ Irregularly shaped or damaged pages.
♦ Pages that are stapled, pasted up, or bound.
♦ Carbon-backed copies.
Load all documents face down in the Automatic Document Feeder (ADF).
Adjust the paper guides to the width of the document so the pages do not skew
as they feed through the scanner.
By default, you can load a document that is up to 279mm (11 in) wide and 1m
(39.37 in) long.
61
Page 70

Sending a Fax
Automatic Send
Documents longer than 1m (39.37 in) cause a document jam. To send longer
documents, use the Allow Long Pages feature. This will allow documents up to
10 m (393 in) long to be scanned and transmitted (subject to available
memory).
To allow long fax pages:
➙
FastAccess: M45
1
2
3
4
5
If Allow Long Pages is not selected and an error is detected while scanning a
page, the scanning stops and an alarm sounds. You can override the error by
pressing the
to complete the job. If you do not press
transmitted and the unscanned pages remain in the scanner and document
feeder.
Menu
Press
Press 4 to select the Scanner Menu.
Press 5 to select the Allow long pages menu option.
Press Æ until
Press
.
_Allow_long_pages_
Allow long pages:
¾
No
Press Æ, then ENTER
Yes
is displayed.
Enter
. You can begin dialing the fax number at this point.
Start
key on the control panel to continue the scanning process
Start
, the pages already scanned are
Automatic Send
1
Load the document face down in the document feeder.
2
If desired, select any special features for the operation.
3
The machine prompts you to enter the telephone number.
To send to a single location, enter the telephone number using one of the
dialing methods and go to the next step. See the "
on page 53 for detailed information.
To send to multiple locations, see the "
63.
4
If necessary, press
62
Konica Fax 9825 User’s Manual
Start
Dialing Methods
Broadcast Send
.
" section on page
" section
Page 71

Broadcast Send
Sending a Fax
Broadcast Send
The machine allows you to transmit to an
without programming the destinations into a dial group. You can program
multiple entries in a broadcast send operation using a combination of
preprogrammed groups, keypad dial, one-touch, and speed dial.
When the machine begins transmitting the document, the LCD displays the
remote telephone number. If a number is busy, the machine continues dialing
the rest of the numbers before redialing the busy number.
Any special features stored with a phonebook entry are used when that
phonebook number is dialed in a group.
1
Load the documents face down in the document feeder.
2
If desired, select any special features for the operation.
3
Enter the first telephone number using one of the dialing methods. Press
Enter
.
If one-touch is used to dial the first number, you must disable automatic
start by pressing Enter within 3 seconds or by selecting the Cancel Auto
Start feature. See the "Pauses and other Dial Options" section on page 57.
4
Enter the next telephone number using any dialing method. Press
5
Perform the previous step to enter each additional telephone number.
6
When all numbers have been entered, press
If there is a group of fax numbers to which you will send faxes frequently, see
Setting up a Group
the "
" section on page 95.
unlimited
Start
number of machines
Enter
.
.
6
Group Dial Pause for Incoming Documents
FastAccess: M2318
(Default = 0)
By enabling this feature, you can make the machine pause during a broadcast
to receive any incoming documents. The pause is inserted after 4 consecutive
successful dials during a broadcast job.
1
2
3
4
5
Menu
Press
Press 2 to select the Fax menu.
Press 3 to select the Fax options menu.
Press 1 to select the Outgoing faxes menu option.
Press 8 to select the Group dial pause menu option.
.
63
Page 72

Sending a Fax
Broadcast Send
_Group_dial_pause_
Pause time (minutes):
¾
0
Enter number 0-60
6
Press Æ until the desired setting is displayed:
Press
Enter
.
7
Sending Relay Broadcasts
You can use a remote machine to send broadcast faxes if both your machine
and the remote machine are Konica Fax 9825s or support the ITU standard for
relay broadcasts. This allows you to reduce long-distance costs when sending
broadcast faxes.
To set up a relay broadcast, you create a speed dial group on the remote fax
machine and enable relay broadcasts. On your local machine, you set up a
speed dial number that uses the Subaddress and Password special features.
On the remote machine:
➙
FastAccess: M544
1
Create a speed dial group that dials all the numbers to which you want to
send the broadcast from this fax machine. (See the "
section on page 95.) Remember the speed dial number, as you will need
to use it on the local machine.
2
3
4
5
Menu
Press
Press 5 to select the Supervisor menu.
Press 4 to select the Mail/Poll/Relay menu.
Press 4 to select the Relay broadcast menu option.
.
0-60
.
Setting up a Group
"
64
___Relay_broadcast___
Relay broadcast:
¾
Disabled
Press Æ, then ENTER
6
Press Æ until the desired setting is displayed:
7
8
Konica Fax 9825 User’s Manual
Enter
Press
If you selected
.
___Relay_broadcast___
Password:
¾
____
Enabled
, you will see this message:
Disabled
Enabled
or
.
Page 73

Sending a Fax
Scheduling Faxes for a Delayed Start
Enter new password
9
Type a four-digit password that will allow other machines to send faxes for
relay broadcast to this machine.
On the local machine:
➙
FastAccess: M221
1
Create an individual speed dial entry that dials the remote fax machine.
(See the "
2
Set the Password special feature for this phonebook entry to the password
you set for relay broadcasts on the remote fax machine.
3
Set the Subaddress special feature for this phonebook entry to #
where
remote fax machine.
4
Place a document in the document feeder on the local machine and dial
the speed dial number that dials the remote machine. The document will
be sent to the remote machine. The remote machine will then relay the
document to all numbers in the group.
Setting up the Phonebook
nnn
is the speed dial number of the group you created on the
" section on page 90.)
Scheduling Faxes for a Delayed Start
nnn
,
6
FastAccess: M211
You can send a document at a later time to a single destination, a group, or for
a polling operation. This delayed start time will override any delay time set for
a phonebook cell.
Delayed jobs (excluding groups) scheduled to be sent at the same time and to
the same destination will be transmitted using the same telephone call.
You can view and cancel pending delay start jobs stored in memory using the
Status key. See the "
To schedule a fax to be sent later:
➙
1
Load the documents face down in the document feeder.
2
3
4
5
6
Menu
Press
Press the 2 key to select the Fax menu.
Press the 1 key to select the Next document menu option.
Press the 1 key to select the Delayed start menu option.
Use the keypad to enter the time. Press Æ to select AM or PM.
Job Status
key.
" section on page 42.
65
Page 74

Sending a Fax
Sending Attachments
7
8
9
10
11
Enter
Press
Use the keypad to enter the date.
Press
The machine prompts you to dial a number.
If desired, select any special features for the operation.
Enter the telephone number using one of the dialing methods. If you want
to send this fax to multiple numbers, press
you have entered all the numbers, press the
If one-touch is used to dial the first number, you must disable automatic
start by pressing
Start feature. See the "Pauses and other Dial Options" section on page 57.
Press
document.
.
Enter
.
within 3 seconds or by selecting the Cancel Auto
Enter
Start
. At the designated time, the machine will transmit the
Sending Attachments
If you have stored a document as described in the "
Keys for Attachments
faxes either by themselves or after a cover page or other documents you insert
into the document feeder.
To send attachments:
➙
" section on page 98, you can send these attachments as
Enter
after each number. When
Stop
key.
Programming One-Touch
1
If you wish to fax a cover page or other documents in front of the attachment, place them in the scanner. Or, if you want to send the attachment
only, skip to the next step.
2
Enter the destination phone number.
3
Press the One-Touch key that is programmed with the attachment.
4
You may add additional attachments by pressing other One-Touch keys.
The documents will be attached in the order you press the One-Touch
keys.
Press
Start
to begin the fax transmission.
5
Manual Send with Voice Contact
You must have an optional telephone connected to your machine to use this
feature.
66
Konica Fax 9825 User’s Manual
Page 75

By transmitting manually, you can speak with a remote user before transmitting
a document.
1
Load the documents face down in the document feeder.
2
Lift the handset and wait for a dial tone.
3
If desired, select any special features for the operation.
4
Dial the telephone number using the keypad, one-touch or speed dial.
5
Speak with the remote user. To begin the transmission, request that the
user send a fax ready tone.
6
When you hear the fax tones, press
Canceling a Transmission
If you stop an active transmission to a single destination, the job is canceled.
See the "
If you stop an active broadcast or group transmission, the machine cancels
only the current transmission and continues to send to the remaining numbers.
To cancel the remaining numbers in the broadcast or group, see the "
a Pending Broadcast or Group Transmission
Cancel a Single Transmission
Cancel a Single Transmission
Sending a Fax
Canceling a Transmission
Start
.
" section on page 67.
" section on page 68.
Cancel
6
If transmission is in progress:
➙
1
2
➙
1
2
3
Stop
Press
Press
will cancel the transmission currently in progress.
Enter
.
If fax job is in memory but not in progress:
Status
Press
Press
Press
Stop
Enter
repeatedly until the job is displayed.
to cancel the displayed job.
to confirm cancellation.
67
Page 76

Sending a Fax
Communication Features
Cancel a Pending Broadcast or Group Transmission
1
2
3
Status
Press
When the desired job displays, press
Enter
Press
key until the job to be canceled is displayed.
to cancel the job.
Communication Features
The machine provides the following additional features for sending faxes:
Page Headers
Resolution, Contrast, and Halftone
Error Correction Mode (ECM)
Charge Codes
The contrast, resolution, and halftone options can be controlled by keys on the
control panel or set with user options. Disabling ECM, page header and
memory send features are set with menu options. Charge codes and dial
options can be entered in the telephone number.
Page Headers
When the machine sends a fax, it includes a header with the document. In
North America, to comply with FCC rules, the header must clearly identify the
company or person sending the fax including the local name and the telephone
number. See the "
The header includes a transmit page count up to 99 pages.
Resolution
Programming the Machine ID
Stop
.
" section on page 18.
68
FastAccess: M41
(Default = Standard)
When faxing a document, you can set the resolution using the
button. For a normal document, set the
document with fine details, set the resolution to Fine or Superfine.
Konica Fax 9825 User’s Manual
Resolution
to Standard; for a
Resolution
Page 77

If the setting is selected from the control panel, the machine returns to the
default setting after the operation. You can set the Resolution option to fax all
documents with the same resolution. (The resolution for copying is always
Superfine
1
Press
2
Press 4 to select the Scanner menu.
3
Press 1 to select the Fax Resolution menu option.
4
Press Æ until the desired setting is displayed:
5
Press
When selecting Superfine as the fax resolution, your document will not be
scanned until the call is initiated and the fax capabilities of the receiving device
are determined. If the receiver can receive superfine documents, the document
will be scanned with superfine resolution. Otherwise, it will revert to fine mode.
Contrast
For a normal document, set the
pencil or colored characters, select the Light setting; for a document with dark
characters, select the Dark setting.
If you select a setting on the control panel, the machine returns to the default
setting after the operation. You can set the Contrast option to change the
default. To change the default, see the "
Sending a Fax
Communication Features
.) Use the following procedure to set the resolution default for faxes:
Menu
.
__Fax_Resolution___
Default resolution:
¾
Standard
Press Æ, then ENTER
Enter
Standard, Fine
.
Contrast
to Normal; for a document with light,
Contrast
" section on page 48.
or
Superfine
.
6
Halftone
You can select the
shading. When you select the halftone mode, you can select either Fine or
Superfine resolution; however, the resolution setting that is used when
transmitting a document is determined by the capability of the remote machine.
If the remote has superfine resolution, then superfine resolution is used; if the
remote has fine resolution, then fine resolution is used.
For a single destination, the document is held in the document feeder until the
resolution capability is identified. For multiple destinations, poll out or delayed
start operations, Fine resolution is used unless Superfine is selected from the
control panel prior to the operation. The copy quality cannot be assured if
multiple destinations or delayed start is used when Halftone is selected.
Halftone
mode to transmit photographs or figures with
69
Page 78

Sending a Fax
Communication Features
If the setting is selected from the control panel, the machine returns to the
default setting after the operation. You can set the Halftone user option setting
to print all documents using the halftone mode. To change the default setting,
see the "
Halftone
" section on page 50.
Error Correction Mode
When using Error Correction Mode (ECM), the machine stores and transmits
a document section-by-section and monitors the transmit signals on the
telephone line. If the machine detects an error, it can resend the section of the
document that was being transmitted during the error.
When the ECM mode is off, the memory previously reserved for ECM
processing is reallocated for document storage.
You can enable or disable ECM in these two ways:
Set ECM in the Phonebook
See the "
Select ECM in the Dial Options
and the phonebook setting. The setting is used for a single job and returns
to the default upon completion of the job. To override the default, see the
Dial Options Menu
"
As per ITU specification for V.34 fax transmission, the ECM is always enabled
by default.
Setting up the Phonebook
" section on page 58.
- this setting overrides the machine setting.
" section on page 90.
- this setting overrides the default setting
Charge Codes
If you wish to use Charge Codes. To use this procedure, the Pause key must
be enabled for Dial Options. To do this, please see Fax Control Panel Keys on
page 30 of the User’s Guide.
This feature allows you to include a charge code with the telephone number.
The display and reports will indicate a "C" symbol for the charge code number.
You can also program the charge code in the phonebook for automatic dialing
or prompt for its input during the dialing sequence. See the "
Phonebook
To enter a charge code with a fax number:
➙
1
Press
2
Press 2 or press Æ until
3
You will be prompted to select
the two using the left or right arrow key. Select one by pressing
70
Konica Fax 9825 User’s Manual
" section on page 90.
Pause
.
Charge Code
blinks, then press
Enter Now
Enter Later.
or
Setting up the
Enter.
Toggle between
Enter.
Page 79

4
If you selected
charge code entered will be obscured by the symbol $), press the
key, then enter the number to be dialed and any other dialing options you
wish. Press
in the display. Enter the number to dial and any other dial options you wish,
then press
5
Enter another number to dial or press
Enter Now,
Enter
when done. If you selected
Enter.
It will then prompt you to enter the charge code.
Outgoing Faxes Menu
FastAccess: M231
Use the Outgoing faxes menu to set the features described in the following
sections.
Sending a Fax
Outgoing Faxes Menu
then enter your charge code number (the
Pause
Enter Later,
Start
to send the fax.
a “C” will appear
Number of Redials
FastAccess: M2311
(Default = 5)
Use this feature to select the number of times the machine redials a number if
the remote machine is busy or does not answer. Bear in mind that if an
incorrect phone number is entered, the machine would dial the incorrect
number this many times as well. The machine enters a redial wait mode, then
redials the number.
1
2
3
4
5
6
7
Menu
Press
Press 2 to select the Fax menu.
Press 3 to select the Fax options menu.
Press 1 to select the Outgoing faxes menu option.
Press 1 to select the Number of redials menu option.
Use the keypad to enter the number of redials:
Press
.
_Number_of_redials_
Redials:
¾
5
Enter number 0-15
Enter
.
6
0-15
.
71
Page 80

Sending a Fax
Outgoing Faxes Menu
Redial Interval
FastAccess: M2312
(Default = 3)
Use this feature to select the time interval between automatic redial attempts.
1
2
3
4
5
6
7
Menu
Press
Press 2 to select the Fax menu.
Press 3 to select the Fax options menu.
Press 1 to select the Outgoing faxes menu option.
Press 2 to select the Redial interval menu option.
Use the keypad to enter the desired redial interval:
Press
.
___Redial_Interval___
Time in minutes:
¾
3
Enter number 0-255
Enter
.
Tone/Pulse Dial Mode
0-255 minutes.
72
FastAccess: M2313
(Default = Tone)
This feature allows you to change the dial mode default setting. The options
are: Tone and Pulse.
1
2
3
4
5
6
7
Konica Fax 9825 User’s Manual
Menu
Press
Press 2 to select the Fax Menu.
Press 3 to select the Fax options menu.
Press 1 to select the Outgoing faxes menu option.
Press 3 to select the Tone/pulse dial menu option.
Press Æ until the desired setting is displayed:
Press
.
___Tone/pulse dial___
Tone/pulse dial:
¾
Tone
Æ
Press
Enter
, then ENTER
.
Tone
or
Pulse
.
Page 81

Dial Prefix
FastAccess: M2314
Some phone systems require that you dial a number to reach an outside line.
The Dial Prefix feature allows you to program a prefix that will be added to the
start of each fax number dialed. You may use the Pause key to insert a Pause
or other Dialing options.
1
Press
2
Press 2 to select the Fax menu.
3
Press 3 to select the Fax options menu.
4
Press 1 to select the Outgoing faxes menu option.
5
Press 4 to select the Dial prefix menu option.
6
Use the keypad to enter the prefix. If needed, use the Pause key to enter
any needed Dialing options. Up to 10 characters may be entered.
7
Press
Menu
.
____Dial_prefix_____
Dial prefix:
¾
_ _ _ _ _ _ _ _ _ _
Enter phone number
Enter
.
Sending a Fax
Outgoing Faxes Menu
6
73
Page 82

Sending a Fax
Outgoing Faxes Menu
Send From Memory
FastAccess: M2315
(Default = Yes)
The machine automatically transmits multiple destination jobs (delayed send,
group, manual broadcast, and mailbox jobs) by scanning the document into
memory and sending the document from memory.
Single destination jobs are transmitted from memory only if the Send From
Memory option is on (the default). If this option is turned off, the fax is scanned
only after connecting to the remote machine and is sent directly from the
document feeder.
You will usually want to use the memory send feature. The document you wish
to fax is stored in the memory of the Konica Fax 9825 when you start to send
the fax. This allows the machine to retry sending the fax in case of failure.
If you disable this feature, the document will not be scanned until after the call
is connected.
1
2
3
4
5
Menu
Press
Press 2 to select the Fax menu.
Press 3 to select the Fax options menu.
Press 1 to select the Outgoing faxes menu option.
Press 5 to select the Send from memory menu option.
.
74
_Send_from_memory_
Send from memory:
¾
Yes
Æ
Press
6
Press Æ until the desired setting displays:
Press
Enter
7
Konica Fax 9825 User’s Manual
, then ENTER
.
Yes
or No.
Page 83

If Memory Fills
FastAccess: M2316
(Default = Yes)
Use this feature to specify whether the machine is to proceed with or cancel a
send operation when memory is full.
1
2
3
4
5
6
7
Menu
Press
Press 2 to select the Fax menu.
Press 3 to select the Fax option menu.
Press 1 to select the Outgoing faxes menu option.
Press 6 to select the If memory fills menu option.
Press Æ until the desired setting displays:
Press
.
__If_memory_fills___
Continue job?:
¾
Yes
Press
Enter
.
Retry Failed Fax
Æ
, then ENTER
Sending a Fax
Outgoing Faxes Menu
Yes
or No.
6
FastAccess: M2317
(Default = Yes)
This feature determines whether to retransmit a document from memory if an
error occurs during the communication.
1
2
3
4
5
6
7
Menu
Press
Press 2 to select the Fax Menu.
Press 3 to select the Fax options menu.
Press 1 to select the Outgoing faxes menu option.
Press 7 to select the Retry failed fax menu option.
Press Æ until the desired setting is displayed:
Press
.
___Retry_failed_fax___
Redial:
¾
Yes
Æ
Press
Enter
, then ENTER
.
Yes
or No.
75
Page 84

Sending a Fax
Outgoing Faxes Menu
76
Konica Fax 9825 User’s Manual
Page 85

Chapter 7
Receiving a Fax
7
This chapter explains how to receive faxes automatically or manually and how
to customize various options such as receiving confidential documents,
receiving documents into memory, and receiving reduced documents.
Answering Fax Calls
You can receive fax calls automatically, manually, or manually with voice. You
may have distinctive ring service and you may also have an answering
machine or telephones on the same line. You will need to set the machine
menus to match your situation.
Receiving Faxes Automatically
FastAccess: M2322
(Default = Yes, Ring = 1)
In automatic receive mode, the machine automatically receives the fax. You
can specify the number of rings before the call is answered.
Use automatic answer mode if you use a dedicated phone line for the machine.
If you use the phone line for both fax and voice communications, you can use
automatic answer mode for times when you do not answer voice calls.
To receive faxes automatically:
➙
1
2
3
4
Menu
Press
Press 2 to select the Fax menu.
Press 3 to select the Fax options menu option.
Press 2 to select the Incoming faxes menu option.
.
77
Page 86

Receiving a Fax
Answering Fax Calls
5
Press 2 to select the Answer phone menu option.
___Answer_phone__
Answer phone:
¾
Automatically
Press Æ, then ENTER
6
Press Æ until
7
Use the keypad to enter the desired ring setting:
Press
Enter
8
Automatically
____Answer_Mode____
Answer on ring:
¾
1
Enter number 1-9
.
displays.
Receiving Faxes Manually
FastAccess: M2322
The manual answer mode enables you to answer all incoming calls manually.
Use this mode if you use a shared line for fax and voice communications during
normal business hours.
This feature is usable only if you have a telephone connected the TEL jack on
your machine or have an extension phone on the same line as your machine.
1-9
.
78
To answer calls and receive faxes manually:
➙
1
2
3
4
5
6
7
Konica Fax 9825 User’s Manual
Menu
Press
Press 2 to select the Fax menu.
Press 3 to select the Fax options menu.
Press 2 to select the Incoming faxes menu option.
Press 2 to select the Answer phone menu item.
Press Æ until
Press
.
___Answer_phone__
Answer phone
¾
Manually
Æ
Press
Enter
, then ENTER
Manually
.
displays.
Page 87

Receiving a Fax
Answering Fax Calls
Manual Answer with Voice Contact
Make sure the Answer Phone option is set to
only if you have a telephone connected the TEL jack on your machine or have
an extension phone on the same line as your machine.
1
When you receive an incoming call, lift the telephone handset.
2
Remove any documents from the automatic document feeder (ADF).
3
If desired, establish voice contact.
4
If you hear a fax tone, press
machine receives the incoming fax.
If you hang up the phone before you press the Start key, the line
disconnects.
Start
and hang up the telephone. The
Using Distinctive Ring Service
FastAccess: M2326
(Default = No)
If you have subscribed to “Distinctive Ring Service” from your telephone
company, you can enable this feature to have the Konica Fax 9825 answer
only calls with a double ring—that is, fax calls only.
1
2
3
4
5
Menu
Press
Press 2 to select the Fax Menu.
Press 3 to select the Fax options menu.
Press 2 to select the Incoming faxes menu option.
Press 6 to select the Distinctive ring menu option.
.
Manually
. This feature is usable
7
____Distinctive_ring____
Distinctive ring:
¾
No
Press Æ, then ENTER
6
Press Æ until the desired setting displays:
Press
Enter
.
7
Yes
or No.
79
Page 88

Receiving a Fax
Answering Fax Calls
Using an Answering Device on the Same Line
The Konica Fax 9825 can answer incoming calls and determine if the calling
party desires the voice or fax communication mode.
If the call is from a fax machine, the machine detects the fax signal and
receives the fax automatically. For voice calls, the telephone answering device
is activated and the outgoing message is heard by the calling party.
1
Ensure the machine is in the VOICE/FAX mode.
2
When the telephone rings, the Konica Fax 9825 determines if it is a voice
or fax call.
3
If it is a fax call, the fax is received automatically. If it is a voice call, the
outgoing message is heard and the answering machine records the
message. The remote machine has the option of also sending a fax.
See the "
a telephone answering device on the same line as the machine.
Telephone Line Connections
" section on page 21 for details on using
Voice/Fax Switch
FastAccess: M2323
If you use the first connection arrangement described in the "
Connections
automatically and allows the telephone answering device to receive any voice
messages from the caller. With this arrangement, you must also turn the
Voice/Fax mode on using the menus.
" section on page 21, the Konica Fax 9825 receives faxes
Telephone Line
80
To enable the Voice/Fax mode:
➙
1
2
3
4
5
6
7
Konica Fax 9825 User’s Manual
Menu
Press
Press 2 to select the Fax menu.
Press 3 to select the Fax options menu.
Press 2 to select the Incoming faxes menu option.
Press 3 to select the Voice/fax switch menu option.
Press Æ until On displays.
Press
.
__Voice/fax_switch___
Voice/fax switch:
¾
On
Æ
Press
Enter
, then ENTER
.
Page 89

Receiving a Fax
Answering Fax Calls
The following menu selections (explained in the sections that follow) will be
displayed:
Pick-up code, Extension phone
and
Manual pick-up.
Pick-Up Code
The pick-up code, when used in conjunction with an extension phone, enables
an extension phone sharing the same phone line to transfer an incoming call
to the fax machine without pressing start on the fax machine.
1
At step 7 in the Set Voice/Fax Mode procedure, press 1 to select
code.
2
Enter a 3-digit code. The # and * characters may be included as a digit.
Press
Enter
.
3
To transfer a call from an extension phone, enter the call pick-up code and
hang up the extension phone.
Extension Phone
With extension phone/monitor phone turned on, an extension phone on the
same line is able to transfer the phone line to the fax machine for fax
communications using the pick-up code.
1
At step 7 in the Set Voice/Fax Mode procedure, press 2 to select
phone
.
2
To enable extension phone monitoring press Æ until
Press
Enter
.
3
To transfer a call from an extension phone, simply enter the call pick-up code
and hang up the extension phone.
Yes
Extension
displays.
Pick-up
7
Manual Call Pick-Up
Use manual call pick-up if you have a telephone answering device with silent
detect capabilities connected to the TEL jack. Turning on manual call pick-up
enables the Konica Fax 9825 to receive a fax if the telephone answering
device hangs up due to silence on the line.
1
At step 7 in the Set Voice/Fax Mode procedure, press 3 to select
pick-up
2
To enable manual call pick-up press Æ until
3
Press
.
Enter
Yes
displays.
.
Manual
81
Page 90

Receiving a Fax
Receive To Memory
Receive To Memory
FastAccess: M2324
(Default = Yes)
If this feature is enabled, all received fax documents are stored in memory if
the printer is unavailable because of a paper jam, lack of paper or ink, or when
the printer is busy. The documents are automatically printed and deleted from
memory when the printer is available.
To enable receiving faxes to memory:
➙
1
2
3
4
5
6
7
Menu
Press
Press 2 to select the Fax menu.
Press 3 to select the Fax options menu.
Press 2 to select the Incoming faxes menu option.
Press 4 to select the Receive to memory menu option.
Press Æ until the desired setting displays:
Press
.
_Receive_to_memory_
Receive:
¾
Yes
Æ
Press
Enter
, then ENTER
.
Yes
or No.
Confidential Receive
This feature is used in conjunction with the Secure Access feature to provide
confidential receive capability. If the Confidential Receive option is enabled
when a remote machine contacts your machine, your machine stores the
documents in memory. See the "
Supervisor Access Mode
Print Confidential Faxes
82
and the "
The confidential documents can be printed locally or retrieved from a remote
machine. See the "
documents using your machine. See the "
section on page 106 to retrieve the documents using a remote machine.
Konica Fax 9825 User’s Manual
Confidential Receive
" section on page 152.
" section on page 83 to print the
Polling Confidential Documents
" section on page 153
"
Page 91

Print Confidential Faxes
FastAccess: M5721
The display says PRINT FILE when documents are stored in memory. In
confidential receive mode, you must enter the secure access password to print
the faxes. The faxes are automatically deleted from memory after printing.
To print confidential documents:
➙
1
2
3
4
5
6
Menu
Press
Press 5 to select the Supervisor menu.
Enter the Supervisor Access four digit password if necessary.
Press 7 to select the Access menu option.
Press 2 to select the Confidential receive menu option.
Press 1 to select the Print option and print the faxes in memory.
.
Reducing Faxes to Fit
FastAccess: M2321
(Default = Auto)
You can select the way the machine prints documents that are larger than the
paper. You can set the machine to automatically reduce the image to fit the
paper or print the image on separate pages.
Reduction is normally required to slightly adjust a received fax so that it will
print correctly on a letter (8.5” x 11”) sheet of paper. Reduction may also be
needed to print faxes that are larger than the supplied paper to a single sheet
of paper. You may select from the following choices:
OFF
: No reduction will be applied. Faxes that are taller than the supplied
paper will be printed on multiple pages.
97%
: The received fax will be adjusted by a factor of 3%.
AUTO
: In addition to the 3% reduction, all faxes that are larger than a the
configured paper size will be reduced to fit this size. If the paper size is set
to Letter, then faxes longer than Letter (A4 and Legal) will be reduced to
print on a letter-sized sheet. If the paper size is set to A4, then faxes longer
than A4 (Legal) will be reduced to print on A4.
1
2
Menu
Press
Press 2 to select the Fax Menu.
.
Receiving a Fax
Reducing Faxes to Fit
7
83
Page 92

Receiving a Fax
Fax Copies, Collation, and Paper Trays
3
Press 3 to select the Fax options menu.
4
Press 2 to select the Incoming faxes menu option.
5
Press 1 to select the Reduce to fit menu option.
___Reduce_to_fit___
Reduce to fit:
¾
Auto
ENTER when done
6
Press Æ until the desired setting displays:
Press
Enter
.
7
Off, Auto, 97%
Fax Copies, Collation, and Paper Trays
Changing the Number of Fax Copies
FastAccess: M2325
(Default = 1)
Use this feature to set the number of fax copies you wish to print. You may
choose whether these copies are to be collated in the Set Collation menu
option.
1
2
3
4
5
Menu
Press
Press 2 to select the Fax Menu.
Press 3 to select the Fax options menu.
Press 2 to select the Incoming faxes menu option.
Press 5 to select the # of fax copies menu option.
.
.
84
__#_of_fax_copies__
# of fax copies:
¾
1
Enter number 1-9
6
Enter the number of copies to print: 1 through 9.
Press
Enter
.
7
Konica Fax 9825 User’s Manual
Page 93

Receiving a Fax
Fax Copies, Collation, and Paper Trays
Collating Multiple Faxes and Copies
FastAccess: M32
Default = None)
You can set the machine to automatically collate received fax documents
before printing.You may choose to enable collation individually for either
copies or faxes, or for copies and faxes.
1
2
3
4
5
Menu
Press
Press 3 to select the Printer Menu.
Press 2 to select the Collation menu option.
Press Æ until the desired setting displays:
and Copy
Press
.
____Collation____
Collation:
¾
None
Æ
Press
.
Enter
, then ENTER
.
None, Fax only, Copy only, Fax
Selecting the Paper Tray for Faxes/Copies
7
FastAccess: M34
(Default = Auto Select)
Use this feature to select the tray you wish to print faxes, copies and reports.
This option can be set only if you have installed the optional second paper tray.
1
2
3
4
5
Menu
Press
Press 3 to select the Printer Menu.
Press 4 to select the Fax/Copy tray menu option.
Press Æ until the desired setting displays:
only, Use lower tray only
Press
.
__Fax/Copy_ tray__
If printing fax/copy
¾
Auto select
Press Æ, then ENTER
Enter
.
Auto select, Use upper tray
.
85
Page 94

Receiving a Fax
Pager Notification
Selecting the Paper Tray for First Fax Page
FastAccess: M35
(Default = Either tray)
Use this feature to select the tray from which to print the first page of each
received faxes. This option can be set only if you have installed the optional
second paper tray. For example, you could print the first page of each fax on
colored paper to make it easier to sort and deliver faxes.
1
2
3
4
5
Menu
Press
Press 3 to select the Printer Menu.
Press 5 to select the First fax page menu option.
Press Æ until the desired setting displays:
low
.
Press
.
__First_fax_page__
Print from:
¾
Either tray
ENTER when done
Enter
.
Either tray
or
Upper 1st, then
Pager Notification
Paging in Response to Received Faxes
FastAccess: M2327
(Default = No)
If you want a message sent to a pager when a fax is received, you can use this
menu option to specify the pager number to use.
Menu
Press
Press 2 to select the Fax Menu.
Press 3 to select the Fax options menu.
Press 2 to select the Incoming faxes menu option.
.
86
1
2
3
4
Konica Fax 9825 User’s Manual
Page 95

Receiving a Fax
Pager Notification
5
Press 7 to select the Notify pager menu option.
____Notify_pager_____
Notify pager:
¾
No
Press Æ, then ENTER
6
Press Æ until the desired setting displays:
7
8
9
10
11
12
Enter
Press
If you selected
Type the pager number. Do not press
Press the
Pause
2-second pause. If this key is set to function as the
press 1 to select the Pause
Options
Type the notification number you want the pager to show when a fax is
received.
Press
.
Yes
, you will see this message:
____Notify_pager_____
Pager phone #:
¾
______________
Enter phone number
Pause/Dial Options
key, a comma will be added after the pager number. This inserts a
" section on page 57 to set the function of this key.)
Enter
.
key. If this key is set to function as the
option. (See the "
Enter
Yes
or No.
yet.
Dial Options
Pauses and other Dial
key,
7
Forwarding Received Faxes
FastAccess: M2328
(Default = No)
You can forward all faxes to another fax machine. Received faxes will be
printed on both this machine and the fax machine to which you forward faxes.
1
2
3
4
Menu
Press
Press 2 to select the Fax Menu.
Press 3 to select the Fax options menu.
Press 2 to select the Incoming faxes menu option.
.
87
Page 96

Receiving a Fax
Pager Notification
5
Press 8 to select the Forward faxes menu option.
____Forward_faxes_____
Forward faxes:
¾
No
Press Æ, then ENTER
6
Press Æ until the desired setting displays:
7
8
9
10
Enter
Press
If you selected
Type the number of the fax machine to which you want to forward incoming
faxes.
Press
.
Yes
, you will see this message:
____Forward_faxes_____
Forward phone #:
¾
______________
Enter phone number
Enter
.
Yes
or No.
88
Konica Fax 9825 User’s Manual
Page 97

Chapter 8
g
g
g
g
Programming the Fax
8
Phonebook
This chapter explains how to store numbers in the fax phonebook.
What is the Phonebook?
The phonebook is made up of 250 memory cells, each of which may be
programmed with an individual fax phone number or a fax group. The first 70
cells can be accessed by the one-touch keys on the front control panel. By
programming your most frequently accessed fax numbers into the first 70 cells
you can dial a number at the touch of a single button.
To access the other cells you can use the Speed Dial key to use either the
Choose by Index or Choose by Name method.
Choose by Index is used by pressing the Speed Dial button on the front control
panel until Choose by index
wish to use.
To use Choose by Name, press the Speed Dial key until Choose by name
displayed and then enter the first letter of the name you wish to use. You can
then toggle through all the names that start with that letter and select the name
of the intended recipient of your fax.
For further information on dialing methods see the "
on page 53.
is displayed and then entering the cell number you
Dialing Methods
is
" section
Since individual numbers and groups are defined using the same set of cells,
you may wish to set aside a number of one-touch cells (01-70) for any
you may wish to define. Otherwise, if you pro
individual numbers there will be no one-touch cells available for definin
roup. You can use groups defined for cells 71-250 through the speed-dial key.
ram cells 01 through 70 with
roups
a
89
Page 98

Programming the Fax Phonebook
Creating Individual Cell Entries
Creating Individual Cell Entries
The following sections describe how to plan your phonebook, how to set up
Individual cells and how to edit them.
Printing the Phonebook
FastAccess: M14
You can print the contents of the phonebook to help you decide which cells to
program with new numbers:
1
2
3
4
5
The telephone numbers assigned to phonebook cell numbers 1-70 can be
accessed with the one-touch keys. Therefore, assign the most frequently used
telephone numbers to phonebook cell numbers 1-70. If you are planning on
creating groups it is convenient to assign them to the One-Touch keys.
Therefore, leave some of the 1-70 cells available for this purpose.
Menu
Press
Press 1 to select the Reports/Help menu
Press 4 to select the Phonebook Report.
Press Æ until the desired setting displays:
name
Press
.
__Phonebook__
Print phonebook:
¾
Sorted by index
Press Æ, then ENTER
.
Enter
.
Sorted by index,
Sorted by
or
Setting up the Phonebook
FastAccess: M221
Quick Access: For one-touch keys (1-70), you can skip directly to step 6 by
holding the one-touch key for 2 seconds.
Use the following procedure to store information for individuals in the
phonebook:
Menu
Press
Press 2 to select the Fax menu.
Press 2 to select the Phonebook setup menu option.
.
90
1
2
3
Konica Fax 9825 User’s Manual
Page 99

Programming the Fax Phonebook
Creating Individual Cell Entries
4
Press 1 to select the Individual menu option.
_____Individual_____
Phonebook cell:
¾
_ _ _
Enter number 1-250
5
Enter a phonebook cell number from 1-250, to which you wish to assign a
telephone number. Then, press
6
You can type a fax number and choose one or more dial options as
described in the next step.
__Phonebook_cell_#_
Enter phone number:
¾
_ _ _ _ _ _ _ _ _ _ _
ENTER when done
7
To use any dial options with this number, press the
select from the Dial Options menu. (If pressing the
inserts a comma in the telephone number, see the "
page 146.) You can insert dial options before, within, or after the number.
See the "
1. Pause
2. Tone
3. Detect Dial Tone
sequence.
4. Charge Code -
when sending faxes to this number.
5. Cancel Auto Start
6. Hook Flash
7. Priority -
8. Send from memory -
ment will not be scanned until after the call is connected.
8
Press
any dial options you want to use.
Dial Options Menu
- Enters a 2-second pause in the telephone number.
- Selects tone dialing.
- Waits for a dial tone at this point in the dialing
The Konica Fax 9825 will prompt for a charge code
-- Cancels the One-Touch automatic start.
- Performs an automatic hook switch operation.
Moves faxes sent to this number to the top of the queue.
If you disable sending from memory, the docu-
Enter
when you have finished typing the fax number and selecting
Enter
.
Dial Options
Dial Options
Pause Key
" section on page 58 for details on dial options.
" section on
key and
key
8
_____Individual_____
Enter remote’s name:
¾
_ _ _ _ _ _ _ _ _ _ _
Letters on ONE TOUCH
91
Page 100

Programming the Fax Phonebook
Creating Individual Cell Entries
9
Use the One-Touch Alphanumeric keypad to enter the name of the person
or company to receive faxes sent to this number (1-16 characters). Then,
Enter
press
10
You can add the following special features or press
phonebook entry with no special features.
1. Delayed start
2. Fax speed
3. ECM -- Error correct
4. Fax resolution
5. Contrast
6. Password
7. Subaddress
To end the procedure, press
another entry or press
To program special features, press Æ until
You may then choose the special feature by pressing its corresponding
menu option number or by highlighting the option and pressing
11
After you have finished adding special features, press
names associated with the One-Touch numbers (1-70) on the control
panel overlay. Use pencil so the names can be changed.
.
_____Individual_____
Special features:
¾
No
Press Æ, then ENTER
Enter
Stop
to go to standby.
to select
Enter
to store the
No
. Now you can program
Yes
blinks, then press
Stop
. Write the
Enter
Enter
.
.
92
Special Features
Delayed Start -
phone number.
a.
Press 1 to select the Delayed Start menu option.
b.
Press Æ until
c.
d.
e.
f.
Konica Fax 9825 User’s Manual
Enter
Press
Use the keypad to enter the start time. Press Æ
Enter
Press
You may select another feature or press
Use this feature to store a delayed start time with the tele-
Yes
blinks.
.
to select AM or PM.
.
Stop
to go to standby.
 Loading...