

Page 1

7832
COLOR IMAGING SYSTEM
User's Manual
Page 2
SAFETY INFORMATION
This section contains detailed instructions on the operation and maintenance of this machine. To
achieve optimum utility of thi s dev ice, a ll opera to rs should care fully read and follow the instructions
in this manual. Please keep this manual in a handy place near the machine.
Please read the next sec tio n be f o re us in g thi s de vi ce . I t co ntai n s impor ta nt inf orm a tio n rela te d
to user safety and prev enting equipment problems.
Make sure you observe all of the precautions listed in this manual.
*Please note that some parts of the contents of t his section may not correspond with the purc hased
product.
■
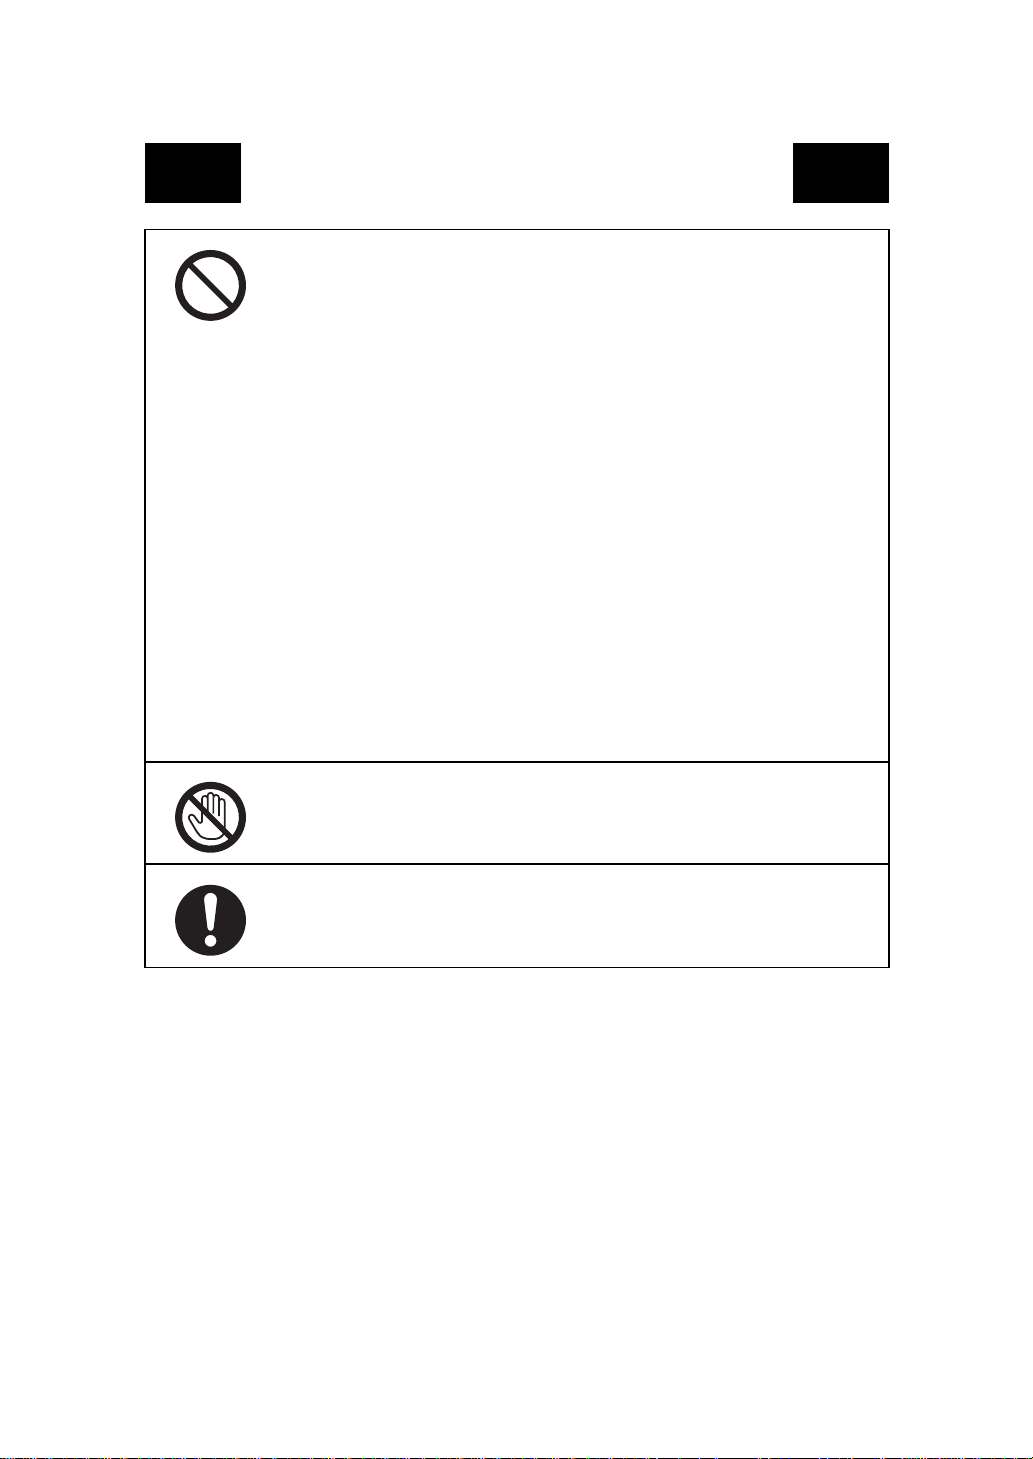
■ Warning and Precaution Symbols
■ ■
Ignoring this warning could cause serious injury or
even death.
Ignoring this caution could cause injury or da m age to
property.
■
■ Meaning of Symbols
■■
A triangle indicates a danger against which you should t ake precaution.
A diagonal line indicates a prohibited course of action.
A black circle indicates an imperative course of action.
This symbol warns against cause burns.
This symbol warns against dismantling the device.
This symbol indicates you must unplug the device.
P-1
PL 02
Page 3
• Do not modify this product, as a fire, electrical shock, or breakdown could result.
If the product employ s a laser, the laser beam sour ce could cause blindness.
• Do not attempt to remove the covers and panels whic h ha v e bee n fixed to the
product. Some products have a high-voltage part or a laser beam source inside that
could cause an electrical shock or blindne ss.
• Only use the power cord supplied in the package. Failure to use this cord could
result in a fire or electrical shock.
• Use only the specified power source voltage. Failure to do that could result in a
fire or electrical shock.
• Do not use a multiple ou tle t ada pt er to c onne ct a ny oth er ap pl ianc es o r mac hi nes .
Use of a power outlet for more than the marked current value could result in a fire
or electrical shock.
Do not unplug and plug in the power cord with a wet hand, as an electrical shock
could result.
Plug the power cord all the way into the power outlet. Failure to do this could
result in a fire or electrical shock.
• Do not scratch, abrade, place a heavy object on, heat, twist, bend, pull on, or damage the power co r d. Us e of a dam a ge d power cord (expos e d cor e wir e , broken
wire, etc.) could result in a fire or breakdown.
Should any of these conditions be found, immediately turn OFF the power switch,
unplug the power cord from the power outlet, and then call your authorized service representative.
• In principle, do not use an extension cord. Use of an extension cord could cause a
fire or electrical shock. Contact you r aut horized service representative if an
extension cord is required.
P-2
Page 4
Do not place a flower vase or other container that contains water, or metal clips or
other small metallic objects on this product. Spilled water or metallic objects
dropped inside the product could result in a fire, electrical shock, or breakdown.
Should a piece of metal, water, or any other similar foreign matter get inside the
product, immed iate ly tur n OF F th e pow er s witch, un plug the pow er co rd f rom th e
power outlet, and then call your authorized service representative.
• If this product becomes inordinately hot or emits smoke, or unusual odor or noise,
immediately turn OFF the power switch, unplug the power cord from the power
outlet, and then call your autho rized service representativ e. If you keep on u sing it
as is, a fire or electrical shock could result.
• If this product has been dropped or its cover damaged, immediately turn OFF the
power switch, unplug the power cord from the power outlet, and then call your
authorized service representative. If you keep on using it as is, a fire or electrical
shock could result.
Do not throw the toner cartridge or toner into an open flame. The hot toner may
scatter and cause burns or other damage.
Connect the power cord to an electrical outlet that is equipped with a grounding
terminal.
P-3
Page 5
• Do not use flammable sprays, liquids, or gases near this product, as a fire could
result.
• Do not leave a toner unit or drum uni t in a place within easy reach of children.
Licking or ingesting any of these things could injure your health.
• Do not let any object pl ug the ventilation holes of this product. Heat could accumulate inside the product, resulting in a fire or malfunction.
• Do not install this product at a site that is exposed to direct sunlight, or near an air
conditioner or heating apparatus. The resultant temperature changes inside the
product could cause a malfunction, fire, or electrical shock.
• Do not place the product in a dusty place, or a site exposed to soot or steam, near a
kitchen table, bath, or a humidifier. A fire, electr ical shock, or breakdown could
result.
• Do not place thi s pro duc t on a n un stable o r tilted bench, or in a l oca tion su bjec t to
a lot of vibration and shock. It could drop or fall, causing personal injury or
mechanical breakdown.
• After installing this product, mount it on a secure base. If the unit moves or falls,
it may cause persona l injury.
• Do not store toner units and PC drum units near a floppy disk or watch that are
susceptible to magnetism. They could cause these products to malfunction.
The inside of this product has areas subject to high temperature, which may cause
burns. When checking the inside of the unit for malfunctions such as a paper misfeed, do not touch the locations (around the fusing unit, etc.) which are indicated by
a “Caution ! High Temperature !” warning label.
Do not place any objects around the power plug as the power plug may be difficult
to pull out when an emergency occurs.
The socket-outlet shall be installed near the machine and shall be easily accessible
as the power plug may be difficult to pull o ut when an emergency occurs.
P-4
Page 6

• Always use this product in a well ventilated location. Operating the product in a
poorly ventila ted room for an exten ded period of time could injure your health.
Ventilate the room at regular intervals.
• Whenever moving thi s product, be sure to disconnect the power cord and ot her
cables. Failure to do this could damage the cord or cable, resulting in a fire, electrical shock, or breakdown.
• When moving this product, always hold it by the locations sp ecified in the operator’s manual or oth er documents. If the unit falls it may cause severe personal
injury. The pro duct may also be damaged or malfunction.
• Remove the power plug from the outlet more th an one time a year and clean the
area between the plug terminals. Dust that accumulates between the plug terminals may cause a fire.
• When unplugging the power cord, be sure to hold onto the plug. Pulling on the
power cord could damage the cord, resulting in a fire or electrical shock.
P-5
Page 7
Precautions for Routine Use
• Do not store toner units, PC drum units, and other supplies and consumables in a
place subject to direct sunlight and high temperature and humidity, as poor
image quality and malfunction could result.
• Do not attempt to replace the ton er unit and PC drum unit in a place exposed to
direct sunlight. If the PC drum is exposed to intense light, poor image quality
could result.
• Do not unpack a toner unit or PC drum unit until the very time of use. Do not
leave an unpacked unit standing. Install it immediat ely or poor image quality
could result.
• Do not keep toner units and PC drum units in an upright positi on or upside
down, as poor image quality could result.
• Do not throw or dro p a toner unit or PC dr um unit as poor image quality could
result.
• Do not use this product in an area where am monia or other gases or chemicals
are present. Failure to do so may shorten the service life of the product, cause
damage or decrease performance .
• Do not use this product in an environment with a temperature outsid e the range
specified in the operator’s manual, as a breakdown or malfunction could result.
• Do not attempt to fee d stapled pap er, carbon p aper or a luminum fo il through th is
product, as a malfunction or fire could result.
Do not touch or scratc h the surface of the ton e r unit, developing roller and the
PC drum, as poor imag e quality could result .
Use the supplies and consumabl es recommended by the dealer. Use of any supply or consumab le not r ecommended coul d r esu lt i n poo r ima g e qu ality and
breakdown.
P-6
Page 8

Thank you very much for your purchase of the Konica7832 (Full color laser imaging system).
This operator’s manual explains how to operate the color copier and replenish its supplies. It also gives
some troubleshooting tips as well as general precautions to be observed when operating the color copier.
To ensure the best performance and effective use of your color copier, read this manual carefully until
you familiarize yourself thoroughly with its operation and features. After you have read through the
manual, keep it for ready reference.
Please use this manual as a quick and handy reference tool for immediately clarifying any questions
which may arise.
Page 9

i
Contents
Organization
Chapters 1 through 3 contain the basic information for making copies.
Be sure to read these chapters before attempting to use your copier.
Chapter 1 Safety Notes
1. Installing the Copier
Installation Site ............................................................................................... 1-1
Power Source .................................................................................................. 1-1
Space Requirements........................................................................................ 1-1
2. Precautions for Use
Operating Environment........................................................ ..... ...................... 1-2
Using the Copier Properly............................................................................... 1-2
Moving............................................................................................................ 1-2
Care of Copier Supplies.................................................................................. 1-2
Storage of Copies............................................................................................ 1-3
Legal Restrictions on Copying........................................................................ 1-3
Chapter 2 Getting to Know Your Copier
1. System Overview
System Overview............................................................................................ 2-1
2. Copier Parts and Accessories
Outside the Copier .......................................................................................... 2-2
Options............................................................................................................ 2-3
Inside the Copier............................................................................................. 2-4
3. Control Panel Keys and Touch Panel
Control Panel Keys and Touch Panel ............................................................. 2-5
4. Touch Panel
What is the Touch Panel?................................................................................ 2-7
How the Screen is Organized.......................................................................... 2-7
Operating the Touch Panel.............................................................................. 2-8
5. Turning ON and OFF and Initial Mode
Turning ON and OFF...................................................................................... 2-9
When Copier is Turned ON............................................................................ 2-9
Initial Mode..................................................................................................... 2-9
Note on making multiple copies..................................................................... 2-9
6. Auxiliary Functions
Auxiliary Functions....................................................................................... 2-10
Chapter 3 Making Copies
1. Basic Copying Overview
Basic Copying Overview................................................................................ 3-1
2. Placing Originals
Placing Originals on the Glass........................................................................ 3-3
Using the Duplexing Document Feeder.......................................................... 3-5
3. Basic Funct i ons
Copy Paper Size.............................................................................................. 3-9
Manual Bypass Copying............................................................................... 3-11
Zoom Ratio ................................................................................................... 3-13
Image Density........................ ...... ........................................ ......................... 3-17
Page 10

Adjusting the background level.................................................................... 3-17
Adjusting the Image Density............................... ...... ................................... 3-18
4. Input Output Mode
Original Copy Types................................................................................ 3-19
Selecting Input Output Mode................................................................... 3-21
Input the number of originals....................................................................... 3-22
Mixed Original Detection Mode.................................................................. 3-23
Instructions for Loading Originals............................................................... 3-24
Finishing Modes ........................................................................................... 3-25
5. Color Adjust Mode (Basic)
Basic Adjustment Items ............................................................................... 3-30
Color Adjust Procedure (Basic)................................................................... 3-31
Selecting the Original Image Type............................................................... 3-32
6. Photo Mode
Making Copies from a Photo....................................................................... 3-33
Setting Mirror Image in Photo Mode........................................................... 3-36
Storing the Photo Size in Memory............................................................... 3-37
Chapter 4 Professional Way to Make Color Copies
1. Using the Applied Input Output Functions
Frame Erase.................................................................................................... 4-1
File Margin..................................................................................................... 4-3
OHP Interleaving............................................................................................ 4-6
Cover Sheet.................................................................................................... 4-9
2. Color Adjust Mode (Professional)
Professional Adjustment Items..................................................................... 4-11
Color Adjust Procedure (Professional: Other Than Color Balance)............ 4-12
Color Adjust Procedure (Color Balance)..................................................... 4-13
3. Using the Digital Art Functions
Digital Art Functions List ............................................................................ 4-15
Monotone ..................................................................................................... 4-17
Background Color........ ..... ........................................ ................................... 4-18
Neg.-Pos. Reverse........................................................................................ 4-19
Color Separation........................................................................................... 4-20
X/Y Zoom .................................................................................................... 4-21
Image Repeat............................................................................................... . 4-23
Multi-Page Enlargement .............................................................................. 4-25
Mirror Image..................... ...... ..................................................................... 4-29
Postcard........................................................................................................ 4-31
ii
Contents
Chapter 5 Setting the Utility Mode
1. Default Settings
Default Settings Changing Procedure............................................................ 5-1
2. Meter Count
Calling up Meter Count.................................................................................. 5-2
Glossary of Touch Panel Terms:.................................................................... 5-2
Printing the Meter Count Data....................................................................... 5-2
3. Copy Track Functions
Setting the Copy Track Functions.................................................................. 5-3
Changing the Account Number...................................................................... 5-4
Page 11

iii
Contents
Programming the Access Numbers................................................................. 5-5
Checking the Number of Copies Made by Each Account.............................. 5-6
Resetting Counters.......................................................................................... 5-7
Prohibiting Color Copying for Each Account................................................. 5-8
Setting the Maximum Number of Copies to be Made by Each Account........ 5-9
4. Gradation Adjust
Gradation Adjust Sequence.................................................. ......................... 5-11
5. Dummy Rotation
Changing Dummy Rotation Setting.............................................................. 5-13
6. Gamma-Curve Limitation
Gamma-Curve Limitation Setting................................................................. 5-14
7. Thick 2 Duplex
Thick 2 Duplex Setting................................................................................. 5-15
Making 2-Sided Copies on Thick 2.............................................................. 5-16
8. Storing an d Calling Jobs
Job Memory Input Procedure........................................................................ 5-17
Calling up a Job............................................................................................. 5-18
9. User’s Choice
User’s Choice Functions............................................................................... 5-19
User’s Choice Setting Changing Procedure.................................................. 5-20
10. Image Centering
Turning ON or OFF Image Centering........................................................... 5-21
11. Scanner Address Input
Scanner Address Input.................................................................................. 5-22
Chapter 6 When a Message Appears
1. When the Message “Load paper in the XXXX Tray.” Appears
Paper Loading Procedures .............................................................................. 6-1
2. When the Message “Please add Toner.” Appears
Replenishing Toner......................................................................................... 6-3
3. When the Message “The Staple Cartridge is empty.” Appears
Replacing the Staple Cartridge ....................................................................... 6-5
4. When the Message “Misfeeding is detected.” Appears
Misfeed Location Displays ............................................................................. 6-7
Misfeed Clearing Procedures.......................................................................... 6-8
5. When the Message “The Fuser Oil has run out.” Appears
Replenishing the Fuser Oil................................................... ..... ...... .............. 6-14
6. When or Appears
When Appears.......................................................................................... 6-17
When Appears......................................................................................... 6-17
7. What Does Each Message Mean?
What Does Each Message Mean?................................................................. 6-18
Chapter 7 Troubleshooting
1. When This Type of Copy is Produced
When This Type of Copy is Produced............................................................ 7-1
2. The Copier is not functioning as designed
The Copier is not functioning as designed...................................................... 7-3
Page 12

Chapter 8 Miscellaneous
1. Specifications
Specifications................................................................................................. 8-1
2. Care of the Copier
Cleaning ......................................................................................................... 8-7
3. Function Combination Matrix
Function Combination Matrix............................. ...... ..................................... 8-9
Precautions for Setting the Color Adjust Function...................................... 8-10
4. Description of Paper Size and Zoom Ratio Table
Description of Paper Size and Zoom Ratio Table........................................ 8-11
5. Index
Index............................................................................................................. 8-12
iv
Contents
Page 13
v
Terms and Symbols for the Type of Originals and Copy Paper
A few special terms and symbols are used in this manual to designate types of originals and copy paper.
This page explains about these terms and symbols.
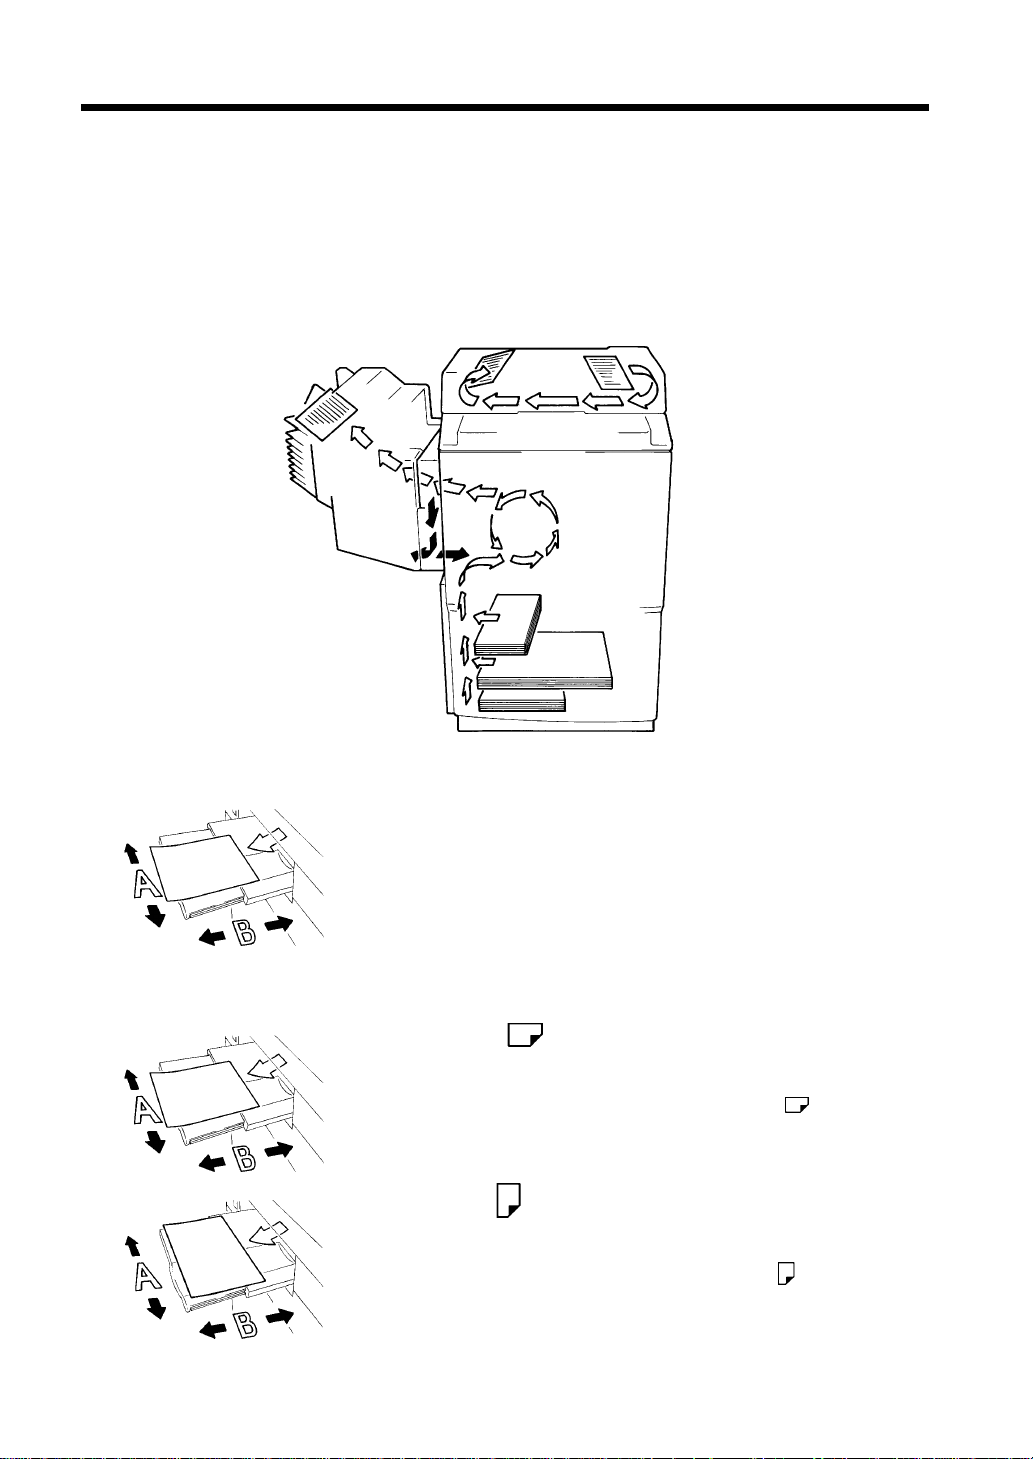
Feeding Direction (copy paper path)
In this copier system, copy paper is taken up from the left-hand side of th e copier and fed through the
copier toward the right-hand side, out face down onto the Exit Tray. In the figure below, the direction in
which the copy paper is fed, as indicated by the arrow, is called the “feeding direction.”
“Width” and “Length”
1139O1610A
Terms and Symbols Used
1139O1610A
1154O001AA
When we talk about the size of the original or copy, we call side A
“width” and side B “length.”
A: Width
B: Length
<Lengthwise >
When the original or copy has a “length” longer than its “width,”
we call it “lengthwise” and use symbol “L” or “ .”
<Crosswise >
When the original or copy has a “length” shorter than its “width,”
we call it “crosswise” and use symbol “C” or “ .”
1139O1620A
Page 14

Safety Information
This device must be used with shielded inter face ( Parallel) cable and shielded network (10/100Base-T)
cable.
The use of non-shielded cable is likely to result in interference with radio communications and is
prohibited under 89/336/EEC rules.
The LAN port of this machine is for the indoor cable splicing. An outdoor cable cannot be used.
vi
Page 15
vii
.
Safety Information
Laser Safety
This is a digital machine which operates by means of a laser. There is no possibility of danger from the
laser, provided the machine is operated according to the instructions in this manual.
Since radiation emitted by the laser is completely confined within protective housing, the laser beam
cannot escape from the machine during any phase of user operation.
This machine is certified as a Class 1 laser product. This means the machine does not produce hazardous
laser radiation.
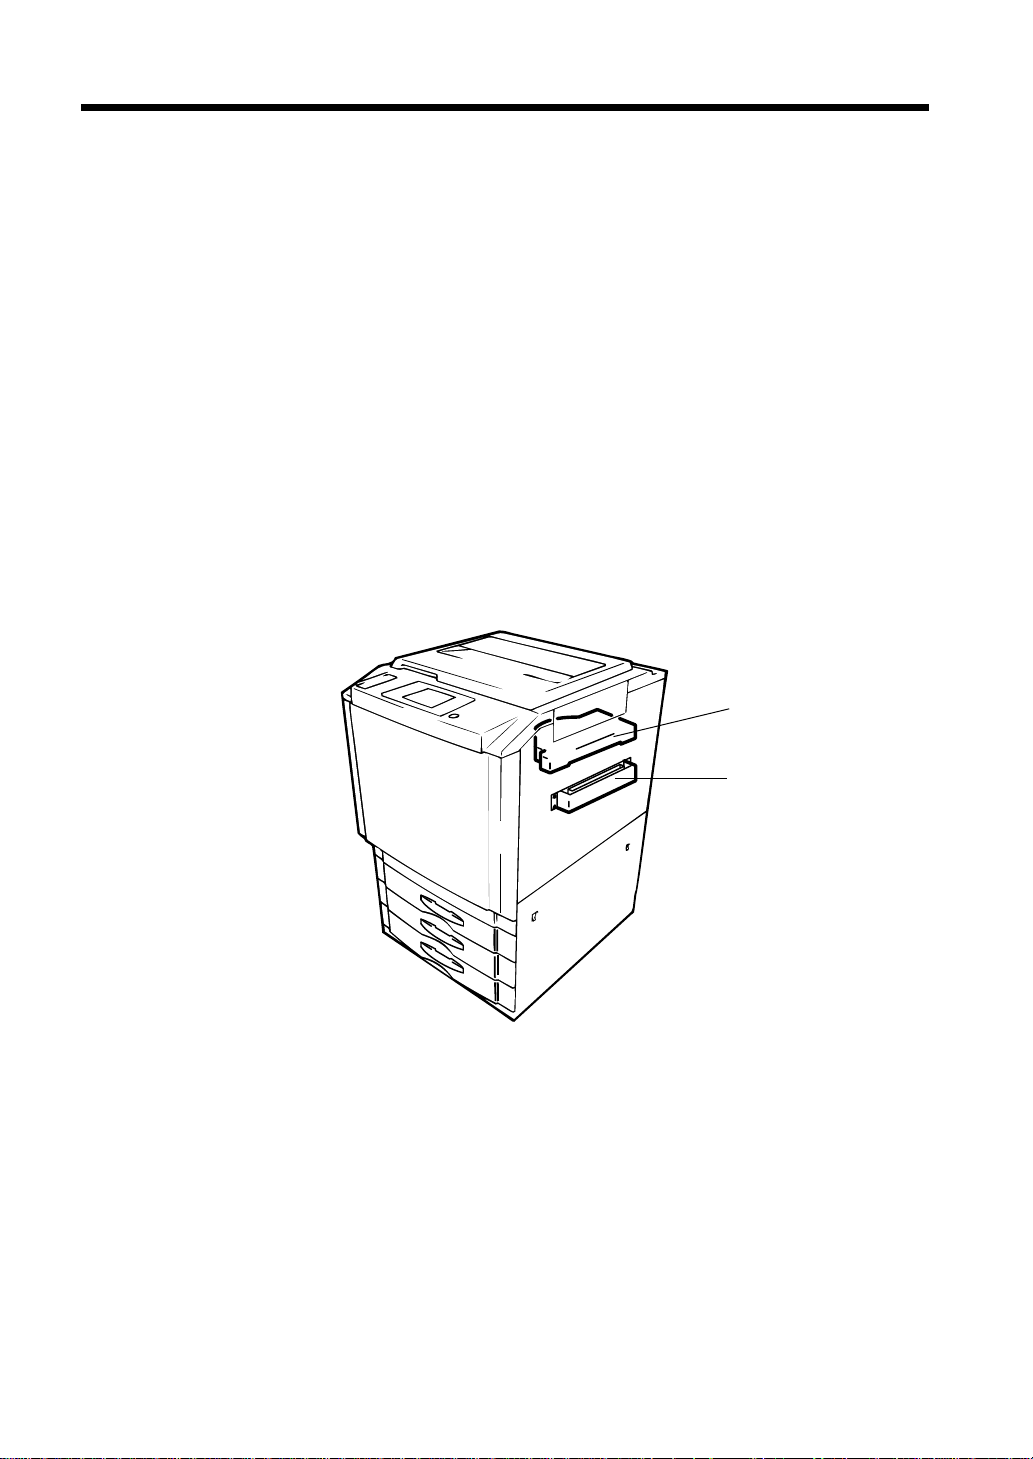
Internal Laser Radiation
Maximum Average Radiat Power: 78.1 µW at the laser aperture of the upper print head unit.
Wavelength: 675-695 nm
This product employs a Class IIIb Laser Diode that emits a laser beam.
The Laser Diode and the Scanning Polygon Mirror are Incorporated in the print head unit.
The print head unit is NOT A FIELD SERVICE ITEM.
Therefore, the print head unit should not be opened under any circumstances.
Upper Print Head Assy.
Lower Print Head Assy
1179O070AA
Page 16

viii
Safety Information
CDRH Regulations
For European Users
CAUTION:
Use of controls, adjustments or performance of procedures other than those specified in this manual
may result in hazardous radiation exposure.
This is a semiconductor laser. The maximum power of the laser diode is 35 mW and the wavelength is
675-695 nm.
Page 17
ix
Safety Information
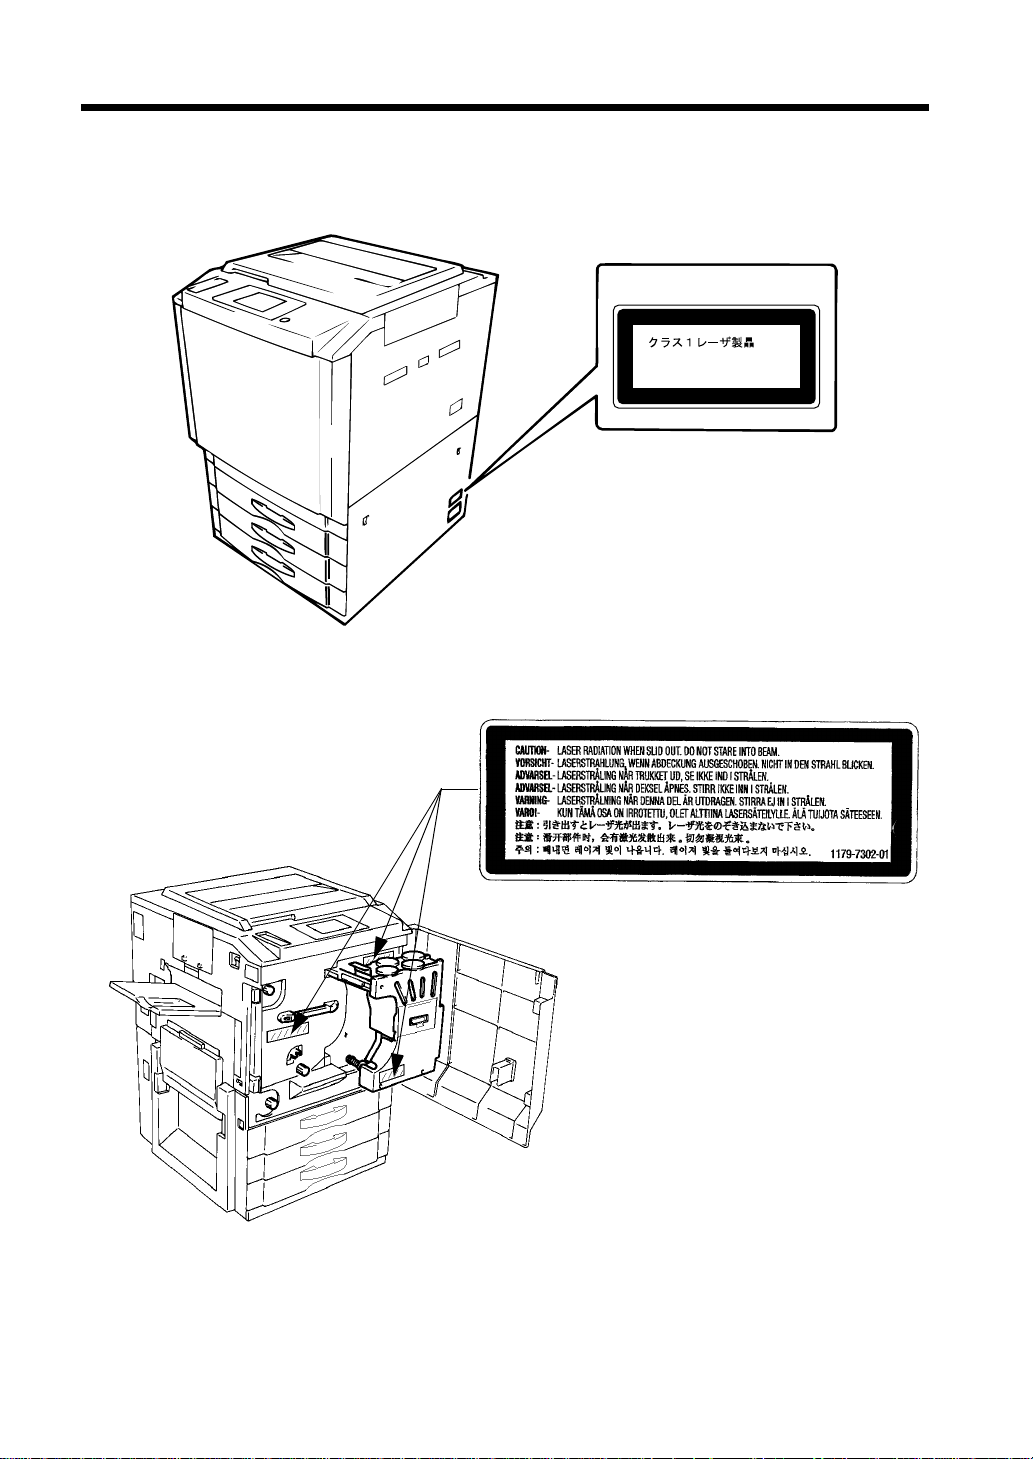
Laser Safety Label
A laser safety labels is attached to the outside of the machine shown below.
CLASS 1 LASER PRODUCT
LASER KLASSE 1 PRODUKT
1179O071AA
Location of Laser Warning Labels
Inside the Copier (Front)
1179O075AA
1179O077AA
Page 18
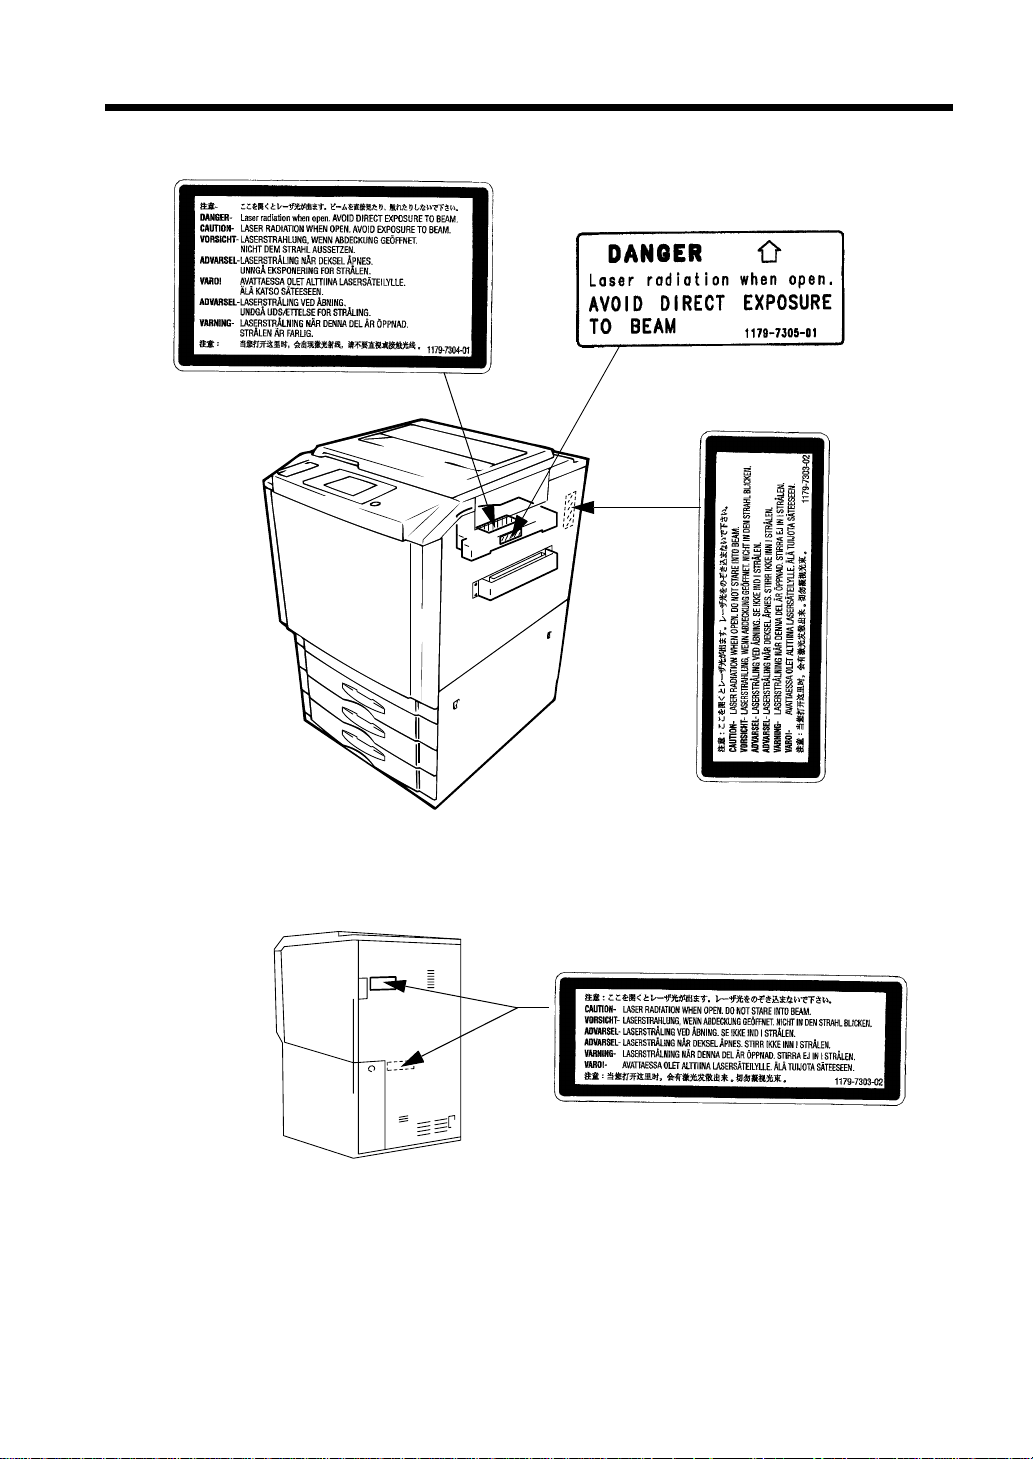
Internal Right Side View
x
Safety Information
1179O080AA
1179O079AA
Rear Side View
1179O078AA
1179O076AA
1179O078AA
1179O069AB
Page 19

xi
Safety Information
Ozone Release
NOTE
= Locate the Machine in a Well Ventilated Room =
A negligible amount of ozone is generated during normal operation of this machine. An unpleasant
odor may, however, be created in poorly ventilated rooms during extensive machine operations. For a
comfortable, healthy, and safe operating environment, it is recommended that the room well ventilated.
REMARQUE
= Placer l’appareil dans une pièce largement ventilée =
Une quantité d'ozone négligable est dégagée pendant le fonctionnement de l’appareil quand celui-ci est
utilisé normalement. Cependant, une odeur désagréable peut être ressentie dans les pièces dont
l'aération est insuffisante et lorsque une utilisation prolon gée de l’ appareil est effectuée. Pour avoir la
certitude de travailler dans un environnement réunissant des conditions de confort, santé et de sécurité,
il est préférable de bien aérer la pièce ou se trouve l’appareil.
Acoustic noise
<For European Users Only>
Machine Noise Regulation 3 GSGV, 18.01.1991 : The sound pressure level at the operator position
according to EN 27779 is equal to or less than 70dB(A).
Page 20
Safety Information
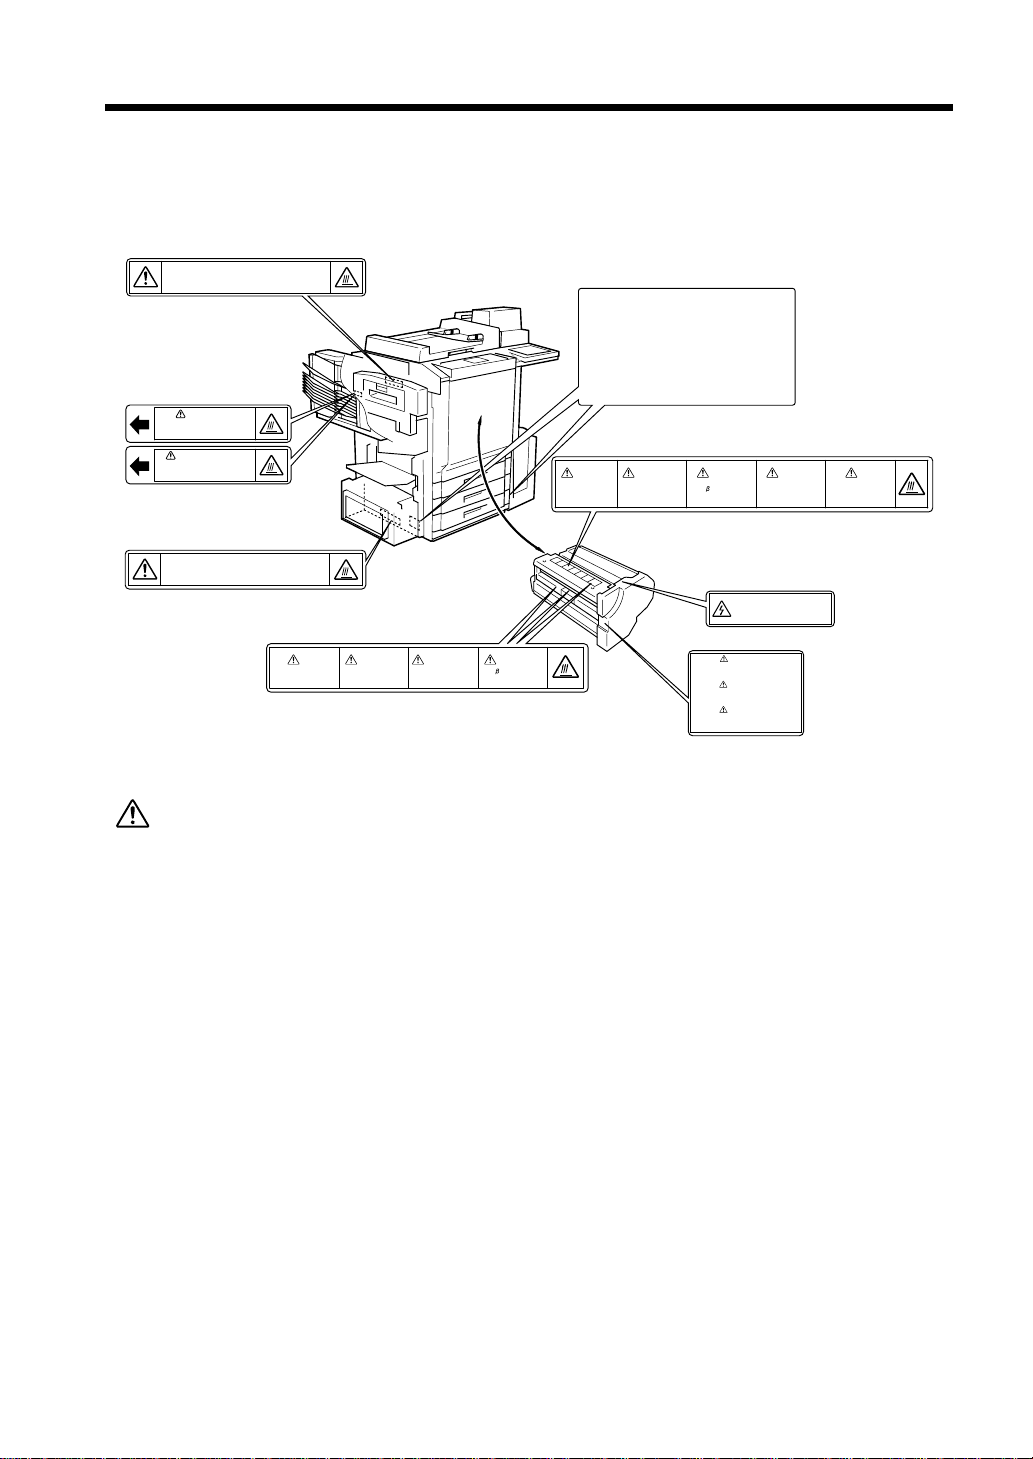
Caution Labels
The caution labels are attached to the machine areas, as shown, when you are advised to pay special
attention to avoid any dangerous situations or serious injury.
:Hot Surface Avoid Contact
CAUTION
:Surface Chaude Ne Pas Toucher
ATTENTION
:HeiBe Oberfl che Nicht Ber hren
VORSICHT
VORSICHT
HeiBe Oberfl che
Nicht Ber hren
CAUTION-ATTENTION
Hot Surface Avoid Contact
Surface Chaude Ne Pas Toucher
:Hot Surface Avoid Contact
CAUTION
:Surface Chaude Ne Pas Toucher
ATTENTION
:HeiBe Oberfl che Nicht Ber hren
VORSICHT
Hot Surface
Avoid Contact
To reduce the risk of injury due to
CAUTION:
unstable equipment,set stabilizers
before use.
Installer les stabilisaleurs avant
ATTENTION:
utilisation afin d’ viter de vous blesser.
Asegurense de posicionar los
ATENCION:
estabilizadores antes de utilizar la
m quia para prevenir accidentes.
ACHTUNG: Um einen sicheren Stand zu gew hrleisten,
sind die Standf Be in St tzposition zu bringen.
CAUTION
ATTENTION
Surface Chaude
Ne Pas Toucher
VORSICHT
Hei e Oberflache
Nicht Beruhren
高圧注意
HIGH VOLTAGE CAUTION
VORSICHT HOCHSPANHUNG
ATTENTION HAUTE TENSION
ATTENCION
Zona Coliente
No Tocar
注意
やけどのおそれあり
さわるな
xii
注意
高温部分
手を触れないで下さい
CAUTION
Hot Surface
Avoid Contact
ATTENTION
Surface Chaude
Ne Pas Toucher
VORSICHT
Hei e Oberfl che
Nicht Ber hren
CAUTION
For continued protection against
possible fire, use only:
GENUINE Konica 7723/7823/7832 FUSER OIL
ATTENTION
Pour assurer la protection contre les
risques d’ incendie, utiliser seulement
ORIGINAL Konica 7723/7823/7832 FUSER OIL
VORSICHT
Um Feuergefahr zu vermeiden,
darf nur ORIGINAL Konica 7723/7823/7832
FUSER OIL verwendet werden.
1179O096AA
CAUTION:
If you touch any place which you are advi sed by any caution label to keep you rself away from, you
may be burned or injured. Do not remove caution label. If any caution label is soiled, please clean
to make legible. If you cannot make them legible, or if the caution label is damag ed pleas e contact
your Service Centre.
Page 21

Chapter 1
Safety Notes
Safety Notes Chapter 1
Page 22
1-1
1. Installing the Copier
Installation Site
To ensure utmost safety and prevent possible malfunctions of the copier, install it in a location which
meets the following requirements.
A place away from a curtain or the like that may
◆
catch fire and burn easily.
An area where there is no possibility of being
◆
splashed with water or other types of liquid.
Safety Notes Chapter 1
An area free from direct sunlight.
◆
A place out of the direct air stream of an air
◆
conditioner, heater, or ventilator.
A well-ventilated place.
◆
A dry place.
◆
A dust-free location.
◆
An area not subject to undue vibration.
◆
A stable and level location.
◆
A place where ammonia or other organic gas is
◆
not generated.
A place which does not put the operator in the
◆
direct stream of exhaust from the copier.
A place which is not near any kind of heating
◆
device.
Power Source
The power source voltage requirements are as follows.
Use a power source with little voltage fluctuation.
◆
Voltage Fluctuation : Within ± 10%
Frequency Fluctuation : Within ± 0.3%
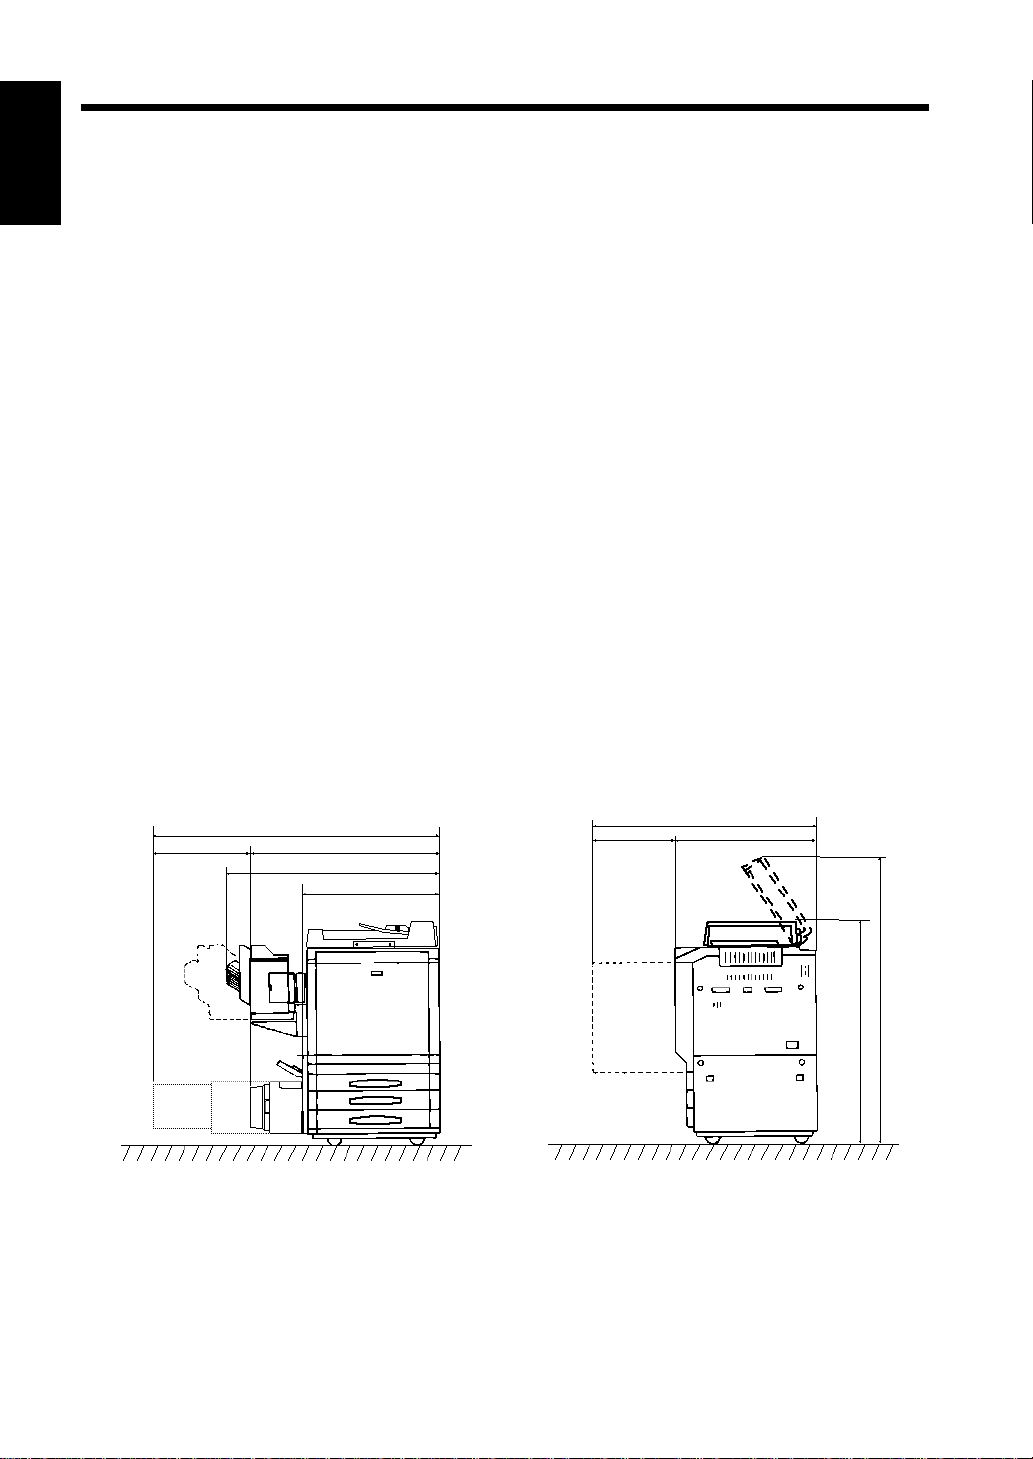
Space Requirements
To ensure easy copier operation, supply replacements and service maintenance, adhere to the
recommended space requirements detailed below.
* Be sure to allow a clearance of 150 mm or more at the back of the copier as there is a ventilation duct.
622 921
1,543
1,086
511
640
1,276
765
Scale: mm
1,476
1,119
1179O047AA
Page 23

2. Precautions for Use
Operating Environment
1-2
The operating environmental requirements of the copier are as follows.
Temperature : 10°C to 30°C (50°F to 86°F) with a fluctuation of 10°C (18°F) per hour.
Humidity : 25% to 85% with a fluctuation of 20% per hour.
Using the Copier Properly
To ensure the optimum performance of the copier, follow the precautions listed below.
NEVER place a heavy object on the copier or subject the copier to shocks.
◆
NEVER open any Doors, or turn OFF the copier while the copier is making copies.
◆
NEVER bring any magnetized object or use flammable sprays near the copier.
◆
NEVER remodel the copier as a fire or electrical shock could result.
◆
ALWAYS insert the Power Plug all the way into the outlet.
◆
ALWAYS make sure that the outlet is visible, clear of the copier or copier cabinet.
◆
ALWAYS provide good ventilation when making a large number of continuous copies.
◆
NOTE
= Locate the Copier in a Well Ventilated Room =
A negligible amount of ozone is generated during normal operation of this copier. An unpleasant odor
may, however, be created in poorly ventilated rooms during extensive copier operations. For a
comfortable, healthy, and safe operating environment, it is recommended that the room be well
ventilated.
Chapter 1
Safety Notes
REMARQUE
= Placer le copieur dans une pièce largement ventilée =
Une quantité d’ozone négligabl e est dégagée pend ant le fo nctionn ement du copieu r quand celui-ci est
utilisé normalement. Cependant, une odeur désagréable peut être ressentie dans les pièces dont
l’aération est insuffisante et lorsque une utilisa tion prolongée du copieur est effectuée. Pour avoir la
certitude de travailler dans un environnement réunissant des co nditions de confort, santé et de
sécurité, il est préférable de bien aérer la pièce ou se trouve le copieur.
Moving
If you need to transport the copier over a long distance, consult your Technical Representative.
Care of Copier Supplies
Use the following precautions when handling the copier supplies (toner, paper, etc.).
Store the paper, toner, and other supplies in a place free from direct sunlight and away from any
◆
heating apparatus. Keep them in a dry, clean environment.
Store paper, which has been removed from its wrapper but not loaded into the Drawer, in a sealed
◆
plastic bag in a cool, dark place.
Keep supplies out of the reach of children.
◆
If your hands become soiled with toner, wash them with soap and water immediately.
◆
Page 24

1-3
2. Precautions for Use
Storage of Copies
• If copies are to be kept for a long time, keep them in a place which is not exposed to light to pr event fading.
• If an adhesive containing solvent (e.g., spray glue) is used to paste copies, the toner on the copies can
melt.
• The color copies have a toner layer thicker than the normal black-and-white copies. When a color copy
is folded, therefore, the toner at the fold can be separated.
NOTE
Safety Notes Chapter 1
This copier is equipped with a counterfeit preventive function that can cause slight noise on the copy
image.
Useful Tip
By activating the “Copy Track Functi ons” offered by t his copier, nobody can use the copier unless he or
she enters an access number that’s unique to his/her account.
It helps prevent dishonest use of the copier.
Legal Restrictions on Copying
Certain types of documents must never be copied by the copier for the purpose or with the intent to pass
copies of such documents off as the original. The following is not a complete list but is meant to be used
as a guide to responsible copying.
Financial Instruments
•Personal Checks
•Travelers Checks
•Money Orders
•Certificates of Deposit
•Bonds or ot her Certificates of Indebtedness
•Stock Certificates
Legal Documents
•Food Stamps
•Postage Stamps (canceled or uncanceled)
•Checks or Drafts drawn by Government Agencies
•Internal Revenue Stamps (canceled or uncanceled)
•Passports
•Immigration Papers
•Motor Vehicle Licenses and Titles
•House and Property Titles and Deeds
General
•Identification Cards, Badg es, or Insi gni as
•Copyrighted Works without permission of the copyright owner
In addition, it is prohibited under any circumstances
Art without permission of the copyright owner.
to copy domestic or foreign currencies or Works of
When in doubt about the nature of a document, consult with legal counsel.
Page 25

Chapter 2
Chapter 2
Getting to Know Your Copier
Getting to Know Your Copier
Page 26
2-1
1. System Overview
System Over vi e w
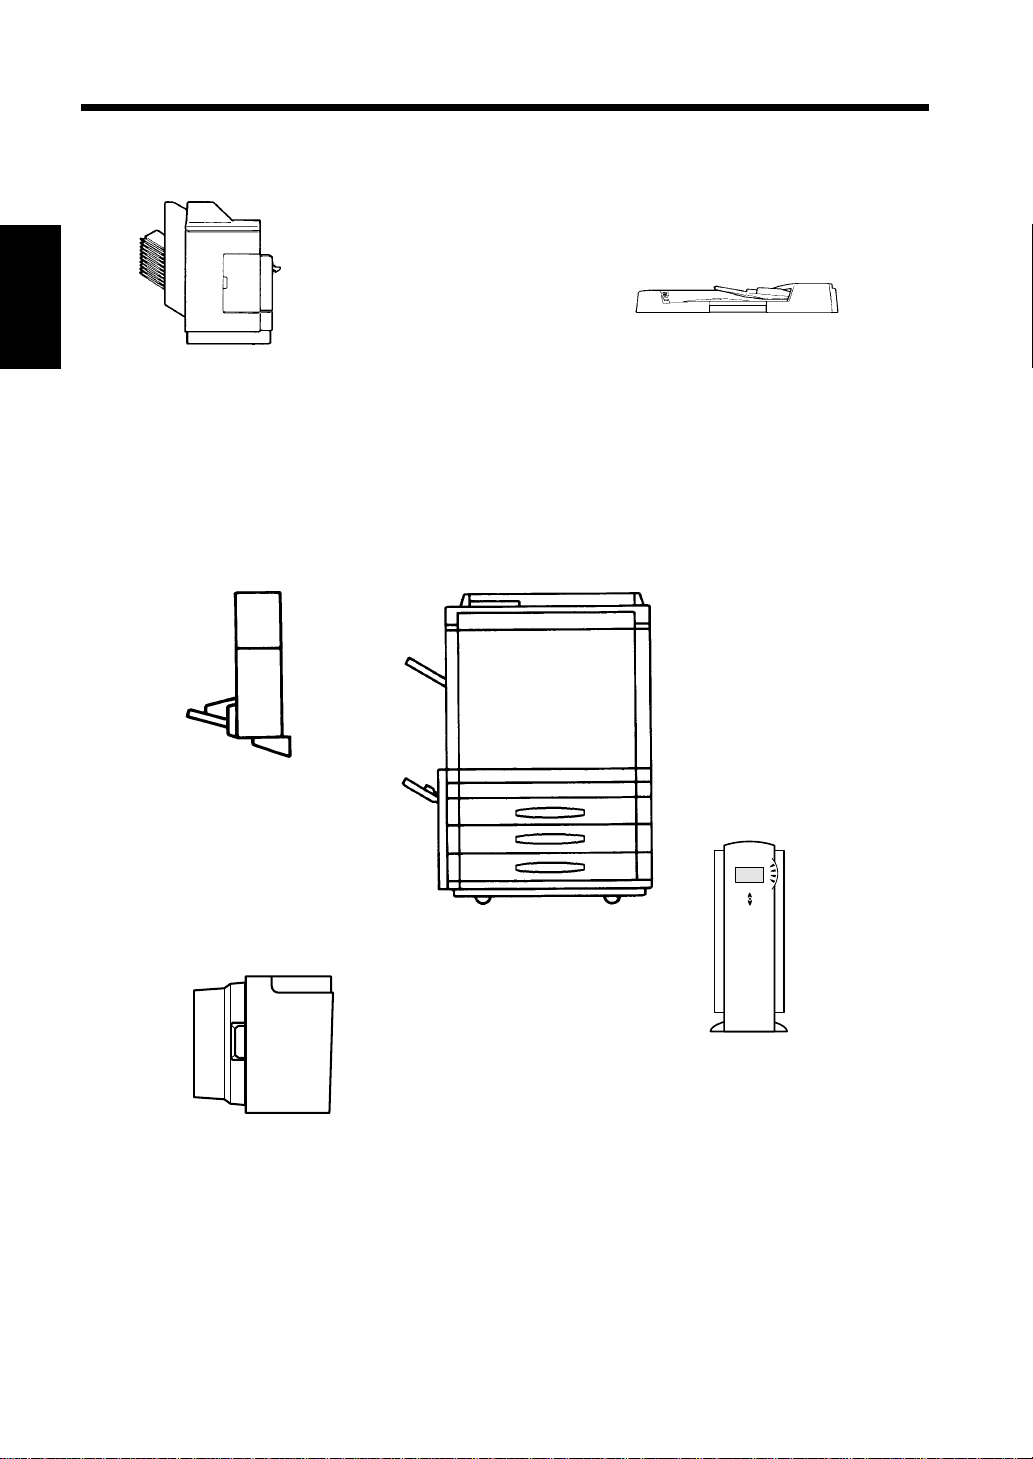
1139O0020A
Sorter ST-723/Staple Sorter
ST-724 <Option>
Permits automatic sorting or grouping of
copies into 10 copy sets or stacks.
In addition, the Staple Sorter
automatically staples the copy sets or
stacks that are sorted or grouped.
Getting to Know Your Copier Chapter 2
1144O184AA
Duplex Unit
AD-723 <Option>
Automatically turns over
1-sided copies to make
2-sided copies.
1151O007AA
Duplexing Document Feeder
DF-724 <Option>
In addition to being capable of feeding in
sheet originals one at a time, it can
automatically turn over the original for the
making of copies from 2-sided originals.
1179O014AA
1154O028AA
Large Capacity Cassette
LT-723<Option>
Holds up to 1,000 sheets of
2
A4C copy paper (80 g/m
).
1179O046AA
Printer Controller Fiery X3e/
Fiery Z4 <Option>
Allows the Copier to be used as a
color printer and color scanner
configured in a computer network.
For details, see the operator’s
manual for Fiery™ provided
separately. Fiery is the trademark
of Electronics for Imagings, Inc.
Page 27
2. Copier Parts and Accessories
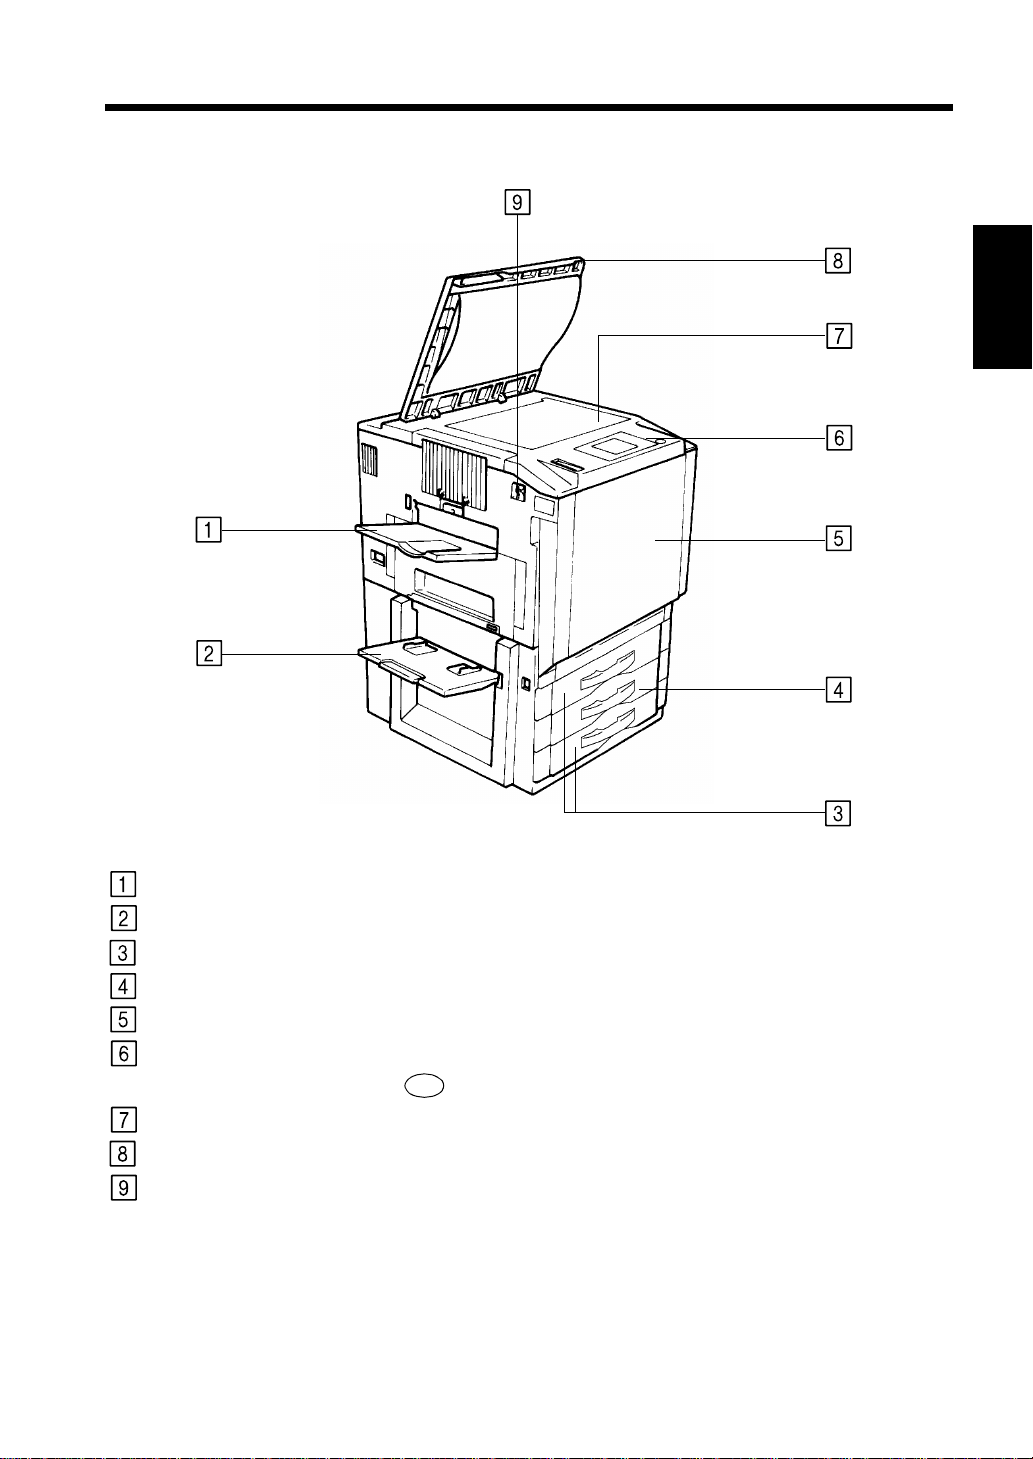
Outside the Copier
2-2
Chapter 2
Getting to Know Your Copier
Exit Tray:
Manual Bypass Tray:
Upper/Lower Tray:
Middle Tray (Universal):
Front Door:
Control Panel:
Original Glass:
Original Cover:
Power Switch:
1179O015AA
Holds copies fed out of the copier.
Use for manual feeding of copy paper into the copier. ☞p.3-11
Holds up to 500 sheets of paper. ☞p.6-1
Holds up to 250 sheets of paper. ☞p.6-1
Open to clear a paper misfeed or add toner. ☞ pp.6-3, 6-9
Use to start a copy cycle or to make copy job settings.
Control Panel Keys and Touch Panel. ☞p.2-5
See
Place your original face down on this Glass. ☞p.3-3
Holds the original in position.
Use to turn the copier ON and OFF. ☞p.2-9
Page 28
2-3
2. Copier Parts and Accessories
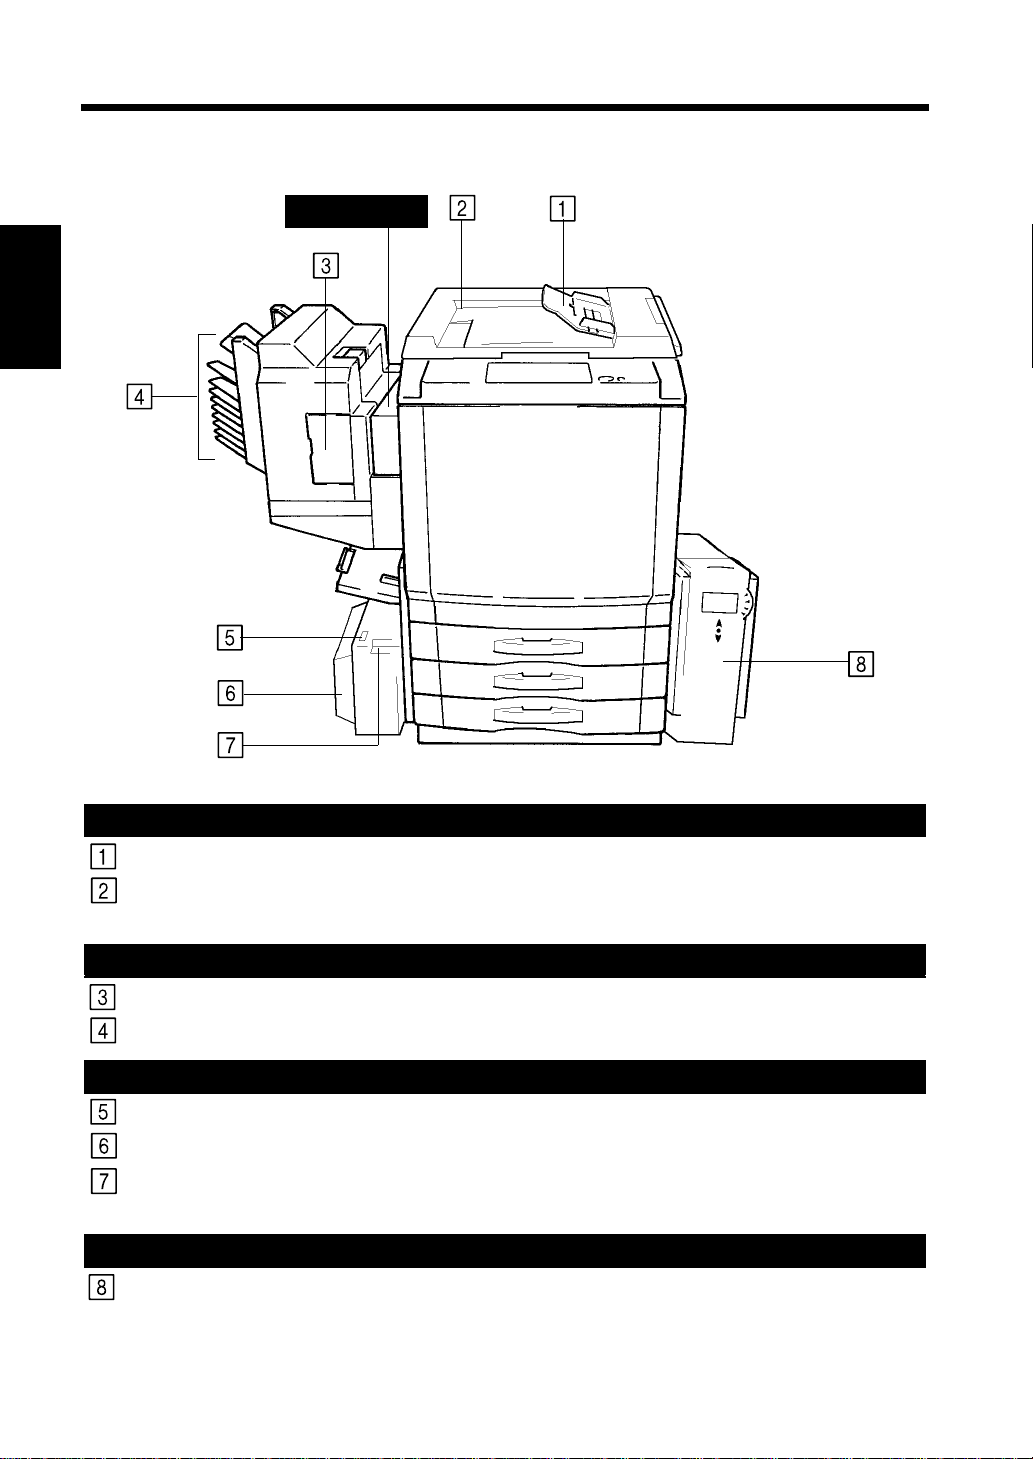
Options
Getting to Know Your Copier Chapter 2
Duplex Unit
Duplexing Document Feeder
Document Feed Tray:
Document Exit Tray:
Load the originals face up on this tray. ☞p.3-6
Receives originals automatically ejected from the Duplexing
Document Feeder.
Sorter / Staple Sorter
Stapler Door:
Sort Bins:
Open to replace the Staple Cartridge. ☞p.6-5
Hold sorted or grouped copies, each capable of holding up to 25.
Large Capacity Cassette
Paper Plate Descent Key:
Cassette Door:
Cassette Release Lever:
Press to lower the Paper Plate.
Open to add paper or clear a misfed sheet of paper.
Use to release the Cassette from the copier for clearing a misfed
sheet of paper or other service job.
Printer Controller (Fiery)
For details, see the Operator’s Manual for Printer Controller.
1179O093AA
Page 29
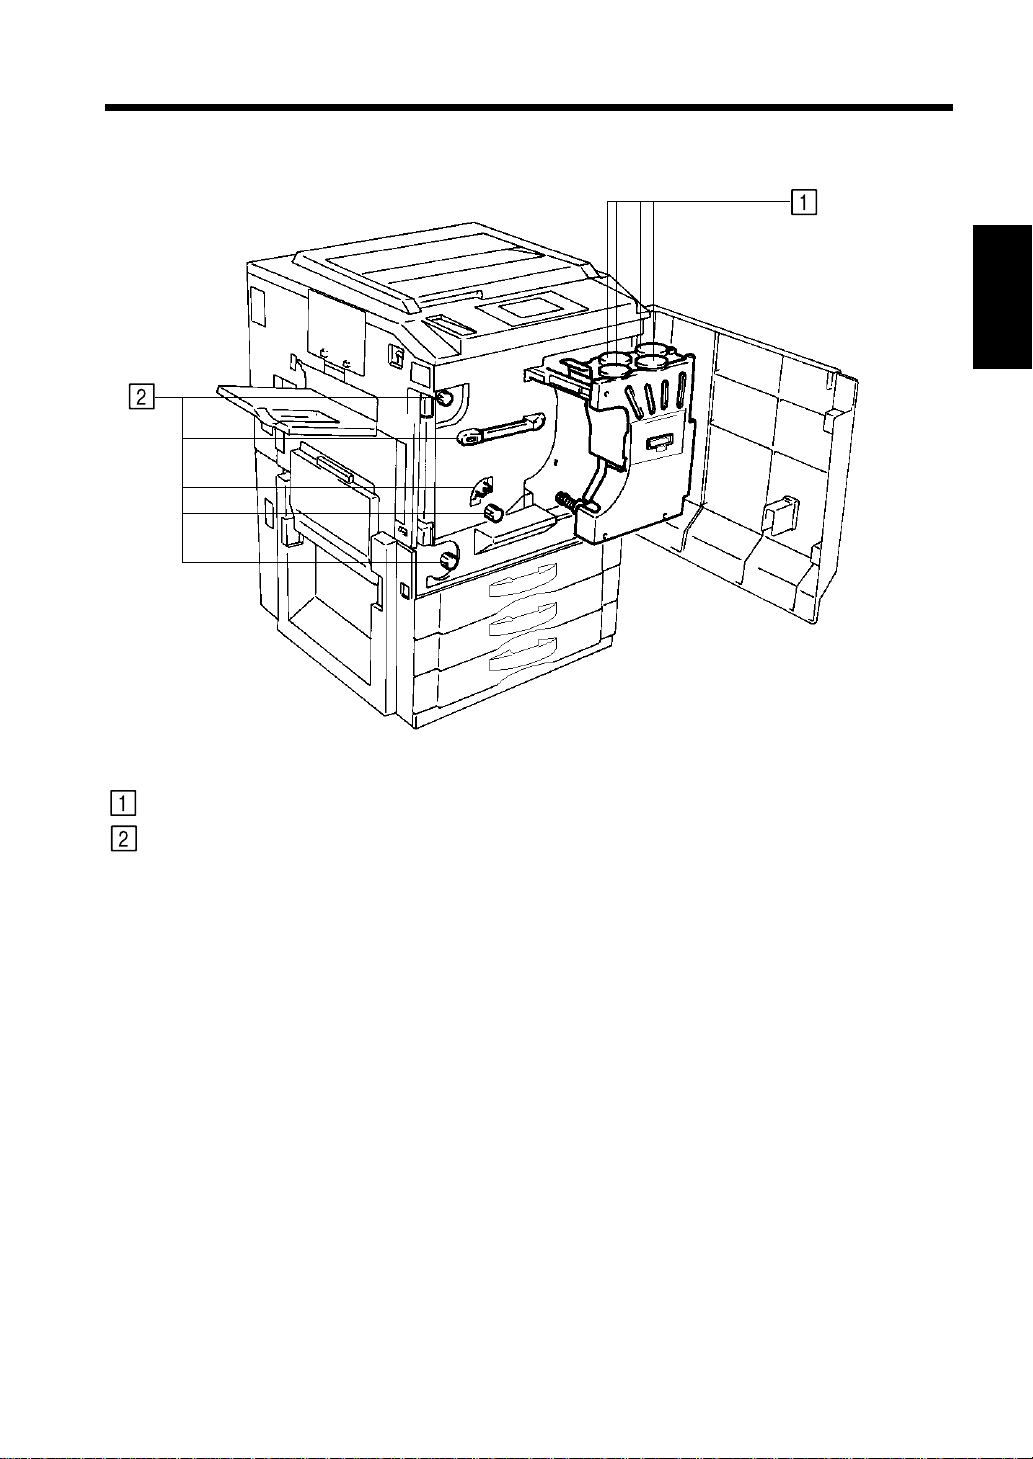
Inside the Copier
2-4
2. Copier Parts and Accessories
Chapter 2
Getting to Know Your Copier
Toner Hopper Lid:
M1 ~ M9:
1179O017AB
Open when adding toner. ☞p.6-3
Operate these parts to clear misfed sheets of paper. ☞p.6-7
Page 30
2-5
See
3. Control Panel Key s an d Touch Panel
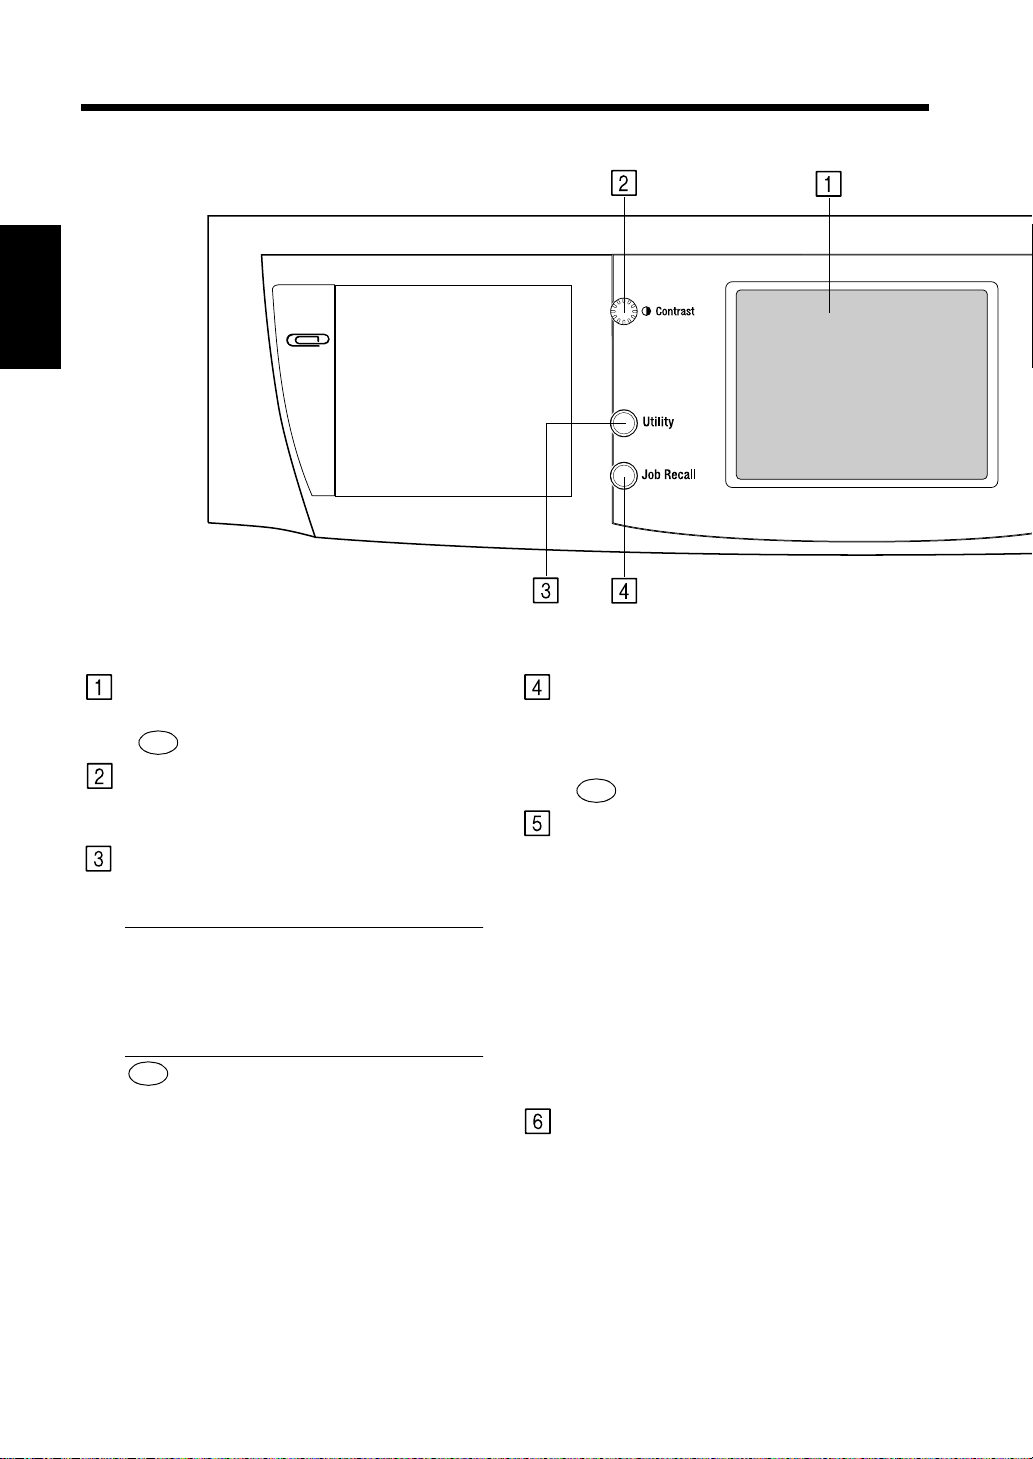
Control Panel Keys and Touch Panel
Getting to Know Your Copier Chapter 2
Touch Panel
•Shows various screens and messages.
See
Touch Panel ☞p.2-7
Display Contrast Control Knob
•Use to adjust the brightness of the Touch
Panel.
Utility Key
•Press to select the Utility Mode setting
screen.
Functions in Utility Mode
• Default Settings
• Meter Count
• Admin. Mode
• Scanner Address Input
Setting the Utility Mode ☞p.5-1
See
• Job Memory Input
• User’s Choice
• Image C ent ering
Job Recall Key
•Press to select the Job Recall screen, on
which you can recall or check a copy job
program previously stored in memory.
Calling up a Job ☞p.5-18
Auto Color/Full Color/Black Keys
•When Auto Color is selected, the copier
automatically checks and determines
whether the original is in color or blackand-white and makes a full-color or blackand-white copy according to the original.
•When Full Color is selected, the copier
makes a full-color copy even if the original
is in black-and-white.
•When Black is selected, the copier makes a
black-and-white copy even if the original is
in color.
Start Key
•Press to start a copy cycle. ☞p.3-2
•If pressed while the copier is warming up,
it enables the Auto Copy Start Function.
p.2-10
☞
Page 31

2-6
3. Control Panel Keys and Touch Panel
1179O007CC
Chapter 2
Getting to Know Your Copier
Stop Key
•Press to stop a multi-copy cycle. ☞p.3-2
Clear Key
Press to:
•Reset the multi-copy entry to 1. ☞p.3-2
•Clear a zoom ratio entered when setting
one using the 10-Key Pad.
Panel Reset Key
•Press to set the copier into the initial mode,
clearing all settings made previously on the
control p anel. ☞p.2-10
NOTE
It does not, however, clear the settings
made immediately before the Interrupt
mode.
Interrupt Key
•Press to interrupt a current job with a different one. Press it again to return to the
previous job. ☞p.2-10
Energy Saver Key
•Press to set the copier into the Energy
Saver Mode. ☞p.2-10
Access Mode Key
•When the copy cycle is completed, press
this key to go to the “Access # Prompt
Screen.”
NOTE
For details see 6. Auxiliary Functions.
p.2-11
☞
Copy Key/Scan Key
•Press to select the Scanner mode or Copy
mode. The Scanner mode can be used
when the optional Printer Controller is
mounted.
10-Key Pad
Use to:
•Enter the number of copies to be made.
•Enter the zoom ratio to be used.
•Enter the number of originals.
Page 32

2-7
4. Touch Panel
What is the Touch Panel?
When you turn ON the Power Switch, the Basic screen as shown below appears on the Touch Panel. It
shows in messages and graphics the currently set functions, available functions to choose from, and the
copier status.
*Some of the Touch Panel screens used in the Operator’s Manual may be different from what you
actually will see on your copier.
How the Screen is Organized
(1) Supplementary Function Keys
Digital Art, Color Adjust, Input Output, and
Basics keys are displayed. When any of these
keys is touched, th e corresponding supp lementary
function screen appears.
•Touching Basics returns you to the Basic screen.
(2) Message Display
(3) Basic Function/Key Display
Getting to Know Your Copier Chapter 2
(4) Press to set the copier into the Photo Mode.
(2) Message Display
Example: Add paper
(3) Basic Function/Key Display
(5) Set Function Display
1179P165CA
Shows the current copier status, operating instructions
and precautions, and other data including the number of
copies selected.
1179P166DA
Shows the basic function keys and the corresponding
functions currently selected for use. Touching a basic
function key shows the corresponding basic function
screen.
*What is shown inside the key is the current setting.
Example: Zoom
1179P167DA
Page 33

(5) Set Function Display
Shows graphic representations of functions set other than the initial ones, inclu ding the
Input Output
and types.
Digital Art
2-8
4. Touch Panel
1144O040AA 1144O041AA 1144O042AA
1144O043AA
1144O046AA
1144O049AA
1144O051AA 1144O052AA 1144O053AA
1 2 2 1 2 2
1 2 in 1 1 2 (2 in 1) Book 1
1144O044AA
Book 2 Sort Group
Sort and Staple Frame Erase
1144O045AA
1144O047AA1144O048AA
1144O050AA
File Margin Cover Sheet
Background
1144O054AA 1144O055AA 1144O056AA
Monotone
Color
Chapter 2
Getting to Know Your Copier
OHP
Interleaving
Neg.-Pos.
Reverse
1144O057AA
Color Separation
(3-Color)
1144O058AA
Color Separation
(4-Color)
1144O059AA
X/Y Zoom
Multi-Page
1144O060AA 1144O061AA
1144O062AA
Image Repeat
Mirror Image
Enlargement
Operating the Touch Panel
You need only to lightly touch the key shown on the Touch Panel to select or activate the function
represented by the key.
NOTE
NEVER press the Touch Panel hard or use a hard or pointed object to press it, as a damaged panel
could result.
Page 34

2-9
5. Turning ON and O FF and Initial Mode
Turning ON and OFF
• Turning Copier ON
Press the Power Switch to the (ON) position.
• Turning Copier OFF
Press the Power Switch to the (OFF) position.
1179O018AA
When Copier is Turned ON
When the Power Switch is turned ON, the message “Warming-up. Pre-program a job.” appears on the
Touch Panel and the copier now enables its auto copy start function.
Auto Copy Start Function ☞p.2-10
Pressing the Start Key at this point does not start a copy cycle. You’re going to have to wait for approx. 9
minutes (at an ambient temperature of 20°C/68°F).
Getting to Know Your Copier Chapter 2
Initial Mode
When the Power Switch is turned ON, the Basic screen appears on the Touch Panel. The settings on this
screen are called the initial mode. The Basic screen serves as the reference for all panel settings to be later
made.
1179P168CA
No. of copies selected :1
Zoom :× 1.000
Paper :Auto Paper
Density :Manual Expo.
Input Output :1 1
Finishing :Non-Sort
Useful Tip
The initial mode can be changed. For details, see Setting the Utility Mode. ☞p.5-1
Note on making multiple copies
If the fusing temperature drops excessively during a multi-copy cycle, there is a possibility that the
copying speed will be reduced. The copying speed will automatically return to normal when the fusing
temperature rises enough to ensure good fusing performance.
Page 35

6. Auxiliary Fun ctions
Auxiliary Functions
2-10
Panel Resetting
The Panel Reset Key resets all control panel
settings to default settings including the nu mber
of copies and zoom ratio.
* If the Duplexing Document Feeder is used, the
original present on the Original Glass will be
ejected out of the unit.
Useful Tips
• The Panel Reset Key enables you to cancel all
previous settings efficiently.
• To avoid miscopy, try to press this Key before
making any se t ting for your own copy job.
• Pressing this Key does not cancel the Interrupt
Mode.
Auto Panel Reset Function
The Auto Panel Reset Function is automatically
activated to return the copier to the default settings
5 min. after the copier has been touched last.
Useful Tip
The time for the copier to enter the Auto Panel
Reset Function can be selected from 1 to 9 min.
by using User’s Choice. Also, the Auto Panel
Reset function can be disabled by the User’s
Choice. ☞p.5-19
Energy Saver Mode
If the copier is shut down when it is not in use, it
takes the copier approx. 9 min. to complete the
warm-up cycle. Instead of turning the copier OFF,
it's a good idea to use the Energy Saver Mode.
This mode will minimize the time for the copier to
complete the warm-up cycle to about 60 sec.
• The Energy Saver Mode is automatically
activated a given period of time after the copier
has been touched last. The initial setting is 15
min.
• Pressing the Energy Saver Key sets the copier
into the Energy Saver Mode.
• To cancel the Energy Saver Mode, press any
key on the Control Panel, for instance, the Start
Key.
Useful Tip
The time for the copier to enter the Energy Saver
Mode can be selected from 1 to 240 min. by
using User’s Choice. ☞p.5-19
Auto Copy Start Function
Even during the copier warm-up, the copier is set
into the Auto Copy Start Function by loading the
originals onto the Duplexing Document Feeder
and pressing the Start Key.
This Function allows a copy process to be sta rted
as soon as the copier completes warming up
(which takes approx. 9 min.).
Interrupt Mode
The Interrupt Mode allows you to interrupt a
current job and run a different one. Pressing the
Interrupt Key once sets the copier into the
Interrupt Mode. Pressing the Key again cancels
the Interrupt Mode and returns to the previous
settings.
NOTES
• Pressing the Interrupt Key resets all settings to
the initial ones.
For details, see “Default Settings.” ☞p.5-1
• Some functions set before the Interrupt Mode
disable Interrupt copying. Further, when in
the Interrupt Mode, the copier defies setting of
some functions.
For more details, see “Function Combination
Matrix.” ☞p.8-9
• To cancel an Interrupt cycle, you need to press
the Interrupt key. The Panel Reset key or Auto
Panel Reset function does not serve this
purpose.
Chapter 2
Getting to Know Your Copier
Page 36

2-11
6. Auxiliary Functions
Access Number
If an access number has been programmed, it
allows only particular persons to use the copier or
a supervisor to keep track of the numbe r o f co pies
made by a pa rticular department.
NOTES
• If an access number has been programmed, a
copy cycle can be initiated only after the access
number has been input to the copier.
<“Access #” Prompt Screen>
Getting to Know Your Copier Chapter 2
1154P449CA
• Before you can use this function, you must first
turn “ON” the “Copy Track” function of the
Administrator Mode available from User ’s
Choice. ☞p.5-3
The Touch Panel changes from the “Access
2
#” prompt to the initial screen. A copy cycle
can now be started. Make your copies as
necessary.
When the copy cycle is completed, press the
3
Access Mode Key to go to the “Access #
Prompt Screen.”
Entering the Access Number
Using the 10-Key Pad, enter the 4-digit
1
access number and press the OK Key.
123
456
789
0C
1154O401
NOTE
To correct the 4-digit access number entered,
first press the Clear Key, then enter the new
number.
Page 37

6. Auxiliary Functions
Using the Copier as a Printer Transfer Drum Cleaning Function
2-12
When the optional Printer Controller (Fiery™) is
hooked up to the copier*, the copier can be used
as a full color printer for a computer.
* An Interface kit is required for this connection.
For more details, see the Operator’s Manual of the
Printer Controller.
To maintain optimum copy quality, this copier
automatically enters the Transfer Drum Cleaning
mode at the following timing.
Cleaning takes about 40 seconds.
Color Mode Timing
Full Color
Mono Color
Black and White
* Timing will differ based on selected paper size
and other settings.
24 or 48* copies in multicopy
mode.
48 or 96* copies in multicopy
mode.
Chapter 2
Getting to Know Your Copier
Page 38

2-13
6. Auxiliary Functions
Getting to Know Your Copier Chapter 2
Page 39

Chapter 3
Making Copies
Chapter 3
Making Copies
Page 40

3-1
1. Basic Copying Overview
Basic Copying Overview
• Place the original in position (step 1), set the number of copies to be made (step 9), and press the Start
Key (step 10). This will allow you to make a full-size copy or copies on paper of the same size as the
original.
NOTE
Automatically selected in the initial mode are Auto Paper, Full Size, and Manual Exposure.
• The s electio ns you make on the Touch Panel will change the exposure level, zoom ratio, the
type of copy a nd so on.
1. Placing the Original ☞ p.3-3
• Load the originals face up on the Duplexing
Document Feeder.
• Raise the Original Cover and place the original
face down on the Glass.
Making Copies Chapter 3
• To make a black-and-white
• To make a colored copy from
To change the copy paper size
To change the zoom ratio
To change the exposure level
• To make 2-sided copies
• To sort copies
• To make a file margin on the
copy from a colored original
a black-and-white original
from 1-sided originals
copy
1151O016AA
Selecting the Color mode
2. Press either Auto Color, Full Color, or Black.
Auto Color: The copier automatically determines whether the
original is in color or black-and-white and makes a fullcolor or black-and-white copy according to the original.
Full Color: The copier makes a full-color copy regardless of the
type of original.
Black: The copier makes a black-and-whi te copy regardless of
the type of original.
Selecting the basic functions
3. Touch Paper.
p.3-9
☞
4. Touch Zoom.
p.3-13
☞
5. Touch Density.
p.3-17
☞
Selecting the Input Output
6. Touch Input Output.
p.3-19
☞
1179O048AA
Auto Color
Full Color
Black
1144O256CA
1179P171CA
A
1179P172CA
Page 41

3-2
Sel
Adj
123
456
789
0C
1. Basic Copying Overview
• To adjust level of colors
• To make outline of image
sharper or softer
7. Touch Color Adjust.
☞
• To make monotone copy
• To make a very large copy
(Multi-Page Enlargement
Copy)
8. Touch Digital Art.
☞
9. Setting the number of copies.
ecting the Color
ust functions
p.3-30
Selecting the Digital Art functions
p.4-15
1179P173CA
Chapter 3
1179P174CA
Making Copies
• Using the 10-Key Pad, set the desired number o f
copies to be made.
NOTE
If you have entered an incorrect number, press
the Clear Key, then enter the correct number.
10. Starting the copy cycle.
• Press the Start Key.
NOTE
To stop the copy cycle, press the Stop Key.
NOTE
Some functions are not compatible with others when set at the same time. For more details, see
“Function Combination Matrix.” ☞ p.8-9
1139O4860A
1179O009CB
Page 42

3-3
2. Placing Originals
Placing Originals on the Glass
Different methods are used to place the original depending on its type. Use the procedure appropriate for
your original. If you are using a Duplexing Document Feeder, see p. 3-5
Sheet Originals
(Using plain paper or origi nals no t suitable fo r the
document feeder)
Raise the Original Cover or Duplexing
1
Document Feeder and place the original f ace
down on the Glass.
Making Copies Chapter 3
Align the rear left corner of the original with
2
the marker on the Width Scale of the
copier glass.
1179O048AA
Highly Transparent Originals
(Using transparencies and translucent paper for
the original)
Place the original in the same way as the
1
sheet originals.
Place a blank white sheet of paper of the
2
same size over the original.
1179O049AA
Gently lower the Original Cover or
3
Duplexing Document Feeder.
1144y001AA
NOTES
• To make an A3 Wide copy with a copier
equipped with a Duplexing Document Feeder,
align the rear left edge of the original with the
(photo) mark on the Length Scale to avoid
▼
lost image. ☞ p.3-4
• To make copies using the Photo mode on a
copier equipped with a Duplexing Document
Feeder, align the rear left edge of the original
with the ▼(photo) mark on the Length Scale.
p.3-4
☞
Gently lower the Original Cover or
3
Duplexing Document Feeder.
Page 43

3-4
1
2
3
2. Placing Originals
Making Copies from A Book Using
Book Copy Mode
(“Book” refers to an open bound original.)
Place the open book so that its top edge is at
1
the rear of the copier and the center of the
book is aligned with the Book Marker
indicated on the Original Length Scale.
1155O027AA
Original Length Scale
Book Marker
When Copier is Equipped with a
Duplexing Document Feeder
Make sure of the correct placement of the original
in any of the following cases if the copier is
equipped with a Duplexing Document Feeder.
• Making copies in the Photo mode
• Making A3 Wide copies
Place the original, by aligning the rear edge
with the Length Scale and the left edge with
the ▼ (Photo) mark.
PHOTO Mark
1144Y002AA
Gently lower the Duplexing Document
Feeder or the Original Cover.
Chapter 3
Making Copies
1154O003AA
Gently lower the Duplexing Document
2
Feeder or Original Cover.
NOTES
• If the book is thick, make a copy with the
Duplexing Document Feeder or Original
Cover raised.
• Do not look directly at the Original Glass
surface as a strong beam of light is emitted.
• Not positioning the open book properly will
result in copies with pages in incorrect order.
• Start copying with the higher-numbered pair.
Make settings in the Photo Mode.
p.3-33
☞
Instructions for Original Placement
• Be sure to raise the Duplexing Document Feeder
15° or more before placing the original. If the
Duplexing Document Feeder is raised to an
angle less than 15°, the copier may fail to select
the correct copy paper size or zoom ratio.
15°
1179O050AA
• Do not place an original weighing more than 2
kg on the Glass.
• When placing an open book, do not press the
book hard on the Glass, as the Glass cou l d cr ack.
Page 44

3-5
2. Placing Originals
Using the Duplexing Document Feeder
The Duplexing Document Feeder automatically feeds original sheets placed on the Document Feed Tray
one by one. After the copy cycle has been completed, it automatically ejects the original onto the
Document Exit Tray.
Some originals may not be suitable for reliable operation of the Duplexing Document Feeder. Here is a
guideline.
Originals Suitable for the Duplexing Document Feeder
Type of Originals: Sheets (Plain paper)
Normal mode
•1-Sided Original (weighing 50 g/m² to 110 g/m²)
•2-Sided Original (weighing 60 g/m² to 90 g/m²)
•Mixed Original Detection mode (weighing 60 g/m² to 90 g/m²)
Original Size: 1-Sided Original, 2-Sided Original Mode: A3L to A5L
2-in-1 (Dual Original Scanning) mode : A4C
Mixed Original Detection mode : A3L to A4
Originals Not Suitable
Making Copies Chapter 3
• Typing paper, paraffin pap er, and other t hin paper
• Thick paper
• Originals greater than A3 or smaller than A5
• Transparencies, translucent paper
• Wrinkled, dog-eared, curled, or torn originals
• Clipped or stapled originals
• Carbon-backed originals
Typing paper,
Typing paper,
paraffin paper,
paraffin paper,
and other thin
and other thin
paper
paper
Thick paper
Thick paper
Continuous
forms
Wrinkled or
dog-eared
original
Stapled
originals
NOTE
For any of these types of originals, raise the Duplexing Document Feeder and place the original
manually on the Glass to make a copy . ☞ p.3-3
1134O073AA
Page 45

Loading the Originals
Slide the Document Guide Plate to the size
1
of the originals.
*When using large size originals , fl ip up t he
Document Feed Tray Extender.
3-6
2. Placing Originals
1151O015AA
Load a neat stack of originals face up on the
2
Document Feed Tray.
1151O016AA
NOTES
• The maximum number of originals that can be
loaded
A4 or smaller : Up to 50
A3 or B4 : Up to 30
• Make sure that the top level of the original
stack does not exceed the ▼ marking.
• Make sure that the Document Guide Plate is in
touch with the edges of the original stack. If it’s
not pressed snugly against the original stack,
skewed feeding could result.
Chapter 3
Making Copies
Page 46

3-7
2. Placing Originals
Using the Single Automatic Document Feeding Mode (SADF Mode)
This is the mode in which you insert your originals one by one into the Duplexing Document Feeder to
make a copy or copies from it. When you load the original, the cop ier autom atically starts the copy cycle.
NOTES
• Originals available for the SADF Mode.
Type : Plain paper
Thickness : 35 g/m² to 200 g/m²
Size : A3L to A5L
• The following features cannot be selected in the SADF Mode.
2-sided original 1-sided copy Staple Mode
2-sided original 2-sided copy Color Se paration
Dual Original Scanning Mode (2-in-1 Mode) Image Repeat
Book Mode Photo Mode
Cover Mode
1
Making Copies Chapter 3
2
Open the Single Feed Tray and slide the
Guide Plate to the size of the original.
1151O018AA
Make sure that the Start Key is lit green and
insert the original face down into the
Document Feed Table.
1151O019AA
The original is automatically taken up and
3
the copy cycle is started.
Making sure that the Start Key lights up
4
green again, load the next original.
NOTES
• Be su re to place one orig inal a t a time.
• Be sure to correct any fold or curl in the
original.
Page 47

3-8
2. Placing Originals
Chapter 3
Making Copies
Page 48

3-9
Paper
3. Basic Functions
We here explain how to select the basic settings to make copies.
Basic Screen
Density
Touch this key to show
the screen that allows
you to select the image
density of the copy.
☞
Copy Paper Size
Auto Paper
When this key is touched, the copier is set to the
Auto Paper mode where the copy paper is
automatically selected according to the size of the
original being used and the zoom ratio selected for
use.
Making Copies Chapter 3
1
2
Useful Tip
This mode is efficient when you want to
automatically make copies on paper of the same
size as your originals.
key:
p.3-17
Touch on the Basic Screen, then
touch to set the copier into the
Auto Paper mode.
Touch .
Paper
Auto Paper
OK
key:
Zoom
Touch this key to
show the screen that
allows you to select
the zoom ratio.
p.3-13
☞
Paper
key:
Touch this key to show
the screen that allows
you to select the paper
1179P171CA
• The copier fails to detect, or wrongly detect,
the size of a wrinkled, dog-eared, or curled
originals.
size.
Manual Selection
The copy paper size can be set manually
according to your need.
Touch and the Touch Panel
1
indicates the paper size currently loaded in
the three Paper Trays.
NOTES
• Wh en the original is placed on the Original
Glass, the original sizes that can be detected in
the Auto Paper mode are A3L, A4L, A4C, A5L,
B4L, B5C, and LetterL. The copier may fail to
detect, or wrongly detect, any other standard
size and irregular sizes. (But, there are
optional parts that can be mounted to enable
detection of B5L, LetterC, LegalL, FLS (8-1/
4×13L), and 11×17L ; ask your Tech. Rep. for
these capabilities.)
• When using the Document Feeder, the original
sizes that can be detected in the Auto Paper
mode are A3L, A4L, A4C, A5 L, A5C , B4L, FLS
(8-1/4×13L). (A5L cannot be used for the
Mixed Original Detection Mode.)
Touch the desired paper size key.
2
Touch .
3
OK
1179P175DB
1179P418DA
Page 49

3-10
3. Basic Functions
Paper Type Setting
If nonstandard paper has been set for any of the
paper sources, the symbol or appears on the
paper select key on the Touch Panel.
1179P470CA
The following two different types of paper can be
designated for each paper source.
: Plain Paper (75 g/m
When this setting is made, the paper source can be
a candidate for Auto Paper.
: Thin Paper (64 g/m
This setting excludes the paper source from
selection for Auto Paper. Make this setting for the
source loaded with thin paper to prevent the paper
from being used for a wrong purpose.
2
to 90 g/m2)
2
to 74 g/m2)
Auto Tray Switching
If the tray currently selected for use runs out of
paper and there is another tray loaded with paper
of the same size and in the same direction, the
copier automatically selects that second tray to
continue copying.
Useful Tip
This feature is a great advantage when you need
to make a large number of copies on the same
size paper. For example, you can make up to
1,250 copies without interruption if all three
trays are loaded wi th p aper o f t he sa m e s ize and
in the same direction. You can even make up to
2,250 copie s if an optional Large Capacity
Cassette is additionally fitted to the copier.
A tray with any kind of paper other than Plain
paper can also be set as a candidate for Auto Tray
Switching. For more details, consult your
Technical Representative.
Chapter 3
Making Copies
The paper type settings are to be made by your
Technical Representative. For more details,
consult your Technical Representative.
NOTE
Only Plain Paper can b e used f or 2-si ded cop ies.
Page 50

3-11
3. Basic Functions
Manual Bypass Copying
• Use the Manual Bypass to make copies on paper not loaded in any tray, or to copy onto OHP films or
any other special paper.
• The setting of copy paper sizes is needed for manual bypass copying.
Copy Paper that Can be Used for Manual Bypass
Types of Paper
◆
• Plain paper (75 g/m
• Thin Paper (64 g/m
• Thick paper
Thick paper 1 (91 g/m
• OHP Films (recommended brand)
Paper Size
◆
• A3L to A5L and A3 wide
• Postcard/A6L
• Max. Size: 297 mm ×432 mm
• Minimum Size: 148 mm ×182 mm
Capacity of the Manual Bypass Tray
◆
• Plain paper, Thin paper, Thick paper 1 ... Up to 90 sheets
• Plain paper/Thin paper (once-copied paper) ... Up to 50 sheets
Making Copies Chapter 3
• OHP films, Thick Paper 2 ... Up to 40 sheets.
2
to 90 g/m2)
2
to 74 g/m2 )
2
to 128 g/m2 ), Thick paper 2 (129 g/m2 to 209 g/m2 )
Using the Manual Bypass Tray
Place the original on the Original Glass.
1
Swing down the Manual Bypass Tray.
2
Insert a neat stack of copy paper into the
3
Manual Bypass Tray until it stops and slide
the Paper Guide Plates to the size of the
copy paper .
NOTES
• Lo ad th e OHP films so that the front side (on
which the white line is printed) faces up in the
direction as shown.
1144O012AA
1179O056AA
• Use o nly the recommended OHP filmes.
• Only Plain Paper can be used for 2-sided
copies.
• When inserting paper with one side previously
printed, load the paper stack so that the blank
side faces down.
• Make sure that the top level of the original
stack does not exceed the ▼ marking.
1144O013AA
Page 51

3-12
8
3. Basic Functions
Select a copy paper size. If the copy paper is
4
non-standard size, touch .
Touch and select the type of
5
copy paper .
If this is going to be the copy cycle for
6
making the first side of the copy, select
for 2nd Side for Dup. If this is going to be
the copy cycle for making the secon d side of
the copy, select .
Paper Type
Yes
Custom Size
1179P177DB
1179P178DB
No
Make the necessary copy function settings.
Useful Tip
Using A3 Wide paper ensures a go od copy of the
entire image of an A3 original with no void
images.
NOTES
• The following functions cannot be set for
Manual Bypass copying:
1 2, 2 2, 1 2[2in1], Book 2, Sort,
Group, Staple
• Whe n a copy is made on OHP films fed into a
Sorter or Staple Sorter, try to remove the copy
(OHP films) from the bin as soon as it is fed in.
If the copy is left a while in the bin, it can curl.
<If the copy paper is non-standard size>
Touch on the screen given in
step 4.
Custom Size
1179P413DA
Chapter 3
Making Copies
1179P179DB
Useful Tip
The copy is also made on the lower face of the
copy paper loaded in the Bypass Tray when
Yes
of 2nd Side for Dup. is selected.
Touch .
7
OK
Touch and enter the length of the copy
paper from the 10-Key Pad. Then touch
and enter the width of the copy paper from
the 10-Key Pad.
Touch .
X
Y
1179P414DA
OK
Page 52

3-13
3. Basic Functions
Zoom Ratio
When you touch on the Touch Panel, a screen appears that allows yo u to set t he zoom ratio. You
have six different ways to choose from to set the zoom ratio. Select one according to your need.
Auto Size
In the Auto Size mode, the copier automatically
selects the zoom ratio according to the size of the
Making Copies Chapter 3
original being used and the copy paper size
selected for use.
Touch to set the copier into the
1
Auto Size mode.
Zoom
Auto Size
1179P171CA
1179P180DA
Selecting a Ratio from among Fixed
Ones
The copier provides most frequently used zoom
ratios ready for immediate use.
Touch the appropriate original-to-copy-size
1
representation key. You have three redu ction
and three enlargement ratios.
1154P252DA
Select the paper size.
2
Touch .
3
Useful Tip
This mode is very helpful for neat filing when
you need to make copies from originals of
assorted sizes.
OK
1154P253DA
When you touch , full size
(×1.000) is selected.
NOTE
When the document feeder is used, the copier
determines the zoom ratio when the first original
is taken up and fed in and uses that zoom ratio
for the subsequent originals (except in the Mixed
Original Detection mode.)
Touch .
2
OK
Full Size
Page 53

3-14
1
2
3. Basic Functions
For a Slightly Smaller Image
This function lets you make a copy slightly
reduced in image size from that of the original.
Touch .
1
Useful Tip
It comes in handy for making a copy, without
losing any portion of the or iginal image, from an
original which has an image area covering its
entire surface.
Touch .
2
Minimal
1154P254DA
OK
Using Zoom Up/Down Keys
Pressing the or key changes the zoom
ratio in 0.001 increments. You can keep touching
the key to change the ratio quickly.
Hold down the or k e y un til the
desired zoom ratio is reached.
Useful Tips
• To save time, first select the fixed zoom ratio
nearest to the target ratio before using the
or key.
▼ ▲
• You can change the zoom ratio between the
range of ×0.250 and ×6.000
▼ ▲
▼ ▲
1154P256DA
Chapter 3
Making Copies
Touch .
OK
Page 54

3-15
User Set
3. Basic Functions
Using the 10-Key Pad
You may use the 10-Key Pad to directly enter the
zoom ratio.
1
2
Making Copies Chapter 3
Touch .
Enter the desired zoom ratio from the 10Key Pad.
User Set
123
456
789
1139O4870A
0C
1154P257DA
Calling up a Ratio from Memory
You can store some of the most frequently used
zoom ratios in memory and recall them later as
necessary.
Touch .
1
1154P257DA
From among the three ratios previously
2
stored in memory, select the desired one.
1139O4870A
Example: ×1.300
Press 1, 3, 0, and 0, in that order.
1149O160BA
To correct a ratio, press the Clear key and
then enter the correct one again.
Useful Tip
The zoom ratio can be entered between the
range of ×0.250 and ×6.000.
Touch .
3
OK
1154P150CA
Useful Tip
It’s a good idea for you to store frequently used
zoom ratios in memory. ☞ p.3-16
Touch .
3
OK
Page 55

Storing a Ratio in Memory
4
5
Touch .
1
User Set
3-16
3. Basic Functions
Touch the memory location key in which to
store the set zoom ratio.
1154P257DA
Enter the desired zoom ratio from the 10-
2
Key Pad.
123
456
789
1139O4870A
0C
1139O4870A
Example: ×1.300
Press 1, 3, 0, and 0, in that order.
1149O160BA
To correct a ratio, press the Clear key and
then enter the correct one again.
Useful Tip
The zoom ratio can be entered between the
range of ×0.250 and ×6.000.
1154P150CA
*When the key is touched, th e ratio is sho wn
on the key, indicating that it has been
stored in memory.
NOTE
When a new ratio is stored, the old one is
erased.
Touch .
OK
Chapter 3
Making Copies
Touch .
3
Store as Presets
1154P149CA
Page 56

3-17
Lighter
3. Basic Functions
Image Density
Touch on the Touch Panel. Then, a screen appears that allows you to adjust the image density
and background level of the copy.
Adjusting the background level:
Slide the level towards the Lighter side if you don’t want the data on the back side of a newspaper or
magazine page copied. Slide it towards the Darker side if you want to reproduce pale colors of a bright
area of the original.
When you adjust the level towards the Darker side, the copier also copies the background. If you slide the
level towards the Lighter side, the resultant copy will become lighter. Select the appropriate level
Making Copies Chapter 3
according to your original.
Density
1179P171CA
1154P151CA
Adjusting the background level
Auto Exposure
The copier automatically selects the best possible
background level. If you make a black-and-white
copy from an original which is a faint pencilwritten text, the copier automatically makes the
text darker as it appears on the copy.
Touch .
1
The key is highlighted, indicating
that the copier is set into the Auto Exposure
mode.
Touch .
2
Auto
Auto
1179P181CA
OK
Manual Exposure
In the Manual Exposure mode, you can vary the
exposure level in eight steps.
Touch or as necessary.
1
Touch .
2
OK
Darker
1154P239CA
Page 57

Adjusting the Image Density
Manual Exposure
In the Manual Exposure mode, you can vary the
exposure level in seven steps.
3-18
3. Basic Functions
Touch or as necessary.
1
<To make the image darker>
<To make the image lighter>
Touch .
2
Lighter Darker
Touch .
Touch .
Darker
Lighter
OK
Chapter 3
1154P239CA
Making Copies
Page 58

3-19
.
4. Input Output Mode
When you touch on the Touch Panel, a screen appears that allows you to set the
Input Output
original copy type or a particular finishing function.
Choose the setting based
on your original and your
desired end-result copy.
p.3-21
☞
1179P182CA
If required, select the
appropriate special
function(s). ☞ p.4-1
* The screen may appear different
depending on the options your
Select a finishing function you want to use
copier is equipped with.
for your copies. (Only when the optional
Sorter or Staple Sorter is mounted) ☞ p.3-25
Making Copies Chapter 3
Original Copy Types
1 1
1 2
2 1
Originals Copies
1136P204AA
Originals Copy
1136P205AA
Original Copies
1134P207AA
• Select 1 1 to make 1-sided copies from 1-sided originals.
Touch
(Only when the Duplex Unit is mounted.)
• Select 1 2 to make 2-sided copies from 1-sided originals.
NOTE
Two originals can be copied onto one sheet of paper.
Touch
(Only when the Duplexing Document Feeder is mounted.)
• Select 2 1 to make 1-sided copies from 2-sided originals
NOTE
You need twice as many sheets of copy paper as originals.
Touch
Page 59

3-20
r
4. Input Output Mode
2 2
Original Copy
1136P207AA
1 [2in1] = 1-sided 2-in-1 copy
Originals Copy
1136P208AA
1 2[2in1] = 2-sided 2-in-1 copy
Originals Copy
1136P210AA
(Only when the Duplexing Document Feeder and Duplex
Unit are mounted.)
• Select 2 2 to make 2-sided copies from 2-sided originals
Touch
(Only when the Duplexing Document Feeder is mounted.)
• Select 1 [2in1] to make a 1-sided copy, through
reduction, from two 1-sided originals side-by-side.
NOTES
• You need half as many sheets of copy paper as the numbe
of originals.
• The size of the original should be A4C and B5C for 2-in-1.
Touch
(Only when Duplexing Document Feeder and Duplex Unit
are mounted.)
• Select 1 2[2in1] to make a 2-sided copy, through
reduction, from four 1-sided originals. Each pair of
originals will be placed side-by-side on either side of the
copy.
NOTES
• You need 1/4 as many sheets of copy paper as the number
of originals.
• The size of the original should be A4C and B5C for 2-in-1.
Chapter 3
Making Copies
Touch
1-Sided Book
Book Original 1-Sided Copies
Each of the two pages of an open book is copied onto one
side of a separate sheet of paper.
Touch , then
touch or
1136P219AA
2-Sided Book
Book Original 2-Sided Copy
(Only when the Duplex Unit is mounted.)
The two pages of an open book are copied onto opposite
sides of a sh eet of paper.
Touch , then
1136P220AA
touch or
NOTE
Only Plain Paper can be used for 2-sided copies.
Page 60

3-21
4. Input Output Mode
Selecting Input Output Mode
1
2
Making Copies Chapter 3
Touch .
Touch the key corresponding to the desired
original-to-copy type.
Input Output
1179P182CA
NOTES
• When you make copies from a book, select the
correct key according to whether the book is
bound on the left or on the right (R-Book).
1179P184CA
• When making copies in 1 2, 1 (2in1), or
1 2 (2in1) mode, input the number of
originals. ☞ p.3-22
1179P183CA
Useful Tip
The original-to-copy type separ at es option s int o
1-Sided, 2-Sided, and Book. Touch any of these
base keys , , and to
make settings in greater detail.
1-Side 2-Side Book
Page 61

3-22
# of Origs
4. Input Output Mode
Input the number of originals
• If you’re going to make copies u sing 1 2, 1 [2in1] or 1 2-[2in1], you need t o input the nu mber of
your originals. Then the copier can arrange the pages in correct order.
When you know the number of originals
Setting Even/Odd
Touch .
1179P185CA
①
Touch or as appropriate.
②
Touch .
③
Using the 10-Key Pad
Touch .
①
Touch .
②
Enter the number of originals from the 10-
③
Key Pad.
NOTES
• The maximum number of originals you can set
is 50.
• To correct a wrong number, press the Clear
key, then enter the correct number.
# of Origs
Even
OK
# of Origs
Input #
Odd
Chapter 3
Making Copies
1179P186CA
Touch .
④
OK
If you want the document feeder to count the number of originals for you
Select to let the document feeder count the number of originals.
Auto
1179P187CA
Touch .
①
Touch .
②
Touch .
③
Load your originals into the document feeder.
④
Press the Start Key.
⑤
Auto
OK
*The document feeder starts feeding the
originals loaded in it to count the number of
originals. (At this time, no copy cycle is run.)
Unload the originals ejected onto the Docu ment
Exit Tray and reload them onto the Document
Feed Tray. Then, press the Start key to make
copies.
1151O016AA
Page 62

3-23
4. Input Output Mode
Mixed Original Detection Mode
You may sometimes need to make copies from origin als of assorted size s and perhaps you want to use the
Duplexing Document Feeder mounted on your copier. You can by using this function.
In the default settings, the key does not appear on the Touch Panel, indicating that the
Mixed Size function is turned ON. When a black copy, 1 1, and manual background adjustment is
selected, however, the function can now be disabled with the key that appears on
the Touch Panel together with key.
NOTE
The copier cannot staple together the copies of different sizes made in the Mixed Original Detection
mode.
Making Copies Chapter 3
Mixed Size
Mixed Size OFF
ON
Originals Copies
Auto Paper Mode
Auto Size Mode,
Copy Paper: A4
1138O537AA
Using the Mixed Original Detection Mode
Load the stack of originals so that the rear
1
edge of each original is pressed against the
rear Document Guide Plate. Then, slide the
front Document Guide Plate against the front
edges of the widest originals.
*When using large size original, flip up the
Document Tray Extender.
1151O017AA
Touch .
2
Input Output
Select or for the “Mixed Size.”
3
NOTE
This function cannot be set when the copier is set
in the Interrupt, OHP Interleaving, Cover Sheet,
Monotone, or Background Color mode.
ON OFF
1179P189CA
1179P188CA
Page 63

4. Input Output Mode
Instructions for Loading Originals
Use the following procedure for loading originals to make 1-sided copies from 2-sided originals.
Procedure
Load the originals crosswise.
If the originals are loaded lengthwise, the directions of the copy images will be mixed up.
Correct: Incorrect:
3-24
2-Sided Originals
Loaded Crosswise
1-Sided Copies
1151O023AA
2-Sided Originals
Loaded Lengthwise
1-Sided Copies
1151O022AB
Precautions for Book Copying
• Place the open book so that its top edge is at the rear of the copier and the center of the book is aligned
with the Book Marker indicated on the Original Length Scale.
• Mak e copies in d escending or der of page.
• Select the desired zoom ratio and copy paper size.
Placing the Book on the Glass Correctly
Original Length Scale
Book Marker
Chapter 3
Making Copies
1155O027AA
1154O003AA
Precautions for 2-in-1 Copying
When the 2-in-1 mode is selected, the copier automatically selects a reduced zoom ratio. However, you
can choose another zoom ratio by changing the User’s Choice setting. ☞ p.5-19
Page 64

3-25
Non-Sort
Sort
4. Input Output Mode
Finishing Modes
Non-Sort
Originals Copies All copies are fed to the 1st B in , wi thou t being
1076O145
sorted, grouped, stapled, or punched.
Touch .
NOTE
Manual Bypass Copying cannot be used for Sort,
Group, or Sort Staple mode.
Sort
Making Copies Chapter 3
Sort-and-Staple
Group
Copies
Originals 1st Bin
2nd Bin
3rd Bin
Copies
Originals
Copies
Originals
1st Bin
2nd Bin
3rd Bin
1076O146
1136O100AA
1076O147
(Only when the Sorter or Staple Sorter is mounted)
Copies are sorted into complete sets of the originals.
* This mode is effective when making multiple
copies from multiple originals.
Touch .
(Only when the Staple Sorter is mounted)
Copies are sorted into complete sets of the originals
and each set is stapled together.
Touch .
Staple
(Only when the Sorter or Staple Sorter is mounted)
The copies made from each single original are
separated into groups. Each group contains the same
number of copies.
Touch .
Group
Page 65

Manual Staple
Staple
Sorting or Grouping
Originals
Manual Staple
1076O191
3-26
4. Input Output Mode
(Only when the Staple Sorter is mounted)
This mode allows you to staple copy sets already
made in the Sort Mode or copy stacks made in the
Group Mode.
Touch on the Basic Screen.
*This feature is efficient for stapling originals after
making copies. ☞ p.3-27
Useful Tip
In the initial mode, the copier automatically switches between Non-S or t and Sort depending on the
number of originals loaded in the Duplexing Document Feeder and the number of copies to be made.
User’s Choice can, however, be used to disable this function. ☞ p.5-19
Chapter 3
Making Copies
Page 66

3-27
Staple
4. Input Output Mode
Using Manual Staple Mode
To use as a stapler:
Align the sheets of paper neatly.
1
Insert the paper stack into the 2nd Bin.
2
Making Copies Chapter 3
1134O039AA
Touch .
3
1179P190CA
• The sheets of paper are stapled.
Useful Tip
This feature is efficient to staple originals after
making copies.
1144O488AA
NOTE
Up to 25 sheets of (plain) paper can be stapled.
Stapling Position
NOTES
• Make sure of the stapling position and press
the paper stack against the bracket.
• Never attempt to reach for the stapling
position. Thi s can be dangerous.
1144O489AA
Page 67

3-28
4. Input Output Mode
Original Direction for Stapling
If the originals are loaded in the Duplexing Document Feeder as shown, the stapling corner is at the rear
left side as indicated by the arrow.
Originals Loaded crosswise
Copy
Stapling Position
1151O024AB
If the originals are placed on the Original Glass as s hown, the stapling corner is at the rear right corner as
indicated by the arrow.
Stapling
Corner
Chapter 3
Making Copies
1179O051AA
Page 68

3-29
4. Input Output Mode
Auto Dual Function in the Sort Mode
Each of the Sort Bins ho lds up t o 25 sheet s of p aper. The A uto Dual Funct ion, ho wever, al lows so rting o f
copies of up to 50 originals under certain conditions.
When less than 5 copies are made from an original set consisting of more than 25 originals, in the Sort
Mode the Sorter or the Staple Sorter is automatically switched into the Auto Dual Function Mode using
the 6th to 10th Bins.
Copies Bins Used
1st to 25th sorted copies 1st to 5th Bins
26th to 50th sorted copies 6th to 10th Bins
* If the number of copies selected exceeds 5, the copy cycle stops at the 25th original.
* To have a complete set of originals, place the copies from the 6th Bin on top of those fro m the 1st Bin.
In the same way, place the copies from the 7th Bin on top of those from the 2nd Bin, and so on.
When the Number of Copies Selected Exceeds 25 in the Group Mode
When more than 25 copies are to be grouped together into one group, the Staple Sorter uses the next Bin
to continue grouping the copies.
Original Copies Bins Used
Making Copies Chapter 3
1st
2nd to Nth: Same way up to 10th
1st to 25th copies 1st Bin
26th and subsequent copies 2nd Bin
If the Number of Copies Selected Exceeds 50 in the Non-Sort Mode
The capacity of the 1st Bin is 50. If more than 50 copies are made in the Non-Sort mode, the Sorter uses
the 1st, 2nd, and subsequent Bins to hold those excess copies.
Auto Dual Function in Sort-and-Staple Mode
When 5 or less copies are made from an original set consisting of more than 26 originals in the Sort-andStaple Mode and the Auto Dual function is activated, the Sort-and-Staple Mode is automatically switched
to the Sort Mode (no stapling takes place.)
Page 69

5. Color Adjust Mode (Basic)
Original Image Type
3-30
When you touch on the Touch Panel, a screen appears that allows you to simply adjust
the hue or tone of the color produced on the copy and how you would like the color of your copy to look.
The copier also allows you to professionally adjust these features. ☞ p.4-11
Adjustment Key
Basic
Touching this Key sho w s th e
Basic Adjustment Menu.
For copy samples, see the “Creative Image Book” separately provided.
Color Adjust
1179P191CA
Professional
Adjustment Key ☞ p.4-11
Key
Allows you to select the
image type of your original.
p.3-32
☞
Basic Adjustment Items
Red
Brightness
Chapter 3
Making Copies
Adjusts only the red component of the original to
make it appear redder or less red.
Green
Adjusts only the green component of the original
to make it appear greener or less green.
Blue
Adjusts only the blue component of the original to
make it appear bluer or less blue.
Sharpness
Enhances the outline of characters, making it
sharper or less sharp.
Adjusts to make the original image brighter or
darker.
Contrast
Makes an original image look less distinct or a
blurred image look clearer and more distinct.
Saturation
Makes the colors appear duller or vivid.
Portrait
Adjusts the flesh tone of the portrait.
Page 70

3-31
OK
5. Color Adjust Mode (Basic)
Color Adjust Procedure (Basic)
1
2
Making Copies Chapter 3
Touch the key and select the item
for adjustment.
Touch the Test Print key.
(Ex.: When “Sharpness” is selected)
Basic
1179P191CA
Press the Start Key. This causes the copier to
4
output a sample copy showing seven images,
each representing a different level of
adjustment for the selected item.
Select the sample you like best, then touch
5
6
.
1179P194CA
Place the original in position again and press
the Start Key.
1179P192CA
Position the image area in the original you
3
want to check for color in the Test Area on
the Glass.
1179P193CA
NOTE
The size of paper should be A4C or LetterC for
test print.
Page 71

3-32
3
5. Color Adjust Mode (Basic)
Selecting the Original Image Type
Select the original image type by pressing the corresponding key to get the best possib le res ul t on your
copy.
Text & Photo
This mode is ideally suited to an original which contains texts, photos, and illustrations.
This feature is selected in the initial mode.
Photo Image
Select this mode to make a clear copy from a photo printed on photographic paper.
Printed Image
When making a copy from a gravure photo of a magazine, this mode is effective in preventing moire
from occurring on the copy.
Text
This mode is just right for making copies from an original that contains texts and fine lines.
Map
If you want to make a copy from an original which has a text on a relatively dark colored background,
such as a map, this mode is just right for the job reproducing fine letters and lines clearly. This feature is
also effective in reproducing faint pencil-written texts clearly.
Touch .
1
Original Image Type
Touch .
OK
Chapter 3
Making Copies
Select the desired image type of your
2
original.
1179P191CA
1179P195CA
Page 72

3-33
Scale to Page
Manual Zoom Input
6. Photo Mode
Photo mode is effective in making copies from photos, allowing you to place the photo image on the copy
at an aesthetically pleasing position. Photo-Sizing offers you a choice between , with
which the image is scaled to fill the entire surface of the copy paper, and
which you need to manually specify the zoom ratio for the copy. Touching the sets the
copier into the Photo mode.
Photo Mode
, with
Making Copies from a Photo
Photo-Sizing Mode: Scale to Page
Making Copies Chapter 3
Select the size of your photo and touch
1
Useful Tip
A frequentl y used photo size can be stored in
copier memory. ☞ p.3-37
. If an appropriate size is not available,
OK
enter the size from the 10-Key Pad.
<Using 10-Ke y Pad>
Touch and enter the length of the photo
from the 10-Key Pad. (If a v alue h as already
been set, press the Clear Key, then enter the
new value.)
Next, touch and enter the width of the
photo from the 10-Key Pad.
X
Y
1179P171CA
1179P197CA
Select the appropriate “Photo Type.”
2
Touch under the “Phot o-
3
Sizing Mode” and touch .
Scale to Page
OK
1179P196DA
1179P198CA
1179P199CA
Page 73

3-34
6
Photo Original Size
Density
Color Adjust
Monotone
7
8
6. Photo Mode
Select the appropriate “Copy Size.”
4
(See Manual Bypass Copying. ☞ p.3-11)
1179P200DA
Select the appropriate “Scale to Page”
5
Mode.
1179P201DA
Useful Tips
• When is selected, the
• When is selected, th e cop ier
Fit entire Image
copier fits the entire image of the photo onto
the copy paper.
Fill entire Page
produces the image on the copy paper with a
uniform margin along four edges
Touch . The Touch Panel shows the
OK
settings made, prompting you to check them.
1179P202DA
Useful Tips
• Touching the ,
Photo-Size Mode Copy Size
‘Fit to 1-Page’ Mode
change the previous settings.
• Touch if you want to adjust the
background level of the copy. ☞ p.3-17
• Touch if you want to make color
adjustments. ☞ pp. 3-30, 4-11
• Touch if you want to make a
single-color copy from a colored or black-andwhite photo. ☞ p.4-17
• Touch if you want to make a
Mirror Image
copy whose image is identical to the original
except reversed as viewed in a mirror.
p.4-29
☞
, , or
key allows you to
Chapter 3
Making Copies
NOTE
Fill entire Page
image being lost on the copy.
may result in part of the
Place the original and press the Start Key.
“Loading the Originals” ☞ p.3-6
Touch .
Exit
Page 74

3-35
Full Size
6. Photo Mode
Photo-Sizing Mode: Manual Zoom Input
Select the size of your photo and touch
1
Making Copies Chapter 3
. If an appropriate size is not available,
OK
enter the size from the 10-Key Pad.
<Using 10-Key Pad>
Touch and enter the length of the photo
from the 10-Key Pad. (If a v alue h as already
been set, press the Clear Key, then enter the
new value.)
Next, touch and enter the width of the
photo from the 10-Key Pad.
X
Y
1179P197DA
Select the appropriate “Copy Size.”
4
(See Manual Bypass Copying. ☞ p.3-11)
1179P204DA
Enter the desired zoom ratio from the 10-
5
Key Pad.
When is touched, you can make a
full size copy.
Useful Tip
A frequently used photo size can be stored in
copier memory. ☞ p.3-37
Select the appropriate “Photo Type.”
2
1179P198CA
Touch under the
3
“Photo-Sizing Mode” and touch .
Manual Zoom Input
OK
1179P205DA
Touch . The Touch Panel shows the
6
OK
settings made, prompting you to check them.
1179P206DA
1179P203CA
Page 75

3-36
1
2
3
6. Photo Mode
Useful Tips
• Touchin g the ,
Photo-Size Mode Copy Size Zoom
key allows you to change the previous settings.
• Touch if you want to adjust the
background level of the copy. ☞ p.3-17
• Touch if you want to make
color adjustments. ☞ p.3-30
• Touch if you want to make a
single-color copy from a colored or black-andwhite photo. ☞ p.4-17
• Touch if you want to make a
copy whose image is identical to the original
except reversed as viewed in a mirror.
p.4-29
☞
Place the original and press the Start Key.
7
“Loading the Originals” ☞ p.3-3
Touch .
8
Photo Original Size
, , or
Density
Color Adjust
Monotone
Mirror Image
Exit
Setting Mirror Image in Photo Mode
On the screen that prompts you to check the
settings made in the Photo Mode, touch
Mirror Image
Touch .
ON
.
1179P207CA
Chapter 3
Making Copies
Touch .
OK
1179P208CA
Page 76

3-37
6. Photo Mode
Storing the Photo Size in Memory
1
2
Making Copies Chapter 3
Touch and enter the length of the photo
from the 10-Key Pad. (If a v alue h as already
been set, press the Clear Key, then enter the
new value.)
Touch and enter the width of the photo
from the 10-Key Pad.
X
1179P196DA
Y
Touch any of the non-labeled keys.
4
non-labeled key
1179P211DA
NOTE
If you touch a key in which a size has previously
been stored, the old data is erased.
Touch .
5
OK
Touch .
3
Store as Presets
1179P209DA
1179P210DA
Page 77

Chapter 4
Professional Way to Make Color Copies
Chapter 4
Professional Way to Make Color Copies
Page 78

4-1
Custom Size
1. Using the Applie d In put Output Functions
This is an introduction to the four convenient features available in input output mode:
Frame Erase, File Margin, Cover Sheet, and OHP.
When you touch on the Touch Panel, a screen appears that allows you to set the
applied functions.
Select the finishing
function (only when the
copier is equipped with
an optional Sorter or
Staple Sorter). ☞ p.3-25
Make the input output
settings for 2-sided and
book copying. ☞ p.3-19
Input Output
1179P172CA
Applied function keys
* The contents of the
display vary from sys tem
to system depending on
which option or options
are installed.
Frame Erase
The copier erases a margin of a set width along the four edges, one edge, or at the center to erase shadows
or other unwanted images. This feature is effective in erasing the communications record on a document
received by fax.
Frame Erase Setting Procedure
Professional Way to Make Color Copies Chapter 4
<When the original is non-standard size>
Touch .
1
Frame Erase
1179P172CA
The copier provides a margin along the four edge s
on the copy.
Touch .
2
1179P229DA
Page 79

4-2
1
Frame Erase
2
3
4
1. Using the Applied Input Output Functions
Touch and enter the length of the original
3
from the 10-Key Pad. Then, touch and
enter the width of the original.
(To correct a value entered, press the Clear
Key.)
Touch and enter the frame erase
4
width from the 10-Key Pad.
X
1179P230DA
Width
1179P231DA
<When the original is standard size>
Y
Touch .
1179P172CA
Select the applicable “Original Size.”
Touch the exact size key or .
Enter the frame erase “Width” from the 10key Pad.
Auto Detect
1179P232DA
Chapter 4
Touch .
5
Useful Tips
• Touch (cancel) to cancel the settings made
for, and exit from, Frame Erase.
• This copier has been designed to have a lost
image of a width of 5 mm on the leading edge,
4 mm on the trailing edge, and 3 mm each on
the front and rear edges in the full size mode.
Set a frame erase “Width” wider than each of
these values to have a frame erase effect at all.
• A shadow can at times be produced along the
edges when you make an A3 Wide copy. We
recommend that Frame Erase be used in such
cases.
OK
C
1179P233DA
Touch .
Useful Tips
• Touch (cancel) to cancel the settings made
for, and exit from, Frame Erase.
• This copier has been designed to have a lost
image of a width of 5 mm on the leading edge,
4 mm on the trailing edge, and 3 mm each on
the front and rear edges in the full size mode.
Set a frame erase “Width” wider than each of
these values to have a frame erase effect at all.
• A shadow can at times be produced along the
edges when you make an A3 Wide copy. We
recommend that Frame Erase be used in such
cases.
OK
C
Professional Way to Make Color Copies
Page 80

4-3
1. Using the Applied Input Output Functions
File Margin
The copier provides a file margin along the leading edge for your ease in filing.
There are four different ways available for making a file margin. Use the one that is most suited to your
need.
Functions
Shift-for-Margin
Original Copy
1161O197CA
The image of the original is shifted to the right to make a
margin along the left edge of the copy.
Original Copy
Margin-by-Reduction
Original Copy
Professional Way to Make Color Copies Chapter 4
Original Copy
The image of the original is shifted to the bottom to make a
margin along the top edge of the copy.
1155O053AA
The image of the original which has almost no file margins
along the sides is reduced to make a wider margin along the
left edge of the copy.
1155O054AA
The image of the original which has almost no file margins
along the sides is reduced to make a wider margin along the
top edge of the copy.
1155O055AA
Useful Tip
If the image of the original covers the entire surface of the
original, Margin-by-Reduction will ensure a copy with no
lost image along the edges.
Page 81

File Margin Setting Procedure
5
6
4-4
1. Using the Applied Input Output Functions
Touch .
1
Place the original on the Original Glass or in
2
the Duplexing Document Feeder.
NOTE
Make sure to correctly place the original in
either portrait or landscape orientation.
Select the applicable “Original Position.”
3
File Margin
1179P172CA
Enter the “File Margin Width” from the 10Key Pad.
1179P236DA
Touch .
NOTE
If the margin width is set larger than necessary
in Shift-for-Margin, a void image can occur.
Try to keep a good margin.
Useful Tip
Touch (cancel) to cancel the settings made
for, and exit from, File Margin.
OK
C
Chapter 4
Select the applicable “File Margin Mode.”
4
1179P234DA
Professional Way to Make Color Copies
1179P235DA
Page 82

4-5
1. Using the Applied Input Output Functions
Original Placement Key to be Selected
Margin on Left Edge
Margin on Right Edge
1179O052AA
1154P1358A1154P1358A1154P1358A1154P135AA
1154P137AA
1154O004AA
1154P135AA
1179O053AA
1154P137AA
1154O005AA
Professional Way to Make Color Copies Chapter 4
Margin on Top Edge
1179O074AA
1154P136AA
1154P138AA
1154O006AA
Page 83

4-6
1. Using the Applied Input Output Functions
OHP Interleaving
When you make copies on OHP films, the OHP Interleaving function inserts copied or non-copied
interleaves after each film. Two different functions are available. Select the appropriate one according to
your need.
Functions
Single Copy
The copier copies onto OHP transparencies and, after each transparency, inserts a copied or non-copied
(blank) sheet of paper.
<Copied Interleaves>
Originals
1
2
OHP
Copies
1
1
2
2
Copied
Interleaves
1145O387CB
<Non-Copied Interleaves>
Copies
Originals
1
1
2
2
OHP
Non-Copied
Interleaves
Chapter 4
1145O388CA
Professional Way to Make Color Copies
Page 84

4-7
1. Using the Applied Input Output Functions
OHP Setting Procedure
Place the original on the Original Glass or in
1
the Duplexing Document Feeder.
Touch .
2
Place the OHP films on the Manual Bypass
3
Tray. The side and edge on which white lin e
has been printed, should be face up and
towards the bypass port.
OHP
1179P172CA
1179O055AA
Touch .
5
Select the Tray in which the interleaves are
6
loaded and touch .
NOTES
• If you make copies from an original set, one
page after another, via the Original Glass,
make them in descending page order.
• If you want to use a Sorter or Staple Sorter for
the copy run, remove the copy (OHP films) as
soon as it is fed into the bin. If it is left in the
bin for a while, it can curl.
Select whether you want to copy on the
7
interleaves (Yes) or not (No) at “Copy onto
Inserts.”
OK
OK
1179P238DA
Professional Way to Make Color Copies Chapter 4
4
1179O056AA
Select the size of the OHP films loaded in
the Manual Bypass Tray.
1179P237DA
1179P239DA
Touch .
8
Useful Tips
• Touching the key allows you to
change the previous settings.
• Touch (cancel) to cancel the settings made
for, and exit from, OHP.
OK
OHP Film
C
Page 85

4-8
1. Using the Applied Input Output Functions
Chapter 4
Professional Way to Make Color Copies
Page 86

4-9
d
d
d
k
k
k
1. Using the Applied Input Output Functions
Cover Sheet
The Cover mode lets you mak e a front co ver, or a front and back cover, for a copy s et. Cover Mode co pies
the first page, or the first and last page, of an original set on different paper from the normal copy paper,
such as colored paper. There are six different Cover functions available. Select the appropriate one
according to your need.
This function can be used only when the Duplexing Document Feeder is mounted.
Functions
Front Cover: Copie
Back Cover: None
Front Cover: Copie
Back Cover: Blank
Front Cover: Copie
Back Cover: Copied
Professional Way to Make Color Copies Chapter 4
1
2
3
1
2
3
1
2
3
1
2
3
1
2
3
1
2
3
1154P508AA
1145O376AA
1154P509AA
1145O377AA
1154P508AA1154P508AA1154P508AA1154P 508AA1154P508AA1154P508AA1154P508AA1154P510AA
1145O378AA
Front Cover: Blan
Back Cover: None
1
2
3
Front Cover: Blan
Back Cover: Blank
1
2
3
Front Cover: Blan
Back Cover: Copied
1
2
3
1154P508AA1154P 511AA
1
2
3
1145O379AA
1154P512AA
1
2
3
1145O380AA
1154P513AA
1
2
3
1149O044AA
Page 87

Cover Sheet Setting Procedure
5OK6
7
8
9
4-10
1. Using the Applied Input Output Functions
Load your originals in the Duplexing
1
Document Feeder.
Touch .
2
Place the copy paper for the cover sheet on
3
the Manual Bypass Tray.
Cover Sheet
1154O009AA
1179P172CA
Touch .
Select the copy paper and touch .
Select a particular function for “Front.”
Select a particular function for “Back.”
OK
1179P241DA
1179P242DA
Chapter 4
Make the necessary settings for the copy
4
paper loaded in the Manual Bypass Tray:
Size, Type, and 2nd Side for Dup.
Manual Bypass Copying. ☞ p.3-11
1144O013AA
1179P240DB
1179P243DA
Touch .
Useful Tips
• Touching the or
key allows you to change the previous settings.
• Touch (cancel) to cancel the settings made
for, and exit from, Cover Sheet.
OK
Cover Paper Paper Source
C
Professional Way to Make Color Copies
Page 88

4-11
Original Image Type
2. Color Adjust Mode (Professional)
These pages explain how to professionally adjust the hue or tone of the color produced on the copy.
When you touch on the Touch Panel, a screen appears that allows you to adjust these
Color Adjust
features.
Professional
Adjustment Key
Touch this key to open the
professional adjustment menu.
Basic
☞
Adjustme nt Keys
p.3-30
Touch this key to select the
Key
image type of your original.
p.3-32
☞
1179P244CA
For copy samples, see the “Creative Image Book” separately provided.
Professional Adjustment Items
Hue
You can select one of seven samples, each havin g
a specific hue level, to obtain the best possible hue
on the copy. You can further fine-tune the hue
level over 19 steps.
Contrast
You can select one of seven samples, each havin g
a specific contrast level, to obtain the best possible
contrast on the copy. You can further fine -tune the
contrast level over 19 steps.
Saturation
You can select one of seven samples, each havin g
a specific saturation level, to obtain the best
possible saturation on the copy. You can further
fine-tune the saturation level over 19 steps.
Professional Way to Make Color Copies Chapter 4
Brightness
You can select one of seven samples, each havin g
a specific brightness level, to obtain the best
possible brightness on the copy. You can further
fine-tune the brightness level over 19 steps.
Sharpness
You can select one of seven samples, each havin g
a specific sharpness level, to obtain the best
possible sharpness on the copy.
Color Balance
You can adjust the balance of cyan, magenta,
yellow, and black in the range between 0% and
200% in 1% increments.
Density
You can select one of seven samples, each havin g
a specific density level, to obtain the best possible
density on the copy. Yo u can further fine-tune the
density level over 19 steps.
Page 89

2. Color Adjust Mode (Professional)
4
5
Fine-Tune
6
Color Adjust Procedure (Professional: Other Than Color Balance)
4-12
Touch and select the item for
1
adjustment.
Touch .
2
(Ex.: When “Hue” is selected)
Professional
1179P244CA
Test Print
Press the Start Key. This causes the copier to
output a sample copy showing seven images,
each representing a different level of
adjustment for the selected item.
Select the sample you like best, then touch
.
OK
1179P247CA
If you would like something in-between
(e.g., a hue level between +2 and +3), touch
. Then, touch or as
necessary to fine-tune the level.
+ –
Chapter 4
1179P245CA
Position the image area of the original you
3
want to check for color in the Test Area on
the Glass.
1179P246CA
NOTE
The size of paper should be A4C or LetterC for
test print.
1179P248CB
NOTE
“Sharpness” does not permit fine-tuning.
Place the original in position again and press
the Start Key.
Professional Way to Make Color Copies
Page 90

4-13
2. Color Adjust Mode (Professional)
Color Adjust Procedure (Color Balance)
Touch and touch
1
Select the color you want to adjust for
2
balance from among C (cyan), M (magenta),
Y (yellow), and BK (black).
Professional
Color Balance
.
1179P244CA
3
Professional Way to Make Color Copies Chapter 4
4
1179P249CA
Touch the or key to change the value
as necessary.
Adjust the balance of another color if
necessary and touch .
▼ ▲
1179P250CA
OK
Page 91

4-14
2. Color Adjust Mode (Professional)
Chapter 4
Professional Way to Make Color Copies
Page 92

4-15
3. Using the Digital Art Functions
These pages explain about how to make settings for the various Digital Art functions the copier offers,
including such ones as making a copy in a specified color and with a colored background.
When you touch , a screen appears that allows you to make settings for the Digital Art
Functions.
For copy samples, see the “Creative Image Book” separately provided .
Digital Art
1179P251CA
Digital Art Functions List
Monotone The original can be copied in one of 20 single colors.
Background
Color
Neg.-Pos.
Reverse
The background of the original can be copied in one of 18 single colors.
The original can be copied with tonal arrangements reversed.
It can be combined with Monotone to produce a monotone copy and with full
color to produce a full color copy with the original tonal arrangements reversed.
Separation
Professional Way to Make Color Copies Chapter 4
Color
4-Color Each
Black
3-Color Each
Black
The colors on the original are separated into four
color channels (yellow, magenta, cyan, and black)
and the particular color data is processed to make
one copy in each of the four colors extracted.
The colors on the original are separated into four
color channels (yellow, magenta, cyan, and black)
and the particular color data is processed to make
one copy of each in black.
The colors on the original are separated into three
color channels (yellow, magenta, and cyan) and
the particular color data is processed to make one
copy in each of the three colors extracted.
The colors on the original are separated into three
color channels (yellow, magenta, and cyan) and
the particular color data is processed to make one
copy of each in black.
Page 93

4-16
3. Using the Digital Art Functions
X/Y Zoom The zoom ratio for the X (horizontal) and Y (vertical) directions can be set
independently.
Image Repeat The entire image on the original can be repeatedly copied onto a single co py at a
desired zoom ratio.
Multi-Page
Enlargement
The original is automatically divided into multiple parts, each being copied onto
a separate sheet of paper. The function is used when you want to enlarge your
original to a size larger than A3.
The copy size may be defined by either of the three ways: using a standard size,
specifying a zoom ratio, or entering a custom size.
Mirror Image An image, identical to the original except reversed, as if viewed in a mirror, is
produced.
Postcard Four identically sized (postcard) images of the original can be produced on a
single A4 copy.
Chapter 4
Professional Way to Make Color Copies
Page 94

4-17
3. Using the Digital Art Functions
Monotone
The original can be copied in any one of 20 single colors.
1179P252CA
For copy samples and the output produced from each color specified on-screen, see the “Creative Image
Book” separately provided.
Monotone Setting Procedure
1
2
Professional Way to Make Color Copies Chapter 4
3
Touch on the Digital Art menu
screen.
Select the color.
You may need to touch to
reach the color of your choice.
Touch and select or
the initial mode.)
Monotone
Monotone 2
Reproduction Shade
as necessary. ( is selected in
Solid Shade
1179P251CA
1179P253CA
Shade: Shade will reproduce the colors in
the original relative to the brightness
of each color. Therefore, red will
appear lighter than black. Shade will
convert the original colors to
different gradations of monotone.
This mode would be excellent for
reproducing photographs.
Solid: Solid will convert the original colors
to the same density of monotone.
This copy will have a much smaller
tonal range than the Shade option.
This mode would be suited for Line
Art drawings or for text.
1179P254CA
Touch .
4
Useful Tip
Touch (cancel) to cancel the settings made
for, and exit from, Monotone.
OK
C
Page 95

4-18
3
3. Using the Digital Art Functions
Background Color
The background of the original can be copied in any one of 18 single colors.
1179P255CA
For copy samples and the output produced from each color specified on-screen, see the “Creative Image
Book” separately provided.
Background Color Setting Procedure
Touch on the Digital
1
Art menu screen.
Select the color you want to use as the
2
background color.
Touch as necessary to
reach the color of your choice.
Background Color
Background 2
1179P251CA
Touch .
Useful Tip
Touch (cancel) to cancel the settings made
for, and exit from, Background Color.
NOTES
• Th is function is valid only when the
background of the original is white.
• All white areas of the original are regarded as
the background and copied in the specified
color.
• The entire tone of colors may change if you use
a colored original.
OK
C
Chapter 4
Professional Way to Make Color Copies
1179P256CA
Page 96

4-19
3. Using the Digital Art Functions
Neg.-Pos. Reverse
The original can be copied with the original tonal arrangements reversed.
It can be combined with Monotone t o produce a monotone copy and with full col or to produ ce a full color
copy with reversed tonal arrangements.
For copy samples, see the “Creative Image Book” separately provided.
Neg.-Pos. Reverse Setting Procedure
Touch on the Digital
1
Art menu screen.
Touch .
2
Neg.-Pos. Reverse
ON
1179P251CA
Professional Way to Make Color Copies Chapter 4
Touch .
3
Useful Tip
Touch to cancel the settings made for, and
exit from, Neg.-Pos. Reverse.
OK
OFF
1179P257CA
Page 97

4-20
4
3. Using the Digital Art Functions
Color Separation
The colors on the original are separated into four color channels (yellow, magenta, cyan, and black) or
three color channels (yellow, magenta, and cyan) and the particular color data is processed to make one
copy in each of the colors extr acted. Th e par ticul ar co lor d ata is also pro cessed to make one copy of each
in black.
For copy samples, see the “Creative Image Book” separately provided.
Color Separation Setting Procedure
Touch on the Digital
1
Art menu screen.
Select either or .
2
Color Separation
4-Color 3-Color
1179P251CA
Touch .
Useful Tip
Touch (cancel) to cancel the settings made
for, and exit from, Color Separation.
OK
C
Chapter 4
Select either or .
3
Each Black
1179P258CA
1179P259CA
Professional Way to Make Color Copies
Page 98

4-21
3. Using the Digital Art Functions
X/Y Zoom
The zoom ratio for the X (horizontal) and Y (vertical) directions can be set independently.
For the setting procedure, you have a choice of , with which you enter the X/Y
zoom ratios from the 10-Key Pad, or , with which you enter the sizes of the original and
copy paper from the 10-Key Pad.
For copy samples, see the “Creative Image Book” separately provided.
Output Size
X/Y Zoom Setting Procedure
<When is selected>
1
Zoom Ratio
Touch on the Digital Art menu
screen.
X/Y Zoom
Zoom Ratio (%)
1179P261CA
Select and then touch .
2
Professional Way to Make Color Copies Chapter 4
Touch and enter the zoom ratio in the
3
length direction from the 10-Key Pad.
Touch and enter the zoom ratio in the
width direction from the 10-Key Pad.
NOTE
To correct a value entered, press the Clear Key.
Zoom Ratio OK
X
Y
1179P251CA
1179P260CA
Touch .
4
Useful Tip
Touch (cancel) to cancel the settings made
for, and exit from, X/Y Zoom.
OK
C
Page 99

4-22
4
5
Output Size
3. Using the Digital Art Functions
<When [Output Size] is selected>
Touch .
1
Select and then touch .
2
X/Y Zoom
Output Size OK
1179P251CA
1179P262CA
Touch under “Copy” and enter the length
of the copy paper from the 10-Key Pad.
Touch under “Copy” and enter the width
of the copy paper from the 10-Key Pad.
Touch .
Useful Tip
Touch (cancel) to cancel the settings made
for, and exit from, X/Y Zoom.
NOTE
For , you cannot enter a length or
width which results in a zoom ratio falling
outside the ×0.250-to-×6.000 range.
X
Y
1179P264DA
OK
C
Chapter 4
Touch under “Original” and enter the
3
length of the original from the 10-Key Pad.
Touch under “Original” and enter the
width of the original from the 10-Key Pad.
X
Y
Professional Way to Make Color Copies
1179P263DA
Page 100

4-23
# of Images
Paper Size
3. Using the Digital Art Functions
Image Repeat
The entire image on the original can be repeatedly copied on a single copy at a desired zoom ratio.
For copy samples, see the “Creative Image Book” separately provided.
Image Repeat Setting Procedure
Touch on the Digital Art
1
menu screen.
Select your “Original Size” and touch .
2
• Touch if your original is a
• Touch if your original is a
Select a copy paper size and touch .
3
Image Repeat
Custom Size
non-standard size.
Photo Size
photo size.
1179P265DA
OK
OK
Touch and, from the 10-Key
5
Pad, enter the number of images you want.
1179P268CA
Touch . Then, the “Check and
6
Change” screen appears allowing you to
check and change any incorrect settings you
have made.
OK
Professional Way to Make Color Copies Chapter 4
4
1179P266DB
Touch and set the zoom ratio from
the 10-Key Pad.
Zoom
1179P267CA
1179P269DA
Useful Tip
Touching the , , ,
or key allows you to change the
previous settings.
Touch .
7
Useful Tip
Touch (cancel) to cancel the settings made
for, and exit from, Image Repeat.
Original Zoom # of Images
OK
C
 Loading...