

Page 1

7415
SERVICE HANDBOOK
INSTRUCTION MANUAL
KONICA CORPORATION
TECHNOLOGY SUPPORT CENTER
TOKYO JAPAN
Page 2

Legal Restrictions on Copying
Certain types of documents must never be copied by the machine for the purpose or with the intent to pass
copies of such documents off as the original. The following is not a complete list but is meant to be used
as a guide to responsible copying.
Financial Instruments
• Personal checks
• Travelers checks
• Money orders
• Certificates of deposit
• Bonds or other certificates of indebtedness
• Stock certificates
Legal Documents
• Food stamps
• Postage stamps (canceled or uncanceled)
• Checks or drafts drawn by government agencies
• Internal revenue stamps (canceled or uncanceled)
•Passports
• Immigration papers
• Motor vehicle licenses and titles
• House and property titles and deeds
General
• Identification cards, badges, or insignias
• Copyrighted works without permission of the copyright owner
In addition, it is prohibited under any circumstances
art without permission of the copyright owner.
◆ When in doubt about the nature of a document, consult with legal counsel.
E
As an
meets the
NERGY STA R® Partner, we have determined that this machine
E
NERGY STA R® Guidelines for energy efficiency.
to copy domestic or foreign currencies or works of
What is an ENERGY STAR® product ?
An ENERGY STA R® product has a special feature that allows it to automatically switch to a “low-power
mode” after a period of inactivity. An
money on utility bills and helps protect the environment.
E
NERGY STA R® product uses energy more efficiently, saves you
Page 3

Thank you very much for your purchase of the Konica 7415.
This operator’s manual explains how to operate the machine and replenish its supplies. It also gives some
troubleshooting tips as well as general precautions to be observed when operating the machine. To ensure
the best performance and effective use of your machine, read this manual carefully until you familiarize
yourself thoroughly with its operation and features. After you have read through the manual, keep it for
ready reference. Please use this manual as a quick and handy reference tool for immediately clarifying
any questions which may arise.
Page 4

i
Contents
Chapter 1 Safety Notes ............................................................................ 1-1
1. Using This Manual ...........................................................................1-2
Caution Labels ..........................................................................1-3
Internal Laser Radiation ...........................................................1-4
Laser Safety Label ....................................................................1-4
2. Installing the Copier .........................................................................1-5
Power Source ............................................................................1-5
Machine Installation .................................................................1-5
3. Precautions for Routine Handling ....................................................1-7
Chapter 2 Getting to Know Your Machine .............................................. 2-1
1. The Various Parts of the Machine ....................................................2-2
Parts of the machine and what they do .....................................2-2
2. The Functions of the Control Panel ..................................................2-6
3. Turning the Machine ON and OFF and Enabling the Initial Mode .2-8
Turning ON and OFF ...............................................................2-8
When the Machine is Turned ON .............................................2-8
Initial Mode ..............................................................................2-8
4. Auxiliary Functions ..........................................................................2-9
Chapter 3 Making Copies ......................................................................... 3-1
1. How to Copy Documents .................................................................3-2
2. Setting the Original Document .........................................................3-4
Setting the original onto the glass ............................................3-5
3. Selecting Paper Trays .......................................................................3-6
How to select a paper tray ........................................................3-6
4. Specifying the Number of Copies ..................................................3-11
How to specify the number of copies to be generated ............3-11
5. Specifying the Zoom Ratio .............................................................3-12
How to specify the zoom ratio ................................................3-12
6. Selecting the Copy Image Density Mode .......................................3-14
How to select the copy image density ....................................3-14
7. Selecting the Function Mode ..........................................................3-16
How to select the Function Mode ...........................................3-16
Select the Function Mode .......................................................3-16
Notes for using the Function Mode ........................................3-19
Chapter 4 Using the User’s Choice Mode .............................................. 4-1
1. The Total Check Function ................................................................4-2
How to read the Total Check Function displays ......................4-2
Count Displays .........................................................................4-2
2. User’s Choice Mode .........................................................................4-4
Page 5

Chapter 5 When an Indicator Lights Up ................................................. 5-1
1. Display Messages .............................................................................5-2
2. The Toner Empty Indicator ..............................................................5-4
How to replace the supply unit .................................................5-4
3. Paper Empty Indicator ......................................................................5-6
How to replenish the paper supply ...........................................5-6
4. Paper Misfeed Indicators ..................................................................5-8
Clearing paper misfeeds ...........................................................5-8
5. Trouble Indicator ............................................................................5-12
How to reset the machine .......................................................5-12
Chapter 6 Troubleshooting ...................................................................... 6-1
1. Improving Image Quality .................................................................6-2
2. Correcting Functional Problems .......................................................6-4
Chapter 7 Miscellaneous ......................................................................... 7-1
1. Specifications ...................................................................................7-2
2. Care and Maintenance ......................................................................7-4
Cleaning ....................................................................................7-4
3. Paper Size and Zoom Ratio Table ....................................................7-5
Appendix Index..........................................................................................A-1
ii
Contents
Chapter 1
Safety Notes
Chapter 2
Getting to Know
Your Machine
Chapter 3
Making Copies
Chapter 4
Using the User
Mode
Chapter 5
When an Indicator
Light Up
Chapter 6
Troubleshooting
Chapter 7
Miscellaneous
Appendix
Index
Page 6
iii
C4007O150CA
1139O161
1139O161
1139O162
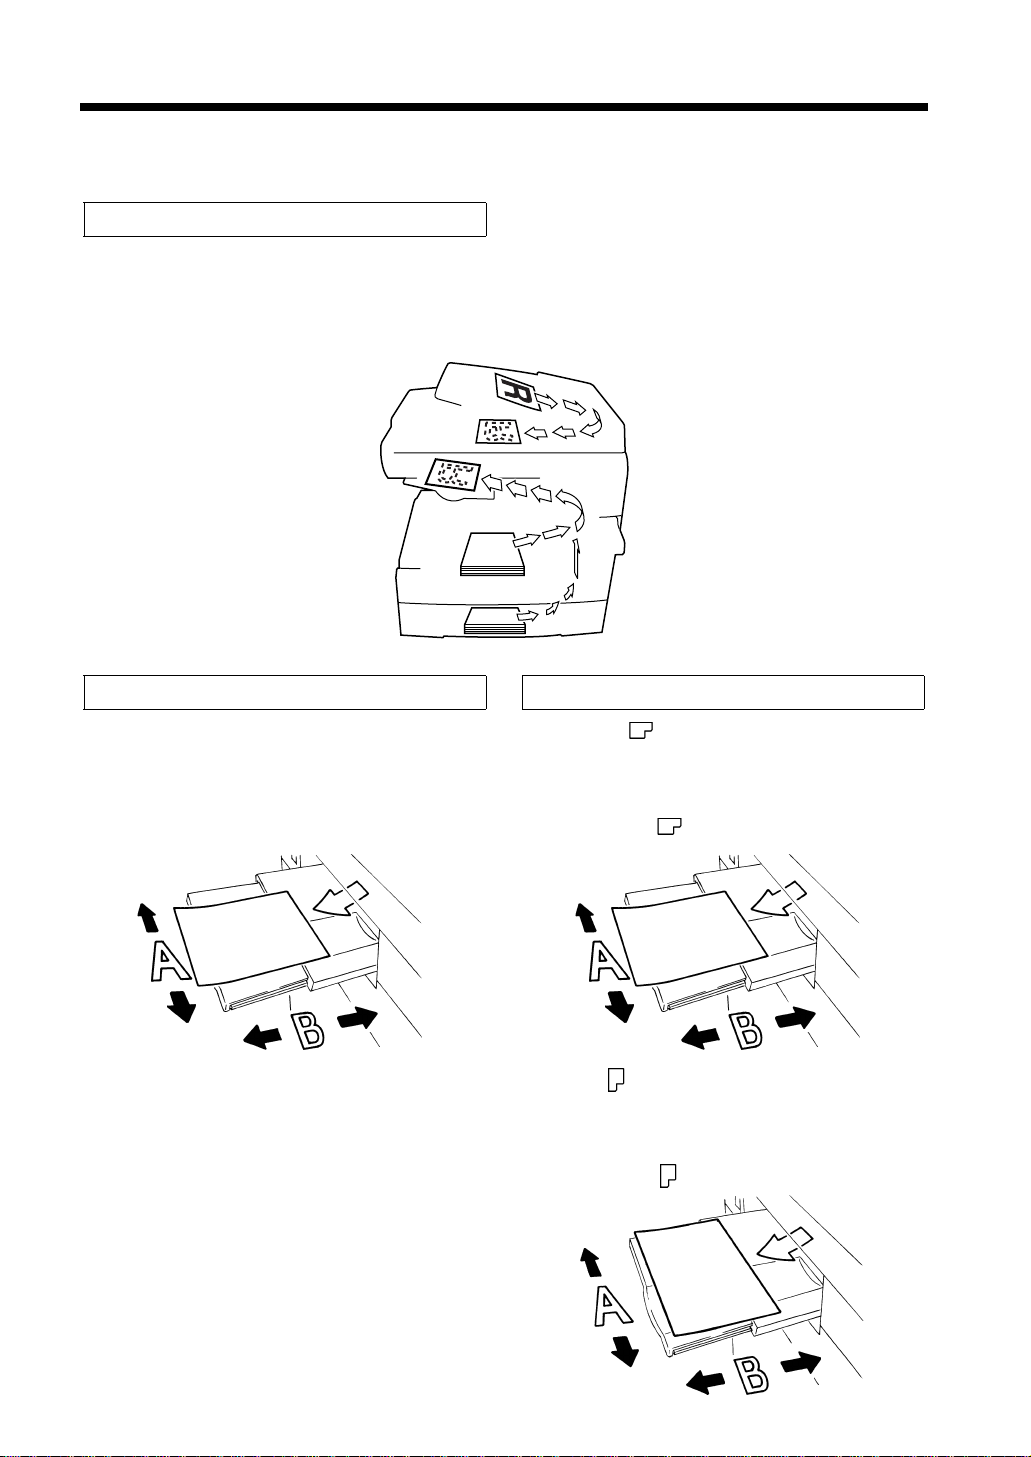
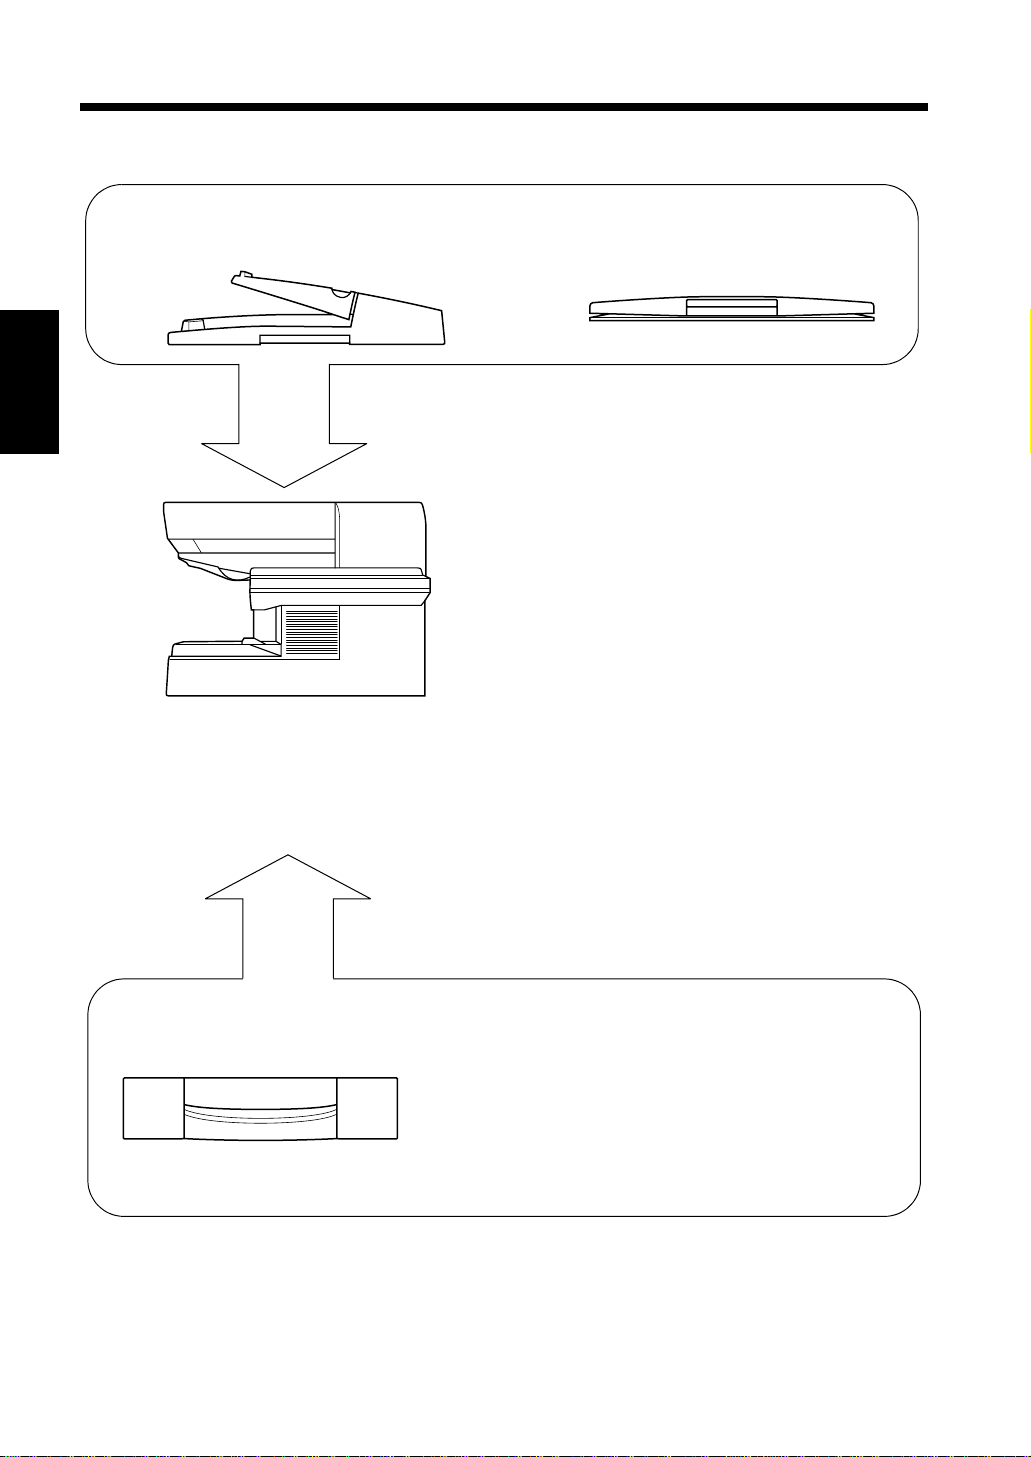
Terms and Symbols for Original Types and Copy Paper
A few special terms and symbols are used in this manual to designate types of originals and copy paper.
This page explains about these terms and symbols.
Feeding Direction (copy paper path)
Paper that has been loaded into the machine will be fed from the right side. The copies will be output
facedown from the central part of the machine.
The arrow that appears in the illustration below indicates the directional orientation of paper as it is fed
into the machine.
“Width” and “Length”
When we talk about the size of the original or
copy, we call side A “width” and side B “length.”
A: width
B: length
Terms and Symbols Used
<Landscape >
When the original or copy has a “length” longer
than its “width,” we call it “landscape” and use
symbol “R” or “ .”
<Portrait >
When the original or copy has a “length” shorter
than its “width,” we call it “portrait” and use
symbol “P” or “”
Page 7

Chapter 1
1-1
Chapter 1
Safety Notes
Safety Notes
Page 8

1-2
1. Using This Manual
Since laser light emitted inside the copier is completely confined within internal protective housings and
external covers, the laser beam cannot escape from the machine during any phase of user operation.
The copier is a safe product which has satisfied Class 1, but in ordinary use be sure to adhere to the
following:
Chapter 1
CAUTION:
Use of controls of adjustments or performance of procedures other than those specified herein may
result in hazardous radiation exposure.
CAUTION:
Do not remove the outer or inner cover using screw driver, etc., while the copier is in operation. If
Safety Notes
either cover is removed, exposure to the laser beam may occur (Max. 5 mW). The laser beam
should not be allowed to enter human eyes.
CAUTION:
If the copier develops trouble, contact a Konica representative for service. Do not continue to use
the copier when it is in a troubled state.
If the safety cautions in the manual become illegible due to soilage, etc., please buy a new copy from your
Service Centre.
The following indicators are used on the caution labels or in this manual to categorize the level of safety
cautions.
DANGER:
Action highly liable to cause a death or serious injury.
WARNING:
Action liable to cause a death or serious injury.
CAUTION:
Action liable to cause light injury, medium trouble or physical damage.
If you find any of these indicators when removing jammed paper, adding toner, or reading the manual, be
sure to follow the information.
Page 9
1. Using This Manual
C4007O170CA
C4007O174CA
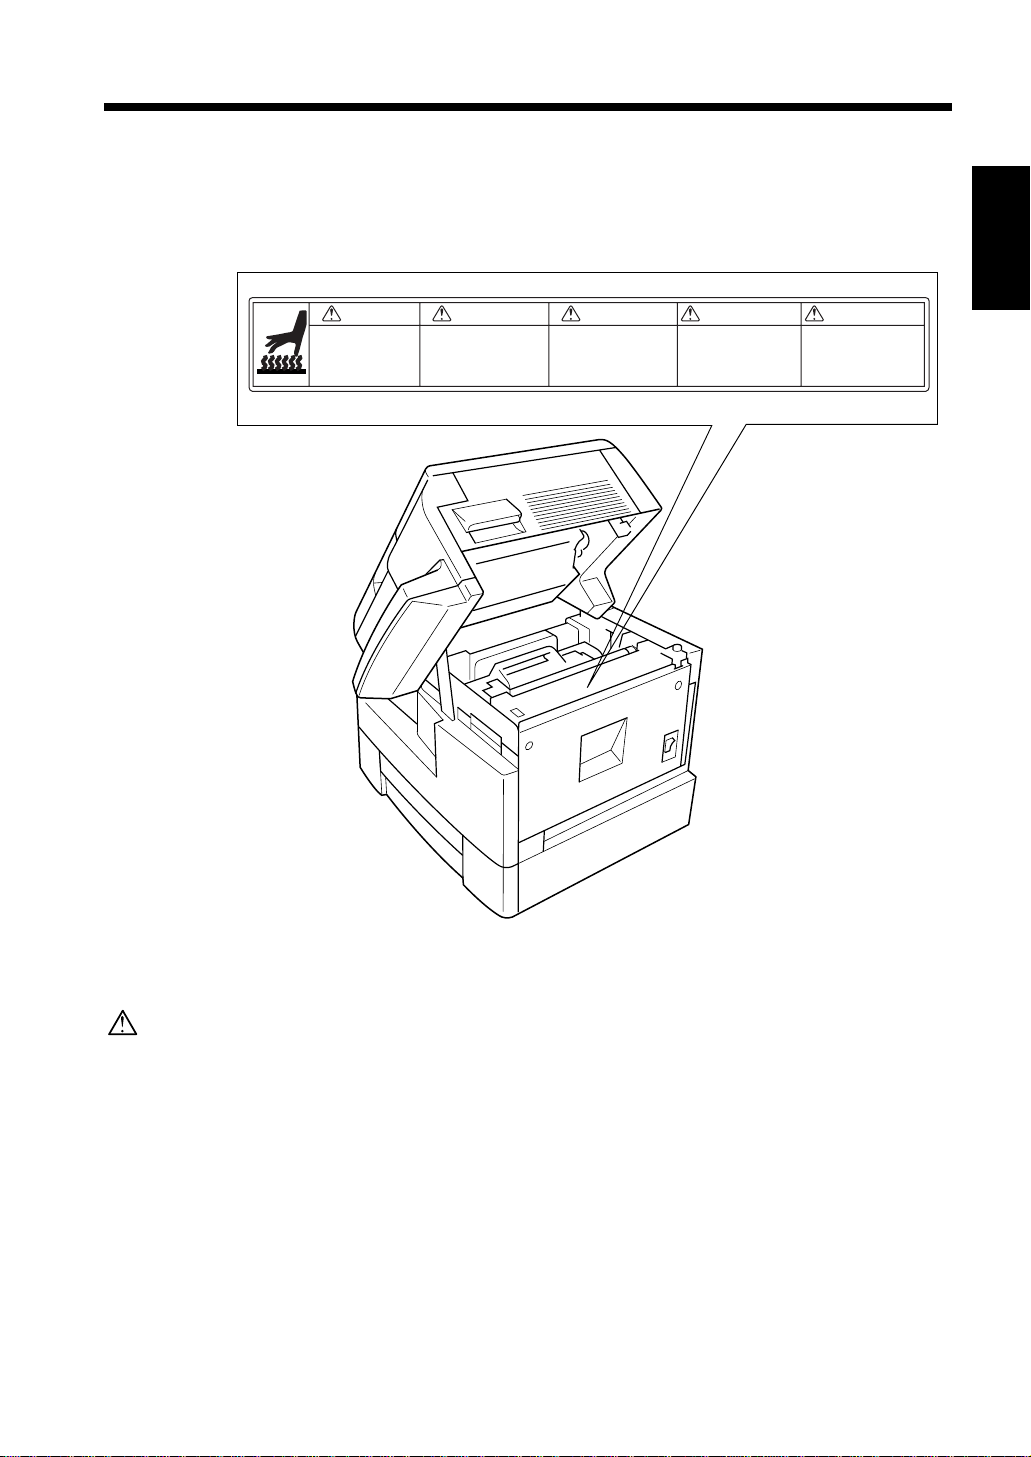
CAUTION ATTENTION PRECAUCION ATTENZIONE
High temperature!
Do not touch. Use
care when clearing
paper.
Température élevée!
Risque de brûlure. Soyez
prudent en retirant la
feuille coincée.
VORSICHT
Heiße Oberfläche!
Brandverletzungsgefahr.
Bei Beseitigung von
Papierstaus vorsichtig
vorgehen.
¡ Temperatura alta !
No tocar. Tener
cuidado al remover el
papel.
Alta temperatura!
Non toccare. Agire
con prudenza nel
rimuovere la carta.
Caution Labels
The caution labels are attached to the machine areas, as shown, when you are advised to pay special
attention to avoid any dangerous situations or serious injury.
1-3
Chapter 1
Safety Notes
CAUTION:
If you touch any place which you are advised by any caution label to keep yourself away from, you
may be burned or injured. Do not remove caution label. If any caution label is soiled, please clean
to make legible. If you cannot make them legible, or if the caution label is damaged please contact
your Service Centre.
Page 10
1-4
C4007O151CA
Print Head
C4007O160CA
Laser Aperture
of the Printed
Head Unit
CAUTION LABEL
1167P001AA
C4007O155CB
Laser safety label
1166O252BA
For Europe
Manufacturer’s
Name Plate
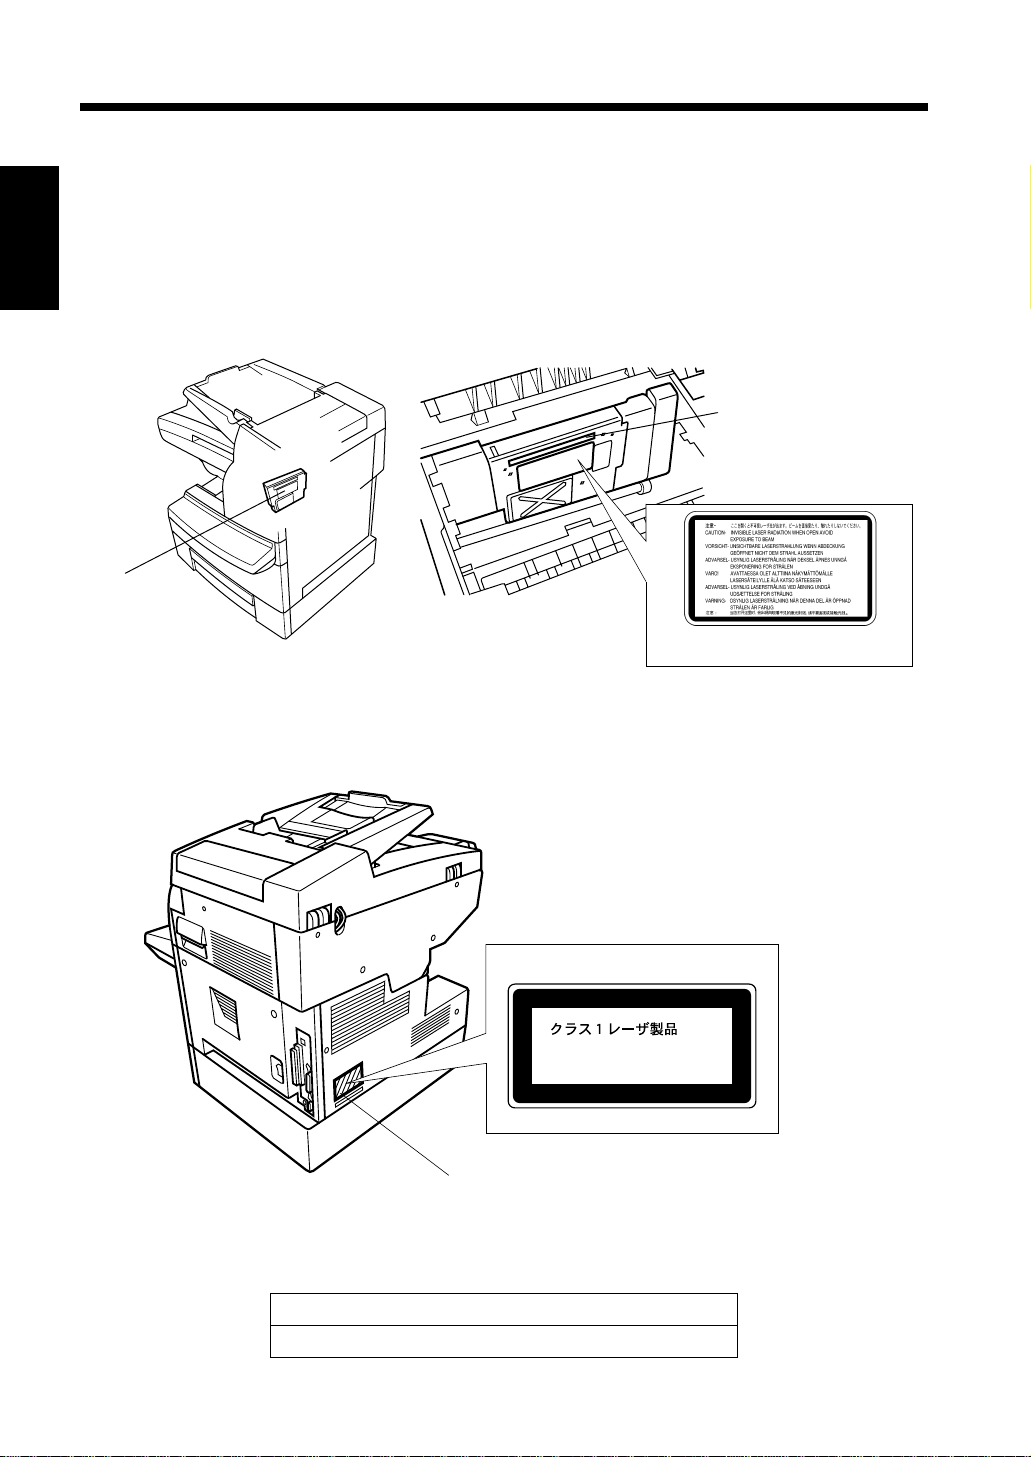
1. Using This Manual
Internal Laser Radiation
Maximum Radiation Power: 1.03 mW at the laser aperture of the print head unit.
Wavelength: 770–810 nm
This product employs a Class 3b Laser Diode that emits an invisible laser beam.
Chapter 1
The Laser Diode and Scanning Polygon Mirror are incorporated in the print head unit.
The print head unit is NOT A FIELD SERVICE ITEM.
Therefore, the print head unit should not be opened under any circumstances.
Safety Notes
Laser Safety Label
A laser safety label is attached to the outside of the machine as shown below.
CLASS 1 LASER PRODUCT
LASER KLASSE
The Manufacturer’s Name Plate is affixed at the position illustrated above.
Please write down the Model Name and Serial No. of your machine here.
1 PRODUKT
Model:
Serial No.:
Page 11

2. Installing the Copier
Power Source
CAUTION: Plug Socket
• A plug socket is limited in capacity. Use only a power source with the correct rating for the
machine; otherwise, hazardous situations such as smoking or overheating may occur. See the to
match the power supply and power consumption:
a) 230V/50 Hz: Less than 3.5A
b) 230V/60 Hz: Less than 3.5A
• Avoid multiple connections in the same outlet. Do not use multiple outlet adaptors.
CAUTION: Power Plug and Lead
• Be sure to insert the power plug firmly into the power socket. Otherwise an accident may occur
as a result of smoking or overheating. If the inserted power plug is loose in the socket, even after
it has been positively inserted, disconnect the plug and contact your electrical contractor.
• The socket-outlet shall be installed near the equipment and shall be easily accessible.
• Do not bend or crush the power lead. If your copier power lead is bent or damaged in any way,
contact your Service Centre immediately. Do not attempt to repair it yourself, and do not
continue to operate the copier. A damaged power lead may result in overheating, a short circuit,
or fire.
• Do not bundle or coil the power lead of the copier. Otherwise an accident may occur as a result
of overheating or fire.
1-5
Chapter 1
Safety Notes
CAUTION: Connecting Multiple Loads to One Socket Outlet Prohibited
Never connect multiple loads to one socket outlet using a multi-outlet extension lead or
branched socket. Otherwise an accident may occur as a result of overheating or fire.
CAUTION: Extension Lead
An extension lead should never be used with this copier.
Machine Installation
CAUTION: Prevention of Fire
Do not install near flammable materials, curtains and volatile combustibles, that can catch or
cause fire.
CAUTION: Prevention of Short Circuit
Do not install the copier where it could be splashed with rain water, or water from tap, to avoid a
short circuit.
Page 12
1-6
Scale: mm
C4007O090CA
562
936
692
911
645
2. Installing the Copier
CAUTION: Temperature and Humidity
• Keep away from direct sunlight, heat sources such as stoves, cool air from an air conditioner and
hot air from a heater.
• Avoid any environment that is outside the range shown below:
Temperature: 10–30°C with a fluctuation of up to 10°C per hour.
Chapter 1
Humidity: 15–85% with a fluctuation of up to 20% per hour.
CAUTION: Ventilation
• Maintain the installation place well-ventilated.
• Keep away from dust or corrosive gases. These materials may cause poor image quality.
• During the use of machine, the machine generates ozone but in an insufficient amount to cause
Safety Notes
any hazard to the human body.
However, if the machine is used in a poorly ventilated room, many copies made, or plural
copiers are used at the same time, an odor may be detected, ensure adequate ventilation for a
comfortable working environment.
CAUTION: Vibration
Do not install on a floor which is subject to vibration or is not level.
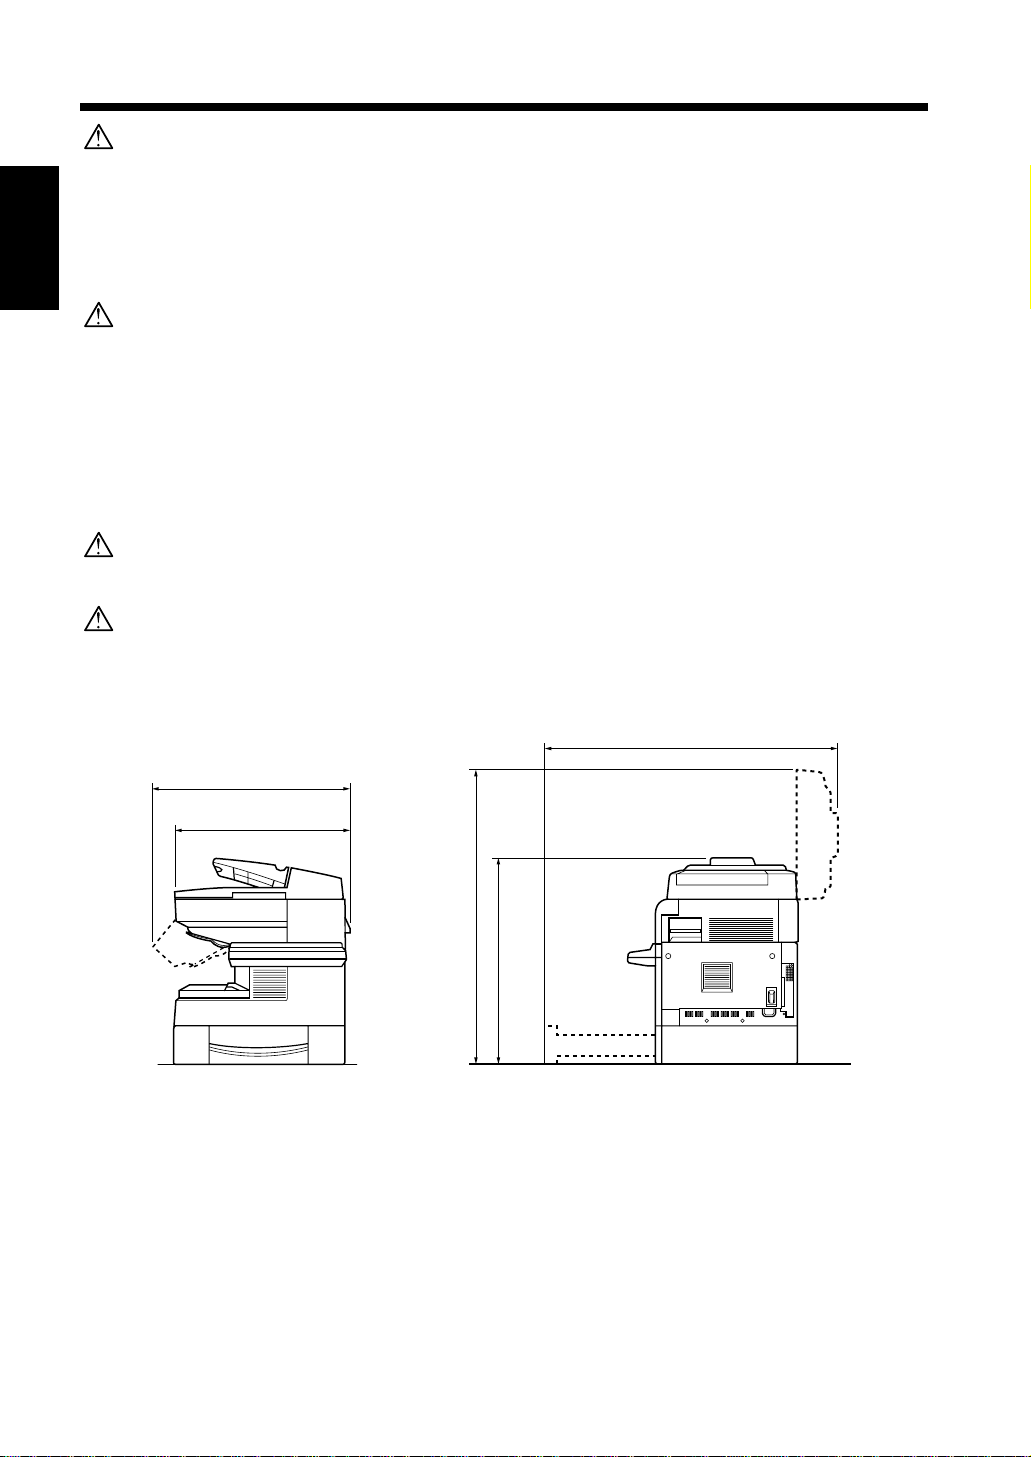
CAUTION: Installation Space
Allow sufficient space for facilitating copy operation, changing parts, and periodic inspection.
Especially leave an adequate space behind the machine to let hot air out from the rear fan.
* At least 150 mm of space is needed on the right and back sides of the unit to ensure proper ventilation.
* The dimensions of the model shown include an Automatic Document Feeder and Paper Feed Unit.
Page 13

3. Precautions for Routine Handling
CAUTION: Actions in Response to Troubles
• An Error Code is displayed, stop the operation to prevent any unexpected accident. Write down
the Error Code as stated in the display, then switch off the copier and disconnect from the power
socket. Contact your Service Centre and inform of the Error Code.
• Do not touch the high temperature or high voltage parts indicated with caution labels or
described in the manual.
• Do not touch the inside of the machine for any other purpose than removing jammed paper or
adding toner.
• If machine repair is necessary, be sure to contact your Service Centre. Never attempt to repair it
by yourself.
• If any abnormal sound, smell or smoke comes from the machine, immediately stop using it, turn
off the power switch, disconnect the power plug and contact your Service Centre.
• If the breaker trips or the fuse blows, turn off the power switch, reset the breaker or the fuse, and
turn on the machine. If the same situation occurs again, contact your Service Centre.
• Insure the replacement fuse conforms with the rating of the power source, never use a fuse with
an incorrect rating.
CAUTION: Prevention of Fire
Do not use volatile combustibles such as a thinner or alcohol near the machine.
1-7
Chapter 1
Safety Notes
CAUTION: Prohibition of Machine Modification
Do not modify or remove any parts by yourself.
CAUTION: Prevention of Machine Troubles
• Do not drop small metallic objects such as paper clips or staple inside the machine.
• Do not place any heavy or hard objects such as a vase, books or ornaments on the machine.
CAUTION: Recommendation of Periodic Check
Be sure to check periodically the following points:
(1) The main lead or the power plug does not generate abnormal heat.
(2) The power plug is not inserted loosely or the lead is not cut or scratched.
If you find anything abnormal in the above items, stop using the machine and contact your
Service Centre.
CAUTION: Toner
• Keep the toner cartridge away from children. The toner is nontoxic; however if you inhale or
contact with eyes by accident, flush with water and seek medical advice.
• Do not throw the empty supply unit into a fire. If it is thrown into a fire the toner may ignite and
cause a dangerous situation.
CAUTION: Dispose of a Disused Copying Machine
Do not dispose of this copier yourself. Contact your Service Centre, who can arrange for its safe
disposal.
If you change the place of installation, please contact your Service Centre.
Page 14

Chapter 1
Safety Notes
1-8
Page 15

Chapter 2
2-1
Chapter 2
Getting to Know Your Machine
Getting to Know Your Machine
Page 16
2-2
C4007O093CA
C4007O094CA
1. The Various Parts of the Machine
Parts of the machine and what they do
Chapter 2
Getting to Know Your Machine
Automatic Document Feeder DF-216 <Option>
Feeds and copies one sheet at a time.
C4007O092CA
Memory for Copier (16MB/32MB) <Option>
Original Cover
Secures the original to be copied.
C4007O091CA
Expands the memory capacity of the machine.
Fax Unit for Konica 7415 <Option>
Allows the machine to support facsimile
functions.
Printer Controller IP-412 <Option>
Allows the machine to support printer functions.
Twain Driver <Option>
Allows the machine to support scanner functions.
Konica 7415
The machine is equipped with a paper tray that is capable of holding up to 250 sheets of paper.
By using the Manual Bypass Tray, it is possible to feed additional sheets of paper or special
papers into the machine individually.
Paper Feed Unit PF-120 <Option>
Allows the machine to store up to 500
additional sheets of paper.
Page 17
Options
C4007O095CA
2-3
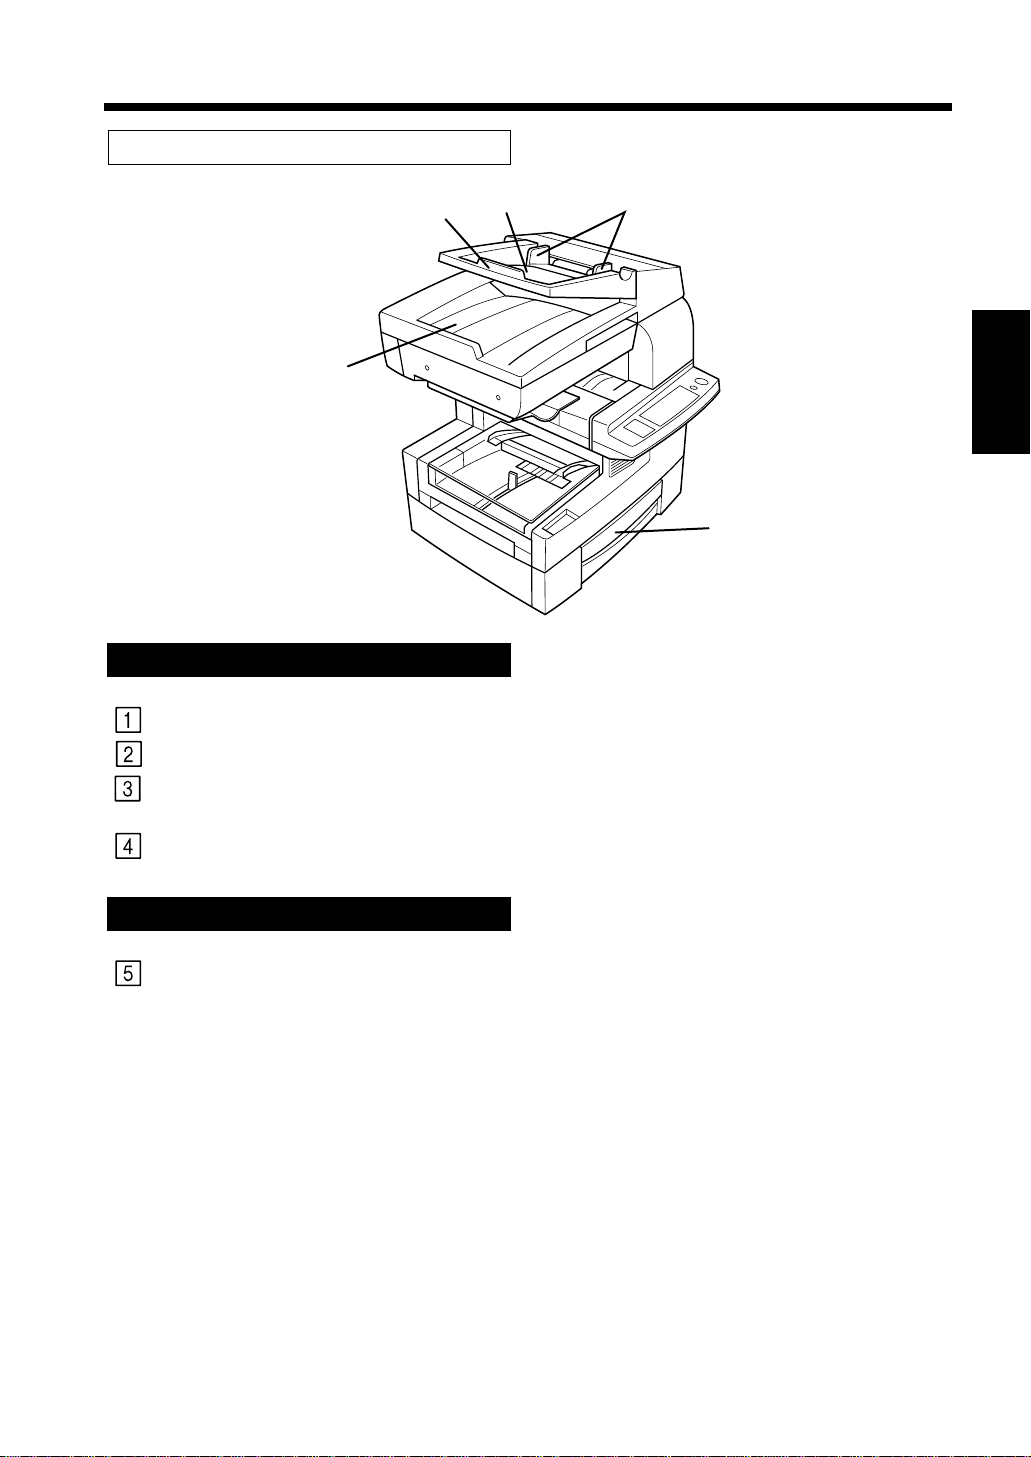
1. The Various Parts of the Machine
3
2
4
Automatic Document Feeder <Option>
Document Guide Plates:
Document Feed Tray:
Document Feed Tray
Extender:
Document Exit Tray:
Adjusted to the size of the original document.
Loaded with the document facing upward.
Pulled out to support large documents.
Receives the document after it is read by the machine.
1
Chapter 2
5
Getting to Know Your Machine
Paper Feed Unit <Option>
Paper Drawer:
Holds up to 500 sheets of paper.
Page 18
2-4
C4007O097CAC4007O089CA
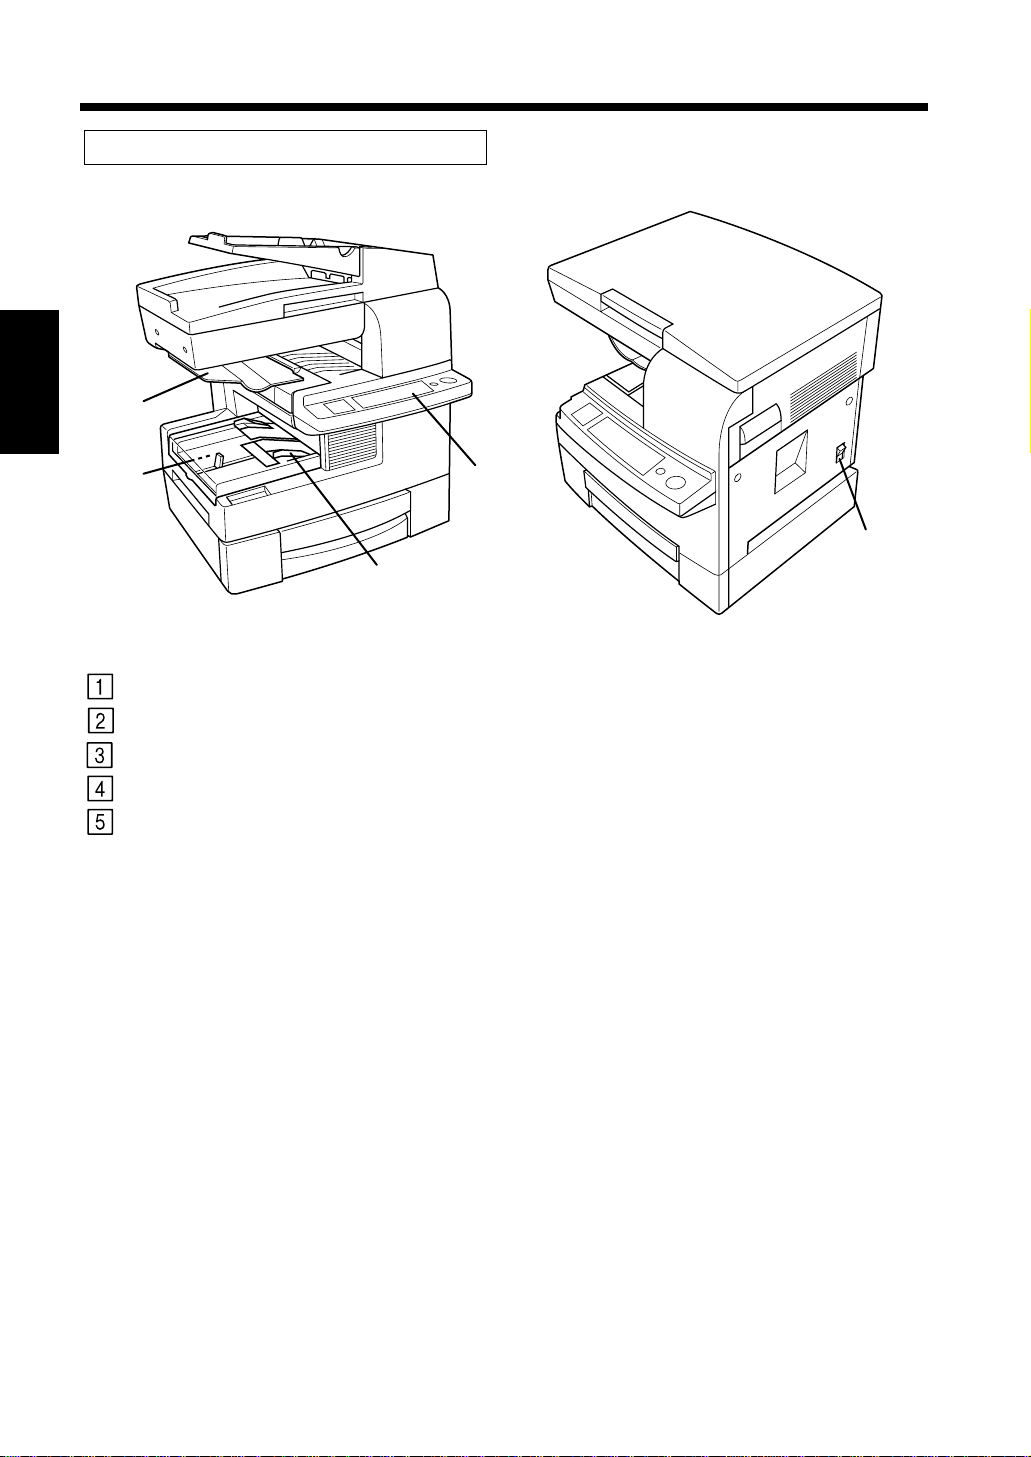
1. The Various Parts of the Machine
Parts of the machine and what they do
Chapter 2
Getting to Know Your Machine
1
2
Copy Tray:
Paper Tray:
Manual Bypass Tray:
Control Panel:
Power Switch:
4
5
3
Copies are output into this tray.
Holds up to 250 sheets of paper.
Use to feed paper into the machine manually. ☞ p. 3-7
Use to control copy and other functions of the unit. ☞ p. 2-6
Use to turn power to the unit ON and OFF. ☞ p. 2-8
Page 19
Inside the Machine
1
3
2
C4007O098CA
4
5
C4007O099CA
2-5
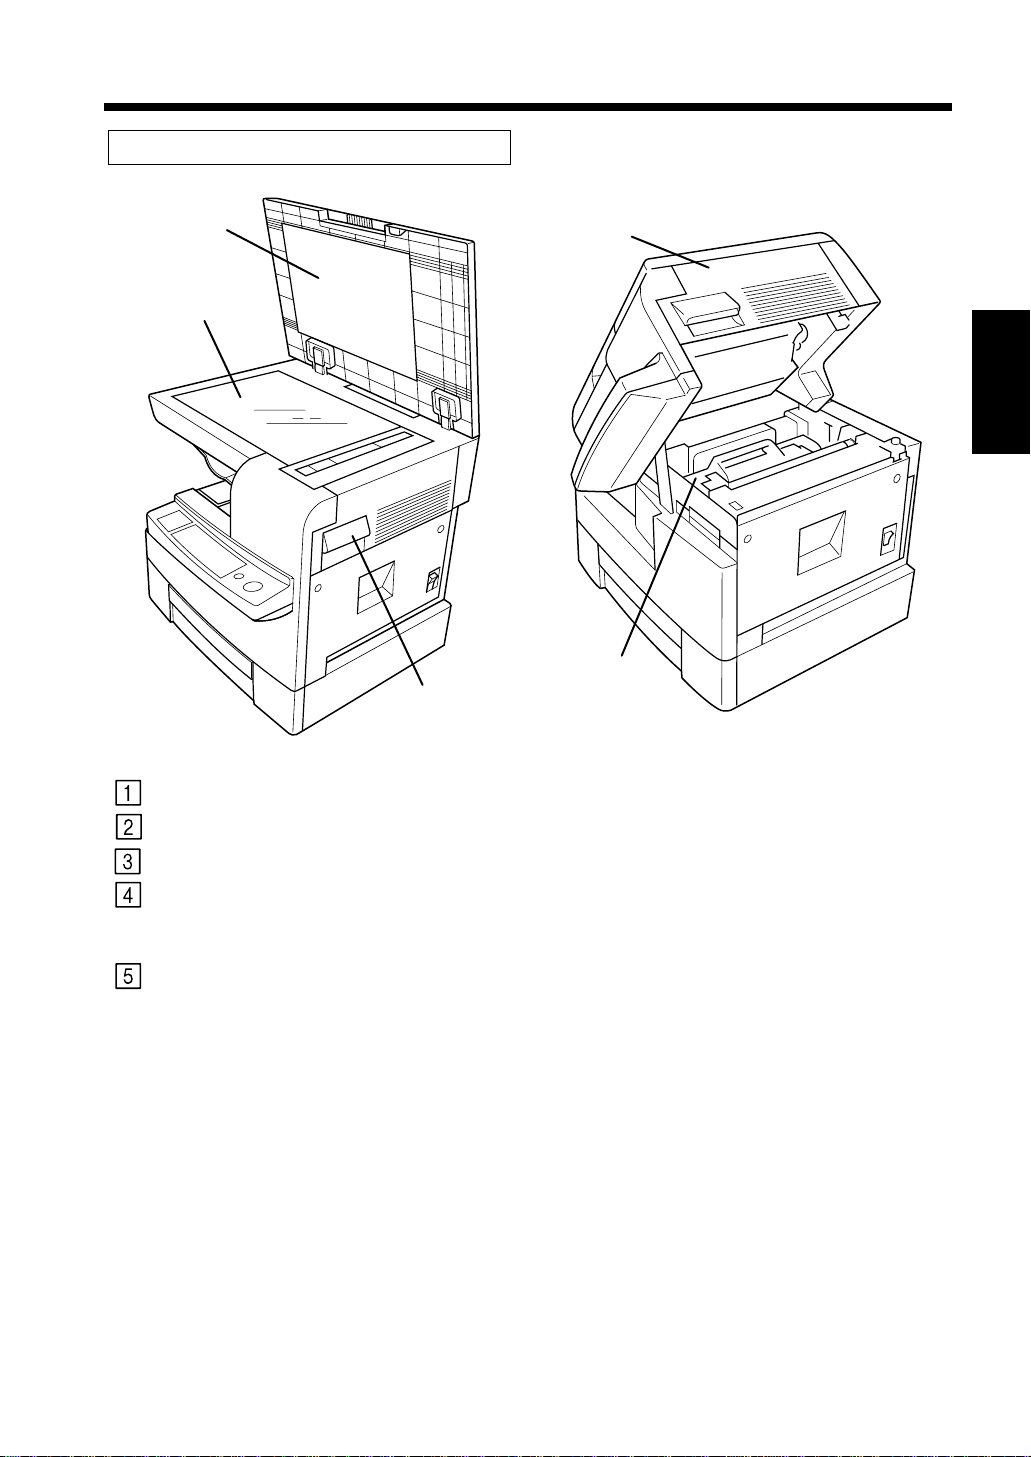
1. The Various Parts of the Machine
Chapter 2
Lock Release Lever:
Original Pad:
Original Glass:
Upper Half of Machine:
Supply Unit:
Getting to Know Your Machine
Pulled when replacing the supply unit or removing paper misfeeds.
Secures the original for copying.
Original is placed on top of this surface for copying.
Opened under the following circumstances:
• When replacing the supply unit. ☞ p. 5-4
• When clearing a misfeed. ☞ pp. 5-8, 5-9, 5-10, 5-11
Transfers the document onto the paper.
Page 20
2-6
76
3
54
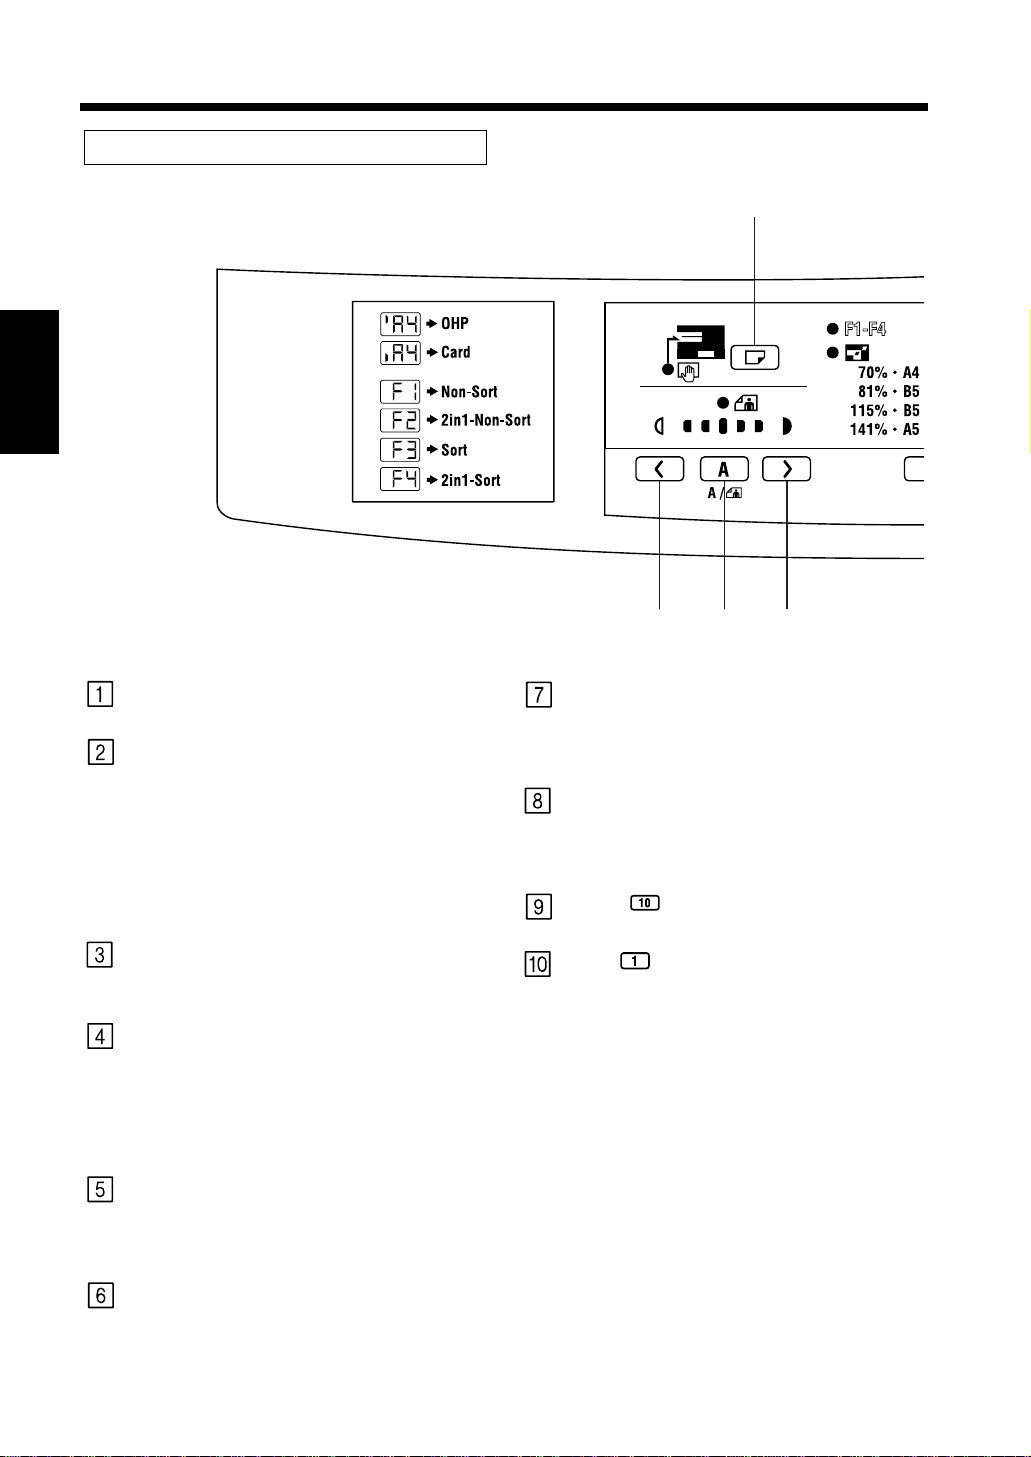
2. The Functions of the Control Panel
Control Panel
Chapter 2
Start Key
Getting to Know Your Machine
• Press to start a copy cycle.
Clear/Stop Key
• Press to cancel a copy operation.
• Press to reset the Copies setting to “1”.
☞ p. 3-11
• Press to return the zoom ratio setting to
100%. ☞ p. 3-13
• Press for three seconds to enable the total
check function. ☞ p. 4-3
Paper Select Key
• Press to select the drawer that contains the
desired paper size. ☞ p. 3-6
Exposure Control Key (Lighter)
• Use to manually adjust the density of the
document. Image will become lighter by
pressing this key. ☞ p. 3-14
• Press for three seconds to enter the User’s
Choice mode. ☞ p. 4-10
Auto Exposure Mode Key
• Press to select either the Auto Exposure
Mode, the Manual Exposure Mode or the
Photo Mode. ☞ pp. 3-14, 3-15
Zoom Key
• Press to change the zoom ratio.
• Use to select the standard zoom ratio.
☞ p. 3-12
Copies/Function Key
• Use to change the copies setting and the
Function Mode Settings.
Function Mode setting ☞ p. 3-16
10 Key
• Use to change the values for each setting.
1 Key
• Use to change the values for each setting.
Exposure Control Key (Darker)
• Use to manually adjust the density of the
document. Image will become darker by
pressing this key. ☞ p. 3-14
Page 21
2-7
C/
7 8 9 0 2 1
C4007O001DA
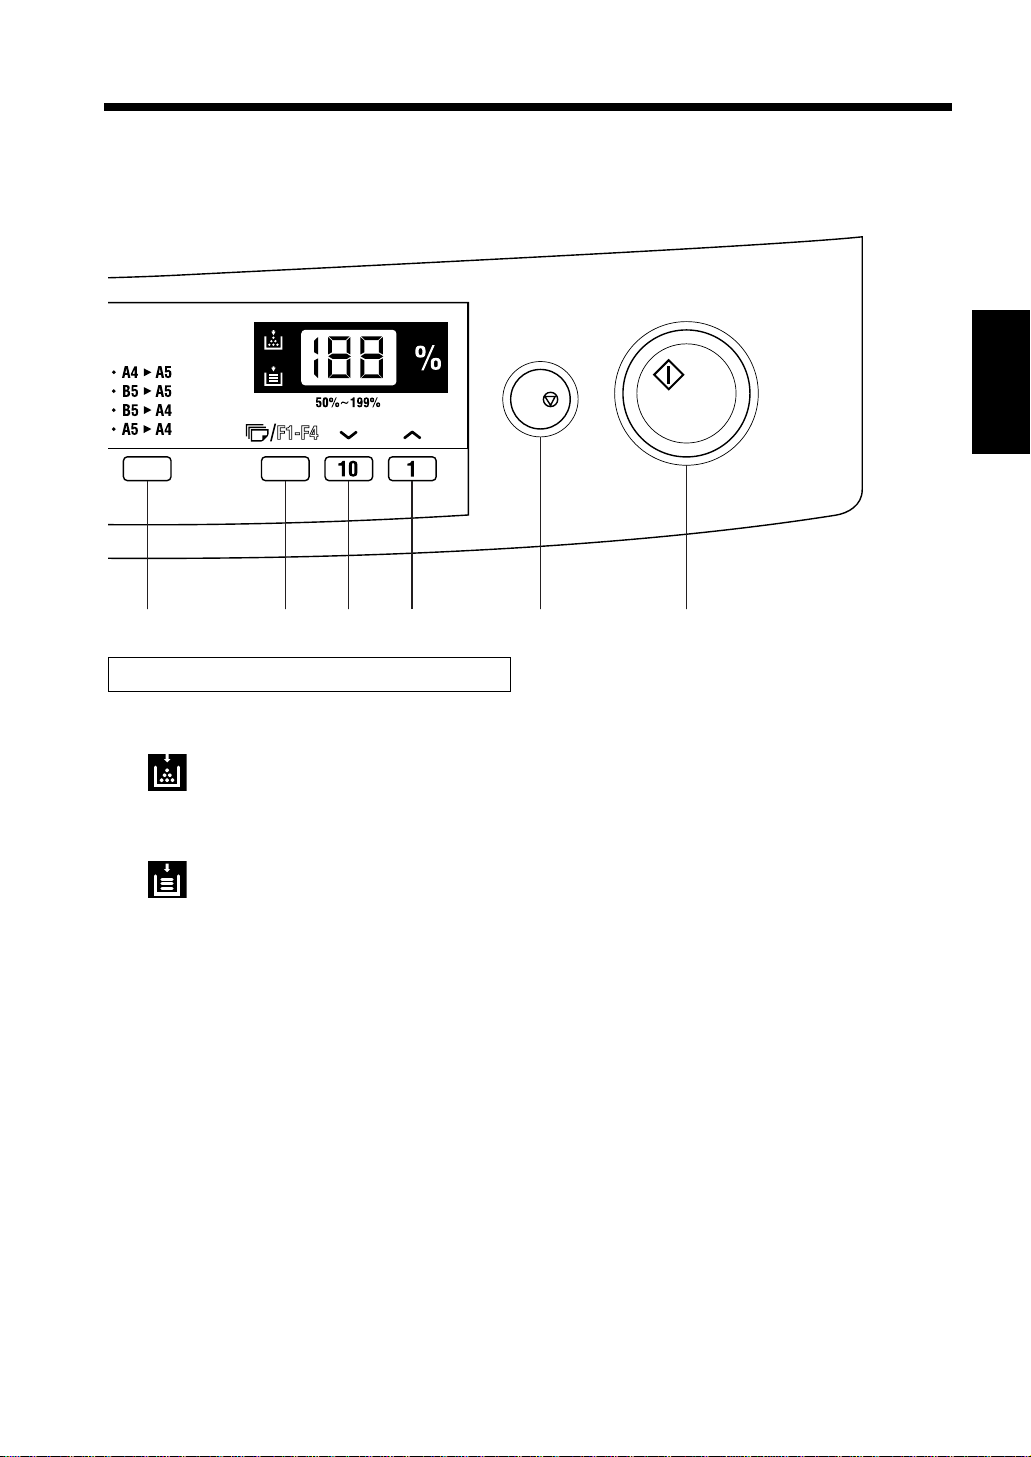
2. The Functions of the Control Panel
Chapter 2
Display Panel
Add Toner Indicator
Indicates that the toner supply is
running low. Replace the supply unit.
☞ p. 5-4
Add Paper Indicator
Indicates that the selected drawer is out
of paper. Replenish the paper supply.
☞ p. 5-6
Getting to Know Your Machine
Page 22
2-8
Useful Tip
C4007O100CA
C4007O062CA C4007O061CA
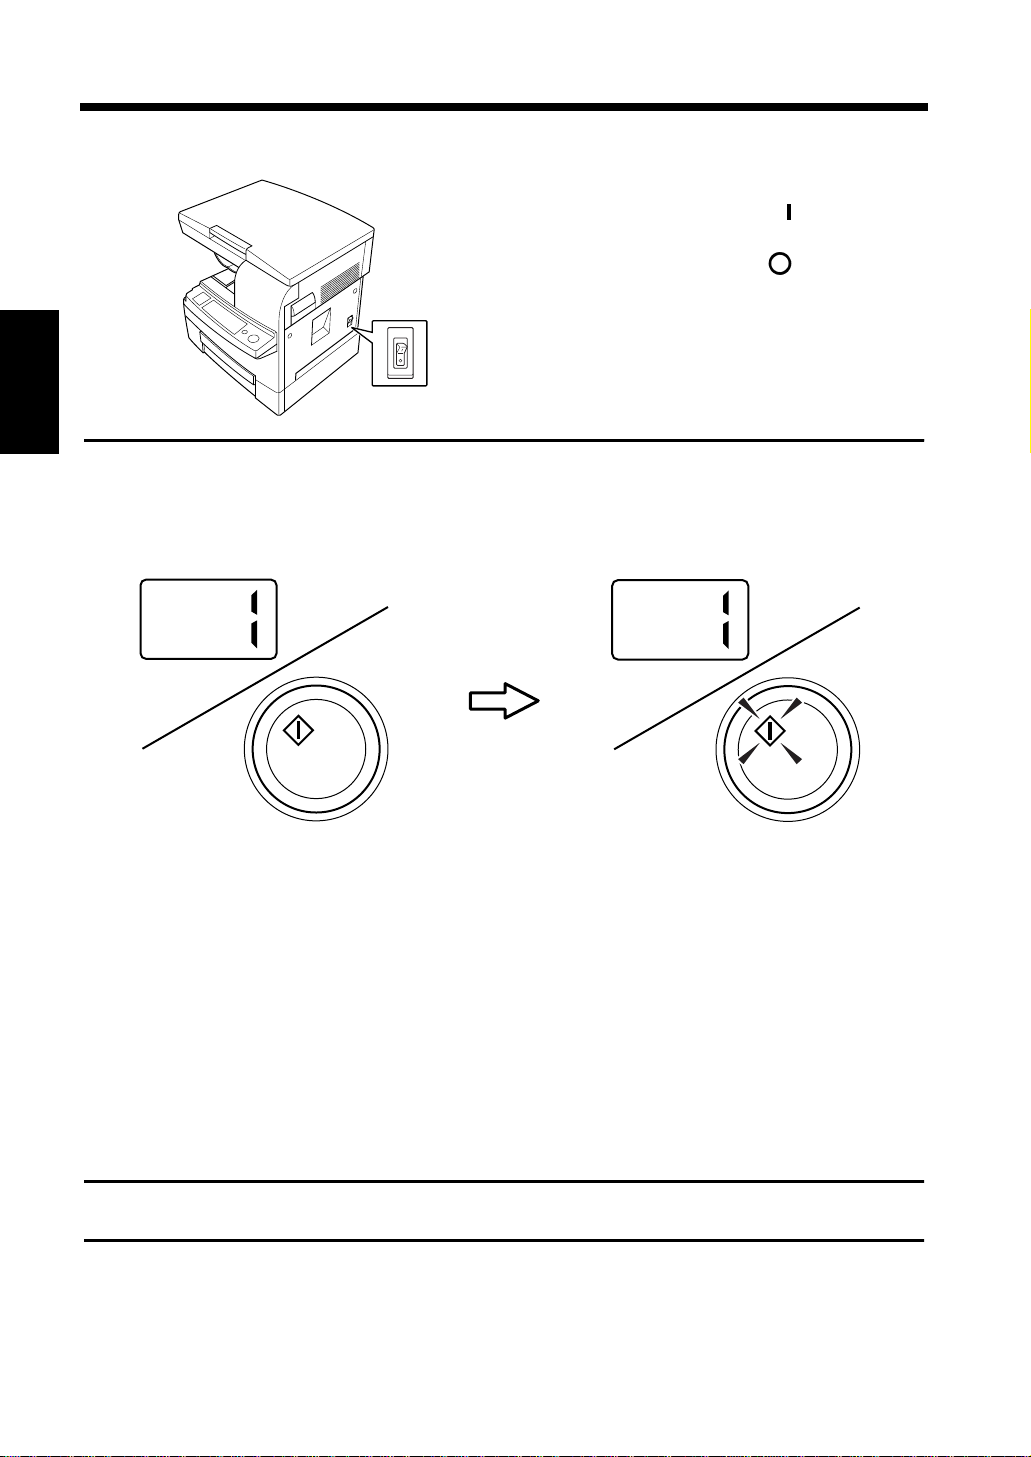
3. Turning the Machine ON and OFF and Enabling the Initial Mode
Turning ON and OFF
• Turning the Machine ON
Press the Power Switch to the (ON) position.
• Turning the Machine OFF
Press the Power Switch to the (OFF) position.
HINTS:
If you turn off the Power Switch in sleeping mode,
the green light of Start Key does not turn off for a
while.
Chapter 2
When the Machine is Turned ON
The unit will enter a warm up mode. In about 30 seconds the machine will be ready to operate and the Start
Key will become lit.
Getting to Know Your Machine
Initial Mode
When power to the unit is turned ON, the Initial Mode screen will appear in the message display. The
Initial Mode is a standard mode for generating copies.
Copies: 1
Paper Drawer: Paper Tray
Zoom: 100%
Exposure: Auto Exposure Mode
Function Mode: Non-Sort Mode (F1)
* The Function Mode will change to Sort if the machine is equipped with an Auto Document Feeder and
Expansion Memory.
The Initial Mode can be changed. For details, see User’s Choice. ☞ p. 4-4
Page 23

2-9
Useful Tip
Useful Tip
4. Auxiliary Functions
Auto Panel Reset Function
The unit automatically returns to the Initial Mode without pressing the Clear/Stop Key one minute after a
copy operation has completed or one minute after the last operation key was pressed.
The period of time until the Auto Panel Reset Function is released can be changed through the User’s
Choice Mode. Please refer to the section of this manual that explains the “User’s Choice Mode” for
details. ☞ p. 4-4
Sleep Function
If the unit is not operated for a specified period of time, the Sleep Function will be enabled, putting the
unit into standby. The default setting is 15 minutes of standing time before this function is enabled. The
Sleep Function is disabled as soon as the Start Key is pressed.
The period of time before the Sleep Function is enabled can be changed through the User’s Choice
Mode. Please refer to the section of this manual that explains the “User’s Choice Mode” for details.
☞ p. 4-4
Chapter 2
Getting to Know Your Machine
Page 24

Chapter 2
2-10
Getting to Know Your Machine
Page 25

Chapter 3
3-1
Chapter 3
Making Copies
Making Copies
Page 26

3-2
C4007O101CA
C4007O102CA
2. Selecting the paper tray.
• Select the desired paper tray
using the Paper Select Key.
☞ p. 3-6
3. Selecting the zoom ratio.
• Select the desired zoom ratio
using the Zoom Key.
☞ p. 3-12
To change the paper
tray
To change the zoom
ratio
F1-F4
C4007O002DA
C4007O003DA
• Select the desired zoom ratio
using the or Key.
☞ p. 3-13
C4007O055CA
1. How to Copy Documents
• Generally, full size copies are reproduced at a zoom ratio of 100%.
To make a full-size copy on paper of the same size as the original, set the document (step 1), specify
the number of copies to be generated (step 6), and press the Start Key (step 7).
(* The default paper tray, zoom ratio and auto exposure settings are automatically selected in the
Initial Mode.)
• Performing the operations indicated by will allow you to adjust the exposure and zoom ratio of
the copy as well as enable the 2in1 Mode.
1. Setting the document.
• Open the Original Cover and set the document
face down onto the glass.
Chapter 3
• Set the document face up into the Automatic
Document Feeder.
Making Copies
Page 27

3-3
To change the
exposure level
4. Selecting the Copy Density
Mode.
• Press the Exposure Control
Keys to specify the desired
level of density. ☞ p. 3-14
To change the
Function Mode
5. Selecting the Function Mode.
• Use the Copies/Function Key
to specify the desired Function
Mode. ☞ p. 3-16
C4007O004DA
C4007O006DA
• Press the Auto Exposure Mode
Key to switch between Auto
Exposure Mode and Photo
Mode. ☞ p. 3-14
C4007O005DA
C4007O055CA
C4007O053CA
1. How to Copy Documents
Chapter 3
6. Specifying the number of copies to be made.
• Use the Key or Key to specify the
number of copies or groups of documents to be
copied. ☞ p. 3-11
* Up to 100 copies can be specified.
* Press the Clear/Stop Key if the wrong number
is entered.
7. Generating copies.
• Press the Start Key.
* Press the Clear/Stop Key to stop the operation
if necessary.
Making Copies
C/
Page 28

3-4
NOTES
1
C4007O103CA
2
C4007O102CA
2. Setting the Original Document
When using the Automatic Document Feeder
With the Automatic Document Feeder, originals placed into the Document Feed Tray are fed in one sheet
at a time, copied, then fed out. Please follow the instructions provided when using this device. Failure to
follow these instructions may cause a misfeed, damage to the original or other complications.
◆ Originals should follow these standards
Type of Paper: Plain paper(50–110 g/m
Paper Size: A4R–A5R
◆ Originals that are not compatible with the Automatic Document Feeder
• Typing paper, paraffin paper and other thin paper types.
• Thick paper.
• Sizes that are larger than A4 or smaller than A5.
• OHP transparencies, tracing paper or other transparent paper types.
• Wrinkled, folded, curled or torn originals.
• Originals that are stapled or are attached with paper clips.
• Carbon paper or paper with coated surfaces.
Chapter 3
* To produce copies from an original document described above, place it on the Original Glass.
☞ p. 3-5
2
)
How to set originals
Adjust the Document Guide Plates to the
Making Copies
size of the document.
Set the document so that the side that you
wish to copy is facing up.
• The maximum number of originals that can be
loaded is 50.
• Make sure that the top of the stack does not
exceed the mark.
• Be sure to place the original document as
shown in the illustration (step 2).
• Adjust the Document Guide Plates so that they
make contact with the sides of the stack. The
stack may not feed properly if the Document
Guide Plates do not secure the stack in place.
Page 29

Setting the original onto the glass
NOTES
1
C4007O101CA
2
C4007O136CA
3
1
C4007O101CA
2
C4007O104CA
3
3-5
2. Setting the Original Document
General Documents
<When setting documents of plain or thick paper
types>
Open the Original Cover.
Set the document onto the glass with the side
that you wish to copy facing down.
Align the centre of the original with the scale
marker.
Transparent Documents
<When setting OHP transparencies or tracing
paper>
Follow the same procedure as described for
general documents.
Chapter 3
Place a blank sheet of paper of the same size
as the original on top of the original.
Making Copies
Gently close the Original Cover.
• When copying larger documents that are bound
together, such as the pages of a book, do not
close the Original Cover of the machine.
• Do not place documents that exceed 3 kg onto
the Original Glass. Do not press or apply
pressure upon original documents once they
have been placed on top of the Original Glass
as damage may result.
• Do not look directly at the bright beam of light
that is emitted through the Original Glass
during operation.
Gently close the Original Cover.
Page 30

3-6
NOTE
Useful Tips
C4007O007DA
C4007O143CA
C4007O008DA
C4007O009DA
C4007O010DA
3. Selecting Paper Trays
How to select a paper tray
Paper trays are selected using the Paper Select Key.
You can select from the Paper Drawer, the Paper Feed Unit and the Manual Bypass Tray depending on the
configuration of your copy application.
C/
The paper tray options can be selected as follows by pressing the Paper Select Key.
Chapter 3
Paper Tray
*no indicator
Paper Feed UnitManual Bypass Tray
The “Manual Bypass” indicator will become lit when the Manual Bypass Tray is selected. The “Paper
Feed Unit” indicator will become lit when the Paper Feed Unit is selected. No indicator will become lit
when the Paper Tray is selected.
Making Copies
Paper Tray Manual Bypass Tray Paper Feed Unit
Be sure to change the “U7: Paper Size Select” User’s Choice setting whenever a different size of paper
is loaded into the Paper Tray. p. 4-6.
• The Paper Tray is prioritized when the Initial Mode is enabled. The Paper Feed Unit can be prioritized
in the Initial Mode through the User’s Choice Mode. ☞ p. 4-8
• Should the paper supply run out while copies are being output from the Paper Tray, copying can
continue through the Paper Feed Unit if the same size paper has been loaded into the Paper Feed Unit.
This feature is called Auto Tray Switching.
Page 31

3-7
···· (Regular)
···· (OHP
···· (Thick)
transparencies)
C4007O024DA
A4 A5 b6 Pb5
I
A4
IA4 IA5 Ib6 IPIb5
C4007O011DA
C4007O012DA
C4007O013DA
C4007O033CA
3. Selecting Paper Trays
Using the Manual Bypass Tray
Use this tray to copy documents onto paper that is not otherwise loaded into the machine or to copy onto
OHP transparencies or specialty paper types.
Paper and media supported by the Manual Bypass Tray
◆ Types of Paper
Regular paper (60–90 g/m
Thick paper (90–163 g/m
2
)
2
)
OHP transparencies
◆ Paper Size
A4 R, A5 R, B5 R, B6 R
Maximum: 216 mm × 356 mm
Minimum: 128 mm × 182 mm
* When the Manual Bypass Tray is selected, the paper size and type appear in the display. Use the
Key and Key to change these settings to match the size and type of the installed paper.
Each press of the keys changes the settings as shown below.
Chapter 3
Making Copies
Display
Regular paper (A4)
Thick paper (A4)
OHP transparencies (A4)
Free Size
Page 32

3-8
NOTES
NOTE
1
2
C4007O105CA
C4007O156CA
3
C4007O014DA
4
C4007O015DA
5
3. Selecting Paper Trays
Loading the paper (standard sizes)
Set the original document.
Insert the paper as far as possible into the
Manual Bypass Tray. Be sure to adjust the
Document Guide Plates to fit the paper.
Chapter 3
• Be sure to feed the paper one sheet at a time.
• Curl the edges of the paper upwards before
setting the paper into the machine.
Select the proper paper size and type using
the and Keys.
(Example) Regular paper (A4 size)
Be sure to set the paper type properly when
copying onto OHP transparencies or thick paper.
Press the Start Key.
Making Copies
Select the Manual Bypass Tray by pressing
the Paper Select Key.
Page 33

NOTES
Loading the paper (non-standard
1
2
C4007O105CA
C4007O156CA
3
C4007O072CA
4
C4007O064CA
5
C4007O052CA
6
C4007O065CA
7
C4007O052CA
sizes/free sizes)
Set the original document.
Insert the paper as far as possible into the
Manual Bypass Tray. Be sure to adjust the
Document Guide Plates to fit the paper.
• Be sure to feed the paper one sheet at a time.
• Curl the edges of the paper upwards before
setting the paper into the machine.
3-9
3. Selecting Paper Trays
Press the Key or the Key to
display “U8”.
Press the Start Key.
Chapter 3
Press and hold the Exposure Control Key
(Lighter) for three seconds. The User’s
Choice Mode will be enabled and “U1” will
appear in the display.
Press the Key or the Key to
display the paper width code. Refer to
“Manual Feed Input Size” for details.
☞ p. 4-6
(Example) Paper Width: 135 mm
Press the Start Key.
Making Copies
Page 34

3-10
NOTE
NOTE
8
C4007O066CA
C4007O108CA
Width
Length
9
C4007O052CA
10
C4007O051CA
11
C4007O014DA
12
C4007O067CA
13
3. Selecting Paper Trays
Press theKey or theKey to
display the paper length code. Refer to
“Manual Feed Input Size” for details.
☞ pp. 4-6, 4-7
(Example) Paper Length: 195 mm
The value entered for the paper length must be
larger than the entered paper width.
Chapter 3
Making Copies
Select the Manual Bypass Tray by pressing
the Paper Select Key.
Press the Key or the Key to
display “P”.
Be sure to set the paper type properly when
copying onto OHP transparencies or thick paper.
Press the Start Key.
Press the Start Key.
Press the Clear/Stop Key twice.
C/
Page 35

3-11
C4007O016DA
NOTE
1
C4007O066CA
2
C4007O068CA
C/
C4007O073CA
4. Specifying the Number of Copies
How to specify the number of copies to be generated
The number of copies to be generated can be specified by using the Key and Key.
Each press of the Key increases the number value by one. Each press of the Key increases the
number value by 10.
C/
A /
(Example: Specifying 23 copies.)
Press the Key twice.
Press the Key three times.
Chapter 3
Press the Clear/Stop Key if the wrong number of
copies is entered.
Making Copies
Page 36

3-12
C4007O017DA
100% 115% 141% 70% 81%
C4007O023DA
C4007O018DA C4007O025DA
5. Specifying the Zoom Ratio
How to specify the zoom ratio
The zoom ratio can be specified by pressing the Zoom Key.
There are two modes to choose from: Standard Copy Zoom and Manual Zoom Select.
Standard Copy Zoom Mode
With this mode, the most often used preset zoom settings can be selected.
Chapter 3
Press the Zoom Key to enable the Copy Zoom Setting Mode.
The following zoom settings can be selected by pressing the Zoom Key.
C/
Making Copies
Page 37

Useful Tips
Manual Copy Zoom Settings
1
C4007O018DA
2
C4007O047CA
The zoom ratio can be adjusted in single
increments with each press of the /
Keys.
(Range: 50–199 %)
Press and hold a or Key to rapidly
change the zoom ratio.
Press the Zoom Key to enter the Copy Zoom
Setting Mode.
3-13
5. Specifying the Zoom Ratio
Chapter 3
Set the zoom ratio using the and
Keys.
• To return the setting to 100%, press the Clear/
Stop Key while in the Copy Zoom Setting Mode.
• After approaching the desired zoom ratio, press
the / Keys to specify the exact
setting.
Making Copies
Page 38

3-14
Useful Tips
Useful Tips
1
C4007O019DA
1
C4007O004DA
C4007O016DA
6. Selecting the Copy Image Density Mode
How to select the copy image density
The copy image density can be selected by pressing the Auto Exposure Mode Key and the Image Density
Key. There are three modes to choose from: Auto Exposure, Manual Exposure and the Photo.
C/
A /
Auto Exposure Mode
Chapter 3
This mode automatically selects the exposure
setting that is optimal for the original document to
be copied.
Press the Auto Exposure Key until all
density level indicators light up.
Making Copies
Press the Auto Exposure Mode Key to switch
between the Auto Exposure Mode, Manual
Exposure Mode and the Photo Mode.
• The Auto Exposure Mode is designed to
provide optimal density ratios for most
applications, however, lighter and darker
setting adjustments are possible through the
User’s Choice Mode. ☞ p. 4-5
• The Auto Exposure Mode is the default Initial
Mode setting. The Manual Exposure Mode or
the Photo Mode can be specified through the
User’s Choice Mode. ☞ p. 4-5
Manual Exposure Mode
This mode allows you to select from nine levels of
exposure.
Press the Exposure Control Keys to select
the optimal level.
• Press the Exposure Control Key to
increase the density of the copy.
• Press the Exposure Control Key to
decrease the density of the copy.
Page 39

Useful Tips
Photo Mode
1
C4007O005DA
2
C4007O020DA
Level Indicator
Darker (Level 4)
Darker (Level 3)
Darker (Level 2)
Darker (Level 1)
Normal
Lighter (Level 1)
Lighter (Level 2)
Lighter (Level 3)
Lighter (Level 4)
Photo Mode is used for copying documents
containing halftones such as photos. This mode
allows you to select from nine levels of exposure.
Press the Auto Exposure Mode Key to select
the Photo Mode.
3-15
6. Selecting the Copy Image Density Mode
• Both the Manual Exposure Mode and the
Photo Mode allow you to select from nine
levels of exposure.
• The indicators appear as follows to indicate
the selected exposure level.
Press the Exposure Control Keys to select
the optimum level.
*A higher darker density level indicates a
darker exposure; a higher lighter density level
indicates a lighter exposure.
*The Exposure Level Priority for the Manual
Exposure Mode and the Photo Mode can be
adjusted through the User’s Choice Mode.
☞ p. 4-5
Chapter 3
Making Copies
Page 40

3-16
C4007O021DA
F1-F4
C4007O140CA
F1 : Non-Sort F2 : 2in1-Non-Sort F3 : Sort F4 : 2in1-Sort
C4007O022DA C4007O069CA
C4007O034DA
C4007O171CA
7. Selecting the Function Mode
How to select the Function Mode
The Function Mode can be selected by pressing the Copies/Function Key.
There are four modes to choose from: Non-Sort Mode, 2in1 Non-Sort Mode, Sort Mode and 2in1 Sort
Mode.
C/
A /
Select the Function Mode
Press the Copies/Function Key to enable the Function Mode.
Chapter 3
The following Function Modes can be selected by pressing the / Keys.
Making Copies
To change the number of copies in the Function Mode you have just set, press the Copies/Function Key.
The Mode display changes to a Copy Number display.
Page 41

F1: Non-Sort
C4007O132CA
Originals
Copies
4
3
2
1
12
12
12
34
34
34
C4007O133CA
Originals
Copies
C4007O134CA
Originals
Copies
3-17
7. Selecting the Function Mode
This mode outputs copies of original documents
just as they are loaded into the machine.
1
1
1
1
2
3
F2: 2in1 Non-Sort
F3: Sort
(Requires installation of the Automatic Document Feeder and expansion memory)
2
2
2
3
3
3
(Requires installation of expansion memory)
Copies two original documents onto one sheet of
paper and outputs the results in the same order as
they were loaded into the machine.
* Use of this function is also made possible only
by installing the expansion memory and when
the original documents are set directly onto
the Original Glass.
Copies a set of original documents while
automatically sorting them into complete sets.
Chapter 3
Making Copies
1
2
1
2
3
3
1
2
3
Page 42

3-18
Useful Tip
C4007O135CA
Originals
Copies
7. Selecting the Function Mode
F4: 2in1 Sort
(Requires installation of the Automatic Document Feeder and expansion memory)
Copies two original documents onto one sheet of
paper and automatically outputs them into
12
34
1
2
3
4
12
34
12
34
complete sets.
The Initial Mode’s default setting when the Automatic Document Feeder and Expansion Memory are
Chapter 3
installed is the Sort Mode. However, this setting of the Initial Mode can be changed through the User’s
Choice Mode. ☞ p. 4-8
Making Copies
Page 43

3-19
How to set original documents when making 2in1 copies.
When using the When setting the original document
Automatic Document Feeder. directly onto the Original Glass.
C4007O106CA C4007O107CA
7. Selecting the Function Mode
Notes for using the Function Mode
The Function Mode Indicator
• The Function Mode indicator will become lit when settings other than the Initial Mode are selected.
• The Zoom indicator will become lit and the zoom ratio will automatically be decreased when F2 (2in1
Non-Sort) or F4 (2in1 Sort) are selected.
2in1 Copying
When using the 2in1 function, it is important to set the original documents correctly to prevent them from
being output in reverse order.
Chapter 3
F2: 2in1 Non-Sort Mode
• The Automatic Document Feeder supports this function.
• This function can also be performed by setting the document directly onto the Original Glass. Place
each individual sheet of the original document onto the glass (in the order of first to last) and press the
Start Key.
HINTS:
Be sure to add a blank sheet of paper to an original document that consists of an odd number of sheets.
F4: 2in1 Sort Mode
• The Automatic Document Feeder supports this function.
• This function cannot be used when copying documents that are placed directly onto the Original
Glass.
Making Copies
Page 44

Chapter 3
3-20
Making Copies
Page 45

Chapter 4
4-1
Using the User’s Choice Mode
Chapter 4
Using the User’s Choice Mode
Page 46

4-2
C4007O137CA
C4007O138CA
1. The Total Check Function
How to read the Total Check Function displays
This machine can keep a count of the number of copies that it has generated since it was first set up.
◆ Total Count
Shows the total number of copies since the machine was installed.
◆ PM Count
Shows the number of copies taken since the last replacement of PM parts.
Count Displays
Count displays appear as shown below.
To t al C ou n t
(Example) When 12,345 appears on the Total Count display:
Chapter 4
PM Count
(Example) When 1,234 appears on the PM Count display:
Using the User’s Choice Mode
Page 47

How to select a Total Check Function
1
C4007O075CA
2
C/
C4007O076CA
3
C4007O073CA
Press and hold the Clear/Stop Key for three
seconds.
The Total Count will be displayed.
C/
Press and hold the Clear/Stop Key again, for
three seconds, to display the PM Count.
4-3
1. The Total Check Function
Press the Clear/Stop Key to return to the
previous status mode.
C/
Chapter 4
Using the User’s Choice Mode
Page 48

4-4
2. User’s Choice Mode
This mode allows you to determine the default settings for functions that are activated when the main
power switch is turned on or the panel is reset with the Auto Panel Reset Function.
The User’s Choice Mode is used to program the most commonly used settings of the machine into the
Initial Mode.
User’s Choice Codes and Functions
Code Functions Code Functions
U1
U2
U3
U4
U5
U6
U7
Auto Panel Reset Function
Sleep Function
Disable Sleep Function
Exposure Mode Priority
Auto Exposure Level Priority
Manual Exposure Level
Priority
Paper Size Select
U8
U9
U0
UA
Ub
UC
Manual Feed Input Size
Density (Automatic Document
Feeder)
Function Mode
Tray Priority (for Copier
Mode)
Image Density (for Printer
Mode)
Tray Priority (for Printer
Mode)
Overview of the User’s Choice Functions
Chapter 4
U1: Auto Panel Reset Function
Sets the period before the Auto Panel Reset Function is enabled after a copy job is completed.
One setting allows you to disable the Auto Panel Reset Function entirely.
Code Setting Default
oF Auto Panel Reset Function is not enabled.
05 Auto Panel Reset Function is enabled after 30 seconds.
1 Auto Panel Reset Function is enabled after 1 minute.
2 Auto Panel Reset Function is enabled after 2 minutes.
3 Auto Panel Reset Function is enabled after 3 minutes.
Using the User’s Choice Mode
4 Auto Panel Reset Function is enabled after 4 minutes.
U2: Sleep Function
Sets the period before the Sleep Function is enabled after a copy job is completed.
Code Setting Default
oF Sleep Function is not enabled.
1 Sleep Function is enabled after 1 minute.
::
15
Sleep Function is enabled after 15 minutes.
::
120 Sleep Function is enabled after 120 minutes.
* Be sure to select the U3 User’s Choice Function (Disable Sleep Function) to completely disable this
function.
Page 49

2. User’s Choice Mode
U3: Disable Sleep Function
Completely disables the Sleep Function Mode.
Code Setting Default
1 Turns OFF the Disable Sleep Function Mode.
2 Enables the Disable Sleep Function Mode.
U4: Exposure Mode Priority
Allows you to select the optimal exposure mode or the Photo Mode from the Initial Mode.
Code Setting Default
1 Auto Exposure Mode
2Photo Mode
3 Manual Exposure Mode
U5: Auto Exposure Level Priority
The Auto Exposure Mode allows you to select from three exposure level settings.
Allows you to select the initial exposure level settings for the Auto Exposure Mode.
Code Setting Default
1Darker
0 Normal
-1 Lighter
4-5
Chapter 4
U6: Manual Exposure Level Priority
Allows you to select the initial exposure level settings for the Manual Exposure Mode and the Photo Mode.
Code Setting Default
4 Darker (Level 4)
3 Darker (Level 3)
2 Darker (Level 2)
1 Darker (Level 1)
0 Normal
-1 Lighter (Level 1)
-2 Lighter (Level 2)
-3 Lighter (Level 3)
-4 Lighter (Level 4)
* A higher darker density level indicates a darker exposure; a higher lighter density level indicates a
lighter exposure.
Using the User’s Choice Mode
Page 50

4-6
2. User’s Choice Mode
U7: Paper Size Select
Allows you to assign a particular paper size to the paper tray.
U8: Manual Feed Input Size
Allows you to specify a paper size when loading non-standard size paper into the Manual Bypass Tray.
<Paper Width>
Chapter 4
* After entering the Paper Width Setting, press the Start Key to enter the Paper Length Setting.
Code Setting Default
1 A4 R
2 A5 R
Code Setting Default
13 128–134 mm (5"–5-1/4")
14 135–144 mm (5-1/4"–5-3/4")
15 145–154 mm (5-3/4"–6")
16 155–164 mm (6"–6-1/2")
17 165–174 mm (6-1/2"–6-3/4")
18 175–184 mm (7"–7-1/4")
19 185–194 mm (7-1/4"–7-3/4")
20 195–204 mm (7-3/4"–8")
21 205–216 mm (8"–8-1/4")
Using the User’s Choice Mode
Page 51

<Paper Length>
Width
Length
C4007O108CA
Code Setting Default
18 182–184 mm (7-1/4")
19 185–194 mm (7-1/4"–7-3/4")
20 195–204 mm (7-3/4"–8")
21 205–214 mm (8"–8-1/2")
22 215–224 mm (8-1/2"–8-3/4")
23 225–234 mm (8-3/4"–9-1/4")
24 235–244 mm (9-1/4"–9-1/2")
25 245–254 mm (9-3/4"–10")
26 255–264 mm (10"–10-1/2")
27 265–274 mm (10-1/2"–10-3/4")
28 275–284 mm (10-3/4"–11-1/4")
29 285–294 mm (11-1/4"–11-1/2")
30 295–304 mm (11-1/2"–12")
31 305–314 mm (12"–12-1/4")
32 315–324 mm (12-1/2"–12-3/4")
33 325–334 mm (12-3/4"–13-1/4")
34 335–344 mm (13-1/4"–13-1/2")
35 345–356 mm (13-1/2"–13-3/4")
4-7
2. User’s Choice Mode
Chapter 4
Using the User’s Choice Mode
Page 52

4-8
2. User’s Choice Mode
U9: Density (Automatic Document Feeder)
Allows you to specify the density level when an original document is set into the Automatic Document
Feeder.
Code Setting Default
1 Recommended for general copying purposes (text documents).
2 Recommended when copying lighter or faded original
documents.
* Only displayed when the Automatic Document Feeder has been installed onto the machine.
U0: Function Mode
Allows you to specify the initial settings of the Function Mode.
Code Setting Default
F1 Non-Sort Mode
F2 2in1Non-Sort Mode
F3 Sort Mode
F4 2in1Sort Mode
* The “F2” settings can be selected when the 16MB/32MB memory board is installed.
The “F3” to “F4” settings can be selected when the 16MB/32 MB memory board and the Automatic
Document Feeder are installed.
UA: Tray Priority (for Copier Mode)
Chapter 4
Allows you to select the paper tray that will be prioritized for feeding paper to the machine when the
power is turned ON.
Code Setting Default
1 Paper Tray
2 Paper Feed Unit
3 Paper Tray with Auto Tray Switching enabled
4 Paper Feed Unit with Auto Tray Switching enabled
* Only displayed when the Paper Feed Unit has been installed onto the machine.
Ub: Image Density (for Printer Mode)
Allows you to set the print density when outputting documents from a personal computer.
Using the User’s Choice Mode
Code Setting Default
3 Darker (Level 3)
2 Darker (Level 2)
1 Darker (Level 1)
0 Normal
-1 Lighter (Level 1)
-2 Lighter (Level 2)
-3 Lighter (Level 3)
* A higher darker density level indicates a darker exposure; a higher lighter density level indicates a
lighter exposure.
* This function is displayed only when the Print Controller is installed.
Page 53

4-9
2. User’s Choice Mode
UC: Tray Priority (for Printer Mode)
Allows you to set the prioritized tray for feeding paper into the machine when outputting documents from
a personal computer.
Code Setting Default
1
Auto Select
2 Paper Tray
3 Paper Feed Unit
* This function is displayed only when the Print Controller is installed.
Chapter 4
Using the User’s Choice Mode
Page 54

4-10
1
C4007O072CA
2
C4007O139CA
U1 U2 U3 U4
U5 U6 U7 U8
U9 U0 UA Ub UC
C4007O070CA
3
C4007O077CA
4
C4007O071CA
5
C4007O078CA
2. User’s Choice Mode
How to select User’s Choice Settings
Press and hold the Exposure Control Key
(Lighter) for three seconds to enter the
User’s Choice Mode. “U1” will be displayed.
The User’s Choice Codes will rotate as
shown below when the Key and
Key are pressed.
Press the Start Key. The currently selected
User’s Choice Code will be displayed.
Display the desired User’s Choice Code
using the Key and the Key.
*For details on the various User’s Choice
Codes. ☞ p. 4-4
Chapter 4
Stop when the desired User’s Choice Code is
displayed.
*For details on the various User’s Choice
Codes. ☞ p. 4-4
Using the User’s Choice Mode
Press the Start Key to register the selected
setting.
*Repeat steps 2–5 to change additional
User’s Choice Functions if necessary.
Page 55

Press the Clear/Stop Key to return to the
6
C4007O073CA
previous status mode.
C/
*The User’s Choice Mode will be cancelled and
the previous status mode will be enabled.
4-11
2. User’s Choice Mode
Chapter 4
Using the User’s Choice Mode
Page 56

4-12
Chapter 4
Using the User’s Choice Mode
Page 57

Chapter 5
5-1
When an Indicator Lights Up
Chapter 5
When an Indicator Lights Up
Page 58

5-2
C4007O039CA
C4007O040CA
C4007O020CA
C4007O021CA
C4007O022CA
C4007O023CA
C4007O024CA
C4007O025CA
1. Display Messages
Error Indicator Cause Response
Toner Empty
The toner supply inside of the
supply unit has been depleted.
Replace the supply unit using the
procedure provided. ☞ p. 5-4
Paper Empty
Paper Misfeed
Chapter 5
The paper supply has been
depleted.
Paper has been misfed somewhere
within the machine.
Paper has been misfed somewhere
within the machine.
Paper has been misfed as it was
being output from the machine.
A paper misfeed has occurred at
the Automatic Document Feeder.
Replenish the paper supply using
the procedure provided.
☞
p. 5-6
Clear the paper misfeed using the
procedure provided.
☞
p. 5-8
Clear the paper misfeed using the
procedure provided.
pp. 5-9, 5-10
☞
Clear the paper misfeed using the
procedure provided.
p
p. 5-9, 5-10
☞
Clear the paper misfeed from the
Automatic Document Feeder using
the procedure provided.
☞
p. 5-11
Trouble
When an Indicator Lights Up
The memory capacity of the
machine has been exceeded.
Return the machine to normal
operating status by pressing any key
other than the Start Key. (Data will
be deleted from the memory.)
A paper size error has occurred. Return the machine to normal
operating status by pressing any key
other than the Start Key. Check the
paper size that is set in the machine
and change the User’s Choice
settings accordingly.
☞
p. 4-6
Page 59

1. Display Messages
C4007O026CA
C4007O027CA
C4007O028CA
C4007O029CA
Error Indicator Cause Response
An internal error has occurred. Reset the machine using the
procedure provided. ☞ p. 5-12
5-3
Cover Open
The Upper Half of the Machine is
open.
The Automatic Document Feeder
is open.
The Paper Misfeed Guide of the
Automatic Document Feeder is
open.
Make sure that the Upper Half of
the Machine is securely closed.
Make sure that the Automatic
Document Feeder is securely
closed.
Make sure that the Paper Misfeed
Guide of the Automatic Document
Feeder is securely closed.
Chapter 5
When an Indicator Lights Up
Page 60

5-4
C4007O038CA
NOTE
NOTE
CAUTION: HOT
1
C4007O109CA
2
C4007O110CA
3
4
C4007O111CA
5
C4007O112CA
2. The Toner Empty Indicator
The error indicator displayed here will appear
when the toner supply inside of the supply unit
has been depleted. The machine will not be
operable under these circumstances.
Follow the procedure provided below to replace
the supply unit when this indicator is displayed.
How to replace the supply unit
Be careful not to touch the areas marked
with bare hands.
Pull the Lock Release Lever and open the
Upper Half of Machine.
Chapter 5
Remove the supply unit.
Remove the new supply unit from its
protective packaging.
Holding it with both hands, shake it 4 or 5
times in the direction of the arrows to
distribute the toner evenly.
Install a new supply unit.
When an Indicator Lights Up
The metal parts within the machine are hot.
Avoid placing your hands in direct contact with
the metal fittings within the machine to avoid
injury.
Page 61

Useful Tip
The supply unit can easily be installed by
NOTE
C4007O113CA
6
C4007O114CA
aligning the front of the unit with the marker
provided within the machine.
Gently swing down and lock the Upper Half
of Machine. Then, close the Front Door.
5-5
2. The Toner Empty Indicator
Only use replacement supply unit that were
designed for use specifically with this machine.
Use of other supply unit may result in irregular
machine performance.
Chapter 5
When an Indicator Lights Up
Page 62

5-6
NOTE
NOTE
1
C4007O115CA
2
C4007O116CA
3
C4007O117CA
C4007O162CA
4
C4007O118CA
5
C4007O119CA
C4007O017CA
C4007O037CA
3. Paper Empty Indicator
The error indicator displayed here will appear
when the paper supply inside of the machine has
been depleted. The machine will not be operable
under these circumstances.
Follow the procedure provided below to replenish
the paper supply when this indicator is displayed.
How to replenish the paper supply
Paper Tray
Remove the Manual Bypass Tray.
The paper should be loaded no higher than the
(Max. Level Indicator).
Slide the Document Guide Plates up against
the edges of the paper stack.
Open the Document Guide Plates.
Chapter 5
Set the paper into the tray so that its front
side is facing up.
When an Indicator Lights Up
Replace the Manual Bypass Tray.
The following indicator will appear in the
display after replenishing the paper:
The copy job is still saved in the machine’s
memory.
Press the Start Key to resume operations.
Page 63

NOTE
NOTE
Paper Feed Unit
1
C4007O141CA
2
C4007O120CA
C4646U009CA
3
C4007O121CA
C4007O017CA
Slide out the Paper Drawer and press down
the Paper Lifting Plate.
5-7
3. Paper Empty Indicator
Gently slide the Paper Drawer back in.
Load the paper stack into the Paper Drawer
so that its front side faces down. Make sure
that the paper stack rests under the two
catches of the Paper Drawer.
The paper should be loaded no higher than the
(Max. Level Indicator) on the Edge Guide.
The following indicator will appear in the
display after replenishing the paper:
The copy job is still saved in the machine’s
memory.
Press the Start Key to resume operations.
Chapter 5
When an Indicator Lights Up
Page 64

5-8
NOTE
1
C4007O153CA
2
C4007O117CA
3
4
C4007O152CA
C4007O017CA
C4007O013CA
J Indicator
Example: The J2 indicator
PC Indicator
C4007O014CA
C4007O015CA
(Flashing alternately)
4. Paper Misfeed Indicators
If a paper misfeed occurs, the machine will stop
operating, the letter “J” will flash alternately with
a number or the “PC” indicator will flash.
Clearing paper misfeeds
PC
<Paper Tray>
Pull the Lock Release Lever to open and
close the Upper Half of the Machine.
Remove the Manual Bypass Tray and
remove the misfeed.
Chapter 5
Remove the paper and reset it back into the
Paper Tray.
When an Indicator Lights Up
The following indicator will appear in the
display after clearing the paper misfeed:
The copy job is still saved in the machine’s
memory.
Press the Start Key to resume operations.
Return the Manual Bypass Tray.
Page 65

<Paper Feed Unit>
NOTE
CAUTION : HOT
1
C4007O163CA
2
C4007O164CA
3
C4007O120CA
4
5
CAUTION: HOT
1
C4007O109CA
2
C4007O110CA
3
C4007O122CA
5-9
4. Paper Misfeed Indicators
J2/J3
Press in the tray stoppers, and then remove
the Paper Drawer.
Remove the misfed sheet of paper.
Be careful not to touch the areas marked
with bare hands.
Pull the Lock Release Lever and open the
Upper Half of Machine.
Remove the supply unit.
Make sure that the paper is correctly loaded
in the Paper Drawer.
Gently slide the Paper Drawer back in.
Pull the Lock Release Lever to open and
close the Upper Half of the Machine.
Chapter 5
The metal parts within the machine are hot.
Avoid placing your hands in direct contact with
the metal fittings within the machine to avoid
injury.
Open the Guide Plates.
When an Indicator Lights Up
Page 66

5-10
Useful Tip
NOTE
4
C4007O123CA
5
C4007O124CA
6
C4007O112CA
C4007O113CA
7
C4007O114CA
C4007O017CA
C4007O018CA C4007O019CA
4. Paper Misfeed Indicators
Remove the misfed sheet of paper.
Remove a misfed sheet of paper jammed in
the Transport Section by pulling it from the
bottom of the Fusing Unit.
Close the Upper Half of Machine.
The following indicator will appear in the
display after clearing the paper misfeed:
The copy job is still saved in the machine’s
memory.
Press the Start Key to resume operations.
Re-install the supply unit.
Chapter 5
The supply unit can easily be installed by
aligning the front of the unit with the marker
provided within the machine.
When an Indicator Lights Up
Load the number of pages that are displayed
into the Document Feed Tray again to
proceed with the copy job.
Page 67

NOTE
J8
1
C4007O125CA
2
C4007O126CA
3
C4007O149CA
4
5
C4007O127CA
C4007O018CA
Remove the original document from the
Document Feed Tray.
Open the Paper Misfeed Guide and gently
remove the paper misfeed.
5-11
4. Paper Misfeed Indicators
Place the original document that was
removed in step 1 into the Automatic
Document Feeder again.
The following indicator will appear in the
display after clearing the paper misfeed:
Open the Automatic Document Feeder and
gently remove the paper misfeed.
Close the paper misfeed guide.
Load the number of pages that are displayed
into the Automatic Document Feeder again
to proceed with the copy job.
Chapter 5
When an Indicator Lights Up
Page 68

5-12
NOTES
C4007O100CA
C4007O142CA
5. Trouble Indicator
If an error occurs within the machine, a “CXXXX” trouble code appears in the display.
How to reset the machine
Press the Power Switch to turn the machine off, then on again.
* Should a “CXXXX” trouble code continue to
appear in the display after resetting the
machine, please contact your Service Centre.
• When calling your Service Centre, give him or her the malfunction code shown on the Message
Display.
(Example) Malfunction Code: C0045
Chapter 5
• After calling your Service Centre, turn OFF the Power Switch and unplug the power cord.
When an Indicator Lights Up
Page 69

Chapter 6
6-1
Troubleshooting
Chapter 6
Troubleshooting
Page 70

6-2
1074O108
1074O109
1074O110
1139O166
1. Improving Image Quality
Symptom Possible Cause Action
The image is too light. A “lighter” exposure level for the
Auto Exposure Mode has been
specified.
A “lighter” exposure level for the
Manual Exposure Mode has been
specified.
The paper is damp. Replace the paper. ☞ p. 5-6
The image is too dark. A “darker” exposure level for the
Auto Exposure Mode has been
specified.
A “darker” exposure level for the
Manual Exposure Mode has been
specified.
The surface of the Original Glass
is dirty.
The original document is not
securely placed upon the Original
Glass.
The copy appears blurred. The paper is damp. Replace the paper. ☞ p. 5-6
Adjust the Auto Exposure Level
Priority of the User’s Choice
Mode. ☞ p. 4-5
Or, disable the Auto Exposure
Mode and adjust settings
manually through the Manual
Exposure Mode. ☞ p. 3-14
Adjust the exposure setting using
the Exposure Control Keys.
☞ pp. 3-14, 3-15
Adjust the Auto Exposure Level
Priority of the User’s Choice
Mode. ☞ p. 4-5
Or, disable the Auto Exposure
Mode and adjust settings
manually through the Manual
Exposure Mode. ☞ p. 3-14
Adjust the exposure setting using
the Exposure Control Keys.
☞ pp. 3-14, 3-15
Wipe the Original Glass clean
with a soft cloth. ☞ p. 7-4
Place the original document
securely on the Original Glass.
Chapter 6
The copy has unintended specks
or spots.
Troubleshooting
The surface of the Original Glass
is dirty.
Wipe the Original Glass clean
with a soft cloth. ☞ p. 7-4
The Original Pad is dirty. Wipe the Original Pad clean with
a soft cloth. ☞ p. 7-4
The original document is a
second-generation copy or an
Set a blank sheet of paper over the
original document. ☞ p. 3-5
OHP transparency (or other
translucent media), etc.
Images from the backside of a
double-sided document may be
reproduced when the front side is
Lower the exposure level setting
using the Exposure Control Key.
☞ pp. 3-14, 3-15
copied.
Page 71

Symptom Possible Cause Action
1139O169
1139O168
Unintended markings appear
along the edges of the copy.
The copy appears uneven or at a
tilt.
6-3
1. Improving Image Quality
The Original Pad is dirty. Wipe the Original Pad clean with
a soft cloth. ☞ p. 7-4
The selected paper size is larger
than the original document (zoom
ratio is set to full size 100%)
The original document is not
placed in the proper orientation
on the Original Glass (zoom ratio
Specify a paper size that is
appropriate to the original
document. ☞ p. 3-6
Place the original document
correctly on the Original Glass.
☞ p. 3-5
is set to full size 100%)
The zoom ratio setting does not
match the size of the original
Select a suitable zoom ratio
setting. ☞ pp. 3-12, 3-13
document.
The original document has not
been set properly.
Set the scale of the original
document properly. ☞ p. 3-5
Adjust the Document Guide
Plates properly when the original
document is placed into the
Automatic Document Feeder.
☞ p. 3-4
There is an obstruction on the
Original Glass (when using the
Automatic Document Feeder).
Remove the obstruction and wipe
the Original Glass clean with a
soft cloth. ☞ p. 7-4
Chapter 6
Troubleshooting
Page 72

6-4
2. Correcting Functional Problems
Symptom Check for: Actions
Nothing is displayed on the
Control Panel.
Nothing happens when the Start
Key is pressed.
The machine will not turn ON. Has the power cord been
The green light of Start Key will
not turn OFF immediately.
* If these procedures do not correct the problem, turn OFF the Power Switch, unplug the power cord
from the power outlet and contact your Service Centre.
Does the green light in the Start
Key turn on?
Has an Error or Trouble Indicator
become lit?
Has the machine just been turned
on?
unplugged?
The circuit breaker for the room
is open.
Do you turn off the Power Switch
in sleeping mode?
The Sleep Function has been
enabled. Press the Start Key to
disable this mode.
Follow the procedures provided.
☞ p. 5-2
The machine is warming up.
Please wait a few moments.
Plug in the power cord.
Close the circuit breaker.
In Sleeping mode, it will take 23
seconds to turn off the green light
of Start Key.
Chapter 6
Troubleshooting
Page 73

Chapter 7
7-1
Miscellaneous
Chapter 7
Miscellaneous
Page 74

7-2
1. Specifications
Machine
Model name Konica 7415
Type Desktop
Platen Type Stationary
Photoconductor OPC
Copying System Electrostatic Dry Powdered Image Transfer
Developing System Fine Micro-Toning System
Fusing System Lamp-Heater Roller
Document Reader CCD Line Sensor
Resolution 600 × 600dpi
Memory 8MB (Standard)
Original Documents Formats: Sheet, Book
Maximum Paper Size: 216 mm × 356 mm
Maximum Paper Weight: 3 kg
Paper Varieties Plain Paper (60–90 g/m
Recycled Paper
Special Paper and Media: OHP, Thick paper (90–163 g/m
* Special paper and media must be fed through the Manual Bypass Tray.
Paper Sizes Paper Tray: (Drawer)
A4 R, A5 R
Manual Bypass Tray:
A4 R, A5 R, B5 R, B6 R
Maximum Paper Size: 216 × 356 mm
Minimum Paper Size: 128 × 182 mm
Paper Feeding System Drawer: 250 Sheets
Manual Bypass Tray: 1 Sheet
Warm-up Time 28 seconds or less at ambient temperature of 23 °C
First Copy 11 seconds or less (A4 R)
Copy Speed A4 R: 15 copies/minute
Magnification Ratios Fixed Ratios
Full Size: 1 : 1 ±1.0 %
Enlargement Ratios: Metric 141 %, 115 %
Reduction Ratios: Metric 81 %, 70 %
Zoom Ratios:
From 50–199 % (in 1 % increments)
Continuous Copies 1–100 Sheets
Exposure Control Auto Exposure Mode
Photo Mode
Manual Exposure Mode
Power Requirements AC 220–240V 50/60 Hz
Power Consumption 715 W
Dimensions Width 562 mm × Depth 530 mm × Height 442 mm (Including Original Cover)
Chapter 7
Weight 28.1 kg
2
)
2
)
Miscellaneous
Page 75

Automatic Document Feeder
Original Documents Plain Paper (50–110 g/m2)
Original Sizes A4 R–A5 R
Capacity Up to 50 sheets
Dimensions Width 552 mm
Weight 4.0 kg
Depth 397 mm × Height 161 mm
×
Paper Feed Unit
7-3
1. Specifications
Paper Type
Paper Size
Capacity 500 Sheets
Dimensions Width 548 mm
Weight 5.5 kg
Plain Paper (60–90 g/m2)
A4 R
Depth 450 mm × Height 128 mm
×
Chapter 7
Miscellaneous
Page 76

7-4
C4007O128CA
1
2
C4007O129CA
1
2
C4007O131CA
1
2
C4007O130CA
2. Care and Maintenance
Cleaning
Outer Cover
Wipe the exterior surface of the machine clean
with a soft cloth.
Original Glass
Open the Original Cover.
Wipe the surface of the Original Glass clean
with a soft cloth.
Original Pad
Open the Original Cover.
Wipe the surface of the Original Pad clean
with a soft cloth dampened with a mild
home detergent.
Control Panel
Turn the main power switch OFF.
Wipe the surface of the Control Panel clean
with a soft cloth.
Chapter 7
Miscellaneous
Page 77

3. Paper Size and Zoom Ratio Table
Paper Size
Name Size (Metric) Size (Inch)
A 4 210 mm × 297 mm 8-1/4 × 11-3/4
A 5 148 mm × 210 mm 5-3/4 × 8-1/4
A 6 105 mm × 148 mm 4-1/4 × 5-3/4
B 5 182 mm × 257 mm 7-1/4 × 10
B 6 128 mm × 182 mm 5 × 7-1/4
Post Card 100 mm × 148 mm 4 × 5-3/4
Name Size (Inch) Size (Metric)
Legal 8-1/2 × 14 216 mm × 356 mm
Foolscap Government Legal 8-1/2 × 13 216 mm × 330 mm
Foolscap 8 × 13 203 mm × 330 mm
Foolscap Folio 8-1/4 × 13 210 mm × 330 mm
8-1/4 × 11-3/4 8-1/4 × 11-3/4 210 mm × 301 mm
Letter 8-1/2 × 11 216 mm × 279 mm
Government Letter 8 × 10⁻¹/2 203 mm × 267 mm
Quarto 8 × 10 203 mm × 254 mm
Statement Half Letter (Invoice) 5-1/2 × 8-1/2 140 mm × 216 mm
Zoom Ratio
7-5
Metric Areas Inch Areas
Original Size Paper Size Zoom Ratio Original Size Paper Size Zoom Ratio
A 4
210 × 297 mm
11-3/4
8-1/2 ×
A 5
148 × 210 mm
5-3/4 × 8-1/4
A 6
105 × 148 mm
5-3/4
4-1/4 ×
B 5
182 × 257 mm
7-1/4 ×
10
B 6
128 × 182 mm
7-1/4
5 ×
A 5 70 % Legal
B 5 86 %
A 6 70 %
B 6 86 %
A 4 141 %
B 5 122 %
8-1/2 ×
215.9 ×
8-1/2 ×
215.9 ×
14
355.6 mm
Letter
11
279.4 mm
A 5 141 % Half Letter
B 6 122 % Letter 129 %
(Invoice)
5-1/2 × 8-1/2
215.9 mm
A 5 81 %
139.7 ×
B 6 70 % Zoom Ratio = Copy Paper Size ÷ Original Size
A 4 115 % 1 (inch) = 25.4 mm
A 6 81 % 1 mm = 0.0394 (inch)
A 5 115 %
B 5 141 %
Letter 78 %
Half Letter
(Invoice)
Legal 154 %
64 %
Chapter 7
Miscellaneous
Page 78

7-6
3. Paper Size and Zoom Ratio Table
Chapter 7
Miscellaneous
Page 79

Appendix
A-1
Index
Appendix
Index
Page 80

A-2
Index
Numerics
2 in 1 Copying pp. 3-16, 3-17, 3-18
A
Add toner pp. 5-4, 5-5
Adding paper pp. 5-6, 5-7
Auto Exposure Level Priority pp. 4-4, 4-5
Auto Exposure Mode Key pp. 2-6, 3-14
Auto Panel Reset Function pp. 2-9, 4-4
Automatic Document Feeder p. 3-4
C
Caution Labels p. 1-3
Changing exposure levels p. 3-3
Changing zoom ratios p. 3-2
Changing paper trays p. 3-2
Cleaning p. 7-4
Clearing paper misfeeds pp. 5-8, 5-9, 5-10, 5-11
Counters p. 4-2
D
Density pp. 2-6, 3-14
Disable Sleep Function p. 4-5
Display indicators p. 5-2
Document Feed Tray Extender p. 2-3
O
OHP pp. 3-5, 3-7
Options p. 2-3
P
Paper sizes pp. 3-4, 3-7
Photo Mode p. 3-15
Placing original documents p. 3-4
R
Removing paper misfeeds pp. 5-8, 5-9, 5-10, 5-11
Replacing the supply unit pp. 5-4, 5-5
S
Sleep Function pp. 2-9, 4-4
Sorting pp. 3-16, 3-17, 3-18
Special paper settings p. 3-7
Supply unit pp. 2-5, 5-4, 5-5
T
Toner pp. 5-4, 5-5
Transparencies pp. 3-5, 3-7
Troubleshooting pp. 6-2, 6-3
E
Energy conservation p. 2-9
Exposure control p. 3-3
I
Image density p. 3-14
Image quality pp. 6-2, 6-3
L
Loading paper into the machine pp. 3-8, 3-9, 3-10,
4-6, 4-7
M
Multiple copies pp. 3-16, 3-17, 3-18
N
Appendix
Non-Sort pp. 2-8, 3-17
Index
U
User’s Choice pp. 4-4, 4-10
User’s Choice Codes p. 4-4
Z
Zoom Ratio pp. 2-6, 3-2, 3-12, 7-5
 Loading...