

Page 1

7216/7220
User Manual
Page 2

Contents
1 Introduction
1.1 We Want You to Be a Satisfied Customer ..................................1-1
1.2 Explanation of Manual Conventions ...........................................1-2
1.3 The Manual – Printed and Digital.................................................1-3
Manual (P r in te d Ve r si on )............................................................1-3
Extended Manual (Digital Version on CD-R)............. .. .. .............1-3
1.4 Explanation of Basic Concepts and Symbols............................1-4
Paper Fe ed i ng . ... .................................... ... .. ...............................1 -4
“Width ” and “L e ng t h ”......................................... .. ... .....................1-4
Paper Or ie nt a tio n .......................................................................1-5
1.5 E n e r gy S ta r ® ......... .. ... .............. ... .. ................................................1-6
What is an ENERGY STAR® Product?......................................1-6
1.6 Safety Information.........................................................................1-7
Warning and Precaut ion Symbols................ ............ ............ ......1-7
Meaning of Sym b o ls ...................................................................1-7
WARNING ..................................................................................1-8
CAUTION ...................................................................................1-9
Precautions for R o u tin e Use..... .............. ... .. .............................1-1 0
For users in count ri es subject to Class B regulati ons..... ..........1-10
For users in count ri es not subject to Class B regulations.........1-10
Laser Saf e ty .. .. ... ............................. .. ... ....................................1-1 1
Laser Safety Label....................................................................1-12
Ozone Release....................... .................... .. ............................1-12
2 Precautions
2.1 Installation Precautions................................................................2-1
Installation Site ...........................................................................2-1
Power Source .............................................................................2-1
Space Requirements................. ............ ...................... ............ ...2-2
2.2 Operation Precautions..................................................................2-3
Operating Environment...............................................................2-3
Proper Use .................................................................................2-3
Transporting the Machine...........................................................2-5
Care of Ma c hi ne S u pp li e s ... .. .....................................................2 -5
Storage of Copies............ .. ...................... ............ ...................... .2-5
7216/7220
Page 3

2.3 Le g a l R estrictio n s on C op y i ng... .. .. .............................. .. .. ........... 2-6
2.4 Components and Their Functions..............................................2-7
2.5 Pa r t N am e s a nd T heir Funct io n s ...... .. ..................................... .. . 2-9
Main Unit.................................................................................... 2-9
Inside of Main Unit ................................................................... 2-11
Document Feeder (Optional) ...................................................2-12
MSBT (Optional).............. .. ............ ........... .. ............ .. ...............2-13
PFU (Opt io n al ) ................................................................ ... .. .... 2-14
JobSep ar a to r (O p t io n al )........................ .. ... ............................. . 2-15
2.6 Names of Control Panel Parts and Their Functions................2-16
Control P an e l P a rts and Th e ir Fu n ct io n s .......... .. ... .............. ... . 2-16
Displa y Ind ications .......... .. ....................................................... 2-19
Adjusting the Angle of the Display [CD] ................................... 2-19
2.7 Power Supply.............................. .. .. ........................ ....................2-20
To turn on th e mac h in e ................................ .. ... ....................... 2-20
To turn off th e machine ............. .. ............... .. .. .......................... 2-20
Default S et tings..... .. ................................................................. 2-20
Auto Reset ............................................................................... 2-21
Power Save Mode.................................................................... 2-21
Auto Shut Off ........................................................................... 2-22
Queued Copy Jobs................................................. .. .......... .. ...2-22
3 Basic Operations
3.1 Ma k i ng C o p ie s ....... .. .. .................................................... .. .. ........... 3-1
To make a sim p le co p y ............. ....... .. ... ..................................... 3-1
3.2 Loading Paper............................................................................... 3-3
Loading Paper Into the 1st Tray............. .. ..................................3-4
Loading Paper Into the 2nd Tray ...............................................3-6
3.3 Loading the Document.................................................................3-8
With the Document Feeder................................................... .....3-8
Positioning sheet documents on the Original Glass .... .......... .. ..3-9
Positioning transparent documents on the Original Glass.......3-10
Positioning books on the Original Glas s................. .. .......... .. ...3-11
Loading docume nts of mixed sizes in the
Document Feeder [CD]............................................................3-11
3.4 Stopping/Restarting/Canceling a Copy Job............................. 3-12
3.5 Co n f ir m a ti on Mo d e [C D ] ........................................................ ... . 3-12
3.6 Re d u c in g Ele ct ricity Us ag e [C D]............................................... 3-12
7216/7220
Page 4

4 Useful Operations
4.1 Specifying a Zoom Setting [CD]............. .. ............ ........... ............4-1
4.2 Using the “Density Set” Function [CD].......................................4-1
4.3 Copying Onto Various Types of Media.......................................4-1
To copy onto OHP transparencies .............................................4-1
To copy onto label sheets [CD] ..................................................4-3
To copy onto envelopes (non-standard si ze) [CD]............. ........4-3
To copy onto postcards [CD]......................................................4-3
5 Before Making Copies
5.1 Paper ..............................................................................................5-1
Paper Ty pe s ......... ........ .. .. ................................................... ... .. ..5 -1
Paper Siz e s ............... ... .. ................................................... .. ... ....5-3
Paper Ca p aci t y ... ............................. .. ... ......................................5 -4
Unsuita ble Paper .. ... ........................................... ... .. ...................5-5
5.2 Print Area.......................................................................................5-6
5.3 P a p e r S to r a ge... .. ... ............................................ .. .. ........................5 -6
5.4 Making C op ie s on Man u a ll y F e d Pa p er .......................................5 -7
Paper That Can Be Fed Manually..............................................5-7
Adjusting the MSBT....................................................................5-8
Loading Plain Paper In to th e Bypass Trays .. .............................5-9
Loading Postcards Into the Bypass Trays [CD]..................... .. .5-10
Loading Envelopes Into the Bypass Trays [ CD].......................5-10
Loading OHP Transparencies Into the Bypass Trays .... ..........5-10
Loading Label Sheet s Into the Bypass Trays [CD]...................5-10
Copying Onto Manuall y Fed Paper by Manual Bypass........... .5-11
Copying Onto Manuall y Fed Paper by MSBT................ ...........5-14
5.5 Selecting the Paper Source........................................................5-17
To make copies using the APS function...................................5-17
To copy with a manually selected paper size...........................5-18
To load spec ia l p ap e r int o th e 1st Tr a y [CD ] ............................5-1 8
Automa tic a lly Select in g the Pap e r S o u rc e [CD] .......................5 -1 8
Order for A u to m a ti ca ll y S w it ch i ng P ape r D ra w e r s [CD ] ...... ... ..5 -1 8
5.6 Original Documents....................................................................5-19
Using the Document Feeder............. .. ...................... ............ ....5-19
Docume n t T ype s .. ... .................................................................5-1 9
Documents of Uniform Sizes....................................................5-20
Mixed Width Document Sizes (DF-321) ...................................5-20
Precautions Co nc e rn i ng th e Doc uments ... .. ...................... .. ... ..5 -2 1
7216/7220
Page 5

5.7 Specifying a Zoom Setting............... ............ .. ............ ............ ... 5-22
Zoom Set ti ng s..... ..................................................................... 5-22
To make copies using the “AUTO” zoom setting ..................... 5-23
To make cop ie s us in g a fix e d z oom s et ti ng ............................. 5-24
To make cop ie s us in g a spe ci fic zoom se t tin g.. .. ..................... 5-25
To make cop ie s us in g the “X /Y ZO O M ” function [CD ] .... ... ...... 5-25
5.8 Specifying the Copy Density (“Density Set” Function)..........5-26
To make copies after specifying a copy density ......................5-27
5.9 In te rr u p ting Cop y Jo bs [C D] ...... .............. ... .. ............................ 5-27
6 Advanced Copy Operations
6.1 Si n gl e -S i de d C opies [CD] ........................................ .. ... ............... 6-1
To make copies using the “2in1” (or “4in1”)
copy function [CD]...................................................................... 6-1
To make copies using the “DUAL PAGE” fun ction [CD] ............6-1
6.2 Double-Sided Copies ................ ...................................................6-1
Double-sid ed copying is not possible under the following
conditions:..................................................................................6-3
To make double-sided copies using the Ori ginal Glass.............6-3
To make double-sided copies using the Document Feeder.......6-4
6.3 Output Copies (“Sort” and “Group” Functions)........................6-5
Notes on Using the “Sort” and “Group” Functions ................ .....6-6
Shift Sorting ....................................... ... .. ................................... 6-6
Crisscross Sorting......................................................................6-6
Shift Grouping............................................................................6-7
Crisscross Grouping ..................................................................6-7
Specif yi ng O u tp u t fu n ct io n .......... .. ... .................................... ... .. . 6-8
6.4 Erasing Sections of Copies [CD] ................................................ 6-9
6.5 Reverse Image Copying [CD].................... ............ ......................6-9
6.6 Making Copies for Filing (“IMAGE SHIFT” function) [CD]........6-9
6.7 Pr o g ra mmed Copy J ob s [CD ] . ... ........................................... ... .. . 6-9
6.8 ID Numbers [CD]........................................................................... 6-9
7 Utility Mode – Copy Functions [CD]
8 Error Messages
8.1 When the Message “TONER EMPTY” Appears......... .. .. ............8-1
To replac e th e to ne r bo tt le ................. ... .. ................................... 8-2
7216/7220
Page 6

8.2 When the Message “PAPER JAM” Appears.............. .. ............ .. .8-4
To clear a paper misfeed in the Duplex................ .......... .. ..........8-4
To clear a paper misfeed in the main unit or 1st Tray................8-5
To clear a paper misfeed in the PFU........ .. .......... .. .......... .. ........8-8
To clear a paper misfeed in the MSBT..................... ............ ......8-9
8.3 When the Message “ORIGINAL DOC.JAM” Appears...............8-11
To clear a misfeed in the ADF (DF- 218)...................................8-11
To clear a misfeed in the RADF (DF-321)................................8-13
8.4 Main Error Messages and Their Remedies............... ................8-15
9 Troubleshooting
9.1 When Incorrect Copies Are Produced........................................9-1
9.2 When Co py i n g Is N ot Pe r fo r m e d Cor re c tly................................9-3
10 Appendix
10.1 Specifications..............................................................................10-1
Main Unit 7216/72 20.................................. ..............................10-1
RADF DF-321...........................................................................10-2
Mixed Width Document Sizes (DF-321) ...................................10-3
ADF DF-2 1 8 .... ........................................................... .. ... .........1 0 -3
PFU PF-3 2 1..... ... .. ...................... ... .. .........................................10-4
Shifter IS-101............................................................................10-4
JobSep ar a to r IT - 10 3..... .. ...................... .. ... ...............................1 0 -4
MSBT MT-103 ..........................................................................10-5
10.2 Care of the Machine....................................................................10-6
Cleaning ...................................................................................10-6
Housing ....................................................................................10-6
Original Glass...........................................................................10-6
Docume n t P ad........................................................................ ..1 0 -6
Control P an e l..................................................................... .. ... ..10 -7
10.3 Function Combination Table [CD]............... ............ .. ................10-7
10.4 Paper Size and Zoom Ratio Tables [CD].......... ............ .. ...........10-7
11 Index
7216/7220
Page 7

7216/7220
Page 8

Introduction
1 Introduction
1.1 We Want You to Be a Satisfied Customer
Thank you for choosing this machine.
This User Manual describes the functions, operating procedures,
precautions, and basi c trou bleshoo ti ng for this mac hine. Befo re usi ng the
machine, be sure to read the User Manual thoroughly in order to ensure
that you use it efficiently. After you have gone through the manual, stor e
it in the holder on the machi ne and keep it handy at all times.
Note that some of t he illustr ations of th e machine us ed in the User M anual
may be different from what you actually see on your machi ne.
1
7216/7220 1-1
Page 9
1
1.2 Explanation of Manual Conv ent i on s
The marks and text formats used in this manual are described below.
WARNING
Failure to observe instru ctions highlighted in this manner may resul t
in fatal or critical injuries.
§ Observe all warnings in order to ensure safe use of the copier.
CAUTION
Failure to observe instru ctions highlighted in this manner may resul t
in serious injuries or pr operty damage.
§ Observe all cautions in order to ensure safe use of the copier.
Note*
(*May also appear as “Important” or “Tip”)
Text highlighted in thi s manner contai ns useful info rmatio n and tips to
ensure safe use of the machi ne.
Introduction
1 The number 1 as formatted here
indicates the first step of a
sequence of actions .
An illustration inserted
2 Subsequent numbers as formatted
here indicate su bsequent steps of a
sequence of actions .
Text fo rma t te d in th is st yl e
?
provides additional assistance.
§ Text formatted in this style descri bes the acti on that will ens ure the
desired results are achieved.
[Combination] key
The names of keys on the control panel are written as shown above.
1-2 7216/7220
here shows what operations
must be perfo r m ed .
Page 10

Introduction
1.3 The Manual – Printed and Digital
Today’s advanced copier systems offer a wide variety of very different
functions. A copier system can be set up for very spec if ic requirements
and adapted for person al copying needs. Generall y, it is experienced
users or syst em admini strators who set up the copier system for individual
needs. One s ingle manual that included all possibl e information, much of
it only relev ant for t he experi enced user or system administrat or, would b e
much too large and complex for every day use. Thi s is why we suppl y two
manuals. You can decide fo r yourself which manual meet s your needs.
Manual (Printed Version)
The printed version of the manual contains all the information that you
need for everyday operation of the copier syst em . You should keep this
manual near the copier system so you can consult it any time.
It contains a lot of useful information, such as:
G Loading originals correctly and using the document feeder.
G Setting a Copy Mode.
G Making copies lighter and darker .
Extended Manual (Digital Version on CD-R)
The extended version of the manual is supplied as a pdf file and is
specifically recommended for exper ienced users and system
administrators.
This version contains – as well as all the informati on in the printed
version
– additional informati on, such as:
G Changing Basic Set ti ngs.
G Using auxil iar y functions.
G Setting up Copy Track and Adm inistrator Numbers.
G Storing and calling individual paper sizes and Zoom Ratios.
1
Is Acrobat Reader already installed?
You will need Acrobat Reader to view t he extended manual. A version
of Acrobat Reader is inc luded on the CD-R that yo u can instal l on your
computer if necessary.
7216/7220 1-3
Page 11
1
Introduction
1.4 Explanation of Basic Concepts and Symbols
The use of words and symbols in this manu al are explained below.
Paper Feeding
During printing, paper is supplied from the right side of the machine and
fed into the output tray on top or the output option at the left wit h the
printed surface of t he page facing down. The paper feed di rection is
shown by the arrows in the diagram below.
“Width” and “Length”
Whenever paper dimen sions are
mentioned in this m anual, the first val ue
always refers to the wid th of the paper
(shown as “X” in the i llustrat ion) and the
second to the length (shown as “Y”).
1-4 7216/7220
Page 12
Introduction
Paper Orientation
Lengthwise ( )
If the width (X) of the paper is shorter
than the length (Y), the paper has a
vertical or por trai t ori entat ion, i ndica ted
by either “L” or
Crosswise ( )
If the width (X) of the paper is longer
than the length (Y), the paper has a
horizontal or landscape orientation,
indicated by either “C” or
1
.
.
7216/7220 1-5
Page 13

1
1.5 Energy Star®
Introduction
As an ENERGY STAR® Partner, we have determined that this machine
meets the ENERGY STAR
As an ENERGY STAR® Partner, we have determined that this machine
meets the ENERGY STAR
What is an ENERGY STAR® Product?
An ENERGY STAR® product has a special feature that allows it to
automatically swi tch to a “low-p ower mode” af ter a per iod of inac tivi ty. An
ENERGY STAR
on utilit y bill s an d h el p s pro te c t th e envi ro n m en t.
®
product uses energy more efficient ly, saves you m oney
®
Guidelines for energy efficiency .
®
Guidelines for energy efficiency .
1-6 7216/7220
Page 14

Introduction
1.6 Safety Information
This section contains detailed inst ructions on the operat ion and
maintenance of t his mac hine. To achiev e o ptimum uti lity of this devic e, al l
operators shoul d caref ully r ead and fol low the i nstruc tions in this man ual.
Please keep this manual in a handy place near the machine.
1
Please read the next section before using this device. It contains important information
related to user safety and preventing equipment problems.
Make sure you observe all of the precautions listed in this manual.
* Ver07
Please note that some parts of the contents of this section may not correspond with the
purchased product.
Warning and Precaution Symbols
WARNING:
Ignoring this warning could cause serious injury or even death.
CAUTION:
Meaning of Symbols
A triangle indicates a danger against which you should take precaution.
A diagonal line indicates a prohibited course of action.
A black circle indicates an imperative course of action.
Ignoring this caution could cause injury or damage to property.
This symbol warns against cause burns.
This symbol warns against dismantling the device.
This symbol indicates you must unplug the device.
7216/7220 1-7
Page 15
1
WARNING
Introduction
• Do not modify this product, as a fire, electrical shock, or breakdown could
result. If the product employs a laser, the laser beam source could cause
blindness.
• Do not attempt to remove the covers and panels which have been fixed to
the product. Some products have a high-voltage part or a laser beam
source inside that could cause an electrical shock or blindness.
• Use only the power cord supplied in the package. If a power cord is not
supplied, only use the power cord and plug that is specified in POWER
CORD INSTRUCTION. Failure to use this cord could result in a fire or
electrical shock.
• Use the power cord supplied in the package only for this machine and
NEVER use it for any other product. Failure to observe this precaution
could result in a fire or electrical shock.
• Use only the specified power source voltage. Failure to do that could result
in a fire or electrical shock.
• Do not use a multiple outlet adapter to connect any other appliances or
machines. Use of a power outlet for more than the marked current value
could result in a fire or electrical shock.
Do not unplug and plug in the power cord with a wet hand, as an electrical
shock could result.
Plug the power cord all the way into the power outlet. Failure to do this could
result in a fire or electrical shock.
• Do not scratch, abrade, place a heavy object on, heat, twist, bend, pull on,
or damage the power cord. Use of a damaged power cord (exposed core
wire, broken wire, etc.) could result in a fire or breakdown.
Should any of these conditions be found, immediately turn OFF the power
switch, unplug the power cord from the power outlet, and then call your
authorized service representative.
• Do not use an extension cord, in principle. Use of an extension cord could
cause a fire or electrical shock. Contact your authorized service
representative if an extension cord is required.
Do not place a flower vase or other container that contains water, or metal
clips or other small metallic objects on this product. Spilled water or metallic
objects dropped inside the product could result in a fire, electrical shock, or
breakdown.
Should a piece of metal, water, or any other similar foreign matter get inside
the product, immediately turn OFF the power switch, unplug the power cord
from the power outlet, and then call your authorized service representative.
• Do not keep using this product, if this product becomes inordinately hot or
emits smoke, or unusual odor or noise. Immediately turn OFF the power
switch, unplug the power cord from the power outlet, and then call your
authorized service representative. If you keep on using it as is, a fire or
electrical shock could result.
• Do not keep using this product, if this product has been dropped or its cover
damaged. Immediately turn OFF the power switch, unplug the power cord
from the power outlet, and then call your authorized service representative.
If you keep on using it as is, a fire or electrical shock could result.
Do not throw the toner bottle or toner into an open flame. The hot toner may
scatter and cause burns or other damage.
1-8 7216/7220
Page 16
Introduction
CAUTION
Connect the power cord to an electrical outlet that is equipped with a
grounding terminal.
• Do not use flammable sprays, liquids, or gases near this product, as a fire
could result.
• Do not leave a toner unit or drum unit in a place within easy reach of
children.
Licking or ingesting any of these things could injure your health.
• Do not let any object plug the ventilation holes of this product. Heat could
accumulate inside the product, resulting in a fire or malfunction.
• Do not install this product at a site that is exposed to direct sunlight, or near
an air conditioner or heating apparatus. The resultant temperature changes
inside the product could cause a malfunction, fire, or electrical shock.
• Do not place the product in a dusty place, or a site exposed to soot or
steam, near a kitchen table, bath, or a humidifier. A fire, electrical shock, or
breakdown could result.
• Do not place this product on an unstable or tilted bench, or in a location
subject to a lot of vibration and shock. It could drop or fall, causing personal
injury or mechanical breakdown.
• After installing this product, mount it on a secure base. If the unit moves or
falls, it may cause personal injury.
• Do not store toner units and PC drum units near a floppy disk or watch that
are susceptible to magnetism. They could cause these products to
malfunction.
The inside of this product has areas subject to high temperature, which may
cause burns. When checking the inside of the unit for malfunctions such as a
paper misfeed, do not touch the locations (around the fusing unit, etc.) which
are indicated by a “CAUTION HOT” caution label.
Do not place any objects around the power plug as the power plug may be
difficult to pull out when an emergency occurs.
1
The socket-outlet shall be installed near the machine and shall be easily
accessible as the power plug may be difficult to pull out when an emergency
occurs.
• Always use this product in a well ventilated location. Operating the product
in a poorly ventilated room for an extended period of time could injure your
health. Ventilate the room at regular intervals.
• Whenever moving this product, be sure to disconnect the power cord and
other cables. Failure to do this could damage the cord or cable, resulting in
a fire, electrical shock, or breakdown.
• When moving this product, always hold it by the locations specified in the
User’s Guide or other documents. If the unit falls it may cause severe
personal injury. The product may also be damaged or malfunction.
• Remove the power plug from the outlet more than one time a year and
clean the area between the plug terminals. Dust that accumulates between
the plug terminals may cause a fire.
• When unplugging the power cord, be sure to hold onto the plug. Pulling on
the power cord could damage the cord, resulting in a fire or electrical shock.
7216/7220 1-9
Page 17
1
Precautions for Routine Use
• Do not store toner units, PC drum units, and other supplies and
consumables in a place subject to direct sunlight and high temperature and
humidity, as poor image quality and malfunction could result.
• Do not attempt to replace the toner unit and PC drum unit in a place
exposed to direct sunlight. If the PC drum is exposed to intense light, poor
image quality could result.
• Do not unpack a toner unit or PC drum unit until the very time of use. Do
not leave an unpacked unit standing. Install it immediately or poor image
quality could result.
• Do not keep toner units and PC drum units in an upright position or upside
down, as poor image quality could result.
• Do not throw or drop a toner unit or PC drum unit as poor image quality
could result.
• Do not use this product in an area where ammonia or other gases or
chemicals are present. Failure to do so may shorten the service life of the
product, cause damage or decrease performance.
• Do not use this product in an environment with a temperature outside the
range specified in the User’s Guide, as a breakdown or malfunction could
result.
• Do not attempt to feed stapled paper, carbon paper or aluminum foil
through this product, as a malfunction or fire could result.
Do not touch or scratch the surface of the toner unit developing roller and the
PC drum, as poor image quality could result.
Use the supplies and consumables recommended by the dealer. Use of any
supply or consumable not recommended could result in poor image quality
and breakdown.
Introduction
For users in countries subject to Clas s B regula tions
This device must be used with shielded interface cables. The use of non-shielded cable is
likely to result in interference with radio communications and is prohibited under CISPR 22
rules and local rules.
For users in countries not subje ct to Class B regulations
WARNING
This is a Class A product. In a domestic environment this product may cause radio
interference in which case the user may be required to take adequate measures.
This device must be used with shielded interface cables. The use of non-shielded cable is
likely to result in interference with radio communications and is prohibited under CISPR 22
rules and local rules.
1-10 7216/7220
Page 18
Introduction
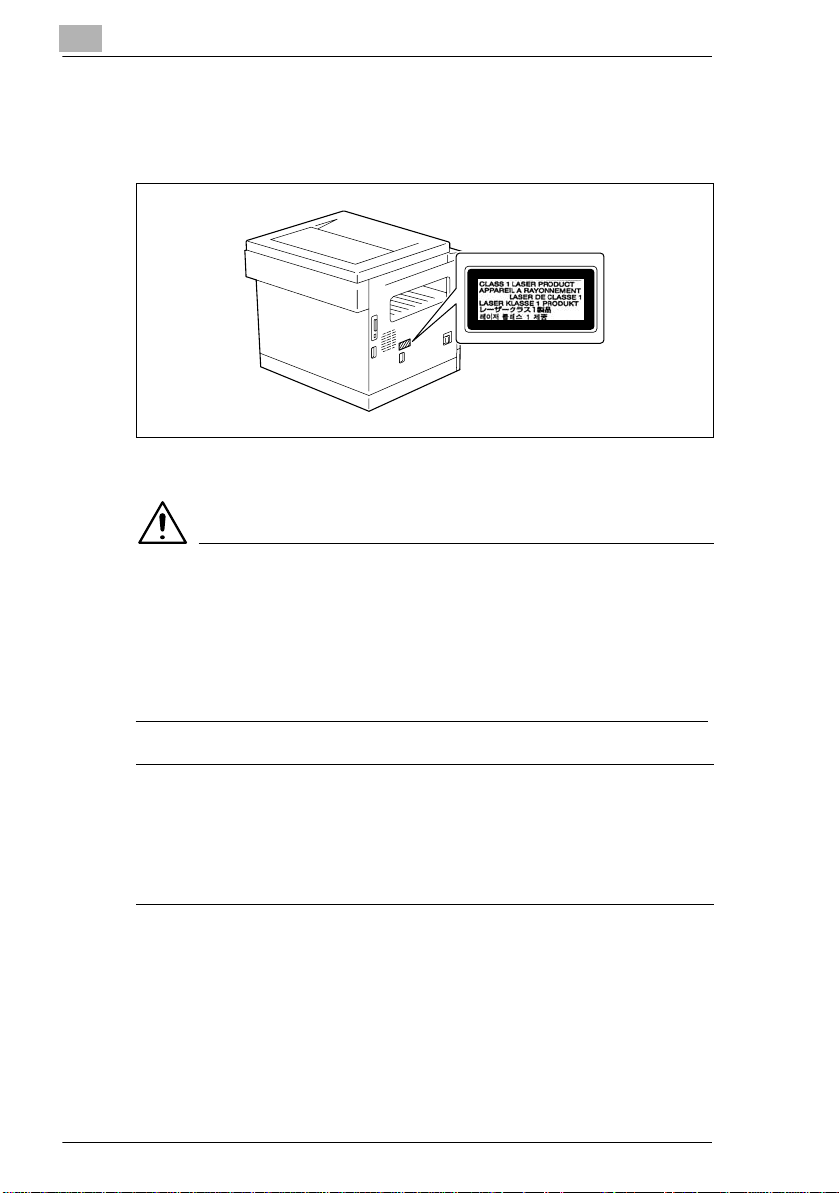
Laser Safety
This is a digital machine which operates using a lase r. There is no
possibility of danger from the laser provided the machine is operated
according to the instructions in this m anual.
Since radiation emit ted by the laser is completel y confined within
protective hou sing, the laser beam cannot escape from the machine
during any phase of user operation.
This machine is certif ied as a Class 1 laser product : Thi s m eans the
machine does not produce hazardous laser radi ation.
Interna l Laser R a diation
Maximum Average Radiati on Power: 6. 32 µW at the lase r apertu re of the
print head unit.
Wavelength: 770-795 nm
This product empl oys a Class 3b laser diode that emits an invi sible laser
beam.
The laser diode and the sca nning polygon mirror are incorporated in the
print head unit.
The print head unit is NOT A FIELD SERVICE ITEM:
Therefore, the print head unit should not be opened under any
circumstances.
1
Laser Aperture of the
Print Head
7216/7220 1-11
Print Head Unit
Page 19
1
Introduction
Laser Safety Label
A laser safety label is attached to the outside of the machine as shown
below.
Ozone Release
CAUTION
Locate the Machine in a Well Ventil ated Room
§ A negligible amount of oz one is gener ated duri ng normal op erati on of
this machine. An un pleasant odor may, however , be cre ated in po orly
ventilated rooms during extensive machine operations. For a
comfortable, healthy, and safe operating environment, it is
recommended that the roo m be well ventilated.
REMARQUE
= Placer l’appareil dans une pièce largement ventilée =
Une quantité d’ozone négligable est dégagée pendant le fonctionnement de l’appareil quand
celui-ci est utilisé normalement. Cependant, une odeur désagréable peut être ressentie dans
les pièces dont l’aération est insuffisante et lorsque une utilisation prolongée de l’appareil est
effectuée. Pour avoir la certitude de travailler dans un environnement réunissant des
conditions de confort, santé et de sécurité, il est préférable de bien aérer la pièce ou se
trouve l’appareil.
1-12 7216/7220
Page 20

Precautions
2 Precautions
2.1 Installation Precautions
Installation Site
To ensure utmost safet y and prevent possible malf unctions, insta ll the
machine in a location that meets the following req uirements.
- A location away f rom curtains, etc. that may catch fire and bur n easily
- A location that is not exp osed to water or other liquids
- A location free from dir ect sunlight
- A location out of the direct airflow of an air conditioner or heater, and
not exposed to extremely high or low temperature s
- A well-ventilated location
- A location that is not exp osed to high humidity
- A location that is not ext remely dusty
- A location not subjected to undue vibrations
- A stable and level location
- A location where ammonia or other organic gases are not gen erated
- A location that does not put the opera tor in the d irect ai rflow of exh aust
from the machine
- A location that is not nea r any kind of heating devices
2
Power Source
The power source requirem ents are as follows.
G Voltage fluctuation: Maximum ±10 %
G Frequency fluctuation: Maximum ±3 Hz
H Use a power source with as l it tl e voltage or frequency fluctuations as
possible.
7216/7220 2-1
Page 21
2
Precautions
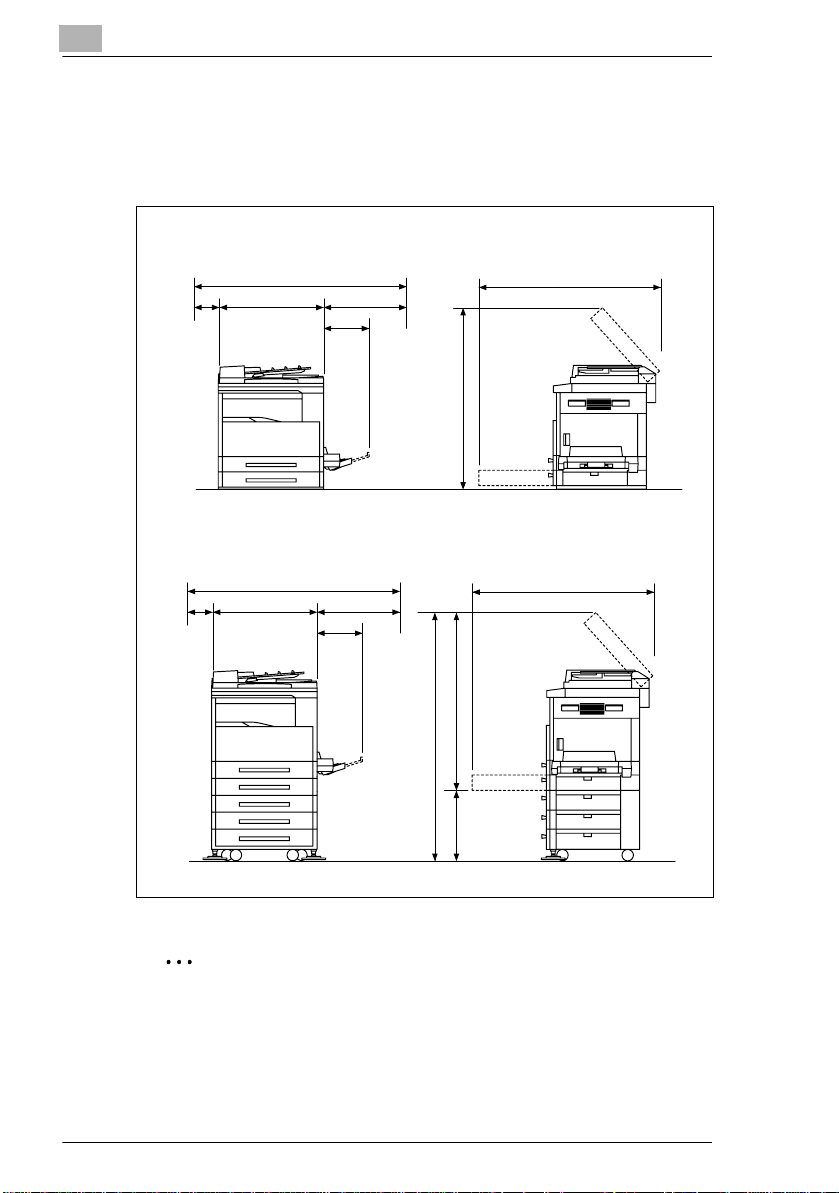
Space Requirements
To ensure easy machine operation, supply replacement, and
maintenance, adhere to the recommended spac e requi rements detailed
below.
7216
*100
7220
*100
599
599
1099
1099
1024
**400
356
995
1069
**400
356
1100
1475
375
Unit: mm
Note
Since there is a ventilat ion duct on the lef t side of th e machine, be sure
to allow a clearance of *100 mm or more on the left side.
Allow a clearance of **400 mm or more on the right side of the
machine so that the side cover can be opened.
2-2 7216/7220
Page 22
Precautions
2.2 Operation Precautions
Operating Environment
The environmental requir ements for correct operat ion of th e machine are
as follows.
G Temperature: 10°C to 30°C with fluctuations of no more than 10°C
within an hour
G Humidity: 15% to 85% with f luctuations of no more than 10% within an
hour
Proper Use
To ensure the optimum perf ormance of the machine, fol low the
precautions listed below.
- Never place heavy objects on the ori gi nal gl ass or s ubj ect i t to sho cks.
- Never open any machine doo rs or turn off the machine while it is
making copies; othe rwise, a paper jam will occur.
- Never bring any magneti zed object or use flammable sprays or liquids
near the machine.
Always make sure that the power plug is completel y plugged into the
electrical outlet.
- Always make sure that the machine’s power plug is visi ble and not
hidden by the machine.
Always unplug the machine from the electrical outlet if the unit is not
to be used for a long period of time.
Always provide good ventilation when making a large num ber of
continuous copies.
2
CAUTION
If the ventilation duct on the left side of the mach ine i s blocked, the
inside of the machine will accumulate heat, resulting in a
malfunction or fire.
§ Be sure to allow a clearance of 100 mm or more on the l eft si de of the
machine for the ventilation duct.
7216/7220 2-3
Page 23

2
Precautions
CAUTION
The area around the fusing unit is extremely hot.
§ Be careful not to touch any par ts around the fusing unit, other than
those indicated in this manual , in or der to red uce the ri sk of burn s. Be
especially careful not to touch parts marked wi th warning labels, and
their surrounding areas.
§ If you get bur nt, immediately cool the ski n under cold water, and then
seek professional medical advice.
2-4 7216/7220
Page 24
Precautions
Transporting the Machine
If you need to transport the machine over a long distance, consult your
technical representative.
Care of Machine Supplies
Use the followi ng p recauti ons when hand ling the m achine suppli es (toner
bottle, paper, etc.).
Store the supplies in a location th at meets the follo wing requi rements.
Store in a sealed pl ast ic bag in a coo l, dar k pl ace paper that has be en
- Only use toner that has bee n man ufactured specifically for this
- Keep all supplies out of the reach of children.
CAUTION
Precautions for handling toner:
§ Be careful not to spill toner inside the copier or get ton er on your
§ If your hands become soiled with toner, immediately wash th em with
§ If toner gets i n y our eye s, i mmediat ely flush them with water, and then
2
Free from direct sunli ght
Away from any heating appar atus
Not subjected to high humidi ty
Not extremely dusty
removed from its wrapper but not loaded into the machine.
machine. Never use other types of toner.
clothes or hands.
soap and water.
seek professional medical advice.
Storage of Copies
Copies that are to be kept for a long tim e should be kept where they
are not exposed to light i n order to prevent them from fading.
- Adhesive that contains solvent (e.g., spray glue) may dissolve the
toner on copies.
7216/7220 2-5
Page 25

2
2.3 Legal Restrictions on Copying
Certain types of documents must never be copied with the purpose or
intent to pass copies of such documents off as the originals.
The following is not a complete list, bu t i s meant to be used as a guide to
responsible cop ying.
Financial Instruments
G Personal checks
G Tra veler’s checks
G Money or ders
G Certi ficates of deposit
G Bonds or other certificates of indebtedness
G Stock certificates
Legal Documents
G Food stam ps
G Postage stamps (canceled or uncanceled)
G Checks or drafts drawn by government agencies
G Internal revenue stamps (canceled or uncanceled)
G Passports
G Immigration papers
G Motor vehicle licenses and t itles
G House and property titles and deeds
General
G Identification ca rds, badges, or insign ias
G Copyrighted works without permission of the copyright owner
In addition, it is prohibited under any ci rcumstances to copy domestic or
foreign currencies, or works of art without permission of the copyright
owner.
When in doubt about the nature of a documen t, consult with legal counsel .
Precautions
2-6 7216/7220
Page 26
Precautions
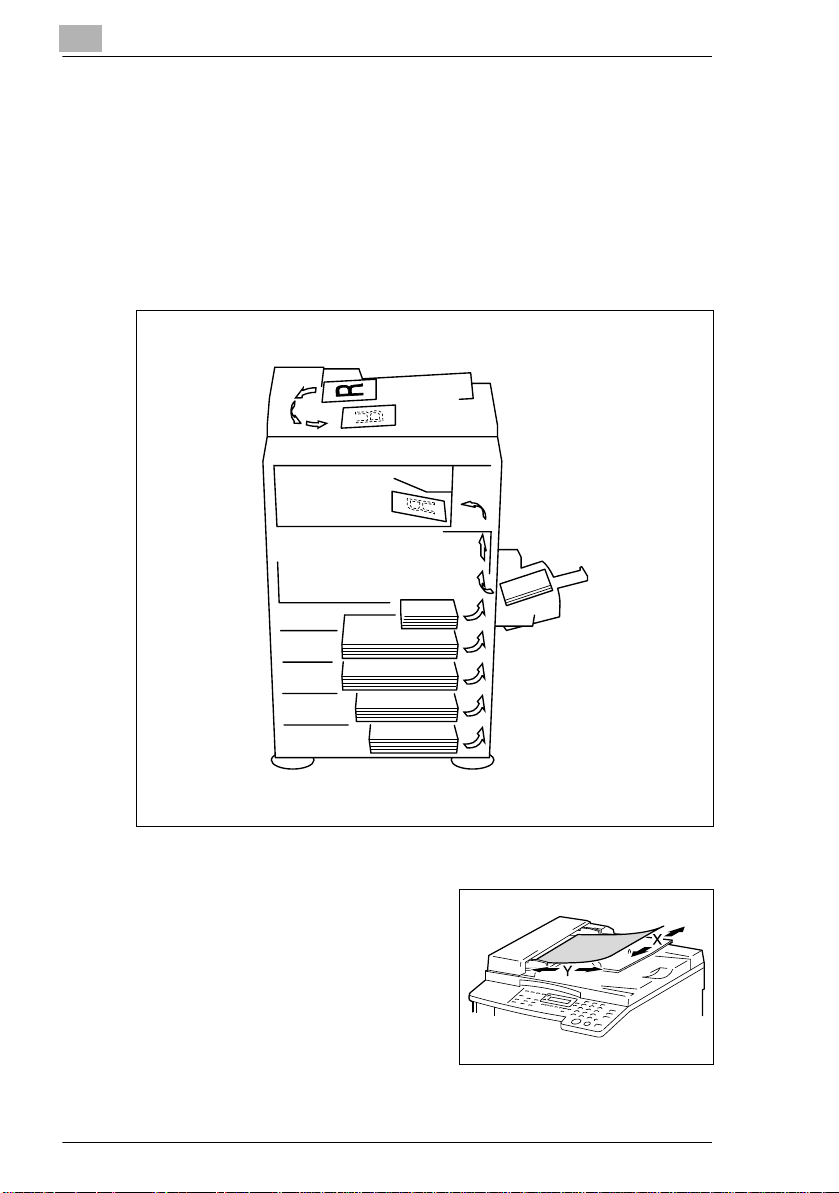
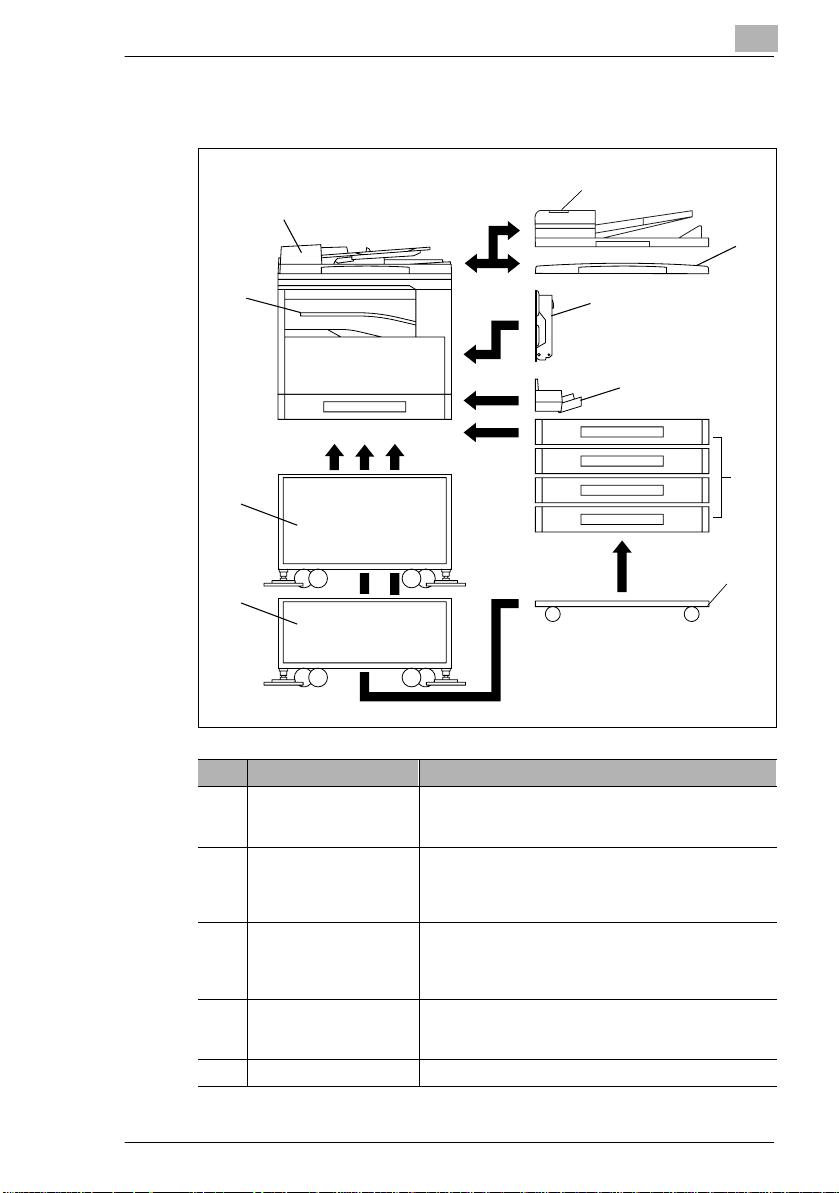
2.4 Components and Their Functions
1
2
2
3
10
4
5
6
9
7
8
No. Part Name Description
1 ADF DF-218 (optional) Automatically feeds one document sheet at a time for
2 RADF DF-321 (Option for
the 7220 only)
3 Platen Cover CV-118
(optional)
4 Duplex AD-321
(Option for the 7220 only)
5 MSBT MT-103 (optional) Can be loaded with 100 sheets of paper.
scanning.
Also referred to as the “ADF” throughout the manual.
Automatically feeds one document sheet at a time for
scanning, and automatically turns over double-sided
documents for scanning.
Also referred to as the “RADF” throughout the manual.
Presses down on the loaded document to keep it in
place.
Also referred to as the “Platen Cover” throughout the
manual.
Automatically turns the pages over, and prints on both
sides. Also referred to as the “Duplex” throughout the
manual.
7216/7220 2-7
Page 27

2
Precautions
No. Part Name Description
6 PFU PF-321(optional:
7216 Up to one, 7220 Up
to four)
7 Desk (Mall) DK-111
(Option for the 7220 only)
8 Desk (Mid) DK-112
(Option for the 7220 only)
9 Desk (Large) DK-113
(option)
10 JobSeparator IT-103
(optional)
11 Copier Memory
32 MB/64 MB
MU-418/MU-419
(optional)*
12 Printer Controller
(optional)* IP 418
13 Internet Fax Kit IF-118
(optional)*
14 NIC KN-419 (optional)* By installing the NIC KN-419 into this machine, network
15 Shifter IS-101 (optional)* Shifts copies and printed pages that are fed out. If the
* The internal options are not shown.
Equipped with a paper drawer that can supply 250
sheets of paper, for upper PFU only.
Also referred to as the “PFU” throughout the manual.
The machine can be placed on the Desk (Mall).
Using the Desk (Mall) allows the machine to be set up
on the floor.
The machine can be placed on the Desk (Mid).
Using the Desk (Mid) allows the machine to be set up on
the floor.
The machine can be placed on the Desk (Large).
Using the Desk (Large) allows the machine to be set up
on the floor.
Allows printed pages to be separated.
Expanding the memory increases the number of
document pages that can be processed by the machine.
Also referred to as the “expansion memory” throughout
the manual.
An internal printer controller. This allows this machine to
be used as a computer printer.
For details, refer to the Printer Controller Manual.
An internal Internet Fax Kit. Allows you to use this
machine as a network scanner.
For details, refer to the User Manual for the Internet Fax
Kit IF-118.
printing from Windows or a NetWare network
environment is possible.
Job Separator is installed, the Shifter cannot be
attached.
2-8 7216/7220
Page 28
Precautions
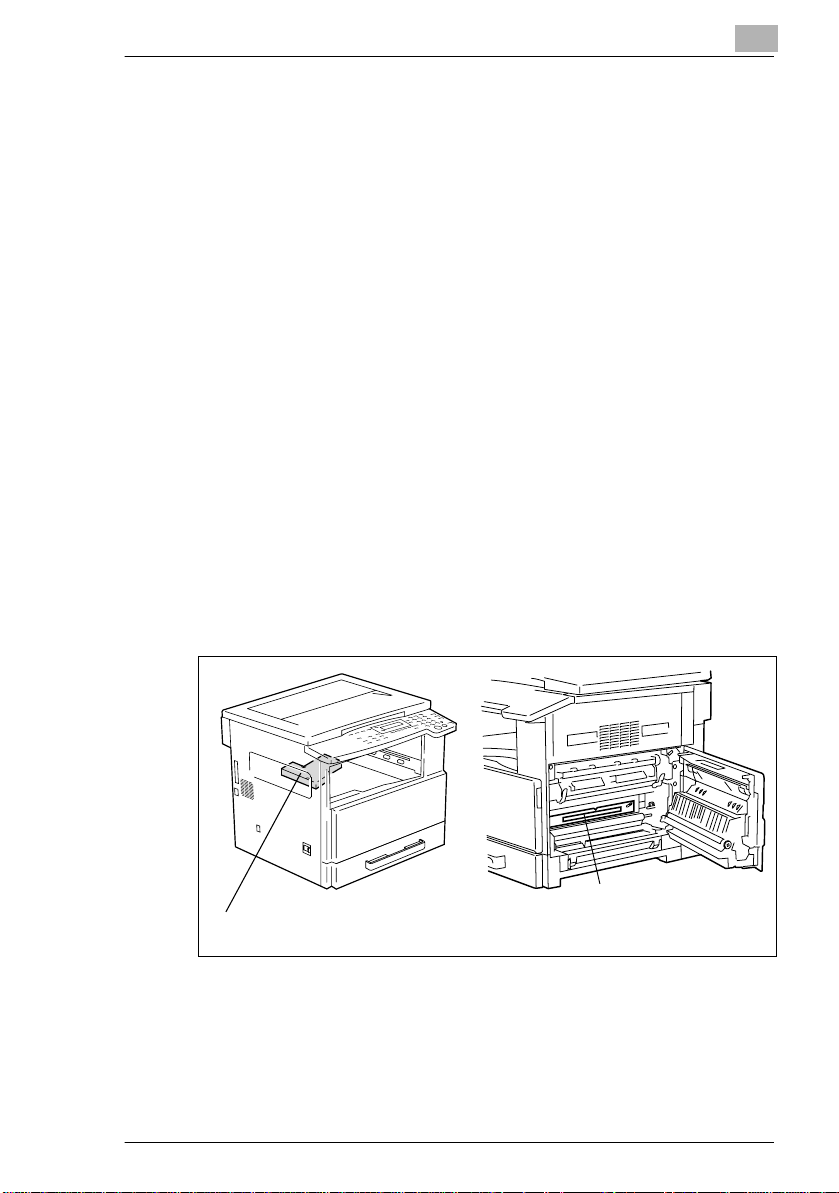
2.5 Part Names and Their Functions
Main Unit
1
2
2
3
11
8
9
10
7
No. Part Name Description
1 Copy Tray Collects fed-out copies facing down.
2 Front Cover Opened when replacing the toner bottle.
3 1st Tray • Holds up to 250 sheets of paper.
4 Manual Bypass • Used for manual feeding of paper.
5 Lock Release Lever Used to open and close the Side Cover.
(p. 8-2)
• The paper size can be adjusted freely.
• Can be loaded with special paper. (p. 7-1)
• The paper is fed one sheet at a time.
• Can be loaded with special paper. (p. 5-7)
6
5
4
12
13
14
7216/7220 2-9
Page 29

2
Precautions
No. Part Name Description
6 Side Cover Opened when clearing paper misfeeds.
7 Power Switch Used to turn the machine on and off. (p. 2-20)
8 Parallel Interface
Connector
9 RJ45 Connector for
Networking
10 Printer USB Connector Used for connecting a USB cable from the computer.
11 Document Scales Used to align the document.
12 Platen Cover (optional) Presses down on the document positioned on the
13 Original Glass When manually feeding a document, position it on the
14 Control Panel Used to start copying or to make various settings.
Used for connecting a parallel cable from the computer.
Used for connecting the network cable when this
machine is used for Internet faxing and network
scanning.
(p. 3-9)
Original Glass.
Original Glass so that it can be scanned.
Position the document face down on the glass. (p. 3-9)
(
p. 2-16)
2-10 7216/7220
Page 30
Precautions
Inside of Main Unit
2
1
3
No. Part Name Description
1 Imaging Unit Creates the copy image.
2 Toner Bottle Holder Opened when replacing the toner bottle.
3 Pressure Lever Used when clearing paper misfeeds in the fusing unit.
Replacement of the Imaging Unit must be performed by
a service representative.
(
p. 8-4)
2
7216/7220 2-11
Page 31

2
Precautions
Document Feeder (Optional)
3
2
1
No. Part Name Description
1 Document Exit Tray Collects documents that have been scanned.
2 Document Guide Plate Adjusted to the width of the document. (p. 3-8)
3 Document Feeder Cover
(Doc. Feed Cover)
4 Document Feeder Tray Holds the documents to be scanned; load documents
Opened when clearing document misfeeds. (p. 8-11)
p. 3-8)
face up. (
4
2-12 7216/7220
Page 32

Precautions
MSBT (Optional)
5
6
No. Part Name Description
5 Bypass Tray Holds up to 100 sheets of plain paper, 20 sheets of
special paper, or 10 envelopes. (
6 Bypass Tray Extender Pulled out when large-sized paper is loaded.
p. 5-9)
2
7216/7220 2-13
Page 33

2
Precautions
PFU (Optional)
7
8
9
10
No. Part Name Description
7 2nd Tray Holds up to 250 sheets of plain paper.
8 3rd Tray
9 4th Tray
10 5th Tray
11 Side Cover Opened when clearing paper misfeeds. (p. 8-8)
With the 7220, up to four PFU can be installed.
With the 7216, one PFU can be installed.
11
2-14 7216/7220
Page 34

Precautions
JobSeparator (Optional)
2
With the JobSeparator installed
12
13
14
No. Part Name Description
12 Copy Tray Lamp Lights up when paper is fed into the Upper Copy Tray.
13 Upper Copy Tray Collects computer printouts.
14 Lower Copy Tray Collects copies.
7216/7220 2-15
Page 35

2
Precautions
2.6 Names of Control Panel Parts and Their Functions
Control Panel Parts and Their Functions
21
3
20
19
18
5 746
15
16
17
No. Part Name Function
1 “ERROR” indicator Flashes when an error has occurred.
2 [Print] key/indicator Lights up while data is being printed from the computer
3 [Status] key Used to view the counters.
4 [Utility] key Used to enter Utility mode and display the first Utility
5 Display Displays setting menus, error messages, and specified
6 [No/Clear] key Erases the entered numbers and letters.
7 [Yes] key Confirms the current setting.
8 [APS/AMS] key Used to select between the APS or the AMS function.
9 [Zoom]
10 [Paper Size] key Used to select the size of the paper to be printed on.
key,
and keys
1314
Refer to “Error Messages” on page 8-1.
and flashes while data is being sent.
For details, refer to the Printer Controller Manual.
mode screen.
• MACHINE SETTING, PAPER SOURCE SETUP,
USER MANAGEMENT,
ADMIN. MANAGEMENT, COPY SETTING 1 & 2
settings such as the number of copies and the zoom
ratio.
Returns to the previous screen.
• Used to select a preset enlargement or reduction
ratio.
• With each press, a zoom ratio between × 0.50 and
2.00 is selected in 0.01 increments.
×
• Used to specify the selection above or below in
setting screens and menus.
81012
911
2-16 7216/7220
Page 36

Precautions
No. Part Name Function
11 [Density Set]
12 [Erase] key Used to select the area of the document that is erased.
13 [Image Shift] key Press to select the “IMAGE SHIFT” function.
14 [Output] key Used to select a copy “OUTPUT” function.
15 [X/Y Zoom] key Used to specify different scaling proportions for the
16 [Reverse Image] key Press to make copies with the dark- and light-colored
17 [Combination] key Used to select between the “2in1” and the “4in1” copy
18 [Copy Program] key • Copy programs can be stored.
19 [Dual Page] key Used to select the “DUAL PAGE” function.
20 [Original] key Used to select between the “DUPLEX ORIG.” function
key,
and keys
• Used to specify the scanning density of copies.
• Used to specify the selection at the left or right in
setting screens.
vertical and horizontal directions.
areas of the document inverted.
functions.
• Stored copy programs can be selected and recalled.
and the “MIXED ORIG.” function.
2
7216/7220 2-17
Page 37

2
Precautions
21 22 23
24
25
26
27
28293031
No. Part Name Function
21 [Scan] key Press to enter Scan mode. The indicator lights up in
22 [Fax] key Does not function on this machine.
23 [Copy] key Press to enter Copy mode. The indicator lights up in
24 [ID] key Used with user management. (p. 6-9)
25 [Power Save] key Press to enter Power Save mode. (p. 2-21)
26 [Interrupt] key Press to enter Interrupt mode. The indicator lights up in
27 [123/ABC] key Does not function on this machine.
28 [Auto Reset] key • Cancels all copy functions and returns them to their
29 [Stop] key Stops the multi-page copy operation.
30 [Start] key • Starts copying.
31 10-Key Pad • Used to specify the number of copies.
green to indicate that the machine is in Scan mode.
(Available only when the NIC KN-419 and the Internet
Fax Kit IF-118 are installed.)
green to indicate that the machine is in Copy mode.
green to indicate that the machine is in Interrupt mode.
Press again to cancel Interrupt mode and return to the
mode before Interrupt mode was entered. (
default settings.
• Deletes all queued jobs.
• Queues a copy job if pressed while the machine is
warming up. (
• The indicator lights up in green to indicate that the
machine is ready to start copying, or it lights up in
orange to indicate that the machine is not ready to
start copying.
• Used to enter setting values.
• The [ ] and [#] keys do not function on this machine.
p. 2-22)
p. 5-27)
2-18 7216/7220
Page 38

Precautions
Display Indications
2
Copy mode screen
5 4
1
2
Utility mode screen
3
6
7
No. Display Indication Description
1 Copy density (document
type)
2 Copy density (density
level)
3 Paper source Indicates the selected paper tray. If special paper is
4 Number of copies Indicates the specified number of copies.
5 Zoom ratio Indicates the current zoom ratio setting.
6 Menu or function name • Displays the current menu, function or settings.
7 Messages Displays messages such as operating instructions.
Indicates the document type for the copy density setting.
“PH OT O ”, “T EX T ”, o r “T EX T / P”
Indicates the density level for the copy density setting.
selected, the paper type is displayed.
“AUTO”, a paper tray and paper size, or paper type
“AUTO” or the current zoom ratio setting is displayed.
[X/Y]” indicates that the “X/Y ZOOM” function is
“×
selected.
• Error messages are displayed when errors occur.
Adjusting the Angle of the Display [CD]
For further information, see chapter “2 Precautions” in the extended
manual on the CD-R.
7216/7220 2-19
Page 39

2
2.7 Power Supply
To turn on the machine
Set the Power Switch to “I”.
The indicato r on the [ Start] key lights up
in orange, and the message “PLEASE
WAIT!” appears in the displ ay.
Note
If the [Star t] key i s pressed while t he
indicator is l it in orange, th e copy job
is queued. When the indicator on
the [Start] ke y lights up in g reen, the
loaded document is scanned and
copies are produced.
To turn of f th e m a chine
1 Check that all jobs are finished.
H I f printed pages remain in the Copy Tray, remove them.
Precautions
2 Set the Power Switch to “2”.
Default Settings
The settings that are aut om atically selected when the machine is turned
off or the [Auto Reset] ke y is pr essed are called the “def ault settings”.
These settings ser ve as a ref erence for all functions.
Copy mode
G Number of copies: 1
G Copy dens it y: AUTO
G Zoom ratio: Full size (× 1.00)
G Paper source: AUTO (with the Document Feede r installed)
G Outp ut fu nction: Non-sort
Tip
The default settings can be customized using the functions in the
Utility mode (“7
2-20 7216/7220
Utility Mode – Copy Functions”).
Page 40

Precautions
Auto Reset
With the auto reset operat ion, the Copy mode screen appe ars after
copying or after a specified length of time has passed after the last
operation is finished. (Manufacturer’s default setting: 1 minute)
Power Save Mode
With the Power Save mode, the machine automatically enters a standby
mode (Power Save mode), inst ead of turning off.
When the machine is in Power Save mode, the indicat or on the [Start] key
remains lit in green, but the display goes off.
2
Tip
The length of time until the auto reset operation is per formed can be
set to 30 seconds or a setting bet ween 1 and 5 minutes.
In addition, the Auto Reset f unction can be disabled.
For details, refer to cha p ter “7 Utility Mode – Copy Functions [CD]”.
Note
If the Auto Shut Off functio n is activated dur ing Power Save mode, the
machine turns off.
Conditions for entering Power Save mode
G The [Powe r Save] key is pressed.
G The specifi ed length of time after the las t oper ation has elapsed.
(Manufacturer’s default setting: 15 minutes)
Tip
The length of time until the machine enters Power Save mode can be
set between 1 and 240 minutes. (Refer to chapter
Copy Functions [CD]”.)
7216/7220 2-21
“7 Util ity Mo de –
Page 41

2
Precautions
Auto Shut Off
With the Auto Shut Off funct ion, the machine automati cally turns off if no
operation i s performed for a specified length of time, in order to conserve
energy. (Manufact urer’s default se tt ing: 30 minutes)
Queued Copy Jobs
Copy jobs can be queued by loadi ng the document and pressing the
[Start] key while “PLEASE WAI T!” appears in the display.
When the indicator on the [St art] key lights up in green, scanning of the
loaded document begins, and copies are produce d.
2-22 7216/7220
Page 42

Basic Operations
3 Basic Operations
3.1 Making Copies
The following procedure describes how to load a docum ent and make a
simple copy of it.
To make a si m p le co py
1 Load the document to be copied.
H Refer to “Loading the Docum ent” on page 3-8.
3
2 Select the desired copy settings.
H Paper (p. 5-17)
H Zoom (p. 5-22)
H Copy density (p. 5-26)
H Advanced Copy Operations
(
p. 6-1)
3 Using the 10-Key Pad, enter th e
desired number of copies.
H The number of copies can be set
to any number between 1 and
99.
H To clear the entered value,
press the [No/Clear] key.
7216/7220 3-1
Page 43

3
Basic Operations
4 Press the [Start] key.
The set number of copi es are made.
H To stop copying before the set
number of copies have been
made, press the [Stop] key.
3-2 7216/7220
Page 44

Basic Operations
3.2 Loading Paper
While loading paper, be sure to observe the followi ng precautions.
G If the paper is curled, flatten it
before loading it.
G Do not load so much paper that the
top of the stack is higher than
the
mark or exceeds the
specified number of sheets.
G Make sure that the paper guides ar e
pushed up ag ainst the e dges of the
paper.
3
Tip
We recommend repl enishing the paper o nly after al l of t he paper in the
drawer has been used.
7216/7220 3-3
Page 45

3
Basic Operations
Loading Paper Into the 1st Tray
1 Pull out the 1st Tray.
Have the necessary precaut ions
?
been observed when pul li ng ou t
the tray?
§ Be careful not to touch the
surface of the Paper Take-up
Roller with your hands.
2 Press down on the Paper-Lifting
Plate until it locks i nto place.
3 Load the paper into the tray so t hat
the front side of t he paper (the side
facing up when the package was
unwrapped) faces up.
Have the necessary precaut ions
?
been observed when loadi ng
the paper?
§ Do not load so much paper t hat
the top of the stack is high er than the
Paper Take-up Roller
Paper- Lif ting Plate
mark .
4 Slide the paper guides against the
edges of the paper.
Is the paper guide positioned
?
correctly?
§ Make sure that t he paper g uides
are pushed up against the
edges of the paper.
3-4 7216/7220
Page 46

Basic Operations
5 Close the 1st Tray.
3
7216/7220 3-5
Page 47

3
Basic Operations
Loading Paper Into the 2nd Tray
Load paper into the 3rd, 4t h and 5th paper trays using the sa me procedure
described below.
1 Pull out the 2nd Tray.
2 Press down on the Paper-Lifting
Plate until it locks i nto place.
3 Load the paper into the tray so t hat
the front side of t he paper (the side
facing up when the package was
unwrapped) faces up.
Have the necessary precaut ions
?
been observed when loadi ng
the paper?
§ Do not load so much paper t hat
the top of the stack is high er than the
4 Slide the paper guides against the
edges of the paper.
Is the paper guide positioned
?
correctly?
§ Make sure that t he paper g uides
are pushed up against the
edges of the paper.
Paper-Lifting Plate
mark.
3-6 7216/7220
Page 48

Basic Operations
5 Close the 2nd Tray.
3
7216/7220 3-7
Page 49

3
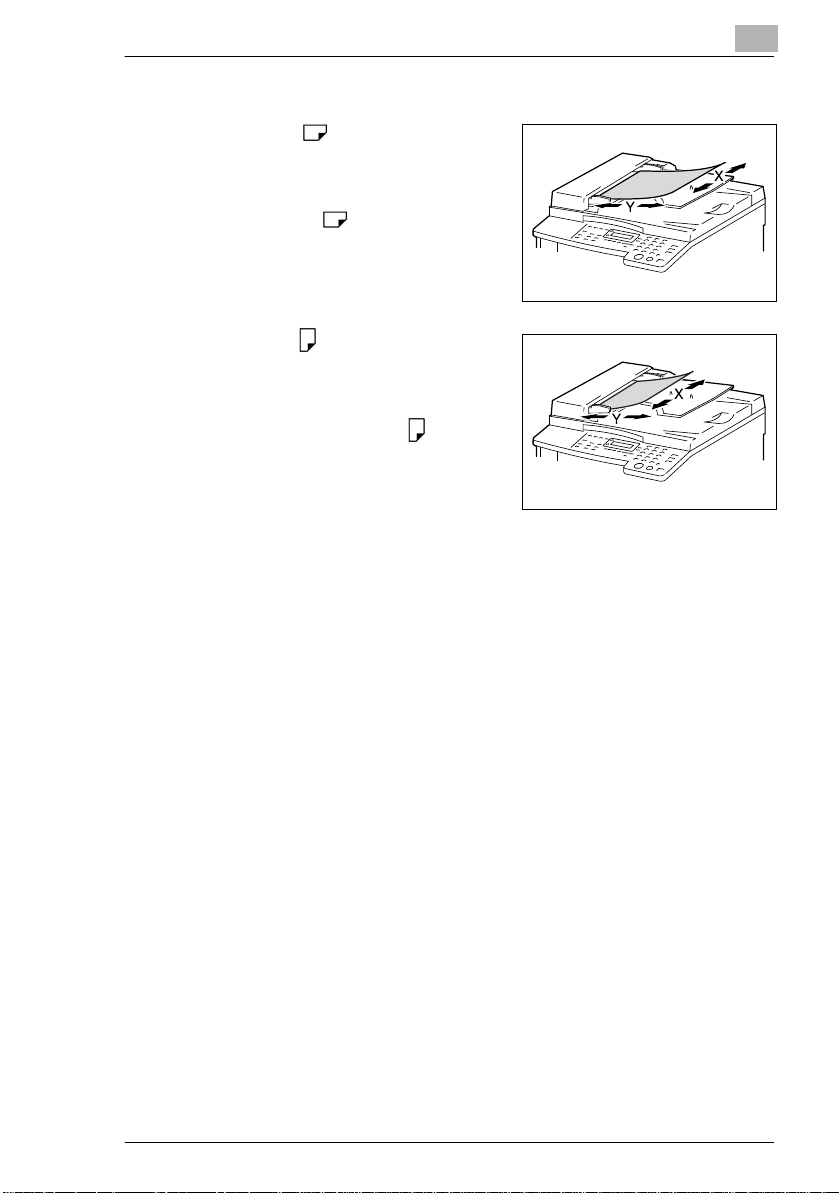
3.3 Loading the Document
The document can be loaded int o the Document Feeder (optional) or
positioned on the Origi nal Glass. Positi on the document correctly
according to the type of document being copied.
With the Document Feeder
1 Slide out the Document Guide
Plates.
2 Load the document pages to be
copied face up into the Document
Feeder.
Have the necessary precaut ions
?
been observed when loadi ng
the document?
§ A maximum of 50 document
pages can be loaded.
(With DF-218)
§ A maximum of 80 document pages can be loaded. (With DF-321)
§ Do not load so many pages that the top of the stack is higher than
the
mark.
Basic Operations
3 Adjust the Document Guide Plates
to fit the size of the docum ent.
Note
Be sure to load the document
correctly, otherwise the pages
may not be fed in straight.
4 If necessary, specify any other copy settings.
H Before Making Copies (p. 5-1)
H Advanced Copy Operations (p. 6-1)
5 Press the [Start] key.
3-8 7216/7220
Page 50

Basic Operations
Positioning sheet documents on the Original Glass
For plain documents or docum ents that cannot be loaded into the ADF,
position them as desc ri bed below.
1 Lift open the Platen Cover , or the Document Feeder if it is install ed.
2 Position the documen t to be copied
face down on the Original Glas s.
H Align the document on the
3 Carefully clos e the Pl aten Cover , or
the ADF i f it is installed.
4 If necessary , specif y any other copy
settings.
H Before Making Copies (p. 5-1)
H Advanced Copy Operations (p. 6-1)
3
scales above and to the le ft of
the Original Glass.
5 Press the [Start ] key.
7216/7220 3-9
Page 51

3
Basic Operations
Positioning transparent documents on the Original Glass
When copying a highl y transparent or tr anslucent document , such as OHP
transparenci es, t raci ng p aper or diaz o p hotosens iti ve paper, posit ion i t as
described below.
1 Lift open the Platen Cover, or the Document Feeder if it is installed.
2 Position the docu me nt to be c opied
face down on the Original Glas s.
H Align the document on the
scales above and to the le ft of
the Original Glass.
3 Place a blank sheet of paper of the
same size over the document.
4 Carefully close the Plat en Cover, or
the Document Feeder if it is
installed.
5 If necessary, speci fy any o ther copy
settings.
H Before Making Copies (p. 5-1)
H Advanced Copy Operations (p. 6-1)
6 Press the [Start] key.
3-10 7216/7220
Page 52

Basic Operations
Positioning books on the Original Glass
When copying two facing pages of a bound docume nt, such as a book or
magazine, position it as described below.
1 Lift open the Platen Cover , or the Document Feeder if it is install ed.
2 Position the book face down onto
the Original Glass, with the top of
the book toward the rear of the
machine and with the center of the
book aligned with the
the Document Scale.
?
§ Do not place objects weight ing
3 Carefully close the Plat en Cover, or the Document Feeder if it is
installed.
3
mark in
Have the necessary precaut ions
been observed when posi tioning
the book on the Original Glass?
more than 3 kg on the Original
Glass. In addition, do not press
down extremely hard on the
document, otherwise the machine may be damaged.
4 Press the [Dual Page ] key.
The “DUAL PAGE” indicator lights
up.
5 If necessary , specif y any other copy
settings.
H Before Making Copies (p. 5-1)
H Advanced Copy Operations
(
p. 6-1)
6 Press the [Start ] key.
Loading documents of mixed sizes in the Document Feeder [CD]
Documents containi ng pages of di fferent siz es can be loaded as a set into
the Document Feeder.
For further infor m ati on, see “3 Basic Operations” in the extended
manual on the CD-R.
7216/7220 3-11
Page 53

3
Basic Operations
3.4 Stopping/Restarting/Canceling a Copy Job
Follow the procedure described below to stop a copy job.
1 Specify the copy settings, and th en press the [Start] key.
Copying begins.
2 During printing, press the [Stop]
key.
The message “*PLEASE WAIT!*”
appears, and printing is stopped.
How can the stopped job be
?
restarted?
§ When the message “PRESS
THE START KEY TO RESUME”
appears, press the [Start] key.
Prin t ing contin ues.
How can the stopped job be
?
canceled?
§ When the message “PRESS THE START KEY TO RESUME”
appears, press the [No/Cl ear] key.
The message “*COPY CANCELED*” appears, and the job is
canceled.
Stop
Restart
Cancel
3.5 Confirmation Mode [CD]
The number of oper ations p erformed since th is machine was instal led can
be checked using t he functi ons avail able when the [Status] key is pre ssed.
For further information, see “3 Basic Operations ” in the extended
manual on the CD-R.
3.6 Reducing Electricity Usage [CD]
The Sleep and Auto Power-off modes are extremel y useful for conserving
energy.
For further information, see “3 Basic Operations ” in the extended
manual on the CD-R.
3-12 7216/7220
Page 54

Useful Operations
4 Useful Operations
4.1 Specifying a Zoom Setting [CD]
For further information, see “4 Useful Operations” in the extended
manual on the CD-R.
4.2 Using the “Density Set” Function [CD]
For further information, see “4 Useful Operations” in the extended
manual on the CD-R.
4.3 Copying Onto Various Types of Media
To copy onto OHP transparencies
As an example, the followi ng procedure describes how to make copies
onto OHP transparenci es loaded into the 1st Tray.
1 Position the A4-siz ed docum ent.
H Refer to “Loading the Docum ent” on page 3-8.
4
2 Adjust the paper guides in the 1st
Tray, and load the OHP
transparencies.
H Load OHP transparencies in the
same orientation as the
document.
Note
A maximum of 20 OHP transparencies can be loaded.
7216/7220 4-1
Page 55

4
Useful Operations
3 Pr e ss th e [Utility] key twice.
The “PAPE SOURCE SETUP”
menu appears.
4 From the 10-Key Pad, pres s the [2]
key.
“TRAY1 PAPER” appears.
5 Press the or key to select
“OHP”, and then press the [Yes]
key.
6 Press the or key to select
“AUTO”, and then press the [Yes]
key.
7 Press the [No/Clear] key.
The main screen appears.
8 Press the [Paper Size] key to select
the paper loaded into the 1st Tray.
9 If necessary, speci fy any o ther copy
settings.
H Before Making Copies (p. 5-1)
H Advanced Copy Operations (p. 6-1)
10Press the [S ta rt] key.
4-2 7216/7220
Page 56

Useful Operations
To copy onto label sheets [CD]
For further infor m ati on, see “4 Useful Operations” in the extended
manual on the CD-R.
To copy onto envelopes (non-standard size) [CD]
For further infor m ati on, see “4 Useful Operations” in the extended
manual on the CD-R.
To copy onto postcards [CD]
For further infor m ati on, see “4 Useful Operations” in the extended
manual on the CD-R.
4
7216/7220 4-3
Page 57

4
Useful Operations
4-4 7216/7220
Page 58

Before Making Copi es
5 Before Making Copies
5.1 Paper
Use paper that meets the following specificat ions.
Paper Types
5
Paper Type
Weight (g/m2)
Paper Source, Etc. 60 to 90 g/m291 to 157g/m260 to 90 g/m
Manual Bypass 2 2 2
Multiple Bypass (MSBT) 2 2 2
1st paper drawer 2 2 2
2nd paper drawer 2 — 2
3rd paper drawer 2 — 2
4th paper drawer 2 — 2
5th paper drawer 2 — 2
Double-sided copies 2 — 2
Paper Type Special Media
Paper Source, Etc.
Manual Bypass 2 2 2 2
Multiple Bypass (MSBT) 2 2 2 2
1st paper drawer 2 2 2 2
2nd paper drawer — — — —
3rd paper drawer — — — —
4th paper drawer — — — —
5th paper drawer — — — —
Double-sided copies — — — —
Plain Paper Special Media
OHP
transparencies
Postcards
Label
Sheets
Recycled
Paper
Envelopes
2
2: Available—: Not available
7216/7220 5-1
Page 59

5
Before Making Copi es
Note
The 2nd paper drawer, the 3rd paper drawer, the 4th paper drawer, the
5th paper drawer and the MSBT are optional.
If the optional Duple x is used to make double- si ded copies , only pl ain
and recycled paper can be used.
5-2 7216/7220
Page 60

Before Making Copi es
Paper Sizes
Non-standard-s ized paper
Paper Source Paper Width Paper Length
Manual Bypass 90 mm to 297 mm 140 mm to 432 mm
Multiple Bypass (MSBT) 90 mm to 297 mm 140 mm to 432 mm
1st paper drawer 90 mm to 297 mm 140 mm to 432 mm
2nd paper drawer 182 mm to 297 mm 140 mm to 432 mm
3rd paper drawer 182 mm to 297 mm 140 mm to 432 mm
4th paper drawer 182 mm to 297 mm 140 mm to 432 mm
5th paper drawer 182 mm to 297 mm 140 mm to 432 mm
Standard-sized paper
5
Paper Size
Paper Source, Etc.
Manual Bypass 2 2 2 2 2 2 2 2
Multiple Bypass (MSBT) 2 2 2 2 2 2 2 2
1st paper drawer 2 2 2 2 2 2 2 2
2nd paper drawer 2 2 2 2 2 2 — 2
3rd paper drawer 2 2 2 2 2 2 — 2
4th paper drawer 2 2 2 2 2 2 — 2
5th paper drawer 2 2 2 2 2 2 — 2
Double-sided copies 2 2 2 2 2 2 — 2
A3 L B4 L A4 L A4 C B5 L B5 C A5 L A5 C
2: Available—: Not available
Note
The 2nd paper drawer, the 3rd paper drawer, the 4th paper drawer, the
5th paper drawer and the MSBT are optional.
If the optional Duple x is used to make double- si ded copies , only pla in
and recycled paper can be used.
7216/7220 5-3
Page 61

5
Before Making Copi es
Paper Capacity
Paper Type
Weight (g/m2)
Paper Source, Etc. 60 to 90 g/m291 to 157g/m260 to 90 g/m
Manual Bypass 1 sheet 1 sheet 1 sheet
Multiple Bypass (MSBT) 100 sheets 20 sheets 100 sheets
1st paper drawer 250 sheets 20 sheets 250 sheets
2nd paper drawer 250 sheets — 250 sheets
3rd paper drawer 250 sheets — 250 sheets
4th paper drawer 250 sheets — 250 sheets
5th paper drawer 250 sheets — 250 sheets
Paper Type Special Media
Paper Source, Etc.
Manual Bypass 1 sheet 1 postcard 1 sheet 1 envelope
Multiple Bypass (MSBT) 20 sheets 20 postcards 20 sheets 10
1st paper drawer 20 sheets 20 postcards 20 sheets 10
2nd paper drawer — — — —
3rd paper drawer — — — —
4th paper drawer — — — —
5th paper drawer — — — —
Plain Paper Special Media
OHP transparencies
Postcards Label Sheets Envelopes
Recycled
Paper
envelopes
envelopes
2
—: Not available
Note
The 2nd paper drawer, the 3rd paper drawer, the 4th paper drawer, the
5th paper drawer and the MSBT are optional.
If the optional Duple x is used to make double- si ded copies , only pl ain
and recycled paper can be used.
5-4 7216/7220
Page 62

Before Making Copi es
Unsuitable Paper
The following types of paper should not be used, otherwi se decreased
print quality, paper misfeeds or damage to the machine may occur.
G OHP transparencies that have already been fed through the machine
Even if the transparency is still blank, do not reuse it.
G Paper that has been printed on by a heat-transf er printer or an inkjet
printer
G Paper that is either extremely thick or extremely thin
G Folded, curled, wrinkled, or torn paper
G Paper that has been left unwrapped for a long period of time
G Damp paper
G Perforated paper or paper with punched holes
G Extremely smooth or extremel y rough pa per, or pape r with a n unev en
surface
G Paper that has been treated, suc h as carbon-backed, heat-sensitive or
pressure-sensitive paper
G Paper that has been decorated with foil or embossing
G Paper of various sizes
G Paper of a non-standard shape (not rectangular)
G Paper that is bound with glue, staples or pa per cl ips
G Paper with labels attached
G Paper with ribbons, hooks, buttons, etc. attached
G Curled or wrinkled paper
G Art paper, coated paper or inkjet printer paper
5
7216/7220 5-5
Page 63

5
5.2 Print Area
Any part of the image within the area indicated below is not cop ied.
G A margin 4 mm (at full size) from the trailing edge of the paper (A)
G A margin 4 mm (at full size) from the leading edge of the paper (B)
G A margin 4 mm (at full size) on both sides of the paper (C)
For details on usi ng the mach ine to print from a compu ter when the pri nter
controller is installed, refer to the Printer Controll er Manual.
Paper output direction
Before Making Copi es
AB
C
5.3 Pap er Storage
Observe the following precautions when storing the paper.
G Store the paper in a location that meets the following requirements.
H Not exposed to direct sunlight
H Not exposed to a flame
H Not exposed to high humidity
H Not extremely dusty
G Unwrapped paper should be placed in a plas ti c bag and stored in a
cool, dark location.
G Keep paper out of the reach of children.
C
A: 4 mm (at full size)
B: 4 mm (at full size)
C: 4 mm (at full size)
5-6 7216/7220
Page 64

Before Making Copi es
5.4 Making Copies on Manually Fed Pap er
Manually feed the copy paper if you wish to make copies onto paper not
loaded into any paper tray, or onto special paper, such as O HP
transpare ncies, postcard s or cards.
Paper That Can Be Fed Manually
Paper types:
G Plain or recycled paper (thickness: 60 g/m
G Special paper
H Cards (thickness: 91 g/m
H OH P transparencies
H Postcards
H Label sheets
H Envelopes
2
to 157 g/m2)
2
to 90 g/m2)
Paper sizes:
G Maximum: 297 mm × 432 mm
G Minimum: 90 mm × 140 mm
Note
When copying using the Manual Bypass, only one page at a time can
be loaded. For det ail s on the nu mber o f pages t hat can b e lo aded int o
the MSBT (optional), refer to
“Paper Capacity” on page 5-4.
5
7216/7220 5-7
Page 65

5
Before Making Copi es
Adjusting the MSBT
Adjust the Bypass Tray Extender to fit the size of the paper as shown
below.
5-8 7216/7220
Page 66

Before Making Copi es
Loading Plain Paper Into the Bypass Tr ays
Load the paper into the Manua l Bypass one sheet at a time.
Up to 100 sheets of paper can be loaded in to t he MSBT. Do not l oad so
much paper into the MSBT that the top of the stack is higher than
the
mark.
Note
When paper othe r t han plain paper is loaded, the paper type mus t be
specified.
1 Load the paper into the Bypass Tray.
Have the necessary pre cauti ons been observed when loading the
?
paper?
§ Load the paper so that the front side of the paper faces down.
§ Make sure that the paper is not curled (rolled).
5
2 Adjust the Bypass Tray Extender and the paper guides to fit the size
of the paper.
7216/7220 5-9
Page 67

5
Before Making Copi es
Loading Postcards Into the Bypass Tr ays [CD]
For further information, see “5 Before Maki ng Copies” in the extended
manual on the CD-R.
Loading Envelopes Into the Bypass Trays [CD]
For further information, see “5 Before Maki ng Copies” in the extended
manual on the CD-R.
Loading OHP Transparencies I nto the Bypass Trays
Load the paper into the Manu al Bypass one sheet at a time.
Up to 20 sheets of paper can be loaded into the MSBT.
§ When loading OHP transpa rencie s, lo ad t hem in t he sa me orien tati on
as the document.
Note
After you have loaded the transparencies, use the control panel to
specify the paper size and paper type for the Bypass Tray.
Loading Label Sheets Into the Bypass Trays [CD]
For further information, see “5 Before Maki ng Copies” in the extended
manual on the CD-R.
5-10 7216/7220
Page 68

Before Making Copi es
Copying Onto Manually Fed Paper by Manual Bypa ss
1 Load the document to be copied.
H Refer to “Loading the Docum ent” on page 3-8.
2 Adjust the paper guides to fit the
size of the paper.
3 Insert one sheet of paper wi th th e
front sid e facing down, l ightly sl iding
the paper as much as possible into
the feed slot.
The manual bypass mark ( )
appears in the bottom lin e of the
screen.
Is a card or a postcard loaded?
?
§ Make sure that it is not curled
(rolled).
4 Press the [No/Clear] key.
The “PAPER SOURCE SETUP” menu appears.
5 Use the and keys to select
the type of paper loaded.
H Select from the following four
paper type settings.
“PLAIN”
“OHP”
“CARD”
“ENVELOPE”
5
6 Press the [Yes] key.
The “PAPER SIZE” menu appears.
7216/7220 5-11
Page 69

5
7 Using the and keys, select
the size of the paper loaded.
H If “OHP” was selected in ste p 5,
select from the following four
paper size settings.
“A4 L”
“A4 C”
“Letter L ”
“Letter C”
H I f paper with a non-standard
size is loaded, pres s the
and then use the 10-Key Pad to
enter the paper size. (For
details, refer to
label sheets [CD]” on page 4-3.)
Do you know the size of F4
?
paper?
§ The default F4 si ze i s 21 0 mm ×
330 mm. To change t he F4 size,
contact your serv ice
representative.
key,
“To copy onto
8 Press the [Yes] key.
The main screen appears.
Before Making Copi es
9 If necessary, specify any other copy settings.
H Zoom (p. 5-22)
H Copy density (p. 5-26)
H Advanced Copy Operations (p. 6-1)
10Press the [S ta rt] key.
Tip
To copy onto more pages using t he same settings, feed paper into the
Manual Bypass to begin making copies automatic ally.
To make continuous copies onto cards, postcar ds, OHP
transparenci es or envelopes, load them into the 1st Tray.
If paper other than pl ain paper is specified and the Manual Bypass is
used, the screen changes as shown below.
5-12 7216/7220
Page 70

Before Making Copi es
Postcards or enve lopes
5
Cards OHP transparencies
7216/7220 5-13
Page 71

5
Copying Onto Manually Fed Paper by MSBT
1 Load the document to be copied.
H Refer to “Loading the Document” on page 3-8.
2 Adjust the Bypass Tray Extender
and the paper guides to fit the size
of the paper.
3 Load the paper with the front side
facing down, lightly slidi ng the paper
as much as possible int o the feed
slot.
The manual bypass mark ( )
appears in the bottom line of the
screen.
Are sheets of cards or postcards loaded?
?
§ Make sure that they are not curled (rolled).
4 Check that “YES/NO” appears in
the bottom line of the scr een, and
then press the [No/Clear] key.
The “PAPER SOURCE SETUP”
menu appears.
Before Making Copi es
Note
“YES/NO” is display ed for approximatel y 5 seconds after paper is
loaded into the MSBT.
5 Use the and keys to select
the type of paper loaded.
H Select from the following four
paper type settings.
“PLAIN”
“OHP”
“CARD”
“ENVELOPE”
6 Press the [Yes] key.
The PAPER SIZE menu appears.
5-14 7216/7220
Page 72

Before Making Copi es
7 Using the and keys, select
the size of the paper loaded.
H If “OHP” was selected in step 5,
select from the following four
paper size settings.
“A4 L”
“A4 C”
“Letter L ”
“Letter C”
H If paper with a non-standard
size is l oaded, press the
(“CUSTOM”), and then use the
10-Key Pad to enter the paper
size. (For details, refer to
“Copying Ont o Various Ty pes of
Media” on page 4-1.)
Do you know the size of F4
?
paper?
§ The default F 4 size i s 210 m m ×
330 mm. To change t he F4 size,
contact your service
representative.
8 Press the [Yes] key.
The main screen appears.
5
key
9 If necessary, specify any other copy settings.
H Zoom (p. 5-22)
H Copy density (p. 5-26)
H Advanced Copy Operations (p. 6-1)
10Press the [Start] key.
Tip
If paper other than plain paper is speci fied and t he MSBT is used, the
screen changes as sho wn below.
7216/7220 5-15
Page 73

5
Before Making Copi es
Cards OHP transparencies
Postcards or enve lopes
5-16 7216/7220
Page 74

Before Making Copi es
5.5 Selecting the Paper Source
The paper used for making copi es can be selected in two ways.
G APS:
If the APS function is select ed, the paper tray containing the most
suitable size of paper is selected based on the size of the document
and the specified zoom ratio.
G M anual paper selection:
The paper that you wish to use for copying can be selected.
To make copies using the APS function
1 Load the document into the ADF.
H Refer to “Loading the Docum ent” on page 3-8.
2 Press the [APS/AMS] key unt il the
APS function is selected.
H Check that “AUTO” appears in
the bottom line of the screen.
3 If necessary , specif y any other copy
settings.
H Zoom (p. 5-22)
H Copy density (p. 5-26)
H Advanced Copy Operations (p. 6-1)
5
4 Using the 10-Key Pad, enter th e desired number of copies, and then
press the [Start] key .
Note
If “APS SIZE ERROR” appears in the display immediatel y after the
[Start] k ey is pr ess ed, no t ray i s l oaded with pa per of the most suitab le
size. Either load paper with the appropriate size, or press the [Pa per
Size] key and select th e desir ed pape r size , and the n press t he [Start ]
key again.
7216/7220 5-17
Page 75

5
Before Making Copi es
To copy with a manually selected paper size
1 Load the document to be copied.
H Refer to “Loading the Document” on page 3-8.
2 Press the [Paper Size] key, and
then select the desired paper size.
H Check that the correct paper
size appears in the bottom line
of the screen.
3 If necessary, speci fy any o ther copy
settings.
H Zoom (p. 5-22)
H Copy density (p. 5-26)
H Advanced Copy Operations (p. 6-1)
4 Using the 10-Key Pad, enter the desired number of copies, and then
press the [Start] key.
To load special paper into the 1st Tray [CD]
For further information, see “5 Before Maki ng Copies” in the extended
manual on the CD-R.
Automatically Selecti ng the Paper Source [CD]
For further information, see “5 Before Maki ng Copies” in the extended
manual on the CD-R.
Order for Automatically Switching Paper Drawers [CD]
For further information, see “5 Before Maki ng Copies” in the extended
manual on the CD-R.
5-18 7216/7220
Page 76

Before Making Copi es
5.6 Original Documents
Using the Document Feeder
The document feeder automatically fee ds in, scans, then feeds out each
page of a multi-page docum ent, one page at a time. The correct type of
document must be loaded in order for the document feeder to function
properly.
Using an incorrect type of document may cause a paper mis feed or
damage to the document or machine.
Note
In order to copy double-sided documents, the RADF DF-321 (for
7220) must be installed.
Document Types
Single-sided documents Double-sided documents Documents of mixed sizes
5
7216/7220 5-19
Page 77

5
Before Making Copi es
Documents of Uniform Sizes
Document feed
method
Document Feeder Sheet documents
Original Glass Sheet documents, books, and
Document type Document size
DF-218
• Single-sided documents
DF-218
Capacity: 50 g/m2 to 110 g/m
DF-321
Capacity: 35 g/m2 to 128 g/m
• Double-sided documents
DF-321
Capacity: 50 g/m2 to 128 g/m
• Documents of mixed sizes
DF-218
Capacity: 60 g/m2 to 90 g/m
DF-321
Capacity: 50 g/m2 to 128 g/m
large objects
Maximum weight: 3 kg
A3 L, B4 L, A4 L/C, B5 L/C,
A5 L/C
DF-321
2
A3 L, B4 L, A4 L/C, B5 L/C,
A5 L/C, B6 L
2
Document width:
90 mm to 297 mm
Document length:
210 mm to 432 mm
2
• With mixed documents widths
DF-218
A3 L and A4 C
2
B4 L and B5 C
A4 L and A5 C
2
DF-321
Refer to the table below.
A3 L, B4 L, A4 L/C, B5 L/C,
A5 L/C
Document width: Up to 297 mm
Document length: Up to 432 mm
Mixed Width Document Sizes (DF-321)
Maximum
Document
Width
Mixed Width
Document
Detection
297 mm A3 L 2 2 — — — — — —
257 mm B4 L 2 2 2 2 — — — —
210 mm A4 L 2 2 2 2 2 2 — —
182 mm B5 L — — 2 2 2 2 2 —
148 mm A5 L — — — — — — 2 2
297 mm 257 mm 210 mm 182 mm 148 mm
A3 L A4 C B4 L B5 C A4 L A5 C B5 L A5 L
A4 C 2 2 — — — — — —
B5 C 2 2 2 2 — — — —
A5 C 2 2 2 2 2 2 — —
2: Co py ing po s sible —: Copying not possible
5-20 7216/7220
Page 78

Before Making Copi es
Precautions Concerning the Documents
The following types of docum ents should not be loaded into the RADF,
otherwise paper mis feeds or damage to the document may occur.
Instead, these types of documents should be posit ioned on the original
glass.
Documents on special paper
G Folded documents (folded in half or fanne d)
G Highly translucent or transpar ent documents, such as diazo
photosensiti ve paper
G Documents with binder holes
G Documents with many binder holes, such as lo ose-leaf paper
G Coated documents, such as heat-sens it ive or carbon-backed paper
G Inkjet printer paper
G Documents that have just been printed with thi s machine
Documents on paper that cannot be fed
G Curled documents
G Wrinkled or torn documents
G Overhead transparencies
If non-stand ard-sized paper is determined to be close to a standard size,
copying with the “APS” or “AMS ”func ti ons is possible.
5
Note
If a document of a non-standard size is positioned on the Original
Glass, the APS and the AMS functions are not available.
After loading a document of a non-standard size, press the [Paper
Size] key to sel ect a paper size or press the [Zoom] key to select a
zoom ratio.
7216/7220 5-21
Page 79

5
5.7 Specifying a Zoom Setting
By specifying a zoom ratio, the copy can be enlarged or reduced.
Zoom Settings
“Zoom” setting Description
Full size Copies are made at the same size as the document (× 1.00).
“AUTO” zoom ratio The most appropriate zoom ratio is automatically selected
Preset zoom ratios The following common zoom ratios for copying from various
Zoom ratios selected
using the
Zoom keys
“X/Y Zoom” function Copies can be made using different scaling proportions for the
and
based on the size of the document loaded and the specified
paper size.
standard document sizes to standard paper sizes are available.
× 0.50
× 0.70 (A3 A4 and B4 B5)
× 0.81 (B4 A4 and B5 A5)
× 1.15 (B4 A3 and B5 A4)
× 1.41 (A4 A3 and B5 B4)
× 2.00
Using the and keys, the zoom ratio can be adjusted
(increased or reduced) in 0.01 increments.
A zoom ratio between × 0.50 and × 2.00 can be set.
vertical and horizontal directions.
Using the and keys, the zoom ratio can be adjusted
(increased or reduced) in 0.01 increments.
The vertical and horizontal zoom ratios can be set between
× 0.50 and × 1.00.
Before Making Copi es
5-22 7216/7220
Page 80

Before Making Copi es
To make copies using the “AUTO” zoom setting
1 Load the document to be copied.
H Refer to “Loading the Docum ent” on page 3-8.
2 Press the [APS/AMS] key unt il the
AMS function is selected.
H Check that “AUTO” appears in
the top line of the screen .
3 Press the [Paper Size] key, and
then select the desired paper size.
4 If necessary , specif y any other copy
settings.
H Copy density (p. 5-26)
H Advanced Copy Operations
(
p. 6-1)
5
5 Using the 10-Key Pad, enter th e
desired number of copies, and then press the [Start] key.
7216/7220 5-23
Page 81

5
Before Making Copi es
To make copies using a fixed zoom setting
1 Load the document to be copied.
H Refer to “Loading the Document” on page 3-8.
2 Press the [Zoom] key, and then
select the desired zoom ratio.
H Each press of the [Zoom] key
changes the zoom ratio as
shown below.
× 1.15 µ × 1.41 µ × 2.00 µ
×
0.50 µ × 0.70 µ × 0.81 µ
×
1.00. . .
3 If necessary, specify any other copy settings.
H Paper (p. 5-17)
H Copy density (p. 5-26)
H Advanced Copy Operations (p. 6-1)
4 Using the 10-Key Pad, enter the desired number of copies, and then
press the [Start] key.
5-24 7216/7220
Page 82

Before Making Copi es
To make copies using a specific zoom setting
1 Load the document to be copied.
H Refer to “Loading the Docum ent” on page 3-8.
2 Press the [ Zo om] key, an d then use
the
desired zoom ratio.
H The zoom ratio is set in 0.01
increments.
3 If necessary , specif y any other copy
settings.
H Paper (p. 5-17)
H Copy density (p. 5-26)
H Advanced Copy Operations (p. 6-1)
4 Using the 10-Key Pad, enter th e desired number of copies, and then
press the [Start] key .
To make copies using the “X/Y ZOOM” function [CD]
For further infor mation, see “5 Bef ore M aking Copies” in the ext ended
manual on the CD-R.
5
and keys to specify the
7216/7220 5-25
Page 83

5
Before Making Copi es
5.8 Specifying the Copy Density (“Density Set” Function)
Document type and copy density settings
G “TEXT” setti ng :
Select the “TEXT” setting when copying text docume nts. Select this
setting to emphasi ze contours and reproduce text documents with
sharpness.
The automatic dens ity l evel and 9 manual dens ity leve ls a re avai lable .
H “[A]” (automatic) density l evel:
The density l evel i s automat i cally adjust ed accor di ng to t he docum ent
being copied.
H Manual density levels:
Select a level between the light est and darkest settings, dep ending on
the document to be copied.
G “PHOTO” setting:
Select this setti ng when copying documents cont aining many areas
with halftones (intermediate colors), such as photographs.
The “[A]” (automatic ) density leve l cannot be sel ected if the “PHOTO”
setting is selected.
G “TEXT/P” setting:
Select the “ TEXT/P” setti ng when c opyi ng docu ments con taining bot h
text and photos.
The automatic dens ity l evel and 9 manual dens ity leve ls a re avai lable .
H “[A]” (automatic) density l evel:
The density l evel i s automat i cally adjust ed accor di ng to t he docum ent
being copied.
H Manual density levels:
In order to prevent the image on the back of newspaper or magazine
articles from appearing in the copy, pres s the
lighter density level. In order to reproduce pale colors in bright areas
of the image, press the
key to select a
key to select a dark er density level.
Note
Selecting a de nsity level that is to o dar k may cause th e medi a color of
the document to be reproduced, and selecting a level that is too light
may produce a very f ai nt copy. Theref ore, s elect t he a ppropriat e l evel
depending on the document.
5-26 7216/7220
Page 84

Before Making Copi es
To make copies after specifying a copy density
1 Load the document to be copied.
H Refer to “Loading the Docum ent” on page 3-8.
2 Press the [Density Set ] key to select
between the “TEXT/P[A]” (AUTO),
“TEXT[A]” (AUTO), “PHOTO”,
“TEXT/P”, or “TEXT” settings.
H The current setting appears on
the left side of the scr een.
3 If the “PHOTO”, “TEXT” or “TEXT/
P” setting was selected, use
the
density level .
4 If necessary , specif y any other copy
settings.
H Paper (p. 5-17)
H Zoom (p. 5-22)
H Advanced Copy Operations
(
p. 6-1)
5
and keys to adjust the
When making copies w ith a
light density level
5 Using the 10-Key Pad, enter th e
desired number of copies, and then
press the [Start] key .
When making copies w ith a
darker density level
5.9 Interrupting Copy Jobs [CD]
For further information, see “5 Before Making Copies” in the extended
manual on the CD-R.
7216/7220 5-27
Page 85

5
Before Making Copi es
5-28 7216/7220
Page 86

Advanced Copy Operations
6 Advanced Copy Operations
6.1 Single-Sided Copies [CD]
To make copies using the “2in1” (or “4in1”) copy function [CD]
For further information, see “6 Advanced Copy Opera ti ons” in the
extended manual on the CD-R.
To make copies using the “DUAL PAGE” function [CD]
For further information, see “6 Advanced Copy Opera ti ons” in the
extended manual on the CD-R.
6.2 D ouble-Sided Copies
Double-sided c opies i n addit ion t o 2in1 and 4i n1 doubl e-si ded c opies c an
be made from single-sided or double-sided documents.
Note
The optional Duplex must be installed. (7220 only)
The type of double-sided copy that can be made depends on the
options that are inst alled.
6
When making 2in1 and 4in1 copies, use the Document Feeder.
When copying double-sided documents, use the RADF.
7216/7220 6-1
Page 87

6
2
1
1
1
2
1
1
2
1
1
2
1
1
4
1
3
1
2
1
1
1
3
12
21
8
1
1
1
7
34
43
12
21
7
1
5
1
3
1
2
1
1
7
12
65
3
12
21
2
15
2
1
1
15
34
12
3
12
10
9
7
34
43
12
21
Advanced Copy Operations
Types of double-sided copying
Double-sid ed copy
methods
Single-sided documents µ
Double-sided copy
Double-sided document µ
Double-sided copy
Single-sided documents µ
2in1 double-sided copy
Single-sided documents µ
4in1 double-sided copy
Double-sided documents µ
2in1 double-sided copy
Indicator
Platen
Cover
CV-118
ADF
DF-218
2 2 2
2 × 2
× 2 2
× 2 2
× × 2
RADF
DF-321
Double-sided documents µ
4in1 double-sided copy
6-2 7216/7220
× × 2
Page 88

Advanced Copy Operations
Double-sided copying is not possible under the following conditions:
G Double-sided documents are loaded into the ADF DF-218.
G The Manual Bypass is selected.
G Special paper (cards, OHP transparencies, envelopes, or label
sheets) is loaded.
G The “PAPER TYPE” function is set to “1-SIDE”.
G Paper with a width less than 140 mm is selected.
To make double-sided copies using the Original Glass
1 Position the documen t(s) to be
copied.
Refer to “Loading the Docu ment” on
page 3-8.
H For details on loading the
documents into the Document
Feeder, refer to
double-sided copies using the
Document Feeder” on page 6-4.
2 Press the [Combination] key.
The “Duplex” indicator lights up.
6
“To make
3 If necessary , specif y any other copy
setting.
H Before Making Copies (p. 5-1)
H Advanced Copy Operations
(
p. 6-1)
4 Using the 10-Key Pad, enter th e desired number of copies.
5 Position the firs t document page,
and then press the [Start] key.
After the document page is
scanned, the message “NEXT
PAGE SCAN=START” appears.
6 Position the secon d docum ent page, and then press the [ Start] key.
After the document page is scanned, a double-sided copy is printed.
7216/7220 6-3
Page 89

6
Advanced Copy Operations
To make double-sided copies using the Document Feeder
1 Position the document(s) to be
copied.
Refer to “Loading the Document” on
page 3-8.
2 Press the [Combination] key.
The desired double- sided copy
function is selected.
3 If necessary, speci fy any o ther copy
setting.
H Before Making Copies (p. 5-1)
H Advanced Copy Operations
(
p. 6-1)
4 Using the 10-Key Pad, enter the desired number of copies, and then
press the [Start] key.
6-4 7216/7220
Page 90

Advanced Copy Operations
6.3 Output Copies (“Sort” and “Group” Functions)
When copying or prin ting t wo or more set s of a document, t he copie s can
be divided either by sets containing a copy of eac h page (sorted) or by
pages (grouped).
Note
If the ADF is not inst alle d, th e “S ort” and “Gr oup” O utput func tions can
only be used if the “DUAL PAGE” function i s selected.
Output functions
G Non-sort function:
The copies are stacked on top of
each other as they are fed out.
Documents
Copies
6
G “Sort” function:
The copies are automatically
divided into sets with each set
containing a copy of each page.
G “Group” function:
The copies are automatically
divided into stacks containing all
copies of the same page.
Documents
Documents
Copies
Copies
7216/7220 6-5
Page 91

6
Advanced Copy Operations
Notes on Using the “Sort” and “Group” Functions
Conditions for sorting
G The number of copies is set to 2 or more.
G The “DUAL PAGE” function is selected if the Document Feeder is not
installed.
Conditions for crisscross sorting
G A4 or B5 paper is used.
G Paper of the same size and type is loaded horizontally in one paper
drawer and verticall y in another drawer.
G The APS function is selected.
G The “MIXED ORIG.” function must not be selected.
G The Document Feeder is installe d.
G The “CRISSCROSS MODE” function in the Utility mode i s set to “ON”.
(
p. 7-1)
G The optional Shifter is not installed.
Shift Sorting
Each copy set is fed out shift ed to
alternating side.
Note
The optional Shifter mu st be
installed.
Crisscross Sorting
Each copy set is fed out in an
alternating cri sscross pattern.
6-6 7216/7220
Page 92

Advanced Copy Operations
Shift Grouping
Each page set is fed out shifted to
alternating sides.
Note
The optional Shifter mu st be
installed.
Crisscross Grouping
Each page set is fed out in an
alternating crisscross pattern.
6
7216/7220 6-7
Page 93

6
Advanced Copy Operations
Specifying Outp u t fu nction
1 Load the document to be copied
into the Document Feeder.
H Refer to “Loading the
Document” on page 3-8.
2 Press the [Output] key.
The indicator f or the de sired Outp ut
function lights up.
Are neither the “Sort” nor t he
?
“Group” indicators lit?
§ The “Non-sort” function is
selected.
3 If necessary, specify any other copy settings.
H Before Making Copies (p. 5-1)
H Advanced Copy Operations (p. 6-1)
4 Using the 10-Key Pad, enter the desired number of copies, and then
press the [Start] key.
6-8 7216/7220
Page 94

Advanced Copy Operations
6
6.4 Erasing Sections of Copies [CD]
Areas such as the unclean- looking frames around copies can be erased.
For further information, see “6 Advanced Copy Opera ti ons” in the
extended manual on the CD-R.
6.5 Reverse Image Copying [CD]
Copies can be made with the light-col ored areas of th e document (media)
and the dark-colored areas of the document (text ) inverted.
For further information, see “6 Advanced Copy Opera ti ons” in the
extended manual on the CD-R.
6.6 Making Copies for F iling (“IMAGE SHIFT” fu nction) [CD]
So that copies can eas il y be stored in filing binders, copies can be made
with an image shift.
For further information, see “6 Advanced Copy Opera ti ons” in the
extended manual on the CD-R.
6.7 Programmed Copy Jobs [CD]
Store up to two of the more frequently used copy setting programs for
immediate recall when necessary.
For further information, see “6 Advanced Copy Opera ti ons” in the
extended manual on the CD-R.
6.8 ID Numbers [CD]
If ID numbers have been spec ifi ed, use of the m achine can be li mited to a
specific use r and the numbe r of copi es for each user can be control led. As
an example, the followi ng procedure describes how to enter the ID
number in order to make copies.
For further information, see “6 Advanced Copy Opera ti ons” in the
extended manual on the CD-R.
7216/7220 6-9
Page 95

6
Advanced Copy Operations
6-10 7216/7220
Page 96

Util it y M o de – Copy Function s [CD ]
7 Utility Mode – Copy Functions [CD]
This chapter de scribes t he various Ut ility mode f unctions that can be us ed
to set copy-related functions.
For further information, see “7 Utility Mode – Copy Functions [CD]” in
the extended manual on the CD-R.
7
7216/7220 7-1
Page 97

7
Utility Mode – Copy Functions [CD]
7-2 7216/7220
Page 98

Error M essa ges
8 Error Messages
8.1 When the Message “TONER EMPTY” Appears
When toner is about to run out, the message shown below appears.
When this message appears, replace the toner bottl e with a new one.
Note
Use only toner develo ped specifically for t his machine. Use of any
other type of toner may cause dam age to the machine. For details,
contact your service representative.
In order to prevent the u sed t oner b ottl e from d irty ing any thing , k eep it
in the box.
8
Dispose of the used toner bott le according to your l ocal regulations.
7216/7220 8-1
Page 99

8
To replace the toner bottle
1 Open the Front Cover.
2 Swing out the Toner Bottle Holder,
and then remove the toner bottle.
3 Holding the sealed end of the new
toner bottle up, slo wly peel off the
seal toward you.
Have the necessary precaut ions
?
been observed when peel ing off
the seal?
§ Since some toner may spur t out
while the seal is being peeled
off, be sure to peel off the seal slowly.
Error Me ssa ges
4 With the side of the toner bottle
marked “UP” facing up, insert the
toner bottle into the Toner Bottle
Holder.
Have the necessary precaut ions
?
been observed while inserting
the toner bottle?
§ As shown at the right, the tab on
the toner bottle should secu rely fit into the notch in the Toner Bottle
Holder.
8-2 7216/7220
Page 100

Error M essa ges
5 Lightly tap the bott om of the toner
bottle 3 or 4 times.
6 Close the Toner Bottle Holder, and
then close th e Fron t C o ver.
H When the Front Cover is cl osed,
?
§ Perform the “TONER
the toner automatically begins
refilling.
Are copies faint immediately
after the toner bott le i s
replaced?
REPLENISHER” function in the
Utility mode (
page 7-1).
8
7216/7220 8-3
 Loading...