

Page 1

IP-511
Print Controller
Network Setup
Read this manual before printing.
Keep readily available for reference.
Page 2

Thank you very much for purchasing the IP-511.
This INSTRUCTION MANUAL includes instructions for making prints, correct handling of the machine, and precau
tions for safety. Please read this manual before printing.
In order to maintain a satisfactory printing performance, please keep this INSTRUCTION MANUAL readily available
for reference.
-
Page 3

SOFTWARE LICENSE AGREEMENT
This package contains the following materials provided by Konica Corporation (Konica): software included as part
of the printing system, the digitally-encoded machine-readable outline data encoded in the special format and in the
encrypted form ("Font Programs"), other software which runs on a computer system for use in conjunction with the
Printing Software ("Host Software"), and related explanatory written materials ("Documentation").
The term "Software" shall be used to describe Printing Software, Font Programs and/or Host Software and also in
clude any upgrades, modified versions, additions, and copies of the Software.
The Software is being licensed to you under the terms of this Agreement.
Konica grants to you a non-exclusive sublicense to use the Software and Documentation, provided that you agree
to the following:
-
1. You may use the Printing Software and accompanying Font Programs for imaging to the licensed output de
vice(s), solely for your own internal business purposes.
2. In addition to the license for Font Programs set forth in Section 1 ("Printing Software") above, you may use Ro
man Font Programs to reproduce weights, styles, and versions of letters, numerals, characters and symbols
("Typefaces") on the display or monitor for your own internal business purposes.
3. You may make one backup copy of the Host Software, provided your backup copy is not installed or used on
any computer. Notwithstanding the above restrictions, you may install the on any number of computers solely
for use with one or more printing systems running the Printing Software.
4. You may assign its rights under this Agreement to an assignee of all of Licensee's right and interest to such
Software and Documentation ("Assignee") provided you transfer to Assignee all copies of such Software and
Documentation Assignee agrees to be bound by all of the terms and conditions of this Agreement.
5. You agree not to modify, adapt or translate the Software and Documentation.
6. You agree that you will not attempt to alter, disassemble, decrypt, reverse engineer or decompile the Software.
7. Title to and ownership of the Software and Documentation and any reproductions thereof shall remain with
Konica.
8. Trademarks shall be used in accordance with accepted trademark practice, including identification of the trade
mark owner's name. Trademarks can only be used to identify printed output produced by the Software. Such
use of any trademark does not give you any rights of ownership in that trademark.
9. You may not rent, lease, sublicense, lend or transfer versions or copies of the Software Licensee does not use,
or Software contained on any unused media, except as part of the permanent transfer of all Software and Doc
umentation as described above
10. In no event will Konica be liable to you for any consequential, incidental or special damages, including any lost
profits or lost saving, even if Konica has been advised of the possibility of such damages, or for any claim by
any third party. Some states or jurisdictions do not allow the exclusion or limitation of incidental, consequential
or special damages, so the above limitations may not apply to you.
11. Notice to Government End Users: The Software is a "commercial item," as that term is defined at 48 C.F.R.
2.101, consisting of "commercial computer software" and "commercial computer software documentation," as
such terms are used in 48 C.F.R. 12.212. Consistent with 48 C.F.R. 12.212 and 48 C.F.R. 227.7202-1 through
227.7202-4, all U.S. Government End Users acquire the Software with only those rights set forth herein.
-
-
-
-
®
Macintosh
Windows® is a registered trademark of Microsoft Corporation.
is a registered trademark of Apple Computer, Inc.
Page 4

CONTENTS
CONTENTS
■ Introduction ............................................................................................................................ v
● About this Manual ..................................................................................................................................... vi
● Conventions Used in this Manual .......................................................................................................... vii
Chapter 1 Network Function Overview
■ Features of the Network Function ..................................................................................... 1-2
■ Using the accompanying CD-ROM ................................................................................... 1-3
■ Network setting procedures .............................................................................................. 1-4
● Windows 95/98/Me configuration (peer-to-peer) ..................................................................................1-4
● Windows NT/2000 configuration (LPD/LPR) ......................................................................................... 1-4
● UNIX configuration (lpd/lpr) ...................................................................................................................1-5
● NetWare configuration ........................................................................................................................... 1-5
● AppleTalk configuration .........................................................................................................................1-5
Chapter 2 Setting Up the Network Function
■ General description of the network setup ........................................................................ 2-2
● Assigning IP Address ............................................................................................................................. 2-2
● Accessing Web Utilities ......................................................................................................................... 2-7
■ Setups on the Control Panel .............................................................................................. 2-8
● Steps for Network Setup ........................................................................................................................ 2-8
● Unit Info .................................................................................................................................................2-10
● Update NIC ............................................................................................................................................. 2-10
● Startup Page .......................................................................................................................................... 2-10
● TCP/IP Setup ......................................................................................................................................... 2-11
● NetWare Setup ...................................................................................................................................... 2-14
● AppleTalk Setup ....................................................................................................................................2-17
● NetBIOS Setup ...................................................................................................................................... 2-18
● FTP Setup .............................................................................................................................................. 2-19
● Email Setup ........................................................................................................................................... 2-20
● DNS Setup ............................................................................................................................................. 2-22
● Admin Password ................................................................................................................................... 2-22
● Factory Default ......................................................................................................................................2-23
■ Printing Status Page ......................................................................................................... 2-24
■ Using MAP (Management Access Program) .................................................................. 2-25
● Operating requirements ....................................................................................................................... 2-25
● Installing MAP .......................................................................................................................................2-26
● Setting up MAP ..................................................................................................................................... 2-28
● Starting MAP ......................................................................................................................................... 2-29
■ Using Web Utilities ........................................................................................................... 2-30
● Main Page ..............................................................................................................................................2-31
● Printer Status ........................................................................................................................................ 2-32
● Advanced Features ...............................................................................................................................2-33
● Network Setup .......................................................................................................................................2-35
ii
Page 5

CONTENTS
● Printer Setup ......................................................................................................................................... 2-45
● Language Select ................................................................................................................................... 2-45
● About Konica ......................................................................................................................................... 2-45
Chapter 3 Windows 95/98/Me Configuration
■ Using IP Peer-to-Peer ......................................................................................................... 3-2
● Basic TCP/IP setup ................................................................................................................................. 3-2
● Installation of IP Peer-to-Peer ................................................................................................................3-3
● Uninstallation of IP Peer-to-Peer ........................................................................................................... 3-4
● IP Peer-to-Peer setup ..............................................................................................................................3-5
● Installation of printer driver ................................................................................................................... 3-8
■ Using IPX Peer-to-Peer ..................................................................................................... 3-10
● Introduction and preparation ...............................................................................................................3-10
● Installation of IPX Peer-to-Peer ...........................................................................................................3-11
● Uninstallation of IPX Peer-to-Peer ....................................................................................................... 3-11
● IPX Peer-to-Peer setup .........................................................................................................................3-12
Chapter 4 Windows NT/2000 Configuration
■ LPD/LPR setup .................................................................................................................... 4-2
● Adding a printer port on Windows NT ..................................................................................................4-2
● Creating a printer port on Windows 2000 .............................................................................................4-5
Chapter 5 Internet Printing (IPP)
■ Settings on the Copier ....................................................................................................... 5-2
■ Settings on Windows 2000 ................................................................................................ 5-3
Chapter 6 NetWare Configuration
■ Setup with NWSetup ........................................................................................................... 6-2
● How to install ........................................................................................................................................... 6-2
● Starting NWSetup ................................................................................................................................... 6-2
● Using the NWSetup program ................................................................................................................. 6-3
■ Setup for NetWare 3.x ...................................................................................................... 6-11
■ Setup for NetWare 4.x ...................................................................................................... 6-12
● Setup information .................................................................................................................................6-12
● NDS setup ..............................................................................................................................................6-13
● Setup for Bindery Emulation ............................................................................................................... 6-13
Chapter 7 UNIX Configuration
■ UNIX printing through TCP/IP ............................................................................................ 7-2
● Introduction .............................................................................................................................................7-2
● Printing overview .................................................................................................................................... 7-3
● Configuring IP address to the network interface card ........................................................................ 7-4
● lpd UNIX Printing ....................................................................................................................................7-5
iii
Page 6

CONTENTS
Chapter 8 AppleTalk Configuration
■ Configuration for AppleTalk .............................................................................................. 8-2
■ How To Access The HTTP Server With An Web Browser ............................................... 8-2
Appendix A Troubleshooting
■ LED Status Indicator ........................................................................................ Appendix A-2
■ Resetting the Network Interface Card to Factory Default ............................. Appendix A-3
■ Status Page ....................................................................................................... Appendix A-4
■ How to Diagnose Problems ............................................................................. Appendix A-5
● Troubleshooting Network Hardware Connections ............................................................ Appendix A-5
● Troubleshooting MAP Problems ......................................................................................... Appendix A-5
● Troubleshooting NetWare Protocol ....................................................................................Appendix A-6
Appendix B Product Specifications
■ Network Interface Card specification ............................................................ Appendix B-2
■ 10/100 Base T UTP cable specifications ......................................................... Appendix B-3
■ Factory Default Settings .................................................................................. Appendix B-4
Appendix C Information for the Network Administrator
■ Using DHCP ....................................................................................................... Appendix C-2
■ Using arp command (Windows 95/98/Me/NT/2000) ....................................... Appendix C-3
■ Using BOOTP to assign IP Address ............................................................... Appendix C-4
■ Using rarp to assign IP Address ..................................................................... Appendix C-6
■ Installing UNIX-TCP/IP Programs .................................................................... Appendix C-7
iv
Page 7

■Introduction
This INSTRUCTION MANUAL discusses how to set up and operate the Network Interface Card which
comes built in to the Print Controller to let the "purpose-designed" Konica copier serve as a netowork
printer.
Refer to the separate INSTRUCTION MANUAL for the copier, as required.
Registered Trademarks
Microsoft, MS and MS-DOS are registered trademarks of Microsoft Corporation in the United States.
IBM is a registered trademark of International Business Machines, Inc. in the United States.
Windows
HP and PCL are registered trademarks of Hewlett-Packard Company.
Agfa Microtype font is a registered trademark of Agfa Corporation.
PEERLESS is a registered trademark of PEERLESS SYSTEMS CORPORATION.
Adobe, Adobe Logo, Acrobat, Acrobat Logo, PostScript and PostScript Logo are registered trademarks
or trademarks of Adobe Systems, Inc.
Other company names and product names used in this manual are the registered trademarks or trade
marks of their respective companies.
TM
is a trademark of Microsoft Corporation.
Introduction
-
Copyright
COPYRIGHT © 2001 Konica corporation. All rights reserved.
Patent Notice
The product includes an implementation of LZW licensed under U.S.Patent 4,558,302.
v
Page 8

Introduction
●About this Manual
This is a INSTRUCTION MANUAL dedicated to the Network Interface Card built into the Konica IP-511
Print Controller.
This manual offers guidance in setting up and operating a Konica's "purpose-designed" Print Controller
when it is used in combination with a dedicated Konica Copier to serve as a network printer.
We assume you are familiar with the basics of networking.
For guidance in operating the copier, print controller and scanner, refer to their separate INSTRUCTION
MANUAL as the need arises.
For instructions for operating Windows95/98/Me/NT4.0/2000, Novell NetWare and Macintosh, refer to
their manuals. For a detailed explanation of how to use applications, refer to their individual manuals.
This manual is made up of the following eight chapters and appendices:
Chapter 1 Network Function Overview
This chapter sketches out the networking features, the use of the accompanying CD-ROM, and the
network setup procedure.
Chapter 2 Setting Up the Network Function
This chapter offers an explanation of how to set up the Network Interface Card. Network settings are
made from the copier's control panel. You can also configure a variety of network settings using the
MAP (Management Access Program) included in the accompanying CD-ROM, which lets you access
the Network Interface Card Web-utilities.
Chapter 3 Windows 95/98/Me Configuration
This chapter offers an explanation of the setup procedure required for a peer-to-peer printing, a way of
handling print jobs from Windows 95/98/Me without going through dedicated print servers.
Chapter 4 Windows NT/2000 Configuration
This chapter offers an explanation of the settings required for printing from Windows NT/2000 by using
network print services across a TCP/IP connection.
Chapter 5 Internet Printing (IPP)
This chapter discusses how to produce printouts via Internet or intranet using Windows 2000.
Chapter 6 NetWare Configuration
This chapter offers an explanation of the setup procedure required for printing via networks on which
Novell NetWare is used as a network operating system.
Chapter 7 UNIX Configuration
This chapter offers an explanation of the setup procedure required for printing via networks on which
UNIX is used as a network operating system.
Chapter 8 AppleTalk Configuration
This chapter offers an explanation of the setup procedure required for printing via networks on which
AppleTalk is used as a network operating system.
Appendices
• Appendix A Troubleshooting
• Appendix B Product Specifications
• Appendix C Information for the Network Administrator
vi
Page 9

●Conventions Used in this Manual
System Requirements
Windows
The following are required to print from Windows-compliant computers to the printing system:
• Computers on which Windows 95/98/Me/NT4.0/2000 can run
• CD-ROM drive (necessary to install the printer driver or the scanner driver)
Using Windows 95/98/Me
• Microsoft Windows 95/98/Me
• 32 MB RAM or more
Using Windows NT4.0/2000
• Microsoft Windows NT4.0/2000
• 32 MB RAM or more
Macintosh
The following are required to print from the Macintosh to the Print Controller.
• Computers on which Mac OS 7.1 or higher can run
• CD-ROM drive (necessary to install the printer driver)
• PS-351
Introduction
vii
Page 10

Introduction
Notation of each product
The following abbreviations are used in this manual:
(1) IP-511 Print Controller: print controller
(2) Konica 7165 Printer/Copier: main body printer or Copier
(3) Internal Network Interface Card: network interface card
(4) A printing system that combines the above
(1), (2) and (3) products: printing system
(5) Microsoft Windows 95: Windows 95
Microsoft Windows 98: Windows 98
Microsoft Windows Me: Windows Me
Microsoft Windows NT4.0: Windows NT4.0 or Windows NT
Microsoft Windows 2000: Windows 2000
Above OSs: Windows 95/98/Me
Windows NT4.0/2000
Windows NT/2000
Windows 95/98/Me/NT/2000
Notation of cautions in this manual are shown with the caution symbol.
Each mark used in this manual has the following meaning.
Things important in operating hardware and software were described.
Precautions and limits at the time of operating hardware and software were written.
Limitations imposed by a combined use of features offered by hardware and software were
described.
Hints, advice, confirming items, etc. at the time of operating hardware and software were written.
viii
Page 11

Introduction
Notation of names shown on the screen are written within square brackets
e.g.,
"click the [OK] button."
Notation of folders
Folders are referred to in upper-to-lower sequence.
For example:
Select the [Printer.inf] file in the "PCL\English\Win9X" folder of the User Software CD.
Indicates where to be referred to for information concerned
e.g., " (p.1-1)."
When you click page number, move reference page.
ix
Page 12

Chapter 1 Network Function Overview
■ Features of the Network Function .............................. 1-2
■ Using the accompanying CD-ROM ............................. 1-3
■ Network setting procedures ........................................ 1-4
1-1
Page 13

Chapter 1 Network Function Overview
This chapter provides an overview of the network features. For the copier, Print Controller and network scan
ner, refer to their respective, separate INSTRUCTION MANUAL.
■Features of the Network Function
The network function offers the following features:
• Automatic Selection of 100BaseTX (Fast Ethernet) or 10BaseT Ethernet connection
• Multiple protocols (TCP/IP, IPX/SPX and AppleTalk [EtherTalk]) supported
• Peer-to-peer printing over TCP/IP from Microsoft Windows 95/98/Me (by using a dedicated utility,
IP-P2P)
• Peer-to-peer printing over IPX/SPX from Microsoft Windows 95/98/Me (by using a dedicated utility,
IPX-P2P)
• LPD/LPR printing over TCP/IP for Microsoft Windows NT/2000
• UNIX lpd/lpr printing through TCP/IP
• Both bindery mode and Novell Directory Services (NDS) supported to accommodate Novell
NetWare print server features
• AppleTalk printing support for the Macintosh
• Automatic IP address acquisition by DHCP
• Built-in HTTP server enables printing system management by linking with the management Access
Program (MAP) provided and a standard web browser
-
• NWSetup utility to set up NetWare from Windows 95/98/Me/NT/2000
• BOOTP Lite utility to assign IP address through Windows 95/98/Me/NT/2000
• UNIX-TCP/IP Programs supports printing from various UNIX systems
• Use of flash memory allows upgrading of firmware through network
1-2
Page 14

Chapter 1 Network Function Overview
■Using the accompanying CD-ROM
The CD-ROM contains utility programs used for the network interface card and the INSTRUCTION MANUAL
(same as this) in the form of PDF (Portable Document Format). The CD-ROM is compatible with Windows
95/98/Me/NT/2000 or Mac OS. The English language version software included in the CD-ROM includes the
following:
MAP (Management Access Program)
Utility program to let Windows 95/98/Me/NT/2000 identify IP- or IPX-based printing systems on the net
works. This also allows you to access the Web Utilities implemented in the network interface card, and
make network and printing system settings by using the Web Utilities in conjunction with Web Brows
ers.
IP-P2P
Program to execute peer-to-peer printing from Windows 95/98/Me via TCP/IP
IPX-P2P
Program to execute peer-to-peer printing through Windows 95/98/Me IPX/SPX
NWSetup
Utility program to set up Novell NetWare for the network interface card from Windows 95/98/Me/NT/
2000
BOOTP Lite
Utility program to assign IP address to the network interface card through Windows 95/98/Me/NT/2000
-
-
UNIX-TCP/IP Programs
Program for printing from various UNIX systems when not running lpd/lpr
1-3
Page 15

Chapter 1 Network Function Overview
■Network setting procedures
Before using the network interface card, you must first connect the network interface card to the network and
then perform the setup procedures for the printing system. The setup procedures depend on the system
environment.
To connect the network interface card to the network, use the Ethernet connector (RJ45) of the network
interface card and a UTP cable (of category 5, recommended).
●Windows 95/98/Me configuration (peer-to-peer)
To print over LAN (Local Area Network) in Windows 95/98/Me, with no print servers installed, you can link
your print controllers with a configuration called peer-to-peer connection. In peer-to-peer connections, TCP/
IP and IPX/SPX protocols are used, each with a dedicated utility program. Setup procedures are as follows:
For IP peer-to-peer connections
1. Make TCP/IP settings on the control panel of the copier.
(p.2-2) (p.2-8)
2. Make TCP/IP settings on your computer (Windows 95/98/Me).
(p.2-2) (p.3-2)
3. Install IP-P2P from the accompanying CD-ROM.
(p.3-3)
4. Install Printer Driver.
(p.3-8)
●Windows NT/2000 configuration (LPD/LPR)
To print by LPD/LPR from Windows NT/2000 use the following setup procedure:
1. Make TCP/IP settings on the control panel of the copier.
(p.2-2) (p.2-8)
2. Make TCP/IP settings on your computer (Windows NT/2000).
(p.2-2) (p.4-2)
3. Add/Create the Printer Port, and install Printer Driver.
(p.4-2)
1-4
Page 16

Chapter 1 Network Function Overview
●UNIX configuration (lpd/lpr)
(p.2-2)
(p.7-1)
(p.Appendix C-1).
●NetWare configuration
To print in a Novell NetWare network, setup procedures depend on the NetWare version and resource
management. As shown, each procedures is comprised of two steps. For more information about each
procedure, refer to the corresponding reference pages indicated.
With NetWare 3.x
1. Make TCP/IP settings on the control panel of the copier.
(p.2-8)
2. Using PCONSOLE, configure for print server features.
(p.6-2)
By using NDS with NetWare 4.x
1. Make TCP/IP settings on the control panel of the copier.
(p.2-8)
2. Using PCONSOLE, configure for print server features.
(p.6-2)
By using bindery emulation with NetWare 4.x
1. Make TCP/IP settings on the control panel of the copier.
(p.2-8)
2. Using PCONSOLE, configure for print server features.
(p.6-2)
●AppleTalk configuration
(p.8-1).
1-5
Page 17

Chapter 2 Setting Up the Network Function
■ General description of the network setup.................. 2-2
■ Setups on the Control Panel........................................ 2-8
■ Printing Status Page...................................................2-24
■ Using MAP (Management Access Program)............ 2-25
■ Using Web Utilities ..................................................... 2-30
2-1
Page 18

Chapter 2 Setting Up the Network Function
■General description of the network setup
With the network interface card, there are five ways to print over TCP/IP.
• Use IP/P2P in peer-to-peer printing setup via Windows 95/98/Me
• Use IPX/P2P in peer-to-peer printing setup via Windows 95/98/Me
• Use LPD/LPR via Windows NT/2000
• Use lpd/lpr via UNIX
• Use UNIX-TCP/IP Programs via UNIX
●Assigning IP Address
Before printing over TCP/IP, you first need to assign the IP address to the network interface card. There
are three ways to assign the IP address to the network interface card.
• Assign an IP address from the copier's control panel.
• Use MAP (Management Access Program) for assigning a IP address
An IP address may be assigned either automatically via DHCP (Dynamic Host Configuration Protocol) or
manually.
When initially connecting the network interface card to networks that are not using DHCP, you need to
confirm the following information:
• IP address to assign to the network interface card
• Network address of the network interface card (MAC[Media Access Control] address or Ethernet
address)
Check with the network administrator for the IP address assigned to the network interface card. The net
work (MAC) address of the network interface card is found on the Status Page (network setup list). It is
also indicated on the label on the network interface card.
(p.2-8)
(p.2-24)
Depending on the network interface card settings, the Status Page cannot be output.
For more information about setup, refer to "Network Setup" in this chapter. (p.2-35)
By Using the Control Panel
For how to setting an IP address and others from the copier's control panel.
(p.2-8)
For how to operate the control panel, refer to the Copier INSTRUCTION MANUAL.
-
2-2
Page 19

Chapter 2 Setting Up the Network Function
Using BOOTP Lite (Windows 95/98/Me/NT/2000)
From Windows 95/98/Me/NT/2000, you can use the BOOTP Lite program to assign the IP address to
the network interface card. TCP/IP must be set up correctly on the computer that will execute this pro
gram. To copy/install the program files in the Windows directory perform the following procedure:
1. Reset the print controller and the main body printer.
The BOOTP Lite program uses the BOOTP protocol. The BOOTP request is for a finite period of
time the print controller and the main body printer must be freshly reset for this to work.
2. Insert the accompany CD-ROM into CD-ROM drive, and double click [Bootpl32.exe] in
the "English\NetUtil\BOOTP" folder.
3. Pull down the [Admin] menu to [Configure] option.
-
4. Enter the [IP address] that you want to assign to the network interface card, its [Sub
net Mask] (make sure it matches what you are using on your subnet), [Default Gate
way] (your router's IP address), and the [MAC address] of the network interface card.
Use colons as delimiters as shown on the Status Page rather than the dashes Windows uses.
5. Click on Go.
6. Wait about five minutes. The network interface card should recycle and produce a
Status Page showing the IP parameters you have just entered.
7. Pull down the [Admin] menu to [Verify].
You should get a message back stating that [The Unit is Active]. If you do not get this message, verify
that TCP/IP is enabled on the Status Page.
8. When you get a response that the unit is active, you should be able to ping the net
work interface card.
-
-
-
2-3
Page 20

Chapter 2 Setting Up the Network Function
Using arp command (Windows 95/98/Me/NT/2000)
From Windows 95/98/Me MS-DOS prompt or at Windows NT/2000 command prompt, you can use the
arp command to assign the IP address to the network interface card. It is necessary that TCP/IP is set up
correctly on the computer that will execute the arp command. Perform the following procedure:
1. At Windows 95/98/Me, select [Start]->[Programs]->[MS-DOS prompt]. At Windows NT/
2000, select [Start]->[Programs]->[Accessories]->[Command prompt].
2. Execute the arp command. For example, if the MAC address of the network interface
card is 00:11:22:33:44:55 and the IP address to assign is 192.168.0.128, then input as
shown below, and then press [Enter].
(Example: C:\>arp -s 192.168.0.128 00-11-22-33-44-55
3. Turn off the main power supply to the print controller and the main body printer, then
turn it back on.
A Status Page will be output. Check that the IP address is correctly set in the list. Or, when about 5
minutes have passed after having restarted the print controller and the main body printer using the
ping command, check that the network interface card responds correctly. The ping command is also
executed at Windows 95/98/Me MS-DOS prompt or Windows NT/2000 Command prompt. An exam
ple of executing a ping command is shown below.
(Example: C:\>ping 192.168.0.128
-
4. Open the prompt window by same way as in 1.
5. Execute the ping command for the assigned IP address. In this case, no response is
returned from the network interface card.
(Example: C:\>ping 192.168.0.128
2-4
Page 21

Chapter 2 Setting Up the Network Function
Using arp command (UNIX)
From UNIX you can use the arp command to assign the IP address to the network interface card. Perform
the following procedure:
1. Turn off the print controller and the main body printer.
2. Log in as superuser on a host on the same subnet as the network interface card.
If the server resides on another subnet, complete this procedure to store the IP
address in the network interface card.
3. Find the MAC address of the network interface card. The address is printed on the
Status Page each time you turn on the print controller and the main body printer.
4. Edit the hosts file (usually /etc/hosts) or use NIS or DIS to add IP address and node
name of the network interface card. See the network administrator for the IP address.
For example, a network interface card with a name of printfast and an IP address of
192.9.200.200 has the entry:
192.9.200.200 printfast
5. Add an entry to the arp cache for IP address and MAC address of the network inter
face card, as:
arp -s 192.9.200.200 0:40:c8:0:0:ff
RS6000 (AIX) requires the ether option after arp -s. For example:
arp -s ether 192.9.200.200 0:40:c8:0:0:ff
6. Check the print controller and the main body printer to see that the network interface
card is connected to the network. Turn on the print controller and the main body
printer.
7. Send a ping command to the network interface card to verify it is running on the net
work, as for example:
ping 192.9.200.200 or ping printfast
The network interface card will not respond to this ping command but it will read its
IP address from the packets.
8. Turn off the print controller and main body printer. Turn them back on and send the
ping command again to verify that the network interface card obtained its IP address.
A confirmation message displays as:
192.9.200.200 is alive
9. Remove the entry from the arp cache using the following command. Specify the net
work interface card either by its IP address or by its name, for example:
arp -d printfast
-
-
-
2-5
Page 22

Chapter 2 Setting Up the Network Function
Using MAP
By using MAP (Management Access Program) included the accompanying CD-ROM that comes with the
network interface card, you can automatically identify the network interface card on the network and set it
up for TCP/IP by using Web Utilities. To use this method to assign the IP address to the network interface
card, the following procedure should be performed on computers in advance:
• TCP/IP correctly configured
• IPX/SPX-compatible protocol installed
• MAP installed and MAP setup correctly executed
For information about how to set up TCP/IP and how to install IPX/SPX-compatible protocol, refer to Win
dows Help menus for example.
For MAP, (p.2-25).
To change an IP address already assigned to a network interface card, you cannot use the arp
command. Use Web Utilities instead. These methods also allow you to set up subnet mask and
default gateway, etc.
-
2-6
Page 23

Chapter 2 Setting Up the Network Function
●Accessing Web Utilities
The network interface card is provided with an HTTP server which have Web Utilities through a Web
Browser, either Netscape(version 4.x or greater) or Internet Explorer (version 4.x or greater): By access
ing this server, you can change settings of the printing system. There are two ways to access Web Utili
ties, through a Web Browser, either through Netscape Navigator, version 4.x or greater or through Internet
Explorer, version 4.x or greater.
• Use MAP to have the network interface card on the networks identified automatically, thereby access
ing Web Utilities.
• Use a Web Browser to type the IP address assigned to the network interface card, and thereby access
the Web Utilities. For example:
http://192.168.0.128/
(p.2-30)
If you designate the proxy setting in your Web Browser you cannot access the Web Utilities. For
more information see your network adminisrator.
-
-
-
2-7
Page 24
Chapter 2 Setting Up the Network Function
■Setups on the Control Panel
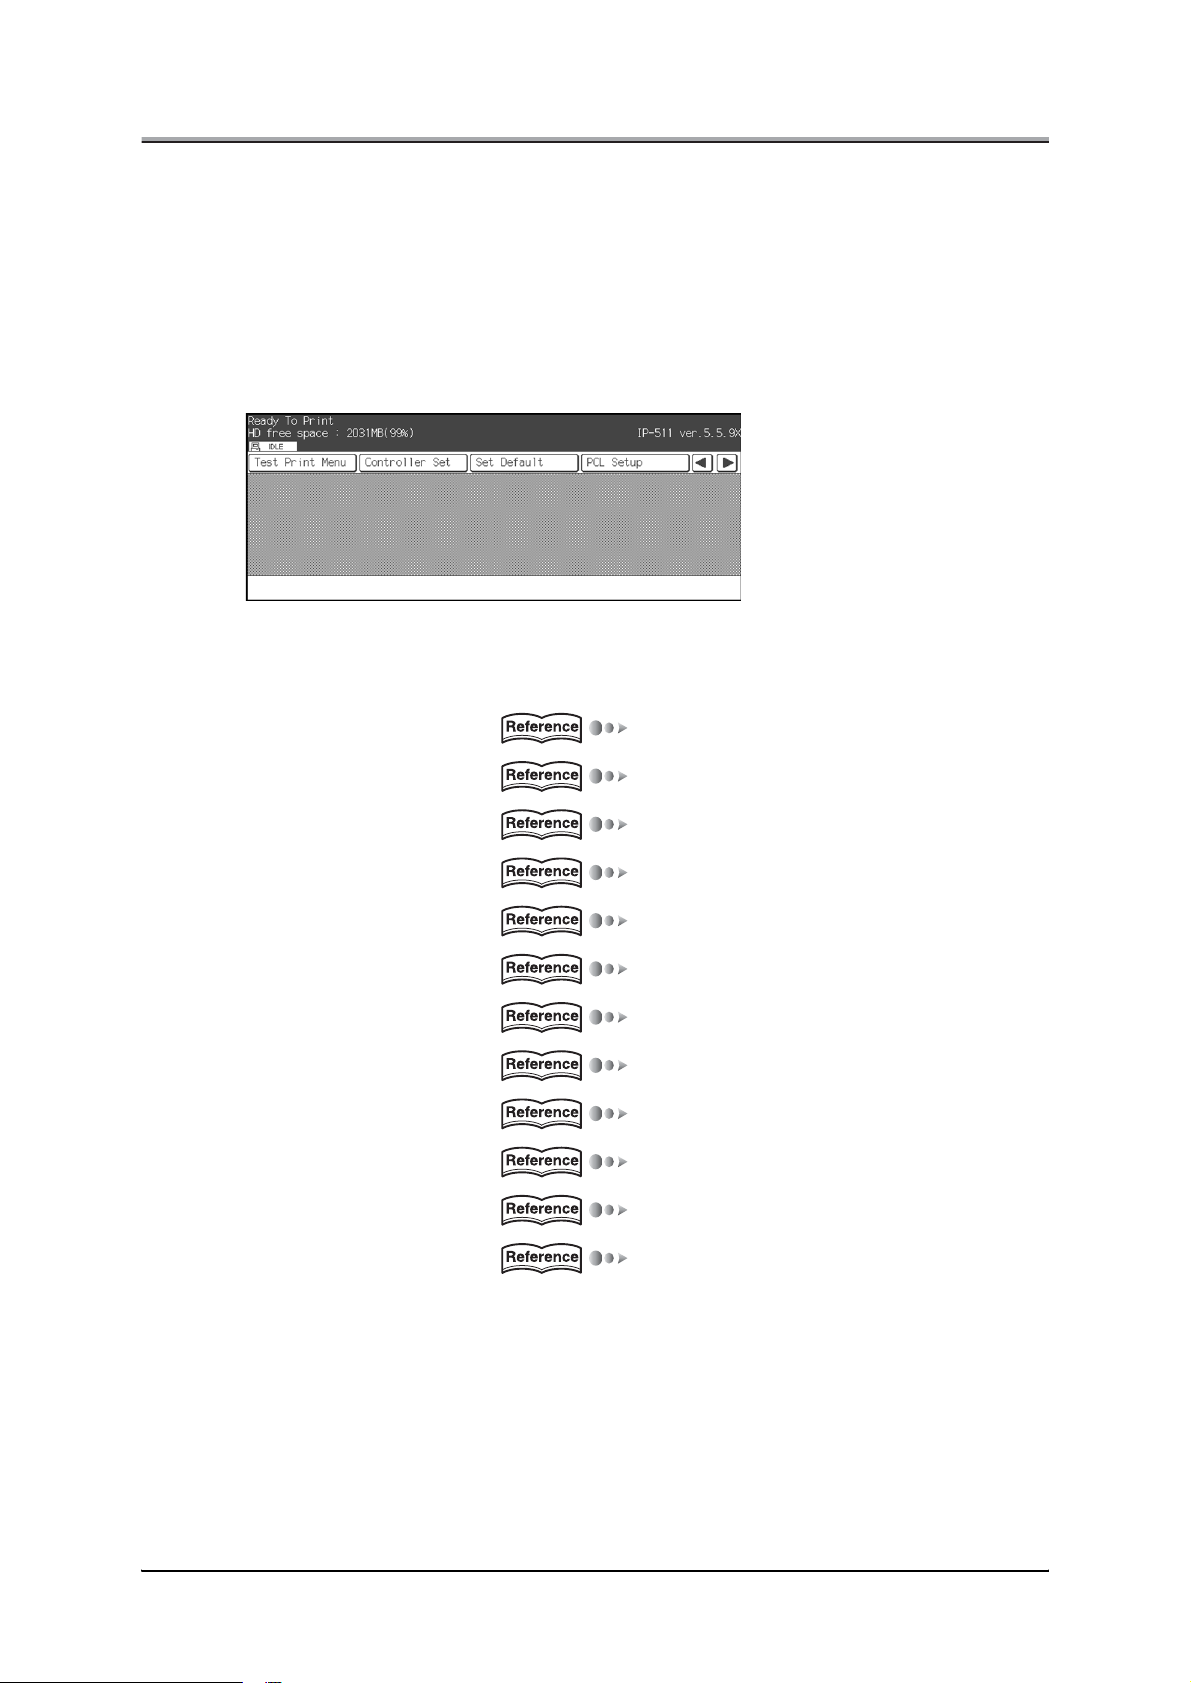
●Steps for Network Setup
A broad outline of the network setup is shown below. For setups to be performed on the copier's control
panel for other than network functions, refer to the "Print Controller INSTRUCTION MANUAL."
1. Press the [MODE] button on the control panel to get to the Printer Mode Basic
screen.
2. Select [Network Setup] key.
3. Select the necessary option from the menu and configure the setting.
The [Network Setup] menu is three layers deep, offering the following options:
Unit Info (p.2-10)
Update NIC (p.2-10)
Startup Page (p.2-10)
TCP/IP Setup (p.2-11)
NetWare Setup (p.2-14)
AppleTalk Setup (p.2-17)
NetBIOS Setup (p.2-18)
FTP Setup (p.2-19)
Email Setup (p.2-20)
DNS Setup (p.2-22)
Admin Password (p.2-22)
Factory Default (p.2-23)
2-8
Page 25

Chapter 2 Setting Up the Network Function
4. When all settings are completed, press [Update NIC] key.
5. After the Update NIC process, turn the main power to the copier off.
6. Wait at least 10 seconds and turn the copier back on.
There are occasions when the print controller malfunctions if you recycle the copier's main power
quickly. There are occasions when the Network Interface card malfunctions if you don't recycle the
copier's main power.
2-9
Page 26
Chapter 2 Setting Up the Network Function
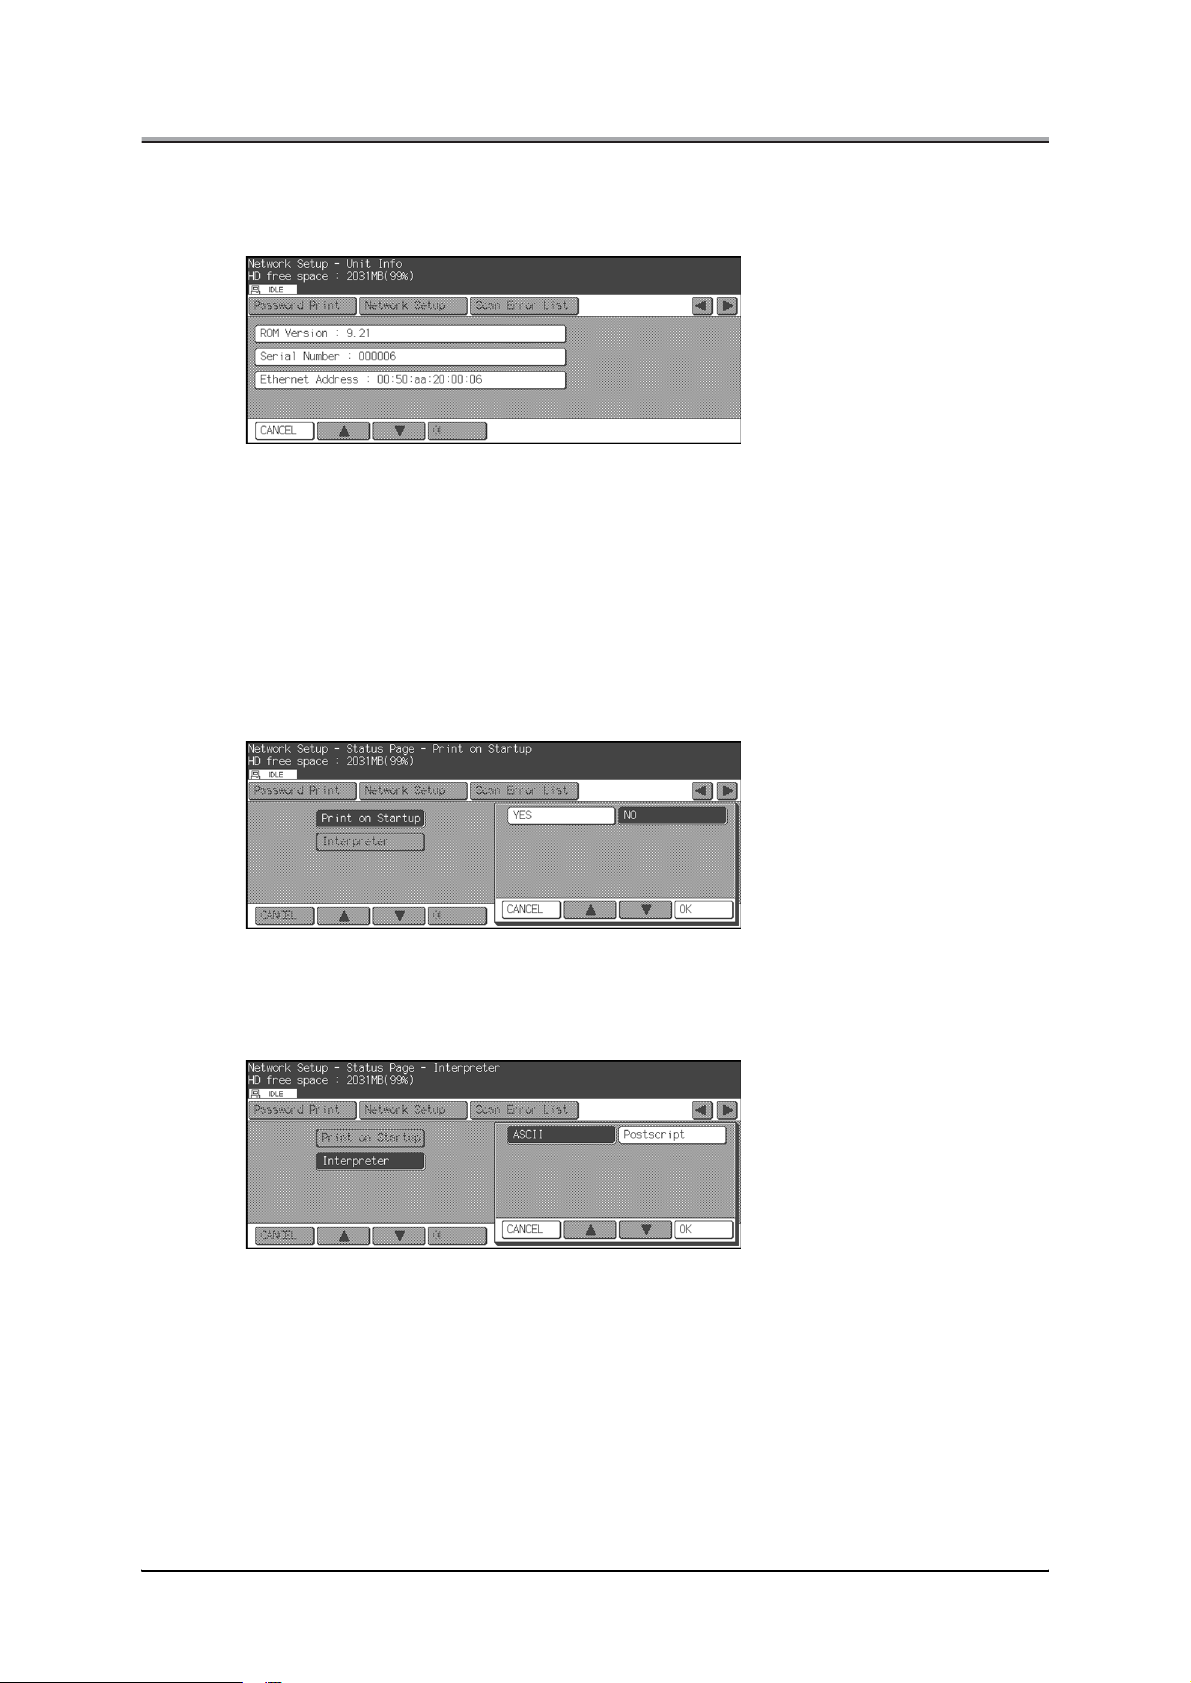
●Unit Info
Shows information about the Network Interface Card's [ROM Version], [Serial Number] and [Ethernet
Address].
●Update NIC
Lets the Network Interface Card take on your settings.
●Startup Page
Allows you to configure settings to get a network settings list, or Status Page, printed out.
Print on Startup
Lets you set whether you want to get Status Page printed out each time the copier is powered up. The
default is [NO].
Interpreter
Lets you select the interpreter from [ASCII] and [PostScript]. The default is [ASCII].
Unless you change this setting to [PostScript], you cannot get [Status Page] printed out.
2-10
Page 27
Chapter 2 Setting Up the Network Function
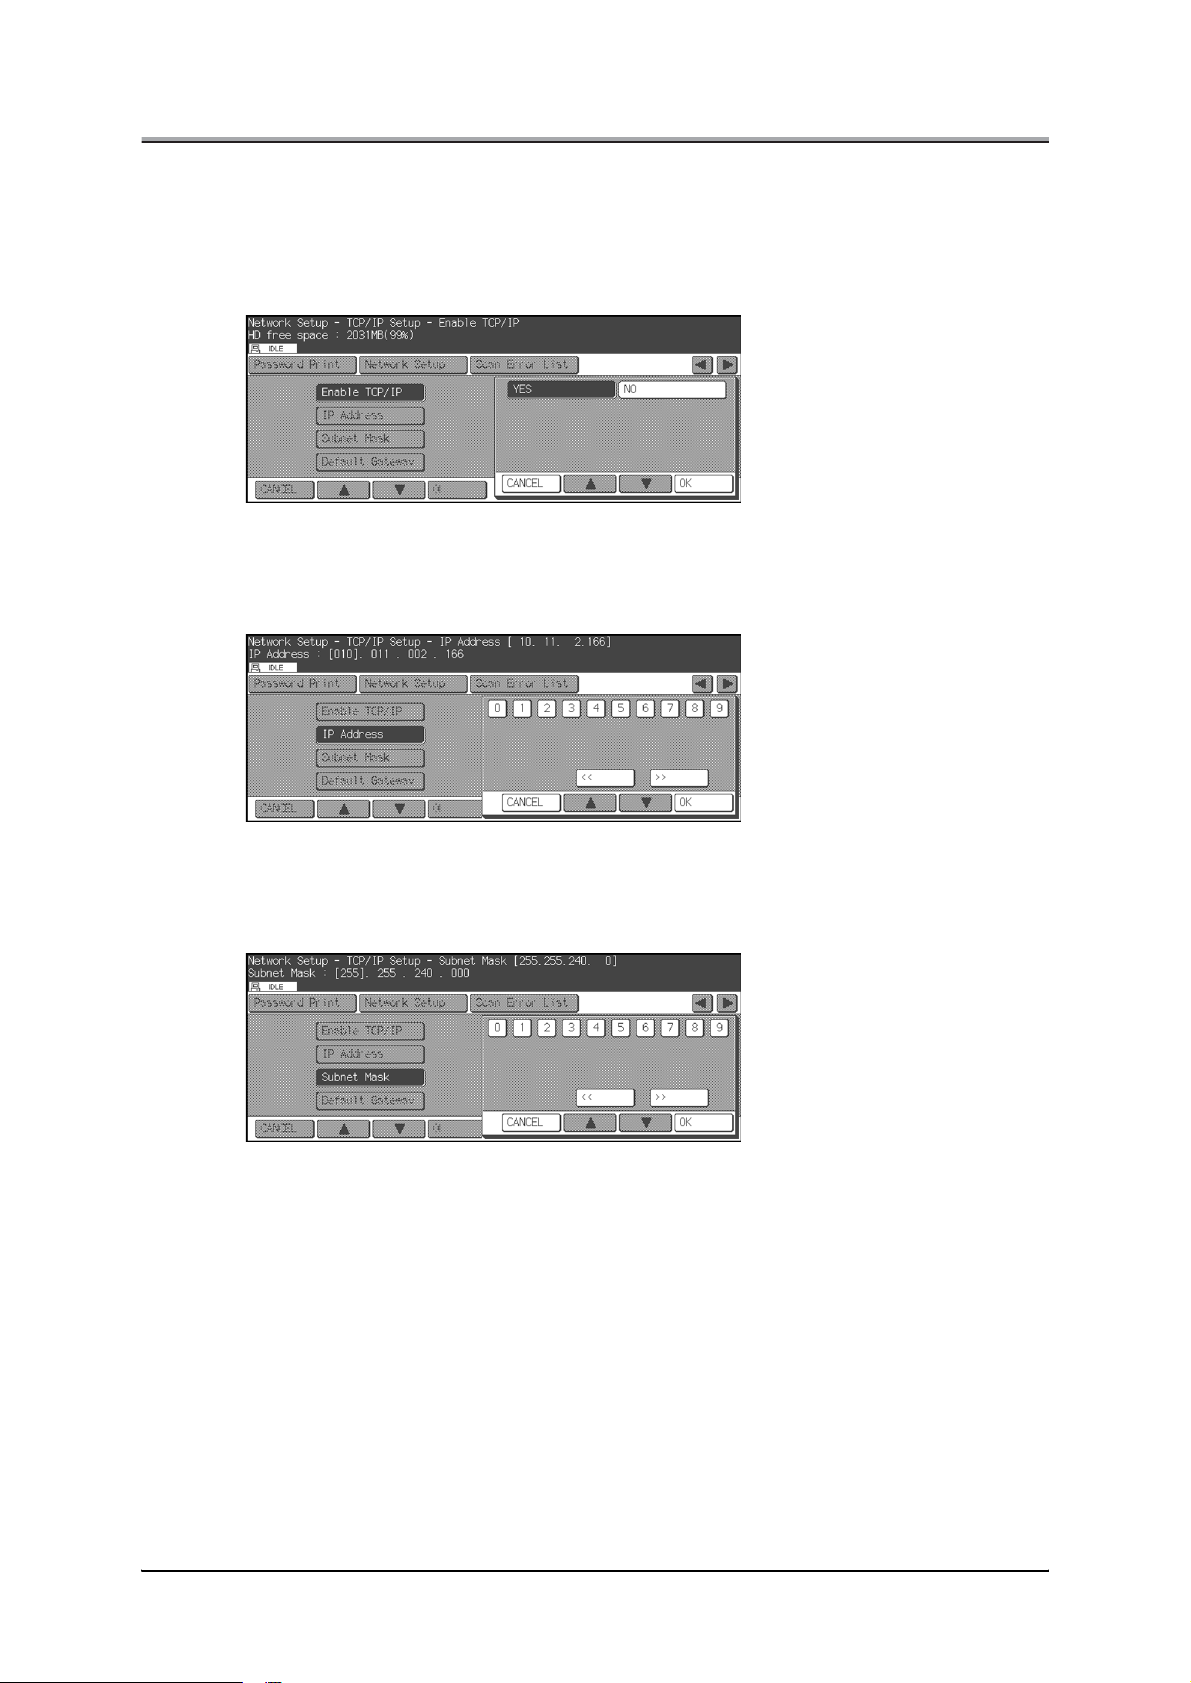
●TCP/IP Setup
Lets you configure the TCP/IP settings for printing on a peer-to-peer basis from Windows 95/98 or printing
from Windows NT across a lpd/lpr connection.
Enable TCP/IP
Lets you set whether TCP/IP is enabled or not. The default is [YES].
IP Address
Lets you enter an IP address. An IP address is made up of four sets of numbers (each from 0 to 255),
separated by dots, (e.g, [192.168.0.10]).
Subnet Mask
Lets you enter a subnet mask. A subnet mask is made up of four sets of numbers (each from 0 to 255),
separated by dots, (e.g, [225.225.225.0]).
2-11
Page 28
Chapter 2 Setting Up the Network Function
Default Gateway
Lets you enter the IP address of the default gateway. This IP address is made up of four sets of num
bers (each from 0 to 255), separated by dots, (e.g, [192.168.0.1]).
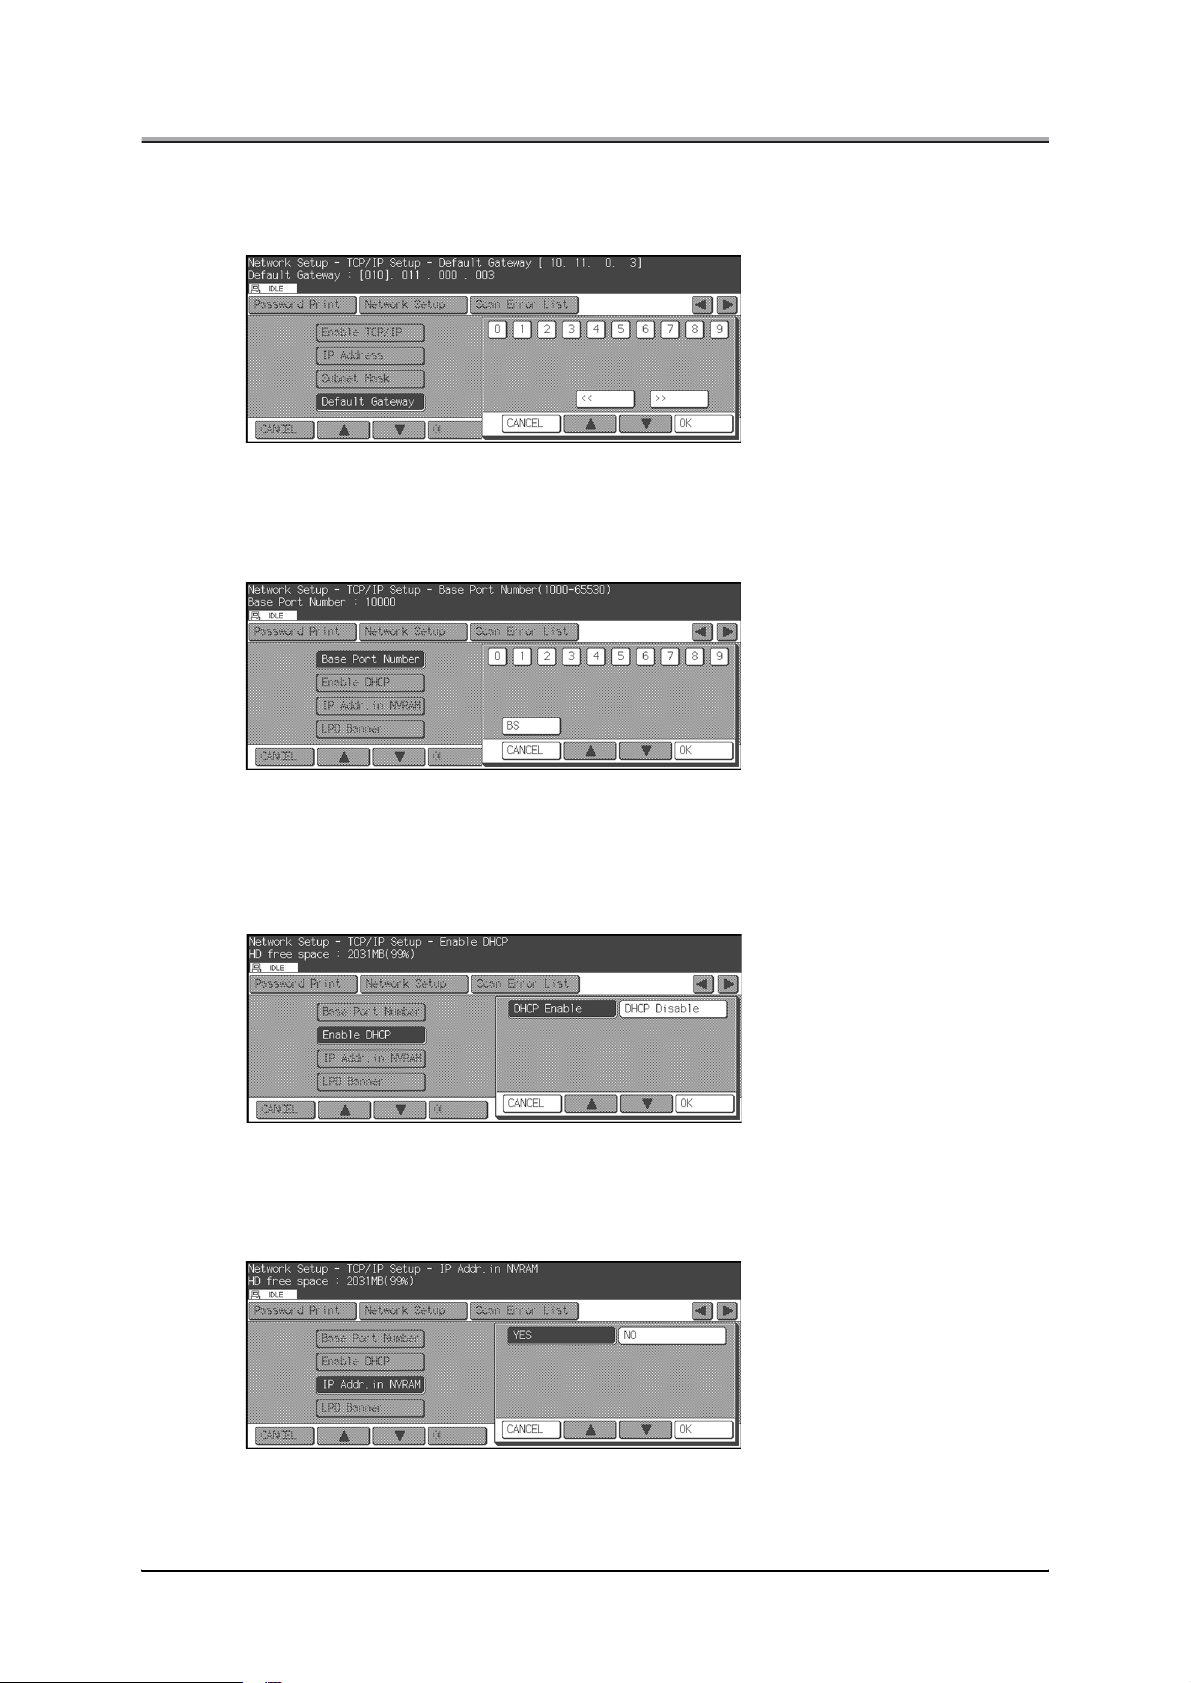
Base Port Number
Lets you enter a base port number from 1000 to 65530.
The default is [10000].
-
Enable DHCP
Lets you set whether DHCP(Dynamic Host Configuration Protocol) is enabled or not. The default is
[DHCP Enable].
IP Addr. in NVRAM
Lets you set whether the entered IP address is stored in NVRAM or not. The default is [YES].
2-12
Page 29

Chapter 2 Setting Up the Network Function
LPD Banner
Lets you set whether the LPD banner is printed or not when printing via lpd/lpr. The LPD banner is the
capability of printing print information as a banner page when printing via lpd/lpr. The default is [NO].
2-13
Page 30
Chapter 2 Setting Up the Network Function
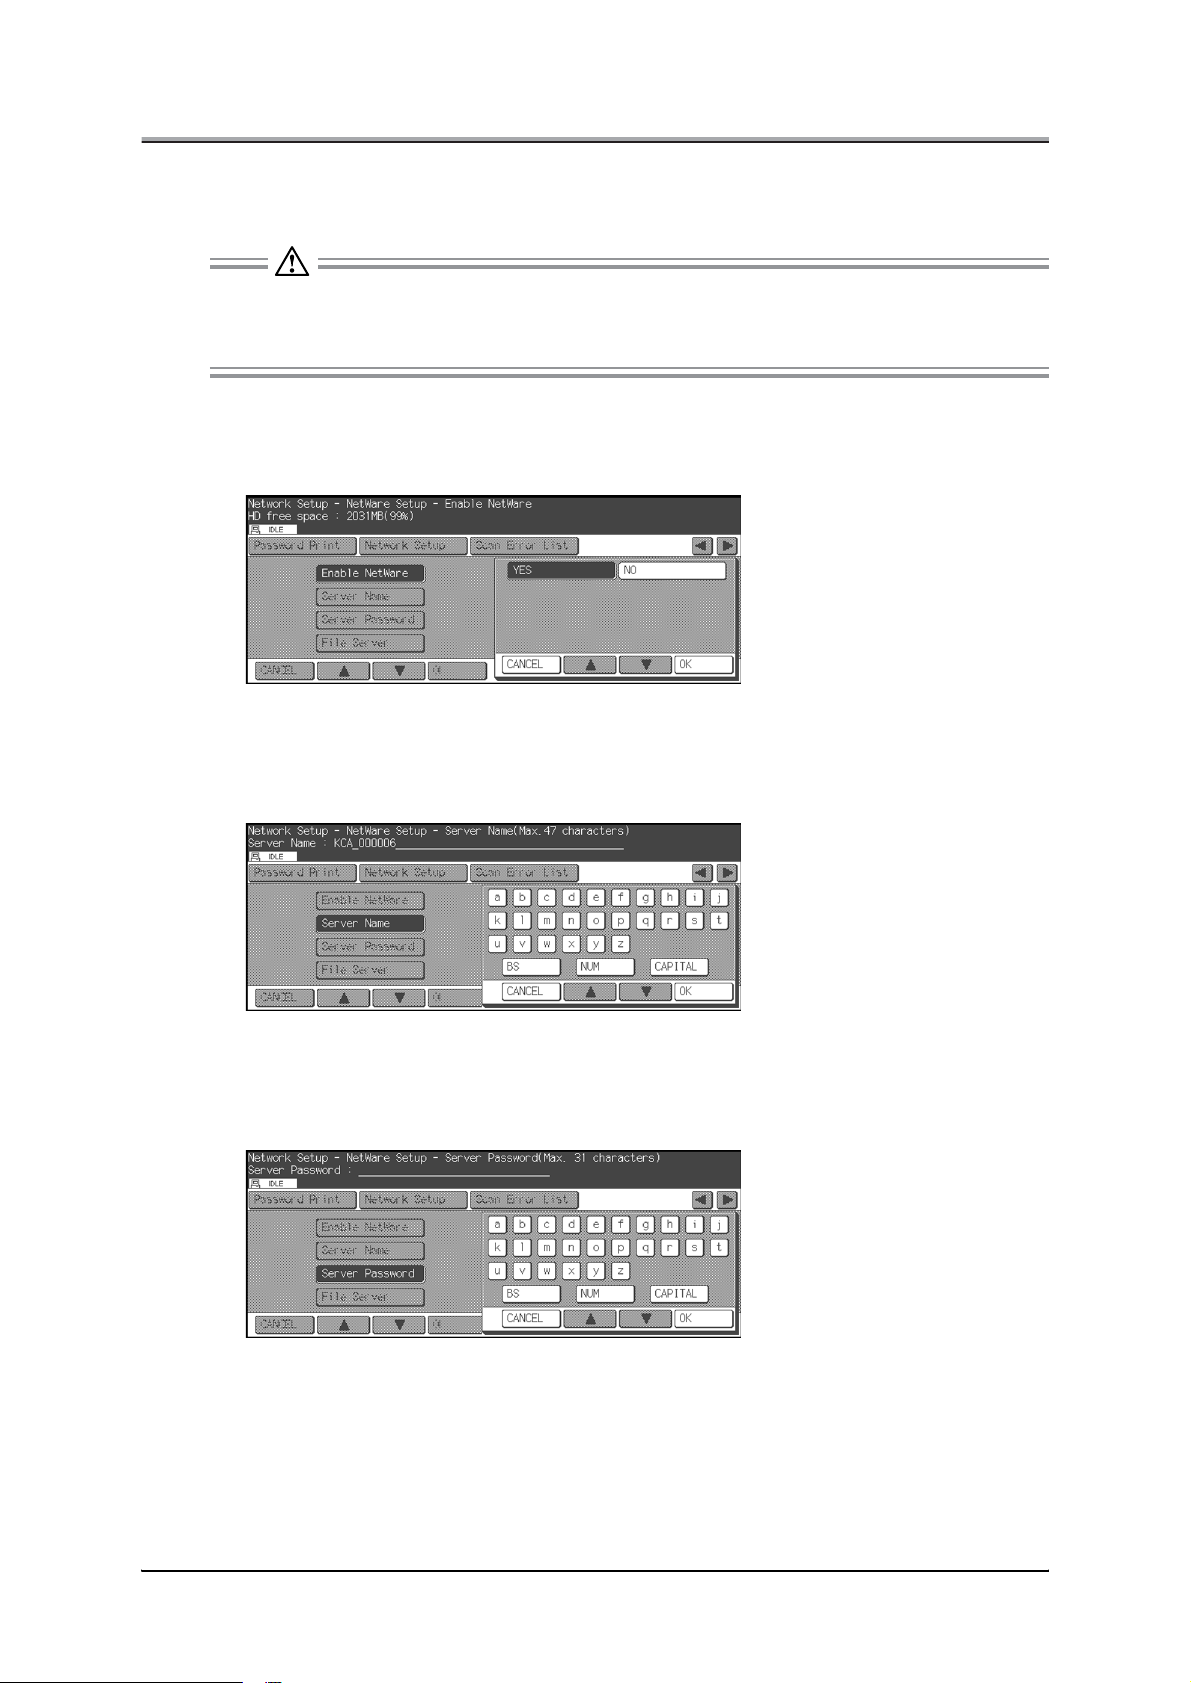
●NetWare Setup
Lets you set up settings for printing under NetWare.
The Network Interface Card takes long to start up if Novell NetWare is not a primary protocol and
NetWare is enabled.
Be sure to select [No] to disable NetWare in an environment where Novell NetWare is not used.
Enable NetWare
Lets you set whether NetWare is available or not. The default is [YES].
Server Name
Lets you enter the name of the NetWare print server.
• A maximum of 47 bytes of symbols and alphanumeric characters is available.
Server Password
Lets you enter a password for the NetWare print server.
• A maximum of 31 bytes of symbols and alphanumeric characters is available.
2-14
Page 31

Chapter 2 Setting Up the Network Function
File Server
Lets you enter a password for a NetWare file server.
• A maximum of 47 bytes of symbols and alphanumeric characters is available.
NDS Context
Lets you enter the name of an NDS context (example: ou=standard.ou=organization_1).
• A maximum of 127 bytes of symbols and alphanumeric characters is available.
NDS Tree
Lets you enter the name of an NDS Directory tree.
• A maximum of 47 bytes of symbols and alphanumeric characters is available.
Queue Scan Rate
Lets you set up intervals (from 1 to 255 seconds) at which the Network Interface Card scans for new
print queues. The default is [1] second.
2-15
Page 32

Chapter 2 Setting Up the Network Function
Frame Type
Lets you select frame types from the following for use on a LAN. The default is [Auto].
1. Auto 2. Ethernet 802.2 3. Ethernet 802.3
4. Ethernet II 5. Ethernet SNAP
Disable Bindery
Lets you disable/enable bindery services of NetWare 4.x or later. Selecting [YES] disables bindery ser
vices and selecting [NO] enables bindery services. The default is [NO].
-
2-16
Page 33

●AppleTalk Setup
Lets you set up settings for printing via AppleTalk.
Enable AppleTalk
Lets you set whether AppleTalk is enabled or not. The default is [YES].
Printer Name
Lets you enter the name of a copier (NIC) used on an AppleTalk network.
• A maximum of 32 bytes of symbols and alphanumeric characters is available.
Chapter 2 Setting Up the Network Function
You cannot use the following symbols.
(, ), *, @, -, =, :
Zone Name
Lets you enter the zone in which the Network Interface Card sits. Leave the field blank if there are no
zones to specify (on networks without seed routers). No prints can be produced without specifying the
correct zone.
• A maximum of 32 bytes of symbols and alphanumeric characters is available.
2-17
Page 34

Chapter 2 Setting Up the Network Function
●NetBIOS Setup
Lets you set up settings for printing over a NetBIOS network.
NetBIOS Name
Lets you enter the NetBIOS name of the copier.
• A maximum of 15 bytes of symbols and alphanumeric characters is available.
Primary Server
Lets you enter an IP address of a primary print server.
• This is made up of four sets of numbers (each from 0 to 255), separated by dots.
Secondary Server
Lets you enter an IP address of a secondary print server.
• This is made up of four sets of numbers (each from 0 to 255), separated by dots.
2-18
Page 35

Chapter 2 Setting Up the Network Function
●FTP Setup
Lets you set up settings for sending scanned image data to FTP servers.
FTP Port Number
Lets you enter an FTP port number between 1 and 65535. The default is [21].
FTP Timeout
Lets you enter an FTP timeout value between 1 and 60 (sec.). The default is [15 sec].
2-19
Page 36

Chapter 2 Setting Up the Network Function
●Email Setup
Lets you set up settings for sending scanned image data by way of email.
SMTP Server Name
Lets you enter the name of an SMTP server.
• A maximum of 239 bytes of symbols and alphanumeric characters is available.
SMTP Port Number
Lets you enter an SMTP port number between 1 to 65535. The default is [25].
SMTP Timeout
Lets you enter an SMTP timeout value between 1 to 60 (sec.). The default is [15 sec].
Max. Message Size
Lets you enter a maximum SMTP message size between 10 to 1000 (x 100 KB). The default is [999 x
100 KB].
2-20
Page 37

Chapter 2 Setting Up the Network Function
From
Lets you enter the system administrator's email address. All returned mails from the system are sent
back to the system administrator at this address.
• A maximum of 239 bytes of symbols and alphanumeric characters is available.
Subjects
Lets you enter the subject of an email within the length of 45 bytes (alphanumeric characters).
Message Body
Lets you enter an email body text up to 239 bytes long (alphanumeric characters).
2-21
Page 38

Chapter 2 Setting Up the Network Function
●DNS Setup
Lets you set up DNS(Domain Name Service) settings for the network your copier is connected to.
DNS Server
Lets you enter the address of a DNS server.
• This is made up of four sets of numbers (each from 0 to 255), separated by dots.
NIC Domain Name
Lets you enter the domain mane of a network interface card.
• A maximum of 127 bytes of symbols and alphanumeric characters is available.
●Admin Password
Lets you enter a password between 4 and 8 bytes or change the current one. You can use numbers, as
well as alphabetical letters. The default is [sysadm]. To change the password, enter it in [Current Pass
word], enter a new password in [New Password], and again enter the new password in [Confirmation].
If all is OK, press the [OK] button to validate the change.
If you have forgotten the renewed password, you can enter [3069] in [Current Password], enter a
new password in [New Password] and [Confirmation].
-
2-22
Page 39

Chapter 2 Setting Up the Network Function
●Factory Default
Lets you reset all the network configurations to default settings. To do this, you need to enter a password.
You also need to recycle the power to the copier to complete the process.
2-23
Page 40

Chapter 2 Setting Up the Network Function
■Printing Status Page
To print the Status Page, select [Printer Setting]-[Test Print Menu]-[NIC Config.].
(p.Appendix A-4)
2-24
Page 41

Chapter 2 Setting Up the Network Function
■Using MAP (Management Access Program)
A utility called MAP is provided on the CD-ROM that comes with the network interface card.
This program automatically identifies the network interface cards on the networks and lists them on Web
Browser screen. From this Web Browser list you can select a network interface card to change its settings
and control Web Utilities.
●Operating requirements
MAP is a utility that runs on Windows 95/98/Me/NT/2000. It identifies the network interface cards on the
networks and achieves connection with HTTP servers implemented on the network interface cards. The
MAP itself has no interface, so either of the following Web Browsers is required as an interface:
• Netscape Navigator (version 4.x or greater)
• Interment Explorer (version 4.x or greater)
To use Web Browser, it is necessary that a TCP/IP protocol be installed to the Windows compliant com
puter.
And to identify the network interface cards, it is necessary that a TCP/IP protocol or an IPX protocol be
set up beforehand both on the network interface cards and on the Windows capable computers.
-
2-25
Page 42

Chapter 2 Setting Up the Network Function
●Installing MAP
Perform the following steps to install MAP:
1. Insert the accompanying CD-ROM into the CD-ROM drive, and double-click on
[Setup.exe] in the "\English\NetUtil\Map" folder.
[Welcome] window will appear.
2. Click the [Next] button.
[Installation Notes] window will appear.
3. Click the [Yes] button.
[Choose Destination Directory] window will appear.
Confirm a folder to install MAP. By default settings, the folder is C:\Program Files\MAP.
2-26
Page 43

Chapter 2 Setting Up the Network Function
4. Confirm a folder to install MAP.
Default is "C:\Program Files\MAP".
5. Click the [Next] button.
[Select Program Folder] window will appear.
6. Click the [Next] button.
Necessary files will be copied from the "User Software CD" to complete the installation.
2-27
Page 44

Chapter 2 Setting Up the Network Function
●Setting up MAP
As a result of executing the MAP setup program, two programs, "MAP Setup” and “MAP" are installed.
The MAP Setup is a program to set up a necessary environment for MAP which identifies the network
interface cards. To use the MAP, it is necessary to execute the MAP Setup program first.
To start the MAP Setup program, select [Start]-->[Programs]-->[Map]-->[MAP Setup]. When the program
starts, the following display will appear.
At the MAP Setup stage, you need to specify protocols used by the network interface cards and a maxi
mum IP hop number. To do this, indicate check-mark next to [Search for IPX based printers] for IPXbased network interface cards, and [Search for IP based printers] for IP-based network interface cards.
When using an IP protocol, specify [Max Hops for IP Search], in which case you can select a number
between 0 and 15. The default number is set to 2. If you select 0, only segments pertaining to computers,
which restart the MAP, are found. If you select 2, all networks which are accessible passing through two or
less routers are found.
Note that selecting a large number can result in the occurrence of a large volume of traffics at one
time.
-
2-28
Page 45

Chapter 2 Setting Up the Network Function
●Starting MAP
To start the MAP, select [Start]-->[Program]-->[Map]-->[MAP].
Once started, MAP searches for the network interface cards existing on the networks according to the
MAP setup. When identifying the network interface card, MAP starts a Web Browser specified as stan
dard, and displays a list of available network interface cards. By default, the network interface card is
named "KCA_(serial number)". When you select a desired network interface card from the list, the
[MainPage] of Web Utilities is displayed.
-
If you designate the proxy setting in your Web Browser you cannot access the Web Utilities. For
more information see your network adminisrator.
2-29
Page 46

Chapter 2 Setting Up the Network Function
■Using Web Utilities
The default language of the Web Utilities is set to English. To switch to another language, click
[Language Select] in the main menu and select another language, [French], for example.
You can use the MAP or specify IP addresses of the network interface cards in a Web Browser to access
Web Utilities. A Web Browser enables you to set up as well as obtain information on the print controllers
displayed. A Web Browser has the following options in its main menu. By clicking on them, you can jump
to specific pages.
To change Web Utilities settings, you need to enter a password and then click the [Accept Settings]
button. The default password is [sysadm].
• Main Page
• Printer Status
• Advanced Features
• Network Setup
• Printer Setup (currently not available)
• Language Select
• About Konica
2-30
Page 47

Chapter 2 Setting Up the Network Function
●Main Page
Displays basic information regarding the current print controller status. Click on the "REFRESH" button to
view updated information.
Status
Displays print controller status.
Printer Configuration
Displays the status of the paper tray and the printer configuration when you click on a illustration of
the main body printer.
Print Controller
Displays the controller configuration when you click on [Print Controller].
2-31
Page 48

Chapter 2 Setting Up the Network Function
●Printer Status
Displays information on the status of the print controller, main body printer, and print jobs. Click on the
[REFRESH] button to display updated information.
Model: IP-511
Network Card Serial Number:
000006
Controller Status Jobs Waiting
IP-511
Engine Status Remaining time
7165
Ready
Ready
Ready to
Print
1
(min)
Controller Status
Displays print controller status. When you click on the model number of a print controller, the con
troller configuration shows in detail.
Engine Status
Displays the status of the main body printer. When you click on the model number of a copier, the
paper tray status and printer configuration are displayed.
Jobs Waiting
Displays the total number of jobs read into the main body printer.
Remaining Time
Displays the time remaining unit the printing process is complete.
-
2-32
Page 49

Chapter 2 Setting Up the Network Function
●Advanced Features
You can check and change the default settings for scanning features-related servers. After setting each of
the following settings, enter a password before clicking [Accept Settings]. You can click [Clear Input] to
cancel your entry.
The default password is [sysadm].
After changing settings, you need to turn the copier's main power off and wait 10 seconds or more
before turning it on again.
Network Card Serial Number 000006
ScanServer Configuration
Default FTP Client Parameters
Default FTP Command Port
FTP Server Access Timeout
Default SMTP Message Parameters
SMTP Server IP Address
or DNS Name
SMTP Server Port Number
SMTP Access Timeout
Maximum Message Size
From:
Subject:
Sender:
Message Body:
KCA_000006@domain_name.com
Subject: This is the Subject
Scan To Email
21
15
seconds
0 0 0 0
. . .
25
15
seconds
999
* 100 kilobytes
A password is required to perform this function.
Accept Settings Clear Input
Default FTP Client Parameters
Let you set up new defaults for use when uploading scanned image data to FTP servers.
Default FTP Command Port
Lets you set up a new default value between 1 to 65535. The factory default is [21].
FTP Server Access Timeout
Lets you set up a new default value between 1 to 60 (sec.). The factory default is [15] (sec.).
2-33
Page 50

Chapter 2 Setting Up the Network Function
Default SMTP Message Parameters
Let you set up default values for use when sending scanned image data by way of email.
SMTP Server IP Address or DNS Name
Lets you enter the IP address of an SMTP server or a DNS name.
SMTP Server Port Number
Lets you enter an SMTP port number between 1 to 65535. The factory default is [25].
SMTP Access Timeout
Lets you enter an SMTP access timeout between 1 to 60 (sec.). The factory default is [15] (sec.).
Maximum Message Size
Lets you set up a maximum SMTP message size between 10 to 1000 (x 100 KB).
The factory default is [999] (x 100 KB).
Scan To Email
Lets you set up a system administrator's email address, subject, and body text as default settings when
sending scanned image data by way of email.
From:
Lets you enter the system administrator's email address. Returned mails from the system are sent to
the system administrator at this address.
Subject:
Lets you enter an alphanumeric subject of email message up to 45 bytes long.
Sender:
Here you can enter an email address of the sender.
This entry is required when the mail sender is not the machine administrator.
Message Body:
Lets you enter a body text up to 239 bytes long (alphanumeric characters).
2-34
Page 51

Chapter 2 Setting Up the Network Function
●Network Setup
The network setup page allows you to check selected options and change specific settings. The following
descriptions explain the function of each item.
After changing settings, you need to turn the copier's main power off and wait 10 seconds or more
before turning it on again.
Model: IP-511
Network Card Serial Number:
000006
System Protocols Others
Reset Setup NetWare Test Printer
Factory Default Setup TCP/IP
Unit Status Setup AppleTalk
Network Address Setup IPP
Change Password
Configure Status
Page
[System]
Reset
Resets the network interface card to make newly set up parameters effective but does not reset the main
body printer and the print controller. To reset the main body printer and print controller, turn off main
power supply, then turn it back on after 10 seconds more.
To reset, enter a password before clicking [RESET]. The default password is [sysadm].
Factory Default
Switches all settings on the network interface card back to their factory default (or initial) values. When
operating a printer in a new environment use this feature to clear all setting values except the serial num
ber and MAC address of the network interface card.
To set back to factory defaults, enter a password before clicking [Restore Factory Default (Requires Net
work Reset)] button. The default password is [sysadm].
-
-
2-35
Page 52

Chapter 2 Setting Up the Network Function
Unit Status
Displays the status of a protocol effective on a selected network interface card. In the uppermost line, the
corresponding protocol (NetWare, TCP/IP or AppleTalk) is displayed whether that protocol is currently
enabled or not. You can change settings using [Setup NetWare], [SetupTCP/IP] and [Setup AppleTalk] in
the protocols group.
Network Address
Displays the serial number and MAC address of the selected network interface card.
Change Password
Allows you to set up or change a password. To change the current password, type it in the [Old Password]
Input field, type a new password in the [New Password] Input field, and then type the same new password
in the [Retype New Password] field, for confirmation. Finally, click on [Accept Settings] to make the new
password effective.
After having changed the password, if you forgot your new password, you can enter [3069] in [Cur
rent Password] and an another new password in [New Password] and [Confirmation]. You can set
up a new password this way.
Remember, [3069] is an "ad hoc" password, and this password does not allow you to access any
password protected settings.
-
2-36
Page 53

Chapter 2 Setting Up the Network Function
[Protocols]
Setup NetWare
For each of the following setup items selected, you can click [Accept Settings] to continue the process, or
you can click on [Clear Inputs] to cancel the setup process.
Keep in mind that a valid password is required after you enter data or change settings on the screen.
The default password is [sysadm].
After changing settings, you need to turn the copier's main power off and wait 10 seconds or more
before turning it on again.
Network Card Serial Number 000006
NetWare Configuration
Enable NetWare:
Print Server Name:
Print Server Password:
Password Retype:
Preferred File Server:
Preferred NDS Context:
Preferred NDS Tree:
Print Queue Scan Rate:
Ethernet Frame Type:
Disable Bindery:
✔
KCA_000006
1
Auto-Sense 802.3 Ethernet II SNAP 802.2
A password is required to perform this function.
Accept Settings Clear Input
[ Home | Unit Info ]
Enable NetWare
When this box is checked, Novell NetWare (IPX/SPX) is enabled as a protocol for print servers. For print
servers on which NetWare is not a primary protocol, be sure to uncheck this box to disable NetWare.
Default is Off.
If Novell NetWare is not a primary protocol and this box is checked, the Network Interface Card
takes long to start up.
Be sure to select [Off] to disable NetWare in an environment where Novell NetWare is not used.
2-37
Page 54

Chapter 2 Setting Up the Network Function
Print Server Name
Each Novell print server has its own name, as assigned. For the print server (network interface card), a
default name, "KCA_(serial number)", is used. The serial number is shown in the Status Page as well as
on the label affixed to the back of the network interface card.
If you want to use a name other than the default name or if you want to change the currently assigned
name, you can type a new print server name into this field. 63 characters can be typed in half size. It is
imperative that the name be identically changed on PCONSOLE as well. Otherwise, your newly entered
name will be ineffective.
Print Server Password
The network administrator assigns passwords to Novell print servers. When passwords are assigned with
PCONSOLE or NWADMIN, those passwords should be set up on the print servers. In Bindery mode, only
upper case passwords can be used.
When typing a password into this field, it must be identical to the password assigned through PCONSOLE
or NWADMIN. The typed password is stored in print server setup memory. For assigning passwords using
PCONSOLE, refer to the Novell manual.
When setting up a print server password, type a password into the [Print Server Password] field, and then
again type the same password into the [Password Retype] field for confirmation. This password is com
mon to all file servers assigned to the print server.
Clicking the [Accept Settings] button will have no effect unless you type one and the same password both
in the [Print Server Password] and [Password Retype] fields.
Password Retype
Type a password here, for confirmation.
-
Preferred File Server
Type a primary file server name in this field to designate a particular file server for your print server to
access. This feature allows you to access a desired file server and avoid accessing an undesired file
server as when the system is set to search for a file server.
Preferred NDS Context
If you are using Novell NetWare 4.x Directory Services, type a preferred NDS context here. The preferred
NDS context needs to be a complete context name. Do not type a period (".") in the front of the context
pass. You do not need to type a container name (print server name) since it is in the name field above.
Here are examples of contexts with type:
Complete Context
o=standard.ou=organization_1
Or Simple Context
standard.organization_1
For further details, check with the system administrator.
Preferred NDS Tree
If you are using Novell NetWare 4.x Directory Services, type a preferred NDS tree in this field. If you do
not know the preferred NDS tree, type WHOAMI from the MS-DOS command line, then press [Enter] for
confirmation.
Print Queue Scan Rate
This option lets you select a queue scan rate for adjusting intervals at which the print server (network
interface card) polls the networks when searching for new print queue. You can type a number between 1
and 255 (seconds).
2-38
Page 55

Chapter 2 Setting Up the Network Function
Ethernet Frame Type
This option lets you select a frame type appropriate to networks in use. To select [Auto Sense] is to let a
proper frame type be automatically selected. To do this, you can either click on the radio button corre
sponding to the frame type in use or click on [Auto-Sense].
Disable Bindery
Bindery Services of Novell NetWare 4.x or greater are disabled when this box is checked and enabled
when this box is not checked. When Bindery is disabled, print servers connected to the Bindery file server
are not supported.
-
2-39
Page 56

Chapter 2 Setting Up the Network Function
Setup TCP/IP
For each of the following items selected, click [Accept Settings] to continue the setup process, or click on
[Clear Input] to cancel the process.
Keep in mind that a valid password is required after you can enter data or change settings on the screen.
The default password is [sysadm].
After changing settings, you need to turn the copier's main power off and wait 10 seconds or more
before turning it on again.
Network Card Serial Number 000006
TCP/IP Configuration
Enable TCP/IP:
IP Address:
Subnet Mask:
Default Gateway:
Base Port Number:
DHCP:
IP Address in NVRAM:
Enable LPD Banner:
Domain Name Server:
NIC Domain Name:
NetBIOS Name:
Primary NetBIOS Name Server:
Secondary NetBIOS Name Server:
NetBIOS (WINS) Naming
✔
IP Settings
10 11 2 166
. . .
255 255 240 0
. . .
10 11 0 3
. . .
10000
DHCP Settings
LPD Settings
DNS Settings
0 0 0 0
domain_name.com
KCA_000006
10 11 2 110
. . .
10 11 16 99
. . .
✔
2-40
IP Address
Type an IP address of the network interface card if it is not in the IP address list on the screen. Check the
address with the system administrator. The default setting is set to "0.0.0.0", which means no IP address
is set up. This does not mean the IP address is set to 0s.
Subnet Mask
Type a subnet mask of the network interface card if it is not in the list on the screen.
Default Gateway
Type a gateway IP address if necessary. Otherwise you can leave this blank.
Base Port Number
Change this parameter as required. You can enter a number between 1000 and 65530.
The default is [10000].
Page 57

Chapter 2 Setting Up the Network Function
DHCP
Checking this box allows the network interface card to automatically obtain an IP address from the DHCP
server. When you check DHCP, you either need to assign the IP address to 0.0.0.0 or uncheck IP Address
in NVRAM.
IP Address in NVRAM
Check this box to enable the network interface card to store its IP address in NVRAM (non-volatile mem
ory).
Enable LPD Banner
Checking this box lets the main body printer print out LPD Banner page for each print job only for the LPD/
LPR printing.
Domain Name Server
Change this parameter as required. You can leave this field blank if you want.
NIC Domain Name
Change this parameter as required. You can leave this field blank if you want.
NetBIOS Name
Change this parameter as required. You can leave this field blank if you want.
-
Primary NetBIOS Name Server
Change this parameter as required. You can leave this field blank if you want.
Secondary NetBIOS Name Server
Change this parameter as required. You can leave this field blank if you want.
2-41
Page 58

Chapter 2 Setting Up the Network Function
Setup AppleTalk
For each of the following items selected, click [Accept Settings] to continue with the setup process, or click
[Clear Inputs] to cancel the setup process.
A default password is [sysadm].
After changing settings, you need to turn the copier's main power off and wait 10 seconds or more
before turning it on again.
Network Card Serial Number 000006
AppleTalk Configuration
Enable AppleTalk:
Printer Name:
Zone Name:
A password is required to perform this function.
✔
KCA_000006
*
Accept Settings Clear Input
[ Home | Unit Info ]
Enable AppleTalk
This check box for AppleTalk toggles the network interface card between disabled and enabled.
Check this box to enable AppleTalk.
Printer Name
This is a printer (network interface card) name used on the AppleTalk network. A default name is
"KCA_(serial number)."
2-42
You cannot use the following symbols.
(, ), *, @, -, =, :
Zone Name
Shows a zone in which the network interface card resides. Leave this blank if no zone is created as when
using networks that have no seed routers. Printing will not start unless the zone name is designated cor
rectly.
-
Page 59

Chapter 2 Setting Up the Network Function
Set IPP Printer Attributes
Let you set up IPP (Internet Printing Protocol) settings.
After setting each of the following settings, enter a password before clicking [Accept Settings]. You can
click [Clear Input] to cancel your entry. The default password is [sysadm].
After changing settings, you need to turn the copier's main power off and wait 10 seconds or more
before turning it on again.
Network Card Serial Number 000006
Set IPP Printer Attributes
Printer Name
KCA_000006
Printer Location
Printer Information
More Printer Information
Printer Driver Installer
Printer Make and Model
Printer Manufacturer
Message from Operator
A password is required to perform this function.
Accept Settings Clear Input Restore Factory Defaults
[ Home | Unit Info ]
Printer Name
Lets you enter the name of the printer.
Printer Location
Printer Information
More Printer Information
Printer driver Installer
Printer Make and Model
Printer Manufacturer
Message from Operator
When an IPP-compliant printer, configuring these settings allows you to check on printer information in
very simple operations.
2-43
Page 60

Chapter 2 Setting Up the Network Function
[Others]
Test Printer
Click on [Start Test] to run a printer test. This requires a previously entered password. The default pass
word is [sysadm].
Configure Status Page (Status Page Menu)
This determines whether or not to output a Status Page (network setup list) when the network interface
card has started up. By default, the list is output. After changing this option, you can type a password and
click [Accept Settings], thereby enabling the new setting. You can also print out the Status Page by click
ing Generate Now button after typing the password. The default password is [sysadm].
Network Card Serial Number 000006
Status Page Menu
Print Status Page on Startup
PostScript ASCII
A password is required to perform this function.
Generate Now Accept Settings Clear Input
[ Home | Unit Info ]
✔
-
-
2-44
When printing the Test Print page or the Status Page, make sure to select the appropriate printer
language for your current environment.
Page 61

Chapter 2 Setting Up the Network Function
●Printer Setup
This page is not available for the present.
●Language Select
This determines in what language the Web Utilities are displayed. The default language is English. To exe
cute this feature, type in a password. The default password is [sysadm]. If Web pages are not correctly dis
played, click on the [REFRESH] button.
Model: IP-511
Network Card Serial Number:
000006
Select Desired Locale
English
Japanese
German
French
Spanish
A password is required to perform
this function.
Accept Settings Clear Input
-
-
Language
English
Japanese
German
French
Spanish
●About Konica
This is a link to the Konica's Web site.
2-45
Page 62

Chapter 3 Windows 95/98/Me Configuration
■ Using IP Peer-to-Peer ................................................... 3-2
■ Using IPX Peer-to-Peer............................................... 3-10
3-1
Page 63

Chapter 3 Windows 95/98/Me Configuration
This printing system employs peer-to-peer printing, a method which sends the print job directly to the print
controller from the Windows 95/98/Me compliant computer, not through the dedicated print server.
■Using IP Peer-to-Peer
As peer-to-peer printing uses the network protocol TCP/IP, the network interface card must be set up for
TCP/IP in advance. For each of the Windows 95/98/Me computers that perform peer-to-peer printing, it is
necessary to set up TCP/IP, install and set up [IP-P2P] included in the accompanying CD-ROM provided,
and set up the printer driver.
●Basic TCP/IP setup
Select [Network] from the [Control Panel] of a Windows 95/98/Me computer that uses the main body
printer via the network interface card to display the [Network] dialog box. Click the [Configuration] tab and
make sure that [TCP/IP] exists in the list of [The following network components are installed]. If it is not
found, add TCP/IP. See Windows 95/98/Me Help or some other means to add TCP/IP.
3-2
When [TCP/IP] exists in the [The following network components are installed] list, confirm the accuracy of
the values of the IP address, etc. Select [TCP/IP] and click the [Properties] button. The [TCP/IP Proper
ties] dialog box appears. Click the [IP Address] tab and confirm or define the TCP/IP address and subnet
mask assigned to the computer. Continue the setup procedure on another screen as necessary. Click
the [OK] button to return to the Network dialog box.
Consult the network administrator to determine the values of parameters for the IP address. If the
IP address is inadequate, failures may occur in various locations in the network.
-
Page 64

Chapter 3 Windows 95/98/Me Configuration
●Installation of IP Peer-to-Peer
To install the IP Peer-to-Peer, double click [Setup.exe] in the [IP-P2P] folder of the accompanying CDROM. The installer will start up. Install the program according to the instructions displayed on the screen.
The [IP Peer-to-Peer Setup] dialog box will appear while installation is still in progress. Set up the neces
sary items shown in the next paragraph.
1. Insert the accompanying CD-ROM into the CD-ROM drive, and double-click on
[Setup.exe] in the "\English\NetUtil\IP-P2P" folder.
[Welcome] window will appear.
-
2. Click the [Next] button.
[Installation Notes] window will appear.
3-3
Page 65

Chapter 3 Windows 95/98/Me Configuration
3. Click the [Yes] button.
[Choose Destination Directory] window will appear.
4. Confirm a folder to install IP-P2P.
Default is C:\Program Files\IP-P2P.
5. Click the [Next] button.
[Select Program Folder] window will appear.
6. Click the [Next] button.
Necessary files will be copied from the "User Software CD" to complete the installation.
●Uninstallation of IP Peer-to-Peer
When uninstalling the IP Peer-to-Peer, perform the following procedure.
1. Change the printer port or delete the printing system using IP Peer-to-Peer from the
[Printer] folder.
2. Delete the [IP-P2P] by using [Add/Delete Applications] from the [Control Panel].
3-4
Page 66

Chapter 3 Windows 95/98/Me Configuration
●IP Peer-to-Peer setup
You can set up the IP Peer-to-Peer while installation is in process.
To change the setting, select [Start] --> [Programs] --> [Ip-p2p] --> [IP-P2P] to start up IP Peer-to-Peer.
Setting IP Peer-to-Peer
1. Once IP Peer-to-Peer begins the [IP Peer To Peer Setup] dialog box appears to enable
you to set up the [Max Hops for], [IP Port], and [Printer Names] of the printing sys
tem.
-
Max Hops for
IP Peer-to-Peer broadcasts a search for the network interface card on the network.
The default of Max Hops for (0-15) is 2. When the value is set to 0, a search will be exercised only in the
segment in which the computer with an activated IP Peer-to-Peer belongs. When the value is 2, up to two
network routers will be searched everywhere accessible via up to two routers. Note that the greater the
value of Maximum Hop Count, the more traffics generated.
IP Port
You need to enter the same number as set in the copier by selecting [TCP/IP Setup]-[Base Port Number].
The Default is [10000].
Printer Names
Designate the network interface card name indicated when you selected the printer port during the printer
driver setup. You may use the serial number of the network interface card, IP address, DNS name, or any
unit name as the network interface card name.
To change the currently assigned printer name, restart Windows. Then execute the IP Peer-to-Peer again
to set up the network interface card for printing via IP Peer-to-Peer. The [Printers] dialog box can be dis
played by clicking the [Printers...] button.
[OK] button
Exits IP-PeerToPeer with saving your setting.
[Cancel] button
Exits IP-PeerToPeer without saving your setting.
[Printers...] button
Gets the [Printers] dialog displayed.
[Help] button
Allows you to get help.
-
3-5
Page 67

Chapter 3 Windows 95/98/Me Configuration
2. Click [Printers...] button to display the [Printers] dialog box.
Set up the network interface card to print by using the IP Peer-to-Peer. You can search the list avail
able network interface card and manually add or remove network interface cards to the Windows Port
Listing.
-
The following options are available on this screen:
OK
Accepts all changes made to setup and exits to the previous screen.
Cancel
Discards any changes made to setup and exits to the previous screen.
Add
Allows a user to manually add a printer to the [Available Printers] list by inputting the information in the
fields to the left of the buttons. By Adding a printer to the list in this manner, the user bypasses the
[Search] function. The port is not checked to see if it is actually available on the network.
• IP Address
Enter the IP address of the printer you wish to add to the list manually.
• Name
Enter the name you wish the printer to be listed by in the [Unit Name] field.
• Port
You need to enter the same number as set in the copier by selecting [TCP/IPSetup]-[Base Port
Number], plus one [1]. The default is [10001].
• Description
Enter the description you wish listed in the [Description] field for the printer.
Delete
Deletes the highlighted printer(s) from the [Available Printers] list below. Printers deleted in this fashion
will no longer be listed in the [PORT] listing when adding a printer. However, This does not actually delete
the printer from the network, it only removes it from the list maintained on this computer.
The printer may be re-added to the list by selecting the [Find Printers] button (described below) as long as
it remains connected to the network.
3-6
Page 68

Chapter 3 Windows 95/98/Me Configuration
Find Printers
Initiates a search routine out to the network. This routine will then list all printers found on the network by
the method defined in the previous setup screen. The default method for displaying the list of printers is by
IP Address.
Clear
Clears the [Available Printers] list below. This will not clear any printer marked with the [Permanent] flag.
Select
Flags the highlighted printer(s) with the [S] flag. Only 30 printers may be selected at one time. When dis
playing the [PORT] list during the process of adding or changing a printer, only Selected printers will be
displayed.
Permanent
Flags the highlighted printer(s) with the [P] flag. Any printer marked with this flag will not be removed from
the [Available Printers] list, even if the printer is physically removed from the network or the [Clear List]
button is selected (described above)
Available Printers
List of printers that was detected on the network. This list can be cleared using the [Clear List] button
(described above) and this list can be updated or refilled using the [Find Printers] button (described
above). Printers in this list are described with three fields:
• Unit Name
Printer Name method defined in the previous screen. The default Printer Name method is by IP
address. Printers may also be displayed by the NIC Serial Number, by the DNS Name of the
printer, or by the Unit Name. The Unit Name is the [Print Server Name] defined in the NIC.
• Unit IP
Actual IP address of the unit. This is displayed regardless of which Unit Name method is
selected.
• Port Number
Currently you do not need to type anything in this field.
• Description
Printer's description. This field usually contains the manufacturer's name and the printer's
model.
• Flags
[S], selected or [P], permanent. Any printers marked with an [S] flag will be displayed in the
Window's Port Listing. When displaying the Windows port list during the process of adding or
changing a printer, only Selected printers will be displayed. Only 30 printers may be selected at
one time.
Any printer marked with a [P] flag will not be removed from the [Available Printers] list, even if
the printer is physically removed from the network or the [Clear List] button is selected.
-
3. Click the [OK] button when all settings are completed.
All setting values are stored when you return to the [IP Peer to Peer Setup] dialog. If you click the
[Cancel] button before clicking [OK], the changed values will not be saved.
3-7
Page 69

Chapter 3 Windows 95/98/Me Configuration
●Installation of printer driver
When all settings are completed, install the printer driver. In case of using the IP Peer-to-Peer, specify the
connection type as [Local], and the printer name set in the IP Peer-to-Peer to the [Printer Port].
For more information on installation and setting of the printer driver, refer to the Konica INSTRUCTION
MANUAL designed for your specific print controller model.
1. Turn on the computer and start Windows.
Exit from all active Windows applications, if required.
2. Click the [Start] button of the task bar. Then, select [Settings] from the Start menu to
click [Printers] from the sub-menu.
The [Printers] window will open.
3. Double-click the [Add Printer] icon of the [Printers] window.
The [Add Printer Wizard] will appear for setting the printer.
4. Click the [Next] button.
The window to select the printer manufacturer and model will appear.
5. Select [Local] and click the [Next] button.
When the printing system is directly connected to a computer in which the printer driver will be
installed, select [Local].
The window to select the printer manufacturer and model will appear.
6. Click the [Have Disk] button.
The [Install From Disk] window will appear.
7. Click the [Browse] button.
The [Open] window will appear.
8. Set the "User Software CD" on the CD-ROM drive.
9. Select the [oemsetup.inf] file in the "\English\Printer\Win9x_Me" folder of the "User
Software CD" and click the [OK] button.
The [Install From Disk] window will appear.
10. Click the [OK] button.
The next [Add Printer Wizard] window to select the printer manufacturer and model will appear.
3-8
Page 70

Chapter 3 Windows 95/98/Me Configuration
11. Be sure that in the list of [Printers], [Konica IP-511 PCL] is highlighted, then click the
[Next] button.
The next [Add Printer Wizard] window to assign a port will appear.
12. From [Available ports], choose the printer name you have set up at [IP PeerToPeer
Setup].
A screen will appear at which you can check/change the printer name.
13. Specify the printer name and click the [Next] button.
Default: [Konica IP-511 PCL]
The next [Add Printer Wizard] window to perform the test page will appear.
14. Select whether you will perform the print test.
Select [Yes (recommended)] to perform the test page, or select [No] not to print it.
15. Click the [Finish] button.
Necessary files will be copied from the "User Software CD" to complete the installation.
The printer driver of the printing system becomes available without restarting your computer.
3-9
Page 71

Chapter 3 Windows 95/98/Me Configuration
■Using IPX Peer-to-Peer
Windows Peer-to-Peer printing allows Windows 95/98/Me computers to print to the printing system with
out an intervening server and without using IP. The main features of the Windows IPX Peer-to-Peer print
ing are as follows:
• Runs on Windows 95/98/Me "out of the box".
• Runs on networks that do not have a NetWare file server, as well as those that do.
• Implements IPX peer-to-peer bi-directional printing between Windows PCs and the printing system.
●Introduction and preparation
The Peer-to-Peer implementation uses the IPX/SPX stacks that are provided with Windows 95/98/Me.
The IPX Peer-to-Peer provided will establish a connection with the printers supporting IPX Peer-to-Peer,
without using an intermediate file server, whether or not your network uses Novell NetWare.
When configuring the network capabilities for the Windows computer, you must include the [IPX/SPX
Compatible Protocol]. If you are not using NetWare, you do not need to activate any NetWare Client appli
cation.
This inclusion of IPX/SPX can also be done after initial Windows installation by going to the [Network]
setup function under [Control Panel]. To do this, you will need the Windows CD.
-
-
-
Because Peer-to-Peer uses the IPX/SPX Protocol, Novell operation must remain enabled on the
network interface card, even if traditional Novell printing facilities are not being used. The name of
the Peer-to-Peer printer, as it appears in the Windows Port List, is the same as the Novell Print
Server name, and may be changed by changing the Novell Print Server name using the Web Utility
or MAP utility.
On power up, the network interface card checks the network to see if there is Novell activity. If there is, it
will use the same frame type and the local network number that it senses. If, in addition, the network inter
face card can log on to a file server, it will assume that Novell is normally used and will store this frame
type and new number in NVRAM so that, when it comes up again, it will not have to spend the time sens
ing (which can take some time).
However, if the network interface card cannot attach to a file server, it will use the sensed values, but will
not store them.
If the network interface card does not see any Novell activity, it will use 802.2 on 802.3 as a frame type
and will assign itself a network number of 0. The frame type and network number being used is reported
on the Status Page.
If a network interface card is being moved from a site that had active Novell to a site that does not, the unit
should be reset to factory default to clear the frame type and network number information.
-
-
3-10
Page 72

Chapter 3 Windows 95/98/Me Configuration
●Installation of IPX Peer-to-Peer
To install the IPX Peer-to-Peer, perform the following procedure:
1. Set the accompanying CD-ROM on the CD-ROM drive.
2. From the Windows main window, click on [Start].
3. Click on [Run].
4. From [Run], type <CDROM drive>:\English\NetUtil\IPX-P2P\setup.exe.
5. Click on [OK].
6. At the [IPX Peer-to-Peer Setup] screen, click on [Next].
If setup detected a previous installation of the IPX Peer-to-Peer, it will prompt you to have Setup
delete the old driver and continue the installation procedure. Click on [Yes] or [No]. Once the IPX
Peer-to-Peer is installed, each printer on the network that supports this peer-to-peer capability will
appear as a [Port] under [Printer Properties].
To use the Peer-to-Peer connection, create a logical printer using the [Add Printer Wizard] accord
ing to the instructions for the print controller. Set up the printer as a [LOCAL] printer. Use the driver
that came with the print controller. When the [Add Printer Wizard] asks you to choose the [Port],
select the name of the Peer-to-Peer printer you wish to print to. When you complete the installation,
select the [Print Test Page] option.
-
●Uninstallation of IPX Peer-to-Peer
1. Delete the printer using IPX Peer-to-Peer from the [Printer] folder.
2. Delete the [IPX-P2P] by using [Add/Delete Applications] from [Control Panel].
3-11
Page 73

Chapter 3 Windows 95/98/Me Configuration
●IPX Peer-to-Peer setup
IPX Peer-to-Peer printing allows you to print to a network printer for networks without a file server or for
networks where you do not want to use the network interface card for printing.
Use peer-to-peer printing on Windows 95/98/Me systems. Click on the [IPX-P2P] menu item in Windows
to bring up the [IPX Setup] window.
In the IPX Setup window, You may select up to 30 active IPX-P2P ports to be active in your port listing.
Selected printer/ports are marked with an "S ".
You may select any number of printers/ports to be permanent. This means that if you "Clear" the printer
list, these printers/ports will remain. Permanent printers/ports are marked with a "P".
An explanation for each field on the screen is described below
:
OK
Accepts changes made to setup and exits the program.
Cancel
Discards any changes made to setup and exits the program.
Clear
Clears the [Available Printers] list below. This will not clear any printer marked with the [Permanent] flag.
Delete
Deletes the highlighted printer(s) from the [Available Printers] list below. Printers deleted in this fashion
will no longer be listed in the [PORT] listing when adding a printer.
However, this does not actually delete the printer from the network, it only removes it from the list main
tained on this computer. The printer may be re-added to the list by selecting the [Find Printers] button
(described below) as long as it remains connected to the network.
Permanent
Flags the highlighted printer(s) with the [P] flag. Any printer marked with this flag will not be removed from
the [Available Printers] list, even if the printer is physically removed from the network or the [Clear List]
button is selected (described above).
Find Printers
Initiates a search routine out to the network. This routine will then list all printers found on the network by
their print server name (defined in the printer). The default Print Server Name for a printer is a three letter
identifier and the six digit serial number of the network interface card (e.g., KCA_(serial number)).
Select
Flags the highlighted printer(s) with the "S" flag. Only 30 printers may be selected at one time. When dis
playing the [PORT] list during the process of adding or changing a printer, only [Selected] printers will be
displayed.
-
-
3-12
Page 74

Chapter 3 Windows 95/98/Me Configuration
Available Printers
List of printers that was detected on the network. This list can be cleared using the [Clear List] button
(described above) and this list can be updated or refilled using the [Find Printers] button (described
above).Printers in this list are described with three fields:
• Unit Name
This is the print server name defined in the printing system. The default print server name for a
printing system is a three letter identifier and the six digit serial number of the network interface
card (e.g., KCA_(serial number)).
• Description
Printer's description. This field usually contains the manufacturer's name and the printer's
model.
• Flags
[S], selected or [P], permanent. Any printers marked with an [S] flag will be displayed in the
[Window's Port] Listing. When displaying the Windows port list during the process of adding or
changing a printer, only [Selected] printers will be displayed. Only 30 printers may be selected
at one time.
Any printer marked with a [P] flag will not be removed from the [Available Printers] list, even if
the printer is physically removed from the network or the [Clear List] button is selected.
Add Printers for IPX Peer-To-Peer Printing
Step 1: Use IPX-P2P to Add Printers
1. To start the IPX Peer-to-Peer, select [Start]->[Programs]->[IPX-P2P]->[IPX-P2P].
2. A list of available IPX-enabled printers is displayed after a brief pause while the pro
gram searched the network.
3. Highlight the printer(s) you wish to have displayed in the Windows Printer Port listing
and click
This will ensure these the printers are included in the Windows Printer Port listing. You may have a
maximum of 30 printers selected at any one time.
"Select".
4. Click [OK] when you have finished selecting all the printers you wish to have dis
played in the Windows Printer Port list.
-
-
3-13
Page 75

Chapter 3 Windows 95/98/Me Configuration
Step 2: Use the Add Printers option in Windows.
1. Click on the Add Printer button.
2. Select Local Printer from the menu.
3. Select the make and model of the printer you want to use. A list of printer ports
appears. Any IPX peer-to-peer printers that have been selected from IPX-P2P Setup
will appear in this list.
4. Select the IPX printer you want to use.
5. Complete the remainder of the printer setup procedure as you would normally.
You may change the printer driver setting at a later time by doing the following:
1. Right click on the printer driver icon and select properties.
2. Select the Details tab (it may take up to 15 seconds to access).
3. Click on the arrow in the box labeled Print to the Following Port.
4. Select the printer address you wish to use.
5. Click OK.
3-14
Page 76

Chapter 4 Windows NT/2000 Configuration
■ LPD/LPR setup.............................................................. 4-2
4-1
Page 77

Chapter 4 Windows NT/2000 Configuration
The network interface card is equipped with the standard print server protocol (LPD: Line Printer Daemon)
for TCP/IP, which enables you to use network printing service for TCP/IP (LPR: Line Printer Remote) from
Windows NT 4.0 (Service Pack 3 or later) or Windows 2000 computers to print.
To use the TCP/IP network protocol for LPD/LPR printing, the network interface card must be set up for TCP/
IP in advance.
Confirm that TCP/IP is set up correctly on the Windows NT/2000 computer using the main body
printer via the network interface card before setting up the print controller. For TCP/IP setting refer
to Windows NT/2000 on-line help, etc.
■LPD/LPR setup
●Adding a printer port on Windows NT
To print by LPD/LPR from Windows NT computer, add a printer port and install the printer driver on Windows
NT.
Before doing
Confirm the following settings:
• TCP/IP setting to each Windows NT computer
• Installation of [Microsoft TCP/IP Printing]
Installation of [Microsoft TCP/IP Printing]
Select [Network] from the [Control Panel] of Windows NT 4.0 to display the [Network] dialog box.
Click the [Service] tab and make sure that [Microsoft TCP/IP Printing] exists in the list of [Network
Services].
If it is not found, add it. For details, see Windows NT on-line help, etc.
To add a various services to Windows NT, the CD-ROM for setting up Windows is required.
4-2
Page 78

Chapter 4 Windows NT/2000 Configuration
Adding a printer port
To add a printer port, perform the following procedure. The CD-ROM containing the printer driver must be
on hand:
1. Click the [Start] button and select [Printers] from [Settings].
2. Double-click [Add Printer] to activate [Add Printer Wizard].
3. Select [My Computer] and then click [Next].
4. Click the [Add Port] button.
5. Select [LPR Port] from [Available Printer Ports] in the [Printer Port] dialog box. Click
the [New Port] button.
4-3
Page 79

Chapter 4 Windows NT/2000 Configuration
6. Type the IP address assigned to the network interface card for [Name or address of
server providing lpd] in the [Add LPR compatible printer] dialog box.
7. Type [PORT1](upper case) for [Name of printer or print queue on that server], and
click the [OK] button.
8. In the list of available ports, put a checkmark next to the LPR port you created and
click [Next].
9. You come to the step of installing the printer driver. Follow the wizard information.
For more details on printer driver installation, refer to the Konica INSTRUCTION MANUAL designed for
your specific print controller model.
4-4
Page 80

Chapter 4 Windows NT/2000 Configuration
●Creating a printer port on Windows 2000
To print by LPD/LPR from Windows 2000 computer, create a printer port and install the printer driver on Win
dows 2000.
Before doing
Confirm the following settings:
• TCP/IP setting to each Windows 2000 computer
• Installation of [Print Services for Unix]
Installation of [Print Services for Unix]
Select [Network and Dialup Connections] from the [Control Panel] of Windows 2000 to display the
[Network and Dialup Connections] dialog box. Then select the [Optional Networking Components]
in the [Advanced] menu to indicate the [Optional Components Wizard].
Select the [Other Network File and Print Services] and then click the [Details] button to display the
[Other Network File and Print Services] dialog box. Make sure that the [Print Services for Unix] is
checked.
If it is not checked, add it. For information regarding adding the [Print Services for Unix], see Win
dows 2000 on-line help, etc.
To add a various services to Windows 2000, the CD-ROM for setting up Windows is required.
-
-
4-5
Page 81

Chapter 4 Windows NT/2000 Configuration
Creating a printer port
To add a printer port, perform the following procedure. The CD-ROM containing the printer driver must be
on hand:
1. Click the [Start] button and select [Printers] from [Settings].
2. Double-click [Add Printer] to activate [Add Printer Wizard].
3. Click [Next].
4. Select [Local printer] and click [Next].
Check [Automatically detect and install my Plug and Play printer] off.
5. Select [Create a new port] and then choose [LPR Port] from [Type]. Click the [Next]
button.
6. Type the IP address assigned to the network interface card for [Name or address of
server providing lpd] in the [Add LPR compatible printer] dialog box.
7. Type [PORT1](upper case) for [Name of printer or print queue on that server], and
click the [OK] button.
8. Follow the wizard information to install the printer driver.
For more details on printer driver installation, refer to the Print Controller INSTRUCTION MANUAL.
4-6
Page 82

Chapter 5 Internet Printing (IPP)
■ Settings on the Copier ................................................. 5-2
■ Settings on Windows 2000 .......................................... 5-3
5-1
Page 83

Chapter 5 Internet Printing (IPP)
This printing system works with IPP (Internet Printing Protocol).
IPP lets you send a print job to a printer connected to the Internet or an intranet: with this protocol, you can
let this printing system produce outputs as requested via Internet or intranet.
Copier
internet
IPP Client
(Windows 2000)
■Settings on the Copier
To run a print job over IPP, it is essential that the TCP/IP settings have been previously set up.
(p.2-11)
You can also set IPP attributes. To do this, choose [Network Setup]-[Set IPP Printer Attributes] from the Web
Utilities.
(p.2-43)
5-2
Page 84

Chapter 5 Internet Printing (IPP)
■Settings on Windows 2000
Complete the steps shown below to add the copier to the existing installation on your computer running
under Windows 2000. We assume that the TCP/IP settings have already been set up on your computer.
You need the accompanying CD-ROM which includes the printer driver.
1. Click the [Start] button, and select [Printers] from [Settings].
2. Double-click [Add Printer] to run [Add Printer Wizard].
3. Click [Next].
4. Choose [Network printer] and click [Next].
5. Choose [Connect to a printer on the Internet or your intranet], then enter the copier's
URL in the [URL] field like this:
http:// [printer's IP address] :631/nic/Print
In the "printer's IP address" column, enter the IP address assigned to your Network Inteface Card.
Alternatively, you can enter the host name of the copier's (NIC's) host name.
If you designate the proxy setting in your Internet Explorer, you cannot access the your printer over
IPP.
For more information see your network adminisrator.
6. Click [Next].
7. The wizard will take you through the process of installing the printer driver of the
[Add Printer Wizard].
For a detailed explanation of how to install the printer driver, refer to the Print Controller INSTRUC
TION MANUAL.
-
5-3
Page 85

Chapter 6 NetWare Configuration
■ Setup with NWSetup .................................................... 6-2
■ Setup for NetWare 3.x ................................................ 6-11
■ Setup for NetWare 4.x ................................................ 6-12
6-1
Page 86

Chapter 6 NetWare Configuration
To print with the printing system equipped with the network interface card by using Novell NetWare, the setup
procedures depend on the NetWare version and the method of resource management.
■Setup with NWSetup
To use NWSetup program you must have IPX NetWare connection and the Novell 32-bit client installed. You
must be logged in to the NetWare server and have administrator access.
NWSetup lets you set up the network interface card on Novell NetWare network using only one program
from Windows 95/98/Me/NT/2000. This program combines the following configuration steps:
• Set up Novell file server and queue on the NetWare server, instead of using NetWare utilities.
• Set up the network interface card for network printing.
●How to install
To install NWSetup, perform the following procedure:
1. Insert the accompanying CD-ROM into the CD-ROM drive, and double-click on
[Setup.exe] in the [NWSETUP] folder.
2. A setup program will start. Confirm the display, and click on the [Next] button.
3. Confirm a folder to install NWSetup. By default, the folder is C:\Program
Files\NWSETUP.
When clicking on the [Next] button, necessary files are copied, and then installation
is completed.
If you are configuring for NDS (Novell Directory Services), make sure you are logged into the cor
rect tree and context before you initiate this program.
●Starting NWSetup
To start the NWSetup, select [Start]->[Programs]->[NWSetup]->[NWSETUP].
After you install NWSetup, a program icon appears in your Start menu.
Once started, NWSetup searches for the network interface cards existing on the network.
NWSetup allows configuration of NICs that are connected to the same context as your NetWare
server as the windows PC running NWSetup.
-
6-2
Page 87

●Using the NWSetup program
1. Select a Print Server.
NWSetup displays a list of all print servers (network interface cards) available on your network after
you start the program. The print server appears with its serial number. Once you select the print
server you want to configure, the Print Server Settings screen appears. This screen lets you set up
your version of NetWare for the print server.
Chapter 6 NetWare Configuration
2. Setup Novell NetWare Step1.
The Print Server Settings are shown below. There are two Print Server Settings screens, which you
need to complete to configure the print server for NetWare. Each screen lets you set up your version
of NetWare for the print server, including directory and bindery services.
Print Server Name
Indicates the NetWare print server name which the print server uses to log in to NetWare. You can enter
any name which does not already exist in the network directory or server bindery.
The maximum field length is 48 characters.
Print Queue Scan Rate
Specifies the rate at which a print server will poll print queues for a new print job. For example, if you place
1 in the field, the print server should poll for new print jobs every 1 second. The minimum value for this
field is 1 and the maximum is 255.
Print Server Password and Print Server Password Retype
Enter the password for a print server which you will use to log in to NetWare. If you have not set a pass
word or have to enter a new password, click on the [Change Password] button. When you change this
field, NWSetup will set the password in both NetWare and the print server.
The maximum length for this field is 32 characters.
Both the New Password and Retype Password fields must be identical before a user is allowed to Finish
this screen.
-
Ethernet Frame Type
Indicates the Ethernet frame type that should be used by the NetWare protocol stack by default. Only one
frame type can be selected.
• Auto-Sense • Ethernet II • 802.2 • 802.3 • 802.3 SNAP
After you configure the settings, click the [Next] button.
6-3
Page 88

Chapter 6 NetWare Configuration
3. Set up Novell NetWare Step 2.
Next settings are shown bellow.
Enable NDS Mode
Indicates whether the print server support Directory Services. When the box is checked, Directory Ser
vices is supported.
• If this box is not checked, then all other fields on this screen will not be enabled.
-
Preferred NDS Context
Enter a text string to set the NDS directory context for which the print server will use to login to the net
work. The maximum field length is 127 characters.
Make sure you enter the whole context, whether typed or typeless.
Preferred NDS Tree
Enter a text string to set the NDS tree which the print server will use to login.
The maximum field length is 47 characters.
Enable Bindery Mode
Determines whether the print server should attempt to service the NetWare network in bindery mode.
• If this box is checked, then Bindery Mode is enabled.
If this field is not enabled, then the Primary File Server field will not be enabled.
Primary File Server
Specifies which NetWare file server that the print server should use as the primary file server. If no pri
mary file server has been selected yet, or if a server that is not available is selected, then the first file
server in the list is selected.
-
-
6-4
Page 89

Chapter 6 NetWare Configuration
4. Setup Novell NetWare Step 3.
When you click the [Next] button at the previous window, next print server settings are shown below.
Print Server Settings
NWSetup lets you set up each printing system. This information is usually entered using NetWare's NWAD
MIN or PCONSOLE utility. NWSetup eliminates the need for configuring the print controller and the print
server through any NetWare utility. A description of each setting follows:
-
Enable Printer
Indicate whether support for the print server is enabled.
• If this box is checked, then the print server is enabled.
• If the box is not checked, then the print server is not enabled. The remaining fields on the screen will
not be enabled.
Printer Name
Displays the name of the printer. This is a read-only field.
Queues Serviced by Printer
Lists all the queues which are to be serviced by the printing system.
• Queues associated with bindery connections are listed in the format bindery server name: queue
name.
• Queues associated with NDS connections are listed by their distinguished names.
Example: If a printer services the queue YOURPTR_Q on the server OLD_SERVER which is a bindery
server, then the queues would be listed as OLD_SERVER:YOURPTR_Q. If an NDS server has a distin
guished name such as ENGINEERING.CORP and with a queue name ENGINGEERING_Q servicing the
printing system, then the queue would be listed as ENGINEERING_Q.ENGINEERING.CORP
-
6-5
Page 90

Chapter 6 NetWare Configuration
Users/Groups Notified by Printer
Lists all users and user groups who will be notified when a printer error is detected.
• Users and groups associated with bindery connections will be listed in the format bindery server
name:user/group name.
• Users and groups associated with NDS connections will be listed by their distinguished names.
Example: If a user named Susan on the bindery server OLD_SERVER is listed on the printer's notify list,
then the user would be listed as OLD_SERVER:SUSAN. If a user named Albert whose NDS context is
ENGINEERING.CORP is on the printer's notify list, then the user would be listed as ALBERT.ENGINEER
ING.CORP When you double click on an entry in this field, the Notify Settings screen appears. See Con
figuring the Notify Settings later in this section.
The print server supports the Notify function only in Bindery mode.
Add Queue
When the user clicks on the [Add Queue] button, a dialog box appears (see above) where the user can
add a queue to the printing system. Below is a description of each field:
-
-
Connection/Server:
Use to select a server connection. This list includes the NDS connection and all of the bindery file server
connections which the user has. The NDS connection is always the first one listed, by default. When a
new connection is selected, the Queue field is automatically updated.
NDS Context:
Specifies an NDS context for the queue. NWSetup lists all the queues within this context or the subcon
texts in the Queue field. This field is only enabled when NDS support is enabled. By default, the NDS
Context should be set to the preferred NDS context specified in the Print Server Settings screen.
Queue:
Lists all the queues available on currently selected connection.
• If an NDS connection is specified, then a list of all queue names in the selected context and, all sub
contexts is displayed.
• If you change the context in the NDS Context field, or, change the connection in the Connection Server
field, then the queue list is refreshed to reflect the new connection or context.
• If you double click on a queue in the list, the queue is automatically added to the printer's service and
you exit this screen.
-
-
6-6
Page 91

Chapter 6 NetWare Configuration
Create Queue
When the user clicks on the [Create Queue] button on the [Port 1] dialog box, [Add Queue to Printer] dia
log box appears.
Below is a description of each field:
Queue Name:
Enter the name of the new queue. This field must be completed in order to create a new queue. The max
imum field length is 47 characters.
File Server Volume:
Indicates the volume on which the queue should be created. This field is enabled only if the current con
nection is an NDS connection. When enabled, it contains a list of all available volumes. For bindery ser
vices, the default volume name is SYS.
NDS Context:
Specifies the NDS context in which the queue is created. This field is enabled only when an NDS connec
tion is being used. When this field first displays, it will list the NDS context specified in the Add Queue dia
log. If you change it, NWSetup verifies that the new context exists on the directory tree. Click on OK to
start the verification process.
Delete Queue:
Highlight the queue you want to delete and click on the [Delete Queue] button. A confirmation screen
appears which asks if you really want to delete the highlighted queue. Press [Yes] to delete, or, [No] to
cancel the deletion.
-
-
-
-
-
-
If you delete a queue, you are not physically deleting the object from the file server. In order to
delete the queue from a file server, you must use your NetWare utility to remove the queue from the
file server queue list.
6-7
Page 92

Chapter 6 NetWare Configuration
Add User (Add a User or Group)
When the user clicks the [Add User] button on the [Port 1] dialog box, the [Add User/Group] dialog box
appears. Below is a description of each field.
Connection:
Select a connection from this field. This list includes the NDS connection and all of the bindery file servers
connections to which a user has access. The NDS connection is always listed first, by default.
NDS Context:
Specifies the NDS context to use when generating a list of users and/or groups. This field is enabled only
for NDS connections. When first displayed, this field lists the preferred NDS context specified in the Print
Server Settings screen. If you change this value, then NWSetup verifies that it is correct when the user
attempts to move to another field or clicks on [OK].
Users/Groups:
Lists all of the user and groups available on the currently selected connection. Any entry on this list can be
added to a printer's service list. The list includes (Print job owner) which refers to the user who sent the
job currently being printed.
• If an NDS connection is selected, NWSetup generates a list of all users and groups in the currently
selected context and all subcontexts.
• When you double click on an entry in the list, the entry is added to the printer's service list.
• The user/group list is updated whenever the Connection or NDS Context fields are changed.
Delay in seconds for first message:
Indicates how long the print server should wait before sending a notification message that an error condi
tion has been detected. The field is set to 30 seconds by default. Its minimum value is 1 second and max
imum value is 3600 seconds.
Delay in seconds for repeat messages:
Indicates how long the print server should wait before sending a repeat notification of an error condition.
This field is set to 60 seconds by default. Its minimum value is 1 second and maximum value is 3600 sec
onds.
Note: The NIC supports the Notify function only in Bindery mode.
-
-
-
6-8
Page 93

Chapter 6 NetWare Configuration
Delete User:
Highlight the User or Group you want to delete and click on the [Delete User] button. A confirmation
screen appears which asks if you want to delete the highlighted User or Group. Click [Yes] to delete, or,
[No] to cancel the deletion.
If you delete a User or Group, you are not physically delete the object from the file server. In oder to
delete the User/Group from a file server, you must use your NetWare utility to remove the User or
Group from the file server User/Group list.
Configuring the Notify Settings
The Notify Settings screen appears when you double-click on an entry in the Users/Groups Notified by
Printer field on the [Port 1] dialog box. Use this screen to set up the notify function for the users or groups.
A description of each field in this dialog box is below.
The print server supports the Notify function only in Bindery mode. Below is a description of each
field.
User/Group name
Indicates the name of the user or group which is being edited. This field cannot be changed.
Delay in seconds for first message:
Indicates how long the print server should wait before sending a notification message to the user that an
error condition has occurred. The field is set to 30 seconds by default but can be set to any value between
1 to 3600 seconds.
Delay in seconds for repeat messages:
Indicates how long the print server should wait before sending a repeat notification message to a user or
group when an error condition has occurred. The field is set to 60 seconds by default but can be set to any
value between 1 to 3600 seconds.
6-9
Page 94

Chapter 6 NetWare Configuration
5. Finishing NWSetup.
When you finish the all above settings, [Setup Complete] dialog box appears.
Click on the [Finish] button to upload the new configuration settings to the network interface card and
file server.
The network interface card will be reset after the new configuration settings have been uploaded to it.
6-10
Page 95

Chapter 6 NetWare Configuration
■Setup for NetWare 3.x
Before setting up NetWare, you have to define the print server name, etc., from the MAP (Web utility).
(p.2-25)
See the manual of Novell NetWare for setting up with PCONSOLE.
The setup procedure of NetWare 3.x is as follows. To perform this procedure, you need authorization to per
form this procedure.
1. Start up PCONSOLE and select the file server to use.
2. Generate and assign a print queue.
3. Define the network interface card as the print server.
4. Define the notification list/password as necessary.
5. Set up the primary file server as necessary.
On completion of setup, turn off the main power of the print controller and the main body printer and turn it
on again. The main body printer will print out a Status Page indicating the file servers equipped with print
server and the queues that the file servers will service.
-
Define the primary file sever if the network connects to many sites and has more than one file
server. PCONSOLE should be used to set up the primary file sever.
6-11
Page 96

Chapter 6 NetWare Configuration
■Setup for NetWare 4.x
Novell NetWare 4.x can operate in two modes, NetWare Directory Service (NDS) and Bindery Emulation
Service (Bindery Emulation). Bindery Emulation and NDS will be executed simultaneously. It is also possible
to set up the print server so that it operates only in Bindery Emulation mode or in NDS mode.
The print server set up for NDS mode will also service the file server of an old version operating in Bindery
mode.
If NDS is not set up properly for the print server and Bindery Service mode is not operating, the
print server cannot find the file server and Novell NetWare protocol will be indicated as inactive in
the Status Page.
●Setup information
NDS
Novell Directory Service (NDS) offers a different, more advanced approach to network management than
previous NetWare versions. Generally, it stores and tracks all network objects.
As a rule, all 4.x servers must have NDS loaded in order to function. In this way, every NetWare 4.x server
is a Directory server, because it services named Directory objects such as printing systems, print server
and print queues.
With the appropriate privileges, you can create a print server object, which, once configured in its context
(or location) on the network, eliminates the cumbersome setup of print servers on every network server.
NDS provides true enterprise networking based on a shared network database rather than individually
defined physical sites. The result is a greatly improved print server setup and management.
Bindery Emulation
NetWare 4.x also provides backward compatibility for 3.x and 4.x print service through Bindery emulation.
The Directory Information Base (DIB) is used to store information about servers and services, users,
printing systems, gateways, etc. It is a distributed database, allowing access to data anywhere on the net
work wherever it is stored.
Pre-4.x NetWare versions provide the same data found in the DIB but the data is stored in the NetWare
Bindery. The DIB was designed with more flexible access, more specific security, and, since it is distrib
uted, it was designed to be partitioned.
The Directory uses an object-oriented structure, rather than the flat-file structure of the Bindery, and offers
network-oriented access, rather than server-oriented access found in the Bindery.
The Directory is backward-compatible with the NetWare Bindery through Bindery emulation mode.
When Bindery emulation is enabled, Directory Services will accept Bindery requests and respond just as
if a Bindery existed on the NetWare server being accessed.
Be aware that information obtained from the Bindery query may not be stored in the server since the
Directory is a partitioned and distributed database. Even though the NetWare 4.x server is not operating
from a Bindery, the applications making Bindery requests will not know the difference.
-
-
6-12
Page 97

●NDS setup
Web utility
This is used for context setup of the print server (network interface card).
Novell NWADMIN
Novell NWADMIN (NetWare Administration) is used to generate a directory tree and print queue
objects in the print server, printing system and tree.
The network interface card is provided with a plug-and-play feature to support NetWare administration
utility (NWADMIN) that enables the NDS administrator to perform centralized management of print
servers.
Refer to the Novell NetWare manual for details of Setup with NWADMIN.
PCONSOLE
NetWare allows the use of PCONSOLE as an alternative of NWADMIN. PCONSOLE is used to set up
static information of print servers regarding which queues to service and to whom information is given
in case of trouble.
Refer to the Novell NetWare manual for details of setup with PCONSOLE of NDS.
Chapter 6 NetWare Configuration
(p.2-37)
●Setup for Bindery Emulation
Make sure of the Bindery Context.
Before connecting the print server (network interface card) to the Novell NetWare 4.x server of bindery
mode, make sure that the NetWare server contains the bindery context.
If the bindery context does not exist, the network administrator should modify the AUTOEXEC.NCF file
to add an adequate SET command and restart the NetWare server or enter a SET command from the
console prompt to make changes.
Note that any command entered following the console prompt is effective immediately but the defi
nition of the autoexec.ncf file becomes effective only after turning off power and on again.
Setup with PCONSOLE in bindery mode.
If it is sure that the bindery context exists in the file server, you can set up the print server with PCON
SOLE.
Refer to the Novell NetWare manual for details of setup with PCONSOLE.
In Bindery mode, only upper-case letters are valid for the printer server password.
-
-
6-13
Page 98

Chapter 7 UNIX Configuration
■ UNIX printing through TCP/IP ..................................... 7-2
7-1
Page 99

Chapter 7 UNIX Configuration
■UNIX printing through TCP/IP
●Introduction
This section explains how to configure the network interface card and your network for use with TCP/IP com
munication in various UNIX environments. Independent setup and installation procedures are provided for
most popular UNIX systems.
The TCP/IP capability of the network interface card will also operate with lpr spoolers on other systems, and
with spooler/supervisor capabilities that communicate raw print jobs to the TCP/IP port of the network inter
face card. This port number is 10001.
SNMP (Simple Network Management Protocol) is a protocol for network management services.
SNMP is supported for Management Information Base (MIB) II over the IP for the network interface
card. This support allows you to query MIB II to get system information about the network interface
card.
The network interface card can support UNIX TCP/IP printing in two modes:
• Host-based where a supplied line printer daemon is run on one or more workstations and print data is
communicated to the network interface card via a TCP/IP port.
• Printer-based lpd where the print controller appears as a host running a line printer daemon.
-
-
Many operating systems provide the option of using host-resident printing or printer-resident printing.
In general, printer-based lpd is easier to use on BSD UNIX systems. This requires an entry in the printcap
file once the network interface card has its IP information. Some UNIX System V systems have restrictions
on support of remote lpd printers, requiring that the host-based lpd approach be used.
Each printing mode has certain advantages over the other mode, as follows:
• The host-resident method can print the username and filename on its banner page; whereas the printerresident method prints a banner page with the host's name.
• The printer-resident method requires you to configure the print controller and the network interface card
only one time, when you install the network interface card; whereas, the host-resident method requires
that a printing daemon be installed on every host that you want to be able to print jobs.
The network interface card will also operate with other host-resident print supervisor/spooler pro
grams that present a print image to the print controller over a TCP/IP port.
-
7-2
Page 100

Chapter 7 UNIX Configuration
●Printing overview
Considering both the host-based and printer-based TCP/IP printing capabilities, the network interface card
works with the following systems:
• All UNIX systems that support lpd
• System V Rel. 4 (on 386 platforms)
• DEC ULTRIX RISC Versions 4.3 and 4.4
• DEC OSF/1 Versions 2.0 and 3.0
• Solaris:
Version 1.1.3 (SunOS 4.1.3),
Version 2.3 (SunOS 5.3),
Version 2.4, and
Version 2
• HP-UX Series 700 and 800 Version 9.01 and Version 10
• IBM AIX Version 3.2.5 and Version 4.0
• SCO UNIX Version 3.2
• AS400
If the systems you are using do not run lpd, refer to "Installing UNIX TCP/IP programs".
(p.Appendix C-7)
The UNIX-TCP/IP Programs on accompanying CD-ROM also include source code so that you can
recompose host-based code for configuring on other System V platforms.
7-3
 Loading...