

Page 1
Instruction Manual
Document Folder Operations
Document Folder can be used when the optional
hard disk (HD-103 Type-A) is installed.
7145
Page 2

Thank you for purchasing KONICA MINOLTA 7145.
This Instruction Manual describes the operating procedures and safety
precautions of the KONICA MINOLTA 7145 so that you can handle it
safely and make the best of its capabilities. Usually keep this manual
close at hand for the convenience of reference later.
Page 3

Contents
Introduction ..................................................................................iii
Getting Started .............................................................................. iv
Features of the Document Folder .....................................................................................iv
How to Use This Manual ..................................................................................................vi
Manual Structure .............................................................................................................vii
Chapter 1: Overview of Document Folder
What is Document Folder? .............................................................. 1-2
System Box and User Box ................................................................ 1-4
Confidentiality ............................................................................ 1-5
Re-Print Function ......................................................................... 1-6
Chapter
1
Chapter
2
Chapter
3
Chapter 2: Storing Documents in Document Folder
Storing Documents in Document Folder ............................................... 2-2
Storing Copy Documents ................................................................. 2-4
Storing Scanned Document .............................................................2-12
Chapter 3: Print Documents
How to See the Document List Screen ................................................. 3-2
Printing the Documents in Box ......................................................... 3-3
Operating the Re-Print Function ...................................................... 3-22
Transmit or Transfer a Document in the Box ........................................3-29
Importing Scanned Documents to Computer ........................................3-42
Chapter 4: Key Operator Mode
Key Operator Operation Menu List ..................................................... 4-2
Displaying/Completing Document Folder Setting .................................... 4-4
System Box Setting ....................................................................... 4-8
User Box Registration/Edit .............................................................4-11
User Box List .............................................................................. 4-15
Chapter
4
Chapter
5
Appendix
Appendix
Index
Index
Re-Print Setting ..........................................................................4-21
i
Page 4

Contents (continued)
Appendix
Specifications ................................................................... Appendix-2
Entering Names ................................................................. Appendix-4
Scan Direct ...................................................................... Appendix-6
Index
ii
Page 5

Introduction
Thank you for your purchase of the Konica Minolta digital electronic photo-copying machine.
This User's Manual describes operating procedures and precautions for use of the Document
Folder functions. Please read this manual before starting operation of the machine.
To operate the Document Folder, the optional hard disk (HD-103 Type-A) is required. Contact
your service representative for this optional hard disk.
After reading this manual, it is advisable to keep it close at hand to consult it any time when necessary in order to operate the Document Folder at its optimum condition.
For its correct operation, also read "Precautions for Installation and Handling" in the "User's Manual (Copy Operations)" before starting operation.
ACKNOWLEDGEMENT:
Microsoft, MS and MS-DOS are registered trademarks of Microsoft Corporation in the
United States.
IBM is a registered trademark of International Business Machines, Inc. in the United
States.
®
Windows
HP and PCL are registered trademarks of Hewlett-Packard Company.
Agfa Microtype font is a registered trademark of Agfa Corporation.
PEERLESS is a registered trademark of PEERLESS SYSTEMS CORPORATION.
Apple, Macintosh and Mac are registered trademarks or trademarks of Apple Computer.Inc.
Adobe, Adobe Logo, Acrobat, Acrobat Logo, PostScript and PostScript Logo are registered
trademarks or trademarks of Adobe Systems, Inc.
Other company names and product names used in this manual are the registered trademarks or trademarks of their respective companies.
COPYRIGHT
© 2004 by Konica Minolta Business Technologies, Inc.
EXEMPTION
• A part or this User's Manual may be used or duplicated without permission.
• Konica Minolta Business Technologies, Inc. is not liable for any incidents caused by
using the Document Folder functions and this manual.
• Information written in this User's Manual is subject to change without notice.
is a trademark of Microsoft Corporation.
iii
Page 6

Getting Started
Features of the Document Folder
Printing the document
Documents in the Document Folder can be printed by opening the Document Folder from
the Copy, Print or Fax screen.
HINT
For details, see p. 3-4.
Transmitting Documents via E-Mail
Documents in the Document Folder can be transmitted via E-mail by opening the Document Folder from the Scanner screen.
HINT
For details, see p. 3-29.
Transferring Documents using FTP
Documents in the Document Folder can be transferred using FTP by opening the Document Folder from the Scanner screen.
HINT
For details, see p. 3-34.
Transmitting Documents to the Computer
Documents in the Document Folder can be transmitted to the shared folder on the computer by opening the document folder from the Scanner screen.
HINT
For details, see p. 3-38.
iv
Page 7

Getting Started (continued)
Printing Copied Documents Immediately Before Again (Re-Print)
By storing documents in the Re-Print Box when copying, up to 10 documents can be
recopied as required.
HINT
For details, see p. 3-22.
v
Page 8
Getting Started (continued)
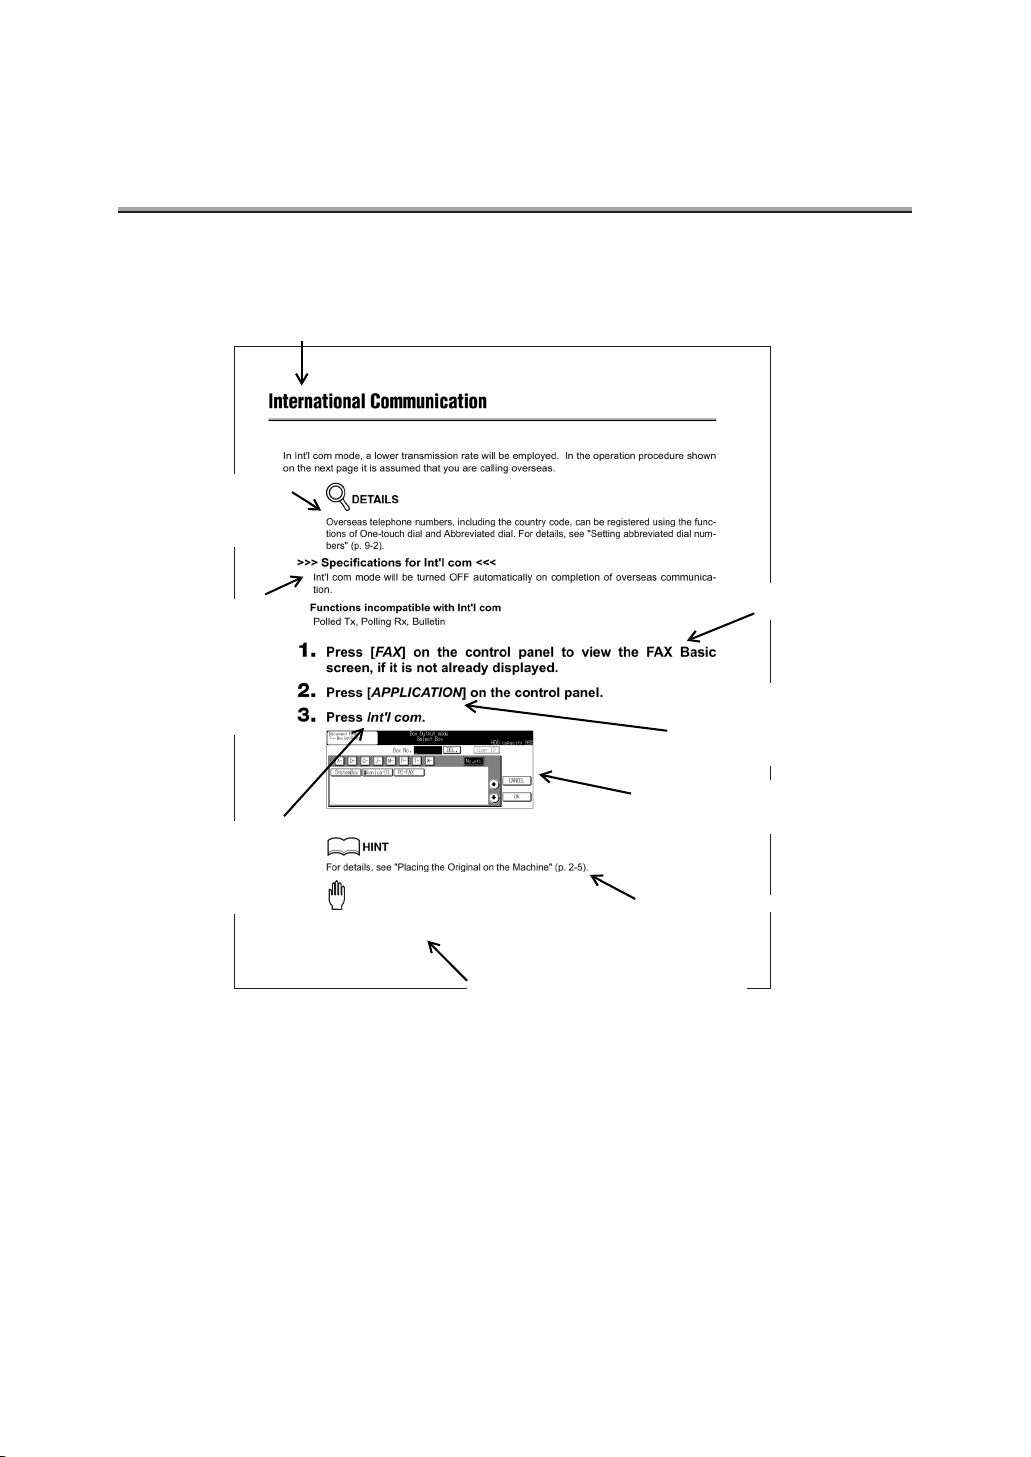
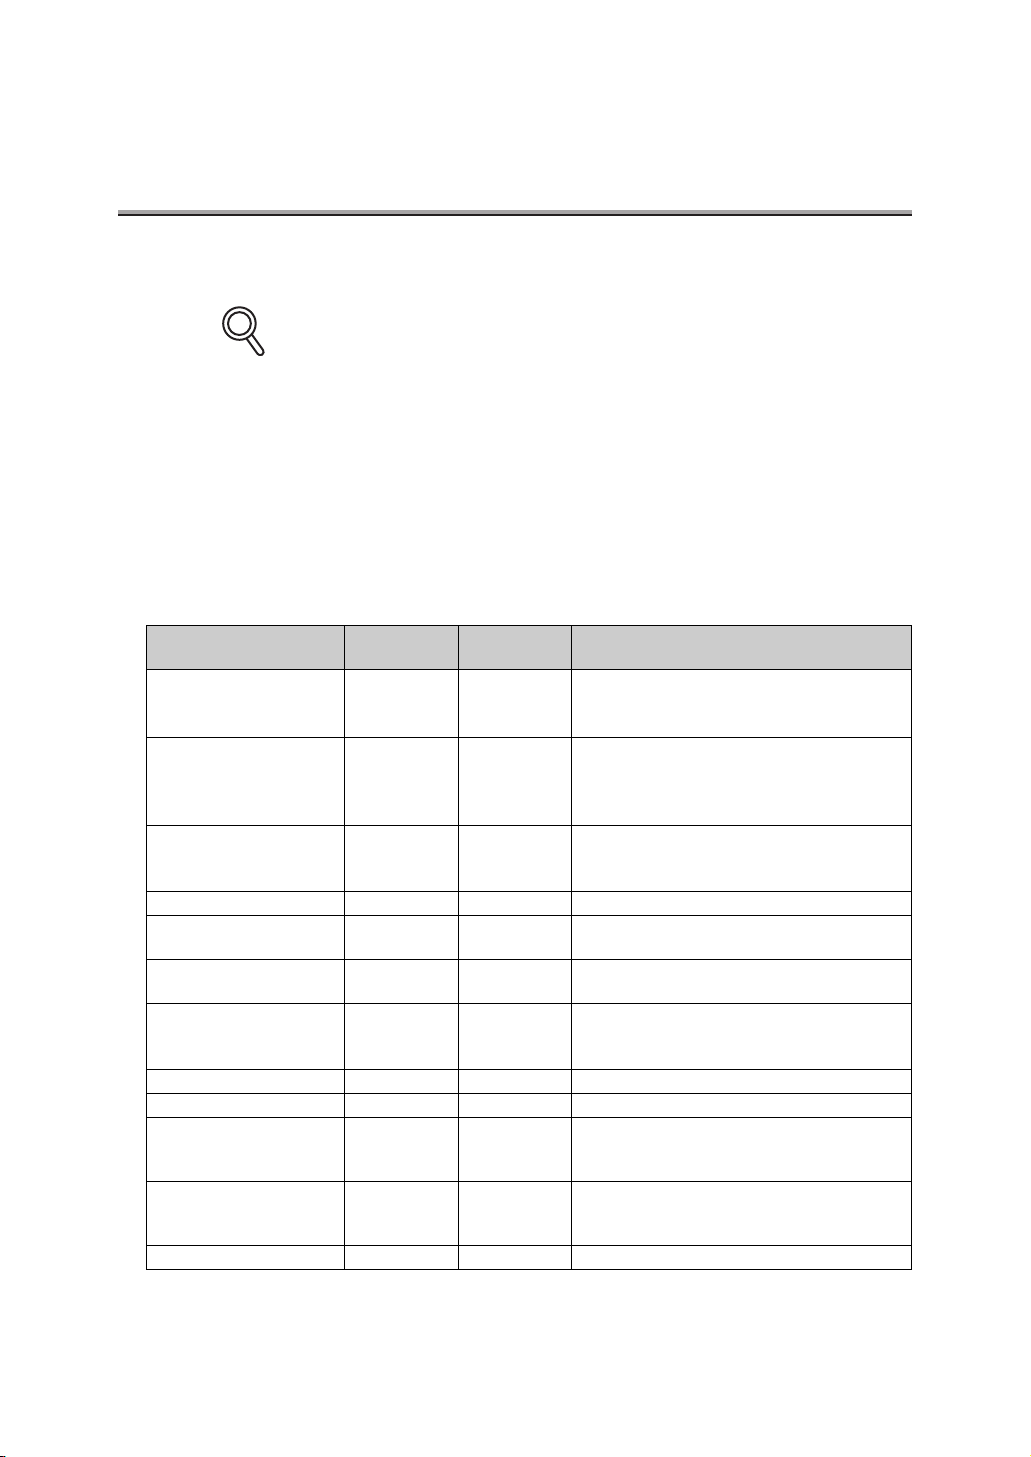
How to Use This Manual
Title
Detailed information on operating
procedures.
Describes principles of functions,
and highlights the
functions that cannot be used
together.
Italic is used to
signify the keys
on the touch
screen.
Shows the view of the
touch screen at the operation.
Reminder!
Enter nothing in the password input area if no password has been established.
Describes cautions which you should
observe during operation.
Shows a reference.
This page does not exist in the document.
Describes operating procedures.
[Italic] is used to
display the buttons
on the control
panel.
vi
Page 9

Getting Started (continued)
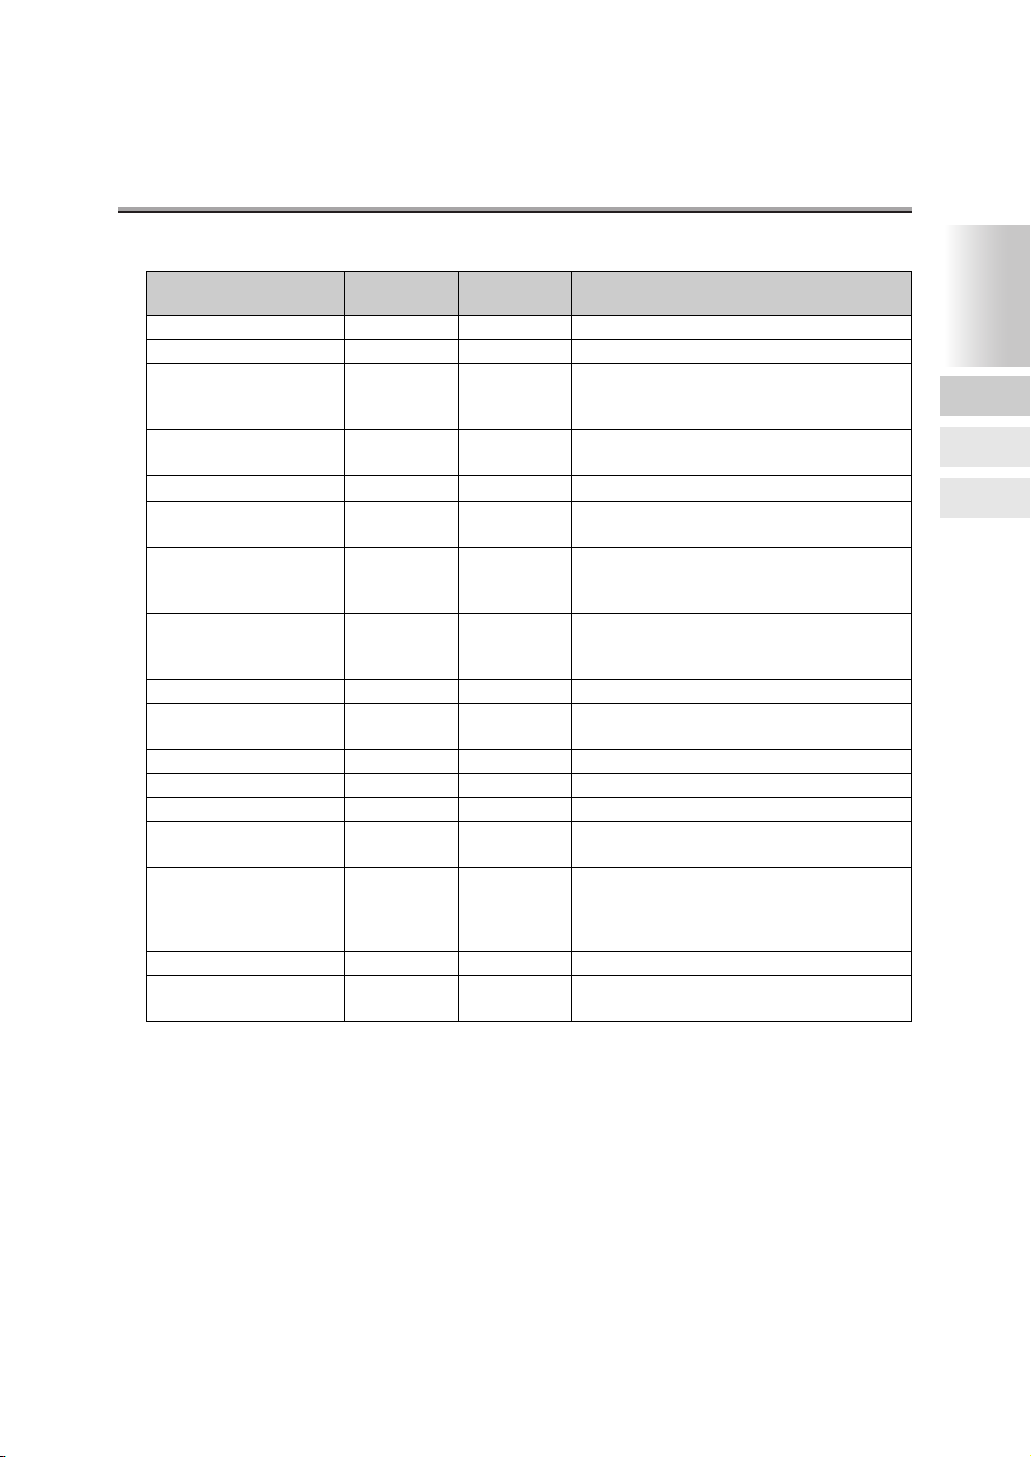
Manual Structure
The following manuals are included with machine.
User's Manual (Copy Operations):
Describes the basic operation and the copy operation.
Refer to this manual to see:
• Precautions for installation and handling
• How to turn the power on/off
• How to supply paper
• Troubleshooting for paper jam, etc.
User's Manual (Network/Scanner Operations)
Describes the setting method of the network function and operating method of the scanner
function, which are provided as the standard functions.
• Refer to this operation manual if you want to see how to use the network, Scan to EMail, Scan to FTP and Scan to PC (SMB) functions.
User's Manual (Security Operation)
Describes the security function.
• Refer to this manual to see how to use the Enhanced Security function and operation
of the copier required to use this function.
User's Manual (Document Folder Operations) (this manual)
Describes the operation of the Document Folder.
• Refer to this manual if you want to know how to use the Document Folder when the
optional hard disk (HD-103 Type-A) is connected.
User's Manual (Internet Fax/Fax Operations)
Describes the internet Fax/Fax operations.
• Refer to this manual if you want to know how to use the Internet Fax when the
optional hard disc (HD-103 Type-A) is connected and how to use the Fax function
when the Fax kit is connected.
vii
Page 10

Getting Started (continued)
User Software CD
Two manuals as follows are contained in this CD:
• Web Utilities User's Manual
• Address Book User's Manual
viii
Page 11

Chapter
Overview of Document
1
Folder
What is Document Folder?..........................................................1-2
System Box and User Box ..........................................................1-4
Confidentiality .............................................................................1-5
Re-Print Function ........................................................................1-6
Chapter
1
What is
Document
Folder?
System Box
and User Box
Confidentiality
Re-Print
Function
Page 12

What is Document Folder?
The Document Folder can be used only when the hard disk (HD-103 Type-A) is installed. Copy
documents, print document, scanned documents and received faxes can be stored in the Document Folder. Documents stored can be printed, transmitted via E-mail, transferred using FTP,
Transmission to the computer, or imported to a computer.
Box 3
Box 2
Box 1
Copy
Print
0001
0001
Copy FaxPrint
Print
Copy
0002
0002
Copy FaxPrint
Fax
0001
Fax
0002
1-2
Page 13
What is Document Folder? (continued)
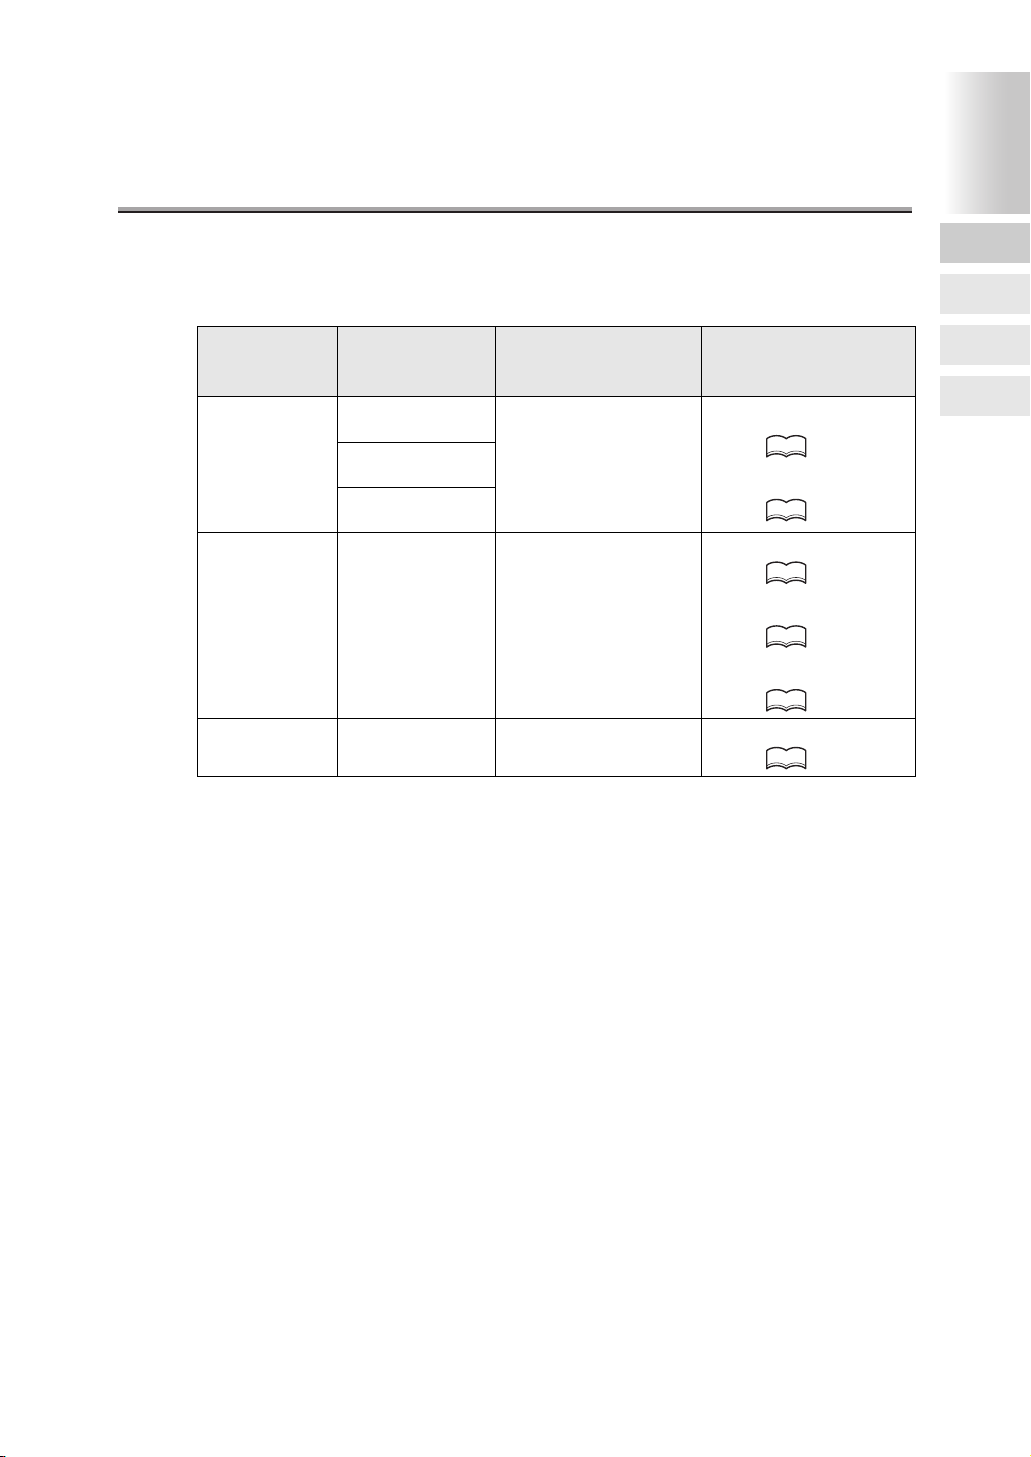
Output Method and Documents which can be output
Documents which can be output and their output method are as follows.
Operation
Printing
Transmission via
E-mail /transfer
with FTP
Importing
computer
Screen to open
the Document
Folder
Copy screen
Fax screen
Printer screen
Scanner screen
Document which can
be output
Copy document
Printer document
Scanner document
*3
Fax-receiving document
Copy document
Printer document
Fax-receiving document
Scanner document
Fax-receiving document
Output method
Printing (auto)
*1,*2
HINT
p. 2-4
Printing (manual)
p. 3-4
HINT
E-mail transmission
p. 3-29
HINT
FTP transfer
p. 3-34
HINT
Transfer to the computer
p. 3-38
HINT
Import to computer
p. 3-42
HINT
Chapter
1
What is
Document
Folder?
System Box
and User Box
Confidentiality
Re-Print
Function
• To print a copy, print, scanner or Fax document, open the Document Folder from the
Copy, Print, or Fax screen.
• To transmit a copy, print or Fax via E-mail or to transfer it with FTP, open the Document
Folder from the Scanner screen.
• Documents received through PC-Fax are automatically stored in the Document Folder.
Refer to "User's Manual (Internet Fax/Fax Operations)" for details.
*1
When the [Copy & Box Store] is selected to store a copy document, the document is
stored in the Document Folder and printed at the same time. For details, see p. 2-4.
*2
If the setting is such that the Fax-receiving documents are printed when being stored by
the key operator, received documents are printed whenever they are stored in the Document Folder. For details, see p. 4-8.
*3
The printing of the scanner documents is restricted only to documents saved in the TIFF
format. Documents save in the PDF format cannot be printed.
1-3
Page 14
System Box and User Box
Document Folder is classified into System Box and User Box.
HINT
See p. 4-11 for details of the User Box Registration.
System Box
When you purchase the copier, the System Box has been set. Its Box No. is 0.
The System Box cannot be deleted.
1-4
User Box
User Boxes are established when required by the key operator.
Box. No. of the User Box is 1 to 999999999.
Page 15

Confidentiality
In the Document Folder, confidentiality of each box is secured by using a User ID and password.
Each document is also kept in confidence by providing a document password for each document.
Chapter
1
What is
Document
Folder?
System Box
and User Box
HINT
Refer to p. 4-11 to establish of User ID.
•
• Refer to p. 4-11 to establish of box password.
• Refer to p. 3-19 to establish of document password.
For each Box
User ID
A box can be operated as a confidential box by using a User ID.
User ID is an ECM user ID set by the key operator of the copier.
If a User ID is set in advance, it should be entered when starting operation of the Document Folder. When a user enters their User ID, they see boxes associated with that user
and boxes that have no user associated with them. They cannot see boxes associated to
another user.
Password
Access to the Document Folder can be limited by the password.
If a password is set on the Document Folder in advance, the password entry screen
appears when the box is selected. All boxes are indicated on the list.
For each document
Document password
Access to documents can be limited by using a password. If a password is set in advance
for a document, password input screen is indicated when the document is selected.
Confidentiality
Re-Print
Function
1-5
Page 16

Re-Print Function
S
When copying documents, they can be stored in the Re-Print Box of the Document Folder to
reprint without re-scanning. Up to ten documents can be stored in the Re-Print Box.
When you purchase the copier, it has been set so that the documents in the Re-Print Box are
automatically deleted after one day.
HINT
See p. 3-22 for information about the Re-Print function.
DETAIL
• While the "Enhanced Security function" is set up, the Re-Print function cannot be used.
• When you purchase the copier, it has been set to OFF so that you cannot use the Re-
Print function. To use the Re-Print function, you must set the Re-Print function to ON in
the key operator mode. For detail, see "Re-Print Setting" (p. 4-21).
1-6
Page 17

Chapter
Storing Documents in
2
Document Folder
Storing Documents in Document Folder .....................................2-2
Storing Copy Documents ............................................................2-4
Storing Scanned Document ......................................................2-12
Chapter
2
Storing
Documents in
Document
Storing Copy
Documents
Storing
Scanned
Document
Page 18
Storing Documents in Document Folder
S
Copied, faxed, printed and scanned documents can be stored in the Document Folder.
DETAIL
Documents received via the Fax are automatically stored in the Document Folder. Refer
•
to p. 4-8 and "User's Manual (Internet Fax/Fax Operations)" to set the method of storage.
• Print documents are stored on the printer driver. Refer to the Print Controller User's Man-
ual for the operation of the printer driver.
Setting when storing documents
c: Setting is stored
U: Not stored (setting changeable at the time of output)
±: Not stored (setting unchangeable at the time of output)
- : No setting items
Copy
document
Setting Print Quantity UU
Tr ay UU
(Exit) tray UU
Output Mode (Sort/Group) UU
Staple
(OnOff/Staple Position)
Punch
(OnOff/Punch Lotation)
E-Sort / E-Group ±±
LENS mode c -
Density cc
Special Original
(Folded /Non-Standard
Size/Mixed)
Copy Mode
(Single-Sided/Double-
Sided)
(Rotation) OFF c -
cc
cc
c -
cc
Print
document
Remarks
• Effective setting for No. of copies (prints) at
the time of [Copy & Box Store]
• Stored in the Box by selecting "1 Copy".
• Effective selection of paper feed tray for the
copy (print) at the time of [Copy & Box
Store]
• Stored in the Box by selecting "APS".
• Effective selection of paper exit tray for the
copy (print) at the time of [Copy & Box
Store]
• Setting is automatically reset to be printed
from the same paper feed tray for all
pages.
2-2
Page 19
Storing Documents in Document Folder (continued)
Copy
document
Store c -
Proof Copy ± -
Application
(Sheet/Cover Insertion)
Chapter ± -
Combination cc
Booklet ±±
OHP Interleave ±±
Image Insert ± -
Dual Page c -
Flip Side ± -
Frame/Fold Erase c -
Non-Image Area Erase c -
AUTO Layout c -
Reduce & Shift ±c
Stamp / Overlay ±
Reverse Image cc
Repeat Mode ± -
± -
Print
document
c
(Added with
the printer
driver)
Remarks
• Setting is automatically reset so that all
pages are printed without a cover, etc. from
the same paper feed tray.
• Setting is automatically reset to be printed
in the double sided mode.
•
• Setting is automatically reset to be printed
in the double sided mode.
• Setting is automatically reset so that all
pages are printed with no board inserted
from the same paper feed tray.
• Setting is automatically reset so that all
pages are printed with no page inserted
from the same paper feed tray.
• Setting is automatically reset to be printed
in the same way as in no setting.
• Setting is automatically reset to be printed
in the same way as in no setting.
• Setting is automatically reset to be printed
in the same way as in no setting.
• Setting is automatically reset to be printed
in the same way as in no setting.
Chapter
2
Storing
Documents in
Document
Storing Copy
Documents
Storing
Scanned
Document
2-3
Page 20
Storing Copy Documents
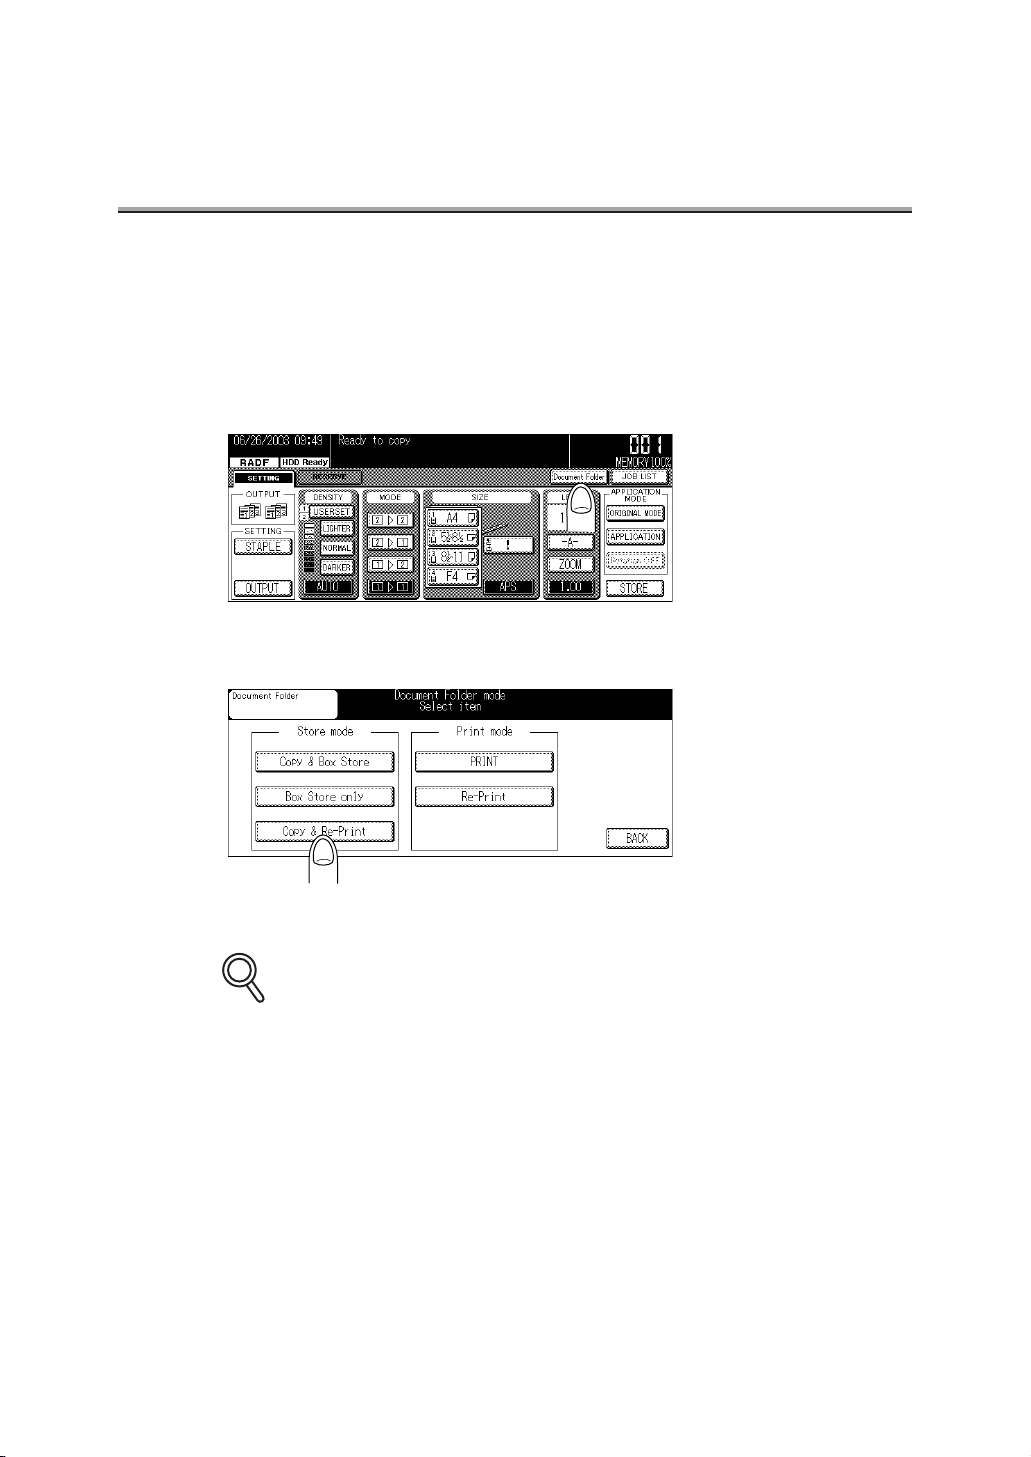
Copy documents can be stored in the Document Folder by three methods as follows:
• Copy & Box Store...................Document is scanned, copied and stored in the Document
Folder of a specified No.
• Box Store only........................Document is scanned and stored in the Document Folder of
a specified No.
• Copy & Re-Print.....................Document is scanned, copied and stored in the Re-Print Box.
For "Copy & Box Store" and "Box Store only" methods
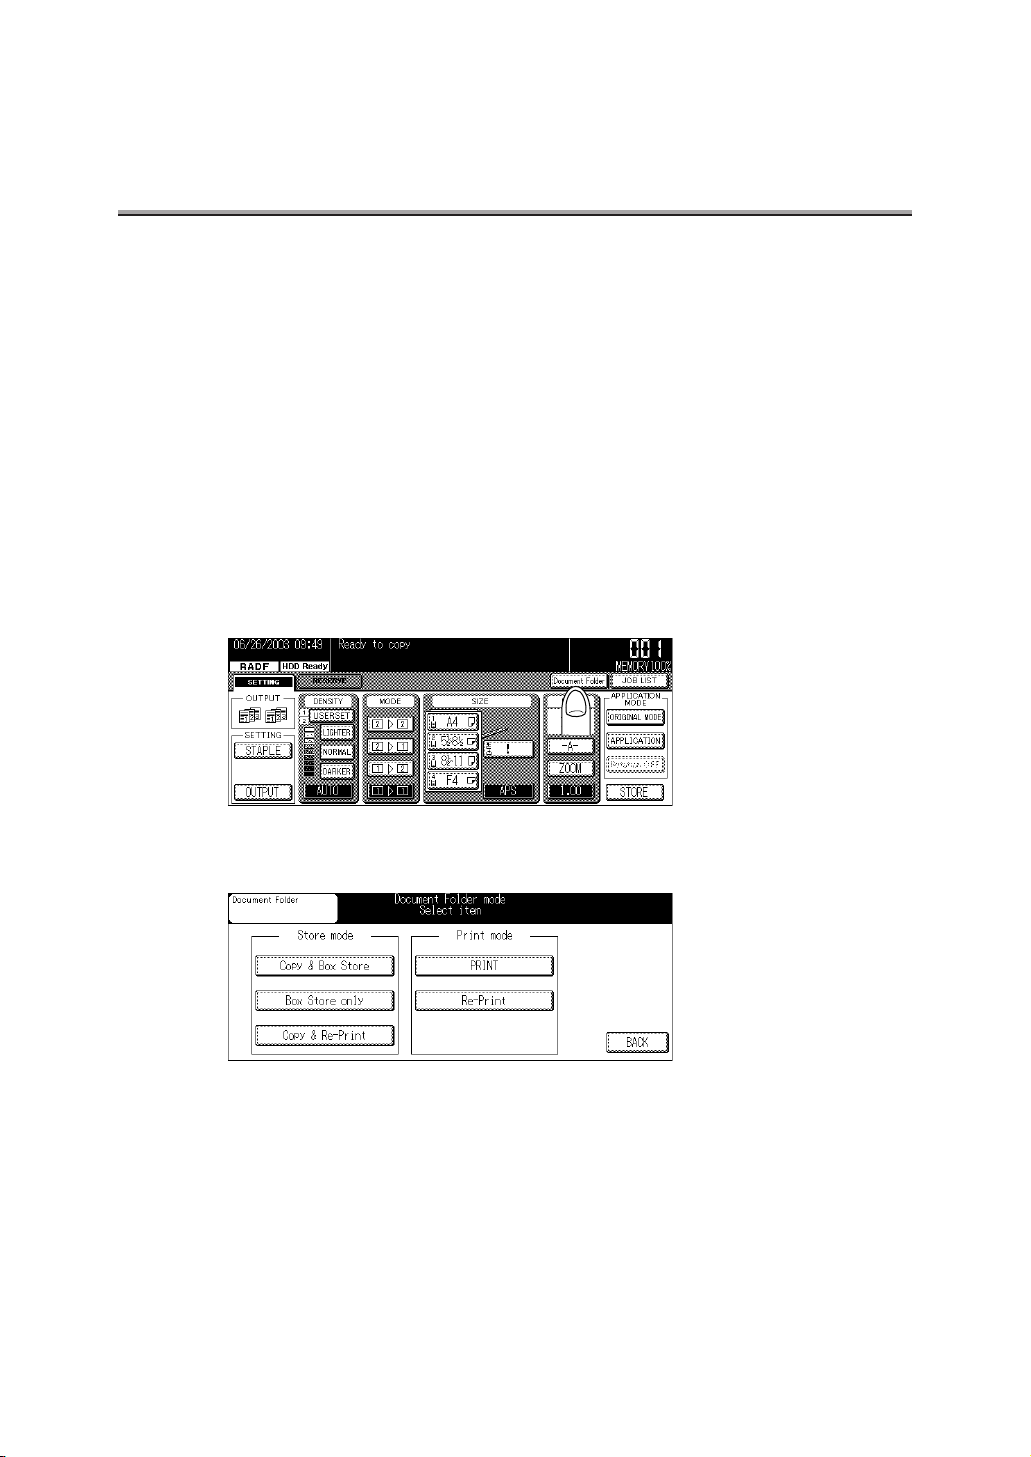
1. Press [COPY] on the control panel to display the Copy
screen.
2. Press Document Folder.
3. Press Copy & Box Store or Box Store only.
2-4
Page 21
Storing Copy Documents (continued)
S
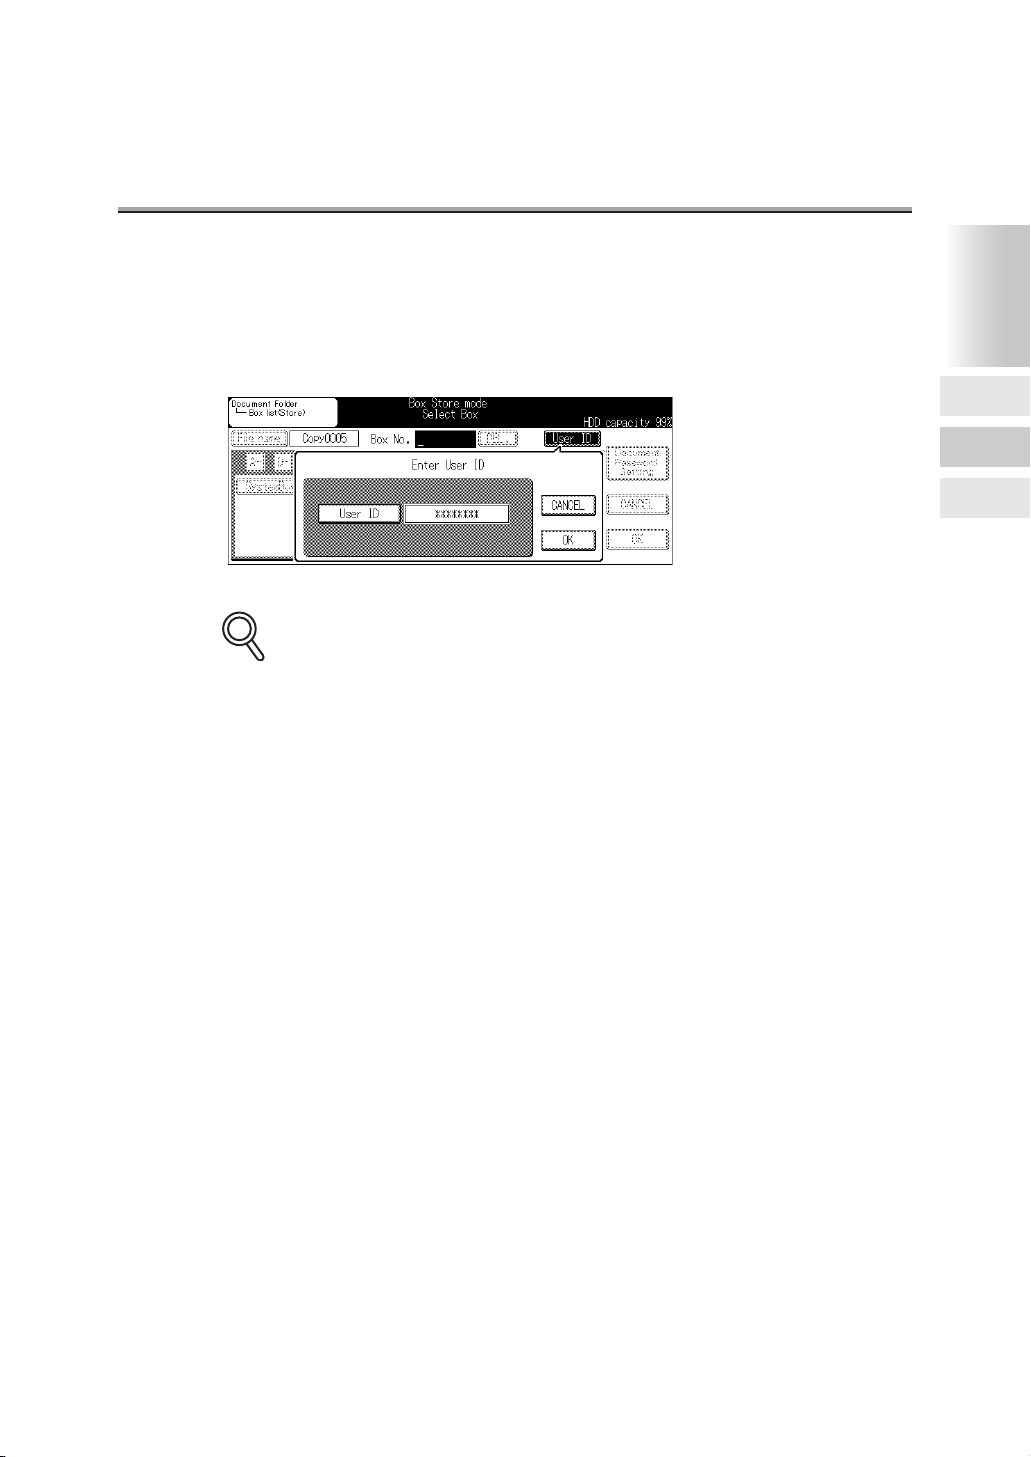
4. To open a box for which the User ID has been set, press the
User ID, enter the User ID (8 digits or less) on the screen displayed with the key pad and press OK.
To open a box for which no User ID has been set, go to the step 5.
DETAIL
If a User ID has been entered for user account verification, a list of appropriate boxes is
•
indicated. In this case, User ID cannot be selected.
• Use a user ID of 4 to 8 digits when the "Enhanced Security function" is being used.
• If an incorrect User ID is entered, an error message is displayed.
Chapter
2
Storing
Documents in
Document
Storing Copy
Documents
Storing
Scanned
Document
2-5
Page 22

Storing Copy Documents (continued)
S
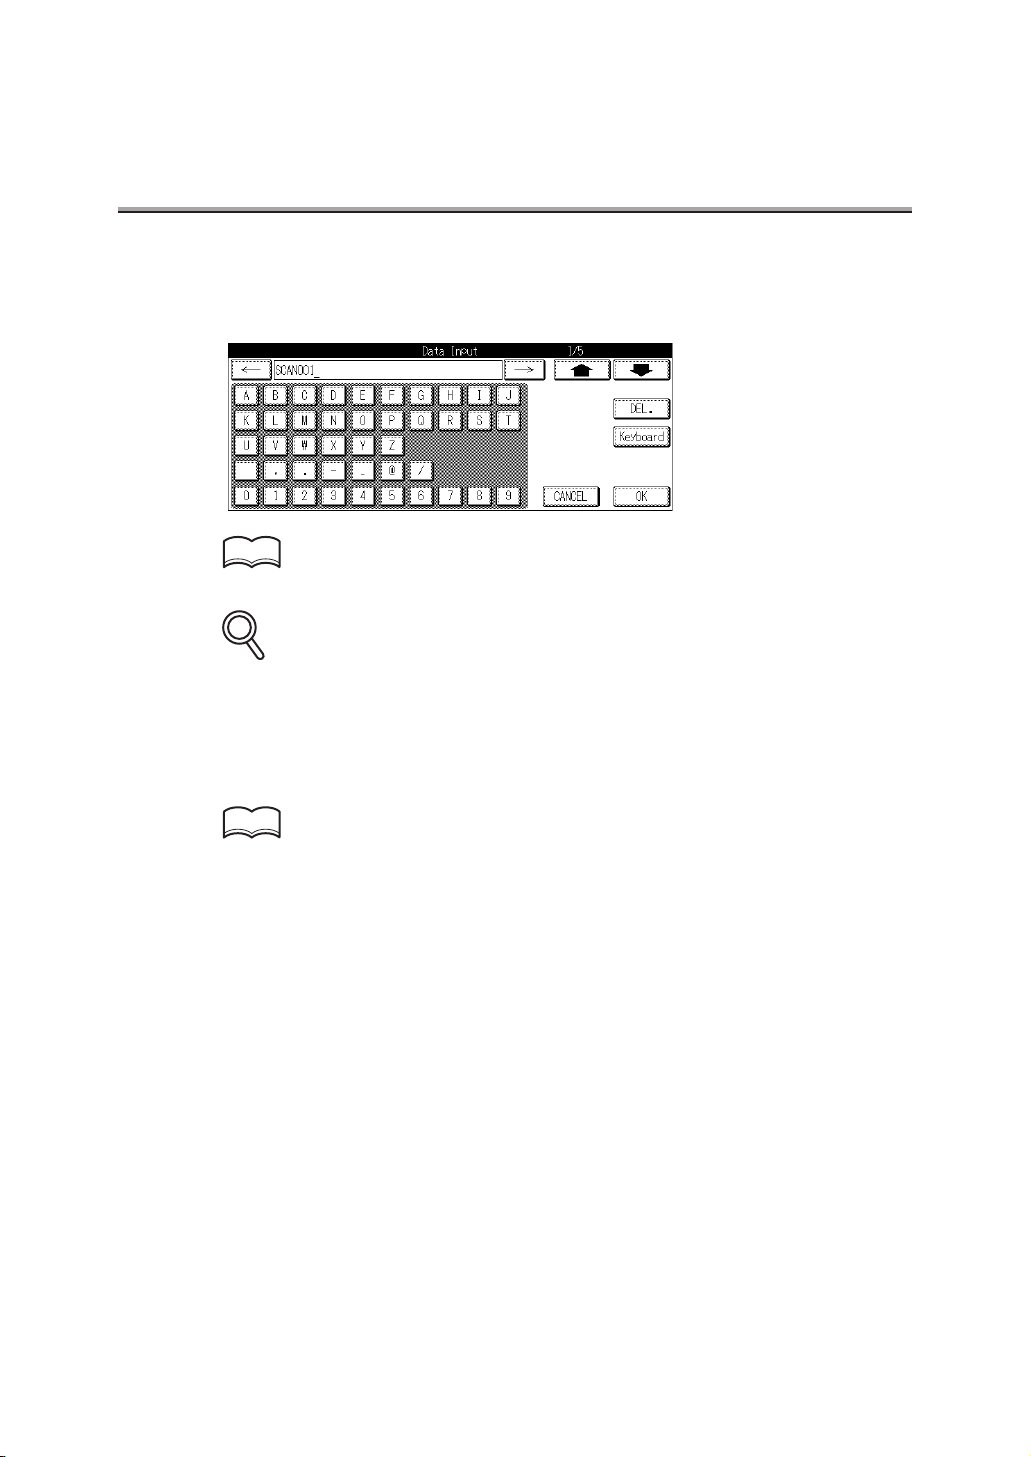
5. Press File Name and enter the document file name on the
Data Input screen displayed.
HINT
For detail, see "Entering Names" (p. Appendix-4).
DETAIL
Copy0001 has been set as the default value.
The numeral value increases by 1 with each document’s storage.
(e.g.) First document: Copy0001 Second document: Copy0002
2-6
Page 23

Storing Copy Documents (continued)
S
6. To set a password for the document, press Document Pass-
word Setting and enter the password in the following proce-
dure.
(1) Press Password.
(2) Enter the password (8 digits or less) and press OK.
DETAIL
• Enter the password in 8 digits or less.
• Use a password of 8 digits when the "Enhanced Security function" is being used.
Chapter
2
Storing
Documents in
Document
Storing Copy
Documents
Storing
Scanned
Document
2-7
Page 24
Storing Copy Documents (continued)
S
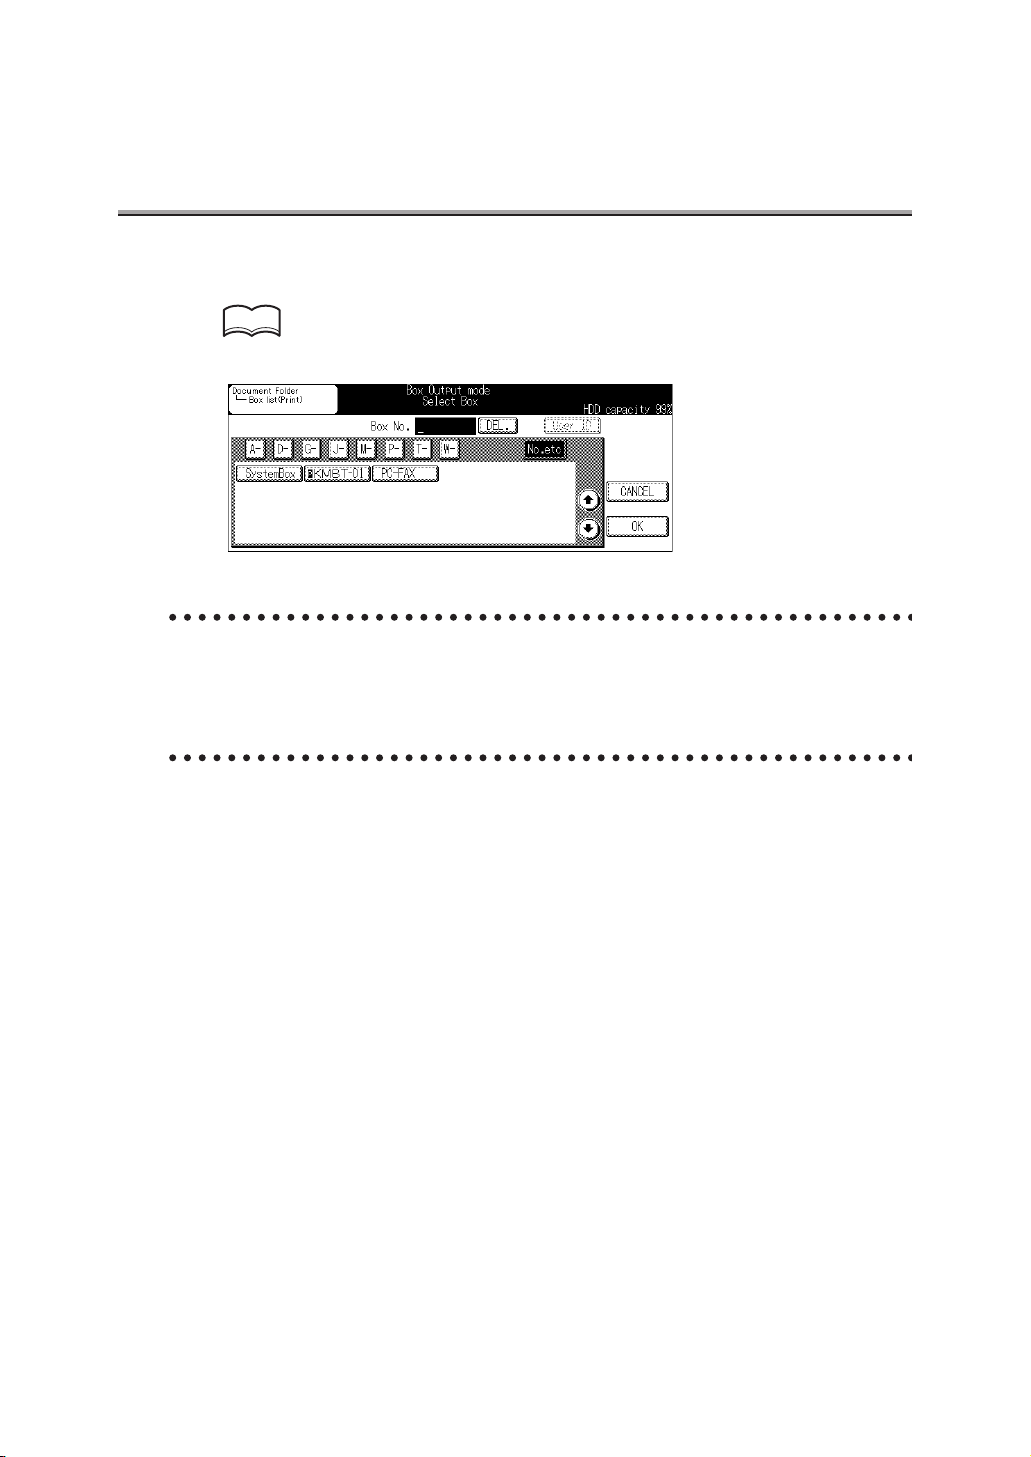
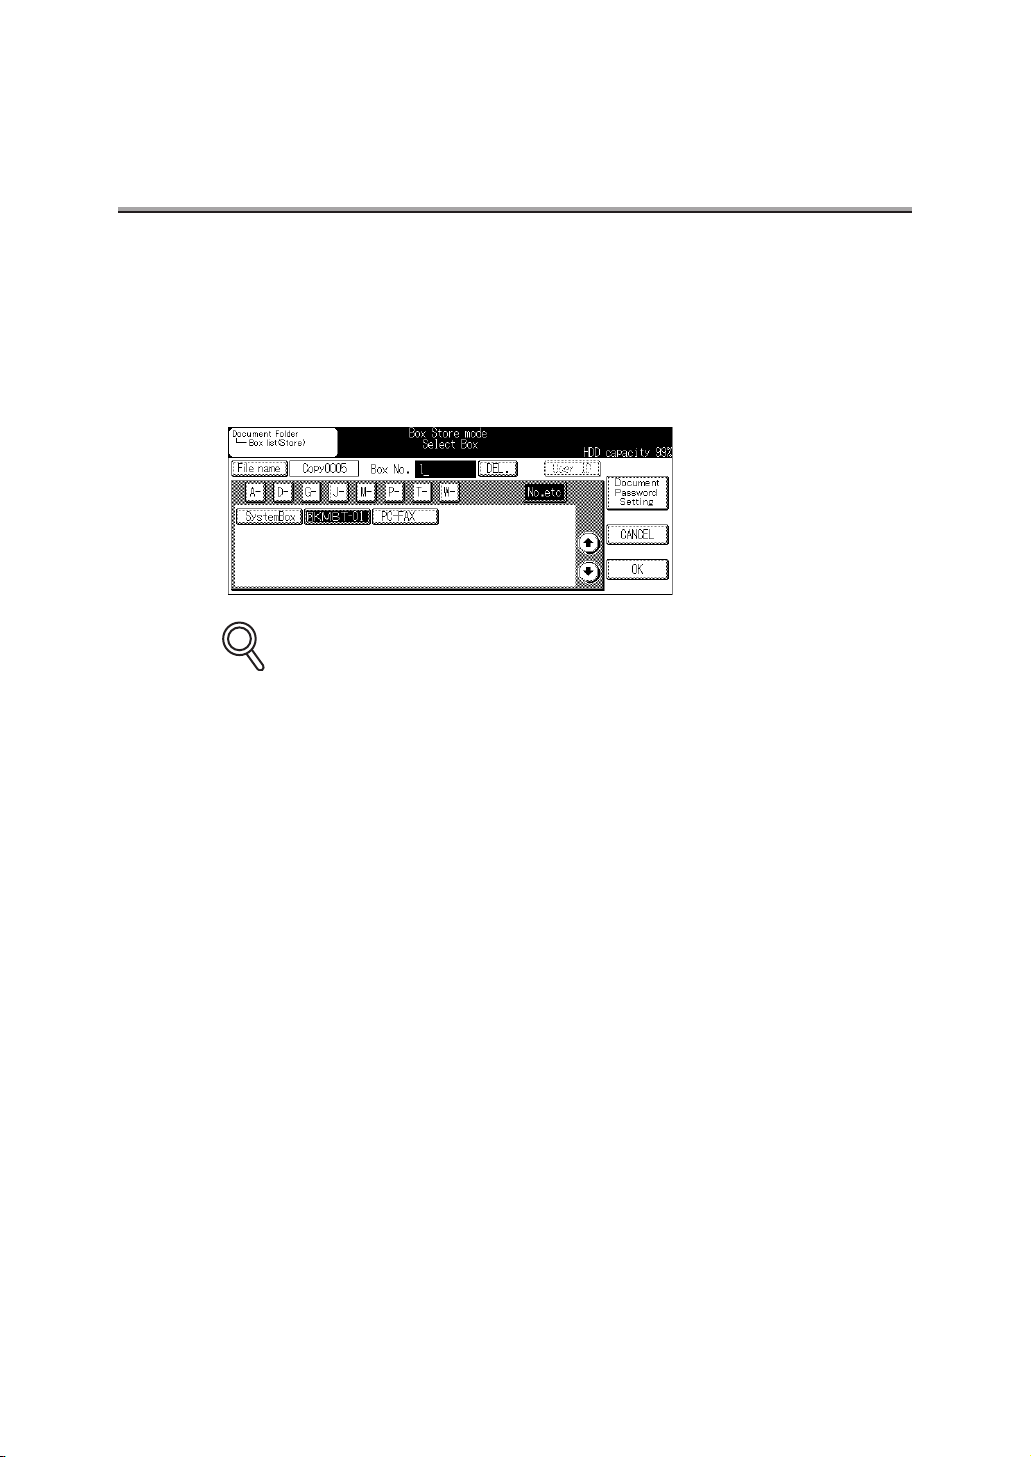
7. To select a box, press Character to search and the key with
the letter or number (No.etc) representing the first letter of
the box that you are searching for. Or enter the Box No. (1 to
9 digits) with the key pad in "Box No.", select the Document
Folder to store the document and press OK.
DETAIL
• By pressing DEL., characters of the Box No. entered are erased one by one.
• "P" is indicated on the left side of a box to which a password has been set.
• When you press Character to search, boxes which have been registered to the charac-
ters are listed.
2-8
Page 25
Storing Copy Documents (continued)
S
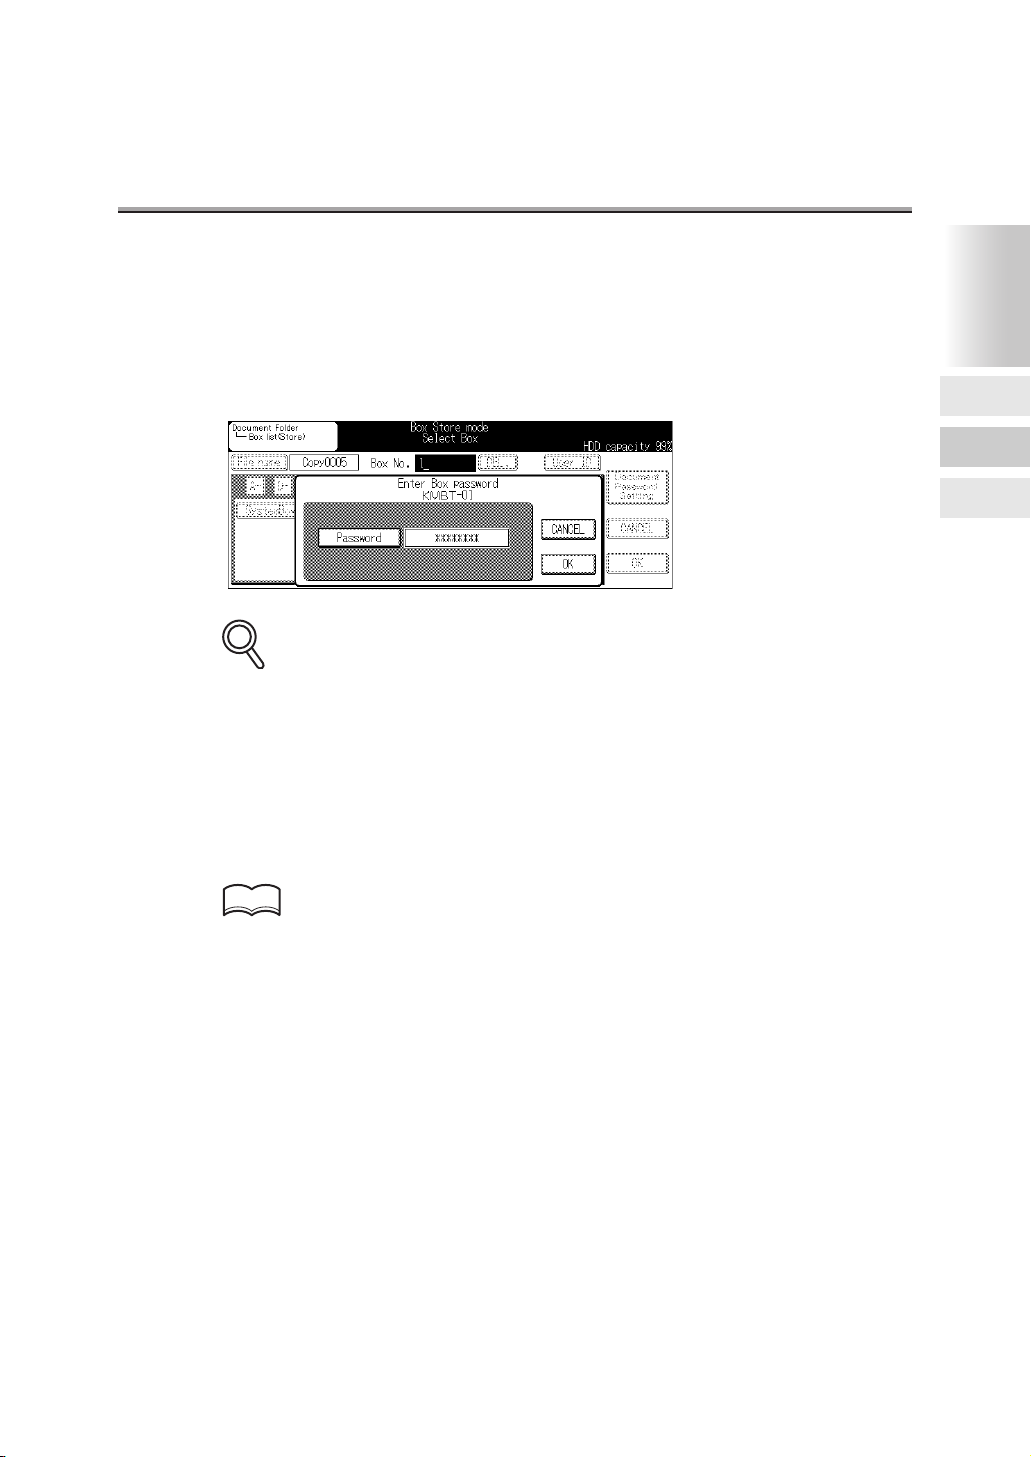
8. When a box for which a password has been set is selected,
the Password Input screen is indicated.
Enter the password in the following procedure.
(1) Press Password.
(2) Enter the password (8 digits or less) and press OK.
DETAIL
Enter the password in 8 digits or less.
•
• Use a password of 8 digits when the "Enhanced Security function" is being used.
9. Set the copy function if required, set the original document
and press [START] on the control panel.
When selecting Copy & Box Store, the scanned document is copied and stored in the
specified box.
When selecting Box Store only, the scanned document is stored in the specified box.
Chapter
2
Storing
Documents in
Document
Storing Copy
Documents
Storing
Scanned
Document
HINT
Refer to "User's Manual (Copy Operations)" for the setting of the copy function.
•
• Refer to p. 3-4 for the output of documents stored in the box.
2-9
Page 26
Storing Copy Documents (continued)
S
For Copy & Re-Print
1. Press [COPY] on the control panel to display the Copy
screen.
2. Press Document Folder.
3. Press Copy & Re-Print.
2-10
Copy screen is displayed.
DETAIL
Up to ten documents can be stored in the Re-Print Box.
Page 27

Storing Copy Documents (continued)
S
4. Set the copy function if required, set the original document
and press [START] on the control panel.
Chapter
2
DETAIL
The default value of the file name is Copy0001. The numerical value increases by 1 with
each document’s storage.
HINT
• Refer to "User's Manual (Copy Operations)" for the setting of the copy function.
• See p. 3-22 for the printing of the documents stored in the Re-Print Box.
Storing
Documents in
Document
Storing Copy
Documents
Storing
Scanned
Document
2-11
Page 28
Storing Scanned Document
S
Scanned documents are stored in the Document Folder using the following procedure.
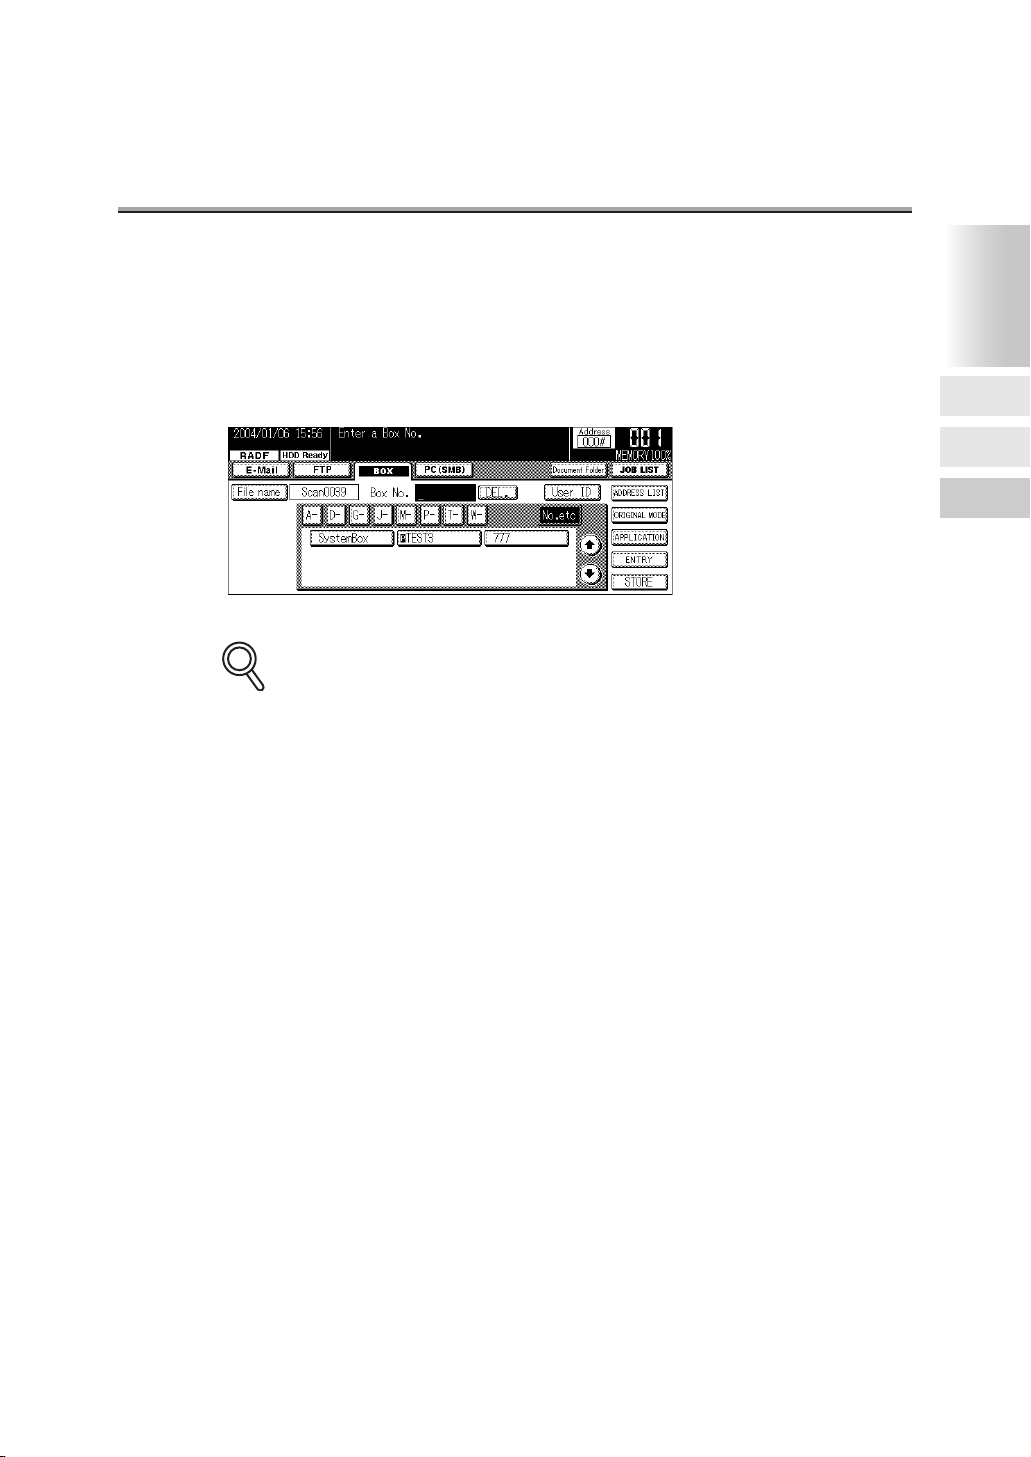
1. Press [SCANNER] on the control panel to display the Scan-
ner screen.
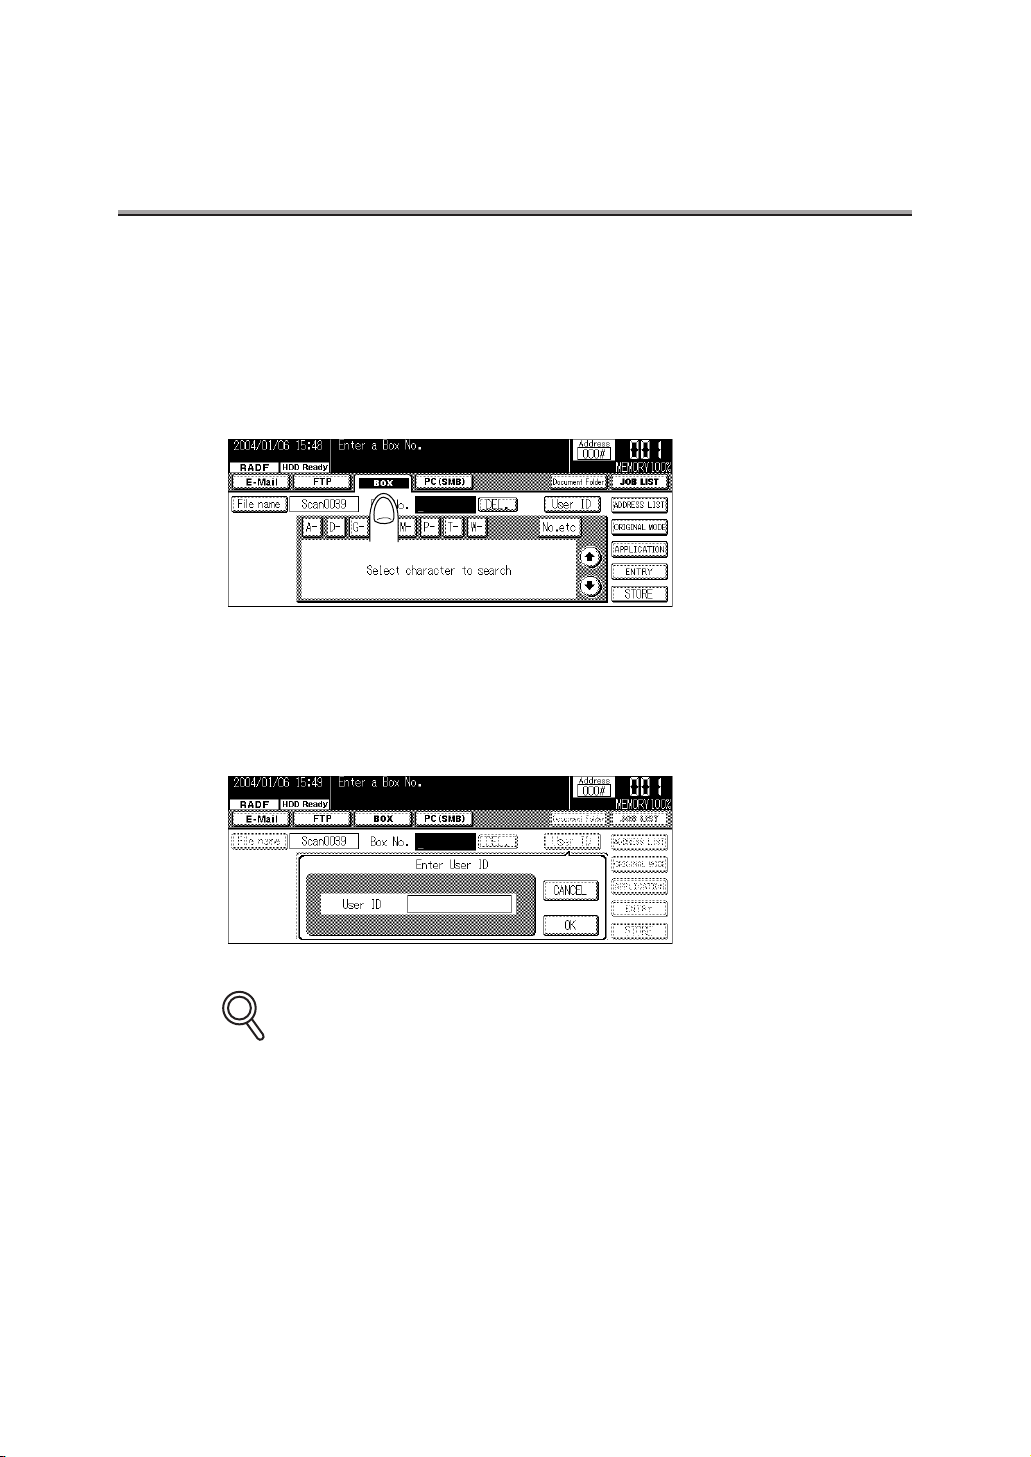
2. Press BOX.
3. To open the box for which a User ID has been set, press the
User ID, enter the User ID (8 digits or less) on the screen displayed with the key pad and press OK.
To open a box for which no User ID has been set, go to step 4.
2-12
DETAIL
Enter the User ID in 8 digits or less.
•
• Use a user ID of 4 to 8 digits when the "Enhanced Security function" is being used.
• If an incorrect User ID is entered, a error message is displayed.
Page 29
Storing Scanned Document (continued)
S
4. To select a box, press Character to search and the key with
the letter or number (No.etc) representing the first letter of
the box that you are searching for. Or enter the Box No. (1 to
9 digits) with the key pad in “Box No.”, select the Document
Folder to store the document.
DETAIL
• By pressing DEL., characters of the Box No. entered are erased one by one.
• "P" is indicated on the left side of a box to which a password has been set.
• When you press Character to search, boxes which have been registered to the charac-
ters are listed.
• If a Box No. which does not exist is entered, a temporary box is used.
Chapter
2
Storing
Documents in
Document
Storing Copy
Documents
Storing
Scanned
Document
2-13
Page 30
Storing Scanned Document (continued)
S
5. Press File Name, enter the file name of the document on the
Data Input screen displayed and press OK.
HINT
For detail, see "Entering Names" (p. Appendix-4).
DETAIL
• Scan0001 has been set as the default value.
• The numeral value increases by 1 with each documents storage.
6. Set the scanner functions as required, set the original docu-
ment and press [START] on the control panel.
2-14
HINT
• Refer to "User's Manual (Network/Scanner Operations)" to setting the scanner.
• See p. 3-29 for the output of documents stored in the box.
Page 31

Storing Scanned Document (continued)
S
7. When selecting a box for which a password has been set, the
Password Input screen is displayed.
Enter the password in the following procedure.
(1) Press Password.
(2) Enter the password (8 digits or under) and press OK.
(3) Press OK.
DETAIL
Enter the password in 8 digits or less.
•
• Use a password of 8 digits when the "Enhanced Security function" is being used.
Chapter
2
Storing
Documents in
Document
Storing Copy
Documents
Storing
Scanned
Document
2-15
Page 32

Chapter
Print Documents
3
How to See the Document List Screen .......................................3-2
Printing the Documents in Box....................................................3-3
Operating the Re-Print Function ...............................................3-22
Transmit or Transfer a Document in the Box .............................3-29
Importing Scanned Documents to Computer............................3-42
Chapter
3
How to See
the Document
List Screen
Printing the
Documents in
Operating the
Re-Print
Function
Transmit or
Transfer a
Document in
the Box
Importing
Scanned
Documents to
Computer
Box
Page 33

How to See the Document List Screen
S
11
10
9
768
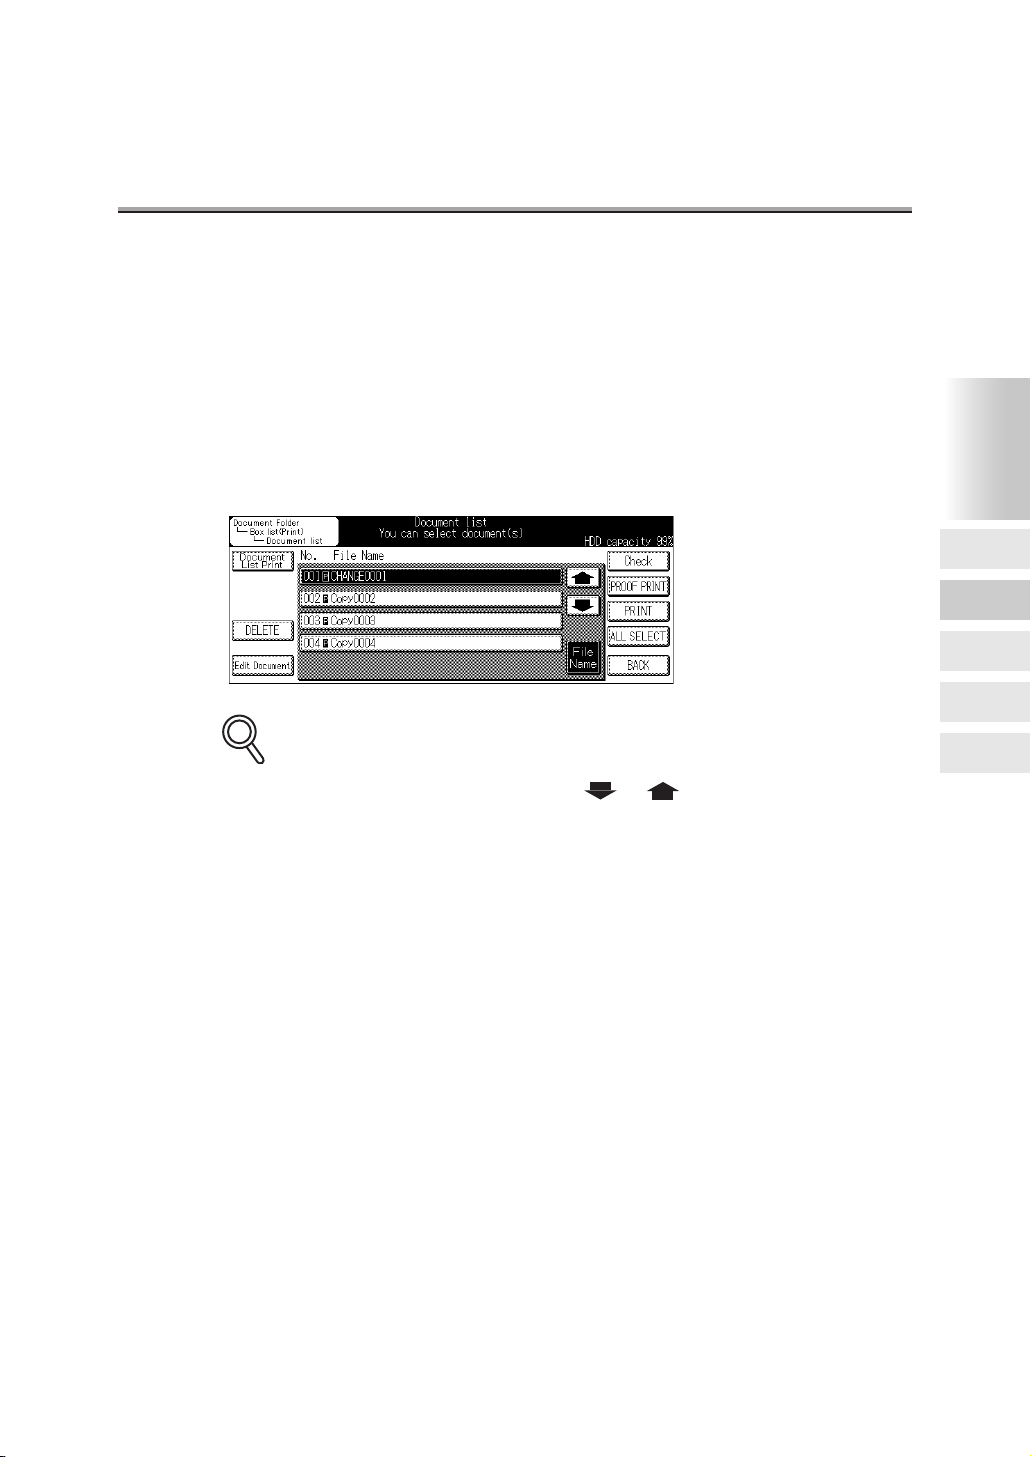
1 Check
2 PROOF PRINT Press to print only the first page of a document.
3 PRINT Press to print a document.
4 ALL SELECT
5 BACK Press to return to the previous screen.
6 File Name
7 Press to display the next screen.
Press to check the functions set when a document
was stored.
Press to select all documents in the Document
Folder. Documents and scanned documents saved
in the PDF format for which a password has been
set are not selected. Documents requiring a password must be selected individually.
When the file name is long, the display is switched
by pressing this button to the document No. and file
name only. By pressing the File Name button
again, the original screen appears.
1
2
3
4
5
3-2
8 Press to display the previous screen.
Press to change the document passwords or docu-
9 Edit Document
10 DELETE Press to delete a document.
11 Document List Print
ment name. New password can be also set for documents for which no password has been set.
Press to print the document list in the Document
Folder.
DETAIL
• "P" is indicated on the right side of No. of a document for which a password has been set.
• The printing of scanner documents is available only for those saved in the TIFF format.
Scanner documents saved in the PDF format cannot be printed.
Page 34

Printing the Documents in Box
S
Documents in the Document Folder can be printed by opening the Document Folder from the
Copy, Fax, or Printer screen.
It is also possible to check the contents of a document, print the document list, delete documents,
change the document name or password, etc., by printing only the first page of the document.
DETAIL
• Scanner documents saved in the PDF format cannot be printed.
• When opening the Document Folder from the Scanner screen, documents can be output
by the E-mail transmission, FTP transfer or Transmission to the computer. They cannot be
printed. Refer to p. 3-29 for the operation.
Setting of functions for document output (printing)
c: Setting changeable ±: Setting unchangeable (or automatic reset)
Copy document Fax document Print document
Setting Print Quantity cccc
Tr ay c±cc
(Exit) tray cccc
Output Mode (Sort/Group) c±cc
Staple
(OnOff/Staple Position)
Punch
(OnOff/Punch Lotation)
E-Sort / E-Group ±±±±
LENS mode ±±±±
Density ±±±±
Special Original
(Folded /Non-Standard
Size/Mixed)
Copy Mode
(Single-Sided/Double-
Sided)
(Rotation) OFF ±±±±
Store ±±±±
Proof Copy ±±±±
Application
(All application functions)
c±cc
c±cc
±±±±
cccc
±±±±
Scanner
document
Chapter
3
How to See
the Document
List Screen
Printing the
Documents in
Operating the
Re-Print
Function
Transmit or
Transfer a
Document in
the Box
Importing
Scanned
Documents to
Computer
Box
3-3
Page 35

Printing the Documents in Box (continued)
Printing documents
Documents in the Document Folder are printed in the following procedure.
1. Press Document Folder on the Copy, Fax or Printer screen.
2. On the Copy screen, press PRINT on the screen displayed.
3-4
Page 36
Printing the Documents in Box (continued)
S
S
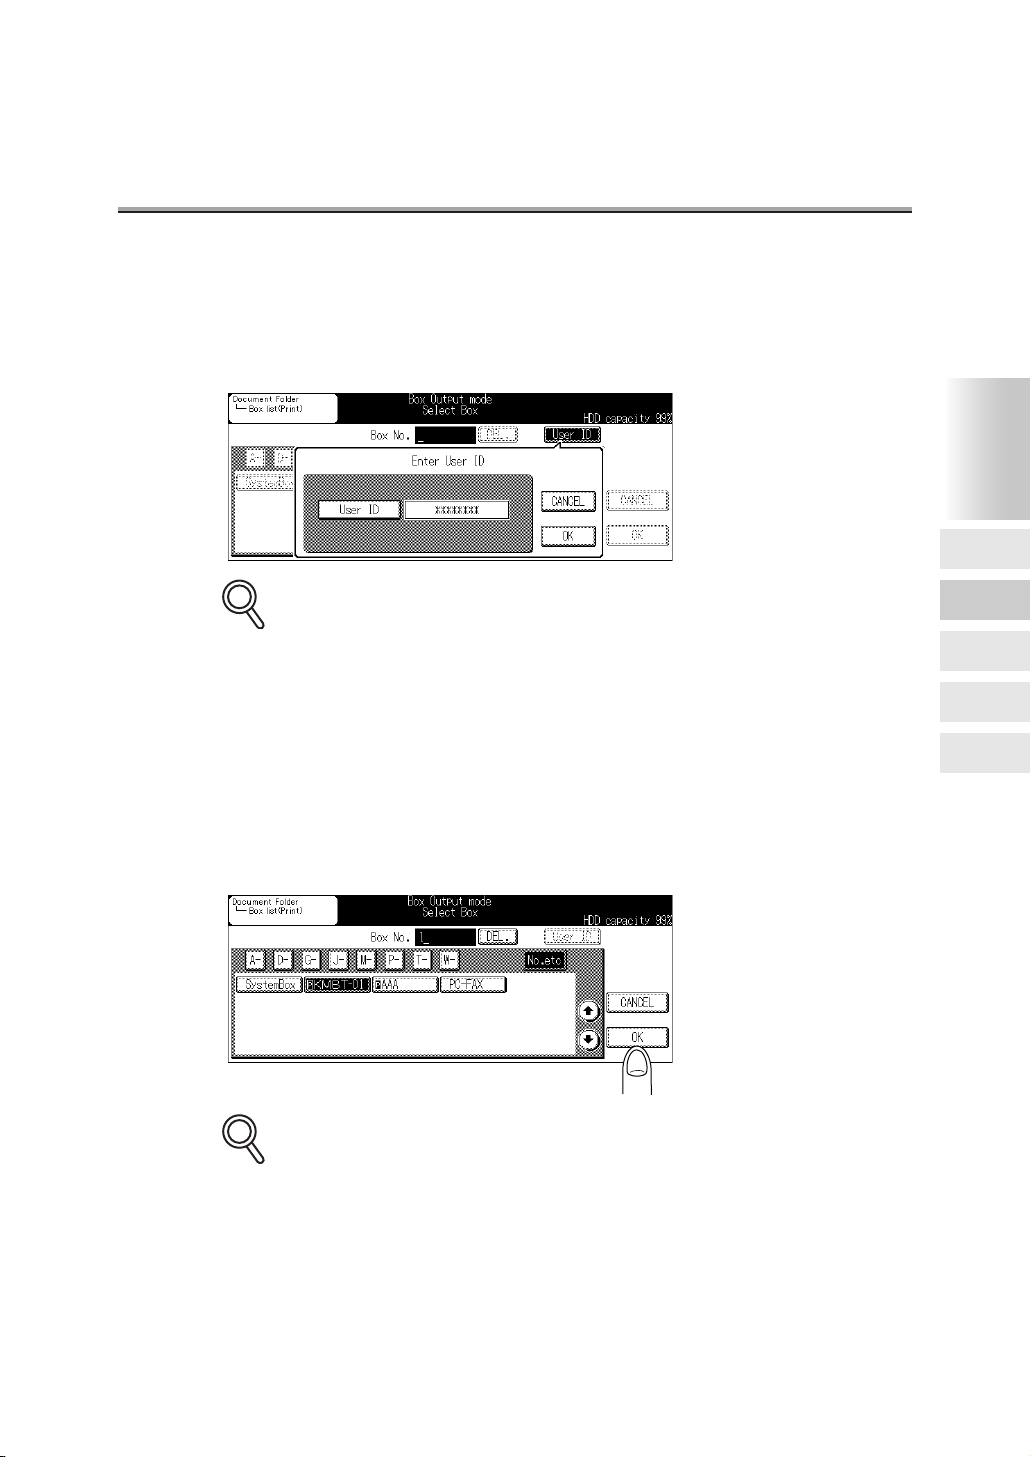
3. When opening a box for which a User ID has been set, press
User ID, enter the User ID (8 digits or less) on the screen displayed with the key pad and press OK.
To open a box for which no User ID has been set, go to the step 4.
DETAIL
•
If a User ID has been entered for user account verification, a list of appropriate boxes is
indicated. In this case, User ID cannot be selected.
• Use a user ID of 4 to 8 digits when the "Enhanced Security function" is being used.
• If an incorrect User ID is entered, an error message is displayed.
4. To select a box, press Character to search and the key with
the letter or number (No.etc) representing the first letter of
the box that you are searching for. Or enter the Box No. (1 to
9 digits) with the key pad in "Box No.", select the Document
Folder to store the document and press OK.
Chapter
3
How to See
the Document
List Screen
Printing the
Documents in
Operating the
Re-Print
Function
Transmit or
Transfer a
Document in
the Box
Importing
Scanned
Documents to
Computer
Box
DETAIL
• By pressing the DEL. button, the box No. entered is erased.
• "P" is indicated on the left side of a box to which a password has been set.
• When you press Character to search, boxes which have been registered to the charac-
ters are listed.
3-5
Page 37

Printing the Documents in Box (continued)
S
5. When selecting a box for which a password has been set, the
Password Input screen is displayed.
Enter the password using the following procedure.
(1) Press Password.
(2) Enter the password (8 digits or less) and press OK.
(3) Press OK.
DETAIL
Enter the password in 8 digits or less.
•
• Use a password of 8 digits when the "Enhanced Security function" is being used.
3-6
Page 38

Printing the Documents in Box (continued)
S
S
6. Select a document to be printed.
Chapter
3
DETAIL
• To display the next or previous screen, press or .
• By pressing BACK, the previous screen appears.
• If a document has a long file name, the screen can be changed to display only the Docu-
ment No. and File Name by pressing File Name. Press File Name again to return to the
former screen.
• "P" is indicated on the right side of No. of a document for which a password has been set.
• Scanner documents saved in the PDF format cannot be printed.
7. When a password has been set for the document, enter the
password in the following procedure.
(1) Press Password .
(2) Enter the password (8 digits or less) and press OK.
How to See
the Document
List Screen
Printing the
Documents in
Operating the
Re-Print
Function
Transmit or
Transfer a
Document in
the Box
Importing
Scanned
Documents to
Computer
Box
DETAIL
• Enter the password in 8 digits or less.
• Use a password of 8 digits when the "Enhanced Security function" is being used.
3-7
Page 39

Printing the Documents in Box (continued)
S
8. Press PRINT.
9. Change the printing function as required.
Setting can be changed for the following functions:
• Copy, Print and Scanner documents:
No. of copies, output setting (output tray, sort, staple, punch), paper size, one/twosided selection
• Fax document:
No. of copies, one / two-sides selection, output tray
DETAIL
Refer to "User's Manual (Copy Operations)" for details of the copy function.
10.Enter the No. of copies with the keypad and press [START]
on the control panel.
Document selected is printed.
3-8
Page 40

Printing the Documents in Box (continued)
S
Printing the First Page only
To print only the first page of the document in the Document Folder to check the contents
of the document, follow the procedure below.
1. Refer to the steps 1 through 5 on p. 3-4 ("Printing docu-
ments") to display the Document List screen.
2. Select a document to be printed.
DETAIL
• To display the next or previous screen, press or .
• By pressing BACK, the previous screen appears.
• If a document has a long file name, the screen can be changed to display only the Docu-
ment No. and File Name by pressing File Name. Press File Name again to return to the
former screen.
• "P" is indicated on the right side of No. of a document for which a password has been set.
• Scanner documents saved in the PDF format cannot be printed.
Chapter
3
How to See
the Document
List Screen
Printing the
Documents in
Operating the
Re-Print
Function
Transmit or
Transfer a
Document in
the Box
Importing
Scanned
Documents to
Computer
Box
3-9
Page 41

Printing the Documents in Box (continued)
S
3. When a password has been set for the document, enter the
password using the following procedure.
(1) Press Password.
(2) Enter the password (8 digits or less) and press OK.
DETAIL
•
Enter the password in 8 digits or less.
• Use a password of 8 digits when the "Enhanced Security function" is being used.
4. Press PROOF PRINT.
5. Press [START] on the control panel.
First page of the document selected is printed.
3-10
Page 42

Printing the Documents in Box (continued)
S
Deleting Documents
Documents in the Document Folder are deleted in the following procedure.
1. Refer to the steps 1 through 5 on p. 3-4 ("Printing docu-
ments") to display the Document List screen.
2. Select a document to be deleted.
DETAIL
• To display the next or previous screen, press or .
• By pressing BACK, the previous screen appears.
• If a document has a long file name, the screen can be changed to display only the Docu-
ment No. and File Name by pressing File Name. Press File Name again to return to the
former screen.
• "P" is indicated on the right side of No. of a document for which a password has been set.
Chapter
3
How to See
the Document
List Screen
Printing the
Documents in
Operating the
Re-Print
Function
Transmit or
Transfer a
Document in
the Box
Importing
Scanned
Documents to
Computer
Box
3. When a password has been set for the document, enter the
password using the following steps.
(1) Press Password.
(2) Enter the password (8 digits or less) and press OK.
3-11
Page 43

Printing the Documents in Box (continued)
S
DETAIL
• Enter the password in 8 digits or less.
• Use a password of 8 digits when the "Enhanced Security function" is being used.
4. Press DELETE.
5. Press YES.
3-12
The document selected is deleted.
Page 44

Printing the Documents in Box (continued)
Printing the Document List
Document list in the Document Folder is printed in the following procedure.
1. Refer to the steps 1 through 5 on p. 3-4 ("Printing docu-
ments") to display the Document List screen.
2. Press Document List Print.
Document list in the box selected is printed.
Chapter
3
How to See
the Document
List Screen
Printing the
Documents in
Operating the
Re-Print
Function
Transmit or
Transfer a
Document in
the Box
Importing
Scanned
Documents to
Computer
Box
3-13
Page 45

Printing the Documents in Box (continued)
S
Checking the Setting of Documents
Check the function settings established when the document was stored using the following
procedure.
1. Refer to the steps 1 through 5 on p. 3-4 ("Printing docu-
ments") to display the Document List screen.
2. Select a document to be checked.
DETAIL
• To display the next or previous screen, press or .
• By pressing BACK, previous screen appears.
• If a document has a long file name, the screen can be changed to display only the Docu-
ment No. and File Name by pressing File Name. Press File Name again to return to the
former screen.
• "P" is indicated on the right side of No. of a document for which a password has been set.
3. When a password has been set for the document, enter the
password using the following procedure.
(1) Press Password.
(2) Enter the password (8 digits or less) and press OK.
(3) Press OK.
3-14
Page 46

Printing the Documents in Box (continued)
S
S
DETAIL
• Enter the password in 8 digits or less.
• Use a password of 8 digits when the "Enhanced Security function" is being used.
4. Press Check.
Setting condition of the document selected is displayed.
5. After checking the setting condition, press EXIT.
Chapter
3
How to See
the Document
List Screen
Printing the
Documents in
Operating the
Re-Print
Function
Transmit or
Transfer a
Document in
the Box
Importing
Scanned
Documents to
Computer
Box
DETAIL
• Press to display the next screen.
• Contents displayed vary depending on the document saving mode.
3-15
Page 47

Printing the Documents in Box (continued)
S
Changing the Document Name
Document names of documents in the Document Folder are changed using the following
procedure.
1. Refer to the steps 1 through 5 on p. 3-4 ("Printing docu-
ments") to display the Document List screen.
2. Select a document for which the document name is to be
changed.
DETAIL
3-16
• To display the next or previous screen, press or .
• By pressing BACK, the previous screen appears.
• If a document has a long file name, the screen can be changed to display only the Docu-
ment No. and File Name by pressing File Name. Press File Name again to return to the
former screen.
• "P" is indicated on the right side of No. of a document for which a password has been set.
• The file name of scanner documents cannot be changed.
Page 48

Printing the Documents in Box (continued)
S
3. When a password has been set for the document, enter the
password using the following procedure.
(1) Press Password.
(2) Enter the password (8 digits or less) and press OK.
DETAIL
• Enter the password in 8 digits or less.
• Use a password of 8 digits when the "Enhanced Security function" is being used.
4. Press Edit Document.
Chapter
3
How to See
the Document
List Screen
Printing the
Documents in
Operating the
Re-Print
Function
Transmit or
Transfer a
Document in
the Box
Importing
Scanned
Documents to
Computer
Box
Document Editing screen is displayed.
3-17
Page 49

Printing the Documents in Box (continued)
5. Press Change File Name.
Data input screen is displayed.
6. Enter the new file name and press OK.
HINT
For detail, see "Entering Names" (p. Appendix-4).
7. Check the file name and press OK.
3-18
\
Page 50
Printing the Documents in Box (continued)
S
Setting/Changing the Password
Establish or change passwords for documents in the Document Folder using the following
procedure.
1. Refer to the steps 1 through 5 on p. 3-4 ("Printing docu-
ments") to display the Document List screen.
2. Select the document for which the password is to be set or
changed.
f
DETAIL
• To display the next or previous screen, press or .
• By pressing BACK, the previous screen appears.
• If a document has a long file name, the screen can be changed to display only the Docu-
ment No. and File Name by pressing File Name. Press File Name again to return to the
former screen.
• "P" is indicated on the right side of No. of a document for which a password has been set.
Chapter
3
How to See
the Document
List Screen
Printing the
Documents in
Operating the
Re-Print
Function
Transmit or
Transfer a
Document in
the Box
Importing
Scanned
Documents to
Computer
Box
3-19
Page 51

Printing the Documents in Box (continued)
S
3. When a password has been set for the document, enter the
password using the following procedure.
(1) Press the Password button.
(2) Enter the password (8 digits or less) and press the OK button.
DETAIL
• Enter the password in 8 digits or less.
• Use a password of 8 digits when the "Enhanced Security function" is being used.
4. Press Edit Document.
3-20
Document Editing screen is displayed.
Page 52

5. Press Password setting.
Printing the Documents in Box (continued)
Chapter
3
Data Entry screen is displayed.
6. Enter the password and press OK.
7. Press OK.
How to See
the Document
List Screen
Printing the
Documents in
Operating the
Re-Print
Function
Transmit or
Transfer a
Document in
the Box
Importing
Scanned
Documents to
Computer
Box
3-21
Page 53

Operating the Re-Print Function
S
When "Copy & Re-Print" method was selected at the time of copy operation, documents have
been stored in the Re-Print Box of the Document Folder. The documents stored in the Re-Print
Box can be printed when required, only the first page of a document can be printed to check the
contents, or the document can be deleted.
When you purchase the copier, it has been set so that the documents in the Re-Print Box are
automatically deleted after one day.
DETAIL
While the "Enhanced Security function" is set up, the Re-Print function cannot be used.
•
• When you purchase the copier, it has been set to OFF so that you cannot use the re-print
function. To use the re-print function, you should set the re-print function to ON in the key
operator mode. For detail, see "Re-Print Setting" (p. 4-21).
Printing the Re-Print Documents
Documents stored in the Re-Print Box are printed in the following procedure.
1. Press Document Folder on the copy screen.
2. Press Re-Print.
3-22
Page 54

Operating the Re-Print Function (continued)
S
S
3. Select a document to be printed.
Chapter
3
DETAIL
• To display the next or previous screen, press or .
• If a document has a long file name, the screen can be changed to display only the Docu-
ment No. and File Name by pressing File Name. Press File Name again to return to the
former screen.
• By pressing CANCEL, previous screen is displayed.
4. Press OK.
5. Change the printing functions as required.
Settings can be changed for the following functions:
No. of copies, output settings (output tray, sort, staple, or punch), paper size, and one/
two-sided selection
DETAIL
How to See
the Document
List Screen
Printing the
Documents in
Operating the
Re-Print
Function
Transmit or
Transfer a
Document in
the Box
Importing
Scanned
Documents to
Computer
Box
Refer to the "User's Manual (Copy Operations)" for details of the copy functions.
3-23
Page 55

Operating the Re-Print Function (continued)
6. Enter the No. of copies with the keypad and press [START]
on the control panel.
Document selected is printed.
3-24
Page 56

Operating the Re-Print Function (continued)
S
Printing the First Page Only
Only the first page of a document stored in the Re-Print Box can be printed using the following
procedure to check the contents of the document.
1. Press Document Folder on the Copy screen.
2. Press Re-Print.
Chapter
3
How to See
the Document
List Screen
Printing the
Documents in
Operating the
Re-Print
Function
Transmit or
Transfer a
Document in
the Box
Importing
Scanned
Documents to
Computer
Box
3. Select a document to be printed.
DETAIL
• To display the next or previous screen, press or .
• If a document has a long file name, the screen can be changed to display only the Docu-
ment No. and File Name by pressing File Name. Press File Name again to return to the
former screen.
• By pressing CANCEL, previous screen is displayed.
3-25
Page 57

Operating the Re-Print Function (continued)
4. Press PROOF PRINT.
First page of the document selected is printed.
5. Press [START] on the control panel.
3-26
Page 58

Operating the Re-Print Function (continued)
Deleting Documents
Documents stored in the Re-Print Box are deleted using the following procedure.
1. Press Document Folder on the Copy screen.
2. Press Re-Print.
Chapter
3
How to See
the Document
List Screen
Printing the
Documents in
Operating the
Re-Print
Function
Transmit or
Transfer a
Document in
the Box
Importing
Scanned
Documents to
Computer
Box
3-27
Page 59

Operating the Re-Print Function (continued)
S
3. Select a document to be deleted.
DETAIL
• To display the next or previous screen, press or .
• If a document has a long file name, the screen can be changed to display only the Docu-
ment No. and File Name by pressing File Name. Press File Name again to return to the
former screen.
• By pressing CANCEL, previous screen is displayed.
4. Press DELETE.
5. Press YES.
Document selected is deleted.
3-28
Page 60

Transmit or Transfer a Document in the Box
S
Documents in the Document Folder can be transmitted via E-mail, transferred with FTP, or sent to
the computer by opening the Document folder from the Scanner screen.
DETAIL
When opening the Document Folder from the Copy/Fax/Printer screen, the document is output by printing. See p. 3-4 for the operation.
Transmitting via E-Mail
Documents in the Document Folder are transmitted via E-mail in the following procedure.
1. Press [SCANNER] on the control panel to display the Scan-
ner screen.
2. Press Document Folder.
3. When opening a box for which a User ID has been set, press
User ID, enter the User ID (8 digits or less) on the screen displayed with the key pad and press OK.
To open a box for which no User ID has been set, go to step 4.
Chapter
3
How to See
the Document
List Screen
Printing the
Documents in
Operating the
Re-Print
Function
Transmit or
Transfer a
Document in
the Box
Importing
Scanned
Documents to
Computer
Box
3-29
Page 61

Transmit or Transfer a Document in the Box (continued)
S
S
DETAIL
• Up to 8 digits can be entered for a user ID.
• Use a user ID of 4 to 8 digits when the "Enhanced Security function" is being used.
• When a user ID has been already entered while in the authorization of a user account, a
list of relevant boxes has been already displayed. On such an occasion as this, the selection of User ID is not available.
• When a wrong user ID has been entered, a warning message will be displayed.
4. To select a box, press Character to search and the key with
the letter or number (No.etc) representing the first letter of
the box that you are searching for. Or enter the Box No. (1 to
9 digits) with the key pad in "Box No.", select the Document
Folder to store the document and press OK.
3-30
DETAIL
• By pressing DEL., characters of the Box No. entered are erased one by one.
• "P" is indicated on the left side of a box to which a password has been set.
• When you press Character to search boxes which have been registered to the charac-
ters are listed.
Page 62

Transmit or Transfer a Document in the Box (continued)
S
S
5. When a box for which a password has been set is selected,
the Password Input screen is indicated.
Enter the password in the following procedure.
(1) Press Password.
(2) Enter the password (8 digits or less) and press OK.
DETAIL
• Enter the password in 8 digits or less.
• Use a password of 8 digits when the "Enhanced Security function" is being used.
6. Select a document to be transmitted via E-mail.
Chapter
3
How to See
the Document
List Screen
Printing the
Documents in
Operating the
Re-Print
Function
Transmit or
Transfer a
Document in
the Box
Importing
Scanned
Documents to
Computer
Box
DETAIL
• The scanner documents cannot be transmitted.
• To display the next or previous screen, press or .
• By pressing BACK, previous screen appears.
• If a document has a long file name, the screen can be changed to display only the Docu-
ment No. and File Name by pressing File Name. Press File Name again to return to the
former screen.
HINT
See p. 3-3 for information about printing to check contents, deleting or editing documents.
3-31
Page 63

Transmit or Transfer a Document in the Box (continued)
S
7. When a password has been set for the document, enter the
password in the following procedure.
(1) Press Password.
(2) Enter the password (8 digits or less) and press OK.
DETAIL
• Enter the password in 8 digits or less.
• Use a password of 8 digits when the "Enhanced Security function" is being used.
8. Press E-Mail/FTP Send.
9. Press E-Mail.
3-32
Page 64

Transmit or Transfer a Document in the Box (continued)
S
10.Select the address indicated or press Enter address and
enter an mail address.
DETAIL
Refer to the "User's Manual (Network/Scanner Operations)" for more information on the mail
address specifying method.
11. Press ORIGINAL MODE, select [File Form] - TIFF or PDF and
press OK.
12.Press [START] on the control panel.
Chapter
3
How to See
the Document
List Screen
Printing the
Documents in
Operating the
Re-Print
Function
Transmit or
Transfer a
Document in
the Box
Importing
Scanned
Documents to
Computer
Box
3-33
Page 65

Transmit or Transfer a Document in the Box (continued)
S
Transmitting with FTP
Documents in the Document Folder are transmitted with FTP in the following procedure.
1. Press [SCANNER] on the control panel to display the Scan-
ner screen.
2. Press Document Folder.
3. When opening a box for which a User ID has been set, press
User ID, enter the User ID (8 digits or less) on the screen displayed with the key pad and press OK.
To open a box for which no User ID has been set, go to step 4.
3-34
DETAIL
• Up to 8 digits can be entered for a user ID.
• Use a user ID of 4 to 8 digits when the "Enhanced Security function" is being used.
• When a user ID has been already entered while in the authorization of a user account, a
list of relevant boxes has been already displayed. On such an occasion as this, the selection of User ID is not available.
• When a wrong user ID has been entered, a warning message will be displayed.
Page 66

Transmit or Transfer a Document in the Box (continued)
S
S
4. To select a box, press Character to search and the key with
the letter or number (No.etc) representing the first letter of
the box that you are searching for. Or enter the Box No. (1 to
9 digits) with the key pad in "Box No.", select the Document
Folder to store the document and press OK.
DETAIL
• By pressing DEL., characters of the Box No. entered are erased one by one.
• "P" is indicated on the left side of a box to which a password has been set.
• When you press Character to search, boxes which have been registered to the charac-
ters are listed.
5. When a box for which a password has been set is selected,
the Password Input screen is indicated.
Enter the password using the following procedure.
(1) Press Password.
(2) Enter the password (8 digits or less) and press OK.
Chapter
3
How to See
the Document
List Screen
Printing the
Documents in
Operating the
Re-Print
Function
Transmit or
Transfer a
Document in
the Box
Importing
Scanned
Documents to
Computer
Box
DETAIL
• Enter the password in 8 digits or less.
• Use a password of 8 digits when the "Enhanced Security function" is being used.
3-35
Page 67

Transmit or Transfer a Document in the Box (continued)
S
S
6. Select a document to be transferred with FTP.
DETAIL
• The scanner documents cannot be transmitted.
• To display the next or previous screen, press or .
• By pressing BACK, previous screen appears.
• If a document has a long file name, the screen can be changed to display only the Docu-
ment No. and File Name by pressing File Name. Press File Name again to return to the
former screen.
HINT
See p. 3-3 for the printing to check, deletion or edition of documents.
7. When a password has been set for the document, enter the
password using the following procedure.
(1) Press Password.
(2) Enter the password (8 digits or less) and press OK.
DETAIL
• Enter the password in 8 digits or less.
• Use a password of 8 digits when the "Enhanced Security function" is being used.
3-36
Page 68

Transmit or Transfer a Document in the Box (continued)
S
8. Press E-Mail/FTP Send.
9. Press FTP.
10.Select the address indicated or press Enter address and
enter the host address, file path and other required items.
Chapter
3
How to See
the Document
List Screen
Printing the
Documents in
Operating the
Re-Print
Function
Transmit or
Transfer a
Document in
the Box
Importing
Scanned
Documents to
Computer
Box
DETAIL
Refer to the "User's Manual (Network/Scanner Operations)" for more information on the FTP
transfer address specifying method.
11. Press ORIGINAL MODE, select [File Form] - TIFF or PDF and
press OK.
12.Press [START] on the control panel.
3-37
Page 69

Transmit or Transfer a Document in the Box (continued)
S
Transmission is made to the computer
Documents in the Document Folder are transmitted to the shared folder on the computer in
the following procedure.
1. Press [SCANNER] on the control panel to display the Scan-
ner screen.
2. Press Document Folder.
3. When opening a box for which a User ID has been set, press
User ID, enter the User ID (8 digits or less) on the screen displayed with the key pad and press OK.
To open a box for which no User ID has been set, go to step 4.
3-38
DETAIL
• Up to 8 digits can be entered for a user ID.
• Use a user ID of 4 to 8 digits when the "Enhanced Security function" is being used.
• When a user ID has been already entered while in the authorization of a user account, a
list of relevant boxes has been already displayed. On such an occasion as this, the selection of User ID is not available.
• When a wrong user ID has been entered, a warning message will be displayed.
Page 70

Transmit or Transfer a Document in the Box (continued)
S
S
4. To select a box, press Character to search and the key with
the letter or number (No.etc) representing the first letter of
the box that you are searching for. Or enter the Box No. (1 to
9 digits) with the key pad in "Box No.", select the Document
Folder to store the document and press OK.
DETAIL
• By pressing DEL., characters of the Box No. entered are erased one by one.
• "P" is indicated on the left side of a box to which a password has been set.
• When you press Character to search, boxes which have been registered to the charac-
ters are listed.
Chapter
3
How to See
the Document
List Screen
Printing the
Documents in
Operating the
Re-Print
Function
Transmit or
Transfer a
Document in
the Box
Importing
Scanned
Documents to
Computer
Box
5. When a box for which a password has been set is selected,
the Password Input screen is indicated.
Enter the password using the following procedure.
(1) Press Password.
(2) Enter the password (8 digits or less) and press OK.
DETAIL
Enter the password in 8 digits or less.
•
• Use a password of 8 digits when the "Enhanced Security function" is being used.
3-39
Page 71

Transmit or Transfer a Document in the Box (continued)
S
S
6. Select a document to be transferred to the computer.
DETAIL
• The scanner documents cannot be transmitted.
• To display the next or previous screen, press or .
• By pressing BACK, previous screen appears.
• If a document has a long file name, the screen can be changed to display only the Docu-
ment No. and File Name by pressing File Name. Press File Name again to return to the
former screen.
HINT
See p. 3-3 for the printing to check, deletion or edition of documents.
7. When a password has been set for the document, enter the
password using the following procedure.
(1) Press Password.
(2) Enter the password (8 digits or less) and press OK.
DETAIL
• Enter the password in 8 digits or less.
• Use a password of 8 digits when the "Enhanced Security function" is being used.
3-40
Page 72

Transmit or Transfer a Document in the Box (continued)
S
8. Press E-Mail/FTP Send.
9. Press PC (SMB).
10.Select the address indicated or press Enter address and
enter the host name and other required items such as a
folder.
Chapter
3
How to See
the Document
List Screen
Printing the
Documents in
Operating the
Re-Print
Function
Transmit or
Transfer a
Document in
the Box
Importing
Scanned
Documents to
Computer
Box
DETAIL
Refer to the "User's Manual (Network/Scanner Operations)" for more information on the PC
(SMB) transfer address specifying method.
11. Press ORIGINAL MODE, select [File Form] - TIFF or PDF and
press OK.
12.Press [START] on the control panel.
3-41
Page 73

Importing Scanned Documents to Computer
S
Importing Scanned Documents to Computer
In order to import the scanned documents stored in the Document Folder to a computer,
an application software compatible with the network/scanner driver, "KONICA MINOLTA
Scanner Driver", and TWAIN scanner driver is required.
Reminder!
When selecting File Form - PDF to scan the original document, scanned documents can-
•
not be imported using the network scanner driver/scanner driver. Contact your service
representative for details.
• Scanner documents cannot be read with the scanner driver of a version before v1.20. If a
scanner driver of a version before v1.20 has been installed in your computer, delete the
scanner driver of the former version and install new one (v1.20 or after) from the attached
CD-ROM.
DETAIL
You can use the optional special tool, Scan Direct, for the Konica Minolta copier compatible
with a scanner. See p. Appendix-6 of Appendix for details.
3-42
Page 74

Importing Scanned Documents to Computer (continued)
Installing the network scanner driver
To use the network/scanner driver [KONICA MINOLTA Scanner Driver], install, first of all, the
network/scanner driver into the computer. Note that the installation of the network/scanner
driver is restricted only to the OS's shown below.
• Windows 95
• Windows 98
• Windows Me
• Windows NT 4.0
• Windows 2000
• Windows XP
1. Turn on the power for the computer and start Windows.
Exit any applications that are running.
2. Put the [User software CD] in the computer's CD-ROM drive.
3. From [My Computer] on the desktop, double-click the icon
for the drive in which the user software CD has been loaded.
Chapter
3
How to See
the Document
List Screen
Printing the
Documents in
Operating the
Re-Print
Function
Transmit or
Transfer a
Document in
the Box
Importing
Scanned
Documents to
Computer
Box
3-43
Page 75

Importing Scanned Documents to Computer (continued)
4. Open the [\English\Scanner] folder on the user software CD,
then double-click [Setup.exe].
The [Select Language] screen is displayed.
5. Select your language, then click the [OK] button.
The [Welcome] screen is displayed.
6. Check the contents, then click the [Next] button.
The [Start Installation] screen is displayed.
3-44
Page 76

Importing Scanned Documents to Computer (continued)
7. Click the [Next] button.
The [Installing] screen is displayed and the necessary files are copied.
Chapter
3
How to See
the Document
List Screen
Printing the
Documents in
Operating the
Re-Print
Function
Transmit or
Transfer a
Document in
the Box
Importing
Scanned
Documents to
Computer
Box
When the copying ends, the [Installation complete] screen is displayed.
3-45
Page 77

Importing Scanned Documents to Computer (continued)
8. Click the [Finish] button.
This completes the installation of the network scanner driver.
3-46
Page 78

Importing Scanned Documents to Computer (continued)
Connecting the computer and the hard disk
The scan data stored on the print controller box is imported into the computer using the application software supporting the TWAIN scanner driver.
There is a variety of application software that supports TWAIN scanner drivers. Here we use
Adobe Acrobat 4.0. When using other application software, refer to the user’s manual for that
software.
This section explains the procedure for connecting the computer and the copier’s hard disk
using Adobe Acrobat 4.0.
1. Run [Adobe Acrobat 4.0].
2. Select [File] - [Import] - [Scan].
Chapter
3
How to See
the Document
List Screen
Printing the
Documents in
Operating the
Re-Print
Function
Transmit or
Transfer a
Document in
the Box
Importing
Scanned
Documents to
Computer
Box
The [Adobe Acrobat Scan] screen is displayed.
3. In [Device], select [KONICA MINOLTA Scanner Driver].
4. In [Format], when importing the scanned data one page at a
time, select [Single sided]; when importing a bound document, select [Double sided].
3-47
Page 79

Importing Scanned Documents to Computer (continued)
5. In the [Destination], when importing scanned data and
inserting it into the currently open file, select [Current Document]; when importing the scan data as a new file, select
[New document].
6. Click the [Scan] button.
7. Input the [Scanner server name (IP address)] and [Scanner
name] for the scanner on which the scan data is stored.
The DNS name or NetBIOS name cannot be used as the scanner server name.
8. Input the [Box No.] and [Password] for the box in which the
scan data to be imported in is stored.
Reminder!
Do not enter anything in the password input area if no password has been established.
9. Click the [OK] button.
The [Scanner Selection] screen is displayed.
3-48
Page 80

Importing Scanned Documents to Computer (continued)
10.Click the [Connect] button.
The [KONICA MINOLTA Scanner Driver] main screen is displayed.
Chapter
3
How to See
the Document
List Screen
Printing the
Documents in
Operating the
Re-Print
Function
Transmit or
Transfer a
Document in
the Box
Importing
Scanned
Documents to
Computer
Box
• Steps 7-10 refer only to the scanner driver settings default setup process. Subsequently, the machine will connect to the previous scanner and the [KONICA
MINOLTA Scanner Driver] screen will be displayed.
• Follow steps 9-10 when experiencing difficulty in reconnecting to the same scanner.
3-49
Page 81

Importing Scanned Documents to Computer (continued)
S
S
Importing scanned data into the computer
The scanned data stored on the print controller box is imported to the computer using the
application software supporting the TWAIN scanner driver.
DETAIL
If [PDF] is selected as the file format, the scan data cannnot be imported using [KONICA
MINOLTA Scanner Driver]. For the details about importing PDF format data, ask your service
representative.
1. From the list on the [KONICA MINOLTA Scanner Driver] main
screen, select the scan data to import.
3-50
The selected scan data is highlighted.
DETAIL
When changing the box number, click [Box No. Selection], then input the box number to
•
change to with the [Scanner box No. Set-up] screen.
• When the scanned data list in the box is displayed using the TWAIN application, some
data might not appear.
In such a case, delete the unnecessary scan data.
• To delete scan data, select the scanned data, then click [Delete].
• When you click [Refresh], the newest box information is displayed.
Page 82

Importing Scanned Documents to Computer (continued)
2. Set the processing for the scanned data importing.
In the default settings, document data is deleted after it has been imported in.
To delete scanned data from the hard disk
1. Click the [Option] button.
The [Variable Option] screen is displayed.
2. Check the [Delete after taking in Scanner document] checkbox.
To leave the scanned data in the hard disk
1. Click the [Option] button.
The [Variable Option] screen is displayed.
2. Uncheck the [Delete after taking in Scanner document] checkbox.
3. To import scanned data with the white sections and black
sections of the document reversed, check the [Use reverse
display of Scanned document] checkbox.
4. To change the computer’s temporary storage location, click
the [Folder Change] button.
The [Browse for Folder] screen is displayed.
Chapter
3
How to See
the Document
List Screen
Printing the
Documents in
Operating the
Re-Print
Function
Transmit or
Transfer a
Document in
the Box
Importing
Scanned
Documents to
Computer
Box
3-51
Page 83

Importing Scanned Documents to Computer (continued)
S
5. To change the storage location, click the [OK] button.
The display returns to the [Variable Option] screen.
Reminder!
Documents are not scanned in normally if the drive specified with the [Temp Folder set-up for
scanner] setting does not have enough free space. Specify a drive with adequate free space.
6. Click the [OK] button.
The display returns to the [KONICA MINOLTA Scanner Driver] main screen.
7. When importing all the pages of data, select [All pages];
when importing specified pages only, select [Specify page].
DETAIL
When operating application software that cannot handle multi-page files, [1] is displayed for
the [Specify page].
3-52
Page 84

Importing Scanned Documents to Computer (continued)
S
8. Click the [Reading] button.
The scan data in the box is imported into the computer.
Scanner driver screen
This section explains the main screen for the network scanner driver.
• Box No.
Currently selected box number
• Scanner Name
Currently selected scanner
• Document
Number assigned automatically during scanning
• Date & Time
Date and time at which the document was scanned
• Page
Total number of pages in the scan data
• Size
Number of pixels vertical/horizontal for the first page of the scan data
• Resolution
Scan data resolution
Chapter
3
How to See
the Document
List Screen
Printing the
Documents in
Operating the
Re-Print
Function
Transmit or
Transfer a
Document in
the Box
Importing
Scanned
Documents to
Computer
Box
DETAIL
You can reorder the contents of the display by clicking [Document], [Date & Time], [Page],
[Size], or [Resolution].
3-53
Page 85

Importing Scanned Documents to Computer (continued)
• [Reading] button
The selected scanned data is read.
• [Delete] button
The selected scanned data is deleted.
• [Refresh] button
The displayed contents are updated to the latest information.
• [Option] button
The [Variable Option] screen is displayed.
• [Close] button
The scanner driver ends.
• [Help] button
Displays the scanner driver help.
• [Box No. Selection] button
The [Scanner Box number. Set-up] screen is displayed.
3-54
The currently connected box number and Password can be changed.
Reminder!
Do not enter anything in the password input area if no password has been established.
• [Scanner Selection] button
The [Scanner Selection] screen is displayed.
Page 86

Importing Scanned Documents to Computer (continued)
• [Add] button
The [Scanner box No. set-up] screen is displayed.
• [Edit] button
The [Scanner Box No. Set-up] screen with the selected scanner information is displayed.
• [Copy] button
A copy of the selected scan settings is prepared.
• [Delete] button
The selected scan data is deleted.
• [Connect] button
The [KONICA MINOLTA Scanner Driver] main screen is displayed.
• [Close] button
The scanner driver ends.
• [Help] button
Help is displayed.
Chapter
3
How to See
the Document
List Screen
Printing the
Documents in
Operating the
Re-Print
Function
Transmit or
Transfer a
Document in
the Box
Importing
Scanned
Documents to
Computer
Box
3-55
Page 87

Chapter
Key Operator Mode
4
Key Operator Operation Menu List..............................................4-2
Displaying/Completing Document Folder Setting........................4-4
System Box Setting.....................................................................4-8
User Box Registration/Edit........................................................4-11
User Box List.............................................................................4-15
Re-Print Setting.........................................................................4-21
Chapter
4
Key Operator
Operation
Menu List
Displaying/
Completing
Document
Folder
System Box
Setting
User Box
Registration/
User Box List
Re-Print
Setting
Edit
Page 88

Key Operator Operation Menu List
The menu as listed below can be used for setting the Key Operator Mode box.
The * mark indicates the default values set when you purchase the machine.
System Box setting
Sets the items for the System Box as shown below. (See p. 4-8.)
Item Description Available value
Password setting
Option setting
Document
auto delete
User Box registration/edit
Sets the items for the User Box as shown below. (See p. 4-11.)
Item Description Available value
Box No. Sets the box No.. 1 - 999999999
Name Sets the box name. 24 characters
Password
Character to search
User ID
Document auto
delete
Option setting
Store FAX Rx
File
Set the password for the System Box.
Sets so that the documents
stored in the System Box are
automatically deleted.
Sets the password for the User
Box.
Sets characters to search
names.
Sets a User ID, when required,
in 8 digits or less.
Sets so that the documents
stored in the User Box are automatically deleted.
Sets whether to print or not the
Fax-receiving documents when
stored in the User Box.
8 digits or less
None*/12 hours/1 day/
2 days/3 days/4 days/
7 days/30 days
8 digits or less
A-/D-/G-/J-/M-/P-/T-/W-/
No.etc*
8 digits or less
None*/12 hours/1 day/
2 days/3 days/4 days/
7 days/30 days
Box Store only*/
Box Store + Print
4-2
Page 89

Key Operator Operation Menu List (continued)
User Box list
User Box list can be displayed. (See p. 4-15.)
Item Description
Document List Print
EDIT
ERASE User Box can be erased.
List of documents stored in the User Box can be
printed.
Setting of User Box (Name, Character to search,
Option setting) can be changed.
Re-Print setting
Sets items for the re-print function.(See p. 4-21)
Item Description Available value
Re-Print
Document auto delete
Sets whether to use the re-print
function or not.
Sets so that the documents
stored in the Re-Print Box are
automatically deleted.
ON/OFF*
None*/12 hours/1 day*/2
days/3 days/4 days/7
days/30 days
Chapter
4
Key Operator
Operation
Menu List
Displaying/
Completing
Document
Folder
System Box
Setting
User Box
Registration/
User Box List
Re-Print
Setting
Edit
4-3
Page 90

Displaying/Completing Document Folder Setting
Displaying the Document Folder setting
Key operator operation Document Folder setting screen is displayed in the following procedure.
1. Press [COPY].
2. Press [HELP].
3. Press Key Ope mode.
4-4
Page 91

Displaying/Completing Document Folder Setting (continued)
S
4. When a password has been set, the Key Operator password
screen appears. Press Password, enter the password (within
8 digits) on the Data Input screen or with the key pad and
press OK.
DETAIL
• The service representative determines the Key Operator password. It is the Key Opera-
tor's responsibility to manage the password. Ask the service representative for the Key
Operator password.
• Use a password of 8 digits when the "Enhanced Security function" is being used.
5. Press OK on the Password Input screen
Chapter
4
Key Operator
Operation
Menu List
Displaying/
Completing
Document
Folder
System Box
Setting
User Box
Registration/
User Box List
Re-Print
Setting
Edit
4-5
Page 92

Displaying/Completing Document Folder Setting (continued)
S
S
6. Press 6. Document Folder.
DETAIL
4.FAX and 5.Printer may not be displayed depending on the optional settings.
7. Set the required items.
4-6
DETAIL
When the "Enhanced Security function" has been set up, 4. Re-Print setting is not indicated.
Page 93

Displaying/Completing Document Folder Setting (continued)
Exiting the Document Folder setting
Key Operator Document Folder setting is completed using the following procedure.
1. Press RETURN on the Box setting screen.
2. Press RETURN on the Key operator mode screen.
Chapter
4
Key Operator
Operation
Menu List
Displaying/
Completing
Document
Folder
System Box
Setting
User Box
Registration/
Edit
The Copy screen returns.
4-7
User Box List
Re-Print
Setting
Page 94

System Box Setting
Set the items for the System Box.
• Password setting
Set the password for the System Box in 8 digits or less.
• Option setting
Document auto delete It can be set so that the documents stored in the System Box are
automatically deleted. Select time until the deletion from the following values:
None*/12 hours/1 day/2 days/3 days/4 days/7 days/30 days
The * mark indicates the default values available when you purchase the machine.
1. Open the Box setting screen (See "Displaying the Document
Folder setting"(p.4-4)).
2. Press 1.System Box setting.
3. Press 1.Password setting.
4-8
Page 95

System Box Setting (continued)
S
4. Press Password, enter the password on the Data Input
screen displayed and press OK.
Enter the password in 8 digits or less.
DETAIL
•
Enter the password in 8 digits or less.
• Use a password of 8 digits when the "Enhanced Security function" is being used.
5. Press 2.Option setting.
6. Press Document auto delete - EDIT and select the time until
the document in the box is deleted.
Chapter
4
Key Operator
Operation
Menu List
Displaying/
Completing
Document
Folder
System Box
Setting
User Box
Registration/
User Box List
Re-Print
Setting
Edit
7. Press OK.
4-9
Page 96

System Box Setting (continued)
8. Press RETURN.
Box setting screen returns.
4-10
Page 97

User Box Registration/Edit
S
In this mode you can register new boxes or make changes to user boxes that have already been
registered.
DETAIL
By pressing the User Box list button, settings of the User Box can be changed. For details,
see p. 4-17.
• Box No.
Sets the Box No. of the User Box in the range of 1 to 999999999.
• Name
Sets the name of the User Box in 24 characters.
• Password setting
Sets the password for the User Box in 8 digits or less.
• User ID
If a User ID is set in advance, User ID entry screen is displayed when the Document
Folder operation is started. When a user enters their User ID, they see boxes associated with that user and boxes that have no user associated with them. They cannot
see boxes associated to another user. Set the User ID in 8 digits or less.
• Character to search
Set a character used to search a name. Select any character from the followings:
A-/D-/G-/J-/M-/P-/T-/W-/No.etc*
• Option setting
Document auto delete function... It can be set so that the documents stored in the Sys-
tem Box are automatically deleted. Select time until the
deletion from the followings:
None*/12 hours/1 day/2 days/3 days/4 days/7 days/30
days
Store FAX Rx File.......................Set whether to print the Fax-receiving documents when
stored in the System Box. Select either of the following
printing methods:
Store only*/Box Store + Print
The * mark indicates the default values available when you purchase the machine.
Chapter
4
Key Operator
Operation
Menu List
Displaying/
Completing
Document
Folder
System Box
Setting
User Box
Registration/
User Box List
Re-Print
Setting
Edit
4-11
Page 98

User Box Registration/Edit (continued)
S
1. Open the Box setting screen (See "Displaying the Document
Folder setting"(p.4-4)).
2. Press 2. User Box registration/edit.
3. Enter the Box No. with the keypad on the control panel.
4. Press OK.
4-12
DETAIL
• Digits can be used in the range of 1 to 999999999.
• If an incorrect data is entered, press DEL. and enter a new box No..
Page 99

User Box Registration/Edit (continued)
S
S
5. When a box for which a password has been set is selected,
the Password Entry screen is displayed.
Enter the password in the following procedure.
(1) Press Password.
(2) Enter the password (8 digits or less) and press OK.
(3) Press OK.
DETAIL
Chapter
4
• Enter the password in 8 digits or less.
• The entry of a password is not required when the "Enhanced Security function" is being
used.
6. Press the Name, enter the box name on the Data Entry
screen displayed and press OK.
Enter the box name in 24 characters.
7. Press Password, enter the password on the Data Entry
screen displayed and press OK.
Enter the password in 8 digits or less.
DETAIL
•
Enter the password in 8 digits or less.
• Use a password of 8 digits when the "Enhanced Security function" is being used.
Key Operator
Operation
Menu List
Displaying/
Completing
Document
Folder
System Box
Setting
User Box
Registration/
User Box List
Re-Print
Setting
Edit
4-13
Page 100

User Box Registration/Edit (continued)
S
S
8. To set a User ID, press User ID and enter the User ID with the
keypad in 8 digits or less.
DETAIL
User ID is an ECM User ID set by the key operator of the copier. Refer to the "User's Manual
(Copy Operations)" for details.
9. Select a Character to search.
Press the key of a character to research to be registered from A- to No.etc.
10.Press Option setting.
11. Press [Document auto delete] - EDIT and select time until the
document in the box is deleted.
12.Press [Store FAX Rx File] - EDIT and select whether to print
the document received via Fax or not when stored in the box.
13.Press OK.
14.Press ENTRY.
0
4-14
User Box is registered.
DETAIL
To exit the registration of the User Box, press RETURN.
•
• To continue the User Box registration process, return to the step 2.
 Loading...