


Energy Star
®
As an ENERGY STAR® Partner, we have determined that this machine
meets the ENERGY STAR
®
Guidelines for energy efficiency.
What is an ENERGY STAR
®
Product?
An ENERGY STAR
®
product has a special feature that allows it to
automatically switch to a “low-power mode” after a period of inactivity. An
ENERGY STAR® product uses energy more efficiently, saves you money
on utility bills and helps protect the environment.


Contents
Contents
1 Introduction
1.1 We Want You to Be a Satisfied Customer ..................................1-1
CE Marking (Declaration of Conformity) .........................................1-1
1.2 SAFETY INFORMATION................................................................1-2
Warning and Precaution Symbols...................................................1-2
Meaning of Symbols........................................................................1-2
WARNING.......................................................................................1-3
CAUTION........................................................................................1-4
Precautions for Routine Use...........................................................1-5
1.3 Safety Information.........................................................................1-6
Laser Safety....................................................................................1-6
Internal Laser Radiation..................................................................1-6
LED Radiation Safety......................................................................1-8
Ozone Release ...............................................................................1-8
Acoustic Noise ................................................................................1-8
1.4 About the User Manual.................................................................1-9
Explanation of Manual Conventions................................................1-9
[ ] key...............................................................................................1-9
1.5 Explanation of Basic Concepts and Symbols..........................1-10
Paper Feeding...............................................................................1-10
“Width” and “Length”.....................................................................1-11
Paper Orientation..........................................................................1-11
2 Precautions
2.1 Installation Precautions................................................................2-1
Installation site ................................................................................2-1
Power source..................................................................................2-1
Space Requirements.......................................................................2-2
2.2 Operation Precautions..................................................................2-3
Operating Environment...................................................................2-3
Proper Use......................................................................................2-3
Transporting the Copier ..................................................................2-4
Care of Copier Supplies..................................................................2-4
2.3 Legal Restrictions on Copying....................................................2-5
Konica 7115/7118 i

3 Before Making Copies
3.1 Available Features........................................................................ 3-1
3.2 Components and Their Functions .............................................. 3-4
3.3 Parts Names and Their Functions .............................................. 3-6
Copier............................................................................................. 3-6
Inside the Copier ............................................................................3-8
Options ...........................................................................................3-9
3.4 Control Panel..............................................................................3-12
Names of Control Panel Parts and Their Functions..................... 3-12
Icons on the Control Panel ........................................................... 3-14
3.5 Turning ON and OFF and the Initial Mode................................ 3-15
How to Turn ON/OFF the Copier..................................................3-15
When Copier is Turned ON.......................................................... 3-15
Default Settings............................................................................3-16
3.6 Useful Functions ........................................................................ 3-17
Panel Resetting ............................................................................ 3-17
Auto Panel Reset.......................................................................... 3-17
Power Save .................................................................................. 3-18
Auto Shut OFF.............................................................................. 3-18
Auto Copy Start ............................................................................ 3-18
Interrupting Copy Jobs .................................................................3-19
Auto Tray Switching...................................................................... 3-19
Account Number...........................................................................3-20
To enter an account number ........................................................3-20
Printing from the Personal Computer ........................................... 3-21
Sending and Receiving Faxes Using the Copier.......................... 3-21
3.7 Copy Paper..................................................................................3-22
Paper Specifications..................................................................... 3-22
Contents
4 Loading Originals
4.1 Two Ways of Loading the Original.............................................. 4-1
Specific Types of Originals............................................................. 4-1
4.2 Loading Originals in the Automatic Document Feeder ............ 4-2
Precautions for Using the Automatic Document Feeder ................ 4-2
Mixed Originals............................................................................... 4-4
4.3 Place the Original on the Original Glass .................................... 4-6
Precautions for Placing the Original on the Original Glass............. 4-6
How to position a sheet original...................................................... 4-7
Highly Transparent Originals.......................................................... 4-8
Books.............................................................................................. 4-9
ii Konica 7115/7118

Contents
5 Making Copies
5.1 Copying..........................................................................................5-1
5.2 Selecting the Paper.......................................................................5-3
5.3 Feeding Paper Manually...............................................................5-5
Making Copies by Using the Bypass Tray ......................................5-6
5.4 Specifying the Zoom Ratio.........................................................5-11
Setting the Zoom Ratio .................................................................5-12
5.5 Adjusting the Image Density......................................................5-16
5.6 Interrupting a Copy Job..............................................................5-18
6 Advanced Copying
6.1 Making 1-Sided Copies.................................................................6-1
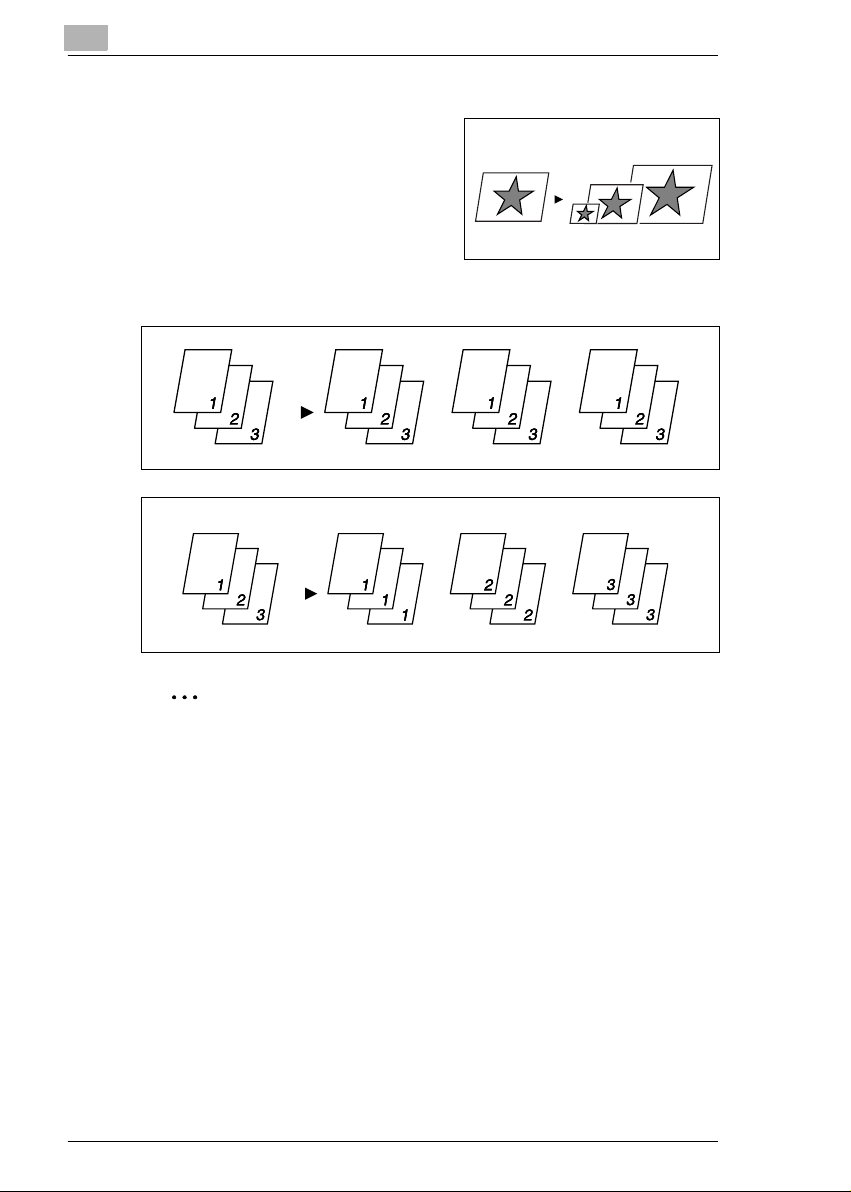
6.2 Output Copies (Sort and Group)..................................................6-5
Three Output Types........................................................................6-5
Sorting.............................................................................................6-6
Grouping .........................................................................................6-8
6.3 Erasing Part of Original Image (Erase) .....................................6-10
Precautions for Erase Position......................................................6-11
6.4 Reversing Original Tonal Arrangements..................................6-13
6.5 Providing a Image Shift ..............................................................6-14
Precautions for Image Shift Position.............................................6-14
7 Using the Utility Mode
7.1 User’s Choice................................................................................7-2
Mixed Orig.......................................................................................7-6
Paper Priority ..................................................................................7-6
Copy Priority....................................................................................7-6
Density Priority................................................................................7-6
Density Level Priority (Auto)............................................................7-6
Density Level Priority (Manual) .......................................................7-7
Output Priority .................................................................................7-7
Crisscross Mode .............................................................................7-7
4in1 Copy Order..............................................................................7-7
Book Binding Position.....................................................................7-7
Margin Setting.................................................................................7-7
Erase Setting (Left, Top, and Frame)..............................................7-8
Auto Panel Reset............................................................................7-8
Power Save.....................................................................................7-8
Auto Shut OFF................................................................................7-8
Density (ADF)..................................................................................7-8
Konica 7115/7118 iii

Printer Density................................................................................ 7-8
Paper Auto Detection ..................................................................... 7-9
Paper Size Detection...................................................................... 7-9
Paper Type (1st Tray).....................................................................7-9
Paper Type (Bypass Tray).............................................................. 7-9
Special Paper Setting..................................................................... 7-9
Making the User’s Choice Settings............................................... 7-10
7.2 Drum Dehumidify........................................................................ 7-12
7.3 Toner Replenisher (Auxiliary Toner Replenishing)................. 7-13
7.4 Custom Size Input...................................................................... 7-14
7.5 Administrator Mode.................................................................... 7-16
Administrator Mode ......................................................................7-16
Copy Track ................................................................................... 7-18
Disable Auto Shut OFF................................................................. 7-26
7.6 Checking the Total Number of Copies/Prints Produced......... 7-28
7.7 Storing a Job...............................................................................7-30
8 Error Displays and Other Indicators
8.1 Major Error Displays and Remedial Actions.............................. 8-1
8.2 When the Add Paper Indicator Lights up................................... 8-4
Adding Paper..................................................................................8-4
8.3 When the Add Toner Indicator Lights up................................... 8-8
8.4 When the Paper Misfeed Indicator Lights................................ 8-11
Misfeed Indications and Misfeed Locations.................................. 8-11
Clearing a Paper Misfeed............................................................. 8-12
Contents
9 Troubleshooting Tips
9.1 When This Type of Copy is Produced........................................ 9-1
9.2 When the Copier is not Operating Correctly..............................9-4
10 Appendix
10.1 Specifications .............................................................................10-1
Copier Konica 7115/7118 ............................................................. 10-1
Automatic Document Feeder DF-217........................................... 10-3
Paper Feed Unit PF-121............................................................... 10-3
Shifting Unit IS-101....................................................................... 10-4
Job Separator IT-102.................................................................... 10-4
Multiple Bypass Tray MT-102.......................................................10-4
10.2 Care of the Copier ......................................................................10-5
iv Konica 7115/7118

Contents
Cleaning........................................................................................10-5
10.3 Function Combination Table......................................................10-6
Function Combination Table .........................................................10-6
Conditions for Combined Functions..............................................10-6
10.4 List of Paper Sizes and Zoom Ratios........................................10-7
Paper Sizes...................................................................................10-7
Zoom Ratios (Original Size to Paper Size) ...................................10-8
Konica 7115/7118 v


Introduction
1 Introduction
1.1 We Want You to Be a Satisfied Customer
Thank you for choosing a Konica 7115/7118.
This User Manual describes the functions, operating procedures,
precautions, and basic troubleshooting for the Konica 7115/7118 copier.
Before using this copier, be sure to read the User Manual thoroughly in
order to ensure that you use the copier efficiently. After you have gone
through the manual, store it in the holder on the rear side of the copier and
keep it handy at all times.
Note that some of the illustrations of the machine used in the User Manual
may be different from what you actually see on your machine.
CE Marking (Declaration of Conformity)
This product complies with the following EU directives:
89/336/EEC, 73/23/EEC and 93/68/EEC directives.
This declaration is valid for the area of the European Union.
This device must be used with shielded interface cables. The use of nonshielded cable is likely to result in interference with radio communications
and is prohibited under EU directives.
1
Konica 7115/7118 1-1

1
1.2 SAFETY INFORMATION
This section contains detailed instructions on the operation and maintenance of this machine. To achieve optimum utility of this device, all operators should carefully read and follow the instructions in this manual.
Please keep this manual in a handy place near the machine.
Please read the next section before using this device. It contains important information
related to user safety and preventing equipment problems.
Make sure you observe all of the precautions listed in this manual.
* Please note that some parts of the contents of this section may not correspond with the pur-
chased product.
Warning and Precaution Symbols
Introduction
WARNING:
CAUTION:
Meaning of Symbols
A triangle indicates a danger against which you should take precaution.
This symbol warns against possible electrical shock.
A diagonal line indicates a prohibited course of action.
This symbol warns against dismantling the device.
A black circle indicates an imperative course of action.
This symbol indicates you must unplug the device.
Ignoring this warning could cause serious injury or even death.
Ignoring this caution could cause injury or damage to property.
1-2 Konica 7115/7118
Introduction
WARNING
• Do not modify this product: Fire, electrical shock, or breakdown could result. If the product employs a laser, the laser beam source could cause
blindness.
• Do not attempt to remove the covers and panels which have been fixed to
the product. Some products have a high-voltage part or a laser beam
source inside that could cause an electrical shock or blindness.
• Use only the power cord supplied in the package. Failure to use this cord
could result in fire or electrical shock.
• Use only the specified power source voltage. Failure to do so could result
in fire or electrical shock.
• Do not use a multiple outlet adapter to connect any other appliances or
machines. Use of a power outlet for more than the marked current value
could result in fire or electrical shock.
Do not unplug and plug in the power cord with a wet hand: An electrical shock
could result.
Plug the power cord all the way into the power outlet. Failure to do so could
result in fire or electrical shock.
• Do not scratch, abrade, place a heavy object on, heat, twist, bend, pull on,
or damage the power cord. Use of a damaged power cord (exposed core
wire, broken wire, etc.) could result in fire or breakdown.
Should any of these conditions be found, immediately turn OFF the power
switch, unplug the power cord from the power outlet, and then call your
authorized service representative.
• In principle, do not use an extension cord. Use of an extension cord could
cause fire or electrical shock. Contact your authorized service representative if an extension cord is required.
Do not place a flower vase or other container that contains water, or metal
clips or other small metallic objects on this product. Spilled water or metallic
objects dropped inside the product could result in fire, electrical shock, or
break-down.
Should a piece of metal, water, or any other similar foreign matter get inside
the product, immediately turn OFF the power switch, unplug the power cord
from the power outlet, and then call your authorized service representative.
• If this product becomes inordinately hot or emits smoke, or emits an unusual odor or noise, immediately turn OFF the power switch, unplug the power
cord from the power outlet, and then call your authorized service representative. If you keep on using it as is, fire or electrical shock could result.
• If this product has been dropped or its cover damaged, immediately turn
OFF the power switch, unplug the power cord from the power outlet, and
then call your authorized service representative. If you keep on using it as
is, fire or electrical shock could result.
Do not throw the toner cartridge or toner into an open flame. The hot toner
may scatter and cause burns or other damage.
1
Connect the power cord only to an electrical outlet that is equipped with a
grounding terminal.
Konica 7115/7118 1-3
1
CAUTION
Introduction
• Do not use flammable sprays, liquids, or gases near this product, as fire
could result.
• Do not leave a toner unit or drum unit in a place within easy reach of
children.
Licking or ingesting any of these substances could injure your health.
• Do not let any object plug the ventilation holes of this product. Heat could
accumulate inside the product, resulting in a fire or malfunction.
• Do not install this product at a site that is exposed to direct sunlight, or near
an air conditioner or heating apparatus. The resulta nt temperature changes
inside the product could cause a malfunction, fire, or electrical shock.
• Do not place the product in a dusty place, or a site exposed to soot or
steam, near a kitchen table, bath, or a humidifier. Fire, electrical shock, or
breakdown could result.
• Do not place this product on an unstable or tilted bench, or in a location
subject to a lot of vibration and shock. It could drop or fall, causing personal
injury or mechanical breakdown.
• After installing this product, mount it on a secure base. If the unit moves or
falls, it may cause personal injury.
• Do not store toner units and PC drum units near a floppy disk or watch that
are susceptible to magnetism. They could cause these products to malfunction.
The inside of this product has areas subject to high temperature, which may
cause burns. When checking the inside of the unit for malfunctions such as a
paper misfeed, do not touch the locations (around the fusing unit, etc.) which
are indicated by a “Caution! High Temperature!” warning label.
Do not place any objects around the power plug, as the power plug may be
difficult to pull out when an emergency occurs.
• Always use this product in a well ventilated location. Operating the product
in a poorly ventilated room for an extended period of time could injure your
health. Ventilate the room at regular intervals.
• Whenever moving this product, be sure to disconnect the power cord and
other cables. Failure to do this could damage the cord or cable, resulting in
fire, electrical shock, or breakdown.
• When moving this product, always hold it by the locations specified in the
User manual or other documents. If the unit falls it may cause severe personal injury. The product may also be damaged or malfunction.
• Remove the power plug from the outlet at least twice a year and clean the
area between the plug terminals. Dust that accumulates between the plug
terminals could cause a fire.
• When unplugging the power cord, be sure to hold onto the plug. Pulling on
the power cord could damage the cord, resulting in fire or electrical shock.
1-4 Konica 7115/7118
Introduction
Precautions for Routine Use
• Do not store t oner units, PC drum units, or other supplies and consumables
in a place subject to direct sunlight and high temperature or humidity, as
poor image quality and malfunction could result.
• Do not attempt to replace the toner unit and PC drum unit in a place exposed to direct sunlight. If the PC drum is exposed to intense light, poor image quality could result.
• Do not unpack a toner unit or PC drum unit until the very time of use. Do
not leave an unpacked unit standing. Install it immediately or poor image
quality could result.
• Do not keep toner units and PC drum units in an upright position or upside
down, as poor image quality could result.
• Do not throw or drop a toner unit or PC drum unit, as poor image quality
could result.
• Do not use this product in an area where ammonia or other gases or chemicals are present. Failure to do so may shorten the service life of the product, cause damage or decrease performance.
• Do not use this product in an environment with a temperature outside the
range specified in the User manual, as breakdown or malfunction could result.
• Do not attempt to feed stapled paper, carbon paper or aluminum foil
through this product, as malfunction or fire could result.
Do not touch or scratch the surface of the toner unit developing roller or the
PC drum, as poor image quality could result.
Use the supplies and consumables recommended by the dealer. Use of any
supply or consumable not recommended could result in poor image quality or
breakdown.
1
Konica 7115/7118 1-5
1
1.3 Safety Information
Laser Safety
This is a digital machine which operates using a laser. There is no
possibility of danger from the laser provided the machine is operated
according to the instructions in this manual.
Since radiation emitted by the laser is completely confined within
protective housing, the laser beam cannot escape from the machine
during any phase of user operation.
This machine is certified as a Class 1 laser product: This means the
machine does not produce hazardous laser radiation.
Internal Laser Radiation
Maximum Average Radiation Power: 26.4 µW at the laser aperture of the
print head unit.
Wavelength: 770-795 nm
This product employs a Class 3b laser diode that emits an invisible laser
beam.
The laser diode and the scanning polygon mirror are incorporated in the
print head unit.
The print head unit is NOT A FIELD SERVICE ITEM:
Therefore, the print head unit should not be opened under any
circumstances.
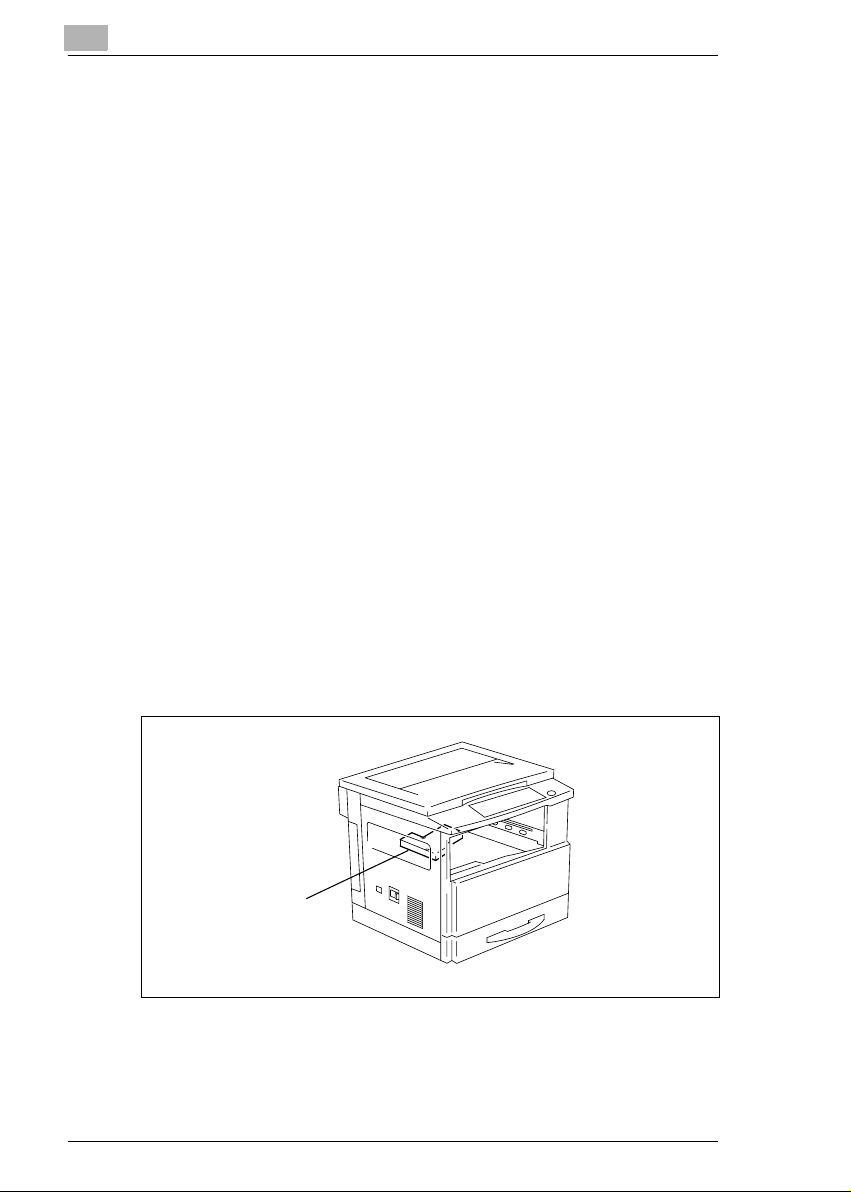
Introduction
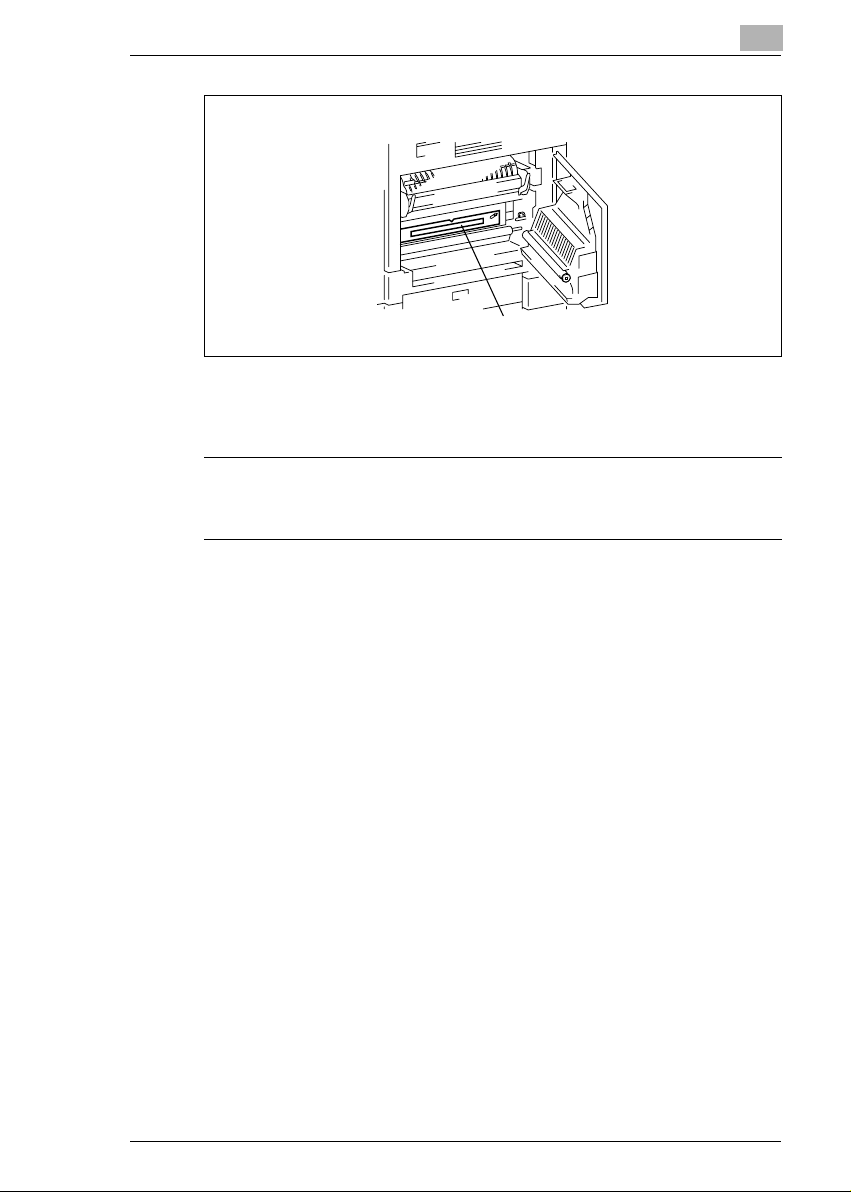
Print Head
1-6 Konica 7115/7118
Introduction
There is a laser aperture at the location shown above, which must,
however, NEVER be viewed directly by the user.
This is a semiconductor laser. The maximum power of the laser diode is
5 mW and the wavelength is 770-795 nm.
Laser Aperture of the
Print Head Unit
CAUTION
Use of controls, adjustments or performance of procedures other than
those specified in this manual may result in hazardous radiation
exposure.
1
Konica 7115/7118 1-7

1
Introduction
LED Radiation Safety
This product is a copier which operates using a LED (light emitting diodes)
exposure system. There is no possibility of danger from LED optical
radiation, because the LED optical radiation level does not exceed the
accessible radiation limit of class 1 under all conditions of operation,
maintenance, service and failure.
Ozone Release
NOTE
= Locate the Machine in a Well Ventilated Room =
A negligible amount of ozone is generated during normal operation of
this machine. An unpleasant odor may, however, be created in poorly
ventilated rooms during extensive machine operations. For a comfortable, healthy, and safe operating environment, it is recommended that
the room well ventilated.
Acoustic Noise
For European Users
Machine Noise Regulation 3 GSGV, 18.01.1991 : The sound pressure lev-
el at the operator position according to EN 27779 is equal to or less than
70dB(A).
1-8 Konica 7115/7118
Introduction
1.4 About the User Manual
Explanation of Manual Conventions
The marks and text formats used in this manual are described below.
WARNING
Failure to observe instructions highlighted in this manner may result
in fatal or critical injuries.
➜ Observe all warnings in order to ensure safe use of the copier.
CAUTION
Failure to observe instructions highlighted in this manner may result
in serious injuries or property damage.
➜ Observe all cautions in order to ensure safe use of the copier.
✎
1
Note
(* May also appear as “Important” or “Tip”)
Text highlighted in this manner contains useful information and tips to
ensure safe use of the copier and serve as supplementary information.
It is recommended that you read all of them.
1 The number 1 as formatted here in-
dicates the first step of a sequence
of actions.
2
Subsequent numbers as formatted
here indicate subsequent steps of a
sequence of actions.
Text formatted in this style pro-
?
vides additional assistance.
➜ Text formatted in this style describes the action that will ensure the
desired results are achieved.
[ ] key
The names of keys on the control panel are written as shown above.
Konica 7115/7118 1-9
An illustration inserted here shows
what operations must be performed.
1
Introduction
1.5 Explanation of Basic Concepts and Symbols
The use of words and symbols in this manual are explained below.
Paper Feeding
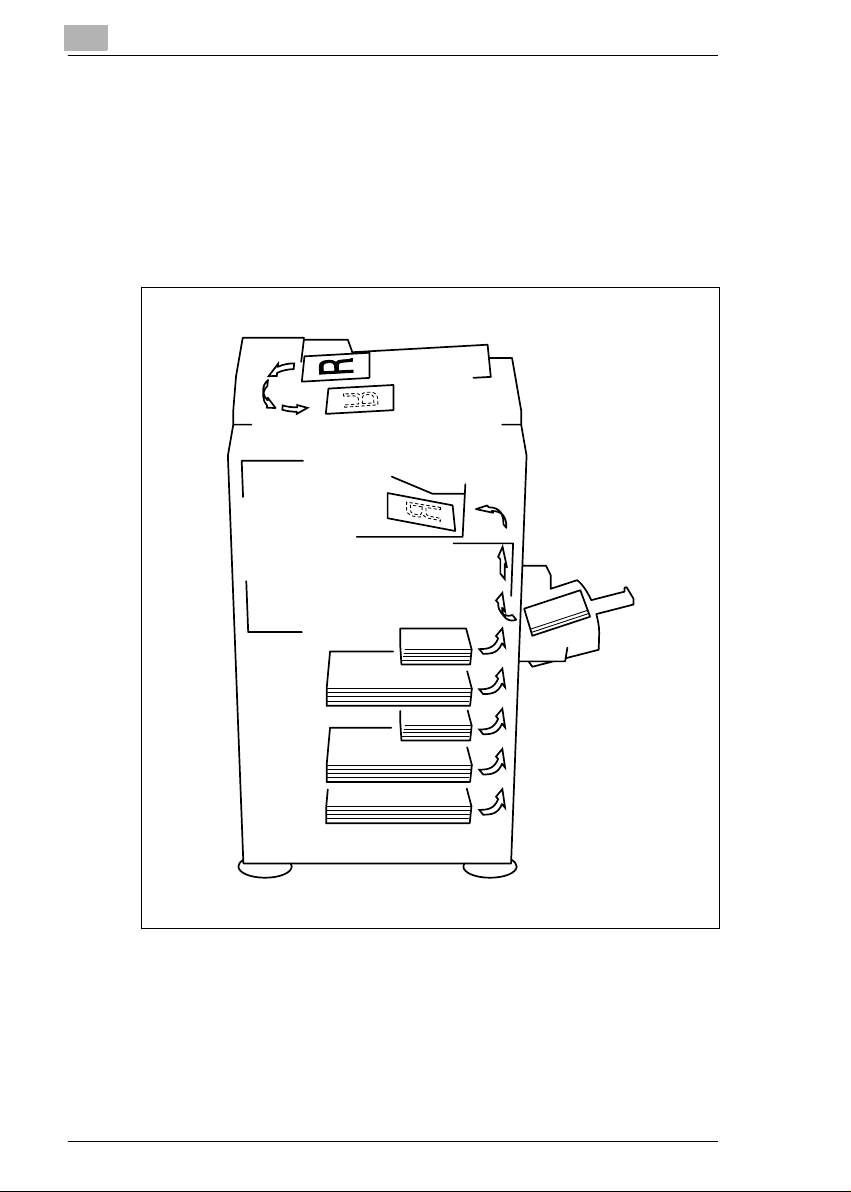
During printing, paper is supplied from the right side of the copier and fed
into the Exit Tray on top with the printed surface of the page facing down.
The paper feed direction is shown by the arrows in the diagram below.
1-10 Konica 7115/7118
Introduction
“Width” and “Length”
Whenever paper dimensions are
mentioned in this manual, the first value
always refers to the width of the paper
(shown as “A” in the illustration) and the
second to the length (shown as “B”).
A: Width
B: Length
Paper Orientation
Lengthwise ( )
If the width (A) of the paper is shorter
than the length (B), the paper has a
vertical or portrait orientation, indicated
by either “L” or .
1
Crosswise ( )
If the width (A) of the paper is longer
than the length (B), the paper has a
horizontal or landscape orientation,
indicated by either “C” or .
Konica 7115/7118 1-11


Precautions
2 Precautions
Observe the following precautions to keep the copier in the best possible
conditions.
2.1 Installation Precautions
Installation site
To ensure utmost safety and prevent possible malfunctions, install the
copier in a location that meets the following requirements:
A location away from curtains, etc. that may catch fire and burn easily
-
A location that is not exposed to water or other liquids
-
A location free from direct sunlight
-
- A location out of the direct airflow of an air conditioner or heater, and
not exposed to extremely high or low temperatures
A well-ventilated location
-
A location that is not exposed to high humidity
-
A location that is not extremely dusty
-
A location not subjected to undue vibrations
-
A stable and level location
-
- A location where ammonia or other organic gases are not generated
A location that does not put the operator in the direct airflow of exhaust
-
from the copier
- A location that is not near any kind of heating devices
2
Power source
The power source requirements are as follows.
G Voltage Fluctuation: Within±10%
G Frequency Fluctuation: Within ± 3Hz
❍ Use a power source with as few voltage or frequency fluctuations as
possible.
Konica 7115/7118 2-1
2
Precautions
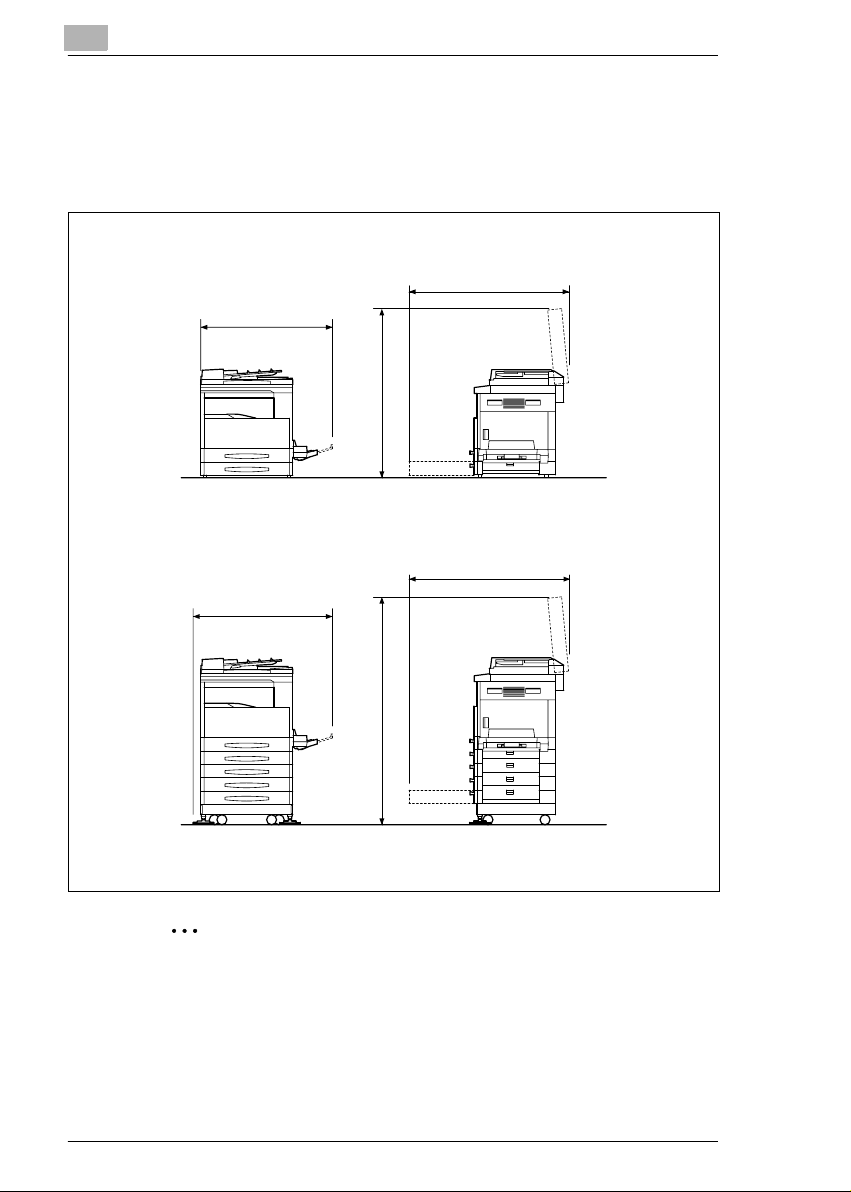
Space Requirements
To ensure easy copier operation, supply replacement, and maintenance,
adhere to the recommended space requirements detailed below.
<Konica 7115>
1038
959
1065
<Konica 7118>
995
1524
1038
Unit: mm
✎
Note
Be sure to allow a clearance of 100 mm or more at the back of the
copier for the ventilation duct and 150 mm or more at the right of the
copier for the removal of the misfed papers.
2-2 Konica 7115/7118
Precautions
2.2 Operation Precautions
Operating Environment
The environmental requirements for correct operation of the copier are as
follows:
G Temperature: 10°C to 30°C (50°F to 90°F) with fluctuations of no more
than 10°C (18°F) within an hour
G Humidity: 15% to 85% with fluctuations of no more than 10% within an
hour
Proper Use
To ensure the optimum performance of the copier, follow the precautions
listed below:
- Never place heavy objects on the Original Glass or subject it to
shocks.
Never open any copier doors or turn OFF the copier while it is making
-
copies/printing, as a paper misfeed could result.
Never bring any magnetized object, or use flammable sprays or
-
liquids, near the copier.
✚
Always make sure that the power plug is completely plugged into the
electrical output.
Always make sure that the copier’s power plug is visible and not
-
hidden by the copier.
✚
Always unplug the copier from the electrical outlet if the copier is not
to be used for a long period of time.
✚
Always provide good ventilation when making a large number of
continuous copies/printed pages.
2
CAUTION
A negligible amount of ozone is generated during normal operation
of this copier. An unpleasant odor may, however, be detected in
poorly ventilated rooms during extensive copier operations.
➜ For a comfortable operating environment, it is recommended that the
room be well ventilated.
Konica 7115/7118 2-3
2
Precautions
CAUTION
The area around the Fusing Unit is extremely hot.
➜ Do not touch any area other than those authorized in the manual to
reduce the risk of burns. Be especially careful not to touch parts
marked with warning labels, and their surrounding areas.
Transporting the Copier
If you need to transport the copier over a long distance, consult your Tech.
Rep.
Care of Copier Supplies
Use the following precautions when handling the copier supplies (toner,
paper, etc.).
✚
Store the supplies in a location that meets the following requirements:
Free from direct sunlight
Away from any heating apparatus
Not subjected to high humidity
Not extremely dusty
✚
Paper that has been removed from its wrapper but not loaded in the
copier should be stored in a sealed plastic bag in a cool, dark place.
Use only toner that has been manufactured specifically for this copier.
-
Never use other types of toner.
Keep all supplies out of the reach of children.
-
CAUTION
Be careful not to spill toner inside the copier or get toner on your
clothes or hands.
➜ If your hands become soiled with toner, immediately wash them with
soap and water.
2-4 Konica 7115/7118

Precautions
2.3 Legal Restrictions on Copying
Certain types of documents must not be copied with the purpose or intent
to pass copies of such documents off as the originals.
The following is not a complete list, but is meant to be used as a guide to
responsible copying.
<Financial Instruments>
G Personal checks
G Travelers checks
G Money orders
G Certificates of deposit
G
Bonds or other certificates of indebtedness
G Stock certificates
<Legal Documents>
G Food stamps
G Postage stamps (canceled or uncanceled)
G Checks or drafts drawn by government agencies
G Internal revenue stamps (canceled or uncanceled)
G Passports
G Immigration papers
G Motor vehicle licenses and titles
G House and property titles and deeds
<General>
G Identification cards, badges, or insignias
G Copyrighted works without permission of the copyright owner
In addition, it is prohibited under any circumstances
foreign currencies, or works of art, without permission of the copyright
owner.
When in doubt about the nature of a document, consult with legal counsel.
2
to copy domestic or
Konica 7115/7118 2-5

Before Making Copies
3 Before Making Copies
3.1 Available Features
The main copy settings available with this copier are listed below. For
details on their operation, refer to the pages indicated.
Copies
G 1-sided copies (p.6-1)
G 2in1 copies (p.6-1)
3
G 4in1 copies (p.6-1)
G Dual Page copies (p.6-2)
Konica 7115/7118 3-1
3
Before Making Copies
Zoom Ratio
G Reduced/Full Size/Enlarge (p.5-11)
Output
G Sort (p.6-6)
G Group (p.6-8)
✎
Note
The Output functions available are limited according to the options
equipped to the copier.
3-2 Konica 7115/7118
Before Making Copies
Applications
G Erase (p.6-10)
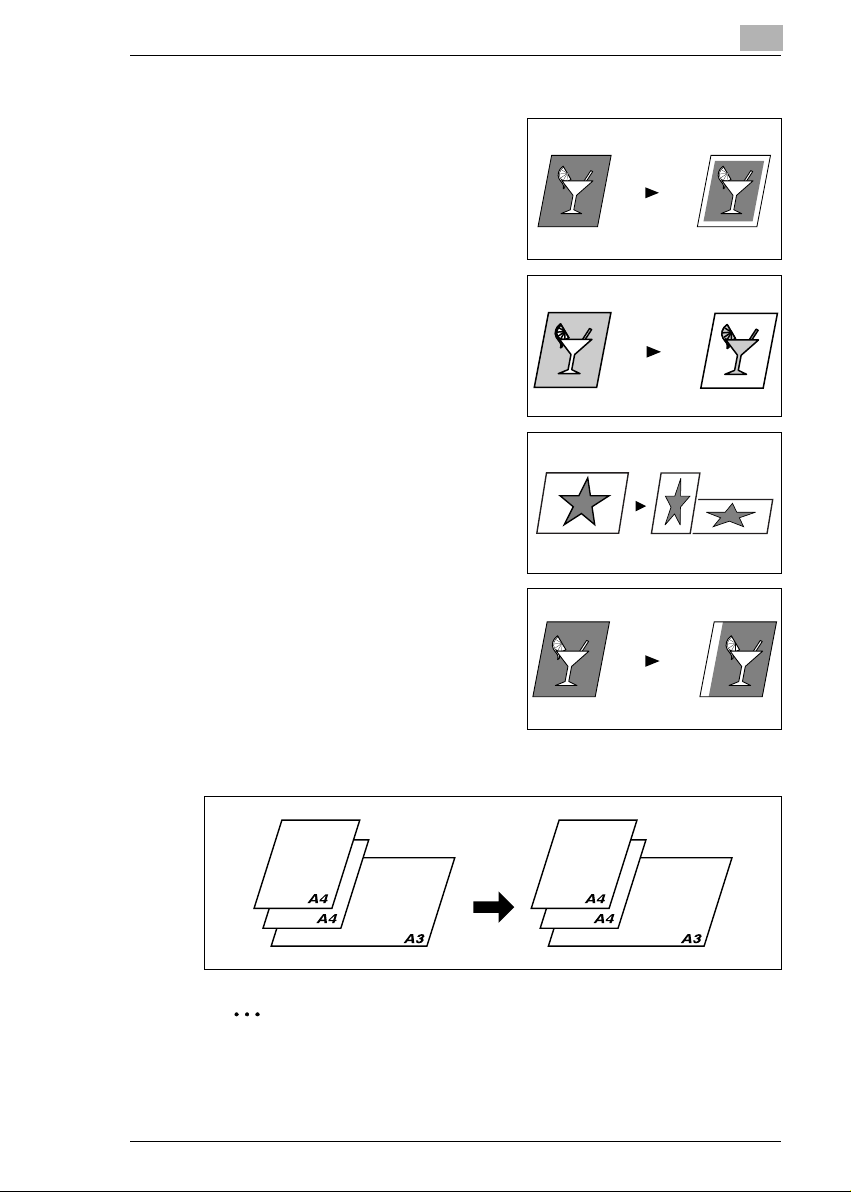
G Reverse Image (p.6-13)
G X/Y Zoom (p.5-14)
G Image Shift (p.6-14)
3
Mixed Orig. Detection
G Mixed Originals (p.4-4)
✎
Note
The Mixed Orig. Detection function is available when the copier is
equipped with an Automatic Document Feeder (option).
Konica 7115/7118 3-3

3
3.2 Components and Their Functions
Copier
G Konica 7115/7118
Platen Cover CV-117 (option)
G
Presses down on an original placed
on the Original Glass.
Standard on Konica 7115.
Automatic Document Feeder DF-217 (option)
G Automatically feeds originals one
page after another for scanning.
Before Making Copies
Paper Feed Unit PF-121 (option)
G Capable of holding up to 250 sheets
of paper.
Shifting Unit IS-101 (option)
G Permits sorting or grouping of copies according to the particular output
setting made.
Job Separator IT-102 (option)
G Performs sorting and grouping of faxes, printed pages, and copies into
the upper or lower bin.
3-4 Konica 7115/7118
Before Making Copies
Multiple Bypass MT-102 (option)
G Up to 50 sheets of Paper can be
loaded in the Bypass Tray.
Pedestal (option)
G Adjusts the height when a Paper
Feed Unit is mounted.
Fax unit for Konica 7115/7118 FK-117 (option)
G Permits fax transmission using this copier.
Printer Controller IP-413 (option)
G A built-in type printer controller that allows the copier to be used as a
printer with the copier connected to a personal computer.
Network Interface Card KN-305 (option)
G Allows the copier to be used as a network printer.
16MB Memory for Copier MU-409 (option)
32MB Memory for Copier MU-410 (option)
G Expands the memory capacity of the copier (16MB, 32MB), thereby
allowing image rotation and 2in1 copying to be performed.
3
Konica 7115/7118 3-5

3
3.3 Parts Names and Their Functions
Copier
1
Before Making Copies
2
3
8
7
6
5
4
9
10
11
* The above illustrations represent a copier mounted with the optional
Platen Cover.
3-6 Konica 7115/7118

Before Making Copies
No. Part Name Description
1 Copy Tray Holds copies fed out face down from the copier.
2 Front Cover Open when replacing the Toner Bottle. (p.8-8)
3 1st Tray Holds up to 250 sheets of paper and easily adjusts to
4 Manual Bypass Tray Use for manual feeding of paper.
5 Lock Release Cover Use to unlock the Side Cover.
6 Side Cover Open to clear a misfed sheet of paper.
7 Power Switch Use to turn the copier ON and OFF. (p.3-15)
8 Original Scales Use to align the original. (p.4-6)
9 Original Cover Holds the original against the Original Glass.
10 Original Glass Place your original on this glass to allow the copier to scan
11 Control Panel Use to start a copy cycle and make necessary settings.
3
different paper sizes.
Special paper can be used. (p.3-22)
The paper is fed one sheet at a time.
Special paper can be used. (p.5-6)
it. The original is to be placed face down. (p.4-6)
(p.3-12)
Konica 7115/7118 3-7

3
Before Making Copies
Inside the Copier
3
2
1
No. Part Name Description
1 Imaging Unit Forms a copy image.
2 Toner Bottle Holder Open to replace the Toner Bottle.
3 Pressure Lever Use to clear a misfed sheet of paper at the Fusing Unit.
The Imaging Unit is to be replaced only by your Tech. Rep.
(p.8-12)
3-8 Konica 7115/7118

Before Making Copies
Options
3
2
1
Automatic Document Feeder
3
4
5
6
No. Part Name Description
1 Document Exit Tray Receives originals which have been scanned by the
2 Document Guide Plate Slide the guide plate to the size of the originals. (p.4-3)
3 Document Feeder
Cover (Doc. Feed
Cover)
4 Document Feeder Tray Load the originals to be copied face up on this tray. (p.4-3)
copier.
Open when clearing an original that has been misfed. (p.8-
18)
Multiple Bypass Tray
No. Part Name Description
5 Bypass Tray Up to 50 sheet s of plain paper or 20 sheets of sp ecial paper
6 Bypass Tray Extender Slide this Bypass Tray Extender out to load pap er of a large
can be loaded on this tray. (p.8-7)
size.
Konica 7115/7118 3-9

3
10
Before Making Copies
7
8
9
11
Paper Feed Unit
No. Part Name Description
7 2nd Tray Up to 250 sheets of plain paper can be loaded. (p.8-6)
83rd Tray
94thTray
10 5thTray
11 Side Cover Open to clear a misfed sheet of paper. (p.8-15)
Konica 7118 accepts a Paper Feed Unit of four trays.
Konica 7115 accepts a Paper Feed Unit of one tray.
3-10 Konica 7115/7118

Before Making Copies
12
3
When Job Separator is Mounted
13
14
15
Shifting Unit
No. Part Name Description
12 Copy Tray Receives copy sets sorted.
Job Separator
No. Part Name Description
13 Copy Tray Lamp Lights up when paper is fed into the Upper Copy Tray.
14 Upper Copy Tray Receives printed pages produced via the personal
15 Lower Copy Tray Receives copies made.
computer or faxes received.
Konica 7115/7118 3-11

3
3.4 Control Panel
Names of Control Panel Parts and Their Functions
Before Making Copies
No. Part Name Description
1 PRINT • Lit while data received from personal computer is being
2 JOB STORE • Press to select the Job Store mode. Two different jobs
3 COUNTER • Press to display the Total Counter or Size Counter
4 REVERSE IMAGE • Press to copy an original with the original tonal
5 ORIGINAL • Press to select the Mixed Org. or Dual Page function.
6 COMBINATION • Press to select the 2in1 or 4in1 function.
printed.
Blinks while data is being transferred.
For details, refer to the Printer Controller User Manual.
can be programmed.
value.
arrangements reversed.
3-12 Konica 7115/7118

Before Making Copies
No. Part Name Description
7 ERASE • Press to select the erase position.
8OUTPUT • Press to select the output function.
9 IMAGE SHIFT • Press to select the Image Shift mode.
10 X/Y ZOOM • Press to make a copy with different zoom ratios set for
11 JOB RECALL • Press to recall either one of the two jobs previously
12 BYPASS TRAY • Press to select the size of the paper loaded in the
13 ZOOM • Press to change the zoom ratio in the range between
14 DISPLAY • Shows the number of copies to be made, the zoom
15 KEY PAD • Use to type in the number of copies to be made and any
16 ID • Press when entering an account number.
17 POWER SAVE • Press to set the copier into the Power Save mode.
18 INTERRUPT • Press to interrupt a copy job.
19 AUTO RESET • Press to reset all copy functions and settings to their
20 CLEAR • Press to reset the number of copies to “1”.
21 STOP • Press to stop a print cycle.
22 START • Press to start a scanning sequence.
23 ENTER • Press to validate the setting just made.
24 RE • Press to select a zoom ratio from among those fixed
25 APS/AMS • Press to select either APS or AMS.
26 PAPER SIZE • Press to select the paper size.
27 DENSITY SET • Press to adjust the image density of the copy.
X (horizontal) and Y (vertical) directions.
stored in memory.
Bypass Tray.
50% and 200% in 1% increments.
• What is shown on the Display changes from the number
of copies to be made to the zoom ratio.
ratio, and other setting data.
other numeric data.
• Becomes valid only when Copy Track has been set.
defaults.
• Holding down the key for 3 seconds or more will set the
copier into the Utility mode.
• Press to stop a scanning sequence.
• Press to start a print cycle.
• Press to validate the setting just made.
• The key lights up green when the copier is ready to
make copies, orange when it is not ready to make
copies.
ratios available as standard.
3
Konica 7115/7118 3-13
3
Icons on the Control Panel
Icon Name Description
Paper Misfeed
indicator
Malfunction indicator Lights up when a malfunction occurs in the copier.
Lights up when a paper misfeed occurs in the
copier.
Before Making Copies
Maintenance indicator Blinks or lights up when the time approaches that
Add Paper indicator Lights up when the paper source currently selected
Add Toner indicator Lights up when toner will soon run out.
copier needs maintenance service.
Call your Tech. Rep.
for use runs out of paper.
3-14 Konica 7115/7118

Before Making Copies
3.5 Turning ON and OFF and the Initial Mode
How to Turn ON/OFF the Copier
Turning Copier ON:
➜ Press the Power Switch to the 1
(ON) position.
Turning Copier OFF:
➜ Press the Power Switch to the 2
(OFF) position.
✎
Note
Do not turn OFF the copier while a copy cycle is being run, as paper
misfeed will result. Before attempting to turn OFF the copier, always
be sure that the current copy cycle has been completed.
Turning OFF the copier will initialize all settings except those for the
jobs previously programmed and Utility Mode.
✎
3
Note
The copier automatically enters the Power Save mode 15 min after it
has been touched last. It also enters the Auto Shut OFF mode
automatically 30 min after it has been touched last.
The time for the copier to enter the Power Save and Auto Shut OFF
mode can be set by selecting User’s Choice. For details, refer to
“Using the Utility Mode” (p.7-1, p.7-8).
When Copier is Turned ON
When the Power Switch is turned ON, the [START] key starts blinking
indicating that the copier is warming up.
At this time, the copier can be specified for the Auto Copy Start function
by loading a document in the Automatic Document Feeder and pressing
the [START] key.
Pressing the [START] key at this time will not immediately start the copy
cycle. Rather, you are going to have to wait for about 30 seconds (at an
ambient temperature of 23°C).
Konica 7115/7118 3-15

3
Before Making Copies
Default Settings
When the copier is turned ON, the function indicators on the control panel
will indicate the default settings which serve as the reference for all control
panel settings to be made later.
Default settings
G Number of copies: 1
G Density: Auto
G RE: 100% (full size)
G Paper Size: APS (When Automatic Document Feeder is mounted)
G Output: Non-Sort
✎
Tip
The default settings can be customized by selecting User’s Choice.
(p.7-2)
3-16 Konica 7115/7118

Before Making Copies
3.6 Useful Functions
Panel Resetting
Press the [AUTO RESET] key to return all modes and functions (zoom
ratio, number of copies, etc.) to their defaults. (All selected settings are
canceled.)
✎
Tip
The [AUTO RESET] key comes in handy for canceling all selected
settings at one time.
To avoid accidentally using settings from the previous copy job, press
the [AUTO RESET] key to return all functions and settings to their
defaults before making any setting for your current job.
Auto Panel Reset
Without pressing the [AUTO RESET] key, the copier automatically resets
all functions and settings to their defaults 1 min after a copy cycle has
been completed or a key operated.
✎
Tip
The length of time before the copier automatically resets itself can be
set between 1 min and 5 min, in addition to 30 seconds. The Auto
Panel Reset function can even be disabled.
For more details, refer to “User’s Choice” (p.7-2, p.7-8).
3
Konica 7115/7118 3-17
3
Before Making Copies
Power Save
Instead of turning OFF the copier, it can be set into a standby state (Power
Save mode).
To set the copier into the Power Save mode, press the [POWER SAVE]
key. In addition, if the copier is not used for a set length of time, it will
automatically enter the Power Save mode. The default length of time is
15 min.
To cancel the Power Save mode, press any key on the control panel.
✎
Note
If the Auto Shut OFF function is activated while the copier is in the
Power Save mode, the copier will automatically turn itself OFF.
✎
Tip
The length of time before the copier enters the Power Save mode can
be set between 1 min and 240 min.
For more details, refer to “User’s Choice” (p.7-2, p.7-8).
Auto Shut OFF
If a set length of time elapses after the copier has been operated last, the
copier is designed to automatically turn itself OFF to save energy. The
default length of time is 30 min.
✎
Tip
The length of time before the Auto Shut OFF function is activated can
be set between 15 min and 240 min. The Auto Shut OFF function can
even be disabled. For more details, refer to “User’s Choice” (p.7-2,
p.7-8 and p.7-26).
Auto Copy Start
If a document is loaded and the [START] key is pressed during the period
after the copier has been turned ON but before it is ready to make copies,
the copier will automatically start the copy cycle as soon as it completes
the warm-up cycle.
3-18 Konica 7115/7118

Before Making Copies
Interrupting Copy Jobs
During a long continuous copy or print cycle, the copier may be needed to
quickly run a different job. To interrupt a current job, press the
[INTERRUPT] key.
Press the [INTERRUPT] key a second time to return to the stopped job.
✎
Note
Depending on the specific settings made, the current job may reject
the Interrupt mode. Also, some functions are not available for the
Interrupt mode. For more details, refer to the “Function Combination
Table” (p.10-6).
Auto Tray Switching
If the current tray runs out of paper during a copy cycle and there is
another tray loaded with paper of the same size and in the same direction,
the copier will automatically select that tray to continue copying.
3
Konica 7115/7118 3-19

3
Before Making Copies
Account Number
If account numbers have been programmed, use of the copier can be
limited to certain people or to a specified number of copies for each
account.
✎
Note
If account numbers have been
programmed, the copier cannot be
used unless the specific account
number is entered first.
<Account number entry screen>
To use this function, set “Copy
Track” of “Administrator Mode”
under the Utility mode. (p.7-20)
To enter an account number
1
Enter the 3-digit account number
from the Key Pad.
Do you want to correct the
?
access number just entered?
➜ Press the [CLEAR] key and then
enter the correct account
number.
2
Press the [ID] key.
3
The account number entry screen changes to the default setting
indication, indicating that the copier is ready to make copies. Run the
desired copy cycle.
4
When the copy cycle is completed, press the [ID] key a second time.
3-20 Konica 7115/7118

Before Making Copies
Printing from the Personal Computer
When the optional printer controller is installed, the copier can be used as
a printer configured to a computer network.
For details of operation, refer to the Printer Controller User Manual.
Sending and Receiving Faxes Using the Copier
When the optional Fax unit is mounted, fax transmission can be made
using this copier.
For details of operation, refer to the Fax unit User Manual, separately
available.
3
Konica 7115/7118 3-21

3
3.7 Copy Paper
Paper Specifications
The following table specifies the type and size of paper to be used with
each tray together with its capacity.
1st Tray Specifications
Paper Type • Plain paper, recycled paper (60 g/m
Paper Size • A3L to A5C, FLS (210 mm × 330 mm)
Capacity • Plain paper, recycled paper: 250 sheets
2nd Tray Specifications
Paper Type Plain paper, recycled paper (60 g/m
Paper Size • A3L to A5C, FLS (210 mm × 330 mm)
Capacity 250 sheets
* Same with the 3rd, 4th, and 5thTray
Before Making Copies
2
• Special paper:
Card (91 g/m
postcards, labels
(Width: 90 mm to 297 mm; length: 140 mm to 432 mm)
• Inch system equivalent
11×17L, 11×14L, Legal L, Letter, 5-1/2×8-1/2
• Special paper: 20 sheets
• Inch system equivalent
11×17L, 11×14L, Legal L, Letter, 5-1/2×8-1/2C
2
to 157 g/m2), OHP transparencies,
to 90 g/m2)
2
to 90 g/m2)
Manual Bypass Tray Specifications
Paper Type • Plain paper, recycled paper (60 g/m
Paper Size • Width: 90 mm to 297 mm
Capacity 1 sheet
Multiple Bypass Tray Specifications
Paper Type • Plain paper, recycled paper (60 g/m
Paper Size • Width: 90 mm to 297 mm
Capacity • Plain paper, recycled paper: 50 sheets
• Special paper:
Card (91 g/m
postcards, labels
• Length: 140 mm to 432 mm
• Special paper:
Card (91 g/m
postcards, labels
• Length: 140 mm to 432 mm
• Special paper: 20 sheets
2
to 157 g/m2), OHP transparencies,
2
to 157 g/m2), OHP transparencies,
2
to 90 g/m2)
2
to 90 g/m2)
3-22 Konica 7115/7118

Before Making Copies
Precautions for Loading Paper
G Be sure to stick to the paper specifications for each tray, i. e., the paper
type, paper size, and capacity, as a paper misfeed could result
otherwise.
G When loading paper of the inch system (Letter, Legal etc.) in the tray,
change “Paper Auto Detection” of the User’s Choice. (p.7-9)
G The Inch lamp lights if paper of the inch system (Letter, Legal etc.) is
loaded in the tray.
G When loading paper of a nonstandard size in the 1st Tray, set “Custom
Size Input” of the Utility mode. (p.7-14)
G When loading paper of a nonstandard size in the Bypass Tray, perform
the “Custom Size Input (Bypass Tray)” procedure under “Making
Copies”. (p.5-9)
G When loading Cards, OHP transparencies, or postcards in the 1st
Tray, change “Paper Type (1st Tray)” of User’s Choice. (p.7-9)
G When loading Cards, OHP transparencies, or postcards in the Bypass
Tray, change “Paper Type (Bypass Tray)” of User’s Choice. (p.7-9
G To disable APS or Auto Tray Switching with recycled paper loaded in
the tray, change “Special Paper Setting” of User’s Choice. (p.7-9)
G When loading paper of any FLS size other than the default setting
(210 mm × 330 mm), setting by your Tech. Rep. is necessary. Consult
your Tech. Rep. for this setting.
For how to load paper, refer to “When the Add Paper Indicator Lights”.
(p.8-4)
3
)
Konica 7115/7118 3-23

Loading Originals
4 Loading Originals
4.1 Two Ways of Loading the Original
The original may be loaded in the Automatic Document Feeder or placed
directly on the Original Glass. Choose the appropriate method according
to the type of the original.
Specific Types of Originals
Original Loading Original Type Original Size
Automatic Document
Feeder
Original Glass Max. weight of sheet
Sheet originals
• Weight of originals:
• Weight of originals of
originals, books, or threedimensional objects: 3 kg
2
50 g/m
to 110 g/m
mixed sizes: 60 g/m
2
90 g/m
2
2
A3L to A5L
• Original width: 90 mm to 297 mm
• Original length: 210 mm to
432 mm
to
A3L to A5
• Original width: Up to 297 mm
• Original length: Up to 432 mm
4
Konica 7115/7118 4-1

4
Loading Originals
4.2 Loading Originals in the Automatic Document
Feeder
The Automatic Document Feeder automatically feeds originals one page
after another and lets the copier scan the data on each original. After the
copier completes scanning the data, the Automatic Document Feeder
ejects it into its tray. To ensure the best possible performance of the
Automatic Document Feeder, use only originals of the appropriate type.
Precautions for Using the Automatic Document Feeder
The following types of originals are not suitable for use in the Automatic
Document Feeder, as a misfeed or damaged original could result. Place
such types of originals on the Original Glass.
G Typing paper, paraffin paper, and other thin paper
G Cards
G Originals larger than A3 or smaller than A5
G OHP transparencies, translucent paper
G Wrinkled, dog-eared, curled, or torn originals
G Clipped or stapled originals
G Coated originals such as carbon-backed paper
✎
Note
When the original are loaded into the Automatic Document Feeder the
original sizes that can be detected in the APS mode are
A3L•B4L•A4L•A4C•B5L•B5C, LetterL, LetterC and FLS. The copier
may not be able to detect, or may detect of any other size or irregular
size.
4-2 Konica 7115/7118

Loading Originals
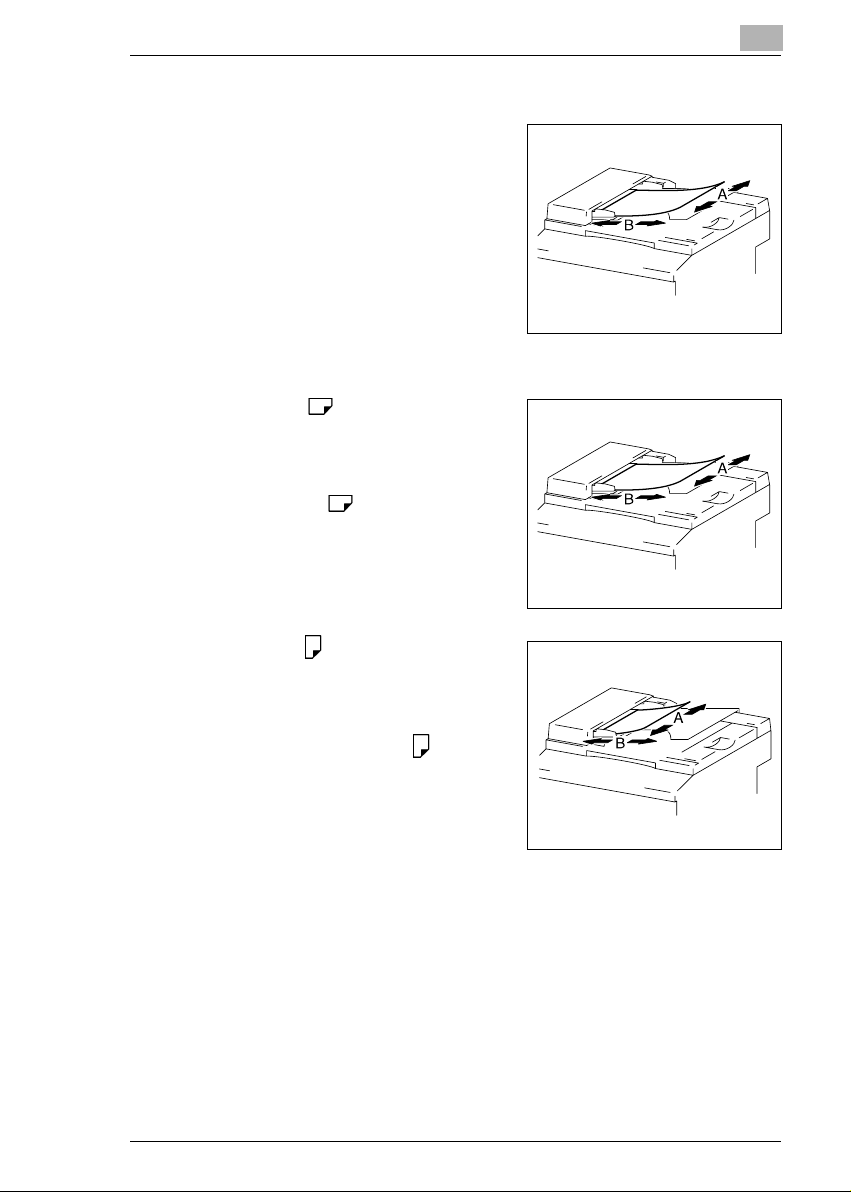
Loading the Originals
1
Slide the front adjustable Document
Guide Plate to the size of the
originals.
2
Place the stack of originals face up
on the Document Feeder Tray.
?
➜ The maximum number of
➜ Be sure that the top level of the
➜ Be sure that the Document Guide Plates touch both the front and
➜ You can make copies automatically from originals of assorted
4
Is the stack of originals neat?
originals that can be loaded is
50.
original stack does not exceed
the Ä marking.
rear edges of the original stack. If they are not pressed snugly
against the original stack, skewed feeding could result.
sizes loaded in the Automatic Document Feeder. Refer to “Mixed
Originals”. (p.4-4)
3
Make the necessary settings.
❍ Making Copies (p.5-1)
❍ Advanced Copying (p.6-1)
4
Press the [START] key to start
feeding and copying the originals
from the top page.
Konica 7115/7118 4-3

4
Loading Originals
Mixed Originals
A stack of originals of different sizes can be copied as a set using the
Automatic Document Feeder.
Originals
(APS)
Copies
✎
Note
This feature can be used only if the width of the originals is the same.
E.g.: A3L and A4C
Making Copies from Originals of Mixed Sizes
1
Slide the front adjustable Document
Guide Plate to the front of the
copier.
2
Load the originals face up in the
Document Feeder Tray so that their
rear edges are in correct alignment
with the Document Guide Plate.
4-4 Konica 7115/7118

Loading Originals
3
Press the front adjustable
Document Guide Plate tightly up
against the front edges of the
originals.
?
➜ The maximum number of
➜ Be sure that the top level of the
➜ Be sure that the Document Guide Plates touch both the front and
4
Press the [ORIGINAL] key to light
the MIXED ORIGINAL lamp.
4
Is the stack of originals neat?
originals that can be loaded is
50.
original stack does not exceed the Ä marking.
rear edges of the original stack. If they are not pressed snugly
against the original stack, skewed feeding could result.
5
Press the [APS/AMS] key to light
the APS lamp.
6
Press the [START] key to start
feeding and copying the originals
from the top page.
Konica 7115/7118 4-5

4
4.3 Place the Original on the Original Glass
The method for positioning the original differs depending on the type of
original being used. Be sure to use the appropriate method that best suits
the type of original. Refer to p.4-2 for information on using the Automatic
Document Feeder.
Precautions for Placing the Original on the Original Glass
Care should be used when positioning the following types of originals.
An original of a nonstandard size:
G The copier is unable to detect the original size automatically, meaning
that neither APS nor AMS can be used. Therefore, use the [PAPER
SIZE] key to select the paper size, or the [RE] key to select the zoom
ratio. (p.5-11)
A highly transparent original (OHP transparencies, translucent paper,
etc.):
G Place a blank sheet of paper of the same size over the original. (p.4-8)
A book or other three-dimensional object:
G Let the copier scan the contents of the original with the Original Cover
or the Automatic Document Feeder raised. Do not attempt to push the
Original Glass with excessive force, as a malfunction could result.
(The maximum load resistance of the Original Glass is 3 kg.)
Loading Originals
4-6 Konica 7115/7118

Loading Originals
How to position a sheet original
Use the following procedure to position plain paper or an original
that is not suitable for use in the Automatic Document Feeder.
1
Raise the Automatic Document Feeder or Original Cover.
2
Place the original face down on the
Original Glass.
3
Position the original in the left rear
corner aligned with the marker on
the scale.
4
4
Gently lower the Automatic Document Feeder or Original Cover.
5
Make the necessary settings.
❍ Making Copies (p.5-1)
❍ Advanced Copying (p.6-1)
6
Press the [START] key to start the copy cycle.
Konica 7115/7118 4-7

4
Loading Originals
Highly Transparent Originals
When making a copy from OHP transparencies, translucent paper, or
other highly transparent original, position the original as detailed
below.
1
Raise the Automatic Document Feeder or Original Cover.
2
Place the original face down on the
Original Glass.
3
Position the original in the left rear
corner aligned with the marker on
the scale.
4
Place a blank sheet of paper of the
same size over the original.
5
Gently lower the Automatic Document Feeder or Original Cover.
6
Make the necessary settings.
❍ Making Copies (p.5-1)
❍ Advanced Copying (p.6-1)
7
Press the [START] key to start the copy cycle.
4-8 Konica 7115/7118

Loading Originals
Books
When copying an open book or magazine, position the original as
detailed below.
1
Raise the Automatic Document Feeder or Original Cover.
2
Position the book face down on the
Original Glass, with the top of the
book toward the rear of the copier
and the center of the open book
aligned with the book mark ( )
on the scale.
?
➜ Do not place any object that
3
Gently lower the Automatic Document Feeder or Original Cover.
?
➜ Let the copier scan the original without lowering the Automatic
4
Are there any cautions when
you place a book directly on the
original Glass?
weighs more than 3 kg on the
Original Glass. In addition, do
not press down hard on the
book, as a damaged Original Glass could result.
Is a thick book or object being copied?
Document Feeder or Original Cover. Do not look directly at the
Original Glass surface during a scanning sequence since a strong
beam of light is emitted. This light beam is not, however, a laser
beam and is not as dangerous.
4
Make the Dual Page setting.
❍ Dual Page (p.6-3)
Konica 7115/7118 4-9


Making Copies
5 Making Copies
5.1 Copying
The following procedure describes how to place an original and make a
basic copy of it.
Making a Basic Copy
1
Position the original.
❍ Original Loading (p.4-1)
5
2
Make the necessary control panel
settings.
❍ Selecting the Paper (p.5-3)
❍ Zoom Ratio (p.5-11)
❍ Image Density (p.5-16)
Konica 7115/7118 5-1
5
3
Enter the number of copies to be
made from the Key Pad. Any
number from 1 to 99 can be
entered.
4
Press the [START] key.
This will start the copy cycle.
To stop the copy cycle in midoperation, press the [STOP] key.
Making Copies
5-2 Konica 7115/7118
Making Copies
5.2 Selecting the Paper
Before making a copy, the tray containing the paper to be used must be
selected.
Either the paper source is selected automatically when the size of the
original is detected, or you specify the specific paper source manually.
G APS:
When “APS” is selected, the tray containing the most suitable size of
paper is selected based on the size of the original and the set zoom ratio.
G Manual paper selection:
The tray containing the paper you want to use can be manually selected.
✎
Note
The copier must be equipped with an Automatic Document Feeder to
use “APS”.
Using “APS”
1 Load the originals in the Automatic Document Feeder.
❍ Original Loading (p.4-1)
2
Press the [APS/AMS] key on the
control panel to light the APS
indicator.
5
3
Make the other necessary settings.
❍ Zoom Ratio (p.5-11)
❍ Image Density (p.5-16)
4
Enter the number of copies to be made from the Key Pad and press
the [START] key.
✎
Note
If the copier does not find paper of the appropriate size immediately
after the [START] key has been pressed, the paper size indicator on
the control panel starts blinking. Load the paper whose paper size
indicator is blinking or press the [PAPER SIZE] key and select another
desired paper size before pressing the [START] key again.
Konica 7115/7118 5-3

5
Making Copies
Manual Paper Selection
1
Position the original.
❍ Original Loading. (p.4-1)
2
Press the [PAPER SIZE] key on the
control panel until the desired paper
size indicator lights.
3
Make the other necessary settings.
❍ Zoom Ratio (p.5-11)
❍ Image Density (p.5-16)
4
Enter the number of copies to be made from the Key Pad and press
the [START] key.
✎
Tip
The Display shows different marks according to the type of paper set
by selecting User’s Choice. Details:
Cards and postcards
If plain paper is set in User’s Choice, the “
even if cards or postcards, or OHP transparencies, are loaded in the
tray.
5-4 Konica 7115/7118
OHP transparencies
Plain paper
” mark will not be displayed
1

Making Copies
5.3 Feeding Paper Manually
Paper can be fed manually through the Bypass Tray if you want to copy
onto paper that is not loaded in any tray, or if you want to copy onto special
paper, such as OHP transparencies, postcards, or cards.
Types of paper that can be fed through the Bypass Tray
G Plain paper (weighing 60 g/m
G Recycled paper (weighing 60 g/m
G Special paper: Card (weighing 91 g/m
transparencies, postcards, and labels
Sizes of paper that can be fed through the Bypass Tray
G Maximum size: 297 mm x 432 mm
G Minimum size: 90 mm x 140 mm
✎
Note
Insert one sheet of paper at a time when using the Manual Bypass
Tray to make a copy. If the optional Multiple Bypass is mounted, the
Bypass Tray can hold up to 50 sheets of paper, or 20 sheets of cards,
postcards, or OHP transparencies.
2
to 90 g/m2)
2
to 90 g/m2)
2
5
to 157 g/m2), OHP
Konica 7115/7118 5-5

5
Making Copies
Making Copies by Using the Bypass Tray
<Manual Bypass Tray>
1
Position the original.
❍ Original Loading (p.4-1)
2
Slide the Paper Guides to the size
of the paper. Load a sheet of paper
so that the front side of the paper
faces down. At this time, gently
insert the paper until it is stopped.
Note that the Bypass Tray location
indicator on the control panel lights.
Do you want to use a type of
?
paper other than plain paper?
➜ To use cards, postcards, or OHP transparencies, first change the
type of paper selecting User’s Choice. Refer to “Paper Type
(Bypass Tray)” (p.7-9).
➜ When loading cards or postcard, be sure to smooth out any curl in
the paper.
3 Press the [BYPASS TRAY] key until
the size of the paper loaded lights.
❍ If the paper used is of custom
size, its size must be input.
Refer to the “Custom Size Input
(Bypass Tray)” procedure that
follows. (p.5-9)
Do you know which FLS size
?
has been set?
➜ The FLS size has been set to 210 mm × 330 mm.
Ask your Tech. Rep. if you want to change the FLS size.
4
Press the [ENTER] key.
5-6 Konica 7115/7118
Making Copies
5
Make any other necessary settings.
❍ Zoom Ratio (p.5-11)
❍ Image Density (p.5-16)
6
Press the [START] key.
✎
Tip
If the same settings apply to the second and subsequent sheets of
paper, you have only to load the paper in the Bypass Tray: This will
automatically start the new copy cycle.
✎
Tip
To make copies continuously on cards, OHP transparencies, or
postcards, load the paper in the 1st Tray. Refer to “Copy Paper” (p.3-
22) and “Adding Paper” (p.8-4).
5
Konica 7115/7118 5-7

5
Making Copies
<Multiple Bypass Tray>
1
Position the original.
❍ Original Loading (p.4-1)
2
Adjust the Paper Guides and the
Bypass Tray Extender to the size of
the paper. Load a stack of paper so
that the front side of the paper faces
down. At this time, gently insert the
paper stack until it is stopped. Note
that the Bypass Tray location
indicator on the control panel lights.
Do you want to use a type of
?
paper other than plain paper?
➜ To use cards, postcards, or OHP transparencies, first change the
type of paper selecting User’s Choice. Refer to “Paper Type
(Bypass Tray)” (p.7-9).
➜ When loading cards or postcards, be sure to smooth out any curl
in the paper.
3
Press the [BYPASS TRAY] key until
the size of the paper loaded lights.
❍ If the paper used is of custom
size, its size must be input.
Refer to the “Custom Size Input
(Bypass Tray)” procedure that
follows. (p.5-9)
Do you know which FLS size
?
has been set?
➜ The FLS size has been set to 210 mm × 330 mm.
Ask your Tech. Rep. if you want to change the FLS size.
4
Press the [ENTER] key.
5
Make any other necessary settings.
❍ Zoom Ratio (p.5-11)
❍ Image Density (p.5-16)
6
Press the [START] key.
5-8 Konica 7115/7118
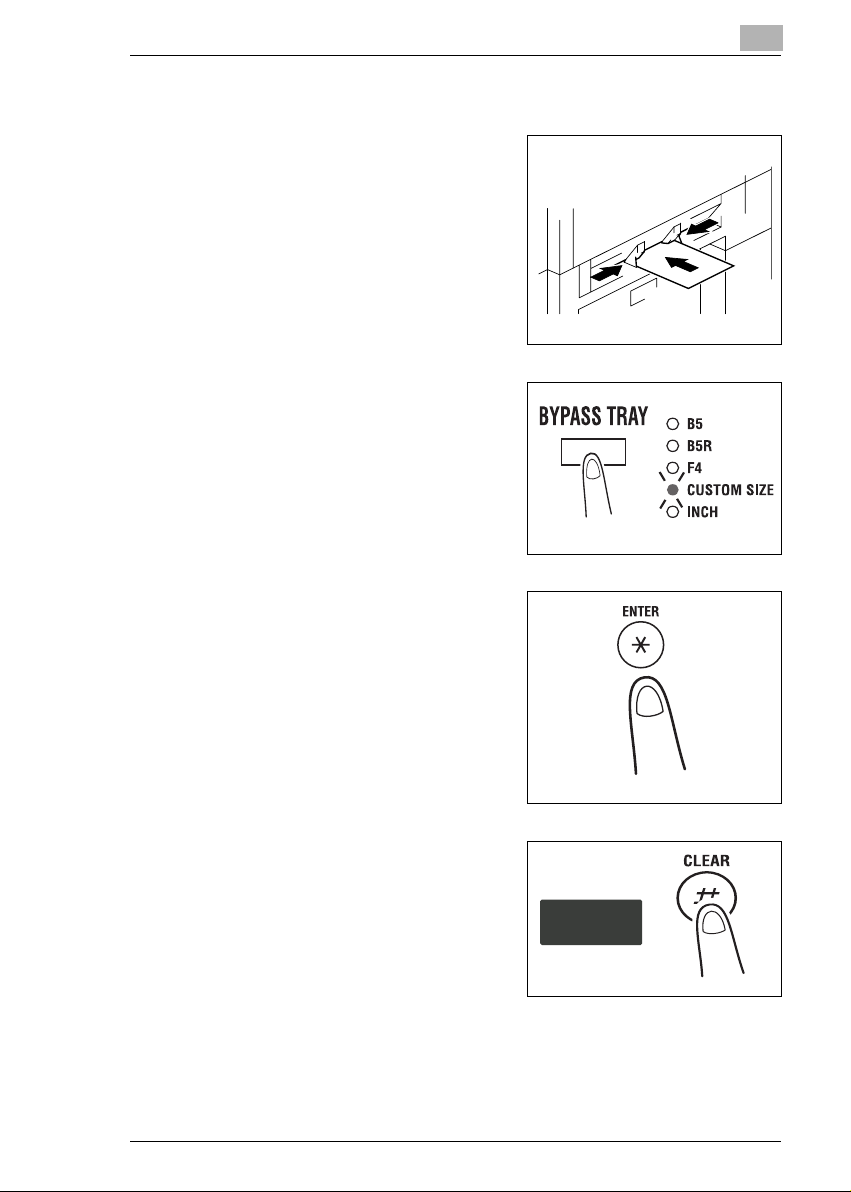
Making Copies
<Custom Size Input (Bypass Tray)>
1
Slide the Paper Guides to the size
of the paper. Gently insert the paper
with the front side of the paper
facing down until it is stopped. Note
that the Bypass Tray location
indicator on the control panel lights.
2 Press the [BYPASS TRAY] key until
the Custom Size indicator blinks.
3
Press the [ENTER] key.
5
4 Press the [CLEAR] key to clear the
old value shown on the Display.
Konica 7115/7118 5-9
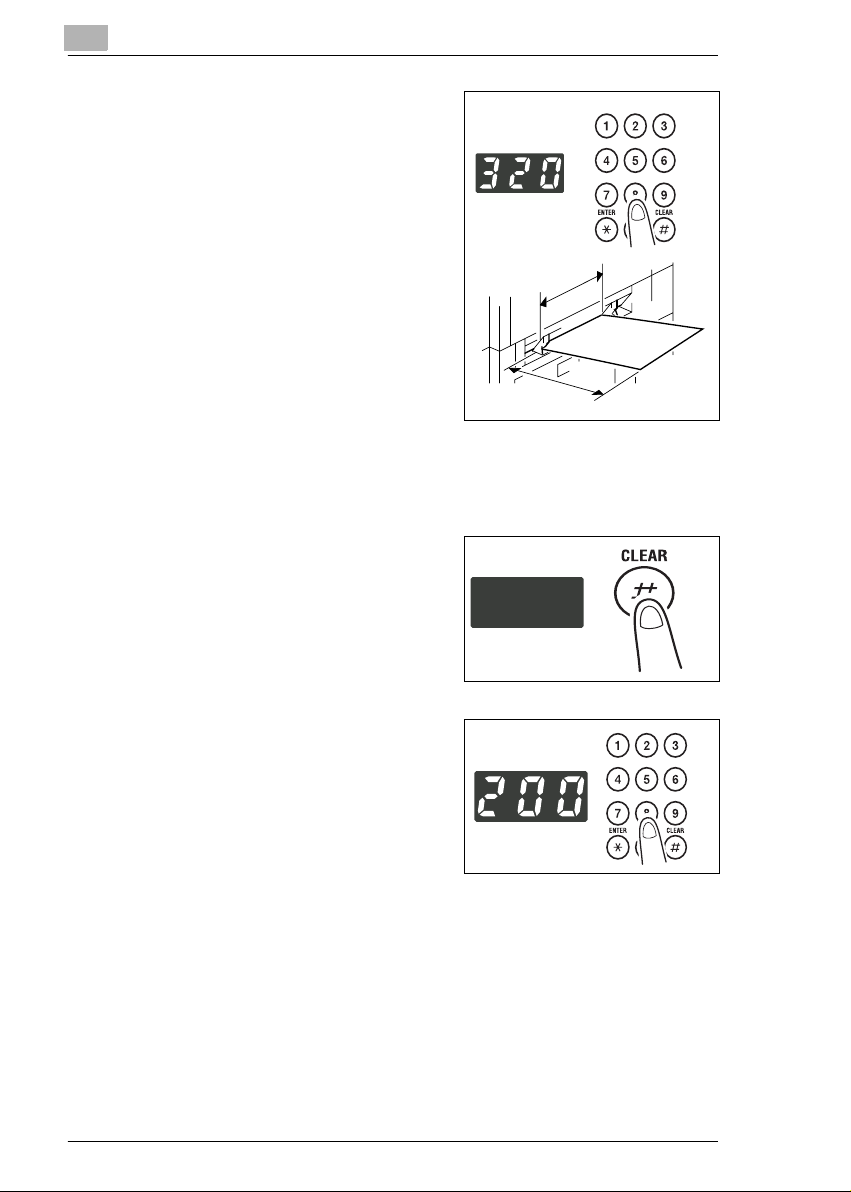
5
5
Enter the length (mm) of the paper
from the Key Pad.
Do you know what is the range
?
for the paper length of custom
size?
➜ The length can range from
140 mm to 432 mm.
Do you want to change the value
?
just entered?
➜ Press the [CLEAR] key and then
re-enter the new value.
What are the precautions for
?
entering a custom size?
➜ Note the conventions for the
paper dimensions, width and length.
6
Press the [ENTER] key.
7
Press the [CLEAR] key to clear the
old value shown on the Display.
Making Copies
Width
Length
8
Enter the width (mm) of the paper
from the Key Pad.
Do you know the range for paper
?
width of custom size?
➜ The width can range from 90
mm to 297 mm.
Do you want to change the value
?
just entered?
➜ Press the [CLEAR] key and then re-enter the new value.
9
Press the [ENTER] key.
5-10 Konica 7115/7118

Making Copies
5.4 Specifying the Zoom Ratio
By specifying a zoom ratio, the copy can be enlarged or reduced.
5
Types of Zoom Ratio
Setting
AMS This setting automatically selects the most appropriate zoom
Fixed ratios The following optimum zoom ratios are available for making
Ratios set using Zoom
([ ][ ]) key
Full Size This setting makes a copy the same size as the original
X/Y Zoom This setting allows the zoom ratio to be set independently for X
Description
ratio based on the size of the original loaded and the paper size
selected for use. The copier must be equipped with an
Automatic Document Feeder.
copies from commonly used original sizes to standard paper
sizes.
• 50%
• 70% (A3 Ö A4, B4 Ö B5)
• 81% (B4 Ö A4, B5 Ö A5)
• 115% (B4 Ö A3, B5 Ö A4)
• 141% (A4 Ö A3, B5 Ö B4)
• 200%
Touching the [ ] or [ ] key increases or decreases the zoom
ratio in 1% increments. The ratio can range from 50% to 200%.
(100%).
(horizontal) and Y (vertical) directions.
The ratios can be set directly from the Key Pad, in the range
between 50% and 100%.
Konica 7115/7118 5-11
5
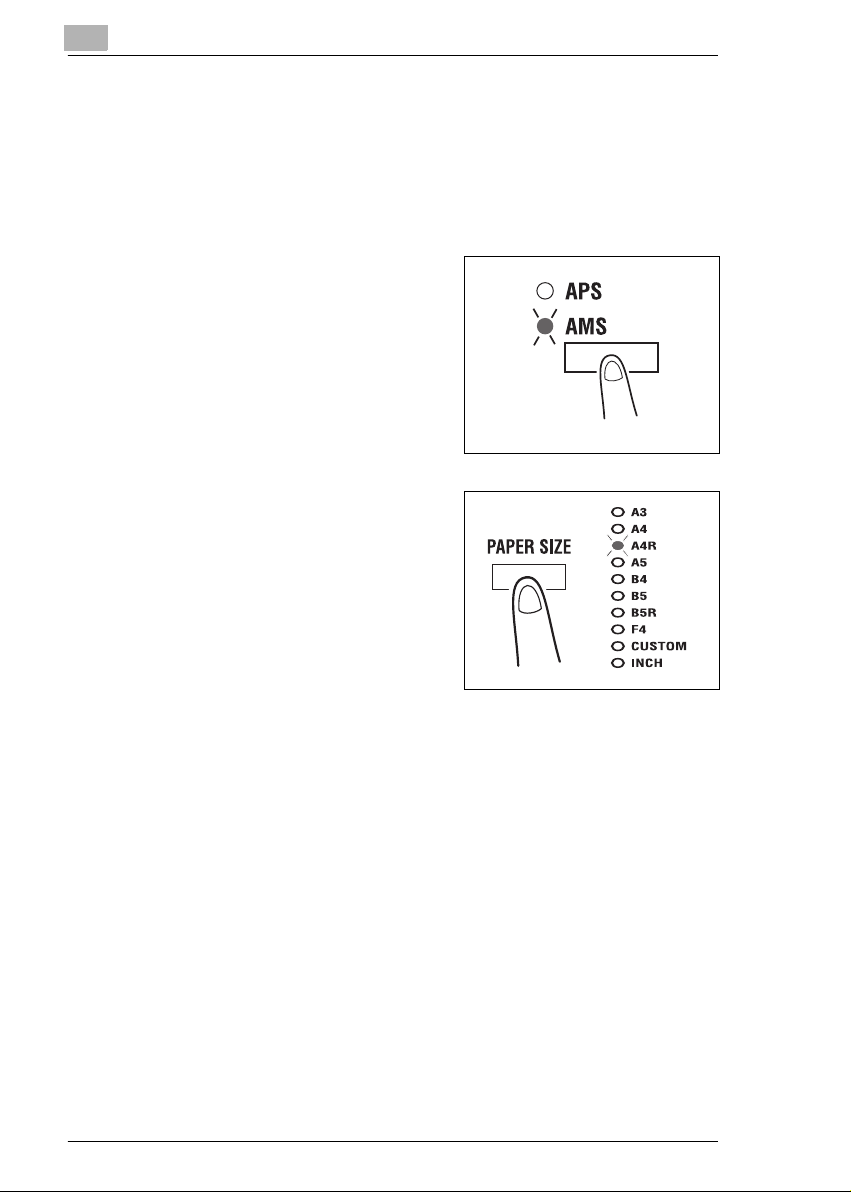
Setting the Zoom Ratio
<AMS>
1
Position the original.
❍ Original Loading (p.4-1)
2
Press the [APS/AMS] key on the
control panel until the AMS indicator
lights.
3
Press the [PAPER SIZE] key on the
control panel until the desired paper
size indicator lights.
Making Copies
4
Make any other necessary settings.
❍ Image Density (p.5-16)
5
Enter the number of copies to be made from the Key Pad and then
press the [START] key.
5-12 Konica 7115/7118

Making Copies
<Fixed and Variable Zoom Ratios>
1
Position the original.
❍ Original Loading (p.4-1)
2
Press the [RE] key on the control
panel until the desired zoom ratio
indicator lights.
❍ To set a custom zoom ratio,
3
Make any other necessary settings.
❍ Paper (p.5-3)
❍ Image Density (p.5-16)
4
Enter the number of copies to be made from the Key Pad and then
press the [START] key.
5
press [ ] or [ ] key to reach
the desired ratio. Pressing this
key changes the ratio in 1%
increments.
Konica 7115/7118 5-13

5
Making Copies
X/Y Zoom
This setting allows you to enter the zoom ratio for X and Y independently
from the Key Pad.
1
Position the original.
❍ Original Loading (p. 4-1)
2
Press the [X/Y ZOOM] key on the
control panel to light the X/Y Zoom
indicator.
3
Press the [CLEAR] key to clear the
old value for X (length).
4 First, enter the zoom ratio (%) for X
(length) from the Key Pad and then
press the [ENTER] key.
Do you know the range for the
?
value X in X/Y Zoom?
➜ The ratio can range from 50% to
100%.
Do you want to change the value just entered?
?
➜ Press the [CLEAR] key and then re-enter the new value.
What happens when a value outside the specified range is
?
entered?
➜ The Display shows “Err”. Press
the [CLEAR] key and re-enter a
new value that falls within the
range.
5-14 Konica 7115/7118
Y (width)
X
(length)

Making Copies
5
Press the [CLEAR] key to clear the
old value for Y (width).
6
Enter the zoom ratio (%) for Y
(width) from the Key Pad and then
press the [ENTER] key.
?
➜ The ratio can range from 50% to
7
Make any other necessary settings.
❍ Image Density (p.5-16)
8
Enter the number of copies to be made from the Key Pad and then
press the [START] key.
5
Do you know the range for the
value Y in X/Y Zoom?
100%.
Konica 7115/7118 5-15

5
5.5 Adjusting the Image Density
The image density setting can be adjusted in two broad modes, “Text” and
“Photo”.
Image Density Setting
G Text mode:
The image density can be adjusted either automatically (Auto) or
manually in five steps.
❍ The image density is adjusted automatically according to the original
from which a copy is to be made.
❍ When you want to make a copy from newspaper or magazine and you
do not want the backside image to be produced on the copy, use the
[ ] key to select a lighter setting. To reproduce a pale color of a bright
image, use the [ ] key to select a darker setting.
Selecting a darker setting could result in a background image being
reproduced on the copy, while selecting a lighter setting could make
the copy image itself too light: Select the appropriate level according
to your original.
G Photo mode:
Select Photo when making a copy from an original having a large
halftone image, such as photos.
Setting the Image Density
Making Copies
1
Position the original.
❍ Original Loading (p.4-1)
2
Press the [DENSITY SET] key on
the control panel to select the
desired mode.
Do you know how to select
?
Auto?
➜ Light the density lamp as shown
on the right.
Auto
5-16 Konica 7115/7118

Making Copies
3
If you want to adjust the image
density manually, press the [ ] or
[ ] key to select the desired
setting.
?
➜ Light the Photo indicator. In the
?
➜ Refer to the diagram on the right
Do you know how to select
Photo?
Photo mode, Auto cannot be
selected.
Do you know what to do after selecting Manual?
for the relationship between the
control panel indication and
image density.
Lightest
(Level -2)
Lighter
(Level -1)
Medium
(Level 0)
Darker
(Level 1)
Darkest
(Level 2)
5
4
Make any other necessary settings.
❍ Paper (p.5-3)
❍ Image Density (p.5-16)
5 Enter the number of copies to be made from the Key Pad and then
press the [START] key.
Konica 7115/7118 5-17

5
5.6 Interrupting a Copy Job
By selecting the [INTERRUPT] key, a multi-copy cycle can be stopped at
any time to make an urgent copy.
✎
Note
Some functions cannot be interrupted. Also, some settings may not
be available when a copy job is interrupted. For more details, refer to
the “Function Combination Table” (p.10-6).
To Interrupt a Copy Job
1
Press the [INTERRUPT] key.
The Interrupt indicator lights and the
current copy cycle pauses.
Do you know what settings can
?
be selected when the
[INTERRUPT] key is pressed?
➜ When the [INTERRUPT] key is
pressed, all functions and
settings indicated on the control
panel are reset to their defaults.
Making Copies
2
Remove the original of the
interrupted copy job and then
position the new one that you want
to copy.
5-18 Konica 7115/7118

Making Copies
3
Make any other necessary settings.
❍ Paper (p.5-3)
❍ Zoom Ratio (p.5-11)
❍ Image Density (p.5-16)
4
Enter the number of copies to be made from the Key Pad and then
press the [START] key.
This will start the interrupt copy cycle.
5
After the interrupt copy has been made, press the [INTERRUPT] key.
The Interrupt indicator will go out and the settings will be recovered for
the interrupted copy job.
6 Reposition the original for the interrupted copy job that has been
removed in step 2.
7
Press the [START] key.
The interrupted copy job will be resumed.
5
Konica 7115/7118 5-19

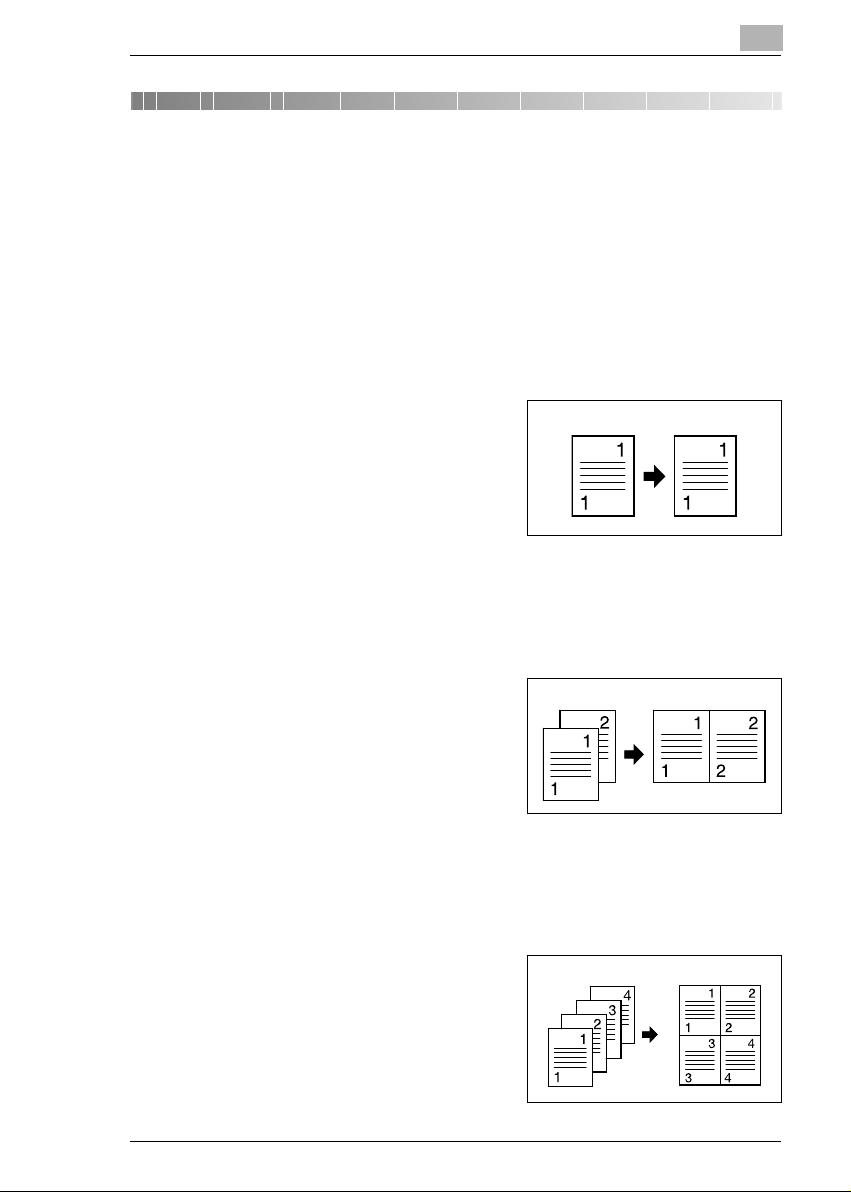
Advanced Copying
6 Advanced Copying
6.1 Making 1-Sided Copies
This section describes the setting combinations for the various types of
originals and copies and the procedure for selecting the appropriate settings to produce the intended results. The [ORIGINAL] key and the [COMBINATION] key on the control panel allow you to make the various setting
combinations.
1-sided:
➜ This is the ordinary 1-sided copy
that this copier can make from a
1-sided original.
2in1:
Important)
✔ This setting is available only when the copier is equipped with an Au-
tomatic Document Feeder.
➜ The copier makes a 1-sided
side-by-side copy from two 1-sided
originals.
6
Original Copy
Originals Copy
4in1:
Important)
✔ This setting is available only when the copier is equipped with an Au-
tomatic Document Feeder.
➜ The copier copies four different
1-sided originals onto one side of a
single sheet of paper.
Konica 7115/7118 6-1
Originals Copy

6
Dual Page:
➜ The copier makes 1-sided
page-by-page copies of an open
book.
Making Settings for 2in1 and 4in1 Copies
1
Load the originals in the Automatic
Document Feeder.
❍ Original Loading (p.4-1)
2 Press the [COMBINATION] key to
light either the 2in1 or 4in1 indicator.
Advanced Copying
Original Copies
3
Make any other necessary settings.
4
Enter the number of copies to be made from the Key Pad and then
press the [START] key.
6-2 Konica 7115/7118

Advanced Copying
Making Settings for Dual Page Copies
1
Position the original.
❍ Original Loading (p.4-1)
2
Press the [ORIGINAL] key to light
the Dual Page indicator.
Is your book left-bound or
?
right-bound?
➜ User’s Choice allows you to se-
lect the type of book.
The default setting is left-bound.
If your book is right-bound,
change the setting for “Book
Binding Position”. (p.7-7)
3 If you want to erase the four edges or the center of the original, press
the [ERASE] key to specify the erase position.
Which one of the three options available for book erase do you
?
want to select?
➜ Frame Erase:
Erases a given width along the
outside edges.
6
Original Copies
➜ Center Erase:
Erases a given width down the
center.
➜ Frame + Center Erase:
Erases a given width along the
outside edges as well as down
the center.
Konica 7115/7118 6-3
Original Copies
Original Copies

6
Advanced Copying
Do you know how to set the erase width for each erase function?
?
➜ The frame erase width can be set in the range between 5 mm and
20 mm, variable in 1-mm increments. The default value is 10 mm.
➜ Only 10 mm is available for the center erase width.
➜ To change the setting for the frame erase width, use “Erase Set-
ting” of User’s Choice. (p.7-8)
4
Make any other necessary settings.
5
Enter the number of copies to be made from the Key Pad and then
press the [START] key.
6-4 Konica 7115/7118

Advanced Copying
6.2 Output Copies (Sort and Group)
When copying or printing two or more copies of a document, the copies
can be divided either by sets containing a copy of each page (Sort) or by
pages (Group).
Three Output Types
Non-Sort:
➜ The copies are stacked on top of
each other as they are made.
Sort:
➜ The copies are automatically divid-
ed into sets with each set containing
a copy of each page.
6
Originals Copies
Originals Copies
Group:
➜ The copies are automatically divid-
ed into stacks with each stack containing copies of the same page.
Konica 7115/7118 6-5
Originals Copies

6
Advanced Copying
Sorting
The copies are automatically divided into sets with each set containing a
copy of each page. The following three types are available: electronic sorting, shift sorting, and crisscross sorting.
What is electronic sorting?
Important)
✔ The copier must be equipped with an Automatic Document Feeder.
➜ The copies are sorted into complete
sets of the originals.
What is shift sorting?
Important)
✔ The copier must be equipped with an Automatic Document Feeder
and a Shifting Unit.
➜ The sorted copy sets are stacked in
the same direction, but in a sawtooth manner by shifting the tray for
each set.
6-6 Konica 7115/7118

Advanced Copying
What is crisscross sorting?
Important)
✔ The copier must be equipped with an Automatic Document Feeder,
16MB Memory for Copier or 32MB Memory for Copier and Paper Feed
Unit or Multiple Bypass Tray.
➜ The sorted copy sets are stacked in
a crisscross manner, one set
stacked lengthwise on top of another set stacked crosswise.
✎
Note
To enable crisscross sorting, the copier must be loaded with paper of
the same size and same paper type, but in two different directions.
6
✎
Note
Crisscross sorting cannot be effected if a Shifting Unit is mounted.
Konica 7115/7118 6-7
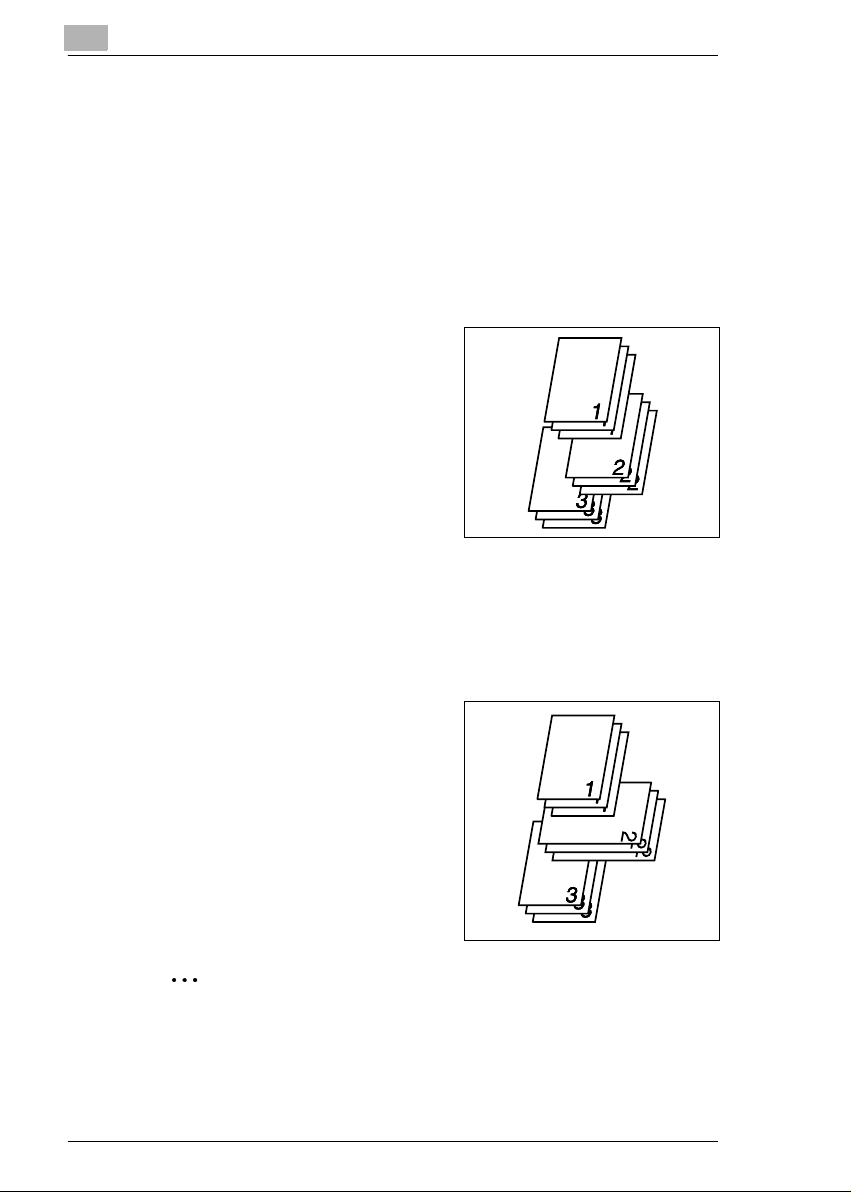
6
Advanced Copying
Grouping
The copies are automatically divided into stacks with each stack containing copies of the same page. The following two types are available: shift
grouping and crisscross grouping.
What is shift grouping?
Important)
✔ The copier must be equipped with an Automatic Document Feeder
and a Shifting Unit.
➜ The grouped copy stacks are
stacked in the same direction, but in
a sawtooth manner by shifting the
tray for each stack.
What is crisscross grouping?
Important)
✔ The copier must be equipped with an Automatic Document Feeder,
16MB Memory for Copier or 32MB Memory for Copier and Paper Feed
Unit or Multiple Bypass Tray.
➜ The grouped copy stacks are
stacked in a crisscross manner, one
stack lengthwise on top of another
stack crosswise.
✎
Note
To enable crisscross grouping, the copier must be loaded with paper
of the same size and same paper type, but in two different directions.
6-8 Konica 7115/7118

Advanced Copying
✎
Note
Crisscross grouping cannot be effected if a Shifting Unit is mounted.
Choosing a set for Output
1 Load the originals in the Automatic
Document Feeder.
❍ Original Loading (p.4-1)
2
Press the [OUTPUT] key to select
the desired output function.
Do you know what it means
?
when both Sort and Group
lamps are off?
➜ It means that Non-Sort is cur-
rently selected for use.
6
3
Make any other necessary settings.
4 Enter the number of copies to be made from the Key Pad and then
press the [START] key.
Konica 7115/7118 6-9

6
6.3 Erasing Part of Original Image (Erase)
The copier erases a margin of a set width along the edges or erases any
other unwanted images. One of the following four different erase functions
can be selected:
What is Left Erase?
➜ A given width is erased from the left
edge of the copy.
What is Top Erase?
➜ A given width is erased from the top
edge of the copy.
What is Frame Erase?
➜ A given width along all four edges is
erased.
Original Copy
Original Copy
Original Copy
Advanced Copying
What is Center Erase?
➜ A given width is erased down the
center.
Original Copies
✎
Note
This setting is available only when Dual Page is selected.
(p.6-3)
6-10 Konica 7115/7118
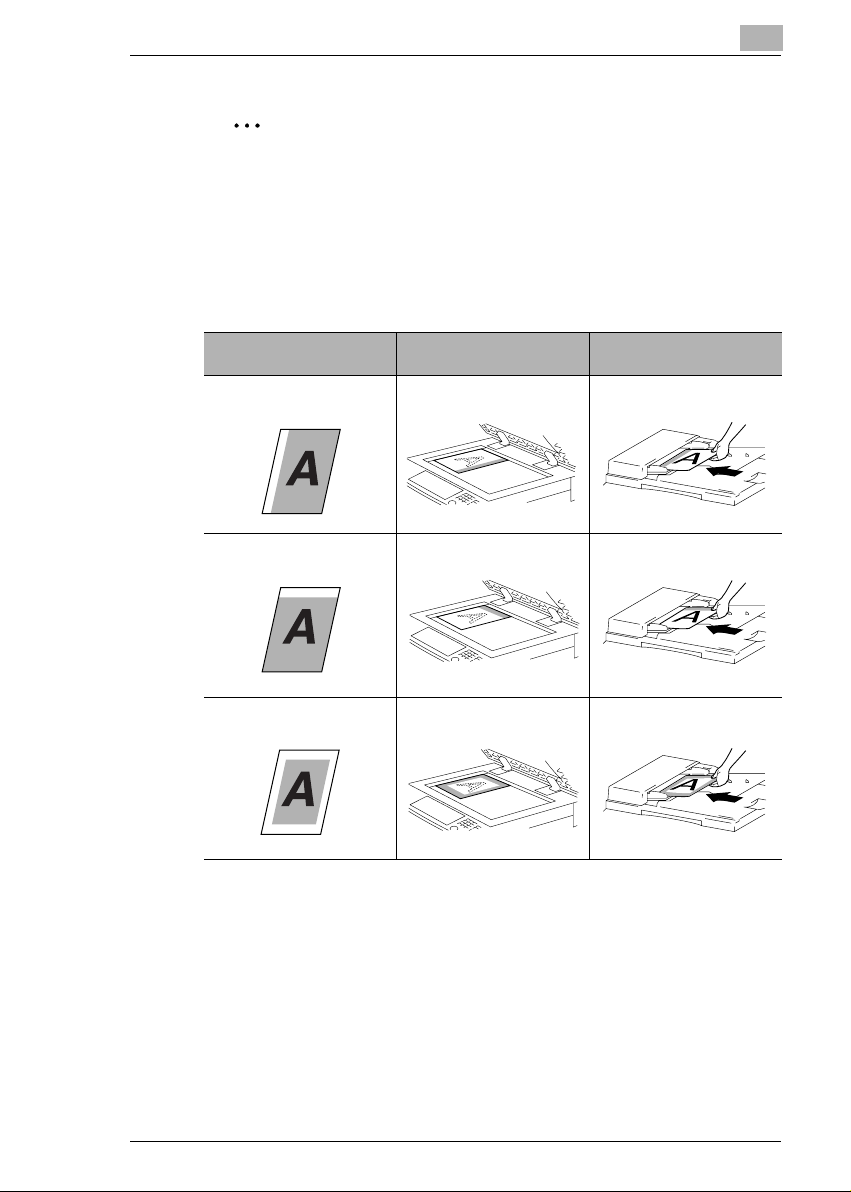
Advanced Copying
✎
Tip
Frame + Center Erase can be set only if Dual Page has been selected.
(p.6-3)
Precautions for Erase Position
Note the correct direction of positioning the original when making copies
in the Erase mode. For more details, refer to the table given below.
6
Result Original Glass
Left Erase
Top Erase
Frame Erase
Automatic Document
Feeder
Konica 7115/7118 6-11
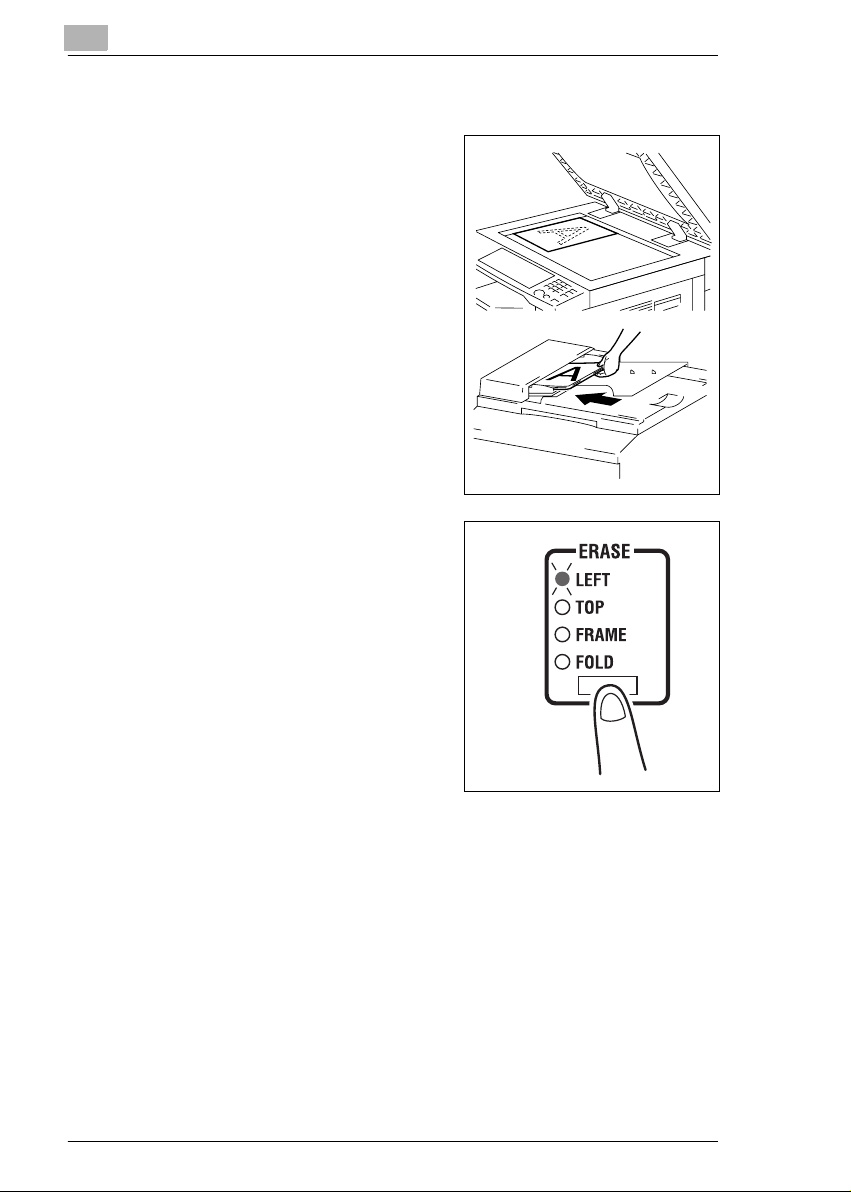
6
Advanced Copying
Setting the Erase Function
1
Position the original.
❍ Original Loading (p.4-1)
2
Press the [ERASE] key to light the
desired erase position indicator.
Do you know how to set the
?
erase width for each erase function?
➜ The Left, Top, and Frame erase
width can be set in the range between 5 mm and 20 mm, variable in 1-mm increments. The
default value is 10 mm.
➜ Only 10 mm is available for the
Center erase width.
➜ To change the erase width, change the setting for “Erase Setting”
of User’s Choice. (p.7-8)
3
Make any other necessary settings.
4
Enter the number of copies to be made from the Key Pad and then
press the [START] key.
6-12 Konica 7115/7118
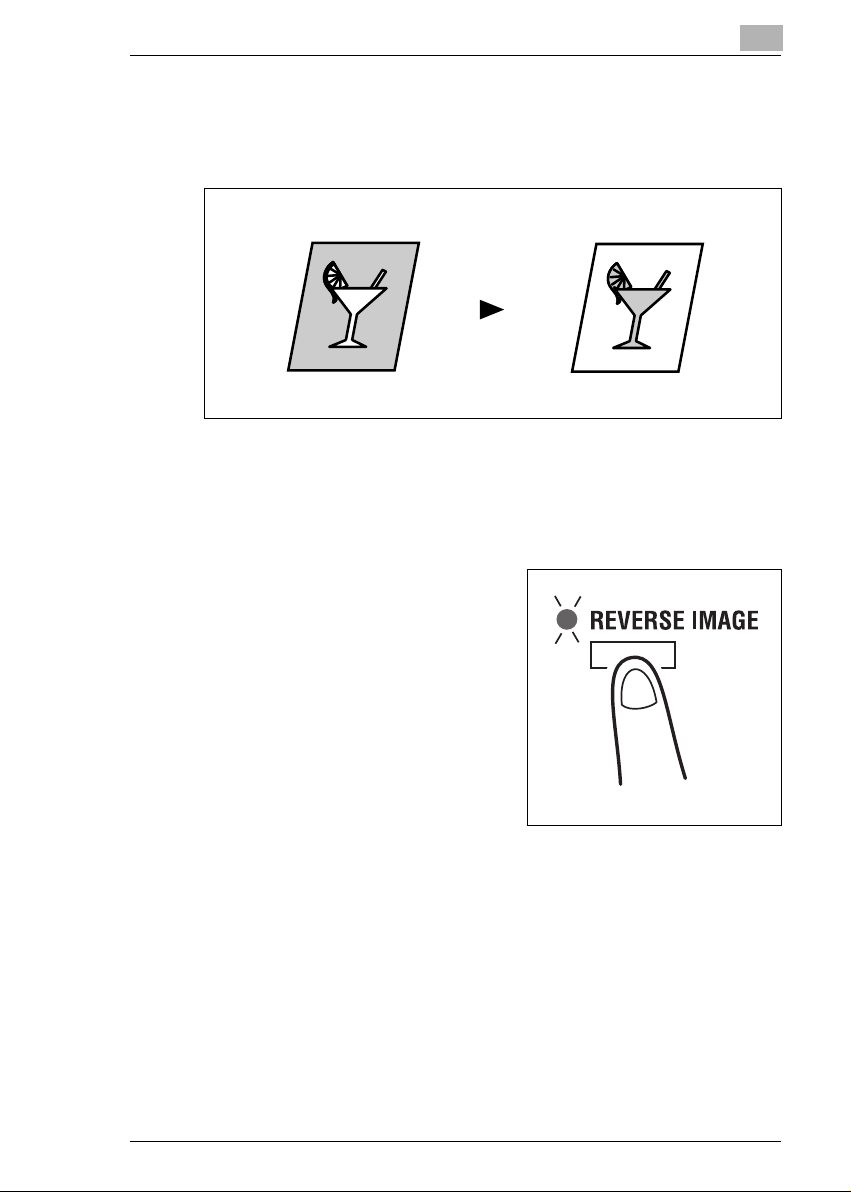
Advanced Copying
6.4 Reversing Original Tonal Arrangements
The white part (background) and the black part (text) are reversed on the
copy.
Original Copy
Reverse Image
1
Position the original.
❍ Original Loading (p.4-1)
2
Press the [REVERSE IMAGE] key
and make sure that the Reverse
Image lamp lights.
6
3
Make any other necessary settings.
4 Enter the number of copies to be made from the Key Pad and then
press the [START] key.
Konica 7115/7118 6-13

6
6.5 Providing a Image Shift
The copier provides a file margin along the leading edge for ease in filing.
Advanced Copying
What is Image Shift?
➜ The image of the original is shifted
to the right to leave a margin along
the left edge of the copy.
Precautions for Image Shift Position
Study the illustration below to be sure of the correct direction of placing
the original when making a copy with a file margin.
Original Glass Automatic Document Feeder
Setting Image Shift
Original Copy
1 Position the original.
❍ Original Loading (p.4-1)
2
Press the [IMAGE SHIFT] key to
light the Image Shift indicator.
Do you know how to set the file
?
margin width?
➜ The file margin width can be set
in the range between 0 mm and
20 mm, variable in 1-mm increments. The default value is 10
mm.
➜ To change the file margin width, change the setting for “Margin
Setting” of User’s Choice. (p.7-7)
3
Make any other necessary settings.
4
Enter the number of copies to be made from the Key Pad and then
press the [START] key.
6-14 Konica 7115/7118
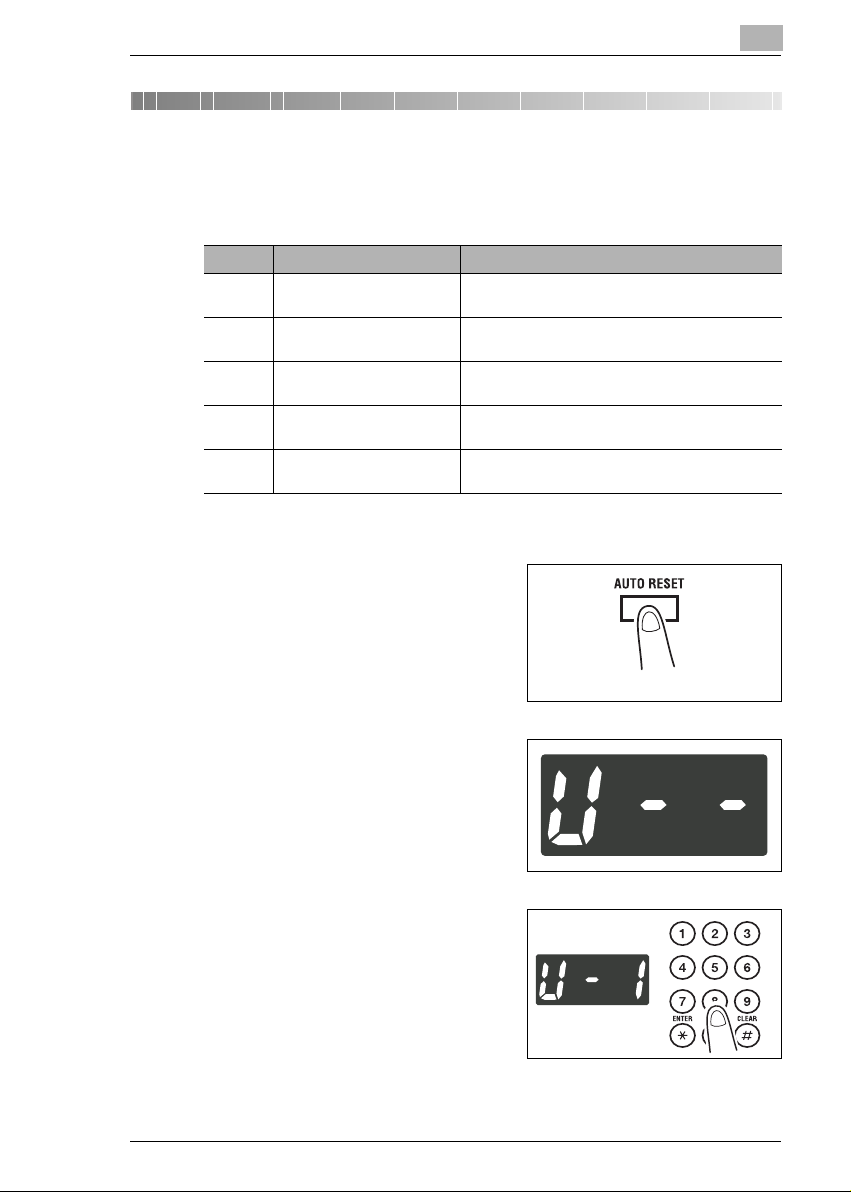
Using the Utility Mode
7 Using the Utility Mode
The Utility mode offers the following subfunctions.
Code Name Description
1User’s Choice Allows you to select the default setting for each of
2 Drum Dehumidify Removes dewdrops that have formed on the
3 Toner Replenisher Replenishes the supply of toner to make up for a
4 Custom Size Input Sets a custom size for the 1st Tray if it is loaded
5 Administrator Mode Allows the administrator of the copier to make
Calling the Utility Mode to the Display
1
Hold down the [AUTO RESET] key
for 3 seconds.
the various functions.
surface of the PC Drum.
lower toner-to-carrier ratio.
with paper of a nonstandard size.
settings for operating and maintaining the copier.
7
2
Check that “U--” appears on the
Display.
3
Using the Key Pad, enter the code
corresponding to the desired
subfunction.
E.g.: Enter “1” to make a setting for
User’s Choice.
4 Press the [START] key.
Konica 7115/7118 7-1
7
7.1 User’s Choice
The functions set and established on the control panel when the copier is
turned ON or the [AUTO RESET] key is pressed are called the default
settings. These settings can be modified by selecting User’s Choice.
Refer to the table given below for the code and default value of each
function.
Using the Utility Mode
Code Name Setting Setting Details
1 Mixed Orig. 0 Mixed Orig. enabled
1 Mixed Orig. disabled 2
2 Paper Priority 0 A3L
1B4L
2A4L
3B5L
4A5L
5FLS L
6A4C 2
7B5C
8A5C
10 11×17L
11 11×14L
12 Legal L
13 Letter L
14 5-1/2×8-1/2L
15 Letter C
16 5-1/2×8-1/2C
20 1st Tray
21 2nd Tray
22 3rd Tray *1
23 4th Tray *1
24 5th Tray *1
25 Multiple Bypass Tray
3 Copy Priority 0 APS 2
1AMS
2 Manual
Default
Value
7-2 Konica 7115/7118

Using the Utility Mode
7
Code Name Setting Setting Details
4 Density Priority 0 Auto 2
1 Manual
2 Photo Manual
5 Density Level (Auto) 0 Lighter
1Normal 2
2 Darker
6 Density Level (Manual) 1 Step 1
2Step 2
3Step 3 2
4Step 4
5Step 5
7 Output Priority 0 Non-Sort 2
1Sort
2Group
8 Crisscross Mode 0 Crisscross stacking enabled 2
1 Crisscross stacking disabled
9 4in1 Copy Order 0 Pattern A 2
1 Pattern B
10 Book Binding Position 0 Left-bound 2
1 Right-bound
11 Margin Setting 0 0mm
::
10 10mm 2
::
20 20mm
12 Erase Setting (Left) 5 5mm
::
10 10mm 2
::
20 20mm
13 Erase Setting (Top) 5 5mm
::
10 10mm 2
::
20 20mm
Default
Value
Konica 7115/7118 7-3

7
Using the Utility Mode
Code Name Setting Setting Details
14 Erase Setting (Frame) 5 5mm
::
10 10mm 2
::
20 20mm
15 Auto Panel Reset 0 30 seconds
11 min 2
22 min
33 min
44 min
55 min
6 Auto Panel Reset disabled
16 Power Save 1 1 min
::
15 15 min 2
::
240 240 min
17 Auto Shut OFF 0 Auto Shut OFF disabled
15 15 min
::
30 30 min 2
::
240 240 min
18 Density (ADF) 0 Mode 1 2
1 Mode 2
19 Print Density 0 -2
1-1
20 2
31
42
20 Paper Auto Detection
(1st Tray)
21 Paper Auto Detection
(2nd Tray)
0Inch
1Metric 2
0Inch
1Metric 2
Default
Value
7-4 Konica 7115/7118
 Loading...