

Page 1

7075
INSTRUCTION MANUAL
Page 2

ENERGY STAR
The Energy Star Program has been established to encourage the widespread and voluntary use of energy-efficient technologies that reduce
energy consumption and prevent pollution. With its automatic energy
saving features Auto Low Power and Auto Shutoff (see item 6.3 Power
Saver Mode) and the automatic duplex function, this product meets the
Energy Star guidelines for energy efficiency. The key operator can adjust
the interval after which the system goes into power saver mode.
CE Declaration
This product complies with EC Directives 73/23/EEC, 89/336/EEC,
92/31/EEC and 93/68/EEC.
®
Program
Page 3

What KONICA 7075 has to offer:
Highly Productive
Konica 7075 produces 75 A4 copies or 44 A3 copies per minute. The
integrated direct duplexing process enables automatic double-sided copying. Double-sided originals are automatically reversed in the RADF.
Digital Image Memory
Konica 7075 works digitally: Originals are initially scanned into the
image memory, then the requested quantity is printed. The standard
memory capacity of 64 MB holds up to 330 pages and can be extended
to max. 512 MB.
Generous Paper Supply
In 3 trays and a multi-sheet bypass tray, Konica 7075 provides a paper
supply of 2.150 sheets . Equipped with the optional large capacity tray,
this can be increased to 6.150 sheets.
User Comfort
All settings are quickly and easily entered via the Interactive Touch
Screen. The Check Screen displays all active settings; and the Proof
Copy function outputs a single set of copies in advance. The Status
Screen informs which job is processed at any time and how long this will
take.
Help Function
Konica 7075 features a Help Key, with which information and user
instructions can be called up. The Help Screen and Help Menu provide
general information. If there is a problem (e.g. a paper jam) corresponding instructions appear automatically.
Multi Access
While one copy job is in progress four further jobs can be programmed
and originals scanned. Jobs will be printed automatically in succession
from the image memory.
Job Memory
30 different copy patterns can be stored and instantly recalled.
Automatic Settings
Please note:
Konica 7075 is equipped with a
special Key Operator Mode.In
this mode, the operator can
monitor the machine performance, adjust default settings,
and control user activity, e.g.
allocate user codes and key
counters.
Access and operation of the Key
Operator Mode are explained in
a separte manual.
Optional Accessories* (not
standard)
This product can be upgraded
with various options. Optionals
or functions, which are not part
of the standard configuration,
are marked with a blue *.
The following automatic functions can be activated as initial settings:
– Automatic exposure adjustment( (AE)
– Automatic paper selection (APS) or
– Automatic magnification selection (AMS)
– Automatic processing of originals (RADF)
– Automatic output mode in the finisher*
– Automatic tray switching (ATS) from an empty tray to another tray
loaded with the same copy paper size.
The initial settings can be changed as required by the key operator or the
Konica service technician.
Digital Image Editing
Konica 7075 offers various digital functions to allow easy editing of
copies. Copied sets can be compiled as desired, for example as a booklet,
or with cover sheets and chapter inserts.
Automatic Finishing
In the multi-purpose finisher* copies are sorted and can be stapled in
various positions. The sophisticated booklet maker* allows automatic
folding and center-stapling of booklets.
Access and Cost Control
The key operator can activate the electronic key counter and allocate up
to 1000 user codes.
* Option
3
Page 4

Contents
1. Advice on Installation and User Safety . . . . . . . . . . . . . . . . . . . . . . . . . . . . . . . . . . . . . . . . . . . . . . . . . . . . . . . . . . . . . . . . . . . . . . . . . . . . .6
1.1 Safety Warnings . . . . . . . . . . . . . . . . . . . . . . . . . . . . . . . . . . . . . . . . . . . . . . . . . . . . . . . . . . . . . . . . . . . . . . . . . . . . . . . . . . . . . . . . . . . . . . . . . . . .6
1.2 Installation . . . . . . . . . . . . . . . . . . . . . . . . . . . . . . . . . . . . . . . . . . . . . . . . . . . . . . . . . . . . . . . . . . . . . . . . . . . . . . . . . . . . . . . . . . . . . . . . . . . . . . . . . . .7
1.3 Installation Space . . . . . . . . . . . . . . . . . . . . . . . . . . . . . . . . . . . . . . . . . . . . . . . . . . . . . . . . . . . . . . . . . . . . . . . . . . . . . . . . . . . . . . . . . . . . . . . . . . .8
2. Main Components of Konica 7075 . . . . . . . . . . . . . . . . . . . . . . . . . . . . . . . . . . . . . . . . . . . . . . . . . . . . . . . . . . . . . . . . . . . . . . . . . . . . . . . . . .10
3. All Functions at a Glance . . . . . . . . . . . . . . . . . . . . . . . . . . . . . . . . . . . . . . . . . . . . . . . . . . . . . . . . . . . . . . . . . . . . . . . . . . . . . . . . . . . . . . . . . . . . . .12
3.1 The Display Keys . . . . . . . . . . . . . . . . . . . . . . . . . . . . . . . . . . . . . . . . . . . . . . . . . . . . . . . . . . . . . . . . . . . . . . . . . . . . . . . . . . . . . . . . . . . . . . . . . .12
3.2 The Operation Panel . . . . . . . . . . . . . . . . . . . . . . . . . . . . . . . . . . . . . . . . . . . . . . . . . . . . . . . . . . . . . . . . . . . . . . . . . . . . . . . . . . . . . . . . . . . . . .13
3.3 The Interactive Touch Screen . . . . . . . . . . . . . . . . . . . . . . . . . . . . . . . . . . . . . . . . . . . . . . . . . . . . . . . . . . . . . . . . . . . . . . . . . . . . . . . . . . . .14
3.3.1 The Basic Screen . . . . . . . . . . . . . . . . . . . . . . . . . . . . . . . . . . . . . . . . . . . . . . . . . . . . . . . . . . . . . . . . . . . . . . . . . . . . . . . . . . . . . . . . . . . . . . . . . .14
3.3.2 The Original Scanning Condition Screen . . . . . . . . . . . . . . . . . . . . . . . . . . . . . . . . . . . . . . . . . . . . . . . . . . . . . . . . . . . . . . . . . . . . . . .15
3.3.3 The Application Selection Screen . . . . . . . . . . . . . . . . . . . . . . . . . . . . . . . . . . . . . . . . . . . . . . . . . . . . . . . . . . . . . . . . . . . . . . . . . . . . . . .15
4. Help Mode . . . . . . . . . . . . . . . . . . . . . . . . . . . . . . . . . . . . . . . . . . . . . . . . . . . . . . . . . . . . . . . . . . . . . . . . . . . . . . . . . . . . . . . . . . . . . . . . . . . . . . . . . . . . . . . 17
4.1 The Help Key . . . . . . . . . . . . . . . . . . . . . . . . . . . . . . . . . . . . . . . . . . . . . . . . . . . . . . . . . . . . . . . . . . . . . . . . . . . . . . . . . . . . . . . . . . . . . . . . . . . . . . 17
4.2 Automatic Help Mode . . . . . . . . . . . . . . . . . . . . . . . . . . . . . . . . . . . . . . . . . . . . . . . . . . . . . . . . . . . . . . . . . . . . . . . . . . . . . . . . . . . . . . . . . . . .18
5. How to Supply Paper, Toner , Staples . . . . . . . . . . . . . . . . . . . . . . . . . . . . . . . . . . . . . . . . . . . . . . . . . . . . . . . . . . . . . . . . . . . . . . . . . . . . . . .19
5.1 Supply Paper . . . . . . . . . . . . . . . . . . . . . . . . . . . . . . . . . . . . . . . . . . . . . . . . . . . . . . . . . . . . . . . . . . . . . . . . . . . . . . . . . . . . . . . . . . . . . . . . . . . . . . .19
5.2 Supply T oner . . . . . . . . . . . . . . . . . . . . . . . . . . . . . . . . . . . . . . . . . . . . . . . . . . . . . . . . . . . . . . . . . . . . . . . . . . . . . . . . . . . . . . . . . . . . . . . . . . . . . . .20
5.3 Supply Staples . . . . . . . . . . . . . . . . . . . . . . . . . . . . . . . . . . . . . . . . . . . . . . . . . . . . . . . . . . . . . . . . . . . . . . . . . . . . . . . . . . . . . . . . . . . . . . . . . . . . .21
6. Before Copying . . . . . . . . . . . . . . . . . . . . . . . . . . . . . . . . . . . . . . . . . . . . . . . . . . . . . . . . . . . . . . . . . . . . . . . . . . . . . . . . . . . . . . . . . . . . . . . . . . . . . . . . . . 23
6.1 Weekly Timer . . . . . . . . . . . . . . . . . . . . . . . . . . . . . . . . . . . . . . . . . . . . . . . . . . . . . . . . . . . . . . . . . . . . . . . . . . . . . . . . . . . . . . . . . . . . . . . . . . . . . .23
6.2 User Password/ Electronic Key Counter (EKC) . . . . . . . . . . . . . . . . . . . . . . . . . . . . . . . . . . . . . . . . . . . . . . . . . . . . . . . . . . . . . . . . .23
6.3 Power Saver Mode . . . . . . . . . . . . . . . . . . . . . . . . . . . . . . . . . . . . . . . . . . . . . . . . . . . . . . . . . . . . . . . . . . . . . . . . . . . . . . . . . . . . . . . . . . . . . . . .24
7. Simple Copying . . . . . . . . . . . . . . . . . . . . . . . . . . . . . . . . . . . . . . . . . . . . . . . . . . . . . . . . . . . . . . . . . . . . . . . . . . . . . . . . . . . . . . . . . . . . . . . . . . . . . . . . . 25
7.1 Automatic Copying . . . . . . . . . . . . . . . . . . . . . . . . . . . . . . . . . . . . . . . . . . . . . . . . . . . . . . . . . . . . . . . . . . . . . . . . . . . . . . . . . . . . . . . . . . . . . . .25
7.2 Position Originals . . . . . . . . . . . . . . . . . . . . . . . . . . . . . . . . . . . . . . . . . . . . . . . . . . . . . . . . . . . . . . . . . . . . . . . . . . . . . . . . . . . . . . . . . . . . . . . . . .26
7.3 Store Mode . . . . . . . . . . . . . . . . . . . . . . . . . . . . . . . . . . . . . . . . . . . . . . . . . . . . . . . . . . . . . . . . . . . . . . . . . . . . . . . . . . . . . . . . . . . . . . . . . . . . . . . . 26
7.4 Basic Functions . . . . . . . . . . . . . . . . . . . . . . . . . . . . . . . . . . . . . . . . . . . . . . . . . . . . . . . . . . . . . . . . . . . . . . . . . . . . . . . . . . . . . . . . . . . . . . . . . . . .27
7.4.1 Duplex / Double-sided Copying . . . . . . . . . . . . . . . . . . . . . . . . . . . . . . . . . . . . . . . . . . . . . . . . . . . . . . . . . . . . . . . . . . . . . . . . . . . . . . . . . 27
7.4.2 Copy Density . . . . . . . . . . . . . . . . . . . . . . . . . . . . . . . . . . . . . . . . . . . . . . . . . . . . . . . . . . . . . . . . . . . . . . . . . . . . . . . . . . . . . . . . . . . . . . . . . . . . . .27
7.4.3 Magnification: Reduce & Enlarge / Zoom / Vertical/Horizontal/Zoom . . . . . . . . . . . . . . . . . . . . . . . . . . . . . . . . . . . . . .28
7.4.4 Paper Size Selection . . . . . . . . . . . . . . . . . . . . . . . . . . . . . . . . . . . . . . . . . . . . . . . . . . . . . . . . . . . . . . . . . . . . . . . . . . . . . . . . . . . . . . . . . . . . . .29
7.4.5 Multi-Sheet Bypass for Special Paper Size/T ype . . . . . . . . . . . . . . . . . . . . . . . . . . . . . . . . . . . . . . . . . . . . . . . . . . . . . . . . . . . . . . .29
7.5 Basic Finishing Functions . . . . . . . . . . . . . . . . . . . . . . . . . . . . . . . . . . . . . . . . . . . . . . . . . . . . . . . . . . . . . . . . . . . . . . . . . . . . . . . . . . . . . . . . .30
8. Other Basic Functions . . . . . . . . . . . . . . . . . . . . . . . . . . . . . . . . . . . . . . . . . . . . . . . . . . . . . . . . . . . . . . . . . . . . . . . . . . . . . . . . . . . . . . . . . . . . . . . . . .33
8.1 Special Originals: Adjust Original Scanning Conditions . . . . . . . . . . . . . . . . . . . . . . . . . . . . . . . . . . . . . . . . . . . . . . . . . . . . . .33
8.1.1 Resolution: High Mode/ Very High Mode/ 600 dpi . . . . . . . . . . . . . . . . . . . . . . . . . . . . . . . . . . . . . . . . . . . . . . . . . . . . . . . . . . .33
8.1.2 Original Quality: Text/ Photo Enhance, Increase Contrast . . . . . . . . . . . . . . . . . . . . . . . . . . . . . . . . . . . . . . . . . . . . . . . . . . . .33
8.1.3 Original T ype: Mixed Originals / Z-Folded Original / SDF . . . . . . . . . . . . . . . . . . . . . . . . . . . . . . . . . . . . . . . . . . . . . . . . . . . . .34
8.1.4 Special Original Size . . . . . . . . . . . . . . . . . . . . . . . . . . . . . . . . . . . . . . . . . . . . . . . . . . . . . . . . . . . . . . . . . . . . . . . . . . . . . . . . . . . . . . . . . . . . . .35
8.2 Check Mode/Proof Copy . . . . . . . . . . . . . . . . . . . . . . . . . . . . . . . . . . . . . . . . . . . . . . . . . . . . . . . . . . . . . . . . . . . . . . . . . . . . . . . . . . . . . . . . .35
8.3 Job Pre-Programming / Reserve Mode . . . . . . . . . . . . . . . . . . . . . . . . . . . . . . . . . . . . . . . . . . . . . . . . . . . . . . . . . . . . . . . . . . . . . . . . .36
8.4 Status Screen: Job List – Job Priority / Job Clear . . . . . . . . . . . . . . . . . . . . . . . . . . . . . . . . . . . . . . . . . . . . . . . . . . . . . . . . . . . . . .36
8.5 Copy Interrupt . . . . . . . . . . . . . . . . . . . . . . . . . . . . . . . . . . . . . . . . . . . . . . . . . . . . . . . . . . . . . . . . . . . . . . . . . . . . . . . . . . . . . . . . . . . . . . . . . . . . . 37
8.6 Job Memory . . . . . . . . . . . . . . . . . . . . . . . . . . . . . . . . . . . . . . . . . . . . . . . . . . . . . . . . . . . . . . . . . . . . . . . . . . . . . . . . . . . . . . . . . . . . . . . . . . . . . . . 38
8.6.1 Save Job Settings . . . . . . . . . . . . . . . . . . . . . . . . . . . . . . . . . . . . . . . . . . . . . . . . . . . . . . . . . . . . . . . . . . . . . . . . . . . . . . . . . . . . . . . . . . . . . . . . . .38
8.6.2 Recall Job Settings . . . . . . . . . . . . . . . . . . . . . . . . . . . . . . . . . . . . . . . . . . . . . . . . . . . . . . . . . . . . . . . . . . . . . . . . . . . . . . . . . . . . . . . . . . . . . . . .39
8.7 Density Shift . . . . . . . . . . . . . . . . . . . . . . . . . . . . . . . . . . . . . . . . . . . . . . . . . . . . . . . . . . . . . . . . . . . . . . . . . . . . . . . . . . . . . . . . . . . . . . . . . . . . . . .39
4
Page 5

Contents
9. Special Functions . . . . . . . . . . . . . . . . . . . . . . . . . . . . . . . . . . . . . . . . . . . . . . . . . . . . . . . . . . . . . . . . . . . . . . . . . . . . . . . . . . . . . . . . . . . . . . . . . . . . . . . .41
9.1 Image Editing Functions . . . . . . . . . . . . . . . . . . . . . . . . . . . . . . . . . . . . . . . . . . . . . . . . . . . . . . . . . . . . . . . . . . . . . . . . . . . . . . . . . . . . . . . . . .42
9.1.1 Non-Image Area Erase . . . . . . . . . . . . . . . . . . . . . . . . . . . . . . . . . . . . . . . . . . . . . . . . . . . . . . . . . . . . . . . . . . . . . . . . . . . . . . . . . . . . . . . . . . . .42
9.1.2 Auto-Layout . . . . . . . . . . . . . . . . . . . . . . . . . . . . . . . . . . . . . . . . . . . . . . . . . . . . . . . . . . . . . . . . . . . . . . . . . . . . . . . . . . . . . . . . . . . . . . . . . . . . . . .42
9.1.3 Reverse Image . . . . . . . . . . . . . . . . . . . . . . . . . . . . . . . . . . . . . . . . . . . . . . . . . . . . . . . . . . . . . . . . . . . . . . . . . . . . . . . . . . . . . . . . . . . . . . . . . . . . .42
9.1.4 All Image Area . . . . . . . . . . . . . . . . . . . . . . . . . . . . . . . . . . . . . . . . . . . . . . . . . . . . . . . . . . . . . . . . . . . . . . . . . . . . . . . . . . . . . . . . . . . . . . . . . . . . .43
9.1.5 Image Repeat . . . . . . . . . . . . . . . . . . . . . . . . . . . . . . . . . . . . . . . . . . . . . . . . . . . . . . . . . . . . . . . . . . . . . . . . . . . . . . . . . . . . . . . . . . . . . . . . . . . . . .43
9.1.6 Image Shift / Reduce and Shift . . . . . . . . . . . . . . . . . . . . . . . . . . . . . . . . . . . . . . . . . . . . . . . . . . . . . . . . . . . . . . . . . . . . . . . . . . . . . . . . . .44
9.1.7 Frame/Fold Erasure . . . . . . . . . . . . . . . . . . . . . . . . . . . . . . . . . . . . . . . . . . . . . . . . . . . . . . . . . . . . . . . . . . . . . . . . . . . . . . . . . . . . . . . . . . . . . . . .45
9.1.8 Stamp
9.2 Copy Editing Functions . . . . . . . . . . . . . . . . . . . . . . . . . . . . . . . . . . . . . . . . . . . . . . . . . . . . . . . . . . . . . . . . . . . . . . . . . . . . . . . . . . . . . . . . . . .48
9.2.1 Sheet / Cover Insertion . . . . . . . . . . . . . . . . . . . . . . . . . . . . . . . . . . . . . . . . . . . . . . . . . . . . . . . . . . . . . . . . . . . . . . . . . . . . . . . . . . . . . . . . . . .48
9.2.2 OHP-Interleave . . . . . . . . . . . . . . . . . . . . . . . . . . . . . . . . . . . . . . . . . . . . . . . . . . . . . . . . . . . . . . . . . . . . . . . . . . . . . . . . . . . . . . . . . . . . . . . . . . . .49
9.2.3 Chapter . . . . . . . . . . . . . . . . . . . . . . . . . . . . . . . . . . . . . . . . . . . . . . . . . . . . . . . . . . . . . . . . . . . . . . . . . . . . . . . . . . . . . . . . . . . . . . . . . . . . . . . . . . . .50
9.2.4 Image Insert . . . . . . . . . . . . . . . . . . . . . . . . . . . . . . . . . . . . . . . . . . . . . . . . . . . . . . . . . . . . . . . . . . . . . . . . . . . . . . . . . . . . . . . . . . . . . . . . . . . . . . .50
9.2.5 Combination . . . . . . . . . . . . . . . . . . . . . . . . . . . . . . . . . . . . . . . . . . . . . . . . . . . . . . . . . . . . . . . . . . . . . . . . . . . . . . . . . . . . . . . . . . . . . . . . . . . . . . .51
9.2.6 Dual Page / Book Copy . . . . . . . . . . . . . . . . . . . . . . . . . . . . . . . . . . . . . . . . . . . . . . . . . . . . . . . . . . . . . . . . . . . . . . . . . . . . . . . . . . . . . . . . . . .52
9.2.7 Booklet . . . . . . . . . . . . . . . . . . . . . . . . . . . . . . . . . . . . . . . . . . . . . . . . . . . . . . . . . . . . . . . . . . . . . . . . . . . . . . . . . . . . . . . . . . . . . . . . . . . . . . . . . . . . . 53
9.2.8 Program Job . . . . . . . . . . . . . . . . . . . . . . . . . . . . . . . . . . . . . . . . . . . . . . . . . . . . . . . . . . . . . . . . . . . . . . . . . . . . . . . . . . . . . . . . . . . . . . . . . . . . . . .54
10. Finishing Options . . . . . . . . . . . . . . . . . . . . . . . . . . . . . . . . . . . . . . . . . . . . . . . . . . . . . . . . . . . . . . . . . . . . . . . . . . . . . . . . . . . . . . . . . . . . . . . . . . . . . . .55
10.1 Select Staple Position* . . . . . . . . . . . . . . . . . . . . . . . . . . . . . . . . . . . . . . . . . . . . . . . . . . . . . . . . . . . . . . . . . . . . . . . . . . . . . . . . . . . . . . . . . . . 55
10.2 Folding / Stapling & Folding Mode (using Booklet-Maker*) . . . . . . . . . . . . . . . . . . . . . . . . . . . . . . . . . . . . . . . . . . . . . . . . . 55
10.3 Cover Sheet Insertion (using Post Inserter*) . . . . . . . . . . . . . . . . . . . . . . . . . . . . . . . . . . . . . . . . . . . . . . . . . . . . . . . . . . . . . . . . . . . 56
10.4 Manual Stapling (using Post Inserter*) . . . . . . . . . . . . . . . . . . . . . . . . . . . . . . . . . . . . . . . . . . . . . . . . . . . . . . . . . . . . . . . . . . . . . . . . . 56
11.Scanner / Document Server* . . . . . . . . . . . . . . . . . . . . . . . . . . . . . . . . . . . . . . . . . . . . . . . . . . . . . . . . . . . . . . . . . . . . . . . . . . . . . . . . . . . . . . . . . 57
11.1 Document Scan and Image Store*/ Delete Mode . . . . . . . . . . . . . . . . . . . . . . . . . . . . . . . . . . . . . . . . . . . . . . . . . . . . . . . . . . . . .57
11.2 Image Store & Output Mode* . . . . . . . . . . . . . . . . . . . . . . . . . . . . . . . . . . . . . . . . . . . . . . . . . . . . . . . . . . . . . . . . . . . . . . . . . . . . . . . . . . .58
11.3 Image Recall Mode . . . . . . . . . . . . . . . . . . . . . . . . . . . . . . . . . . . . . . . . . . . . . . . . . . . . . . . . . . . . . . . . . . . . . . . . . . . . . . . . . . . . . . . . . . . . . . .59
(*)
/ Overlay . . . . . . . . . . . . . . . . . . . . . . . . . . . . . . . . . . . . . . . . . . . . . . . . . . . . . . . . . . . . . . . . . . . . . . . . . . . . . . . . . . . . . . . . . . . . . . . . . 46
12.Tr oubleshooting . . . . . . . . . . . . . . . . . . . . . . . . . . . . . . . . . . . . . . . . . . . . . . . . . . . . . . . . . . . . . . . . . . . . . . . . . . . . . . . . . . . . . . . . . . . . . . . . . . . . . . . . .61
12.1 Selfdiagnostic System . . . . . . . . . . . . . . . . . . . . . . . . . . . . . . . . . . . . . . . . . . . . . . . . . . . . . . . . . . . . . . . . . . . . . . . . . . . . . . . . . . . . . . . . . . . . .61
12.2 Recall Copy Count / Periodic Maintenance . . . . . . . . . . . . . . . . . . . . . . . . . . . . . . . . . . . . . . . . . . . . . . . . . . . . . . . . . . . . . . . . . . . .61
12.3 Memory Overflow . . . . . . . . . . . . . . . . . . . . . . . . . . . . . . . . . . . . . . . . . . . . . . . . . . . . . . . . . . . . . . . . . . . . . . . . . . . . . . . . . . . . . . . . . . . . . . . . .62
12.4 Call Service . . . . . . . . . . . . . . . . . . . . . . . . . . . . . . . . . . . . . . . . . . . . . . . . . . . . . . . . . . . . . . . . . . . . . . . . . . . . . . . . . . . . . . . . . . . . . . . . . . . . . . . . .62
12.5 Paper Jam . . . . . . . . . . . . . . . . . . . . . . . . . . . . . . . . . . . . . . . . . . . . . . . . . . . . . . . . . . . . . . . . . . . . . . . . . . . . . . . . . . . . . . . . . . . . . . . . . . . . . . . . . .63
12.6 Solving Simple Problems . . . . . . . . . . . . . . . . . . . . . . . . . . . . . . . . . . . . . . . . . . . . . . . . . . . . . . . . . . . . . . . . . . . . . . . . . . . . . . . . . . . . . . . . . 64
12.7 Daily Care . . . . . . . . . . . . . . . . . . . . . . . . . . . . . . . . . . . . . . . . . . . . . . . . . . . . . . . . . . . . . . . . . . . . . . . . . . . . . . . . . . . . . . . . . . . . . . . . . . . . . . . . . .66
13.Function Combinations . . . . . . . . . . . . . . . . . . . . . . . . . . . . . . . . . . . . . . . . . . . . . . . . . . . . . . . . . . . . . . . . . . . . . . . . . . . . . . . . . . . . . . . . . . . . . . . . 67
14.T echnical Specifications Konica 7075 . . . . . . . . . . . . . . . . . . . . . . . . . . . . . . . . . . . . . . . . . . . . . . . . . . . . . . . . . . . . . . . . . . . . . . . . . . . . . . .69
* Option
5
Page 6

1. Advice on Installation and User Safety
This section contains important information on the safe installation and
use of the Konica 7075. In the interest of your own safety and to ensure
an optimum functionality of your new equipment, we advise you to read
the following precautions carefully.
1.1 Safety Warnings
1. ATTENTION: While in use, a high voltage is generated inside the
equipment. Do not touch to avoid electrical shock!
2. Do not attempt to repair any parts of this equipment. All repairs must
be carried out exclusively by approved Konica service technicians.
3. While in use, some parts inside the unit get very hot. To avoid getting
burned, follow instructions carefully when clearing paper jams and
only touch designated parts.
4. In case of liquid running into the unit, immediately switch off the
equipment, disconnect from the mains and inform your Konica
service.
5. To disconnect the unit from the mains, pull the plug from the socket,
which has to be located close to the equipment and must not be
obstructed at any time!
6. While toner is not hazardous to your health, it should be kept out or
reach of children. If toner is inhaled, swallowed or gets into contact
with the eyes, consult your doctor.
7. If the equipment has to be opened, only the green knobs and handles
should be touched.
Care Advice:
One precondition for a good
copy quality is a clean platen
glass. We suggest to clean the
platen glass and the underside
of the document feeder daily
with a clean soft, possibly damp
cloth or the special Konica cleaning liquid. Never use volatile or
corrosive cleaners or solvents
on this equipment.
8. Before switching on the equipment, always ensure that the unit is
securely closed.
9. This equipment is not to be confused with shelves or other office
furniture. Do not obstruct the top of the unit with any items but keep
free at all times.
10.Avoid dropping anything into the unit (e.g. staples or else).
11.The touch screen of the operating panel is protected with a thin glass.
Only make function selections with your fingertips, and avoid pressing
on the display with hard or pointed items (e.g. pens).
12.Do not load stapled or creased paper into the document feeder, the
paper trays or the sheet bypass.
6
Page 7
1. Advice on Installation and User Safety
1.2 Installation
An inadequate location of the system can lead to a loss in copy quality
and can even damage the equipment. The following should therefore be
considered before installing the unit.
1. The location of the equipment must be level and must not be subject
to vibration (please refer also to 1.3 Installation Space on page 8).
2. The unit should only be installed in surroundings which are dry, clean
and well ventilated.
3. The equipment and its exclusive power outlet must be easily accessible
and not be obstructed in any way.
4. Only connect the unit to a tested socket which is approved by the
local electricty board. Ensure that neither the socket nor the connecting lead are damaged in any way. Do not use any extension lead or
branched socket.
5. The unit is intended for use in temperatures between 10° and max.
30° Celsius and a humidity of min 10 % and max. 80 %. Avoid
installing this equipment in locations with considerably varying temperatures (close to heating or window) as well as direct sunlight.
6. When in use ozone is generated by the equipment, however in small,
not hazardous amounts. The unit is equipped with two ozone filters
which are replaced after every 3 million processed pages. Nevertheless
an odour may be detected after long periods of use in a poorly ventilated room. This can be avoided by adequate ventilation at regular
intervals.
7. Ammonia or other gaseous fumes, extremely dusty conditions as well
as strongly varying levels of humidity and/or room temperature can
have a negative effect on the performance of the system, leading to a
deterioration of the copy quality.
7
Page 8
1. Advice on Installation and User Safety
400
1203
1603
400
475
887
1762
1845
775
950
120
2344
1858
550321
100 100
887
1203
386
486
400
1603
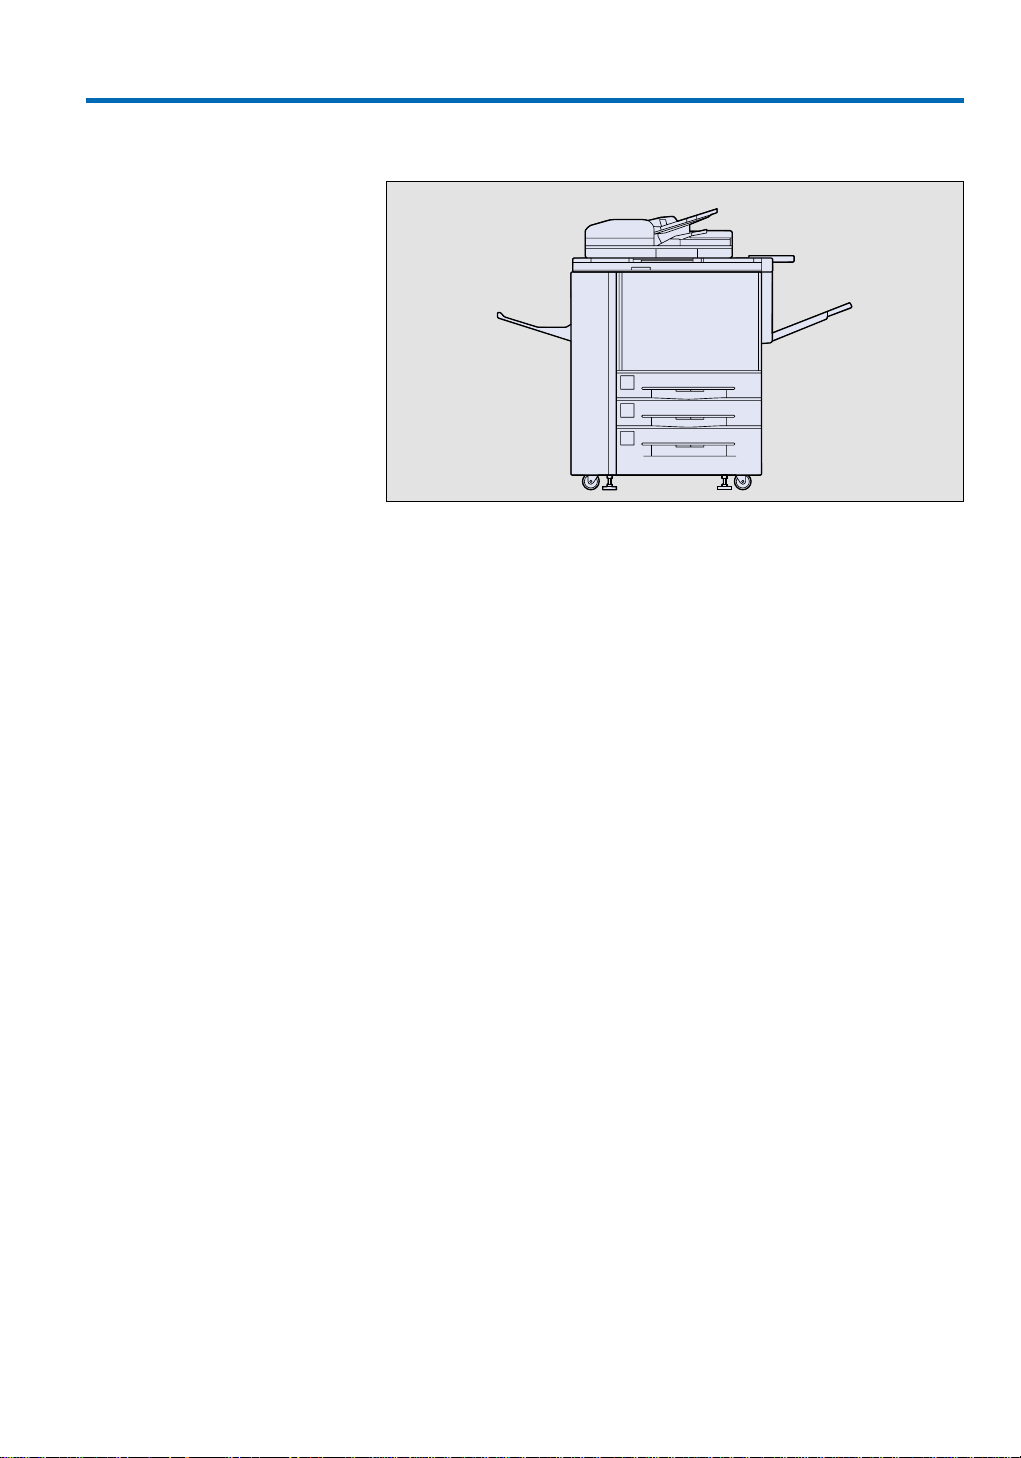
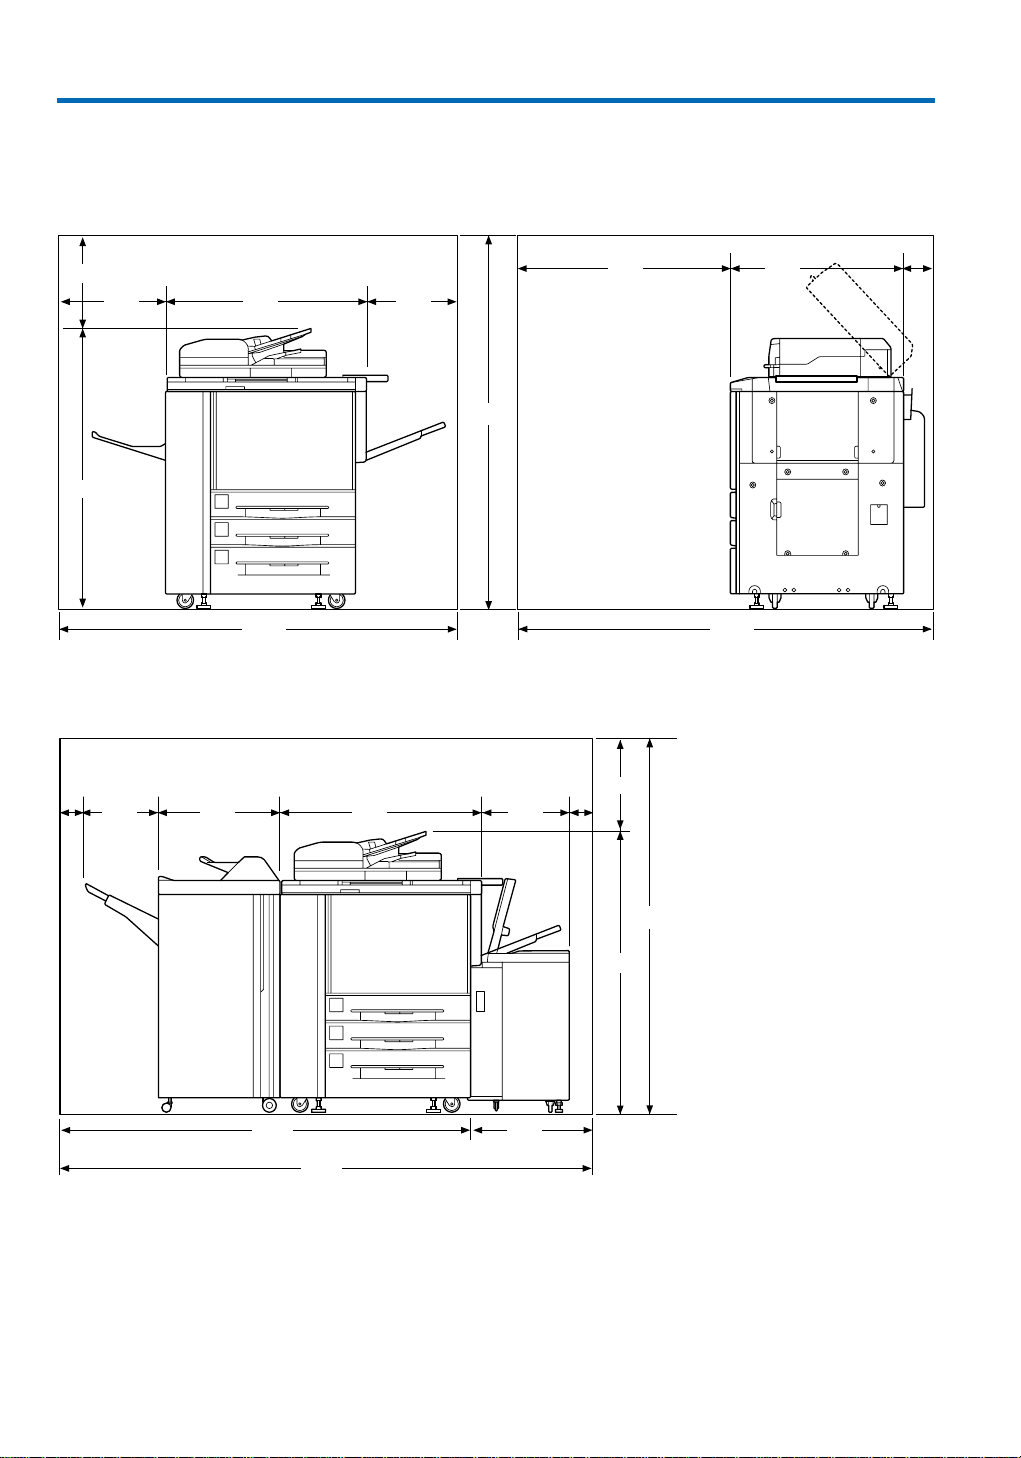
1.3 Installation Space
Basic System
System with Finisher (FS-108)* and Large Capacity Tray (LT-401)*
8
Page 9
1. Advice on Installation and User Safety
3430
2660
5501117
150
100
887
1203
626
770
400
1603
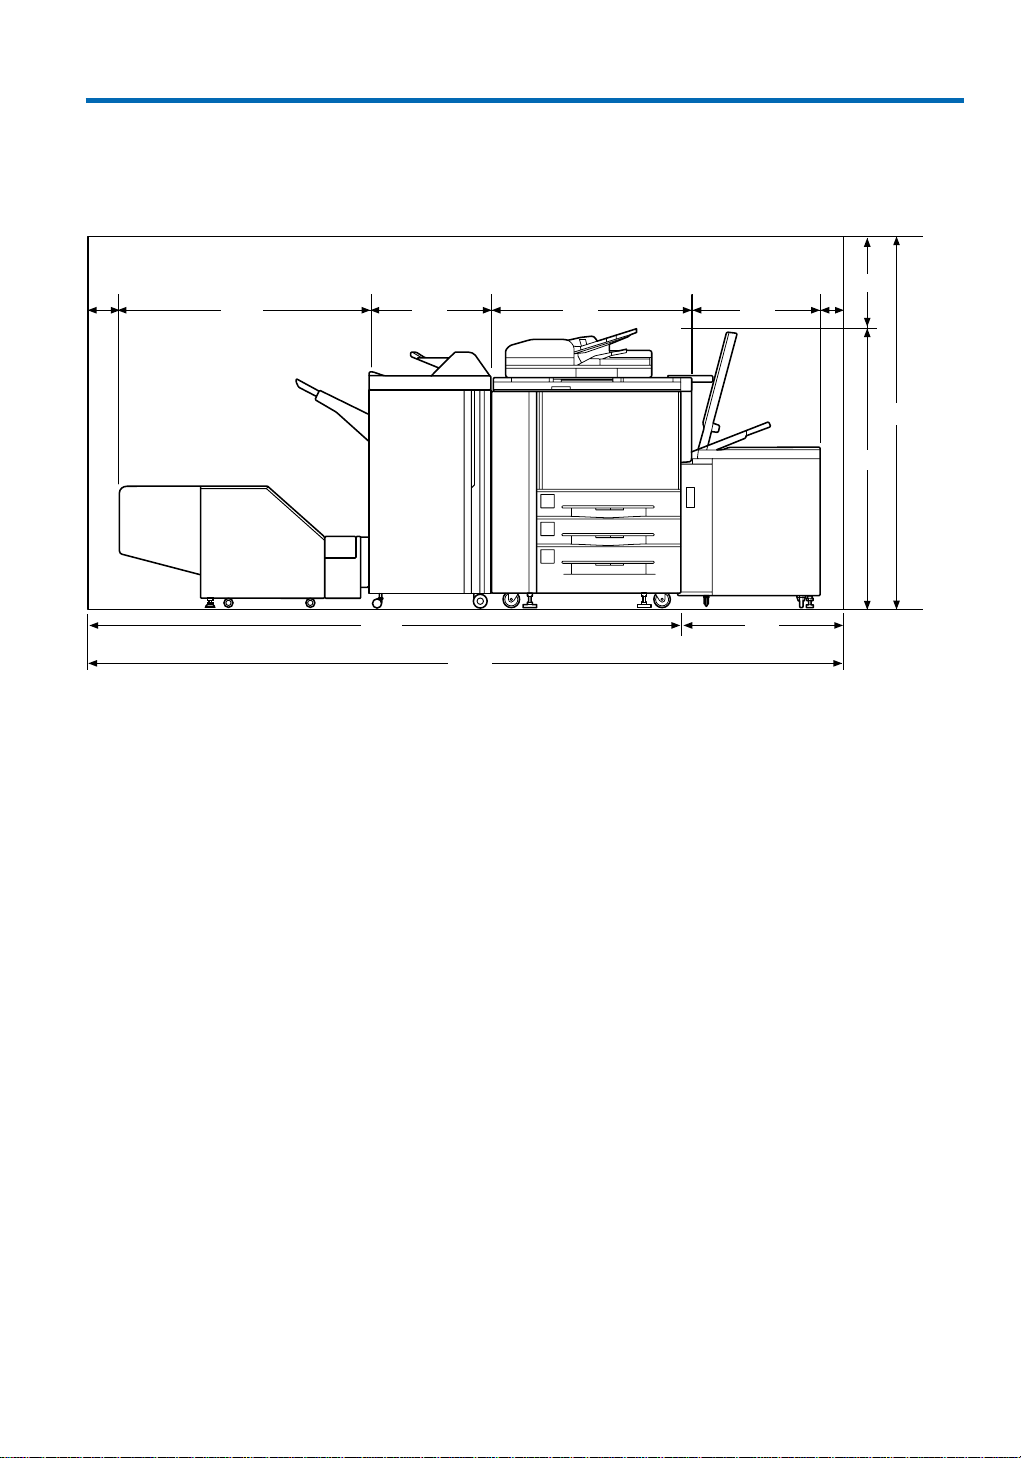
System with Booklet Maker (FS-108BM)*, Trimmer (TU-108)* and Large Capacity Tray (LT-411)*
All dimensions in mm.
9
Page 10
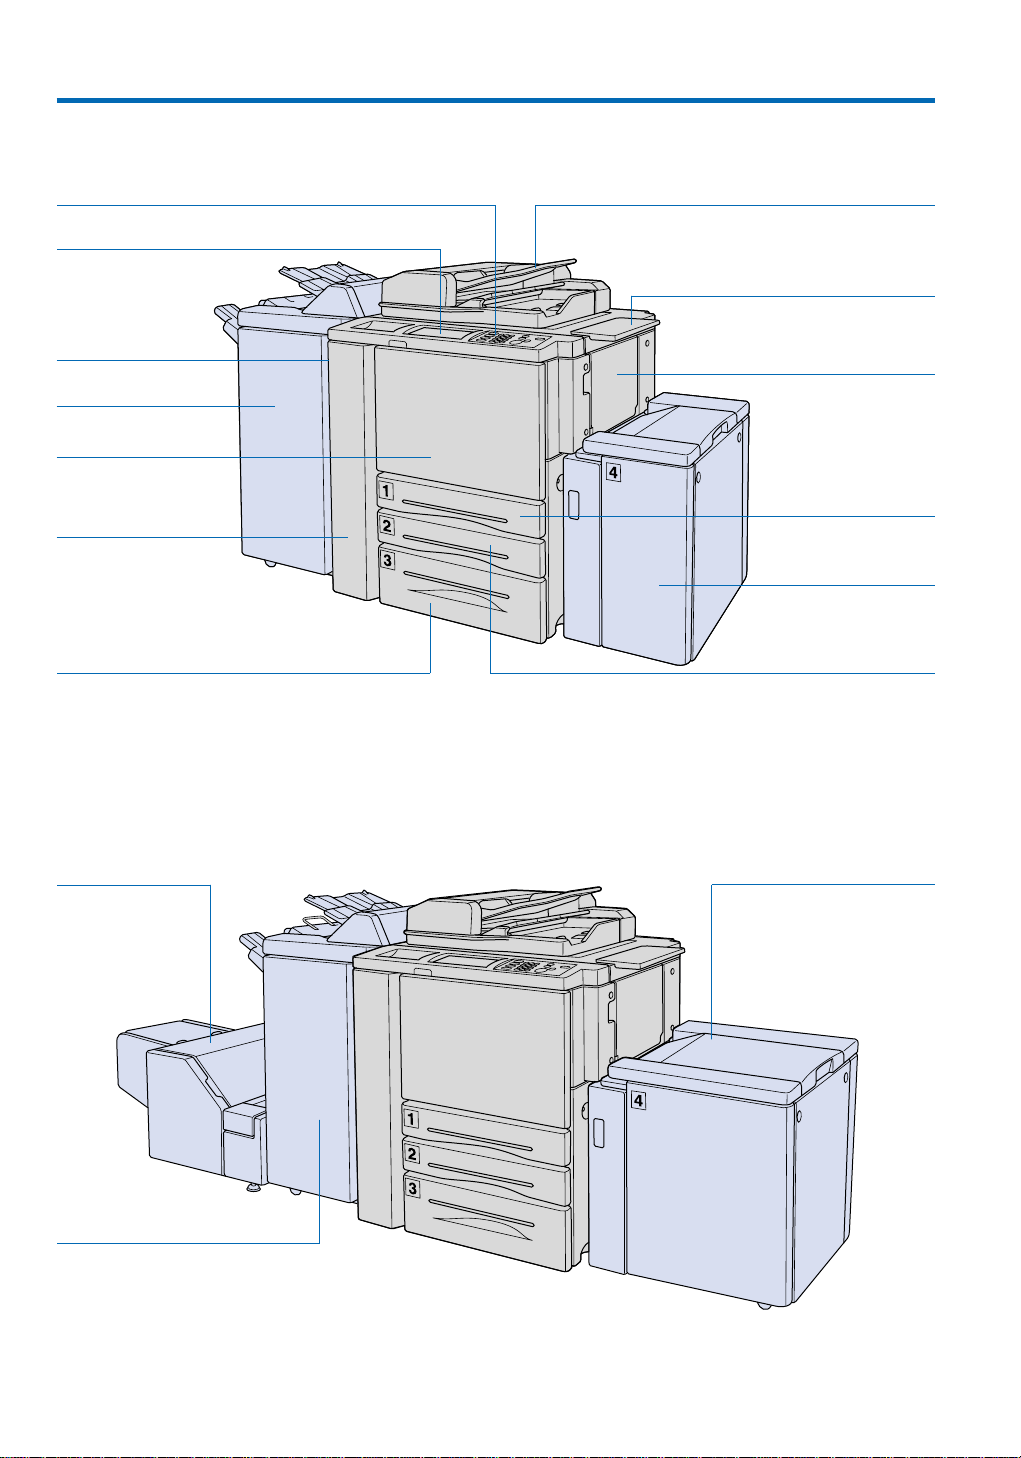
2. Main Components of Konica 7075
External:
Control Panel
LCD Touch Screen
Power Switch
Finisher (FS-108)*
Front Door
Left Door
Tray 3: Universal Tray
for 1,000 Sheets A5R to A3+
Original Insertion in RADF
Work Table
Multi-Sheet Bypass Tray for
150 Sheets A5R to A3+
Tray 1:
Universal Tray for
500 Sheets A5R to A3+
Tray 4 (LT-401)*:
Large Capacity Tray
for 4,000 Sheets A4
Tray 2: Universal Tray
for 500 Sheets A5R to A3
Trimmer
(TU-108)*
Booklet Maker
(FS-108BM)*
10
Tray 4 (LT-411)*:
Large Capacity Tray for
4,000 Sheets A3 to A4R
Page 11
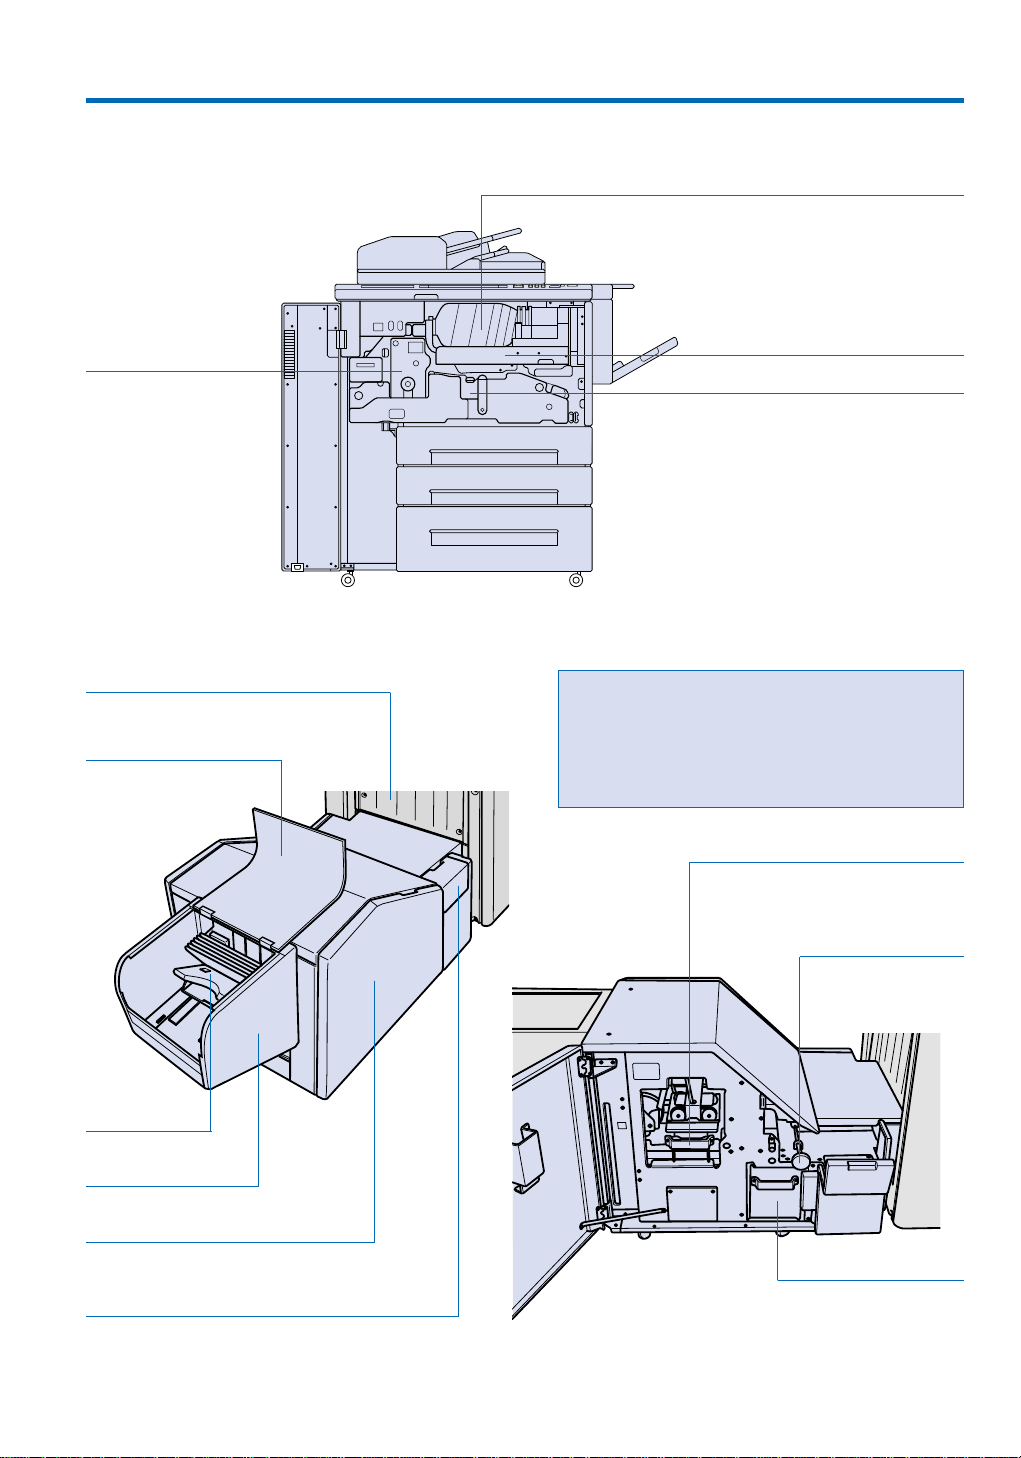
2. Main Components of Konica 7075
Internal:
Toner Bottle
Fixing Unit
Booklet Maker (FS-108BM)*
Trimmer Stacker Cover:
Open to take out
finished sets.
Toner Unit
Drum Unit
Important:
Do not place heavy objects on the trimmer stakker or apply any weight on it, and do not use it
for storage. Excessive weight applied to the inside or outside of the trimmer stacker will damage
the equipment.
Trimmer Pressure Release Lever
Opens to allow removal
of mishandled paper.
Trimmer
Unit Tray
Trimmer Stacker
Front Door
Front Right Cover
Opens for removal of mishandled paper.
Trimmer Unit Knob
Turn for easier
removal of
mishandled paper.
Waste Basket
Holds cutoffs from
booklets. Pull out and
empty regularly!
11
Page 12
3. All Functions at a Glance
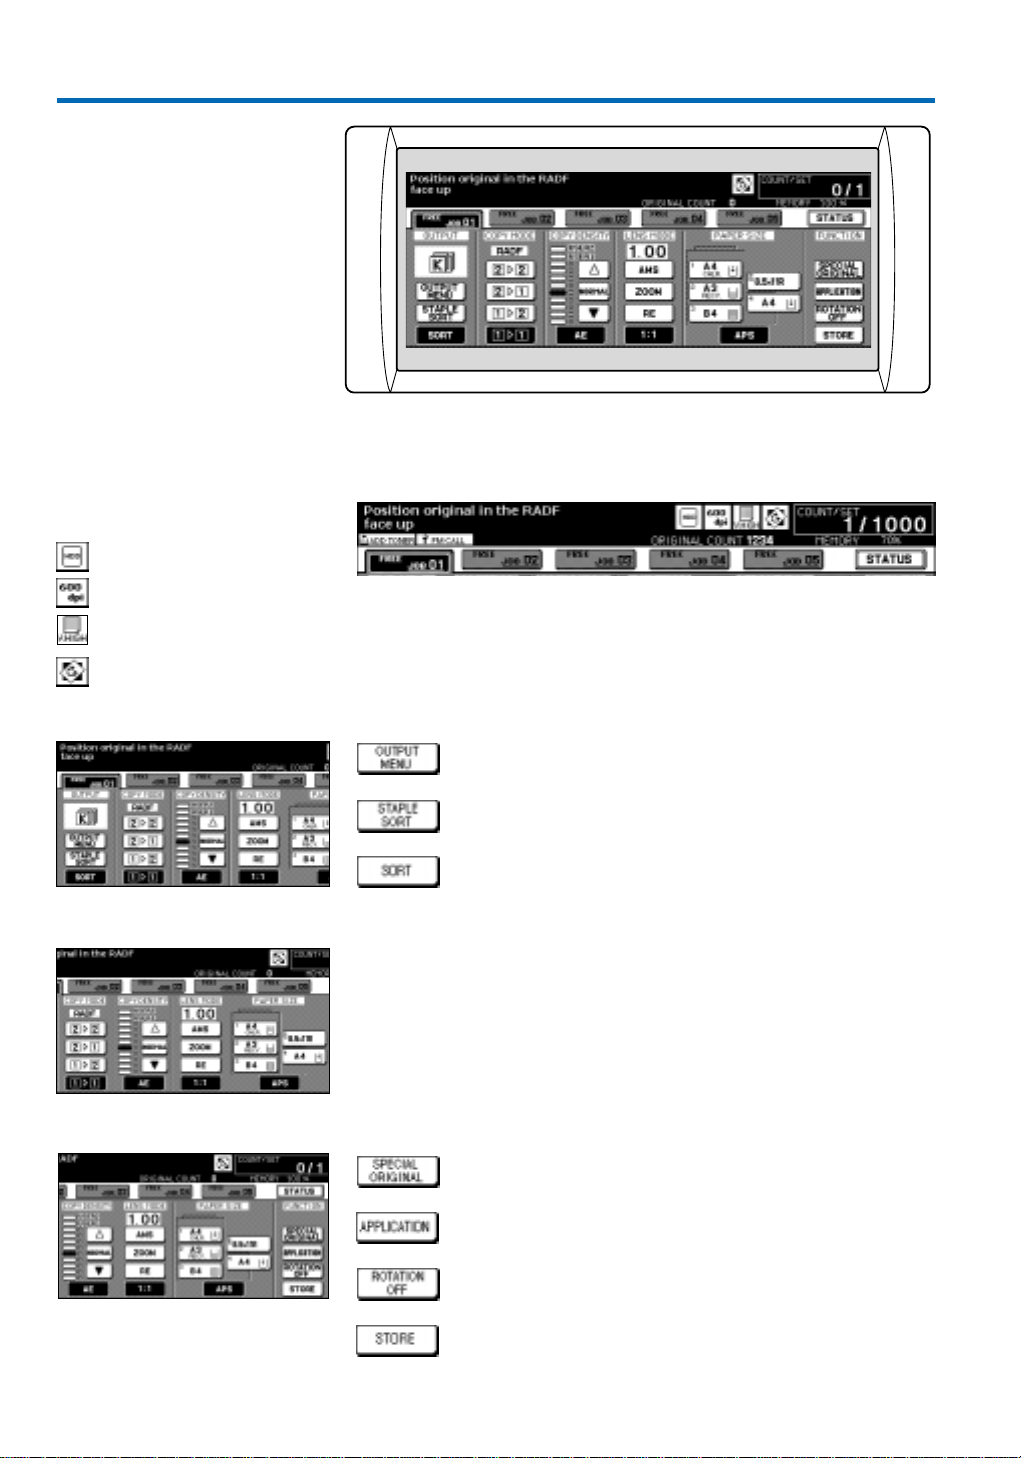
3.1 The Display Keys
User Instructions
These icons appear, if the following
functions are active:
Scanner/Document Server
600 dpi
High
Resolution
Rotation
Output
Basic Functions
Functions
Screens appearing on the LCD show detailed user instructions and corresponding operation steps.
The selected copy quantity and the number of processed copies are displayed.
Activates the output screen, in which group mode, the exit
tray and further output modes are selected and the stapling
position can be changed.
Sets of max. 50 pages are stapled*.
Sets are offset* or exit alternately rotated by 90°.
In the middle section of the touch screen the basic functions are entered.
Calls up the screen to adjust original scanning conditions, e.g.
increase the resolution, and select various original scanning
modes.
Calls up the application selection screen.
12
Press to deactivate the automatic rotation of the image by 90°
(e.g. from A4 to A4R).
Press to activate Store Mode. Then press Start to scan orginals
fed via the RADF or positioned on the plated glass into the
image memory.
* Option
Page 13
3. All Functions at a Glance
CHECK
COPY
SCANNER/SERVER
PRINTER
INTERRUPT
PROOF COPY
TIMER
STOP
JOB MEMORY
COUNTER
AUTO RESET
HELP
POWER SAVER
ON/OFF
CLEAR QTY.
START
COPIE
SCANNER / SERVER
PRINTER
JOB MEMORY
CHECK
HELP
AUTO RESET
COUNTER
CLEAR QTY.
INTERRUPT
TIMER
PROOF COPY
POWER SAVER
ON/OFF
START
STOP
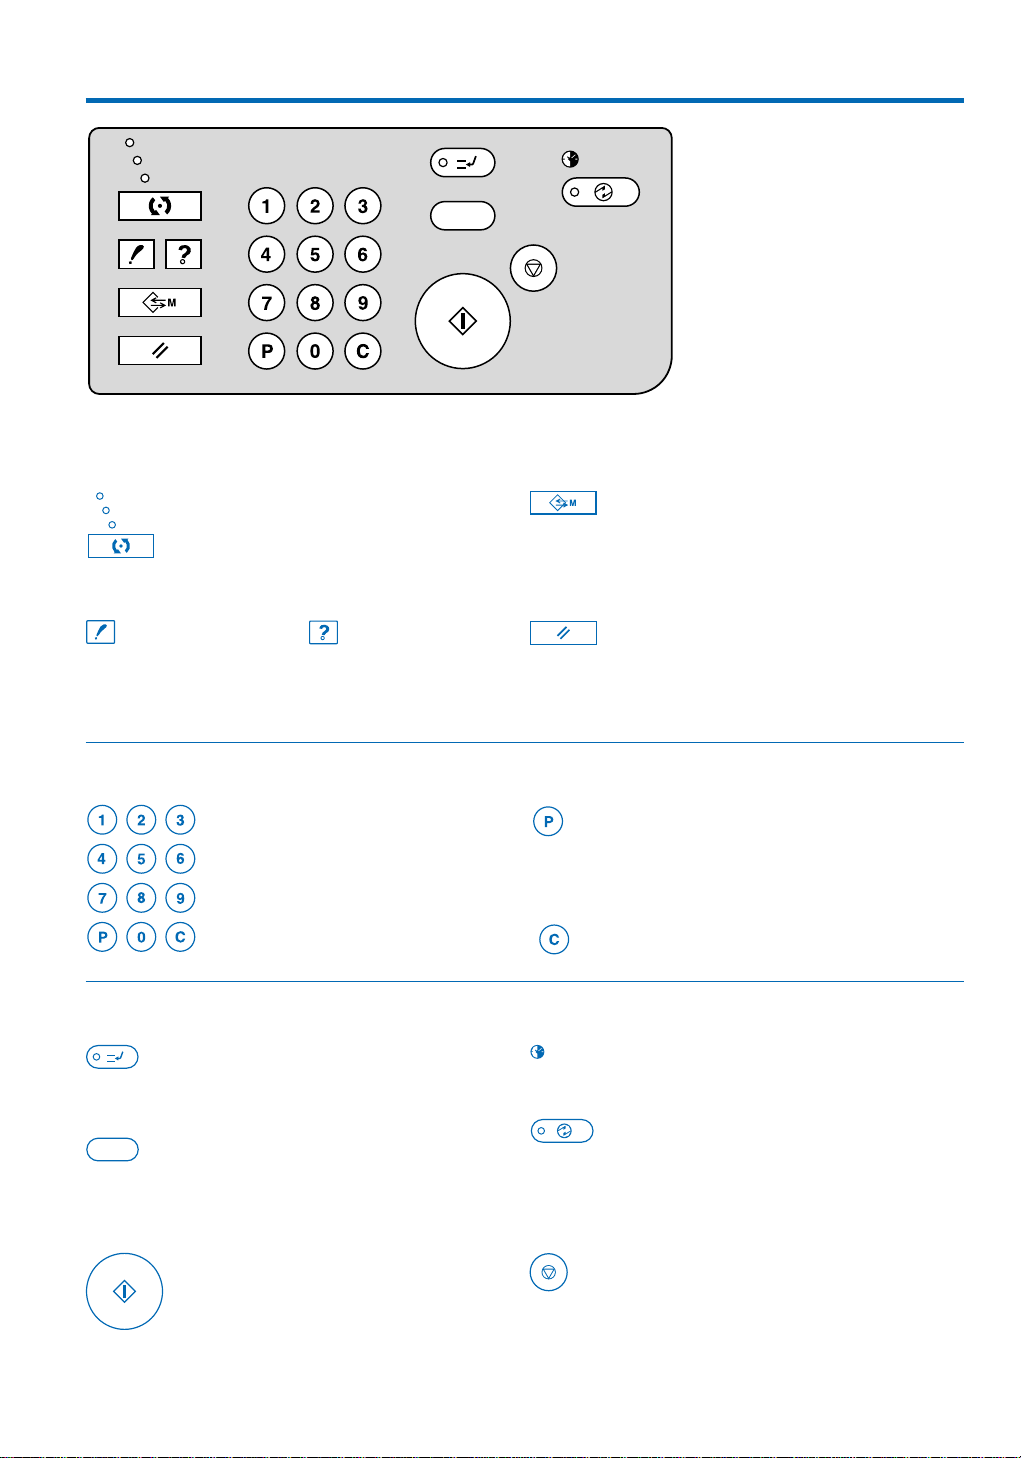
3.2 The Operation Panel
Mode Job Memory
Switches between Copier,
Document Server and Printer.
Check Help Auto Reset
All user selections
are displayed.
Activates a general
help screen or user
instructions for the
currently selected
function.
Activates the screen for selecting job
store/job recall functions. 30 jobs can be
stored.
Restores initial settings.
Copy Preselection Recall
Numeric key pad to enter copy
quantity, EKC user codes,
numeric values for various
functions, and to read counters.
Interrupt Timer
To interrupt copying in progress, in
order to copy another job in-between.
Proof Copy
Press to print one sample copy set
without deleting the memory.
Start
Press to start copying or scanning.
Clear Quantity
Power Saver
Stop
Calls up the counters.
Resets the copy quantity entered.
Lights if the timer is active.
Activates the power saver mode; also
releases the unit, if the system is “off”
under the timer.
Stops the copying process and erases the
memory.
13
Page 14
3. All Functions at a Glance
3.3 The Interactive Touch Screen
The interactive touch screen serves to enter all software selections, which
are then shown in the display.
Functions are selected with the soft keys. Selections are shown automatically resp. after calling up the check screen.
Soft keys, which can be activated in the LCD, show a dark shadow underneath and on the right edge of the key.
Keys of activated functions are shown inverted, i.e. in black with white
text. Keys of functions, which are not available, are shown in grey.
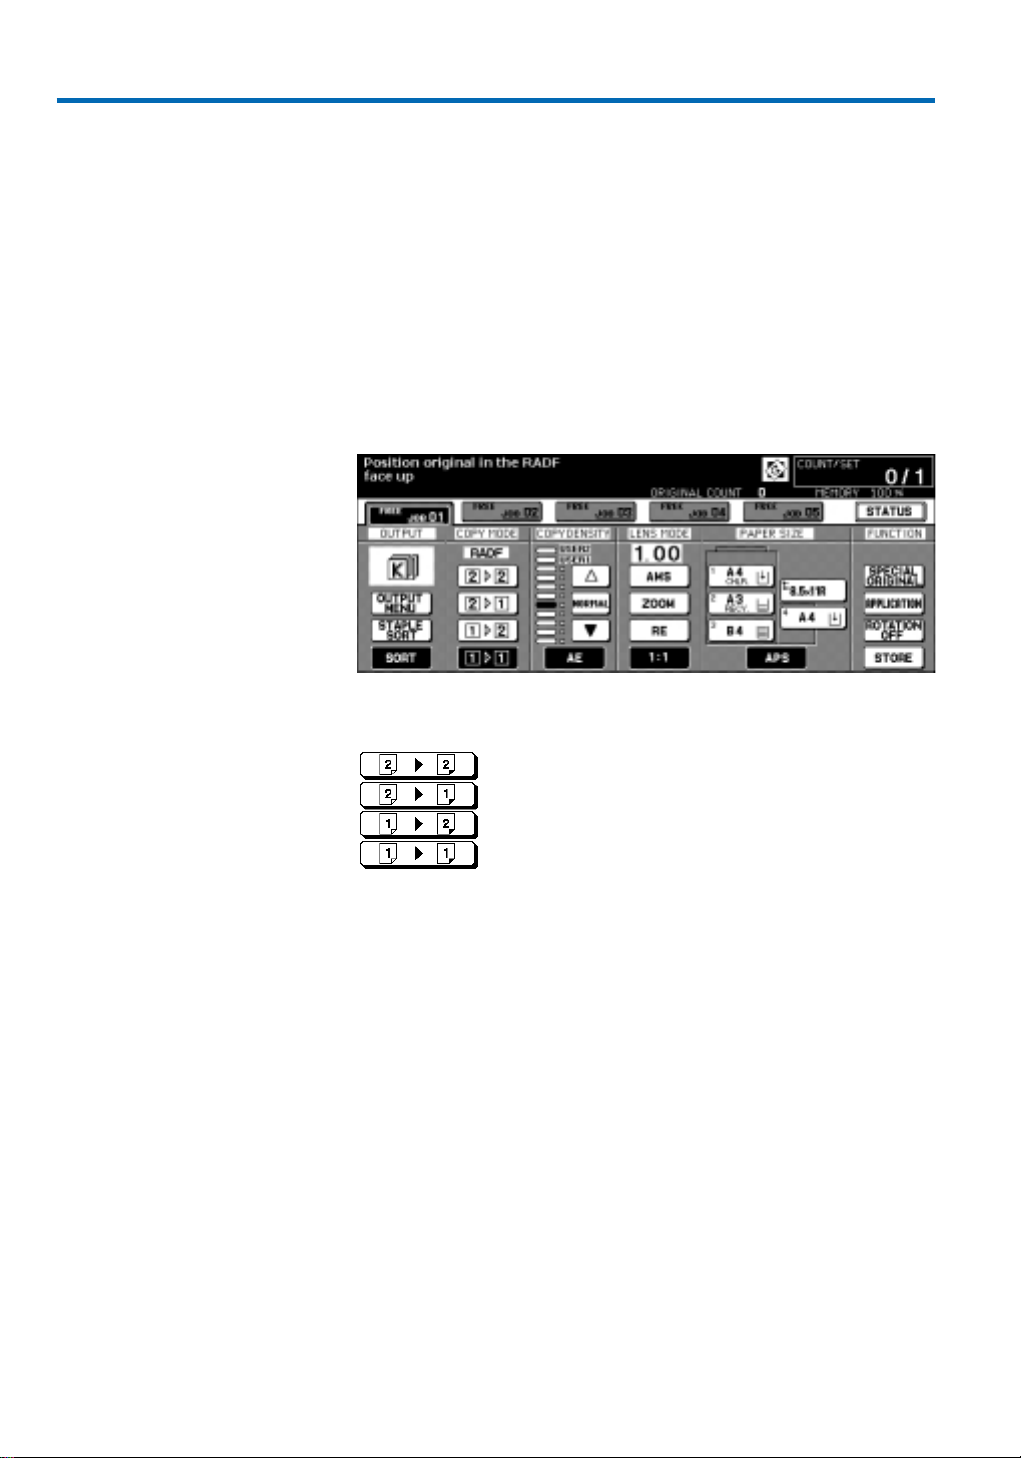
3.3.1 The Basic Screen
All basic functions are activated directly in the basic screen:
Duplex/Double-sided Copying
double-sided original 3 double-sided copy
double-sided original 3 single-sided copy
single-sided original 3 double-sided copy
single-sided original 3 single-sided copy
Copy Density
Adjust for darker or lighter copies. AE automatically adjusts the density
setting. Under USER 1 and USER 2 the operator can store two individual
density settings.
Lens Mode
AMS is the automatic magnification selection.
ZOOM range from 33 % to 400 %.
RE: 6 preset magnification ratios and 3 individually programmed
magnification ratios are provided.
1:1= same size copying.
Paper Size
If APS is active, originals are automatically copied in the same size. If a
specific paper tray is selected, this switches APS off and AMS on.
While the system operates resp. after all functions have been entered and
the originals are scanned, a new screen can be called up with the FREE
JOB . . . key. In this screen all functions for the next copy job can be
selected; and originals can be scanned. Up to four further copy jobs can
be preprogrammed and scanned in this way.
The STATUS screen displays the present and waiting copy and print jobs.
The MEMORY indicator displays the remaining image memory capacity.
14
Page 15
3. All Functions at a Glance
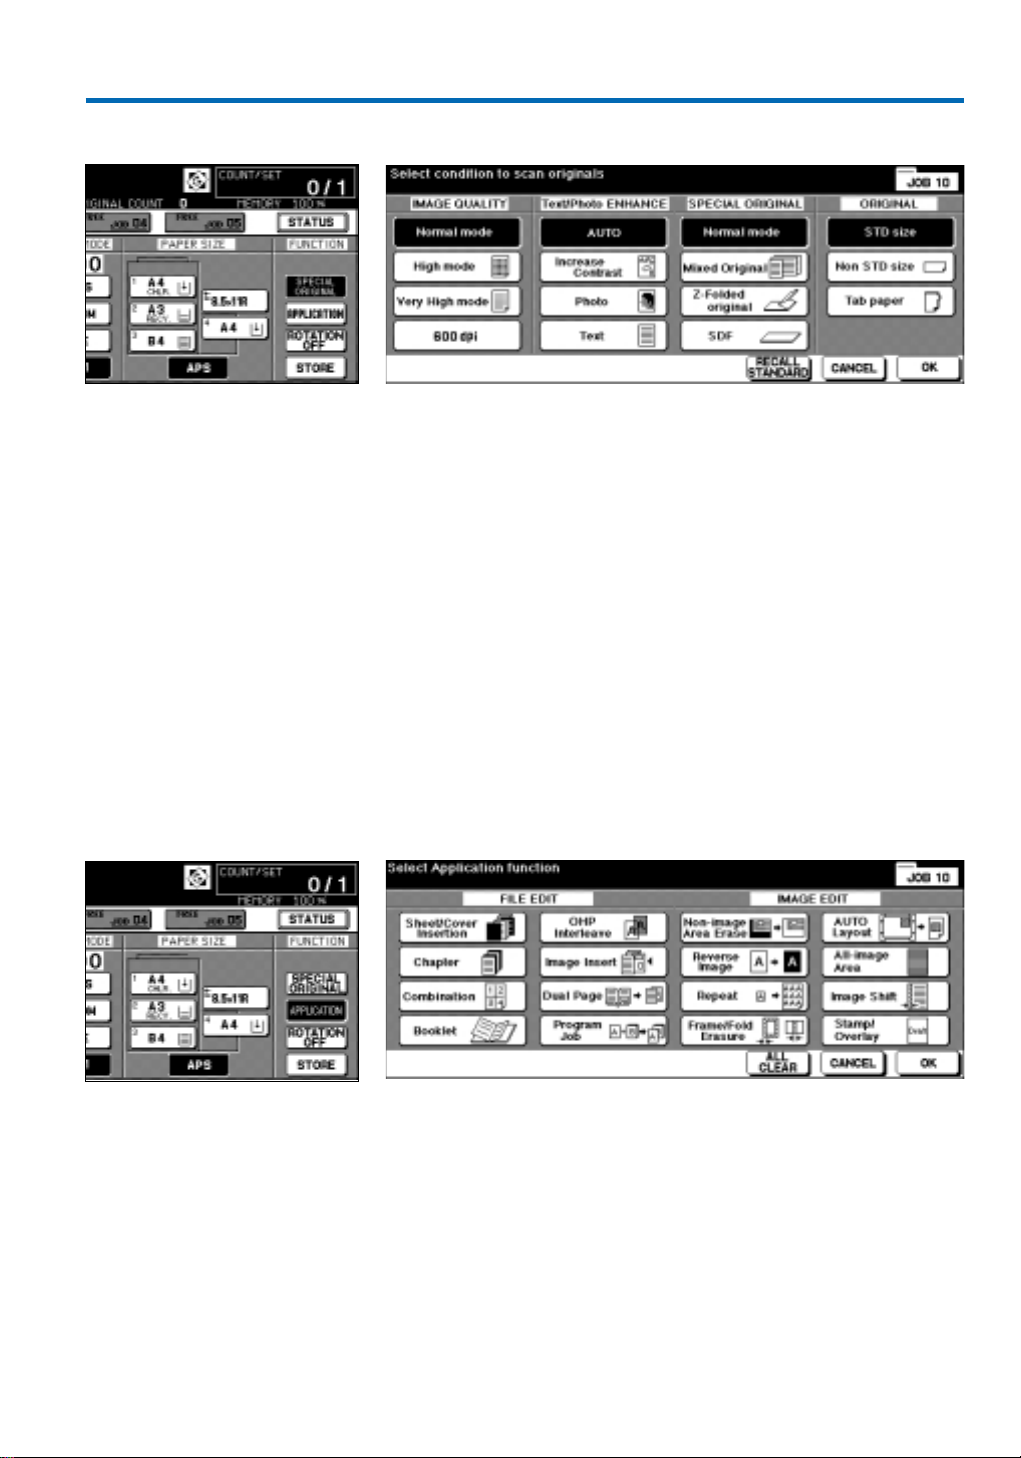
3.3.2 The Original Scanning Condition Screen
The SPECIAL ORIGINAL key activates this screen, which enables various
adjustments related to the original quality, as well as the selection of
functions to process special originals.
Under IMAGE QUALITY, the resolution can be changed for difficult
originals from the standard setting to High mode, Very High mode
(equivalent to 256 grayscales), or 600 dpi.
Under Text/Photo ENHANCE the automatic setting can be changed to
Increase Contrast for pale originals, or Photo for true photo originals
and Text for originals containing just text print.
SPECIAL ORIGINAL provides adjustments for unusual originals: Mixed
Original for the automatic processing of original sets containing various
sizes, and Z-Folded original for folded A3 originals. The SDF (single
document feeder) allows the individual processing of originals up to 200g
in the RADF.
The setting under ORIGINAL can be adjusted from STD size to Non STD
size and to Tabpaper for originals of unusual sizes, and tabbed originals.
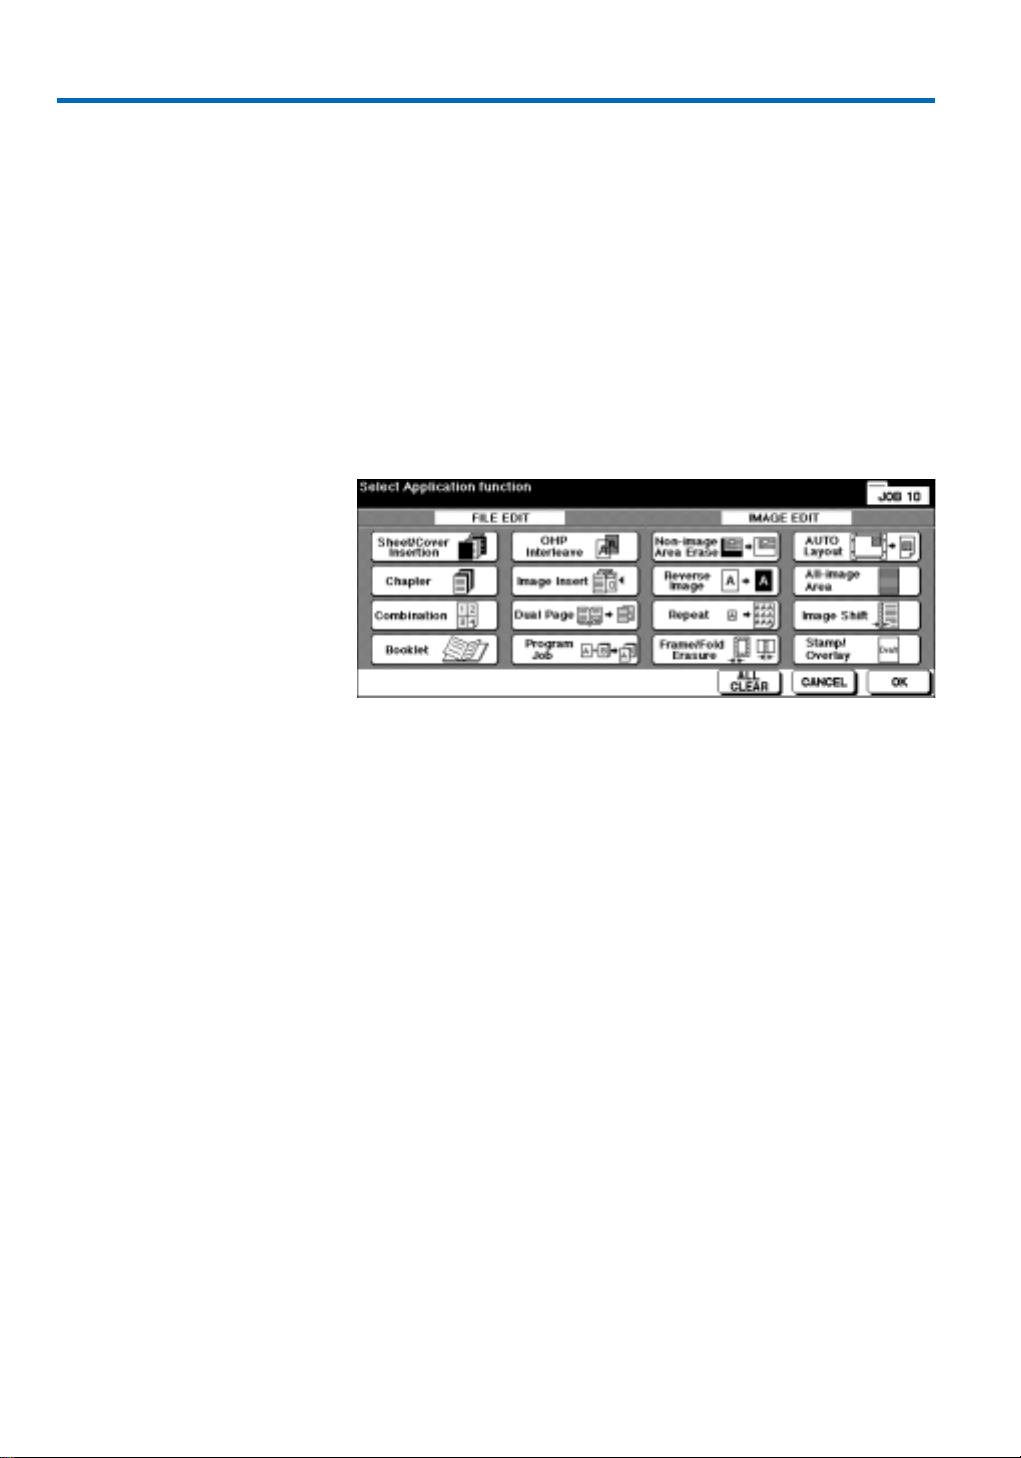
3.3.3 The Application Selection Screen
The APPLICATION key calls up the screen for the special functions. The
following functions can be selected:
FILE EDIT
Sheet/Cover Insertion
To program positions for covers and inserts (p. 46)
OHP Interleave
To copy OHP films with inserts (p. 47)
Chapter
To start each new chapter on a righthand (front) page (p. 48).
15
Page 16
3. All Functions at a Glance
Image Insert
To insert an original from the platen glas into a document set copied via
the RADF (p. 48).
Combination
To combine from 2 to 8 originals on one copy (p. 49).
Dual Page
To copy from books, magazines etc. automatically onto two separate A4
pages (p. 50).
Booklet
To combine several pages automatically as an A4 or A5 booklet (p. 51).
Program Job
To combine various settings and papers from several trays in one copy set
(p. 52).
IMAGE EDIT
Non-Image Area Erase
For copying from the platen glass with open RADF; automatically eliminates black shadows (p. 40).
Auto Layout
To center an original image on the copy (p. 40).
Reverse Image
Negative reproduction of the original, black is copied white and vice versa
(p. 40).
All-Image Area
To make a copy without image cutoff on the edges (p. 41).
Repeat
Places a defined area from the original onto the copy as often as possible
(p. 41).
Image Shift
Shifts the image on the front and the back of the page to the left or
right; also with automatic reduction (p.42).
Frame/Fold Erasure
Creates a frame of 1 to 15mm and/or a center fold of 1 to 30 mm (p. 43).
(*)
Stamp
To provide copies automatically with various stamps, watermarks etc.; to
overlay a scanned image onto each page of the copy set (p.44).
/Overlay
16
* Option
Page 17
4. Help Mode
CHECK HELP
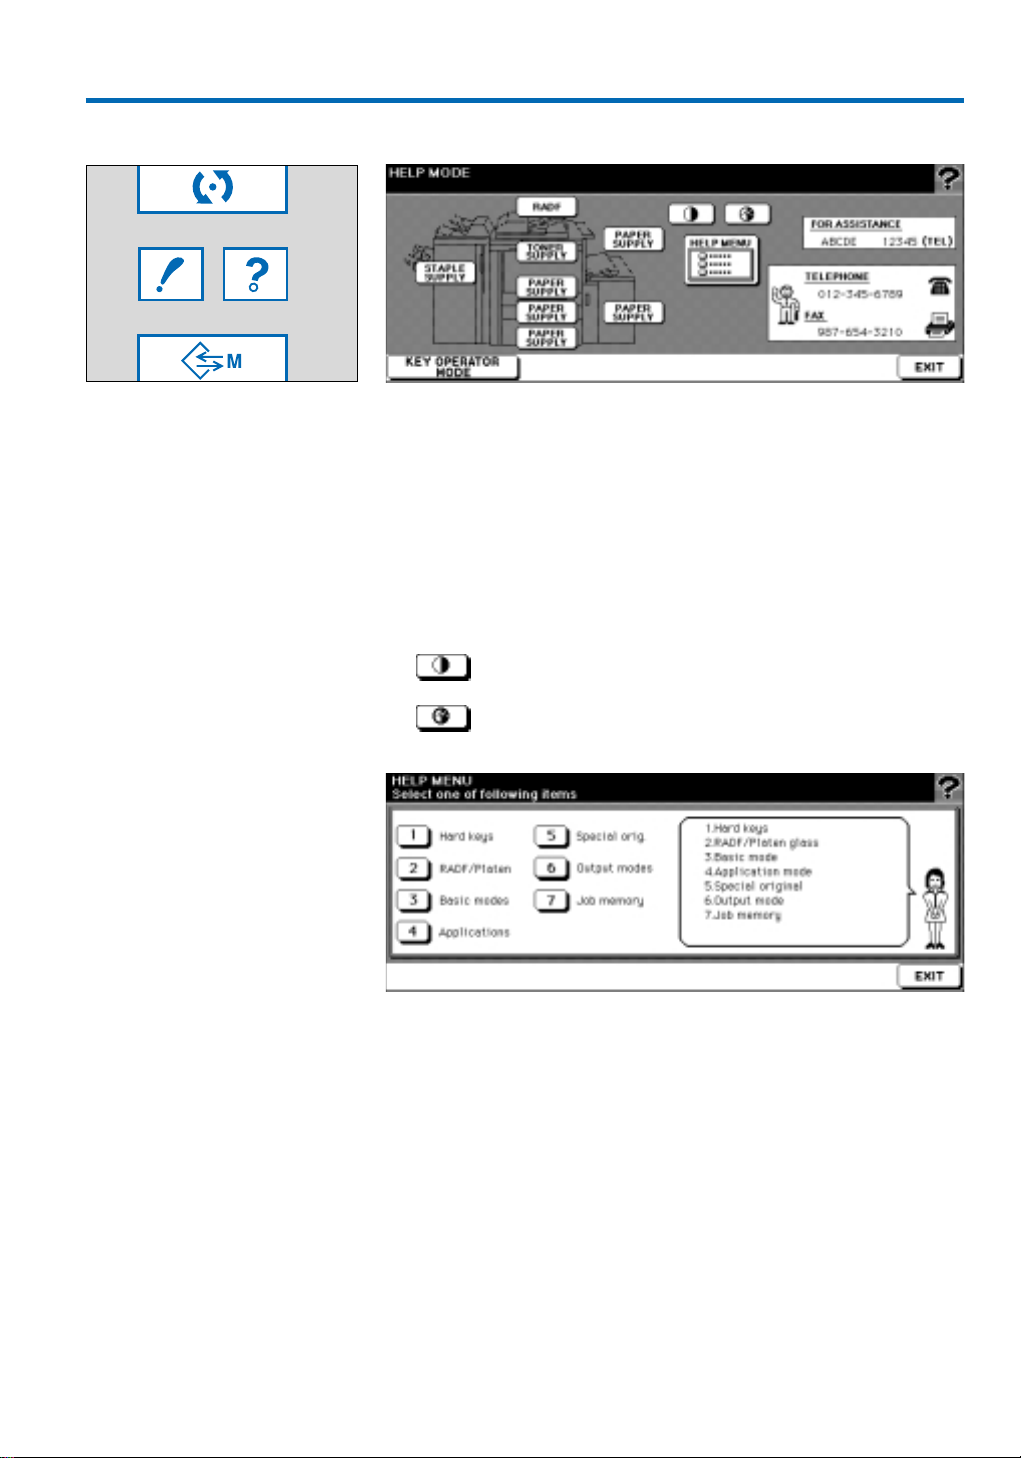
4.1 The Help Key
The HELP hard key calls up varied help information.
General information regarding the function is available, as well as detailed
user instructions, explaining the operation procedures step by step.
There are two ways to call up the required information:
1. Press HELP, while the basic screen is displayed in the LCD, to call up
the help screen. Press any of the soft keys for detailed information on
the relevant copier part. Pressing the HELP MENU soft key calls up the
help menu screen displayed below, in which general information regarding the use of the system and its functions can be activated.
Press this key to call up a screen, in which you can adjust
the display contrast lighter or darker.
If the weekly timer has been activated, you can recall the
timer settings by pressing this key.
2. Pressing HELP, while any function is activated, calls up help screens
with detailed operation instructions for the corresponding function.
17
Page 18

4. Help Mode
4.2 Automatic Help Mode
A similar screen appears automatically if a paper jam occurs,
showing where the jam is located.
Further screens follow, explaining
the necessary operation steps to
clear the paper jam.
If there is a problem, copying will be interrupted and a help information is
displayed on the screen. If the service icon is displayed, please inform your
key operator or the Konica service.
If the problem is a paper jam, please follow exactly the instructions displayed on the screen. As you carry out operation steps, new screens
appear automatically. Once the problem is solved, the help screens will
disappear.
Press Illustration explanation, if you need more details regarding the
relevant operation steps.
18
Page 19
5. How to Supply Paper, Toner, Staples
This section contains information regarding the system’s paper trays, how
to refill toner and replace staples.
5.1 Supply Paper
General
This Konica system is equipped with up to 4 paper trays and a multi-sheet
bypass.
Each tray selection key in the basic screen displays the filling level of the
corresponding tray. If a tray is nearly empty the filling level indicator will
flash. If a selected tray is empty, the tray key will flash.
Press the HELP key while the basic screen is displayed, to call up the basic
help screen. Pressing the soft key for any of the paper trays will display a
help screen explaining how to refill paper.
How to supply paper in trays 1 to 3:
1. Withdraw the tray from the mainbody as far as it will go.
2. If required, the guide plates can be adjusted to a different size.
3. Fan the paper before inserting it!
4. Stack paper into the tray with the curly side up. Paper must not be sta-
cked higher than the red mark.
5. Push the paper tray into the copier until it locks into place.
* Option
How to supply paper in tray 4*:
1. Open the cover of the LCT.
2. Insert the paper after fanning it thoroughly.
3. If you want to add more paper, press the green button, to release the
bottom plate of the LCT.
Multi-Sheet Bypass
The multi-sheet bypass is located on the right of the system.
Paper in sizes A3+ to A6R can be processed, as well as thick and thin
paper, OHP film and special materials (e.g. transparancies, labels, index
sheets).
1. Open the bypass tray.
2. Insert the paper and adjust the paper guides.
3. To copy onto the material inserted into the bypass tray, press the
bypass key in the basic screen.
19
Page 20
5. How to Supply Paper, Toner, Staples
5.2 Supply Toner
If the toner runs low, a warning message appears in the LCD.
Important:
Toner should be kept out of reach of children. If toner is inhaled, swallowed or gets into contact with the eyes, consult your doctor.
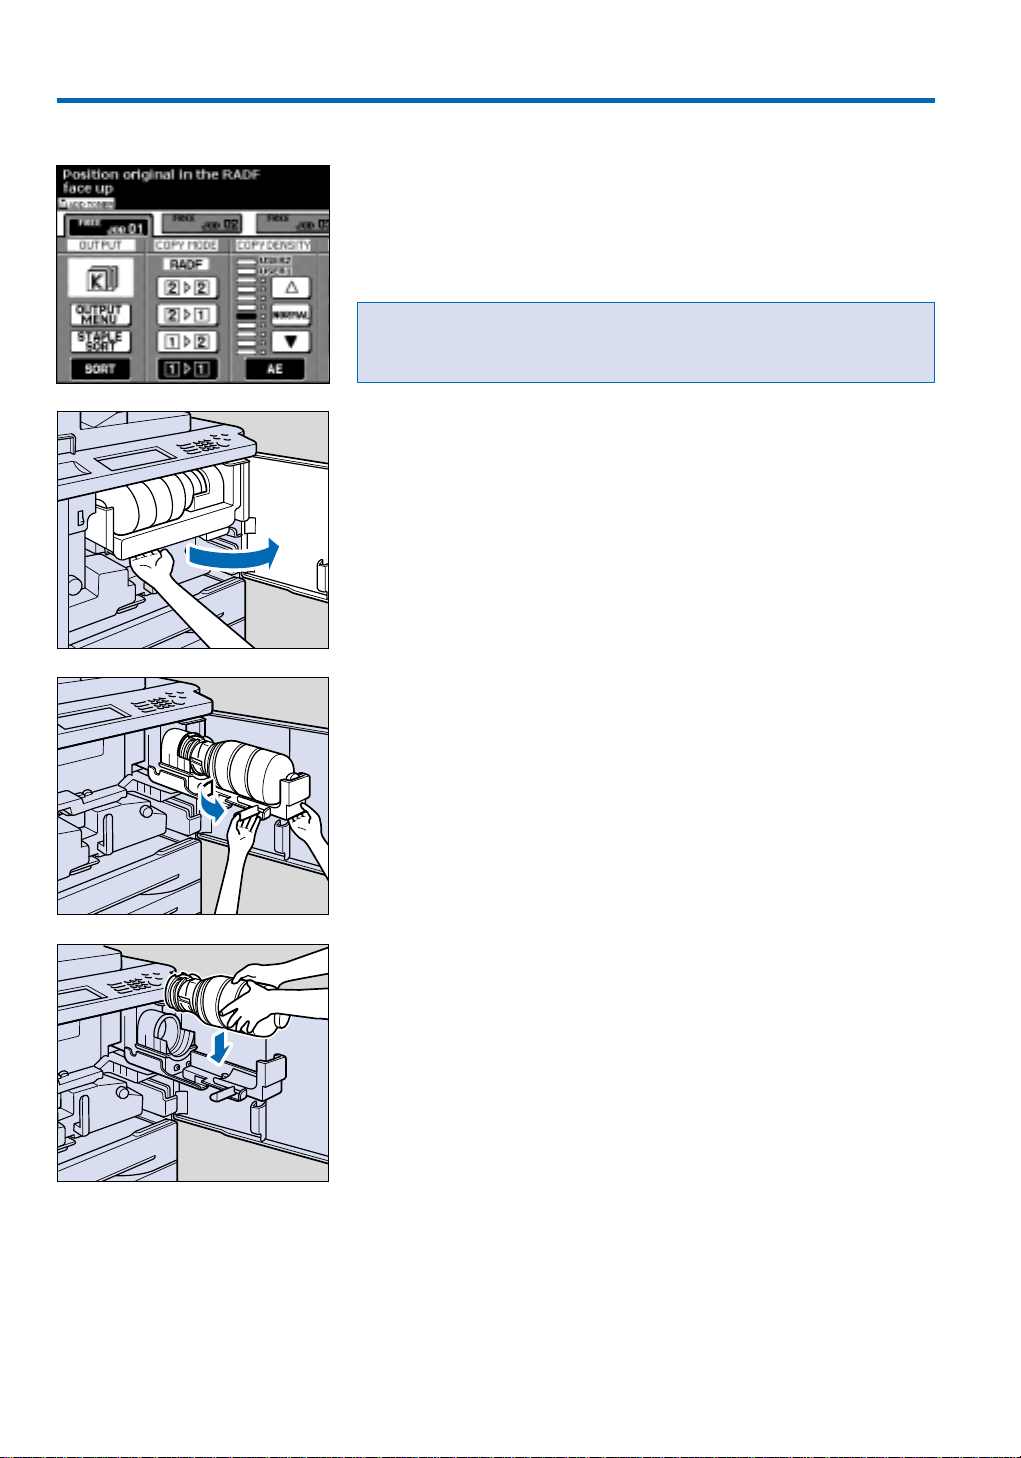
How to supply toner:
1. Open the front door of the mainbody and pull out the toner unit fully
to the right.
2. Pull the lever on the left towards you, to release the toner bottle.
3. Remove the empty toner bottle.
4. Lightly tap the new toner bottle on a solid surface and shake it a few
times. Remove the plastic cap from the toner bottle.
5. Insert the new toner bottle.
20
Page 21
5. How to Supply Paper, Toner, Staples
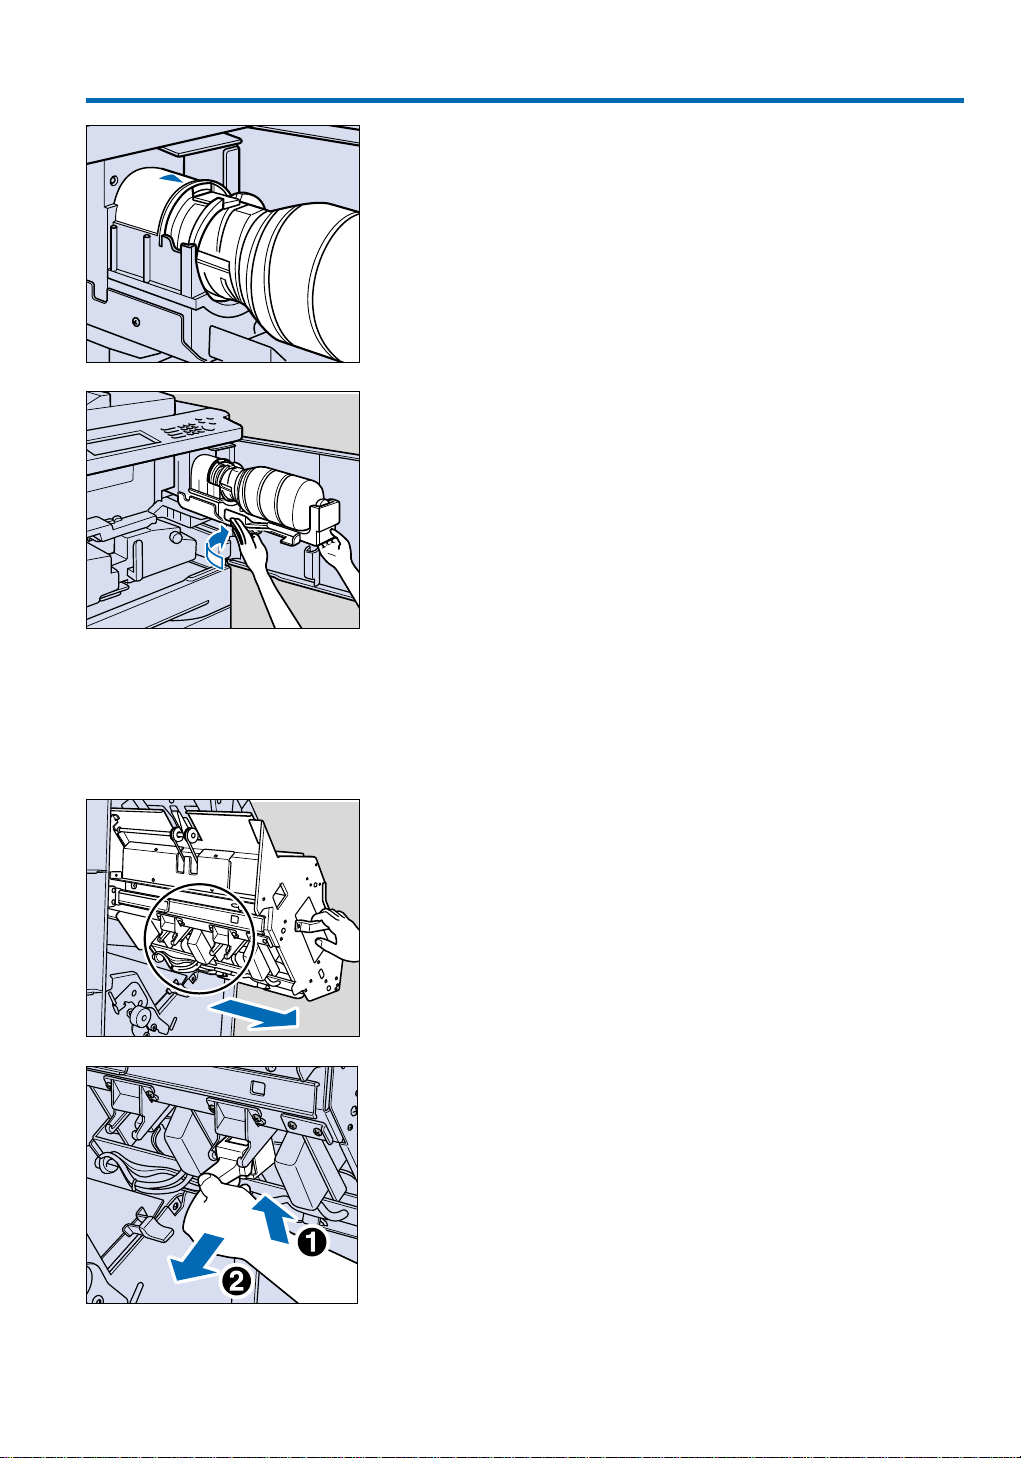
6. Align the arrows marked on the notches of the bottle to the arrows in
the unit.
7. Finally move the left lever to the back, to secure the toner bottle.
8. Return the toner box into the copier, and close the front door.
The procedure how to refill toner is of course also explained in the help
menu.
5.3 Supply Staples
If the staple cartridge is empty, a warning message appears.
Please only use original Konica staple cartridges as a refill!
1. Open the finisher door and pull out the stacker unit by its handle.
2. Release the cartridge housing by pulling it upwards slightly, then for-
wards.
21
Page 22
5. How to Supply Paper, Toner, Staples
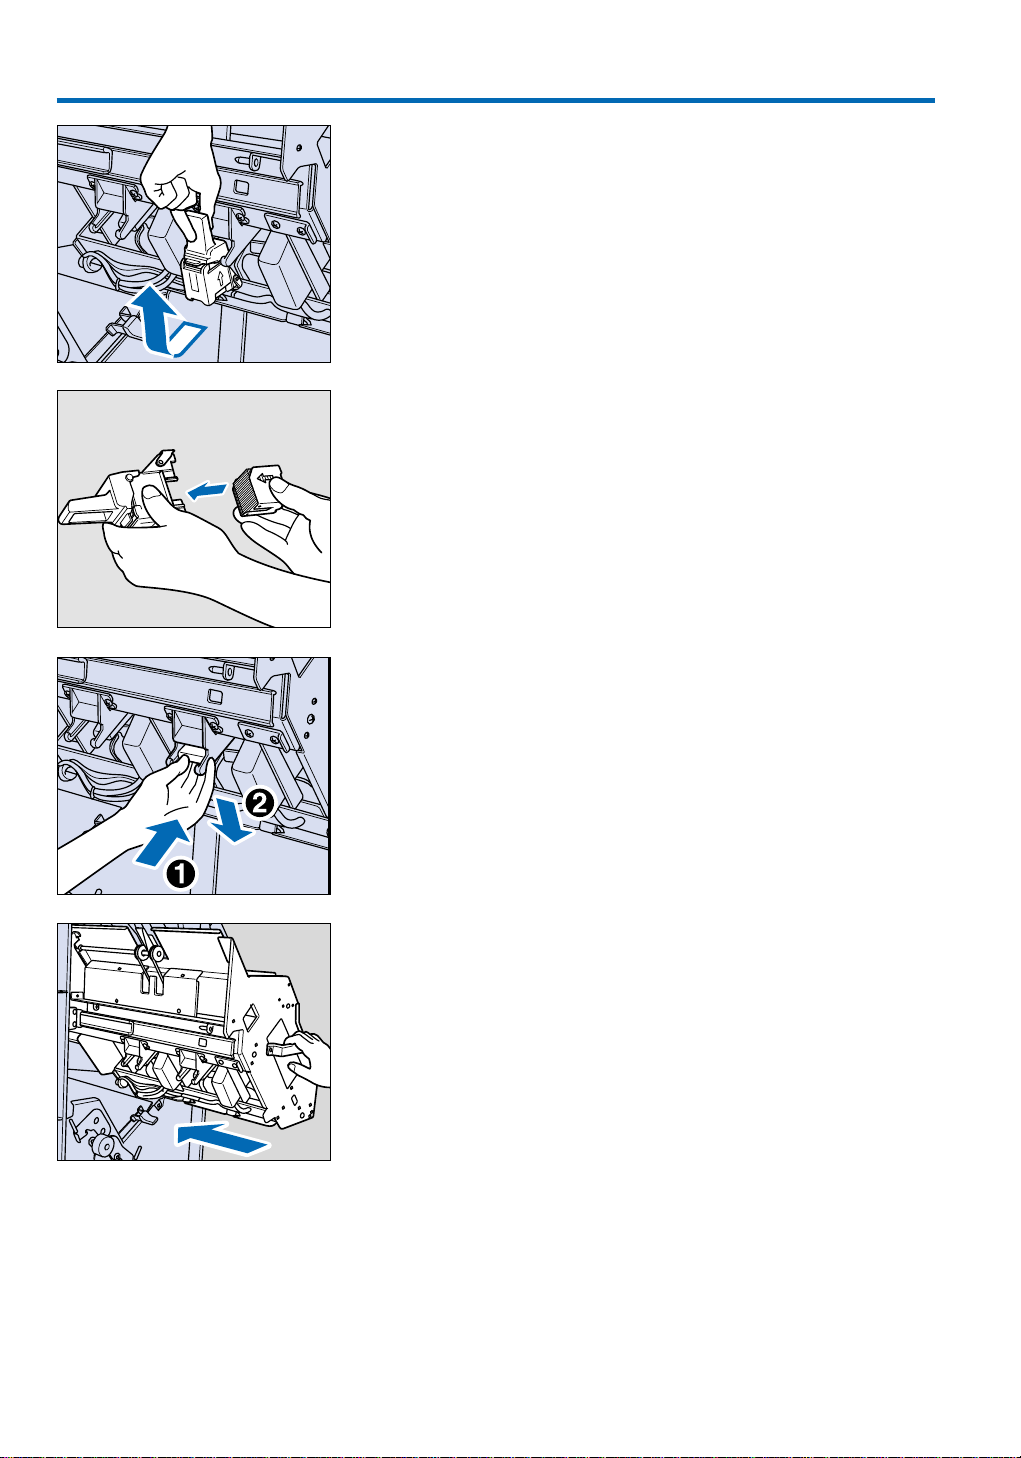
3. Now lift the cartridge housing from its holder as shown.
4. Remove the empty staple cartridge from the cartridge housing. Insert a
new staple cartridge so that the two arrows are aligned.
5. Re-insert the cartridge housing as it was removed: First, set it onto its
holder, then push downwards by pressing the green lever.
6. Now push the cartridge housing into the stacker unit, and press down
until it clicks into place.
7. Push the stacker unit back into the finisher* and close the door.
The second cartridge housing is removed and re-inserted in the same way.
22
* Option
Page 23
6. Before Copying
TIMER
POWER SAVER
ON/OFF
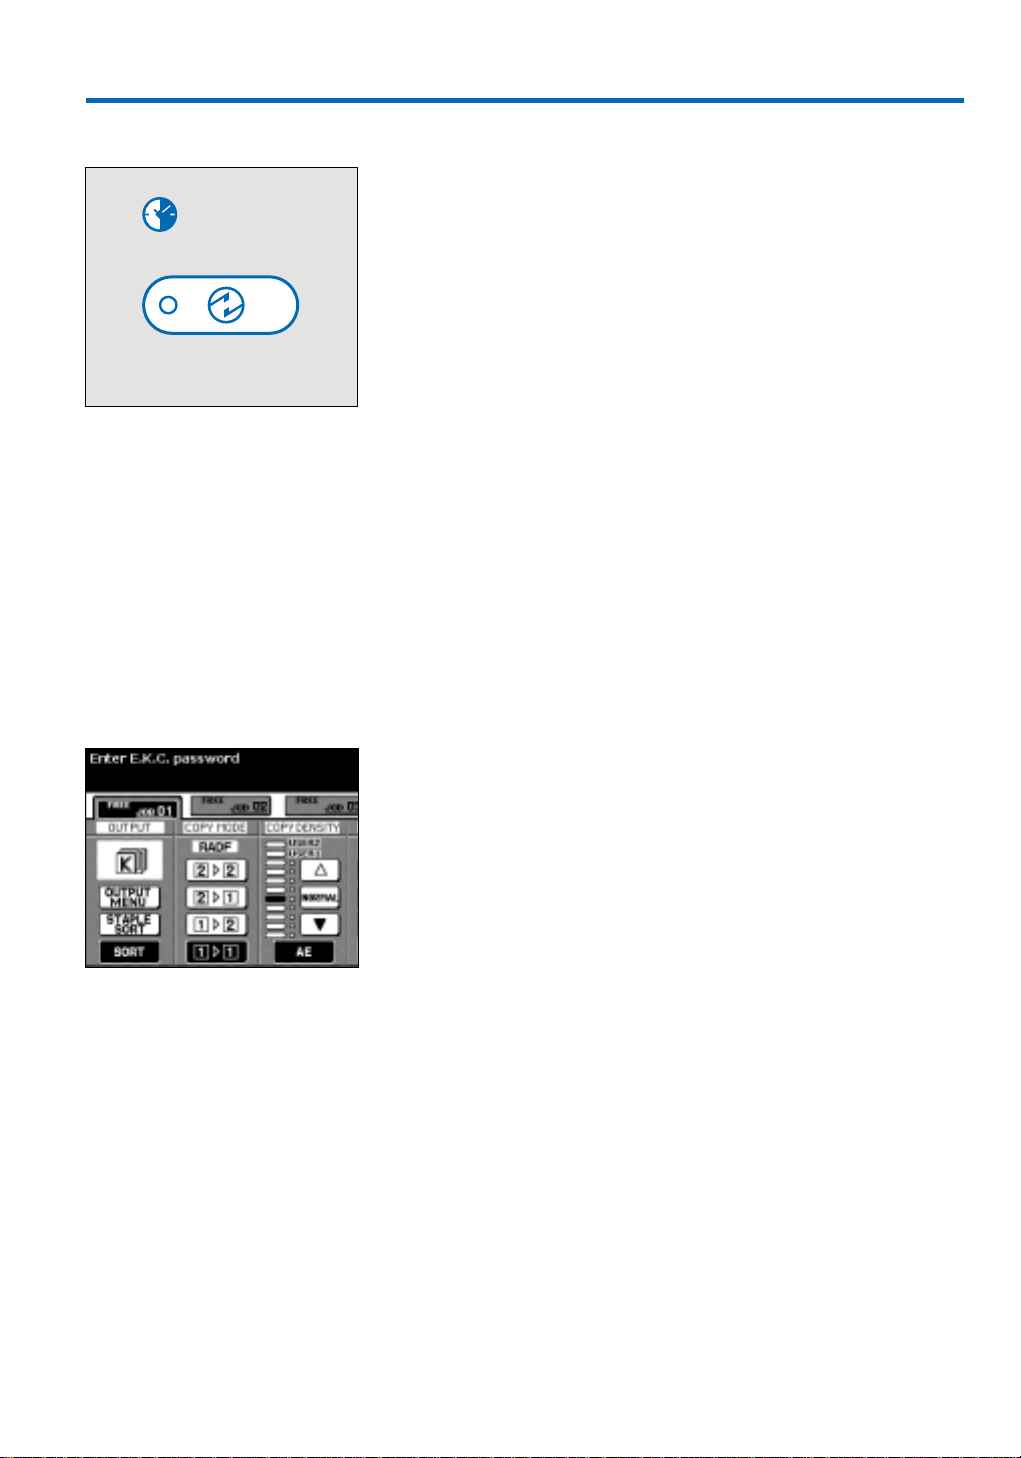
6.1 Weekly Timer
The timer indicator is lit, if the weekly timer is activated in the Konica
7075. In this case, please do not switch the unit on and off at the main
power switch; the machine turns on and off automatically.
Please contact your key operator, if you need to use the system while it is
not running. He can change the ON/OFF timer or interrupt the timer.
Timer Interrupt
While the unit is off over the timer, press the POWER SAVER ON/OFF
key to activate the copier. After entering a special 4-digit off-time code,
press START and specify the duration of the actual on-time (e.g. 2 hours
and 15 minutes). After the specified period, the system will automatically
switch off again.
6.2 User Password/ Electronic Key Counter (EKC)
This system has an integrated electronic key counter, which manages
1000 user accounts. Copies can be allocated to users, accounts or
projects, if the key operator has activated this function. A copy limit can
be allocated to each counter.
If the electronic key counter is activated in this unit, a user password must
be entered to access the machine (also for Job Reservation and after
pressing the INTERRUPT key). Please contact your key operator, if you
need a password or cannot remember your allocated password.
Password Access
– After switching on the system, a request to enter a password is displayed
on the screen.
– Enter your 8-digit code over the key pad and press START.
– If you hit a wrong key, still enter 8 digits in total, and press START.
Now repeat the procedure with the correct code.
– The number of copies made as well as the copy limit for this counter
are now displayed for a moment.
– If the copy limit has been reached for any password, the system will not
produce any further copies under this code. Depending on how the
copier is adjusted, a copy job in progress can either be completed or
will be interrupted.
The message on the screen
instructs you to enter a password.
Disable Access:
After you have finished copying, you should delete your password so that
others cannot make copies on your counter:
– Press the P key and C key simultaneously, until the EKC password
request is displayed again on the screen.
Depending on how the key operator has adjusted the system, the
access will be impossible immediately after having finished the job.
23
Page 24

6. Before Copying
6.3 Power Saver Mode
Auto Low Power
– The key operator can adjust the system, so that the unit will automati-
cally switch into Auto Low Power Mode after a delay of 5 minutes or
more after copying. In this mode the temperature of the fixing unit is
lowered to conserve enery.
– To switch the system on again, press any key except the Power Saver or
Start key.
Auto Shut-Off
– The key operator can also adjust the system to automatically switch
into Auto Shut-Off Mode after a delay of 30 minutes or more after
copying. There is a certain warm-up time, if the copier is activated
again from this mode.
– To switch 7075 on again, press any key except the Power Saver or
Start key.
Power Saver Key
– At any time the Auto Low Power Mode or the Auto Shut-Off Mode
(depending on how the key operator has adjusted the system) can be
activated by pressing the Power Saver key. A request to confirm is then
displayed on the screen.
24
Page 25

7. Simple Copying
7.1 Automatic Copying
COPIE
SCANNER / SERVER
PRINTER
This section deals with the functions needed for simple, straightforward
copying jobs.
Some features and functions of this system cannot be activated simultaneously. The table after page 66 shows, which functions are compatible.
If the system is also connected as
a printer, press the Mode key,
until the Basic screen appears.
– Switch the unit on at the main switch (see also 6.1 Timer), and wait
until the system is ready. Warm-up time is max. 6 minutes.
– The display shows the basic screen.
– If the electronic key counter (EKC) is active enter your password and
press START (see also 6.2 Electronic Key Counter).
– Insert original(s) into the RADF, select the desired copy quantity and
press START.
– Copies exit into the Finisher*
Automatic Functions
These functions are active after having pressed the AUTO RESET key (the
key operator can adjust this initial setting).
Automatic Paper Size Selection (APS)
– The copier automatically selects a tray with the paper size of the original.
– The original is copied same size, i.e. with magnification 1.00.
– If the corresponding paper size is not available, the image will be auto-
matically rotated by 90° on the copy, where possible (e.g. A4 to A4R).
– If the Automatic Rotation does not work, check if the ROTATION
OFF key is activated (black). If yes, press the key to switch the function
on again.
– If no paper of a suitable size is available, a message will appear on the
screen to supply paper of the required size.
– APS does not work with AMS or if an individual magnification ratio
was entered.
Automatic Magnification Selection (AMS)
– If you specify a particular tray to copy from resp. a particular paper size
to copy onto, the system automatically calculates the correct magnifica-
tion ratio.
– The original is copied in the corresponding size onto the copy paper.
– AMS does not work with APS or if an individual magnification ratio
was entered.
Automatic Exposure
– The original is automatically exposed with the suitable density.
– To manually adjust the copy density (lighter/darker), touch the respecti-
ve arrow keys. AE switches back to the automatic exposure.
Auto Reset
– A short time after the last copy or the last selection is made, the system
returns to the initial settings.
– The key operator can adjust the interval until Auto Reset is performed,
or switch off Auto Reset altogether.
* Option
25
Page 26

7. Simple Copying
7.2 Position Originals
Important:
Transparencies, torn, mounted
or stuck, as well as very thin
and very thick originals must
not be copied via the RADF.
Insert Originals into RADF
Originals in sizes A3 to A5R are processed automatically. Double-sided
originals can be reversed automatically. Up to 100 originals can be inserted
into the RADF at one time (for documents of more than 100 originals, see
7.3 Store Mode).
– Close the RADF securely.
– Insert originals face-up into the RADF.
– Align the original guides to the original size.
Position Original on Platen Glass
– Open the RADF.
– Position the original face-down in the right rear corner of the platen
glass.
– Close the RADF. It can also remain open, e.g. for 3-dimensional origi-
nals, such as books, etc. (in this case, see also 9.1.1 Non-Image Area
Erase).
7.3 Store Mode
26
This function allows to scan originals via the platen glass into the image
memory, in order to produce copied sets. It allows to process original sets
of more than 100 pages through the RADF, and lets you combine originals fed via the RADF with originals placed on the platen glass.
– Press the STORE key.
– Position originals, which cannot be fed through the RADF, one after the
other onto the platen glass, starting with the first page.
– If you want to use the function to extend the RADF capacity, insert a
maximum of 100 originals into the RADF at one time, starting with the
first pages.
– Press START to scan the data into the image memory.
– You can also combine originals fed via the RADF with originals positio-
ned on the platen glass. In this case you have to keep the page order.
Different sizes cannot be combined.
– When all originals have been scanned, press STORE again to switch off
the store mode; then start copying by pressing START.
Page 27

7. Simple Copying
7.4 Basic Functions
The basic functions are selected in the basic screen.
User instructions appear in the dark area at the top.
The present selections made to the basic functions are displayed in the
lower screen area.
The soft keys are pressed to select the functions.
Popup screens appear for some functions, in which further selections are
made.
7.4.1 Duplex / Double-sided Copying
– Press one of the four keys.
7.4.2 Copy Density
– For a lighter or a darker copy, press one of the arrow keys.
– Pressing AE activates the automatic exposure again.
– Two individual density settings can be programmed under User 1 and
User 2 by the key operator.
– You can individually adjust the scale for the 9 density settings from light
to dark (please refer to item 8.6 Density Shift).
double-sided original 3 double-sided copy
double-sided original 3 single-sided copy
single-sided original 3 double-sided copy
single-sided original 3 single-sided copy
27
Page 28

7. Simple Copying
7.4.3 Magnification: Reduce & Enlarge / Zoom / Vertical/Horizontal Zoom
You have various options to adjust the magnification ratio:
– Press the 1.00 key, if you want to copy same size. AMS, automatic
magnification selection is switched off. To switch on again, press the
corresponding key.
– 8 frequently used magnification ratios (e.g. from A3 to A4) are preset.
Press the RE key to activate the popup-screen shown above; then select
the desired magnification ratio.
– The three User Preset keys provide individual magnification ratios and
can be programmed by the key operator.
This screen appears after pressing
“ZOOM”. You can adjust the
zoom ratio with the arrow keys or
by entering a value via the keypad.
– For individual adjustments, press the ZOOM key, and the popup-screen
above will be displayed. Use the arrows to set the required magnifica-
tion ratio; or enter the value via the keypad.You can select a ratio from
0.33 to 4.00 (33 % to 400 %). Confirm both selections by pressing OK.
– For individual adjustment of the vertical and the horizontal magnifica-
tion ratio, follow the same instructions, but enter an individual value for
each direction. Confirm both values by pressing OK.
28
Page 29

7. Simple Copying
7.4.4 Paper Size Selection
– In this screen, simply press on the desired paper size. Your originals will
then automatically be reduced or enlarged onto the selected copy size
(AMS).
– If you press APS, the copier looks for the size corresponding to the
original size. Same-size copies will be produced. If paper of the same
size is not available, the image will automatically be rotated by 90°,
providing this is possible (e.g. from A4 to A4R). If no suitable paper size
can be detected, you will be prompted with a user instruction to supply
the missing paper size.
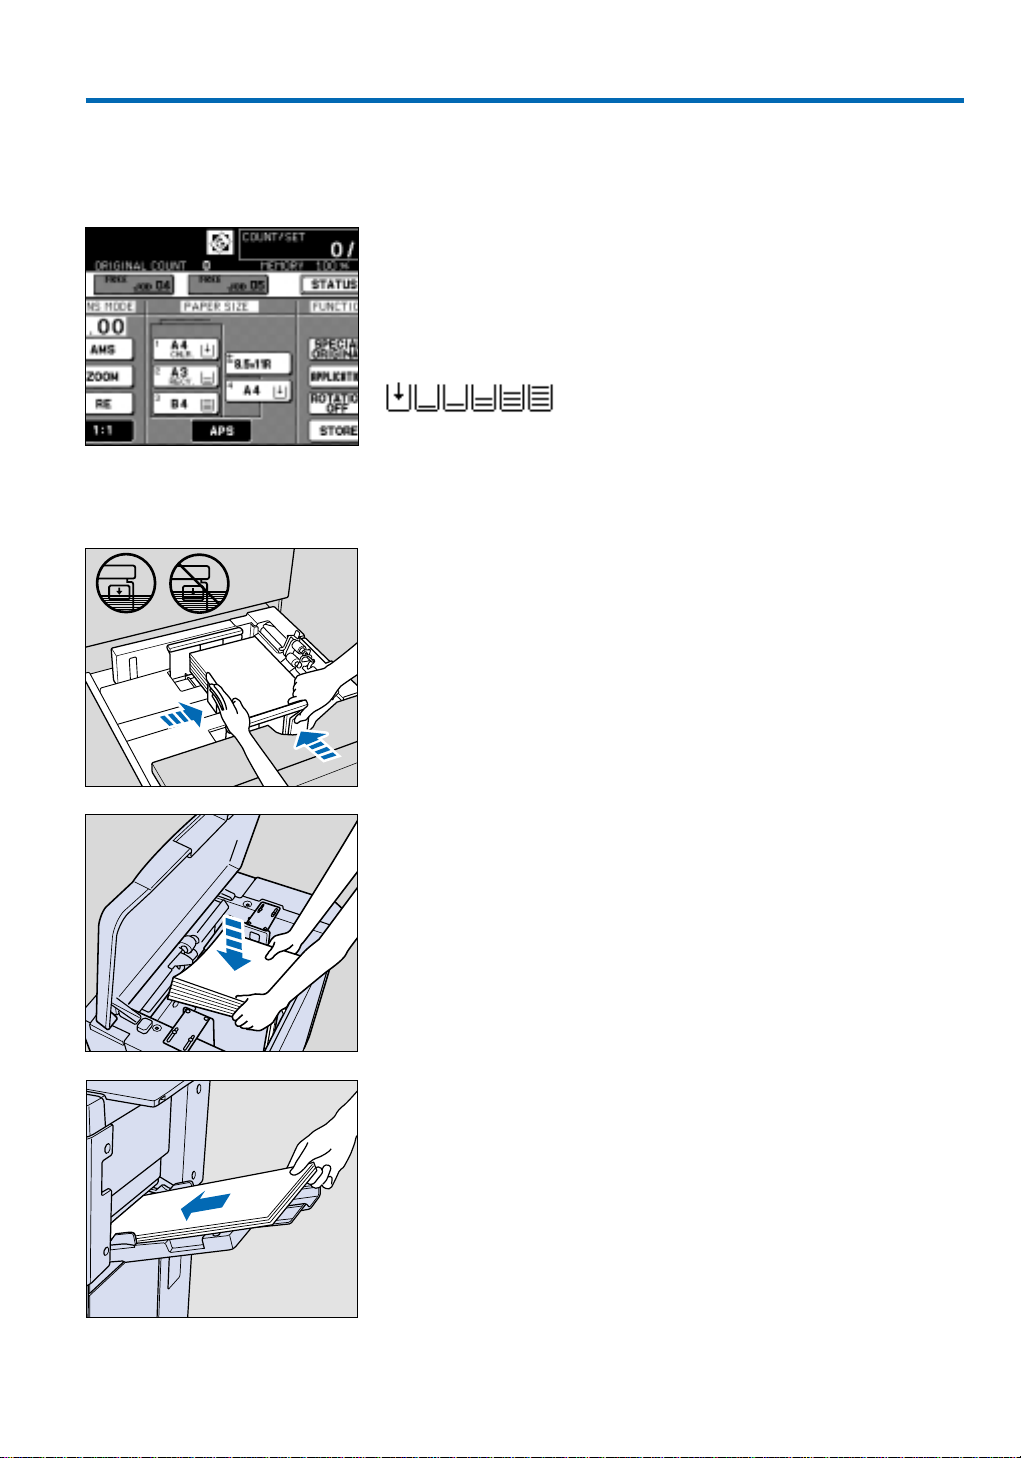
7.4.5 Multi-Sheet Bypass for Special Paper Size/Type
Load tabbed sheets always as
complete sets. They have to be
positioned face up so that the
tabs are on the right at the rear of
the multi-sheet bypass tray. If TAB
is selected, double-sided copying
(132 and 232) is not possible.
– If you select the multi-sheet bypass tray, the basic screen will display the
PAPER TYPE/SIZE key. Press this key to call up the screen shown
above.
– If you want to process special material (e.g. OHP films, transparancies,
tabs), please press the corresponding key. Copying onto tabs is not possible.
– STD size (special) and Non STD size allow copying onto unusual
paper sizes. Use the arrow keys on the popup screen displayed above
to enter the desired size. If no suitable paper size is available a further
popup screen can be called up under Non STD size to enter the desired horizontal and vertical dimensions.
29
Page 30

7. Simple Copying
7.5 Basic Finishing Functions
Unit with Finisher*:
Selections for sort and stapling functions are directly made in the Basic
Screen by pressing the SORT and STAPLE SORT keys. The selected out-
put mode is displayed in the screen.
Sort
One complete set of copies after the other exits into the main tray – each
offset by 3 cm, to allow easy separation of the sets.
Staple
Copy sets of up to 50 pages can be stapled in various stapling positions.
For details on how to change the stapling position and select specific out-
put modes, please refer to section 10. Finishing Options (page 53).
Group
All copies of the first original exit first; all copies of the next original exit
on top of that and so on, each offset by 3 cm.
– Press the OUTPUT MENU key to call up the Output Mode Screen
shown above. Here you can press GROUP with exit of the copies in the
MAIN TRAY; or press SUB TRAY and select GROUP on the popup
screens shown above, e.g. if you want to combine GROUP and FACE
UP.
Face up
Copies exit face up, but only into the sub tray of the Finisher*.
– Press the OUTPUT MENU key, press SUB TRAY and select FACE UP in
the popup screen.
30
* Option
Page 31

7. Simple Copying
Unit without Finisher*:
If no Finisher* is installed, copies will exit face down in sets, and will be
stacked witout separation. The following finishing functions are available:
Sort
– Press the SORT key on the Basic Screen to activate the electronic sort
function. Copied sets exit alternately rotated by 90° to allow easy separation of sets. This function cannot be activated unless the required
paper sizes are available both in portrait and in landscape orientation
(e.g. A4 and A4R).
– Press the OUTPUT MENU key, in order to call up further finishing
functions:
Group
All copies of the first original exit first; all copies of the next original exit
on top of that and so on.
Rotation and Group
All copies of the first original exit first; all copies of the next original exit
alternately rotated by 90° on top of that and so on. This function cannot
be activated unless the required paper sizes are available both in portrait
and in landscape orientation (e.g. A4 and A4R).
Face up
Copies exit face up.
Face down
Copies exit face down.
31
Page 32

32
Page 33

8. Other Basic Functions
This section provides instructions for all other basic copying functions,
which are available in this system.
8.1 Special Originals: Adjust Original Scanning Conditions
Press the SPECIAL ORIGINAL key to call up the display shown above.
This is where various adjustments, relating to the type and quality of your
originals, can be made in order to ensure an optimum reproduction.
Always confirm any selection made by pressing OK. Press CANCEL to
deactivate a selected function. Pressing RECALL STANDARD will return
all functions to their standard settings (top row of soft keys); and you will
return to the Basic Screen.
8.1.1 Resolution: High Mode/ Very High Mode/ 600 dpi
If you want to copy originals with graphic images or high-quality photos
etc., this function helps to improve the results. With the Very High
mode, a reproduction in 256 halftones is achieved. However, if Very
High mode is selected, originals have to be placed on the platen glass
and copied manually one after the other.
Important:
If Very High mode is selected, the copier functionality is limited,
because in this function, originals are not scanned into the image
memory and canot be processed via the RADF!
8.1.2 Original Quality: Text/Photo Enhance, Increase Contrast
This function improves the reproduction of halftones. The copied image is
lighter and has more detail. The standard reproduction setting is for originals that contain text and photos.
– Select Photo for halftone photo originals.
– Select Text to improve the contrast in text originals.
– Select Increase Contrast for lightly printed originals.
Advice
To achieve even better results when copying photo originals, combine
this function with High or Very High Resolution.
33
Page 34

8. Other Basic Functions
8.1.3 Original Type: Mixed Originals / Z-Folded Original / SDF
Originals of various sizes can be processed automatically from the stack.
Or the RADF is adjusted to handle A3 originals that have been folded
with special care. And thicker originals can be processed via the SDF.
Mixed Originals
Originals of the following different sizes can be positioned in the RADF as
a stack:
– Sizes A3, B4, A4R, A4, B5 and A5; or
– Sizes B4, A4R, B5R, B5 and A5; orr
– Sizes B5R and A5R
You have two options how to copy the original stack:
– APS is automatically active, so that each original is copied same size,
i.e. 1:1.
– If you want all copies to have one size, select the required size (e.g.
A4). Each original will then be copied with the corresponding magnifi-
cation ratio onto the specified copy size.
Z-Folded Original
Activate this function to ensure careful and complete processing of A3
originals, which were previously folded, via the RADF.
34
SDF
In this mode thick originals or paste-ups can be fed one sheet at a
time.The key operator can set the machine to automatically feed and scan
an original, which is placed in the document feeder. This function only
works if the Store mode is activated.
Page 35

8. Other Basic Functions
8.1.4 Special Original Size
Advice:
Select Tabpaper to copy tab-
bed originals onto tabbed sets,
including the tab information.
In this mode, only tabbed sets
can be processed.
8.2 Check Mode/Proof Copy
Advice:
The scanned originals will only
remain in the image memory
after the printing of a sample
copy, if the copy quantity setting is more than 1.
Press the Non STD size key to access the screen shown above. Here you
can specify the scanning area for originals of particular sizes:
Always select a slightly lager size than your original. If you select WHOLE
AREA, the complete area of the platen glass is scanned and is copied
onto the selected paper size with the selected magnification ratio.
This screen allows to check if all required settings have been made; and in
order to check a correct copy result, you have the option to print a single
sample copy without deletion of the image memory afterwards.
– Press the CHECK key on the operating panel to call up a screen, which
displays all settings made for the copy job.
– To generate a sample set of copies, press PROOF COPY on the screen
or on the operation panel. A single set of copies will be printed.
– The screen now indicates, which previously made settings can still be
adjusted. Functions, which are darkened in the screen, cannot be changed or adjusted.
– To change a setting, press the corresponding key in the screen and then
press CHANGE SETTING. This will open another screen, in which the
changes can be made. Some functions cannot be changed but can be
deleted.
– To delete a function, press the corresponding key in the screen and
then press RELEASE SETTING. This will activate a screen, in which you
can press YES to delete the function or NO to keep the setting.
– If you do not need to make any adjustments, press START. In this case
the sample copy set will be counted for the total set quantitiy.
– If the sample copy set does not look as desired, press the STOP key on
the panel to delete the image memory and start again .
35
Page 36

8. Other Basic Functions
8.3 Job Pre-Programming / Reserve Mode
While a copy job is being processed, you can already enter all settings for
up to four further copy jobs and scan the originals. Job settings that are
stored in the Job Memory cannot be recalled in the Reserve mode.
– Press FREE JOB 02. You can only call up this screen, while a copy job is
being processed. The key operator can adjust the system, so that inser-
ting the originals into the RADF will automatically activate FREE JOB 02.
– Make all required selections for the next job.
– Insert your originals and press START. Originals will be scanned.
– Copying of the new job will start automatically once the previous job is
completed.
– If a problem occurs with the job being processed, the Print Job indica-
tor will be replaced by e.g. Add Paper or Jam. If this happens, press the
corresponding key and follow the user instructions.
8.4 Status Screen: Job List – Job Priority / Job Clear
36
Press the STATUS key in the Basic Screen to open the Job Status Screen
shown above. This screen displays the number and mode of pre-programmed jobs as well as the remaining copy quantity for the current job
and the time required for completing the job. Information on the current
status of the machine (see below) is also provided. In this screen it is possible to change the order of reserved jobs or to delete jobs before they
are processed. Press the desired reserve job key; then press JOB
PRIORITY and the highlighted reserve job is advanced by one in printing
order. When pressing JOB CLEAR the highlighted reserved job will be
deleted.
The other keys allow to access further screens:
The USER NAME CHECK key calls up a screen in which the user names
of those generating the print jobs are displayed. For copy jobs user names
can neither be allocated nor displayed.
The PREVIOUS JOB LIST key allows to call up a list of already processed
print and copy jobs.
Page 37

8. Other Basic Functions
The NON COMPLETE JOB LIST key displays a list of the next five print
and copy jobs to be processed. This list also displays the names of users
having sent the print jobs.
To return to the Basic Screen, press OK.
The following indications are displayed in the Status Screen:
Mode:
Copier = The machine works in copying mode
Printer = The machine works in printing mode
Scanner = The machine works in scanning mode
Status:
Ready = Ready to use in each mode
Printing = Current job is in progress
Scanning = Scanning originals into the image memory
Interrupt = Interrupting the current job
Paper Supply = Required paper size is not available
Error = Error has been detected
Stop = Interrupting the current job
Reserve = Ready to reserve
Jam = Paper jam has occured
8.5 Copy Interrupt
This function allows to interrupt a copy job being processed, in order to
quickly produce a few copies in-between. The settings of the initial job
and the image memory remain.
– Press the INTERRUPT key on the operation panel. The key keeps
flashing until the system is ready, then lights.
– Set the required functions and select the copy quantity.
– Position the originals and press START.
– After the in-between copies have been made, again press INTERRUPT
to switch the function off.
– Press START to continue with the previous job.
37
Page 38

8. Other Basic Functions
8.6 Job Memory
This Konica system allows to save all settings for frequently needed jobs
once, and to recall them whenever needed.
– The settings for 30 jobs can be saved. (The key operator can lock saved
jobs to protect them against inadvertent deletion.)
– All basic functions, all special functions, as well as the finishing settings
and the copy quantity can be programmed and saved.
8.6.1 Save Job Settings
– Enter all required function settings.
– Press the JOB MEMORY key on the operating panel; and in the acces-
sed screen press STORE.
– The following screen displays all selections made. Press OK to call up
the Job Memory Screen.
– In the screen displayed above, you select a place for the job to be stored.
If all memory keys in this screen have been used, use the arrows to call
up further screens with more memory keys.
– Select a free number by pressing on it, and confirm with OK.
– If there is no free job memory available, you can overwrite a job key,
which does not show the padlock symbol. Jobs, which display the little
padlock symbol, are protected against overwriting. Contact your key
operator if you want to have your job protected.
– The screen displayed next allows to enter a name for the job (up to 16
digits). Use the DELETE key to correct a wrongly entered letter.
– Press OK to save the job name, which is then displayed in the next
screen. Again, press OK to confirm your settings and return to the
Basic Screen.
38
Page 39

8. Other Basic Functions
8.6.2 Recall Job Settings
– On the operating panel, press the JOB MEMORY key.
– Select the desired job by pressing the job number. If necessary, use the
arrow key to display the required job memory key on the screen.
Confirm your selection with OK; or press JOB CHECK to display the
settings programmed in this job.
– The system is now set to the selections of the recalled job.
– After copying, you can recall the initial settings by pressing AUTO RESET.
– In Reserve mode (i.e. while a job is being processed) job settings cannot
be recalled.
8.7 Density Shift
Density Shift 0 to 5; 3 is the
standard setting and is factory-set
in the system.
Density shift 0
Density shift 1
Density shift 2
Density shift 3 (standard)
Density shift 4
Density shift 5
The 9 manual density settings can be individually adjusted to a lighter or
darker scale for each mode.
– Press SPECIAL ORIGINAL in the Basic Screen. In the Enhance mode
various density settings can be adjusted.
– Press e.g. Photo and then P to adjust this mode.
– You can now adjust the density scale between 0 (dark) and 5 (light).
The set value is indicated in the message area of the display.
– For adjustments to the other modes (AUTO refers to Text/Photo mode)
press the corresponding key and then P to call up the Density Shift
mode.
– Once you have completed the adjustment, press STOP to leave the
Density Shift mode.
39
Page 40

40
Page 41

9. Special Functions
This section deals with the system’s special functions and explains how
they are operated.
How to Select Special Functions:
– Pressing the APPLICATION key in the Basic Screen calls up the
– To activate a function, simply press the corresponding soft key.
– For some functions another screen is displayed, in which further selec-
– To confirm your selections, press OK. If you press CANCEL, the
– Pressing ALL CLEAR will cancel all previously selected special functions;
– After you have made your selections among the special functions, leave
– As long as any special function is selected, the APPLICATION key will
Application Selection Screen.
tions must be made.
function(s) will not be active resp. your adjustments will not be programmed.
and you will return to the Basic Screen.
the Application Selection Screen by pressing OK.
be black with white type.
The function keys are either
white, black or shaded grey.
White = Function is not
selected
Black = Function is
selected
Grey Shade = Function is not
available in this
combination
How to Change Special Function Settings:
– Press the APPLICATION key in the Basic Screen to call up the
Application Selection Screen.
– The keys of all selected functions are inverted, i.e. black with white
type. To call up the adjustment screen for any activated function, press
the inverted function key twice.
– Now make your adjustments in the screen, and confirm with OK, until
you are back in the Basic Screen.
How to Switch Off Special Functions:
– Pressing AUTO RESET on the operating panel cancels all present
settings and returns the system to initial settings. If you only want to
cancel a certain special function, call up the Application Selection
Screen.
– The keys of all selected functions are inverted, i.e. black with white
type.
– Press the black key once. The key is now white with black type. The
function is no longer active.
– Press OK to return to the Basic Screen.
– If you want to cancel all special functions but keep the other copier
settings, you can do this by pressing ALL CLEAR in the Application
Selection Screen.
41
Page 42

9. Special Functions
9.1 Image Editing Functions
The following functions allow the editing of the original, so that the copy
will show a changed image. You can for example shift the image, repeat
a portion of the image, and so on.
9.1.1 Non-Image Area Erase
Dark areas around the original are automatically erased. In this function,
the RADF is not available and has to remain open.
– Position the original on the platen glas.
– For duplex copying in this mode, you have to select the STORE MODE
– An A4 size copy is produced; but you can select a different size if
Advice:
The factory setting for this function is, that black areas are erased along
straight lines. The technical service can also adjust the function to erase
the black areas exactly along the contours of the originals, e.g. objects.
and scan your originals.
required.
9.1.2 Auto-Layout
9.1.3 Reverse Image
This function allows easy centering of the image on the copy. Careful
positioning of the original is not necessary.
– Press the function key. Together with Auto Layout the Non Image
Area Erase function is automatically selected but can be switched off.
– Originals can only be copied via the platen glass; the RADF is not availa-
ble and has to remain open, unless you switch off Non Image Area
Erase.
– For duplex copying in this mode, you have to select the STORE MODE
and scan your original with the STORE key.
– An A4 size copy is produced; but you can select a different size if
required.
The white areas of the originals are reproduced in black, and vice versa.
42
Page 43

9. Special Functions
7075 70757075
Original Normal
Copie
All Image
Copie
9.1.4 All Image Area
Originals are copied completely to the edges to avoid image loss.
9.1.5 Image Repeat
This function lets you fill the copy with repeated small motifs or a defined
portion of an original.
– Press the function key. If you select AUTO, the Non Image Area Erase
function is also active.
– Position the original on the platen glass, and in this case leave the
RADF open.
– Select Vertical/Horizontal, if you want to repeat a portion of an origi-
nal. Use the arrows to specify the width and the height of the original
portion. Both values can range from 10 mm to 150 mm. Press ENTER
REPEAT WIDTH BY KEYPAD, if you want to enter the values from the
touch screen keypad.
– Press one of the function keys for a specific number of repeats of an
original part on the copy. The size of the original part depends on how
many times it will be placed on the copy; the part will be copied same
size.
– Position the original on the platen glass. The specified area is measured
from left to right and from top to bottom.
– An A4 size copy is produced; but you can select a different size if
required.
43
Page 44

9. Special Functions
9.1.6 Image Shift / Reduce and Shift
With this function you can shift the image into all directions by up to 250
mm, e.g. to create a filing margin. Or you shift and reduce the image at
the same time, so that no portion of the image is lost at the opposite
edge.
– Press the required function key.
– If you want to shift the image on the front page and/or on the back
page of the copy, press FRONT and/or BACK; press BOTH SIDES, if
you want to create an identical margin on both pages.
– Now specify the position of the margin. Press e.g. RIGHT SHIFT, which
will shift the image to the right and create a filing margin on the left. It
is also possible to combine margins; e.g. a margin on the left can be
combined with one at the top or the bottom of the page.
– If you press BOTH SIDES, the margin on the back page will always be
opposite (i.e. left margin on the front page and right margin on the
back page).
– Use the arrows or the keypad to define each margin. Confirm your
selections with OK.
– In Reduce & Shift mode the BOTH SIDES key is not available. First
specify the margins for the front page, as these figures serve to calculate the reduction ratio. The image is reduced in relation to the margin
width, so that no portion of the image gets lost.
– For the back page you can select different margins, but the reduction
ratio will not change.
44
Page 45

9. Special Functions
9.1.7 Frame/Fold Erasure
This function helps to avoid dark shadows, which appear when copying
3-dimensional originals, e.g. books. You can specify a frame erasure width
between 1 and 15 mm and a fold erasure width between 1 and 30 mm.
– Select the desired function.
– Press Frame Erasure (All sides) to specify the same frame erasure
– Use the arrows or the keypad to adjust the frame and/or fold erasure
– Confirm all your selections by pressing OK.
width for all sides of the page. If you want to define an individual
frame erasure width for each side of the page, press Frame Erasure
(Each side).
width.
45
Page 46

9. Special Functions
9.1.8 Stamp(*)/ Overlay
This function allows to print various letters at a fixed or specified position
onto the copy. Some but not all prints can be used in multiple combinations. In the Overlay Mode it is possible e.g. to repeat a previously scanned motif on every page.
Stamps*, Watermarks* and other Imprints
You can have the following imprints on your copies:
Advice:
The key operator can adjust
the system so that the page
numbers are automatically positioned at the page edges if
booklets are processed.
46
Stamp*: The text for the stamp can be selected from 8 options (e.g.
Urgent) and is printed onto the copy at the designated position; only on
the first page if desired.
Page Numbering: The page numbers are printed in the specified format
at the designated position onto the copy set.
Set Numbering: The copy sets are numbered in the specified format. The
set number is printed onto the copy at the designated postion; only on
the first page if desired.
Date/Time: The date and/or the time are printed in the specified format
at the designated position onto the copy.
Watermarks*: Eight suggestions are available (e.g. “Confidential”) The
watermark is positioned obliquely in the centre of the page and printed in
a light shade behind the text. Four density levels are available to select the
intensity of the watermark.
Watermark Numbering: Copied sets are numbered in the specified format. The watermark number is repeatedly printed over the page. Four
density levels are available to select the intensity of the watermark.
* Option:
Stamp* and Watermark* are only available,
if the optional hard disk is installed!
Page 47

9. Special Functions
Overlay original
Original set
Copies
– Press the corresponding function key for the desired print, e.g. STAMP.
– Under PRINTING POSITION on the right side of the screen you can
– Press FINE ADJ. OF POSITION to display the Fine Adjustment Setting
– Pressing the CHARACTER SIZE key you will be offered various options
– With the PRINTED PAGE key you can designate whether to position
Original
Copy
12
–2 –1 0
– For the Set Numbering, Page Numbering and Watermark Numbering
– Once all selections are made, confirm by pressing OK, until you have
– Insert the originals into the RADF. If you want to process the originals
Select the desired wording (for Stamp* and Watermark*) or a format
for the print (for Date/Time, Set Numbering, Page Numbering and
Watermark Numbering).
specify where the print should be positioned on the page (except for
watermarks, which are automatically printed in a fixed position).
Screen. Using the keypad you can now make fine adjustments of the
previously selected position.
to change the character size (except for watermark).
the print on all pages or only on the first page. For the P AGE
NUMBERING function, pressing this key calls up another screen, in
which further adjustments can be made to print page numbers on the
covers and/or inserts. The PRINTED PAGE key is not available for
Watermark and Watermark Numbering.
Function, press STARTING NO. to specify the desired starting number
for the first page of the set. You can also specify to start numbering
pages halfway through the document: Press the +/- key and enter a
minus number, e.g. -2 to print “1” on page 4.
returned to the Basic Screen.
via the platen glass, activate the STORE MODE in the Basic Screen and
scan each original.
Image Overlay
– Press the corresponding function key. This also activates the Store
mode.
– Make all other required settings.
– A4 copy size is automatically selected; but you can specify another size
if required.
– The original, which you want to repeat on every page, is processed
first: Insert it into the RADF or position it on the platen glass. Scan it by
pressing the START key.
– Next, insert your original set into the RADF. If you want to copy these
originals via the platen glass, position one original after the other and
scan each one by pressing START.
– Once all originals have been scanned, deactivate the STORE MODE by
pressing the key. Then press START to copy.
47
Page 48

9. Special Functions
9.2 Copy Editing Functions
Use the functions described in this section to determine how copies or
copied sets should be completed, i.e. as a booklet or with each chapter
beginning on a right (front) page, etc.
9.2.1 Sheet / Cover Insertion
Copied sets can be individually completed with front and back covers and
inserted sheets. Covers and inserts are fed from each tray and the multisheet bypass tray.
Insert the desired paper into the tray displayed on the screen. If other
than the displayed trays are desired, use the two keys at the bottom of
the screen. The size of covers and inserted sheets has to be identical to
the size of the copied set.
Options for Sheet & Cover Insertion:
– Select the required functions by pressing the corresponding keys. All
combinations are possible, e.g.:
– Copied front and back cover, blank inserts.
– Copied front cover, blank back cover, copied inserts; etc.
– If you want to have covers of a different colour or material from
inserts, select two different trays.
Entering Insert Positions:
Altogether max. 30 inserts are possible. A selected front and back cover is
automatically indicated in the first and last position of the page setting
screen.
– Use the keypad to enter the page number of a copied insert. If you
have selected BLANK INSERT, enter the page number after which you
require a blank insert.
– Press SET to confirm. The next insert position can now be entered. If
you want to enter more than 15 insert positions, use the arrow key to
call up further page setting possibilities.
– The DELETE key deletes a wrongly entered position, which can then be
corrected.
– If you have entered all required insert positions, confirm by pressing
OK, until you have returned to the Basic Screen.
48
Page 49

9. Special Functions
9.2.2 OHP-Interleave
This function allows copying onto OHP films with automatic insertion of
blank or copied sheets into the set of transparancies.
OHP Films with Blank Interleaves
Each original is copied onto an OHP film. Blank interleaves and copied
OHP films exit alternatingly.
OHP Films with Copied Interleaves
Each original is copied onto paper and onto an OHP film. Copied interleaves and copied OHP films exit alternatingly.
– OHP films can only be fed via the Multi-Sheet Bypass. They should not
– Only A4 size is possible.
– Copy preselection is fixed to one (1) copy.
– Position originals in the RADF. If you want to position your originals on
be placed on top of paper. Empty the bypass tray before inserting the
transparencies.
the platen glass, press STORE in the Basic Screen in order to scan the
originals.
49
Page 50

9. Special Functions
8
4
6
2
5
1
8
1
7
6
5
4
3
2
Front pages
Copies
Originals
7
3
9.2.3 Chapter
When duplex copying, you can use this function to start each new chapter on a right (front) page. Up to 30 positions can be specified for chapter
beginnings with page numbers up to 250. This function is only available
in combination with duplex coping 1 3 2 or 2 3 2.
Chapter can be combined with the Booklet function. Or press the Copy
Insertion key in the display, to select special (e.g. coloured) paper for the
specified pages; this paper is then fed from the selected sheet insertion
tray.
– Select the function and use the keypad to enter page numbers for front
– Press SET after each entry. If you want to change an entry, press
– When 15 entries have been made, press the arrow key to call up a
– After entering all required page numbers, confirm by pressing OK, until
– 1 3 2 is automatically selected. For double-sided originals, change this
– Position originals in the RADF. If you want to position your originals on
In this example, page 2 and page
6 are positioned on front pages.
pages. The first entry should be an even page number.
DELETE.
screen in which another 15 positions can be entered.
you have returned to the Basic Screen.
to 2 3 2; and make further function selections as desired.
the platen glass, Press STORE in the Basic Screen to scan the originals.
9.2.4 Image Insert
50
This function serves to combine originals, which are processed via the
RADF, with pages, which cannot be fed through the RADF (e.g. photos,
pasted or thick originals). These images are scanned from the platen glass
and are automatically positioned after the specified pages in the copied
set. Up to 30 inserts are possible.
Page 51

9. Special Functions
8
1
7
6
5
4
3
2
8
7
6
1
5
4
3
2
Originals
Images
Copies
– Select the function; and use the keypad to enter the page numbers,
– Confirm each page number by pressing SET. The last number entered
– When 15 entries have been made, press the arrow key to call up a
– After entering all required page numbers, confirm by pressing OK,
The images are inserted after the
designated pages, in this case
after pages 2 and 4.
9.2.5 Combination
– The Store mode is activated now. First position the original set in the
– After scanning all originals, press STORE to deactivate the Store mode.
– Press START to start copying. The specified quantity of copied sets is
This function lets you combine two, four or eight original images on one
page.
after which the images are to be inserted. If several inserts should fol-
low after the same page number, enter that number as many times, i.e.
once for every insert.
can be cancelled at any time by pressing DELETE.
screen in which another 15 positions can be entered.
until you have returned to the Basic Screen. Select other functions as
required, and set the number of copies.
RADF and press START to scan. The system now prompts you to scan
the inserts via the platen glass, one after the other in the order, in
which they are to be inserted in the copied set.
now automatically produced from memory.
– Press the corresponding function key for the required combination:
2-in-1, 4-in-1 or 8-in-1. If 2-in-1 is selected the HORIZONTAL ORDER
is fixed. For 4-in-1 and 8-in-1 both the HORIZONTAL ORDER and
VERTICAL ORDER can be selected.
– If you want to copy up to 16 originals onto the front and back of a
single sheet, select 1 3 2 or 2 3 2 (for double-sided originals); now
make other required settings.
– A4 copy size is automatically selected; but you can specify another size
if required.
– Position originals in the RADF. If you want to position your originals on
the platen glass, press STORE and scan each original.
– When all originals have been scanned, deactivate the STORE mode and
start copying by pressing START.
51
Page 52

9. Special Functions
9.2.6 Dual Page / Book Copy
Use this function to automatically copy the left and right page of an open
book onto two separate A4 sheets or onto the front and back of one A4
sheet. The front and back cover can be included, and the booklet mode
also selected. In combination with this function the booklet will not be
stapled automatically.
– Press the function key. This automatically activates also Auto Layout
– Make sure that Output - 1 to n, corresponding to the normal page
– Select one of the book copy modes. Confirm by pressing OK, until you
– If the pages of the book are smaller than A4 size, you can now specify
– Position the book on the platen glass; it does not have to be aligned
– Scan the pages of the book in reading order. Once all required pages
– Make further selections, e.g. 1 3 2, if the pages of the book are to be
– Press START to start copying.
and Non Image Area Erase.
order of a book, is selected.
have returned to the Basic Screen.
a magnification ratio (e.g. 1,41 for A5 size pages).
exactly. The RADF has to remain open (if Non Image Area Erase is active).
Follow the user instructions in the display and start by scanning the
front and back cover of the book.
are scanned, press STORE to deactivate the mode.
copied onto the front and back of A4 sheets.
52
Page 53

9. Special Functions
9.2.7 Booklet
Single pages are combined on the front and back of copies in such a way,
that you only need to fold the copied set in the center to have a booklet
with correct page order. Booklets can be A4 size (folded A3 copies) or A5
size (folded A4 copies).
Advice:
Cover with Copy sheet
If the insides of the cover
should be blank, insert a blank
page each in second and
last-but-one position of your
original set.
– Select one of the functions. For a booklet with a cover, press CHANGE
OF THE COVERS TRAY, until the required tray is displayed. If Cover
with Copy Sheet is selected, the first two and the last two pages of
the original are copied onto the cover (see advice on the left).
– Make sure that Output - 1 to n, corresponding to the normal page
order of a book, is selected.
– A3 copy size is automatically selected (for a booklet in A4 size). For an
A5 size booklet, select A4 size (resp. A4R size, if the Booklet Maker* is
equipped and you want to have the A5 booklet folded and/or stapled
automatically).
– 1 3 2 is automatically selected. For double-sided originals, you have to
change this to 2 3 2.
– If the Konica 7075 is equipped with the Booklet Maker*, you can select
automatic finishing of your booklets with centerfold and stapling (refer
to section 10. Finishing Options).
– Insert the originals into the RADF. If you want to position your originals
on the platen glass, press STORE in the Basic Screen and scan each
original.
* Option
53
Page 54

9. Special Functions
1 Original Set
Copies
3
2
1
2 Original Set
5
4
3 Original Set
8
7
6
8
7
6
5
4
3
2
1
st
nd
rd
9.2.8 Program Job
This function enables you to make different function selections for various
parts of your original, and then output them all as a complete set. You
may combine e.g. one-sided and double-sided copies as well as paper fed
from different trays in one document. Different copy sizes and some functions such as Sheet and Cover Insertion and Booklet are not possible (see
also 13. Function Combinations).
– Press Program Job. This also activates the Store mode.
– Make the required settings for the first portion of your original. Only
position those pages in the RADF or on the platen glass relating to the
previously made settings. Then press START to scan these pages.
– Once a scan has been completed, the popup menu shown above will
be displayed. Press DECISION to continue with the job. If you press
CANCEL, the data of the last scanned original portion are deleted, but
not the whole image memory.
– Change the settings as required for the next portion of your original.
Scan the respective originals by pressing START; follow this procedure
until all parts of your original have been scanned. You can divide your
set of originals into max. 100 portions but have to keep to the required
order of pagination.
– Once your set of originals has been scanned in total, press STORE to
deactivate the Store mode, and select the desired output mode (folding
and stapling resp. folding are not possible).
– Press START to print the complete document.
54
Page 55

10. Finishing Options
If the system is equipped with the Finisher* or the Booklet Maker*, a
variety of automatic finishing functions is available, such as the booklet
stapling function. This section contains instructions for these special
output functions. Simple Sorting and Stapling is explained under item
7.5 Basic Finishing Functions.
10.1 Select Staple Position*
– Press the OUTPUT MENU key on the Basic Screen to call up the
display shown above. If the MAIN TRAY soft key is not shown in black
(= active), press the corresponding key.
– Select one of the eight stapling positions. Press OK to confirm your
selection. Remember to position your originals in correct relation to the
chosen stapling position.
10.2. Folding, Stapling & Folding, and Timming Mode
(using Booklet-Maker* and Trimmer*)
Advice:
Please note that the limited
number of pages possible for
STAPLING & FOLDING and
FOLDING also reduces the
max. possible number of
originals: If the Booklet mode
is selected, in combination with
FOLDING max. 12 originals and
for STAPLING & FOLDING up
to 64 originals are possible.
– Select STAPLING & FOLDING to finish copies as booklets with
centerfold and center-stapling. Up to 16 sheets can be folded and
center-stapled (see "Advice"). If the Trimmer* is installed, TRIM is now
automatically selected. To cancel the trimming mode, press TRIM.
– Press FOLDING, if you want copies to exit with a centerfold but not
stapled in the center. Up to 3 sheets can be folded (see "Advice" in the
box). If you want to trim your folded copies, press TRIM to activate the
trimming mode.
– Selecting either of these finishing modes automatically activates the
No Cover Sheet option of the Booklet mode (your key operator can
adjust the automatic setting). If you want to change the booklet mode
setting or deselect this function, press APPLICATION to call up the
Application Selection Screen, where these changes can be made.
– Copies exit into the booklet tray of the Booklet Maker*.
* Option
55
Page 56

10. Finishing Options
MANUAL OPERATION
10.3 Cover Sheet Insertion (using Post Inserter*)
Advice:
If you want to add a cover sheet
also at the Back of the document, remember to load cover
sheets and back pages in the
right order (alternatingly) in the
Post Inserter. The back pages
must be inserted with the printed side face down in the Post
Inserter.
If the system is equipped with the optional Post Inserter (PI-108)*, it is
possible to compile copied sets and booklets automatically with covers of
up to 200g/m
copy onto them. Covers and copies have to have the same size.
– Press the COVER SHEET key to display the corresponding popup menu.
Here you can specify whether a cover sheet should be inserted at the
Front, Front & Back or only at the Back of the document. If the
Booklet mode is active, it does not matter whether you select Front
or Front & Back.
– Enter other selections required, e.g. STAPLING & FOLDING to produce
a booklet with a thicker cover.
2
. These covers can be preprinted, but is is not possible to
10.4 Manual Stapling (using Post Inserter*)
If the Booklet Maker* is equipped with the optional Post Inserter
(PI-108)*, manual stapling of copied sets and booklets is possible. Centerstapling for booklets is available for max. 16 sheets per set. Copied sets
of up to 50 pages can be stapled in one or two positions on the left side.
– Position the copied set in the feeding tray of the Post Inserter* as
shown in the illustration.
56
– Press the mode-button on the Post Inserter* operation panel until the
indicator of the desired stapling position lights.
– Now, activate the stapling process by pressing the Start/Stop button.
– Depending on the selected stapling mode, stapled copies exit into the
Main tray or into the Booklet tray of the Booklet Maker*.
* Option
Page 57

11. Scanner / Document Server*
If your Konica system has the optional HDD* installed, you can store
documents permanently or temporarily (depending on the settings made
by the key operator) on the HDD and recall them from the HDD.
(The functions of scanning into the network and image editing in the
HDD are not yet available even though already provided on the screen.)
There are two possibilities to store data (= jobs) on the HDD* (see 11.1
and 11.2):
11.1 Document Scan and Image Store* / Delete Mode
COPIE
SCANNER / SERVER
PRINTER
– Press MODE on the operation panel to switch to Scanner/Server.
The corresponding function indicator lights.
– Press IMAGE STORE/DELETE on the screen shown above, to call up
the next display. Here you press SCANNER HDD (other keys are not
available yet). In the next screen, enter the desired password in up to 8
characters via the keypad.
|
Important:
You can either use a specified
password repeatedly or always
enter a new password. You will
need the password every time
you want to recall or delete a
job stored in the HDD under
this password.
– Confirm the specified password by pressing OK to display the Job
Name Entry Screen.
57
Page 58

11. Scanner / Document Server*
– If you want to delete the data of a job, use the arrow keys on the right
side of the job name list to highlight the name of the job to be deleted;
then press JOB DELETE. A popup menu will appear for you to confirm
that you want to delete the selected data. Press Yes to confirm or No
to cancel this action.
– If you want to store the data for a new job on the HDD, you first have
to name the job by entering up to 8 characters from the keypad displayed on the screen above. Confirm with OK.
– The Scanner Setting Screen (i.e. a restricted Basic screen) is now
displayed, for you to select the desired scanning conditions. Settings
referring to output or finishing conditions as well as copy quantity cannot be entered in this screen (see also 11.2 Image Store & Output
Mode*).
– Position originals in the RADF or on the platen glass; then press START
to start scanning. Once all originals are scanned the system automatically begins storing the data in the HDD. When storing is completed the
Basic Screen is displayed.
11.2 Image Store & Output Mode*
– Press OUTPUT MENU on the Basic screen to call up the display shown
above. Now press the HDD STORE key.
– Follow the procedure explained under 11.1: Enter the desired password
in up to 8 characters via the keypad displayed on the activated screen.
Confirm by pressing OK to access the next screen.
– Now enter a job name in up to 8 characters for the job to be stored.
Confirm by pressing OK until you have returned to the Basic Screen.
Advice:
Image data scanned under
Program Job mode can also be
stored in the HDD memory.
– Make all selections for the required copying functions as usual, then
enter the desired copy quantity.
– Process your original set as usual via the RADF or the platen glass. Press
START to print the copy job and to activate the automatic storing of
the scanned data on the HDD.
58
* Option
Page 59

11. Scanner / Document Server*
– To suspend the current job, press STOP. A popup menu will be
displayed to ask you how to complete the current job:
– Press CONTINUE to continue printing the job and to store the data on
the HDD.
– Press EXIT to cancel the printing job and delete the data.
– Or press EXIT after Storing Data to HDD to cancel the printing job
but store the data on the HDD.
11.3 Image Recall Mode
– Press MODE on the operation panel to switch to SCANNER/SERVER.
The corresponding function indicator lights.
COPIE
SCANNER / SERVER
PRINTER
– Press IMAGE RECALL on the screen shown above to access the next
display, where you press HDD. The screen shown below will be
displayed. Enter the password in up to 8 characters referring to the job
you have stored in the HDD.
59
Page 60

11. Scanner / Document Server*
– A list appears showing all data/jobs stored under the previously entered
password. Press the desired job name key. Now use the arrow key pointing to the right to move the job to the recall list on the right.
– More than one job at a time can be recalled to be output in succession,
provided that the jobs have been stored in the same copying conditions.
– To cancel a job moved to the recall list, use the lower arrow key to
return the selected job to the left.
– If you want to display a list showing all selections made for a recalled
job, press JOB CHECK.
– Confirm with OK to recall the desired jobs from the HDD. After data
transmission is completed, the Basic Screen will be displayed.
– You can now make any other selections required, e.g. 132, finishing
functions and copy quantity. Then press START to start printing.
60
* Option
Page 61

12. Troubleshooting
R
12.1 Selfdiagnostic System
This copier is equipped with an integrated selfdiagnostic system. A variety
of information and data is easily recalled, e.g. a reading of the total copy
counter (see below). Detailed information regarding any type of problem
is automatically displayed on the screen.
The following status information will be displayed:
– Periodic maintenance
– Memory overflow
– Call service (electronic problem)
– Paper jam
– Refill toner (for procedure, see page 18)
12.2. Recall Copy Count / Periodic Maintenance
The system should undergo a routine maintenance after every 250,000
copies. A user instruction prompting you to call the service will be
displayed on the screen. You can easily call up the information, how
many copies have been made since the last PM.
COUNTER
CLEA
To display the counter list, proceed as follows:
– Press P. The screen will display the counter list as shown above.
– Now press CHECK on the control panel to display the targeted PM
volume and the number of copies produced since the last routine maintenance.
– Press the EXIT key to return to the Basic Screen.
– It is also possible to print the counter list. In this case, do not press EXIT
but the Counter list output key. The Basic Screen will appear. Check
that A4 size is selected and start printing by pressing START.
61
Page 62

12. Troubleshooting
12.3 Memory Overflow
This Konica system is equipped with an integrated image memory, into
which originals are scanned and from which the information is printed.
The remaining memory capacity is displayed on the Basic Screen. If extensive documents are scanned, or if many originals should be copied with
high resolution, this can use the complete memory capacity. In this case
the screen shown below will be displayed and you can decide how to
continue.
Advice:
If this problem occurs frequently with your applications, you
should contact your Konica service with regard to an extension
to the image memory.
12.4 Call Service
Advice: Overriding of
Problems
As far as possible, limited availability of the system will be
ensured, even after an electronic problem occurs. In this case,
corresponding information will
be displayed, prompting you to
isolate the faulty component by
pressing AUTO RESET. After
this, switch the system off and
on; and copying will be possible
again.
Important: Do not forget to
report the problem to the
Konica service anyway, quoting
the corresponding error code.
– Pressing JOB STOP will stop the copy job and delete the image
memory. You can now start again with different function selections or
fewer originals.
– If you press SCAN STOP, the pages scanned so far will be printed.
With the booklet mode selected this function key is not available
because the copying result would not be satisfactory.
– The CONTINUE key only appears on the screen, if memory overflow
occurs during a reserved job. In this case already scanned copy jobs will
be printed completely. Press CONTINUE to finish scanning the current
job and start copying as soon as sufficient memory capacity will be
available.
If a problem occurs, a user prompt to switch the machine off and on will
be displayed on the screen. Should this information appear again after
the machine has been switched on, please contact the Konica service. If
an electronic problem occurs, which can only be rectified by an authorised Konica technician, the screen shown below appears.
62
– Note down the error code and the telephone number of the Konica
service.
– Switch the system off and unplug it from the socket.
– Call the Konica service, and report the error code.
Page 63

12. Troubleshooting
12.5 Paper Jam
Paper Jam Position Screen
If a paper jam occurs, the touch screen will automatically display an
illustration with all jam positions and instructions how to clear the jam.
Pressing the corresponding key calls up step-by-step operating instructions and more detailed graphical displays.
If there is more than one paper jam, the help screens appear in the order,
in which jams need to be cleared. After clearing one jam, a new screen
will appear until all jams are cleared and the Basic Screen is displayed
again.
How to clear a paper jam:
– Have a look a the paper jam positions.
– If you are not sure what to do, press the Illustration explanation key.
The first operation step will be displayed on the screen. Call up further
operation steps with the arrow. The Illustration Explanation Screen will
disappear, once the jam has been cleared.
– If there is another paper jam, follow the user instructions on the next
screen.
– Once all paper jams have been cleared, the Basic Screen appears again.
Attention!
During copying, the fixing unit
gets very hot! Avoid touching
the fixing unit, or you might get
burned.
Only touch and move the green
levers and dials, as instructed.
No other parts inside the system
must be touched or moved.
Fixing Unit
63
Page 64

12. Troubleshooting
12.6 Solving Simple Problems
Problem Check Possible Solution
The copier is not working – Was the system switched on? – Switch the system on.
No copies are produced – Is the front door of the unit closed? – Securely close the front door.
after pressing Start. – Is a suitable paper size available? – Refill paper of a size corresponding
When copying under the – Was the user code entered correctly? – Carefully enter your code again.
EKC/key counter mode, no – Has your key counter reached the – Ask your key operator for informacopies are produced after allocated copy limit? tion regarding your copy limit.
entering the user code.
The copy has a dirty look. – Is the platen glass clean? – Clean the platen glass.
The copy is too light. – Is the density adjustment suitable? – Change the density adjustment to
– Is the timer indicator lit? – Contact your key operator.
– Is the plug in the socket? – Insert the plug into the socket.
to the original.
– Is the copy preselection set to 0 ? – Enter a copy quantity.
– Was a user password entered? – Enter your EKC password.
– Is the Basic Screen displayed? – Call up this screen.
– Was the Power Saver key pressed? – Press the Power saver key to switch
off the power saver mode.
– Is the original clean? – The copy can only be as good as
the original.
– Is the density adjusted too dark? – Change the density adjustment to
a more suitable setting.
a more suitable setting.
– Does the screen show a „Refill – Refill toner.
toner“ promt?
– Was the copy paper inserted – Turn the copy paper. When refilling
correctly? copy paper, check the arrow on the
wrapping. Paper must always be
inserted with the arrow mark
pointing downwards (except in
tray 4 and the bypass tray).
The copy is too weak. – Is the copy paper damp? – Insert dry copy paper.
After a paper jam has been – Can you find other paper jams – Try to clear all paper jams that you
cleared, copying is still not than the indicated one? can find.
posssible.
Paper jams occur repeatedly. – Were labels or OHP films inserted – Only feed special papers via the
The Basic Screen looks – Did your key operator make special – If you press the Check key, a list
different from the illustra- adjustments? of all active settings will be
tions in this instruction displayed. Ask your key operator
manual. for more information.
64
– Is the service call screen displayed? – Call the Konica service.
into a tray and not into the sheet sheet bypass.
bypass?
Page 65

12. Troubleshooting
Problem Check Possible Solution
Copies are reduced or – Is AMS active? – If a paper tray was selected in the
enlarged, even though the Paper Size screen, AMS is active.
full size ratio 1:1 has been Select APS or press the 1.00
selected. indicator.
The copying process is – Is there a paper jam indication? – Clear the paper jam.
interrupted. – Have you reached the copy limit of – Contact your key operator.
Copying starts immediately – Did you press Start during the – Wait until the instruction
after the warm-up phase. warm-up phase? „Position originals in RADF“ is
RADF
Originals are not fed by the – Are original size and paper quality – Thick and pasted originals must
RADF. within the specifications? be positioned on the platen glass.
Finisher
your key counter?
displayed, before making your
selections.
– Were too many originals insered – Only up to 100 originals can be
into the RADF? inserted at any one time.
The Finisher does not work – Is there a paper jam in the finisher? – Clear the paper jam.
The stapling is in the wrong – Is the automatic rotation active? – Reposition the originals, so that the
place. images will not be rotated.
– Is the finisher door closed? – Securely close the finisher door.
65
Page 66

12. Troubleshooting
12.7 Daily Care
One precondition for a good copy quality is a clean platen glass! We suggest to clean the platen glass and the underside of the document feeder
daily with a clean soft, possibly damp cloth or the special Konica cleaning
liquid.
Open the RADF and also wipe the slit scanning glass on the left with a
soft clean cloth.
Never use volatile or corrosive cleaners or solvents with this equipment!
66
Page 67

14. Technical Specifications Konica 7075
Typ: Console type with fixed platen glass
Transfer Process: Indirect electrostatic laser method, OPC drum; dry, 2-component magnetic brush.
Light Source: Xenon lamp, 280 W
Image Memory: 64 MB standard, 512 MB max.
Copy Speed: 75 A4 or 44 A3 copies / minute
First A4 copy after 3.9 seconds
Warm-up Time: approx. 6 minutes
Original Size max. A3
Copy Size: A5R to A3+ (special size = 314 mm x 445 mm)
Paper Sources: Tray 2: 500 sheets A5R to A3+, user-adjustable (universal tray)
Paper Weight: 50 to 200 g/m
Exposure: Automatic or manual; 2 density user sets
Magnification: 1.Fixed ratios:
Copy Preselection: up to 9,999 copies
Toner Yield: approx. 50,000 copies at 6 % coverage
Power Supply: 220 to 240 V, 50 Hz; 16A
Power Consumption: max. 2,800 W
Dimensions: Width 2,059 mm, Depth 775 mm, Height 1,160 mm
Weight: approx. 280 kg (without options)
Tray 2: 500 sheets A5R to A3+, user-adjustable (universal tray
Tray 3: 1,000 sheets A5R to A3+, user adjustable (universal tray)
Tray 4*: 4,000 sheets A4
Multi-Sheet Bypass: 150 sheets A6R to A3+, single sheets of special paper,
labels etc.
2
from the trays
50 to 200 g/m
60 to 170 g/m
2
via the Multi-Sheet Bypass
2
in the duplex unit
1:1, 50%, 71%, 82%, 86%, 115%, 122%, 141%, 200%
2.Three user sets for special ratios between 33 % and 400 %
3.Zoom 33 % to 400 % in 1 % steps, individual horizontal/vertical adjustment
In use 456 Wh
Stand-by 257 Wh (all without options)
(incl. Finisher* and LCT*)
RADF
Function: Automatic feeding of single- and double-sided originals
Original Types: Plain paper, 50 to 130 g/m
2
Thick paper, max. 200 g/m2 via SDF
Original Sizes: A3 to A5R
Capacity: max. 100 sheets
Fold out this page:
The Function Combinations table shows, which functions can be selected together.
* Options
69
Page 68

13. Function Combinations
Z-Folded Original
Very High Resolution
Text/Photo Enhance
Staple
131
132
231
232
600 dpi
AE
All Image Area
AMS
APS
Auto Layout
Booklet
Chapter
Combination (2-/4-/8-in-1)
Copy Interrupt
Cover Insertion
Dual Page
Electronic Sort
Fold Erasure
Frame Erasure
Group
High Resolution
Image Insert
Image Overlay
Image Repeat
Image Shift
Job Preprogramming/Reserve
Magnification
Memory Mode
Mixed Originals
Multi-Sheet Bypass
Non Image Area Erase
OHP Interleave
Program Job
Proof Copy
RADF
Reduce & Shift
Reverse Image
Rotation
SDF
Sheet Insertion
Sort
Special Original Size
Stamp/ Watermark etc.
Staple
Text/ Photo Enhance
Very High Resolution
••••••••••••••••••••
•••••••
• •••••••••••••• •••
•••••••
• •••••••••••• •••••
••••••••••••••••••••
• •••••••••••••• •••
••••••••••• ••••••••
••••• • •••••• ••••
••• • • ••• •• •
••
2)
• ••••• •• •• • •
••• • ••••• ••
••••••••••••••••••••
• •••••• ••••• • •
••• • • • •• •
• • •• ••••••• • •
••••• • ••••••• • •
••••• • ••••••• • •
•••••••••••••
• ••••••••••••••••••
• ••••• •• •• • •
•••
•••••••
•••••••••••• ••
• ••••••••••• ••••••
••••••••••• ••••••••
• •••••••••••••••••
••• ••••
•••••••••••••••••
•••• • ••
•••• ••••
• ••••• • ••••
• •••••••••••
•••••••••••
•••••••••
•••• •••••
••••••••
••••••
••••••
•••••
••••
•••
••
••
Stamp/Watermark etc.
Special Original Size
Sort
Sheet Insertion
SDF
Rotation
Reverse Image
Reduce & Shift
RADF
Proof Copy
Program Job
OHP Interleave
Non Image Area Erase
Multi-Sheet Bypass
Mixed Originals
Memory Mode
1)
••••••• ••••
1)
••••••• •••
• • ••••• • •
3)
•• •• •• • •
67
Page 69

Job Preprogramming/Reserve
Image Shift
Image Repeat
Image Overlay
Image Insert
High Resolution
Group
Frame Erasure
Fold Erasure
Electronic Sort
Dual Page
Cover Insertion
Copy Interrupt
Combination (2-/4-/8-in-1)
Chapter
Booklet
Auto Layout
APS
AMS
•••••••••••••• •••
•••••••••••••••••••
•• ••••••• ••• ••
•• ••••••• ••••• ••
•••••••••••••••••••
•••••••••••••••••••
••••••• ••••••••••
• •• ••••• •••••
•• ••••• • •
••••
••••••••
•• •
•• • •
•••••••••••
•• •
••••
••••
•• •••
•• ••
•• •
•••••
•
••
•
•
All Image Area
AE
600 dpi
232
231
132
68
The table shows which functions are compatible and which functions cannot
be active at the same time.
• Only these functions can be selected together.
1)
If TAB is selected for inserted sheets, duplex 132 and 232 is not available.
2)
Booklet stapling is only available, if the optional booklet maker is equipped.
3)
The combination with Date&Time stamp is available.
Page 70

14. Technical Specifications Konica 7075
Optional Accessories:
Finisher FS-108
Functions: Face-up; Sort/Group by Offsetting; Stapling
Paper Size: A3 to A5R
Capacity: max. 3,000 sheets in main tray
Stapling Capacity: max. 50 sheets
Stapling Positions: A4/A3 top left
Booklet Maker FS-108BM
Functions: Face-up; Sort/Group by Offsetting; Stapling, Folding; Stapling & Folding
Paper Sizes: A3 to A5R
Capacity: max. 3,000 sheets in main tray
Stapling Capacity: max. 50 sheets; max. 16 sheets center-stapling for booklets
Stapling Positions: A4/A3 top left
max. 200 sheets in sub tray
A4R/A3R top left
A4/A4R/A3R two staples on left side
max. 200 Blatt sheets in sub tray
approx. 25 booklets of 5 folded sheets each in booklet tray
A4R/A3R top left
A4/A4R/A3R two staples on left side
Booklet Stapling (center-stapling in two positions) for A3 (folded to A4) and
A4 (folded to A5)
Post Inserter (PI-108; only in combination with finisher / booklet maker)
Functions: Inserting of sheets into the finisher for preprinted covers; manual stapling
Paper Sizes: A3 to A5R
Paper Weight: 50 to 200 g/m
Capacity: max. 200 sheets
Trimmer (TU-108, only in combination with the booklet maker)
Function: Trimming of booklet edges
Trimming Width: max. 10 mm
Paper Sizes: A3, B4, A4R
Paper Weight: 60 to 90 g/m
Capacity: max. 512 sheets
Trimming Capacity: max. 16 sheets in Stapling & Folding mode
max. 3 sheets in Folding mode
Large Capacity Tray (Tray 4, either LT-401 or LT-411)
Capacity: 4,000 sheets
Paper Sizes: LT-401 A4
LT-411 A3, B4, A4, A4R; adjustable by the Konica service
HDD HD-102
Functions: Various stamps, watermarks; extension of the system as document server
Extension to
Image Memory 64 MB and 128 MB-Module
2
2
, plus heavy cover (max. 200 g/m2)
Controller To connect Konica 7075 as printer.
Subject to change without notice!
70
Page 71

Page 72

OUT OF ORDER
been called.
Service has
Page 73

INSTRUCTION MANUAL
7075
OUT OF ORDER!
Service has
been called
If a problem occurs:
Open this page and place manual on the unit.
Page 74

KONICA REPRESENTED IN EUROPE
KONICA BUSINESS MACHINES EUROPE GMBH, LILIENTHALSTRASSE 1, D-21337 LÜNEBURG (GERMANY), TEL. (0 41 31) 8 86 - 0, FAX (0 41 31) 8 86 - 2 99
http://www.konica-europe.com
ANDORRA
AUSTRIA
BELGIUM
BULGARIA
CYPRUS
CZECH REPUBLIC
DENMARK
ESTONIA
FINLAND
FRANCE
GERMANY
GREECE
HUNGARY
ICELAND
IRELAND
ITALY
LIECHTENSTEIN
LUXEMBOURG
MA LTA
MONACO
NETHERLANDS
NORWAY
POLAND
PORTUGAL
REPUBLIC OF BELARUS
REPUBLIC OF LATVIA
REPUBLIC OF LITHUANIA
ROMANIA
RUSSIA
SLOVAKIA
SPAIN
SWEDEN
SWITZERLAND
TURKEY
UCRAINE
UNITED KINGDOM
 Loading...