

Page 1
7022/7130
INSTRUCTION MANUAL
7022/7130
Basic
Advanced
Page 2

Thank you very much for your purchase of the Konica 7022/7130.
This Manual deals with making copies, correct handling of the machine, and
precautions for safety. Please read before copying.
In order to maintain a satisfactory copying performance, please keep this
Manual readily available for reference in the right hand rear pocket of the
machine.
ENERGY STAR
The ENERGY STAR Program has been established
to encourage the widespread and voluntary use of
energy-efficient technologies that reduce energy
consumption and prevent pollution. As an
®
Program
ENERGY
STAR Partner, Konica Corporation, Inc. has
determined that this product meets the
ENERGY
STAR guidelines for energy efficiency grounding it on
the following features.
Auto Low Power
This function conserves energy by lowering the set temperature of the fixing
unit. In the standard setting, Auto Low Power operates automatically when 1
minute have elapsed after completion of the last copy, with the copier remaining
in the ready to copy state during that time.
The time period for the Auto Low Power function can be set for 1 minute, 5
minutes, 10 minutes, 15 minutes, 30 minutes, 60 minutes, 90 minutes, 120
minutes, or 240 minutes. See p. 2-12 for details.
Automatic Shut-Off
This function achieves further energy conservation by partially turning OFF the
power supply, thereby reducing energy consumption to 20W or less. In the
standard setting, Automatic Shut-Off follows Auto Low Power, operating
automatically when 1 minute (for a machine with no option)/15 minutes (for the
machine with options) have elapsed after completion of the last copy, with the
copier remaining in the ready to copy state during that time.
The time period for the Automatic Shut-Off function can be set for 1 minute, 5
minutes, 10 minutes, 15 minutes, 30 minutes, 60 minutes, 90 minutes, 120
minutes or 240 minutes. See p. 2-12 for details.
Automatic Duplex Copying
To reduce paper consumption, use this function to make double-sided (duplex)
copies, automatically.
We recommend that you utilize the Auto Low Power function, the Automatic
Shut-Off function, and the Automatic Duplex Copying function.
Page 3

Contents
Contents
Features of the Konica 7022/7130
Basic
1
Safety
Section 1: Safety Information
Information
1
Safety
Information
2
Machine
Information
3
Copying
Operations
Caution Labels and Indicators ..............................................................................1-2
Requirements for Safe Use...................................................................................1-4
Power Source.............................................................................................................1-4
Environment...............................................................................................................1-5
Precautions for Routine Handling ..............................................................................1-7
2
Machine
Section 2: Machine Information
Information
Machine Configuration ..........................................................................................2-2
External Machine Items .............................................................................................2-2
Internal Machine Items ..............................................................................................2-4
Standard/Optional Equipment....................................................................................2-5
Basic Screen..............................................................................................................2-6
Control Panel Layout..................................................................................................2-8
Turning On the Power Switch................................................................................2-9
To Turn On the Power ................................................................................................2-9
To Turn Off the Power ..............................................................................................2-11
Reducing the Power in Standby Mode (Auto Low Power)........................................2-12
Shutting Off Automatically (Auto Shut-Off)...............................................................2-12
Shutting Off / Reducing the Power Manually ...........................................................2-13
Entering an EKC Password (EKC)...........................................................................2-14
Loading Paper.....................................................................................................2-15
Loading Paper in Main Body Trays and DB-210 Trays.............................................2-15
Loading Paper in DB-410 Tray .................................................................................2-17
Loading Paper in Multi-Sheet Bypass Tray ..............................................................2-18
Changing Paper Size of Main Body Trays and DB-210 Trays.............................2-19
4
Job Memory
&Help Mode
5
Trouble-
shooting
6
Machine
Specifications
7
Advanced
Information
8
Applications
9
Paper &
Original Info
10
Maintenance
11
Key Operator
i
& Supplies
Mode
Page 4

Contents (continued)
3
Copying
Section 3: Copying Operations
Operations
Positioning Originals .............................................................................................3-2
Positioning Originals in RADF....................................................................................3-2
Positioning Original on Platen Glass..........................................................................3-5
Setting Print Quantity ............................................................................................3-7
To Set Print Quantity ..................................................................................................3-7
To Change Print Quantity...........................................................................................3-7
Selecting Paper Size.............................................................................................3-8
To Select Paper Size Automatically (APS).................................................................3-8
To Specify Desired Paper Size (AMS) .....................................................................3-10
Selecting Magnification Ratio (Lens Mode) ........................................................3-12
To Copy in 1.00 Magnification Mode........................................................................3-12
To Copy in Fixed Magnification Mode (FIXED) ........................................................3-13
To Copy in Zoom Mode............................................................................................3-14
Selecting Density Level.......................................................................................3-15
To Select Copy Density............................................................................................3-15
Making Double-Sided Copies (1a2, 2a2) ..........................................................3-17
Using RADF.............................................................................................................3-17
Using Platen Glass ..................................................................................................3-19
Making Single-Sided Copies from Double-Sided Originals (2a1) ......................3-21
Copying Using Memory.......................................................................................3-22
To Scan Originals into Memory (Store Mode)..........................................................3-22
To Set Next Copying Job (Reserve).........................................................................3-25
To Check/Control Jobs in Progress (Job List Screen)..............................................3-27
Output Mode for Machine without Finisher .........................................................3-29
Output Mode for Machine with Finisher ..............................................................3-31
Output Mode for Machine with Inner Tray IT-101 ................................................3-34
Checking Feature Selections and Proof Copying ...............................................3-36
Interrupt Copying ................................................................................................3-38
4
Job Memory
Section 4: Job Memory & Help Mode
&Help Mode
Storing Job Conditions (Job Memory: Job Store) .................................................4-2
Recalling Stored Job Settings (Job Memory: Job Recall).....................................4-5
Displaying Screen for Operation Guide (Help Mode)............................................4-7
To Display Help Screen from Basic Screen ...............................................................4-7
To Display Help Screen from Other Screens .............................................................4-9
ii
Page 5

Contents (continued)
5
Trouble-
shooting
Section 5: Troubleshooting
When “Call for Service” Message is Displayed .....................................................5-2
Limited Use of the Copier in Trouble ..........................................................................5-3
Preventive Maintenance........................................................................................5-4
Clearing Mishandled Paper...................................................................................5-5
When “JAM” Appears on Folder Key.....................................................................5-7
When “ADD PAPER” Appears on Folder Key .......................................................5-9
When “Memory Full” Message Is Displayed (Memory Overflow)........................5-10
Action 1....................................................................................................................5-10
Action 2....................................................................................................................5-11
When Power OFF/ON Screen Is Displayed ........................................................5-12
Troubleshooting Tips...........................................................................................5-13
6
Machine
Section 6: Machine Specifications
Specifications
Main Body Specifications......................................................................................6-2
Option Specifications ............................................................................................6-3
1
Safety
Information
2
Machine
Information
3
Copying
Operations
4
Job Memory
&Help Mode
5
Trouble-
shooting
6
Machine
Specifications
7
Advanced
Information
8
Applications
9
Paper &
Original Info
10
Maintenance
& Supplies
11
Key Operator
Mode
iii
Page 6

Contents (continued)
Advanced
7
Advanced
Section 7: Advanced Information
Information
Programmed Shut-Off (Weekly Timer)..................................................................7-2
Rotation.................................................................................................................7-4
Vertical/Horizontal Zoom Mode.............................................................................7-6
8
Applications
Section 8: Applications
To Display Application Selection Screen...............................................................8-2
Inserting Sheets and Covers (Sheet/Cover Insertion) ..........................................8-3
Positioning Title Pages on the Right Side (Chapter) .............................................8-7
Lay Out Several Pages onto One Sheet (Combination)......................................8-10
Making a Multiple Page Signature Booklet (Booklet)..........................................8-13
Copying onto Transparent Films (OHP)..............................................................8-16
Inserting Images into Printed Sets (Image Insert) ..............................................8-18
Dividing an Image into Right and Left Pages (Dual Page)..................................8-21
Copying Mixed Size Originals (Mixed Original)...................................................8-25
Copying Folded Originals (Folded Original) ........................................................8-27
Copying Non-Standard Size Originals (Non-Standard Size)...............................8-29
Reverse the Second Side in 1-2 Mode (Flip Side 2) ...........................................8-31
Making Copy Quality Closer to Originals (Text/Photo Enhance).........................8-34
Reversing Colour in Black and White Image (Reverse Image) ...........................8-37
Repeating Selected Image Area (Repeat: Vert./Horiz. Mode) ............................8-39
Repeating Automatically or Selecting Repeating Times
(Repeat: AUTO/ Repeat Mode)...................8-42
Eliminating Black Copy Marks Along Borders (Frame/Fold Erasure)..................8-46
Copying Image in the Centre of Copy Paper (AUTO Layout)..............................8-49
Adjusting Position of Copy Image (Image Shift)..................................................8-51
Reducing Images to Create Binding Margin (Reduce&Shift)..............................8-53
Erasing Outside of the Original (Non-Image Area Erase)...................................8-56
Printing Stamp, Page, Watermark onto Copies (Stamp).....................................8-58
Overlaying an Image onto Each Page Copied in the Job (Overlay)....................8-63
iv
Page 7

Contents (continued)
9
Paper &
Section 9: Paper and Original Information
Original Info
Paper Information..................................................................................................9-2
Paper Weight .............................................................................................................9-2
Tray/ Exit Tray Capacity..............................................................................................9-3
Paper Size..................................................................................................................9-4
Special Paper in Multi-Sheet Bypass Tray .................................................................9-5
To Store Copy Paper..................................................................................................9-5
Original Information...............................................................................................9-6
Platen Glass Originals ...............................................................................................9-6
RADF Originals..........................................................................................................9-7
10
Maintenance
Section 10: Maintenance & Supplies
& Supplies
Adding Toner.......................................................................................................10-2
Inserting a New Staple Cartridge into FS-107 Finisher ......................................10-5
Cleaning Image Scanning Section......................................................................10-9
Cleaning the Document Glass and Cover................................................................10-9
Cleaning the RADF................................................................................................10-10
Cleaning Image Printing Section.......................................................................10-12
Checking Copy Count .......................................................................................10-14
1
Safety
Information
2
Machine
Information
3
Copying
Operations
4
Job Memory
&Help Mode
5
Trouble-
shooting
6
Machine
Specifications
7
Advanced
Information
11
Key Operator
Section 11: Key Operator Mode
Mode
How to Access the Key Operator Mode ..............................................................11-2
To Display the Key Operator Mode Screen ..............................................................11-2
[1] System Initial..................................................................................................11-4
[1] Time....................................................................................................................11-4
[2] Language ............................................................................................................11-6
[2] Copier Initial ...................................................................................................11-7
[1] Copy Mode..........................................................................................................11-8
[2] Density................................................................................................................11-9
[3] Magnification.....................................................................................................11-10
[4] Tray ...................................................................................................................11-11
[5] Output ...............................................................................................................11-12
[6] Non-Image Erase..............................................................................................11-14
[3] Preset Key....................................................................................................11-15
[1] Density..............................................................................................................11-15
[2] Magnification.....................................................................................................11-17
v
8
Applications
9
Paper &
Original Info
10
Maintenance
& Supplies
11
Key Operator
Mode
Page 8

Contents (continued)
Section 11: Key Operator Mode (continued)
[4] E.K.C. (Electronic Key Counter)...................................................................11-18
How to Access the EKC Setting Mode...................................................................11-19
[1] Change EKC Data ............................................................................................11-20
[2] EKC Data List ...................................................................................................11-22
[3] All Counter Reset..............................................................................................11-24
[4] EKC On/Off Setting...........................................................................................11-25
[5] Copy Limit Reached Effect................................................................................11-26
[5] Lock Job Memory.........................................................................................11-27
[6] Paper Type...................................................................................................11-28
[7] Panel Contrast .............................................................................................11-29
[8] Key Operator Data .......................................................................................11-30
[9] Weekly Timer ...............................................................................................11-31
How to Access the Weekly Timer Setting Mode ....................................................11-32
[1] Weekly Timer Setting........................................................................................11-33
[2] Weekly Timer Copier ON/OFF Time Set ..........................................................11-34
[3] Machine Working Day Individual Set ................................................................11-36
[4] Lunch Hour Off Function...................................................................................11-38
[5] Password Setting ..............................................................................................11-39
[10] Touch Panel Adjustment ............................................................................11-40
[11] Power Save................................................................................................11-41
[12] Memory Switch ..........................................................................................11-42
[13] List Print.....................................................................................................11-46
[14] Application Customize ...............................................................................11-47
[15] Density Shift...............................................................................................11-48
[16] KRDS Host.................................................................................................11-49
Index
vi
Page 9

Features of the Konica 7022/7130
• AE - Automatic Exposure
Automatically adjusts exposure to compensate for quality of the original.
• AMS - Automatic Magnification Selection
Automatically selects an appropriate magnification ratio when Paper Size is selected
manually. Automatically selected when the AMS key is touched.
• APS - Automatic Paper Selection
Automatically selects copy paper size to match the original documents.
• ATS - Automatic Tray Switching
Automatically switches tray to allow copying to continue without interruption if the
selected tray empties while copying is in progress.
• Auto Layout
The original image on the platen glass or in the document feeder is copied and centred
on a sheet.
• Auto Low Power
Automatically lowers the power after a specified period of copier inactivity.
• Auto Reset
Automatically resets to auto mode defaults after a specified period of copier inactivity.
• Auto Shut-Off
Automatically shuts off the main power after a specified period of copier inactivity.
• Booklet
Creates A4R or A4 size booklets from A4 size originals in 1a2 or 2a2 copy mode.
• Chapter
Starts chapter pages on the right side (front pages) of the finished document. Only
a
duplex mode (1
2 or 2a2) is compatible with this feature.
• Combination
Copies a fixed number (2, 4, or 8) of pages onto one sheet of copy paper to create a
draft copy of a multi-page report at the same time as saving paper.
• Copy Density
Manually selects up to 9 density levels.
• Copy Mode
Selects the desired simplex mode (1a1 or 2a1); or duplex mode (1a2 or 2a2).
• Counter List
Displays on the screen and prints the following data: total counter of the machine,
copier counter, FAX Tx/Rx counter, print counter and the date when the counter
started.
vii
Page 10

Features of the Konica 7022/7130 (continued)
•Density Shift
Shifts each of nine density levels in four density modes (Auto, Text, Photo, Increase
Contrast) to three levels lighter or three levels darker.
•Dual Page
Copies both pages of an open book or book-size sheet separately onto two A4 sheets
a
1 mode or separately onto each side of one A4 sheet in 1a2 mode. You can use
in 1
the Dual Page mode with the Front or Front/Back cover mode. The cover page(s) will be
scanned and copied normally before image division is performed on the other pages.
• Flip Side 2
1-2 Flip Side 2 arranges the even pages of the simplex originals upside down on the
reverse side of duplex copies.
Similarly, 2-1 Flip Side 2 rearranges the reverse side of duplex originals which reads
upside down to make normal simplex copies.
• Folded Original
This feature sets the RADF to accept folded originals.
• Frame/Fold Erasure
Erases border and/or fold image area using Frame (1-15mm), Fold (1-30mm), Top (1100mm), and/or Bottom (1-100mm).
• Image Insert
Stores pages in memory from the platen glass, and inserts the pages into a document
copied from the document feeder.
•Image Shift
Creates or removes a binding margin at the top, bottom, right and left edges (shift amount
from -250mm ~ +250mm, in 1mm increments); reduces image to prevent image loss
(reduce & shift amount from -250mm ~ +250mm, in 1mm increments).
• Interrupt Copying
Interrupts copying-in-progress to perform an urgent copy, using any of the copier
features for the interrupt job.
• Job List
Displays the Job List Screen to view the current machine status, changes the operation
order of reserve jobs, or deletes the unused reserve job.
• Job Memory
Programs up to 15 jobs and recalls each job by job number, as needed. All compatible
platen glass functions can be programmed into Job Memory directly after they are
selected.
• Lens Mode (FIXED, Zoom)
Selects fixed ratios, three reduction, three enlargement, and three user-set ratios.
Zoom ratios can be selected from 25% ~ 400% in 1% increments.
viii
Page 11

Features of the Konica 7022/7130 (continued)
• Machine Status Confirmation
Displays the current machine status on LCD for confirmation.
• Manual Shut-off
Shuts off the machine’s power when pressing [POWER SAVER ON/OFF] on the control
panel.
• Mixed Original
Copies mixed size originals from the document feeder in APS or AMS mode. APS
automatically selects the paper size of each original. AMS mode allows you to select
one paper size for all originals.
• Non-Image Area Erase
When copying from the platen glass when the document cover is open, copies only the
image area and not the exposed area of glass, which would otherwise copy as black.
• Non-Standard Size
Identifies the special original size which the 7022/7130 cannot detect, in order to select
the optimal paper size for copying or printing.
•OHP
Copies onto transparency film and interleave blank or copied paper for each original
copied.
• Output Mode for Machine with FS-107 Finisher Installed:
Non-Sort, Sort, Staple, and Group modes using the two exit trays (or three/four exit
trays including optional FT-107 tray)
Selects an output tray and output mode on the Output Mode popup menu.
• Output Mode for Machine with IT-101 Inner Tray Installed:
Non-Sort, Rotation sort, Rotation group, and Group modes using the two exit trays
Selects an output tray and output mode on the Output Mode popup menu.
• Output for Machine with no Finisher Installed:
Non-sort, Rotation sort, Rotation group, and Group modes
Selects an output mode on the Output Mode popup menu.
• Paper Capacity
Total 1,050 sheets in the machine with DK-109 desk, including a 50-sheet Multi-sheet
bypass tray.
Total 2,050 sheets in the machine with DB-210 drawer, including four 500-sheet trays
and a 50-sheet Multi-sheet bypass tray.
Total 2,550 sheets in the machine with DB-410 drawer, including a 1,500-sheet tray and
a 50-sheet Multi-sheet bypass tray.
•Platen Memory
Scans documents into memory from the platen glass and/or the document feeder and
inserts the pages into another document copied from the document feeder. If an
incompatible function is selected in this mode, the latter function will not be selected,
and an Error message will be displayed.
ix
Page 12

Features of the Konica 7022/7130 (continued)
• Power Saver
Automatically turns off all but nominal power supply after a specified period of copier
inactivity, for optimal efficiency. Power is returned after a brief warm up period by
pressing the power switch on the control panel.
•Proof Copy
To ensure correct output before running multiple copies, run a proof copy by touching
PROOF COPY on the Check Screen.
• Repeat
Selects the horizontal image area across the page, and repeats it down the page as
many times as the repeat width setting (10 ~ 150mm) permits in manual or auto.
• Reserve
Scans in subsequent copy jobs while the machine is busy printing or copying.
• Reverse Image
Reverses the image from black-on-white to white-on-black or vice versa.
•Rotation
Rotates the image before copying when the portrait/landscape orientation of the original is different from the orientation of the copy paper.
• Rotation Exit (Rotation Sort / Rotation Group)
When IT-101 Inner Tray or no Finisher is installed, Rotation Exit alternately switches the
horizontal and vertical orientation of each sorted set as it outputs to the exit tray. Be
sure to load both A4 and A4R in separate trays (including the Multi-sheet bypass tray)
before selecting this feature.
• Sheet/Cover Insertion
Insert up to 15 blank or copied sheets from any tray including the Multi-sheet bypass
tray, or inserts blank or copied front and back covers from any tray including the Multisheet bypass tray to enhance the presentation of multi-page documents.
•Stamp
Prints watermark, regular stamp, date/time, page number, and numbering onto the
output copies to enhance the presentation and usefulness of the copies.
•Staple
Selects the stapling position and number of staples.
• Text/Photo Enhance
Enhances photo image in Photo mode, regular image in Text/Photo mode, text image in
Text mode, lighter image in Increase Contrast mode.
• Userset Density (USERSET 1, USERSET 2)
Outputs up to 16 density samples on a total of 4 pages that display 4 samples per page,
then programs the desired density under USERSET 1 and/or USERSET 2.
x
Page 13

Features of the Konica 7022/7130 (continued)
• Weekly Timer
Can be set according to the needs of each work environment. Turns main body power
Off/On daily or weekly, during lunch time, on holidays, and also enables the Timer
Interrupt mode, which allows temporary use of the machine even when the machine is
in the daily, weekly, or holiday Off mode.
xi
Page 14

Page 15

Basic
1
Safety
Information
2
Machine
Information
3
Copying
Operations
4
Job Memory
&Help Mode
5
Trouble-
shooting
6
Machine
Specifications
Page 16

Page 17

Safety Information
1
1
Safety
Safety
Information
Information
1
Caution Labels and Indicators ................................................................ 1-2
Requirements for Safe Use ................................................................ 1-4
Precautions for Installation and Use
Page 18
Caution Labels and Indicators
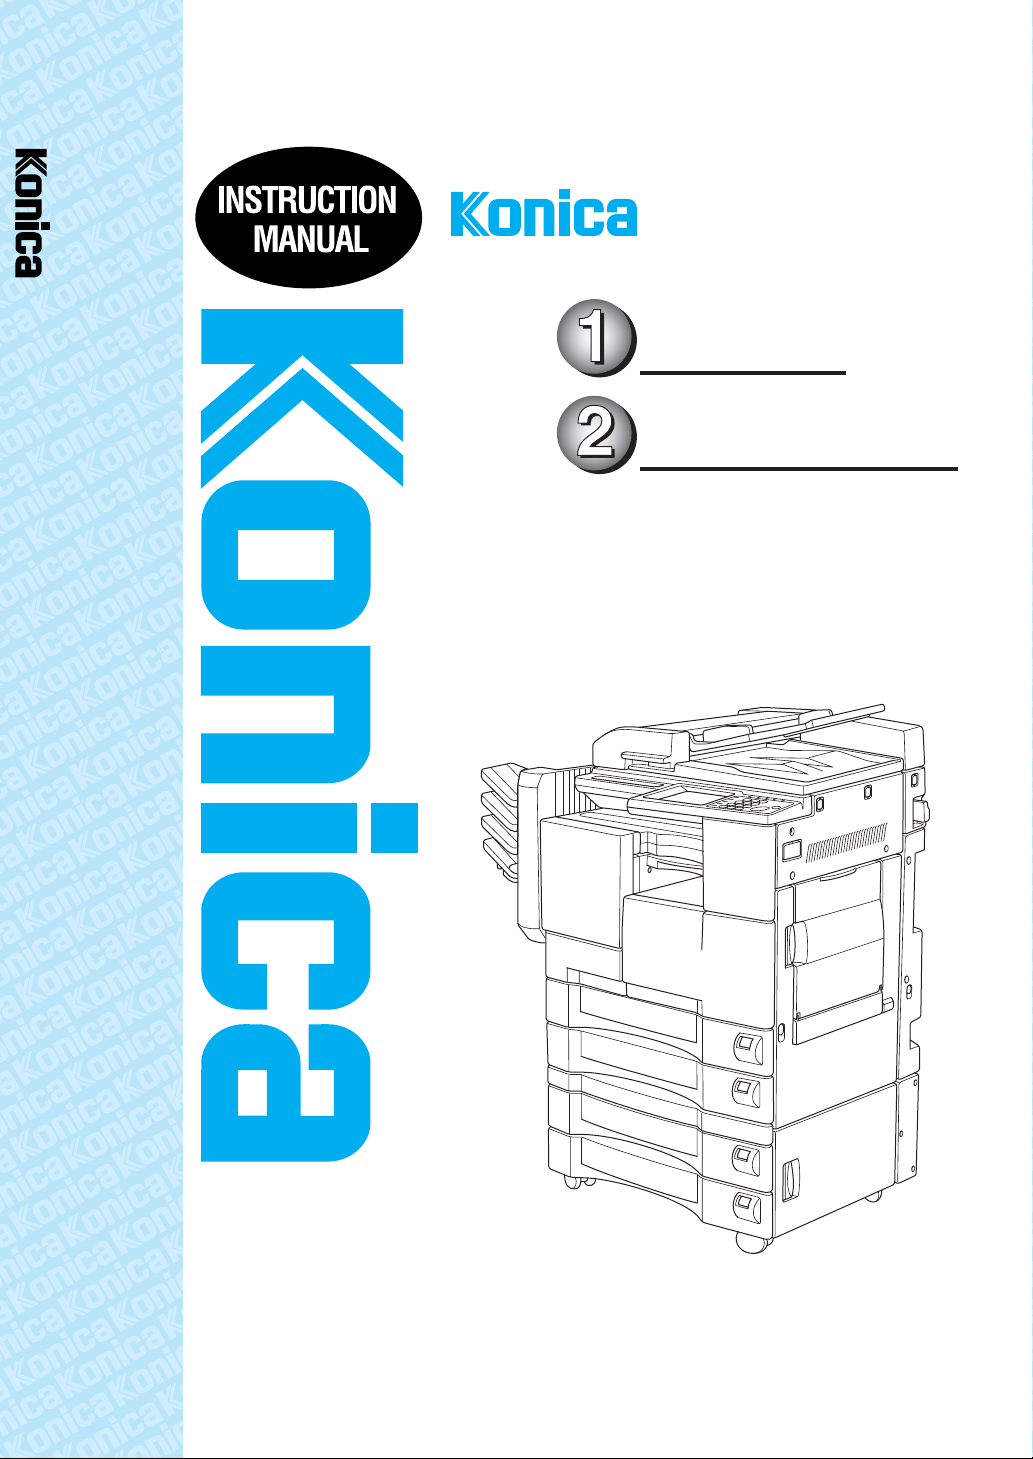
The caution labels and indicators are attached to the machine areas, as shown below,
where you are advised to pay special attention to avoid any dangerous situations or
serious injury.
WARNING
This area generates
high voltage. If
touched, electrical
shock may occur. DO
NOT TOUCH!
CAUTION
The fixing unit is
very hot.
To avoid getting
burned, DO NOT
TOUCH!
CAUTION
Burns or injury may occur from touching the areas detailed in
the caution labels and caution indicators. Do not remove
caution labels or indicators. If any caution label or caution
indicator is soiled, please clean to make legible. If you cannot
make them legible, or if the caution label or indicator is
damaged, please contact your service representative for
replacement labels.
1-2
Page 19
Caution Labels and Indicators (continued)
The following indicators are used on the caution labels or in this manual to categorize
the level of safety cautions.
DANGER:
Action liable to cause death or serious injury.
WARNING:
Action likely to cause death or serious injury.
CAUTION:
Action liable to cause minor injury, machine trouble or physical damage.
If you find any of these indicators when removing jammed paper, adding toner, or
reading the manual, be sure to follow the information.
Reminder!
If the safety cautions in the manual become illegible due to soilage, etc.,
please procure a new copy from your service representative.
1
Safety
Information
1-3
Page 20

Requirements for Safe Use
To ensure your safe use of the machine, you are required to observe the following
precautions without fail for the machine’s power source and during installation and
routine handling. Be sure to read and observe them.
Power Source
CAUTION: Plug Socket
• A socket is limited in capacity. Use only a power source with the correct rating for the
machine; otherwise, hazardous situations such as smoking or overheating may occur.
See the following list to match the power supply and power consumption:
a) 230V / 50Hz: More than 15A
b) 230V / 60Hz: More than 15A
• Avoid multiple connections in the same outlet. Do not use multiple outlet adaptors.
CAUTION: Power Plug and Cord
• Be sure to insert the power plug firmly into the power socket. Otherwise an accident
may occur as a result of smoking or overheating. If the inserted power plug is loose in
the socket, even after it has been positively inserted, disconnect the plug and contact
your electrical contractor.
• For plug cable equipment, the outlet must be near the equipment and easily
accessible.
• Do not bend or crush the power cord. If your copier power cord is bent or damaged in
any way, contact your service representative immediately. Do not attempt to repair it
yourself, and do not continue to operate the copier. A damaged power cord may result
in overheating, short circuit, or fire.
• Do not bundle or coil the power cord of the copier. Otherwise an accident may occur
as a result of overheating or fire.
CAUTION: Connecting Multiple Loads to One Outlet Prohibited
Never connect multiple loads to one outlet using a multi-outlet extension cord or branched
socket. Otherwise an accident may occur as a result of overheating or fire.
CAUTION: Extension Cord
An extension cord must never be used with this machine.
1-4
Page 21
Requirements for Safe Use (continued)
Environment
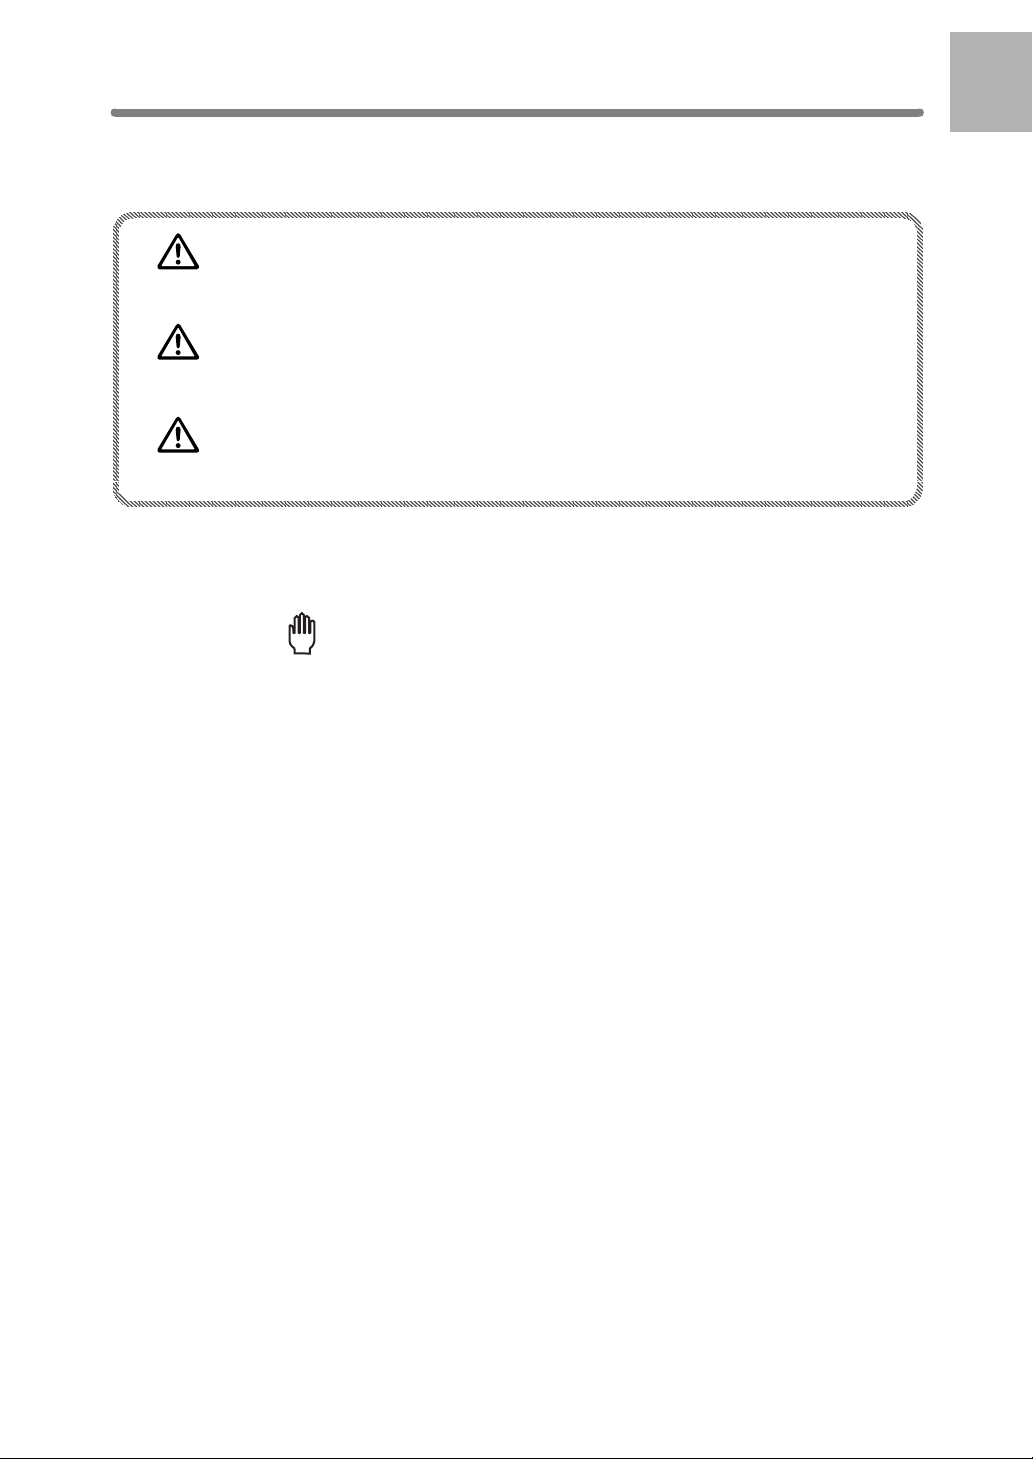
CAUTION: Prevention of Fire
Do not install near flammable materials, curtains or
volatile combustibles, that can catch or cause fire.
CAUTION: Prevention of Short Circuit
Do not install the copier where it could be splashed
with rain water or water from a tap, to avoid a shor t
circuit.
CAUTION: Temperature and Humidity
• Keep away from direct sunlight, heat sources such
as stoves, cool air from an air conditioner and hot
air from a heater.
• Avoid any environment that is outside the range
shown below:
10 to 30°C in temperature
10 to 80% in humidity
1
Safety
Information
CAUTION: Ventilation
• Install the machine in a well-ventilated place.
• Keep away from dust or corrosive gases. These materials may cause poor image quality.
• During use, the machine generates ozone in an insufficient amount to cause any
hazard to the human body.
However, if the machine is used in a poorly ventilated room and many copies are
made or more than one copier is used at the same time, an odor may be detected.
Ensure adequate ventilation for a comfortable working environment.
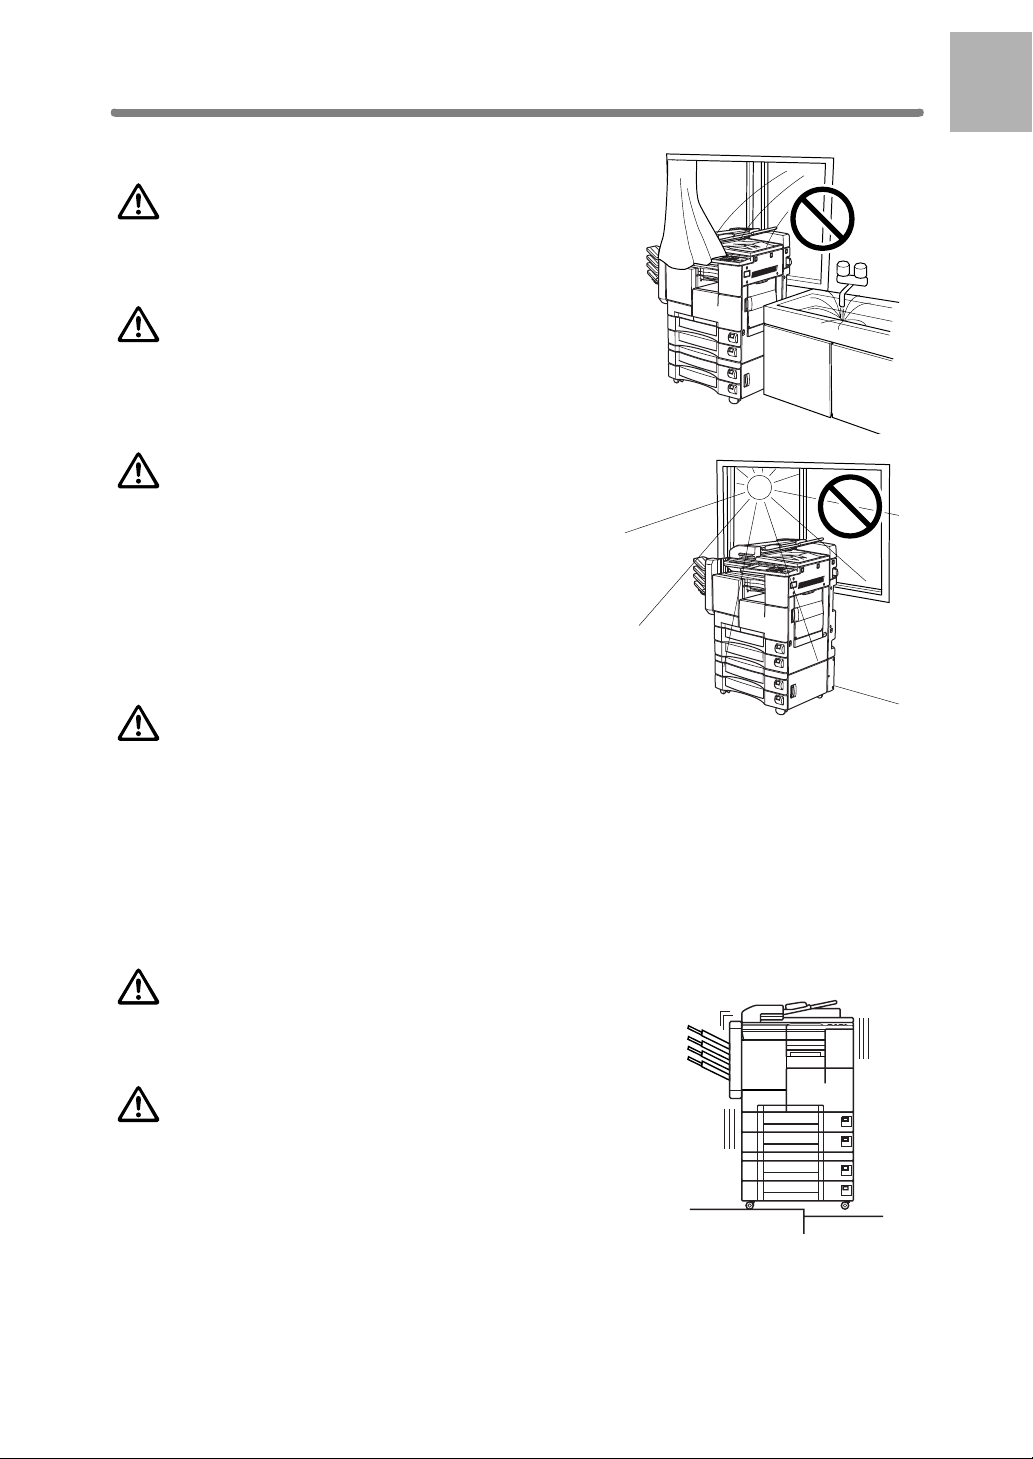
CAUTION: Vibration
Do not install on a floor which is subject to vibration or is
not level.
CAUTION: Transportation
Be sure to contact your service representative when
moving or transporting the machine. If you move the
machine, trouble may be caused by vibration.
1-5
Page 22
Requirements for Safe Use (continued)
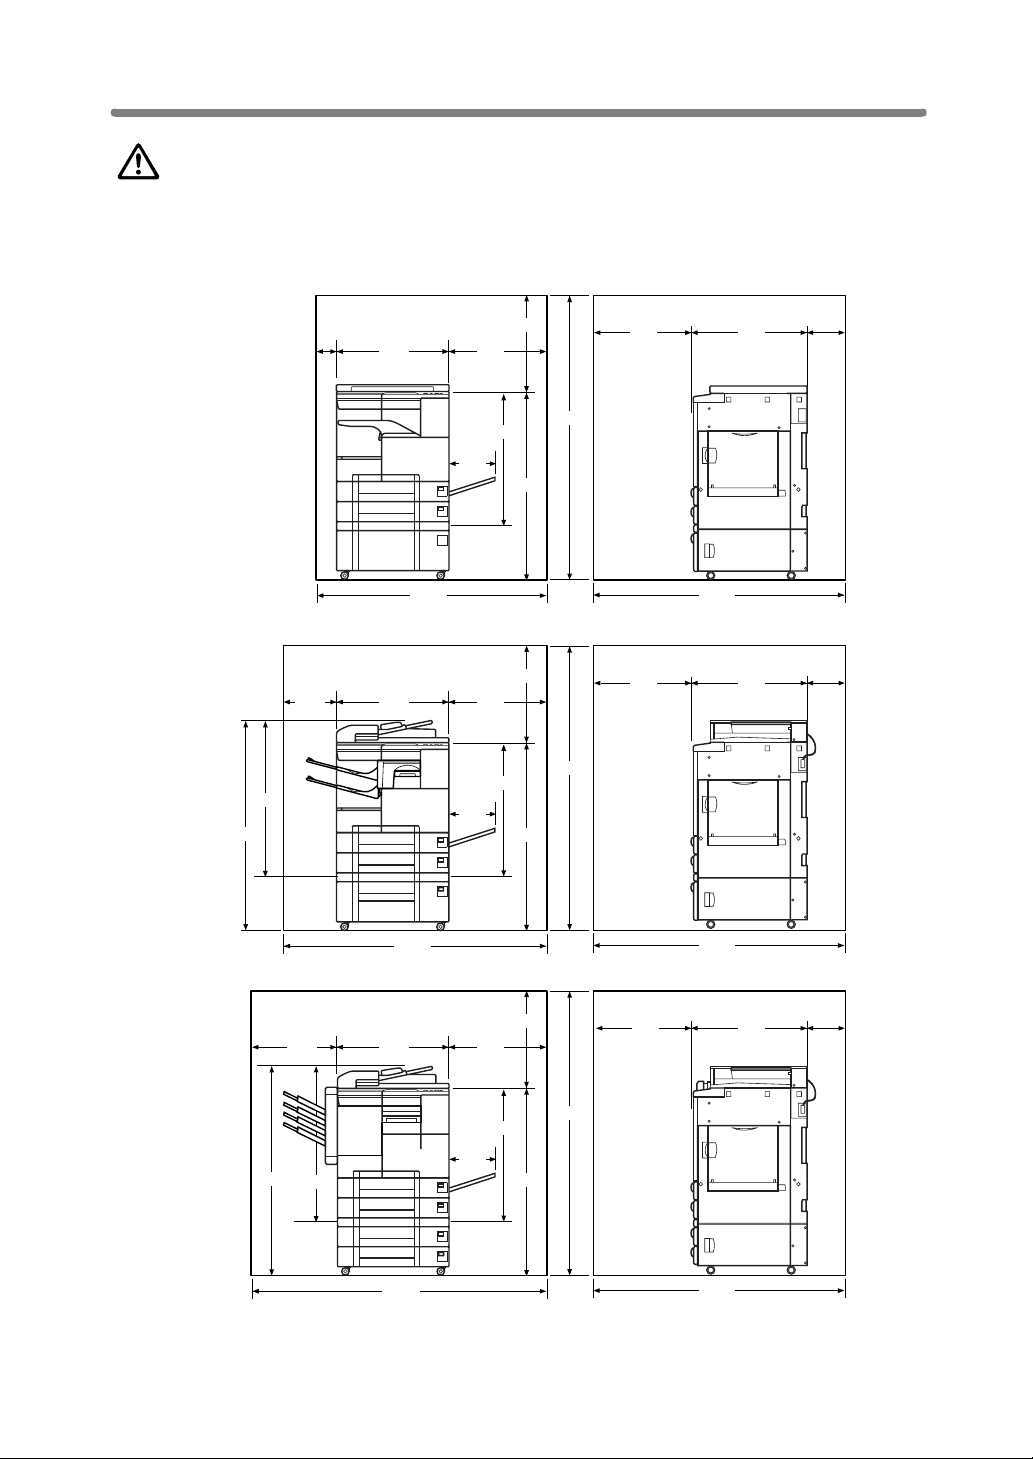
CAUTION: Installation Space
Allow sufficient space to facilitate copy operation, changing parts, and periodic
inspection. Leave an adequate space behind the machine to let hot air out from the rear
fan.
Unit: mm
1172
875
252
100
590
590
1190
550
500
730
245
500
730
245
1577
1027
Main body + DK-109
550
1577
1027
550
550
1345
595
595
200
200
1-6
1172
450
875
1342
Main body + DF-314 + IT-101 + DB-410
550
590
1540
Main body + DF-314 + DB-210 + FS-107 + FT-107
245
500
730
1577
1027
550
1345
1345
595
200
Page 23
Requirements for Safe Use (continued)
Precautions for Routine Handling
WARNING: High Voltage
DO NOT TOUCH the high voltage parts indicated with WARNING label or as described
in the manual.
CAUTION: Actions in Response to Troubles
• If the Service Call screen is displayed and copier operations cannot be continued,
stop the operation to prevent any unexpected accident. Write down the report code
(stated on the 2nd line of the message), then switch off the copier and disconnect
from the power socket. Contact your service representative and inform them of the
report code.
• Do not touch high temperature parts indicated with CAUTION labels or as described
in the manual.
• Do not touch the inside of the machine for any purpose other than removing jammed
paper or adding toner.
• If machine repair is necessary, be sure to contact your service representative. Never
attempt to repair it by yourself.
• If any abnormal sound, smell or smoke comes from the machine, immediately stop
using it, turn off the power switch, disconnect the power plug and contact your service
representative.
• If the breaker trips or the fuse blows, turn off the power switch, reset the breaker or
the fuse, and turn on the machine. If the same situation occurs again, contact your
service representative.
1
Safety
Information
• Ensure the replacement fuse conforms with the rating of the power source. Never use
a fuse with an incorrect rating.
CAUTION: Prevention of Fire
Do not use volatile combustibles, such as thinner or alcohol, near the machine.
CAUTION: Prohibition of Machine Modification
Do not modify or remove any parts by yourself.
CAUTION:Prevention of Machine Troubles
• Do not drop small metallic objects, such as paper clips or
staples, inside the machine.
• Do not place any heavy or hard objects such as a vase,
books or ornaments on the machine.
1-7
Page 24

Requirements for Safe Use (continued)
CAUTION: Recommendation of Periodic Check
Be sure to periodically check the following:
(1) The main cord or the power plug does not generate abnormal heat.
(2) The power plug is not inserted loosely or the cord is not cut or scratched.
(3) The grounding wire is correctly connected.
(4) The power plug or the power outlet is not covered with dust.
If you find anything abnormal with the above items, stop using the machine and contact
your service representative.
CAUTION: Toner
• Keep the toner cartridge away from children. The toner is nontoxic; however if you inhale
or it makes contact with eyes by accident, flush with water and seek medical advice.
• Do not throw the empty toner cartridge into a fire. If it is thrown into a fire the toner
may ignite and cause a dangerous situation.
CAUTION: Paper
Check copy paper to be sure it conforms to the specifications outlined in Section 9.
• Do not use paper with any staples left in, or paper that conducts electricity (silver, car-
bon, etc.), otherwise an accident may occur as a result of fire.
• To avoid machine trouble, do not use heat-sensitive paper, paper that conducts elec-
tricity (silver, carbon, etc.), or coloured OHP film.
CAUTION: Power Saver and Weekly Timer
• In Power Saver mode, the copier is still connected to the main power supply and
power is still applied to certain areas of the machine. To avoid any unexpected
troubles, turn the power OFF when not using the copier for long periods of time.
• When the Weekly Timer function is operating, turning power OFF will disable the
function.
CAUTION: Fixing Unit
The internal fixing unit is very hot. To avoid getting burned, DO NOT TOUCH. Be
careful when withdrawing the fixing unit.
WARNING: Drum Unit
The internal drum unit generates a high voltage.
To avoid an electrical shock, DO NOT TOUCH.
CAUTION: Disposal of Copier
Do not dispose of this copier yourself. Contact your service representative, who can
arrange for its safe disposal.
If you change the place of installation, please contact your service representative.
1-8
Page 25

Requirements for Safe Use (continued)
CAUTION: Paper Capacity for the Exit Tray
The exit tray capacity is max. 100 sheets. If a copy run of more than 100 is required, be
sure to remove the copies from the exit tray before the maximum capacity is reached.
Failure to do so will cause the copier to jam.
CAUTION: Paper Capacity for the IT-101 Inner Tray
The IT-101 Inner Tray is equipped with two exit trays.
Select an exit tray and output mode on the Output Mode popup menu.
To prevent paper misfeed, do not exceed the paper capacity of the Inner tray.
When the total number of copies in the copy run exceeds the capacity stated in Section
9, be sure to unload the exit tray while the copier is still copying. Failure to do so will
cause the copier to jam.
CAUTION: FS-107 Finisher Paper Capacity
The FS-107 Finisher is equipped with two exit trays, which may be increased to three or
four trays by installing the optional FT-107 Finisher Tray(s).
Select an exit tray and output mode on the Output Mode popup menu.
To prevent paper misfeed, do not exceed the paper capacity of the Finisher.
When the total number of copies in the copy run exceeds the capacity stated in Section
9, be sure to unload the exit tray while the copier is still copying. Failure to do so will
cause the copier to jam.
1
Safety
Information
1-9
Page 26

Page 27

Machine Information
Machine Configuration, Turning On the Power
2
Machine Configuration............................................................................ 2-2
Turning On the Power Switch............................................................. 2-9
Loading Paper ...................................................................................... 2-15
Changing Paper Size of Main Body Trays and DB-210 Trays........... 2-19
and Loading Paper
2
Machine
Information
Machine
Configuration
Turn On/Off
the Power
Loading
Paper
Changing
Paper Size
Page 28

Machine Configuration
External Machine Items
1 Platen cover (option)
18 LCD touch screen
17 Power switch
16 Finisher (FS-107)
(option)
15 Front door
of Finisher
14 Front door
of Main body
13 Main power switch
Left rear side
of Main body
10 Tray 3
11 Tray 4
19 Control panel
2 RADF (option)
3 Work table (Option)
4 Key counter
(Option)
5 Multi-sheet
bypass tray
6 Right side door
of Main body
7 Tray 1
8 Tray 2
9 Right side door
of Drawer base
DB-210
2-2
10 Tray 3
DB-410
9 Right side door
of Drawer base
12 Storage
DK-109
Page 29

Machine Configuration (continued)
1 Platen cover (option) covers documents to be copied and holds them in place.
2 RADF (Reversing Automatic Document Feeder) (option) automatically feeds
multiple originals one at a time to the platen glass for copying.
3 Work table (option) provides a convenient workspace for documents both before
and after copying.
4 Key counter (option) manages the number of copies made on the machine.
5 Multi-sheet bypass tray used for small quantity copying onto plain paper or special
paper.
6 Right side door of Main body opens to allow removal of mishandled paper or
cleaning the transfer/separator electrode wire.
7 Tray 1 (universal tray) is user-adjustable and holds 500 sheets from B4 to A5R.
8 Tray 2 (universal tray) is user-adjustable and holds 500 sheets from A3 to A5R.
9 Right side door of Drawer base opens to allow removal of mishandled paper.
10 Tray 3 (DB-210 universal tray) (option) is user-adjustable and holds 500 sheets A3
to A5R.
10 Tray 3 (DB-410 fixed tray) (option) is initially fixed at A4. It can be reset by service
8.5"x11", 8.5"x11"R, B5, B5R, or A4R.
11 Tray 4 (DB-210 universal tray) (option) is user-adjustable and holds 500 sheets
from A3 to A5R.
12 Storage accommodates copy paper or copy materials.
13 Main power switch turns machine power ON/OFF to operate it as copier/scanner/
printer/facsimile.
14 Front door of Main body opens to the internal copier to allow clearing of mishan-
dled paper, replenishing of toner or cleaning the corona wire.
15 Front door of Finisher opens to the internal finisher to allow clearing of mishan-
dled paper, or inserting new staple cartridge.
16 FS-107 Finisher (option) sorts, staples and groups into finished sets.
17 Power switch turns copier power On/Off when pressed.
18 LCD Touch screen displays interactive operation screens.
19 Control panel controls copier operations.
2
Machine
Information
Machine
Configuration
Turn On/Off
the Power
Loading
Paper
Changing
Paper Size
2-3
Page 30
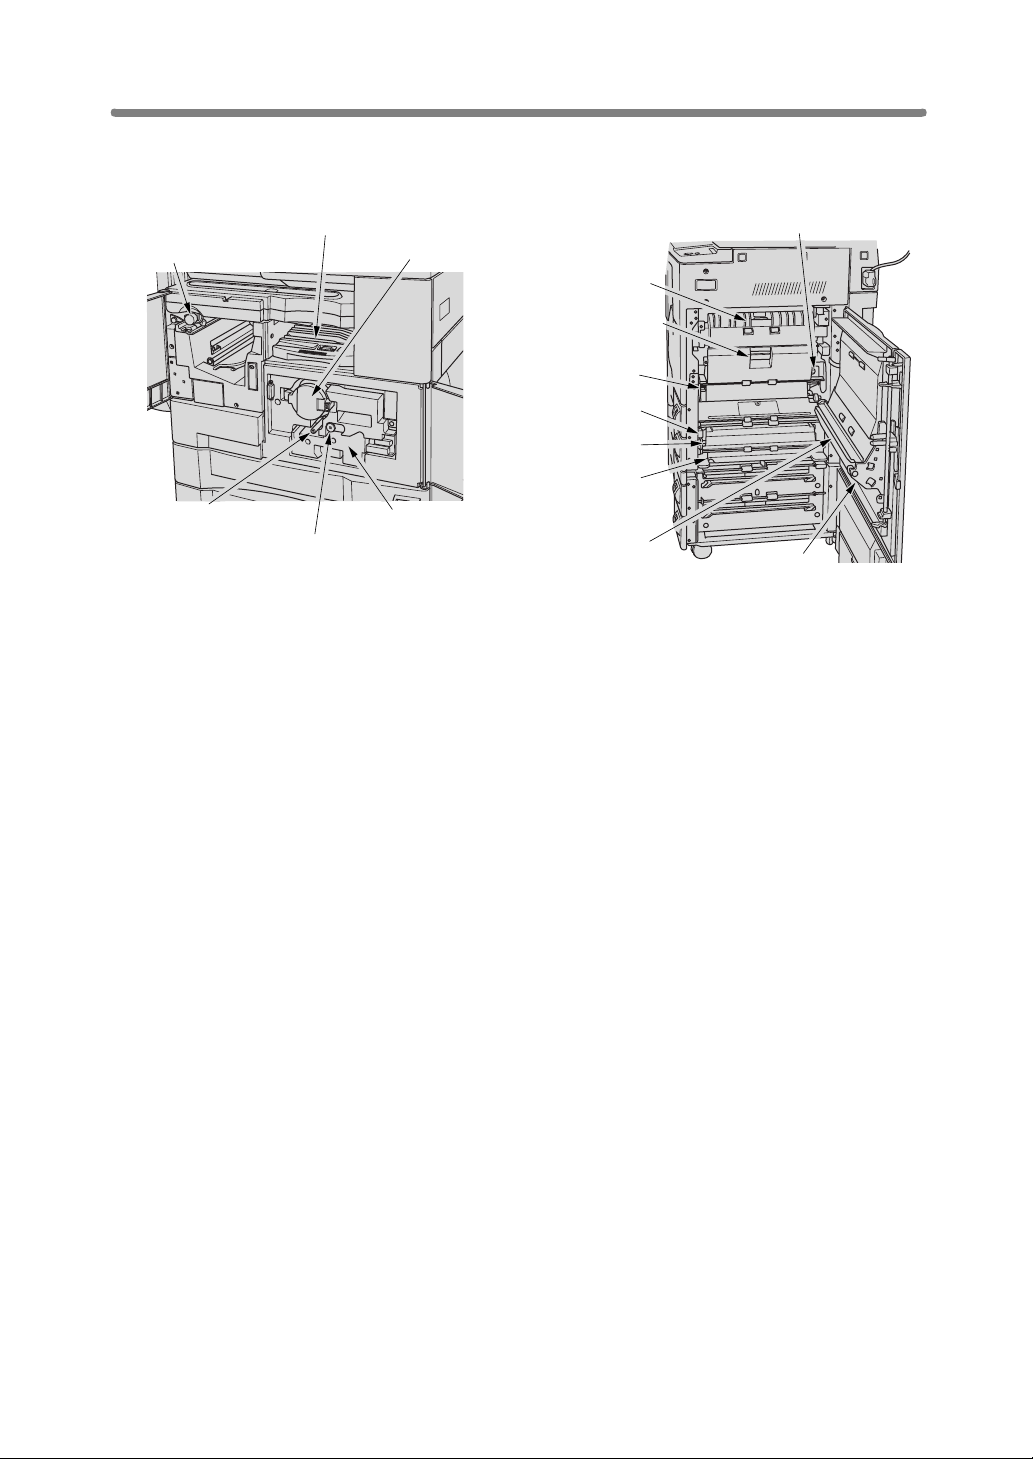
Internal Machine Items
2 Finisher conveyance unit
1 Finisher knob
3 Toner bottle cover
Machine Configuration (continued)
7 Transfer/Separator wire
cleaning lever
8 Fixing unit guide 5
9 Conveyance
unit cover 6
10 Lever 1
11 Lever 2
12 Cover 3
13 Lever 7
4 Writing unit glass
cleaning knob
5 Corona wire cleaning knob
6 Developing unit
14 ADU
15 Lever 4
1 Finisher knob can be turned to ease removal of mishandled paper in the Finisher.
2 Finisher conveyance unit can be opened to ease removal of mishandled paper in
the Finisher.
3 Toner bottle cover is to be opened when supplying toner.
4 Writing unit glass cleaning knob is withdrawn to clean the writing unit glass.
5 Corona wire cleaning knob is withdrawn to clean the corona wire.
6 Developing unit prints images to the drum, and needs to be replaced periodically.
7 Transfer/Separator wire cleaning lever forms the copy image.
8 Fixing unit guide 5 fuses the toner onto the copy paper, and is to be opened for
removal of mishandled paper.
9 Conveyance unit cover 6 passes the paper through the drum unit, and is to be
opened for removal of mishandled paper.
10 Lever 1 can be opened for removal of mishandled paper.
11 Lever 2 can be opened to release the pressure rollers for removal of mishandled
paper.
12 Cover 3 can be opened for removal of mishandled paper.
13 Lever 7 can be opened for removal of mishandled paper.
14 ADU is used for stackless duplex copying.
15 Lever 4 can be opened for removal of mishandled paper in ADU.
2-4
Page 31

Standard/Optional Equipment
DF-314 Reversing Automatic
FT-107 Finisher Tray
FS-107 Finisher
IT-101 Inner Tray
Document Feeder
Machine Configuration (continued)
CV-109 Platen Cover
MU-403/
MU-404/
MU-405
Memory Unit
2
Machine
Information
Machine
Configuration
Turn On/Off
the Power
Loading
Paper
Changing
Paper Size
Main body
IP-011 Image
Processor
MU-403/
MU-404
Memory Unit
IP-422 Image
Processor
MU-411 Memory Unit
PS-343 PostScript 3
DK-109 Desk Unit DB-210 Drawer Base Unit DB-410 Drawer Base Unit
FK-102 Fax Kit
2-5
Page 32

Machine Configuration (continued)
Basic Screen
The Basic Screen displays when copying operation becomes available after warm-up.
4 RESERVE key
3 Message area
2 Icon area
1 SETTING key
14 MODE setting area
5 JOB LIST key
6 Job No. icon
7 COUNT/SET
indicator
8 Memory indicator
9 SCAN key
10 Paper size/type
indication area
11 SIZE setting area13 DENSITY setting area
12 LENS setting area
1 SETTING key is selected when the screen displays basic copying conditions.
Touch this key to return to the current print job settings when making selections for a
reserve job.
When any trouble occurs during a reserve setting, “SETTING” changes to flashing
“JAM” or “ADD PAPER” according to the problem. See p. 5-7 to p. 5-9.
2 Icon area displays the following icons.
: ADD TONER icon is displayed when toner supply becomes low.
: PM CALL icon is displayed when preventive maintenance is due.
: FINISHER MODE icon is displayed when a
specific finisher mode is selected. When Staple mode is selected, this icon indicates
the number of staples and staple position.
: ROTATION icon is displayed when the Rotation is automatically functioning.
3 Message area displays the machine status and procedure required at that time.
4 RESERVE key is touched to select copy conditions for a subsequent job while the
current scan/print job is in progress.
5 JOB LIST key is touched to view the current job status, to change the printing order
of reserve jobs, or to cancel printing a reserve job.
6 Job No. icon is displayed when [START] is pressed to start a reserve job
of that number.
Your service representative can set the Job No. icon to display the page count while
scanning the originals, and also the copy count when printing job starts, instead of the
job number.
7 COUNT/SET indicator indicates the print quantity entered from the control panel
keypad, and also indicates the print count on the left of the set count while printing.
2-6
Page 33

Machine Configuration (continued)
8 Memory indicator indicates the remaining memory available for the next operation.
9 SCAN key is touched to start scanning originals when any copy condition which
requires Store mode is selected, or Store mode is directly selected on the Application Selection Screen.
10 Paper size/type indication area displays the paper size loaded in each tray and
paper type of the selected tray under the “SIZE” indication, if specified by the Key
Operator.
11 SIZE setting area is used to select the desired paper size or APS.
12 LENS setting area is used to select the desired magnification ratio.
13 DENSITY setting area is used to specify the desired exposure level.
a
14 MODE setting area is used to select the copy mode (1
1, 1a2, 2a1, or 2a2).
2
Machine
Information
Machine
Configuration
Turn On/Off
the Power
Loading
Paper
Changing
Paper Size
2-7
Page 34

Machine Configuration (continued)
Control Panel Layout
12345678910
11121314151617
1 LCD TOUCH SCREEN displays machine and copying status, help information,
interactive screens, and touch keys for selecting all functions.
2 CHECK displays a screen showing all settings that are selected for the current job.
3HELP displays a screen with help for the currently selected function, and access to the
Key Operator Mode Screen.
4DATA blinks while receiving print data in printer mode, then lights after completing it.
5 KEYPAD enters numeric values.
6 SCAN/PRINT switches the machine operation mode to scanner and printer in turn.
7FAX switches the machine operation mode to facsimile.
8COPY switches the machine operation mode to copy.
9 INTERRUPT stops copying/facsimile/printing/scanning in progress to allow copying from
the platen glass.
10 POWER SAVER ON/OFF
inactive.
11 STOP/CLEAR stops the copying sequence; deletes the stored memory.
12 START activates copying or scanning.
13 [#] (CLEAR QTY.) allows resetting of print quantity.
14 [✽] (COUNTER) displays the Counter List Screen or accesses programming modes for
setting special functions.
15 AUTO RESET restores copier to default settings or to Key Operator settings.
16 OUTPUT displays screens for selecting an Exit tray for Sort/ Staple/ Group mode in the
machine with Finisher, selecting an Exit tray for E-SORT+sort/ E-SORT+group/ Group
mode in the machine with Inner tray, or selecting E-SORT+sort/ E-SORT+group/ Group
mode in the machine without Finisher.
17 APPLICATION displays a menu screen for selecting special application functions, or
displays screens for selecting Job Store/ Job Recall functions.
activates power-saving mode for times when the copier is
2-8
Page 35

Turning On the Power Switch
To Turn On the Power
1.
Turn ON the main power switch.
The main power switch is located on the rear left side of the main body.
Reminder!
When turning the main power switch OFF then ON, wait for 3 seconds or
longer before turning it ON again; otherwise the copier may not function normally.
2.
Turn ON the power switch.
The power switch is located on the far left side of the control panel.
2
Machine
Information
Machine
Configuration
Turn On/Off
the Power
Loading
Paper
Changing
Paper Size
Warm-up takes approximately 30 seconds.
2-9
Page 36

Turning On the Power Switch (continued)
3.
The Basic Screen will be displayed.
The message on the Basic Screen will inform you that copying job is now available.
DETAILS
• When the initial settings are changed by the Key Operator, the modified
conditions will be displayed on the Basic Screen.
• When “Enter E.K.C. password” is displayed, enter your password to use
the machine.
2-10
Page 37

Turning On the Power Switch (continued)
To Turn Off the Power
1.
Turn OFF the power switch.
The power switch is located on the far left side of the control panel.
The touch screen and all the LEDs on the control panel will go out.
2.
Turn OFF the main power switch.
The main power switch is located on the rear left side of the main body.
2
Machine
Information
Machine
Configuration
Turn On/Off
the Power
Loading
Paper
Changing
Paper Size
DETAILS
• When using the machine as facsimile or printer, do not turn off the main
power switch.
• When the machine is using the Weekly Timer function, turning off the
main power switch will deactivate the function.
2-11
Page 38

Turning On the Power Switch (continued)
Reducing the Power in Standby Mode (Auto Low Power)
This function automatically lowers the power after a specified period (initially 1 minute)
of copier inactivity.
turn orange to show copier inactivity, and all other LEDs except those of the operation mode
keys and the LCD screen will be turned off.
If the machine has no options, the power will be turned off after 1 minute of copier inactivity, as the Auto Shut-Off function activates at the same time.
To start a copying job, press any key on the control panel or touch the LCD screen.
The Auto Low Power will be released and the LCD screen recovers brightness.
The [POWER SAVER ON/OFF] LED will be lit, the [START] LED will
HINT
The Auto Low Power function can be set to 1 minute/ 5 minutes/ 10 minutes/
15 minutes/ 30 minutes/ 60 minutes/ 90 minutes/ 120 minutes/ 240 minutes
in the Key Operator mode. For the Key Operator setting, see p. 11-41.
DETAILS
• If the Auto Shut-Off function activates at the same time, the power will be
turned off without the LCD screen becoming dark.
• The LCD screen will not become dark during a duplex copying job or
when the Jam Position Screen is displayed.
Shutting Off Automatically (Auto Shut-Off)
This function automatically shuts off the power after a specified period (initially 1 minute
for a machine with no options / 15 minutes for the machine with options) of copier
inactivity.
The [POWER SAVER ON/OFF] LED will be lit. All other LEDs and the LCD screen will be
turned off.
To start a copying job, press [POWER SAVER ON/OFF].
Copying will become available.
HELP
CHECK
PPLICATION
OUTPUT
UTO RESET
DATA
2 31
564
897
0
CLEAR QTY.
FAX
INTERRUPT
START
COPY
POWER SAVER
STOP/CLEAR
ON / OFF
HINTS
• The Auto shut-off can be set for 1 minute/ 5
minutes/ 15 minutes/ 30 minutes/ 60 minutes/
90 minutes/ 120 minutes/ 240 minutes in the
Key Operator mode. For the Key Operator
setting, see p. 11-41.
• When “Timer interrupt mode / Enter password”
is displayed after pressing [POWER SAVER
ON/OFF], see p. 7-2 and follow the procedure
to continue.
2-12
Page 39

Turning On the Power Switch (continued)
Shutting Off / Reducing the Power Manually
Follow the procedure below to shut off or reduce the power manually.
1.
Press [POWER SAVER ON/OFF].
DATA
HELP
CHECK
PPLICATION
OUTPUT
UTO RESET
2.
The Power save mode will be activated.
2 31
564
897
0
CLEAR QTY.
The machine is initially set to automatically activate the Low Power mode.
The [POWER SAVER ON/OFF] LED will be lit, the [START] LED will turn orange to
show copier inactivity. All other LEDs except those of the operation mode keys and the
LCD screen will be turned off.
DETAILS
The Key operator can set the machine to activate the Shut-Off mode when
[POWER SAVER ON/OFF] is pressed. See p. 11-42 to p. 11-45.
FAX
INTERRUPT
START
COPY
POWER SAVER
STOP/CLEAR
ON / OFF
2
Machine
Information
Machine
Configuration
Turn On/Off
the Power
Loading
Paper
Changing
Paper Size
To release the mode, press [POWER SAVER ON/OFF].
The machine will be available for copying operation.
HELP
CHECK
PPLICATION
OUTPUT
UTO RESET
DATA
2 31
564
897
0
CLEAR QTY.
FAX
INTERRUPT
START
COPY
POWER SAVER
STOP/CLEAR
ON / OFF
2-13
Page 40

Turning On the Power Switch (continued)
Entering an EKC Password (EKC)
The Electronic Copy Monitor (EKC) allows the Key Operator to monitor all copying
activities by controlling EKC password accounts. Copy quantity limits for specific
accounts can be set.
The EKC is not factory-set. An EKC password is required only when the EKC is
activated, a User Password is assigned, and “Enter E.K.C. password” is displayed on
the touch screen.
Copying will be available by following procedure:
HINT
For details of the EKC setting, see p. 11-18 to p. 11-26.
1.
Enter EKC password.
Enter your 8-digit EKC password, using the keypad.
HINT
For setting an EKC password, see p. 11-20 to p. 11-21.
DETAILS
If an invalid EKC password is entered, continue by entering the correct
password.
2.
Press [START].
Your current copy count and copy limit will be displayed for 3 sec.
Current count / limit
018888/025000
3.
Start a copying job.
When the message changes to “Ready to copy,” copying job is available on the
machine.
DETAILS
When your copy count reaches the copy limit, the message “Copy limit
reached” will be displayed. In that case, contact the Key Operator to reset
your copy limit.
4.
Press [✽] while pressing [#].
The initial state will be restored, with the message “Enter E.K.C. password” displayed
on the screen.
2-14
Page 41

Loading Paper
A paper indicator is shown on each tray key of the Basic Screen to indicate the paper
level of the tray. (Four levels are provided: )
When paper in a tray becomes empty, the indicator “” appears on the tray key.
Follow the procedure below to insert paper in the empty tray.
DETAILS
When the Multi-sheet bypass tray is empty, “ ” will be displayed on the
bypass tray key instead of the paper size indication.
HINT
The Key Operator can set the machine to indicate the paper type for each
tray selected on the screen. For details, see p. 11-28.
2
Machine
Information
Machine
Configuration
Turn On/Off
the Power
Loading
Paper
Changing
Paper Size
Loading Paper in Main Body Trays and DB-210 Trays
Main body trays: Tray 1 and 2
DB-210 trays: Tray 3 and 4
1.
Withdraw the main body tray or DB-210 tray.
HINT
See p. 2-2 to check positions of each tray.
Reminder!
Do not withdraw the tray forcibly; otherwise you may be injured.
2-15
Page 42

2.
Stack paper with curl side up.
Load paper, aligning it to the right side of the tray.
Loading Paper (continued)
Rear guide plate
Reminder!
• Do not load paper above the red line on the side guide plates.
• Be sure that the rear guide plate is correctly positioned according to the
paper size loaded; otherwise machine trouble may occur.
3.
While pressing the release knob, move the side guide plate against
Hook
Size indication dial
the paper.
Release the release knob to lock the slide guide plate.
Reminder!
Do not change the paper size indication of the size indication dial at the front
of the tray.
Copying using a tray with a different size indicated may cause a paper misfeed.
4.
Push in the tray until it locks into place.
The indicator on the tray key will change from “” to “”.
2-16
Page 43

Loading Paper in DB-410 Tray
DB-410 tray: Tray 3
1.
Withdraw the DB-410 tray.
HINT
See p. 2-2 to check positions of each tray.
Reminder!
Do not withdraw the tray forcibly; otherwise you may be injured.
2.
Stack paper with curl side up.
Load paper, aligning it to the right side of the tray.
The tray bottom will lower due to the stacker paper weight.
Loading Paper (continued)
2
Machine
Information
Machine
Configuration
Turn On/Off
the Power
Loading
Paper
Changing
Paper Size
Size indication dial
Reminder!
• Do not load paper above the hooks on the side guide plates.
• Be sure that the rear guide plate is correctly positioned according to the
paper size to be loaded; otherwise machine trouble may occur.
3.
Push in the tray until it locks into place.
The indicator on the tray 3 key will change from “” to “”.
2-17
Page 44

Loading Paper (continued)
Loading Paper in Multi-Sheet Bypass Tray
1.
Open the Multi-sheet bypass tray located on the right side of the
copier.
When loading large paper, withdraw the right edge of the Multi-sheet bypass tray to
extend it.
2.
Load copy paper, and adjust the paper guides to the paper size.
The loaded paper size will be indicated on the bypass tray key of the Basic Screen.
Reminder!
Load transparency film one sheet at a time. A maximum of 50 sheets (80g/
2
) of paper can be loaded at one time.
m
3.
When copying is completed, close the Multi-sheet bypass tray.
2-18
Page 45

Changing Paper Size of Main Body Trays and DB-210 Trays
The main body trays and DB-210 trays are user-adjustable. Change the paper size of
the tray according to the procedure below.
1.
Withdraw the tray for which the paper size will be changed.
Reminder!
Do not withdraw the tray forcibly; otherwise you may be injured.
2.
Remove the rear guide plate, then insert it into the position
designated for your desired paper size.
Remove the rear guide plate while pressing both edges of it.
The rear guide plate positions are marked on the tray base plate.
2
Machine
Information
Machine
Configuration
Turn On/Off
the Power
Loading
Paper
Changing
Paper Size
Reminder!
Be sure to insert the rear guide plate into the position of the paper size to be
set; otherwise machine trouble may occur.
3.
Set the size indication dial at the correct paper size.
A4
Reminder!
Be sure that the correct paper size is indicated; otherwise a paper misfeed
may occur.
4.
Push in the tray until it locks into place.
The tray key on the Basic Screen will indicate the paper size currently specified.
2-19
Page 46

Page 47

3
Copying Operations
How to Make a Basic Copy
3
Copying
Operations
Positioning
Originals
Setting Print
Quantity
Paper Size
Lens Mode
Positioning Originals ............................................................................... 3-2
Setting Print Quantity.......................................................................... 3-7
Selecting Paper Size............................................................................... 3-8
Selecting Magnification Ratio (Lens Mode) ...................................... 3-12
Selecting Density Level......................................................................... 3-15
Making Double-Sided Copies (1
Making Single-Sided Copies from Double-Sided Originals (2
a
2, 2a2)........................................ 3-17
a
1) ........ 3-21
Copying Using Memory .................................................................... 3-22
Output Mode for Machine without Finisher ........................................... 3-29
Output Mode for Machine with Finisher............................................ 3-31
Output Mode for Machine with Inner Tray IT-101 .................................. 3-34
Checking Feature Selections and Proof Copying ............................. 3-36
Interrupt Copying................................................................................... 3-38
Density
1-1, 2-2
2-1
Using
Memory
Output without
Finisher
FS-107
Output Modes
IT-101
Output Modes
Check Mode
& Proof Copy
Interrupt
Mode
Page 48

Positioning Originals
Positioning Originals in RADF
The document feeder (RADF) automatically feeds up to 50 originals directly to the
platen area, starting with the top sheet. The RADF should only be used for unstapled,
smooth, flat originals.
Positioning originals in Normal mode
1.
Arrange originals in order.
Reminder!
• Before placing originals in the tray, be sure the document feeder is fully
close. Once closed, do not open the document feeder, otherwise selected
copy conditions may be automatically altered.
• Be sure not to use unsuitable RADF originals. See p. 9-6 for details.
2.
Position original(s) FACE UP in the document feeder tray.
Place two-sided originals with page one FACE UP.
Up to 50 originals can be set at a time.
3.
Adjust paper guides.
3-2
Reminder!
• Do not set more than 50 originals or set originals over the red line indicated on the paper guides; otherwise a paper misfeed will occur.
• If the number of originals exceeds 50, divide them into blocks not
exceeding 50 sheets, then load them from the block with the first page.
See p. 3-22 to p. 3-24.
Page 49

Positioning Originals (continued)
Positioning originals in Mixed original mode
Mixed size originals can be copied together from the document feeder.
HINT
To use the Mixed original mode, see procedure on p. 8-25 to p. 8-26.
1.
Arrange originals in order.
Arrange the mixed size originals as illustrated below.
To the
depth
To the left
3
Copying
Operations
Positioning
Originals
Setting Print
Quantity
Paper Size
Setting
direction
Reminder!
• Before placing originals in the tray, be sure the document feeder is fully
close. Once closed, do not open the document feeder, otherwise the
selected copy conditions may be altered automatically.
• Be sure not to use unsuitable RADF originals. See p. 9-6 for details.
HINT
See p. 9-7 for allowable combinations of mixed originals.
2.
Position mixed originals FACE UP, aligned with the left rear side of the
document feeder tray.
Place two-sided originals with page one FACE UP.
Up to 50 originals can be set at a time.
3.
Adjust paper guides.
Lens Mode
Density
1-1, 2-2
2-1
Using
Memory
Output without
Finisher
FS-107
Output Modes
IT-101
Output Modes
Check Mode
& Proof Copy
Interrupt
Mode
3-3
Page 50

Positioning Originals (continued)
Positioning originals in Folded original mode
Folded original mode detects the folded original size without using the size detection
sensor of the RADF.
HINT
To use the Folded original mode, see procedure on p. 8-27 to p. 8-28.
1.
Arrange originals in order.
2.
Position original(s) FACE UP in the document feeder tray.
Place two-sided originals with page one FACE UP.
Up to 50 originals can be set at a time.
Reminder!
• Before placing originals in the tray, be sure the document feeder is fully
close. Once closed, do not open the document feeder, otherwise the
selected copy conditions may be altered automatically.
• Be sure not to use unsuitable RADF originals. See p. 9-6 for details.
3.
Adjust paper guides.
3-4
Page 51

Positioning Originals (continued)
Positioning Original on Platen Glass
Use the platen glass when originals are not suitable for use with the document feeder,
e.g., when size is incompatible, or when originals are folded, stapled, torn, or in otherwise poor condition.
1.
Raise the document feeder (or platen cover).
Place original FACE DOWN in the left rear corner, aligning the edge with the left
measuring guide.
3
Copying
Operations
Positioning
Originals
Setting Print
Quantity
Paper Size
Lens Mode
Density
2.
Gently close the document feeder (or platen cover) to prevent the
original from shifting on the glass.
Reminder!
When selecting Book Copy, Non-Image Area Erase, AUTO mode in Repeat,
or AUTO Layout, DO NOT CLOSE the document feeder. For details on each
function, see Section 8.
3.
When repeating the original placement, press the release lever under
the document feeder.
1-1, 2-2
2-1
Using
Memory
Output without
Finisher
FS-107
Output Modes
IT-101
Output Modes
Check Mode
& Proof Copy
Interrupt
Mode
3-5
Page 52

Positioning Originals (continued)
000000000000000000000000000000000000000000000000000000000000000000000000000000000000000000000000000000000000000000000000000000000000000000000000000000000000000000000000000000
000000000000000000000000000000000000000000000000000000000000000000000000000000000000000000000000000000000000000000000000000000000000000000000000000000000000000000000000000000
000000000000000000000000000000000000000000000000000000000000000000000000000000000000000000000000000000000000000000000000000000000000000000000000000000000000000000000000000000
000000000000000000000000000000000000000000000000000000000000000000000000000000000000000000000000000000000000000000000000000000000000000000000000000000000000000000000000000000
000000000000000000000000000000000000000000000000000000000000000000000000000000000000000000000000000000000000000000000000000000000000000000000000000000000000000000000000000000
000000000000000000000000000000000000000000000000000000000000000000000000000000000000000000000000000000000000000000000000000000000000000000000000000000000000000000000000000000
000000000000000000000000000000000000000000000000000000000000000000000000000000000000000000000000000000000000000000000000000000000000000000000000000000000000000000000000000000
000000000000000000000000000000000000000000000000000000000000000000000000000000000000000000000000000000000000000000000000000000000000000000000000000000000000000000000000000000
4.
Use only the lower cover to ease the original placement.
CAUTION
Do not place heavy originals and do not press strongly when a
thick original is placed on the platen glass and is under
pressure of the RADF; otherwise, the glass may be broken and
you may be injured.
3-6
Page 53

Setting Print Quantity
X
X
This section describes how to set or change print quantity.
To Set Print Quantity
The copier is initially set to copy the original set in amounts determined by the print
quantity setting, then outputs sorted sets.
1.
Enter the desired print quantity on the control panel keypad.
HELP
CHECK
APPLICATION
OUTPUT
AUTO RESET
DATA
2 31
564
897
0
FA
CLEAR QTY.
Entered quantity will be displayed on the touch panel.
To Change Print Quantity
Follow the procedure below to change the print quantity after it has been entered.
1.
Press [# (CLEAR QTY.)].
HELP
CHECK
APPLICATION
OUTPUT
AUTO RESET
DATA
2 31
564
897
0
FA
CLEAR QTY.
3
Copying
Operations
Positioning
Originals
Setting Print
Quantity
Paper Size
Lens Mode
Density
1-1, 2-2
2-1
Using
Memory
Output without
Finisher
FS-107
Output Modes
IT-101
Output Modes
Check Mode
& Proof Copy
Interrupt
Mode
The quantity displayed on the touch panel will return to 1.
2.
Enter the correct quantity.
Entered quantity will be displayed on the touch panel.
3-7
Page 54

Selecting Paper Size
To select an appropriate paper size for getting your desired copy result, use APS
(Automatic Paper Selection), or select paper size manually on the touch screen, as
required.
To Select Paper Size Automatically (APS)
APS detects the size of originals placed on the RADF or platen glass and automatically
selects and feeds copy paper of the same size, or selects an appropriate size according
to the magnification ratio selected.
HINTS
• See the table on the following page for the relation of original size,
magnification ratio and copy paper size.
• The initial settings may have been altered by Key Operator. See p. 11-7 to
p. 11-14.
1.
Touch to highlight APS at lower right corner of the Basic Screen.
APS is already highlighted when the initial settings are restored.
2.
Select additional copy conditions, as desired.
3.
Enter the desired print quantity from the control panel keypad.
HINT
See p. 3-7 for details on setting print quantity.
4.
Position original(s).
HINTS
• See p. 9-6 to p. 9-8 for paper sizes detectable from the RADF or on the
platen glass.
• See p. 3-2 to p. 3-6 for details on positioning originals.
• Key Operator can deactivate APS when original is set in the RADF or on
the platen glass. See p. 11-42 to p. 11-45.
5.
Press [START].
DETAILS
• If the appropriate copy paper is not loaded in any tray, no copying will be
performed, and a message will prompt you to load the appropriate paper.
• Copy result may not be satisfactory due to the Rotation function. In this
case, turn the function OFF manually. See. p. 7-4.
3-8
Page 55

Selecting Paper Size (continued)
See the table below for the relation of original size, magnification ratio and
copy paper size.
Paper size Paper size
A3 B4 A4R B5RA4 B5 A5R
0.25 - 0.42
0.43 - 0.50
0.51 - 0.57
0.58 - 0.61
0.62 - 0.71
0.72 - 0.77
0.78 - 0.82
0.83 - 0.86
0.87 - 0.89
0.90 - 1.00
1.01 - 1.10
Magnification ratio
1.11 - 1.15
1.16 - 1.22
1.23 - 1.41
1.42 - 1.63
1.64 - 1.73
1.74 - 2.00
2.01 - 4.00
A5R
B5R
(B5)
A4R(A4)
B4
A3
A5R
B5R
(B5)
A4R
(A4)
B4
A3
Original size
A5R
B5R
(B5)
A4R
(A4)
B4
A3
A5R
B5
(B5R)
A4
(A4R)
A3
A5R
B5R
(B5)
A4R
(A4)
B4
A3
A5R
B5
(B5R)
A4
(A4R)
A3
A5R
B5R
(B5)
A4R(A4)
B4
A3
0.25 - 0.42
0.43 - 0.50
0.51 - 0.57
0.58 - 0.61
0.62 - 0.71
0.72 - 0.77
0.78 - 0.82
0.83 - 0.86
0.87 - 0.89
0.90 - 1.00
1.01 - 1.10
1.11 - 1.15
1.16 - 1.22
1.23 - 1.41
1.42 - 1.63
1.64 - 1.73
1.74 - 2.00
2.01 - 4.00
( ): Rotation functions
3
Copying
Operations
Positioning
Originals
Setting Print
Quantity
Paper Size
Magnification ratio
Lens Mode
Density
1-1, 2-2
2-1
Using
Memory
Output without
Finisher
FS-107
Output Modes
IT-101
Output Modes
Check Mode
& Proof Copy
Interrupt
Mode
3-9
Page 56

Selecting Paper Size (continued)
To Specify Desired Paper Size (AMS)
When a paper size is specified on the touch screen, an appropriate reduction or
enlargement ratio will be selected automatically according to the original size detected
from the RADF or the platen glass.
HINTS
• See the table on the following page for the relation of original size, copy
paper size, and magnification ratio.
• Wide paper size can be specified when AMS is in use.
In this case, the same magnification ratio as that of the standard size will
be selected automatically.
• To copy in 1.00 (100%) magnification mode and specifying a paper size,
see p. 3-12.
1.
Touch a tray key on the Basic Screen to select the desired paper size.
The selected tray key will be highlighted, and under LENS MODE, -A- will also be
highlighted.
2.
Select additional copy conditions, as desired.
3.
Enter the desired print quantity from the control panel keypad.
HINT
See p. 3-7 for details on setting print quantity.
4.
Position original(s).
HINTS
• See p. 9-6 to p. 9-8 for original sizes detectable from the RADF or on the
platen glass.
• See p. 3-2 to p. 3-6 for details on positioning originals.
5.
Press [START].
The scanned image will be printed on the specified paper size using an automatically
selected magnification ratio.
DETAILS
Copy result may not be satisfactory due to the Rotation function. In this
case, turn the function OFF manually. See. p. 7-4.
3-10
Page 57

A3
B4
A4
A4R
B5
Paper size
B5R
A5R
Selecting Paper Size (continued)
See the table below for the relation of original size, copy paper size, and
selection magnification ratio.
Original size
A3 B4 F4 A4 A4R B5 B5R A5 A5R
1.00 1.15 1.27 1.00 1.41 1.15 1.63 1.41 2.00
0.86 1.00 1.10 0.86 1.22 1.00 1.41 1.22 1.73
0.50 (0.71) 0.58 (0.82) 0.64 (0.90) 1.00 (0.71) 0.71 (1.00) 1.15 (0.82) 0.82 (1.15) 1.41 (1.00) 1.00 (1.41)
0.71 0.82 0.90
0.43 (0.61) 0.50 (0.71) 0.55 (0.78) 0.86 (0.61) 0.61 (0.86) 1.00 (0.71) 0.71 (1.00) 1.22 (0.86) 0.86 (1.22)
0.61 0.71 0.78
0.50 0.58 0.64 0.50 0.71 0.58 0.81 0.71 1.00
0.71 (1.00)
0.61 (0.86)
1.00
0.86
0.82 (1.15)
0.71 (1.00)
1.15 1.00 1.41
1.00 0.86 1.22
( ): Rotation functions
3
Copying
Operations
Positioning
Originals
Setting Print
Quantity
Paper Size
Lens Mode
Density
1-1, 2-2
2-1
Using
Memory
Output without
Finisher
FS-107
Output Modes
IT-101
Output Modes
Check Mode
& Proof Copy
Interrupt
Mode
3-11
Page 58

Selecting Magnification Ratio (Lens Mode)
When the copier is turned ON, the magnification ratio is set to 1.00 (100%) automatically
on the Basic Screen.
Follow each procedure described in this section to select the desired magnification
ratio.
To Copy in 1.00 Magnification Mode
Follow this procedure to make a 100% copy of the original image.
1.
Close the RADF securely, then press [AUTO RESET].
The initial settings are restored. Check that APS indicates that the 1.00 magnification
is selected.
HINT
The initial settings may be altered by the Key Operator. See p. 11-7 to p. 11-
14.
2.
Select additional copy conditions, as desired.
DETAILS
Specifying paper size will release 1.00 magnification and set
automatically. In this case, touch
3.
Enter the desired print quantity from the control panel keypad.
HINT
See p. 3-7 for details on setting print quantity.
4.
Position original(s).
HINT
See p. 3-2 to p. 3-6 for details on positioning originals.
5.
Press [START].
1.00
to highlight it again.
-A-
(AMS)
3-12
Page 59

Selecting Magnification Ratio (Lens Mode) (continued)
To Copy in Fixed Magnification Mode (FIXED)
Use the 6 preset ratios (0.71, 0.82, 0.86, 1.15, 1.22, 1.41) and 3 user preset ratios to
increase or decrease magnification in fixed amounts.
>>> Specification for Fixed Magnification Mode <<<
Incompatible Conditions: AMS, Repeat mode in Repeat, Reduce & Shift in Image Shift
1.
Touch FIXED on the Basic Screen.
The popup menu for selecting the desired preset/user preset ratio will be displayed.
3
Copying
Operations
Positioning
Originals
Setting Print
Quantity
Paper Size
Lens Mode
Density
1-1, 2-2
Reminder!
When starting a new copying job, be sure to close the RADF securely, then
press [AUTO RESET].
2.
Select the desired magnification.
DETAILS
Touching any key on the popup menu will momentarily highlight that key,
then the popup menu will disappear automatically.
The selected ratio will be displayed on the Basic Screen.
Three user preset ratios are adjustable by the Key Operator. See p. 11-17.
3.
Select additional copy conditions, as desired.
4.
Enter the desired print quantity from the control panel keypad.
HINT
See p. 3-7 for details on setting print quantity.
5.
Position original(s).
HINT
See p. 3-2 to p. 3-6 for details on positioning originals.
6.
Press [START].
2-1
Using
Memory
Output without
Finisher
FS-107
Output Modes
IT-101
Output Modes
Check Mode
& Proof Copy
Interrupt
Mode
3-13
Page 60

Selecting Magnification Ratio (Lens Mode) (continued)
To Copy in Zoom Mode
Use the Zoom mode to reduce or enlarge the copied original image in 1% increments.
>>> Specification for Zoom Mode <<<
Zoom range: 25% to 400%
Incompatible Conditions: AMS, Repeat mode in Repeat, Reduce & Shift in Image Shift
1.
Touch ZOOM on the Basic Screen.
The popup menu for setting a zoom ratio will be displayed.
Reminder!
When starting a new copying job, be sure to close the RADF securely, then
press [AUTO RESET].
2.
Touch the Vertical/Horizontal zoom key on the popup menu, if it is not
highlighted, then set the desired zoom ratio.
DETAILS
Use the keypad on the popup menu to enter the desired magnification ratio
c
in 3 digits, or use arrows (
If an incorrect ratio is entered, continue by entering the correct 3-digit ratio.
3.
Touch OK.
The popup menu disappears automatically and the specified zoom ratio will be
displayed on the Basic Screen.
4.
Select additional copy conditions, as desired.
5.
Enter the desired print quantity from the control panel keypad.
HINT
See p. 3-7 for details on setting print quantity.
6.
Position original(s).
HINT
See p. 3-2 to p. 3-6 for details on positioning originals.
7.
Press [START].
/ d) to scroll to the desired ratio.
3-14
Page 61

Selecting Density Level
Automatic Exposure (AE) operates with the default settings. It detects the density of the
original image and automatically selects the appropriate exposure for the copy.
ABCD
EFGH
IJKLM
NOPQ
RSTUV
WXYZ
Light original
ABCD
EFGH
IJKLM
NOPQ
RSTUV
WXYZ
Normal
ABCD
EFGH
IJKLM
NOPQ
RSTUV
WXYZ
Dark original
To Select Copy Density
Select manual copy density to adjust exposure (density) when originals are too light or
too dark. Manual adjustments can be made in 9 levels on the Basic Screen.
1.
Touch DARKER to darken, or touch LIGHTER to lighten the copy
image.
Move the arrow (a) to the left side of the desired exposure level indicator.
3
Copying
Operations
Positioning
Originals
Setting Print
Quantity
Paper Size
Lens Mode
Density
1-1, 2-2
2-1
Using
Memory
Output without
Finisher
FS-107
Output Modes
IT-101
Output Modes
Check Mode
& Proof Copy
Interrupt
Mode
Reminder!
When starting a new copying job, be sure to close the RADF securely, then
press [AUTO RESET].
DETAILS
• Touch NORMAL to select the middle density level.
• To select the user-set density (USER1 or USER2), see p. 11-15.
• When resuming AE, touch AUTO.
2.
Select additional copy conditions, as desired.
3.
Enter the desired print quantity from the control panel keypad.
HINT
See p. 3-7 for details on setting print quantity.
3-15
Page 62

4.
Position original(s).
5.
Press [START].
Selecting Density Level (continued)
HINT
See p. 3-2 to p. 3-6 for details on positioning originals.
3-16
Page 63

Making Double-Sided Copies (1a2, 2a2)
Front
Front
Front
Front
Front
Front
Front
Front
Front
Front
Front
Front
Front
Front
Front
The Basic Screen is initially set to 1a1 copy mode to make single-sided copies from
single-sided originals.
Follow the procedure below to make double-sided copies from the originals scanned
from the document feeder or from the platen glass.
Using RADF
Select the copy mode according to the original type (single-sided or double-sided).
2-2 Copying
3
Copying
Operations
Positioning
Originals
Setting Print
Quantity
Paper Size
Double-sided original
Front
Front
1-2 Copying
Front
Front
Front
Single-sided original
1.
Touch 1a2 or 2a2 on the Basic Screen to highlight it.
Reminder!
When starting a new copying job, be sure to close the RADF securely, then
press [AUTO RESET].
Duplex copy
Back
Back
Back
Back
Back
Duplex copy
Lens Mode
Density
1-1, 2-2
2-1
Using
Memory
Output without
Finisher
FS-107
Output Modes
IT-101
Output Modes
Check Mode
& Proof Copy
Interrupt
Mode
2.
Select additional copy conditions, as desired.
DETAILS
Some incompatible conditions may automatically release the selected copy
mode. In this case, arrange the settings so that they are compatible with the
selected copy mode.
3-17
Page 64

Making Double-Sided Copies (1a2, 2a2) (continued)
3.
Enter the desired print quantity from the control panel keypad.
HINT
See p. 3-7 for details on setting print quantity.
4.
Position originals FACE UP in the document feeder.
HINTS
• See p. 3-2 to p. 3-4 for details on positioning originals.
• Use RADF store mode (p. 3-22 to p. 3-24) when the original count
exceeds 50.
5.
Press [START].
The machine scans originals, then prints duplex copies when they are ready for output.
Press [STOP/CLEAR] to suspend the scanning or printing job.
CAUTION
When the finisher / paper exit / inner tray capacity is exceeded
due to the print quantity selected, remove the copied sets as
they exit; otherwise, mishandled paper will occur.
3-18
Page 65

Making Double-Sided Copies (1a2, 2a2) (continued)
Using Platen Glass
Use the platen glass to scan originals unsuitable for the document feeder.
>>>Specification for Double-Sided Copying Using Platen Glass<<<
❒ Use the Platen store mode.
❒ See p. 9-6 for the information on unsuitable RADF originals.
❒ Incompatible Conditions: Using RADF, OHP, Image Insert, Special Original (Non-
Standard Size)
1.
Open the document feeder.
The RADF indication on the Basic Screen will disappear and the 1a2 and 2a2 keys
will be dimmed to show inactivity.
2.
Position original FACE DOWN on the platen glass.
Be sure to start from the first page.
HINTS
See p. 3-5 for details on positioning originals.
3
Copying
Operations
Positioning
Originals
Setting Print
Quantity
Paper Size
Lens Mode
3.
Touch 1a2 on the Basic Screen to highlight it.
Reminder!
DO NOT press [AUTO RESET] at this point, otherwise the selected mode
will be released and the copier cannot scan the original placed on the glass.
4.
Select additional copy conditions, as desired.
DETAILS
Some incompatible conditions may automatically release the selected copy
mode. In this case, arrange settings so that they are compatible with the
selected copy mode.
5.
Enter the desired print quantity from the control panel keypad.
Density
1-1, 2-2
2-1
Using
Memory
Output without
Finisher
FS-107
Output Modes
IT-101
Output Modes
Check Mode
& Proof Copy
Interrupt
Mode
HINT
See p. 3-7 for details on setting print quantity.
6.
Touch SCAN on the Basic Screen.
The front side image of the double-sided copy will be scanned into memory.
3-19
Page 66

Making Double-Sided Copies (1a2, 2a2) (continued)
7.
Replace the original on the platen glass with the back side down, then
touch SCAN.
DETAILS
Repeat this step until all originals are scanned.
Memory indicator on the upper right of the Basic Screen allows you to check
the remaining memory.
To delete the scanned data without printing, press [STOP/CLEAR].
8.
Press [START] to print.
All the data in memory will be output.
Press [STOP/CLEAR] to suspend the printing job.
CAUTION
When the finisher / paper exit / inner tray capacity is exceeded
due to the print quantity selected, remove the copied sets as
they exit; otherwise, mishandled paper will occur.
3-20
Page 67

Making Single-Sided Copies from Double-Sided Originals (2a1)
Front
Front
Front
Front
Front
Use RADF and select 2a1 copy mode to make single-sided copies from double-sided
originals.
2-1 Copying
Double-sided original
1.
Touch 2a1 on the Basic Screen to highlight it.
Reminder!
When starting a new copying job, be sure to close the RADF securely, then
press [AUTO RESET].
2.
Select additional copy conditions, as desired.
DETAILS
Some incompatible conditions may automatically release the selected copy
mode. In this case, arrange the settings so that they are compatible with the
selected copy mode.
Front
Front
Front
Front
Front
Back
Back
Back
Back
Back
Simplex copy
3
Copying
Operations
Positioning
Originals
Setting Print
Quantity
Paper Size
Lens Mode
Density
1-1, 2-2
2-1
Using
Memory
Output without
Finisher
FS-107
Output Modes
IT-101
Output Modes
Check Mode
& Proof Copy
Interrupt
Mode
3.
Enter the desired print quantity from the control panel keypad.
HINT
See p. 3-7 for details on setting print quantity.
4.
Position originals FACE UP in the document feeder.
HINTS
• See p. 3-2 to p. 3-4 for details on positioning originals.
• Use RADF store mode (p. 3-22 to p. 3-24) when the original count
exceeds 50.
5.
Press [START].
The machine starts to scan originals, then prints simplex copies when they are ready
for output.
Press [STOP/CLEAR] to suspend the scanning or printing job.
3-21
Page 68

Copying Using Memory
R
U
This section describes various copying features available on this machine using its
built-in memory.
To Scan Originals into Memory (Store Mode)
Store mode allows you to scan all the originals first, then to start a continuous printing
job.
Use RADF store mode to scan a large amount of originals.
Use Platen store mode for originals that cannot be fed through the document feeder
due to thickness, size or condition.
DETAILS
RADF tray capacity is 50; however, more than 50 originals can be scanned
into memory using RADF store mode.
>>>Specification for Store Mode<<<
❒ Incompatible with RADF store mode: Image Insert, Dual Page
❒ Incompatible with Platen store mode: None
1.
Make copying selections, as desired.
Reminder!
When starting a new copying job, be sure to close the RADF securely, then
press [AUTO RESET].
2.
Press [APPLICATION] on the control panel.
DATA
HELP
CHECK
APPLICATION
OUTPUT
AUTO RESET
2 31
564
897
0
FAX
INTERR
STA
CLEAR QTY.
The Application Selection Screen will be displayed.
3.
Touch Store Mode to highlight it.
You may find the key already highlighted due to the copying selections made.
3-22
Page 69

Copying Using Memory (continued)
4.
Touch OK to return to the Basic Screen.
5.
Enter the desired print quantity from the control panel keypad.
HINT
See p. 3-7 for details on setting print quantity.
6.
Position original(s).
Using platen glass:
Place original FACE DOWN. Start scanning from the first page.
Reminder!
When Dual Page, Non-Image Area Erase, Auto detection mode of Repeat,
or AUTO Layout is selected, keep the RADF open throughout the scanning
procedure.
3
Copying
Operations
Positioning
Originals
Setting Print
Quantity
Paper Size
Using RADF:
Position originals FACE UP.
If the number of originals exceeds 50, divide them into blocks not exceeding 50 sheets
and load them from the block with the first page.
HINT
See p. 3-2 to p. 3-6 for details on positioning originals.
7.
Touch SCAN on the Basic Screen to scan.
DETAILS
Repeat steps 6 and 7 until all originals are scanned.
Memory indicator on the upper right of the Basic Screen allows you to check
the remaining memory.
To delete the scanned data without printing, press [STOP/CLEAR].
Lens Mode
Density
1-1, 2-2
2-1
Using
Memory
Output without
Finisher
FS-107
Output Modes
IT-101
Output Modes
Check Mode
& Proof Copy
Interrupt
Mode
HINT
Should memory overflow occur frequently, it is recommended that you
contact your service representative to extend the memory capacity in your
machine.
8.
Press [START] to print.
All the data in memory will be output.
Press [STOP/CLEAR] to suspend the printing job.
3-23
Page 70

Copying Using Memory (continued)
CAUTION
When the finisher / paper exit / inner tray capacity is exceeded
due to the print quantity selected, remove the copied sets as
they exit; otherwise, mishandled paper will occur.
3-24
Page 71

Copying Using Memory (continued)
To Set Next Copying Job (Reserve)
The Reserve function allows you to set up a new job while a current job is in progress.
When the current job is finished, the Reserve job starts printing immediately.
>>>Specifications for Reserve<<<
❒ Job settings: Max. 5 (current job plus 4 reserve jobs)
❒ When the current job is in Store mode, Image Insert, or Dual Page, the reserve job
setting will be available after the copier starts to print the current job.
❒ Incompatible Conditions: Interrupt copying, Scanning in Store mode, Proof copy
1.
Press [START] to start scanning/printing for the current job.
RESERVE
2.
Touch RESERVE to highlight it.
The Reserve Job Setting Screen will be displayed.
will become active to show that the reserve job setting is now available
.
3
Copying
Operations
Positioning
Originals
Setting Print
Quantity
Paper Size
Lens Mode
Density
1-1, 2-2
2-1
Using
Memory
Output without
Finisher
FS-107
Output Modes
IT-101
Output Modes
Check Mode
& Proof Copy
Interrupt
Mode
On the Reserve Job Setting Screen, all keys on the LCD and control panel will function
for the reserve job.
3.
Select copy conditions for the reserve job, as desired.
HINT
When trouble occurs while setting the reserve job, the SETTING key on the
Basic Screen will change to JAM or ADD PAPER key. See p. 5-7 to p. 5-9.
4.
Position original(s) after completing the scan for the current job.
HINT
See p. 3-2 to p. 3-6 for details on positioning originals.
3-25
Page 72

Copying Using Memory (continued)
5.
Press [START] to start scanning for the reserve job.
DETAILS
When setting more than one reserve job, the next reserve job setting will be
available after the copier starts to scan for the previous reserve job.
When completed, the Basic Screen for the current printing job will be restored.
Repeat steps 2 to 5 to reserve more than one job.
6.
Copying of the reserve job will start automatically after completing the
current job.
CAUTION
When the finisher / paper exit / inner tray capacity is exceeded
due to the print quantity selected, remove the copied sets as
they exit; otherwise, mishandled paper will occur.
3-26
Page 73

Copying Using Memory (continued)
To Check/Control Jobs in Progress (Job List Screen)
The Job List Screen allows you to perform the following functions.
• Confirm machine status • Change order of reserve job
• Delete reserve job
1.
Touch JOB LIST on the Basic Screen.
3
Copying
Operations
Positioning
Originals
Setting Print
Quantity
Paper Size
Lens Mode
The Job List Screen will be displayed.
Check the current status of the machine.
2.
Perform the desired setting on the screen.
HINT
See the next page for details of the screen.
To change the order of a reserve job:
Touch the lower/upper arrow key to highlight the desired reserve job, then touch
ADVANCE.
The highlighted reserve job is advanced by one in printing order unless the job
preceding it is already in progress.
To clear reserve job:
To uc h
DELETE
the lower/upper arrow key
to highlight the desired reserve job, then touch
. The Job Clear Confirmation Screen will be displayed.
Touch YES to clear the highlighted reserve job, or NO to cancel.
Density
1-1, 2-2
2-1
Using
Memory
Output without
Finisher
FS-107
Output Modes
IT-101
Output Modes
Check Mode
& Proof Copy
Interrupt
Mode
3.
Touch OK on the Job List Screen.
The Basic Screen will be restored.
3-27
Page 74

Copying Using Memory (continued)
Contents of Job List Screen
NO. : Displays the No. (001-999) for each job assigned to the machine.
MODE: Displays the machine’s current mode of operation. Four modes are listed below.
STATUS: Displays the current status of the machine for each job.
TOTAL PAGE(s): Displays the number of scanned pages for each job. (0 to 9999)
PAGE(s) LEFT: Displays the remaining copy count of the job.
MINUTE(s) TO GO: Displays the time (in minutes) required for completing the job.
COPIER
FAX
PRINTER
SCANNER
ERROR : Error in each mode
PRINTING : Printing in each mode
NO PAPER : No paper in each mode
STOP : Stop in each mode
JAM : Jam in each mode
SCANNING : Scanning original(s) in copy mode
WAITING : Waiting to be output
0 to 9999
Copy count = No. of scanned pages x Print quantity
Shorter than 1 minute: <1
2 ~ 999
DETAILS
• The time displayed is an approximation; output may take slightly longer.
• If paper supply for a job in FAX or PRINTER mode becomes depleted,
the JOB LIST key will change to ADD PAPER.
3-28
Page 75

Output Mode for Machine without Finisher
This section describes the output modes for the copier without a Finisher.
The Stack mode is initially selected.
1 Stack mode copies the original set in amounts determined by the print quantity
setting, then outputs sorted sets normally.
E-SORT + sort mode rotates every other set by 90° upon exit, provided the same paper
2
size is loaded in two trays, one tray with paper loaded in portrait orientation and the other
tray with paper loaded in landscape orientation, e.g., A4 and A4R.
3 Group mode copies each original page in amounts determined by the print quantity
setting, then outputs grouped sets normally.
E-SORT + group mode rotates every other grouped set by 90° upon exit, provided the
4
same paper size is loaded in two trays, one tray with paper loaded in portrait orientation
and the other tray with paper loaded in landscape orientation, e.g., A4 and A4R.
3
Copying
Operations
Positioning
Originals
Setting Print
Quantity
Originals
3
2
1
Stack (default)
>>>Specification for Output Modes without Finisher<<<
❒
Incompatible with Group mode: Proof Copy, Sheet/Cover Insertion, Booklet, OHP,
Image Insert, Repeat, AUTO Layout, Non-Image Area Erase, Stamp (Numbering)
❒ Incompatible with E-SORT + sort mode:
cial Original (Mixed Original), Repeat, AUTO Layout, Non-Image Area Erase
❒ Incompatible with E-SORT + group mode:
Frame/Fold Erasure, or Platen store mode with Chapter, Flip Side 2, Image Shift, or
Stamp (excluding Numbering) is used), Proof Copy, Sheet/Cover Insertion,
OHP, Image Insert, Special Original (Mixed Original), Repeat, AUTO Layout, NonImage Area Erase, Stamp (Numbering)
E-SORT + sort
Example:
3-set copies
Group
Sheet/Cover Insertion, Booklet, OHP,
Using platen glass (unless Dual Page,
E-SORT + group
Booklet,
Spe-
Paper Size
Lens Mode
Density
1-1, 2-2
2-1
Using
Memory
Output without
Finisher
FS-107
Output Modes
IT-101
Output Modes
Check Mode
& Proof Copy
Interrupt
Mode
1.
When using E-SORT + sort or E-SORT + group mode, load the same
paper size into two trays in different orientation.
HINT
Stack mode is initially selected. Key Operator can change the initial output
mode. See p. 11-12.
3-29
Page 76

Output Mode for Machine without Finisher (continued)
R
U
2.
Press [OUTPUT] on the control panel.
HELP
CHECK
APPLICATION
OUTPUT
AUTO RESET
The Output Mode popup menu will be displayed.
3.
Select the desired output mode.
Touch the desired output mode key to highlight it.
To select Stack mode, deselect all the keys.
DATA
2 31
564
897
0
FAX
INTERR
STA
CLEAR QTY.
4.
Touch OK.
The Basic Screen will be restored.
5.
Select additional copy conditions, as desired.
6.
Enter the desired print quantity from the control panel keypad.
HINTS
• See p. 9-3 to be sure that the exit tray capacity is not exceeded.
• See p. 3-7 for details on setting print quantity.
7.
Position original(s) FACE UP in the document feeder or FACE DOWN
on the platen glass.
HINT
See p. 3-2 to p. 3-6 for details on positioning originals.
8.
Press [START].
Press [STOP/CLEAR] to suspend the scanning or printing job.
CAUTION
When the paper exit tray capacity is exceeded due to the print
quantity selected, remove the copied sets as they exit;
otherwise, mishandled paper will occur.
3-30
Page 77

Output Mode for Machine with Finisher
Finisher FS-107 is initially equipped with two exit trays. If desired, up to two optional exit
trays can be installed.
Each exit tray provides output modes as described below.
1 Stack mode means that the offset-stacker finisher modes are not selected. Copies
will be stacked upon exit without being offset by sorted sets.
2 Sort mode outputs multiple copies of the original set; each sorted set will be offset by
30mm upon exit.
3 Staple mode offsets and staples each sorted set. Up to 50 sheets (or a stack up to
5mm thick) can be stapled.
4 Group mode groups together multiple copies of each original and offsets the sets by
30mm upon exit.
3
Copying
Operations
Positioning
Originals
Setting Print
Quantity
4
3
2
1
Example:
Make 3 copied sets
from 4 original sheets
Staple-sortSortStack
4
3
2
1
4
3
2
1
4
3
2
1
Offset by 30mm
4
3
2
1
4
3
2
4
1
3
2
1
4
2 staples
3
2
1
1 oblique
staple
4
3
2
1
4
3
2
1
4
3
2
1
4
3
2
1
4
3
2
1
Offset by 30mm
Group
4
4
4
3
3
3
2
2
2
1
1
1
The copier is initially set to output to tray 1 in Sort mode.
Follow the procedure on the next page to change the output mode, as desired.
>>>Specification for Output Modes with Finisher<<<
❒ Incompatible with Sort mode: Using platen glass (unless Image Insert, Dual Page,
or Platen store mode is used), OHP, Repeat, AUTO Layout, Non-Image Area Erase
❒ Incompatible with Staple mode: Using platen glass (unless Image Insert, Dual
Page, or Platen store mode is used), Booklet, OHP, Special Original (Mixed Original
with APS), Repeat, AUTO Layout, Non-Image Area Erase
Paper Size
Lens Mode
Density
1-1, 2-2
2-1
Using
Memory
Output without
Finisher
FS-107
Output Modes
IT-101
Output Modes
Check Mode
& Proof Copy
Interrupt
Mode
Reminder!
Using excessively curled paper or some types of thin paper in Staple mode
may cause poor results in arrangement of the stapled sets.
Incompatible with Group mode: Proof Copy, Sheet/Cover Insertion, Booklet, OHP,
❒
Image Insert, Repeat, AUTO Layout, Non-Image Area Erase, Stamp (Numbering)
3-31
Page 78

Output Mode for Machine with Finisher (continued)
R
U
1.
Close the RADF securely, then press [AUTO RESET].
HINT
The Sort mode using tray 1 is initially selected.
Key Operator can change the initial output mode. See p. 11-12.
2.
Press [OUTPUT] on the control panel.
DATA
HELP
CHECK
APPLICATION
OUTPUT
AUTO RESET
2 31
564
897
0
FAX
INTERR
STA
CLEAR QTY.
The Output Mode popup menu will be displayed.
3.
Select the desired output mode.
Touch to highlight the desired output mode key in the OUTPUT mode area.
To select Stack mode, deselect all the keys.
When selecting Staple mode, select the staple position as follows.
When selecting any other mode, proceed to step 6.
4.
Touch STAPLE SET.
3-32
Page 79

Output Mode for Machine with Finisher (continued)
5.
Select the desired staple position.
Touch to highlight the desired staple position key on the Staple Position Selection
popup menu.
3
Copying
Operations
Positioning
Originals
Setting Print
Quantity
DETAILS
STAPLE SET on this screen will change to ADD STAPLER when replacement of the staple cartridge is required. See p. 10-5.
Touch OK to restore the Output Mode popup menu.
6.
Touch OK.
The Basic Screen will be restored.
DETAILS
The finisher mode icon (Stack: none, Sort: , Group: , Staple: ) or
staple position icon appears/diappears in the message area of the screen to
indicate the selected output mode.
7.
Select additional copy conditions, as desired.
8.
Enter the desired print quantity from the control panel keypad.
HINT
See p. 9-3~p. 9-4 to be sure that the finisher capacity is not exceeded.
9.
Position original(s).
HINT
See p. 3-2 to p. 3-6 for details on positioning originals.
10.
Press [START].
Press [STOP/CLEAR] to suspend the scanning or printing job.
Paper Size
Lens Mode
Density
1-1, 2-2
2-1
Using
Memory
Output without
Finisher
FS-107
Output Modes
IT-101
Output Modes
Check Mode
& Proof Copy
Interrupt
Mode
CAUTION
When the finisher exit tray capacity is exceeded due to the print
quantity selected, remove the copied sets as they exit;
otherwise, mishandled paper will occur.
3-33
Page 80

Output Mode for Machine with Inner Tray IT-101
This section describes the following four output modes for a copier with the Inner Tray.
Stack mode is initially selected.
The Inner Tray IT-101 is equipped with two exit trays.
1 Stack mode copies the original set in amounts determined by the print quantity
setting, then outputs sorted sets normally.
E-SORT + sort mode rotates every other sorted sets by 90° upon exit, provided the
2
same paper size is loaded in two trays, one tray with paper loaded in portrait orientation
and the other tray with paper loaded in landscape orientation, e.g., A4 and A4R.
3 Group mode copies each original page in amounts determined by the print quantity
setting, then outputs grouped sets normally.
E-SORT + group mode rotates every other grouped set by 90° upon exit, provided the
4
same paper size is loaded in two trays, one tray with paper loaded in portrait orientation
and the other tray with paper loaded in landscape orientation, e.g., A4 and A4R.
Originals
3
2
1
Example:
3-set copies
Stack (default)
>>>Specification for Output Modes with Inner Tray<<<
❒
Incompatible with Group mode: Proof Copy, Sheet/Cover Insertion, Booklet, OHP,
Image Insert, Repeat, AUTO Layout, Non-Image Area Erase, Stamp (Numbering)
❒ Incompatible with E-SORT + sort mode:
cial Original (Mixed Original), Repeat, AUTO Layout, Non-Image Area Erase
❒ Incompatible with E-SORT + group mode:
Frame/Fold Erasure, or Platen store mode with Chapter, Flip Side 2, Image Shift, or
Stamp (excluding Numbering) is used), Proof Copy, Sheet/Cover Insertion,
OHP, Image Insert, Special Original (Mixed Original), Repeat, AUTO Layout, NonImage Area Erase, Stamp (Numbering)
1.
When using E-SORT + sort or E-SORT + group mode, load the same
E-SORT + sort
Group
Sheet/Cover Insertion, Booklet, OHP,
Using platen glass (unless Dual Page,
E-SORT + group
paper size into two trays with different orientation.
Spe-
Booklet,
3-34
HINT
Stack mode is initially selected. Key Operator can change the initial output
mode. See p. 11-12.
Page 81

Output Mode for Machine with Inner Tray IT-101 (continued)
R
U
2.
Press [OUTPUT] on the control panel.
DATA
HELP
CHECK
APPLICATION
OUTPUT
AUTO RESET
2 31
564
897
0
FAX
INTERR
STA
CLEAR QTY.
The Output Mode popup menu will be displayed.
3.
Select the desired output mode.
Touch the desired output mode key to highlight it.
To select Stack mode, deselect all the keys.
4.
Touch OK.
The Basic Screen will be restored.
5.
Select additional copy conditions, as desired.
6.
Enter the desired print quantity from the control panel keypad.
HINTS
• See p. 9-3 to be sure that the exit tray capacity is not exceeded.
• See p. 3-7 for details on setting print quantity.
3
Copying
Operations
Positioning
Originals
Setting Print
Quantity
Paper Size
Lens Mode
Density
1-1, 2-2
2-1
Using
Memory
Output without
Finisher
FS-107
Output Modes
IT-101
Output Modes
Check Mode
& Proof Copy
Interrupt
Mode
7.
Position original(s) FACE UP in the document feeder or FACE DOWN
on the platen glass.
HINT
See p. 3-2 to p. 3-6 for details on positioning originals.
8.
Press [START].
Press [STOP/CLEAR] to suspend the scanning or printing job.
CAUTION
When the inner tray capacity is exceeded due to the print
quantity selected, remove the copied sets as they exit;
otherwise, mishandled paper will occur.
3-35
Page 82

Checking Feature Selections and Proof Copying
R
U
Use the Check mode to confirm copying selections before starting print operation.
In this mode, use Proof copy to produce a sample of the copied set before making
multiple copies. This is a convenient and cost effective way of viewing the results of the
following copying selections.
• Copying conditions using Store mode • Booklet
• Sheet/Cover insertion • Image insert
• Chapter • Dual Page
• Combination
>>>Specifications for Check Mode and Proof Copy<<<
❒ Proof copy is available when using RADF or Platen store mode for multiple originals.
❒ Proof copy cannot be used for testing the Userset density.
❒ Proof copy is not compatible with Group or E-SORT + group output mode and
Reserve mode.
1.
Select the desired copy conditions and enter the desired print quantity.
Reminder!
When starting a new copying job, be sure to close the RADF securely, then
press [AUTO RESET].
2.
Position original(s).
HINT
See p. 3-2 to p. 3-6 for details on positioning originals.
3.
Press [CHECK] on the control panel.
DATA
HELP
CHECK
APPLICATION
OUTPUT
AUTO RESET
The Check Screen will be displayed.
Verify the settings made for the current job.
• If settings are OK, proceed to step 8.
• If a sample copy is needed, proceed to the next step.
2 31
564
897
0
FAX
INTERR
STA
CLEAR QTY.
3-36
Page 83

Checking Feature Selections and Proof Copying (continued)
4.
If any setting change is required before proofcopying, touch EXIT to
return to the Basic Screen, then change settings, as required.
5.
Touch PROOF COPY on the Check Screen.
A sample copy will be output.
DETAILS
• Press [STOP/CLEAR] to suspend the proof copying. In this case, the
scanned image data will not be deleted from memory.
• You can change selections with an asterisk (*) displayed on the left side
after proof copying.
3
Copying
Operations
Positioning
Originals
Setting Print
Quantity
Paper Size
Lens Mode
Density
1-1, 2-2
If the copy result is satisfactory, proceed to step 7.
If any setting change is required, proceed to the next step.
DETAILS
If the desired selection cannot be changed, press [STOP/CLEAR] to delete
all the data in memory, then press [AUTO RESET] to restart the job setting.
6.
Touch EXIT (or press [CHECK]) to return to the Basic Screen.
Change the settings, as required.
7.
Change the print quantity, as required.
DETAILS
Proof copy can be performed as needed, until the print quantity amount on
the Basic Screen reaches zero.
If required, change the print quantity on the Basic Screen.
8.
Press [START].
If the print quantity is not changed, the copier will output the rest, except the sample
sets.
CAUTION
When the finisher / paper exit / inner tray capacity is exceeded
due to the print quantity selected, remove the copied sets as
they exit; otherwise, mishandled paper will occur.
2-1
Using
Memory
Output without
Finisher
FS-107
Output Modes
IT-101
Output Modes
Check Mode
& Proof Copy
Interrupt
Mode
3-37
Page 84

Interrupt Copying
Use the Interrupt mode to interrupt copying in progress to perform a simple job. When
interrupt copying is completed, the settings for the initial job restore automatically and
the Basic Screen displays.
Interrupt copying is available when the copier is performing the following operations:
• Continuously printing the image stored in memory
• Scanning the originals into memory
• Scanning the originals into memory while printing in Reserve mode
The Interrupt mode cannot be selected with the following copier conditions:
• The Basic Screen is not displayed.
• The Call for Service message displays or a paper misfeed occurs.
1.
Press [INTERRUPT] on the control panel.
HELP
CHECK
APPLICATION
OUTPUT
AUTO RESET
DATA
FAX
2 31
564
897
0
CLEAR QTY.
INTERRUPT
START
COPY
POWER SAVER
STOP/CLEAR
ON / OFF
The [INTERRUPT] LED turns on and the SETTING indicator on the Basic Screen
changes to INTERRUPT.
HINT
The timing to enter the Interrupt mode varies according to the job in
progress on the machine when [INTERRUPT] is pressed.
See the following page.
3-38
DETAILS
In Reserve mode, pressing [INTERRUPT] before the copier finishes
scanning the reserve job originals clears the settings selected for the
reserve job.
For details of Reserve mode, see p. 3-25 to p. 3-26.
Page 85

2.
Set copy conditions, as desired.
The initial settings in Interrupt mode are as follows.
a
Copy Mode : 1
1
RADF : ON
AE : ON
Lens Mode : 1.00 (100%)
APS : ON
Print Quantity : 1
Finisher : Exit Tray 1 in Sort mode
DETAILS
Remove any document from the platen glass or from the document feeder, if
present.
Interrupt Copying (continued)
3
Copying
Operations
Positioning
Originals
Setting Print
Quantity
3.
Position original(s).
HINT
See p. 3-2 to p. 3-6 for details on positioning originals.
4.
Press [START] to start the interrupt copying.
DETAILS
When [CHECK] is pressed during Interrupt copying, the information
displayed reflects the initial copy job settings. Check mode will not display
Interrupt copy job information.
5.
When Interrupt copying is completed, press [INTERRUPT] again.
The [INTERRUPT] LED turns out and the INTERRUPT indicator on the Basic Screen
returns to the SETTING indicator.
The settings of the initial job will be restored on the Basic Screen.
6.
Press [START] to resume copying.
CAUTION
When the finisher / paper exit / inner tray capacity is exceeded
due to the print quantity selected, remove the copied sets as
they exit; otherwise, mishandled paper will occur.
Paper Size
Lens Mode
Density
1-1, 2-2
2-1
Using
Memory
Output without
Finisher
FS-107
Output Modes
IT-101
Output Modes
Check Mode
& Proof Copy
Interrupt
Mode
3-39
Page 86

Interrupt Copying (continued)
DETAILS
For particular jobs in progress, copying will cease only after certain phases
of the immediate operation are completed, as indicated by the [INTER-
RUPT] LED conditions described below.
• Collectively printing image stored in memory
The LED blinks until one set of the current job is printed.
Then the LED remains steady for the temporary job performed in
Interrupt mode.
• Scanning originals into memor
The LED blinks until scanning is completed for all originals placed in the
document feeder.
Then, the LED remains steady for the temporary job performed in
Interrupt mode.
• Scanning originals into memory while printing in Reserve mode
The LED blinks until the copier completes the current printing job, scans
all originals placed on the document feeder, and prints one set of the
Reserved job.
The LED remains steady for the temporary job performed in Interrupt
mode.
y
3-40
Page 87

4
Job Memory & Help Mode
How to Use Helpful Functions
4
Job Memory
&Help Mode
Job Memory
Storing Job Conditions (Job Memory: Job Store) ................................... 4-2
Recalling Stored Job Settings (Job Memory: Job Recall) .................. 4-5
Displaying Screen for Operation Guide (Help Mode).............................. 4-7
Help Mode
Page 88

Storing Job Conditions (Job Memory: Job Store)
R
U
Use Job Store to store up to 15 frequently used copy job settings, which can be
recalled at any time. The stored jobs can be given alphabetical names.
>>>Specifications for Job Memory<<<
❒ All copying functions can be selected.
❒ Interrupt mode cannot be used while in Job Memory.
1.
Make job selections from the Basic Screen and/or Application Selection
Screen.
Reminder!
When starting a new copying job, be sure to close the RADF securely, then
press [AUTO RESET].
2.
Press [APPLICATION] on the control panel.
HELP
CHECK
APPLICATION
OUTPUT
AUTO RESET
The Application Selection Screen will be displayed.
3.
Touch JOB MEMORY.
The Job No. Selection Screen will be displayed.
DATA
2 31
564
897
0
FAX
INTERR
STA
CLEAR QTY.
4.
Touch ENTRY.
The Job Store Check Screen will be displayed.
4-2
Page 89

Storing Job Conditions (Job Memory: Job Store) (continued)
5.
Review the settings on the Job Store Check Screen.
Check that the selections made in step 1 are correctly entered.
DETAILS
If any correction is required, touch CANCEL to return to the Basic Screen.
Make new selections, then restart the Job Store operation from step 2.
6.
Touch OK.
The Job No. Selection Screen will be restored.
DETAILS
To suspend the storing job after step 7, press [AUTO RESET].
Job Memory mode will be cancelled, and the Basic Screen will return from
any screen.
7.
Touch to highlight one of the keys numbered from 1~15 to store the
job under that number.
4
Job Memory
&Help Mode
Job Memory
Help Mode
The screen displays 5 job number keys. The arrow keys at the right side can be used
to scroll to the next/previous page.
A blank key indicates that no job is stored under that number. A job without a lock icon
( ) displayed can be overwritten.
The job with a lock icon ( ) is locked and cannot be selected.
HINT
To lock or unlock a job, and to delete a locked job, see p. 11-27.
DETAILS
If you wish to cancel the job number selection, touch CANCEL to restore the
Basic Screen, which displays the settings made in step 1.
If you wish to cancel the settings, press [AUTO RES ET].
4-3
Page 90

Storing Job Conditions (Job Memory: Job Store) (continued)
8.
Touch OK.
The Job Name Registration Screen will be displayed.
9.
Enter a job name.
Enter a job name in up to 24 characters, using the touch screen alphabet keypad.
If required, scroll with the upper and lower arrows to use lower case and symbol keys.
To correct an entry, touch DEL. repeatedly to delete each character entered, then
enter the correct job name.
DETAILS
If you do not wish to enter a name, simply touch OK. The key displays 6
asterisks (*) in place of a name.
10.
Touch OK.
The Job No. Selection Screen will be restored.
Check that the job name has been correctly entered.
11.
Touch OK to complete the setting and return to the Basic Screen.
4-4
Page 91

Recalling Stored Job Settings (Job Memory: Job Recall)
R
U
Use Job Recall to recall jobs that are already stored in Job Memory.
1.
Press [APPLICATION] on the control panel.
HELP
CHECK
APPLICATION
OUTPUT
AUTO RESET
The Application Selection Screen will be displayed.
2.
Touch JOB MEMORY.
The Job No. Selection Screen will be displayed.
DATA
2 31
564
897
0
CLEAR QTY.
FAX
INTERR
STA
4
Job Memory
&Help Mode
Job Memory
Help Mode
3.
Touch to highlight a job number key to select a job you want to recall.
The screen displays 5 job number keys. If required, scroll to the next page with the
arrow keys to reach the desired job number key (6~15).
4-5
Page 92

Recalling Stored Job Settings (Job Memory: Job Recall) (continued)
4.
If desired, touch JOB CHECK.
The Job Recall Check Screen displays to enable you to review the settings.
5.
Touch OK.
The settings of the selected job will be recalled on the restored Basic Screen.
To cancel the recall mode, touch CANCEL to return to the Basic Screen.
6.
Position original(s), then press [START] to print.
4-6
Page 93

Displaying Screen for Operation Guide (Help Mode)
R
U
The Help Screen provides you with the information about the current screen mode and
about setting procedures. Help mode can be accessed from any screen except Job
Memory and Key Operator Screens.
Help mode provides two types of Help Screens according to the current screen mode:
1 Help Screen accessed from Basic Screen
2 Help Screen accessed from screens other than Basic Screen
To Display Help Screen from Basic Screen
1.
Return to the Basic Screen, then press [HELP].
DATA
HELP
CHECK
APPLICATION
OUTPUT
AUTO RESET
2 31
564
897
0
FAX
INTERR
STA
CLEAR QTY.
The Help Screen will be displayed.
2.
Touch the desired key to display specific information.
• Staple provides information on replacing staple cartridge.
• RADF provides information on positioning originals in the document feeder.
• Ton er provides information on adding toner.
• TRAY provides information on loading paper in each tray.
• HELP MENU displays the Help Menu Screen which provides a list of all of the copier
functions. When a function item is touched, the Help Screen displays information
specific to that topic.
• Assistance displays the extension number of the Key Operator.
• Service call displays the phone/fax number of your service center.
4
Job Memory
&Help Mode
Job Memory
Help Mode
DETAILS
• Touch on the Help Screen, if provided, to scroll to the next page.
Touch to return to the previous page.
• Touch Key-Ope mode to enter the Key Operator mode. See p. 11-2.
4-7
Page 94

Displaying Screen for Operation Guide (Help Mode) (continued)
3.
Touch EXIT to return to the Basic Screen.
DETAILS: Help Menu Screen
Select one of the 5 help menu items on the Help Menu Screen to display
subsequent Help Screens.
Touch on the Help Screen, if provided, to scroll to the next page.
Touch to return to the previous page.
Touch MENU on the subsequent Help Screen to return to the Help Menu
Screen, then touch EXIT to restore the Basic Screen.
•“1. Hard keys” displays information on control panel buttons.
•“2. Screen keys” displays information on the keys provided on the LCD
touch screen.
•“3. RADF and Platen” displays information on unsuitable RADF originals
and maintenance of the document feeder and platen glass.
•“4. Applications” displays operational information on 16 application
functions provided on the Application Selection Screen.
•“5. Job memory” displays information on Job Memory.
4-8
Page 95

Displaying Screen for Operation Guide (Help Mode) (continued)
R
U
To Display Help Screen from Other Screens
1.
While in any screen other than the Basic Screen, press [HELP].
DATA
HELP
CHECK
APPLICATION
OUTPUT
AUTO RESET
2 31
564
897
0
FAX
INTERR
STA
CLEAR QTY.
The Help Screen displays to provide the information about the current screen mode
and setting procedures.
2.
Touch EXIT.
The screen that was displayed before pressing [HELP] will be restored.
4
Job Memory
&Help Mode
Job Memory
Help Mode
4-9
Page 96

Page 97

Troubleshooting
5
How to Handle Machine Troubles
When “Call for Service” Message Is Displayed ...................................... 5-2
Preventive Maintenance ..................................................................... 5-4
Clearing Mishandled Paper..................................................................... 5-5
When “JAM” Appears on Folder Key.................................................. 5-7
When “ADD PAPER” Appears on Folder Key......................................... 5-9
W
hen “Memory Full” Message Is Displayed (Memory Overflow)
......... 5-10
When Power OFF/ON Screen Is Displayed.......................................... 5-12
Troubleshooting Tips......................................................................... 5-13
5
Trouble-
shooting
Call for
Service
Preventive
Maintenance
Clearing
Mishandled
Paper
JAM Key
ADD PAPER
Key
Memory
Overflow
Power OFF/ON
Screen
Troubleshooting
Tips
Page 98

When “Call for Service” Message Is Displayed
A “Call for Service” message indicates a machine condition that requires the attention
of your service representative.
The Call for Service Screen usually displays the telephone and facsimile numbers of
your service representative.
CAUTION
When the Call for Service Screen is displayed, be sure to
contact your service representative immediately by following
the procedure below.
1.
Make note of the Report code No. indicated in the second line of the
message area.
HINT
If your machine uses the Remote Diagnostics option and is automatically
monitored by your service representative, the Key Operator can call for
service using the Key Operator setting. See p. 11-49.
Reminder!
After calling for service using the Key Operator setting, be sure to turn OFF
the power switch and main power switch immediately, then unplug the
machine as described here.
2.
Turn OFF the power switch and main power switch.
3.
Unplug the machine.
4.
Contact your service representative and report the condition and
code No.
5-2
Page 99

When “Call for Service” Message Is Displayed (continued)
0
Limited Use of the Copier in Trouble
If the message shown below is displayed on the Call for Service Screen, you may
continue operating the copier on a limited function basis and utilize the trays and ADU
that are not affected by the trouble. To obtain this limited functionality of the copier,
consult your service representative. Be sure to utilize the limited function only
temporarily, and arrange for machine repair immediately.
1.
If the limited use of the copier is available, the following message is
displayed in the message area instead of the Report code.
ex. Tray 2 failure
Press AUTO to select except this tray
2.
Press [AUTO RESET].
Please switch ON/OFF
E 18-2
Make note of the Report code No.
3.
Turn OFF then ON the power switch.
A copying job can continue without using the troubled portion of the machine (ex. Tray
2).
5
Trouble-
shooting
Call for
Service
Preventive
Maintenance
Clearing
Mishandled
Paper
JAM Key
CAUTION
EVEN IF THE COPYING JOB CAN BE CONTINUED WITH THE
ABOVE OPERATION, BE SURE TO CONTACT YOUR SERVICE
REPRESENTATIVE IMMEDIATELY WHEN THE CALL FOR
SERVICE SCREEN IS DISPLAYED.
ADD PAPER
Key
Memory
Overflow
Power OFF/ON
Screen
Troubleshooting
Tips
5-3
Page 100

Preventive Maintenance
After a set number of copies have been made on your copier, Preventive Maintenance
(PM) will be required for maintaining optimal performance.
When preventive maintenance is due, a message and PM CALL icon ( ) will prompt
you to contact your service representative for maintenance.
5-4
 Loading...