

Page 1

7020
INSTRUCTION MANUAL
Page 2

ENERGY STAR® Program
The ENERGY STAR Program has been established to encourage
the widespread and voluntary use of energy-efficient
technologies that reduce energy consumption and prevent
pollution. With its automatic energy saving features Auto Low
Power and Auto Shutoff (see item 6.3 Power Saver Mode) and its
automatic duplex function, this product meets the Energy Star
guidelines for energy efficiency. The key operator can adjust the
interval after which the system goes into power saver mode.
CE Declaration
This product complies with EC Directives 73/23/EEC, 89/336/EEC,
92/31/EEC and 93/68/EEC.
2
Page 3

What KONICA 7020 has to offer:
High-Speed Copying
20 A4 or 13 A3 pages per minute.
Extensive Paper Supply
Equipped with a drawer base unit*, Konica 7020 makes available
up to 2,550 sheets in its trays and multi-sheet bypass.
Automatic Duplexing
Konica 7020 offers high productivity also when duplex copying.
Even double-sided originals are processed and reversed automatically.
Job Memory
15 different copy patterns can be stored and instantly recalled.
Touch Screen for Convenient Operation
All settings are quickly and easily entered via the interactive
touch screen. The CHECK key calls up a display to confirm all
active settings. And a JOB LIST informs which job is processed at
any time and how long this will take.
Help Function
Konica 7020 provides a HELP key with which a corresponding Help
screen can be called up at any time. If there is a problem (e.g. a paper
jam), a Help menu appears automatically.
Automatic Settings
The following functions are active when
– the unit is switched on;
– AUTO RESET is pressed;
– the unit returns to the initial settings automatically:
● Preselection 1
● Same-size copying 1:1
● automatic paper selection (APS)
● automatic exposure adjustment (AE)
● automatic processing of originals (RADF*)
● copies exit into the exit tray
These initial settings can be changed by the key operator or the
Konica service technician.
The key operator can individually adjust the delay for the auto-
Please note:
Konica 7020 is equipped with a special
Key Operator Function. In this mode, the
operator can monitor the machine
performance, adjust default settings, and
control user activity, e.g. allocate user
codes and key counters.
Access and operation of the Key Operator
Function are explained in a separate
manual.
matic return to the initial settings. Or the function can be
deactivated altogether.
Digital Image Editing
Various digital functions allow easy editing of copies and enable
the creation of completely new layouts.
Versatile Copying Comfort
A variety of special functions enables the combination of
custom-made copied sets which can be compiled e.g. as a
booklet or with cover sheets and chapter inserts.
Optional Accessories* (not standard)
This product can be upgraded with various
options. Optionals or functions, which are
not part of the standard configuration,
are marked with a blue *.
* Option
Complete Finishing
In the finisher* copies are sorted and can be stapled in various
positions.
Access and Cost Control
The key operator can activate the electronic key counter and
allocate up to 128 user codes.
3
Page 4

Contents
1. Advice on Installation and User Safety ......................................................................................................6
1.1 Safety Warnings .................................................................................................................................. 6
1.2 Installation .......................................................................................................................................... 7
1.3 Installation Space ................................................................................................................................ 8
2. Main Components ........................................................................................................................................ 9
2.1 External Machine ............................................................................................................................... 9
2.2 Internal Machine .............................................................................................................................. 10
2.3 Standard/Optional Equipment ........................................................................................................... 11
3. All Functions at a Glance ...........................................................................................................................12
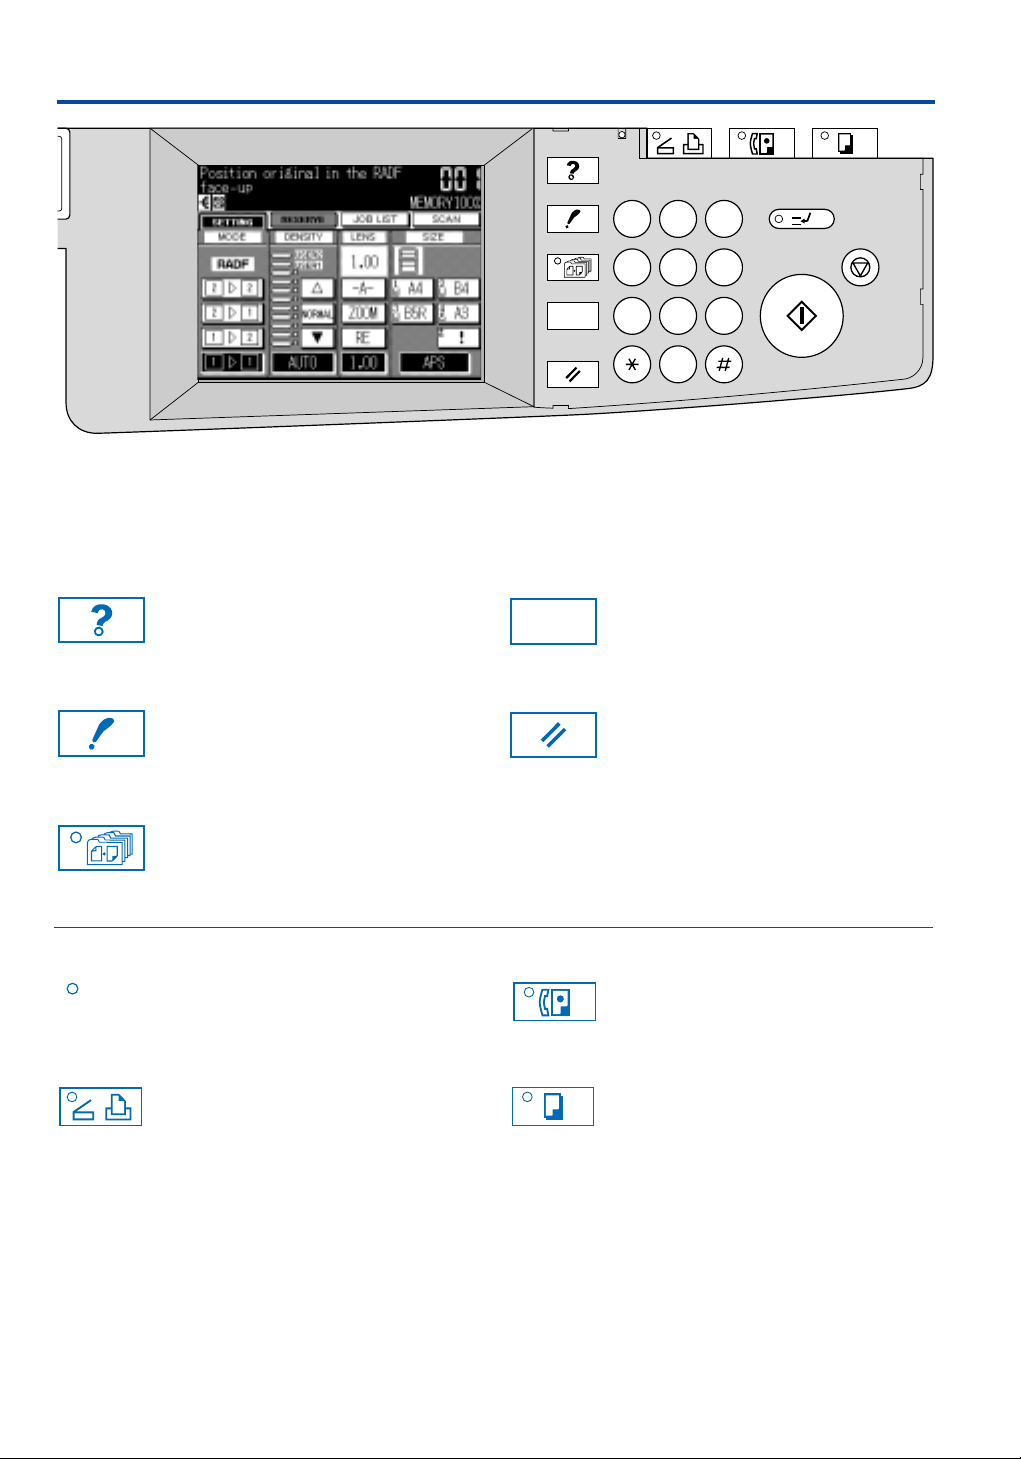
3.1 Operation Panel ................................................................................................................................ 12
3.2 The Touch Screen ............................................................................................................................. 14
3.2.1 The Basic Screen ............................................................................................................................... 14
3.2.2 The Application Selection Screen ...................................................................................................... 15
4. The Help Function.......................................................................................................................................16
4.1 The Help Key ..................................................................................................................................... 16
4.2 Automatic Help Mode ....................................................................................................................... 16
5. How to Supply Paper, Toner, Staples.......................................................................................................17
5.1 Supply Paper .....................................................................................................................................17
5.2 Supply Toner ..................................................................................................................................... 18
5.3 Supply Staples ................................................................................................................................... 20
6. Before Copying ...........................................................................................................................................22
6.1 Weekly Timer ....................................................................................................................................22
6.2 User Password / Electronic Key Counter (EKC) .................................................................................. 22
6.3 Power Saver Mode ............................................................................................................................ 23
7. Simple Copying........................................................................................................................................... 24
7.1 Automatic Copying ........................................................................................................................... 24
7.2 Position Originals .............................................................................................................................. 25
7.3 Store Mode ....................................................................................................................................... 25
7.4 Select Finishing Functions / Stapling Position* .................................................................................. 26
7.5 Basic Functions.................................................................................................................................. 27
7.5.1 Copy Mode / Duplex Copying ........................................................................................................... 27
7.5.2 Copy Density ..................................................................................................................................... 28
7.5.3 Magnification: Reduce & Enlarge / Zoom / Vertical/Horizontal Zoom ................................................ 28
7.5.4 Paper Size Selection .......................................................................................................................... 29
8. Other Basic Functions.................................................................................................................................30
8.1 Job Programming / Reserve Mode ..................................................................................................... 30
8.2 Check Screen / Proof Copy ............................................................................................................... 30
8.3 Job List / Advance or Delete Jobs ...................................................................................................... 31
8.4 Copy Interrupt .................................................................................................................................. 32
8.5 Job Memory: Save and Recall Job Settings ........................................................................................ 32
4
* Option
Page 5

Contents
9. Special Functions ......................................................................................................................................34
9.1 Image Editing Functions .................................................................................................................. 35
9.1.1 Text / Photo Enhance ...................................................................................................................... 35
9.1.2 Auto Layout .................................................................................................................................... 35
9.1.3 Reverse Image ................................................................................................................................ 35
9.1.4 Image Shift ..................................................................................................................................... 36
9.1.5 Image Repeat.................................................................................................................................. 36
9.1.6 Non Image Area Erase .................................................................................................................... 37
9.1.7 Frame / Fold Erasure ....................................................................................................................... 37
9.1.8 Stamp, Watermark, and other Imprints .......................................................................................... 38
9.2 File Editing Functions ......................................................................................................................39
9.2.1 Sheet / Cover Insertion ................................................................................................................... 39
9.2.2 OHP Function.................................................................................................................................. 40
9.2.3 Chapter .......................................................................................................................................... 40
9.2.4 Image Insert .................................................................................................................................... 41
9.2.5 Combination ................................................................................................................................... 42
9.2.6 Dual Page / Book Copy ...................................................................................................................42
9.2.7 Booklet Mode ................................................................................................................................. 43
9.2.8 Special Originals ............................................................................................................................. 43
10. Troubleshooting ....................................................................................................................................... 45
10.1 Selfdiagnostic System ..................................................................................................................... 45
10.2 Periodic Maintenance / Reading the Copy Counter......................................................................... 45
10.3 Memory Overflow ........................................................................................................................... 46
10.4 Call Service ..................................................................................................................................... 46
10.5 Paper Jam .......................................................................................................................................47
10.6 Care Advice .................................................................................................................................... 48
10.7 Solving Simple Problems .................................................................................................................50
11. Function Combinations ............................................................................................................................51
12. Technical Specifications ...........................................................................................................................54
Main Body ...................................................................................................................................... 54
Optional Accessories ....................................................................................................................... 55
5
Page 6

1. Advice on Installation and User Safety
Dear User,
The following concerns the safe use of your new equipment.
Please take the time to read the following precautions carefully.
1.1 Safety Warnings
1. ATTENTION: While in use, a high voltage is generated inside
the equipment. Do not touch to avoid electrical shock!
2. Do not attempt to repair any parts of this equipment. All
repairs must be carried out exclusively by approved Konica
service technicians.
3. While in use, some parts inside the unit get very hot. To avoid
getting burned, follow instructions carefully when clearing
paper jams and only touch designated parts.
4. In case of liquid running into the unit, immediately switch off
the equipment, disconnect from the mains and inform your
Konica service.
5. To disconnect the unit from the mains, pull the plug from the
socket, which has to be located close to the equipment and
must not be obstructed at any time!
6. While toner is not hazardous to your health, it should be kept
out of reach of children. If toner is inhaled, swallowed or gets
into contact with the eye, consult your doctor.
7. If the equipment has to be opened, only the green knobs and
handles should be touched.
8. Before switching on the equipment, always ensure that the
unit is securely closed.
9. This equipment is not to be confused with shelves or other
office furniture. Do not obstruct the top of the unit with any
items but keep free at all times.
Care Advice:
One precondition for a good copy quality
is a clean platen glass! We suggest to
clean the platen glass and the underside
of the doucment feeder daily with a clean
soft, possibly damp cloth or the special
Konica cleaning liquid. Never use volatile
or corrosive cleaners or solvents with this
equipment!
6
10. Avoid dropping anything into the unit (e.g. paper clips,
staples or else).
11. The touch screen of the operating panel is protected with a
thin glass. Only make function selections with your fingertips,
and avoid pressing on the display with hard or pointed items
(e.g. pens).
12. Do not load stapled or folded paper into the document
feeder, the paper trays or the sheet bypass.
Page 7

1. Advice on Installation and User Safety
1.2 Installation
An inadequate location of the system can lead to a loss in copy
quality and can even damage the equipment. The following
should therefore be considered before installing the unit. Also
see 1.3 Installation Space for the minimum space requirements
of Konica 7020.
1. The location of the equipment must be level and must not be
subject to vibration.
2. The unit should only be installed in surroundings which are
dry, clean and well ventilated.
3. The equipment and its exclusive power outlet must be easily
accessible and not be obstructed in any way.
4. Only connect the unit to a tested socket which is approved by
the local electricity board. Ensure that neither the socket nor
the connecting lead are damaged in any way. Do not use any
extension lead or branched socket.
5. The unit is intended for use in temperatures between 10° and
max. 30° Celsius as well as humidity between 10% and max.
80%. Avoid installing this equipment in locations with greatly
varying temperatures (close to heating or window) as well as
direct sunlight.
6. When in use ozone is generated by this equipment, however in
small, not hazardous amounts. An odour may be detected after
long periods of use in a poorly ventilated room. This can be
avoided by adequate ventilation at regular intervals.
7. Ammonia or other gaseous fumes, extremely dusty conditions
as well as strongly varying levels of humidity and/or room
temperature can have a negative effect on the performance
of the system, leading to a deterioration of the copy quality.
7
Page 8
1. Advice on Installation and User Safety
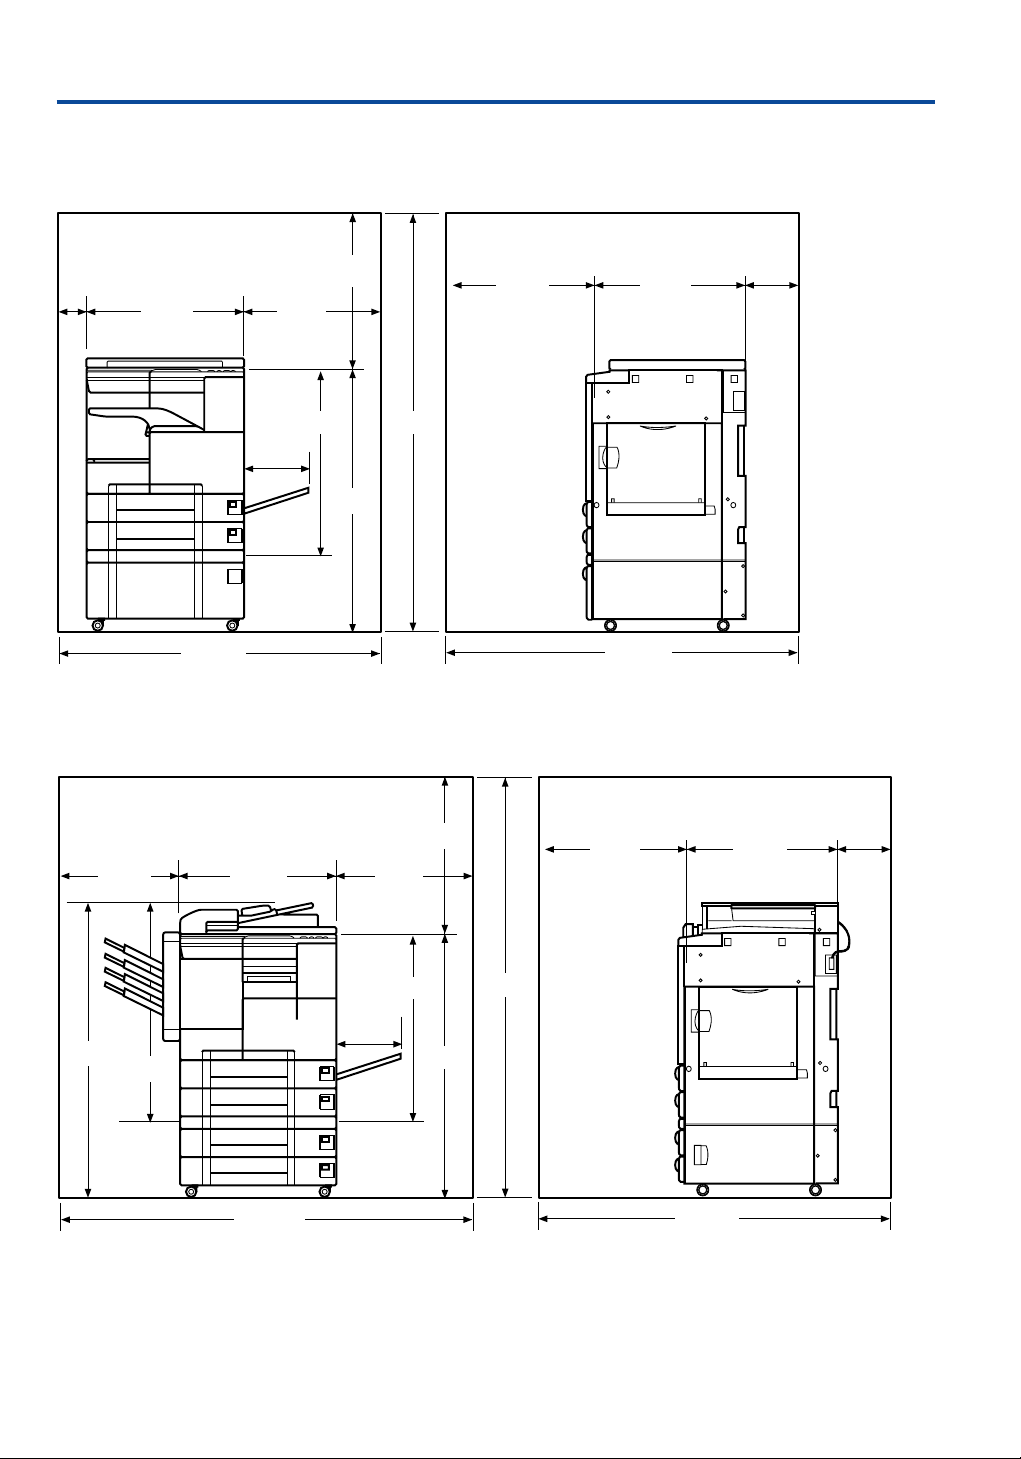
1.3 Installation Space
Basic Model with Basic Pedestal*
500
730
550
1577
1027
100
590
245
1190
System with RADF*, DB-Unit (DB-209)* and Finisher*
550
450
590
500
550
550
1345
595
595
200
200
1172
875
All dimensions in mm
8
1540
245
730
1577
1027
1345
Page 9
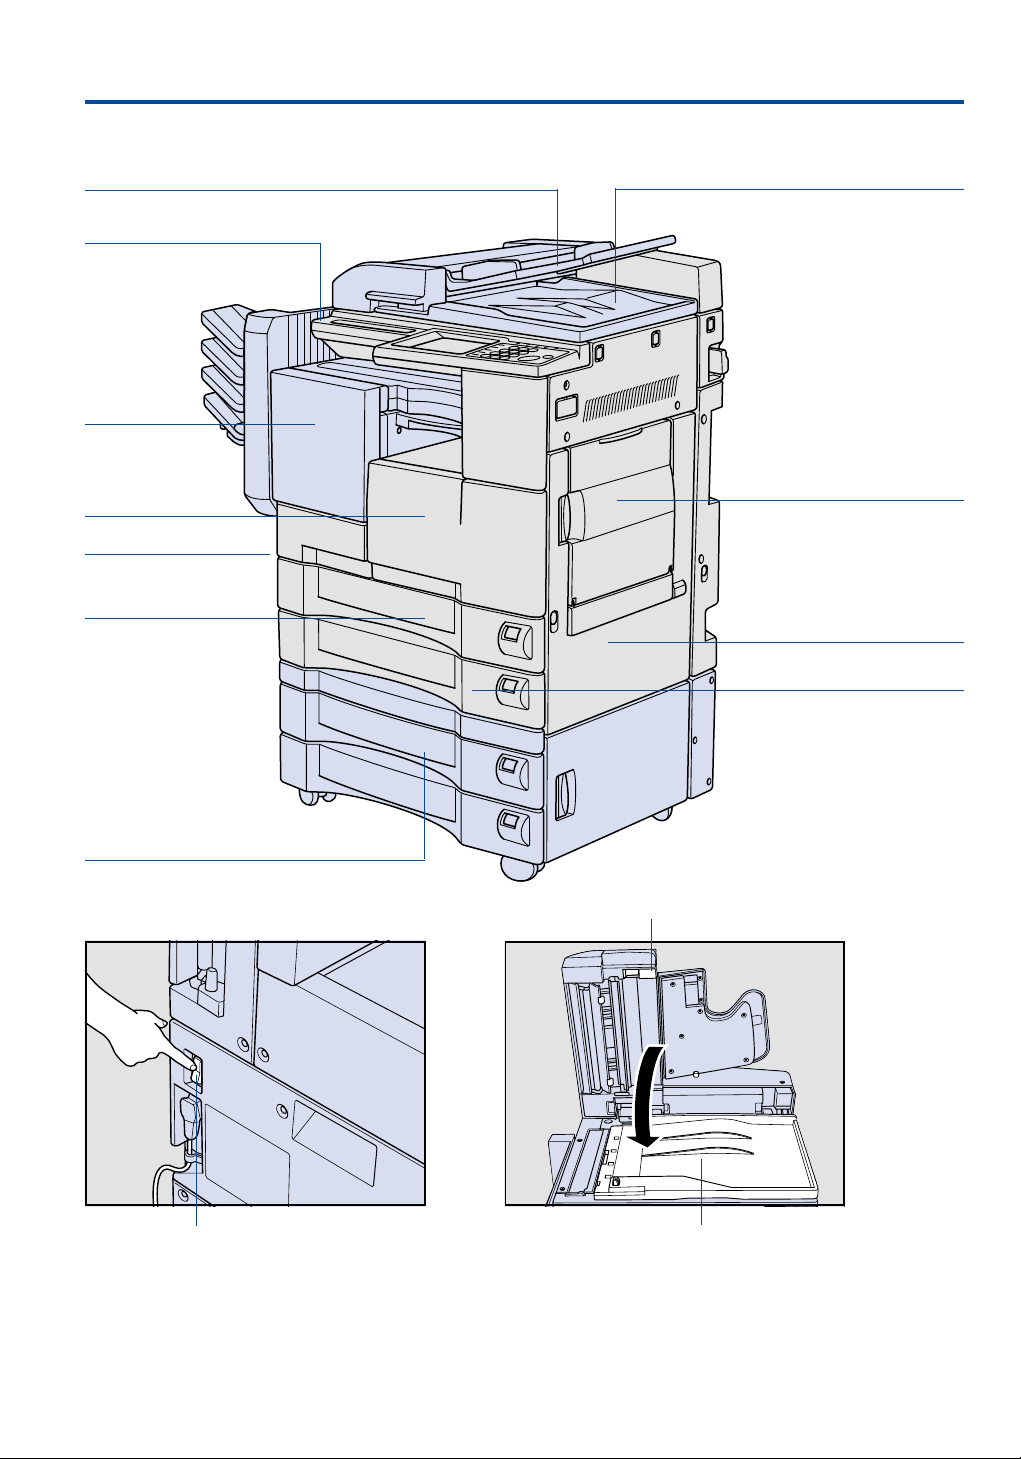
2. Main Components
2.1 External Machine
Original Insertion in RADF* RADF*
On / Off Copier Function
Finisher*
Front door
Main power switch
see below
Tray 1:
Universal Tray
for 500 Sheets
A5R – B4
DB-Unit DB-209*
with Trays 3 and 4:
Universal Trays,
each for 500 Sheets A5R – A3
Multi-Sheet Bypass Tray
50 Sheets A5R – A3
Right Side Paper Conveyance
Tray 2:
Universal Tray
for 500 Sheets A5R – A3
Release Button
Main Power Switch
* Option
Original Cover
For easier manual copying, separate the
RADF by pressing the green release button.
The heavy left part remains open.
After placing all originals, firmly close the
left RADF part until it clicks into place.
9
Page 10
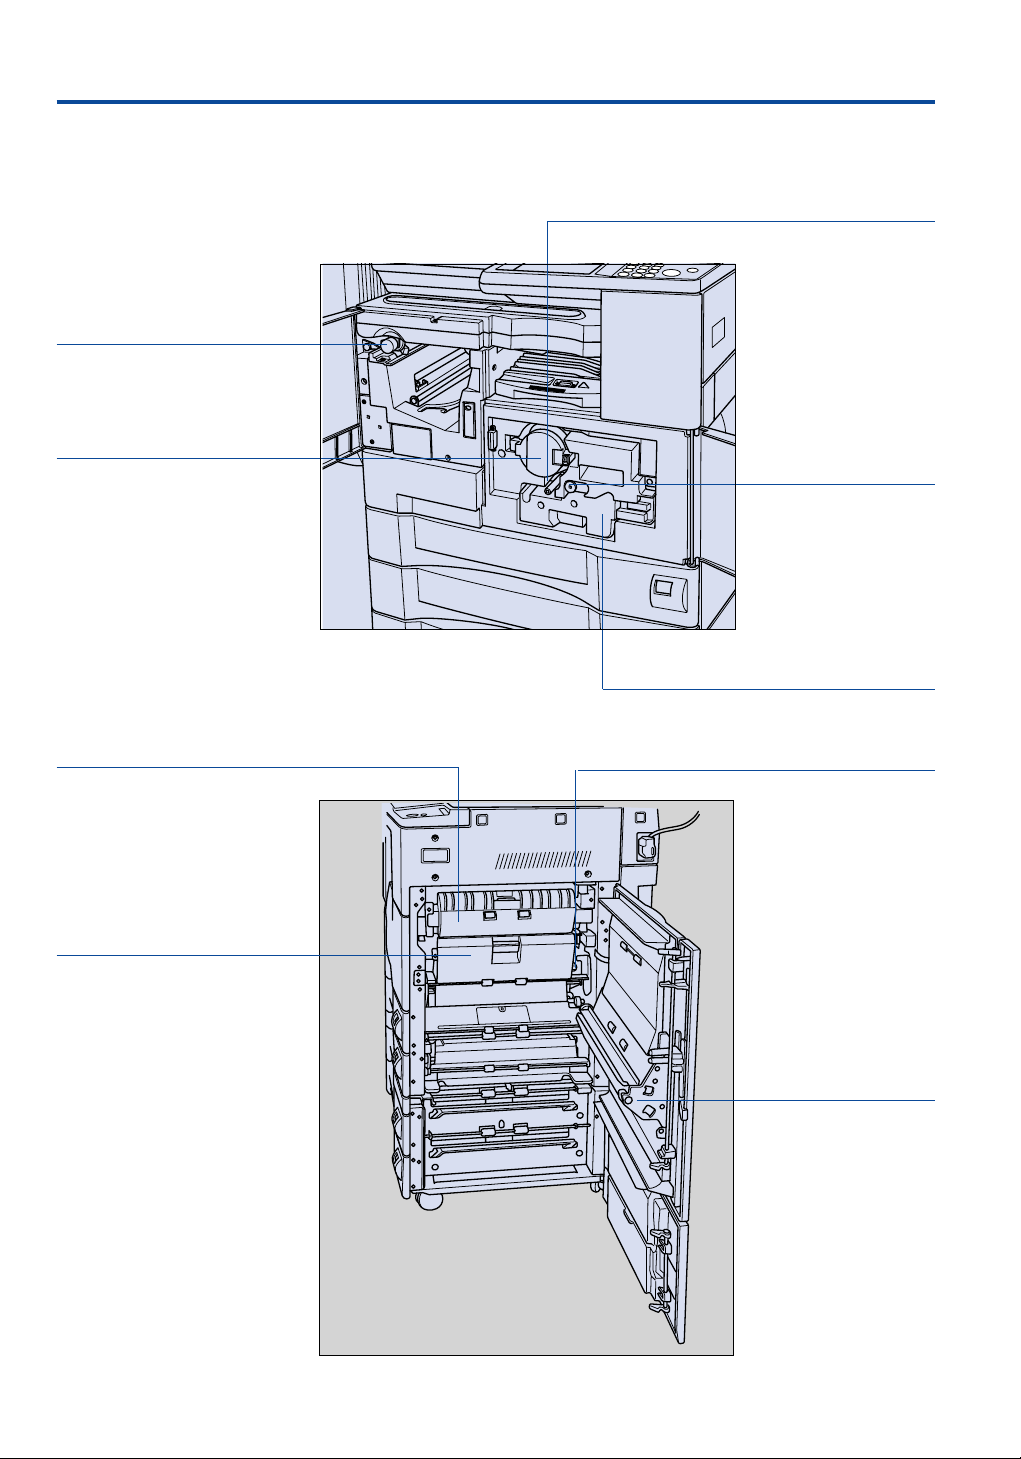
2. Main Components
2.2 Internal Machine
Finisher knob
Toner bottle cover
Writing unit glass cleaning knob
Corona wire
cleaning knob
Fixing unit guide
Conveyance unit cover
Developing unit
Transfer/Separator wire
cleaning lever
ADU
10
Page 11
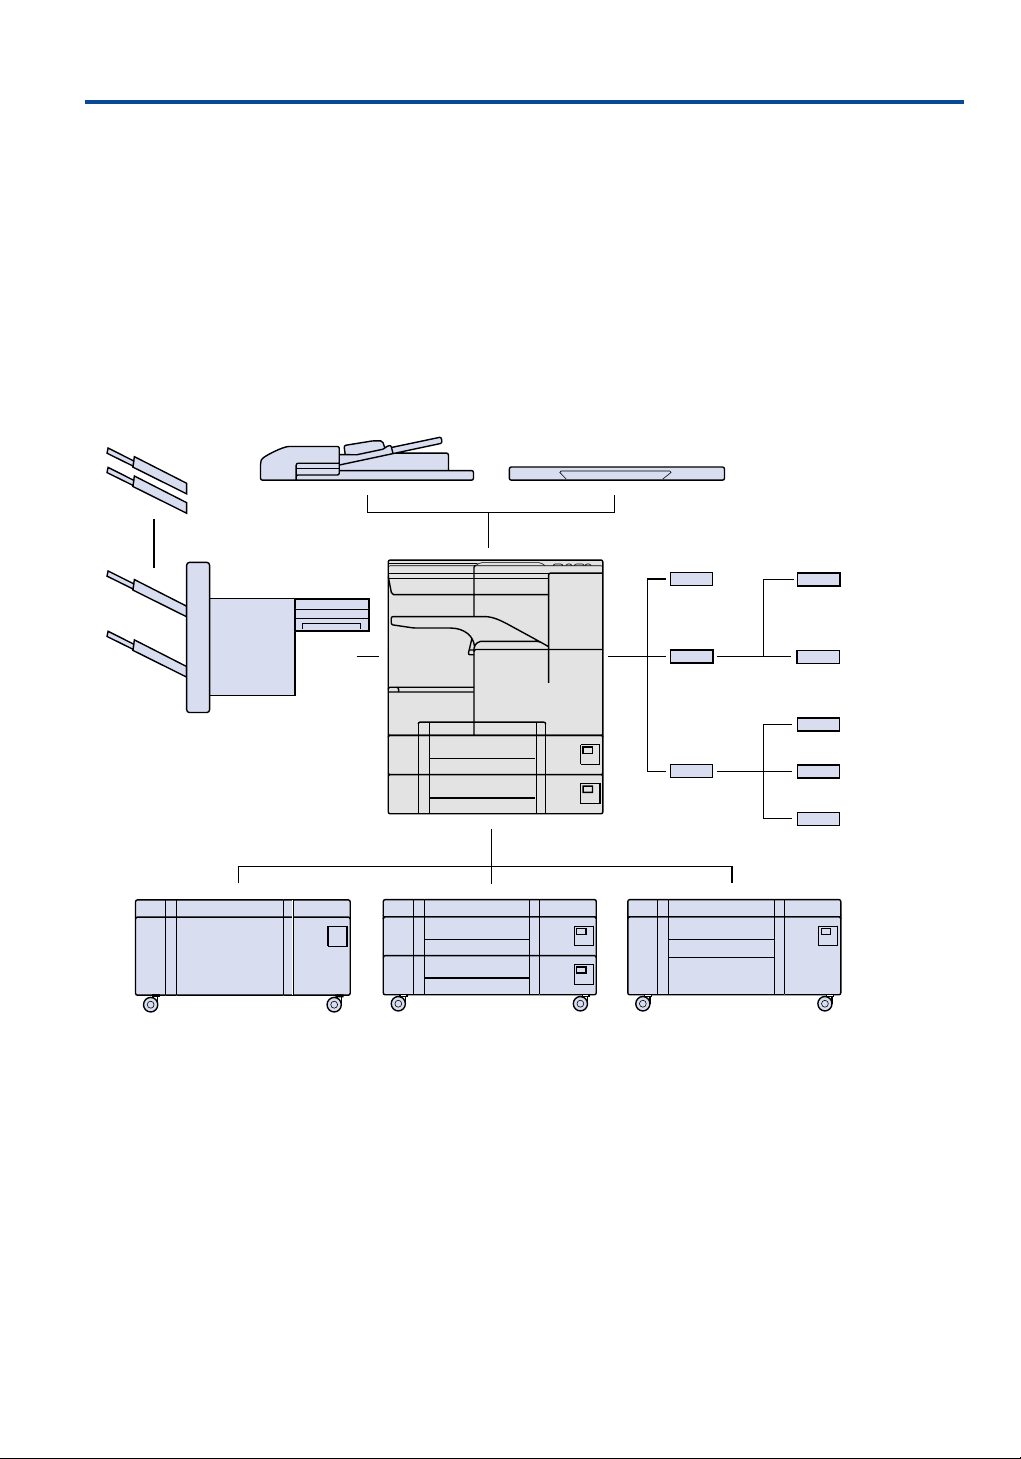
2. Main Components
2.3 Standard/Optional Equipment
Finisher Exit Trays
FT-107
Finisher
FS-107
The finisher can be equipped
with up to 4 exit trays
RADF DF-314 Platen cover
Main body
FaxKit
(FK-101)
Print
Controller
(IP-011)
Print
Controller
(IP-421)
Print Server
EasyCom Xpress
Network
Interface Card
(KN-304)
Network
Interface Card
(KN-303)
HDD (HD-103)
PostScript 3 Option
(PS-341)
DK-109
Basic Pedestal
DB-209
with 2 trays for
500 sheets each
with LCT for 1,500 sheets
DB-409
(A4/A4R)
11
Page 12
3. All Functions at a Glance
3.1 Operation Panel
Help
Activates a general help menu or
detailed user instructions for a selected
HELP
Check
function.
All user selections are displayed.
HELP
CHECK
APPLICATION
OUTPUT
AUTO RESET
Output
OUTPUT
Auto Reset
DATA
SCANNER / PRINTER
2 31
FAX
COPY
INTERRUPT
564
STOP/CLEAR
897
0
CLEAR QTY.
START
Activates the Output Mode Screen, in
which finishing functions are selected (exit
tray, sort, group, staple mode)
Restores initial settings.
CHECK
Application
Activates the Application Selection
Screen, and provides access to Store
APPLICATION
Mode and Job Memory.
Data
Indicator blinks while receiving print data
DATA
in printer mode; lights upon completion
of receiving process.
Scanner / Printer
Switches to scanner* and printer*
mode.
SANNER / PRINTER
AUTO RESET
Fax
Switches to fax mode*.
FAX
Copy
Switches to copier mode.
COPY
12
* Option
Page 13
3. All Functions at a Glance
LCD Touch Screen
displays machine and copying status, help information,
interactive screens, and touch keys for function selections.
Depending on the service adjustment, additional status
information is displayed:
Automatic Rotation
Sort
Add Toner
Routine maintenance
Copy Preselection
2 31
564
897
0
Interrupt
INTERRUPT
Start
START
Numeric keypad to enter copy
quantity, user codes, numeric values
for various functions and to read
counters.
To interrupt copying job in
progress, in order to copy another
job in-between.
Press to start copying.
Counters
Displays the counter list screen.
Clear Quantity
Clears the selected copy quantity.
CLEAR QTY.
Stop/Clear
Interrupts the copying process and erases
the memory.
STOP/CLEAR
13
Page 14
3. All Functions at a Glance
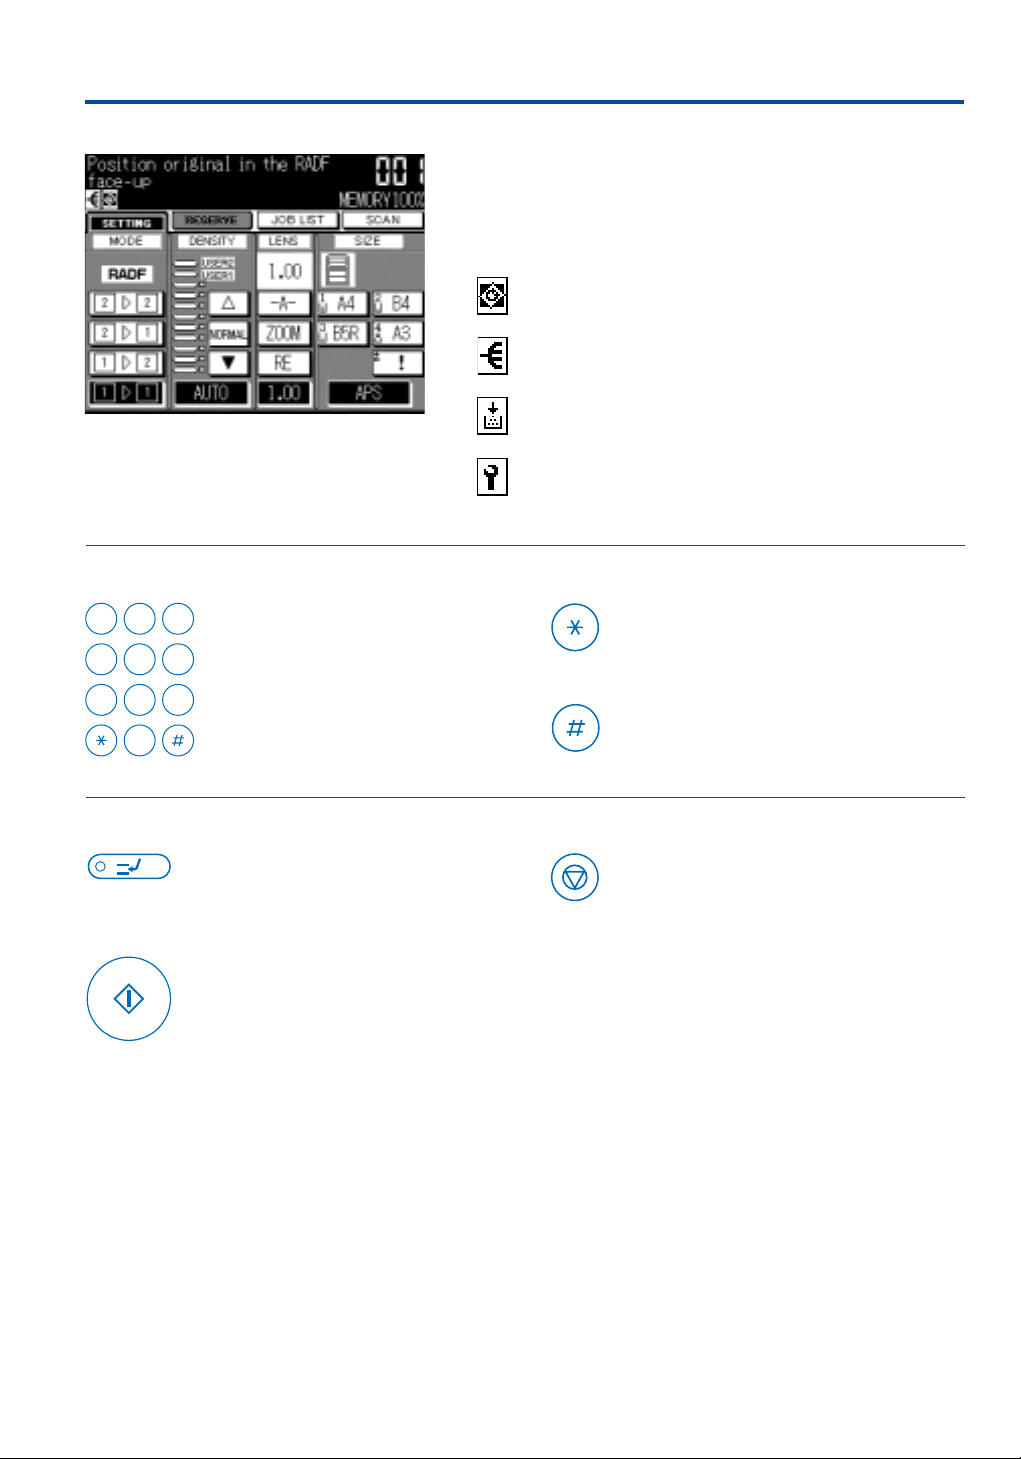
3.2 The Touch Screen
The interactive touch screen serves to enter all software selections, which are then shown in the display.
Functions are selected with the soft keys. Selections are shown
automatically resp. after calling up the Check screen.
Soft keys, which can be activated in the LCD, show a dark
shadow underneath and on the right of the key.
Keys of activated functions are shown inverted, i.e. in black with
white text. Keys of functions, which are not available, are
shown in grey.
3.2.1 The Basic Screen
In the Basic Screen under the SETTING tab, the basic functions
are activated:
COPY MODE / Single- and Double-sided Copying
double-sided original 3 double-sided copy
double-sided original 3 single-sided copy
single-sided original 3 double-sided copy
single-sided original 3 single-sided copy
Basic Screen
COPY DENSITY
Adjust for darker or lighter copies. Press AUTO for automatic
contrast setting.
LENS MODE
6 preset magnification ratios and 3 userset ratios are provided.
Zoom range 25% to 400%. 1.00 = same size copying.
–A– = The correct magnification ratio is automatically selected.
PAPER SIZE
If APS is active, originals are automatically copied in the same
size. If a specific paper tray is selected, this switches APS off.
The RESERVE Screen is identical to the Basic screen and allows
function selections for another 4 copy jobs during copying.
The JOB LIST Screen displays the present and waiting copy and
print jobs.
The SCAN Key activates the store mode to scan originals
(page 25).
The MEMORY Indicator displays the remaining memory
capacity.
14
Page 15

3. All Functions at a Glance
3.2.2 The Application Selection Screen
The APPLICATIONS hard key calls up the screen for the special
functions.
In this screen Store Mode can be selected (page 25). The JOB
MEMORY key (page 32) activates the Job Memory for
programming and retrieval of complete copy patterns.
The following functions can be selected:
FILE EDIT
Sheet / Cover Insertion
To program positions for covers and inserts (page 39).
OHP Interleave
To copy OHP films with inserts (page 40).
Chapter
To start each new chapter on a righthand (front) page (page 40).
Application Selection Screen
The operator can suppress the access to
particuler functions respectively can
change the sequence of functions on the
display. In this case, the display looks
different.
Image Insert
To insert an original from the platen glas into a document set
copied via the RADF (page 41).
Combination
To combine from 2 to 8 originals on one copy (page 42).
Dual Page
To copy from books, magazines etc. automatically onto two
separate A4 pages (page 42).
Booklet
To combine several pages automatically as an A4 or A5 booklet
(page 43).
Special Originals
To process originals of mixed sizes, Z-folded originals, special
sizes, and to fix the direction for duplex copies and for double
sided originals. (page 43).
IMAGE EDIT
Text / Photo Enhance
For improved reproduction of halftone originals (page 35).
Auto-Layout
To center an original image on the copy (page 35).
Reverse Image
Negative reproduction of the original, black is copied white and
vice versa (page 35).
Image Shift
Shifts the image on the front and the back of the page by up to
250 mm left or right; also with automatic reduction (page 36).
Repeat
Places a defined area from the original onto the copy as often as
possible (page 36).
Non Image Area Erase
For copying from the platen glass with open RADF; automatically
eliminates black shadows (page 37).
Frame / Fold Erasure
Creates a frame of 1 to 15 mm and/or a center fold of 1 to 30 mm
(page 37).
Stamp / Watermark
Watermarks, stamps, date and time as well as page and set numbers
can automatcally be printed onto copies.
(page 38).
15
Page 16
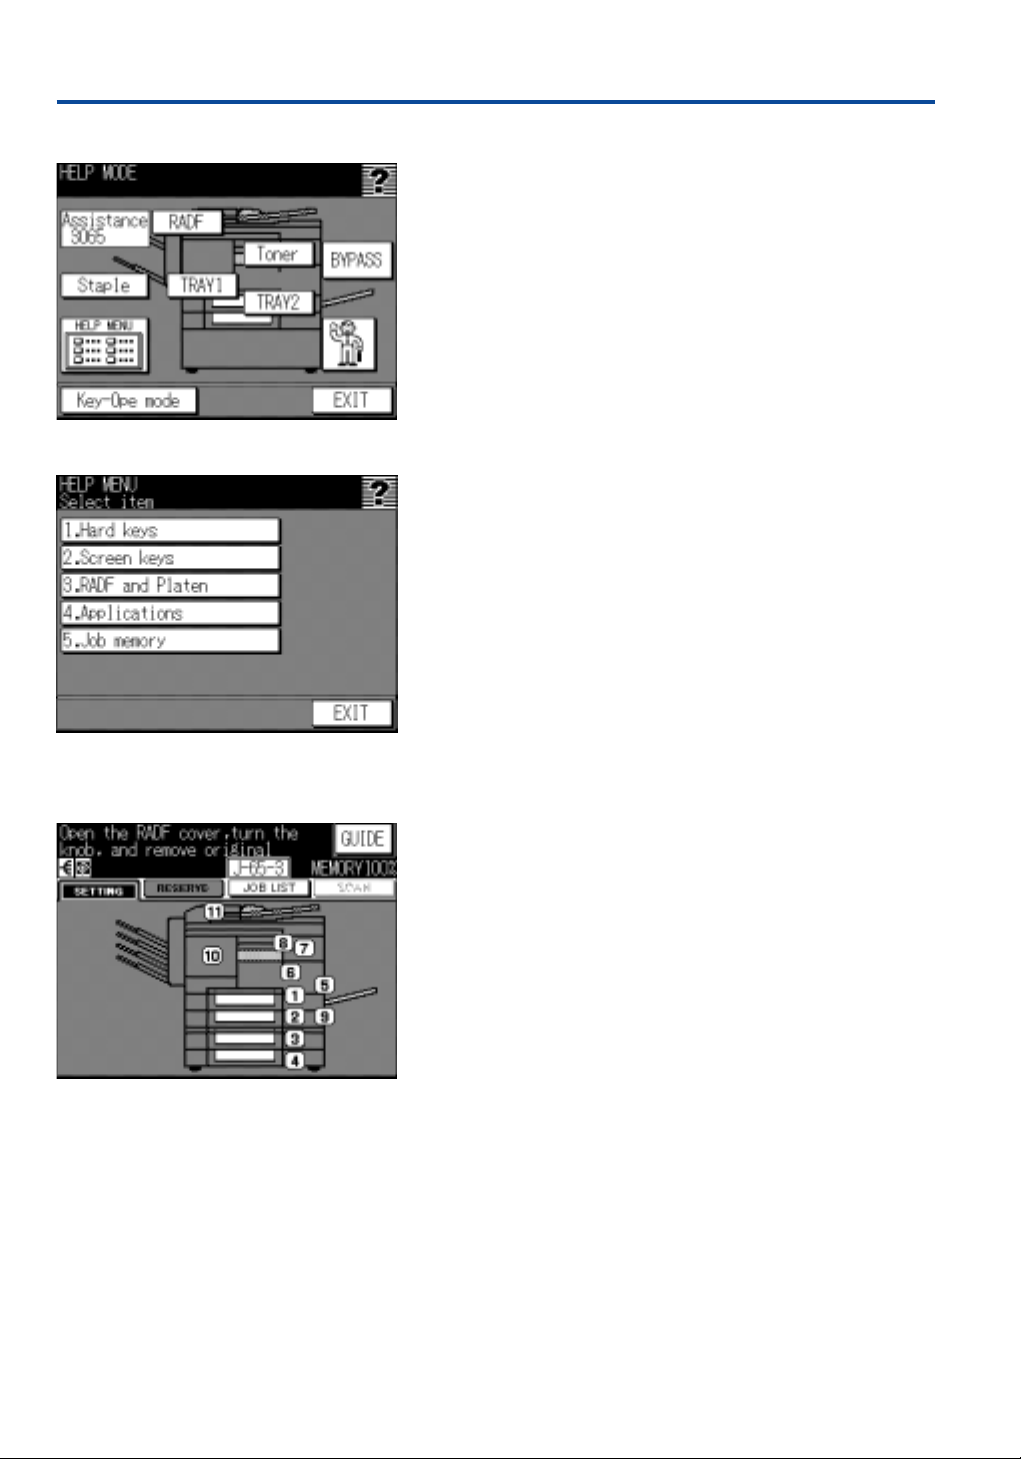
4. The Help Function
4.1 The Help Key
The HELP hard key calls up varied help information.
General information regarding the functions is available, as well
as detailed user instructions, explaining the operation procedures step by step.
There are two ways to call up the required information:
1. Press HELP, while the basic screen is displayed in the LCD, to
call up the Basic Help screen. Press any of the soft keys (e.g.
RADF, etc.) for detailed information on the relevant copier
part. Pressing the HELP MENU soft key calls up the Help
Menu screen, in which general information regarding the use
of the machine and its functions can be activated.
Touching Key-Ope mode the operator has direct access to
the key operator-mode.
2. Pressing HELP, while any function is activated, calls up help
screens with detailed operation instructions for the
corresponding function.
4.2 Automatic Help Mode
A similar screen appears automatically if a
paper jam occurs, showing where the jam
is located. Further screens follow, explaining the necessary operation steps to clear
the paper jam.
If there is a problem, copying will be interrupted and a help
information is displayed on the screen. If the service icon is
displayed, please inform your key operator or the Konica service.
If the problem is a paper jam, please follow exactly the instructions displayed on the screen. As you carry out operation steps,
new screens appear automatically. Once the problem is solved,
the help screens will disappear.
Press the GUIDE key, if you need more details regarding the relevant operation steps.
16
Page 17
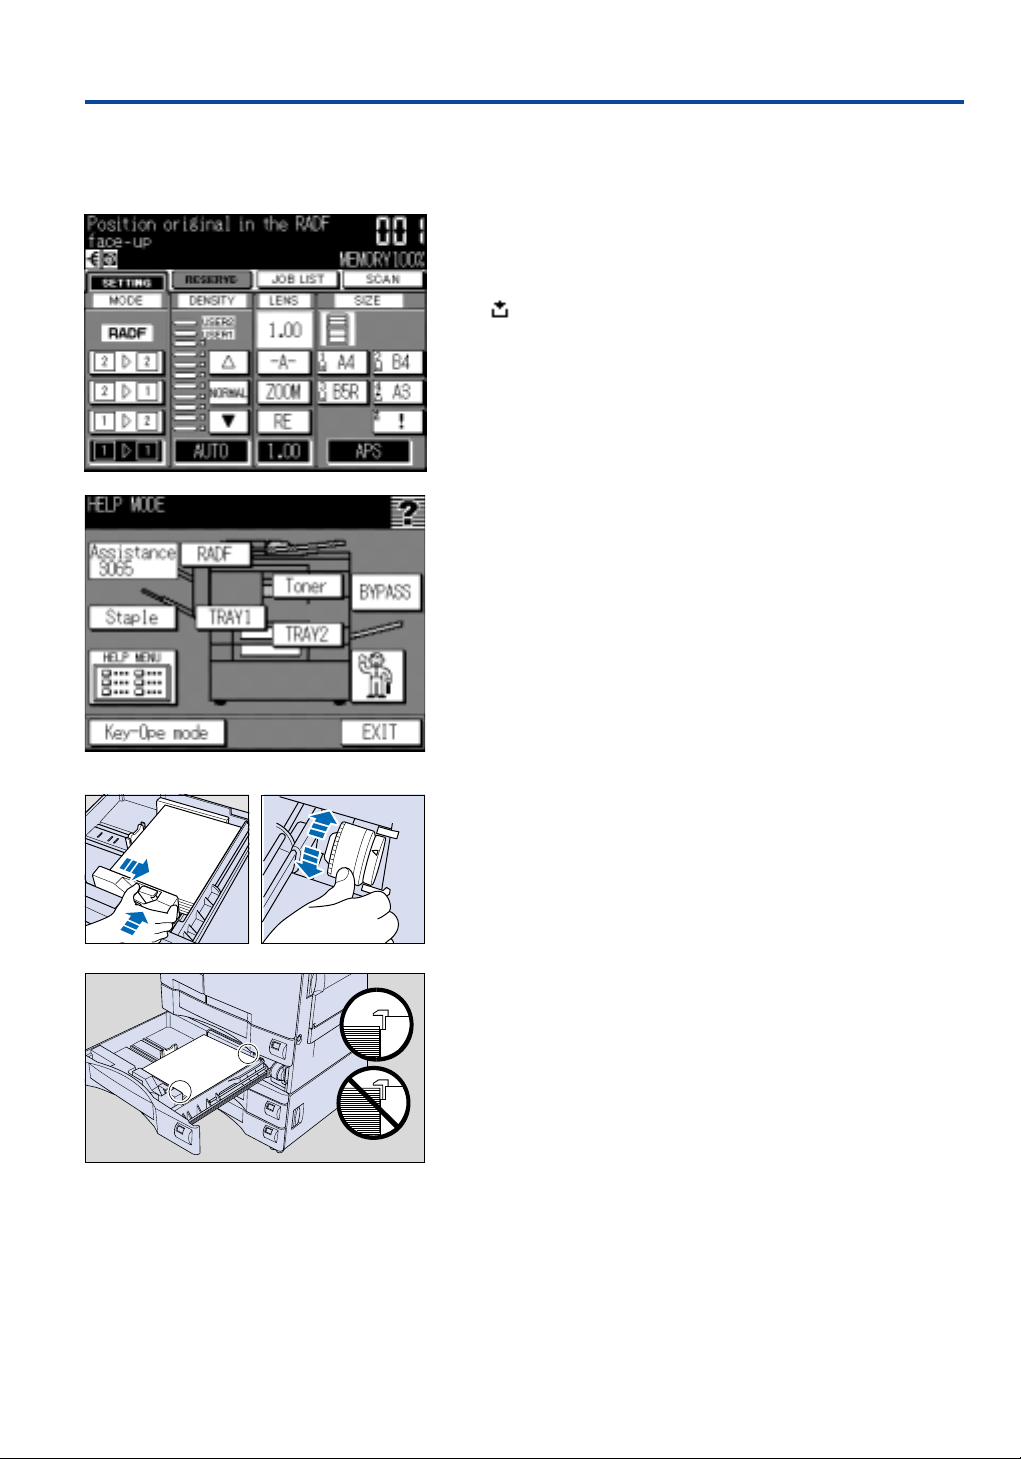
5. How to Supply Paper, Toner, Staples
This section contains information regarding the paper trays, how
to refill toner and replace staples.
5.1 Supply Paper
General
This system is equipped with up to 4 paper trays and a multisheet bypass. If paper of a certain size has been used up, the
corresponding paper size indicator on the screen will fade.
The Symbol appears on the display and blinks whenever the
chosen paper tray is empty.
Press the HELP key, while the basic screen is displayed, to call up
the Basic Help Screen. Pressing the soft key for any of the paper
trays will display a help screen explaining how to refill paper.
A4
How to supply paper in the 500-sheet-trays
1. Withdraw the tray from the unit as far as it will go.
2. If required, the guide plates (universal trays) can be adjusted
to a different size. In this case, set the size indication dial (at
the right side) at the correct copy size!
3. Fan the paper before inserting it!
4. Stack paper into the tray with the curly side up. Paper must
not be stacked higher than the red mark. If trays are overstacked, the system might not copy!
5. Push the paper tray into the unit until it locks into place.
17
Page 18
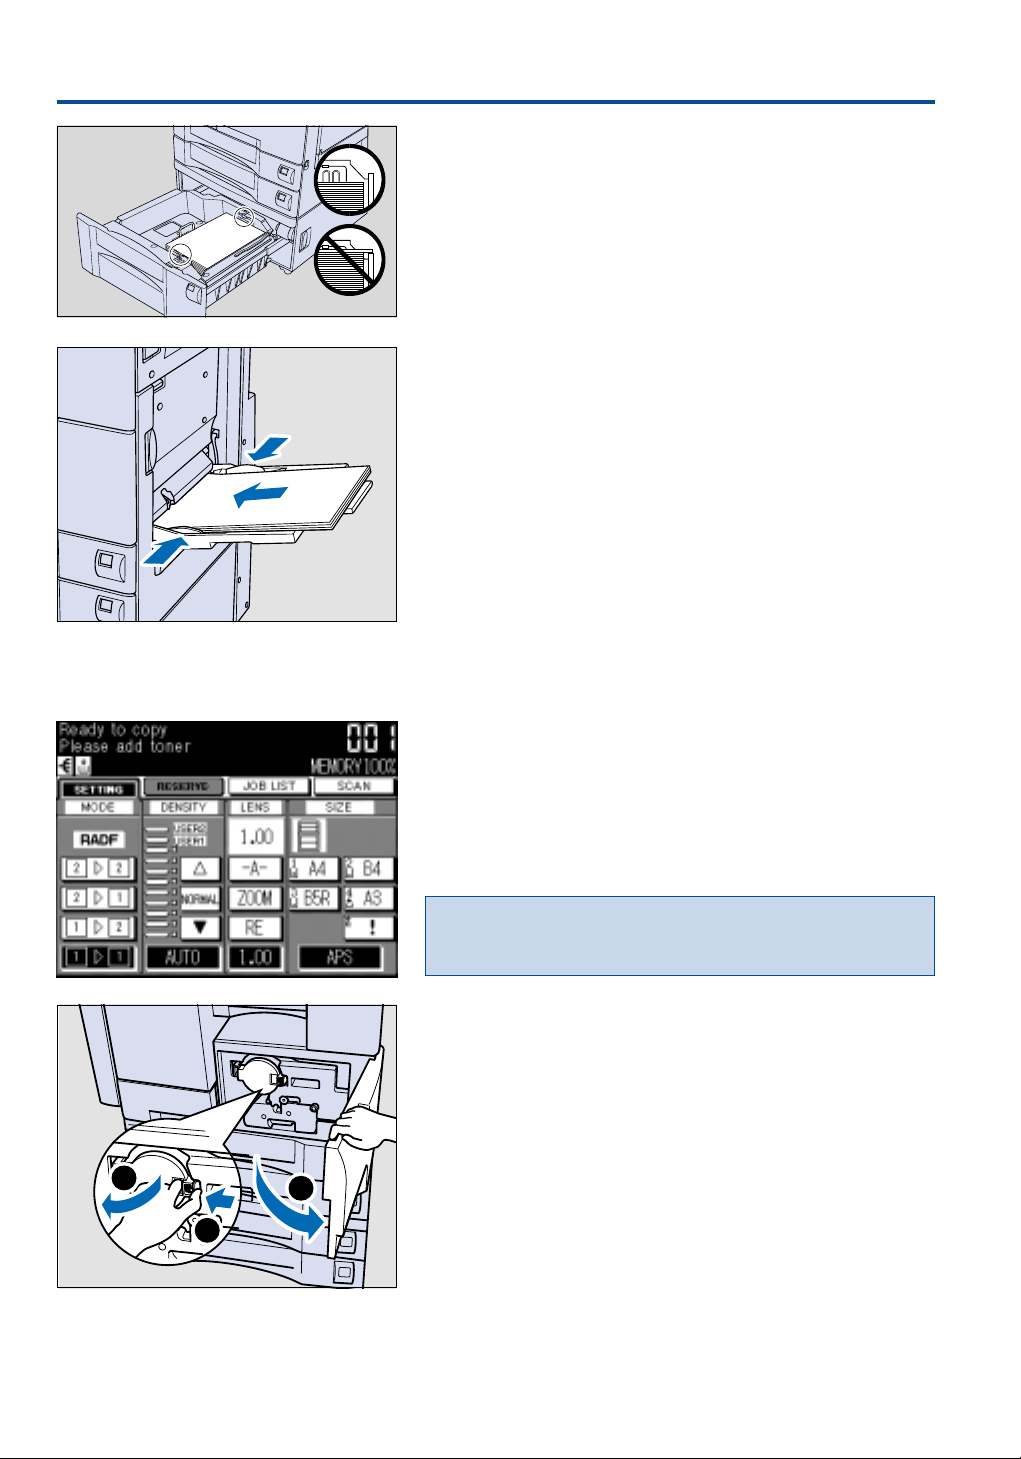
5. How to Supply Paper, Toner, Staples
Loading Paper in DB-409*
1. Withdraw the tray from the unit as far as it will go.
2. Fan the paper before inserting it!
3. Stack paper into the tray with the curly side up. Paper must
not be stacked higher than the red mark. If trays are overstacked, the system might not copy!
4. Push the paper into the unit. Do not change copy size!
Multi-Sheet Bypass
The sheet bypass is located on the right of the unit. Paper in
sizes A3 to A5R can be processed, as well as thick and thin
paper, OHP films and special materials (e.g. labels,
transparencies).
1. Open the bypass tray.
2. Insert the paper and adjust the paper guides.
3. To copy onto the material inserted into the bypass tray, press
the PAPER SIZE key in the basic screen and in the next
screen, select the sheet bypass with the corresponding key.
5.2 Supply Toner
3
2
If the toner runs low, a warning message appears in the LCD.
Important:
Toner should be kept out of reach of children. If toner is inhaled,
swallowed or gets into contact with the eye, consult your doctor.
How to Supply Toner:
1. To loosen the toner inside the cartridge, lightly tap the
cartridge on a solid surface and shake it a few times. Remove
the plastic cap from the cartridge.
2. Open the front door. Unlock and open the green lid.
1
18
* Option
Page 19

5. How to Supply Paper, Toner, Staples
3. Withdraw the toner bottle, then turn it clockwise to position
the mark 5 at the top.
2
1
1
4. Fully withdraw the toner bottle straight toward the front and
dispose it.
5. Remove the cap of the new toner bottle.
2
6. Insert the new toner bottle, positioning the 5 mark at the top.
2
7. Close and lock the toner bottle cover, then close the front
door.
The procedure how to refill toner is of course also explained in
the help function.
2
1
19
Page 20

5. How to Supply Paper, Toner, Staples
5.3 Supply Staples
If the staple cartridge is empty, a warning message appears.
Please only use original Konica staple cartridges as a refill!
To access the display shown, press OUTPUT key first, then
STAPLE SET. Press ADD STAPLER now. The staple cartridge
now moves into a position at the finisher* front door.
The display shows a warning sign. Do not open the finisher front
door before the check stapler screen is displayed.
Push the two green levers together as shown, to release the
staple cartridge from the cartridge holder.
20
* Option
Page 21

5. How to Supply Paper, Toner, Staples
Remove the staple cartridge.
Remove the empty staple case.
Insert the new staple case into the cartridge, until the arrows on
the case and the cartridge are aligned over each other. Only now
remove the tape holding the staples in place.
Insert the staple cartridge into the finisher in such a way, that
the green part is visible. Press on this green area until the
cartridge clicks into place.
Close the finisher front door. Touch BACK on the check stapler
screen and wait until the stapler returns to its original position.
The basic screen will be restored.
21
Page 22

6. Before Copying
6.1 Weekly Timer
The copier provides a timer function that can be activated by the
operator. In this case, please do not switch the unit on and off at
the main power switch; the machine turns on and off automatically.
Timer Interrupt
– Press the Power switch on the left side of the panel.
– A four digit timer interrupt password is needed if the operator
has installed a password. Enter the code and touch START.
– Now specify the actual ON-time period; hours one-digit and
minutes two-digit numbers (e.g. 2 h, 05 minutes). Confirm
each input by pressing START.
Please contact the operator if a timer
interrupt password is needed or a change
of the ON/OFF times is required.
6.2 User Password / Electronic Key Counter (EKC)
– After the specified period, the system will automatically go off
again.
This unit has an integrated electronic key counter, which manages up to 128 user accounts. Copies can be allocated to users,
accounts or projects, if the key operator has activated this function. A copy limit can be allocated to each counter.
If the electronic key counter is activated in this unit, a user password has to be entered to access the machine. Please contact
your key operator, if you need a password or can‘t remember
your allocated password.
The message on the screen instructs you to
enter a user password.
22
Password Access:
– After switching on the system, a request to enter a password is
displayed on the screen.
– Enter your 5-digit code over the keypad, and press START.
– If you hit a wrong key, still enter 5 digits in total, and then press
START. Now repeat the procedure with the correct code.
– The number of copies made as well as the copy limit for this
counter are now displayed for a moment.
– If the copy limit has been reached for any password, the
system will not produce any further copies under this code.
Depending on how the copier is adjusted, a copy job in
progress can either be completed or will be interrupted.
Page 23

6. Before Copying
6.3 Power Saver Mode
If the Power Saver Mode is active, the LCD
goes dark.
Auto Low Power / Auto Shut-Off
– The key operator can adjust this system, so that the unit will
automatically switch into Auto Low Power Mode after a delay
of 5 minutes or more after copying. In this mode the temperature of the fixing unit is lowered to conserve energy. After a
further delay which can be specified by the key operator, the
system goes into Auto Shut-Off mode in which the energy
consumption is further lowered.
– To switch on the unit when in one of these energy saving
modes, press any key except the Start key.
Power Saver Key
– There is a certain warm-up time, if the system is activated
again from this mode.
– To deactivate the mode, press the Power key again on the left
side of the panel.
23
Page 24

7. Simple Copying
7.1 Automatic Copying
Basic Screen
This section deals with the functions needed for simple, straightforward copying jobs.
Some features and functions of this system cannot be activated
simultaneously. The table after page 50 shows, which functions
are compatible.
– Switch the unit on at the main switch (see also 6.1 Timer), and
wait until the system is ready. Warm-up time is approx. 30 sec.
– The display shows the Basic screen.
– If the copier is also connected as a printer* and/or Fax*, press
the COPY key, until the basic screen appears.
– If the Electronic Key Counter (EKC) is active, enter your pass-
word and press START (see also 6.2 Electronic Key Counter).
– Insert original(s) into the RADF*, select the desired copy
quantity and press START.
– Copies exit into the Finisher* or into the exit tray inside the
unit.
Automatic Functions
These functions are active under AUTO RESET:
Automatic Paper Size Selection (APS)
– The copier automatically selects a tray with the paper size of
the original.
– The original is copied same size.
– If the corresponding paper size is not available, the image will
be rotated by 90° on the copy, where possible (e.g. A4 to
A4R).
– Press OUTPUT if the automatic rotation does not work.
Activate this function in the finishing screen.
– If no paper of a suitable size is available, a message will appear
on the screen to supply paper of the required size.
– APS does not work with AMS or if an individual magnification
ratio was entered.
Automatic Magnification Selection (AMS)
– If you specify a particular tray to copy from resp. a particular
paper size to copy onto, the system automatically calculates
the correct magnification ratio.
– The original is copied in the corresponding size onto the copy
paper.
– AMS does not work with APS or if an individual magnification
ratio was entered.
24
Automatic Exposure (AE)
– The original is scanned and exposed with a suitable density.
– For a manual darker/lighter exposure press the corresponding
arrows.
– The AUTO key on the Basic screen activates AE.
AUTO RESET
– A short time after the last copy or the last selection is made,
the system returns to the initial settings.
– The key operator can adjust the interval until Auto Reset is
performed, or switch off Auto Reset altogether.
* Option
Page 25

7. Simple Copying
7.2 Position Originals
Insert Originals into RADF*
Originals in sizes A3 to A5R are processed automatically. Doublesided originals can be reversed automatically. Up to 50 originals
can be inserted into the RADF* at one time (for documents of
more than 50 originals, see 7.3 Store Mode).
– Close the RADF* securely.
– Insert originals face-up into the RADF*. Transparencies, torn,
mounted or stuck, stapled, as well as very thin and very thick
originals must not be copied via the RADF*.
– Align the original guides to the original size.
Position Original on Platen Glass (also see page 9)
– Open the RADF*.
– Position the original face-down on the platen glass in the
upper left corner.
– Close the RADF*. It can also remain open, e.g. for 3-dimensio-
nal originals, such as books, etc. (in this case, see also 9.1.6
Non-Image Area Erase).
Auto-Start:
The operator can adjust the unit to start copying automatically,if
an original is placed on the platen glass and the platen cover/
RADF* is closed. Originals in sizes A5 and larger are detected.
7.3 Store Mode
Advice:
Store Mode may also be activated directly
in the Basic Screen with the SCAN key.
Press SCAN: Originals are scanned into
memory.
Touch STOP/CLEAR and AUTO RESET to
switch Store Mode off again.
This function allows to scan originals via the platen glass into the
image memory, in order to produce copied sets. It allows to
process original sets of more than 50 pages through the RADF*,
and lets you combine originals fed via the RADF* with originals
placed on the platen glass.
– Press APPLICATION key to access the display shown.
– Touch Store Mode and OK to return to the Basic Screen.
– Make other required function selections.
– Position originals, which cannot be fed through the RADF*,
one after the other onto the platen glass, starting with the first
page.
– If you want to use the function to extend the RADF* capacity,
insert a maximum of 50 originals into the RADF* at one time,
starting with the beginning of the document.
– Always press the SCAN key, to scan originals into the image
memory.
– You can also combine originals fed via the RADF* with
originals positioned on the platen glas. In this case you have to
keep the page order. Different sizes cannot be combined.
– When all originals have been scanned, start copying by
pressing START.
25
Page 26

7. Simple Copying
7.4 Select Finishing Functions / Stapling Position*
Unit without Finisher*
The copy exit tray has a capacity for up to 100 sheets.
The following functions are available:
Press OUTPUT to call up the screen shown on the left.
GROUP
All copies of the first original are exited, followed by all copies of
the second original, and so on.
The following functions are possible only when rotation is active
and the same paper size (e.g. A4) is available in portrait and
landscape direction.
In this screen, also the Auto Rotation
function can be switched on and off. The
default setting for Auto Rotation is ON.
Rotation + Group and Rotation + Sort
cannot be selected, while ROTATION is
deactivated.
In this screen, also the Auto Rotation
function can be switched on and off. The
default setting for Auto Rotation is ON.
Rotation + Group
All copies of the first original are exited, followed by all copies of
the second original turned by 90°, and so on.
Rotation + Sort
One complete set of copies is exited in page order, followed
by the second complete copied set, and so on. Every set of
copies exits turned by 90° in relation to the previous set, clearly
separating one set from the next one.
Unit with Finisher*
The finisher* has at least 2 and up to 4 exit trays. Each tray is
shown on the display.
An unlimited amount of copies can be stacked in the Finisher*,
because the unit switches automatically to an empty exit tray, if
the max. capacity of an exit tray has been reached. To ensure
continuous stacking of copies, filled exit trays have to be emptied
to become available again.
– Press OUTPUT to call up the screen shown on the left.
– Select a function and, if required, specify an exit tray.
GROUP
All copies of the first original are exited into the selected exit
tray; on top all copies of the second original are exited, offset by
3 cm, and so on. If the max. tray capacity has been reached,
further copies automatically exit into the next tray.
26
SORT
One complete set of copies after the other – each offset by 3 cm
– is exited into the selected exit tray. Once the max. tray capacity
has been reached, further copied sets automatically exit into the
next tray.
* Option
Page 27

7. Simple Copying
Only press the ADD STAPLER key when
the copier does not staple any more (see
page 20).
7.5 Basic Functions
STAPLE
– The presently selected stapling position is shown in the
STAPLE key. For a different stapling position, press the key
STAPLE SET to call up the screen shown on the left.
– Select the required stapling position for your document, and
confirm the setting with OK.
The basic functions are selected on the Basic screen shown on the
left, which consists of the following two parts.
User instructions appear on the left side at the top.
The lower area of the screen displays the present basic function
selections.
The soft keys on the screen are pressed to select the functions.
For some functions pop-up menus appear, in which further
selections are made.
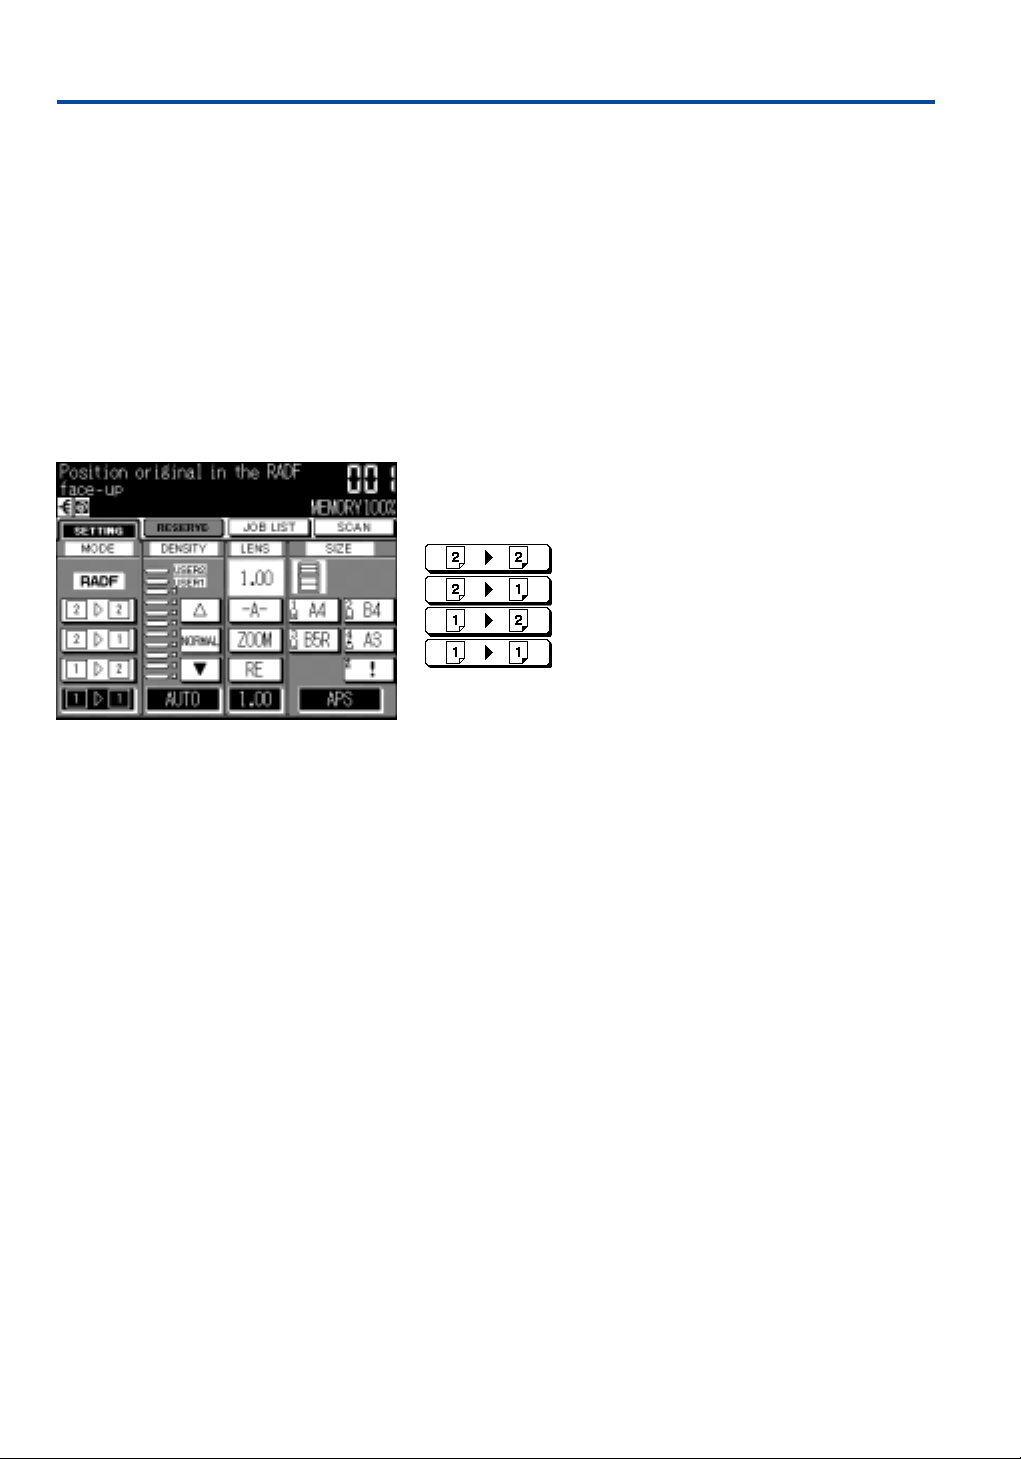
7.5.1 Copy Mode / Duplex Copying
– Press one of the four keys.
double-sided original 3 double-sided copy
double-sided original 3 single-sided copy
single-sided original 3 double-sided copy
single-sided original 3 single-sided copy
27
Page 28

7. Simple Copying
7.5.2 Copy Density
– For a lighter or a darker copy, press the corresponding arrow
key.
– Pressing AUTO activates the automatic exposure.
– The key operator can program two individual density settings
under the USER settings.
– The key operator can individually adjust the scale for the 9
lighter to darker density settings.
7.5.3 Magnification: Reduce & Enlarge / Zoom / Vertical/Horizontal Zoom
You have several different options to adjust the magnification
ratio:
– Pressing the 1.00 key in this screen, will produce size to size
copies. This deactivates AMS (Automatic Magnification
Selection). To reactivate press –A–.
– Exact magnification ratios (e.g. A3 to A4) are preset. Press RE
to display the pop-up menu shown on the left and select the
desired magnification.
– The three X keys provide individual magnification ratios and
can be programmed by the key operator.
This screen appears after pressing “Zoom“.
You can adjust the zoom ratio with the
arrow keys or by entering a value via the
keypad.
– For individual adjustments, press the ZOOM key, and the
display on the left will be called up. Use the arrows to set the
required magnification ratio; or enter the value via the keypad.
You can select a ratio from 0.25 to 4.00 (25% to 400%).
Confirm your selection by pressing OK.
– For individual adjustment of the vertical and the horizontal
magnification ratio do the same but select an individual value
for each direction. Enter the values for both directions via the
keypad, and press OK to confirm.
28
Page 29

7. Simple Copying
7.5.4 Paper Size Selection
– In this screen, simply press the key corresponding to the
desired paper source. Your originals will then automatically be
reduced or enlarged onto the selected copy size (AMS).
– If you press APS, the copier looks for the size corresponding to
the original size. Same-size copies will be produced. If paper of
the same size is not available, the image will automatically be
rotated by 90°, providing this is possible (e.g. from A4 to A4R).
If no suitable paper size can be detected, you will be prompted
with a user instruction to supply the missing paper size.
– If the Automatic Rotation function does not work, you can
activate the function in the Output screen. If not, ask your
operator.
29
Page 30

8. Other Basic Functions
This section provides information on further basic copying
functions, which this system makes available.
8.1 Job Programming / Reserve Mode
While a copy job is being processed, you can make all selections
for the next job. Up to four copy jobs can be programmed.
– Press RESERVE. You can only call up this screen, while a copy
job is being processed.
– Make all required selections for the next job. Job Memory
settings cannot be recalled in Reserve mode.
– Insert your originals and press START. Originals will be
scanned and the Basic screen appears automatically.
– For further job programming press RESERVE again.
– The new copy job will be started automatically, once the
previous job is completed.
– Press JOB LIST to call up a list of pre-programmed jobs (see
below).
– If a problem occurs in the job being processed, in place of the
SETTING key another key will appear, e.g. ADD PAPER or
JAM. If this happens, press the corresponding key and follow
the instructions.
8.2 Check Screen / Proof Copy
This screen is displayed after a sample copy
was printed; the star mark indicates the
selections, to which changes can be made.
This screen allows to check if all required settings have been
made; and in order to check a correct copy result, you have the
option to print a single sample copy without deletion of the
image memory afterwards.
– Press the CHECK key on the operating panel to call up a
screen which displays all settings made for the next copy job.
– If originals are inserted in the RADF* or have been scanned, a
sample set of copies can be generated. Press PROOF COPY for
a set of copies. The display now indicates, which previously
made settings can still be adjusted.
– If you do not need to make any adjustments, press START. In
this case the sample copy set will be counted for the total set
quantity.
– If the sample copy is no good and you want to start again,
press the STOP/CLEAR key on the panel to delete the image
memory.
Advice:
The scanned originals will only remain in the image memory after
the printing of a sample copy, if the copy quantity setting is more
than 1.
30
* Option
Page 31

8. Other Basic Functions
8.3 Job List / Advance or Delete Jobs
In the Basic screen, press the JOB LIST key to call up this screen.
It displays which copy and/or print jobs are waiting to be processed and how long each individual job will need for completion.
The screen also gives information on the present system status
(see below).
You can change the order, in which jobs are processed; and you
can delete jobs before or while they are processed. Use the
arrows to mark the job you want to bring forward or delete;
then press the corresponding key.
If you press ADVANCE, the marked job will move up one
position in the Job List. Press OK to leave the Job List screen.
Job List Screen
The displays in the Job List screen have the following meaning:
‘Mode‘ refers to the mode in which the system will process the
job:
COPIER = System works in copier mode
PRINTER = System works in printer mode
SCANNER = System works in scanner mode
‘Status‘ refers to the present status of the system. The following
indications are displayed:
READY = Ready to use in each mode
WAITING = Warming up
PRINTING = A copy or scan or print job is being
INTERRUPT = Present copy was interrupted for
SCANNING = Originals are scanned for copying
ERROR = Some problem occurred
NO PAPER = Paper of the required size is not
STOP = The present job was interrupted
JAM = Paper jam occurs
RESERVE = The reserved job will be started
processed
copying in-between
available
immediately
31
Page 32

8. Other Basic Functions
8.4 Copy Interrupt
This function allows to interrupt a copy job that is being processed, in order to quickly produce a few copies in-between. The
settings of the initial job and the image memory remain.
– Press the INTERRUPT key on the operation panel. The key
blinks first and lights as soon as the unit is available.
– Set the required functions and select the copy quantity.
– Position the originals and press START.
– After the in-between copies have been made, press
INTERRUPT again to switch the function off.
– Press START, to complete the previous job.
A special tab indicates the screen for
in-between copying.
8.5 Job Memory: Save and Recall Job Settings
This function allows to save all settings for frequently needed
jobs once, and to recall them whenever needed.
– The settings for 15 jobs can be saved. (The key operator can
‘lock‘ saved jobs to protect them against inadvertent deletion.)
– All basic functions, all special funtions, as well as the finishing
settings and the copy quantity can be programmed and saved.
– Enter your required selections.
– On the operating panel, press the APPLICATION key to call up
the display shown on the left. Now press JOB MEMORY and
ENTRY next.
– The following screen displays all selections made. Press OK to
call up the Job Store screen.
32
Page 33

8. Other Basic Functions
– In the screen displayed on the left, you select a place for the
– Select a free number by pressing on it, and confirm with OK.
– If there is no free job memory available, you can overwrite a
– In the next screen, you can allocate a name to your job (there
– Once the name is complete, press OK, to save the job name.
job to be stored. If all 5 places in this screen have been used,
use the arrows to call up further screens with more memory
places.
job which does not show the padlock symbol. Jobs which
display the little padlock symbol, are protected against overwriting. Contact your key operator if you want to have your
job protected.
are three screens for capitals, small letters and symbols.) Use
the arrows at the bottom to access screens 2 and 3. Wrong
letters can be deleted with the CANCEL key.
This name is displayed in the next screen. Confirm with OK, to
save the job and return to the basic screen.
Programmed job memory settings can be recalled whenever
required:
– On the operating panel, press the JOB MEMORY key.
– Use the arrows to scroll the job numbers until the required job
name is displayed in the screen.
– Select the job by pressing the job number. Confirm your
selection with OK; or press Job Check, to display the settings
programmed in this job. Press OK to confirm.
– The system is now set to the selections of the recalled job.
– After copying, you can recall the intitial settings by pressing
AUTO RESET.
33
Page 34

9. Special Functions
The Application Selection Screen displays
all Special Functions.
The operator can suppress the access to
particuler functions respectively can
change the sequence of functions on the
display. In this case, the display looks
different.
This section deals with the system‘s special functions and
explains how they are operated.
How to Select Special Functions:
– Pressing the APPLICATION key on the operating panel calls up
the Application Selection screen.
– To activate a function, simply press the corresponding soft key.
– For some functions another screen is displayed, in which further
selections must be made.
– To confirm your selections, press OK. If you press CANCEL, the
function(s) will not be active resp. your adjustments will not be
programmed.
– Pressing ALL CLEAR will cancel all previously selected special
functions; and you will return to the Basic screen.
– After you have made your selections among the special func-
tions, leave the Application Selection screen by pressing OK.
– The Basic screen will be displayed again.
– As long as any special function is selected, the indicator in the
APPLICATION key is lit.
The function keys are either white, black or
shaded grey.
White = Function is not selected
Black = Function is selected
Grey Shade = Function is not available in
this combination
How to Change Special Function Settings:
– Press the APPLICATION key on the operating panel to call up
the Application Selection screen.
– The keys of all selected functions are inverted, i.e. black with
white type. To call up the adjustment screen for any activated
function, press the inverted function key twice.
– Now make your adjustments in the screen, and confirm with
OK, until you are back in the Basic screen.
How to Switch Off Special Functions:
– Pressing AUTO RESET cancels all present settings and returns
the system to initial settings. If you only want to cancel a
particular special function, call up the Application Selection
screen.
– The keys of all selected functions are inverted, i.e. black with
white type.
– Press the black key once. The key is now white with black
type. The function is no longer active.
– Press OK to return to the Basic screen.
– If you want to cancel all special functions but keep the other
copier settings, you can do this by pressing ALL CLEAR in the
Application Selection screen.
34
Page 35

9. Special Functions
9.1 Image Editing Functions
9.1.1 Text/Photo Enhance
The following functions allow the editing of the original, so that
the copy will show a changed image. You can for example shift
the image, repeat a portion of the image, and so on.
This function improves the reproduction of halftones. The copied
image is lighter and has more detail.
– Select PHOTO for halftone photo originals.
– Select TEXT to improve the contrast in text originals.
– Select INCREASE CONTRAST for lightly printed originals.
Advice:
The key operator can adjust the density scale for each of the 3
modes (see Key Operator Manual, 15. Density Adjustment).
9.1.2 Auto Layout
9.1.3 Reverse Image
This function allows easy centering of the image on the copy.
Careful positioning of the original is not necessary.
– Press the function key. Together with AUTO Layout the Non
Image Area Erase function is automatically selected, but can
be switched off.
– Originals can only be copied via the platen glas; the RADF* is
not available and has to remain open, unless you switch off
Non Image Area Erase.
– For duplex copying in this mode, you have to select the Store
Mode and scan your originals.
– An A4 size copy is produced; but you can select a different size
if required.
The white areas of the originals are reproduced in black, and vice
versa.
* Option
35
Page 36

9. Special Functions
9.1.4 Image Shift
9.1.5 Image Repeat
With this function you can shift the image left or right by up to
250 mm, e.g. to create a filing margin. You can also shift and
reduce the image at the same time, so that no portion of the
image is lost at the opposite edge.
– Press the required function key.
– For Image Shift, now use the arrows to define the margin
width for the front page and the back page, if you want to
produce double-sided copies.
– For a left margin (filing margin) on the front page, enter positi-
ve values. If you enter negative values (e.g -25 mm), the front
page margin will be created on the right. On the back page,
the margin is always opposite, i.e. on the right with positive
values, on the left with negative values.
– In the Reduce & Shift function, the specified margin is
created on the front and the back of the page. At the same
time the image is reduced in relation to the margin width, so
that nothing is cut off at the opposite edge.
This function lets you fill the copy with repeated small motifs or
a defined portion of an original.
36
– Press the function key to call up the display on the left. If you
select AUTO, the Non Image Area Erase function is also
active. The original is repeated as often as possible on the
copy.
– Position the original on the platen glass and, in this case, leave
the RADF* open.
* Option
Page 37

9. Special Functions
9.1.6 Non Image Area Erase
– Select Verti./horiz., if you want to repeat a portion of an ori-
ginal. Use the arrows to specify the width and the height of
the original portion. Both values can range from 10 mm to
150 mm.
– Press Repeat to specify the number of repeats on the copy (2,
4 or 8 times). The repeated part of the original will not be
reduced. Its size depends on the number of repetitions.
– Position the original on the platen glas. The specified area is
measured from left to right and from top to bottom.
– An A4 size copy is produced; but you can select a different
size if required.
Dark areas around the original are automatically erased. With
this function, the RADF* is not available and has to remain open.
– Position the original on the platen glas.
– For duplex copying in this mode, you have to select the Store
Mode and scan your originals.
– An A4 size copy is produced; but you can select a different size
if required.
9.1.7 Frame / Fold Erasure
Advice:
The factory setting for this function is, that black areas are erased
along straight lines. The technical service can also adjust the
function to erase the black areas exactly along the contours of
the originals, e.g. objects.
This function helps to avoid dark shadows, which appear when
copying 3-dimensional originals, e.g. books. A specified area
around the original and in the centerfold can be erased.
You can specify a frame erasure width between 1 and 15 mm
and a fold erasure width between 1 and 30 mm.
– Select the desired function. Both functions can be combined.
– Use the arrows to adjust the frame and/or fold erasure width.
37
Page 38

9. Special Functions
9.1.8 Stamp, Watermark, and other Imprints
This function allows you to print watermark, regular stamp, date/
time, page and set numbers onto the copies. These 5 types of
stamp can be used individually or in multiple combinations.
Watermark
Prints the letters selected from 4 options over the scanned
image, positioning it on the centre of the page.
Stamp
Prints the letters selected from 7 options over the scanned image
at the location designated on the screen.
Confidental
The position for watermarks cannot be
changed. For the other imprints one of the
six positions can be selected.
Date/Time
Prints the date and time in the specified form over the scanned
image at the location designated on the screen.
Page
Prints the page numbers in the specified form over the scanned
image at the location designated on the screen.
Numbering
Prints the set numbers in the specified form over the scanned
image at the location designated on the screen.
– Select the desired key on the Stamp Menue screen, e.g.
STAMP. Choose one text option (for watermark or stamp)
respectively a format (for date/time, page and set numbers) for
the stamp.
– Press POSITION and in the next screen determine the position
of the stamp. The WATERMARK position cannot be changed.
– Confirm with OK. Press Only first page to print the selected
stamp on the first page only. Touch OK to leave the display.
– Press ORIGI. DIRECT to change the direction of the original.
Press OK until the Basic display appears on the screen.
– Position originals in the RADF*. If you want to position your
originals on the platen glass, select the Store Mode and scan
each original by pressing the SCAN key.
38
* Option
Page 39

9. Special Functions
9.2 File Editing Functions
9.2.1 Sheet / Cover Insertion
Use the functions described in this section to determine how
copies or copied sets should be completed, i.e. as a booklet, or
with each chapter beginning on a right (front) page, etc.
Copied sets can be individually completed with front and back
covers and inserted sheets. Covers and inserts are fed from tray
1 (the key operator can specify a different tray). Covers can also
be fed from the Multi-Sheet Bypass.
Insert the desired paper into the specified tray; thicker paper (for
covers) has to be fed from the bypass. The size of covers and
inserted sheets has to be identical to the size of the copy set.
Options for Sheet & Cover Insertion:
– Select the required functions by pressing the corresponding
keys. All combinations are possible, e.g:
– Copied front and back cover, blank inserts.
– Copied front cover, blank back cover, copied inserts; etc.
– If you want to have covers of a different colour or material
from inserts, position the cover material in the bypass tray
and select BYPASS as source for covers.
– Thick paper for front and back covers, can only be
processed in the bypass tray.
Entering Insert Positions:
Once the function is selected and confirmed with OK, the
Setting screen shown on the left appears. The screen is identical
for copied and blank inserts.
A selected front and back cover is automatically indicated in the
first and last position of this screen.
– Use the keypad to enter the page number of a copied insert.
If you have selected blank inserts, enter the page number
after which you require a blank insert.
– Press SET to confirm. The next insert position can now be
entered.
– The DELETE key deletes a wrongly entered position, which can
then be corrected.
– If you have entered all required insert positions, confirm by
pressing OK, until you have returned to the Basic screen.
– Position originals in the RADF*. If you want to position your
originals on the platen glass, select the Store Mode and scan
each original by pressing the SCAN key.
39
Page 40

9. Special Functions
9.2.2 OHP Function
This function allows copying onto OHP films as well as automatic
insertion of blank or copied sheets into the set of transparencies.
– OHP films can only be fed via the Multi-Sheet Bypass. They
should not be placed on top of paper. Empty the bypass tray
before inserting the transparencies.
– Only A4 size is possible.
– Copy preselection is fixed to one (1) copy.
– Position originals in the RADF*. If you want to position your
originals on the platen glass, select the Store Mode and scan
each original by pressing the SCAN key.
OHP
Each original is copied onto an OHP film.
OHP films with blank interleaves
Each original is copied onto an OHP film. Blank interleaves and
copied OHP films exit alternatingly.
OHP films with copied interleaves
Each original is copied onto paper and onto an OHP film. Copied
interleaves and copied OHP films exit alternatingly.
9.2.3 Chapter
Originals
7
5
4
3
6
1
2
Front Pages
Copies
new chapter on a right (front) page. Up to 15 positions can be
specified for chapter beginnings, with page numbers up to 999.
When duplex copying, you can use this function to start each
7
5
8
3
6
4
2
1
This function is only possible in combination with duplex copying
1 3 2 or 2 3 2.
Chapter can be combined with the Booklet function. Or special
8
(e.g. coloured) paper can be selected for the specified pages; this
paper is then fed from the sheet insertion tray.
– Select the function and use the keypad, to enter page num-
bers for front pages. The first entry should be an even page
number.
– Press SET after each entry. If you want to change an entry,
press DELETE.
– After entering all required page numbers, confirm by pressing
OK, until you have returned to the Basic screen.
–1 3 2 is automatically selected. Change this to 2 3 2 for
double-sided originals; and make further required selections.
– Position originals in the RADF*. If you want to position your
originals on the platen glass, select the Store Mode and scan
each original by pressing the SCAN key.
40
* Option
Page 41

9. Special Functions
9.2.4 Image Insert
Originals
8
7
6
5
4
3
2
1
6
5
4
3
2
1
8
7
Copies
Inserts
This function serves to combine originals which are processed via
the RADF* with pages, which cannot be fed through the RADF*
(e.g. photos, pasted or thick originals). These images are scanned
from the platen glass and are automatically positioned after the
specified pages in the copied set. A total of 15 inserts with page
numbers up to 999 is possible.
Images are inserted
after the specified
pages, in this example after pages 2 and 4.
– Select the function; and use the keypad to enter the page
numbers, after which the images are to be inserted. If several
inserts should follow after the same page number, enter that
figure as many times, i.e. once for every insert.
– Confirm each page number by pressing SET. The last number
entered can be cancelled at any time by pressing DELETE.
– After entering all required page numbers, confirm by pressing
OK, until you have returned to the Basic screen. If you want to
combine this function with Booklet, you have to activate this
function here; it can no longer be selected afterwards.
– Select other functions as required, and set the number of
copies.
– First, position the original set in the RADF*, and press SCAN.
– The unit now prompts you to scan the inserts via the platen
glass, one after the other in the order, in which they are to be
inserted into the copied set.
– Press START to start copying. The specified quantity of copied
sets is now automatically produced from memory.
41
Page 42

9. Special Functions
9.2.5 Combination
9.2.6 Dual Page / Book Copy
This function lets you combine two, four or eight original images
on one page.
– Press the key for the required combination: 2-in-1, 4-in-1 or
8-in-1. With the selections under LAYOUT, you specify the
page order: from top to bottom, or from left to right.
– If you want to place up to 16 originals on the front and back
of a single sheet, select 1 3 2 or 2 3 2 (for double-sided
originals); now make other required settings.
– A4 copy size is automatically selected; but you can specify
another size if required.
– Position originals in the RADF*. If you want to position your
originals on the platen glass, select the Store Mode and scan
each original by pressing the SCAN key.
– When all originals have been scanned, start copying by
pressing START.
Use this function to automatically copy the left and right page of
an open book onto two separate A4 sheets or the front and
back of one A4 sheet. The front and back cover can be included,
and the booklet mode also selected.
– Press the function key. This automatically activates also Auto
Layout, Non Image Area Erase and the Store Mode.
– Select the required output option and one of the three book
copy modes. Confirm by pressing OK, until you have returned
to the Basic screen.
– Position the book on the platen glass; the RADF* has to
remain open. Follow the user instructions in the display and
start by scanning the front and back cover of the book.
– Scan the required pages of the book in reading order.
– Make further selections, e.g. 1 3 2, if the pages of the book
are to be copied on the front and back of A4 sheets.
– Press START to start copying.
42
* Option
Page 43

9. Special Functions
9.2.7 Booklet Mode
Single pages are combined on the front and back of copies in
such a way, that you only need to fold the copied set in the
center to have a booklet with correct page order. The booklets
can be A4 size (folded A3 copies) or A5 size (folded A4 copies).
– Press the function key. This will also activate 1 3 2. For
double-sided originals you have to change this to 2 3 2.
– A4 copy size is automatically selected (for a booklet in A5
size). For an A4 booklet you have to select A3 copy size.
– Position originals in the RADF. If you want to position your
originals on the platen glass, select the Store Mode and scan
each original by pressing the SCAN key.
9.2.8 Special Originals
In this screen different modes can be selected to obtain the
optimum copying result according to the original type. Some
modes are incompatible.
Mixed Originals
If this function is active, you can position originals of the
following mixed sizes together in the RADF*:
– A3, B4, A4R, A4, B5, and A5; or
– A4R, B5R, and A5; or
– B5R and A5R
You have two options for the size of the copies:
– APS is automatically active, so that each copy will be identical
in its size to the corresponding original.
– If you want all copies to have the same size, select the required
size (e.g. A4). Each original will then be copied with the
corresponding magnification ratio onto the specified copy size.
43
Page 44

9. Special Functions
Folded Originals
Use the Folded Original mode with the document feeder to copy
A3 originals, which have previously been folded.
Non-standard Size
Using Non-standard Size mode, the copier will search and copy
onto the standard size copy paper that is closest to the original
size.
Duplex 1 32
Select this function to arrange the even pages of simplex
originals upside down on the reverse side of duplex copies.
– Press the key for the desired upside-down direction and
confirm with OK.
– Duplex 1 3 2 is not automatically active. It needs to be
activated.
Advice:
Choose Left/Right bind for A4R originals (e.g. for A3 copies)
where the reverse side shall not be positioned upside down.
Choose Top/Bottom bind if the A4 reverse side shall be
positioned upside down.
Duplex 2 3 1
Select this function to rearrange the reverse side of duplex
originals which read upside down to make normal simplex
copies. This avoids having to turn every 2
– Press the key for the desired upside-down direction and
confirm with OK.
– Duplex 2 3 1 is not automatically active. It needs to be
activated.
Advice:
Choose this function only for originals with an “upside-down“
reverse side:
Left/Right bind for originals which are fed in landscape direction
(A3 oder A4R),
Top/Bottom bind for A4 originals.
nd
copy by hand.
44
* Zubehör
Page 45

10. Troubleshooting
10.1 Selfdiagnostic System
This copier has an integrated selfdiagnostic system. You can
easily recall a variety of information, e.g. read the total copy
counter (see below). Detailed information regarding any type of
problem is automatically displayed on the screen.
The following status information will be displayed:
– Periodic maintenance
– Memory overflow
– Call service (electronic problem)
– Paper jam
– Refill toner (for procedure, see page 18)
10.2 Periodic Maintenance / Reading the Copy Counter
This system should undergo a routine maintenance after every
100.000 copies. A user instruction prompting you to call the
service, will be displayed on the screen. You can easily call up the
information, how many copies have been made since the last PM.
– Press
– The Counter List screen is displayed. The PM count is indicated
in the third line of the screen. The number of copies produced
since the last routine maintenance as well as the targeted PM
volume (100.000 copies) and the date of the last PM are
displayed.
– Press PRINT for a pritout of the Counter List screen.
– Press OK to return to the Basic screen.
-key on the keypad.
*
45
Page 46

10. Troubleshooting
10.3 Memory Overflow
10.4 Call Service
The copier is equipped with an integrated image memory, into
which originals are scanned and from which the information is
printed. The remaining memory capacity is displayed in the top
part of the screen. If extensive documents are scanned, or if
many originals should be copied with high resolution, this can
use the complete memory capacity. In this case a user prompt
like the one on the left will be displayed. You can decide to copy
the originals already scanned or to abandon the job and start
again with fewer originals resp. different functions.
In any case, check that already printed copy sets are complete.
Advice:
If this problem frequently occurs with your applications, you
should contact your Konica service with regard to an extension
to the image memory.
If an electronic problem occurs, which can only be rectified by an
authorized Konica service technician, the information shown on the
left is displayed on the screen.
– Note down the error code and the telephone number of the
Konica service.
– Switch off the power switch and the main power switch on
the left side of the copier, and unplug it from the socket.
– Call the Konica service, and report the error code.
46
Advice: Overriding of Problems
As far as possible, parts of the system might still be available,
even when an electronic problem occurs. In this case, corresponding information will be displayed, prompting you to isolate
the faulty component by pressing AUTO RESET. After this,
switch the unit off and on; and copying will again be possible.
Important: Do not forget to report the problem to the Konica
service anyway, quoting the corresponding error code.
Page 47

10. Troubleshooting
10.5 Paper Jam
Paper Jam Position Screen.
If a paper jam occurs, the touch screen will automatically display an
illustration with all jam positions and instructions how to clear the
jam. Pressing GUIDE calls up step-by-step operating instructions
and more detailed graphical displays.
If there is more than one paper jam, the help screens appear in
the order, in which jams need to be cleared. After clearing one
jam, a new screen will appear until all jams are cleared and the
Basic screen is displayed again.
How to Clear a Paper Jam:
– Have a look at the paper jam positions.
– If you are not sure what to do, press the GUIDE key. The first
operation step will be displayed on the screen. Call up further
operation steps with the arrows. The GUIDE screen will disappear, once the jam has been cleared or you press EXIT.
– If there is another paper jam, follow the user instructions on
the next screen.
– Once all paper jams have been cleared, the Basic screen
appears again.
The Fixing Unit
is behind this cover.
Attention!
During copying, the fixing unit gets very hot! Avoid touching the
areas of the fixing unit, or you might get burned.
Only touch and move the green levers and dials, as instructed. No
other parts inside the system must be touched or moved!
47
Page 48

10. Troubleshooting
10.6 Care Advice
One precondition for a good copy quality is a clean platen glass!
We suggest to clean the platen glass and the underside of the
document feeder daily with a clean soft, possibly damp cloth or
the special Konica cleaning liquid.
Raise the document cover*, and also clean the left partition glass
and the RADF* roller with a clean soft cloth.
Never use volatile or corrosive cleaners or solvents with this
equipment!
48
Keep the writing unit glass and the electrode wires clean;
otherwise soil marks may be copied, resulting in dark lines on
the copies.
Open the machine front door. Withdraw and push in the writing
unit glass cleaning knob and the corona wire cleaning knob,
several times. Firmly push in these knobs, then close the machine
front door.
* Option
Page 49

10. Troubleshooting
Open the right side door of the main body. Pull on the green
lever to open the paper conveyance unit. Release the two hooks
on the top edge of the conveyance unit cover, then open its
front cover. Now, close the paper conveyance unit again.
Push and slide the transfer/separator wire cleaning lever to the
left and right, several times. Move the lever to the right until it
stops, then close the conveyance unit front cover. Close the right
side door of the main body.
49
Page 50

10. Troubleshooting
10.7 Solving Simple Problems
Problem Check Solution
The copier is not working. – Was the system switched on? – Switch the system on.
– Is the plug in the socket? – Insert the plug into the socket.
No copies are produced after – Is the front door of the unit closed? – Securely close the front door.
pressing START. – Is a suitable paper size available? – Refill paper of a corresponding size
– Is the copy preselection set to 0? – Enter a copy quantity.
– Was a user password entered? – Enter your EKC password.
– Does the Touch Screen show the – Call up the screen.
Basic screen?
When copying under the – Was the user code entered correctly? – Carefully enter your code again.
EKC/key counter mode, no
copies are produced after – Has your key counter reached the – Ask your key operator for informaentering the user code. allocated copy limit? tion regarding your copy limit.
The copy has a dirty look. – Is the platen glas clean? – Clean the platen glas.
– Is the original clean? – The copy can only be as good as
– Is the density adjusted too dark? – Change the density adjustment to
The copy is too light. – Is the density adjustment suitable? – Change the adjustment to a more
– Does the screen show a “Refill – Refill toner.
toner“ prompt?
– Was the copy paper inserted – Turn the copy paper. When refilling
correctly? copy paper, check the arrow on
Also check the main switch at the
left side of the unit.
to the original.
the original.
a more suitable setting.
suitable setting.
the wrapping. Paper must always
inserted with the arrow mark
pointing downwards (except in the
bypass tray).
The copy is too weak. – Is the copy paper damp? – Insert dry copy paper. Make sure
– Is the service call screen displayed? – Call the Konica service.
The magnification ratio – Has a special function been selected, – Switch off the special function.
cannot be adjusted. such as Frame & Fold Erasure or
Dual Page?
The functions 1 3 2 or 2 3 2 – Is the paper conveyance unit on – Check the conveyance unit and
cannot be selected. the right side fully closed? close the right side door securely.
The functions 2 3 1 or 2 3 2 – Is the RADF* properly closed? – Securely close the RADF*.
cannot be selected.
50
you store copy paper correctly.
* Option
Page 51

10. Troubleshooting
Problem Check Solution
Paper jams occur repeatedly. – Was thin or thick paper or OHP film – Only feed special papers via the
After a paper jam has been – Can you find other paper jams than – Try to clear all paper jams that you
cleared, copying is still not the indicated one? can find.
possible.
Some screens look diffe- – Did your key operator make special – If you press the CHECK key, a list
rent from the illustrations adjustments? of all active settings will be called
in this operator manual. up. Ask your key operator for more
Copies are reduced or – Is AMS active? – If a paper tray was selected in the
enlarged, even though the PAPER SIZE screen, AMS is active.
full size ratio 1:1 has been Select APS or press the 1.00
selected. indicator.
The copying process is – Is there a paper jam indication? – Clear the paper jam.
interrupted. – Have you reached the copy limit of – Contact your key operator.
RADF*
The RADF* indicator does – Is the RADF* closed? – Close the RADF* properly.
not light after pressing
AUTO RESET.
Originals are not fed by the – Are original size and paper quality – Thick and pasted originals must be
RADF*. within the specifications? positioned on the platen glass.
inserted into a tray and not into the sheet bypass.
sheet bypass?
information.
your key counter?
– Were too many originals inserted – Only up to 50 originals can be
into the RADF*? inserted at any one time.
Finisher*
The finisher* does not work. – Is there a paper jam in the finisher*? – Clear the paper jam.
– Is the finisher* fully inserted into – Securely push the finisher* into the
the mainbody? copier, until it clicks into place.
The stapling is in the wrong – Is the automatic rotation active? – Reposition the originals, so that the
place. images will not be rotated.
Duplex
Automatic duplexing is not – Check the duplex unit for a copy – Remove the copy from the duplex
possible. left in it. unit.
Fold out this page:
The table Function Combinations shows, which functions
can be selected together.
51
53
Page 52

11. Function Combinations
TextPhoto Enhance
Staple
Stamp / Watermark
Sort
Sheet/Cover Insertion
Rotation
Reverse Image
Reduce & Shift
RADF
Proof Copy
OHP Function
Non-standard-size Originals
Non Image Area Erase
Multi-Sheet Bypass
Mixed Originals
1 3 1 •••••••••••••••••
1 3 2 •••••••••• ••••••
2 3 1 •••••••••• • •••
2 3 2 •••••••••• • ••••
AMS (–A–) • • • • • • • • • • • • • •
APS • • •• • ••• • •• • • •
Auto Layout • • • • • • • •
Booklet • • • • • • • • • • •
Chapter • • • • • • • • • • • • • •
Combination (2-in-1/4-in-1/8-in-1) • • • • • • • • • • • • •
Copy Interrupt • • • • • • • • • • • • • • • •
Dual Page • • • • • • • • • • •
Duplex 1 3 2 ••••••• •• • ••
Duplex 2 3 1 ••••••• •• • ••
Electronic Group • • • • • • • • • • • •
Electronic Sort • • • • • • • • • • • •
Folded Original • • • • • • • • • • • • • • •
Fold Erasure • • • • • • • • • • • • • • •
Frame Erasure • • • • • • • • • • • • • • •
Group • • • • • • • • • • •
Image Insert • • • • • • • • • • •
Image Repeat • • • • • • •
Image Shift • • • • • • • • • • •
Job Programming/Reserve • • • • • • • • • • • • • • •
Magnification • • • • • • • • • • • • • •
Mixed Originals • • • • • • • •
Multi-Sheet Bypass • • • • • • • • • • • • •
Non Image Area Erase • • • •
Non-standard-size Original • • • • • • • • •
OHP Function • • • • • •
Proof Copy • • • • • • • • •
RADF ••••••••
Reduce & Shift • • • • • •
Reverse Image • • • • • •
Rotation • • • • •
Sheet/Cover Insertion • • • •
Sort • • •
Stamp / Watermark • •
Staple •
Magnification
•
4751
Page 53

rogramm ng/Reserve
Job
Image Shift
Image Repeat
Image Insert
Group
Frame Erasure
Fold Erasure
Folded Original
Electronic Sort
Electronic Group
Duplex 2 3 1
Duplex 1 3 2
Dual Page
Copy Interupt
Combination (2-in1/4-in-1/8-in-1)
Chapter
Booklet
Auto Layout
APS
••••••••• •• ••
••••••••••••
AMS (–A–)
2 3 2
2 3 1
1 3 2
52
The table shows which functions are compatible and which
functions cannot be active at the same time.
• Only these functions can be selected together.
Page 54

12. Technical Specifications Konica 7020
Type: Console type with fixed platen glass
Transfer Process: Indirect electrostatic laser method, OPC drum
Light Source: Xenon lamp, 280 W
Image Memory: 32 MB standard, 288 MB max.
Copy Speed: 20 A4 / 13 A3 copies / minute
1. A4 copy after 5 seconds
Warm-up Time: approx. 30 seconds
Original Size: max. A3
Copy Sizes: A5 to A3
Paper Sources: Tray 1: 500 sheets A5R to B4, user-adjustable (universal tray)
(Standard) Tray 2: 500 sheets A5R to A3, user-adjustable (universal tray)
Paper Weights: 60 to 90 g/m
Duplex: Direct, stackless duplexing process for sizes A5 to A3
Exposure: Automatic or manual; 2 density user sets
Multi-Sheet Bypass: 50 sheets A5R to A3; single sheets of special materials
2
from the trays
2
50 to 130 g/m
via the Multi-Sheet Bypass
Magnification: 1. Fixed ratios:
Copy Preselection: max. 999
Toner Yield: approx. 26.000 copies at 6% toner coverage
Power: 220 to 240 V, 50 Hz; 16A
Power Consumption: max. 1.030 W
Dimensions: Width 590 mm, Depth 595 mm, Height 730 mm
Weight: approx. 72 kg (without options)
1:1, 71%, 82%, 86%, 115%, 122%, 141%
2. Three user sets for special ratios between 25% and 400%
3. Zoom 25% to 400% in 1% steps; individual horizontal/vertical adjustment
Copying 960 Wh
Idling 90 Wh
Low Power Mode 70 Wh (without options)
54
Page 55

12. Technical Specifications Konica 7020
Optional Accessories:
Platen Cover
RADF
Function: Automatic original feeder for single- and double-sided originals
Originals: Plain paper 60 to 90 g/m
Original Sizes: A3 to A5R
Capacity: max. 50 sheets
Pedestals
Basic Pedestal: With front door and storage space
DB-209: Magazin 3: 500 sheets A5R to A3, user-adjustable (universal tray)
Magazin 4: 500 sheets A5R to A3, user-adjustable (universal tray)
DB-409: Magazin 3: 1.500 sheets A4 (can be adjusted by the service
to A4R, B5/B5R)
Finisher
Functions: Sort/Group by offsetting; Stapling
No. of Trays: 2 trays standard; upgradable with one or two optional trays
Capacity: 2 exit trays: 1 x 100 sheets + 1000 sheets
3 exit trays: 2 x 100 sheets + 600 sheets
4 exit trays: 4 x 100 sheets
Extended capacity by automatic switching to an empty tray, if one
is filled to capacity
Stapling Capacity: max. 50 sheets
Stapling Positions: 4 positions for single stapling
4 positions for double stapling
Dimensions: Width 705 mm, Depth 502 mm, Height 392 mm
2
Finisher Tray: The finisher can be upgraded with one or two trays
Fax Kit: Super G3 Fax with 33.600 bps
Print Controller: IP-011 for WIN Styler
IP-421 for PCL 6
Network Interface Cards: EasyCom Xpress Print Server for IP-011
KN-304 for IP-011(alternatively)
KN-303 for IP-421
Memory Extensions: 64/128 MB for the Konica 7020 image memory
32/64 MB for the IP-011 print controller
32/64/128 MB for the IP-421 print controller
PostScript 3 Option: for IP-421
Hard Disk: 6 GB for IP-421
All Technical Specifications are Subject to Change without Notice!
55
Page 56

OUT OF ORDER!
been called.
Service has
56
Page 57

If a problem occurs: Open this page and place manual on the unit!
7020
INSTRUCTION MANUAL
O
U
T O
F O
Service has
been called
RD
ER!
57
Page 58

KONICA REPRESENTED IN EUROPE
ANDORRA
AUSTRIA
BELGIUM
BULGARIA
CYPRUS
CZECH REPUBLIC
DENMARK
ESTONIA
FINLAND
FRANCE
GERMANY
GREECE
HUNGARY
ICELAND
IRELAND
ITALY
LIECHTENSTEIN
LUXEMBOURG
KONICA BUSINESS MACHINES EUROPE GMBH, LILIENTHALSTRASSE 1, D-21337 LÜNEBURG (GERMANY), TEL. (0 41 31) 8 86 - 0, FAX (0 41 31) 8 86 - 2 99
http://www.konica-europe.com
REPUBLIC OF BELARUS
REPUBLIC OF LATVIA
REPUBLIC OF LITHUANIA
NETHERLANDS
SWITZERLAND
UNITED KINGDOM
MA LTA
MONACO
NO RWAY
POLAND
PORTUGAL
ROMANIA
RUSSIA
SLOVAKIA
SPAIN
SWEDEN
TURKEY
UCRAINE
 Loading...