

Page 1
Page 2

Contents
CONTENTS
1 Introduction
1.1 Introduction ......................................................................................... 1-2
1.1.1 Welcome to Minolta ........................................................................................................ 1-2
1.1.2 Roadmap of this Manual ................................................................................................1-3
2 About PageScope Router
2.1 About PageScope Router .................................................................. 2-2
2.1.1 Features .......................................................................................................................... 2-2
2.1.2 Supported Input Sources ..............................................................................................2-2
2.1.3 Supported MFP / Controllers ......................................................................................... 2-3
3 Installation
3.1 Installation ...........................................................................................3-2
3.1.1 Hardware Requirements ................................................................................................ 3-2
3.1.2 Software Requirements ................................................................................................. 3-2
3.1.3 Installing the PageScope Router Client Software .......................................................3-3
4 Getting Started
4.1 Getting Started .................................................................................... 4-2
4.1.1 Starting and Closing the Application ........................................................................... 4-2
4.1.2 User Interface ................................................................................................................. 4-3
4.1.3 Document Manager ........................................................................................................4-4
4.1.4 Document Viewer ........................................................................................................... 4-5
4.1.5 Page Viewer ....................................................................................................................4-8
4.1.6 Thumbnail Viewer .........................................................................................................4-12
4.1.7 Configuring Client Options ......................................................................................... 4-13
4.1.8 Column Settings ...........................................................................................................4-14
4.1.9 Submit Color Profile .....................................................................................................4-15
i
Page 3

Contents
4.1.10 Change Password ........................................................................................................ 4-16
4.1.11 Cache Settings .............................................................................................................4-17
4.1.12 PageScope Router Server Address ............................................................................ 4-18
5 Working with Repositories
5.1 Working with Repositories ................................................................ 5-2
5.1.1 Repository Overview ......................................................................................................5-2
5.1.2 Repository Viewer .......................................................................................................... 5-3
5.1.3 Repository Selection ...................................................................................................... 5-5
5.1.4 Repository Document List .............................................................................................5-6
5.1.5 Document Control Overview .........................................................................................5-7
5.1.6 Add a Repository Folder ................................................................................................5-8
5.1.7 Open a Folder or Document ..........................................................................................5-9
5.1.8 Copy or Move a Folder or Document ............................................................................5-9
5.1.9 Delete a Folder or Document ......................................................................................5-12
5.1.10 Saving Documents ....................................................................................................... 5-12
5.1.11 Sending Documents by E-mail .................................................................................... 5-18
5.1.12 Printing Documents .....................................................................................................5-20
5.1.13 Document Properties ................................................................................................... 5-22
6 Working with Documents
6.1 Working with Documents .................................................................. 6-2
6.1.1 Document Overview .......................................................................................................6-2
6.1.2 Viewing Documents .......................................................................................................6-2
6.1.3 Image Editing Description .............................................................................................6-3
6.1.3.1 Image Editing Functions .......................................................................................6-3
6.1.3.2 Crop ......................................................................................................................6-5
6.1.3.3 Despeckle .............................................................................................................6-5
6.1.3.4 Deskew .................................................................................................................6-6
6.1.3.5 Resize .................................................................................................................. 6-7
6.1.3.6 Brightness and Contrast .......................................................................................6-9
6.1.3.7 Rotation .............................................................................................................. 6-11
6.1.4 Color Management ....................................................................................................... 6-12
6.1.4.1 Color Matching a Document ...............................................................................6-13
6.1.4.2 ICC Color Profiles ...............................................................................................6-15
ii
Page 4

Contents
6.1.5 Annotation Overview ................................................................................................... 6-16
6.1.5.1 Annotation Marks ............................................................................................... 6-16
6.1.5.2 Adding annotations ............................................................................................. 6-17
6.1.5.3 Editing Annotations ............................................................................................6-17
6.1.5.4 Deleting Annotations ..........................................................................................6-18
6.1.5.5 Permanent Annotations ......................................................................................6-18
6.1.5.6 Annotation Properties .........................................................................................6-19
6.1.6 Document Editing Overview ........................................................................................6-22
6.1.6.1 Document Editing Functions ..............................................................................6-22
6.1.6.2 Add Page ............................................................................................................ 6-23
6.1.6.3 Remove Page ..................................................................................................... 6-25
6.1.6.4 Reorder Page .....................................................................................................6-26
6.1.6.5 Clipboard Support ..............................................................................................6-28
7 Capturing Documents
7.1 Capturing Documents ........................................................................7-2
7.1.1 Capturing Overview .......................................................................................................7-2
7.1.2 Connecting a TWAIN Device ......................................................................................... 7-2
7.1.3 Scanning with a TWAIN Device ..................................................................................... 7-3
7.1.4 Receiving Documents by E-Mail ................................................................................... 7-5
7.1.5 Receiving Documents by FTP .......................................................................................7-6
7.1.6 Importing a File ...............................................................................................................7-6
8 Document Routes
8.1 Document Routes ............................................................................... 8-2
8.1.1 Creating a Document Route .......................................................................................... 8-2
8.1.2 Remove a Document Route ...........................................................................................8-3
8.1.3 Rename a Document Route ........................................................................................... 8-3
8.1.4 Using Document Routes ................................................................................................ 8-4
8.1.5 Document Route Processing ........................................................................................8-5
8.1.6 Document Route Routing .............................................................................................. 8-6
8.1.7 Configuring Document Route Settings ........................................................................8-7
8.1.7.1 Processing Tab .................................................................................................... 8-9
8.1.7.2 Conversion Tab ..................................................................................................8-12
8.1.7.3 Repository Tab ...................................................................................................8-14
8.1.7.4 Email Tab ........................................................................................................... 8-15
8.1.7.5 Exchange Tab .................................................................................................... 8-17
8.1.7.6 SharePoint Tab ..................................................................................................8-19
8.1.7.7 Notes Tab ...........................................................................................................8-20
iii
Page 5

Contents
8.1.7.8 UNC Tab ............................................................................................................8-22
8.1.7.9 FTP Tab .............................................................................................................8-24
8.1.7.10 Addressing Tab ................................................................................................ 8-26
Index
This document is protected as an unpublished work under the US Copyright Act of 1976.
Copyright ©2002 Minolta Systems Laboratory, Inc. All Rights Reserved
iv
Page 6

1Introduction
Introduction Chapter 1
1
Page 7
1.1 Introduction
1.1 Introduction
1.1.1 Welcome to Minolta
Thank you for your decision to purchase the Minolta PageScope Router software.
Introduction Chapter 1
Read this User’s Manual carefully before using this software for the first time, and always
keep the manual within easy reach.
These documents may not be reproduced, transmitted, transcribed, stored in an archive system
or translated without the express prior written consent of Minolta Co. Ltd.
We reserve the right to make changes to the content of this manual.
Trademarks
Microsoft, Windows, WindowsNT, Windows2000, WindowsXP, Microsoft Excel, Microsoft
Word, Microsoft Internet Explorer and Windows Explorer are either registered trademarks or
trademarks of the Microsoft Corporation.
Acrobat and Acrobat Reader are registered trademarks of Adobe Systems Inc.
All other names of products and brand-names are trademarks or registered trademarks of their
respective proprietors.
1-2
Page 8
1.1 Introduction
1.1.2 Roadmap of this Manual
Where to Find What in this User’s Manual
You don’t know exactly where to find the information you need? The following table is
designed to help you.
To find information on a specific problem quickly and precisely, please refer to the index at the
end of the User’s Manual.
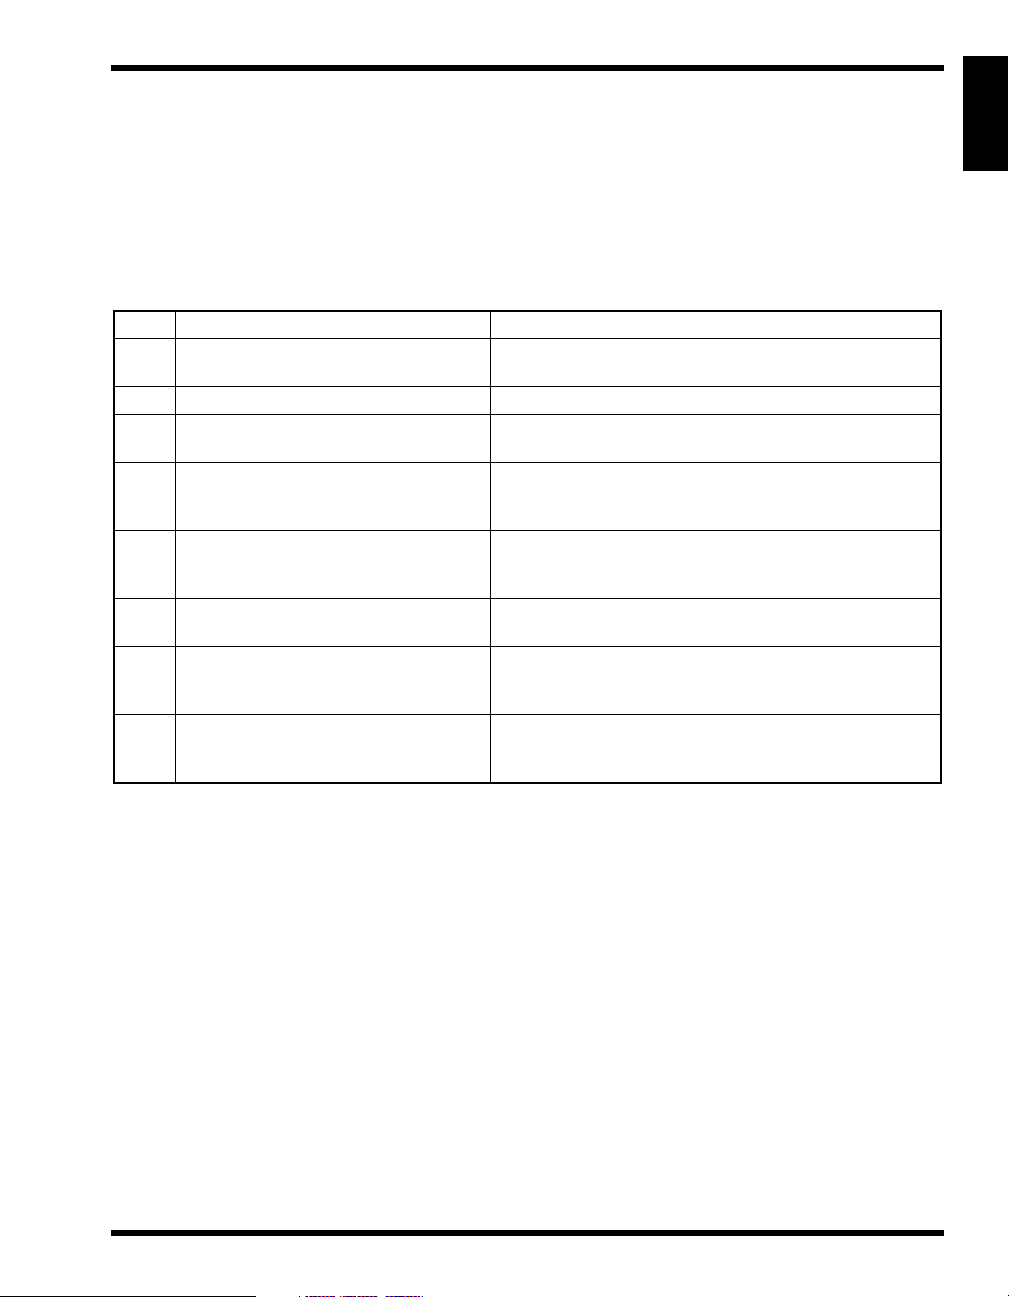
No. Title of chapter Content of chapter
1 Introduction Introductory remarks and information on how to use this
User’s Manual.
2 About PageScope Router This chapter contains general information on the software.
3 Installation This chapter contains information on how to install and
uninstall the software.
4 Getting Started This chapter provides information on how to start
PageScope Router, what the main window looks like and
how to configure basic program settings.
5 Working with Repositories This chapter provides information on how to manage
Repositories, copy and move documents in those
Repositories.
6 Working with Documents This chapter provides information on how to copy, move,
and edit documents.
7 Capturing Documents This chapter provides information on how to import an
image into PageScope Router, convert it into various
formats and save it.
8 Document Routes This chapter provides information on how to automatically
send documents to other PageScope Router users from an
MFP.
Introduction Chapter 1
1-3
Page 9

1.1 Introduction
Introduction Chapter 1
1-4
Page 10

2About Page-
Scope Router
About PageScope Router Chapter 2
2
Page 11

2.1 About PageScope Router
2.1 About PageScope Router
2.1.1 Features
PageScope Router is a software application that resides on a Windows Server and uses MFP
(Multi Function Peripheral) Scan Functions to place scanned documents into the PageScope
Router system.
The system manages users’ files by arranging and grouping the files in collections of
documents called Repository Areas, and provides the ability to manipulate the documents.
Files are also sent to the system by several methods including Email, FTP, and File Copy.
Other features include:
• Distribution of scanned data (FTP, UNC Path, SMTP e-mail, 3rd party solutions)
• Image Editing
• Management of scanned data
About PageScope Router Chapter 2
2.1.2 Supported Input Sources
There are several ways in which documents may be placed into a PageScope Router system.
They include:
• FTP - (Document Route only)
• Email - (Document Route only)
• Twain scanner directly attached to the client PC
• Import/Copy a file directly from the user’s PC into an existing Repository Area.
Supported File Types
These are the only file types supported by PageScope Router Client software.
• TIFF 6.0 (RAW, G3, G4, Pack bits, JPEG)
• Tiff Single and Multi-page
• Tiff Technical Note 2
• TIFF - F Support
• JPEG
• PDF (received from MFPs)
2-2
Page 12

2.1 About PageScope Router
2.1.3 Supported MFP / Controllers
Supported MFP (Multi Function Peripheral) devices include any devices supporting the
following methods of file transfer:
• Scan to FTP
• Scan to Email
About PageScope Router Chapter 2
2-3
Page 13

2.1 About PageScope Router
About PageScope Router Chapter 2
2-4
Page 14

3Installation
Installation Chapter 3
3
Page 15

3.1 Installation
3.1 Installation
3.1.1 Hardware Requirements
The following are the hardware requirements for the client workstation.
Hardware Requirements
Processor:
•
Pentium II 233MHz or higher
RAM:
•
Hard Drive:
•
Display:
•
Network Protocol:
•
3.1.2 Software Requirements
Installation Chapter 3
The PageScope Router client software does not require any special supporting software on the
client PC.
It is supported on the following Windows operating systems that have been properly installed:
• Windows 98SE
• Windows Me
• Windows 2000 Professional (SP2)
• Windows XP Professional/HomeEdition
64 MB or higher
500 MB or higher
XGA 16bit Color or higher
TCP/IP
3-2
Page 16
3.1 Installation
3.1.3 Installing the PageScope Router Client Software
The PageScope Router Client software is installed on a client workstation after being
downloaded from the PageScope Router Server using an Internet Browser.
Note
Before you can download the software, you must obtain the URL of the PageScope Router Server
PC. Contact the system administrator for this information.
Downloading the Client Installation File
1. At the Client workstation, start Internet Explorer.
2. Type the complete URL of the PageScope Router Server in the address field. For example,
enter: http://10.15.120.96/PSRServer or http://hostmachinename/PSRServer. Go to this
web page.
3. The
Minolta PageScope Router v1.0
web page should be displayed. Click one of the
following links:
• Download PageScope Router Client Application Install
• Download 508 Compliant PageScope Router Client Application Install
Note
The 508 compliant version will install a user interface that is compliant with Section 508 of the Rehabilitation Act of 1973
4. When prompted, select
to save the file on the server.
Save
5. Select a directory location to save the PSRClient.exe (or PSRClient508.exe) file. After the
file is downloaded, click
Installing the Client Software
to close the dialog.
OK
1. Disable all anti-virus software.
2. Use Windows Explorer to locate the PSRClient.exe (or PSRClient508.exe) file saved in
the last step. Select and double-click the filename.
3. The PageScope Router Client installation will begin and a
Preparing to Install
dialog
will be displayed.
4. A
Welcome....
dialog will be displayed. Click
to continue.
Next
Installation Chapter 3
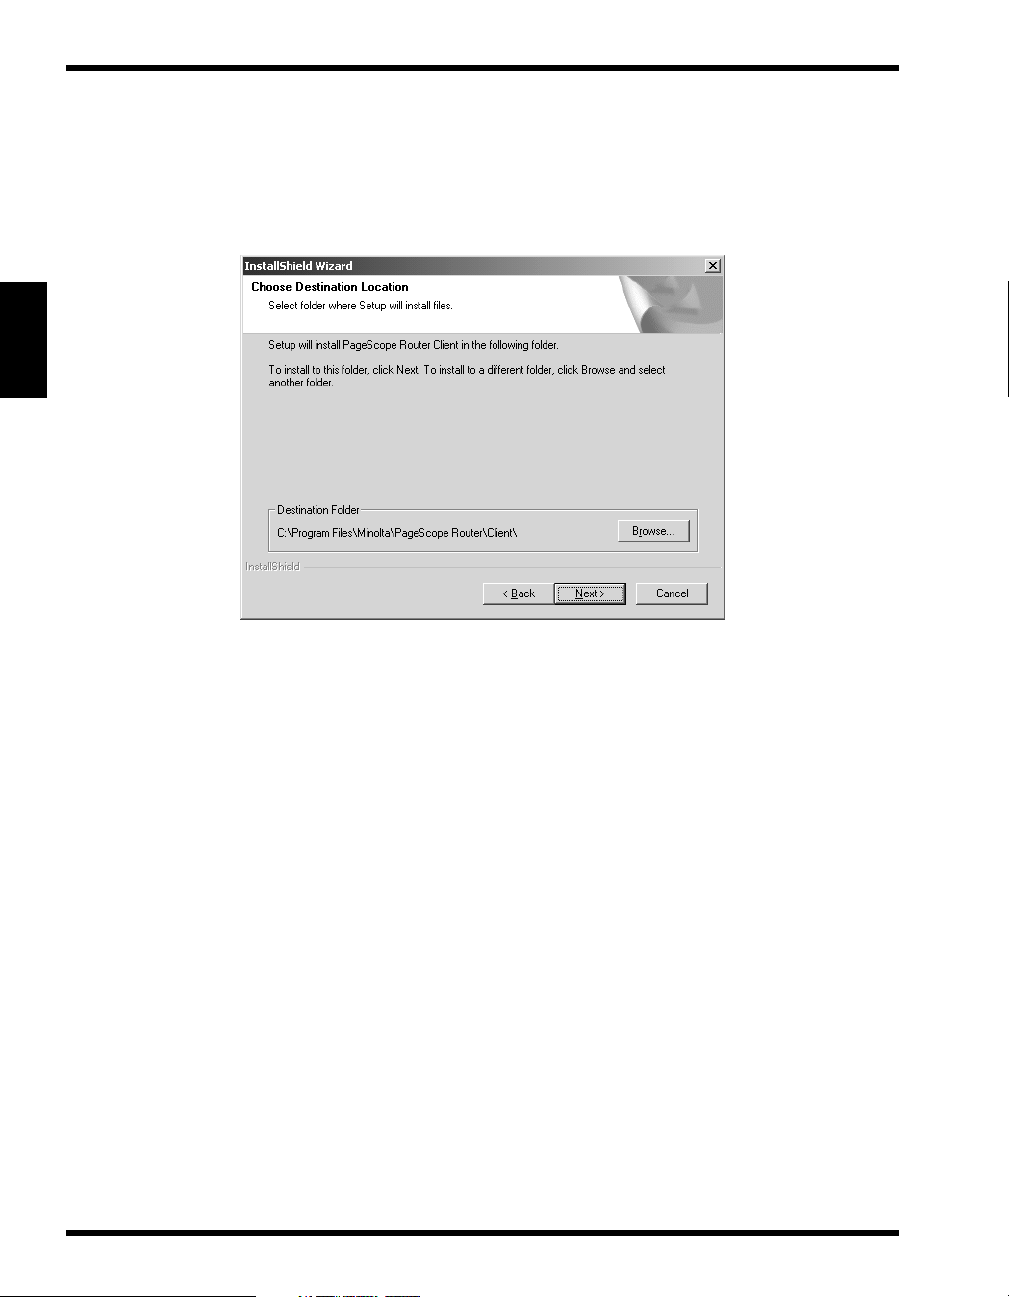
5. A
Choose Destination Location
dialog will be displayed. Enter a new directory for the
software by selecting Browse, or use the recommended default location. Click
continue.
6. The installation will proceed and a
Setup Status
dialog will be displayed as the individ-
ual components are installed and configured. A percentage complete will be displayed.
Next
to
3-3
Page 17
3.1 Installation
7. When the installation is complete, a dialog box will be displayed indicating whether or
not the installation was successful.
8. Click
PageScope Router Client Installation is complete.
Installation Chapter 3
to complete the installation.
Finish
3-4
Page 18

4Getting Started
4
Getting Started Chapter 4
Page 19
4.1 Getting Started
4.1 Getting Started
4.1.1 Starting and Closing the Application
Note
You must have rights to access the server PC where the PageScope Router Server software is
installed.
Starting PageScope Router Client
1. Install the PageScope Router Client software using the procedure in the Installing the
PageScope Router Client Software section.
2. Start the PageScope Router Client by selecting the link: Start | Programs | Minolta | PageScope Router Client | PageScope Router Client
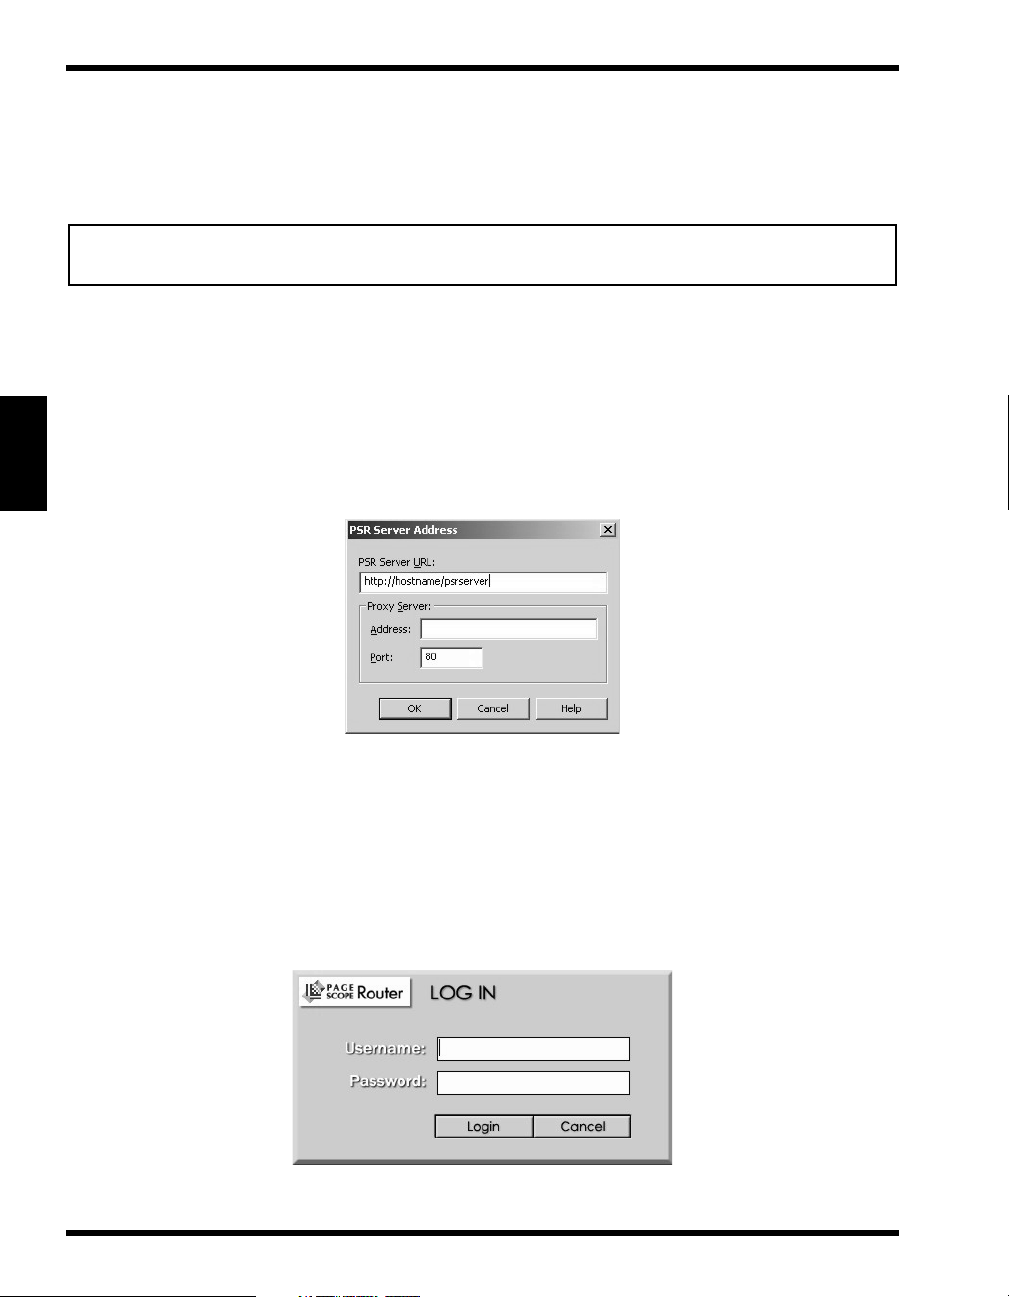
3. The first time the Client is started on your PC, the following dialog will be displayed.
Getting Started Chapter 4
4. In the “PSRouter Server URL:” field, type the URL of the PC where the PageScope
Router Server software is installed. In the example above, http://hostname... refers to the
PC where the PageScope Router Server software is installed.
5. If necessary, enter the correct information in the fields in the “Proxy Server:” section.
OK
Click
6. The following Log In dialog is displayed.
to continue.
4-2
Page 20
4.1 Getting Started
7. Obtain a valid PageScope Router user name and password from the system administrator.
Enter these values into the Username: and Password: fields and click Login to continue.
8. The main PageScope Router Client User Interface, the Document Manager, will open on
your desktop.
Closing PageScope Router Client
The PageScope Router Client application is closed by clicking the button on the Document
Manager window.
4.1.2 User Interface
The User Interface for PageScope Router Client consists of two application windows:
•
Document Manager window
This window is displayed when the program starts. It is
used for PageScope Router operations and repository
functions such as repository selection, and repository
document operations.
•
Document Viewer window
This window is used to display thumbnail images of
each page of a document, a selected document page,
and provides controls for page operations and image
editing.
Important Note
A Section 508 compliant version of the User Interface can be specified during installation of the client
software.
Getting Started Chapter 4
4-3
Page 21
4.1 Getting Started
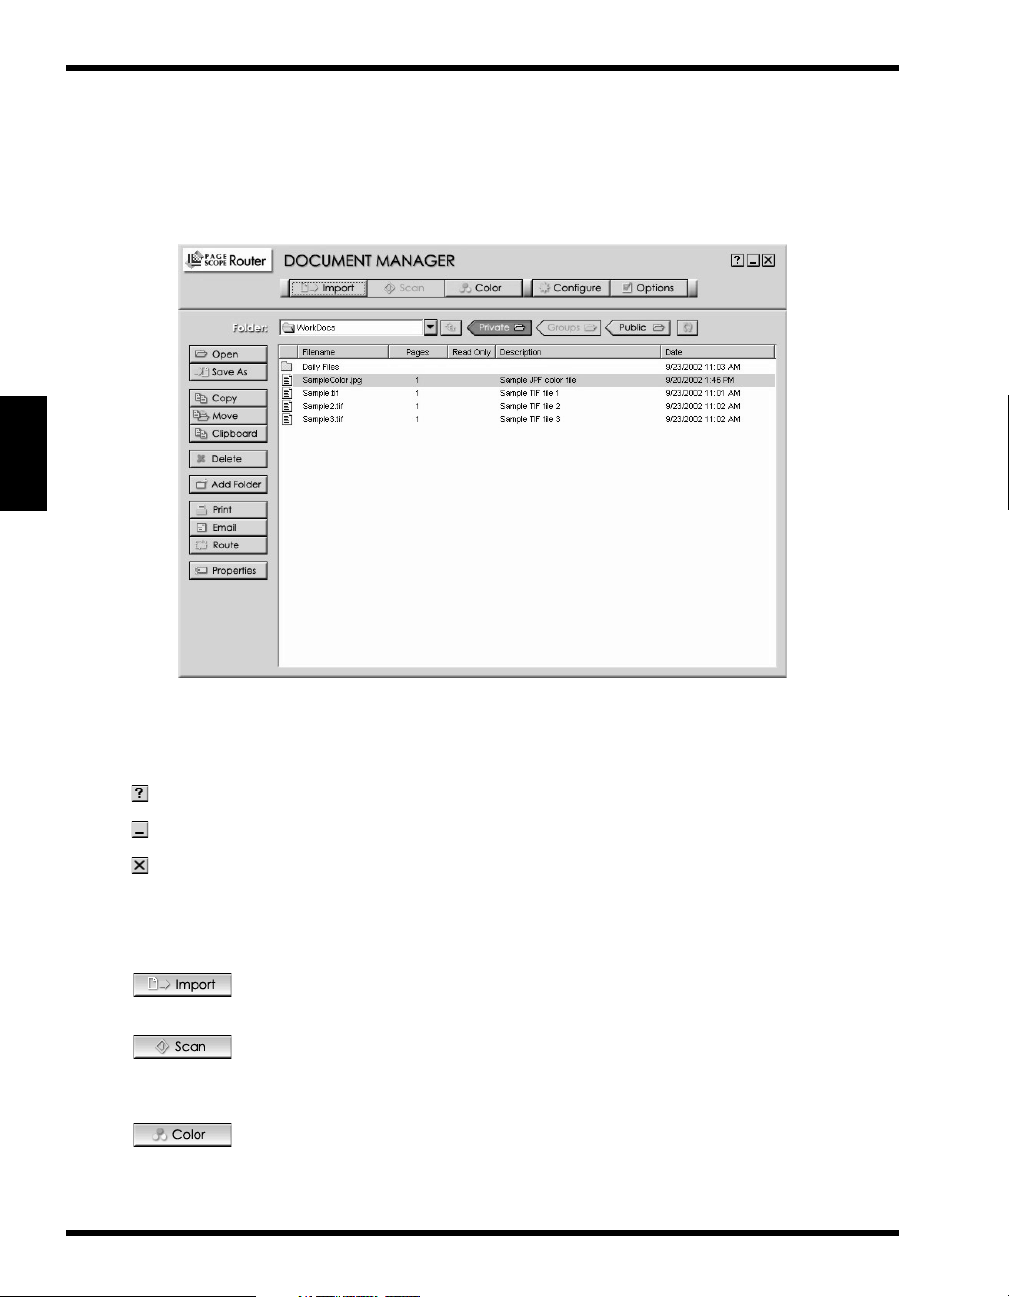
4.1.3 Document Manager
The Document Manager is the application window that is displayed when the PageScope
Router Client starts. The window is composed of groups of buttons, used for PageScope
Router operations and repository functions such as repository selection, and repository
document operations.
Getting Started Chapter 4
User Interface Control Group
The following UI control buttons are provided:
• Opens the Help document for PageScope Router.
• Minimizes the Document Manager onto the Taskbar.
• Closes the PageScope Router Client application.
Main Group
The following document and configuration buttons are provided:
• Allows you to import documents from a network location into
a Repository. See
• Allows the selection and launching of an interface dialog for
TWAIN Scanners attached to the user’s workstation. See
7.1.6 – Importing a File
– Connecting a TWAIN Device
• Performs Color Management on the selected document. This
allows you to modify the color space of a document by using
ICC Color Profiles. See
.
.
6.1.4 – Color Management
7.1.2
.
4-4
Page 22

4.1 Getting Started
• Opens the Document Route Configure dialog. This provides
you with the ability to create and configure Document Routes,
used for routing documents. See
Route Settings
• Displays a dialog list for functions needed to set up the PageScope Router software. Includes options for Cache Settings,
PageScope Router Server Settings, and Document List Column
Settings. See
.
4.1.7 – Configuring Client Options
8.1.7 – Configuring Document
.
4.1.4 Document Viewer
PageScope Router client provides the user with the ability to view documents that are placed
in a Repository. The user selects a document using the Document Manager and clicks the
Open button. The first page of the document is displayed in a section of the Document Viewer,
and all of the document pages are displayed in an optional thumbnail viewer.
The Document Viewer is composed of several functional areas and groups of buttons that
provide the following main functions:
• Document Page Viewer
• Document Thumbnail Viewer
• Document Control
• Page Control
• Page View Control
Getting Started Chapter 4
4-5
Page 23
4.1 Getting Started
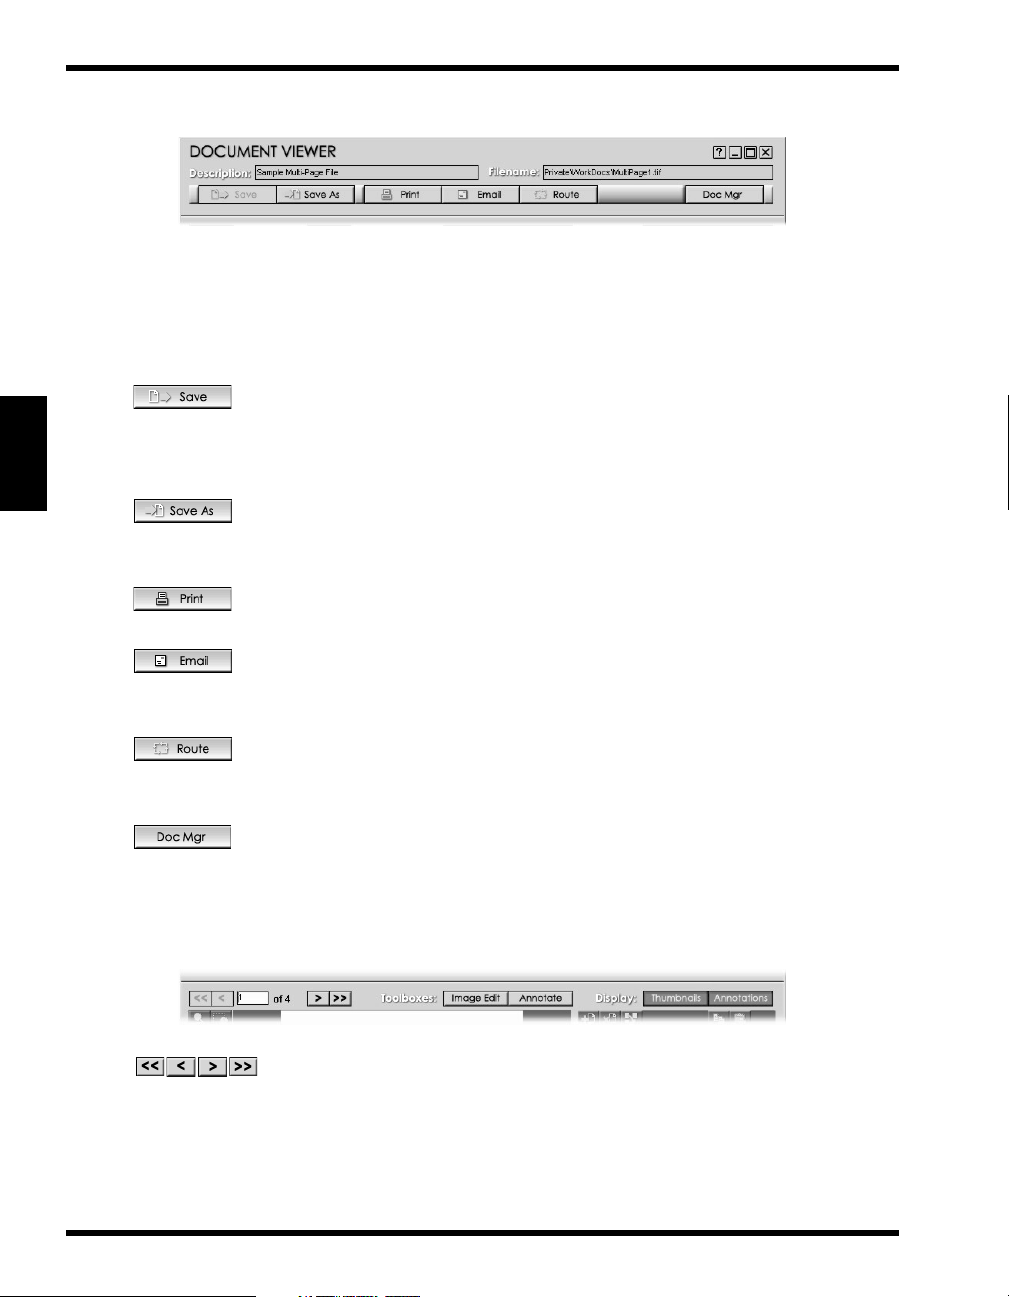
Document Control Functions
Getting Started Chapter 4
•
Description:
Filename:
•
•
•
•
•
•
•
Save
Save As
Print
Email
Route
Doc Mgr
This field contains a description of the current document.
This field contains the filename of the current document.
This button is only available on the Document Viewer. It is
used to Save any changes that are made to the current document in the viewer window. These changes include Image Editing, Annotation, and document Page changes.
This button opens a dialog and allows the user to save the
selected document in other locations. It also provides the ability to convert the document into another file format.
This opens the Print dialog and allows the user to print the
selected document.
This launches the user’s Email client dialog and allows the user
to send the selected document as an Email attachment to
another user.
This opens the Route Document(s) dialog and uses Document
Route to process and send the selected document to other users
and locations.
This returns you to the Document Manager, placing the dialog
on top of other Windows dialogs.
Page Control Functions
•
Page
4-6
navigation controls
This group provides the user with information about the number of pages in the current document, the page number of the
currently displayed page, and provides buttons to navigate
through the document. The buttons will only be available if the
document contains multiple pages.
Page 24
4.1 Getting Started
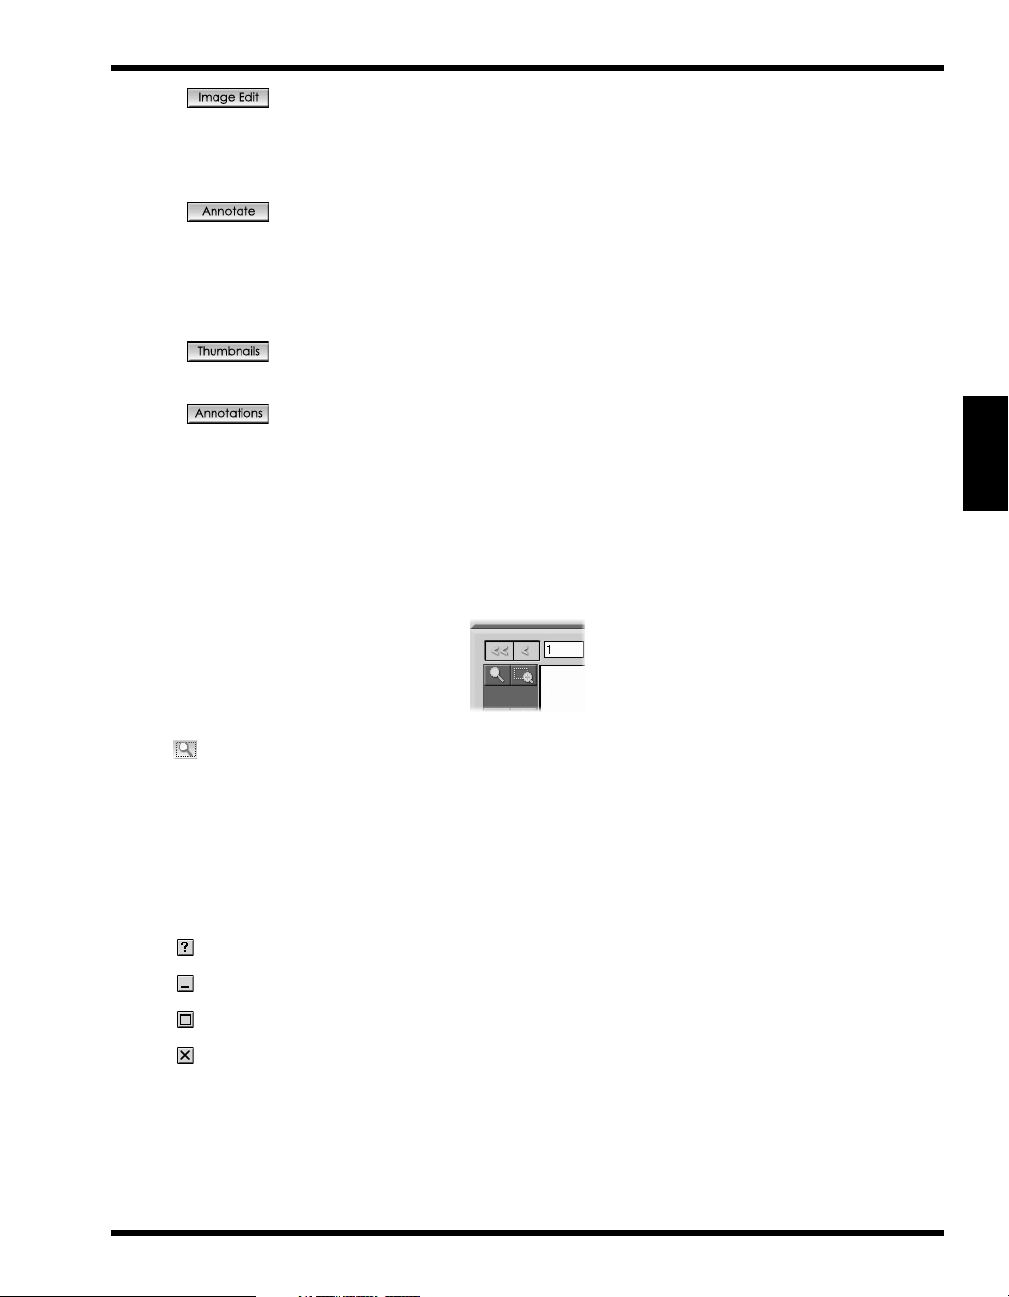
•
•
•
•
Page View Control
Image Edit Toolbox
This button enables a set of image editing controls and makes
them visible on the Viewer frame. See
Description
Annotation Toolbox
Selecting this button enables a set of annotation editing controls and makes them visible on the Viewer frame. The button
will only be present if the current file supports annotations. See
6.1.5 – Annotation Overview
Display: Thumbnails
This button is used to display or hide the Thumbnail Viewer.
Display: Annotations
This button is used to display or hide annotations that may have
been placed on the current image. The button will only be
present if the current file supports annotations.
tions that have been burned into an image cannot be turned off.
for complete information.
for complete information.
6.1.3 – Image Editing
Annota-
Note:
Getting Started Chapter 4
•
Change View
This button allows the user to modify the way the image is displayed. These settings only affect the viewed image, not the original document. See
Viewer
User Interface Control
for complete information.
The Document Viewer also provides the following UI control buttons:
• Opens the Help document for PageScope Router.
• Minimizes the Document Viewer onto the Taskbar.
• Maximizes the Document Viewer window to the full screen size.
• Closes the Document Viewer.
4.1.5 – Page
4-7
Page 25
4.1 Getting Started
4.1.5 Page Viewer
The Document Viewer contains a Page Viewer area that displays a single full-size page of a
document at a time. The size of the area is fixed within the Document Viewer window but
expands if the Thumbnail view is disabled. The entire Document Viewer window can be
maximized to fill the screen.
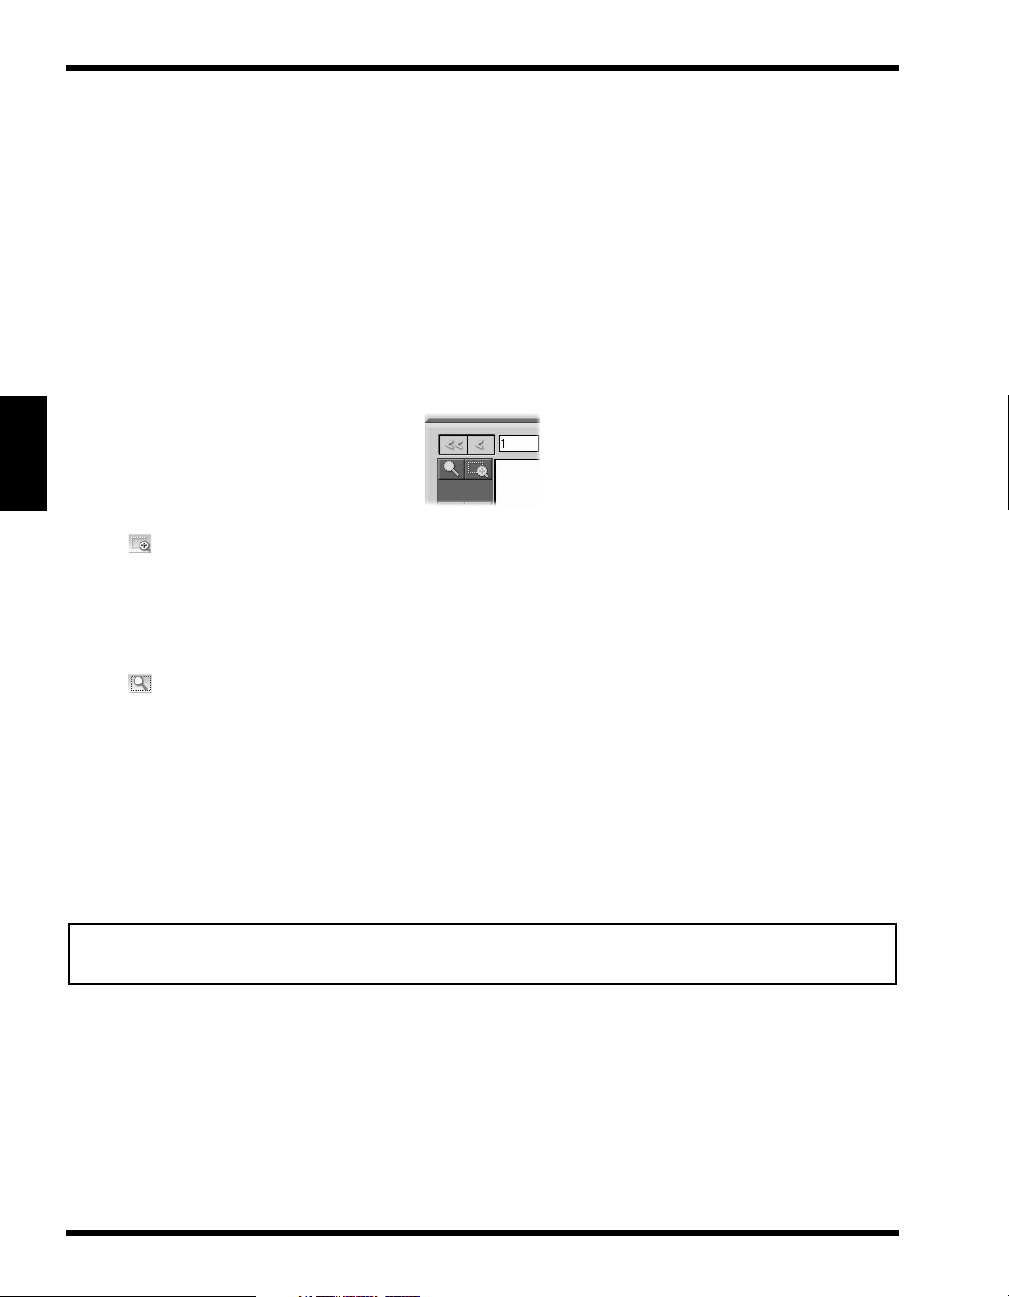
Viewer Settings
There are several functions provided to modify the way the pages are viewed in the PageScope
Router Client page view. There are two buttons on the side of the Document Viewer that are
used to modify the page view.
•
Rubberband Zoom
When this button is clicked, you can drag the mouse while holding the left mouse
button to mark a section of the currently viewed image. When the button is
released, the marked section of the image will expand to fill the viewer window.
Getting Started Chapter 4
•
This function provides a fast way to zoom in on a section of an image.
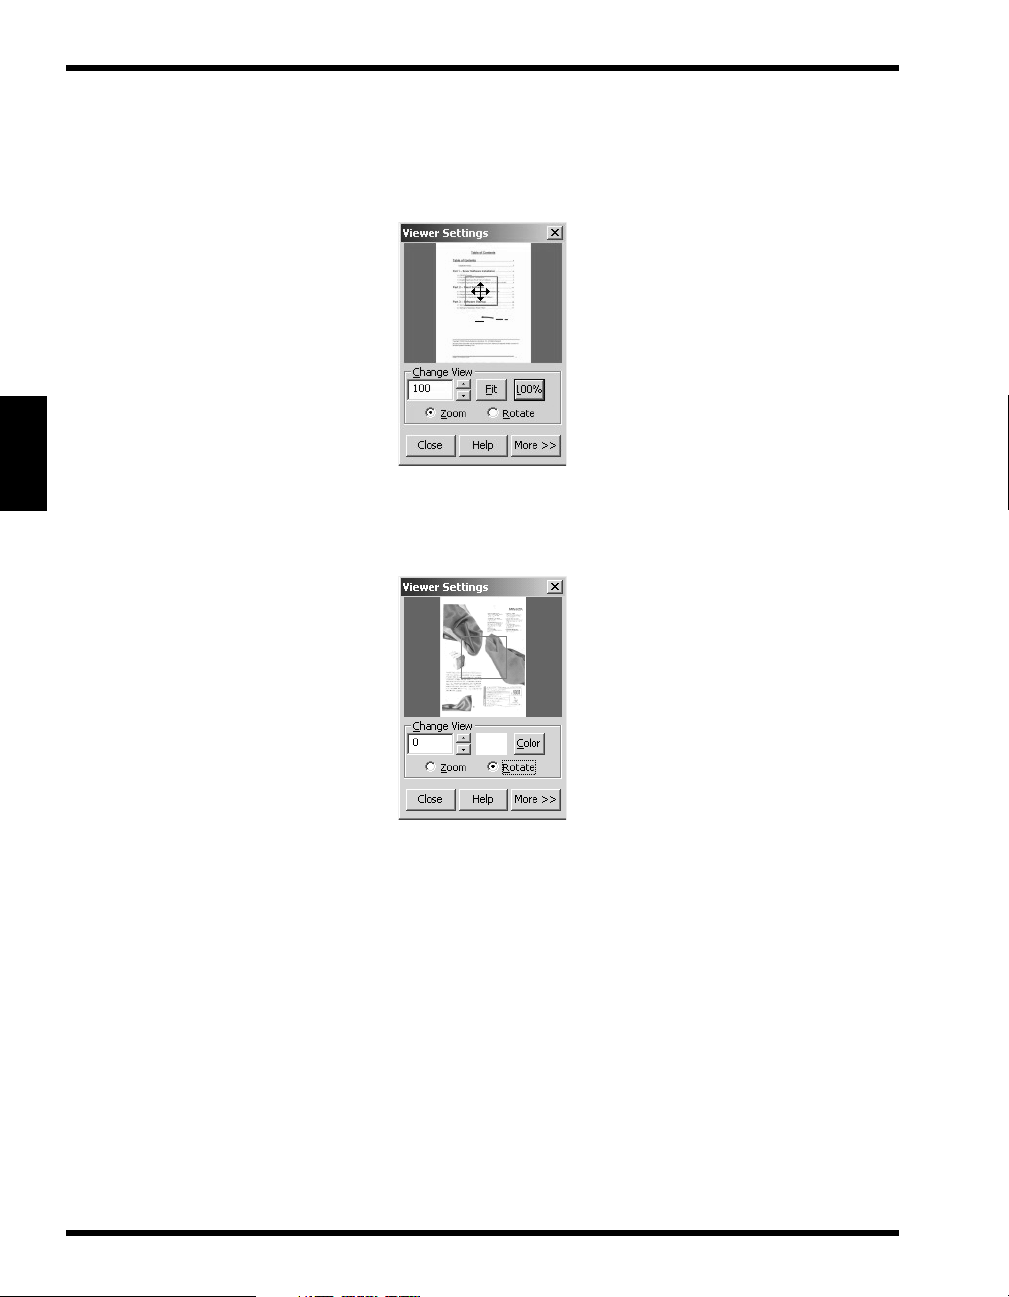
View Settings Dialog
This button opens a new dialog that allows the user to modify the way the image
is displayed. These settings only affect the viewed image, not the original document. When this button is clicked, one of the dialogs shown below is displayed.
These dialogs provides the ability to modify the scaling or Zoom factor of the image, the
rotation angle of the image, and the ability to save these settings. The dialog controls will
change their function, depending on the function being performed. Refer to the description in
each section.
Important Note
These operations only affect the user’s view of the document, and does not change the underlying
document in any way.
4-8
Page 26
4.1 Getting Started
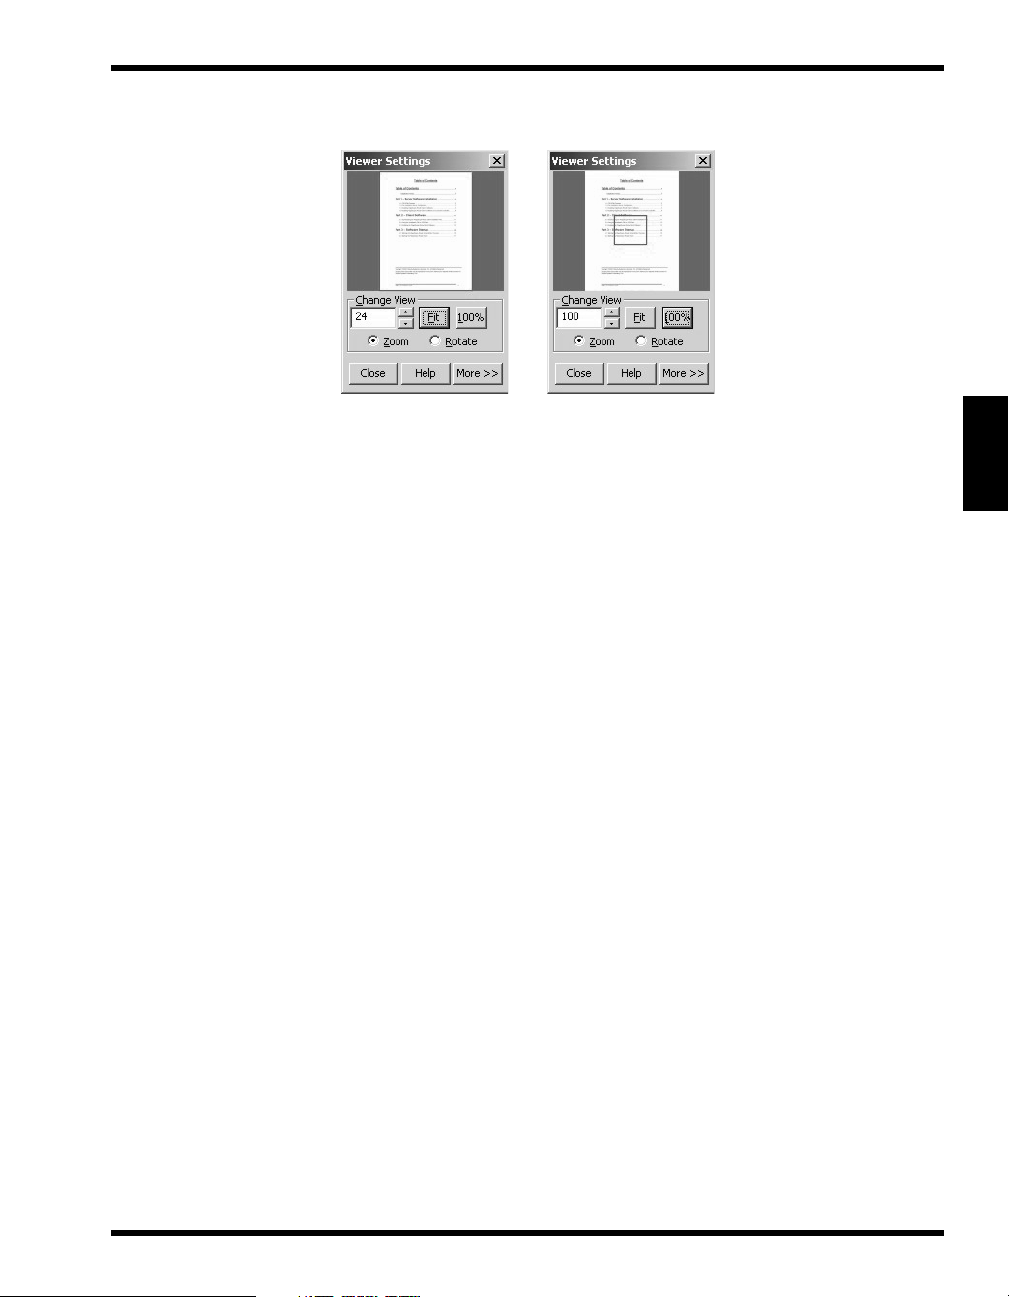
Image Zoom
The displayed dialog contains a thumbnail representation of the image, along with image
controls that are used to change the image display. A rectangle is placed on the image showing
the section of the image that is currently being displayed in the main viewer.
Change View
•
•
•
•
•
•
•
radio button This button is selected to enable the zoom controls.
Zoom
button This button changes the image scale so that the entire
Fit
button This button displays the image at 100% so that the
100%
Zoom Factor
button This button closes the dialog.
Close
button This button opens the help file.
Help
More >>
section:
image fits in the viewer window.
image resolution matches the screen resolution. The
rectangle on the image shows the section of the image
that is currently being displayed in the main viewer.
field The viewer provides the ability to change the size of
the viewed image to any value from 1 to 800% of the
original. The zoom level may also be increased or
decreased by 25% at a time. You may enter a value in
this field, or use the arrow controls to change the zoom
as required.
button This button changes the dialog and adds a
Options
section described below.
Getting Started Chapter 4
View
4-9
Page 27
4.1 Getting Started
Pan Image
When an image is zoomed and only a section is displayed, the mouse pointer can be used to
move the rectangle placed on the image as shown below. The section of the image that is
displayed will change accordingly.
Image Rotation
Getting Started Chapter 4
•
Rotate
•
Rotation Angle
•
White/Black
•
Color
radio button This button is selected to enable the rotate controls.
button This button opens color setting dialog to set backgroud
field The viewer provides the ability to change the angle of
the viewed image.The angle may be Clockwise (0 to
180) or Counterclockwise (0 to -180). You may enter a
value in this field, or use the arrow controls to change
the angle in 90-degree increments as required.
radio buttons These buttons are used to set the background color of
the new image outside of the rotated original image.
(for monochrome image only)
color of the new image outside of the rotated original
image. (for color image only)
4-10
Page 28
4.1 Getting Started
•
•
•
button This button closes the dialog.
Close
button This button opens the help file.
Help
More >>
button This button changes the dialog and adds a View
Options section described below.
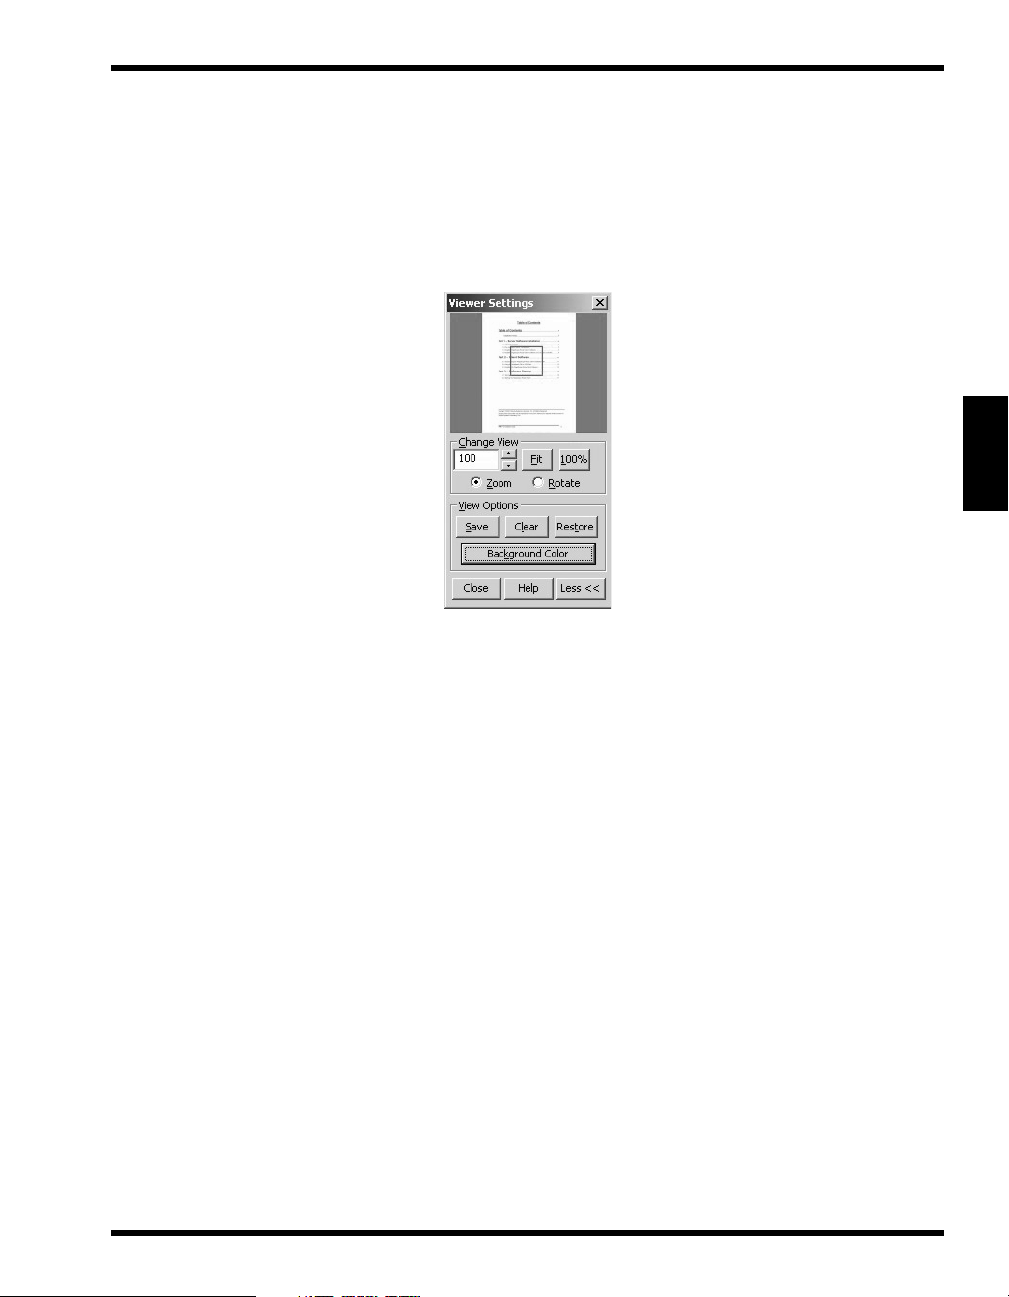
View Options
When the
More >>
button is clicked on any of the dialogs shown above, a
section is added to the dialog. The following functions are added.
•
Restore
button The user may elect to return the viewed image to its
original state with regard to zooming and rotate view.
image rotations that have been saved, either by
Note:
this user or by a previous user, will not be undone
through the restore command.
View Options
Getting Started Chapter 4
•
•
•
button You can save the scale (zoom percentage) and rotate
Save
button This button clears currently saved persistent view set-
Clear
Background Color
view settings for an individual page of a document by
clicking this button. This information will be associated
with a page of a document, and will apply to all users.
This information will persist across PageScope Router
Client application sessions and may be modified by all
users.
tings for the page.
button This button can be used to change the background color
of the Page Viewer, the area on the Document Viewer
where the image is displayed.
4-11
Page 29

4.1 Getting Started
4.1.6 Thumbnail Viewer
In addition to the full-page view of the document, the Document Viewer includes a section that
can be used to display thumbnail images of the selected document. The thumbnail viewer
consists of small renderings of each page of the document. The
Document Viewer frame will display or hide the thumbnails as desired.
The thumbnails will be displayed in a fixed section of the Document Viewer, each page
numbered consecutively according to the sequence in the document. If all of the thumbnail
images cannot fit in the viewing area, a scroll bar will be provided to enable the user to view
all thumbnails.
A document page may be selected and placed into the page viewer by clicking on the
thumbnail using the mouse.
The following page management functions may be performed on the document using the
thumbnail viewer.
• Add Page
• Remove Page
• Reorder Page
• Copy image to clipboard
Thumbnails
button on the
Getting Started Chapter 4
• Paste image from clipboard
See
6.1.6 – Document Editing Overview
for complete information.
4-12
Page 30
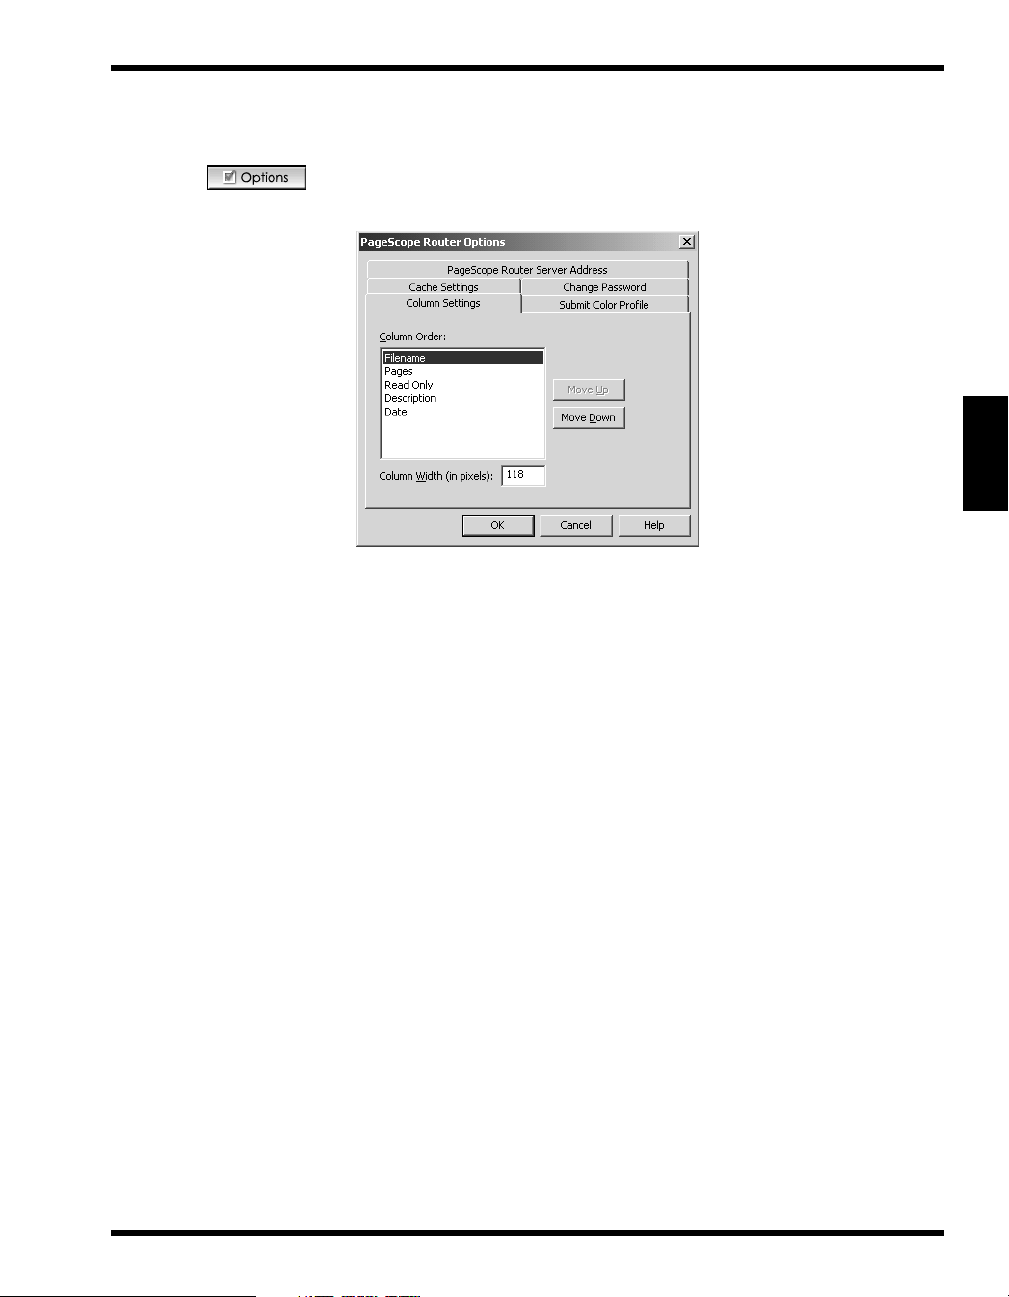
4.1.7 Configuring Client Options
There are several configurable options used in PageScope Router.
4.1 Getting Started
When the button is clicked on the Document Manager, the following
Router Options
The dialog contains several dialog tabs, each used to configure a specific parameter. Click on
the desired tab and use the links below for information on the specific item.
• Document List Column Settings
• Submit Color Profile
• Changing the User Password (for Non-OS User only)
• Cache Settings
dialog will open.
PageScope
Getting Started Chapter 4
• PageScope Router Server Address
4-13
Page 31

4.1 Getting Started
4.1.8 Column Settings
The
Repository Viewer
displays a list of documents and folders for a selected Repository
Area, showing names and basic information.
This tab dialog allows you to change the order and width of the columns of information
displayed.
To Change the Column Order and Width
1. In the
Getting Started Chapter 4
2. Use the
Column Order:
Move Up
listbox, use the mouse pointer to select the column.
and
Move Down
buttons to change the position of the column.
3. In the
Column Width
(in pixels): field, you may enter a new column width if necessary.
4. Repeat for the other columns if necessary.
5. Click
to accept the changes and close the dialog.
OK
4-14
Page 32

4.1 Getting Started
4.1.9 Submit Color Profile
The Color Management function allows you to change the color space of a document to a
different one based on an ICC Color Profile. If the required Profile is not available in the
PageScope Router System for the MFP being used, you may select a custom ICC Profile from
the local PC or network and upload it to the PageScope Router server. The PageScope Router
Administrator then assigns the profile to a particular MFP and scanning condition.
This tab dialog allows you to locate a custom ICC Profile and send it to the PageScope Router
Server.
To Submit an ICC file
1. In the
2. Click
Color Profile:
required ICC file, or click the
to Submit the file and close the dialog.
OK
listbox, type the complete directory path and filename of the
Browse
button to locate the file.
Getting Started Chapter 4
4-15
Page 33

4.1 Getting Started
4.1.10Change Password
You may change your PageScope Router user Password. This tab dialog provides the fields
necessary to make this change.
To Change the Password
1. Select the
Change Password
2. Enter the new password in the
Getting Started Chapter 4
3. Click
to accept the change and close the dialog.
OK
Note
This feature is for Non-OS User only.
checkbox This will enable the other fields.
New Password:
and
Confirm New Password:
fields.
4-16
Page 34

4.1 Getting Started
4.1.11Cache Settings
PageScope Router uses a portion of your disk space to hold copies of the files that are
requested for viewing. This allows quick retrieval and display of frequently requested
documents.
This tab dialog allows you to specify how much of the disk space can be used by PageScope
Router for your cache, and also allows you to clear the cache.
To Change the Cache Size
1. In the
2. Click the
3. Click
Percentage...
cache size. Note that this value is the percent of the disk drive where PageScope Router is
installed.
Clear Cache Now
to accept the change and close the dialog.
OK
field, enter a number or use the arrow controls to specify a new
button to remove all files from the cache directory.
Getting Started Chapter 4
4-17
Page 35

4.1 Getting Started
4.1.12PageScope Router Server Address
This tab dialog allows you to change the URL of the PageScope Router Server that you wish
to access.
To Change the Server URL
Getting Started Chapter 4
1. In the
Server.
2. In the
3. Click
PSR Server URL:
Proxy Server:
to accept the change and close the dialog.
OK
field, enter the complete URL address of the PageScope Router
section, enter the correct information, if necessary.
4-18
Page 36

5Working with
Repositories
5
Working with Repositories Chapter 5
Page 37

5.1 Working with Repositories
5.1 Working with Repositories
5.1.1 Repository Overview
PageScope Router manages users’ files by arranging and grouping the files in collections of
documents called Repository Areas.
The PageScope Router Repository Areas use folders and sub-folders to contain all files placed
into the System by the PageScope Router users. The files are sent to the system by several
methods including:
• Scanning from an MFP device
• Email
• File copy
Repository Areas
There are three types of Repository Areas:
Private Repository Area
•
Group Repository Area
•
Working with Repositories Chapter 5
Public Repository Area
•
The Repository Viewer section of the Document Manager window provides the ability to
display list of folders and documents in the Repositories, and buttons to manage the folders
and documents.
A Private Repository Area is managed by an individual
PageScope Router user. Only that user may view the
Repository Area, add folders or documents to it, and
manipulate the documents in it. The top-most level of a
Private Repository Area is its owner’s INBOX.
A Group Repository Area is managed by the PageScope Router Administrator. These Areas are created
for use by users who are members of a Network Group
that has been created on the main network. The designated Network Group is associated with the Repository
Area, and only those members can add folders or documents to it, and manipulate the documents in it.
The Public Repository Area is managed by the PageScope Router administrator. All users of the PageScope
Router system may view the Public Repository Area,
add folders or documents to it, and manipulate the documents in it.
5-2
Page 38

5.1.2 Repository Viewer
5.1 Working with Repositories
The Document Manager provides a
Repository Viewer
section that allows you to specify a
Repository Area to view, either Private, Public, or Group. The viewer displays a document list
for that Repository Area, showing the documents and folders in the Repository, and provides
document control buttons to allow you to manage repository documents.
Repository Management
In general, you can Create, Rename, and Delete folders within PageScope Router
Repositories. However, the functions allowed vary with the type of Repository. Refer to the
sections and links below for specific information:
Private Repository Area
A user’s Private Repository Area is automatically created by the PageScope Router server
when the user is added to the PageScope Router system. The user cannot add or delete Private
Repository Areas.
•
Create folders
The user can create folders and sub-folders in their own
Private Repository area. These folders are only accessible by the authorized user.
•
Rename folders
The user can rename any folder or sub-folder in their
own Private Repository area.
•
Copy/Move folders
The user can copy or move any folder or sub-folder in
their own Private Repository area.
•
Delete folders
The user can delete any folder or sub-folder in their
own Private Repository area.
Group Repository Area
The PageScope Router administrator creates Group Repository Areas and associates them
with User Groups that were created in the Network Domain environment. The user cannot add
or delete Group Repository Areas.
Only PageScope Router users that are members of the designated Domain Group can access or
manage the associated Group Repository Area and perform the following functions.
•
Create folders
The group member user can create folders and subfolders in the Group Repository area. These folders are
only accessible by all authorized group members.
•
Rename folders
The group member user can rename any folder or subfolder in the Group Repository area.
•
Copy/Move folders
The group member user can copy or move any folder or
sub-folder in the Group Repository area.
5-3
Working with Repositories Chapter 5
Page 39

5.1 Working with Repositories
•
Delete folders
The group member user can delete any folder or subfolder in the Group Repository area.
Note
• The PageScope Router administrator can designate folders within a Group Repository Area as
“Read Only.” Users may add and view documents stored in folders designated as “Read Only,” but
cannot Rename, Move, or Delete them.
• The PageScope Router Administrator may designate folders within a Group Repository Area as
“Inaccessible.” “Inaccessible” folders may not be viewed by any PageScope Router user.
Public Repository Area
The Public Repository Area is automatically created by the PageScope Router server at
installation time. The user cannot add or delete Public Repository Areas.
•
Create folders
The user can create folders and sub-folders in the Public Repository area. These folders are accessible by all
users.
•
Rename folders
The user can rename any folder or sub-folder in the
Public Repository area.
•
Copy/Move folders
The user can copy or move any folder or sub-folder in
the Public Repository area.
•
Delete folders
The user can delete any folder or sub-folder in the Public Repository area.
Note
• The PageScope Router administrator can designate folders within the Public Repository Area as
“Read Only.” Users may add and view documents stored in folders designated as “Read Only,” but
cannot Rename, Move, or Delete them.
• The PageScope Router Administrator may designate folders within the Public Repository Area as
“Inaccessible.” “Inaccessible” folders may not be viewed by any PageScope Router user.
Working with Repositories Chapter 5
For a description of the document manipulation functions that are available in Repository
areas, see
5.1.5 – Document Control Overview
.
5-4
Page 40

5.1.3 Repository Selection
5.1 Working with Repositories
The
Repository Viewer
allow the user to specify a Private, Public, or Group Repository Area. The viewer will then
display a document list for the selected Repository Area.
The Repository Selection section is shown below.
To Select a Repository
1. Open the Document Manager.
2. Click one of the following buttons to select a Repository.
• This button selects the user’s Private repository and lists the
• This button selects Group repositories and lists the folder and
area of the Document Manager provides a section with controls that
folder and document contents of the repository in the Document List View.
document contents of a selected repository in the Document
List View. The Group Repositories are displayed based on the
Network Group membership of the user.
• This button selects the Public repository and lists the folder and
document contents of the repository in the Document List
View.
3. You can select a folder in the Document List by double-clicking the folder name, or highlighting the folder and clicking the button.
4. The Folder: field displays the name of the currently selected Repository folder.
5. The (
selected folder.
6. The (
tion and updates the Document List View.
Refer to
) button changes the Document List View up to the parent folder level of the
Up
Refresh
5.1.6 – Add a Repository Folder
) button refreshes the content of the current repository or folder informa-
for instructions to add a folder.
5-5
Working with Repositories Chapter 5
Page 41

5.1 Working with Repositories
5.1.4 Repository Document List
The
Repository Viewer
area of the Document Manager provides a document list for the
selected repository, which lists the documents and folders in a particular Repository Area.
The Document List section is shown below.
Document List fields
The document list for the selected repository contains the following information about each
folder or document. The information is organized as columns in the display.
•
Description
This is a description of the folder or document that was
entered when the item was created.
•
Date
•
Pages
•
Filename
Working with Repositories Chapter 5
•
Read Only
Changing the Document List Display
You may change the following display settings:
•
Column Order
•
Sort Order
and
Column width
5-6
This is the Date & Time the document or folder was
created.
This is the number of pages in the document.
This is the document filename or folder name.
This indicates if the folder or document has been
marked as Read-Only by the PageScope Router
Administrator.
See
4.1.8 – Column Settings
for more information.
You may change the sort order of any column. You may
choose between ascending and descending order on
any selected column by clicking the column name.
Page 42

5.1 Working with Repositories
5.1.5 Document Control Overview
PageScope Router gives you the ability to manipulate complete documents that are selected in
the Document List display.
The operations, as shown on the image below, include copying/moving between Repository
Folders, saving locally, emailing, and printing.
Document Control Functions:
The following buttons allow the user to manipulate documents in the Repository.
•
Add Folder
This button opens a dialog used to add a folder to the Repository that is currently selected. See
Folder
.
5.1.6 – Add a Repository
Note
The following functions will be unavailable until a document is highlighted with the mouse pointer.
•
•
Open
Save As
This button opens the selected document and displays it in the
Document Viewer window. See
ument
.
5.1.7 – Open a Folder or Doc-
This button opens a dialog and allows you to save the selected
document in a Network location. It also provides the ability to
convert the document into another file format. See
Saving Documents
•
Copy
This button opens a dialog and allows you to copy the selected
.
5.1.10 –
folder or document in a different Repository location. See
– Copy or Move a Folder or Document
.
Working with Repositories Chapter 5
5.1.8
5-7
Page 43

5.1 Working with Repositories
•
•
•
•
•
Move
Clipboard
Delete
Print
Email
This button opens a dialog and allows you to move the selected
folder or document to a different Repository location. See
– Copy or Move a Folder or Document
.
5.1.8
This button places a copy of the selected document on the Windows Clipboard. See
ment
.
5.1.8 – Copy or Move a Folder or Docu-
This button removes the selected folder or document from the
selected Repository. See
5.1.9 – Delete a Folder or Document
This opens the Print dialog and allows you to print the selected
document. See
5.1.12 – Printing Documents
.
This launches the user’s Email client dialog and allows you to
.
send the selected document as an Email attachment to another
user. See
•
Route
This opens the Document Route Routing dialog and uses a
5.1.11 – Sending Documents by E-mail
.
Document Route to process and send the selected document to
other users and locations. Documents are processed automatically using Document Routes, a method of file transfer
designed into the PageScope Router system. See
Document Routes
•
Properties
for more information.
8.1.4 – Using
This button displays a dialog containing information about the
selected folder or document. See
ties
.
5.1.13 – Document Proper-
5.1.6 Add a Repository Folder
To Add a Folder
Working with Repositories Chapter 5
1. Open the Document Manager.
2. Click the button. The Add a Folder dialog will be displayed.
3. In the
4. In the
5-8
Name:
Description:
field, enter the name of the new folder.
field, enter an optional description for the new folder.
Page 44

5.1 Working with Repositories
5. Click OK to proceed and add the folder or
Cancel
to stop the operation.
5.1.7 Open a Folder or Document
To Open a folder or a document
1. Open the Document Manager.
2. Select a Repository. Refer to section
3. Use the mouse and highlight the desired folder or document. Click the button.
4. If a folder was selected, the folder contents will be displayed in the Document List.
5. If a document was selected, the Document Viewer will open, displaying the selected document.
5.1.3 – Repository Selection
.
5.1.8 Copy or Move a Folder or Document
PageScope Router gives you the ability to
or an entire folder from the current Repository location to another folder in your own Private
Repository Area, in a Group Repository Area to which you have access, or to any Public
Repository Area.
•
Copy
This button opens a dialog and allows you to copy the
selected item(s) in a different Repository location. The
selected item(s) will remain in their current location,
and copies will be placed in the target location.
Copy
or
one document, multiple documents,
Move
•
Move
•
Clipboard
To Copy a folder or document
1. Open the Document Manager.
2. Select a Repository. Refer to section
3. Use the mouse and highlight the desired folders or documents. You may select multiple
items.
This button opens a dialog and allows you to move the
selected item(s) to a different Repository location. The
selected item(s) will be removed from their current
location, and moved to a new location.
This button places a copy of the selected document on
the Windows Clipboard. Note that you can only place a
single page document on the clipboard. You cannot
copy a folder to the clipboard.
5.1.3 – Repository Selection
.
5-9
Working with Repositories Chapter 5
Page 45

5.1 Working with Repositories
4. Click the button. The following dialog will be displayed.
5. The Copy Selected Items dialog is used to specify the Destination or Target folder where
the selected items will be copied.
6. Use the Repository selection buttons on the dialog to locate the desired target folder.
7. When the target folder is selected, the button will be enabled. Click this button to proceed and copy the items or Cancel to stop the operation.
To Move a folder or document
1. Open the Document Manager.
2. Select a Repository. Refer to section
3. Use the mouse and highlight the desired folder or document. You may select multiple
items.
Working with Repositories Chapter 5
5.1.3 – Repository Selection
.
5-10
Page 46

5.1 Working with Repositories
4. Click the button. The following dialog will be displayed.
5. The Move (Multiple Items) To: dialog is used to specify the Destination or Target folder
where the selected items will be moved.
tain the name of the folder or document being moved.
6. Use the Repository selection buttons on the dialog to locate the desired target folder.
For a single item, the dialog title will con-
Note:
7. When the target folder is selected, the button will be enabled. Click this button to proceed and move the items or Cancel to stop the operation.
To Copy a document to the Windows Clipboard
1. Open the Document Manager.
2. Select a Repository. Refer to section
5.1.3 – Repository Selection
.
3. Use the mouse and highlight the desired document.
4. Click the button. The highlighted document will be placed on the Windows
clipboard.
Working with Repositories Chapter 5
5-11
Page 47

5.1 Working with Repositories
5.1.9 Delete a Folder or Document
PageScope Router gives you the ability to delete one or more folders or documents from an
accessible Repository Area. You may delete any item in a Repository Area to which you have
access, as long as the administrator has not marked the folder in which the document resides as
“read only.” The delete operation is not permitted on documents that are currently being
modified by other users of the PageScope Router system.
To Delete a folder or document
1. Open the Document Manager.
2. Select a Repository. Refer to section
3. Use the mouse and highlight the desired folders or documents. You may select multiple
items.
4. Click the button. The following dialog will be displayed.
5. Click
to proceed and delete the item or No to stop the operation.
Yes
5.1.3 – Repository Selection
.
5.1.10Saving Documents
Repository documents that have been selected in the Document Manager or opened for
viewing in the Document Viewer may be saved to another Repository location or saved to a
local PC hard drive or network location.
To Save a Repository document from the Document Manager
Working with Repositories Chapter 5
1. Open the Document Manager.
2. Refer to section
want to save in another location. You may select multiple documents.
5.1.2 – Repository Viewer
and select the Repository document(s) that you
3. Click the button on the left side of the Document Manager window.
4. Proceed to the
To Save a Repository document from the Document Viewer
1. Open the Document Manager.
2. Refer to section
click the selection or click the button on the left side of the Document Manager window.
Save As Dialog
5.1.2 – Repository Viewer
section below.
and select a Repository document. Double-
5-12
Page 48

5.1 Working with Repositories
3. The document will be displayed in the Document Viewer. Perform all desired Image Editing, Annotation, or Page operations. Click if the changes must be made to the
original image.
4. Click the button on the top of the Document Viewer window.
5. Proceed to the
Save As Dialog
Save As Dialog
section below.
1. When the button is clicked in the Document Manager or Viewer, the following dialog will be displayed.
2. The Save As dialog allows you to specify the name, target location, and file format of the
document to be saved. This dialog is similar to the Document List Viewer of the Document Manager window.
Note
To Save the document to a local PC hard drive, click the button and proceed to the
Saving Locally section.
3. To Save the document to a different Repository location, use the buttons on the dialog and
the following steps to specify the target Repository Folder.
• Select a Private, Group, or Public Repository
• Highlight a folder and click the button. You may also double-click the high-
lighted folder. Repeat until the desired target folder is located.
5-13
Working with Repositories Chapter 5
Page 49

5.1 Working with Repositories
4. Enter the following information about the file in the specified fields.
Name:
•
field The name of the document is automatically entered into
this field. Use the default name or enter a new name if
desired.
This field will not be enabled if multiple
Note:
documents are being saved from the Document Manager.
•
Description:
•
Save Options:
field Enter an optional description for the file in this field.
radio buttons If the document is a multi-page document, you may
save all of the pages or a range of pages from the document. Select one of the following:
•
All
Pages from...
•
Saves all pages in the document.
Saves a range of pages. You must enter the page numbers of the pages to be saved.
•
Selection
Saves only the document page currently selected in the
viewer.
This field will not be enabled if multiple
Note:
documents are being saved from the Document Manager.
5. File type Conversion - If the document will be converted and saved in another file format,
click the button. The following additional fields will be displayed on the dialog as shown.
Working with Repositories Chapter 5
5-14
Page 50

6. Enter the desired information.
5.1 Working with Repositories
File Type:
•
list This dropdown list contains the file types to which the
document may be converted. The available selections
are TIF, JPG, or PDF.
•
Format:
list This dropdown list contains additional format parame-
ters that change according to the selected file type. For
a TIF or PDF file type, a file compression may be specified.
•
Colors:
list This dropdown list contains the color resolution that is
available for the selected file type. For a TIF or PDF
file type, monochrome (1-bit) or color (8&24-bit) conversions are available. For a JPG file type, only the
color conversion is available.
•
Quality:
field This is only enabled when a JPG file type is selected.
This number specifies the quality of the image. A value
of 1 is the lowest compression (highest quality, large
file) and 255 is the highest compression (lowest quality,
small file). Type a value or use the arrow controls to
specify a number from 1 to 255.
7. When all of the document information has been entered, click the button. The
specified document will be saved in the target location, modified as directed. The Save As
dialog will be closed, and you will be returned to the Document Manager or Viewer window.
Saving Locally
1. When the button is clicked in the
be displayed.
Save As
dialog, the following dialog will
Working with Repositories Chapter 5
5-15
Page 51

5.1 Working with Repositories
2. Use the standard Windows controls on the dialog to select the target location for the document to be saved. This may be any network location to which you have access.
3.
File Name:
Note:
field - Use the original default file name or enter a new file name in this field.
This field will not be enabled if multiple documents are being saved from the Doc-
ument Manager.
4.
Save Range:
radio buttons - If the document is a multi-page document, you may save all
of the pages or a range of pages from the document. Select one of the following:
•
All
Pages
•
Saves all pages in the document.
Saves a range of pages. You must enter the page numbers of the pages to be saved.
This field will not
Note:
be enabled if multiple documents are being saved from
the Document Manager.
•
Selection
Saves only the document page currently selected in the
viewer.
This field will not be enabled if multiple
Note:
documents are being saved from the Document Manager.
5.
More >>
button (File type Conversion) - Click this button if the document will be converted and saved in another file format. The following additional fields will be displayed
on the dialog.
Enter the required information.
Save as Type:
•
Working with Repositories Chapter 5
•
Colors:
•
Subfile Type:
list This dropdown list contains the color resolution that is
5-16
list This dropdown list contains the file types to which the
document may be converted. The available selections
are TIF, JPG, or PDF.
available for the selected file type. For a TIF or PDF
file type, monochrome (1-bit) or color (8&24-bit) conversions are available. For a JPG file type, only the
color conversion is available.
list This dropdown list contains additional format parame-
ters that change according to the selected file type. For
a TIF or PDF file type, a file compression may be specified.
Page 52

5.1 Working with Repositories
•
Quality:
field This is only enabled when a JPG file type is selected.
This number specifies the quality of the image. A value
of 1 is the lowest compression (highest quality, large
file) and 255 is the highest compression (lowest quality,
small file). Type a value or use the arrow controls to
specify a number from 1 to 255.
6. When all of the document information has been entered, click the
button. The spec-
Save
ified document will be saved in the target location, modified as directed. The Save As dialog will be closed, and you will be returned to the Document Manager or Viewer window.
5-17
Working with Repositories Chapter 5
Page 53

5.1 Working with Repositories
5.1.11Sending Documents by E-mail
PageScope Router allows you to send documents via email. You may send the image that is
currently open in the Document Viewer, or you may send one or more documents directly
from the Document List in the Document Manager.
TIFF file annotations are included with the image.
Important!
You must insure that standard email client software, such as Microsoft Outlook, has been correctly
installed and configured on your PC. The PageScope Router Client will interface to the user’s email
client using the MAPI interface defined by Microsoft and the email system used shall suppor t POP3
and IMAP4.
To Send an Email from the Document Manager
1. Open the Document Manager.
2. Refer to section
5.1.2 – Repository Viewer
and select the Repository document(s) that you
want to send. You may select multiple documents.
3. Click the button on the left side of the Document Manager window.
4. The following sample Email dialog will be displayed.
Working with Repositories Chapter 5
5. All of the selected document(s) will be attached to the email to be generated. Refer to the
Email software documentation for complete information on addressing and sending the
Email.
6. When the Email has been sent, close the dialog.
5-18
Page 54

To Send an Email from the Document Viewer
1. Open the Document Manager.
5.1 Working with Repositories
2. Refer to section
you want to send.
3. Click the button on the top of the Document Viewer window.
4. The following sample Email dialog will be displayed.
5. The selected document will be attached to the email to be generated. Refer to the Email
software documentation for complete information on addressing and sending the Email.
5.1.2 – Repository Viewer
, select and open the Repository document that
6. When the Email has been sent, close the dialog.
Working with Repositories Chapter 5
5-19
Page 55

5.1 Working with Repositories
5.1.12Printing Documents
You can print documents directly from the PageScope Router client. You can print the
document that is currently in the viewer, or you can select and print multiple documents from
a document list.
To Print from the Document Manager
1. Open the Document Manager.
2. Refer to
5.1.2 – Repository Viewer
and select the Repository document(s) that you want
to print. You may select multiple documents.
3. Click the button on the left side of the Document Manager window.
4. The following Print dialog will be displayed.
5. This dialog uses standard Windows Print functionality, and may be different for each
printer type. Select the following items:
Working with Repositories Chapter 5
•
Printer list
Select the desired printer from the list. Use Properties
to configure as necessary.
•
Print Range section
•
Copies
•
PageScope Router Options section
5-20
This is used for MultiPage documents only. Select All
pages, the current page that is in the viewer (Selection),
or a range of pages (Pages).
Select the number of copies, and check Collate if
desired and enabled.
In this section, you may select Print annotations if
present to print any annotations that may be present on
the TIFF document.
Annotations that are burned
Note:
into the TIFF file cannot be omitted.
Page 56

6. Click OK to print and close the dialog.
To Print from the Document Viewer
1. Open the Document Manager.
5.1 Working with Repositories
2. Refer to section
5.1.2 – Repository Viewer
, select and open the Repository document that
you want to view and print.
3. Click the button on the top of the Document Viewer window.
4. The following Print dialog will be displayed.
5. This dialog uses standard Windows Print functionality, and may be different for each
printer type. Select the following items:
•
Printer list
•
Print Range section
•
Copies
•
PageScope Router Options section
6. Click
to print and close the dialog.
OK
Select the desired printer from the list. Use Properties
to configure as necessary.
This is used for MultiPage documents only. Select All
pages, the current page that is in the viewer (Selection),
or a range of pages (Pages).
Select the number of copies, and check Collate if
desired and enabled.
In this section, you may select Print annotations if
present to print any annotations that may be present on
the TIFF document.
Annotations that are burned
Note:
into the TIFF file cannot be omitted.
5-21
Working with Repositories Chapter 5
Page 57

5.1 Working with Repositories
5.1.13Document Properties
PageScope Router gives you the ability to view the Name and Description of each folder and
document. You may also rename a document in an accessible Repository Area as long as the
administrator has not marked the folder in which the document resides as “read only.” The
rename operation is not permitted on documents that are currently being modified by other
users of the PageScope Router system.
To display the Properties of a folder or document
1. Open the Document Manager.
2. Select a Repository. Refer to section
5.1.3 – Repository Selection
.
3. Use the mouse and highlight the desired folder or document.
4. Click the button. The following dialog will be displayed.
5. The title of the dialog will be Folder Properties or Document Properties depending on the
type of item that was selected.
6. The
7. The
To Rename the folder or document
Name:
Description:
field will contain the name of the item.
field will contain an optional description for the item.
1. You may also change the Name and Description of the selected item. If necessary, you
may enter the new Name and Descriptions in the displayed fields.
Working with Repositories Chapter 5
2. Click
to proceed and add the folder or
OK
Cancel
to stop the operation.
5-22
Page 58

6Working with
Documents
6
Working with Documents Chapter 6
Page 59

6.1 Working with Documents
6.1 Working with Documents
6.1.1 Document Overview
PageScope Router provides you with the ability to perform a number of operations on the
document files stored in the following Repository locations:
1. Your Private Repository Area
2. Group Repository Areas to which you have access
3. Public Repository Areas
These operations are grouped into several functional categories.
Repository Functions
•
Document Editing
•
Image Editing
•
6.1.2 – Viewing Documents
See
These include operations that affect the entire document, such as copying or moving the whole document
from one Repository location to another.
These include operations on the individual pages
within a multi-page document, such as adding, copying, deleting, or reordering the sequence of pages in a
document.
These include image editing operations on each page,
such as scaling, rotation, and annotations (TIF images
only).
.
6.1.2 Viewing Documents
The PageScope Router Client user interface provides a document viewer that is used to display
the pages and content of each document.
The selected documents are displayed in the following manners:
Page View
•
Working with Documents Chapter 6
Thumbnail View
•
Important!
Only the following file types are supported by PageScope Router.
The Document Viewer contains a Page Viewer area
which displays a single full-size page of a document at
a time.
The Document Viewer includes a Thumbnail Viewer
area that displays thumbnail images of the selected
document pages.
1. Tiff 6.0 (Raw, G3, G4, Pack bits, JPEG)
6-2
Page 60

6.1 Working with Documents
2. Tiff Single and Multi-page
3. JPEG
4. PDF (multi-page, Rasterized)
6.1.3 Image Editing Description
The PageScope Router Client gives you the ability to modify the image pages in each
document using the page viewer, and save these changes in the original document.
The modifications are performed using an image editor that provides the ability to change the
size, orientation, and brightness of the image, correct skewed images, and to “clean” images
by removing background noise.
The image color may also be modified to match the output from the MFP devices to the
system displays and printers. See
Important!
The following are important points when editing images.
• Image files that are located in folders that the administrator has marked as “read only” cannot be
edited.
• Only one user may edit a particular image file at any one time. If the document is already in use by
another user, a warning message will be displayed.
• Image editing may be performed on an image being viewed in the Document Viewer. It cannot be
performed in the thumbnail view.
• These operations will modify the original document.
6.1.4 – Color Management
.
6.1.3.1 Image Editing Functions
The PageScope Router Client includes an image editor that provides several functions. When
the button is clicked, the following group of editing buttons is displayed on the
user interface.
To use the image editor
1. Select the image that you want to modify.
2. Click the button to enable the image editor functions. The buttons will
become visible on the user interface.
3. Click the button corresponding to the desired editing function.
6-3
Working with Documents Chapter 6
Page 61

6.1 Working with Documents
4. Perform the operation.
5. Repeat for all necessary functions.
to save the changes to the document.
6. Click
Edit Functions
The following is a list of the available image editing functions.
Save
•
Crop
The crop operation allows you to select and save a region of the
image.
•
•
Despeckle
Deskew
The despeckle operation removes specks from scanned images.
The deskew operation corrects image skew introduced by
improper positioning of the original on the scan device at scan
time.
•
Resize
•
Brightness
Contrast
•
•
Rotate image
The resize operation adjusts the size of an image.
This operation adjusts the brightness of an image.
This operation adjusts the contrast of an image.
This operation enables you to rotate images in whole degree
increments.
•
Rotate in increments
This operation enables you to rotate images in 90-degree increments.
•
Color Management
This operation modifies the image color to match the output
from the MFP devices to the system displays and printers.
Notes
For each of the functions listed above.
• By default, the function is applied to the current page (page currently in the viewer) only. However,
the user may elect to perform the operation on all pages within the document.
• The changes are permanently applied to the document once the user has elected to Save the
document. They cannot be undone.
Working with Documents Chapter 6
6-4
Page 62

6.1 Working with Documents
6.1.3.2 Crop
The crop operation allows the user to select and retain a region of the image. The non-selected
portion of the image is discarded.
To Crop an image
1. Select the image that you want to modify.
2. Click the button to enable the image editor functions. The buttons will
become visible on the user interface.
3. Click the button.
4. While holding the left mouse button, drag the mouse to mark a section of the currently
viewed image. When the button is released, the following dialog is displayed.
5. Click
Crop Now
to proceed and crop the image or
Cancel
to stop the operation.
Note
If the image is a page from a multipage document, select the
checkbox to crop all pages.
Apply to all pages in the document
6.1.3.3 Despeckle
The despeckle operation removes specks from scanned images. The despeckle functionality is
limited to black-and-white images.
To Despeckle an image
1. Select the image that you want to modify.
2. Click the button to enable the image editor functions. The buttons will
become visible on the user interface.
3. Click the button. The following dialog is displayed.
Working with Documents Chapter 6
6-5
Page 63

6.1 Working with Documents
4. Select the correct radio button.
If the image is a page from a multipage document,
Note:
you may select Despeckle all pages to apply the operation to all pages.
5. Click
to proceed and Despeckle the image or
OK
Cancel
to stop the operation.
6.1.3.4 Deskew
The deskew operation corrects image skew that may be introduced by improper positioning of
the original on the scan device at scan time.
To Deskew an image
1. Select the image that you want to modify.
2. Click the button to enable the image editor functions. The buttons will
become visible on the user interface.
3. Click the button. The following dialog is displayed.
4. Select the correct radio buttons in the dialog.
•
Deskew Mode Options:
•
Page Options:
Working with Documents Chapter 6
5. Click
to proceed and Deskew the image or
OK
6-6
The operation can be configured to give the processing
priority to Speed or Quality. Choose Speed for large
documents or when processing time is critical, or
choose Quality for small documents or when processing accuracy is most important.
If the image is a page from a multipage document, you
may select Deskew all pages to apply the operation to
all pages. Otherwise select Deskew this page only.
Cancel
to stop the operation.
Page 64

6.1 Working with Documents
6.1.3.5 Resize
The resize operation adjusts the size of an image.
To Resize an image
1. Select the image that you want to modify.
2. Click the button to enable the image editor functions. The buttons will
become visible on the user interface.
3. Click the button. The following dialog is displayed.
4. Enter the new information in the dialog as described below.
Current Image:
•
section This section displays information about the image
being displayed. The information includes:
• Image Width and Height in pixels.
• Image Size in bytes
• Image Horizontal and Vertical Resolution in DPI
New Image:
•
Width
•
section This section provides fields for new size information.
fields Enter the new image width in the desired field. Values
may be entered directly as pixels or as a percent of the
original width. You may use the arrow controls to
change the values.
Height
•
fields Enter the new image height in the desired field. Values
may be entered directly as pixels or as a percent of the
original height. You may use the arrow controls to
change the values.
Working with Documents Chapter 6
6-7
Page 65

6.1 Working with Documents
•
Resolution
fields Enter the new image horizontal and vertical resolution.
You may use the arrow controls to change the values.
•
Identical Values
checkbox If the Maintain Aspect Ratio checkbox is not checked,
this checkbox is enabled. If it is checked, a value
entered in either the horizontal or vertical resolution
fields is automatically entered in the other field. If it is
NOT checked, different horizontal and vertical resolutions may be assigned in the image.
•
Method:
Maintain Aspect Ratio
•
list Use this dropdown list to select the resize method.
checkbox
Select this checkbox if the height to width size relationship must be maintained during the operation.
•
Document Options:
checkbox
If the image is a page from a multipage document, you
may select
the operation to all pages.
5. After the modifications have been made, click
Cancel
to stop the operation.
to all pages in the document to apply
Apply
to proceed and Resize the image or
OK
Working with Documents Chapter 6
6-8
Page 66

6.1 Working with Documents
6.1.3.6 Brightness and Contrast
These operations adjust the brightness and contrast of an image. The user indicates the desired
level of brightness/contrast, either by entering a number or making use of an on-screen slider
control. The image is adjusted on the screen.
To adjust the image brightness
1. Select the image that you want to modify.
2. Click the button to enable the image editor functions. The buttons will
become visible on the user interface.
3. Click the button. The following dialog is displayed.
4. The dialog contains several controls:
Thumbnails
•
section This section displays 2 thumbnail images showing the
Original (Before) and Modified (After) versions of the
image. These allow you to see the effect of the brightness change before it is accepted.
Percentage
•
section This section is used to specify the new brightness
value. You may enter the value in the field provided, or
use the slider control to specify the value. The acceptable range is -100 to +100 with 0 being the center value
of the image being displayed.
OK
5. Click
to proceed and change the image or
Cancel
Working with Documents Chapter 6
to stop the operation.
6-9
Page 67

6.1 Working with Documents
To adjust the image contrast
1. Select the image that you want to modify.
2. Click the button to enable the image editor functions. The buttons will
become visible on the user interface.
3. Click the button. The following dialog is displayed.
4. The dialog contains several controls:
Working with Documents Chapter 6
•
Thumbnails
•
Percentage
5. Click
OK
section This section displays 2 thumbnail images showing the
section This section is used to specify the new contrast value.
to proceed and modify the image or
Original (Before) and Modified (After) versions of the
image. These allow you to see the effect of the contrast
change before it is accepted.
You may enter the value in the field provided, or use
the slider control to specify the value. The acceptable
range is -100 to +100 with 0 being the center value of
the image being displayed.
Cancel
to stop the operation.
6-10
Page 68

6.1 Working with Documents
6.1.3.7 Rotation
You may rotate images either in 90-degree increments, or in other whole degree
increments.You may specify the direction of rotation (either clockwise or counter-clockwise)
and return the viewed image to its original, non-rotated state.
To Rotate an image in 90-degree increments
1. Select the image that you want to modify.
2. Click the button to enable the image editor functions. The buttons will
become visible on the user interface.
3. Click the button to rotate the image counterclockwise in 90 degree increments.
4. Click the button to rotate the image clockwise in 90 degree increments.
To Rotate an image by degree
1. Select the image that you want to modify.
2. Click the button to enable the image editor functions. The buttons will
become visible on the user interface.
3. Click the button. The following dialog is displayed.
4. The Rotate dialog contains several controls:
Thumbnails
•
section This section displays 2 thumbnail images showing the
Original (Before) and Modified (After) versions of the
image. These allow you to see the effect of the applied
rotation before it is accepted.
Working with Documents Chapter 6
6-11
Page 69

6.1 Working with Documents
•
Clockwise Angle (degrees)
•
Background Color
•
Select Background Color
•
Resize
•
Document Options
checkbox If this button is checked, rotated image will be adjusted
radio buttons
checkbox
section
This section is used to specify the angle of rotation.
You may enter the clockwise angle in the field provided, use the arrow controls to change the value in +/90 degree increments, or use the slider control to specify the value.
These buttons are used to set the background color of the
new image space that is created outside of the rotated
original image. The available colors are White or Black.
button
This button is used to set the background color of the
new image space that is created outside of the rotated
original image. This button opens Color Setting dialog
to select desired color.
to fit the size of original image.
If the image is a page from a multipage document, you
may select
to all pages in the document to apply
Apply
the operation to all pages.
5. Click
to proceed and Deskew the image or
OK
Cancel
to stop the operation.
6.1.4 Color Management
The PageScope Router Client software allows the user to perform Color Matching on images.
This process matches the color space of the MFP device to the output devices and displays
used by the PageScope Router system.
The following notes provide useful information about Color Matching.
The purpose of color matching
When an image is scanned, the brightness and tone (color saturation/hue) of the resulting
Working with Documents Chapter 6
scanned image may appear to be different from the original document. This may occur with
older MFP devices, for example CF2001/CF9001 “Scan to HDD”, in which color matching is
not performed. PageScope Router allows you to correct these images during Document Route
processing, or from a Repository folder location.
Color Space
The color space of the image can be changed according to your purpose.
The standard color space for the Windows PC or the internet
6-12
sRGB:
•
Page 70

6.1 Working with Documents
•
Apple RGB:
EFIRGB:
•
The standard color space for the Macintosh
The standard color space for the Fiery Controller used with
MFP devices
Printing the Scanned Image
When you print the scanned image, you must insure that the RGB source profile in the printer
driver is the same as the color space in PageScope Router. If your printer doesn’t have the
RGB profile setting or you don’t know which color space should be chosen, please choose
sRGB color space in PageScope Router.
Settings for color matching
When you perform color matching, please choose the proper ICC profile according to your
MFP model. ICC profile is the color characteristic data of the scanner of MFP.
If you use older models, you may need to choose the proper setting of “the background
remove” and/or “the acquisition course”.
6.1.4.1 Color Matching a Document
There are two ways to send documents to Color Management: from the Repository Document
List in the Document Manager, or from the Image Editing toolkit.
To Color Match a Document from the Document Manager
1. Open the Document Manager.
2. Refer to section
5.1.2 – Repository Viewer
and select the Repository document(s) that you
want to process. You may select multiple documents.
3. Click the button on the left side of the Document Manager window.
4. The Color Management dialog will be displayed.
5. Proceed to Color Management Dialog below.
To Color Match a Document from the Document Viewer
1. Open the Document Manager.
2. Refer to
5.1.2 – Repository Viewer
, select, and open the Repository document that you
want to process.
3. Click the button to enable the image editor functions. The buttons will
become visible on the user interface.
4. Click the button. The Color Management dialog will be displayed.
5. Proceed to Color Management Dialog below.
Working with Documents Chapter 6
6-13
Page 71

6.1 Working with Documents
Color Management Dialog
1. The Color
2.
section - This section contains a list of the Repository documents that were selected
Files
Management
dialog will be displayed.
in the Document List view, as well as any local documents that were added. The Repository Files are noted with (*) before the filename. The following controls are also included
in this section:
•
Import Local Files
Add Local...
•
checkbox Select this checkbox to import the selected files.
button Use this button to open a dialog and select a file(s)
from your local file system. The selected file(s) will be
added to the File list.
Working with Documents Chapter 6
•
Remove
3.
Color Profile
button Select a file in the list and click this button to remove
section - This section is used to specify an ICC Color Profile to be used for
the Color Matching process.
•
Explicit Profile
Managed Profile
•
•
Device:
•
Background Remove
field This dropdown list is used to select the MFP device
6-14
the file from the list.
radio button This selection allows you to specify and use a custom
color profile with the MFP.
radio button This selection allows you to use the default color pro-
file with the MFP.
that is used to obtain the document. (Available when
Managed Profile is selected)
checkbox
When checked, this indicates to the system the setting
that should be used when selecting the appropriate ICC
profile for color management. (Available when Managed Profile is selected)
Page 72

6.1 Working with Documents
•
Color Profile:
field This field contains the ICC Color Profile to be used
during the color matching process. You can use the
Browse button to search for a new ICC Profile to be
used. (Available when Explicit Profile is selected)
4. Options section - This section provides the ability to set the following options:
•
Color Space:
list Use this dropdown list to select the color space to be
used for the selected documents.
•
Save Original
checkbox Select this checkbox to save an unmodified copy of the
original document.
5. When all of the options have been selected, click
to proceed or
OK
Cancel
to stop the
operation.
6.1.4.2 ICC Color Profiles
The PageScope Router Client allows the user to upload custom ICC Color Profiles to the
PageScope Router Server. There are two ways to upload the files: automatic and manual.
Automatic Upload
A custom ICC Profile will be automatically uploaded to the PageScope Router server when
the user selects a custom “override” profile as part of a Document Route. An ICC Profile
uploaded in this manner is only accessible through the Document Route to which it has been
assigned. See
8.1.4 – Using Document Routes
.
Manual Upload
The user may select a custom ICC Color Profile from the local PC or network and upload it to
the PageScope Router server by selecting ICC Profile Upload from the user interface. An ICC
Profile uploaded in this manner is accessible only to the administrator, who may assign that
profile to a particular MFP and scanning condition. See
4.1.9 – Submit Color Profile
.
6-15
Working with Documents Chapter 6
Page 73

6.1 Working with Documents
6.1.5 Annotation Overview
Annotations are a way to attach additional information to a file.
Annotations, known collectively as “annotation marks”, may be text messages, graphical
symbols, or graphical markings. They are placed directly on the image using a special
annotation editor feature available on the PageScope Router user interface. This editor is used
to add, delete, or edit annotations.
Important!
The following are important points for using annotations.
• Annotation operations may only be performed on TIFF files. They are stored in the TIFF file itself
as annotation “tags”, but are not burned directly into the page image.
• Annotations cannot be added to files in folders the administrator has marked as “read only”.
• Only one user may perform an annotation operation on a particular document at any one time. If
the document is already in use by another user, a warning message will be displayed.
• Annotation may be performed on a document being viewed in the Document Viewer. It cannot be
performed in the thumbnail view.
• When a document is printed, the user can choose whether or not to print annotations.
When the button is clicked, the annotation editor will open and the editing
controls will be displayed on the Document Viewer as shown below.
6.1.5.1 Annotation Marks
The following Annotations are supported.
mark Add descriptive text to the image in various fonts, sizes, and
mark Highlights an important area of an image.
mark Creates a black-filled rectangle, useful for covering areas of an
mark Add notes to the image.
mark Adds a rectangle on a document.
Working with Documents Chapter 6
•
Typed Text
•
Highlight
•
Line
•
Redaction
•
Sticky Note
•
Rectangle
mark Adds a single line on a document.
6-16
colors.
image.
Page 74

6.1 Working with Documents
•
Ellipse
Image reference stamp
•
mark Adds an ellipse on a document.
mark
Adds a predefined stamp on the document.
6.1.5.2 Adding annotations
To add a new annotation:
1. Click the button to open the annotation editor.
2. Click the button corresponding to the desired annotation mark.
3. Place or draw the annotation.
4. Repeat for all annotations.
5. Click to add the annotations to the document.
Note
These annotations may be burned into the image using the “burn annotation” function.
6.1.5.3 Editing Annotations
There are several editing functions available.
To edit an annotation
1. Click the button to open the annotation editor.
2. Click the button and select the annotation mark to be edited.
3. Click the right mouse button on the selected annotation. The dialog below is displayed.
The following editing functions are available:
Undo
•
Cut
•
Undo the last edit action.
Remove the annotation from the image and place it on
the clipboard.
Copy
•
Place a copy of the annotation on the clipboard.
6-17
Working with Documents Chapter 6
Page 75

6.1 Working with Documents
•
Paste
Delete
•
•
Select All
Place the annotation from the clipboard to the image.
Delete the annotation.
Select all of the annotations. This can be used to
remove all of the annotations in one action.
•
Bring to Front
Annotations are placed in layers on the image. This
action places the annotation on the front visible layer.
•
Send to Back
Properties...
•
This action sends the annotation to the back layer.
This opens the annotation properties dialog.
4. Perform the desired edit operation.
5. Repeat for all annotations.
6. Click to save the document.
Note
Annotations that have been “burned into” the image file cannot be deleted.
6.1.5.4 Deleting Annotations
To delete an annotation
1. Click the button to open the annotation editor.
2. Click the button and select the annotation mark to be deleted.
3. Click the keyboard Delete key to remove the annotation.
4. Repeat for all annotations.
5. Click to save the document.
Note
Annotations that have been “burned into” the image file cannot be deleted.
6.1.5.5 Permanent Annotations
Standard annotations are stored in the TIFF file itself as information contained in annotation
Working with Documents Chapter 6
“tags” in the file. They can be added, deleted, or edited as needed and are not part of the file
image itself.
However, it is possible to “burn” annotations into the page image itself using a separate
operation. This operation modifies the underlying image data for the page and removes the
annotation tags from the page. These changes are applied to the underlying document once the
user has elected to “save” the document, and cannot be undone once saved. Note that once
annotations are “burned into” the TIFF file, they are considered to be part of the image, and
are not subject to the operations that can be performed on annotations.
6-18
Page 76

6.1 Working with Documents
This operation is performed when adding or editing annotations.
1. Click the button to open the annotation editor.
2. Click the button and select the annotation mark to be burned-in.
3. Click the Burn Annotation button.
4. Repeat for all desired annotations.
5. Click to save the document.
6.1.5.6 Annotation Properties
The default properties of the annotations may be changed.
To view or change annotation properties
1. Click the button to open the annotation editor.
2. Click the button. The Default Annotation Properties dialog is displayed.
3. There are 5 tab dialogs, all shown below, with configuration information for different
types of annotations. Select the desired tab and refer to the information below. Modify as
necessary.
4. When complete, click Close to accept the changes.
Line tab
Width (points):
•
field This is used to change the width of the lines used in
annotations.
Update
•
Style:
•
button This button is used to make the change.
list Use this dropdown list to select different line styles.
Working with Documents Chapter 6
6-19
Page 77

6.1 Working with Documents
Fill tab
•
•
•
list Use this dropdown list to select different fill opacities.
Mode:
Patterns:
Bitmap
list Use this dropdown list to select different fill patterns.
button Use this button to select bitmap iamge (for Stamp
annotation only)
Color tab
These buttons are used to set the color of several annotation types. Each button opens a color
dialog for selection.
Working with Documents Chapter 6
•
Foreground
button This is used to set the primary line color of the annota-
tion.
•
•
•
6-20
Background
button This is used to set the background color of the annota-
tion.
Redact
button This is used to set the color of the Redaction annota-
tion.
button This is used to set the color of the Hilite annotation.
Hilite
Page 78

6.1 Working with Documents
•
button This is used to set the background color of the Note
Note
Text and Font tab
•
Update Text
Select Font
•
•
Strike-through
annotation.
button This button is used to make the change.
button This is used to select the font to be used in Text and
Note annotations.
checkbox This is used to add a strike-through (slanted line) to the
displayed text
•
Underline
Advanced tab
•
Raster Operations:
checkbox This is used to add an underline to the displayed text.
Working with Documents Chapter 6
list Select a Boolean operator from the list. This controls
the way the annotations are displayed on the image.
6-21
Page 79

6.1 Working with Documents
6.1.6 Document Editing Overview
PageScope Router gives you the ability to edit and modify the page content of documents.
This type of editing allows the document pages to be added, deleted, or reordered.
Important!
The following are important points when editing documents.
• Documents that are located in folders that the administrator has marked as “read only” cannot be
edited.
• Only one user may edit a particular document at any one time. If the document is already in use
by another user, a warning message will be displayed.
• You will be able to edit documents that are in multi-page TIFF file format, and multi-page Raster
PDF format.
• These changes are applied to the underlying document once you have elected to “save” the
document. Deleted pages cannot be retrieved once you have saved the document.
See
6.1.6.1 – Document Editing Functions
6.1.6.1 Document Editing Functions
The following are the functions that are available to you. These functions are selected using
the buttons found on the Thumbnail Viewer as shown below.
.
Working with Documents Chapter 6
6-22
•
Add pages
•
Remove pages
•
Reorder pages
•
Clipboard support
This feature enables you to add pages to a document.
This operation removes the current page (page currently in the
viewer).
This feature enables you to change the order of pages within a
document.
The PageScope Router Client provides the ability to use the
Windows clipboard. You can copy a single page to the clipboard, and paste a page from the clipboard into a document.
Page 80

6.1.6.2 Add Page
6.1 Working with Documents
Add pages
- This feature enables you to add pages to a document by copying or moving
pages from one document into another document. Using the mouse and a drag and drop
interface, select the page(s) to be copied or moved from one document, and indicate where in
the other document to place those pages. The additional pages become part of the target
document once you have elected to “save” that document.
To Add a page
1. Select the document that you want to modify.
2. Enable the Thumbnail Viewer by clicking the button. The document page
thumbnail images will be displayed.
3. Click the button. The following
Add Pages From Another Document
dialog is dis-
played.
4. The
Add Pages From Another Document
dialog allows you to open a different document, display the document pages, and copy or move specific pages to your current document. There are 2 sections in the dialog, the
Source Document
Target Document
and
sections. Each section displays thumbnail images of the pages in each document.
Working with Documents Chapter 6
6-23
Page 81

6.1 Working with Documents
5. In the
Document
6. The
Select A Document
Source
Document section, click the button. The following
dialog is displayed.
dialog allows you to locate a document to add to the current
Select A
document. This dialog is similar to the Document List Viewer of the Document Manager
window. Use the buttons on the dialog and the following steps to obtain a document.
• Select a Private, Group, or Public Repository
• Highlight a folder and click the button. You may also double-click the high-
lighted folder. Repeat until the folder is located.
• Highlight the desired document(s) and click the button.
• The dialog will close and you will return to the Add Pages From Another Document
dialog. The new document pages will be displayed in the Source Document section.
7. In the Source Document section, use the left mouse button to select the specific pages that
will be copied or moved.
8. Click the button to insert a copy of the selected pages in the Target Document
window.
9. Click the button to insert a copy of the selected pages in the Target Document
Working with Documents Chapter 6
window, and remove them from the Source Document.
10. In the Target Document section, use the left mouse button to select the specific page
where the new pages will be inserted.
11. When you have completed the changes, click the button to accept the changes
and close the dialog, or click to cancel the operation and close the dialog.
12. You will return to the Document Viewer and the new pages will be displayed in the
thumbnail viewer.
6-24
Page 82

6.1 Working with Documents
13. When all document editing is completed, be sure to click the button to save
the changes to the document.
6.1.6.3 Remove Page
Remove pages
- This operation removes the current page (page currently in the viewer).
After removal, the viewer will display the next page without any gaps in the document. If the
page deleted was the final page in the document, the previous page is displayed. This change is
applied to the underlying document once you have elected to “save” the document, and the
page cannot be retrieved once the document has been saved.
To Remove a page
1. Select the document that you want to modify.
2. Enable the Thumbnail Viewer by clicking the button. The document page
thumbnail images will be displayed.
3. In the Thumbnail Viewer, use the left mouse button to select the specific page(s) that will
be removed. You may select multiple pages.
4. Click the button. The following dialog is displayed.
5. The selected pages will be highlighted. Change the selections if desired.
6. Click
OK
to proceed and remove the pages or
Cancel
to stop the operation.
7. When all document editing is completed, be sure to click the button to save
the changes to the document.
6-25
Working with Documents Chapter 6
Page 83

6.1 Working with Documents
To Remove a page (alternate method)
1. Select the document that you want to modify.
2. Enable the Thumbnail Viewer by clicking the button. The document page
thumbnail images will be displayed.
3. In the Thumbnail Viewer, use the left mouse button to select the specific page(s) that will
be removed. You may select multiple pages.
4. Press the Delete key on the keyboard.
5. A dialog will be displayed with the question “Are you sure you want to delete the selected
pages?”
6. Click
to proceed and remove the pages or No to stop the operation.
Yes
7. When all document editing is completed, be sure to click the button to save
the changes to the document.
6.1.6.4 Reorder Page
Reorder pages
The feature will be available on the thumbnail view, and uses a drag and drop interface to
move one or more pages from their current location within the file to another location. You
may also use this interface to delete a selected page or pages. The change is applied to the
underlying document once you have elected to “save” the document.
To Reorder pages
1. Select the document that you want to modify.
2. Enable the Thumbnail Viewer by clicking the button. The document page
thumbnail images will be displayed.
3. In the
Thumbnail Viewer
be moved. You may select multiple pages.
- This feature enables you to change the order of pages within a document.
, use the left mouse button to select the specific page(s) that will
Working with Documents Chapter 6
6-26
Page 84

6.1 Working with Documents
4. Click the button. The following dialog is displayed.
5. The selected pages to be moved will be highlighted. Change the selections if desired.
6. Enter the destination page position in the Move to before Page: field. This is the location
where the moved pages will be inserted.
7. Click
to proceed and move the pages or
OK
Cancel
to stop the operation.
8. When all document editing is completed, be sure to click the button to save
the changes to the document.
To Reorder pages (alternate method)
1. Select the document that you want to modify.
2. Enable the Thumbnail Viewer by clicking the button. The document page
thumbnail images will be displayed.
3. In the Thumbnail Viewer, use the left mouse button to select the specific page that will be
moved. You may only move single pages.
4. While holding the left mouse button, drag the pointer from the selected page to the
desired new target page position. Note: The selected page will be inserted BEFORE the
target page.
5. Release the left mouse button. The selected page will be inserted in the correct position.
6. When all document editing is completed, be sure to click the button to save
the changes to the document.
Working with Documents Chapter 6
6-27
Page 85

6.1 Working with Documents
6.1.6.5 Clipboard Support
Clipboard support
- The PageScope Router Client provides the ability to use the
Windows clipboard. You can copy a single page to the clipboard, and paste a page from the
clipboard into a document.
To Copy a page to the clipboard
1. Select the document that you want to modify.
2. Enable the Thumbnail Viewer by clicking the button. The document page
thumbnail images will be displayed.
3. In the Thumbnail Viewer, use the left mouse button to select the specific page that will be
copied. You may only select a single page.
4. Click the button. The page will be copied onto the Windows clipboard.
5. When all document editing is completed, be sure to click the button to save
the changes to the document.
To Paste a page from the clipboard
1. Select the document that you want to modify.
2. Enable the Thumbnail Viewer by clicking the button. The document page
thumbnail images will be displayed.
3. Click the button. The page will be pasted from the Windows clipboard into the thumb-
nail viewer.
4. When all document editing is completed, be sure to click the button to save
the changes to the document.
Working with Documents Chapter 6
6-28
Page 86

7Capturing
Documents
Capturing Documents Chapter 7
7
Page 87

7.1 Capturing Documents
7.1 Capturing Documents
7.1.1 Capturing Overview
There are several ways in which documents may enter Repository Areas in a PageScope
Router system. They include:
• FTP - (Document Route only)
• Email - (Document Route only)
• Twain scanner attached to the client PC
Capturing Documents Chapter 7
• Copy a file from the user’s PC directly into an existing Repository Area.
The system also tracks the following information about each file entered into a Repository
Area:
1. Color Management Completed (yes or no.)
2. Destination Color Space (sRGB, EFI RGB, or Apple RGB)
When the file first enters PageScope Router, Color Management Completed is always “no,”
and the Destination Color Space is always blank. The values are updated after Color
Management is performed. Color Management may only be performed on a file once.
7.1.2 Connecting a TWAIN Device
The PageScope Router system is capable of receiving images from a TWAIN device (scanner,
digital camera, etc.) directly connected to the PageScope Router Client PC.
To use this ability, you must connect your TWAIN device correctly, and an appropriate device
driver corresponding to the TWAIN device must be installed on your computer.
Refer to the instructions provided with your TWAIN device for information about device
drivers and installation.
Once the TWAIN is correctly connected and installed, you may Scan with the TWAIN Device.
7-2
Page 88

7.1 Capturing Documents
7.1.3 Scanning with a TWAIN Device
PageScope Router will use the software provided with your TWAIN scanner to perform the
scan operation. You must first select a Repository Folder in which to store the scanned image.
To Scan with a TWAIN Device
1. Insure that the scanner is connecting properly. See
7.1.2 – Connecting a TWAIN Device
2. Open the Document Manager.
3. Select a Repository. Refer to section
5.1.3 – Repository Selection
.
4. Use the mouse and select the destination folder where the image will be stored.
5. Click the button. The following dialog will be displayed.
6. You must assign a name and specify a file format for the image that will be scanned and
saved. Enter this information about the file in the specified fields.
•
field Enter the desired name of the new image file into this
Name:
field.
•
Description:
•
list This drop-down list contains the file formats in which
Type:
field Enter an optional description for the file in this field.
the image may be saved. Select the desired format.
.
Capturing Documents Chapter 7
•
More >>
button Click this button to display the following additional
format configuration fields on the dialog. The available
selections are TIF, JPG, or PDF.
7-3
Page 89

7.1 Capturing Documents
•
Colors:
list This drop-down list contains the color resolution that is
available for the selected file type. For a TIF or PDF
file type, monochrome (1-bit) or color (8&24-bit) conversions are available. For a JPG file type, only the
color conversion is available.
•
Subfile Type
: list This drop-down list contains additional format parame-
ters that change according to the selected file type. For
a TIF or PDF file type, a file compression may be specified.
Capturing Documents Chapter 7
•
Quality:
field This is only enabled when a JPG subfile type is
selected. This number specifies the quality of the
image. A value of 1 is the lowest compression (highest
quality, large file) and 255 is the highest compression
(lowest quality, small file). Type a value or use the
arrow controls to specify a number from 1 to 255.
7. When all of the image file information has been entered, click the Scan button. The following
Select Source
dialog will be displayed.
8. This dialog will list all of the TWAIN Devices that are currently recognized by the PC.
Select the TWAIN device you want to use in the
button. The User Interface for the selected TWAIN scanner will be dis-
9. Click the
Select
Sources:
list.
played. Refer to the manufacturer’s documentation for information on completing the
scan and performing any image editing. When scanning is complete and the image is
accepted, the TWAIN scanner User Interface will close and the image will be placed in
the selected Repository folder.
7-4
Page 90

7.1 Capturing Documents
7.1.4 Receiving Documents by E-Mail
Documents can be entered into the PageScope Router system as E-mail attachments.
The PageScope Router Server monitors a mail queue that is configured by the PageScope
Router Administrator. E-mails properly addressed can be sent to a user’s Inbox or sent to a
Private or Public Document Route to be processed according to the rules of the Route.
Below are the rules for addressing E-mails in a PageScope Router system for typical
destinations. You may send E-mails directly to a PageScope Router User’s Inbox, a User’s
Private Document Route, or a Public Document Route.
In each example, substitute the actual PageScope Router User Name, Server Name, and
Document Route Name for the names in
E-mail Addressing Rules
1. Route to a PageScope Router OS Users Inbox
UserName@PSRServerName
•“
2. Route to a PageScope Router Non-OS Users Inbox
shown in each example.
italics
”
Capturing Documents Chapter 7
•“PSR.
3. Route to a PageScope Router OS Users Private Document Route
•“
4. Route to a PageScope Router Non-OS Users Private Document Route
•“PSR.
5. Route to a Public Document Route
•“
See
8.1.6 – Document Route Routing
UserName@PSRServerName
UserName.DocumentRouteName@PSRServerName
UserName.DocumentRouteName@PSRServerName
DocumentRouteName@PSRServerName
.
”
”
”
”
7-5
Page 91

7.1 Capturing Documents
7.1.5 Receiving Documents by FTP
Documents can be entered into a PageScope Router Repository folder by sending them to an
FTP site.
The PageScope Router Server monitors one or more FTP directories that are configured by the
PageScope Router Administrator. Files arriving in these directories are then processed
according to the appropriate Document Route. After processing, the file is removed from the
FTP directory.
8.1.6 – Document Route Routing
See
7.1.6 Importing a File
Capturing Documents Chapter 7
PageScope Router allows you to Import or copy a file directly from your PC into a Repository
folder.
To Copy a file from a PC
1. Open the Document Manager.
2. Select a Repository. Refer to
3. Use the mouse and select the destination folder where the file will be saved.
4. Click the button.
5. The standard Windows File Open browse dialog will be displayed. Select the desired file.
Only supported file types (TIF, JPG, PDF) may be selected.
Note:
6. The following
Import a Document
.
5.1.3 – Repository Selection
dialog will be displayed.
.
7. Enter the following information about the file in the specified fields.
•
Name:
•
Description:
8. Click
field Enter the desired name of the new image file into this
field.
field Enter an optional description for the file in this field.
to finish the operation and copy the file into specified location.
OK
7-6
Page 92

8Document
Routes
Document Routes Chapter 8
8
Page 93

8.1 Document Routes
8.1 Document Routes
8.1.1 Creating a Document Route
A new Document Route is created using the following steps.
1. Start the PageScope Router client and Login.
2. Click the
3. The
Document Routes Chapter 8
4. The dialog contains various dialog “tabs” used to configure the processing and routing
functions of the Document Route, and the default tab is the Processing tab.
Configure
Document Route Configuration
button on the Document Manager window.
dialog will open.
5. Click the New button. The
6. Type a name for the new Document Route. Click
return to the previous dialog.
Apply
7. Click the
8. The new Document Route has been created, and will now appear on the drop-down list in
all of the Configuration dialog tabs. Before using it, you must first configure the Document Route. See
the Document Route.
button on the
8.1.7 – Configuring Document Route Settings
Name Document Route
Document Route Configuration
dialog is displayed.
OK
to accept the name or
window.
for information to setup
Cancel
to
8-2
Page 94

8.1.2 Remove a Document Route
To Remove a Document Route
1. Start the PageScope Router client and Login.
8.1 Document Routes
2. Click the
3. The
Document Route Configuration
Configure
button on the Document Manager window.
dialog will open.
4. Select a Document Route from the list. Click the Remove button at the bottom of the dialog.
5. The Document Route name status indicator will change to a .
Note
The Remove button will change to a Restore button. Click this Restore button to restore a Document
Route that was selected accidentally. The Document Route name status indicator will return to a .
6. Click
once you click
to remove the Document Route.
Apply
.
Apply
You cannot restore a Document Route
Note:
8.1.3 Rename a Document Route
To Rename a Document Route
1. Start the PageScope Router client and Login.
2. Click the
3. The
Configure
Document Route Configuration
4. Select a Document Route from the list. Click the
log.
button on the Document Manager window.
dialog will open.
Rename
button at the bottom of the dia-
Document Routes Chapter 8
5. The
Name Document Route
dialog will open.
6. Enter a new Document Route name, and click
to apply the change.
OK
8-3
Page 95

8.1 Document Routes
8.1.4 Using Document Routes
To Route a Document
1. Open the Document Manager.
2. Refer to
5.1.2 – Repository Viewer
and select the Repository document(s) that you want
to route. You may select multiple documents.
3. Click the button on the left side of the Document Manager window.
4. The following
Document Routes Chapter 8
Route Document(s)
dialog will be displayed.
This dialog will list all of the Document Routes that are available. This will include all of
the Public Document Routes, and any Private Document Routes that you have created.
Note
You cannot access Private Document Routes that belong to another user.
5.
Choose Document Route:
section - Select the desired Document Route from those
listed in the Private: or Public: lists.
6.
Configure
section - If necessary, the buttons in this section allow you to view Document
Route information, create a new route, or remove a route.
•
Show...
button This will display the current configuration of the
selected Document Route. It will open the Document
Route Configuration dialog. You may select all of the
tab dialogs to view the information, but you cannot
change any settings.
8-4
Page 96

8.1 Document Routes
•
•
7. Once the Document Route has been selected, click the
button This may be used to create a new Document Route. It
New...
will open the Confirmation dialog. See
Remove
ing a Document Route
button This may be used to remove a Document Route. It will
open the Confirmation dialog. See
Document Route
.
.
Route Now
8.1.2 – Remove a
button. An acknowl-
8.1.1 – Creat-
edgement message will be displayed stating that the document has been successfully submitted for processing. The selected document(s) will be processed and routed according
to the Document Route configuration.
Important!
Once the document has been submitted for processing, the specified action may not take place
immediately. The Routing action is placed in a queue on the PageScope Router Server, and the
delay will depend on the volume of Routing actions to accomplish, other server loading factors, and
whether the PageScope Router Routing Service is running. This method prevents the loss of important document routing.
8.1.5 Document Route Processing
PageScope Router allows you to automatically perform image processing on documents that
are routed by a Document Route. The processing functions are selected for each Document
Route using the Document Route Configuration dialog, and the functions are performed on the
selected documents, in the selected order, before the documents are routed.
Document Routes Chapter 8
The functions available are:
• Despeckle
• Deskew
• Color Management or Color Matching using ICC Color Profiles
Despeckle
Documents sometimes contain black specks due to faulty printing or copying. The Despeckle
function removes those specks from scanned black and white images.
Deskew
The deskew operation corrects image skew introduced by improper positioning of the original
on the scan device at scan time.
Color Management
The Color Matching process matches the color space of the MFP device used to obtain the
document to the output devices and displays used by the PageScope Router system. See
– Color Management
for more information.
6.1.4
8-5
Page 97

8.1 Document Routes
8.1.6 Document Route Routing
The PageScope Router system routes the modified documents after all image-processing
operations have been completed. You may specify a set of destinations to which the
documents should be distributed, and at least one destination must be specified.
order in which a document is distributed to these destinations cannot be specified.
The destinations are configured by using the appropriate “Tab Dialog” on the Document Route
Configuration dialog. The following is a list of destination types that can be specified.
Routing Destinations
•
PageScope Router Repository Folder Routing
The modified documents can be placed into a Repository Folder to which you have access. The user speci-
Document Routes Chapter 8
fies the PageScope Router folder into which a copy of
the modified document(s) shall be placed. If you are
using a Private Document Route, you may specify a
folder or subfolder within your own Private Repository
Area, a folder within the Public Repository Area, or a
folder within the Repository Area of any Group of
which you are a member.
Note:
The
•
Email Server Routing
The modified documents can be sent as an attachment
via the server’s SMTP Service. You only need to provide a valid list of email addresses.
•
Microsoft Exchange Server Routing
The modified documents can be placed in a Microsoft
Exchange folder. You must provide an authorized User
name and Password to access the Exchange folder.
•
Microsoft SharePoint Portal Server Routing
The modified documents can be placed in a Microsoft
SharePoint Portal Server folder. You must provide an
authorized User name and Password to access the
SharePoint Portal Server folder.
•
Lotus Notes Routing
The modified documents can be placed into a Lotus
Notes database folder. You must provide an authorized
User name and Password to access the Lotus Notes
database folder. Note that only Lotus Domino Version
5.0 will be supported.
8-6
Page 98

8.1 Document Routes
•
UNC Path Routing
The modified documents can be placed in a UNC Path
location. A UNC path location is the Universal Naming
Convention identifier for a folder residing at a network
location. To access this location you must have a Username and Password for an account with the correct
read and write security rights.
•
FTP Server Routing
The modified documents can be placed in an FTP
folder. You must provide an authorized User name and
Password to access the FTP folder.
8.1.7 Configuring Document Route Settings
The Document Routes used in PageScope Router are configured by modifying information
displayed on a Document Route Configuration dialog.
To access the configuration dialog
1. Start the PageScope Router client and Login.
2. Click the
3. The
Document Route Configuration
Configure
button on the Document Manager window.
dialog will open.
Document Routes Chapter 8
This dialog contains several “tab dialogs” used to configure the processing and routing
functions of the Document Route.
4. Select a Document Route from the list displayed on the left.
8-7
Page 99

8.1 Document Routes
5. Select the Tab Dialog for each required operation and enter the appropriate information
using the fields and controls provided on each Tab.
tus indicator will change to a , indicating that the selected Document Route is the route
being edited.
The Document Route name sta-
Note:
6. When the configuration has been completed, click the
information and close the dialog or the
Refer to the following sections for information to configure each function.
•
8.1.7.1 – Processing Tab
•
8.1.7.2 – Conversion Tab
•
8.1.7.3 – Repository Tab
•
8.1.7.4 – Email Tab
•
Document Routes Chapter 8
8.1.7.5 – Exchange Tab
•
8.1.7.6 – SharePoint Tab
•
8.1.7.7 – Notes Tab
•
8.1.7.8 – UNC Tab
•
8.1.7.9 – FTP Tab
Cancel
button to cancel the operation.
button to accept the entered
OK
8-8
Page 100

8.1 Document Routes
8.1.7.1 Processing Tab
The Processing tab dialog contains the following data fields and buttons to configure Color
Management and image processing during Document Routing.
Document Routes Chapter 8
Document Route Selection
Document Route
•
New
•
button This button is used to create a new Document Route.
Remove
•
Rename
•
Dialog Functions
Save Original
•
(Save Original) Repository Folder:
•
button This button is used to remove the selected Document
button This button is used to rename the selected Document
list box This is a list of available Document Routes, used to
checkbox When checked, an unmodified copy of the original doc-
select the Document Route that will be modified.
A next to a Document Route name indicates that the
selected Document Route is being edited.
Route.
Route.
ument will be saved in the Repository folder specified.
field
This field contains the name of the Repository location
where the original document will be saved. Enter the
location or use the Browse button to specify a location.
See the section
Folder Option
Save “Original” to PageScope Router
below for additional information.
8-9
 Loading...