

Konica Minolta 3240, 3340 User Manual

As an ENERGY STAR Partner, Konica Business Machines U.S.A., Inc. has determined
that this product meets the
E
NERGY STAR guidelines for energy efficiency.
Recycled paper is used for the inside pages of this book.
Konica 3240/3340
Copier
User’s Manual

1996 Konica Business Machines U.S.A., Inc.
MAINTENANCE AGREEMENT
The KONICA 3240/3340 copier will give you many years of trouble-free service. To ensure high
quality copying performance and to prevent premature wear and failure of precision parts and
components, periodic cleaning and routine adjustments should be scheduled.
We recommend that you contact your service center to discuss the benefits and advantages of
Konica’s Customer Service Maintenance Agreement and to be shown how a maintenance plan can
be tailored to your individual copying needs.
NOTICE:
Konica Business Machines U.S.A., Inc. has made every effort to ensure that the information in this
manual is complete and accurate. However, constant efforts are also being made to improve and
update the product. Therefore, Konica Business Machines U.S.A., Inc. shall not be liable for errors
in this manual or for any consequential damages resulting from the use of this manual. The
information contained herein is subject to change without notice.
FEDERAL OR STATE STATUTES MAY PROHIBIT THE COPYING OF CERTAIN
DOCUMENTS OR INFORMATION, RESULTING IN FINES OR IMPRISONMENT FOR
VIOLATORS.
MANUAL PART NUMBER:
OP-03-3240/3340
CORRESPONDENCE:
Correspondence regarding this manual may be mailed to the address shown below.
KONICA BUSINESS MACHINES U.S.A., INC.
Digital Systems Solutions Group
& New Product Development
500 DAY HILL ROAD
WINDSOR, CT 06095

i
Contents
Section 1: Introduction
To the User ................................................................................................................. 1-2
Overview of the User's Manual .............................................................................1-3
Copier Features .......................................................................................................... 1-4
Standard Equipment ..............................................................................................1-4
Optional Equipment............................................................................................... 1-4
Section 2: Safety Information
User Instructions ........................................................................................................2-2
Machine Safety Labels ............................................................................................... 2-3
Regulations.................................................................................................................2-4
FCC Regulations ...................................................................................................2-4
Canadian Department of Communications Regulations ......................................2-4
Machine Installation and Power Requirements..........................................................2-5
Machine Handling and Care.......................................................................................2-7
Routine Safety Check .................................................................................................2-9
Section 3: Machine Information
Machine Layout ......................................................................................................... 3-2
Site Requirements ......................................................................................................3-6
Control Panel Layout .................................................................................................3-7
LCD Screen ................................................................................................................ 3-8
Basic Screen .......................................................................................................... 3-8
Initial Settings ............................................................................................................ 3-9
Auto/Reset Mode ....................................................................................................... 3-9
Auto Shut-Off Mode ..................................................................................................3-9
Automatic Paper Selection (APS) .............................................................................. 3 -9
Automatic Magnification Selection (AMS) ............................................................... 3 -9
Automatic Exposure Selection (AES) ......................................................................3-10

ii
Contents
Automatic Tray Switching (ATS) ............................................................................3-10
Power Saver Mode ...................................................................................................3-10
Key Operator Settings .............................................................................................. 3-11
Auto Low Power Timer.......................................................................................3-11
Non-Image Area Erase ........................................................................................ 3-11
RADF Frame Erasure Selection ..........................................................................3-11
Odd-Even Original Counter ................................................................................3-11
Count of Sheet Insertion Originals......................................................................3-11
Weekly Timer Option..........................................................................................3-12
LCD Panel Contrast............................................................................................. 3-12
Service Settings ........................................................................................................3-13
Cascade Mode......................................................................................................3-13
OK Key ................................................................................................................3-13
AMS Display - –A–.............................................................................................3-13
Staple Sheet Limitation .......................................................................................3-13
Maximum Print Quantity Limitation ..................................................................3-13
Master Key Code Setting for ECM/Weekly Timer ............................................3-13
Auto Copy - Original Size and Off-Timer .......................................................... 3-13
Section 4: Paper Information
Positioning Originals on the Platen Glass .................................................................. 4 -2
Positioning an Original for Manual Copying .......................................................4-2
Using the Reversing Automatic Document Feeder (RADF) ..................................... 4-3
Positioning Originals .............................................................................................4-4
Positioning Mixed Originals .................................................................................4-5
Paper in Main Body/Drawer Base Unit...................................................................... 4-6
Paper in Multi-Sheet Bypass ...................................................................................... 4 -6
Paper in Automatic Duplex Tray ...............................................................................4-6
Paper in Sorter ............................................................................................................ 4-7
Paper Weight Compatibility Chart ............................................................................. 4-7

iii
Contents
Section 5: Basic Operations
Basic Screen ............................................................................................................... 5 -2
Copy Mode ............................................................................................................5-3
1-1, 1-2, 2-2, 2-1............................................................................................... 5-3
1s2 Mode Odd-Even Original Counter On ...................................................5-6
Copy Density ......................................................................................................... 5-7
Automatic Exposure Selection (AES) ............................................................. 5-7
Manual Mode (Lighter, Normal, Darker) ........................................................ 5-7
Lens Mode .............................................................................................................5-8
Automatic Magnification Selection (AMS) ....................................................5-8
Special Ratio Table ..........................................................................................5-9
Selecting a Special Ratio for Non-Standard Paper ........................................5-10
Preset and User Set Ratios .............................................................................5-11
Zoom Mode ....................................................................................................5-12
Copy Size.............................................................................................................5-13
Auto Copy ................................................................................................................ 5-14
Interrupt Mode ......................................................................................................... 5-15
Check Mode .............................................................................................................5-16
Entering a User Password ........................................................................................ 5-17
Section 6: Output Modes
Sorter Specifications .................................................................................................. 6-2
Non-Sort Mode...........................................................................................................6-4
Cascade Mode ............................................................................................................ 6 -5
Sort Mode...................................................................................................................6-6
Group Mode ............................................................................................................... 6-7
ST-217 In-Bin Stapler Sorter: Staple Sort Mode ....................................................... 6- 8
ST-217 In-Bin Stapler Sorter: Manual Staple Sort In-Bin ...................................... 6-10
ST-217 In-Bin Stapler Sorter: Manual Staple in the Top Bin ................................. 6-11
ST-216 Off-Line Stapler ..........................................................................................6-12

iv
Contents
Section 7: Job Memory
Job Store .....................................................................................................................7-2
Job Recall ................................................................................................................... 7 -4
Job Memory Form ......................................................................................................7-5
Section 8: Applications
Application Function Menu .......................................................................................8-2
Sheet/Cover Insertion .................................................................................................8-3
OHP Interleave ...........................................................................................................8-8
Book Copy ............................................................................................................... 8-10
Image Shift ............................................................................................................... 8-11
Simplex Mode (1-1, 2-1) ..................................................................................... 8-11
Duplex Mode (1-2, 2-2).......................................................................................8-13
Reduce & Shift ......................................................................................................... 8-15
Frame/Fold Erasure .................................................................................................. 8-17
Thin/Thick Paper...................................................................................................... 8-19
Mixed Original Mode ...............................................................................................8-20
2 in 1 Format ............................................................................................................ 8-21
Photo Mode ..............................................................................................................8-22
Photo Mode.......................................................................................................... 8-22
Photo-Text Mode .................................................................................................8-22
Moisture Paper ......................................................................................................... 8-23
Section 9: Key Operator Mode
To the Key Operator...................................................................................................9-2
How to Access the Key Operator Mode ...............................................................9-2
Function Menu Map ................................................................................................... 9-3
Initial Setting Mode [1] .............................................................................................. 9-5

v
Contents
How to Access the Initial Setting Mode ............................................................... 9-6
Copy Mode [1]....................................................................................................... 9-7
Copy Density [2] ...................................................................................................9-8
Lens Mode [3] ....................................................................................................... 9-9
APS/Paper Tray [4] ............................................................................................. 9-10
Output Mode [5] .................................................................................................. 9-11
Preset/User Set Ratio(s) [2]......................................................................................9-12
ECM (Electronic Copy Monitor) Setting [3] ...........................................................9-13
ECM Setting Menu..............................................................................................9-14
Password Setting [1]............................................................................................9-15
Count/Limit Setting [2] .......................................................................................9-17
Reset E.C.M. [3] .................................................................................................. 9-18
ECM ON/OFF Setting [4] ................................................................................... 9-20
Set Copy Limit-Machine Disable [5]..................................................................9-21
Job Memory Setting [4] ........................................................................................... 9-22
Screen Contrast Adjustment [5] ............................................................................... 9-24
OK Key Timer Setting [6]........................................................................................ 9-25
Weekly Timer Functions [7] .................................................................................... 9-27
Weekly Timer Setting Menu ............................................................................... 9-28
Weekly Timer ON/OFF Setting [1] .................................................................... 9-29
Summertime Setting [2] ...................................................................................... 9-30
Date, Time Setting [3] ......................................................................................... 9-31
Set Weekly ON/OFF Timer [4]...........................................................................9-32
Specify Copier Working Days [5]....................................................................... 9-34
Machine Working Day Setting [6] ......................................................................9-35
Lunch Hour ON/OFF Setting [7] ........................................................................ 9-36
Time Off Password [8] ........................................................................................ 9-38
Memory Switch Setting [8] ...................................................................................... 9-39
Section 10: Maintenance
Loading Paper .......................................................................................................... 10-2
Adding Toner ...........................................................................................................10-6
Inserting a New Staple Cartridge .............................................................................10-8
ST-217 In-Bin Stapler .........................................................................................10-8
Off-Line Stapler.................................................................................................10-10

vi
Contents
Preventive Maintenance ......................................................................................... 10-11
Reading PM Count ............................................................................................10-11
Reading the Total Count ...................................................................................10-11
Cleaning the Document Glass and Cover ..............................................................10-12
Cleaning the Platen Glass..................................................................................10-12
Cleaning the Inner Surface of the Document Cover.........................................10-12
Cleaning with the Wire Cleaning Knob ............................................................10-12
Section 11: Troubleshooting
Call for Service ........................................................................................................11-2
Clearing Mishandled Paper ...................................................................................... 11-3
Clearing a Wedged Staple from the Off-Line Stapler Unit.................................... 11-13
Copying Tips .......................................................................................................... 11-14
Section 12: Machine Specifications
Specifications ...........................................................................................................12-2

Section 1: Introduction
To the User
Overview of the User's Manual
Copier Features
Standard Equipment
Optional Equipment

1-2 Introduction
Introduction
To the User
Welcome to the Konica 3240/3340 copier product, which provides a high technology LCD screen
for performing a full range of features in your working environment. General product information
is given below.
Key Operator Functions
Custom settings can be made by the key operator (or anyone who is responsible for the machine).
Access to the Key Operator mode may require a master password, if previously set by service. Use
the password system to limit use of key operator functions to a person who is authorized to handle
the responsibility.
Copier Service, Repairs & Supplies
Copier service and repairs should be performed only by an authorized Konica service
representative. To maintain personal safety, and to avoid machine damage, never disassemble the
machine for any reason. To ensure optimal copy quality, use only supplies that are recommended
by Konica Business Machines, U.S.A., Inc. For convenience, use the form located at the end of
Section 10: Maintenance to record all service, repair, and supply orders.
Machine Labels
Information labels are affixed to the copier to provide quick and easy instructions on basic
copying, loading paper, adding toner, and clearing mishandled paper. In addition, safety labels are
attached to various internal areas of the copier and top bin of the ST-217 In-Bin Stapler Sorter,
providing cautionary information to prevent personal injury or damage to the copier. Sample
machine safety labels are shown in Section 2: Safety Information.
Control Panel
The 3240/3340 control panel is designed for user friendliness and ease of operation. The basic
section on the right consists of a keypad as well as the keys for selecting Print Quantity, Power
Saver, Interrupt and Start Print; the mid section includes special mode keys for selecting Auto
Copy, Check, Application, Job Memory and Auto Reset; adjacent to these keys, on the left, is the
LCD screen with an array of four interactive function keys and an OK key below; the far left
portion of the control panel includes Output mode keys for Group, Staple and Sort functions.
Copying modes, selections, and setting changes can be made from the LCD screen and the
Function keys. The upper portion of the LCD screen automatically displays machine status
information, as required.

Introduction 1-3
Introduction
To the User (continued)
Overview of the User’s Manual
To enjoy optimal performance, read this manual before using the copier. Be sure to handle the
machine and perform all copying operations only as recommended in the manual. Keep the manual
located with the machine so that all users may refer to it, as needed.
Manual Organization:
The User’s Manual is made up of twelve main copier sections, plus a glossary of copier terms.
Section pages list topics covered in each section. Highlights are as follows:
Machine Information in Section 3 can be used as a reference for all copying operations. This
section contain specifications that are useful for many copying jobs, especially when capacities,
sizes and weights are factors.
Paper Information in Section 4 contains specifications on paper capacity, paper size, paper weight,
compatibility, etc.
Basic Operations in Section 5 provides information on using the LCD screen and making all
copying selections, such as Copy Mode, Copy Density, Lens Mode, and Copy Size.
Applications in Section 8 is devoted to special copying functions, which are easy to use.
Key Operator Mode in Section 9 describes key operator functions, and shows you how to make
machine setting changes to customize the machine for your working environment. The key
operator mode should be used only by an authorized person.
Troubleshooting in Section 11 provides instructions on clearing mishandled paper, and offers
troubleshooting hints to help prevent and solve problems.
Page Design:
The page layout of this manual is designed to help you perform each operation quickly and easily.
The basic format includes an introductory explanation of each function; step-by-step procedures;
and illustrations to enhance many of the procedures. Caution statements specific to the topic are
included on the page, so that they will catch your eye before procedures are started. Special notes
are located on the page, as required.

1-4 Introduction
Introduction
Copier Features
40 CPM
2 IN 1 FORMAT
AUTO COPY
AUTOMATIC DUPLEX
AUTOMATIC EXPOSURE SELECTION (AES)
AUTOMATIC MAGNIFICATION SELECTION (AMS)
AUTOMATIC PAPER SELECTION (APS)
AUTOMATIC TRAY SWITCHING (ATS)
AUTO RESET
BOOK COPY
CHECK SCREEN
ELECTRONIC COPY MONITOR (ECM)
FRAME/FOLD ERASURE
IMAGE SHIFT
Standard Equipment
3240 Main Body with 2 Paper Trays (500/500)
3340 Main Body with Automatic Duplex Unit (ADU) and 1 Paper Tray (500)
Reversing Automatic Document Feeder (RADF)
Configuration Options:
with Multi-Sheet Bypass (100 sheets)
with Plain Stand
with 1 Paper Tray (500) and Storage (DB-206A)
with 3 Paper Trays (500) (DB-206B)
with 1 Paper Tray (500) and Large Capacity Tray (1,500) (DB-606)
Optional Equipment
ST-217, a 20-Bin Stapler Sorter with in-bin stapling
ST-216, a 20-Bin Sorter with off-line stapling option
Weekly Timer
Key Counter
JOB MEMORY
KEY OPERATOR MODE
LCD SCREEN WITH INTERACTIVE FUNCTION KEYS
MIXED ORIGINAL
MOISTURE PAPER
OHP INTERLEAVE
BLANK SHEET INTERLEAVING
COPY SHEET INTERLEAVING
PHOTO MODE
PHOTO-TEXT MODE
POWER SAVER MODE
REDUCE & SHIFT
SHEET/COVER INSERTION
THIN/THICK PAPER

Section 2: Safety Information
User Instructions
Machine Safety Labels
Regulations
FCC Regulations
Canadian Department of Communications Regulations
Machine Installation and Power Requirements
Machine Handling and Care
Routine Safety Check

2-2 Safety Information
Safety Information
User Instructions
The following pages include important safety information, which should be read and understood
before you attempt to operate the machine. If you have any concerns about safety matters, please
contact your service representative.
Keep this manual permanently located with the machine, and in good, legible condition. The
manual should be readily available to all users.
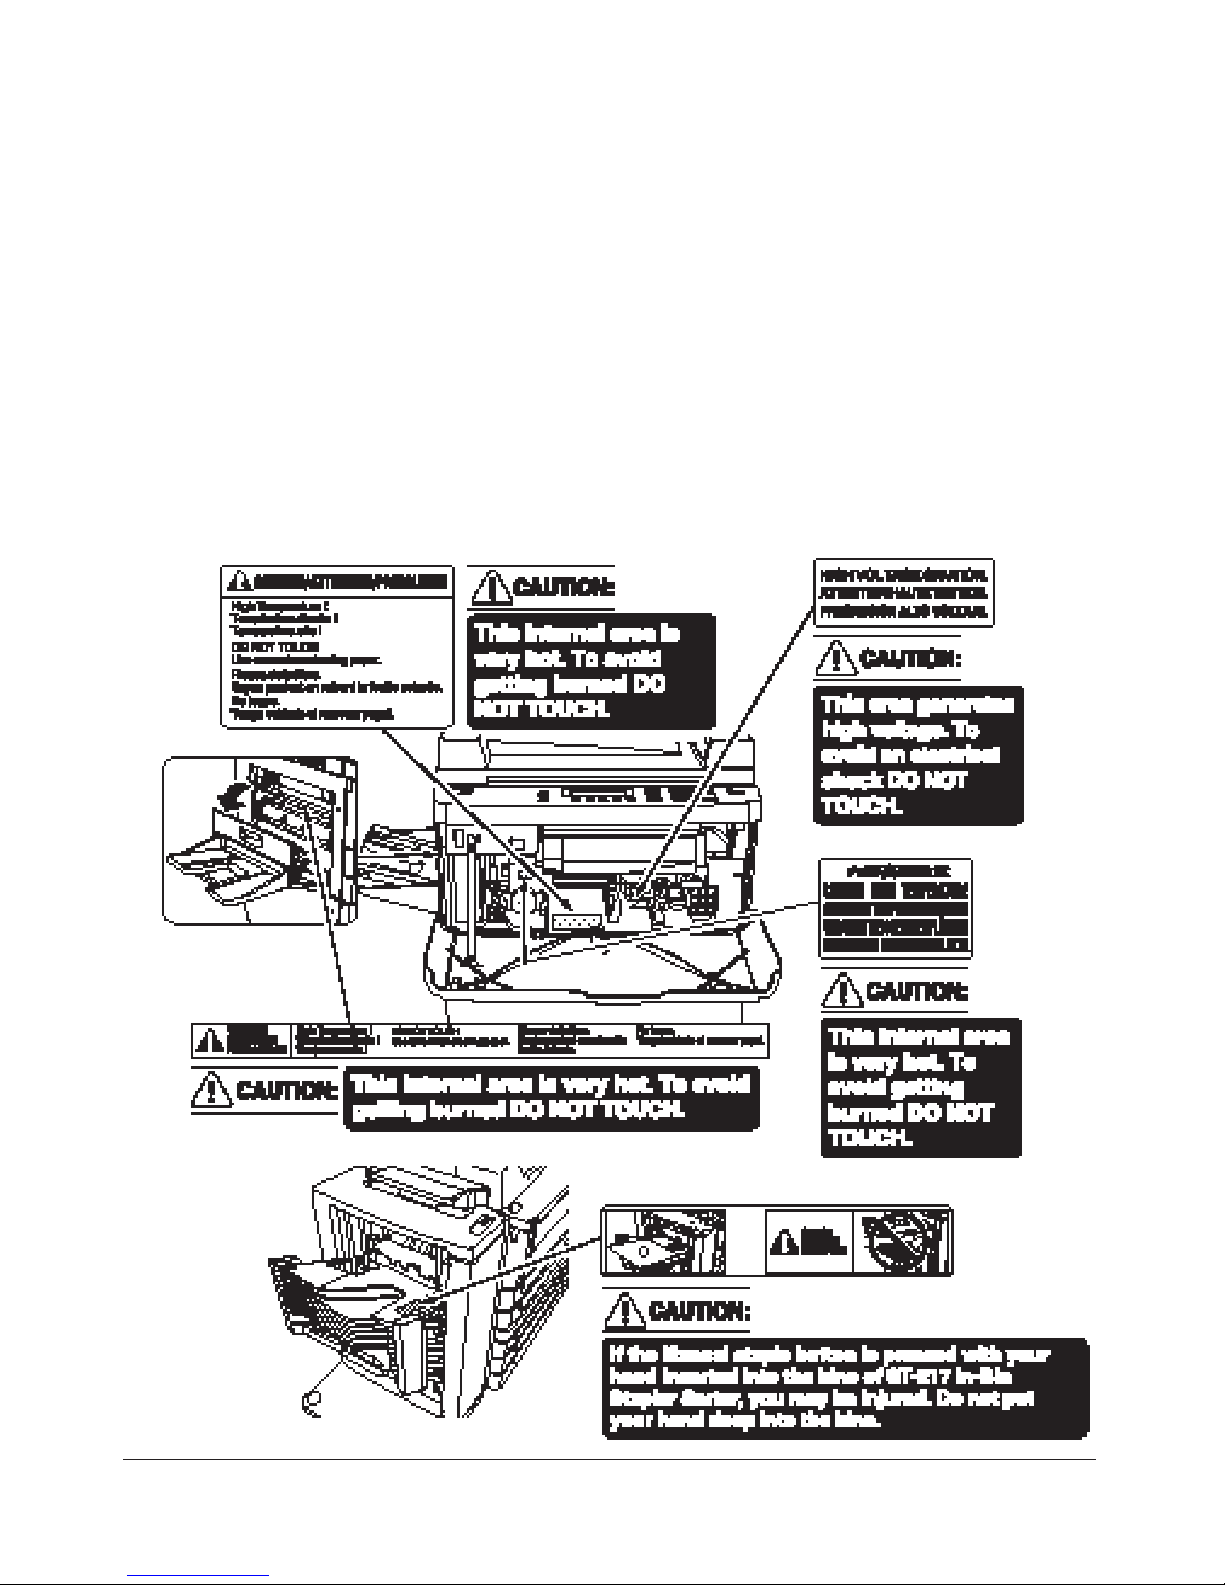
Machine safety labels are attached to some inside areas of the machine. The purpose of the safety
labels is to alert you of imminent or potentially hazardous situations or conditions. Examples of
machine safety labels are shown on the following page.
The following standard safety categories are commonly used on product labelling.
DANGER:
Danger indicates an imminent hazardous situation, which, if not avoided, will result in
death or serious injury.
WARNING:
Warning indicates a potentially hazardous situation, which if not avoided, could result in
death or serious injury.
CAUTION:
Caution indicates a potentially hazardous situation, which, if not avoided, may result in
minor or moderate bodily injury.
Note: The DANGER category is not required for this product, and is included here for general user information.
Safety Information 2-3
Safety Information
Machine Safety Labels
If you touch any machine area that you are advised by any caution label to avoid, you may be
burned or injured.
Do not remove caution labels. If any caution label is illegible due to soilage, clean the label. If
cleaning does not render the label legible, please contact your Konica service representative.
Sample Machine Safety Labels

2-4 Safety Information
Safety Information
Regulations
FCC Regulations
Warning: The Konica 3240/3340 copier generates, uses, and can radiate radio frequency energy. If
it is not installed and used in accordance with the instruction manual, interference with radio
communications may result. This equipment has been tested and found to comply with the limits
for a Class A computing device, pursuant to Subpart B, Part 15, of FCC rules, which are designed
to provide reasonable protection against interference from such equipment when it is operating in a
commercial environment.
Users operating this equipment in a residential area are likely to cause interference, in which case
they may be required to correct the interference at their own expense.
Canadian Department of Communications Regulations
Le présent appareil n’émet pas de bruits radioélectriques dépassant les limites applicables aux de
Classe A prescrites dans le règlement sur la brouillage radioélectrique édicté par Le Ministère des
Communications du Canada.
This equipment does not exceed the Class A limits for radio noise emissions as set out in the radio
interference regulations of the Canadian Department of Communications.

Safety Information 2-5
Safety Information
Machine Installation and Power Requirements
CAUTION:
FAILURE TO HEED THE FOLLOWING CAUTIONS MAY RESULT IN BODILY INJURY
AND/OR COPIER DAMAGE
❒ FIRE PREVENTION
Install copier away from materials that can catch fire, such as curtains; flammable or volatile
materials; and dampness.
❒ WATER DAMAGE
Do not install or operate the copier outdoors near a lake, pond, or river, etc.; and do not allow the
machine to come in contact with splashes of rain, water, or any liquid.
❒ TEMPERATURE AND HUMIDITY
Install copier away from direct sunlight, heat sources (stoves, heaters) and cold temperatures (air
conditioners). Avoid any environment that is outside 50°~91.4°F (10°~33°C), with 10~80%
humidity.
❒ VENTILATION
Do not allow the machine to come in contact with dust or ammonia gas, or fumes from printing or
cleaning solutions, etc.; otherwise, image quality will be poor. Install the machine in a wellventilated area, for comfort; otherwise, an ozone odor will be detected during large copy runs.
When in use, the copier generates ozone in amounts too small to be hazardous to the human body.
❒ VIBRATIONS
If the machine is constantly vibrated or jolted, trouble may occur. Install the machine on a level
and horizontal floor, free from vibrations.
❒ SPACE ALLOTMENT
Install copier in an area with adequate space for performing copier operations; replacing supply
items; and for conducting preventive maintenance. (See p. 3-6 to p. 3-7.)
❒ MACHINE RELOCATION
Before moving the copier to another location, contact your Konica service representative.

2-6 Safety Information
Safety Information
Machine Installation and Power Requirements (continued)
CAUTION:
FAILURE TO HEED THE FOLLOWING CAUTIONS MAY RESULT IN COPIER DAMAGE,
OVERHEATING, RISK OF ELECTRICAL SHOCK, AND/OR PERSONAL INJURY
❒ PLUG SOCKET
A plug socket is limited in capacity. Use an exclusive power source for the copier; otherwise, an
accident from overheating and/or smoking may occur. The total power consumption of the copier,
including all possible options, must not exceed the capacity of the main power supply.
❒ PLUG AND CORD (LEAD)
Unless the power plug is firmly inserted into the socket, an accident from overheating and/or
smoking may occur. Firmly insert the power cord plug into the electrical outlet before turning the
copier power switch On. If the inserted plug is loose in the socket, disconnect it, and consult an
electrician for repair; but, do not attempt to operate the copier.
A damaged power cord may result in overheating, short circuit or fire. Do not bend, crush, wind, or
kick the cord; or impact it with a desk or any item; or roll up the power cord. If the copier power
cord is bent or damaged, immediately contact your Konica service representative; and do not
attempt to repair it yourself, or continue to operate the copier.
The electrical-outlet shall be installed near the equipment and shall be easily accessible.
❒ ADAPTERS AND PLURAL LOADS
Never use adapters; and never connect plural loads or a branched socket to one socket outlet;
otherwise an accident may occur from overheating or fire.
❒ EXTENSION CORDS (LEADS)
An extension cord or lead is limited in capacity, and unless the cord or lead has adequate capacity,
smoking may occur, and an accident may be caused from overheating. Should smoking and/or
overheating occur, contact an electrician immediately. If you require further information about
power requirements, power consumption, extension cords, adapters and connectors, please contact
your Konica service representative, and also consult your electrician.

Safety Information 2-7
Safety Information
Machine Handling and Care
CAUTION:
FAILURE TO HEED THE FOLLOWING CAUTIONS MAY RESULT IN COPIER DAMAGE,
OVERHEATING, AND/OR PERSONAL INJURY
❒ MACHINE CONTACT
Never touch internal high voltage, high temperature or magnetism areas indicated with a
CAUTION HIGH TEMPERATURE label. Never touch the drum surface.
Never touch the inside of the copier for any purpose other than for removing mishandled paper or
adding toner.
❒ MACHINE CARE
Do not drop paper clips, staples and other small metallic objects into the copier; or spill water or
any other liquid into the copier.
Do not use the copier surface to support vases, books, etc. These items will interfere with the work
space and may cause damage to the copier or to originals.
❒ ABNORMAL CONDITIONS
If any abnormal sound, odor, or smoke generates from the copier, immediately stop using the
machine, turn off the main power switch, disconnect the plug and contact your Konica service
representative.
If a circuit breaker is tripped or if a fuse blows, stop using the copier and contact an electrician. If
information is needed regarding the power source or power consumption of the copier, contact
your Konica service representative.
❒ MACHINE MODIFICATION
Do not modify the machine in any way or remove any part or screw; and never attempt to perform
any maintenance function that is not specifically described in this manual. Do not connect the
machine with any options other than those specified.
❒ EXCEEDING TOP BIN CAPACITY
The top bin capacity of each sorter is 100 sheets.
If print quantity exceeds the 100-sheet top bin capacity, remove copies before the limit is reached;
otherwise mishandled paper may occur.

2-8 Safety Information
Safety Information
Machine Handling and Care (continued)
CAUTION:
FAILURE TO HEED THE FOLLOWING CAUTIONS MAY RESULT IN COPIER DAMAGE,
OVERHEATING, AND/OR PERSONAL INJURY
❒ TOTAL BIN CAPACITY IN CASCADE MODE
ST-217 In-Bin Stapler Sorter and ST-216 Off-Line Stapler Sorter feature the Cascade mode which
can be activated by Service.
Using the ST-217 In-Bin Stapler Sorter
Do not set the copy count above 700; otherwise, paper misfeed may occur. If you should set the
print quantity above 700, be sure to remove the copies delivered to the 20th bin before the
maximum capacity is reached.
Using the ST-216 Off-Line Stapler Sorter
Do not set the copy count above 670; otherwise, paper misfeed may occur. If you should set the
print quantity above 670, be sure to remove the copies delivered to the 20th bin before the
maximum capacity is reached.
❒ MANUAL STAPLE BUTTON
If the Manual staple button is pressed while your hand is inserted in any the bins of the ST-217 InBin Stapler Sorter, you may be injured. Do not insert your hand deeply into any bin.

Safety Information 2-9
Safety Information
Routine Safety Check
CAUTION:
❒ FIRE PREVENTION
Check for abnormal heat from power cord and/or plug. Do not use flammable liquids, thinners or
alcohol near the machine; these materials may cause a fire.
❒ PERIODICAL CHECK
Check for loose connection on power plug, damage to power cord and/or plug (creasing, fraying,
etc.) Be sure the plug is inserted fully, and is not scratched or cut. If any abnormality occurs, do not
continue to operate the machine.
❒ SERVICE MESSAGES
If a service message displays, turn the machine off, disconnect the power cord from the outlet, and
report the condition to your service representative.
❒ TONER
Check to be sure toner in storage is out of the reach of children, or anyone incapable of using
supplies safely. Although toner is non-toxic, do not inhale toner or allow it to come in contact with
eyes. If inhalation or eye contact occurs, immediately consult a physician. Please refer to the
appropriate material safety data sheet for additional toner safety information.
❒ PAPER
Check paper to be sure it is according to specifications outlined in Section 4.
❒ CLEANING MATERIALS
Check the type of cleaning material used on your machine to be sure it is recommended by Konica.
If necessary, check with your Konica representative. Never use cleaning materials for purposes
other than cleaning, and be sure to keep all cleaning materials out of the reach of children or
anyone who is incapable of using them safely.
❒ POWER SAVER
Use Power Saver mode for short periods of machine inactivity. When not using the machine for
long periods of time, turn power off, except when the weekly timer function is operating.
❒ DISPOSAL OF THE COPIER
Dispose of this copier according to your local regulations.

Section 3: Machine Information
Machine Layout
Site Requirements
Control Panel Layout
LCD Screen
Basic Screen
Initial Settings
Auto Reset Mode
Auto Shut-Off Mode
Automatic Paper Selection (APS)
Automatic Magnification Selection (AMS)
Automatic Exposure Selection (AES)
Automatic Tray Switching (ATS)
Power Saver Mode
Key Operator Settings
Auto Lower Power Timer
Non-Image Area Erase
RADF Frame Erasure Selection
Odd-Even Original Counter
Count of Sheet Insertion Originals
Weekly Timer Option
LCD Panel Contrast
Service Settings
Cascade Mode
OK Key
AMS Display - –A–
Staple Sheet Limitation
Maximum Print Quantity Limitation
Master Key Code Setting for ECM/Weekly Timer
Auto Copy - Original Size and Off-Timer
3-2 Machine Information
Machine Information
Machine Layout

Machine Information 3-3
Machine Information
Machine Layout
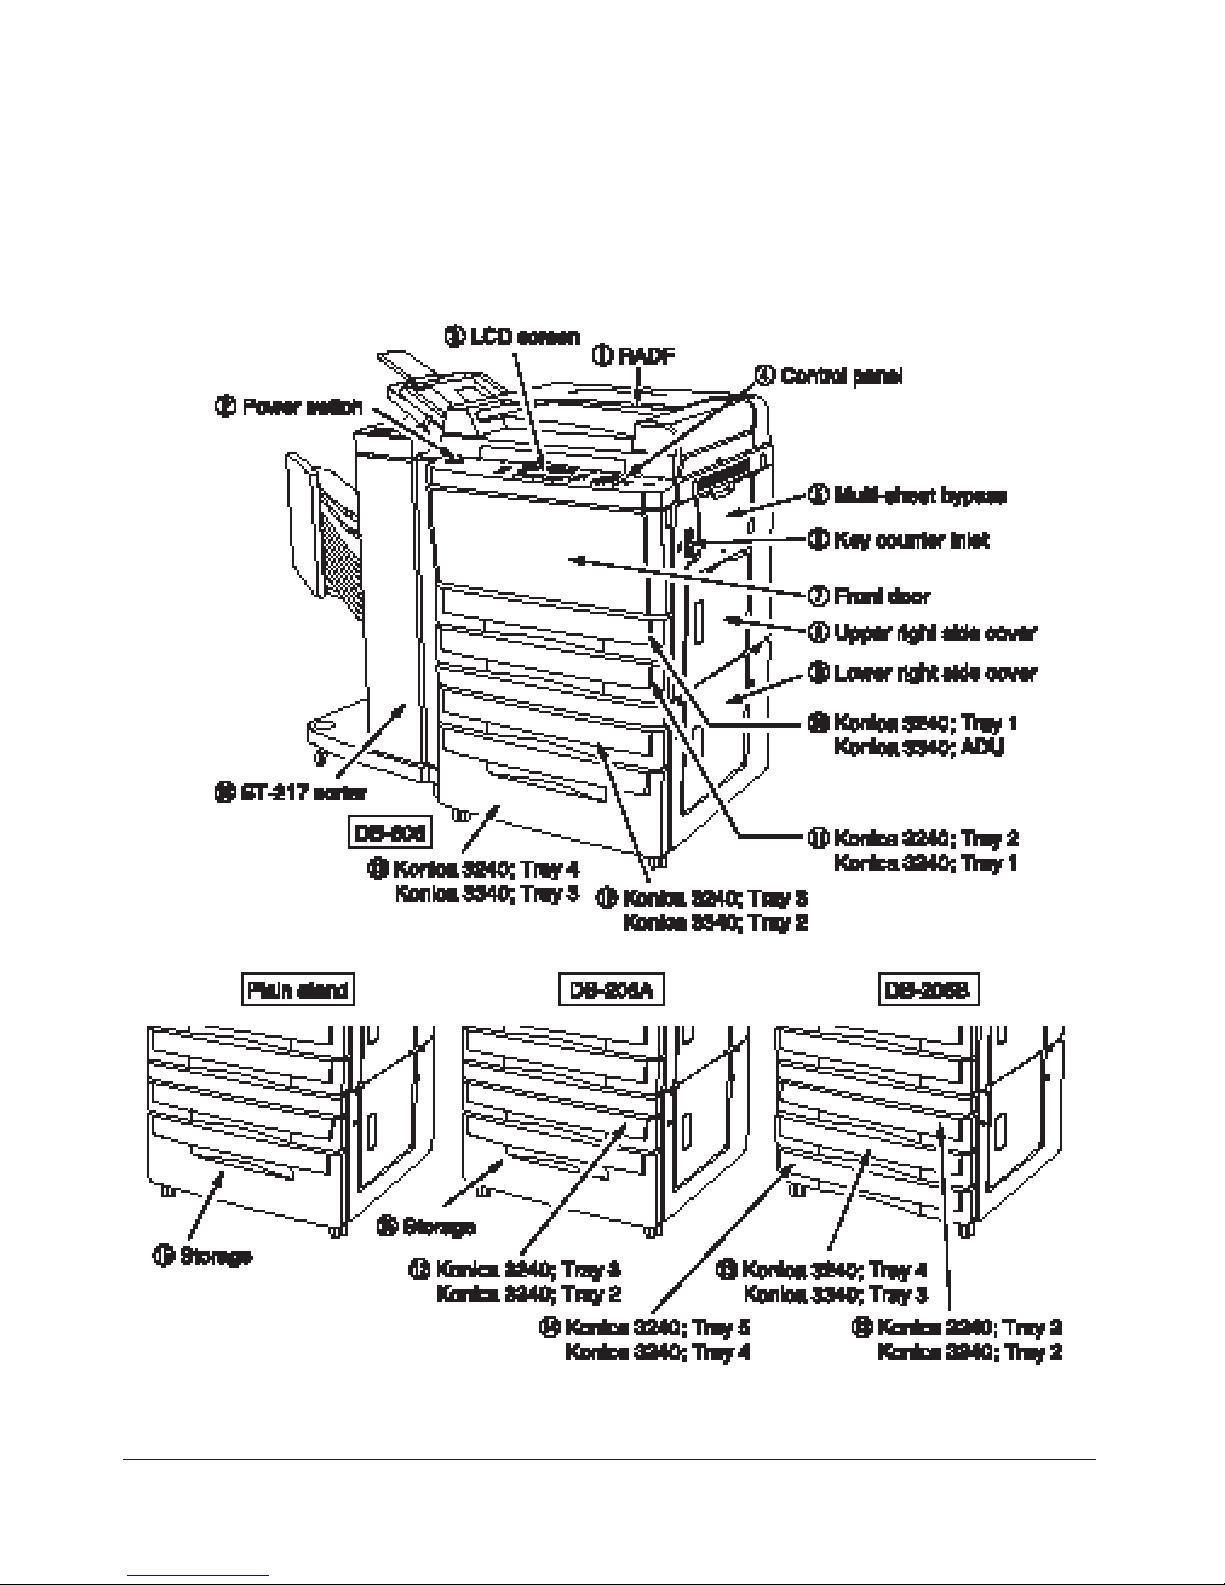
1 RADF (Reversing Automatic Document Feeder) automatically feeds multiple originals one
at a time to the platen glass for copying, then discharges them.
2 POWER SWITCH turns power to the copier ON/OFF alternately, when pressed.
3 LCD SCREEN displays interactive operation screens.
4 CONTROL PANEL controls copier operations in conjunction with the Function keys under
the LCD screen.
5 MULTI-SHEET BYPASS holds 100 sheets (max.) of regular paper, or 1 sheet of thin,
heavy stock.
6 KEY COUNTER INLET for inserting the optional Key counter.
7 FRONT DOOR opens to the inner copier for clearing mishandled paper and replenishing toner.
8 UPPER RIGHT SIDE COVER opens to allow removal of mishandled paper.
9 LOWER RIGHT SIDE COVER opens to allow removal of mishandled paper.
Konica 3240
10 TRAY 1 is initially fixed at 8.5"x11"R and holds 500 sheets.
11 TRAY 2 (universal tray) is user adjustable and holds 500 sheets of either 11"x17"/8.5"x11"/
8.5"x11"R/or 5.5"x8.5".
12 TRAY 3 (DB-206A/206B) is initially fixed at 8.5"x11" and holds 500 sheets.
12 TRAY 3 (DB-606) is initially fixed at 8.5"x14" and holds 500 sheets.
13 TRAY 4 (DB-206B) is initially fixed at 8.5"x14" and holds 500 sheets.
13 TRAY 4 (DB-606) is initially fixed at 8.5"x11" and holds 1,500 sheets.
14 TRAY 5 (DB-206B) is initially fixed at 11"x17" and holds 500 sheets.
15 Storage accommodates copy paper, copy materials, etc.
Konica 3340
10 ADU is used for duplex copying.
11 TRAY 1 (universal tray) is user adjustable and holds 500 sheets of either 11"x17"/8.5"x11"/
8.5"x11"R/or 5.5"x8.5".
12 TRAY 2 (DB-206A/DB-206B) is initially fixed at 8.5"x11" and holds 500 sheets.
12 TRAY 2 (DB-606) is initially fixed at 8.5"x14" and holds 500 sheets.
13 TRAY 3 (DB-206B) is initially fixed at 8.5"x14" and holds 500 sheets.
13 TRAY 3 (DB-606) is initially fixed at 8.5"x11" and holds 1,500 sheets.
14 TRAY 4 (DB-206B) is initially fixed at 11"x17" and holds 500 sheets.
15 Storage accommodates copy paper, copy materials, etc.
16 IN-BIN STAPLER SORTER (option) device that sorts, staples & sorts, and groups.
3-4 Machine Information
Machine Information
Machine Layout (continued)
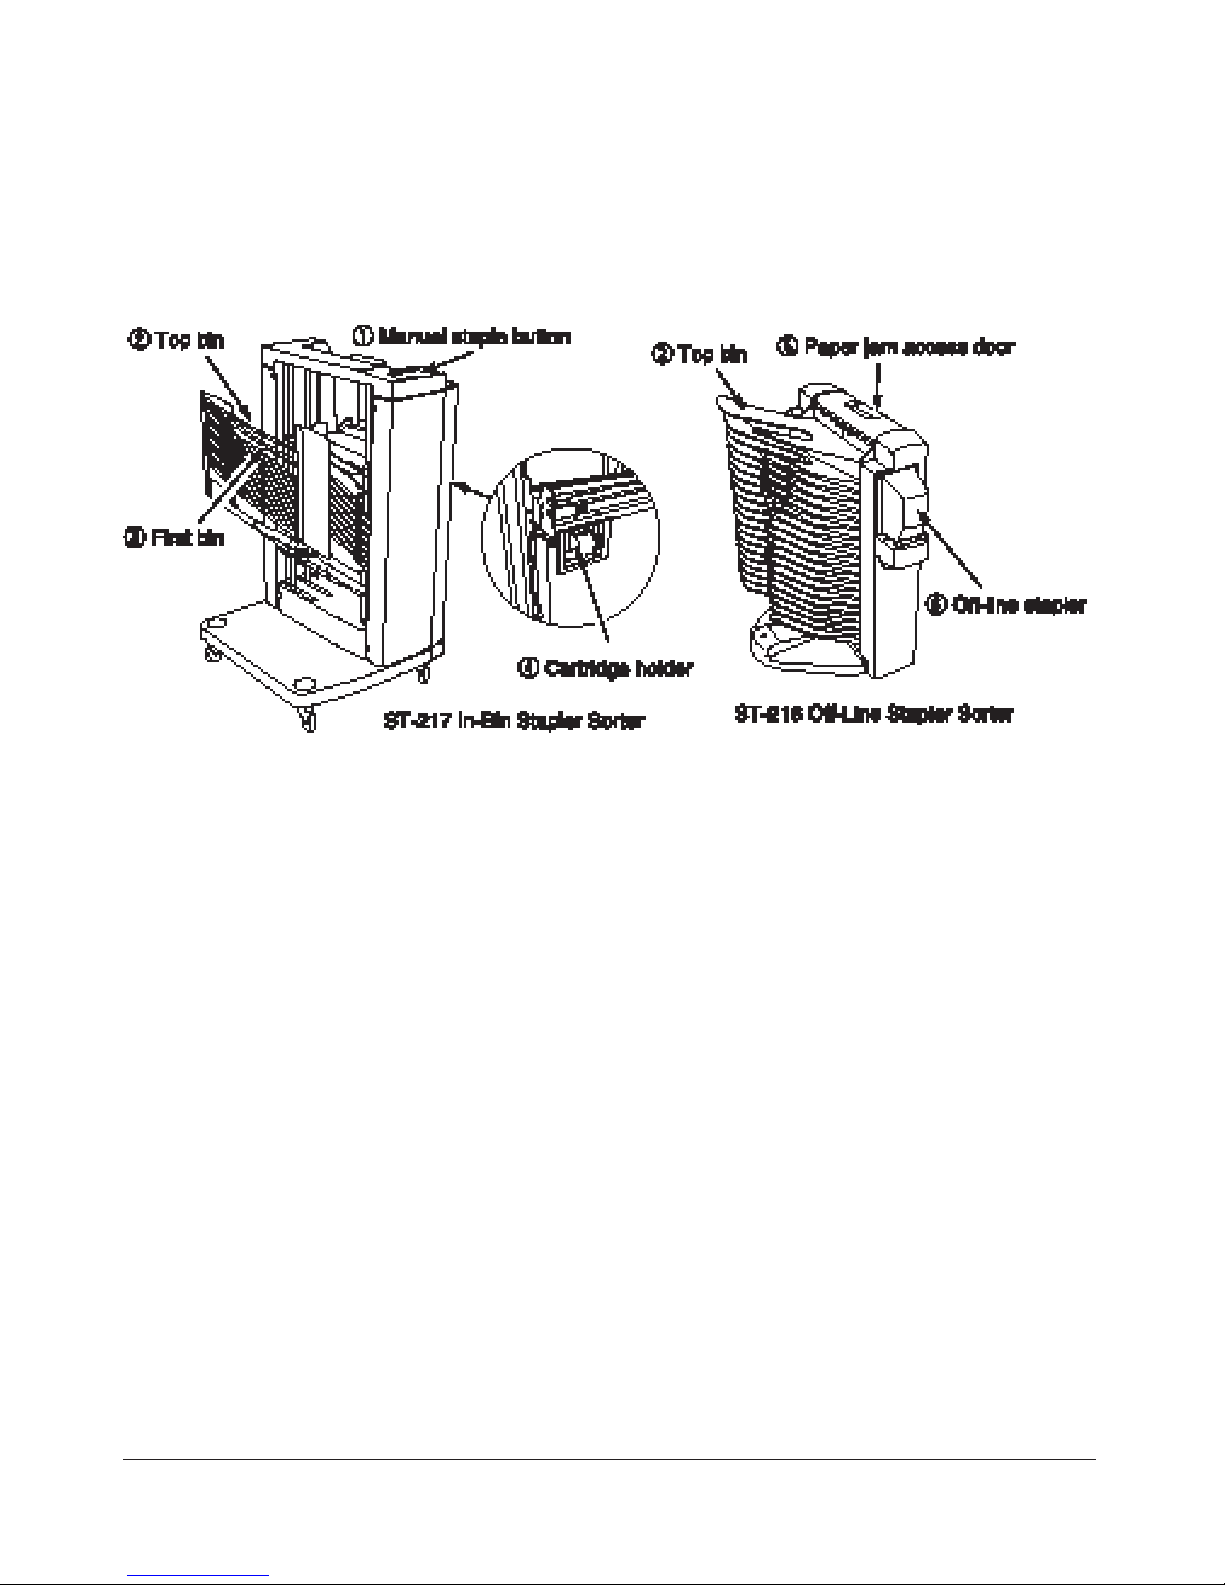
1 MANUAL STAPLE BUTTON manually staples copies in-bin or after being positioned in
first bin.
2 TOP BIN receives non-sorted copies; and in the ST-217 In-Bin Stapler Sorter staples sheets
that are manually placed here.
3 FIRST BIN is the first bin of the sorter.
4 CARTRIDGE HOLDER accommodates new cartridge replacing an empty cartridge.
5 PAPER JAM ACCESS DOOR opens to allow removal of jammed paper in the sorter.
6 OFF-LINE STAPLER staples sheets manually.

Machine Information 3-5
Machine Information
Machine Layout (continued)
1 Toner unit
2 Drum unit
3 Knob 3
4 Lever 1
5 Knob 2
6 Fixing unit
7 Total counter
3-6 Machine Information
Machine Information
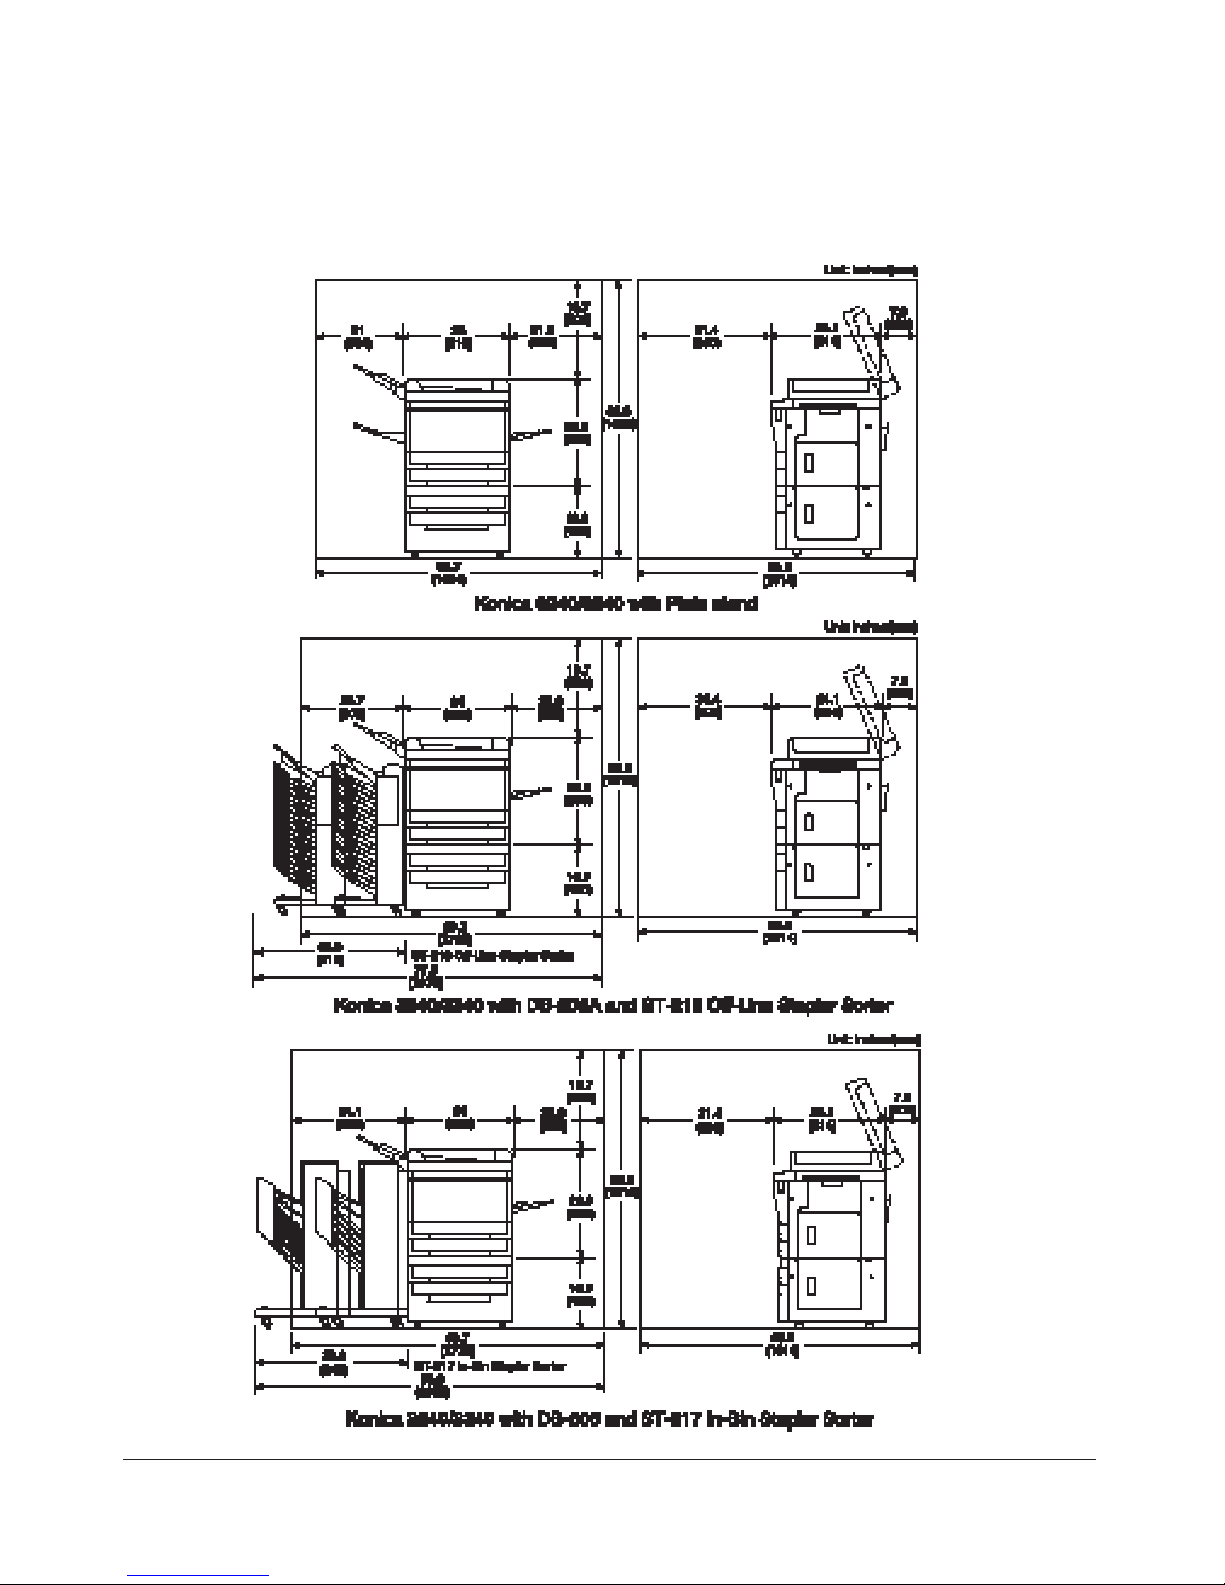
Site Requirements
Machine Information 3-7
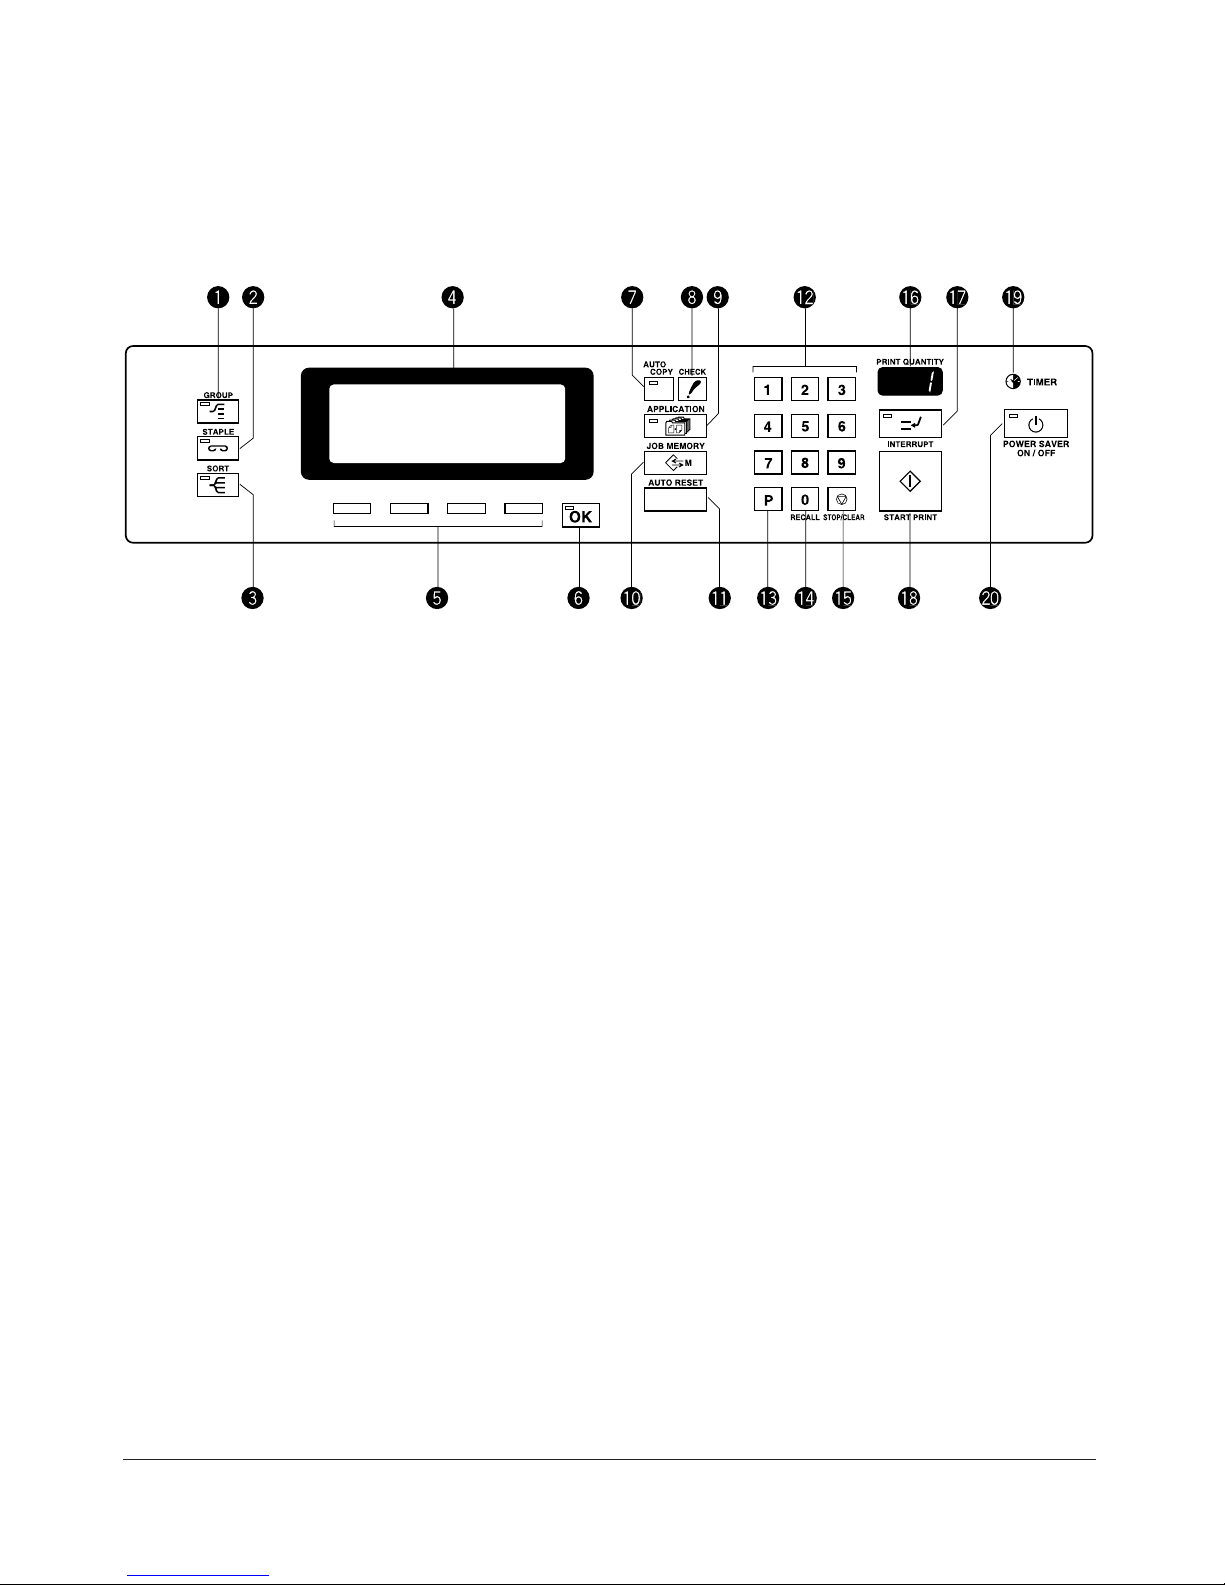
Machine Information
Control Panel Layout
1 GROUP selects Group mode.
2 STAPLE selects Staple-sort mode.
3 SORT selects Sort mode.
4 LCD SCREEN displays machine and copying status; and interactive screens for the four
Function keys.
5 FUNCTION KEYS interact with the LCD screen.
6 [OK] completes the selection made by the four Function keys.
7 AUTO COPY automatically activates copying each time the Document Feeder is closed.
8 CHECK displays a screen showing all settings that are selected for the current job.
9 APPLICATION displays a menu for selecting special application functions.
10 JOB MEMORY displays screens for selecting job store/job recall functions.
11 AUTO RESET restores copier to automatic mode settings or to key operator settings.
12 KEYPAD enters numeric values.
13 [P] accesses programming modes for setting special functions.
14 [0] RECALL recalls the print quantity for the current job.
15 STOP/CLEAR stops the copying sequence; allows resetting of print quantity.
16 PRINT QUANTITY indicator displays the current print quantity setting.
17 INTERRUPT stops copying in progress to allow copying from the platen glass.
18 START PRINT activates copying.
19 TIMER lights when the timer function is set.
20 POWER SAVER activates energy-saving mode for times when the copier is inactive, or
activates timer off mode when weekly timer function is active.

3-8 Machine Information
Machine Information
LCD Screen
The LCD displays interactive screens for making copy job selections. Selections made by pressing
the four Function keys are highlighted. The screens also work with the conventional control panel
keys.
After the power switch is turned on, the Basic screen displays. Then, the message “please wait
Copier is warming up” displays for approximately 2 min. 30 sec., until the fixing temperature is
reached.
When the Basic screen is displayed, the four Function keys become interactive. The interactive
condition enables you to communicate directly with the copier system simply by pressing the
Function keys or by pressing conventional keys, as required. In addition, the screens automatically
display information regarding machine and copying status.
Basic Screen
The Basic screen displays after the power switch is turned on. The Basic screen includes a twoline message bar at the top, and mode indicators at the bottom for Copy Mode, Copy Density,
Lens Mode, and Copy Size. This screen enables you to use the four Function keys under the
screen plus conventional keys to select modes, functions, settings, paper trays, etc. Copying
conditions after warm-up can be set in the Initial Setting menu of the Key Operator mode.
CAUTION:
The LCD screen of the control panel is covered with glass. Do not drop heavy items on the glass,
or put excess weight or pressure on it; otherwise the glass may break or become scratched.

Machine Information 3-9
Machine Information
Initial Settings
Initial settings represent the initial full-auto machine condition when power is turned on; when
ECM password is set; or when Auto Reset mode is restored, either manually or automatically.
Print Quantity : 1
Magnification Ratio : 100%
RADF : ON
Copy mode : 1-1 (Konica 3240)
1-2 (Konica 3340)
AES: (Automatic Exposure Selection) : ON
APS: (Automatic Paper Selection) : ON
Sorter : OFF
Note: All settings can be set by the key operator except Print Quantity.
Auto Reset Mode
The Auto Reset function can be set for OFF/ 30 seconds/ 1 minute/ 1.5 minute/ 2 minutes/ 2.5
minutes/ 3 minutes. Initially, the mode is set to function after 1 minute of copier inactivity. The
Auto Reset key function also re-displays the Basic screen, unless the settings are changed by the
key operator in the Initial settings menu. For the key operator setting, see p. 9-39 to 9-43.
Auto Shut-Off Mode
This mode automatically shuts off the main power after a specified period of copier inactivity. The
Auto shut-off function can be set for 30 minutes/ 60 minutes/ 90 minutes/ 120 minutes/ or 240
minutes. Initially, the mode is set to function after 60 minutes of copier inactivity.
For the key operator setting, see p. 9-39 to 9-43.
Automatic Paper Selection (APS)
When APS is highlighted on the LCD screen, the appropriate copy paper size is automatically
selected. When copying from the platen glass or document feeder, APS detects the sizes indicated
below. For the key operator setting, see p. 9-39 to 9-43.
PLATEN GLASS: 11"x17", 8.5"x14", 8.5"x11", 8.5"x11"R
ADF (1-1 OR 1-2 MODE): 11"x17", 8.5"x14", 8.5"x11", 8.5"x11"R
RADF (2-2 OR 2-1 MODE): 11"x17", 8.5"x14", 8.5"x11", 8.5"x11"R
 Loading...