


QMS 3825/3225
Print System
Large-LargeCapacity Input
Tray Option
1800403-001C
This document was created with FrameMaker 4.0.4

Trademarks
The following are trademarks or registered trademarks of their respective owners.
Other product names mentioned in this manual may also be trademarks or registered
trademarks of their respective owners. Registered trademarks are registered in the
United States Patent and Trademark Office; some trademarks may also be registered in
other countries. QMS, the QMS logo, Crown, and the Crown seal are registered
trademarks of QMS, Inc., and PS Executive Series is a trademark of QMS, Inc.
Proprietary Statement
The digitally encoded software included with your QMS 3825/3225 Print System is
Copyrighted 1995 by QMS, Inc. All Rights Reserved. This software may not be
reproduced, modified, displayed, transferred, or copied in any form or in any manner or
on any media, in whole or in part, without the express written permission of QMS, Inc.
Copyright Notice
This manual is Copyrighted 1995 by QMS, Inc., One Magnum Pass, Mobile, AL
36618. All Rights Reserved. This manual may not be copied in whole or in part, nor
transferred to any other media or language, without the express written permission of
QMS, Inc.

Contents
Introduction ..................................................................................... 1
Installing the LLCIT 1
Moving the Printer 1
Large-Large-Capacity Input Tray Indicators 2
Selecting a Paper Size 2
Adding Paper to the LLCIT ............................................................. 3
Changing LLCIT Paper Size ...........................................................4
Remove and Disassemble the LLCIT 4
Set DIP Switches to Match Paper Size 9
Adjust Side Rails to Match DIP Switches 10
Reassemble the LLCIT 17
❖
This document was created with FrameMaker 4.0.4


Introduction
Introduction
The Large-Large-Capacity Input Tray (LLCIT) for your QMS 3825/
3225 Print System allows you to load 2,500 sheets of paper at a time,
in letter, legal, ledger, A3, A4, and B4 sizes.
Installing the LLCIT
The LLCIT must be installed by a QMS-authorized service representative. See appendix A, “QMS Customer Support,” in your printer
manual if you do not know how to reach your service contact.
Moving the Printer
Because the LLCIT holds a heavy load, it has a metal prop plate at
the back corner for added support. The prop plate helps prevent the
printer from tipping, even when the LLCIT is fully loaded. If you need
to move the printer, you must
■
Remove the paper from the LLCIT
■
Remove the prop plate to avoid damage to the printer or the floor
To remove the prop plate, simply remove the two screws holding it in
place. The prop plate slips off easily. Reinstall the prop plate as soon
as the printer is in its new location.
Be careful not to tip the printer while moving it.
WARNING!
from place to place, you must remove the metal prop plate from under the
back corner of the LLCIT. Be careful not to tip the printer while moving it.
ACHTUNG!
müssen Sie die Metallstütze unter der hinteren Ecke des LLCIT entfernen.
Achten Sie beim Verschieben darauf, daß das Drucksystem nicht kippt.
QMS 3825/3225 Large-Large-Capacity Input Tray Option
This document was created with FrameMaker 4.0.4
Once the LLCIT is installed, if you need to move the printer
Soll der Drucker versetzt werden and der LLCIT ist installiert,
1

Introduction
Large-Large-Capacity Input Tray Indicators
The Large-Large-Capacity Input Tray (LLCIT) has step-by-step
instruction illustrations, a button to lower the interior tray , and an error
light to alert you to any condition that requires your attention.
Instruction Illustrations
Tray Down Button
Error Light
Once you know how to load paper from
reading this manual, the step-by-step
illustrations will help you remember in what
order to perform the various steps.
Press this button to lower the paper tray inside
the LLCIT. The tray must be at the bottom
position before you can load paper.
If the printer runs out of paper, the tray lowers
automatically.
This button lights when the tray is in motion.
This red light comes on if paper is loaded
incorrectly, if the paper size does not match the
tray’s setting, or if the LLCIT door is open.
Selecting a Paper Size
Changing the paper size for the LLCIT requires special care to avoid
damaging electrical connections. We recommend that you
✓
Evaluate your printing needs and choose one size for the
LLCIT
✓
Have the service representative set the LLCIT for that size
during installation
✓
Do not alter the size setting
» Note: Only a qualified QMS service technician should change the LLCIT size
settings. Service instructions for changing the paper size begin on page 4. If
you damage the printer or the Large-Large-Capacity Input Tray while
changing the size settings, it will affect your warranty.
QMS 3825/3225 Large-Large-Capacity Input Tray Option2

Adding Paper to the LLCIT
Adding Paper to the LLCIT
The LLCIT holds up to 2,500 sheets of paper in letter, legal, ledger,
A3, A4, and B4 sizes. Once the size is set, add paper of the same
size and orientation as the paper that was previously loaded.
» Note: Only a qualified QMS service technician should change the LLCIT paper
size. Service instructions begin on page 4. If you damage the printer or the
Large-Large-Capacity Input Tray while changing the size settings, it will
affect your warranty.
To add paper to the LLCIT
1 Remove the upper and lower input bins.
2 Push the Tray Down button to lower the interior paper tray.
The tray moves slowly.
3 When the light stops flashing, open the LLCIT door and lift
the clear plastic lid.
4 Remove and discard the top and bottom sheets from the new
paper supply.
Top and bottom sheets sometimes have traces of glue which can
cause jams.
5 Follow the paper manufacturer’s instructions as to which
side of the paper should be printed on first.
Printing on the proper side first helps prevent excessive paper
curl, which is especially important if you are using the optional
Large-Capacity Output Stacker (LCOS). The paper wrapper usually has an arrow to indicate which side to print on first. Load
paper so the arrow points up.
6 Bow the paper slightly to insert it into the bin, and slide it in
until it is aligned with the innermost edge of the bin.
» Note: Make sure to use the same size paper in the same orientation as
you were using before.
7 Close the lid, and shut the door until it snaps.
8 Wait for the paper tray to reach its uppermost position.
QMS 3825/3225 Large-Large-Capacity Input Tray Option
3
Changing LLCIT Paper Size
Changing LLCIT Paper Size
Changing the paper size for the LLCIT requires special care to avoid
damaging electrical connections. We recommend that you:
✓
Evaluate your printing needs and choose one size for the LLCIT
✓
Have the service representative set the LLCIT for that size
during installation
✓
Do not alter the size setting
» Note: Only a qualified QMS service technician should change the LLCIT size
settings. The following instructions are included to assist service personnel.
If you damage the printer or the Large-Large-Capacity Input Tray while
changing the size settings, it will affect your warranty.
WARNING!
printer. Do not lift the LLCIT with paper loaded in it.
ACHTUNG!
Sie den LLCIT nie mit eingelegtem Papier.
It takes two people to lift the LLCIT in and out of the
Man benötigt 2 Personen um den LLCIT zu tragen. Tragen
Remove and Disassemble the LLCIT
» Note: Before you begin this procedure, note the paper size setting. You will
need to know what you are changing from to complete the process.
1 Remove the upper and lower input bins.
2 Press the Tray Down
button.
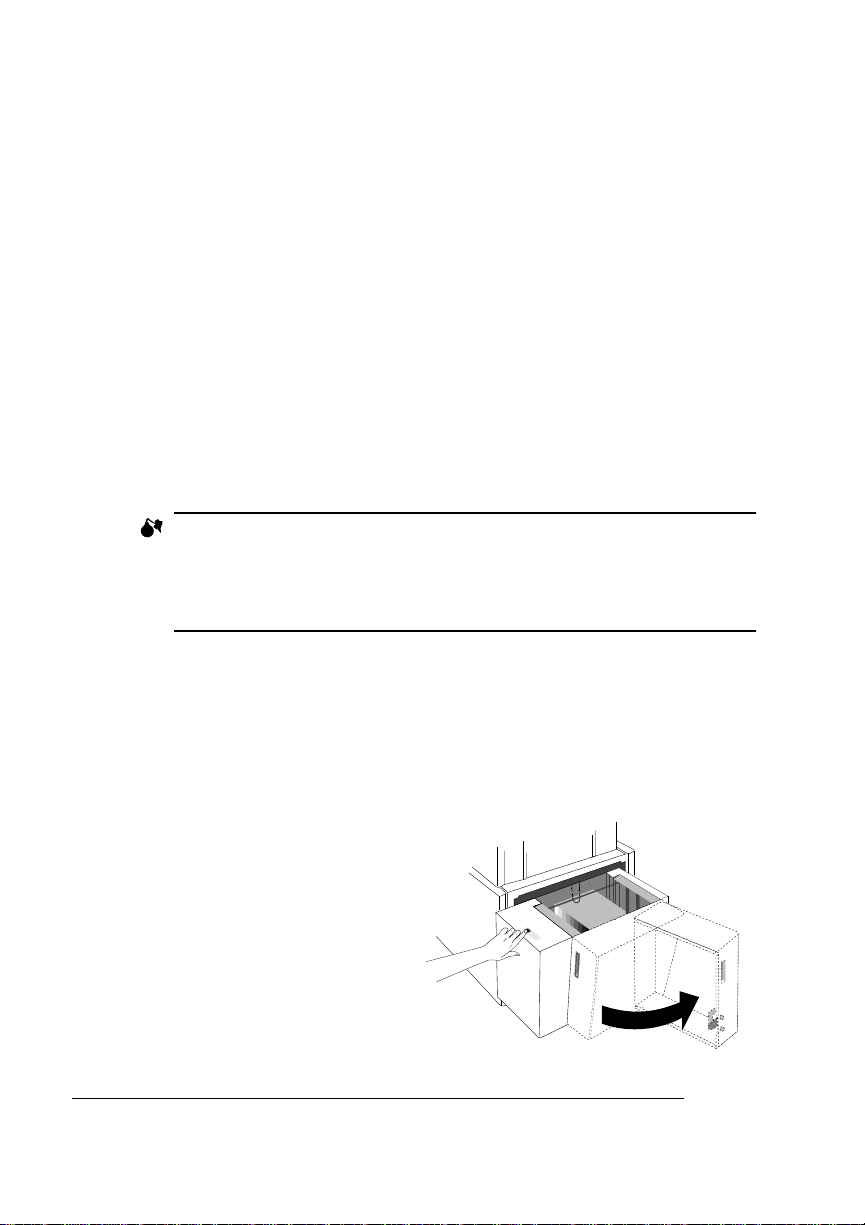
3 As soon as the tray
moves down enough to
remove the paper, open
the door to stop the tray
movement.
4 Remove all the paper.
QMS 3825/3225 Large-Large-Capacity Input Tray Option4

Changing LLCIT
Paper Size
5 Close the door. The tray will rise to the top.
6 When the tray reaches the top, open the door.
7 Turn off the printer.
8 Shut the door.
9 Remove the metal prop plate from beneath the back corner
of the LLCIT by removing the two screws that attach it and
slipping off the plate.
Set aside the prop plate and screws to reinstall after you finish
with the tray.
10 Lift and pull the LLCIT
from the printer as you
would any input bin.
Set it gently on the floor,
being careful not to overextend the cable at the
back-right corner of the
tray.
QMS 3825/3225 Large-Large-Capacity Input Tray Option
5

Changing LLCIT
Paper Size
11 Unscrew the silver screw from the top back of the indicator
area cover.
12 Open the front door of the LLCIT.
QMS 3825/3225 Large-Large-Capacity Input Tray Option6

Changing LLCIT
Paper Size
13 Unscrew the two silver screws from the front of the indicator
area cover.
14 Open the clear lid.
15 Carefully lift the indicator area cover forward to clear the
magnetic door clasp and set it gently on the floor, being
careful not to overextend the blue wire harness.
wire harness
QMS 3825/3225 Large-Large-Capacity Input Tray Option
7

Changing LLCIT
Paper Size
16 Remove the clear lid.
QMS 3825/3225 Large-Large-Capacity Input Tray Option8

Changing the
LLCIT Paper Size
Set DIP Switches to Match Paper Size
1 Use a pen or pencil
to set the six DIP
switches, which help
the printer sense
paper size.
The following chart
(which is also posted
on the inside of the
indicator area cover)
shows how to set the
DIP switches.
» Note: The default size is
letter .
Up = 1 Down = 0
DIP switch #
Paper Size
B4
A4
A4R
11 x 8.5"
8.5 x 11"
Legal
A3
Ledger
Sizes shown in shaded cells are not available on this printer.
123456
000110
001000
0
100010
1
101000
100000
000010
0 1 0 1 0
0 1 1 0 0
QMS 3825/3225 Large-Large-Capacity Input Tray Option
This document was created with FrameMaker 4.0.4
9

Changing the
LLCIT Paper Size
Adjust Side Rails to Match DIP Switches
The side rails must be adjusted to match the paper size you have
chosen. The steps for adjusting the right side rail are the same for all
sizes. The steps for the left rail differ according to the paper size. Follow the steps for the right side, then check the chart to see which set
of instructions to follow for the left side. After adjusting both sides, skip
to “Reassemble the LLCIT,” on page 16.
» Note: If you ar e changing between Letter and Ledger or between A3 and A4,
the side rails do not need to be adjusted.
QMS 3825/3225 Large-Large-Capacity Input Tray Option10

Changing the
LLCIT Paper Size
Adjusting the Right Side Rail
1 Remove the front and rear thumb screws on the right rail.
Front
Rear
QMS 3825/3225 Large-Large-Capacity Input Tray Option
11

Changing the
LLCIT Paper Size
2 Click the silver top section of the side rail into the notch for
the paper size you want.
.
3 Slide the rail until the front notch lines up with the proper
size and the screw hole lines up with the matching hole.
» Note: On the front rail, the forward screw hole matches international
paper sizes while the rear hole matches US paper sizes.
QMS 3825/3225 Large-Large-Capacity Input Tray Option12

Changing the
LLCIT Paper Size
4 Adjust the back of the rail until the slot lines up with the
matching size indicator and the screw hole is visible.
» Note: On the back rail, the long slot matches international paper sizes
while the short slot matches US paper sizes.
5 Reinsert the thumb screws.
QMS 3825/3225 Large-Large-Capacity Input Tray Option
13

Changing the
LLCIT Paper Size
Adjusting the Left Side Rail
When you adjust the left side rail, check this chart to see which set of
instructions to follow. Once you have changed the left side rail, skip to
“Reassemble the LLCIT” on page 17.
From this size
To this size
Letter (11" x 8.5")
Ledger (11" x 17")
Legal (8.5" x 14")
A3 (297 x 420 mm)
A4 (210 x 297 mm)
B4 (250 x 327 mm)
■
Left Side Rail - A Instructions
Letter Ledger Legal A3 A4 B4
None A C C A
None A C C A
AA CCA
B B B None B
B B B None B
AAACC
To change from any US size or B4 to any US size or B4:
a Repeat steps 1 through 5 of “Adjusting the Right Side
Rail” for the left side.
b Then skip to page 17.
■
Left Side Rail - B Instructions
To change from any US size or B4 to A3 or A4, you must remove
the left side rail from the tray. Follow these steps:
a Remove the front and rear thumb screws.
QMS 3825/3225 Large-Large-Capacity Input Tray Option14
This document was created with FrameMaker 4.0.4

Changing the
LLCIT Paper Size
b Remove the
three black
screws from
the silver top
section of the
side rail.
c Lift the end of
the size
indicator bar at
top rear.
d Remove the
silver section
of the side rail.
e Disconnect the keyring-type fastener at the bottom of the
chain guide.
f Tilt and
remove the
side rail.
» Note: Store the
2 rail sections, 2
thumb screws,
and 3 black
screws in the
printer’s storage
cabinet in case
you change the
paper size again
later.
g Reattach the chain guide.
h Skip to “Reassemble the LLCIT” on page 17.
QMS 3825/3225 Large-Large-Capacity Input Tray Option
15

Changing the
LLCIT Paper Size
■
Left Side Rail - C Instructions
To change from A3 or A4 paper to any US size or B4, you must
install the left side rail in the tray. You should find two sections of
the side rail, one black and one silver, three black screws, and
two thumb screws stored in the printer’s storage cabinet.
a Disconnect the keyring-type fastener at the bottom of the
chain guide.
b Tilt the side rail into the left side of the tray.
c Lift the left end of the size indicator bar at top rear out of
the way, and set the silver top section of the side rail in
place, fastening it with its three black screws.
You may need to push the side rail above its normal position
to attach the front screw while avoiding the nearby punched
metal tab. Once attached, the rail rests under the tab.
d Align the side rail for the proper paper size and insert the
two thumb screws.
e Lower the size indicator bar into place.
f Reattach the chain guide.
g Proceed to “Reassemble the LLCIT” on the next page.
QMS 3825/3225 Large-Large-Capacity Input Tray Option16

Changing the
LLCIT Paper Size
Reassemble the LLCIT
1 Angle the clear lid into place, inserting the right peg into its
hole, then sliding the left peg into its groove. Leave the lid
open.
QMS 3825/3225 Large-Large-Capacity Input Tray Option
17

Changing the
LLCIT Paper Size
2 Replace the indicator area cover by aligning it in front of the
body and sliding it straight back, being careful that the magnetic door catch is accessible and that the tongues at the
back of the cover are inside the housing.
3 Reinsert the three silver screws you removed when access-
ing the DIP switches.
4 Close the lid and the door, making sure the door snaps shut.
5 Insert the LLCIT as you would any paper cassette, lining up
the guides with the support rails and sliding the LLCIT until
it snaps into place.
WARNING!
Do not lift the LLCIT with paper loaded in it.
ACHTUNG!
Tragen Sie den LLCIT nie mit eingelegtem Papier.
6 Reinstall the prop plate you removed at the outset of this
process.
QMS 3825/3225 Large-Large-Capacity Input Tray Option18
It takes two people to lift the LLCIT back into place.
Man benötigt 2 Personen um den LLCIT zu tragen.

Changing the
LLCIT Paper Size
7 Add paper, making sure the feed edge is appropriate for the
paper size you have chosen.
Check the chart in your user’s guide or system administrator’s
guide to find the proper feed edge.
8 Reinsert the upper paper cassettes.
9 Turn the printer on and wait for the tray to rise.
❖
QMS 3825/3225 Large-Large-Capacity Input Tray Option
19

 Loading...