

Page 1

®
magicolor 2430 DL
Printer Driver for
Mac OS 9 User’s Guide
4139-7749-01A
1760672-001A
Page 2

Copyright Notice
The digitally encoded software and publication included with your printer are
Copyrighted © 2004 by KONICA MINOLTA BUSINESS TECHNOLOGIES, INC.,
Marunouchi Center Building, 1-6-1 Marunouchi, Chiyoda-ku, Tokyo, 100-0005,
Japan. All Rights Reserved.
This software may not be reproduced, modified, displayed, transferred, or copied in
any form or in any manner or on any media, in whole or in part, without the express
written permission of KONICA MINOLTA PRINTING SOLUTIONS U.S.A., INC.
No part of this publication may be reproduced, stored in a retrieval system, or transmitted in any form or by any means, electronic, mechanical, photocopying, recording, or otherwise, without the prior written permission of KONICA MINOLTA. The
information contained in this guide is intended for use with the KONICA MINOLTA
magicolor 2430 DL printers only.
Trademarks
KONICA MINOLTA and the KONICA MINOLTA logo are trademarks or registered
trademarks of KONICA MINOLTA HOLDINGS, INC.
magicolor is a trademark or registered trademark of KONICA MINOLTA PRINTING
SOLUTIONS U.S.A., INC.
Notice
KONICA MINOLTA BUSINESS TECHNOLOGIES, INC. reserves the right to make
changes to this guide and to the equipment described herein without notice. Considerable effort has been made to ensure that this manual is free of inaccuracies and
omissions. However, KONICA MINOLTA BUSINESS TECHNOLOGIES, INC. makes
no warranty of any kind including, but not limited to, any implied warranties of merchantability and fitness for a particular purpose with regard to this manual.
KONICA MINOLTA BUSINESS TECHNOLOGIES, INC. assumes no responsibility
for, or liability for, errors contained in this manual or for incidental, special, or consequential damages arising out of the furnishing of this manual, or the use of this manual in operating the equipment, or in connection with the performance of the
equipment when so operated.
Page 3
System Requirements for the Printer Driver
Before installing the printer driver, make sure that your system meets the following system requirements.
Computer Apple Macintosh computer with a Pow-
erPC G3 or later processor (PowerPC G4
or later is recommended)
Connection between computer
and printer
Operating system Mac OS 9.0.4 or later
RAM More than OS recommendation (128 MB
Available disk space 256 MB or more is recommended (for
USB connection
Network connection
(10Base T/100Base TX)
Mac OS X Classic mode (9.2.2 or later)
When using the Classic environment of
Mac OS X, Mac OS X 10.2.6 or later is
required.
or more is recommended)
storing images)
System Requirements for the Printer Driver
1
Page 4
Installing the Printer Driver
1
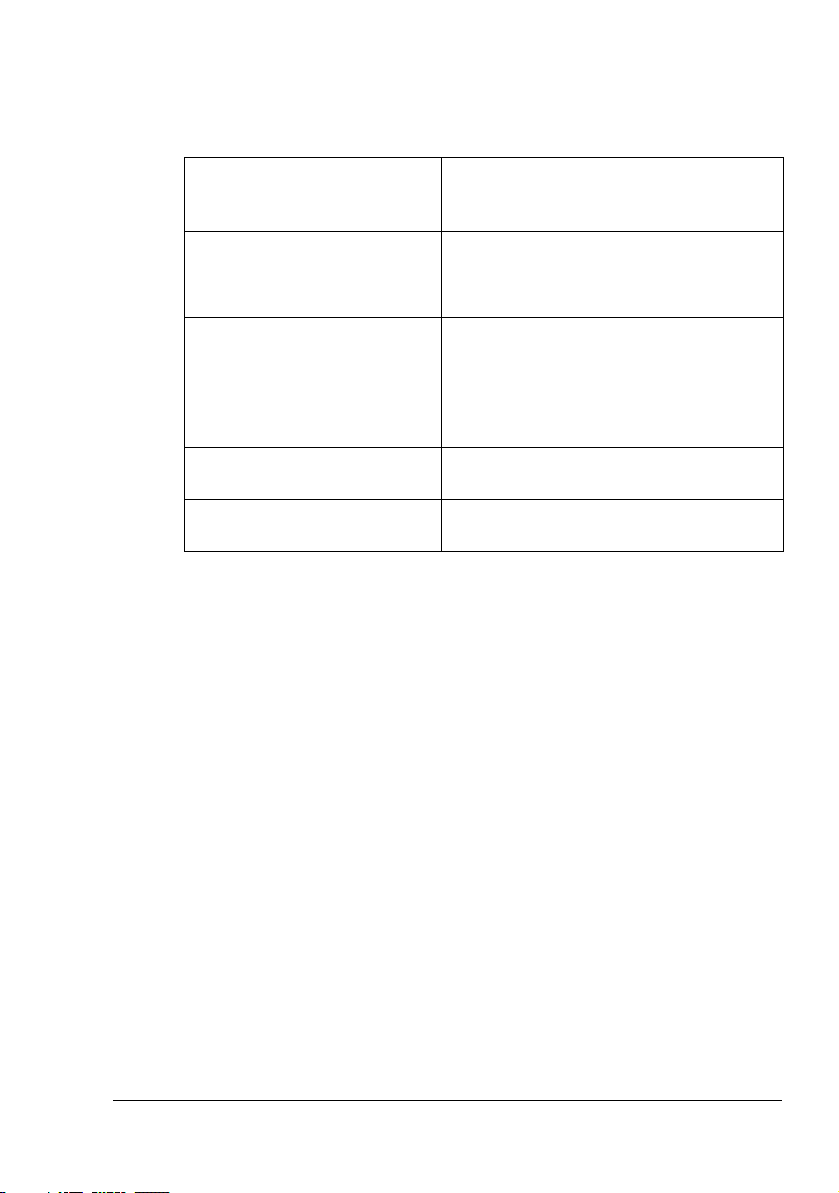
Double-click the magicolor 2430 DL Installer icon.
The installer for the printer driver starts up.
" When using Mac OS X, start up the Classic environment before
installing the printer driver.
2 Check the details of the license agreement, and click Accept if you agree
to the terms of the license.
3 While Easy Install is selected, click Install.
Easy Install installs the printer driver and ColorSync profiles.
Installation starts.
Installing the Printer Driver2
Page 5
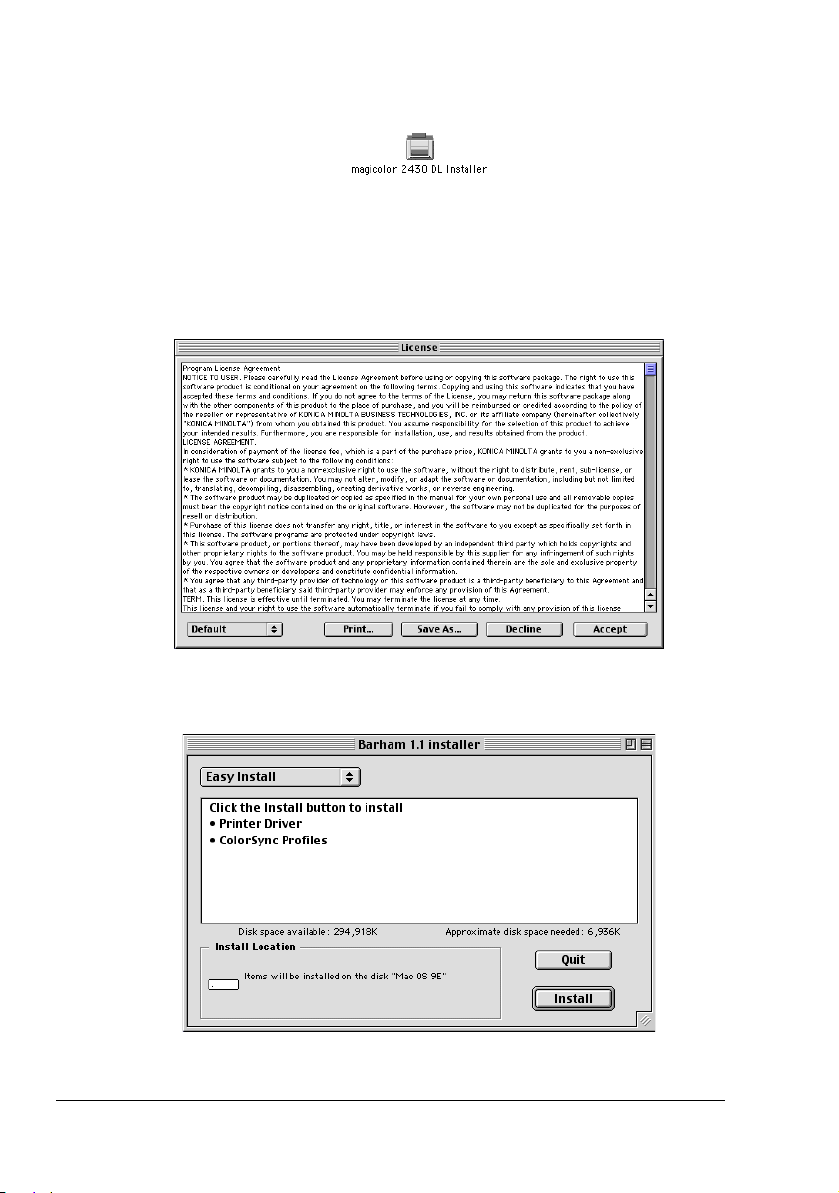
4 After the installation has been completed, click Quit.
This completes the installation of the magicolor 2430 DL printer driver.
Selecting the Printer in the Chooser
1
Connect the printer and computer.
If you are using a USB connection, use the USB cable to connect the
printer and your computer.
If you are using a network connection, use an 10Base-T/100Base-TX
cable to connect the printer to a Ethernet network.
2 Select Chooser from the Apple menu.
" When using Mac OS X, the Apple menu is available with the icon
for the Classic environment in the menu bar.
To display the Classic status in the menu bar, select the “Show
Classic status in menu bar” check box in the Classic dialog box.
Selecting the Printer in the Chooser
3
Page 6
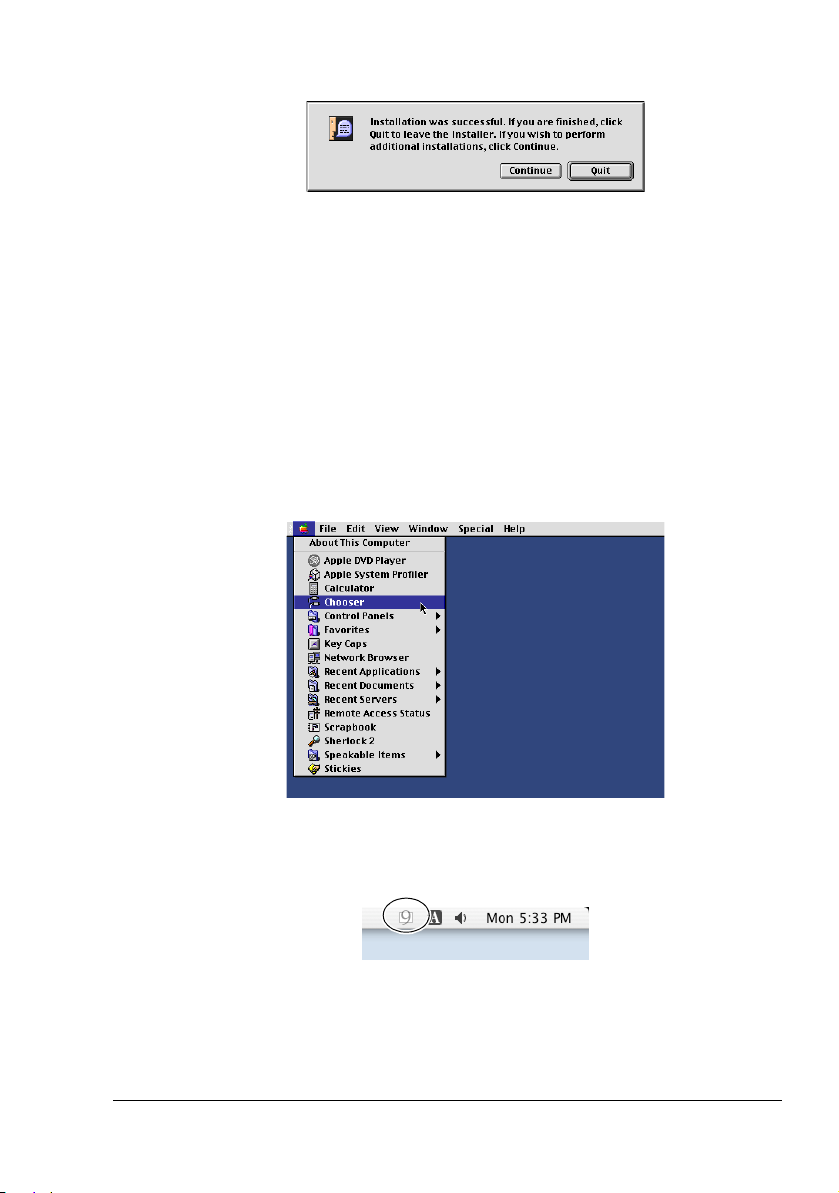
3 Select the magicolor 2430 DL icon from the icons on the left side of the
Chooser.
The printer name appears in the Select a printer section on the right side
of the Chooser.
The icon displayed for the printer name differs depending on whether you
are using a USB connection or a network connection.
4 Select the printer.
If you are using a USB connection, select the icon.
If you are using a network connection, select the icon.
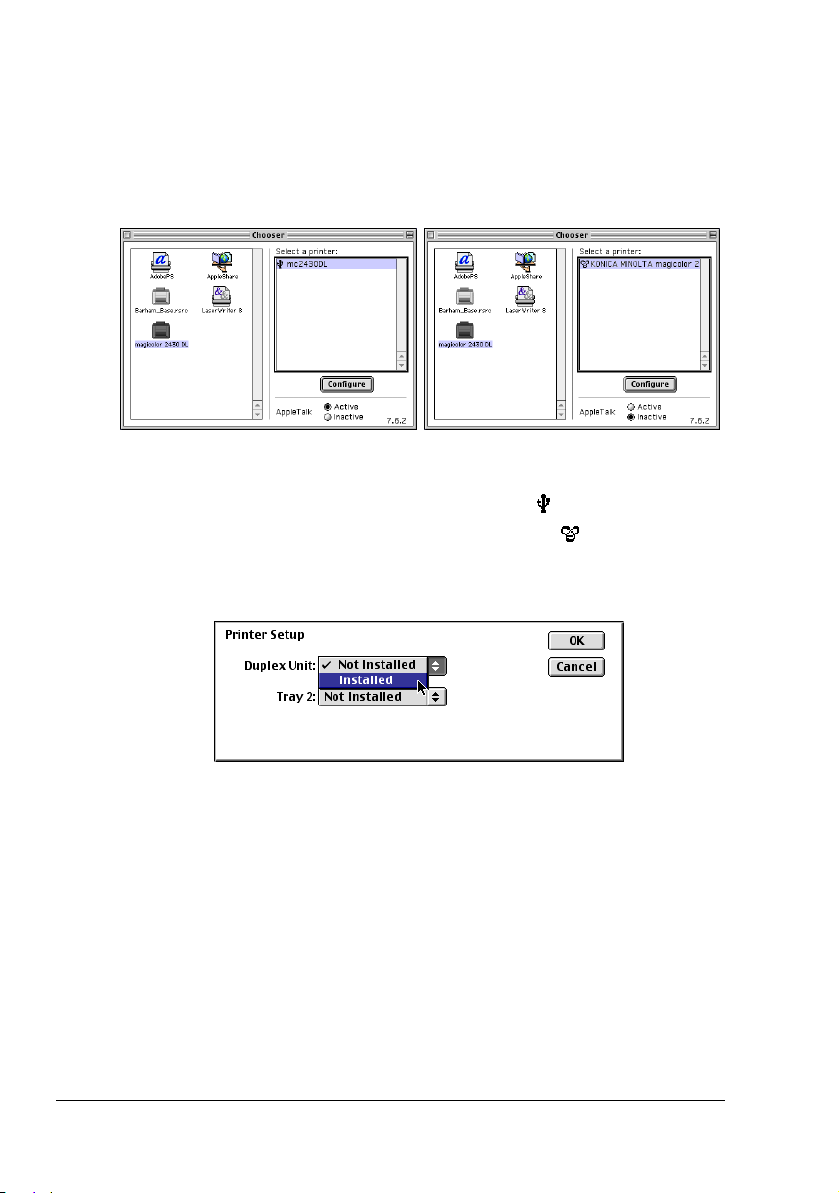
5 Click Configure.
The Printer Setup dialog box appears.
6 Select the options that are installed, and then click OK.
7 Close the Chooser.
The icon for the magicolor 2430 DL appears on the desktop.
With a USB connection, mc2430DL appears.
With a network connection, KONICA MINOLTA magicolor2430D
appears.
" In the Classic environment, no icon appears on the desktop.
Selecting the Printer in the Chooser4
Page 7
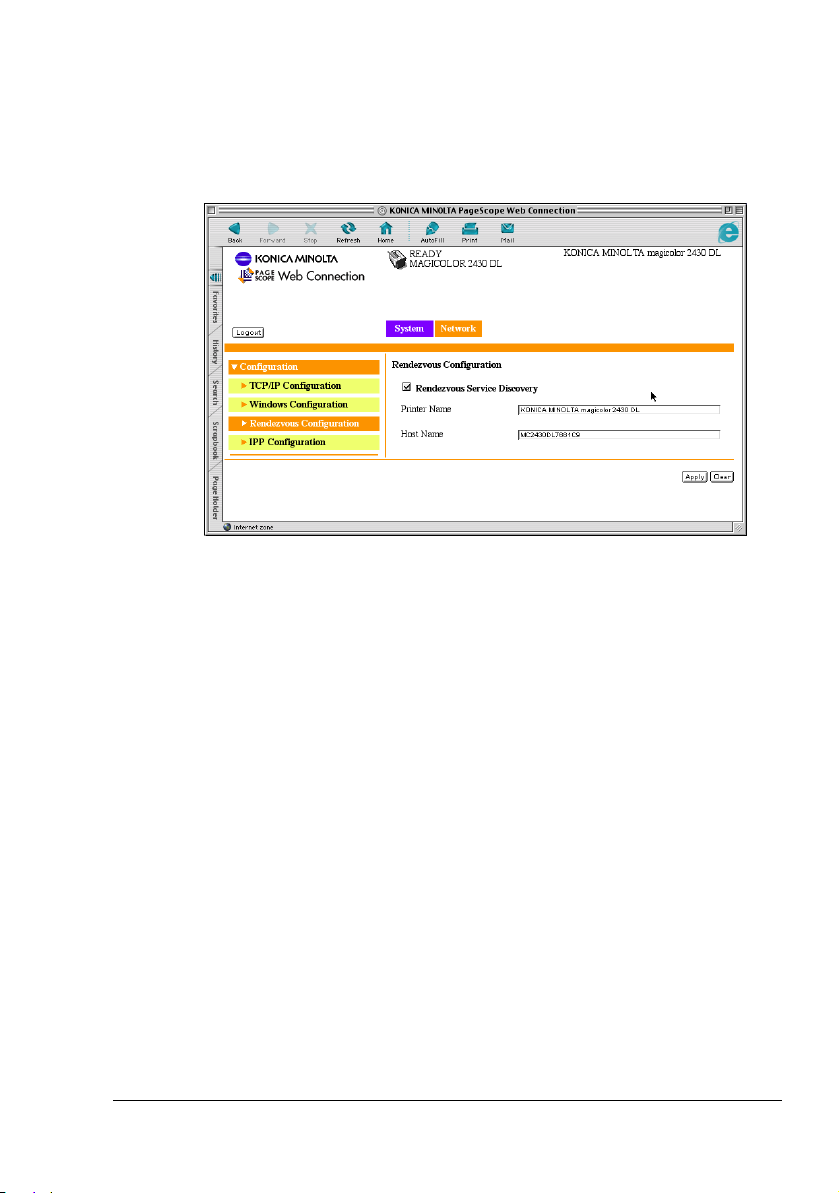
" You can log in to PageScope Web Connection and use the Rendez-
vous Configuration menu to change the name of the printer. If
Enable Rendezvous Service Discovery is not selected, the printer
name will not appear in the Select a printer section on the right side
of the Chooser. Refer to Utilities and Documentation CD-ROM for a
description of PageScope Web Connection.
Selecting the Printer in the Chooser
5
Page 8
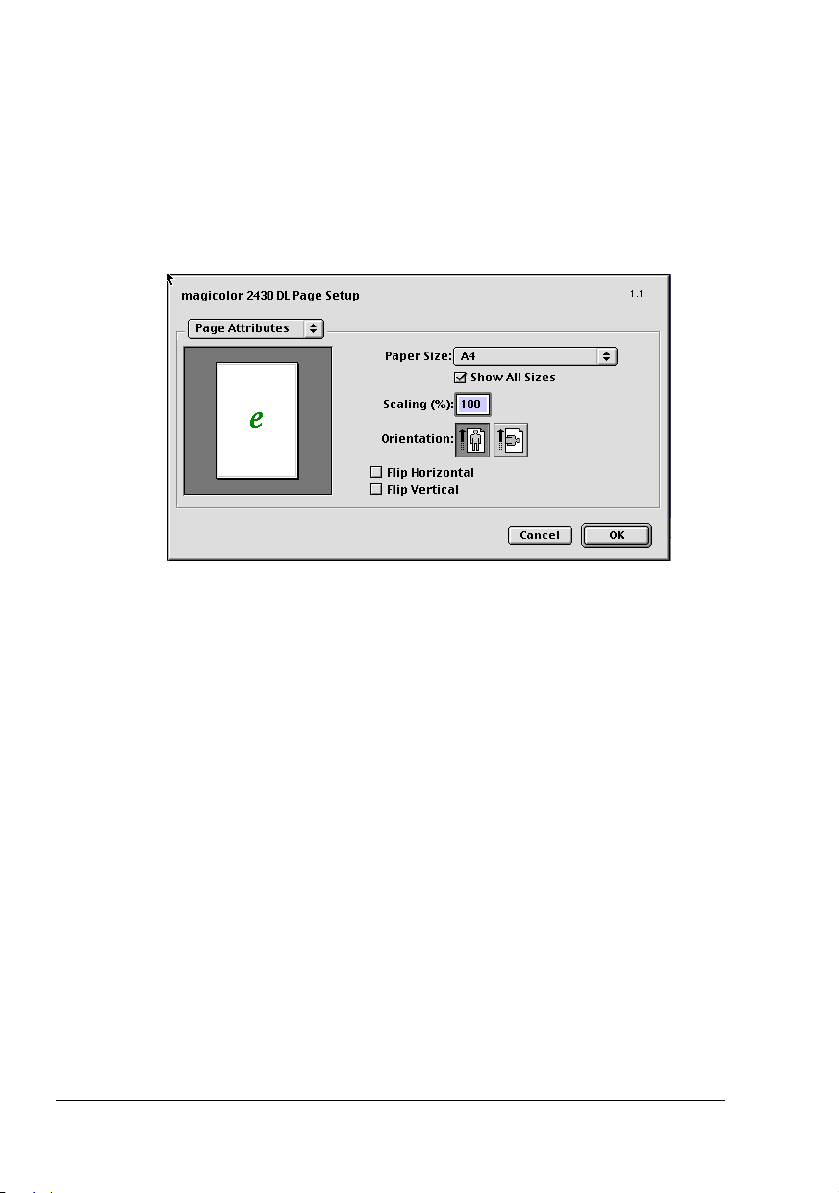
Specifying Page Setup Settings
The Page Setup dialog box appears when Page Setup... is selected from the
File menu.
Page Attributes Options
The Page Attributes section is used to specify the options for the Paper
Size, scaling, and page orientation.
Paper Size
Select the desired Paper Size from the Paper Size pop-up menu.
Show all Paper Sizes
Select to display all available paper sizes in the Paper Size pop-up menu.
Scaling (%)
If you want to enlarge or reduce the size of the printout, enter the scale
ratio (25%-400%) here.
Orientation
Select either a vertical or horizontal page orientation for printouts.
Flip Horizontal: Select this option to flip the image along its vertical
axis; the left and right sides of the print image are
reversed.
Flip Vertical: Select this option to flip the image along its horizon-
tal axis; the top and bottom of the print image is
inverted.
" Regardless of which paper size is selected, the printer does not print
within 0.157 inch (4 mm) of the edge of the paper.
Specifying Page Setup Settings6
Page 9

Specifying a Custom Paper Size
You can also specify a paper size that is not listed in the Paper Size pop-up
menu.
1 Select Edit Custom Paper Sizes... from the Paper Size pop-up menu, in
the Page Setup dialog box.
The Edit Paper Sizes dialog box appears.
2 Enter a name for the custom paper size in the Name field, enter the
dimensions in the Width and Height fields, and then click Add.
" The default units used for the dimensions for Width and Height is
inches. To specify the dimensions in millimeters, enter “mm” after
entering the each of the values for the dimensions.
Specifying Page Setup Settings
7
Page 10

3 To add several different custom paper sizes, click New and repeat step 2.
" To delete an existing custom paper size, select the custom paper
size from the list on the left of the dialog box, and then click Delete.
4 The custom paper size setting is saved, and the name of the custom
paper size can now be selected from the Paper Size pop-up menu.
5 After you have finished entering the settings, click Done.
If you clicked Add in step 2, but do not save the custom paper size setting, a message appears, asking if you want to save the settings. Click
OK.
" The Default Size option in the lower left of the Edit Paper Sizes
dialog can be used to select the default paper size. Changes to
this setting take effect the next time the application is used.
Specifying Page Setup Settings8
Page 11

Specifying Print Settings
The following dialog box appears when Print... is selected from the File
menu in the application being used.
You can specify the following options from the Print dialog box.
Specifying Print Settings
9
Page 12

Print Dialog Box Options
Section Description
General This section contains options for the number
of copies to be printed, the paper source, and
the range of pages to be printed.
Paper Type/Quality This section contains options for the paper
type, the print quality, and the type of image
being printed.
Layout This section contains options for the number
of pages per sheet of paper and other duplex
printing.
Image This section contains options for printing in
color, grayscale or Black & White, and ColorSync options.
Background This section contains options for spooling the
print data for background or foreground printing and the document printing time.
Watermark This section contains options for watermark
settings.
Advanced This section contains options for advanced
settings.
" No warning message will be displayed if options that cannot be used
together are selected.
Common buttons
Preview
Click this button to view a preview image of the printout, to check that the
print options are set correctly.
Cancel
Click this button to close the Print dialog box without applying any of the
settings.
OK
Click this button to print using the selected print options.
Specifying Print Settings10
Page 13

General Options
The General section is used to specify the number of copies to be printed,
the paper source, and the range of pages to be printed.
Copies
This specifies the number of copies to be printed. If the Collated check-
box is selected, all pages in the documents are printed as sets of printouts.
For example, if 2 is entered for Copies and Collated is selected, the
pages will print in the following order:
1,2,3,4,5,1,2,3,4,5
If Collated is not selected, the pages will print in the following order:
1,1,2,2,3,3,4,4,5,5
Paper Source
This specifies the paper source to be used when printing.
All pages from: All pages in the document are printed using the
paper in the specified paper tray.
First page from: The first page of the document is printed on paper
from a paper tray different from the tray used to print
the rest of the document.
Remaining from: The rest of the document is printed from the speci-
fied paper tray when the first page is to be printed on
paper from a different tray.
" Depending on the paper tray selected, you may not be able to use
some paper sizes. For details, refer to the User’s Guide (CD-ROM)
provided with the printer.
Pages
All: Prints all the pages in the document.
From, To: Specifies the range of pages to be printed.
Specifying Print Settings
11
Page 14

Paper Type/Quality Options
The Paper Type/Quality section is used to specify the paper type, the print
quality, and the type of image being printed.
Paper Type
This option specifies the type of paper on which the print image will be
printed.
" Depending on the paper type selected, you may not be able to use
some paper sizes. For details, refer to the User’s Guide (CD-ROM)
provided with the printer.
Print Quality
This option specifies Draft, Normal or Best as the print resolution.
If Draft is selected, the image is printed at 600×600 dpi. If Normal is
selected, the image is printed at 1200×600 dpi. If Best is selected, the
image is printed at 2400×600 dpi.
Image Type
This option specifies the type of image being printed, Photographic or
Tex t.
Specifying Print Settings12
Page 15

Layout Options
The Layout section is used to specify the number of pages per sheet of
paper and other layout options when printing.
Pages Per Sheet
This specifies the number of pages to be printed on one sheet of paper.
For example, if 2 is selected, two pages are printed on one sheet of paper.
If more than one page is printed on one sheet of paper and the Print Bor-
der check box is selected, a border is printed around the image of each
page printed on one sheet of paper.
Print Both Sides
This specifies that both sides of the paper will be printed on.
When Print Both Sides is selected, you can select the Binding setting to
specify if the binding edge is along the long edge or the short edge of the
paper.
" To print on both sides of the paper, the optional Duplexing Unit must
be installed on the printer.
In addition, the printer must be set up with the Chooser to use the
duplex unit. For details on selecting the duplex unit with the Chooser,
refer to “Selecting the Printer in the Chooser” on page 3.
When Print Both Sides is selected, you may not be able to use some
types of paper. For details, refer to the User’s Guide (CD-ROM) provided with the printer.
Specifying Print Settings
13
Page 16

Image Options
The Image section is used to specify the settings used when printing in color
or grayscale, and the ColorSync options.
ColorSync Color Matching
The ColorSync Color Matching section is used specify the ColorSync color
matching settings.
Matching Method
This specifies the color quality for the printed image. If Automatic is
selected, the driver determines a matching method automatically. If printing Line Art or graphics, select Business Graphics. If you are printing a
photographic image, select Photographic.
Printer Profile
This specifies the printer profile to be used when printing the document.
Specifying Print Settings14
Page 17

Color
The Color section is used to specify the color settings to be used when printing the image.
Saturation
This specifies the color saturation.
Brightness
This specifies the brightness (lightness) of the printed image.
Contrast
This specifies the contrast for the printed image.
Specifying Print Settings
15
Page 18

Grayscale
The Grayscale section is used to specify the grayscale settings to be used
when printing the image in grayscale.
Brightness
This specifies the brightness (lightness) of the printed image.
Contrast
This specifies the contrast of the printed image.
Black & White
The Black & White section is used to print a document in black and white
(monocolor).
" This section contains no options that can be set by the user.
Specifying Print Settings16
Page 19

Background Options
The Background section is used to specify whether or not to spool the print
data for background printing and when to print a document.
Print in
If Foreground is selected, you will not be able to perform other tasks on
your computer until printing has finished.
If Background is selected, the print data is processed in the background,
allowing you to continue using your computer for other tasks.
Print Time
This specifies when a print job should be printed.
Urgent: The document is given highest priority and is printed before
other print jobs.
Normal: The document is printed in the order it appears in the print
queue.
Print at: The print data is printed at the specified data and time.
Put document on hold:
The print data for a document is put on hold (Printing is
paused).
Specifying Print Settings
17
Page 20

Watermark Options
The Watermark section is used to specify the watermark options.
Select the desired watermark from the pop-up menu.
New
This is used to create a new watermark. After clicking New, a dialog box
appears for you to enter the name for the new watermark.
Enter the name for the watermark, and then click Create to create a new
watermark.
Edit
This is used to edit an existing watermark. After selecting the name of an
existing watermark that you want to edit and clicking Edit, the watermark
edit dialog will appear and the watermark text and options can be
selected. You can change the text, position and color settings.
Specifying Print Settings18
Page 21

Delete
This is used to delete an existing watermark. After selecting the watermark that you want to delete and clicking Delete, the watermark tab dialog appears. Click Delete to delete the watermark.
" The Edit and Delete buttons are available only when Watermark is
selected from the pop-up menu.
Watermark Edit dialog
Text
Use the Tex t tab to specify the text to appear in the watermark.
Te xt
Use this field to specify the text of the selected watermark.
Font
This specifies the font to be used for the text in the watermark.
Style
This specifies the text style to be used for the watermark. Click the corresponding button to turn Bold, Italic, or Outline on or off.
Size
This specifies the font size to be used for the text in the watermark.
" You can check the effect of the settings in the preview area on the left
side of the dialog box.
Specifying Print Settings
19
Page 22

Position
Use the Position tab to specify the angle to be used for the watermark.
Angle
Click within the circle, or on the arrows, to specify the angle for the watermark.
The value for the specified angle appears beside Angle.
" You can check the effect of the settings in the preview area on the left
side of the dialog box.
Specifying Print Settings20
Page 23

Color
Use the Color tab to specify the color to be used for the text in the watermark.
Color
If you click the color selection box beside Color, a dialog box appears.
Select the color to be used for the text in the watermark, and then click
OK.
Density
This specifies the color density for the text in the watermark.
" You can check the effect of the settings in the preview area on the left
side of the dialog box.
Specifying Print Settings
21
Page 24

Advanced Options
The Advanced section is used to specify advanced print options.
Transmit Once
When this option is selected, the computer will only send the print job to
the printer once and the printer will produce additional copies on it’s own.
" This option is only used for jobs with multiple copies.
Print To Disk
Select this check box to save the document as a print data file without
printing the document.
Compress Pixmaps
This option will compress pixmaps when possible, resulting in faster
spooling times and smaller spool files.
Specifying Print Settings22
Page 25

Checking Print Jobs
To check the progress of print jobs, double-click the magicolor 2430 DL
desktop printer icon.
" In the Classic environment, Print Monitor automatically starts up,
and the icon appears in the Dock. Click the Print Monitor icon to
check the status of print jobs.
Checking Print Jobs
23
Page 26

Troubleshooting
Symptom Action
A printer on the network
does not appear in the
Chooser.
When printing on both
sides of paper with a custom size, an error occurs.
When printing from a Web
browser, each frame is
printed on a separate
page.
Double-sided printing cannot be selected.
Tray 2 cannot be selected.
The error was cancelled,
but the error message
appeared again.
Using Administrator mode in PageScope
Web Connection, select the Enable Rendez-
vous Service Discovery check box in the
Rendezvous Configuration menu.
Both sides of paper with a custom size cannot be printed on. In addition, there are limitations on the media types that can be
selected. Refer to the User’s Guide
(CD-ROM) provided with the printer.
Depending on the Web browser being used,
each frame will be printed on a separate
page. Try printing from a different Web
browser. You can confirm it using the “preview” function of the print dialog.
If the printer is connected by USB, select the
installed options with the Chooser. For details
on selecting options with the Chooser, refer to
“Selecting the Printer in the Chooser” on
page 3. In addition, there are limitations on
the media types that can be selected. Refer
to the User’s Guide (CD-ROM) provided with
the printer.
Occasionally, the error message appears a
few times, even though the error was cancelled.
Troubleshooting24
 Loading...