

Page 1

Recycled paper is used for the inside pages of this book.
Konica 2223 Copier
User’s Manual
As an ENERGY STAR partner, Konica Business Machines U.S.A., Inc. has
determined that this product meets the ENERGY STAR guidelines for energy
efficiency.
Page 2

Konica 2223 User’s Manual
© 1997 by Konica Business Machines U.S.A., Inc.
Disclaimer
Konica Business Machines U.S.A., Inc. has made every effort to ensure that the
information in this manual is complete and accurate. However, constant efforts are
also being made to improve and update the product. Therefore, Konica Business
Machines U.S.A., Inc. shall not be liable for errors in this manual or for any
consequential damages resulting from the use of this manual. The information
contained herein is subject to change without notice.
FEDERAL OR STATE STATUTES MAY PROHIBIT THE COPYING OF CERTAIN
DOCUMENTS OR INFORMATION, RESULTING IN FINES OR IMPRISONMENT
FOR VIOLATOR.
User’s Manual Part Number
OP-03-2223
Correspondence
Konica welcomes your comments regarding the content of this manual. Mail all
correspondence regarding documentation to the following address:
Konica Business Machines U.S.A., Inc.
New Product Development
500 Day Hill Road
Windsor, CT 06095
Page 3

Table of Contents
Section 1: Introduction
Copier Highlights................................................................................1-2
Features.........................................................................................1-2
Standard Equipment ......................................................................1-2
Optional Equipment ....................................................................... 1-2
To the User ........................................................................................ 1-3
Using this Manual............................................................................... 1-4
Section 2: Safety Information
FCC Regulations................................................................................2-2
Canadian Department of Communications Regulations .................... 2-2
User Instructions ................................................................................ 2-3
Safety Alert Symbols......................................................................2-3
Machine Safety Labels....................................................................... 2-4
Installation Requirements...................................................................2-6
Power Source Information.................................................................. 2-7
Machine Handling and Care............................................................... 2-8
Routine Safety Check ...................................................................... 2-11
Section 3: Copier Information
External View .....................................................................................3-2
Internal View ......................................................................................3-4
Options...............................................................................................3-5
Control Panel .....................................................................................3-6
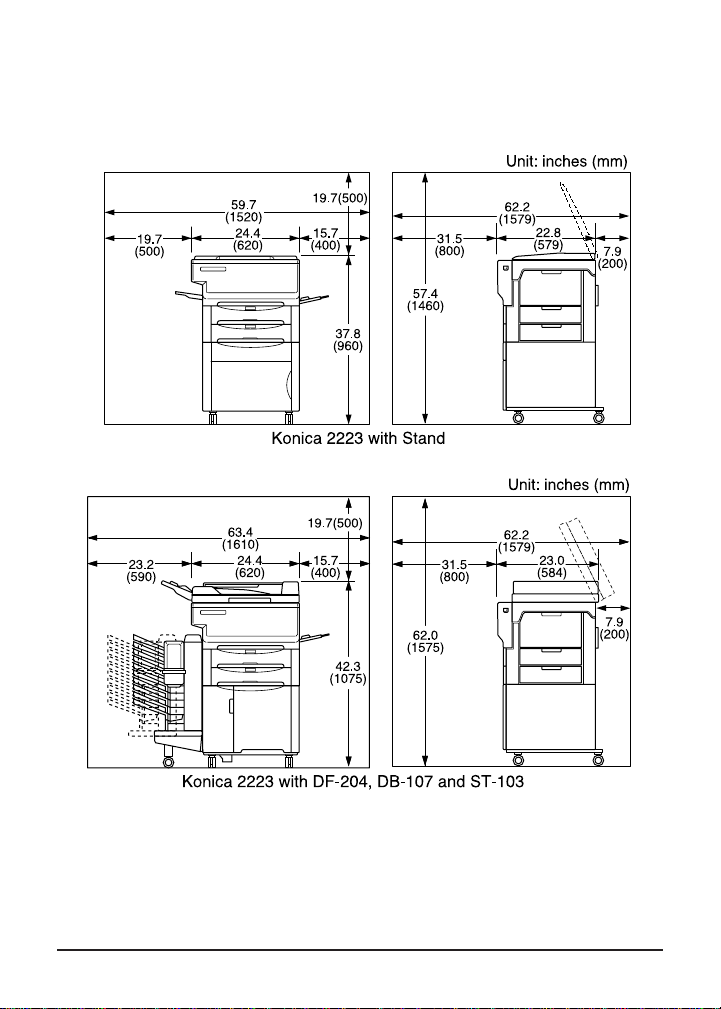
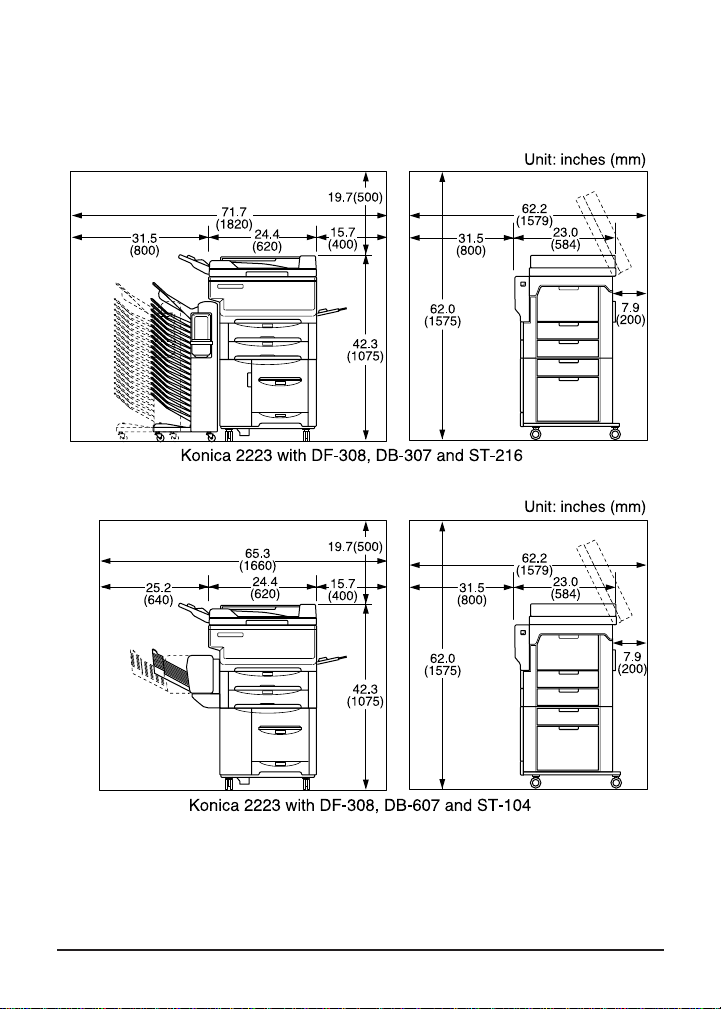
Site Requirements..............................................................................3-8
Turning the Copier On......................................................................3-10
Power Saver..................................................................................... 3-10
Auto Low Power........................................................................... 3-11
Manual Shut-Off........................................................................... 3-11
Auto Shut-Off ...............................................................................3-11
Automatic Settings ...........................................................................3-12
Initial Machine Settings ................................................................ 3-12
Auto Reset ...................................................................................3-12
Automatic Paper Selection (APS) ................................................ 3-12
Automatic Exposure Selection (AES) ..........................................3-13
Automatic Magnification Selection (AMS) .................................... 3-13
Automatic Humidity Sensor.......................................................... 3-13
Automatic Edge Delete ................................................................ 3-13
Odd-Even Original Counter in 1s2 Mode ................................... 3-13
i
Page 4

Table of Contents
Section 4: Paper Specifications
Originals on Platen Glass...................................................................4-2
Originals on Reversing Automatic Document Feeder (RADF) ........... 4-2
Originals on Automatic Document Feeder (ADF)............................... 4-2
Copy Paper in Main Body Trays ........................................................ 4-2
Copy Paper in Drawer Base (DB-307/DB-607).................................. 4-2
Copy Paper and Special Stock in Bypass.......................................... 4-3
Copy Paper in Automatic Duplex Unit (ADU)..................................... 4-3
Copy Paper in 10-Bin In-Bin Stapler Sorter (ST-104) ........................ 4-3
Copy Paper in 10-Bin Off-Line Stapler Sorter (ST-103) ..................... 4-3
Copy Paper in 20-Bin Off-Line Stapler Sorter (ST-216) ..................... 4-3
Paper Size/Weight Compatibility Chart .............................................. 4-4
Section 5: Basic Copying
Copying from the Platen Glass .......................................................... 5-2
Auto Copy ...................................................................................... 5-3
Copying from the Document Feeder (RADF/ADF).............................5-4
Copying Mixed Size Originals ........................................................ 5-5
Using the Bypass ............................................................................... 5-6
Copy Density......................................................................................5-7
AES................................................................................................5-7
Manual Density ..............................................................................5-7
Copy Size...........................................................................................5-8
Lens Modes........................................................................................ 5-9
Automatic Magnification Selection (AMS) ...................................... 5-9
Preset and User Preset Ratios ....................................................5-10
Programming a User Preset Ratio ............................................... 5-11
Zoom Mode..................................................................................5-12
Special Ratio Table......................................................................5-13
Using the Sorter ...............................................................................5-14
Specifications: 10-Bin In-Bin Stapler Sorter (ST-104).................. 5-14
Specifications: 10-Bin Off-Line Stapler Sorter (ST-103) .............. 5-15
Specifications: 20-Bin Off-Line Stapler Sorter (ST-216) .............. 5-16
Non-Sort, Sort, and Group Modes for ST-104/103/216.................... 5-17
Staple-Sort Modes for ST-104 ......................................................... 5-18
Automatic In-Bin Stapling.............................................................5-18
Manual In-Bin Stapling.................................................................5-18
Off-Line Stapling Option...............................................................5-19
ii
Page 5

Table of Contents
Section 6: Duplex Copying
Automatic Duplex............................................................................... 6-2
1s2 Mode Using the RADF/ADF (Odd-Even Original Counter OFF).......
1s2 Mode Using the RADF/ADF (Odd-Even Original Counter ON) ........
1s2 Mode Using the Platen Glass................................................ 6-4
2s2 Mode Using the RADF .......................................................... 6-5
2s1 Mode Using the RADF .......................................................... 6-6
Manual Duplex ................................................................................... 6-7
1-Sided to 2-Sided Using the Bypass ............................................6-7
2-Sided to 2-Sided Using the Bypass ............................................6-8
Section 7: Special Copying
Shift/Reduce & Shift ...........................................................................7-2
Using the Platen Glass .................................................................. 7-2
Using the RADF/ADF.....................................................................7-3
Frame and Fold Erasure ....................................................................7-4
Using Frame and Fold Erasure...................................................... 7-4
Setting Frame Erasure................................................................... 7-5
Setting Fold Erasure ......................................................................7-6
Book Copy.......................................................................................... 7-7
Photo Enhance................................................................................... 7-8
OHP Interleave................................................................................... 7-9
Section 8: Maintenance and Supplies
Service, Supplies, and Repairs .......................................................... 8-2
Daily Maintenance..............................................................................8-3
Cleaning the Platen Glass ............................................................. 8-3
Cleaning the Inner Surface of the Platen Cover............................. 8-3
Cleaning the RADF/ADF Conveyance Belt Surface ......................8-3
Cleaning the Corona Wire..................................................................8-4
Removing/Inserting Paper Trays........................................................8-4
Loading Paper....................................................................................8-5
Service-Adjustable Tray (Tray 1, 2 and 4) ..................................... 8-5
LCT (Large Capacity Tray: Tray 3) ................................................ 8-6
User-Adjustable Tray (Option) .......................................................8-7
Adding Toner...................................................................................... 8-8
6-2
6-3
iii
Page 6

Table of Contents
Section 8: Maintenance and Supplies (continued)
Replacing the Staple Cartridge ........................................................8-10
In-Bin Stapler ...............................................................................8-10
Off-Line Stapler............................................................................8-11
Installing the Off-Line Corner Stapling adapter ................................8-12
Removing the Off-Line Corner Stapling Adapter..............................8-12
Preventive Maintenance................................................................... 8-13
Reading the PM Count.................................................................8-13
Moving the Copier ............................................................................8-14
Section 9: Troubleshooting
Opening and Closing the Copier ........................................................ 9-2
User Codes ........................................................................................9-3
Mishandled Paper Codes................................................................... 9-4
Clearing Mishandled Paper................................................................ 9-5
Service Codes..................................................................................9-16
Reporting Service Codes ............................................................. 9-16
Clearing a Wedged Staple ...............................................................9-17
In-Bin Stapler (Code J75) ............................................................ 9-17
Off-Line Stapler............................................................................9-18
Troubleshooting Hints ...................................................................... 9-20
Glossary
Specifications
iv
Page 7

Section 1: Introduction
Copier Highlights
Features
Standard Equipment
Optional Equipment
To the User
Using this Manual
Introduction 1-1
Page 8

Introduction
Copier Highlights
The Konica 2223 is a 23 copies-per-minute (cpm) desktop copier
available with either platen cover or automatic document feeder (RADF/
ADF) configuration. The Konica 2223 copier system offers the following
features, standard equipment and optional equipment:
Features:
23 CPM
Image Shift
Reduce & Shift
Frame/Fold Erasure
Book Copy
Photo Mode
OHP Interleave
Standard Equipment:
50-sheet Stack Bypass
Main Body with Two Tray Ports
User’s Manual
Optional Equipment:
Platen Cover
Automatic Document
Feeder (DF-204)
Reversing Automatic
Document Feeder (DF-308)
Drawer Base with ADU (DB-107)
Drawer Base with LCT, PFU and ADU (DB-307)
Drawer Base with LCT and PFU (DB- 607)
Stand
10-Bin In-Bin Stapler Sorter (ST-104)
10-Bin Off-Line Stapler Sorter (ST-103)
20-Bin Off-Line Stapler Sorter (ST-216)
Off-Line Stapler
Automatic Duplex
Auto Reset
Auto Shut-Off
Power Saver
Automatic Paper Selection (APS)
Automatic Exposure Selection (AES)
Automatic Magnification Selection (AMS)
Automatic Humidity Sensor
Service-Adjustable Paper
Tray (8.5"x11"R)
User-Adjustable Paper Tray
Key Counter
Remote Diagnostics
Working Table
1-2 Introduction
Page 9

Introduction
To the User
Welcome to the Konica 2223 copier system. To ensure optimal
performance and safety, handle and operate the 2223 copier system as
recommended in this manual.
Copier Service and Repairs: If you require service or repairs, contact
your Konica dealer or service representative immediately. Do not
attempt to disassemble or repair the copier yourself. All repairs should
be performed by an authorized Konica service representative.
Supplies: Use only supplies recommended by Konica Business
Machines U.S.A., Inc. If you require special information regarding
supply items, please contact your Konica dealer or service
representative. Follow recommendations regarding compatibility, usage,
storage, and handling of all supplies.
Control Panel: The 2223 control panel is consistent with Konica’s userfriendly style, is designed for easy operation. Keys for basic functions
are located on the right side, special function keys are located on the
left side and the message area is located in the center of the panel. A
detailed description of the control panel is included on pages 3-6~3-7.
Maintenance Agreement: The Konica 2223 copier system will give you
many years of trouble-free service. To ensure high quality copying
performance and to prevent premature wear of precision parts and
components, periodic cleaning and routine adjustments should be
scheduled.
Konica recommends that you contact your service center to discuss the
benefits of Konica’s Customer Service Maintenance Agreement and to
learn how a maintenance plan can be tailored to meet your individual
needs.
Introduction 1-3
Page 10

Introduction
Using this Manual
The Konica 2223 User’s Manual includes nine sections of information
relating to the copier and copying functions, plus a glossary and
specifications. For easy reference, each section begins with a list of
subjects covered.
To ensure the best performance and most effective use of this copier,
read this manual before using the copier, and keep it located with the
machine for quick reference and the convenience of all users.
Section 1: Introduction presents an overall introduction to the copier,
including a list of its features.
Section 2: Safety Information provided safety precautions for copier
set-up and operation.
Section 3: Copier Information identifies copier parts, accessories, and
features, including the control panel and automatic settings.
Section 4: Paper Specifications lists paper capacities, weights, and
sizes for all copying modes and accessories.
Section 5: Basic Copying describes simple copying procedures,
including using the bypass and using the optional sorters.
Section 6: Duplex Copying describes 1s2, 2s2, and 2s1 modes
copying procedures, using RADF/ADF and platen glass.
Section 7: Special Copying provides instruction for advanced copying
applications such as Image Shift, Reduce & Shift, Frame/Fold Erasure,
Book Copy, Photo Mode, and OHP Interleave.
Section 8: Maintenance and Supplies includes information on copier
care and maintenance. This section describes how to replace supplies
and periodically clean machine components.
Section 9: Troubleshooting provides troubleshooting information to
help you solve problems relating to copy quality, mishandled paper,
error messages, and error codes.
1-4 Introduction
Page 11

Section 2: Safety Information
FCC Regulations
Canadian Department of Communications Regulations
User Instructions
Safety Alert Symbols
Machine Safety Labels
Installation Requirements
Power Source Information
Machine Handling and Care
Routine Safety Check
Safety Information 2-1
Page 12

Safety Information
FCC Regulations
NOTICE: The Konica 2223 copier generates, uses, and can radiate
radio frequency energy. If it is not installed and used in accordance
with the instruction manual, interference with radio communications
may result. This equipment has been tested and found to comply with
the limits for a class A computing device, pursuant to Subpart J, Part
15, of FCC rules, which are designed to provide reasonable protection
against interference from such equipment when it is operating in a
commercial environment.
Users operating this equipment in a residential area are likely to cause
interference, in which case they may be required to correct the
interference at their own expense.
Canadian Department of Communications Regulations
Le présent appareil n’émet pas de bruits radioélectriques dépassant
les limites applicables aux de Classe A prescrites dans le règlement
sur la brouillage radioélectrique édicté par Le Ministère des
Communications du Canada.
This equipment does not exceed the Class A limits for radio noise
emissions as set out in the radio interference regulations of the
Canadian Department of Communications.
2-2 Safety Information
Page 13
Safety Information
User Instructions
The following pages contain important safety information. To avoid risk
of fire, electric shock, serious personal injury, and/or poor machine
performance, read all safety information before operating the copier
and heed all safety precautions. If you have any questions or concerns
about safety matters, contact a Konica service representative.
Keep this manual permanently located with the copier, and in good,
legible condition. The manual should be readily available to all users.
Safety Alert Symbols
Safety Alert Symbols are attached to some inside areas of the machine
and are also used in this manual to alert you to potentially hazardous
situations or conditions. The following are typical examples of safety
alert indicators used on product labeling.
DANGER
Indicates an imminently hazardous situation which, if not avoided, will
result in death of serious injury.
WARNING
Indicates a potentially hazardous situation which, if not avoided, could
result in death or serious injury.
CAUTION
Indicates a potentially hazardous situation which, if not avoided, may
result in minor or moderate injury.
NOTE: The above safety alert information is presented for better understanding
of hazardous situations. Since this product has only the potential for hazardous
situations classified under CAUTION, only CAUTION indications will be found
on the copier and in this manual.
Safety Information 2-3
Page 14
Safety Information
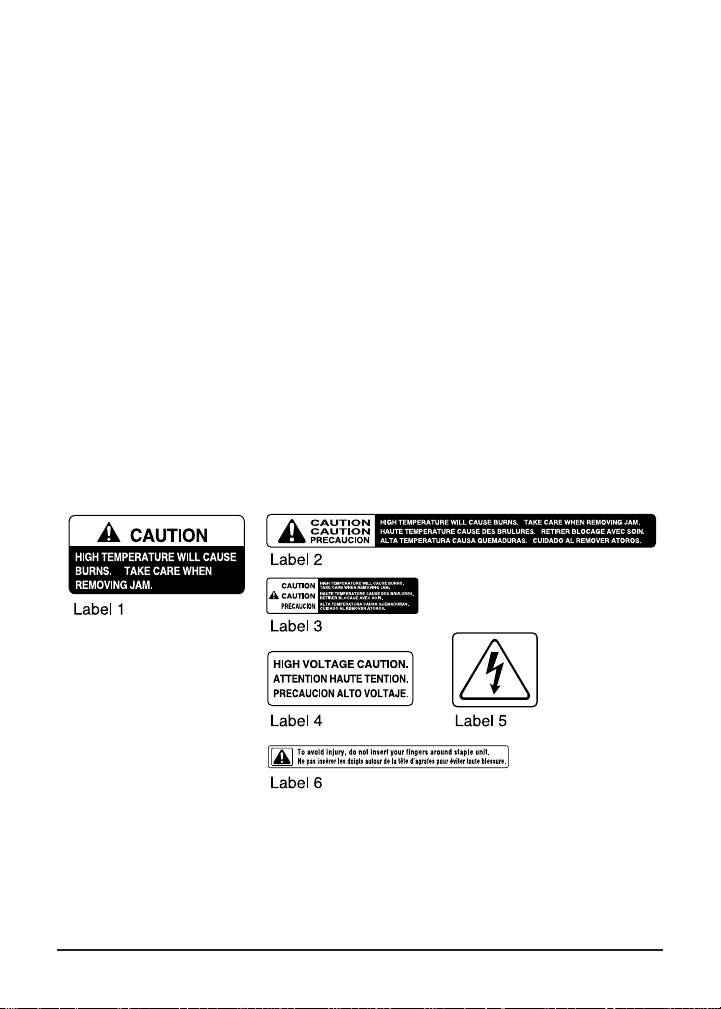
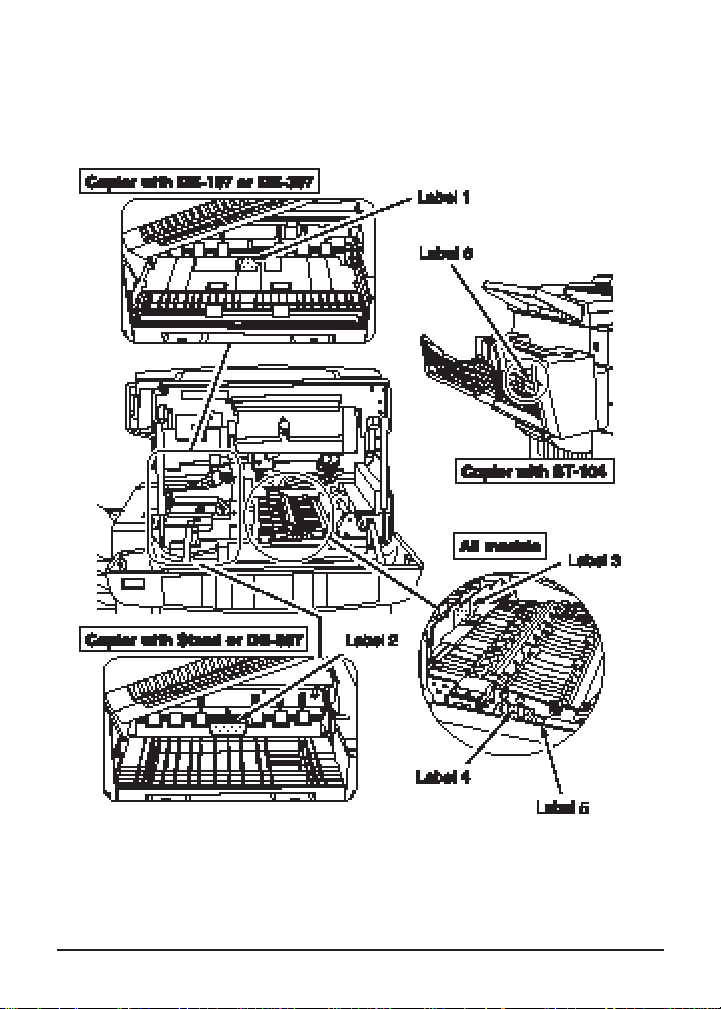
Machine Safety Labels
Machine safety labels are attached to some inside areas of the copier.
The purpose of these safety labels is to alert you to imminent or
potentially hazardous situations or conditions.
You may be injured if you touch any machine area that you are
advised by any caution label or caution indication to avoid.
Do not remove caution labels. If any caution label is removed, or if any
caution indicator is illegible due to soilage, contact your Konica service
representative.
The copier has caution labels at the locations shown right. When
removing mishandled paper, adding toner, or stapling, exercise care in
order to avoid any accidents such as burns, electric shock, or other injury.
2-4 Safety Information
Page 15
Safety Information
Machine Safety Labels (continued)
Safety Information 2-5
Page 16

Safety Information
Installation Requirements
CAUTION
FIRE PREVENTION
❐ Install copier away from flammable materials, curtains and volatile
combustibles.
TEMPERATURE AND HUMIDITY
❐ Install copier away from direct sunlight, heat sources (stoves,
heaters), cold temperatures (air conditioners), and dampness.
❐ Do not install or operate copier outdoors near a lake, pond, river,
etc. Do not allow copier to come in contact with splashes of rain,
water, or any liquid.
❐ Avoid any environment that is outside 50°~86°F (10°~30°C) with
10~80% relative humidity.
VENTILATION
❐ Install copier in a well-ventilated area to maintain a comfortable
working environment. When in use, the copier generates ozone in
amounts too small to be hazardous to the human body. However,
if the machine is used in a poorly ventilated area or if many copies
are made, an odor may be detected.
❐ Install copier in an area free from dust, ammonia gas or fumes
from printing or cleaning solutions, etc. Exposure of the copier to
these materials may also cause poor image quality.
INSTALLATION SPACE
❐ Install copier in an area with adequate space for performing copier
operations, replacing supply items, and conducting regular
maintenance.
❐ Install copier on a flat, sturdy surface, free from strong vibrations.
Be sure the surface is able to support the additional weight of
paper and supplies.
2-6 Safety Information
Page 17

Safety Information
Power Source Information
CAUTION
PLUG SOCKET
❐ A plug socket is limited in capacity. Use an exclusive power source
for the copier. The total power consumption of the copier, plus all
possible options, must not exceed the capacity of the main power
supply. For information about power requirements and power
consumption related to the copier, contact your Konica service
representative.
❐ Firmly insert the copier plug into the outlet. If the inserted plug is
loose in the socket, disconnect the plug and consult an electrician
for repair.
POWER CORD
❐ Do not bend, crush, wind, or roll up the power cord. If your copier
power cord is bent or damaged in any way, contact your Konica
service representative immediately. Do not attempt to repair it
yourself, and do not continue to operate the copier. A damaged
power cord may result in overheating, a short circuit, or fire.
EXTENSION CORDS (LEADS)
❐ Do not use an extension cord without first consulting with an
electrician and a Konica service representative.
ADAPTERS AND MULTIPLE LOADS
❐ Do not use adapters or connectors with the main power cord.
❐ Never connect plural loads or a branched socket to one socket
outlet. Otherwise, an accident may occur as a result of overheating
or fire.
Safety Information 2-7
Page 18

Safety Information
Machine Handling and Care
CAUTION
INTERNAL MACHINE COMPONENTS
❐ Never touch internal high voltage, high temperature or magnetism
area indicated with caution labels.
❐ Never touch the drum surface or any internal machine part
indicated by a do not touch (or pull) statement.
❐ Never touch the inside of the copier for any purpose other than
removing mishandled paper or adding toner.
ABNORMAL CONDITIONS
❐ If any abnormal sound, odor, or smoke generates from the copier,
immediately stop using the machine, turn off the main power
switch, disconnect the plug and contact your service
representative.
❐ If a circuit breaker is tripped or if a fuse blows, stop using the
copier and contact an electrician. If information is needed
regarding the power source or power consumption of the copier,
contact your Konica service representative.
FIRE PREVENTION
❐ Do not use any volatile combustibles, e.g., paint thinner, alcohol,
etc., on or near the machine.
MACHINE MODIFICATIONS
❐ Do not modify the machine in any way or remove any part.
❐ Never remove any covers or guards that are fastened with screws.
There are no user-serviceable areas within these covers.
❐ Never attempt any maintenance function that is not specifically
described in this manual.
2-8 Safety Information
Page 19

Safety Information
Machine Handling and Care (continued)
CAUTION
SERVICE CODES
❐ If a service code (F code) is indicated on the machine control
panel, make a note of the code, turn the machine off, disconnect
the power cord from the outlet, and report the F code to your
service representative.
MACHINE CARE
❐ Do not drop paper clips, staples, or other small metallic objects
into the copier.
❐ Do not spill water or any other liquid into the copier.
❐ Do not use the copier surface to support vases, books, etc. These
items will interfere with the work space and may cause damage to
the copier or to originals.
TONER
❐ Keep toner away from children. Do not inhale toner or allow it to
come in contact with eyes. If inhalation or eye contact occurs,
consult a physician immediately. For additional toner safety
information, refer to the appropriate Material Safety Data Sheet
(MSDS).
SUPPLIES AND CLEANING MATERIALS
❐ Use only paper and supplies recommended by Konica Business
Machines U.S.A., Inc.
❐ Never use supplies or cleaning materials for purposes other than
that for which they were intended. Keep all materials out of the
reach of children.
❐ Follow all warnings and instruction labels attached to or
accompanying the copier.
Safety Information 2-9
Page 20

Safety Information
Machine Handling and Care (continued)
CAUTION
ST-104 10-BIN IN-BIN STAPLER SORTER HANDLING
❐ To avoid injury when using the In-Bin Stapler Sorter, do not insert
your fingers around staple unit.
SORTER TOP BIN CAPACITY
❐ When using the sorter, the maximum capacity of the top bin is 100
sheets. If print quantity exceeds 100, remove copies before the
limit is exceeded during continuous copying. Otherwise, an
accident or mishandled paper may occur.
POWER SAVER
❐ Turn machine power off when not copying for long periods of time.
MACHINE RELOCATION/DISPOSAL
❐ Before moving the copier to another location, contact your Konica
service representative.
❐ Do not dispose of the copier yourself. Contact your Konica service
representative.
2-10 Safety Information
Page 21

Safety Information
Routine Safety Check
To ensure safety when operating this copier, perform a periodic safety
check on the copier and electrical connections by referring to the
following check list. Any special concerns should be immediately
brought to the attention of your Konica service representative.
Check for:
❐ power cord and plug for abnormal heat
❐ power plug for loose connection
❐ power cord and plug for any damage, fraying, and/or creasing
❐ ground wire to ensure correct connection
Special Concerns
Contact your Konica service representative if you have any questions
or concerns about:
❐ Safety
❐ Signs of overheating
❐ Copier damage
❐ Damage to the electrical connection
❐ Abnormal copier operation
❐ Supplies
Safety Information 2-11
Page 22

Section 3: Copier Information
External View
Internal View
Options
Control Panel
Site Requirements
Turning the Copier On
Power Saver
Auto Low Power
Manual Shut-Off
Auto Shut-Off
Automatic Settings
Initial Machine Settings
Auto Reset
Automatic Paper Selection (APS)
Automatic Exposure Selection (AES)
Automatic Magnification Selection (AMS)
Automatic Humidity Sensor
Automatic Edge Delete
Odd-Even Original Counter in 1s2 Mode
Copier Information 3-1
Page 23
Copier Information
External View
3-2 Copier Information
Page 24

Copier Information
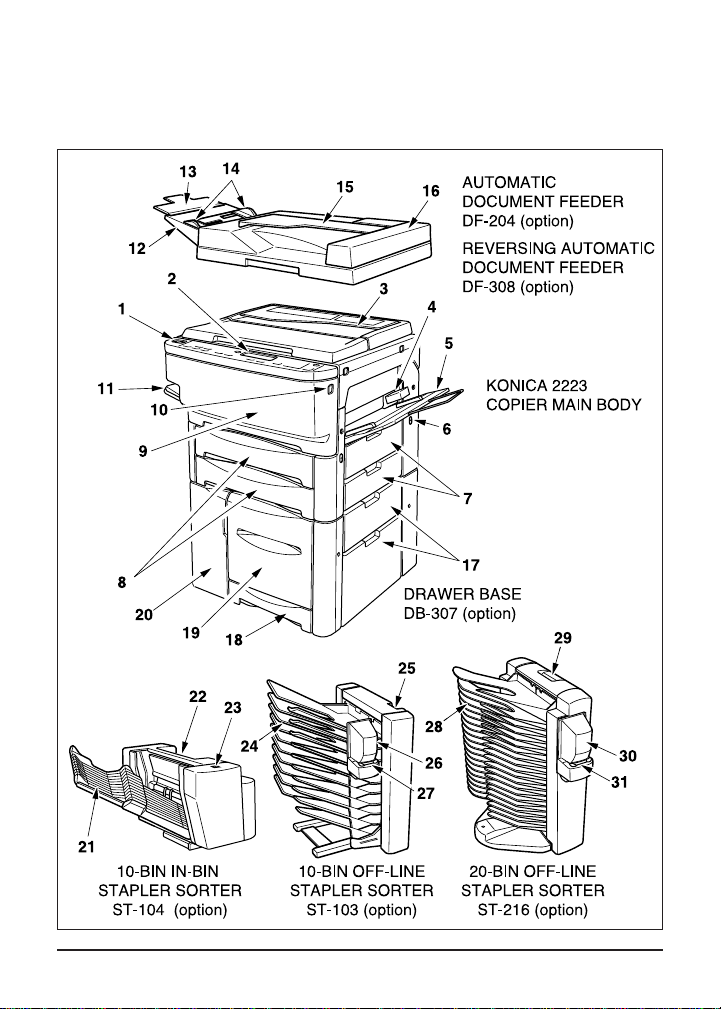
External View (continued)
KONICA 2223 COPIER MAIN BODY
1 MAIN POWER SWITCH
2 CONTROL PANEL
3 PLATEN COVER
4 KEY COUNTER (option)
5 50-SHEET STACK BYPASS
6 TOTAL COUNTER
7 SIDE COVER (main body)
8 PAPER TRAY (main body)
9 COPIER FRONT DOOR
10 FRONT DOOR RELEASE BUTTONS
(both sides of front door)
11 PAPER EXIT TRAY
DOCUMENT FEEDER (DF-204/308) (option)
12 RADF/ADF TRAY
13 RADF/ADF TRAY EXTENSION
14 RADF/ADF PAPER GUIDES
15 ORIGINAL EXIT TRAY
16 RADF/ADF PAPER ACCESS
DRAWER BASE (DB-307) (option)
17 SIDE COVER (drawer base)
18 DRAWER BASE PAPER TRAY
19 LARGE CAPACITY TRAY
20 AUTOMATIC DUPLEX UNIT
10-BIN IN-BIN STAPLER SORTER (ST-104) (option)
21 SORTER BINS
22 SORTER COVER
23 MANUAL STAPLE BUTTON
10-BIN OFF-LINE STAPLER SORTER (ST-103) (option)
24 SORTER BINS
25 SORTER RELEASE LEVER
26 STAPLER COVER
27 OFF-LINE STAPLER (option)
20-BIN OFF-LINE STAPLER SORTER (ST-216) (option)
28 SORTER BINS
29 SORTER RELEASE LEVER
30 STAPLER COVER
31 OFF-LINE STAPLER (option)
Copier Information 3-3
Page 25
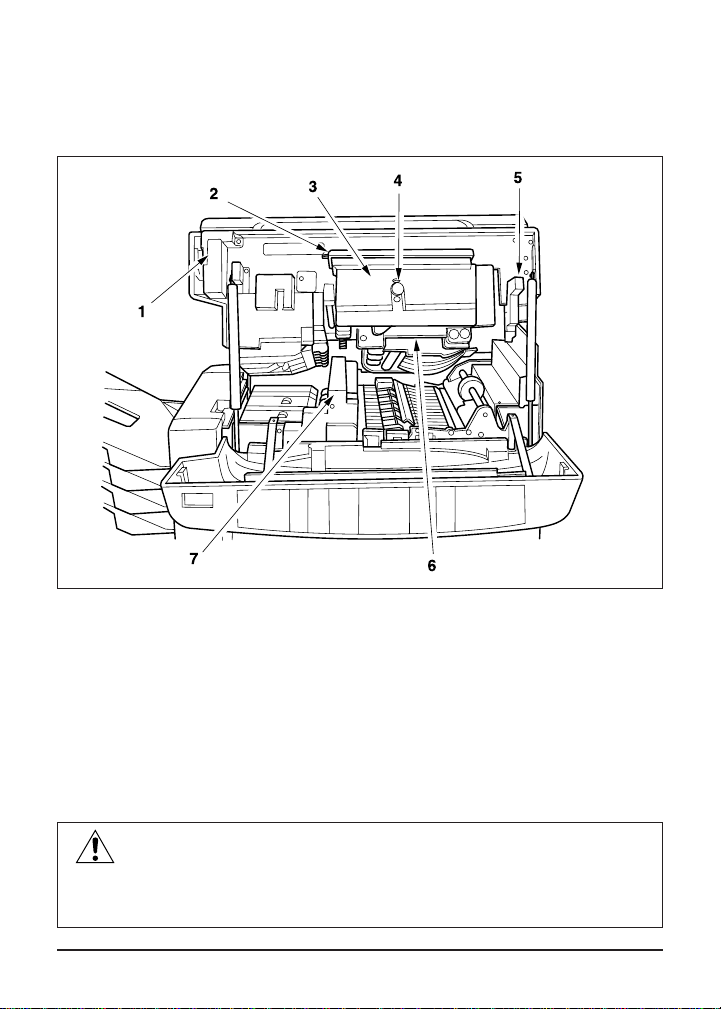
Copier Information
Internal View
1 UPPER MAIN BODY
2 TONER BOX COVER
3 TONER BOX
4 CORONA WIRE CLEANING KNOB
5 UPPER UNIT RELEASE LEVER
6 DRUM UNIT
7 FIXING UNIT
CAUTION
The main body contains internal high voltage and high
temperature areas. Never touch areas indicated by caution labels.
3-4 Copier Information
Page 26
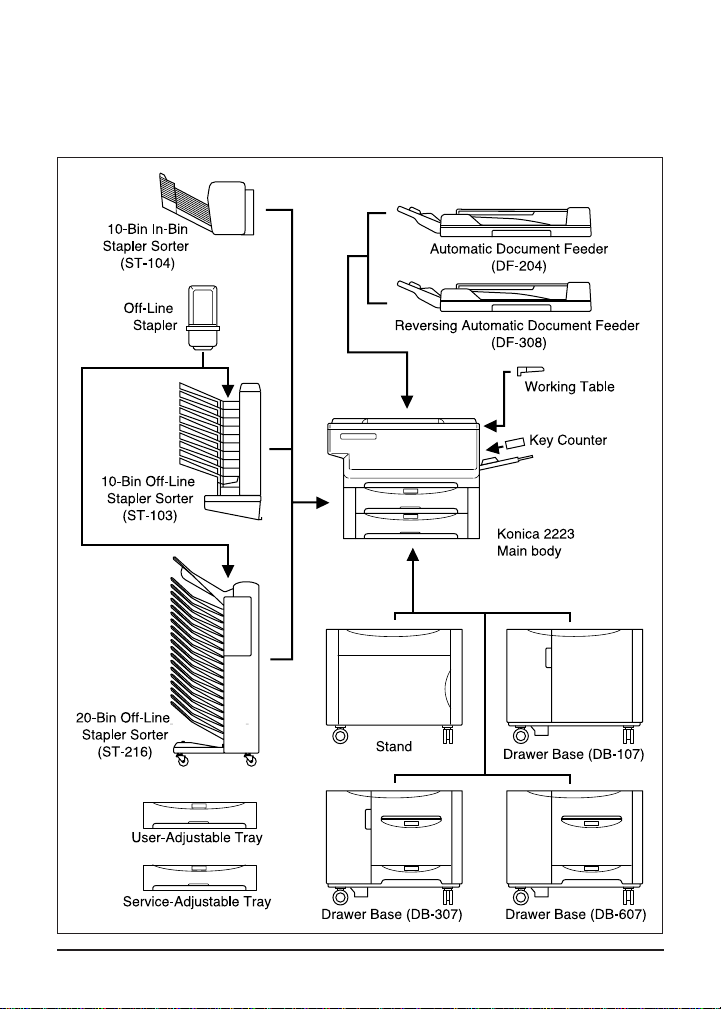
Copier Information
Options
Copier Information 3-5
Page 27
Copier Information
Control Panel
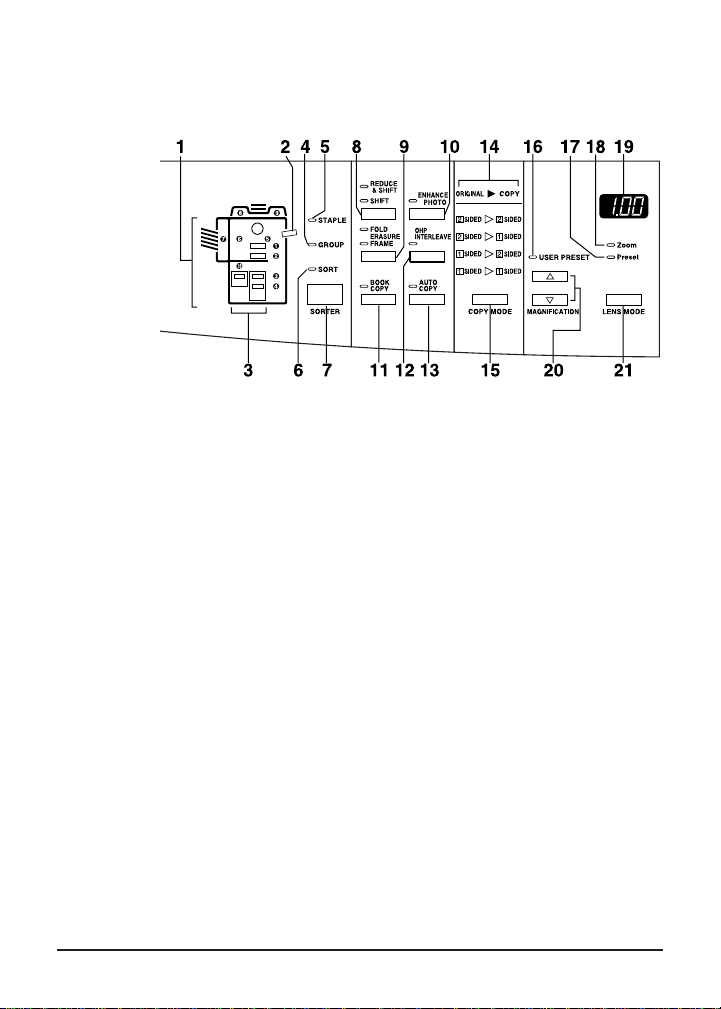
1 COPIER DIAGRAM represents all areas of the copier with illuminated displays
to indicate mishandled paper locations and empty paper trays.
2 BYPASS INDICATOR flashes when the bypass tray is open, and lights steady
when tray is open and paper is placed in it.
3 PAPER TRAY INDICATORS light the paper source selected and flash when a
paper tray is empty.
4 GROUP lights to indicate Group mode is selected.
5 STAPLE lights to indicate Staple-Sort mode is selected when the In-Bin
Stapler Sorter (ST-104) is installed.
6 SORT lights to indicate Sort mode is selected.
7 SORTER button selects Staple-Sort, Group, Sort, and Non-Sort modes. Non-
Sort functions when light is off.
8 SHIFT/REDUCE & SHIFT creates a margin and reduces the image to prevent
image loss.
9 ERASURE (Fold/Frame) erases the center strip and/or border image.
10 ENHANCE PHOTO copies half-tone or half-tone with text originals.
11 BOOK COPY produces two 8.5”x11” copies (dual pages) from an opened book
or large original sheet.
12 OHP INTERLEAVE inserts an OHP transparency copy with each blank plain
paper.
13 AUTO COPY automatically activates copying each time the Document Feeder
is closed.
14 ORIGINALsCOPY INDICATORS light the copy mode selected.
15 COPY MODE selects 1s1, 1s2, 2s2, 2s1 copy modes.
16 USER PRESET INDICATOR lights when the user set lens mode is selected.
17 PRESET INDICATOR lights when the Preset mode is selected.
18 ZOOM INDICATOR lights when the Zoom mode is selected.
19 RATIO WINDOW displays the magnification ratio in use, and machine codes.
20 MAGNIFICATION [▼]/[▲] arrows increase or decrease the current ratio.
21 LENS MODE selects Preset or Zoom modes for manual ratio selection.
3-6 Copier Information
Page 28
Copier Information
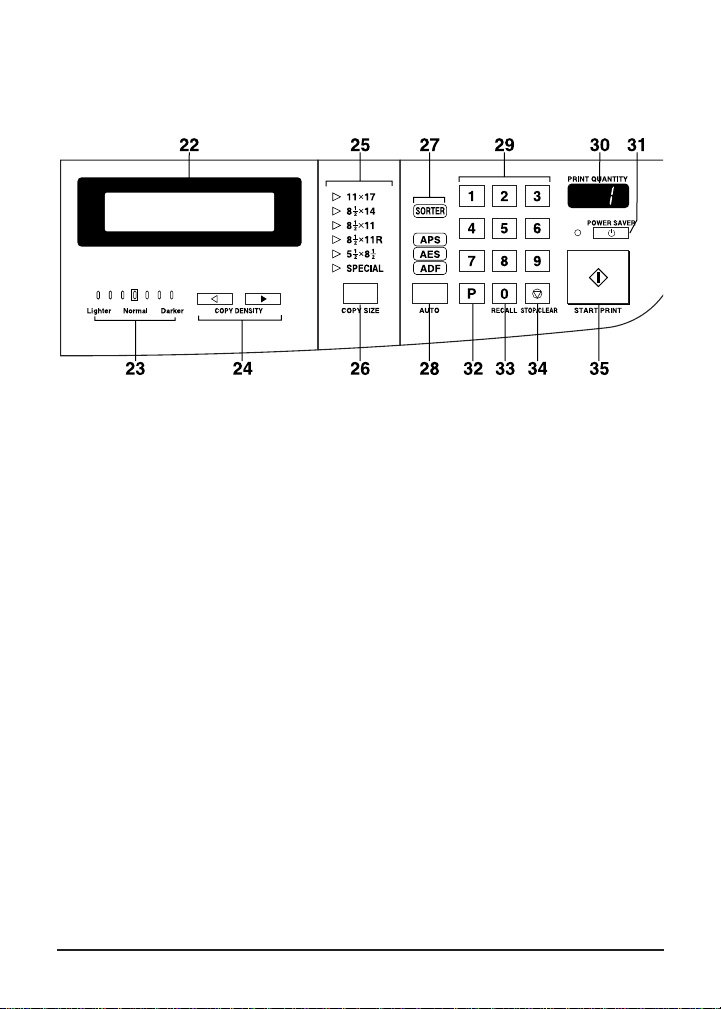
Control Panel (continued)
22 MESSAGE AREA displays information on copier status and instructions for
use.
23 COPY DENSITY INDICATORS light the density level selected.
24 COPY DENSITY manually overrides AES in seven levels, from normal to
lighter or darker.
25 COPY SIZE INDICATORS light to indicate the copy size selected.
26 COPY SIZE overrides APS for manual copy size selection.
27 AUTO INDICATORS light when the AUTO button is pressed to indicate APS,
AES, ADF and SORTER are activated; go out when copy conditions are set
manually.
28 AUTO restores the initial machine settings and clears copy selections.
29 KEYPAD is used to enter print quantity and Frame/Fold Erasure values.
30 PRINT QUANTITY WINDOW displays print quantity when selected and
cumulative quantity while copying is in progress.
31 POWER SAVER activates an energy saving mode when the copier will not be
used for an extended period of time.
32 [P] KEY is sued to access all programming functions.
33 [O] RECALL recalls print quantity selected while copying is in progress.
34 STOP/CLEAR stops continuous copying and allows reset of print quantity.
35 START PRINT indicates
green; activates copying when pressed while copier is in the ready-to-copy
state.
wait
when light is amber and
ready
when light is blue-
Copier Information 3-7
Page 29
Copier Information
Site Requirements
3-8 Copier Information
Page 30
Copier Information
Site Requirements (continued)
Copier Information 3-9
Page 31

Copier Information
Turning the Copier On
1 Turn ON the main power
switch, located on the left front
of the copier and wait
approximately 65 seconds for
copier to warm up.
2 When warm up is completed,
the START PRINT light changes
from amber to blue-green and
the copier is ready to copy
using initial machine settings.
NOTE: To conserve energy, be sure to turn off the copier at the end of the workday.
Power Saver
There are two modes for the power saver as described below.
Auto Low Power mode:
The mode conserves energy by lowering the temperature setting of the
fixing unit. This provides a two-fold compatible function that serves to
minimize energy consumption and maximize copying performance.
Shut-Off mode (Auto/Manual):
The mode conserves energy by partially turning OFF the power supply.
The copying performance of this mode is inferior to the conservation
can be achieved.
CAUTION
To prevent accidents, shut off power when copier is not expected
to be used for a long period; at night, for example.
3-10 Copier Information
Page 32

Copier Information
Power Saver (continued)
Auto Low Power
If certain period of time (detected from 2, 5, 10, 15,
30 minutes) has passed after completion of the last
copy, with the copier kept ready for copying, power
saving will work automatically. The power saving
message will be displayed, but the power saver
indicator will not light.
The initial time is 15 minutes, and the time can be
changed by service. Please contact your service
representative.
To release the auto low power mode, press any
key except
Manual Shut-Off
1 Press
2 To release the shut-off mode and make copies,
POWER SAVER on the control panel. The
LED will light and all other areas of the control
panel will not be lit.
press any key except
START PRINT and POWER SAVER.
START PRINT.
Auto Shut-Off
When a certain period of time has elapsed since completion of a
copying operation (detected from 30, 60, 90, 120 minutes, or no
setting) and the copier is ready for copying, the shut-off mode (if
turned On) will automatically go into effect.
The initial setting time of 60 minutes can be changed by service.
Please contact your service representative.
To release the shut-off mode and make copies, press any key except
START PRINT.
Copier Information 3-11
Page 33

Copier Information
Automatic Settings
Initial Machine Settings
The machine settings listed below describe the initial condition of the
copier after warm up is completed. These initial settings will be
restored automatically if Auto Reset is set at 2 minutes, or if
pressed. ADF, AES, APS, and Sorter are service adjustable.
Print Quantity: 1
Magnification: 1.00
AES: ON
APS: ON
ADF: ON, if equipped
Sorter: OFF, if equipped
Special Features: OFF
Auto Reset None or 2 Minutes
If Auto Reset is activated by your service representative, the initial
machine settings will reset automatically after 2 minutes have elapsed
since manual selections were made. Otherwise, the initial machine
settings can be restored manually by pressing
panel.
AUTO on the control
AUTO is
Automatic Paper Selection (APS)
APS functions as a scanless operation. When the APS light is on, the
appropriate copy paper size feeds automatically for the following original
sizes on both the platen glass and RADF/ADF: 11”x17”, 8.5”x14”,
8.5”x11”, or 8.5”x11”R. ADF originals that are 5.5”x8.5” will be detected as
8.5”x11”. The next larger copy size will be selected for non-standard
originals; for example, an 8”x13” original will select 8.5”x14” copy paper
size. Platen originals that are 5.5"x8.5" will be detected as 8.5"x11"R. APS
can be set by service, as required. If there is no copy paper that is the
same size as the original, the display will flash indicating the necessary
paper size. When copy size is selected manually, APS will not function
and the APS indicator light will go out. APS can also be disabled by
pressing
3-12 Copier Information
BOOK COPY, raising the RADF/ADF, or changing the lens mode.
Page 34

Copier Information
Automatic Settings (continued)
Automatic Exposure Selection (AES)
When the AES light is on, exposure is selected automatically to
produce the appropriate copy density. Manual density adjustments
override AES.
Automatic Magnification Selection (AMS)
AMS operates automatically when copy size is selected manually, i.e.,
when copy size is smaller or larger than the original. The copier
automatically reduces or enlarges the copy image to accommodate the
selected paper size.
Automatic Humidity Sensor
The Automatic humidity sensor is used to control paper feeding
performance depending on the humidity level. This automatic sensor is
used to enhance copy quality and copy reliability and to prevent paper
from being mishandled.
Automatic Edge Delete
Automatic Edge Delete automatically erases all four borders of the
page by a maximum of 5mm to enhance copy quality and copy
reliability when using the document feeder. This feature can be
activated or de-activated by your Konica service representative.
Odd-Even Original Counter in 1 s 2 Mode
The odd-even original counter automatically counts the originals and
copies the last page independently (as 1-sided) if the original contains
an odd number of pages. This feature can be activated or de-activated
by your Konica service representative.
Copier Information 3-13
Page 35

Section 4: Paper Specifications
Originals on Platen Glass
Originals on Reversing Automatic Document Feeder (RADF)
Originals on Automatic Document Feeder (ADF)
Copy Paper in Main Body Trays
Copy Paper in Drawer Base (DB-307/DB-607)
Copy Paper and Special Stock in Bypass
Copy Paper in Automatic Duplex Unit (ADU)
Copy Paper in 10-Bin In-Bin Stapler Sorter (ST-104)
Copy Paper in 10-Bin Off-Line Stapler Sorter (ST-103)
Copy Paper in 20-Bin Off-Line Stapler Sorter (ST-216)
Paper Size/Weight Compatibility Chart
Paper Specifications 4-1
Page 36

Paper Specifications
Originals on Platen Glass
MAXIMUM ORIGINAL SIZE: 11”x17” maximum
MAXIMUM BOOK WEIGHT: 15 lb (6.8kg)
MAXIMUM BOOK THICKNESS: 1.6” (40mm)
ORIGINAL PLACEMENT: Face down, aligned at left; same orientation as copy paper
Originals on Reversing Automatic Document Feeder (RADF)
ORIGINAL SIZE: 11”x17”~5.5”x8.5”
ORIGINAL WEIGHT: 20~24 lb (no special paper)
ORIGINAL PLACEMENT: Face down, with same orientation as copy paper
RADF/ADF MAXIMUM CAPACITY: 50 sheets (20 lb bond)
CURLING TOLERANCE: 10mm maximum
Originals on Automatic Document Feeder (ADF)
ORIGINAL SIZE: 11"x17"~5.5"x8.5"
ORIGINAL WEIGHT: 20~24 lb (no special paper)
ORIGINAL PLACEMENT: Face down, with same orientation as copy paper
RADF/ADF MAXIMUM CAPACITY: 50 sheets (20 lb bond)
CURLING TOLERANCE: 10mm maximum
Copy Paper in Main Body Trays
PAPER WEIGHT: 16~24 lb
TOTAL PAPER CAPACITY: 500 sheets (20 lb)
Tray 1: 250 sheets (20 lb); Service adjustable; 8.5"x11"
Tray 2: 250 sheets (20 lb); Service adjustable; 8.5"x11"R
Copy Paper in Drawer Base (DB-307/DB-607)
PAPER WEIGHT: 16~24 lb
TOTAL PAPER CAPACITY: 1,250 sheets (20 lb)
Tray 3: 1,000 sheets (20 lb); Service adjustable; 8.5"x11"
Tray 4: 250 sheets (20 lb); Service adjustable; 8.5"x11"R
NOTES:
1 Use only paper recommended by Konica Business Machines U.S.A., Inc.
2 Reliability and copy quality are not guaranteed for all special stock. For specific
information, contact your Konica service representative.
4-2 Paper Specifications
Page 37

Paper Specifications
Copy Paper and Special Stock in Bypass
PAPER SIZE: Adjustable, 11”x17”, 8.5”x14”, 8.5”x11”, 8.5”x11”R, 5.5”x8.5”
PAPER WEIGHT: 16~32 lb; special stock: OHP, labels, 3-hole punch, rag content
PAPER ORIENTATION: Same as original
BYPASS MAXIMUM CAPACITY: 50 sheets (16~24 lb);feed special stock one sheet at a time
Copy Paper in Automatic Duplex Unit (ADU)
PAPER SIZE: Adjustable, 11”x17”, 8.5”x14”, 8.5”x11”, 8.5”x11”R, 5.5”x8.5”
PAPER WEIGHT: 16~24 lb; no special stock
PAPER ORIENTATION: Same as original
BYPASS MAXIMUM CAPACITY: 10 sheets (16~24 lb);feed special stock one sheet at a time
Copy Paper in 10-Bin In-Bin Stapler Sorter (ST-104)
PAPER WEIGHT: 16~24 lb; special paper in top bin only
MAXIMUM CAPACITY (20 lb sheets):
NON-SORT MODE (top bin): 100 (8.5”x11”, 5.5”x8.5”); 50 (11”x17”, 8.5”x14”)
SORT MODE: 20 (8.5”x11”, 8.5”x11”R); 10 (11”x17”, 8.5”x14”)
GROUP MODE: 10 (8.5”x11”, 8.5”x11”R); 5 (11”x17”, 8.5”x14”)
STAPLE-SORT MODE: 20 (8.5”x11”); 10 (11”x17”)
Copy Paper in 10-Bin Off-Line Stapler Sorter (ST-103)
PAPER WEIGHT: 16~24 lb; special paper in top bin only
MAXIMUM CAPACITY (20 lb sheets):
NON-SORT MODE (top bin): 100 (11”17”, 8.5”x14”, 8.5”x11”, 8.5”x11”R, 5.5”x8.5”)
SORT MODE: 50 (8.5”x11”); 30 (11”x17”, 8.5”x14”, 8.5”x11”R)
GROUP MODE: 30 (11”x17”, 8.5”x14”, 8.5”x11”, 8.5”x11”R)
MAXIMUM SHEETS STAPLED: 25 (11”x17”, 8.5”x14”, 8.5”x11”, 8.5”x11”R)
Copy Paper in 20-Bin Off-Line Stapler Sorter (ST-216)
PAPER WEIGHT: 16~24 lb; special paper in top bin only
MAXIMUM CAPACITY (20 lb sheets):
NON-SORT MODE (top bin): 100 (11”x17”, 8.5”x14”, 8.5”x11”, 8.5”x11”R, 5.5”x8.5”)
SORT MODE: 50
GROUP MODE: 30 (11”x17”, 8.5”x14”, 8.5”x11”, 8.5”x11”R, 5.5"X8.5")
MAXIMUM SHEETS STAPLED: 25 (11”x17”, 8.5”x14”, 8.5”x11”, 8.5”x11”R)
NOTES:
1 Use only paper recommended by Konica Business Machines U.S.A., Inc.
2 Reliability and copy quality are not guaranteed for all special stock. For specific
information, contact your Konica service representative.
(11”x17”, 8.5”x14”, 8.5”x11”, 8.5”x11”R, 5.5”x8.5”)
Paper Specifications 4-3
Page 38

Paper Specifications
Paper Size/Weight Compatibility Chart
NOTES:
1 Use only paper recommended by Konica Business Machines U.S.A., Inc.
2 Reliability and copy quality are not guaranteed for all special stock. For specific
information, contact your Konica service representative.
4-4 Paper Specifications
Page 39

Section 5: Basic Copying
Copying from the Platen Glass
Auto Copy
Copying from the Document Feeder (RADF/ADF)
Copying Mixed Size Originals
Using the Bypass
Copy Density
AES
Manual Density
Copy Size
Lens Modes
Automatic Magnification Selection (AMS)
Preset and User Preset Ratios
Programming a User Preset Ratio
Zoom Mode
Special Ratio Table
Using the Sorter
Specifications: 10-Bin In-Bin Stapler Sorter (ST-104)
Specifications: 10-Bin Off-Line Stapler Sorter (ST-103)
Specifications: 20-Bin Off-Line Stapler Sorter (ST-216)
Non-Sort, Sort and Group Modes for ST-104/103/216
Staple-Sort Modes for ST-104
Automatic In-Bin Stapling
Manual In-Bin Stapling
Off-Line Stapling Option
Basic Copying 5-1
Page 40

Basic Copying
Copying from the Platen Glass
Use the platen glass when a Document Feeder (RADF/ADF) is not
installed or originals cannot be used with the RADF/ADF, e.g., when
size is incompatible, or when originals are folded, stapled, or in poor
condition.
ORIGINAL SIZE: 11”x17” maximum
ORIGINAL PLACEMENT: Face down, same as copy paper feeding direction
HINTS:
1 When copying opened books, use Frame and/or Fold Erasure to eliminate black
copy marks along borders and center strip (refer to Special Copying section).
2 To minimize toner usage when the original is so thick that the document cover
cannot be completely closed, place white paper on the part of the platen glass
which is not covered by the original.
1 Raise document cover.
2 Place original FACE DOWN on
platen glass, centering it with
left measuring guide. Be sure
original is as flat as possible.
3 Close cover.
4 Select optional copying
features (lens mode, density,
copy size, etc.).
5 Use numeric keypad to enter
print quantity.
6 Press
START PRINT.
NOTE: Press STOP/CLEAR to change print quantity or to stop continuous copying.
Press RECALL to check original print quantity. Copying will continue while initial
print quantity is displayed.
5-2 Basic Copying
Page 41

Basic Copying
Copying from the Platen Glass (continued)
Auto Copy
Use Auto Copy to automatically start the copying operation as soon as
the document cover is closed down over the platen original. With this
feature, there is no need to press
Auto Copy automatically activates 20 seconds after the last copying
operation.
AUTO COPY OFF-TIMER: 20 seconds
INCOMPATIBLE: Using RADF/ADF, 2-2, 2-1, Book Copy, Mixed Size Originals
START PRINT.
1 Press AUTO COPY.
2 Select optional copying
features (density lens mode,
etc.)
3 Use numeric keypad to enter
print quantity.
4 Open the document cover, and
place original FACE DOWN on
the platen glass.
5 Close the document cover to
start copying.
NOTES:
1 Auto Copy functions only when an original is placed on the platen glass.
2 Auto Copy does not function when an original smaller than 5.5"x8.5" is placed on
the platen glass.
3 The Auto Copy Off-timer can be set for 10 seconds, 20 seconds, 30 seconds, or
no setting by service.
Basic Copying 5-3
Page 42

Basic Copying
Copying from the Document Feeder (RADF/ADF)
Use the Document Feeder (RADF/ADF) to copy up to 50 unstapled,
smooth, flat originals. Originals will be directed to the platen glass,
automatically. Originals will be fed from the top sheet.
ORIGINAL PLACEMENT: Face down, same as copy paper feeding direction
RADF/ADF MAXIMUM CAPACITY: 50 sheets (20 lb bond)
RADF/ADF CURLING TOLERANCE: 10mm maximum
INCOMPATIBLE: Book Copy
1 Arrange originals in order and
face down as shown. Press
AUTO to clear previous
settings. The ADF indicator will
light.
2 Place original(s) FACE DOWN
on the RADF/ADF, with page 1
on bottom. If necessary, use
the RADF/ADF tray extension
to support large originals.
3 Adjust paper guides to the
paper width.
4 Select optional copying
features (density, lens mode,
etc.).
5 Use numeric keypad to enter
print quantity.
6 Press
START PRINT.
NOTES:
1 If paper guides are not aligned to the originals, originals will not feed correctly.
2 When APS is on, 5.5”x8.5” originals will be detected as 8.5”x11”. Non-standard
originals will be detected as the next larger standard size.
5-4 Basic Copying
Page 43

Basic Copying
Copying from the Document Feeder (RADF/ADF) (continued)
Copying Mixed Size Originals
When mixed size originals are
placed in the RADF/ADF for
copying, each original in the
mixed set is copied to paper of the
same size (APS mode) or to
paper of desired size with
appropriate ratio automatically
selected (AMS mode).
ORIGINAL SIZE: Combine 11”x17” and 8.5”x11” OR 8.5”x14” and 8.5”x11”R
INCOMPATIBLE: Using platen glass, Reduce&Shift, Book Copy, OHP Interleave
1 Close RADF/ADF securely.
2 Open the RADF/ADF tray
extension.
3 Placed mixed size originals
FACE DOWN an RADF/ADF,
keeping all originals aligned at
the right side irrespective of
their sizes.
4 Select APS mode to copy each
original size to a matching copy
size in 1:1 mode; or select AMS
mode to copy all originals to the
same paper size, with a ratio
selected automatically.
5 Select optional copying
features (density, lens mode,
etc.).
6 Use numeric keypad to enter
print quantity.
7 Press
START PRINT.
Basic Copying 5-5
Page 44

Basic Copying
Using the Bypass
Use the bypass to stack up to 50 sheets of copy paper or feed special
stock (labels, OHP transparencies, heavy/thin stock, 3-hole punch, rag
content) one sheet at a time. The bypass is also used for manual
duplex copying (refer to Manual Duplexing for instructions).
STACK MODE: 11”x17”~5.5”x8.5”; 16~24 lb
SINGLE FEED MODE: 25 lb~32 lb, OHP transparencies, label sheets, rag content
PAPER PLACEMENT IN BYPASS: Same as original orientation
BYPASS PERFORMANCE: Maximum skew: 2%;
BYPASS TRAY CAPACITY: 50 sheets, 20 lb; feed special stock one sheet at a time
INCOMPATIBLE: 1s2, 2s2, Mixed Size Originals
Maximum image wash at both edges: 5mm
1 Place original on platen or
RADF/ADF.
2 Open bypass tray. Pull out tray
extension for large paper.
3 Place up to 50 sheets in bypass
and adjust paper guides. Be
sure paper is inserted straight.
4 Press
COPY SIZE to select
SPECIAL.
5 Enter print quantity.
6 Press
START PRINT once to
copy a stack, or press after
each single sheet is inserted.
7 When completed, push in tray
extension and close bypass.
NOTE: Reliability and copy quality are not guaranteed for all special stock. Use only
paper and special stock recommended by Konica Business Machines U.S.A., Inc.
5-6 Basic Copying
Page 45

Basic Copying
Copy Density
AES
Automatic Exposure Selection
(AES) detects the density of the
original and automatically selects
the appropriate density for
copying. AES is the initial setting.
Manual Density
Use the manual copy density mode to adjust exposure (density) when
originals are too light or too dark. Manual adjustments can be made in
seven levels.
1 Place originals FACE DOWN
on platen glass or RADF/ADF.
2 Press Copy Density arrows to
select desired density.
Press: [t] to make lighter
[s] to make darker
3 Press
START PRINT.
NOTE: Both AES and manual copy density settings may can be changed during
copying.
Basic Copying 5-7
Page 46

Basic Copying
Copy Size
When copying an original to a different size copy paper, select the copy
paper size by pressing the
Selection (APS) function is released and “-A-” is displayed in the
magnification ratio display, indicating that Automatic Magnification
Selection (AMS) is activated. The correct magnification will
automatically be selected in response to the size of the original and the
selected copy paper size.
COPY SIZE button. The Automatic Paper
1 Place original on platen glass or
RADF/ADF.
2 Press COPY SIZE to select the
desired copy paper size. “-A-” is
displayed in the ratio window
and the selected paper size
indicator light.
3 Press
START PRINT. The
proper magnification ratio is
selected and copying starts.
NOTE: To resume APS mode, press AUTO.
5-8 Basic Copying
Page 47

Basic Copying
Lens Modes
Automatic Magnification Selection (AMS)
Automatic Magnification Selection (AMS) operates in the Auto mode
when copy size is selected manually. “-A-” is displayed in the
magnification ratio window while an appropriate reduction or
enlargement ratio will be applied automatically to accommodate the
original image to the selected copy paper size. The ratios selected for
AMS are shown in the table below.
INCOMPATIBLE: Using bypass, APS
NOTES:
1 To copy 5.5”x8.5” originals to copy paper size 5.5”x8.5”, press COPY SIZE to
select 5.5”x8.5”, then select 1.00 magnification.
2 To determine ratios for non-standard paper sizes, refer to the Special Ratio
Table on page 5-13.
Basic Copying 5-9
Page 48

Basic Copying
Lens Modes (continued)
Preset and User Preset Ratios
Use the Preset and User Preset lens modes to increase or decrease
magnification in fixed increments. The seven available Preset ratios
are factory-set. One frequently-used ratio can also be programmed and
stored as a User Preset ratio and reprogrammed by the user as
needed.
PRESET RATIOS: 0.50, 0.65, 0.77, 1.00, 1.29, 1.55, 2.00
USER PRESET RATIO: Programmable from 0.50~2.00 in 1% increments
1 Press LENS MODE to illuminate
the Preset or User Preset
indicator.
2 To display the desired Preset
ratio, press [▲] or [▼].
To display the User Preset
ratio, press [▲] after 2.00 is
displayed.
3 When the desired ratio is
displayed in the ratio window,
press
START PRINT.
NOTE: To select 0.50 quickly, press [▼] and [P] simultaneously. To select 2.00
quickly, press [▲] and [P] simultaneously. To scroll, press the magnification arrows
continuously.
5-10 Basic Copying
Page 49

Basic Copying
Lens Modes (continued)
Programming a User Preset Ratio
For convenience, program a frequently-used ratio that is not available
as a factory preset ratio. This ratio can be set and changed by the user
as needed.
USER PRESET RATIO: Programmable from 0.50~2.00 in 1% increments
1 While pressing [P], press LENS
MODE
. The User Preset
indicator light will flash.
2 Use the Keypad to enter a
three-digit ratio (0.50~2.00).
3 If necessary, press
CLEAR
to restore the original
ratio or to clear a mis-entry.
4 Press
[P] to store the new ratio.
STOP/
NOTE: The User Preset ratio will remain stored until it is overwritten.
Basic Copying 5-11
Page 50

Basic Copying
Lens Modes (continued)
Zoom Mode
Use the Zoom mode to increase or decrease magnification in 1%
increments.
ZOOM RANGE: 0.50 through 2.00 in 1% increments
1 Press LENS MODE to select
Zoom mode. The Zoom
indicator will light.
2 Press [▼] to reduce the current
ratio, or press [▲] to enlarge
the current ratio.
3 When the desired ratio is
displayed in the ratio window,
press
START PRINT.
NOTE: To select 0.50 quickly, press [▼] and [P] simultaneously. To select 2.00
quickly, press [▲] and [P] simultaneously. To scroll, press the magnification arrows
continuously.
5-12 Basic Copying
Page 51

Basic Copying
Lens Modes (continued)
Special Ratio Table
Use the Special Ratio Table below to determine the magnification ratios
for non-standard paper sizes.
1 Locate original width on horizontal axis. Then locate copy width on vertical axis.
2 Find the point (ratio) on the table where the two values meet.
3 Locate original length on horizontal axis. Then locate copy length on vertical axis.
4 Find the point (ratio) on the table where the two values meet.
5 Enter the appropriate ratio, using Preset or Zoom modes. Use the smaller ratio for
reduction. Use the larger ratio for enlargement.
Ratios must fall within the 0.50~2.00 range.
Basic Copying 5-13
Page 52

Basic Copying
Using the Sorter
Specifications: 10-Bin In-Bin Stapler Sorter (ST-104)
Non-Sort Mode: Feeds non-sorted/non-grouped copies to the top bin.
COPY PAPER SIZE: 11”x17”~5.5”x8.5”
COPY PAPER WEIGHT: 16~24 lb
MAXIMUM TOP BIN CAPACITY: 100 (8.5”x11”, 8.5”x11”R, 5.5”x8.5”);
50 (11”x17”, 8.5”x14”)
Sort Mode: Copies and collates a complete set of originals in each bin.
MAXIMUM ORIGINALS: 20 (8.5”x11”, 5.5”x8.5”)
MAXIMUM PRINT QUANTITY: 10 (if 10 is exceeded, 10 will be used)
MAXIMUM BIN CAPACITY:
COPY PAPER SIZE: 11”x17”~5.5”x8.5”
COPY PAPER WEIGHT: 20~24 lb
Group Mode: Groups multiples of each original in each bin.
MAXIMUM ORIGINALS: 10 (8.5”x11”, 5.5”x8.5”)
MAXIMUM PRINT QUANTITY: 10 (if 10 is exceeded, 10 will be used)
MAXIMUM BIN CAPACITY:
COPY PAPER SIZE: 11”x17”~5.5”x8.5”
COPY PAPER WEIGHT: 20~24 lb
Staple Sort Mode: Copies, collates, and staples a complete set of originals.
MAXIMUM ORIGINALS: 20
MAXIMUM PRINT QUANTITY: 10 (if exceeded, 10 will be used)
COPY PAPER SIZE: 11”x17”, 8.5”x11”
COPY PAPER WEIGHT: 20~24 lb
STAPLER SHEET CAPACITY: 20 (8.5”x11”); 10 (11”x17” short edge feed)
INCOMPATIBLE: Using platen glass, Group Mode, OHP Interleave, Mixed
Size Originals
20 (8.5”x11”, 8.5”x11”R); 10 (11”x17”, 8.5”x14”)
10 (8.5”x11”, 8.5”x11”R), 5 (11”x17”, 8.5”x14”)
NOTE: Use only paper recommended by Konica Business Machines U.S.A., Inc.
Copy quality and reliability are not guaranteed for all special stock.
5-14 Basic Copying
Page 53

Basic Copying
Using the Sorter (continued)
Specifications: 10-Bin Off-Line Stapler Sorter (ST-103)
Non-Sort Mode: Feeds non-sorted/non-grouped copies to the top bin.
COPY PAPER SIZE: 11”x17”, 8.5”x14”, 8.5”x11”, 8.5”x11”R, 5.5”x8.5”
COPY PAPER WEIGHT: 16~24 lb; special stock
MAXIMUM BIN CAPACITY: 100 sheets
Sort Mode: Copies and collates a complete set of originals in each bin.
MAXIMUM ORIGINALS: 50 (20 lb)
MAXIMUM PRINT QUANTITY: 10 (if exceeded, 10 will be used)
MAXIMUM BIN CAPACITY: 50 (8.5”x11”); 30 (11”x17”, 8.5”x14”, 8.5”x11”R)
COPY PAPER SIZE: 11”x17”, 8.5”x14”, 8.5”x11”, 8.5”x11”R
COPY PAPER WEIGHT: 16~24 lb; no special paper
INCOMPATIBLE: OHP Interleave
Group Mode: Groups multiples of each original in each bin.
MAXIMUM ORIGINALS: 10
MAXIMUM PRINT QUANTITY: 30 (if exceeded, 30 will be used)
MAXIMUM BIN CAPACITY: 30
COPY PAPER SIZE: 11”x17”, 8.5”x14”, 8.5”x11”, 8.5”x11”R
COPY PAPER WEIGHT: 16~24 lb; no special paper
INCOMPATIBLE: OHP Interleave
Sort Mode with Off-Line Stapler:
MAXIMUM ORIGINALS: 25
MAXIMUM PRINT QUANTITY: 10 (if exceeded, 10 will be used)
COPY PAPER WEIGHT: 16~24 lb
STAPLER SHEET CAPACITY: 25 sheets
STAPLE POSITIONS (user-adjustable): Side staple: 10 ± 5mm from edge;
Corner staple: 13 ± 3/5mm from edge
NOTE: Use only paper recommended by Konica Business Machines U.S.A., Inc.
Copy quality and reliability are not guaranteed for all special stock.
Basic Copying 5-15
Page 54

Basic Copying
Using the Sorter (continued)
Specifications: 20-Bin Off-Line Stapler Sorter (ST-216)
Non-Sort Mode: Feeds non-sorted/non-grouped copies to the top bin.
COPY PAPER SIZE: 11”x17”, 8.5”x14”, 8.5”x11”, 8.5”x11”R, 5.5”x8.5”
COPY PAPER WEIGHT: 16~24 lb; special paper
MAXIMUM BIN CAPACITY (20 lb): 100 sheets
Sort Mode: Copies and collates a complete set of originals per bin.
COPY PAPER SIZE: 11”x17”, 8.5”x14”, 8.5”x11”, 8.5”x11”R, 5.5"x8.5"
COPY PAPER WEIGHT: 16~24 lb; no special paper
MAXIMUM ORIGINALS: 50
MAXIMUM PRINT QUANTITY: 20 (if exceeded, 20 will be used)
MAXIMUM BIN CAPACITY (20 lb): 50 sheets
INCOMPATIBLE: OHP Interleave
Group Mode: Groups multiples of each original in each bin.
COPY PAPER SIZE: 11”x17”, 8.5”x14”, 8.5”x11”, 8.5”x11”R, 5.5"x8.5"
COPY PAPER WEIGHT: 16~24 lb; no special paper
MAXIMUM ORIGINALS: 20
MAXIMUM PRINT QUANTITY: 30 (If exceeded, 30 will be used)
MAXIMUM BIN CAPACITY (20 lb): 30 sheets
INCOMPATIBLE: OHP Interleave
Sort Mode with Off-Line Stapler:
COPY PAPER WEIGHT: 16~24 lb
MAXIMUM ORIGINALS: 25
MAXIMUM PRINT QUANTITY: 20 (if exceeded, 10 will be used)
STAPLER SHEET CAPACITY (20 lb): 25 sheets
STAPLE POSITIONS (user-adjustable): Side staple: 10 ± 5mm from edge;
Corner staple: 13 ± 3/5mm from edge
NOTE: Use only paper recommended by Konica Business Machines U.S.A., Inc.
Copy quality and reliability are not guaranteed for all special stock.
5-16 Basic Copying
Page 55

Basic Copying
Using the Sorter (continued)
Non-Sort, Sort, and Group Modes for ST-104/103/216
Non-Sort Mode
1 Place originals face down on
platen glass or RADF/ADF.
2 If a sorter mode is lit, press
SORTER until light goes off.
3 Enter print quantity.
4 Press
Sort Mode
1 Place originals face down on
2 Press
3 Enter print quantity.
4 Press
START PRINT.
Result: All copies will exit to the
top bin.
platen glass or RADF/ADF.
SORTER once to select
Sort mode.
START PRINT.
Result: One copy of the original
set exits to each bin.
Group Mode
1 Place originals face down on
platen glass or RADF/ADF.
2 Press
SORTER twice to select
Group mode.
3 Enter print quantity.
4 Press
START PRINT.
Result: Multiple copies of each
original exit to each bin.
NOTE: To locate the Sorter release lever in case of mishandled paper, see External
View in Section 3.
Basic Copying 5-17
Page 56

Basic Copying
Using the Sorter (continued)
Staple-Sort Modes for ST-104
CAUTION
To avoid injury when using the stapling sorter, do not insert your
fingers around staple unit.
Automatic In-Bin Stapling
1 Place originals face down on
RADF/ADF, inserting the edge
to be stapled first as shown.
2 Press
3
4 Press START PRINT. Stapling
Manual In-Bin Stapling
1 Place originals on RADF/ADF
SORTER until the Staple
and Sort indicators light.
Enter print quantity (maximum 10).
will be performed automatically
when copying is completed.
or platen glass, as shown.
2 Press SORTER to select Sort.
3 Press
4 When copying is completed,
5
NOTE: Copied sets made beforehand can also be stapled by inserting a set in the
first bin with side to be stapled at front right. When the manual staple button on the
sorter lights green, press the button. To clear a wedged staple, see page 9-17.
5-18 Basic Copying
START PRINT.
press manual staple button on
the sorter to staple copies.
Remove stapled copies from bins
.
Page 57

Basic Copying
Using the Sorter (continued)
Off-Line Stapling Option
1 Make copies as required.
2 Remove copies from each bin.
3 Neatly arrange the copied
sheets (maximum 25).
4 Insert left side of paper into
stapler. If corner stapler
adapter is installed, insert
upper left corner into stapler.
5 Press
AUTO to clear the
setting.
NOTES:
1 When copier or sorter is in use, the staple indicator (▲) lights red, indicating that
the stapler cannot be used.
2 To clear a wedged staple, see page 9-18.
Basic Copying 5-19
Page 58

Section 6: Duplex Copying
Automatic Duplex
1s2 Mode Using the RADF/ADF (Odd-Even Original Counter OFF)
1s2 Mode Using the RADF/ADF (Odd-Even Original Counter ON)
1s2 Mode Using the Platen Glass
2s2 Mode Using the RADF
2s1 Mode Using the RADF
Manual Duplex
1-Sided to 2-Sided Using the Bypass
2-Sided to 2-Sided Using the Bypass
Duplex Copying 6-1
Page 59

Duplex Copying
Automatic Duplex
1s2 Mode Using the RADF/ADF (Odd-Even Original Counter OFF)
Count originals first to determine
whether the original count is odd
or even. If odd, simply include a
blank sheet as the last page
before placing originals on the
RADF.
ORIGINAL WEIGHT/SIZE: 20~24 lb; 11"x17", 8.5"x14", 8.5"x11", 8.5"x11"R
ORIGINAL PLACEMENT: Face down, same as copy paper feeding direction
RADF MAXIMUM CAPACITY: 50 sheets (20 lb)
COPY PAPER: Appropriate paper, as specified in Section 4
ADU TRAY MAXIMUM CAPACITY: 10 sheets (16 to 24 lb)
INCOMPATIBLE: Using bypass, Book Copy, OHP Interleave
1 Arrange even number of
originals in sequence. If original
count is odd, insert a blank
sheet for last page to make the
count even. Copy only an even
number of originals.
2 Place originals FACE DOWN
on RADF/ADF and adjust paper
guides.
3 Press
4 Enter print quantity.
5 Press
COPY MODE to
illuminate 1s2.
START PRINT.
6-2 Duplex Copying
Page 60

Duplex Copying
Automatic Duplex (continued)
1s2 Mode Using the RADF/ADF (Odd-Even Original Counter ON)
The odd-even original counter is a
service-activated function that
automatically counts the originals
and copies the last page
independently (as 1-sided) if the
original contains an odd number
of pages. To activate the OddEven Original Counter, contact
your service representative.
If the odd-even original counter is OFF, follow the procedures on p. 6-2.
1 Place originals FACE DOWN
on the RADF/ADF and adjust
paper guides.
2 Press
3 Enter print quantity.
4 Press
5 Press
6 Reset the originals on the
COPY MODE to
illuminate 1s2.
START PRINT. If
counting is required, continue
with step 5; otherwise, go to
step 6 and indicate whether
number is odd or even.
[P] to automatically count
originals. Originals will exit after
they are counted.
RADF. The count will display. If
the count is Even, press
.
PRINT
START
Duplex Copying 6-3
Page 61

Duplex Copying
Automatic Duplex (continued)
1s2 Mode Using the Platen Glass
Count originals first to determine
whether the original count is odd
or even. If odd, simply copy a
blank sheet as the last page.
ORIGINAL SIZE: 11"x17", 8.5"x14", 8.5"x11", 8.5"x11"R
ORIGINAL PLACEMENT: Face down, same as copy paper feeding direction
COPY PAPER: Appropriate paper, as specified in Section 4
ADU TRAY MAXIMUM CAPACITY: 10 sheets (16 to 24 lb)
INCOMPATIBLE: Using bypass, Book Copy, OHP Interleave, Mixed Size Originals
1 Arrange even number of one-
sided originals in sequence. If
necessary, use blank sheet as
last page.
2 Place original 1 FACE DOWN
on platen glass.
3 Press COPY MODE to
illuminate 1s2.
4 Enter print quantity.
5 Press
6 Remove original 1 and place
START PRINT.
next original to be copied on
glass. Press
START PRINT.
Repeat until all originals are
copied.
6-4 Duplex Copying
Page 62

Duplex Copying
Automatic Duplex (continued)
2s2 Mode Using the RADF
RADF ORIGINALS: 20~24 lb; 11"x17", 8.5"x14", 8.5"x11", 8.5"x11"R
ORIGINAL PLACEMENT: Face down, same as copy paper feeding direction
RADF MAXIMUM CAPACITY: 50 sheets (20 lb)
COPY PAPER: Appropriate paper, as specified in Section 4
ADU MAXIMUM TRAY CAPACITY: 10 sheets (16 to 24 lb)
INCOMPATIBLE: Using bypass, Book Copy, OHP Interleave
1 Press AUTO to clear settings.
2 Arrange two-sided originals in
order.
3 Place originals FACE DOWN
on RADF and adjust paper
guides.
4 Press COPY MODE to
illuminate 2s2.
5 Enter print quantity.
6 Press
START PRINT.
Duplex Copying 6-5
Page 63

Duplex Copying
Automatic Duplex (continued)
2s1 Mode Using the RADF
RADF ORIGINALS: 20~24 lb; 11"x17", 8.5"x14", 8.5"x11", 8.5"x11"R
ORIGINAL PLACEMENT: Face down, same as copy paper feeding direction
RADF MAXIMUM CAPACITY: 50 sheets (20 lb) in Non-Sort Mode; 25 in Sort
Mode
COPY PAPER: Appropriate paper, as specified in Section 4
INCOMPATIBLE: Book Copy
1 Arrange two-sided originals in
sequence.
2 Place originals FACE DOWN
on RADF.
3 Adjust paper guides to paper
size.
4 Load paper in bypass tray, if
desired.
5 Press
6 Enter print quantity.
6 Press
COPY MODE to
illuminate 2s1.
START PRINT.
Each two-sided original will be
copied to two separate sheets.
6-6 Duplex Copying
Page 64

Duplex Copying
Manual Duplex
1-Sided to 2-Sided Using the Bypass
ORIGINAL PLACEMENT: Face down, same as copy paper feeding direction
COPY PAPER: 8.5”x11” 20 lb bond; using bypass, feed sheets one at a time
MAXIMUM STACK QUANTITY: 20 sheets (20 lb)
DUPLEX FEEDING DIRECTION: Trailing edge of first copy is leading edge in bypass
AMBIENT TEMPERATURE AND HUMIDITY: 77°F (25°C); 50% RH
1 Arrange one-sided originals in
sequence and place page 1
face down on plate glass or
face down on RADF/ADF.
2 Close document cover.
3
Press
START PRINT
4
Immediately
bypass tray face down without
changing direction of page
heading, i.e., the trailing edge at
exit becomes the leading edge
into the bypass.
5 Remove first original, and place
page 2 on platen glass. Close
cover.
6 Press
7 Press
COPY SIZE to select
SPECIAL.
START PRINT.
Repeat the procedure until
duplex copying is completed for
all originals.
to copy side 1.
insert copy into the
NOTE: When making multiple 2-sided copies of the same original it is possible to
stack up to 20 single-sided copies in the bypass in order to copy the second side.
Duplex Copying 6-7
Page 65

Duplex Copying
Manual Duplex (continued)
2-Sided to 2-Sided Using the Bypass
ORIGINAL PLACEMENT: Face down, same as copy paper feeding direction
COPY PAPER: 8.5”x11” 20 lb bond; using bypass, feed sheets one at a time
MAXIMUM STACK QUANTITY: 20 sheets (20 lb)
DUPLEX FEEDING DIRECTION: railing edge of first copy is leading edge in bypass
AMBIENT TEMPERATURE AND HUMIDITY: 77°F (25°C); 50% RH
1 Raise document cover and
place side 1 original face down
on platen glass or RADF/ADF.
2 Close document cover.
3 Press
4
5 Turn original over and place
6 Press
7 Press
START PRINT to copy
side 1.
Immediately
insert the copy into
the bypass tray face down
without changing direction of
page heading, i.e., the trailing
edge at exit becomes the
leading edge into the bypass.
side 2 face down. Close cover.
COPY SIZE to select
SPECIAL.
START PRINT.
Repeat the procedure until
duplexing is completed for all
originals.
NOTE: When making multiple 2-sided copies of the same original it is possible to
stack up to 20 single-sided copies in the bypass in order to copy the second side.
6-8 Duplex Copying
Page 66

Section 7: Special Copying
Shift/Reduce & Shift
Using the Platen Glass
Using the RADF/ADF
Frame/Fold Erasure
Using Frame and Fold Erasure
Setting Frame Erasure
Setting Fold Erasure
Book Copy
Photo Enhance
OHP Interleave
Special Copying 7-1
Page 67

Special Copying
Shift/Reduce & Shift
Using the Platen Glass
Use Shift to create a 10 mm binding margin. Use Reduce & Shift to
reduce the overall image when a binding margin is likely to cause
image loss.
ORIGINAL SIZE AND COPY SIZE SHOULD BE THE SAME
ORIGINAL PLACEMENT: Face down, page heading at top
MAGNIFICATION: 1:1 only
COPY REDUCTION: 11'x17"/8.5"x14" to 97% of Original; 8.5"x11"R to 96% of
Original; 8.5"x11"/5.5"x8.5" to 95% of Original
INCOMPATIBLE: Change Magnification, AMS, Book Copy (incompatible with
Reduce & Shift only)
1 Place originals FACE DOWN
on platen glass with page
heading at top.
2 Press
3 Press SHIFT/REDUCE & SHIFT
4 Press
5 To clear Image Shift mode,
COPY MODE to select
desired copy mode.
to select Shift or Reduce &
Shift.
START PRINT.
press
AUTO.
Shift Result:
1s1: Image shifts right every page
1s2: Image shifts left even pages
NOTES:
1 When using bypass with Reduce & Shift, a 3% reduction is automatically selected.
2 To remove an existing binding margin, place page heading at bottom.
7-2 Special Copying
Page 68

Special Copying
Shift/Reduce & Shift (continued)
Using the RADF/ADF
ORIGINAL SIZE AND COPY SIZE SHOULD BE THE SAME
ORIGINAL PLACEMENT: Face down, page heading at top
MAGNIFICATION: 1:1 only
COPY REDUCTION: 11'x17"/8.5"x14" to 97% of Original; 8.5"x11"R to 96% of
Original; 8.5"x11"/5.5"x8.5" to 95% of Original
INCOMPATIBLE: Change Magnification, AMS, Book Copy (incompatible with
Reduce & Shift only)
1 Place originals FACE DOWN
on RADF/ADF with page
heading at top.
2 Press
3 Press
4 Press
5 To clear Image Shift mode,
Shift Result:
1s 1:Image shifts right every page
1s 2:Image shifts left even pages
2s 1:Image shifts left even pages
2s 2:Image shifts left even pages
COPY MODE to select
desired copy mode.
SHIFT/REDUCE & SHIFT
to select Shift or Reduce &
Shift.
START PRINT.
AUTO.
press
(RADF only)
Image shifts right odd pages
(RADF only)
NOTES:
1 When using bypass with Reduce &
Shift, a 3% reduction is
automatically selected.
2 To remove an existing binding margin,
place page heading at bottom.
Special Copying 7-3
Page 69

Special Copying
Frame and Fold Erasure
Using Frame and Fold Erasure
When copying a page or dual pages of an opened book onto one sheet
of the same size, use Frame/Fold Erasure separately or together to
eliminate the black copy marks along borders and the center strip.
Original size and copy size should be the same.
FRAME ERASURE: 05mm/10mm/15mm
FRAME PAPER SIZE: 11”x17”, 8.5”x14”, 8.5”x11”, 8.5”x11”R, 5.5”x8.5”
FOLD ERASURE: 10mm/20mm/30mm
FOLD PAPER SIZE: 11”x17” or 8.5”x11”R
FRAME AND FOLD PAPER SIZE: 11”x17” or 8.5”x11”R
INCOMPATIBLE: Using bypass, Book Copy
1 Place book or sheet on platen
glass or RADF/ADF.
2 Select copy size, if required.
3 Set Frame/Fold Erasure, as
needed (see pages 7-5~7-6).
4 Press
5 Enter print quantity.
6 Press
ERASURE once to select
Frame Erasure, twice to select
Fold Erasure, three times to
select Frame and Fold erasure.
START PRINT.
Frame erases borders. Fold
erases center strip. Frame and
Fold erases borders and center
strip.
NOTE: When copying an 11”x17” original to an 8.5”x11”R copy, select a 0.65
reduction ratio after selecting the copy size.
7-4 Special Copying
Page 70

Special Copying
Frame and Fold Erasure (continued)
Setting Frame Erasure
Set Frame Erasure when using Frame Erasure to eliminate the black
copy marks along borders. Refer to page 7-4 for instructions on using
Frame and/or Fold Erasure.
FRAME MEASUREMENT: 05mm/10mm/15mm
1 Press ERASURE to select
Frame Erasure. The current
Frame measurement will be
displayed in the message area.
2 Press
3 Use keypad to enter a Frame
4 Press [P] twice to store the
[P]. The Frame light will
flash.
measurement (05mm, 10mm,
15mm).
Press: [0][5] for 5mm
[1][0] for 10mm
[1][5] for 15mm
The Frame measurement is
displayed in the message area.
Frame measurement. The
Frame erasure light will go out,
and the initial print quantity will
be displayed.
Frame Erasure eliminates black
copy marks along borders.
NOTE: The frame setting will remain valid until it is changed.
Special Copying 7-5
Page 71

Special Copying
Frame and Fold Erasure (continued)
Setting Fold Erasure
Set Fold Erasure when using Frame Erasure to eliminate the black
copy marks along center strip. Refer to page 7-4 for instructions on
using Frame and/or Fold Erasure.
FOLD MEASUREMENT: 10mm/20mm/30mm
1 Press ERASURE to select Fold
Erasure. The current Fold
measurement will be displayed
in the message area.
2 Press
3 Use keypad to enter a Frame
4 Press [P] to store the Fold
[P]. The Fold light will
flash.
measurement (10mm, 20mm,
30mm).
Press: [1][0] for 10mm
[2][0] for 20mm
[3][0] for 30mm
The Fold measurement is
displayed in the message area.
measurement. The Frame
erasure light will go out, and the
initial print quantity will be
displayed.
Fold Erasure eliminates black
copy marks along borders.
NOTE: The fold setting will remain valid until it is changed.
7-6 Special Copying
Page 72

Special Copying
Book Copy
Use Book Copy to copy an open book or a large sheet onto two
8.5”x11” sheets; or to increase manual copying speed, place two lettersized sheets side by side on the platen glass.
BOOK SIZE: 15 lb (6.8kg) maximum; approximately 11”x17” when opened
BOOK THICKNESS: 1.6” (40mm) maximum
SHEET SIZE: 11”x17”
COPY PAPER: 8.5”x11” (even number of sheets)
INCOMPATIBLE: RADF/ADF, APS, AMS, 2 s2, 2s1, Frame/Fold Erasure, OHP
Interleave, Mixed size originals
HINT: If book does not cover entire platen glass and the document cover cannot be
completely closed, place paper over the exposed glass to reduce toner consumption.
1 Place opened book or sheet on
platen glass, centering edge with
left measuring guide. Be sure
original is as flat as possible.
2 Gently close cover. If original
skews when closing cover, keep
cover open to make the copy.
3 Press
4 Enter print quantity.
5 Press START PRINT.
6 To release Book Copy, press
BOOK COPY. Copy Size
8.5”x11” will be automatically
selected. If another size is
selected, Book Copy will function
incorrectly (see note).
In 1s1 mode, two letter-size
sheets will be output.
In 1s2 mode, one two-sided
letter-size sheet will be output.
AUTO.
NOTE: If using the bypass, insert at least two sheets of 8.5”x11” paper and select
SPECIAL by pressing COPY SIZE.
Special Copying 7-7
Page 73

Special Copying
Photo Enhance
The Photo Enhance mode reproduces a gray-scale photo or half-tone
image close to that of the original, an improvement over the standard
copying mode.
ORIGINAL SIZE: 11" x17" maximum
COPY PAPER: Appropriate paper, as specified in Section 4.
1 Place photo FACE DOWN on
platen glass or RADF/ADF, as
required.
2 Close document cover, if
required.
3 Press PHOTO ENHANCE to
illuminate
4 Enter print quantity.
5 Press
6 When copying is completed,
press AUTO to exit Photo
mode.
PHOTO indicator.
START PRINT.
7-8 Special Copying
Page 74

Special Copying
OHP Interleave
Use OHP Interleave to copy and insert one OHP film transparency in
addition to each blank sheet.
OHP/COPY PAPER: Must be the same size and orientation
COPY PAPER SOURCE: Tray 1, 2, 3, or 4
OHP SHEET SOURCE: Bypass tray only
MAXIMUM PRINT QUANTITY: 1
INCOMPATIBLE: Sorter, Book Copy, Mixed Size Original
1 Load 8.5”x11” paper in tray.
2 Open bypass and insert one
OHP. Adjust paper guides.
3 Place original FACE DOWN on
platen glass or RADF/ADF.
4 Press OHP INTERLEAVE until
OHP indicator lights.
the
5 Press
START PRINT.
A blank regular sheet and a
copied OHP sheet will be
produce for each original.
6 Press
AUTO to release OHP
Interleave mode.
NOTES:
1 The copier is initially set to insert blank paper between films (blank interleave),
however, it can be set to insert copied sheet (copy interleave) by service.
2 Do not place OHP film transparencies in any tray other than the bypass.
Special Copying 7-9
Page 75

Section 8: Maintenance and Supplies
Service, Supplies, and Repairs
Daily Maintenance
Cleaning the Platen Glass
Cleaning the Inner Surface of the Platen Cover
Cleaning the RADF/ADF Conveyance Belt Surface
Cleaning the Corona Wire
Removing/Inserting Paper Trays
Loading Paper
Service-Adjustable Tray (Tray 1, 2 and 4)
LCT (Large Capacity Tray: Tray 3)
User-Adjustable Tray (Option)
Adding Toner
Replacing the Staple Cartridge
In-Bin Stapler
Off-Line Stapler
Installing the Off-Line Corner Stapling Adapter
Removing the Off-Line Corner Stapling Adapter
Preventive Maintenance
Reading the PM Count
Moving the Copier
Maintenance and Supplies 8-1
Page 76

Maintenance and Supplies
Service, Supplies, and Repairs
Service and Repairs: When you experience a problem with the copier,
you may be able to quickly resolve the problem by following the suggested
solutions listed in the Troubleshooting section of this manual.
If you are unable to resolve the problem, contact your Konica service
representative. Before calling, be sure to have the following information
readily available: the model number and serial number of the copier, a
description of the problem, and any machine codes displayed on the
control panel.
For easy reference, enter the name and telephone number of your
Konica representative and the model and serial number of your copier
below.
For Konica service call:
Copier Model and Serial Number:
Supplies: Use only supplies recommended by Konica Business
Machines U.S.A., Inc. Otherwise, poor copy quality may result.
To maintain your supply inventory, be sure to do the following:
❐ Check your supplies at regular intervals.
❐ Order a supply item before it is depleted or nearly depleted.
For supplies call:
8-2 Maintenance and Supplies
Page 77

Maintenance and Supplies
Daily Maintenance
The platen glass and the inner surface of the document cover should
be kept clean to prevent soil marks from being copied. Occasionally,
an anti-static cleaner may be required to ensure that a static charge is
not generated. Ask your Konica service representative to suggest an
appropriate cleaner. For optimal copy quality, follow the instructions
below.
Cleaning the Platen Glass
1 Raise the document cover.
2 Wipe the glass with a clean soft cloth, dampened
slightly with water or an anti-static cleaner.
Cleaning the Inner Surface of the Platen Cover
1 Raise the document cover.
2 Wipe the inner surface with a clean soft cloth.
Cleaning the RADF/ADF Conveyance Belt Surface
1 Raise the document cover.
2 Wile the RADF/ADF conveyance belt surface
with a clean, soft cloth dampened with an antistatic spray.
NOTE: Never use paint solvents, such as benzene or thinners, to clean any portion
of the copier. To avoid copier damage, do not spray or pour water or cleaner
directly on the platen glass. Do not use any abrasive clean the glass.
Maintenance and Supplies 8-3
Page 78

Maintenance and Supplies
Cleaning the Corona Wire
Occasionally cleaning the corona wire will help to maintain optimal
copy quality and efficient operation of the copier. Cleaning of the
corona wire is recommended approximately every three months.
1 Press release buttons located
on left and right sides of copier
and open front door.
2 Slowly slide wire cleaning knob
in and out (in direction of arrow
as shown) five or six times.
3 Close copier front door.
Removing/Inserting Paper Trays
When loading paper or clearing mishandled paper, it may be
necessary to remove the paper trays.
1 Withdraw paper tray.
2 Carefully lift the front sides of
the tray and remove the tray.
8-4 Maintenance and Supplies
3 To insert tray, lift the front
sides of the tray and align the
drawer rails to the tray rails.
4 Push in the tray completely.
Page 79

Maintenance and Supplies
Loading Paper
When a paper tray is empty, a message displays in the message area
and the tray location flashes on the control panel copier diagram.
MAIN BODY
TRAY 1: Service-adjustable: 250 sheets (20 lb)
TRAY 2: Service-adjustable: 250 sheets (20 lb)
DB-307/607
TRAY 3: Service-adjustable: 1,000 sheets (20 lb)
TRAY 4: Service-adjustable: 250 sheets (20 lb)
Service-Adjustable Tray (Tray 1, 2 and 4)
1 Fan new paper to prevent
paper mishandles.
2 Fully withdraw paper tray from
main body, or drawer base.
3 Push down the bottom T-bar
plate inside the tray until it locks
into place.
4 With curl side up, place paper
in tray from left.
5 Stack paper up to, but not
above, the guide stops located
on the right side of the tray.
6 While pressing the front guide
knob, move paper guide
against copy paper.
Be sure to insert paper into
slightly below hook level of the
paper tray.
7 Reset the tray into the copier.
NOTE: For best results, store paper on flat surface in cool, dry area. Do not open
paper packages until paper is needed and keep partially used packages tightly
wrapped during storage.
Maintenance and Supplies 8-5
Page 80

Maintenance and Supplies
Loading Paper (continued)
LCT (Large Capacity Tray: Tray 3)
1 Fan new paper to prevent
2 Fully withdraw LCT from drawer
3 While pressing the front guide
4 With curl side up, place paper
5 Stack paper up to, but not
6 While pressing the front guide
7 Reset the LCT into the copier.
paper mishandles.
base.
lever, move front paper guide to
the front side.
in LCT.
above the line of the rear guide
plate.
lever, move front paper guide
against copy paper.
Be sure to insert paper into
slightly below hook level of the
LCT.
NOTE: For best results, store paper on flat surface in cool, dry area. Do not open
paper packages until paper is needed and keep partially used packages tightly
wrapped during storage.
8-6 Maintenance and Supplies
Page 81

Maintenance and Supplies
Loading Paper (continued)
User-Adjustable Tray (Option)
1 Fan new paper to prevent
2 Fully withdraw paper tray from
3 Push down the bottom T-bar
4 With curl side up, place paper
5 Stack paper up to, but not
6 While pressing the front guide
7 Move rear paper guide against
8 Reset the tray into the copier.
paper mishandles.
main body, or drawer base.
plate inside the tray until it locks
into place.
in tray from left.
above, the guide stops located
on the right side of the tray.
knob, move paper guide
against copy paper.
Be sure to insert paper into
slightly below hook level of the
paper tray.
copy paper.
NOTE: For best results, store paper on flat surface in cool, dry area. Do not open
paper packages until paper is needed and keep partially used packages tightly
wrapped during storage.
Maintenance and Supplies 8-7
Page 82

Maintenance and Supplies
Adding Toner
When toner supply is low, the message ADD TONER will be displayed
in the message area. No further copying will be possible and P25 will
flash in the magnification ratio window.
CAUTION
Before adding toner, carefully read the directions and safety
information included with the toner cartridge. Keep toner away
from children. Although toner is non-toxic, do not inhale it or allow
it to enter your eyes. In case toner comes in contact with eyes,
consult your physician. If you have additional concerns, read the
Material Safety Data Sheet (MSDS).
1 To loosen toner, gently strike
the bottom of cartridge against
a solid surface. Turn cartridge
over and repeat procedure.
2 Shake cartridge vigorously.
3 Remove only the bottom plastic
cap.
4 While pressing release buttons
on left and right sides of copier
front door, open the front door.
5 Raise green toner box lid.
8-8 Maintenance and Supplies
6 Insert cartridge over unit with
>PP< mark facing you,
inserting first the right, then the
left side of the cartridge, until
completely upright.
Page 83

Maintenance and Supplies
Adding Toner (continued)
CAUTION
Incinerate used toner cartridge at regulated facilities only.
7 While slightly pressing down
toner cartridge, slide toner
release lever left, as shown.
8 Hold cartridge and tap side.
9 Leave for approximately one
minute, then lightly tap again to
empty toner.
10 Return green lever to the right.
11 Repeat steps 7~10 three times.
12 Remove and properly dispose
of empty toner cartridge.
13 Close toner cover.
14 Close copier front door.
NOTE: If toner gets on hands or clothes, brush it off vigorously. Do not use water.
Maintenance and Supplies 8-9
Page 84

Maintenance and Supplies
Replacing the Staple Cartridge
In-Bin Stapler
1 Holding the sorter handle,
2 Open the sorter cover and
3 Raise stapler unit. Remove any
4 Holding new staple cartridge
5 Insert the new staple cartridge
6 Close the sorter cover and
7 Check the operation two or
gently slide the sorter to the
left.
remove the empty staple
cartridge.
staples remaining in driving
portion of unit. Then return
stapler unit to its original
position.
as shown, remove stopper.
Slide any loose staples
together.
as shown.
slide the sorter to its original
position.
three times using the manual
staple mode.
NOTE: The staple cartridge holds 3,000 staples.
8-10 Maintenance and Supplies
Page 85

Maintenance and Supplies
Replacing the Staple Cartridge (continued)
Off-Line Stapler
1 Press the stapler release button
and open the stapler.
2 Press the cartridge holder in
the direction of the arrow, as
shown.
3 Remove the empty staple
cartridge.
4 Check the new staple cartridge
and remove any protruding
staples.
5 Insert the new cartridge.
6 Return cartridge holder to
7 Close the stapler.
NOTE: The staple cartridge holds 5,000 staples.
original position to lock it with a
click.
Maintenance and Supplies 8-11
Page 86

Maintenance and Supplies
Installing the Off-Line Corner Stapling Adapter
1 Press the stapler release button
and open the stapler unit.
2 Remove the corner stapling
adapter from the location
shown.
3 Partially close the stapler and
insert the corner stapling
adapter in the slot as illustrated.
When inserting the adapter, do
not close the stapler
completely.
4 When adapter is inserted, close
the stapler.
Removing the Off-Line Corner Stapling Adapter
1 Hold the corner stapling
adapter on each side and lift
slightly.
2 Withdraw the adapter.
3 Press the stapler release button
and open stapler unit.
4 Return the corner stapling
adapter to its storage position,
then close stapler.
8-12 Maintenance and Supplies
Page 87

Maintenance and Supplies
Preventive Maintenance
Reading the PM Count
Preventive Maintenance (PM) is recommended for maintaining optimal
copier performance. When preventive maintenance is due, a message
will display in the message area. Contact your Konica service
representative.
It is possible to estimate the time when the next PM is due by reading
the total copy count since the last PM. Use the following procedure to
display the total number of copies made since the last PM.
1 Using the keypad, press [P] and [5]
simultaneously.
2 Read the PM count displayed in the message
area and the print quantity window.
Example: Message Area
Line 1 displays the current copy count toward the
PM count limit.
Line 2 displays the date of the last PM.
Example: Print Quantity Window
The print quantity window will display the copy
count in two digits, rounded to the next thousand.
Multiply the two-digit number by 1,000 to obtain the
correct count of copies made since the last PM.
Maintenance and Supplies 8-13
Page 88

Maintenance and Supplies
Moving the Copier
Before moving the copier using the instructions below, contact your
Konica service representative.
1 Turn the four handles located
on both sides of copier until the
screw on the handle is at the
top.
2 Then withdraw the handles.
3 Turn the extended handles until
screw is located at the bottom.
Withdraw handles completely.
4 To lock the handles for lifting,
turn them until the screw is in
the top position, making sure
that the pin at the end of the
handle is also at the top. Be
sure to extend all four handles
before lifting the copier.
8-14 Maintenance and Supplies
5 Carefully lift the copier using
the extended handles and
move it to another location.
6 Return the carrying handles to
their original positions by
reversing steps 1~4.
Page 89

Section 9: Troubleshooting
Opening and Closing the Copier
User Codes
Mishandled Paper Codes
Clearing Mishandled Paper
Code J11
Code J12
Code J13
Code J14
Code J15
Codes J31 and J16
Code J32
Code J61
Code J62
Codes J63 and J65
Code J72 (ST-103/ST-216)
Code J72 (ST-104)
Code J92
Code J93
Code J94
Code J95
Service Codes
Reporting Service Codes
Clearing a Wedged Staple
In-Bin Stapler (Code J75)
Off-Line Stapler
Troubleshooting Hints
Troubleshooting 9-1
Page 90

Troubleshooting
Opening and Closing the Copier
1 To open copier, press release buttons located
on the left and right sides of copier and open
front door.
2 Firmly press down the toner box cover.
3 While firmly pressing down toner box cover, lift
the release lever to raise upper main body.
4 To close copier, firmly push down toner box
cover.
5 Then close copier front door.
NOTE: When RADF/ADF is raised, copier main body cannot be opened. When
copier main body is opened, RADF/ADF cannot be raised.
9-2 Troubleshooting
Page 91

Troubleshooting
User Codes
User Codes (P Codes) displayed in the ratio window indicate machine
conditions that the user can quickly and easily correct. In most cases,
P Codes simply require returning the machine to its original ready-tocopy state.
CODE SOLUTION
P20, 26, 27, 88
P25 Add toner.
P51 Close front door of main body.
P61 Close RADF/ADF paper access.
P64 Open RADF/ADF and remove original from platen glass.
P68, 69 Firmly close RADF/ADF.
P71 Close sorter cover properly.
P74 The number of sheets per bin exceeds the staple
P76 The staple cartridge is empty. Replace the new staple
P77 The copy size except 11”x17” and 8.5”x11” is selected in
P78 The stapler unit is not installed completely. Install the
P81 Insert key counter.
P91 Close ADU door.
P94 Reset tray 2 to copier properly.
P96 Remove paper remaining in ADU.
P97 Use only tray except bypass.
Call your service representative.
Remove original and place it correctly on RADF/ADF.
Connect sorter to main body properly.
capacity. Remove sheets from bins.
The number of sheets in sorter bins exceeds bin
capacity. Remove sheets from bins.
Paper remains in the sorter bins; or paper remains after
stapling. Remove paper from bins.
cartridge.
the Automatic In-Bin Stapling. Select 11”x17” or 8.5”x11”
by pressing
stapling by pressing
stapler unit securely.
COPY SIZE, or release the Automatic In-Bin
SORTER button.
Troubleshooting 9-3
Page 92

Troubleshooting
Mishandled Paper Codes
Mishandled Paper locations are conveniently displayed on the control
panel diagram, as shown below. When mishandled paper occurs, a
specific J Code also flashes in the ratio window on the control panel,
the message area displays instructions to guide you through paper
recovery quickly and easily, and the Start Print light changes to amber,
indicating the WAIT condition. Copying is not possible in this condition.
A label illustrating the removal of mishandled paper is also located
inside the front door of the copier.
The following pages illustrate how to remove mishandled paper from
each area of the copier.
Copier Diagram
1 J11 Main Body Paper Feed
2 J12 Main Body Paper Feed
3 J13 Drawer Base Paper Feed
4 J14 Drawer Base Paper Feed
5 J16, J31 Bypass
6 J32 Paper Exit
J92 ADU
7 J72 Sorter
J75 In-Bin Stapler (ST-104)
8 J61, J62 RADF/ADF Paper Feed
9 J63, J65 RADF/ADF Paper Exit
10 J15 ADU
NOTE: When removing mishandled paper, be sure to leave no torn paper inside the
machine, avoid touching or scratching the drum in any way, and keep all metal and
magnetic objects, e.g., watches, jewelry, etc., away from the drum area.
9-4 Troubleshooting
Page 93

Troubleshooting
Clearing Mishandled Paper
Code J11
1 Press release buttons on sides of copier and
open front door. While firmly pressing down toner
box cover, lift the release lever to raise upper part
of main body.
2 Open right side cover 1 of copier and remove the
mishandled paper.
3 If the mishandled paper cannot be removed in
step 2, withdraw tray 1 and remove the
mishandled paper. Then return the tray to its
original position.
4 Press down the toner box cover to close upper
part of main body. Then close copier front door.
NOTE: When the RADF/ADF is raised, the upper part of the main body cannot be
opened.
Troubleshooting 9-5
Page 94

Troubleshooting
Clearing Mishandled Paper (continued)
Code J12
1 Open right side cover 2 of copier, and remove the
mishandled paper. Then return the cover to its
original position.
2 If there is no mishandled paper in the right side
cover, withdraw tray 2 and remove the
mishandled paper.
3 Return tray 2 to its original position.
Code J13
1 Open right side cover 3 of copier, and remove the
mishandled paper. Then return the cover to its
original position.
9-6 Troubleshooting
2 If there is no mishandled paper in the right side
cover, withdraw LCT and remove the mishandled
paper.
3 Return LCT to its original position.
Page 95

Troubleshooting
Clearing Mishandled Paper (continued)
Code J14
1 Open right side cover 4 of copier, and remove the
mishandled paper. Then return the cover to its
original position.
2 If there is no mishandled paper in the right side
cover, withdraw tray 4 and remove the
mishandled paper.
3 Return tray 4 to its original position.
Code J15
1 Open ADU door.
2 Remove one sheet of paper hanging down at the
far left.
Be sure to remove only one sheet.
3 Close ADU door.
Troubleshooting 9-7
Page 96

Troubleshooting
Clearing Mishandled Paper (continued)
Codes J31 and J16
CAUTION
To avoid electric shock, do not touch the high voltage area
indicated by a caution label inside the main body.
1 Press release buttons on left and right sides of
copier and open copier front door. Then, push
down on toner box cover and raise the release
lever to open upper part of main body.
2 Open right side cover of copier and remove
mishandled paper from inside main body. Then,
return the cover to its original position.
3 Push down the toner box cover to close the upper
part of the main body.
NOTE: If J31 is indicated and the power is switched off
without mishandled paper being removed, J16 will be
displayed when power is switched on.
9-8 Troubleshooting
4 When using the bypass:
Remove mishandled paper from the bypass tray
opening.
Page 97

Troubleshooting
Clearing Mishandled Paper (continued)
Code J32
CAUTION
The fixing unit is very hot. To avoid burns, do not touch it.
To avoid the possibility of electric shock, do not touch the high
voltage area inside the main body indicated by a caution label.
1 Press release buttons on left and right sides of
copier and open copier front door. Then, push
down on toner box cover and raise the release
lever to open upper part of main body.
2 Remove the mishandled paper from the right
hand side of the fixing unit. To avoid soiling the
fixing rollers, do not pull the paper out from the
left hand side.
3 Push down the toner box cover to close the upper
part of the main body.
NOTE: When the RADF/ADF is raised, the upper part of the main body cannot be
opened.
Troubleshooting 9-9
Page 98

Troubleshooting
Clearing Mishandled Paper (continued)
Code J61
If the RADF/ADF is lifted during copying operations,
J61 will be displayed.
1 Raise the RADF/ADF and remove the mishandled
original.
2 Close the RADF/ADF correctly.
Code J62
1 Raise the RADF/ADF. While pressing the release
button, remove the mishandled original.
2 Close the RADF/ADF correctly.
Codes J63 and J65
1 Open the conveyance cover and remove the
mishandled original.
2 Close the cover.
9-10 Troubleshooting
3 If the original cannot be removed, raise the
RADF/ADF and remove the original from under
the RADF/ADF.
4 Close the RADF/ADF correctly.
Page 99

Troubleshooting
Clearing Mishandled Paper (continued)
Code J72 (ST-103/ST-216)
CAUTION
The fixing unit inside the main body is very hot. To prevent
accidental burns, do not touch it.
Do not touch the high voltage area of the main body indicated by a
caution label.
1 Slide the sorter away from the
copier main body, to the left.
2 Open the sorter door and
remove the mishandled paper.
3 Open the front door and check
the paper path of the main
body.
4 If the paper cannot be removed, remove the
mishandled paper from the sorter bin side.
5 Close sorter cover, return the sorter to its original
position, and open and close the copier front
door.
6 If the paper cannot be removed using the above
procedure, open the copier front door and open
the upper part of the main body. Then remove the
mishandled paper from the right hand side of the
paper exit. When completed, close the upper
main body and copier front door.
Troubleshooting 9-11
Page 100

Troubleshooting
Clearing Mishandled Paper (continued)
Code J72 (ST-104)
CAUTION
The fixing unit inside the main body is very hot. To prevent
accidental burns, do not touch it.
Do not touch the high voltage area of the main body indicated by a
caution label.
1 Slide the sorter away from the main body, to the
left.
2 Open the sorter cover and conveyance cover.
Remove the mishandled paper.
3 Open the front door and check the paper path of
the main body.
4 If the paper cannot be removed, remove the
mishandled paper from the sorter bin side.
5 Close conveyance and sorter covers, return the
sorter to its original position, and open and close
the copier front door.
9-12 Troubleshooting
6 If the paper cannot be removed using the above
procedure, open the copier front door and open
the upper part of the main body. Then remove the
mishandled paper from the right hand side of the
paper exit. When completed, close the upper
main body and copier front door.
 Loading...