

Page 1

®
magicolor 2200
User’s Guide
1800616-001B
Page 2

Trademarks
The following a re reg istered t rademarks of MINO LTA-QMS, Inc.: QMS , the MI NOLTA-QMS
logo, and magicolo r.
Minolta is a trademar k of Mi no lta C o., Lt d. Other pr oduct name s men tione d in th is ma nua l may
also be trademarks or reg istered trade marks of their re spective own ers.
Proprietary Statement
The digitally encode d software incl uded with your pr inter is Copyr ighted © 2000 by MINOLTAQMS, Inc. All Rights R eserved. This so ftware may not be rep roduced, modified , displ ayed,
transferred, or co pied in any form or in an y manner or on any me dia, in whole or in part,
without the express writt en permission of MI NOLTA-QMS, Inc.
Copyright Notice
This manual is Copyrig hted © 2000 by MINOLTA-QMS, Inc., One Magnum Pass, Mob ile, AL
36618. All Rights Res erved. This do cument may not be copie d, in whole or par t, nor
transferred to any ot her media or lan guage, without written p ermissio n of MI NOLTA-QMS, Inc.
Manual Notice
MINOLTA-QMS, Inc. reserves the ri ght to make change s to this manual and to the equipment
described herein without notice. Considerable effort has been made to ensure that this manual
is free of inacc uracies and omis sions. However, MINOLTA-QMS, Inc. makes no warran ty of
any kind including, but not lim ited to, any implie d warran ties of me rchanta bility an d fitnes s for
a particular purpose with regard to t his manual. MINO LTA-QMS, Inc. assumes no
responsibility for, or liability for, errors cont ained in this man ual or for inci dental, special , or
consequential dama ges arising out of the furnishin g of this manual, or the use of this manu al
in operating th e equip ment, o r in conn ection wi th the performa nce of the equip ment w hen
so operated.
Registering the Prin te r
Mail
—Fill out and send in the registration card enclosed in your shipment.
Internet
—www.qms.com/support/prodreg (US only)
Page 3

Contents
Replacing Consumables .................................................................................7
Consumable Life Expectancies 8
Replacing Consumables 8
Replacing Toner Cartridges 9
Replacing the OPC Drum, Laser Lens Cover, and Waste Toner Pack 13
Replacing the Fuser Unit and Transfer Roller Kit 20
Replacing the Fuser Oil Roller 26
Replacing the Transfer Belt 28
Using Media....................................................................................................33
Introduction 34
Media Handling 34
Media Types 35
Loading Media 40
Media Storage 47
Page 4

Maintaining the Printer .........................................................................................49
Maintaining the Printer 50
Cleaning 52
Troubleshooting ..................................................................................................... 53
Introduction 54
Printing a Status Page 54
Preventing Media Jams 54
Automatic Jam Recovery 55
Understanding the Media Path 56
Clearing Media Jams 57
Solving Problems with Media Jams 69
Solving Other Problems 71
Solving Problems with Printing Quality 75
Status, Error, and Service Messages 85
Additional Assistance 97
Installing Other Accessories ..................................................................................99
Introduction 100
BuzzBox 106
Antistatic Protection 109
Dual In-Line Memory Modules 109
Emulations, Fonts, and Other Software 114
Kanji Font Internal IDE Hard Disk 118
QFORM 120
Interfaces and Daughterboards 121
SCSI Interface 124
Internal IDE Hard Disk Drive 126
Media Trays 128
Printer Stand/Cabinet 129
SC-210 Convenience Copier 129
Time-of-Day Clock (Standard on Models EN and DP) 129
4
Page 5

Color Printing ...................................................................................................133
Introduction 134
Repacking the Printer ......................................................................................137
Storing the Printer 138
Relocating Your Printer 138
Repacking the Printer 139
Technical Specifications .................................................................................. 145
Requirements 146
Engine and Controller Specifications 150
Print Media 155
Document Option Commands 156
Supported DOCs 156
Contents
5
Page 6

Page 7

Replacing Consumables
1
Page 8

The stated life expectancy of each consumable is based on printing under specific
operating conditions, such as media type, number of color planes, page size, and page
coverage (@ normal 5% coverage of letter/A4-size media). The actual life expectancy will
vary depending on these and other printing variables, including continuous or intermittent
printing, ambient temperature, and humidity. For further information about the
consumables statistics page and replacement menus, refer to the CrownBook.
Failure to follow instructions as outlined in the User’s Guide could result in voiding
your warranty.
The following messages indicate that a consumable needs to be replaced:
REPLACE OIL ROLLER
'(
REPLACE FUSER UNIT
$23($23
!(
REPLACE OPC DRUM
REPLACE WASTE TONER
WASTE TONER NEAR FULL
FUSER OIL LOW, FUSER OIL EMPTY,
REPLACE OIL ROLLER
!!
)
*)+(,
-!.!
!
/4
56+7
56+7
$
"#
$#%
&
"#
/
0#
1%
"#
$2389
93!
:0
2(%4
Page 9

Item/Message Display This item needs replacing by user after... Page Reference
Toner
<COLOR>
Transfer belt
REPLACE TRANSFER BELT
plane
*A
a black-only, single-sided (simplex) print job makes one pass, and a two-color (duplex) print job
makes two passes. A single-sided color
OPC drum, since most color print jobs use all four toner colors. A two-sided color page may consist
of up to eight passes of the OPC drum, since most color print jobs use all four toner colors. Stated
consumable life is expressed at 5% in simplex letter/A4 pages. A duplex page is equivalent to two
simplex pages.
The number of sheets/faces printed shown on the startup page differs from the number of sheets/
faces printed statistics in CrownView and on the consumables statistics page (Operator Control/
Consumables/Print Statistics). The numbers on the startup page refer to number of sheets/faces
printed during the lifetime of the printer. The numbers in CrownView and on the consumables statistics page refer to the number of sheets/faces printed to date during the current consumables
tracking period (Administration/Consumables/Start Period menu).
TONER EMPTY
(also called an
image
Approximately 6,000 single-sided pages per
cartridge—black, yellow, magenta, cyan at
5% coverage of each color.
100,000 single-sided images (1:1 color/
monochrome printing)
) is a single
pass
page
(also called a
of the OPC drum (one toner color). For example,
face
) consists of four passes of the
“Replacing Toner
Cartridges” on
page 9
“Replacing the
Transfer Belt” on
page 28
Ordering Consumables
Choosing the right consumables for your magicolor 2200 printer not only increases its
reliability and performance, but also minimizes the risk of damage.
For example, only MINO LTA-QMS toner ca rtridges are designed to m eet the exact
specifications of your MINOLT A-QMS pri nter , gi ving maximum perfor mance, ef ficiency,
and long life.
Toner cartridges and other consumables for the magicolor 2200 are available from your
local vendor or Q-SHOP (www.q-shop.com). See the
Service & Support Guide
for the
telephone number of the MINOLTA-QMS office nearest you for inf ormat ion on ordering.
Replacing Toner Cartridges
Characters and images ar e create d in your lase r printe r thro ugh a proces s that appli es toner
to the photosensitive (OPC) drum (which functions like photographic film). Your printer
Replacing Toner Cartridges 9
Page 10

uses four toner cartridges: black, yellow, magenta, and cyan. Handle the toner cartridges
carefully to avoid spilling toner inside the printer or on yourself.
5"
The carbon-particle toner is nontoxic. If yo u get ton er on your hands, wash t hem in cool
water or a neutral detergent. If you get toner on your clothes, lightly dust them off as
much as possible. If some toner remains on your clothes, use cool, not hot water, to
rinse the toner off, provided your clothing is washable.
Attention
If you get toner in your eyes, wash it out immediately and consult a doctor. Material
Safety Data Sheets (MSDS) information can be found at www.minolta-qms.com
(click on the Answer Base).
Toner Cartridge Life
A toner cartridge contains enough toner (yellow, magenta, cyan, or black) to print a
maximum of 6,000 (@ normal 5% page coverage) letter/A4-size pages.
X
When toner runs low in a cartridge,
indicates the toner color). It’s your option whether to continue printing; usually, parts of
the page print lighter.
When toner is low, it’s sometimes helpful to take the cartridge out of the printer and
redistribute the toner by gently rocking the cartridge horizontally side to side (as you do
for a new cartridge) five or six times. Then reinstall the cartridge.
TONER LOW
displays in the message window (
X
The printer, approximately 100 pages after detecting that toner in a cartridge is low,
X
displays
continues even though the out-of-toner warning appears. However, the color gradually
fades, so replace the toner cartridge as soon as possible.
TONER EMPTY
in the message windo w (
X
indicates the toner color). Printing
Replacing Toner Cartridges10
Page 11
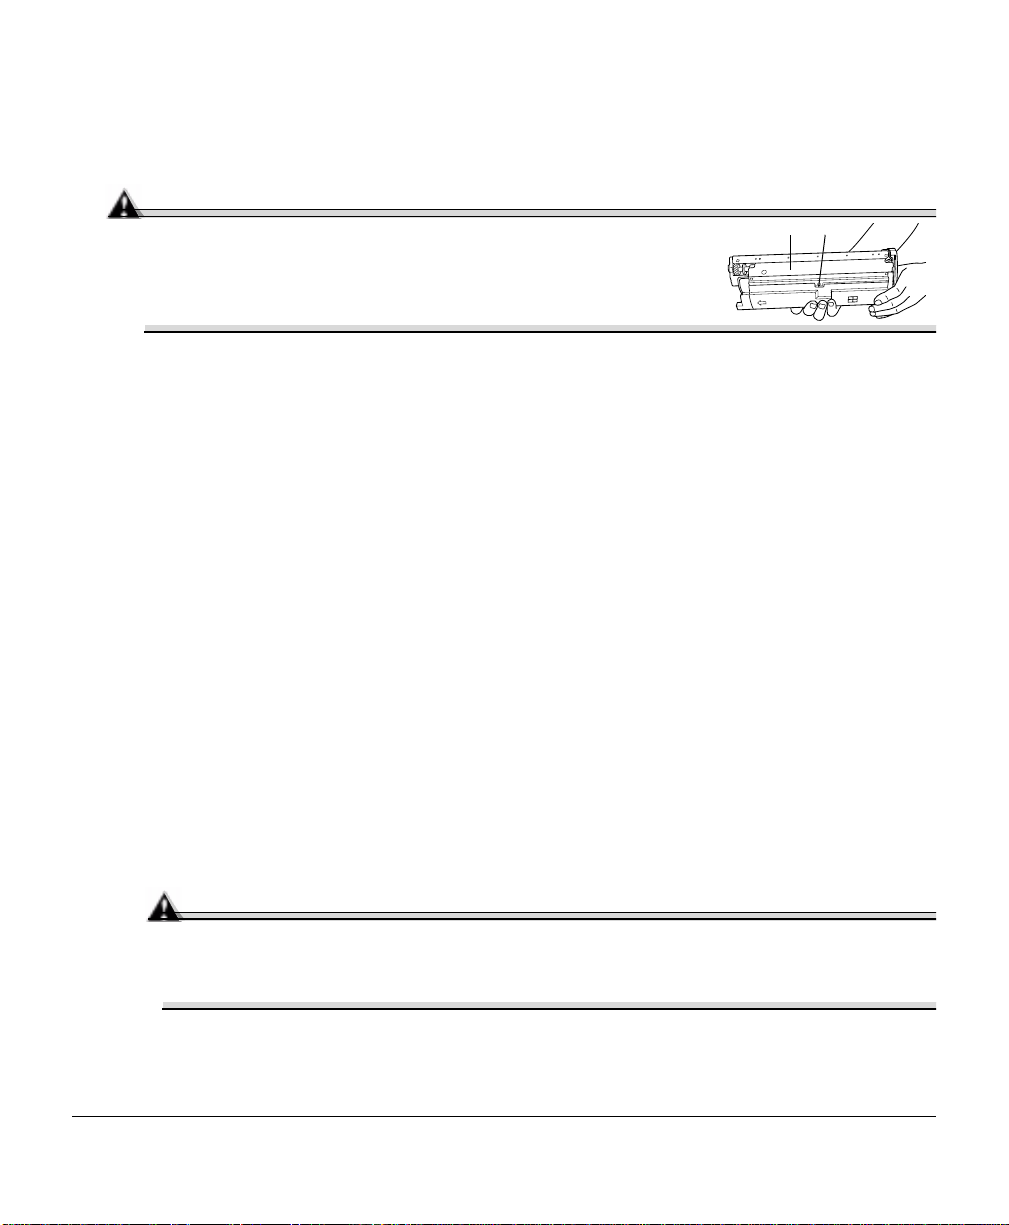
Toner Cartridge Handling
cd
Attention
Do not hold a toner cartridge vertically. Do not touch the
c
toner roller surface
could lower image quality.
Keep toner cartridges:
„
In their packaging until you’re ready to install them.
„
In a cool, dry location away from sunlight (due to heat).
The maximum storage temperature is 95° F (35° C) and the maximum storage humidity is 80% without condensation.
„
Level during storage.
Do not stand or store cartridges on their ends or turn them upside down; the toner
inside the cartridges may become caked or unequally distributed.
„
Away from salty air and corrosive gases such as aerosols.
„
Away from disk drives and floppy disks.
The magnets in the cartridges can damage stored data.
or the protective shutter d. This
Toner Cartridge Replacement
1
Check the message display to see what toner color is out.
2
Open the printer’s front cover.
Attention
Be careful not to spill toner on the inside of the printer’s front cover. Toner will
fall from there into the upper media tray. If toner does fall onto the open cover,
immediately wipe it with a dry, lint-free soft cotton cloth or swabs.
If the toner cartridge you want to replace is the one showing, go to step 5. If not, go
to step 3.
Replacing Toner Cartridges 11
Page 12
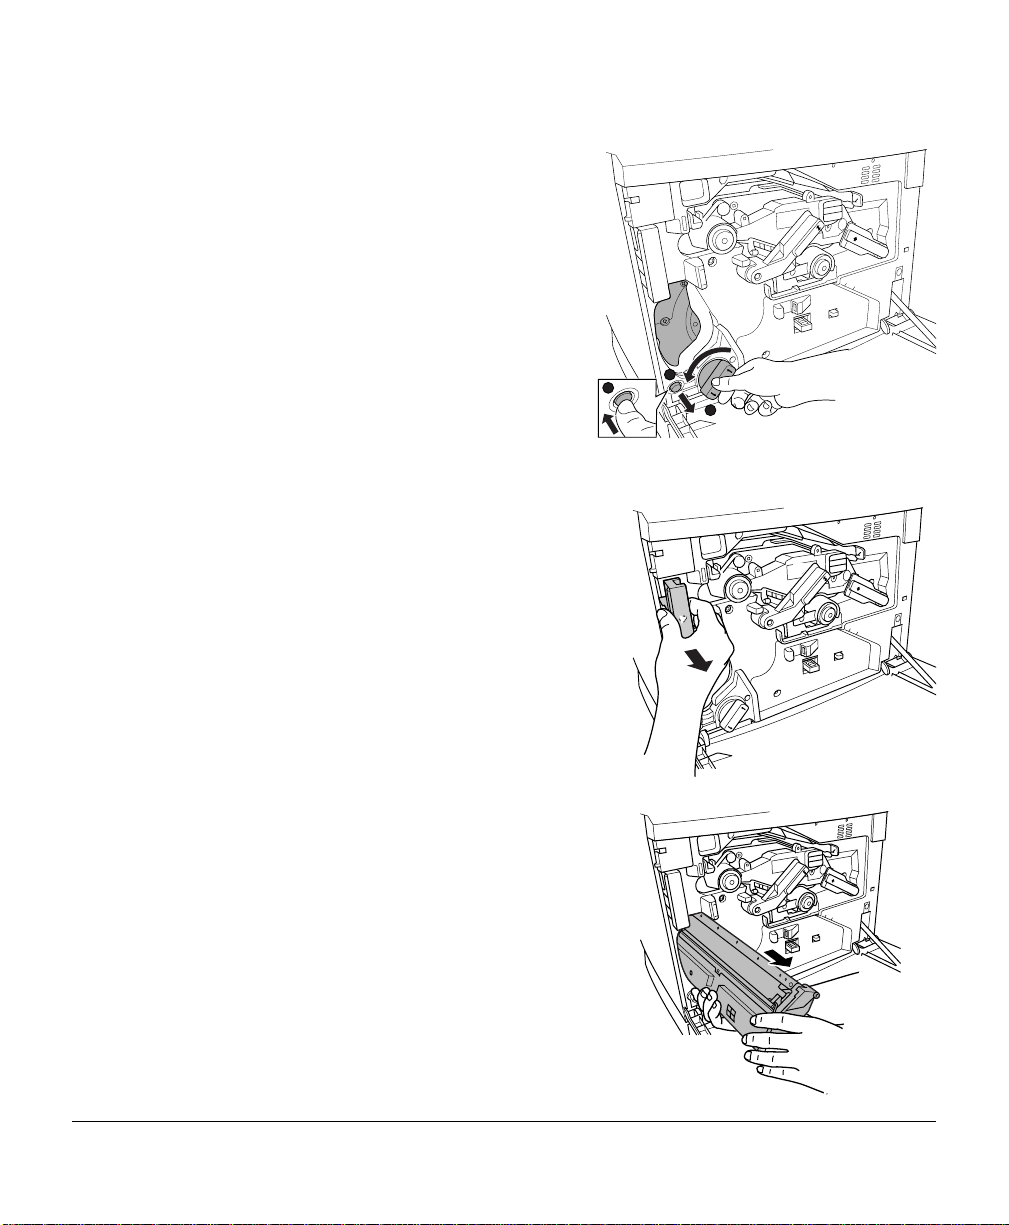
3
Press the toner cartridge carrousel button
c
and release the button dbefore turning
e
the carrousel dial
it stops.
The carrousel rotates 90° and stops.
The toner cartridge carrousel may start to
turn automatically from the weight of the
inserted toner cartridge. Make sure you
have fully turned to the next slot before trying to insert another toner cartridge.
4
Continue step 3 until the color to be
replaced is visible.
5
Pull the release lever to eject the toner
cartridge you are going to replace.
counterclockwise until
1
2
3
5"
Dispose of it properly according to your
local regulations (do not dispose of it by
burning).
6
Remove the new toner cartridge from its
shipping carton.
Replacing Toner Cartridges12
Page 13
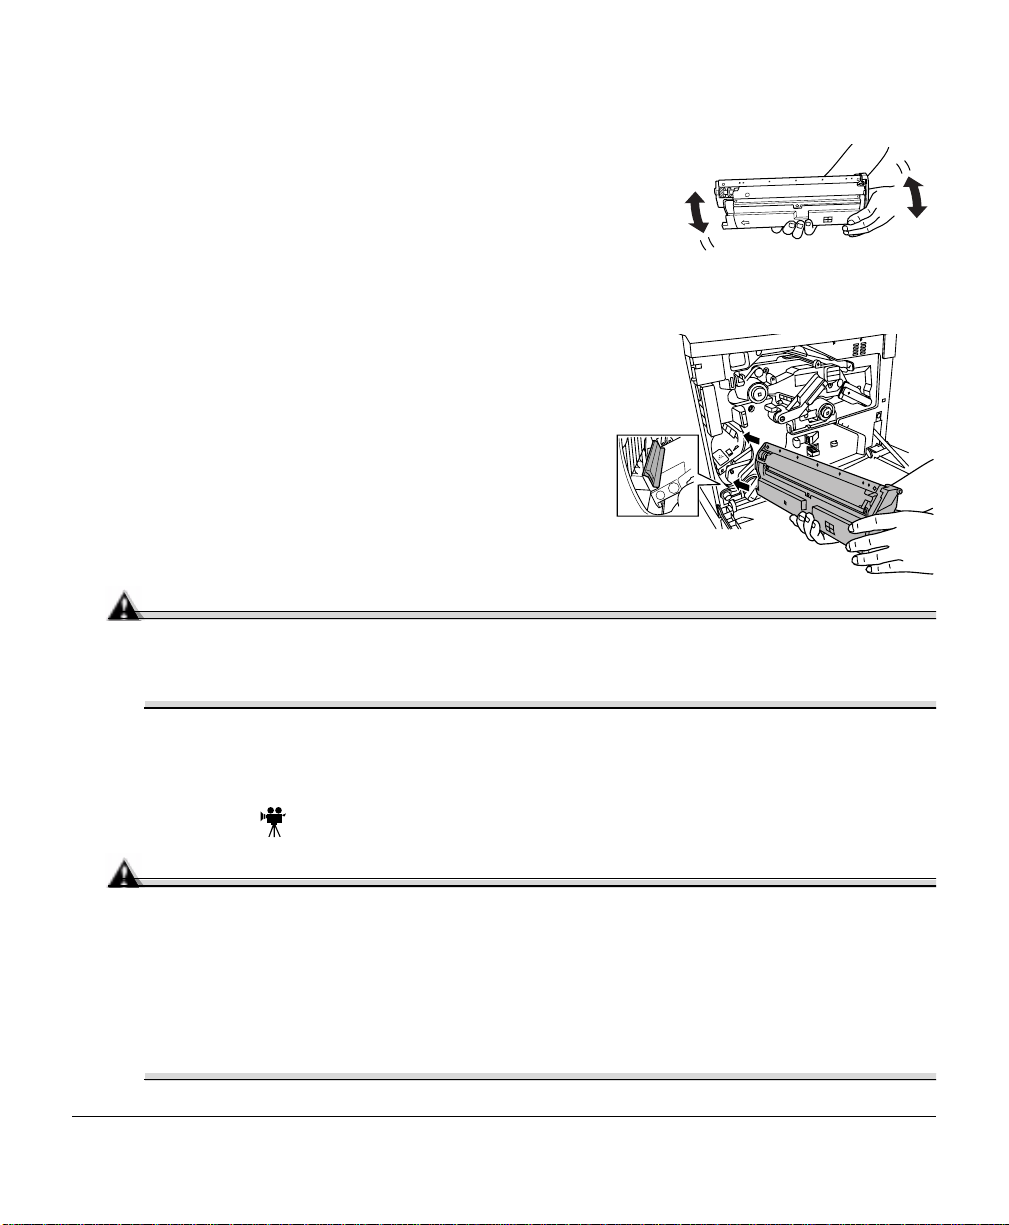
7
Distribute the toner inside the cartridge.
Holding a cartridge with both hands, gently shake it
five or six times.
5"
Each toner cartridge has a colored end that
corresponds to a colored label inside the cartridge slots. Always install the toner
cartridge in the slot with a label of the same color.
8
Place the front end of the toner cartridge
installation guides into the cartridge installation rails on the cartridge carrousel.
9
Gently push the new cartridge into the printer.
10
Close the printer’s front cover.
Refilled Toner Cartridges
Attention
Refilled toner cartridges may produce variations in toner quality and reliability and
can reduce th e print q uality of your docume nts. Any damage to th e printe r or quali ty
problems caused by a refilled toner cartridge use will void your warranty.
Replacing the OPC Drum, Laser Lens Cover, and Waste Toner Pack
Attention
The OPC drum is extremely sensitive to bright light and direct sunlight. Always
leave it in its protective bag until you’re ready to install it. Any exposure to light
should be avoided, or permanent damage could result. Any damage resulting from
mishandling of the OPC drum will v oid the wa rranty o f the OPC dru m. Also, handl e
the cartridge carefully by its sides so you don’t touch the surface (the green part) of
the drum. The drum is also extremely sensitive to hand oils and scratches, both of
which reduce print quality.
Replacing the OPC Drum, Laser Lens Cover, and Waste Toner Pack 13
Page 14
When the OPC drum is wor n out, the message
not print until the drum kit is replaced.
REPLACE DRUM
appears. The printer will
When you replace the OPC drum cartridge after a
message displays in the mes sage window, the printer automati cally recovers. However, the
replaced waste toner pack consumables monitoring system must be reset.
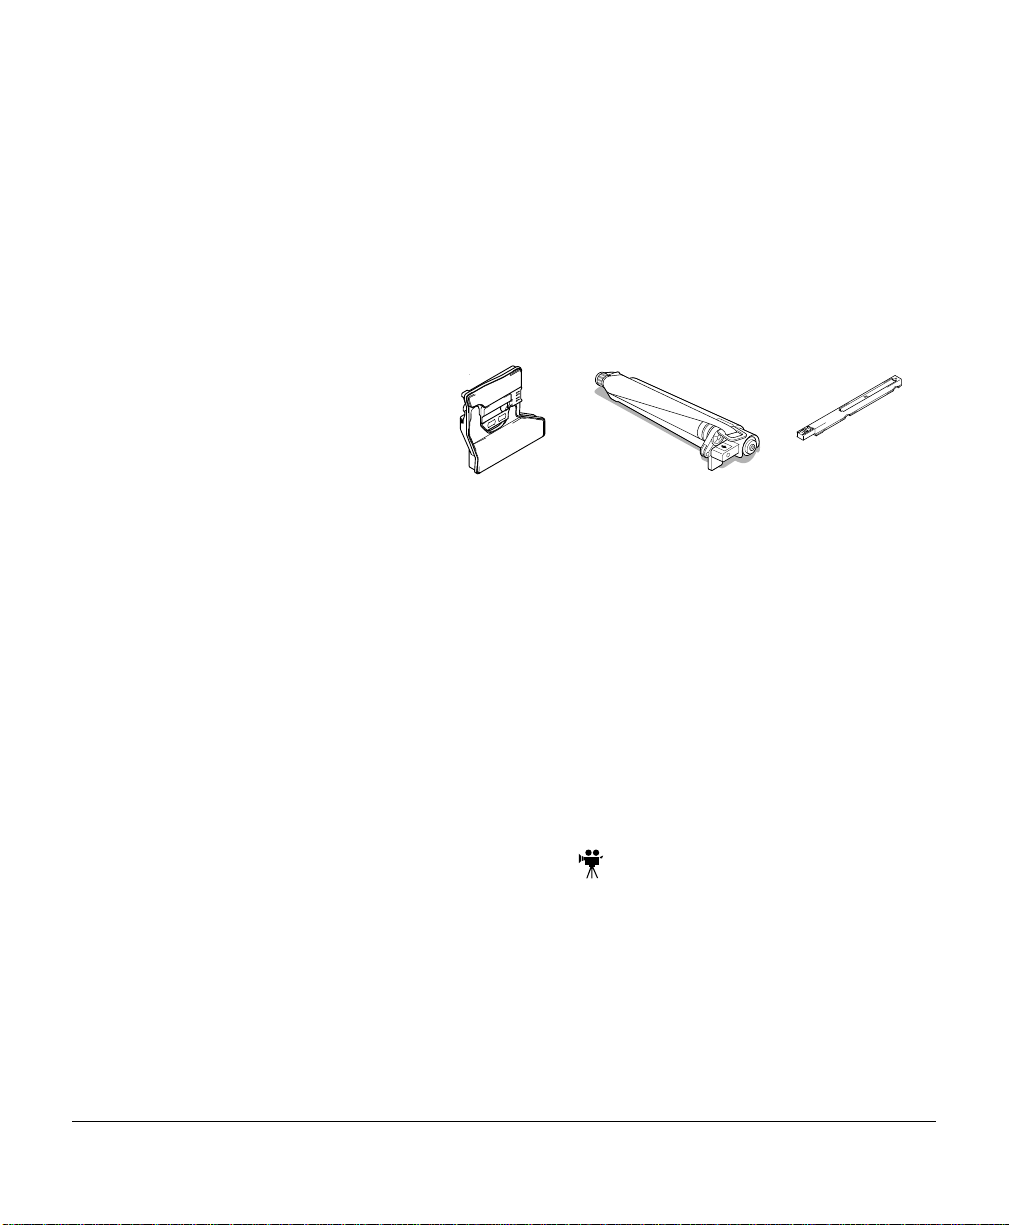
The three items below are included in the OPC drum kit. If one needs replacing, replace
all three items.
„
Waste tone r pack
„
OPC drum cartridge
„
Laser lens cover
5"
The OPC drum life is directly related to the number of rotations of the drum. Longest
drum life is achieved wit h continuou s printin g. Intermit tent prin ting with small job sizes
requires cleaning rotations before and after each job, and subsequently will impact
OPC life.
The steps are:
„
Removing the used waste toner pack
„
Removing the used OPC drum cartridge
„
Replacing the laser lens cover
„
Installing the new OPC drum cartridge
DRUM LOW or REPLACE DRUM
„
Installing the new waste toner pack
Removing the Used Waste Toner Pack
When the waste toner pack is nearly full, the message “
appears. Prepare to replace the entire OPC drum kit.
1
Turn of f the print er.
2
Open the printer’s front cover.
Replacing the OPC Drum, Laser Lens Cover, and Waste Toner Pack14
WASTE TONER NEAR FULL
”
Page 15
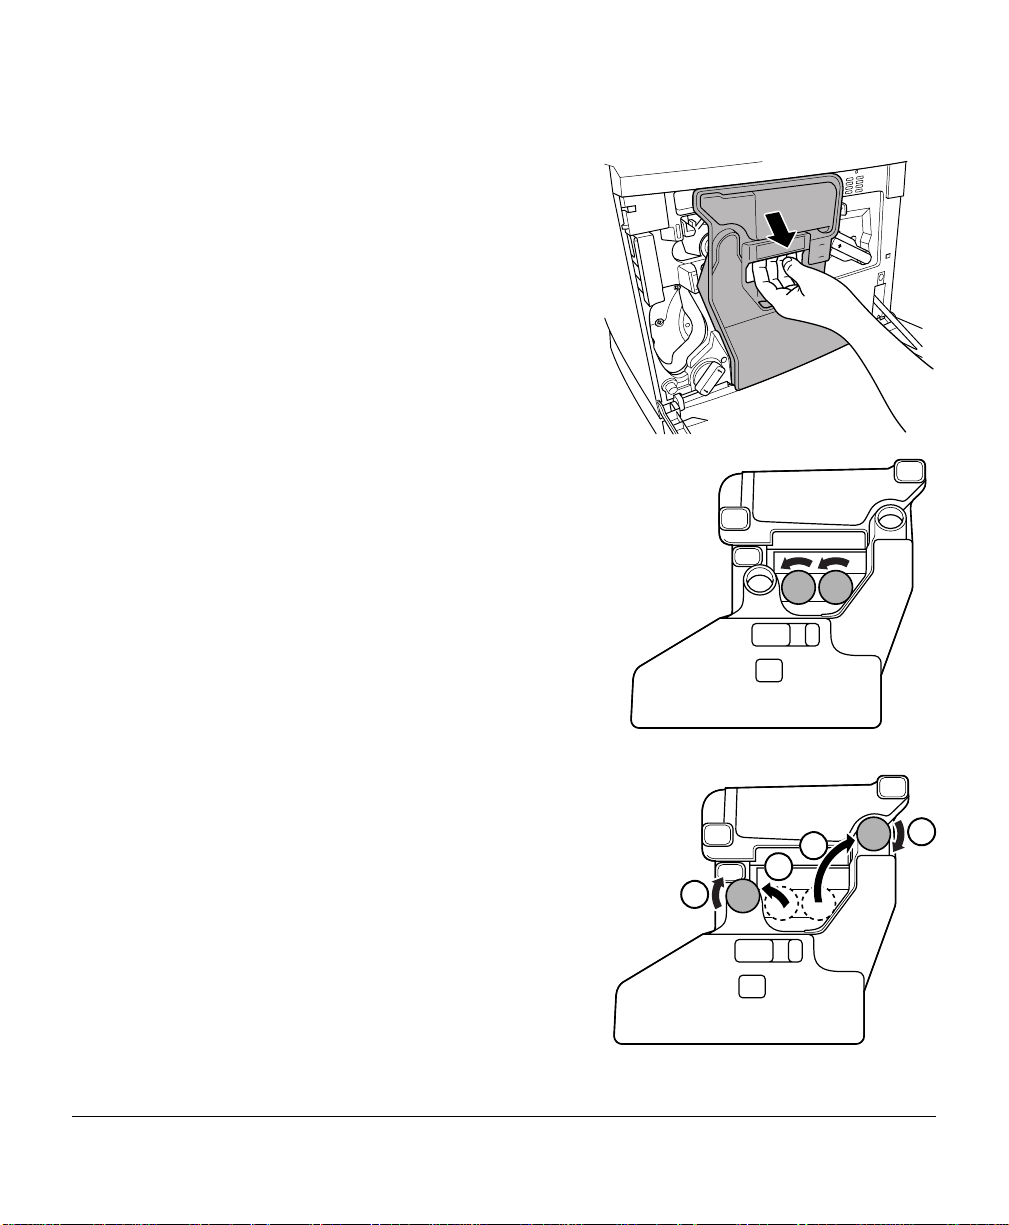
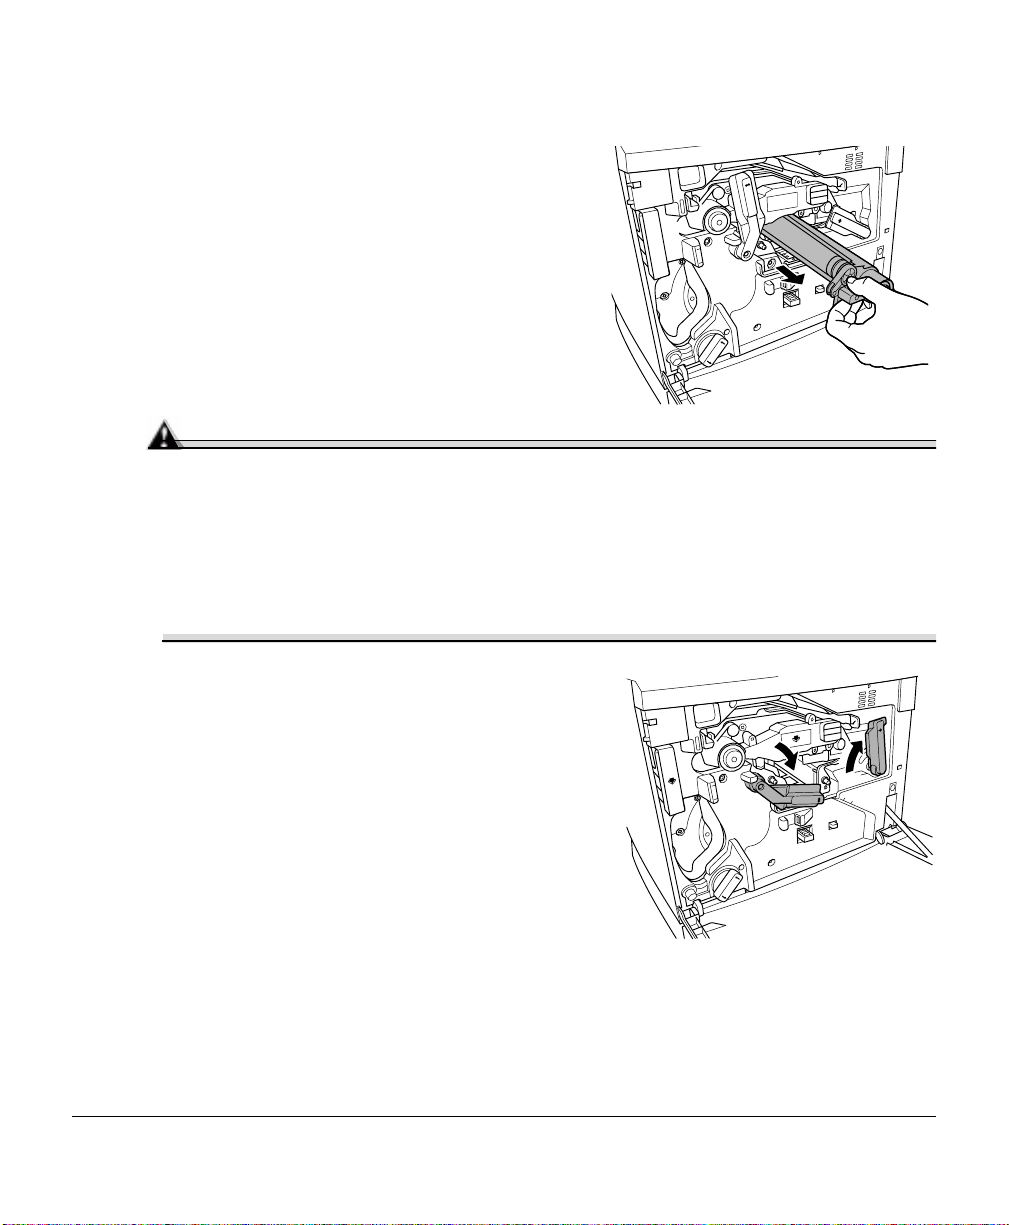
3
Carefully remove the waste toner pack using
the handle.
Keep the waste toner pack upright so the
toner does not spill.
4
Turn the two caps labeled “A” counterclockwise and remove them.
5
Twist the two “A” caps c onto the two “A”
d
holes
Turn the caps clockwise to secure them.
.
2
1
1
1
1
2
2
2
Replacing the OPC Drum, Laser Lens Cover, and Waste Toner Pack 15
Page 16
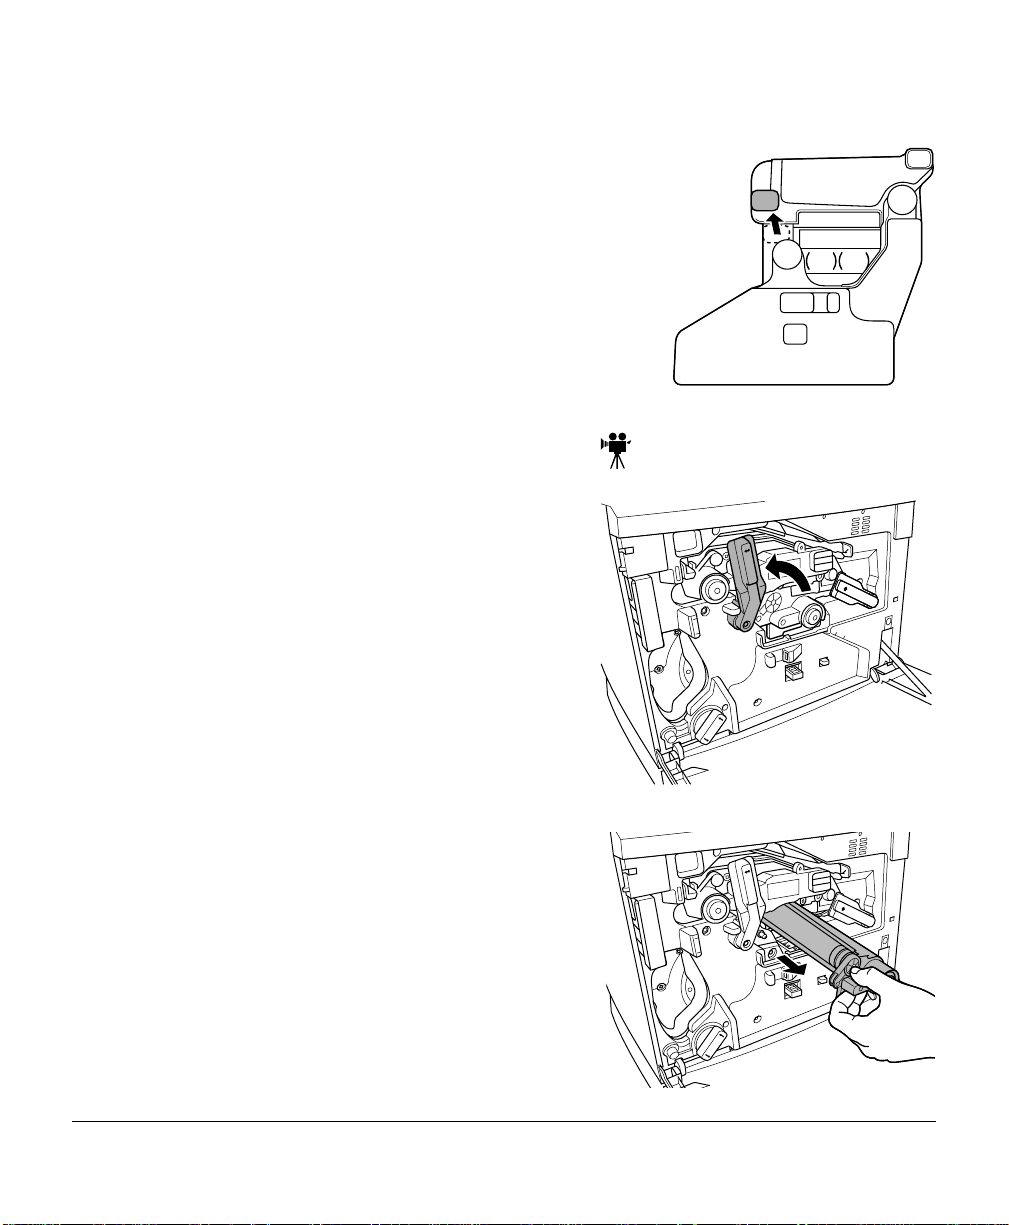
6
Remove waste toner pack cap labeled “B” and insert
it into hole “B.”
7
Dispose of the used waste toner pack.
5"
Dispose of it properly according to your local
regulations (do not dispose of it by burning).
8
Continue with replacing the OPC drum
cartridge.
Reinstall the new waste toner pack after replacing
the OPC drum.
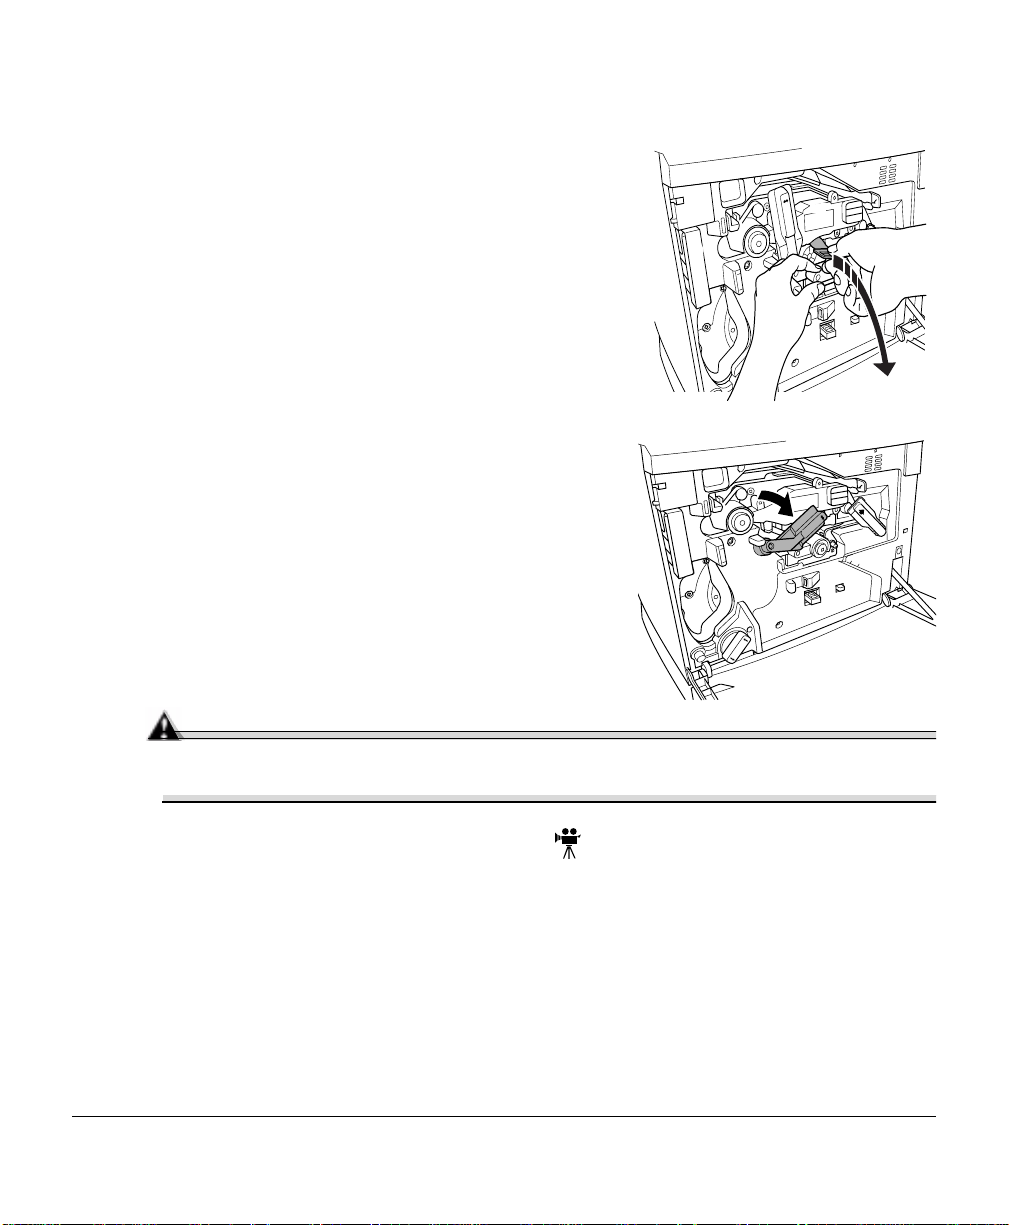
Removing the Used OPC Drum Cartridge
1
With the front cover open, rotate the transfer belt unit left release lever counterclockwise to the top (12 o’clock) position.
This raises the transfer belt unit.
2
Hold the OPC drum cartridge handle and
carefully pull it out about 8 inches (20 cm).
Replacing the OPC Drum, Laser Lens Cover, and Waste Toner Pack16
Page 17
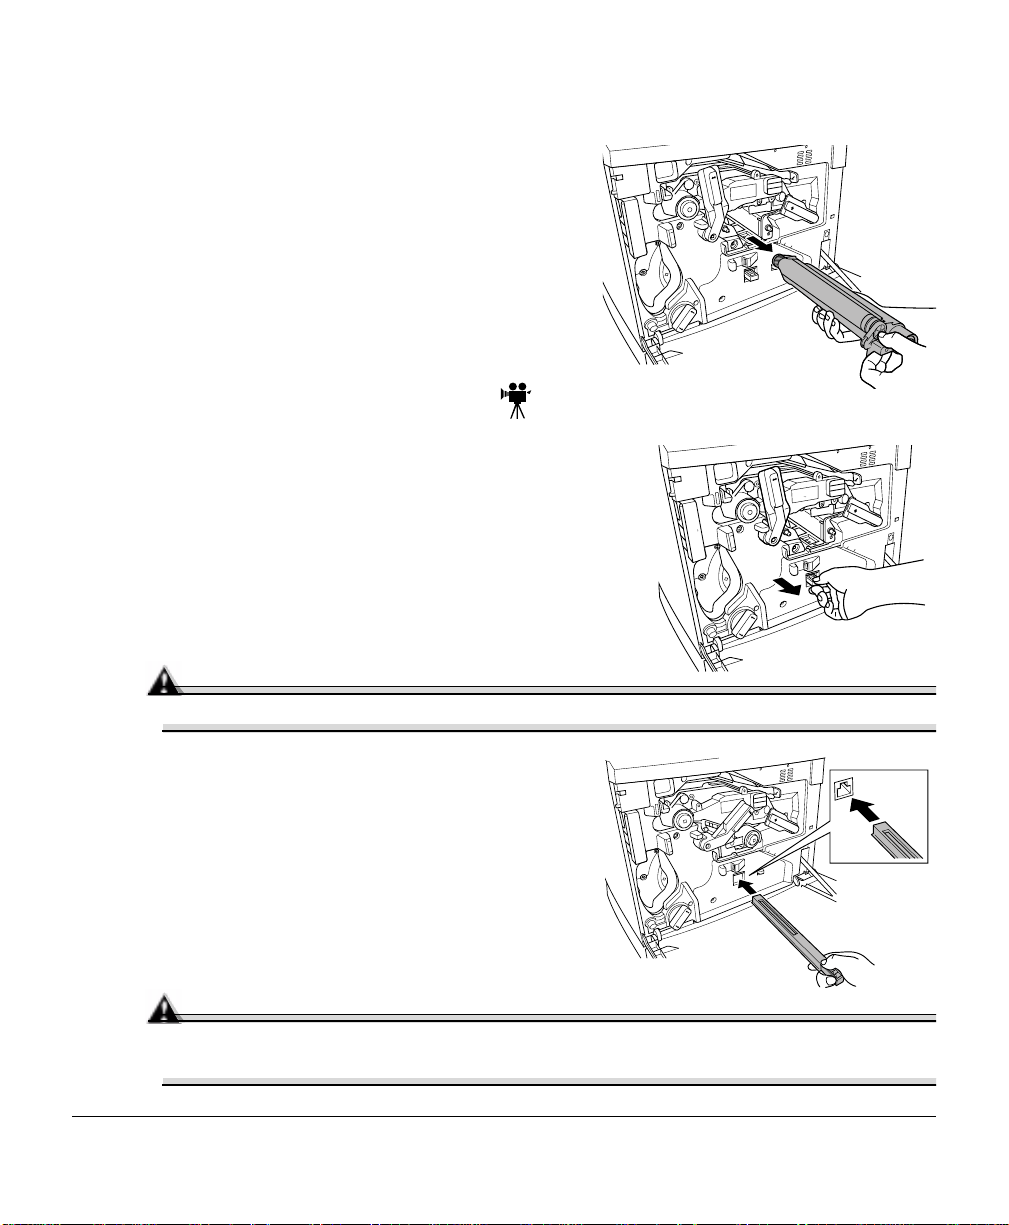
3
Support the bottom of the drum with your
hand, then carefully pul l the cartri dge toward
you and remove it.
5"
Dispose of it properly according to
your local re gul ati ons .
Replacing the Laser Lens Cover
1
Press on the laser lens cover lock release lever and
gently pull the laser lens cover toward you.
5"
Dispose of it properly according to your local
regulations.
2
Remove the new laser lens cover from the OPC
drum kit box.
Attention
Do not touch the glass surface of the laser lens.
3
Place the front end of the laser lens cover into
its installation rail.
4
Carefully insert the laser l ens cover and
check to make sure it is fully inserted.
Attention
If the laser lens cover is not properly installed, serious damage to the printer
could result.
Replacing the OPC Drum, Laser Lens Cover, and Waste Toner Pack 17
Page 18
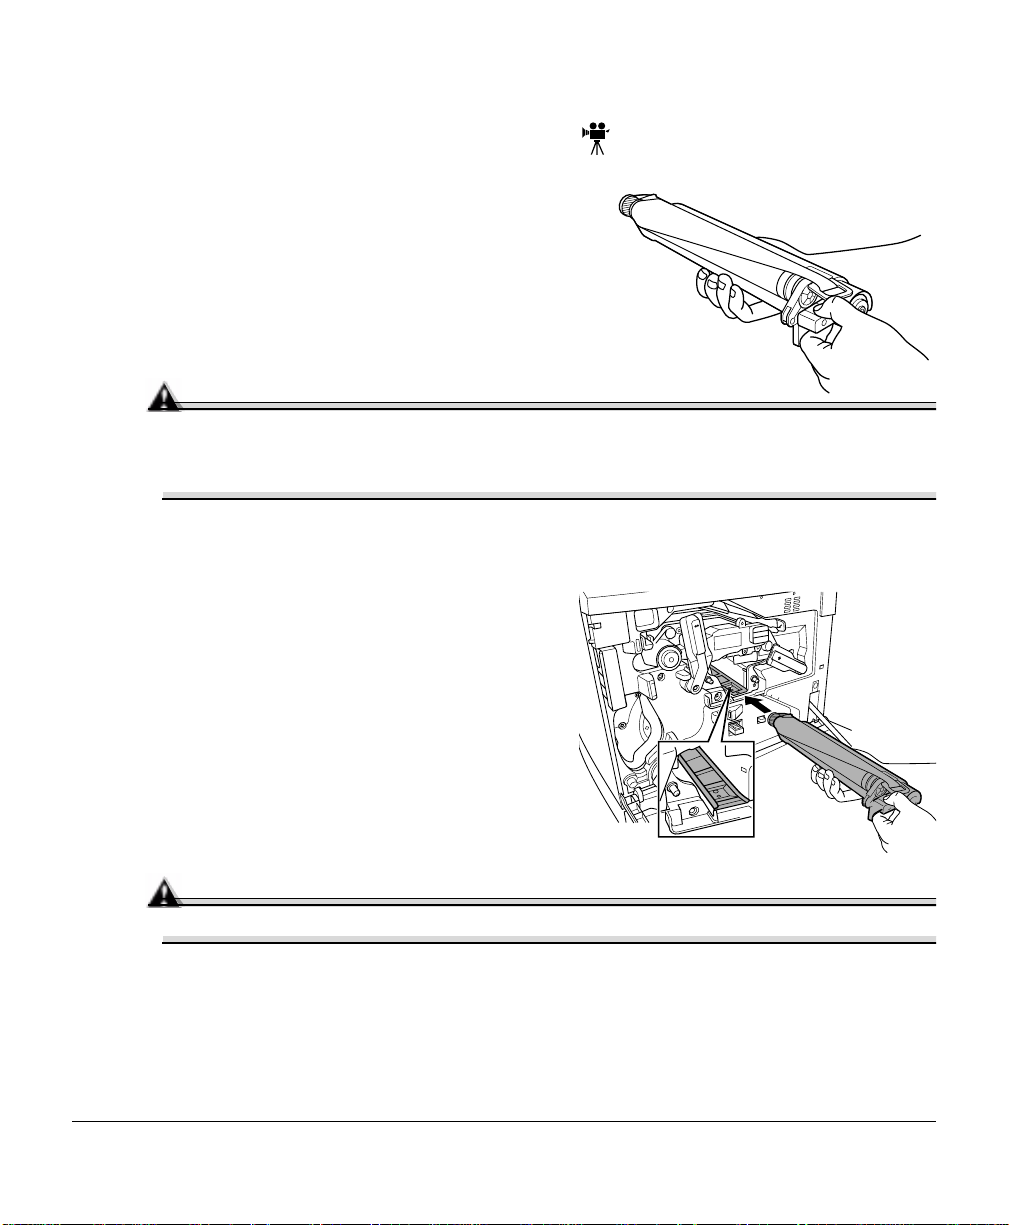
Installing the New OPC Drum Cartridge
1
Remove the new OPC drum cartridge from
its shipping box.
Attention
Keep the protective sheet on the cartridge. Do not touch t he protective sheet on
the photosensitive (green) surface or scratch the surface. This could lower
image qual ity.
Make sure the transfer belt left release lever is still set to its top position
(12 o’clock).
2
Hold the OPC drum cartridge level, place
the front en d of the OPC dr um cartridge
installation guide into the installation rail.
3
Carefully push the OPC dr um ca rtridge in.
Attention
The cartridge should slide easily into the printer. Don’t force it.
Replacing the OPC Drum, Laser Lens Cover, and Waste Toner Pack18
Page 19
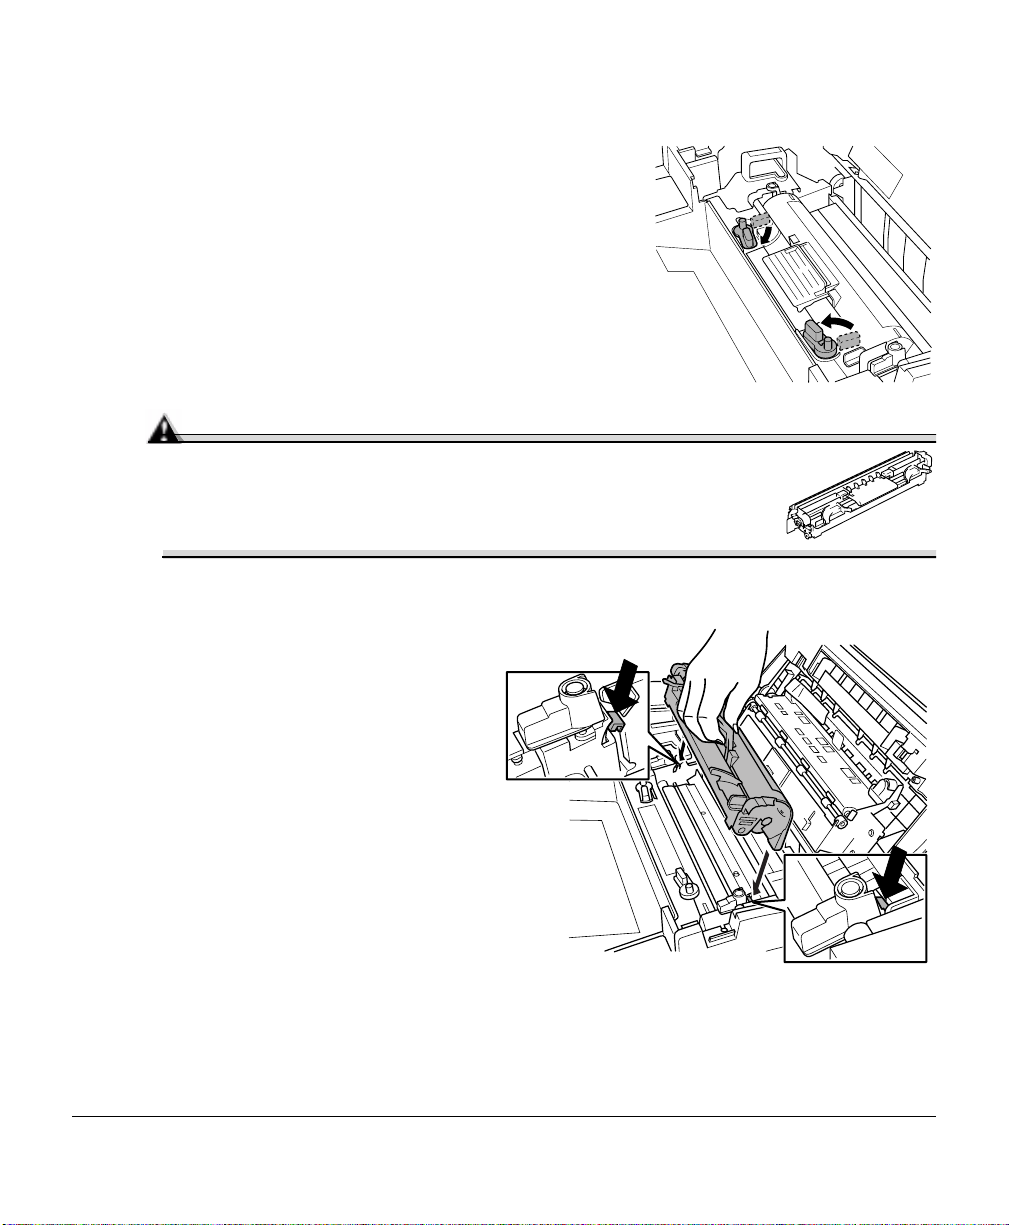
4
Press on the front handle of the OPC drum cartridge with one hand and hold the front handle of
the OPC protective cover with the other hand.
5
Peel the protective cover off (straight toward
you).
5"
Dispose of it properly according to your local
regulations.
6
Turn the left release lever of the transfer belt
clockwise to its correct position (2 o’clock).
This lowers the transfer belt.
Also make sure the transfer belt right release
lever is set to its correct position (10 o’clock).
Attention
If the transfer belt left release lever is at its top position (12 o’clock), the waste
toner pack cannot be installed.
Installing the New Waste Toner Pack
1
Remove the new waste toner pack from the drum kit box.
Replacing the OPC Drum, Laser Lens Cover, and Waste Toner Pack 19
Page 20
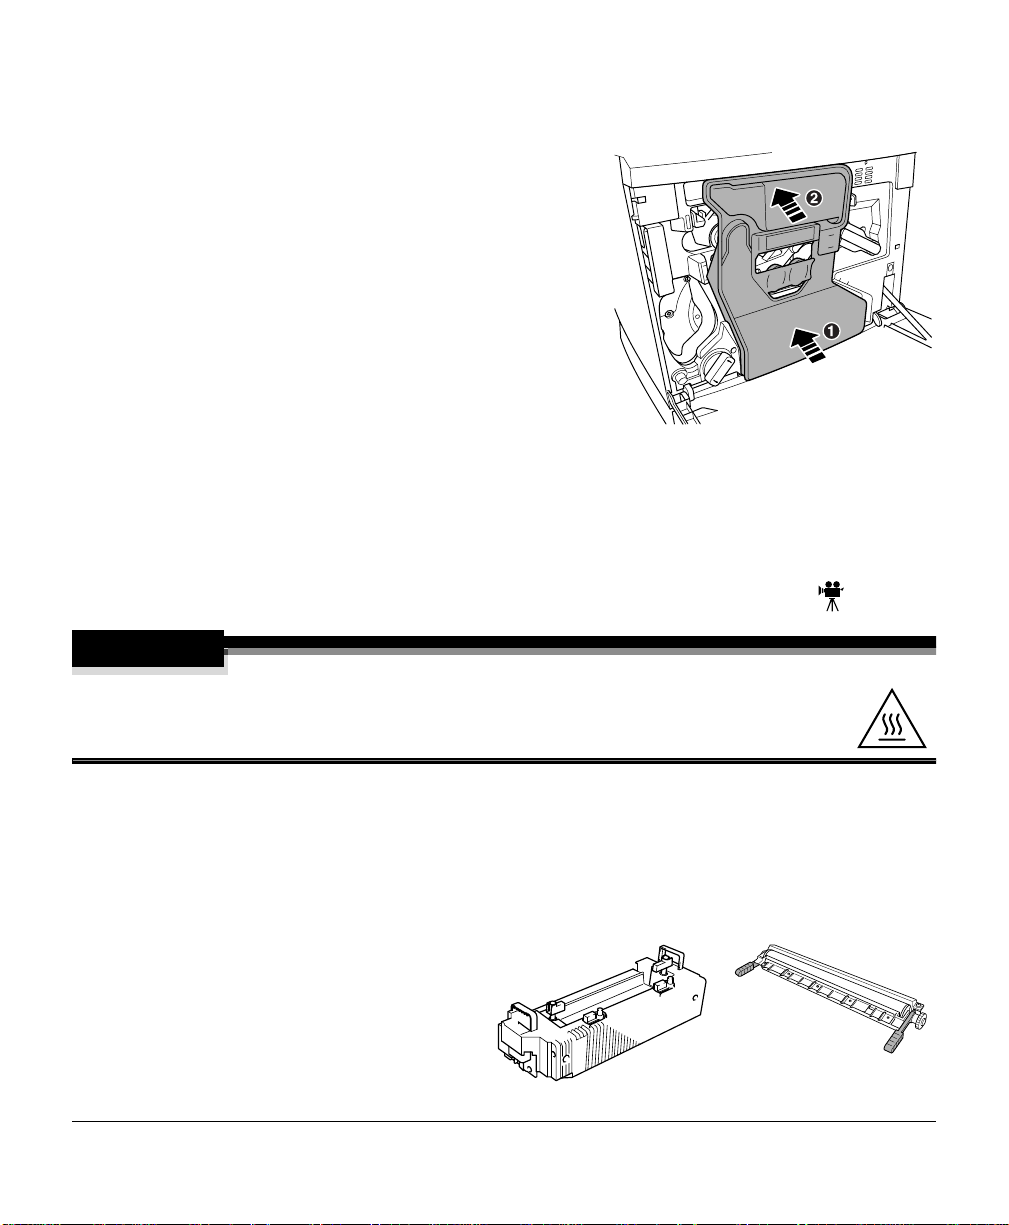
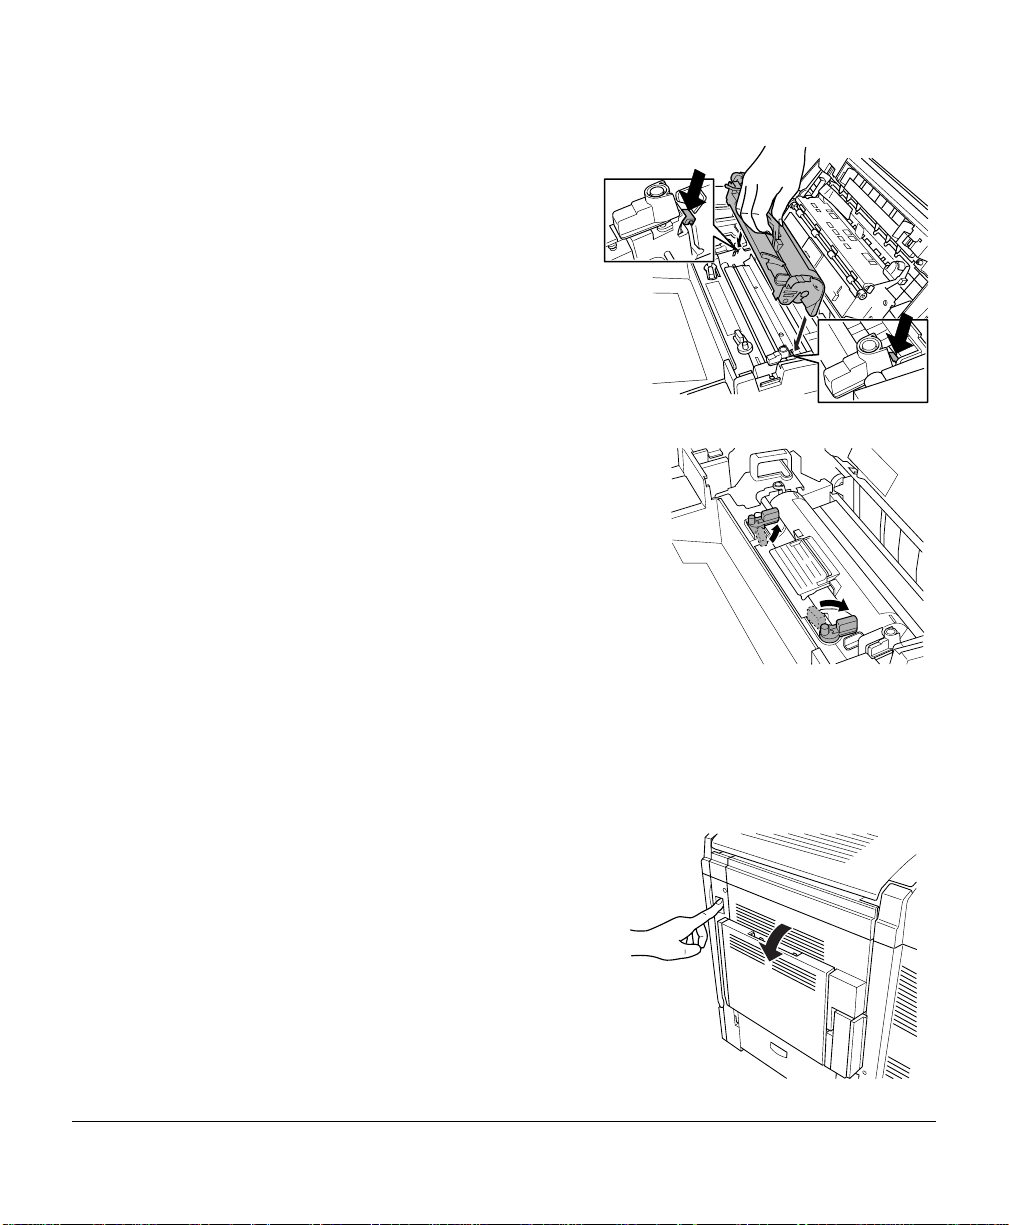
2
Insert the bottom of the waste toner pack c
into its inst allation pos ition in the pr inter.
3
Insert the top of the waste toner pack
into its installation position in the printe r
until it is firmly seated.
4
Close the printer’s front cover.
If the waste toner pack is not correctly
installed or the transfer belt right release
lever is at its top position (12 o’clock), the
front cover cannot be closed. Turn on the
printer.
5
In the Operator Control/Consumables/Items Replaced/Waste Toner menu, choose
Yes to reset the consumables monitoring system.
d
2
Replacing the Fuser Unit and Transfer Roller Kit
WARNING!
The fuser unit is hot. When the top cover is opened, the fuser unit temperature
drops graduall y ( one hour wait time). Do not r epl ace the f user oil roller until you
are sure that the fuser unit has cooled down.
1
When the fuser is worn out, the message “
printer does not print. Repla ce the fuser kit. After the new fuser kit is installed, printing
automatically resumes.
The fuser kit includes the two items below. When replacing the fuser unit, replace the
transfer roller as well.
„
Fuser unit
„
Transfer roller unit
REPLACE FUSER UNIT
” appears and the
Replacing the Fuser Unit and Transfer Roller Kit20
Page 21
Replacing the Fuser Unit
1
Turn of f the print er.
2
Open the prin ter’s top cover.
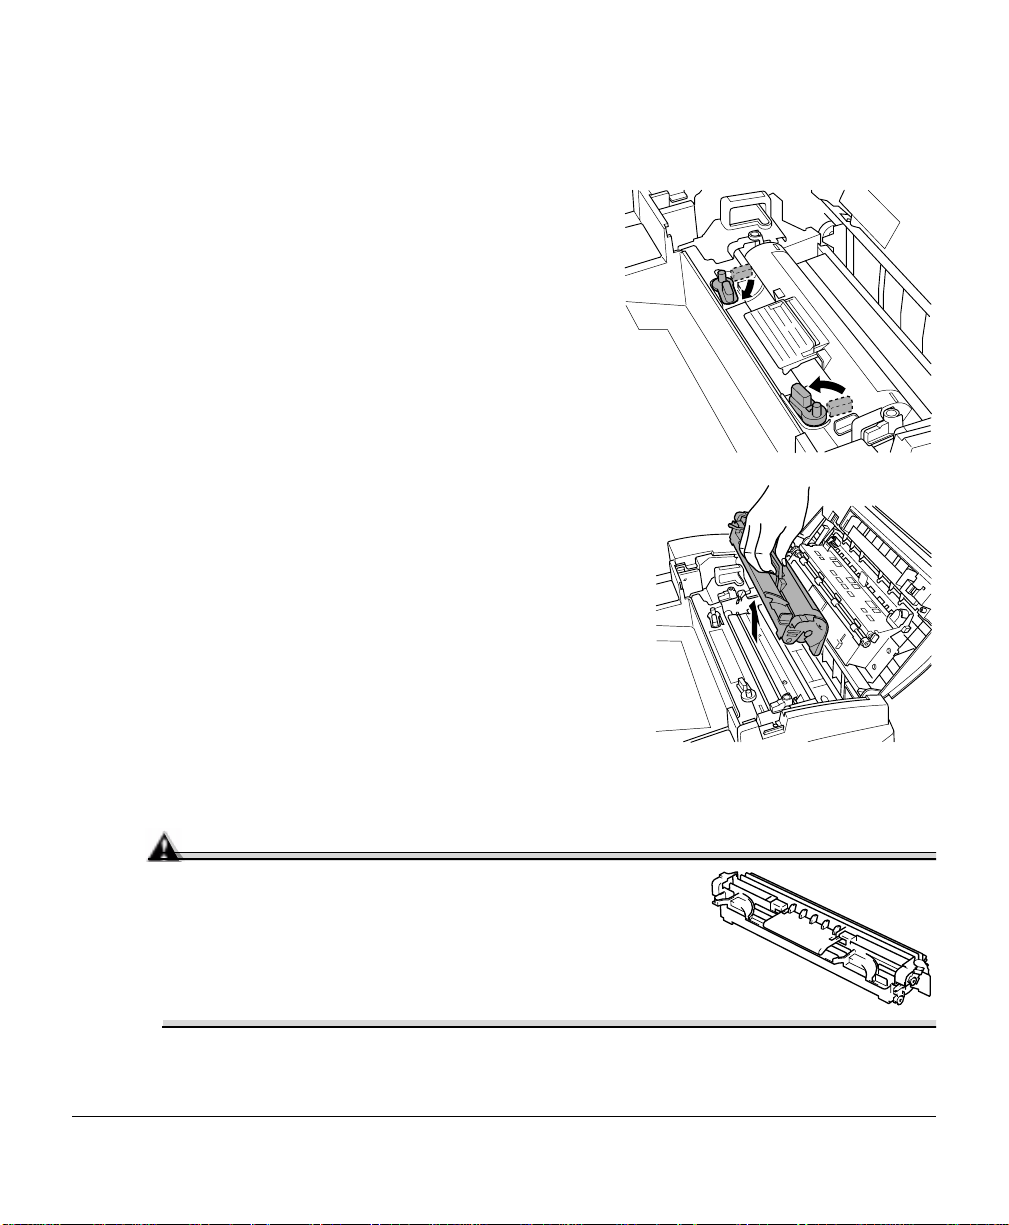
3
Rotate the two fuser oil roller lock levers to
release the fuser oil roller.
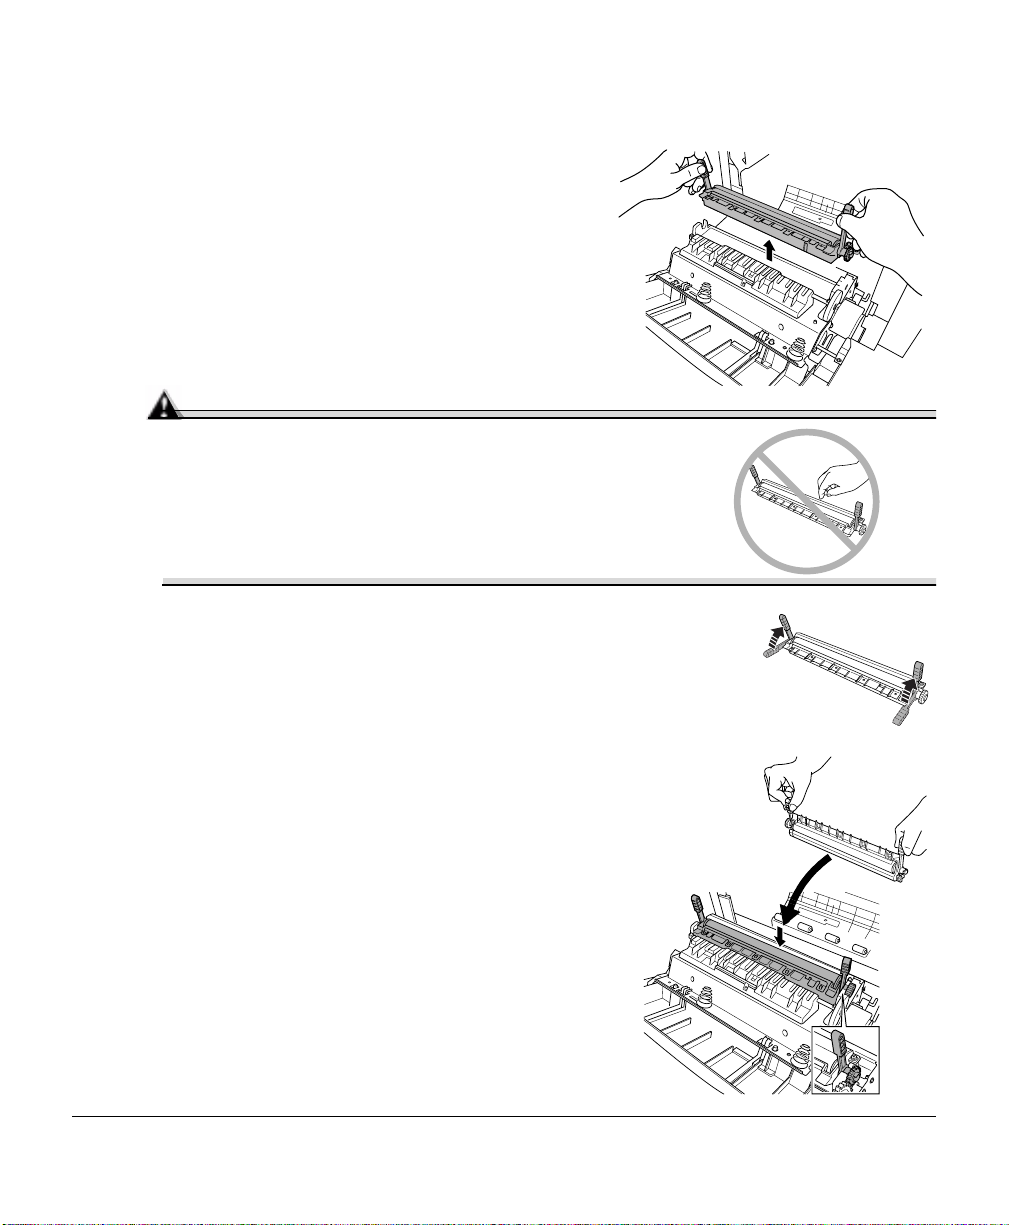
4
Remove the fuser oil roller.
Hold it by the green handle only.
5
Place the fuser oil roller on a table or level surface.
Attention
Since the fuser oil roller removed here is to be
installed in the new fuser unit, handle it with care.
If you set the fuser oil roller on the table do it as
shown in the illustration. Do not allow the roller
surface to contact the t able or get dirty. This could
lower image q uality.
Replacing the Fuser Unit and Transfer Roller Kit 21
Page 22

6
Turn the release levers (front, rear) to
release the fuser unit.
7
Holding the fuser unit handles,
lift up the u nit.
5"
Dispose of it properly according
to your local regulations.
8
Remove the new fuser from its
shipping box.
Replacing the Fuser Unit and Transfer Roller Kit22
Page 23
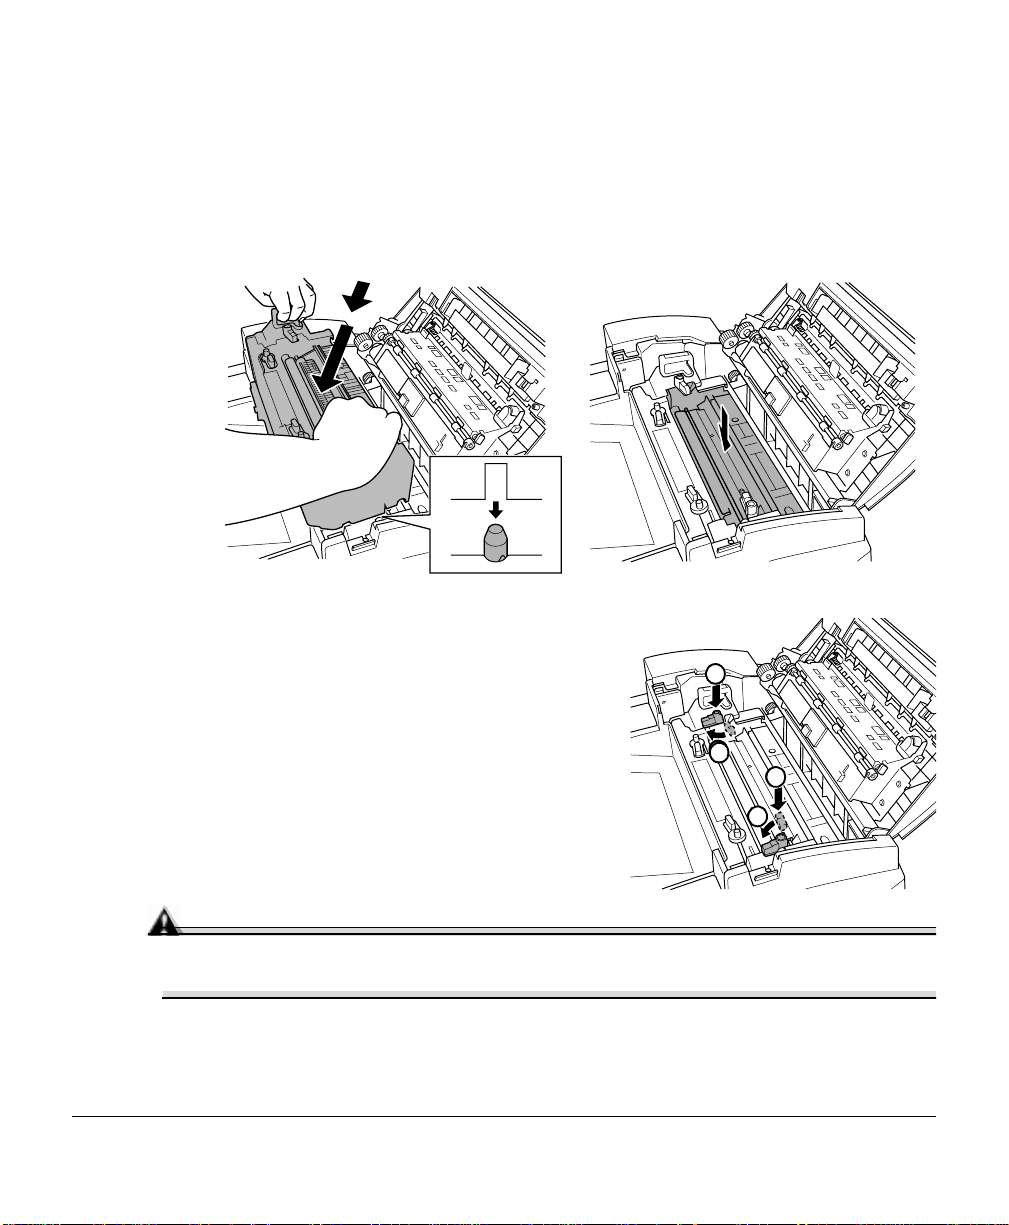
9
Carefully lower the new fuser unit so that the two pins in the fuse r unit installation
section go into the two installation holes in the fuser unit.
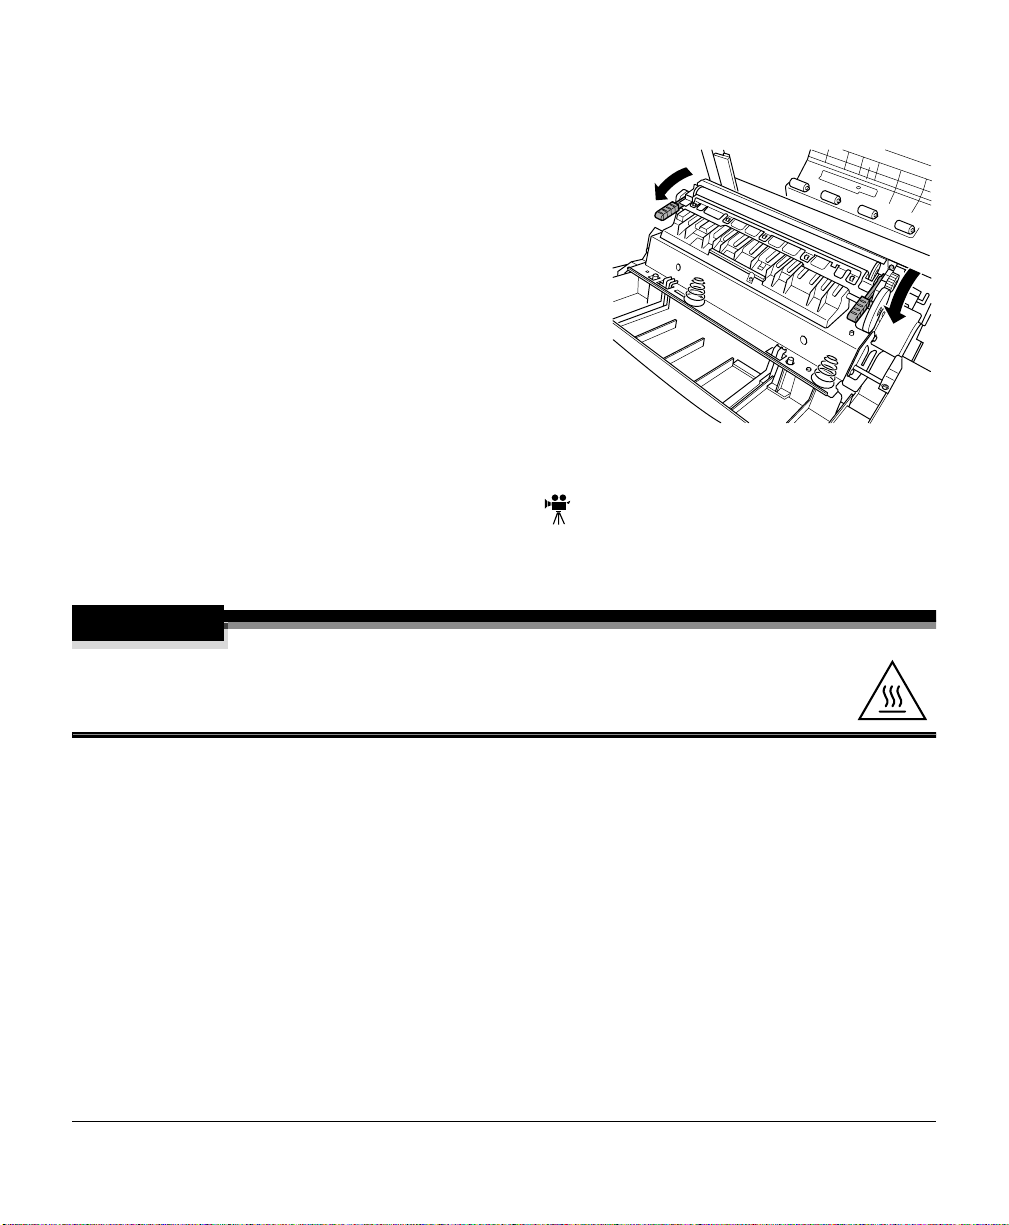
10
Press in on the fuser unit release levers cand
d
rotate them downward
.
1
1
1
This secures the fuser unit.
2
2
1
1
2
2
Attention
If the fuser unit r eleas e levers ar e no t set corr ect ly, the fuser oil roller cann ot b e
installed. Set the fuser unit release le vers to the fixed position.
Replacing the Fuser Unit and Transfer Roller Kit 23
Page 24
11
Reinstall t he fuser oil roller (removed
in step 4).
12
Rotate the two oil roller levers to lock
the oil roller into place.
13
Close the printer’s top cover.
Check the release button to make sure the top cover is properly closed.
Replacing the Transfer Roller Unit
5"
If there is media in the multipurpose tray, remove it. Close the multipurpose tray.
1
Press the right cover release button and carefully open the right cover.
Replacing the Fuser Unit and Transfer Roller Kit24
Page 25
2
Holding the tw o transfer roller unit handles,
remove the transfer roller unit.
5"
Dispose of it properly according to your local
regulations.
3
Remove the ne w transfer roller unit from the
fuser kit box.
Attention
Do not touch the surface of the transfer
roller unit. This could lower image quality.
4
Place the new transfer roller unit on a
level surface.
5
Lift up the two transfer roller unit handles.
6
Holding the two transfe r roll er uni t handl es, car efully lower it so the transfer roller unit shaft goes
into the two transfer roller unit installation
guides.
Replacing the Fuser Unit and Transfer Roller Kit 25
Page 26
7
Lower the two transfer roller unit handles.
8
Carefully close the righ t cover.
Check the r elease but ton st atus t o make sure
the cover is properly closed.
9
If necessary, reopen the multipurpose tray
and put the media back in.
Replacing the Fuser Oil Roller
The fuser oil roller provides a lubricant fo r the printer via an oil-impregn ated roller. This
oil is necessary for the proper functioning of the printer.
WARNING!
The fuser unit is hot. When the top cover is opened, the fuser unit temperature
drops gradually (one hour wait time). Do not replace the fuser oil roller until you
are sure that the fuser unit has cooled down.
When the fuser oil roller is worn out, the message “
and the printer does not print. Replace the fuser oil roller. After the new roller is installed,
printing automatically resumes.
5"
When you replace t he fuser oil roller a fter a
displays in the message window, the printer automatically recovers.
REPLACE OIL ROLLER
REPLACE OIL ROLLER
” appears
message
Replacing the Fuser Oil Roller26
Page 27
1
Turn of f the print er.
2
Open the prin ter’s top cover.
3
Rotate the two fuser oil roller lock levers to
release the fuser oil roller.
5"
Dispose of it properly according to your local
regulations.
4
Remove the ne w fuser oil roll er from its
shipping box.
Attention
If you set the new fuser oil roller on a table, do it as shown in
the illustr ation. Do not allow the roller surface to contact the
table or get dirty. This could lower image quality.
5
Insert the new fuser oil roller
installation guides (front, rear)
into the fuser unit installation
rail.
6
Carefully lower the roller.
Replacing the Fuser Oil Roller 27
Page 28

7
Rotate the two oil roller levers to lock the oil
roller into place.
Attention
If the two fuser oil roller release levers are
not correctly set, the top cover cannot be
closed. Set the release levers to the roller
fixed position.
8
Carefully close the top cover.
Check the release button to make sure the
top cover is properly closed.
9
Turn on the printer.
Replacing the Transfer Belt
When the transfer belt is at its end of life, the message “
appears, and the printer does not print. Replace the transfer belt. After the new transfer
belt is installed, printing automatically resumes.
1
Open the printer’s front cover.
2
Remove the waste toner pack.
3
Rotate the left transfer belt lock lev er.
REPLACE TRANSFER BELT
Replacing the Transfer Belt28
”
Page 29
4
Remove the OPC drum cartridge and set it
aside.
Attention
The OPC drum is extremely sensitive to bright light and direct sunlight. Always
put it in its protective bag until you’re ready to reinstall it. Any exposure to
light should be avoided, or permanent damage could result.
Also, handle the cartridge carefully by its sides so you don’t touch the surface
(the green part) of the drum. The drum is also extremely sensitive to hand oils
and scratches, both of which reduce print quality.
5
Rotate the left lever to its 4 o’clock position.
Replacing the Transfer Belt 29
Page 30
6
Grasp the handles of the transfer belt and remove it.
5"
Dispose of it properly according to your local regulations.
7
Remove the new transfer belt from its packaging and insert it into the printer.
8
Press on the transfer belt front handle with
one hand, take the handle of the transfer belt
fixture with your ot her ha nd, a nd pull the fixture straight toward you.
5"
Dispose of it properly according to your
local regulations.
Replacing the Transfer Belt30
Page 31

9
Rotate the transfer belt lock lever.
10
Reinstall the OPC drum cartridge.
Replacing the Transfer Belt 31
Page 32

11
Close the transfer belt lock lever.
12
Check to make sure the laser lens cover is
firmly seated.
13
Reinstall t he waste tone r pack.
14
Close the front cover and turn on the printer.
2
1
Replacing the Transfer Belt32
Page 33

Using Media
2
Page 34

Introduction
This chapter provides information on handling, selecting, and storing media. Refer to the
Maintenance Guide
Media Handling
Before purchasing a large quantity or special media, do a trial printing with the same
media and check print quality. Check with our web site www.minolta-qms.com for a list of
current approved media.
Attention
Do not use the media types listed below. These could cause poor print quality, media
jams, or damage to the printer.
Do not use media that is
„
Not approved
„
Meant for ink jet printers
„
Folded, embossed, warped, or wrinkled
„
Perforated or prepunched
for media specifications.
„
Too slick, too coarse
„
Composed of foil or gilt
„
Coated with a processed surface (such as carbon paper, heat-sensitive paper, heatpressure paper)
„
Irregularly shaped (not rectangular); no t uniform in size
„
Bound with glue, tape, or paper clips
„
Attached to ribbons, hooks, buttons, etc.
Do not use envelopes that have
„
Sticky flaps
Introduction34
Page 35

„
Metal clasps, fasteners, transparent windows, peel-off strips for sealing
„
Material that will melt, vaporize, offset discolor, or emit dangerous fumes
Do not use labels that have
„
Label(s) al ready peeled off
„
Labels that peel off easily
„
Glue or sealer that might come off
„
Material that will melt, vaporize, offset discolor, or emit dangerous fumes
Media Types
Plain Paper
Formatting
Input Upper and
Orientation Upper and
Type
Weight
Duplexing
Format data within your application.
500 sheets of 20 lb bond (75 g/m²) paper (letter/A4/legal)
Optional Trays
Multipurpose
Tray
Optional Trays
Multipurpose
Tray
Any standard or recycled office paper suitable for plain-paper laser printers,
such as
„
Hammermill Laser Print
„
Georgia-Pacific Microprint Laser 1000
„
Neusiedler Color Copy 90
„
Xerox 4024
16–24 lb bond (60–90 g/m²)
Up to 28 lb bond (105 g/m²)
each; capacity for other weights varies accordingly.
150 sheets of 20 lb bond (75 g/m²) paper; capacity for other
weights varies accordingly.
Simplex—Face up; Duplex—Face down
Simplex—Face down; Duplex—Face up
Media Types 35
Page 36

Letterhead and Memo Media
Formatting
Input Upper and
Orientation Upper and
Type
Weight
Duplexing Upper and
Notes
Format letterhead or m em o da ta wi thin your application. Try printing your data on
a plain sheet of paper first to check placement.
Optional Trays
Multipurpose
Tray
Optional Trays
Multipurpose
Tray
Any standard or recycled office paper suitable for plain-paper laser printers,
such as
„
Hammermill Laser Print
„
Georgia-Pacific Microprint Laser 1000
„
Neusiedler Color Copy 90
„
Xerox 4024
16–24 lb bond (60–90 g/m²)
Optional Trays
Multipurpose
Tray
Check your application documentation for other information about printing on
letterhead and memo media.
Up to 500 sheets
Up to 150 sheets
Face up—top of page toward the right
Face down—top of page toward the printer side
Face down—top of page toward the right
Face up—top of page toward the printer side
Thick Stock
Formatting
Input Multipurpose
Orientation
Format the information to be printed on the thick stock within your application. Try
printing your data on a plain sheet of paper first to check placement.
Tray Only
Face down
Up to 50 sheets, depending on the thickness of the media
Media Types36
Page 37

Type
Weight
Duplexing
Notes
Envelopes
For information about thick stock media recommended for your printer, go to
www.minolta-qms.com/support, then click on Answer Base, or contact Technical
Support. See the
telephone numbers.
Simplex: 24–43 lb bond (90–163 g/m²)
Autoduplex: Up to 28 lb bond (105 g/m²)
Manual Duplex: 24 lb (90 g/m²) to 43 lb (163 g/m²) bond
Autoduplexing thick stock over 28 lbs (105 g/m²) is not supported. Thicker stock
may be manually duplexed.
Y ou shou ld tes t t he nu mber o f she ets of thick stoc k th e mul tipurpo se tra y can hold
to ensure that its performance is acceptable.
43 lb (163 g/m²) bond is also referred to as 90 lb index stock.
Service & Support Guide
for a complete listing of support
Formatting
Input Multipurpose
Orientation
Type
Duplexing
Notes
Your printer receives the instructions to pr int on envelopes from your application.
„
Print on the front s ide only. Some parts of the envelop e consist of three lay ers
of paper—the front, back, and flap . Any thi ng p rinted in these layered regions
may be lost or faded.
„
See your application documentation for specific information on printing
envelopes.
Tray Only
Face down
Use common office envelopes approved for laser printing with diagonal joints,
sharp folds and edges, and ordinary gummed flaps, such as
„
Commercial #10: Columbian Recycled COR02
„
International DL: Auto Fil #01914
Not supported
„
You can print
„
Envelopes should be dry.
„
Do not preload or preseal envelopes.
Up to 50, depending on the thickness of the envelopes
on the address side of the envelope.
only
Media Types 37
Page 38

Labels
Formatting
Input Multipurpose
Orientation
Type
Weight
Duplexing
Notes
Format label data within your application. Try printing your data on a plain sheet
of paper first to check placement.
Tray Only
Face down
Use only labels recommended for laser printers, such as
„
Avery 5260
16–90 lb (60–163 g/m²)
Not supported
„
Avoid using labels with exposed adhesive; it may stick to the transfer belt or
the fuser roller, causing labels to peel off and media jams to occur.
„
Adhesive label stock is supported only in letter or A4 sheets.
„
A label consists of a fa ce sh eet (the printin g surfa ce), ad hesive, a nd a c arrier
sheet
— The face sheet must follow the plain paper specification.
— The face sheet surface must cover the entire carrier sheet, and no
adhesive should come through on the surface.
„
You can print continuously with label paper. However, this could affect the
media feed, depending on the media quality and printing environment. If
problems occur, stop the continuous print and print one sheet at a time.
„
Check your application documentation for other information on
printing labels.
Up to 50 sheets, depending on the thickness of the labels
Postcards
Formatting
Input Multipurpose
Orientation
Type
Weight
Duplexing
Format postcard data within your application. Try printing your data on a plain
sheet of paper first to check placement.
16–90 lb (60–163 g/m²)
Not supported
Up to 50 sheets, depending on the thickness of the postcards
Tray Only
Face down
Use only postcards recommended for laser printers
Media Types38
Page 39

Notes
Transparencies
If the postcard is warped, press on the warped area before
putting in multipurpose tray.
Formatting
Input Location
Orientation Upper and
Type
Duplexing
Format the information to be printed on the transparencies within your
application. Try printing your data on a plain sheet of paper first to check
placement.
Capacity
Optional Trays
Multipurpose
Tray
Use any full-color transparencies (also known as OHP film) that meet normal
photocopier standards. We recommend
„
Q-Media Transparency Media for the magicolor 2200 for color printing
„
3M PP2500 for monochrome printing
Not supported
Upper and Optional Trays
Multipurpose tray
Up to 50 sheets, depending on the thickness of the
transparencies
If you have problems feeding 50 sheets, try loading only 5–10
sheets at a time. Load ing a la rge number of tr anspa rencies a t a
time may cause static buildup, thus causing feeding problems
Face up
Face down
.
Media Types 39
Page 40

Notes
Loading Media
Take off the top and bottom sheets of a ream of
paper. Holding a stack of approximately 250
sheets at a time, fan the stack to prevent static
buildup for the paper before i nse rting it in a tr ay.
5"
Do not fan transparency media.
Attention
Always load the media short edge first.
„
If you touch the face of transparencies with your bare hands, print quality
may be affected.
„
Do not handle transp arency medi a too m uch. Do not fan tran sparen cy medi a
before loading it. Resulting static electricity may cause printing errors.
„
Keep the media path clean. Transparencies are especially sensitive to a dirty
media path. If there are shadows on either the top or the bottom of the
sheets, see “Cleaning the Printer Interior” in the
„
Y ou can pri nt continuous ly with trans parencies. Howev er , this co uld affect the
media feed, depending on the media quality and printing environment. If
problems occur, stop the continuous print and print one sheet at a time.
„
Check your appl icati on do cumen tation fo r other inform ation about printi ng on
transparencies.
Maintenance Guide.
OHP
Attention
Do not mix media of different sizes, types, or weights, as this will cause
printer jamming.
„
When refilling media, first remove any media remaining in the tray. Stack it with the
new media, even the edges , then r eload i t. Alth ough the magicolo r 2200 was design ed
Loading Media40
Page 41

for printing on a wide range of media types, it is not intend ed to prin t exc lusiv ely on a
single media type except plain paper. Continuous printing on media other than plain
paper (such as envelopes, labels, thick stock, or transparencies) may adversely affect
print quality or reduce engine life.
„
For media other than standard plain paper or transparencies, both the driver (Paper
tab, Paper Type option) and the MP Size key on the control panel need to be sel ec ted.
It is important to use the MP Size key to set the multi purpose tray to the appropriate
media size in order to obtain optimum printing results.
Autoduplexing
Duplex (2-sided) printing can be done automatically with the optional duplex unit
installed.
5"
Only up to 28 lb bond (105 g/m²) plain paper can be duplexed.
If you are printing duplex from the upper or optional tray, load the media printing-side
down with the top of the media (or letterhead or memo information) toward the right side
of the tray. If you are printing duplex from the multipurpose tray, load the media
printing-side up with the top of the media toward the printer. Set the driver, for example:
1
In the printer driver, make sure you have selected Duplexer and clicked on the
Add butto n.
2
In the print er driver, select Simp lex (1-sided pages), or Long Edge (flipped horizontally as in a loose-lea f notebook) , or Short Edg e (flippe d verticall y as on a cli pboard)
as the Duplex option.
3
Click OK.
Upper and Optional Media Trays
1
Slide the media tray open.
Loading Media 41
Page 42

2
Push the media pressure plate down to lock it
in position.
3
Adjust the media guides to fit the size paper you’re loading.
Squeeze the retainers, move the guides to the appropriate location (media sizes are
listed on the tray), and release the retainers. The media should fit easily between
the guides.
Loading Media42
Page 43

4
Load the paper face-up, short edge toward the
right of the tray.
Often, an arrow on the media package label
indicates the printing-side of the media.
Do not overfill the tray.
A fill limit mark is provided on th e inside of
the tray. The media tray holds 500 sheets of
20 lb bond (75 g/m²) paper.
Make sure that the paper fits easily between
the guides and the paper corner s are under the
left and right media-separating tabs and are
not bent.
Attention
Always readjust the media guides after inserting the media. Improperly
adjusted guides may cause poor print quality, media jams, or printer damage.
Loading Media 43
Page 44

5
Slide the tray back into the printer.
5"
If you have removed the tray from the
printer, slightly tilt up the tray to insert
it into the ins tallation rails to slide it
back in.
Multipurpose Tray
Page sizes other than letter, A4, and legal can be printed only from the multipurpose tray
(also known as tray 1). Use the MP (Multipurpose)
page size.
Other special types of media (such as thick stock, transparencies, and envelopes) are also
fed from the mult ipurpo se tr ay. See “Media Specifications ” in t he
more information about media.
1
Open the multipurpose tray on the right side
of the print er.
Size
key on the control panel to set the
Maintenance Guide
for
Loading Media44
Page 45

2
Open the media support.
Attention
Load only one type/size of media per tray at a time.
3
Load the media face down, short edge toward the printer.
DOWN
FACE
Often, an arrow on the paper package label
indicates the face-up (printing) side of the
paper.
A fill limit mark is provided on th e inside of the
media guides on the multipurpose tray. The
multipurpose tray holds 150 sheets of 20 lb
bond (75 g/m²) paper.
Loading Media 45
Page 46

4
Adjust the media guides to fit the size media
you’re loading.
Attention
Always adjust the media guides after inserting the media. A guide that is not
properly adjusted can caus e poor print quality, media jams, or printer damage.
5
Specify the media size in the multipurpose tray by using the MP Size key on the
control panel.
Printing Envelopes from the Multipurpose Tray
1
Flex the envelope stack (including the edges) to remove any stiffness.
2
Place the envelopes on a fl at surf ace, and f latt en them by pr essin g down the cor ners.
LTR.
LGL.
EXE.
A5
B5
A4
3
Correct any bent corners, and then tap the envelopes on a flat surface to align them.
4
Place the envelope stack into the multipurpose tray with the flap-side up.
Check your application documentation to determine if the flap should be placed on
the left or on the right. Print a single envelope to check the orientation before printing multiple copies.
Loading Media46
Page 47

5
Adjust the media guides to the width of the envelopes.
Make sure the guide s ar e snu g enough to keep the e nvelop es straight , but not so tight
that they buckle the envelopes.
6
Open the flap of each envelope immediately (before it cools) after the envelope is
delivered to the output tray.
5"
Because the envelopes pass through heated rollers, the gummed area on the flaps
may seal. Using envelopes with emulsion-based glue avoids this problem.
Printing Area
The printing area on all media sizes is up to about 0.157 inch
(4 mm) from the edges of the media.
Media Storage
When storing media, avoid:
„
Direct sunlight
„
Excess heat and humidity
„
Dust
If media has been removed from its wrapper, place it in its original packaging and store in a
cool, dark place on a level surface.
Media Storage 47
Page 48

Page 49

Maintaining the Printer
3
Page 50

Maintaining the Printer
Handle the printer with care to preserve its life. Abuse may cause damage and void
your warranty. If dust and paper scraps remain on the inside or outside of the printer,
printer performance and print quality will suffer, so the printer should be cleaned
periodically. Keep the following guidelines in mind:
„
When cleaning the printer, always turn it off (O) and unplug it. Disconnect all
interface cables before cleaning inside the printer.
If you have an optional 5-bin mailbox i nstal led, turn the printe r off fi rst, t hen turn
off the mailbox.
„
Either clean the printer before use, or allow time after unplugging it to allow the
fuser unit to cool down.
Attention
The fuser unit is ho t. When th e to p cove r is opened, the fuser unit
temperature drops gradually (one hour wait time).
„
Be careful when cleaning the inside or removing paper jams, as the fuser unit and
other internal parts may become very hot.
„
Do not place anything on the top of the printer.
„
Use a soft cloth to clean the printer.
WARNING!
Do not spill water or detergent into the printer; otherwise the printer will be damaged
and an electric shock may occur.
„
Never spray cleaning solution directly on the printer’s surface; the spray could
penetrate through the air vents of the printer and damage the internal circuits.
Avoid using abrasive or corrosive solutions or solutions that contain solvents,
(such as alcohol and benzene) to clean the printer.
„
Always test any cleaning soluti on (suc h as mild deter ge nt) on a smal l area of your
printer to check the solution's performance.
Maintaining the Printer50
Page 51

„
Never use sharp or rough implements, such as wire or plastic cleaning pads.
„
Always close the printer covers gently. Never expose the printer to vibrations.
„
Do not put a cover on t he prin ter immediat ely aft er using it. T urn i t of f and wai t until it
cools down.
„
Do not leave the printer’s covers open for any length of time, especially in well-lit
places; light may damage the OPC drum cartridge.
„
Do not open the printer during printing.
„
Do not tap paper stacks on the printer.
„
Do not tilt, lubricate, or disassemble the printer.
„
Do not touch the electrical contacts, gears, or laser beam devices. Doing so may damage the printer and cause the print qua lity to deterio rate.
„
Keep media in the output tray at minimum level. If the media stacks too high, your
printer may experience media jams and excessive media curl.
„
Lift the printer from the bottom only, using the carrying grips and the carrying bars.
Make sure two people are available to lift the printer when moving it.
When moving the printer, keep the printer level to avoid toner spillage.
„
If you get toner on your skin, wash it off with cool water and neutral detergent.
WARNING!
If you get toner in your eyes, wash it out immediately with cool water and consult a doctor.
Material Safety Data Sheets (MSDS) information can be found at www.minolta-qms.com
(click on the Answer Base).
„
Read all caution and warning labels carefully, making sure to follow any instructions
contained in them. These labels are located on the inside of the printer’s covers and
the interior o f the printer bod y.
„
Make sure any parts removed during cleaning are replaced before you plug in
the printer.
See Chapter 7, “Repacking the Printer,” for printer storing and shipping instructions.
Maintaining the Printer 51
Page 52

Cleaning
You should perform a thorough cleaning every 30,000 single-sided pages or 12 months,
whichever comes earlier.
Always test any cle aning sol ution ( such as a mild de ter gent) on a small area of your pri nter
to check the solution’s performance.
Use Avoid
A soft
control panel
A soft
Mild detergent to clean the
printer
dry
cloth to clean the
damp
cloth to clean the printer Sharp or rough implements (such as wire or plastic
Sharp or ro ugh implements (such as wire or plastic
cleaning pads)
Any liquid
cleaning pads)
Abrasive or corrosive solutions that contain solvents
(such as alcohol or benzine)
This item needs
cleaning...
Duplex unit paper guides
or rollers
Laser lens cover Removing the waste toner pack to clean
OPC drum cartridge Every 30,000 single-sided pages, or 12
Paper exit rollers Every 30,000 single-sided pages, or 12
Printer exterior As needed.
Printer interior Every 30,000 single-sided pages, or 12
Registration roller Every 30,000 single-sided pages, or 12
Transfer roller Every 30,000 single-sided pages, or 12
After... By...
Every 30,000 single-sided pages, or 12
months, whichever comes earlier.
around it or to replace it.
months, whichever comes earlier.
months, whichever comes earlier.
months, whichever comes earlier.
months, whichever comes earlier.
months, whichever comes earlier.
User
See the
Guide.
Maintenance
Cleaning52
Page 53

Troubleshooting
4
Page 54

Introduction
This chapter provides information to aid you in resolving printer problems you may
encounter, or at least guide you to the proper sources for help.
Printing a Status Page
Print a status page to verify the printer is printing correctly.
Press Key (Until) Display Reads
Online
Menu
Next ( )
Select
Select
Select
Online
IDLE
OPERATOR CONTROL
ADMINISTRATION
ADMINISTRATION–SPECIAL PAGES
PRINT STATUS
YES
IDLE
Preventing Media Jams
(and onlin e LED is off)
(and onlin e LED is on)
Make sure that... Avoid...
Media matches the printer specifications Media that is folded, wrinkled, or excessively curled
Media is flat, especially on the leading edge Double feeding (
sheets—they may be sticking together
The printer is on a hard, flat, level surface Fanning transparencies since this causes static
You have the correct media type selected if
you’re printing on envelopes, labels, thick
stock, or transparencies.
Y ou stor e medi a in a dry loc ation aw ay fro m
moisture and humidity
Loading more than one ty pe/size/w eight of medi a in a
tray at the same time
Overfilling the media
remove the media and fan the
)
input
trays
Introduction54
Page 55

Make sure that... Avoid...
You always adjust the media width regulation guides in the multipurpose tray
inserting the media (
properly adjusted can cause poor print
quality, paper jams, or printer damage)
You remove transparencies from the output
tray immediately to avoid static buildup.
You load the media (for s ingle -sided pages)
printing-side up in the upper or optional
trays or printing-side down in the multipurpose tray (m
an arrow on the end of the wrapper to
indicate the printing side—if you can’t
determine which side of the media to print
on, remove the media from the tray, rotate
the stack a half-turn, turn the stack over,
and then place it back in the tray)
The printer is on a hard, flat, level surface
a guide that is not
any manufacturers place
after
Automatic Jam Recovery
The magicolor 2200 provides automatic jam recovery (when enabled through the
Administration/Engine/Page Recovery menu). After you remove any jammed media,
printing automatically resumes from the page the printer stopped at when the jam
occurred.
Allowing the
output tray has a 500-sheet capacity—jamming may
occur if you allow media to accumulate more than
500 sheets at a time
output
tray to overfill (
)
the face-down
5"
For automatic jam recovery to work, it is necessary to leave the printer tu rn ed o n when
you remove the jammed media.
Automatic Jam Recovery 55
Page 56

Understanding the Media Path
Understanding the printer’s media path will help you locate media jams.
cccc
Media exit unit
dddd
Output tray
eeee
Fuser
ffff
Transfer belt
gggg
OPC drum cartridge
hhhh
Duplex unit (standard on DP model)
iiii
Multipurpose tray
jjjj
Upper media tray
kkkk
Lower feeder unit and optional tray (standard on DP model)
llll
5-bin mailbox
cccc
dddd
eeee
ffff
gggg
DP Model
hhhh
iiii
DP Model with
5-bin Mailbox
jjjj
kkkk
llll
Simplex
Duplex
Understanding t he Me di a Pat h56
Page 57

Media Tray (Upper Tray Standard on All Models and Optional Tray
Standard on DP Model)
The media tr ay(s) is (are) located at th e bottom front of the printe r. The media is picked
from the tray, passed under the OPC drum cartridge and the transfer belt, passed through
the fuser, and delivered via the paper exit unit to the output tray on top of the printer.
Multipurpose Tray (Standard on All Models)
The multipurpose tray is located at the right of the printer. The media is picked from the
multipurpose tray, passed under the OPC drum cartridge and the transfer belt, passed
through the fuser, and delivered via the paper exit unit to the output tray on top of the
printer.
Duplex Unit (Standard on DP Model)
The media is picked from a media tray, passed under the transfer belt, passed through the
fuser, fed into the duplex unit where the media undergoes a change in direction, cycles
through the transfer belt and fuser again, and is delivered via the paper exit unit to the
output tray, which is the top of the printer.
Since several sheets cycle through the printer/duplex unit at the same time, recovering
from a media jam ma y require the removal of more than one sheet.
To manually duplex, remove the media, flip it over, and reload it.
5-bin Mailbox (Optional on All Models)
The 5-bin mailbox is located on the top of the printer. The media is picked from the tray,
passed under the transfer belt, passed through the fuser, and delivered via the paper exit
unit to the 5-bin mailbox, which is on top of the printer.
Clearing Media Jams
To avoid damage, always remove jammed media gently, without tearing it. Any pieces of
media left in the printer, whether large or small, can obstruct the paper path and cause
further jams. Do not reload media that has jammed.
Clearing Media Jams 57
Page 58

Attention
The image is not fixed on the media before the fusing process. If you touch the
printed surface, the toner may stick to your hands, so be careful not to touch the
print face when r emovi ng t he jammed me dia. Make sure not to spi ll any toner inside
the printer. Unfused toner can dirty your hands, clot hes, or anyt hing else it gets on. If
you accidentally get toner on your hands, wash them in cool water. If you
accidentally get toner on your clothes, lightly dust them off as much as possible. If
some toner remains on your clothes, use cool, not hot water, to rinse the toner off,
provided your clothing is washable. If toner gets on your skin, wash it off with water
or a neutral detergent.
WARNING!
If you get toner in your eyes, wash it out immediately with cool water and consult a doctor.
Material Safety Data Sheets (MSDS) information can be found at www.minolta-qms.com
(click on the Answer Base).
If, after clearing the media jam, the jam message in the control panel window persists,
open and close the printer’s covers. This should clear the jam message.
Handling Media Jams by Location
Location of Jam Page Reference
Tray 1—multipurpose tray page 60
Tray 2—upper tray
Tray 5—optional tray (lower feeder unit)
Near OPC drum page 61
Near duplex unit page 64
In mailbox page 67
page 59
Clearing Media Jams58
Page 59

Clearing Misfeed (Upper or Optional Tray) Jams
1
Remove the medi a tray(s).
2
Carefully remo ve the jammed media.
3
Shuffle the media currently in the tray and
even up the front edges.
4
Reinsert the media printing face up.
Make sure the media is lying flat, is under the media separating tabs, and doesn’t exceed the media limit mark.
Check to see if the media width guides are correct.
5
Slide the tray (s) back into the printer.
6
Open the front cover, then close it.
The media jam display is cancelled.
Clearing Media Jams 59
Page 60

Clearing Misfeed (Multipurpose Tray) Jams
1
Remove the media from in the multipurpose tray.
2
Carefully remo ve the jammed media.
3
Shuffle the media that was removed in step 1 and
even up the front edges.
4
Reinsert the media printing face down.
Make sure the media is lying flat and doesn’t exceed the
media limit mark. Check to see if the media width guides
are correct.
5
Open the front cover, then close it.
The media jam display is cancelled.
Clearing Inner Jams, Outer Jams, and Drum Jams
Media Jams inside the Lower Right Door (Vertical Transport Area)
1
Open the lowe r right door(s).
2
Carefully remo ve the jammed media.
3
Close the lower right door(s).
The media jam display is cancelled.
Clearing Media Jams60
Page 61

Media Jams near the OPC Drum
1
If there is any media in the multipurpose tray, remove it
and close the multipurpose tray.
2
Press the right-side cover release button and carefully
open the cover all the way.
3
Remove the jammed media by pulling it
slowly from the bottom of the fu ser.
Attention
Do not pull jammed media from the top of the
printer through the fusing rollers.
This prevents any unfused toner from dirtying
the fuser rollers.
Clearing Media Jams 61
Page 62

4
Close the right-side cover.
The media jam display is cancelled.
5
Check the release button to make sure the cover is securely closed.
6
If media was removed in step 1, open the multipurpose tray.
7
Shuffle the media that was removed in st ep 1 and even
up the front edges.
8
Reinsert the media printing face down.
Make sure the media is lying flat and doesn’t exceed
the media limit mark. Check to see if the media width
guides are correct.
Media Jams near the Duplex Unit (Standard on DP Model)
1
Open the top cover.
Attention
Do not pull jammed media from the top of the
printer through the fusing rollers.
This prevents any unfused toner from dirtying
the fuser rollers.
Clearing Media Jams62
Page 63

2
Carefully remo ve the jammed media in the top
cover media reverse area.
3
Open the media jam removal cover with your left
hand and carefully remove the jammed media in
the duplex media feed area with your right hand.
4
Close the media jam removal cover with your left
hand and close the top cover.
5
Check the release button to make sure the door is
securely closed.
6
If the multi purpose tray is closed, open it.
Clearing Media Jams 63
Page 64

7
Pressing the duplex unit cov er release , carefull y open
the cover.
8
Remove the jammed media.
9
Close the duplex unit’s cover.
10
Close the multipurpose tray.
11
If there still is a jam message, press the
right-side cover rel ease button and caref ully
open the cover all the way.
12
Lift the inner paper guide.
Clearing Media Jams64
Page 65

13
Remove the jammed media by pulling it toward you.
If the media came out easily, skip ahead to step 15.
If the media did not come ou t easily or if you cannot reach the media from this are a,
keep the duplex unit’s lower cover open.
14
Open the duplex unit cover.
15
Remove the jamme d media by pulling it slowly from the bottom of the fuser rollers.
Be careful not to touch the transfer belt while removing jammed media.
16
Close the printer’s top cover.
17
Close the duplex unit’s paper guide, lower cover, and top cover.
Media Jams near the Fuser Unit
1
Open the top cover.
Attention
Do not pull jammed media from the top of the
printer through the fusing rollers.
This prevents any unfused toner from dirtying
the fuser rollers.
Clearing Media Jams 65
Page 66

2
Carefully remo ve the jammed media.
3
Open the media jam removal cover and carefully
remove the media tha t is jammed there.
4
Close the media jam removal cover.
5
Close the top cover.
Check the release button to make sure the top cover is securely closed.
6
Open the right-side cover.
7
Remove the jammed media by pulling it slowly
from the bottom o f the fuser.
Be careful not to touch the transfer belt while
removing jammed media.
Clearing Media Jams66
Page 67

8
Close the right-side cover.
Check the release button to make sure the duplex unit
cover is securely closed.
The media jam display is cancelled.
Media Jams in the Optional 5-bin Mailbox
1
Carefully remove the jammed media from the paper
eject area of the mailbox.
2
Open the mailbox door.
Clearing Media Jams 67
Page 68

3
Lift up the paper jam removal gui de in the mailbox
with your left hand, an d use your righ t hand t o ca refully remove the jammed paper.
4
Close the mailbox door.
The media jam display is cancelled.
Clearing Other Jams
Remove jammed media from the output tray by gently pulling it to the left away from the
media exit area.
Clearing Media Jams68
Page 69

Solving Problems with Media Jams
5"
Frequent jams in any area indicate that area should be checked, repaired, or cleaned.
Repeated jams may also happen if you’re using the wrong weight print media.
Symptom Cause Solution
Several
sheets go
through
the printer
together .
Paper jam
message
stays on
5-bin mailbox jams.
Duplex
unit jams.
The front edges of the media
are not even .
The media is moist from
humidity.
Front cover needs to be
opened and closed again to
reset the printer.
Some media re mains jammed
in the printer.
The wrong media is being
used.
The wrong media is being
used.
Media may still be jammed. Check for media stuck in the paper guides in the duplex
Remove the media and even up the front edges, then
reload it.
Remove the mo ist media and replace it with new, dry
media.
Open and close the front cover of the printer again.
Recheck the paper path and make sure you have
removed all of the media jams.
Make sure that you are using only plain paper (or
recycled plain paper).
Make sure that you are using only letter/A4 paper.
Use only supported media. Refer to the “Media Types”
on page 35.
Plain paper and thick stock up to 28 lb bond (105 g/m²)
can be autoduplexed if the optional duplex unit is
installed. For heavier weights, manual duplexing is
required. To manually duplex, remove the media, flip it
over, and reload it.
Make sure that you have not mixed media types in your
multipurpose tray.
Do not duplex envelopes, glossy stock, labels, transfer
media, or transparencies.
unit’s top cover, and the media supply area on the lower
left of the printer.
If you removed jammed m edia from near the OPC dr um,
reset the OPC drum’s locking levers.
Solving Problems with Media Jams 69
Page 70

Symptom Cause Solution
Media is
jamming.
The media is not correctly
positioned in the tray.
The number of sheets in the
tray exceeds the maximum
allowed.
The width regulation guides
are not correctly adjusted to
the media size.
The media in upper or
optional tray is not under the
media separating tabs.
Warped or wrinkled media is
loaded in the tray.
Labels, letterhead, envel opes,
postcards, t hick stock, or
transfer material ar e loaded in
the upper or optional tray.
The recommended transparency (OHP) or label paper is
facing the wrong way in the
multipurpose tray.
Envelopes are facing
the wrong way in the m ult ipu r pose tray.
Multiple sheets of transp arency (OHP) media are c ollecting static electricity in the tray.
The media is moist from
humidity.
Unsupported media (wrong
size, thickness, type, etc.) is
being used.
Media supply roller is dirty. Clean the media supply roller.
Remove the jammed media aand reposition the media
properly in the tray.
Remove the excess media and reload the correct number of sheets in the tray.
Adjust the regulation guides in the tray to match the size
of the media.
Remove the media and reload it s o the front corn ers are
under the media separating tabs.
Remove the media, smooth it out, and reload it. If it still
jams, do not use that media.
Special media must be loaded in the multipurpose tray
only.
Load the transparencies or labels according to the manufacturer’s instructions.
Load the envelopes in the multipurpose tray so the the
flaps are facing up.
If the flaps are on the short edge, set the envelopes in
the multipurpose tray so that the flaps are on the printer
side.
Remove the OHP media and load them in the tray one
sheet at a tim e. Do not fa n transp arencies before loading
them.
Remove the mo ist media and replace it with new, dry
media.
Use media that is covered by the printer warranty.
Solving Problems with Media Jams70
Page 71

Solving Other Problems
Symptom Cause Solution
Data was
sent to the
printer, but it
doesn’t print.
Data indicator stays on.
Printer
resets.
Printing
takes too
much time.
An error message is
displayed in the message
window.
The transfer belt installation guide is not set correctly in the installation rail.
Too many typefaces are
being downloaded at the
same time.
Occasionally, software
applications interfere with
each other.
Downloading too many
typefaces can overl oad the
printer memory and cause
the printer to reset to
default.
The printer is set to a slow
printing mode (for e xample,
for OHP, thick stock, or
some other special kind of
media).
The printer is set to power
saving mode.
The printer memory is
insufficient.
Handle ac cording to the message displayed.
Remove the transfer belt. Place the front end of the
intermediate transfer unit installation guide (2 locations)
correctly in the installation rail. Next, lightly push in the
unit. Carefully insert the transfer belt about 6 inches
(152.4 mm). Let go with your right ha nd that was holdi ng
the top handle of the transfer belt, hold the front handle
with both hands, and carefully push in.
Make sure you have enough printer memory.
Some applications send a printer prep file to the printer
at the beginning of each document. When this occurs,
other prep files cannot be sent without resetting the
printer. Monitor your activities to see if there is a correlation between your use of a certain application and the
printer resetting. If so, c onta ct the application developer.
Additional memory (RAM) or a hard drive, whi ch can be
used for font storage, is available and easily installed.
It takes more time to print with special media. When
using regular paper, make sure that the media type is
set properly in the driver.
It takes a little time for printing to start in power saving
mode. If you do not want to use this mode, disable it.
Add more memory.
Solving Other Problems 71
Page 72

Symptom Cause Solution
You are
experiencing
problems
duplexing.
Transfer belt
cannot be
removed.
You are
experiencing
problems
with the 5-bin
mailbox.
The printer
pauses.
A blank
startup page
ejects or
blank pages
come out
during a
printing job
Media or settings are
not correct.
The OPC drum unit is
installed.
The transfer belt left
release lever is not set in
the transfer belt removal
position.
The wrong media is being
used.
The printer pauses for the
Auto-Image Density Control (AIDC) cycle.
The toner cartridge is
empty or miss ing.
The wrong media is being
used.
Make sure that you are using only plain paper. Do not
duplex envelopes, glossy stock, labels, postcards,
transfer media, or transparencies. Make sure that you
have not mixed media types in your multipurpose tray.
Make sure that your document h as more than one pag e.
Go into the printer’s control panel and make sure that
duplex is an available option.
In the printer driver, choose Short Edge (flippe d as on a
clipboard) or Long Edge (flipped a s in a loose-leaf notebook). Make sure that you are using correct media.
Make sure that all of the covers are closed. Open and
then close the covers to confirm that they are securely
closed.
If you turned the printer off, make sure that you have
turned the printer on again and waited for it to warm up
Remove the OPC drum unit first, then remove the transfer belt.
Turn the transfer belt left release lever clockwise to the
4 o’clock position, then remove the transfer belt.
Make sure that you are using only letter/A4 plain paper.
After 100 1-sided pages of a continuous print run, the
magicolor 2200 automatically pauses to do an AIDC
cycle. This process is provided to make sure reliable
printer operation with optimum output quality.
Check the toner cartridges. The image does not print if
the cartridges are empty.
If the toner cartridges are not empty and blank pages
are ejecting, take e ac h c artridge out, rock it fro m si de to
side, and reinstall it in the printer.
Check that the media type set in the driver matches the
media loaded in the printer.
Solving Other Problems72
Page 73

Symptom Cause Solution
Not all pages
print.
Text appears
fuzzy or
unclear.
The printer could have the
wrong kind of cable, or
your printer may not be
configured for the correct
cable and port.
The Cancel key was
pressed.
The media tray is empty. Check the message window to see if the tray you are
A new toner cartridge has
been installed, but the
“break-in” period has not
been reached.
Check your cable.
Make sure no one pressed the Cancel key while your
job was printing.
using is out of media.
Print at least 20 pages to achieve maximum printing
quality in the new cartridges.
Solving Other Problems 73
Page 74

Symptom Cause Solution
Printer power
is not on.
The power cord is not
correctly plugged into the
outlet.
The mailbox power cord is
not correctly connected.
The power switch is not
correctly turned on (I
position).
Something is wrong with
the outlet you are using for
the printer.
The printer is connected to
an outlet with a voltage or
frequency that does not
match the printer specifications.
Turn the power switch off (O position), then remove the
power cord from the outlet and plug it back in.
Turn the power switch and the mailbox power sw it ch o ff
(O position), then reconnect the mailbox power cord
using the procedure below:
—Connect the mailbox power cord plug end to the
mailbox power socket (lower connection).
—Connect the mailbox power cord socket end to the
printer power plug.
—Connect the printer power cord socket end to the
mailbox power plug (upper connection).
—Plug the printer power cord into the outlet.
Set the power switch to the off (O) position, then set it
back to the on (I) position.
Turn the printer power switch and the mailbox power
switch off (O position), then turn on the power again
using the procedure below:
—Turn the mailbox power switch on.
—Turn the printer power switch on.
Plug another electrical appliance into the outlet and see
whether it operates properly.
Use a power source with the following specifications:
Power
—
Japan: 100 VAC 50–60 Hz 12 amps
North America: 120 VAC 50–60 Hz 8 amps
Europe: 220-240 VAC 50–60 Hz 6 amps
Latin America: 120 VAC 50–60 Hz 8 amps
Voltage fluctuation
—
Japan: 100 VAC ±10%
North America: 120 VAC ±10%
Europe: 220-240 VAC ±10%
Latin America: 120 VAC ±10%
Frequency fluctuation rate
—
220-240 VAC 50–60 Hz 6 amps
220-240 VAC ±10%
within 50/60 ±3 Hz
Solving Other Problems74
Page 75

Solving Problems with Printing Quality
Symptom Cause Solution
Nothing is
printed.
Image is too
light; there is
low image
density.
ABCDE
ABCDE
ABCDE
ABCDE
The toner cartridge is
damaged.
The driver is not set correctly.
The OPC drum cartridge is
damaged.
The transfer roller unit is
misinstalled.
The media is moist from
humidity.
The media set in the driver
mismatches the media
loaded in the printer.
Image darkness sensor is
dirty.
The media is moist from
humidity.
There is not much toner left
in the cartridge.
One or more toner cartridg es
are defective.
Media type may be set incorrectly.
The transfer unit may be
misinstalled or defective.
Image darkness (Auto-Image
Density Control [AIDC]) sensor is dirty.
Remove the toner cartridge and check for damage. If necessary, replace it.
Select the proper setting in the driver to switch from transparency (OHP) film to plain paper.
Remove the OPC drum cartridge and check for damage. If
necessary, replace the entire drum kit.
Reset the transfer roller unit.
Adjust the humidity for paper storage. Remove the moist
media and replace it with new, dry media.
Load the correct media in the printer.
Open the front cover. Lift up the transfer belt release lever
to the 12 o’clock position. Next, return the lever to the 3
o’clock position. Repeat this operation several times. (This
cleans the surface of the image darkness sensor.)
Remove the moist media and replace with new, dry media.
Remove the toner cartridge and gently rock it horizontally
five or six times to redistribute the toner.
Replace the toner cartridge.
Remove the toner cartridges and check for damage. If nec-
essary, replace it.
Envelopes, glossy stock, labels, transfer media, and thick
stock have to be set in the thick stock mode.
Reinstall the image transfer unit. If necessary,
replace it.
Open the front cover. Lift up the transfer belt release lever
to the 12 o’clock position. Next, return the lever to the 3
o’clock position. Repeat this operation several times. (This
cleans the surface of the image darkness sensor.)
Solving Problems with Printing Quality 75
Page 76

Symptom Cause Solution
ABCDE
E
E
E
The print
contains
whited out
areas.
ABCD
ABCD
ABCD
Media may be moist. Remove the moist media and replace it with new, dry
media.
Humidity may be too high. Adjust the humidity in the paper storage area.
The fuser unit may be defec-
tive.
The OPC drum cartridge is
damaged.
The transfer roller unit is
misinstalled.
Check the fuser unit for damage. If necessary, replace it.
Remove the OPC drum cartridge and check for damage. If
necessary, replace the entire drum kit.
Reset the transfer roller unit.
Horizontal
white lines
appear in
image.
Printouts
seem faded
on one side.
The toner cartridge is
damaged.
The OPC drum cartridge is
damaged.
The transfer unit is misinstalled.
The transfer roller is damaged.
The printer is not on a level
enough surface.
Remove the toner cartridge and check for damage. If nec-
essary, replace it.
Remove the OPC drum cartridge and check for damage. If
necessary, replace the entire drum kit.
Make sure that the transfer unit was correctly installed.
Replace the transfer roller.
Level the printer (not exceeding 1.5° slant at any point
around the machine).
Solving Problems with Printing Quality76
Page 77

Symptom Cause Solution
Irregular
print or mottled image
appears.
The media is moist from
humidity.
Remove the moist media and repla ce it with new, dry
media.
There is
insufficient
fusing or the
image comes
off when
rubbed.
The print or
color density
may be
uneven.
The media is moist from
humidity.
Media with speci ficati ons no t
covered by the printer warranty is being used.
Your media type may be
incorrectly set.
The toner cartridges may be
near empty or damaged.
The OPC drum may bave
misinstalled or defective.
Remove the moist media and repla ce it with new, dry
media.
Use media that is covered by the printer warranty.
Envelopes, glossy stock, labels, transfer media, and thick
stock have to be set in the Thick Stock mode.
Remove the toner cartridges and gently rock them five or
six times to redistribute the toner. Then, reinstall the car-
tridges.
Install new toner cartridges.
Reinstall the OP C dr um cartridge. If necessary, replace the
entire drum kit.
Solving Problems with Printing Quality 77
Page 78

Symptom Cause Solution
Image is
blurred;
background
is lightly
stained;
there is insufficient gloss
of the printed
image.
One or more toner cartridg es
may be defective.
The OPC drum may be misinstalled or defective.
The fuser oil may be
depleted.
Check the toner cartridges. If necessary, replace them.
Reinstall the OP C dr um cartridge. If necessary, replace the
entire drum kit.
Check the fuser oil condition. If necessary, replace it.
Background
is foggy.
Entire sheet
is printed in
black or
color.
The toner cartridge is
defective.
The OPC drum cartridge is
damaged.
The toner cartridge is
defective.
The OPC drum cartridge is
damaged.
Remove the toner cartridge and check for damage. If nec-
essary, replace it.
Remove the OPC drum cartridge and check for damage. If
necessary, replace the entire drum kit.
Remove the toner cartridge and check for damage. If nec-
essary, replace it.
Remove the OPC drum cartridge and check for damage. If
necessary, replace the entire drum kit.
Solving Problems with Printing Quality78
Page 79

Symptom Cause Solution
Part of image
is missing.
Image is too
dark.
The media is moist from
humidity.
Media with speci ficati ons no t
covered by the printer warranty is being used.
The toner cartridge is
defective.
The OPC drum cartridge is
damaged.
The toner cartridge is
defective.
The OPC drum cartridge is
damaged.
Remove the moist media and repla ce it with new, dry
media.
Use media that is covered by the printer warranty.
Remove the toner cartridge and check for damage. If nec-
essary, replace it.
Remove the OPC drum cartridge and check for damage. If
necessary, replace the entire drum kit.
Remove the toner cartridge and check for damage. If nec-
essary, replace it.
Remove the OPC drum cartridge and check for damage. If
necessary, replace the entire drum kit.
Dark tones
are uneven.
There are
toner
smudges or
residual
images.
The toner in the toner cartridges is uneven.
The OPC drum cartridge is
damaged.
Toner cartridge misinstalled
or defective.
The image transfer roller
need cleaning.
Remove the toner cartridges and gently rock them five or
six times to redistribute the toner. Then, reinstall the car-
tridges.
Remove the OPC drum cartridge and check for damage. If
necessary, replace the entire drum kit.
If the toner smudges are on only the front of the page:
„
Remove the toner cartridges and gently rock them five
or six times to redistribute the toner. Then, reinstall the
cartridges.
„
One or more toner cartridges may be defective. Check
the toner cartridges. Install new ones, if necessary.
If toner smudges are on the front
„
Open the printer front cover once and close it again to
clean the image transfer roller.
back of the page:
and
Solving Problems with Printing Quality 79
Page 80

Symptom Cause Solution
There are
dark spots on
the image.
The fuser oil roller is dirty or
worn.
The transfer belt is defective. Remove the transfer belt and check for damage. If neces-
Remove the fuser oil roll er and check the roller surfa ce. If i t
is very dirty, replace it.
sary, replace it.
There are
toner
smudges on
the back side
of the page
(whether o r
not it has
been
duplexed).
Image
defects in
same place
on every
page.
ABCDE
ABCDE
ABCDE
ABCDE
The paper transport rollers
may be dirty.
The media path is dirty with
toner.
The fuser oil roller is dirty or
worn.
The toner cartridge is
defective.
The OPC drum cartridge is
defective.
The fuser unit is defective. Replace the fuser unit.
The transfer belt is defective. Remove the transfer belt. If necessary, replace it.
Clean the paper transport, pressure, and fuser oil rollers.
Check the transport roller. If necessary, replace it.
Print several blank sheets and the excess toner should dis-
appear.
Remove the fuser oil roller and check the roller surface for
dirt or worn places. If necessary, replace the fuser oil roller.
Remove the toner cartridge and check for damage. If nec-
essary, replace it.
Remove the OPC drum cartridge and check for damage. If
necessary, replace the entire drum kit.
Solving Problems with Printing Quality80
Page 81

Symptom Cause Solution
Abnormal
areas (white
or black)
appear in a
regular
pattern.
Width of abnormal area:
1.25" (31.75 mm)
The toner cartridge is
damaged.
Width of abnormal area:
3" (76.2 mm)
Remove the toner cartridge with the color causing the
abnormal image. Replace it with a new toner cartridge.
Replace the transfer belt.
ABCDE
ABCDE
ABCDE
ABCDE
Image
defects cyclical (evenly
spaced).
The transfer belt is d amage d.
Width of abnormal area:
3.25" (82.55 mm)
The OPC drum cartridge is
damaged.
Width of abnormal area:
8" (203.2 mm)
The transfer belt is d amage d.
Lateral image defects have
1–2 mm spacing.
Lateral image defects have
35 mm spacing.
Lateral image defects have
75 mm spacing.
Lateral image defects have
95 mm spacing.
Lateral image defects have
204 mm spacing.
Lateral image defects have
other spacing.
Replace the entire drum kit.
Replace the transfer belt.
Clean the laser lens cover.
Replace the color toner cartridge.
Replace the image transfer roller.
Replace the entire OPC drum kit.
Replace the fusing unit.
Replace the entire OPC drum kit.
Solving Problems with Printing Quality 81
Page 82

Symptom Cause Solution
Abnormal
areas (white
or black belt
or spots)
appear.
ABCDE
ABCDE
ABCDE
ABCDE
The toner cartridge may be
defective.
The OPC drum cartridge
may be defective or
scratched.
The fuser oil roller is dirty or
worn.
The fuser b elt may be dirty. Clean the fuse r belt.
The fusing unit may be
defective.
Remove the toner cartridge and check for damage. If nec-
essary, replace it.
Remove the OPC drum cartridge and check the photosen-
sitive surface (the green surface) for scratches. If neces-
sary, replace the entire drum kit.
Remove the fuser oil roller and check the roller surface for
dirt or scratches. If necessary, replace the fuser oil roller.
Replace the fusing unit.
Lateral lines
or bands
appear on
image.
The printer is not on a level
enough surface.
The media path is dirty with
toner.
The toner cartridge is damaged.
The fuser oil roller is dirty or
worn.
The toner cartridge is
defective.
The OPC drum surface is
scratched or damaged.
The transfer belt is misinstalled or defective.
Level the printer (not exceeding 1.5° slant).
Print several sheets an d the e xcess toner s hould disap pear.
Remove the toner cartridge and check for damage. If nec-
essary, replace it.
Remove the fuser oil roller and check the roller surface for
dirt or worn places. If necessary, replace the fuser oil roller.
Remove the toner cartridge and check for damage. If
necessary, replace it.
Remove the OPC drum cartridge and check the green
photosensitive surface for scratches. If necessary, replace
the entire drum kit.
Remove the transfer belt and reinstall it. If necessary,
replace it.
Solving Problems with Printing Quality82
Page 83

Symptom Cause Solution
Lateral lines
appear cyclically (evenly
spaced) on
image.
Vertical
streaking
appears.
Lateral lines have 1–2 mm
spacing.
Lateral lines have 35 mm
spacing.
Lateral lines have 75 mm
spacing.
Lateral lines have 95 mm
spacing.
Lateral lines have 204 mm
spacing.
Trailing edge 35 mm, other
spacing
The laser lens cover may be
dirty.
One or more toner cartridg es
may be defective.
The OPC drum may be
defective or misinstalled.
The fuser unit may be defective or misinstalled.
The transfer unit may be
defective or misinstalled.
If a wide vertical white band
appears, check the transfer
belt surface.
Replace the laser lens cover.
Replace the color toner cartridge.
Replace the image transfer roller.
Replace the entire OPC drum kit.
Replace the fusing unit
Replace the entire OPC drum kit.
Check to see if the laser lens cover is dirty. If necessary,
clean it with a clean soft cloth.
The item may be defective or misinstalled. Remove the
designate item, check it for damage and reinstall it. If nec-
essary, replace the entire drum kit.
Clean the transfer belt surface. If necessary, replace it.
Make sure that the transfer unit is closed.
Solving Problems with Printing Quality 83
Page 84

Symptom Cause Solution
Colors are
not registering properly;
colors are
mixed or
have
page-to-page
variation.
ABCDE
ABCDE
ABCDE
ABCDE
ABCDE
ABCDE
ABCDE
ABCDE
The front cover may not be
properly closed.
The OPC drum cartridge is
not correctly seated.
The toner in the cartridges
may need to be redis trib ute d.
The toner cartridge may be
defective.
The media is moist from
humidity.
The transfer roller is
misinstalled.
Agfa Screening is not
enabled.
Make sure that the printer’s front cover is closed.
Remove the OPC drum cartridge and reinstall it.
Remove the toner cartridges and gently rock them five or
six times to redistribute the toner. Then, reinstall the car-
tridges.
Remove the toner cartridge and check for damage. If nec-
essary, replace it.
Remove the moist media and repla ce it with new, dry
media.
Confirm the proper instal lation of the transfer roller.
Make sure you have Agfa Screening chosen in the
Administration/Emulations/PostScript/Halftone Type
menu in the driver.
The image is
offset.
ABCDE
ABCDE
ABCDE
ABCDE
ABCDE
ABCDE
ABCDE
ABCDE
Colors look
drastically
wrong.
The OPC drum cartridge is
defective.
The fuser oil roller is
defective.
The fuser unit is defective. Check the fuser unit. If necessary, replace it.
The toner cartridges are
incorrectly installed.
Check the OPC drum cartridge. If necessary, replace the
entire drum kit.
Check the fuser oil roller. If necessary, replace it.
Remove the toner cartridges and reinstall them.
Solving Problems with Printing Quality84
Page 85

Symptom Cause Solution
The color has
a poor reproduction or
has poor
color density.
ABCDE
The paper image transfer is
defective.
The Auto-Image Density
Control (AIDC) detection
sensor is dirty.
Check the OPC drum cartridge. If necessary, replace the
entire drum kit.
Open the front cover. Lift up the transfer belt release lever
to the 12 o’clock position. Next, return the lever to the 3
o’clock position. Repeat this operation several times. (This
cleans the surface of the AIDC detection [image darkness]
sensor.)
ABCDE
ABCDE
ABCDE
Status, Error, and Service Messages
Status, error, and service messages are displayed in the control panel message window.
They provide information about your printer and help you locate many problems. When
the condition associated with a displayed message has changed, the message is cleared
from the window.
Status, Error, and Service Messages 85
Page 86

Status and Error Messages
5"
Status messages are not displayed while the printer is off line.
This message... means... Do this...
X
> ACTIVE JOBS
<
The printer is on line and
<
X
actively processing jobs. (
identifies the number of jobs in
process.)
>
No action needed.
<X> COVER OPEN
<
X
> LIFE LOW
x
> MISSING
<
X
> TONER EMPTY
<
<
X
> TONER LOW
ACC ALREADY DISABLED
ACC ALREADY ENABLED
<X>
The
open and must be closed.
The <
end of life, such as the fuser oil
roller . If you have a ne w fuser oil
roller on hand, you may want to
install it now. If you don’t, order
one now. A limited number of
copies (about 100 ) wi ll s til l print.
However, when the oil runs out,
the printer stops and the
OIL EMPTY
The
missing, such as the OPC drum
or toner.
The
is empty.
The
is low. There is still enough for
approximately 100 letter/A4
pages (at 5% coverage) before
the printer stops.
The accounting option selected
is now in effect.
(specified cover) is
X
> (specified item) is near
FUSER
message appears.
<X>
(specifie d item) is
<X>
(color) toner cartridge
<X>
(color) toner cartridge
Close the cover.
Replace the specified
item.
Install a new item.
Replace the toner cartridge.
Redistribute the toner in
the cartridge, or replace
the cartridge.
No action needed.
ACC DISABLED
ACC ENABLED
Status, Error, and Service Messages86
Page 87

This message... means... Do this...
ACC FILE 95% FULL
ACC FILE 90% FULL
ACC FILE 85% FULL
ACC FILE 80% FULL
ACC FILES GOT REMOVED
ACC FILES NOT EMPTY SHRUNK
TO %D
ACC_GETSTATUSREC;CODE-%D,
RESETTING ACC TO INITIAL
STATE
The Job Accounting File is 80,
85, 90, or 9 5 % full.
The accounting option is disabled and the accounting files
are empty . After a reset, the files
are removed. This prevents you
from wasting disk space with
empty accounting files.
An attempt to reduce the size of
the accounting files has been
made unsuccessfully because
the size of files is bigger than
the space re quired.
The accounting files have been
reset.
If you want accounting
enabled, copy the job
accounting and paper
accounting file s to flop py
disk(s), or transfer them
to your host computer
using ftp (if available).
Then reset the accounting files so that new jobs
can be accepted. If you
don’t want to use
accounting, you can disable it.
No action needed.
Reset the accounting
files.
No action needed.
ADJUST <
CALIBRATING PRINT QUALITY
INPUT> BIN
<
INPUT>
The
not inserted correctly.
After 100 1-sided pages of a
continuous print run, t he magicolor 2200 automatically pauses
to do an Auto-Image Density
Control (AIDC) cycle. This process is provide d to make sure
reliable printer operation with
optimum output quality.
(specified tray) is
Adjust the tray.
Wait. No action needed.
Status, Error, and Service Messages 87
Page 88

This message... means... Do this...
CANCEL ALL JOBS
CANCEL JOB
CHECK WASTE TONER
CREATED FILE
CREATING
FILE, WAIT...
DSK TOO SMALL ACC NOT
ENABLED
XXXXXXXXXXXX
The Cancel key has been
pressed, and one o r more o f the
print jobs in the print queue are
being canceled.
The Cancel key has been
pressed, and the print job in the
print queue is being canceled.
Either the waste toner i s full and
needs to be replaced, or it is
incorrectly installed.
The accounting file has been
created.
The specified accounting file is
created when accounting is
enabled and the files are not in
existence or these files are created following a Reset Accounting (
XXXXXXXXXXXX
the Job Accounting or Paper
Accounting file).
There is not enough space in
the hard disk to create the
accounting file.
represents
Press Select for all jobs
with a printing, interpreting, spooled, or terminating status to be
completely removed
from the system.
Press Select and the job
in the print queue wil l be
canceled.
Make sure that the
waste toner is not full
and is correctly installed.
No action needed.
Wait. No other action
needed.
Remove unnecessary
files stored in the hard
disk.
END JOB
The Cancel key has been
pressed and the End Job op tion
selected.
Status, Error, and Service Messages88
Press Select to provide
an end-of-job indicat or
for a print job that does
not have one.
Page 89

This message... means... Do this...
ENERGY SAVER
EXTENDED ACC FILE SIZE BY
X>
KB
<
FUSER OIL EMPTY
IDLE
The printer is in energy saver
mode to reduce power consumption during periods of inactivity. When a print job is
received, the printer returns to
normal power within 90 seconds. While in “deep sleep,” the
printer’s message window will
not display operator status such
as door- and tray-open messages. The printer remains in
“deep sleep,” until a print job is
received, or until the printer is
manually switched from offline
to online.
X
> (size of the non-empty
The <
accounting file) has been
increased successfully.
The fuser oil roller for the fuser
is depleted. The printer will not
print any more copies un til a
new fuser oil roller is installed.
The printer is o n line, but no jobs
are in process.
No action needed.
No action needed.
Install a new fuser oil
roller.
No action needed.
INITIALIZING
INPUT BIN JAM
INPUT IDLE
PRINTING
MAILBIN POWER OFF
The printer is warming up and
getting ready to go on line.
Input bin jams occur in the
input bin.
The printer is on line and printing jobs already in the queue.
No new jobs are arriving at the
communicati on interfaces.
The mailbox unit power is off. Turn off the printer, turn
Wait. No other action
needed.
Locate and remove the
jam.
No action needed.
on the mailbox unit, th en
the turn on the printer.
Status, Error, and Service Messages 89
Page 90

This message... means... Do this...
MAIN UNIT COVER OPEN
MEDIA JAM DUPLEX
MEDIA JAM EXIT
MEDIA JAM FUSER
MEDIA JAM MAIL BIN
The front, top, or duplex covers
are open and must be closed.
Media has jammed in the duplex
area or duplex refeed area on
the models with duplex units
installed.
Media has jammed be tween th e
print engine and the output tray.
A media jam has been detected
between the fuser and output
tray rollers located near the top
cover.
Exit jams occur in the media
eject area.
Media has jammed leaving the
fuser area.
Mail bin jams occur if the media
is jammed in t he 5-bin mailbox
on the models with the 5-bin
mailbox installed, between the
printer and the 5-bin mailbox, in
the mailbox eject area, or in the
mailbox transport area.
Close the specified
cover(s).
Locate and remove the
jam.
MEDIA JAM MPT
Media has jammed while being
pulled from the specified multipurpose tray.
Status, Error, and Service Messages90
Page 91

This message... means... Do this...
MEDIA JAM OPTIONAL TRAY
MEDIA JAM TRANSFER
MEDIA JAM UPPER TRAY
MEDIA SIZE MISMATCH
NEW FILE SIZE IN EFFECT
Tray jams occur between the
standard upper or optional tray
and the print engine. A misfeed
jam may be as simple as a
sheet of media not being picke d,
or it may be that the media was
picked but not fed properly.
The lower feeder unit (optional
on all models except the DP)
door is open.
Transfer jams occur in the transfer roller area. This type of jam
means that the media did not
make it to the paper exit area.
Media has jammed while being
pulled from the specified tray.
The media detected in the tray
doesn’t match the media size
setting.
The size of the accounting files
has been increased or
decreased.
Locate and remove the
jam.
Close the door.
Locate and remove the
jam.
Change the media in the
tray or change the
media size set ting
Press Select to accept
changes.
.
NO PRNTREQ ERROR
ONLINE
OUTPUT BIN FULL
A printer hardware error has
occurred.
The printer is online and ready
to print.
The media has exceeded the
limit in the specified output bin.
Reboot printer. If message continues to
appear, contact your
service provider or Support. See the
Suuport Guide
port telephone numbers.
No action needed.
Remove the media from
the specified output bin.
Service &
for sup-
Status, Error, and Service Messages 91
Page 92

This message... means... Do this...
PAPER MISMATCH
PRINTING STATUS
X
PUT <
PUT <
PUT <
BIN
REPLACE <
RESETTING ACCOUNTING
> IN INPUT <Y>
SIZE>
PAPER IN <
TYPE MEDIA>
X
>
IN INPUT
BIN>
The media detected in the tray
doesn’t match the media size
setting.
A status page is printing Wait until after the status
<X>
The
in the input tray
The Operator Control/Chain
Inputbins is set to Off and the
displayed tray is empty. Refill it
with the specified size media.
<
detected by the engine, and
<
Operator Control/Chain Inputbins is set to On and a chained
tray is empty.
The specified item
be replaced, such as the OPC
drum.
The reset accounting operation
is in process.
specified media is not
SIZE>
is the media size
BIN>
is the empty tray.
<
Y
>
<X>
.
needs to
Change the media in the
tray or change the
media size set ting
page prints, and the
message clears.
Refill the tray with the
specified type media.
Refill the tray with the
specified size media.
Refill the tray with the
specified type media.
Replace the specified
item.
No action needed.
.
WAITING FOR IDLE
An active job is in process.
Access to the menu is not
allowed until the job is finished.
Status, Error, and Service Messages92
Wait until the print job is
finished and the printer
goes idle.
Page 93

This message... means... Do this...
WAITING ON INPUT
END JOB?
WARMING UP
WASTE TONER NEAR FULL
The compiler is waiting on
incoming data for the first job in
the queue. The job may not
have an end-of-job indicator and
therefore cannot end. The message clears if more input arrives
from the port or if you press the
Cancel key. No other jobs can
be printed until this job has
ended.
The printer is warming up. Wait. No other action
The waste toner pack is nearly
filled with toner.
Wait until the job is finished and the printer
goes idle to access the
configuration menu.
needed.
Replace the waste tone r
pack.
Status, Error, and Service Messages 93
Page 94

Service Messages
This service message... Means...
SERVICE CALL 04 MAIN UNIT
SERVICE CALL 05 FLASH ROM
SERVICE CALL 08 MAIN MOTOR
SERVICE CALL 09 FUSING MOTOR
SERVICE CALL 0B XFER FAN BELT
SERVICE CALL 0C PWR SUPPLY FAN
SERVICE CALL 0D ENGINE FAN
SERVICE CALL OE SUCTION FAN
SERVICE CALL OF FUSING UNIT FAN
SERVICE CALL 10 POLYGON MOTOR
SERVICE CALL 12 LASER ERROR
SERVICE CALL 14 XFER ROLLER
SERVICE CALL 15 XFER BELT CLN
SERVICE CALL 16 XFER BELT ROT
SERVICE CALL 17 TONER RACK
SERVICE CALL 18 FUS UPP WARMUP
An error has been detected with the
item indicated in the service message. Correction of these errors is
performed by a MINOLTA-QMSauthorized servi ce prov ider o nly. Contact your local vendor.
A service mess age sometimes
occurs as a result of an unusual combination of events, not because of an
actual problem. When the printer
stops and a service message displays in the message window, turn
the printer off and then back on. This
often clears the service message
indicator, and printer operation
resumes. Always try this before
making a service call.
Service calls should be placed to the
vendor from whom y ou purchased t he
printer. If you cannot get servi ce f r om
your vendor, see the
port Guide
information.
for additional contact
Service & Sup-
SERVICE CALL 19 FUS UPP LOWTMP
SERVICE CALL 1A FUS UPP HIGHTMP
SERVICE CALL 1B FUS UPP THERM
SERVICE CALL 1C FUS LOW WARMUP
SERVICE CALL 1D FUS LOW LOWTMP
SERVICE CALL 1E FUS LOW HIGTMP
Status, Error, and Service Messages94
Page 95

This service message... Means...
SERVICE CALL 1F FUS LOW THERM
SERVICE CALL 20 FUS RETRACT
SERVICE CALL 21 TRANS DET SENS
SERVICE CALL 22 MAN TRAY LIFT
SERVICE CALL 29 MEM MALF COUNTER
SERVICE CALL 2A MEM MALF DATA
SERVICE CALL 2B MEM MALF ACCESS
SERVICE CALL 2C MEM MALF INSTALL
SERVICE CALL 30 5BIN MAIL
SERVICE CALL 31 5BIN INST MAIL
An error has been detected with the
item indicated in the service message. Correction of these errors is
performed by a MINOLTA-QMSauthorized servi ce prov ider o nly. Contact your local vendor.
A service mess age sometimes
occurs as a result of an unusual combination of events, not because of an
actual problem. When the printer
stops and a service message displays in the message window, turn
the printer off and then back on. This
often clears the service message
indicator, and printer operation
resumes. Always try this before
making a service call.
Service calls should be placed to the
vendor from whom y ou purchased t he
printer. If you cannot get servi ce f r om
your vendor, see the
Support Guide
contact information.
Service &
for additional
Status, Error, and Service Messages 95
Page 96

HP-GL Error Codes and PCL Error Codes
The following tables list error codes that could appear on the printer message window
when running the HP-GL, PCL or HPXL emulation.
HP-GL PCL
Error
Code
0 Not enough memory for job. 0 Not enough memory for job.
1 Too many transformations. 1 State lost.
2 Math error. 2 Math error.
3 Job aborted. 3 Job aborted.
4 Instruction not recognized. 4 Out of memory for macros.
5 Wrong number of parameters. 5 Disk full. Cannot store fonts.
6 Out of range parameter , or ill egal
7 Not used.
8 Unknown character set.
9 Position overflow.
10 Buffer overflow.
11 Not used.
HPXL
Description Error
Code
6–13 Internal error 1–8.
character .
Description
Error
Code
0 Not enough memory for job.
1 Math error.
2–7 Internal error 1–6
Description
Status, Error, and Service Messages96
Page 97

PostScript Errors
If your printer i s having tro uble pri nting when using Post Script e mulation, y ou should t urn
on the Error Handler in the control panel menu. Error Handler is a diagnostic tool that
identifies PostScript errors encountered during a print job.
Menu
Choices
Default
Notes
Administration/Startup Options/Do Error Handler
Yes—Load the Error Handler on reboot.
No—Don’t load the Error Handler on reboot.
No
Refer to the
porated, Reading, PA: Addison-Wesley, 1990, ISBN 0-201-18127-4) for information on PostScript errors.
You must reboot the printer after turning on the error handler.
PostScript Language Reference Manual
Additional Assistance
If you’ve followed all of the instructions in this guide and still have problems you can’t
solve, refer to t he
for current in formation on getting help.
Service & Support Guide
(Adobe Systems Incor-
or visit our web site at www.minolta-qms.com
Additional Assistance 97
Page 98

Page 99

Installing Other
Accessories
5
Page 100

Introduction
The optional lower feeder unit and duplex unit were discussed in the
Installation Guide
This chapter provides information about the following accessories. Contact your local
vendor for purchase information.
5-bin Mailbox
BuzzBox
Dual In-Line
Memory Modules
(DIMMs)
Emulations,
Fonts, and Other
Software
Interfaces and
Daughterboards
Internal IDE Hard
Disk Drive
Media Tray, 500
Sheet
Printer Stand and/
or Cabinet
SC-210
Convenience
Copier
Time-of-Day Clock
Three models: For 100-, 120-, or 220-volt printers
Via parallel connection for 100, 120, and 220 volts
Additional memory must be 32, 64, or 128 MB, PC-100 Compliant
SDRAM DIMMs, up to a printer maximum of 384 MB.
„
ImageServer
„
LNO3
„
CGM
„
Kanji Font Internal IDE Hard Disk
„
QFORM
„
PlanetPress (forms-creation utility)
„
Fonts
„
Crown for DECnet-TCP/IP (equipped with 10BaseT)
„
CrownNet for Ethernet 10BaseT/100BaseTX (equipped with RJ45
connector)
„
CrownNet for Token-Ring (equipped with STP and UTP connectors)
„
LocalTalk Interface
„
SCSI Interface
Standard with models EN and DP
Purchasing extra trays may be convenient when changing media formats and/or media qualities vary.
Tabletop or floor model printer stand and/or cabinet
SC-210 Color Convenience Copier
Standard with models EN and DP
.
Introduction100
 Loading...