

Page 1

QMS® 2060 WX
Print System
Setup Guide
1800466-001A
Page 2

Trademarks
The following are trademarks or registered trademarks of their respective owners. Other
product names mentio ned in this manua l may also be trademar ks or register ed
trademarks of their resp ective owners. Regis tered trademark s are regis tered in the
United States Patent and Trademark Office; s ome tradem ar ks may also be regis tere d in
other countries. QMS, and the QM S logo are regis tered trademar ks of QMS, Inc.
TrueType/Apple Computer, Inc. Windows/Mic rosoft Cor poration. Xerox/Xerox
Corporation. Hamme rm ill/Hammerm ill. Avery/Avery.
Proprietary Statement
The digitally encoded software included with your Q MS 2060 WX Print System is
Copyrighted © 1996 by QMS, Inc. All Rights Reserved. This software may not be
reproduced, modified , displayed, transferred, or copied in any form or i n any manner o r
on any media, in whole or in par t, without the express written per miss ion of QMS, Inc.
Copyright Notice
This manual is Copyrighte d © 1997 by QMS, Inc., One Magnum Pass, Mobile, AL
36618. All Rights Reser ved. This manual m ay not be copied in whole or in par t, nor
transferred to any other media or language, without the expr ess written permiss ion of
QMS, Inc.
Manual Notice
QMS, Inc. reserves the right to m ake changes to this manual and to the eq uipment
described herein w ithout notice. Considerable effor t has been mad e to ensure tha t this
manual is free of inaccuracies and omissions. However, QMS, Inc. makes no warranty
of any kind including, but not limited to, any implied warranties of merchantability
and fitness for a particular pur pose w ith regard to t his ma nual. QMS, Inc. assumes
no responsibility for, or liability for, errors contained in this manual or for incidental,
special, or conseque ntial damages ar ising out of the fur nishing of this manual, or the
use of this manual in operating the equipm ent, or in con nection with the performanc e of
the equipment when so ope rated.
.
Page 3

Contents
Introduction ........................................................................... 1
About the Documentation ....................................................1
Standard Product Documentation 1
Typographic Conventions 2
Find a Good Location ...........................................................3
Location Requirements 3
Power Requirements 4
PC Requirements 4
Unpack the Printer ................................................................5
Check the Shipment Contents .............................................6
Shipment Contents 6
Install the Toner Cartridge ...................................................7
Load the Media Cassette ....................................................10
Prepare the Paper 10
Page 4

Load the Paper 11
Connect the Printer to Your PC and Plug It In ................. 15
Parallel Connection 15
Install a Printer Driver .........................................................16
Windows 95 (Parallel Connections) 16
Ethernet Connection 16
Windows 95 (Ethernet Connections) 17
Windows NT 3.51 18
Windows NT 4.0 20
Install a Network Print Monitor .......................................... 23
Windows 95 23
Windows NT 3.51/4.0 29
Register the Printer .............................................................36
Install i ng Options ................................................................ 37
For More Assistance ........................................................... 37
A QMS Customer Support
Sources of Support ........................................................... A-2
QMS World-wide Offices .................................................. A-5
Index
v
Your QMS Vendor A-2
Your Application Vendor A-2
Q-FAX A-2
The QMS Corporate Bulletin Board System A-3
CompuServe A-3
Internet A-3
QMS Customer Resp onse Center (CRC) A-4
QMS 2060 WX Print System Setup Guideii
Page 5
Introduction
Introduction
The QMS 2060 WX Print System is a powerful but easy-to-use 20page-per-minute laser print er that produces 600 dpi monochrome
documents on an extensive range of media sizes in Windows 95,
Windows NT 3.51, and Windows NT 4.0 environments.
About the Documentation
The documentation pr ovides a window into the many capabilities of
your printer. The more familiar you are with the documentation, the
easier it’ll be for you to achieve the results you want from your printer.
Standard Product Documentation
QMS 2060 WX
Print System
&
&
&
QMS 2060 WX Print System Set up Guide
Read Me First
QMS 2060 WX
Print System
Setup Guide
(Y ou’ re looking at
this right now.)
QMS 2060 WX
Print System
User’s Guide
This sheet provides a quick overview of
the setup procedures described in
detail in the
This manual contains d etai led,
illustrated instr u ction s to guide you as
you unpack and set up your printer,
connect it directly to a PC via the
parallel port or to a network via the
Etherne t port, and then install a
Windows 95 or Windows NT printer
driver and network print monitor.
This manual guides you through the
day-to-day operation of your printer. It
includes information on printing files;
adding print media; selecting input and
output bins; duplexing; collating;
replacing print media and toner;
handling, cleaning, and maintaining
your printer; and troubleshooting
printer problems.
Setup Guide
.
1
Page 6
About the
Documentation
Typographic Conventions
The following typographic conventions are used in this manual:
Mixed-Case
Courier
Mixed-Case
Italic
Courier
UPPERCASE
COURIER
lowercase bold PostScript operators and DOS commands
lowercase italic
UPPERCASE File and utility na mes
↵ Press the Ent er key (PC) or Retur n key
^ Press and hold down the Ctrl key (PC)
» Note:
Notes contain tip s, extra information, or impo rtant infor m ati on
Text you type, and messages and information
displayed on the screen
Variable text you type; replace the italicized
word(s) with information specific to your printer
or computer
Information displayed in the printer message
window
Variable information in text
(Macintosh)
that deserves emphasis or reiteration.
s
Caution:
Cautions present information that you need to know to a void
equipment damage, process failure, or extreme annoyance.
M
WARNING!
Warnings indicate the possibility of personal injury if a
specific procedure is not performed exactly as des cribed in the
manual.
ACHTUNG!
Bitte halten Sie sich exakt an die im Handbuch
beschriebene Vorgehensweise, da sonst Verletzungsgefahr
bestehen könnte.
QMS 206 0 W X Print System Setup Guide2
Page 7
Find a Good Location
Location Requirements
n
On a hard, level surface capable of supporting the 53 lb (24 kg)
printer. (By “level” we mean that the surface should be so flat—1°
or less slant—that you can lay a round pencil down on it, and it
doesn’t roll in any direction.)
n
In an area with a temperature range of 50° - 95° F/10° - 35° C
(with temperature fluctuation of
of 15% - 85% (with humidit y fluct uat ion of
n
Away from cooling and heating sources, extreme temperature
changes, direct sunlight, excessive dust, corrosive chemicals or
vapors, water pipes, refrigerators, any strong electromagnetic
field (such as that created by an air conditioner), items that can
easily burn (such as a curtain), and excessive vibration. Don’t
connect it to the same electri cal outlet as noise-generating equipment.
±10°) and relative humidity range
Find a Good
Location
± 20°).
n
6 feet (1.8 meters) or less from your PC for a parallel connecti on.
n
Close to an easily accessible power supply.
n
In a well-ventilated room.
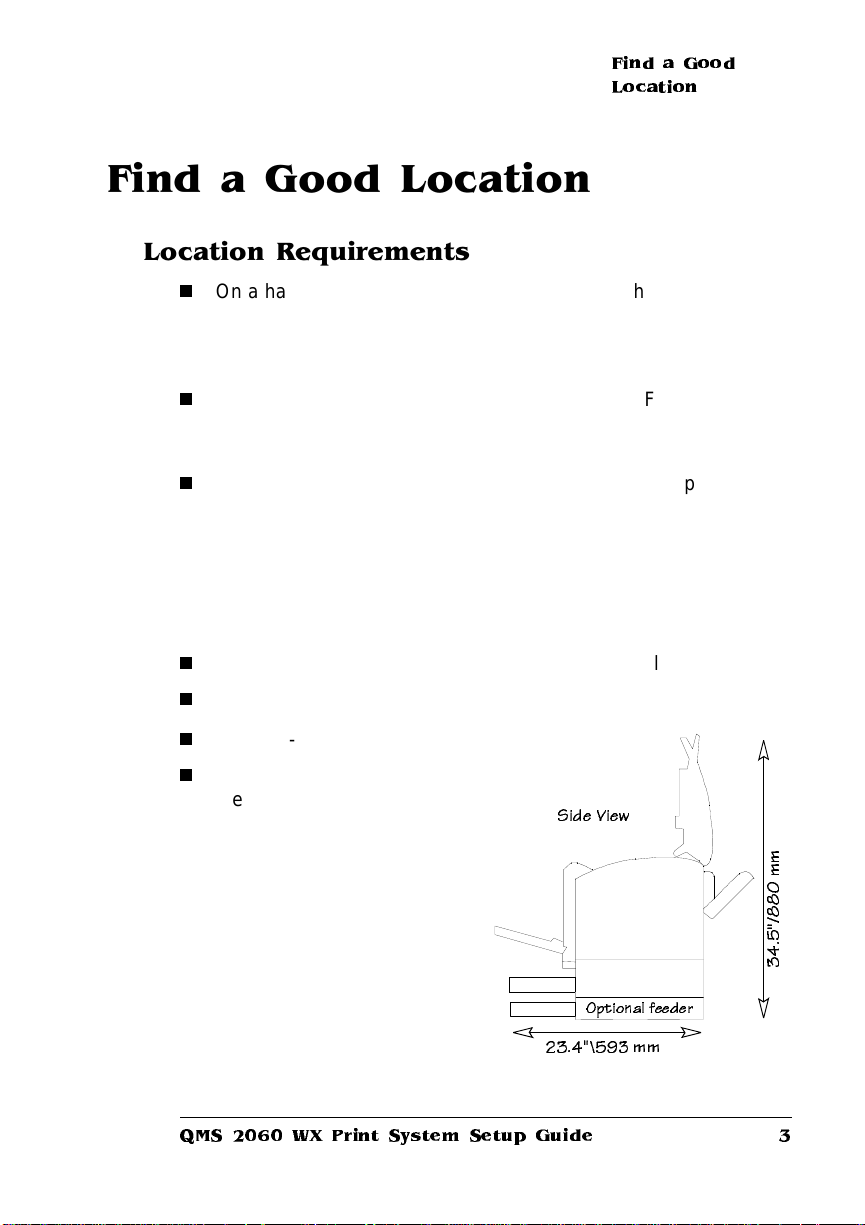
n
With enough space around
the printer to allow adequate
ventilation and easy servicing:
Side View
- Front 36"/914 mm
- Rear 12"/305 mm
- Left side 12"/305 mm
- Right side 12"/305 mm
Optional feed er
23.4"\593 mm
QMS 2060 WX Print System Set up Guide
m
m
0
8
8
/
"
5
.
4
3
3
Page 8

Find a Good
Location
Power Requirements
Your printer requires a properl y grounded AC outlet with a power
range of ±10% of the rated line voltage (either 100/120 V or
220/240 V).
» Note:
Your printer ca nnot autom atically switch bet we en voltages; in
other words, 110 volt and 220 volt systems are not interchangeable.
To determine the rated voltage of your print e r, refer to the data plate
on the back of the printer.
Make sure that the capacity of the electrical outlet is at least 1.2 times
that used by the printer. Noise-generating equipment should not be
connected to the same electrical outlet as the printer.
The recommended frequency is 50-60 Hz for a 100/120 V system and
50-60 Hz for a 200/240 V system. The frequency fluctuation is ±0.3%.
Energy Star Compliance
The QMS 2060 WX Pr int S y stem is complia nt
with US Environmental Protecti on Ag ency
(EPA) Energy Star regulations. Aft er a
specified period of inactivit y, the print er
changes to a low-power state (the engine
remains on, but the fuser turns off).
When a print job is received, the printer
returns to normal power within 90 seconds.
PC Requirements
Printer performance depend s upon the type of PC to which you
connect it. We recommend a Pentium-class PC with at least 16 MB of
RAM (if you’re using Windows 95) or 32 MB of RAM (if you’re using
Windows NT 3.51 or 4.0).
QMS 206 0 W X Print System Setup Guide4
Page 9

Unpack the Printer
The packing m aterials that protect yo ur printer du ring shipment—
cardboard, polystyrene, tape, and shipping spacers—must be
removed before you can use the printer.
Use the following procedure to unpack the printer. To ensure that your
printer was not damaged during shipment, follow the entire procedure.
Unpack the
Printer
» Note:
s
M
» Note:
Save the packing materials in case you ever have to move or
ship the printer to a new location.
Caution:
before turning it on.
1 Lift off the box and remove everything except the printer
2 Lift the printer out of the shipp i ng car to n.
3 Remove the protective plas tic covering , and then rem ove
4 Remove the packing materials and tape from inside the
To avoid damaging the printer, remove all packing materials
from the shipping carton.
Use the carrying grips on the bottom of the left and right sides of
the printer.
WARNING!
yourself.
ACHTUNG!
niemals, das Gerät alleine anzuheben oder zu tragen.
any tape and polystyrene from the printer body.
printer and cassette.
The printer weighs about 53 lbs (24 kg). Don’t lift it by
Der Drucker wiegt ca 24 kg; bitte versuchen Sie
Make sure all of the polystyrene is removed.
5 Slide the cassette into the printer.
6 Place the printer in its proper l ocation.
QMS 2060 WX Print System Set up Guide
5
Page 10
Check the
Shipment
Contents
Check the Shipment Contents
Shipment Contents
n
QMS 2060 WX Print System
n
250-sheet universal media cassette
n
Documentation
-
QMS 2060 WX Print System Read Me First
-
QMS 2060 WX Print Syst em Setup Guid e
-
QMS 2060 WX Print System User’s Guide
-
QMS Network Print Monitor for Windows 95 Admin istrato r’s
(on disk or CD-ROM with the software)
Guide
-
QMS Network Print Mon itor for Windows NT Administrat or’s
(on disk or CD-ROM with the software)
Guide
n
Documentation binder and binde r inser ts
(this manual)
n
Power cord
n
Software
- Windows 95, Windows NT 3.51, and Windows NT 4.0 printer
drivers
- QMS Network Print Mon itors for Windows 95, Windows NT
3.51, and Windows NT 4.0
n
Toner cartridge
n
Warranty and registration card
» Note:
An interface cable is not included in the shipment. If you need
a cable, contact your QMS vendor or a local computer store. (Refer to
the “Connect the Printer to Y our PC and Plug It In” section on page 15
for more information on the type of cable you need.)
QMS 206 0 W X Print System Setup Guide6
Page 11
Install the Toner
Cartridg e
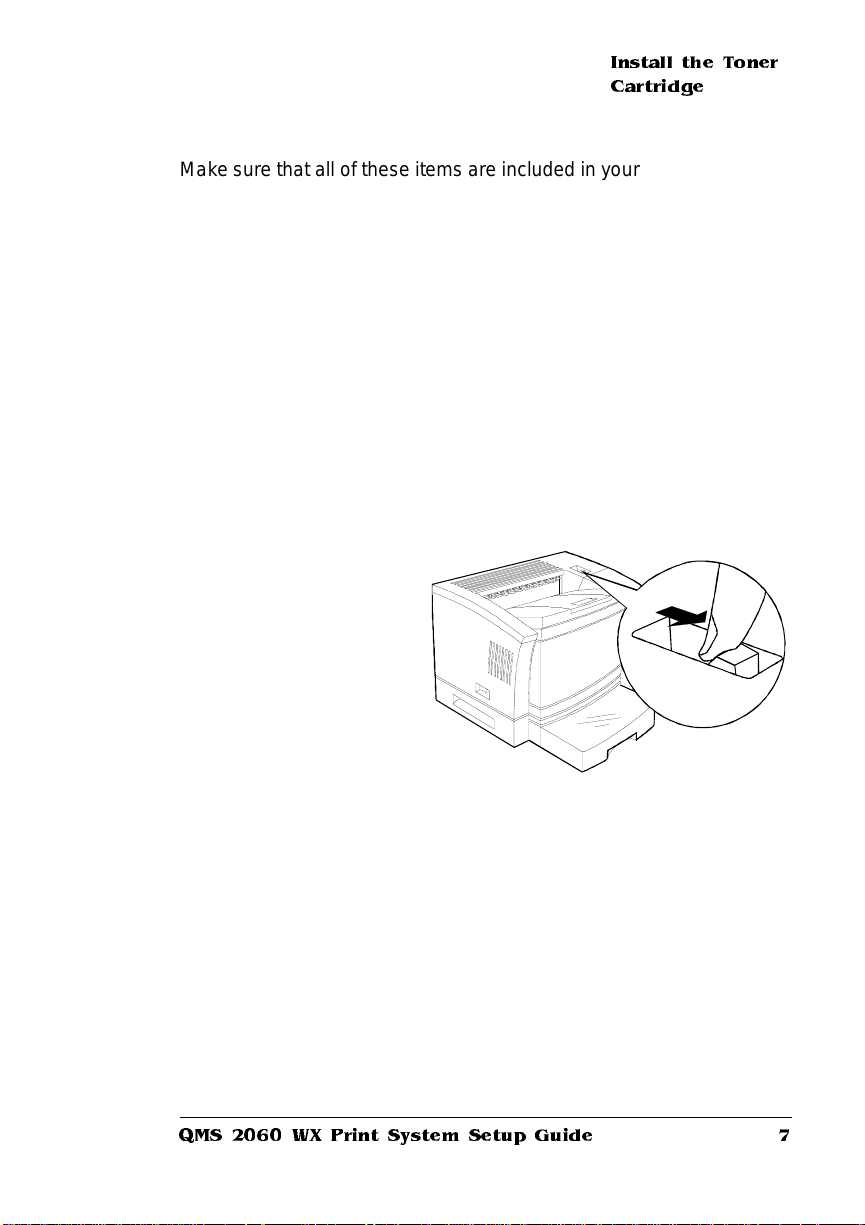
Make sure that all of these items are included in your shipment before
setting up your printer. If any items are missing or damaged, contact
your shipping company or your QMS vendor. See appendix A, “QMS
Customer Suppor t,” for product sales and suppor t information.
Install the Toner Cartridge
» Note:
» Note:
Toner car tr idges are sensiti ve to bright light. Don’t remove one
from its protective bag until you’re ready to install it. Store toner
cartri dges i n an environment that is not subject to extreme heat or
humidity, salty air, or corrosive gases, such as aerosols. Also, keep
toner cartr idge s away from your computer. The magnets in the
cartridges can damage data, particularly on floppy disks.
1 Pull the latch on top of
the printer forward,
and open the top
cover.
2 Remove a toner cartri dg e f rom its shippi ng car ton and pro-
tective aluminum bag.
Don’t open the cartr idge c over or touch the OPC drum of
the cartr idge; this may deteriorate the drum and red uce pr int
quality.
QMS 2060 WX Print System Set up Guide
7
Page 12
Install the Toner
Cartridge
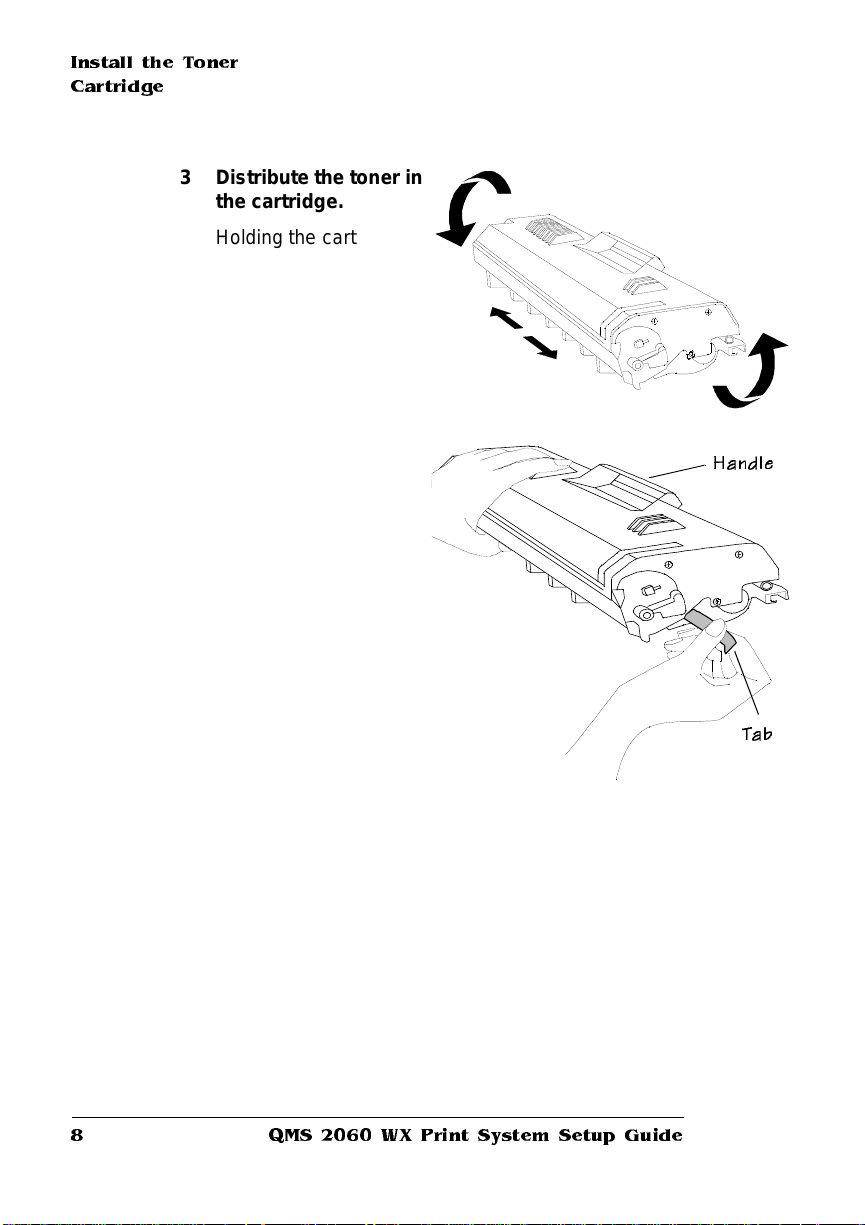
3 Distribute the toner in
the cartridge.
Holding the cartridge
with both hands, gently
rock it from side-to-side
five or six times to distribute the toner.
4 Remove the tape seal.
a Position the
cartri dge so the
center handle faces
away from you.
b Holding the
cartri dge in place
with your left hand,
use your right hand
to grasp the tab on
the side of the toner
cartridge.
c P ull the plastic st r ip
straight out.
If the strip breaks, grasp the clear part of the tape seal and
pull it straight out.
d Discard the strip and the tape seal.
Handle
Tab
QMS 206 0 W X Print System Setup Guide8
Page 13

Install the Toner
Cartridg e
5 Slide the toner car tri dg e in the print er.
a Holding the handle of the toner cartridge so that the arrow on
the cartr idge is facing away from you, angle the cartridg e
down into the printer.
b Place the car tridge on the rails inside the upper unit of the
printer, and gently slide it straight down until it’s fir mly seated.
6 Close the printer’s top cover.
QMS 2060 WX Print System Set up Guide
9
Page 14

Load the Media
Cassette
Load the Media Cassette
The QMS 2060 WX Print System comes stan dard with a 250-sheet
universal cassette. Loading media in the cassette involves the following steps:
n
Prepare the paper
n
Load the paper
Prepare the Paper
» Note:
» Note:
s
Ensure that the media si ze matches the cassett e size (for
example, letter/A4 media must be loaded only when the universal
cassette is set to letter/A4 size or when a letter/A4 cassette is
available). Since the media cassette sends a media size signal to the
printer controller, using the wrong size media will cause your image to
be positioned incorrectly on the page or clipped.
1 Unwrap the paper, and pull the stack out.
Don’t unpack the paper above the printer because this
might cause particles to fall into the printer components. Note the
arrows on the wrapper . They show which side o f the paper should
be on the top when it’s loaded in the cassette.
2 With one hand at each end of the stack, lift and hold it in a
curved position, without gripping.
3 Grip each end of the stack firmly.
4 Straighten the stack, and then roll the fanned sheets from
side to side to get air through the sheets and prevent stati c
buildup.
5 Take off the top and bottom sheets.
Caution:
glue buildup that could cause the printer to jam.
The top and bottom sheets sometimes have residual
QMS 206 0 W X Print System Setup Guide10
Page 15
Load the Paper
Load the Media
Cassette
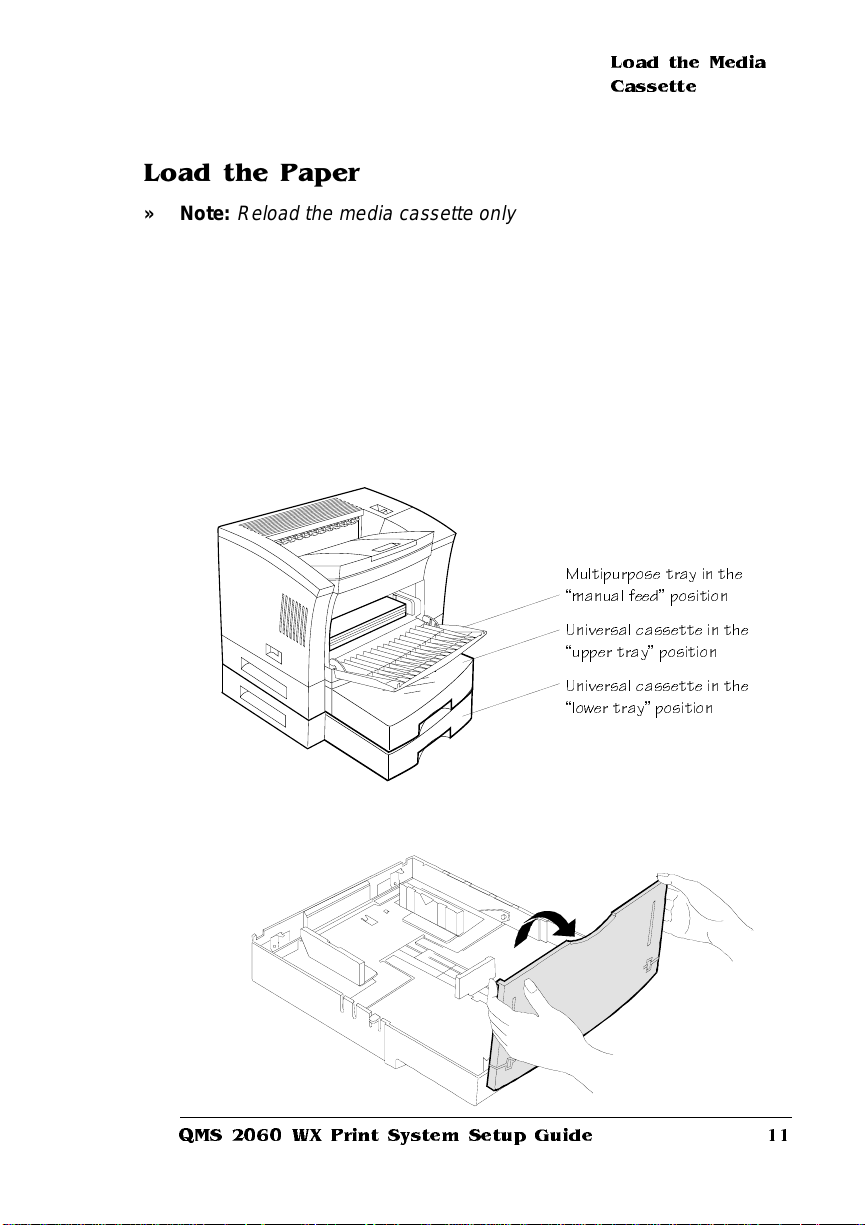
» Note:
» Note:
Reload the media cassette only when it’s empty.
1 Pull out the universal cassette.
This cassette is known as a universal cassette because
you can load any of the supporte d media sizes in it. In the printer
driver it’s called the upper tray because it’s in the upper position if
an optional feeder is installed. The cassette in the optional feeder
is called the lower tray in the printer driver because it’s in the
lower position. Information on the optional feeder are in chapter 5,
“Printer Options,” of the User’s Guide. Instructions for using the
multipurpose tray are in chapter 3, “Printing,” in the User’s Guide.
Multipurpose tray in the
manual feed position
Univers al cassette in the
upper tray position
Univers al cassette in the
lower tray position
2 Open the cassette cover.
QMS 2060 WX Print System Set up Guide
11
Page 16
Load the Media
Cassette
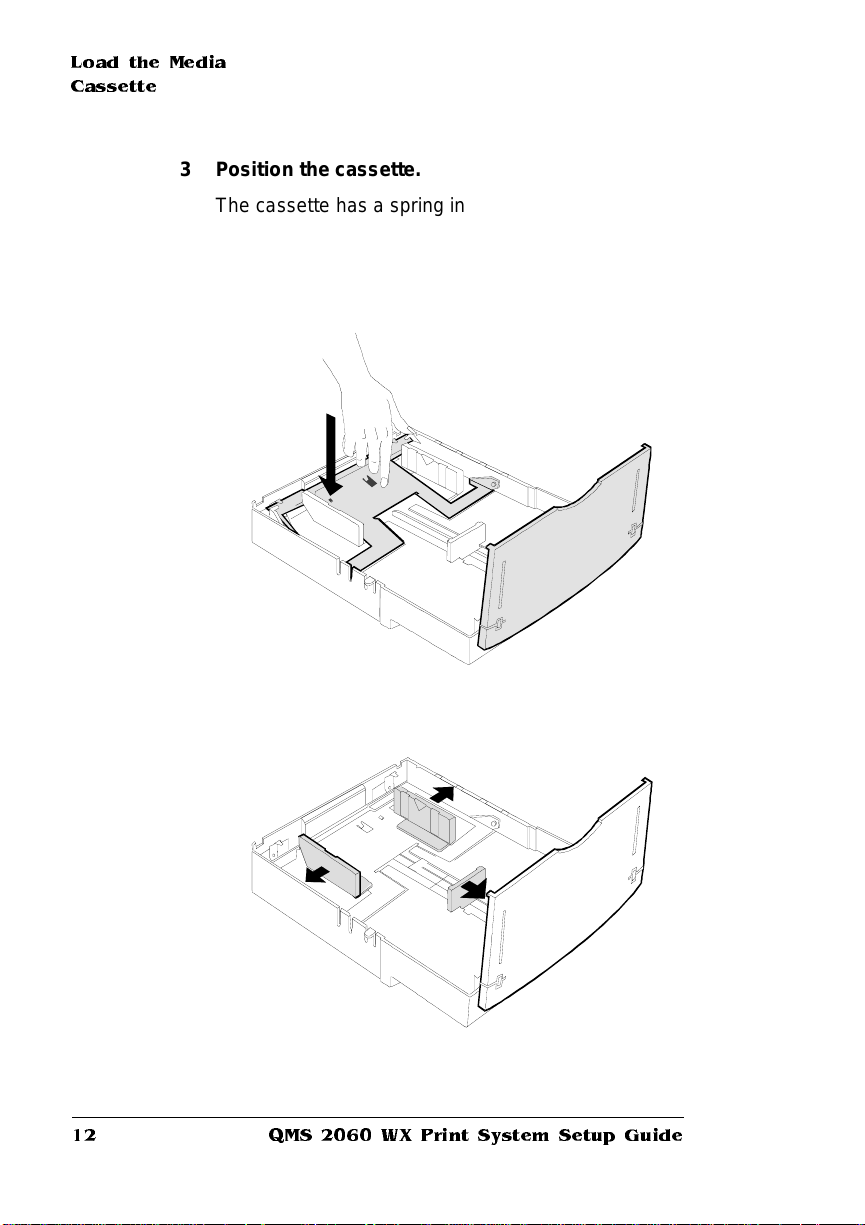
3 Position the cassette.
The cassette has a spring in the bottom that provides some resistance when print media is placed on it. Lay the cassette flat on a
hard surface, and push down on the plate in the cassette until it
locks.
4 Adjust the med ia guid es to fit the pap er size .
QMS 206 0 W X Print System Setup Guide12
Page 17

5 Load the media face up in the cassette.
Short-edge Feed Long-edge Feed
n
Media sizes—A3, A4, A5. B4, B5,
Executive, Legal, Letter, Tabloid
n
Media sizes—A4 LEF, Letter LEF
Load the Media
Cassette
» Note:
To pr int lett er/A 4-size media at 20 pages per minute, you
must load the media for long-edge feed (LEF) and select Lette r
LEF or A4 LEF as the media size in the printer driver. See chapter
3, “Printing,” of your user’s guide for more information.
6 Ensure that the media stack lies flat, does not exceed the top
limit mark, and is positi on ed un der the retai ni ng clips.
QMS 2060 WX Print System Set up Guide
13
Page 18

Load the Media
Cassette
7 Adjust the media stop to fit the media size .
The printer delivers your output, print-side down, to the output
tray at the top of the printer. The media stop keeps the sheets
positioned in the output tray
QMS 206 0 W X Print System Setup Guide14
Page 19

Connect the
Printer to Your
PC and Plug It In
Connect the Printer to Your PC and Plug It In
» Note:
Printer performance depends upon the type of PC to which you
connect it. We recommend a Pentium-class PC with at least 16 MB of
RAM (if you’re using Windows 95) or 32 MB of RAM (if you’re using
Windows NT 3.51 or 4.0).
Parallel Connection
1 Using a Centronics IEEE 1284 para llel
cable, connect the para llel port on the
printer to the parallel port on the PC.
If you’re replacing a printer already connected to a PC, you probably already h ave
a parallel cable. If not, contact your QMS
vendor or a local computer store.
Also, see appendix B, “Technical Specifications,” for detailed informat ion on PC -t oprinter cabling.
2 Plug the printer i nto a groun ded , surge -
protected, electrical outlet.
Parallel
Port
QMS 2060 WX Print System Set up Guide
15
Page 20

Install a Printer
Driver
Ethernet Connection
1 Using a twisted-pair (RJ45) Ethern et
2 Plug the printer i nto a groun ded , surge -
cable, connect the Eth ern et por t on the
printer to a 10BaseT concentrator.
If you’re replacing a printer already connected to an Ethernet network, you may
already have a twisted pair (RJ45) Ethernet
cable. If not, contact your QMS vendor or a
local computer store.
Also, see appendix B, “Technical Specifications,” for detailed informat ion on PC -t oprinter ca bling.
protected, electrical outlet.
Ethernet
Port
Install a Printer Driver
Windows 95 (Parallel Connections)
Windows 95 and the parallel port on the QMS 2060 WX both support
Plug and Play technology, which lets your PC and its a ttached devices
work together autom atical ly. After you’ve connected the printer to the
PC and plugged it in, the correct printer driver is automatically
selected for you when you perform the following proced ure.
» Note:
If you’ re using an Ethernet network connection, refer to the next
section, “Windows 95 (Ethernet Connecti ons),” for information on
installing the printer driver.
1 If it’s on, shut down your PC in the usual way.
QMS 206 0 W X Print System Setup Guide16
Page 21

Install a Printer
Driver
2 Tu rn on the printer (the power switch is on the left side).
The printer goes through an initialization warm-up and self-testing
that lasts less than 2 minutes. When the warm-up is comple te,
Idle displays in the message window.
3 Turn on the PC.
4 A message window informs you New Hardware Found, and
then you’re prompted to insert the printer drive r disk.
5 Insert the QMS 2060 WX printer drivers disk or CD-ROM
(shipped with you r printer) in the app ropri ate disk driv e on
your PC, and choose OK to continue.
6 Follow the instructions on the screen to install the printer driver.
When the installation is compl ete, t he Windows 95 deskt op
appears.
7 Remove the disk or CD-ROM from the PC, and store it in a
safe place.
Windows 95 (Ethernet Connections)
Because Ethernet connections don’t support Plug and Play
technology, you must install the printer d r iver manually as follows.
» Note:
You can also use this procedure if you want to install the printer
driver manually on a Windows 95 PC attached to a printer via the
parallel port.
1 From the Window s 95 Sta r t menu choo se S e tting s.
2 From the Setti ng s m enu choo se Pr in te rs.
3 Insert the QMS 2060 WX printer drivers disk or CD-ROM
(shipped with you r printer) in the app ropri ate disk driv e on
your PC.
4 Double-click on Add Printer.
5 Follow the instructions in the Add Printer Wizard.
6 When you're prompted to select a manufacturer and printer,
choose Have Disk...
QMS 2060 WX Print System Set up Guide
17
Page 22

Install a Printer
Driver
7 In the Install From Disk window, choose Browse...
8 Select the disk drive i n wh ich you inse r ted the disk or C D -
ROM in the previous step, and then select th e appropriate
language directory (for example, English).
QMSWX.I NF displ ays in the File Name list.
9 Choose OK to return to the Instal l from Disk window.
10 Choose OK again.
11 In the displ ayed list of printers, sel ect the printer driv er you
want to install (QMS 2060 WX ), and then choo se Next.
12 Continue following the instructions in the Add Printer Wizard
to complete the instal la tion .
13 When the installation is complete, exit from the Printers
window.
14 Remove the disk or CD-ROM from the PC, and store it in a
safe place.
Windows NT 3.51
Because Windows NT 3.51 doesn’t support Plug and Play technology, you must install th e print er driver manually as follows.
» Note:
If you’re using Windows NT 4.0, refer to “Windows NT 4.0” on
page 20.
1 Insert the QMS 2060 WX printer drivers disk or CD-ROM
(shipped with you r printer) in the app ropri ate disk driv e on
your PC.
2 Open Print Manag er.
3 In Print Manager, select the printer’s icon or window.
4 From the Pr in ter m enu, choos e Properties.
A Printer Proper ties dialog box displays.
5 In the Driver box select Other.
An Install Driver dialog box displays.
QMS 206 0 W X Print System Setup Guide18
Page 23

Install a Printer
Driver
6 Type the full pathname of the directory where the printer
driver is located on the CD-ROM or disk, and then choose OK.
A Select Driver dialog box displays.
7 In the Printer Driver box, select the QMS 2060 WX printer
driver.
Print Manager instal ls the new dri ver.
8 In Print Manager from the Printer m enu, choo se Create
Printe r.
A Create Printer dialog box displays.
9 In the Printer Name box, type a name for the printer.
This name can be up to 32 characters long. It will appear in the
title bar of the printer window and will be the name network users
use to connect to the printer if you share it over the network.
10 In the Driver box, select the QMS 2060 WX Print System .
11 If you want to, in the Description box, type a description.
12 In the Print To box, select the appropriate port to use
13 If you want to share the printer, select the Share this printer
on the network checkbox.
a If necessary, type a Share Name.
Print Manager usually crea tes th is share name. PCs run ning
Windows NT see this name when connecting to the printe r.
However, PCs running MS-DOS require a share name that
conforms to MS-DOS naming co nventions (a name with 8 or
fewer character s, a period, and an optional extension with 3
or fewer characters), in order to connect.
b In the Location box, type a description of the printer’s location
to let network users know where their printed documents can
be found.
14 Choose OK.
15 Remove the disk or CD-ROM from the PC, and store it in a
safe place.
QMS 2060 WX Print System Set up Guide
19
Page 24

Install a Printer
Driver
Windows NT 4.0
Because Windows NT 4.0 doesn’t support Plug and Play technology,
you must install the printer dri ver manually as follows.
1 Insert the QMS 2060 WX printer drivers disk or CD-ROM
(shipped with your printer) into the appropriate disk drive on
your PC.
2 In the Windows NT Start menu choose Settings.
3 In the Settings menu, choose Pri nters.
4 In the Printers window dou ble-cli ck the Add Printer ic on.
The Add Printer Wizard opens.
5 When prompted, choose My Com puter to identi fy how the
printer is attached to your workstation, and then choose
Next.
My Computer means Local Printer. This is the appropriate choice
whether you are connecting the printer directly to your computer
via the parallel port or to a network via the Ethernet port (in which
case you’ll replace LPT1 with QMS Port when you install the
QMS Network Print Monitor in “Wind ows NT 3.51/4 .0” on
page 29).
6 When prompted, select the app ropri ate port to use with the
printer, and then choose Next.
7 When prompted to select a manufacturer an d mod el of
printer, choose Have Disk.
8 In the Install from Disk dialog box, type
drive
:\
(where
the disk or CD-ROM in step 1), and choose OK.
QMS 2060 WX pr int er disp lays in the list box.
9 Select the QMS 2060 WX printer, and then choose Next.
drive
is the let ter of t he disk drive in whic h y ou inserte d
QMS 206 0 W X Print System Setup Guide20
Page 25

Install a Printer
Driver
10 If you’re replacing an existing Windows NT 4.0 printer driver,
perform this step; otherwise, skip to step 11.
a When prompted, choose Replace Existing Driver, and then
choose Next.
» Note:
If you’re updating a currently installed QMS 2060 WX
on a Windows NT 4.0 station, always choose to replace the
existing driver. Otherwise, when you’ve finished the
installation, a second QMS 2060 WX icon, named “copy 2,” is
displayed in the Printers window.
b When prompted, for a printer name, either accept the
displayed name or type a new one, and then choose Next.
11 When prompted for sharing information , choose ei ther
Shared or Not Shared, and then choose Next.
n
If you chose Not Shared, skip to step 12.
n
If you chose Shared, provide the sharing informa tion.
a In the Share Name edit box, type the name of the printe r.
This is the name displayed when your PC is connected to
the printer.
b If you’re sharing your printer with a Windows NT 4.0
workstation, choose OK and skip to step 12.
If you’re sharing your printer with a Windows 95
workstation, in the Alternate Drivers list box, select the
Windows 95 operating system, and choose OK.
If the operating system on your PC does not have the
QMS 2060 WX printer driver for Windows 95, you’ll be
prompted to install it: Insert the QMS 2060 WX printer
driver disk and choose OK.
The required files are copied to the appropriate director y.
QMS 2060 WX Print System Set up Guide
21
Page 26

Install a Printer
Driver
» Note:
printer driv er mus t be in stall ed on the serv er and on e v ery client PC .
*The QMS 2060 WX printer driver must be installed on the server.
**Client PCs supported are Windows 95 and Windows NT 4.0 configured.
When connected to a Windows NT 4.0 server, the QMS 2060 WX
printer driver is automatically downloaded to any requesting client
PC that is running Windows 95 or Windows NT 4.0.
When connected to a Windows 95 server , the QMS 2060 WX
*Server PC
Windows 95
**Client PC
*Server PC
Windows NT 4.0
The QMS 2060 WX printer
driver must be installed on all
requesting clients.
**Client PC
The QMS 2060 WX printer
driver is automatically down-
loaded to all requesting clients.
QMS 2060 WX
**Client PC
QMS 2060 WX
**Client PC
*The QMS 2060 WX printer driver must be installed on the server.
**Client PCs supported are Windows 95 and Windows NT 4.0 configured.
**Client PC
**Client PC
12 When asked if you would like to print a test page, choose
either Yes or No, and then choose Finish.
The Windows NT 4.0 printer driver installs, and then the Windows
desktop appears.
QMS 206 0 W X Print System Setup Guide22
Page 27

Install a Network
Print Monitor
13 Remove the disk or CD-ROM from the PC, and store it in a
safe place.
Install a Network Print Monitor
» Note:
If you connected your printer via the parallel port, you can skip
this section. The QMS Netwo rk Pr int Moni tor is used only with
printers connected to an Ethernet network.
The QMS Network Print Monitors (QMSMON) for Windows 95 and
Windows NT 3.51/4.0 are designed specificall y for QMS printers
using TCP/IP protocol to transport print jobs and access printer status
information.
Windows 95
» Note:
» Note:
If you’re using Windows NT, refer to the installation instructions
on page 29.
The QMS Network Pr i nt M onit or i s installed on your Microsoft
Windows 95 workstation or server. A setup script (SETUP.EXE) is
provided on the QMS Network Print Mon itor for Windows 95 disk or
CD-ROM. This file is also available electronically on the Internet,
CompuSer ve, and the QMS Bullet in Boa rd. S ee appendi x A, “QMS
Customer Support,” for access information.
You must be logged on as a member of the Administrator group
to install the QMS Network Print Monitor. Also, the TCP/IP network
software must be installed.
Install the Print Monitor
1 Insert the disk or CD-ROM on which the Q MS Network Print
Monitor for Windows 95 is locate d in the appropr iate disk
drive on your PC.
2 In Windows 95 Expl or er chang e to the dri ve in which you
inserted the disk in step 1.
QMS 2060 WX Print System Set up Guide
23
Page 28

Install a Network
Print Monitor
3 Double-click the SETUP.EXE icon to start the installa tion
program.
4 In the Welcome dialog box, choose OK to start the installa-
tion.
5 In the Select Destination Director y box, either sel ect Pro-
gram Files/QMS and choo se OK, or type an appropriate destination and choos e OK.
6 In the Install dialog box, choose Yes.
7 If you’re replacing a QMS Network Print Monitor, a Make
Backups? window gives you the oppor tuni ty to back up the
files of the existing monito r.
n
If you want to create backup files, choose Yes.
If you choose Yes, the Select Backup Directory dialog box
appears. Enter an appropriate destination and press Enter or
choose OK.
n
If you don’t want to create backup files, choose No.
8 In the Add QMS Port dialog box, type the Port Name and IP
Address and choose OK.
9 When the Installati on Complete d ialo g box appears, choos e
OK.
The installatio n is complet e.
» Note:
If you’re updating an existing QMS Network Pri nt Monit or,
the printer autom aticall y reboots when the inst alla tio n is
complete.
10 Remove the disk or CD-ROM from the PC, and store it in a
safe place.
Add a Printer Port
Before you can use the QMS Network Print Monitor to transport print
jobs to the printer and receive status information on them from the
printer, you must add the QMS port associated with the printer to your
system configuration.
QMS 206 0 W X Print System Setup Guide24
Page 29

Install a Network
Print Monitor
1 From the Start m enu , choose Se tti ng s.
2 From the Setting s m enu, choos e Printers.
3 In the Printers window, click the right mouse button on an
existing printer to display the printer’s menu.
4 Choose Proper ti es to displ ay the Proper tie s dialo g box.
5 Choose the Details tab and then choos e Add Port.
6 Select Other.
7 Select QMS Port from the list then choose OK.
The Add QMS Port window appears.
8 Type the logical name for the port in the Port Nam e text box.
This is a descriptive identifier of the port (for example, QMS 2060
WX). Each port name must be unique. The maximu m port name
is up to 128 characters. This name displays in the Print to: list box
of the Printer Properties dialog b ox in Print Manager.
If the port name exists already, the following message displays:
The port name “port_name” already exists on this
computer. Please choose another name. You must
choose another Port Name.
QMS 2060 WX Print System Set up Guide
25
Page 30

Install a Network
Print Monitor
» Note:
On initial access to the Add QMS Port dialog box, whatever
you type in the Por t Name text box is automatically copied to the
IP Address text box. The port name and IP address can be the
same or they can be different. However, If they are different, then
first click the cursor in the IP Address text box and type it. Then
click the cursor in the Port Name text box and type it.
9 Type the Internet Protocol Address for the port.
This address is either the unique host name or the dot notation
identifier of the network device.
Host Name A symbolic name that identifies a device. This name must
exist in your Network Host Name file and must be unique.
Dot Notation
Identifier
A unique set of four numbers, separated by periods,
which identifies a device on the internet (for example
191.45.105.227).
If an invalid or previously used IP address (host name or dot notation identifier) is gi ven, the following message disp lays: The
port address “IP_Address” could not be resolved
on this computer. Accept it anyway?
Do one of the following:
a Select No and type another valid IP address (this is what
QMS recommends).
b Select Yes and add this address in the Network Host Name
file on you computer before you send any print jobs to the
port. If a print job is sent to the port before the address is
entered in the Networ k Host N am e file, pr int ing of the job
fails.
c S elect Cancel to abor t adding the por t and to exit from the
Add QMS Port dialog box.
10 Choose OK.
11 Choose Close in Printer Ports dialog box, then choose OK in
Print Ser ver P roper tie s to close the Pr in te rs dial og box.
QMS 206 0 W X Print System Setup Guide26
Page 31

Install a Network
Print Monitor
Configure a QMS Port
After a QMS port has been added, its settings must be conf igured.
The following procedure describes how to configure a QMS port.
1 From the Start m enu , choose Se tti ng s.
2 Choose Printers.
3 In the Printers window click the right mouse button on an
existing printer to display the printer’s menu.
4 In the Print Servers Properties dialog box choose the Proper-
ties tab.
5 From the Print Mon ito r Prope r ties di al og box select Details,
and then select the QMS port from the “Print to the following
port :” drop-down list box .
6 Choose the Port Settings button to disp lay the Confi gu re
QMS Port window.
QMS 2060 WX Print System Set up Guide
27
Page 32

Install a Network
Print Monitor
7 Configure the Tim ers.
The following timeouts are used by the QMS Network Pr int Monitor when transporting pri nt jobs to the print device and reporting
their print status to Print Manager:
a Status update interval
Determi nes how often the QMS Network Pri nt Monit or
updates Print Manag er with status informat ion on the print
device attached to the port. Scroll through the list box and
select a value between 1 and 600 seconds. The default is 5
seconds.
b Status request timeout
Sets the amount of time that the QMS Network Pr int Moni tor
waits for a response from the print device before notifying
Print Manager that the device is not responding. Scroll
through the list box and select a value between 1 and 600
seconds. The default is 10 seconds.
c Send request timeout
Sets the amount of time that the QMS Network Pr int Moni tor
waits for a print job to be sent before it returns control to the
Microsoft Windows 95 Print Spooler. Scroll through the list
box and select a value between 1 and 600 minutes. The
default is 60 minutes.
If this timeout
This is what happens...
expires and the job
was sent via a...
Windows 95 Server The print job is automatically terminated
and cleared from the system.
Workstation The Windows 95 Print Spooler dialog box
displays, asking for a retry or cancel
response.
» Not e:
Regardless of your response, the
job is terminated and cleared from the
system.
QMS 206 0 W X Print System Setup Guide28
Page 33

8 Config ure the au di ble al er t.
This settin g en ables th e Q MS Net work Print M onitor’s problem
alert sound. Click the Audible Alert check box to have the monitor
beep the system speaker when it encounters an error writing to
the QMS port. Clear the check box to disable the problem alert
sound.
9 Choose OK.
10 Close the Print Servers Proper ties dial og box.
Windows NT 3.51/4.0
Install a Network
Print Monitor
» Note:
If you’re using Windows 95, refer to the installation instruction s
on page 23.
The QMS Network Pr i nt M onit or i s installed on your Microsoft Windows NT workstation or server. A setup script (MONITOR.INF) is provided on the QMS Network Print Monitor Windows disk or CD-ROM.
This file is also available electronically on the Internet, Com puS er ve,
and the QMS Bulletin Board. See appen dix A, “QMS Customer Su p port,” for access information.
There are two different methods for installing the QMS Network Print
Monitor, depending on whether you’re performing a new installation or
upgrading an existing installation. Both methods are descr ibed here.
Install the Print Monitor—New Installation
Use this procedure when installing the QMS Network Print Monitor for
the first time.
» Note:
You must be logged on as a member of the Administrator group
to install the QMS Network Print Monitor. Also, the TCP/IP network
software must be installed.
1 Insert th e QM S Pri nt Mo ni tor for Wind ows NT di sk or C D-
ROM in the appropriate disk drive of your PC.
2 From the Start m enu , choose Se tti ng s.
3 From the Setting s m enu, choos e Printers.
QMS 2060 WX Print System Set up Guide
29
Page 34

Install a Network
Print Monitor
4 In the Printers window click the right mouse button to dis-
play the Print Servers Prope r ties dial og box.
5 In the Print Servers Properti es dialo g box select the Ports
tab.
6 Choose the Add Port button.
7 Choose the Printer Ports button.
8 Choose the New Monitors button.
9 Type the path where the MONITOR.INF file is located (for
example, a:\i386).
10 Press ↵ or choose OK to display the Select Port Monito r di a-
log box .
11 Press ↵ or double -click QM S Port under Port Monitor.
If the monitor is not located in the source directory that displays,
edit the path and choose OK. The monit or instal lation dial og box
displays briefly, informing you that the setup program is copying
files.
12 Choose OK to display the Add the QMS Port dialog box.
13 Refer to “Add a Print Device” on page 32 to add a QMS port.
Install a Print Monitor—Upgrade Installation
Use this procedure when upgrading to a different version of the QMS
Network Print Monitor.
» Note:
You must be logged on as a member of the Administrator group
to install the QMS Network Print Monitor. Also, the TCP/IP network
software must be installed.
1 Insert th e QM S Pri nt Mo ni tor for Wind ows NT di sk or
CD-ROM in the appropriate disk drive of your PC.
2 From the Start menu choose Settings.
3 From the Setti ng s m enu choo se Pr in t er.
4 In the Printers window click the right mouse button to dis-
play the Print Servers Prope r ties dial og box.
QMS 206 0 W X Print System Setup Guide30
Page 35

Install a Network
Print Monitor
5 In the Print Servers Properti es dialo g box select the Ports
tab.
6 Type in the path where the MONI TOR.INF file is located (for
example, a:\i386).
7 Press ↵ or choose OK and the Select Port Monitor dialog box
displays.
8 Press ↵ or do ubl e -click QM S po r t und er Port Mo ni to r.
» Note:
If an error box appears, choose OK.
9 Choose Cancel in the Printers Ports dialog box then choose
Cancel in the Print Servers Properti es di alo g box.
10 Close the Printers dialog box.
11 From the Start Menu, choose Setti ngs .
12 Choose Control Panel to open it.
13 Choose the Services icon.
14 Highlight Spooler in the Services dialog box, and choose the
Stop button (located on the right side of the dialog box).
The following message displays:
Are You Sure You Want To Stop Spooler Service?
15 Choose Ye s.
The Spooler status is set to blank, and the following message dis-
plays:
Attempting to stop the spooler service on
username
16 Choose the Start button.
Spooler status is set to Star ted , and the following mes sage dis -
plays:
Attemptin g to sta rt the spoo ler se rvice on
17 In the Servi ces dialo g box choos e the Clos e button.
QMS 2060 WX Print System Set up Guide
username
31
Page 36

Install a Network
Print Monitor
18 Close the Control Panel.
The QMS Network Print Monit or is now upgraded for all queues
using it.
19 Add the QMS Port as explained in the next section, “Add a
Print Device.”
Add a Print Device
Before you can use the QMS Network Print Monitor to transpor t print
jobs to the printer and receive status information on them from the
printer, you must add the QMS port associated with the print device to
your system configuration.
1 From the Start m enu , choose Se tti ng s.
2 Choose Printers.
3 In Printers window click the right mouse button.
4 In the Print Servers Properties dialog box select the Ports tab.
5 Choose the Add Port button.
6 Choose the Printer Ports button.
7 Select QMS Port from the list then choose OK.
QMS 206 0 W X Print System Setup Guide32
Page 37

Install a Network
Print Monitor
8 Type the logical name for the port in the Port Nam e text box.
This is a descriptive identifier of the port (for example, QMS 2060
WX). Each port name must be unique. The maximu m port name
is up to 128 characters. This name displays in the Print to: list box
of the Printer Properties dialog b ox in Print Manager.
If the port name exists already, the following message displays:
The port name “port_name” already exists on this
computer. Please choose another name. You must
choose another Port Name.
» Note:
On initial access to the Add QMS Port dialog box, whatever
you type in the Por t Name text box is automatically copied to the
IP Address text box. The port name and IP address can be the
same or they can be different. However, If they are different, then
first click the cursor in the IP Address text box and type it. Then
click the cursor in the Port Name text box and type it.
9 Type the Internet Protocol Address for the port.
This address is either the host name or the dot notation iden tifier
of the network device.
Host Name A symbolic name th at identifies a device. This name must
exist in your Network Host Name file.
Dot
Notation
Identifier
A unique set of four numbers, separated by periods,
which identifies a device on the internet (for example
191.45.105.227).
If an invalid IP address (host name or dot notation identifier) is
given, the following message displays: The port address
“IP_Address” could not be resolved on this com-
puter. Accept it anyway?
Do one of the following:
a Select No, and type another valid IP address (this is what
QMS recommends).
b Select Yes, and add this address in the Network Host Name
file on your computer before you send any print jobs to the
port. If a print job is sent to the port before the address is
entered in the Network Host Name file, printing of the job fails.
QMS 2060 WX Print System Set up Guide
33
Page 38

Install a Network
Print Monitor
c S elect Cancel to cancel adding the por t and to exit from the
Add QMS Port dialog box.
10 Choose OK.
11 Choose Close in Printer Ports dialog box, then choose OK in
Print Ser ver P roper tie s to close the Pr in te rs dial og box.
Configure a QMS Port
After a QMS port has been added, its settings must be conf igured.
The following procedure describes how to configure a QMS port.
1 From the Start m enu , choose Se tti ng s.
2 Choose Printers.
3 In the Printers window click the right mouse button.
4 In the Print Servers Properties dialog box select the Ports tab.
5 Select QMS Port from the list then choose the Configure Port
button.
6 Configure the Tim ers.
The following timeouts are used by the QMS Network Pr int Monitor when transporting pri nt jobs to the print device and reporting
their print status to Print Manager:
a Status update interval
Determines how often the QMS Netwo rk Print Monitor updates
Print Manager with status information on the print device
attached to the port. Scroll through the list box and select a
value between 1 and 600 seconds. The default is 5 seconds.
b Status request timeout
Sets the amount of time that the QMS Network Pr int Moni tor
waits for a response from the print device before notifying
Print Manager that the device is not responding. Scroll
through the list box and select a value between 1 and 600
seconds. The default is 10 seconds.
QMS 206 0 W X Print System Setup Guide34
Page 39

Install a Network
Print Monitor
c Send request timeout
Sets the amount of time that the QMS Network Pr int Moni tor
waits for a print job to be sent before it returns control to the
Microsoft Windows NT Print Spooler. Scroll through the list
box and select a value between 1 and 600 minutes. The
default is 60 minutes.
If this timeout
This is what happens...
expires and the job
was sent via a...
NT Server The print job is automatically terminated
and cleared from the system.
Workstation The Windows NT Print Spooler dialog box
displays, asking for a retry or cancel
response.
» Not e:
Regardless of your response, the
job is terminated and cleared from the
system.
7 Configure the events to log.
The following types of messages can be reported in the Application Event Log. See your Microsoft Windows NT documentation
for details on this log.
aErrors
Enables error message reporting in the Application Event
Log. Click the Errors check box to enable error message
reporting. A clear check box disables error message reporting in the log.
b Warnings
Enables warning me ssag e repor t ing in the Appl icati on Event
Log. Click the Warnings check box to enable warning message reporting. A clear check box disables warning message
reporting in the log.
QMS 2060 WX Print System Set up Guide
35
Page 40

Register the
Printer
c Information
Enables information message reporting in the Application
Event Log. Click the Information check box to enable information message reporting. A clear check box disables error
message repor t ing in the log.
8 Config ure the au di ble al er t.
This settin g en ables th e Q MS Net work Print M onitor’s problem
alert sound. Click the Audible Alert check box to have the monitor
beep the system speaker when it encounters an error writing to
the QMS port. A clear check box disables the problem alert
sound.
9 Choose OK.
10 Close the Print Servers Proper ties dial og box.
Register the Printer
QMS is committed to developing prin ters that offer you flexible, efficient solutions, so we’re interested in knowing how you plan to use
your printer. Please register now in one of the following ways:
n
Internet—T o r egister on the Internet, visit the QMS home page at
http://www.qms.com, and then use the on-line warranty registra tion form.
n
Mail—To register by mail, fill out and send in your warranty card.
n
Telephone—To register by telephone, in the US call QMS tollfree at (800) 637-8049. In other countrie s, refer to appendix A,
“QMS Customer Suppor t ,” for the appropriate telephone numbe r.
QMS 206 0 W X Print System Setup Guide36
Page 41

Installing Options
If you purchased any printer options, such as extra memory (SIMMs)
or a duplexer, then install t hem now. If installati on instr ucti ons are
included with the option, follow them. If not, installation inst ruct ions
are included in chapter 5, “Printer Options,” in the
User’s Guide
.
Installing Options
QMS 2060 WX
» Note:
Remember to turn of f th e print er before you install an option.
For More Assistance
For more assistance refer to appendix A, “QMS Customer Support,”
in this manual and to chapter 8, “Troubleshoot ing ,” in the
WX Print System User’s Guide.
v
QMS 2060
QMS 2060 WX Print System Set up Guide
37
Page 42

Page 43

A
QMS Customer Support
In This Appendix . . .
n
Sources of customer support
n
QMS world-wide offices
Page 44

Sources of
Support
Sources of Support
Several sources of help and information are available, depending on
the type of help you need:
Your QMS Vendor
Your local vendor (the one from whom you bought the printer) may be
best equipped to help you. Your vendor has specially trained ser vice
technicians available to answer questions, and the equipment to analyze your printer problems.
Your Application Vendor
Often, “printing” problems have more to do with the application being
used than with the printer. In t his case, the application manufacturer
is the best source of help.
Q-FAX
Q-FAX, a QMS information retrieval service, provides application
notes, technical support notes on common printing problems, and
information about printer specificat ions, option s, accessories, consumables, and prices.
In the United States and Canada, call (800) 633-7213 to reach QF AX. In all other countries, call (334) 633-3850. Have your fax number
handy when you call (or place the call from your fax machine's handset).
You can choose to have either a directory (a list of currently available
documents) or a specific document sent to you. The first time you call,
request the directory (press 2 on your phone or fax keypad when
prompted). Then call back to request specific document s. You can
order up to three documents per call.
» Note:
FAQ numbers may be subject to change, so you may want to
obtain a directory of Q-FAX document s before requesting a specific
document.
QMS 2060 WX User's GuideA-2
Page 45

Sources of
Support
The QMS Corporate Bulletin Board System
The QMS Cor porate Bulle tin Board Syst em (BBS ) contains techni cal
support notes, applicat ion not es, drivers, patches, and utilities, and
you may leave technical questions not requi ring an immediat e
response on electronic mail for the Sysop (System Operator).
The bulletin board [(334) 633-3632] ope rates at 1200, 2400, 9600,
and 14400 baud, 8 data bits, no parity, 1 stop bit, with XMODEM,
YMODEM, and ZMODEM capabilities. Contact the QMS Customer
Response Center (CRC) for more information about the bulletin
board.
CompuServe
Through CompuServe, you ask general (non-technical) questions,
share information with other users, and access printing information
and programs. When you use CompuServe, type go qmsprint↵ to
go directly to the forum where QMS is located. The QMS library section contains application notes, printer drivers, utilities, technical information, and announcement files.
Internet
The QMS server provides access to technical reports, new product
announcements, a trade show schedule, and other general informa tion about QMS.
If you have access to the World Wide Web, you can view the QMS
home page at http://www.qms.com/. The QMS ftp resource is
ftp.qms.com.
QMS Customer Support
A-3
Page 46

Sources of
Support
QMS Customer Response Center (CRC)
You can contact the QMS Customer Response Center (CRC) in three
different ways:
n
Telephone—You can call the CRC at (334) 633-4500 (U S)
Monday–Friday, 7:00 am– 6:00 pm, Central Tim e.
» Note:
ready so our technicians can help you more quickly:
þ
Your phone number, fax number, and shipping address
þ
A description of the problem
þ
The printer model
þ
The type of host computer you’re using
þ
The type and version of operating system you’re using
þ
The interface you’re using
þ
The application and version you’re using
þ
The emulation you’re using
þ
Your printer’s system software version (listed in the control
panel message window during printer startup)
n
Fax—You can fax questions to the CRC at (334) 633-3716 (US).
Provide the same informat ion as listed a bove, and indicate
whether you would like a faxed or a phoned reply.
n
Internet—If you have access to the World Wide Web, you can
access the CRC through the QMS home page at
http://ww w.qms.com/.
If you call for assistance, have the following informat ion
QMS 2060 WX User's GuideA-4
Page 47

QMS World-wide Offices
QMS United States and Latin America
General Contact
1 (334) 633-4300
Fax 1 (334) 633-4866
Email info@qms.com
Internet http:/ /www.qms.com
Customer Response Center (CRC)
Technical Assistance
1 (334) 633-4500 7:00 am–6:00 pm Central Time M– F
Fax 1 (334) 633-3716
Internet http:/ /www.qms.com
Bulletin Board Service
1 (334) 633-3632
Latin America Fax
1 (334) 639-3347
National Service
Service Information, Installation, and Maintenance Pricing
1 (800) 762-8894
On-Site Service and Depot Repair Information
1 (800) 858-1597 7:00 am–7:00 pm Central Time
Spare Parts Ordering and Information
1 (334) 633-4300 x2530 8:00 am–5:00 pm Central Time
QMS Canada
General Contact
1 (514) 333-5940
Fax 1 (514) 333-5949
Supplies and Accessories 1 (800) 268-0343 x223
National Service
On-Site Service and Depot Repair Information
1 (800) 268-4969 8:30 am–7:00 pm Eastern Time
Spare Parts Ordering and Information
1 (905) 206-9234 x238 8:30 am–5:00 pm Eastern Time
Bulletin Board Service
1 (905) 206-0084
QMS World-
wide Offices
QMS Customer Support
A-5
Page 48

QMS World-
wide Offices
QMS in Japan
QMS in L atin America
QMS EMEA
General Contact
(+81)- 3 3779-9600
Fax (+81)-3 3779-9650
Internet http:/ /www.qmsj.co.jp
General Contact
Cra 43 DD#8-42
Offi cina 20 1
Medellin, Colombia
(+57) (4) 312 13 70
Fax (+57) (4) 268 92 97
QMS Austral i a
QMS Benelux
Belgium, Netherlands, and all
unlisted countries
QMS France
QMS GMBH
Germany and
Austria
30, Atchison Street
St. Leonards NSW 2065
Australia
(+61) 2–9901 3235
Fax (+61) 2–9901 3273
Planetenbaan 60 ‘Corner Plaza’
3606 AK Maarssen
The Netherlands
(+31) 346–551333
Fax (+31) 346–550170
Internet http:/ /www.qms.nl
Vélizy Plus
1 Bis, Rue du Petit Clamart
78142 Vélizy Cedex
France
(+33) 1–410 79 393
Fax (+33) 1–408 30 110
Gustav Heinemann Ring 212
D-81739 Munich
Germany
(+49) 89 63 02 67 0
Fax (+49) 89 63 02 67 67
QMS 2060 WX User's GuideA-6
Page 49

QMS World-
wide Offices
v
QMS Italy
QMS Nordic
Sweden, Finland,
Norway, and
Denmark
QMS South
Africa
QMS UK
United Kingdom
and Ireland
Via della Repubblica 56
43100 Parm a
Italy
(+39) 52–1231 998
Fax (+39) 52–1232 902
Arenavägen 41, 6th floor
121 77 Johanneshov
Sweden
(+46) 8–600 01 30
Fax (+46) 8–600 01 33
Saskay House
Unit 24 Sunninghill Business Park
Peltier Road, Sunninghill, Johannesburg
Republic of South Africa
(+27) 11–807 6957
Fax (+27) 11–807 6960
Old Bridge House, The Hythe
Staines, Middlesex TW18 3JF
United Kingdom
(+44) 1784–442255
Fax (+44) 1784–461641
QMS Customer Support
A-7
Page 50

Page 51

Index
B
Bulletin board, QMS A-3
C
Cassette
Loading 10
Connection
Printer to PC 15
Customer Response Center (CRC),
QMS A-4
Customer support, QMS A-2
D
Documentation
Standard product 1
Driver, printer
Installing, Windows 95 16, 17
Installing, Windows NT 18, 20
E
Energy star 4
I
Installation
Cassette 10
Printer driver, Windows 95 16, 17
Printer driver, Windows NT 18, 20
Printer options 37
Toner cartridge 7
Installation, ne w
Print Monitor 29
Installation, upgrade
Print Monitor 30
Internet A-3
L
Location requirements 3
Page 52

M
Manual
Contents 2
Typographic conventions 2
Media cassette
Loading 10
Memory
PC, minimum 4, 15
N
Network Print Monitor, QMS
Installing 23
P
PC
Requirements, minimum 4, 15
Power requirements 4
Energy star, compliance 4
Print Monitor, Network, QMS
Installing 23
Printer
Power requirements 4
Registration 36
Printer driv er
Installing, Windows 95 16, 17
Installing, Windows NT 18, 20
Q
Q-FAX A-2
QMS
Customer Response Center (CRC)
A-4
World-wide offic es A-5
QMS Port, Add 24, 32
QMS Port, Configure 27
Timers 28
QMS Port, configure 34
Timers 34
R
Registration, printer 36
Requirements
PC 4, 15
S
Service, QMS
United States A-5
Setup
Printer 3
Shipment
Contents 6
Unpacking 5
Support, QMS
Bulletin board A-3
Customer A-2
Internet A-3
Technical A-4
World-wide A-5
T
Technical support, QMS A-4
Timers 28, 34
Toner cartridge
Installing 7
U
Unpacking, printer 5
W
Windows 95 Network Print Monitor
Installing 23
Windows 95 printer driver
Installing 16, 17
Windows NT Network Print Monitor
Installing 23
Windows NT printer driver
Installing 18, 20
v
I-2 QMS 2060 WX User's Guide—Index
 Loading...