

Page 1

QMS
3825/3225/2025
Print System
Administrators
Guide
1800367-001B
Page 2

Trademarks
QMS, QMS-PS, imPRESS, QUIC, Crown , the Crown logo, and the QMS logo are registered
trademarks of QMS, Inc. registered in the United States Patent and Trademark Office. PostScript
is a trademark of Adobe Systems, Incorporated for a page description language and may be
registered in certain jurisdictions. Throughout this manual, “PostScript Level 2” is used to refer to
a set of capabilities defined by Adobe Systems for its PostScript Level 2 page description
language. The se capab il ities, am on g other s, are imple ment ed in this produ ct throu gh a program
designed and developed by QMS which is compatible with Adobe's PostScript Level 2 language.
Macintosh, AppleTalk, and LocalTalk/Apple Computer, Inc. HP, HP PCL, and HP-GL are
registered trad emarks of Hewle tt-Pa c kard Comp any. DEC, DECnet, LN03, and VMS are
registered trademarks of Digital Equipment Corporation. UNIX/UNIX Systems Laboratories.
Proprietary Statement
The digitally encoded software included with your QMS 3825/3225/2025 Print System is
Copyrighted 1995 by QMS, Inc. All Rights Reserved. Thi s softwa re may not be reproduce d,
modified, displayed, transferred, or copied in any form or in any manner or on any media, in
whole or in part, without the express written permission of QMS, Inc.
Copyright Notice
This manual is Copyrighted 1995 by QMS, Inc., One Magnum Pass, Mobile, AL 36618. All
Rights Reserved. This manual may not be copied in whole or in part, nor transferred to any other
media or language , witho ut the expre s s writt en perm is sion of QMS, Inc.
Manual Notice
QMS, Inc. reserves the right to make changes to this manual and to the equipment describe d
herein without notice. Considerable effort has been made to ensure that this manual is free of
inaccuracies and omissions. However, QMS, Inc. makes no warranty of any kind including,
but not limited to, any implied warranties of merchantability and fitness for a particular
purpose with regard to this manual. QMS, Inc. assumes no responsibility for, or liability for,
errors contained in this manual or for incidental, special, or consequential damages arising out of
the furnishing of this manual, or the use of this manual in operating the equipment, or in
connection with the performance of the equipment when so operated.
Page 3
Contents
1 Introduction
How to Use this Manua l . ..... ..... ..... ..... ....... ..... ...... ..... ..... ..... ..... ....1-2
Typographic Conventions 1-3
Shipment Contents ..................... ....... ....... ..... ....... ....... ....... ..... ....1-4
QMS Product Registration ..........................................................1-5
Configuring the QMS 3825/3225/2025 Print System .................1-5
Methods of Confi gu ratio n ....... ..... ..... ....... ..... ...... ..... ..... ..... ..... ....1-5
Configuration for Individual Jobs 1-6
Configuration for Departmental Use 1-7
Before You Begin ........................... ......... ............ ............ ............ .1-8
Printing a Status Page 1-8
The Configuration Menus ............................................................1-9
Changing Defa ult Config ur atio n Se tting s .... ....... ......... ....... .....1 -1 1
Page 4
Selection of Choices 1-11
Alphanumeric Values 1-13
Saving Printer Con fig urati on Changes . . ......... ....... ....... ......... . 1-1 4
Upgrading Pr int System So ftware ... .............. ............ ....... ....... 1-1 5
Using the Printer’s Floppy Disk Drive 1-16
Using the Parallel Port 1-19
2 Installation Menu
Introduction . . .... ... ..... ...... . ....... .... ... ..... ...... . ....... ..... .. ..... ...... ... ..... .. 2 -2
Keypad Language . .......... ....... ............ ......... .......... ........... .......... .. 2-2
Passwords .... ....... ..... .............. ....... ............ ....... ............ ....... ......... 2 -3
Setting Passwords 2-3
Using Passwords 2-3
3 Operator Con trol Menu
Introduction . . .... ... ..... ...... . ....... .... ... ..... ...... . ....... ..... .. ..... ...... ... ..... .. 3 -2
Copies ............... .............. .............. .......... .............. ....... .............. ... 3-2
Duplex ............... .............. .............. .......... .............. ....... .............. ... 3-3
Tumble Duplex ............................................................................. 3-3
Collation ....................................................................................... 3-4
Orientation ................................................................................... 3-4
Inputbin ........................................................................................ 3-5
Outputbin ..................................................................................... 3-6
Chain Inputbi ns . ... ... ....... .... ... ...... ... ..... ..... .... ... ..... ...... ... ..... ...... ... 3-7
Crown Accounting .......... ........................................................... .. 3-7
Accounting Menu 3-8
Job Accounting Files 3-11
Accounting File Format Description 3-12
Accounting Files Description of Fields 3-13
QMS 3825/3225/2025 System Administrators Guideii
Page 5

Copying the Accounting Files 3-21
Processing Accounting Information on the Host 3-23
4 Administration/
Commu nications Submenu
The Communications Submenu ............................ .....................4-2
Timeouts ......................................................................................4-3
PS Wait Timeout 4-3
Emul Timeout 4-4
Job Timeout 4-4
ESP Timeout 4-4
Serial Commu nicati on . ..... ....... ....... ......... ...... ....... ....... ....... ..... ....4-5
Mode 4-6
Emulation 4-6
Min K Spool 4-6
Spool Timeout 4-6
End Job Mode 4-7
Def Job Prio 4-7
Baud Rate 4-7
Parity 4-7
Ignore Parity 4-8
Rcv Sw Flow Ctl 4-8
Xmit Sw Flow Ctl 4-8
Data Bits 4-8
Stop Bits 4-8
Hdwe Flow Ctl 4-9
PS Protocol 4-9
Parallel Communication ............................................................4-11
Mode 4-11
Emulation 4-11
Min K Spool 4-12
Spool Timeout 4-12
Data Bits 4-12
End Job Mode 4-12
Def Job Prio 4-13
PS Protocol 4-13
iii
Page 6
AppleTalk Communication .. ............................................. ........ 4-15
Mode 4-15
Connection 4-16
Min K Spool 4-16
Def Job Prio 4-16
Optional Interface ...................................................................... 4-16
5 Emulations Submenu
The Emulations Submenu .......................................................... 5-2
ESP Default Opti on ................ .. ..... ..... .... ... ....... .... . ....... .... ... ....... .. 5 -3
PCL 5 .... . ........... .............. . ........... ..................... . .... . ........... ............ 5- 4
Default Font 5-5
Symbol Set 5-5
Lines/Inch X100 5-5
Line Termination 5-6
Point Size X100 5-6
Retain Temporary 5-6
Scalable Fonts 5-6
Default Font Idx 5-7
Monochrome GL/2 5-7
Downld Location 5-7
LN03 Plus ......................................... ............ ............ ......... ........... 5-8
Product ID 5-8
Autowrap 5-8
Paper Size 5-9
Paper Override 5-9
X-Origin Inset 5-9
Y-Origin Inset 5-9
Reset Override 5-9
Orientation 5-10
PostScript .. ......... ........ ......... .......... ......... ......... ........ ......... .......... 5 -10
Lineprinter .... .......................... ............................... ..................... 5-11
Font 5-12
Point Sz 100ths 5-12
Character Map 5-12
Line Numbering 5-12
QMS 3825/3225/2025 System Administrators Guideiv
Page 7

Tab Stops 5-12
LF IS CRLF 5-12
CR IS CRLF 5-13
FF IS CRFF 5-13
Orientation 5-13
Autowrap 5-13
Lines Per Page 5-13
Margins 5-13
HP-GL ..........................................................................................5-14
Plotter 5-14
Scaling Percent 5-15
Origin 5-15
Reverse Image 5-15
Enhanced Mode 5-15
Expand Mode 5-16
Paper Type 5-16
Pens 1-8 5-16
CCITT Groups 3 and 4 ................ ....... ....... ..... ....... ....... ....... ..... ..5 -17
CCITT Commands 5-17
Command Syntax 5-17
imP RE SS .... .. ... .. ... .. ... .. .... ... .. ... .. ... .. .... . .... .. ... ... .. .... . .... .. ... .. ... .... . ..5 -2 4
Optional Emulations ..................................................................5-24
6 Special Pages and Startup
Options Subm enus
The Special Pages Sub m enu ..... ......... ....... ....... ......... ....... ...... ....6-2
Calibration Page 6-2
Header Page 6-3
Header Inputbin 6-3
Trailer Page 6-3
Trailer Inputbin 6-4
Status Page Type 6-4
The Startup Options Submenu ..................... ..............................6-5
Do Start Page 6-5
Do Sys Start 6-5
v
Page 8
Do Error Handler 6-6
7 Memory Submenu
Introduction . . .... ... ..... ...... . ....... .... ... ..... ...... . ....... ..... .. ..... ...... ... ..... .. 7 -2
QMS Memory Management 7-2
QMS Memory Definitions ............................................................7-3
Evaluation of Y our Printing Env ironm en t ................ ..... ... ....... .. 7-5
Printer Features and Memory Clients 7-6
Memory Sub menu ... ....... ...... ..... ... ..... ....... ....... ..... .... ..... ..... ....... .. 7 -8
Memory Clien ts .. ... ..... ..... .... ... ....... .... ... ..... ...... ... ... ...... ... ..... ...... ... 7-8
Spool Buffers 7-9
PS Heap 7-10
PostScript F ont Cache 7-10
Emulation 7-11
Temporary Emulation 7-12
Display List 7-12
Disk Cache 7-13
Frame Buffer 7-14
MB Printer Mem 7-14
System Memory 7-14
8 Engine, Miscellaneous,
and Disk Operations
Submenus
Eng in e Su bm e n u ... .. ........ ...... ........ ..... ......... ..... ......... ..... ......... .... 8-2
Image Alignment 8-3
Default Paper 8-5
Input Bin and Output Bin Names 8-5
Toner Low Action 8-5
Offset Stacking 8-5
Gamma Correction 8-6
Letterhead 8-6
QMS 3825/3225/2025 System Administrators Guidevi
Page 9
Rotate Duplex 8-7
Resolution 8-8
Print Mode 8-8
Powersave Mode 8-8
Maintenance Due 8-8
Miscellaneo us Op tio ns ............ ..... ..... ....... ..... ...... ..... ..... ..... ..... ....8-9
Restore Defaults 8-9
Clock Operations 8-10
Printer Name 8-10
Printer Type 8-10
The Disk Operations Submenu .................................................8-11
Identifying Hard Disks 8-11
Installing Optional Fonts and Emulations 8-12
Removing Fonts and Emulations 8-15
Formatting a Disk 8- 16
Backing Up the Hard Disk 8-17
Restoring the Hard Disk 8-18
A QMS Customer Support
Sources of Supp ort ........ ..... ... ..... ....... ....... ..... .... ..... ..... ....... ..... ... A-2
Your QMS Vendor A-2
Your Application Vendor or Manufacturer A-2
Q-FAX A-2
QMS Corporate Bulletin Board System A-3
CompuServe A-3
Internet A-3
QMS Customer Technical Assurance (CTA) A-4
QMS National Service Telephone Numbers A-4
QMS World-wide Offices ............................................................ A-5
B Cable Pinouts
Loc a lTal k ........... . .... .. ....... . .... .. .......... .............. . ........... .............. . ... B-2
Serial ............................................................................................ B-2
IBM PC/XT, PC/ AT, and Compatibl e Com puters ...... . ...... . ..... .. . B-3
vii
Page 10
Centronics Parallel ....................... ....... ............ ......... .......... .........B -3
Notes to the Centronics Parallel Cable
Index
❖
Pinouts Table B-4
QMS 3825/3225/2025 System Administrators Guideviii
Page 11

1
Introduction
In This Chapter . . .
■ How to use this manual
■ Configuring the printer
■ Methods of configu ra tio n
■ Printing a status page
■ The configuration m enus
■ The control panel keys
■ Changing default settin gs
■ Installing syst em software up g rad es
Page 12
How to Use this
Manual
How to Use this Manual
This manual is designed to help you, the system administrator, customize printer configurati on with as little trial and error as possible.
■ Chapter 1 - Introduction
This chapter introduces the printer and the confi guration me nu
structure and explains how to upgrade system software.
■ Chapter 2 - The Installatio n Menu
This chapter explains how to use the Installation m enu to establish password protection for the Operator Cont rol and Administ ra tion menus, and how to set the message window language.
■ Chapter 3 - The Operator Con trol Menu
This chapter explains the set-up opti ons in the Operator Cont rol
menu, which control the printer’s paper handling features, such
as the number of copies and whether collation is enabled. This
chapter also describes t he printer-based accounting features.
■ Chapter 4 - Administrati on /Co mm unica tion s Su bme nu
This chapter explains the host-print er communication configuration options i n the Administration menu.
■ Chapter 5 - Administrati on /Em ulati on s Subm en u
This chapter explains the configurat ion opti ons in the Emulat ion s
submenu of the Administration me n u.
■ Chapter 6 - Administrati on /Spe cia l Pages an d
Startup Sub menu s
This chapter covers options in the Special Pages and Startup
Options submenus of the Administrat ion menu, which control the
printing of special-purpose pages and printer start-up option s.
■ Chapter 7 - Administrati on/M emo ry Subm enu
This chapter explains memory confi gurat ion. Read this chapter
for instructions on customizing mem ory to achieve the most productive use of the printer in your printing environment.
QMS 3825/3225/2025 System Administrators Guide1-2
Page 13
How to Use this
Manual
■ Chapter 8 - Administration /Eng in e, Miscel lan eou s, and
Operations Submenus
This chapter explains the configu ration optio ns in the Engine,
Miscellaneous, and Disk Operations submenus of the Administration menu. These options control the printer’s image alignment
and input and output bin names, specialized dupl exing opt ions,
and the use of optional printer hard disk(s).
The appendixes to this manual cover QMS Customer Supp ort and
cable pinouts.
Typographic Conve ntions
The following typographic conve ntions are used in this manual:
Mixed-Case
Cour ier
Mixed-Case
Italic
Courier
UPPERCASE
COUR IER
Mixed-Case bold QMS Document Option Commands (DOC)
lowercase italic
UPPERCASE File and utility names
Text you type, and messages and information
displayed on the computer monitor
Variable text you type; replace the italicized word(s)
with information specific to your printer or workstation
Information displayed in the printer message window
Variable information in text
» Note: Notes co ntain tips, extra inform ation, or im po rtant infor mation
that deserves emp hasis or reiteration.
Caution:
Cautions present information that you need to know to avoid
equipment damage or extreme annoyance.
WARNING!
Warnin gs in dicate the possibility of personal in jur y if a
specific pro cedu r e is not per for m ed exactly as described in the
manual.
ACHTUNG!
Bitte halten Sie sich exakt an die im Handbuch besc h rieben e
Vorgehensweise, da so nst Verletzungsgefahr besteh en könnte.
Introduction
1-3
Page 14
Shipment
Contents
Shipment Contents
Your shipment contains the following:
■ The QMS 3825/3225/2025 Print System
■ The
■ The
■ The PS Executive Series Utilities on d isk
■ Two binders
■ The
■ The
■ The
■ The
■ Two paper cassettes (8.5" x 11" and 11" x 17", or A4 and A3)
■ A toner cartridge
■ An OPC drum
■ A cleaning unit
■ System software disks
■ A power cord
■ A warranty card
If you find any part of the shipment missing or damaged, contact the
shipping company or your vendor immediatel y. Do not return any
merchandise to QMS witho ut authorizat ion.
QMS 3825/3225/2025 Print System User’s Guide
QMS 3825/3225/2025 Print System Administrator’s Guide
QMS Crown Do cu men t Option Com m an ds
LN03 Plus Emulation for QMS Printe rs
QMS Crown Network Note s
QMS imPRES S Programm ing Langua g e
on disk
manual
manual
guide on disk
QMS 3825/3225/2025 System Administrators Guide1-4
Page 15
QMS Product
Registratio n
QMS Product Registration
QMS is committed to develop ing print systems tha t offer you flexible,
efficient solutions, so we’re interested in knowing how you plan to use
your printer. Register it now, and we’ll send you a special gift.
To register by mail, fill out and send in your warranty card. To register
by telephone, in the US call QMS toll-free at (800) 637-8049. In other
countries, refer to appendi x A, “QM S Customer Support,” for the
appropriate telephone number.
Configuring the QMS 3825/ 3225/2025 Print System
This manual guides you through the process of configuring the printer
options to meet your unique printin g requirem ent s. As with any network printer, one setting for any particular printer option may not meet
the needs of every user. As you are configuring the printe r, try to pick
the setting that meets the needs of most of the users.
Methods of Configuration
There are five major ways to configure your printer for your needs —
some appropriate for users and some only for system administrators .
Users configure options one job at a time using these methods:
■ An application
■ PS Executive Series Util it ies
■ QMS Docum ent Option Commands
System administrators configure the printer to meet the needs of an
entire department through these m eth ods:
Introduction
1-5
Page 16
Methods of
Configuration
■ The printer control panel
■ A remote console, for network users only
Configuration for Individual Jobs
Using an Application
Using an application is the best way for individual users to get the
results they want from the department al printe r. This helps prevent
confusion in network environments and saves unnecessary changes
at the printer control panel. Your application documentat ion explains
how to control printer settings: probably by choosing opt ions from a
printing menu.
Applications use printer drivers to send the appropriate commands to
the printer. If your application doesn’t have a QMS 3825/3225/ 2025
Print System driver, you can select a comparable PostScript driver,
such as another QMS driver or a LaserWriter driver. However, comparable drivers may not allow access to all of your printer’s features.
For best results, use the driver that accompanied your new printer.
Using PS Executive Series Utilities
You can also use the PS Executive Series Utilities (shipped with your
printer) to control the printer from your host. See the README file on
the utilities disk for inform ati on on install ing th e utiliti es, and see the
utilities’ on-line help for det ails on using the softwa re .
Using QMS Document Option Commands
The QMS 3825/3225/2025 Print System provides a powerful feature
that can accommodate your requests (and the requests of any other
user on the network) without affecting the printer confi gurati on for
other print jobs. This feature is the set of QMS Docum ent Opti on
Commands or QMS DOC.
With QMS DOC, you can add commands to the beginnin g of your
files that, when interpreted by the printer, turn on specific file processing or document handling feature s available on the printer. Use QMS
DOC to specify an emulation, select a specific input bin or paper size,
QMS 3825/3225/2025 System Administrators Guide1-6
Page 17
Methods of
Configu ra tion
select duplex (double-sided) or simplex (single-sided) printing, select
page orientation and backgrounds, use number-up and booklet printing, and more. The features you select and the QMS DOC you use at
the beginning of your file take effect only for the current print job. After
your file prints, the QMS DOC comma nds added to the beginni ng of
the next file take effect for it. If no QMS DOC appears on the next file,
the printer’s default values resume.
QMS DOC is the key to making th e Q MS 3825/ 3225/2025 Print System a true departmental printer. The
Commands
mation on using the commands. Appendix C in your user’s guide,
“Document Option Commands, ” lists all the QMS DOC your printer
supports, plus instructions for using new and revised command s.
manual, included with your printer, gives complete infor-
QMS Crown Document Option
Using Other Printer Commands
PostScript operators and HP-GL and HP PCL commands can enable
job-specific features your applicat ion or page description language
can’t access. See the
(Adobe Systems, Inc., Reading, MA: Addison-Wesley, 1990, ISBN
0-201-18127-4) and the
Reference Manual
further information .
PostScript Languag e Re ference Manual
PCL 5 Printer Language Technical
(Hewlett-Packard part number 5961-050 9) for
Configuration for Departmental Use
Using the Control Panel
QMS printers are configured at the factory for the most typical printing
environments, so most users don’t have to use the contro l panel
often. However, if you do need to change a printer setting for all print
jobs (not just on a per-job basis), you can do so through the control
panel. In a shared printing environment, only the system administra tor should make changes though the printe r’s control panel.
Using a Remote Console
Most of the configuration choices that can be made at the control
panel can also be made through a remote console in many network
Introduction
1-7
Page 18
Before You Beg in
environments. To avoid confusion in a shared printing environm ent,
only the system administrator should make config uration ch anges.
Before You Begin
Before you start configuring the printer, you should have the following:
■ A security disk. This disk allows you to set passwords for the
printer set-up menus, and to set the messag e window langu age
(English, French, German, or Spanish).
■ A status page. The status page list s the current default setti ngs
for many of the printer options. Factory defa ult s are listed in
appendix D, “Factory Default Settings,” of the user’s guide, but a
status page shows current settings and serves as a reference so
you can always reset your printer to its most recent settin gs.
Printing a Status Page
There are two types of status page, standard and advanced. The
standard status page includes the followi ng items on one page:
■ Printer identification (the printer’s name, release information,
number of sheets printed)
■ Printer settings (printer set-up opt ions for paper hand ling)
■ Current memory configuration (printer mem ory settings)
■ Timeouts (printer timeout settin gs)
■ Communications settings and input buffer sizes (settings for
printer-host communicati on, including spool ing me mory siz es)
■ Hard disk status (list of installed hard disks currently on line)
■ Angle bracket, one-half inch from the bottom-lef t corner of the
page, for use in image a lignm ent.
QMS 3825/3225/2025 System Administrators Guide1-8
Page 19
The Co n figu r ation
Menus
The advanced status page prints multiple pages with the current
menu configurati on sett ings and font informat ion in additi on to the
standard status page information.
To select which type of status page to print, see “Status Page Type” in
the Special Pages submenu in chapter 6. After setting which type of
status page to print, press the Status Page key to print a status page.
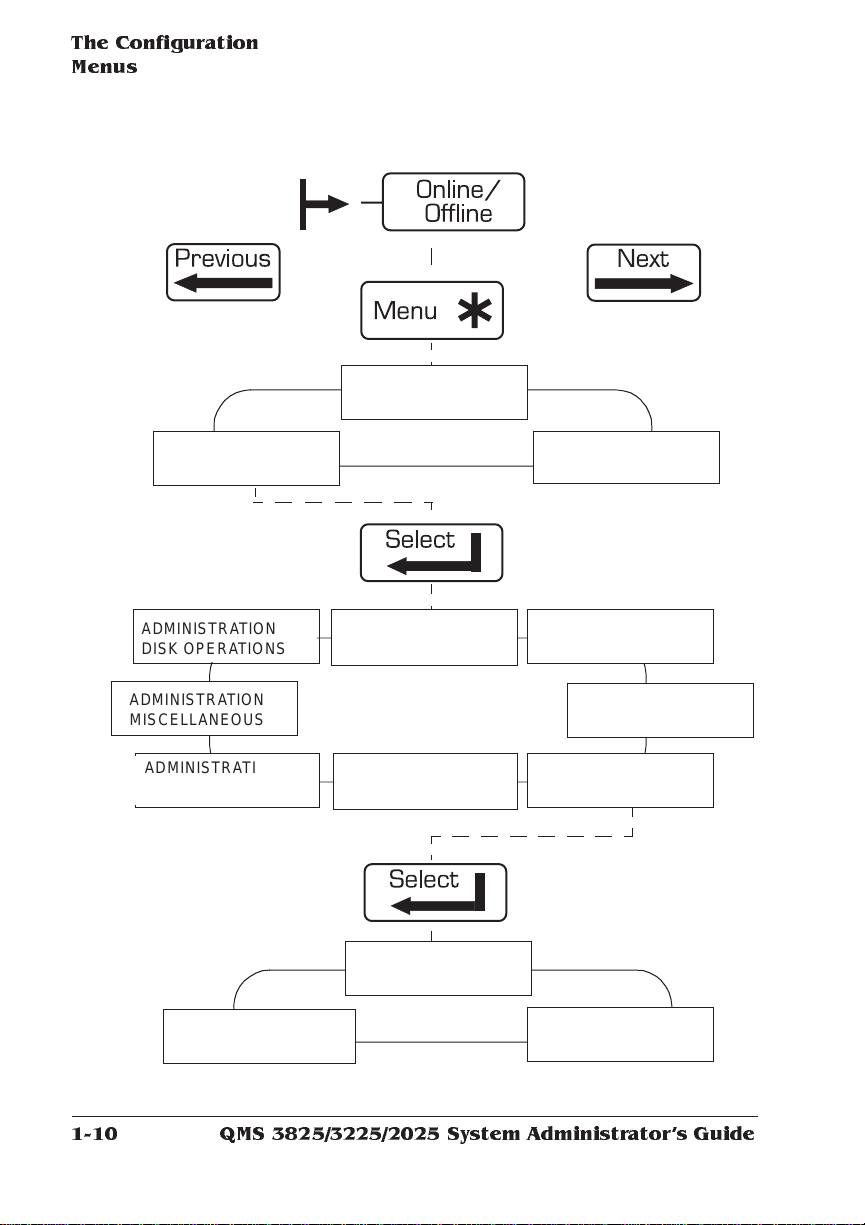
The Configuration Menus
The Configuration menu is divided into three main menus: Installation, Operator Control, and Admini strat ion.
■ The Installation menu, which appears only when the security disk
is inserted in the printer’s disk drive, is used to establish passwords for the Operator Control and Administration menus, and to
set the message window language.
■ The Operator Control me nu con trols the defau lt setting s of most
printer features.
■ The Administration menu is the largest of the three menus. It con-
trols the default settings of printer-ho st co mm uni ca tions, emulations, and other document-processing features.
Menus are arranged in a hierarchy as shown on the next page. To
access the configuration menu:
■ Press the Online/O ffline key to take the printer off line.
■ Press the Menu key to access the menu.
The top line of the message window displays the current menu level,
and the second line displays the first available option. Move down
one level by pressing the Select key. The Next and Previous keys
change the displayed option in the message window for the current
menu level. The options in each level are arranged in a loop, so
repeatedly pressing either the Next or Previous key returns you to the
option starting poin t.
Introduction
1-9
Page 20
The Configuration
Menus
CONFIGURATION
INSTALLATION
CONFIGURATION
ADMINISTRATION
ADMINISTRATION
DISK OPERATIONS
ADMINISTRATION
MISCELLANEOUS
ADMINISTRATION
ENGINE
STARTUP OPTIONS
DO ERROR HANDLER
ADMINISTRATION
COMMUNICATIONS
ADMINISTRATION
MEMORY
STARTUP OPTIONS
DO START PAGE
CONFIGURATION
OPERATOR
ADMINISTRATION
EMULATIONS
ADMINISTRATION
SPECIAL PAGES
ADMINISTRATION
STARTUP OPTIONS
STARTUP OPTIONS
DO SYS START
QMS 3825/3225/2025 System Administrators Guide1-10
Page 21
Changing Default
Configu ra tion
Settings
Changing Default Configuration Settings
There are two types of printer menu options: those that require you to
choose from a selection of possible choices and those that require
you to enter an alphanumeric value. Many default settings may never
need changing.
Selection of Choices
If an option has choices, the second line of the message window displays each choice one at a time. To view all the possible choices for
that option, press the Next key repeatedly. The menu cycles through
all the choices for that option. Th e Admini strat ion/ Com mun icati ons/
Serial/Baud Rate menu is an example of an option with a selection of
choices. The following example shows how to change the baud rate
for serial communicati on:
1 Press the Online/Offl in e key to take the printer off line.
2 Press the Menu key. The message wi nd ow displays
CONFIGURATION
OPERATOR CONTROL
3 Press the Next key until ADMINISTRATION displays on the
second line of the message window:
CONFIGURATION
ADMINISTRATION
4 Press the Select key. This opens the Admi nistrati on men u.
ADMINISTRATION now displays on the first line of the message window:
ADMINISTRATION
COMMUNICATIONS
Introduction
1-11
Page 22
Changing Default
Configur ation
Settings
5 Press the Select key again. This opens the Communications
menu. COMMUNICATIONS now disp lays on the first line of the
message window:
COMMUNICATIONS
TIMEOUTS
6 Press the Next key until SERIAL displays on the second line:
COMMUNICATIONS
SERIAL
7 Press the Select key to open the Serial subm en u:
SERIAL
MODE
8 Press the Next key until BAUD RATE displ a y s :
SERIAL
BAUD RATE
9 Press the Select key. The first choice in the set of baud rate
values displays on the bottom line. This value is also the current default setting:
BAUD RATE
*9600
10 P ress the Next key un til the value you wan t (for exampl e,
2400) displays:
BAUD RATE
2400
11 Press the S elec t key. Th e message window displ ays a con-
firmation message for three seconds:
2400
IS SELECTED
12 Th en, the messag e win do w displays the op tio n’s name:
SERIAL
BAUD RATE
You have now changed the baud rate to 2400. The change does not
QMS 3825/3225/2025 System Administrators Guide1-12
Page 23
Changing Default
Configu ra tion
Settings
take effect until you save the changes and place the printer ba c k on
line. Review “Saving Printer Conf igurat ion Chan ges” later in this
chapter.
Alphanumeric Values
When an option requires a value, you enter the value one digit or
character at a time. You use the Next and Previous keys to increase
or decrease the displayed character or digit value. Spaces can also
be used when a value, such as a password, must be an exact number
of characters. The Copies option in the Operator Control menu is an
example of an option that requires a value. The following instructions
show how to change a value:
1 Press the Online/Offl in e key to take the printer off line.
2 Press the Menu key. The follo wing messa ge displays i n the
message window:
CONFIGURATION
OPERATOR CONTROL
3 Press the Select key to open the Operator Con trol menu.
OPERATOR CONTROL now displays on the first line of the
message window:
OPERATOR CONTROL
COPIES
4 Press the Select key again to displ ay the curre nt valu e:
COPIES
001
5 Notice that the first digit is flashing . (The defaul t copy co unt
is 1.) You may select any number o f copi es up to 999. For
this example, we are setting the copy count to 159.
Introduction
1-13
Page 24
Saving Printer
Configur ation
Changes
6 Press the Next key once. The first digi t chan ges from 0 to 1.
Press the Select key.
COPIES
101
7 The second digit is now flashing. Press the Next key until the
second digit changes to 5. Press the Select key.
COPIES
151
8 The third digit is now flashi ng . Press the P revi ou s key until
the last digit changes to 9.
COPIES
159
9 Press the Select key. The message window momentarily con-
firms the chang e you have made:
159 COPIES
IS SELECTED
Then the message window displays the option’s name again.
You have now changed the copy count to 159 copies per print job.
The change does not take effect until you save the change and pl ace
the printer back on line. Review the next section, “Saving Printer Configuration Changes.”
Saving Printer Configuration Changes
Whenever you change a printer menu option, the printer prompts you
to save the change before you place the printer back on line. Saving a
menu change means that the new value of the option is recorded and
stored in the printer’s memor y. Once stored in memory, the value
takes effect automaticall y whenever the print er is turned on. Follow
these steps to save your configuration changes:
QMS 3825/3225/2025 System Administrators Guide1-14
Page 25
Upgrading P rint
System Softw a re
1 Press the Online/Offl ine key. The following message dis-
plays in the message window:
SAVE CHANGES?
NO
2 If you want to save all the configura tion chan ges yo u have
made, press the Next key (the message window displays YES
on the second line), and then press the Select key. You r
changes take effect when you press the Online/O ffli ne key
again.
3 If you do not want to save your changes, ju st press the
Select key to select NO. Press the Onli ne/ Offl ine key agai n.
If you ever save a menu change that you did not want to save, you
can always go back into the configuration menu and change it back to
the previous setting. There is also an option fo r resettin g all menu
options to their factor y default settings ( see “Rest ore Defaults” in
chapter 8, “Engine, Miscellaneous, and Disk Operations.”).
» Note: So me Administration menu chang es do not take effect until the
printer is restarted. Some chan ges cause the printer to reboot
automatically. Other s cause the m essag e
REBOOT NOW?
*YES
» Note:to a ppear in the message window. Press the Select key to reboot
the printer, or the Next and S elec t k eys to choose
your c o nfigu r a tion c h a n ges until the p rinter is restarted.
NO
and postpone
Upgrading Print System Software
Print system software upgrades for the QMS 3825/3225/ 2025 Print
System are supplied on 3.5" 1.44 MB di sks. Installin g system software upgrades requires copying the contents of the disks to the
printer ’s internal hard disk from the printer’s floppy disk drive or
Introduction
1-15
Page 26
Upgrad ing Print
System Software
through the parallel port. (To install through the parallel port you must
have the QMS system software loaded on your host com put er ). Both
procedures are explained in this section.
Using the Printers Floppy Disk Drive
To install system software upgrades via the printer’s floppy disk drive,
follow these instructions:
1 Turn the printer off and the n on again . The fol lowi ng mes-
sage displays in the message window :
QMS SOFTLOAD
READY TO BOOT
2 Once this message appears , you have 10 second s to press
the Select key. When you press the Select key, the following
message appears in the messag e window:
QMS SOFTLOAD
BOOT SYSTEM
» Note: If more than 10 seconds pass before you press the Select
key, the IDLE message appears. You m u st r etur n to step 1.
3 Press the Next key until INSTALL TO DISK appears on the
second line of the message window:
QMS SOFTLOAD
INSTALL TO DISK
4 Press the Select key to enter the Insta ll to Disk subm enu .
The following messag e appears in the messag e windo w:
INSTALL TO DISK
DISKETTE
5 Press the Select key to load the software from the printer’s
floppy disk dr ive. The followi ng mes sage ap pears in the window:
x.x
x.x
x.x
INSTALL TO DISK
TARGET DISK 6
QMS 3825/3225/2025 System Administrators Guide1-16
Page 27
Upgrading P rint
System Softw a re
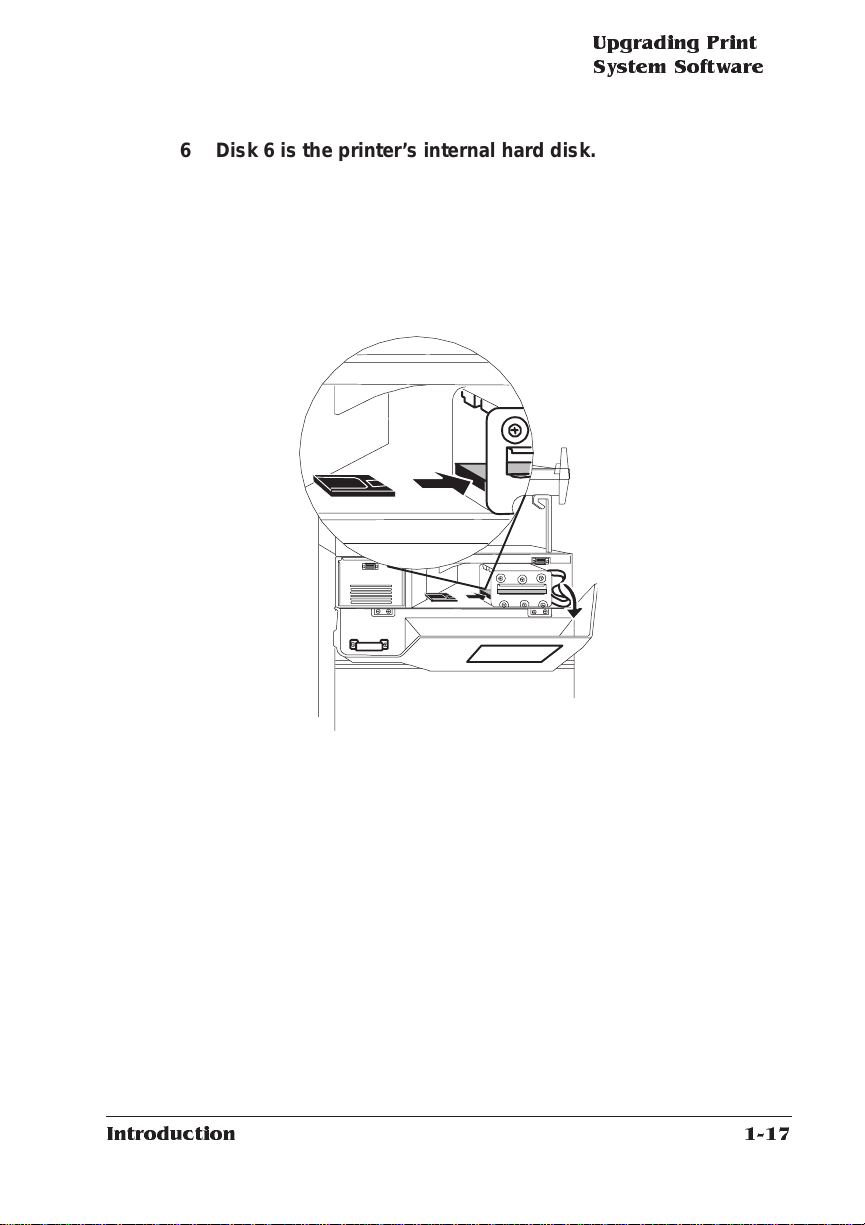
6 Disk 6 is the printer ’s internal hard disk. Press the S ele ct
key. The following message displays:
INSTALL TO DISK
INSERT DISK
7 Pull the control panel assemb ly away from the fron t of the
printer. The floppy disk drive is located inside the prin ter as
shown below.
8 Insert the first disk into the floppy disk drive, and then press
the Select key.
The message window reads INSTALL TO DISK/INSTALLING; then INSTALL TO DISK/DSK 6: before switching back to
INSTALL TO DISK/INSERT DISK when it is ready for the next
disk. Each disk takes several minutes to load. This process continues until all the disks have been loaded.
9 Press the Select key after inserti ng each disk.
10 Rem ov e the last disk and close the contro l panel assem bl y.
You have now completed installing the new system software and
are ready to boot the system.
Introduction
1-17
Page 28
Upgrad ing Print
System Software
11 Press the Me nu key. The message window displays the fol-
lowing message:
QMS SOFTLOAD
INSTALL TO DISK
12 P ress the Next key un til the message wi nd ow displays the
following message:
QMS SOFTLOAD
BOOT SYSTEM
13 Press the Select key to enter the Boot System submenu. The
following message ap pears in the message wind ow:
BOOT SYSTEM
HARD DISK
14 P ress the S elec t key and the follo wing mess age ap pear s:
BOOT SYSTEM
HARD DISK 6
15 Hard disk 6 is the internal hard disk. If you have any external
hard disks connected , you can cycle through them by pressing the Next key. For this example we are using the internal
hard disk. Press the Select ke y. The system begi ns load in g,
and the following message displays:
BOOT SYSTEM
LOADING
x.x
x.x
x.x
16 At this po int, DO NOT TOUCH ANY KEYS until the system
has completed load ing. The system m ay go throu gh many
cycles of rebooti ng , which may take several minu tes. When
the system rebooting is comple te, the message wi ndo w displays:
IDLE
» Note: If you do touch some keys dur ing this step, you m u st go
back to step 12 and start from there again.
QMS 3825/3225/2025 System Administrators Guide1-18
Page 29
Upgrading P rint
System Softw a re
Using the Parallel Port
To install system software up grades via the parallel port, follow these
instructions:
1 Turn the printer off and the n on again . The fol lowi ng mes-
sage displays in the window:
QMS SOFTLOAD
READY TO BOOT
2 Once this message appears , you have 10 second s to press
the Select key. When you press the Select key, the following
message appears in the messag e window:
QMS SOFTLOAD
BOOT SYSTEM
» Note: If 10 seconds pass before y ou press the S elect key, the IDLE
message appears. You must r etur n to step 1.
3 Press the Next key until INSTALL TO DISK appears on the
second line of the message window:
QMS SOFTLOAD
INSTALL TO DISK
4 Press the Select key to enter the Insta ll to Disk subm enu .
Then press the Next key until the following message appears
in the message window:
INSTALL TO DISK
PARALLEL
5 Press the Select key to load the software from the host
system parallel port. The following message appears in the
window:
x.x
x.x
x.x
INSTALL TO DISK
TARGET DISK 6
Introduction
1-19
Page 30
Upgrad ing Print
System Software
6 Disk 6 is the printer ’s internal hard disk. Press the S ele ct
key. The following message displays:
INSTALL TO DISK
CONNECTING....
7 Go to your host computer and send the syste m software.
The software is installed when the following messag e
appears:
INSTALL TO DISK
COMPLETE
8 Once you have completed installin g the system so ftware,
you are ready to boot the system. Return to your printer and
press the Menu key. The message windo w displ ays the following message:
QMS SOFTLOAD
INSTALL TO DISK
9 Press the Next key until the message wind ow displ ays the
following message:
QMS SOFTLOAD
BOOT SYSTEM
10 Press the Select key to enter the Boot System submenu. The
following message ap pears in the message wind ow:
BOOT SYSTEM
HARD DISK
11 Press the S elec t key and the fol lowi ng message ap pear s:
BOOT SYSTEM
HARD DISK 6
12 Hard disk 6 is the internal hard disk. If you have any external
hard disks connected you can cycle throu gh them by pressing the Next key. For this example we are using the internal
x.x
x.x
QMS 3825/3225/2025 System Administrators Guide1-20
Page 31

Upgrading P rint
System Softw a re
hard disk. Press the Select ke y. The system begi ns load in g,
and the following message displays:
BOOT SYSTEM
LOADING
13 At this po int, DO NOT TOUCH ANY KEYS until the system
has completed load ing. The system m ay go throu gh many
cycles of rebooti ng , which may take several minutes. When
the system rebooting is comple te , the followi ng message
appears:
IDLE
» Note: If you do touch so me keys during this stop, you must go
back to step 9 and start from there again.
❖
Introduction
1-21
Page 32

Page 33

2
Installation Menu
In This Chapter . . .
■ Setting the message window language
■ Setting and using passwords
Page 34

Introduction
Introduction
When the security disk is inserted in the printer’s disk drive, you can
access the Installation menu. The options in the In stall ati on men u
allow you to select the message window language and establish
passwords for the Operator Control and Admi nistrat ion menus
CONFIGURATION
INSTALLATION
INSTALLATION
USE ADMIN PWD
INSTALLATION
ADMIN PASSWORD
INSTALLATION
KEYP AD LANGUAGE
Keypad Language
Use the Keypad Language option to select message displays in
English, French, German, or Spanish. Th e defau lt is English.
INSTALLATION
OPERATOR PASSWRD
INSTALLATION
USE OPERATOR PWD
QMS 3825/3225/2025 System Administrators Guide2-2
Page 35

Passwords
Setting Passwords
The two password setti ng opti ons, Ope rator P as swrd and Adm in
Password, are options that require alphan ume ric values, which may
be up to 16 characters in length. If the password you choose is not 16
characters long, you must pad the remainder of the passwo rd with
spaces. See chapter 1, “Introduction,” for inform ati on on entering
alphanumeric values.
Using Passwords
The password enabling options, Use Opera tor Pwd and Use Adm in
Pwd, can be used to prevent unauthorized access to the printer’ s
configuration me nu.
If Use Operator Pwd is set On, anyone attempting to enter the Operator Control menu must enter the operator password before accessing
any of the submenus.
Passwords
If Use Admin Pwd is set On, anyone attempting t o enter the Administration menu must enter the Admin Password before accessing any of
the submenus.
Default for both is Off.
❖
Installation M enu
2-3
Page 36

Page 37

3
Operator Control Menu
In This Chapter . . .
■ Copies
■ Duplex and tumble duplex
■ Collation
■ Orientation
■ Input and output bins
■ Chaining input bins
■ Job accounting
Page 38

Introduction
Introduction
The options in the Operator Control menu allow you to set the default
values for the various paper handling features of the QMS 3825/
3225/2025 Print System. The Operator Control menu may be protected by a password (see chapter 2, “Installation Menu,” fo r more
information).
CONFIGURATION
OPERATOR CONTROL
OPERATOR CONTROL
ACCOUNTING
OPERATOR CONTROL
CHAIN INPUTBINS
R
E
P
O
U
O
P
T
OPERATOR CONTROL
INPUTBIN
Copies
The Copies option allows you to set the number of copies of each file
to be printed. The factory default value is 1. The maximum is 999.
Changing this option at the printer cont rol panel effects all print jobs.
Most applications can print multipl e copies. If you use your applica tion’s multiple-copy feature, keep the printer’ s Copies option set t o 1.
OPERATOR CONTROL
COPIES
N
O
R
T
L
O
C
R
O
A
T
N
I
B
U
T
OPERATOR CONTROL
DUPLEX
(IF DUPLEXER INSTALLED)
OPERATOR CONTROL
TUMBLE DUPLEX
(IF DUPLEXER INSTALLED)
OPERATOR CONTROL
COLLATION
OPERATOR CONTROL
ORIENTATION
QMS 3825/3225/2025 System Administrators Guide3-2
Page 39

Duplex
Duplex
The Duplex option allows you to print on both sides of paper, if the
Advanced Paper Handling opt ion (duplexer, large-capacity input tray,
and system table) has been installed. Duplex choices are On and Off.
The default value is Off. Setting Duplex to On at the printer makes all
jobs print duplex. If you want to print individual jobs duplex, leave the
printer setting at Off and choose duplex through your application.
» Note: If yo u are printing letterh ead in duplex mode, the letterhead
paper m ust be loaded face down in the input bins.
Tumble Duplex
The Tumble Duplex option allows you to specify this advanced
duplexing option. To use Tumble Duplex, the Advan ce d Paper Handling option must be installe d, and both the Dupl ex and Tumble
Duplex options must be On. Choices for Tumble Duplex are On and
Off with a de fa u lt value of Off. The following illustration shows the difference between duplex and tumble dup lex, using three-holepunched paper as an example.
Operator Control M enu
Side 1
Side 1
Side 2
Portrait
Duplex
Side 2
Portrait
Tumble Duplex
Side 1
Side 1 Side 2
Side 2
Landscape
Landscape
3-3
Page 40

Collation
Collation
The Collation option allow s you to choose whether to print all copies
of a single page before any copies of the next page or whether to
print one copy of every page before starting the next entire copy.
Choices are On and Off with a default of On. The following illustration
shows the difference between collated and uncollated jobs.
Collated Uncollated
4
3
2
1
4
3
2
1
1
1
3
2
2
4
4
3
Orientation
Orientation allows you to select placement of the image on the phy sical sheet of paper. The choices are Portrait and Landscape. The
default is Portrait. If you specify orientation through your applicat ion,
keep the printer ’s Orientat ion opt ion set to Port rait.T he foll owing illustration shows page orientation relat ive to paper in the input bins.
Portrait
QMS 3825/3225/2025 System Administrators Guide3-4
Landscape
Page 41

Inputbin
The Inputbin option has a selection of choices for the printer’s default
paper source. The choices are Upper, Lower, and LCIT (if the
Advanced Paper Handling option is installed). Choose LCIT to use
the large-capacit y input tray on the 3825, 3225 , or 2025 Print Systems or the large-large-cap acity inpu t tray on the 3825 or 3225. The
default is Upper. These illustration s show where the input bins are
located:
Inputbin
Sheet size may be specified by the QMS DOC %%IncludeFeature:input comm and o r, if the printer is on a DECnet network, by the
VMS SHEET_SIZE param ete r. See
or
Commands
VMS Interface for QMS Printers
Outputbin
The Outputbin option allows you to choose the printer’s default output
stacker. The default is Upper and the choices for Outputbin are
Upper
Lower
Large-
Capacity
Upper
Lower
Large-Large-
Capacity
QMS Crown Document Option
for more information.
Operator Control M enu
3-5
Page 42

Outputbin
The illustration below show s the output bins. On the control panel
printer icon, the output bins are labeled 1, 2 , and 3 with 1 being the
Upper bin, 2 being the Lower bin, and 3 being the Side bin. The
optional Large Capacity Out put Stacker is not shown on the icon.
■ Upper
■ Lower
■ Side (The side, face-up bin, displays as an option only
when folded out for use.)
■ LCOS (On the 3825 only, if the optional Large-Capacity
Output Stack er is installed)
■ * (The printer stacks paper in any available face-down
bin — upper, lower, or LCOS, if installed).
Side
(folds out)
Upper
Lower
Side
(folds out)
LCOS (Optional)
Upper
Lower
Use the Side output bin for small jobs or when using special print
media that may have difficult y passing through to the main outp ut
bins. Since output is stacked face up in the Side bin, duplex jobs are
not stacked i n numerical ord er and have to be hand sorted.
QMS 3825/3225/2025 System Administrators Guide3-6
Page 43

Chain Inputbins
The Chain Inputbins option specif ies whether the print er switches to
another input bin containing th e same size paper when one input bin
is empty. The default value for Chain Input bin is O n.
Crown Accounting
Crown accounting, a tool to help you keep track of the use of printer
resources, is available on your QMS Print System, with or without a
network connection.
Paper use is the most commonly monitored resource. However,
Crown accounting also allows you to monit or
■ paper use per user
■ time consumed serving each user’s jobs
Chain Inputbins
■ connectivity options
■ frequency of jams
■ times of peak use
■ number, complexity, and average size of jobs per user
■ commonly used features, such as duplexing or finishing
» Note:If yo u are connected to a network via TCP/IP, you h ave a choice of
using Crown accounting or the standard TCP/IP accounting through
your U NIX host software. Se e the TCP/IP Prot ocol Option Users Guide
for more information on TCP/IP acc ountin g.
As jobs are printed on the QMS printer, the system collects information about different job parameters in relation to the jobs. When each
Operator Control M enu
3-7
Page 44

Crown Accounting
job completes, th e printer stores an ent ry for the job in the Job
Accounting file(s).
Caution:
Doing so may cause inconsistencies in the information stored.
Do not turn the pr inter off while th e disk is being accessed.
Accounting Menu
The Accounting menu includes five submenus, allowing you to enable
or disable job accounting, allocate disk space when accounting is
enabled, reset accounting, store job accounting inf ormati on in a single job file or in multiple file s, and copy the a c counti ng inf ormat ion to
a floppy disk.
Job accounting informat ion may be stored in a single file if it can be
retrieved via FTP on your host. Otherwise, the selected job accounting file should be spread into several files so that each of the files (or
segments) fits on a floppy disk.
Operator Control/Accounting Menu
Accounting Mode
Disk Space
Resetaccounting
Job File Segment
Copy to Floppy
Accounting Mode
The Accounting Mo de option enables or d isables job accounting.
Choices are Enabled or Disabled with a default of Enabled. When you
disable accounting, any files containing data remain untouched. However, empty files are removed to save disk space.
Disk Space
The Disk Space option allocates disk space for job accounting files.
The range of values is 51200 (50 KB) to 10240 (10 MB) with a default
value of 01024 KB (1 MB).
QMS 3825/3225/2025 System Administrators Guide3-8
Page 45

Crown Accounting
The amount of space required for each job can vary between 200 and
250 bytes, so each 1 MB in the job accounting file will store information on 4,000 to 5,000 jobs.
If the selected value is greater than the current value, the file size is
increased to reserve the extra space. If the value is smaller than the
current file size , any empty job accounting files are moved. If only one
file is used and it is not empty, it cannot be shrunk.
If no accounting information exists in the system when shrinking the
usage, the job accounting files are recreated using the new size. The
printer does not ask for confirmation for th is opera tio n. It takes effect
immediat el y.
Resetaccounting
The Resetaccounting option erases the A ccou nting files and recreates them using the current file size. If this operation is selected when
accounting is disabled, the files are removed but not recreated, thus
saving disk space. The range of values is Yes and No. The default
value is No.
This operation is also available as the resetaccount command for
the admin user at a remote console. See the
for more information on the rese ta ccou nt comm and .
Guide
When job files are more than 80% full but less than 100% full, the following message displays on the control panel and remote conso le:
xxxxxxxx
(
xxx%
is the percentage full, reported as 85%, 90%, or 95%.) This is
an appropriate time to copy these file s to floppies o r to transfer them
to your host computer using ftp if it is available to you. Then use the
option to reset the accounting files to empty after they are copied to a
floppy or to a host.
When the file is 100% full, the
xxx
message displays.
Operator Control M enu
FILE
FILE IS FULL
xxx%
Remote Console User’s
FULL
3-9
Page 46

Crown Accounting
» Note: When accounting is enabled and the Job Accounting files are
100% fu ll, no further print jobs are acc epted by the prin ter until
Resetaccou ntin g is selected or until Acco u ntin g is disabled. If you
disable Accountin g at this time, no job information is stor ed. You can
retrieve your accou ntin g files while they ar e fu ll an d then do the
Resetaccounting ope ratio n. Ho wever, to avoid delaying jo bs being sent
to the printer, it is advisable to perform the retrieve/reset operations
before the job accounting files fill up.
Job File Segment
The Job File Segment menu allows you to decide whether accounting
information is stored in the printer in a single file or in multiple files.
Choices are Single and Multiple, with Multiple as the defaul t.
Although it is convenient to store accounting data in a single file, the
multiple file option is useful if you must transfer your files to your host
via floppy disk.
If a single file is used, its size equals th e Disk Space value described
earlier in this section. The file name will be ACC1.JOB.
If multiple files are selected, their combined size equals the File Size
value described earlier in this section. Each file will be 1 MB, except
the last file, which includes the remaining dedicated space. That is, if
you dedicate 10 MB to accounting and select multiple files, the printer
creates 10 files of 1 MB each. If you dedicate 5.5 MB to accounting,
the printer create s 5 files of 1 MB each and one of 500 KB. The Job
file names will be ACC1.JOB, ACC2.JOB, and so on.
Copy to Floppy
This option copies each of the Accounting files to 1.44 MB, DOS -formatted floppy disks, using the printe r’s internal floppy drive.
Insert a disk in the printer’s floppy drive, select the menu entry for the
first file you want to copy, and press Select. It takes several minut es
for the file to copy. When the copying is complete, the message window displays
COPY TO FLOPPY
*EXIT
QMS 3825/3225/2025 System Administrators Guide3-10
Page 47

Crown Accounting
Press Select and remove the disk. Then follow the same procedure to
copy additional files, using a separate disk for each file. There is a
menu entry for each possible file, but you need to copy only the ones
you use. The last selection copies the auxiliary accounting files to the
floppy disk. These files — ACC.STA, ACC.PAP, ACC.DIC — are
described later in this chapter.
» Note: Take th e prin ter off line while r etrieving accounting files so that
no jobs will be sent during the r etrieval pro cess. Jobs sent while data
is being retrieved m ay be lost from the accounting files.
Job Accounting Files
The following acco unting fil es are stored in ASCII form at on DSK6,
the printer ’s hard disk, in the DSK6:/ad mi n dire ctory:
x
■ Job Accounting File (ACC
This is the main accounting file. When each job co mpl ete s, the
printer stores an entry for the job in this file. The job accounting
file may be a single file or multiple files, with
when multiple files are used. Inform ati on in thi s file is kept intact
after the printer is turned off and back on again.
.JOB)
x
as the file number
■ Paper Accounting File (ACC. PAP)
This file contains de s criptio ns of the pape r typ es suppo rted on
the QMS 3825 Print System.
■ Status Accounting File (ACC. STA)
This file stores configuration inf orma tio n about accounting.
■ Dictionary File (ACC.DIC)
This file contains documentat ion about accounting and a description of the fields used in the other accounting files.
Caution:
it simpler to use the inform ation in different environments after it is
retrieved from the printer 's hard disk.
Operator Control M enu
All the acco unting files are stored in ASCII format to make
3-11
Page 48

Crown Accounting
Accounting File Format Description
Accounting files are recorded in ASCII format in a series of tagged
fields.
New fields can be added without losing backward compatibility,
because each field is tagged. A version field is included in the
ACC.STA file to identify the supported fields as the system evolv es.
» Note: Field 45 in the Job A ccounting File exam ple on page 3-13
illustrates that new fields can be added to the series but used where
logical, in this case between fields 6 and 7. Field 45, which p rovides
information about the interface used, was added in response to a
customer request.
Conventions
The following conventi ons are the same for job, paper, and status
files:
■ Tag Ide nti fie rs
These three-digit numbers are used to identify fields. The three-
digit number is used instead of a name to minimize use of disk
space. The Dictionary file (ACC.DI C) provi des the field nam es
associated with each tag identifier.
■ String Information
String information for record fiel d values is stored inside braces
(for example, {this is a string}). This allows spaces within string s
and stores only the necessary characters of a string value. String
fields for which no value is specified are stored as {}, instead of
using blanks or the maximum field size.
■ New Records
New records are separated by a <CR> character to increase
readability.
■ Separators
A typical record in any of the accounting files is a sequence of
pairs of tag identifiers and field values separated by commas.
The tag identifier and field value are separated by a colon.
QMS 3825/3225/2025 System Administrators Guide3-12
Page 49

Crown Accounting
Example
The following is an example of the format of an accounting file record:
1: 3, 2:{this is a string}, <CR>
In this example, the record has fields identified by tags 1 and 2. Since
these values don't use 3 digits for the tag identifier, spaces are stored
instead, to provide consistency and simplicity while using only a small
amount of extra space. In this exampl e, the value for the f ield ta gged
1 is the integer 3 and the value for the field tagged 2 is a string. The
<CR> represents the carriage return character.
Accounting Files Description of Fields
This section includes examples of a job accounting file, a paper
accounting file, and a status accounting file. Each exa mpl e is followed by a chart explaining the various fields, using data from the
example to help clarify the fields.
Job Accounting File Record Example
This is a sample record extracted from an actual job accounting file:
0: 6, 1: 1, 2:{ 8h 5m52}, 3:{ 2/ 7/95}, 4:3,
5:{lsmith}, 6:{}, 45:{ IF 1 Ethernet},
7:{Microsoft Word - WW6083WO.DOC}, 8:{}, 9:
2794, 10: 15414, 11: 1, 12: 0, 13: 2, 14: 3,
15: 0, 16:0, 17: 1, 18: 0, 19: 1,
20:3, 21: 2
Job Accounting File Record Description
Field IDDescription Example Explanation
0: The Job ID field is the
document’s nu mber. The numbe r
sequence restarts whenever the
printer is turned off and on again.
Operator Control M enu
0: 6 This is the 6th
job since the
printer was
restarted
3-13
Page 50

Crown Accounting
1: This field is the document’s
internally assigned priority.
2: This field indicates the time a
document arrived in the printer
by hour, minute, and second.
3: This field indicates the date a
document arrived in the printer.
4: This field is the document’s
completion code:
0 User aborted document
1 Printer aborted document
2 Emulation aborted
document
3 Successfully printed
document
5: The User Name field
corresponds to th e %%For DOC.
6: The Host Name field
corresponds to the %%Host
DOC.
45: T he Connection field indicates
the I/O port in which t he job
arrived.
7: The File Name field corresponds
to the %%Title DOC.
8: The Charge Number field
corresponds to the %%Charge
Number DOC. This field
identifies the account.
1:1 Priority 1, the
highest, has
been assigned
to this job
2:
{8h5m52}
3: {2/ 7/95} Printer received
4: 3 Job printed
5: {lsmith} L Smith sent job
6: {} No host name
45:IF 1
Ethernet
7: {Microsoft
Word WW6083WO.
DOC}
8: {} No charge
Printer received
job at 8:05:52
job on Feb. 7,
1995
successfully
assigned
This job arrived
via Ethernet
QMS DOC was
used to assign
the title
Microsoft Word WW6083WO.
DOC
number
assigned
QMS 3825/3225/2025 System Administrators Guide3-14
Page 51

Crown Accounting
9: The Compile Time field is the
processor time in milliseconds
(1/
second) spent translating
1000
the page description language.
Typically, it also includes
minimal other system activity.
10 T he Print Time field represents
the total elapsed time in
milliseconds(1/
used by the document since its
first page started printing until its
last page cleared the printer.
11: The Header Count field indicates
how many images comprise the
document header page(s)
subjob. An image equals one
page face.
12: T he Error Count field indicates
how many images comprise the
document error page(s) subjob.
An image equals one page face.
13: T he Body Count field represents
the number of images in the
actual document, excluding
multiple copies. An image equals
one page face.
14: T he Simplex Count field is
number of the page faces
printed, including body and
header pages and taking into
consideration multiple copies.
15: T he Duplex Count field
represents the sheet count of
duplex pages printed, taking into
consideration multiple copies.
1000
second)
9: 2794 Processor
spent 2.794
seconds
compiling the
page
10: 15414 Job took 15.414
seconds from
the start of the
first page to the
end of the last
page
11: 1 There is one
header page
12: 0 No error pages
13: 2 Two pages in
the document
14: 3 Three page
faces printed
15: 0 No duplex
pages
Operator Control M enu
3-15
Page 52

Crown Accounting
16: T he Finishing Options field is a
number formed by adding the
codes for the different options:
0None
2 Offset Stacking
17: T he Chunk Count field
represents the number of
collated chunks for this job. If the
complete document does not fit
in memory, chunk collation is
activated. A value of 1 for this
field indicates no partial collation
was necessary.
18: T he Jam field indicates how
many times the printer jammed
while printing the document.
19: T he Paper Types Count field
indicates how many different
types of paper were used in the
document and represents the
number of separate index entries
that follow the main record for the
document in the Job Accounting
file. A <CR> follows this field
before the index entries.
20: The Index Count field represents
the number of sheets of paper of
a specific type used by the
document. The actual description
of the paper is in the Paper
Accounting file.
21: T he Index field represents the
record number in the Paper
Accounting file that contains the
description for the preceding
paper count. A <CR> follows
each occurrence of this field.
16: 0 No finishing
options
17: 1 Entire job
printing in one
collated unit
18: 0 No jams during
this document
19: 1 One type of
paper used in
this job
20: 3 Job used three
sheets of paper
21: 2 A description of
the paper type is
in Paper
Accounting file
number 2
QMS 3825/3225/2025 System Administrators Guide3-16
Page 53

Crown Accounting
Paper Accounting File Record Example
The following example shows a Paper Accoun ting file:
22: 8268, 23: 11693, 24: 75, 25:{ white}, 26:{
plain}, 27:{ },
22: 8500, 23: 11000, 24: 75, 25:{ white}, 26:{
plain}, 27:{ },
22: 7165, 23: 10118, 24: 75, 25:{ white},
26:{ plain}, 27:{ },
22: 14000, 23: 8500, 24: 75, 25:{ white},
26:{ plain}, 27:{ },
22: 16535, 23: 11693, 24: 75, 25:{ white}, 26:{
plain}, 27:{ },
22: 14331, 23: 10118, 24: 75, 25:{ white}, 26:{
plain}, 27:{ },
22: 17000, 23: 11000, 24: 75, 25:{ white}, 26:{
plain}, 27:{ },
22: 7500, 23: 10500, 24: 75, 25:{ white},
26:{ plain}, 27:{ },
22: 8268, 23: 5827, 24: 75, 25:{ white}, 26:{
plain}, 27:{ },
Paper Accounting File Record Description
The Paper Accounting file has one record for each of the nine possible paper sizes. Field 21 refers to a specific record in the Paper
Accounting file. In the example above, Fi eld 21 indi ca tes tha t the
paper is of the second type. Therefore, the second record from the
Paper Accounting file describes the pap er used. The second record
tells you:
Field ID Description Example Explanation
22: The Paper Width field contains
the paper width in mils (1/
23: The Paper Height field contains
the paper height in mils (1/
Operator Control M enu
1000
1000
22: 8500 The paper is
").
23: 11000 Paper is 11000
").
8500 mils or
8.5" wide
mils or 11” high
3-17
Page 54

Crown Accounting
24: The Paper Weight represents the
weight per surface square units
(g/m2)
25: The Color field indicates the
color of the paper.
26: The Type field indicates
additional properties of the
paper.
27: The Label field represents a
name for the paper type.
24: 75 Paper weighs
25: white Paper is white
26: plain Paper is plain
27: { } No paper type
75 g/m
name
2
» Note: Fields 24, 25, 26, and 27 are designed primarily for future
enhancements to the accounting capabilities.
Status Accounting File Record Example
The following is an example of the Status Accounting file:
28: 1, 29: 9, 30: 1048576, 31: 1048576, 32:
74993, 33: 74993, 34: 1, 35: 1, 36: 309, 37:2,
38:1, 39:0, 40:0, 41:31, 42:23, 43:31, 44:31
Status Accounting File Record Description
Field ID Description Example Explanation
28: The Version field indicates the
accounting file’s version
number. The initial version is 1.
29: The Number of Paper T ypes f ield
indicates how many records are
in the Paper Accounting file.
30: The Job Accounting File Size
field indicates how many bytes
are dedicated to accou nting files.
Maximum is 10 MB.
28: 1 This is the first
version of the
file
29: 9 The paper
accounting file
has 9 records
30:
1048576
1048576 bytes,
or 1 MB, is
dedicated to
accounting
QMS 3825/3225/2025 System Administrators Guide3-18
Page 55

Crown Accounting
31: The Last Job File Size field
indicates the size of the last file.
In the multiple-file configurat io n,
each file is 1 MB except the last,
which holds any remaining
space.
32: The Job File Usage field
indicates in bytes the total
current use in all the job files.
33: The Current Job File Usage field
indicates in bytes the current
level of use in the current Job
Accounting file.
34: The Maximum Number of Job
Files field indicates the
maximum number of job files.
For example, even if your system
is configured for multiple files, if
only 1 MB is dedicated to
accounting, the maximum
number of files is 1. If 5.5 MB is
dedicated to accounting, the
maximum number of files is 6.
35: The Current Job File field
indicates which file has been
used most recently. By
comparing this with Field 33, you
can determine which file is
current and how much space is
left in it.
31:
1048576
32: 74993 All accounting
33: 74993 The accounting
34: 1 There can be
35: 1 The most
1048576 bytes,
or 1 MB, is in
the last file
files total 74993
bytes
file which is
currently
receiving data
totals 74993
bytes
only 1 job
accounting file.
Although the
printer is
configured for
multiple files
(see field 37)
there is only one
because only 1
MB is
dedicated to
accounting
recently used
file is File 1
Operator Control M enu
3-19
Page 56

Crown Accounting
36: The Number of Jobs field
indicates how many documents
are accounted for in the Job
Accounting file(s). A value of 0
can mean that no jobs have
been printed or that accounting
is disabled.
37: The Multifile field has a value of
1 if a single file is used and a
value of 2 if multiple files are
used to store job information.
38: The Enabled field indicates
whether accounting is currently
enabled or disabled.
1 Enabled
0 Disabled
39: The Job File Full flag indicates
whether the Job Accounting file
is full.
1 File is full; Resetaccounting
should be performed
0 Job accounting file is not full
40: The Paper Accounting File Full
flag indicates whether the Paper
Accounting file is full.
1 File is full; Resetaccounting
should be performed
0 Job accounting file is not full
41: The User field indicates the
maximum character length of the
User Name field in the Job
Accounting file. User names are
assigned w ith QMS DOC.
42: The Host field indicates the
maximum character length of the
Host Name field in the Job
Accounting file. Host names are
assigned w ith QMS DOC.
36: 309 Current Job
Accounting files
hold data on
309 jobs
37: 2 Job Accounting
is set for
multiple files
38: 1 Accounting is
currently
enabled
39: 0 Accounting files
are not full
40: 0 The Paper
Accounting file
is not full
41: 31 The User name
can be up to 31
characters
42: 23 The Host name
can be up to 23
characters
QMS 3825/3225/2025 System Administrators Guide3-20
Page 57

Crown Accounting
43: The File field indicates the
maximum character length of the
File Name field in the Job
Accounting file. File names are
assigned w ith QMS DOC.
44: The Charge field indicates the
maximum character length of the
Charge Number field in the Job
Accounting file. Charge
numbers are assigned with QMS
DOC.
43: 31 The File Name
can be up to 31
characters
44: 31 The Charge
field can be up
to 31 characters
Copying the Accounting Files
Accounting files should be transferred to your host computer periodically to keep the printer from being overloaded with data and to allow
you easy analysis of data.
» Note: The printer mu st be o ff line when any of the o perations
discussed in this section are perform ed. U se the
DSK6:/admin directory to see which accounting fi les you are going to
retrieve. The
ls
andcpcommands are issued from a remote console.
Copy the accounting information in one of the following ways, which
are described in detail in the next section.
ls
command in the
■ Use the Copy to Floppy Accounting menu option
■ Use the cp com ma nd from a remote consol e
■ Use the File Transfer Protocol (FTP) if a TCP/IP connection is
available to the printer
Using the Copy to Floppy Menu Option
This option copies each of the accounti ng files to 1.44 MB floppy
disks, using the printer’s internal floppy drive.
1 Insert a 3.5", DOS-formatted flo pp y disk into the printer’s
internal floppy disk drive.
Pull the control panel toward you to open the front of the printer
and access the floppy disk drive.
Operator Control M enu
3-21
Page 58

Crown Accounting
2 In the Operator Control /A ccou nti ng men u, choo se Cop y to
Flop py.
3 Select the files you want to copy, choosing from the Job
Accounting Files (ACC1. JOB throug h ACC10. JOB),
ACC.STA, ACC.PAP, ACC.DIC.
Since each file is 1 MB, you need a separat e floppy disk for each
file. Not all files will exist, so you need to copy only the ones that
are necessary.
4 Remove the flop py disk from the pr inte r and take it to your
host compu ter.
Using the cp Command
Use the cp comma nd to download a c counting info rmat ion f rom the
printer's hard disk to a floppy disk as follows:
1 Using a remote console , take the printer off line.
2 Insert a 3.5" DOS-formatted flop py disk into the printer’s
floppy disk drive.
3 Download the accou nti ng infor matio n to the flo ppy disk
using the following commands:
» Note: The device names (DS K6 or FLP0) must be uppercase. The
file names can be either uppercase or lo werc ase. If multiple Job
Accounting files are used, each of the AC Cx.JOB files should be
retrieved. (x is the nu mber of each subsequent Job Accounting
file.)
cp DSK6:/admin/acc1.job FLP0:/acc1.job↵
cp DSK6:/admin/acc.pap FLP0:/acc.pap↵
cp DSK6:/admin/acc.sta FLP0:/acc.sta↵
cp DSK6:/admin/acc.dic FLP0:/acc.dic↵
4 Remove the flop py disk from the pr inte r and take it to your
host compu ter.
QMS 3825/3225/2025 System Administrators Guide3-22
Page 59

Crown Accounting
Using the File Transfer Protocol (FTP)
» Note: FTP works only when the printer message window displays
If multiple Job Accounting files are used, each o f the ACCx.JOB files
should be copied. (x is the nu mber of each su bseq uent Job Accounting
file.)
Use FTP on the host to copy the files from the printer ’s hard disk to
the host as follows:
1 Type ftp
Ethernet address of the printer or its corresponding Ethernet
name).
2 When prompted for a us er id, ente r admin as user name and
give the appropriate passw ord , if required .
3 At the ftp> prompt, type bin↵ to use binary mod e for the
download proced ure.
4 Type
» Note: If multip le J ob Accounting files are used, each o f the
ACCx.JOB files should be copied. (x is the number of each
subsequent Job Accounting file.)
5 Quit ftp .
printer-name
get DSK6:/admin/acc1.job acc.job↵
get DSK6:/admin/acc.pap acc.pap↵
get DSK6:/admin/acc.sta acc.sta↵
(where
printer-name
is either the
IDLE
.
Processing Acc ounting Inform ation on the Host
After the accounting files are stored on your host, you can create your
own filters (programs) based on your specific requirements using the
file and record descriptions shown earlier in this chapter.
❖
Operator Control M enu
3-23
Page 60

Page 61

4
Administration/ Communications Submenu
In This Chapter . . .
■ Timeouts
■ Serial communica tions
■ Parallel communications
■ AppleTalk communications
■ Optional interface communications
Page 62

The Communications Submenu
The Comm unication s
Submenu
The default settings for printer-host commu nicat ions are one portion
of the Administration menu. The Communications submenu is shown
below.
ADMINISTRATION
COMMUNICATIONS
COMMUNICATIONS
TIMEOUTS
COMMUNICATIONS
OPTIONAL INTERF A CES
COMMUNICATIONS
APPLETALK
QMS 3825/3225/2025 System Administrators Guide4-2
COMMUNICATIONS
SERIAL
COMMUNICATIONS
PARALLEL
Page 63

Timeouts
Timeouts
For many print jobs, the time required for transmission from host to
printer is negligible. However, some print jobs require more transmission and processing time due to their size. The values in the Timeouts
submenu help to ensure reliable tran smission while preventing the
printer from being tied up by any one job.
COMMUNICATIONS
TIMEOUTS
TIMEOUTS
PS WAIT TIMEOUT
TIMEOUTS
ESP TIMEOUT
TIMEOUTS
JOB TIMEOUT
PS Wait Timeout
The PostScript Wait Timeout value is the maximum number of seconds the printer waits on data for a PostS cript job in process. The
range is 0 to 99999 seconds, and the default value is 30 seconds. If
this time expires and no new data for the job in process has been
received by the PostScript interpreter, the current job is closed. A
value of 0 seconds means that the interpreter does not time out while
waiting on more data.
Administrat ion/ C o mmunicat ions Subm en u
TIMEOUTS
EMUL TIMEOUT
4-3
Page 64

Timeouts
Emul Timeout
The Emulation Timeout value is the maximum number of seconds the
printer waits on data for a job (other than PostScript ) in pr ocess. The
range is 0 to 99999 seconds, and the default value is 5 seconds. If
this time expires and no new data for the job in process has been
received by the printer, the current job is closed. A value of 0 seconds
means that the printer does not time out wh ile waiting on m ore data.
Job Timeout
The Job Timeout value is the maximum number of seconds that the
printer can process a PostScript job. The range is 0 to 99999 seconds
and the default value is 0 seconds (infinity). A Job Timeout value
greater than 0 seconds prevents jobs that contai n an unreco vera ble
loop from remaining in the printer and blocking other jobs. However, if
the Job Timeout value is too short, jobs that require extensive processing may not finish before time expires. This timeout ca n be overridden by your application.
ESP Timeout
The ESP Timeout value is the maximum number of seconds the
printer attempts an emu lati on se lecti on using the Emulat ion Sensing
Processor. The range is 0 to 99999 seconds and the default value is 3
seconds. If ESP cannot select an emulation before this time expires,
the printer uses the default emulation to process the job (see chapter
5, “Emulations Su b men u”).
Do not set the ESP Timeout to 0 seconds unless you are using the
PostScript interactive mode (see the Mode option in the foll owing
section, “Serial Communicati on”). A value of 0 disables the timeout.
QMS 3825/3225/2025 System Administrators Guide4-4
Page 65

Serial
Comm u nicatio n
Serial Commun ication
The Serial submenu is shown below.
COMMUNICATIONS
SERIAL
SERIAL
PS PROTOCOL
SERIAL
HDWE FLOW CTL
SERIAL
STOP BITS
SERIAL
DATA BITS
SERIAL
XMIT SW FLOW CTL
SERIAL
RCV SW FLOW CTL
SERIAL
IGNORE PARITY
SERIAL
MODE
SERIAL
EMULATION
SERIAL
MIN K SPOOL
SERIAL
SPOOL TIMEOUT
SERIAL
END JOB MODE
SERIAL
DEF JOB PRIO
SERIAL
BAUD RATE
SERIAL
PARITY
Administrat ion/ C o mmunicat ions Subm en u
4-5
Page 66

Serial
Communication
Mode
The Mode option enables or disables the PostScript interactive mode
from the host. The options are Noninteract ive, Inte ractive, and Disabled. Noninteractive establishes one-way comm unication f rom the
host to the printer. Interactive establishes tw o-way comm unication
between the host and the printe r. Disabled turns off serial communication with the host so that the printer stops accepting print jobs over
the serial interface. The default value is Interactive.
Emulation
The Emulation opt ion let s you set the serial interface’s default emu lation. You can select from the standard emulations supported by the
printer (PCL 5, Lineprinte r, HP-GL, LN03 Plus, imPRESS , ESP,
CCITT, and PostScript), an optional emulatio n, or Hexdump. The factory default value is ESP.
Selecting Hexdump generat es a listing, in hexadecimal format , of all
data received over the interface. Hexdump is useful for diagnosing
communication problems.
Min K Spool
This five-digit value sets the minimum num ber of kilobytes of system
memory dedicated to the serial interface. The range is 00000 to
99999 and the default value is 00015. See “Dedicating Memory to an
Interface” in chapter 7 for informatio n about t he Min K Spool sett ing.
Spool Timeout
The Spool Timeout option is a numeric value for the number of seconds that the printer waits for addit ional data from the host while it is
spooling a job. The range is 00000 to 99999 seconds and the default
value is 00030 seconds. If you change this setting, you must ensure
that the new setting does not conflict with the P S Wait Timeout and
Emul Timeout values.
QMS 3825/3225/2025 System Administrators Guide4-6
Page 67

Serial
Comm u nicatio n
If the Spool Timeout value expires before the printer has received all
data for a job it is spooling, the printer terminates the spooled print
job.
End Job M ode
This option selects the End of Job terminator to be used for the serial
interface without con sideration fo r interacting timeou ts. There are
three choices available: None, QMS EOD (%%EndOfDocument), and
HP EOD (<ESC>%-12345X). Only one form of EOD can be used at a
time. The def ault is QMS EOD. Refer to
for more information on E nd Job Mode.
QMS Crown Network Notes
Def Job P rio
The Def Job Prio (Default Job Priority) option det ermi nes which jobs
are printed first, according to the inte rface from which the y are
received, when jobs are received simultaneousl y. The range is from
001 to 100 with 001 being the first job. The default is 001.
Baud Rate
Baud Rate is the data transmission rate used by the host. The baud
rate options are 300, 600, 1200, 2400, 4800, 9600, 1920 0, and
38400. The default value is 9600. Set this option to match th e baud
rate used by the host.
» Note: Baud rates 19200 and 38400 require RT S/CTS p rotocol (see
Hdwe Flow Ctl, later in this section ).
Parity
The Parity option allows you to choose the type of parity checking
performed by the host. Parity acts as a check bit to identify data transmission errors. The options are None, Mark, Space, Odd, or Even.
The default value is None. Set this option to match the parity used by
the host.
Administrat ion/ C o mmunicat ions Subm en u
4-7
Page 68

Serial
Communication
Ignore Parity
The Ignore Parity option specif ies how the printer should handle parity errors. Choices are On and Off. When I gnore Pari ty is Off, the
printer reports parity errors by replacing the character(s) affected by
the error with a question mark. When Ignore Parity is On, the printer
ignores parity errors and prints its best interpretation of the character(s) affected by the error. The default is Off.
Rcv Sw Flow Ctl
If your host uses software flow control, the Rcv S w Flow Ctl (Receive
Software Flow Control) option allo ws you to choose the type of flow
control used by the printer for its communicat ion wit h the host. The
choices are None, XON/XOFF, and ETX/ACK. The default value is
XON/XOFF. Set this option to match the type of flow control expected
by the host.
Xmit Sw Flow Ctl
If your host uses software flow control, the Xmit Sw Flow Ctl (Transmit Software Flow Control) option all ows you to choose the type of
flow control used by the host for its communication with the printer.
The choices are None, XON/XOFF, and ETX/ACK. The default value
is None. Set this option to match the type of flow control used by the
host.
Data Bits
The Data Bits option allows you to set the number of data bits per
character in the data stream. The choices are 7 or 8 bits. The default
value is 8 bits. Set this option to match the numb er of data bits transmitted by the host.
Stop Bits
The Stop Bits option allows you to set the number of stop bits per
character in the data stream. The choices are 1 or 2 bits. The default
QMS 3825/3225/2025 System Administrators Guide4-8
Page 69

Serial
Comm u nicatio n
value is 1 bit. Set this option to match the number of stop bit s trans mitted by the host.
Hdwe Flow Ctl
The Hdwe Flow Ctl (Hardware Flow Control) option allows you to pick
the type of hardware flow control used by your host. The choices are
DSR POL (default value: Lo), DSR (default value: Off), DTR POL
(default value: Lo), DTR (default value: On), RTS (default value: Off),
and CTS (default value: Off).
If your host uses hardware flow control, set this option to match the
type used by the host.
PS Protocol
This option sets the binary communicat ions prot ocol (BCP ) for communicating over a serial, parallel, or optional net work inte rface to a
PostScript printer. Binary communications protocol allows any 8-bit
binary value (0-255) to be treated as data, while allowing a few of the
values to function as special control characters. When communicating 8-bit binary data in Binary or Binary Fixed mode, the print er uses
the quoting mechanism of the BCP to distinguish between the special
control characters and print job binary data.
To differentiate data from the special control characters, any data that
is the same as one of the following special control characters must be
quoted:
ASCII
Keyboard
^A SOH 0 x01 Quote data character
^C ETX 0x03 Abort job and flush to end of file
^D EOT 0x04 End-of-file marker
^E ENQ 0x05 (Reserved for future use)
^Q DC1 0x11 XON in XON/XOFF flow control
^S DC3 0x13 XOFF in XON/XOFF flow control
ASCII
Name
ASCII
Hex Value
Control
Function
Administrat ion/ C o mmunicat ions Subm en u
4-9
Page 70

Serial
Communication
^T DC4 0 x 14 Job status request
^\ FS 0x1C (Reserved for future use)
A data byte is quoted by replacing it with a two-character sequence.
The first character is a ^A (ASCII hex 0x01), and the second character is the character itself XORed with the ASCII value 0x40. For
example, to send the value 0x14 (^T) as data, send the two character
sequence 0x01 0x54 (^A T) instead. (ASCII T in the example is the
result of XORing ^T with 0x40.)
This method of quoting guarantees th at whenever any of the eight
control characters is received by the printer, the control function is
intended regardless of whether the preceding character is a ^A. Any
data byte not equal to one of the eight special control characters is
transmitted by sending the data byte.
The settings for this option are as follows:
Normal enables standard, ASCII hex protocol . Data is sent and
received in ASCII format. Print jobs can alter this value through PostScript operators. The default is Normal.
Normal Fixed enables standa rd, ASCII hex protocol. Print jobs cannot alter this value through PostScript operators.
Binary enables binary comm unications proto co l. Print jobs can alter
this value through PostS cript operators.
Binary Fixed enables binary comm uni catio ns protocol. Print jobs
cannot alter this value through PostScript operators.
» Note: Wh e n PS Protocol is set to the Nor m al Fixed or Binary Fixed
mode, and a print job sends PostSc r ip t oper ator s to change the input
device mode, the operators are expected but not acted on.
QMS 3825/3225/2025 System Administrators Guide4-10
Page 71

Para llel
Comm u nicatio n
Parallel Communication
The Parallel submenu is shown below.
COMMUNICATIONS
PARALLEL
P ARALLEL
PS PROTOCOL
PARALLEL
DEF JOB PRIO
PARALLEL
END JOB MODE
PARALLEL
MODE
APPLETALK
DATA BITS
PARALLEL
EMULATION
PARALLEL
MIN K SPOOL
PARALLEL
SPOOL TIMEOUT
Mode
The Mode option controls whether the parallel interface is active. The
default value is Enabled. I f you are not using the parallel int erf ace,
you can select Disabled to prevent any jobs from being received over
the interface.
Emulation
The Emulation opt ion det ermi nes the int erfa ce ’s default emulat ion.
The default value is ESP. You can se lect a def ault emul atio n for the
interface from the standard emulations supported by the print er (PCL
Administrat ion/ C o mmunicat ions Subm en u
4-11
Page 72

Parallel
Communication
5, Lineprinter, HP-GL, LN03 Plus, imPRESS, ESP, CCITT, and PostScript), an optional emulati on, or Hexdump.
Selecting Hexdump generat es a listing, in hexadecimal format , of all
data received over the interface. Hexdump is useful for diagnosing
communication problems.
Min K Spool
This five-digit value sets the minimum num ber of kilobytes of system
memory dedicated to the Para llel interf ace. Th e range is 00000 to
99999 and the default is 00015. See “Dedicating Memory to an Interface,” in chapter 7, “Memory Submenu,” for information about the Min
K Spool setting.
Spool Timeout
The Spool Timeout option is a numeric value for the number of seconds that the printer waits for addit ional data from the host while it is
spooling a job. The range is 00000 to 99999 seconds and the default
value is 00030 seconds. If you change this setting, you must ensure
that the new setting does not conflict with the P S Wait Timeout and
Emul Timeout values.
If the Spool Timeout value expires before the printer has received all
data for a job it is spooling, the printer closes the spooled print job.
Data Bits
The Data Bits option sets the number of data bits per character in the
data stream from the host. The choices are 7 and 8 bits. The default
value is 8 bits. Set this value to match your host.
End Job M ode
This option selects the End of Job termin ator to be use d for the parallel interface. The re are three choices: None, QMS EOD (% %En dOf Document), and HP EOD (<ESC>%-12345X). Only one form of EOD
QMS 3825/3225/2025 System Administrators Guide4-12
Page 73

Para llel
Comm u nicatio n
can be used at a time. The default is QMS EOD. Refer to
Network Notes
for more informati on on En d Job Mode.
QMS Crown
Def Job P rio
The Def Job Prio (Default Job Priority) option det ermi nes which jobs
are printed first, according to the inte rface from which the y are
received, when jobs are received simultaneousl y. The range is from
001 to 100. The default is 001, which is the highest priority.
PS Protocol
This option sets the binary communicat ions prot ocol (BCP ) for communicating over a serial, parallel, or optional net work inte rface to a
PostScript printer. Binary communications protocol allows any 8-bit
binary value (0-255) to be treated as data, while allowing a few of the
values to function as special control characters. When communicating 8-bit binary data in Binary or Binary Fixed mode, the print er uses
the quoting mechanism of the BCP to distinguish between the special
control characters and print job binary data.
To differentiate data from the special control characters, any data that
is the same as one of the following special control characters must be
quoted:
ASCII
Keyboard
^A SOH 0 x01 Quote data character
^C ETX 0x03 Abort job and flush to end of file
^D EOT 0x04 End-of-file marker
^E ENQ 0x05 (Reserved for future use)
^Q DC1 0x11 XON in XON/XOFF flow control
^S DC3 0x13 XOFF in XON/XOFF flow control
^T DC4 0 x 14 Job status request
^\ FS 0x1C (Reserved for future use)
ASCII
Name
ASCII
Hex Value
Control
Function
Administrat ion/ C o mmunicat ions Subm en u
4-13
Page 74

Parallel
Communication
A data byte is quoted by replacing it with a two-character sequence.
The first character is a ^A (ASCII hex 0x01), and the second character is the character itself XORed with the ASCII value 0x40. For
example, to send the value 0x14 (^T) as data, send the two character
sequence 0x01 0x54 (^A T) instead. (ASCII T in the example is the
result of XORing ^T with 0x40)
This method of quoting guarantees th at whenever any of the eight
control characters is received by the printer, the control function is
intended regardless of whether the preceding character is a ^A. Any
data byte not equal to one of the eight special control characters is
transmitted by sending the data byte.
The settings for this option are as follows:
Normal enables standard, ASCII hex protocol . Data is sent and
received in ASCII format. Print jobs can alter this value through PostScript operators. The default is Normal.
Normal Fixed enables standa rd, ASCII hex protocol. Print jobs cannot alter this value through PostScript operators.
Binary enables binary comm unicat ions protoco l. Print jobs can alter
this value through PostS cript operators.
Binary Fixed enables binary comm uni catio ns protocol. Print jobs
cannot alter this value through PostScript operators.
» Note: Wh e n PS Protocol is set to the Nor m al Fixed or Binary Fixed
mode, and a print job sends PostSc r ip t oper ator s to change the input
device mode, the operators are accepted but n o t acted on.
QMS 3825/3225/2025 System Administrators Guide4-14
Page 75

AppleTalk
Comm u nicatio n
AppleTalk Communication
The AppleTa lk submenu allow s you to configure the printer-host communications when using the AppleTalk interface. The AppleTalk submenu is shown below.
» Note: Ap pleTalk does not have an option for Emulation . Only
PostScript em ulation jobs can be received over the AppleTalk
interface.
COMMUNICATIONS
APPLETALK
APPLETALK
MODE
APPLETALK
DEF JOB PRIO
APPLETALK
MIN K SPOOL
Mode
There are two choices for Mode: Enabled and Disabl ed. If the Mode
set-up option is Disabled, the printer accepts no jobs through this protocol. Enabled mode allows communicat ion bet ween the host computer and the printer. Any change to this option takes effect only after
turning the printer power off and on again. The def ault is Enabl ed.
Administrat ion/ C o mmunicat ions Subm en u
APPLETALK
CONNECTION
4-15
Page 76

Optional In terface
Connection
The Connection set-up option defi nes the type of connecti on you are
using. The options are Conventional and S pool, with Conve ntional
being the default. Spool allows you to use the AppleTalk protocol that
manages interaction between workstations and print servers. This
option allows print spoolin g. Conventional does not provide print
spooling. Select Con venti onal to print directly to the printe r. Any
change to this option takes effect only after turning the print er power
off and on again.
Min K Spool
This five-digit value sets the minimum num ber of kilobytes of system
memory dedicated to the AppleTalk interface. The range is 0 to 99999
seconds and the default is 00015. See “Dedicat ing M emo ry to an
Interface,” in chapter 7, “Memory Submenu,” for information about the
Min K Spool setting.
Def Job Prio
The Def Job Prio (Default Job Priority) option det ermi nes which jobs
are printed first, according to the inte rface from which the y are
received, when jobs are received simultaneously. The range is from
001 to 100. The default is 001, which is the highest priority.
Optional Interface
You can order an optional interface for your QMS printer so you can
connect to other networks. If an optional interface is installed, it
appears in the Communications subm enu. Refer to the interface doc umentation and to your network documenta tion for information on
connecting your printer to the network and configuring it for network
printing.
❖
QMS 3825/3225/2025 System Administrators Guide4-16
Page 77

5
Emulations Submenu
In This Chapter . . .
■ HP PCL5 emulation set tin gs
■ Lineprinter emulation settings
■ HP-GL emu lat ion sett ings
■ LN03 Plus emulation se ttings
■ ESP Default set tin gs
■ PostScript emulation levels
■ CCITT and imPRE SS informat ion
■ Optional emulations
Page 78

The
Emulations
Submenu
The Emulations Submenu
The options in the Emulations subm enu of the Adm inistrat ion m enu
select the default values for the various document processing features of the QMS 3825/3225/2 025 Pri nt System . The Administ rati on
menu may be protected by a password. See chapter 2, “Install atio n
Menu,” for more information . The Emu lations su bme nu is shown
below.
ADMINISTRATION
EMULATIONS
EMULATIONS
ESP DEFAULT
EMULATIONS
OPTIONAL EMULATION
EMULATIONS
HP-GL
EMULATIONS
LINEPRINTER
EMULATIONS
PCL 5
EMULATIONS
LN03 PLUS
EMULATIONS
POSTSCRIPT
» Note: This chapter also include s informatio n a bout two other
standard emulation s, CCITT and i mPR ESS , which are accessible only
through QMS Document Option Commands.
QMS 3825/3225/2025 System Administrators Guide5-2
Page 79

ESP Default Option
The ESP Default lets you set which emulat ion th e printer uses if the
Emulation Sensing Processor ca nnot identify the emulation of a print
job. ESP has a specific length of time within which it attempts to identify the emulation (see “Timeouts” in chapter 4 of this manual). If thi s
time expires, the printer automaticall y uses the emulat ion you select
as ESP Default to process the job.
The choices for ESP Default are those emulations supporte d by the
printer. The default value is PCL 5. If your print jobs are predominantly one emulation, select that emulation as the ESP Default.
ESP D efault
Option
Emulations Submenu
5-3
Page 80

PCL 5
PCL 5
The PCL 5 submenu contains settings for the default conditions of the
HP LaserJet IIISi emulation. The illustration belo w shows the PCL 5
settings.
EMULATIONS
PCL 5
PCL 5
DOWNLD LOCATION
PCL 5
MONOCHROME GL/2
PCL 5
DEFAULT FONT IDX
PCL 5
SCALABLE FONTS
PCL 5
DEFAULT FONT
PCL 5
RETAIN TEMPORARY
PCL 5
SYMBOL SET
PCL 5
LINES/INCH X100
PCL 5
LINE TERMINATION
PCL 5
POINT SIZEX100
Default Font
The Default Font option h as a selection of choice s for the PCL 5
default font. Fonts marked with an asterisk (*) are scalable. Select by
index instructs the printer to select the font by the Default Font Index.
The default value is Courier 12. The choic es are
QMS 3825/3225/2025 System Administrators Guide5-4
Page 81

PCL 5
Courier12 Times* Univ*bolditalic
Courier12 Bold Times*Italic Univcond*
Courier12 Italic Times*Bold Univcond*Italic
Courier10 Times*BldItalic Univcond*Bold
Courier10 Bold Univ* Univcond*Bld Itlc
Courier10 Italic Univ*Italic Select by index
Lineprinter Univ*Bold
Symbol Set
Symbol Set allows you to select the character set used by PCL 5
jobs. The default for Symbol S et is Roman-8. Th e choice s are
Desktop ISO-25 Pi-Font
ECMA-94 ISO-57 PS-Math
HP German ISO-60 PS-Text
HP Spanish ISO-61 PS-Zapf-Dingbats
ISO-2 ISO-69 V en tura-Dingbats
ISO-4 ISO-84 Ventura-Intl
ISO-6 ISO-85 V en tura-Math
ISO-10 Legal Ve n tura-US
ISO-1 1 Math-8 Windows
ISO-14 Microsoft-Pub Zapf-Dingbats100
ISO-15 PC8-US Zapf-Dingbats200
ISO-16 PC8-DN Zapf-Dingbats300
ISO-17 PC-850 Roman-8
ISO-21
Lines/Inch X100
Lines/Inch X100 sets the default line spacing for PCL 5. The number
of lines per inch is set in hundredths. Multiply the desired number of
lines per inch by 100. For example, to set 6.6 lines per inch, enter
660. Choices range from 100 to 4800 (1 to 48 lines) with a default of
600, or 6 lines per inch.
Emulations Submenu
5-5
Page 82

PCL 5
Line Termination
Line Term inat ion set s the printer response to a carriage return or line
feed character while in PCL 5 emulation. The choice s are
CR = CR, LF = LF
CR = CR + LF, LF = LF
CR = CR, LF = CR + LF
CR or LF = CR + LF
CR stands for carriage return. LF stands for line feed. Th e defau lt is
CR=CR, LF=LF .
Point Size X100
This option sets the point size in hundredths for scalable default fonts
(those listed with an asterisk [*] in the Default Font option s). For
example, a 24-point default size is selected by entering 2400. Point
sizes are selectable in increments of 25. The mini mum value is 25
(0.25 points), the ma ximum is 99975 (999. 75 point s), and the defaul t
is 1200 (12 points).
Retain Temporary
Retain Temporary allows you to choose whether to retain temporary
PCL 5 macros and fonts at the end of each print job. The options are
Off (tempo ra ry fo nts and macros are delet ed at the end of each job),
On (save the temporary macros and fonts), and On Compatibilit y
(retain the entire state of PCL as well as the temporary macros, fonts,
and patterns from previous PCL jobs). The default is Off.
Scalable Fonts
Scalable fonts allows you to specify whethe r to scale PCL 5 fonts.
The options are Enable and Disable with the defau lt being Ena ble.
Disabling Scalable fonts essenti ally recreates PCL 4 and allows you
to prevent PCL4 documents from inadvertently selecting P CL 5 scalable fonts.
QMS 3825/3225/2025 System Administrators Guide5-6
Page 83

PCL 5
Default Font Idx
This option sets the default font ind ex whe n the default font is set to
select by index. The setting is a numeric value with a minimum of 0, a
maximum of 327 67, and a def ault equal to your Select by Inde x
value.
Monochr ome GL/2
This option allows your printer to emulat e a monochrome or color
plotter. Options are On (sets the printer to monochrome, or 2-pen)
and Off (sets the printer to color, or 8-pen). When Monochrome GL/2
is set to On, grayscale patterns are substituted for colors. Default is
On.
Downld Location
This option allows you to set the default storage f or PCL objects
(fonts, macros, and patterns). Choices are Memory and Disk. If set to
Memory, all downloaded PCL objects will by default reside in temporary storage in RAM. If set to Disk, they will be stored in the default
disk resource, if present. The default setting is Disk. Systems with a
hard disk and large amounts of memory may enhance system performance by using Memory for PCL object storage. Docu men t Option
Commands specifying locations fo r downloaded objects will override
this setting on a per job basis.
» Note: It is po ssible to set Downld Loc ation to Disk even if no disk is
installed. If Disk is c h osen when no disk is present, mem or y will be use d
for storage.
Emulations Submenu
5-7
Page 84

LN03 Plus
LN03 Plus
The LN03 Plus emulation includ es the followin g menu options:
EMULATIONS
LN03 PLUS
LN03 PLUS
ORIENTA TION
LN03 PLUS
RESET OVERRIDE
LN03 PLUS
Y-ORIGIN INSET
LN03 PLUS
PRODUCT ID
LN03 PLUS
X-ORIGIN INSET
LN03 PLUS
AUT OWRAP
LN03 PLUS
PAPER SIZE
LN03 PLUS
PAPER OVERRIDE
Product ID
The Product ID setting is the emulation print er mode l. If your host
sends a Device Attributes request to the printer, the printer responds
with the product ID. Yo u can select LN03, LQ P0 2, or LA100. Th e factory default setting is LN03.
Autowrap
The Autowrap setting determi nes whethe r text that exceeds the right
margin “wraps” to the next line on the page. The range is On and Off.
The default setting is On (wrap text to next line).
QMS 3825/3225/2025 System Administrators Guide5-8
Page 85

LN03 Plus
Paper Size
The Default Paper option specifies the paper size that is to be used at
power up or when no paper size is specified. Available paper sizes
are Letter, A4, and Legal. The default va lue is Le tte r.
Paper Override
The Paper Override option sets the paper selecti on. Th e range of
possible values is On and Off. The def ault value is Off. If set to Off,
the emulation uses the transformation point for the size of paper
selected and uses the current paper size (does not change paper
trays). If Paper Override is set to On, the emulat ion uses the transf or mation point for the size of paper selected and uses the specified
paper size.
X-Origin Inset
The X-Origin Inset option moves the lower-left corner of the image
(0,0) to the right from 0 to 300 dots (1 inch at a resolution of 300 dpi).
Use this option to eliminate clipping of the right edg e of the image on
some systems. The default offset is 75 dots.
Y-Origin Inset
The Y-Origin Inset option moves the lower-lef t corner of the image
(0,0) downward from 0 to 300 dots (1 inch at a resolution of 300 dpi).
Use this option to eliminat e clipping of the top edge of the image on
some systems. The default offset is 75 dots.
Reset Override
The Reset Override option determi nes whethe r the printer autom ati cally resets to the initial power-up configuration before every print job
or whether it retains the configuration from the previous print job. The
range of possible values is Off and On. The default setting is Off.
Emulations Submenu
5-9
Page 86

PostScript
Orientation
The Orientation option specifie s the orientati on to be used by the
LN03 Plus emulation. The range of possible values is Portrait and
Landscape. The default value is Portrait. Portrait orientation has the y
axis parallel to the long edge of the page. Landscape orientation has
the y axis parallel to the short edge of the page.
» Note: This option applies only to the LN03 Plu s em ulation. The LN03
Plus emulation r espects or ientation o nly wh en it is set through the
LN03 Plus e mu lation menu or through the LN03 emulations
orientation com m and.
PostScript
By selecting PostScript in the Emulations submenu, you are able to
choose which emulation level of PostScript the printer uses to print
your file. The choices are Level 2 for QMS Level 2 emulation, Level 1
B/W for PostScript Level 1 emul ation that uses no color operators,
and Level 1 Color for PostScript Level 1 emulation that uses color
operators. Level 2 works for Level 2 files and most Level 1 files. The
default is Level 2.
QMS 3825/3225/2025 System Administrators Guide5-10
Page 87

Lineprinter
The Lineprinter submenu contains setting s for the def ault conditions
for this emulati on. Th e Lineprint er emu lat ion print s simple byte-oriented lineprinter files. A byte-oriented lineprinter handle s jobs consisting of a series of bytes, where lines are delimited by carriage
returns and line feed characters. The illustration below shows the
options within the Lin eprint er emul ati on.
Lineprinter
EMULATIONS
LINEPRINTER
LINEPRINTER
MARGINS
LINEPRINTER
LINES PER PAGE
LINEPRINTER
AUTOWRAP
LINEPRINTER
ORIENTATION
LINEPRINTER
FFISCRFF
LINEPRINTER
FONT
LINEPRINTER
CRISCRLF
LINEPRINTER
POINT SZ 100THS
LINEPRINTER
CHARACTER MAP
LINEPRINTER
LINE NUMBERING
LINEPRINTER
TAB STOPS
LINEPRINTER
LFISCRLF
Emulations Submenu
5-11
Page 88

Lineprinter
Font
This option specifies the font t o be used to print the current job. Any
PostScript fonts available on the printer can be used. To see a list of
PostScript fonts available, print an advanced status page. The default
is Courier.
Point Sz 100ths
This option is a five-digit value which specifies, in incremen ts of .01
point, the point size of the font to be used to print the current print job.
The range is from 400 (4 points) to 25600 (256 points). The default is
00880 (8.8 points).
Character Map
This selection specifies the type of character map to be used. The
choices are ASCII and EBCDIC. The d efault is AS CI I.
Line Numbering
Line numbering specifie s that a five-digit numbe r is to be prefixed to
the beginning of each line. The choices are On and Off with Off being
the default.
Tab Stops
This option specifies the number of spaces between tab sto ps. The
minimum number of tab stops is 0 and the maxi mum is 256. The
default is 8.
LF IS CRLF
Use this option to stipulate whet her each line fee d in the print job is
translated to a carriage return/line feed combination. The choices are
On and Off with On being the default.
QMS 3825/3225/2025 System Administrators Guide5-12
Page 89

Lineprinter
CR IS CRLF
CRISCRLF determines whether each carriage return in the print job is
translated to a carriage return/line feed combination. The choices are
On and Off with Off being the default .
FF IS CRFF
This option stipulat es w heth er each form feed in the print job is trans lated to a carriage return/form fe ed combi nati on. The options are On
and Off with On being the default.
Orientation
This option specifies whet her text is print ed Portrait or Landsca p e.
The default is Portrait .
Autowrap
This option indicates whether long lin es are to be wrapped onto the
next line instead of being truncated. The options are On and Off with
Off being the def ault .
Lines Per Page
This option specifies the number of lines print ed on a page before an
automatic page eject. Interline spacing is se t to the selected point
size. Logical pages consisting of more lines than specified are split
into multiple pages. The minimum Lines Per Page setting is 1, and
the maximum is 128. The def ault is 87.
Margins
This option defines the left, right, top, and bottom margins from 0 to
17 inches in .01" increments. The minim um setting is 0 and the maximum is 1700 (17"). The default is 0.
Emulations Submenu
5-13
Page 90

HP-GL
HP-GL
The HP-GL options conta in settings for th e defau lt condition s of the
HP-GL (plotter) emu lation. The illu strat ion below shows the HP-GL
options.
EMULATIONS
HP-GL
HP-GL
PEN (1-8)
HP-GL
PAPER TYPE
HP-GL
EXPAND MODE
HP-GL
PLOTTER
HP-GL
ENHANCED MODE
HP-GL
SCALING PERCENT
HP-GL
ORIGIN
HP-GL
REVERSE IMAGE
Plotter
The Plotter option selects which type of HP-GL compatible plotter the
QMS printer emulat es for HP-G L jobs. The choice s are 7470A,
7475A, 7550A, and ColorPro. (Selecting Col orPro does not result in
color printing. Colors are represented by varying gray shades.) The
default value is 7550A.
QMS 3825/3225/2025 System Administrators Guide5-14
Page 91

HP-GL
Scaling Percent
The Scaling Percent option is a numeric value for the percentage of
enlargement or reduction of the plot. The minimum value is 1 and the
maximum is 150. Th e default value is 100 (same size).
» Note: To scale plots, select the paper size originally used for the plot
in the Paper Typ e m enu; then enter the r eduction o r enlargement
needed to fit the plot on the n ew page in the Scaling Percent submenu.
If necessary, enter new x,y coordinates in the Origin submenu to
reposition the plot on the page.
Origin
The Origin option is a numeric value for the distance to move the plot
origin along the x and y axes in increments of .001". The mini mum
value is 0, and the maximum values are 8500 (8.5") for the x axis and
11000 (11") for the y axis. The default values are 0000 (x axis) and
00000 (y axis). Values of 0 for both x axis and y axis align the plot origin with the lower-left corner of the paper. The default values move
the plot origin just inside the boundaries of the printable region of the
page. Setting values less than the defaults or too high may result in
lost portions of the plot when printe d.
Reverse Image
The Reverse Image option has two choices for printing white plots on
a black background. The defau lt value is Off (print black on a white
background). If you select On, black lines in the plot print in white,
and white lines print in black.
Enhanced Mode
The Enhanced Mode option has two choices that specify the resolution of a downloaded character set. The choices are Off (standard
resolution for fixed- and variable-spaced fonts, 4x8 character gri d) or
On (enhanced resolution for variable spaced fonts, 32x32 character
grid). The default value is Off.
Emulations Submenu
5-15
Page 92

HP-GL
Expand Mode
The Expand Mode option expands the def aul t scaling poin ts (P1 and
P2), the hard-clip plottin g range, and the maxim um plot tin g area to
the imageable area of the QMS printe r. The default value is Off (do
not expand).
Paper Type
The Paper Type option allows you to scale an image to the defined
paper size when printing a plot image. The choices are A (8.5" x 11"),
A4 (210 mm x 297 mm), B (11" x 17"), A3 (297 mm x 420 mm), or
Scale to Paper. The default value is Scale to Paper.
Pens 1-8
The Pen options set the width and color of the 8 “pens” the printer
uses when printing HP-GL emulation jobs. The pen widt h may be set
from 0 (0 mm wide) to 60 (60 mm wide). The pen color choices are
Black (100% black), Violet (59% black), Brown (50% black), Gray25%, Gray-50%, Gray-75%, Red (70% black), Orange (25.8% black),
Y ellow (1 1% black), Green (41% black), Blue (89% black), Cyan (30%
black), and Magenta (59% black). The default settings a re
Pen Width Color
1 7 mm Black
2 3 mm Black
33 mmRed
43 mmGreen
5 3 mm Blue
63 mmViolet
73 mmOrange
8 3 mm Brown
QMS 3825/3225/2025 System Administrators Guide5-16
Page 93

CCITT Groups 3 and 4
By adding the QMS DOC %%In cludeF eatur e:em ulatio n (ccit t) to
the beginning of your file, you can access the printer-resident CCITT
Group 3 and 4 emulation.
CCITT Commands
The CCITT command language consists of ASCII text strings that set
options for the CCITT emul ati on. The opti ons must be set on a
per-image basis because they are returned to their defaul t values
after each image is decompressed. If the correct decompression
options are not set before the decompression begi ns, the emul atio n
absorbs the data until it finds a valid end-of-job marker.
Unlike QMS DOC, CCITT commands do not need to be placed at the
beginning of a document but can be placed where needed.
The remainder of this section provides the function , syntax, and
default settings of all available CCI TT com ma nds.
CCITT Groups
3and4
Command Syntax
The following conventions are used in the discussion of all CCITT
commands that f ollow.
mixed-case bold CCITT comman d
mixed-case bold
italic
%% Introduce the command; you must type these
( ) Enclose command variabl es; you must type the
Emulations Submenu
Command variable; replace the variable with
information specific to your document
characters
parentheses
5-17
Page 94

CCITT Groups
3and4
BitReverse
Function Causes the CCITT emulatio n to reverse the bits wit hin
Syntax %%BitRe verse
Default fals e
BlockEnd
Function Indicates whether a CCIT T End of Blo c k is included in
Syntax %%BlockEnd
Default false
each byte of the image data automatically.
(true/false)
true
false
the image data.
true
false
Indicates that the bits are to be reversed.
Indicates that the bits are not to be reversed.
(true/false)
Indicates that a BlockEnd is required in the
image data. Otherwise, an error results.
Indicates that a BlockEn d is not required in
the image data but, if present, it is accepted
with no error.
Compression
Function Sets the data compression type of the data following the
%%ImageData command.
Syntax % %Compressi on
type
Default 0 (Group 4)
QMS 3825/3225/2025 System Administrators Guide5-18
(type)
0 Group 4
1 Group 3, 1-dimensional
2 Group 3, 2-dimensional
Page 95

CCITT Groups
3and4
DPI
Function Sets the print resolution (dots per inch) to match the
scanned resolution of the original imag e.
Syntax %%DPI
horizontal
vertical
Default Currently selected print system resolution.
Notes This command can also be used to scale the image. DPI
resolutions above the original scanned resolution wil l
reduce the image while DPI reso lutions b elow the
original scanned resolution will enl arge the ima ge.
(horizontal vertical)
Identifies the horizontal reso lution.
Identifies the vertical resolut ion.
EBAMode
Function Sets the Encoded Byte Align flag, which indicat es that
the image data is broke n into individual lines that are
each aligned on a byte boundary.
Syntax %%E BAMo de
true
false
Default fals e
Note EBAMode must typical ly be used with Group 3 1-D
images, which may or may not be from fax machines.
Indicates that the data is encoded byte aligned.
Indicates that the data is not encoded byte
aligned.
(true/false)
Emulations Submenu
5-19
Page 96

CCITT Groups
3and4
ImageData
Function Instructs the emulation to begin decompression of the
Syntax %%ImageData
Default None—no options.
Notes You must specify %%ImageSize before %%ImageData.
ImagePosition
Function Sets the image position (in 0.001" increments) from the
Syntax %% Im a gePositi on
Default 0 0—Places the image in the upper-left corner of the
image data using the currently set image option s.
If you do not, the data following %%ImageData is
absorbed with no effect on the file.
This command begins reading the image data after the
end of the current line. After the image, the input stream
is flushed until the next set of %% characters is
encountered.
upper-left corner of the page.
(x y)
x
y
page.
The horizontal location of the image’s upper-left
corner.
The vertical location of the image’s upper-left
corner.
QMS 3825/3225/2025 System Administrators Guide5-20
Page 97

CCITT Groups
3and4
ImageSize
Function Sets the image size to be used for decompression of the
image data that follows the %%ImageData command.
Syntax %%ImageSize
width
height
Default None.
Notes This command must be used in order t o decompress an
image.
This comman d must be sent b efore t h e %% ImageData
command. If it is not, the image is ignored.
The width of the image in pixels.
The height of the image in pixels.
(width height)
InvertImage
Function Indicates whether the blac k and white pixels in the
image are reversed.
Syntax %% In vertImage
true
false
Default fals e
Indicates that t he black an d white pixels in the
image are reversed.
Indicates that t he black an d wh ite pixels in the
image are not reversed.
(true/false)
Emulations Submenu
5-21
Page 98

CCITT Groups
3and4
JobEnd
Function Signals the end of a CCITT print job and resets the
Syntax %%JobEnd
Default None—no options.
Notes If this command is omitted, the printer remains in CCITT
LineEnd
Function Sets Line-End flags, which indicate whether CCI TT
Syntax %%LineEnd
Default fals e
printer to the default mode. Ends the job and returns the
printer to ESP mode.
emulation mod e until the emulat ion wait timeout expire s
(Administration/Timeouts/Emul Timeout menu).
end-of-lines are included in the image data.
(true/false)
true
false
Indicates that end-of-lines are required in the
image data. Otherwise , an error results.
Indicates that end-of-lines are not required in the
image data but, if present, are accepted with no
error.
QMS 3825/3225/2025 System Administrators Guide5-22
Page 99

CCITT Groups
3and4
PageEnd
Function Instructs the emulation to eject the current page
(whether or not any data has been printed to it) and
clear the page memory.
Syntax %% PageEnd
Default None—no options.
Notes You must include this command for a page to be printed.
Image data must be included after this command.
If an image has not been decompressed since the
beginning of the job or since the last %%PageEnd, a
blank page is ejected.
Rotation
Function Sets the rotation to be used when the image is
decompressed.
Syntax %%Rotati on
degre
e
Default 0
Notes Rotation occurs about the current image position origin
set by the %%ImageP o siti on command. If no
%%ImagePosition command has been used, rotation
occurs about the origin (0,0).
(degree)
00° (no) rotation
90 90° rotation
180 180° rotation
270 270° rotation
Any rotation (exce p t 0) about the defa ult image position
(0,0) causes the image to be rotated off the page.
Therefore, any rotation othe r than 0° must coincide with
a %%Imag ePosition command.
Emulations Submenu
5-23
Page 100

imPRESS
imPRESS
Using %%IncludeFeature:emulation(i mpress) QMS DOC, you can
access the imPRESS full-page layout and graphics page description
language. For details about imPRESS, see the
gramming Language
guide, provided on disk with your printer.
Optional Emulation s
The QMS printer supports optional emulations, such as QUIC II. If an
optional emulation is installe d on the printer, the appropriate emulation options display in the Emulat ions submen u. Ref er to that emu lation’s documentation for complete inform ati on.
❖
QMS imP RESS Pro-
QMS 3825/3225/2025 System Administrators Guide5-24
 Loading...