

Page 1

magicolor 1680MF
Printer / Copier /
Scanner User’s
Guide
A0HF-9561-00A
Page 2

Thank You
Thank you for purchasing a magicolor 1680MF. You have made an excellent choice.
Your magicolor 1680MF is specially designed for optimal performance in Windows
and Macintosh environments.
Trademarks
KONICA MINOLTA and the KONICA MINOLTA logo are trademarks or registered
trademarks of KONICA MINOLTA HOLDINGS, INC.
magicolor and PageScope are trademarks or registered trademarks of KONICA
MINOLTA BUSINESS TECHNOLOGIES, INC.
All other trademarks and registered trademarks are the property of their respective
owners.
Copyright Notice
Copyright © 2008 KONICA MINOLTA BUSINESS TECHNOLOGIES, INC., Marunouchi Center Building, 1-6-1 Marunouchi, Chiyoda-ku, Tokyo, 100-0005, Japan. All
Rights Reserved. This document may not be copied, in whole or part, nor transferred
to any other media or language, without written permission of KONICA MINOLTA
BUSINESS TECHNOLOGIES, INC.
Notice
KONICA MINOLTA BUSINESS TECHNOLOGIES, INC. reserves the right to make
changes to this guide and to the equipment described herein without notice. Considerable effort has been made to ensure that this guide is free of inaccuracies and
omissions. However, KONICA MINOLTA BUSINESS TECHNOLOGIES, INC. makes
no warranty of any kind including, but not limited to, any implied warranties of merchantability and fitness for a particular purpose with regard to this guide.
KONICA MINOLTA BUSINESS TECHNOLOGIES, INC. assumes no responsibility
for, or liability for, errors contained in this guide or for incidental, special, or consequential damages arising out of the furnishing of this guide, or the use of this guide in
operating the equipment, or in connection with the performance of the equipment
when so operated.
x-1
Page 3

SOFTWARE LICENSE AGREEMENT
This package contains the following materials provided by KONICA MINOLTA BUSINESS
TECHNOLOGIES, INC. (KMBT): software included as part of the printing system (“Printing
Software”), the digitally-encoded machine-readable outline data encoded in the special format
and in the encrypted form (“Font Programs”), other software which runs on a computer system
for use in conjunction with the Printing Software (“Host Software”), and related explanatory written materials (“Documentation”). The term “Software” shall be used to describe Printing Software, Font Programs and/or Host Software and also include any upgrades, modified versions,
additions, and copies of the Software.
The Software is being licensed to you under the terms of this Agreement.
KMBT grants to you a non-exclusive sublicense to use the Software and Documentation, provided that you agree to the following:
1. You may use the Software and accompanying Font Programs for imaging to the licensed
output device(s), solely for your own internal business purposes.
2. In addition to the license for Font Programs set forth in Section 1 above, you may use
Roman Font Programs to reproduce weights, styles, and versions of letters, numerals,
characters and symbols (“Typefaces”) on the display or monitor for your own internal business purposes.
3. You may make one backup copy of the Host Software, provided your backup copy is not
installed or used on any computer. Notwithstanding the above restrictions, you may install
the Host Software on any number of computers solely for use with one or more printing systems running the Printing Software.
4. You may assign its rights under this Agreement to an assignee of all of Licensee’s right and
interest to such Software and Documentation (“Assignee”) provided you transfer to
Assignee all copies of such Software and Documentation Assignee agrees to be bound by
all of the terms and conditions of this Agreement.
5. You agree not to modify, adapt or translate the Software and Documentation.
6. You agree that you will not attempt to alter, disassemble, decrypt, reverse engineer or
decompile the Software.
7. Title to and ownership of the Software and Documentation and any reproductions thereof
shall remain with KMBT and its licensor.
8. Trademarks shall be used in accordance with accepted trademark practice, including identification of the trademark owner’s name. Trademarks can only be used to identify printed
output produced by the Software. Such use of any trademark does not give you any rights
of ownership in that trademark.
9. You may not rent, lease, sublicense, lend or transfer versions or copies of the Software Licensee does not use, or Software contained on any unused media, except as part of the permanent transfer of all Software and Documentation as described above.
10. IN NO EVENT WILL KMBT OR ITS LICENSOR BE LIABLE TO YOU FOR ANY CONSEQUENTIAL, INCIDENTAL INDIRECT, PUNITIVE OR SPECIAL DAMAGES, INCLUDING
ANY LOST PROFITS OR LOST SAVING, EVEN IF KMBT HAS BEEN ADVISED OF THE
POSSIBILITY OF SUCH DAMAGES, OR FOR ANY CLAIM BY ANY THIRD PARTY. KMBT
OR ITS LICENSOR DISCLAIMS ALL WARRANTIES WITH REGARD TO THE SOFTWARE, EXPRESS OR IMPLIED, INCLUDING, WITHOUT LIMITATION IMPLIED WARRANTIES OF MERCHANTABILITY, FITNESS FOR A PARTICULAR PURPOSE, TITLE
AND NON-INFRINGEMENT OF THIRD PARTY RIGHTS. SOME STATES OR JURISDICTIONS DO NOT ALLOW THE EXCLUSION OR LIMITATION OF INCIDENTAL, CONSEQUENTIAL OR SPECIAL DAMAGES, SO THE ABOVE LIMITATIONS MAY NOT APPLY
TO YOU.
x-2
Page 4

11. Notice to Government End Users: The Software is a “commercial item,” as that term is
defined at 48 C.F.R.2.101, consisting of “commercial computer software” and “commercial
computer software documentation,” as such terms are used in 48 C.F.R. 12.212. Consistent with 48 C.F.R. 12.212 and 48 C.F.R. 227.7202-1 through 227.7202-4, all U.S. Government End Users acquire the Software with only those rights set forth herein.
12. You agree that you will not export the Software in any form in violation of any applicable
laws and regulations regarding export control of any countries.
x-3
Page 5

Legal Restrictions on Copying
Certain types of documents must never be copied with the purpose or intent to pass
copies of such documents off as the originals.
The following is not a complete list, but is meant to be used as a guide to responsible
copying.
Financial Instruments
z Personal checks
z Traveler’s checks
z Money orders
z Certificates of deposit
z Bonds or other certificates of indebtedness
z Stock certificates
Legal Documents
z Food stamps
z Postage stamps (canceled or uncanceled)
z Checks or drafts drawn by government agencies
z Internal revenue stamps (canceled or uncanceled)
z Passports
z Immigration papers
z Motor vehicle licenses and titles
z House and property titles and deeds
General
z Identification cards, badges, or insignias
z Copyrighted works without permission of the copyright owner
In addition, it is prohibited under any circumstances
rencies, or works of art without permission of the copyright owner.
When in doubt about the nature of a document, consult with legal counsel.
to copy domestic or foreign cur-
" In order to prohibit the illegal reproduction of certain documents, such as
paper currency, this machine is equipped with a counterfeit prevention feature.
Due to the counterfeit prevention feature that this machine is equipped with,
images may be distorted.
x-4
Page 6

For EU member states only
This symbol means: Do not dispose of this product
together with your household waste!
Please contact the Local Authority for appropriate disposal instructions. In the case of a new device being
purchased, the used one can also be given to our dealer
for appropriate disposal. Recycling of this product will
help to conserve natural resources and prevent potential
negative consequences for the environment and human
health caused by inappropriate waste handling.
This product complies with RoHS (2002/95/EC) directive.
x-5
Page 7

Contents
1 Introduction .................................................................................................... 1-1
Getting Acquainted with Your Machine ....................................................... 1-2
Space Requirements................................................................................... 1-2
Part Names ................................................................................................. 1-3
Front View............................................................................................. 1-3
Rear View ............................................................................................. 1-4
Front View with Option.......................................................................... 1-5
Drivers CD/DVD .......................................................................................... 1-6
Printer Drivers ....................................................................................... 1-6
Scanner Drivers .................................................................................... 1-6
Applications CD/DVD.................................................................................. 1-7
Applications........................................................................................... 1-7
Documentation CD/DVD ............................................................................. 1-8
Documentation...................................................................................... 1-8
System Requirements................................................................................. 1-9
2 Control Panel and Configuration Menu ....................................................... 2-1
About the Control Panel ................................................................................ 2-2
Control Panel Indicators and Keys.............................................................. 2-2
Contentsx-6
Page 8

Display Indications ...................................................................................... 2-4
Main Screen (Copy Mode) .................................................................... 2-4
Main Screen (Scan Mode) .................................................................... 2-6
Print Screen .......................................................................................... 2-7
Checking the Machine Status and Settings ................................................ 2-8
PRINTER MODE Menu............................................................................... 2-8
TONER REMAINING .................................................................................. 2-9
T/C CHANGE.............................................................................................. 2-9
REPORT/STATUS Menu.......................................................................... 2-11
TOTAL PRINT..................................................................................... 2-11
SUPPLY STATUS............................................................................... 2-12
REPORT ............................................................................................. 2-12
Configuration Menu Overview .................................................................... 2-13
UTILITY Menu........................................................................................... 2-13
MACHINE SETTING Menu................................................................. 2-14
TRAY1 PAPER SETUP Menu ............................................................ 2-17
ADMIN. MANAGEMENT Menu........................................................... 2-19
COPY SETTING Menu ....................................................................... 2-20
3 Media Handling .............................................................................................. 3-1
Print Media ..................................................................................................... 3-2
Specifications.............................................................................................. 3-2
Types .......................................................................................................... 3-3
Plain Paper (Recycled Paper)............................................................... 3-3
Thick Stock ...........................................................................................3-4
Envelope ............................................................................................... 3-5
Label ..................................................................................................... 3-6
Letterhead............................................................................................. 3-7
Postcard................................................................................................ 3-7
Printable Area ................................................................................................ 3-8
Envelopes ................................................................................................... 3-9
Page Margins .............................................................................................. 3-9
Loading Media .............................................................................................. 3-10
How do I load media? ............................................................................... 3-10
Tray 1 (Multipurpose Tray)........................................................................ 3-10
Loading Plain Paper............................................................................ 3-10
Other Media ........................................................................................ 3-12
Loading Envelopes ............................................................................. 3-12
Loading Label Sheets/Letterheads/Postcards and Thick Stock.......... 3-14
Output Tray .................................................................................................. 3-16
Media Storage .............................................................................................. 3-17
Original Media .............................................................................................. 3-18
Specifications............................................................................................ 3-18
Placing a Document to be Copied .............................................................. 3-19
Contents x-7
Page 9

4 Using the Printer Driver ................................................................................ 4-1
Selecting Printer Driver Options/Defaults (for Windows) .......................... 4-2
Uninstalling the Printer Driver (for Windows) ............................................. 4-3
Windows Vista/XP/Server 2003/2000 ......................................................... 4-3
Displaying Printer Driver Settings ............................................................... 4-3
Windows Vista............................................................................................. 4-3
Windows XP/Server 2003 ........................................................................... 4-3
Windows 2000............................................................................................. 4-4
Printer Driver Settings ................................................................................... 4-5
Common Buttons ........................................................................................ 4-5
Basic Tab .................................................................................................... 4-6
Layout Tab .................................................................................................. 4-7
Overlay Tab................................................................................................. 4-7
Watermark Tab ........................................................................................... 4-7
Quality Tab.................................................................................................. 4-7
Version Tab................................................................................................. 4-8
5 Using the Copier ............................................................................................ 5-1
Making Basic Copies ..................................................................................... 5-2
Basic Copy Operation ................................................................................. 5-2
Specifying the Copy Quality Setting............................................................ 5-3
Selecting the Document Type............................................................... 5-3
Specifying the Copy Density................................................................. 5-3
Specifying the Zoom Ratio .......................................................................... 5-4
Selecting a Preset Zoom Ratio ............................................................. 5-4
Specifying a Custom Zoom Ratio ......................................................... 5-4
Making Advanced Copies ............................................................................. 5-5
Setting a Copy Function.............................................................................. 5-5
ID Card Copying ................................................................................... 5-5
Repeat Copying .................................................................................... 5-6
Poster Copying ..................................................................................... 5-7
6 Using the Scanner ......................................................................................... 6-1
Scanning From a Computer Application ..................................................... 6-2
Basic Scanning Operation........................................................................... 6-2
Windows TWAIN Driver Settings ................................................................ 6-3
Windows WIA Driver Settings ..................................................................... 6-5
Macintosh TWAIN Driver Settings............................................................... 6-6
Scanning With the Machine .......................................................................... 6-8
Basic Scanning Operation........................................................................... 6-8
7 Replacing Consumables ............................................................................... 7-1
Replacing Consumables ............................................................................... 7-2
About Toner Cartridges............................................................................... 7-2
Replacing a Toner Cartridge ....................................................................... 7-5
Replacing All Toner Cartridges at the Same Time.................................... 7-10
Contentsx-8
Page 10

Replacing the Imaging Cartridge............................................................... 7-11
Replacing the Fuser Unit........................................................................... 7-15
8 Maintenance ................................................................................................... 8-1
Maintaining the Machine ............................................................................... 8-2
Cleaning the Machine .................................................................................... 8-4
Exterior........................................................................................................ 8-4
Media Rollers .............................................................................................. 8-5
Cleaning the Media Feed Roller ........................................................... 8-5
Print Head Window ................................................................................... 8-10
Clearing the Print Head Window......................................................... 8-10
9 Troubleshooting ............................................................................................ 9-1
Introduction .................................................................................................... 9-2
Printing a Configuration Page ...................................................................... 9-3
Preventing Media Misfeeds ........................................................................... 9-4
Understanding the Media Path ..................................................................... 9-5
Clearing Media Misfeeds .............................................................................. 9-5
Media Misfeed Messages and Clearing Procedures................................... 9-6
Clearing a Media Misfeed in the Machine............................................. 9-7
Clearing a Media Misfeed From Tray 1............................................... 9-14
Solving Problems with Media Misfeeds ..................................................... 9-15
Solving Other Problems .............................................................................. 9-17
Solving Problems with Printing Quality .................................................... 9-20
Status, Error, and Service Messages ......................................................... 9-26
Status Messages....................................................................................... 9-26
Error Messages......................................................................................... 9-27
Service Messages..................................................................................... 9-30
10 Installing Accessories ................................................................................. 10-1
Dust Cover .................................................................................................... 10-2
Installing the Dust Cover ........................................................................... 10-2
A Appendix ........................................................................................................A-1
Technical Specifications ...............................................................................A-2
Consumable Life Expectancy Chart............................................................A-5
User-Replaceable .................................................................................A-5
Service-Replaceable.............................................................................A-5
Contents x-9
Page 11

Contentsx-10
Page 12

1Introduction
Page 13

Getting Acquainted with Your Machine
Space Requirements
To ensure easy operation, consumable replacement and maintenance,
adhere to the recommended space requirements detailed below.
505 mm (19.9")
405 mm (15.9")
100 mm
(3.9")
Front View
100 mm
(3.9")
160 mm
(6.3")
405 mm (15.9")
765 mm (30.1")
Side View
Getting Acquainted with Your Machine1-2
234 mm (9.2")376 mm (14.8")
100 mm
(3.9")
610 mm (24.0")
Page 14
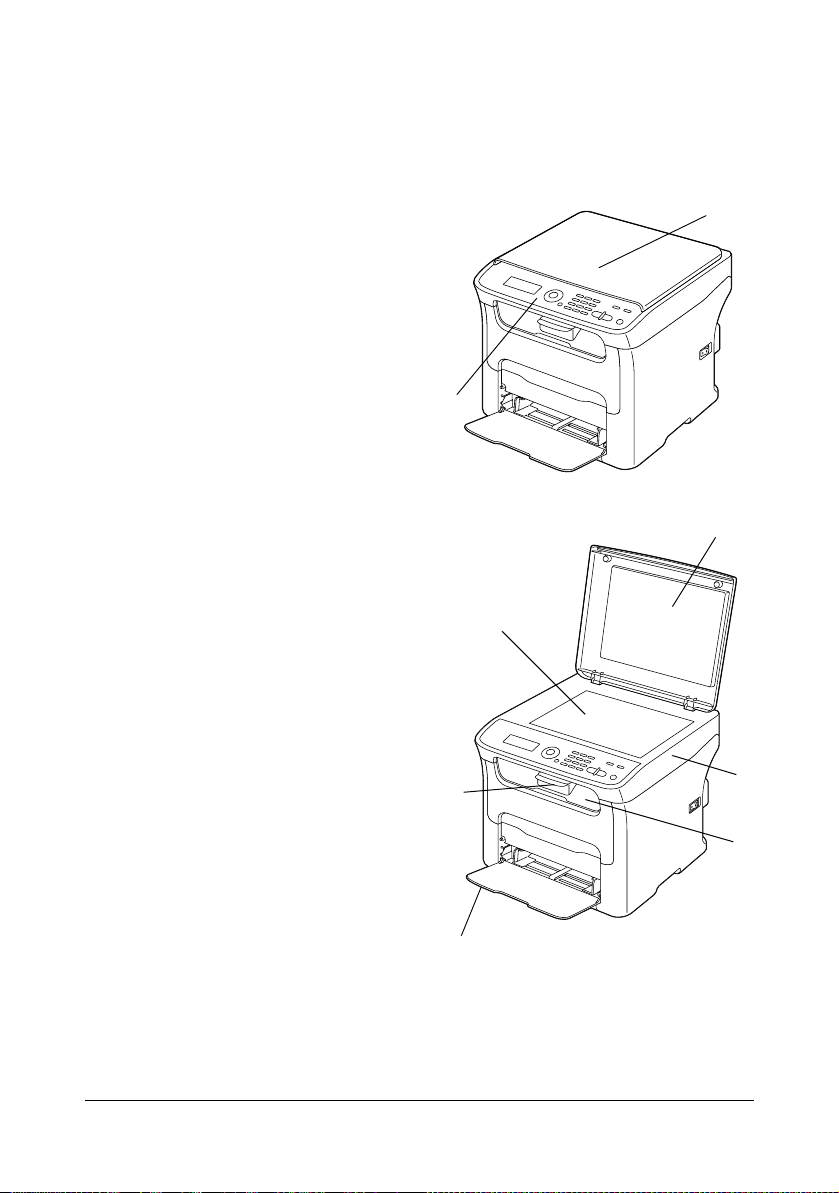
Part Names
The following drawings illustrate the parts of your machine referred to
throughout this guide, so please take some time to become familiar with
them.
Front View
1—Control panel
2—Original cover
3—Tray 1 (Multipurpose tray)
4—Output tray
5—Extension tray
6—Original glass
7—Original cover pad
8—Scanner unit
2
M
1
7
6
8
5
M
4
3
Getting Acquainted with Your Machine 1-3
Page 15
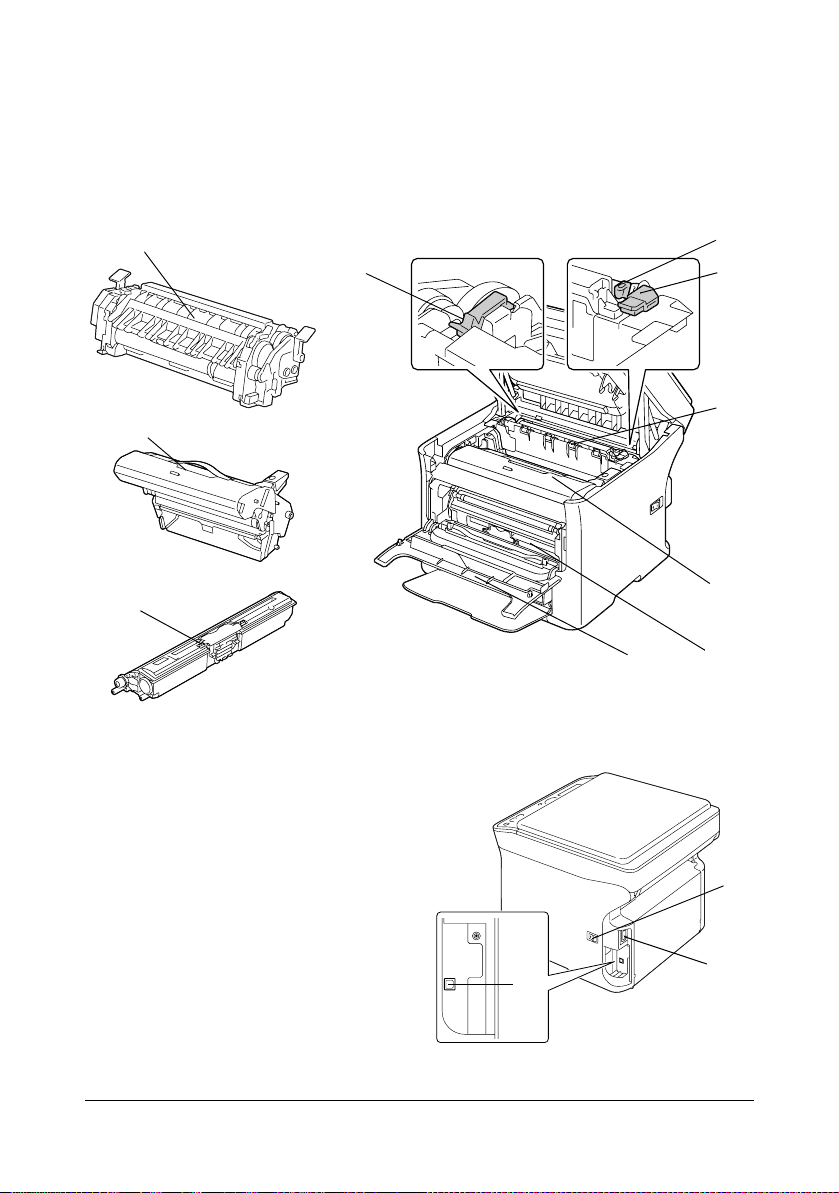
9—Fuser unit
10—Fuser separator levers
11—Fuser cover lever
12—Imaging cartridge
13—Toner cartridge
14—Front cover
9
12
10
11
10
9
13
Rear View
1—Power switch
2—Power connection
3—USB port
12
14
13
1
2
3
Getting Acquainted with Your Machine1-4
Page 16

Front View with Option
1—Dust Cover
M
1
Getting Acquainted with Your Machine 1-5
Page 17

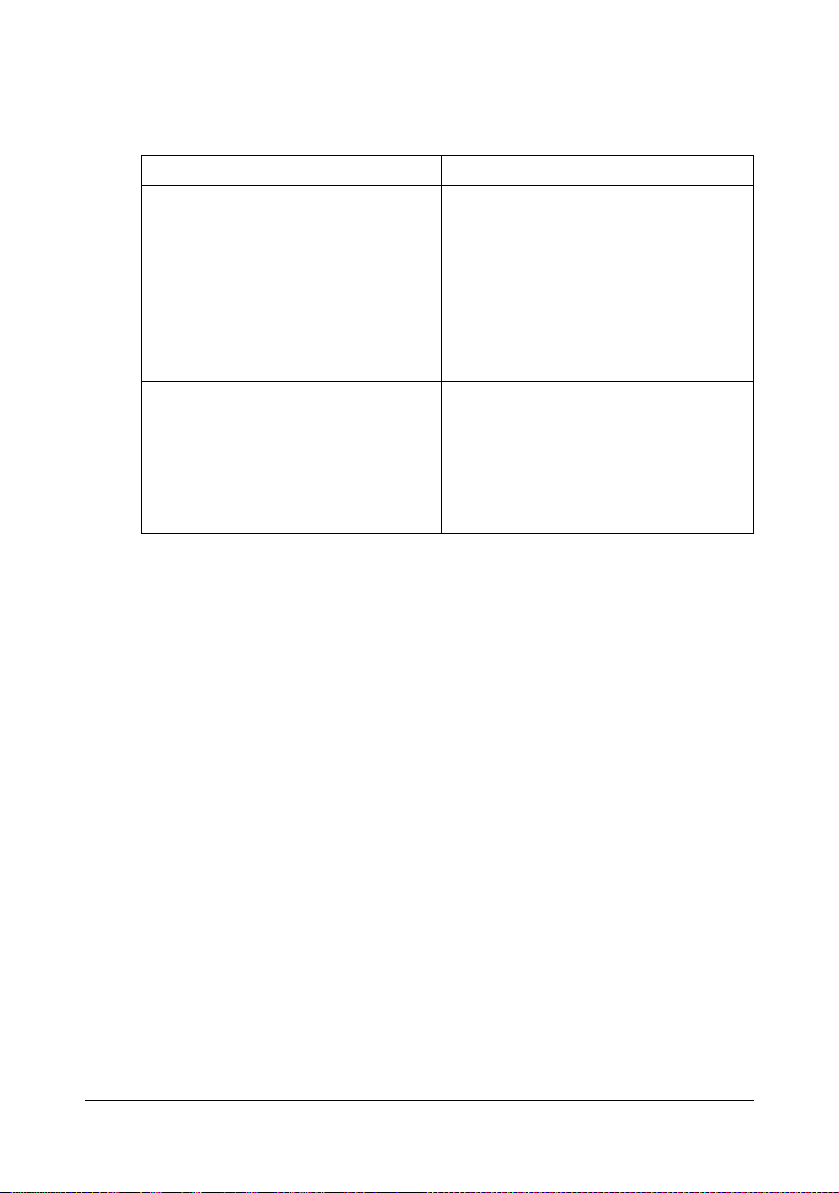
Drivers CD/DVD
Printer Drivers
Drivers Use/Benefit
Windows Vista/XP/Server 2003/
2000
Windows Vista/XP/Server 2003 for
64bit
Macintosh OS X (10.2.8/10.3/10.4/
10.5)
Scanner Drivers
Drivers Use/Benefit
TWAIN Driver for Windows Vista/XP/
Server 2003/2000
TWAIN Driver for Macintosh OS X
(10.2.8/10.3/10.4/10.5)
WIA Driver for Windows Vista/XP This driver enables you to set scan-
WIA Driver for Windows Vista/XP for
64 bit
These drivers give you access to all of
the printer features. For details, refer
to “Displaying Printer Driver Settings”
on page 4-3.
These drivers enable you to set scanning functions, such as the color setting and size adjustments.
For details, refer to “Windows TWAIN
Driver Settings” on page 6-3.
ning functions, such as the color setting and size adjustments.
For details, refer to “Windows WIA
Driver Settings” on page 6-5.
" For details on the installation of the drivers, refer to the Installation
Guide.
" For details of the Macintosh drivers, refer to the Reference Guide on
the Documentation CD/DVD.
" Windows TWAIN driver does not correspond to 64-bit applications
though it corresponds to 32-bit applications on 64-bit OS.
Getting Acquainted with Your Machine1-6
Page 18
Applications CD/DVD
Applications
Applications Use/Benefit
PaperPort SE This software is a document manage-
ment software package that helps you
scan, organize, access, share, and
manage both your paper and digital
documents on your personal computer.
For details, refer to the PaperPort SE
User’s Guide from the Help menu.
LinkMagic This software enables scanned docu-
ments to be saved in a file, processed,
mail attached, and printed out.
For details, refer to the Reference
Guide on the Documentation CD/
DVD.
Getting Acquainted with Your Machine 1-7
Page 19
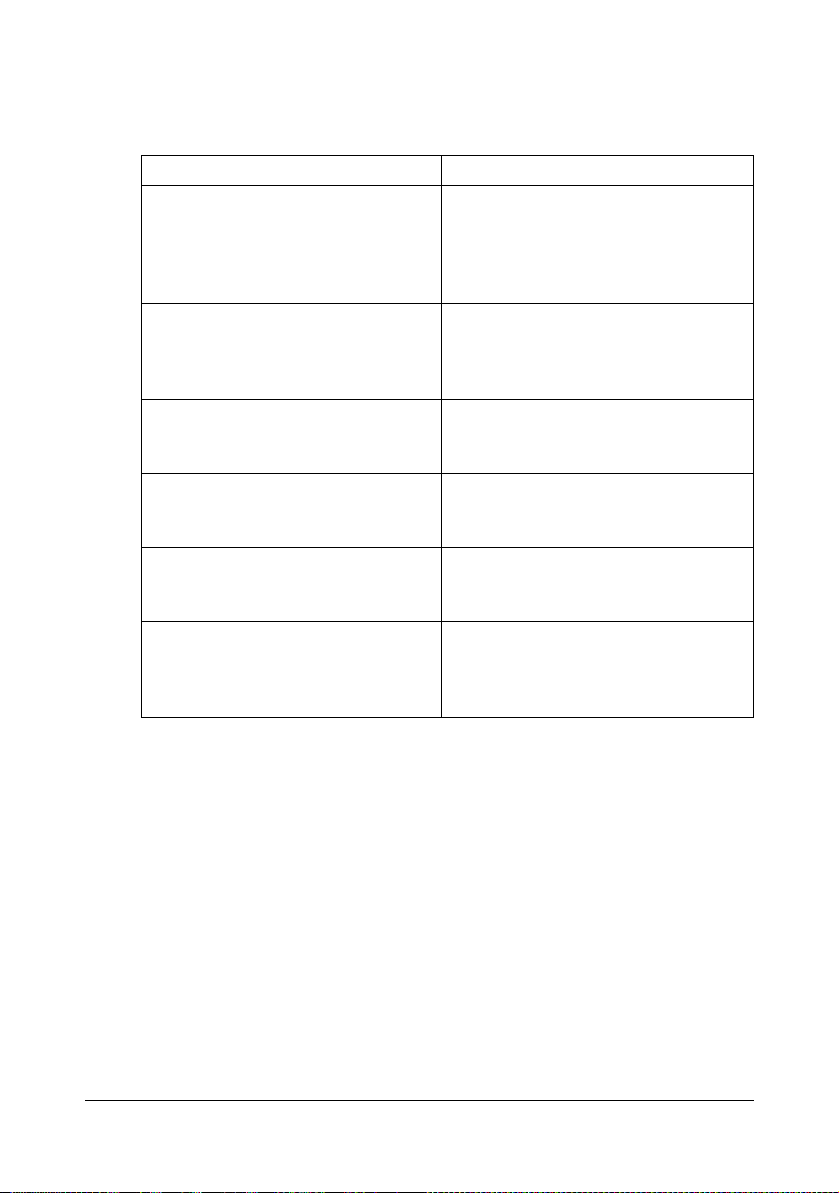
Documentation CD/DVD
Documentation
Documentation Use/Benefit
Installation Guide This manual provides installation
details that must be performed in
order to use this machine, such as
setting up the machine and installing
the drivers.
Printer/Copier/Scanner User’s Guide
(this manual)
Reference Guide This manual provides details on
Quick Guide The Quick Guide provides simple pro-
Service & Support Guide The Need Assistance sheet provides
Readme This guide provides details on operat-
This manual provides details on general daily operations, such as using
the drivers and control panel and
replacing consumables.
installing the Macintosh drivers and on
specifying settings for LinkMagic.
cedures for copy and scanning operations and for replacing consumables.
information on product support and
servicing.
ing conditions and precautions. Be
sure to read this information before
using the machine.
Getting Acquainted with Your Machine1-8
Page 20

System Requirements
Personal computer
For Windows
– Pentium II: 400MHz or higher (Pentium 3: 500MHz or higher is recom-
mended)
For Macintosh
– PowerPC G3 or later (G4 or later is recommended)
– Intel processor
Operating System
– Microsoft Windows Vista Home Basic/Home Premium/Ultimate/Busi-
ness/Enterprise, Windows Vista Home Basic/Home Premium/ Ultimate/Business/Enterprise x64 Edition, Windows XP Home Edition/
Professional (Service Pack 2 or later), Windows XP Professional x64
Edition, Windows Server 2003, Windows Server 2003 x64 Edition,
Windows 2000 (Service Pack 4 or later)
– Mac OS X (10.2.8 or later; We recommend installing the latest patch)
Free hard disk space
256 MB or more
RAM
128 MB or more
CD/DVD drive
I/O interface
– USB Revision 2.0 and USB Revision 1.1 compliant port
" The USB cable is not included with the machine.
" For details of the Macintosh drivers, refer to the Reference Guide on
the Documentation CD/DVD.
Getting Acquainted with Your Machine 1-9
Page 21

Getting Acquainted with Your Machine1-10
Page 22

2Control Panel
and Configuration
Menu
Page 23
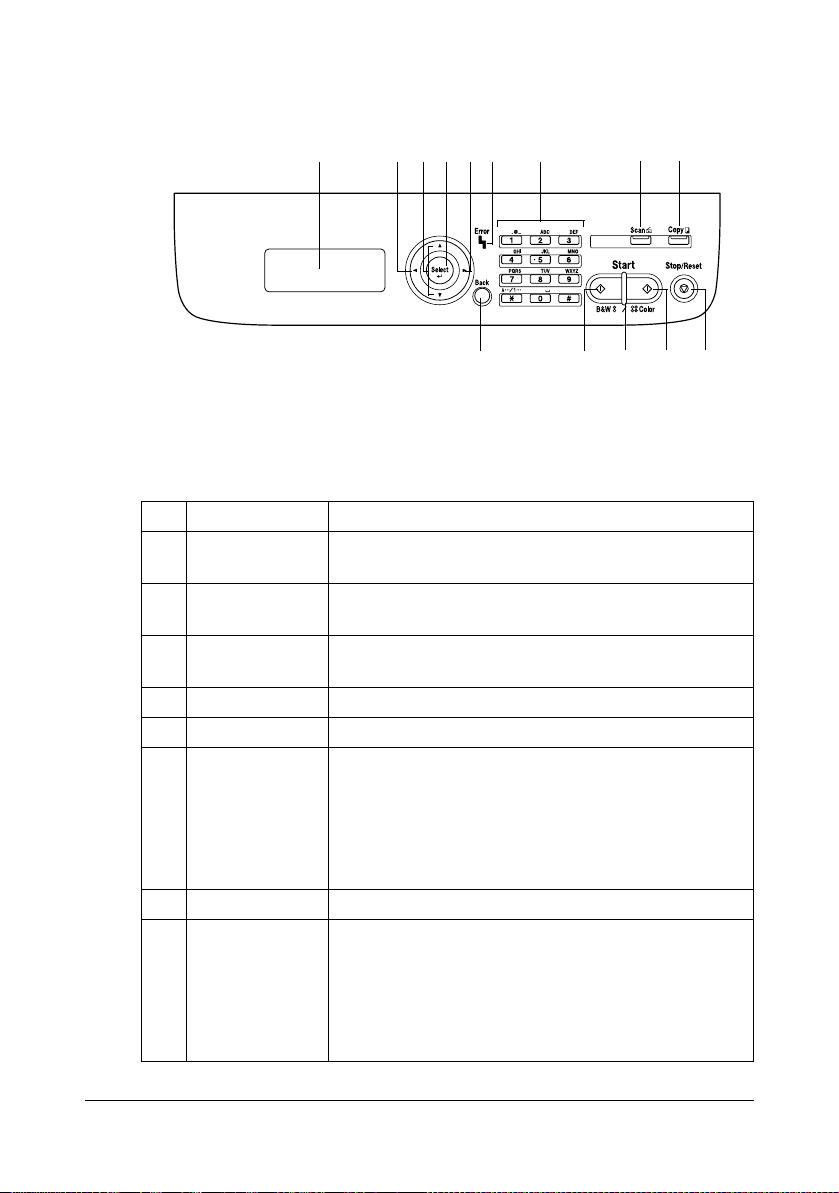
About the Control Panel
132435 879
Control Panel Indicators and Keys
No. Name Function
1 Message win-
dow
2 +/, keys Moves up and down through menus, options, or
3 */) keys Moves left and right through menus, options, or
4 Select key Press to select the setting that is currently displayed.
5 Error indicator Indicates an error condition.
6 Back key Clears the specified number of copies and entered
Displays settings, menus, and messages.
choices.
choices.
text.
131261011
Press to return to the previous screen.
Press to cancel the setting that is currently displayed.
7 Keypad Enters desired number of copies.
8 Scan key/LED Enters Scan mode. (Scan to PC)
Lights up in green to indicate that the machine is in
Scan mode.
For details on the Scanner functions, refer to chapter
6, “Using the Scanner”
About the Control Panel2-2
Page 24
No. Name Function
9 Copy key/LED Enters Copy mode.
Lights up in green to indicate that the machine is in
Copy mode.
For details on the Copy functions, refer to chapter 5,
“Using the Copier”.
10 Start (B&W) key Starts monochrome copying or scanning.
11 Start indicator Lights up in blue when copying is possible.
Lights up in orange when copying is not possible, for
example, during warm-up or if an error has occurred.
12 Start (Color) key Starts color copying or scanning.
13 Stop/Reset key Returns the settings to their defaults and stops func-
tions.
About the Control Panel 2-3
Page 25
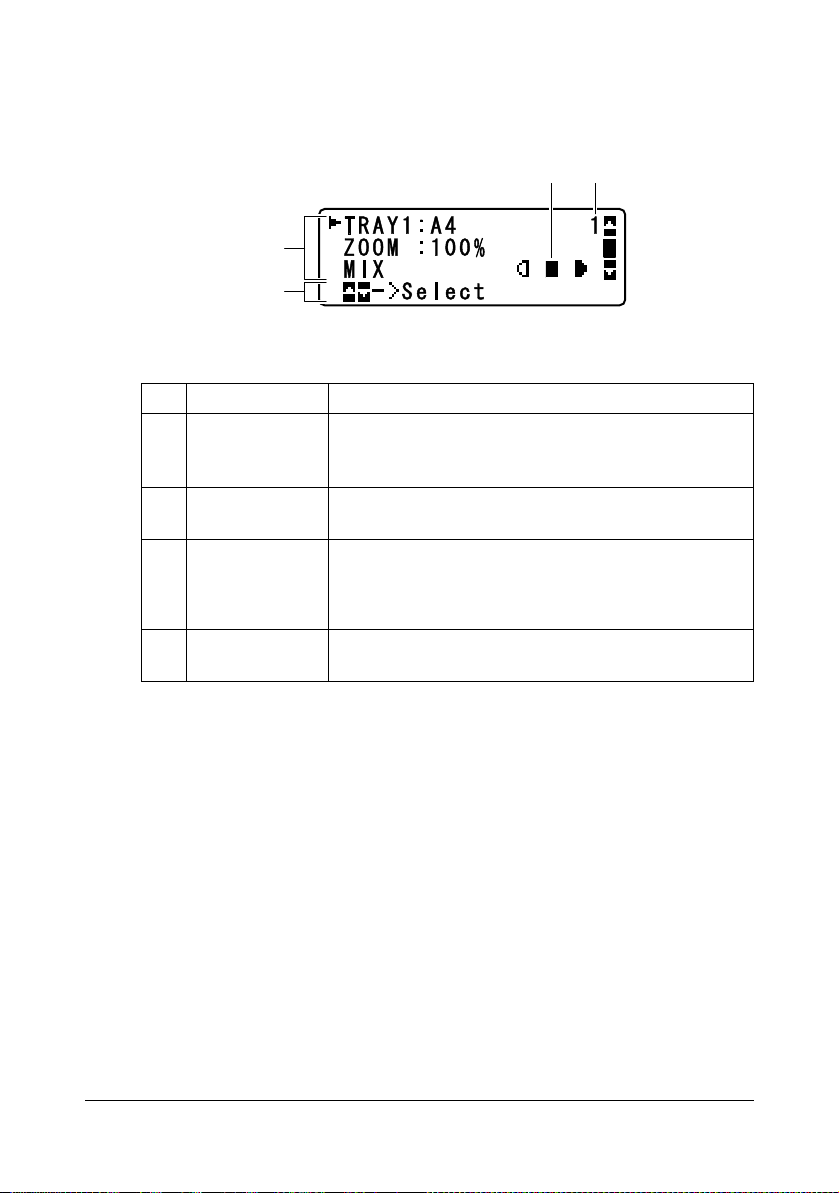
Display Indications
Main Screen (Copy Mode)
3 4
1
2
No. Indication Description
1 Copy settings Allows the current settings to be checked and the
various settings to be changed. For details, refer to
“Copy settings” on page 2-5.
2 Status Depending on the situation, the machine status or an
error message may appear.
3 Copy density Indicates the copy density.
AUTO appears when DENSITY is set to AUTO and
the
TEXT copy mode is selected.
4 Number of
copies
Indicates the number of copies.
About the Control Panel2-4
Page 26
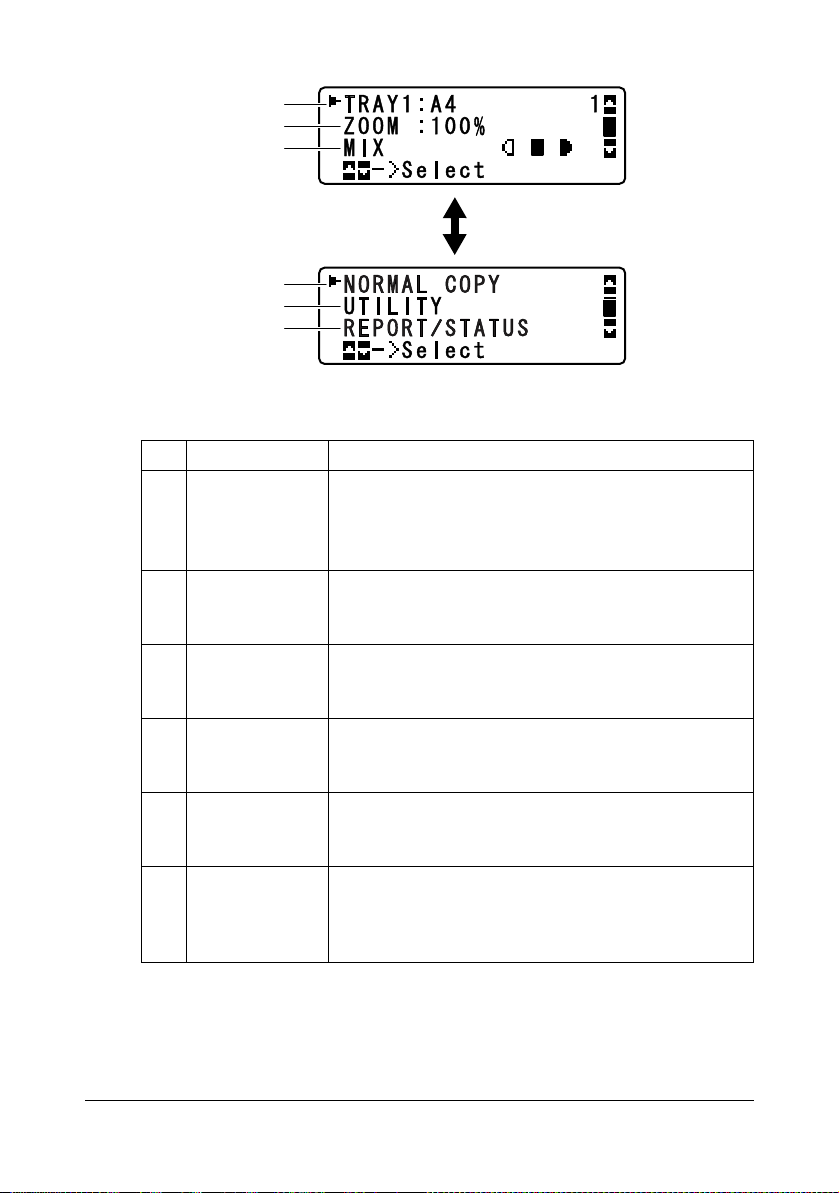
Copy settings
1
2
3
Press +/,
4
5
6
No. Indication Description
1 Media size Indicates the media size that is selected. The media
size setting can be changed with TRAY1 PAPER
SETUP
“TRAY1 PAPER SETUP Menu” on page 2-17.
2 Zoom ratio Indicates the zoom ratio that is specified. For details
on specifying the zoom ratio, refer to “Specifying the
Zoom Ratio” on page 5-4.
3 Copy quality Indicates the copy quality that is selected. For details
on selecting the copy quality, refer to “Specifying the
Copy Quality Setting” on page 5-3.
4 Copy function Indicates the copy function that is set. For details on
setting a copy function, refer to “Setting a Copy
Function” on page 5-5.
5
UTILITY
6
REPORT/STATUS
Select this menu item to change the various
machine settings. For details, refer to “UTILITY
Menu” on page 2-13.
Select this menu item to view the total number of
pages printed by this machine and print the reports.
For details, refer to “REPORT/STATUS Menu” on
page 2-11.
in the UTILITY menu. For details, refer to
About the Control Panel 2-5
Page 27

Main Screen (Scan Mode)
Document pages can be scanned if a Start key is pressed while this screen is
displayed. To scan in color, press the Start-Color key. To scan in black and
white, press the Start-B&W key.
For details, refer to “Scanning With the Machine” on page 6-8.
" In order to scan by pressing the Start key while the screen shown
above is displayed, the TWAIN scanner driver, the printer driver and
LinkMagic (Windows only) must be installed on the computer.
About the Control Panel2-6
Page 28
Print Screen
When a print job is received, PRINTER: Printing appears in the status
section of the main screen. To display the print screen (as shown below),
press the * key while PRINTER: Printing is displayed.
To cancel printing, press the Stop/Reset key when the print screen appears.
Press the Select key to select
YES.
1
No. Indication Description
1 Status Displays messages indicating operations such as
printing.
2 Media tray/
media size
Indicates the media tray and media size that is
selected.
2
" When a print job is received from the printer driver, the paper size
specified with the printer driver has priority if it is different from the
paper size specified from the control panel with TRAY1 PAPER
SETUP
in the UTILITY menu.
About the Control Panel 2-7
Page 29
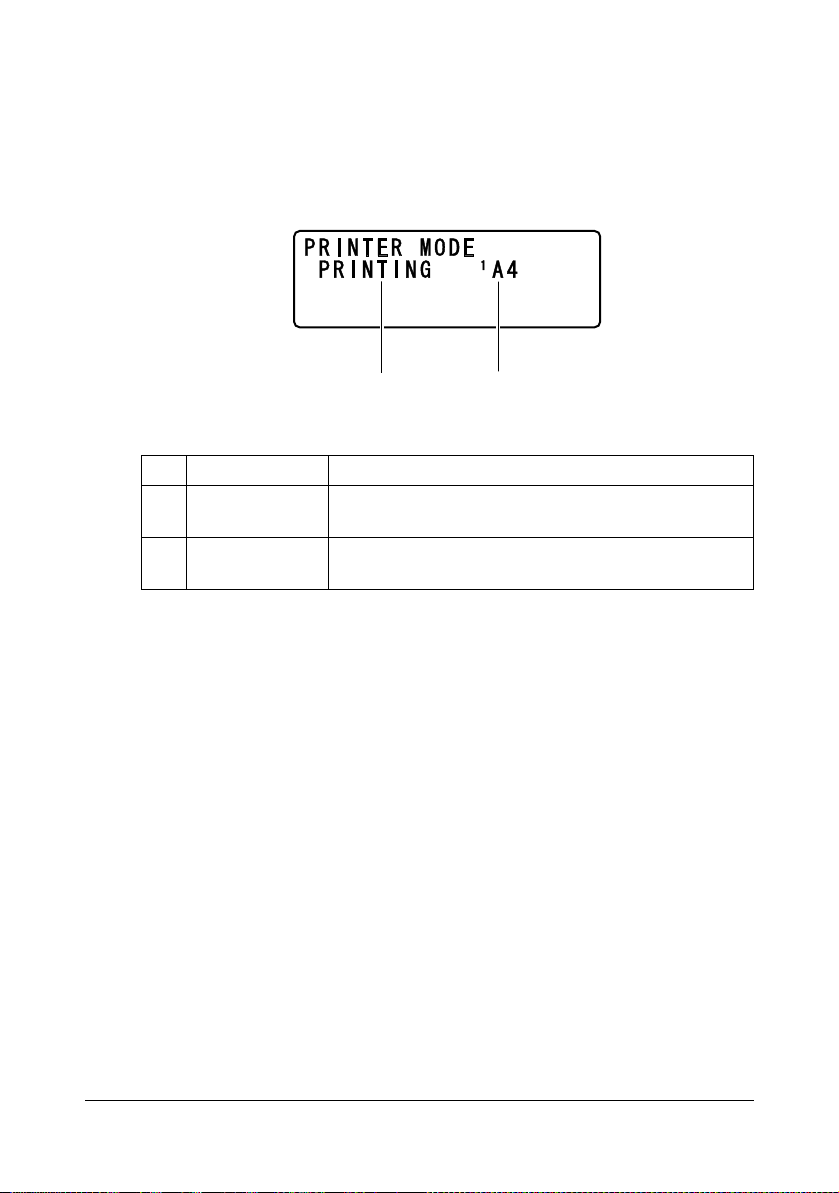
Checking the Machine Status and Settings
PRINTER MODE Menu
With the main screen displayed, press the * key to display the PRINTER
MODE screen.
From this menu, a general estimate of the amount of toner remaining in the
toner cartridges can be viewed, and the printer operation mode can be
switched. The printer operation modes include one for replacing a toner cartridge (REPLACE MODE), one for replacing all toner cartridges (EJECT
MODE), and one for cleaning the print head window (P/H CLEAN MODE).
The PRINTER MODE menu is structured as shown below.
" To return to the previous screen, press the Back key. To display the
main screen, press the Stop/Reset key.
PRINTER MODE TONER REMAIN-
ING
T/C CHANGE REPLACE MODE Y TONER
EJECT MODE M TONER
P/H CLEAN MODE C TONER
K TONER
Checking the Machine Status and Settings2-8
Page 30

TONER REMAINING
A general estimate of the amount of toner remaining in the toner cartridges
can be viewed.
" If the Select key is held down for at least 2 seconds while the screen
described above is displayed, the configuration page will be printed.
T/C CHANGE
REPLACE MODE
EJECT MODE
Switches the machine to the REPLACE MODE.
This mode is used when replacing a toner cartridge.
For details on replacing a toner cartridge, refer
to “Replacing a Toner Cartridge” on page 7-5.
" To return to normal operation mode from
REPLACE MODE, press the Stop/Reset
key.
Switches the machine to the EJECT MODE.
This mode is used when replacing all toner cartridges at the same time.
For details on replacing all toner cartridges,
refer to “Replacing All Toner Cartridges at the
Same Time” on page 7-10.
" To return to normal operation mode from
EJECT MODE, press the Stop/Reset
key.
Checking the Machine Status and Settings 2-9
Page 31

P/H CLEAN MODE
Switches the machine to the P/H CLEAN
MODE.
P/H CLEAN MODE is a mode that allows the
user to clean the print head window more easily. The print head window is not cleaned automatically.
For details on cleaning the print head window,
refer to “Clearing the Print Head Window” on
page 8-10.
" To return to normal operation mode from
P/H CLEAN MODE, refer to “Clearing the
Print Head Window” on page 8-10.
Checking the Machine Status and Settings2-10
Page 32

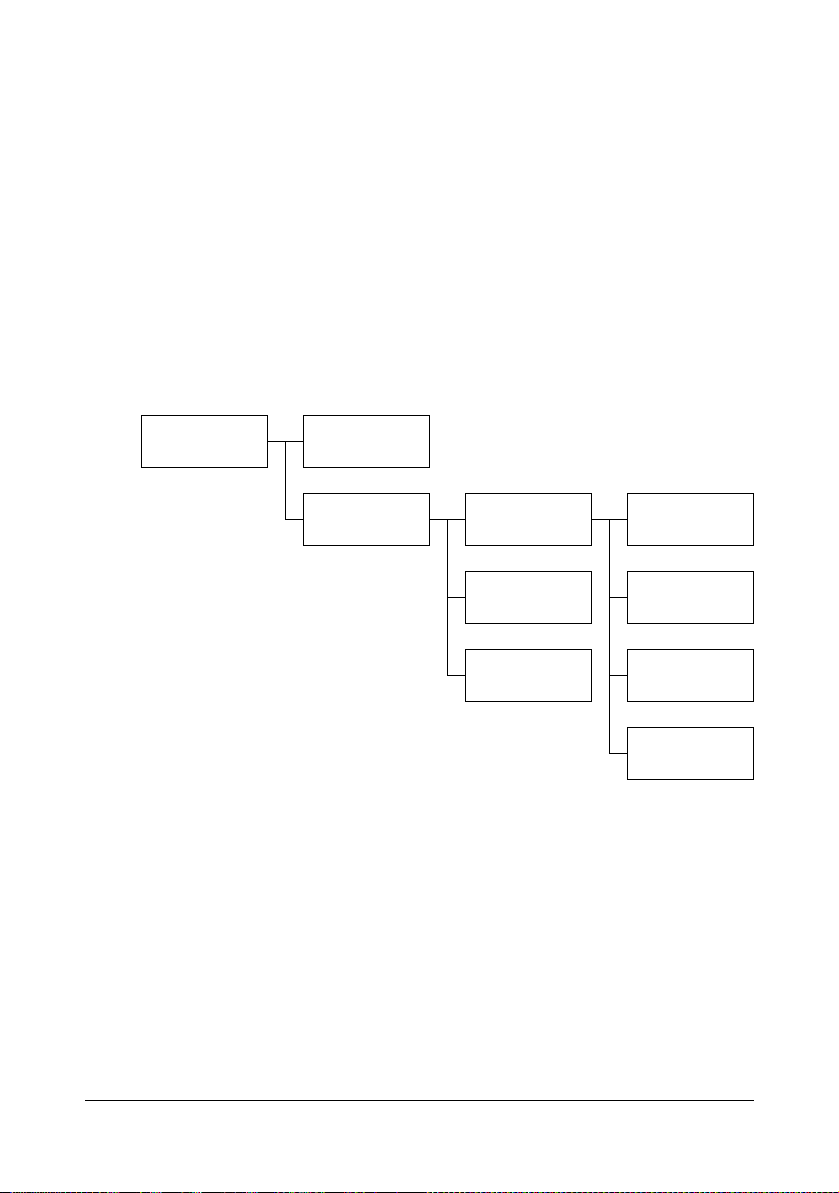
REPORT/STATUS Menu
To display the REPORT/STATUS screen, select REPORT/STATUS in the
main screen, and then press the Select key. From this menu, the total number of pages printed by this machine can be viewed. In addition, the reports
can be printed. The REPORT/STATUS menu is structured as shown below.
" To return to the previous screen, press the Back key. To display the
main screen, press the Stop/Reset key.
REPORT/STATUS TOTAL PRINT
SUPPLY STATUS
REPORT
TOTAL PRINT
The total number of pages for each of the following can be checked.
TOTAL PRINT
MONO COPY
COLOR COPY
MONO PRINT
COLOR PRINT
TOTAL SCAN
This counter shows the total number of pages
printed.
This counter shows the total number of pages
copied in black-and-white.
This counter shows the total number of pages
copied in color.
This counter shows the total number of pages
printed in black-and-white.
This counter shows the total number of pages
printed in color.
This counter shows the total number of document pages that were scanned.
Checking the Machine Status and Settings 2-11
Page 33

SUPPLY STATUS
The remaining amount of toner in the toner cartridges and the remaining service life of the imaging cartridges can be displayed as a percentage.
C TONER
M TONER
Y TONER
K TONER
I/C
Displays the remaining amount of toner in the
cyan (C) toner cartridge as a percentage.
Displays the remaining amount of toner in the
magenta (M) toner cartridge as a percentage.
Displays the remaining amount of toner in the
yellow (Y) toner cartridge as a percentage.
Displays the remaining amount of toner in the
black (K) toner cartridge as a percentage.
Displays the remaining service life of the imaging cartridge as a percentage.
REPORT
The machine settings can be printed.
UTILITY MAP
CONFIGURATION PAGE
Prints the UTILITY menu and its settings.
Prints a estimate of the percentage of toner
remaining and the settings, information and status of this machine.
Checking the Machine Status and Settings2-12
Page 34

Configuration Menu Overview
To display the settings menu for this machine, select UTILITY in the main
screen, and then press the Select key. From the UTILITY menu, settings for
the various machine functions can be changed.
UTILITY Menu
From this menu, various machine settings can be changed. The UTILITY
menu is structured as shown below.
" To return to the previous screen in the UTILITY menu, press the Back
key. (If the Back key is pressed while settings are being specified,
those settings are not saved.)
" The ADMIN. MANAGEMENT menu is accessible only by the adminis-
trator. To display the settings for this menu, select ADMIN. MANAGE-
MENT
, use the keypad to type in the 6-digit administrator access code
(default: 000000), and then press the Select key.
UTILITY MACHINE SETTING
TRAY1 PAPER SETUP
ADMIN. MANAGEMENT
COPY SETTING
Configuration Menu Overview 2-13
Page 35

MACHINE SETTING Menu
MACHINE SETTING AUTO PANEL RESET
ENERGY SAVE MODE
LCD CONTRAST
KEY SPEED TIME TO START
LANGUAGE
TONER OUT STOP
INTERVAL
TONER LOW
AUTO CONTINUE
CALIBRATION
Configuration Menu Overview2-14
Page 36

" Manufacturer’s default settings appear in bold.
AUTO PANEL RESET
ENERGY SAVE MODE
LCD CONTRAST
KEY
SPEED
TIME TO
START
INTERVAL
LANGUAGE
Setting
OFF / 30sec / 1min / 2min /
3min / 4min / 5min
Specify the length of time until all settings that
have not been programmed, such as the number of copies, are cleared and return to their
default settings when no operation is performed.
To set the machine to perform the auto panel
reset operation, select from 30sec, 1min, 2min,
3min, 4min or 5min for the length of time until
the auto panel reset operation is performed.
Setting
5 min / 15 min / 30 min / 60
min
Enters Energy Save mode in order to conserve
energy when no operation is performed. Specify
the length of time in minutes until the machine
enters Energy Save mode.
Setting (LIGHT) (DARK)
Specify the brightness of the message window.
Setting
0.1sec / 0.3sec / 0.5sec /
1.0sec / 1.5sec / 2.0sec /
2.5sec / 3.0sec
Specify the length of time until the cursor begins
to move continuously when a key is held down.
Setting
0.1sec / 0.3sec / 0.5sec /
1.0sec / 1.5sec / 2.0sec /
2.5sec / 3.0sec
Specify the length of time until the cursor continuously moves between settings or characters.
Setting
ENGLISH / FRENCH / GERMAN /
ITALIAN / SPANISH / PORTUGUESE
/ RUSSIAN / CZECH /
SLOVAK / HUNGARIAN / POLISH
/
JAPANESE
Select the language of the menus and messages that appear in the message window.
Configuration Menu Overview 2-15
Page 37

TONER OUT STOP
TONER LOW
AUTO CONTINUE
CALIBRATION
Setting
Select whether or not printing and copying stop
when the toner has run out.
ON is selected, printing and copying stop
If
when the toner runs out.
OFF is selected, printing and copying contin-
If
ues even if toner has run out.
Setting
Select whether or not a warning message
appears when the toner is nearly empty.
Setting
Select whether or not printing continues when a
size error occurs during printing.
Setting
Select whether or not to perform image stabilization. If ON is selected, image stabilization is
started.
ON / OFF
ON / OFF
ON / OFF
ON / OFF
Configuration Menu Overview2-16
Page 38

TRAY1 PAPER SETUP Menu
TRAY1 PAPER SETUP
" Manufacturer’s default settings appear in bold.
Media type
PLAIN PAPER / LETTERHEAD / THICK1 / THICK2 /
LABELS / ENVELOPE / POSTCARD
Paper size The available paper sizes differ depending on the setting
selected as the media type.
Setting selected as the
media type
Available paper sizes
PLAIN PAPER A4 / A5 / B5 / LEGAL /
LETTER / G LETTER /
STATEMENT / EXECUTIVE
/ FOLIO / OFICIO
/ G LEGAL / CUS-
TOM(PLAIN)
THICK1, THICK2 A4
/ A5 / B5 / LETTER / G
LETTER
/ STATEMENT /
EXECUTIVE / CUSTOM(THICK)
LETTERHEAD, LABELS A4
/ A5 / B5 / LETTER / G
LETTER
/ STATEMENT /
EXECUTIVE
ENVELOPE C6
POSTCARD
/ DL
The screen for selecting
the paper size does not
appear, and the following
paper size is automatically
specified.
100 × 148 mm
[3.9 × 5.8 inch]
Configuration Menu Overview 2-17
Page 39

Select the type and size of the media loaded into Tray 1. If CUS-
TOM(PLAIN)
settings for
The setting range for LENGTH is 195 to 356 mm for PLAIN PAPER, and
184 to 297 mm for THICK1 and THICK2.
The default setting is 297 mm.
The Setting range for WIDTH is 92 to 216 mm.
The default setting is 210 mm.
When a media type is selected, a screen appears, showing the available
media sizes. The available media sizes differ depending on the selected
media type.
or CUSTOM(THICK) is selected as the paper size, specify
LENGTH and WIDTH separately.
The default paper size for a setting other than
LETTER for 120 V models, and A4 for 220 V models.
ENVELOPE or POSTCARD is
" When printing from the printer driver, the printer driver settings have
priority over the settings specified in the TRAY1 PAPER SETUP
menu. Check that Tray 1 is loaded with media of the type and size
specified in the printer driver.
" The setting for CUSTOM is displayed in metric (mm) even if ADMIN.
MANAGEMENT/USER SETTING/PRESET ZOOM
is set to INCH.
Configuration Menu Overview2-18
Page 40

ADMIN. MANAGEMENT Menu
" The ADMIN. MANAGEMENT menu is accessible only by the adminis-
trator. To display the settings for this menu, select ADMIN. MANAGE-
MENT
, use the keypad to type in the 6-digit administrator access code
(default: 000000), and then press the Select key.
ADMIN. MANAGEMENT
ADMINISTRATOR
NO.
USER SETTING PRESET ZOOM
" Manufacturer’s default settings appear in bold.
ADMINISTRATOR NO.
USER
PRESET ZOOM
SETTING
Specify the new administrator access
code.
Setting
Select the measurement units for the
preset zoom ratios.
The default setting is
and Canada, and
countries.
INCH / METRIC
INCH for USA
METRIC for other
Configuration Menu Overview 2-19
Page 41

COPY SETTING Menu
COPY SETTING QUALITY PRIORITY
DENSITY PRIORITY
DENSITY LEVEL AUTO
" Manufacturer’s default settings appear in bold.
MANUAL
QUALITY PRIORITY
DENSITY PRIORITY
DEN-
AUTO
SITY
LEVEL
MANUAL
Setting
MIX , TEXT , PHOTO , FINE/MIX ,
FINE/TEXT , FINE/PHOTO
Select the type of document being copied.
Setting
Select the density that is normally used.
Setting
Adjust the density of the background color.
Setting
Specify the default copy density.
AUTO / MANUAL
(LIGHT) (DARK)
(LIGHT) (DARK)
Configuration Menu Overview2-20
Page 42

3Media Handling
Page 43

Print Media
Specifications
Media Media Size Copy Print
A4 8.2 x 11.7 210.0 x 297.0 Yes Yes
B5 (JIS) 7.2 x 10.1 182.0 x 257.0 Yes Yes
A5 5.9 x 8.3 148.0 x 210.0 Yes Yes
Legal 8.5 x 14.0 215.9 x 355.6 No Yes
Letter 8.5 x 11.0 215.9 x 279.4 Yes Yes
Statement 5.5 x 8.5 139.7 x 215.9 Yes Yes
Executive 7.25 x 10.5 184.2 x 266.7 Yes Yes
Folio 8.25 x 13.0 210.0 x 330.0 No Yes
Letter Plus 8.5 x 12.69 215.9 x 322.3 No Yes
UK Quarto 8.0 x 10.0 203.2 x 254.0 No Yes
Foolscap 8.0 x 13.0 203.2 x 330.2 No Yes
Government Legal 8.5 x 13.0 215.9 x 330.2 No Yes
B5 (ISO) 6.9 x 9.8 176.0 x 250.0 No Yes
Envelope DL 8.7 x 4.3 220.0 x 110.0 Yes Yes
Envelope C6 6.4 x 4.5 162.0 x 114.0 Yes Yes
J-Postcard 3.9 x 5.8 100.0 x 148.0 Yes Yes
Kai 16 7.3 x 10.2 185.0 x 260.0 No Yes
Kai 32 5.1 x 7.3 130.0 x 185.0 No Yes
Government
Letter
16 K 7.7 x 10.6 195.0 x 270.0 No Yes
Oficio Mexico 8.5 x 13.5 215.9 x 342.9 No Yes
Custom,
Minimum*
Custom,
Maximum*
Notes: * With thick stock
The minimum size is 3.6 x 7.25 inch (92.0 x 184.0 mm).
The maximum size is 8.5 x 11.7 inch (216.0 x 297.0 mm).
Inch Millimeter
8.0 x 10.5 203.2 x 266.7 Yes Yes
3.6 x 7.7 92.0 x 195.0 Yes Yes
8.5 x 14.0 216.0 x 356.0 Yes Yes
Print Media3-2
Page 44

Types
Before purchasing a large quantity of special media, do a trial print with the
same media and check the print quality.
Keep media on a flat, level surface in its original wrapper until it is time to
load it. For a list of approved media, refer to http://printer.konicaminolta.com.
Plain Paper (Recycled Paper)
Capacity Tray 1 Up to 200 sheets, depending on the media
weight
Orientation Tray 1 Face up
Driver
Media Type
Weight 60 to 90 g/m² (16 to 24 lb bond)
Use plain paper that is
Suitable for plain paper printers and copiers, such as standard or recycled
office paper.
Note
Do not use the media types listed below. These could cause poor print
quality, media misfeeds, or damage to the machine.
Plain Paper (Recycled)
DO NOT use media that is
Coated with a processed surface (such as carbon paper and colored
paper that has been treated)
Carbon backed
Unapproved iron-on transfer media (such as heat-sensitive paper,
heat-pressure paper, and heat-press transfer paper)
Cold-water-transfer paper
Pressure sensitive
Designed specifically for inkjet printers (such as superfine paper, glossy
film, and postcards)
Already been printed on by another printer, copier, or fax machine
Dusty
Wet (or damp)
" Keep media between 15% and 85% relative humidity. Toner does
not adhere well to moist or wet media.
Print Media 3-3
Page 45

Layered
Adhesive
Folded, creased, curled, embossed, warped, or wrinkled
Perforated, three-hole punched, or torn
Too slick, too coarse, or too textured
Different in texture (roughness) on the front and back
Too thin or too thick
Stuck together with static electricity
Composed of foil or gilt; too luminous
Heat sensitive or cannot withstand the fusing temperature (180°C
[356°F])
Irregularly shaped (not rectangular or not cut at right angles)
Attached with glue, tape, paper clips, staples, ribbons, hooks, or buttons
Acidic
Any other media that is not approved
Thick Stock
Paper thicker than 90 g/m2 (24 lb bond) is referred to as thick stock. Test all
thick stock to ensure acceptable performance and to ensure that the image
does not shift.
You can print continuously with thick stock. However, this could affect the
media feed, depending on the media quality and printing environment. If
problems occur, stop the continuous printing and print one sheet at a time.
Capacity Tray 1 Up to 50 sheets, depending on their thick-
ness
Orientation Face up
Driver
Media Type
Weight
Thick Stock 1
Thick Stock 2
Thick Stock 1: 91 to 163 g/m
Thick Stock 2: 164 to 209 g/m
2
(25 to 43.5 lb bond)
2
(43.6 to 55.6 lb bond)
DO NOT use thick stock that is
Mixed with any other media in the trays (as this will cause media misfeed-
ing)
Print Media3-4
Page 46

Envelope
Print on the front (address) side only. Some parts of the envelope consist of
three layers of paper—the front, back, and flap. Anything printed in these layered regions may be lost or faded.
You can print continuously with envelope. However, this could affect the
media feed, depending on the media quality and printing environment. If
problems occur, stop the continuous printing and print one sheet at a time.
Capacity Tray 1 Up to 10 sheets, depending on their thick-
ness
Orientation Face up
Driver
Media Type
Use envelopes that are
Envelope DL or C6 size
(Other envelope sizes are not supported.)
Common office envelopes approved for laser printing with diagonal joints,
sharp folds and edges, and ordinary gummed flaps
Envelope
" Because the envelopes pass through heated rollers, the gummed
area on the flaps may seal. Using envelopes with emulsion-based
glue avoids this problem.
Approved for laser printing
Dry
DO NOT use envelopes that have
Sticky flaps
Tape seals, metal clasps, paper clips, fasteners, or peel-off strips for seal-
ing
Transparent windows
Too rough of a surface
Material that will melt, vaporize, offset, discolor, or emit dangerous fumes
Been presealed
Print Media 3-5
Page 47

Label
A sheet of labels consists of a face sheet (the printing surface), adhesive, and
a carrier sheet:
The face sheet must follow the plain paper specification.
The face sheet surface must cover the entire carrier sheet, and no adhe-
sive should come through on the surface.
You can print continuously with label sheets. However, this could affect the
media feed, depending on the media quality and printing environment. If
problems occur, stop the continuous printing and print one sheet at a time.
Try printing your data on a sheet of plain paper first to check placement.
Check your application documentation for more information on printing labels.
Capacity Tray 1 Up to 50 sheets, depending on their thick-
ness
Orientation Face up
Driver
Media Type
Use label sheets that are
Recommended for laser printing
DO NOT use label sheets that
Have labels that easily peel off or have parts of the label already removed
Have backing sheets that have peeled away or have exposed adhesive
Labels
" Labels may stick to the fuser, causing them to peel off and media
misfeeds to occur.
Are precut or perforated
Do not use
Shiny backed paper Full-page labels
OK to use
(uncut)
Print Media3-6
Page 48

Letterhead
You can print continuously with letterhead. However, this could affect the
media feed, depending on the media quality and printing environment. If
problems occur, stop the continuous printing and print one sheet at a time.
Try printing your data on a sheet of plain paper first to check placement.
Capacity Tray 1 Up to 50 sheets, depending on their size and
thickness
Orientation Face up
Driver
Media Type
Letterhead
Postcard
You can print continuously with postcard. However, this could affect the
media feed, depending on the media quality and printing environment. If
problems occur, stop the continuous printing and print one sheet at a time.
Try printing your data on a sheet of plain paper first to check placement.
Capacity Tray 1 Up to 50 sheets, depending on their thick-
ness
Orientation Face up
Driver
Media Type
Postcard
Use postcards that are
Approved for laser printing
DO NOT use postcards that are
Coated
Designed for inkjet printers
Precut or perforated
Preprinted or multicolored
" If the postcard is warped, press on the warped
area before putting it in the tray.
Print Media 3-7
Page 49

Folded or wrinkled
Printable Area
The printable area on all media sizes is
up to 4.0 mm (0.157") from the edges
of the media.
Each media size has a specific printable area (the maximum area on which
the machine can print clearly and without distortion).
This area is subject to both hardware
limits (the physical media size and the
margins required by the machine) and
software constraints (the amount of
memory available for the full-page
frame buffer). The printable area for all media sizes is the page size minus
4.0 mm (0.157") from all edges of the media.
a
a
Printable
Area
a
a=4.0 mm (0.157")
a
" When printing in color on legal-size media, the following limitations
apply.
z The printable area is 339.6 (13.4") mm from the leading edge of
the paper. (However, there is a non-printable area up to 4.0 mm
(0.157") from the leading edge.)
z The bottom margin is 16.0 mm (0.63").
Printable Area3-8
Page 50

Envelopes
Envelopes can only be printed on their front sides (side where the recipient’s
address is written). In addition, printing on the front side in the area overlapping the back flap cannot be guaranteed. The location of this area differs
depending on the envelope type.
Non-printable area
Non-guaranteed printable area
aa
Guaranteed printable area
a
a
Front side
(can be printed)
a=4.0 mm (0.157")
Back side
(cannot be printed)
" The envelope print orientation is determined by your application.
" With the Envelope DL size (long edge feeding), the nonprintable areas
on the left and right sides are 6 mm.
Page Margins
Margins are set through your application. Some applications allow you to set
custom page sizes and margins while others have only standard page sizes
and margins from which to choose. If you choose a standard format, you may
lose part of your image (due to printable area constraints). If you can custom-size your page in your application, use those sizes given for the printable
area for optimum results.
Printable Area 3-9
Page 51

Loading Media
How do I load media?
Take off the top and bottom sheets of a
ream of paper. Holding a stack of approximately 200 sheets at a time, fan the
stack to prevent static buildup before
inserting it in a tray.
Note
Although this machine was designed for printing on a wide range of
media types, it is not intended to print exclusively on a single media
type except plain paper. Continuous printing on media other than plain
paper (such as envelopes, labels, or thick stock) may adversely affect
print quality or reduce engine life.
When refilling media, first remove any media remaining in the tray. Stack it
with the new media, even the edges, then reload it.
Do not mix media of different types and sizes, as this will cause media misfeeds.
Tray 1 (Multipurpose Tray)
For details on the types and sizes of media that can be printed from Tray 1,
refer to “Print Media” on page 3-2.
Loading Plain Paper
1 Open Tray 1.
" If media has been loaded
into Tray 1, remove all media
from the tray.
Loading Media3-10
Page 52

2 Slide the media guides to pro-
vide more space between them.
3 Load the paper face up in the
tray.
" Do not load paper above
M
mark. Up to 200
the
sheets (80 g/m
plain paper can be
loaded into the tray at
one time.
Loading Media 3-11
2
[21 lb]) of
Page 53

4 Slide the media guides against
the edges of the paper.
5 Select TRAY1 PAPER SETUP in the UTILITY menu, and then select
the settings for the size and type of paper that is loaded. See also “Print
Media” on page 3-2.
Other Media
When loading media other than plain paper, set the media mode (Envelope,
Label, Letterhead, Postcard, Thick Stock 1, or Thick Stock 2) in the driver for
optimum print quality.
Loading Envelopes
1 Open Tray 1.
" If media has been loaded
into Tray 1, remove all media
from the tray.
Loading Media3-12
Page 54

2 Slide the media guides to pro-
vide more space between them.
3 Load the envelopes flap side
down in the tray.
" Before loading enve-
lopes, press them down
to make sure that all air is
removed, and make sure
that the folds of the flaps
are firmly pressed, otherwise the envelopes may
become wrinkled or a
media misfeed may
occur.
" Up to 10 envelopes can be loaded into the tray at one time.
" For envelopes with the flap along the long edge (Envelope C6 and
Envelope DL), load the envelopes with the flap side inserted first.
Loading Media 3-13
Page 55

4 Slide the media guides against
the edges of the envelopes.
5 Select TRAY1 PAPER SETUP in the UTILITY menu, and then select
the settings for the size and type of media that is loaded. See also “Print
Media” on page 3-2.
Loading Label Sheets/Letterheads/Postcards and Thick Stock
1 Open Tray 1.
" If media has been loaded
into Tray 1, remove all media
from the tray.
Loading Media3-14
Page 56

2 Slide the media guides to pro-
vide more space between them.
3 Load the media face up in the
tray.
" Up to 50 sheets can be
loaded into the tray at
one time.
4 Slide the media guides against
the edges of the media.
5 Select TRAY1 PAPER SETUP in the UTILITY menu, and then select
the settings for the size and type of media that is loaded. See also “Print
Media” on page 3-2.
Loading Media 3-15
Page 57

Output Tray
The printed media is fed out facing down into the output tray below the control
panel. This tray has a capacity of approximately 100 sheets (A4/Letter) of 80
2
paper.
g/m
" If the media is stacked too high in the output tray, your machine may
experience media misfeeds, excessive media curl, or static buildup.
The output tray can be pulled out to
be extended. Adjust the output tray
according to the size of paper to be
printed on.
Output Tray3-16
Page 58

Media Storage
Keep media on a flat, level surface in its original wrapper until it is time to
load it.
Media that has been stored for a long time out of its packaging may dry up
too much and cause misfeeding.
If media has been removed from its wrapper, place it in its original pack-
aging and store in a cool, dark place on a level surface.
Avoid moisture, excessive humidity, direct sunlight, excessive heat (above
35°C [95°F]), and dust
Avoid leaning against other objects or placing it in an upright position.
Before using stored media, do a trial print and check print quality.
Media Storage 3-17
Page 59

Original Media
Specifications
The following types of documents can be placed on the original glass.
Document type Sheets or books
Maximum document size A4 or Letter
Maximum weight 3 kg (6.6 lb)
Observe the following precautions when placing a document on the original
glass.
Do not place objects weighing more than 3 kg (6.6 lb) on the original
glass; otherwise the glass may be damaged.
Do not press down extremely hard on a book spread on the original glass;
otherwise the original glass may be damaged.
Original Media3-18
Page 60

Placing a Document to be Copied
1
Lift to open the original cover.
2 Position the document on the
original glass.
Document
" Align the document with
the arrow on the left side
toward the rear of the
machine.
Placing a Document to be Copied 3-19
Page 61

3 Gently close the original cover.
" For details on copying the placed document, refer to chapter 5, “Using
the Copier”. For details on scanning, refer to chapter 6,
“Using the Scanner”.
Placing a Document to be Copied3-20
Page 62

4Using the Printer
Driver
Page 63

Selecting Printer Driver Options/Defaults (for Windows)
Before you start working with your machine, you are advised to verify and
change the default printer driver settings if necessary.
1 Choose the driver’s properties as follows:
– (Windows Vista)
From the Start menu, select Control Panel, and then click Hardware
and Sound to select Printers. Right-click the KONICA MINOLTA
magicolor 1680MF printer icon, and then select Printing Prefer-
ences.
– (Windows XP/Server 2003)
From the start menu, select Printers and Faxes to display the Print-
ers and Faxes directory. Right-click the KONICA MINOLTA magicolor
1680MF printer icon and select Printing Preferences.
– (Windows 2000)
From the Start menu, select Settings and then Printers to display the
Printers directory. Right-click the KONICA MINOLTA magicolor
1680MF printer icon and select Printing Preferences.
2 Select the Basic tab. Select the default settings for your machine, such as
the default media format you use.
3 Click Apply.
4 Click OK to exit from the Printing Preferences dialog box.
Selecting Printer Driver Options/Defaults (for Windows)4-2
Page 64

Uninstalling the Printer Driver (for Windows)
This section describes how to uninstall the printer driver if necessary.
" You must have administrator privileges in order to uninstall the printer
driver.
" If the User Account Control window appears when uninstalling on
Windows Vista, click the Allow button or the Continue button.
Windows Vista/XP/Server 2003/2000
1 Close all applications.
2 Choose Uninstall Program as follows:
– (Windows Vista/XP/Server 2003)
From the Start menu, choose All programs, KONICA MINOLTA,
magicolor 1680MF, Printer, and then Uninstall.
– (Windows 2000)
From the Start menu, choose Program, KONICA MINOLTA,
magicolor 1680MF, Printer, and then Uninstall.
3 When the Uninstall dialog box appears, select the printer to be deleted,
and then click Uninstall button.
4 The printer driver will be uninstalled from your computer.
Displaying Printer Driver Settings
Windows Vista
1 From the Start menu, select Control Panel, and then click Hardware
and Sound to select Printers.
2 Right-click the KONICA MINOLTA magicolor 1680MF printer icon then
select Printing Preferences.
Windows XP/Server 2003
1 From the start menu, select Printers and Faxes to display the Printers
and Faxes directory.
2 Right-click the KONICA MINOLTA magicolor 1680MF printer icon and
select Printing Preferences.
Uninstalling the Printer Driver (for Windows) 4-3
Page 65

Windows 2000
1 From the Start menu, select Settings, and then click Printers to display
the Printers directory.
2 Right-click the KONICA MINOLTA magicolor 1680MF printer icon and
select Printing Preferences.
Displaying Printer Driver Settings4-4
Page 66

Printer Driver Settings
Common Buttons
The buttons described below appear on each tab.
OK
Click to exit the Properties dialog box, saving any changes made.
Cancel
Click to exit the Properties dialog box without saving any changes made.
Apply
Click to save all changes without exiting the Properties dialog box.
Help
Click to view the help.
Easy Set
Click Save to save the current settings. Specify a Name and Comment to
access the settings for use again later.
Name: Type in the name of the settings to be saved.
Comment: Add a simple comment to the settings to be saved.
Afterward, the saved settings can be selected from the drop-down list. To
change the registered settings, click Edit.
Select Default from the drop-down list to reset the functions in all tabs to their
default values.
Printer View
Click the button to display an image of the printer in the figure area.
When this button is clicked, it changes to the Paper View button (when a tab
other than the Watermark tab or Quality tab is selected), the Watermark
View button (when the Watermark tab is selected), or the Quality View button (when the Quality tab is selected).
" This button does not appear on the Version tab.
Paper View
Click the button to display a sample of the page layout in the figure area.
When this button is clicked, it changes to the Printer View button.
" This button does not appear on the Watermark, Quality and Version
tabs.
Printer Driver Settings 4-5
Page 67

Watermark View
Click the button to display a preview of the watermark.
When this button is clicked, it changes to the Printer View button.
" This button appears only when the Watermark tab is selected.
Quality View
Click the button to display a sample of the settings selected in the Quality tab.
When this button is clicked, it changes to the Printer View button.
" This button appears only when the Quality tab is selected.
Default
Click the button to reset the settings to their defaults.
" This button does not appear on the Version tab.
" When this button is clicked, the settings in the displayed dialog box
are reset to their defaults. The settings on other tabs are not changed.
Basic Tab
The Basic Tab allows you to
Specify the orientation of the media
Specify the size of the original document
Select the output media size
Register/edit custom paper sizes
Zoom (expand/reduce) documents
Specify the number of copies
Turn on/off job collation
Specify the paper source
Specify the type of media
Select the paper used for the front page
Printer Driver Settings4-6
Page 68

Layout Tab
The Layout Tab allows you to
Print several pages of a document on the same page (N-up printing)
Print a single copy for enlargement and print several pages
Rotate the print image 180 degrees
Specify image shift settings
" Double-Sided printing is not available with this machine.
Overlay Tab
" Be sure to use overlays with print jobs with a media size and orienta-
tion that matches the overlay form.
In addition, if settings have been specified for “N-up” in the printer
driver, the overlay form cannot be adjusted to match the specified settings.
The Overlay Tab allows you to
Select the form Overlay to use
Add, edit or delete overlay files
Print the form on all pages or only the first page
Watermark Tab
The Watermark Tab allows you to
Select the watermark to be used
Add, edit or delete watermarks
Print the watermark on the background
Print the watermark on only the first page
Print multiple copies of the selected watermark on a single page
Quality Tab
The Quality Tab allows you to
Specify whether to print in color or black and white
Specify the color matching for printing documents
Specify the resolution for the printout
Select whether or not economy print is used
Adjust the contrast (Contrast)
Printer Driver Settings 4-7
Page 69

Control the darkness of an image (Brightness)
Adjust the saturation of printed image (Saturation)
Adjust the sharpness of the printed image (Sharpness)
Version Tab
The Version Tab allows you to view information about the printer driver.
Printer Driver Settings4-8
Page 70

5Using the Copier
Page 71

Making Basic Copies
This section contains descriptions of the basic copy operation procedure and
the functions that are frequently used when making copies, such as specifying the zoom ratio and the copy density.
" Before making copies, check that the Copy key is lit up in green. If the
key is not lit up in green, press the Copy key to enter Copy mode.
" The default paper size setting can be changed with TRAY1 PAPER
SETUP
in the UTILITY menu. For details, refer to “TRAY1 PAPER
SETUP Menu” on page 2-17.
If, while specifying settings, no key is pressed for the length of time specified
AUTO PANEL RESET, the entered settings are canceled and the main
for
screen (Copy mode) is displayed.
Basic Copy Operation
1 Position the document to be
copied.
" For details on positioning
the document, refer to
“Placing a Document to
be Copied” on page 3-19.
2 Press the Copy key.
3 Specify the desired copy settings.
" For details on specifying the copy mode and the copy density, refer
to “Specifying the Copy Quality Setting” on page 5-3.
For details on specifying the zoom ratio, refer to “Specifying the
Zoom Ratio” on page 5-4.
For details on ID card copying, repeat copying or poster copying,
refer to “Setting a Copy Function” on page 5-5.
4 Using the keypad, specify the desired number of copies.
" If the number of copies was incorrectly entered, press the Back
key, and then specify the correct number of copies.
Making Basic Copies5-2
Page 72

5 To print color copies, press the Start-Color key. To print monochrome
copies, press the Start-B&W key.
Copying begins.
" If the Stop/Reset key is pressed while copying, JOB CANCEL
appears. To stop copying, select YES. To continue copying, select
NO.
Specifying the Copy Quality Setting
Select the document type and copy density appropriate for the contents and
density of the document to be copied.
Selecting the Document Type
1 In the main screen (Copy mode), press the + or , key to select the cur-
rent copy quality setting, and then press the Select key.
2 Press the + or , key to select MODE, and then press the Select key.
3 Press the + or , key to select MIX, TEXT, PHOTO, FINE/MIX, FINE/
TEXT
or FINE/PHOTO, and then press the Select key.
The main screen (Copy mode) appears again.
Specifying the Copy Density
1 In the main screen (Copy mode), press the + or , key to select the cur-
rent copy quality setting, and then press the Select key.
2 Press the + or , key to select DENSITY, and then press the Select key.
3 Press the * or ) key to select the desired copy density, and then press
the Select key.
As the indicator is moved to right, the density becomes darker.
The main screen (Copy mode) appears again.
" If TEXT or FINE/TEXT is selected as the copy mode, select
AUTO or MANUAL in step 3. If MANUAL is selected, specify
either
the copy density.
Making Basic Copies 5-3
Page 73

Specifying the Zoom Ratio
The zoom ratio can be specified either by selecting a preset zoom ratio or by
specifying a custom zoom ratio.
Selecting a Preset Zoom Ratio
1 In the main screen (Copy mode), press the + or , key to select the cur-
rent zoom ratio setting, and then press the Select key.
2 Press the + or , key to select FIXED, and then press the Select key.
3 Press the + or , key to select the desired zoom ratio, and then press the
Select key.
The main screen (Copy mode) appears again.
" The following zoom ratios can be selected.
In metric dimensions:
50%, 70% (A4→A5), 81% (A4→B5), 100%, 115% (B5→A4), 141%
→
A4), 200%
(A5
In inch dimensions:
50%, 64% (LT→ST), 78% (LG→LT), 100%, 129% (ST→LT), 154%
→
LG), 200%
(ST
The zoom ratio cannot be changed using the keypad.
Specifying a Custom Zoom Ratio
1 In the main screen (Copy mode), press the + or , key to select the cur-
rent zoom ratio setting, and then press the Select key.
2 Press the + or , key to select MANUAL, and then press the Select key.
3 Use the keypad to type in the desired zoom ratio, or press the + or , key
to specify the zoom ratio, and then press the Select key.
The main screen (Copy mode) appears again.
" Each press of the
A setting between 50% and 200% can be specified.
+
or , key changes the zoom ratio by 1%.
Making Basic Copies5-4
Page 74

Making Advanced Copies
This section contains descriptions on setting ID card copying, repeat copying
and poster copying.
Setting a Copy Function
ID card copying, repeat copying and poster copying can be set.
" If a copy function other than NORMAL COPY has been set, the zoom
ratio is automatically set (and cannot be changed).
" With ID card copying, repeat copying or poster copying, position the
document pages to be scanned so that they are aligned in the
upper-left corner of the original glass. Since the image is printed 4 mm
from the top and left side, adjust the position of the document as necessary. For details on positioning the document on the original glass,
refer to “Placing a Document to be Copied” on page 3-19.
ID Card Copying
With ID card copying, the back and front of a document, such as a certificate,
are copied at full size on a single sheet of paper.
front side back side
A
B
Making Advanced Copies 5-5
Page 75

" The paper sizes that are available for ID card copying are A4, Let-
ter and Legal.
1 Position the document on the original glass.
" For details on positioning the document on the original glass, refer
to “Placing a Document to be Copied” on page 3-19.
2 In the main screen (Copy mode), press the + or , key to select the cur-
rent copy function setting, and then press the Select key.
3 Press the + or , key to select ID CARD COPY, and then press the
Select key.
4 To print color copies, press the Start-Color key. To print monochrome
copies, press the Start-B&W key.
Scanning of the document begins.
5 When NEXT PAGE? appears, position the back side of the document at
the same location as the front side, and then press the Select key.
After the back side has been scanned, printing automatically begins.
" To print only the front sides that were scanned first, press the
Start-Color key or the Start-B&W key in step 5.
Repeat Copying
With repeat copying, small documents, such as memos, are tiled and printed
on a single page.
1 Position the document on the original glass.
" For details on positioning the document on the original glass, refer
to “Placing a Document to be Copied” on page 3-19.
2 In the main screen (Copy mode), press the + or , key to select the cur-
rent copy function setting, and then press the Select key.
Making Advanced Copies5-6
Page 76

3 Press the + or , key to select REPEAT COPY, and then press the
Select key.
4 When the How to Repeat Copy screen appears, check the settings, and
then press the Select key.
5 To print color copies, press the Start-Color key. To print monochrome
copies, press the Start-B&W key.
6 Use the keypad to type in the document length, and then press the Select
key.
" To change the document size, press the Back key to delete the
current size, and then use the keypad to specify the desired size.
7 Use the keypad to type in the document width, and then press the Select
key.
After the document has been scanned, printing automatically begins.
" To change the document size, press the Back key to delete the
current size, and then use the keypad to specify the desired size.
Poster Copying
With poster copying, the length and width of the scanned document are each
enlarged 200%, and printed on four pages.
" If the scanned image does not fit on the size of paper that is used,
there may be margins on the sides of the image or the image may not
fit in the paper.
1 Position the document on the original glass.
" For details on positioning the document on the original glass, refer
to “Placing a Document to be Copied” on page 3-19.
2 In the main screen (Copy mode), press the + or , key to select the cur-
rent copy function setting, and then press the Select key.
Making Advanced Copies 5-7
Page 77

3 Press the + or , key to select POSTER COPY, and then press the
Select key.
4 To print color copies, press the Start-Color key. To print monochrome
copies, press the Start-B&W key.
After the document has been scanned, printing automatically begins.
Making Advanced Copies5-8
Page 78

6Using the Scanner
Page 79

Scanning From a Computer Application
Documents can be scanned from a computer connected to this machine with
a USB cable. Scanning settings can be specified and the scanning operation
can be performed from TWAIN- or WIA-compatible applications. From the
scanner driver, a preview can be displayed and various adjustments, such as
the size of the scan area, can be specified.
" For details on the installation of the scanner driver refer to the Installa-
tion Guide.
Basic Scanning Operation
1 Position the document to be
scanned.
" For details on positioning
the document, refer to
“Placing a Document to
be Copied” on page 3-19.
2 Start the application to be used
for scanning.
3 Start the scanner driver according to the application settings.
4 Specify the necessary scanner driver settings.
5 Click the Scan button in the scanner driver.
Scanning From a Computer Application6-2
Page 80

Windows TWAIN Driver Settings
Load
Load a saved settings file (dat file) for scanning.
Save
Save the current settings as a settings file (dat file).
Default
Return all settings to their defaults.
Help icon
Click to display the Help.
About icon
Click to display the software version information.
Paper source
This setting cannot be changed with this machine.
Original Size
Specify the original size.
Scan Type
Specify the scan type.
Resolution
Specify the resolution.
Scale
Specify the enlargement or reduction ratio for the selected area.
" If the resolution is set at 1200 × 1200dpi or higher, a setting larger
than 100% cannot be specified.
Scanning mode
Select Auto or Manual. When Manual is selected, a tab appears so that
detailed settings can be specified, for example, for Brightness/Contrast and
Filter.
" The parameters that can be set differ depending on the scanning
mode that is selected.
" If Auto is selected as the scanning mode, scanning is performed after
a prescan is performed so that a preview image can be checked.
Scanning From a Computer Application 6-3
Page 81

Image size
Shows the data size of the scan image.
Rotation
Select the orientation of the image to be scanned.
Close
Click to close the TWAIN driver window.
Prescan
Click to begin scanning a preview image.
Scan
Click to begin scanning.
AutoCrop icon
Click to automatically detect the scanning position based on the preview
image.
Zoom icon
Click to rescan the area selected in the preview window and enlarge it to fit
the window.
Mirror icon
Click to display a mirror image of the preview image.
Tone Reversal icon
Click to reverse the colors of the preview image.
Clear icon
Click to erase the preview image.
Preview window
Displays a preview image. Drag the rectangle over the image to select an
area.
Before/After (RGB)
Move the pointer in the preview window to display the color tones at the
pointer’s position before and after adjustments.
Width/Height
Displays the width and height for the selected area in the selected measurement units.
Scanning From a Computer Application6-4
Page 82

Windows WIA Driver Settings
Color picture
Select this setting when scanning in color.
Grayscale picture
Select this setting when scanning in grayscale.
Black and white picture or text
Select this setting when scanning in black and white.
Custom Settings
Select this setting when scanning with Adjust the quality of the scanned
picture settings applied.
" If settings have been specified with Adjust the quality of the
scanned picture, Custom Settings is automatically selected.
Adjust the quality of the scanned picture
Click this message to display the Advanced Properties dialog box. In the
Advanced Properties dialog box, settings can be specified for Brightness,
Contrast, Resolution, and Picture type (select from color, grayscale, or
black and white).
" These settings are applied when Custom Settings is selected.
Preview window
Displays a preview image. Drag the rectangle over the image to select an
area.
Preview
Click to begin scanning a preview image.
Scan
Click to begin scanning.
Cancel
Click to close the WIA driver window.
Scanning From a Computer Application 6-5
Page 83

Macintosh TWAIN Driver Settings
Load
Load a saved settings file (dat file) for scanning.
Save
Save the current settings as a settings file (dat file).
Default
Return all settings to their defaults.
Help icon
Click to display the Help.
About icon
Click to display the software version information.
Paper source
This setting for this item cannot be changed with this machine.
Original Size
Specify the original size.
Scan Type
Specify the scan type.
Resolution
Specify the resolution.
Scale
Specify the enlargement or reduction ratio for the selected area.
" If the resolution is set at 1200 × 1200dpi or higher, a setting larger
than 100% cannot be specified.
Scanning mode
Select Auto or Manual. When Manual is selected, a tab appears so that
detailed settings can be specified, for example, for Brightness/Contrast and
Filter.
" The parameters that can be set differ depending on the scanning
mode that is selected.
" If Auto is selected as the scanning mode, scanning is performed after
a prescan is performed so that a preview image can be checked.
Scanning From a Computer Application6-6
Page 84

Image size
Shows the data size of the scan image.
Rotation
Select the orientation of the image to be scanned.
Close
Click to close the TWAIN driver window.
Prescan
Click to begin scanning a preview image.
Scan
Click to begin scanning.
AutoCrop icon
Click to automatically detect the scanning position based on the preview
image.
Zoom icon
Click to rescan the area selected in the preview window and enlarge it to fit
the window.
Mirror icon
Click to display a mirror image of the preview image.
Tone Reversal icon
Click to reverse the colors of the preview image.
Clear icon
Click to erase the preview image.
Preview window
Displays a preview image. Drag the rectangle over the image to select an
area.
Before/After (RGB)
Move the pointer in the preview window to display the color tones at the
pointer’s position before and after adjustments.
Width/Height
Displays the width and height for the selected area in the selected measurement units.
Scanning From a Computer Application 6-7
Page 85

Scanning With the Machine
The machine keys can be used to make scans. Scanning is performed with
the scan settings specified in LinkMagic. To change the scan settings, change
the settings in LinkMagic.
In order to perform this operation, the following requirements must be met.
z This machine is connected to a computer using a USB cable.
z The TWAIN scanner driver, the printer driver and LinkMagic (Windows
only) are installed on the computer.
z Either LinkMagic is activated or the LinkMagic icon appears in the
Windows notification area.
The scan data is saved in the folder specified with LinkMagic.
For details on LinkMagic, refer to the Reference Guide on the Documentation
CD/DVD.
" Before scanning, check that the Scan key is lit up in green. If the key
is not lit up in green, press the Scan key to enter Scan mode.
Basic Scanning Operation
1 Position the document to be
scanned.
" For details on positioning
the document, refer to
“Placing a Document to
be Copied” on page 3-19.
2 Press the Scan key to enter
Scan mode.
3 To scan color scans, press the Start-Color key. To scan monochrome
scans, press the Start-B&W key.
" If the Stop/Reset key is pressed while scanning, JOB CANCEL
appears. To continue scanning, select NO. To stop scanning,
YES.
select
Scanning With the Machine6-8
Page 86

7Replacing
Consumables
Page 87

Replacing Consumables
Note
Failure to follow instructions as outlined in this manual could result in
voiding your warranty.
Note
If an error message (TONER OUT, I/C LIFE END, etc.) appears, print
out the configuration page, and then check the status of the other
consumables. For details on the error messages, refer to “Error Messages”
on page 9-27. For details on printing the configuration page, refer to
“Printing a Configuration Page” on page 9-3.
About Toner Cartridges
Your machine uses four toner cartridges: black, yellow, magenta, and cyan.
Handle the toner cartridges carefully to avoid spilling toner inside the machine
or on yourself.
" Install only new toner cartridges in your machine. If a used toner car-
tridge is installed, then toner remaining amount may not be accurate.
" The toner is nontoxic. If you get toner on your skin, wash it off with
cool water and a mild soap. If you get toner on your clothes, lightly
dust them off as best as you can. If some toner remains on your
clothes, use cool, not hot water, to rinse the toner off.
CAUTION
If you get toner in your eyes, wash it out immediately with cool water
and consult a doctor.
" Refer to the following URL for recycling information.
US: printer.konicaminolta.com/products/recycle/index.asp
Europe: cleanplanet-printer.konicaminoltaeurope.com/cleanplanet/
choose.php
Other regions: printer.konicaminolta.com
Replacing Consumables7-2
Page 88

Note
Do not use refilled toner cartridges or unapproved toner cartridges. Any
damage to the machine or quality problems caused by a refilled toner
cartridge or an unapproved toner cartridge will void your warranty. No
technical support is provided to recover from these problems.
When replacing a toner cartridge, refer to the following table. For optimum
print quality and performance, use only approved KONICA MINOLTA toner
cartridges for your specific machine type, as listed in the table below. You can
find your machine type and the toner cartridge part numbers on the consumables reorder label inside the original cover.
Machine
Typ e
Machine Part
Number
AM A0HF 011
EU A0HF 021
AP A0HF 041
Toner Cartridge Type Toner Cartridge
Part Number
Standard-Capacity Toner Cartridge -Yellow (Y) A0V3 05F
Standard-Capacity Toner Cartridge -Magenta (M) A0V3 0AF
Standard-Capacity Toner Cartridge -Cyan (C) A0V3 0GF
High-Capacity Toner Cartridge - Black (K) A0V3 01F
High-Capacity Toner Cartridge - Yellow (Y) A0V3 06F
High-Capacity Toner Cartridge - Magenta (M) A0V3 0CF
High-Capacity Toner Cartridge - Cyan (C) A0V3 0HF
Standard-Capacity Toner Cartridge -Yellow (Y) A0V3 05H
Standard-Capacity Toner Cartridge -Magenta (M) A0V3 0AH
Standard-Capacity Toner Cartridge -Cyan (C) A0V3 0GH
High-Capacity Toner Cartridge - Black (K) A0V3 01H
High-Capacity Toner Cartridge - Yellow (Y) A0V3 06H
High-Capacity Toner Cartridge - Magenta (M) A0V3 0CH
High-Capacity Toner Cartridge - Cyan (C) A0V3 0HH
Standard-Capacity Toner Cartridge -Yellow (Y) A0V3 05K
Standard-Capacity Toner Cartridge -Magenta (M) A0V3 0AK
Standard-Capacity Toner Cartridge -Cyan (C) A0V3 0GK
High-Capacity Toner Cartridge - Black (K) A0V3 01K
High-Capacity Toner Cartridge - Yellow (Y) A0V3 06K
High-Capacity Toner Cartridge - Magenta (M) A0V3 0CK
High-Capacity Toner Cartridge - Cyan (C) A0V3 0HK
Replacing Consumables 7-3
Page 89

Machine
Typ e
Number
GC A0HF 081
Machine Part
Toner Cartridge Type Toner Cartridge
Standard-Capacity Toner Cartridge -Yellow (Y) A0V3 05N
Standard-Capacity Toner Cartridge -Magenta (M) A0V3 0AN
Standard-Capacity Toner Cartridge -Cyan (C) A0V3 0GN
High-Capacity Toner Cartridge - Black (K) A0V3 01N
High-Capacity Toner Cartridge - Yellow (Y) A0V3 06N
High-Capacity Toner Cartridge - Magenta (M) A0V3 0CN
High-Capacity Toner Cartridge - Cyan (C) A0V3 0HN
Part Number
" For optimum print quality and performance, use only the corre-
sponded TYPE genuine KONICA MINOLTA toner cartridges.
Keep toner cartridges:
In their packaging until you’re ready to install them.
In a cool, dry location away from sunlight (due to heat).
The maximum storage temperature is 35°C (95°F) and the maximum stor-
age humidity is 85% (noncondensing). If the toner cartridge is moved from
a cold place to a warm, humid place, condensation may occur, degrading
print quality. Allow the toner to adapt to the environment for about one
hour before use.
Level during handling and storage.
Do not hold, stand or store cartridges on their ends or turn them upside
down; the toner inside the cartridges may become caked or unequally
distributed.
Away from salty air and corrosive gases such as aerosols.
Replacing Consumables7-4
Page 90

Replacing a Toner Cartridge
Note
Be careful not to spill toner while replacing a toner cartridge. If toner
spills, immediately wipe it off with a soft, dry cloth.
MACHINE SETTING/TONER OUT STOP in the UTILITY menu is set to
If
ON, the message TONER OUT/CHANGE X TONER (where “X” indicates
the color of the toner) appears when the toner cartridge is nearly empty. Follow the steps below to replace the toner cartridge.
1 Check the message window to see which color toner cartridge needs
replacing.
" If the machine detects that a toner cartridge is empty (TONER
OUT or TONER LIFE END appears), the empty toner cartridge is
automatically moved so that it can be replaced.
If this has occurred, skip steps 2 through 5, and continue with step
6.
2 With the main screen displayed, press the * key to display the PRINTER
MODE screen.
3 Press the , key to select T/C CHANGE and then press the Select key.
4 Press the Select key to select REPLACE MODE.
5 Press the + or , key to select the color for the toner cartridge to be
replaced and then press the Select key.
The toner cartridges rotate within the machine to move the toner cartridge
of the selected color to a position where it can be replaced.
" To e x i t REPLACE MODE, press the Stop/Reset key.
6 Open the front cover.
" Before opening the front
cover, open Tray 1 if it is
not already open.
Replacing Consumables 7-5
Page 91

7 Check that the toner cartridge to be replaced has been moved to the front.
" You can identify the toner cartridge by the color of the handle.
8 Pull down the handle on the
toner cartridge until the toner
cartridge is unlocked and moves
out slightly toward you.
Remove the toner cartridge.
" Do not manually rotate
the toner cartridge carousel. In addition, do not
rotate the carousel with
force, otherwise it may be
damaged.
Note
Do not touch the contact
indicated the illustration.
Replacing Consumables7-6
Page 92

Note
Dispose of the empty toner cartridge according to your local
regulations. Do not burn the toner cartridge.
For details, refer to “About Toner Cartridges” on page 7-2.
9 Check the color of the new toner cartridge to be installed.
10 Remove the toner cartridge from the bag.
11 Shake the cartridge a few times
to distribute the toner.
" Make sure that the toner
roller cover is securely
attached before shaking
the toner cartridge.
12 Remove the cover from the
toner roller.
" Do not touch or scratch
the toner roller.
Replacing Consumables 7-7
Page 93

13 Align the shaft on each end of
the toner cartridge with its holders, and then insert the cartridge.
" Before inserting the toner
cartridge, make sure that
the color of the toner cartridge to be installed is
the same as the label on
the toner cartridge carousel.
Note
Do not touch the contact
indicated the illustration.
Replacing Consumables7-8
Page 94

14 Press in the toner cartridge until
it locks into place.
15 Close the front cover.
16 Press the Stop/Reset key to reset the machine.
" The machine must complete a calibration cycle (less than 2 min-
utes) after a toner cartridge has been replaced. If you open the
scanner unit or front cover before the machine is reset, the calibration stops, then starts over again after the cover is closed.
Replacing Consumables 7-9
Page 95

Replacing All Toner Cartridges at the Same Time
Note
Be careful not to spill toner while replacing a toner cartridge. If toner
spills, immediately wipe it off with a soft, dry cloth.
By selecting the
tridges can be replaced at the same time.
Follow the procedure described below to use the EJECT MODE.
EJECT MODE in the PRINTER MODE menu, all toner car-
1 With the main screen displayed, press the * key to display the PRINTER
MODE screen.
2 Press the , key to select T/C CHANGE and then press the Select key.
3 Press the , key to select EJECT MODE and then press the Select key.
4 Perform the operations described in steps 6 through 15 of “Replacing a
Toner Cartridge” on page 7-5 through 7-9 to replace the magenta toner
cartridge.
" To exit EJECT MODE, press the Stop/Reset key.
5 Follow the same procedure to replace the cartridges for the cyan, black,
then yellow toners.
6 Press the Stop/Reset key to reset the machine.
" The machine must complete a calibration cycle (less than 2 min-
utes) after a toner cartridge has been replaced. If you open the
scanner unit or front cover before the machine is reset, the calibration stops, then starts over again after the cover is closed.
Replacing Consumables7-10
Page 96

Replacing the Imaging Cartridge
When replacing an imaging cartridge, refer to the following table. For optimum print quality and performance, use only approved KONICA MINOLTA
imaging cartridge for your specific machine type, as listed in the table below.
You can find your machine type and the imaging cartridge part numbers on
the consumables reorder label inside the original cover.
Machine
Typ e
AM A0HF 011 Imaging Cartridge A0VU 011
EU A0HF 021 A0VU 0Y1
AP A0HF 041 A0VU 0Y1
GC A0HF 081 A0VU 0Y1
Machine Part
Number
Part Name Imaging Cartridge
Part Number
" For optimum print quality and performance, use only the corre-
sponded TYPE genuine KONICA MINOLTA imaging cartridge.
" You are advised to replace the indicated imaging cartridge when the
message
1 Open the scanner unit.
I/C LIFE END/REPLACE I/C appears.
" If there is paper in the
output tray, remove it,
and then fold up the output tray before opening
the scanner unit.
Replacing Consumables 7-11
Page 97

Note
M
M
Do not touch the wires and flat
cable shown in the illustration.
2 Grab the handle and lift it up
slightly to the back, and then
slowly pull the imaging cartridge
out vertically.
Note
Dispose of the used imaging cartridge according to your local
regulations. Do not burn the imaging cartridge.
Replacing Consumables7-12
Page 98

3 Prepare the new imaging cartridge.
M
Note
Do not touch the PC drum and the transfer belt on the imaging
cartridge.
4 Slowly insert the new imaging
cartridge vertically, and then
push it slightly down toward you
to finish installing the imaging
cartridge.
5 Carefully close the scanner unit.
Replacing Consumables 7-13
Page 99

Note
M
Do not touch the wires and flat
cable shown in the illustration.
" The machine must complete a calibration cycle (less than 2 min-
utes) after the imaging cartridge has been replaced. If you open
the scanner unit or front cover before the machine is reset, the calibration stops, then starts over again after the cover is closed.
Replacing Consumables7-14
Page 100

Replacing the Fuser Unit
For optimum print quality and performance, use only approved KONICA
MINOLTA fuser unit for your specific machine type.
1 Turn off the machine and discon-
nect the power cord.
Note
There are extremely hot parts within the machine. Before replacing
the fuser unit, wait about 20 minutes after turning off the machine,
and then check that the fusing section has reached room
temperature, otherwise, you may get burnt.
2 Open the scanner unit.
" If there is paper in the
output tray, remove it,
and then fold up the output tray before opening
the scanner unit.
Replacing Consumables 7-15
 Loading...