

Page 1
Network Scanner
Chapter 1 : Introduction
Chapter 2 : Overview of the Scanning Features
Chapter 3 : Before Using the Scanning Features
Chapter 4 : About the Copied Data Processing Features
Chapter 5 : About the Network Scanner Features
Chapter 6 : Configuring Destination with the Network Scanner Features
Chapter 7 : Using the Network Scanner Features
Chapter 8 : About the Network Scanner Driver
Chapter 9 : About the Secure Folder
Chapter 10 : Troubleshooting
Chapter 11 : Utility Tools
Chapter 12 : Appendix
Page 2

Table of contents
1 Introduction
1.1 Introduction ....................................................................................... 1-2
1.1.1 ACKNOWLEDGEMENTS: .............................................................. 1-2
1.1.2 EXEMPTION ................................................................................... 1-2
1.1.3 OpenSSL Statement ...................................................................... 1-3
1.2 Composition of User's Guide .......................................................... 1-6
1.3 About this Manual ............................................................................. 1-7
1.3.1 Manual Composition ...................................................................... 1-8
1.3.2 Conventions Used in this Manual .................................................. 1-9
1.3.3 Utility Tools of This Product ......................................................... 1-10
1.3.4 How to read this Manual .............................................................. 1-11
2 Overview of the Scanning Features
2.1 Overview of Features and Connection Modes ............................... 2-2
2.1.1 About the HDD ............................................................................... 2-2
2.1.2 Copied Data Processing Features ................................................. 2-3
2.1.3 Network Scanner Features ............................................................ 2-5
2.2 Product Specifications ..................................................................... 2-6
3 Before Using the Scanning Features
3.1 About the Control Panel ................................................................... 3-2
3.2 How to operate the Touch Panel .................................................... 3-4
3.3 How to Input Characters .................................................................. 3-6
3.3.1 About keys on the character input screen ..................................... 3-6
3.3.2 About character input .................................................................... 3-6
3.4 How to Search .................................................................................. 3-7
3.4.1 Destination Search ......................................................................... 3-7
3.4.2 Searching a box/file ....................................................................... 3-8
3.5 Thumbnail ........................................................................................ 3-11
bizhub PRO 1050/1050e Scanner i
Page 3

4 About the Copied Data Processing Features
4.1 Overview of the STORE/RECALL Features .....................................4-2
4.1.1 About folders and boxes .................................................................4-4
4.2 About Screens of the STORE/RECALL Tabs ..................................4-6
4.2.1 About common keys on the list screens .........................................4-6
4.3 Registering a Personal Folder ..........................................................4-7
4.4 Deleting a Personal Folder .............................................................4-10
4.5 Creating a Box (Personal Folder/Public Folder) ...........................4-12
4.6 Deleting a Box (Personal Folder/Public Folder/Secure Folder) ..4-16
4.7 Selecting a Storage Location .........................................................4-20
4.8 About the Copied Data Storage Setting Screen ...........................4-31
4.9 Changing Data Transmission Method to PC ................................4-34
4.10 Output from the HDD-A ..................................................................4-41
4.11 About the Recall Tab’s Output Setting Screen .............................4-45
4.11.1 Keys on the setting screen ...........................................................4-45
5 About the Network Scanner Features
5.1 Overview of the Network Scanner Features ...................................5-2
5.2 Send by an E-Mail ..............................................................................5-4
5.2.1 Items to be configured ....................................................................5-4
5.3 Store on the HDD-B ...........................................................................5-6
5.3.1 Items to be configured ....................................................................5-6
5.4 Send to the FTP server .....................................................................5-7
5.4.1 Items to be configured ....................................................................5-7
5.5 Send to the SMB server ....................................................................5-9
5.5.1 Items to be configured ....................................................................5-9
5.6 Send to a Group ...............................................................................5-11
5.7 Use the Network Scanner Features ...............................................5-12
6 Configuring Destination for the Network Scanner
Features
6.1 About Registration ............................................................................6-2
6.1.1 Change/delete destinations/storage locations ...............................6-2
6.1.2 The keys on the Destination Manual Input screen ..........................6-3
ii bizhub PRO 1050/1050e Scanner
Page 4

6.2 Registering an E-Mail Address ........................................................ 6-4
6.3 Registering the HDD-B ..................................................................... 6-6
6.4 Registering the FTP server .............................................................. 6-9
6.5 Registering the SMB server ........................................................... 6-12
6.6 Registering a Group ....................................................................... 6-15
7 Using the Network Scanner Features
7.1 The keys on the Select Destinations/Storage Locations Screen . 7-2
7.2 Transmission to an E-Mail Address ................................................ 7-4
7.3 Storage on the HDD-B ..................................................................... 7-9
7.4 Transmission to the FTP server .................................................... 7-14
7.5 Transmission to the SMB server ................................................... 7-19
7.6 Transmission to a Group ................................................................ 7-24
7.7 About the Scanner Setting Basic Screen ..................................... 7-26
8 About the Network Scanner Driver
8.1 Reading in from HDD-B ................................................................... 8-2
8.1.1 Network Scanner Driver ................................................................. 8-3
8.2 To install the Network Scanner Driver ............................................ 8-4
8.3 Import Scanned Data to Computers ............................................... 8-5
8.3.1 TWAIN-compliant applications
can be used to read in scanned data 8-5
8.4 Features and Settings of the Network Scanner Driver ................. 8-8
9 About the Secure Folder
9.1 Overview of the Secure Folder ........................................................ 9-2
9.2 Creating a Box (Secure Folder) ....................................................... 9-3
9.3 Deleting a Box (Secure Folder) ........................................................ 9-6
9.4 Output from the Secure Folder ....................................................... 9-7
10 Troubleshooting
10.1 Cannot connect to the scanner ..................................................... 10-2
10.2 When an Error Message Appears ................................................. 10-4
10.2.1 Errors during scanning with the [STORE] tab .............................. 10-4
10.2.2 Errors during scanning with the [SCAN] tab ................................ 10-5
bizhub PRO 1050/1050e Scanner iii
Page 5

11 Utility Tools
11.1 PageScope JobEditor .....................................................................11-2
11.1.1 How to use PageScope JobEditor ................................................11-3
11.2 PageScope JobEditorServer ..........................................................11-8
11.2.1 How to use PageScope JobEditorServer .....................................11-9
12 Appendix
12.1 Glossary ............................................................................................12-2
12.2 Index .................................................................................................12-5
iv bizhub PRO 1050/1050e Scanner
Page 6

Introduction Chapter 1
1
Introduction
Page 7

1
1 Introduction
1.1 Introduction
Thank you very much for purchasing the bizhub PRO 1050/1050e.
This User's Guide describes the operating procedures and safety precau-
Introduction Chapter 1
1.1.1 ACKNOWLEDGEMENTS:
tions of the bizhub PRO 1050/1050e so that you can handle it safely and
make the best of its capabilities. Usually keep this manual close at hand for
the convenience of reference later.
And also, be sure to read "User's Guide (Copy) ‘Safety Information’" before
operation.
- KONICA MINOLTA, KONICA MINOLTA logo, and the essentials of imag-
ing are registered trademarks of KONICA MINOLTA HOLDINGS, INC..
- bizhub, bizhub PRO, and PageScope are trademarks of KONICA MI-
NOLTA BUSINESS TECHNOLOGIES, INC..
- Microsoft, MS, Windows and MS-DOS are registered trademarks or
trademarks of Microsoft Corporation in the United States and / or other
countries.
- IBM is a registered trademarks of the IBM Corporation.
- Macintosh and PowerMac are registered trademarks or trademarks of
Apple Computer, Inc. in the United States and / or other countries.
- Adobe, Adobe Logo, Acrobat, Acrobat Logo, PostScript and PostScript
Logo are registered trademarks or trademarks of Adobe Systems, Inc..
- RC4® is a registered trademark or trademark of RSA Security Inc. in the
United States and/or other countries.
- Other company names and product names used in this manual are the
registered trademarks or trademarks of their respective companies.
Copyright © 2006 KONICA MINOLTA BUSINESS TECHNOLOGIES, Inc.
Introduction
1.1.2 EXEMPTION
- No part of this manual may be used or duplicated without permission.
- Manufacturer and Sales Company will have no liability for any influences
caused by using the printing system and this User’s Guide.
- The information written in this Network Scanner User’s Guide is subject
to change without prior notice.
1-2 bizhub PRO 1050/1050e Scanner
Page 8

Introduction
1.1.3 OpenSSL Statement
OpenSSL License
Copyright (c) 1998-2000 The OpenSSL Project. All rights reserved.
Redistribution and use in source and binary forms, with or without modification, are permitted provided that the following conditions are met:
1. Redistributions of source code must retain the above copyright notice,
this list of conditions and the following disclaimer.
2. Redistributions in binary form must reproduce the above copyright notice, this list of conditions and the following disclaimer in the documentation and/or other materials provided with the distribution.
3. All advertising materials mentioning features or use of this software must
display the following acknowledgment:
– "This product includes software developed by the OpenSSL Project for
use in the OpenSSL Toolkit. (http://www.openssl.org/)"
4. The names "OpenSSL Toolkit" and "OpenSSL Project" must not be used
to endorse or promote products derived from this software without prior
written permission. For written permission, please contact opensslcore@openssl.org.
5. Products derived from this software may not be called "OpenSSL" nor
may "OpenSSL" appear in their names without prior written permission
of the OpenSSL Project.
6. Redistributions of any form whatsoever must retain the following acknowledgment:
– "This product includes software developed by the OpenSSL Project for
use in the OpenSSL Toolkit (http://www.openssl.org/)"
THIS SOFTWARE IS PROVIDED BY THE OpenSSL PROJECT ``AS IS'' AND
ANY EXPRESSED OR IMPLIED WARRANTIES, INCLUDING, BUT NOT LIMITED TO, THE IMPLIED WARRANTIES OF MERCHANTABILITY AND FITNESS FOR A PARTICULAR PURPOSE ARE DISCLAIMED. IN NO EVENT
SHALL THE OpenSSL PROJECT OR ITS CONTRIBUTORS BE LIABLE FOR
ANY DIRECT, INDIRECT, INCIDENTAL, SPECIAL, EXEMPLARY, OR CONSEQUENTIAL DAMAGES (INCLUDING, BUT NOT LIMITED TO, PROCUREMENT OF SUBSTITUTE GOODS OR SERVICES; LOSS OF USE, DATA, OR
PROFITS; OR BUSINESS INTERRUPTION) HOWEVER CAUSED AND ON
ANY THEORY OF LIABILITY, WHETHER IN CONTRACT, STRICT LIABILITY,
OR TORT (INCLUDING NEGLIGENCE OR OTHERWISE) ARISING IN ANY
WAY OUT OF THE USE OF THIS SOFTWARE, EVEN IF ADVISED OF THE
POSSIBILITY OF SUCH DAMAGE.
This product includes cryptographic software written by Eric Young
(eay@cryptsoft.com).
This product includes software written by Tim Hudson (tjh@cryptsoft.com).
1
Introduction Chapter 1
bizhub PRO 1050/1050e Scanner 1-3
Page 9

1
Introduction Chapter 1
Introduction
Original SSLeay License
Copyright (C) 1995-1998 Eric Young (eay@cryptsoft.com) All rights reserved.
This package is an SSL implementation written by Eric Young (eay@cryptsoft.com). The implementation was written so as to conform with Netscape’s
SSL.
This library is free for commercial and non-commercial use as long as the following conditions are aheared to. The following conditions apply to all code
found in this distribution, be it the RC4, RSA, lhash, DES, etc., code; not just
the SSL code.
The SSL documentation included with this distribution is covered by the
same copyright terms except that the holder is Tim Hudson (tjh@cryptsoft.com).
Copyright remains Eric Young's, and as such any Copyright notices in the
code are not to be removed. If this package is used in a product, Eric Young
should be given attribution as the author of the parts of the library used. This
can be in the form of a textual message at program startup or in documentation (online or textual) provided with the package.
Redistribution and use in source and binary forms, with or without modification, are permitted provided that the following conditions are met:
1. Redistributions of source code must retain the copyright notice, this list
of conditions and the following disclaimer.
2. Redistributions in binary form must reproduce the above copyright notice, this list of conditions and the following disclaimer in the documentation and/or other materials provided with the distribution.
3. All advertising materials mentioning features or use of this software must
display the following acknowledgement:
– "This product includes cryptographic software written by Eric Young
(eay@cryptsoft.com)"
– The word 'cryptographic' can be left out if the routines from the library
being used are not cryptographic related :-).
4. If you include any Windows specific code (or a derivative thereof) from
the apps directory (application code) you must include an acknowledgement:
– "This product includes software written by Tim Hudson (tjh@crypt-
soft.com)"
THIS SOFTWARE IS PROVIDED BY ERIC YOUNG ``AS IS'' AND ANY EXPRESS OR IMPLIED WARRANTIES, INCLUDING, BUT NOT LIMITED TO,
THE IMPLIED WARRANTIES OF MERCHANTABILITY AND FITNESS FOR A
PARTICULAR PURPOSE ARE DISCLAIMED. IN NO EVENT SHALL THE AUTHOR OR CONTRIBUTORS BE LIABLE FOR ANY DIRECT, INDIRECT, INCIDENTAL, SPECIAL, EXEMPLARY, OR CONSEQUENTIAL DAMAGES
(INCLUDING, BUT NOT LIMITED TO, PROCUREMENT OF SUBSTITUTE
1-4 bizhub PRO 1050/1050e Scanner
Page 10

Introduction
GOODS OR SERVICES; LOSS OF USE, DATA, OR PROFITS; OR BUSINESS
INTERRUPTION) HOWEVER CAUSED AND ON ANY THEORY OF LIABILITY, WHETHER IN CONTRACT, STRICT LIABILITY, OR TORT (INCLUDING
NEGLIGENCE OR OTHERWISE) ARISING IN ANY WAY OUT OF THE USE
OF THIS SOFTWARE, EVEN IF ADVISED OF THE POSSIBILITY OF SUCH
DAMAGE.
The licence and distribution terms for any publically available version or derivative of this code cannot be changed. i.e. this code cannot simply be copied and put under another distribution licence [including the GNU Public
Licence.]
1
Introduction Chapter 1
bizhub PRO 1050/1050e Scanner 1-5
Page 11

1
1.2 Composition of User's Guide
This machine is provided with the following user's guides as printed matters.
User's Guide - Copier
This guide describes an outline of the machine and copy operations.
Please refer to this guide for safety information, turning on/off the machine,
paper supply, dealing with machine trouble such as paper jam, and copy op-
Introduction Chapter 1
eration available on the machine.
User's Guide - POD Administrator's reference
This guide provides you with detailed information about the machine management and how to customize the machine according to your daily use.
Please refer to this guide for a setup and management of the machine including registration of copy paper, tray setting, and a network setup.
User's Guide - Network Scanner <This book>
This guide describes the operation of the network scanner function equipped
for the machine as standard.
Please refer to this guide for full information on reading data or storing data
(Scanner to HDD, Scan to E-Mail, Scan to FTP, Scan to SMB).
Introduction
User's Guide - Security
This guide describes the security functions.
Please refer to this guide for how to use the Enhanced Security mode, and
for detailed machine operation in Enhanced Security mode.
The following user's guide is also provided as a PDF file.
User's Guide - Printer
This guide describes the operation of the printer function equipped for the
machine.
Please refer to this guide for how to use KONICA MINOLTA PCL driver, PostScript PPD driver, KONICA MINOLTA PS driver, and PageScope Web Connection in user mode.
1-6 bizhub PRO 1050/1050e Scanner
Page 12
Introduction
1.3 About this Manual
This manual is the User's Guide for bizhub PRO 1050/1050e Network Scanner features.
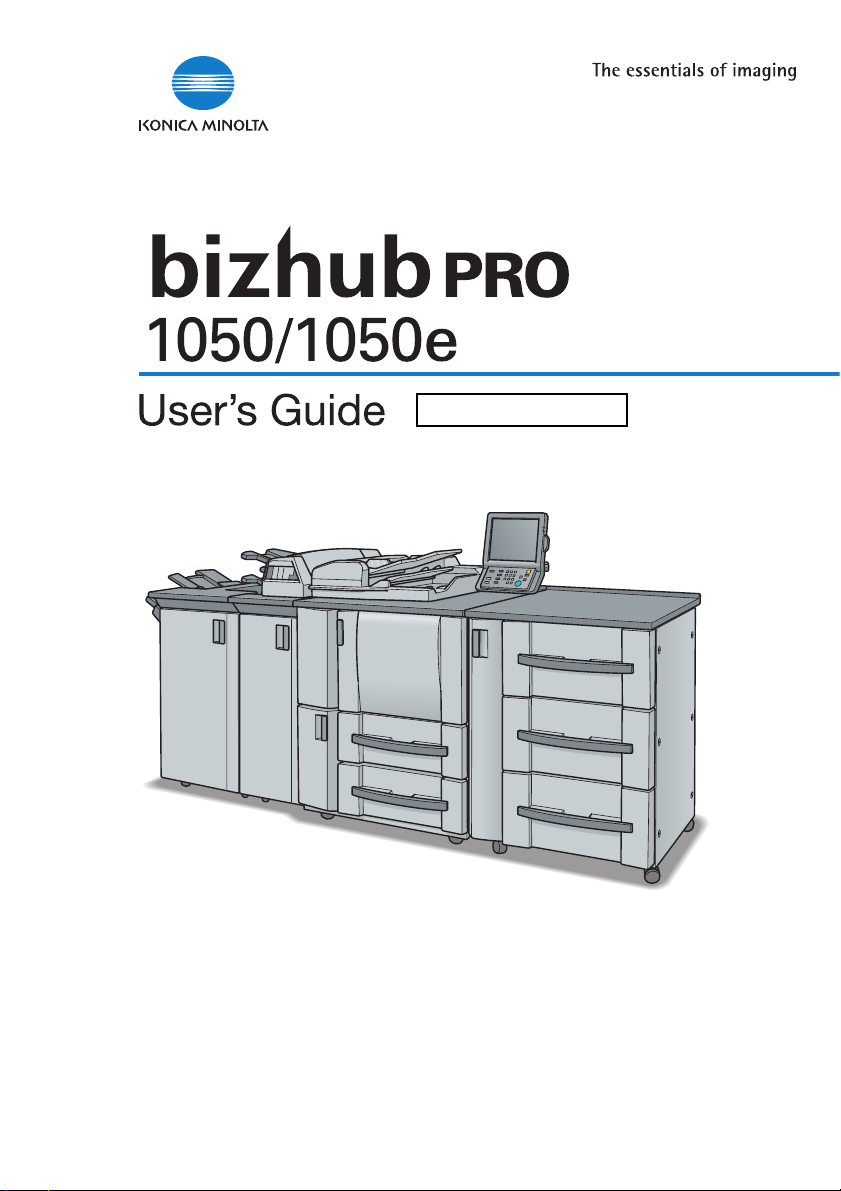
This manual describes the following features operated on the Control Panel.
- [SCAN] tab, [STORE] tab, [RECALL] tab
1
Introduction Chapter 1
2
Reminder
A screen display may change with destinations.
A button name etc. may become the display in a parenthesis.
Refer to the User’s Guide (Copy) or the User’s Guide (POD Administrator
Reference) on how to use other button.
bizhub PRO 1050/1050e Scanner 1-7
Page 13

1
1.3.1 Manual Composition
This manual is composed of the following 12 chapters:
Chapter 1 Introduction
This chapter describes this User's Guide.
Chapter 2 Overview of the Scanning Features
This chapter overviews the Network Scanner features and the Copied Data
Introduction Chapter 1
Processing Features.
Chapter 3 Before Using the Scanning Features
This chapter describes how to use Control Panel, Touch Panel, character input and search features.
Chapter 4 About the Copied Data Processing Features
This chapter describes the Copied Data Processing Features.
Chapter 5 About the Network Scanner Features
This chapter describes the operational flow of the Network Scanner features.
Chapter 6 Configuring Destination for the Network Scanner Features
This chapter describes destination/storage location for the Network Scanner
features.
Chapter 7 Using the Network Scanner Features
This chapter describes in detail how to use the Network Scanner features.
Chapter 8 About the Network Scanner Driver
This chapter describes how to use the Network Scanner Driver.
Chapter 9 About the Secure Folder
This chapter describes the Secure Folder.
Chapter 10 Troubleshooting
This chapter describes how to solve major troubles in the Network Scanner
features and the Copied Data Processing Features.
Chapter 11 Utility Tools
This chapter describes the accompanying utility tools, PageScope JobEditor
and PageScope JobEditorServer.
Chapter 12 Appendix
The glossary and index regarding the scanning features.
Introduction
1-8 bizhub PRO 1050/1050e Scanner
Page 14

Introduction
1.3.2 Conventions Used in this Manual
Notation of each product
The following abbreviations are used in this manual:
1 bizhub PRO 1050/1050e Printer/Copier: copier
2 bizhub PRO 1050/1050e Print Controller: print controller
3 A printing system that combines the
above (1) and (2) products:
4 Microsoft Windows 98: Windows 98
5 Microsoft Windows Me: Windows Me
6 Microsoft Windows NT4.0: Windows NT4.0 or Windows NT
7 Microsoft Windows 2000: Windows 2000
8 Microsoft Windows XP: Windows XP
9 Above OSs: Windows 98/Me
printing system
Windows NT4.0/2000/XP
Windows NT/2000/XP
Windows 98/Me/NT/2000/XP
1
Introduction Chapter 1
bizhub PRO 1050/1050e Scanner 1-9
Page 15

1
1.3.3 Utility Tools of This Product
The utility tools used in the Network Scanner features are as follows. For
more information on how to operate the utility tools, refer to the User's Guide
for the each or the corresponding pages of this manual.
KONICA MINOLTA Scanner Driver (TWAIN-compliant)
This driver creates a connection between a computer and the copier, by
which the scanned data stored in the box are imported to the computer. You
Introduction Chapter 1
are to use application software compliant with TWAIN scanner driver. Data
types that can be handled by this driver are limited only to the TIFF.
For more information, refer to "Reading in from HDD-B" on Page 8-2.
PageScope ScanDirect/Pro
This software creates a connection between a computer and the copier, by
which the scanned data stored in the box are imported to the computer. Data
types that can be handled by this software are the TIFF and the PDF.
For more information, refer to the User's Guide for PageScope ScanDirect/
Pro.
PageScope JobEditor
This software creates a connection between a computer and the copier. It
stores the copied data in the computer, and sends back the copied data
stored and edited in the computer to the copier.
For more information, refer to "PageScope JobEditor" on Page 11-2.
Introduction
PageScope JobEditorServer
This software creates a connection between a computer and the copier. It
stores the copied data in the computer automatically, and sends back the
copied data stored and edited in the computer to the copier.
For more information, refer to "PageScope JobEditorServer" on Page 11-8.
!
Detail
PageScope JobEditor and PageScope JobEditorServer for USA are excluded.
About how to obtain PageScope JobEditor and PageScope JobEditorServer, contact your service representative.
1-10 bizhub PRO 1050/1050e Scanner
Page 16
Introduction
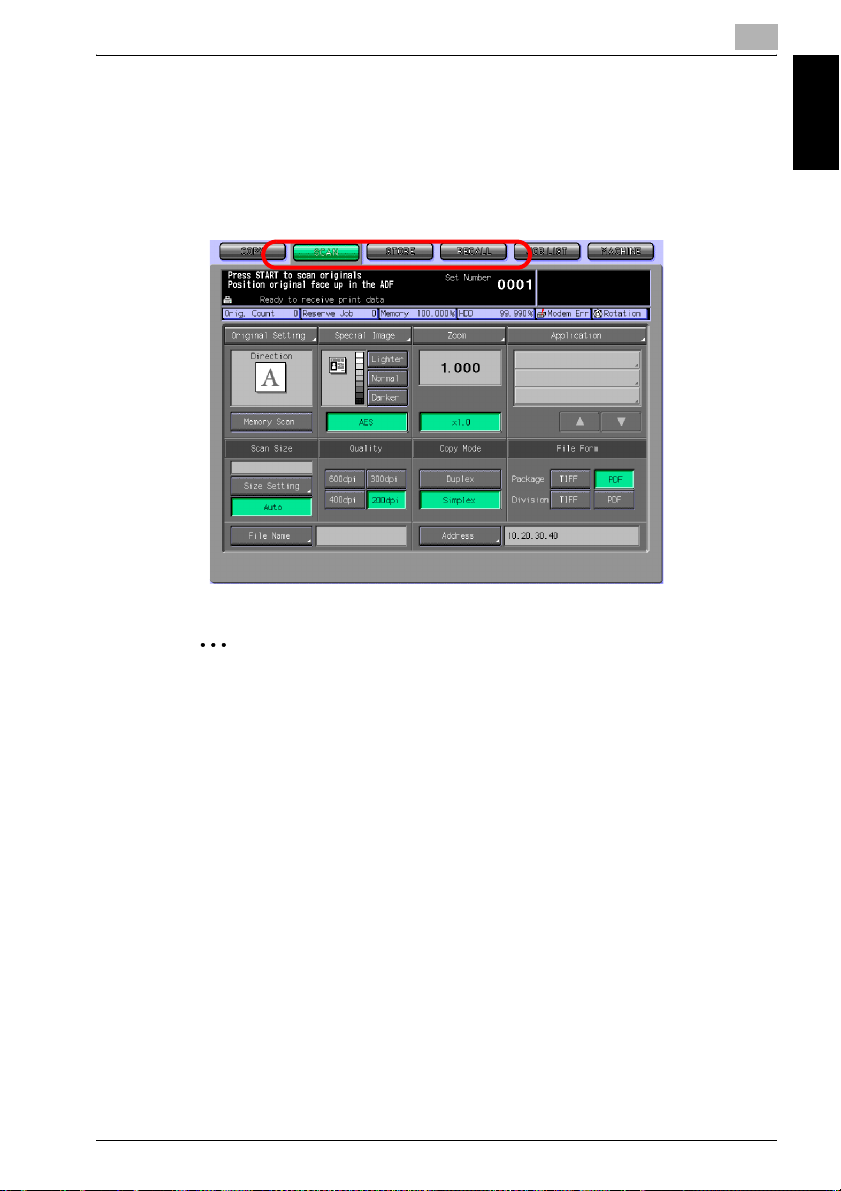
1.3.4 How to read this Manual
1
Show an object and feature
of a procedure.
Note
Explanations to supplement
the body.
Memoes may be included in
the body.
Detail
Hints and Advices on
operating procedures.
Reminder!
Explains important notices
on operating procedures.
Describes operating
procedures.
[ ] are used for the terms
displayed on the screens.
6
Configuring Destination for the Network Scanner Features
6.2 Registering an E-Mail Address
When using the function to send the scanned data as an E-Mail attached file,
you can register the destination E-Mail address in advance. The registration
is done in the following steps.
!
Detail
For E-Mail/FTP/HDD/SMB, destinations can be registered as many as
500 in sum.
Select the [SCAN] tab.
1
he Select Destinations/Storage
Locations screen appears.
Make sure that [E-Mail] is select-
2
ed.
In the initial settings, the Select
Destinations/Storage Locations screen (E-Mail) is dis-
Chapter 6
played. For information on the
initial settings of the Scan
screen, contact your administrator of the copier.
3 Press the [Manual Address] key.
If the E-Mail address is
already registered, the Name
is dis-played.
In the initial settings, such in-
dex keys as [A-C] and [D-F]
are displayed.
On how to edit/delete a regis-
tered address, contact your
Configuring Destination for the Network Scanner Features
6-4 bizhub PRO 1050/1050e Scanner
administrator of the copier.
The Destination Manual Input screen appears.
Introduction Chapter 1
This page does not exist in the document.
bizhub PRO 1050/1050e Scanner 1-11
Page 17

Page 18

2
Overview of the Scanning
Features
Overview of the Scanning Features Chapter 2
Page 19
2
Overview of the Scanning Features
2 Overview of the Scanning Features
2.1 Overview of Features and Connection Modes
The copier has the Network Scanner features and the Copied Data Processing Features.
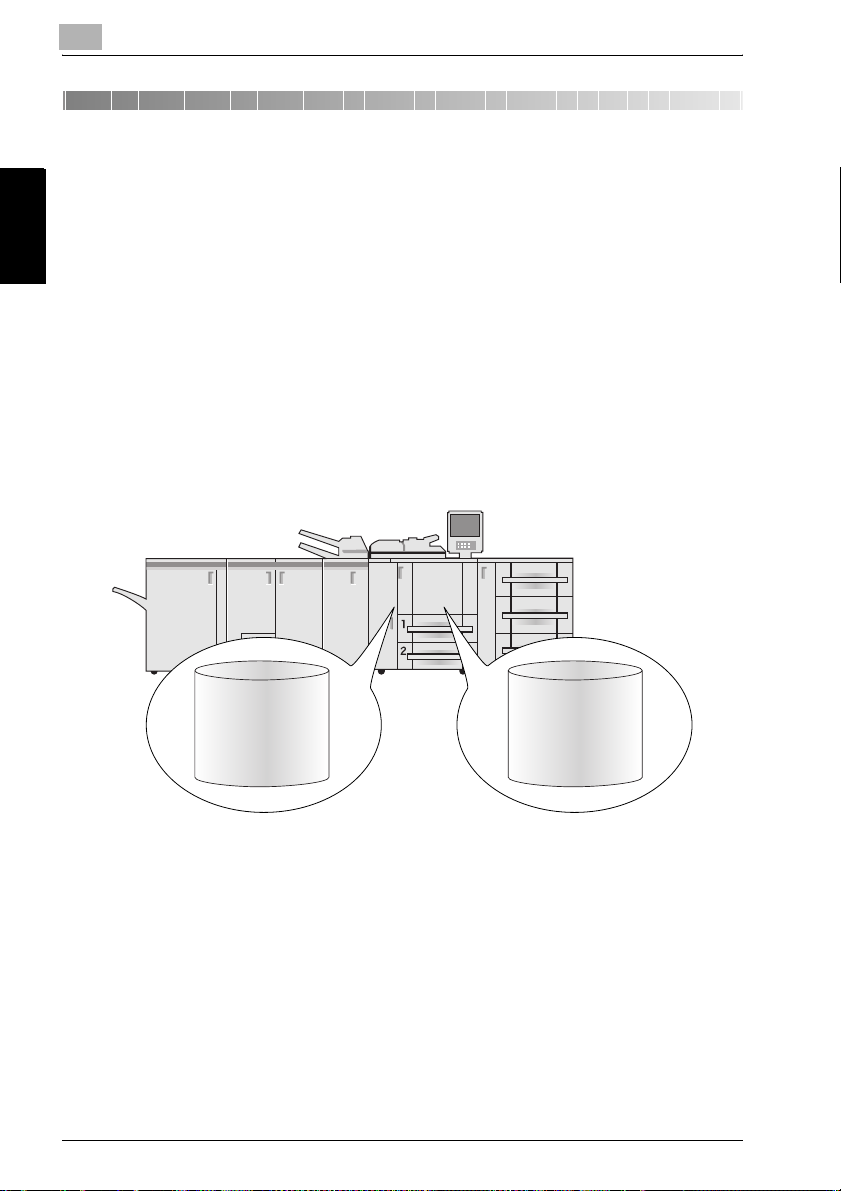
2.1.1 About the HDD
The copier has two types of internal HDDs; the HDD of the main body of the
copier and that of the print controller. The HDD of the copier main body is
used for processing the copied data and that of the print controller is used
for the network scanner.
In this manual, the HDD in the copier main body is referred to as "HDD-A"
and that of the print controller as "HDD-B" and both of them are collectively
referred to as "internal HDD".
Overview of the Scanning Features Chapter 2
HDD-BHDD-A
HDD of copier HDD of print controller
2-2 bizhub PRO 1050/1050e Scanner
Page 20

Overview of the Scanning Features
2.1.2 Copied Data Processing Features
The Copied Data Processing features enable you to import and process copied documents that are converted to digital data (copied data) and stored on
the internal HDD (HDD-A) of the copier using the accompanying utility tool,
PageScope JobEditor. The processed copied data can be returned to the
HDD-A and re-output anytime.
Copied data stored in the HDD-A can be transmitted to the computer via
FTP/SMB in the PDF/TIFF format.
Also, copied data on the HDD-A can be re-output whenever necessary. With
this, you can conveniently print out the document many times.
The Copied Data Processing Features are operated by using the [STORE]/
[RECALL] tab.
2
Overview of the Scanning Features Chapter 2
bizhub PRO 1050/1050e Scanner 2-3
Page 21

2
Overview of the Scanning Features Chapter 2
Overview of the Scanning Features
!
Detail
For more information on the Copied Data Processing Features, refer to
"About the Copied Data Processing Features" on Page 4-2.
For more information on PageScope JobEditor, refer to "PageScope
JobEditor" on Page 11-2.
PageScope JobEditor and PageScope JobEditorServer for USA are excluded.
About how to obtain PageScope JobEditor and PageScope JobEditorServer, contact your service representative.
FTP/SMB server
Original
PageScope
Job Editor
Printing out
RECALL
Network
Connection
Personal A Personal B
HDD-A
Public
Secure
Personal A
Box
0001
Copy
0001
COPY/STORE
Box
0002
Copy
0001
Box
Box
0005
Box
0004
Copy
0003
Copy
0001
Copy
0001
0001
Box
0001
Copy
0001
2-4 bizhub PRO 1050/1050e Scanner
Page 22
Overview of the Scanning Features
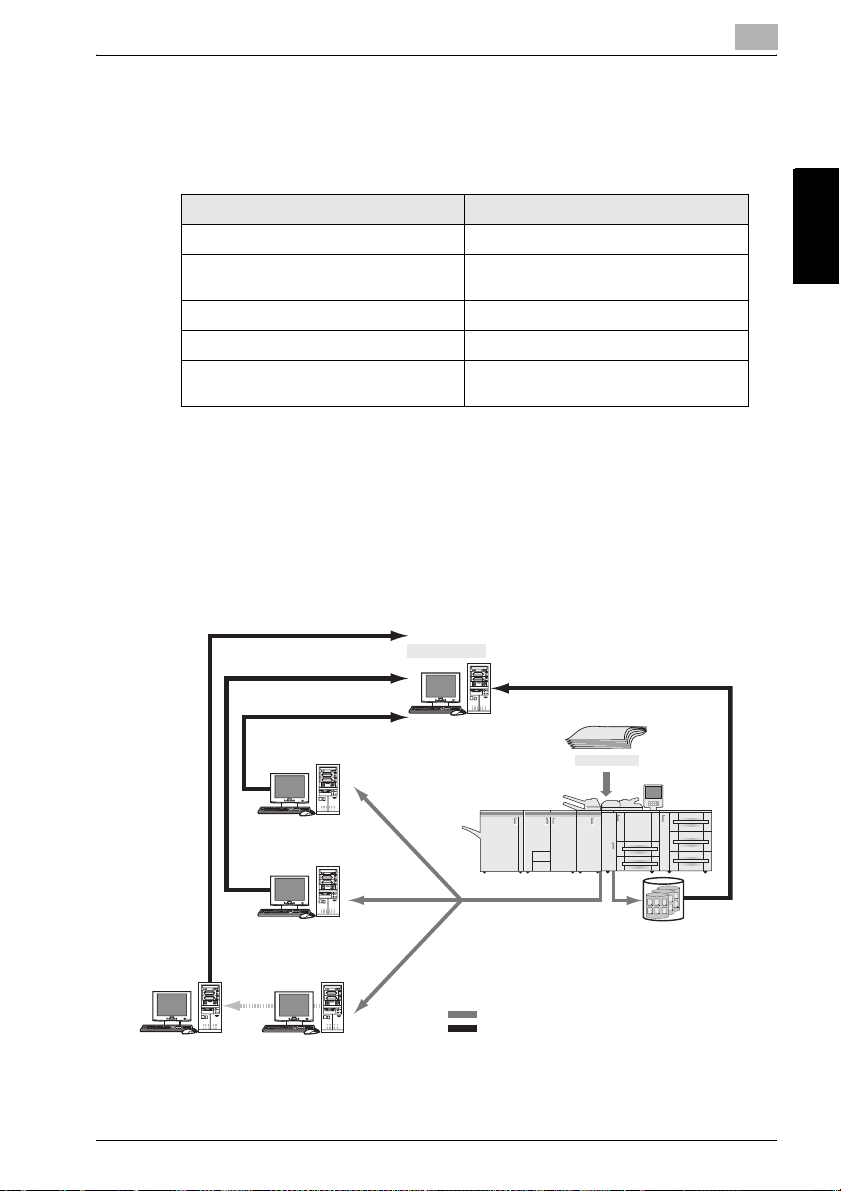
2.1.3 Network Scanner Features
The Network Scanner features enable the followings by converting a
scanned document to digital data.
Features Reference page
Sending data by an E-Mail. “Send by an E-Mail” on page 5-4
Storing on the print controller’s HDD
(HDD-B).
Sending to the FTP server. “Send to the FTP server” on page 5-7
Sending to the SMB server. “Send to the SMB server” on page 5-9
Importing data stored on the HDD-B to
the network-connected computer.
The Network Scanner features are operated by using the [SCAN] tab.
!
Detail
To use the copier as a network scanner, it needs to be connected to the
network. For more information on the network configuration, contact your
network administrator.
“Store on the HDD-B” on page 5-6
“Import Scanned Data to Computers” on
page 8-5
2
Receiving as an E-Mail attached file:
E-Mail software
Downloading from FTP:
FTP client
Import
Storing on the HDD-B:
TWAIN-compliant applications
Network Scanner Driver
File sharing using SMB protocol
Original
SCAN
Copier
SMB server
Box0003
Box0002
Copy
Report Report
Box0001
0001
Copy
Report Report
Copy Document
Printing Document Scanning Document
0001
Copy
Report Report
Copy Document
Printing Document Scanning Document
0001
Copy
Report
Report
0002
Copy Document
Printing Document Scanning Document
Copy
Report
Report
0002
Scanning DocumentCopy Document Printing Document
Copy
Report
Report
0002
Scanning DocumentCopy Document Printing Document
Scanning DocumentCopy Document Printing Document
HDD-B
POP server
FTP server
SMTP server
(E-Mail)
Data flow in scanning by the copier
Data flow in importing by a computer
bizhub PRO 1050/1050e Scanner 2-5
Overview of the Scanning Features Chapter 2
Page 23

2
2.2 Product Specifications
For information on the product specifications of the copier, the print controller and the network, refer to the User's Guide for the each or contact your
administrator for the each.
Product Specifications of Scanning Features
Item Specifications
Original type sheet/book/cubic object
Max. original size A3 (297mm × 420mm) /11" × 17" (279.4mm ×
Cubic object Thickness: Max. 30mm
Original position Deep-left-sided
Scanning resolution 200dpi, 300dpi, 400dpi, 600dpi
Reading speed A4 : Simplex 105 pages/minute
Interface Ethernet(100BASE-TX/10Base-T)
Reading modes • Scan to HDD
Overview of the Scanning Features Chapter 2
Compression method MMR compression for TIFF/PDF format files
Configurable items for reading Original Setting, Special Image, Zoom, Application,
The specifications of the configurable items for reading except File Form, File
Name and Address are in accordance with that of the copier. For more information, refer to the User's Guide (Copy)
Overview of the Scanning Features
432mm)
Weight: Max. 6.8kg
8.5 × 11 : Simplex 103 pages/minute
• Scan to FTP
•Scan to SMB
•Scan to E-Mail
Compression method can be changed to MH compression
For more information, contact your service representative.
Scan Size, Quality, Copy Mode, File Form, File
Name, Address
Duplex 65 pages/minute
Duplex 65 pages/minute
2-6 bizhub PRO 1050/1050e Scanner
Page 24

3
Before Using the
Scanning Features
Before Using the Scanning Features Chapter 3
Page 25
3
Before Using the Scanning Features
3 Before Using the Scanning Features
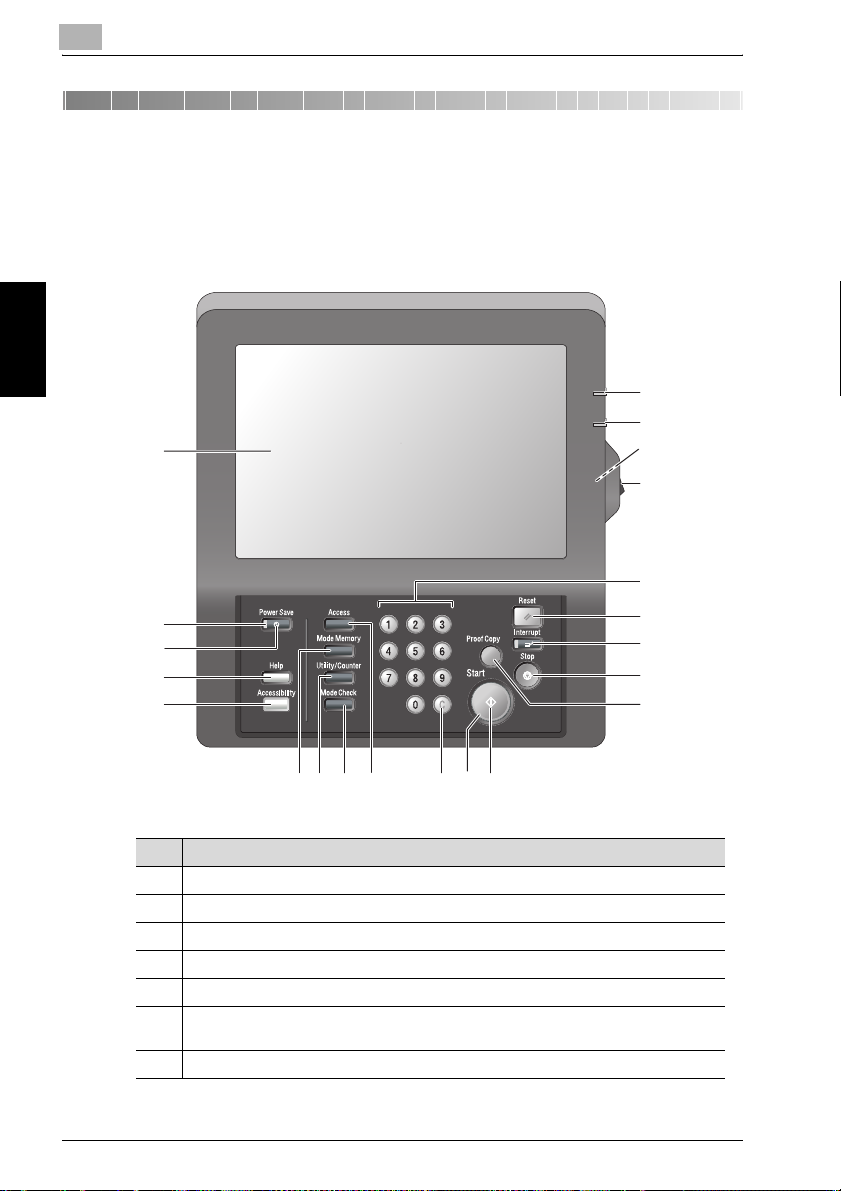
3.1 About the Control Panel
For detailed information on names and functions of various parts of the Control Panel, refer to the User's Guide (Copy).
19
20
18
21
1
2
17
16
15
14
3
4
5
6
Before Using the Scanning Features Chapter 3
78910111213
No. Description
1 Power Switch turns machine power on/off when pressed.
2 Keypad enters numeric values.
3 Reset restores copier to the initial settings.
4 Interrupt stops copying/printing/scanning in progress to allow a simple copying job.
5 Stop ceases the copying sequence; deletes the stored memory.
6 Proof Copy outputs a single set of copies to confirm whether the current settings are
selected properly.
7 Start activates copying or scanning.
3-2 bizhub PRO 1050/1050e Scanner
Page 26

Before Using the Scanning Features
No. Description
8 Start LED lights in green when machine operation is available, and turns red if any
operation cannot be started.
9 [C] (Clear quantity) allows resetting of print quantity.
10 Access sets the machine to allow copying/scanning/printing only when the User Au-
thentication/Volume Track password is entered.
11 Mode Check displays a screen showing all settings that are selected for the current
job.
12 Utility/Counter displays the Utility Screen / Counter Screen or accesses programming
modes for setting special functions.
13 Mode Memory displays screens for selecting job store/job recall functions.
14 Accessibility adjusts the response time when touch screen keys or control panel keys
are pressed.
15 Help displays a screen with help for the currently selected function.
16 Power Save enables temporary use of the machine when the Power Save LED is lit,
or activates power-saving mode for times when the copier is inactive.
17 Power Save LED lights when any power-saving mode is activated, machine power is
off due to the timer function, or user password is required for use.
18 LCD Touch Screen displays machine and copying status, help information, interactive
screens, and touch keys for selecting all functions.
19 Power LED lights in red when the main power switch is turned ON, then turns green
when the power switch is turned ON.
20 Data LED blinks while receiving print data.
21 Brightness Adjustment Dial can be turned to adjust the brightness of the touch screen
(positioned at the back).
3
bizhub PRO 1050/1050e Scanner 3-3
Before Using the Scanning Features Chapter 3
Page 27
3
Before Using the Scanning Features
3.2 How to operate the Touch Panel
To operate the Copied Data Processing Features/Network Scanner features,
use the Touch Panel of the copier.
!
Detail
You can select an item by touching keys lightly on the Touch Panel.
Select a function
Touch a function displayed in a key to select the function.
The selected key is highlighted in green.
To input values
Touch lightly the Keypad on the Touch Panel to input the specified values.
Before Using the Scanning Features Chapter 3
3-4 bizhub PRO 1050/1050e Scanner
Page 28
Before Using the Scanning Features
!
Detail
You may also input values through the Keypad on the Control Panel.
For more information on how to input characters, refer to "How to Input
Characters" on Page 3-6.
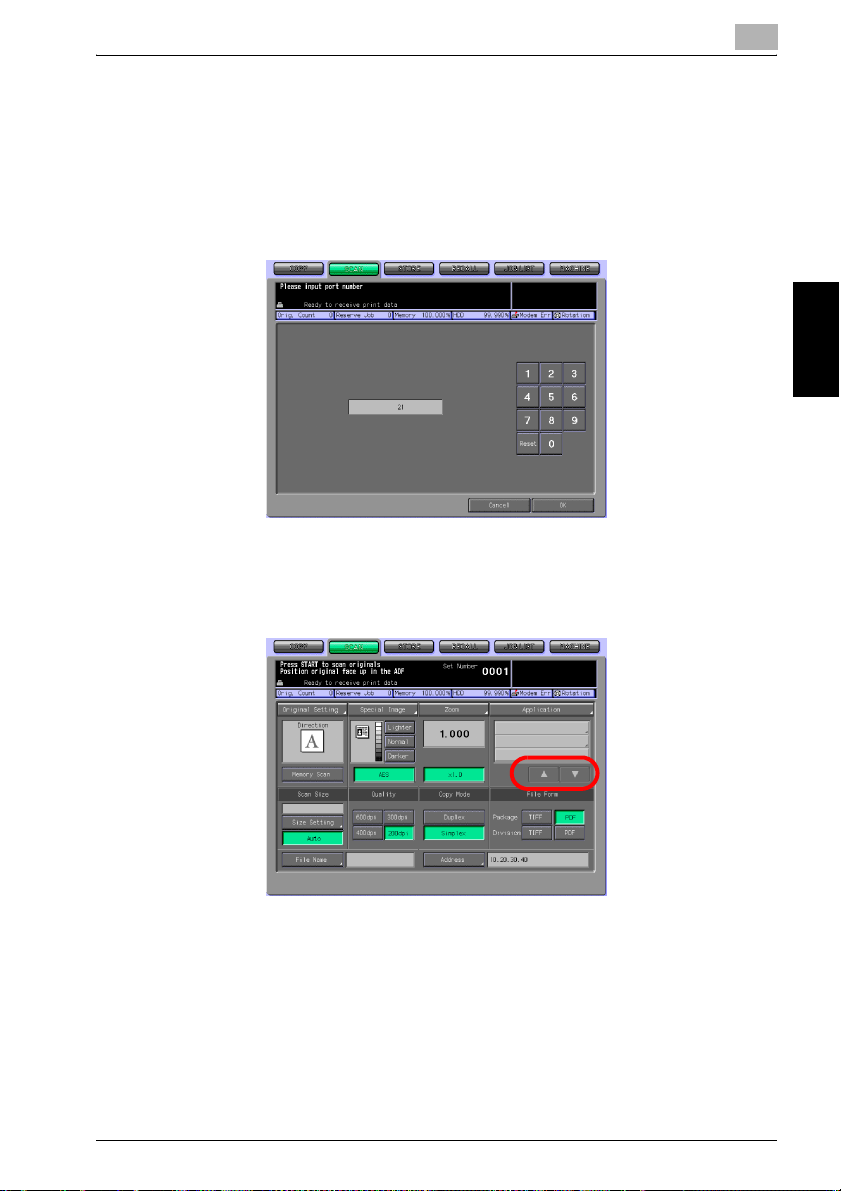
To switch between pages
When all items cannot be displayed in a single page, touch lightly the [▼]/[▲]
key to switch between pages.
3
bizhub PRO 1050/1050e Scanner 3-5
Before Using the Scanning Features Chapter 3
Page 29

3
Before Using the Scanning Features
3.3 How to Input Characters
As you touch the item where you can input characters, the character input
screen appears.
You can input alphabets and signs. Character array is the same with computer keyboards.
3.3.1 About keys on the character input screen
Keys on the character input screen are described here.
Button Function
Before Using the Scanning Features Chapter 3
▼
/
Delete This key deletes the character on the left of the cursor.
OK This key determines the characters you input, and the charac-
Cancel This key cancels the characters you input, and the character
Shift This key switches between an upper case letter and a lower
This key moves a cursor.
▼
ter input screen closes.
input screen closes.
case letter, and between numbers and signs.
3.3.2 About character input
The followings describe basic steps to input characters on the character input screen.
1 Press the corresponding key to input the desired character.
2 Press the [OK] key.
The character input screen closes. The input characters are displayed
on the corresponding column.
3-6 bizhub PRO 1050/1050e Scanner
Page 30
Before Using the Scanning Features
3.4 How to Search
The Copied Data Processing Features/Network Scanner features enables
you to search the registered destination and specified storage location by
their names. You can also search the stored Box No..
3.4.1 Destination Search
You can search the desired destination out of the registered destinations.
Search
You can search the registered destination by using the [Search] key. Searchable destinations include E-Mail addresses, storage locations on the internal
HDD, FTP server addresses and SMB server addresses.
3
The following is how to use the [Search] key.
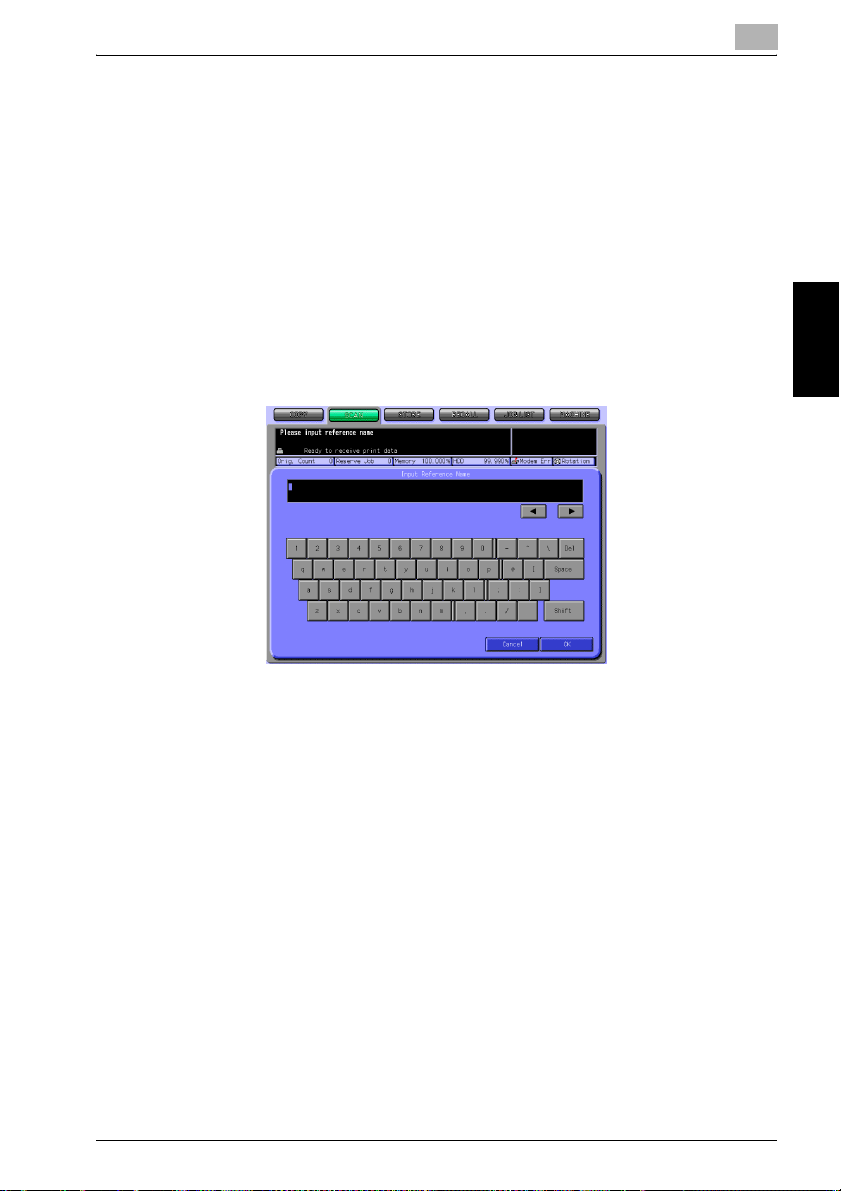
1 Press the [Search] key.
The search letter input screen appears.
2 Input the Reference Name you registered, and press the [OK] key.
The desired destination will be displayed.
!
Detail
You can search by at minimum one character.
If the search results are too many, press the [Search] key to add search
letters (The search letters you entered are saved until you operate scanning).
Pressing the [Cancel] key cancels the input search letters, and the search
letter input screen closes.
bizhub PRO 1050/1050e Scanner 3-7
Before Using the Scanning Features Chapter 3
Page 31

3
3.4.2 Searching a box/file
In the Copied Data Processing Features, you can search quickly the desired
box out of the boxes created on the HDD-A by its Box No..
Also, if you know the Folder Name, Box Name and File Name, you can perform the Direct Call.
No. Search
In the [STORE]/[RECALL] tab screen, you can search the registered Box No.
by using the [No. Search] key.
Before Using the Scanning Features
The following is how to use the [No. Search] key.
1 Press the [No. Search] key.
The No. Search screen appears.
Before Using the Scanning Features Chapter 3
3-8 bizhub PRO 1050/1050e Scanner
2 Input the Box No. you want to search, press the [OK] key.
The screen appears to display the list of files that are in the corresponding box.
When a corresponding box does not exist, the message "No correspondent box" appears. Confirm the Box No., and return to the step 1
to repeat the procedures.
Page 32

Before Using the Scanning Features
!
Detail
Pressing the [Cancel] key cancels the input Box No., and the No. Search
screen closes.
If a password is configured for the box, you need to enter the password.
Direct Call
If you know all the registered Folder Name, Box Name and File Name, or if
you know the Box Name and File Name, you can select the file by using the
[Direct Call] key in the [STORE] / [RECALL] screen.
The following is how to use the [Direct Call] key.
1 Press the [Direct Call] key.
– If you press the [Direct Call]
key on the box list screen, the
Box Name input screen appears.
– If a folder or a box is Pass-
word-protected, you cannot
search it with the Direct Call.
The Folder Name input screen appears.
3
2 Input the Folder Name and press
the [OK] key.
– For more information on how
to input characters, refer to
"How to Input Characters" on
Page 3-6.
The Box Name input screen appears.
3 Input the Box Name and press the
[OK] key.
– For more information on how
to input characters, refer to
"How to Input Characters" on
Page 3-6.
The File Name input screen appears.
bizhub PRO 1050/1050e Scanner 3-9
Before Using the Scanning Features Chapter 3
Page 33

3
Before Using the Scanning Features
4 Input the File Name and press the
[OK] key.
– When a corresponding file
does not exist, the message
"Failed direct call" appears.
Confirm that the Folder Name,
Box Name and File Name are
correct, and return to the step
1 to repeat the procedures.
The screen appears with the desired file being selected.
!
Detail
For more information on how to input characters, refer to "How to Input
Characters" on Page 3-6.
If the desired file is not found, you are brought back to the list screen, and
the message is displayed on the upper left of the Touch Panel.
Before Using the Scanning Features Chapter 3
3-10 bizhub PRO 1050/1050e Scanner
Page 34

Before Using the Scanning Features
3.5 Thumbnail
When transmitting or outputting the data stored in the HDD-A, contents of
the data can be confirmed in advance by displaying the thumbnail.
!
Detail
For more information of HDD-A to be used, refer to “About the HDD” on
page 2-2.
3
Button Function
Top Page Thumbnail on the top page is displayed.
Back Page Thumbnail on the preceding page is displayed.
Next Page Thumbnail on the succeeding page is displayed.
Last Page Thumbnail on the last page is displayed.
Page Select Used when designating the page to display the thumbnail.
Close Exit the thumbnail.
bizhub PRO 1050/1050e Scanner 3-11
Press this button and designate the page using the Keypad on
the screen displayed.
Before Using the Scanning Features Chapter 3
Page 35

Page 36

4
About the Copied Data
Processing Features
About the Copied Data Processing Features Chapter 4
Page 37

4
About the Copied Data Processing Features
4 About the Copied Data Processing Fea-
tures
4.1 Overview of the STORE/RECALL Features
Copied data stored in the HDD(HDD-A) in the copier main body can be unloaded into the computer using the attached utility tool, PageScope JobEditor, and processed or transmitted to the computer through FTP/SMB.
Copied data processed with PageScope JobEditor can be returned to the
HDD-A and output anytime.
Copied data on the HDD-A can be re-output whenever necessary. With this,
you can conveniently print out the document many times.
This enables you to combine a print job sent from a computer and copied
data to print as one job.
The STORE/RECALL features are operated by using the [STORE] tab and the
[RECALL] tab on the Touch Panel.
About the Copied Data Processing Features Chapter 4
4-2 bizhub PRO 1050/1050e Scanner
Page 38

About the Copied Data Processing Features
!
Detail
PageScope JobEditor and PageScope JobEditorServer for USA are excluded.
About how to obtain PageScope JobEditor and PageScope JobEditorServer, contact your service representative.
When Security Strengthen Mode is ON, PageScope JobEditor and PageScope JobEditorServer are not available. For more information, contact
your administrator.
For more information of HDD-A to be used, refer to “About the HDD” on
page 2-2.
FTP/SMB server
Network
Connection
PageScope
Job Editor
Printing out
RECALL
Personal A Personal B
HDD-A
Public
Secure
Personal A
Box
0001
Copy
0001
COPY/STORE
Box
0002
Copy
Copy
0001
0001
Original
Box
0003
4
Box
Box
0005
0004
Copy
Copy
0001
0001
Box
0001
Copy
0001
bizhub PRO 1050/1050e Scanner 4-3
About the Copied Data Processing Features Chapter 4
Page 39

4
4.1.1 About folders and boxes
Copied data are managed by boxes created in folders on the HDD-A.
About Folders
Use the [STORE] tab to store the data read in from the copier's ADF or the
original scanning glass on the HDD-A. You can store data in two types of
folders, Personal Folder or Public Folder.
When you output the stored data on the HDD-A by using the [RECALL] tab,
you can output files stored in three types of folders, Personal Folder, Public
Folder or Secure Folder.
Details of each folder are as follows.
Personal Folder
A folder created for each user where data of the user is managed. A Password can be configured for each Personal Folder. For information on how to
add a Personal Folder, refer to "Registering a Personal Folder" on Page 4-7.
Public Folder
This folder is used as a public space. No Password can be configured for this
folder.
About the Copied Data Processing Features
Secure Folder
This folder stores data for secure printing of the printing features. This folder
cannot be specified as a storage location by using the [STORE] tab.
About Boxes
Each folder has its boxes where data can be classified and managed.
Data are stored in these boxes.
A Password can be configured for a box. To open a box with a Password,
you need to input the Password.
About the Copied Data Processing Features Chapter 4
4-4 bizhub PRO 1050/1050e Scanner
Page 40

About the Copied Data Processing Features
Types of a folder, box and file
Types of a folder, box and file Number Create/Delete Naming
Personal Folder Multiple Able Able
Personal Folder - Box Multiple Able Able
Personal Folder - Box - File Multiple Able Able
Public Folder Single Unable Unable
Public Folder - Box Multiple Able Able
Public Folder - Box - File Multiple Able Able
!
Detail
For more information on the Secure Folder, refer to Chapter "9 About the
Secure Folder".
4
bizhub PRO 1050/1050e Scanner 4-5
About the Copied Data Processing Features Chapter 4
Page 41

4
About the Copied Data Processing Features
4.2 About Screens of the STORE/RECALL Tabs
Screens of the STORE/RECALL tabs include such screens on which to specify a storage location as the folder list screen (Personal Folder), the box list
screen (Personal Folder/Public Folder), and the file list screen.
There are also screens to create new folders (Personal Folder) or new boxes
(Personal Folder/Public Folder), screens to specify a storage location as a
Box No., the Direct Call input screen and the Scanner Setting Basic screen.
This page describes the keys on the list screens. The screens are different
depending on how to store data.
4.2.1 About common keys on the list screens
Here are the common keys on the folder list screen, the box list screen and
the file list screen.
Button Function
This is displayed on a Folder or a Box to which a password is configured.
About the Copied Data Processing Features Chapter 4
4-6 bizhub PRO 1050/1050e Scanner
Clear All Pressing this key deselects what you had selected, and you are
[▼]/[▲] Pressing these keys switches between pages when a whole list is
Cancel Pressing this key cancels each setting on the screen, and you are
OK Pressing this key determines the settings and brings you to the
brought back to the first screen of the [STORE]/[RECALL] tab.
not displayed on a single page.
brought back to the previous page.
next page. On the file list screen, pressing this key starts to transmit/output the selected file.
Page 42

About the Copied Data Processing Features
4.3 Registering a Personal Folder
A Personal Folder is registered (created) for each user, where you manage
data you want to STORE/RECALL. Register a Personal Folder in the following steps.
!
Detail
At maximum, 1000 Personal Folders can be registered.
1 Select the [STORE] tab.
2 Press the [Scanner to HDD] key.
4
3 Select the [Personal Folder] key.
bizhub PRO 1050/1050e Scanner 4-7
About the Copied Data Processing Features Chapter 4
Page 43

4
About the Copied Data Processing Features
4 Press the [New Register] key.
5 Press the [Folder Name Input] key
to display the character input
screen. Input any Folder Name.
– Input a Folder Name within 64
characters in alphameric characters and signs.
– For more information on how
to input characters, refer to
"How to Input Characters" on
Page 3-6.
– The below characters cannot be registered as a Folder Name irre-
spectively whether they are upper or lower case.
Public, Admin, BoxAdmin
6 If you configure a Password for a
folder, press the [Password Input]
key to display the character input
screen. Input any Password.
– Input a Password within 64
characters in alphameric characters and signs.
– The input Password is shown
by "*".
– For more information on how
to input characters, refer to "How to Input Characters" on Page 3-6.
About the Copied Data Processing Features Chapter 4
4-8 bizhub PRO 1050/1050e Scanner
– Be sure to keep a record of the password.
Page 44

About the Copied Data Processing Features
7 Press the [OK] key.
The box list screen appears.
8 If you register only a folder, press
the [Cancel] key to go to the step
9. If you register a box also, go to
the step 4 "Creating a Box (Personal Folder/Public Folder)" on
Page 4-12.
9 Make sure that the Folder Name
you registered on the folder list is
displayed.
– If you want to register multiple
Personal Folders, return to the
step 4 and repeat the procedures.
4
bizhub PRO 1050/1050e Scanner 4-9
About the Copied Data Processing Features Chapter 4
Page 45

4
About the Copied Data Processing Features
4.4 Deleting a Personal Folder
To delete a registered Personal Folder, follow the steps below.
1 Select the [RECALL] tab.
2 Press the [Personal Folder] key.
3 Select the folder you want to de-
lete.
About the Copied Data Processing Features Chapter 4
4-10 bizhub PRO 1050/1050e Scanner
Page 46

About the Copied Data Processing Features
4 Press the [Folder Delete] key.
– If a Password is not configured
for the Folder, a screen appears and confirms you
whether to delete the folder.
Go to the step 6.
If a Password is configured for the
Folder, the Password input screen
appears.
5 Enter the Password and press the
[OK] key.
The confirmation screen appears
and confirms you whether to delete the folder.
6 Press the [Yes] key.
The folder is deleted and the folder
list screen (Personal Folder) appears.
4
7 Confirm that the folder is deleted.
– When you want to delete those
Personal Folders or Personal
Boxes with unknown password, your administrator can
delete such folders.
– Your administrator cannot
have access to boxes in a Personal Folder with unknown
password. But deleting the
folder enables him to delete those boxes in the folder.
bizhub PRO 1050/1050e Scanner 4-11
About the Copied Data Processing Features Chapter 4
Page 47

4
About the Copied Data Processing Features
4.5 Creating a Box (Personal Folder/Public Folder)
The copied data are managed in boxes created in the folders of the HDD-A
(Personal Folder/Public Folder). Create a box by the following steps.
!
Detail
At maximum, 1000 Boxes can be registered.
1 Select the [STORE] tab.
2 Press the [Scanner to HDD] key.
3 Select a folder in which you create a box.
– When you select a Personal
Folder
Press the [Personal Folder]
About the Copied Data Processing Features Chapter 4
4-12 bizhub PRO 1050/1050e Scanner
key, and select any folder from
the list. Press the [OK] key.
If a Password is configured for
the folder, the Password input
screen appears. Enter the
Password and press the [OK]
key.
Page 48

About the Copied Data Processing Features
– For more information on the types of folder, refer to "Overview of
the STORE/RECALL Features" on Page 4-2.
– When you select a Public Fold-
er
Press the [Public Folder] key.
4 Press the [New Box] key.
– In case of Personal Folder
4
– In case of Public Folder
5 Press the [Box Name Input] key to
display the character input screen.
Enter any Box Name.
– Input a Box Name within 20
characters in alphameric characters and signs.
– For more information on how
to input characters, refer to
"How to Input Characters" on
Page 3-6.
bizhub PRO 1050/1050e Scanner 4-13
About the Copied Data Processing Features Chapter 4
Page 49

4
About the Copied Data Processing Features
If you do not register a Box Name, the Box No. becomes the Box
Name.
6 If you configure a Password for a
box, press the [Password Input]
key to display the character input
screen. Enter any Password.
– Input a Password within 8
characters in alphameric characters and signs.
– Eight "*"s are displayed re-
gardless of the number of
characters you input.
– For more information on how to input characters, refer to "How to
Input Characters" on Page 3-6.
– Be sure to keep a record of the password.
7 When you change the box
number, press the [Box No. Input]
to display the character input
screen. Enter any Box No..
– Usually, there is no need to
change a Box No..
– Input a 9 digit (000000001-
999999998) Box No..
– For more information on how
to input characters, refer to
"How to Input Characters" on Page 3-6.
– The Box No. already registered cannot be used.
8 Press the [OK] key.
The file list screen appears.
About the Copied Data Processing Features Chapter 4
4-14 bizhub PRO 1050/1050e Scanner
Page 50

About the Copied Data Processing Features
9 If you register only a box, press
the [Return] and go to the step 10.
If you go on to store data on the
HDD-A, go to the step 5 of “Scanner to HDD” on Page 4-22.
10 Make sure that the Box Name you registered on the box list is dis-
played.
– In case of Personal Folder
4
– In case of Public Folder
– If you have not registered a
Box Name, the Box No. becomes the Box Name, and the
Box No. is displayed on the
list.
If you want to register multiple
boxes, return to the step 4 and repeat the procedures.
bizhub PRO 1050/1050e Scanner 4-15
About the Copied Data Processing Features Chapter 4
Page 51

4
About the Copied Data Processing Features
4.6 Deleting a Box (Personal Folder/Public Folder/Secure Folder)
Delete a box in the following steps.
1 Select the [RECALL] tab.
2 Select a folder.
– When you select a Personal
Folder
Press the [Personal Folder] key
to display the list. Select the
folder containing the box you
want to delete, and press the
[OK] key.
– When a password has been
set, the password input screen
is displayed. Enter the password and press the [OK] key.
– When you select a Public Fold-
er
Press the [Public Folder] key.
About the Copied Data Processing Features Chapter 4
4-16 bizhub PRO 1050/1050e Scanner
Page 52

About the Copied Data Processing Features
– When you select a Secure
Folder
Press the [Secure Folder] key.
3 Select the box you want to delete.
– When you select a Personal
Folder
– When you select a Public Fold-
er
4
– When you select a Secure
Folder
4 Press the [Box Delete] key.
bizhub PRO 1050/1050e Scanner 4-17
About the Copied Data Processing Features Chapter 4
Page 53

4
About the Copied Data Processing Features
– When you select a Personal
Folder
– When you select a Public Fold-
er
– When you select a Secure
Folder
If a Password is configured for
the box, the Password input
screen appears.
If a Password is not configured
for the box, a screen appears
and confirms you whether to
delete the folder. Go to the
step 6.
5 Enter the Password and press the
[OK] key.
The confirmation screen appears
and confirms you whether to delete the box.
About the Copied Data Processing Features Chapter 4
4-18 bizhub PRO 1050/1050e Scanner
Page 54

About the Copied Data Processing Features
6 Press the [Yes] key.
The box is deleted, and the box list
screen appears.
7 Confirm that the box is deleted.
– When you select a Personal
Folder
– When you select a Public Fold-
er
4
– When you select a Secure
Folder
As for Public Boxes and Secure Boxes, your administrator
can delete such boxes even
when password is unknown.
bizhub PRO 1050/1050e Scanner 4-19
About the Copied Data Processing Features Chapter 4
Page 55

4
About the Copied Data Processing Features
4.7 Selecting a Storage Location
If you want not to print but to store copied data, select a storage location by
using the [STORE] tab.
Copied data can be stored in either of the following three types of storage
locations.
Scanner to HDD Storing data on the HDD-A enables you to print them again any-
Scanner to PC Copied data can be sent to a computer. You can edit/process the
HDD to PC Copied data stored on the HDD-A can be sent to a computer. You
time. Also, you can combine a print job sent from a computer and
copied data to print as one job.
data to print.
can edit/process the data to print.
!
Detail
For more information of HDD-A to be used, refer to “About the HDD” on
page 2-2.
Scanner to HDD
You can store copied data on the HDD-A in the following steps.
0 A file can be registered to 10000 at the maximum for every box.
1 Select the [STORE] tab.
About the Copied Data Processing Features Chapter 4
4-20 bizhub PRO 1050/1050e Scanner
Page 56

About the Copied Data Processing Features
2 Press the [Scanner to HDD] key.
3 Select a folder in which you store data.
– When you select a Personal
Folder
– Press the [Personal Folder] key
to display the list. Select the
folder and press the [OK] key.
– If a Password is configured for
the folder, the Password input
screen appears. Enter the
Password and press the [OK]
key.
– When you select a Public Fold-
er
Press the [Public Folder] key.
– For information on how to cre-
ate a folder, refer to "Registering a Personal Folder" on Page
4-7.
4
4 Select the box in which you store data and press the [OK] key.
– In case of Personal Folder
bizhub PRO 1050/1050e Scanner 4-21
About the Copied Data Processing Features Chapter 4
Page 57

4
About the Copied Data Processing Features
– In case of Public Folder
– Press the [No. Search] key and
enter a Box No. to select a box
by Box No.. For more information, refer to "No. Search" on
Page 3-8.
– For information on how to cre-
ate a box, refer to "Creating a
Box (Personal Folder/Public
Folder)" on Page 4-12.
– If a Password is configured for
the box, the Password input screen appears. Enter the Password
and press the [OK] key.
The file list screen appears.
5 Press the [Store] key.
– The selected Folder Name and
Box Name are displayed in the
Folder Name field and the Box
Name field respectively.
The File Name input screen appears.
6 Input a File Name and press the [OK] key.
– For more information on how to input characters, refer to "How to
Input Characters" on Page 3-6.
The setting screen appears.
7 Configure the necessary items.
– For more information on the
configurations on the Scanner
Setting Basic screen, refer to
"About the Copied Data Stor-
About the Copied Data Processing Features Chapter 4
4-22 bizhub PRO 1050/1050e Scanner
age Setting Screen" on Page
4-31.
Page 58

About the Copied Data Processing Features
8 Set an original and press the [Start] button.
The original is scanned, and the copied data are stored in a specified
box.
The continuous storage confirmation screen appears.
9 To continue storing data, press
the [Yes] key. To finish storing data, press the [No] key.
– Pressing the [Yes] key displays
the file list screen. Return to
the step 5 and repeat the procedures.
4
bizhub PRO 1050/1050e Scanner 4-23
About the Copied Data Processing Features Chapter 4
Page 59

4
About the Copied Data Processing Features
Scanner to PC
You can transmit copied data from the copier to a computer to store them
by using PageScope JobEditor/PageScope JobEditorServer. PageScope
JobEditor or PageScope JobEditorServer needs to be installed and configured.
!
Detail
For more information on PageScope JobEditor, refer to "PageScope
JobEditor" on Page 11-2.
For more information on PageScope JobEditorServer, refer to "PageScope JobEditorServer" on Page 11-8.
PageScope JobEditor is connected manually to the copier. PageScope
JobEditorServer is connect automatically to the copier. For information
on switching between the manual and automatic connection, refer to
"Changing Data Transmission Method to PC" on Page 4-34.
PageScope JobEditor and PageScope JobEditorServer for USA are excluded.
About how to obtain PageScope JobEditor and PageScope JobEditorServer, contact your service representative.
About the Copied Data Processing Features Chapter 4
4-24 bizhub PRO 1050/1050e Scanner
Page 60

About the Copied Data Processing Features
Store copied data in a computer in the following steps.
1 Select the [STORE] tab.
2 Press the [Scanner to PC] key.
The setting screen appears.
4
3 Configure the necessary items.
– For more information on the
configurations on the Scanner
Setting Basic screen, refer to
"About the Copied Data Storage Setting Screen" on Page
4-31.
4 Set an original and press the [Start] button.
The transmitting screen and the continuous storage confirmation
screen appears.
bizhub PRO 1050/1050e Scanner 4-25
About the Copied Data Processing Features Chapter 4
Page 61

4
About the Copied Data Processing Features
5 Connect to the copier through PageScope JobEditor installed on the
computer, and store the copied data. PageScope JobEditorServer receives data automatically.
– For more information on how to operate PageScope JobEditor, re-
fer to "PageScope JobEditor" on Page 11-2.
– For more information on how to operate PageScope JobEditorS-
erver, refer to "PageScope JobEditorServer" on Page 11-8.
– PageScope JobEditor and PageScope JobEditorServer for USA
are excluded.
– About how to obtain PageScope JobEditor and PageScope
JobEditorServer, contact your service representative.
6 To continue storing data, press
the [Yes] key. To finish storing data, press the [No] key.
– Pressing the [Yes] key displays
the setting screen. Return to
the step 3 and repeat the procedures.
About the Copied Data Processing Features Chapter 4
4-26 bizhub PRO 1050/1050e Scanner
Page 62

About the Copied Data Processing Features
HDD to PC
You can transmit copied data stored on the HDD-A to a computer to store
them by using PageScope JobEditor/PageScope JobEditorServer or FTP/
SMB.
Set up the data transmitting method to PC beforehand.
!
Detail
For information on changing data transmission method to PC, refer to
"Changing Data Transmission Method to PC" on Page 4-34.
PageScope JobEditor and PageScope JobEditorServer for USA are excluded.
Transmit copied data stored on the HDD-A to a computer in the following steps.
1 Select the [STORE] tab.
4
2 Press the [HDD to PC] key.
– Data is transmitted by the fol-
lowing methods:
– Transmit to PC
–Operate on PC
– FTP/SMB
– To set the transmission meth-
od, press [Change Data Send
System].
– For more information, refer to
"Changing Data Transmission Method to PC" on Page 4-34.
bizhub PRO 1050/1050e Scanner 4-27
About the Copied Data Processing Features Chapter 4
Page 63

4
About the Copied Data Processing Features
3 Select a Folder.
– When you select a Personal
Folder
– Press the [Personal Folder] key
to display the list. Select any
folder and press the [OK] key.
– If a Password is configured for
the Personal Folder, the Password input screen appears.
Enter the Password.
– If you know the target file,
press the [Direct Call] key to
specify the location directly. For more information, refer to "Direct
Call" on Page 3-9.
– When you select a Public Fold-
er
– Press the [Public Folder] key.
4 Select a box and press the [OK] key.
– In case of Personal Folder
About the Copied Data Processing Features Chapter 4
4-28 bizhub PRO 1050/1050e Scanner
Page 64

About the Copied Data Processing Features
– In case of Public Folder
– If a Password is configured for
the box, the Password input
screen appears. Enter the
Password.
– Press the [No. Search] key and
enter a Box No. to search a
box by Box No.. For more in-
formation, refer to "No.
Search" on Page 3-8.
– If you know the target file,
press the [Direct Call] key to specify the location directly. For more
information, refer to "Direct Call" on Page 3-9.
5 Select a file and press the [OK]
key.
– When you select a file and
press the [Thumbnail] key, a
thumbnail of the selected file is
displayed. For more informa-
tion of Thumbnail, refer to
"Thumbnail" on Page 3-11.
– When you select a file and
press the [File Check] key, de-
tailed settings of the selected file are displayed.
– For information on changing data transmission method to PC, refer
to "Changing Data Transmission Method to PC" on Page 4-34.
When [Transmit to PC] or [Operation on PC] has been selected for the
[Change Data Send System], transmission of data to the computer is
started and the screen showing ongoing transmission and the continuous storage confirmation screen are displayed. Then go to the step 8.
When [FTP/SMB] has been selected for the [Change Data Send System], screen to set where to transmit is displayed. Then go to the next
step.
4
6 Select FTP or SMB, select where
to send and press [Setting
Screen].
– For information on selecting
destination, refer to "Trans-
mission to the FTP server" on
Page 7-14 or "Transmission to
the SMB server" on Page 7-19
– Both the FTP and SMB can be
transmitted at the same time.
bizhub PRO 1050/1050e Scanner 4-29
About the Copied Data Processing Features Chapter 4
Page 65

4
About the Copied Data Processing Features
7 Confirm the File Name, FTP Ad-
dress, SMB Address and select
File Form and press [OK] key.
– If a file name longer than 21
characters has been set for the
file, characters on the 21st
and on are automatically deleted so that the file name is
changed to 20 characters.
Data start to be transmitted to the
computer.
The transmitting screen and the continuous storage confirmation
screen appears.
8 To continue operation, press the
[Yes] key. To finish the transmission, press the [No] key.
– Pressing the [Yes] key displays
the file list screen. Return to
the step 5 and repeat the procedures.
About the Copied Data Processing Features Chapter 4
4-30 bizhub PRO 1050/1050e Scanner
Page 66

About the Copied Data Processing Features
4.8 About the Copied Data Storage Setting Screen
On the Copied Data Storage Setting screen, such settings as original settings and quality settings can be configured.
!
Detail
Those settings that can be configured on the Copied Data Storage Setting screen are for the features of the copier.
For more information on the settings, refer to the User's Guide (Copy).
4
Original Setting
Pressing the [Original Setting] key enables you to configure the following settings.
Original Setting
Original Direction
Binding Direction
Special Original Normal, Mixed Original, Z-
Recall STD Pressing this key recalls ini-
Normal, Left, Upside Down,
Right
R & L Binding, Upper Binding
Folded, Single Feed
tial settings.
Memory Scan
bizhub PRO 1050/1050e Scanner 4-31
About the Copied Data Processing Features Chapter 4
Page 67

4
About the Copied Data Processing Features
Special Image
Pressing the [Special Image] key enables you to configure the following settings.
Special Image
Image Text & Photo, Low Contrast,
Background
Adjust
Preset Density Preset1, Preset2
Recall STD Pressing this key recalls ini-
Photo, Text
Lighter, Normal, Darker
tial settings.
Lighter, Normal, Darker
AES (AE)
Zoom
Pressing the [Zoom] key enables you to
configure the following settings.
Manual Zoom
Enlarge Preset1 2.000 (A5 > A3)
Reduce Preset5 0.939 (A4 > B5)
Preset Zoom 4.000, 2.000, 0.500
Preset2 1.545 (A4 > A3)
Preset3 1.294 (A4 > B4)
Preset4 1.214 (B4 > A3)
Preset6 0.772 (B4 > A4)
Preset7 0.647 (A3 > A4)
Preset8 0.500 (A3 > A5)
×1.0
About the Copied Data Processing Features Chapter 4
4-32 bizhub PRO 1050/1050e Scanner
Page 68

About the Copied Data Processing Features
Application
Annotation
Pressing the [Annotation] key enables
you to configure the following settings.
Printing Position, Fine Adjustment
[Function Off]
Frame/Folder Eraser
Pressing the [Frame/Folder Eraser] key
enables you to configure the following
settings.
All sides, Each side, Fold Eraser
Frame, Fold
Up Side, Right Side, Down Side, Left Side
[Function Off]
All-Image Area
4
Scan Size
Size Setting
Pressing the [Size Setting] key enables
you to configure the following settings.
11 x 17, 8.5 x 14, 8.5 x 11R, 8.5 x 11, 5.5 x
8.5, A3, A4R, A4, A5, B4, B5R, B5
Auto
Copy Mode
Duplex, Simplex
bizhub PRO 1050/1050e Scanner 4-33
About the Copied Data Processing Features Chapter 4
Page 69

4
About the Copied Data Processing Features
4.9 Changing Data Transmission Method to PC
There are 3 methods to transmit copied data to the computer: [Transmit to
PC], [Operate on PC] and [FTP/SMB].
Transmit to PC Copied data can be automatically transmitted to the computer
Operate on PC By installing the utility tool, PageScope JobEditor, to the compu-
FTP/SMB Copied data is converted to PDF/TIFF data and transmitted to
by setting the computer to which the data is to be transmitted on
the copier and installing and setting the utility tool, PageScope
JobEditorServer, to the computer.
ter on the network and connecting the copier using this tool,
copied data can be unloaded to the computer.
the FTP or SMB server.
!
Detail
Network settings are needed to transmit copied data to a computer. For
more information, contact your administrator.
PageScope JobEditor and PageScope JobEditorServer can be installed
on Windows 2000/XP Professional.
PageScope JobEditor and PageScope JobEditorServer for USA are excluded.
About how to obtain PageScope JobEditor and PageScope JobEditorServer, contact your service representative.
Change over [Transmit to PC], [Operation on PC] or [FTP/SMB] in the following procedure.
Transmit to PC
If you configure the automatic transmission to a PC, the computer specified
on the copier can automatically receive copied data through PageScope
JobEditorServer.
About the Copied Data Processing Features Chapter 4
4-34 bizhub PRO 1050/1050e Scanner
Page 70

About the Copied Data Processing Features
!
Detail
An administrator needs to specify the IP Address of the target computer
on the copier. For more information, contact your administrator.
For more information on PageScope JobEditorServer, refer to "PageScope JobEditorServer" on Page 11-8.
PageScope JobEditor and PageScope JobEditorServer for USA are excluded.
About how to obtain PageScope JobEditor and PageScope JobEditorServer, contact your service representative.
Configure the automatic transmission to the PC in the following steps.
1 Select the [STORE] tab.
4
2 Press the [Change Data Send Sys-
tem] key.
bizhub PRO 1050/1050e Scanner 4-35
About the Copied Data Processing Features Chapter 4
Page 71

4
About the Copied Data Processing Features
3 Press the [Transmit to PC] key.
– If you have not specified a tar-
get computer on the copier,
you cannot select the [Transmit To PC] key. For more information, contact your
administrator.
4 Press the [OK] key to close the screen.
About the Copied Data Processing Features Chapter 4
4-36 bizhub PRO 1050/1050e Scanner
Page 72

About the Copied Data Processing Features
Operate on PC
If you configure the receiving operation on a PC, the computer with PageScope JobEditor can receive copied data.
!
Detail
For more information on PageScope JobEditor, refer to "PageScope
JobEditor" on Page 11-2.
PageScope JobEditor and PageScope JobEditorServer for USA are excluded.
About how to obtain PageScope JobEditor and PageScope JobEditorServer, contact your service representative.
Configure the receiving operation on a PC in the following steps.
1 Select the [STORE] tab.
4
2 Press the [Change Data Send Sys-
tem] key.
bizhub PRO 1050/1050e Scanner 4-37
About the Copied Data Processing Features Chapter 4
Page 73

4
About the Copied Data Processing Features
3 Press the [Operate on PC] key.
4 Press the [OK] key to close the screen.
About the Copied Data Processing Features Chapter 4
4-38 bizhub PRO 1050/1050e Scanner
Page 74

About the Copied Data Processing Features
FTP/SMB
By setting the FTP/SMB in advance, copied data stored in the HDD-A can be
converted to PDS/TIFF data and transmitted to the FTP server or SMB server.
!
Detail
For more information of HDD-A to be used, refer to “About the HDD” on
page 2-2.
Configure the FTP/SMB in the following steps.
1 Select the [STORE] tab.
4
2 Press the [Change Data Send Sys-
tem] key.
3 Press the [FTP/SMB] key.
bizhub PRO 1050/1050e Scanner 4-39
About the Copied Data Processing Features Chapter 4
Page 75

4
About the Copied Data Processing Features
4 Press the [OK] key to close the screen.
About the Copied Data Processing Features Chapter 4
4-40 bizhub PRO 1050/1050e Scanner
Page 76

About the Copied Data Processing Features
4.10 Output from the HDD-A
Copied data stored on the HDD-A with the [STORE] tab or secure print jobs
transmitted from a computer can be output using the [RECALL] tab.
!
Detail
For more information of HDD-A to be used, refer to “About the HDD” on
page 2-2.
For more information on secure output, refer to the User's Guide (Printer).
1 Select the [RECALL] tab.
4
2 Specify the folder in which the data you output are stored.
– When you select a Personal
Folder
– Press the [Personal Folder] key
to display the list. Select any
folder and press the [OK] key.
– When you select a Public Fold-
er
– Press the [Public Folder] key.
bizhub PRO 1050/1050e Scanner 4-41
About the Copied Data Processing Features Chapter 4
Page 77

4
About the Copied Data Processing Features
– When you select Secure Fold-
er
– Press the [Secure Folder] key.
– For more information on the
types of folder, refer to "Over-
view of the STORE/RECALL
Features" on Page 4-2.
– A Password may be config-
ured for the Personal Folder. In
that case, the Password input
screen appears. Enter the
Password.
– If you know the target file, press the [Direct Call] key to specify the
location directly. For more information, refer to "Direct Call" on
Page 3-9.
3 Select a box and press the [OK] key.
– When you select a Personal
Folder
– When you select a Public Fold-
er
About the Copied Data Processing Features Chapter 4
4-42 bizhub PRO 1050/1050e Scanner
– When you select a Secure
Folder
– If a Password is configured for
the box, the Password input
screen appears. Enter the
Password.
– Press the [No. Search] key and
enter a Box No. to search a
box by Box No.. For more in-
Page 78

About the Copied Data Processing Features
formation, refer to "No. Search" on Page 3-8.
– If you know the target file, press the [Direct Call] key to specify the
location directly. For more information, refer to "Direct Call" on
Page 3-9.
The output setting screen appears.
4 Select a file from the list on the left
side, and press the [>>>] key.
– When you select a file and
press the [Thumbnail] key, a
thumbnail of the selected file is
displayed. For more information of Thumbnail, refer to
"Thumbnail" on Page 3-11.
– When you select a file and
press the [File Check] key, detailed settings of the selected file are displayed.
– For more information on the keys on the setting screen, refer to
"About the Recall Tab’s Output Setting Screen" on Page 4-45.
The selected file is added to the list on the right side.
5 Select [Wait Output], [Proof Out-
put] or [Auto Output], and press
the [OK] key.
Hereafter, the Auto Output is explained. For more information on
Wait Output or Proof Output, refer
to "The flow of operation of the
Wait Output and Proof Output" on
Page 4-47.
The print quantity confirmation
screen appears.
4
6 Input the print quantity on the Key-
pad and press the [OK] key.
– By pressing [All], all pages of
the selected file are output.
– By pressing [Output Page],
only 1 page can be designated
to be output.
The selected file is output.
The confirmation screen asks you
whether to continue recalling data.
bizhub PRO 1050/1050e Scanner 4-43
About the Copied Data Processing Features Chapter 4
Page 79

4
About the Copied Data Processing Features
7 To continue recalling data, press
the [Yes] key. To finish recalling
data, press the [No] key.
– Pressing the [Yes] key displays
the file list screen. Return to
the step 4 and repeat the procedures.
About the Copied Data Processing Features Chapter 4
4-44 bizhub PRO 1050/1050e Scanner
Page 80

About the Copied Data Processing Features
4.11 About the Recall Tab’s Output Setting Screen
On the Recall Tab’s Output Setting screen, you can configure the settings for
outputting stored copied data or secure output print jobs.
!
Detail
On how to open the setting screen, refer to "Output from the HDD-A" on
Page 4-41.
4.11.1 Keys on the setting screen
4
Button Function
Thumbnail Pressing this key displays a thumbnail of the selected file. For
File Check Pressing this key displays a list of settings of the selected file.
File Combination You can output all the selected files at once. At maximum, you
Image Combination You can output images of all the selected files at once. At
File Delete Pressing this key deletes the selected file. On the confirmation
Clear All Reset all the output settings.
Wait Output After recalling data, the [MACHINE] tab’s screen appears. You
Proof Output When a number of copies are printed, the [MACHINE] tab’s
more information of Thumbnail, refer to "Thumbnail" on Page
3-11.
can combine 5 files at one time.
maximum, you can combine 5 files at one time.
screen, press the [Yes] key to delete the file.
can change the setting. For more information, refer to "The
flow of operation of the Wait Output and Proof Output" on
Page 4-47.
screen appears after printing one copy. If you see no problem,
press the [Start] button to restart the output. For more information, refer to "The flow of operation of the Wait Output and
Proof Output" on Page 4-47.
bizhub PRO 1050/1050e Scanner 4-45
About the Copied Data Processing Features Chapter 4
Page 81

4
About the Copied Data Processing Features
Button Function
Auto Output If this key is pressed, the output starts without pressing the
start button.
About the Copied Data Processing Features Chapter 4
4-46 bizhub PRO 1050/1050e Scanner
Page 82

About the Copied Data Processing Features
The flow of operation of the Wait Output and Proof Output
4
In case of Wait Output
Exit the operation
as it is.
In case of Proof Output
One sheet is outputted
Confirm the outputted paper
Repeat the operation after step 4 (p.
4-43) of "Output
from the HDD-A".
The screen which confirm settings appears
Settings will be decided
[MACHIN]E tab blinks
Select the [MACHINE] tab
Change settings
The confirmation screen asks you
whether to continue to recall data
Yes No
Output it by the present settings
Output the one sheet
for a confirmation
Press the [Proof Copy] key
One sheet is outputted
Confirm the outputted paper
If it is in the state in which an output is
possible, [Start] button will shine green
Press the [Start] button
It is outputted
Press the [Cancel] key
Setting change is canceled
Press the [Close] key
Change settings and
press the [OK] key
Change settings
Select a setting to change
and press the [Change] key
Output Application screen appears
If you exit the job and you don't output it, please
delete the present job from the [Reserved JOB] of
[JOB LIST] tab
For more information on the method of job deletion,
refer to the User's Guide of the Copier
bizhub PRO 1050/1050e Scanner 4-47
About the Copied Data Processing Features Chapter 4
Page 83

Page 84

5
About the Network
Scanner Features
About the Network Scanner Features Chapter 5
Page 85

5
About the Network Scanner Features
5 About the Network Scanner Features
5.1 Overview of the Network Scanner Features
The Network Scanner features to use the internal HDD (HDD-B) of the print
controller are operated on the SCAN tab screen.
Data scanned by the Network Scanner features can be transmitted to the EMail addresses, the HDD-B, the FTP server and the SMB server. The
scanned data stored on the HDD-B can also be imported to the networkconnected computers using the TWAIN-compliant applications and the Network Scanner Driver.
!
Detail
"Send by an E-Mail"........................................p.5-4
"Store on the HDD-B" .....................................p.5-6
"Send to the FTP server".................................p.5-7
"Send to the SMB server" ...............................p.5-9
"Send to a Group".........................................p.5-11
"Import Scanned Data to Computers" ............p.8-5
When the Security Strengthen mode is ON, A data is unacquirable using
applications compatible with TWAIN and network scanner driver. For
more information, contact your administrator.
Also, you can configure the density, lens mode, original size, resolution, original quality, file format and scan mode to perform scanning by using the features of the copier.
About the Network Scanner Features Chapter 5
5-2 bizhub PRO 1050/1050e Scanner
Page 86

About the Network Scanner Features
!
Detail
"About the Scanner Setting Basic Screen" .. p.7-26
To use the copier as a network scanner, it needs to be connected to the
network. For more information on the network configuration, contact your
network administrator.
Original
SCAN
5
E-Mail server
Copier
E-Mail
FTP server
FTP
SMB server
HDD-B
SMB
Internet
bizhub PRO 1050/1050e Scanner 5-3
About the Network Scanner Features Chapter 5
Page 87

5
5.2 Send by an E-Mail
You can send the data read in from the copier's ADF or the original scanning
glass (scanned data) to an E-Mail address as an attached file.
For detailed information on how to operate the function, refer to "Transmission to an E-Mail Address" on Page 7-4.
Original
SCAN
About the Network Scanner Features
Copier
5.2.1 Items to be configured
In order to send the scanned data to an E-Mail address, the following items
need to be configured.
Address (E-Mail address)
Select an E-Mail address from the registered addresses, or specify an address as you operate scanning. You can specify multiple addresses.
For information on how to register an address, refer to "Registering an E-Mail
Address" on Page 6-4.
Title
You can choose an E-Mail title from 5 types, or you can input a title as you
operate scanning.
On how to input a title, refer to "Transmission to an E-Mail Address" on Page
7-4.
Sentence
You can choose a sentence from 5 types, or you can input a sentence as you
operate scanning.
On how to input a sentence, refer to "Transmission to an E-Mail Address" on
Page 7-4.
POP serverSMTP server
Internet
About the Network Scanner Features Chapter 5
5-4 bizhub PRO 1050/1050e Scanner
Page 88

About the Network Scanner Features
!
Detail
When the E-Mail is in excess of the maximum transmission size that has
been set, it is not sent to the SMTP server, but cancelled on the bizhub
PRO 1050/1050e.
Transmission from the copier is up to the STMP server. If the network or the
POP server has any problem, the mail may not reach a recipient. When you
send an important data, do not forget to confirm the reception.
!
Detail
Depending on settings of the recipient server, the size of an attached file
is regulated. For more information, contact your administrator.
5
bizhub PRO 1050/1050e Scanner 5-5
About the Network Scanner Features Chapter 5
Page 89

5
5.3 Store on the HDD-B
In order to store the data read in from the copier's ADF or the original scanning glass (scanned data) on the HDD-B, you need to configure boxes on the
HDD-B in advance. The scanned data are stored in the boxes.
The data stored in the boxes can be imported to computers through the network.
For detailed information on how to operate the function, refer to "Storage on
the HDD-B" on Page 7-9.
Original
About the Network Scanner Features
SCAN
Copier
5.3.1 Items to be configured
In order to store the scanned data on the HDD-B, the following items need
to be configured.
Box No.
Specify a 9-digit-number for the box in which you store data.
Password
You can configure a password (8 digits at maximum).
A Box No. and Password can be registered in advance. On how to register
them, refer to "Registering the HDD-B" on Page 6-6.
HDD-B
About the Network Scanner Features Chapter 5
5-6 bizhub PRO 1050/1050e Scanner
Page 90

About the Network Scanner Features
5.4 Send to the FTP server
You can send the data read in from the copier's ADF or the original scanning
glass (scanned data) to the FTP server.
The scanned data sent to the FTP server can be downloaded from computers that have access to the FTP server.
For detailed information on how to operate the function, refer to "Transmission to the FTP server" on Page 7-14.
Original
SCAN
5
Copier
5.4.1 Items to be configured
In order to send the scanned data to the FTP server, the following items need
to be configured.
Host Address
You specify an FTP server name or an IP Address of the FTP server.
File Path
You specify a directory in the FTP server.
Login Name
You specify a Login Name for the FTP server.
Password
You specify a corresponding Password to each Login Name for the FTP
server.
Port No.
You specify a Port No. when necessary.
For information on how to configure a Port No., refer to "Transmission to the
FTP server" on Page 7-14.
FTP server
Internet
About the Network Scanner Features Chapter 5
Firewall
A selection is made to decide if the PASV mode is used or not.
bizhub PRO 1050/1050e Scanner 5-7
Page 91

5
About the Network Scanner Features
You can register a Host Address, File Path, Login Name and Password in advance. For information on how to register them, refer to "Registering the FTP
server" on Page 6-9.
2
Reminder
Depending on a network condition, transmission to the FTP server may
damage the scanned data.
Make sure that the scanned data are not damaged.
About the Network Scanner Features Chapter 5
5-8 bizhub PRO 1050/1050e Scanner
Page 92

About the Network Scanner Features
5.5 Send to the SMB server
You can send the data read in from the copier's ADF or the original scanning
glass (scanned data) to the SMB server.
The scanned data sent to the SMB server can be file-shared with computers
with the SMB protocol.
For detailed information on how to operate the function, refer to "Transmission to the SMB server" on Page 7-19.
Original
SCAN
5
Copier
5.5.1 Items to be configured
In order to send the scanned data to the SMB server, the following items
need to be configured.
Host Address
You specify an SMB server name or an IP Address of the SMB server.
File Path
You specify a directory in the SMB server.
Login Name
You specify a Login Name for the SMB server.
Password
You specify a corresponding Password to each Login Name for the SMB
server.
You can register a Host Address, File Path, Login Name and Password in advance. For information on how to register them, refer to "Registering the
SMB server" on Page 6-12.
SMB server
Internet
About the Network Scanner Features Chapter 5
bizhub PRO 1050/1050e Scanner 5-9
Page 93

5
About the Network Scanner Features
2
Reminder
Depending on a network condition, transmission to the SMB server may
damage the scanned data.
Make sure that the scanned data are not damaged.
About the Network Scanner Features Chapter 5
5-10 bizhub PRO 1050/1050e Scanner
Page 94

About the Network Scanner Features
5.6 Send to a Group
If you register multiple destinations/storage locations as a Group, you can
send/store the data read in from the copier's ADF or the original scanning
glass (scanned data) to them at one time.
- At maximum, 100 destinations can be registered to one Group.
- Multiple E-Mail addresses can be registered.
- As for the HDD, FTP server and SMB server, one for each can be regis-
tered to a Group.
For detailed information on how to operate the function, refer to "Transmission to a Group" on Page 7-24.
For information on how to register a Group, refer to "Registering a Group" on
Page 6-15.
Copier
5
Original
SCAN
Select destinations at once
Group
E-Mail HDD-B FTP SMB
Multiple
Single Single Single
bizhub PRO 1050/1050e Scanner 5-11
About the Network Scanner Features Chapter 5
Page 95

5
About the Network Scanner Features
5.7 Use the Network Scanner Features
To scan data using the Network Scanner features, follow the flow below.
Did you register the destination?
YES NO
Do you register the destination?
YESNO
About the Network Scanner Features Chapter 5
Chapter 6 Configuring Destination for the Network Scanner Features
Registering destination
Specifying destination
Chapter 7 Using the Network Scanner Features
Configuring the scanner
“About the Scanner Setting Basic Screen” on page 7-26
Perform scanning
5-12 bizhub PRO 1050/1050e Scanner
Page 96

6
Configuring Destination
for the Network Scanner
Features
Configuring Destination for the Network Scanner Features Chapter 6
Page 97

6
Configuring Destination for the Network Scanner Features
6 Configuring Destination for the Network
Scanner Features
6.1 About Registration
When you transmit scanned data to destinations/storage locations, you can
input a destination every time or you can also select it from the registered
destinations. Frequently used destinations are recommended to be registered in advance.
!
Detail
"Registering an E-Mail Address".....................p.6-4
"Registering the HDD-B".................................p.6-6
"Registering the FTP server"...........................p.6-9
"Registering the SMB server"........................p.6-12
"Registering a Group" ...................................p.6-15
6.1.1 Change/delete destinations/storage locations
About how to change/delete destinations/storage locations, contact your
administrator.
Configuring Destination for the Network Scanner Features Chapter 6
6-2 bizhub PRO 1050/1050e Scanner
Page 98

Configuring Destination for the Network Scanner Features
6.1.2 The keys on the Destination Manual Input screen
You can register a destination in the Destination Manual Input screen.
On how to display the Destination Manual Input screen, refer to the step 1 to
3 for the each registration. This page describes the common keys.
!
Detail
Since the registration procedures for a Group are different from others,
there is no Destination Manual Input screen.
Destination Manual
Input screen (HDD)
Destination Manual
Input screen (FTP)
Destination Manual Input screen (E-Mail)
6
Destination Manual
Input screen (SMB)
Button Function
Register The input is registered, and you are brought back to the Select
Scanner Screen The Scanner Setting Basic screen appears.
Cancel The input is canceled, and you are brought back to the Select
OK The input is determined, and you are brought back to the Select
Destinations screen.
Destinations screen.
Destinations/Storage Locations screen. After transmitted once,
destination setting is cleared without being registered.
bizhub PRO 1050/1050e Scanner 6-3
Configuring Destination for the Network Scanner Features Chapter 6
Page 99

6
Configuring Destination for the Network Scanner Features
6.2 Registering an E-Mail Address
When using the function to send the scanned data as an E-Mail attached file,
you can register the destination E-Mail address in advance. The registration
is done in the following steps.
!
Detail
For E-Mail/FTP/HDD/SMB, destinations can be registered as many as
500 in sum.
1 Select the [SCAN] tab.
The Select Destinations/Storage
Locations screen appears.
2 Make sure that [E-Mail] is select-
ed.
– In the initial settings, the Select
Destinations/Storage Locations screen (E-Mail) is displayed. For information on the
initial settings of the Scan
screen, contact your administrator of the copier.
3 Press the [Manual Address] key.
– If the E-Mail address is already
registered, the Name is displayed.
– In the initial settings, such in-
dex keys as [A-C] and [D-F] are
displayed.
– On how to edit/delete a regis-
tered address, contact your
administrator of the copier.
The Destination Manual Input screen appears.
Configuring Destination for the Network Scanner Features Chapter 6
6-4 bizhub PRO 1050/1050e Scanner
Page 100

Configuring Destination for the Network Scanner Features
4 Configure the necessary items on
the Manual Address screen.
Pressing an each item displays the
character input screen.
– For more information on how
to input characters, refer to
"How to Input Characters" on
Page 3-6.
– [Address]
Enter an E-Mail address within
250 characters in alphameric characters and signs.
– [Register Name]
Enter a Name that is displayed on the Select Destinations/Storage
Locations screen (E-Mail) within 24 characters in alphameric char-
acters and signs.
– If you do not input a Name, the first 24 characters of an E-Mail ad-
dress are displayed on the Select Destinations/Storage Locations
screen (E-Mail).
– [Reference Name]
Used as a search keyword when you search destinations. Needs to
be input within 24 characters in alphameric characters and signs.
5 Press the [Register] key.
The E-Mail address is registered, and you are brought back to the Select Destinations/Storage Locations screen (E-Mail).
6
6 Make sure that the registered
Name is displayed.
!
Detail
If the desired Name is not displayed on the page, press [▼] / [▲] to
switch between pages.
An administrator is to edit/delete once registered destinations. For more
information, contact your administrator.
bizhub PRO 1050/1050e Scanner 6-5
Configuring Destination for the Network Scanner Features Chapter 6
 Loading...