

Page 1

INSTRUCTION MANUAL
E
Page 2

2 3BEFORE YOU BEGIN
Thank you for purchasing this Minolta digital camera. Please take the time to read
through this instruction manual so you can enjoy all the features of your new camera.
Check the packing list before using this product. If any items are missing, immediately
contact your camera dealer.
Minolta DiMAGE S414 digital camera
AA alkaline batteries (set of four)
Neck strap NS-DG304
Lens cap LF-236
CompactFlash card
AV cable AVC-100
USB cable USB-600
DiMAGE Viewer CD-ROM
DiMAGE Viewer instruction manual
Camera manual
Warranty card
BEFORE YOU BEGIN FOR PROPER AND SAFE USE
Read and understand all warnings and cautions before using this product.
Using batteries improperly can cause them to leak harmful solutions, overheat, or explode
which may damage property or cause personal injury. Do not ignore the following warnings.
• Only use the batteries specified in this instruction manual.
• Do not install the batteries with the polarity (+/–) reversed.
• Do not use batteries which show wear or damage.
• Do not expose batteries to fire, high temperatures, water, or moisture.
• Do not attempt to short or disassemble batteries.
• Do not store batteries near or in metallic products.
• Do not mix batteries of different types, brands, ages, or charge levels.
• Do not charge alkaline batteries.
• When recharging rechargeable batteries, only use the recommended charger.
• Do not use leaking batteries. If fluid from the batteries enters your eye, immediately rinse
the eye with plenty of fresh water and contact a doctor. If fluid from the batteries makes
contact with your skin or clothing, wash the area thoroughly with water.
• Tape over battery contacts to avoid short-circuiting during disposal; always follow local
regulations for battery disposal.
WARNING
• Use only the specified AC adapter within the voltage range indicated on the adapter unit.
An inappropriate adapter or current may cause damage or injury through fire or electric
shock.
• Do not disassemble this product. Electric shock may cause injury if a high voltage circuit
inside the product is touched.
• Immediately remove the batteries or unplug the AC adapter and discontinue use if the
camera is dropped or subjected to an impact in which the interior, especially the flash unit,
is exposed. The flash has a high voltage circuit which may cause an electric shock
resulting in injury. The continued use of a damaged product or part may cause injuries or
fire.
• Keep batteries or small parts that could be swallowed away from infants. Contact a doctor
Because the performance of alkaline batteries with digital cameras is low, the
use of Ni-MH batteries is recommended. Although alkaline batteries are supplied with this product, its performance will be limited; only use alkaline batteries for test photographs or when Ni-MH batteries, the Minolta external battery pack, or the AC adapter are not available. Fully recharge the Ni-MH batteries just before using the camera.
Camera Notes
Apple, the Apple logo, Macintosh, Power Macintosh, Mac OS, and the Mac OS logo are registered
trademarks of Apple Computer Inc. Microsoft and Windows are registered trademarks of the
Microsoft Corporation. The official name of Windows is Microsoft Windows Operating System.
Pentium is a registered trademark of the Intel Corporation. Power PC is a trademark of the
International Business Machines Corporation. QuickTime is a trademark used under license. All other
trademarks are the property of their respective owners.
Page 3

4 5FOR PROPER AND SAFE USE
immediately if an object is swallowed.
• Store this product out of reach of children. Be careful when around children not to harm
them with the product or parts.
• Do not fire the flash directly into the eyes. It may damage eyesight.
• Do not fire the flash at vehicle operators. It may cause a distraction or temporary
blindness which may lead to an accident.
• Do not use the monitor while operating a vehicle or walking. It may result in injury or an
accident.
• Do not look directly at the sun or strong light sources through the viewfinder. It may
damage your eyesight or cause blindness.
• Do not use this product in a humid environment, or operate this product with wet hands.
If liquid enters the product, immediately remove the batteries or unplug the AC adapter
and discontinue use. The continued use of a product exposed to liquids may cause
damage or injury through fire or electric shock.
• Do not use the product near inflammable gases or liquids such as gasoline, benzine, or
paint thinner. Do not use inflammable products such as alcohol, benzine, or paint thinner
to clean the product. The use of inflammable cleaners and solvents may cause an
explosion or fire.
• When unplugging the AC adapter, do not pull on the power cord. Hold the adapter unit
when removing it from an outlet.
• Do not damage, twist, modify, heat, or place heavy objects on the AC adapter cord. A
damaged cord may cause damage or injury through fire or electric shock.
• If the product emits a strange odor, heat, or smoke, discontinue use. Immediately remove
the batteries taking care not to burn yourself as the batteries become hot with use. The
continued use of a damaged product or part may cause injuries or fire.
• Take the product to a Minolta Service Facility when repairs are required
This mark on your camera certifies that this camera meets the requirements of
the EU (European Union) concerning interference causing equipment
regulations. CE stands for Conformité Européenne (European Conformity).
Digital Camera:
Tested To Comply
With FCC Standards
FOR HOME OR OFFICE USE
This device complies with Part 15 of the FCC Rules. Operation is
subject to the following two conditions: (1) This device may not
cause harmful interference, and (2) this device must accept any
interference received, including interference that may cause
undesired operation.
Do not remove the ferrite cores from the cables.
Tested by the Minolta Corporation
101 Williams Drive, Ramsey, New Jersey 07446, U.S.A.
This Class B digital apparatus complies with Canadian ICES-003.
Cet appareil numérique de la classe B est conforme à la norme NMB-003 du Canada.
The following marks may be found on the product:
CAUTION
• Do not use or store the product in a hot or humid environment such as the glove
compartment or trunk of a car. It may damage the product and batteries which may result
in burns or injuries caused by heat, fire, explosion, or leaking battery fluid.
• If batteries are leaking, discontinue use of the product.
• The camera temperature rises with extended periods of use. Care should be taken to
avoid burns.
• Burns may result if the memory card or batteries are removed immediately after extended
periods of use. Turn the camera off and wait for it to cool.
• Do not fire the flash while it is in contact with people or objects. The flash unit discharges
a large amount of energy which may cause burns.
• Do not apply pressure to the LCD monitor. Adamaged monitor may cause injury, and the
liquid from the monitor may cause inflammation. If liquid from the monitor makes contact
with skin, wash the area with fresh water. If liquid from the monitor comes in contact with
the eyes, immediately rinse the eyes with plenty of water and contact a doctor.
• When using the AC adapter, insert the plug securely into the electrical outlet.
• Do not use if the AC adapter cord is damaged.
• Do not cover the AC adapter. Afire may result.
• Do not obstruct access to the AC adapter; this can hinder the unplugging of the unit in
emergencies.
• Unplug the AC adapter when cleaning or when the product is not in use.
Page 4

6 7TABLE OF CONTENTS
The basic operation of this camera is covered between pages 15 and 42. This section of
the manual covers the camera parts, preparation of the camera for use, and the basic
camera operation for recording, viewing, and deleting images.
The basic and advanced auto-recording mode sections cover all the basic functions of
the camera in this mode and in the multi-function recording mode. Take time to read
these sections before moving on to the multi-function recording mode section. The basic
playback section describes how to view images. The other sections can be read as
needed.
Many of the features of this camera are controlled with menus. The menu navigation
sections concisely describe how to change menu settings. Descriptions of the settings
immediately follow the navigation sections.
Throughout the text are shooting tips and camera notes. Shooting tips give advice and
information on photography and how to use the camera to achieve the best results.
Camera notes cover details on camera operation.
TABLE OF CONTENTS
Basic recording operation........................................................................................................25
Focus lock ...............................................................................................................................26
Focus range.............................................................................................................................26
Focus signals...........................................................................................................................27
Special focusing situations......................................................................................................27
Digital-subject-program button ................................................................................................28
Flash modes............................................................................................................................30
Flash range - auto-recording mode.........................................................................................31
Flash signals............................................................................................................................31
Camera-shake warning ...........................................................................................................31
Drive modes ............................................................................................................................32
Self-timer .................................................................................................................................33
Remote control (sold separately) ............................................................................................34
Continuous advance ................................................................................................................35
Bracketing................................................................................................................................36
Display button - recording mode .............................................................................................37
Playback - basic operation...................................................................................................................38
Single-frame playback and histogram display.........................................................................38
Viewing and deleting images...................................................................................................39
Display button - playback........................................................................................................40
Enlarged playback...................................................................................................................41
Auto-recording mode - advanced operation.........................................................................................42
Navigating the auto-recording mode menu.............................................................................42
Image size and image quality..................................................................................................44
Voice memo.............................................................................................................................46
Date imprinting ........................................................................................................................47
Digital zoom .............................................................................................................................48
Instant playback.......................................................................................................................49
Exposure compensation..........................................................................................................50
What is an Ev? What is a stop?..............................................................................................51
Multi-function recording mode ..............................................................................................................52
Autofocus areas and control....................................................................................................52
Navigating the multi-function recording mode menu ...............................................................54
Exposure modes......................................................................................................................56
Program......................................................................................................................56
Aperture priority - A.....................................................................................................56
Manual exposure - M ..................................................................................................57
Bulb exposures ........................................................................................................................58
Focus modes...........................................................................................................................59
White balance ..........................................................................................................................60
Names of parts ....................................................................................................................................10
Camera body...........................................................................................................................10
Viewfinder................................................................................................................................12
Mode dial.................................................................................................................................12
Data panel...............................................................................................................................13
LCD monitor display................................................................................................................14
Getting up and running.........................................................................................................................15
Attaching the neck strap and lens cap....................................................................................15
Changing batteries ..................................................................................................................16
Battery condition indicator.......................................................................................................17
Auto power save......................................................................................................................17
External power supplies (sold separately)...............................................................................18
Changing the CompactFlash card ...........................................................................................18
Setting the date and time ........................................................................................................20
Auto-recording mode - basic operation ................................................................................................22
Setting the camera to record images automatically................................................................23
Handling the camera ...............................................................................................................24
Using the zoom lens ................................................................................................................24
Page 5

8 9TABLE OF CONTENTS
Automatic white balance.............................................................................................60
Preset white balance ..................................................................................................60
Custom white balance ................................................................................................61
Camera sensitivity - ISO..........................................................................................................62
Flash range and camera sensitivity.........................................................................................62
Full-time AF .............................................................................................................................63
Metering modes .......................................................................................................................63
Exposure bracketing increment...............................................................................................64
Color mode..............................................................................................................................64
Image control - sharpness, contrast, & filter............................................................................65
A short guide to photography...............................................................................................................66
Movie recording....................................................................................................................................68
Notes on movie recording .......................................................................................................69
Recording movies with the IR Remote Control RC-3 (sold separately)..................................69
Playback mode - advanced operation..................................................................................................70
Playing back voice memos ......................................................................................................70
Viewing movies........................................................................................................................71
Navigating the playback-mode menu......................................................................................72
Frame-selection screen...........................................................................................................74
Viewing images on a television...............................................................................................75
Deleting files............................................................................................................................76
Locking files .............................................................................................................................77
Changing the index playback format.......................................................................................77
Slide Show...............................................................................................................................78
About DPOF............................................................................................................................80
Creating a DPOF print order ...................................................................................................80
Ordering an index print ............................................................................................................81
Canceling a DPOF print order.................................................................................................81
Copying images .......................................................................................................................82
Setup mode ....................................................................................................................................84
Navigating the setup menu......................................................................................................84
LCD monitor brightness...........................................................................................................86
Formatting CompactFlash cards .............................................................................................86
Auto power save......................................................................................................................86
Language.................................................................................................................................87
Display mode ...........................................................................................................................87
File number (#) memory..........................................................................................................88
Folder name ............................................................................................................................88
Select folder.............................................................................................................................89
Audio signals...........................................................................................................................89
Shutter FX ...............................................................................................................................89
Volume ....................................................................................................................................89
Resetting the camera ..............................................................................................................90
Date and time setting ..............................................................................................................91
Date format ..............................................................................................................................91
Video output ............................................................................................................................91
Data-transfer mode ..............................................................................................................................92
System requirements...............................................................................................................92
Connecting the camera to a computer....................................................................................93
Connecting to Windows 98 and 98 Second Edition................................................................95
Automatic installation ..................................................................................................95
Manual installation......................................................................................................96
CompactFlash card folder organization...................................................................................98
Disconnecting the camera from the computer ......................................................................100
Windows 98 and 98 Second Edition.........................................................................100
Windows Me, 2000 Professional, and XP................................................................100
Macintosh..................................................................................................................101
Changing the CompactFlash card - data-transfer mode.......................................................102
Auto power save - data-transfer mode ..................................................................................102
QuickTime system requirements...........................................................................................103
Appendix ..................................................................................................................................103
Troubleshooting.....................................................................................................................103
About Ni-MH batteries...........................................................................................................105
Removing the driver software - Windows..............................................................................106
Care and storage...................................................................................................................107
Technical specifications.........................................................................................................110
Page 6

10 11NAMES OF PARTS
* This camera is a sophisticated optical instrument. Care should be taken to keep these
surfaces clean. Please read the care and storage instructions in the back of this manual
(p. 107).
CAMERA BODY
Data panel (p. 13)
Shutter-release button
Lens*
Card-slot door (p. 18)
The USB port and AV-out
terminal are located behind
the card-slot door.
Self-timer/
Remote-control
lamp (p. 33)
Flash (p. 30)
Digital-subject-program button (p. 28)
Strap eyelet (p. 15)
Viewfinder* (p. 12)
LCD monitor*
(p. 14)
Menu button
Battery-chamber lock (p. 16)
Flash mode/Magnification button (p. 30, 41)
DC terminal cover (p. 18)
Access lamp
QV/ Delete button (p. 38)
Tripod socket
Speaker
Microphone
Remote-control
receiver
Mode dial (main switch)
Viewfinder window*
Battery-chamber door (p. 16)
Card-slot door release
Drive-mode button (p. 32)
Exposure-compensation button (p. 50)
Controller
Display button (p. 37, 40)
Page 7
Frame counter (p. 45)
Digital-subject-program icons (p. 28)
12 13NAMES OF PARTS
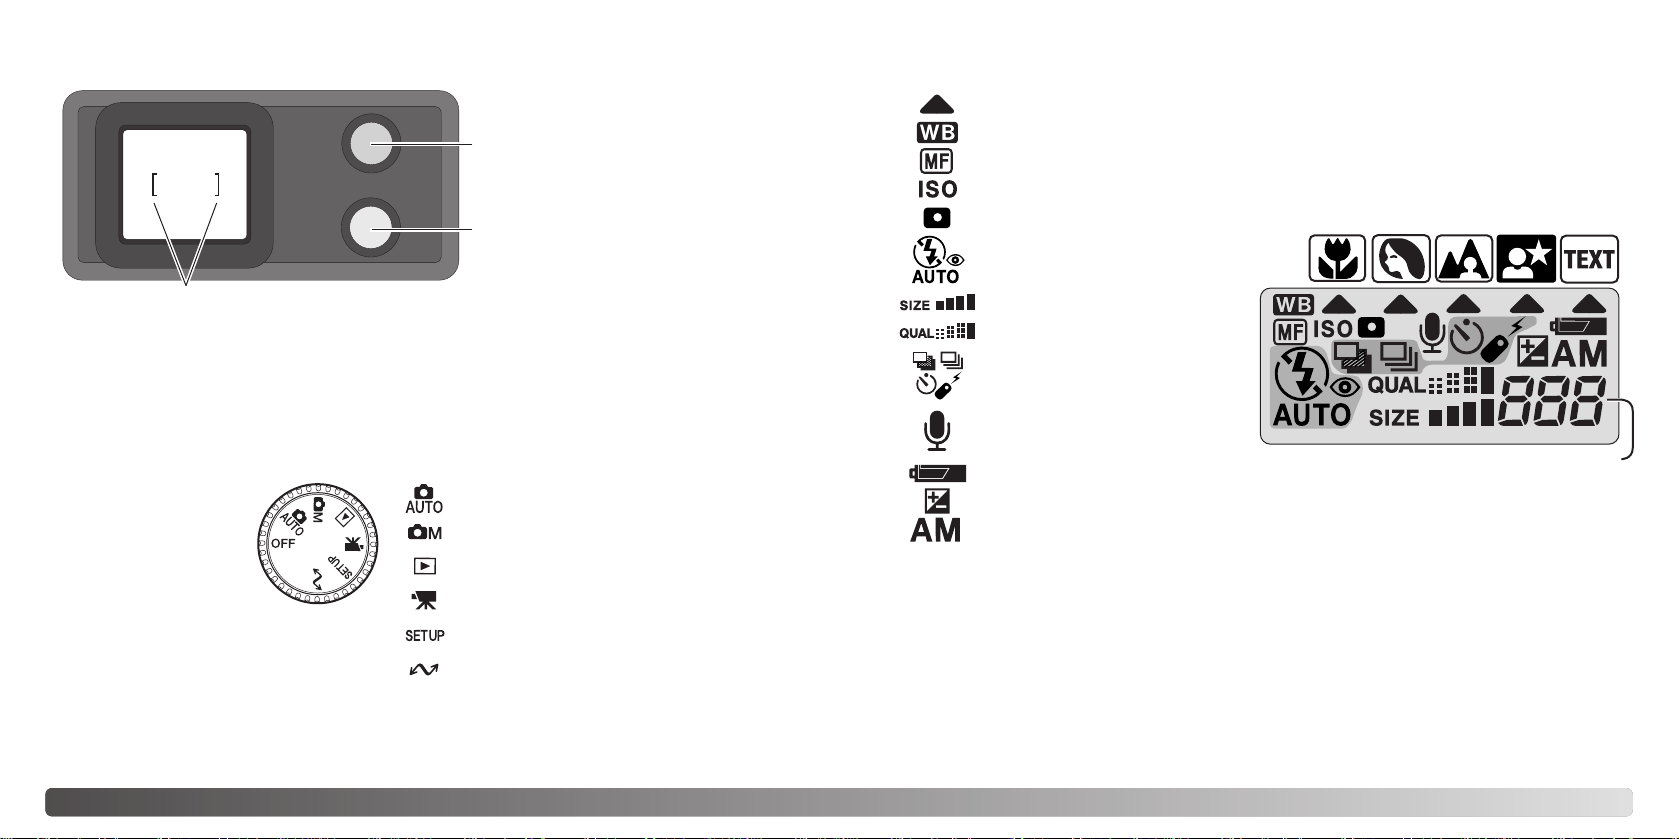
DATA PANEL
MODE DIAL
Auto-recording mode (p. 22, 42)
Multi-function recording mode (p. 52)
Playback mode (p. 38, 70)
Movie-recording mode (p. 68)
Setup mode (p. 84)
Data-transfer mode (p. 92)
VIEWFINDER
Focus lamp
(green)
Flash lamp
(orange)
Focus frame
This dial gives direct
and easy access to
the camera’s major
modes. It also acts as
the main switch.
Digital-subject-program indicators (p. 28)
Exposure-compensation indicator (p.
50)
Camera-sensitivity indicator (p.
62)
Spot-metering indicator (p.
63)
Battery-condition indicator (p.
17)
White-balance indicator (p.
60)
Flash-mode indicators (p.
30)
Manual-focus indicator (p.
59)
Image-size display (p. 44)
Image-quality display (p.
44)
Drive-mode indicators (p.
32)
Microphone indicator (p.
46)
Exposure-mode indicators (p. 56)
Because the optical viewfinder and the lens are slightly separated, the image seen
through one is not exactly the same as the other; this is called parallax. Parallax can
cause errors in framing at close distances and is more pronounced at longer focal
lengths. When the subject is closer than 1m (3ft) at the wide-angle lens position or 3m
(10ft) at the telephoto lens position, use the LCD monitor to compose the image; because
the lens creates the monitor image, it does not suffer from parallax.
The frame counter cannot exceed
999. When the number of
recordable images exceeds this,
999 will be displayed. The frame
counter will continue to count
down when the number of
recordable images falls below one
thousand.
Page 8
14 15NAMES OF PARTS
Using your thumb and index
finger, pinch the outside tabs of
the lens cap to remove or attach.
Always replace the lens cap
when the camera is not in use.
Attach the camera strap to the strap
eyelets as shown. Make sure the neck
strap passes through the loop of the lenscap strap. Always keep the camera strap
around your neck in the event that you
drop the camera.
Attach the small strap to the lens cap by passing one of the
small loops through the eyelet on the cap (1) and then
passing the other loop through the first loop (2) and
tightening.
1
2
ATTACHING THE NECK STRAPAND LENS CAP
GETTING UP AND RUNNING
4
3
LCD MONITOR DISPLAY
c. Flash-mode indicator (p. 30)
e. Contrast-compensation display (p. 65)
f. Filter display (p. 65)
g. Exposure-compensation display (p. 50)
h. White-balance indicator (p. 60)
n. Camera-sensitivity (ISO) display (p. 62)
k. Metering-mode indicator (p. 63)
m. Camera-shake warning (p. 31)
j. Shutter-speed display
l. Aperture display
o. Manual-focus indicator (p. 59)
s. Macro indicator (p. 28)
r. Drive-mode indicator (p. 32)
p. Focus signal (p. 27)
q. Frame counter (p. 13)
x. Digital-zoom display (p. 48)
v. Image-size display (p. 44)
u. Image-quality indicator (p. 44)
t. Battery-condition indicator (p. 17)
b. Mode indicator (p. 12)
1. Focus frame (p. 25)
2. Spot metering area (p. 63)
3. AF sensors (p. 25)
d. Sharpness display (p. 65)
a. Voice memo indicator (p. 46)
w. Color mode indicator (p. 48)
Indicators and displays from both the auto-recording and multi-function recording modes
have been displayed for clarity.
i. Exposure-mode (p. 56)/
Digital-subject-program indicators (p. 28)
Page 9
16 17GETTING UP AND RUNNING
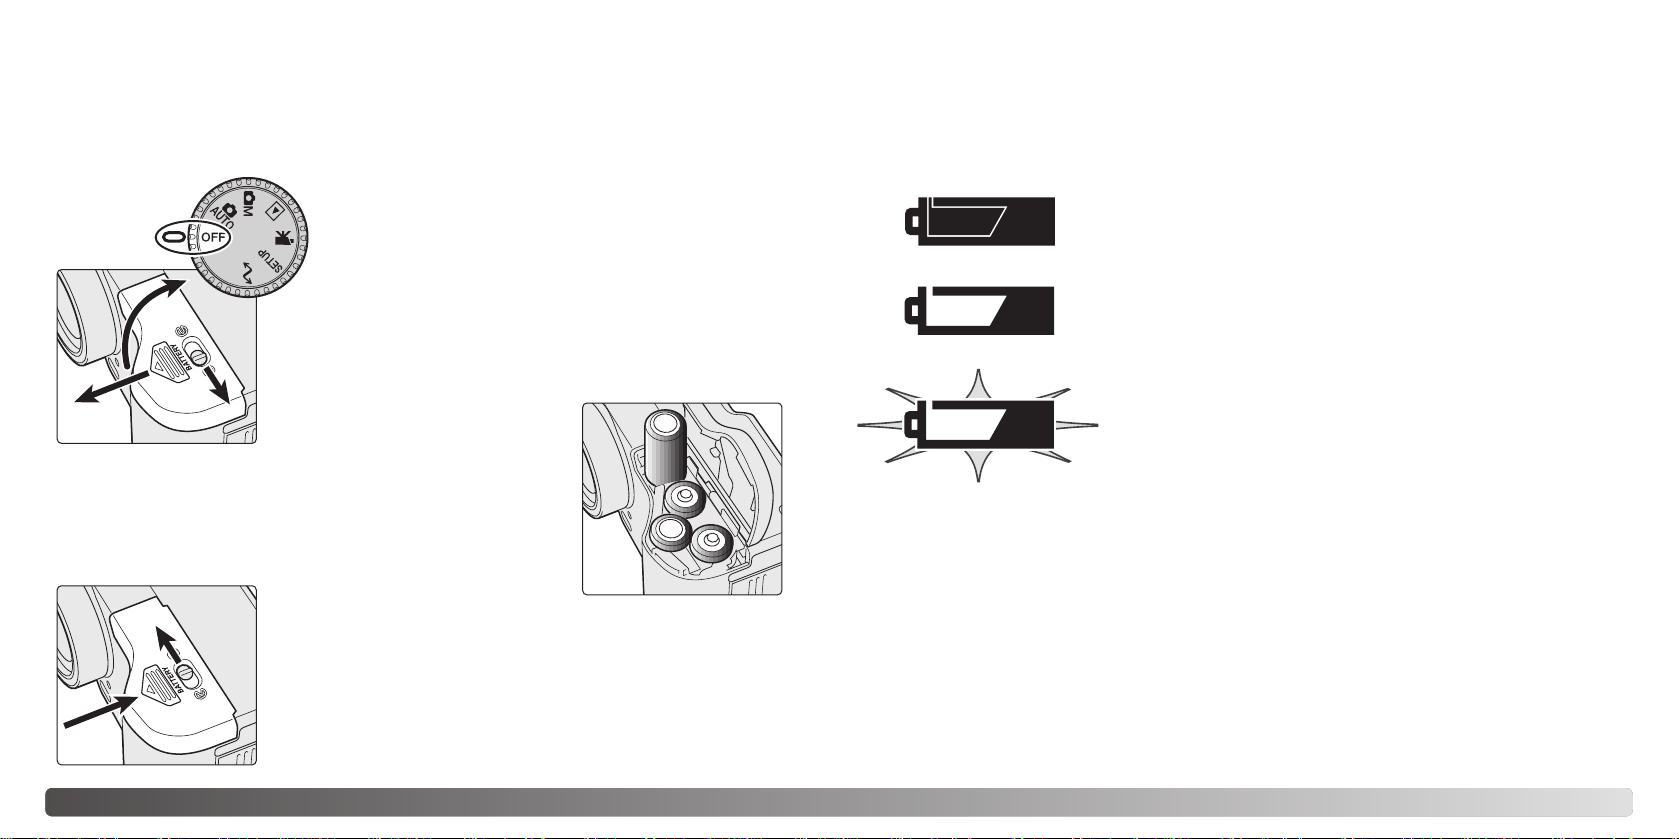
CHANGING BATTERIES
Insert the batteries. Make sure the positive and negative
battery terminals are oriented as illustrated on the diagram in
the battery chamber.
This digital camera uses four AA-size alkaline or Ni-MH batteries. Ni-MH batteries are
recommended because of longer life. When using Ni-MH batteries, fully recharge them
with a battery charger suitable for complex electronic equipment. Please consult your
vendor about an appropriate charger.
When replacing batteries, the mode dial should be in the
off position. If the camera is not turned off when
replacing exhausted batteries, the low-battery warning
may not reset.
Close the battery-chamber door and slide it back toward the
body (4) to engage the safety catch. Move the lock lever (5) to
the close position.
After installing the batteries, the set-time/date message may
appear on the monitor. The clock and calendar are set in the
custom 2 section of the setup menu (p. 20).
BATTERY CONDITION INDICATOR
Full-battery Icon - the batteries are fully charged. This icon is
displayed for five seconds on the monitor when the camera is
turned on. The icon remains on the data panel.
Blinking low-battery icon - when displayed on the data panel
with no other icons, power is insufficient for camera operation.
The shutter will not release. When replacing exhausted
batteries, wait thirty seconds between removing the old
batteries and inserting the new ones.
Low-battery warning - battery power is very low. The batteries
should be replaced as soon as possible. This warning
automatically appears and remains on the monitor until the
batteries are changed.
AUTO POWER SAVE
To conserve battery power, the camera will turn off displays and unnecessary functions
if an operation is not made within a certain period. The LCD monitor will turn off after thirty
seconds. The data panel turns off after one minute. To restore the displays, press any
button or key, or turn the mode dial to another position. The length of the auto-powersave period for the data panel can be changed in the basic section of the setup menu (p.
84).
This camera is equipped with an automatic battery-condition indicator. When the camera
is on, the battery-condition indicator appears on the data panel and monitor. The monitor
icon will change from white to red when battery power is low. If the data panel and
monitor are blank, the batteries may be dead or installed incorrectly.
Open the battery-chamber door by moving the batterychamber lock (1) to the open position. Slide the door forward
(2) to release the safety catch; the door should spring open (3).
1
2
4
3
5
When installing batteries, make sure the battery terminals are clean. Residue or dirt on
the terminals can sometimes cause a false low-battery warning. Always use a clean, dry
cloth to clean batteries.
Page 10
1 2 3
4
18 19GETTING UP AND RUNNING
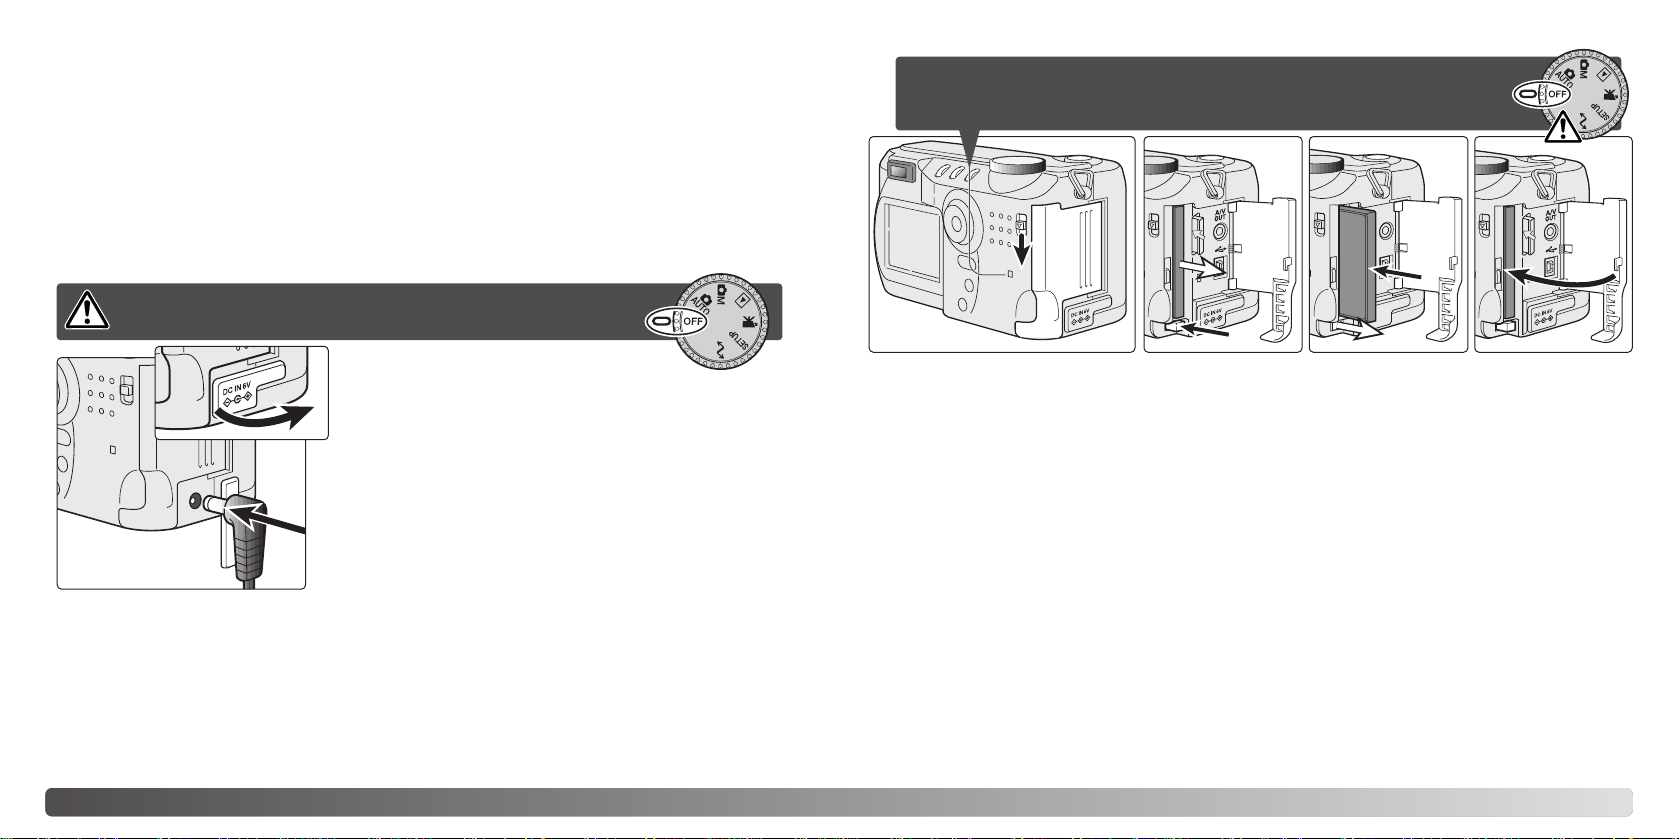
EXTERNAL POWER SUPPLIES (SOLD SEPARATELY)
CHANGING THE COMPACTFLASH CARD
The AC Adapter allows the camera to be powered from an electrical household outlet.
The AC Adapter is recommended when the camera is interfaced with a computer or
during periods of heavy use. AC Adapter model AC-1Lis for use in North America, Japan,
and Taiwan; AC-2L is for use in all other areas.
The External High-power Battery Pack Kit EBP-100 is a portable source of power for the
camera. The kit contains a high-power lithium-ion battery, holder, and charger. The
battery and charger are also available separately. This battery pack will significantly
extend the operating time of the camera.
A type I CompactFlash card must be inserted for the camera to operate. If a card has not
been inserted, a no-card warning will automatically be displayed on the monitor and three
dashes (– – –) will be displayed on the data-panel frame counter. For CompactFlash card
care and storage, see page 109.
Slide the card-slot door release down to open the card-slot door (1).
To eject a CompactFlash card, press the card-eject lever (2). The card can now be pulled
out. Take care when removing the card as it becomes hot with use.
Insert the memory card into the card slot until the card-eject lever pops out (3). Insert the
card so the face is toward the front of the camera. Always push the card in straight, never
at an angle. Never force the card. If the card does not fit, check that it is oriented
correctly.
Close the card-slot door (4).
A card used in another camera may have to be formatted before being used. A card is
formatted in the basic section of the setup menu (p. 84); this operation permanently
erases all data on the card. If the unable-to-use-card message appears, the card is not
compatible with the camera and cannot be formatted.
Always turn off the camera and confirm the access lamp is not lit before
inserting or removing a CompactFlash card, otherwise the card may be
damaged, and data lost.
Always turn off the camera before changing between
power supplies.
Remove the DC terminal cover from the left. The cover
is attached to the body to prevent loss.
Insert the mini plug of the AC adapter or battery pack
into the DC terminal. Always remove exhausted
batteries before connecting an external power supply.
Wait thirty seconds between removing the old batteries
and plugging in the external power source.
Insert the AC adapter plug into an electrical outlet.
Page 11
Setup
Basic Custom1 Custom2
Reset default
Date/Time set
Date format
Video output
–
–
MM/DD/YYYY
NTSC
20 21GETTING UP AND RUNNING
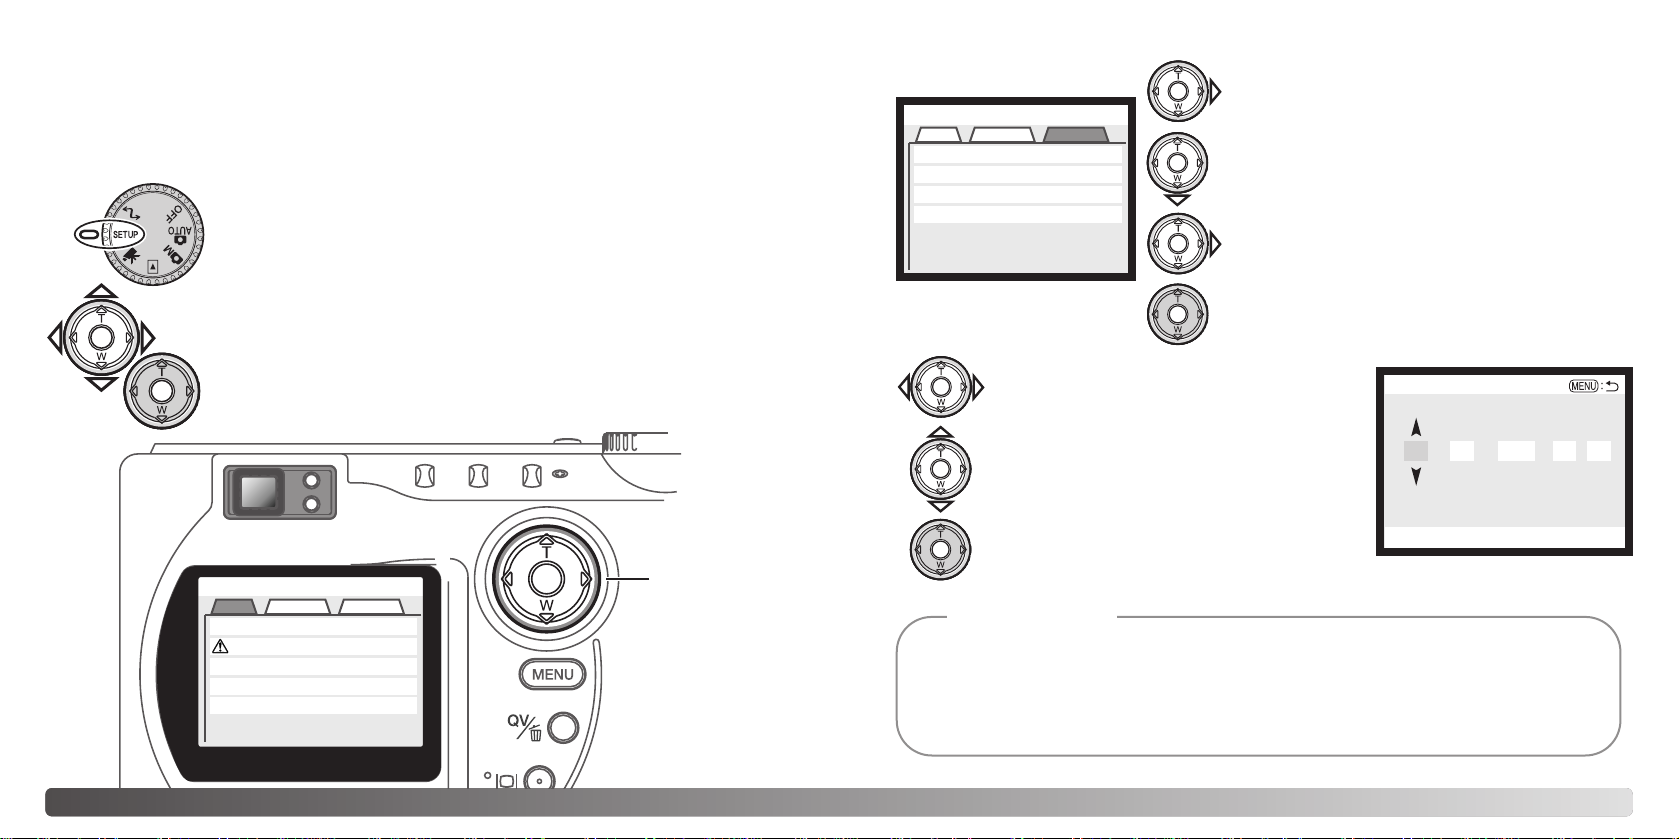
SETTING THE DATE AND TIME
After initially inserting a memory card and batteries, the camera’s clock and calendar
must be set. When images are recorded, the image data is saved with the date and time
of recording. Depending on the region, the menu language may also have to be set. To
change the language, see the camera notes on the following page.
Turn the mode dial on the top of the camera to the setup position. The
camera will turn on and the setup menu will be displayed.
Navigating the menu is simple. The up/down and left/right keys of the
controller move the cursor and change settings on the menu.
Pressing the center of the controller selects menu options and sets
adjustments.
Use the right key to highlight the custom 2 tab
at the top of the menu.
Use the down key to highlight the date/time-set
menu option.
Press the center of the controller to display the
date/time setting screen.
Use the left and right keys to select the item
to be changed.
Press the center of the controller to set the
clock and calendar. The setup menu will be
displayed.
Press the right key. “Enter” will appear on the
right side of the menu.
Custom 2 section of the
setup menu
Date/Time setting screen
Use the up and down keys to adjust the item.
For customers in certain areas, the menu language must also be set. Highlight the language option in the basic section of the setup menu. Press the right key to display the language settings. Using the up/down keys, highlight the desired language. Press the center
of the controller to set the highlighted language; the setup menu will be displayed in the
selected language.
Camera notes
Controller
Setup
Basic Custom1 Custom2
LCDbrightness
Format
Power save
Language
Display mode
3
–
1 min.
English
–
Enter
Setup
Date/Time set
20034 20
16
33
:.
.
Page 12
22 23AUTO-RECORDING MODE - BASIC OPERATION
AUTO-RECORDING MODE
BASIC OPERATION
SETTING THE CAMERA TO RECORD IMAGES AUTOMATICALLY
Turn the mode dial to automatic recording (1); all camera
operations are now fully automatic. The autofocus,
exposure, and imaging systems will work together to
bring beautiful results effortlessly.
While many of the camera’s systems in this mode are
automatic, the camera’s operation can be optimized to
different subjects very simply with the digital subject
program button (p. 28). The flash mode (p. 30) and drive
mode (p. 32) can also be changed. Image size and
quality can be set on the auto-recording mode menu (p.
42).
Exposure mode
Camera sensitivity (ISO)
Flash mode
Focus area
Focus control
Drive mode
Exposure compensation
Color mode
White balance
Program
Multi-segment
Auto
Metering mode
Auto flash
Wide focus area
Autofocus
0.0
Natural Color
Auto
Fixed
Fixed
Fixed
Can be changed*
Fixed
Fixed
Can be changed*
Can be adjusted*
Fixed
Fixed
Single-frame advance
* Changes to the flash or drive mode will reset when the mode dial is turned to another position.
Adjustments made with exposure compensation will be reset to 0.0 when the camera is turned
off or changed to another mode.
This section covers the basic operation of this camera. Thoroughly familiarize yourself
with the operations in this section before moving on to the other sections in the manual.
The sophisticated technology employed in the auto-recording mode frees the
photographer from complicated camera settings to be able to simply concentrate on the
subject and composition. Although automated, the camera’s operation can be changed
to meet various conditions as well as to suit personal shooting preferences.
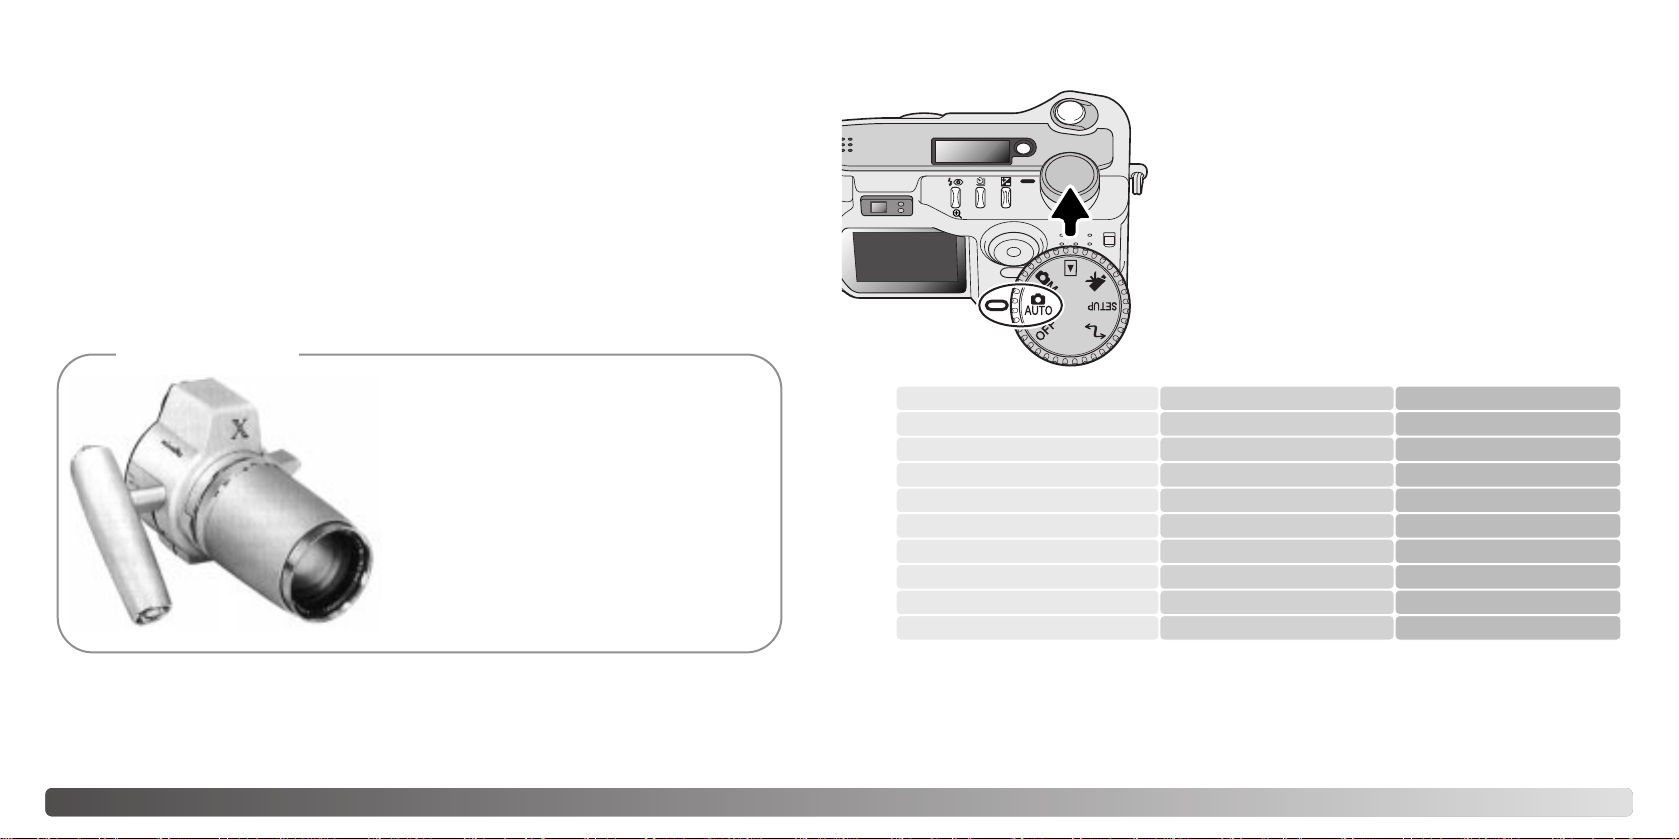
Innovation and creativity has always been a
driving force behind Minolta products. The
Electro-zoom X was purely an exercise in
camera design. It was unveiled at Photokina
in Germany in 1966.
The Electro-zoom X was an electronically
controlled aperture-priority mechanical SLR
with a built-in 30 - 120mm f/3.5 zoom lens giving twenty 12 X 17mm images on a roll of
16mm film. The shutter-release button and
battery chamber are located in the grip. Only
a few prototypes were built making it one of
Minolta’s rarest cameras.
Minolta History
1
Page 13
24 25AUTO-RECORDING MODE - BASIC OPERATION
BASIC RECORDING OPERATION
Press the shutter-release button partway down (1) to lock the
focus and exposure.
• The focus signals (p. 27) on the monitor will confirm the focus. If
the focus signal is red, the camera was unable to focus on the
subject. Repeat the previous steps until the signal is white.
• When the focus is set, an AF sensor will briefly appear on the
live image to indicate the point of focus.
• The shutter speed and aperture value will change from white to
black indicating the exposure is locked.
Press the shutter-release button all the way down (2) to take
the picture.
• The access lamp will glow indicating image data is being written
to the CompactFlash card. Never remove a memory card while
data is being transferred.
With the mode dial set to auto recording, the camera will be on and the
LCD monitor will activate.
USING THE ZOOM LENS
This camera is equipped with a 7.15 to 28.6mm optical zoom. This is equivalent to a 35
- 140mm zoom lens on a 35mm camera. In 35mm photography, focal lengths below
50mm are referred to as wide-angle; the angle of view is larger than that of the human
eye. Above 50mm is referred to as telephoto and makes distant objects appear closer.
The effect of the optical zoom is visible in both the viewfinder and LCD monitor.
Place the subject within the focus frame.
• The focus-lock function (p. 26) can be used with off-center
subjects.
• The subject must be within the focus range of the lens: 0.5m
- ∞ (wide-angle position), 0.9m - ∞ (telephoto position). For
subjects closer than 0.6m, use the macro function (p. 28).
• If the subject is closer than 1m at the wide-angle lens position
or 3m at the telephoto lens position, use the LCD monitor to
frame the subject.
1
2
Controller
The zoom lens is operated
by the controller. Pressing
the up key (T) will zoom in to
the telephoto position of the
lens. Pressing the down key
(W) will zoom out to the wideangle position.
While using the viewfinder or LCD monitor, grip the camera
firmly with your right hand while supporting the body with
your left hand. Keep your elbows at your side and your feet
shoulder-width apart to hold the camera steadily.
When taking vertical pictures, hold the camera so that the
flash is above the lens with the grip to the bottom. Take care
not to cover the lens with your fingers or the strap.
HANDLING THE CAMERA
Page 14
26 27AUTO-RECORDING MODE - BASIC OPERATION
FOCUS LOCK FOCUS SIGNALS
SPECIAL FOCUSING SITUATIONS
This digital camera has a quick, accurate autofocusing system. The focus icon in the
lower right corner of the LCD monitor and the green focus lamp next to the viewfinder
indicate the focus status.
The camera may not be able to focus in certain situations. If the autofocus system cannot
focus on a subject, the focus icon will turn red. In this situation the focus-lock function can
be used to focus on another object at the same distance as your main subject, and then
the image can be recomposed to take the picture.
The subject in the
focus frame is low in
contrast.
The subject is too dark. Two subjects at differ-
ent distances overlap
in the focus frame.
The subject is near a
very bright object or
area.
The focus-lock function is used when the subject is off-center and outside the focus
frame. Focus lock may also be used when a special focusing situation prevents the
camera from focusing on the subject. This function is controlled with the shutter-release
button.
Place the subject within the focus frame. Press and
hold the shutter-release button partway down.
• The focus signals will indicate that the focus is locked.
The shutter speed and aperture value will change from
white to black indicating the exposure is locked.
• When the focus is set, an AF sensor will briefly appear on
the live image to indicate the point of focus.
Without lifting your finger from the shutter-release
button, recompose the subject within the image area.
Press the shutter-release button all the way down to
take the picture.
• The shutter can be released even if the camera cannot focus on the subject.
• When the AF system cannot focus, the focus is set to infinity. When the flash is in use, the focus
is set between 3.0 and 3.8m. In this case, focus lock can be used with an object at the same
distance as the main subject or the camera can be focused manually in the multi-function
recording mode (p. 59).
FOCUS RANGE
Wide-angle lens position
Telephoto lens position
Macro mode (p. 28)
0.5m - ∞ (1.6ft - ∞)
0.9m - ∞ (3ft - ∞)
0.16m - 0.6m (0.5ft - 2ft)
All distances are measured from the CCD.
CCD plane
Focus locked.
Focus icon: white
Focus lamp: steady
Focus icon: red
Focus lamp: blinking
Cannot focus. The subject is too close or a special
situation is preventing the AF system from focusing.
Page 15
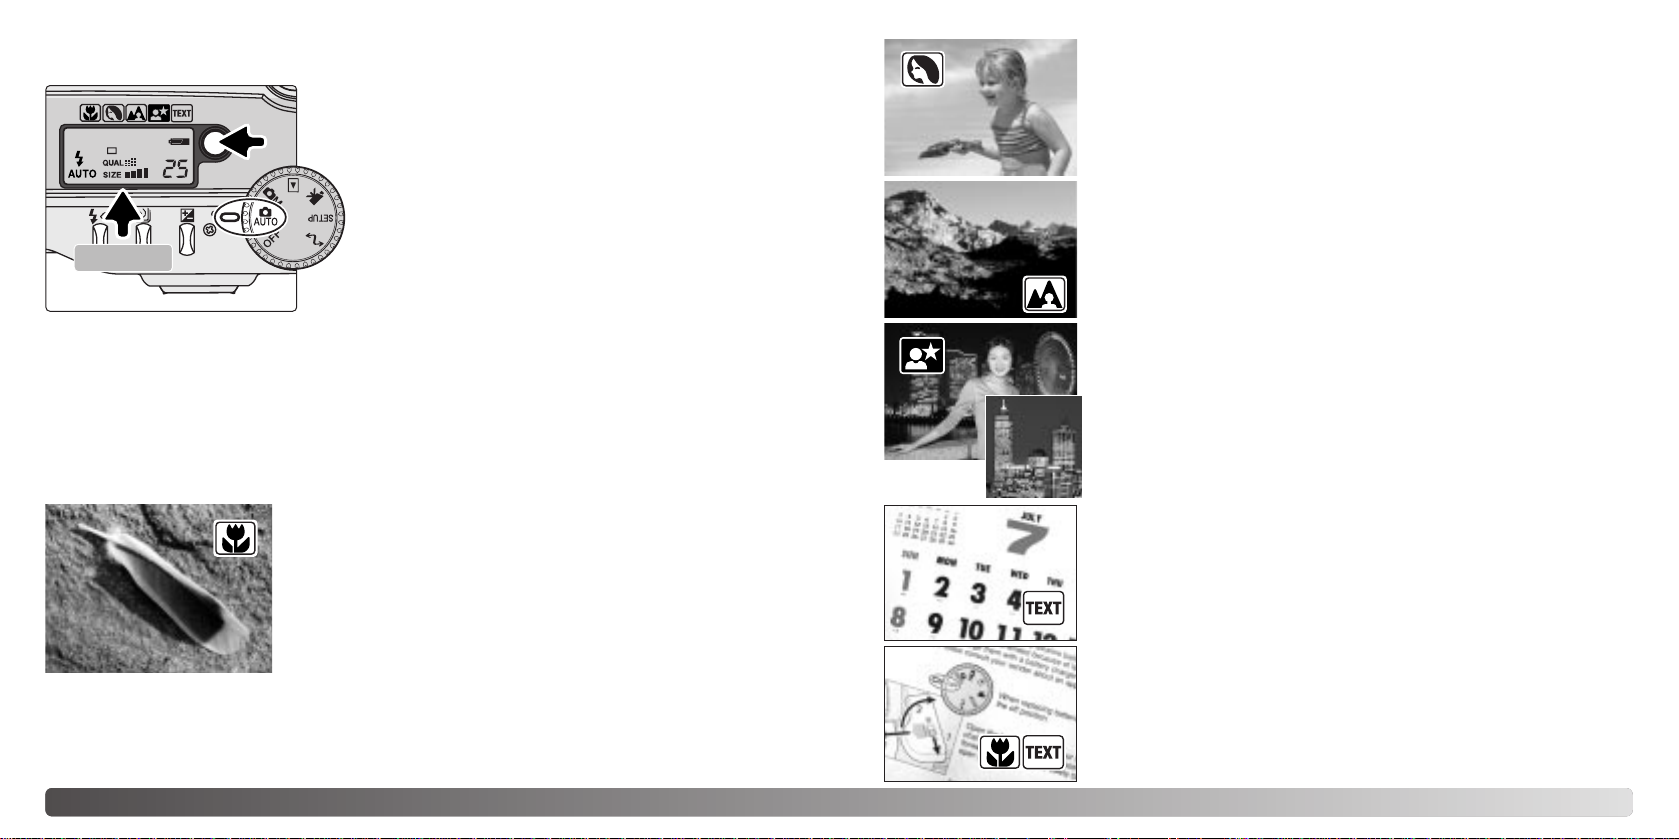
The digital-subject-program button (1) optimizes
the camera’s exposure, white-balance, and imageprocessing systems for various conditions and
subjects. Pressing the subject-program button
cycles through the modes: macro, portrait,
landscape, night portrait, text, macro & text, and
the original exposure mode. A pointer will indicate
the active subject program. The subject program
will remain in effect until it is changed or the mode
dial is turned to another position. Except for macro,
digital subject programs cannot be used in the
multi-function recording mode.
While subject programs optimize camera performance for each shooting condition, some
changes can be made to camera settings. The flash mode (p. 30) can be changed and
the exposure can be altered using the exposure-compensation function (p. 50). In
extreme lighting conditions, changes in exposure compensation may not produce the
intended results in the portrait, night portrait, or text modes. The camera-shake warning
(p. 31) may appear in macro, landscape, night portrait, or text modes.
28 29AUTO-RECORDING MODE - BASIC OPERATION
TEXT - for the crisp reproduction of black text or line art on white
backgrounds. The flash mode is set to flash cancel (p. 30). Fillflash can be used. Use a tripod to eliminate camera shake and
ensure the sharpest images.
NIGHT PORTRAIT - for deep, subtle night scenes. When used
with fill-flash, the subject and background exposures are
balanced. When taking pictures of a landscape at night, use a
tripod to eliminate blurring from camera shake. To take portraits
with night scenes, set the flash mode to fill-flash (p. 30). Ask your
subject not to move after the flash burst; the shutter will still be
open for the background exposure.
DIGITAL-SUBJECT-PROGRAM BUTTON
MACRO - used for close-up photography between 16 and 60
cm (6 ~ 24in.) from the CCD. When the macro mode is
selected, the lens will automatically zoom to the correct
position. The zoom position cannot be changed. The LCD
monitor should be used to compose the picture and will
automatically activate if off. The viewfinder cannot be used
because of parallax. The flash is set to flash cancel (p. 30).
Fill-flash can be used, but can cause extreme overexposure
and uneven illumination.
This subject program can be used in the multi-function
recording mode. It will not reset if the position of the mode
dial is changed.
PORTRAIT - optimized to reproduce soft skin tones and a slight
defocusing of the background. The flash mode can be changed
(p. 30). Most portraits look best at a telephoto setting; longer
focal lengths do not exaggerate facial features and the shallower
depth of field softens the background.
LANDSCAPE - optimized to produce sharp, colorful landscapes.
The flash mode is set to flash cancel. Fill-flash can be used (p.
30).
MACRO & TEXT - for close-up images of text or line art between
16 - 60cm (6 ~ 24in.) from the CCD. T wo pointers will indicate the
combined modes on the data panel and the macro and text
indicators will be displayed on the monitor. The use of a tripod is
recommended. The flash is set to flash cancel. Fill-flash can
cause extreme overexposure and uneven illumination.
1
CCD plane
Page 16
30 31
If the shutter speed falls below the point where the camera can be safely hand held, the
camera-shake warning will appear on the LCD monitor and the orange focus lamp will
blink slowly. Camera shake is slight blurring caused by subtle hand motion and is more
pronounced at the telephoto setting of the lens than at the wide-angle setting. Although
the warning appears, the shutter can still be released. If the warning appears, the
following steps can be taken:
• Place the camera on a tripod.
• Use the built-in flash.
• Zoom the lens towards the wide-angle position until the warning
disappears.
CAMERA-SHAKE WARNING
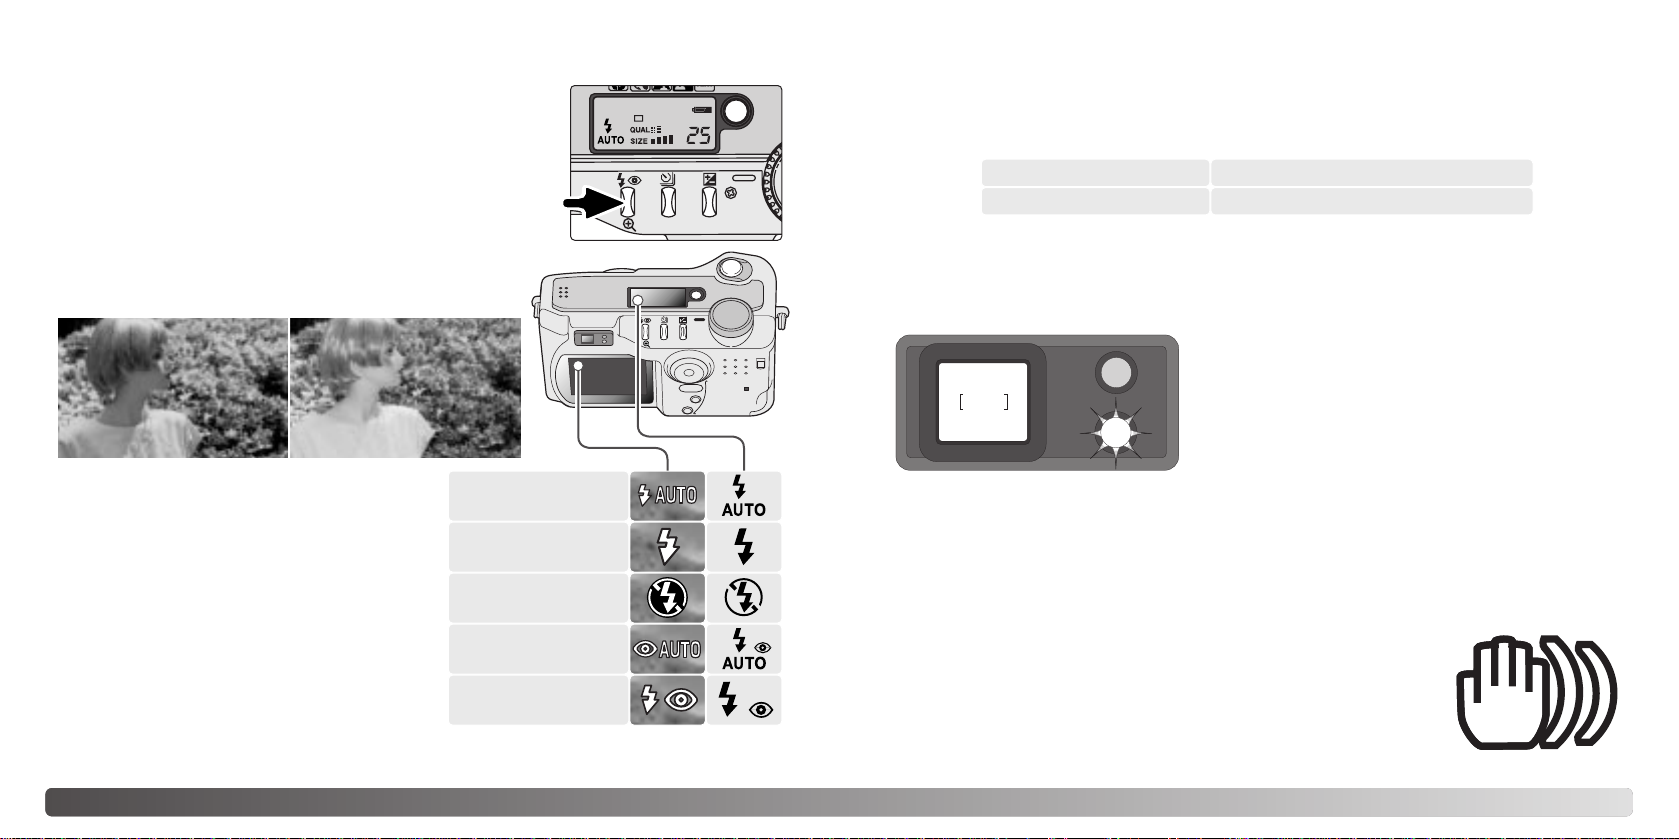
FLASH RANGE - AUTO-RECORDING MODE
The camera will automatically control the flash output. For well-exposed images, the
subject must be within the flash range. Because of the optical system, the flash range is
not the same at the lens’ wide-angle position as it is at the telephoto position.
Wide-angle position
Telephoto position
0.5m ~ 3.5m (1.6 ft. ~ 11.5 ft.)
0.9m ~ 3.0m (3.0 ft. ~ 9.8 ft.)
Flash cancel - the flash will not fire. Use flash
cancel when flash photography is prohibited,
natural light is desired to illuminate the
subject, or the subject is beyond the flash
range. The camera-shake warning may
appear when flash cancel is selected (p. 31).
Red-eye reduction - the flash fires twice
before the main flash burst to reduce red-eye;
an effect caused by light reflected from the
retina. Use in low-light conditions when taking
photographs of people or animals. The preflashes contract the pupils of the subject’s
eyes.
FLASH MODES
To set the flash mode, simply press the flash mode
button (1) on the back of the camera until the desired
mode is displayed.
Autoflash - the flash fires automatically in low-light and
backlit conditions.
Fill-flash - the flash fires with each exposure regardless
of the amount of ambient light. Fill-flash can be used to
reduce harsh shadows caused by strong direct light or
sunshine.
FLASH SIGNALS
The orange flash lamp next to the viewfinder
indicates the status of the flash. When the lamp
glows steadily, the flash is charged and ready to
fire. When the lamps blinks quickly, the flash is
charging and the shutter will not release. The flash
lamp is also used as a camera-shake warning, see
below.
At the wide-angle lens position, when using the flash with subjects closer than 1m (3ft.),
vignetting can occur. A slight shadow or shading may be apparent at the bottom of a
horizontal image.
AUTO-RECORDING MODE - BASIC OPERATION
1
Autoflash
Fill-flash
Flash cancel
Autoflash with
red-eye reduction
Fill-flash with
red-eye reduction
Page 17
The drive modes control the rate and method images are
captured. Icons indicating the selected drive mode appear on
the data panel and LCD monitor.
To change the drive mode, simply press the drive-mode
button (1) on the back of the camera until the desired mode
is displayed.
32 33AUTO-RECORDING MODE - BASIC OPERATION
Used for self-portraits, the self-timer will delay the release of the shutter for approximately
ten seconds after the shutter-release button is pressed. The self-timer is set with the
drive-mode button (p. 32).
With the camera on a tripod, compose the picture as described in the
basic recording operation section (p. 25). Focus lock ( 26) can be used
with off-center subjects. Press the shutter-release button partway down
to lock the exposure and focus (1). Press the shutter-release button all
the way down to begin the countdown (2). Because focus and exposure
are determined when the shutter-release button is pressed, do not stand
in front of the camera when taking a self-timer image. Always confirm the
focus with the focus signals before beginning the countdown (p. 27).
During the countdown, the self-timer lamp on the front
of the camera (3) will start to blink and is accompanied
by an audio signal. A few seconds before the
exposure, the self-timer lamp will blink rapidly. The
lamp will glow steadily just before the shutter fires. To
stop the countdown, press the drive-mode button.
The self-timer is canceled after the exposure. The
audio signal can be turned off in the custom 1 section
of the setup menu (p. 84).
DRIVE MODES
Single-frame
advance
Continuous
advance
Self-timer/
Remote control
Bracketing
To take a single image each time the shutterrelease button is pressed (p. 25).
To take multiple images when the shutterrelease button is pressed and held.
To delay the release of the shutter. Used for
self-portraits.
To take a series of three images with
differing exposures.
LCD monitor
Data panel
The self-timer can be used to minimize camera shake with long exposures. When using the camera on a tripod, photographs of static subjects (landscapes, still-lifes, or close-up photographs)
can be made with the self-timer. Because no contact is made with the camera during exposure,
there is no risk of camera shake caused by the operator.
Shooting tips
SELF-TIMER
1
All drive-mode indicators have
been shown for clarity. The
single-frame advance and
continuous drive indicators
occupy the same area of the
data panel. All the drive-mode
icons appear in the lower right
corner of the monitor.
3
1
2
Page 18
The continuous-advance drive mode allows a series of images to be captured while
holding down the shutter-release button. Continuous advance acts like a motor drive on
a film camera. The number of images that can be captured at one time and the rate of
capture depend on the image-quality and image-size setting. The maximum rate of
capture is 1.6 fps. The continuous-advance mode is set with the drive-mode button (p.
32).
When the shutter-release button is pressed and held, the camera will begin
recording images until the maximum number has been taken or the shutter
button is released. This mode cannot be used with TIFF images (p. 44).
The built-in flash can be used, but the rate of capture is reduced because
the flash must recharge between frames.
Compose the picture as described in the basic recording operation section
(p. 25). Press the shutter-release button partway down (1) to lock the
exposure and focus for the series. Press and hold the
shutter-release button all the way down (2) to begin
taking pictures.
The following chart lists the approximate maximum
number of images that can be captured with different
image-quality and image-size combinations.
34 35AUTO-RECORDING MODE - BASIC OPERATION
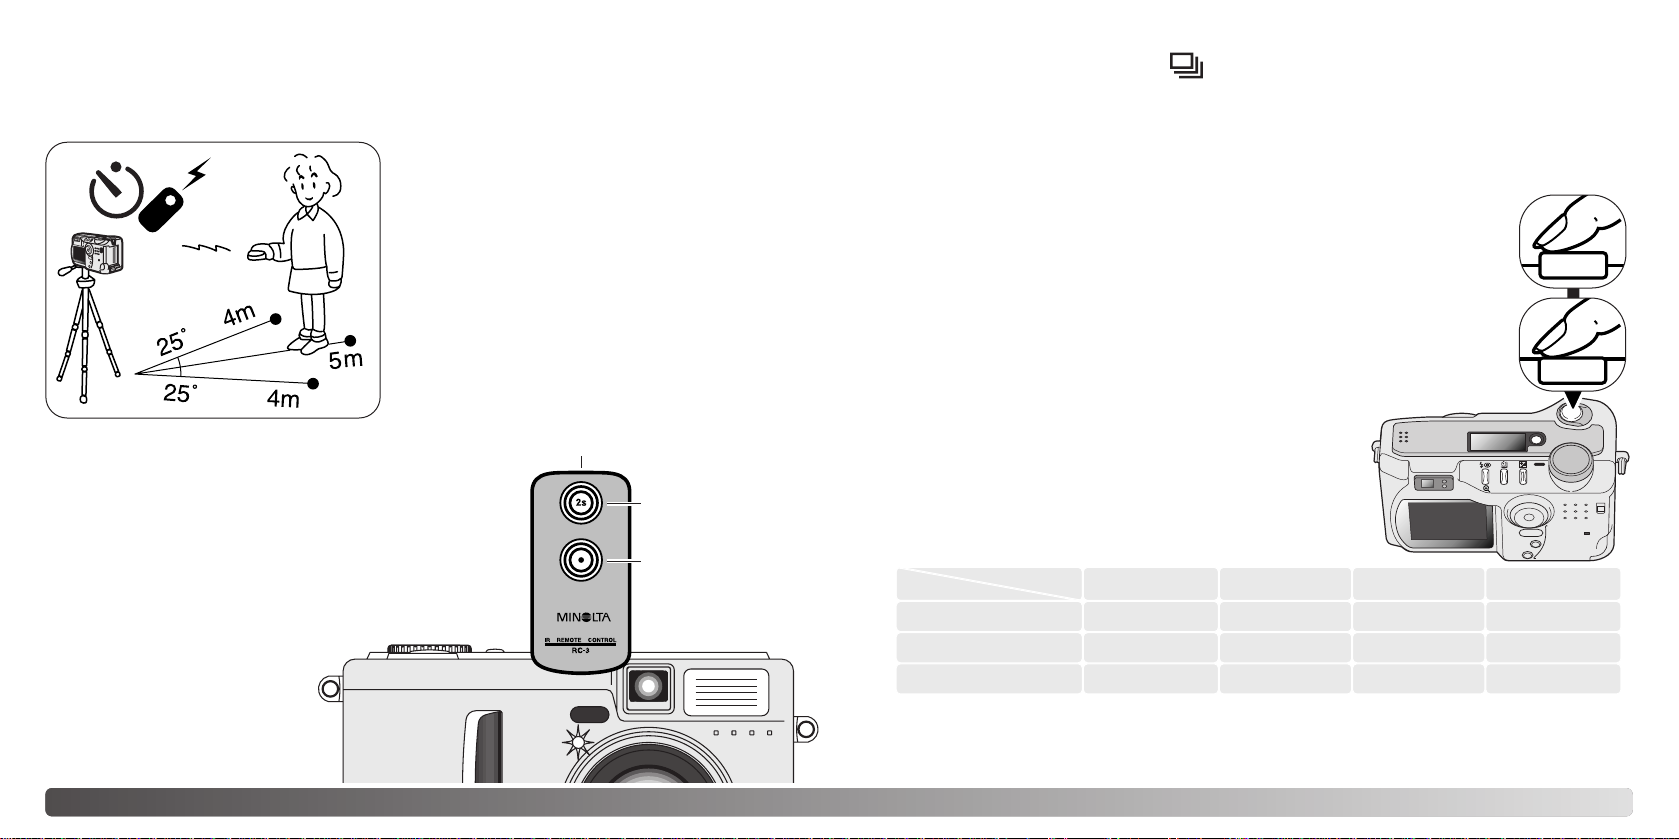
REMOTE CONTROL (SOLD SEPARATELY)
The IR Remote Control RC-3 allows remote camera operation up to 5m (16 ft.) away . The
remote control unit can be used in movie recording (p. 68).
Place the camera on a tripod, and set the drive
mode to self-timer / remote control (p. 32).
Arrange the camera and subject to compose
the picture. Frame the subject within the focus
frame when setting up the camera.
Focus lock cannot be used with the IR remote
control. In multi-function recording mode, focus
area selection can be used for off-center
subjects (p. 52).
Emitter window
Delay button
Release button
CONTINUOUS ADV ANCE
While pointing the emitter window of the remote
control unit toward the camera, press the release
button or the delay button to take the picture. When
the release button is pressed, the self-timer lamp on
the front of the camera will blink once before the
picture is taken. When the delay button is pressed,
the self-timer lamp on the front of the camera will blink
for two seconds before the picture is taken.
The drive mode does not reset after the exposure so
multiply images can be captured.
The remote control may not
operate with backlit subjects
or under fluorescent light.
Economy
Standard
Fine
2272 X 1704 1600 X 1200 1280 X 960 640 X 480
6
9
14
10
16
24
15
23
31
33
43
53
Quality
Size
1
2
Page 19

Compose the picture as described in the basic recording operation section
(p. 25). Press the shutter-release button partway down (1) to lock the
exposure and focus for the series. Press and hold the shutter-release
button all the way down (2) to make the bracket series; three consecutive
images will be captured. If the memory card is filled or the shutter button
is released before the series has completed, the camera will reset and the
entire bracket must be made again. When using flash, there will be a delay
between frames as the flash charges. The remaining number of frames in
the bracket series is displayed on the monitor next to the bracketing icon.
This drive mode makes a three-image bracket of a scene. Bracketing is a method of
taking a series of images of a static subject in which each image has a slight variation in
exposure. The bracketing mode is set with the drive-mode button (p. 32). Brackets
cannot be made with TIFF images (p. 44).
The order of the bracket series is normal exposure (as
indicated by the shutter speed and aperture displays),
underexposure, and overexposure. The exposure bracket in
auto-recording mode is set to 0.5 Ev increments. In the
multi-function recording mode the increment can be set to
0.3, 0.5, or 1.0 Ev increments in the custom 1 section of the
menu (p. 54).
Normal
1
2
36 37AUTO-RECORDING MODE - BASIC OPERATION
Number of frames in
bracketing series
Frame counter
LCD
monitor
off
The display button controls the LCD monitor display. The display cycles to the next
position each time the button is pressed: standard display, focus frame only, real-time
histogram, live image only , and monitor of f. The number of screens and their formats can
be changed in the basic section of the setup menu (p. 84)
Battery power can be conserved by turning the monitor off and using the viewfinder to
take pictures. When the menu or exposure-compensation button is pressed, or the macro
mode is activated, the monitor will automatically turn on. Full-time AF (p. 63) and the
digital zoom (p. 48) are disabled when the monitor is off.
DISPLAY BUTTON - RECORDING MODEBRACKETING
When using exposure compensation (p. 50), the
bracketing series will be made in relation to the
compensated exposure. Under extreme conditions, one
of the bracketed exposures may be inaccurate because it
is outside the exposure control range of the camera.
Over
Under
Display button
Standard display Focus frame only Live image onlyReal-time histogram
The real-time histogram shows the approximate luminance distribution of the live image.
The histogram is not accurate when the monitor image is amplified in low-light conditions,
or when the camera is focusing. The histogram of the recorded image may not have the
same distribution as the real-time histogram.
Page 20

38 39PLAYBACK - BASIC OPERATION
PLAYBACK - BASIC OPERATION
Images can be viewed in the Quick View or playback modes. This section covers the
basic operations in both modes. The playback mode has additional functions, see page
70.
To view images from the playback mode, turn the
mode dial to the playback position.
To view images from the auto-recording,
multi-function recording, or movie recording
modes, press the Quick View / delete button.
SINGLE-FRAME PLAYBACK AND HISTOGRAM DISPLAY
Date of capture
Frame number/ total number of images
Lock indicator (p. 77)
Print indicator (p. 80)
Image size (p. 44)
Image quality (p. 44)
Time of
capture
Mode
indicator
Shutter speed
Aperture value
White-balance
setting (p. 60)
Sensitivity
setting (p. 62)
Degree of exposure
compensation (p. 50)
Folder name (p. 88)
Folder number - image file number
Histogram
To view the histogram of the displayed still image, press the up key. The
histogram shows the luminance distribution of the image from black (left) to
white (right). The 224 vertical lines indicates the relative proportion of that light
value in the image. The histogram can be used to evaluate exposure, but
displays no color information. To return to single-frame playback, press the
down key.
VIEWING AND DELETING IMAGES
To return to the recording mode from Quick View, press the
menu button or shutter-release button partway down.
In Quick View or the playback mode, use the left/right keys of the controller
to scroll through the images.
The displayed image can be deleted. Once deleted, an image cannot be recovered.
To delete the displayed image, press the
QV/delete button. A confirmation screen will
appear.
Press the center of the controller to delete the
image.
Use the left/right keys to highlight “Yes,” “No” will
cancel the operation.
Controller
Menu button
Quick View / Delete button
Delete this frame?
NoYes
Voice-memo
indicator (p. 70)
Page 21

40
Full display
Index playback
In index playback, the left/right keys of the controller will move the yellow border to the
next or the previous image. When the image is highlighted with the border, the date of
recording, voice memo indicator, the lock and printing status, and the frame number of
the image are displayed at the bottom of the screen. The highlighted image can be
deleted using the QV/delete button (p. 39), or an accompanying voice memo can be
played by pressing the controller (p. 70). When the display information button is pressed
again, the highlighted image will be displayed in the single-frame playback mode. Anine
or four image index can be displayed. The index-playback format can be changed in the
basic section of the playback-mode menu (p. 72).
The display button controls the display
format. Each time the button is pressed, the
display cycles through to the next format: full
display, image only, index playback.
Image only
DISPLAY BUTTON - PLAYBACK
41PLAYBACK - BASIC OPERATION
ENLARGED PLAYBACK
In single-frame playback, a still image can be enlarged up to 3.5X in 0.2X increments for
closer examination. 640 X 480 size images can only be enlarged between 1.2X and 2.0X.
The maximum enlargement of 1024 X 768 digital zoom images is 3.2X. TIFF images
cannot be enlarged.
Display button
With the image to be magnified displayed, press the
magnification button (1) to activate the enlarged
playback mode. The degree of magnification is
displayed on the LCD monitor.
Use the four-way keys of the controller to scroll the
image.
Pressing the up key increases the image
magnification. Pressing the down key decreases the
magnification.
To scroll the image, press the center of the controller; the
button switches between the enlarged-playback and scroll
screens.
To exit the enlarged playback mode, press the
magnification button (1).
The display button switches between showing
the full display and the image only.
1
Scroll
Zoom
Page 22

Settings made with the auto-recording menu will
remain in effect until changed or the camera is
reset to its default settings (p. 90).
Image size - To set the pixel resolution of the
images. Image size affects the size of the image
file.
Image quality - To set the rate of compression of
the images. Image quality affects the size of the
image file.
Voice memo - To record audio after a still image
has been captured. The function can be turned off
and the length of the recording can be set.
Date imprint - The date of recording can be
imprinted on each image. The date is set in the
custom 2 section of the setup menu (p. 20).
Digital zoom - The digital zoom can be turned on
or off.
Instant playback - After taking a picture, the image will be displayed on the monitor for
two or ten seconds. The displayed image can be deleted before being saved to the
CompactFlash card.
Read the following sections for more details on these options and settings. All of these
functions appear on the multi-function recording mode menu (p. 54).
42 43AUTO-RECORDING MODE - ADVANCED OPERATION
NAVIGATING THE AUTO-RECORDING MODE MENU
In auto-recording mode, press the menu button (1) to activate the menu. The menu
button also turns off the menu after settings are made. The four-way keys of the controller
(2) are used to move the cursor in the menu. Pressing the center of the controller will
enter a setting.
Use the up/down keys of the controller to scroll through the menu options. Highlight
the option whose setting needs to be changed. When scrolling in one direction, the
cursor will jump between the top and bottom of the menu.
With the menu option to be changed highlighted, press the right controller key; the
settings will be displayed with the current setting highlighted. To return to the menu
options, press the left key.
Once a setting has been
selected, the cursor will return to
the menu options and the new
setting will be displayed.
Changes can continue to be
made. To return to the autorecording mode, press the
menu button.
Changes made on the autorecording mode menu will also
affect the multi-function
recording mode.
Auto
Basic
Image size
Quality
Voice memo
Date imprint
Digital zoom
2272 X1704
Standard
Off
Off
Off
Inst.Playback Off
Use the up/down keys to highlight
the new setting.
2272 X 1704
1600 X 1200
1280 X 960
640 X 480
Fine
Standard
Economy
On
On
Image size
Quality
Date imprinting
Digital zoom
Basic
15 sec.Voice memo
5 sec.
Off
Off
Off
10 sec.Inst.Playback
2 sec.
Off
Press the center of the controller
to select the highlighted setting.
2
1
TIFF
AUTO-RECORDING MODE -
ADVANCED
OPERATION
Page 23

44 45AUTO-RECORDING MODE - ADVANCED OPERATION
Changing image size affects the
number of pixels in each image. The
greater the image size, the larger the
file size. Choose image size based on
the final use of the image - smaller
images will be more suitable for web
sites whereas larger sizes will produce
higher quality prints.
Image quality controls the rate of compression, but has no effect on the number of pixels
in the image. The higher the image quality, the lower the rate of compression and the
larger the file sizes. If economical use of the memory card is important, use the economy
mode. Standard image quality is sufficient for normal usage. The TIFFmode will produce
the highest quality image and the largest image files. Astatus bar is displayed when large
images are saved.
Data panel
LCD monitor
2272
1600
1280
640
Number of pixels
(hor. X vert.)
2272 X 1704
1600 X 1200
1280 X 960
640 X 480
IMAGE SIZE AND IMAGE QUALITY
Data panel
TIFF
LCD monitor File type
TIFF
JPEG
JPEG
JPEG
TIFF
Fine
Standard
Economy
12313
6121734
11 19 26 42
17 27 33 48
Approximate number of images that can be stored on a 16MB memory card.
Quality
Size
2272 X 1704 1600 X 1200 1280 X 960 640 X 480
TIFF
Fine
Standard
Economy
12MB 5.7MB 3.7MB 1.0MB
2MB 1.0MB 720KB 320KB
1.2MB 650KB 460KB 240KB
750KB 430KB 330KB 190KB
Approximate file sizes.
File formats vary with the image quality setting. The fine, standard, and economy settings
are formatted as a JPEG file. TIFF, fine, standard, and economy files can be recorded as
color or monochrome images (p. 64) in the multi-function recording mode.
Image size and quality must be set before the picture is taken. Changes are displayed
on the data panel and LCD monitor. Image size and quality must be reset manually. See
navigating the auto-recording mode menu section on page 42. In multi-function recording
mode, image size and quality are controlled in the basic section of the multi-function
recording menu (p. 54).
If image size or quality are changed, the frame counter will display the approximate
number of images that can be recorded at that setting on the installed memory card. One
memory card can contain images with differing sizes and qualities. The number of
images that can be stored on a memory card is determined by the size of the card and
the file size of the images. The actual file size is determined by the scene; some subjects
can be compressed further than others.
Economy - the smallest file sizes.
TIFF - the highest quality image.
Fine - high-quality image.
Standard - the default setting.
The frame counter indicates the approximate number of images that can be stored on the memory card at the camera’s image quality and size settings. If the settings are changed, the frame
counter adjusts accordingly. Because the counter uses approximate file sizes, the actual image
taken may not change the counter or may decrease it by more than one. When the frame counter
displays zero, it indicates no more images at the image size and quality settings can be captured.
Changing those settings may allow more images to be saved to the card.
Camera Notes
FINE
STD.
ECON.
Page 24

46 47AUTO-RECORDING MODE - ADVANCED OPERATION
Voice memo allows a five or fifteen second audio track to be recorded with a still image.
The function is activated and the length of the recording time is set on the auto-recording
mode menu (p. 42). In multi-function recording mode, voice memo is controlled in the
custom 2 section of the multi-function recording menu (p. 54). When the function is
active, the microphone icon is displayed on the data panel and LCD monitor. The voice
memo must be set before taking a picture. It will remain in effect until reset.
After an image is captured, a screen
will appear indicating the audio
recording has started. Abar graph (1)
will display the amount of recorded
time remaining. The recording will
automatically stop when the set time
has elapsed. To cancel the recording
and erase the audio track, press the
down key of the controller (2) or the
shutter-release button (3) before the
recording has finished.
The voice memo is attached to the
last frame in a continuous-advance
or bracketing series (p. 32). The
voice memo can be played back in
Quick View or in the playback mode
(p. 70). Images with voice-memo
audio tracks have a note icon
displayed with them.
VOICE MEMO
When making audio recordings, be careful not to touch or cover the microphone. The quality of
the recording is proportional to the subject to microphone distance. For best results, hold the cam-
era approximately 20cm (8in) from your mouth.
Recording Tips
Recording audio
: Stop
Auto
1
2
The date of recording can be printed directly on the image.
The imprinting function must be activated before the image is
taken. Once activated, the date will continue to be imprinted
until the function is reset; a yellow bar is displayed behind the
frame counter on the monitor to indicate date imprinting is
active.
DATE IMPRINTING
Every time a still image is recorded, it is stored with an exif tag that contains the date and time
of recording as well as shooting information. This information can be viewed with the camera in
the playback or Quick View mode, or on a computer with the DiMAGE Viewer software.
Camera Notes
Date-imprinting indicator
Microphone
3
Date imprinting is activated with a menu; see
navigating the auto-recording mode menu
section on page 42. In multi-function recording
mode, date imprinting is controlled in the
custom 2 section of the multi-function
recording menu (p. 54).
The date is imprinted in the lower right corner
of the image when viewed horizontally. It is
printed directly on the photograph writing over
the image information. The date can be
imprinted in three formats: year/month/day,
month/day/year, and day/month/year. The
date and date format are set in the custom 2
section of the setup-mode menu (p. 84).
Page 25

2272 X 1704 1600 X 1200 1280 X 960
48 49AUTO-RECORDING MODE - ADVANCED OPERATION
INSTANT PLAYBACK
Off
2 sec
10 sec
Instant playback is disabled.
The captured image will be displayed for two or ten seconds. While dis-
played, the image can be deleted before being saved.
: delete : store
Auto
Press the controller to delete the
image.
Use the left/right keys of the
controller to highlight “YES.” “NO”
will cancel the operation.
To delete an image during the
instant playback, press the
QV/delete button (1). A
confirmation screen will appear.
After an image is captured, it can be displayed on the monitor before being saved. An
index display is used with the continuous-advance or bracketing drive modes (p. 32).
When used with voice memo, the audio recording begins after the image is played back.
Instant playback is activated with a menu; see navigating the auto-recording mode menu
section on page 42. Instant playback is also set in the custom 2 section of the multifunction recording menu (p. 54). There are three menu settings:
If the center of the controller is pressed
during the instant playback, the displayed
image will immediately be saved and the
playback canceled.
Delete this frame?
NoYes
DIGITAL ZOOM
Assisting the optical zoom is a 2.2X digital zoom. The effect of the digital zoom doubles
the power of the telephoto position of the optical zoom giving the equivalent of a 308mm
lens on a 35mm camera. The effect is visible on the LCD monitor only. The digital-zoom
is canceled if the LCD monitor is turned off (p. 37). The digital zoom is activated in the
auto-recording menu (p. 42). In the multi-function recording mode, it is activated in the
custom 1 section of the multi-function recording mode menu (p. 54).
At the maximum telephoto position,
press the up key (T) to activate the
digital zoom. X2.2 will be displayed in
the top right corner of the monitor.
To cancel the digital zoom, press the
down key.
When an image is taken with the digital zoom, the final image size depends on the imagesize setting on the camera, see chart.
Image size setting
Size of
recorded image
1024 X 768 1024 X 768 1024 X 768 640 X 480
Controller
To store an image during playback. To delete an image.
1
640 X 480
Page 26

50 51AUTO-RECORDING MODE - ADVANCED OPERATION
adjust set
To adjust the exposure, press the
exposure-compensation button (1).
The exposure compensation screen
will appear.
Use the left/right keys of the
controller (2) to adjust the exposurecompensation value. Change in
exposure compensation is visible in
the live image on the monitor.
EXPOSURE COMPENSATION
The camera exposure can be adjusted to make the final picture lighter or darker by as
much as ±2Ev in 1/3 increments. In auto-recording mode, exposure compensation is
reset when the mode dial is moved to another position. The exposure-compensation
value will remain in effect until it has been reset in the multi-function recording mode.
The exposure compensation must be set before the image is captured. When setting the
exposure compensation, the amount of compensation is shown next to the exposurecompensation indicator on the monitor. After the setting is made, the shutter-speed and
aperture displays will indicate the actual exposure. Because the exposure can be
adjusted in fine steps, the shutter speed or aperture value displayed may not change.
When set to any value other than 0.0, the exposure-compensation indicator will remain
on the data panel and LCD monitor as a warning.
WHAT IS AN EV? WHAT IS ASTOP?
Sometimes the camera’s exposure meter is deceived by certain conditions. Exposure compensation can be used in these situations. For example, a very bright scene, such as a snowy landscape or a white sandy beach, can appear too dark in the captured image. Before taking the picture, adjusting the exposure by +1 or +2 EV will result in an image with normal tonal values.
In the example above, the dark water caused the camera to overexpose the image making it
bright and washed-out. By compensating the exposure, detail is brought out in the leaves, and
the stones and water appear richer.
Shooting tips
Ev stands for exposure value. The term stop comes from the name of aperture plates
used in early lenses. Achange of one Ev or one stop will adjust the exposure calculated
by the camera by a factor of two.
Change in Ev Change in stops Adjustment to exposure
+2.0 Ev
+1.0 Ev
0.0 Ev
–1.0 Ev
–2.0 Ev
+2 stops
+1 stop
–1 stop
–2 stops
4X as much light
2X as much light
1/2 as much light
1/4 as much light
Calculated exposure
1
2
Exposure-compensation indicator and value
–2.0Ev–1.0EvCalculated camera
exposure
Page 27

52 53MULTI-FUNCTION RECORDING MODE
The focus area selection controls which spot focus area is active. This function can be
used for off-center subjects or to single out an individual subject from a group.
MULTI-FUNCTION RECORDING MODE
AUTOFOCUS AREAS AND CONTROL
In the multi-function recording mode, the controller selects the focus area used. The wide
focus area and focus area selection allow flexibility in a variety of situations.
Once a spot focus area is selected, it will remain active even after the picture has been
taken. Only when one focus area is displayed, can the controller be used to zoom (p. 24)
or adjust the exposure (p. 56).
To select another focus area, press the center of the controller; all five areas should be
displayed. The controller can now be used to change the spot focus area. The selected
focus area selection remains in effect when the LCD monitor is turned off.
1
2
Press and hold the controller to display the spot focus
areas; the active area is blue. Use the four-way key of the
controller to highlight the desired autofocus area.
Switching between the wide focus area and the spot focus areas is
simple. Press and hold the controller until the wide-focus-area frame lines
change to the spot-focus-area display . Press and hold the controller again
to return to the wide-focus-area frame lines.
The wide focus area is an array of local focus areas that
work together to control focus. This system is especially
effective with moving subjects or quick shooting in fastmoving events. When focus locks, one of the AF sensors
within the wide focus area will briefly indicate the point of
focus.
Press the shutter-release button partway down (1) or press
the center of the controller (2) to select the area; the other
four areas will disappear.
Except for digital subject programs, the basic operation of the camera in multi-function
recording mode is identical to the auto-recording mode. Thoroughly familiarize yourself
with the previous sections before moving on.
The multi-function recording mode allows greater flexibility over image making. This
recording mode gives more control over autofocus and composition. The menu controls
are extensive allowing critical adjustments to image qualities such as color, sharpness,
and contrast. Unlike the auto-recording mode, settings made in multi-function recording
are not reset when the position of the mode dial is changed.
Page 28

Custom
54 55MULTI-FUNCTION RECORDING MODE
Activate the recording-mode menu with the menu button. The basic tab at the top of
the menu will be highlighted. Use the left/right keys of the controller to highlight the
appropriate menu tab; the menus will change as the tabs are highlighted.
NAVIGATING THE MULTI-FUNCTION RECORDING MODE MENU
In multi-function recording mode, press the menu button (1) to activate the menu. The
menu button also turns off the menu after making settings. The four-way keys of the
controller (2) are used to move the cursor in the menu. Pressing the center of the
controller will enter a setting.
When the desired menu section is displayed, use the up/down keys to scroll through
the menu options. Highlight the option whose setting needs to be changed. When
scrolling in one direction, the cursor will jump between the top and bottom of the menu.
With the menu option to be changed highlighted, press the right controller key; the
settings will be displayed with the current setting highlighted. To return to the menu
options, press the left key.
Press the controller to select the
highlighted setting.
Once a setting has been selected,
the cursor will return to the menu
options and the new setting will be
displayed. Changes can continue
to be made. To return to the
recording mode, press the menu
button. Changes made to image
size, image quality, voice memo,
date imprint, digital zoom, and
instant playback will affect the
auto-recording mode.
Multi
Basic Custom1 Custom2
Exposure mode
Image size
Quality
White balance
Focus mode
Program
2272 X 1704
Standard
Auto
AF
Sensitivity Auto
Use the up/down keys to highlight
the new setting.
Refer to the auto-recording mode section
for details on image size (p. 44), image
quality (p. 44), voice memo (p. 46), date
imprinting (p. 47), digital zoom (p. 49),
and instant playback (p. 49).
Exposure mode Program
Aperture priority
Manual
2272 X 1704
1600 X 1200
1280 X 960
640 X 480
TIFF
Fine
Standard
Economy
Cloudy
Auto
Image size
Quality
White balance
Basic
On / Off
1.0 Ev
Multi-segment
Spot
On / Off
Full-time AF
Exposure bracket
Metering mode
Digital zoom
Custom 1
Color mode
Natural Color
Voice memo
Date imprinting
Custom 2
Daylight
Hard (+)
On
15 sec.
5 sec.
Off
Tungsten
fluorescent
AF
MF
ISO 400
ISO 200
ISO 100
ISO 64
Auto
Focus mode
Sensitivity
0.5 Ev
0.3 Ev
10 sec.Instant playback
2 sec.
Off
B&W
Vivid Color
Sepia
Normal
Soft (–)
High (+)
Normal
Low (–)
Solarization
Warm (+)
Off
Cool (–)
Filter
Contrast
Sharpness
Off
2
1
Page 29

Manual exposure mode allows individual selection of
shutter speeds and apertures. This mode overrides the
exposure system giving the photographer total control over
the final exposure. The shutter speeds can be changed in
half stop increments between 1/1000 and 4 seconds.
As changes are made to the exposure, the effect will be visible on the monitor. The
shutter-speed and aperture display will turn red on the monitor if the image is extremely
under or overexposed. If the monitor is black, increase the exposure until the image is
visible; decrease the exposure if the monitor is white. If the LCD monitor is turned off, the
exposure is fixed at the last setting and cannot be changed. When the shutter-release
button is pressed partway down, the brightness of the live image may change while the
camera is focusing.
In manual exposure mode, the auto camera-sensitivity setting will fix the ISO value at
100. The camera sensitivity can be changed in the basic section of the multi-function
recording menu (p. 54). The flash mode is set to flash cancel. Fill-flash can be selected
(p. 30), but the live image will not reflect the ambient or flash exposure. Bulb exposures
can be made, see page 58.
The photographer selects the aperture and the camera sets the appropriate shutter
speed to ensure correct exposure. When aperture priority is selected, the aperture value
on the monitor turns blue and a double arrow icon appears next to it. If the LCD monitor
is turned off, the aperture value is fixed at the last setting and cannot be changed. The
flash mode is set to flash cancel. Fill-flash can be selected (p. 30).
Use the left/right keys of the controller (1) to set the desired aperture value. Press the
shutter-release button to activate the exposure system; the corresponding shutter speed
will be displayed on the monitor.
The aperture value can be changed in two
steps: f/3.0 and f/6.7 at the lens’ wide-angle
position, f/3.6 and f/8.0 at the lens’
telephoto position. As the lens is zoomed,
the aperture will automatically shift. If the
aperture value is beyond the shutter-speed
range, the shutter-speed display will turn
red on the monitor. For more on the
aperture and image control, see page 66.
56 57MULTI-FUNCTION RECORDING MODE
Program
The program exposure mode controls both the shutter speed and aperture to ensure
perfect exposures. The sophisticated exposure system allows the photographer the
freedom to shoot without having to worry about the technical details of exposure settings.
The shutter speed and aperture values of the exposure are displayed on the monitor. If
shutter speed and aperture displays turn red, the scene is beyond the exposure control
range of the camera.
EXPOSURE MODES
The three exposure modes allow extensive control over image making: program,
aperture priority, and manual exposure. Exposure modes are set in the basic section of
the multi-function recording mode menu (p. 54).
Aperture priority - A
1
Manual exposure - M
To change the shutter speed use the left/right
keys of the controller (1) to set the desired
shutter speed.
To change the aperture press the exposurecompensation button (2); the aperture value
will turn blue. Use the left/right keys of the
controller (1) to set the desired aperture.
The exposure-compensation button switches
between the shutter speed and aperture
display. The value that can be set will be blue
with a double arrow icon to the left.
1
2
Page 30

Bulb photographs can be taken in the manual-exposure
mode (M) (p. 57). Exposures up to fifteen seconds can be
made by pressing and holding the shutter-release button.
The use of a tripod is recommended. The camera’s
exposure system cannot be used to calculate bulb
exposures; a separate light meter is recommended.
Set the exposure mode to manual in the basic section of
the multi-function recording mode menu (p. 54). Set the
drive mode to single-frame advance (p. 32).
58 59MULTI-FUNCTION RECORDING MODE
FOCUS MODES
This camera has autofocus and manual focus control. The focus mode is set in the basic
section of the multi-function recording mode menu (p. 54).
Autofocus will produce excellent results in almost every situation, however, under certain
conditions, the autofocus system will not work accurately; see special focusing situations
on page 27. In these situations the camera can be manually focused.
After setting the camera to the manual focus mode (MF), “ZOOM” and “FOCUS” will
appear at the top of the LCD monitor. Press the center of the controller to switch between
the two functions; the function highlighted in blue is active. With “FOCUS” highlighted,
use the up/down keys of the controller to focus; the approximate focus distance is
displayed at the bottom of the monitor next to the frame counter. All distances are
measured from the CCD.
When the focus is set to the minimum focusing distance, as the lens is zoomed, the
distance will change to match the minimum focusing distance at each focal length.
Manual focus is not available when the monitor is turned off; the controller function is
automatically switched to the zoom.
Press the controller to switch between focus
and zoom (1). The active function is
highlighted in blue (2).
Use the up/down keys of the
controller to zoom or focus.
Focus
distance
from the
CCD.
1
BULB EXPOSURES
Use the controller (1) to decrease the shutterspeed value below four seconds until “bulb” is
displayed.
To set the aperture value, press the exposurecompensation button (2); the aperture display
should turn blue. Use the controller (1) to set
the aperture.
To take the picture, press and hold the shutterrelease button (3) for the duration of the
exposure. Releasing the shutter button will end
the exposure. The monitor will be blank during
the exposure.
When making bulb exposures, noise can be more pronounced because of the unusually long
exposure times, especially at 400 ISO. When making long bulb exposures, a camera sensitivity
setting of 64 or 100 will produce excellent results. At higher ISO settings, using shorter exposure
times (8 seconds or less) will reduce the effect of noise.
Camera Notes
1
2
3
Bulb indicator
2
Page 31

Preset white-balance settings must be set before the image is taken. Once set, the effect
is immediately visible on the LCD monitor.
The built-in flash can be used with
preset white-balance settings, but will
create a pinkish or blueish cast with
the fluorescent and tungsten settings.
The flash is daylight balanced and will
produce acceptable results with the
daylight and cloudy settings.
60 61MULTI-FUNCTION RECORDING MODE
Custom-white-balance function allows a photographer to calibrate the camera to a
specific lighting condition. The setting can be used repeatedly until reset. Custom white
balance is especially useful with mixed-lighting conditions or when critical control over
color is needed. The object used to make a calibration should be white. A blank piece of
white paper is an ideal surface and can easily be carried in a camera bag. To calibrate
the white balance for ambient light exposures, set the flash mode to flash-cancel (p. 30).
Automatic White Balance
Preset White Balance
The automatic white balance compensates for the color temperature of a scene. In most
cases, the auto setting will balance the ambient light and create beautiful images, even
under mixed-lighting conditions. When the built-in flash is used, the white balance is set
for the color temperature of the flash.
WHITE BALANCE
Custom White Balance
White balance is the camera’s ability to make different types of lighting appear neutral.
The effect is similar to selecting daylight or tungsten film, or using color compensating
filters in conventional photography.
An indicator is displayed on the monitor if a setting other than auto white-balance is
chosen. White balance is set in the basic section of the multi-function recording mode
menu (p. 54).
Multi
Basic Custom1 Custom2
Exposure mode
Ima
Qua
Foc
Cloudy
Sensitivity Custom
Whi
Select set or recall.
RecallSet
M
Custom WB set
Set WB with shutter button
If the custom white-balance setting needs to be used again,
select the custom setting on the basic section of the menu; a
window will appear. Highlight “recall” and press the controller to
enter the command; the last custom white-balance setting will
be applied to the camera.
Fill the image area with a white object; the object does not
need to be in focus. Press the shutter-release button to
make the calibration. The custom setting will remain in
effect until another calibration is made or the whitebalance setting is changed.
To calibrate the camera, select the custom setting in the
white balance option in the basic section of the multifunction recording mode menu; a window will open asking
you to choose “set” or “recall.” Use the controller to
highlight “set” and then press the center of the controller
to enter the command; the custom white-balance
calibration screen will appear.
Select set or recall.
RecallSet
Fluorescent - for fluorescent lighting:
office ceiling lights.
Tungsten - for incandescent lighting:
household filament light bulbs.
Daylight - for outdoor and sunlit
subjects.
Cloudy - for overcast outdoor
scenes.
Page 32

62 63MULTI-FUNCTION RECORDING MODE
CAMERA SENSITIVITY - ISO
FLASH RANGE AND CAMERASENSITIVITY
The flash range is measured from the CCD. Because of the optical system, the flash
range is not the same at the lens’ wide-angle position as it is at the telephoto position.
Five camera sensitivity settings can be selected: Auto, 64, 100, 200, and 400; the
numerical values are based on an ISO equivalent. ISO is the standard used to indicate
film sensitivity: the higher the number, the more sensitive the film. Camera sensitivity is
set in the basic section of the multi-function recording mode menu (p. 54).
The auto setting automatically adjusts the camera sensitivity to the light conditions
between ISO 64 and 320. When the flash is activated and camera sensitivity is set to
auto, the ISO value is set between ISO 64 and 200. When any other setting than auto is
used, “ISO” will appear on the data panel, and “ISO” and the set value will be displayed
on the monitor.
Photographers can select a specific sensitivity setting. As the ISO value doubles, the
camera sensitivity doubles. Like grain in silver-halide film that increases with speed,
noise increases with sensitivity in digital imaging; an ISO setting of 64 will have the least
noise and 400 will have the most noise. An ISO setting of 400 may allow the camera to
be hand-held in low-light conditions without the need of a flash.
At the wide-angle lens position, when using the flash with subjects closer than 1m (3ft),
vignetting can occur. A slight shadow or shading may be apparent at the bottom of a
horizontal image.
The icons indicating the metering modes are displayed on the monitor. The metering
mode is set in the custom 1 section of the multi-function recording mode menu (p. 54).
METERING MODES
FULL-TIME AF
With full-time AF active, the autofocus systems continually focuses to keep the monitor
image sharp. This also reduces the autofocusing time when taking pictures. Full-time AF
can be activated in the custom 1 section of the multi-function recording mode menu (p.
54).
When the monitor is turned off or when the camera is set to manual focus, full-time AF is
disabled. Turning the full-time AF function off can help conserve battery power.
ISO setting
AUTO
64
0.5m ~ 3.5m (1.6 ft. ~ 11.5 ft.)
Flash range (telephoto)
0.9m ~ 3.0m (3.0 ft. ~ 9.8 ft.)
0.5m ~ 2.0m (1.6 ft. ~ 6.6 ft.) 0.9m ~ 1.7m (3.0 ft. ~ 5.6 ft.)
100
200
400
0.5m ~ 2.5m (1.6 ft. ~ 8.2 ft.)
0.5m ~ 3.5m (1.6 ft. ~ 11.5 ft.)
0.5m ~ 5.0m (1.6 ft. ~ 16.4 ft.)
0.9m ~ 2.1m (3.0 ft. ~ 6.9 ft.)
0.9m ~ 3.0m (3.0 ft. ~ 9.8 ft.)
0.9m ~ 4.2m (3.0 ft. ~ 13.8 ft.)
Flash range (wide angle)
Multi-segment metering uses 270 segments to measure luminance and color.
This data is combined with distance information to calculate the camera
exposure. This advanced metering system will give accurate worry-free
exposures in almost all situations.
Spot metering uses a small area within the
image to calculate the exposure. When this
mode is selected, the LCD monitor will
automatically activate if off and a small circle will appear in
the middle of the live image indicating the measuring area.
The spot allows precise exposure measurements of a
particular object without being influenced by extremely
bright or dark areas within the scene. If the LCD monitor
is turned off, the spot-metering mode will remain active.
Page 33

64 65MULTI-FUNCTION RECORDING MODE
EXPOSURE BRACKETING INCREMENT
In multi-function recording mode, three bracketing steps can be selected: 0.3 Ev, 0.5 Ev,
1.0 Ev . The larger the number, the greater the difference in exposure between the images
in the bracketed series. For information on the bracketing drive mode, see page 36. The
bracketing increment can be changed in the custom 1 section of the multi-function
recording mode menu (p. 54).
0.3 Ev
bracket
0.5 Ev
bracket
1.0 Ev
bracket
Normal
Under
Over
Changes in color, sharpness, and contrast can be made using the custom 2 section of
the multi-function recording mode menu (p. 54). The sharpness, contrast and filter
imaging controls give photographers the ability to maximize the image information at the
scene.
Any changes made with these functions are applied to the live image on the monitor.
Changes made to sharpness and contrast may be difficult to see on the monitor.
However, when viewed on a computer, the changes will be evident. The levels must be
set before the image is recorded. If any setting other than normal or off is selected, an
indicator will be displayed showing an increase (+) or decrease (–) in the quality selected.
Turning the camera off will not reset these functions.
Filter
Contrast
Sharpness
To adjust the overall color of a Natural Color or Vivid Color
image: warm (+) and cool (–).
To increase or decrease the contrast of the scene in three
levels: high (+), normal, and low (–).
To accent or soften details in an image in three levels: hard
(+), normal, and soft (–).
IMAGE CONTROL - SHARPNESS, CONTRAST, & FILTER
COLOR MODE
B&W
Solarization
The color mode controls the appearance of a still image.
This must be set before the image is recorded. The color
mode is set in the custom 2 section of the multi-function
recording mode menu (p. 54). The live image on the
monitors will reflect the selected mode. The color mode
has no effect on image file size.
Natural Color reproduces the colors in the scene
faithfully. This mode uses no monitor indicator when
active. Vivid Color increases the saturation of colors.
Black & White produces monochrome images. The sepia
mode creates warm tone monochrome images.
Solarization produces a partial reversal of tones and
colors in the highlights.
Solarization
Black & White
Vivid Color
Sepia
Normal
Contrast: low
Contrast: high
Sharpness: hard
Sharpness: soft
Page 34

6766 A SHORT GUIDE TO PHOTOGRAPHY
Photography can be a rewarding pursuit. It is a broad and disciplined field that can take
years to master. But the pleasure in making photographs and the joy of capturing a
magical moment cannot be compared. This guide is an introduction to some basic
photographic principles.
The lens aperture controls not only exposure, but also depth of field; the area between
the closest and the furthest object in focus. The larger the aperture value, the greater the
depth of field and the longer the shutter speed needed to make the exposure. The
smaller the aperture value, the shallower the depth of field and the faster the shutter
speed needed to make the
exposure. Usually landscape
photographs use a large depth of
field (large aperture value) to keep
the foreground and background in
focus, and portraits use a shallow
depth of field (small aperture value)
to separate the subject from the
background.
Depth of field also changes with focal
length. The wide-angle position of the
lens has a large depth of field; the
telephoto position has a shallow depth
of field.
The shutter controls not only exposure,
but also the ability to stop motion. Fast
shutter speeds are used in sport
photography to stop action. Slow shutter
speeds can be used to show the flow of
motion such as water cascading over a
waterfall. The use of a tripod is
recommended with slow shutter speeds.
The change in aperture and shutter speed is not apparent in the live image. Unlike film
cameras, test photographs can be taken and immediately viewed. For critical work, take
a test photograph at the set aperture or shutter speed and view the result in Quick View.
The image can be deleted if not acceptable and another test image can be taken at a
different setting.
A SHORT GUIDE TO PHOTOGRAPHY
Page 35

68 69MOVIE RECORDING
The RC-3 remote control (sold separately)
can be used to record movie clips up to 5m
(16ft) away . Simply point the remote control
toward the camera and use the release or
delay button to start and stop the recording.
When using the release button, the selftime lamp (1) will blink once before the
camera starts to record; when using the
delay button, the self-timer lamp will blink
for two seconds before recording. The lamp
will glow to indicate the camera is
recording. Both buttons will stop the
camera instantly when pressed. The
remote control may not operate with backlit
subjects or under fluorescent light.
This camera can record up to sixty seconds of digital video with sound. The motion JPEG
image is 320 X 240 pixels (QVGA). The effective image area is 284 X 211 pixels; two thin
lines will appear to the left and right of the image when played back. Under certain
conditions less than sixty seconds of digital video may be recorded.
Total recording time with an 16MB CompactFlash card is approximately 51 seconds. The
digital video recording rate is approximately 296KB per second. Actual CompactFlash
card capacity depends on the subject and the number of still images captured.
MOVIE RECORDING
Set the main dial to movie recording. Before recording,
the data-panel and monitor frame counters show the
maximum time in seconds can be recorded with the
next movie clip. Amaximum of 60 seconds is displayed
until the amount of remaining time falls below one
minute, then the remaining number of seconds that can
be recorded is displayed.
Available recording time
RECORDING MOVIES WITH THE IR REMOTE CONTROL RC-3
Frame the picture as described in the basic recording
operation section (p. 25). Press the shutter-release
button partway down to lock the focus. Press the
shutter-release button all the way down and release to
start recording. An indicator will appear in the lower
right corner of the monitor during recording.
Emitter window
Delay button
Release button
In movie recording, some functions can be used, some are fixed, and some are disabled.
This mode has no menu controls.
The zoom and focus are fixed during recording. The camera will continue to record until
the recording time is used or the shutter-release button is pressed again. When
recording, the data panel and monitor frame counters will count down the remaining time.
NOTES ON MOVIE RECORDING
Exposure mode
Camera sensitivity (ISO)
Flash
Focus area
Focus control
Exposure compensation
Macro mode
White balance
Program (fixed)
Auto (fixed)
Disabled
Wide focus area (fixed)
Autofocus (fixed)
Available (p. 50)
Available (p. 28)
Auto (fixed)
Digital zoom Disabled
1
Display button All displays available except monitor off (p. 37)
Page 36

Playback time is displayed on a bar at the top of the
image. The display returns to Quick View or the
playback mode when the movie clip finishes.
Pressing the controller during playback pauses the
movie clip; pressing the controller again resumes the
playback. When the movie clip finishes, the first
frame is displayed.
70 71PLAYBACK MODE - ADVANCED OPERATION
PLAYBACK MODE -
The basic functions in this mode are described in the basic playback section on pages
38 through 41. This section covers how to play back movie clips and voice memos as
well as the advanced functions on the playback menu.
Play
: pause : stop 23s
VIEWING MOVIES
Use the left/right keys of the controller to display the
movie clip to be viewed.
To cancel the playback of a movie, press the down key of the controller.
ADVANCED OPERATION
PLAYING BACK VOICE MEMOS
Voice memos (p. 46) can be played back in Quick View and the playback
mode. The voice memo indicator will be displayed at the bottom of the
monitor if an audio track is attached to the displayed still image.
Press the center of the controller to start the
audio playback.
Press the down key of the controller to cancel
the playback.
Playback time is displayed on a bar at the top of the
image. The display returns to Quick View or the playback
mode when the audio track finishes.
stop
Speaker
Movie clips can be played back in Quick View and the playback mode. Athumbnail of the
first frame of the clip indicates a movie file.
Press the center of the controller to play
back the clip.
Press the display button to view the movie
with or without the guidance bar.
Press the display button to view the
image with or without the guidance
bar.
Page 37

72 73PLAYBACK MODE - ADVANCED OPERATION
Play
Basic Custom1 Custom2
Delete
Lock
Index format
–
–
9 frames
Activate the playback-mode menu with the menu button. The basic tab at the top of
the menu will be highlighted. Use the left/right keys of the controller to highlight the
appropriate menu tab; the menus will change as the tabs are highlighted.
In playback mode, press the menu button (1) to activate the menu. The menu button also
turns off the menu after making settings. The four-way keys of the controller (2) are used
to move the cursor in the menu. Pressing the center of the controller will enter a setting.
When the desired menu section is displayed, use the up/down keys to scroll through
the menu options. Highlight the option whose setting needs to be changed.When
scrolling in one direction, the cursor will jump between the top and bottom of the menu.
With the menu option to be changed highlighted, press the right controller key; the
settings will be displayed with the current setting highlighted. To return to the menu
options, press the left key.
Press the controller to select the
highlighted setting.
Once a setting has been selected,
the cursor will return to the menu
options and the new setting will be
displayed. Changes can continue
to be made. To return to the
playback mode, press the menu
button.
Use the up/down keys to highlight the
new setting.
NAVIGATING THE PLAYBACK-MODE MENU
1 Copying to camera memory.
Refer to the following sections
for descriptions of the menu
options and their settings.
Choosing “Yes” will execute
the operation, “No” will cancel it.
Yes No
For information on frame-selection screens, see
page 74.
New folder
name
2 Change CF card.
3 Copying to CF card.
4 Copying completed.
Delete This frame
All frames
Marked frames
9 frames
Lock
Index format
Basic
This frame
All frames
Marked frames
Unlock frames
Slide show Enter
1 - 60 sec.
Yes
Duration
Repeat
Custom 1
Print This frame
All frames
Marked frames
Index print
Custom 2
Yes
Cancel print All frames - F
All frames - C
Copy
This frame
Pressing the down key of the
controller will cancel the slide
show and return to the menu.
Number of
copies
All framesPlayback
Marked frames
Marked frames
4 frames
No
No
Yes No
To specify the number of
copies of each image.
2
1
Page 38

74 PLAYBACK MODE - ADVANCED OPERATION
FRAME-SELECTION SCREEN
The left/right keys
of the controller
move the yellow
border to select the
image.
The up key of the
controller selects
the frame; when
selected, an icon
will appear next to
the image. The
down key will
deselect the image
removing the icon.
Menu button
Cancels the screen
and any operation
made.
The garbage-can icon indicates the
image is selected for deletion.
The key icon indicates the image is
locked or selected to be locked.
The check icon indicates the image
is selected for the slide show or to
be copied to another CompactFlash
card.
The printer icon indicates the image
is selected for printing. The number
next to the icon shows the number
of copies requested.
Play
: select : confirm : enter
75
VIEWING IMAGES ON ATELEVISION
It is possible to view camera images on your television. The camera has a video-out
terminal to make the connection using the supplied AV cable. The camera is compatible
with the NTSC and PAL standards. The video-output setting can be checked and set in
the custom 2 section of the setup menu (p. 84).
2
3
Press the controller to complete the operation.
1. Turn off the television and the camera.
2. Insert the mini-plug end of the AV cable into the camera’s A V-out terminal.
3. Plug the other end of the AV cable into the video and
audio input terminals on the television. The yellow plug
is for the video output. The white plug is for the monaural audio output. The audio output will also be heard
through the camera’s speaker while connected to a
television.
4. Turn the television on.
5. Change the television to the video channel.
6. Turn the camera’s mode dial to the playback position.
The camera’s monitors will not activate when the camera is attached to a television. The playback-mode display will be visible on the television screen.
7. View images as described in the playback section.
Mark frames
When a marked-frames setting is chosen on a menu, the frame selection screen will
appear. This screen allows multiple images to be chosen. An indicator in the bottom left
corner shows if the image is a movie clip or has a voice memo. The index format of the
screen can be changed in the basic section of the playback-mode menu (p. 72).
Page 39

76 77PLAYBACK MODE - ADVANCED OPERATION
Single, multiple, or all files in a folder can be deleted with the playback-mode menu.
Before an image file is deleted, a confirmation screen will appear; choosing “Yes” will
execute the operation, “No” will cancel it. To delete files in other folders, the folder must
first be selected in the custom 1 section of the setup menu (p. 84). The delete option has
three settings:
This frame - The file displayed or highlighted in playback mode will be deleted.
All frames - All unlocked files in the selected folder will be deleted.
Marked frames - T o delete multiple files. When this setting is chosen, the frame-selection
screen will be displayed. Use the left/right keys of the controller to highlight the first file
to be deleted. Pressing the up key will mark the thumbnail with the garbage-can icon. To
deselect a file for deletion, highlight it with the yellow border and press the down key; the
garbage-can icon will disappear. Continue until all the files to be deleted are marked.
Press the controller to continue (the confirmation screen will appear), or press the menu
button to cancel the operation and return to the playback menu. On the confirmation
screen, highlighting and entering “Yes” will delete the marked files.
The delete function will only erase unlocked files. If a file is locked, it must be unlocked
before it can be deleted.
Single, multiple, or all files in a folder can be locked. A locked file cannot be deleted by
either the playback-mode menu functions or the QV/delete button. Important image files
should be locked. To lock files in other folders, the folder must first be selected in the
custom 1 section of the setup menu (p. 84). The lock option has four settings:
This frame - The file displayed or highlighted in playback mode will be locked.
All frames - All files in the folder will be locked.
Marked frames - To lock or unlock multiple files. When this setting is chosen, the frame-
selection screen will be displayed. Use the left/right keys of the controller to highlight the
file to be locked. Pressing the up key will mark the thumbnail with the key icon. T o unlock
a file, highlight it with the yellow border and press the down key; the key icon will
disappear. Continue until all the files to be locked are marked. Press the controller to lock
the marked frames, or press the menu button to cancel the operation and return to the
playback menu.
Unlock frames - All files in the folder will be unlocked.
Locking a file will protect it from a delete function. However, the formatting function (p.
86) will erase all files on a CompactFlash card whether locked or not.
The index format option
allows the index playback to
be displayed with four or nine
images. This affects all index
displays.
DELETING FILES
CHANGING THE INDEX PLAYBACK FORMAT
LOCKING FILES
Deleting permanently erases the file. Once deleted, a file cannot be
recovered. Care should be taken when deleting images.
Page 40

78 79PLAYBACK MODE - ADVANCED OPERATION
To select all the images in the folder to be displayed in the
slide-show presentation.
The custom 1 section of the playback-mode menu controls the slide-show function. This
function automatically displays all still images in a folder in order.
SLIDE SHOW
Slide
show
Menu options
Playback
Duration
Settings
Enter
Repeat
All frames
Marked
Frames
1 - 60s.
Yes / No
To select specific images in the folder to be displayed in
the slide-show presentation. When this setting is chosen,
the frame-selection screen will be displayed. Use the
left/right keys of the controller to highlight the image to be
included in the presentation. Pressing the up key will mark
the image with a check icon. To deselect a marked image,
highlight it with the yellow border and press the down key;
the check icon will disappear. Continue until all the images
have been edited. Press the controller to set the marked
frames, or press the menu button to cancel the operation
and return to the playback menu.
To select the period each image will be displayed during
the slide show.
To start the slide-show presentation. Pressing the center of
the controller will pause the presentation. During the slide
show, press the down key of the controller to stop the presentation and return to the playback-mode menu.
Selecting “Yes” will cause the slide show to repeat until it
is canceled using the down key of the controller. “No” will
end the slide show presentation and return to the playback-mode menu when all the images have been displayed once.
Frame countdown / total
number of
images in the
presentation.
Press the controller to pause and restart
the presentation.
To cancel the presentation, press the
down key of the controller.
Page 41

80 81PLAYBACK MODE - ADVANCED OPERATION
The print menu option is used to set an order for standard prints from images in a specific
folder. Single, multiple, or all images can be printed. If a CompactFlash card has multiple
folders, a printing file must be created for each folder. Folders are selected in the custom
1 section of the setup menu (p. 84).
This-frame - To create a DPOF file for the image displayed or highlighted in playback
mode.
All-frames - To create a DPOF file for all images in the folder specified in the custom 1
section of the setup menu (p. 84).
Marked frames - T o chose a group of images to be printed or when the number of copies
for each image varies. When selected, the frame selection screen will appear. Use the
left/right keys of the controller to highlight an image to be printed. Pressing the up key will
mark the image with the printer icon. The number next to the icon indicates the number
of copies of that image will be printed. Pressing the up key will increase the number of
copies, pressing the down key will decrease the number. A maximum of nine copies can
be ordered. To deselect an image for printing, press the down key until the the number
of copies reaches zero and the printer icon disappears. Continue until all the images to
be printed are marked. Press the controller to create the DPOF file, or press the menu
button to cancel the operation and return to the playback menu.
ABOUT DPOF
This camera is supported by DPOF™ version 1.1. The DPOF (Digital Print Order Format)
allows direct printing of still images from digital cameras. After the DPOF file is created,
the CompactFlash card is simply taken to a photofinishing service or inserted into the
CompactFlash-card slot of DPOF compatible printers. When a DPOF file is created, a
misc. folder is automatically made on the CompactFlash card to store it (p. 98).
CREA TING ADPOF PRINT ORDER
When the this-frame or all-frames setting is chosen, a screen will appear requesting the
number of copies of each image; a maximum of nine copies can be ordered. Use the
up/down keys of the controller to set the number of copies desired. If the all-frames
setting was used to create a print order, any additional images saved afterwards in the
folder will not be included in the order.
DPOF files created with another camera will be canceled.
The cancel-print option deletes the DPOF files. When the setting is selected, a
confirmation screen will appear; choosing and entering “Yes” will execute the operation
and cancel the print order.
All frames F - To cancel the printing file in the folder. Folders are selected in the custom
1 section of the setup menu (p. 84).
All frames C - To cancel all printing files on the CompactFlash card.
CANCELING A DPOF PRINT ORDER
ORDERING AN INDEX PRINT
To create an index print of all the images in the folder, select
“Y es.” To cancel an index print, simply change the setting to
“No.” If an index-print order is created, any additional
images saved afterwards in the folder will not be included in
the index print. If a CompactFlash card has multiple folders,
an index print must be selected for each folder. Folders are
selected in the custom 1 section of the setup menu (p. 84).
The number of images printed per sheet differs between printers.
The information printed with the thumbnails can vary.
Page 42

Press the center of the controller to continue or the menu button to cancel the copy
operation.
After the copy-completed message is highlighted, a new screen will
appear to indicate the name of the new folder containing the copied
images; press the controller to return to the menu.
When the image(s) to be copied are
selected, a screen with four
messages is displayed; the
messages are highlighted during the
copying procedure. When the
change-CF-card message is
highlighted, remove the camera’s
CompactFlash card and insert the
card to which the image should be
copied.
82 83PLAYBACK MODE - ADVANCED OPERATION
Image files can be copied from one CompactFlash card to another. Up to 23MB of data
can be transferred. Every time the copy function is used, a new folder is automatically
created for the images (p. 98). Images with voice memos are copied with their audio files.
Copies of locked images are unlocked (p. 77). DPOF information is not copied.
This frame - To copy the image displayed or highlighted in playback mode.
Marked frames - To copy single or multiple images. When selected, the frame-selection
screen will appear; highlight the image to be copied with the yellow border and then press
the up key of the controller to mark it with the check icon. To deselect an image to be
copied, highlight the selected image and press the down key; the check icon will
disappear. Continue until all the images to be copied are marked. Press the controller to
continue, or press the menu button to cancel the operation and return to the playback
menu.
COPYING IMAGES
Play Copy
Enter
Copying to camera memory
1
2
3
4
Change CF card
Copying to CF card
Copy completed
<101MLTCP>
OK
If too many images have been selected, a warning will appear and the copy routine will
be canceled. Divide the number of images into two or three batches. The copyunsuccessful message will appear when one or all of the images could not be copied.
Check the second CompactFlash card to see which files were copied and then repeat the
procedure for the images that were not transferred.
On February 20th, 1962, John Glenn became the first American to orbit the Earth. On
board his Friendship 7 spacecraft was a Minolta Hi-matic camera to record that historic
event. The 4 hour, 55 minute, and 23 second flight orbited the Earth three times at an
average speed of 28,000 kph (17,500 mph).
Mr. Glenn visited our Sakai camera factory in Japan on May
24th, 1963 to plant a palm tree to celebrate the occasion.
The palm tree is still in the courtyard of the factory and
stands over eight meters tall (26ft).
The camera? It was not lost. It is on display at the
Smithsonian Institution’s National Air and Space
Museum in Washington D.C. This and other
objects from John Glenn’s Friendship 7 Mercury
flight can be found in galley 210, “Apollo to the
Moon.”
Minolta History
Page 43

84 85SETUP MODE
NAVIGATING THE SETUP MENU
To access the menu, simply turn the mode dial to the setup position. The four-way keys
of the controller (1) are used to move the cursor in the menu. Pressing the controller will
enter a setting.
Once a setting has been selected,
the cursor will return to the menu
options and the new setting will be
displayed. Setting can continue to
be made.
Setup
Basic Custom1 Custom2
LCDbrightness
Format
Power save
Language
Display mode
3
–
1 min
English
–
When the menu activates, the basic tab at the top of the menu will be highlighted. Use
the left/right keys of the controller to highlight the appropriate menu tab; the menus will
change as the tabs are highlighted.
When the desired menu section is displayed, use the up/down keys to scroll through
the menu options. Highlight the option whose setting needs to be changed. When
scrolling in one direction, the cursor will jump between the top and bottom of the menu.
With the menu option to be changed highlighted, press the right controller key; the
settings will be displayed with the current setting highlighted. To return to the menu
options, press the left key.
Press the controller to select the
highlighted setting.
Use the up/down keys to highlight
the new setting.
Choosing “Yes” on the confirmation
screens will execute the operation, “No”
will cancel it.
Yes No
On the date/time setting screen, use the
left/right keys of the controller to select the year,
month, day, hour, or minute. The up/down keys
are used to change the value. Press the central
button of the controller to set the calendar and
clock.
LCD brightness
Format
Language
Basic
1 (Low) ~ 5 (High)
Enter
1, 3, 5 , 10 min.
Español
Japanese
English
Deutsch
Français
Power save
File # memory
Folder name
Custom 1
On / Off
Standard form
OffAudio signals
Date form
1
2
OffShutter FX
1
2
Reset default
Date/Time set
Custom 2
Enter
Enter
MM/DD/YYYY
Date format YYYY/MM/DD
DD/MM/YYYY
NTSC Video output
1 (Low) - 3 (High)Volume
PAL
Display mode
Scale
Standard display
Focus frame
Histogram
Grid
Image only
Select folder
(Folder name)
Refer to the following sections
for descriptions of the menu
options and their settings.
1
SETUP MODE
Enter
Setup
Date/Time set
20034 20
16
33
:.
.
Page 44

86 87SETUP MODE
LCD MONITOR BRIGHTNESS
The brightness of the LCD monitor can be set in five levels from 1 (low) to 5 (high). When
this option is selected, the live image is displayed behind the menu. As each setting is
highlighted, the monitor will adjust accordingly; the controller must be pressed to set the
highlighted level.
FORMATTING COMPACTFLASH CARDS
The formatting function is used to erase all data on a CompactFlash card. Before
formatting a CompactFlash card, copy the data to a computer or storage device. Locking
images will not protect them from being deleted when the card is formatted. Always
format the CompactFlash card using the camera; never use a computer to format a card.
When the format option is selected and entered, a confirmation screen will appear.
Choosing “Yes” will format the card, choosing “No” will cancel the formatting operation. A
screen will appear to indicate the card has been formatted; press the controller to return
to the setup menu.
A CompactFlash card used in another camera may have to be formatted before being
used. If the unable-to-use-card message appears, the card is not compatible with the
camera and cannot be formatted.
AUTO POWER SAVE
The camera will turn off the data panel to conserve battery power if no operation is made
within a certain period. The length of this period can be changed to 1, 3, 5, or 10 minutes.
The auto-power-save option will not affect the display period of LCD monitor; it will shut
down after 30 seconds. To restore the displays when they shut down, simply press the
shutter-release button.
When the camera is connected to the computer, the auto-power-save period is set to ten
minutes. This period cannot be changed.
LANGUAGE
The language used in the menus can be changed. The language is selected in the basic
section of the setup menu (p. 84).
DISPLAY MODE
Standard display Focus frame only
Live image only
Real-time histogram
ScaleGrid
Setup
Basic Custom1 Custom2
LCDbrightness
Format
Power save
Language
Display mode
Std. display
Focus frame
Histogram
Grid
Scale
Image only
The recording mode
displays activated by the
display button (p. 37)
can be selected in the
basic section of the
setup menu. The display
cycle is the same as the
order shown on the
menu.
Display-mode settings with a check mark are
included in the display cycle. To change
displays used, highlight the setting using the
controller, and then press the right key (1) to
check or uncheck the box. Press the
controller to set the selected displays (2).
1
When a CompactFlash card is formatted, all data is erased.
2
Page 45

88 89SETUP MODE
FILE NUMBER (#) MEMORY
When file number memory is selected, if a new folder is created, the first file stored in the
folder will have a number one greater than the last file saved. If the file number memory
is disabled, the image file name will have a number one greater than the last image saved
in the folder.
If file number memory is active and the CompactFlash card is changed, the first file saved
to the new card will have a number one greater than the last file saved on the previous
card if the new card does not contain an image with a greater file number. If it does, the
file number of the new image will be one greater than the greatest on the card.
SELECT FOLDER
This option allows the selection of existing folders. All images recorded will be placed in
the selected folder if the folder-name option is set to standard form. In quick view or
playback mode, only the images in the selected folder can be viewed or edited.
Except for the all-frames-C setting in the custom 2 section of the playback-mode menu,
changes made with menus only affect the images in the selected folder. To make
changes to all images in multiple folders, each folder must be selected and the menu
operation repeated for each folder. Formatting a CompactFlash card erases all folders
regardless if they are selected or not.
FOLDER NAME
All recorded images are stored in folders on the memory card. Folder
names come in two formats, standard and date.
Standard folders have an eight character name. The initial folder is
named 100MLT24. The first three digits are the folder’s serial number,
which will increase by one each time a new folder is created. The next
three letters refer to Minolta, and the last two numbers indicate the
camera used; 24 indicates a DiMAGE S414.
A date folder name also starts with the three digit serial number and is
followed by one register for the year, two register for the month, and two
registers for the day: 101YMMDD. The folder 10130412 was created in
2003 on April 12th.
With the date folder format selected, when an image is recorded a new folder with the
day’s date will be created. All images recorded that day will be placed in that folder.
Images recorded on a different day will be placed in a new folder with the corresponding
date. If the file number memory function is off, when a new folder is created, the serial
number in the image-file name is reset to 0001. If file number memory function is on, the
serial number in the image-file will be one greater than the last image saved. For more
information on folder organization and file names, see page 98.
100MLT24
10130412
(Standard)
(Date)
VOLUME
The speaker volume can be increased or decreased. This affects the audio signals and
shutter FX only and will not change the levels of the voice memo or movie audio track.
AUDIO SIGNALS
Every time a button is pressed, an audio signal will give a positive confirmation of the
operation. The audio signals can be turn off in the custom 1 section of the setup menu
(p. 84). The tone of the signal can also be changed; signal 1 is mechanical and signal 2
is electrical.
SHUTTER FX
When the shutter is released, a shutter sound effect
will give a positive confirmation of the operation. The
sound effect can be turn off in the custom 1 section
of the setup menu (p. 84). Two shutter effects are
available; signal 1 is mechanical and signal 2 is
electrical. The mechanical shutter sound was taken
from the legendary Minolta CLE, a compact
rangefinder that represents the pinnacle of the
development of the Leitz-Minolta CL.
Page 46

90 91SETUP MODE
Image quality
RESETTING THE CAMERA
This function affects all modes. When selected, a confirmation screen will appear;
choosing “Yes” resets the following functions and settings, “No” cancels the operation.
Default Setting Page
Image size
Camera sensitivity (ISO)
Drive mode
Metering mode
Flash mode
Voice memo
Exposure bracket
Standard
2272 X 1704
Auto
Single-frame advance
Multi-segment
Auto flash
Off
0.5 Ev
56Exposure mode
Focus mode
Focus area
Digital zoom
Program
Autofocus
Wide focus area
Off
Exposure compensation 0.0
White balance Auto white balance
Date imprinting
Instant playback
Off
Off
Natural Color
Audio signals
File number memory
1
Off
Color mode
Shutter FX 1
59
52
48
32
30
44
44
46
47
49
63
50
62
60
64
64
65
65
65
77
Sharpness
Index playback format
Normal
9 frames
Filter
Contrast
Normal
Off
LCD monitor brightness
Auto-power-save period
3
1 minute
86
86
89
89
88
Full-time AF Off 63
Display mode
Standard, focus frames only, realtime histogram, live image only
87
Folder name Standard 88
Volume 2 89
78
78
Duration (Slide Show)
Repeat (Slide Show)
5 seconds
No
DA TE AND TIME SETTING
It is important to accurately set the clock. When a still image or a movie clip is recorded,
the date and time of the recording are saved with the image and are displayed during
playback or can be read with the DiMAGE Viewer software included on the CD-ROM.
The camera’s clock is also used with date imprinting (p. 47). To set the clock and
calender, see page 20.
DATE FORMAT
The date format that is displayed or imprinted can be changed: YYYY/MM/DD (year,
month, day), MM/DD/YYYY (month, day, year), DD/MM/YYYY(day, month, year). Simply
select the format and enter it by pressing the center of the controller; the new format will
be displayed on the menu.
VIDEO OUTPUT
Camera images can be displayed on a television (p. 75). The video output can be
changed between NTSC and PAL. North America uses the NTSC standard and Europe
uses the P AL standard. Check which standard is used in your region to play back images
on your television set.
Page 47

92 93DATA-TRANSFER MODE
DATA-TRANSFER MODE
Read this section carefully before connecting the camera to a computer. Details on using
and installing the DiMAGE Viewer software are found in the supplied software manual.
The DiMAGE manuals do not cover the basic operation of computers or their operating
systems; please refer to the manual supplied with your computer.
IBM PC / AT Compatible Macintosh
Windows 98, 98SE, Me,
2000 Professional, and XP.
Mac OS 9.0 ~ 9.2.2 and Mac OS X
10.1.3 - 10.1.5, 10.2.1, and 10.2.2.
Check the Minolta web site for the latest compatibility information:
North America: http://www.minoltausa.com
Europe: http://www.minoltaeurope.com/pe/digital/languages_stage.html
Users with Windows 98 or 98 second edition will need to install the driver software on the
included DiMAGE Viewer CD-ROM (p. 95). No special driver software is required for
other Windows or Macintosh operating systems.
Customers who have bought a previous DiMAGE digital camera and have installed the
Windows 98 driver software must repeat the installation procedure. The updated version
of the driver software included on the supplied DiMAGE Viewer CD-ROM is required for
the operation of the DiMAGE S414 with a computer. The new software will have no affect
on the performance of older DiMAGE cameras.
SYSTEM REQUIREMENTS
For the camera to be connected directly to the computer and used as a mass-storage
device, the computer must be equipped with a USB port as a standard interface. Both the
computer and the operating system must be guaranteed by their manufacturers to
support USB interface. The following operating systems are compatible with the camera:
CONNECTING THE CAMERA TO A COMPUTER
Start up the computer. The computer must be turned on before connecting the
camera.
Insert the CompactFlash card into the camera. Confirm
that the correct card is in the camera. To change the
CompactFlash while the camera is connected to a
computer, see page 102.
Afresh set of batteries should be used when the camera is connected to a computer . The
use of the AC adapter (sold separately) is recommended over the use of batteries. For
users with Windows 98 or 98SE, read the section on how to install the necessary USB
driver before connecting the camera to a computer (P. 95).
1
2
3
Open the card-slot door. Attach the smaller plug of the
USB cable to the camera. Make sure the plug is firmly
attached.
Attach the other end of the USB cable to the computer’s
USB port. Make sure the plug is firmly attached. The
camera should be connected directly to the
computer’s USB port. Attaching the camera to
a USB hub may prevent it from operating
properly.
4
4
3
5
Trans
Initializing USB
connection
Set the mode dial to the data-transfer position to initiate
the USB connection. A screen will appear to indicate
the beginning of the connection process. When the
signal has been received by the computer, the
LCD monitor will turn off.
(Continued on next page)
Page 48

94 95DATA-TRANSFER MODE
When the camera is properly connected to the
computer, a drive icon, or volume, will appear. When
using Windows XP or Mac OS X, a window will open
requesting instructions on what to do with the image
data; follow the directions in the window. If the
computer does not recognize the camera, disconnect
the camera and restart the computer. Repeat the
connection procedure above.
Mac OS X
Windows XP
Mac OS
The volume name varies between memory cards.
Mac OS X
Windows
The driver needs only to be installed once. If the driver cannot be installed automatically,
it can be installed manually with the operating system’s add-new-hardware wizard; see
the instructions on the following page. During installation, if the operating system
requests the Windows 98 CD-ROM, insert it into the CD-ROM drive and follow the
accompanying instructions on the screen. No special driver software is required for other
Windows or Macintosh operating systems.
Before connecting the camera to the
computer, place the DiMAGE Viewer
CD-ROM in the CD-ROM drive. The
DiMAGE installer menu should
automatically activate. To
automatically install the Windows 98
USB driver, click on the starting-upthe-USB-device-driver-installer
button. A window will appear to
confirm that the driver should be
installed; click “Yes” to continue.
Automatic Installation
CONNECTING TO WINDOWS 98 AND 98 SECOND EDITION
When the driver has been
successfully installed, a window will
appear. Click “OK.” Restart the
computer and connect the camera (p.
93) to complete the operation.
Page 49

96 97DATA-TRANSFER MODE
Choose the recommended search for a
suitable driver. Click “Next.”
Choose to specify the location of the
driver. The browse window can be used to
indicate the driver location. The driver
should be located in the CD-ROM drive at
:\Win98\USB. When the location is shown
in the window, click “Next.”
Manual Installation
To install the Windows 98 driver manually, follow the instructions in the connecting-thecamera-to-a-computer section on page 93.
When the camera is plugged into the
computer, the operating system will detect
the new device and the add-new-hardwarewizard window will open. Place the DiMAGE
software CD-ROM in the CD-ROM drive.
Click “Next.”
The add new hardware wizard will confirm
the location of the driver. Click “Next” to
install the driver in the system.
One of three drivers may be located:
MNLVENUM.inf, USBPDR.inf, or
USBSTRG.inf. The letter designating the
CD-ROM drive will vary between
computers.
The last window will confirm the driver has
been installed. Click “Finish” to close the
add new hardware wizard. Restart the
computer.
When the my-computer window is opened,
a new removable-disk icon will be
displayed. Double click on the icon to
access the camera’s CompactFlash card;
see page 98.
Page 50

98 99DATA-TRANSFER MODE
Once the camera is connected to the computer, image and audio
files can be accessed by double clicking on icons. Image folders are
located in the DCIM folder. To copying images and audio
recordings, simply drag and drop the file icon into a location in the
computer.
Files and folders on the memory card can
be deleted using the computer. Never
format the memory card from the
computer; always use the camera to
format the card. Only files recorded by the
camera should be stored on the memory
card.
Image and audio file names begin with “PICT” followed by a four-digit file number and a
tif, jpg, mov, or thm extension. Voice-memo audio files have a wav extension and the file
name corresponds to its image file. The thumbnail images (thm) are produced with TIFF
images and movie clips and are only used in camera and DiMAGE Viewer operation.
Copy images (p. 82) are placed in a folder with a name ending in “CP.” When a new folder
is created, the first three digits in the folder name will be one greater than the largest
folder number on the card. When the index number in the image file name exceeds
9,999, a new folder will be created with a number one greater than the greatest folder
number on the memory card: e.g. from 100MLT24 to 101MLT24.
The number in the image file name may not correspond to the frame number of the
image. As images are deleted in the camera, the frame counter will adjust itself to show
the number of images on the card and reassign the frame numbers accordingly. The
serial numbers used with image files will not change when an image is deleted. When a
new image is recorded, it will be assigned a number one greater than the largest serial
number in the folder. File serial numbers can be controlled with the file-number-memory
function in the custom 1 section of the setup menu (p. 84).
COMPACTFLASH CARD FOLDER ORGANIZATION
Image files contain exif tag data. This data includes the time and date the image was recorded
as well as the camera settings used. This data can be viewed with the camera or the DiMAGE
Viewer software. If a camera image is opened in a photo-retouching application that does not support exif tags, such as Adobe Photoshop, and then the image is saved overwriting the original
data, the exif tag information is erased. When using software other than the DiMAGE Viewer,
always make a backup copy of the image files to protect the exif tag data.
To view images correctly on your computer, the monitor’s color space may need to be adjusted.
Refer to your computer manual on how to calibrate the display to the following requirements:
sRGB, with a color temperature of 6500K, and a gamma of 2.2. Changes made to the captured
image with the camera’s contrast and color-saturation controls will affect any color-matching soft-
ware in use.
Camera Notes
PICT0001.THM
Drive Icon
Dcim
PICT0001.TIF
PICT0002.JPG
PICT0003.MOV
Fine, standard,
or economy
image
Movie clip
Misc
The misc. folder
contains DPOF
print files (p. 80).
PICT0002.WAV
PICT0002’s
voice-memo
audio file
100MLT24 10130801
TIFF image
102MLTCP
PICT0003.THM
Page 51

100 101DATA-TRANSFER MODE
DISCONNECTING THE CAMERA FROM THE COMPUTER
Windows Me, 2000 Professional, and XP
Confirm that the access lamp is not lit. Turn of f the cameraand then disconnect the USB
cable.
To disconnect the camera, click once on the unplug-or-eject-hardware icon
located on the task bar. A small window will open indicating the device to be
stopped.
Windows 98 / 98 Second Edition
When more than one external device are connected to the computer, repeat the
procedure above except right click on the unplug-or-eject-hardware icon; a small window
indicating the unplug-or-eject-hardware routine will open. Click on the small window.
Click on the small window to stop
the device. The safe-to-removehardware window will open. Close
the window, turn the camera off,
and then disconnect the USB
cable.
The hardware devices to be stopped will be
displayed in the unplug-or-eject-hardware
window. Highlight the device by clicking on it
then click “Stop.”
Confirm that the access lamp is not lit and then drag
the mass-storage device icon and drop it into the
trash. Turn the camera off, and then disconnect the
USB cable.
A confirmation screen will appear to
indicate the devices to be stopped.
Click “OK” to stop the device.
A third and final screen will appear
to indicate the camera can be safely
disconnected from the computer.
Close the window, turn the camera
off, and then disconnect the USB
cable.
Macintosh
Never disconnect the camera when the access lamp is red - the data
or memory card may permanently be damaged.
Page 52

102 103DATA-TRANSFER MODE
CHANGING THE COMPACTFLASH CARD - DATA-TRANSFER MODE
Windows 98 and 98 Second Edition
1. Turn off the camera.
2. Change the CompactFlash card.
3. Turn the mode dial to the data-transfer position to remake the USB connection.
Windows ME, 2000 professional, and XP
Macintosh
1. Stop the USB connection using the unplug-or-eject-hardware routine (p. 100).
2. Turn off the camera.
3. Change the CompactFlash card.
4. Turn the mode dial to the data-transfer position to remake the USB connection.
1. Stop the USB connection by dragging the drive icon into the trash (p. 101).
2. Turn off the camera.
3. Change the CompactFlash card.
4. Turn the mode dial to the data-transfer position to remake the USB connection.
AUTO POWER SAVE - DATA-TRANSFER MODE
If the camera does not receive a read or write command within ten minutes, it will shut
down to save power. When the camera shuts down, an unsafe-removal-of-device
warning may appear on the computer monitor. Click “OK.” Neither the camera or
computer will be damaged in this operation.
Turn off the camera with the mode dial. Remake the USB
connection by turning the mode dial back to the data-transfer
position.
Never remove a memory card when the access lamp is red - the data or
memory card may permanently be damaged.
QUICKTIME SYSTEM REQUIREMENTS
IBM PC / AT Compatible
Pentium-based computer
Windows 95, 98, 98SE, NT, Me,
or 2000 Professional.
32MB or more of RAM
Sound Blaster or compatible sound card
DirectX 3.0 or later recommended
QuickTime is used for viewing movie clips
and playing voice-memo audio files. To
install QuickTime, follow the instructions in
the installer. Macintosh users can download
the latest version of QuickTime free of
charge from the Apple Computer web site:
http://www.apple.com.
Problem Symptom Cause Solution
The camera
will not work.
Nothing displayed on the
data panel or
the monitors.
The batteries are dead.
The batteries are inserted
incorrectly.
The AC adapter is not
connected properly.
Replace batteries (p. 16).
Reinsert the batteries taking
care that the negative and positive terminals are oriented as
indicated on the inside of the
battery chamber door (p.16).
Check that the adapter is connected to the camera and a
live electrical outlet (p. 18).
The camera was accidentally turned on
while in a bag or case, or the lens was hindered while extending.
Turn the camera off and on to
restore operation.
TROUBLESHOOTING
The section covers minor problems with basic camera operation. For major problems or
damage, or if a problem continues to reoccur frequently , contact a Minolta service facility
listed on the back cover of this manual.
Page 53

Shutter will
not release.
“000” is displayed on the
frame counter.
CompactFlash card is full
and unable to store an
image at the image-quality or image-size setting
on the camera.
Insert a new CompactFlash
card (p. 18), delete some
images (p. 76), or change the
image-quality or image-size
setting (p. 44).
No-card warning appears on
the monitors.
No CompactFlash card in
the camera.
Insert a CompactFlash card
(p.18).
Pictures are
not sharp.
Focus signal is
red.
Subject is too close.
Make sure the subject is within
the autofocus range (p. 26) or
use the macro mode (p. 28).
The camera is in macro
mode.
Cancel the macro mode setting
(p. 28).
A special situation is preventing the autofocus system from focusing (p.27)
Use the focus-lock function to
focus on an object at the same
distance as the subject (p. 26)
or use manual focus (p. 59).
Pictures are
taken indoors
or in low-light
situations without flash.
Slow shutter speeds
result in blurred images
when the camera is handheld.
Use a tripod, change the camera sensitivity to a higher setting (p. 62), or use the flash (p.
30).
Continuous
advance does
not work.
The image quality is set to TIFF.
Change the image-quality setting (p. 44).
While using
flash, the pictures are too
dark.
The subject is beyond the flash range (p.
62).
Move closer to the subject or
change the camera sensitivity
to a higher setting (p. 62).
Problem Symptom Cause Solution
Shutter speed and
aperture combination is
extremely under or overexposing the live image.
Change the shutter speed or
aperture value until an image
appears on the monitor (p. 57).
Shooting data
is displayed,
but live image
is entirely
black or
white.
Camera set to
manualexposure
mode (M).
104 105APPENDIX
Problem Symptom Cause Solution
“Err” displayed on the
data panel.
Turn off the camera and remove the batteries or unplug the external power
supply. Wait for the message to disappear before reinserting the batteries or
plugging in the power supply. If the camera is hot, allow it to cool before
removing the batteries and Compactflash card.
If the camera does not function normally, turn it off, remove and reinsert the batteries, or
unplug and reconnect the AC adapter. Always turn the camera off using the mode dial
otherwise the CompactFlash card may be damaged and camera settings reset. The
camera temperature rises with extended periods of use. Care should be taken to avoid
burns when handling the camera, batteries, or CompactFlash card.
When using Ni-MH batteries, clean both battery terminals with dry cloth to wipe off any
dirt or residue. Because of the sophisticated computer system, the camera critically
monitors power levels. If the battery terminals are dirty , the camera may give a false lowbattery warning. If battery performance is unusually low, wipe the battery terminals with
a clean, dry cloth.
Ni-MH battery performance will decrease if the batteries are often recharged before they
have been fully discharged. Completely exhaust the Ni-MH batteries using the camera
before charging.
ABOUT NI-MH BATTERIES
Page 54

106 107APPENDIX
1.Insert a memory card in the camera and connect it to the computer with the USB cable.
Other devices must not be connected to the computer during this procedure.
2. Right click on the My-computer icon. Select “properties” from the drop-down menu.
Windows XP: from the start menu go to the control panel. Click on the performance and
maintenance category. Click “System” to open the system properties window.
3.Windows 2000 and XP: select the hardware tab in the properties window and click the
device-manager button.
Windows 98 and Me: click the device-manager tab in the properties window.
4.The driver file will be located in the universal-serial-bus-controller or other-devices
location of the device manager. Click on the locations to display the files. The driver
should be indicated with the camera name. Under certain conditions, the driver name
may not contain the camera name. However, the driver will be indicated by either a
question mark or exclamation point.
5. Click on the driver to select it.
6.Windows 2000 and XP: click on the action button to display the drop-down menu.
Select “uninstall.” Aconfirmation screen will appear. Clicking “Yes” will remove the driver from the system.
Windows 98 and Me: click the remove button. A confirmation screen will appear.
Clicking “Yes” will remove the driver from the system.
7. Disconnect the USB cable and turn off the camera. Restart the computer.
REMOVING THE DRIVER SOFTWARE - WINDOWS
CAMERA CARE
• Do not subject the camera to shock or impact.
• Turn off the camera when transporting.
• This camera is neither waterproof nor splashproof. Inserting or removing batteries or
the CompactFlash card, or operating the camera with wet hands may damage the
camera.
• When at the beach or near water, take care not to expose the camera to water or sand.
Water, sand, dust, or salt can damage the camera.
• Do not leave the camera under direct sunlight. Do not point the lens directly at the sun;
the CCD may be damaged.
CLEANING
• If the camera or the outside of the lens is dirty, gently wipe it with a soft, clean, dry cloth.
If the camera or lens comes in contact with sand, gently blow away loose particles.
Wiping may scratch the surface.
• To clean the lens surface, first blow away any dust or sand, then gently wipe the lens
with a cloth or tissue designed for optics. Use lens-cleaning fluid if necessary.
• Never use organic solvents to clean the camera.
• Never touch the lens surface with your fingers.
STORAGE
• Store in a cool, dry, well-ventilated area away from dust and chemicals. For long
periods of disuse, store the camera in an airtight container with a silica-gel drying
agent.
• Remove the batteries and CompactFlash card from the camera when not in use for
extended periods.
• Do not store the camera in an area with naphthalene or mothballs.
• During long periods of storage, operate the camera occasionally. When taking the
camera out of storage, check that the camera is functioning properly before using.
CARE AND STORAGE
Page 55

108 109APPENDIX
LCD MONITOR CARE
• Although the LCD monitor is manufactured using high precision technology, there may
occasionally be a lack of color or bright points on the LCD monitor.
• Do not apply pressure to the surface of the LCD monitor; it may be permanently
damaged.
• In a cold environment, the LCD monitor may become temporarily dark. When the
camera warms up, the display will function normally.
• The LCD monitor may be slow to react in low temperatures or may turn dark in a hot
environment. When the camera reaches normal operating temperature, the display will
function normally.
• If fingerprints are on the LCD monitor surface, gently wipe with a soft, clean, dry cloth.
OPERATING TEMPERATURES AND CONDITIONS
• This camera has been designed for use in temperatures from 0°C to 40°C (32°F to
104°F).
• Never leave the camera exposed to extreme high temperatures, such as in a car
parked in the sun, or to extreme humidity.
• When taking the camera from a cold to a warm environment, place it in a sealed plastic
bag to prevent condensation from forming. Allow the camera to come to room
temperature before removing it from the bag.
BEFORE IMPORTANT EVENTS OR JOURNEYS
• Check the camera’s operation; take test pictures and purchase spare batteries.
• Minolta has no responsibility for any damage or loss incurred by equipment
malfunction.
COPYRIGHT
• TV program, films, video tapes, photographs, and other materials may be copyrighted.
Unauthorized recording or duplication of such material may be contrary to copyright
laws. Taking pictures or images of performances, exhibitions, etc., is prohibited without
approval and can infringe on copyright. Images protected by copyright can only be used
under the provisions within the copyright laws.
BATTERIES
• Battery performance decreases with temperature. In cold environments, we
recommend keeping spare batteries in a warm place, such as the inside of a coat.
Batteries can recover their power when they warm up. As the performance of Ni-MH
batteries are less affected by temperature, their use is recommended when shooting in
cold environments.
• Remove the batteries when the camera is not in use for an extended period. Leaking
battery fluid may damage the battery-chamber.
• Occasionally, when using alkaline batteries, the battery-condition indicator will give a
false low-battery-power warning, even though there is enough power capacity.
Continue to use the camera; the low-battery indicator will disappear.
• If batteries have been exhausted when used in the camera, do not reload them even if
their charge seems to recover over time. These batteries will interfere with normal
camera operation.
COMPACTFLASH CARD CARE AND HANDLING
CompactFlash Cards are manufactured with precision electronic components. The following may cause data loss or damage:
• Improper use of the card.
• Bending, dropping, or subjecting the card to impact.
• Heat, moisture, and direct sunlight.
• Static electrical discharge or electromagnetic fields near the card.
• Removing the card or interrupting the power supply while the camera or a computer is
accessing the card (reading, writing, formatting, etc.).
• Touching the electrical contacts of the card with your fingers or metal objects.
• Using the card beyond its life. Purchasing a new card periodically may be necessary.
Minolta has no responsibility for any loss or damage to data. It is recommended that a
copy of the card data be made.
QUESTIONS AND SERVICE
• If you have questions about your camera, contact your local camera dealer or write to
the Minolta distributor in your area.
• Before shipping your camera for repair, contact a Minolta Service Facility.
Page 56

110 111APPENDIX
TECHNICAL SPECIFICATIONS
Batteries: 4 AA Ni-MH or alkaline batteries. Ni-MH batteries are
recommended over alkaline.
Battery performance (recording): Approximately 160 frames. Based on Minolta’s stan-
dard test method: 1,850mAh Ni-MH batteries, LCD
monitor on, full-size images (2272 X 1704), standard
image quality, no instant playback, no voice memo,
flash used with 50% of the frames.
Approximately 300 frames: based on Minolta’s standard test method: 1,850mAh Ni-MH batteries, LCD
monitor off, full-size images (2272 X 1704), standard
image quality, no instant playback, no voice memo,
flash used with 50% of the frames.
Battery performance (playback): Approx. continuous playback time: 120 min. Based on
Minolta’s standard test method: 1,850mAh Ni-MH batteries, LCD monitor on.
External power source: AC adapter (AC-1L or AC-2L)
High-power battery pack (EBP-100)
Dimensions: 113.5 (W) X 64.5 (H) X 58.5 (D) mm
4.47 (W) X 2.54 (H) X 2.30 (D) in.
Weight: Approximately 335g (11.8 0z.)
(without batteries or CompactFlash card)
Operating temperature: 0° - 40°C
Operating humidity: 5 - 85% (noncondensing)
Specifications are based on the latest information available at the time of printing and
are subject to change without notice.
Number of effective pixels: 4.0 million
CCD: 1/1.8-type interline primary-color CCD with a total of
4.1 million pixels.
Camera sensitivity (ISO): Auto and 64, 100, 200, and 400 ISO equivalents.
Aspect ratio: 4:3
Lens construction: 11 elements in 9 groups including one AD glass and
two double-sided aspheric elements.
Maximum aperture: f/3.0 (wide-angle position), f/3.6 (telephoto position)
Focal length: 7.15 - 28.6 mm (35mm equivalent: 35 - 140 mm)
Focusing range (from the CCD): 0.5 m (1.6 ft.) - infinity (wide-angle position)
0.9 m (3.0 ft.) - infinity (telephoto position)
0.16 - 0.6 m (0.5 - 2.0 ft.) in macro mode
Filter diameter: 35.5 mm
Autofocusing system: Video AF
Shutter: CCD electronic shutter plus mechanical shutter
Shutter speeds: 1/1000 - 4s, bulb (15s maximum)
Built-in flash recycling time: 8s (approx)
Viewfinder: Optical real-image zoom viewfinder.
Monitor LCD: 46 mm TFT color
Monitor field of view: Approximately 100%
A/D conversion: 12 bits
Recording media: Type I CompactFlash cards
File formats: JPEG, TIFF, motion JPEG (mov), WAV. DCF 1.0 and
DPOF compliant.
Printing output control: Exif print, PRINT Image Matching II
Menu languages: Japanese, English, German, French, and Spanish
Video output: NTSC and PAL
Page 57

9222-2799-31 PR-A212
Printed in China
© 2003 Minolta Co., Ltd. under the Berne Convention
and the Universal Copyright Convention.
Minolta Co., Ltd. 3-13, 2-Chome, Azuchi-Machi, Chuo-Ku, Osaka 541-8556, Japan
Minolta Corporation 101 Williams Drive, Ramsey, New Jersey 07446, U.S.A.
Minolta Canada Inc. 369 Britannia Road East, Mississauga, Ontario L4Z 2H5, Canada
Minolta Europe GmbH Minoltaring 11, D-30855 Langenhagen, Germany
Reparatur/Repair Senator-Helmken-Strasse 1, D-28197 Bremen, Germany
Minolta France S.A.S. 365 Route de Saint-Germain, F-78420 Carrieres-Sur-Seine, France
Minolta (UK) Limited 7 Tanners Drive, Blakelands, Milton Keynes, MK14 5BU, England
Minolta Austria Ges. m.b.H. Amalienstrasse 59-61, A-1131 Wien, Austria
Minolta Camera Benelux B.V. Zonnebaan 39, P.O. Box 6000, NL-3600 HA Maarssen, The Netherlands
Belgian Branch Prins Boudewijnlaan 1, B-2550 Kontich, Belgium
Minolta (Schweiz) AG Riedstrasse 6, CH-8953 Dietikon, Switzerland
Minolta Svenska AB Albygatan 114, S-171 54 Solna, Sweden
Finnish Branch Niittykatu 6 PL 37, SF-02201 Espoo, Finland
Minolta Portugal Limitada Av. do Brasil 33-A, P-1700 Lisboa, Portugal
Minolta Hong Kong Limited Room 208, 2/F, Eastern Center, 1065 King’s Road, Quarry Bay, Hong Kong
Minolta Singapore (Pte) Ltd. 10, Teban Gardens Crescent, Singapore 608923
Page 58

9229-2799-21 PR-A212
English
Français
Español
Deutsch
Minolta Co., Ltd.
Ni-MH batteries are recommended over alkaline for digital cameras.
The recording performance of the DiMAGE S414 with 1,850mAh Ni-MH
batteries is approximately 160 frames when using the camera with the
LCD monitor on, or approximately 300 frames when using the camera
with the LCD monitor off. This is based on Minolta’s standard test
method: full-size images (2272 X 1704), standard image quality, no
instant playback, no voice memo, flash used with 50% of the frames.
The number of recordable frames can vary with battery and charger
brands, and under differing operating conditions.
Although alkaline batteries are supplied with this product, its
performance will be limited; only use alkaline batteries for test
photographs or when Ni-MH batteries, the Minolta external battery
pack, or the AC adapter are not available. Fully recharge the Ni-MH
batteries just before using the camera.
When using Ni-MH batteries, clean both battery terminals with a dry
cloth to wipe off any dirt or residue. Because of the sophisticated
computer system, the camera critically monitors power levels. If the
battery terminals are dirty, the camera may give a false low-battery
warning. If battery performance is unusually low, first wipe the battery
terminals with a clean, dry cloth before replacing the batteries.
Ni-MH battery performance will decrease if the batteries are often
recharged before they have been fully discharged. Completely exhaust
the Ni-MH batteries using the camera before charging. Always turn off
the camera before changing the batteries.
ABOUT NI-MH BATTERIES
SPECIAL NOTICE
Recomendamos usar las pilas de Ni-MH en lugar de las pilas alcalinas
en las cámaras digitales. El rendimiento de grabado de la cámara
DiMAGE S414 con pilas Ni-MH de 1.850 mAh es de aproximadamente
160 fotogramas, cuando esté utilizando la cámara con el monitor LDC
encendido y de aproximadamente 300 fotogramas cuando esté
utilizando la cámara con el monitor LCD apagado. Esto está basado en
el método de prueba estándar de Minolta: imágenes completas (2272
X 1704), calidad estándar de la imagen, sin reproducción instantánea,
sin archivos de voz y uso del flash en el 50% de los fotogramas. Debido
a las diferentes condiciones operativas, el número de fotogramas
grabados puede variar.
Aunque se proporcionan pilas alcalinas con este producto, su uso es
limitado; utilice sólo las pilas alcalinas cuando vaya a realizar
fotografías de prueba o cuando las pilas de Ni-MH, el conjunto externo
de pilas Minolta o el adaptador AC no estén disponibles. Recargue las
pilas Ni-MH justo antes de utilizar la cámara.
Al utilizar pilas Ni-MH, limpie los dos terminales de la pila con un paño
seco para asegurarse de que no queda ningún resto de suciedad ni
residuos. Debido al complejo sistema de ordenador, la cámara controla
de manera crítica los niveles de alimentación de la pila. Si los
terminales de la pila están sucios, la cámara puede dar una falsa
advertencia sobre el bajo estado de la pila. Si el rendimiento de las
pilas por lo general es bajo, limpie primero los terminales con un paño
limpio y seco antes de cambiarlas.
El rendimiento de las pilas Ni-MH disminuirá si se recargan a menudo
antes de que se hayan gastado por completo. Asegúrese de que las
pilas están completamente gastadas utilizando la cámara antes de
cargarlas. Apague siempre la cámara antes de cambiar las pilas.
Für Digitalkameras ist der Einsatz von NiMH-Akkus zu empfehlen. Die
mögliche Aufnahmezahl mit 1850 mAh NiMH-Akkus ist ca. 160 Bilder,
bei eingeschaltetem LCD Monitor, oder 300 Bilder bei ausgeschaltetem
LCD Monitor. Basierend auf dem Minolta Teststandard: volle Auflösung
(2272 X 1704 Pixel), Bildqualität „Standard“, keine Schnellansicht,
keine Tonaufzeichnung, Einsatz des Blitzgerätes bei 50% der
Aufnahmen. Die Anzahl der aufzunehmenden Bilder kann bei Akkus
und Ladegeräten unterschiedlicher Marken und unter verschiedenen
Aufnahmebedingungen variieren.
Die Aufnahmezahl der Alkali-Batterien ist geringer als mit NiMH-Akkus.
Da Alkali-Batterien generell lagerungsempfindlich sind, sollten die
mitgelieferten Alkali-Batterien nur für eine erste Funktionsüberprüfung
verwendet werden. Im praktischen Einsatz sollten NiMH-Akkus, das
externe Powerpack (EPB100) oder ein Netzgerät eingesetzt werden.
NiMH-Akkus müssen vor dem Einsatz in der Kamera voll geladen
werden (Bitte beachten Sie die Hinweise des Akku-Herstellers bzw.
Ladegerät-Herstellers).
Reinigen Sie alle Batteriekontakte der Kamera mit einem weichen,
sauberen und trockenen Tuch. Bei einer Verschmutzung der Batteriekontakte kann es dazu kommen, dass die Batteriezustands-Anzeige
eine schwache Batterieladung, anzeigt obwohl die Akkus voll geladen
sind. Wenn die Akkuleistung ungewöhnlich niedrig ist, reinigen Sie in
einem solchen Fall die Kontakte der Kamera und der Akkus bevor Sie
frisch geladene Akkus einlegen.
Die Kapazität der NiMH-Akkus kann im Laufe der Zeit abnehmen, wenn
sie vor dem erneuten Laden nicht vollständig entladen werden. Daher
entladen Sie die Akkus vor dem Aufladen vollständig unter Benutzung
der Kamera. Schalten Sie die Kamera immer aus, bevor Sie die
Akkus/Batterien wechseln.
HINWEIS ZU NI-MH AKKUS
WICHTIGER HINWEIS
Les batteries Ni-MH sont recommandées pour les appareils
numériques au lieu des piles alcalines. La capacité d’enregistrement du
DiMAGE S414 avec des batteries Ni-MH 1850mAh est d’environ 160
images avec l’écran LCD allumé et de 300 images écran éteint. Ceci
est basé sur les méthodes de tests Minolta : taille image maxi
(2272X1704), qualité mode standard, sans affichage de contrôle sur
l’écran, pas de mémorisation sonore, flash utilisé sur 50% des vues. Le
nombres d’images peut varier en fonction de la marque des batteries
ou des conditions de prise de vue.
Avec le jeu de piles alcalines fournies, les performances seront très
limitées. Utiliser les piles alcalines uniquement pour quelques essais
ou si les batteries Ni-MH, le pack d’alimentation externe ou l’adaptateur
secteur ne sont pas disponibles. Recharger à fond les batteries Ni-MH
avant d’utiliser l’appareil.
Lors de l’utilisation de batteries Ni-MH, nettoyer à l’aide d’un tissu
propre et sec les deux contacts des accumulateurs afin de retirer
poussières et saletés résiduelles. La complexité du système numérique
nécessite un seuil de tension minimal critique. Si les contacts des
batteries sont sales, l’appareil peut l’interpréter comme un signal de
tension insuffisante. Si les performances sont anormalement faibles,
nettoyer les contacts avec un tissu propre et sec.
La performance des batteries Ni-MH décroît si elles sont souvent
rechargées avant leur décharge complète. Utiliser à fond les batteries
avant de les recharger. Toujours éteindre l’appareil avant de remplacer
les batteries.
A PROPOS DES BATTERIES NI-MH
NOTE SPÉCIALE
AVISO ESPECIAL
PILAS Ni-MH
AVVERTENZE SPECIALI
SPECIALE AANWIJZINGEN
SPECIALINFORMATION
BEMÆRK
ERITYISMUISTUTUS
Page 59

Dansk
Nederlands
Suomi
Italiano Svenska
Ni-MH-batterier rekommenderas istället för alkaline-batte-rier till
digitalkameror. Tagnings-/inspelningsprestanda för DiMAGE S414 med
1850mAh Ni-MH-batterier är cirka 160 bildrutor när kameran används
med LCD-bildskär-men påslagen, eller cirka 300 bildrutor när kameran
an-vänds med LCD-bildskärmen avstängd. Detta är baserat på Minoltas
standardiserade testmetod: bilder i full storlek (2272 X 1704), standard
bildkvalitet ingen snabbvisning, inget röstminne, blixt använd på 50% av
bilderna. Det antal bilder som kan exponeras kan variera beroende på
batteri- och laddarfabrikat samt på olika arbets- och tagningsförhållanden.
Fastän alkaline-batterier levereras med denna produkt, kommer dess
prestanda att vara begränsade; använd bara alkaline-batterier för
testbilder eller när Ni-MH-batterier, Minoltas externa batteripack, eller
AC-adaptern inte är tillgängliga. Ladda upp Ni-MH-batterierna
fullständigt precis innan kameran skall användas.
När Ni-MH-batterier används, rengör batteriernas båda poler med en
ren trasa för att torka av allt smuts eller kvarvarande materia. Tack vare
det avancerade dator-systemet, känner kameran kritiskt av
effektnivåerna. Om batteriernas poler blivit smutsiga, kan kameran
kanske ge en felaktig varning för svaga batterier. Om batteriernas
prestanda är ovanligt dåliga, torka av batteriernas poler med en ren och
torr trasa.
Ni-MH-batteriernas prestanda kommer att försvagas om batterierna laddats upp ofta innan de har laddats ur fullständigt. Kör totalt slut på NiMH-batterierna med kamerans hjälp innan de laddas upp på nytt. Stäng
alltid av kameran innan batterierna byts ut.
OM NI-MH-BATTERIER
OM NI-MH BATTERIER
Voor de voeding van digitale camera’s wordt het gebruik van Ni-MH
accu’s aanbevolen. De opname-prestaties van de DiMAGE S414, bij
gebruik van 1.850mAh Ni-MH accu’s, zijn ongeveer als volgt: ca. 160
opnamen bij fotograferen met de LCD monitor aan en ca. 300 opnamen
met de LCD monitor uitgeschakeld (gebaseerd op Minolta’s standaard
test methode: hoogste resolutie (2272 X 1704), standard opslag
kwaliteit, instant playback uitgeschakeld, geen voice memo functie,
terwijl de flitser werd gebruikt bij 50% van de opnamen). De werkelijke
prestaties zijn uiteraard mede afhankelijk van de opname
omstandigheden, het accutype en de totale tijd dat de camera (en dan
met name de LCD monitor) ingeschakeld staat):
Hoewel met de camera alkaline batterijen worden meegeleverd, zijn de
prestaties daarvan beperkt. Wij adviseren u dan ook deze batterijen
alleen te gebruiken voor een eerste kennismaking met de camera, of
wanneer Ni-MH accu's, de Minolta Externe Voedingsset of de Minolta
Lichtnetadapter niet beschikbaar zijn. Verder is het raadzaam om NiMH accu’s volledig op te laden vlak voor gebruik van de camera (let wel
op de oplaadtijd).
Reinig voor gebruik alle polen van de accu’s en de contacten van de
camera met een schone, droge doek om mogelijke aanslag of vuil te
verwijderen. Het geavanceerde computersysteem houdt het
batterijniveau in de camera namelijk kritisch in de gaten; zijn de
batterijcontacten vuil geworden, dan kan het zijn dat de camera op
basis daarvan een (valse) melding voor te lage batterijspanning geeft.
Ziet u onverwachts zo'n waarschuwing, reinig dan de batterij-contacten
zoals aangegeven.
De prestaties van Ni-MH accu's kunnen teruglopen wanneer deze vaak
zijn geladen voordat ze volledig ontladen waren. Het is daarom
raadzaam de accu's eerst volledig te ontladen en daarna pas weer op
te laden. Let op dat de camera is uitgeschakeld voordat u de batterijen
verwisseld.
INFORMATIE OVER DE VOEDING VAN DE CAMERA
Ni-MH akkuja suositellaan digitaalikameroihin alkaaliparistojen sijasta.
DiMAGE S414:ssa 1,850mAh Ni-MH akut riittävät noin 160 kuvan
ottamiseen, kun LCD monitori on päällä tai noin 300 kuvan ottamiseen,
kun LCD monitori ei ole päällä. Tämä perustuu Minoltan
standarditestiin: täyskokoiset kuvat (2272 X 1704), kuvanlaatuna
standard, ei välitöntä kuvankatselua, ei äänimuistiota, salama 50%:ssa
kuvista. Kuvien määrä voi vaihdella akkujen ja laturin merkin mukaan
sekä poikkeavissa käyttöolosuhteissa.
V aikka kameran mukana tulee alkaaliparistot, niiden riittoisuus on hyvin
rajallinen. Käytä alkaaliparistoja vain koekuviin tai kun Ni-MH akkuja,
Minoltan ulkoista paristokoteloa tai AC adapteria ei ole käytettävissä.
Lataa Ni-MH akut täyteen juuri ennen kameran käyttämistä.
Kun käytät Ni-MH akkuja, puhdista akkujen molemmat navat liasta ja
jäämistä käyttäen kuivaa kangasta. Hienoviritteisestä
tietokonejärjestelmästä johtuen kamera tarkkailee varauksen määrää
kriittisesti. Jos akkujen navat ovat likaiset, kamera voi antaa
virheellisen varoituksen virran vähäisyydestä. Jos akkuteho on
epätavallisen heikko, pyyhi akkujen navat kuivalla, puhtaalla kankaalla
ennen kuin asetat ne uudelleen kameraan.
Ni-MH akkujen varauskyky heikkenee, jos akut ladataan usein ennen
kuin ne ovat täysin tyhjentyneet. Tyhjennä Ni-MH akut aina kokonaan
kameran avulla ennen kuin lataat niitä. Sammuta kamera aina ennen
kuin vaihdat akkuja.
NI-MH AKUT
Con fotocamere digitali è consigliato l'uso di batterie Ni-MH. L'uso di batterie
Ni-MH a 1,850mAh, con la fotocamera DiMAGE S414, rende possibile la
registrazione di circa 300 fotogrammi senza uso dello schermo LCD. I dati
indicati sono calcolati secondo i metodi di controllo standard Minolta che
prevedono: immagini a risoluzione intera (2272 X 1704), qualità immagine
standard, non utilizzo della funzione di visualizzazione immediata e di
registrazione del sonoro e uso del flash nel 50% delle esposizioni. Il numero
dei fotogrammi memorizzabili può variare in relazione al tipo delle batterie,
del charger ed alle diverse condizioni operative.
Questo apparecchio è fornito, all'acquisto, di batterie alcaline che, pur
consentendone un corretto utilizzo, garantiscono tuttavia prestazioni
limitate; per questo motivo vi consigliamo di utilizzare le batterie alcaline per
effettuare fotografie di prova o se non sono disponibili altre fonti di
alimentazioni, come le batterie Ni-MH, l'adattatore CA o l'unità di
alimentazione esterna Minolta (accessorio opzionale). Prima di usare la
fotocamera controllate sempre che le batterie Ni-MH siano ben cariche.
Quando usate batterie Ni-MH, pulite entrambi i terminali della batteria con
un panno asciutto e pulito per eliminare eventuali particelle o residui di
sporco. Acausa del suo sofisticato sistema computerizzato, la fotocamera
è particolarmente sensibile ai livelli di alimentazione. Se i terminali della
batteria sono sporchi, la fotocamera può segnalare una falsa avvertenza di
scarsa alimentazione. Se le prestazioni delle batterie risultano
particolarmente ridotte, pulite i terminali delle batterie con un panno pulito e
asciutto prima di reinserirle nella fotocamera.
Le prestazioni delle batterie Ni-MH diminuiscono in caso di ripetute ricariche
prima del completo esaurimento della carica. Fate attenzione a esaurire
completamente la carica delle batterie prima di procedere alla loro ricarica.
Spegnete sempre la fotocamera prima di sostituire le batterie.
A VVERTENZE SULLE PRESTAZIONI DELLE BATTERIE
Ni-MH batterier er mere velegnede til digitalkameraer end alkaliske
batterier. Optagekapaciteten for DiMAGE S414 med 1.850 mAh Ni-MH
batterier er cirka 160 billeder, når kameraet bruges med LCD monitoren
tændt, og cirka 300 billeder, når LCD monitoren er slukket. Disse
opgivelser er baseret på Minoltas standard testbetingelser: Fuld
billedstørrelse (2.272 X 1.704), standard billedkvalitet, omgående
afspilning frakoblet, Voice memo frakoblet og flash benyttet til 50% af
optagelserne. Det opgivne antal billeder kan variere, afhængig af
brugsforholdene.
Alkaliske batterier medfølger kameraet, men kapaciteten er begrænset.
Brug kun alkaliske batterier, hvis Ni-MH batterier, Minoltas eksterne
batteripakke eller AC adapter ikke er til rådighed. Sørg for, at Ni-MH
batterierne er fuldt opladede, lige inden du benytter kameraet.
Ved brug af Ni-MH batterier: Aftør begge batteripoler med en tør klud,
så de er helt rene. Kameraet kontrollerer løbende batterikapaciteten,
og hvis der er dårlig kontakt, kan du få en forkert meddelelse om lav
batterikapacitet. Hvis kapaciteten er usædvanlig lav , kan du først prøve
at rense batteripolerne, inden du udskifter batterierne.
Ni-MH batteriers ydeevne falder, hvis de ofte oplades, inden de er fuldt
afladede. Brug helst batterierne i kameraet, til de er fuldt afladede,
inden du oplader dem. Husk altid at slukke kameraet, inden du
udskifter batterierne
.
Minolta Co., Ltd.
 Loading...