

Page 1
GB/
D
Thank you for purchasing this Konica product.
Digital Revio KD-300Z is a digital camera equipped with a 3.34 megapixel CCD for high quality digital photography.
Before using the camera, please read this User’s Manual carefully and
follow its instructions to assure proper use.
Wir danken Ihnen für das Vertrauen, das Sie Konica mit dem Kauf
dieses Produkts bewiesen haben.
Bei der Digital Revio KD-300Z handelt es sich um eine Digitalkamera,
deren CCD-Element mit 3,34 Mio. Pixeln arbeitet, so dass
Digitalaufnahmen von höchster Qualität erzielt werden.
Bitte lesen Sie diese Anleitung vor Inbetriebnahme der Kamera
aufmerksam durch, damit Sie alle Funktionen optimal nutzen können,
und befolgen Sie alle Anweisungen, um einen fehlerfreien Betrieb zu
gewährleisten.
Page 2

Contents
Please purchase “Secure Digital (SD) Memory Cards” or “Multi-Media
Cards*” (MMC) for use with this camera. These cards are referred to in
these User’s Instructions as “Memory Cards.”
Names of Parts.......................... 4
* MultiMedia Card is a registered trademark of Infineon Technologies AG
(Germany), licensed to MMCA (MultiMediaCard Association).
Basic Preparations
Camera Basics
Camera Functions
Image Playback Basics
Advanced Image Playback
and Delete Functions
Camera Setup Options
Loading and Recharging the
Battery Pack.............................. 9
Using the LCD Monitor when
Shooting .................................. 13
Selecting Flash Mode ............. 22
Macro and Landscape
Photography............................ 24
Using the Self-timer ................ 26
Setting Image Quality.............. 27
Exposure Compensation......... 29
Using Color Mode for B&W
and Sepia Images ................... 30
Displaying Images on the LCD
Monitor .................................... 42
“Thumbnail” Picture Review in
Forward/Reverse Direction ..... 45
Closeup Image Playback ........ 45
Displaying Exposure
Information .............................. 46
Formatting Memory Cards ........
Turning the Electronic Tone
ON/OFF ................................... 59
Setting Auto Power-Off........... 60
Selecting the Automatic
57
Loading and Removing Memory
Cards ....................................... 10
Recording Moving Images ...... 17
White Balance ......................... 31
Aperture-Priority
Photography............................ 34
Using Manual Focus ............... 35
Long Exposure Mode.............. 36
Increasing Exposure Sensitivity
to 2x, 4x................................... 38
Playing Movies ........................ 43
Multiple Image Display
(Index Display) ......................... 47
Erasure Prevention .................. 48
Erasing Individual Images ....... 49
Erasing All Images................... 50
Focus Mode ............................. 62
Mode Lock ON/OFF................ 63
Digital Zoom ON/OFF ............. 65
Selecting the Display Language .....
Selecting the Video
66
Setting the Date ...................... 12
Using the Optical
Viewfinder................................ 18
Selecting the Metering
Mode........................................ 39
Other Functions....................... 41
Rotating Images ...................... 52
Automatic Playback ................ 53
Digital Print Order Format
(DPOF) Setting......................... 54
Output Mode ........................... 67
Creating a New Folder on the
Memory Card........................... 68
Returning Settings to their
Default Values.......................... 70
Transferring Images to Other
Devices
Other Information
Computer................................. 73
LCD Monitor Operations ......... 76
Caution and Warning Symbols ..
77
Sending Images to a Printer ..... 74Transferring Images to a
Handling Precautions.............. 77
Troubleshooting ....................... 83
Specifications.......................... 87
32
Page 3
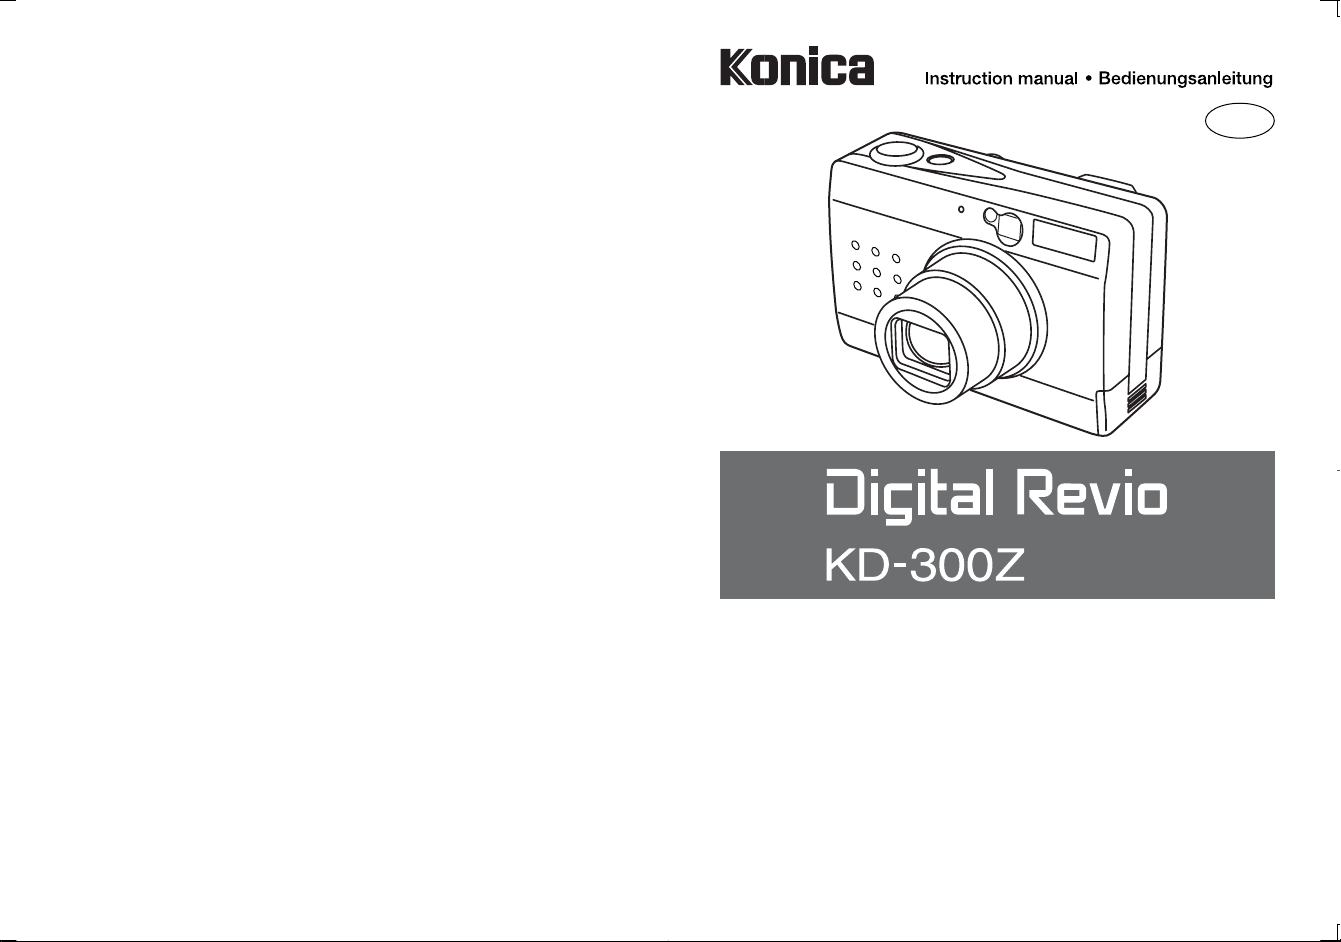
Names of Parts
<Operating Controls>
“ ” Macro/
Landscape mode button
(page 24)
Use this button to select Macro
or Landscape mode.
“ ” Flash mode button
(page 22)
Use this button to select
flash mode.
“DISPLAY” button
In the recording mode ( ), use
this button to turn the LCD
monitor ON/OFF.
“POWER” button
Use to turn camera
power ON/OFF.
Shutter release button
Mode select lever
Use this lever to switch between
record, playback, and setup
modes.
“@” “#” “%” “fi” buttons
Use to select items on each
menu, and to select forward/
reverse playback modes.
“W” “T” Zoom buttons
Use to control the lens’s zoom
setting (wide-angle to telephoto)
when recording, and to enlarge
images during playback.
“ ” button
Use this button to adjust
LCD screen brightness and
to set items on menus.
“MENU” button
Use this button to display or
turn off the menus in recording
or playback mode.
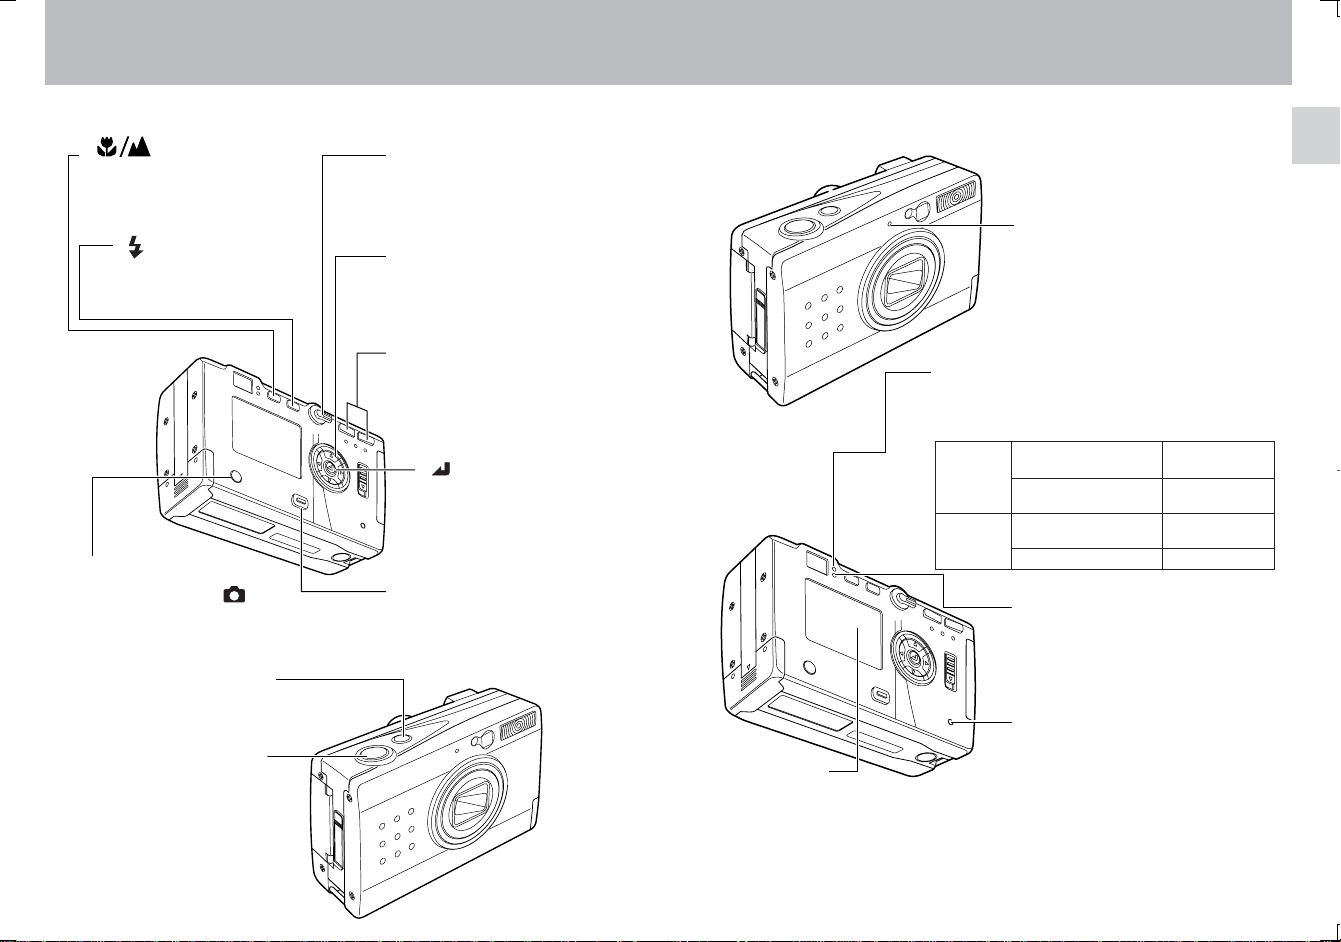
<Displays and Indicators>
Caution LED (red)
This LED is used to signal the charge status of
the lithium ion battery, the charging status of the
electronic flash, and the camera shake warning.
During
Recording
Other
LCD monitor
Functions as viewfinder
during recording, and displays
images and menu information
during the playback and setup
modes.
Self-timer LED (red)
This LED flashes when using selftimer photography, and it lights
steadily when recording moving
images or playback and when using
the setup mode.
Flash charging
Camera shake
warning
During battery
charging
Battery charging error
Flashes (about
2 times/sec)
Flashes (about
4 times/sec)
Lights steadily
Flashes
Standby LED (green)
This LED is used to indicate the infocus status and the completion of
battery recharging.
Card access LED (orange)
This LED flashes to indicate that the
camera is currently writing data to
the memory card.
¶ Never open need to standardize
to cover or door, or remove the
memory card when this LED is
flashing.
54
Page 4
<Other Parts>
Optical viewfinder
Light sensor
Lens and lens cover
Connector cover
Video output connector (page 16)
Power supply input socket (page 9)
Battery pack
compartment
and cover
(page 9)
Flash
(page 18)
Strap lug (page 11)
Memory card
door release
Memory card door
(page 10)
Tripod socket
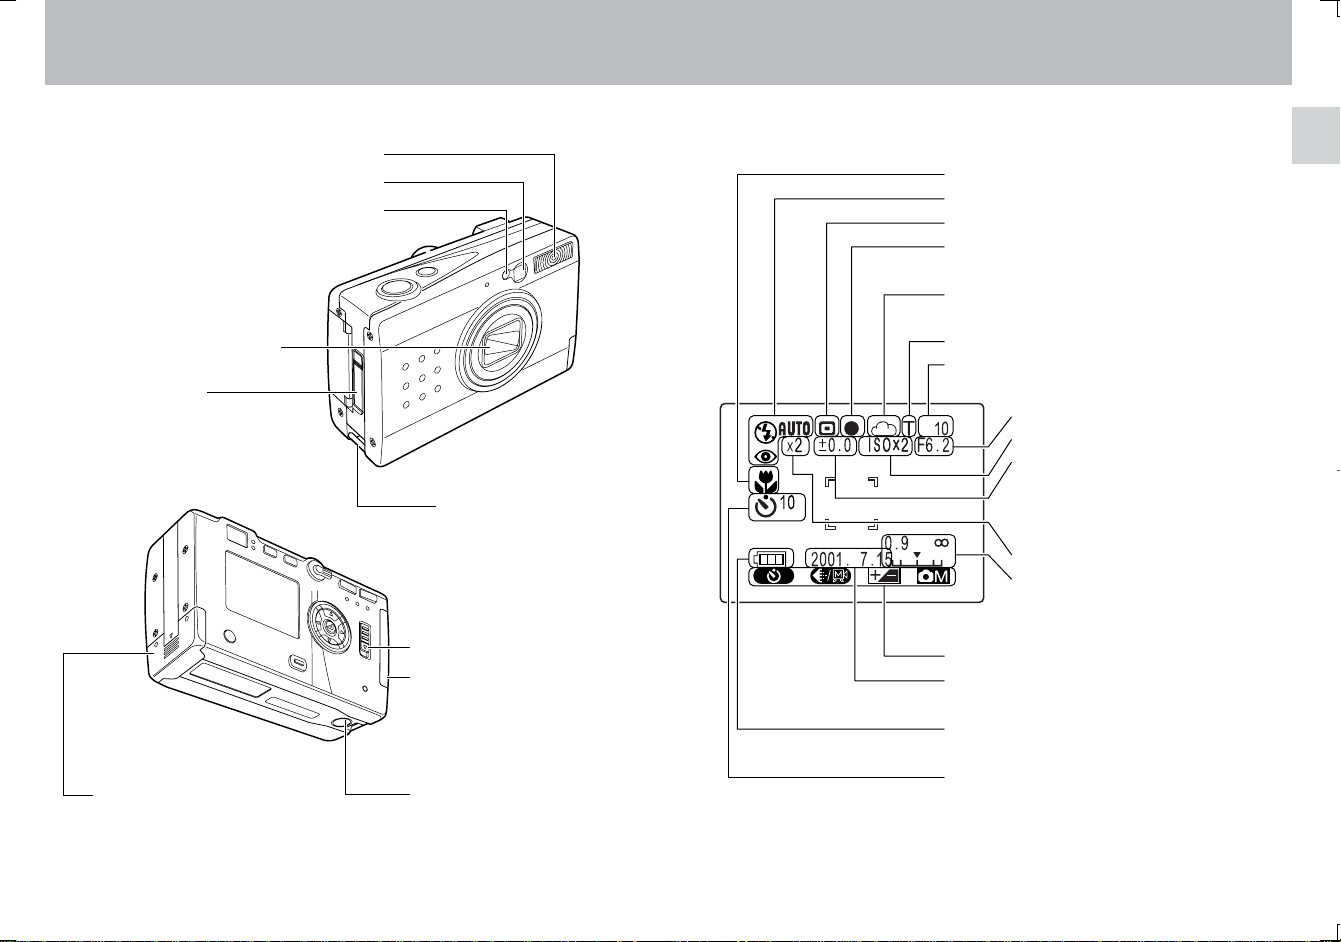
<LCD Monitor Information>
Macro/Landscape mode (page 24)
Flash mode (page 22)
Metering mode (page 39)
Focus mark (lights when focus is set)
Color mode (page 30) / White balance
mode (page 31)
Image quality (page 27)
Number of images recordable
Auto-Exposure mode (page 34)
Sensitivity (page 38)
Long time exposure (page 36) /
Exposure compensation value
(page 29)
Digital zoom (page 15)
Focusing scale (displayed only
during manual focus) (page 35)
Menu display during recording
Data (page 12): Automatically displayed
for 3 seconds after power is turned ON.
Battery indicator (page 9): Indicates
remaining battery capacity
Self-timer (page 26): Displays the
number of seconds remaining until the
self-timer releases the shutter.
76
Page 5
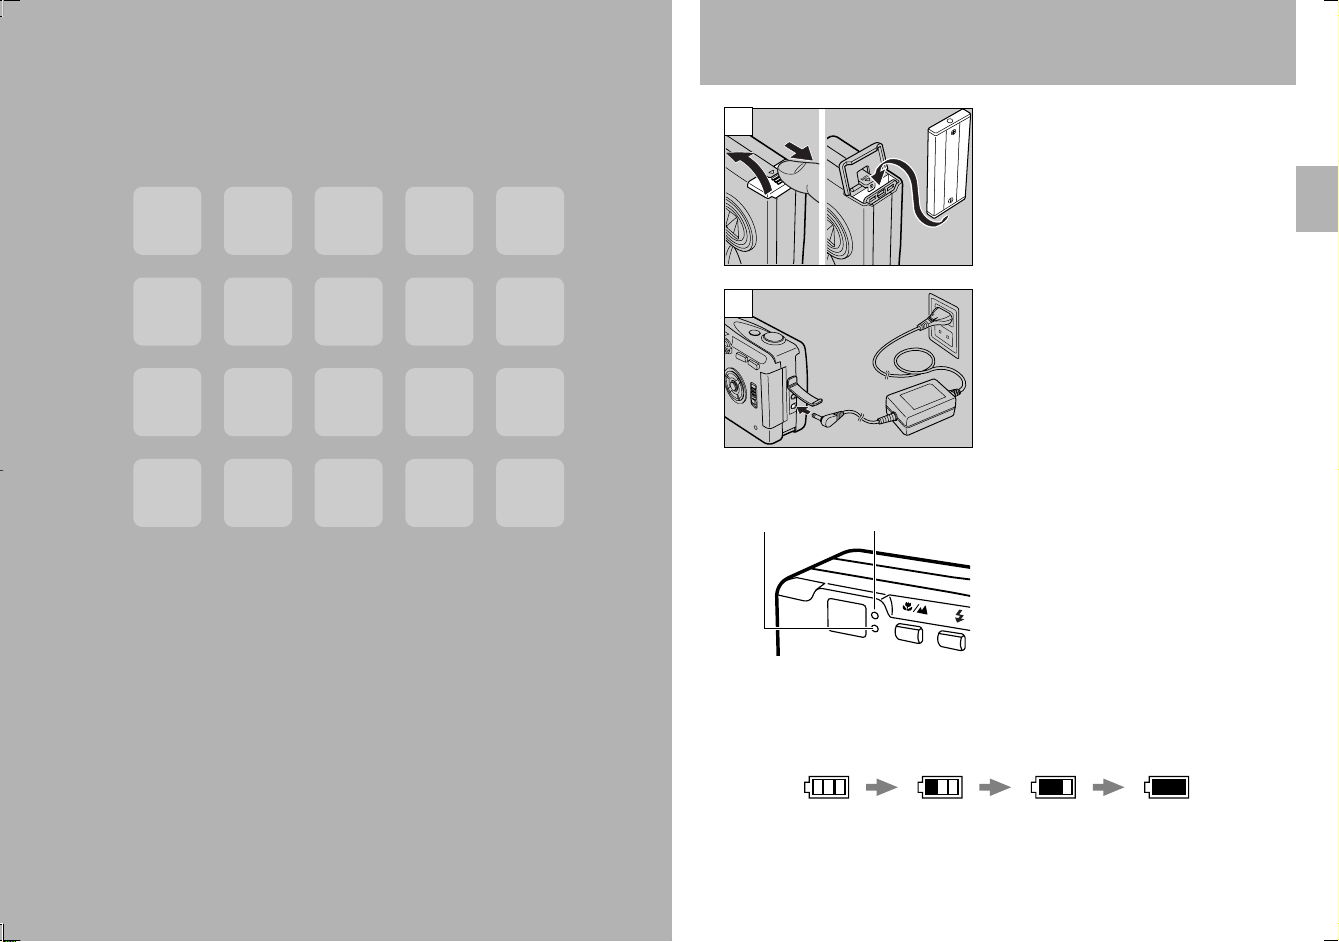
Loading and Recharging the Battery Pack
Basic
Preparations
1
2
Open the battery compartment
cover and insert the supplied
battery pack.
¶ Be sure to insert the battery pack in
the correct direction; the camera will
not operate if the battery pack is
loaded incorrectly.
Connect the AC adapter to the
camera and plug it into a household
outlet to begin recharging.
<Recharging Time>
Standby LED Caution LED
Full recharging requires
approximately 5 hours.
During recharging, the caution LED will
light steadily. When recharging is
completed, the caution LED will go out
and the standby LED will light.
<Recharging Status>
Charge the battery pack in accordance with the battery indicator status
shown on the LCD monitor.
Low
warning
Charge
required
9
Page 6

Loading and Removing Memory Cards
<Loading>
1
2
3
<Removal>
Slide the memory card door release
to open the card door.
Insert the memory card.
¶ Slide in the card until it stops with a
secure click.
¶ Be careful to insert the memory card in
the correct direction.
Close the memory card door.
Slide the memory card door release
to open the card door, and pull out
the memory card.
Write Protect Switch
(SD Memory Cards only)
SD Memory Cards are provided with
a write-protect switch. When this
switch is moved downward, further
recording on the card is disabled, to
LOCK
protect any images and data already
on the card. When in this status, no
further images can be recorded on
the card, and images already on the
card cannot be erased.
The LCD monitor will display
“WRITE PROTECT”.
<Attaching the hand strap>
Attach the supplied hand strap as shown.
Press the edge of the memory card in
slightly before pulling out.
1110
Page 7
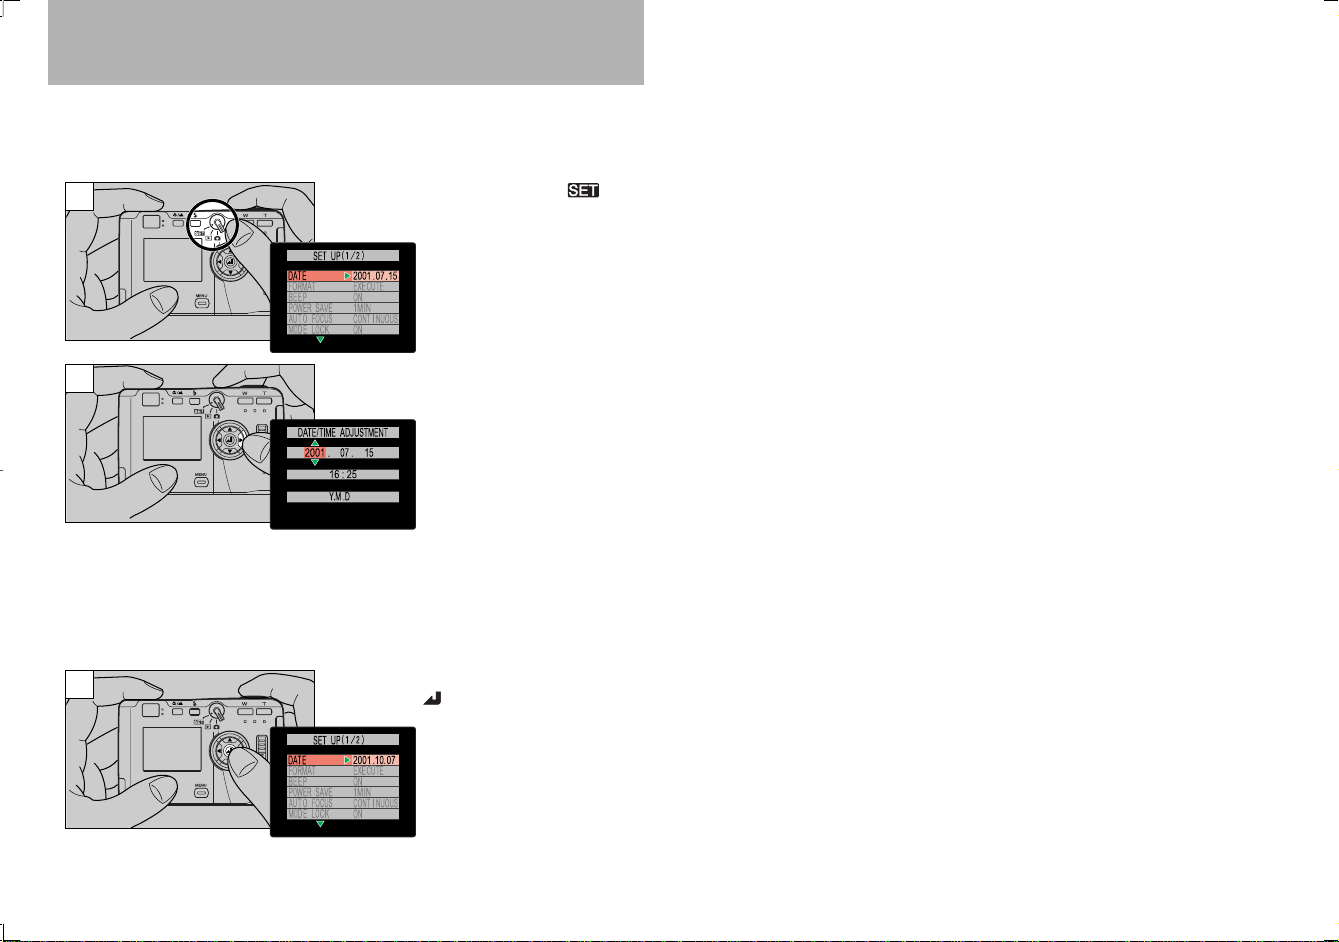
Setting the Date
Follow these instructions to set the date, time, and calendar display mode:
<Operation>
1
2
3
Set the mode select lever to “ ”.
Press the “#” button.
The monitor will show the
date/time setting display.
Press the “@” and “#”
buttons to change the
setting item, and the “%”
and “fi” buttons to change
the numerical values.
To cancel the setting operation: Press
the “MENU” button; the setting contents
will revert to those before the setting
operation was begun.
To confirm the new setting data,
press the “
” button.
12
This completes the
operation, and the LCD
monitor will return to the
menu screen.
Page 8

Camera
Basics
Using the LCD Monitor
when Shooting
Use the LCD monitor to compose
your pictures when particularly
accurate composition is needed. The
image recorded will be the same as
that seen through the monitor .
1. Set the mode select lever to
” , then press the power
“
ON/OFF button to turn on
camera’s power.
An electronic beep will be heard for
several seconds, followed by the
appearance of the LCD monitor.
Automatically displayed for
3 seconds, then turns off.
13
Page 9

2. Hold the camera steadily with
both hands as shown to avoid
camera shake.
3. Compose your picture while
watching through the LCD
monitor.
Press the zoom buttons to range
between telephoto and wideangle lens settings, thus enlarging
or reducing the size of your
subject. Press the “T” button to
enlarge the subject, and the “W”
button to reduce the size of the
subject.
The magnification ratio is
displayed on the screen.
4. Press the shutter release
button to take the picture
1 Lightly depress the shutter
release button halfway (see
page 16) to begin focusing; the
focus mark will light and the
electronic beep will be heard
when focus is locked.
“Beep,
beep”
<Hints for Holding the
Camera Steady>
Blurry pictures are most often
caused by camera shake. Find the
position and stance that is most
comfortable for you and allows you
to hold the camera steadily.
¶ Rest the right index finger lightly
on the shutter release.
¶ Take care that the flash and lens
are not covered by your hand or
fingers.
¶ Press the shutter release button
gently, without grasping the
camera too tightly,
¶ Use the left hand to support the
camera firmly.
¶ Hold your elbows close to your
body and hold the camera
steadily.
WT WT
<Use the Digital Zoom for
Even Greater Enlargements>
Press the “T” button until the
zoom function reaches the
maximum telephoto setting;
release your finger slightly,
then press the button again.
The digital zoom will further
enlarge the subject in three
steps (1.3x, 1.6x and 2x the
maximum optical zoom value).
¶ Since electronic circuitry is used
to increase the magnification
ratio, the results cannot be seen
in the optical viewfinder. Always
be sure the LCD monitor is
turned ON when using the digital
zoom function.
¶ Digital zoom cannot be used
when the LCD monitor is not
turned ON.
¶ Digital zoom also cannot be
used when image quality is set
to [T] or [ ]. If pictures are
taken with digital zoom when
image quality is set to [S] or [F],
actual image quality will be
equivalent to [N].
2 Press down further on the
shutter release button to take
the picture; recording of the
image begins when the
electronic beep sound.
“Beep”
The LCD monitor
will become
momentarily
recorded image will be displayed.
dark, then the
3 The caution LED and card
access LED will flash while the
camera is writing image data to
the memory card.
Card access LED
Caution LED
1514
Page 10

Recording Moving Images
<Precautions when Recording>
¶ Wait until the caution LED has
stopped flashing before taking
your next photograph .
¶ When the camera is in the “ ”
mode, setting the auto PowerSave function allows the camera
to automatically enter the auto
power-off (“power-save”) mode if
left inactive for a set period of
time. From this “sleep” state, the
camera can be restored to its
normal shooting condition by
depressing the shutter button
halfway, or by pressing one of
the other function buttons. (For
details, see page 60).
¶ Never open the memory card
door or remove a memory card
while the card access LED is
flashing, since the memory card
may be damaged and data lost.
<Shutter Release Button
Half-way Down>
When the shutter release button is
pressed down lightly, it will stops
part way in its travel. In this semidepressed position, the camera
automatically sets focus and
exposure. When the shutter release
button is pressed further down, the
shutter is released and the image is
recorded.
Not pressed
<Other Uses>
The camera can be connected to a
television monitor to allow use of
the screen as a large viewfinder.
When connected to a television
monitor, the camera’s own built-in
LCD monitor turns off, and the
subject is displayed instead on the
television screen.
¶ The camera’s built-in LCD
monitor turns off whenever a
video cable is connected to the
camera.
¶ Use a standard video cable to
connect the camera to the
television.
This function allows you to record
up to 15 seconds of simple movie
images. The monitor display during
movie recording is shown below:
1 Press the “MENU” button.
2 Select [ ], then press the
” button to set for movie
“
recording [
].
3 Press the shutter release
button to begin recording;
fifteen seconds later the
recording will end
automatically.
This number
indicates the
remaining
number of
movies that
can be
(each movie represents a maximum of
15 seconds of recording time).
¶ To stop recording before the 15
seconds has elapsed, press the
shutter release button again.
recorded
<NOTE>
¶ The optical zoom can be used,
but the digital zoom (page 15)
does not function during movie
recording.
¶ To view movies on a computer,
installation of QuickTime 4.1 or
later version is required.
Half-pressed
Fully depressed
1716
Page 11

Using the Optical Viewfinder
Turning the LCD monitor off will
help conserve battery power.
Turning LCD monitor OFF (page 76)
1. Set the mode select lever to
”, then press the
“
“POWER” button to turn power
ON.
2. Press the “DISPLAY” button to
turn off the LCD monitor.
3. Hold the camera steadily as
shown to prevent camera
shake.
Using the optical
viewfinder to compose
your picture.
¶ See <Hints for Holding the Camera
Steady> on page 14.
4. Look through the optical
viewfinder while composing
your image.
Press the “T” button to enlarge
the subject, and the “W” button to
reduce the size of the subject.
WT WT
<Precaution when using the
optical viewfinder>
When using the optical
viewfinder, take note of the
distance to your subject. As
distance to the subject
decreases, parallax (the
difference between what you
see in the viewfinder and the
actual image recorded through
the lens) increases. When
accurate subject composition
is required, use the LCD
monitor to take your pictures.
¶ Parallax: see page 25.
5. Press the shutter release
button to take the picture.
1 Lightly depress the shutter
button halfway to begin
focusing; the focus mark will
light and the electronic beep
will be heard when focus is
locked.
“Beep,
beep”
2 Press down further on the
shutter release button to take
the picture; recording of the
image begins when the
electronic beep sound.
“Beep”
3 The caution LED and card
access LED will light while the
camera is writing image data to
the memory card.
Caution LED
Card access LED
¶ Your next picture can be taken
when the caution LED stops
flashing.
1918
Page 12

MEMO
Page 13

Camera
Functions
This section introduces various functions available during image
recording. Use them to enhance the range of your camera work.
When shooting with the LCD monitor turned
OFF:
Note that the LCD monitor must be turned ON to set
functions or to confirm previous settings.
21
Page 14

Selecting Flash Mode
A variety of flash modes are available for different conditions.
<Usable Flash Range>
About 90 cm
Camera
Usable flash range
About 2 meters
When sensitivity is normal
About 2.5 meters
Zoom set at wide
Zoom set at telephoto
<Flash Modes>
When the “ ” button is pressed, the display changes as follows:
[
] Auto flash
mode (default):
[
] Red-eye reduction
auto-flash mode:
[ ] Fill-in flash mode:
[ ] Flash-off mode:
The camera automatically determines lighting
conditions and switches between flash and
available-light exposure as needed.
The flash fires twice to help reduce the
“red-eye” phenomenon*.
In this mode, the flash fires regardless of
surrounding light conditions. This mode
provides fill-flash when shooting in a backlight
environment or under strong sunlight when
shadows are cast on the main subject.
In this mode the flash does not fire. This mode is
effective when shooting an evening sunset or to
preserve indoor mood.
<Operation>
1 Press the “ ” button to select
the desired flash mode.
Display
appearance
when the
“red-eye
reduction”
mode is
selected.
2 Press the shutter release
button to take the picture.
<NOTE>
¶ If the caution LED flashes when
the shutter release button is
depressed halfway, it indicates
that a slow shutter speed will be
selected (low light conditions); in
this case, use of a tripod is
recommended to prevent
camera shake.
¶ If the caution LED flashes when
the shutter release button is
depressed halfway, it indicates
that a slow shutter speed will be
selected (low light conditions); in
this case, use of a tripod is
recommended to prevent camera
shake.
* “Red-eye” Phenomenon: This phenomenon may occur when using flash to
photograph persons or pets under dark conditions. In some cases, the
flash reflects against the retinas of the subject’s eyes, causing the pupils to
appear red in the photograph.
2322
Page 15

Macro and Landscape Photography
Use the macro and landscape shooting modes when photographing
extremely close and distant subjects.
<Macro/Landscape Selection>
About 6 cm (zoom set at wide)
About 90 cm
Camera
Macro range Normal photography
Landscape range
Each time the “ ” button is pressed, the mode changes
alternately as follows:
[No display] Normal mode
[
[
] Macro mode
] Landscape mode
Sharp images are produced when shooting
subjects between 6 cm and 90 cm (at wideangle setting) from the camera.
Sharp images are produced of
landscapes and other distant subjects.
<Operation>
1 Press the “ ” button
and select the desired mode.
Display
appearance
when the macro
mode is
selected.
2 Press the shutter release
button to take the picture.
<Combined Modes>
When shooting in the macro
mode, pressing the “
will permit macro flash
photography.
Take care, however, since very
close subjects may receive
excessive exposure. In this
case, use the exposure
compensation function to
compensate the exposure.
” button
<NOTE>
When shooting with the optical
viewfinder (LCD monitor turned
OFF), if the macro mode [ ] is
selected, the LCD monitor will
automatically turn ON when the
shutter release button is depressed
halfway.
Since parallax occurs when using
the optical viewfinder for macro
photography, we recommend that
you use the LCD monitor to
compose your photographs when
shooting extreme closeups.
* Parallax refers to the difference
between what is seen in the
viewfinder and the actual image
recorded through the camera’s
taking lens.
View through
optical
viewfinder
Image actually
recorded by
camera
2524
Page 16

Using the Self-Timer
Setting Image Quality (File Compression)
The self-timer is a convenient function when you wish to include
yourself in your pictures, or to avoid camera shake when shooting
closeups.
]: The shutter is released ten seconds after pressing the shutter
[
release button. Use this setting when you need time to enter
the picture composition yourself.
]:The shutter is released 2 seconds after pressing the shutter
[
release button. Use this setting with a tripod during macro
photography and during lengthy exposures to avoid camera
shake.
<Operation>
1 Press the “MENU” button.
2 Press the “@” button to select
].
[
3 Press the “ ”button and
select the desired self-timer
delay time [
] or [ ].
Display
appearance
when 10second
delay is
selected.
4 Press the “MENU” button to
turn off the MENU display.
5 With camera on tripod,
compose your picture and
when ready, press the shutter
release button.
¶ Follow the same procedure to return
to normal shooting mode.
Use this function to change the amount of file compression and thus
image quality, and when shooting movies.
[N] Normal 1024 × 768 About 280 KB
[F] Fine 2048 × 1536 About 1 MB
[S] Super Fine 2048 × 1536 About 2 MB
[T] TIFF-RGB (no compression) 2048 × 1536 About 9.1 MB
[ ] Movie 320 × 240
¶ When TIFF-RGB [T] is selected, color mode cannot be used to select B/W or
Sepia.
¶ Capacities are only given as general references. Actual file size will differ
depending on the color and other characteristics of the image photographed.
Quality Image Dimensions (Pixels) File Size
(Maximum 15 seconds)
<Operation>
1 Press the “MENU” button.
2 Press the “@” button to select
].
[
3 Press the “ ” button to select
the desired image quality or
movie mode.
Display
appearance
when [N]
(Normal)
mode is
selected.
4 Press the “MENU” button to
turn off the menu display.
5 Press the shutter release
button to take the picture.
2726
Page 17

Exposure Compensation
<General Guidelines for Selecting Image Quality>
For high image quality, select [S] or [F] compression; when taking pictures for
viewing on a television monitor, select [F] or [N], and when taking pictures
which will be used in small size on the Internet or other computer application,
use [N]. When images are to be enlarged, or when image quality is
particularly important, select [S] or the uncompressed [T] mode.
Remember that the uncompressed TIFF-RGB [T] mode results in very large
file sizes (approximately 9.1 MB), and requires high memory card capacity.
This function provides a range of compensation for exposure.
<Operation>
1 Press the “MENU” button.
2 Press the “@” or “#” button
and select [
” button to confirm the
the “
], then press
selection.
3 Press “%” or “fi” button to
select the desired amount of
exposure compensation, then
press the “
” button to
confirm the selection.
Display
appearance
when +0.7
is selected.
4 Press the “MENU” button to
turn off the menu display.
5 Press the shutter release
button to take the picture.
+2.0
⋅
⋅
⋅
+0.7
% fi
+0.3
% fi
±0.0
% fi
–0.3
% fi
–0.7
% fi
–1.0
⋅
⋅
⋅
–2.0
¶ During flash photography, exposure
compensation is limited to the
range of ± 1.0 step, regardless of
the value shown in the display.
Press the “%” button
to increase the
amount of exposure
(+), and the “fi”
button to decrease
exposure (–).
2928
Page 18

Using Color Mode for B&W and Sepia Images
White Balance
In addition to the normal color picture mode, you can also take pictures
in black and white (B/W) or sepia tone (Sepia).
¶ B/W and sepia picture modes cannot be selected when image quality is set
for uncompressed TIFF-RGB [T] format.
<Operation>
1 Press the “MENU” button.
2 Press the “#” button to select
3 Select [COLOR MODE], then
], then press the “ ”
[
button to confirm the selection.
press the “#” button.
4 Press the “%” or “fi” button to
select either [SEPIA] or [B/W]
mode.
5 Press the “@” button.
6 Press the “MENU” button
twice to turn off the menu
display.
Display
appearance
when
[SEPIA]
mode is
selected.
7 Press the shutter release
button to take the picture.
An image’s color will change depending on the kind of light source
present. Select the white balance as follows to compensate for different
light sources.
[AUTO]
[
[
[
[
[PRESET] Use this setting when you wish to set the white balance
(default) In this mode, the white balance is set automatically by
the camera.
] Bright sun
]Incandescent light bulbs (Tungsten)
] Cloudy weather
] Fluorescent light
manually. Instructions for setting the white balance can
be found on page 33.
<Operation>
1 Press the “MENU” button.
2 Press the “#” button and
select [
“
” button to confirm the
selection.
], then press the
3 Press “%” or “fi” button to
select [WB MODE], then press
the “#” button.
4 Press “%” or “fi” button to
select the desired white
balance mode ([
], or [ ]).
[
], [ ],
3130
Page 19

5 Press the “@” button.
6 Press the “MENU” button
twice to turn off the menu
display.
Display
appearance
when [ ]
is selected.
7 Press the shutter release
button to take the picture.
<Adjusting the Preset Value>
Use this function to manually set the white balance value. It allows you
to select what part of the subject you wish to serve as the standard for
“white” in the final image. For more exacting settings, use of a piece of
white paper or cardboard is recommended.
¶ Electronic zoom must be disabled when setting the preset white balance
value.
<Operation>
1 Select [PRESET], then press
” button to confirm
the “
selection.
2 Point the camera at the white
part of the subject or other
material you wish to serve as
the white standard in the
image.
3 Press the “ ” button to set
the white balance.
4 Press the “MENU” button
twice to turn off the menu
display.
Display
appearance
when
[PRESET]
is selected.
5 Press the shutter release
button to take the picture.
Make sure the white material fills
up the entire screen as shown.
3332
Page 20

Aperture-Priority Photography
By default, the camera uses a programmed automatic exposure mode
which automatically sets both aperture and shutter speed in
accordance with the available light. In the aperture-priority AE mode,
you can manually fix the aperture at either F2.8 or F6.2 (values at the
wide-angle setting), and the camera will automatically set the shutter
speed for the correct exposure at that aperture.
<Operation>
1 Press the “MENU” button.
4 Press the “%” or “fi” button to
select [F6.2] or [F2.8].
2 Press the “#” button to select
3 Press the “%” or “fi” button to
], then press the “ ”
[
button to confirm the selection.
select [AE MODE], then press
the “#” button.
34
5 Press the “@” button.
6 Press the “MENU” button
twice to turn off the menu
display.
Display
appearance
when [F6.2]
is selected.
7 Press the shutter release
button to take the picture.
Page 21

Using Manual Focus
The camera is set by default to automatic focus (AF), but is can also be
used with manual focus (MF) if desired. When MF is selected, a
focusing scale is displayed on the screen; the user specifies the desired
focusing distance.
<Operation>
1 Press the “MENU” button.
4 Press the “%” or “fi”button to
select [MF] or [AF].
2 Press the “#” button to select
], then press the “ ”
[
button to confirm the selection.
3 Press the “%” or “fi” button to
select [FOCUSING], then press
the “#” button.
5 Press the “@” button.
6 Press the “MENU” button
twice to turn off the menu
display.
Display
appearance
when [MF]
is selected.
7 Press the “@” or “#” button to
specify the desired shooting
distance on the focusing scale,
then press the shutter release
button to take the picture.
Accurate focusing may not be
possible at subject distances of 0.9 m.
35
Page 22

Long Exposure Mode (Time Exposure)
By extending the shutter speed (the time the shutter remains open
during an exposure), you can photograph darker subjects like a night
scene or a moody indoor scene. Long shutter speeds of 8, 4, and 2
seconds can be selected.
¶ To avoid camera shake, use of a tripod is recommended when using time
exposures.
<Operation>
1 Press the “MENU” button.
2 Press the “#” button to select
], then press the “ ”
[
button to confirm the selection.
3 Press the “%” or “fi” button to
select [LONG EXP], then press
the “#” button.
4 Press the “%” or “fi” button to
select [8 SEC], [4 SEC], or [2
SEC].
5 Press the “@” button.
6 Press the “MENU” button
twice to turn off the menu
display.
Display
appearance
when [4
SEC] is
selected.
7 Press the shutter release
button to take the picture.
¶ The exposure compensation
[ ] function is disabled when
using long exposures.
<Other Applications>
By pressing the “
” button,
the red-eye reduction fill-in
flash mode can also be
selected together with long
exposures.
This flash mode is effective when
shooting pictures of human
subjects against a sunset or night
scene.
3736
Page 23

Increasing Exposure Sensitivity to 2x, 4x
Selecting the Metering Mode
This camera is set by default to a standard sensitivity, but the sensitivity
can be increased by a factor of 2x or 4x when desired. This allows you
to fine-tune exposure for important scenes, or when lighting is
somewhat insufficient.
<Operation>
1 Press the “MENU” button.
2 Press the “#” button to select
], then press the “ ”
[
button to confirm the selection.
3 Press the “%” or “fi” button to
select [SENSITIVITY], then
press the “#” button.
4 Press the “%” or “fi” button to
select [X4], [X2], or
[ST ANDARD].
5 Press the “@” button.
6 Press the “MENU” button
twice to turn off the menu
display.
This function allows you to select from three types of light-meter
operation. Select the mode that best suits your subject and type of
photography.
[EVALUATION] Evaluative Metering (default):
[CENTER] Center-Weighted Metering:
[SPOT AREA] Spot Metering:
The evaluative metering method divides the entire screen
area into areas and evaluates the amount of light striking
the screen area, setting the optimum exposure for the
available lighting conditions. This mode provides correct
exposures for general photography and a wide variety of
conditions with normal light and dark.
The center of the screen (
calculating correct exposure. This mode is optimum
when you wish to emphasize the lighting conditions in
the center part of the screen.
This mode calculates exposure based only on the light
striking the small central spot (
you wish to set the exposure based on the light striking a
small part of the subject.
Guideline for
Light-Metering
) is given emphasis in
). Use this mode when
LCD monitor
Spot meter
Center-weighted
meter
Display
appearance
when [X4] is
selected.
7 Press the shutter release
button to take the picture.
3938
Page 24

Other Functions
<Operation>
1 Press the “MENU” button.
2 Press the “#” button to select
3 Press the “%” or “fi” button to
], then press the “ ”
[
button to confirm the selection.
select [METERING], then press
the “#” button.
4 Press the “%” or “fi” button to
select [SPOT AREA], [CENTER],
or [EVALUATION].
5 Press the “@” button.
6 Press the “MENU” button
twice to turn off the menu
display.
Display
appearance
when
[SPOT
AREA] is
selected.
7 Press the shutter release
button to take the picture.
<Focus Lock>
Camera focus and exposure are
measured and locked when the
shutter is depressed halfway. If you
find that your focus is occasionally
correct, particularly when shooting
subjects located at the edge of the
screen, use this feature in
conjunction with the exposure mode
to produce better focus results.
<Operation>
1 Point the center focus frame at
the subject you wish to be in
clear focus and depress the
shutter button halfway. The
focus will be locked on the
central subject.
2 While keeping the shutter
release button depressed
halfway, move the camera to
compose the subject as
desired, then press the shutter
the rest of the way down to
take the picture.
<Turning the Exposure
Mode Symbols ON/OFF>
Certain exposure symbols on the
LCD monitor can be temporarily
turned off if desired to avoid
cluttering the screen.
¶ The flash mode, macro/landscape
mode, and self-timer mode symbols
cannot be turned off.
<Example>
For example, when the camera is set
to the exposure conditions and
functions shown in the accompanying
illustration, pressing the “%” or “fi”
button will cause the symbols to
disappear temporarily as shown.
Press the “%” or “fi” button again to
restore the symbols to the screen.
4140
 Loading...