

Page 1

INSTRUCTION MANUAL
PS-361
IP-601 PostScript Option
Read this manual bef ore printing.
Keep readily available for reference.
Page 2

Thank you very much for purchasing the Konica PS-361 (IP-601 PostScript option).
This INSTRUCTION MANUAL includes instructions for making prints, handling the ma-
chine correctly, and safety precautions. Please read this man ual before performing any
printing operations or using the equipment in any wa y.
In order to maintain satisfactory printing performance, please keep this INSTRUCTION
MANUAL readily a v ailab le for ref erence.
Page 3

SOFTWARE LICENSE AGREEMENT
This package contains the following materials provided by Adobe Systems Incorporated (“Adobe”) and Konica
Corporation (Konica): software included as part of the printing system, including PostScript® software and other
Adobe software (“Printing Software”), the digitally-encoded machine-readable outline data encoded in the special
format and in the encrypted form (“Font Programs”), other software which runs on a computer system for use in
conjunction with the Printing Software (“Host Software”), and related explanatory written materials (“Documentation”).
The term “Software” shall be used to describe Printing Software, Font Programs and/or Host Software and also
include any upgrades, modified versions, additions, and copies of the Software.
The Software is being licensed to you under the terms of this Agreement.
Konica grants to you a non-exclusive sublicense to use the Software and Documentation, provided that you agree to
the following:
1. You may use the Printing Software and accompanying Font Programs for imaging to the licensed output
device(s), solely for your own internal business purposes.
2. In addition to the license for Font Programs set forth in Section 1 (“Printing Software”) above, you may use
Roman Font Programs to reproduce weights, styles, and versions of letters, numerals, characters and symbols
(“Typefaces”) on the display or monitor for your own internal business purposes.
3. You may make one backup copy of the Host Software, provided your backup copy is not installed or used on any
computer. Notwithstanding the above restrictions, you may install the Adobe Driver Software on any number of
computers solely for use with one or more printing systems running the Printing Software.
4. You may assign its rights under this Agreement to an assignee of all of Licensee’s right and interest to such
Software and Documentation (“Assignee”) provided you transfers to Assignee all copies of such Software and
Documentation Assignee agrees to be bound by all of the terms and conditions of this Agreement.
5. You agree not to modify, adapt or translate the Software and Documentation.
6. You agree that it will not attempt to alter, disassemble, decrypt, reverse engineer or decompile the Software.
7. Title to and ownership of the Software and Documentation and any reproductions thereof shall remain with
Adobe and Konica.
8. Trademarks shall be used in accordance with accepted trademark practice, including identification of the trademark owner’s name. Trademarks can only be used to identify printed output produced by the Software. Such use
of any trademark does not give you any rights of ownership in that trademark.
9. You may not rent, lease, sublicense, lend or transfer versions or copies of the Software Licensee does not use,
or Software contained on any unused media, except as part of the permanent transfer of all Software and
Documentation as described above
10. In no event will Konica or Adobe be liable to you for any consequential, incidental or special damages, including
any lost profits or lost saving, even if Konica has been advised of the possibility of such damages, or for any
claim by any third party. Some states or jurisdictions do not allow the exclusion or limitation of incidental,
consequential or special damages, so the above limitations may not apply to you.
11. Notice to Government End Users: The Software is a “commercial item,” as that term is defined at 48 C.F.R.
2.101, consisting of “commercial computer software” and “commercial computer software documentation,” as
such terms are used in 48 C.F.R. 12.212. Consistent with 48 C.F.R. 12.212 and 48 C.F.R. 227.7202-1 through
227.7202-4, all U.S. Government End Users acquire the Software with only those rights set forth herein.
12. You are hereby notified that Adobe Systems Incorporated, a Delaware corporation located at 345 Park Avenue,
San Jose, CA 95110-2704 (“Adobe”) is a third-party beneficiary to this Agreement to the extent that this Agreement contains provisions which relate to Licensee’s use of the Software, Font Programs, Typefaces and the
trademarks licensed hereby. Such provisions are made expressly for the benefit of Adobe and are enforceable by
Adobe in addition to Konica.
Adobe® and PostScript® are registered trademarks of Adobe Systems Incorporated.
Macintosh® is a registered trademark of Apple Computer, Inc.
Windows® is a registered trademark of Microsoft Corporation.
Printed in Japan KONICA CORPORATION
Page 4

CONTENTS
■ Introduction...........................................................................................................iv
■ About Supplied Items ........................................................................................... vi
■ About this Manual................................................................................................. vi
■ About Composition of This Manual...................................................................... vii
■ System Requirements ........................................................................................ viii
■ Rules in This Manual ............................................................................................ ix
CONTENTS
About Registered Trademarks ......................................................................................iv
Copyright ......................................................................................................................iv
Patent Notice ................................................................................................................iv
Built-in Font....................................................................................................................v
Windows ..................................................................................................................... viii
Macintosh ................................................................................................................... viii
Parallel Port ................................................................................................................ viii
Chapter 1 Outline ...................................................................................1-1
■ Contents of This Chapter................................................................................... 1-2
■ Outline of the Print Controller ............................................................................ 1-3
● IP-601 + PS-361 and Print Engine ....................................................................... 1-3
● Hardware Configuration........................................................................................ 1-5
● Host Interface ....................................................................................................... 1-5
● Engine Interface ................................................................................................... 1-5
● Data Flow ............................................................................................................. 1-6
● How to Use Memory ............................................................................................. 1-7
● Printer Driver ........................................................................................................ 1-8
● Page Description Language ................................................................................. 1-8
Chapter 2 Setup .....................................................................................2-1
■ Contents of This Chapter................................................................................... 2-2
■ Installation of the Printer Driver ......................................................................... 2-3
● Before Installation................................................................................................. 2-3
● Installation to Windows......................................................................................... 2-3
● Installation to Macintosh ....................................................................................... 2-6
Chapter 3 Printer Driver ........................................................................3-1
■ Contents of This Chapter................................................................................... 3-2
■ Working Environment ........................................................................................ 3-3
● Compliant OS ....................................................................................................... 3-3
ii PS-361 (IP-601 PostScript option)
Page 5

CONTENTS
■ Print from Applications (Windows)..................................................................... 3-3
● Execution of Printing............................................................................................. 3-3
● Print Settings ........................................................................................................ 3-3
■ Print from Applications (Macintosh)................................................................. 3-11
● Execution of Printing........................................................................................... 3-11
● Print Settings ...................................................................................................... 3-11
■ Printer Driver Function List .............................................................................. 3-13
Chapter 4 Control Panel Setup .............................................................4-1
■ Contents of This Chapter................................................................................... 4-2
■ Control Panel Layout ......................................................................................... 4-3
● The Control Panel of the 7075 Printer/Copier ...................................................... 4-3
● Touch Screen........................................................................................................ 4-4
● Basic Screen ........................................................................................................ 4-6
● Job Status Screen ................................................................................................ 4-7
● Printer Mode Basic Screen ................................................................................... 4-9
● Cancel ................................................................................................................ 4-10
● Check ................................................................................................................. 4-10
● Interrupt / Reserve.............................................................................................. 4-12
● How to Enter Settings on the LCD Touch Screen ............................................... 4-13
● Procedures of the Printer Setting ....................................................................... 4-14
■ Configuration of Printer Setting Menu ............................................................. 4-15
■ Functions of the Printer Setting ....................................................................... 4-16
● Test Print............................................................................................................. 4-16
● Controller Set...................................................................................................... 4-16
● Set Default .......................................................................................................... 4-18
● PCL Setup .......................................................................................................... 4-19
Appendix A Troubleshooting ..............................................Appendix A-1
Appendix B Product Specifications ...................................Appendix B-1
Appendix C Font List...........................................................Appendix C-1
INDEX.....................................................................................................................Index-1
PS-361 (IP-601 PostScript option) iii
Page 6

Introduction
■ Introduction
The Konica PS-361 is a PostScript option for the IP-601 Print Controller.
The IP-601 + PS-361 Print Controller works as an interface between the Konica
7075 Printer/Copier and a workstation, and enables direct PostScript printing from
the workstation environment.
The print engine on the printer side and the optional network interface card include separate operating manuals, namely, the 7075 INSTRUCTION MANUAL
and the KN-302 INSTRUCTION MANUAL (on CD), respectively.
For detailed operations of Windows 95/98/NT 4.0/2000 or Mac OS, refer to the
operating manuals for each operating system.
For applications operations, refer to the operating manuals provided with each
application.
About Registered Trademarks
Microsoft, MS and MS-DOS are registered trademarks of Microsoft Corporation in
the United States.
IBM is a registered trademark of International Business Machines, Inc. in the
United States.
Windows
Apple, Macintosh and Mac are registered trademarks or trademarks of Apple
Computer, Inc.
Adobe, Adobe Logo, Acrobat, Acrobat Logo, PostScript and PostScript Logo are
registered trademarks or trademarks of Adobe Systems, Inc.
Other company names and product names written in this manual are the registered trademarks or trademarks of their respective companies.
TM
is a trademark of Microsoft Corporation.
Copyright
COPYRIGHT © 2000 Adobe Systems, Incorporated. All rights reserved.
Patent Notice
The product includes an implementation of LZW licensed under U.S.Patent
4,558,302.
iv PS-361 (IP-601 PostScript option)
Page 7

Introduction
Built-in Font
The IP-601 + PS-361 system supports for Adobe PostScript 3 Language and
includes the 136 built-in Adobe PostScript 3 fonts. For a complete list, see
“Appendix C Font List”.
• A part or all of this INSTRUCTION MANUAL shall not be used or copied without
permission.
• Konica shall have no liability for any influences caused by using the 7075 + IP-601
+ PS-361 system and this manual.
• Information written in this INSTRUCTION MANUAL is subject to change without
notice.
• Adobe Systems Incorporated and Konica Corporation shall have the copyright of
this printer driver.
• This printer driver shall not be copied except for the purpose of backup.
PS-361 (IP-601 PostScript option) v
Page 8

Introduction
■ About Supplied Items
The following items are supplied to the PS-361:
• PS protection chip
• User Software CD (Including printer driver, Adobe Acrobat Reader, this
INSTRUCTION MANUAL and Release Note*)
*Release Note describes the latest information and limits of the system
and the user software.
■ About this Manual
This manual describes the printing operations of the Konica 7075 Printer/Copier
when it is connected to the Konica IP-601 + PS-361 Print Controller.
An optional Network Interface Card (KN-302) is required to use the
Konica 7075 Printer/Copier as printer connected to a network. To
learn more about printer operations on the network, refer to the “7075
INSTRUCTION MANUAL” and the “KN-302 INSTRUCTION MANUAL”
which are provided with the Print Engine (7075) on the printer side
and the optional Network Interface Card (KN-302), respectively.
vi PS-361 (IP-601 PostScript option)
Page 9

■ About Composition of This Manual
This manual is composed of the following four chapters and Appendix:
Chapter 1: Outline
Chapter 1 describes the Print Controller (IP-601 + PS-361) hardware and the
outline of its functions, and briefly explains how to connect the parallel ports of
computers to the Print Controller and the Printer (7075).
Chapter 2: Setup
Chapter 2 describes how to install the printer driver in the computers. It enables printing from each application of the Windows-compliant computers or
the Macintosh to the Printer (7075) by way of a network/parallel port.
Chapter 3: Printer Driver
Chapter 3 describes how to print from applications and various functions of
Introduction
the printer driver installed in the computers.
Chapter 4: Control Panel Setup
Chapter 4 describes the layout of the Control Panel of the Printer (7075) and
explains how to operate and set functions on the Control Panel.
Appendix
• Appendix A describes troubleshooting tips for the Print Controller.
• Appendix B describes product specifications.
• Appendix C lists the built-in printer fonts included with the Print Controller.
PS-361 (IP-601 PostScript option) vii
Page 10

Introduction
■ System Requirements
Windows
The following are required to print from the Windows-compliant computers to the
Print Controller.
• Computers on which Windows 95/98/NT 4.0/2000 can run
• CD-ROM drive (necessary to install the printer driver)
Using Windows 95/98
• Microsoft Windows 95/98
• 32MB RAM or more
Using Windows NT 4.0
• Microsoft Windows NT 4.0 and NT Service Pack 3
• 32MB RAM or more
Using Windows 2000
• Microsoft Windows 2000
• 32MB RAM or more
Macintosh
The following are required to print from the Macintosh to the Print Controller.
• Computers on which Mac OS 7.1 or more can run
• CD-ROM drive (necessary to install the printer driver)
Parallel Port
The following are required to print to the Print Controller by way of the parallel
port.
• Windows-compliant computers
• IEEE 1284 parallel cable
One end of the cable is required to have a DB 25 pin male connector (con-
nected to the Print Controller).
viii PS-361 (IP-601 PostScript option)
Page 11
■ Rules in This Manual
• Notation of the name of each section in this manual is written within quotation
marks e.g., “Chapter 1 Outline.”
• Notation of names shown on the screen are written within square brackets e.g.,
click the [OK] button.
• Notation of cautions in this manual are shown with the caution symbol.
Each mark used in this manual has the following meaning.
Precautions and limits at the time of operating hardware or software
are written.
Introduction
Hints, advice, confirming items, etc. at the time of operating hardware
or software are written.
• Notation of sub-folders
Sub-folders are written in a logical string as, for example, “\route level
folder\sub folder 1\sub folder 2.”
For example, instructions for selecting the [ko601118e.exe] file in the [Driver]
folder in the [English] folder in the [PS3] folder of the User Software CD, are
written as
Select the [ko601118e.exe] file in the “PS3\English\Driver” folder of the User
Software CD.
PS-361 (IP-601 PostScript option) ix
Page 12

Chapter 1 Outline
■ Contents of This Chapter ........................... 1-2
■ Outline of the Print Controller ................... 1-3
●IP-601 + PS-361 and Print Engine ......................1-3
●Hardware Configuration......................................1-5
●Host Interface.......................................................1-5
●Engine Interface...................................................1-5
●Data Flow..............................................................1-6
●How to Use Memory ............................................1-7
●Printer Driver........................................................1-8
●Page Description Language ...............................1-8
PS-361 (IP-601 PostScript option) 1-1
Page 13

Chapter 1 Outline
■ Contents of This Chapter
This chapter describes the outline of the Konica IP-601 + PS-361 Print Controller,
which is attached to the Konica 7075 engine .
For copier functions, refer to the “7075 INSTRUCTION MANUAL”.
1-2 PS-361 (IP-601 PostScript option)
Page 14

■ Outline of the Print Controller
● IP-601 + PS-361 and Print Engine
The Konica IP-601 + PS-361 is the Print Controller used to connect the Konica
7075 Printer/Copier to computers or to a network on which the Konica 7075 can
function as a PostScript printer from applications on Windows 95/98/NT 4.0/2000
or Macintosh. The optional Konica KN-302 Network Interface Card is required for
connecting to a network.
The operation panel of the Konica 7075 can be used either in the copy mode or
the printer mode.
Even while the Konica 7075 is printing or copying, the IP-601 + PS-361 can receive the next job, and while the IP-601 + PS-361 is receiving a print job, you can
use the copying mode.
The IP-601 + PS-361 supports PostScript 3. When the command for printing is
executed from applications on Windows 95/98/NT 4.0/2000 or Macintosh, print
Chapter 1 Outline
data is sent to the IP-601 + PS-361 by way of a parallel cable (IEEE 1284) or a
network. The PostScript interpreter inside the Print Controller rasterizes the print
data to image data, which is sent to the Konica 7075 Print Engine via the video
interface card installed in the Print Engine. The Serial bus (IEEE 1394) provides a
high speed transmitting method for data, commands and status transferring between the PostScript interpreter and the video interface card. The maximum
transferring rate is 200Mbps. The Printer Engine receives image data through the
PCI bus from the video interface card.
The 7075 + IP-601 system can continuously print Letter/A4-size paper at the print
speed of 75 ppm (400 dpi/600 dpi). In addition, this system supports the duplex
function and the finisher function which enables the use of five paper trays, stapling, folding and stitching.
PS-361 (IP-601 PostScript option) 1-3
Page 15
Chapter 1 Outline
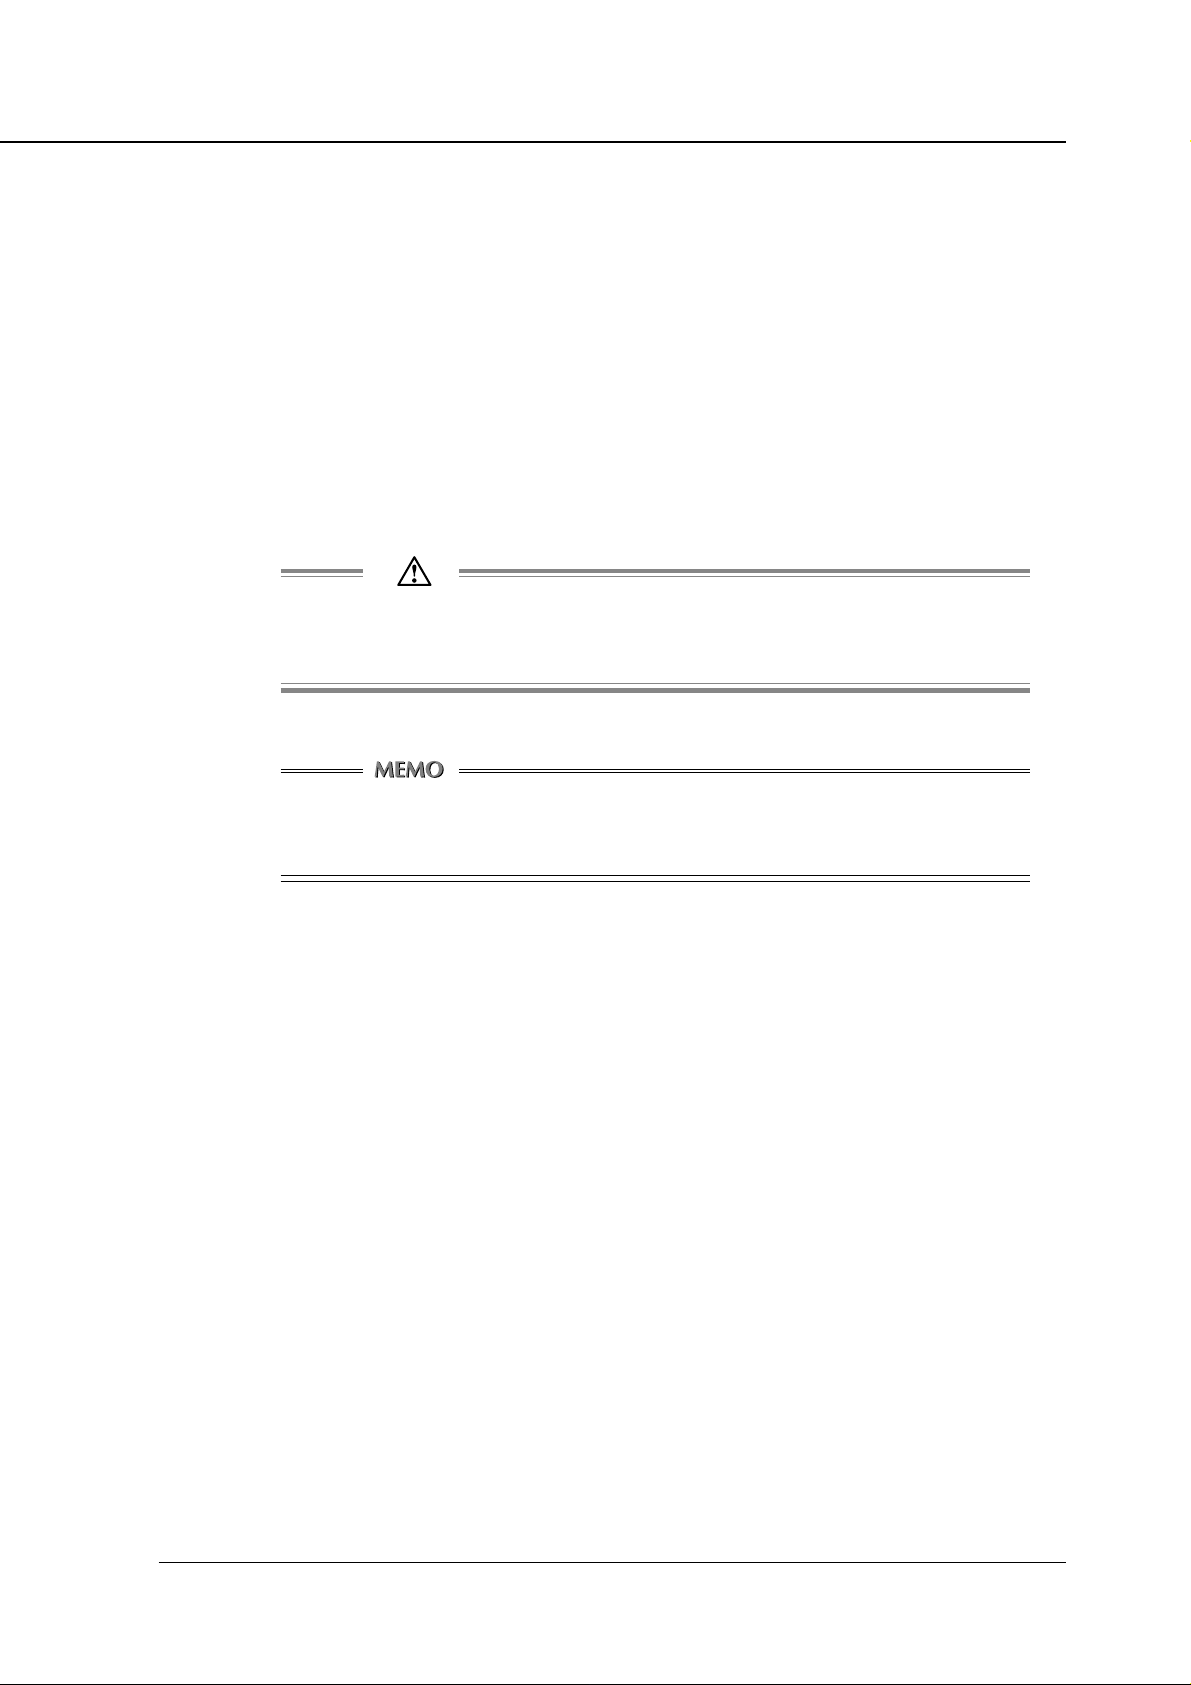
Conceptual Connection
For use as a networked printer
(KN-302 required)
E-RDH (Electronic Recirculating Document Handler)
The Konica 7075 E-RDH is used to print from the IP-601 + PS-361. The ERDH system temporarily stores in memory the print data you select from
IP-601 + PS-361 Konica 7075 Printer/Copier
For use as a local printer
available options. The E-RDH memory is 64 MB (standard) and can be extended to 512 MB.
When using the E-RDH in the one-sided mode, printing will be performed
simultaneously while the print controller rasterizes the pages in the print job
and sends them to the E-RDH memory. While pages are being printed from
the E-RDH memory, the print controller continues to rasterize the next print
job in the sequence.
1-4 PS-361 (IP-601 PostScript option)
Page 16

● Hardware Configuration
Basic Configuration
Configuration of the IP-601 + PS-361 is as follows:
• Architecture: IBM Compatible PC System
• Processor: Intel Pentium III 500 Mhz
• Memory: 64 MB standard / 512 MB max.
• Hard Drive: IDE compatible 2.0 GB min.
• Floppy Drive: 3.5" Floppy Disk
● Host Interface
Parallel
Centronics (IEEE 1284) / compatible bi-directional
Chapter 1 Outline
Ethernet (option)
100BaseTX and 10BaseT
The optional KN-302 card is used to connect to the Ethernet. The KN-302 is
the internal network interface card which supports multiple protocols on the
Ethernet. This card includes a CPU and flash memory with an upgradable
program.
The KN-302 supports the following network protocols.
• IPX/SPX (NetWare, Peer to Peer)
• TCP/IP (LPD/LPR, Peer to Peer)
Refer to the corresponding operating manual for connection to the KN-302.
● Engine Interface
IEEE 1394 (The maximum transferring rate is 200Mbps.)
Use this Engine Interface only to connect the IP-601 and the 7075.
Otherwise, system trouble may occur.
PS-361 (IP-601 PostScript option) 1-5
Page 17
Chapter 1 Outline
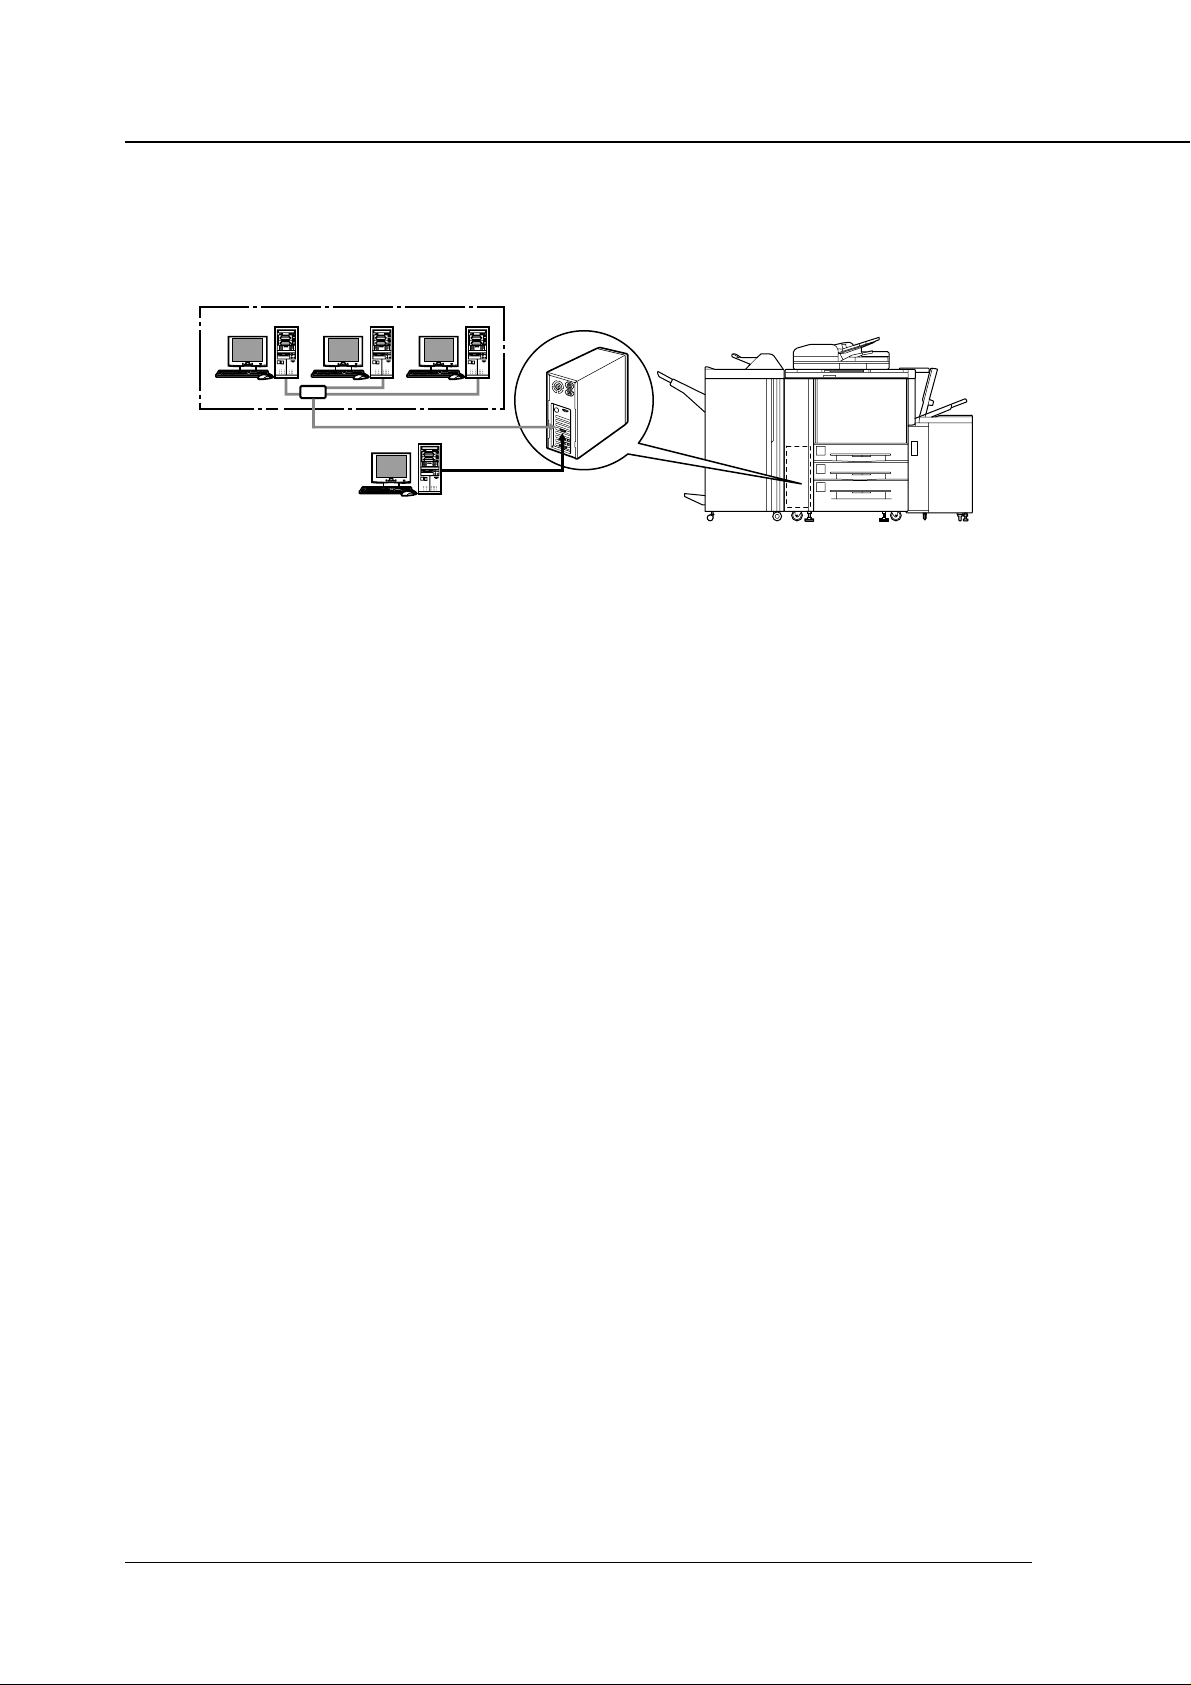
● Data Flow
Computer
Print Commands
Host
Interface
Print Controller
IP-601 + PS-361
Spooler
Parallel I/F
(IEEE 1284)
ISA bus
Application
Printer Driver
(TCP/IP, IPX/SPX, AppleTalk)
Input Buffer
Hard Disk
PDL Processing (Rasterization)
Web Browser
HTML
Ethernet I/F
Network Interface Card
KN-302 (Option)
PCI bus
Video Interface Card
Print Engine
PDL command
Rasterized image data
Printer status
Page Memory
IEEE 1394
Print Controller Interface (IEEE 1394)
Engine Interface (PCI bus)
PCI bus
E-RDH Memory
Engine (Print)
1-6 PS-361 (IP-601 PostScript option)
Page 18

Chapter 1 Outline
● How to Use Memory
Most of the IP-601 + PS-361 memory is used for rasterizing images. Only a small
part of it is used for the system operation. The E-RDH memory of the Konica 7075
is used for print processing.
The basic memory setting of the IP-601 is 64 MB, which allows 1 bit mode (400
dpi/600 dpi) printing for all sizes of paper. The memory of the IP-601 + PS-361
can be expanded to 512 MB maximum.
In addition, the E-RDH memory of the Konica 7075 can be expanded to 512 MB
maximum.
The more memory in the IP-601, the more pages can be rasterized while waiting
for the pre vious job to print.
Memory Overflow
Depending on the functions selected in the printer driver, occasional memory
overflow may occur if the volume of the print job is large. In this case the print
job is cancelled.
e.g. Booklet, Fold & Stitch, 2 in 1, etc.
In case of frequent memory overflow, extending the memory capacity of the
Konica 7075 Printer/Copier is recommended.
Memory Upgrading
To obtain optimum printer performance, memory expansion is recommended.
Contact the nearest Konica service representative for details.
PS-361 (IP-601 PostScript option) 1-7
Page 19

Chapter 1 Outline
● Printer Driver
The Print Controller works according to the condition of the printer driver.
The printer driver can be used on the following OS:
• Windows 95
• Windows 98
• Windows NT 4.0 and NT Service Pack 3
• Windows 2000
• Mac OS 7.1 or more
Refer to “Chapter 2 Setup” (p. 2-1) for how to set up the printer.
Refer to “Chapter 3 Printer Driver” (p. 3-1) for detailed functions of the printer
driver.
● Page Description Language
PDL (page description language) controls the transfer of information from the
computer to the Print Controller.
“PostScript 3” comes as PDL with the IP-601 + PS-361.
1-8 PS-361 (IP-601 PostScript option)
Page 20

Chapter 2 Setup
■ Contents of This Chapter ........................... 2-2
■ Installation of the Printer Driver................ 2-3
●Before Installation ...............................................2-3
●Installation to Windows.......................................2-3
●Installation to Macintosh.....................................2-6
PS-361 (IP-601 PostScript option) 2-1
Page 21

Chapter 2 Setup
■ Contents of This Chapter
To use the Konica 7075 + IP-601 + PS-361 system, connect the 7075 + IP-601 +
PS-361 system to computers by way of the parallel port and install the printer
driver on the computers.
This chapter describes how to install the printer driver.
Refer to “Chapter 3 Printer Driver” (p. 3-1) for how to print from applications and
functions of the printer driver.
2-2 PS-361 (IP-601 PostScript option)
Page 22

■ Installation of the Printer Driver
● Before Installation
Models and Environment of Computers
The Konica 7075 with the IP-601 Print Controller + PS-361, can be used with
most computers ranging from personal computers to workstations.
The IP-601 + PS-361 includes the printer driver for Windows 95/98/NT 4.0/
2000 and for Macintosh.
● Installation to Windows
To install the Konica IP-601 + PS-361 printer driver to Windows 95/98/NT 4.0/
2000, perform the following steps.
Please keep the “User Software CD” on hand since it is required to install the
printer driver.
Chapter 2 Setup
1. Turn on the computer and start Windows.
Exit from all active Windows applications, if running.
Using Windows NT 4.0/2000
Log on as an Administrator ( or a user entitled to install printer drivers,
such as Po w er User, etc.).
2. Set the “User Software CD” on the CD-ROM drive.
3. Double-click the [My Computer] icon on the desktop to open the [My
Computer] window. Then double-click the CD icon (User Software CD).
Opening from the [Start] menu
Right-click the [Start] button of the task bar to click [Explore]. Then,
you can select the CD icon (User Software CD) from [Address].
4. Double-click the [ko601118e.exe] file in the “\PS3\English\Driver” folder
of the “User Software CD”.
After unzipping the program files, the Adobe PostScript Driver Setup program
will run to display the [Welcome] window.
5. Click the [Next] button.
The [End User License Agreement] window will appear.
PS-361 (IP-601 PostScript option) 2-3
Page 23

Chapter 2 Setup
6. Click the [ACCEPT] button.
To use the Konica IP-601 + PS-361 printer driver, you are required to agree
to the License. When you agree to the license, click the [ACCEPT] button to
proceed to the next step.
7. Depending on your computer environment, the [Printer Installation
Type] window will appear. In this case, select [Install a new PostScript
printer] and click the [Next] button.
The [Printer Connection Type] window will appear.
8. Select [It is directly connected to your computer (Local Printer)] and
click the [Next] button.
When the Konica 7075 Printer/Copier (IP-601 + PS-361) is directly connected to a computer in which the printer driver will be installed, select [Local
Printer].
The [Local Port Selection] window will appear by clicking the [Next] button.
When selecting [Network Printer]
When personal computers or workstations are connected to the
network and you want to print via
the network, connect to the optional
Network Interface Card (KN-302) and select [Network Printer].
For a [Network Printer], type the network path or queue name and
click the [Next] button. If you don’t know its path or name, click the
[Browse] button to view available network printers. Follow the procedure through 9 to 16.
9. Select the Port the Konica IP-601 + PS-361 is connected to, then click
the [Next] button.
The [Select Printer Model] window will appear.
10. Select the [Konica IP-601 PostScript] in the [Printers] list, then click the
[Next] button.
The [Printer Information] window will appear.
Using Windows NT 4.0/2000
When clicking the [Next] button on the [Select Printer Model] window,
the [Sharing] window will appear. Specify the settings for printer sharing, and click the [Next] button to open the [Printer Information] window.
2-4 PS-361 (IP-601 PostScript option)
Page 24

Chapter 2 Setup
11. Confirm the printer name.
To change the printer name, enter another name in the [Printer Name] text box.
Default: [Konica IP-601 PostScript]
12. Select whether you will use this printer as your default printer or not.
Select [Yes] to specify the printer as your default, otherwise select [No].
13. Select whether you will perform the print test or not, then click the
[Next] button.
Select [Yes (recommended)] to perform the test page, while select [No] not to
perform it.
The [Setup Information] window will appear.
14. Confirm the installed components and click the [Install] button.
The [Printer Configuration] window will appear.
15. Select whether you configure the printer or not, then click the [Next]
button.
Select [Yes] to setup the printer, otherwise select [No]. When you check the
[Yes], the [Konica IP-601 PostScript Properties] window will appear. You can
setup the printer using the printer properties, as needed.
When you select [No], or you click the [OK] button or [Cancel] button in the
[Konica IP-601 PostScript Properties] window, the [Setup Complete] window
will appear.
Properties windows
The printer properties window will be different for each environment,
depending on the Windows environment in which you install the
printer driver.
For more information, refer to “Chapter 3 Printer Driver” (page 3-1).
16. Click the [Finish] button.
Necessary files will be copied from the “User Software CD” to finish the
installation.
If you have checked [Yes, I want to view the ReadMe file.], after clicking the
[Finish] button the ReadMe file will open.
Closing the ReadMe file or clicking the [Finish] button without checking [Yes, I
want to view the ReadMe file.], the setup will finish to return the desktop
window, then Konica IP-601 + PS-361 printer will be available.
The printer driver of the Konica IP-601 + PS-361 becomes available without
restarting your computer.
PS-361 (IP-601 PostScript option) 2-5
Page 25

Chapter 2 Setup
● Installation to Macintosh
To install the Konica IP-601 + PS-361 printer driver to Macintosh, perform the
following steps.
Please keep the “User Software CD” on hand since it is required to install the
printer driver.
To install the printer driver
1. Turn on the computer and start Macintosh.
Exit from all active Macintosh applications, if running.
2. Set the “User Software CD” on the CD-ROM drive.
Copying the PPD file to HD
Select the [*.ppd] file in the [\PS3\English\Driver] of the “User Softw are
CD”, then copy the file to your [HDD] - [System Folder] - [Extensions] [Printer Descriptions].
3. The printer drivers differ from your Macintosh model and OS to another.
[Using PowerMacintosh]
Confirm your OS version.
[Mac OS 8.1 or more]
Double-click the [AdobePS Installer] icon in the [\PS3\English\OS8_1
or more\Driver] folder of the “User Software CD”.
[Mac OS 7.1 or more to 8]
Double-click the [AdobePS Installer] icon in the [\PS3\English\OS7_1
or more\Driver] folder of the “User Software CD”.
[Using other Macintosh]
Regardless of your OS version, perform the above step, [Mac OS
7.1 or more to 8].
The dialog will appear.
4. Click the [Continue] button.
[License] dialog will appear.
5. Click the [ACCEPT] button.
To use the Konica IP-601 + PS-361 printer driver, you are required to agree
to the License. When you agree to the license, click the [ACCEPT] button to
follow the next step. [Adobe Driver 8.7 Installer] dialog will appear.
6. Click the [Install] button.
The installation program will run.
After finishing the installation, the message will be displayed.
2-6 PS-361 (IP-601 PostScript option)
Page 26

Chapter 2 Setup
7. Click the [Finish] button.
Follow the steps of [Selecting the printer on Chooser].
(To restart the computer is recommended if you perform [Mac OS 7.1 or more to
8] in the Step 3.)
Selecting the printer in Chooser
1. Select the [Chooser] of [Apple Menu].
2. Confirm [AppleTalk] is set to [Active].
3. Click the [AdobePS].
4. Click the printer name corresponding with the IP-601 + PS-361 printer in
the list of [Select a PostScript Printer]. Refer to the Network Interface
Card Status Page for relevent printer name.
5. Click the [Create] button when you first use the IP-601 + PS-361 printer.
The dialog will appear.
6. Click the [▼] button of the each item to setup the Konica IP-601 + PS-
361 printer option.
7. Click the [OK] button.
Return to the [Chooser] dialog.
8. Close the [Chooser] dialog.
PS-361 (IP-601 PostScript option) 2-7
Page 27

Chapter 3 Printer Driver
■ Contents of This Chapter ........................... 3-2
■ Working Environment................................. 3-3
●Compliant OS.......................................................3-3
■ Print from Applications (Windows)........... 3-3
●Execution of Printing...........................................3-3
●Print Settings .......................................................3-3
■ Print from Applications (Macintosh)....... 3-11
●Execution of Printing.........................................3-11
●Print Settings .....................................................3-11
■ Printer Driver Function List ..................... 3-13
PS-361 (IP-601 PostScript option) 3-1
Page 28

Chpater 3 Printer Driver
■ Contents of This Chapter
This chapter describes how to print from applications to the Konica 7075 + IP-601
+ PS-361 system and how to use the functions of the printer driver installed in
computers.
Refer to “Chapter 2 Setup” (p. 2-1) for installation of the printer driver.
3-2 PS-361 (IP-601 PostScript option)
Page 29

■ Working Environment
● Compliant OS
The Printer Driver can be used on the following OS:
• Windows 95
• Windows 98
• Windows NT 4.0 and NT Service Pack 3
• Windows 2000
• Mac OS 7.1 or more
Refer to “Chapter 2 Setup” (p. 2-1) for installation of the Printer Driver.
■ Print from Applications (Windows)
● Execution of Printing
Chpater 3 Printer Driver
1. Click the [File] menu of each application and click [Print].
2. Check that Konica IP-601 + PS-361 printer’s name is shown on [Printer
Name] and click [OK].
When IP-601 + PS-361 printer is not shown, select it from the list box.
Setting the [Print] dialog box
Refer to the user’s manual of each application.
Uncheck the [Collate Printing] check box from each application.
● Print Settings
Perform various settings at the time of printing on the printer property or [Print]
dialog, etc.
The windows for kinds of settings come with different appearance depending on
the Windows environment.
Refer to “Printer Driver Function List” (p. 3-13) for the setting items and values.
PS-361 (IP-601 PostScript option) 3-3
Page 30

Chpater 3 Printer Driver
Windows 95/98
The various settings on Windows 95/98 can be performed from the [Konica IP-601
PostScript Properties]. [Konica IP-601 PostScript Properties] may be opened by
using the following methods. The contents of appearance depends on the opening
methods.
Method 1
Click the [Properties] shown from the menu by right-clicking the Konica IP-601
+ PS-361 printer icon in the [Printers] window displayed by clicking [Start][Settings]-[Printers].
To open the [Printers] window from [My Computer]
You can open the [Printers] window by double-clicking the [Printers]
folder in the [My Computer] Window opened by double-clicking the [My
Computer] icon on the desktop.
3-4 PS-361 (IP-601 PostScript option)
Page 31

Chpater 3 Printer Driver
Method 2
Select the Konica IP-601 + PS-361 printer name from the [Printer Name] of
the [Print] dialog shown by clicking the [File] - [Print] on each application, then
click the [Properties] button.
With the exception of the [General] tab/[Sharing] tab/[Fonts] tab
shown in Method 1, you can specify the setup items displayed in
Method 2. As shown in Method 2, some part of the functions from the
[Paper] tab/[Device Options] tab/[PostScript] tab cannot be set up.
PS-361 (IP-601 PostScript option) 3-5
Page 32

Chpater 3 Printer Driver
Windows NT 4.0
The various settings on Windows NT 4.0 can be performed from the [Konica IP601 PostScript Properties], [Konica IP-601 PostScript Default Document Properties], or [Konica IP-601 PostScript Document Properties]. Each window will be
opened by the following wa ys .
Method 1
Click the [Properties] shown from the menu by right-clicking the Konica IP-601
+ PS-361 printer icon in the [Printers] window displayed by clicking [Start][Settings]-[Printers].
To open the [Printers] window from [My Computer]
You can open the [Printers] window by double-clicking the [Printers]
folder in the [My Computer] Window opened by double-clicking the [My
Computer] icon on the desktop.
[Konica IP-601 PostScript Properties]
3-6 PS-361 (IP-601 PostScript option)
Page 33

Chpater 3 Printer Driver
Method 2
Click the [Default Document] shown from the menu by right-clicking the
Konica IP-601 + PS-361 printer icon in the [Printers] window displayed by
clicking [Start]-[Settings]-[Printers].
[Konica IP-601 PostScript Default Document Properties]
Method 3
Select the Konica IP-601 + PS-361 printer name from the [Printer Name] of
the [Print] dialog shown by clicking the [File] - [Print] on each application, then
click the [Properties] button.
[Konica IP-601 PostScript Document Properties]
The setup items on the window by Method 2 are as same as those by
Method 3 But these items are different from those on the window by
Method 1.
From Windows NT 4.0, you can specify the various settings using
both the [Konica IP-601 PostScript Default Document Properties], or
[Konica IP-601 PostScript Document Properties] and the [Konica IP601 PostScript Properties] displayed from the [Printers] window.
PS-361 (IP-601 PostScript option) 3-7
Page 34

Chpater 3 Printer Driver
Windows 2000
The various settings on Windows 2000 can be performed from the [Konica IP-601
PostScript Properties] and the [Konica IP-601 PostScript Printing Preferences],
[Konica IP-601 PostScript Printing Defaults], or [Layout] tab/[Paper/Quality] tab in
the [Print] dialog. Each window will be opened by the following wa ys.
Method 1
Click the [Properties] shown from the menu by right-clicking the Konica IP-601
+ PS-361 printer icon in the [Printers] window displayed by clicking [Start][Settings]-[Printers]. ([Konica IP-601 PostScript Properties]
To open the [Printers] window from [My Computer]
You can open the [Printers] window by double-clicking the [Control
Panel] - [Printers] folder in the [My Computer] Window opened by
double-clicking the [My Computer] icon on the desktop.
[Konica IP-601 PostScript Properties]
3-8 PS-361 (IP-601 PostScript option)
Page 35

Chpater 3 Printer Driver
Method 2
Click the [Printing Preferences] shown from the menu by right-clicking the
Konica IP-601 + PS-361 printer icon in the [Printers] window displayed by
clicking [Start]-[Settings]-[Printers]. ([Konica IP-601 PostScript Printing Preferences])
[Konica IP-601 PostScript Printing Preferences]
The window in Method 2 can be also shown by clicking the [Printing Preferences] button on the [General] tab on the window in Method 1.
Also [Konica IP-601 PostScript Printing Defaults] can be displayed by clicking
the [Printing Defaults] button in the [Adv anced] tab on the window in Method 1.
[Konica IP-601 PostScript Printing Defaults]
[AdobePS Konica IP-601 PostScript Advanced Options] can be displayed by
clicking the [Advanced] button in [Konica IP-601 PostScript Printing Preferences] and [Konica IP-601 PostScript Printing Defaults].
[AdobePS Konica IP-601 PostScript Advanced Options]
PS-361 (IP-601 PostScript option) 3-9
Page 36

Chpater 3 Printer Driver
Method 3
Select the Konica IP-601 + PS-361 printer name from the [Printer Name] of
the [Print] dialog shown by clicking the [File] - [Print] on each application, then
display the [Layout] tab, or [Paper/Quality] tab.
[Layout] tab [Paper/Quality] tab
Setting items displayed in the window in Method 2 are similar to those
of the [Layout] tab and the [Paper/Quality] tab in Method 3 and the
settings in the [AdobePS Konica IP-601 PostScript Advanced Options]
window may be viewed by clicking the [Advanced] button in these two
windows.
These setting items are different from those displayed in the window
in Method 1.
From Windows 2000, you can specify the various settings using the
[Konica IP-601 PostScript Printing Preferences], [Konica IP-601
PostScript Printing Defaults], or [Layout] tab and [Paper/Quality] tab in
the [Properties] of the [Print] dialog, and [Konica IP-601 PostScript
Properties].
3-10 PS-361 (IP-601 PostScript option)
Page 37

■ Print from Applications (Macintosh)
● Execution of Printing
1. Click the [File] menu of each applicaiton and click [Print].
2. Confirm the Konica IP-601 + PS-361 printer name is displayed in the
[Printer name] box, then clic [OK] button.
If the Konica IP-601 + PS-361 printer name is not displayed, select the
printer.
Setting the [Print] dialog box
Refer to the user’s manual of each application.
● Print Settings
Chpater 3 Printer Driver
Each application used is displayed in the print dialog box.
The following are the popular print dialog boxes.
Setting Items
Printer Specific Options (1) Printer Specific Options (2)
Layout Error Settings
PS-361 (IP-601 PostScript option) 3-11
Page 38

Chpater 3 Printer Driver
PostScript Settings
Refer to “■ Printer Driver Function List” (p . 3-13) for the printer driver functions.
3-12 PS-361 (IP-601 PostScript option)
Page 39

■ Printer Driver Function List
Terms defined below are abbrebiations of terms used in the list of functions
shown on the next page.
These functions which take a particular route, can be set by using the Printer
Driver of the Konica 7075 + IP-601 + PS-361 system.
Properties:
[Konica IP-601 PostScript Properties] displayed from the [Printers] window
properties (95/98):
[Konica IP-601 PostScript Properties] displayed by clicking the [Properties]
button in the [Print] dialog shown by clicking the [File] - [Print] from Windows
95/98 applications
Properties (NT):
[Konica IP-601 PostScript Default Document Properties], [Konica IP-601
Chapter 3 Printer Driver
PostScript Document Properties] or [Konica IP-601 PostScript Properties] of
Windows NT 4.0
Refer to page 3-7 for instructions on how to display the window.
Properties (2000):
[Konica IP-601 PostScript Printing Preferences], or [Konica IP-601
PostScript Printing Defaults] of Windows 2000
Refer to page 3-9 for instructions on how to display the window.
Properties (2000): - [Advanced Options]
[AdobePS Konica IP-601 PostScript Advanced Options] displayed by clicking the [Advanced] button of [Konica IP-601 PostScript Printing Preferences]
or [Konica IP-601 PostScript Printing Defaults]
The route for Macintosh settings are omitted, as each Macintosh application
comes with various print dialog box es.
Refer to “Chapter 4 Control Panel Setup” (p. 4-1) for instructions on how to setup
the printer from the Control Panel of the Konica 7075.
PS-361 (IP-601 PostScript option) 3-13
Page 40

Chapter 3 Printer Driver
Konica 7075 Special Functions
Job Offset O 95/98 O NT 4.0 O 2000 O Macintosh
Set Value Off / On
Description When [On] is selected, e v ery set of copies is offset upon exit.
Operation 95/98: Properties / Properties (95/98) - [Device Options] tab
NT: Properties (NT) - [Advanced] tab (Printer Features)
2000: Properties (2000) - [Advanced Options] (Printer Features)
Collate O 95/98 O NT 4.0 O 2000 O Macintosh
Set Value Sort / Group
Description Pr ints the m ulti sets according to the selected method, sorting or each page
grouping.
Operation 95/98: Properties / Properties (95/98) - [Device Options] tab
NT: Properties (NT) - [Advanced] tab (Printer Features)
2000: Properties (2000) - [Advanced Options] (Printer Features)
Combination O 95/98 O NT 4.0 O 2000 O Macintosh
Set Value -None- / Booklet / 2-in-1 / 2-in-1 Repeat
Description Prints 2 pages onto 1 sheet with the selected method.
Operation 95/98: Properties / Properties (95/98) - [Device Options] tab
NT: Properties (NT) - [Advanced] tab (Printer Features)
2000: Properties (2000) - [Advanced Options] (Printer Features)
Fold, Stitch O 95/98 O NT 4.0 O 2000 O Macintosh
Set Value -None- / Fold Only / Fold, Trim / Fold, Stitch / Fold, Stitch, Trim
Description Makes f olded / stitched / trimmed set according to the slected method.
Operation 95/98: Properties / Properties (95/98) - [Device Options] tab
NT: Properties (NT) - [Advanced] tab (Printer Features)
2000: Properties (2000) - [Advanced Options] (Printer Features)
Stapling O 95/98 O NT 4.0 O 2000 O Macintosh
Set Value -None- / Single (Portrait) / Single (Landscape) / Double Side (Portrait) /
Double Side (Landscape) / Double Top (Portrait) / Double Top (Landscape)
Description Makes the stapled set b y the selected positioning method.
Operation 95/98: Properties / Properties (95/98) - [Device Options] tab
NT: Properties (NT) - [Advanced] tab (Printer Features)
2000: Properties (2000) - [Advanced Options] (Printer Features)
Wait Mode O 95/98 O NT 4.0 O 2000 O Macintosh
Set Value -None- / W ait / W ait with Proof
Description Stops to print before printing out multiple sets according to the selected method.
3-14 PS-361 (IP-601 PostScript option)
Page 41

Chapter 3 Printer Driver
Operation 95/98: Properties / Properties (95/98) - [Device Options] tab
NT: Properties (NT) - [Advanced] tab (Printer Features)
2000: Properties (2000) - [Advanced Options] (Printer Features)
Image Shift O 95/98 O NT 4.0 O 2000 O Macintosh
Set Value Off / On
Description When [On] is selected, prints documents with the binding margins set up
from the LCD Panel of the 7075.
Operation 95/98: Properties / Properties (95/98) - [Device Options] tab
NT: Properties (NT) - [Advanced] tab (Printer Features)
2000: Properties (2000) - [Advanced Options] (Printer Features)
Front Cover O 95/98 O NT 4.0 O 2000 O Macintosh
Set Value -None- / Printed / Blank
Description Inserts a sheet to the top of each set of copies as a front cover by the selected
method.
Operation 95/98: Properties / Properties (95/98) - [Device Options] tab
NT: Properties (NT) - [Advanced] tab (Printer Features)
2000: Properties (2000) - [Advanced Options] (Printer Features)
Front Cover Tray
Set Value -None- / Manual Feed / Tray1 / Tray2/ / Tray3 / Tray4 / PI Tray
Description Uses the paper of selected tray as a front cover.
Operation 95/98: Properties / Properties (95/98) - [Device Options] tab
* When Printed/Blank is set up in Front Cover, Manual Feed is automatically selected as Front Cover
Tray if you set up -None- in Front Cover Tray.
Back Cover O 95/98 O NT 4.0 O 2000 O Macintosh
Set Value -None- / Printed / Blank
Description Inserts a sheet to the bottom of each set of copies as a back cover by the
Operation 95/98: Properties / Properties (95/98) - [Device Options] tab
Back Cover Tray
O 95/98 O NT 4.0 O 2000 O Macintosh
NT: Properties (NT) - [Advanced] tab (Printer Features)
2000: Properties (2000) - [Advanced Options] (Printer Features)
selected method.
NT: Properties (NT) - [Advanced] tab (Printer Features)
2000: Properties (2000) - [Advanced Options] (Printer Features)
O 95/98 O NT 4.0 O 2000 O Macintosh
Set Value -None- / Manual Feed / Tray1 / Tray2/ / Tray3 / Tray4 / PI Tray
Description Uses the paper of selected tray as a back cov er.
PS-361 (IP-601 PostScript option) 3-15
Page 42

Chapter 3 Printer Driver
Operation 95/98: Properties / Properties (95/98) - [Device Options] tab
NT: Properties (NT) - [Advanced] tab (Printer Features)
2000: Properties (2000) - [Advanced Options] (Printer Features)
* When Printed/Blank is set up in Back Cover, Manual Feed is automatically selected as Back Cover
Tray if you set up -None- in Back Cover Tray.
Output Bin O 95/98 O NT 4.0 O 2000 O Macintosh
Set Value -Default- / Sub Tray / Main Tray
Description Prints to the selected output tray.
Operation 95/98: Properties / Properties (95/98) - [Paper] tab
NT: Properties (NT) - [Advanced] tab (Printer Features)
2000: Properties (2000) - [Advanced Options] (Printer Features)
* When -Default- is selected, outputs to Main Tray.
Paper / Output
Paper Size O 95/98 O NT 4.0 O 2000 O Macintosh
Set Value Statement / Letter / Legal / Tabloid / A3 / A4 / A5 / A6 / B4 / B5 / B6 / F4 / 8K
/ 16K / Statement(W) / Letter(W) / Tabloid(W) / A3W / A4W / A5W / B4W /
B5W
Description Selects a paper size.
Operation 95/98: Properties / Properties (95/98) - [Paper] tab
NT: Properties (NT) - [Page Setup] tab / [Advanced] tab (Paper Siz e)
2000: Properties (2000) - [Advanced Options] (Paper/Output)
Orientation O 95/98 O NT 4.0 O 2000 O Macintosh
Set Value Portrait / Landscape / Rotated
Description Prints onto the selected paper direction. [Rotated] is availab le with [Landscape].
Operation 95/98: Properties / Properties (95/98) - [Paper] tab
NT: Properties (NT) - [Page Setup] tab / [Advanced] tab (Orientation)
2000: Properties (2000) - [Layout] tab
Duplex O 95/98 O NT 4.0 O 2000 O Macintosh
Set Value None / Flip on long edge / Flip on short edge
Description Performs the duplex printing with specified method.
Operation 95/98: Properties / Properties (95/98) - [Paper] tab
NT: Properties (NT) - [Page Setup] tab / [Advanced] tab (Print on
Both Sides (Duplex Printing))
2000: Properties (2000) - [Layout] tab
Paper source O 95/98 O NT 4.0 O 2000 O Macintosh
Set Value AutoSelect Tray / Tray1 / Tray2 / Tray3 / Tray4 / Manual feed
3-16 PS-361 (IP-601 PostScript option)
Page 43

Chapter 3 Printer Driver
Description Prints using the selected input tray.
Operation 95/98: Properties / Properties (95/98) - [Paper] tab
NT: Properties (NT) - [Page Setup] tab / [Advanced] tab (Paper
Source)
2000: Properties (2000) - [Paper/Quality] tab
Paper type O 95/98 O NT 4.0 O 2000 O Macintosh
Set Value Plain Paper / Thin Paper / Thick Paper / Tabbed Sheet / 2nd Original /
OHP(Transparency) / OHP-Interleav e(Blank) / OHP-Interlea v e(Print) /
User defined type
Description Prints under the condition of each selected paper type. (with Man ual Feed)
Operation 95/98: Properties / Properties (95/98) - [Paper] tab
NT: Properties (NT) - [Advanced] tab (Media)
2000: Properties (2000) - [Paper/Quality] tab
* When OHP-Interleave(Blank)/OHP-Interleave(Print) is selected in Paper type, the tray specified in
paper source is used for interleaving papers. OHP is fed from Manual feed.
* For paper type settings of each tray except Manual feed, sets up from the 7075. For details, see the
“7075 INSTRUCTION MANUAL”.
Margins O 95/98 - NT 4.0 - 2000 - Macintosh
Set Value Units (Inches / Millimeters), Top / Bottom / Left / Right
Description Prints with the margins set using the specified unit.
Operation 95/98: Properties / Properties (95/98) - [Paper] tab - [Margins] button
Copies - 95/98 O NT 4.0 O 2000 O Macintosh
Set Value 1 - 9999
Description Prints the number of copies specified.
Operation NT: Properties (NT) - [Page Setup] tab / [Advanced] tab (Copy
Count)
2000: Properties (2000) - [Advanced Options] (Paper/Output)
Page Order - 95/98 - NT 4.0 O 2000 O Macintosh
Set Value Front to Bac k / Bac k to Front
Description Prints by the specified order .
Operation 2000: Properties (2000) - [Layout] tab
Layout O 95/98 O NT 4.0 O 2000 O Macintosh
Set Value 1 / 2 / 4 / 6 / 9 / 16
Description Prints the selected page(s) onto 1 sheet.
PS-361 (IP-601 PostScript option) 3-17
Page 44

Chapter 3 Printer Driver
Operation 95/98: Properties / Properties (95/98) - [Graphics] tab
NT: Properties (NT) - [Advanced] tab (Page Layout (N-up) Option)
2000: Properties (2000) - [Layout] tab
Print page border O 95/98 - NT 4.0 - 2000 O Macintosh
Set Value Description Prints the page border when the check box is check ed in over 2-up (Layout)
printing.
Operation 95/98: Properties / Properties (95/98) - [Graphics] tab
* [From To Tray Assignment] can be set on the [Device Settings] tab of [Konica IP-601 PostScript
Properties] on Windows NT 4.0/2000. Refer to the “7075 INSTRUCTION MANUAL” for the available
paper sizes in each input tray.
Graphics
Resolution O 95/98 O NT 4.0 O 2000 O Macintosh
Set Value 400dpi / 600dpi
Description Prints with specified resolution
Operation 95/98: Properties / Properties (95/98) - [Graphics] tab
NT: Properties (NT) - [Advanced] tab (Resolution)
2000: Properties (2000) - [Advanced Options] (Graphic)
Scaling O 95/98 O NT 4.0 O 2000 O Macintosh
Set Value 1 - 1000
Description Prints the document image reduced or enlarged to the specified value .
Operation 95/98: Properties / Properties (95/98) - [Graphics] tab
NT: Properties (NT) - [Advanced] tab (Scaling)
2000: Properties (2000) - [Advanced Options] (Graphic)
Special - Print as a negative image
O 95/98 O NT 4.0 O 2000 - Macintosh
Set Value Yes / No
Description Prints with black and white reverse under selection.
Operation 95/98: Properties / Properties (95/98) - [Graphics] tab
NT: Properties (NT) - [Advanced] tab (Negative Output)
2000: Properties (2000) - [Advanced Options] (PostScript Options)
Special - Print as a mirror image
O 95/98 O NT 4.0 O 2000 - Macintosh
Set Value Yes / No
Description Prints with left and right reverse under selection.
3-18 PS-361 (IP-601 PostScript option)
Page 45

Chapter 3 Printer Driver
Operation 95/98: Properties / Properties (95/98) - [Graphics] tab
NT: Properties (NT) - [Advanced] tab (Mirrored Output)
2000: Properties (2000) - [Advanced Options] (PostScript Options)
Installable options
Finisher O 95/98 O NT 4.0 O 2000 O Macintosh
Set Value No Finisher / FS-108 / FS-108B
Description Let printer recognize the selected finisher.
Operation 95/98: Properties - [Device Options] tab
NT: Properties - [Device Settings] tab
2000: Properties - [Device Settings] tab
Sheet Feeder O 95/98 O NT 4.0 O 2000 O Macintosh
Set Value None / PI-108
Description Let printer recognize the selected sheed feeder.
Operation 95/98: Properties - [Device Options] tab
NT: Properties - [Device Settings] tab
2000: Properties - [Device Settings] tab
Trimmer Unit O 95/98 O NT 4.0 O 2000 O Macintosh
Set V alue None / TU-108
Description Let printer recognize the selected trimmer unit.
Operation 95/98: Properties - [Device Options] tab
NT: Properties - [Device Settings] tab
2000: Properties - [Device Settings] tab
Large Capacity Tray O 95/98 O NT 4.0 O 2000 O Macintosh
Set Value None / LT-401 / L T-411
Description Let printer recognize the selected large capacity tray (tr ay4).
Operation 95/98: Properties - [Device Options] tab
NT: Properties - [Device Settings] tab
2000: Properties - [Device Settings] tab
Memory Configuration O 95/98 O NT 4.0 O 2000 O Macintosh
Set Value 64 / 96 / 128 / 160 / 192 / 224 / 256 / 288 / 320 / 352 / 384 / 416 / 448 / 480 /
512 (MB RAM)
Description Let printer recognize the selected value as available printer memory.
Operation 95/98: Properties - [Device Options] tab
NT: Properties - [Device Settings] tab
2000: Properties - [Device Settings] tab
PS-361 (IP-601 PostScript option) 3-19
Page 46

Chapter 4 Control Panel Setup
■ Contents of This Chapter ........................... 4-2
■ Control Panel Layout.................................. 4-3
●The Control Panel of the 7075 Printer/Copier
...............................................................................4-3
●Touch Screen .......................................................4-4
●Basic Screen ........................................................4-6
●Job Status Screen ...............................................4-7
●Printer Mode Basic Screen .................................4-9
●Cancel .................................................................4-10
●Check ..................................................................4-10
●Interrupt / Reserve.............................................4-12
●How to Enter Settings on the LCD Touch Screen
.............................................................................4-13
●Procedures of the Printer Setting ....................4-14
■ Configuration of Printer Setting Menu.... 4-15
■ Functions of the Printer Setting .............. 4-16
●Test Print ............................................................4-16
●Controller Set .....................................................4-16
●Set Default ..........................................................4-18
●PCL Setup...........................................................4-19
PS-361 (IP-601 PostScript option) 4-1
Page 47

Chapter 4 ControlPanel Setup
■ Contents of This Chapter
This chapter describes the Basic Screen of the printer mode and the setup menu
of the Control Panel of the Konica 7075 Printer/Copier. Refer to the operating
manual of the copier for other functions and screens of the Control Panel.
Refer to “Chapter 3 Printer Driver” (p. 3-1) to learn how to use the printer driver
from applications, and how to set up the printer from the printer driver.
4-2 PS-361 (IP-601 PostScript option)
Page 48

■ Control Panel Layout
● The Control Panel of the 7075 Printer/Copier
Chapter 4 Control Panel Setup
1 23
COPY
SCANNER / SERVER
PRINTER
HELP
CHECK
JOB MEMORY
AUTO RESET
15 14 13
4
COUNTER
56 78
INTERRUPT
PROOF COPY
CLEAR QTY.
12 11 10
START
STOP
TIMER
POWER SAVER
ON / OFF
1 LCD TOUCH SCREEN
Displays machine and copying status; help information; interactive screens;
and touch keys for selecting all functions.
2 CHECK
Displays a screen showing all settings that are selected for the current job.
3 MODE
Switches the machine operation mode to copy, scanner/server, and printer in
9
turn.
4 KEYPAD
Enters numeric values.
5 PROOF COPY
Outputs a single set of copies to confirm whether the current settings are
selected properly.
6 INTERRUPT
Stops printing in progress to allow copying from the platen glass.
7 STOP
Stops the copying sequence or printing; deletes the stored memory.
8 TIMER
Lights when the timer function is set.
9 POWER SAVER ON/OFF
Activates power-saving mode for times when the copier is inactive, or activates timer interrupt mode when weekly timer function is active.
PS-361 (IP-601 PostScript option) 4-3
Page 49

Chapter 4 ControlPanel Setup
10 START
Activates scanning or copying.
11 [C] (CLEAR QTY.)
Allows resetting of print quantity.
12 [P] (COUNTER)
Displays the Counter Screen or accesses programming modes for setting
special functions.
13 HELP
Displays a screen with help for the currently selected function.
14 AUTO RESET
Restores copier to automatic mode settings or to key operator settings.
15 JOB MEMORY
Displays screens for selecting job store/job recall functions.
● Touch Screen
The Touch Screen is an LCD (liquid crystal display) that displays interactive
screens with touch sensitive keys for making copy/print job selections. Selections
are highlighted at the touch. The screens also work with the conventional control
panel keys.
The Touch Screen of the Control Panel is covered with glass. Do not
drop heavy items on the glass, or put excess weight or pressure on it;
otherwise the glass may break or become scratched.
After the power switch is turned on, the Konica name displays for approximately
10 seconds, until initial machine settings are established. Then, the Warm-Up
Screen displays for approximately 6 minutes, until the fixing temperature is
reached.
When the Basic Screen is displayed, the Touch Screen becomes interactive. The
interactive condition enables you to communicate directly with the copier system
simply by touching keys displayed on the screen; or by pressing conventional
keys, as required.
4-4 PS-361 (IP-601 PostScript option)
Page 50

Chapter 4 Control Panel Setup
When you touch the [STATUS] key on the Basic Screen, the Job Status
Screen will be displayed. (See below).
[Basic Screen]
[Job Status Screen]
These screens automatically display information regarding machine and copying/
printing status. Additional help is available any time with the [HELP] key, which
can be pressed from any screen, except from Job Memory or Key Operator Mode
Screens.
PS-361 (IP-601 PostScript option) 4-5
Page 51

Chapter 4 ControlPanel Setup
● Basic Screen
The Basic Screen displays the status and the condition of the Konica 7075 + IP601 + PS-361 system.
[Notice icon] means the followings:
INITIALIZING
The Print Controller is in the initialization mode.
PRINT
The Print Controller is currently printing.
ERROR
The Print Controller generated an error message.
IDLE
The IP-601 + PS-361 is ready to receive the print data from your computer.
WAIT
The Print Engine is under warm-up.
4-6 PS-361 (IP-601 PostScript option)
Page 52

Chapter 4 Control Panel Setup
● Job Status Screen
When you touch the [STATUS] key on the Basic Screen, the Job Status Screen
will be displayed and you can confirm the status of a print job.
Contents of the Job Status Screen are as follows:
NO.
Displays the No. (1-99) for each job assigned to the machine.
MODE
Displays the machine’s current mode of operation. Two modes are listed
below.
COPIER
PRINTER
STATUS
Displays the current status of the machine for each job.
[Indication] [Meaning]
IDLING Ready to use in each mode
ERROR Error in each mode
PRINTING Output in each mode
RESERVE Ready to reserve
NO PAPER No paper in copy/print mode
STOP Stop in each mode
JAM Jam in each mode
INTERRUPT Interrupting the previous job
TOTAL PAGE(s)
Displays the number of print original pages for each job. (0 to 9999)
PS-361 (IP-601 PostScript option) 4-7
Page 53

Chapter 4 ControlPanel Setup
P AGE(s) T O GO
Displays the remaining print count of the job.
0 to 9999 (The number exceeding 9999 will be displayed as 9999≠.)
MINUTE(s) TO GO
Displays the time (in minutes) required for completing the job.
Exceeding 999 minutes: 999↑
Shorter than 1 minute: <1
Other
The following message will be displayed on the bar when the reserved job
does not exist.
RESERVED JOB DOES NOT EXIST
4-8 PS-361 (IP-601 PostScript option)
Page 54

Chapter 4 Control Panel Setup
● Printer Mode Basic Screen
When the Konica 7075 + IP-601 + PS-361 system starts properly, the Printer
Mode Basic Screen is displayed on the LCD by pressing the [MODE] button.
When the [MODE] button is pressed again, the LCD is changed to the Copy Mode
Basic Screen, and the normal copy settings becomes available.
[Test Print]
Display the Test Print Setup Screen.
You can print the test print by selecting the item.
[Controller Set]
Display the Controller Set Screen.
You can perform various settings related to the Print Controller.
[Set Default]
Display the Set Default Screen.
You can select default values of various settings.
[PCL Setup]
Display the PCL Setup Screen.
You can perform various settings related to PCL.
PS-361 (IP-601 PostScript option) 4-9
Page 55

Chapter 4 ControlPanel Setup
● Cancel
You can stop the job reserved or the job in progress. If the job is still on your
computer, first, delete the job from your computer and press the [Stop] key of
the Control Panel. You can not stop the remaining job completely by only
pressing the [Stop] key. The [Stop] key can clear the memory of the Print
Controller and E-RDH but not clear the remaining job on your computer.
How to cancel the job
1. While a job is currently printing, touch the [Stop] key to cancel the job.
The confirmation screen will appear.
2. Touch the [EXIT] to confirm the cancelation.
Touch the [CONTINUE] to continue printing without canceling the job.
● Check
You can check the current job settings and see how the printed job will look
before printing out multiple sets.
How to check the job - Wait Mode - Wait
1. Select Wait Mode - Wait in the printer property on your computer.
Select [Wait Mode] from the upper list of [Printer features] in [Device Options]
tab of the printer property and select [Wait] from the list “Change setting for”
by clicking the [▼] button of the lower box of the [Printer features].
2. The settings are displayed on the LCD.
The [Printer Check Mode Screen] will appear on the LCD Touch Screen and
no printing is performed.
4-10 PS-361 (IP-601 PostScript option)
Page 56

Chapter 4 Control Panel Setup
3. Confirm the current settings.
4. Change setting values of [Print Quantity], [Duplex Mode] or [Image
Shift], if necessary.
• How to change [Print Quantity]
Enter the value from the keypad on the Control Panel of the 7075 when the
[Printer Check Mode Screen] appears.
• How to change [Duplex Mode]
To show the [Basic Screen], touch the [Duplex Mode] and then touch [CHANGE
SETTING]. Set the [Duple x Mode] on the [Basic Screen]. To return to the [Printer
Check Mode Screen], press the [CHECK] button on the Control P anel of the 7075.
• How to change [Image Shift]
Available only when On is selected in [Image Shift] of printer driver.
To show the [Image Shift Screen], touch the [Image Shift] and then touch [CHANGE
SETTING]. Set the [Image Shift] on the [Image Shift Screen]. To return to the [Printer
Check Mode Screen], touch [EXIT] on the [Image Shift Screen].
5. Touch the [PROOF PRINT] to print one copied set for proofreading, if
necessary.
6. Touch the [Exit] and then press [Start] to resume the rest of the print job.
How to check the job - Wait Mode - Wait with Proof
1. Select Wait Mode - Wait with Proof in the printer property on your computer.
Select [Wait Mode] from the upper list of [Printer features] in [Device Options]
tab of the printer property and select [Wait with Proof] from the list “Change
setting for” by clicking the [▼] button of the lower box of the [Printer features].
2. Start printing.
The [Printer Check Mode Screen] will appear on the LCD Touch Screen and
one set of copy for proofreading will be printed.
3. Change setting values of [Print Quantity], [Duplex Mode] or [Image
Shift], if necessary.
(Refer to the above mentioned procedure : How to check the job - Wait
Mode - Wait with Proof, 4.)
4. Touch the [PROOF PRINT] to print one copied set for proofreading, if
necessary.
5. Touch [EXIT] and then press [Start] to resume the rest of the print job.
PS-361 (IP-601 PostScript option) 4-11
Page 57

Chapter 4 ControlPanel Setup
● Interrupt / Reserve
The Interrupt mode can be used to interrupt the current printing operation to
perform a copying job. The Interrupt mode can be selected when the engine is
receiving print data or when printing is already in progress.
Under some conditions of printing or Finisher settings, the Interrupt mode
cannot be used.
How to interrupt
1. Press the [INTERRUPT] key when the print job is in progress.
2. Place new original(s) on the platen glass or in the document feeder.
3. Press [START] key to start Interrupt Copying .
4. After copying is completed, press the [INTERRUPT] key again to enable
the engine to resume the Interrupted print job.
If the [INTERRUPT] key is pressed while receiving the job data, Interrupt mode will become available after the receiving is complete.
If the [INTERRUPT] key is pressed while printing is in progress, Interrupt mode will become available after the current set of print job is
completed.
Even without pressing the [INTERRUPT] key again, interrupted print
job will resume automatically on the following conditions:
• AUTORESET is being activated and when it reaches the set value
• When Interrupt release timer which works 1 min after INTERRUPT
job is complete works.
This timer works when AUTORESET is not activated
How to use Reserve function
1. Touch the [FREE] folder to set the conditions for a copying job.
2. This copying job will be performed after the print job in progress is
completed.
4-12 PS-361 (IP-601 PostScript option)
Page 58

Chapter 4 Control Panel Setup
● How to Enter Settings on the LCD Touch Screen
You can select or change settings from the LCD by using the Printer Mode.
Item Selection
Various settings are performed by touching an icon of the item you would like
to select on the LCD.
Currently selected items are displayed with reverse color.
Appearance of Selected Items
The icon selected by touching changes into the reverse color.
PS-361 (IP-601 PostScript option) 4-13
Page 59

Chapter 4 ControlPanel Setup
● Procedures of the Printer Setting
The following shows the typical procedure for the printer setting using the LCD
Touch Screen:
1. Press the [MODE] key to show the [Printer Mode Basic Screen].
The [Copy Mode Basic Screen] is switched to the [Printer Mode Basic
Screen].
2. Touch the [Controller Set] key.
The [Printer Mode Basic Screen] is switched to the [Controller Set Screen].
3. Touch the [Banner Page] key.
The setting screen of the selected item is displayed.
4. Touch the [On] icon.
The icon color is changed to the reverse color.
5. Touch the [OK] icon.
Touch the [▼] or [▲] key to select other sub-menu or items which you will
change.
Touch the [Cancel] Key to return to the previous screen.
Refer to “Configuration of Printer Setting Menu” (p. 4-15) for the printer setting
details.
4-14 PS-361 (IP-601 PostScript option)
Page 60

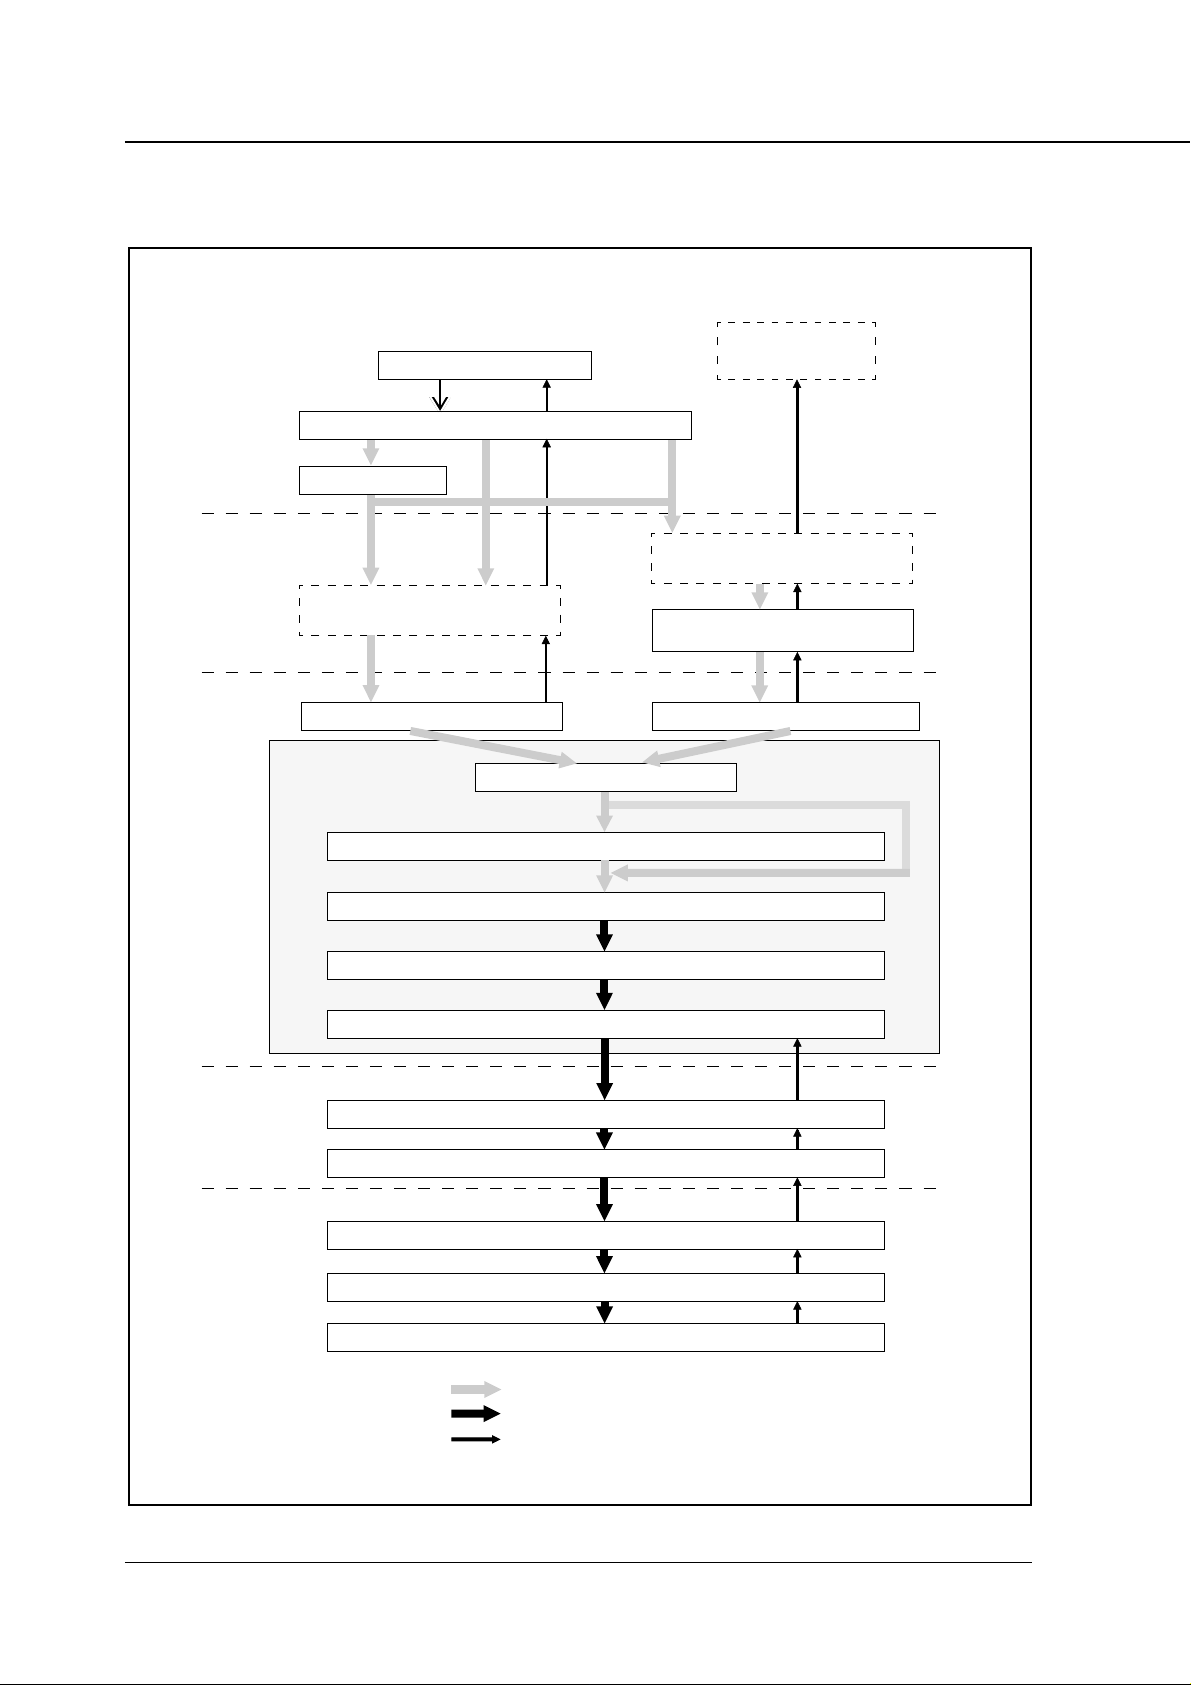
■ Configuration of Printer Setting Menu
Chapter 4 Control Panel Setup
Printer Mode Basic Screen
Test Print
Controller Set
Sub Menu Item
PCL Demo Page
PCL Font List
PS Demo Page
PS Font List
Config. Data
Banner Page
Spool
Job Timeout
Copier Timeout
On / Off
On / Off
5 / 10 / 15 / 20 / 30 / 60 / 120 / 180 / 240 / 300
15 / 30 / 60 / 120
Set Default
PCL Setup
Default Paper
Resolution
Print Quality
Duplex
Orientation
Courier Style
CR/LF Mapping
Input T ray
8.5x11 / 8.5x11R / 8.5x14R / 11x17R /
A3R / B4R / A4R / A4 / B5 / B5R / B6R
400x400 / 600x600
1 bit
Off / Long Edge / Short Edge
Portrait / Landscape
Dark / Light
CR/LF / CR
Auto T ray / T ray1 / Tra y2 / T ray3 /
Tray4 / Bypass Tray
PS-361 (IP-601 PostScript option) 4-15
Page 61

Chapter 4 ControlPanel Setup
■ Functions of the Printer Setting
● Test Print
Select [Test Print] on the Printer Mode Basic Screen to display the Test Print
Setup Screen.
Items of the Test Print Setup Screen are as follows:
[PS Demo Page]
Touch [PS Demo Page] to print the PS Demo Page immediately.
[PS Font List]
Touch [PS Font List] to print the PS Font List immediately.
[Config. Data]
Touch [Config. Data] to print the Config. Data immediately.
Items of the Config. Data are as follows:
• Version information
• Current settings (Resolution / Print Quality / Copy mode timeout / Default
Paper Size / Language)
• Installed Paper (Tray1 / Tray2 / Tray3 / Tray4 / Bypass Tray)
• Device status (Total RAM installed / Hard disk free space)
• Miscellaneous (PS pages printed)
● Controller Set
To enable the settings, it is necessary to Turn OFF/ON the 7075.
Select [Controller Set] on the Printer Mode Basic Screen to display the Controller
Set Screen.
Items of the Controller Set Screen are as follows:
[Banner Page]
Touch [Banner Page] to set the Banner Page. Items of the Banner Page Set
Screen are as follows:
• On : prints the Banner Page antecedent to the set of print job
• Off : (Default)
4-16 PS-361 (IP-601 PostScript option)
Page 62

Chapter 4 Control Panel Setup
[Spool]
Touch [Spool] to set the Spool condition. Items of the Spool Set Screen are as
follows:
• On : spool waiting print job queue within HDD (Default)
• Off : interpreter within IP-601 process the print job without spool
[Job Timeout]
Touch [Job Timeout] to set the Job Timeout value. When it reaches the Job
Timeout value without receiving any print job data or without any communication between IP-601 + PS-361 and your computer, IP-601 + PS-361 deems it
to be the end of the print job. Items of the Job Timeout Set Screen are as
follows:
• 5 : set the Job Timeout value to 5 seconds
• 10 : set the Job Timeout value to 10 seconds
• 15 : set the Job Timeout value to 15 seconds
• 20 : set the Job Timeout value to 20 seconds
• 30 : set the Job Timeout value to 30 seconds (Default)
• 60 : set the Job Timeout value to 60 seconds
• 120 : set the Job Timeout value to 120 seconds
• 180 : set the Job Timeout value to 180 seconds
• 240 : set the Job Timeout value to 240 seconds
• 300 : set the Job Timeout value to 300 seconds
[Copier Timeout]
Touch [Copier Timeout] to set the Copier Timeout value. When it reaches the
Copier Timeout value after operations for copy on the Control Panel of the
7075, IP-601 + PS-361 can receive the print job data. Items of the Copier
Timeout Set Screen are as follows:
• 15 : set the Copier Timeout value to 15 seconds
• 30 : set the Copier Timeout value to 30 seconds (Default)
• 60 : set the Copier Timeout value to 60 seconds
• 120 : set the Copier Timeout value to 120 seconds
PS-361 (IP-601 PostScript option) 4-17
Page 63

Chapter 4 ControlPanel Setup
● Set Default
It is not necessary to Turn OFF/ON the 7075.
Select [Set Default] on the Printer Mode Basic Screen to display the Set Default
Screen.
Items of the Set Default Screen are as follows:
[Default Paper]
Touch [Default Paper] to set the default Paper Size. Items of the Default Paper
Set Screen are as follows:
8.5x11 / 8.5x11R / 8.5x14R / 11x17R / A3R / B4R / A4R / A4 (Default) / B5 /
B5R / B6R
[Resolution]
Touch [Resolution] to set the default Resolution. Items of the Default Resolution Set Screen are as follows:
• Engine Default : set the Resolution to Engine Default
• 400x400 : set the Resolution to 400 dpi (Default)
• 600x600 : set the Resolution to 600 dpi
[Print Quality]
Touch [Print Quality] to set the default Print Quality. Only [1 bit] is available.
[Duplex]
Touch [Duplex] to set the default Duplex. Items of the Default Duplex Set
Screen are as follows:
• Off : set the Duplex off (Default)
• Long Edge : set the Long Edge Duplex
• Short Edge : set the Short Edge Duplex
[Orientation]
Touch [Orientation] to set the default Orientation. Items of the Default Orientation Set Screen are as follows:
• Portrait : set the Orientation to Portrait (Default)
• Landscape : set the Orientation to Landscape
4-18 PS-361 (IP-601 PostScript option)
Page 64

Chapter 4 Control Panel Setup
● PCL Setup
It is not necessary to Turn OFF/ON the 7075.
Select [PCL Setup] on the Printer Mode Basic Screen to display the PCL Setup
Screen.
Items of the PCL Setup Screen are as follows:
[Courier Style]
Touch [Courier Style] to set the Courier Style. Items of the Courier Style are
as follows:
• Dark : use old version Courier Style
• Light : use new version Courier Style (Default)
[CR/LF Mapping]
Touch [CR/LF Mapping] to set the CR/LF Mapping. Items of the CR/LF Mapping are as follows:
• CR/LF : replace line ending LF code to CR/LF
• CR : does not convert line ending code (Default)
[Input T ray]
Touch [Input Tray] to set the Input Tray. Items of the Input Tray are as follows:
• Auto Tray (Default)
•Tray1
•Tray2
•Tray3
•Tray4
• Bypass T r ay
PS-361 (IP-601 PostScript option) 4-19
Page 65

Appendix A Troubleshooting
■ Basic Tr oubleshooting ............. Appendix A-2
■ General Problems of Printing .. Appendix A-2
●The Print Controller does not respond to the “Print”
command............................................Appendix A-2
●A message to demand a paper size which you do
not use is displayed. .........................Appendix A-2
●You can not print the test print.........Appendix A-3
●The print setting of a job does not correspond to
the result of printing..........................Appendix A-3
●Memory Overflow...............................Appendix A-3
PS-361 (IP-601 PostScript option) Appendix A-1
Page 66

Appendix A Troubleshooting
■ Basic T roubleshooting
This section describes how to troubleshoot. If problems are not resolved by using
the following countermeasures, contact your Konica service representative.
First check the following ordinary causes of abnormalities:
1. Check the power of the copier and computers and cable connections.
2. Check the LCD Touch Screen of the copier to find information concerning the current trouble.
3. If possible, print the “Test Print” from the LCD of the copier to check
that the settings are appropriate.
4. Check the current status of the Print Controller.
• Check the current status shown on the LCD of the Control Panel.
• Touch the [STATUS] key on the Basic Screen to check the job status.
• When your job is being processed or waiting for being printed;
Windows:
The current status is displayed on the dialog shown by double-clicking
[Start]-[Settings]-[Printers]-[Konica IP-601 PostScript].
Macintosh:
The current status is displayed on the window shown by double-clicking
[Konica IP-601 PostScript] on the desktop.
■ General Problems of Printing
● The Print Controller does not respond to the “Print” command.
1. Check that [Konica IP-601 PostScript] is selected as a current printer.
It is a requirement that [Konica IP-601 PostScript] is selected as a present
printer on Windows or Macintosh before printing.
2. Check that the power switch of the copier is turned on.
3. Print the “Test Page” from Windows.
When you can not print a job from a computer even though you can print a
test print, contact a system administrator or a service representative.
● A message to demand a paper size which you do not use is dis-
played.
Cancel the job to change the paper size of “Page (Paper) Setup” dialog on an
application.
Appendix A-2 PS-361 (IP-601 PostScript option)
Page 67

Appendix A Troubleshooting
● You can not print the test print.
1. Check the LCD of the 7075 Control Panel.
When “Ready to copy” is displayed on the LCD, go to Step 2.
When a diagnostic message or an error message is displayed on the LCD,
refer to the operating manual of the copier.
2. Try to make a copy.
When copying is available, go to Step 3.
3. Turn off the copier and restart it. Print the test print again after the Print
Controller is ready.
Contact your Konica service representative if you cannot print the test page
after taking the above-mentioned procedures.
● The print setting of a job does not correspond to the result of print-
ing.
1. Check that the printer setting is not changed.
Refer to “Chapter 3 Printer Driver ■ Printer Driver Function List” for the
printer setting. (p. 3-13)
● Memory Overflow
1. Depending on the functions selected in the printer driver, occasional
memory overflow may occur if the volume of the print job is large. In
this case the print job is cancelled.
e.g. Booklet, Fold & Stitch, 2 in 1, etc.
In case of frequent Memory Overflow it is recommended that you extend the
memory capacity in the 7075 Printer/Copier.
When an error message “Print Controller Memory OverFlow” is displayed on
the LCD Touch Screen using Duplex printing or Application function, you may
cancel the print job and re-try to print with another function.
PS-361 (IP-601 PostScript option) Appendix A-3
Page 68

Appendix B Product Specifications
■ Product Specifications............. Appendix B-2
PS-361 (IP-601 PostScript option) Appendix B-1
Page 69

Appendix B Product Specifications
■ Product Specifications
Type: Built into the Konica 7075 Printer/Copier
Paper: • Paper sizes specified in the printer driver:
Paper Feeding and Amount of Feeding Paper:
Load Output Paper: The same as the copier
Mode: Dual operation of the Copier and the Printer is avail
Statement / Letter / Legal / Tabloid / A3 / A4 / A5 / A6 /
B4 / B5 / B6 / F4 / 8K / 16K / Statement(W) / Letter(W) /
Tabloid(W) / A3W / A4W / A5W / B4W / B5W
• Paper sizes selected automatically according to the
job settings:
Statement / Letter / A4R / A5R / A6R / B5R / B6R / F4R
/ StatementWR / LetterWR / A4WR / A5WR / B5WR
The same as the copier
able.
(5 jobs can be processed at the maximum.)
Next job reservation: Next copy job reservation is available while printing the
current job.
Special Printing: Duplex, Negative image, Mirror image, Layout (N-up),
Scaling, Job Offset, Booklet, 2-in-1, 2-in-1 Repeat,
Fold and Stitch, Wait Mode, Image Shift, Front/Back
Cover , Watermarks, Trim, etc.
Orientation: Portrait, Landscape
Resolution: 400x400dpi, 600x600dpi
Gradation: 1 bit
Printable Area: Normal paper size:
Head / Foot / Right / Left Margins: 2.5 mm
Wide paper size:
Margins: 0 mm (compared with standard type; Full Bleed)
No. of Print: 1 to 9999
Printing Speed: 75ppm/A4, 8.5x11 (400X400 dpi / 600X600 dpi)
Warm-up: The same as the copier
Fast print time: The same as the copier
Printer Language: P ostScript 3
Compliant OS: Windows 95/98
Windows NT 4.0
Windows 2000
Macintosh OS 7.1 or more
Appendix B-2 PS-361 (IP-601 PostScript option)
Page 70

Appendix B Product Specifications
Printer Driver: Printer driver for Windows 95/98/NT 4.0/2000
(in common)
Printer driver for Macintosh OS 7.1 or more
Printer driver for Macintosh OS 8.1 or more
Compliant Host Computer: A Windows-based computer
Macintosh
Notice: Specifications are subject to change for improvements without notice.
PS-361 (IP-601 PostScript option) Appendix B-3
Page 71

Appendix C Font List
■ Internal Font List....................... Appendix C-2
PS-361 (IP-601 PostScript option) Appendix C-1
Page 72

Appendix C Font LIst
■ Internal Font List
Appendix C-2 PS-361 (IP-601 PostScript option)
Page 73

Appendix C Font List
PS-361 (IP-601 PostScript option) Appendix C-3
Page 74

Appendix C Font LIst
Appendix C-4 PS-361 (IP-601 PostScript option)
Page 75

INDEX
INDEX
Built-in Font .................................................... v
Bypass Tra y.............................................. 4-19
C
Symbols and Numbers
[C] (CLEAR QTY.) ...................................... 4-4
[P] (COUNTER).......................................... 4-4
100BaseTX ................................................ 1-5
10BaseT..................................................... 1-5
2-in-1 ........................................................ 3-14
2-in-1 Repeat ........................................... 3-14
2nd Original.............................................. 3-17
400dpi ...................................................... 3-18
400x400 ................................................... 4-18
600dpi ...................................................... 3-18
600x600 ................................................... 4-18
7075 Printer/Copier .................................... 1-3
A
A message to demand a paper size which you
do not use is displayed.......... Appendix A-2
About Composition of This Manual .............. vii
About Supplied Items .................................... vi
About this Manual ......................................... vi
AdobePS Konica IP-601 PostScript Advanced
Options.................................................. 3-9
Advanced tab ............................................. 3-9
Appearance of Selected Items ................. 4-13
Apple Menu ................................................ 2-7
AppleTalk.................................................... 2-7
AUTO RESET ............................................ 4-4
Auto Tray .................................................. 4-19
AutoSelect Tray ........................................ 3-16
B
Cancel ...................................................... 4-10
Centronics .................................................. 1-5
CHECK....................................................... 4-3
Check ....................................................... 4-10
Chooser...................................................... 2-7
Collate ...................................................... 3-14
Combination ............................................. 3-14
Compliant OS............................................. 3-3
Conceptual Connection.............................. 1-4
Config. Data ............................................. 4-16
Configuration of Printer Setting Menu ...... 4-15
Control Panel Layout.................................. 4-3
Control Panel Setup ................................... 4-1
Controller Set ................................... 4-9, 4-16
COPIER ..................................................... 4-7
Copier Timeout......................................... 4-17
Copies ...................................................... 3-17
Copyright....................................................... iv
Courier Style ............................................ 4-19
CR ............................................................ 4-19
CR/LF....................................................... 4-19
CR/LF Mapping ........................................ 4-19
D
Dark ......................................................... 4-19
Data Flow ................................................... 1-6
Default Paper ........................................... 4-18
Device Options tab..................................... 3-5
Double Side.............................................. 3-14
Double Top ............................................... 3-14
Duplex ............................................ 3-16, 4-18
Back Cover............................................... 3-15
Back Cover Tray ....................................... 3-15
Back to Front............................................ 3-17
Banner Page ............................................ 4-16
Basic Screen .............................................. 4-6
Basic Troub leshooting ................ Appendix A-2
Before Installation ...................................... 2-3
Blank ........................................................ 3-15
Booklet ..................................................... 3-14
Bottom...................................................... 3-17
E
E-RDH........................................................ 1-4
Engine Default.......................................... 4-18
Engine Interface ......................................... 1-5
ERROR .............................................. 4-6, 4-7
Error Settings ........................................... 3-11
Ethernet ..................................................... 1-5
Execution of Printing ........................ 3-3, 3-11
Index-1
Page 76

INDEX
F
Finisher .................................................... 3-19
Flip on long edge...................................... 3-16
Flip on short edge .................................... 3-16
Fold Only.................................................. 3-14
Fold, Stitch ............................................... 3-14
Fold, Stitch, Trim....................................... 3-14
Fold, Trim.................................................. 3-14
Font List .....................................Appendix C-1
Fonts tab .................................................... 3-5
Front Cover .............................................. 3-15
Front Cover Tray....................................... 3-15
Front to Back ............................................ 3-17
FS-108 ..................................................... 3-19
FS-108B ................................................... 3-19
Functions of the Printer Setting................ 4-16
G
General Problems of Printing ..... Appendix A-2
General tab ........................................ 3-5, 3-9
Graphics................................................... 3-18
Group ....................................................... 3-14
Input T r ay.................................................. 4-19
Installable options .................................... 3-19
Installation of the Printer Driver.................. 2-3
Installation to Macintosh............................. 2-6
Installation to Windows............................... 2-3
Internal Font List ........................Appendix C-2
INTERRUPT....................................... 4-3, 4-7
Interrupt / Reserve ................................... 4-12
Introduction ................................................... iv
IP-601............................................................ iv
IP-601 + PS-361 ................................... iv, 1-3
IP-601 + PS-361 and Print Engine............. 1-3
IPX/SPX ..................................................... 1-5
Item Selection .......................................... 4-13
J
JAM ............................................................ 4-7
JOB MEMORY ........................................... 4-4
Job Offset................................................. 3-14
Job Status Screen...................................... 4-7
Job Timeout.............................................. 4-17
K
H
Hardware Configuration ............................. 1-5
HELP.......................................................... 4-4
Host Interface............................................. 1-5
How to cancel the job............................... 4-10
How to change [Duplex Mode] ................. 4-11
How to change [Image Shift] .................... 4-11
How to change [Print Quantity] ................ 4-11
How to check the job...................... 4-10, 4-11
How to Enter Settings on the LCD Touch
Screen................................................. 4-13
How to interrupt........................................ 4-12
How to Use Memory .................................. 1-7
How to use Reserve function ................... 4-12
I
IDLE ........................................................... 4-6
IDLING ....................................................... 4-7
IEEE 1284 .......................................... 1-3, 1-5
IEEE 1394 .......................................... 1-3, 1-5
Image Shift ............................................... 3-15
INITIALIZING ............................................. 4-6
KEYPAD..................................................... 4-3
KN-302 ....................................... 1-3, 1-5, 2-4
Konica 7075 Special Functions................ 3-14
Konica IP-601 PostScript Default Document
Properties.............................................. 3-7
Konica IP-601 PostScript Document Properties
.............................................................. 3-7
Konica IP-601 PostScript Printing Defaults ......
.............................................................. 3-9
Konica IP-601 PostScript Printing Preferences
.............................................................. 3-9
Konica IP-601 PostScript Properties ................
.............................................. 3-4, 3-6, 3-8
L
Landscape...................................... 3-16, 4-18
Large Capacity Tray.................................. 3-19
Layout............................................. 3-11, 3-17
Layout tab................................................. 3-10
LCD ............................................................ 4-4
LCD TOUCH SCREEN .............................. 4-3
Left ........................................................... 3-17
Light ......................................................... 4-19
Index-2
Page 77

INDEX
liquid crystal display ................................... 4-4
Long Edge................................................ 4-18
LPD/LPR .................................................... 1-5
LT-401....................................................... 3-19
LT-411....................................................... 3-19
M
Mac OS 7.1 or more to 8............................ 2-6
Mac OS 8.1 or more................................... 2-6
Macintosh.................................................... viii
Main Tra y.................................................. 3-16
Manual Feed ............................................ 3-15
Manual feed ............................................. 3-16
Margins .................................................... 3-17
Memory Configuration.............................. 3-19
Memory Overflow ............... 1-7, Appendix A-3
Memory Upgrading..................................... 1-7
MINUTE(s) TO GO..................................... 4-8
MODE ................................................ 4-3, 4-7
N
NetWare ..................................................... 1-5
Network Printer .......................................... 2-4
NO PAPER................................................. 4-7
NO.............................................................. 4-7
NT Service Pack 3 ...................................... viii
O
OHP(Transparency) ................................. 3-17
OHP-Interleave(Blank) ............................. 3-17
OHP-Interleave(Print)............................... 3-17
Orientation ..................................... 3-16, 4-18
Other .......................................................... 4-8
Outline........................................................ 1-1
Outline of the Print Controller..................... 1-3
Output Bin ................................................ 3-16
P
Page Description Language....................... 1-8
Page Order............................................... 3-17
PA GE(s) T O GO ......................................... 4-8
Paper / Output.......................................... 3-16
Paper Size................................................ 3-16
Paper source............................................ 3-16
Paper tab.................................................... 3-5
Paper type................................................ 3-17
Paper/Quality tab ..................................... 3-10
Parallel ....................................................... 1-5
Parallel Port................................................. viii
Patent Notice................................................. iv
PCL Setup........................................ 4-9, 4-19
PDL ............................................................ 1-8
Peer to Peer ............................................... 1-5
PI Tra y ...................................................... 3-15
PI-108....................................................... 3-19
Plain Paper............................................... 3-17
Portrait............................................ 3-16, 4-18
PostScript 3........................................ 1-3, 1-8
PostScript Settings................................... 3-12
PostScript tab............................................. 3-5
POWER SAVER ON/OFF .......................... 4-3
PowerMacintosh......................................... 2-6
PPD file ...................................................... 2-6
PRINT ........................................................ 4-6
Print as a mirror image............................. 3-18
Print as a negative image......................... 3-18
Print Controller Memory OverFlow...................
.............................................. Appendix A-3
Print from Applications (Macintosh) ......... 3-11
Print from Applications (Windows) ............. 3-3
Print page border ..................................... 3-18
Print Quality ............................................. 4-18
Print Settings.................................... 3-3, 3-11
Printed...................................................... 3-15
PRINTER ................................................... 4-7
Printer Driver ...................................... 1-8, 3-1
Printer Driver Function List....................... 3-13
Printer Mode Basic Screen ........................ 4-9
Printer Specific Options ........................... 3-11
PRINTING .................................................. 4-7
Procedures of the Printer Setting ............. 4-14
Product Specifications................ Appendix B-2
PROOF COPY ........................................... 4-3
Properties......................................... 3-4, 3-13
Properties (2000) ..................................... 3-13
Properties (2000): - [Advanced Options]..........
............................................................ 3-13
properties (95/98)..................................... 3-13
Properties (NT) ........................................ 3-13
PS Demo Page ........................................ 4-16
PS Font List.............................................. 4-16
PS protection chip ......................................... vi
Index-3
Page 78

INDEX
PS-361 .......................................................... iv
R
Registered Tr ademarks ................................. iv
RESERVE .................................................. 4-7
RESERVED JOB DOES NOT EXIST ........ 4-8
Resolution ...................................... 3-18, 4-18
Right......................................................... 3-17
Rotated..................................................... 3-16
Rules in This Manual..................................... ix
S
Scaling ..................................................... 3-18
Set Default ....................................... 4-9, 4-18
Setup.......................................................... 2-1
Sharing tab................................................. 3-5
Sheet Feeder ........................................... 3-19
Short Edge ............................................... 4-18
Single ....................................................... 3-14
SOFTWARE LICENSE AGREEMENT............i
Sort .......................................................... 3-14
Spool ........................................................ 4-17
Stapling .................................................... 3-14
START........................................................ 4-4
STATUS...................................................... 4-7
STOP ................................................. 4-3, 4-7
Sub Tra y ................................................... 3-16
System Requirements................................. viii
Troubleshooting.......................... Appendix A-1
TU-108 ..................................................... 3-19
U
Units ......................................................... 3-17
User defined type ..................................... 3-17
User Software CD ......................... vi, 2-3, 2-6
Using Windows 2000................................... viii
Using Windows 95/98.................................. viii
Using Windows NT 4.0................................ viii
W
WAIT .......................................................... 4-6
Wait ................................................ 3-14, 4-10
Wait Mode ............................ 3-14, 4-10, 4-11
Wait with Proof ............................... 3-14, 4-11
Windows...................................................... viii
Windows 2000............................................ 3-8
Windows 95/98........................................... 3-4
Windows NT 4.0......................................... 3-6
Working Environment................................. 3-3
Y
You can not print the test print..........................
.............................................. Appendix A-3
T
Tabbed Sheet........................................... 3-17
TCP/IP........................................................ 1-5
Test Print .......................................... 4-9, 4-16
The Control Panel of the 7075 Printer/Copier ..
.............................................................. 4-3
The Print Controller does not respond to the
“Print” command.................... Appendix A-2
The print setting of a job does not correspond
to the result of printing........... Appendix A-3
Thick Paper .............................................. 3-17
Thin Paper................................................ 3-17
TIMER ........................................................ 4-3
Top ........................................................... 3-17
TOTAL PAGE(s).......................................... 4-7
Touch Screen ............................................. 4-4
Trimmer Unit............................................. 3-19
Index-4
Page 79

MANUFACTURER
●
KONICA CORPORATION
●
TOKYO JAPAN
2000. 9
1
 Loading...