

Page 1

Conference phones for every situation
The Konftel 300IP User Guide
ENGLISH
Page 2
2
1
TABLE OF CONTENTS
Our patented audio technology, OmniSound®, is embedded into all Konftel phones to
ensure crystal-clear voice transmission. We’re now taking OmniSound® to the next level.
OmniSound® 2.0 provides the Konftel 300 with the capability to deliver an even more
impressive audio quality. Just like OmniSound full duplex,® OmniSound 2.0 uses®
an omni-directional microphone and three speakers for optimal audio performance.
OmniSound® 2.0 is enhanced with innovative features – noise suppression minimises
distracting background noise, wideband voice transmission gives 7 kHz during VoIP calls
and an equaliser allows you to adjust sound levels during your meeting.
Konftel AB hereby declares that this conference unit complies with all essential requirements and other relevant provisions of Directive 1999/5/EC.
Warning!
do not expose the Konftel 300IP to rain or moisture.
Warning!
Do not open the case on the Konftel 300IP.
Description 2
General .................................................. 2
Maintenance .......................................... 2
Connections ........................................... 2
Keypad .................................................. 4
Display screen ........................................ 5
Navigation and selection in menus ........... 6
Answering and making calls 8
Answering calls....................................... 8
Answering calls on hold ........................... 8
Making calls ........................................... 8
Redialling............................................... 8
Calling from the phonebook ..................... 9
During a call 10
Adjusting the speaker volume ..................10
Placing calls on temporary hold ...............10
Ending calls ..........................................10
Secure connection .................................10
Making multi-party calls 11
Adding another party to a call .................11
Making conference group calls ................11
Managing phone lines 12
Selecting account when dialling .............12
Switching between lines during multi-
party calls .............................................13
Cutting a line ........................................14
Transferring calls ...................................14
Proles 15
Using a user prole ................................15
Changing the prole name and password .16
Phonebook 17
Searching for contacts ...........................17
Adding contacts ....................................17
Editing contacts ....................................17
Deleting contacts ...................................18
Deleting all conference groups ................18
Displaying phonebook status ...................18
Conference guide ...................................19
Making conference group calls ................19
Displaying conference group participants 20
Adding a conference group .................... 20
Editing a conference group .................... 20
Deleting a conference group ...................21
Deleting all conference groups ................21
Displaying conference guide status ..........21
Recording 22
Starting a recording .............................. 22
Mute function ....................................... 22
Hold .................................................... 22
Ending a recording ................................ 22
Listening to a recording ......................... 23
Editing the name of a recording.............. 23
Deleting a recording ...............................24
Deleting all recordings ............................24
Adjusting the recording indicator .............24
Displaying recording feature status ..........24
Settings 25
Basic settings....................................... 25
Advanced settings ................................ 27
Settings during a call ............................ 28
System ................................................ 29
Checking status .................................... 30
Using the web interface 32
Checking network addresses .................. 32
Logging in to the Konftel 300IP ............. 33
Managing the phonebook ....................... 34
Managing the conference guide ...............37
Checking the call list ............................. 39
Basic settings....................................... 40
Restarting the Konftel 300IP ................. 42
Checking status .................................... 43
IP, SIP, URI and IP telephony 44
FAQ and Troubleshooting 46
Optional accessories 47
Technical specications 48
Service and guarantee 50
Page 3
2
3
DESCRIPTION
DESCRIPTION
GENERAL
The Konftel 300IP is a conference phone for IP telephony offering a host of innovative
features:
• OmniSound® 2.0 audio technology
• IP telephony for exible and affordable telephony
• Option of using two accounts simultaneously
• Conference feature for automatic multi-party dialling.
• Management of lines during a call (dialling new parties, creating a multi-party call,
splitting a multi-party call)
• Recorder capability
• Web interface for simple management of contacts, conference groups and settings
• Extra microphone connection for wider reception (option)
• Connection for wireless headset or PA system (option)
• Future-proof, can be upgraded with smart functions.
• Two-year guarantee.
The Konftel 300IP is a future-proof product that is constantly evolving with smart new
features.
MAINTENANCE
Clean the equipment with a soft, dry cloth. Never use liquids.
CONNECTIONS
Please refer to the “Konftel 300IP Installation Guide” for instructions on how to connect and register your conference phone.
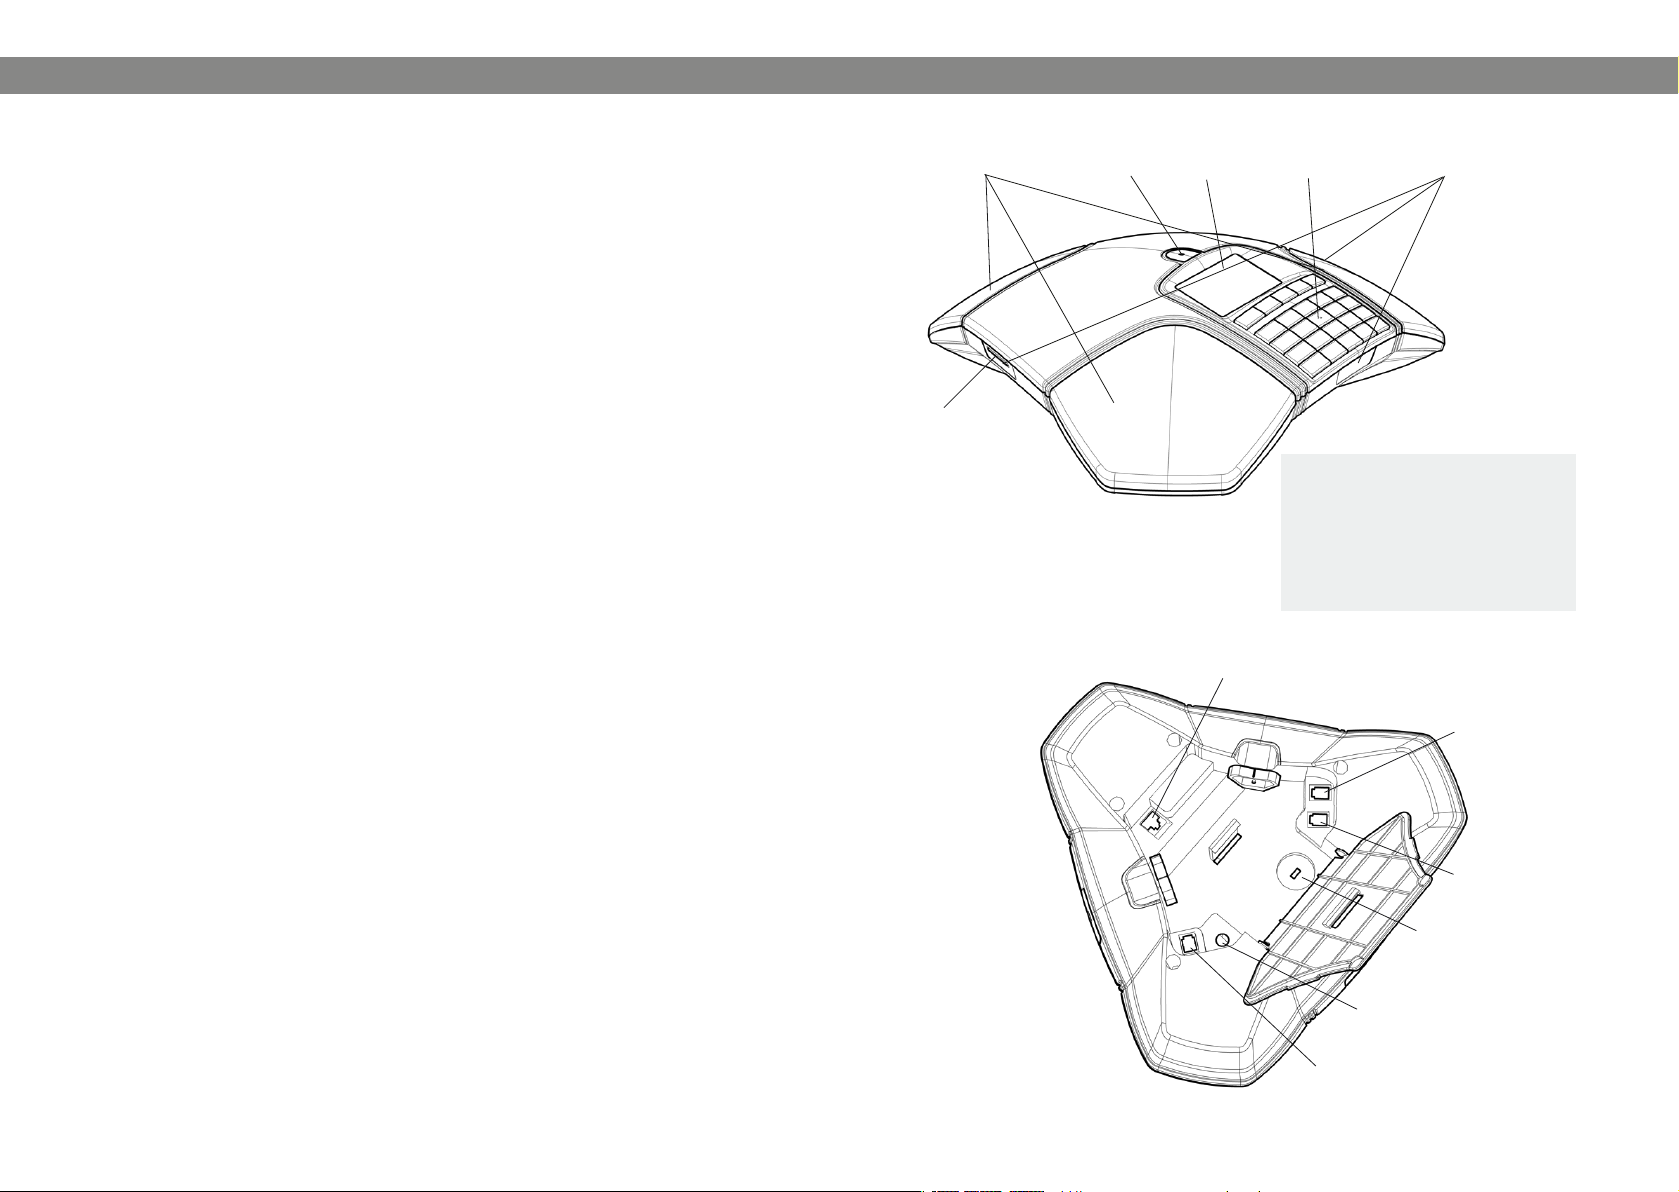
Display screenSpeaker Microphone Keypad LEDs
SD memory
card port
LEDs
Flashing blue Incoming call
Steady blue light Call in progress
Flashing red Hold, microphone and
speaker turned off
Steady red light Mute, microphone turned
off
Network cable port
Expansion microphone port
AUX port
Security lock port
Power supply port
Expansion microphone port
Page 4
4
5
DESCRIPTIONDESCRIPTION
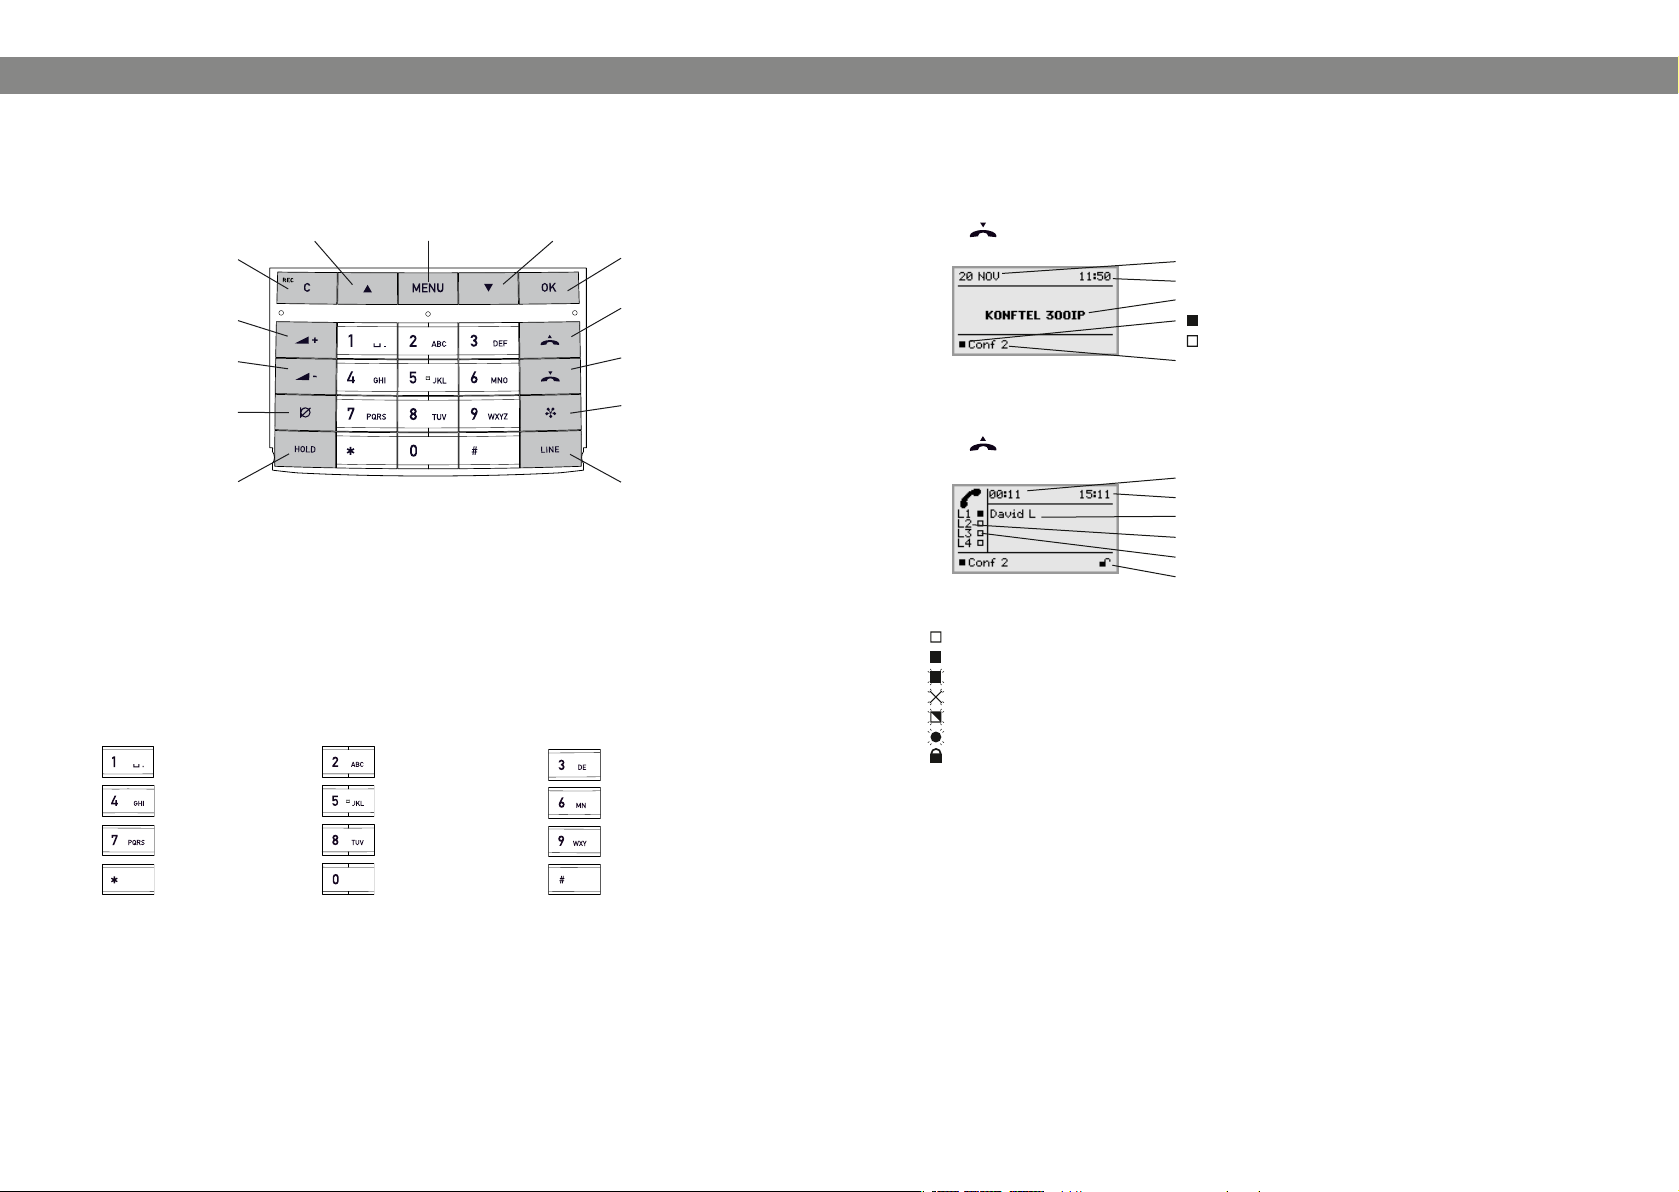
KEYPAD
UP ARROW
navigation in menus,
display of call list
recording
Mute
HOLD
C
Alphanumerical buttons, phonebook
no/end/back,
Increase volume
Decrease volume
Writing text
Each button contains letters and characters - more than those shown on the button (see
illustration below). Press the same button repeatedly to change to another character. If
there are two letters under the same button that you want to enter one after the other,
you need to pause slightly before entering the second letter.
Press C to delete the last character you entered.
(blank) . - 1
MENU,
settings menu
A B C Å Ä Á À 2
DOWN ARROW
navigation in menus,
display of call list
OK
yes/conrm choice
Answer/connect
new line
Hang up/end line
CONFERENCE
automatic dialling
of conference
groups
LINE
Line selection
D E F É È 3
DISPLAY SCREEN
On Hook
Press to display this screen.
Date
Time
Display text (can be changed)
Registered
Not registered
Account name (can be changed)
Off Hook
Press to display this screen.
Call duration
Time
Information text (see below)
Phone lines (L1–L4)
Line status (see below)
Secure connection (see page 10)
Line status:
Line free (Before account name – telephone not registered)
Line connected (Before account name – telephone registered)
Line on hold (“HOLD” displayed on the screen – all calls on hold)
Line (called party) busy
Own line put on hold by other party
Recording call
Secure connection
G H I 4
P Q R S 7
J K L 5
T U V Ü Ú 8
0
M N O Ö Ø Ñ 6
W X Y Z 9
Information text displays one of the following:
• Number or name of each phone line
(The name will be displayed if a number is in the phone book)
• Explanation of what you should do (For example ENTER NUMBER)
• Status (For example HOLD when you place all calls on hold)
Page 5
676 7
DESCRIPTIONDESCRIPTION
CONF GUIDE
BASIC
SETTINGS
SETTINGS SYSTEM STATUSRECORDING
DEFAULT
PROFILE 1
PROFILE 2
PROFILE 3
PROFILE 4
PROFILES
PHONE BOOK
SEARCH
CONTACT
ADD
CONTACT
EDIT
CONTACT
ERASE
CONTACT
ERASE
ALL
STATUS
SEARCH
GROUP
ADD
GROUP
EDIT
GROUP
ERASE
GROUP
ERASE
ALL
STATUS
PLAYBACK
FILE
RENAME
FILE
ERASE
FILE
ERASE
ALL
SETTINGS
STATUS
BASIC
ADVANCED
RESTART
REBOOT
FACTORY
RESET
ACCOUNTS
NETWORK
NAT
TRAVERSAL
MEDIA
TIME
DEVICE
ACCOUNTS
LANGUAGE
KEY TONE
RING LEVEL
EQUALIZER
AUX PORT
PA
TIME
FORMAT
SCREEN
TEXT
DEFAULT
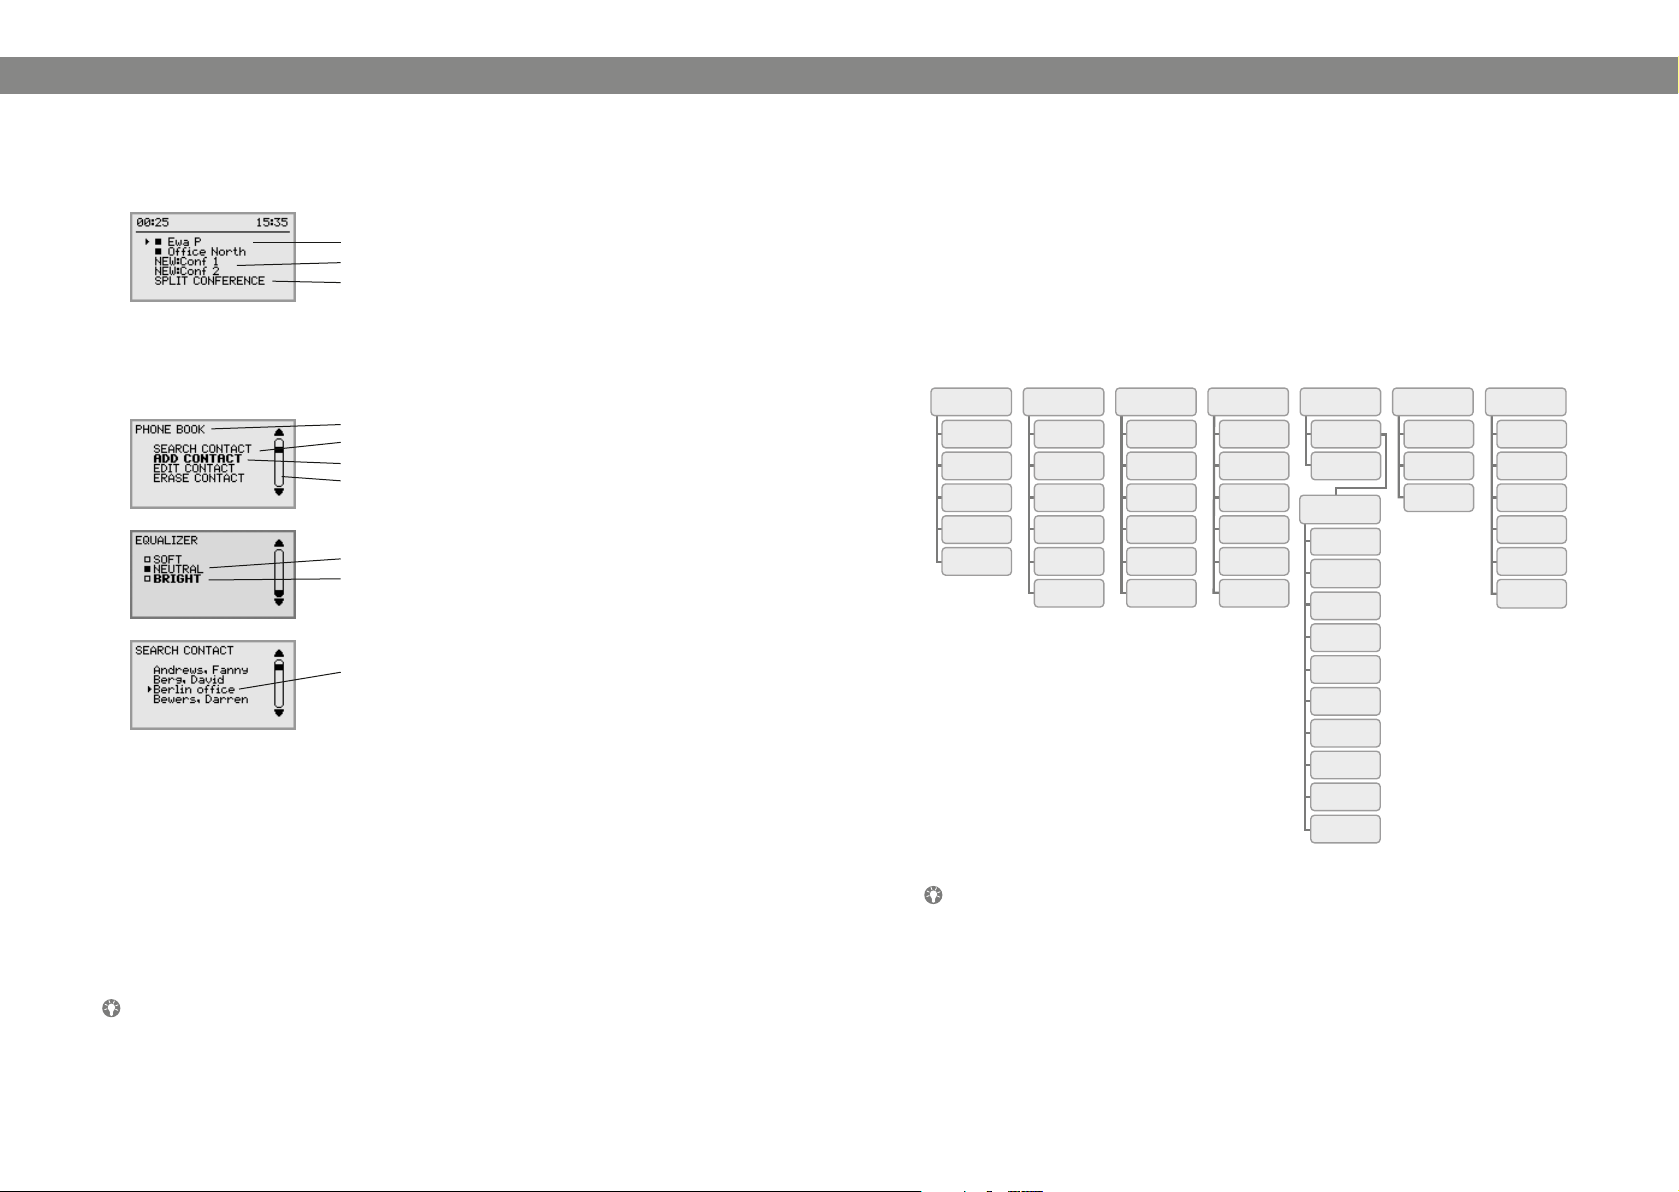
Line menu
Press LINE to switch to and from this menu.
Line/number/name
New line (two lines if two accounts are registered)
Option for creating or splitting conference calls
Menu
Press MENU to switch to and from a menu.
Current menu
Submenu
Marked option – open by pressing OK button
Scrolling list
(indication of where the marked option is in the list or menu)
List of setting options:
Existing settings
Marked option – select by pressing OK button
List of names:
Marked name – select by pressing OK button
Writing style in instructions
In the instructions, MENU > SETTINGS (5) means you should:
Press MENU.
Mark the SETTINGS option using the arrow buttons and conrm by pressing OK to
open the menu (or press button number 5).
Correspondingly, Phone book > Conference Guide in the web interface means you
should select Menu Phone book and the Conference Guide tab.
Menu tree
NAVIGATION AND SELECTION IN MENUS
Press MENU.
Select the option you want from the menu using the arrow buttons.
Conrm by pressing OK to select the marked option.
Cancel the setting or go back one level in the menu by pressing C.
Quit the menu by pressing MENU again.
Note that after you have made changes to a setting, you must press OK to activate
the setting.
It is possible to open a menu option directly by pressing the number button that
corresponds to the position of the option in the menu (e.g. 2 to open PHONE BOOK
and then 3 to select EDIT CONTACT).
The simplest way to make settings and edit contacts is using a PC and the Konftel
300IP web interface (see page 32).
Page 6

8
9
ANSWERING AND MAKING CALLS
ANSWERING AND MAKING CALLS
ANSWERING CALLS
A ring tone is heard and the blue LEDs start ashing.
Press to answer.
The LEDs show a steady blue light.
ANSWERING CALLS ON HOLD
If a call is made to the conference phone during another call, you will hear a double
tone, INCOMING CALL will be displayed on the screen and the blue LEDs start ashing.
Press to answer.
The original call will automatically be put on hold.
Press the (Conference) button to connect the calls.
Press to end the new call and HOLD to reconnect the original call.
Use the line mode LINE (See page 13) to switch between the calls.
MAKING CALLS
See “MANAGING PHONE LINES” on page 12 about selecting an account before dialling.
Dial the number.
Press .
The number is called and the LEDs show a steady blue light. The duration of the call is shown
on the display screen.
Or:
Press .
Dial the number and press OK to conrm.
The number is called and the LEDs show a steady blue light. The duration of the call is shown
on the display screen.
CALLING FROM THE PHONEBOOK
Please turn to page 17 for instructions on adding and updating contacts in the phonebook.
Press and hold down a number button for two seconds.
The phonebook appears on the display screen. The pre-programmed names appear in alphabetical order, starting with the number button’s rst letter.
Use the arrow buttons to mark the name in the phonebook.
Press .
The number you have selected is dialled.
REDIALLING
Press an arrow button.
The last number that you dialled appears on the display screen.
Use the arrow buttons to scroll through the call list.
Press .
The number you have selected is dialled.
You can delete the call list by scrolling to the end of the list and pressing OK when
the question “CLEAR LIST?” appears.
Page 7
10
11
DURING A CALL
MAKING MULTI-PARTY CALLS
ADJUSTING THE SPEAKER VOLUME
Adjust the speaker volume using the buttons and .
PLACING CALLS ON TEMPORARY HOLD
Mute
Press (Mute) to turn off the microphone.
The LEDs change from blue to red. The other party cannot hear what you are saying.
Press (Mute) to reconnect the call.
Hold
Press HOLD to put the call on hold.
The LEDs change from blue to ashing red. Both the microphone and the speaker are turned off
and the call is on hold.
Press HOLD to reconnect the call.
ENDING CALLS
End the call by pressing .
SECURE CONNECTION
The Konftel 300IP supports secure data connections between devices (authentication
and encryption). This feature must be activated by the administrator.
You know the feature is activated if you see a closed padlock in the lower right-hand
corner of the display screen when the Konftel 300IP has a secure connection to the
other phone. If the phone or PBX you are calling does not support secure connections,
you will see an open padlock on the screen. See the illustration on page 5.
Turn to “MANAGING PHONE LINES” on the next page for instructions on putting an
individual on hold during a multi-party call and other more advanced features.
ADDING ANOTHER PARTY TO A CALL
If there are free lines, new parties can be added, regardless of whether you have used
the (Conference) button or if you are making a normal call.
Press during the call to get a new dialling tone.
Calls in progress are put on hold.
Dial the new number.
You can also press an arrow button to use the call list or use the menu to access
the phonebook.
Press the (Conference ) button to merge all lines into a multi-party call.
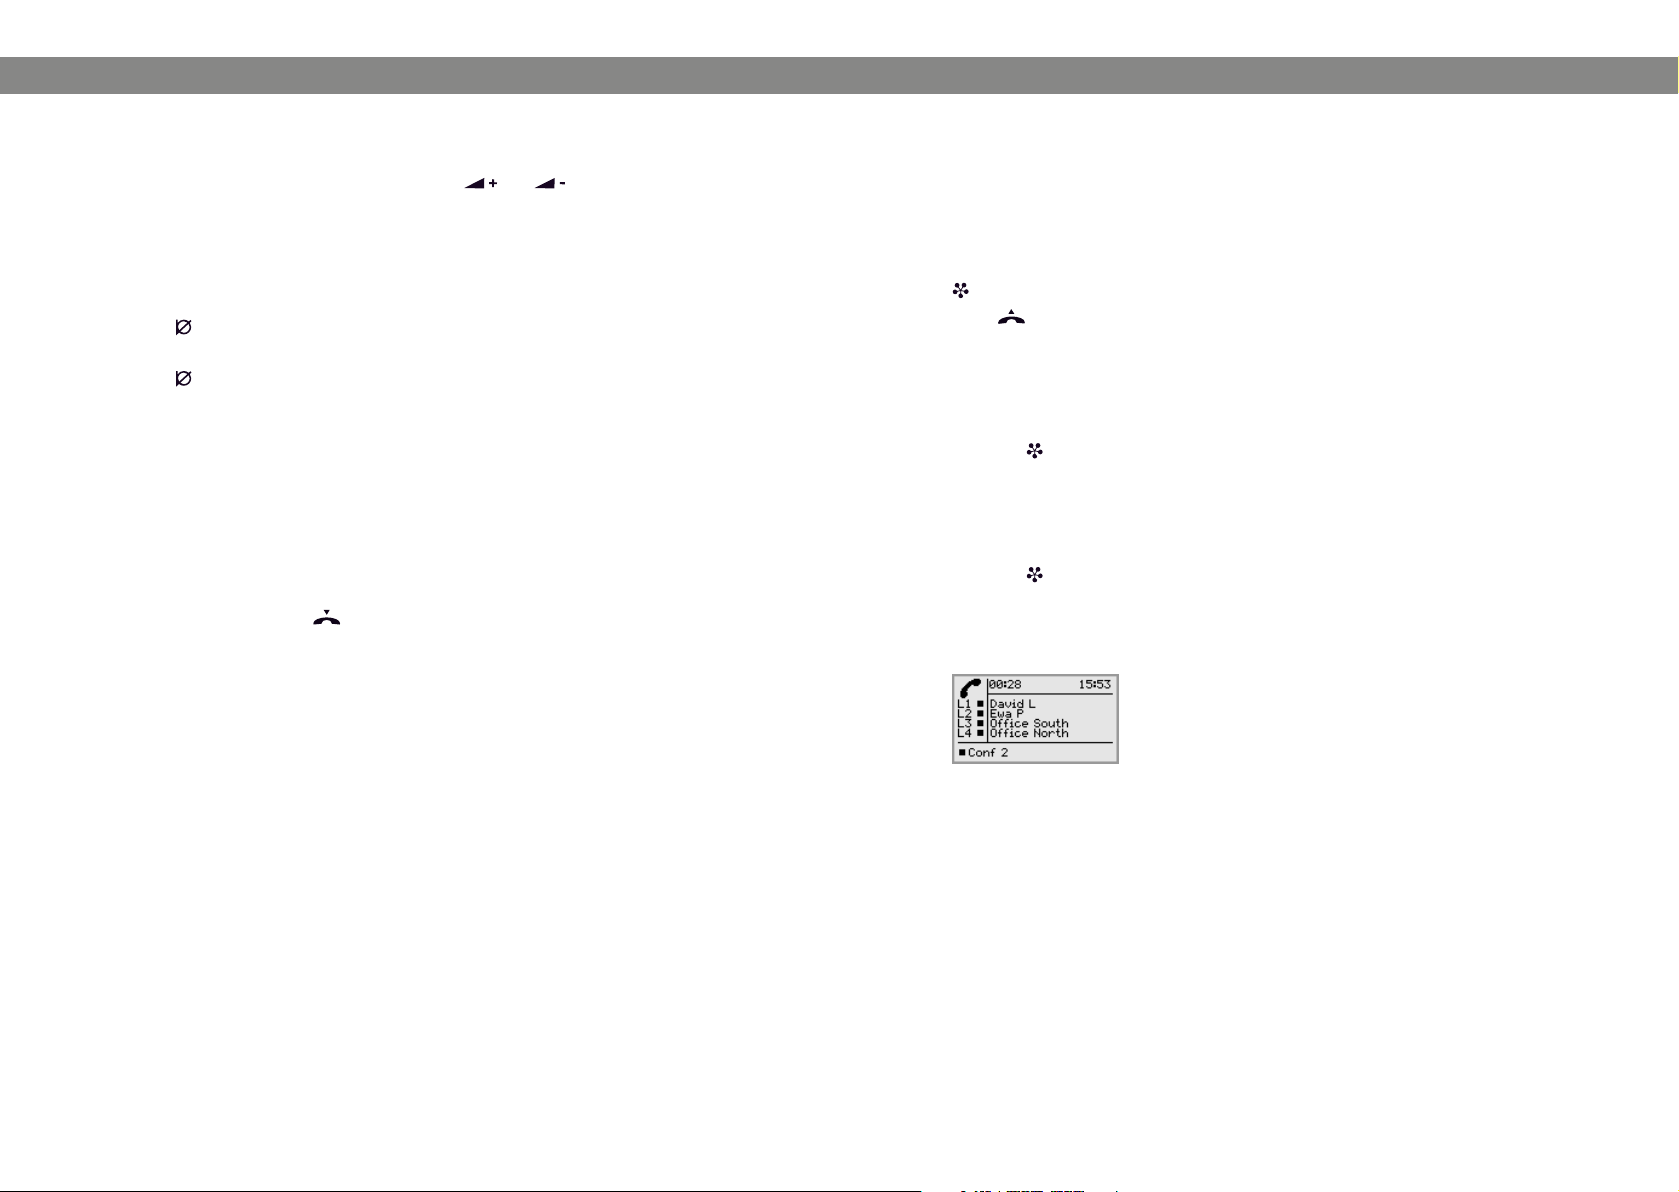
MAKING CONFERENCE GROUP CALLS
See “CONFERENCE GUIDE” on page 19 to create and edit conference groups.
Press the (Conference) button.
Select the conference group you want to call and press OK to conrm.
The Konftel 300IP dials all the contacts in the group.
The box in front of a person’s name lls as soon as that person answers.
Page 8
12
13
MANAGING PHONE LINES
MANAGING PHONE LINES
SELECTING ACCOUNT WHEN DIALLING
If you have more than one account registered in your Konftel 300IP, you can use the
line mode to select the account that you want to use for the new call.
Making a new call
Press LINE.
The line menu with the name of your accounts is displayed.
Select the account you wish to use for the new call and press OK or .
Dial the number and press OK to conrm.
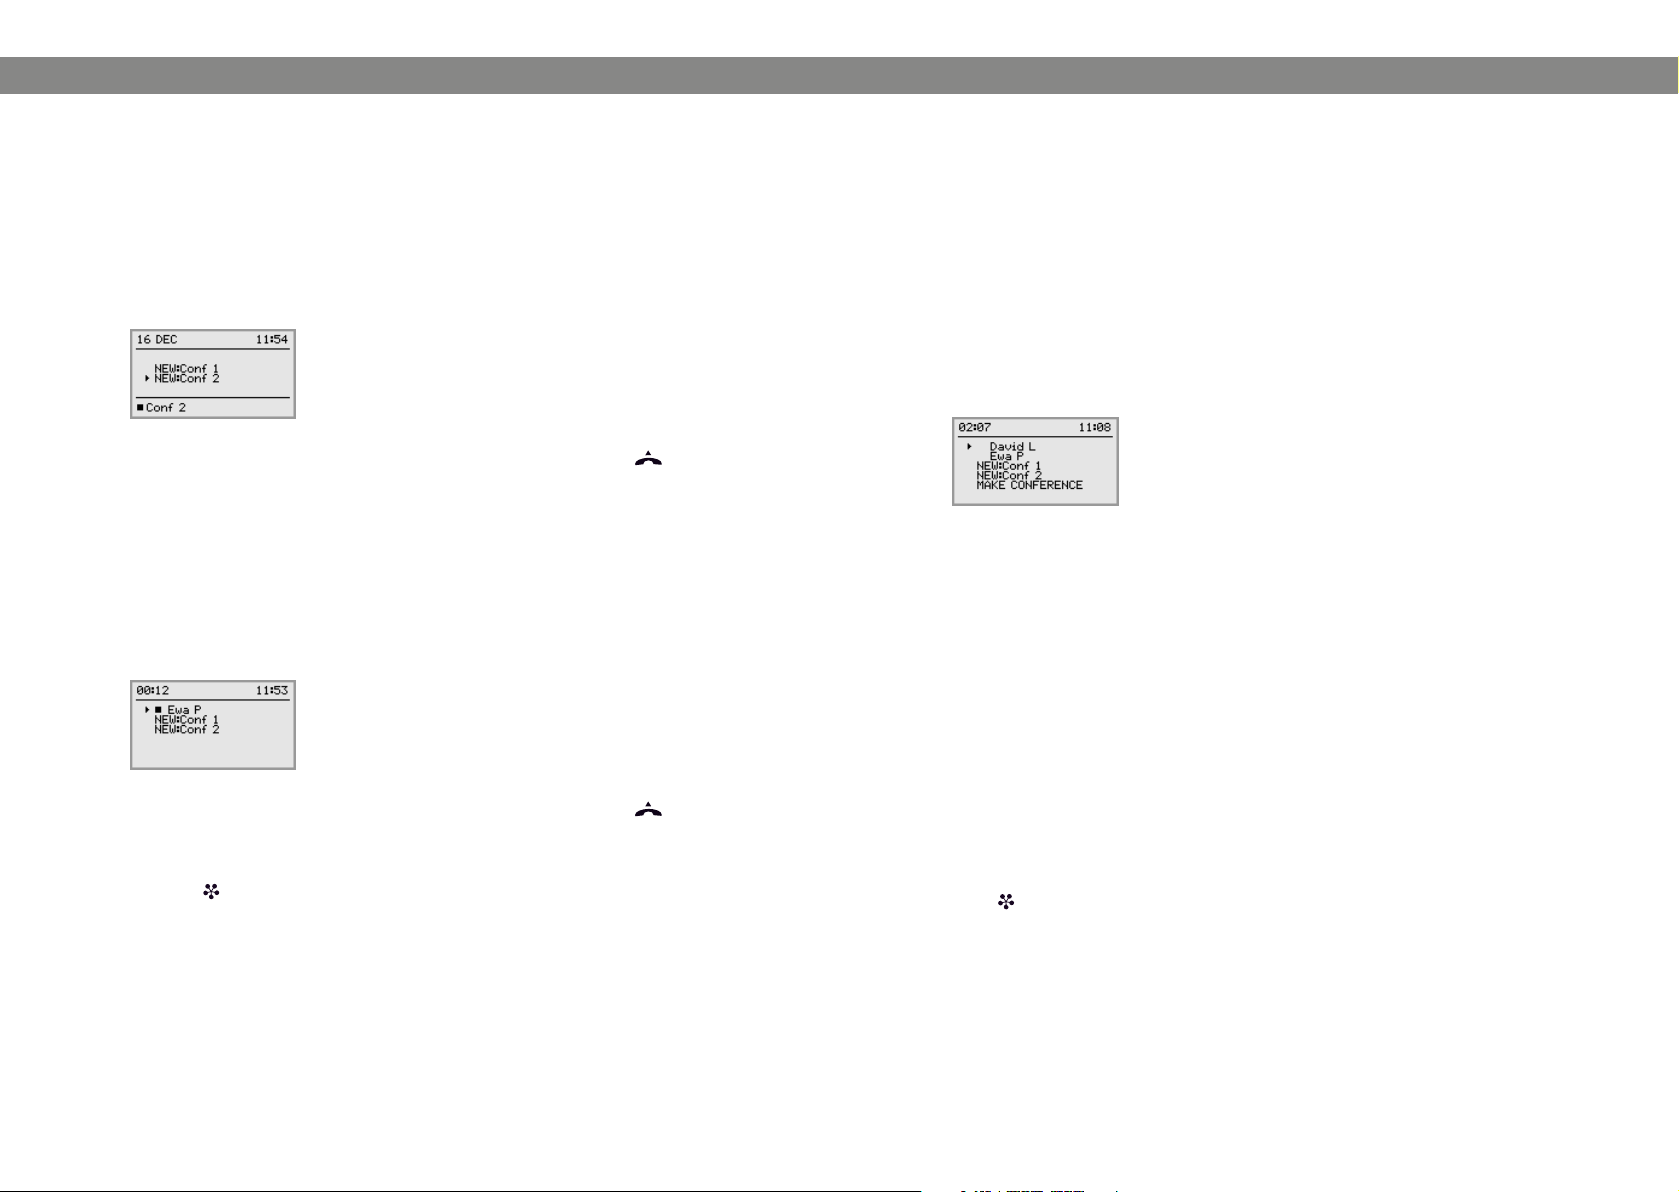
Adding a party
In the same way, a party can be added and an account selected for that party during a
call.
Press LINE.
The line menu with the name of your accounts (NEW:Xxx) and lines that are already busy will be
displaye d.
SWITCHING BETWEEN LINES DURING MULTI-PARTY CALLS
Talking privately with one individual
Press HOLD.
All lines are put on hold.
Alternatively, you can press HOLD after opening the line menu or you can select
SPLIT CONFERENCE from the line menu to put the lines on hold.
Press LINE.
The line menu is displayed.
Mark a party in the line menu and press OK or HOLD.
The party is reconnected to the call.
Switching to another caller
This assumes that you are talking with just one individual as described above.
Mark another party in the line menu and press HOLD.
The rst party is put on hold and the other is connected to the call.
Select the account you wish to use for the new call and press OK or .
Other calls are put on hold.
Dial the new number.
Press the (Conference ) button to merge all lines into a multi-party call.
Talking to several parties
This assumes that you are talking with just one individual as described above.
Mark another party in the line menu and press OK.
Both the rst and the second party are connected to the call.
Talking to all parties
Press (Conference).
All parties are connected to the call.
An alternative way to connect all lines to the call is to select MAKE CONFERENCE
in the line menu.
Page 9

14
15
MANAGING PHONE LINES
PROFILES
CUTTING A LINE
Individual lines can be cut out of a multi-party call.
Press LINE.
The line menu is displayed.
Mark the line you want to cut and press .
TRANSFERRING CALLS
If you wish to transfer a call to another telephone.
Select MENU > TRANSFER.
Dial the number and press OK to conrm.
The call is transferred to the other telephone.
NB. Some PBXs do not support this option.
The Konftel 300IP gives you the option of using a password to protect contact information in the phonebook and conference guide. All contacts entered by default can be
accessed by all users and cannot be password protected. All contacts entered by Admin
are also displayed in default mode.
To enter personal contacts, conference groups and settings that are inaccessible to
other users, select user prole and enter the PIN code for the prole. The four personal
user proles each hold up to 1000 contacts and 20 conference groups.
Settings that are unique for each prole are:
• Standard account (If two accounts are registered)
• Language
• Ringtone level
• Keypad tone
• Time format
• Equalizer
• Display text
Contacts and other settings are managed in the same way if you log in with a user
prole, except that the changes you make do not affect other users.
Note the user prole name and PIN code can only be changed via the web interface.
Admin is able to change all user prole names and PIN codes.
USING A USER PROFILE
Select MENU > PROFILES (1).
Mark the prole you want and press OK.
Enter the PIN code for the prole.
The default code is 0000.
Logging out of the prole
Select MENU > PROFILES (1).
Press OK with the LOGOUT option marked.
Page 10

16
17
PROFILES
PHONEBOOK
CHANGING THE PROFILE NAME AND PASSWORD
Log in to Konftel 300IP, see pages 32–33.
Select Settings > Basic.
Click on the Edit button under the heading Proles.
Enter a name and a new PIN code.
Click on Set and save your settings by clicking on Save.
Make a note of the name and PIN code and keep them in a safe place. The adminis-
trator is able to reset the settings.
The Konftel 300IP’s phonebook can hold up to 1000 numbers in each user prole. See
page 8 for making calls via the phonebook.
Entering text with the keypad
Please turn to page 4 for instructions on using the keypad to enter text.
SEARCHING FOR CONTACTS
The simplest way to search for a contact in the address book is to hold down
an alphanumeric button for two seconds (see page 8). You can also search for a
contact via the PHONEBOOK menu.
Select MENU > PHONE BOOK > SEARCH CONTACT.
Mark the contact you want.
You can use the arrow buttons to press an alphanumeric button to jump to the rst
name that starts with that letter in the list.
Press OK or to dial the selected contact, C to return to the PHONEBOOK menu
or MENU to exit the menu.
ADDING CONTACTS
Select MENU > PHONE BOOK > ADD CONTACT.
Enter the name of the contact and press OK to conrm.
Write the number and press OK to conrm.
Press OK to add another contact or MENU to exit the menu.
EDITING CONTACTS
Select MENU > PHONE BOOK > EDIT CONTACT.
Mark the contact you want to change. Press OK to conrm.
Make the change and press OK to conrm.
Delete a number or a letter in a name by pressing C. If you want to cancel the
change you are making and leave the name or number as they were, press C until
the PHONEBOOK menu appears.
Page 11

18
19
PHONEBOOK
CONFERENCE GUIDE
DELETING CONTACTS
Select MENU > PHONE BOOK > ERASE CONTACT (2,4).
Mark the contact you want to delete and press OK.
Conrm that you really want to delete the contact by pressing OK or cancel the
deletion of a contact by pressing C.
DELETING ALL CONFERENCE GROUPS
Select MENU > PHONE BOOK > ERASE ALL (2,5).
Conrm that you really want to delete all contacts by pressing OK or cancel the
deletion of a contact by pressing C.
DISPLAYING PHONEBOOK STATUS
Select MENU > PHONE BOOK > STATUS (2,6).
The display screen indicates the number of contacts already stored plus how many more
contacts can be added.
The conference guide makes it easy to set up calls with as many as ve people,
including your own phone. The Konftel 300IP automatically dials all the contacts in the
conference group.
You can create 20 conference groups in each user prole.
Entering text with the keypad
Please turn to page 4 for instructions on using the keypad to enter text.
MAKING CONFERENCE GROUP CALLS
Press the (Conference) button.
Select the conference group you want to call.
You can use the arrow buttons to press an alphanumeric button to jump to the rst
name that starts with that letter in the list.
Press OK if you want to see who is in the group before you make the call.
(Then press OK again or to call.)
Press directly if you want to make the call without rst checking who is in the
group.
The Konftel 300IP dials all the contacts in the group.
The box in front of a person’s name lls as soon as that person answers.
You can also use the menu to search for and dial a conference group.
Select MENU > CONF GUIDE > SEARCH GROUP (3,1), select the conference group
you want and conrm by pressing OK or in the same way as above.
Adding another party to a call
Press during the call to get a new dialling tone.
Calls in progress are put on hold.
Dial the new number.
You can also press an arrow button to use the call list or use the menu to access
the phonebook.
Press the (Conference) button to connect the calls.
Page 12

20
21
CONFERENCE GUIDE
CONFERENCE GUIDE
DISPLAYING CONFERENCE GROUP PARTICIPANTS
Select MENU > CONF GUIDE > SEARCH GROUP (3,1).
Mark the group you want and press OK.
The names of the conference group participants are displayed.
Press C to return to the CONFERENCE GUIDE menu or MENU to exit the menu.
Press OK or to dial the group.
ADDING A CONFERENCE GROUP
Select MENU > CONF GUIDE > ADD GROUP (3,2).
Enter a group name and press OK to conrm.
Press OK to enter the rst person.
Write the name of the rst person and press OK to conrm. Enter the number and
press OK to conrm.
Press OK to add another person and repeat the above steps.
Conclude by pressing C.
EDITING A CONFERENCE GROUP
Select MENU > CONF GUIDE > EDIT GROUP (3,3).
Here, you can change the name of a conference group, add or delete a person from a
group and change a person’s name and phone number.
Mark your choice of option in the menu using the arrow buttons and press OK to
conrm.
The names of the conference groups are displayed.
Mark the group you want to change and press OK to conrm.
Mark a person you want to change and press OK to conrm.
Make the change and press OK to conrm.
Delete a number or a letter in a name by pressing C. If you want to cancel the
change you are making and leave the name or number as they were, press C until
the CONFERENCE GUIDE menu appears.
DELETING A CONFERENCE GROUP
Select MENU > CONF GUIDE > ERASE GROUP (3,4).
Mark the group you want to delete and press OK.
Conrm that you really want to delete the group by pressing OK or cancel the dele-
tion of a group by pressing C.
DELETING ALL CONFERENCE GROUPS
Select MENU > CONF GUIDE > ERASE ALL (3,5).
Conrm that you really want to delete all groups by pressing OK or cancel the dele-
tion of all groups by pressing C.
DISPLAYING CONFERENCE GUIDE STATUS
Select MENU > CONF GUIDE > STATUS (3,6).
The display screen indicates the number of conference groups already stored plus how
many more groups can be added.
Page 13

22
23
RECORDING
RECORDING
It is possible to record a phone conference on an SD (Secure Digital) memory card
so you can listen to it later on. It is possible to record a call in progress and use the
Konftel 300IP as a dictaphone.
A ashing symbol appears on the display screen during recording. A beep is heard every
20 seconds so that other parties in the call know it is being recorded. The beep can be
turned off (see page 24).
The recorded call is saved on the memory card. The document is named after the time
at which the recording began (e.g. 14-35-01.wav) and is saved in a folder with the
current date. This name can be changed after the recording has ended.
STARTING A RECORDING
Remember to notify all parties in the call before you start recording.
Press the
The recording symbol ashes on the display screen.
REC
/C button for two seconds and press OK to conrm.
MUTE FUNCTION
Press the (Mute) button during a call to turn the microphone off.
The LEDs change from blue to red.
The other party cannot hear what you are saying and only the called party is recorded.
HOLD
Press HOLD during the call to put the call on hold.
The LEDs change from blue to ashing red.
Both the microphone and the speaker are turned off and the call is on hold. None of the parties
will now be recorded.
ENDING A RECORDING
Press the
The recording symbol is no longer displayed on the screen.
If you are recording a call and the call is ended, you will be asked if you want to
stop recording.
REC
/C button for two seconds and press OK to conrm.
LISTENING TO A RECORDING
You can listen to a recorded phone conference on your Konftel 300IP or a computer using an SD memory card reader. Recordings are saved in wav format and can be played
back on your choice of media player. Listening to recordings on the Konftel 300IP:
Select MENU > RECORDING > PLAYBACK FILE (4,1).
Mark the folder you want (date) and press OK to conrm.
A list of all recordings for the specied date is displayed. Names, date, time and length are
displayed for each recording.
Mark the recording you want and start the playback by pressing OK.
Adjusting the speaker volume
Increase the volume using the button and lower it using .
Pause playback
Pause the playback by pressing OK.
Restart playback by pressing OK again.
Move forward in the recording during playback
Move forward in the recording by pressing arrow down or backward by pressing
arrow up.
The recording advances about 10 seconds every time you press the button.
Stop playback
Stop the playback by pressing C.
EDITING THE NAME OF A RECORDING
The recording is named by default with the time at which the recording started.
Select MENU > RECORDING > RENAME FILE (4,2).
Mark the folder you want and press OK to conrm.
Mark the recording to be edited and press OK.
Make the change and press OK to conrm.
Delete a number or a letter in a name by pressing C.
If you want to cancel the change you are making and leave the name or number as they
were, press C several times until the RENAME FILE menu appears.
Page 14

24
25
RECORDING
SETTINGS
DELETING A RECORDING
Select MENU > RECORDING > ERASE FILE (4,3).
Mark the folder you want and press OK.
Mark the recording to be deleted and press OK.
Conrm that you really want to delete the recording by pressing OK again, or cancel
the deletion of a recording by pressing C.
DELETING ALL RECORDINGS
Select MENU > RECORDING > ERASE ALL (4,4).
Conrm that you really want to delete all recordings by pressing OK again, or cancel
the deletion of a recording by pressing C.
ADJUSTING THE RECORDING INDICATOR
A short beep is heard every 20 seconds so that all the parties in the call know it is
being recorded. This feature can be turned off.
Select MENU > RECORDING > SETTINGS (4,5).
Select your choice and press OK to conrm.
DISPLAYING RECORDING FEATURE STATUS
Select MENU > RECORDING > STATUS (4,6).
The display screen indicates the number of recordings, the total length of recorded calls and
how many hours of recording time are left before the memory card is full.
The Konftel 300IP has two groups of settings: Basic and Advanced. You must enter the
Admin. PIN code to access the advanced settings.
The simplest way to make settings is using a PC and the Konftel 300IP web inter-
face (see page 32).
BASIC SETTINGS
Select default account
If the phone has two registered accounts, you can choose one of them as default.
Select MENU > SETTINGS > BASIC > ACCOUNTS (5,1,1).
Select ACCOUNT 1 or ACCOUNT 2 and press OK to conrm.
The account name is displayed. NOT CONFIGURED will be displayed if the selected account is
not registered.
Selecting languages
Select MENU > SETTINGS > BASIC > LANGUAGE (5,1,2).
Select the language you want and press OK to conrm.
Deactivating keypad tones
You can select whether or not you want a tone to be heard when you press a button.
Note that this setting does not affect the tone you hear when you dial a number in call
mode.
Select MENU > SETTINGS > BASIC > KEY TONE (5,1,3).
Select your choice and press OK to conrm.
Adjusting ring level volume
Select MENU > SETTINGS > BASIC > RING LEVEL (5,1,4).
Select your choice and press OK to conrm.
There are six volume levels plus a silent mode. You will hear the ring tone for each
level you select. If you select silent mode, an LED on the phone ashes when an
incoming call is received.
Adjusting sound (equaliser)
The sound reproduction can be adjusted to the required pitch (SOFT, NEUTRAL and
BRIGHT).
Select MENU > SETTINGS > BASIC > EQUALIZER (5,1,5).
Select your choice and press OK to conrm.
Page 15

26
27
SETTINGS
SETTINGS
Settings when connecting external equipment (Aux)
The Konftel 300IP can be connected to a wireless headset or an external PA system.
An optional PA interface box is required for PA system connection.
Select MENU > SETTINGS > BASIC > AUX PORT (5,1,6).
Select the PA option to activate features for external microphone mixer and PA
system.
Do not select the PA option unless a PA system is connected. This option turns
off the internal microphone and internal speakers. The HEADSET option may be
selected whether or not a headset is connected.
Settings for external PA system
It is assumed that the PA option has been activated in the previous menu before making these settings.
Select MENU > SETTINGS > BASIC > PA (5,1,7).
Select INTERNAL MIC and press OK to switch between on (shaded box) and off.
To ensure maximum audio quality, do not use the internal microphone and external
microphones connected via the PA interface box at the same time.
Only the internal microphone is turned off. Any external microphones connected to
the Konftel 300IP are still turned on.
Select INTERNAL SPKR and press OK to switch between on (shaded box) and off.
To ensure maximum audio quality, do not use the internal speakers and external
speakers connected via the PA interface box at the same time.
Changing text on the display screen
The text on the display screen can be changed when the Konftel 300IP is on hook.
Select MENU > SETTINGS > BASIC > SCREEN TEXT (5,1,8).
Delete existing text using C and enter your new text. Press OK to conrm.
Resetting
This resets all user settings for the user prole shown to factory default settings. The
phonebook, conference guide and all basic settings are reset. Account, network and SIP
settings are not reset.
Select MENU > SETTINGS > BASIC > DEFAULT (5,1,9).
Conrm that you really want to reset the settings to default by pressing OK again, or
cancel the resetting procedure by pressing C.
ADVANCED SETTINGS
Only Admin. is able to make these settings. See “Installation and Administration of
Konftel 300IP”.
Time format
The date and time can only be set by Admin. The time is normally retrieved from a time
server. The time format has 12-hour and 24-hour options.
Select MENU > SETTINGS > BASIC > TIME FORMAT (5,1,7).
Select your choice and press OK to conrm.
Page 16

28
29
SETTINGS
SETTINGS
SETTINGS DURING A CALL
The HEADSET/PA, PHONE BOOK, TRANSFER and EQUALIZER menus may be accessed during a call and are displayed when the MENU button is pressed. The rst
option is either HEADSET or PA depending on whether PA is activated or not.
These HEADSET/PA settings can only be accessed when a call is connected.
Turn off the internal speakers when using a headset
PA should not be activated when using the HEADSET menu option.
A wireless headset can be used if a person needs to move far away from the conference
phone (e.g. during a seminar or presentation). The internal speakers can be turned
off temporarily if you wish to use the Konftel 300IP as a personal telephone with a
headset.
Select MENU > HEADSET.
Select YES when asked “SPEAKER OFF?”.
The speakers come on automatically when the call is ended.
Adjusting microphone volume from PA system
PA should be activated when using the PA menu option.
Select MENU > PA > PA MONITOR.
Adjust the microphone volume from the mixer so that the level on the display screen
is around 10–12 when speaking in a normal tone.
Adjusting PA calibration manually
It is possible to calibrate the duplex performance of the conference phone when it is
connected to a PA system. The calibration level can be set automatically by the Konftel
300IP or adjusted manually to any value between 0 and 5 (0 being full duplex).
• Increase the calibration if the remote party experiences disturbing echoes.
• Decrease the calibration if the remote party experiences low duplex, i.e. your voice
is muted or clipped when the other party is speaking.
The position of the PA system’s microphones and speakers and the amplier’s set-
tings may affect full duplex performance.
Select MENU > PA > CALIBRATION.
AUTO is the default setting and is recommended in most cases. The gure shown in
brackets is the measured calibration value.
Select different levels and compare the audio quality to achieve your preferred setting.
NB. You must ask the person you are calling to assess the effect of the adjustments
you make.
SYSTEM
The system menu can be used for manual restarts and resets.
Restarting the phone programme
This restarts the phone, which takes about two minutes.
Select MENU > SYSTEM > RESTART (6,1).
Conrm that you really want to restart by pressing OK again, or cancel the restart by
pressing C.
Restarting the phone
This restarts the telephone application, which takes less than 30 seconds.
Select MENU > SYSTEM > REBOOT (6,2).
Conrm that you really want to restart by pressing OK again, or cancel the restart by
pressing C.
Restore to factory settings
This option fully restores the Konftel 300IP to factory settings. All settings are deleted,
including PIN codes and registered accounts. Alternatively, a PIN code is required for
Admin.
Select MENU > SYSTEM > FACTORY RESET (6,3).
Enter the PIN code for Admin and press OK.
Conrm that you really want to restart by pressing OK again, or cancel the restart by
pressing C.
Page 17

30
31
SETTINGS SETTINGS
CHECKING STATUS
The status menu can be used for troubleshooting. Only the administrator is able to
change these settings. See “Installation and Administration of Konftel 300IP” for an
explanation of the settings.
Account 1
To check account settings for SIP account 1.
Select MENU > STATUS > ACCOUNTS > ACCOUNT 1 (7,1,1).
This shows the status for:
- ACCOUNT NAME
- STATUS
- REGISTRAR
- SIP ID
- AUTH.NAME
- REALM
- PROXY
Account 2
To check account settings for SIP account 2.
Select MENU > STATUS > ACCOUNTS > ACCOUNT 2 (7,1,2).
Shows the same information as the menu option above.
Transfer protocol
To check which protocol is used to transmit data packages over the network.
Select MENU > STATUS > ACCOUNTS > TRANSPORT (7,1,3).
Current protocol is displayed.
Network
To check which protocol is used to transmit data packages over the network.
Select MENU > STATUS > NETWORK (7,2).
This shows the status for:
- DHCP
- IP ADDRESS
- HOSTNAME
- DOMAIN
- NETWORK
- GATEWAY
- DNS 1
- DNS 2
- VLAN
NAT Traversal
To check whether address conversion is activated, which may be necessary if the phone
is behind a rewall.
Select MENU > STATUS > NAT TRAVERSAL (7,3).
This shows the status for:
- STUN
- TURN
- ICE
Media
To check priorities of audio codecs and DTMF signalling.
Select MENU > STATUS > MEDIA (7,4).
This shows the status for:
- CODEC PRIORITY
- VAD
- DTMF SIGNALLING
- SECURITY RTP
- SECURE SIGNALLING
Time
To check time servers and time zones.
Select MENU > STATUS > TIME (7,5).
This shows the status for:
- NTP
- NTP SERVER
- TIMEZONE
Equipment
To check the phone’s serial number and software version.
Select MENU > STATUS > DEVICE (7,6).
This shows the status for:
- KONFTEL 300IP (software version and date)
- SERIAL NUMBER
- MAC ADDRESS
Page 18

32
33
USING THE WEB INTERFACE
USING THE WEB INTERFACE
You can use the web browser of a PC connected to the same network to manage
contacts, conference groups and settings in the Konftel 300IP.
Your choice of language for the Konftel 300IP does not affect the web interface,
which is only in English.
For security reasons, recordings can only be managed directly on the Konftel 300IP.
All other settings that can be made directly on the Konftel 30IP can also be made via
the web interface. It is also possible to import and export contacts and conference
groups, name user proles and change PIN codes, which can only be done via the web
interface. The administrator can also view logs, update software and create a conguration le.
Settings for accounts and networks require you to log in as an administrator. However,
you can always check all settings as a user. Settings that require administrator rights
are listed in the “Konftel 300IP Installation Guide” and “Installation and Administration
of Konftel 300IP”.
The default setting for the PIN code is 0000 for the user account (Default, Prole 1,
Prole 2, Prole 3 and Prole 4). We recommend that you change the PIN codes in
order to protect the settings. The code may consist of eight digits. The administrator
can always view and change the PIN codes to the user accounts. The administrator’s
PIN code can only be reset with a complete reset to factory settings.
CHECKING NETWORK ADDRESSES
You must use the network address to log into the web server in the Konftel 300IP.
Press MENU and select the menu option STATUS > NETWORK (7,2).
Check the conference phone’s network address under the heading IP ADDRESS.
LOGGING IN TO THE KONFTEL 300IP
Enter the phone’s network address in the web browser address bar.
Select Default or an empty user prole in Prole and enter the PIN code.
The default code is 0000.
You can create a personal password-protected phonebook using a user prole.
Page 19

34
35
USING THE WEB INTERFACE
USING THE WEB INTERFACE
MANAGING THE PHONEBOOK
Select Phone Book.
Here, you can add, change and delete contacts. You can also import existing contacts.
When you call or are called by a contact who is already in the phonebook, that
person’s name is displayed on the screen.
Adding a contact
Enter the contact’s name under Name:
Enter the contact’s phone number or URI under Number/URI.
Information about URI can be found on pages 42–43.
The way the number can be written may depend on the SIP PBX being used, but
normally you can use:
• Complete phone number, including country code
• Phone number, including area code
• Local phone number only
• Internal speed dial number (with company’s own PBX)
• URI, e.g. sip:user@company.com
• URI with IP address, e.g. sip:10.10.1.100 (within a local network)
Click on Add contact.
Editing contacts
Click on the Edit contact button after the contact you want to change.
Edit the contact and click on Save contact.
Deleting contacts
Click on the Erase contact button after the contact you want to delete.
Conrm that you want to delete the contact.
You can also delete all contacts by pressing the Erase all button.
Importing contacts
You can import contacts from a comma separated values (CSV) le. One way of creating
a CSV le is using Microsoft Excel and saving the le in CSV format.
Enter the names of the contacts in the rst column and their phone numbers or URIs in
the second. Do not use hyphens or spaces in the number. Note that Excel ignores zeros
at the beginning of numbers. The cells must therefore be formatted as text.
Information about URI can be found on pages 44–45.
CSV les can also be created using software that can save in unformatted text format.
Write a name, followed by a semi-colon and number – one contact on each line. When
you save the le, give it a csv extension instead of txt.
Page 20

36
37
USING THE WEB INTERFACE
It is normally possible to export contact books stored in your PC in CSV format.
Click on the Scroll… button under the heading Import in the web window.
Open your CSV le.
Click on Import.
The name is limited to 15 characters, since the Konftel 300IP screen cannot
display more than 15 characters.
Exporting contacts
You can export your contacts as a CSV document in order to import them into another
phone.
Click on Export.
Save the document.
USING THE WEB INTERFACE
MANAGING THE CONFERENCE GUIDE
Select Phone Book > Conference guide.
Here, you can add, change and delete conference groups. It is also possible to import
groups that you have created.
When a call is connected to a contact who is already in the phonebook, that
person’s name is displayed on the screen.
Adding a conference group
Give the group a name, enter the names and phone numbers of the group members.
You can also add participants from the phone book by clicking the drop-down list
Phone book.
Save the group by clicking on Add group.
Editing a conference group
Click on Edit group next to the contact you want to change.
Edit the group and click on Save group.
Page 21

38
39
USING THE WEB INTERFACE
USING THE WEB INTERFACE
Deleting a conference group
Click on the Erase group button next to the group you want to delete.
Conrm that you want to delete the group.
You can also delete all groups by pressing Erase all groups.
Importing conference groups
You can import conference groups using a comma separated values (CSV) le. See
“Importing contacts” on page 35 for more information.
Enter the name of the group in the rst column, the names of the group members in the
second and their phone numbers or URIs in the third.
Click on the Scroll… button under the heading Import in the web window.
Open your CSV le.
Click on Import.
Exporting conference groups
You can export your groups as a CSV document in order to import them into another
phone.
Click on Export.
Save the document.
CHECKING THE CALL LIST
Incoming, outgoing and missed calls are displayed in the call list in chronological order.
Select Call list > Recent.
Select one of the tabs Incoming, Outgoing or Missed to lter the list.
Page 22

40
41
USING THE WEB INTERFACE
USING THE WEB INTERFACE
BASIC SETTINGS
The settings only affect the user prole you selected when you logged in.
Select Settings > Basic.
Select Settings > Basic.
Select default account
The Konftel 300IP can save settings for two accounts, e.g. a company PBX and a
public IP telephony service provider. This setting determines which account should be
used as default.
You can select the account you want to use for a call by pressing LINE before dialling
the number.
Select Account 1 or Account 2 under the heading Default account and click on
Save.
Selecting languages
Select a language in the list under the heading Language and click on Save.
Changing the ring tone level
Select the tone level from the list under the heading Ring level and click on Save.
Changing key tone
Select On or Off under the heading Key tone and click on Save.
Changing the recording indicator
A short beep is heard every 20 seconds so that all the parties in the call know it is
being recorded. This feature can be turned off.
Select On or Off under the heading Recording tone and click on Save.
Changing PIN code and prole name
The PIN code can be changed from the default setting to protect against unauthorised
use.
Click on the Edit button under the heading Proles.
Enter a new PIN code.
The code may consist of 8 digits.
If you are changing a user prole, you can also change the name.
Click on the Set and Save buttons.
Make a note of the new PIN code and keep it in a safe place.
The administrator is always able to view and change the name and PIN code of the
prole.
Settings when connecting external equipment (Aux)
The Konftel 300IP can be connected to a wireless headset or an external PA system.
An optional PA interface box is required for PA system connection.
Select the PA option to activate features for external microphone mixer and PA
system.
Do not select the PA option unless a PA system is connected. This option turns
off the internal microphone and internal speakers. The HEADSET option may be
selected whether or not a headset is connected.
Changing the time format
Select 12 hour or 24 hour under the heading Time format and click on Save.
Page 23

42
43
USING THE WEB INTERFACE
USING THE WEB INTERFACE
Adjusting the sound
The sound reproduction can be adjusted to the required pitch (SOFT, NEUTRAL and
BRIGHT).
Select Soft, Neutral or Bright under the heading Equalizer and click on Save.
Display text
The display text appears on the screen when the Konftel 300IP is on hook.
Enter the text in the text eld and click on Save.
RESTARTING THE KONFTEL 300IP
Select Settings > System.
CHECKING STATUS
Although it is not possible to make settings in the Status menu, the information here
may be useful when troubleshooting.
Select Status.
You can nd the phone’s serial number, network port address and current software
version on the Basic tab. Settings made by the administrator for the network, time
server, SIP accounts and media are on other tabs.
Restarting the phone application
This only restarts the phone software with the current settings. The restart takes about
30 seconds.
Click on Restart.
Restarting the phone
This shuts down and restarts the phone. This restart takes about three minutes.
Click on Reboot.
Page 24

44
45
IP, SIP, URI AND IP TELEPHONY
IP, SIP, URI AND IP TELEPHONY
IP stands for Internet Protocol and is the standard protocol for transferring information
over the Internet between computers and other devices. The same standard is normally
used in local networks too. An IP address is the unique network address that a computer has in the network.
An IP phone is a phone that, like a PC, is connected to the network/Internet. Like the
PC, it has an IP address and the call is transmitted as data packets over the network.
Calls can be made from an IP phone to other IP phones (without leaving the network)
and to regular phones over the public telephone network.
SIP stands for Session Initiation Protocol and is a standardised protocol (communication
regulations) for connecting phone calls via networks – in most cases via the Internet
too.
To make and receive calls, the phone has to be registered to an SIP switch. The switch
can be a company PBX or be located with an IP telephony service provider. The SIP
switch ensures that the call is connected to the right address within the network or
sends the call to the public telephone network if the recipient is not registered as an IP
telephone in the same switch.
Making calls with IP phones
When you use an IP phone to make a call to another IP phone within the network,
the call does not usually cost anything. When you use an IP phone to make a call to a
regular analogue phone, you normally pay the standard rate from the point at which the
SIP switch connects the call to the telephone network.
An IP phone can be moved and used all over the world. The only requirement is access
to the Internet or, to be more accurate, access to the SIP switch where it is registered.
Users must bear in mind that calls to analogue phones are connected to the telephone
network where the switch is located.
A company can make free calls to its ofces in different countries provided it uses IP
phones connected to the same SIP switch. If the SIP switch being used is in another
country, it may be necessary to have two SIP accounts in the phone. One for the
company’s internal IP calls and one for local external calls via the analogue telephone
network. Otherwise there is a risk of making overseas calls to order a pizza from down
the road.
IP phone’s network address. The address that you use instead is easier to understand,
i.e. the phone’s e-address or public address.
These addresses are designed like email addresses, i.e. name@domain, for example
bob@company.com. A complete URI (Uniform Resource Identier) is created when the
protocol that is used to communicate with the resource is added to the address. A URI
might look like this: sip:bob@company.com.
URIs can be used instead of phone numbers to make calls from one IP phone to
another.
Phone numbers and network addresses
An IP phone has a normal phone number plus a network address. When someone calls
an IP phone number, the SIP switch converts the call into data packets that are sent
over the network to the phone’s network address.
You can make a call from an IP phone to another using the network address. When you
send an email to someone, you don’t need to know the computer’s network address,
and it’s the same when you make a call from an IP phone, you don’t need to know the
Page 25

46
47
FAQ AND TROUBLESHOOTING
OPTIONAL ACCESSORIES
I'm not getting a dialling tone
Check that the phone is registered. This is shown as a shaded box in the bottom lefthand corner of the screen If the box is not shaded, contact your phone administrator.
How can I upgrade my Konftel 300IP with the latest software version?
You need to log in as an administrator to upgrade software in the Konftel 300IP. You
can search for the most recent version via the web interface and then install it auto-
matically in the Konftel 300IP. For more details, see “Installation and Administration of
Konftel 300IP”.
The web interface does not appear in my computer.
The phone can be connected to another network than your computer, such as a VLAN
(Virtual LAN). Contact the phone administrator.
Microphone and/or speakers are not working.
The phone may be connected to a PA system that is not turned on or set in position PA
without being connected. See page 26.
You can nd answers to more FAQ on our website, www.konftel.com/300ip.
Item no. Designation
900102080 Expansion microphones (1 pair) extend the voice pickup range to 70
m2.
900102083 Travel case
900102084 Wall mounting bracket
900102087 Interface box for connection to external speakers and microphone
system (PA system)
900103384 Security lock cable
Page 26

48
49
TECHNICAL SPECIFICATIONS
TECHNICAL SPECIFICATIONS
Size Diameter 240 mm, height 77 mm
Weight 1 kg
Colour Liquorice black
Display screen Illuminated graphics (LCD), 128x64
Keypad Alphanumerical 0–9, *, on, off, mute, hold, volume up,
volume down, 5 buttons for menu navigation, line mode,
conference guide
Anti-theft protection Kensington security slot
Memory Support for SD memory cards up to 2 GB
Connectivity
Network connection RJ45, Ethernet 10/100 Base T
Power supply Transformer 100–240 V AC/13.5 V DC
IEEE 802.3af Power over Ethernet.
Extra microphones x2 modular 4/4
Auxiliary Modular 4/4 for wireless headset
Network and communication
Network addressing DHCP and static IP
NAT traversal STUN, ICE and TURN
Connection protocol SIP 2.0 (RFC 3261 and companion RFCs)
Transport UDP, TCP, TLS and SIPS
Security SRTP
Audio support Codecs: G722, G711 A-law, G711 µ-law, G729ab
DTMF tone generation RFC, SIP INFO, In-band
Time servers NTP and SNTP
Conguration Via integrated web server
Environment
Temperature: 5°–40°C
Relative humidity: 20-80% condensation free
Recommended acoustic conditions:
Reverberation period: 0.5 S Rt 60
Background noise: 45 dBA
Approvals
Electrical safety EN 60950-1:2006,
ANSI/UL 60950-1-2002,
CAN/CSA-C22.2, No. 60950-1-03
EMC/Radio EN 301 489-3 V1.4.1 (2002-08),
EN 301 489-1 V1.6.1 (2005-09),
FCC Part 15 subpart B class A,
FCC Part 15 subpart C,
EN 300220-1:2000,
EN 300220-2:2000
RoHS
Sound
Technology OmniSound™® 2.0 Wideband
Microphone Omni-directional
Reception area Up to 30 metres2, >10 people
Speaker Frequency band 200–7000 Hz,
Volume 90 dB SPL 0.5 m
Equalizer Three pitches: soft, neutral, bright
Page 27

50
51
SERVICE AND GUARANTEE
If anything is wrong with your Konftel unit, please contact the place of purchase.
Guarantee
We give a two-year guarantee on our conference telephones.
Service
Service is offered after the expiration of the guarantee. Please contact your retailer and
ask for a cost estimate.
Konftel support
If you have any questions about the guarantee and service, please contact your Konftel
support centre.
Europe:
+46(0)90-706 489 (Monday–Friday 8.00–17.00 GMT+1)
E-mail: rma@konftel.com
USA and Canada:
+1 866-606-4728 (Monday–Friday 08.00–17.00 GMT-8)
E-mail: konftel.usa@konftel.com
Page 28

Konftel is a leading company within loudspeaker communication and audio technology. We develop
and sell products and technology for telephone conferences based on cutting-edge expertise within
acoustics and digital signal processing. A key attribute of our products is that all the conference
telephones have built-in, high-quality audio technology – OmniSound® providing crystal-clear
sound. Read more about Konftel and our products on www.konftel.com.
www.konftel.com
Konftel AB, Box 268, SE-901 06 Umeå, Sweden
Phone: +46 90 706 489 Fax: +46 90 131 435 E-mail: info@konftel.com
110048-61-001 Rev 2c
 Loading...