

Page 1
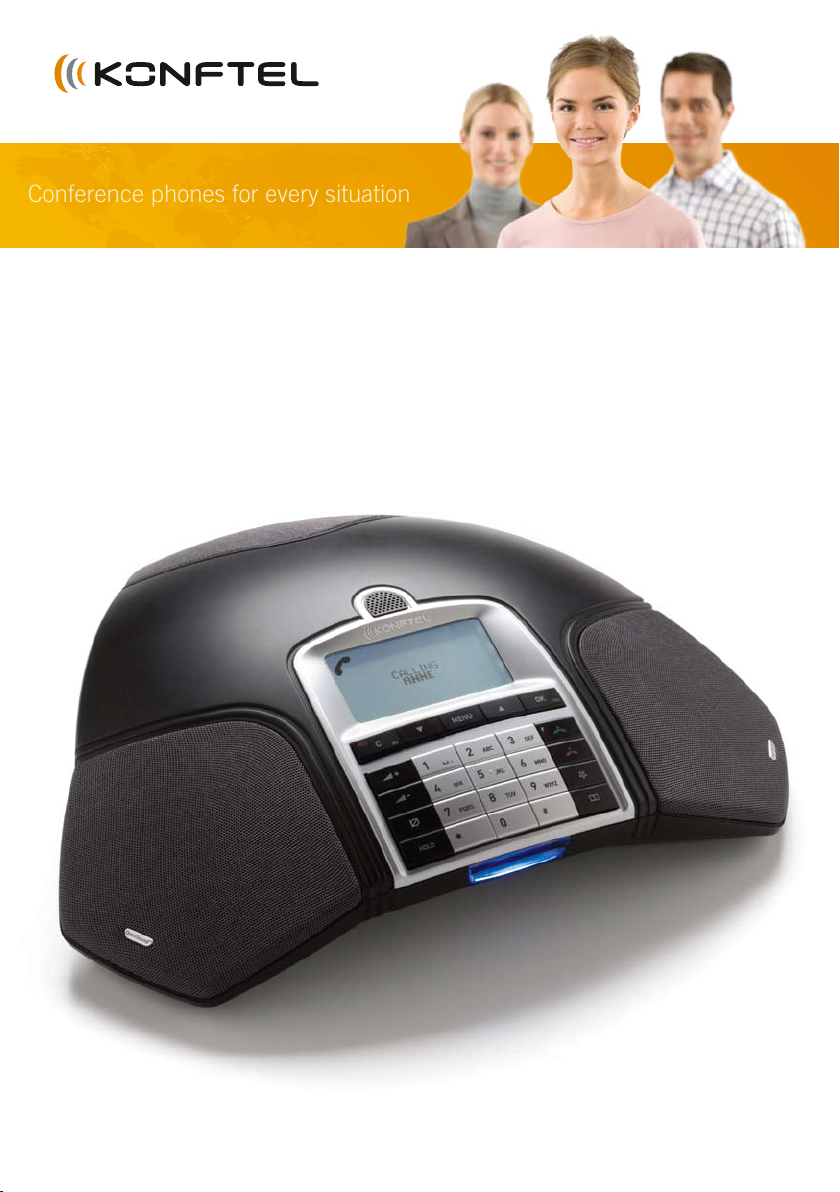
Conference phones for every situation
The Konftel 250 User Guide
ENGLISH
Page 2
B
Our patented audio technology, OmniSound®, is embedded into all Konftel phones to
ensure crystal-clear voice transmission. We’re now taking OmniSound® to the next level.
OmniSound® 2.0 provides the Konftel 250 with the capability to deliver an even more
impressive audio quality. Just like OmniSound® full duplex, OmniSound® 2.0 uses
an omni-directional microphone and three speakers for optimal audio performance.
OmniSound® 2.0 is enhanced with innovative features – noise suppression minimises
distracting background noise and an equalizer allows you to adjust sound levels during
your meeting.
Konftel AB hereby declares that this conference unit complies with all essential require-
ments and other relevant provisions of Directive 1999/5/EC.
Warning!
Do not expose the Konftel 250 to water or moisture.
Warning!
Do not open the casing of the Konftel 250.
Warning!
Only use the power adapter provided to connect the unit to the mains.
Page 3

1
TABLE OF CONTENTS
Description 2
General .................................................. 2
Maintenance .......................................... 2
keypad................................................... 4
Navigation and selection in menus ........... 5
Connections 6
Unpacking ............................................. 6
Connecting and installing ........................ 6
Select region and language ...................... 6
Answering and making calls 7
Answering calls....................................... 7
Ending calls ........................................... 7
Making calls ........................................... 7
Making three-way calls ............................ 8
During a call 9
Adjusting the speaker volume ................... 9
Placing calls on temporary hold ................ 9
Ending calls ........................................... 9
Conference guide 10
Creating conference groups.....................10
Making conference group calls ................10
Making multi-party calls .........................11
Displaying conference group participants .11
Editing conference groups ......................11
Deleting conference groups .....................12
Delete all conference groups ...................12
Conference guide settings ......................12
Displaying conference guide status ..........12
Phonebook 13
Searching for contacts ...........................13
Adding contacts ....................................13
Editing contacts ....................................13
Deleting contacts ...................................14
Deleting all conference groups ................14
Displaying phonebook status ...................14
Recording 15
Starting a recording ...............................15
Mute function ........................................15
Hold .....................................................15
Ending a recording .................................15
Listening to a recording ..........................16
Managing recordings ..............................17
Adjusting the recording indicator .............17
Displaying recording feature status ..........17
Settings 18
Selecting languages ...............................18
Select region .........................................18
Deactivating keypad tones ......................18
Adjusting date and time .........................18
Adjusting ring level volume .....................19
Adjusting the ash/R pulse duration .......19
Selecting Caller ID standard ...................19
Adjusting sound (equalizer) .................... 20
Changing text on the display screen ........ 20
Adjusting LCD contrast .......................... 20
Resetting ............................................. 20
Checking status .................................... 20
Optional accessories 21
Troubleshooting 22
Technical specications 23
Service and guarantee 24
Page 4

2
DESCRIPTION
GENERAL
The Konftel 250 conference phone offers a host of innovative features:
• OmniSound® 2.0 audio technology.
• Conference guide for easy set-up of multiparty calls.
• Record your meetings with an SD memory card so that you can listen to them later
on.
• Expansion microphones can be added to increase the voice pickup range.
(Optional.)
• 2 year guarantee.
MAINTENANCE
Clean the equipment with a soft, dry cloth. Never use liquids.
Page 5
3
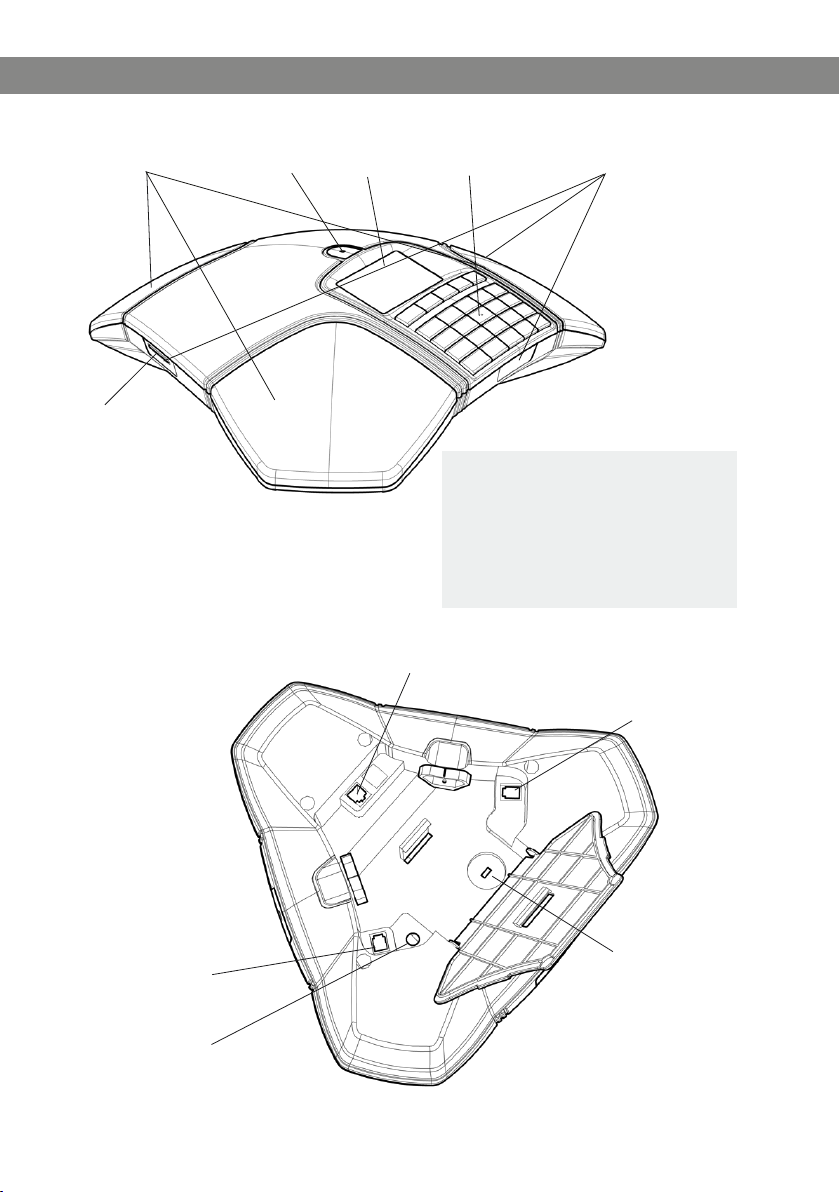
SD memory
card port
DESCRIPTION
Display screenSpeaker Microphone Keypad LEDs
LEDs
Flashing blue Incoming call
Steady blue light Call in progress
Flashing red Hold, microphone and
speaker turned off
Steady red light Mute, microphone turned
off
Analogue line connection
Expansion
microphone port
Power supply port
Expansion
microphone
port
Security lock port
Page 6
4
DESCRIPTION
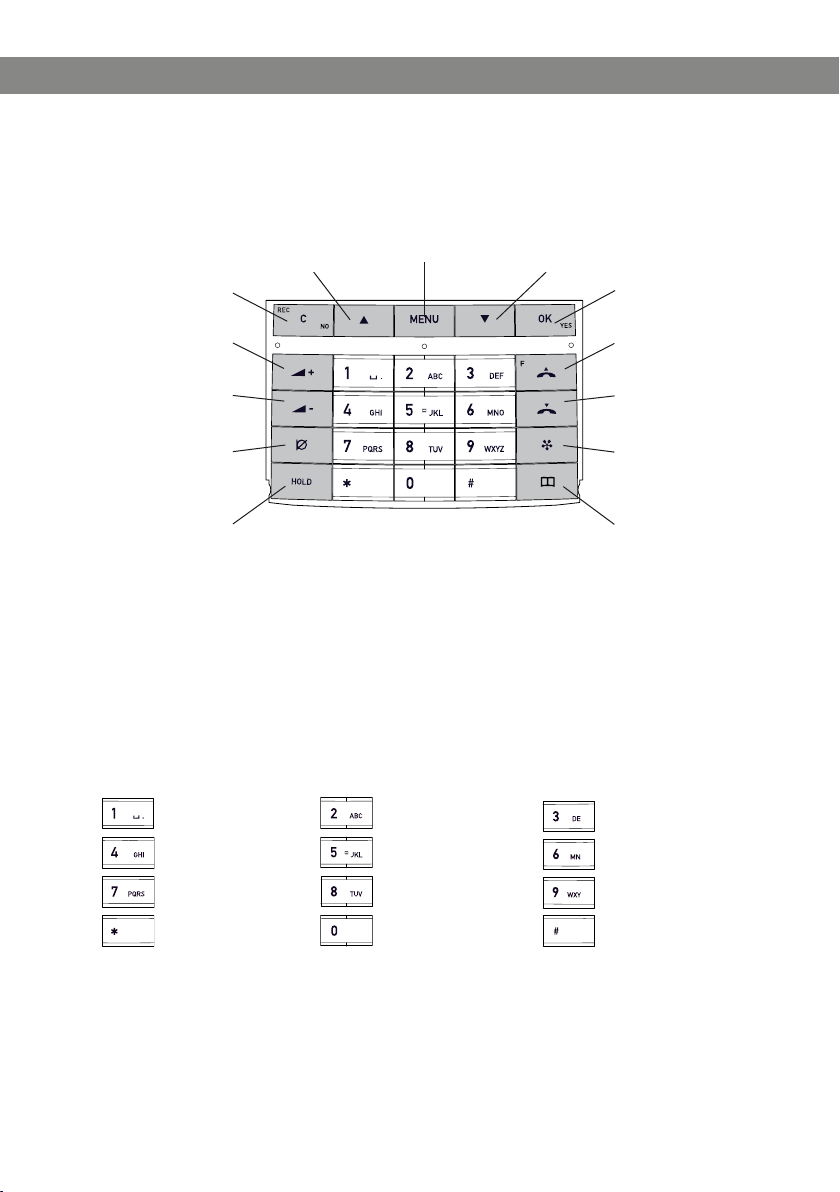
KEYPAD
UP ARROW
navigation in menus,
display of call list
C,
no/end/back
recording
Increase volume
Decrease volume
MUTE
the caller cannot
hear you
HOLD
puts a call on hold
MENU,
settings menu
Alphanumerical buttons
DOWN ARROW
navigation in menus,
display of call list
OK,
yes/conrm choice
Answer/connect
calls and
Flash/R-pulse
Hang up/end call
CONFERENCE
automatic dialling
of conference
groups
Phonebook
Writing text
Each button contains letters and characters – more than those shown on the button
(see illustration below). Press the same button repeatedly to change to another character. If there are two letters under the same button that you want to enter one after the
other, you need to pause slightly before entering the second letter.
Press the C button to delete the last character you entered.
(space) . - 1
G H I 4
P Q R S 7
A B C Å Ä Á À 2
J K L 5
T U V Ü Ú 8
0
D E F É È 3
M N O Ö Ø Ñ 6
W X Y Z 9
Page 7
SEARCH CONTACT
PHONE BOOK SETTINGS CONF GUIDE RECORDING STATUS
ADD CONTACT
EDIT CONTACT
ERASE CONTACT
ERASE ALL
STATUS
LANGUAGE
KEY TONE
TIME DATE
RING LEVEL
FLASH
EQUALIZER
SCREEN TEXT
REGION
CALLER ID
DEFAULT
LCD CONTRAST
SEARCH GROUP
SHOW GROUP
ADD GROUP
EDIT GROUP
ERASE GROUP
ERASE ALL
SETTINGS
STATUS
PLAYBACK FILE
RENAME FILE
DELETE FILE
DELETE ALL
SETTINGS
STATUS
5
DESCRIPTION
NAVIGATION AND SELECTION IN MENUS
Press MENU.
Select the option you want from the menu using the arrow buttons.
Conrm by pressing OK to select the marked option.
Cancel the setting or go back one level in the menu by pressing C.
Quit the menu by pressing MENU again.
Note that after you have made changes to a setting, you must press OK to activate
the setting.
Writing style in instructions
In the instructions, MENU > SETTINGS means you should:
Press MENU.
Mark the SETTINGS option using the arrow buttons and conrm by pressing OK to
open the menu.
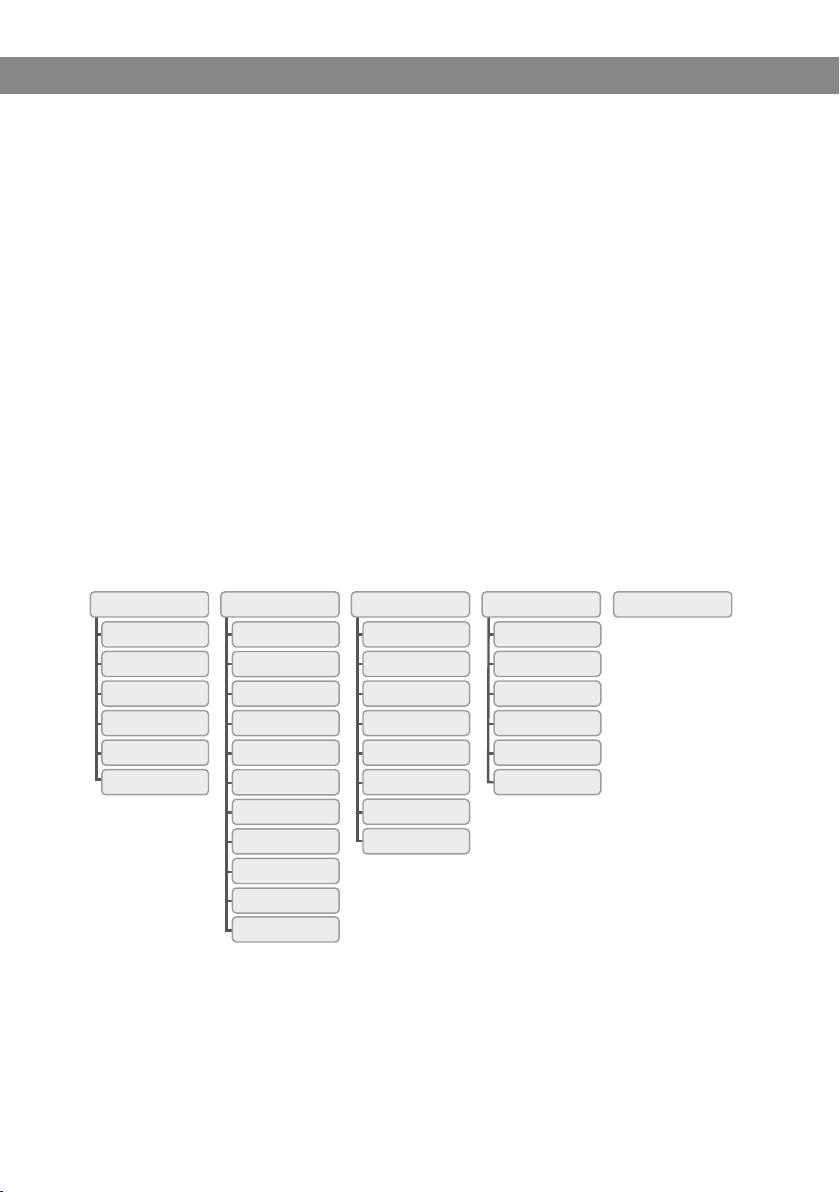
Menu tree
Page 8
6
CONNECTIONS
UNPACKING
Check that all parts are included in the package. If any parts are missing, please
contact your retailer.
• The Konftel 250 conference phone
• Power adapter with universal socket compatibility
• 7.5 metre cable for electric power and line connection
• Intermediate plugs for analogue connection
• Quick reference guides in different languages
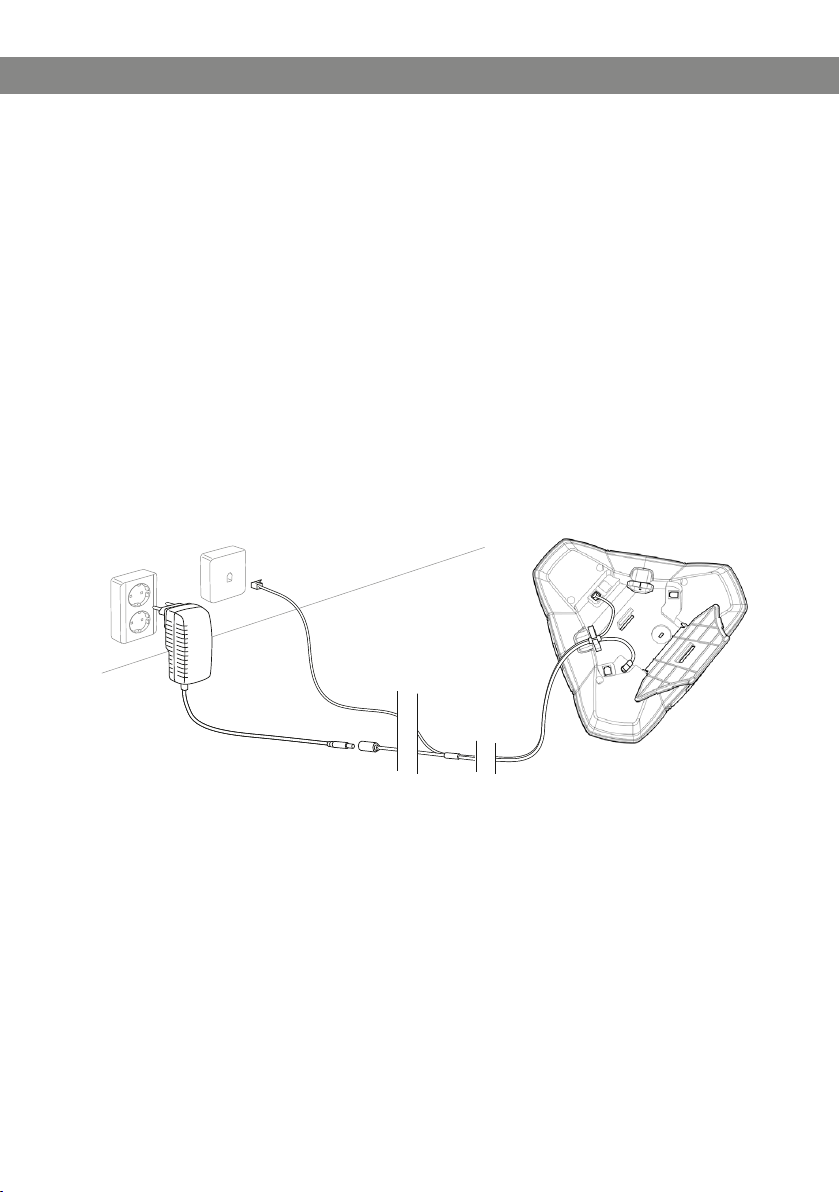
CONNECTING AND INSTALLING
Connect to an analogue line as illustrated.
Plug the Konftel 250 into the mains using the power adapter as illustrated.
Place the conference phone in the middle of the table.
SELECT REGION AND LANGUAGE
The rst time the Konftel 250 is started, you will be required to select the region in
which you are located. The Konftel 250 then automatically congures to the telecom
network for that region.
Select the region in which you are located. Click OK to conrm your selection.
You can use the arrow buttons to press an alphanumeric button to jump to the rst
region that starts with that letter in the list.
Select the language you want. Click OK to conrm your selection.
Select MENU > SETTINGS if you want to set the date and time or make other
adjustments.
Page 9

7
ANSWERING AND MAKING CALLS
ANSWERING CALLS
A ring tone is heard and the blue LEDs start ashing.
Press to answer.
The LEDs show a steady blue light. The duration of the call is shown on the display screen.
ENDING CALLS
End the call by pressing .
MAKING CALLS
Dial the number.
Press .
The number is called and the LEDs show a steady blue light. The duration of the call is shown
on the display screen.
Or:
Press .
Dial the number.
The number is called and the LEDs show a steady blue light. The duration of the call is shown
on the display screen.
Redialling
Press an arrow button.
The last number that you dialled appears on the display screen.
Use the arrow buttons to look through previously dialled numbers.
Press .
The number you select is dialled.
Calling from the phonebook
Please turn to page 13 for instructions on adding and updating contacts in the phonebook.
Press (Phonebook).
Mark the contact you want.
You can use the arrow buttons to press an alphanumeric button to jump to the rst
name that starts with that letter in the list.
Press .
The contact you select is dialled.
Page 10

8
ANSWERING AND MAKING CALLS
MAKING THREE-WAY CALLS
The simplest way to set up a multi-party call is to use the conference guide (see page
10). You can connect another party to an on-going call as follows. During a call, the
button acts as Flash/R-pulse, which means it transmits commands to the PBX.
If you experience problems making multi-party calls: Different PBXs may require
different signals. Please contact your telephone administrator or service provider.
Turn to page 12 for more details.
Press (F).
A second dialling tone is heard.
Dial the second participant’s number and wait for an answer.
Press the (F) button and then 3.
All three participants are now linked together in one call.
If you don’t get an answer when you dial the second number
Go back to the rst call by pressing (F).
Page 11

9
DURING A CALL
ADJUSTING THE SPEAKER VOLUME
Adjust the speaker volume using the buttons and .
PLACING CALLS ON TEMPORARY HOLD
Mute
Press (Mute) to turn off the microphone.
The LEDs change from blue to red. The other party cannot hear what you are saying.
Press (Mute) to reconnect the call.
Hold
Press HOLD to put the call on hold.
The LEDs change from blue to ashing red. Both the microphone and the speaker are turned off
and the call is on hold.
Press HOLD to reconnect the call.
ENDING CALLS
End the call by pressing .
Page 12

10
CONFERENCE GUIDE
The conference guide allows you to create 20 conference groups with up to six people in
each. You can now call the participants in a meeting by simply pressing a few buttons.
You may need to adjust some settings in your Konftel 250 to make it compatible with
your PBX. Please turn to page 12 in this User Guide for more details.
Entering text with the keypad
Please turn to page 4 for instructions on using the keypad to enter text.
CREATING CONFERENCE GROUPS
Select MENU > CONF GUIDE > ADD GROUP.
Enter a group name and press OK to conrm.
Press OK to enter the rst person.
Write the name of the rst person and press OK to conrm. Enter the number and
press OK to conrm.
Press OK to add another person and repeat the above steps.
Conclude by pressing C.
MAKING CONFERENCE GROUP CALLS
Press the (Conference) button.
Select the conference group you want to call.
The Konftel 250 dials the rst person and asks you to conrm when the person answers.
Press OK when the rst person has answered.
Continue in the same way for each person in the group.
If you don’t get an answer
Press C if one of the persons you are trying to call does not answer.
The conference guide will ask you if you want to redial that person.
Either press OK or C.
If you decide not to redial (C) you will be asked if you want to end the conference guide or
continue to the next person.
Press OK to continue and C to end the guide.
When the guide has ended, you will be connected with up to six people and ready to start your
conference.
Please note that you can also call a conference group via SEARCH GROUP in the
CONF GUIDE menu.
Page 13

11
CONFERENCE GUIDE
MAKING MULTI-PARTY CALLS
Press the (Conference) button.
Select QUICK GUIDE with the arrow buttons. Press OK to conrm.
The Quick Guide asks you to dial the rst number.
Dial the rst person’s telephone number. Press OK to conrm.
Press OK when the rst person has answered.
Press OK to call another person and repeat the above steps. Press C when you have
called all the persons you want for your meeting.
If one of the persons does not answer, follow the steps for calling a saved conference
group (see above).
DISPLAYING CONFERENCE GROUP PARTICIPANTS
Select MENU > CONF GUIDE > SHOW GROUP.
Mark the group you want and press OK.
The names of the conference group participants are displayed.
EDITING CONFERENCE GROUPS
Select MENU > CONF GUIDE > EDIT GROUP.
Here, you can change the name of a conference group, add or delete a person from a
group and change a person’s name and phone number.
Mark your choice of option in the menu using the arrow buttons and press OK to
conrm.
The names of the conference groups are displayed.
Mark the group you want to change and press OK to conrm.
Mark a person you want to change and press OK to conrm.
Make the change and press OK to conrm.
Delete a number or a letter in a name by pressing C. If you want to cancel the
change you are making and leave the name or number as they were, press C until
the CONFERENCE GUIDE menu appears.
Page 14

12
CONFERENCE GUIDE
DELETING CONFERENCE GROUPS
Select MENU > CONF GUIDE > ERASE GROUP.
Mark the group you want to delete and press OK.
Conrm that you really want to delete the group by pressing OK or cancel the dele-
tion of a group by pressing C.
DELETE ALL CONFERENCE GROUPS
Select MENU > CONF GUIDE > ERASE ALL.
Conrm that you really want to delete all groups by pressing OK or cancel the dele-
tion of all groups by pressing C.
CONFERENCE GUIDE SETTINGS
When a multi-party call is going to be connected, a special signal (ash or R-pulse) is
produced which transmits the command (request, return and conference) to the PBX.
It may be necessary to change the type of signal if calls are connected via a PBX.
Different PBXs may require different signals. These requirements should be specied
in the technical data for the PBX. Settings for the most common PBXs are listed on
Konftel’s website.
Select MENU > CONF GUIDE > SETTINGS.
Enter the command for a request for a new dialling tone and press OK to conrm.
(“F” is the basic setting)
Enter the command to connect everyone to a multi-party call and press OK to
conrm. (“F3” is the basic setting)
Enter the command to return to your original call and press OK to conrm. (“F” is
the basic setting)
If you experience problems making multi-party calls
It may be necessary to change the duration of the R-pulse so that it works with your
PBX. Read “ADJUSTING THE FLASH/R PULSE DURATION” on page 19.
Your PBX may not be programmed to admit multi-party calls or the procedure may be
different. Please contact your telephone administrator or service provider.
DISPLAYING CONFERENCE GUIDE STATUS
Select MENU > CONF GUIDE > STATUS.
The display screen indicates the number of conference groups already stored plus how many
more groups can be added.
Page 15

13
PHONEBOOK
The Konftel 250 has a phonebook that holds up to 50 entries. See page 7 for making
calls via the phonebook.
Entering text with the keypad
Please turn to page 4 for instructions on using the keypad to enter text.
SEARCHING FOR CONTACTS
Press (Phonebook).
Another way to search for a contact in the address book is to hold down a number
button for two seconds (see page 8). You can also search for a contact via the
PHONEBOOK menu. (MENU > PHONE BOOK > SEARCH CONTACT).
Mark the contact you want.
You can use the arrow buttons to press an alphanumeric button to jump to the rst
name that starts with that letter in the list.
Press OK or to dial the selected contact, C to return to the PHONEBOOK menu
or MENU to exit the menu.
ADDING CONTACTS
Select MENU > PHONE BOOK > ADD CONTACT.
Enter the name of the contact and press OK to conrm.
Write the number and press OK to conrm.
Press OK to add another contact or MENU to exit the menu.
EDITING CONTACTS
Select MENU > PHONE BOOK > EDIT CONTACT.
Mark the contact you want to change. Press OK to conrm.
Make the change and press OK to conrm.
Delete a number or a letter in a name by pressing C. If you want to cancel the
change you are making and leave the name or number as they were, press C until
the PHONEBOOK menu appears.
Page 16

14
PHONEBOOK
DELETING CONTACTS
Select MENU > PHONE BOOK > ERASE CONTACT.
Mark the contact you want to delete and press OK.
Conrm that you really want to delete the contact by pressing OK or cancel the
deletion of a contact by pressing C.
DELETING ALL CONFERENCE GROUPS
Select MENU > PHONE BOOK > ERASE ALL.
Conrm that you really want to delete all contacts by pressing OK or cancel the
deletion of a contact by pressing C.
DISPLAYING PHONEBOOK STATUS
Select MENU > PHONE BOOK > STATUS.
The display screen indicates the number of contacts already stored plus how many more
contacts can be added.
Page 17

15
RECORDING
It is possible to record a phone conference on an SD (Secure Digital) memory card so
you can listen to it later on.
A ashing symbol appears on the display screen during recording. A beep is heard every
20 seconds so that other parties in the call know it is being recorded. The beep can be
turned off (see page 17).
The recorded call is saved on the memory card. The document is named after the time
at which the recording began (e.g. 14-35-01.wav) and is saved in a folder with the
current date. This name can be changed after the recording has ended (see page 17).
STARTING A RECORDING
Remember to notify all parties in the call before you start recording.
Press the
The recording symbol ashes on the display screen.
MUTE FUNCTION
Press the (Mute) button during a call to turn the microphone off.
The LEDs change from blue to red.
The other party cannot hear what you are saying and only the called party is recorded.
REC
/C button for two seconds and press OK to conrm.
HOLD
Press HOLD during the call to put the call on hold.
The LEDs change from blue to ashing red.
Both the microphone and the speaker are turned off and the call is on hold. None of the parties
will now be recorded.
ENDING A RECORDING
Press the
The recording symbol is no longer displayed on the screen.
REC
/C button for two seconds and press OK to conrm.
Page 18

16
RECORDING
LISTENING TO A RECORDING
You can listen to a recorded phone conference on your Konftel 250 or a computer using
an SD memory card reader. Recordings are saved in .wav format and can be played
back on your choice of media player.
Listening to recordings on the Konftel 250:
Select MENU > RECORDING > PLAYBACK FILE.
Mark the folder you want (date) and press OK to conrm.
A list of all recordings for the specied date is displayed. Names, date, time and length are
displayed for each recording.
Mark the recording you want and start the playback by pressing OK.
Adjusting the speaker volume
Increase the volume using the button and lower it using .
Pause playback
Pause the playback by pressing OK.
Restart playback by pressing OK again.
Move forward in the recording during playback
Move forward in the recording by pressing arrow down or backward by pressing
arrow up.
The recording advances about 10 seconds every time you press the button.
You can also jump further forward in the recording:
Key 3 – forward 1 minute
Key 6 – forward 10 minutes
Key 1 – backward 1 minute
Key 4 – backward 10 minutes
Stop playback
Stop the playback by pressing C.
Page 19

17
RECORDING
MANAGING RECORDINGS
Editing the name of a recording
The recording is named by default with the time at which the recording started.
Select MENU > RECORDING > RENAME FILE.
Mark the folder you want and press OK to conrm.
Mark the recording to be edited and press OK.
Make the change and press OK to conrm.
Delete a number or a letter in a name by pressing C.
If you want to cancel the change you are making and leave the name or number as they
were, press C several times until the RECORDING menu appears.
Deleting a recording
Select MENU > RECORDING > DELETE FILE.
Mark the folder you want and press OK.
Mark the recording to be deleted and press OK.
Conrm that you really want to delete the recording by pressing OK again, or cancel
the deletion of a recording by pressing C.
Deleting all recordings
Select MENU > RECORDING > DELETE ALL.
Conrm that you really want to delete all recordings by pressing OK again, or cancel
the deletion of a recording by pressing C.
ADJUSTING THE RECORDING INDICATOR
A short beep is heard every 20 seconds so that all the parties in the call know it is
being recorded. This feature can be turned off.
Select MENU > RECORDING > SETTINGS.
Select your choice and press OK to conrm.
DISPLAYING RECORDING FEATURE STATUS
Select MENU > RECORDING > STATUS.
The display screen indicates the number of recordings, the total length of recorded calls and
how many hours of recording time are left before the memory card is full.
Page 20

18
SETTINGS
SELECTING LANGUAGES
Select MENU > SETTINGS > LANGUAGE.
Select the language you want and press OK to conrm.
SELECT REGION
The rst time the Konftel 250 is started, you will be required to select the region in
which you are located. The Konftel 250 then automatically congures to the telecom
network for that region. Your selected entries can be changed later via this menu.
Select MENU > SETTINGS > REGION.
Select the region in which you are located.
DEACTIVATING KEYPAD TONES
You can select whether or not you want a tone to be heard when you press a button.
Note that this setting does not affect the tone you hear when you dial a number in call
mode.
Select MENU > SETTINGS > KEY TONE.
Select your choice and press OK to conrm.
ADJUSTING DATE AND TIME
Changing the date
Select MENU > SETTINGS > TIME DATE > DATE.
Change the ashing gures for the year using the arrow buttons or by entering the
gures on the keypad. Press OK to conrm and to continue to the month, and then
proceed in the same way for the day.
Changing the time
Select MENU > SETTINGS > TIME DATE > TIME.
Change the ashing gures for the hour using the arrow buttons or by entering the
gures on the keypad. Press OK to conrm and to continue to minutes.
Changing the time format
Select MENU > SETTINGS > TIME DATE > TIME FORMAT.
Select either a 12-hour or a 24-hour format using the arrow buttons and press OK
to conrm your choice.
Page 21

19
SETTINGS
ADJUSTING RING LEVEL VOLUME
Select MENU > SETTINGS > RING LEVEL.
Select your choice and press OK to conrm.
There are six volume levels plus a silent mode. You will hear the ring tone for each
level you select. If you select silent mode, an LED on the phone ashes when an
incoming call is received.
ADJUSTING THE FLASH/R PULSE DURATION
The Flash/R pulse (Register recall) is used to request a new line from the PBX. Different
countries and PBXs may require different durations for activating the Flash/R pulse.
Duration requirements should be specied in the technical data for the PBXs.
Select MENU > SETTINGS > FLASH.
Select your choice and press OK to conrm.
Examples of suitable settings are:
100 ms – Scandinavia, Europe, Siemens HiPath
300 ms – Germany, France, Israel
500 ms – USA
SELECTING CALLER ID STANDARD
Konftel 250 needs to be congured to match the Caller ID standard in your country.
Note that in some cases even individual states/provinces within a country use different
standards. The table below is a guideline for choosing the correct setting. If the caller
ID is not working properly, select another setting or contact your telephone service
provider for further information.
Caller ID standard Country
Bellcore (Telcordia) Canada (usually), USA, Australia, New Zealand,
China, Hong Kong, Singapore
ETSI Austria, Belgium, Czech Republic, France, Germany, Italy,
Luxemburg, Norway, Poland, Spain, Slovenia, Switzerland,
Turkey, South Africa, Taiwan
BT (British Telecom) United Kingdom
DTMF Denmark, Finland, Greece, Iceland, Netherlands, Portugal,
Sweden, China, India, Saudi Arabia, Brazil, Uruguay
Select MENU > SETTINGS > CALLER ID.
Select your choice and press OK to conrm.
Page 22

20
SETTINGS
ADJUSTING SOUND (EQUALIZER)
The sound reproduction can be adjusted to the required pitch (SOFT, NEUTRAL and
BRIGHT).
Select MENU > SETTINGS > EQUALIZER.
Select your choice and press OK to conrm.
CHANGING TEXT ON THE DISPLAY SCREEN
The text on the display screen can be changed when the Konftel 250 is on hook.
Select MENU > SETTINGS > SCREEN TEXT.
Delete existing text using C and enter your new text. Press OK to conrm.
ADJUSTING LCD CONTRAST
Select MENU > SETTINGS > LCD CONTRAST.
Select your choice and press OK to conrm.
RESETTING
There is a menu option under SETTINGS that resets all settings to default. Please note
that this also deletes all contacts in the phonebook and all groups saved in the conference guide.
Select MENU > SETTINGS > DEFAULT.
Conrm that you really want to reset the settings to default by pressing OK again, or
cancel the resetting procedure by pressing C.
CHECKING STATUS
If you need to check the software version or serial number.
Select MENU > STATUS.
Page 23

21
See www.konftel.com/250.
OPTIONAL ACCESSORIES
Page 24

22
TROUBLESHOOTING
If your Konftel 250 is not working properly:
• Check that the microphone is turned on during the call. The blue microphone LEDs
must be lit.
• If the display shows “ANALOG OVERCURRENT”, the Konftel 250 is connected to a
digital telephone jack. Switch to an analogue phone jack.
• Bypass any extension cables and check that the Konftel 250 is working properly.
• If the Konftel 250 needs to wait for a second dialling tone, you should enter a pause
using the pause/mute button when entering a telephone number as an instruction or
in the phonebook.
You can nd more FAQ on the Konftel website, www.konftel.com/250.
Page 25

23
TECHNICAL SPECIFICATIONS
Size Diameter 240 mm, height 77 mm
Weight 1 kg
Colour Charcoal black
Display screen Illuminated graphics (LCD), 128x64
Keypad Alphanumerical 0–9, *, off hook/F, on hook, mute, hold,
volume up, volume down, 5 buttons for menu navigation,
phone book, conference guide
Anti-theft protection Kensington security slot
Memory Support for SD memory cards up to 2 GB
Connectivity
Analogue telephone connectivity
Modular 6/6 modular (RJ11) to a public analogue telecommunication network or an analogue PBX
Power supply AC adapter 100–240 V AC/14 V DC
Expansion microphones 2 modular 4/4
Audio
Technology OmniSound® 2.0
Microphone Omni-directional
Reception area Up to 30 metres2, >10 people
Speakers Frequency band 200–3300 Hz
Sound level 90 dB SPL 0.5 m
Equalizer Three pitches: soft, neutral, bright
Environment
Temperature 5°–40°C
Relative humidity 20-80% condensation free
Recommended acoustic conditions
Reverberation period: 0.5 S Rt 60
Background noise: 45 dBA
Approvals
Telecommunication TBR21, 47 CFR Part 68/ TIA, IC CS-03 Issue 1999/01/01
EMC EN301 489-1,3. EN 300 220-1,2, FCC subparts B and C
Electrical safety UL 60950-1, EN 60950-1:2001
Page 26

SERVICE AND GUARANTEE
If anything is wrong with your Konftel unit, please contact the place of purchase.
Guarantee
We give a two-year guarantee on our conference telephones.
Service
Service is offered after the expiration of the guarantee. Please contact your retailer and
ask for a cost estimate.
Konftel support
If you have any questions about the guarantee and service, please contact your Konftel
support centre
Europe: +46(0)90-706 489 (Monday–Friday 8.00–17.00 GMT+1)
E-mail: rma@konftel.com
USA and Canada:
+1 866-606-4728 (Monday–Friday 08.00–17.00 GMT-8)
E-mail: konftel.usa@konftel.com
24
Page 27

Page 28

Konftel is a leading company within loudspeaker communication and audio technology. We develop
and sell products and technology for telephone conferences based on cutting-edge expertise within
acoustics and digital signal processing. A key attribute of our products is that all the conference
telephones have built-in, high-quality audio technology – OmniSound® providing crystal-clear
sound. Read more about Konftel and our products on www.konftel.com.
www.konftel.com
Konftel AB, Box 268, SE-901 06 Umeå, Sweden
Phone: +46 90 706 489 Fax: +46 90 131 435 E-mail: info@konftel.com
110075-61-001 Rev 2a
 Loading...