

Page 1
7
Under-Cabinet Radio SKRD 30 A1
Under-Cabinet Radio
CY
Operating instructions
KOMPERNASS GMBH
BURGSTRASSE 21 · D-44867 BOCHUM
www.kompernass.com
ID-Nr.: SKRD 30 A1-09/10-V3
Ugradbeni radio
Upute za upotrebu
Page 2
SKRD 30 A1
A
1
2
3
4
5 6 7 8 9 0 q w e r
uiopp
zt
B
Page 3

Index
Introduction . . . . . . . . . . . . . . 2
Information for these operating
instructions . . . . . . . . . . . . . . . . . . . . 2
Copyright . . . . . . . . . . . . . . . . . . . . .2
Proper usage . . . . . . . . . . . . . . . . . . 2
Warning notices . . . . . . . . . . . . . . . . 3
Safety . . . . . . . . . . . . . . . . . . . . . . . .4
Danger from electric shock . . . . . . . . 4
Handling of batteries . . . . . . . . . . . . 4
Basic Safety Instructions . . . . . . . . . .5
Operating components . . . . .6
Setting up and connecting . . .7
Safety instructions . . . . . . . . . . . . . . 7
Package contents and transport
inspection . . . . . . . . . . . . . . . . . . . . .7
Unpacking . . . . . . . . . . . . . . . . . . . . 7
Disposal of the packaging . . . . . . . . 8
Set-up location requirements. . . . . . .8
Electrical connection . . . . . . . . . . . . . 8
Inserting the battery . . . . . . . . . . . . . 9
Mounting under a wall cupboard . . 9
Disassembly . . . . . . . . . . . . . . . . . .10
Setting up the device . . . . . . . . . . . 10
Providing mains power . . . . . . . . . . 10
VHF wire antenna . . . . . . . . . . . . .10
Handling and operation . . .11
Switching On and Off . . . . . . . . . .11
Basic settings . . . . . . . . . . . . . . . . . 11
Activating the settings menu . . . . . 11
Setting the time . . . . . . . . . . . . . . . .12
Setting the date . . . . . . . . . . . . . . .12
Adjusting the display brightness . . .13
Setting the memory function . . . . . .13
Setting the time of day format . . . .14
Kitchen timer . . . . . . . . . . . . . . . . . .14
Setting the kitchen timer . . . . . . . . .14
Starting the kitchen timer . . . . . . . .15
Pausing the kitchen timer. . . . . . . . .15
Programming the kitchen timer . . . .16
Accessing the kitchen timer . . . . . .16
Programming alarm wake times . . .17
Wake with alarm tone . . . . . . . . . .17
Waken with radio . . . . . . . . . . . . . . 18
Switching the alarm off . . . . . . . . . .18
When the wake time has arrived . .18
Radio operation . . . . . . . . . . . . . . .19
Switching the radio on/off . . . . . . .19
Adjusting the volume. . . . . . . . . . . .19
Manual station selection. . . . . . . . .19
Search for the next station . . . . . . .19
Saving stations manually . . . . . . . .20
Access saved stations . . . . . . . . . .20
Automatic station search
(AMS function) . . . . . . . . . . . . . . .20
Additional functions . . . . . . . . . . . .21
Automatic switch off (Sleep function) 21
Button lock . . . . . . . . . . . . . . . . . . . 21
Bass accentuation . . . . . . . . . . . . . .21
Cleaning . . . . . . . . . . . . . . . .22
Safety instructions . . . . . . . . . . . . . 22
Cleaning the housing . . . . . . . . . . .22
Troubleshooting . . . . . . . . . .22
Safety instructions . . . . . . . . . . . . . 22
Malfunction causes and remedies . 23
Storage/Disposal . . . . . . . . .24
Storage . . . . . . . . . . . . . . . . . . . . . .24
Disposal of the device . . . . . . . . . .24
Disposing of the batteries . . . . . . . .24
Appendix . . . . . . . . . . . . . . .25
Information regarding the
EG conformity declaration . . . . . . .25
Technical data . . . . . . . . . . . . . . . .25
Warranty . . . . . . . . . . . . . . . . . . . .26
Service . . . . . . . . . . . . . . . . . . . . . .26
Importer . . . . . . . . . . . . . . . . . . . . .26
GB
CY
SKRD 30 A1
1
Page 4
Introduction
GB
CY
Introduction
Information for these operating instructions
These operating instructions are a component of the Under-Cabinet Radio
SKRD 30 A1 (henceforth designated as the device) and they provide you with
important information about the intended use, safety, installation and connection
as well as operation of the device.
The operating instructions must be kept available in the vicinity of the device
at all times. They are to be read and used by anyone assigned to service and
repair faults in the device.
Retain these operating instructions and pass them on with the device to any
future owners.
Copyright
This documentation is copyright protected.
Any copying or reproduction, including as extracts, as well as the reproduction
of images, also in an altered state, is not permitted without the express written
consent of the manufacturer.
Proper usage
This device is only intended for the reception of VHF radio programmes, as a
kitchen timer and as an alarm by means of an alarm tone or radio in enclosed
spaces. The device is intended as a free standing unit or for mounting under a
cupboard. For these purposes the supplied stand and/or mounting plate must be
used. Any other use or uses beyond those mentioned are considered unintended
use. The device is not intended for use in commercial or industrial environments.
WARNING
Danger from unintended use!
Danger from the device can result if it is used for unintended purposes and/or
other types of use.
Use the device exclusively for intended purposes. ►
Observe the procedures described in these operating instructions. ►
No warranty claims of any kind will be accepted for damage caused by improper
use, unauthorised r
replacement parts.
The operator alone bears liability.
2
epairs, unauthorised modifi cations or for the use of unapproved
SKRD 30 A1
Page 5
Introduction
Warning notices
In the current operating instructions the following warning notices are used:
DANGER
A warning in this danger level indicates a hazard threatening
situation.
In the e
vent that the hazardous situation is not avoided it can lead to death
or serious injury.
The directives in this warning are there in order to avoid the danger of ►
death or serious injury.
WARNING
A warning of this danger level signifi es a possible dangerous
situation.
If the dangerous situation is not avoided it can lead to injuries.
The directives in this warning are there to avoid personal injuries. ►
IMPORTANT
A warning of this danger level signifi
damage.
If the situation is not avoided it can lead to property damage.
The directives in this warning are there to avoid property damage. ►
GB
CY
es possible property
SKRD 30 A1
NOTICE
A notice signifi es additional information that assists in the handling of the ►
device.
3
Page 6

Introduction
GB
CY
Safety
In this section you receive important safety information regarding handling of the
device.
This device complies with the statutory safety regulations. Incorrect usage can
lead to injuries and property damage.
Danger from electric shock
DANGER
Risk of fatal electrocution!
A lif
e-threatening situation can arise from contact with live
wires or components!
Observe the following safety instructions to avoid electric shock hazards:
Do not use the device if the mains power plug or the connection cable are ►
damaged.
Do not, under an
electric shock is present if the power carrying connections are touched or
the electrical or mechanical construction is changed.
Handling of batteries
WARNING
Danger from improper use!
For safe handling of batteries observe the following safety instructions:
Do not throw batteries into a fi re. ►
Do not short circuit batteries. ►
Do not attempt to recharge batteries. ►
Regularly check the condition of the batteries. Leaking batter
cause permanent damage to the device. Special caution should be shown
when handling damaged or leaking batteries. Danger from acid burns!
Wear protective gloves.
Store batteries in a place inaccessible to children. If swallowed seek ►
immediate medical attention.
ou do not intend to use the device for an extended period of time, ►
If y
remove the batteries.
y circumstances, open the device housing. The risk of an ►
y acid can ►
4
SKRD 30 A1
Page 7

Introduction
Basic Safety Instructions
For safe handling of the device observe the following safety instructions:
Before use check the device for visible external damage. Do not put into ■
operation a device t
Damaged cables or connections should be replaced by authorised qualifi ed ■
persons or by the customer service department.
P
ersons who, due to their physical, intellectual or motor abilities, are incapable ■
of operating the device safely may only use the device under supervision or
dir
ection from a responsible person.
Only allow children to use the device under supervision. ■
Repairs should only be carried out by authorized specialist companies or by ■
the customer service department. Incorrect repairs can result in danger to the
user
. In addition warranty claims become void.
A repair to the device during the warranty period may only be carried out ■
by a customer service department authorized by the manufacturer otherwise
no additional w
Defective components may only be replaced with original replacement parts. ■
Only by using original replacement parts can you guarantee that the safety
r
equirements are complied with.
Protect the device from moisture and liquid penetration. Never submerge the ■
device in water, do not place the device in the vicinity of water and do not
stand an
y object fi lled with liquid (i.e. vases) on the device.
Do not place any objects on the device. ■
Do not operate the device in the vicinity of open fl ames (i.e. candles). ■
Avoid direct sunlight. ■
Always pull on the power plug when disconnecting from the wall socket, ■
never pull on the connection cable.
If malfunctions occur or thunder storms thr
wall socket.
hat is damaged or has been dropped.
arranty claims can be considered for subsequent damages.
GB
CY
eaten pull the power plug from the ■
SKRD 30 A1
5
Page 8
Operating components
GB
CY
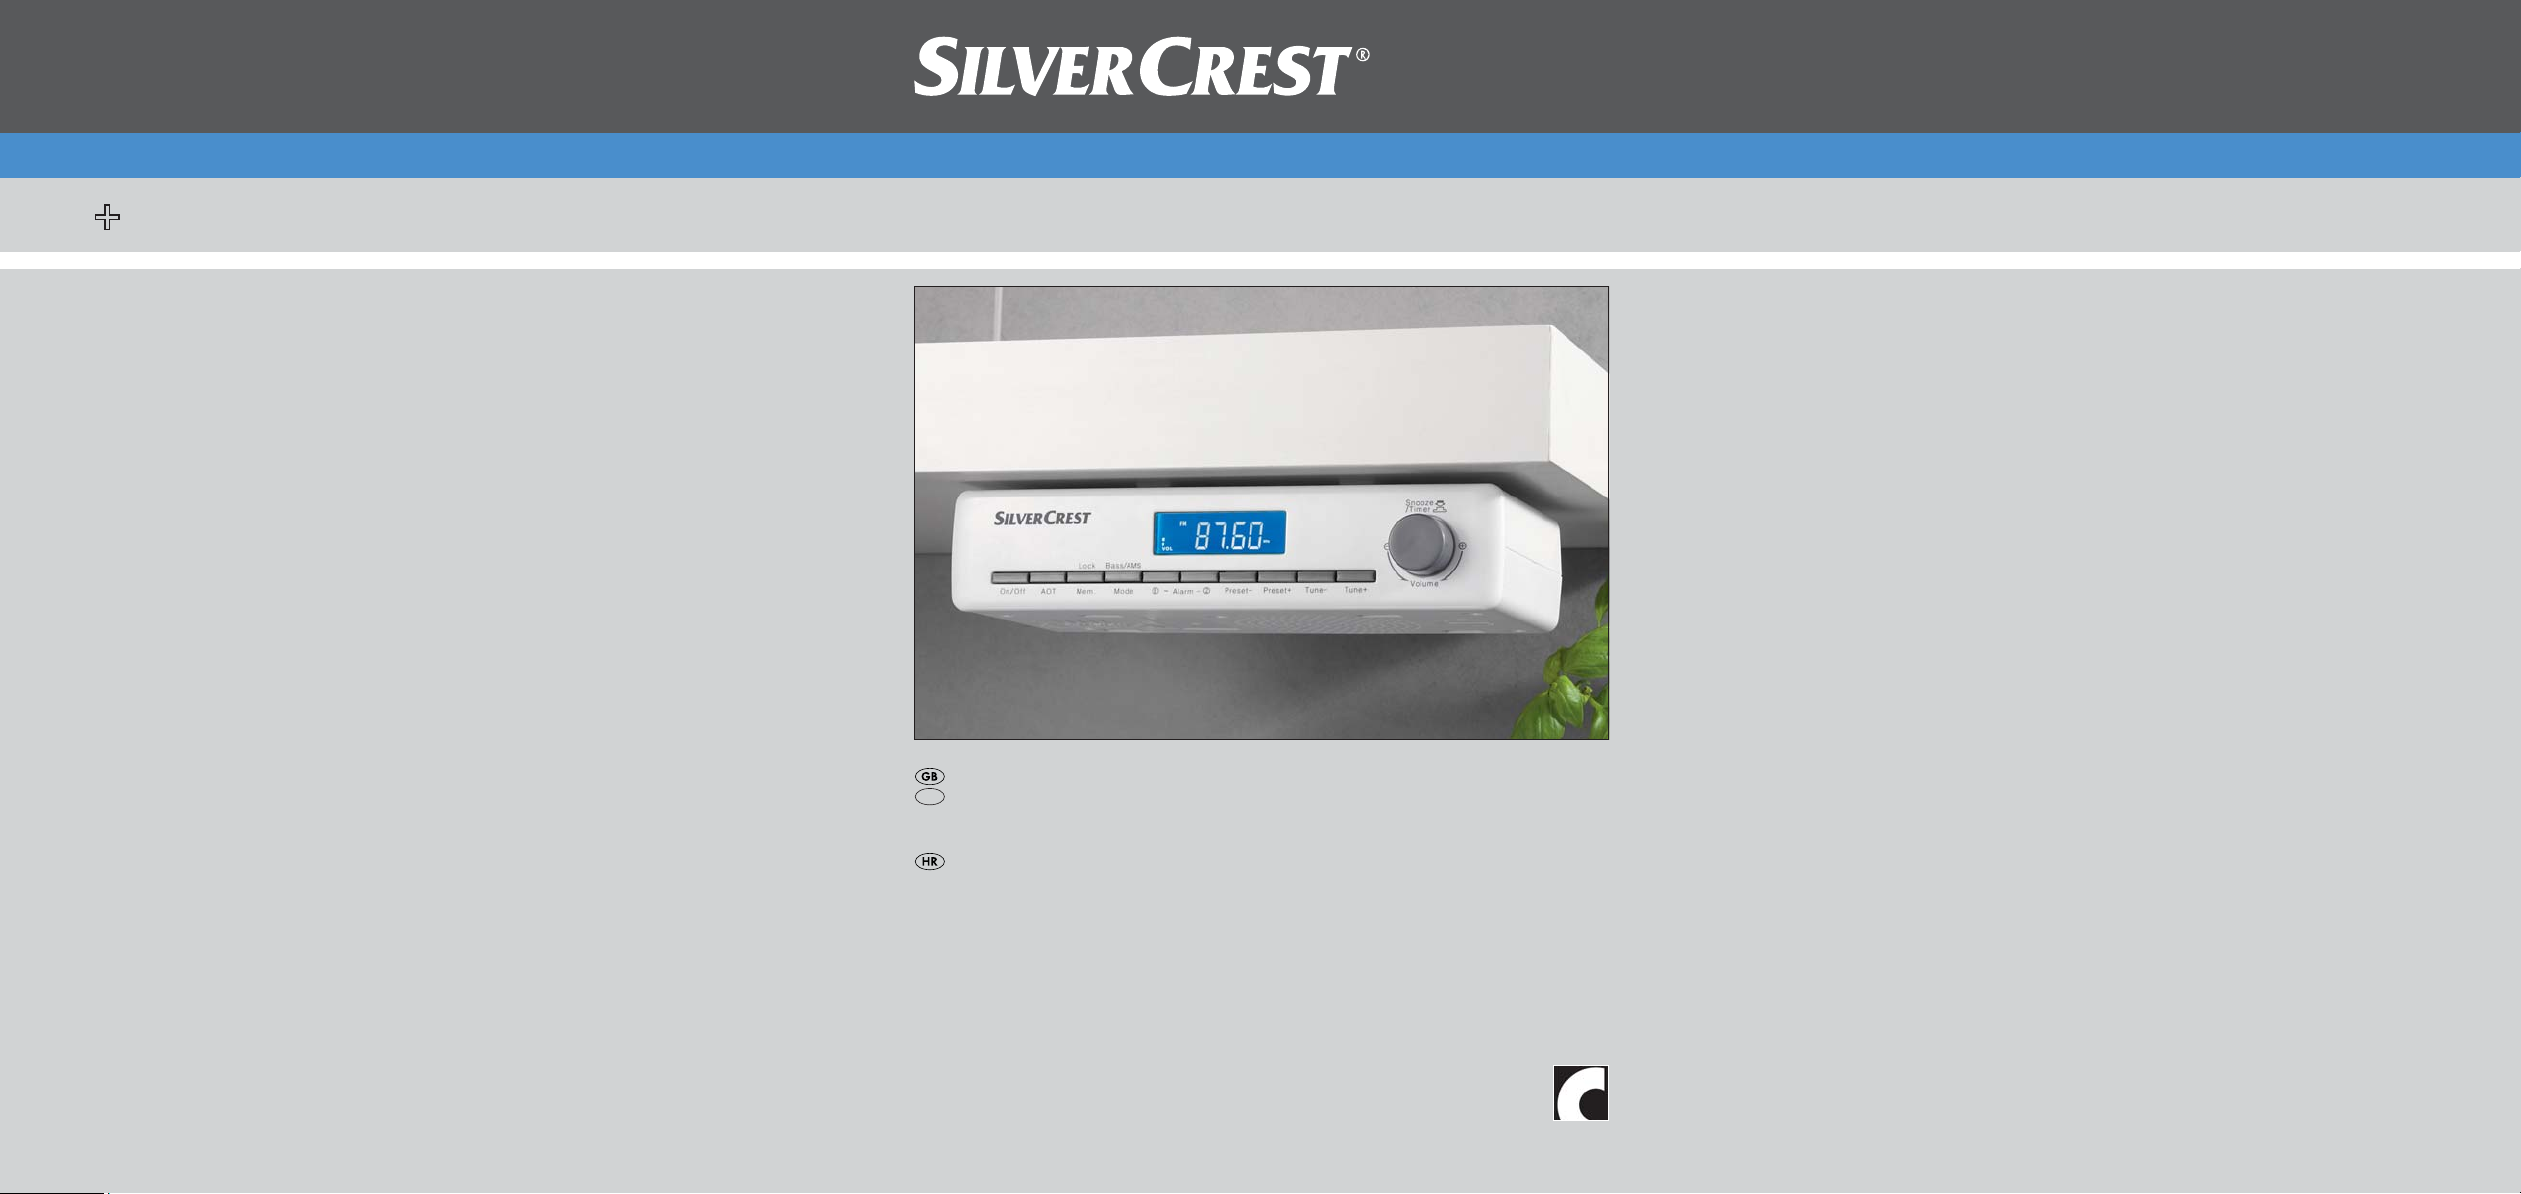
Operating components
(for illustrations see fold out sides fi gure A)
Mounting plate/Stand
2
Control panel
3
Display
4
On/Off : On/Off switch (Radio)
5
AOT: Timer switch off
6
Lock/Mem.: Button lock/memory slot selection
7
Bass/AMS/Mode: Bass accentuation/Station search/Access setting menu
8
Alarm 1: Alarm 1 programming
9
Alarm 2: Alarm 2 programming
10
Preset–: selection of the previous memory slot
11
Preset+: selection of the next memory slot
12
Tune–: Decrease the reception frequency
Tune+: Increase the reception frequency
13
VOLUME/Snooze/Timer: Volume control/Alarm switch off /Timer setting
14
Wire antenna for VHF reception
15
Mains connection cable
16
Recesses for stand
17
Speakers
18
Battery compartment
19
Unlocking buttons for the mounting plate
20
6
SKRD 30 A1
Page 9
Setting up and connecting
Setting up and connecting
Safety instructions
WARNING
Damage may occur to property and injuries to people when
operating the device!
Observe the following safety instructions to avoid dangers:
Packaging material should not be used as a play thing. There is a risk of ►
suff ocation!
T
o avoid risks to persons and property, observe the requirements for the ►
set-up location and the electrical connections.
Package contents and transport inspection
The device is delivered with the following components as standard:
Under-Cabinet Radio SKRD 30 A1 ▯
Mounting plate/Stand ▯
4 Securing screws ▯
1 x Battery 3 V Type CR2032 ▯
Operating instructions ▯
NOTICE
Check the contents to make sure everything is there and for visible damage. ►
If the items supplied are incomplete, or damaged due to defective packaging ►
or transportation, contact the Service Hotline (see section Ser
GB
CY
vice).
Unpacking
SKRD 30 A1
Remove all device parts and the operating instructions from the carton. ♦
Remove all packing material. ♦
7
Page 10

Setting up and connecting
GB
CY
Disposal of the packaging
The packaging protects the device from transport damage. The packaging materials are selected from the point of view of their environmental friendliness and
disposal technology and are therefore recyclable.
The recirculation of packaging into the material circuit saves on raw material
and reduces generated waste. Dispose of packaging material that is no longer
needed according to the regionally established regulations.
NOTICE
If possible preserve the device's original packaging during the warranty ►
period so that in the case of a warranty claim you can package the device
operly for return.
pr
Set-up location requirements
For the safe and fault free operation of the device, the set-up location must fulfi ll
the following conditions:
When setting up the device place it on a fi rm, fl at and even surface. Use the ■
supplied stand.
Set up or mount the de
ings and the speak
Do not operate the device in a hot, wet or very humid location or in the vicin- ■
ity of fl ammable materials.
The sur
faces of furniture may contain components that could aff ect and sof- ■
ten the rubber feet on the device. If necessary, place an anti-slip mat under
the rubber feet of the de
The wall socket must be easily accessible so that, in an emergency, the plug ■
can be quickly withdrawn from the socket.
vice in such a way that the available ventilation open- ■
er are not covered.
vice.
Electrical connection
Before connecting the device, compare the connection data (voltage and ■
frequency) on the rating plate of the device with that of your power supply
network. This data must be compatible to avoid possible damage to the device.
Make sure that the device's connection cable is not damaged and is not ■
laying over hot surfaces and/or sharp edges.
Mak
e sure that the connection cable is not tightly stretched or bent. ■
Do not allow the connection cord to hang over edges (Trip wire eff ect). ■
8
SKRD 30 A1
Page 11
Setting up and connecting
Inserting the battery
By inserting the battery you can avoid the loss of programmed time of day and
alarm times in the event of a possible power outage. The battery ensures that
the internal clock continues to run even during a power failure. When power is
restored the correct time appears automatically in the display 3.
NOTICE
The device can also be operated without a battery. ►
Open the cover of the battery compartment ♦
device by turning the cover to the left, with a coin, as far as it will go and
then lift off .
Insert the battery type CR2032 (supplied) into the battery compartment. ♦
The side with the marking + points upwards.
Close the batter
turn it to the right.
y compartment by attaching the cover and then with a coin ♦
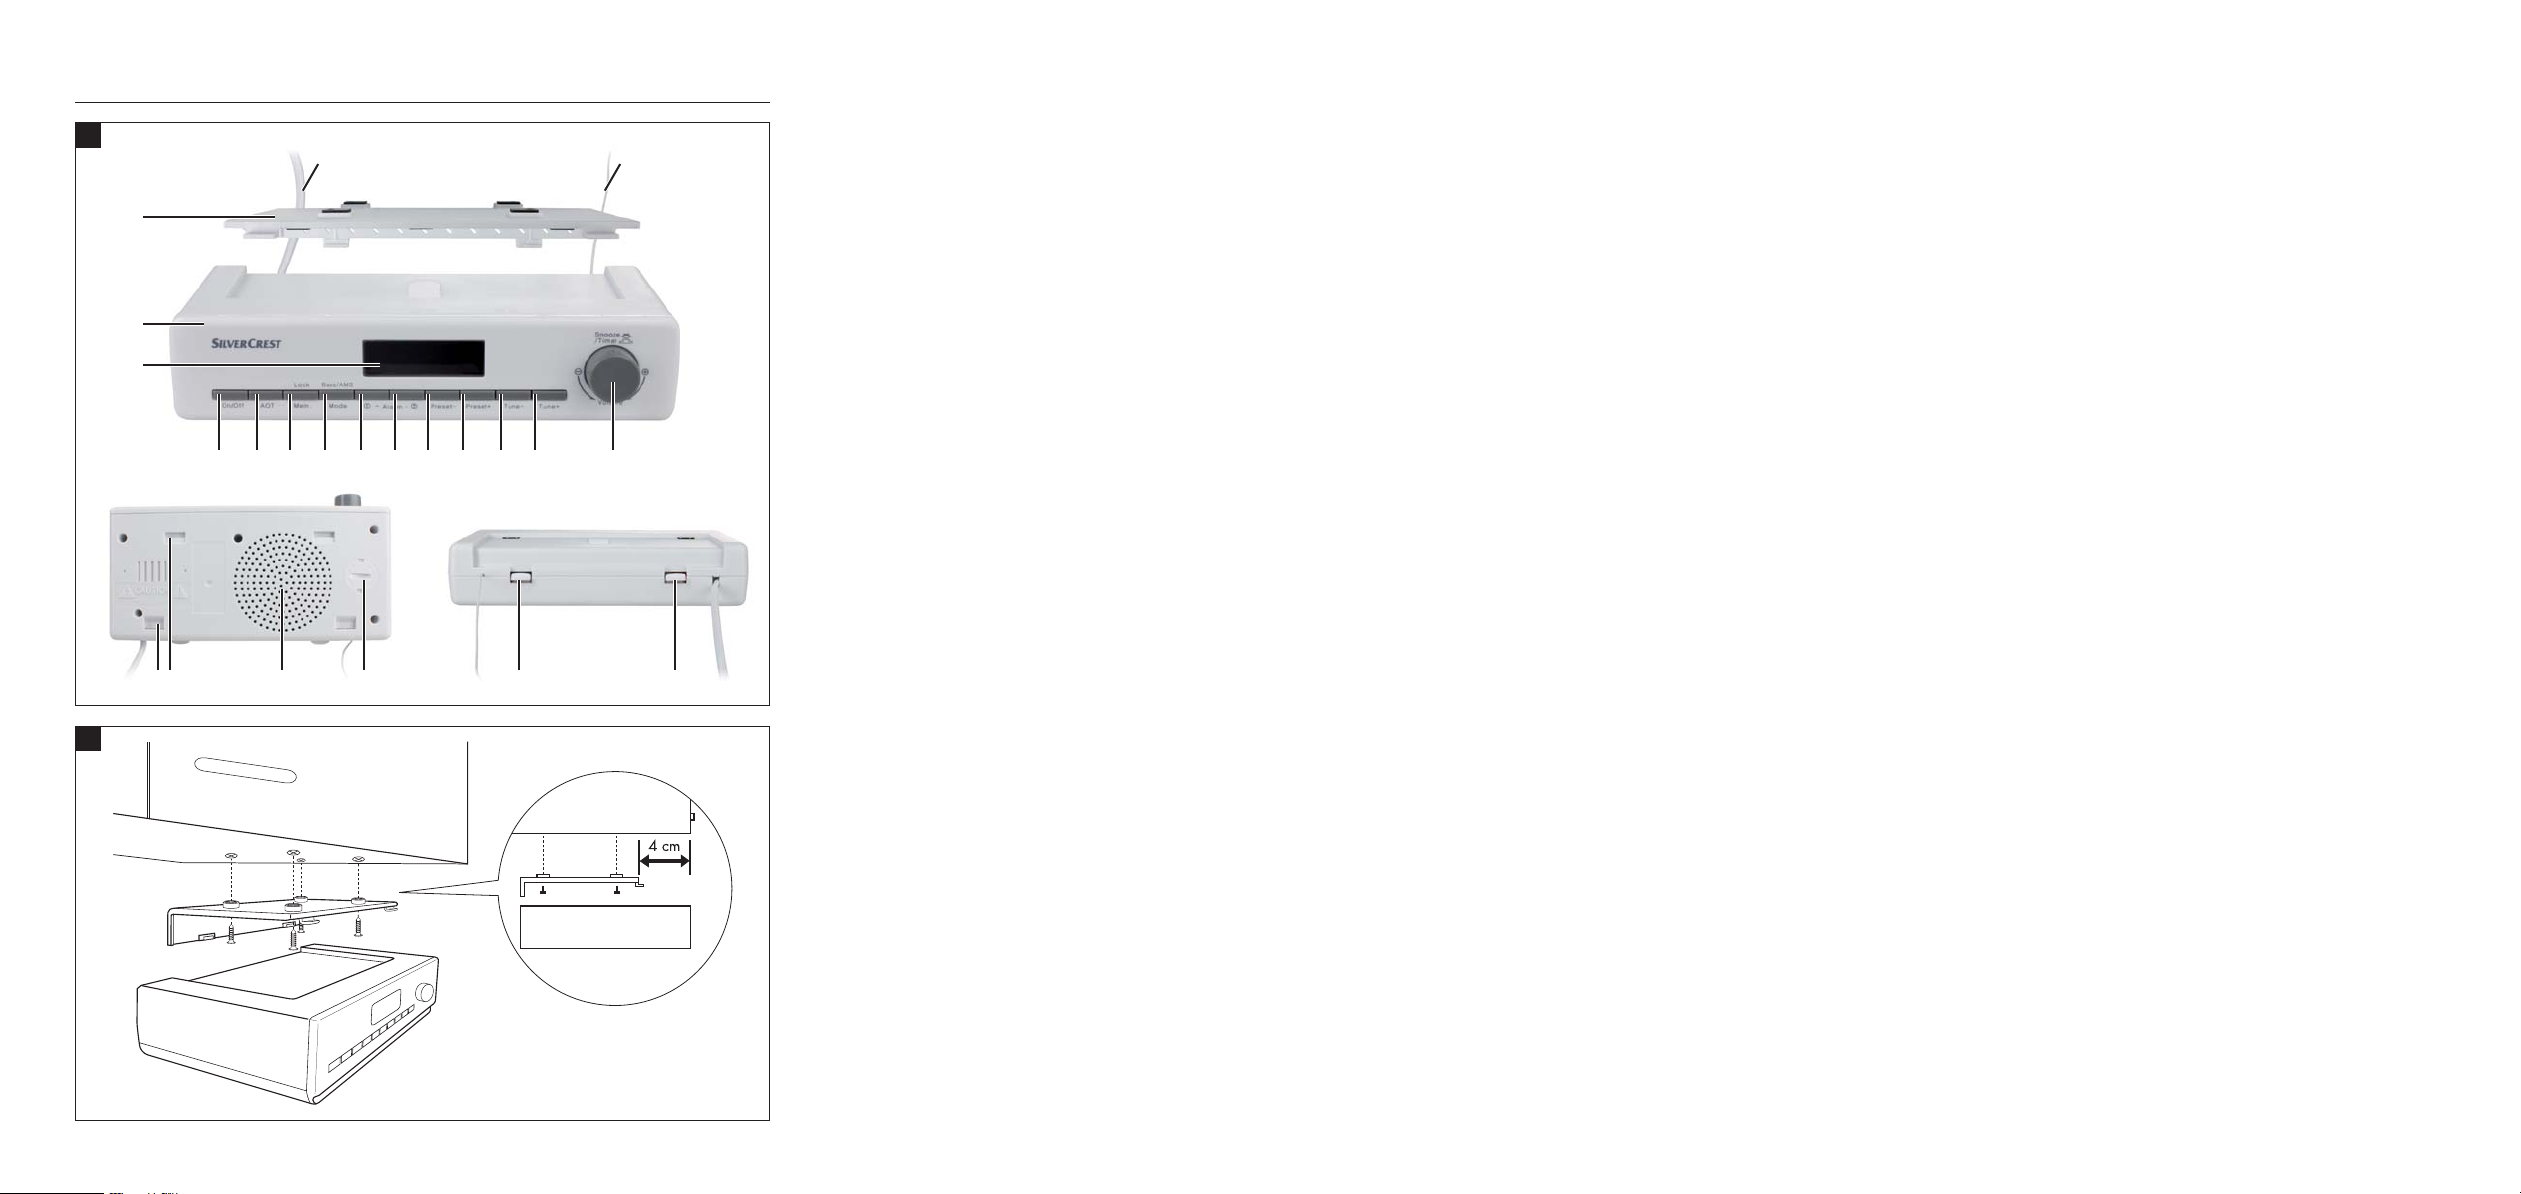
Mounting under a wall cupboard
(Illustration see fold out side fi gure B)
With the supplied mounting plate you can mount the device under, for example, a wall cupboard. For mounting of the device proceed as follows:
Press both unlocking buttons ♦
thereby, at the same time, sliding the mounting plate backwards and
remove the mounting plate .
Find a suitable set-up location for the device (see also the section ♦
Requirements for the set-up location).
Hold the mounting plate ♦
edge of the mounting plate should be approx. 4 cm behind the front of
the cupboard so that, after Remove the mounting, the device is fl ush with the
cupboard.
Mark the 4 fastening points with a pencil. ♦
Using a spike or nail, make a small depression at the respective marking ♦
points. Screw the mounting plate
illustrated in fi gure B.
Place the device aslant, with the front recesses in the top face, in the mount- ♦
ing plate
plate until the device audibly locks into place.
Check to make sure that the device is secure. ♦
. Press the rear part of the device upwards against the mounting
on the rear panel of the device downwards
20
under the set-up location. Thereby the front
on the underside of the
19
tightly with the supplied screws as
GB
CY
SKRD 30 A1
9
Page 12
Setting up and connecting
GB
CY
Disassembly
Press both unlocking buttons ♦
thereby sliding, at the same time, the device forward and then remove the
device downwards.
Unscrew the screws on the mounting plate ♦
plate .
Setting up the device
As an alternative you can stand the device on a top. So as not to cover up the
ventilation slots and the speaker 18 on the underside of the device, when setting
up the device it must be mounted on the stand . For assembly of the stand
proceed as follows:
Press both unlocking buttons ♦
thereby, at the same time, sliding the mounting plate backwards and remove
the mounting plate . The mounting plate can now be used as a stand.
Slide both front retaining tabs of the stand ♦
the underside of the device.
Press both rear retaining tabs of the stand ♦
the underside of the device until the stand audibly locks into place.
Find a suitable set-up location for the device (see also the section ♦
Requirements for the set-up location).
on the rear panel of the device downwards,
20
and remove the mounting
on the rear panel of the device downwards
20
into the rear recesses 17 on
into the front recesses 17 on
Providing mains power
Insert the mains connection cable ♦
day will be shown in the display 3 (0:00 o'clock).
VHF wire antenna
Unwind the wire antenna ♦
10
power plug into a socket. The time of
16
completely for VHF reception.
15
SKRD 30 A1
Page 13
Handling and operation
Handling and operation
In this section you receive important information for the handling and operation
of the device.
Switching On and Off
After the device has been connected to the power supply it is already switched
on. Via the On/Off 4 button you switch between the operational modes clock/
standby operation and radio.
NOTICE
The On/Off switch ►
mains power. To completely disconnect the device from the mains power
the mains power cable plug 16 must be pulled from the mains socket.
Basic settings
After the device has been connected to the mains power supply it shows the time
of day and the day of the week in the display 3. The device is in the operational
mode clock/standby operation.
Activating the settings menu
To activate the settings menu, whilst in the operational mode clock/standby operation,
press the Bass/AMS/Mode 7 button. The time of day, shown in the display 3,
begins to blink. Each further actuation of the Bass/AMS/Mode 7 button switches
to the next setting potential. The menu item sequence is:
Setting the time of day ▯
Setting the date ▯
Adjusting the display brightness ▯
Setting the memory function ▯
Setting the time of day format ▯
4
does not disconnect the device completely from the
GB
CY
SKRD 30 A1
NOTICE
The setting menu ends automatically if you do not actuate any buttons for ►
approx. 15 seconds. The executed setting is saved.
11
Page 14
Handling and operation
GB
CY
Setting the time
Prerequisite: The device is in the operational mode clock/standby operation.
Press the Bass/AMS/Mode ♦
begins to blink.
Set with the buttons Tune+ ♦
each button press the time of day changes by one minute. Holding down
the respective button for more than 2 seconds starts the speed setting.
Press the Bass/AMS/Mode ♦
move to the next menu item.
NOTICE
The time of day will revert back to 00:00 o'clock if the device is disconnected ►
from the mains power supply and no battery is inserted or if the battery is too
eak.
w
Setting the date
Prerequisite: The device is in the operational mode clock/standby operation.
Press the Bass/AMS/Mode ♦
blink.
Set with the buttons Tune+ ♦
button press the date is changed by one day. The weekday indicator changes
automatically. Holding down the respective button for more than 2 seconds
starts the speed setting.
Press the Bass/AMS/Mode ♦
move to the next menu item.
7
button once. The time of day indicator
and Tune– 12 the current time of day. With
13
7
button again to save the current setting and
7
button twice. The date indicator begins to
and Tune– 12 the current date. With each
13
7
button again to save the current setting and
12
NOTICE
The date will revert back to 01.01.2010: if the device is disconnected from ►
the mains power supply and no battery is inserted or if the battery is too weak.
SKRD 30 A1
Page 15
Handling and operation
Adjusting the display brightness
Prerequisite: The device is in the operational mode clock/standby operation.
Press the Bass/AMS/Mode ♦
display brightness is shown (H=bright or L=dim).
Set, with the button Tune+ ♦
display to be brighter.
Set, with the button Tune– ♦
display to be darker.
Press the Bass/AMS/Mode ♦
move to the next menu item.
13
12
Setting the memory function
You can set up to 10 date reminders to which an automatic reminder will be
triggered. The function SdA (SdA=Special Day Alert) is useful as a reminder, for
example, of birthdays or other recurring events. The reminder occurs every year
on the same date.
Prerequisite: The device is in the operational mode clock/standby operation.
Press the Bass/AMS/Mode ♦
selected reminder date is shown alternating with the indicator SDA. Next to
the indicator SDA is the number of the memory slot for that date. Possible
reminders are SDA 0 to SDA 0.
Select with the buttons Preset+ ♦
date to be set.
Set with the buttons Tune+ ♦
With each button press the date is changed by one day. Holding down the
respective button for more than 2 seconds starts the speed setting.
13
7
button three times. The current setting for the
, the display brightness to H if you want the
, the display brightness to L if you want the
7
button again to save the current setting and
7
button four times. The current setting of the
11
and Preset– 10 the memory slot for the
and Tune– 12 the date for this memory slot.
GB
CY
SKRD 30 A1
NOTICE
Press the button AOT ►
for the currently selected memory slot. In the display -- -- is shown.
Press the button Lock/Mem. ♦
function is to be triggered. The setting is carried out with the buttons Tune+ 13
12
and Tune–
programmed reminder dates
Press the Bass/AMS/Mode ♦
move to the next menu item.
on the hour between 00 and 23. This setting applies to all
5
if you want to switch off the reminder function
6
to set the time of day at which the reminder
7
button again to save the current setting and
13
Page 16
Handling and operation
GB
CY
Setting the time of day format
Prerequisite: The device is in the operational mode clock/standby operation.
Press the Bass/AMS/Mode ♦
time of day format is shown (24=24 hour format or 12=12 hour format).
With the button Tune+ ♦
time of day display in the 24 hour format .
With the button Tune– ♦
time of day display in the 12 hour format .
Press the Bass/AMS/Mode ♦
move to the next menu item.
set the time of day format to 24 if you want a
13
12
set the time of day format to 12 if you want a
Kitchen timer
The device has a convenient kitchen timer with which, for example, cooking and
baking times can be monitored. The programmable time range of the kitchen
timer lies between 1 minute and 23 hours, 59 minutes.
Setting the kitchen timer
Press the Snooze/Timer ♦
upper corner of the display the saucepan symbol for the kitchen timer is
superimposed.
Turn the VOLUME ♦
Turning in a clockwise direction increases the time; turning in a counter
clockwise direction reduces the time.
14
knob to set the time range for the kitchen timer.
14
7
button fi ve times. The current setting for the
7
button again to save the current setting and
button. The display shows 00:00. In the right
14
NOTICE
If, during the setting, approx. 15 seconds passes without any changes ►
taking place the device reverts back to the previous operational mode.
SKRD 30 A1
Page 17
Handling and operation
Starting the kitchen timer
After setting the time press the button Snooze/Timer ♦
time begins to run backwards. In the right, upper corner of the display a
backwards running clock is superimposed.
NOTICE
If, during the operation of the kitchen timer, another function is selected ►
the display of the remaining time fades out. The saucepan symbol and the
ard running clock in the right, upper corner of the display, however,
backw
continue to be shown. Press the button Snooze/Timer 14 again to allow
the remaining time of the kitchen timer to be shown once more.
30 seconds before the kitchen timer run time has expired the device begins to
acoustically indicate, with individual signal tones, the arrival of the set time. Thereby
the interval between the individual tones becomes shorter and shorter. When the
set time has arrived the kitchen timer's alarm signal sounds as a continuous tone.
Press the button Snooze/Timer ♦
Pausing the kitchen timer.
Press, while the kitchen timer is running, the button Snooze/Timer ♦
kitchen timer is paused. The displayed remaining time begins to blink.
NOTICE
After approx. 15 seconds the device reverts back to the previous operational ►
mode. Press the button Snooze/Timer
of the kitchen timer to be shown once more.
To restart the kitchen timer press the button Snooze/Timer ♦
kitchen timer restarts.
To switch off the kitchen timer before the set time has expired press and hold ♦
down the Snooze/Timer
again. The displayed
14
to switch off the kitchen timer alarm signal.
14
again to allow the remaining time
14
button for at least 2 seconds.
14
again. The
14
14
GB
CY
. The
SKRD 30 A1
15
Page 18

Handling and operation
GB
CY
Programming the kitchen timer
You can preprogramme the kitchen timer with the most frequently used times so
that it is not necessary to continually reenter them. Up to 10 times can be preprogrammed. All 10 memory slots are preprogrammed with 10 minutes as standard.
For the programming of the kitchen timer proceed as follows:
Press the button Snooze/Timer ♦
Turn the VOLUME ♦
clockwise direction increases the time; turning in a counter clockwise direction reduces the time.
Press the button Lock/Mem. ♦
kitchen timer saucepan symbol a blinking T is shown.
Select with the buttons Preset+ ♦
T0 and T9 for the timer that is to be set.
Press the button Lock/Mem. ♦
selected memory slot. The blinking T under the saucepan symbol is now showing constantly.
Repeat the process for the other memory slots. ♦
knob to set the time to be programmed. Turning in a
14
14
6
to activate the timer selection. Under the
11
6
again to programme the set time on the
Accessing the kitchen timer
To access a programmed time for the kitchen timer proceed as follows:
Press the button Snooze/Timer ♦
Select with the buttons Preset+ ♦
T0 and T9.
Press the button Snooze/Timer ♦
14
11
14
to activate the kitchen timer.
and Preset– 10 a memory slot between
to activate the kitchen timer.
and Preset– 10 the desired timer between
again to start the kitchen timer.
16
SKRD 30 A1
Page 19

Handling and operation
Programming alarm wake times
The device has two alarms available. All settings for both alarms can be carried
out independently from each other. You can select whether at the programmed
time an alarm tone shall sound or the radio shall play.
NOTICE
If, during alarm wake programming, no button is pressed for approx. ►
15 seconds the alarm will activate with the current settings.
erequisite: The device is in the operational mode clock/standby operation.
Pr
To set the wake time proceed as follows:
Press the Alarm1 button ♦
of the respective alarm is shown blinking in the display 3 and the indicator
A1 and/or A2 appears. The weekday on which this alarm is to be activated
is shown above the time indicator.
Set with the buttons Tune+ ♦
each button press the wake time changes by one minute. Holding down the
respective button for more than 2 seconds starts the speed setting.
Press the button AOT ♦
Sa-Su or Mo-Su. The respective selected combination is shown above the
wake time.
Press and hold down the button AOT ♦
between the weekday combinations and individual weekday setting alternatives.
8
or the Alarm2 button 9. The set wake time
and Tune– 12 the desired wake time. With
13
5
to switch between the weekday combinations Mo-Fr,
5
for at least 2 seconds to switch
GB
CY
NOTICE
With the individual weekday setting alternative you switch between ►
the days of the week with the button AOT
Wake with alarm tone
Prerequisite: The device is in the operational mode clock/standby operation.
To select "Alarm tone" for the respective alarm press the Alarm1 button ♦
or the Alarm2 button
the symbol
SKRD 30 A1
appears.
5
.
9
several times in succession until, in the display 3,
8
17
Page 20

Handling and operation
GB
CY
Waken with radio
If you want to be woken by the radio, before activating the wake time carry out
the following settings:
Switch the radio on by pressing the On/Off ♦
Select the station with which you want to be woken (see section ♦
Station setting).
With the V
Volume settings).
Switch the radio off by pressing the On/Off ♦
To select "Radio" for the respective alarm press the Alarm1 button ♦
Alarm2 button
symbol
OLUME ♦
appears.
knob set the desired volume (see section
14
9
several times in succession until, in the display 3, the
Switching the alarm off
Prerequisite: The device is in the operational mode clock/standby operation.
To switch off the respective alarm press the Alarm1 button ♦
9
button
display 3.
several times in succession until no symbols are shown in the
When the wake time has arrived
With the setting "Wake with alarm tone" a fourfold signal tone sounds in
intervals of 2 seconds. The volume of the signal tone will continually increase
until the maximum volume has been reached. The duration of the wake signal is
restricted to 10 minutes.
With the setting "Wake with radio" the radio will switch on. The previously
selected station will be activated for a maximum of 60 minutes at the set volume.
Press the button Snooze/Timer ♦
4
button.
4
button.
8
or the Alarm2
to activate a repeat wake after 9 minutes.
14
8
or the
18
NOTICE
The repeat wake function is possible up to 60 minutes after the set wake ►
time has arrived.
ess the Alarm1 button ♦
Pr
alarm.
NOTICE
The alarm becomes active again when the next wake time has arrived ►
(i.e. on the next day).
8
or the Alarm2 button 9 to end the current
SKRD 30 A1
Page 21

Handling and operation
Radio operation
NOTICE
For a good radio reception the wire antenna ►
coiled. Adjust the antenna, whilst in radio operation, to the best reception.
The technical factors of the device allow for tuning reception frequencies ►
outside of the permitted VHF (FM) range of 87.5–108 MHz. In some
countries, diff
frequency ranges.
Please note that information received outside of the assigned radio
frequency ranges may not be exploited, passed on to third parties or
otherwise misused.
Switching the radio on/off
Switch the radio on by pressing the On/Off ♦
shows the current reception frequency of the tuned station.
Switch the radio off by pressing the On/Off ♦
changes back to the operational mode clock/standby operation. The current time of day is shown.
Adjusting the volume.
With the VOLUME ♦
direction increases the volume; turning in a counter clockwise direction
reduces the volume. The volume level is shown on the left border of the
display
erent national regulations may apply to the assigned radio
14
3
.
must be completely un-
15
4
button.The display 3
4
button again.The device
knob set the desired volume. Turning in a clockwise
GB
CY
Manual station selection
By a single press on the buttons Tune+ ♦
station. The frequency of the station is shown in the display
tuning the speaker is switched off .
Search for the next station
The device can automatically search for the nearest station.
Press and hold down the button Tune+ ♦
The device searches for the nearest station with suffi cient reception quality.
Repeat this process until you have found the station you are looking for. ♦
SKRD 30 A1
and Tune– 12 tune the desired
13
or Tune- 12 for at least two seconds.
13
3
. During the
19
Page 22

Handling and operation
GB
CY
Saving stations manually
Prerequisite: The device is in the radio operational mode.
The device has 30 memory slots available for station frequencies. To save a station
frequency proceed as follows:
Tune, as described previously, the desired station. ♦
Press the button Lock/Mem. ♦
the lower, right corner of the display.
Select with the buttons Preset+ ♦
for the tuned station between 1 and 30.
Press the button Lock/Mem. ♦
station is saved on the selected memory slot. The symbol MEM lights up
constantly.
6
once. The symbol MEM begins to blink in
11
and Preset– 10 the desired memory slot
6
again. The reception frequency of the tuned
Access saved stations
Prerequisite: The device is in the radio operational mode.
11
Select with the buttons Preset+ ♦
for the saved station between 1 and 30.
and Preset– 10 the desired memory slot
Automatic station search (AMS function)
Prerequisite: The device is in the radio operational mode.
To allocate the memory slots to the station frequencies with the strongest receivable stations a station search can be carried out.
20
NOTICE
With the carrying out of the following described function all previously ►
saved stations will be lost.
7
ess and hold down the button Bass/AMS/Mode ♦
Pr
seconds. The device begins the station search and allocates to the memory
slots 1-30 the found stations.
NOTICE
If more than 30 stations are found only the fi rst 30 reception frequencies ►
will be saved.
If less than 30 stations ar
e found the last memory slots remain unchanged. ►
for at least two
SKRD 30 A1
Page 23

Handling and operation
Additional functions
Automatic switch off (Sleep function)
With the sleep function the radio switches itself off after a time lapse of between
5 and 120 minutes.
To access the function press the button AOT ♦
until the radio switches itself off is shown.
Press the button AOT ♦
the button for more than 2 seconds starts the speed setting.
NOTICE
The setable time frame lasts from 120 to 5 minutes. The setting takes place ►
in stages of 5 minutes. After which the indicator OFF appear
indicator OFF the sleep function is switched off .
Button lock
You can lock the buttons of the device so that settings cannot be altered by
unauthorised people or children.
Press and hold down the button Lock/Mem. ♦
switch the button lock on or off . When the button lock is switched on the
symbol appears in the display.
Bass accentuation
With the bass accentuation you can switch on an enhanced playback of the low
frequencies.
5
repeatedly to set the desired time. Holding down
5
. The current remaining time
s. With the
6
for at least two seconds to
GB
CY
SKRD 30 A1
Prerequisite: The device is in the radio operational mode.
Press briefl y the button Bass/AMS/Mode ♦
on or off . With the bass accentuation switched on the symbol BASS appears
in the display.
7
to switch the bass accentuation
21
Page 24

Cleaning/Troubleshooting
GB
CY
Cleaning
Safety instructions
DANGER
Life-threatening situation from electric shock!
R
emove the plug from the mains power socket before cleaning. ►
IMPORTANT
Damaging of the device!
Mak
e sure when you are cleaning the device that no moisture gets inside ►
in order to avoid irreparable damage to it.
Cleaning the housing
Clean the surfaces of the device with a soft, dry cloth. ■
Troubleshooting
In this section you receive important information for the localization and remedying
of malfunctions. Observe the instructions in order to avoid danger and damage.
Safety instructions
22
WARNING
Observe the following safety information to avoid danger and property
damage:
Repairs to electronic devices may only be carried out by specialists who ►
have been trained by the manufacturer. Considerable danger to the consumer and damage to the de
vice can occur as a result of incorrect repairs.
SKRD 30 A1
Page 25

Troubleshooting
Malfunction causes and remedies
The following table will help with localizing and remedying minor malfunctions:
Defect Possible cause Solution
Insert the plug into the
mains power socket.
Check the circuit fuse.
Increase the volume with the
VOLUME
Switch the radio on with the
On/Off
Tune the station correctly with the
buttons Tune+
Try to improve reception by moving
the wire antenna
The display is
showing nothing.
No sound
Noisy radio
reception
NOTICE
The plug is not inserted.
Mains power socket is
not supplying power.
The volume is set to
minimum.
The radio is switched off .
The radio station is not
properly tuned in.
Reception is too weak.
If you cannot solve the problem with the aforementioned methods, please ►
contact Customer Service.
14
4
button.
knob.
and Tune– 12.
13
.
15
GB
CY
SKRD 30 A1
23
Page 26

Storage/Disposal
GB
CY
Storage/Disposal
Storage
If you do not intend to use the device for an extended period of time, disconnect
it from the mains power supply, remove the battery and store it at a clean, dry
location that is not subjected to direct sunlight.
Disposal of the device
Do not dispose of the device in your normal domestic waste.
This product is subject to the European directive 2002/96/EC-WEEE
(Waste Electrical and Electronic Equipment).
Dispose of the device through an approved disposal centre or at your community
waste facility. Observe the currently applicable regulations. In case of doubt,
please contact your waste disposal centre.
Disposing of the batteries
Batteries must not be disposed of in the household waste. Every consumer is
legally obligated to hand in batteries at a collection centre in his/her community/district or a dealer. This obligation is intended to ensure that batteries are
disposed of in an environmentally friendly manner. Hand batteries in only when
they are fully discharged.
24
SKRD 30 A1
Page 27

Appendix
Appendix
Information regarding the EG conformity declaration
This device complies regarding conformance to the basic
requirements and other relevant regulations of the European
directive for electromagnetic compatibility 2004/108/EC,
the low voltage directive 2006/95/EC as well as the Ecodesign directive 2009/125/EC (Supplement 1275/2008
Appendix II, Nr.1)
The complete original declaration of conformity can be
obtained from the importer.
Technical data
Operational voltage 220-240 V / 50 Hz
Battery for data retention
Power consumption
Operation approx. 5 W
Standby approx. 1.8 W
Speaker power output:
Radio frequency range (VHF) 87.5 - 108 MHz
1 x 3 V Type CR2032
(supplied)
approx. 1W
(with 10 % harmonic distortion)
GB
CY
SKRD 30 A1
Operating temperature +5 - +40 °C
Humidity (no condensation) 5 - 90 %
Measurements (H x W x D):
(without stand)
Weight approx. 600 g
Protection class
4.9 x 22 x 12 cm
II
25
Page 28

Appendix
GB
CY
Warranty
With this device you receive a 3 year warranty from the date of purchase. The
device has been manufactured with care and meticulously examined before
delivery.
Please retain your receipt as proof of purchase. In the case of a warranty claim,
please get in touch, by telephone, with our service department. Only in this way
can a post-free dispatch for your goods be assured.
NOTICE
The device is intended solely for private, non-commercial use. If this product has
been subjected to improper or inappropriate handling, abuse, or modifi cations
not carried out by one of our authorised sales and service outlets, the warranty
becomes void.
Your statutory rights are not restricted in any way by this warranty. The warranty
period will not be extended as a result of warranty adjustments. This applies also
to replacement and repaired parts.
Possible damage and/or faults present at the time of purchase must be reported
immediately after unpacking or, at the very latest, within two days after the
purchase date.
After expiry of the warranty period incidental repairs are subject to payment.
The warranty adjustment is valid only for material or manufacturing defects ►
not, however, for transport damage, wear and tear or for damage to break-
ts, i.e. switches or rechargeable batteries.
able par
Service
Importer
26
DES UK LTD
Tel.: 0871 5000 700
E-Mail: support.uk@kompernass.com
Kompernass Service Ireland
Tel: 1850 930 412
Standard call rates apply. Mobile operators may vary.
E-Mail: support.ie@kompernass.com
CY
Kompernass Service Cyprus
Tel: 800 9 44 01
E-Mail: support.cy@kompernass.com
KOMPERNASS GMBH
BURGSTRASSE 21
44867 BOCHUM, GERMANY
www.kompernass.com
(£ 0.10 / minute)
(0,082 EUR/Min.)
SKRD 30 A1
Page 29

Sadržaj
Uvod . . . . . . . . . . . . . . . . . . . . . .28
Informacije u vezi sa ovim uputama
za rukovanje . . . . . . . . . . . . . . . . . . . .28
Autorsko pravo . . . . . . . . . . . . . . . . . . 28
Uporaba u skladu sa namjenom . . . . .28
Upozoravajuće napomene . . . . . . . . . 29
Sigurnost . . . . . . . . . . . . . . . . . . . . . . .30
Opasnost uslijed električne struje . . . . .30
Rukovanje sa baterijama . . . . . . . . . . . 30
Opće sigurnosne napomene . . . . . . . .31
Element za posluživanje . . . . . .32
Postavljanje i priključivanje . . .33
Sigurnosne napomene . . . . . . . . . . . . . 33
Obim isporuke i transportna inspekcija . 33
Raspakiranje . . . . . . . . . . . . . . . . . . . .33
Zbrinjavanje ambalaže . . . . . . . . . . . .34
Zahtjevi u pogledu lokacije postavljanja .34
Električni priključak . . . . . . . . . . . . . . .34
Umetanje baterije . . . . . . . . . . . . . . . .35
Postavljanje pod visećim ormarom . . . . 35
Demontaža . . . . . . . . . . . . . . . . . . . . .36
Postavljanje uređaja . . . . . . . . . . . . . . . 36
Snabdijevanje električnom energijom . 36
UKV - pokretna antena . . . . . . . . . . . .36
Posluživanje i pogon . . . . . . . .37
Uključivanje i isključivanje . . . . . . . . . .37
Osnovna podešenja . . . . . . . . . . . . . . 37
Aktiviranje podesnog menija . . . . . . . .37
Podešavanje točnog vremena . . . . . . .38
Podešavanje datuma . . . . . . . . . . . . . .38
Podešavanje pozadinskog osvjetljenja
na displayu . . . . . . . . . . . . . . . . . . . . . 39
Podešavanje funkcije podsjećanja . . . .39
Podešavanje formata točnog vremena .40
Kuhinjski timer . . . . . . . . . . . . . . . . . . .40
Podešavanje kuhinjskog timera . . . . . . 40
Pokretanje kuhinjskog timera . . . . . . . . 41
Prekidanje kuhinjskog timera . . . . . . . .41
Programiranje kuhinjskog timera . . . . .42
Pozivanje kuhinjskog timera . . . . . . . . .42
Programiranje vremena buđenja . . . . .43
Buđenje sa zvukom alarma . . . . . . . . .43
Buđenje sa radio-programom . . . . . . .44
Isključivanje budilnika . . . . . . . . . . . . .44
Kada je došao trenutak za buđenje . .44
Radio-pogon . . . . . . . . . . . . . . . . . . . .45
Uključivanje/Isključivanje radio-prijemnika 45
Podešavanje glasnoće . . . . . . . . . . . . . 45
Manualno podešavanje postaje . . . . . 45
Traženje slijedećeg odašiljača . . . . . . . 45
Manualno pohranjivanje postaje . . . . .46
Pozivanje pohranjene postaje . . . . . . .46
Automatsko traženje odašiljača
(AMS-funkcija) . . . . . . . . . . . . . . . . . .46
Daljnje funkcije . . . . . . . . . . . . . . . . . .47
Automatsko isključivanje
(funkcija drijemanja) . . . . . . . . . . . . . . 47
Blokada tipki . . . . . . . . . . . . . . . . . . . . 47
Pojačanje basova . . . . . . . . . . . . . . . . 47
Čišćenje . . . . . . . . . . . . . . . . . . .48
Sigurnosne napomene . . . . . . . . . . . . . 48
Čišćenje kućišta . . . . . . . . . . . . . . . . . .48
Otklanjanje grešaka. . . . . . . . .48
Sigurnosne napomene . . . . . . . . . . . . . 48
Uzroci i otklanjanje grešaka . . . . . . . .49
Skladištenje/Zbrinjavanje . . . .50
Skladištenje . . . . . . . . . . . . . . . . . . . . . 50
Zbrinjavanje uređaja . . . . . . . . . . . . . .50
Zbrinjavanje baterija . . . . . . . . . . . . . .50
Prilog . . . . . . . . . . . . . . . . . . . . .51
Napomene u vezi sa
EU-izjavom o konformitetu . . . . . . . . .51
Tehnički podaci . . . . . . . . . . . . . . . . . .51
Jamstvo . . . . . . . . . . . . . . . . . . . . . . . . 52
Servis . . . . . . . . . . . . . . . . . . . . . . . . . .52
Uvoznik . . . . . . . . . . . . . . . . . . . . . . . . 52
HR
SKRD 30 A1
27
Page 30

HR
Uvod
Uvod
Informacije u vezi sa ovim uputama za rukovanje
Ove upute za rukovanje predstavljaju sastavni dio ugradbenog radio-prijemnika
SKRD 30 A1 (u nastavku uređaj) i daju Vam važne napomene za namjensko
korištenje, sigurnost, priključivanje i posluživanje uređaja.
Upute za rukovanje moraju stalno biti raspoložive u blizini uređaja. Ove upute
mora čitati i primijeniti svaka osoba zadužena za posluživanje uređaja i otklanjanje
smetnji.
Upute za rukovanje sačuvajte i predajte ih slijedećem vlasniku zajedno sa uređajem.
Autorsko pravo
Ova dokumentacija je zaštićena autorskim pravima.
Svako umnožavanje, odnosno svako naknadno tiskanje, čak i isječaka, kao i
reprodukcija slika - i u promijenjenom obliku - dopušteno je isključivo uz pismeno
odobrenje proizvođača.
Uporaba u skladu sa namjenom
Ovaj uređaj je namijenjen isključivo za prijem UKW-radio-programa, za funkciju
kuhinjskog timera i za alarm pomoću alarmnog zvuka ili radio-programa u zatvorenim prostorijama. Uređaj je predviđen za slobodno postavljanje ili za montažu
ispod ormara. U tu svrhu mora biti korišten isporučeni stalak, odnosno montažna
ploča. Svaki drugi način uporabe i svaki način koji prelazi opisane okvire, smatra
se nenamjenskim. Uređaj nije predviđen za uporabu u gospodarskim ili industrijskim područjima.
28
UPOZORENJE
Opasnost uslijed nenajmenske uporabe!
Od uređaja u slučaju nenamjenske uporabe i/ili drugih načina korištenja
mogu polaziti razne opasnosti.
Uređaj koristite isključivo na namjenski način. ►
Pridržavajte se načina postupanja opisanih u ovim uputama za rukovanje. ►
Potraživanja svake vrste zbog oštećenja nastalih uslijed nenamjenske uporabe,
nestručno izv
puštenih zamjenskih dijelova su isključena.
Rizik nosi isključivo korisnik uređaja.
edenih popravki, nedopuštenih preinaka uređaja ili korištenja nedo-
SKRD 30 A1
Page 31
Uvod
Upozoravajuće napomene
U ovim uputama za rukovanje korištene su slijedeće upozoravajuće napomene:
OPASNOST
Upozoravajuća napomena ovog stupnja opasnosti označava
pri
jeteću opasnu situaciju.
Ukoliko ne izbjegnete opasnu situaciju, to može dovesti do smrti ili do teških
ozljeda.
Pridržavajte se naputaka navedenih u ovoj upozoravajućoj napomeni, ►
kako biste izbjegli opasnost nastupanja smrti ili teških ozljeda osoba.
UPOZORENJE
Upozoravajuća napomena ovog stupnja opasnosti označava
moguću opasnu situaciju.
Ukoliko opasnu situaciju ne izbjegnete, to može dovesti do ozljeda.
Pridržavajte se naputaka navedenih u ovoj upozoravajućoj napomeni, ►
kako biste izbjegli opasnost ozljeda osoba.
PAŽNJA
Upozoravajuća napomena ovog stupnja opasnosti označava
mogući nas
Ukoliko ne izbjegnete ovu opasnu situaciju, to može dovesti do predmetne štete.
Slijedite naputke navedene u ovoj upozoravajućoj napomeni, kako biste ►
izbjegli nastanak predmetne štete.
NAPOMENA
Napomena označava dodatne informacije, koje olakšavaju rukovanje ►
s uređajem.
tanak predmetne štete.
HR
SKRD 30 A1
29
Page 32

HR
Sigurnost
U ovom poglavlju možete pronaći važne sigurnosne napomene u vezi rukovanja
uređajem.
Ovaj uređaj odgovara propisanim sigurnosnim odredbama. Nestručna uporaba
može dovesti do ozljede osoba i do predmetne štete.
Opasnost uslijed električne struje
OPASNOST
Opasnost po život uslijed električne struje!
Prilik
om kontakta sa vodovima ili gradbenim dijelovima
pod naponom postoji opasnost po život!
Obratite pažnju na slijedeće sigurnosne napomene, kako biste izbjegli
opasnost uslijed električne struje:
Ne koristite uređaj, kada je mrežni utikač ili priključni kabel oštećen. ►
Niukom slučaju ne otvarajte kućište uređaja. Ukoliko dodirnete priključke ►
koji su pod naponom i pritom promijenite električni ili mehanički ustroj
eđaja, postoji opasnost od strujnog udara.
ur
Rukovanje sa baterijama
Uvod
30
UPOZORENJE
Opasnost uslijed nestručnog rukovanja!
U cilju sigurnog rukovanja baterijama molimo da se pridržavate slijedećih
sigurnosnih napomena:
Baterije ne bacajte u vatru. ►
Ne izazovite kratak spoj baterije. ►
Ne pokušavajte baterije ponovo napuniti. ►
U redovnim vremenskim razmacima kontrolirajte baterije. Iscurjela baterijska ►
kiselina može izazvati trajna oštećenja uređaja. Posebno oprezni budite
prilik
om rukovanja sa oštećenim ili iscurjelim baterijama. Opasnost od
nagrizanja! Nosite zaštitne rukavice.
Baterije čuvajte na mjestu nedostupnom djeci. U slučaju gutanja neizostavno ►
zatražite liječničk
Izvadite baterije, kada uređaj duže vrijeme ne koristite. ►
u pomoć.
SKRD 30 A1
Page 33

Uvod
Opće sigurnosne napomene
Za sigurno rukovanje uređajem uvažite slijedeće sigurnosne napomene:
Uređaj prije uporabe kontrolirajte i pogledajte, da li postoje vidljiva vanjska ■
oštećenja. Uređaj koji je oštećen ili koji je pao ne pustite u pogon.
U slučaju oštećenja k
stručnog personala ili servisa za kupce.
Osobe, k
sigurno rukovati uređajem, isti smiju koristiti isključivo pod nadzorom ili po
napucima odgo
Djeci dopustite rukovanje uređajem isključivo pod nadzorom. ■
Popravke uređaja smiju izvršiti isključivo autorizirane stručne radionice ili servis ■
za kupce. Nestručno izvedene popravke mogu dovesti do opasnosti za
k
Reparaturu uređaja za vrijeme jamstvenog roka smije izvršiti isključivo servis ■
za kupce autoriziran od strane proizvođača, jer u protivnom ne postoji pravo
na jamstv
Defektni gradbeni dijelovi smiju biti zamijenjeni isključivo originalnim ■
zamjenskim dijelovima. Samo kod takvih zamjenskih dijelova je zajamčeno
ispunjav
Zaštitite uređaj od vlage i prodiranja tekućina. Uređaj nikada ne uronite u ■
vodu, ne postavljajte ga u blizini vode i ne postavljajte na njega predmete
napunjene tek
Ne postavljajte nikakve predmete na uređaj. ■
Uređaj ne koristite u blizini otvorenih plamena (npr. svijeća). ■
Izbjegavajte neposredan utjecaj sunčeve svjetlosti. ■
Dovod uvijek povlačite držanjem za priključni utikač, nikada ne povlačite za ■
sam kabel.
Ak
oje zbog svojih tjelesnih, duševnih ili motoričkih osobina nisu u stanju ■
vorne druge osobe.
orisnika. Osim toga jamstvo proizvođača prestaje važiti.
o u slučaju kasnijih oštećenja.
anje sigurnosnih zahtjeva.
ućinom (na primjer vaze).
o dođe do smetnji ili u slučaju oluje izvucite mrežni utikač iz utičnice. ■
HR
ablova ili priključaka iste dajte zamijeniti od autoriziranog ■
SKRD 30 A1
31
Page 34

Element za posluživanje
Element za posluživanje
(Slike pronađite na isklopnoj stranici, slika A)
HR
Montažna ploča/Stalak
2
Komandno polje
3
Display
4
On/Off : Uključivanje/Isključivanje (radio)
5
AOT: Timer isključivanja
6
Lock/Mem.: Blokada za tipke/odabir memorijskog mjesta
7
Bass/AMS/Mode: Podizanje basova/automatsko traženje postaje/pozivanje
podesnog menija
8
Alarm 1: Alarm 1 programiranje
9
Alarm 2: Alarm 2 programiranje
10
Preset–: pozivanje prethodnog memorijskog mjesta
11
Preset+: pozivanje slijedećeg memorijskog mjesta
12
Tune–: smanjenje prijemne frekvencije
Tune+: povećanje prijemne frekvencije
13
VOLUME/Snooze/Timer: Reguliranje glasnoće/isključivanje alarma/podešavanje
14
timera
Pokretna antena za UKW-prijem
15
Mrežni priključni kabel
16
Utori za stalak
17
Zvučnik
18
Pretinac za baterije
19
Tipke za deblokadu montažne ploče
20
32
SKRD 30 A1
Page 35

Postavljanje i priključivanje
Postavljanje i priključivanje
Sigurnosne napomene
UPOZORENJE
Prilikom puštanja uređaja u rad može doći do predmetne
štete i do ozljeda osoba!
Obratite pažnju na slijedeće sigurnosne napomene, kako biste izbjegli
opasnosti:
Materijali pakiranja ne smiju biti korišteni za igru. Postoji opasnost ►
od gušenja.
Obr
atite pažnju na napomene u vezi sa zahtjevima u pogledu mjesta ►
postavljanja i u pogledu električnog priključka uređaja, kako biste
izbjegli ozljede i nastanak pr
Obim isporuke i transportna inspekcija
Uređaj se standardno isporučuje sa slijedećim komponentama:
Ugradbeni radio SKRD 30 A1 ▯
Montažna ploča/stalak ▯
4 vijka za učvršćavanje ▯
1 x baterija 3 V tipa CR2032 ▯
Upute za uporabu ▯
edmetne štete.
HR
Raspakiranje
SKRD 30 A1
NAPOMENA
Ispitajte cjelovitost obima isporuke i provjerite, postoje li vidljiva oštećenja. ►
U slučaju nepotpune isporuke ili oštećenja uslijed oskudnog pakiranja ili ►
transportnih oštećenja molimo da se obratite dežurnoj servisnoj telefonskoj
liniji (vidi poglavlje Ser
Izvadite sve dijelove uređaja i upute za rukovanje iz kartona. ♦
Odstranite cjelokupni materijal pakiranja. ♦
vis).
33
Page 36

HR
Postavljanje i priključivanje
Zbrinjavanje ambalaže
Pakiranje (ambalaža) uređaj štiti od transportnih oštećenja. Materijali ambalaže su
izabrani u skladu sa načelima za očuvanje okoliša i načelima tehnologije zbrinjavanja otpada, te su zbog toga prikladni za recikliranje.
Povrat pakiranja u kružni tok materijala štedi sirovine i smanjuje količinu nastalog
otpada. Materijale pakiranja, koji Vam više nisu potrebni, zbrinite u skladu sa
važećim mjesnim propisima.
NAPOMENA
Ako je moguće, sačuvajte originalno pakiranje za vrijeme važenja jamstvenog ►
roka uređaja, kako biste uređaj u slučaju korištenja prava na jamstvo mogli
edno zapakirati.
ur
Zahtjevi u pogledu lokacije postavljanja
Za siguran i pouzdan rad uređaja bez grešaka mjesto postavljanja mora zadovoljiti
slijedeće uvjete:
Prilikom postavljanja uređaj postavite na čvrstu, ravnu i vodoravnu podlogu. ■
Koristite priloženi stalak.
eđaj tako postavite ili montirajte, da postojeći ventilacijski otvori i zvučnik ■
Ur
ne budu prekriveni.
Ur
eđaj ne pogonite u vrućem, mokrom ili vrlo vlažnom okruženju, niti u ■
blizini zapaljivih materijala.
P
ovršine elemenata namještaja mogu sadržavati tvari agresivne za gumene ■
nogice uređaja, koje iste mogu razmekšati. Po potrebi podmetnite podlogu
pod gumene nogice ur
Utičnica mora biti lako dostupna, tako da mrežni utikač u slučaju opasnosti ■
brzo može biti izvučen.
eđaja.
Električni priključak
Prije priključivanja uređaja usporedite podatke za priključak (napon i frekvenciju) ■
na tipskoj ploči sa vrijednostima Vaše strujne mreže. Ovi podaci moraju biti
podudarni, kako ne bi došlo do oštećenja uređaja.
Provjerite, da li je priključni kabel uređaja neoštećen i osigurajte, da ne bude ■
postavljen tako da prelazi preko vrućih površina i/ili oštrih ivica.
Obr
atite pažnju na to, da priključni kabel ne bude zategnut ili savijen. ■
Ne pustite priključni kabel da visi preko kutova (opasnost od protepanja). ■
34
SKRD 30 A1
Page 37

Postavljanje i priključivanje
Umetanje baterije
Umetanjem baterije izbjeći ćete, da u slučaju nestanka struje dođe do gubljenja
programiranog točnog vremena i podešenog vremena alarma. Baterija omogućava
nastavak rada internog sata i za vrijeme nestanka struje. Kada se struja ponovo
pojavi, na displayu 3 će automatski biti prikazano ispravno točno vrijeme.
NAPOMENA
Uređaj može raditi i bez baterija. ►
Otvorite poklopac pretinca za baterije ♦
ćete pokrov pomoću kovanice do kraja okrenuti u lijevu stranu i istu odići.
Umetnite bateriju tipa CR2032 (sadržana u obimu isporuke) u pretinac za ♦
baterije. Strana sa oznakom + okrenuta je prema gore.
Zatv
orite pretinac za baterije tako, što ćete postaviti pokrov i pomoću kovanice ♦
ga okrenuti u desnu stranu.
Postavljanje pod visećim ormarom
(Sliku možete pronaći na isklopnoj stranici, slika B)
Uređaj možete sa priloženom montažnom pločom na primjer montirati pod
visećim ormarom. Montažu uređaja izvedite na slijedeći način:
Pritisnite dvije tipke za deblokadu ♦
prema dolje, pritom istovremeno gurnite montažnu ploču prema natrag i
skinite montažnu ploču .
Potražite prikladno mjesto za uređaj (vidi i poglavlje ♦ Zahtjevi za mjesto
pos
tavljanja).
Držite montažnu ploču ♦
ivica montažne ploće ca. 4 cm nalaziti iza čeone strane visećeg ormara,
tako da uređaj nakon montaže bude u jednoj ravni sa visećim ormarom.
Označite 4 točke za učvršćenje pomoću klina. ♦
Sa klinom ili čavlom napravite malu udubinu na mjestima označavanja. ♦
Pričvrstite montažnu ploču
zan na slici B.
Umetnite uređaj koso, sa prednjim utorima u gornjoj strani uređaja u montažnu ♦
ploču
sve dok uređaj čujno ne ulegne.
Provjerite siguran položaj uređaja. ♦
. Pritisnite stražnji dio uređaja prema gore u montažnu ploču ,
pod mjesto postavljanja. Pritom se treba prednja
smještene na stražnjoj strani uređaja
20
uz pomoć priloženih vijaka, na način prika-
na donjoj strani uređaja tako, što
19
HR
SKRD 30 A1
35
Page 38

HR
Demontaža
Pritisnite dvije tipke za deblokadu ♦
dolje, pritom istovremeno uređaj gurnite prema naprijed i izvadite uređaj
prema donjoj strani.
Okrenite vijke na montažnoj ploči ♦
Postavljanje uređaja
Alternativno možete i postaviti uređaj. Da prilikom postavljanja ventilacijske otvore
i zvučnik 18 na donjoj strani uređaja ne biste prekrili, uređaj mora na stalku biti
montira. Montažu stalka izvedite na slijedeći način:
Pritisnite dvije tipke za deblokadu ♦
prema dolje, pritom istovremeno gurnite montažnu ploču prema natrag i
skinite montažnu ploču . Montažna ploča sada funkcionira kao stalak.
Gurnite dva prednja držača stalka ♦
uređaja.
Gurnite dva stražnja držača stalka ♦
uređaja, sve dok stalak čujno ne ulegne u svoje ležište.
Potražite prikladno mjesto za postavljanje uređaja (vidi i poglavlje ♦ Zahtjevi
z
a mjesto postavljanja).
Postavljanje i priključivanje
na stražnjoj strani uređaja prema
20
prema van i montažnu ploču skinite.
smještene na stražnjoj strani uređaja
20
u stražnje utore 17 na donjoj strani
u prednje utore 17 na donjoj strani
Snabdijevanje električnom energijom
Utaknite mrežni utikač priključnog mrežnog kabela ♦
playu 3 će točno vrijeme (0:00 Uhr) biti prikazano.
UKV - pokretna antena
Odmotajte pokretnu antenu ♦
36
za UKV-prijem potpuno.
15
u utičnicu. Na dis-
16
SKRD 30 A1
Page 39

Posluživanje i pogon
Posluživanje i pogon
U ovom poglavlju možete pronaći važne napomene u vezi sa posluživanjem i
radom uređaja.
Uključivanje i isključivanje
Nakon priključivanja na struju uređaj će već biti uključen. Preko tipke On/Off 4
možete vršiti prebacivanje između pogonskih modusa Sat/standby i radio.
NAPOMENA
Prekidač On/Off ►
uređaj potpuno odvojili od strujne mreže, morate mrežni utikač priključnog
mrežnog kabela 16 izvaditi iz utičnice.
Osnovna podešenja
Nakon priključivanja uređaja na izvor struje uređaj na displayu 3 prikazuje točno
vrijeme i dan u tjednu. Uređaj se nalazi u pogonskom modusu Sat/standby.
Aktiviranje podesnog menija
Za aktiviranje podesnog menija pritisnite u pogonskom modusu Sat/standby
tipku Bass/AMS/Mode 7. U displayu 3 prikazani sat počinje treptati. Svako
dodatno aktiviranje tipke Bass/AMS/Mode 7 prebacuje na slijedeću opciju
podešavanja. Redosljed točaka menija je slijedeći:
Podešavanje točnog vremena ▯
Podešavanje datuma ▯
Podešavanje svijetlosti prikaza na displayu ▯
Podešavanje funkcije podsjećanja ▯
Podešavanje formata točnog vremena ▯
4
uređaj ne odvaja potpuno od strujne mreže. Da biste
HR
SKRD 30 A1
NAPOMENA
Podesni meni će se automatski završiti, ako ca. 15 sekundi ne pritisnete niti ►
jednu tipku. Izvršena podešenja se memoriraju.
37
Page 40

HR
Podešavanje točnog vremena
Pretpostavka: Uređaj se nalazi u pogonskom modusu Sat/standby.
Pritisnite tipku Bass/AMS/Mode ♦
treptati.
Podesite pomoću tipke Tune+ ♦
aktiviranjem tipke vrijeme će se promijeniti za po jednu minutu. Držanje dotične tipke duže od 2 sekunde pokreće brzo podešavanje.
Pritisnite tipku Bass/AMS/Mode ♦
postavke i prešli na slijedeću točku menija.
NAPOMENA
Točno vrijeme će biti vraćeno na 00:00 sati, ako uređaj odvojite od strujne ►
mreže, ukoliko nije umetnuta baterija ili je baterija preslaba.
Podešavanje datuma
Pretpostavka: Uređaj se nalazi u pogonskom modusu Sat/standby.
Pritisnite tipku Bass/AMS/Mode ♦
Podesite pomoću tipke Tune+ ♦
njem tipke datum će biti promijenjen za po jedan dan. Prikaz dana u tjednu
automatski se mijenja. Držanje dotične tipke duže od 2 sekunde pokreće
brzo podešavanje.
Pritisnite tipku Bass/AMS/Mode ♦
postavku i prešli na slijedeću točku menija.
Posluživanje i pogon
7
jedanput. Prikaz točnog vremena počinje
i Tune– 12 aktualno točno vrijeme. Jednim
13
7
ponovo, da biste pohranili aktualne
7
dvaput. Prikaz datuma počinje treptati.
i Tune– 12 aktualni datum. Svakim pritiska-
13
7
ponovo, da biste pohranili aktualnu
38
NAPOMENA
Datum će biti vraćen na 01.01.2010, ako uređaj odvojite od strujne mreže, ►
ukoliko nije umetnuta baterija ili je baterija preslaba.
SKRD 30 A1
Page 41

Posluživanje i pogon
Podešavanje pozadinskog osvjetljenja na displayu
Pretpostavka: Uređaj se nalazi u pogonskom modusu Sat/standby.
7
Pritisnite tipku Bass/AMS/Mode ♦
skog osvjetljenja displaya je prikazano (H=svijetlo ili L=tamno).
Podesite pomoću tipke Tune+ ♦
snažnije osvjetljenje displaya.
Podesite pomoću tipke Tune– ♦
slabije osvjetljenje displaya.
Pritisnite tipku Bass/AMS/Mode ♦
pohranili i prešli na slijedeću točku menija.
Podešavanje funkcije podsjećanja
Možete podesiti do 10 vrijednosti datuma, na kojima će biti aktivirano automatsko podsjećanje. Funkcija SdA (SdA=Special Day Alert) je korisna, da bi Vas
na primjer podsjetila na rođendane ili na druge događaje, koji se periodično
ponavljaju. Podsjećanje će biti izvršeno svake godine na isti dan.
Pretpostavka: Uređaj se nalazi u pogonskom modusu Sat/standby.
Pritisnite tipku Bass/AMS/Mode ♦
datuma za podsjećivanje biti će naizmjenično sa dojavom SDA prikazana.
Osim prikaza dojave SDA broj memorijskog mjesta označava datum. Moguće
vrijednosti su SDA 01 do SDA 10.
Izaberite sa tipkama Preset+ ♦
koji želite podesiti.
Podesite pomoću tipke Tune+ ♦
Svakim pritiskanjem tipke datum će biti promijenjen za po jedan dan. Držanje dotične tipke duže od 2 sekunde pokreće brzo podešavanje.
triput. Aktualno podešenje pozadin-
osvjetljenje displaya na H, ako želite
13
12
osvjetljenje displaya na L, ako želite
7
ponovo, da biste aktualnu postavku
7
četiri puta. Aktualna postavka odabranog
11
i Preset– 10 memorijsko mjesto datuma,
i Tune– 12 datum za to memorijsko mjesto.
13
HR
SKRD 30 A1
NAPOMENA
Pritisnite tipku AOT ►
memorijsko mjesto želite isključiti. Na displayu se -- -- pojavljuje.
Pritisnite tipku Lock/Mem. ♦
aktiviranje funkcije podsjećanja, podesili. Podešenje vršite sa tipkama Tune+
i Tune– 12 na svaki puni sat između 00 i 23. Ova postavka vrijedi za
13
sve programirane termine za podsjećivanje
Pritisnite tipku Bass/AMS/Mode ♦
pohranili i prešli na slijedeću točku menija.
5
,ako funkciju podsjećanja za aktualno odabrano
6
, da biste točno vrijeme, u koje dolazi do
7
ponovo, da biste aktualno podešenje
39
Page 42
HR
Posluživanje i pogon
Podešavanje formata točnog vremena
Pretpostavka: Uređaj se nalazi u pogonskom modusu Sat/standby.
7
Pritisnite tipku Bass/AMS/Mode ♦
točnog vremena biti će prikazano (24=24-satni format ili 12=12-satni format).
Postavite s tipkom Tune+ ♦
točnog vremena u 24-satnom formatu .
Postavite s tipkom Tune– ♦
točnog vremena u 12-satnom formatu .
Pritisnite tipku Bass/AMS/Mode ♦
postavku i prešli na slijedeću točku menija.
13
12
Kuhinjski timer
Uređaj raspolaže praktičnim kuhinjskim timerom, sa kojim na primjer mogu biti
nadzirana vremena kuhanja i pečenja. Podesivo vremensko područje kuhinjskog
timera je između 1 minute i 23 sata i 59 minuta.
Podešavanje kuhinjskog timera
Pritisnite tipku Snooze/Timer ♦
kutu displaya pojavljuje se simbol lonca za kuhinjski timer.
Okrenite gumb VOLUME ♦
kuhinjski timer. Okretanje u smjeru kazaljke sata povećava vrijeme; Okretanje u smjeru protivnom kazaljci sata umanjuje vrijeme.
14
pet puta. Aktualno podešenje formata
format točnog vremena na 24, ako želite prikaz
format točnog vremena na 12, ako želite prikaz
7
ponovo, da biste pohranili aktualnu
. Pojavljuje se prikaz 00:00. U desnom gornjem
14
, da biste podesili vremensko područje za
40
NAPOMENA
Ako za vrijeme podešavanja u trajanju od ca. 15 sekundi ne izvršite niti ►
jednu promjenu, uređaj automatski prelazi u prethodni pogonski modus.
SKRD 30 A1
Page 43

Posluživanje i pogon
Pokretanje kuhinjskog timera
Nakon podešavanja vremena pritisnite tipku Snooze/Timer ♦
Prikazano vrijeme počinje teći unatraške. U desnom gornjem kutu displaya
pojavljuje se simbol sata, koji teče unatraške.
NAPOMENA
Ukoliko za vrijeme odbrojavanja kuhinjskog timera odaberete drugu ►
funkciju, nestati će prikaz preostalog vremena. Simbol lonca i simbol sata
oji teče unatraške će međutim i dalje biti prikazani u desnom gornjem
k
kutu displaya. Pritisnite tipku Snooze/Timer 14 ponovo, da biste ponovo
pozvali prikaz preostalog vremena kuhinjskog timera.
30 sekundi prije isteka kuhinjskog timera uređaj započinje sa pojedinačnim
signalnim zvukovima upozoravati na dostizanje podešenog vremena. Razmaci
pojedinačnih zvukova su pritom sve kraći. Nakon dostizanja podešenog vremena
oglašava se alarmni signal kuhinjskog timera kao trajni interval.
Pritisnite tipku Snooze/Timer ♦
isključili.
Prekidanje kuhinjskog timera
Pritisnite na aktiviranom kuhinjskom timeru tipku Snooze/Timer ♦
timer se zaustavlja. Prikazano preostalo vrijeme trepti.
ponovo.
14
, da biste alarmni signal kuhinjskog timera
14
. Kuhinjski
14
HR
SKRD 30 A1
NAPOMENA
Uređaj se nakon ca. 15 sekundi ponovo vraća na prethodni pogonski modus. ►
Pritisnite tipku Snooze/Timer
kuhinjskog timera ponovo pozvali.
Da biste ponovo pokrenuli kuhinjski timer, pritisnite tipku Snooze/Timer ♦
ponovo. Kuhinjski timer se ponovo pokreće.
Da biste kuhinjski timer isključili prije isteka vremena, pritisnite i držite tipku ♦
Snooze/Timer
najmanje 2 sekunde.
14
ponovo, da biste prikaz preostalog vremena
14
14
41
Page 44

HR
Posluživanje i pogon
Programiranje kuhinjskog timera
Često korištena vremena za kuhinjski timer možete programirati unaprijed, kako
ih ne biste svaki puta ponovo morali unositi. Mogu biti unaprijed programirana
najviše 10 vremena. Svih 10 programskih mjesta su standardno unaprijed programirana na vrijednost od 10 minuta.
Za programiranje kuhinjskog timera postupite na slijedeći način:
Pritisnite tipku Snooze/Timer ♦
Okrenite gumb VOLUME ♦
gramirano. Okretanje u smjeru kazaljke sata povećava vrijeme; Okretanje u
smjeru protivnom kazaljci sata umanjuje vrijeme.
Pritisnite tipku Lock/Mem. ♦
lonca za označavanje kuhinjskog timera pojavljuje se treptući T.
Birajte sa tipkama Preset+ ♦
treba biti podešen, u rasponu između T0 i T9.
Pritisnite tipku Lock/Mem. ♦
vrijeme na izabranom memorijskom mjestu. Treptući T ispod simbola lonca
sada će biti konstantno prikazano.
Ponovite ovaj postupak za ostala memorijska mjesta. ♦
Pozivanje kuhinjskog timera
Da biste pozvali programirano vrijeme za kuhinjski timer, postupite na slijedeći
način:
Pritisnite tipku Snooze/Timer ♦
Birajte sa tipkama Preset+ ♦
T0 i T9.
Pritisnite tipku Snooze/Timer ♦
, da biste aktivirali kuhinjski timer.
14
, da biste podesili vrijeme, koje treba biti pro-
14
6
, da biste aktivirali izbor timera. Ispod simbola
11
i Preset– 10 memorijsko mjesto za timer, koji
6
ponovo, da biste programirali podešeno
, da biste aktivirali kuhinjski timer.
14
11
i Preset– 10 željeni timer u rasponu između
ponovo, da biste pokrenuli kuhinjski timer.
14
42
SKRD 30 A1
Page 45

Posluživanje i pogon
Programiranje vremena buđenja
Uređaj raspolaže sa dva budilnika. Sva podešenja mogu biti vršena za oba
budilnika neovisno. Možete birati, da li se u programiranom vremenu treba
oglasiti alarmni ton ili uključiti radio.
NAPOMENA
Ako za vrijeme programiranja vremena buđenja ca. 15 sekundi ne ►
pritisnete niti jednu tipku, vrijeme buđenja će biti aktivirano sa aktualnim
ama.
postavk
Pretpostavka: Uređaj se nalazi u pogonskom modusu Sat/standby.
Za podešavanje vremena buđenja postupite na slijedeći način:
Pritisnite Alarm1-tipku ♦
za određeni alarm treptati će na displayu 3 i prikaz A1 odnosno A2 se
pojavljuje. Iznad prikaza vremena biti će prikazani dani u tjednu, na kojima
je ovaj alarm aktivan.
Sa tipkama Tune+ ♦
Jednim aktiviranjem tipke vrijeme za buđenje biti će promijenjeno za po
jednu minutu. Držanje dotične tipke duže od 2 sekunde pokreće brzo
podešavanje.
Pritisnite tipku AOT ♦
sub-ned ili pon-ned prebacivali. Odabrana kombinacija biti će prikazana
iznad vremena za buđenje.
Pritisnite i držite tipku AOT ♦
između kombinacija dana u tjednu i mogućnosti podešavanja pojedinačnog
dana u tjednu.
8
ili Alarm2-tipku 9. Podešeno vrijeme buđenja
i Tune– 12 podesite željeno vrijeme za buđenje.
13
5
, da biste između kombinacija dana u tjednu pon-pet,
5
najmanje 2 sekunde, da biste prebacivali
HR
NAPOMENA
Kod podešavanja pojedinačnog dana u tjednu prebacujete pomoću ►
tipke AOT
Buđenje sa zvukom alarma
Pretpostavka: Uređaj se nalazi u pogonskom modusu Sat/standby.
Da biste za određeni budilnik izabrali "Zvuk alarma", pritisnite Alarm1-tipku ♦
ili Alarm2-tipku
pojavi.
SKRD 30 A1
5
sa jednog na drugi dan u tjednu.
9
više puta uzastopno, dok se na displayu 3 simbol ne
8
43
Page 46

HR
Posluživanje i pogon
Buđenje sa radio-programom
Ako želite biti probuđeni sa radio-programom, prije aktiviranja vremena buđenja
izvršite slijedeća podešenja:
Uključite radio tako, što ćete tipku On/Off ♦
Izaberite postaju, koja Vas treba probuditi (vidi poglavlje ♦ Podešavanje
pos
taje).
Podesite pomoću dugmeta VOLUME ♦
Podešavanje glasnoće).
Isključite radio tako, što ćete tipku On/Off ♦
Da biste za odgovarajući budilnik izabrali „radio“, pritisnite Alarm1-tipku ♦
8
ili Alarm2-tipku 9 više puta uzastopno, sve dok se na displayu 3
simbol
Isključivanje budilnika
Pretpostavka: Uređaj se nalazi u pogonskom modusu Sat/standby.
Da biste budilnik isključili, pritisnite Alarm1-tipku ♦
puta uzastopno, sve dok na displayu
simbol.
Kada je došao trenutak za buđenje
Kod postavke „Buđenje sa zvukom alarma“ se u razmacima od po 2
sekunde oglašava četverostruki signalni zvuk. Glasnoća signalnog zvuka se
kontinuirano povećava sve do postizanja maksimalne glasnoće. Trajanje signala
za buđenje ograničeno je na 10 minuta.
Kod postavke „Buđenje radio-programom“ uključuje se radio-prijemnik.
Prethodno izabrana postaja biti će aktivirana podešenom glasnoćom u trajanju
od maksimalno 60 minuta.
Pritisnite tipku Snooze/Timer ♦
nakon 9 minuta.
ne pojavi.
, da biste aktivirali ponavljanje buđenja
14
4
pritisnuti.
željenu glasnoću (vidi poglavlje
14
4
pritisnuti.
8
3
više ne bude prikazan niti jedan
ili Alarm2-tipku 9 više
44
NAPOMENA
Ponavljanje buđenja moguće je najkasnije 60 minuta nakon dostizanja ►
podešenog vremena buđenja.
8
ili Alarm2-tipku 9, da biste okončali aktualni alarm.
Pritisnite Alarm1-tipk
NAPOMENA
Alarm će u trenutku dostizanja slijedećeg vremena za buđenje (na primjer ►
slijedećeg dana) ponovo biti aktivan.
u ♦
SKRD 30 A1
Page 47

Posluživanje i pogon
Radio-pogon
NAPOMENA
Za dobar radio-prijem morate pokretnu antenu ►
Antenu u radio-pogonu usmjerite tako, da bude postignut najbolji mogući
prijem.
Tehničke osobine uređaja omogućuju podesivu frekvenciju prijema izvan ►
dopuštenog područja UKW (FM)-pojasa od 87,5–108 MHz. U raznim
emljama mogu postojati različite nacionalne odredbe u vezi sa dodijeljenim
z
krugovalnim frekvencijskim područjima. Obratite pažnju na to, da informacije primljene izvan dodijeljenog frekvencijskog krugovalnog područja ne
smijete koristiti, proslijediti trećim osobama ili zloupotrebljavati suprotno
njihovoj namjeni.
Uključivanje/Isključivanje radio-prijemnika
Uključite radio tako, što ćete tipku On/Off ♦
aktualnu frekvenciju prijema podešene postaje.
Isključite radio tako, što ćete tipku On/Off ♦
vraća u pogonski modus Sat/standby. Pojavljuje se aktualno točno vrijeme.
Podešavanje glasnoće
Pomoću VOLUME-regulatora ♦
smjeru kazaljke sata povećava glasnoću; Okretanje u smjeru protivnom kazaljci sata umanjuje vrijeme. Razina glasnoće biti će na lijevom rubu displaya 3
prikazana.
podesite željenu glasnoću. Okretanje u
14
potpuno odmotati.
15
4
pritisnuti. Display 3 prikazuje
4
ponovo pritisnuti. Uređaj se
HR
Manualno podešavanje postaje
Pojedinačnim pritiskanjem tipke Tune+ ♦
postaju. Frekvencija odašiljača biti će na displayu
za vrijeme podešavanja isključen.
Traženje slijedećeg odašiljača
Uređaju možete naložiti da automatski traži slijedeći odašiljač.
Pritisnite i držite tipku Tune+ ♦
traži najbližu slijedeću postaju sa dostatnom kvalitetom prijema.
Ponovite ovaj postupak, sve dok ne pronađete traženu postaju. ♦
SKRD 30 A1
i Tune– 12 možete podesiti željenu
13
ili Tune- 12 najmanje dvije sekunde. Uređaj
13
3
prikazana. Zvučnik je
45
Page 48

HR
Posluživanje i pogon
Manualno pohranjivanje postaje
Pretpostavka: Uređaj se nalazi u pogonskom modusu Radio.
Uređaj na raspolaganje stavlja 30 memorijskih mjesta za emisione frekvencije.
Za pohranjivanje odašiljačke frekvencije postupite na slijedeći način:
Željenu postaju podesite na prethodno opisani način. ♦
Pritisnite tipku Lock/Mem. ♦
kutu displaya počinje treptati.
Izaberite sa tipkama Preset+ ♦
podešenu postaju u rasponu između 1 i 30.
Pritisnite tipku Lock/Mem. ♦
ljača biti će pohranjena na izabranom memorijskom mjestu. Simbol MEM
svijetli konstantno.
Pozivanje pohranjene postaje
Pretpostavka: Uređaj se nalazi u pogonskom modusu Radio.
Izaberite sa tipkama Preset+ ♦
pohranjenu postaju u rasponu između 1 i 30.
Automatsko traženje odašiljača (AMS-funkcija)
Pretpostavka: Uređaj se nalazi u pogonskom modusu Radio.
Da biste memorijska mjesta za odašiljačke frekvencije dodijelili najjačim postajama, možete provesti automatsko traženje odašiljača.
6
jedanput. Simbol MEM u donjem desnom
11
i Preset– 10 željeno memorijsko mjesto za
6
ponovo. Frekvencija prijema podešenog odaši-
11
ili Preset– 10 željeno memorijsko mjesto za
46
NAPOMENA
Prilikom izvođenja u nastavku opisane funkcije doći će do gubljenja svih ►
prethodno pohranjenih postaja.
7
Pritisnite i dr
započinje sa traženjem odašiljača i dodjeljuje memorijskim mjestima 1-30
pronađene postaje.
NAPOMENA
Ako uređaj pronađe više od 30 postaja, biti će pohranjene samo 30 prve ►
odašiljačke frekvencije.
o uređaj pronađe manje od 30 postaja, zadnja memorijska mjesta ►
Ak
ostaju nepromijenjena.
žite tipku Bass/AMS/Mode ♦
najmanje dvije sekunde. Uređaj
SKRD 30 A1
Page 49

Posluživanje i pogon
Daljnje funkcije
Automatsko isključivanje (funkcija drijemanja)
Sa funkcijom drijemanja radio se nakon vremenskog razdoblja u trajanju od
5 do 120 minuta samostalno isključuje.
5
Pritisnite tipku AOT ♦
do isključivanja radio-prijemnika biti će prikazano.
Pritisnite tipku AOT ♦
dotične tipke duže od 2 sekunde pokreće brzo podešavanje.
NAPOMENA
Podesivi vremenski raspon iznosi između 5 i 120 minuta. Podešavanje se ►
vrši u koracima od po 5 minuta. Nakon toga se pojavljuje prikaz OFF.
K
Blokada tipki
Tipke uređaja možete blokirati, tako da neovlaštene osobe ili djeca ne mogu
vršiti promjenu postavki.
Pritisnite i držite tipku Lock/Mem. ♦
ili isključili blokadu tipki. Kod uključene blokade tipki na displayu će se pojaviti
simbol .
od prikaza OFF funkcija drijemanja je isključena.
, da biste funkciju pozvali. Aktualno preostalo vrijeme
5
ponovo, da biste podesili željeno vrijeme. Držanje
6
najmanje dvije sekunde, da biste uključili
HR
Pojačanje basova
S pojačanjem basova možete uključiti pojačanu reprodukciju dubokih frekvencija.
Pretpostavka: Uređaj se nalazi u pogonskom modusu Radio.
SKRD 30 A1
Nakratko pritisnite tipku Bass/AMS/Mode ♦
pojačanje basova. Kod uključenog pojačanja basova će se na displayu
pojaviti simbol BASS.
7
, da biste uključili ili isključili
47
Page 50

HR
Čišćenje/Otklanjanje grešaka
Čišćenje
Sigurnosne napomene
OPASNOST
Opasnost po život uslijed električne struje
Izvucite mr
uređaja.
PAŽNJA
Oštećenje uređaja!
Osigur
kako biste izbjegli nepopravljivo oštećenje uređaja.
Čišćenje kućišta
Površine uređaja očistite sa mekom i suhom krpom. ■
Otklanjanje grešaka
U ovom poglavlju možete pronaći važne napomene za lokaliziranje smetnji i njihovo
otklanjanje. Uvažite ove napomene, kako biste opasnosti i oštećenja izbjegli.
ežni utikač iz utičnice, prije nego što započnete sa čišćenjem ►
ajte, da prilikom čišćenja ne dođe do prodiranja tekućine u uređaj, ►
Sigurnosne napomene
UPOZORENJE
Obratite pažnju na slijedeće sigurnosne napomene, kako biste izbjegli opasnosti
i predmetne štete:
Popravke električnih uređaja smiju vršiti isključivo stručnjaci podučeni od ►
proizvođača. Nestručno izvedene popravke mogu izazvati znatne opasnosti
orisnika i dovesti do oštećenja uređaja.
za k
48
SKRD 30 A1
Page 51

Otklanjanje grešaka
Uzroci i otklanjanje grešaka
Slijedeća tablica će Vam pomoći u lokaliziranju i otklanjanju manjih smetnji:
Pogreška Mogući uzrok Otklanjanje
Display ništa
ne prikazuje.
Nema tona
Ometajući šumovi
prilikom prijema
radio-programa
NAPOMENA
Mrežni utikač nije utaknut. Utaknite mrežni utikač u utičnicu.
Utičnica ne isporučuje
napon.
Glasnoća je postavljena
na minimalnu vrijednost.
Radio je isključen.
Postaja nije ispravno
podešena.
Prijem je preslab.
Ako sa naprijed navedenim koracima niste uspjeli riješiti problem, molimo ►
da se obratite servisu za kupce.
Provjerite osigurače u domaćinstvu.
Povećajte glasnoću pomoću
VOLUME-regulatora
Radio pomoću tipke On/Off 4
uključite.
Odašiljač sa tipkom Tune+ 13
12
i Tune–
Pokušajte pokretanjem antene 15
poboljšati prijem.
ispravno podesite.
14
HR
.
SKRD 30 A1
49
Page 52

HR
Skladištenje/Zbrinjavanje
Skladištenje/Zbrinjavanje
Skladištenje
Ukoliko uređaj ne koristite duže vrijeme, odvojite ga od napajanja strujom,
izvadite bateriju i uređaj skladištite na čistom i suhom mjestu bez neposrednog
utjecaja sunčeve svjetlosti.
Zbrinjavanje uređaja
Uređaj niukom slučaju ne bacajte u obično kućno smeće. Ovaj
proizvod podliježe europskoj smjernici 2002/96/EC-WEEE (Waste
Electrical and Electronic Equipment).
Uređaj otklonite preko ovlaštenog poduzeća za otklanjanje otpada ili preko vašeg
komunalnog poduzeća za otklanjanje otpada. Obratite pažnju na aktualne važeće
propise. U slučaju dvojbe se povežite sa Vašom ustanovom za zbrinjavanje.
Zbrinjavanje baterija
Baterije ne smiju biti zbrinute sa kućnim smećem. Svaki potrošač je zakonski obavezan baterije predavati na sabirnom mjestu njegove općine/njegovog kvarta
ili u trgovini. Ova obaveza služi za to, da baterije mogu biti zbrinute na ekološki
ispravan način. Baterije vratite isključivo u ispražnjenom stanju.
50
SKRD 30 A1
Page 53

Prilog
Prilog
Napomene u vezi sa EU-izjavom o konformitetu
Ovaj uređaj odgovara osnovnim zahtjevima i drugim relevantnim propisima europske smjernice za elektromagnetnu
podnošljivost 2004/108/EC, niskonaponske smjernice
2006/95/EC i smjernice za ekološki dizajn 2009/125/EC
(naputak 1275/2008 prilog II, br.1).
Cjelokupnu originalnu izjavu o konformitetu možete nabaviti
kod uvoznika.
Izjava o sukladnosti za ovaj proizvod dostupna je na internet
stranici www.lidl.hr.
Tehnički podaci
Pogonski napon 220-240 V / 50 Hz
Baterija za osiguranje podataka
Snaga uređaja
Pogon ca. 5 W
1 x 3 V tip CR2032
(sadržane u obimu isporuke)
HR
SKRD 30 A1
Standby ca. 1,8 W
Izlazna snaga zvučnika: ca. 1 W (sa 10 % šumova)
Frekvencijsko područje radio
(UKW)
Pogonska temperatura +5 - +40 °C
Vlaga (bez kondenzacije) 5 - 90 %
Dimenzije (V x Š x D)
(bez stalka)
Težina ca. 600 g
Zaštitna klasa
87,5 - 108 MHz
4,9 x 22 x 12 cm
II
51
Page 54

HR
Prilog
Jamstvo
Na ovaj uređaj dobivate jamstvo u trajanju od 3 godine od datuma kupnje. Uređaj
je pažljivo proizveden i prije isporuke brižljivo kontroliran.
Molimo sačuvajte blagajnički račun kao dokaz o kupnji. Molimo vas, da se u
slučaju garancije telefonski povežete sa svojom servisnom ispostavom. Samo na
taj način vaša roba može biti besplatno uručena.
NAPOMENA
Jamstvo vrijedi isključivo za greške materijala ili greške u izradi, a ne za ►
transportne štete, potrošne dijelove ili za oštećenja lomljivih dijelova, na
primjer prekidača ili baterija.
Proizvod je namijenjen isključivo za privatnu, a ne za gospodarsku uporabu.
U slučaju zlouporabe i nestručnog rukovanja, primjene sile i zahvata, koje nije
izvršila naša autorizirana servisna ispostava, jamsto prestaje važiti.
Vaša zakonska prava ovim jamstvom ostaju netaknuta. Jamstveni rok se ne produžava korištenjem prava na jamstvo. To vrijedi i za zamijenjene i popravljene
dijelove.
Eventualno već prilikom kupnje postojeće štete i nedostaci moraju biti javljeni
odmah nakon raspakiranja, najkasnije međutim dva dana nakon datuma kupnje.
Popravke vršene nakon isteka jamstvenog roka podliježu obavezi plaćanja.
Servis
Uvoznik
52
Ovlašteni servis: Microtec sistemi d.o.o.
Tel.: 01/3692-008
E-Mail: support.hr@kompernass.com
Lidl Hrvatska d.o.o. k.d.,
p.p. 61
10020 Novi Zagreb
Proizvođač:
KOMPERNASS GMBH
BURGSTRASSE 21
D-44867 BOCHUM, Njemačka
SKRD 30 A1
 Loading...