

Page 1

5
ROBOT DE COCINA
ROBOT DA CUCINA
KOMPERNASS GMBH · BURGSTRASSE 21 · D-44867 BOCHUM
www.kompernass.com
ID-Nr.: KH701-10/07-V1
KH 701
ROBOT DE COCINA
Instrucciones de manejo
ROBOT DA CUCINA
Instruzioni per l’uso
FOOD PROCESSOR
Operating Instructions
KÜCHENMASCHINE
Bedienungsanleitung
Page 2
1
2
3
4
q
w
w
q
w
f
q
q
w
g
h
j
w
q
d
e
r
l
k
s
a
o
t
i
u
y
Page 3

- 1 -
Índice Página
Indicaciones de seguridad 2
Uso conforme al previsto 2
Datos técnicos 3
Volumen de suministro 3
Descripción de aparatos 3
Primera puesta en funcionamiento 3
Posiciones de funcionamiento 4
Trabajar con el brazo amasador,
la varilla para batir o la varilla para mezclar 4
Trabajar con el picador 5
Trabajar con el mezclador 6
Limpieza y cuidados 7
Solución de fallos 7
Evacuación 8
Garantía y servicio 8
Importador 8
Cantidades recomendadas 9
Lea atentamente este manual de instrucciones antes del primer uso y consérvelo para posteriores utilizaciones.
Entréguelas en caso de traspasar el aparato a terceros.
Page 4

Robot de cocina
KH 701
Indicaciones de seguridad
¡Riesgo de descarga eléctrica!
• Conecte y ponga el aparato en funcionamiento
sólo siguiendo las indicaciones de la placa de
características.
• Preste atención a que el cable de red no se moje
ni humedezca cuando el aparato está funcionando.
• Extienda el cable de red de modo que no se
pueda aplastar o dañar de alguna forma. No
deje colgar el cable de red desde la superficie
de trabajo.
• En caso de que el cable de red o la clavija de
red estén dañados, deberán ser sustituidos por
personal cualificado o el servicio de asistencia
técnica para prevenir posibles situaciones de
peligro.
• Saque la clavija de red de la base de enchufe si
no va utilizar el aparato, antes de limpiarlo y en
caso de avería. No es suficiente con desconectarlo, ya que mientras esté insertada la clavija de
red en la base de enchufe sigue llegando tensión
de red al aparato. Así se evita una conexión involuntaria del mismo. ¡Después de un corte de corriente el aparato se vuelve a poner en marcha!
• No accione el aparato sin ingredientes. ¡Peligro
de sobrecalentamiento!
• No permita utilizar el aparato a personas (incluidos los niños) cuyas facultades físicas, sensoriales
o mentales, así como su falta de conocimientos o
de experiencia, les impida hacer un uso seguro del
mismo si no están bajo vigilancia o han sido instruidos correctamente.
• Vigile a los niños para asegurarse de que no juegan con el aparato.
Advertencia: Nunca sumerja el aparato en
agua u otros líquidos.¡Peligro de descarga
eléctrica!
¡Peligro de lesiones!
• Precaución: ¡los discos raspadores y de corte,
así como la cuchilla mezcladora están muy afilados!
• ¡Proceda con cuidado al colocar, extraer y limpiar
los discos raspadores o de corte y la cuchilla
mezcladora!
• Atención: Mientras que el aparato esté en
marcha, introduzca únicamente los ingredientes
que vaya a utilizar en el bol para mezclar, el
picador o en el mezclador.
• Nunca introduzca las manos u objetos extraños
en el tubo de alimentación o en el mezclador,
para evitar lesiones y daños en el aparato.
• Cambie los accesorios sólo una vez detenido el
accionamiento.
• ¡El aparato continúa funcionando durante un
poco de tiempo después de desconectarlo!
• No deje nunca el aparato sin vigilancia.
Uso conforme al previsto
Este aparato está previsto para la elaboración de
alimentos en cantidades normales en el hogar y sólo
para el uso privado en espacios cerrados y protegidos de la lluvia.
El aparato no está previsto para el uso profesional
o industrial o para su funcionamiento al aire libre.
Sólo se pueden utilizar en el aparato los accesorios
originales.
- 2 -
Page 5

Datos técnicos
Tensión de red: 220–240 V/ 50 Hz
Consumo de potencia: 550W
Capacidad máx. del
bol para mezclar: aprox. 3,8l
Mezclador: aprox. 1,5l
Volumen de suministro
Robot de cocina KH701
Bol para mezclar con tapa
Mezclador con tapa y embudo
Picador con compactador
Disco de corte reversible (grueso y fino)
Disco raspador reversible (grueso y medio)
Disco rallador (fino)
Brazo amasador con contenedor de masa
Varilla para batir
Varilla para mezclar
Soporte para accesorios
Material de montaje
Instrucciones de uso
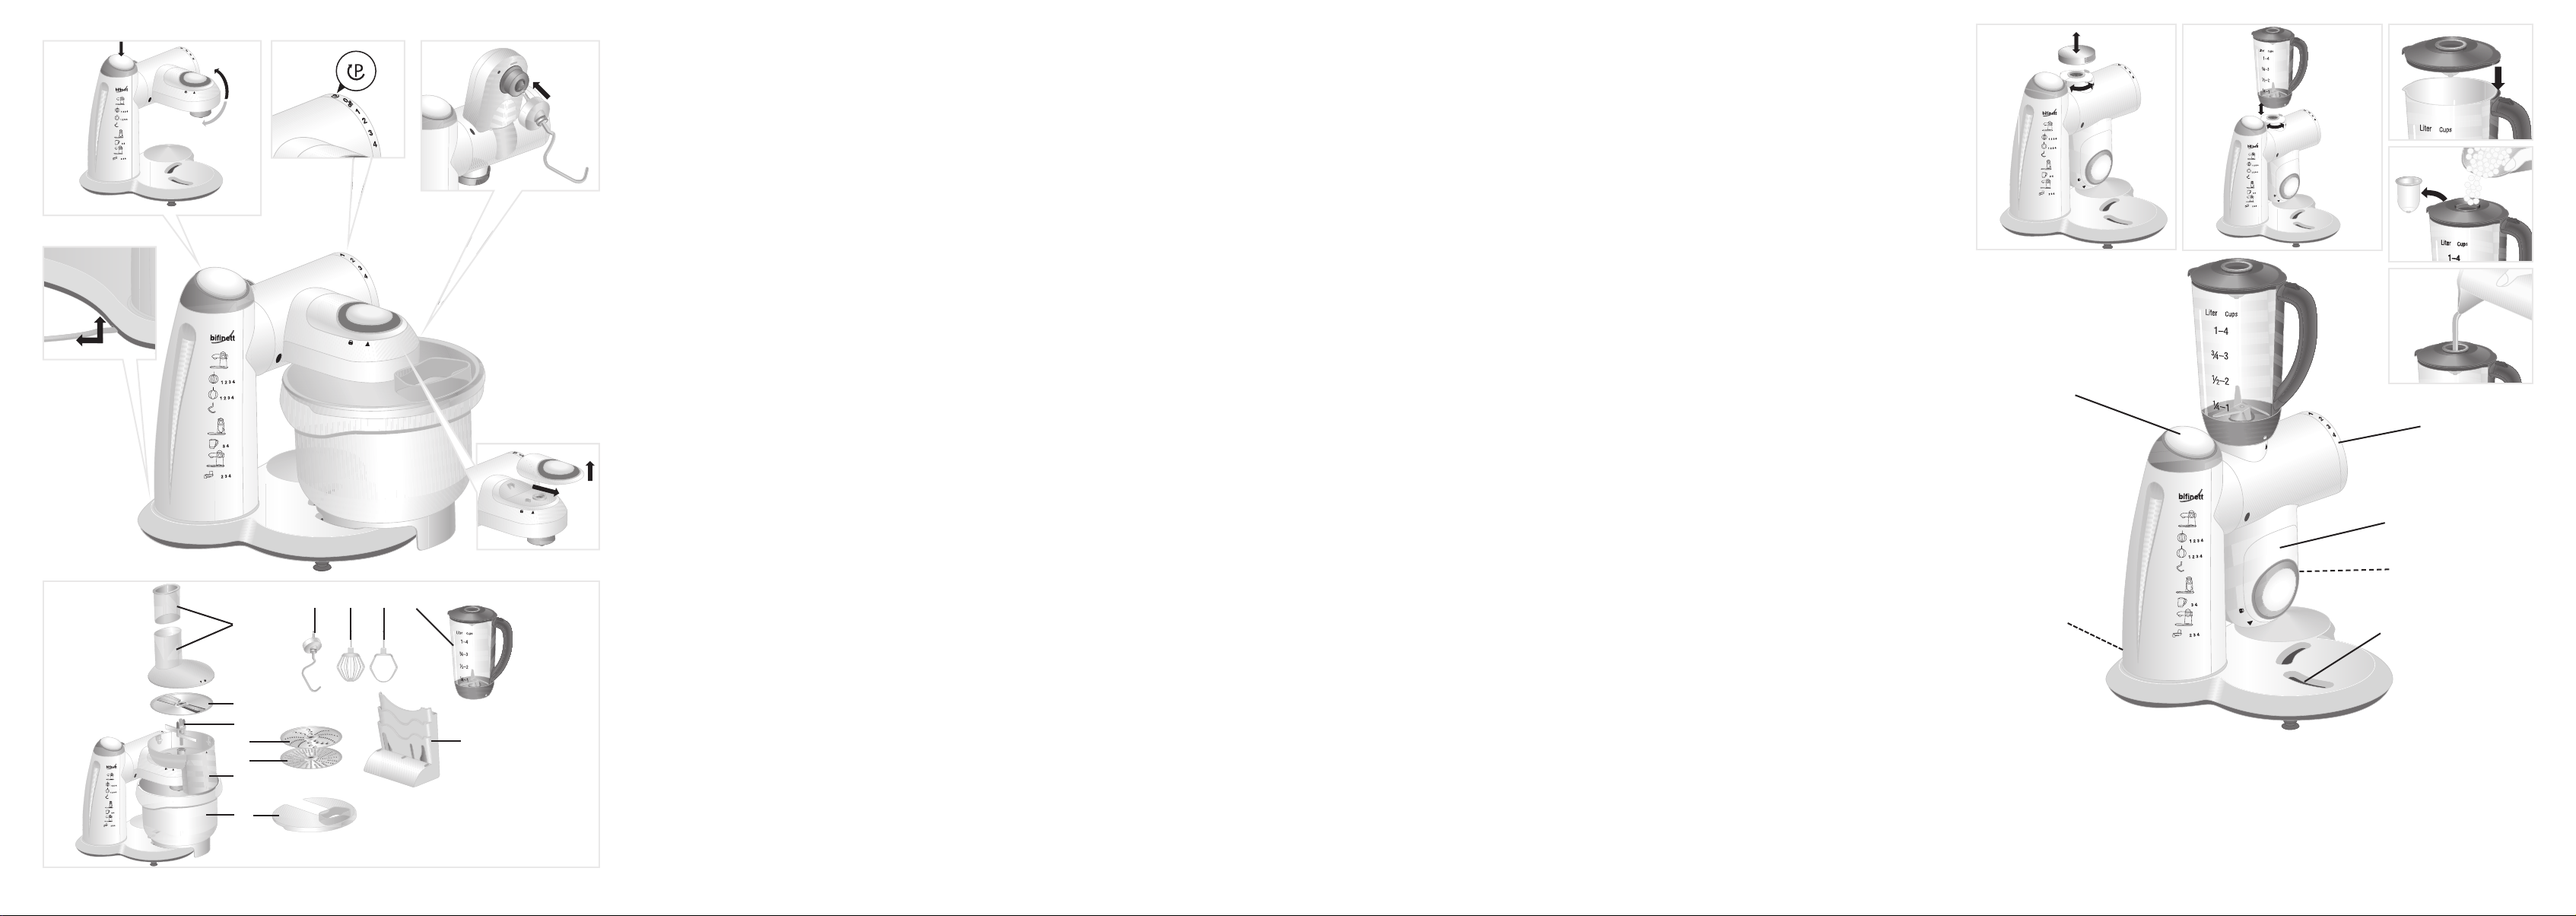
Descripción de aparatos
q
Brazo amasador con contenedor de masa
w
Varilla para mezclar
e
Varilla para batir
r
Mezclador con tapa y embudo
t
Soporte para accesorios
y
Bol para mezclar con tapa
u
Picador
i
Disco rallador
o
Disco raspador reversible
a
Eje impulsior del picador
s
Disco de corte reversible
d
Tapa con compactador para el picador
f
Tecla de liberación
g
Interruptor giratorio
h
Brazo basculante
j
Accionamiento
k
Cavidades para el bol para mezclar
l
Compartimento de recogida del cable
Primera puesta en
funcionamiento
• Antes de la primera puesta en funcionamiento
compruebe la integridad del volumen de suministro y
si presenta posibles daños visibles.
• Retire todos los materiales de embalaje del aparato.
• Limpie antes del primer uso todas las piezas del
aparato, tal como se describe en el apartado
"Limpieza y cuidados“.
• Coloque el aparato sobre una base lisa y limpia.
• Fije el aparato a la base con las cuatro ventosas.
• Saque el cable de alimentación de su compartimento de recogida l(imagen 6).
• Introduzca la clavija de red en la base de enchufe.
- 3 -
Page 6
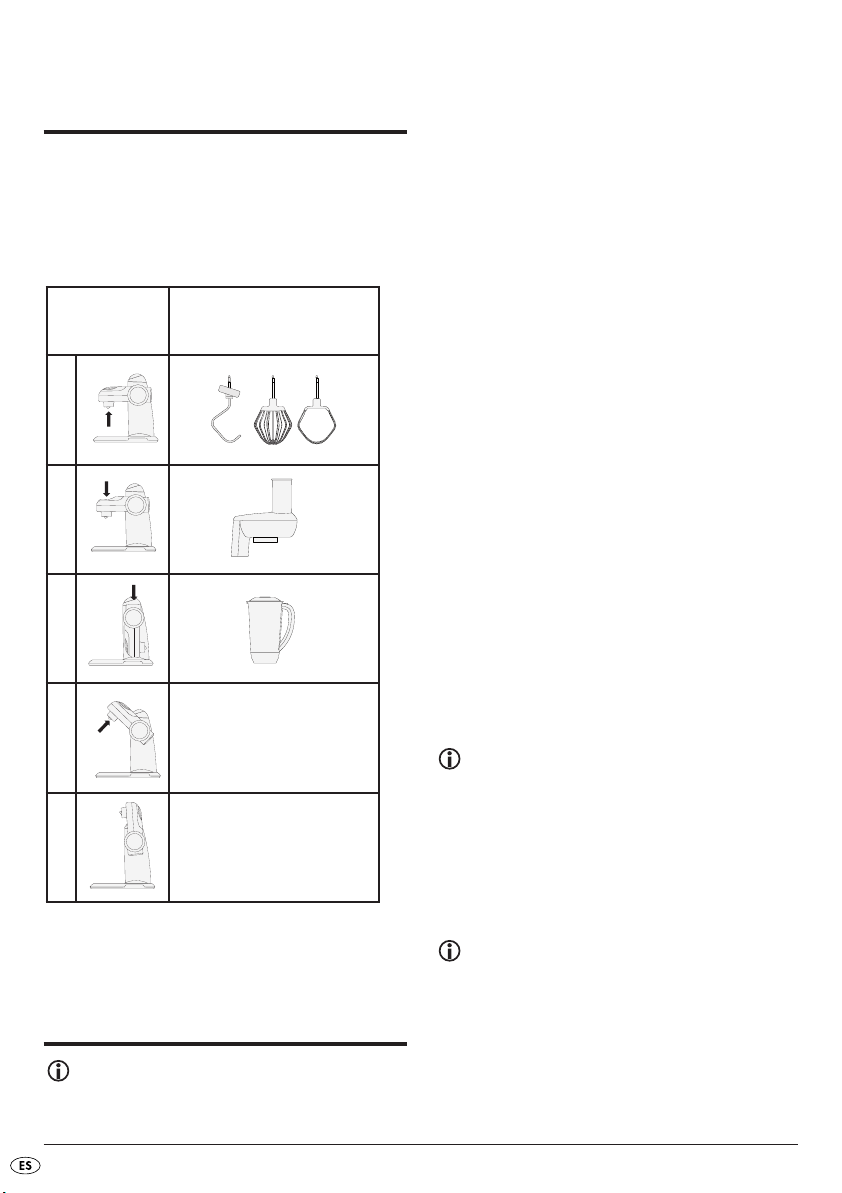
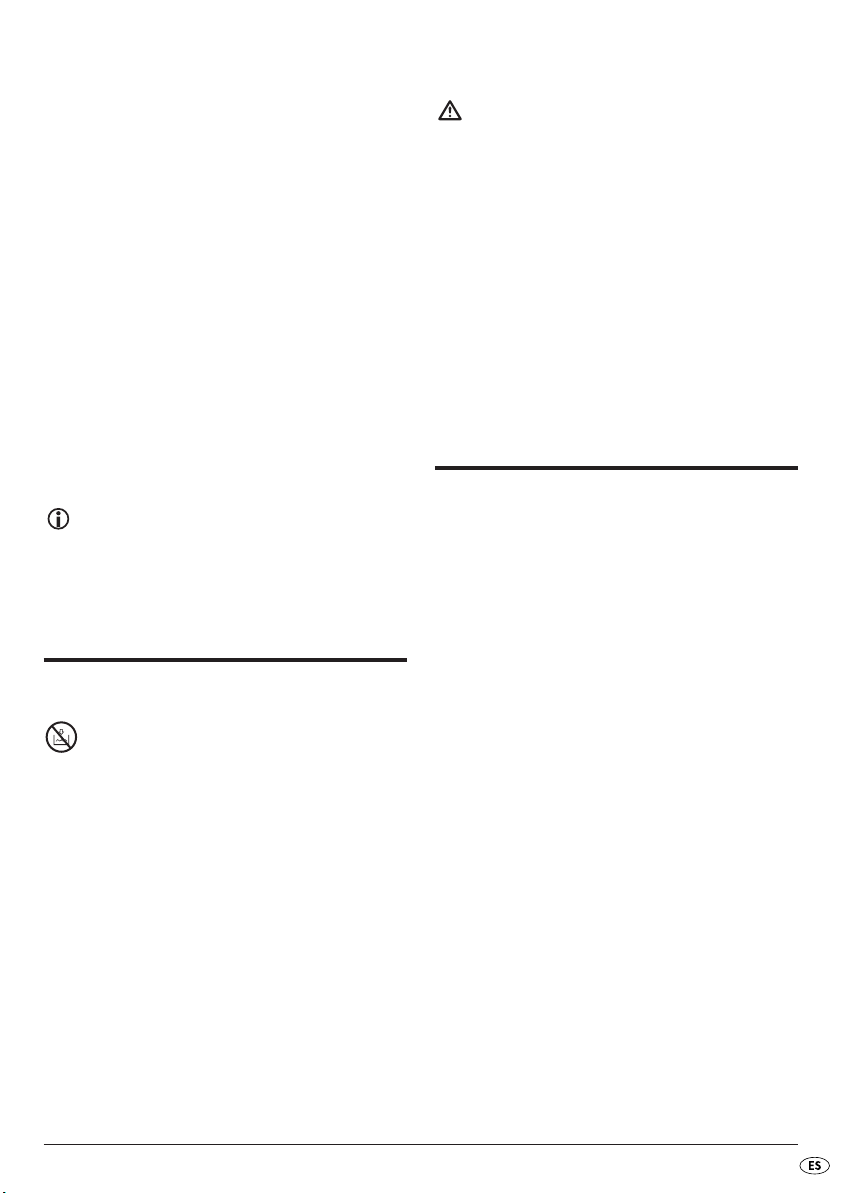
Posiciones
de funcionamiento
Atención: Ponga el aparato en funcionamiento una
vez haya colocado los accesorios como se indica en
esta tabla y lo haya ajustado a la posición de funcionamiento. Nunca ponga el aparato en funcionamiento sin ingredientes.
Trabajar con el brazo
amasador, la varilla para
batir o la varilla para mezclar
Indicación: Sólo se debe utilizar el aparato si se
han protegido los orificios de accionamiento que
no se vayan a utilizar con las tapas de protección.
Posición Accesorios
1
2
3
4
Colocar el bol para mezclar
Colocar el brazo amasador, la
varilla para batir y la varilla
para mezclar
5
Añadir cantidades grandes de
alimentos
Proceda de la siguiente manera para preparar el aparato para el funcionamiento con el brazo amasador q,
la varilla para batir eo la varilla para mezclar w:
• Pulse la tecla de liberación fy lleve el brazo
basculante ha la posición de funcionamiento 4
(véase capítulo „Posiciones de funcionamiento“)
(imagen 1).
• Coloque el bol para mezclar y. La base del
bol para mezclar ydebe introducirse en las
cavidades kdel aparato.
• Pulse la tecla de liberación fy lleve el brazo
basculante ha la posición de funcionamiento 1
(véase capítulo „Posiciones de funcionamiento“)
(imagen 1).
• Coloque el interruptor giratorio gen P y manténgalo en este punto hasta que el accionamiento
j
permanezca en la posición de parada (imagen
2). Si el accionamiento no se mueve, se habrá
alcanzado la posición de parada.
• Pulse la tecla de liberación fy lleve el brazo
basculante ha la posición de funcionamiento 4
(véase capítulo „Posiciones de funcionamiento“)
(imagen 1).
• Dependiendo de la tarea a realizar, introduzca el
brazo amasador q, la varilla para batir eo la
varilla para mezclar wen el accionamiento
j
hasta que encaje.
Indicación: El brazo amasador qestá equi-
pado con un contenedor de masa. Gire el contenedor de masa, hasta que el brazo amasador
q
pueda encajar (imagen 3).
• Introduzca los ingredientes en el bol para mezclar y.
Indicación: Tenga en cuenta que durante
el proceso de amasado o mezclado en el bol
para mezclar, la masa aumenta de tamaño y,
debido al movimiento, será empujada hacia arriba. Observe la tabla del capítulo „Cantidades
recomendadas“.
- 4 -
Page 7
• Pulse la tecla de liberación fy lleve el brazo
basculante ha la posición de funcionamiento 1
(véase capítulo „Posiciones de funcionamiento“)
(imagen 1).
• Coloque la tapa sobre el bol para mezclar y.
• Ajuste el interruptor giratorio gal nivel deseado.
¡Peligro de lesiones por piezas
giratorias!
No sujete nunca el bol para mezclar ydurante el
funcionamiento.
¡Cambie los accesorios sólo una vez detenido el
accionamiento j! Después de la desconexión, el
accionamiento jsigue funcionando durante cierto
tiempo. Sólo se debe utilizar el aparato si se han
protegido los orificios de accionamiento que no se
vayan a utilizar con las tapas de protección. En caso
de avería desconecte el aparato y desenchufe la clavija de red, para evitar una conexión no autorizada
del aparato.
Introducir ingredientes
• Conecte el aparato a través del interruptor
giratorio g.
• Coloque el interruptor giratorio gen P y manténgalo en este punto hasta que el accionamiento
j
permanezca en esta posición (imagen 2).
• Retire la tapa.
• Pulse la tecla de liberación fy lleve el brazo basculante ha la posición de funcionamiento 5
(véase capítulo „Posiciones de funcionamiento“).
• Introduzca los ingredientes o cuélelos a través de
las aperturas de llenado de la tapa.
Después del trabajo
• Conecte el aparato a través del interruptor giratorio g.
• Coloque el interruptor giratorio gen P y manténgalo en este punto hasta que el accionamiento
j
permanezca en esta posición (imagen 2).
• Retire la tapa.
• Pulse la tecla de liberación fy lleve el brazo
basculante ha la posición de funcionamiento 4
(véase capítulo „Posiciones de funcionamiento“).
• Retire los accesorios del accionamiento j.
• Extraiga el bol para mezclar y.
• Limpie todas las piezas (véase capítulo „Limpieza
y cuidados“).
Trabajar con el picador
Indicación: Asegúrese de que no se encuentre en el brazo basculante hel brazo amasador q, la varilla para batir eni la varilla para
mezclar w.
Proceda de la siguiente manera para preparar el
aparato para el funcionamiento con el picador u:
• Pulse la tecla de liberación fy lleve el brazo basculante ha la posición de funcionamiento 4
(véase capítulo „Posiciones de funcionamiento“)
(imagen 1).
• Coloque el bol para mezclar y. La base del
bol para mezclar ydebe introducirse en las
cavidades kdel aparato.
• Pulse la tecla de liberación fy lleve el brazo basculante ha la posición de funcionamiento 1
(véase capítulo „Posiciones de funcionamiento“).
• Retire la tapa de protección del accionamiento
para el picador u(imagen 4).
- 5 -
Page 8

• Introduzca el picador ucon el eje de impulsión
a
en la abertura del accionamiento (marca del
picador usobre la marca del brazo basculante
h
) y gírelo en sentido horario hasta que encaje
(imagen 5).
• Retire la tapa con compactador d.
• Según el tipo de tarea, coloque el disco de corte
s
, raspador oo rallador ien el eje impulsor
a
del picador (imagen 5).
• Coloque la tapa con compactador den el picador uy bloquéela (imagen 5).
• Ajuste el interruptor giratorio gal nivel deseado.
Indicación: No presione demasiados ingredientes en el picador u. Observe la tabla del
capítulo „Cantidades recomendadas“.
• Introduzca los ingredientes a través del tubo de
alimentación con el compactador d.
¡Peligro de lesiones por piezas
giratorias!
Para evitar lesiones y daños en el aparato, no introduzca nunca las manos u objetos extraños en el
tubo de alimentación. Introduzca los ingredientes
sólo con el compactador.
¡Cambie los accesorios sólo una vez detenido el
accionamiento j! Después de la desconexión, el
accionamiento jsigue funcionando durante cierto
tiempo. Sólo se debe utilizar el aparato si se han
protegido los orificios de accionamiento que no se
vayan a utilizar con las tapas de protección. En caso
de avería desconecte el aparato y desenchufe la clavija de red para evitar una conexión no autorizada
del aparato.
Después del trabajo
• Conecte el aparato a través del interruptor giratorio g.
• Gire el picador uen sentido antihorario y retírelo.
• Desmonte el picador uy limpie todas las piezas
(véase capítulo „Limpieza y cuidados“).
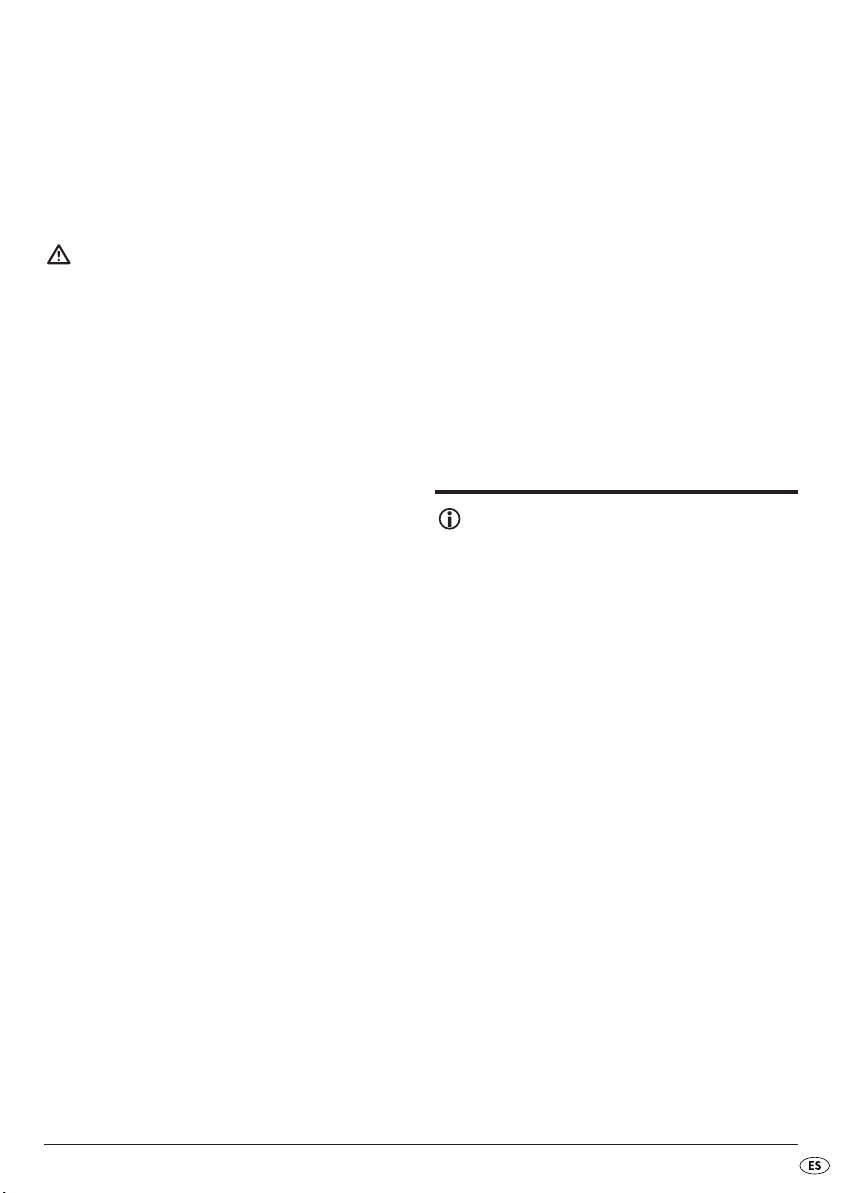
Trabajar con el mezclador
¡Peligro de lesiones!
Deje enfriar los líquidos calientes hasta que estén
tibios (aprox. 30–40°C) antes de introducirlos en
el mezclador r.
Proceda de la siguiente manera para preparar el
aparato para el funcionamiento con el mezclador :
• Pulse la tecla de liberación fy lleve el brazo
basculante ha la posición de funcionamiento 3
(véase capítulo „Posiciones de funcionamiento“).
• Retire la tapa de protección del accionamiento
del mezclador (imagen 7).
• Coloque el mezclador r(marca de la base
sobre la marca del aparato base) y gírelo en
sentido antihorario hasta que encaje (imagen 8).
• Introduzca los ingredientes.
Cantidad máxima: 1 litro;
líquidos espumosos máximo 0,5 litro;
cantidad óptima de ingrediente sólidos: 50–100gr.
Indicación: Observe la tabla del capítulo
„Cantidades recomendadas“.
• Coloque la tapa con embudo y presiónela firmemente (imagen 9).
• Ajuste el interruptor giratorio gal nivel deseado.
¡Peligro de lesiones debido a cuchillas
afiladas/accionamiento giratorio!
¡No agarre nunca el mezclador rcolocado!
¡Retire/coloque el mezclador rsólo cuando el
accionamiento esté detenido j! Ponga el funcionamiento el mezclador rsólo con la tapa colocada.
En caso de avería desconecte el aparato y desenchufe la clavija de red, para evitar una conexión no
autorizada del aparato.
- 6 -
r
Page 9
Introducir ingredientes
• Conecte el aparato a través del interruptor giratorio g.
• Presione la tecla en el asa del mezclador r,
retire la tapa e introduzca los ingredientes
o
• Extraiga el embudo e introduzca poco a poco
los ingredientes sólidos a través de la apertura
de llenado (imagen 10)
o
• Introduzca los ingredientes líquidos a través del
embudo (imagen 11).
Después del trabajo
• Conecte el aparato a través del interruptor giratorio g.
• Gire el mezclador ren sentido horario y retírelo.
Indicación: Es mejor limpiar el mezclador
r
justo después del uso (véase capítulo
„Limpieza y cuidados“).
Limpieza y cuidados
¡Peligro de descarga eléctrica!
Advertencia: Nunca sumerja el aparato en
agua u otros líquidos.
¡Atención!
No utilice productos de limpieza abrasivos.
Extraiga la clavija de red.
Limpie el aparato con un paño húmedo. Si es
necesario, utilice un poco de lavavajillas.
A continuación seque completamente el aparato.
Limpie el bol para mezclar, el picador
giratorio y los accesorios
Todos los accesorios (excepto el mezclador r)
son aptos para el lavado en el lavavajillas.
No aprisione las piezas de plástico en el lavavajillas, ya que se pueden provocar deformaciones.
Limpiar el mezclador
¡Peligro de lesiones por cuchillas
afiladas!
No toque la cuchilla del mezclador con las manos
desnudas.
¡Atención!
No utilice productos de limpieza abrasivos.
Para la limpieza introduzca agua con un poco de
lavavajillas en el mezclador rutilizado.
Conecte el mezclador rdurante algunos segundos.
Vierta el agua y enjuague el mezclador rcon agua
limpia. Retire los posibles residuos con un cepillo.
Solución de fallos
Si el aparato se para de repente:
El aparato se ha sobrecalentado y se ha activado
la desconexión de seguridad automática.
• Ajuste el interruptor giratorio gal 0.
• Extraiga la clavija de red de la base de enchufe.
• Deje que el aparato se enfríe durante15 minutos
• Si después de 15 minutos el aparato todavía no
se ha enfriado completamente no se encenderá.
• Espere otros 15 minutos y vuelva a conectarlo.
Si no se puede encender el aparato:
• Compruebe si la clavija de red se encuentra
conectada a la base de enchufe.
• Compruebe si los cobretores del accionamiento
del mezclador ry el picador u, el bol para
mezclar yy la tapa están colocadas y encajadas correctamente.
• Compruebe si el brazo basculante hse encuentra el la posición de funcionamiento correspondiente (véase capítulo „Posiciones de funcionamiento“).
Si las acciones descritas no le son de utilidad, el
aparato está averiado. Deje que lo repare personal
cualificado o el servicio de atención al cliente.
- 7 -
Page 10
Evacuación
De ningún modo deberá tirar el aparato
en la basura doméstica.
Evacue el aparato en un centro de evacuación autorizado a través de las instalaciones de evacuación
comunitarias.
Tenga en cuenta las normativas actuales en vigor. En
caso de dudas póngase en contacto con su centro
de evacuación.
Evacue todos los materiales de embalaje de
forma respetuosa con el medio ambiente.
Garantía y servicio
Con este aparato recibe usted 3 años de garantía
desde la fecha de compra. El aparato ha sido
fabricado cuidadosamente y ha sido probado antes
de su entrega. Guarde el comprobante de caja
como justificante de compra. Si necesitara hacer uso
de la garantía, póngase en contacto por teléfono
con su punto de servicio habitual. Éste es el único
modo de garantizar un envío gratuito.
La garantía cubre los defectos de fabricación o
del material, pero no las piezas sujetas a desgaste
y los daños sufridos por las piezas frágiles (p.ej. el
interruptor o las pilas). Este producto ha sido diseñado
exclusivamente para el uso particular y no para el uso
industrial.
En caso de manipulación indebida e incorrecta, uso
de la fuerza y en caso de abrir el aparato personas
extrañas a nuestros centros de asistencia técnica
autorizados, la garantía pierde su validez. Esta
garantía no reduce en forma alguna sus derechos
legales.
Kompernass Service España
C/Invención 7
Polígono Industrial Los Olivos
28906 Getafe – Madrid
Tel.: 902 430758
Fax: 91 6652551
e-mail: support.es@kompernass.com
Importador
KOMPERNASS GMBH
BURGSTRASSE 21
D-44867 BOCHUM
www.kompernass.com
- 8 -
Page 11
- 9 -
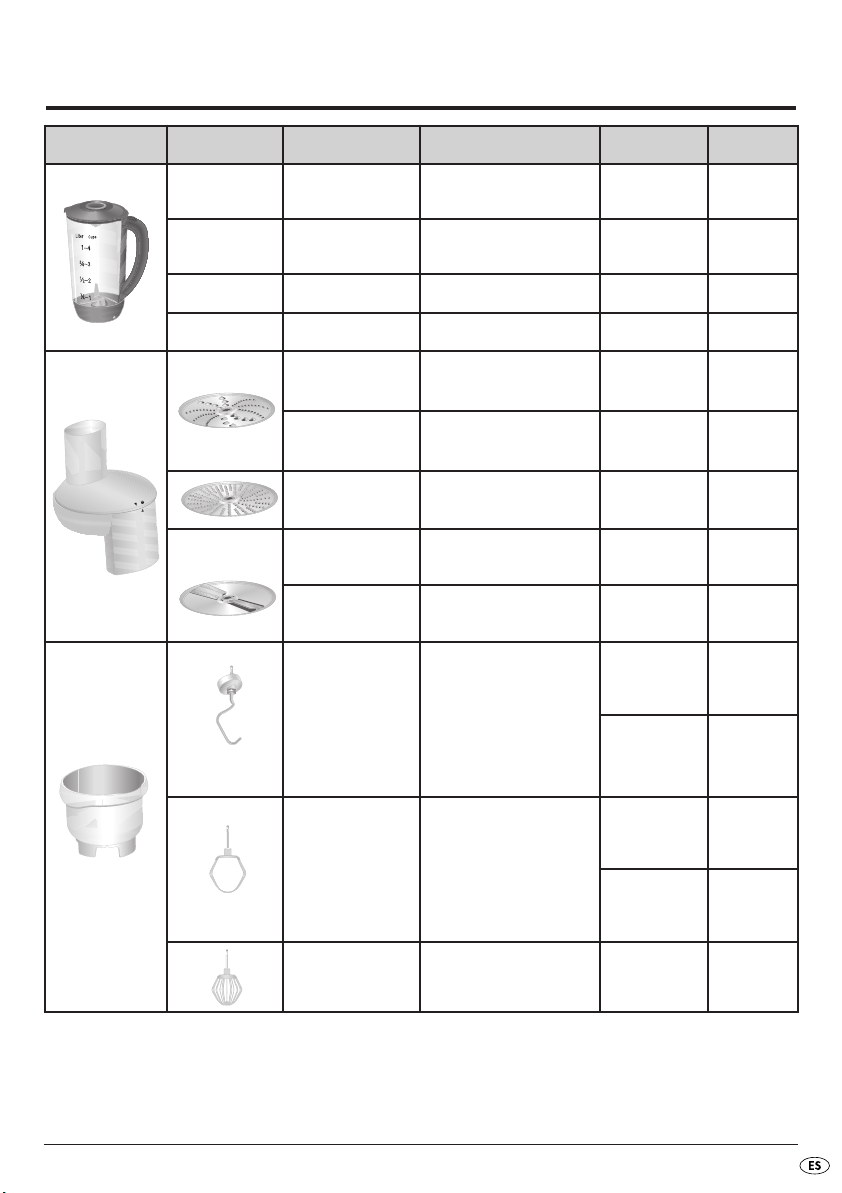
Cantidades recomendadas
*1: Utilice la parte áspera del disco raspador o del disco cortador reversible.
*2: Utilice la parte fina del disco raspador o del disco cortador reversible.
*3: La cantidad máxima para la masa con levadura es de 1,5 veces la indicada en la receta.
*4: La cantidad máxima para la masa de buñuelos es de 1,5 a 2 veces la indicada en la receta.
Accesorio Accesorios Alimento Cantidad Tiempo Graduación
- Zumo
400gr de ingredientes +
600ml de agua
30 seg. 3, 4
-
Nueces
Almendras
100gr 10 seg. 3, 4
- Cubitos de hielo 110gr 10 seg. 3, 4
- Líquidos 1000ml. 10 seg. 3, 4
Zanahorias, pata-
tas, pepinos
500gr
*
1
25 seg. 2, 3, 4
Zanahorias, pata-
tas, pepinos
500gr
*
2
50 seg. 2, 3, 4
Zanahorias, pata-
tas, pepinos
500gr 25 seg. 2, 3, 4
Zanahorias, pata-
tas, pepinos
500gr
*
1
25 seg. 2, 3, 4
Zanahorias, pata-
tas, pepinos
500gr
*
2
40 seg. 2, 3, 4
Masa con
levadura
500gr de harina, 1 huevo,
80gr de aceite (temperatura
ambiente), 80gr de azúcar,
200–250ml de leche
caliente, 25gr de levadura
fresca o 1 paquete de leva-
dura seca, 1 pizca de sal
*
3
1. Proceso de
mezclado:
2 min.
1
2. Proceso de
mezclado:
10 min.
2
Masa de buñuelos
125gr de mantequilla
(temperatura ambiente),
100–125gr de azúcar,
1 huevo,
1 pellizco de sal,
250gr de harina
*
4
1. Proceso de
mezclado:
30 seg.
1
2. Proceso de
mezclado:
6 min.
2
Clara batida al
punto de nieve
8 claras de huevo 2–3 min. 4
Page 12

- 10 -
Page 13

Indice Pagina
Avvertenze di sicurezza 12
Uso conforme 12
Dati tecnici 13
Fornitura 13
Descrizione dell’apparecchio 13
Prima messa in funzione 13
Posizioni di esercizio 14
Funzionamento con gancio da impasto, frusta e frullino 14
Funzionamento con tritatutto 15
Funzionamento con mixer 16
Pulizia e cura 17
Eliminazione dei guasti 17
Smaltimento 17
Garanzia & assistenza 18
Importatore 18
Quantità di riempimento consigliate 19
Leggere attentamente le istruzioni per l'uso prima del primo impiego e conservarle per l'impiego successivo.
In caso di cessione dell'apparecchio a terzi, consegnare anche il manuale di istruzioni.
- 11 -
Page 14

- 12 -
Robot da cucina
KH 701
Avvertenze di sicurezza
Pericolo di scossa elettrica!
• Collegare e utilizzare l’apparecchio solo in conformità ai dati riportati sulla targhetta.
• Impedire che il cavo di rete si inumidisca o si
bagni durante l’uso.
• Collocare il cavo di rete in modo tale da impedirne lo schiacciamento o altro tipo di danneggiamento. Impedire che il cavo di rete penda dalla
superficie di lavoro.
• In caso di danni al cavo di rete o alla spina di
rete, fare eseguire la sostituzione da personale
qualificato specializzato o dal centro di assistenza ai clienti, al fine di evitare pericoli.
• Estrarre la spina di rete dalla presa di corrente
quando non si utilizza l’apparecchio, prima di
pulirlo, e in caso di guasto. Non è sufficiente
spegnere l’apparecchio poiché esso è ancora
sotto tensione fino a quando la spina è inserita
nella presa. In tal modo si evita l’accensione involontaria dell’apparecchio. Dopo un’interruzione
di corrente, l’apparecchio si riaccende!
• Non azionare mai l’apparecchio senza ingredienti. Pericolo di surriscaldamento!
• Questo apparecchio non è indicato per l’uso da
parte di persone (inclusi bambini) con limitate
capacità fisiche, sensoriali o mentali o prive
dell’esperienza e/o della conoscenza necessaria,
a meno che tali persone non vengano sorvegliate
da un responsabile per la sicurezza o abbiano ricevuto indicazioni sull’impiego dell’apparecchio.
• Sorvegliare i bambini per assicurarsi che non giochino con l’apparecchio.
Attenzione: non immergere mai l’apparecchio in acqua o altri liquidi. Pericolo di scossa
elettrica!
Pericolo di lesioni!
• Attenzione: il disco di taglio o di grattugia e la
lama del mixer sono molto affilati!
• Esercitare cautela nell’inserimento e nella rimozione, nonché nella pulizia del disco di taglio e di
grattugia e della lama del mixer!
• Attenzione: mentre l’apparecchio è in funzione, versare nel recipiente, nel tritatutto o nel mixer
esclusivamente gli ingredienti da lavorare.
• Non inserire mai le mani o oggetti estranei nel
pozzetto di riempimento o nel mixer, per evitare
lesioni e danni all’apparecchio.
• Sostituire gli accessori solo a motore fermo.
• Dopo lo spegnimento l’apparecchio continua
a girare per breve tempo!
• Non lasciare mai l’apparecchio incustodito.
Uso conforme
L’apparecchio è previsto per la lavorazione di alimenti in quantità per uso domestico e solo per l’uso
privato in ambienti chiusi, protetti dalla pioggia.
L’apparecchio non è previsto per l’uso commerciale
o industriale o all’aperto. L’apparecchio deve essere
utilizzato solo con gli accessori originali.
Page 15

- 13 -
Dati tecnici
Tensione di rete: 220–240V/ 50 Hz
Potenza assorbita: 550 W
Capacità max.
Recipiente: ca. 3,8l
Mixer: ca. 1,5l
Fornitura
Robot da cucina KH701
Recipiente con coperchio
Mixer con coperchio e imbuto
Tritatutto con pressa
Disco da taglio (grosso e sottile)
Disco da grattugia (grossa e medio-fine)
Disco da tritatura (fine)
Gancio da impasto con deflettore
Frusta
Frullino
Porta-accessori
Materiale di montaggio
Istruzioni per l’uso
Descrizione dell’apparecchio
q
Gancio da impasto con deflettore
w
Frullino
e
Frusta
r
Mixer con coperchio e imbuto
t
Porta-accessori
y
Recipiente con coperchio
u
Tritatutto
i
Disco di tritatura
o
Disco di grattugia
a
Albero motore tritatutto
s
Disco di taglio
d
Coperchio con pressa per il tritatutto
f
Tasto di sbloccaggio
g
Interruttore rotante
h
Braccio girevole
j
Motore
k
Intagli per il contenitore
l
Vano portacavo
Prima messa in funzione
• Prima della prima messa in funzione, controllare
l’integrità della fornitura in relazione alla completezza e all’eventuale presenza di danni visibili.
• Rimuovere dall’apparecchio tutti i materiali di
imballaggio.
• Prima del primo impiego, pulire tutti i componenti
dell’apparecchio come descritto alla sezione
„Pulizia e cura“.
• Collocare l’apparecchio su un piano liscio e pulito.
• Fissare l’apparecchio sul piano tramite le quattro
ventose.
• Estrarre il cavo di rete dal vano portacavo
l
(figura 6).
• Inserire la spina di rete nella presa di corrente.
Page 16

- 14 -
Posizioni di esercizio
Attenzione: utilizzare l’apparecchio solo se gli
accessori sono stati montati in base alla tabella e
l’apparecchio è in posizione di esercizio. Non
azionare mai l’apparecchio senza ingredienti.
Funzionamento con gancio da
impasto, frusta e frullino
Avviso: utilizzare l’apparecchio solo se le
aperture di automazione non utilizzate sono
protette dalle apposite coperture.
Posizione Accessori
1
2
3
4
Collocamento del recipiente
Inserimento di gancio da impasto, frusta e frullino
5
Aggiunta di grosse quantità di
lavorazione
Per preparare l’apparecchio all’uso con il gancio da
impasto q, la frusta ee il frullino w, procedere
come segue:
• premere il tasto di sbloccaggio fe portare il
braccio girevole hnella posizione di esercizio 4
(v. capitolo „Posizioni di esercizio“) (figura 1).
• Inserire il contenitore y. La base del contenitore
y
deve inserirsi negli intagli kdell’apparecchio.
• Premere il tasto di sbloccaggio fe portare il
braccio girevole hnella posizione di esercizio 1
(v. capitolo „Posizioni di esercizio“) (figura 1).
• Posizionare l’interruttore rotante gsu P e mantenere fino a quando il motore jsi ferma in posizione di parcheggio (figura 2). Se il motore non
si muove, significa che la posizione di parcheggio è già stata raggiunta.
• Premere il tasto di sbloccaggio fe portare il
braccio girevole hnella posizione di esercizio 4
(v. capitolo „Posizioni di esercizio“) (figura 1).
• A seconda del compito da eseguire, inserire il
gancio da impasto q, la frusta eo il frullino
w
fino all’aggancio nel motore j.
Avvertenza: il gancio da impasto qè prov-
visto di un deflettore. Ruotare il deflettore fino a
consentire l’inserimento del gancio da impasto
q
(figura 3).
• Inserire gli ingredienti da lavorare nel contenitore y.
Avviso: ricordare che durante il procedimento
di impasto o di frullatura, l’impasto può aumentare di volume o essere spinto verso l’alto dal movimento. Rispettare le indicazioni della tabella al
capitolo „Quantità di riempimento consigliate“.
• Premere il tasto di sbloccaggio fe portare il
braccio girevole hnella posizione di esercizio 1
(v. capitolo „Posizioni di esercizio“) (figura 1).
• Inserire il coperchio sul contenitore y.
• Impostare l’interruttore rotante gsul livello
desiderato.
Page 17

- 15 -
Pericolo di lesioni dovute alle parti rotanti!
Non mettere mai le mani nel contenitore ymentre
l’apparecchio è in funzione.
Sostituire gli accessori solo se il motore jè fermo!
Dopo lo spegnimento, il motore jcontinua a girare
per breve tempo. Mettere in funzione l’apparecchio
solo se le aperture di automazione non utilizzate sono
protette dalle apposite coperture. In caso di guasto,
spegnere l’apparecchio e staccare la spina, per evitare un’accensione involontaria dell’apparecchio.
Inserimento degli ingredienti
• Spegnere l’apparecchio dall’interruttore rotante
g
.
• Posizionare l’interruttore rotante gsu P e mantenere fino a quando il motore jsi ferma (figura 2).
• Rimuovere il coperchio.
• Premere il tasto di sbloccaggio fe portare il
braccio girevole hnella posizione di esercizio 5
(v. capitolo „Posizioni di esercizio“).
• Inserire gli ingredienti o aggiungerli tramite
l’apposita apertura del coperchio.
Dopo la lavorazione
• Spegnere l’apparecchio dall’interruttore rotante g.
• Posizionare l’interruttore rotante gsu P e mantenere fino a quando il motore jsi ferma (figura 2).
• Rimuovere il coperchio.
• Premere il tasto di sbloccaggio fe portare il
braccio girevole hnella posizione di esercizio 4
(v. capitolo „Posizioni di esercizio“).
• Prelevare gli accessori dal motore j.
• Prelevare il contenitore y.
• Pulire tutti gli elementi (v. capitolo „Pulizia e cura“).
Funzionamento con
tritatutto
Avviso: assicurarsi che sul braccio girevole
h
non si trovi il gancio da impasto q, la frusta
e
o il frullino w.
Per preparare l’apparecchio al funzionamento con
il tritatutto u, procedere come segue:
• premere il tasto di sbloccaggio fe portare il
braccio girevole hnella posizione di esercizio 4
(v. capitolo „Posizioni di esercizio“) (figura 1).
• Inserire il contenitore y. La base del contenitore
y
deve inserirsi negli intagli kdell’apparecchio.
• Premere il tasto di sbloccaggio fe portare il
braccio girevole hnella posizione di esercizio 1
(v. capitolo „Posizioni di esercizio“).
• Rimuovere la copertura di protezione per il tritatutto u(figura 4).
• Inserire il tritatutto ucon l’albero motore
a
nell’apertura di automazione (la marcatura del
tritatutto udeve poggiare sulla marcatura del
braccio girevole h) e ruotare in senso orario
fino all’arresto (figura 5).
• Rimuovere il coperchio con la pressa d.
• A seconda del compito da eseguire, inserire il
disco di taglio s, grattugia oo tritatura
i
sull’albero motore adel tritatutto (figura 5).
• Inserire il coperchio con la pressa dsul tritatutto
u
e bloccare (figura 5).
• Impostare l’interruttore rotante gsul livello
desiderato.
Avviso: non premere troppi ingredienti nel
tritatutto u. Rispettare le indicazioni della
tabella al capitolo „Quantità di riempimento
consigliate“.
• Inserire gli ingredienti attraverso il pozzetto di
riempimento con l’ausilio della pressa d.
Page 18

- 16 -
Pericolo di lesioni dovute alle parti rotanti!
Non inserire mai le mani o oggetti estranei nel
pozzetto di riempimento, per evitare lesioni e danni
all’ apparecchio. Inserire gli ingredienti solo con
l’ausilio della pressa.
Sostituire gli accessori solo se il motore jè fermo!
Dopo lo spegnimento, il motore jcontinua a girare
per breve tempo. Mettere in funzione l’apparecchio
solo se le aperture di automazione non utilizzate sono
protette dalle apposite coperture. In caso di guasto,
spegnere l’apparecchio e staccare la spina, per evitare un’accensione involontaria dell’apparecchio.
Dopo la lavorazione
• Spegnere l’apparecchio dall’interruttore rotante g.
• Ruotare il tritatutto uin senso antiorario e prelevarlo.
• Smontare il tritatutto ue pulire tutti gli elementi
(v. capitolo „Pulizia e cura“).
Funzionamento con mixer
Pericolo di ustioni!
Fare raffreddare i liquidi bollenti alla temperatura
corporea (ca. 30–40°C), prima di versarli nel
mixer r.
Per preparare l’apparecchio al funzionamento con
il mixer r, procedere come segue:
• Premere il tasto di sbloccaggio fe portare il
braccio girevole hnella posizione di esercizio 3
(v. capitolo „Posizioni di esercizio“).
• Rimuovere il coperchio di protezione dell’azionamento del mixer (figura 7).
• Collocare il mixer r(la marcatura della base
deve poggiare sulla marcatura dell’apparecchio
base) e ruotare in senso antiorario fino all’arresto
(figura 8).
• Versare gli ingredienti.
Quantità massima: 1 litro;
liquidi schiumosi massimo 0,5 litro;
quantità di lavorazione ottimale solida: 50–100g
Avviso: rispettare le indicazioni della tabella al
capitolo „Quantità di riempimento consigliate“.
• Collocare il coperchio con l’imbuto e premere
saldamente (figura 9).
• Impostare l’interruttore rotante gsul livello
desiderato.
Pericolo di lesioni dovute alla lama
affilata/al meccanismo rotante!
Non toccare mai il mixer rmontato! Rimuovere/
montare il mixer rsolo se il motore jè fermo!
Azionare il mixer rsolo con il coperchio inserito.
In caso di guasto, spegnere l’apparecchio e staccare
la spina, per evitare un’accensione involontaria
dell’apparecchio.
Inserimento degli ingredienti
• Spegnere l’apparecchio dall’interruttore rotante g.
• Premere il tasto sulla maniglia del mixer r,
prelevare il coperchio e inserire gli ingredienti
o
• Estrarre l’imbuto e inserire gli ingredienti solidi
progressivamente tramite l’apposita apertura
(figura 10)
o
• Versare gli ingredienti liquidi tramite l’imbuto
(figura 11).
Dopo la lavorazione
• Spegnere l’apparecchio dall’interruttore rotante g.
• Ruotare in senso orario il mixer re prelevarlo.
Avvertenza: si consiglia di pulire sempre il
mixer rsubito dopo l’uso (v. capitolo „Pulizia
e cura“).
Page 19

- 17 -
Pulizia e cura
Pericolo di scossa elettrica!
Attenzione: non immergere mai l’apparec-
chio in acqua o altri liquidi.
Attenzione!
Non utilizzare detergenti abrasivi.
Staccare la spina.
Pulire l’apparecchio con un panno umido. Se necessario, utilizzare un po’ di detersivo.
Al termine, fare asciugare l’apparecchio completamente.
Pulire il contenitore, il tritatutto e gli accessori
Tutti gli accessori (escluso il mixer r) sono lavabili in
lavastoviglie.
Non inserire in lavastoviglie le parti in plastica, poiché
potrebbero deformarsi.
Pulizia del mixer
Pericolo di lesioni dovute alla lama
affilata!
Non toccare la lama del mixer con le mani nude.
Attenzione!
Non utilizzare detergenti abrasivi.
Per la pulizia, versare acqua con un po’ di detersivo
nel mixer rmontato.
Azionare il mixer rper qualche secondo. Eliminare
l’acqua saponata e risciacquare il mixer rcon acqua
pulita. Rimuovere eventuali resti con uno spazzolino.
Eliminazione dei guasti
Se l’apparecchio improvvisamente si
arresta:
l’apparecchio è surriscaldato e si attiva il dispositivo
automatico di sicurezza.
• Impostare l’interruttore rotante gsu 0.
• Staccare la spina dalla presa.
• Fare raffreddare l’apparecchio per 15 minuti.
• Se dopo 15 minuti l’apparecchio non è ancora
completamente raffreddato, esso non si accenderà.
• Aspettare altri 15 minuti e riaccendere.
Se l’apparecchio non si accende:
• controllare che la spina sia stata inserita nella
presa di corrente.
• Controllare che le coperture di azionamento per
il mixer re il tritatutto u, il contenitore ye il coperchio siano inserite e bloccate correttamente.
• Controllare che il braccio girevole hsi trovi nella
rispettiva posizione di esercizio (v. capitolo „Posizioni di esercizio“).
Se le azioni descritte non dovessero dare alcun esito,
significa che l’apparecchio è guasto. Fare riparare
l’apparecchio da un centro qualificato specializzato
o dal servizio di assistenza ai clienti.
Smaltimento
Non gettare per alcun motivo l’apparecchio insieme ai normali rifiuti domestici.
Smaltire l’apparecchio attraverso un’azienda di
smaltimento autorizzata o attraverso l’ente di smaltimento comunale.
Rispettare le prescrizioni attualmente in vigore.
In caso di dubbio mettersi in contatto con l’ente
di smaltimento competente.
Smaltire tutto il materiale di imballaggio
in modo ecocompatibile.
Page 20

- 18 -
Garanzia & assistenza
Questo apparecchio è garantito per tre anni a partire
dalla data di acquisto. L'apparecchio è stato prodotto
con cura e debitamente collaudato prima della consegna. Conservare lo scontrino come prova d'acquisto.
Nei casi contemplati dalla garanzia, mettersi in
comunicazione telefonicamente con il centro di assistenza più vicino. Solo in questo modo è possibile
garantire una spedizione gratuita della merce.
La prestazione della garanzia vale solo per difetti
del materiale o di fabbricazione. Il prodotto è destinato esclusivamente all'uso domestico e non a quello
commerciale.
La garanzia decade in caso di impiego improprio
o manomissione, uso della forza e interventi non eseguiti dalla nostra filiale di assistenza autorizzata.
Kompernass Service Italia
Corso Lino Zanussi 11
33080 Porcia (PN)
Tel.: 0434 550833
Fax: 0434 550833
e-mail: support.it@kompernass.com
Importatore
KOMPERNASS GMBH
BURGSTRASSE 21
D-44867 BOCHUM
www.kompernass.com
Page 21

- 19 -
Quantità di riempimento consigliate
*1: utilizzare il lato del disco di grattugia o taglio più grosso.
*2: utilizzare il lato del disco di grattugia o taglio più fine.
*3: la quantità massima della pasta lievitata è pari a 1,5 volte la ricetta indicata.
*4: la quantità massima della pasta frolla è pari a 1,5–2 volte la ricetta indicata.
Elemento da
inserire
Accessori Alimento Quantità Tempo Livello
- Succo
400g di ingredienti +
600ml di acqua
30 sec. 3, 4
-
Noci
Mandorle
100g 10 sec. 3, 4
- Cubetti di ghiaccio 110 g 10 sec. 3, 4
- LIQUIDI 1000ml 10 sec. 3, 4
Carota, patata,
cetriolo da insalata
500g
*
1
25 sec. 2, 3, 4
Carota, patata,
cetriolo da insalata
500g
*
2
50 sec. 2, 3, 4
Carota, patata,
cetriolo da insalata
500g 25 sec. 2, 3, 4
Carota, patata,
cetriolo da insalata
500g
*
1
25 sec. 2, 3, 4
Carota, patata,
cetriolo da insalata
500g
*
2
40 sec. 2, 3, 4
Pasta lievitata
500g di farina, 1 uovo,
80g di olio (a temperatura
ambiente), 80g di zuc-
chero, 200–250ml di latte
caldo, 25g di lievito fresco
o 1 pacchetto di lievito
secco, 1 presa di sale
*
3
1. procedimento
di frullatura:
2 min.
1
2. procedimento
di frullatura:
10 min.
2
Pasta frolla
125g burro
(a temperatura ambiente),
100–125 grammi di
zucchero,
1 uovo,
1 presa di sale,
250g di farina
*
4
1. procedimento
di frullatura:
30 sec.
1
2. procedimento
di frullatura:
6 min.
2
Albumi montati a
neve
8 albumi 2–3 min. 4
Page 22

- 20 -
Page 23

List of contents Page
Safety Notices 22
Intended Use 22
Technical data 23
Items supplied 23
Appliance description 23
Taking into use 23
Operating positions 24
Working with kneading hooks, beaters and whisks 24
Working with the food processor 25
Working with the mixer 26
Cleaning and care 27
Troubleshooting 27
Disposal 27
Warranty & Service 28
Importer 28
Recommended filling quantities 29
Read these operating instructions carefully before using the appliance for the first time and preserve this
manual for later reference. Pass this manual on to whoever might acquire the appliance at a future date.
- 21 -
Page 24

- 22 -
Food Processor
KH 701
Safety Notices
Danger of electrical shock!
• Ensure that the power supply to be used tallies
with the details on the model details plate.
• Ensure that the power cable never becomes wet
or moist whilst in use.
• Always place the power cable so that it cannot
be trapped or otherwise sustain damage. Do not
allow the power cable to hang from the work
area.
• Should the power cable or plug be damaged, to
avoid possibly life-threatening risks immediately
arrange for it to be replaced by qualified specialists
or the customer services department.
• Remove the plug from the wall socket when the
appliance is not in use, before cleaning it and if
it malfunctions. Switching off the appliance is not
sufficient because the appliance receives power
as long as the power plug is connected to the
socket. You can thus avoid unintentional switch-on
of the appliance. After power-outages the appliance
continues to run!
• Do not operate the appliance without ingredients.
Risk of overheating!
• This appliance is not intended for use by individuals
(including children) with restricted physical, physiological or intellectual abilities or deficiences
in experience and/or knowledge unless they are
supervised by a person responsible for their safety
or receive from this person instruction in how the
appliance is to be used.
• Children should be supervised to ensure that they
do not play with the appliance.
Warning: Never submerse the appliance in
water or other liquids. Danger of electrical
shock!
Risk of personal injuries!
• Caution: the cutting and rasping discs and the
mixing knives are very sharp!
• Take care with their installation and removal, as
well as when cleaning them!
• Attention: When the machine is running, only
insert into the mixing bowl, food processor or the
mixer the ingredients to be processed.
• To avoid personal injury and damage to the
appliance, NEVER insert or place your hands or
foreign objects into the loading shaft or in the
mixer.
• Only exchange accessories when the drive has
come to a complete standstill.
• After being switched off, the drive continues to
run for a short time!
• NEVER leave the appliance unsupervised.
Intended Use
The appliance is intended for the processing of foodstuffs
in private-domestic quantities and intended only for
use in private houselholds, in enclosed spaces protected from the elements.
The appliance is not intended for use in commercial
or industrial applications or for use outdoors. The appliance may only be used with original accessories.
Page 25

- 23 -
Technical data
Mains voltage: 220–240 V/50 Hz
Power consumption: 550W
max. capacity
Mixing bowl: ca. 3,8 l
Mixer: ca. 1,5l
Items supplied
Food Processor KH701
Mixing bowl with lid
Mixer with lid and funnel
Food processor with stodger
Cutter turning disc (thick and thin)
Rasper turning disc (coarse and medium-fine)
Rubbing disc (fine)
Kneading hooks with dough deflecter
Beater
Whisk
Accessory holder
Assembly material
Operating Instructions
Appliance description
q
Kneading hooks with dough deflecter
w
Mixing beater
e
Whisk
r
Mixer with lid and funnel
t
Accessory holder
y
Mixing bowl with lid
u
Food processor
i
Rubbing disc
o
Rasper turning disc
a
Drive shaft for food processor
s
Cutter turning disc
d
Lid with stodger for the food processor
f
Unlocking button
g
Turn-switch
h
Swivel arm
j
Drive motor
k
Recesses for the mixing bowl
l
Cable storage compartment
Taking into use
• Before taking the appliance into use, check that
all listed items are present and that there are no
visible damages on/to them.
• Remove all packaging materials from the appliance.
• Before the first usage thoroughly clean all component parts as described in the section „Cleaning
and care“.
• Place the appliance on a flat and clean surface.
• Secure the appliance to the surface with the four
suction discs.
• Remove the power cable from the cable storage
compartment l (Fig. 6).
• Insert the plug into the power socket.
Page 26

- 24 -
Operating positions
Important: Only operate the appliance when
accessories are attached and in the operating
positions shown in this table. NEVER operate the
appliance without ingredients.
Working with kneading
hooks, beaters and whisks
Note: The appliance may only be used when
the drive openings not being utilised are covered with drive protection lids.
Position Accessories
1
2
3
4
Positioning of the mixing bowl
Utilisation of kneading hooks,
beaters and whisks
5
Insertion of large amounts to be
processed
To prepare the appliance for work with kneading
hooks q, beaters eand whisk w, proceed as
follows:
• Press the unlocking button fand bring the swivel
arm hinto operating position 4 (see chapter
„Operating positions“) (Fig. 1).
• Insert the mixing bowl y. The base of the mixing
bowl ymust engage in the recesses kon the
appliance.
• Press the unlocking button fand bring the swivel
arm hinto operating position 1 (see chapter
„Operating positions“) (Fig. 1).
• Place and hold turn-switch gin position P, until
the drive motor jremains stationary in the park
position (Fig. 2). Should the drive motor not move
it is already at the park position.
• Press the unlocking button fand bring the swivel
arm hinto operating position 4 (see chapter
„Operating positions“) (Fig. 1).
• Depending on the task to be performed, insert
the kneading hooks q, beaters eor whisks wso
that they firmly engage in the drive jmotor.
Note: The kneading hooks qare fitted with a
pastry deflector. Turn the pastry deflector until the
kneading hooks qcan engage (Fig. 3).
• Place the ingredients to be processed into the
mixing bowl y.
Note: Pay heed that during the kneading
and/or mixing process the pastry in the mixing
bowl increases in volume, or is pressed upwards
through the rotary movement. Take note of the
table in the chapter „Recommended filling
quantities“.
• Press the unlocking button fand bring the swivel
arm hinto operating position 1 (see chapter
„Operating positions“) (Fig. 1).
• Place the lid onto the mixing bowl y.
• Set the rotary switch gto the desired level.
Page 27

- 25 -
Risk of injury from rotating parts!
NEVER reach into the mixing bowl when it is in use.
Only change accessories when the drive motor
j
is at standstill! After being switched off, the drive motor
j
continues to run for a short time. The appliance
may only be used when the drive openings not
being utilised are covered with drive protection lids.
In cases of malfunction switch the appliance off and
remove the plug from the wall socket, this will avoid
an unintentional switching-on of the appliance.
Refilling with ingredients
• Turn the appliance off with the rotary switch g.
• Turn the rotary switch gto P and hold it firmly
until the drive motor jcomes to a standstill (Fig. 2).
• Remove the lid.
• Press the unlocking button fand bring the swivel
arm hinto operating position 5 (see chapter
„Operating positions“).
• Refill with ingredients or insert the ingredients through
the refill opening in the lid.
On task completion
• Turn the appliance off with the rotary switch g.
• Turn the rotary switch gto P and hold it firmly
until the drive motor jcomes to a standstill (Fig. 2).
• Remove the lid.
• Press the unlocking button fand bring the swivel
arm hinto operating position 4 (see chapter
„Operating positions“).
• Remove the accessories from the drive motor j.
• Remove the mixing bowl y.
• Clean all parts (see chapter „Cleaning and
care“).
Working with the food
processor
Note: Ensure that on the swivel arm hneither the
kneading hooks q, the whisk enor the mixing
beater ware attached.
Proceed as follows to prepare the appliance for operation with the food processor u:
• Press the unlocking button fand bring the swivel
arm hinto operating position 4 (see chapter
„Operating positions“) (Fig. 1).
• Insert the mixing bowl y. The base of the mixing
bowl ymust engage in the recesses kon the
appliance.
• Press the unlocking button fand bring the swivel
arm hinto operating position 1 (see chapter
„Operating positions“).
• Remove the drive protection lid for the food
processor u(Fig. 4).
• Insert the food processor uwith the drive shaft
a
into the drive opening (The marking on the food
processor uto the marking on the swivel arm h)
and turn it clockwise as far as it will go (Fig. 5).
• Remove the lid with stodger d.
• Depending on the task to be performed, place
the cutting s, rasping oor rubbing idisc onto
the drive shaft aof the food processor. (Fig. 5).
• Place the lid with stodger don the food processor
u
and latch it down (Fig. 5).
• Set the rotary switch gto the desired level.
Note: Do not press too many ingredients in the
food processor u. Take note of the table in the
chapter „Recommended filling quantities“.
• Insert ingredients through the loading shaft with
the stodger d.
Page 28

- 26 -
Risk of injury from rotating parts!
To avoid personal injury and damage to the appliance, NEVER insert or place your hands or foreign objects into the loading shaft. Only insert ingredients by
use of the stodger.
Only change accessories when the drive motor
j
is at standstill! After being switched off, the drive motor
j
continues to run for a short time. The appliance
may only be used when the drive openings not being
utilised are covered with drive protection lids. In cases of malfunction switch the appliance off and remove the plug from the wall socket, this will avoid
an unintentional switching-on of the appliance.
On task completion
• Switch the appliance off with the rotary switch g.
• Turn the food processor uanti-clockwise and
remove it.
• Disassemble the food processor uand clean all
parts (see chapter „Cleaning and care“).
Working with the mixer
Risk of scalds!
Allow hot fluids to cool to a hand-warm temperature
(ca. 30–40°C) before they are poured into the
mixer r.
Proceed as follows to prepare the appliance for operation with the mixer r:
• Press the unlocking button fand bring the
swivel arm hinto operating position 3 (see
chapter „Operating positions“).
• Remove the drive protection lid for the mixer
(Fig. 7).
• Fit the mixer r(Marking on the base onto the
marking on the base machine) and turn it anti-
clockwise as far as it will go (Fig. 8).
• Fill with ingredients.
Maximum amounts: 1 litre;
foaming liquids, maximum 0,5 litre;
optimal processing amount for solids: 50–100 g
Note: Take note of the table in the chapter
„Recommended filling quantities“.
• Place on the lid with funnel and press it down
firmly (Fig. 9).
• Set the rotary switch gto the desired level.
Risk of injury from sharp knife/
rotating drive!
NEVER reach into the mixer rwhen it is in use!
Remove/place the mixer ronly when the drive
motor jis at stillstand! Only use the mixer rwith
the lid firmly in position.
In cases of malfunction switch the appliance off and
remove the plug from the wall socket, this will avoid
an unintentional switching-on of the appliance.
Refilling with ingredients
• Turn the appliance off with the rotary switch g.
• Press the button on the handle of the mixer r,
remove the lid and fill with ingredients
or
• remove the funnel and slowly refill with solids
through the refill opening (Fig. 10)
or
• refill with fluid ingredients by means of the
trichter (Fig. 11).
On task completion
• Switch the appliance off with the rotary switch g.
• Turn the mixer rclockwise and remove it.
Note: The mixer ris best cleaned immediately
after use (see chapter „Cleaning and care“).
Page 29

- 27 -
Cleaning and care
Danger of electrical shocks!
Warning: Never submerse the appliance in
water or other liquids.
Attention!
DO NOT use any abrasive cleaning agents.
Remove the power plug.
Wipe the appliance with a damp cloth. If necessary,
use a mild detergent.
Afterwards, dry the appliance completely.
Cleaning the mixing bowl, food processor
and accessories
All accessories (except the mixer r) can be cleaned
in a dishwasher.
Do not jam the plastic parts together in the dishwasher,
as deformations are then possible.
Cleaning the mixer
Risk of injury from the sharp knife!
Do not handle the mixer knife with bare hands.
Attention!
DO NOT use any abrasive cleaning agents.
For cleaning, put some water with detergent into the
assembled for use mixer r.
Switch the mixer ron for a few seconds. Pour out
the cleaning solution and then rinse the mixer rwith
clear water. Possible residues can be removed with a
dishwashing brush.
Troubleshooting
If the appliance suddenly ceases
operation:
The appliance has overheated and triggered the
automatic safety switch-off.
• Place the rotary switch gat 0.
• Remove the plug from the wall socket.
• Allow the appliance to cool for 15 minutes.
• If, after 15 minutes, the appliance has not yet
cooled off completely, it will not start.
• Wait a further 15 minutes and try switching on again.
If the appliance does not switch itself on:
• Check to see if the plug is in the power socket.
• Check to see if the drive protection lids for the
mixer rand food processor u, the mixing bowl
y
and the lid are correctly placed and properly
engaged.
• Check to see if the swivel arm his in the required
position (see chapter „Operating positions“).
Should the measures described above not provide a
solution, then the appliance is defective. Arrange for
the appliance to be repaired in a qualified specialist
workshop or by customer services.
Disposal
Do not dispose of the appliance in your
normal domestic waste.
Dispose of the appliance through an approved disposal
centre or at your community waste facility.
Observe the currently applicable regulations. In case
of doubt, please contact your waste disposal centre.
Dispose of packaging materials in an environmentally responsible manner.
Page 30

- 28 -
Warranty & Service
This appliance is guaranteed for 3 years from the
date of purchase. It has been carefully produced
and meticulously checked before delivery. Please
keep your receipt as proof of purchase. Contact
your service centre by telephone in case of
questions pertaining to the warranty.
Your goods can be transmitted free of cost only in
this manner.
The warranty covers only material or manufacturing
faults, not normal wear or damage to fragile parts
such as switches or rechargeable batteries.
The appliance is intended solely for private, not
commercial, use. If this product has been subjected
to improper or inappropriate handling, abuse, or
interventions not carried out by one of our authorised sales and service outlets, the warranty will
be considered void. This warranty does not
affect your statutory rights.
DES Ltd
Units 14–15
Bilston Industrial Estate
Oxford Street
Bilston
WV14 7EG
Tel.: 0870 787 6177
Fax: 0870 787 6168
e-mail: support.uk@kompernass.com
Importer
KOMPERNASS GMBH
BURGSTRASSE 21
D-44867 BOCHUM
www.kompernass.com
Page 31

- 29 -
Recommended filling quantities
*1: Use the rough side of the raspel or cutter turning disc.
*2: Use the fine side of the raspel or cutter turning disc.
*3: The maximum volume for yeast dough amounts to 1.5 times the given recipe.
*4: The maximum volume for biscuit pastry amounts to 1.5 to 2 times the given recipe.
Attachment Accessories Foodstuff Amount Time Level
- Juice
400g Ingredients +
600ml Water
30 sec. 3, 4
-
Nuts
Almonds
100g 10 sec. 3, 4
- Ice cubes 110 g 10 sec. 3, 4
- Fluids 1000ml 10 sec. 3, 4
carrots, potatoes,
cucumber
500g
*
1
25 sec. 2, 3, 4
carrots, potatoes,
cucumber
500g
*
2
50 sec. 2, 3, 4
carrots, potatoes,
cucumber
500g 25 sec. 2, 3, 4
carrots, potatoes,
cucumber
500g
*
1
25 sec. 2, 3, 4
carrots, potatoes,
cucumber
500g
*
2
40 sec. 2, 3, 4
Yeast dough
500g Flour, 1 Egg, 80g
Oil (room temperature),
80g Sugar, 200–250ml
Warm milk, 25g Fresh yeast
or 1 packet of dried yeast,
1 pinch of Salt
*
3
1. Stir process:
2 min.
1
2. Stir process:
10 min.
2
Biscuit pastry
125g butter (room
temperature),
100–125g Sugar,
1 Egg,
1 pinch salt
250g flour
*
4
1. Stir process:
30 sec.
1
2. Stir process:
6 min.
2
Meringue 8 Egg whites 2–3 min. 4
Page 32

- 30 -
Page 33

Inhaltsverzeichnis Seite
Sicherheitshinweise 32
Bestimmungsgemäßer Gebrauch 32
Technische Daten 33
Lieferumfang 33
Gerätebeschreibung 33
Erste Inbetriebnahme 33
Betriebspositionen 34
Arbeiten mit Knethaken, Schlag- und Rührbesen 34
Arbeiten mit Durchlaufschnitzler 35
Arbeiten mit Mixer 36
Reinigen und Pflegen 37
Fehler beheben 37
Entsorgen 37
Garantie & Service 38
Importeur 38
Empfohlene Füllmengen 39
Lesen Sie die Bedienungsanleitung vor der ersten Verwendung aufmerksam durch und heben Sie diese für
den späteren Gebrauch auf. Händigen Sie bei Weitergabe des Gerätes an Dritte auch die Anleitung aus.
- 31 -
Page 34

- 32 -
Küchenmaschine
KH 701
Sicherheitshinweise
Gefahr eines elektrischen Schlages!
• Das Gerät nur gemäß den Angaben auf dem
Typenschild anschließen und betreiben.
• Darauf achten, dass im Betrieb das Netzkabel
niemals nass oder feucht wird.
• Das Netzkabel so führen, dass es nicht eingeklemmt oder anderweitig beschädigt werden
kann. Das Netzkabel nicht von der Arbeitsfläche
herunterhängen lassen.
• Sollte das Netzkabel oder der Netzstecker
beschädigt sein, diese durch qualifiziertes Fachpersonal oder den Kundendienst ersetzen lassen,
um Gefährdungen zu vermeiden.
• Den Netzstecker aus der Steckdose ziehen, wenn
das Gerät nicht benutzt wird, bevor das Gerät
gereinigt wird und im Fehlerfall. Ausschalten
alleine genügt nicht, weil noch immer Netzspannung im Gerät anliegt, solange der Netzstecker
in der Steckdose steckt. Ein unbeabsichtigtes
Einschalten des Gerätes wird so vermieden.
Nach Stromunterbrechung läuft das Gerät wieder
an!
• Das Gerät nie ohne Zutaten betreiben.
Überhitzungsgefahr!
• Dieses Gerät ist nicht dafür bestimmt, durch Personen (einschließlich Kinder) mit eingeschränkten,
physischen, sensorischen oder geistigen Fähigkeiten oder mangels Erfahrung und/oder mangels
Wissen benutzt zu werden, es sei denn, sie
werden durch eine für ihre Sicherheit zuständige
Person beaufsichtigt oder erhielten von ihr
Anweisungen, wie das Gerät zu benutzen ist.
• Kinder sollten beaufsichtigt werden, um sicherzustellen, dass sie nicht mit dem Gerät spielen.
Warnung: Das Gerät nie in Wasser oder
andere Flüssigkeiten tauchen. Gefahr eines
elektrischen Schlages!
Verletzungsgefahr!
• Vorsicht: die Schneid- bzw. Raspelscheiben
sowie das Mixermesser sind sehr scharf!
• Vorsichtig beim Einsetzen und Herausnehmen
sowie bei der Reinigung der Schneid- bzw.
Raspelscheiben und Mixermesser!
• Achtung: Während das Gerät läuft, aus-
schließlich die zu verarbeitenden Zutaten in
die Rührschüssel, Durchlaufschnitzler oder in
den Mixer geben.
• Niemals Hände oder Fremdgegenstände in den
Einfüllschacht oder in den Mixer stecken, um
Verletzungen und Beschädigungen des Gerätes
zu vermeiden.
• Zubehör nur bei Stillstand des Antriebs wechseln.
• Das Gerät läuft nach dem Ausschalten noch
kurze Zeit nach!
• Lassen Sie das Gerät niemals unbeaufsichtigt.
Bestimmungsgemäßer
Gebrauch
Das Gerät ist für die Verarbeitung von Lebensmitteln
in haushaltsüblichen Mengen und nur für den privaten Gebrauch in geschlossenen, regengeschützten
Räumen vorgesehen.
Das Gerät ist nicht für den gewerblichen oder
industriellen Gebrauch oder den Betrieb im Freien
vorgesehen. Das Gerät darf nur mit Originalzubehör
benutzt werden.
Page 35

- 33 -
Technische Daten
Netzspannung: 220–240V / 50Hz
Leistungsaufnahme: 550W
max. Fassungsvermögen
Rührschüssel: ca. 3,8l
Mixer: ca. 1,5l
Lieferumfang
Küchenmaschine KH701
Rührschüssel mit Deckel
Mixer mit Deckel und Trichter
Durchlaufschnitzler mit Stopfer
Schneid-Wendescheibe (dick und dünn)
Raspel-Wendescheibe (grob und mittelfein)
Reibscheibe (fein)
Knethaken mit Teigabweiser
Schlagbesen
Rührbesen
Zubehörhalter
Montagematerial
Bedienungsanleitung
Gerätebeschreibung
q
Knethaken mit Teigabweiser
w
Rührbesen
e
Schlagbesen
r
Mixer mit Deckel und Trichter
t
Zubehörhalter
y
Rührschüssel mit Deckel
u
Durchlaufschnitzler
i
Reibscheibe
o
Raspel-Wendescheibe
a
Antriebswelle Durchlaufschnitzler
s
Schneid-Wendescheibe
d
Deckel mit Stopfer für den Durchlaufschnitzler
f
Entriegelungstaste
g
Drehschalter
h
Schwenkarm
j
Antrieb
k
Aussparungen für die Rührschüssel
l
Kabelstaufach
Erste Inbetriebnahme
• Vor der ersten Inbetriebnahme den Lieferumfang
auf Vollständigkeit und eventuell sichtbare
Beschädigungen überprüfen.
• Alle Verpackungsmaterialien vom Gerät
entfernen.
• Vor dem ersten Gebrauch sämtliche Geräteteile,
wie im Abschnitt „Reinigen und Pflegen“
beschrieben, reinigen.
• Das Gerät auf einen glatten und sauberen
Untergrund stellen.
• Das Gerät mit den vier Saugnäpfen am
Untergrund befestigen.
• Netzkabel aus dem Kabelstaufach lherausziehen (Bild 6).
• Netzstecker in die Steckdose einstecken.
Page 36

- 34 -
Betriebspositionen
Achtung: Das Gerät nur betreiben, wenn das
Zubehör nach dieser Tabelle angebracht und in
Betriebsposition ist. Nie ohne Zutaten betreiben.
Arbeiten mit Knethaken,
Schlag- und Rührbesen
Hinweis: Das Gerät darf nur genutzt werden,
wenn die nicht genutzten Antriebsöffnungen mit
den Antriebsschutzdeckeln gesichert sind.
Position Zubehör
1
2
3
4
Platzieren der Rührschüssel
Einsetzen von Knethaken,
Schlag- und Rührbesen
5
Zugeben von großen
Verarbeitungsmengen
Um das Gerät für den Betrieb mit Knethaken q,
Schlag- eund Rührbesen wvorzubereiten, bitte wie
folgt vorgehen:
• Entriegelungstaste fdrücken und den Schwenkarm hin die Betriebsposition 4 (siehe Kapitel
„Betriebspositionen“) bringen (Bild 1).
• Rührschüssel yeinsetzen. Sockel der Rührschüssel ymuss in den Aussparungen kam Gerät
stecken.
• Entriegelungstaste fdrücken und den
Schwenkarm hin die Betriebsposition 1 (siehe
Kapitel „Betriebspositionen“) bringen (Bild 1).
• Drehschalter gauf P stellen und festhalten, bis
der Antrieb jin Parkposition stehen bleibt
(Bild 2). Bewegt sich der Antrieb nicht, ist die
Parkposition bereits erreicht.
• Entriegelungstaste fdrücken und den Schwenkarm hin die Betriebsposition 4 (siehe Kapitel
„Betriebspositionen“) bringen (Bild 1).
• Je nach Aufgabe Knethaken q, Schlag- eoder
Rührbesen wbis zum Einrasten in den Antrieb
j
einstecken.
Hinweis: Der Knethaken qist mit einem
Teigabweiser ausgestattet. Den Teigabweiser
drehen, bis der Knethaken qeinrasten kann
(Bild 3).
• Die zu verarbeitenden Zutaten in die Rührschüssel
y
einfüllen.
Hinweis: Beachten, dass während des
Knet-, bzw. Rührvorgangs der Teig in der Rührschüssel an Masse zunimmt, oder durch die
Bewegung etwas nach oben gedrückt wird.
Tabelle im Kapitel „Empfohlene Füllmengen“
beachten.
• Entriegelungstaste fdrücken und Schwenkarm
h
in Betriebsposition 1 (siehe Kapitel
„Betriebspositionen“) bringen (Bild 1).
• Deckel auf die Rührschüssel yaufsetzen.
• Drehschalter gauf die gewünschte Stufe stellen.
Page 37

- 35 -
Verletzungsgefahr durch rotierende Teile!
Während des Betriebes nie in die Rührschüssel
y
greifen.
Zubehör nur bei Stillstand des Antriebs jwechseln!
Nach dem Ausschalten läuft der Antrieb jkurze
Zeit nach. Das Gerät darf nur genutzt werden,
wenn die nicht genutzten Antriebsöffnungen mit den
Antriebsschutzdeckeln gesichert sind. Im Fehlerfall
Gerät ausschalten und Netzstecker ziehen, um ein
unbeabsichtigtes Einschalten des Gerätes zu
vermeiden.
Zutaten nachfüllen
• Gerät am Drehschalter gausschalten.
• Drehschalter gauf P stellen und festhalten, bis
der Antrieb jstehen bleibt (Bild 2).
• Deckel abnehmen.
• Entriegelungstaste fdrücken und Schwenkarm
h
in Betriebsposition 5 (siehe Kapitel
„Betriebspositionen“) bringen.
• Zutaten einfüllen oder Zutaten durch die Einfüllöffnung im Deckel nachfüllen.
Nach der Arbeit
• Gerät am Drehschalter gausschalten.
• Drehschalter gauf P stellen und festhalten, bis
der Antrieb jstehen bleibt (Bild 2).
• Deckel abnehmen.
• Entriegelungstaste fdrücken und Schwenkarm
h
in Betriebsposition 4 (siehe Kapitel
„Betriebspositionen“) bringen.
• Zubehör aus dem Antrieb jnehmen.
• Rührschüssel yentnehmen.
• Alle Teile reinigen (siehe Kapitel „Reinigen und
Pflegen“).
Arbeiten mit
Durchlaufschnitzler
Hinweis: Stellen Sie sicher, dass sich am
Schwenkarm h weder Knethaken q, Schlag-
e
oder Rührbesen w befinden.
Um das Gerät für den Betrieb mit Durchlaufschnitzler
u
vorzubereiten, bitte wie folgt vorgehen:
• Entriegelungstaste fdrücken und den Schwenkarm hin die Betriebsposition 4 (siehe Kapitel
„Betriebspositionen“) bringen (Bild 1).
• Rührschüssel yeinsetzen. Sockel der Rührschüssel ymuss in den Aussparungen kam Gerät
stecken.
• Entriegelungstaste fdrücken und den Schwenkarm hin die Betriebsposition 1 (siehe Kapitel
„Betriebspositionen“) bringen.
• Antriebsschutzdeckel für den Durchlaufschnitzler
u
entfernen (Bild 4).
• Durchlaufschnitzler umit der Antriebswelle
a
in die Antriebsöffnung einstecken (Markierung
am Durchlaufschnitzler uauf Markierung am
Schwenkarm h) und im Uhrzeigersinn bis zum
Anschlag drehen (Bild 5).
• Deckel mit Stopfer dentfernen.
• Je nach Aufgabe Schneid- s, Raspel- ooder
Reibscheibe iauf die Antriebswelle ades
Durchlaufschnitzlers aufsetzen (Bild 5).
• Deckel mit Stopfer dauf den Durchlaufschnitzler
u
aufsetzen und verriegeln (Bild 5).
• Drehschalter gauf gewünschte Stufe stellen.
Hinweis: Nicht zu viele Zutaten in den Durchlaufschnitzler udrücken. Tabelle im Kapitel
„Empfohlene Füllmengen“ beachten.
• Zutaten durch den Einfüllschacht mittels Stopfer
d
einfüllen.
Page 38

- 36 -
Verletzungsgefahr durch rotierende Teile!
Niemals Hände oder Fremdgegenstände in den
Einfüllschacht stecken, um Verletzungen und
Beschädigungen des Gerätes zu vermeiden.
Zutaten nur mit Stopfer einfüllen.
Zubehör nur bei Stillstand des Antriebs jwechseln!
Nach dem Ausschalten läuft der Antrieb jkurze Zeit
nach. Das Gerät darf nur genutzt werden, wenn die
nicht genutzten Antriebsöffnungen mit den Antriebsschutzdeckeln gesichert sind. Im Fehlerfall Gerät
ausschalten und Netzstecker ziehen, um ein unbeabsichtigtes Einschalten des Gerätes zu vermeiden.
Nach der Arbeit
• Gerät am Drehschalter gausschalten.
• Durchlaufschnitzler ugegen den Uhrzeigersinn
drehen und abnehmen.
• Durchlaufschnitzler udemontieren und alle Teile
reinigen (siehe Kapitel „Reinigen und Pflegen“).
Arbeiten mit Mixer
Verbrühungsgefahr!
Heiße Flüssigkeiten auf eine handwarme Temperatur
(ca. 30-40°C) abkühlen lassen, bevor diese in den
Mixer reingefüllt werden.
Um das Gerät für den Betrieb mit Mixer rvorzubereiten, bitte wie folgt vorgehen:
• Entriegelungstaste fdrücken und den
Schwenkarm hin die Betriebsposition 3
(siehe Kapitel „Betriebspositionen“) bringen.
• Mixerantriebsschutzdeckel abnehmen (Bild 7).
• Mixer raufsetzen (Markierung am Sockel auf
Markierung am Grundgerät) und gegen den
Uhrzeigersinn bis zum Anschlag drehen (Bild 8).
• Zutaten einfüllen.
Maximalmenge: 1 Liter;
schäumende Flüssigkeiten maximal 0,5 Liter;
optimale Verarbeitungsmenge fest: 50–100 g.
Hinweis: Tabelle im Kapitel „Empfohlene Füllmengen“ beachten.
• Deckel mit Trichter aufsetzen und fest drücken
(Bild 9).
• Drehschalter gauf gewünschte Stufe stellen.
Verletzungsgefahr durch scharfe
Messer/rotierenden Antrieb!
Nie in den aufgesetzten Mixer rgreifen! Mixer
r
nur bei Stillstand des Antriebs jabnehmen/aufsetzen! Den Mixer rnur mit aufgesetztem Deckel
betreiben.
Im Fehlerfall Gerät ausschalten und Netzstecker
ziehen, um ein unbeabsichtigtes Einschalten des
Gerätes zu vermeiden.
Zutaten nachfüllen
• Gerät am Drehschalter gausschalten.
• Taste am Griff des Mixers rdrücken, Deckel
abnehmen und Zutaten einfüllen
oder
• Trichter herausnehmen und feste Zutaten nach
und nach durch die Nachfüllöffnung einfüllen
(Bild 10)
oder
• flüssige Zutaten durch den Trichter einfüllen
(Bild 11).
Nach der Arbeit
• Gerät am Drehschalter gausschalten.
• Mixer rim Uhrzeigersinn drehen und abnehmen.
Hinweis: Mixer ram besten sofort nach
Gebrauch reinigen (siehe Kapitel „Reinigen und
Pflegen“).
Page 39

- 37 -
Reinigen und Pflegen
Gefahr durch elektrischen Schlag!
Warnung: Das Gerät nie in Wasser oder
andere Flüssigkeiten tauchen.
Achtung!
Keine scheuernden Reinigungsmittel verwenden.
Netzstecker ziehen.
Gerät feucht abwischen. Bei Bedarf etwas Spülmittel
benutzen.
Gerät anschließend vollständig trocknen.
Rührschüssel, Drehschnitzler und Zubehörteile reinigen
Alle Zubehörteile (außer Mixer r) sind
spülmaschinengeeignet.
Die Kunststoffteile nicht in der Spülmaschine
einklemmen, da Verformungen möglich sind.
Mixer reinigen
Verletzungsgefahr durch scharfe Messer!
Mixermesser nicht mit bloßen Händen berühren.
Achtung!
Keine scheuernden Reinigungsmittel verwenden.
Zur Reinigung, Wasser mit etwas Spülmittel in den
aufgesetzten Mixer rgeben.
Mixer rfür einige Sekunden einschalten. Spülwasser ausschütten und Mixer rmit klarem Wasser
ausspülen. Eventuelle Rückstände mit einer
Spülbürste entfernen.
Fehler beheben
Wenn das Gerät plötzlich stehen bleibt:
Das Gerät ist überhitzt und die automatische
Sicherheitsabschaltung ist aktiviert.
• Drehschalter gauf 0 stellen.
• Netzstecker aus der Steckdose ziehen.
• Das Gerät 15 Minuten abkühlen lassen.
• Ist das Gerät nach den 15 Minuten noch nicht
vollständig abgekühlt, wird es nicht angehen.
• Weitere 15 Minuten warten und erneut einschalten.
Wenn das Gerät sich nicht einschalten lässt:
• Überprüfen, ob sich der Netzstecker in der
Steckdose befindet.
• Überprüfen, ob die Antriebsabdeckungen für
Mixer rund Durchlaufschnitzler u, die Rührschüssel yund der Deckel richtig eingesetzt und
eingerastet sind.
• Überprüfen, ob sich der Schwenkarm hin der
jeweils erforderlichen Betriebsposition befindet
(siehe Kapitel „Betriebspositionen“).
Sollten die beschriebenen Maßnahmen keine
Abhilfe schaffen, ist das Gerät defekt. Gerät von
einer qualifizierten Fachwerkstatt oder dem Kundenservice reparieren lassen.
Entsorgen
Werfen Sie das Gerät keinesfalls in den
normalen Hausmüll.
Entsorgen Sie das Gerät über einen zugelassenen
Entsorgungsbetrieb oder über Ihre kommunale Entsorgungseinrichtung.
Beachten Sie die aktuell geltenden Vorschriften.
Setzen Sie sich im Zweifelsfall mit Ihrer Entsorgungseinrichtung in Verbindung.
Führen Sie alle Verpackungsmaterialien
einer umweltgerechten Entsorgung zu.
Page 40

- 38 -
Garantie & Service
Sie erhalten auf dieses Gerät 3 Jahre Garantie ab
Kaufdatum. Das Gerät wurde sorgfältig produziert
und vor Anlieferung gewissenhaft geprüft. Bitte
bewahren Sie den Kassenbon als Nachweis für
den Kauf auf. Bitte setzen Sie sich im Garantiefall
mit Ihrer Servicestelle telefonisch in Verbindung.
Nur so kann eine kostenlose Einsendung Ihrer
Ware gewährleistet werden.
Die Garantieleistung gilt nur für Material- oder
Fabrikationsfehler, nicht aber für Verschleißteile
oder für Beschädigungen an zerbrechlichen Teilen,
z.B. Schalter oder Akkus. Das Produkt ist lediglich
für den privaten und nicht für den gewerblichen
Gebrauch bestimmt.
Bei missbräuchlicher und unsachgemäßer Behandlung, Gewaltanwendung und bei Eingriffen, die
nicht von unserer autorisierten Service-Niederlassung
vorgenommen wurden, erlischt die Garantie. Ihre
gesetzlichen Rechte werden durch diese Garantie
nicht eingeschränkt.
Schraven
Service- und Dienstleistungs GmbH
Gewerbering 14
D-47623 Kevelaer
Tel.: +49 (0) 180 5 008107
(14 Ct/Min. aus dem dt. Festnetz)
Fax: +49 (0) 2832 3532
e-mail: support.de@kompernass.com
Importeur
KOMPERNASS GMBH
BURGSTRASSE 21
D-44867 BOCHUM
www.kompernass.com
Page 41

- 39 -
Empfohlene Füllmengen
*1: Verwenden Sie die grobe Seite der Raspel- bzw. Schneid-Wendescheibe.
*2: Verwenden Sie die feine Seite der Raspel- bzw. Schneid-Wendescheibe.
*3: Die Höchstmenge für Hefeteig beträgt das 1,5-fache des angegebenen Rezeptes.
*4: Die Höchstmenge für Spritzgebäckteig beträgt das 1,5- bis 2-fache des angegebenen Rezeptes.
Aufsatz Zubehör Lebensmittel Menge Zeit Stufe
- Saft
400g Zutaten +
600ml Wasser
30 sek. 3, 4
-
Nüsse
Mandeln
100g 10 sek. 3, 4
- Eiswürfel 110 g 10 sek. 3, 4
- Flüssigkeiten 1000 ml 10 sek. 3, 4
Karotte, Kartoffel,
Salatgurke
500g
*
1
25 sek. 2, 3, 4
Karotte, Kartoffel,
Salatgurke
500g
*
2
50 sek. 2, 3, 4
Karotte, Kartoffel,
Salatgurke
500g 25 sek. 2, 3, 4
Karotte, Kartoffel,
Salatgurke
500g
*
1
25 sek. 2, 3, 4
Karotte, Kartoffel,
Salatgurke
500g
*
2
40 sek. 2, 3, 4
Hefeteig
500g Mehl, 1 Ei, 80 g Öl
(Raumtemperatur), 80g
Zucker, 200–250 ml warme
Milch, 25g Frischhefe oder
1 Paket Trockenhefe,
1 Prise Salz
*
3
1. Rührvorgang:
2 min.
1
2. Rührvorgang:
10 min.
2
Spritzgebäckteig
125g Butter
(Raumtemperatur),
100–125g Zucker,
1 Ei,
1 Prise Salz,
250g Mehl
*
4
1. Rührvorgang:
30 sek.
1
2. Rührvorgang:
6 min.
2
Eischnee 8 Eiweiße 2–3 min. 4
Page 42

- 40 -
 Loading...