

Page 1
KH /KH DVD Player
Operating Instructions
Page 2

The Silvercrest KH /KH DVD Player incorporates a technology for copyright
protection that is protected by process claims of certain US patents and/or other intellectual ownership rights of the Macrovision Corporation and other Copyright owners.
The use of this technology for copyright protection must be approved by Macrovision
Corporation and is exclusively intended for non-commercial use in the private area; all
other uses require the explicit approval of the Macrovision Corporation.
Reverse engineering and disassembly are explicitly prohibited.
Produced under the license of Dolby Laboratories, Inc.
“Dolby” and the Double-D symbol are registered trade marks of Dolby Laboratories,
Inc. Confi dential Unpublished Works.
- Dolby Laboratories, Inc. All rights reserved.
The device is protected by the US patents .., .., .., ...
and ,,
The Licence only applies to private use.
Kompernaß GmbH • Burgstraße 21 • D-44867 Bochum, Germany
www.kompernass.com
—
Status of the Operating Instructions: September
Page 3
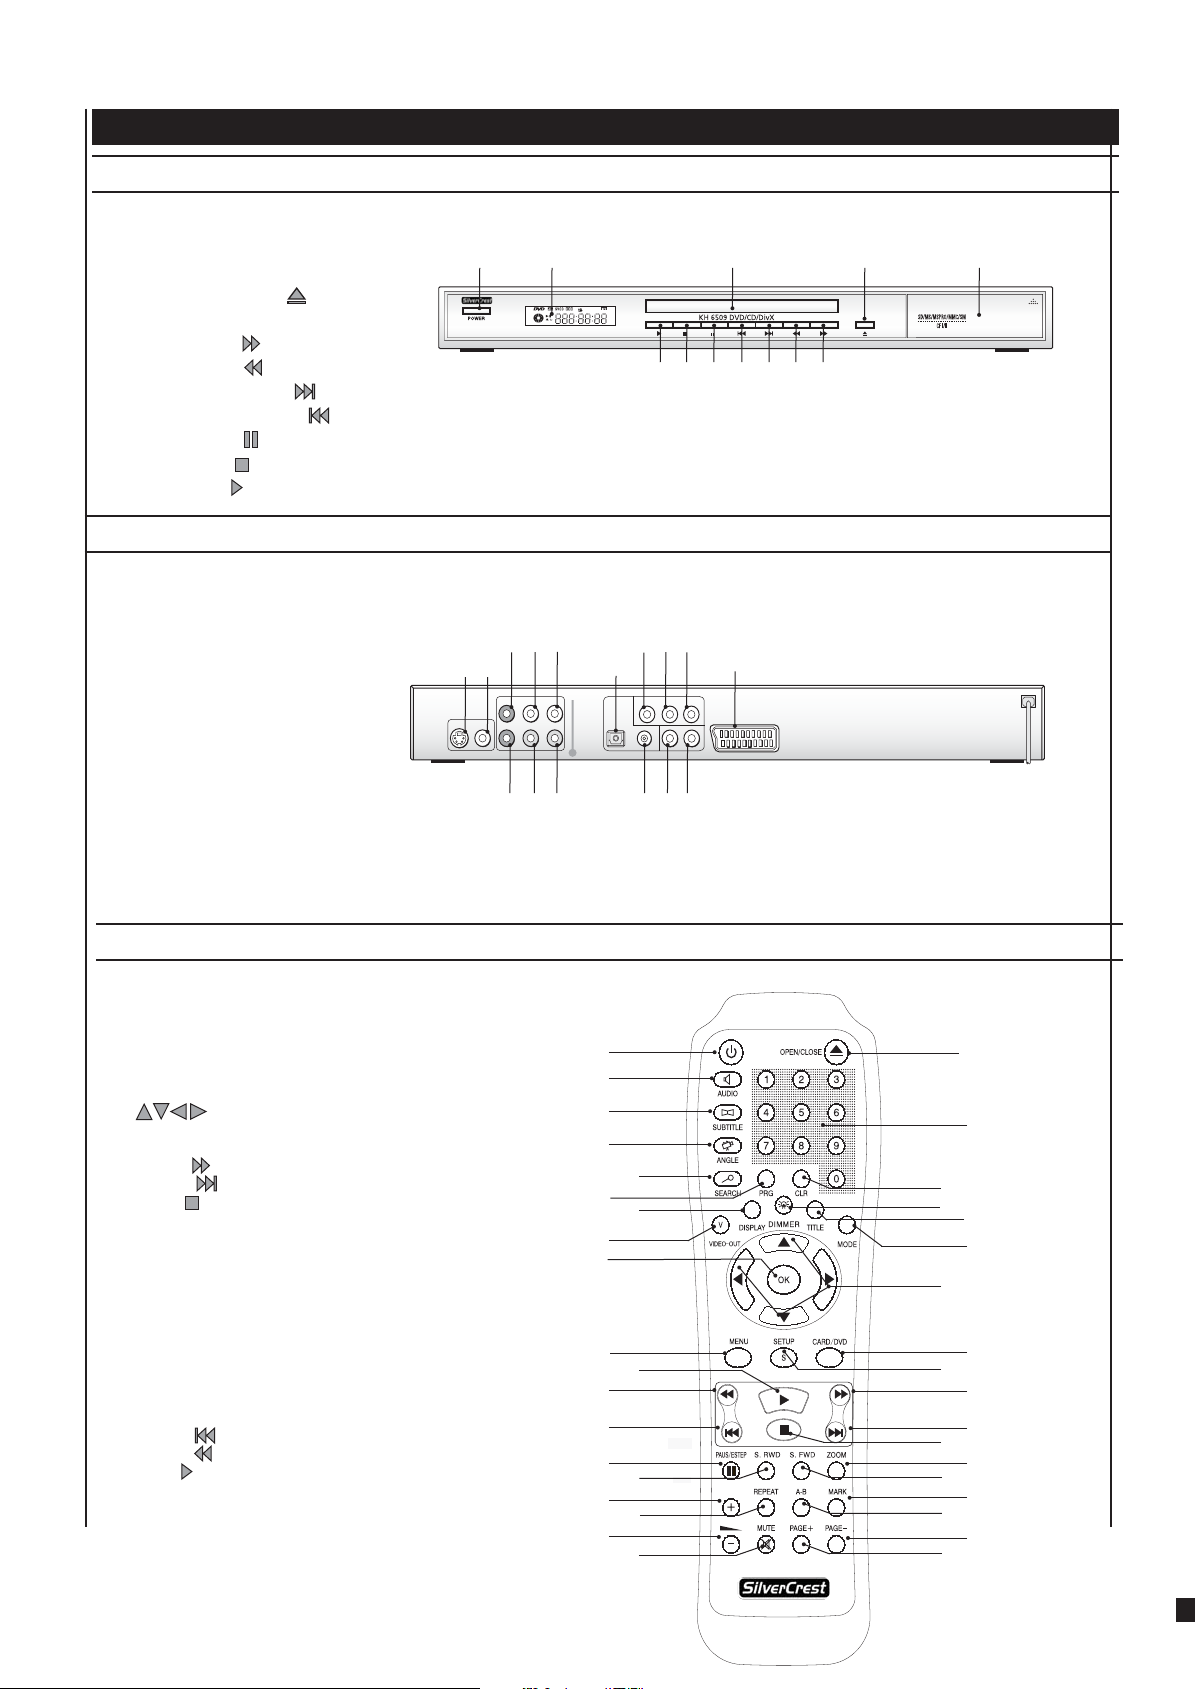
Controls, displays and connections ...
... on the DVD player
q “Power“ button
w Display
e Disc drawer
r “Open/Close“ button
t Memorycard Slot
y “F.Fwd“ button
u “F.Rwd“ button
i “Skip forward“ button
o “Skip Backward“ button
a “Pause“ button
s “Stop“ button
d “Play“ button
qw r te
… at the back of the DVD player
q “S-Video“ socket“
“Video“ socket
w
“Center“chinch socket
e
“SL“chinch socket
r
“FL“chinch socket
t
„Optical“ socket
y
u Y“socket
“Pb/Cb socket
i
“Pr/Cr socket
o
“Euro SCART“ socket
a
„R“ socket
s
d
„L“ socket
f “Coaxial“socket
g “FR“chinch socket
h “SR“chinch socket
j “Subwoofer“chinch socket
wq
e
uoi y1)1!d
tr
y
ghj
o
iu
fds
a
... on the remote control
q „Standby/On“ button
w „Open/Close“ button
e numeral pad/buttons „0“ bis „9“
r „CLR“ button
t „Dimmer“ button
y „Title“ button
u „Mode“ button
i
o „Card/DVD“ button
a „Setup“ button
s „F.Fwd“ button
d „Skip +“ button
f „Stop“ button
g „Zoom“ button
„S.FWD“ button
h
j „Mark“ button
k „A-B“ button
l „Page-“ button
1( „Page+“ button
2) „Mute“ button
2! „Vol-“ button
2@
„Repeat“ button
2# „Vol+“ button
2$ „S.RWD“ button
2% „Pause/Step“ button
2^ „Skip –“ button
2& „F.Rwd“ button
2* „Play“ button
2( „Menu“ button
3) „OK“ button
3! „Video-out“ button
3@ „Display“ button
3# „PRG“ button
3$ „Search“ button
3% „Angle“ button
3^ „Subtitle“ button
3& „Audio“ button
control buttons
q
3&
3^
3%
3#
3!
3)
2(
2&
2^
2%
2#
2!
3$
3@
2*
2$
2@
2)
r
t
i
a
f
h
k
1(
w
e
y
u
o
s
d
g
j
l
Page 4
DVD Player KH6508/KH6509
Warranty
In order to procure free repairs, please contact the
service hotline. Keep your cash receipt ready for this
purpose.
The sender is requested to write the following details clearly:
Last name:
First name:
Street:
Pincode/Place:
Fill out this section completely and enclose with the device!
Country:
Telephone:
Date/Signature
Kompernass Service
United Kingdom
08707/876177
www.mysilvercrest.de
Error description:
✄
Page 5
Index
1. Technical Data 6
Video output 6
Audio output 6
Digital audio output 6
2. Use and function 6
3. Scope of the delivery 6
4. Setting up the DVD Player/Safety instructions 7
5. Remote control 7
5.1. Loading the batteries 7
5.2. Using the remote control 7
5.3. Exchanging batteries 8
6. Connecting the DVD Player to a television 8
6.1. Connection to a television with SCART cable/RGB 8
6.2. Connection to a television via S-Video 8
6.3. Connection to a television via video input (Composite Video) 9
6.4. Connection via components signal (YPbPr/Progressive Scan and YUV) 10
7. Connecting the DVD Player to a Video Projector 10
8. Connecting Audio-Components to the DVD Player 11
8.1. Connecting a HiFi system 11
8.2. Connecting digial audio components via digital cables 11
Connection via coaxial cable 12
Connecting via optical cable 12
8.3. Connecting digital audio-components via analog cable 12
9. Necessary settings on the DVD Player prior to operation 13
9.1. Operating the OSD menu 13
9.2. Language settings 13
9.3. Video settings 14
Setting the screen format 15
Setting the television standard 15
Setting Video Output 15
Setting the DVD play function 16
Setting the JPG display 16
9.4. Audio settings 16
Setting Prologic 16
Setting Digital Output 16
Setting delay center/back 17
Setting EQ mode 17
Speaker settings 17
Setting speaker sizes 17
Stereo-Downmix 17
10. Starting the DVD Player 19
10.1 Inserting the DVD 19
10. 2 Inserting memory cards with MP3/WMA/DivX/Nero Digital/JPEG fi les 20
SmartMedia Memory Cards (SM) 20
CompactFlash memory cards (CF I/CF II) 20
Silvercrest KH 6508/KH 6509
Page 6
MultiMediaCard /SecureDigital memory cards 20
MemoryStick memory cards (MS) 21
11. Playing DVDs, VCDs or S-VCDs 23
11.1. Functions while a DVD, VCD or S-VCD is being played 24
Stopping playback (Pause) 24
Terminating playback (Stop) 24
... with Resume Function 24
... without Resume Function 24
Calling DVD-Menu (Menu) 24
Playback Control (PBC) with VCDs/S-VCDs 25
Jump to the beginning of the chapter (Skip) 25
Direct chapter selection 25
Enter the chapter number with the numeral buttons 25
Search function (Search) 25
Direct Chapter Selection by way of the search function (Search) 25
Entering the time position with the search function 25
Entering the chapter number with the search function 26
Fast Search Forward/Rewind 26
Slow Play Forward/Return (Slow Motion) 26
Single Frame Forward (Step) 27
Enlarging the picture (Zoom) 27
Changing the camera angle (Angle) 27
Subtitle fade-in/fade-out 27
Changing the playback language 28
Programmed playback (Program) 28
Programming example 29
Fade-in disc information 29
Switching on diff erent play modes 29
Random Playback 30
Repeat play 30
Repeating sequences (A – B) 30
Bookmark function 31
12. Playing audio-CDs 33
12.1 Functions while playing an audio-CD 33
Stopping playback (Pause) 33
Ending playback (Stop) 34
... with Resume function 34
... without Resume function 34
Jumping to the beginning of a title (Skip) 34
Direct title selection 34
Entering the title with the numeral buttons 34
Search function 34
Selecting passages of a title by way of the time position 34
Selecting titles by their time position 34
Selecting titles by title numbers 35
Search in Fast Forward/Fast Rewind 35
Programmed playback (Program) 35
Program example 36
Fading-in CD information 36
Switching on diff erent Play Modes 36
Random playback 36
Repeat play 36
Repeating sequences (A – B) 37
Bookmark function 37
13. Playing CD-Rs/CD-RWs with MP3, DivX, Nero Digital or WMA Files 39
Functions when playing a CD-R/CD-RW with MP3, DivX, Nero Digital or WMA fi les 41
Silvercrest KH 6508/KH 6509
Page 7
Stopping playback (Pause) 41
Ending playback (Stop) 41
... with Resume function 41
... without Resume function 41
Jumping to the beginning of a title (Skip) 41
Direct title selection 41
Entering the title with the numeral buttons 41
Selecting a title by way of the search function (Search) 41
Repeating sequences (A – B) 42
Select Play mode 42
Programmed playback (Program) 43
14. Playback JPEG-CDs 46
14.1 Functions when displaying JPEG pictures 47
To stop display (Pause) 48
Terminating picture display (Stop) 48
... with Resume Function 48
Jump to the next/previous picture (Skip) 48
Turning pictures 48
Entering the picture number with the numeral buttons 48
Picture selection via the search function (Search) 48
Selecting the display mode 48
Programmed picture display (Program) 50
15. General Functions of the DVD Player 52
Setting the sound volume 52
Dimmer 52
Muting the sound (Mute) 52
Child lock 52
Returning the DVD Player to the works settings 53
Switching off the DVD Player 53
Cleaning the DVD Player 53
Disposal 54
Disposing of the batteries 54
16. Faults and how they can be remedied 56
17. Glossary/Index 60
What are DVDs, VCDs and S-VCDs? 60
Playback Control (PBC) 60
What are title and chapter? 60
What are SCART, S-Video, Composite-Video Progressive Scan and YUV? 60
Fields (Interlace)/Frames (Progressive Scan) 60
Decoder 61
Dolby Surround 61
Dolby Prologic 61
Dolby Digital (5.1) 61
DTS 61
What are PAL, NTSC and SECAM? 61
Audio-CDs 61
MP3 61
WMA 61
Nero Digital 62
DivX 62
JPEG 62
What are folders? 62
Silvercrest KH 6508/KH 6509
Page 8
1. Technical Data
Mains: AC 220V - 240V ~ 50Hz
Input: 15 watt
TV standard: PAL/NTSC
Operating temperature: +5 ~ +35°C
Moisture: 5 ~ 90 % (no condensation)
Weight: about 2 kgs
Dimensions: 430 mm × 46 mm × 230 mm
Video output
Output level: 1 + 0.2/-0.2 Vp-p (75 Ω)
Horizontal resolution: >=500 lines
Signal-to-interference ratio: >60 dB
Audio output
Impedance: 10 kΩ
Output level: 1.8 + 0.2/-0.8 Vrms (1kHz 0 dB)
Harmonic distortion: <0.01 % (JIS-A 1kHz, typical)
Dynamic range: >80 dB (JIS-A 1 KHz, typical)
Signal-to-interference ratio: >95 dB(JIS-A 1 kHz, typical)
•
Stereo and mono televisions in the TV standards PAL or
NTSC and the screen formats 4:3 LB, 4:3 Pan & Scan, 16:9
• Video-Projectors featuring the appropriate connecting
facilities and the connection of a DVD player by the manufacturer of the video projector is provided/permitted
The following can be connected to the Silvercrest 6508/
KH6509 DVD Player for the output of sound and music
…
• The speakers of the television connected to the DVD
Player
• External audio units such as HiFi systems, receivers or
surround sound systems (analog/digital)
Warning!
We do not accept any liability/warranty for damage
incurred as a result of incorrect use!
3. Scope of the delivery
Digital audio output
Coaxial output and optical output
2. Use and function
The Silvercrest KH 6508/ KH6509 DVD Player is exclusively intended …
• as an entertainment electronics device to play
• ... DVD-Videos in the formats12 cm (diameter) and 8 cm
(diameter) with the country/regional code 2 or , identifi ed by the logo .
• ... Video-CDs (VCDs) und Super Video-CDs (S-VCDs) in the
formats 12 cm (diameter) und 8 cm (diameter), identifi ed
by the logo .
• ... Audio-CDs in the formats 12 cm (diameter) and 8 cm
(diameter), identifi ed by the logo .
• ... Generally, the fi le formats CD Audio (.cda), MP3 (.mp3),
Windows Media Audio (.wma), DivX (.avi), Nero digital(.
mp4) and JPEG (.jpg) on the storage media CD-R and
CD-RW.
…
1. DVD player
2. Infrared remote control
3. 2 batteries for the remote control, type AAA/R 03
4. RGB-SCART cable
5. Operating instructions
6. Nero Digital CD
7. Audio/Video RCA connector cable
•
...
for stationary operation indoors
• ... for private, non-commercial use
The following can be connected to the Silvercrest
6508/ KH6509 DVD Player for video display when playing DVDs, VCDs and S-VCDs …
Silvercrest KH 6508/KH 6509
Page 9

4. Setting up the DVD Player/Safety
instructions
1 Carefully remove the DVD Player and the supplied acces-
sories from the packaging.
2 Peel off the protection foils on the front mirror panel
3 Place the DVD Player on a level, non-slip base.
Warning!
Overheating can cause irreparable damage to the
DVD Player, and there is the risk of fi rel
Please note:
No liability/warranty is accepted for damage to theDVD Player as a result of the following …
To prevent damage, functional interference and the danger
of an electric shock, do not use the DVD Player …
• In the immediate vicinity of heat sources such as stoves,
fan heaters and similar appliances! Exposure to heat can
case the DVD Player to overheat and the risk of melting
plastic parts, thereby causing irreparable damage!
Warning!
Overheating can result in the danger of fi re!
• Do not play in moist environments, for example in cellars
or in the sauna! Moisure penetrating the applicance can
lead to malfunctions and cause irreparable damage to
the DVD-Player!
Warning!
Moisture entering the DVD Player can result in the
danger of electric shock!
• Not in the immediate vicinity of water, for instance in
a bathroom or near a swimming pool. Never place any
water-fi lled containers, for instance a fl ower vase, on the
DVD Player.
• Exposure to moisture
• Water entering the set
• Overheating
Caution!
Do not plug the DVD Player into a mains socket. Wait
until the DVD Player has been connected to a television.
If at any time later on the video or audio connection
are to be changed, then it is essential that the DVD
Player is fi rst disconnected from the mains, otherwise
any devices connected to the DVD Player could be
irreparably damaged as a result of the arising voltage peaks!
5. Remote control
.. Loading the batteries
1 Open the battery compartment at the back of the remote
control and remove the battery compartment cover.
2 Insert the two supplied AAA/R 03 type batteries (micro-
cells) in the battery compartment. Ensure that the batteries are inserted according to their polarity.
3 Return the battery compartment cover.
Warning!
If water enters the DVD Player, or if dropped in water,
then it can be irreparably damaged and there is the
danger of an electric shock!
• Do not place in a bookcase, cupboards or other closed
furniture, no on beds and bedding as this will cover the
ventilation openings in the case. The DVD Player will then
overheat.
For the same reason do not place any other devices (e.g.
a television) on the DVD Player.
To ensure adequate ventilation at the selected point of
installation there must be a space of at least 10 cm at the
back, on either side, and above the DVD Player in relation
to walls and any objects.
.. Using the remote control
Proceed as follows to ensure faultless operation when using
the remote control…
• Point the remote control at the DVD Player
• Ensure that there are no obstacles between the remote
control and the DVD Player that could interfere with reception.
• Do not use the remote control at a distance of more than
5 meters from the DVD Player.
Otherwise remote controlled operation of the DVD Player
functions can be disrupted.
Silvercrest KH 6508/KH 6509
Page 10
.. Exchanging batteries
The batteries must be exchanged when remote controlled
operation of the DVD Player is disrupted or does not function at all.
Always exchange both batteries together to re-establish
full power.
Please note:
Spent batteries must not be disposed of in the domestic waste. Hand in spent batteries at collecting
or special waste-disposal points, or return them to
the place where they were purchased.
If you eventually have to dispose of the remote control
of the DVD Player, then ensure that the batteries are
removed beforehand!
6. Connecting the DVD Player to a television
After having set up the DVD Player it can then be connected
to a television. The DVD Player can be connected to televisions with the PAL, NTSC and SECAM television standards.
To connect the DVD Player to a television with …
Proceed as follows to connect the DVD Player to a television with a SCART cable …
1 Insert the plug of the supplied SCART cable in the “EURO
SCART” inscribed socket at the back of the DVD Player.
2 Insert the plug on the other end of the SCART cable in
the television’s SCART socket.
3 Set the television in the AV channel to RGB mode. Refer
to the operating instructions of the given television if
you are not sure how to set this.
• NTSC standard, then the video settings in the so-called
“OSD” menu of the DVD Player must be changed because
this is where PAL has been works adjusted as television
standard.
• Settings do not have to be changed to use the SECAM
standard. The works adjusted settings for the PAL standard
also enable DVD Player operation with SECAM televisions
provided that they can also process PAL signals.
For this subject please also refer to Chapter 9.3 “Video
➧
Settings: Setting Video Output ”
There are diff erent ways to connect the DVD Player, depending upon the confi guration of the given television:
.. Connection to a television with SCART
cable/RGB
Please note:
The best connection in terms of quality is when the
DVD Player is connected to a television with a SCART
cable via the RGB input. Select this connection if the
television features an RGB connection. Check the
operating instructions for the given television if
you are not sure whether or not the television has
an RGB input.
For this subject please also refer to Chapter 9.3.“Video
➧
Settings: Setting Video Output”.
.. Connection to a television via S-Video
Please note:
For this connection variant, the TV should have an SVideo input and two uncovered chinch sockets. Besides, you require an S-video cable and an audio/video
chinch cable not included in the delivery contents.
These can be obtained from a specialised dealer.
If you are not sure whether or not the television is
S-Video capable or has chinch sockets, then please
refer to the operating instructions for the given television.
To connect the DVD Player to the television via S-Video …
Silvercrest KH 6508/KH 6509
Page 11
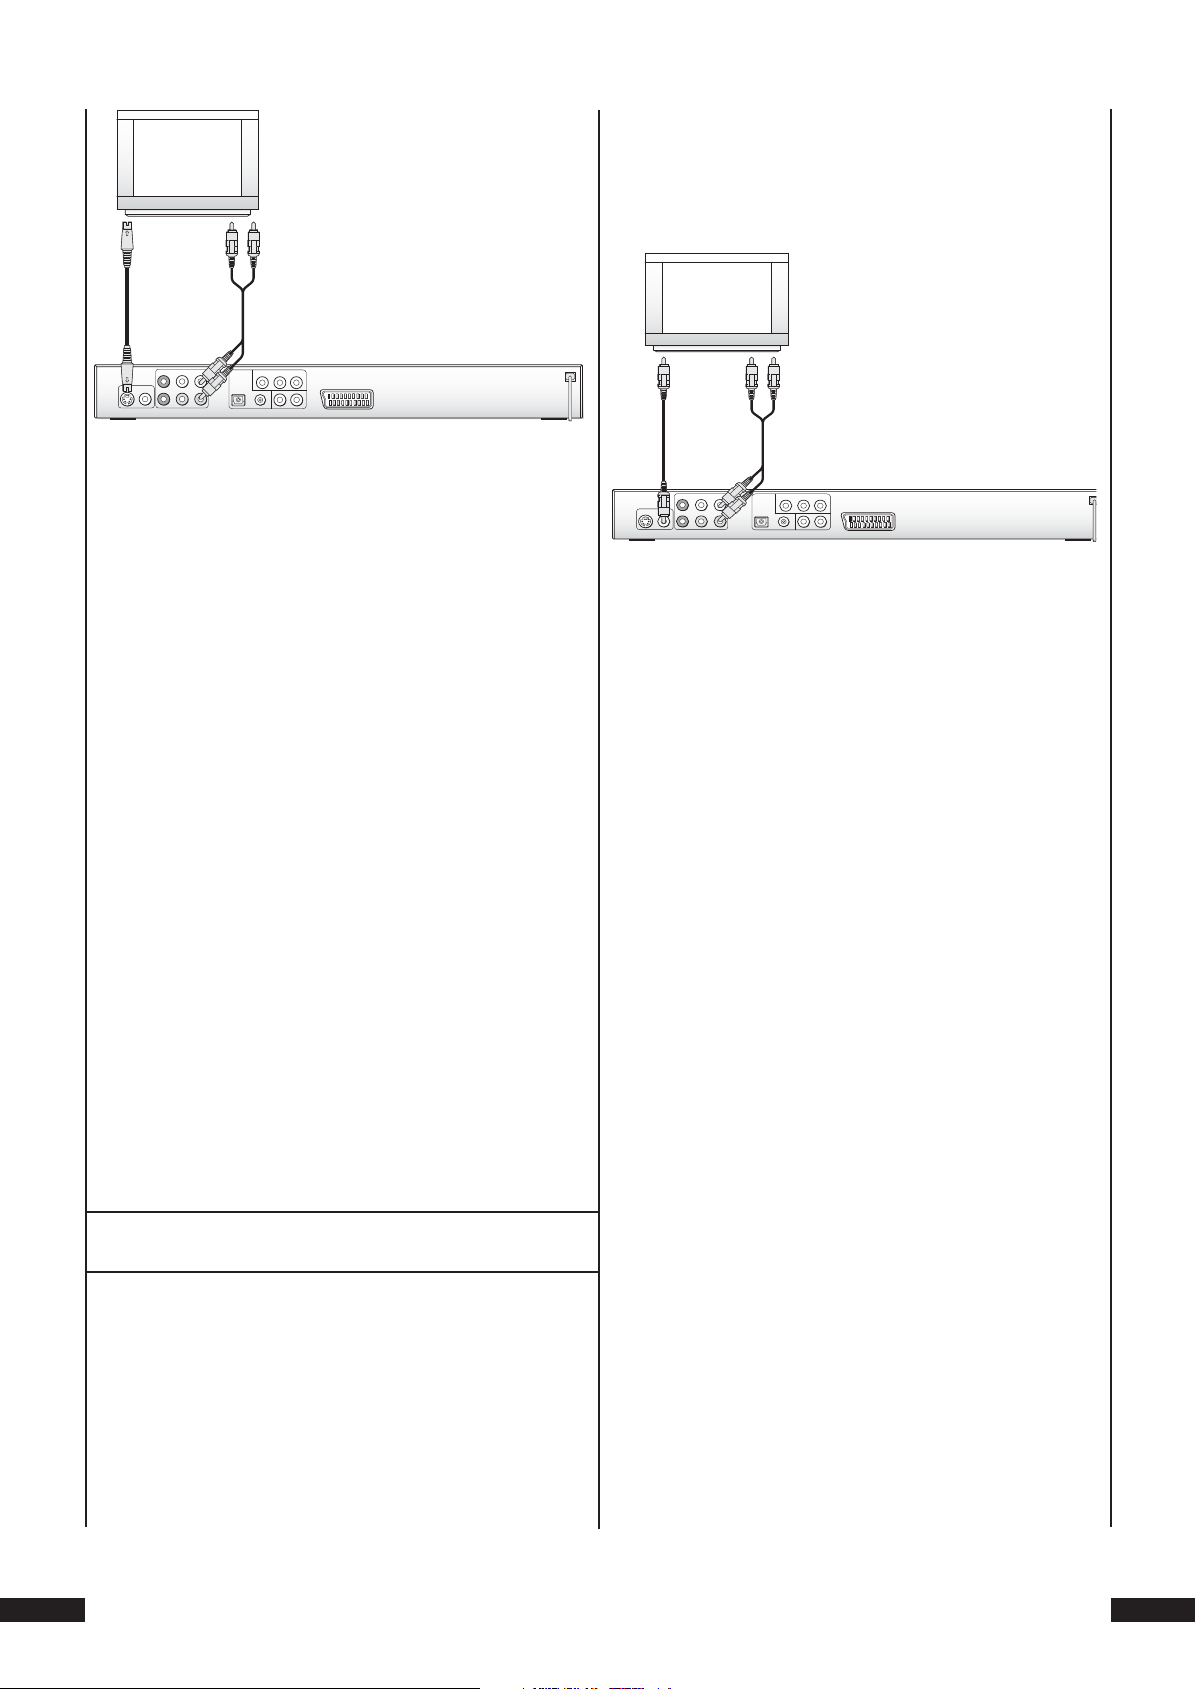
1 Insert the S-Video cable into the “S-Video” socket at the
back of the DVD Player.
2 Insert the S-Video cable in the S-Video socket on the
television.
3 Put in the white plug of the audio/video chinch cable,
not included in the delivery contents in the chinch jack
inscribed with „FL“ on the rear side of the DVD player.
4 Insert the white plug on the other end of the audio/video
chinch cable in the audio socket for the left channel on
the television.
5 Insert the red plug of the audio/video chinch cable in the
“FR” chinch socket at the back of the DVD Player.
6 Insert the red plug on the other end of the audio/video
chinch cable in the audio socket for the right channel on
the television.
7 Set the television to the AV channel that is to reproduce
the S-Video signal. If you are not sure how to eff ect this
setting, then please refer to the operating instructions for
the given television. Furthermore, check in the operating
instructions whether any other settings have to be be set
on the television.
For this subject please also refer to Chapter 9.3.“Video
➧
Settings: Setting Video Output”.
… then the DVD Player can be connected to the television
via the video input (the so-called “Composite Video“ connection).
Proceed as follows for this purpose …
1 Put in the yellow plug of the audio/video chinch cable,
in the „video“ socket marked in yellow on the rear side
of the DVD player.
2 Insert the yellow plug on the other end of the audio/video
chinch cable into the corresponding chinch socket of the
television
3 Insert the white plug of the audio/video chinch cable in
the “FL” chinch socket on the back of the DVD Player.
4 Then insert the white plug on the other end of the audio/
video chinch cable into the audio socket for the left channel on the television.
5 Insert the red plug of the audio/video chinch cable into
the “FR” chinch socket on the back of the DVD Player.
6 Insert the red plug on the other end of the audio/video
chinch cable in the audio socket for the right channel on
the television.
7 Check the operating instructions for the given television
if any settings have to be made on the television in order
to be able to operate the DVD Player.
.. Connection to a television via video input
(Composite Video)
If the television to which the DVD Player is to be connected
is …
• not S-Video capable, and does
• not have a SCART socket, but does have chinch sockets
For this subject please also refer to Chapter 9.3.“Video
➧
Settings: Setting Video Output”.
Silvercrest KH 6508/KH 6509
Page 12
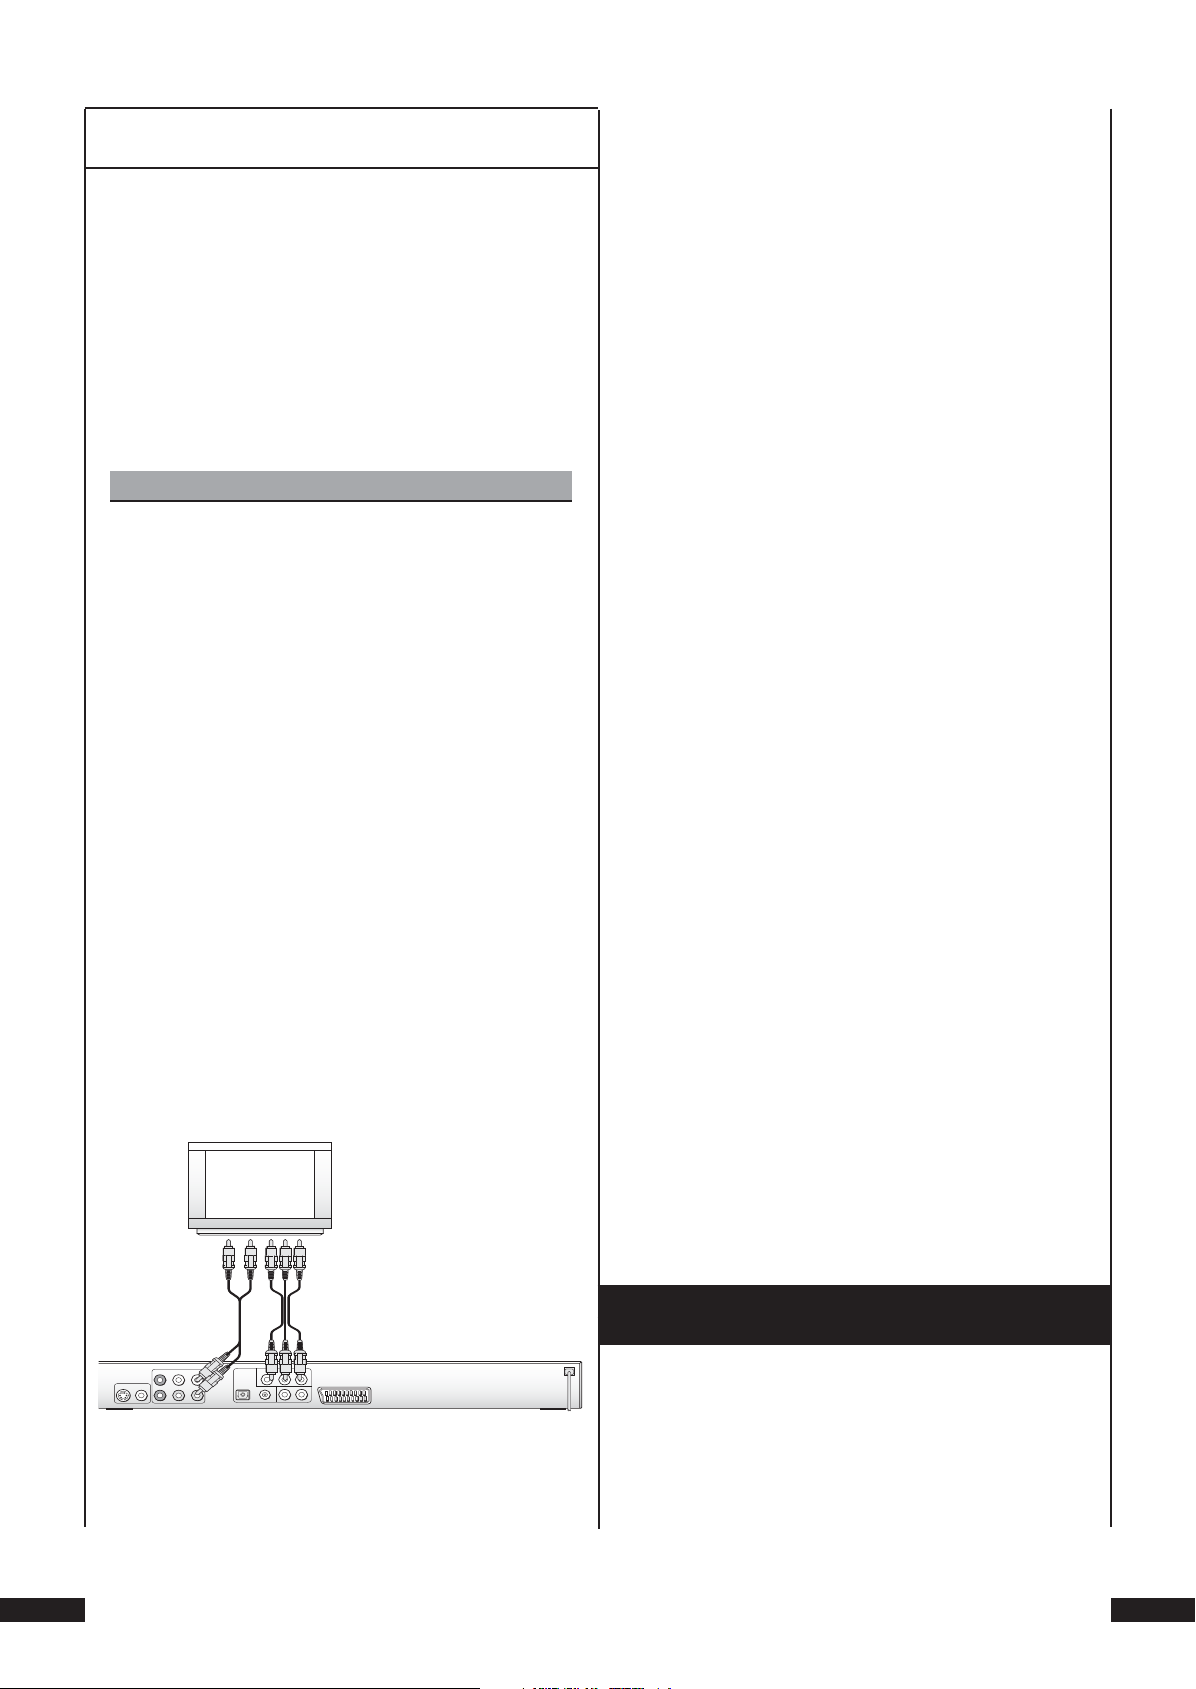
.. Connection via components signal
(YPbPr/Progressive Scan and YUV)
Output of the so-called “components signals” is by way of
the YPbPr sockets of the DVD Players. The components
signals are available in the form of
• so-called “YUV“ signals (half frame)
and as
1 On the rear side of the DVD player, you will fi nd the three
so-called „Component Colour Out“ sockets „Y“, „Pb/Cb“
and „Pr/Cr“. Then put in the red plug of the audio/video
chinch cable in the chinch jack inscribed with „Pr/Cr“ on
the rear side of the DVD player.
2 Insert the red plug at the other end of the audio/video
chinch cable in the corresponding Component Video
IN-socket “Pr/Cr” on the television.
• so-called “YPbPr“ signals (full frame/Progressive Scan).
For this subject please refer to Chapter 17 “Glossary/In-
➧
dex”.
Please note:
For both methods of connection the television to
which the DVD Player is to be connected must have
two unassigned audio chinch sockets.
The cabling for both methods is identical; YPbPr signals for Progressive Scan can only be used if the television (or the video projector) that is to be connected
to the DVD Player is Progressive Scan capable.
If you are not sure whether or not the television ( or
video projector) that is to be connected to the DVD
Player is Progressive Scan capable and has chinch
sockets, then please refer to the operating instructions for the given television (or video projector).
Both variants – and “YPbPr“ and “YUV“– require the following …
• an audio/video chinch cable
3 Insert the white or blue plug of the audio/video cable in
the “Pb/Cb” chinch socket at the back of the DVD Player.
4 Insert the white or blue plug at the other end of the au-
dio/video chinch cable in the corresponding Component
Video IN-socket “Pb/Cb” on the television.
5 Insert the yellow or green plug of the audio/video chinch
cable in the “Y” chinch socket at the back of the DVD
Player.
6 Insert the yellow or green plug of the audio/video chinch
cable in the corresponding Component Video IN-socket
“Y” on the television.
7 Pick up the two additional chinch cables and insert the
the white plug of the chinch cable in the “FL” chinch socket
on the back of the DVD Player.
8 Then insert the white plug on the other end of the chinch
cable in the audio socket for the left channel on the television.
9 Insert the red plug of the chinch cable in the “FR” chinch
socket on the back of the DVD Player.
• two additional chinch cables; these are available from
your local dealer.
To connect the DVD Player via component signal …
10 Finally, insert the red plug on the other end of the chinch
cable in the audio socket for the right channel on the
television.
11 Refer to the operating instructions for the given televi-
sion to fi nd out whether any settings have to be made
on the television so that the DVD Player can be used in
this connection with the television.
For this subject please also refer to Chapter 9.3.“Video
➧
Settings: Setting the Video Output”.
7. Connecting the DVD Player to a Video
Projector
A video projector can be connected to the DVD Player so that
DVDs and S-VCDs can be shown by the video projector.
Refer to the operating instructions for the video projector to
fi nd out which connecting facilities should be used and how
the connection can be established. Any additional cables that
may be necessary are available from your local dealer.
Silvercrest KH 6508/KH 6509
Page 13
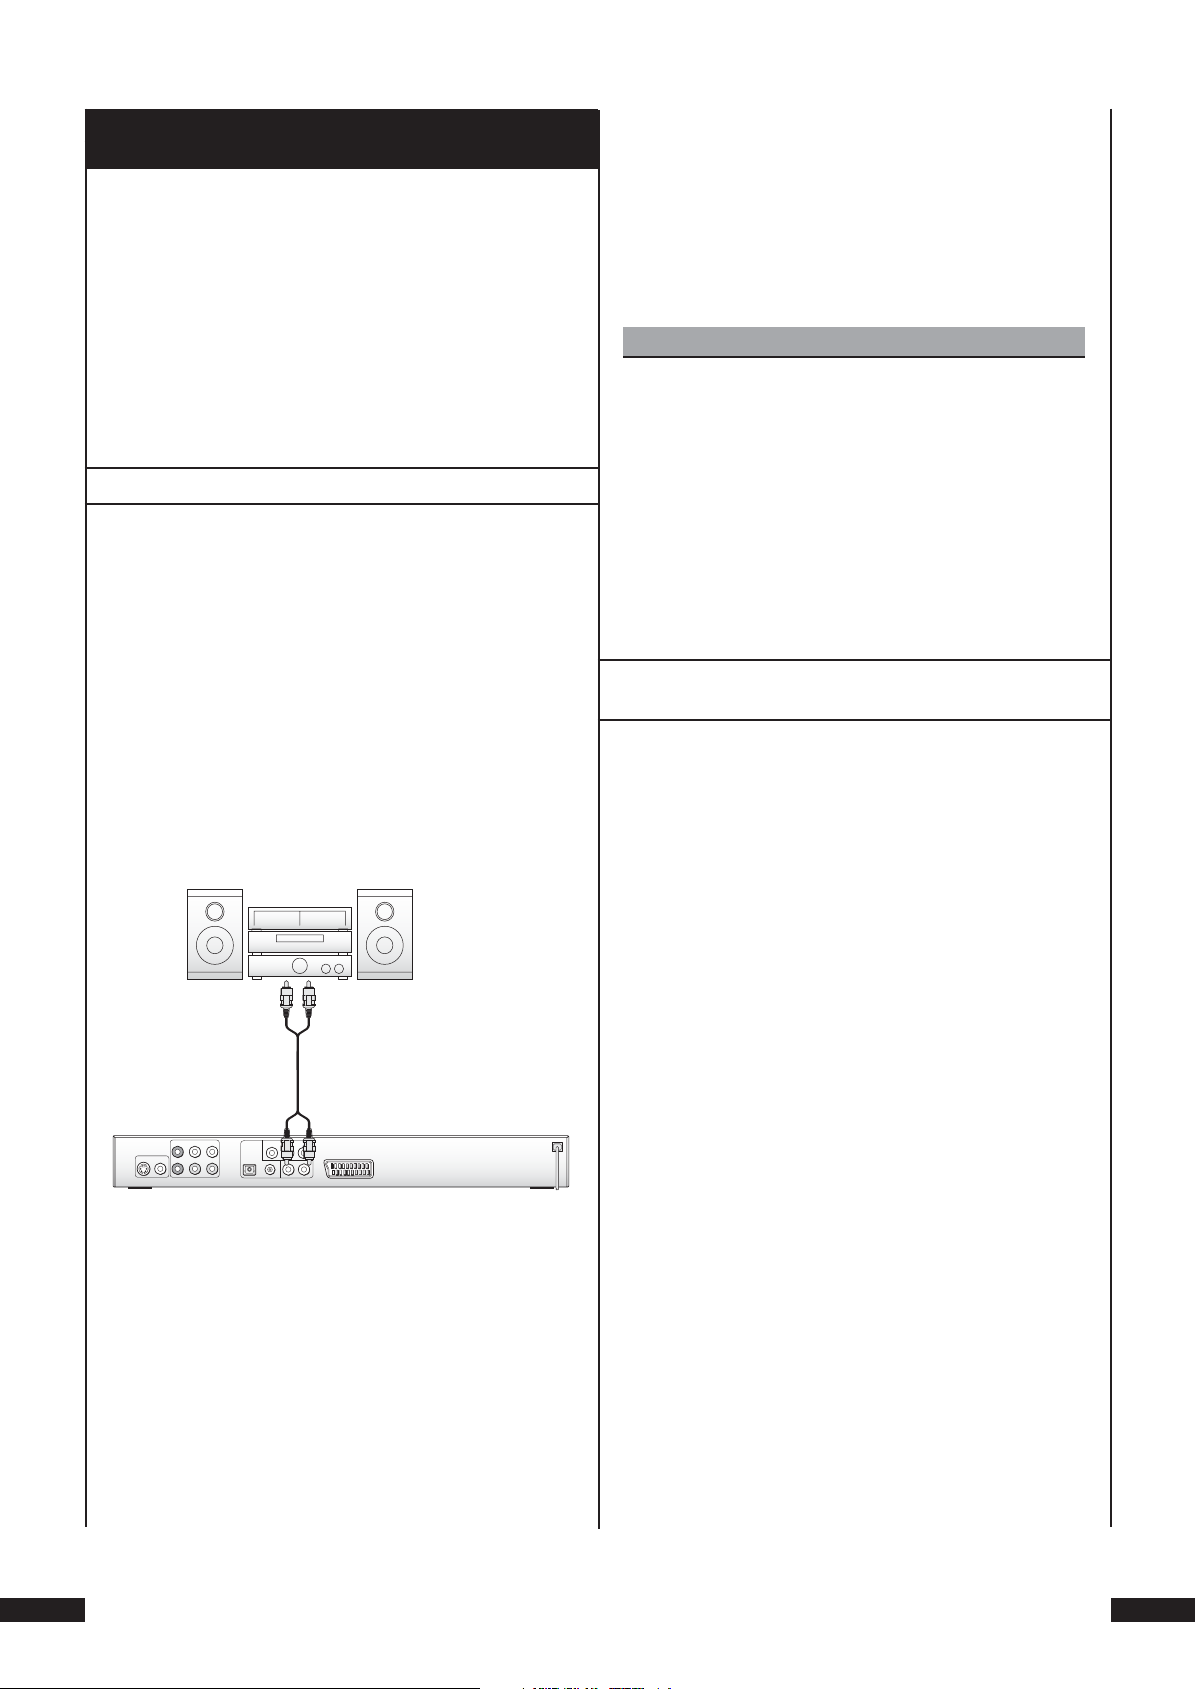
8. Connecting Audio-Components to the
DVD Player
In addition to sound reproduction of DVDs/VCDs/S-VCDs,
as well as audio and MP3-CDs by way of …
• the speakers of the television to which the DVD Player is
connection, or
4 Insert the red plug on the other end of the chinch cable
in the chinch socket for the right channel on the HiFi
system.
5 Refer to the operating instructions to fi nd out whether
any settings have to be made on the HiFi system to reproduce the sound of a DVD, VCD/S-VCD, Audio- or MP3-CD
by HiFi system.
… the sound can also be reproduced by external audio components such as HiFi systems, Dolby Digital/DTS receivers or
surround-sound systems.
The following possibilities are available:
.. Connecting a HiFi system
To play DVDs, VCDs/S-VCDs, audio and MP3-CDs with the
DVD Player and enjoy the experience of a full sound, a HiFi
system can be connected to the DVD Player. Before actually
connecting the DVD Player, please refer to the operating
instructions for the given HiFi system to check …
• Whether the HiFi system is suitable for connection to a
DVD Player. If yes …
• Whether the HiFi system has chinch sockets. If yes …
Proceed as follows to connect the DVD Player to a hifi
system …
Please note:
For an optimal sound experience set up the speakers
of the HiFi system to the right and left of the television
to which the DVD Player is connected.
If the DVD Player has been connected to the television with a SCART cable, then the audio signals will
be transmitted both via the chinch cable to the HiFi
system and via the SCART cable to the television. In
this case set the minimum sound volume on the television if the sound is to be reproduced by the HiFi
system.
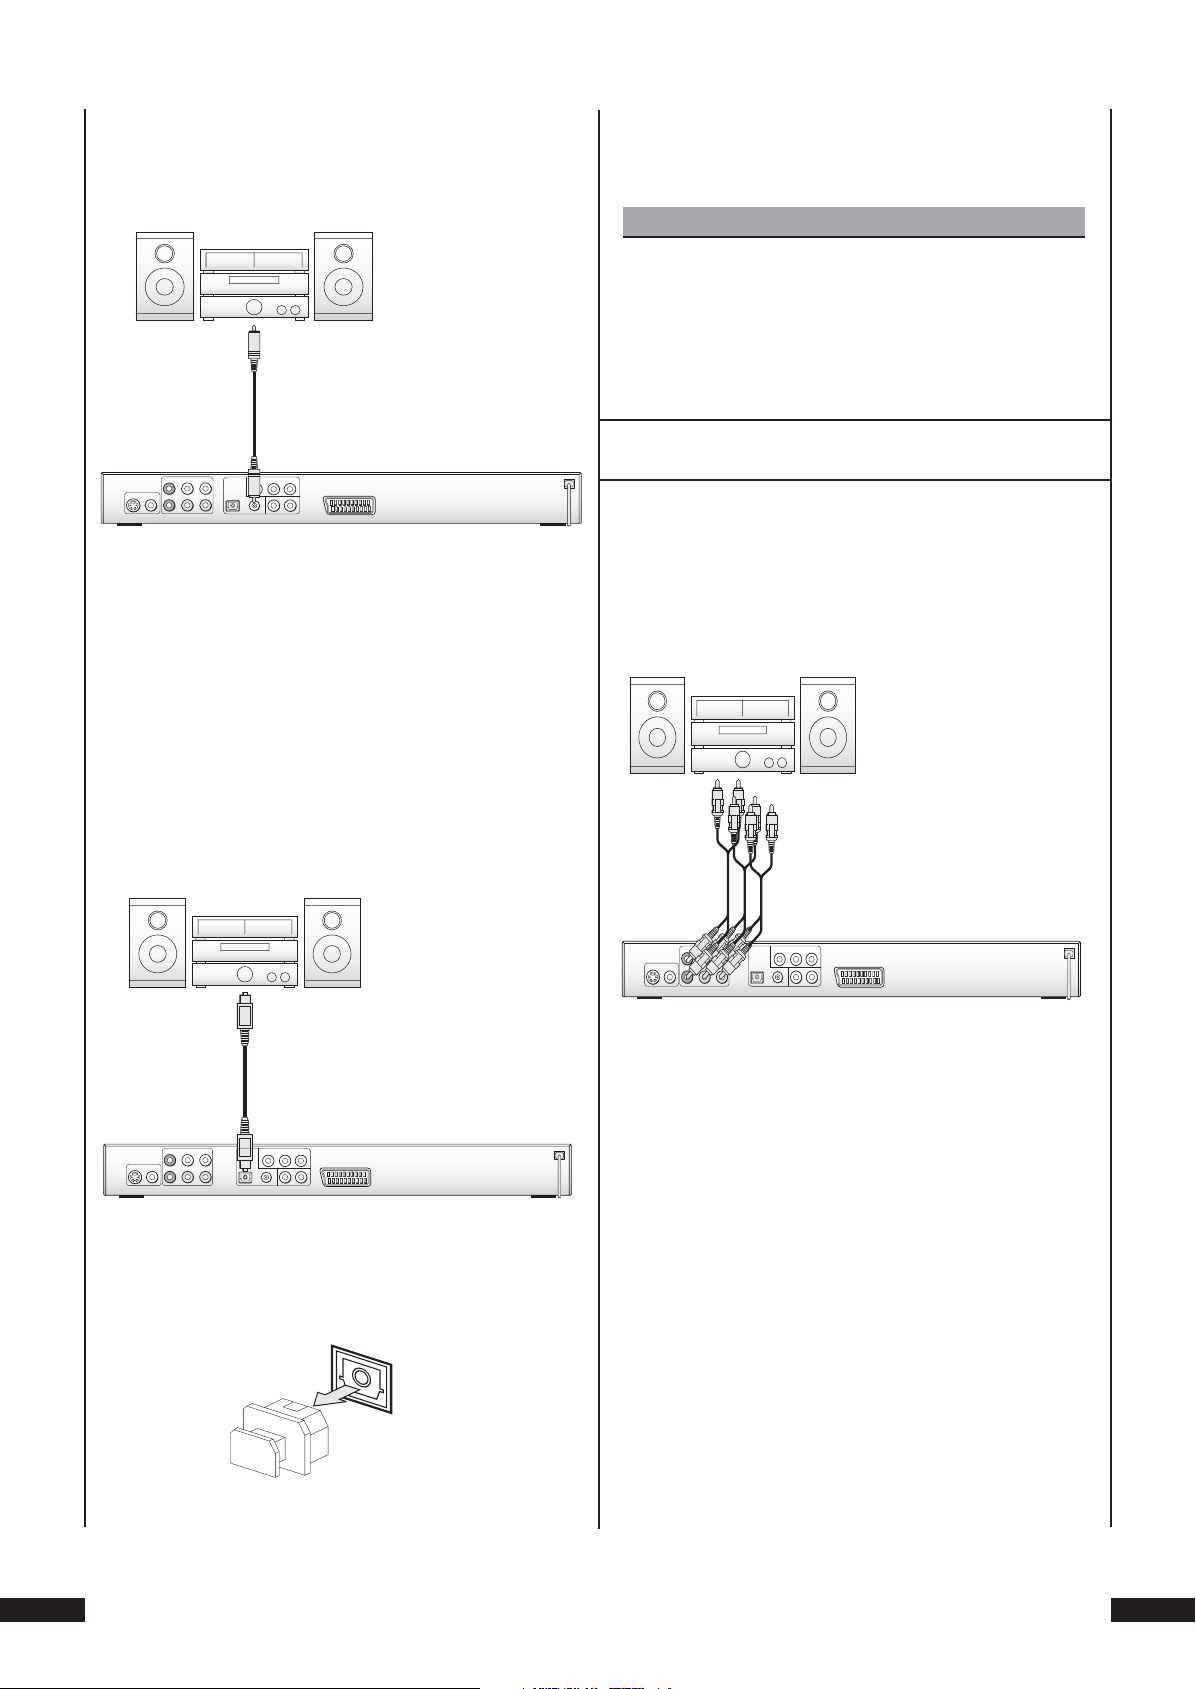
.. Connecting digial audio components via
digital cables
To enjoy stereophonic sound with DVDs, VCDs/S-VCDs or
audio CDs (distinguishable by the Dolby Digital or DTS logo),
the DVD Player can be connected to digital audio components – e.g. a Dolby Digital or DTS receiver, and a suitable
surround-sound system.
The necessary cables for the subsequently described connection method are available from your local dealer.
1 Insert the white plug of the chinch cable in the “L” chinch
socket on the back of the DVD player.
2 Insert the white plug on the other end of the chinch ca-
ble in the chinch socket for the left channel on the HiFi
system.
3 Insert the red plug of the chinch cable in the “R” chinch
socket at the back of the DVD Player.
Check the operating instructions for the given audio component whether it can be connected to a DVD Player …
• with a coaxial cable
• with an optical cable
Silvercrest KH 6508/KH 6509
Page 14
Connection via coaxial cable
Proceed as follows to connect the DVD Player to a surroundsound system with a digital coaxial cable …
1 Insert the coaxial cable plug into the “COAXIAL” socket
on the back of the DVD Player.
2 Insert the plug on the other end of the coaxial cable in
the corresponding socket of your Dolby Digital or DTS
amplifi er.
2 Insert the plug at the other end of the optical cable into
the corresponding socket on the audio
component.
Note:
Make sure that no dirt can enter into the socket for the
optical cable. This could cause signal interference.
Always insert the protective plug into the socket if
no optical cable is connected.
.. Connecting digital audio-components via
analog cable
If the digital audio-component does not have a digital input,
then the DVD Player can also be connected via a conventional
analog chinch cable.
Proceed in the following manner to connect the DVD
Player with analog cables …
Connecting via optical cable
To connect the DVD-Player to an ausio component by means
of an optical cable...
1 Remove the protective plug out of the socket marked
„optical“ on the back of the DVD-Players and insert the
plug of the optical cable.
1 Insert a chinch cable in the…
• “FL“ socket (Front L channel)
• “FR“ socket (Front R channel)
• “SL“ socket (Rear L channel)
• “SR“ socket (Rear R channel)
• “CENTER“ socket (front middle channel) and
• the “SUBWOOFER“ (Bass) socket
… at the back of the DVD Player.
2 Connect the chinch cable with the corresponding analog
inputs on the digital audio component.
Silvercrest KH 6508/KH 6509
Page 15
9. Necessary settings on the DVD Player
prior to operation
All settings on the DVD Player can be eff ected with the remote
control via the so-called “OnScreen Display” menu (abbreviated “OSD” menu). The OSD menu is superimposed on the
television screen.
Before using the DVD Player for the fi rst time to play DVDs,
VCDs/S-VCDs or audio-/MP3-CDs, a few settings have to be
made by way of the OSD menu. The actual settings depend,
among other things, on …
• The language in which the OSD menu is to be shown.
• The television standard of the television to which the
DVD Player is to be connected.
• The picture format that can be presented by the television.
Proceed in the following manner to eff ect the necessary settings by way of the OSD menu …
1 First insert the power cable plug of the DVD Player into
a mains socket.
2 To switch on the DVD Player press the “Power” button on
the front of the DVD Player. If the DVD Player has already
been switch on and is in standby mode, then press the
“Standby” button on the remote control once to turn on
the DVD Player.
“Load” will then start to fl ash on the display on the front
of the DVD Player, which is then followed by “NoDisc”. The
following appears on the television screen:
4 Press the “Setup” button on the remote control once.
The OSD menu with its menu items are displayed on the
television screen:
Language Video Audio More Aud Parental
5 The “Language” menu item is the fi rst to be automatically
selected. The individual menu items can now be selected
with the control buttons and on the remote control,
and called by pressing the “OK” button on the remote
control. The sub-menu of the selected menu item will
then be displayed.
6 Sub-items can be selected in the sub-menu with the con-
trol buttons and , and called by pressing the “OK”
button. The selectable options available in the selected
menu sub-item are then displayed.
7 It is now possible to run through the diff erent selectable
options of a menu sub-item by repeatedly pressing the
control buttons and on the remote control.
8 After all settings have been made, press the “Setup” button
on the remote control once to fade out the OSD menu.
.. Language settings
3 Study the following brief instructions to familiarize yourelf
with the operation of the OSD menu:
.. Operating the OSD menu
Proceed in the following manner to call the OSD menu of
the DVD Player ...
The “Language” menu item is the fi rst to be automatically
selected. Press the “OK” button once. The “Language” menu
is displayed on the television screen, together the following sub-items and the currently selected settings for each
sub-item:
OSD Menu English
Set the language in which the OSD menu is to be displayed on the television screen.
Subtitle English
Set the language in which the subtitle is to be displayed
on the television screen while a fi lm is being shown.
Please note:
Subtitles can only be shown in the selected language
while a DVD/VCD/S-VCD is being played if the given
language is available as a subtitle on the DVD/VCD/
S-VCD.
Silvercrest KH 6508/KH 6509
Page 16
If this is not the case then no subtitles will be shown
while the DVD/VCD/S-VCD is being played.
Information concerning the available subtitles will be
printed on the sleeves of most DVDs/VCDs/S-VCDs.
2 Select with the control buttons and on the remote
control the language in which the OSD menu is to be
displayed.
3 Confi rm the choice by pressing the “OK” button once.
For this subject please refer to the Chapter 11.1. “Subtitle
➧
fade-in/fade-out”
Audio English
Set the language in which the contents of the DVD/VCD/
S-VCD are being played.
Please note:
Films can only be played in the selected language if
this language is available on the DVD/VCD/S-VCD.
If this is not the case, then the fi lm will be shown in a
language that is available on the DVD/VCD/S-VCD.
The available languages are usually indicated on the
sleeves of most DVDs/VCDs/S-VCDs.
For this subject please also refer to Chapter 11.1. “Chang-
➧
ing the playback language”
DVD Menu English
Set the language (if available) in which the menu of
DVDs/VCDs/S-VCDs is to be displayed on the television
screen.
Please note:
Not all fi lms on DVD/VCD/S-VCD have a menu. If there
is a menu, then it can only be displayed in the selected
language if the given language is actually available
on the DVD/VCD/S-VCD. If this is not the case, then
the menu will be displayed in a language that is available on the DVD/VCD/S-VCD. With many DVDs/VCDs/
S-VCDs that have a menu, you can select the language
in which the menu is to be displayed.
For this subject please also refer to Chapter 11.1 “Calling
➧
DVD menu” and “Playback Control (PBC) with VCDs/SVCDs”.
Proceed in the following manner to change the current
settings of one or more sub-items ...
1 The menu sub-item “OSD-Menu“ is the fi rst to be auto-
matically selected. Press the “OK” button on the remote
control. The available languages for the sub-item “OSD
Menu” will now be displayed on the television screen.
4 If the current settings are to be changed to other sub-
items …
• Subtitle
• Audio
• DVD-Menu
... then select one of the sub-items with the control buttons and , and the “OK” button, and then the required
language with the control buttons and , and the
“OK” button.
With the “Subtitles” sub-item it is possible to select, in
addition to the diff erent languages, also one of the options “Auto” or “Off ”:
• If you select the “Auto” option, then the sub-titles (if they
exist) will be displayed on the screen in the fi rst available language on the DVD/VCD/S-VCD when the fi lm is
played.
• If the “Off ” option is selected, then subtitles will not be
displayed, other than you press the “Subtitle” button while
the fi lm is being played.
For this subject please refer to the Chapter 11.1. “Subtitle
➧
fade-in/fade-out”
.. Video settings
1 Fade in the OSD menu if, at this moment, it is not being
displayed on the television screen.
2 Select the menu item “Video” by pressing the control
button once and then confi rm by pressing the “OK”
button once.
The “Video” menu, together with the following sub-items
and current settings for each sub-item, will be displayed
on the television screen:
Language Video Audio More Aud Parental
TV Shape 4:3 PS
TV System Auto
Video-Output RGB
Priotity DVD Audio
Picture View Fit to screen
3 The menu sub-item “TV shape“ is the fi rst to be automati-
cally selected.
Silvercrest KH 6508/KH 6509
Page 17
Setting the screen format
4 Press the “OK” button once. The available options for the
sub-item “TV Shape” will then be displayed:
4:3 Letter Box
Screen format 4:3 “Letterbox“: The top and bottom picture edges have a black bar when fi lms in the 16:9 format
are shown.
4:3 Pan Scan
Screen format 4:3 “Pan & Scan“: To make the best possible use of the screen’s height the right and left picture
edges are clipped off when fi lms in the 16:9 format are
shown.
16:9
Widescreen format 16:9: Films in the 16:9 format are
shown in their full size with 16:9 (1.78:1) widescreen televisions without any black bars at the top and bottom
edges of the picture and without clipping the left and
right picture edges.
5 Select the required screen format with the control buttons
and confi rm by pressing the “OK” button once.
Please note:
NTSC
DVDs/VCDs/S-VCDs recorded in the NTSC standard are
played in this setting. DVDs/VCDs/S-VCDs recorded in the
PAL standard are automatically converted so that they
can be played in the NTSC format. Set “NTSC” if the DVD
Player is connected to an NTSC television.
8 Select the appropriate television standard with the con-
trol buttons and confi rm by pressing the “OK” button
once.
Please note:
The correct setting depends upon the television with
which the DVD Player is to be connected. Most televisions will conform with the television standard in
your country except if the television was purchased
abroad.
If you are not sure which is the customary television
standard in your country, then refer to the operating
instructions for the given television, or turn to the
Glossary in the instructions to fi nd the explanation
under the headword “Television Standard”.
For this subject please refer to Chapter 17. “Glossary/In-
➧
dex”.
The correct setting depends on the television with
which the DVD Player is to be connected. If you are not
sure which screen format your television can present,
then please refer to the operating instructions for the
given television.
Setting the television standard
6 Press the control button once to select the menu sub-
item “T V System”.
7 Press the “OK” button once. The available operations for
the sub-item “TV System” will then be displayed:
Auto
The standard in which the DVD/VCD/S-VCD was recorded
is automatically selected in this setting. Only set “Auto”
if the DVD Player is connected to a multi-standard
television!
PAL
DVDs/VCDs/S-VCDs recorded in the PAL standard are
played in this setting. DVDs/VCDs/S-VCDs recorded in
NTSC standard are automatically converted so that they
can be played in the PAL format. Set “PAL” if the DVD Player
is connected to a PAL television.
Setting Video Output
9 Press the control button once to select the menu sub-
item “Video Output”
10 Conform by pressing the “OK” button once. The available
options for the sub-item “Video Output” will now be displayed:
RGB
Setting to connect the DVD Player to an RGB-capable
television with a 21-pin SCART cable
S-Video
Setting to connect the DVD-Player via S-Video
YUV
Setting to connect the DVD-Player via component
signal
YPbPr
Setting to connect the DVD-Player via component signal
YPbPr (Progressive Scan)
Silvercrest KH 6508/KH 6509
Page 18
Warning!
.. Audio settings
In the event that the wrong video output is set – e.g.
“YPbPr” although the television is not Scan-capable – then the television screen may suddenly turn
black.
This is not a defect of the television or DVD Player!
In such an event …
• Press once the “Stop” button on the front panel
of the DVD Player or on the remote control and
• then continue pressing the “Video Out” button on
the remote control until the picture reappears on
the television screen.
11 Then select with the control buttons and the setting
for the video output that matches the connection of the
DVD Player with the television.
12 Confi rm the selection by pressing the “OK” button once,
thereby concluding the video setting procedure.
Setting the DVD play function
1 Press the control button once, to set the menu
„Priority content“.
Press „OK“ , to display the sub-items „DVD-Audio“ and
„DVD-Video“.
2 By means of the control button , select the desired setting,
depending on whether the priority you wish to play a
video or an audio DVD and confi rm via „OK“ .
Setting the JPG display
1 Press the control button once, to set the menu „Picture
CD view“.
Press „OK“ , to display the sub-items „Original“ or „Fit to
Screen“.
1 Press the control button twice to select the “More Aud”
menu item.
2 The “More Aud“ menu with the following sub-items and
the current settings for each sub-item will now be displayed on the television screen:
Language Video Audio More Aud Parental
Prologic Off
Digital Out Raw
Pink Noise Off
CNTR CTRL 0M/0Ft
REAR CTRL 0M/0Ft
EQ MODE OFF
Setting Prologic
3 The “Prologic“ menu sub-item is the fi rst to be automati-
cally selected. Press the “OK” button once. The available
options for the “Prologic” sub-item will be displayed on
the television screen:
Off
Set “Off ” if an amplifi er, receiver or HiFi system not compatible with Dolby Prologic is connected to the analog
stereo output (“FL” and “FR” chinch sockets) of the DVD
Player
On
Set “On” when an amplifi er, receiver or HiFi system compatible with Dolby Prologic is connected to the analog
stereo output (via chinch cable in the “FL” and “FR” chinch
sockets) of the DVD Player, as described in the Chapter
“Connecting a HiFi System”. In this instance it will be
additionally necessary to set “Stereo Downmix” in the
speaker settings.
Setting „Original“: the images are shown in original size
in the TV screen.
Setting „Fit to Screen“: the images are enlarged to adapt
to the size of the TV screen.
Note:
Depending on which resolution the original image
has, it may appear to be out of focus in the setting
„Fit to Screen“.
2 Select the desired setting using the control button and
confi rm via „OK“ .
Silvercrest KH 6508/KH 6509
For this subject please refer to Chapter 9.4. “Audio Set-
➧
tings: Setting Speaker Sizes – Stereo-Downmix“.
4 Select with the control buttons and between the
options “On” and “Off ”. Confi rm the choice by pressing
the “OK” button once.
Setting Digital Output
5 Press the control button once to select the menu
sub-item “Digital Output”. Press the “OK” button once to
confi rm. The options available for the sub-item “Digital
Output” will be displayed on the television screen:
Page 19
Raw
Setting EQ mode
Set to „Raw“, if you have connected a multi-channel digital
audio component, for e.g. a Dolby Digital or DTS receiver
or a 5.1 channel surround system to the DVD player via a
coaxial cable or optical cable.
PCM
Set to „PCM“, if you have connected a two-channel digital
audio component to the DVD player via a coaxial cable
or optical cable.
Off
Set “Off ” if no digital audio components have been connected to the DVD Player.
6 Select with the control buttons and between the
options “Raw”, “PCM” and “Off ”. Press the “OK” button once
to confi rm the choice.
Setting delay center/back
7 By means of the control button select „Center delay“,
or „Back delay“ and confi rm via „OK“.
8 Use the control buttons and to select between the options
„0M/0Ft“ , „0.3M/1Ft“ , „0.6M/2Ft “ , „0.9M/3Ft“ , „1.2M/4Ft“
, „1.5M/5Ft“ . Press the „OK“ button once, to confi rm the
selection.
9 Using the control button, select „EQ MODE“ and confi rm
via „OK“.
10 By means of the control button and choose between the
options „Pop“, „Rock“, „Live“, „Jazz“, „Classic“. To deactivate
EQ mode, select „off “. Confi rm via „OK“.
11 Press the button „Setup“ a once, to fade out the OSD
menu.
Speaker settings
For an optimal sound experience it is necessary to adapt
sound reproduction to …
• The connected audio components
• The spatial conditions at the point of installation of the
DVD Player/audio components, and
• Your personal preferences.
Please note:
The subsequent steps are only related to the connection of a DVD Player to an audio component via
analog cables.
Calculate the distances as follows:
Distance from the center loudspeaker to the listener = dis-
tance from the right and left loudspeakers to the listener
- distance from the center loudspeaker to the listener
Distance from the right and left rear loudspeakers to the
listener=distance from the right and left front loudspeakers to the listener-distance from the right and left rear
loudspeakers to the listener
Please Note:
In order to activate the menu option „Center delay“,
or. Back delay“, „Surround“ must be activated in the
menu „Audio“!
Please Note:
Use the menu option „ Pink Noise“ to check the function of the loudspeakers. Press „OK“ to activate the
individual loudspeakers „Left“, „Center“, „Right“,“Left
Surr“, „Right Surr“ and „Subwoofer“.
If the Surround and Center loudspeakers are deactivated in the menu option „Audio“, they cannot be
tested with the Pink Noise function.
If you have opted for a digital connection …
• Connection via a coaxial cable, or optical cable
… then the subsequently described speaker settings
do not have to be adjusted on the DVD Player, but
rather on the given audio component. Please refer to
the operating instructions for the given audio component to fi nd out how the settings are adjusted on
the given component.
Setting speaker sizes
Before changing the speaker settings:
Stereo-Downmix
The speakers have been works adjusted to the so-called
“Stereo-Downmix” setting:
Silvercrest KH 6508/KH 6509
Page 20
Language Video Audio More Aud Parental
Front Speaker Large
Center Speaker Off
Surround Speakers Off
Subwoofer Off
If you have …
• connected a DVD Player to a stereo television and not
connected any audio components to the DVD Player,
or
• connected a Dolby Prologic-compatible amplifi er, receiver or such a HiFi system to the stereo output of the
DVD Player (via chinch cable to the “FL” and “FR” chinch
sockets), as described in the Chapter “Connecting a HiFi
Symstem”, ...
4 Confi rm the choice by pressing the “OK” button on the
remote control once. The Audio menu with the following
sub-items is then displayed on the television screen:
Language Video Audio More Aud Parental
Front Speaker Large
Center Speaker Off
Surround Speakers Off
Subwoofer Off
5 Select the “Front” option for the front audio channels of
the audio component by pressing the control button
once.
6 Press the “OK” button to select between the available
settings:
... then do not change the works-adjusted Stereo-Downmix
settings!
Otherwise, if the settings are changed the sound when
playing DVDs, VCDs/S-VCDs, Audio- and MP3-CDs will
not be audible or only very quiet!
Proceed in the following manner to adjust speaker settings
when the DVD Player is connected to an audio component
with an analog cable …
1 In the event that a disc loaded in the DVD Player is being
played, then terminate playback by pressing the “Stop”
button on the front of the DVD Player or on the remote
control.
2 Call the OSD menu of the DVD Player by pressing the
“Setup” button on the remote control once. The OSD
menu with its menu items is displayed on the television
screen:
Language Video Audio More Aud Parental
• “Large“ when large speakers for the front audio channels
are connected to the audio components
or
• “Small“ when small speakers for the front audio channels
are connected to the audio components.
After having selected a setting for “Front”:
7 Select the “Center“ option for the center speaker channel
of the audio component by pressing the control button
once.
8 Press the “OK” button to select from the available set-
tings:
• “Large“ if a large center speaker is connected to the audio
component.
Please note:
After having selected “Small” in the “Front” option, it
is then no longer possible to select the “Large” setting
for the center speaker. You can select “Large” for the
center speaker, if the subwoofer is setting “On”.
3 Select the “Audio” menu item by pressing the control
button on the remote control twice.
Silvercrest KH 6508/KH 6509
• “Small“ when a small center speaker is connected to the
audio component.
• “Off “ to turn off the audio channel for the center speaker
or if you do not want to connect a center speaker to the
audio component.
Having selected a setting for “Center”, proceed in the
following manner:
Page 21

9 Select the “Rear” option for the rear audio channels of
audio components by pressing the control button
once.
10. Starting the DVD Player
Having …
10 Press the “OK” button once to select from the available
settings:
• “Large“ if large rear speakers have been connected to the
audio component.
Please note:
If the “Small” setting is selected in the “Front” option,
then the “Large” setting for the rear speakers can no
longer be selected. You can select “Large” for the rear
speaker, if the subwoofer is setting “On”.
• “Small“ when small rear speakers are connected to the
audio component.
• “Off “ it you want to turn off the audio channels for the
rear speakers or when no speakers are connected to the
audio component.
Having selected a setting for “Rear”, proceed in the following manner:
12 Select the “Subwoofer“ option for the subwoofer channel
of the audio component by pressing the control button
once.
13 Press the “OK” button to select between the available
settings:
• “On“ if a subwoofer is connected to the audio component.
• “Off “ to turn off the audio channel for the subwoofer or
when no subwoofer has been connected to the audio
component.
Please note:
• set up the DVD Player at an appropriate point
• connected the DVD Player to the television (or video projector) with one of the listed connecting facilities
• connected the DVD Player (if required) to an HiFi or surround-sound system or a Dolby Digital or DTS Receiver
• ensured that the remote control is operational by loading
the batteries
• and know how to call and operate the settings menu
with the remote control
... then the DVD-Player will be ready to operate
. Inserting the DVD
To play a disc with the DVD player:
1 Switch on the television connected to the DVD player.
2 Make certain that the DVD player is ready for operation
and switched on.
If the television, the DVD-Player and any other possibly conected appliances (e.g. an audio component) are ready and
on and the DVD-Player is correctly connected to the television, the Silvercrest logo will appear on the TV screen.
If no disc is inserted in the disc compartment of the DVDPlayers: The message „No disc“ apears on the TV screen.
3 Open the disc compartment by pressing the button
„Open/Close“ on the remote control or the button on
the front of the DVD-Player once. “ Open“ will appear on
the TV screen.
If you have selected the “Small” setting in the “Front”
option, then the “Off ” setting cannot be selected for
the subwoofer.
If the “Off ” setting has been selected for the “Center”,
“Rear” and “Subwoofer” options, then sound is only
reproduced by two channels (stereo). This equals the
works setting for Stereo-Downmix.
Having selected for “Subwoofer“, thereby concluding all
settings in the “Size” menu sub-item, proceed in the following manner:
14 Leave the “Audio” menu sub-items by pressing the control
button four times.
4 Place the disc into the DVD compartment with the writ-
ing/label facing up. For twin-sided discs:
The side you would like to play must face down.
5 After having inserted the disc: press the button „Open/
Close“ on the remote control or the button on the front of
the DVD-Player again to close the disc compartment.
6 The contents of the will will now be loaded; this may take
a few seconds. In the meantime the message „Loading“
appears on the TV screen.
Silvercrest KH 6508/KH 6509
Page 22

. Inserting memory cards with MP/WMA/
DivX/Nero Digital/JPEG fi les
Note:
The DVD-Player always starts in DVD mode. In order
to read memory cards, press „Card/DVD“ on the remote control.
The DVD-Player recognises JPEG, MP3, DivX, Nero
Digital and WMA fi le formats.
• Never try to insert memory cards into the memory card
slots using force!
This could result in irreparable damage to the DVD player,
memory card and the fi les on the memory card!
SmartMedia Memory Cards (SM)
Note:
Always only insert one memory card in the DVD-Player. The DVD-Player always reads the data from the upper compartment. If a memory card is inserted, the
data in the bottom compartment are not read.
In order to insert memory cards of types CFI/CFII , SD, MS/
MSPro, MMC and SM into the DVD-Player:
1 Switch on the television connected to the DVD-Player.
2 Make certain that the DVD player is ready for operation
and switched on.
If the television, the DVD player and any additionally
connected equipment (e.g. an audio component) are
ready for operation and switched on and the DVD player
is correctly connected to the television, you will see the
OPENING logo on the television screen.
If no disc is present in the disc tray of the DVD player: „No
Disc“ is displayed on the television screen.
3 Open the fl ap in front of the memory card slot on the
front side of the DVD player. To do this, press once with
your fi nger on the dotted triangle on the fl ap. The fl ap
opens.
Only SmartMedia memory cards of type 3.3 V can be
used! SmartMedia memory cards of type 5 V cannot
be used! SmartMedia memory cards of types 3.3 V
and 5 V can easily be diff erentiated according to the
diagram below:
5 Volt 3,3 Volt
You must insert SmartMedia memory cards (3,3V) into the
upper memory card compartment. Insert SM-memory cards
into the upper memory card compartment contacts fi rst and
straight. For this purpose...
- the side of the memory card with the contacts must face
up and
- the slanted edge of the memory card must face right.
CompactFlash memory cards (CF I/CF II)
4 Now slide the memory card into one of the two memory
card slots. Follow the steps below – depending on which
type of memory card you would like to play.
Warning!
Always be sure to insert the memory cards into the
memory card slots as described below! Never bend the
memory cards while inserting them into the memory
cards slots! Only push the memory cards up to the
stop in the memory card slot with a light pressure.
If memory cards cannot be inserted without applying force:
• Check whether it is a type of memory card that the DVD
player can play. Only memory cards of types CF I/CF II,
SD, MS/MSPro, MMC and SM can be played. Do not try
to insert memory cards of other types into one of the
memory card slots!
• Check whether you have inserted the memory card into
the memory card slot in the correct direction.
CompactFlash memory cards types 1 and 2 must be inserted
into the bottom memory card compartment. Insert CFmemory cards into the upper memory card compartment contacts
fi rst and straight.
The side of the memory card with the manufacturer‘s logo
label must face up.
MultiMediaCard /SecureDigital memory
cards
MultiMediaCard/SecureDigital memory cards must be inserted into the upper memory card compartment. Insert
MMC/SD memory cards into the upper memory card compartment contacts fi rst and straight.
For this purpose...
- the side of the memory card with the contacts must face
down and
- the slanted edge of the memory card must face right.
Silvercrest KH 6508/KH 6509
Page 23

MemoryStick memory cards (MS)
MemoryStick memory cards must be inserted into the upper
memory card compartment. Insert MF memory cards into
the upper memory card compartment contacts fi rst and
straight. For this purpose...
- the side of the memory card with the contacts must face
down and
- the slanted edge of the memory card must face left.
5 Press the DVD/Card button to display the memory con-
tents.
6 The red indicator light next to the bottom slot lights
up.
Silvercrest KH 6508/KH 6509
Page 24

Playing DVDs,
VCDs or S-VCDs
Silvercrest KH 6508/KH 6509
Page 25

11. Playing DVDs, VCDs or S-VCDs
Proceed in the following manner to play a DVD/VCD/S-VCD
on the DVD Player …
1 Switch on the television to which the DVD Player is con-
nected.
2 Ensure that the DVD Player has been switched on and is
ready to operate.
If the television, DVD player and possibly other connected devices (e.g. an audio component) are operational and switched
on and the DVD player is properly connected to the television,
you can now see the SilverCrest Opening logo on the television:
• but rather the symbol , then the DVD/VCD/SVCD
can be played on the DVD Player, or
• the given DVD/VCD/S-VCD cannot be played on
the DVD Player. To check, simply by trying to play
the DVD.
DVD/VCD/S-VCD
5 Press the “Open/Close” button on the front of the DVD
Player or on the remote control once again to close the
disc drawer. “Close” will be indicated on the display on
the front of the DVD Player and on the television screen
while the disc drawer is closing.
6 The contents of the DVD/VCD/S-VCD are now loaded;
this can take several seconds. In the meantime “Load”
will be fl ashing on the display on the front of the DVD
Player, and “Load” is displayed on the television screen.
“NoDisc” is faded in on the television screen and on the
display on the front side of the DVD Player if no disc has
been loaded in the disc drawer of the DVD Player.
3 Open the disc drawer on the front of the DVD Player by
pressing once the “Open/Close” button on the front
of the DVD Player or on the remote control. “Open” then
appears on the display on the front of the DVD Player
and on the television screen.
4 Load a DVD/VCD/S-VCD with label side facing upwards
in the disc drawer.
Please note:
7 The loaded DVD/VCD/S-VCD starts automatically.
Depending upon the loaded DVD/VCD/S-VCD, the fi lm
on the DVD may not be immediately played because an
option may fi rst appear on the television screen.
In such an event …
Select with the control buttons
mote control, the menu item with which fi lm playing
is started.
8 To start playback of the fi lm …
• Press the “OK” button on the remote control once
or
• Press the “Play“ button on the front of the DVD Player
or on the remote control once.
“Play“ is briefl y displayed on the television screen, and the display on the front of the DVD Player indicates the following:
1 2 3 4 5
on the re-
DVDs, VCDs and S-VCDs that are to be played on the
DVD Player may have a country code printed on the
DVD/VCDs/S-VCDs sleeve. The DVD Player can only
play DVDs/VCDs/S-VCDs with the Country Code 2.
If no country code is printed on the sleeve of a DVD/
VCD/S-VCD …
The DVD video symbol when a DVD has been load-
1
ed or, when a VCD/S-VCD is loaded: “VCD“ or “S-VCD”
The symbols and for the play mode
2
The number of the currently playing title
3
Silvercrest KH 6508/KH 6509
Page 26

DVD/VCD/S-VCD
The time hitherto played of the current DVD/VCD/S-VCD
4
in hours, minutes and seconds
Please note:
Calling DVD-Menu (Menu)
The current audio playback setting – in this example:
5
Dolby Digital-Symbol (depending on the loaded DVD)
.. Functions while a DVD, VCD or S-VCD is
being played
The following functions of the DVD Player can be used while
a DVD/VCD/S-VCD is being played …
Stopping playback (Pause)
To stop playback of the fi lm on the loaded DVD/VCD/SVCD …
1 Press the “Pause/Step” button on the front of the DVD
Player or on the remote control once during playback.
“ “ will fl ash on the display on the front of the DVD
Player, and “ “ Pause will be displayed on the television
screen.
A still frame of the chapter that has just been stopped
will be displayed on the television screen.
2 To resume fi lm Repeat press the “Play” button once.
Terminating playback (Stop)
This function may not be available on all DVDs! The
symbol is shown in the television screen when an
attempt is made to carry out a function that is not
available.
With many fi lms on DVD there is a main menu on the disc,
which, in addition to the option of playing the main fi lm,
enables for example …
• Selecting the language of subtitles and fi lm sound
• Direct selection of fi lm chapters
• Playback of bonus material relating to the fi lm (back-
ground information, “Making of”, etc.)
In the event that there is such a menu on the DVD loaded
in the DVD Player, then this menu can be called by pressing
the “Menu” button while the fi lm is being played.
To select the individual menu items press the control buttons
menu item press …
• Once the “Play” button on the front of the DVD Player
or on the remote control
on the remote control; to confi rm the selected
To terminate playback of the fi lm on the loaded DVD/VCD/
S-VCD press the “Stop” button on the front of the DVD
Player or on the remote control once.
... with Resume Function
If you have terminated playback of the fi lm on the loaded
DVD/VCD/S-VCD by pressing the “Stop” button once, the
DVD Player automatically stores the point at which play was
stopped. This is known as the “Resume Function”. “Stop [Play
to Resume] is displayed on the television screen. As soon as
the “Play” button on the front of the DVD Player or on the
remote control is depressed once again, playback of the fi lm
from the stored point is continued.
... without Resume Function
Press the “Stop” button a second time to terminated playback of the fi lm on the loaded DVD/VCD/S-VCD. The stored
place at which playback was stopped is then deleted. When
the “Play” button is pressed once again, playback starts at
the beginning of the fi lm.
or
• Once the “OK” button on the remote control.
To return to fi lm playback select the menu items that starts
fi lm play and press …
• Once the “Play”
or on the remote control
• Once the “OK” button on the remote control.
Use the buttons “Page-“ and “Page+“ to select between the
pages of the DVD menu.
button on the front of the DVD Player,
or
Note:
This function is not available for all DVDs.
Please note:
If film payback has been terminated by pressing
the“Stop” button once (Play Stop with Resume
Function), or by pressing the “Stop” button twice
Silvercrest KH 6508/KH 6509
Page 27

(Play Stop without Resume Function), then the main
menu on the disc cannot be called.
Playback Control (PBC) with VCDs/S-VCDs
The selected chapter is instantly played without having to
press the “Play” button. The number of the selected chapter
is indicated on the display on the front of the DVD Player, to
the left of the playing time.
Some VCDs/S-VCDs feature Playback Control (“PBC”). Playback Control defi nes the main menu via which diff erent
functions of the VCD/S-VCD can be operated.
If the VCD/S-VCD loaded in the DVD-Player features PBC, then
it must be activated so that the menu can be faded in.
Proceed in the following manner to activate PBC …
1 Press during playback, or when playback has been
stopped, the “Mode” button on the remote control once.
The “Playback Mode” menu will then be faded in on the
television screen:
Play Mode
Mode Off
Repeat Off
2 The “Mode” menu item is the fi rst to be automatically se-
lected. Press the “Ok” button on the remote control to select
between the “Off ”, “Shuffl e” and “PBC” options. Set “PBC” and
press the “Mode” button once again. The “Play Mode” will
then be faded out so that PBC is now switched on.
Please note:
If PBC is switched on during playback, then playback
may be stopped and resumed at the beginning.
2 To fade in the PBC main menu press during playback the
“menu” button on the remote control once.
Direct chapter selection
Instead of the control buttons and the chapters on
the currently played DVD/VCD/S-VCD can also be directly
selected by the following entry capabilities:
Enter the chapter number with the numeral
buttons
Please note:
This function may not be available on all DVDs/VCDs/
S-VCDs! If you try to carry out a function that is not
available, then the symbol is displayed on the television screen.
The numeral buttons on the remote control can be used
instead of the Skip function to directly enter the chapters
within the fi lm on the loaded DVD/VCD/S-VCD.
For this purpose proceed in the following manner …
1 During playback or stop mode, press on the remote con-
trol the corresponding numeral buttons for the chapter
number – e.g. the “3” for the third chapter, or consecutively
the “1” and “0” buttons for the tenth chapter. The entered
numbers are displayed on the television screen.
2 Then press the “OK” button on the remote control. Play-
back of the chapter with the entered number then starts
automatically.
DVD/VCD/S-VCD
Jump to the beginning of the chapter (Skip)
What are Title and Chapter? For this subject please refer
➧
to the Chapter 17. “Glossary/Index”.
Please note:
This function may not be available on all DVDs/VCDs/
S-VCDs! If you try to carry out a function that is not
available, then the symbol is displayed on the television screen.
By means of the buttons „Skip forward“ and „Skip backward“
on the remote control or the buttons „Skip forward“ and
„Skip backward“ on the front of the appliance, you can move
within the fi lm on the inserted DVD/VCD/S-VCD while it is
playing ...
• To jump forwards to the beginning of the next chapter, or
• To jump back to the previous chapter.
Search function (Search)
Chapters on the loaded DVD/VCD/S-VCD can be selected
during playback not only by way of the Skip function, or by
direct selection via the numeral keys on the remote control,
but also by the Search function:
Direct Chapter Selection by way of the search
function (Search)
Please note:
This function may not be available on all DVDs/VCDs/
S-VCDs! If you try to carry out a function that is not
available, then the symbol is displayed on the television screen.
Entering the time position with the search
function
Proceed in the following manner to select a chapter by entering its time position …
Silvercrest KH 6508/KH 6509
Page 28

DVD/VCD/S-VCD
1 Press the “Search” key on the remote control once during
playback of the loaded DVD/VCD/S-VCD. The “Search”
menu is displayed on the television screen:
Search
Time – – : – – : – –
Title/Chapter – – –/– – –
Proceed in the following manner to select in Fast Search
certain passages within the fi lm on the loaded DVD/VCD/SVCD …
1 For Fast Search Forward press during playback the
“F.Fwd” button …
Fast Search Forward/Rewind
2 The “Time” input fi eld marked with “– – : – – : – –“ is the fi rst
one to be automatically selected. Enter with the numeral
keys 0 to 9 the time position of the desired chapter in six
digits in hours, minutes and seconds.
Example: To start playback 1 hour, 5 minutes and 30 seconds
after the beginning of the fi lm, press one after the other the
numeral keys …
• „0“, „1“ for 1 hours;
• „0“, „5“ for 5 minutes;
• „3“, „0“ for 30 seconds
Press the “OK” key once to start playback at the selected
point.
Entering the chapter number with the search
function
Proceed in the following manner to select a chapter by entering the title and chapter number …
1 Press the “Search” key on the remote control once dur-
ing playback of the loaded DVD/VCD/S-VCD. The “Search”
menu is displayed on the television screen:
2 Press the control key once to select the input fi eld
marked with “– – –/ – – –“ of the “Title/Chapter” option.
Enter with the numeral keys 0 to 9 of the remote control
the title number (three digits) on the left-hand side of the
slash, and the chapter number (3 digits) on the right-hand
side.
• Once for double the search speed; “ x2” is displayed on
the television screen.
• Twice times for four-fold search speed; “ x4” is displayed
on the television screen.
• Three times for eight-fold search speed; “ x8” is displaye-
don the television screen.
• Four times for 16-fold rapid search speed; „ x16“ is dis-
played on the TV screen
• Five times for 32-fold rapid search speed; „ x32“ is dis-
played on the TV screen
2 For Fast Search Rewind press the “F.Rwd” button dur-
ing playback …
• Once for double the search speed; “ x2” is displayed on
the television screen.
• Twice times for four-fold search speed; “ x4” is displayed
on the television screen.
• Three times for eight-fold search speed; “ x8” is displayed
on the television screen.
• Four times for 16-fold search speed; „
x16“ is displayed
on the TV screen
• Five times for 32-fold search speed; „x 32“ is displayed
on the TV screen
Search
Time – – : – – : – –
Title/Chapter – – –/– – –
Example: To start title 01 of chapter 08 press the numeral
keys “0“, “0“, “1“ and “0“, “0“, “8“ one after the other
Then press the “OK” key once to start playback at the selected point.
If you wish to delete a position in the input fi elds, then select
the position to be deleted with the control keys
press once the “CLR” key on the remote control. The display
is then returned to “– –“.
Silvercrest KH 6508/KH 6509
Please note:
Sound is not reproduced during Fast Search.
3 To continue fi lm playback at the selected point at nor-
mal speed, press during Fast Search Forward/Return the
“Play” button on the front of the DVD Player or on the
remote control once. “Play” is once again displayed on
the television screen.
Slow Play Forward/Return (Slow Motion)
and
Proceed in the following manner for slow playback of the
fi lm on the loaded DVD/VCD/S-VCD …
1 For slow play forward press “S.FRW” button during play-
back …
Page 29

• Once for half the playback speed (compared to normal
playback speed); “ 1/2” is displayed on the television
screen.
Enlarging the picture (Zoom)
Please note:
• Twice for one-fourth of the playback speed; “ 1/4” is
displayed on the television screen.
• Three times for one sixth of the playback speed; “ 1/6” is
displayed on the television screen.
• Four times for one seventh of the playback speed; “ 1/7”
is displayed on the television screen.
For slow playback Return press the “S.RWD” button during playback…
• Once for half the playback speed; “ 1/2” is displayed on
the television screen.
• Twice for one-fourth of the playback speed; “ 1/4” is
displayed on the television screen.
• Three times for one sixth of the playback speed; “ 1/6”
is displayed on the television screen.
• Four times for one seventh of the playback speed; “ 1/7”
is displayed on the television screen.
Please note:
Sound is not reproduced during slow playback.
2 To continue fi lm playback at the selected point in normal
speed, press once the “Play” button on the front of the
DVD Player or on the remote control “ Play” is once again
displayed on the television screen.
Single Frame Forward (Step)
Please note:
This function may not be available on all DVDs/VCDs/
S-VCDs! If you try to carry out a function that is not
available, then the symbol is displayed on the television screen.
While the fi lm on the loaded DVD/VCD/S-VCD is being
played it is possible to enlarge the picture on the television screen in three stages by pressing on the “Zoom”
button on the remote control …
• Once for the fi rst enlargement stage; “ 1” is displayed
on the television screen.
• Twice for the second enlargement stage: “ 2” is displayed
on the television screen.
• Three times for the third enlargement stage; “ 3” is displayed on the television screen.
To turn off the zoom function and return to a normal picture
size, press the “Zoom” button a fourth time; “ Off ” is displayed on the television screen.
Changing the camera angle (Angle)
Please note:
This function may not be available on all DVDs/VCDs/
S-VCDs! If you try to carry out a function that is not
available, then the symbol is displayed on the television screen.
Some fi lms on DVD/VCD/S-VCD contain chapters which
were shot at diff erent camera angles. When fi lms contain
such chapters then the same chapter can be watched from
diff erent angles.
DVD/VCD/S-VCD
This function may not be available on all DVDs/VCDs/
S-VCDs! If you try to carry out a function that is not
available, then the symbol is displayed on the television screen.
Proceed in the following manner to advance a fi lm of a loaded
DVD/VCD/S-VCD forward, frame-by-frame …
1 Press during play the “Pause/Step” button once to stop
play. The still picture of the chapter stopped, is displayed
on the television screen.
2 The still picture will then be advanced frame-by-frame
each time the “Pause/Step” button is depressed.
3 To return to fi lm play press once the “Play” button on
the front of the DVD Player or on the remote control.
Press the “Angle” button on the remote control while the fi lm
of the loaded DVD/VCD/S-VCD is being played; the angle is
changed each time the “Angle” button is depressed.
Subtitle fade-in/fade-out
Please note:
This function may not be available on all DVDs/VCDs/
S-VCDs! If you try to carry out a function that is not
available, then the symbol is displayed on the television screen.
If the fi lm of the loaded DVD/VCD/S-VCD has subtitles, then
these can be displayed on the television screen by pressing
the “Subtitle” button on the remote control.
Silvercrest KH 6508/KH 6509
Page 30

DVD/VCD/S-VCD
on the television screen when the “Subtitle” button is depressed for the fi rst time. The available languages are faded
in one after the other on the television screen each time the
“Subtitle” button is pressed.
“ “ is displayed on the screen, together with the number
of the currently faded-in language (e.g. “1/10” for the fi rst of
ten subtitle languages).
The subtitles will be displayed in the fi rst available language
Program Input Title/Chapter
1 – – – – 8 – – – – 15 – – – – 22 – – – –
2 – – – – 9 – – – – 16 – – – – 23 – – – –
3 – – – – 10 – – – – 17 – – – – 24 – – – –
4 – – – – 11– – – – 18 – – – – 25 – – – –
5 – – – – 12 – – – – 19 – – – –
6 – – – – 13 – – – – 20 – – – –
7 – – – – 14 – – – – 21 – – – –
Play program Clear all
When the last of the available subtitle languages has been
faded-in (e.g. “10/10” for the tenth of ten available subtitle
languages), then the subtitle function can be turned off by
depressing the “Subtitle” button on the remote control once
again; “ Off ” is displayed on the television screen.
Changing the playback language
Please note:
This function may not be available on all DVDs/VCDs/
S-VCDs! If you try to carry out a function that is not
available, then the symbol is displayed on the television screen.
With some fi lms on a DVD/VCD/S-VCD it is possible to select
another playback language by depressing the “Audio” button
on the remote control.
The fi rst available playback language is turned on when the
“Audio” button is depressed for the fi rst time. The available
playback languages are set one after the other each time the
“Audio” button is pressed. The playback language that has
been selected is displayed on the television screen.
Programmed playback (Program)
Each of the faded-in numbers from 1 to 25stands for an
available program storage place for a chapter. Enter the
following after the faded-in numbers …
• In the fi rst input fi eld marked with “– – “: the title number
under which the chapter that is to be programmed is
stored on the loaded DVD/VCD/S-VCD
and
• In the second input fi eld marked with “– –“: the number
under which the chapter that is to be programmed is
stored on the loaded DVD/VCD/S-VCD.
What are title and chapter? For this subject please refer
➧
to Chapter 17. “Glossary/Index”
2 Use the control buttons on the remote control
to change between the program storage places 1 to 25,
and between the input fi elds marked with “– –“. Enter
the title and chapter numbers in the input fi elds with
the numeral buttons 0 to 9 on the remote control.
3 To delete an entry in an input fi eld select with the control
buttons the corresponding input fi eld and press
the “CLR” button once. The display is returned to “– –“.
Please note:
This function may not be available on all DVDs/VCDs/
S-VCDs! If you try to carry out a function that is not
available, then the symbol is displayed on the television screen.
With the „Program“ function you can compile your own fi lm
program, by selecting only certain chapters of an inserted
DVD/VCD/S-VCD for playing. You can select the order in which
the chapters are played
yourself. You can compile a maximum of 25 chapters of a
fi lm for programmed play.
Proceed in the following manner for programmed playback …
1 Press the “PRG” button on the remote control once while
a fi lm is being played or when playback has been terminated. The program menu is displayed on the television
screen:
To delete the entries in all input fi elds select with the
control buttons the option “Clear All” under the
input fi elds, and press the “OK” button once.
4 When you have programmed the required chapters, se-
lect with the control buttons the option “Play
Program” under the input fi elds, and press the “OK” button
once. Programmed playback will then commence with
the chapter entered in the program storage place 1.
5 By pressing within the programmed chapters the buttons
“Skip” and “Skip” on the front of the DVD Player or
on the remote control, you can advance to the beginning
of the next chapter, or jump back to the beginning of the
previous chapter.
6 To delete programmed playback press the “Stop” button
on the front of the DVD Player or on the remote control
twice during playback.
Silvercrest KH 6508/KH 6509
Page 31

Please note:
If you are not sure of the number of a title or chapter that is to be programmed, then select the corresponding chapter during fi lm playback by pressing
the “Skip” /”Skip” button, and then press the
“Display” button on the remote control twice, to fade
in all information relating to the loaded DVD/VCDSVCD on the television screen. This is also where you
will fi nd, among other things, the current title and
chapter number.
For this subject please refer to Chapter 11.1 “Fade-in Disc
➧
Information”.
Programming example
You would like to enter the numbers 03 and 10 of a fi lm on
a DVD/VCD/S-VCD for programmed playback; the main fi lm
in this example has the title number one:
1 In the program menu the fi rst entry fi eld under storage
place 1 is automatically marked. Press, one after the other,
the “0” button and “1” button to enter the title number
01.
With this function you can fade-in all available information
relating to a DVD/VCD/S-VCD loaded in the DVD Player during playback on the television screen.
For this purpose proceed in the following manner …
1 Press during playback the “Display” button on the remote
control once. The following will be faded in on the television screen:
• Top left: The already played time of the currently playing
DVD/VCD/S-VCD in hours, minutes and seconds.
• Top right: The remaining time until the end of the currently playing chapter in hours, seconds and minutes.
2 Press the “Display” button a second time to display the
following on the television screen:
For DVD
• The already played time of the currently playing DVD in
hours, minutes and seconds.
• The remaining time until the end of the currently playing
chapter in hours, seconds and minutes
DVD/VCD/S-VCD
2 Press the control button once to change to the second
entry fi eld under program storage place 1.
3 Press once, one after the other, the “0” button, and once
the “3” button, to entre the chapter with the number
03.
4 Then select with the control buttons the fi rst
input fi eld under program storage place 2.
5 Press, one after the other, the “0” button and the “1” but-
ton to entre the title number 01.
6 Press once the control button to change to the second
input fi eld under program storage place 2.
7 Then press, one after the other, the “1” and “0” buttons to
entre the chapter with the number 10.
8 Having programmed the two required chapters, select
with the control buttons the “Play Program“ option under the input fi elds. Press the “OK” button once to
start playback of the programmed chapters.
Fade-in disc information
Please note:
This function may not be available on all DVDs/VCDs/
S-VCDs! If you try to carry out a function that is not
available, then the symbol is displayed on the television screen.
• The type of loaded disc (DVD)
• The current title number/the total number of titles
•
The current chapter number/the total number of chapters
• The currently selected camera angle/the number of currently available camera angles
• The currently set playback language
• The currently selected subtitle setting
For VCD/SVCD
• The already played time of the currently playing VCD/
SVCD in hours, minutes and seconds.
• The remaining time until the end of the currently playing
chapter in hours, seconds and minutes
• The type of loaded disc (VCD/S-VCD)
3 To fade-out the disc information press the “Display” key
once again.
Switching on diff erent play modes
Please note:
This function may not be available on all DVDs/VCDs/
S-VCDs! If you try to carry out a function that is not
Silvercrest KH 6508/KH 6509
Page 32

DVD/VCD/S-VCD
evision screen.
available, then the symbol is displayed on the tel-
Play Mode
Mode Off
Repeat Off
The following play modes can be switched on during playback of a DVD/VCD/S-VCD:
With DVDs: Press the “OK” button to choose between
the options “Chapter”, “Title” and “Off ”.
Random Playback
• Select “ Title” to keep on repeating the currently played title
When the random mode is switched on the chapters on the
loaded DVD will be played in a random order.
Proceed in the following manner to switch on random playback …
1 Press the “Mode” key on the remote control once during
playback. The “Play Mode” menu will then be displayed
on the television screen:
– on most DVDs this will be the entire fi lm – until repeat
play is switched off or play is terminated by pressing the
“Stop” key twice.
• Select “Chapter” to keep on repeating the currently played
chapter until repeat play is switched off or play is terminated by pressing the “Stop” key twice.
or
Play Mode
Mode Off
Repeat Off
2 The “Mode“ menu item is the fi rst one to be automatically
selected.
Press the “OK” key to select between the two options
“Off ” and “Shuffl e” (in addition, with VCDs/S-VCDs you
can select the “PBC” option). Select “Shuffl e” and press the
“Mode” key once again. The “Play Mode” menu is faded
out and the shuffl e function is switched on.
3 To turn off the shuffl e function press the “Mode key dur-
ing playback and select in the “Play Mode” menu, under
the “Mode” menu item the “Off ” option by pressing the
“OK” key. Press the “Mode” key once again to switch off
the shuffl e function.
Repeat play
The “Repeat Playback” function …
... with DVDs either titles or chapters of the loaded DVD can
be repeated.
... with VCDs/S-VCDs either individual titles or the entire
VCD/SVCD can be repeated.
• While the fi lm is playing, press the „Repeat“ button once:
the Repeat function is deactivated.
• While the fi lm is playing, press the „Repeat“ button twice:
the current chapter is repeated until you press the „Re peat“ button again three times; the repeat function is
deactivated.
• While the fi lm is playing, press the „Repeat“ button three
times: the current title (for DVDs mostly the entire fi lm)
must be repeated until you press the „Repeat“ button
again twice.
With VCDs/S-VCDs: By pressing the “Ok” button you can
select between the “Off ”, Single” and “All” options.
• Select “Single“ to continue repeating the currently played
title on the VCD/S-VCD until repeat playback is switched
off or playback is terminated by pressing the “Stop”
button twice.
• Select “All” to continue repeating the entire VCD/S-VCD
until until repeat playback is switched off or playback is
switched off by pressing the “Stop”
button twice.
3 To switch off repeat play, press the “Mode” key during
playback and select in the “Play Mode” menu under the
“Repeat” menu item to “Off ” option by pressing the “OK”
key. Repeat play is switched off when the “Mode” key is
depressed once again.
Proceed in the following manner to switch on repeat play …
1 Press once during playback the “Mode” key on the remote
control. The “Play Mode” menu will be displayed on the
television screen:
2 Press the control key once to select the “Repeat” menu
item:
Silvercrest KH 6508/KH 6509
Repeating sequences (A – B)
Any sequence within a chapter of the currently loaded DVD/
VCD/S-VCD can be repeatedly played with this function.
Proceed in the following manner …
1 Press during playback the “A-B” key on the remote con-
trol as soon as the desired beginning of the sequence
is played; “Rep A –“ will be displayed on the television
screen.
Page 33

2 Press once again the “A – B” key as soon as the end of the
desired sequence is reached. Ensure that the start and
end of a sequence is within a chapter.
Repeat playback of the selected sequence starts immediately without having to press the “Play”
key. The sequence will continue to be played until the “A – B” key is
pressed once again to switch off the function. “Rep Off ”
will then be displayed on the television screen.
Bookmark function
So-called “bookmarks” can be set while a DVD/VCD/S-VCD is
being played so that selected passages in a fi lm can be viewed
once again later on. Up to three bookmarks can be set.
Proceed in the following manner …
1 Press once, while a fi lm is being played, the “Mark” key
on the remote control. The following will then appear on
the television screen:
Bookmark 1 – – : – – : – –
Bookmark 2 – – : – – : – –
Bookmark 3 – – : – – : – –
DVD/VCD/S-VCD
2 As soon as the chapter is reached where a bookmark is
to be set, press the “OK” key on the remote control. The
precise time position of this chapter within the fi lm will
then be shown in hours, minutes and seconds under
“Bookmark 1”.
3 To set another bookmark, press the control key once
to select “Bookmark 2” displayed on the television screen.
Press the “OK” key once again as soon as the chapter is
reached where a second bookmark is to be set.
4 Proceed in such a manner to set a third bookmark. Hav-
ing set all the desired bookmarks, press the “Mark” key
once again to fade out the selected bookmarks on the
television screen.
5 Later, if you wish to skip to the chapter in which a book-
mark has been set, then simply press the “Mark” key once
again.
6 Select the desired book mark with the control keys and .
7 Confi rm the choice by pressing the “OK” key once. Play-
back of the selected chapter now commences automatically.
Silvercrest KH 6508/KH 6509
Page 34

Playing audio-CDs
Silvercrest KH 6508/KH 6509
Page 35

12. Playing audio-CDs
Proceed in the following manner to play audio-CDs on the
DVD Player …
1 Switch on the television to which the DVD Player is con-
nected.
2 Ensure that the DVD Player has been switched on and is
ready for operation.
If the television, DVD player and possibly other connected devices (e.g. an audio component) are operational and switched
on and the DVD player is properly connected to the television,
you can now see the SilverCrest opening logo on the television:
6 The contents of the audio-CD will then be loaded; this
will take several seconds. “Load” will fl ash on the display
on the front of the DVD Player, and “Loading” will be displayed on the television screen.
7 As soon as the contents of the inserted audio-CD has
been loaded, the display on the front of the DVD Player
will briefl y indicate the following …
1 2 3 4
“CD“
1
The symbols and for playback mode
2
CD
“NoDisc” will appear on the television screen and on the
display on the front of the DVD Player if there is no disc
in the disc drawer of the DVD Player.
3 Open the disc draw on the front of the DVD Player by
pressing the “Open/Close” button once on the front
panel of the DVD Player, or on the remote control. “Open”
will then appear on the display on the front of the DVD
Player and on the television screen.
4 Place an audio-CD, label facing upwards, in the disc
drawer.
5 Press once again the “Open/Close” button on the front
of the DVD Player or on the remote control to close the
disc drawer. “Close” will then appear on the display on
the front of the DVD Player and on the television screen
while the disc drawer is closing.
The number of the currently played track
3
Time played hitherto in hours, minutes and seconds
4
8 While stop mode, the display on the front of the DVD
player will be briefl y indicate the following...
• The total number of titles on the loaded audio-CD
• The total playing time of the titles on the loaded audioCD
. Functions while playing an audio-CD
The following DVD Player functions can be used while an
audio-CD is being played …
Stopping playback (Pause)
Proceed in the following manner to stop a title on the loaded
audio-CD …
1 Press once the “Pause/Step” button on the front of the
DVD Player or on the remote control while the title is
being played. “ “ Pause will fl ash on the display on the
front of the DVD Player, and “ “ Pause will be displayed
on the television screen.
2 Press the “Play” button once to continue playback of
the title.
Silvercrest KH 6508/KH 6509
Page 36

Ending playback (Stop)
To terminate playback of a title on the loaded audio-CD, press
the “Stop” button on the front of the DVD Player or on the
remote control once.
2 Confi rm by pressing the “OK” button on the remote con-
trol once. Playback of the title with the entered number
starts immediately.
Search function
... with Resume function
If playback of a title on the loaded audio-CD has been terminated by pressing the “Stop” button once, then the DVD
Player will automatically store the point at which playback
was terminated (“Resume” function”). The television screen
will display “Stop [Play to Resume]”. As soon as the “Play”
button on the front of the DVD Player or on the remote control is pressed again, playback of the title will be resumed
from the point it was stopped.
... without Resume function
If playback of a title on the loaded audio-CD has been terminated by pressing the “Stop” button once, pressing the
“Stop” button a second time will delete the stored point
at which playback was interrupted. Consequently, when the
“Play” button is pressed, playback will commence with the
fi rst title on the audio-CD.
Jumping to the beginning of a title (Skip)
Pressing the “Skip Forward” and “Skip Backward” buttons on the front of the DVD Player while a title is being
played will initiate the following functions …
The Search function can be used to directly select certain
titles, or passages of certain titles, on the loaded audio-CD:
Selecting passages of a title by way of the
time position
Proceed as follows to select a certain passage of a given title
by entering its time position …
1 Press the “Search” button on the remote control once
while a title is being played or during stopped playback.
The “Search” menu will be displayed on the television
screen:
Track Search
Time – – : – – : – –
Track – – : – – : – –
2 Enter the six-digit time position in hours, minutes
and seconds in the “Time” input field marked with
“– – : – – : – –“.
Example: You wish to select a passage that commences
one minute after the beginning of the title. Press, one after
the other, the following numeral buttons …
• Advance to the beginning of the next title, or
• Return to the beginning of the preceding title.
The selected title is immediately played without having to
press the “Play” button. The number of the selected title
is indicated on the display on the front of the DVD Player to
the left of the playing time.
Direct title selection
Instead of the “Skip Forward” and “Skip Backward” buttons, titles can be directly selected on the audio-CD that is
being played with the following input procedures:
Entering the title with the numeral buttons
Proceed as follows for direct title selection by entering the
title number with the numeral buttons …
1 Press during title playback, or when playback has been
stopped or terminated, the numeral buttons on the remote control that are equivalent to the title number – e.g.
button “3” for the third title, or consecutively the buttons
“1” and “0” for the tenth title. The entered numbers are
indicated on the television screen.
• “0“, “0“ for 0 hours;
• “0“, “1“ for 1 minutes;
• “0“, “0“ for 0 seconds.
2 Press the “OK” key on the remote control once to start
playback of the title at the selected time position.
Selecting titles by their time position
Proceed in the following manner to select titles on the audio-CD by entering its time position …
1 Press the “Search” button on the remote control twice
during playback. The “Search” menu is displayed on the
television screen:
Disc Search
Time – – : – – : – –
Track – – –
2 Use the numeral keys 0 to 9 to enter in the “Time” input
fi eld marked with “– – : – – : – –“ the six-digit time position, in hours, minutes and seconds, of the required title
on the audio-CD.
2 Then press the “OK” button on the remote control once
to start playback at the selected time position.
CDSilvercrest KH 6508/KH 6509
Page 37

Selecting titles by title numbers
• Three times for the eight-fold search speed; “ x8” is displayed on the television screen.
Instead of entering the title number by way of the numeral
buttons on the remote control, the required title number
can also be entered in the “Search” menu:
1 Press the “Search” button on the remote control twice
during playback. The “Search” menu will be displayed on
the television screen:
Search
Time – – : – – : – –
Track – – –
2 Press the control button once to select the input fi eld
marked with “– – –“.
3 Use the numeral buttons 0 to 9 to enter the number of
the required title on the audio-CD. One- two- and threedigit numbers can be entered.
4 Press the “OK” button on the remote control once to
start playback of the track selected with the entered
number.
Search in Fast Forward/Fast Rewind
Proceed in the following manner to select a certain passage
within a title on the audio-CD by fast search …
1 For fast forward search press the “F.Fwd” button dur-
ing playback …
• Once for double the search speed; “ x2” is displayed on
the television screen.
• Twice times for the four-fold search speed; “ x4” is displayed on the television screen.
• Three times for the eight-fold search speed; “
played on the television screen.
• Four times for 16-fold rapid search speed; „ x16“ is dis
played on the TV screen
• Five times for 32-fold rapid search speed; „ x32“ is dis
played on the TV screen
x8” is dis-
• Four times for 16-fold search speed; „
x16“ is displayed
on the TV screen
• Five times for 32-fold search speed; „ x32“ is displayed
on the TV screen
Please note:
The current title can be heard at high playback speed
during fast search.
2 To continue title playback in normal speed at any se-
lected point, press the “Play” button on the front of
the DVD Player or on the remote control once during
fast forward/rewind search; “Play ” is displayed on the
television screen.
Programmed playback (Program)
The “Program” function enables you to compile your own
music program by selecting specifi c titles on the loaded audio-CD. Moreover, you can also decide the sequence in which
the titles are to be played. A maximum of twelve tracks from
an audio-CD can be compiled for programmed playback.
Proceed in the following manner for programmed playback …
1 Press the “PRG” button on the remote control once during
playback or stopped playback. The program menu will
be displayed on the television screen:
Program Input Title/Chapter
1 – – – – 8 – – – – 15 – – – – 22 – – – –
2 – – – – 9 – – – – 16 – – – – 23 – – – –
3 – – – – 10 – – – – 17 – – – – 24 – – – –
4 – – – – 11– – – – 18 – – – – 25 – – – –
5 – – – – 12 – – – – 19 – – – –
6 – – – – 13 – – – – 20 – – – –
7 – – – – 14 – – – – 21 – – – –
Play program Clear all
Each of the faded-in numbers from 1 to 25 stands for one
of the available program memory locations.
CD
For fast search in rewind press the “F.Rwd” button
during playback …
• Once for double the search speed; “ x2” is displayed on
the television screen.
• Twice times for the four-fold search speed; “ x4” is displayed on the television screen.
2 Use the control buttons on the remote control
to alternate between the program storage places 1 to 25
marked with “– – – “. Enter the title numbers in the input
fi elds with the numeral buttons 0 to 9 on the remote
control. One- two-digit and three-digit numbers can be
entered.
3 To clear an entry in one of the input fi elds, select the cor-
responding input fi eld with the control buttons
Silvercrest KH 6508/KH 6509
Page 38

and press the “CLR” button once. The display returns to
“– – – “.
To clear the entries in all input fi elds, select the “Clear all”
option underneath the input fi elds with the control buttons , and then press the “OK” button once.
Switching on diff erent Play Modes
The following Play Modes can be switched on during playback of an audio-CD:
Random playback
4 Having programmed all the required titles, select the “Play
program” option under the input fi elds with the control
buttons , and then press the “OK” button once.
Playback of the music program commences with the title
of the audio-CD selected for program storage place 1.
5 Within the programmed titles it is possible to jump for-
ward to the beginning of the next title, or back to the
previous title, by pressing the “Skip” or “Skip” buttons on the front of the DVD Player.
6 To clear programmed playback press the “Stop” button
on the front of the DVD Player or remote control twice
during playback.
Program example
You wish to select the third and tenth title of an audio-CD
for programmed playback.
1 Press the “3” button once in the input fi eld of the program
storage place 1.
2 Press the control button once to select the input fi eld
of the program storage place 2.
3 Press the “1” and “0” buttons in succession in the input
fi eld of the program storage place 2.
4 Select the “Play Program” option with the control buttons
, then press the “OK” button to start playback of
the programmed titles.
Fading-in CD information
In addition to the information displayed on the television
screen …
• The played time of the currently played audio-CD
• The remaining time up to the end of the currently played
title on the audio-CD
The titles on the loaded audio-CD are played in a random
sequence when random playback is switched on in the following manner …
1 Press the “Mode” button on the remote control once dur-
ing playback. The “Play Mode” menu is displayed on the
television screen:
Play Mode
Mode Off
Repeat Off
2 The “Mode” menu item is the fi rst to be automatically
selected. Press the “OK” button on the remote control
to selected between the two options “Off ” and “Shuffl e”.
Set “Shuffl e” and press the “Mode” button once again.
The mode menu is faded out and the shuffl e function is
then switched on.
3 To switch off the shuffl e function, press the “Mode” key
during playback , and select in the “Play Mode” the “Off ”
option within the “Mode” menu item by pressing the “OK”
button. Renewed depression of the “Mode” button turns
off the shuffl e function.
Repeat play
Individual titles, as well as the entire audio-CD, can be repeated with the “Repeat Play” function.
Proceed in the following manner to switch on repeat play …
1 Press once during playback the “Mode” key on the remote
control. The “Play Mode” menu will be displayed on the
television screen.
2 Press the control key once to select the “Repeat” menu
item:
Play Mode
Mode Off
Repeat Off
… press the “display” button on the remote control once during playback to fade in the number of the currently played
title.
To fade out the CD information press the „Display“ button
once again.
CDSilvercrest KH 6508/KH 6509
3 Press the “OK” button to select between the “Off ”, Single”
and “All” options.
• Select “Single“ to continue repeating every title you select
on the audio-CD until the repeat mode is switched off , or
playback is terminated by pressing the “Stop” button
twice.
Page 39

• Select “All” to continue repeating the entire CD until repeat play is switched off , or playback is terminated by
pressing the “Stop” button twice.
4 To switch off repeat play, press the “Mode” button dur-
ing playback, and select in “Play Mode” the “Off ” option
in the “Repeat” menu item by pressing the “OK” button.
Repeat playback is switched off when the “Mode” button
is pressed once again.
Repeating sequences (A – B)
4 Proceed in the afore-described manner to set a third
Bookmark. After all the required Bookmarks have been
set, press the “Mark” button once again to fade out the
selected Bookmarks on the television screen.
5 When, later, you wish to advance to the passages where
you have set Bookmarks, press the “Mark” button once
again.
6 Select with the control buttons and the required
Bookmark.
Any sequence of the currently played title can be repeated
with this function.
Proceed in the following manner …
1 Press during title playback the “A-B” button on the remote
control as soon as the required sequence commences.
“Rep A -” is displayed on the television screen.
2 Press the “A – B” button once again as soon as the end of
the required sequence is reached. Ensure that the beginning and end of the sequence are always within a title.
Repeat playback of the selected sequence commences
immediately without having to press the “Play” button.
The sequence continues to be repeated until the “A – B”
button is pressed once again to turn off the function. “Rep
Off ” is then briefl y displayed on the television screen.
Bookmark function
So-called Bookmarks can be set while an audio-CD is being
played so that the selected passages of individual titles can
then be heard once again later on.
7 Confi rm the choice by pressing the “OK” button once.
Playback of the selected passage commences automatically at the point where you have set the Bookmark.
CD
Proceed in the following manner to set up to three Bookmarks …
1 Press the “Mark” button on the remote control once while
the title is being played. The following will be displayed
on the television screen:
Bookmark 1 – – : – – : – –
Bookmark 2 – – : – – : – –
Bookmark 3 – – : – – : – –
2 As soon as the passage is reached where you wish to set
a Bookmark, press the “OK” button on the remote control
once. The precise time position of this passage within the
title will then by shown “under “Bookmark 1” in hours,
minutes and seconds
3 To set a second Bookmark press the control button
once again so that “Bookmark 2” can be selected on the
faded-in display on the television screen. Press the “OK”
button once again as soon as the passage is reached
where the second Bookmark is to be set.
Silvercrest KH 6508/KH 6509
Page 40

Playing CD-Rs/CD-RWs
with MP3, DivX, Nero
Digital or WMA Files
Silvercrest KH 6508/KH 6509
Page 41

13. Playing CD-Rs/CD-RWs with MP3, DivX,
Nero Digital or WMA Files
To play a CD-R/CD-RW with MP3 , DivX, Nero-Digital or WMA
fi les with the DVD-Player ...
1 Switch on the television to which the DVD Player is con-
nected.
2 Ensure that the DVD Player has been switched on and is
operational.
If the television, DVD player and possibly other connected devices (e.g. an audio component) are operational and switched
on and the DVD player is properly connected to the television,
you can now see the SilverCrest opening logo on the television:
6 The contents of the CD-R/CD-RW is then being loaded;
this can take several seconds. “Load” will fl ash on the display on the front of the DVD Player, and “Loading” will be
displayed on the television screen.
Please note:
As opposed to audio CDs, the titles on a CD-R/CDRW with MP3, DivX, Nero-Digital or WMA fi les can be
stored folders, for example to organise titles of various genres. Depending on this, the following steps
- if necessary - are each described for CD-Rs/CD-RWs
with folder structure and for CD-Rs/CD-RWs without
folder structure.
For this subject please refer to Chapter 17 “Glossary/In-
➧
dex”.
“NoDisc” will appear on the television screen and on the
display on the front of the DVD Player if there is no disc
in the disc drawer of the DVD Player.
3 Open the disc drawer on the front of the DVD Player by
pressing the “Open/Close” button once on the front
panel of the DVD Player, or on the remote control. “Open”
will then appear on the display on the front of the DVD
Player and on the television screen.
4 Insert a CD-R/CD-RW with MP3-, DivX-, Nero-Digital or
WMA fi les with the marked/labelled side facing up into
the disc compartment.
5 Press once again the “Open/Close” button on the front
of the DVD Player or on the remote control to close the
disc drawer. “Close” will then appear on the display on
the front of the DVD Player and on the television screen
while the disc drawer is closing.
7 As soon as the contents of the inserted CD-R/CD-RW has
been loaded, the CD-R menu is faded in on the television
screen. All functions available during playback of the CDR/CD-RW with MP3, DivX, Nero Digital or WMA fi les can
be controlled by way of the CD-R menu.
When there are no folders: The fi rst title on the CD-R/
CD-RW is immediately played.
8 The CD-R-Menu shows …
When there are no folders:
00:01:15
CD-R MENU
ROOT
Volume 1 – Title 1 1
Volume 2 – Title 2 2
Mode Folder Normal
ROOT 0
• on the left-hand side the main folder (Root) on the loaded
CD-R/CD-RW; this is also displayed when the MP3 , DivX,
Nero-Digital or WMA fi les are not stored in folders on the
loaded CD-R/CD-RW.
• On the right-hand side of all titles of the loaded CD-R/CDRW (here designated as “Volume 1 - Title 1“ and “Volume
2 - Title 2“)
• Under the mode selection bar
MP3, WMA,
DivX and Nero Digital
Silvercrest KH 6508/KH 6509
Page 42

Please continue reading directly at Step 10.
When there are folders:
CD-R MENU
ROOT
Mode Folder Normal
ROOT 0
Folder 1 1
Folder 2 2
• On the left-hand side – the main folder (“Root”) on the
loaded CD-R/CD-RW
• Detailed information concerning the currently played
title is faded in to the left, underneath the CD-R menu,
e.g. the name of the “Artist”, the name of the “Album”, the
“Year” of the recording, etc.
Please note:
Display of the detailed information relating to the currently played title presupposes that this information
has been stored on the CD-R/CD-RW. No information,
or only limited information relating to a title, will be
displayed, depending on the above circumstance.
The display on the front of the DVD Player indicates …
• On the right-hand side – all sub-folders with MP3 , DivX,
The number of the currently played title
1
Nero-Digital or WMA fi les on the loaded CD-R/CD-RW
(here designated as “Folder 1“ and “Folder 2“)
• Under the mode select bar
2
The time hitherto played of the currently played title.
1
2
DivX and Nero Digital
The fi rst sub-folder on the right-hand side is the fi rst
MP3, WMA,
to be automatically selected. Press the control buttons
on the remote control to change between the
individual folders; press the “OK” button once to display
the contents of a selected folder.
9 If you have selected a folder to display its contents, then
For DivX, Nero Digital Files the display on the front of the
DVD Player indicates …
The number of the currently played title
1
the following will be displayed in the CD-R menu …
2
The time hitherto played of the currently played title.
• On the left-hand side – all sub-folders with MP3 , DivX,
Nero-Digital or WMA fi les (consecutively numbered) on
1
2
the loaded CD-R/CD-RW
• On the right-hand side – all titles (consecutively numbered) within the currently selected sub-folder
Changing folders (only if there are folders)
CD-R MENU
If you wish to play a title from another sub-folder on the CD-
ROOT 0
Folder 1 0
Folder 2 0
.. 0
Volume 1 – Title 1
Volume 2 – Title 2 1
R/CD-RW with MP3 or WMA fi les it will fi rst be necessary to
change the current folder to the required folder.
Proceed as follows …
Mode Folder Normal
1 If a title is currently being played, then discontinue play-
10 Press the control buttons and on the remote control
to alternate between the individual titles; press the “OK”
back by pressing the “Stop” button on the front of the
DVD Player or on the remote control.
button once to select a title for playback. The selected
title will then be played immediately without having to
press the “Play” button.
2 Press the control button on the remote control once to
change over from the list of titles of the currently selected
sub-folder in the right half of the CD-R menu to the list
Displayed on the television screen …
of sub-folders in the left half of the menu.
• “Play ” is briefly shown to the left above the CD-RMenu
• The currently played time is faded-in to the right above
the CD-R-Menu. This display can be faded out by pressing the “Display” button on the remote control once.
Silvercrest KH 6508/KH 6509
3 Select at this point with the control buttons and the
sub-folder to which you wish to change.
4 Confi rm the selection by pressing the “OK” button on the
remote control once.
Page 43

5 The list of titles in the selected sub-folder are shown in
the right half of the CD-R menu.
• Advance to the beginning of the next title, or
6 Select a new title for playback with the control buttons
and and the “OK” button.
Functions when playing a CD-R/CD-RW with
MP, DivX, Nero Digital or WMA fi les
The following functions of the DVD Player can be used while
a CD-R/CD-RW with MP3 or WMA fi les is being played …
Stopping playback (Pause)
Proceed in the following manner to stop a title on the loaded
CD-R/ CD-RW …
1 Press once the “Pause/Step” button on the front of the
DVD Player or on the remote control while the title is
being played. “ “ will fl ash on the display on the front
of the DVD Player, and “ “ Pause will be shown on the
television screen.
2 Press the “Play” button once to continue playback of
the title.
Ending playback (Stop)
To terminate playback of a title on the loaded CD-R/CD-RW,
press the “Stop” button on the front of the DVD Player or
on the remote control once.
... with Resume function
If playback of a title on the loaded CD-R/CD-RW has been terminated by pressing the “Stop” button once, then the DVD
Player will automatically store the point at which playback
was terminated (“Resume” function). The television screen
will display “Stop [Play to Resume]”. As soon as the “Play”
button on the front of the DVD Player or on the remote control is pressed, playback of the title will be resumed from the
point it was stopped.
... without Resume function
If playback of a title on the loaded CD-R/CD-RW has been
terminated by pressing the “Stop” button once, then press
the “Stop” button a second time to clear the stored point
at which playback was interrupted. Consequently, when the
“Play” button is pressed, playback will commence with the
start of the last selected title.
• Return to the beginning of the preceding title.
The selected title is immediately played without having to
press the “Play” button. The number of the selected title
is indicated on the display on the front of the DVD Player to
the left of the playing time.
If there are folders: In this case it will only be possible to
skip within the currently selected sub-folder …
• Advance to the beginning of the next title, or
• Return to the beginning of the preceding title.
Direct title selection
Instead of the control buttons and , titles can be directly
selected on the CD-R/CD-RW that is being played by the following input procedures:
Entering the title with the numeral buttons
Proceed as follows to select a title directly by entering the
title number with the numeral buttons …
1 Press during playback of a title, or when playback has
been stopped or terminated, the numeral buttons that
are equivalent to the title number – e.g. button “3” for
the third title, or consecutively the buttons “1” and “0” for
the tenth title. The entered numbers are indicated on the
television screen.
If there are folders: With the entry of the title number
by way of the numeral keys it is only possible to select
titles within current sub-folder for playback.
Please Note:
This option does not work with DivX and Nero-Digital fi les!
Selecting a title by way of the search function
(Search)
The search function can also be used for direct selection of
a title in the current sub-folder.
Proceed in the following manner …
MP3, WMA,
DivX and Nero Digital
Jumping to the beginning of a title (Skip)
Pressing the “Skip Forward” and “Skip Backward” buttons on the front of the DVD Player while a title on the loaded
CD-R/CD-RW with MP3 or WMA fi les is being played will initiate the following functions …
1 Press the “Search” button on the remote control once
during playback of a title during Stop mode.
2 The “Search” menu appears on the television screen.
Silvercrest KH 6508/KH 6509
Page 44

Search
Track – – – –
3 Enter the number of the required title with the numeral
buttons 0 to 9.
If there are folders: All titles on the current sub-fi le are
played consecutively. Playback ends with the last title of
the current sub-folder.
Folder repeat
One to four digital title numbers can be entered.
If there are no folders: All titles on the CD-R/CD-RW are
played consecutively. After the last title on the CD-R/CD-
4 Press the “OK” button on the remote control once. Play-
back with the title of the entered number will then start
RW has been played, playback recommences with the
fi rst title on the CD-R/CD-RW
automatically.
If there are folders: All titles in the current sub-folder are
If there are folders: By entering the title number via the
search function it is possible to select the title within the
currently selected sub-folder for playback.
Please Note:
played consecutively. After the last title in this sub-folder
has been played, playback recommences with the fi rst
title of the sub-folder.
Folder repeat is continued until playback is stopped by
pressing the “Stop” button twice.
This option does not work with DivX and Nero-Digital fi les!
Disc Normal
DivX and Nero Digital
Repeating sequences (A – B)
MP3, WMA,
Any sequence of the currently played title can be repeated
If there are no folders: All titles on the CD-R/CD-RW are
played consecutively. Playback ends with the last title on
the CD-R/CD-RW.
with this function.
If there are folders: All titles in the sub-folders of the
Proceed in the following manner …
CD-R/CD-RW are played consecutively. Playback ends
with the last title of the last sub-folder.
1 Press during title playback the “A-B” button on the remote
control as soon as the required sequence commences.
Disc repeat
“Rep A -” is displayed on the television screen.
If there are no folders: All titles on the CD-R/CD-RW are
2 Press the “A – B” button once again as soon as the end of
the required sequence is reached. Ensure that the beginning and end of the sequence are always within a title.
played consecutively. After playback of the last title on
the CD-R/CD-RW playback is resumed with the fi rst title
on the CD-R/CD-RW.
Repeat playback of the selected sequence commences
immediately without having to press the “Play” button.
The sequence continues to be repeated until the “A – B”
button is pressed once again to turn off the function.
Please Note:
This option does not work with DivX, WMA and NeroDigital fi les!
Select Play mode
It is possible to select between the following play modes
for the playback on CD-Rs/CD-RWs with MP3, DivX, Nero
Digital or WMA fi les:
Folder Normal
If there are no folders: All titles on the CD-R/CD-RW are
played consecutively. Playback ends with the last title on
CD-R/CD-RW.
If there are folders: All titles in all sub-folders of the CDR/CD-RW are played consecutively. After playback of the
last title in the last sub-folder of the CD-R/CD-RW, playback is resumed with the fi rst title of the fi rst sub-folder
of the CD-R/CD-RW.
Disc repeat is continued until playback is stopped by
depressing the “Stop” button twice.
Shuffle
If there are no folders: All titles on the CD-R/CD-RW are
played in a random sequence until each title on the CDR/CD-RW has been played once.
If there are folders: All titles in the current sub-folder
are played in a random sequence until each title in the
current sub-folder has been played once.
Program Begin/Program End
If there are no folders: With this function you can compile your own music programme by selecting only cer-
Silvercrest KH 6508/KH 6509
Page 45

tain titles on the CD-R/CD-RW with MP3 or WMA fi les
for playback. You can decide the sequence in which the
titles are played.
If there are folders: With this function you can compile
your own music programme by selecting certain titles
within the current sub-folder for playback. You can decide
the sequence in which the titles are played.
To operate the “Programmed Playback” function please
➧
refer to Chapter “Programmed Playback (Program)”.
Single Track
3 One of the Play Modes is displayed with each depres-
sion of the “OK” button. When the required play mode
is displayed, then leave the mode select bar by pressing
the control button once. The mark is then once again
located in the list of the titles of the previously selected
sub-folder.
4 Proceed as follows to playback titles in the set mode …
If there are no folders:
• Press the “Play” button once to start playback of the
fi rst tile on the CD-R/CD-RW
If there are no folders: The currently selected title is
played once again.
If there are folders: The currently selected title in the
current sub-folder is played once.
Repeat Single
If there are no folders: Playback of the currently selected
title is repeated.
If there are folders: Playback of the currently selected title in the current sub-folder is continuously repeated until
termination by pressing the “Stop” button twice.
To select the Play Modes ….
1 In the event that a CD-R/CD-RW with MP3 or WMA fi les
is being played, then playback is terminated by pressing
the “Stop” button on the front of the DVD Player or on
the remote control once.
2 Press the control button once whilst in the list of the
titles of a sub-folder (the mark is therefore in the righthand half of the CD-R menu; see fi g. 1). The mark will
then change to the mode select bar; the preset “Folder
Normal” mode has been selected (see fi g. 2).
or
• Press the “OK” button once to start playback at the currently selected title.
If there are folders:
• Press the “Play” button once to start playback of the
fi rst title in the current sub-folder
or
• Press the “OK” button once to start playback of the currently selected title in the current sub-folder.
Programmed playback (Program)
Set the “Program Begin” mode to select several titles for programmed playback:
1 The fi eld “Program __:__“ is faded in above the CD-R menu.
Select the fi rst titles to be programmed with the control
buttons and on the remote control.
If there are folders: Titles can only be selected for programmed playback from the currently selected sub folder
of the CD-R/CD-RW. Titles from diff erent sub-folders cannot be selected for programmed playback.
MP3, WMA,
DivX and Nero Digital
CD-R MENU
ROOT
Folder 1
Folder 2
Mode Folder Normal
.. 0
MP
Volume 1 – Title 1 1
MP
Volume 2 – Title 2 2
Fig. 1
CD-R MENU
ROOT
Folder 1
Folder 2
Mode Folder Normal
.. 0
MP
Volume 1 – Title 1 1
MP
Volume 2 – Title 2 2
Fig. 2
2 Confi rm the selected titles by pressing the “OK” button
on the remote control.
3 The selected title is displayed as the fi rst stored title for
programmed playback in the faded-in fi le above the CDR menu – e.g. “Program 1:05” if the fi fth title of the currently selected sub-folder was selected as the fi rst title
for programmed playback.
4 Repeat the steps 1 and 2 until all the required titles have
been selected for programmed playback.
5 Then press the control button once to change the
mode select bar.
6 Press the “OK” button once; the “Program End” mode is
displayed in the mode select bar.
Silvercrest KH 6508/KH 6509
Page 46

7 Press the “Play” button on the front of the DVD Player
or on the remote control once to start playback of the
programmed titles.
8 Within the programmed titles it is then possible to jump
to the beginning of the next title or back to the previous
title by pressing the “Skip” or “Skip” buttons on the
front of the DVD Player or on the remote control.
To clear the entries in all input fi elds, select the “Clear
all” option under the input fi elds with the control keys
and then press the “OK” button once.
4 After all the required titles have ben programmed, select
the “Play program” option below the input fi elds with the
control buttons . Press the “OK” button once.
Playback of the compiled music program commences
with the title selected for program storage place 1.
9 To clear programmed playback press twice during play-
back, the “Stop” button on the front of the DVD Player
or on the remote control.
5 By pressing within the programmed titles the buttons
“Skip” and “Skip” on the front of the DVD Player or
on the remote control, you can advance to the beginning of the next title, or jump back to the beginning of
It is also possible to proceed in the following manner for
the previous title.
programmed playback:
6 To clear programmed playback, press during playback
Note
the “Stop” button on the front of the DVD Player or on
the remote control twice.
This programming only works if the CD has been fresh-
DivX and Nero Digital
ly inserted and no music has yet been started.
MP3, WMA,
1 Press the “PRG” button on the remote control once dur-
ing playback or when playback has been stopped. The
following will then be shown on the television screen:
Program Input Title/Chapter
1 – – – – 8 – – – – 15 – – – – 22 – – – –
2 – – – – 9 – – – – 16 – – – – 23 – – – –
3 – – – – 10 – – – – 17 – – – – 24 – – – –
4 – – – – 11– – – – 18 – – – – 25 – – – –
5 – – – – 12 – – – – 19 – – – –
6 – – – – 13 – – – – 20 – – – –
7 – – – – 14 – – – – 21 – – – –
Play program Clear all
Each of the faded-in numbers from 1 to 25 stand for one
of the available program storage places.
2 Use the control buttons on the remote control
to change between the “– – –“ marked input fi elds of the
program storage places 1 to 25. Enter the title numbers
in the input fi elds with the numeral buttons 0 to 9 on the
remote control. One-, two- and three-digit title numbers
can be entered.
If there are folders: Only titles from the current subfolder can be selected for programmed playback. Titles
from diff erent sub-folders cannot be selected for programmed playback.
3 To clear an entry in one of the input fi elds, select the cor-
responding input fi eld with the control buttons
and press the “CLR” button once. The display jumps back
to ”– – –“.
Silvercrest KH 6508/KH 6509
Page 47

Playback JPEG-CDs
Silvercrest KH 6508/KH 6509
Page 48

14. Playback JPEG-CDs
Proceed as follows to playback CD-Rs/CD-RWs with pictures
in JPEG format with the DVD Player …
1 Switch on the television to which the DVD Player is con-
nected.
2 Ensure that the DVD Player has been switched on and is
operational.
If the television, DVD player and possibly other connected devices (e.g. an audio component) are operational and switched
on and the DVD player is properly connected to the television,
you can now see the SilverCrest opening logo on the television:
6 The contents of the CD-R/CD-RW will then be loaded, a
process that can take several seconds. During this period
“Load” will fl ash on the display on the front of the DVD
Player and “Loading” will be displayed on the television
screen.
Please note:
Contrary to audio-CDs, JPEG pictures on CD-Rs/CDRWs can be stored in folders, e.g. to sort pictures according to diff erent genres.
For this subject please refer to Chapter 17. “Glossary/In-
➧
dex”.
If there are folders: Please continue to read directly at
Step 8.
7 The JPEG pictures on the loaded CD-R/CD-RW are then
each shown consecutively for a few seconds on the television screen.
If there are no folders: The display on the front of the
“NoDisc” will be displayed on the television screen and
DVD Player will display …
on the display on the front of the DVD Player if there is
JPEG
no disc in the disc drawer of the DVD Player.
3 Open the disc drawer on the front of the DVD Player by
“JPEG“
1
The symbols and for the Play Mode
2
The number of the currently shown JPEG picture
3
2 3 1
pressing the “Open/Close” button on the front of the
DVD Player or on the remote control. “Open” will then
appear on the display on the front of the DVD Player and
on the television screen.
8 The CD-R menu will then appear on the television screen.
All functions available during playback of JPEG CD can
be controlled via the CD-R menu.
9 The following can be seen in the CD-R menu ...
4 Place a CD-R/CD-RW with JPEG pictures – label facing
If there are no folders:
upwards – in the disc drawer.
CD-R MENU
5 Renewed depression of the “Open/Close” button on
the front of the DVD Player, or on the remote control, will
close the disc drawer. “Close” will then appear on the display on the front of the DVD Player and on the television
ROOT ROOT 0
JPG
Picture 1 1
JPG
Picture 2 2
screen.
Mode Folder Normal
Silvercrest KH 6508/KH 6509
Page 49

• On the left-hand side the main folder (“Root”) on the
loaded CD-R/CD-RW; this is also shown if pictures are
not stored in folders on the loaded CD-R/CD-RW.
• On the right-hand side all pictures of the loaded CD-R/
CD-RW (here referred to as “Picture 1” and “Picture 2”).
• On the right-hand side: all pictures (numbered consecutively) with the current sub-folder
11 Press the control buttons and on the remote control
to change between the individual pictures of the list; press
the “OK” button once to select a picture for display. The
selected picture will then be immediately displayed.
Please note:
If only one picture is shown on the right-hand side,
even though several pictures are stored on the loaded
CD-R/CD-RW, then this will be the last picture in the
list. In this case continue pressing the control button
until all pictures are displayed.
• Under the mode select bar
Please continue to read directly at Step 11.
If there are folders:
CD-R MENU
ROOT ROOT 0
Mode Folder Normal
• On the left-hand side of the main folder (“Root) on the
loaded CD-R/CD-RW
Folder 1 1
Folder 2 2
“ Play” will be briefl y displayed on the television screen
on the left-hand side above the CD-R menu, while the
display on the front of the DVD Player will indicate the
number of the currently displayed picture.
Change folders (only if there are folders):
If a picture from a sub-folder on the loaded CD-R/CD-RW is
to be shown, then it will be necessary to change from the
current folder to the required folder.
For this purpose, proceed in the following manner …
1 In the event that a picture is shown, then display can be
interrupted by pressing the “Stop” button on the front
of the DVD Player, or on the remote control, once.
2 Press the control button on the remote control once to
change from the list of pictures of the current sub-folder
in the right half of the CD-R menu to the list of sub-folders in the left half of the menu.
3 Select with the control buttons and to change over
to the required sub-folder.
• On the right-hand side all sub-folders on the loaded CDR/CD-RW (here referred to as “Folder 1” and “Folder 2”).
• Under the mode select bar
The fi rst sub-folder on the right-hand side is automatically
selected fi rst. Press the control buttons on the remote control
or the numbers on the right in the menu with the number
keys on the remote control, to change over between the individual folders; press the „OK“ button once, to display the
contants of a selected folder.
10 If you have selected a folder to see its contents, then the
CD-R menu will display …
CD-R MENU
ROOT 0 ROOT 0
Folder 1 1
Folder 2 2
Mode Folder Normal
JPG
Folder 1 1
JPG
Folder 2 2
• On the left-hand side: all sub-folders (numbered consecutively) on the loaded CD-R/CD-RW
4 Confi rm your choice by pressing the “OK” button on the
remote control once.
5 The list of pictures in this sub-folder will then be displayed
in the right half of the CD-R menu.
6 Select a new picture for display with the control buttons
and , and with the “OK” button.
7 Press the control buttons and on the remote control
to change between the individual pictures in the list; press
the “OK” button once to select a picture for display. The
selected picture is displayed instantly.
“ Play” is displayed on the television screen on the lefthand side above the CD-R menu; the number of the currently displayed picture is shown on the display on the
front of the DVD Player.
. Functions when displaying JPEG pictures
The following functions of the DVD Player can be used while
the JPEG pictures are being displayed …
JPEG
Silvercrest KH 6508/KH 6509
Page 50

To stop display (Pause)
To display the current picture for an indefi nite period, press
during picture display the “Pause/Step” button on the
front of the DVD Player or on the remote control. “ “ will
fl ash on the display on the front of the DVD Player, while
“ “ Pause will be displayed on the television screen.
Terminating picture display (Stop)
“3” button for the third picture, or consecutively the “1”
and “0” buttons for the tenth picture. The entered numbers are displayed on the television screen.
If there are folders: Only pictures in the current subfolder can be selected by direct picture selection.
Picture selection via the search function
(Search)
To terminate the display of a picture, press the “Stop”
button on the front of the DVD Player, or on the remote
control, once.
... with Resume Function
If you have terminated the display of pictures on the loaded
CD-R/CD-RW by pressing the “Stop” button once, then the
DVD Player will automatically store the point at which picture display was stopped (“Resume Function”). As soon as
the “Play” button on the front of the DVD Player or on the
remote control is depressed once again, picture display from
the stored point is continued.
Jump to the next/previous picture (Skip)
Use the “Skip Forward” and “Skip Backward” buttons on
the front of the DVD Player, or on the remote control, during
picture display to jump between the pictures of the loaded
CD-R/CD-RW, either …
• forward to the next picture, or
JPEG
• backward to the previous picture.
Proceed in the following manner for direct picture selection
by way of the search function …
1 Press while the CD-R menu is faded in the “Search” button
on the remote control once.
2 The “Search” menu is shown on the television screen:
Search
Track – – – –
3 Enter with the numeral buttons 0 to 9 on the remote
control the number of the picture you wish to display.
The picture number can be composed of one to four
digits.
If there are folders: Only the pictures in the current subfolder can be selected with the numeral buttons.
4 Press the “OK” button on the remote control once to in-
stantly display the selected picture.
Selecting the display mode
The selected picture is instantly displayed. The number of
the displayed picture is indicated on the display on the front
of the DVD Player.
The Skip function can be used to jump only between the
next/previous picture of the current sub-folder.
Turning pictures
During the image display you can turn the currently displayed
image in 90° steps. For this purpose, press the control buttons
on the remote control; the image is turned by 90° each
time the button is pressed. The respectively selected turn
– between 90° and 270° - is faded in on the TV screen.
Entering the picture number with the
numeral buttons
Proceed in the following manner to select a picture directly by
entering the picture number with the numeral buttons …
1 During picture display, or when picture display has been
stopped/terminated, enter the title number with the corresponding numeral keys on the remote control – e.g. the
The following Play Modes can be selected to display JPEG
pictures on CD-Rs/CD-RWs:
Folder Normal
If there are no folders: All pictures are shown consecutively. Picture display ends with the last picture on the
CD-R/CD-RW.
If there are folders: All pictures in the current sub-folder
are shown consecutively. Picture display ends with the
last picture of the current sub-folder.
Folder repeat
If there are no folders: All pictures on the CD-R/CD-RW
are shown consecutively. After the last picture on the CD-R/
CD-RW has been shown, display resumes with the fi rst
picture on the CD-R/CD-RW.
If there are folders: All pictures in the current sub-folder
are shown consecutively. After the last picture in this subfolder has been shown, display resumes with the fi rst
picture of the current sub-folder.
Silvercrest KH 6508/KH 6509
Page 51

Folder repeat is continued until picture display is terminated by pressing the “Stop” button twice.
Disc Normal
Single Track
The current picture is shown once.
Repeat Single
If there are no folders: All pictures on the CD-R/CD-RW
are shown one after the other. Picture display ends with
the last picture on the CD-R/CD-RW.
If there are folders: All pictures in all sub-folders of the
CD-R/CD-RW are shown consecutively, starting with the
current sub-folder. Picture display ends with the last picture in the last sub-folder on the CD-R/CD-RW.
Disc repeat
If there are no folders: All pictures on the CD-R/CD-RW
are shown consecutively. After the last picture on the
CD-R/CD-RW has been shown, display is resumed with
the fi rst picture on the CD-R/CD-RW.
If there are folders: All pictures in all sub-folders of the
CD-R/CD-RW are shown consecutively, commencing with
the current sub-folder. After the last picture in the last
sub-folder has been shown, display is resumed with the
fi rst picture in the fi rst sub-folder.
Disc repeat is continued until picture display is terminated
by depressing the “Stop” button twice.
Shuffle
The currently selected picture continues to be shown until
terminated by depressing the “Stop” button twice.
Proceed in the following manner to select a display mode …
1 In the event that JPEG pictures of a CD-R/CD-RW are al-
ready being displayed, then fi rst terminate picture display
by pressing the “Stop” button on the front of the DVD
Player or on the remote control once.
2 Press the control button once while in the picture list
(the marks are in the right half of the CD-R menu; see fi g.
1). The marks then change to the mode select bar; the
preset “Folder Normal” mode has then been selected
(see fi t 2).
If there are no folders:
CD-R MENU
ROOT ROOT 0
JPG
Mode Folder Normal
Picture 1 1
JPG
Picture 2 2
Fig. 1
If there are no folders: All pictures on the CD-R/CD-RW
are shown in a random sequence. Random picture display
is continued until every picture on the CD-R/CD-RW has
been shown once.
If there are folders: All pictures in the current sub-folder
are shown in a random sequence. Random picture display
is continued until every picture in the current sub-folder
has been shown once.
Program Begin/Program End
If there are no folders: This function enables you to
compile your own picture selection by selecting certain
pictures on the CD-R/CD-RW for display. You can determine the sequence in which the pictures are shown.
If there are folders: This function enables you to compile
your own picture selection by selecting certain pictures
of the current sub-folder for display. You can determine
the sequence in which the pictures are shown.
For programmed picture display please refer to chapter
➧
“Programmed Display (Program)”.
CD-R MENU
ROOT ROOT 0
JPG
Mode Folder Normal
Picture 1 1
JPG
Picture 2 2
Fig. 2
If there are folders:
CD-R MENU
ROOT 0 .. 0
Folder 1 1
Folder 2 2
Mode Folder Normal
JPG
Picture 1 1
JPG
Picture 2 2
Fig. 1
JPEG
Silvercrest KH 6508/KH 6509
Page 52

CD-R MENU
ROOT 0 .. 0
Folder 1 1
Folder 2 2
JPG
Picture 1 1
JPG
Picture 2 2
4 Repeat steps 1 and 2 until you have selected all required
pictures for programmed picture display.
5 Press the control button once to change the mode
select bar.
Mode Folder Normal
Fig. 2
3 One of the modes is displayed with each depression of
the “OK” button. When the required display mode is displayed, then leave the mode select bar by pressing the
control button once. The mark is then once again in
the picture list.
4 If there are no folders:
• Press the “Play” button once to start picture display with
the fi rst picture on the CD-R/CD-RW
or
• Press the “OK” button once to start picture display at the
currently displayed picture.
If there are folders:
• Press the “Play” button once to start picture display with
the fi rst picture in the current sub-folder
or
6 Press the “OK” button once; the “Program End” mode is
then displayed in the mode select bar.
7 Press the Control button once to return to the CD-R
menu.
8 Press the “Play” button on the front of the DVD Player or
on the remote control once to start programmed picture
display.
9 Press the “Skip” or “Skip” buttons on the front of
the DVD Player within the programmed pictures to jump
forward to the next picture or back to the previous picture.
10 To cancel programmed picture, press during display the
“Stop” button on the front of the DVD Player or on the
remote control twice.
• Press the “OK” button once to start picture display with
JPEG
the currently selected picture in the current sub-folder.
Programmed picture display (Program)
If you have set “Program Begin” mode to select several pictures for programmed picture display:
1 The “Program _:_” fi eld is faded in above the CD-R menu.
Select the fi rst picture that is to be programmed with the
control buttons and on the remote control.
If there are folders: Only one picture at a time from the
current sub-folder can be selected for programmed picture display. Pictures from diff erent sub-folders cannot
be selected for programmed picture display.
2 Confi rm selection by pressing the “OK” button on the
remote control once.
3 The selected picture is then displayed in the faded-in
fi eld above the CD-R menu as the fi rst stored picture for
programmed picture display, e.g. “Program 1:05” if the
fi fth picture of the current sub-folder has been selected
as the fi rst picture for programmed picture display.
Silvercrest KH 6508/KH 6509
Page 53

General Functions of the
DVD Player
Silvercrest KH 6508/KH 6509
Page 54

15. General Functions of the DVD Player
Setting the sound volume
Press the “Vol+” button on the remote control to increase
the sound volume during playback of DVDs, VCDs/S-VCDs,
audio CDs and CD-Rs/CD-RWs with MP3 or WMA fi les, or the
“Vol -” button to diminish the volume.
The change in volume between the “0” (sound OFF) and “16”
(maximum volume) is indicated on the television screen.
Dimmer
2 Then press the “Setup” button on the remote control once
to display the OSD menu on the television screen.
3 Press the control button to select the “Parentel” menu
item, and then press the “OK” button on the remote control once.
4 The “Parental” menu is displayed with its sub-items ...
Password – – – –
Rating G
Load factory Reset
Press the „Dimmer“ button t on the remote control, to increase
or reduce the brightness of the display on the DVD-Player.
The display shows „Lo“ (dark), „NOr“ (normal) or HI (bright).
Muting the sound (Mute)
To mute sound press the “Mute” button on the remote control once during playback of DVDs, VCDs/S-VCDs, audio-CDs
and CD-Rs/CD-RWs with MP3 or WMA fi les. The symbol is
displayed on the television screen. Press the “Mute” button
once again to turn on the sound.
Child lock
Many DVDs and VCDs/S-VCDs have a parent guidance rating
to indicate the age group for which the given DVD/VCD/SVCD is suitable. The age group for DVD/VCD/S-VCD is usually
indicated on the disc sleeve and/or on the DVD/VCD/S-VCD
itself.
The DVD Player features a child lock with three settings to
prevent playback of DVDs/VCDs/S-VCDs that have not been
released for the set age group.
... is displayed. The menu sub-option „Password“ is automatically selected.
5 By pressing the control button select the menu sub-
option „Age rating“.
6 By pressing the „OK“ button, select between the options
„G“, „PG-13“ and „Adult“. Confi rm your selection by press
ing the „OK“ button once.
7 By pressing the control button select the menu sub-
option „Password“ again. In the marked entry fi eld „– – – –“
enter your selected password.
8 Press the „OK“ button once to confi rm your entry. The
symbol will be displayed again behind the entry fi eld.
9 Press the control button once to return to the main menu
bar..
10 Fade out the OSD menu by pressing the „Setup“ button
once. The child protection function is now activated at
the set age rating level.
The three child lock ratings are:
G
PG-13
Adult
Setting the child lock …
1 If a disc is currently being played by the DVD Player, then
stop playback by pressing the “Stop” button on the
front of the DVD Player, or on the remote control, once.
Silvercrest KH 6508/KH 6509
Will only play DVDs/VCDs/S-VCDs with no
age limit, i.e. for 0 years and older.
Will not play DVDs/VCDs/S-VCDs rated for
persons of 13 years and older.
Will play all DVDs/VCDs/S-VCDs even if
rated for persons of 18 years/adults only.
If an attempt is now made to play DVDs/VCDs/S-VCDs
with a higher age release rating than the one set in the
OSD menu, then “Rating Error” will be displayed on the
television screen.
Please note:
The exact function of the child lock depends on the
individual DVD/VCD/S-VCD. With some DVDs/VCDs/
S-VCDs playback is not possible when the child lock
has been activated; other chapters that are unsuitable
for the given age release rating are either skipped or
redrawer by other (suitable) chapters.
Furthermore, please note that …
• … DVDs/VCDs/S-VCDs that have no parent guidance rating printed on the sleeve may still, nevertheless, feature an age release rating, and
Page 55

• … on some DVDs/VCDs/S-VCDs with a printed parent guidance rating, the child lock will not indicate
any function in connection with the set age release
rating.
Please note:
Should you have forgotten your password, then you
can continue with the works set “8888” password.
Returning the DVD Player to the works
settings
If you wish to reverse all the settings you have made in the
OSD menu back to the original works settings, then proceed
in the following manner …
• The DVD Player is connected to a stereo television and no audio units are connected to the DVD
Player, or
• A Dolby Prologic-compatible audio unit has been
connected to the stereo output (via a chinch cable
and the chinch sockets “FL” and “FR”) of the DVD
Player – as described in chapter “Connecting a HiFi
system”
… then there will be no sound, or only very soft, during playback of DVDs, VCDs/SVCDs and audio-CDs,
MP3 or WMA CDs, after returning to the works settings. In this case the previous speaker settings for
Stereo Downmix in the OSD menu, “Audio” menu item,
“Size” sub-item, must be returned to the previous
settings:
1 In the event that a disc loaded in the DVD Player is cur-
rently being played, then terminate this by pressing the
“Stop” button on the front of the DVD Player, or on the
remote control, once.
2 Press the “Setup” button on the remote control to display
the OSD menu on the television screen.
3 Press the control button to select the “Parental” menu
item, and then press the “OK” button on the remote control.
4
The “Parental” menu is then displayed with its sub-items …
Password – – – –
Rating G
Load factory Reset
The “Password” menu sub-item is the fi rst to be automatically selected.
5 Press the control button to select the “Load Factory”
menu sub-item. The “Reset” option is then marked.
6 Press the “OK” button once.
7 The DVD Player is then returned to the works settings.
Wait for ten seconds before restarting the DVD Player.
• Front: LARGE
• Center: Off
• Rear: Off
• Subwoofer: Off
For this subject please refer to chapter 9.4, “Audio Set-
➧
tings: Setting Speaker Sizes – Stereo Downmix”
Switching off the DVD Player
Proceed in the following manner to switch off the DVD
Player …
1 In the event that a disc loaded in the DVD Player is be-
ing played, then terminate this by pressing the “Stop”
button on the front of the DVD Player, or on the remote
control, twice.
2 Open the disc drawer so that a disc loaded in the DVD
Player can be removed when the “Open/Close” button
on the front of the DVD Player, or on the remote control,
is pressed once. Reclose the the disc drawer by pressing
the “Open/Close” button once.
3 Press the “Standby“ button on the remote control once.
The DVD Player will then be switched over to operating
readiness or to “Standby mode”. Press the “Standby” button to switch on the DVD Player.
Please note:
Please realise that returning to the works settings will
cancel all your previous settings in the OSD menu!
Warning:
A return to the works settings will also change the
Stereo Downmix settings. In the event that …
To switch off the DVD Player entirely press the “Power”
button on the front of the DVD Player once.
Cleaning the DVD Player
Only use a slightly moist cloth with a mild detergent to clean
the case surface of the DVD Player. Ensure that no moisture
can enter the DVD Player when it is being cleaned!
Clean the inside of the disc drawer – if necessary – only
with a clean, dry brush (e.g. lens brush available from pho-
Silvercrest KH 6508/KH 6509
Page 56

tographic dealers). NEVER moist-clean the inside of the disc
compartment.
Waring!
Moisture penetrating the DVD Player can give rise to
the danger of an electric shock! Moreover, the DVD
Player can become irreparably damaged!
Disposal
The packaging consists of 100% environmentally friendly
materials, which can be disposed of at the local recycling
facilities.
To dispose of electrical appliances that are no longer required,
please consult your local or municipal authorities.
Disposing of the batteries
Do not dispose of the batteries together with household
waste. Every consumer is legally obligated to dispose of batteries at a collection site of his community / city district or at
a retail store. This obligation is intended to ensure that batteries are disposed of in an environmentally safe fashion. Only
return batteries that have already been discharged.
Silvercrest KH 6508/KH 6509
Page 57

Faults and how they can
be remedied
Silvercrest KH 6508/KH 6509
Page 58

16. Faults and how they can be remedied
Fault Possible cause/Remedy
➔ The display is blank/ DVD
Player does not indicate
any function even though
it has been switched on
➔ Display indicated “No
Disc“, even though a disc
has been loaded
➔ The loaded disc won’t play
➔ No picture or only a black-
and-white picture
A Check that the power cable has been correctly plugged into a mains socket.
B Check whether the mains socket is conducting power by connecting another
electrical appliance to the same mains socket.
C Switch off the DVD Player by pressing the “Power” button on the front panel,
and wait for ten seconds. Then switch the DVD Player on again by pressing the
“Power” button.
A The disc is dirty, scratched or damaged. Clean the disc or load another disc.
B The country/regional code of the loaded DVD/VCD/S-VCD does not match the
regional/country code of the DVD Player. In this case the DVD/VCD/S-VCD cannot by played on the DVD Player.
A condensation fi lm may have formed on the laser scanning lens of the DVD Player.
This is very likely if the DVD Player has been exposed to extreme temperature fl uctuations. Place the DVD Player in a dry environment at normal room temperature.
Remove the disc from the disc drawer. Leave the DVD Player switched on for at least
one hour without using it to allow the condensation fi lm to evaporate.
A Check that all the connecting cables between the DVD Player and television (or
video projector) have been fi rmly plugged into the correct sockets.
➔ No 4:3 or 16:9 screen for-
mat displayed
➔ None of the buttons on
the DVD Player or remote
control function/Other
functions
B Check that the settings in the OSD menu match the manner of connection of the
DVD Player with the television (or video projector)
For this subject please refer to Chapter 6. “Connecting the DVD Player to a Televi-
➧
sion”
C Refer to the operating instructions for the given television (or video projector) to
check that all the settings have been made on the television that are necessary
to use the DVD Player with the television.
A Refer to the operating instructions for the given television to establish the screen
format.
B Check whether the settings in the OSD menu conform with the television’s avail-
able screen format.
A Switch off the DVD Player by pressing the “Power” button on the front of the DVD
Player. Wait for ten seconds and then press the “Power” button once again to
switch the DVD Player on again.
B If the faults continue to persist: Reset the works settings for the DVD Player.
For this subject please refer to Chapter 17. “General Functions of the DVD Player”.
➧
Silvercrest KH 6508/KH 6509
Page 59

➔ No sound
A Check whether the television and/or the DVD Player have been switched to mute
mode.
B Check whether all connecting cables between the DVD Player and connected
audio components have been fi rmly inserted into the correct sockets.
C Check whether the settings on the OSD menu match the manner of connection
of the audio components with the DVD Player.
For this subject please refer to Chapter 8. “Connecting Audio Components to the
➧
DVD Player”.
D Refer to the operating instructions for the given television to check that all the
settings have been made on the television that are necessary to use the DVD
Player with the television.
E Refer to the operating instructions for connected audio components to fi nd out
whether settings have to be made to enable their use in connection with the
DVD Player.
F In the event that …
• the DVD Player has been connected to a stereo television and no audio components have been connected to the DVD Player, or
➔ Remote control does not
function
➔ Language playback/Sub-
title language does not
match the setting in the
OSD menu.
• a Dolby Prologic-compatible audio component has been connected via the
stereo output (with chinch cable in the “FL” and “FR” chinch sockets) of the DVD
Player, as described in the chapter “Connecting a HiFi System” …
then check whether the settings in the “Audio” OSD menu item, “Size” sub-item,
match the settings for Stereo-Downmix.
A Check whether the batteries have been inserted in the remote control with the
correct polarity.
B Check whether the batteries in the remote control have become exhausted; ex-
change both batteries if necessary..
C Ensure that there are no obstacles between the remote control and the DVD
Player.
D Do not operate the remote control at a distance of more than fi ve meters from
the DVD Player.
The playback language/subtitle language set in the OSD menu is not available on
the loaded disc.
➔ One or several functions
cannot be switched on
The selected function may not be available on all DVDs/VCDs/S-VCDs. If you attempt
to carry out a function that is not available, then the symbol will be displayed on
the television screen.
Silvercrest KH 6508/KH 6509
Page 60

Contact our service partner in your vicinity if …
• When the listed functional faults cannot be remedied
in the described manner!
• When faults other than those listed arise!
Warning!
NEVER open the case of the DVD Player! It does not
contain any parts that can be repaired by the user.
The warranty becomes null and void if the case has
been opened. We do not accept any liability/warranty
for damage resulting from opening the case or repair attempts that were not carried out by qualifi ed
personnel!
Silvercrest KH 6508/KH 6509
Page 61

Glossary/Index
Silvercrest KH 6508/KH 6509
Page 62

17. Glossary/Index
What are DVDs, VCDs and S-VCDs?
DVD stands for “Digital Versatile Disc”. They are used to
store audio and video data. They are available in the
formats 8 cm and 12 cm (diameter) DVDs off er a signifi cantly higher storage capacity than CD-Rs/CD-RWs – a
playback duration of the stored audio and video data of
up to eight hours.
What are SCART, S-Video, Composite-Video
Progressive Scan and YUV?
Scart
SCART defi nes a 21-pin, standard plug connection to
transmit RGB signals, video signals and S-Video signals,
as well as a number of other control and extra signals.
S-Video
VCDs/S-VCDs
“Video-CD“ (VCD) and “Super Video-CD“ (S-VCD) defi ne
two processes that save storage space by compressed
storage of fi lms on CDs. VCDs and S-VCDs are available
in the formats 8 cm and 12 cm (diameter). Their storage
capacity is signifi cantly lower than that of DVDs. Consequently, the 8 cm format provides a storage capacity for
a playback duration of 20 minutes. and the 12 cm format
for 74 minutes.
VCDs are available in two versions:
• Version 1.1 VCDs/S-VCDs will only playback audio and
video data.
• Version 2.0 VCDs/S-VCDs features PBC (Playback Control)
functions; still frames can be reproduced in a high resolution.
Playback Control (PBC)
Version 2.0 VCDs/S-VCDs feature Playback Control
(“PBC“).
operate the diff erent functions of the VCD/S-VCD.
A main menu is available on the VCD/S-VCD to
Connecting the DVD Player to a television by way of SVideo separates brightness and colour signals to achieve
higher picture sharpness and diminish so-called “coloured
noise” caused by the superimposition of the coloured,
usually intensely saturated, parts of a video picture with
an irregular, restless disturbance structure.
Composite-Video
A video signal or FBAS signal where the video signal contains both colour and brightness information.
Progressive Scan
Normally, televisions and video projectors are controlled
by half pictures or so-called “fi elds”. This produces clearly
visible line structures. Progressive Scan, on the other hand,
defi nes the output of full pictures or so-called ‘”frames”
(with this DVD Player at the YPbPr output). Progressive
Scan signals can only be processed by appropriate playback units (primarily large-format television, projectors).
Compared with conventional video signals, the picture
quality is signifi cantly enhanced.
YUV (Component Video Out)
What are title and chapter?
Titles are the largest video and audio units on DVDs.
On many DVDs the (main) fi lm has the title number 01.
Further title numbers can be assigned to bonus material (e.g. fi lm trailers, background information, etc) on
many DVDs.
Chapters are the next smallest video and audio units below titles. If the title(s) of a DVD/VCD/S-VCD is/are divided
into chapters, then these are assigned numbers which can
be entered for direct access to the given chapter.
Please note that not all DVDs …
• feature title(s) subdivided into (numbered) chapters,
• and that chapters may also be designed as “scenes” (e.g.
in the main menu of DVDs)
YUV defi nes the component signal supplied by this unit
to the YPbPr output in the form of half-pictures or socalled “fi elds”. Normally, this is the best signal for controlling large-format televisions and projectors which
cannot process Progressive- Scan signals. As with RGB
video transmission, YUV is composed of three separate
video signals:
• the brightness signal “Y” and
•
the two colour diff erentiation signals “U” and “V”.
Fields (Interlace)/Frames (Progressive Scan)
A standard television picture is composed of 576 visible
lines; all odd lines are fi rst shown followed, in alternation, by all even lines, i.e. half-picture or fi eld. Consequently, only 30 full pictures or frames (60 fi elds) can
be displayed per second. This method is known as the
“Interlace” format.
Silvercrest KH 6508/KH 6509
Page 63

This contrasts with the “Progressive Scan” format where
all lines are shown each time, i.e. 60 frames or full pictures per second. This increases the over-all quality of
the picture so that still pictures and text appear to be
signifi cantly sharper.
Decoder
The sound on DVDs featuring home cinema surround
sound is stored in a coded form on the DVD. There are
diff erent coding formats for diff erent purposes, e.g. AC-3
to reproduce Dolby Digital surround sound.
To reproduce coded sound the playback units (e.g. DVD
Player) or the connected audio components (e.g. surround-sound units) must feature a so-called decoder to
transform the coded signals into sound and music.
DTS
DTS stands for “Digital Theatre System“ and defi nes one
of the most common surround-sound formats for DVDs.
As is the case with Dolby Digital 5.1, DTS uses three front
and two rear surround-sound channels, as well as a bass
channel.
What are PAL, NTSC and SECAM?
PAL
PAL is the abbreviation of “Phase Alternation Line“. PAL
is the customary and most wide spread colour television
standard in central and western Europe (with the exception of France; see “SECAM”).
NTSC
The Silvercrest KH 6508/KH6509 DVD-Player features an
AC-3 decoder (for Dolby Digital 5.1 surround-sound signals).
Dolby Surround
Dolby Surround is an analog sound signal that uses the
two channels of a stereo sound signal to accommodate
stereo sound information for another channel. A Dolby
surround-sound decoder transforms the sound/music signals and conducts them to two additional loudspeakers
set up behind the listening point.
Dolby Prologic
Compared with the Dolby surround-sound format, Dolby
Prologic uses another channel in the stereo signal, the cocalled “Centre” channel. The corresponding centre speaker
is positioned in the centre between the stereo speakers.
The lowest sounds are supplied to a base speaker that
is known as a “subwoofer”. The subwoofer can be positioned at any point within a room. This is because the
bass sounds reproduced by the subwoofer can hardly
be accurately localised by the human ear.
Dolby Digital (.)
Dolby Digital, also known as AC3, is a digital sound format for up to six separate audio channels. Most current
DVDs store the sound in the so-called “Dolby Digital 5.1“
format where the “5” stands for the three front and two
rear surround-sound channels, and the “1” for the bass
channel.
NTSC stands for “National Television System Committee“
and is the colour television standard used primarily in
the USA and Japan.
SECAM
NTSC stands for “National Television System Committee“
and is the colour television standard used primarily in
the USA and Japan.
Audio-CDs
Audio-CDs only hold audio data. They are likewise available in the 8 cm and 12 cm formats (diameter). Playback
duration for their stored audio data is 20 minutes (8 cm
format) and 74 minutes (12 cm format). Audio-CDs hold
audio data in CDA format.
MP
MP3 defi nes a process or format for the compression of
audio data developed by the Fraunhofer Institute. Music
compressed in the MP3 format take up only a fraction
of the original storage space so that far more music can
be stored than on, for instance, CD-Rs/CD-RWs than on
the normal commercial audio-CDs storing audio data in
CDA format.
WMA
WMA (“Windows® Media Audio“) is a fi le format for audio
data developed by Microsoft®.
Silvercrest KH 6508/KH 6509
Page 64

Nero Digital
NERO is a dta compresion program, which can compress all
video formats to less than 20% of their
original size, while still maintaining a high qualiyt. CDs, which
have been recorded with NERO, can
contain chapters and sub-titles in two languages. The CDs
are operated via the normal buttons that are used for DVDs.
Data, which are not created with the NERO Digital „Standard
Profi le“, may not play immediately or only with restrictions.
DivX
DivX is a coding format for videos and multi-medial data,
invented by DivX Networks, Inc.
JPEG
JPEG (“Joint Photographics Expert Group“) defi nes a widespread graphics format developed by the organisation
of the same name in which the video data of the colour
and grey scales are compressed.
What are folders?
Contrary to audio-CDs, the titles on a CD-R/CD-RW with
MP3, WMA and JPEG fi les are stored in folders, for instance,
to sort titles according to diff erent genres.
For instance, the structure of an MP3-CD can be as follows
if the MP3 fi les are stored in folders:
MP3-CD Folder MP3 fi le
Silvercrest KH 6508/KH 6509
Page 65

Important warranty notes
Silvercrest DVD player KH 6508/KH6509
Dear Customers.
Thank you for deciding on buying a Silvercrest product with a 36-month warranty (from the date of
purchase).
Please read the documentation enclosed with the product carefully before use.
Should there be a complaint or hardware disturbance, in spite of the high quality level of the de-
vice, you have the option of contacting the service hotline. If there is no telephonic solution, you
will receive a processing number (RMA) as well as the address where you can send your product for
processing the warranty.
In case you are sending in the product, please enclose a copy of the purchase receipt. #
The device should be packed in a manner that is safe for transport and the RMA number should be
directly visible.
Products sent in without the RMA number cannot be processed.
Note: Your warranty claims are not limited by the warranty.
Tel.: 08707/876177
Page 66

Kompernaß GmbH • Burgstraße • D- Bochum, Germany
www.kompernass.com
Kompernaß GmbH • Burgstraße • D- Bochum, Germany
www.kompernass.com
 Loading...