


3 B/C
STEPPER
KH 6002
KOMPERNASS GMBH · BURGSTRASSE 21 · D-44867 BOCHUM
www.kompernass.com
ID-Nr.: KH6002-04/09-V1
STEPPER
Operating instructions
SSWWIINNGG ΣΣTTEEΠΠEEPP
Οδηγίες χρήσης
SWINGSTEPPER
tjeningsvejledning
Be

KH 6002
Your stepper presents itself
With the stepper you can raise your fitness, improve your circulation and increase your calorie consumption.
Furthermore, you can strengthen your muscles using the elastic ropes.
The stepper simulates stair climbing in which your leg and buttock muscles are trained. With the additional elastic ropes you also have the opportunity to strengthen your arm and shoulder muscles.
Παρουσίαση του Swing Stepper
Με το Swing Stepper μπορείτε να προάγετε τη φυσική σας κατάσταση, να βελτιώσετε την κυκλοφορία του
αίματος και να αυξήσετε την κατανάλωση θερμίδων. Προσθέτοντας τους ιμάντες έλξης μπορείτε επίσης να
δυναμώσετε και τους μύες σας.
Το στέπερ προσομοιώνει το ανέβασμα μιας σκάλας, όπου ασκούνται οι μύες των μηρών και των γλουτών. Με τους
πρόσθετους ιμάντες έλξης έχετε επίσης τη δυνατότητα να δυναμώσετε τους μύες των χεριών και των ώμων.
Din Swing Stepper præsenterer sig
Med Swing Stepper man du komme i bedre form, forbedre blodomløbet og øge kalorieforbruget. Ved anvendelse af trækremmene kan du desuden styrke dine muskler.
Stepperen simulerer gang op ad trapper, hvorved benenes og bagdelens muskler trænes. Med de medfølgende trækremme har du desuden mulighed for at styrke arm- og skuldermusklerne.
Fig. similar
σύμφωνα με την εικόνα
Afbildningen er omtrentlig

CONTENT PAGE
Scope of delivery 2
Intended use 2
Conformity 2
Safety notices 2
Assembling and setting up 3
Setting the rising height 5
Training instructions 6
Using the computer 8
Switching on/off...............................................................................................................................8
Select display....................................................................................................................................8
Specify training objectives...............................................................................................................8
Resetting the display.........................................................................................................................8
Stretching exercises 9
Exercise without the elastic ropes 10
Exercises with the elastic ropes 10
The correct length ..........................................................................................................................10
The right grip ..................................................................................................................................10
Wrists...............................................................................................................................................10
Exercises..........................................................................................................................................10
Cleaning, care and maintenance 13
Replacing the battery 13
Replacement parts 14
If a problem arises... 16
Disposal 16
Specifications 17
Importer 17
Warranty & Service 17
Read the operating instructions carefully before using the appliance for the first time and preserve this
booklet for later reference. Pass the manual on to whomsoever might acquire the appliance at a later date.
- 1 -

STEPPER
KH 6002
Scope of delivery
– Swing stepper
– 2 plastic feet
– 1 Phillips screwdriver
– 2 self-tapping cross-head screws
– Adjusting screw
– Computer unit
– Battery, type AAA LR03
– 2 elastic ropes
– These operating instructions
Intended use
The device is solely suitable as a piece of training
equipment and is only approved for setting up and
usage in the home. It is unsuitable for any other kind
of usage, e.g. as a replacement for a step or as a
children‘s toy. It is not approved for usage in commercial or therapeutic areas or professional studios.
Please perform only the exercises described and
shown in these instructions with the stepper. Improper usage and/or excessive training will cause damage to one‘s health.
Conformity
The mark has been attached to the device in
compliance with the applicable European directives. The Declaration of Conformity has been deposited with the manufacturer.
The article conforms to the requirements of the following standards:
DIN EN 957-1:2005, DIN EN 957-8:1998,
DIN 32935 (for the elastic ropes)
Safety notices
General hazard!
Maximum load: The stepper has been designed to
handle a maximum user body weight of 100 kg.
No adjusters must be allowed to protrude from the
stepper that could hamper the movements of the
user. The stepper must be set up in an area that provides you with sufficient space within which to train.
An area measuring at least 2 x 2 m is required.
Place the stepper on a flat and level surface so that
it stands steady during training and does not wobble.
Every time before you use the device, you should
check that it is in perfect condition. If it is not in perfect condition, do not use it. Faulty parts must be replaced or else the device‘s correct functioning and
safety will be impaired.
Repair work must only be carried out by authorised
qualified personnel. Only original replacement
parts must be used.
Danger for children!
Make sure the packaging foil does not become a
death-trap for children (risk of suffocation).
Never allow small children to play with the battery.
Swallowing it can cause serious damage to one‘s
health.
Keep children away from the pedals whilst you are
training (risk of crushing injuries).
The device is not a children‘s toy. When it is not in
use, please store it out of reach of children.
- 2 -
Risk of burns!
The hydraulic dampers become hot during training.
You must never touch them, and not directly after
training either.
Risks due to incorrect/
excessive training!
Please make absolutely sure you follow all the instructions contained in the chapter entitled „Training
instructions“ from page 6 onwards.
Assembling and setting up
Most of the device is supplied pre-assembled. Only a
few things need to be done in order to make it ready
for use.You will need a Phillips type screwdriver
(supplied).
q
e
Caution!
It is possible that oil could escape due to leakage of
the hydraulic dampers. To avoid soiling of the floor
or carpet, place the device on a level, non-slip underlay.
Prevent liquids from entering the computer. The sensitive electronics could get damaged. Protect the
computer against direct sunlight.
Never use force when handling the device.
Check regularly that all the screws, nuts and bolts
are tight. Self-locking nuts cannot come loose due to
vibrations. This feature, however, can only be guaranteed the first time the nuts are tightened.
If the stepper is ever disassembled, all the self-lokking nuts must be replaced with new ones.
If you do not need to use the device for a longer period of time, remove the battery from the computer
or else it could leak and cause damage.
w
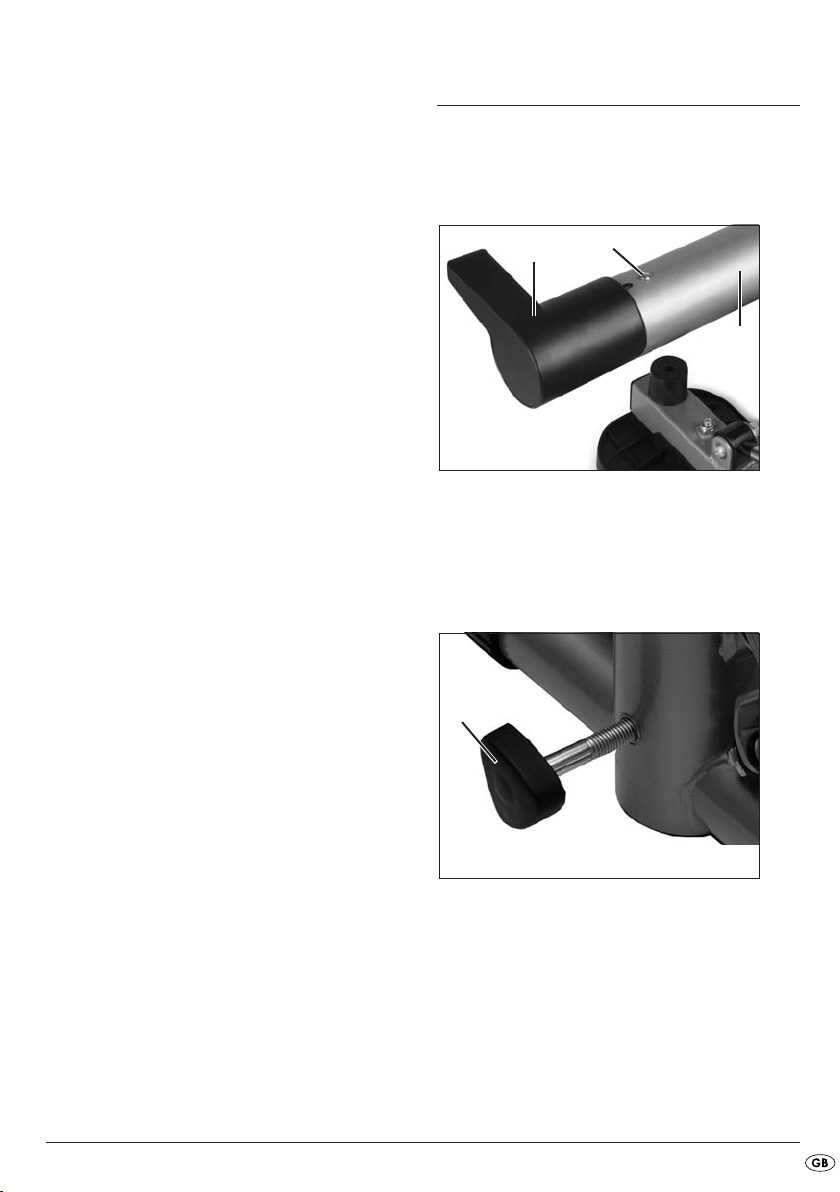
1. Insert the two plastic feet
tube
If necessary, rotate the foot quntil the
w
slot fits into the recess of the floor tube
2. Screw the self-tapping screws
led holes on the underside of the floor tube
into the rear floor
q
into the pre-dril-
e
w
.
w
r
3. Screw the adjusting screw rinto the thread on
the front frame.
.
- 3 -
i
t
4. Insert the supplied battery into the battery compartment
terminal first. Make sure the polarity is correct!
in the computer casing y: negative
t
y
u
5. Connect the computer and the device via the
connector
breaking the pins inside.
(if required) without bending or
u
6. Press slightly on the lug iand insert the computer
into the post without pinching the cable. If
y
necessary, rotate the computer
splay lettering can be read during training.
7. Place the device on a firm, level surface with a
non-slip protective covering for your floor or carpet. Maintain a safe distance around the device
of 2 x 2 m away from other objects and walls.
so that the di-
y
- 4 -

o
Setting the rising height
8. Hook both elastic ropes into the eyelets othat
are located in front of the pedal treads. Then
tighten the screw connection on both rope
hooks. Before every training session in which
you want to use the elastic ropes, please make
sure the screw connections on the rope hooks
are always closed.
Attention!
The hooks on the stepper must not be subjected to
loads crossways, since they have only been designed to withstand tensile loads in an upwards direction. The same applies to the hooks on the elastic
ropes. Ignoring these instructions can lead to the
hooks on the stepper breaking.
Attention!
If the elastic ropes are not being used whilst training
with the stepper, they must definitely be unhooked
and removed from the device. This is to avoid a risk
of tripping.
9. Finally, check whether all nuts, bolts and screws
are tight. The device is ready for use.
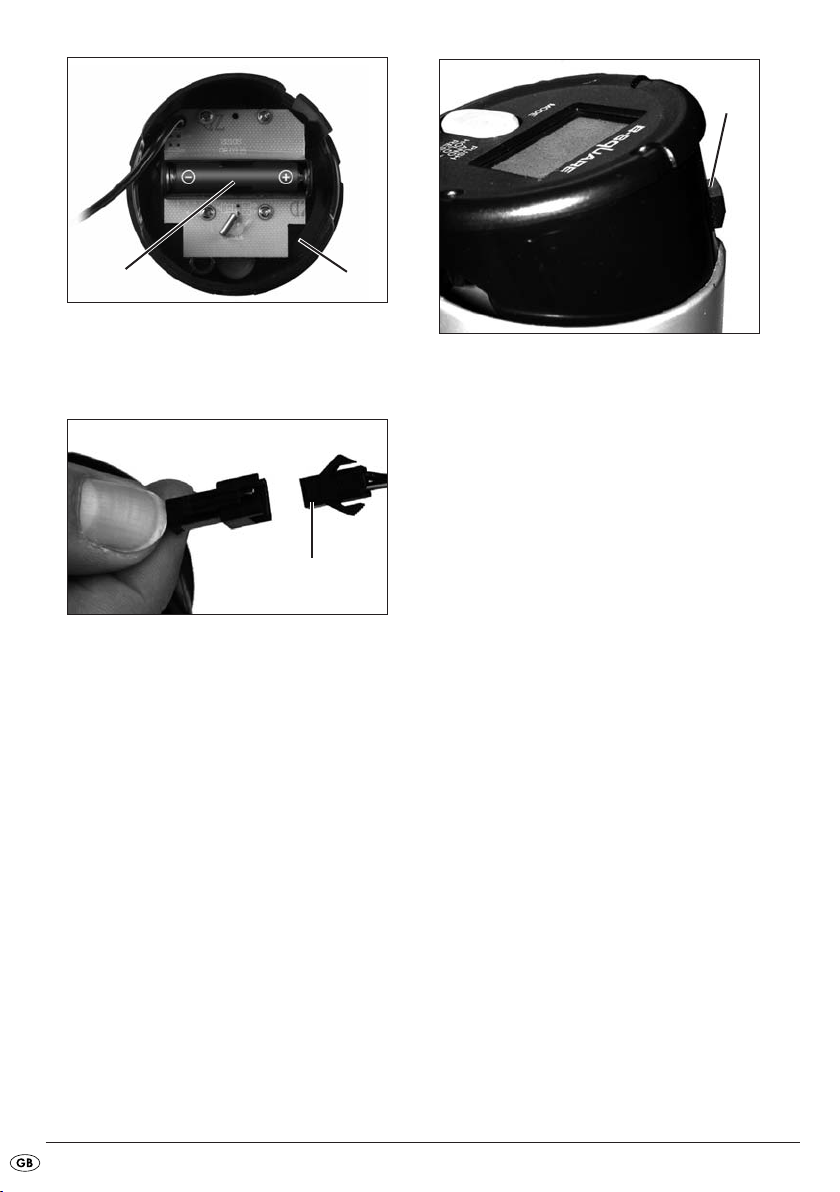
r
You can use the adjusting screw rto set the position of the pedals and thus adjust the rising height.
• Turning clockwise makes the pedals steeper.
- 5 -

Training instructions
Risks due to incorrect/
excessive training!
You should consult a doctor before beginning your
training programme. Tell him/her what piece of training equipment you want to use, show him/her these
instructions and allow a general fitness check to be
performed. He/she can give you further helpful tips
for your personal training programme.
A doctor‘s advice is absolutely necessary if you
have not done any sport for a longer period of time,
if you have problems with your heart, circulation,
balance or breathing (asthma), if you have ortho
paedic problems, if you are pregnant or if you are
taking medication that affects your pulse rate, blood
pressure or cholesterol level.
You must not train if you are feeling unwell or are
suffering from other illnesses. Do not train directly after meals, if you are tired or if there are other conditions that could be negatively affected by training.
During training pay attention to the signals provided
by your body. Stop training if you notice the following symptoms: pains, headache, breathing difficulties, irregular heartbeat, extreme shortness of breath, a feeling of being dazed, dizziness or nausea.
Consult a doctor before continuing training.
Regular training strengthens your cardiovascular system and helps you achieve a greater sense of wellbeing.
Intense fitness training puts a strain on the whole
body. You must therefore increase the strain slowly
and make sure you give yourself enough breaks.
Start by training within a range of performance in
which you are not completely overexerting yourself.
Start with 10 to 15 minutes a day. After a few
weeks you can then extend your training. We recommend the following training frequency: 3 consecutive days of training
1 day break
2 consecutive days of training
1 day break
Give yourself enough time and make absolutely sure
you include a warm-up and recovery phase.
Before starting training, it is advisable to warm up
your muscles with some stretching exercises. By doing so you will reduce the risk of injuries and increase the success of your endeavours. You will find the
exercises on page 9.
You should start training slowly. 10 to 15 minutes
per day with 2 days of breaks within a week (as listed above). If you are an advanced user, you can
increase the training time and frequency according
to your wishes. After every training session you
should enter the cool-down phase. This means you
should once more repeat the stretching exercises
that you did before starting training. You can relieve
your muscles by shaking out your arms and legs.
Please only perform the exercises shown and described in these instructions.
- 6 -

Risk of injury!
Before starting training, make sure you set up the
stepper in a location that provides you with enough
free space in which to train. An area measuring 2 x
2 m is required.
Wear comfortable clothes made from breathable fabrics. Your clothing should be close-fitting so that it
does not get caught in the moving parts of your
stepper and so that it does not become a nuisance
when you are training your arm muscles using the
elastic ropes.
Wear sports shoes with a non-slip sole during training – do not train barefoot.
Make sure the soles of your feet are in full contact
with the treads of the pedals to avoid injury. Do not
stand too far back on the pedals and do not pull
too vigorously on the elastic ropes. The device could
tip over.
Make sure the room in which you are training is well
aired but avoid draughts since they can quickly cause you to catch a cold.
Getting onto the stepper
Press one pedal right down with your foot so that the
pedal arm and its stopper are resting on the base
frame. Then place your foot onto the tread of the lowered pedal arm. Next, place the other foot onto the
other pedal tread that is raised at an angle.
Movement of the stepper during training
Your stepper simulates stair climbing. Due to the
swing effect, the pedal treads not only move up and
down but also swing out to the left and right.
Worked-out muscle groups
Your leg and buttock muscles are trained primarily
during the exercises without the elastic ropes.
Exercises involving stepping as well as pulling on the
elastic ropes will strengthen your buttocks, legs,
arms and shoulder muscles. Exercises in which you
are not stepping but are using the elastic ropes will
strengthen your arms and shoulder muscles.
Posture
You must make sure you maintain an upright posture
during training. Make absolutely sure you avoid the
formation of a hollow back. When stepping steadily
and evenly, the stoppers of the pedal arms should
not come into contact with the base frame. Therefore, just before touching down on one side, shift your
weight from one leg to the other. It can also be helpful if you allow your arms to swing at a slight angle
in front of the upper part of your body in time with
your step rhythm.
Step motion
With this stepper, the step motion is guided by the
stepper.
Getting off
Whilst standing on the stepper, press one of the treads right down so that the stopper of the pedal arm
is resting on the base frame. Then lift your foot off
the pedal tread that is raised at an angle and place
it on the floor. Afterwards, take your foot off the pedal tread that is lowered.
Brake-resistance system
This stepper is a speed-dependent system.
- 7 -

Using the computer
You can use the device without the computer. The
computer display can, however, help you train effectively since it provides you with information
about your training so far. The stepper is a device
with a C precision classification. This means no demands can be made on the accuracy of the computer‘s displays.
Switching on/off
• To switch on press the red MODE button.
The display will come on.
• If you do not use the device for 5 minutes, the
computer will switch off automatically.
Select display
During your workout the display will show the following on the first line:
– STOP (as soon as you interrupt your workout)
– The number of steps per minute (estimate)
The second line shows various workout data (modes). To switch from one mode to the next, press the
MODE button briefly.
1. TMR (lights up): duration of workout so far, 0:00
to 99:59
2. REPS: number of steps during current workout, 0
to 9999
3. CAL: calories consumed
1)
, 0 to 9999
4. TTR: number of steps since battery inserted, 0 to
9999
• If you would like to see all workout data in suc-
cession, press the MODE button repeatedly until
the TMR field flashes. The display will then switch
from mode to mode automatically every 5 seconds.
1)
Calculations are based on pre-programmed standard values which can only serve as a guide. Calories consumed while using the resistance straps
are not taken into consideration.
Specify training objectives
You can specify one or multiple targets:
– Duration of workout (TMR)
– Number of steps (REPS)
– Calorie consumption (CAL)
1. Hold down the MODE button until 0:00 (TMR)
appears on the second line of the display and
the first 0 flashes (approx. 4 seconds).
2. To specify the length of the session, press the
MODE button repeatedly until the desired time in
minutes shows on the display.
3. Wait a few seconds until the display shows the
next mode (REPS). Press the MODE button to set
the number of steps in increments of 10.
4. In the next mode (CAL) you can set the desired
number of calories to be consumed in increments
of 10.
5. Start your workout. The display counts down the
preset values to zero.
6. When the set target is reached the computer
stops counting for approx. 10 seconds. The computer then starts again at zero.
Resetting the display
The display is set to zero only before your first training session. With all subsequent training units, the
computer continues counting from the point at which
your last training session ended.
- 8 -

• To reset the counter to zero2), press and hold
down the red MODE button until all the symbols
appear in the display simultaneously (approx. 3
seconds).
2)
The total number of training steps (repetitions)
(TTR) is maintained. This number is only reset to
zero when the battery is replaced.
Stretching exercises
Danger!
Serious injuries can result from overstretching muscles and tendons.
Before stretching, you should perform a 5 to 10-minute warm-up, e.g. jogging on the spot or skipping
with a skipping rope. When performing the stretching exercises, please make sure:
– you perform each exercise slowly.
– you only stretch until you feel a slight pull. Then
remain in this position for 20 seconds.
Stretching your hip extensor and thigh flexor
muscles
Position your feet so that they are parallel and
shoulder-width apart. With your legs straight, bend
the upper part of your body over until your hands
almost touch the ground. Remain in this position.
Stretching your calf muscles
Stand facing the wall with your feet straight. One
leg is slightly bent the other straight. Bend your arms
slightly and move your pelvis forwards a little. Repeat the exercise with the other leg.
Stretching your thigh muscles
Stand with your feet shoulder-width apart and with
the your toes turned slightly outwards. Slowly go as
far as possible into a squatting position and bob up
and down gently.
Stretching the insides of your thighs
Lie down on your back in a comfortable position. Bend
your legs by bringing your knees up and keeping your
feet on the floor. With your legs in this position, spread
them sideways. The soles of your feet should be touching one another. Slowly lower both knees.
- 9 -

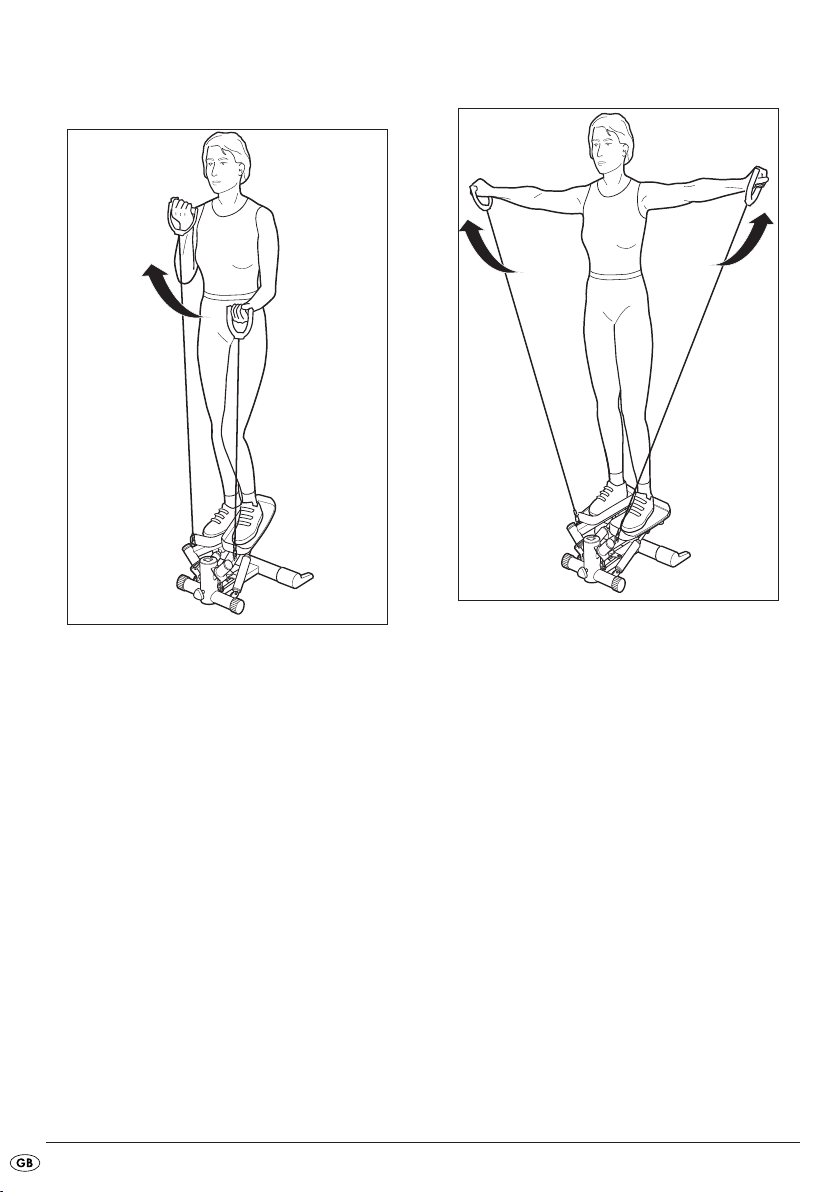
Exercise without the elastic ropes
Exercises with the elastic ropes
Exercise:
for thighs, calves and buttocks
1. Move your arms backwards and forwards very
naturally whilst stepping – as if you were walking
or climbing stairs.
2. Gradually raise your arms slightly higher.
The correct length
Danger!
The elastic rope can be stretched to a maximum
length of 185 cm. Exceeding this length can damage it and injure the user.
The longer you pull the elastic rope the more you
must exert yourself.
The strap material is made from natural substances
which, during the manufacturing process, are subject to natural fluctuations. Because of this, in individual cases irregular measurement results can occur,
however, they do not impair the safety of the product.
Length in cm Effort in N
(10 N
1 kg)
≈
120 ca. 56 ±10N
140 ca. 73 ±10N
160 ca. 90 ±10N
185 ca. 114 ±10N
The right grip
Make sure you always keep the handles hori-
zontal when pulling the elastic ropes. Otherwise, lateral loadings could occur on the hooks
for the pull cables.
Wrists
Do not bend your wrists since this could strain
them.
- 10 -

Exercises
The following applies to all the exercises below:
– Hold the handles in your hands.
– Perform the movements in a controlled manner.
– Keep your arms tensed.
– Before every training session
using the elastic ropes, make sure the screw connections on the rope hooks are closed firmly.
Exercise 1:
for your arms, shoulders, legs and buttocks
Exercice 2:
for your arms and particularly your shoulders
1. Keep your left arm slightly bent and raise it in
front of your body to approximately shoulder
height and press down the right pedal.
2. Lower your left arm and raise your right arm while
at the same time pressing down on the left pedal.
3. Repeat steps 1 and 2.
1. Do not step.
2. Keep your hands at hip height.
3. Pull the right handle towards your chin. Keep the
back of your hand facing upwards.
4. At the same time lower the left handle.
5. Repeat steps 3 and 4.
We recommend 3 exercise sets comprising 6 to 10
repetitions each.lungen.
- 11 -
Exercise 3:
for your arms, legs, buttocks and in particular
your upper arms
1. The palms of your hands are facing upwards.
2. Press your elbows firmly against your body.
3. Lower the left pedal and pull up on the rope with
your left arm.
4. Lower the right pedal and your left arm and at
the same time pull up your right arm.
Exercise 4:
for your back, shoulders, chest, legs and buttocks
1. Start stepping.
2. Whilst stepping, raise your arms sideways up to
shoulder height.
3. Lower your arms again.
4. Repeat steps 2 and 3.
Variation: perform the exercise with the palms of
your hands facing upwards.
- 12 -

Cleaning, care and maintenance
Caution!
Do not use strong, abrasive or corrosive detergents/cleaners or solvents! Prevent moisture from entering the computer!
1. Clean the device at least once a week using a
soft cloth (if necessary, the cloth can be slightly
moistened).
2. If squeaking sounds occur, grease the moving bearings and axle connections with hub and bearing grease (obtainable from bicycle dealers).
3. Before every training session, please check the
stepper for possible damage or signs of wear.
Pay particular attention to the plastic washers in
the rod axles, to the pedal treads as well as to
the elastic ropes and rope fasteners. If a part is
faulty and needs to be replaced, the stepper
must not be used until the faulty part has been replaced.
4. Please pay attention to the following parts which
are subjected to greater wear due to the load
placed upon them:
- Plastic washers, part no. 25, 26, 31, 32, 34, 61
- Elastic ropes, part 47
Replacing the battery
If the display quality begins to fade, replace the battery with a new one of type „Micro (AAA/LR03).
1. Carefully lever and rotate the computer unit
out of the post.
2. Remove the battery carefully but with a little force. Start by pulling the battery out by its positive
terminal.
3. Insert a new battery by inserting its negative terminal first. Make sure the polarity is correct! (see
“Assembling and setting up”)
4. Insert the computer unit
(see “Assembling and setting up”).
back into the post
y
y
- 13 -
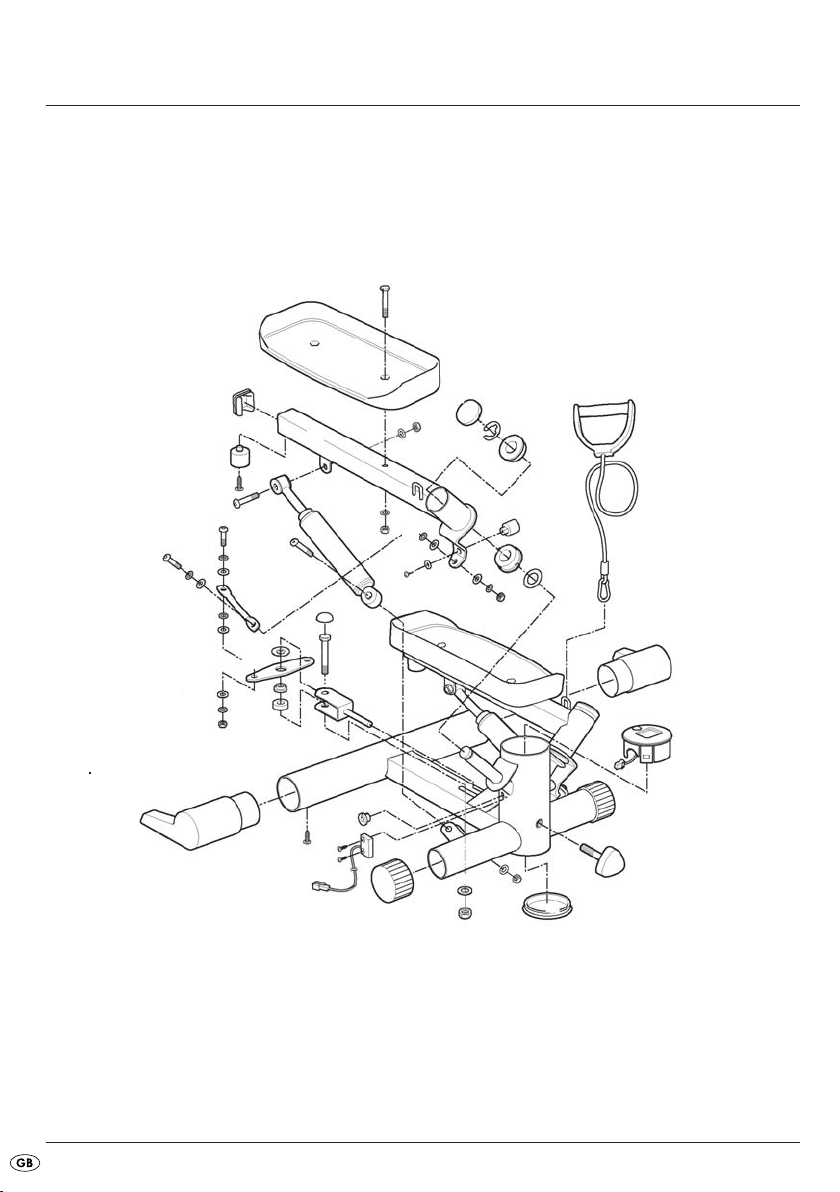
Replacement parts
4
5
50
50
55
03
51
58
59
56
57
49
45
1
2
4
44
47
21
20
52
28
27
26
54
53
60
61
15
16
17
18
19
9
10
13
14
48
11
12
8
7
29
30
31
22
23
24
25
32
33
34
36
35
38
37
40
39
41
42
43
46
5
6
- 14 -

No. Quantity Component
1 1 Base frame
2 1 Computer
3 2 Front plastic foot
4 2 Rear plastic foot
5 4 Self-tapping screw 17.5 mm
6 2 Bolt M8 x 43 mm
7 2 Hydraulic cylinder
8 2 Bolt M8 x 43 mm
9 2 Washer
10 2 Self-locking nut M8
11 2 Stopper
12 1 Right crossbeam
13 1 Right footrest
14 4 Bolt M8 x 55 mm
15 4 Washer
16 4 Self-locking nut M8
17 2 Plastic cap for the crossbeam
18 2 Retaining ring
19 2 Plastic bush
20 2 Plastic bush
21 2 Washer
22 2 Diagonal connector
23 2 Bolt M8 x 335
24 2 Washer
25 2 Plastic washer
26 2 Plastic washer
27 2 Washer
28 2 Self-locking nut M8
31 2 Plastic washer
32 2 Plastic washer
33 2 Washer
34 2 Plastic washer
35 2 Washer
36 2 Self-locking nut M8
37 2 Grommet
38 2 Guide bush
39 1 Reversing plate
40 2 Washer
41 2 Plastic cap
42 2 Bolt M12 x 81
43 1 Retaining clevis
44 1 Left crossbeam
45 1 Adjusting screw
46 1 Left footrest
47 2 Elastic ropes
48 2 Plastic cap for the crossbeam
49 1 Plastic cap
50 2 Screw
51 1 Cable guard
52 1 Magnet
53 1 Washer
54 1 Self-tapping screw 12 mm
55 1 Sensor with cable
56 2 Washer
57 2 Nut M8
58 1 Washer
59 1 Nut M12
29 2 Bolt M8 x 335
30 2 Washer
60 2 Washer
61 2 Plastic washer
- 15 -

If a problem arises...
Fault Cause Remedy
No computer display Battery inserted incorrectly or empty.
Check the battery is positioned correctly (check polarity)!
Replace the battery!
The connecting plug
Connect it properly!
The pins inside the plug are bent or have been broken off.
Replace the connecting plug!
Connecting cable has been pinched or is damaged.
Replace the connecting plug!
Steps are counted incorrectly
Press the pedals further down.
Disposal
Do not dispose of the appliance in your
normal domestic waste. This product is
subject to the European guideline
2002/96/EC.
Dispose of the appliance through an approved disposal centre or at your community waste facility.
Observe the currently applicable regulations.
In case of doubt, please contact your waste disposal
centre.
is not properly connected.
u
Battery disposal!
Batteries may not be disposed of with normal
domestic waste. All consumers are statutorily obliged to dispose of batteries at the collection point in
their community/district or with the original supplier.
The purpose of this obligation is to ensure that
batteries can be disposed of in an environmentally
friendly manner. Only dispose of batteries when
they are fully discharged.
Dispose of all packaging materials in an
environmentally friendly manner.
- 16 -

Specifications
Power supply/battery type: 1 x 1,5 V (Micro/AAA/LR03)
Maximum body weight of the user in kg: 100
Readable step counter: 0 - 9999
Readable training duration in min.: 00:00 - 99:59
Readable calories in kcal: 0 - 9999
Readable speed,in steps/min. 0 to 9999
Max. length of elastic rope in cm: 185
Dimensions (L x W x H) in cm: 52 x 52 x 24.5
Weight in kg: 9.1
Area of use: H = home use
Accuracy: C
Importer
KOMPERNASSGMBH
BURGSTRASSE 21
44867 BOCHUM, GERMANY
www.kompernass.com
Warranty & Service
The warranty for this appliance is for 3 years from
the date of purchase. The appliance has been
manu-factured with care and meticulously examined
before delivery. Please retain your receipt as proof
of purchase. In the case of a warranty claim, please
make contact by telephone with our service department. Only in this way can a post-free despatch for
your goods be assured.
The warranty covers only claims for material and
maufacturing defects, not for wearing parts or for
damage to fragile components. This product is for
private use only and is not intended for commercial
use.
The warranty is void in the case of abusive and improper handling, use of force and internal tampering not carried out by our authorized service
branch. Your statutory rights are not restricted in
any way by this warranty.
DES Ltd
Units 14-15
Bilston Industrial Estate
Oxford Street
Bilston
WV14 7EG
Tel.: 0870/787-6177
Fax: 0870/787-6168
e-mail: support.uk@kompernass.com
Kompernass Service Ireland
Tel: 1850 930 412
Standard call rates apply. Mobile operators may vary.
e-mail: support.ie@kompernass.com
- 17 -
(0,082 EUR/Min.)

- 18 -

Περιεχόμενα Σελίδα
Συνοδευτικός εξοπλισμός 20
Ενδεδειγμένη χρήση 20
Συμμόρφωση 20
Υποδείξεις ασφαλείας 20
Συναρμολόγηση και τοποθέτηση 21
Ρύθμιση ύψους στεπ 23
Υποδείξεις γυμναστικής 24
Χρήση υπολογιστή 26
Ενεργοποίηση/απενεργοποίηση...................................................................................................26
Επιλογή ένδειξης............................................................................................................................26
Εμφάνιση στόχων γυμναστικής .....................................................................................................26
Επαναφορά ένδειξης .....................................................................................................................26
Ασκήσεις διατάσεων 27
Άσκηση χωρίς ιμάντα έλξης 28
Ασκήσεις με ιμάντες έλξης 28
Το σωστό μήκος..............................................................................................................................28
Η σωστή λαβή.................................................................................................................................28
Καρποί ............................................................................................................................................28
Ασκήσεις .........................................................................................................................................28
Καθαρισμός, φροντίδα και συντήρηση 31
Αντικατάσταση μπαταρίας 31
Ανταλλακτικά 32
Όταν υπάρχει κάποιο πρόβλημα ... 34
Απόρριψη 34
Τεχνικά στοιχεία 35
Εισαγωγέας 35
Εγγύηση και σέρβις 35
Φυλάξτε αυτή την οδηγία για ερωτήσεις που θα προκύψουν αργότερα – και σε περίπτωση παράδοσης της
συσκευής δώστε την επίσης σε αυτούς που θα την αποκτήσουν!
- 19 -

SWING ΣΤΕΠΕΡ
KH 6002
Συνοδευτικός εξοπλισμός
– Swing Stepper
– 2 πλαστικές βάσεις
– 2 σταυρολαμαρινόβιδες
– Σταυροκατσάβιδο
– Βίδα ρύθμισης
– Μονάδα υπολογιστή
– Μπαταρία, τύπος ΑAA LR03
– 2 ιμάντες έλξης
– Αυτό το εγχειρίδιο χρήσης
Ενδεδειγμένη χρήση
Η συσκευή προορίζεται για χρήση μόνο ως συσκευή
γυμναστικής και επιτρέπεται η τοποθέτηση και η
χρήση της μόνο στο χώρο του σπιτιού. Δεν είναι
κατάλληλο για καμία άλλη χρήση, π.χ. ως
αντικατάστατο σκαλοπατιού ή ως παιδικό παιχνίδι.
Δεν επιτρέπεται η τοποθέτηση και λειτουργία στον
εμπορικό, θεραπευτικό ή επαγγελματικό τομέα.
Εκτελείτε με το στέπερ αποκλειστικά τις ασκήσεις που
περιγράφονται και απεικονίζονται σε αυτό το
εγχειρίδιο.
Η ακατάλληλη χρήση ή η υπέρμετρη γυμναστική
οδηγεί σε βλάβες της υγείας.
Συμμόρφωση
Σύμφωνα με τις αντίστοιχες Ευρωπαϊκές Οδηγίες η
συσκευή φέρει τη σήμανση . Η δήλωση
συμμόρφωσης παρέχεται από τον κατασκευαστή.
Το άρθρο αντιστοιχεί στις προδιαγραφές των
παρακάτω προτύπων:
DIN EN 957-1:2005, DIN EN 957-8:1998,
DIN 32935 (για τους ιμάντες έλξης).
Υποδείξεις ασφαλείας
Γενικός κίνδυνος!
Μέγιστο φορτίο: Το στέπερ έχει σχεδιαστεί για μέγιστο
βάρος χρήστη έως 100 kg.
Το στέπερ δεν πρέπει να διαθέτει συστήματα ρύθμισης
που μπορεί να εμποδίσουν την κίνηση του χρήστη.
Το στέπερ πρέπει να τοποθετείται σε θέση που να
υπάρχει αρκετός χώρος για γυμναστική. Απαιτείται
επιφάνεια τουλάχιστον 2 x 2 m.
Τοποθετήστε το στέπερ σε ένα επίπεδο δάπεδο χωρίς
κλίση, για να είναι σταθερό κατά τη γυμναστική και
να μην “γέρνει”.
Ελέγχετε ότι η συσκευή δεν παρουσιάζει προβλήματα,
πριν από κάθε χρήση. Σε αντίθετη περίπτωση μην την
θέτετε σε λειτουργία. Τα ελαττωματικά μέρη πρέπει να
αντικαθίστανται, διαφορετικά επηρεάζεται η
λειτουργία και η ασφάλεια.
Οι επισκευές επιτρέπεται να εκτελούνται μόνο από
εξουσιοδοτημένο ειδικό προσωπικό. Πρέπει να
χρησιμοποιούνται μόνο γνήσια ανταλλακτικά.
Κίνδυνος για τα παιδιά!
Προσέχετε η μεμβράνη συσκευασίας να μην βρεθεί
στα χέρια παιδιών, επειδή είναι ιδιαίτερα επικίνδυνη
(κίνδυνος ασφυξίας).
Μην αφήνετε ποτέ τα μικρά παιδιά να παίζουν με την
μπαταρία. Η κατάποση μπορεί να οδηγήσει σε
σοβαρά προβλήματα υγείας.
Κατά τη γυμναστική φροντίστε τα παιδιά να βρίσκονται
μακριά από τα πεντάλ (κίνδυνος σύνθλιψης).
Η συσκευή δεν είναι παιχνίδι για παιδιά. Όταν δεν
χρησιμοποιείται, πρέπει να φυλάσσετε σε θέσεις μη
προσβάσιμες σε παιδιά.
- 20 -

Κίνδυνος εγκαύματος!
Οι υδραυλικοί αποσβεστήρες θερμαίνονται κατά τη
γυμναστική. Μην τους αγγίξετε σε καμία περίπτωση,
ιδιαίτερα απευθείας μετά το τέλος της γυμναστικής.
Κίνδυνος από εσφαλμένη/
υπέρμετρη γυμναστική!
Τηρείτε οπωσδήποτε όλες τις υποδείξεις του
κεφαλαίου “Υποδείξεις γυμναστικής” στη σελίδα 24.
Προσοχή!
Σε περίπτωση διαρροής στους υδραυλικούς
αποσβεστήρες μπορεί να εξέλθει λάδι. Για να
αποφύγετε τυχόν ακαθαρσίες στο δάπεδο ή στο χαλί,
τοποθετήστε τη συσκευή σε επίπεδο, αντιολισθητικό
υπόστρωμα.
Αποφύγετε την εισροή υγρών στον υπολογιστή.
Το ευαίσθητο ηλεκτρονικό σύστημα μπορεί να
υποστεί βλάβες. Προστατέψτε τον υπολογιστή
από την άμεση έκθεση στο ηλιακό φως.
Μην ασκείτε κανενός είδους βία κατά τη χρήση της
συσκευής.
Ελέγχετε τακτικά τη σταθερή έδραση όλων των βιδών
και των παξιμαδιών. Τα παξιμάδια αυτόματης
ασφάλισης δεν είναι δυνατό να χαλαρώσουν από τη
δόνηση. Αυτή η ιδιότητα μπορεί να εγγυηθεί μόνο με
ένα μεμονωμένο σφίξιμο. Σε περίπτωση που το στέπερ
αποσυναρμολογηθεί μία φορά, τα παξιμάδια
αυτόματης ασφάλισης πρέπει να αντικατασταθούν με
καινούρια.
Όταν η συσκευή δεν είναι απαραίτητη για μεγάλο
χρονικό διάστημα, αφαιρείτε την μπαταρία από τον
υπολογιστή, επειδή σε περίπτωση διαρροής της θα
μπορούσαν να προκληθούν ζημιές.
Συναρμολόγηση και
τοποθέτηση
Η συσκευή παραδίδεται σε μεγάλο βαθμό
προσυναρμολογημένη. Απαιτούνται μόνο μερικές
χειρολαβές, για να μπορέσει να τεθεί σε λειτουργία.
Χρειάζεστε ένα σταυροκατσάβιδο (περιλαμβάνεται
στο συνοδευτικό εξοπλισμό).
q
1. Τοποθετήστε τις δύο πλαστικές βάσεις
τέτοιον τρόπο στον πίσω σωλήνα δαπέδου
ώστε οι επιφάνειες των ποδιών να δείχνουν προς
τα πίσω. Στρέψτε τη βάση
μέχρι η εγκοπή να βρεθεί στην υποδοχή του
δαπέδου
2. Βιδώστε τις λαμαρινόβιδες
υπάρχουν ήδη στην κάτω πλευρά του σωλήνα
δαπέδου
w
w
r
e
w
κατά
q
w
όσο χρειάζεται,
q
.
στις οπές που
e
.
,
3. Στερεώστε τη βίδα ρύθμισης
στο μπροστινό πλαίσιο.
- 21 -
στο σπείρωμα
r

i
t
4. Τοποθετήστε την μπαταρία που συνοδεύει το
προϊόν στη θήκη μπαταρίας
του υπολογιστή
πρώτα τον αρνητικό πόλο. Φροντίστε για τη
σωστή πολικότητα!
y
:
y
στο περίβλημα
t
u
5. Συνδέστε τον υπολογιστή και τη συσκευή με το
βύσμα
σπάσετε τους πείρους στο εσωτερικό.
(αν απαιτείται), χωρίς να λυγίσετε ή να
u
6. Πιέστε ελαφρώς στη μύτη iκαι τοποθετήστε τον
υπολογιστή
το καλώδιο.
Στρέψτε τον υπολογιστή
ώστε η ετικέτα να μπορεί να αναγνωστεί κατά τη
διάρκεια της γυμναστικής.
7. Τοποθετήστε τη συσκευή σε ένα σταθερό, επίπεδο
δάπεδο με ένα αντιολισθητικό προστατευτικό
κάλυμμα για το δάπεδο ή το χαλί.
Διατηρείτε γύρω από τη συσκευή μια απόσταση
ασφαλείας 2 X 2 m από άλλα αντικείμενα και
τοίχους.
στην κολόνα, χωρίς να συνθλίψετε
y
αν είναι απαραίτητο,
y
- 22 -

o
Ρύθμιση ύψους στεπ
8. Αγκιστρώστε τους δύο ιμάντες έλξης στους
δακτυλίους
βιδώστε σφιχτά τον κοχλιωτό σύνδεσμο και στα
δύο άγκιστρα. Πριν από κάθε περίοδο
γυμναστικής με τους ιμάντες έλξης, φροντίζετε
οι κοχλιωτές συνδέσεις των αγκίστρων να είναι
πάντα κλειστές.
Προσοχή
Τα άγκιστρα στο στέπερ δεν πρέπει να επιβαρύνονται
εγκάρσια, επειδή έχουν σχεδιαστεί αποκλειστικά για
επιβαρύνσεις έλξης από επάνω.
Το ίδιο ισχύει και για τα άγκιστρα στους ιμάντες
έλξης. Μη τήρηση αυτής της οδηγίας μπορεί να
οδηγήσει στο σπάσιμο των αγκίστρων στο στέπερ.
Προσοχή
Όταν οι ιμάντες έλξης δεν χρησιμοποιούνται κατά τη
γυμναστική με το στέπερ, πρέπει να απαγκιστρώνονται
πάντα και να αφαιρούνται από τη συσκευή. Έτσι
αποφεύγεται ο κίνδυνος παραπατήματος.
9. Τέλος, ελέγχετε αν όλα τα παξιμάδια και οι βίδες
έχουν σφίξει με ασφάλεια. Η συσκευή είναι έτοιμη
για λειτουργία.
πριν από τα πέλματα. Έπειτα
o
r
Με τη βοήθεια της βίδας ρύθμισης rμπορείτε να
ρυθμίσετε τη θέση των πεντάλ και επομένως το ύψος
του στεπ.
• Στρέφοντας δεξιόστροφα, τα πεντάλ ρυθμίζονται
απότομα.
- 23 -

Υποδείξεις γυμναστικής
Κίνδυνος από εσφαλμένη/
υπέρμετρη γυμναστική!!
Πριν από την έναρξη ενός προγράμματος
γυμναστικής, πρέπει να συμβουλευτείτε τον ιατρό
σας. Ενημερώστε τον/την για τη συσκευή γυμναστικής
που θέλετε να χρησιμοποιήσετε, δείξτε του/της αυτό
το εγχειρίδιο και κάντε ένα γενικό τσεκ απ. Μπορεί να
σας δώσει περαιτέρω βοηθητικές συμβουλές που
αφορούν μόνο εσάς και τη γυμναστική.
Η ιατρική συμβουλή είναι οπωσδήποτε απαραίτητη,
όταν δεν έχετε αθληθεί για μεγάλο χρονικό διάστημα,
έχετε προβλήματα καρδιάς, κυκλοφορίας αίματος,
ισορροπίας ή ορθοπεδικά προβλήματα ή
αναπνευστικές διαταραχές (άσθμα), αν είστε έγκυος ή
παίρνετε φάρμακα που επηρεάζουν τους παλμούς,
την πίεση αίματος ή τη χολιστεριναιμία.
Αν δεν αισθάνεστε καλά ή αν υποφέρετε από άλλες
ασθένειες, δεν πρέπει να γυμνάζεστε. Μην γυμνάζεστε
απευθείας μετά το φαγητό, αν είναι κουρασμένοι ή
υπό άλλες συνθήκες, που θα μπορούσαν να
επηρεαστούν αρνητικά από τη γυμναστική.
Λαμβάνετε υπόψη κατά τη γυμναστική τα σήματα του
σώματός σας. Διακόψτε τη γυμναστική, όταν
παρατηρήσετε τα παρακάτω συμπτώματα: Πόνοι
(πονοκέφαλος), αναπνευστικές διαταραχές,
αρρυθμίες, ακραίο λαχάνιασμα, ζάλη, ίλιγγο ή
ναυτία. Συμβουλευτείτε τον ιατρό σας, πριν
συνεχίσετε τη γυμναστική.
Η τακτική γυμναστική δυναμώνει το σύστημα
κυκλοφορίας αίματος-καρδιάς και συμβάλλει στην
ευεξία.
Η έντονη γυμναστική αντοχής χρησιμοποιεί
ολόκληρο το σώμα. Αυξήστε στη συνέχεια σιγά σιγά
την ένταση και τηρείτε τις απαιτούμενες παύσεις. Στη
συνέχεια μπορείτε να γυμνάζεστε σε μια κλίμακα
απόδοσης, στην οποία δεν εξαντλείστε.
Ξεκινήστε καθημερινά με 10 έως 15 λεπτά.
Μετά από μερικές εβδομάδες μπορείτε να επεκτείνετε
τη γυμναστική. Στο σημείο αυτό, προτείνουμε τον
παρακάτω ρυθμό γυμναστικής:
3 ημέρες συνεχόμενης γυμναστικής
1 ημέρα παύση
2 ημέρες συνεχόμενης γυμναστικής
1 ημέρα παύση
Φροντίζετε οπωσδήποτε να υπάρχει αρκετός χρόνος
για προθέρμανση και χαλάρωση.
Πριν από τη γυμναστική συνιστάται η προθέρμανση
των μυών με ασκήσεις διατάσεων. Έτσι μειώνετε τον
κίνδυνο τραυματισμών και αυξάνετε το βαθμό
επιτυχίας των κόπων σας. Οι ασκήσεις υπάρχουν στη
σελίδα 27.
Η γυμναστική πρέπει να ξεκινά με αργούς ρυθμούς.
10 με 15 λεπτά την ημέρα με 2 ημέρες παύσης μέσα
σε μία εβδομάδα (όπως περιγράφεται παραπάνω).
Ως προχωρημένος μπορείτε να αυξάνεται τη διάρκεια
της γυμναστικής, καθώς και το ρυθμό, όπως εσείς
θέλετε. Μετά από κάθε γυμναστική πρέπει να
μεταβαίνετε στη φάση Cool-down. Αυτό σημαίνει, ότι
πρέπει να επαναλάβετε τις ασκήσεις διατάσεων, που
ολοκληρώσατε και πριν από τη γυμναστική.
Κουνώντας τα πόδια και τα χέρια επιτυγχάνετε τη
χαλάρωση των μυών.
Εκτελείτε μόνο τις ασκήσεις που απεικονίζονται
και περιγράφονται στο παρόν εγχειρίδιο.
- 24 -

Κίνδυνος τραυματισμού!
Φροντίστε πριν από την έναρξη της γυμναστικής, να
τοποθετήσετε το στέπερ σε θέση με αρκετό ελεύθερο
χώρο για τη γυμναστική. Απαιτείται επιφάνεια 2 x 2 m.
Φοράτε άνετο και διαπερατό στον αέρα ρουχισμό.
Ο ρουχισμός πρέπει να είναι στενός, για να μην
εγκλωβίζεστε στα κινούμενα μέρη του στέπερ και για
να μην εμποδίζει κατά τη γυμναστική των μυών των
χεριών κατά τη χρήση των ιμάντων έλξης.
Φοράτε κατά τη γυμναστική αθλητικά παπούτσια με
αντιολισθητική σόλα, μην γυμνάζεστε ξυπόλητοι.
Τοποθετείτε τα πόδια πλήρως επάνω στα πέλματα των
πεντάλ, για την αποφυγή τραυματισμών. Μην
στέκεστε πολύ μακριά πίσω στα πεντάλ και μην
τραβάτε πολύ δυνατά τους ιμάντες έλξης. Η συσκευή
μπορεί να ανατραπεί.
Φροντίζετε ο χώρος γυμναστικής να αερίζεται καλά,
αποφύγετε ωστόσο το ρεύμα αέρα, επειδή μπορεί να
κρυώσετε εύκολα.
Ανέβασμα στο στέπερ
Πιέστε το 1 πεντάλ με το πόδι πλήρως προς τα κάτω,
ώστε ο βραχίονας πεντάλ με τον αναστολέα του
να αγγίζει το πλαίσιο βάσης. Έπειτα ανεβαίνετε με το
πόδι στα πέλματα του βραχίονα πεντάλ που
βρίσκεται κάτω. Έπειτα τοποθετήστε το άλλο πόδι στο
άλλο πέλμα που βρίσκεται επάνω.
Κατέβασμα
Πιέστε, ενώ στέκεστε στο στέπερ, ένα από τα πέλματα
πλήρως προς τα κάτω, ώστε ο αναστολέας του
βραχίονα να αγγίζει το πλαίσιο βάσης. Έπειτα
ανασηκώνετε το πόδι από το πέλμα με κλίση
προς τα επάνω και το ακουμπάτε στο δάπεδο. Στη
συνέχεια, απομακρύνετε και το πόδι από το πέλμα
προς τα κάτω.
Κίνηση του στέπερ κατά τη γυμναστική
Το στέπερ προσομοιώνει το ανέβασμα μιας σκάλας.
Μέσω του εφέ αιώρησης, τα πέλματα δεν κινούνται
μόνο προς τα επάνω και κάτω, αλλά στις εξωτερικές
πλευρές έχουν κλίση και προς τα αριστερά και προς
τα δεξιά.
Ομάδες μυών που επηρεάζονται
Στις ασκήσεις χωρίς ιμάντα έλξης, γυμνάζονται
κυρίως οι μύες μηρών και γλουτών. Οι ασκήσεις που
χρησιμοποιείτε το στέπερ και τους ιμάντες έλξης
δυναμώνουν τους μύες των γλουτών, των μηρών, των
χεριών και των ώμων. Οι ασκήσεις, στις οποίες δεν
χρησιμοποιείτε το στέπερ, αλλά τους ιμάντες έλξης,
δυναμώνουν τους μύες των χεριών και των ώμων.
Στάση σώματος
Πρέπει να φροντίζετε η στάση του σώματος κατά τη
γυμναστική να είναι ίσια. Αποφύγετε οπωσδήποτε τη
λόρδωση στην πλάτη. Κατά τη σταθερή χρήση του
στέπερ, οι αναστολείς των βραχιόνων πεντάλ δεν
πρέπει να αγγίζουν το πλαίσιο της βάσης. Επομένως,
πάντα λίγο πριν από την επαφή, πραγματοποιείτε την
αλλαγή φορτίου από το ένα πόδι στο άλλο. Μπορεί
επίσης να σας βοηθήσει, αν κινείτε συντονισμένα και
τα χέρια σας ελαφρά λυγισμένα με το ρυθμό στεπ
από το επάνω μέρος του σώματός σας.
Κίνηση βήματος
Στο στέπερ πρόκειται για μια ανεξάρτητη κίνηση
βήματος.
Σύστημα αντίστασης-πέδησης
Σε αυτό το στέπερ πρόκειται για ένα σύστημα που
εξαρτάται από την ταχύτητα.
- 25 -

Χρήση υπολογιστή
Μπορείτε να χρησιμοποιήσετε τη συσκευή χωρίς τον
υπολογιστή. Η οθόνη του υπολογιστή μπορεί να σας
βοηθήσει να προγραμματίσετε αποτελεσματικά τη
γυμναστική, επειδή παρέχει πληροφορίες για τη
μέχρι τώρα πρόοδο της γυμναστικής. Το στέπερ
αντιστοιχεί στην κατηγορία ακριβείας Γ. Αυτό
σημαίνει ότι δεν υπάρχει απαίτηση για την ακρίβεια
των ενδείξεων στον υπολογιστή.
Ενεργοποίηση/απενεργοποίηση
• Για την ενεργοποίηση πατήστε το κόκκινο πλήκτρο
MODE. Η ένδειξη της οθόνης είναι ορατή.
• Αν δεν χρησιμοποιήσετε τη συσκευή για 5 λεπτά,
ο υπολογιστής απενεργοποιείται αυτόματα.
Επιλογή ένδειξης
Κατά τη γυμναστική, η οθόνη προβάλλει στην
πρώτη γραμμή
– STOP, μόλις διακόψετε τη γυμναστική
– τον αριθμό των βημάτων ανά λεπτό
(κατά προσέγγιση).
Στη δεύτερη γραμμή προβάλλει διάφορα δεδομένα
γυμναστικής (λειτουργίες). Για την αλλαγή από τη
μία λειτουργία στην επόμενη, πατήστε σύντομα το
πλήκτρο MODE.
1. TMR (ανάβει): τρέχων χρόνος γυμναστικής,
0:00 έως 99:59
2. REPS: αριθμός των βημάτων της πραγματικής
μονάδας γυμναστικής, 0 έως 9999
3. CAL: θερμίδες που καταναλώθηκαν1), 0 έως 9999
4. TTR: αριθμός των βημάτων γυμναστικής από την
τοποθέτησης της μπαταρίας, 0 έως 9999
• Αν θέλετε τα δεδομένα γυμναστικής να προβάλλονται
δίπλα το ένα στο άλλο, πατήστε το πλήκτρο MODE
τόσο συχνά, μέχρι το πεδίο TMR να αρχίσει να
αναβοσβήνει. Η ένδειξη της οθόνης αλλάζει
αυτόματα κάθε 5 λεπτά από λειτουργία σε λειτουργία.
1)
Ο υπολογισμός βασίζεται σε εκ των προτέρων
προγραμματισμένες βασικές τιμές, που μπορούν
να χρησιμεύσουν μόνο ως κατευθυντήριες τιμές Η
κατανάλωση θερμίδων από τη χρήση των ιμάντων
έλξης δεν λαμβάνεται υπόψη.
Εμφάνιση στόχων γυμναστικής
Είναι δυνατό να εμφανίζεται ένας ή περισσότεροι στόχοι:
– Διάρκεια γυμναστικής (TMR)
– Αριθμός βημάτων (REPS)
– Κατανάλωση θερμίδων (CAL).
1. Κρατήστε το πλήκτρο MODE πατημένο για τόσο
χρονικό διάστημα, μέχρι να εμφανιστεί στη
δεύτερη γραμμή της οθόνης η ένδειξη 0:00 (TMR)
και να αναβοσβήνει το πρώτο 0 (περ. 4 δευτ.)
2. Για την εμφάνιση της διάρκειας γυμναστικής, πατήστε
το πλήκτρο MODE τόσο συχνά, μέχρι η οθόνη
να προβάλλει την επιθυμητή διάρκεια σε λεπτά.
3. Περιμένετε μερικά δευτερόλεπτα μέχρι η οθόνη να
προβάλλει την επόμενη λειτουργία (REPS).
Πατήστε το πλήκτρο MODE, για να ρυθμίσετε τον
αριθμό των βημάτων ανά 10 βήματα.
4. Στην επόμενη λειτουργία (CAL) μπορείτε να
ρυθμίσετε την επιθυμητή κατανάλωση θερμίδων,
ανά 10 βήματα.
5. Ξεκινήστε τη γυμναστική. Η οθόνη μετρά τις
προρυθμισμένες τιμές μέχρι το μηδέν.
6. Όταν επιτευχθεί ο ρυθμισμένος στόχος, ο υπολο-
γιστής για περ. 10 δευτερόλεπτα σταματά να μετρά.
Στη συνέχεια, ο υπολογιστής ξεκινά από το μηδέν.
Επαναφορά ένδειξης
Η ένδειξη της οθόνης βρίσκεται στο μηδέν μόνο
πριν από την πρώτη περίοδο γυμναστικής. Σε όλες
τις επόμενες περιόδους γυμναστικής, ο υπολογιστής
συνεχίζει τη μέτρηση από το σημείο, στο οποίο έληξε
η τελευταία περίοδος γυμναστικής.
- 26 -

• Για να επαναφέρετε τη μέτρηση από το μηδέν2),
κρατήστε το κόκκινο πλήκτρο MODE πατημένο
για τόσο χρονικό διάστημα, μέχρι η οθόνη να
προβάλει όλα τα σύμβολα ταυτόχρονα
(περ. 3 δευτερόλεπτα).
2)
Ο συνολικός αριθμός των βημάτων γυμναστικής
(TTR) διατηρείται. Αυτός ο αριθμός επαναφέρεται
στο μηδέν μόνο κατά την αντικατάσταση
μπαταρίας.
Ασκήσεις διατάσεων
Κίνδυνος!
Από το υπερβολικό τέντωμα των μυών και των
τενόντων μπορεί να προκληθούν σοβαροί
τραυματισμοί.
Πριν από τις διατάσεις πρέπει να εκτελείτε
προθέρμανση 5 έως 10 λεπτών, π.χ. επί τόπου
τρέξιμο, σκοινάκι. Κατά την εκτέλεση των ασκήσεων
διατάσεων, έχετε υπόψη τα παρακάτω:
– Εκτελείτε την κάθε άσκηση αργά.
– Τεντώνετε μόνο τόσο, μέχρι να αισθανθείτε ένα
ελαφρύ τράβηγμα. Παραμείνετε σε αυτήν τη θέση
για 20 δευτερόλεπτα.
Διάταση των μυών κνημών
Κοιτώντας τον τοίχο, τα πόδια βρίσκονται σε όρθια
θέση. Το ένα πόδι λυγισμένο, το άλλο πόδι ίσιο.
Λυγίστε τα χέρια ελαφρώς και πιέστε τη λεκάνη
λίγο προς τα μπροστά. Επαναλάβετε την άσκηση με
το άλλο πόδι.
Διάταση των μυών μηρών
Τα πόδια ανοιχτά παράλληλα με τους ώμους, τα
δάκτυλα στραμμένα ελαφρώς προς τα έξω. Καθίστε
σιγά όσο πιο πολύ μπορείτε και κινηθείτε ελαφρώς.
Διάταση του εκτείνοντος μυός γλουτών και
καμπτήρα μυός μηρών
Τοποθετήστε τα πόδια παράλληλα με τους ώμους, με
τεντωμένα πόδια, σκύψτε προς τα εμπρός, σχεδόν
μέχρι να χέρια να αγγίξουν το δάπεδο.
Aραμείνετε σε αυτήν τη θέση.
Διάταση των εσωτερικών πλευρών των μηρών
Άνετη θέση ανάσκελα. Πόδια ανοιχτά, σε διάσταση.
Ενώστε τις πατούσες. Φέρτε τα πόδια σιγά προς το
πάτωμα.
- 27 -

Άσκηση χωρίς ιμάντα έλξης
Ασκήσεις με ιμάντες έλξης
Άσκηση:
για μηρούς, γάμπες και γλουτούς
1. Κινείτε τα χέρια κατά τη διάρκεια του στεπ εντελώς
φυσικά μπροστά και πίσω – όπως όταν τρέχετε ή
ανεβαίνετε σκάλες.
2. Ανεβάστε τα χέρια σταδιακά πιο ψηλά.
Το σωστό μήκος
Κίνδυνος!
Ο ιμάντας έλξης πρέπει να βρεθεί σε διάταση έως
185 cm. Διαφορετικά μπορεί να καταστραφεί και να
τραυματίσει το χρήστη.
Όσο πιο πολύ τραβάτε τον ιμάντα έλξης, τόσο
περισσότερη δύναμη πρέπει να ασκήσετε.
Το υλικό ιμάντα έλξης είναι ένα φυσικό προϊόν το
οποίο κατά τη διαδικασία παραγωγής υπόκειται σε
φυσικές διακυμάνσεις. Για το λόγο αυτό ίσως
υπάρχουν μεμονωμένα αποτελέσματα μετρήσεων με
αποκλίσεις και τα οποία ωστόσο δεν επηρεάζουν την
ασφάλεια του προϊόντος.
Μήκος σε cm Άσκηση δύναμης σε N
(10 N
1 kg)
≈
120 περ. 56 ±10N
140 περ. 73 ±10N
160 περ. 90 ±10N
185 περ. 114 ±10N
Η σωστή λαβή
Φροντίζετε, οι χειρολαβές κατά το τράβηγμα των
ιμάντων έλξης να είναι πάντα σε οριζόντια θέση.
Σε άλλη περίπτωση μπορεί να δημιουργηθούν
στο άγκιστρο για τους ιμάντες έλξης, εγκάρσια
φορτία.
Καρποί
Μην λυγίζετε τους καρπούς, επειδή διαφορετικά
θα τους επιβαρύνετε.
- 28 -

Ασκήσεις
Για όλες τις παρακάτω ασκήσεις ισχύει:
– πιάστε τις λαβές με τα χέρια.
– εκτελείτε τις κινήσεις ελεγχόμενα.
– κρατάτε τα χέρια υπό πίεση.
– πριν από κάθε γυμναστική με τους ιμάντες έλξης,
ελέγχετε ότι οι κοχλιωτές συνδέσεις των αγκίστρων
είναι ασφάλεια.
Άσκηση 1:
για χέρια, ώμους, πόδια και γλουτούς
Άσκηση 2:
για τα χέρια και ιδιαίτερα για τους ώμους
1. Ανασηκώστε το αριστερό χέρι ελαφρά λυγισμένο
μπροστά από το σώμα έως περίπου το ύψος των
ώμων και πιέστε προς τα κάτω το δεξιό πεντάλ.
2. Κατεβάστε το αριστερό χέρι και ανασηκώστε το
δεξιό χέρι, ενώ πιέζετε προς τα κάτω το αριστερό
πεντάλ.
3. Επαναλάβετε το Βήμα 1 και 2.
1. Μην κάνετε στεπ.
2. Κρατήστε τα χέρια στο ύψος της λεκάνης.
3. Τραβήξτε τη δεξιά λαβή προς την κατεύθυνση του
πηγουνιού. Το επάνω μέρος του χεριού να είναι
προς τα επάνω.
4. Ταυτόχρονα κατεβάστε την αριστερή λαβή προς τα
κάτω.
5. Επαναλάβετε το Βήμα 3 και 4.
Συνιστούμε 3 σύνολα ασκήσεων από 6 έως 10
επαναλήψεις.
- 29 -

Άσκηση 3:
για χέρια, πόδια, γλουτούς και ιδιαίτερα το επάνω
μέρος των χεριών
Άσκηση 4:
για πλάτη, ώμους, στήθος, πόδια και γλουτούς
1. Οι παλάμες κοιτούν προς τα επάνω.
2. Οι αγκώνες πιέζουν σταθερά το σώμα.
3. Κατεβάστε το αριστερό πεντάλ και τραβήξτε με το
αριστερό χέρι τον ιμάντα προς τα επάνω.
4. Κατεβάστε το δεξιό πεντάλ και το αριστερό χέρι,
ταυτόχρονα τραβήξτε το δεξιό χέρι προς τα
επάνω.
1. Ξεκινήστε με στεπ.
2. Ενώ κάνετε στεπ, σηκώστε τα χέρια στο πλάι μέχρι
το ύψος των ώμων.
3. Κατεβάστε ξανά τα χέρια.
4. Επαναλάβετε τα Βήματα 2 και 3.
Παραλλαγή: Εκτελέστε την άσκηση με τις παλάμες
προς τα επάνω.
- 30 -

Καθαρισμός, φροντίδα και
συντήρηση
Προσοχή!
Μην χρησιμοποιείτε επιθετικά, τριπτικά ή καυστικά
καθαριστικά μέσα και διαλυτικά!
Αποφύγετε την εισροή υγρασίας στον υπολογιστή!
1. Καθαρίζετε τη συσκευή τουλάχιστον μία φορά την
εβδομάδα με μαλακά, αν είναι απαραίτητο,
ελαφρά νωπό πανί.
2. Σε περίπτωση που υπάρχουν θόρυβοι τριξίματος,
λιπάνετε τα κινούμενα έδρανα και τις αξονικές
συνδέσεις με γράσο για τα κέντρα των τροχών και
τα έδρανα από καταστήματα με προϊόντα για
ποδήλατα.
3. Ελέγχετε το στέπερ πριν από κάθε περίοδο
γυμναστικής για τυχόν ζημιές και πιθανά σημάδια
τριβής. Δώστε ιδιαίτερη προσοχή στις πλαστικές
ροδέλες στους άξονες ανύψωσης, στα πέλματα,
καθώς και στους ιμάντες έλξης και στις συνδέσεις
ιμάντων. Σε περίπτωση που ένα εξάρτημα είναι
ελαττωματικό και πρέπει να αντικατασταθεί, το
στέπερ δεν επιτρέπεται να χρησιμοποιηθεί πια
μέχρι την αντικατάσταση του ελαττωματικού
εξαρτήματος.
4. Προσέχετε τα παρακάτω εξαρτήματα, που μέσω
του φορτίου εκτίθενται σε υψηλότερο βαθμό
φθοράς:
– Πλαστικές ροδέλες,
Αρ. εξαρτήματος, 25, 26, 31, 32, 34, 61
– Ιμάντες έλξης, Εξάρτημα 47
Αντικατάσταση μπαταρίας
Όταν η ποιότητα της ένδειξης φθίνει, αντικαταστήστε
την μπαταρία με μια καινούρια τύπου
“Micro/AAA/LR03”.
1. Αφαιρέστε προσεκτικά τη μονάδα υπολογιστή
από την κολόνα και γυρίστε την ανάποδα.
2. Αφαιρέστε την μπαταρία προσεκτικά, αλλά με λίγη
δύναμη. Αποθέστε την στο θετικό πόλο.
3. Τοποθετήστε την καινούρια μπαταρία, πρώτα τον
αρνητικό πόλο. Φροντίστε για τη σωστή
πολικότητα! (βλέπε Κεφάλαιο “Συναρμολόγηση
και τοποθέτηση”)
4. Τοποθετήστε τη μονάδα υπολογιστή
κολόνα (βλέπε Κεφάλαιο “Συναρμολόγηση και
τοποθέτηση”).
y
y
ξανά στην
- 31 -

4
5
50
50
55
03
51
58
59
56
57
49
45
1
2
4
44
47
21
20
52
28
27
26
54
53
60
61
15
16
17
18
19
9
10
13
14
48
11
12
8
7
29
30
31
22
23
24
25
32
33
34
36
35
38
37
40
39
41
42
43
46
5
6
Ανταλλακτικά
- 32 -

Αρ. Ποσότητα Χωριστό εξάρτημα
31 2 Πλαστική ροδέλα
1 1 Πλαίσιο βάσης
2 1 Υπολογιστής
3 2 Πλαστική βάση μπροστά
4 2 Πλαστική βάση πίσω
5 4 Λαμαρινόβιδα 17,5 mm
6 2 Βίδα M8 x 43 mm
7 2 Υδραυλικός κύλινδρος
8 2 Βίδα M8 x 43 mm
9 2 Ροδέλα
10 2 Παξιμάδι αυτόματης ασφάλισης M8
11 2 Αναστολέας
12 1 Τραβέρσα δεξιά
13 1 Επιφάνεια υποποδίου δεξιά
14 4 Βίδα M8 x 55
15 4 Ροδέλα
16 4 Παξιμάδι αυτόματης ασφάλισης M8
17 2 Πλαστικό καπάκι για τραβέρσα
32 2 Πλαστική ροδέλα
33 2 Ροδέλα
34 2 Πλαστική ροδέλα
35 2 Ροδέλα
36 2 Παξιμάδι αυτόματης ασφάλισης M8
37 2 Λαστιχένιος δακτύλιος
38 2 Οδηγός
39 1 Πλάκα αναστροφής
40 2 Ροδέλα
41 2 Πλαστικό καπάκι
42 2 Βίδα M12 x 81 mm
43 1 Φουρκέτα συγκράτησης
44 1 Τραβέρσα αριστερά
45 1 Βίδα ρύθμισης
46 1 Επιφάνεια υποποδίου αριστερά
47 2 Ιμάντες έλξης
48 2 Πλαστικό καπάκι για τραβέρσα
18 2 Δακτύλιος συγκράτησης
19 2 Πλαστικό δαχτυλίδι
20 2 Πλαστικό δαχτυλίδι
21 2 Ροδέλα
22 2 Εγκάρσια σύνδεση
23 2 Βίδα M8 x 335 mm
24 2 Ροδέλα
25 2 Πλαστική ροδέλα
26 2 Πλαστική ροδέλα
27 2 Ροδέλα
28 2 Παξιμάδι αυτόματης ασφάλισης M8
29 2 Βίδα M8 x 335 mm
30 2 Ροδέλα
49 1 Πλαστικό καπάκι
50 2 Βίδα με σπείρωμα
51 1 Προστασία καλωδίου
52 1 Μαγνήτης
53 1 Ροδέλα
54 1 Λαμαρινόβιδα 12 mm
55 1 Αισθητήρας με καλώδιο
56 2 Ροδέλα
57 2 Παξιμάδι M8
58 1 Ροδέλα
59 1 Παξιμάδι M12
60 2 Ροδέλα
61 2 Πλαστική ροδέλα
- 33 -

Όταν υπάρχει κάποιο πρόβλημα ...
Βλάβη
Καμία ένδειξη
υπολογιστή
Η μέτρηση των βημάτων
δεν είναι σωστή
αιτία λύση
Η μπαταρία δεν έχει τοποθετηθεί σωστά ή έχει καταναλωθεί.
Έλεγχος της σωστής θέσης της μπαταρίας (ελέγξτε την πολικότητα)!
Αντικατάσταση μπαταρίας!
Η έδραση του βύσματος σύνδεσης
Διόρθωση έδρασης!
Οι πείροι στο εσωτερικό του βύσματος είναι λυγισμένο/σπασμένοι.
Αντικατάσταση βύσματος σύνδεσης!
Το καλώδιο σύνδεσης είναι παγιδευμένο/κατεστραμμένο.
Αντικατάσταση βύσματος σύνδεσης!
Πιέστε τα πεντάλ μέχρι κάτω
Απόρριψη
Μην απορρίπτετε ποτέ τη συσκευή στα
κανονικά οικιακά απορρίμματα. Αυτό το
προϊόν υπόκειται στην Ευρωπαϊκή Οδηγία
2002/96/EC.
Να απορρίπτετε την συσκευή μέσω εγκεκριμένης
επιχείρησης απόρριψης ή μέσω του τοπικού
συστήματος απόρριψης.
Τηρείτε τις τρέχουσες ισχύουσες προδιαγραφές.
Σε περίπτωση αμφιβολιών επικοινωνήστε με το
σύστημα αποκομιδής απορριμμάτων.
δεν είναι σωστή.
u
Απόρριψη μπαταριών/ηλεκτρικών
συσσωρευτών
Οι μπαταρίες/ηλεκτρικοί συσσωρευτές δεν
επιτρέπεται να απορρίπτονται στα οικιακά
απορρίμματα. Όλοι οι καταναλωτές υποχρεώνονται
βάσει νόμου να παραδίδουν τις μπαταρίες/τους
ηλεκτρικούς συσσωρευτές σε ένα κέντρο συλλογής
της εκάστοτε κοινότητας/προαστίου ή στο εμπόριο.
Αυτή η υποχρέωση χρησιμεύει στην δυνατότητα
απόρριψης των μπαταριών/ηλεκτρικών
συσσωρευτών με τρόπο φιλικό προς το περιβάλλον.
Να επιστρέφετε τις μπαταρίες/τους ηλεκτρικούς
συσσωρευτές μόνο σε αποφορτισμένη κατάσταση.
- 34 -
Να οδηγείτε όλα τα υλικά συσκευασίας
σε απόρριψη φιλική προς το περιβάλλον.

Τεχνικά στοιχεία
Παροχή ισχύος / Τύπος μπαταρίας: 1 x 1,5 V (Micro/AAA/LR03)
Μέγιστο βάρος χρήστη, σε kg: 100
Ευκρινής μετρητής βημάτων: 0 – 9999
Ευκρινής διάρκεια γυμναστικής, σε λεπτά: 00:00 – 99:59
Ευκρινείς θερμίδες, σε kcal: 0 – 9999
Ευκρινής ταχύτητα σε βήματα/λεπτό 0 έως 9999
Μέγ. μήκος ιμάντα έλξης, σε cm: 185
Διαστάσεις (Μ x Π x Υ), σε cm: 52 x 52 x 24,5
Βάρος, σε kg: 9,1
Χώρος τοποθέτησης: H = Οικιακός χώρος
Ακρίβεια: C
Εισαγωγέας
KOMPERNASS GMBH
BURGSTRASSE 21
44867 BOCHUM, GERMANY
www.kompernass.com
Εγγύηση και σέρβις
Έχετε για αυτή τη συσκευή 3 χρόνια εγγύηση από
την ημερομηνία αγοράς. Η συσκευή κατασκευάστηκε
και ελέγχθηκε προσεκτικά πριν από την αποστολή.
Παρακαλούμε φυλάξτε την απόδειξη ταμείου ως
απόδειξη για την αγορά. Σε περίπτωση εγγύησης
ελάτε σε επικοινωνία με το τμήμα του σέρβις
τηλεφωνικά. Μόνο έτσι μπορεί να εξασφαλιστεί μια
δωρεάν αποστολή του εμπορεύματός σας.
Η απόδοση εγγύησης ισχύει μόνο για σφάλματα
υλικού ή κατασκευής, όχι όμως για εξαρτήματα
φθοράς ή για βλάβες σε εύθραυστα εξαρτήματα,
π.χ. διακόπτες ή συσσωρευτές. Το προϊόν
προορίζεται μόνο για την ιδιωτική και όχι για την
επαγγελματική χρήση.
Σε περίπτωση κακής μεταχείρισης και ακατάλληλης
χρήσης, σε χρήση βίας και σε παρεμβάσεις οι
οποίες δεν διεξήχθησαν από το εξουσιοδοτημένο
μας τμήμα σέρβις, η εγγύηση παύει να ισχύει. Τα νομικά σας δικαιώματα δεν περιορίζονται μέσω αυτής
της εγγύησης.
Kompernass Service Eλλάδα
Kalothanassi G. Amalia α 10-12 Thiatiron Str.
14231 N.Ionia Athens
Tel.: 210 2790865
Fax: 210 2796982
e-mail: support.gr@kompernass.com
- 35 -

- 36 -

INDHOLDSFORTEGNELSE SIDE
Pakkens indhold 38
Anvendelsesområde 38
Overensstemmelse 38
Sikkerhedsanvisninger 38
Montering og opstilling 39
Indstilling af stigningen 41
Træningsanvisninger 42
Anvendelse af computeren 44
Tænd/sluk.......................................................................................................................................44
Valg af visning................................................................................................................................44
Angivelse af træningsmål..............................................................................................................44
Nulstilling af visningen...................................................................................................................44
Strækøvelser 45
Øvelse uden trækrem 46
Øvelser med trækremme 46
Den rigtige længde........................................................................................................................46
Det rigtige greb ..............................................................................................................................46
Håndled..........................................................................................................................................46
Øvelser............................................................................................................................................46
Rengøring, pleje og vedligeholdelse 49
Udskiftning af batteriet 49
Reservedele 50
Hvis der opstår problemer ... 50
Bortskaffelse 50
Tekniske data 51
Importør 52
Garanti og service 52
Læs betjeningsvejledningen igennem før første brug, og opbevar den til senere brug. Lad vejledningen følge
med, hvis apparatet gives videre til andre."
- 37 -

SWINGSTEPPER
KH 6002
Pakkens indhold
– Swing Stepper
– 2 kunststoffødder
– 2 stjerne-pladeskruer
– Stjerneskruetrækker
– Justeringsskrue
– Computerenhed
– Batteri, type AAA LR03
– 2 trækremme
– Denne betjeningsvejledning
Anvendelsesområde
Apparatet egner sig udelukkende som træningsapparat og må kun opstilles og bruges til private formål. Det er uegnet til alle andre formål, f.eks. som
erstatning for en trinplade eller som legetøj for
børn. Det må ikke opstilles og bruges i erhvervsmæssige eller terapeutiske sammenhænge eller i
professionelle træningscentre. Brug kun stepperen til
at udføre de øvelser, der er beskrevet og anført i
denne vejledning. Ukorrekt brug eller overdreven
træning fører til helbredsskader.
Overensstemmelse
I overensstemmelse med de relevante EU-direktiver
er apparatet udstyret med --mærket. Overensstemmelseserklæringen opbevares hos producenten.
Varen efterlever følgende standarder:
DIN EN 957-1:2005, DIN EN 957-8:1998,
DIN 32935 (for trækremmene).
Sikkerhedsanvisninger
Generel fare!
Maksimal belastning: Stepperen er designet til en
maksimal kropsvægt på 100 kg.
Der må ikke være nogen indstillingsanordninger på
stepperen, som kan forhindre brugerens bevægelser.
Stepperen skal opstilles på et sted, som giver dig
nok plads til træningen. Der kræves et areal på
mindst 2 x 2 m.
Placer stepperen på et jævnt og vandret underlag,
så den står fast under træningen og ikke “vipper”.
Kontroller altid apparatet for fejl, inden det anvendes. Hvis der er fejl på apparatet, må du ikke bruge
det. Defekte dele skal udskiftes, da funktion og
sikkerhed ellers kan blive reduceret.
Reparationer må kun udføres af autoriserede
fagfolk. Der må kun bruges originale reservedele.
Fare for børn!
Pas på, at emballagefilmen ikke fører til dødsfald
hos børn (kvælningsfare).
Lad aldrig små børn lege med batteriet. Hvis et
barn sluger batteriet, kan det føre til alvorlige
helbredsskader.
Hold børn væk fra pedalerne, mens du træner
(klemningsfare).
Apparatet er ikke legetøj for børn. Når det ikke
bruges, bør det opbevares utilgængelig for børn.
- 38 -

Fare for forbrændinger!
Hydraulikstøddæmperne bliver varme under
træningen. Du må under ingen omstændigheder
røre dem, heller ikke umiddelbart efter træningen.
Fare ved forkert/
overdreven træning!
Efterlev uden forbehold alle anvisninger i kapitlet
„Træningsanvisninger“ fra side 42.
Pas på!
Hvis hydraulikstøddæmperne lækker, kan der løbe
olie ud. For at undgå tilsmudsninger af gulve eller
tæpper, bør du placere apparatet på et jævnt,
skridsikkert underlag.
Undgå, at der trænger væske ind i computeren.
Den følsomme elektronik kan tage skade. Beskyt
computeren mod direkte sollys.
Der må ikke anvendes nogen form for vold ved
håndteringen af apparatet.
Kontroller jævnligt, at alle skruer og møtrikker sidder godt fast. Selvfastgørende møtrikker kan ikke gå
løs pga. vibrationer. Denne egenskab garanteres
dog kun for én fastskruning. Hvis stepperen på
et tidspunkt skilles ad, skal alle selvfastgørende
møtrikker udskiftes med nye.
Hvis du i en længere periode ikke bruger apparatet, skal du tage batteriet ud af computeren, da det
ellers kan lække og forårsage skader.
Montering og opstilling
Apparatet er i vidt omfang monteret på forhånd.
Der kræves en smule monteringsarbejde, inden
du kan tage det i brug. Du skal bruge en
stjerneskruetrækker (medfølger).
q
1. Sæt de to kunststoffødder
gulvrør
Drej eventuelt foden
i gulvrørets hak
2. Skru pladeskruerne
gulvrørets underside
, så gribefladerne vender bagud.
w
r
e
i det bagerste
q
, indtil noten passer ind
q
.
w
i de forborede huller på
e
.
w
w
3. Skru justeringsskruen
forreste stel.
- 39 -
i gevindet på det
r

i
t
4. Sæt det medfølgende batteri i batterirummet ti
computerkabinettet
minuspolen først. Sørg for, at polerne vender
rigtigt!
y
:
y
u
5. Forbind computeren og apparatet via stikket
(hvis der er behov for det), uden at stifterne
bøjes eller brækker af.
u
6. Tryk let foran i, og sæt computeren yi søjlen,
uden at klemme kablet.
Drej eventuelt computeren
læses under træningen.
7. Stil apparatet på et fast, jævnt underlag med en
skridsikker beskyttelses-dækning til gulv eller
tæppe.
Sørg for en sikkerhedsafstand omkring apparatet
på 2 x 2 m til andre genstande og til væggene.
, så teksten kan
y
- 40 -

o
Indstilling af stigningen
8. Sæt de to trækremme fast i øjerne oover
trædefladerne. Skru derefter samlestykket
fast på de to trækkroge. Før hver træning
med de to trækremme skal du kontrollere, at
trækkrogenes samlestykker er låst.
Pas på!
Krogene på stepperen må ikke belastes på langs,
da de udelukkende er beregnet til trækbelastninger
opad. Det samme gælder for trækkrogene på
trækremmene. Hvis dette ikke overholdes, kan
krogene på stepperen brække.
Vigtigt!
Hvis trækremmene bruges ved træning med stepperen, skal de tages af krogene og fjernes fra apparatet. På den måde undgås risiko for at falde.
9. Kontroller derefter, at alle møtrikker og skruer er
strammet solidt. Apparatet er klar til brug.
r
Med justeringsskruen rkan du indstille pedalernes
placering og dermed påvirke stigningen.
• Drej i urets retning for at gøre pedalerne stejlere.
- 41 -

Træningsanvisninger
Fare ved forkert/
overdreven træning!!
Inden du går i gang med et træningsprogram,
bør du konsultere din læge. Fortæl lægen, hvilket
træningsapparat du ønsker at bruge, vis ham/hende
denne vejledning, og få foretaget et tjek af din
almene træningstilstand. Lægen kan give dig
yderligere nyttige tip til din individuelle træning.
Det er ubetinget nødvendigt at konsultere lægen,
hvis du i længere tid ikke har dyrket sport, hvis du
har hjerte-, kredsløb- eller balanceproblemer,
ortopædiske problemer eller vejrtrækningsbesvær
(astma), hvis du er gravid, eller hvis du tager
medicin, der påvirker din puls, dit blodtryk eller dit
kolesterolniveau.
Hvis du føler dig utilpas eller lider af andre
sygdomme, bør du ikke træne. Træn ikke umiddelbart
efter måltider, ved træthed eller andre indikatorer,
som kan påvirkes negativt af din træning.
Vær opmærksom på din krops signaler under
træningen. Afbryd træningen, hvis du oplever følgende symptomer: Hovedpine eller andre smerter,
vejrtrækningsbesvær, uregelmæssigt hjerteslag,
ekstrem stakåndethed, følelsesløshed, svimmelhed
eller kvalme. Konsulter din læge, inden du fortsætter
med træningen.
Regelmæssig træning styrker dit hjerte-kar-system og
hjælper dig med at få et bedre velbefindende.
Intensiv konditionstræning påvirker hele kroppen.
Øg derfor belastningen langsomt, og sørg for at
holde nok pauser. Træn først på et belastningsniveau,
som du ikke bliver helt udkørt af.
Start med 10 til 15 minutter dagligt.
Efter et par uger kan du udvide
træningen. I den forbindelse anbefaler vi følgende
træningsrytme
3 dage i træk med træning
1 dags pause
2 dage i træk med træning
1 dags pause
Tag dig god tid, og planlæg med en opvarmnings-
og hvilefase.
Inden træningen anbefales det at varme musklerne
op med lidt strækøvelser. På den måde reducerer
du faren for at komme til skade, og du får bedre
resultater af dine anstrengelser. Øvelserne finder du
på side 45.
Du bør gå langsomt i gang med træningen. 10 til
15 minutter om dagen med 2 dages pause i løbet
af en uge (som anført ovenfor). Hvis du er mere
erfaren, kan du efter eget valg øge såvel træningstiden
som rytmen. Efter hver træning skal du skifte til
nedkølingsfasen. Det vil sige, at du skal gentage
de strækøvelser, som du udførte før træningen, en
gang til. Ved at strække arme og ben opnår du en
afslapning af musklerne.
Udfør kun de øvelser, der er afbildet og beskrevet i
denne vejledning.
- 42 -

Fare for tilskadekomst!
Inden du går i gang med at træne, skal du sørge
for at placere stepperen på et sted, som giver dig
nok frirum til træningen. Der kræves et areal på
mindst 2 x 2 m.
Sørg for at have behageligt og åndbart tøj på.
Tøjet skal sidde tæt ind til kroppen, så det ikke bliver
fanget i stepperens bevægelige dele, og så tøjet
ikke virker forstyrrende ved træning af armmusklerne
ved anvendelse af trækremmene.
Ved træning skal du bære sportssko med skridsikker
sål - træn ikke i bare fødder.
Sæt hele foden på pedalernes trædeflade, så du
ikke kommer til skade. Stil dig ikke for langt bagud
på pedalerne, og træk ikke for kraftigt i trækremmene.
Apparatet kan vælte.
Sørg for god udluftning i træningslokalet, men
undgå gennemtræk, da dette hurtigt kan føre til
forkølelser.
Gå op på stepperen
Tryk én pedal helt ned med foden, så pedalarmen
ligger med sin stopper på understellet. Gå derefter
op med foden på den nedadsænkede pedalarms
trædeflade. Den anden fod skal du derefter sætte
på den anden, skråt opadstående trædeflade.
Gå ned
Mens du står på stepperen, skal du trykke en af
trædefladerne helt ned, så pedalarmstopperen
ligger på understellet. Fjern derefter foden fra den
skråt opadvendende trædeflade, og sæt den på
gulvet. Fjern derefter foden fra den nedadvendende
trædeflade.
Stepperens bevægelse under træningen
Stepperen simulerer gang op ad trapper. I kraft af
svingeffekten bevæger trædefladerne sig ikke kun
op og ned, men drejer også ud til højre og venstre.
Belastede muskelgrupper
Ved øvelser uden trækrem trænes hovedsagligt
benenes og bagdelens muskler. Øvelser, hvor du
anvender step og trækremmene, styrker bagdelen,
benene, armene og skuldermusklerne. Øvelser, hvor
du ikke stepper, men bruger trækremmene, styrker
armene og skuldermusklerne.
Kropsholdning
Under træningen skal du sørge for at holde kroppen
ret. Det er vigtigt at undgå at svaje i ryggen. Ved
regelmæssig stepping bør pedalarmstopperen ikke
røre understellet. Kort inden du rammer, skal du
altså flytte vægten fra det ene ben til det andet. Det
kan også være nyttigt at lade armene svinge med i
din steprytme foran overkroppen.
Skridtbevægelse
I forbindelse med stepperen er der tale om en
afhængig skridtbevægelse.
Bremse-modstandssystem
I forbindelse med denne stepper der tale om et
hastighedsafhængigt system.
- 43 -

Anvendelse af computeren
Du kan starte apparatet uden at bruge computeren.
Computerdisplayet kan imidlertid hjælpe dig med
at udforme træningen effektivt, idet den giver
dig oplysninger om det hidtidige træningsforløb.
Stepperen opfylder nøjagtighedsklasse C. Det
vil sige, at det ikke hævdes, at visningerne på
computeren er nøjagtige.
Tænd/sluk
• Tænd ved at trykke på den røde tast MODE.
Displayvisningen bliver synlig.
• Hvis du ikke betjener apparatet i 5 minutter,
slukker computeren automatisk.
Valg af visning
Under træningen viser displayet på den første linje
– STOP, så snart du afbryder træningen
– antallet af skridt pr. minut (ekstrapolation).
På den anden linje vises forskellige træningsdata
(funktioner). Hvis du vil skifte fra en funktion til den
næste, skal du trykke kort på tasten MODE.
1. TMR (lyser): træningstid indtil nu, 0:00 til 99:59
2. REPS: Antal skridt for den aktuelle træningsenhed,
0 til 9999
3. CAL: forbrugte kalorier1), 0 til 9999
4. TTR: Antal træningsskridt, siden batteriet blev sat
i, 0 til 9999
• Hvis du vil have vist alle træningsdata efter
hinanden, skal du trykke på tasten MODE,
indtil feltet TMR blinker. Displayvisningen skifter
automatisk fra tilstand til tilstand
hvert 5 sekund.
1)
Beregningen beror på forudprogrammerede
standardværdier, som kun tjener som rettesnor.
Der tages ikke hensyn til kalorieforbruget ved
anvendelse af trækremmene.
Angivelse af træningsmål
Du kan angive et eller flere mål:
– Træningsvarighed (TMR)
– Antal skridt (REPS)
– Kalorieforbrug (CAL).
1. Hold tasten MODE nede, indtil displayets anden
linje viser 0:00 (TMR) og det første 0 blinker
(ca. 4 sek.)
2. Hvis angive en træningsvarighed, skal du trykke
på tasten MODE, indtil displayet viser den
ønskede varighed i minutter.
3. Vent et par sekunder, indtil displayet viser den
næste funktion (REPS). Tryk på tasten MODE,
for at indstille antallet af skridt i enheder på
10 skridt.
4. I den næste funktion (CAL) kan du indstille det
ønskede kalorieforbrug i enheder på 10 skridt.
5. Start træningen. Displayet viser de forudindstille-
de værdier ned til nul.
6. Når det indstillede mål er nået, tæller compute-
ren i ca. 10 sekunder ikke videre længere.
Derefter starter computeren fra nul.
Nulstilling af visningen
Displayvisningen står før din første træning på nul.
Ved alle efterfølgende træningsenheder fortsætter
computeren tællingen på det sted, hvor din sidste
træning sluttede.
- 44 -

• Hvis du vil nulstille tællingen til nul2),
skal du holde den røde tast MODE nede,
indtil displayet viser alle symboler på samme tid
(ca. 3 sekunder).
2)
Det samlede antal træningsskridt (TTR) bevares.
Dette tal nulstilles kun ved batteriskift.
Strækøvelser
Fare!
Overstrækning af muskler og sener kan føre til
alvorlige skader.
Inden strækøvelserne bør du udføre en opvarmningstræning af 5 til 10 minutters varighed, f.eks. løb på
stedet eller sjipning. Når du udfører strækøvelserne,
skal du være opmærksom på følgende:
– Udfør samtlige øvelser langsomt.
– Stræk dig kun så langt, at du kan mærke et let
træk. Hold derefter denne stilling i 20 sekunder.
Strækning af hofteledet og lårledet
Stil fødderne parallelt i skulderbredde, og bøj med
strakte ben overkroppen fremad, indtil hænderne
næsten rører gulvet.
Hold denne stilling.
Strækning af lægmusklerne
Ret blikket mod væggen, fødderne står lige. Det ene
ben er bøjet, det andet er strakt. Bøj armene lidt, og
skub bækkenet en smule fremad. Gentag øvelsen
med det andet ben.
Strækning af lårmuskulaturen
Stå med fødderne spredt i skulderbredde og med
spidsen af fødderne drejet en smule udad. Gå
langsomt så langt som muligt ned på hug, og vip
let.
Strækning af lårets inderside
Bekvem rygstilling. Vidt strakte ben, spredt ud til siden. Fodsålerne rører hinanden.
Sænk langsomt begge knæ.
- 45 -

Øvelse uden trækrem
Øvelser med trækremme
Øvelse:
for lår, læg og bagdel
1. Bevæg armene helt naturligt frem og tilbage
under stepping – som ved løb eller gang op ad
trapper.
2. Løft armene lidt højere op lidt efter lidt.
Den rigtige længde
Fare!
Trækremmen må maksimalt strækkes 185 cm. Ellers
kan den blive beskadiget, og brugeren kan komme
til skade.
Jo længere du strækker trækremmen, desto mere
kraft skal du bruge.
Trækbåndets materiale er et naturprodukt, som er
udsat for naturlige svingninger under produktionsforløbet. Disse svingninger kan i enkelte tilfælde føre
til divergerende måleresultater, hvilket dog ikke har
negativ indflydelse på produktets sikkerhed.
Længde i cm Kraftforbrug i N
(10 N
1 kg)
≈
120 ca. 56 ±10N
140 ca. 73 ±10N
160 ca. 90 ±10N
185 ca. 114 ±10N
Det rigtige greb
Når du trækker i trækremmene, skal du sørge
for altid at holde håndgrebene vandret. Der
kan ellers opstå tværbelastning af krogene til
trækbåndene.
Håndled
Bøj ikke håndledene, da de ellers kan blive
overbelastet.
Øvelser
For alle de følgende øvelser gælder:
– Tag grebene i hånden.
– udfør bevægelserne kontrolleret.
– hold armene spændt.
– kontroller inden hver træning med trækremmene,
at trækkrogenes samlestykker er låst solidt fast.
- 46 -

Øvelse 1:
for arme, skuldre, ben og bagdel
Øvelse 2:
for armene og især for skuldrene
1. Løft venstre arm let bøjet foran kroppen, til den er
ca. i skulderhøjde, og tryk højre pedal ned.
2. Sænk venstre arm, løft højre arm, og træd venstre
pedal ned.
3. Gentag trin 1. og 2.
1. Step ikke.
2. Hold hænderne i hoftehøjde.
3. Træk højre greb i retning af hagen. Hånd-ryggen
peger opad.
4. Sænk samtidig det venstre greb nedad.
5. Gentag trin 3. og 4.
Vi anbefaler 3 øvelsessæt med hver 6 til 10
gentagelse.
- 47 -

Øvelse 3:
for arme, ben, bagdel og især overarmene
Øvelse 4:
for ryg, skulder, bryst, ben og bagdel
1. Håndfladerne vender opad.
2. Pres albuerne godt ind mod kroppen.
3. Sænk den venstre pedal, og træk med venstre
arm remmen opad.
4. Sænk højre pedal og venstre arm, og træk højre
arm opad.
1. Gå i gang med steppingen.
2. Løft under steppingen armene sidelæns op til
skulderhøjde.
3. Sænk armene igen.
4. Gentag trin 2. og 3.
Variation: Udfør øvelsen med håndfladerne opad.
- 48 -

Rengøring, pleje og vedligeholdelse
Pas på!
Brug ikke aggressive, skurende eller ætsende
rengørings- eller opløsningsmidler!
Undgå, at der trænger fugt ind i computeren!
1. Rengør apparatet mindst én gang om ugen med
en blød og eventuelt let fugtig klud.
2. Hvis der forekommer knirkelyde, skal du smøre
de bevægelige lejer og akseforbindelser med
en nav- og kuglelejefedt, som kan fås hos
cykelhandleren.
3. Kontroller inden hver træning stepperen for
eventuelle beskadigelser og for eventuelle tegn
på slid. Vær i den forbindelse særligt opmærksom
på kunststofskiverne i koblingsakslerne, på
trædefladerne og på trækremmene og båndmonteringerne. Hvis en komponent er defekt og
skal udskiftes, må stepperen ikke bruges, før den
defekte komponent er blevet udskiftet.
4. Vær opmærksom på de følgende dele, som på
grund af den påvirkning, du udsætter dem for,
kan være udsat for et større slid:
– Kunststofunderlagsskiver,
komponent nr., 25, 26, 31, 32, 34, 61
– Trækremme, komponent 47
Udskiftning af batteriet
Hvis visningskvaliteten bliver dårligere, skal du
udskifte batteriet med et nyt af typen
„Micro/AAA/LR03“.
1. Løft forsigtigt
og vend den om.
2. Tag batteriet ud forsigtigt, men med en smule
kraft. Start ved pluspolen.
3. Sæt det nye batteri i med minuspolen først.
Sørg for, at polerne vender rigtigt! (se kapitlet
“Montering og opstilling”)
4. Sæt computerenheden
(se kapitlet “Montering og opstilling”).
computerenheden ud af søjlen,
y
tilbage i søjlen,
y
- 49 -

Reservedele
4
5
50
50
55
03
51
58
59
56
57
49
45
1
2
4
44
47
21
20
52
28
27
26
54
53
60
61
15
16
17
18
19
9
10
13
14
48
11
12
8
7
29
30
31
22
23
24
25
32
33
34
36
35
38
37
40
39
41
42
43
46
5
6
- 50 -

Nr. Antal Komponent
31 2 Kunststofunderlagsskive
1 1 Understel
2 1 Computer
3 2 Kunststoffod, forrest
4 2 Kunststoffod, bagerst
5 4 Pladeskrue 17,5 mm
6 2 Skrue M8 x 43 mm
7 2 Hydraulikcylinder
8 2 Skrue M8 x 43 mm
9 2 Underlagsskive
10 2 Selvfastgørende møtrik M8
11 2 Stopper
12 1 Tværbjælke til højre
13 1 Fodbræt til højre
14 4 Skrue M8 x 55
15 4 Underlagsskive
16 4 Selvfastgørende møtrik M8
17 2 Kunststofkappe til travers
32 2 Kunststofunderlagsskive
33 2 Underlagsskive
34 2 Kunststofunderlagsskive
35 2 Underlagsskive
36 2 Selvfastgørende møtrik M8
37 2 Gummiring
38 2 Styrebøsning
39 1 Vendeplade
40 2 Underlagsskive
41 2 Kunststofkappe
42 2 Skrue M12 x 81 mm
43 1 Holdegaffel
44 1 Tværbjælke til venstre
45 1 Justeringsskrue
46 1 Fodbræt til venstre
47 2 Trækremme
48 2 Kunststofkappe til travers
18 2 Fjederring
19 2 Kunststofindkapsling
20 2 Kunststofindkapsling
21 2 Underlagsskive
22 2 Tværskinneforbindelse
23 2 Skrue M8 x 335 mm
24 2 Underlagsskive
25 2 Kunststofunderlagsskive
26 2 Kunststofunderlagsskive
27 2 Underlagsskive
28 2 Selvfastgørende møtrik M8
29 2 Skrue M8 x 335 mm
30 2 Underlagsskive
49 1 Kunststofkappe
50 2 Gevindskrue
51 1 Kabelbeskytter
52 1 Magnet
53 1 Underlagsskive
54 1 Pladeskrue 12 mm
55 1 Sensor med kabel
56 2 Underlagsskive
57 2 Møtrik M8
58 1 Underlagsskive
59 1 Møtrik M12
60 2 Underlagsskive
61 2 Kunststofunderlagsskive
- 51 -

Hvis der opstår problemer ...
Problem
Ingen computervisning
Skridtene tælles
forkert
Arsag Oplysning
Batteriet er sat forkert i eller brugt op.
Kontroller, at batteriet er sat korrekt i (vær opmærksom på polariteten)!
Udskift batteriet!
Tilslutningsstikket
Sæt stikket rigtigt!
Benene inde i stikket er bøjet/brækket af.
Udskift tilslutningsstikket!
Tilslutningskablet sidder i klemme/er beskadiget.
Udskift tilslutningsstikket!
Træd pedalerne helt ned
Bortskaffelse
Kom under ingen omstændigheder
apparatet i det normale husholdningsaffald.
Dette produkt er underlagt 2002/96/EC.
Bortskaf apparatet via et godkendt renovationsfirma
eller via din kommunes renovationstjeneste.
Overhold de gældende forskrifter. Kontakt din lokale renovationstjeneste, hvis du er i tvivl.
sidder ikke rigtigt.
u
Bortskaffelse af almindelige og
genopladelige batterier
Batterier må ikke bortskaffes sammen med
husholdningsaffaldet. Ifølge gældende lovgivning
er alle forbrugere forpligtede til at aflevere
almindelige og genopladelige batterier på en
kommunal genbrugsstation eller hos en forhandler.
Denne forpligtelse medvirker til, at almindelige og
genopladelige batterier kan bortskaffes på en
miljøvenlig måde. Aflever altid almindelige og
genopladelige batterier i uopladet tilstand.
- 52 -
Aflever alle emballagematerialer, så de
bortskaffes miljørigtigt.

Tekniske data
Energitilførsel/batteritype: 1 x 1,5 V (Micro/AAA/LR03)
Maksimal kropsvægt for brugeren, i kg: 100
Aflæselig skridttæller: 0 – 9999
Aflæselig træningsvarighed, i min.: 00:00 – 99:59
Aflæselige kalorier, i kcal: 0 – 9999
Aflæselig hastighed, i skridt/min. 0 til 9999
Maks. længde trækrem, i cm: 185
Mål (L x B x H), i cm: 52 x 52 x 24,5
Vægt, i kg: 9,1
Anvendelsesområde: H = Hjemmebrug
Nøjagtighed: C
Importør
KOMPERNASSGMBH
BURGSTRASSE 21
44867 BOCHUM, TYSKLAND
www.kompernass.com
Garanti og service
På denne afspiller får du 3 års garanti fra købsdatoen. Apparatet er produceret omhyggeligt og er
inden levering afprøvet samvittighedsfuldt. Opbevar
kassebonen som bevis for købet. I garantitilfælde
bedes du kontakte dit servicested telefonisk. Kun på
den måde kan der garanteres gratis indsendelse
af din vare.
Garantien gælder kun for materiale- eller fabrikationsfejl, men ikke ved sliddele eller beskadigelser
ved skrøbelige dele, f.eks. kontakten eller akkumulatorer. Produktet er kun beregnet til privat og ikke til
erhvervsmæssigt brug.
Ved misbrug og uhensigtsmæssig behandling, anvendelse af vold og ved indgreb, som ikke er foretaget af vores autoriserede service-afdeling, ophører garantien. Dine juridiske rettigheder
indskrænkes ikke ved denne garanti.
Kompernass Service Danmark
Hornbækvej 473
DK-3080 Tikøb
Tel.: +45 4975 8454
Fax: +45 4975 8453
e-mail: support.dk@kompernass.com
- 53 -
 Loading...