

Page 1

UK
KOMPERNASS GMBH · BURGSTRASSE 21 · D-44867 BOCHUM
www.kompernass.com
ID-Nr.: KH5001-07/07-V1
Page 2
Analogue comfort telephone KH5001
Operating Manual
Page 3

KH 5001
Page 4
3)
2!
2&
2@
2#
2$
2%
2*
2^
2(
118mm
2*
Page 5

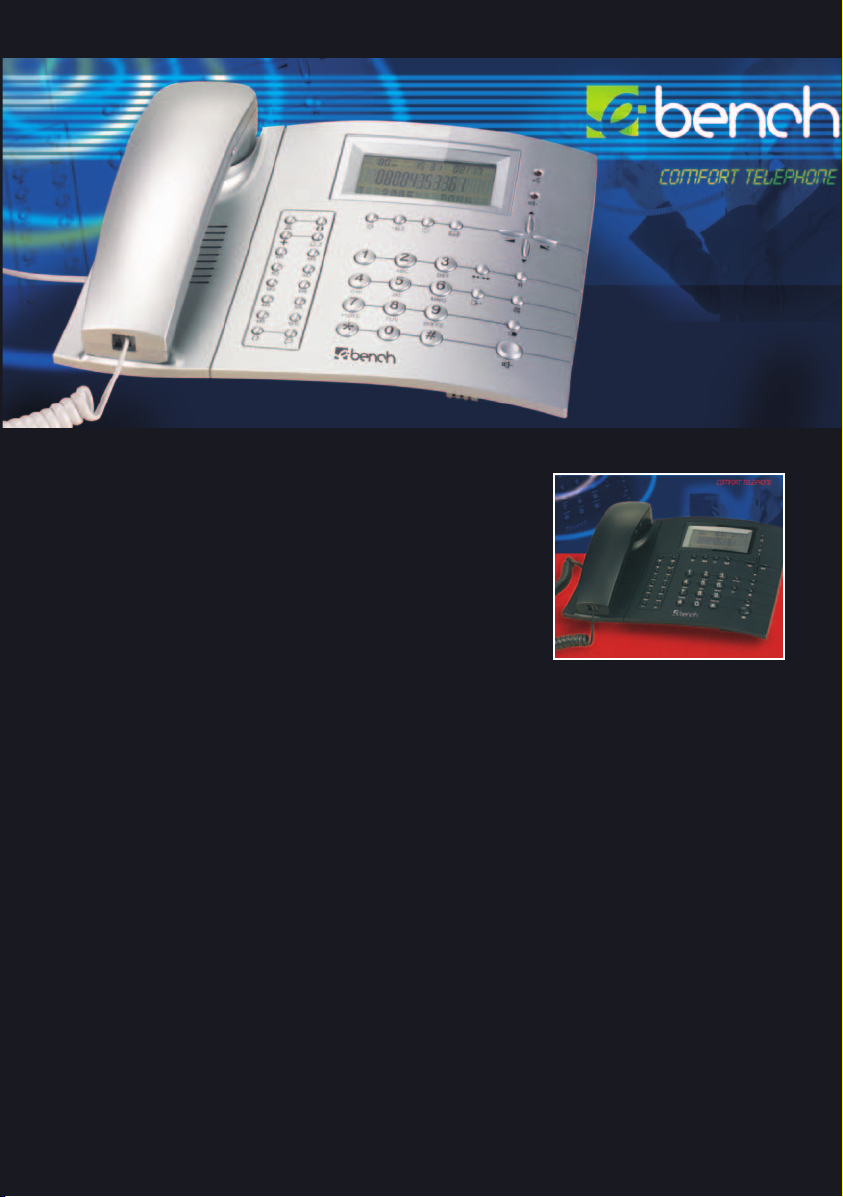
e-bench KH 5001
Analogue Comfort Telephone with hands-free function e-bench KH 5001
Table of contents
1. Intended Use 4
2. Technical Data 4
3. Package contents 4
4. Safety Instructions 4
5. Operating elements 5
6. Connecting 6
a) Connecting the receiver 6
b) Connecting to the PSTN line 6
c) Inserting the batteries 6
d) Changing the batteries 6
7. Wall Mounting 6
8. Initial settings 6
a) Selecting the display language 6
b) Allocating the memory capacity 7
9. Basic settings 7
a) Changing the display language 7
b) Adjusting the display contrast 8
c) Setting Date / Time 8
d) Setting the Local Code 8
e) Setting the dial tone code 9
f) Setting duration for Flash pulse 9
g) Selecting the ring tone 9
h) Setting the ringer volume 9
i) Setting the dialling mode 10
j) Changing the dialling mode 10
10.Making a phone call 10
a) Receiving phone calls 10
b) Terminating phone calls 10
c) Adjusting the receiver volume 11
d) Call waiting and transferring 11
e) Making a phone call 11
f) Dialling with Local Code 11
g) Redialling when line is busy 12
h) Incoming call list / Dialled list 12
i) Assigning the target
dialling buttons 12
j) Target dialling 12
k) Changing the target
dialling buttons 12
l) Using the Phone Book 12
m) Copying Phone Book entry
from the list 13
n) Dialling from the Phone Book 13
o) Deleting Phone Book entry 14
11. Special functions 14
b) Sleep function 14
c) VIP Caller numbers 14
d) Wake-up alarm function 14
e) Single button emergency call/
baby call 15
f) Deleting lists 15
g) Delete all – "Reset" 16
12. Is there a problem? 16
13. Cleaning and Care 16
14. Disposal 16
15. Warranty and service 17
16. Conformity declaration 17
17.Importer 17
18.Index 18
Keep this manual for future reference and pass it on with the equipment
to any future users.
- 3 -
Page 6

e-bench KH 5001
Telephone KH5001
1. Intended Use
The product is intended:
• for connecting to PABX phone lines
and for directly connecting to the
analogue Public Switching Telephone
Network (PSTN) lines.
• private use.
This product is not intended:
• for connecting to digital phone lines
(e.g. ISDN).
• for any other purpose that may cause
damage in case of machine failure.
• for use in commercial areas of
application.
2. Technical Data
Functions: Hands-free
speaking, Sleep
and VIP function,
Mute switch,
Music-On-Hold,
Redialling,
Automatic
dialling, Call
duration metre,
Alarm function,
48 Ring tones
Network features
Dialling modes: Tone / Pulse
Flash function: 80-900 ms
Network functions: CallerID,Mailbox
display
Memory
Target dialling
memory: 10
Phone book: 32 entries
Incoming call list: 65 entries
Dialled list: 8 entries
Single button
emergency call: 1 number
Power requirement for
memory preservation: 3 x 1,5 V
(UM4/AAA)
3. Package contents
The "Comfort Telephone" set includes:
1 Telephone unit
1 Receiver
1 Spiral cord for the receiver
1 TAE connector cord
1 Operating manual
1 warranty card
1 spacer piece
4. Safety Instructions
Warning! To prevent malfunctioning
of and damages to the phone:
• Use the appliance only in dry
rooms and never in excessively
humid premises..
• Do not keep the appliance in a
place directly under the sun or
near other heat-generating appliances (e.g. heaters).
• Do not attempt to open or repair
the phone. In this case, the device is
not safe and the warranty is voided.
Only authorised technicians should
be allowed to repair a defective appliance, if necessary.
- 4 -
Page 7

e-bench KH 5001
• Do not allow individuals (including
children) to use the appliance whose
physical, sensorial or mental abilities
or lack of experience and knowledge
hinder their safe usage of it if they
have not previously been supervised
or instructed in its correct usage. Tell
children about the appliance and its
potential dangers so that they do not
play with it.
• Disconnect the appliance from the
TAE socket in the event of a thunderstorm.
This appliance is equipped with
non-skid rubber rests. As the base
surface may be made of a variety
of materials and generally treated
with different cleaning agents, it
cannot be completely ruled out that
some substances contain ingredients
which may corrode the rubber rests
and soften them. If required, place a
non-skid base under the rubber rests
of the appliance.
Warning! To prevent malfunctioning of
and damages to the telephone network:
• This phone carries a general permission of the telecommunication depart-
ment. Users may, therefore, connect
the appliance to the PSTN lines if the
following conditions are met:
– This phone is intended for operation
on analogue (conventional) telephone
lines. It cannot be connected under
any circumstances to lines belonging
to digital systems (e.g. ISDN).
– This phone can only be connected
to a TAE socket using the connecting
cord supplied along. Another type of
cord may have a different pin assignment.
– This phone can only be connected to
the telephone network by inserting
the requisite plug. Under any circum-
stances, the mounted plug components should not be separated.
If these conditions are not complied
with, the phone no longer satisfies the
regulations governing the permission
for connecting to PSTN lines.
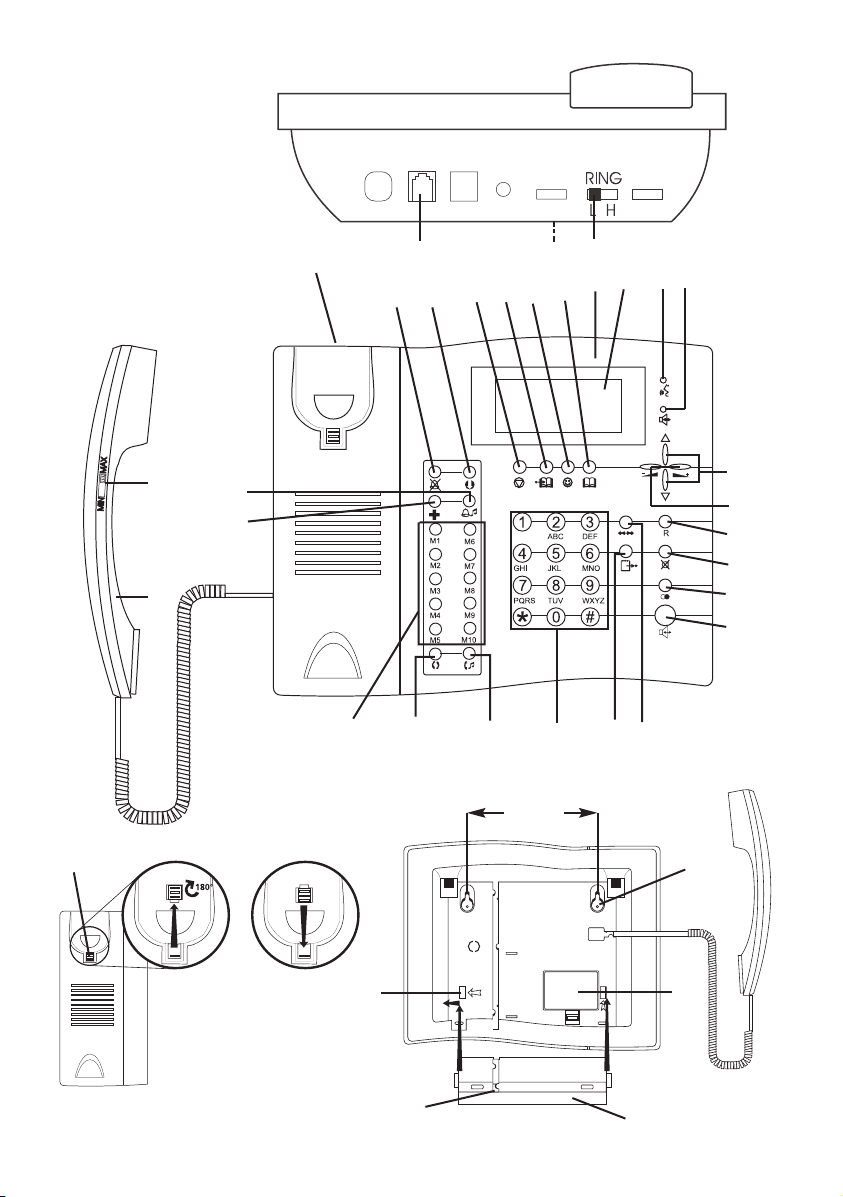
5. Operating elements
Telephone
q
Display
w
Call list entry / Incoming call
e
Speaker active
r
Carrying out adjustments/Browsing
t
the call history list (incoming calls)
Adjust volume
y
Flash key
u
Mute microphone / Changing dialling
i
mode briefly
Redialling or Pulse
o
Hands-free phone / Enabling speaker
a
Prefix dialling / Alarm function
s
Browsing the call history list
d
(outgoing calls)
Numeric pad
f
Hold with Music
g
Auto redialling
h
Memory dialling buttons
j
Telephone receiver
k
Adjusting receiver volume
l
Single button emergency call
;
Selecting Ring tones
2)
Sleep mode
2!
Telephone setting mode
2@
Deleting settings
2#
Saving number from the call list to
2$
Phone Book
Defining VIP call numbers
2%
- 5 -
Page 8

e-bench KH 5001
Calling Phone Book / Saving settings
2^
TAE connecting cord
2&
Battery compartment
2*
Adjusting Ring tone volume
2(
6. Connecting
If you have carefully read through
the safety instructions, you may
now connect the phone:
a) Connecting the receiver
• Insert the spiral cord connectors
into the narrow sockets...
• on the left side of the telephone
unit...
• and below the receiver.
b) Connecting to the PSTN line
• Insert one end of the plain phone
cord into the large socket at the back
of the Telephone and the other end...
• into the socket marked "F" on the
TAE socket (connection to the PSTN
line). In the case of sockets with 3 inlets sockets this is the middle socket.
c) Inserting the batteries
Open the battery compartment cover
2*
on the rear side. Insert three
UM4/AAA type batteries of 1.5V.
Make sure that the "+" sign on the
batteries matches with the alignment
seen inside the battery compartment.
d) Changing the batteries
• Change the batteries as soon as possible if the display window shows
the alert "BATTERY LOW".
Used batteries should not be dis-
posed of in the household waste.
Return these to your retailer or to
an appropriate collection site for
disposal.
7. Wall Mounting
For mounting the appliance on a wall
select a position which is both level and
at which there are no electrical cables
or pipelines for water, gas or drainage
installed.
• Remove the phone fuse below the
phone retaining fork, turn it through
180° and then push it back in until it
firmly engages.
• Place the spacer piece in the groove
on the left side of the underside
of the telephone and press it down
until it engages in the groove on the
right side.
• Lay the connecting cable in the cable
channel of the spacing piece .
• Hang the telephone by the wall
bracket , using 2 screws fixed
in the wall and spaced at a distance
of 118 mm.
8. Initial settings
After the first insertion of batteries the
following functions are called up with
the receiver on the hook:
a) Selecting the display language
Selecting the language of your choice
for messages in the display window:
- 6 -
Page 9

e-bench KH 5001
Press the button, till the
t
desired language appears in the
display window.
Press the button, to save
2^
the selected setting.
If this function is not presented automatically – or, if you wish to once again call
this function at a later point of time:
This can be done through the programming mode as described under Section 8.
b) Allocating the memory capacity
This function, as described here, will
appear only when starting the opera-
tions in a new phone – it cannot be
recalled later! However, you can call
this function only by removing the
batteries for more than 10 minutes.
In such case, all entries in the Phone
Book and other settings are lost.
Phone Book and Incoming call list share
a common memory area. The following
memory allocation is preset at factory:
– 32 entries for the Phone Book:
– 65 entries for the Incoming call list
Using this function, you can change the
memory allocation between Phone Book
and Incoming call list:
Phone book: Max. 112 entries
Incoming call list: Max 91 entries
For this, press the button to
t
change the number of entries for
the Phone Book. If you...
– decrease the preset number, the
Incoming call list will be increased
by a corresponding number,
– increase the preset number, the
Incoming call list will be decreased
by a corresponding number.
Setting the Phone Book size alone is
enough to achieve this. As this concerns
the memory allocation, any changes
made for one of the two numbers will
affect the other number.
Press the button, to save the
2^
settings.
9. Basic settings
The functions described here are only
accessible in the programming mode.
To call the programming mode,...
hold the button for at least
2@
3 seconds while the receiver is
on hook. Now the display starts
blinking with the selected language.
Each time you press the you can
2@
scroll through all setting options.
To terminate the programming mode, ...
press the button twice, or...
2^
• refrain from operating any button
for more than 10 seconds. The phone
will return to the normal operating
state.
a) Changing the display language
If you have called the programming
mode, first the set language will start
blinking in the display window. You
can change this as described under
7.a).
- 7 -
Page 10

e-bench KH 5001
b) Adjusting the display contrast
If you have called the programming
mode, ...
press the button repeatedly till
2@
the text "SET LCD CONTRAST" is
displayed.
press the button to change
t
set value according to your personal
preference.
press the button again to confirm
2@
your choice and move on to another
setting option.
c) Setting Date / Time
If your telecom provider is offering the
feature "Caller ID", the time and the
date (besides the year) are automatically
set. If this is not the case, you can make
the settings yourself:
If you have called the programming
mode, ...
press the button repeatedly
2@
till the digits for the year start
blinking.
press the button to change
t
the set digits.
press the button repeatedly
2@
till the digits for the Month start
blinking.
press the button to change
t
the set digits.
press the button repeatedly till
2@
the digits for the Day start blinking.
press the button to change
t
the set digits.
press the button repeatedly
2@
till the digits for the Hour start
blinking.
press the button to change
t
the set digits.
press the button repeatedly
2@
till the digits for the Minutes start
blinking.
press the button to change
t
the set digits.
And finally, press the button
2@
again to confirm your selection
and to move on to the next setting
option.
d) Setting the Local Code
If you set the prefix for your local
network, it will be suppressed while
displaying phone calls from the own
local network.
If you have called the programming
mode ...
Press the button repeatedly
2@
till the text "SET LOCAL CODE" is
displayed and the first digits start
blinking.
Press to set the first digit.
t
Press the button again till the
2@
next digit starts blinking..
Press the buttons to change
t
the next digit.
Repeat these steps for all the other
digits , till your local dialling prefix is
set. If you do not wish to set all the
5 digits, simply set the open digits
to "-".
Press the button again to confirm
2@
your selection and to move on to the
next setting option.
- 8 -
Page 11

e-bench KH 5001
e) Setting the dial tone code
Is your telephone connected to a PABX?
If not, you can skip this item.
If, however, a dial tone needs to be
requested first, you can set the dial
tone code here. This will be automatically prefixed after selecting a call
number from the memory by pressing the button twice (see also
Section 9f).
Press the button repeatedly till
2@
the text "PREFIX" is displayed.
Press to set the Local Code.
t
In the display...
a short Flash pulse will be prefixed
a short Earth pulse will be prefixed
as Local Code
- no Local Code will be prefixed
or you can select any digit between 0...9
as Local Code (in most of the PABX installation "0" is used as the Local Code.
Press the button again to confirm
2@
your selection and to move on to the
next setting option.
f) Setting duration for Flash pulse
Various services such as Call Forwarding
require a Flash pulse which you can initialise with the button R. In order that this
will not be misinterpreted as "On hook",
this pulse should not be too long, however, long enough to be identified as
Flash pulse.
Ask your service provider or refer to
the user manual for the PABX as to
how long the Flash pulse should be.
The factory setting is 100 ms and for
most of the appliances this is sufficient.
Press the button repeatedly till
2@
the text "FLASH TIME" is displayed:
Press to change the setting.
t
Select the value specified by your
service provider or your PABX.
Press the button again to confirm
2@
your selection and to move on to the
next setting option.
g) Selecting the ring tone
Using this function, you can select the
desired ring tone from among 48 ring
tones:
Press the button repeatedly or
2)
the button till the desired
ring tone is heard.
To save the change to terminate this
a
function, press the button twice
or just wait for a few seconds.
When you press the button once the
text "LINE IN USE" is displayed: If you
press it again, the phone is again
ready for operation.
h) Setting the ringer volume
Using this function, you can adjust the
volume level for the ring tone set as
above:
Press the button You can hear the
2)
set ring tone.
Press the button repeatedly
y
till the desired volume (Display:
"1"..."4") is set..
- 9 -
Page 12

e-bench KH 5001
For saving the changes and to termi-
a
nate the function, press the button twice.
When you press the button once the
text "LINE IN USE" is displayed: If you
press it again, the phone is again ready for operation.
Using the switch "RING L/H"
tionally the ringer volume can be set
to 1 (L) and the previously set volume
(H).
i) Setting the dialling mode
Today many telephone sets are capable
of transmitting the dialled number
through Tone dialling mode to the
service provider or to the PABX. Only
the older machines still have the Pulse
dialling mode:
– The Tone dialling can be identified
while dialling by its double tone in
the receiver.
– The Pulse dialling can be identified
while dialling by its typical "beats"
in the receiver.
The dialling mode is automatically set
by the telephone: The dialling mode
selected after connecting to the line
will be stored.
2(
addi-
Press and hold the button when
i
the receiver is on hook. In the display
window the following alternating
messages appear:
"DIAL IN PULSE" – pulse dialling is
enabled,
"DIAL IN TONE" – tone dialling is
enabled.
Release the , button if the desired
i
dialling mode is displayed.
10.Making a phone call
When the phone is connected correctly
and you can hear the dial tone on pikking up the receiver:
a) Receiving phone calls
To receive an incoming phone call...
• Pick up the receiver off the hook or...
press the button. This enables
a
the hands-free mode. When the
hands-free mode is on, you can
pick up the receiver off the hook
and listen to the call.
b) Terminating phone calls
To terminate incoming and outgoing
calls...
j) Changing the dialling mode
As against the above-described function,
you can change between the dialling
modes. This is useful if, for example,
your PABX requires a Pulse dialling
mode, but you may need to use the
Tone dialling mode for certain other
services:
• Place the receiver on the hook or...
press the button, again when
a
the hands-free mode is on.
- 10 -
Page 13

e-bench KH 5001
c) Adjusting the receiver volume
Using the slider on the receiver, you
1*
can adjust the receiver volume. There
are two levels (MIN / MAX) available
here.
With the receiver on the hook press
y
the button , to set the ringing
volume to one of four levels.
d) Call waiting and transferring
You can put your incoming or out-going
calls on call waiting mode, for example,
for enquiries or transferring a call to other users of PABX.
If your service provider or your PABX
supports this function:
Press the button R, to put a call on
u
call waiting mode.
Press the button R again to return
u
from the call waiting to the present
caller.
• You can simply put down the receiver
when the caller to whom you wish to
transfer the waiting call, acknowled-
ges the call.
If your service provider does not support
such a function and your phone is also
not connected to a PABX:
Press the button, if you wish to
g
put the caller on an internal waiting
line of your telephones on waiting.
Your caller will be presented with
music while on hold, till you decide
to press the button.
Press the buttons, to select
t
from amonng the 16 tunes, while the
music is being played. A call waiting line without music is the mute function.
Here too the call is kept on waiting:
Press the button, if you wish to
i
disable or enable the microphone
during a call.
In this, you can hear the caller but
he cannot hear you.
e) Making a phone call
To make outgoing calls,...
• Pick up the receiver and dial the
number or
Press the button when the recei-
a
ver is on the hook. With this the
hands-free mode is enabled. During
the hands-free mode you can pick up
the receiver and continue speaking.
• You can also dial the number first
and then pick up the receiver or
press the button. The number
is dialled automatically.
f) Dialling with Local Code
To dial a call number from the memory
with prefixed Local Code, first the required number must be displayed.
For example, press the button
2^
and search for the desired number in
the Phone Book (see also Section 9n).
Press the button twice. Instantly,
s
the call number will be dialled along
with the prefixed Local Code.
- 11 -
Page 14

e-bench KH 5001
In the case of the function described
above, the phone will dial immediately. You need not pick up the receiver first or press the button. The
Local Code can be prefixed from the
memory functions (Phone Book,
Dialled list and Target dial memory).
g) Redialling when line is busy
Pick up receiver or press the button
a
Press the button, to redial the
o
last dialled number.
Or...
Press the button, to redial the
h
last dialled number for a set length
of time (Auto-redial). This is possible
only in hands-free mode.
h) Incoming call list / Dialled list
If your service provider has the provision
in his range of services to transfer call
numbers and the callers have not blokked such transfer of call numbers, the
numbers will appear in Incoming call list.
The numbers that you have dialled yourself are saved to a dialled list.
Press the button, to scroll
t
through the Incoming call list.
Press the button repeatedly,
d
to scroll through the dialled list.
• As soon as you pick up the receiver
or press the button, the number
shown in the display window will be
automatically dialled.
i) Assigning the target dialling buttons
Totally 10 target dailling numbers are
available with assigned buttons in your telephone set:
Hold one of the 10 target dialling
j
buttons pressed or more than 3 seconds. As soon as the text " DDRN
MEMORY" is displayed, enter the
number which you wish to save
to this target dialling button.
Press the target dialling button
j
again to save the entry.
j) Target dialling
Press a target dialling button along
j
with the number stored in it. The
number will appear in the display
window.
Pick up receiver or press the
a
button, to automatically dial the
displayed number.
Press the to discard your entry.
2#
Each time you press the button,
you can delete one digit.
k) Changing the target dialling buttons
You can change the assigned buttons
- for target dialling at anytime. For this, simply hold the target
dialling button pressed for more than
3 seconds – and follow the same method
as described under j).
l) Using the Phone Book
To call the Phone Book function, press
the button when the receiver is either
on or off the hook...
use the the button. When the
2^
text "EDIT SEARCH " is displayed,
...
- 12 -
Page 15

e-bench KH 5001
use the button to select the
t
function "EDIT ".
• When the text "PLS INPUT NAME"
is displayed, you can use the key
pad to enter letters:
– Press the required digit button
repeatedly till the letter under the
digit is displayed in the display
window (e.g. press the button
8 three-times for the letter "V").
– If you do not enter anything for
more than 1 second, the display
moves on the next digit.
– If you do not enter anything
for more than 15 seconds, the
function will be cancelled.
Press the button again to save
2^
the entered name and to move on
to enter the number:
• Enter the number.
Now press the button again,
2^
to save, the number and the
corresponding name
or press the button to discard
2#
your entry. With every pressing of
this button, you can delete one digit
at a time.
• Retrieve the number to be copied
from the list into the display window
and ...
Then press the button. The text
2$
"COPIED INTO BOOK" is displayed
for confirmation.
If the text "ERROR" is displayed, this
number is already available.
n) Dialling from the Phone Book
To call the Phone Book function, press
the...
button, when the receiver is
2^
either on or off the hook. When the
text "EDIT SEARCH " is displayed,
...
use the button to select the
t
function "SEARCH "..
• When the text "PLS INPUT NAME"
is displayed, you can use the key
pad to enter letters:
Press the required digit button
repeatedly till the letter under the
digit is displayed in the display window (e.g. press the button 8 threetimes for the letter "V").
Instantly, the Phone Book will list the
first entry starting with this letter.
m) Copying Phone Book entry from the
list
You can also copy a number from the
Incoming call list or dialled list in the
phonebook:
to return to the standard status,
2^
press the button twice or do not
press any buttons for at least 10 seconds.
- 13 -
Press the buttons, to scroll
t
through the other entries till the desired Phone Book entry is displayed.
If you need the fixed Local Code,
s
press the button twice (see also
Section 8e).
Pick up the receiver or press the
a
button to automatically dial the
displayed number.
Page 16

e-bench KH 5001
o) Deleting Phone Book entry
If you see the Phone Book entry in the
display window as described under m),
....
hold the button pressed till the
2#
text "ERASED" is displayed.
You can change the Phone Book entries
by deleting them as described above and
by saving a new entry.
11. Special functions
The following useful special functions
are available on your telephone set:
a) Mailbox message
Some service providers offer a Mailbox
service (e.g. like an answering machine).
Whenever a message has been recorded
into this, the service provider will send a
message to the customer. On your
phone ...
the LED starts blinking twice every
e
6 seconds when new messages have
arrived. Besides, a symbol is displayed
in the display window. Retrieve this
from your provider as instructed in
the service offer.
the LED starts blinking once every
e
6 seconds when a new entry has
been added to the Incoming call list
("Missed Call"). Check the Incoming
call list for new numbers as described
under 9.h).
Hold the button pressed till the
2!
text "SLEEP" is displayed and the
time display starts blinking.
With each pressing of the button,
you can increment the time setting
by 1 hour.
or press the buttons to
t
increase / decrease the setting by
an hour up to maximum 24 hours.
Press the button briefly during
2!
the Sleep period to cancel this state.
c) VIP Caller numbers
If during the Sleep mode certain caller
numbers are nevertheless allowed to
activate ringing, you can save them as
so-called "VIP" Caller numbers.
If you wish to assign such a VIP flag to
a call number:
• Bring into the display the phone
number from the call history list (incoming calls) that is to be taken over.
Then hold the pressed. The sym-
2%
bol VIP is displayed for confirmation.
If you again want to erase the VIP marking on a phone number, bring into the
display the "VIP" number from the call
history list (incoming calls).
Press the button when the VIP
2%
number is displayed. Now the VIP
symbol will be removed.
b) Sleep function
If you do not wish to be disturbed by
the ringing of the phone, you can temporarily disable it. An adjustable time
limit allows this state to be automatically cancelled ("Sleep").
d) Wake-up alarm function
Using this function you can make your
phone to ring precisely at a predefined
time:
- 14 -
Page 17

e-bench KH 5001
Hold the button pressed when
s
the receiver is on hook, till the text
"SET ALARM TIME" is displayed and
the digit for hours starts blinking.
press the buttons to change
t
the set digit.
press the button again till the
s
digit for minutes starts blinking.
press the buttons to change
t
the set digit.
Finally, press the button again
s
to confirm your settings.
In the display window a clock symbol
will appear below on the right.If you
have set the time correctly, as described under 8.c, you will hear the wakeup alarm right on time.
If your service provider has the provision
for information about time and date in
his range of telecom services, setting the
correct time is not required.
When the alarm rings, simply pick up
the receiver,to disable the alarm ring
/alarm function. The clock symbol will
disappear from the display window.
If you wish to enable the alarm function
with the preset alarm time again, ...
Simply press the button briefly
s
again. The clock symbol will appear
in the display window.
Enabling the Single button emergency
call:
Hold the button pressed for
;
more than 3 seconds till first the
text "ON" is displayed in the window and shortly thereafter the
text "PLS INPUT NUMBER".
• Now enter the number to be dialled.
Finally, press the button again
;
to confirm the settings.
This function is now activated – on
pressing any button the phone will
instantly dial the set number. Using
the automatically set hands-free
function you can conduct conversations in your room leisurely.
Disabling the Single button emergency
call:
Hold the button pressed for more
;
than 3 seconds till the text "OFF" is
displayed. The function is of course
disabled but the saved number is
retained in the memory.
Changing the Single button emergency
number:
• For this, follow the same steps
as described under "Enabling".
e) Single button emergency call/baby call
You can program your phone in such a
way that a previously saved number gets
selected as soon as any button is pressed
(Emergency Call or Baby Call function).
f) Deleting lists
If you wish to delete the Incoming call
list or dialled list:
• Retrieve the lists as described
under 9.h).
- 15 -
Page 18

e-bench KH 5001
To delete a single entry in the display...
Press the button briefly To delete
2#
the entire list...
Hold the button pressed for mo-
2#
re than 3 seconds. In this operation,
entries in the dialling list with a VIP
flag will not be deleted.
To delete a VIP flag ...
Retrieve the VIP flag to display it
2%
and press the button. The VIP
flag is now deleted..
g) Delete all – "Reset"
If you wish to delete all settings and
lists as well as the Phone Book,
• Unplug the phone cord from the
socket (TAE socket)
• and remove the batteries from the
phone for at least 10 minutes.
Thereafter, the phone is reverted back
to the factory settings – however, the
settings must be made all over again.
12. Is there a problem?
If malfunctions do occur in spite of
previously fault free operation, you may
consider using the "Reset" function
which, however, would mean making
the settings all over again. If this still
does not solve the problem, contact the
customer service and get the telephone
set checked.
Do not open the telephone unit – there
are no user-serviceable components inside.
Such attempts may damage the phone
severely; besides, the appliance will no
longer satisfy the regulations stipulated
by the telecommunications department.
13. Cleaning and Care
• To clean the appliance, only use
a soft dry cloth.
• Do not use any detergents or abrasive cleaners – the housing and especially the display could become matt.
• Never immerse the telephone set
in water or other fluids! This can
damage the appliance and severely
impair the PSTN lines.
• Check the batteries at least once per
year.
If something is not functioning properly,
check first if all connections and settings
have been made the way they are described in this operating manual.
Ask your service provider, about settings
that need to be customised to the range
of services offered – and, whether all features of this telephone set are supported at all.
14. Disposal
Do not dispose of the device in
normal domestic waste.
Dispose of the device over a registered
waste disposal firm or through your
communal waste disposal facility.
Observe the currently valid regulations.
In case of doubt, consult your waste
disposal facility.
- 16 -
Page 19

Battery disposal!
Batteries may not be disposed of with
normal domestic waste. All consumers
are statutorily obliged to dispose of
batteries at the collection point in their
community/district or with the original
supplier.
The purpose of this obligation is to
ensure that batteries can be disposed of
in an environmentally-friendly manner.
Only dispose of batteries when they are
fully discharged.
15. Warranty and service
Please read the conditions for warranty
and service centre addresses on the warranty card.
16. Conformity declaration
e-bench KH 5001
Kompernass GmbH hereby declares that
the above Analogue Comfort Telephone
KH5001 complies with the basic requirements and other regulations of the directive 1999/5/EG. The full text of the
conformity declaration is available with
the manufacturer for public scrutiny.
17. Importer
KOMPERNASS GMBH
BURGSTRASSE 21
D-44867 BOCHUM
www.kompernass.com
- 17 -
Page 20

e-bench KH 5001
18.Index
alarm 4-5, 14-15
automatically 7-15
baby call 15
batteries 4, 6-7, 16
busy 12
call list 4-5, 7, 12-15
call number 9, 11, 14
Call waiting 11
Caller ID 8
contrast 8
Date / Time 8
Day 8
DIAL IN PULSE 10
DIAL IN TONE 10
dial tone code 9
Dialled list 4, 12-13, 15
dialling mode 5, 10
digit 8-9, 12-13, 15
display 4-10, 12-16
duration 4, 9
Earth pulse 9
Flash pulse 9
hands-free mode 10-12
Hands-free speaking 4
Hour 8, 14
language 6-7
letters 13
Local Code 8-9, 11-13
Mailbox 4, 14
Mailbox message 14
Making a phone call 10-11
Memory 4-5, 7, 9,11-12, 15
memory capacity 7
Minutes 7-8, 15-16
Month 8
music while on hold 11
mute function 11
ncoming call list 12
on call waiting 11
Phone Book 4-5, 7, 11-14,16
Phone Book entry 13
programming mode 8
PSTN line 6
Pulse dialling 10
receiver 4-7, 10-13, 15
Redialling 4-5, 12
Reset 16
ring tone 5, 9
Ring tones 4-5, 9
ringer volume 9-10
service provider 9-12, 14-16
Single button emergency call 5, 15
Sleep 4-5, 14
Sleep function 14
spiral cord 4, 6
TAE socket 5-6, 16
Target dialling 4, 12
target dialling buttons 12
Tone dialling 10
transferring 11
VIP Caller numbers 14
VIP flag 14, 16
VIP function 4
volume 5, 9-11
Wake-up alarm function 14
year 8
you can use the key pad to enter letters 13
- 18 -
 Loading...