

Page 1
3A
INDOOR LIGHT CHAIN
KH 4139
INDOOR LIGHT CHAIN
Operating instructions
KOMPERNASS GMBH · BURGSTRASSE 21 · D-44867 BOCHUM
www.kompernass.com
ID-Nr.: KH4139-08/08-V1
SISÄVALOSARJA
Käyttöohje
INOMHUS-LJUSSLINGA
Bruksanvisning
Page 2
KH 4139
q
w
e
r
Page 3

CONTENT PAGE
Intended Use 2
Important safety instructions 2
Technical data 3
Items supplied 3
Appliance description 3
Utilisation 3
Changing bulbs 3
Cleaning 4
Maintenance 4
Disposal 4
Importer 4
Service 4
Read the operating instructions carefully before using the appliance for the first time and preserve this
booklet for later reference. Pass the manual on to whomsoever might acquire the appliance at a later date.
- 1 -
Page 4

INDOOR LIGHT CHAIN
KH 4139
• Ensure that the plug is at all times easily accessible so that it may be swiftly removed in the event
of danger.
Intended Use
This light string is intended for decorative purposes
in domestic use and only in dry rooms.
This light string is not intended for illumination purposes,
for commercial or industrial applications or for use
outdoors.
Important safety instructions
To avoid potentially fatal electric
shocks:
• Ensure that a bulb is in every bulb holder when
the plug is connected to a wall socket. Touching
exposed contacts in the bulb holder can be
potentially fatal.
• Ensure that neither the light string, the power cable
nor the plug come into contact with water or other
liquids.
• Use the appliance in dry rooms only, not outdoors.
• When in use, ensure that the power cable between
the lamps and to the power plug does not become
trapped or liable to being damaged. Should the
power cables or the plug become damaged the
light string may no longer be used, as it is no longer
safe.
• Immediately remove the plug from the socket if
the light string fails to function correctly or is recognisably damaged, especially if the glass of
a bulb is broken. First replace the bulb. Arrange
for the appliance to be checked by Customer
Services if other damage is recognisable.
• After use or during extended absences, ALWAYS
remove the plug from the power socket. For as
long as the plug is inserted in the wall socket the
appliance itself is under electrical power.
To avoid the risks of fire:
• Do not connect the light string to a wall socket if
it is still in its packaging. This would lead to a
build-up of heat.
• Use only spare bulbs that correspond to the
details given in the technical data. Using more
powerful bulbs, or those with different wattages,
could lead to the other bulbs becoming too hot
or to an overload of the power cable.
• Replace failed bulbs as soon as possible! Due to
the automatic shunting of failed bulbs the electrical energy distributes itself amongst the remaining bulbs, causing them to glow more brightly.
On the one side this also shortens their service
life, on the other, the bulbs will become hotter.
• DO NOT place the light string under inflammable objects, especially not under straw stars,
paper, curtains or drapes.
To avoid the risk of accidents and
personal injuries:
• Lead the light string and its power cables such
that no one can trip or stumble over them.
• Do not permit children or infirm people to come
into close contact with electrical appliances without supervision, they are not always able to
correctly assess the potential dangers of them.
• Keep children under 3 years of age away from
the light string. They could swallow small pieces
from it!
- 2 -
Page 5

Technical data
Mains voltage: 220-240 V ~50Hz
Number of bulbs: 100 bulbs
Bulb type: 2.5 V / 0.35 W
Pinned plug: 8 mm for light strings, green
Rated power: 37 W total
Lamp spacing: 15 cm
Light string length: 18,3 m
Protection class: II /
Items supplied
Light string
2 replacement bulbs
Operating instructions
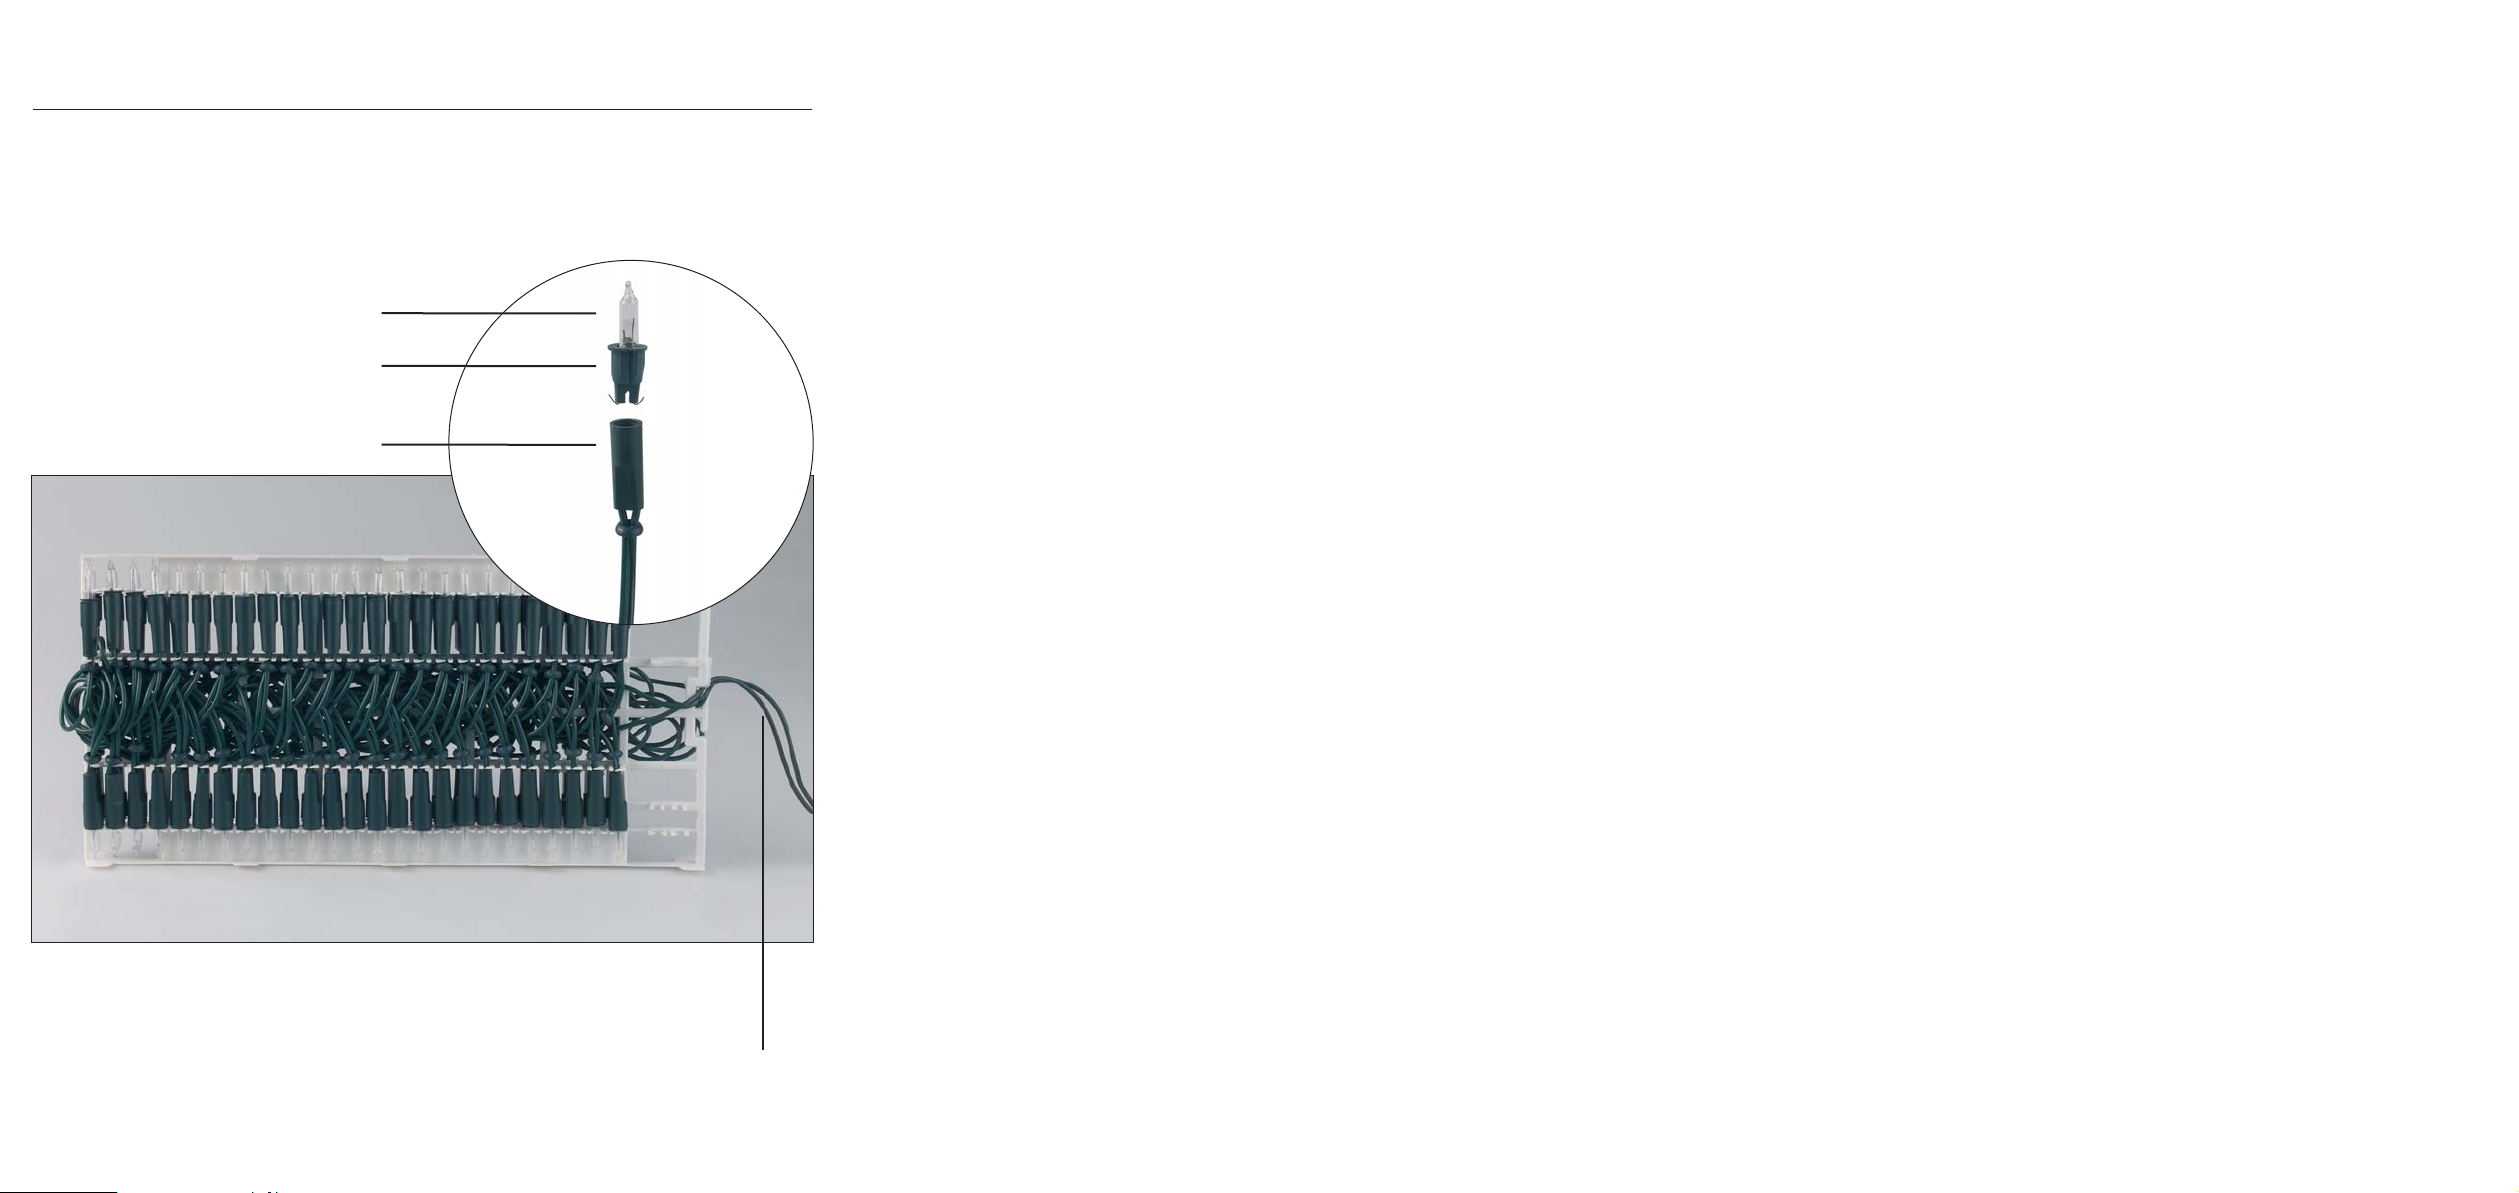
Appliance description
Bulb
q
Pinned plug
w
Pinned socket
e
Power socket
r
Utilisation
• Check to ensure that the light string is undamaged
and all parts and remnants of the packaging are
removed from it.
• Check to ensure that every pinned socket
contains a bulb.
• Drape the light string amongst the branches of
the tree to be decorated.
• To take the light string into use, insert the plug
into a wall socket.
• If the light string does not emit light: Check that
each individual bulb is sitting firmly in its pinned
socket and the plug is well seated in the wall socket.
• Should individual lamps not emit light: Replace
them as described in the following
Changing bulbs
Caution:
• First remove the plug from the wall socket. For as
long as the plug is inserted in the wall socket the
appliance itself is under electrical power.
• After immediate use, first allow the bulb to cool
down.
Caution:
The bulbs have a pinned socket, not a threaded
socket! Do not attempt to screw the bulbs out and
do not use any tools. If you do, the bulb glass could
splinter. Risk of injury!
• Remove the bulb
plug
from the pinned socket e.
w
• For replacements, only use such bulbs as are
detailed under the technical data. Using more
powerful bulbs, or those with different wattages,
could lead to the other bulbs becoming too hot
or to an overload of the power cable.
• Insert the new bulb
plug
in the pinned socket e. Thereby, the
w
pinned plug is directed, the bulb itself can thus
not be inserted falsely.
• Insert the plug in the wall socket. If the light
string does not emit light, check to ensure that
the new bulb is seated correctly in the socket.
together with the pinned
q
complete with the pinned
q
- 3 -
Page 6

Caution:
Should the glass body of a lamp detach itself or the
glass has broken:
• Immediately remove the plug from the wall socket!
There is a risk to life if the protruding filaments
are touched.
• Carefully attempt to remove the pinned plug
from the pinned socket e with long-nosed pliers
– under no circumstances should you use your
fingers. There is a risk of injury through broken
glass.
• Make contact with Customer Services if you do
not feel confident about it or were not successful
in your attempt.
w
Cleaning
Caution!
Disconnect the power plug from the power socket.
Failure to do so brings with it the risk of a fatal electric shock should you come into contact with electrical parts or moisture permeates the appliance. After
immediate use, first allow the bulbs to cool down.
Disposal
Do not dispose of the device in normal
domestic waste.
Dispose of the device over a registered waste
disposal firm or through your communal waste
disposal facility.
Observe the currently valid regulations. In case of
doubt, consult your waste disposal facility.
Dispose of the packaging materials in an
environmentally responsible manner.
Importer
KOMPERNASS GMBH
BURGSTRASSE 21
D-44867 BOCHUM
www.kompernass.com
Service
• You can now clean the light string with a dry cloth.
DO NOT use liquids, they could permeate into
the pinned socket. Also, to avoid damage to the
plastic surfaces do not use any form of
detergent.
Maintenance
The light string is maintenance-free, no effort is required
on the part of the user.
• Before taking it into use, check the light string for
visible exterior damage.
DES Ltd
Units 14-15
Bilston Industrial Estate
Oxford Street
Bilston
WV14 7EG
Tel.: 0870/787-6177
Fax: 0870/787-6168
e-mail: support.uk@kompernass.com
Irish Connection
Harbour view
Howth
Co. Dublin
Tel: 00353 (0) 87 99 62 077
Fax: 00353 18398056
e-mail: support.ie@kompernass.com
- 4 -
Page 7

SISÄLLYSLUETTELO SIVU
Määräystenmukainen käyttö 6
Tärkeitä turvaohjeita 6
Tekniset tiedot 7
Toimituslaajuus 7
Laitteen kuvaus 7
Käyttö 7
Lampun vaihtaminen 7
Puhdistus 8
Kunnossapito 8
Hävittäminen 8
Maahantuoja 8
Huolto 8
Säilytä käsikirja myöhempää käyttöä varten. Jos myyt laitteen, anna käsikirja uudelle omistajalle!
- 5 -
Page 8

SISÄVALOSARJA
KH 4139
• Huolehdi siitä, että pistoke on aina käsillä, jotta se
voitaisiin mahdollisessa vaaratilanteessa irrottaa
nopeasti pistorasiasta.
Määräystenmukainen käyttö
Tämä koristevaloketju on tarkoitettu koristetarkoituksiin
yksityistalouksissa ja ainoastaan kuivissa tiloissa
käytettäväksi.
Tätä koristevaloketjua ei ole tarkoitettu valaistustarkoituksiin, kaupalliseen tai teolliseen käyttöön tai
ulkona käytettäväksi.
Tärkeitä turvaohjeita
Hengenvaarallisen sähköiskun
välttämiseksi:
• Tarkasta, että jokaisessa istukassa on lamppu, kun
verkkopistoke on pistorasiassa. Istukan esillä
olevien kontaktien koskettaminen voi olla hengenvaarallista.
• Varmista, ettei koristevaloketju, verkkojohto tai
verkkopistoke koskaan joudu kosketuksiin veden
tai muiden nesteiden kanssa.
• Käytä koristevaloketjua vain kuivissa tiloissa.
Laitetta ei saa käyttää ulkotiloissa.
• Varmista, etteivät lamppujen ja verkkopistokkeen
väliset johdot joudu käytössä puristuksiin tai voi
vaurioitua muuten. Jos johdot tai verkkopistoke
on vaurioitunut, ei koristevaloketjun käyttöä saa
jatkaa, koska se ei ole enää turvallista.
• Irrota verkkopistoke heti, jos koristevaloketju ei
toimi moitteettomasti tai se on selvästi vaurioitunut,
erityisesti jos lamppujen lasi on särkynyt. Vaihda
silloin ensiksi lamppu uuteen. Anna valtuutetun
huoltoliikkeen tarkastaa koristevaloketju ensin,
jos siinä on havaittu muita vaurioita.
• Vedä pistoke pois pistorasiasta käytön jälkeen tai
poissa ollessasi. Koristevaloketjussa on verkkojännitettä niin kauan, kun verkkopistoke on pistorasiassa.
Tulipalovaaran välttämiseksi
• Älä liitä koristevaloketjua pistorasiaan sen ollessa
vielä pakkauksessa. Muutoin kuumuus patoutuu.
• Käytä varaosina ainoastaan teknisissä tiedoissa
ilmoitettuja lamppuja. Tehokkaammat tai wattimäärältään toisenlaiset lamput saattavat johtaa
siihen, että ne tai toiset lamput kuumenevat käytössä liikaa tai ylikuormittavat virtajohtoa.
• Vaihda palaneet lamput mahdollisimman nopeasti
uusiin! Palaneiden lamppujen automaattinen
silloitus jakaa sähköenergian jäljellä oleville
lampuille, jotka siksi hehkuvat aina kirkkaammin.
Tämä lyhentää toisaalta myös jäljellä olevien
lamppujen käyttöikää, toisaalta ne taas kuumenevat enemmän.
• Älä aseta valoketjua helposti syttyvien esineiden,
kuten olkitähtien, paperin tai verhojen alle.
:
Onnettomuus- ja loukkaantumisvaarojen välttämiseksi:
• Vedä koristevaloketju ja johdot niin, ettei niihin
voida kompastua.
• Tätä laitetta ei ole tarkoitettu sellaisten henkilöiden
(mukaan lukien lapset) käyttöön, joiden rajoitetut,
fyysiset, aistilliset tai henkiset kyvyt tai kokemuksen
ja/tai tiedon puute estävät käytön, lukuun ottamatta tilanteita, joissa heitä valvoo turvallisuudesta
vastaava henkilö tai joissa he ovat saaneet tältä
ohjeita laitteen käytöstä. Lapsia tulee valvoa,
jotta varmistettaisiin, etteivät he leiki laitteella.
• Pidä alle 3-vuotiaat lapset poissa koristevaloketjun
lähettyviltä. Sen pienet osat voivat joutua nieluun!
- 6 -
Page 9

Tekniset tiedot
Verkkojännite: 220-240 V ~50Hz
Lamppujen määrä: 100 lamppua
Lampputyyppi: 2,5 V / 0,35 W
Pistoke: 8 mm valoketjuille, vihreä
Nimellisteho: 37 W yhteensä
Lamppuväli: 15 cm
Koristevaloketjun
pituus: 18,3 m
Suojausluokka: II /
Toimituslaajuus
Koristevaloketju
2 varalamppua
Käyttöohje
Laitteen kuvaus
Lamppu
q
Pistoke
w
Pistoistukka
e
Virtajohto ja verkkopistoke
r
Käyttö
Lampun vaihtaminen
Varo:
• Irrota ensiksi pistoke pistorasiasta. Tuotteessa
on verkkojännite niin kauan, kun pistoke on
pistorasiassa.
• Anna käytössä kuumenneiden lamppujen ensin
jäähtyä.
Varo:
Lampuissa on pistoke, ei kierrettä! Älä yritä kiertää
lamppuja irti, äläkä käytä työkaluja. Muutoin lamppujen lasi saattaa särkyä.
Loukkaantumisvaara!
• Vedä lamppu
pistoistukasta
• Käytä varaosina ainoastaan teknisissä tiedoissa
ilmoitetun kaltaisia pistolamppuja. Tehokkaammat
tai wattimäärältään toisenlaiset lamput saattavat
johtaa siihen, että ne tai toiset lamput kuumenevat
käytössä liikaa tai ylikuormittavat virtajohtoa.
• Työnnä uusi lamppu
pistoistukkaan e. Pistoistukka ohjautuu, lamppua ei
siksi voida asettaa väärin.
• Aseta sitten verkkopistoke pistorasiaan. Jos koristevaloketju ei pala, tarkasta, että uusi lamppu on
oikein paikoillaan pistoistukassa.
yhdessä pistokkeen wkanssa
q
.
e
yhdessä pistokkeineen
q
w
• Tarkasta, että koristevaloketju ei ole vaurioitunut
ja että kaikki pakkauksen osat ja jäämät on poistettu tuotteesta.
• Tarkista, että jokaisessa pistoistukassa on lamppu.
• Ripusta koristevaloketju koristeltavan puun oksille.
• Työnnä verkkopistoke pistorasiaan ottaaksesi
koristevaloketjun käyttöön.
• Jos koristevaloketju ei pala: Tarkasta jokainen
lamppu yksitellen varmistaaksesi, että se on
kiinteästi pistoistukassaan ja että verkkopistoke
on tiiviisti pistorasiassa.
• Jos yksittäiset lamput eivät pala: Vaihda ne
seuraavassa kuvatulla tavalla.
Vaara:
Jos lampun lasiosa on irronnut tai lasi särkynyt:
• Vedä heti verkkopistoke pistorasiasta! Ulos
työntyviä johtoja kosketettaessa on olemassa
hengenvaara.
• Yritä vetää pistoke
toistukasta
sormiasi. Lasinsirut aiheuttavat loukkaantumisvaaran.
• Käänny valtuutetun huoltoliikkeen puoleen, jos et
ole varma tai jos et onnistu irrottamaan jäänteitä
istukasta.
- 7 -
e
varovasti kärkipihdeillä pis-
w
– älä missään tapauksessa käytä
Page 10

Puhdistus
Varo!
Irrota ensin pistoke pistorasiasta. Muutoin sähköisku
voi aiheuttaa hengenvaaran, jos puhdistettaessa
kosketetaan sähköisiin osiin tai jos laitteeseen pääsee
kosteutta. Anna käytössä kuumenneiden lamppujen
ensin jäähtyä.
• Nyt voit puhdistaa koristevaloketjun kuivalla liinalla.
Älä käytä nesteitä, ne saattavat tunkeutua pistokkeeseen. Älä käytä myöskään puhdistusaineita,
jotta muovipinnat eivät vaurioituisi.
Kunnossapito
Koristevaloketjua ei tarvitse huoltaa, käyttäjän ei
tarvitse suorittaa mitään kunnossapitotöitä.
• Tarkasta koristevaloketju ennen jokaista käyttöä
ulkoisesti havaittavien vaurioiden varalta.
Hävittäminen
Maahantuoja
KOMPERNASS GMBH
BURGSTRASSE 21
D-44867 Bochum
www.kompernass.com
Huolto
Kompernass Service Suomi
Petäjäksentie 19
FIN - 26100 Rauma
Tel.: 02 822 28 87
Fax: 010 293 02 63
e-mail: support.fi@kompernass.com
Älä missään tapauksessa heitä koristevaloketjua tavallisen kotitalousjätteen joukkoon.
Hävitä koristevaloketju valtuutetun jätteidenhuoltolaitoksen tai kunnallisen jätehuollon kautta.
Noudata voimassa olevia määräyksiä.
Epäselvissä tilanteissa ota yhteyttä paikalliseen
jätehuoltoviranomaiseen.
Hävitä kaikki pakkausmateriaalit ympäristöystävällisellä tavalla.
- 8 -
Page 11

INNEHÅLLSFÖRTECKNING SIDAN
Föreskriven användning 10
Viktiga säkerhetsanvisningar 10
Tekniska specifikationer 10
Leveransens omfattning 11
Beskrivning 11
Användning 11
Byta lampor 11
Rengöring 12
Skötsel 12
Kassering 12
Importör 12
Service 12
Spara den här anvisningen för senare frågor – och överlämna den tillsammans med apparaten om du
överlåter den till någon annan person!
- 9 -
Page 12

INOMHUSLJUSSLINGA KH 4139
Föreskriven användning
Den här ljuskedjan är avsedd för dekoration och får
endast användas i torra utrymmen.
Den här ljuskedjan är inte avsedd till belysning och
den får inte användas yrkesmässigt, industriellt eller
utomhus.
Viktiga säkerhetsanvisningar
För att undvika livsfarliga elchocker:
• Kontrollera att det sitter en lampa i varje fattning
så länge kontakten sitter i ett eluttag. Det kan vara
livsfarligt att röra vid de blottade kontakterna inuti
fattningen.
• Se till så att ljuskedjan, kabeln och kontakten
aldrig kommer i kontakt med vatten eller andra
vätskor.
• Använd bara ljuskedjan inomhus i torra utrymmen,
aldrig utomhus.
• Akta så att ledningen mellan lamporna och till
kontakten inte kan klämmas eller skadas på annat
sätt när du använder ljuskedjan. Om ledningarna
eller kontakten skadas blir ljuskedjan farlig och
får inte användas längre.
• Dra genast ut kontakten om ljuskedjan inte fungerar
som den ska eller har synliga skador, i synnerhet
om glaset gått sönder på någon av lamporna.
Sätt i en ny lampa innan du sätter i kontakten.
Lämna in ljuskedjan till kundtjänst för kontroll om
du konstaterar några andra skador på den.
• Dra alltid ut kontakten ur uttaget om du inte ska
vara hemma eller inte ska använda ljusjedjan.
Det finns ström i ljuskedjan så länge kontakten
sitter i uttaget.
• Se till att kontakten alltid är lätt att komma åt så
att det går snabbt att dra ut den vid nödsituationer.
För att undvika eldsvådor
• Koppla inte ström till ljusslingan så länge den
ligger i sin förpackning. Då bildas det för mycket
värme.
• Använd bara den typ av reservlampor som anges
i tekniska data. Starkare lampor eller lampor
med annat wattal kan leda till att den eller de
övriga lamporna blir för varma och till att kabeln
blir överbelastad.
• Byt trasiga lampor omedelbart! På grund av den
automatiska överbryggningen fördelas energin
från trasiga lampor till resten av lamporna, som
därför lyser desto starkare. Då förkortas för det
första lampornas livslängd och för det andra så
blir de övriga lamporna så mycket hetare.
• Sätt inte ljuskedjan under brännbara föremål och
särskilt inte under halmstjärnor, papper, gardiner
och draperier.
:
För att undvika olyckor och personskador:
• Lägg ljuskedjan och kabeln så att ingen kan snava
över dem.
• Den här ljusjedjan ska inte användas av personer
(inklusive barn) med begränsad fysisk, sensorisk
eller mental förmåga eller bristande erfarenhet
och kunskap om de inte först övervakats eller
instruerats av någon ansvarig person. Se noga
till så att barnen inte leker med ljusjedjan.
• Håll barn under 3 år på avstånd från ljuskedjan.
De kan svälja smådelarna!
Tekniska specifikationer
Nätspänning: 220 - 240V ~50Hz
Antal lampor: 100 lampor
Lamptyp: 2,5 V / 0,35 W
Sticksockel: 8 mm för ljuskedjor, grön
Nominell effekt: 37 W totalt
Lampavstånd: 15 cm
Ljuskedjans längd: 18,3 m
Skyddsklass: II /
- 10 -
Page 13

Leveransens omfattning
Ljuskedja
2 reservlampor
Bruksanvisning
Akta:
De här lamporna har en sticksockel och inga gängor!
Försök aldrig skruva ut lamporna och använd inga
verktyg för att dra ut dem ur fattningen. Då kan
lampglaset spricka. Risk för skärskador!
Beskrivning
Lampa
q
Sticksockel
w
Fattning
e
Sladd med kontakt
r
Användning
• Kontrollera att ljuskedjan är i felfritt skick och att
alla delar och rester av förpackningsmaterial tagits
bort.
• Kontrollera att det sitter en lampa i varje fattning.
• Häng ljuskedjan över julgranens grenar när det
är dags att klä den.
• Sätt kontakten i uttaget för att tända ljuskedjan.
• Om ljuskedjan inte lyser: Kontrollera om alla
lampor sitter ordenligt i sina fattningar och att
kontakten är riktigt instucken i uttaget.
• Om bara enstaka lampor inte lyser: Byt lampa
enligt följande beskrivning:
Byta lampor
• Dra ut lampan
ur fattningen e.
• Använd bara sådana lampor som anges under
tekniska data som reservlampor. Starkare lampor
eller lampor med annat wattal kan leda till att
den eller de övriga lamporna blir för varma och
till att kabeln blir överbelastad.
• Stick in den nya lampan
i fattningen e. Sticksockeln styrs in i fattningen
och lampan kan inte sättas i på fel sätt.
• Sätt sedan kontakten i ett eluttag. Om ljusslingan
inte lyser nu heller kontrollerar du den nya lampan
för att se efter så att den sitter som den ska i
fattningen.
tillsammans med sticksockeln
q
med sticksockeln
q
w
w
Varning:
Om glaset har lossnat eller splittrats på någon av
lamporna:
• Dra genast ut kontakten ur uttaget! Det är livsfarligt
att komma i kontakt med de trådar som sticker ut
ur lampan.
• Försök dra ut sticksockeln
ningen
inte fingrarna. Då kan du skära dig på glassplitter.
• Vänd dig till kundtjänst om du är osäker eller
misslyckades med att dra ut sockeln.
med en spetsig tång – använd absolut
e
försiktigt ur fatt-
w
Akta:
• Dra först ut kontakten ur uttaget. Det finns spänning
kvar i produkten så länge kontakten sitter i ett
eluttag.
• Om lamporna varit tända ska du först låta dem
svalna.
- 11 -
Page 14

Rengöring
Akta!
Dra först ut kontakten ur uttaget. Annars kan du få
en livsfarlig elchock om du kommer i kontakt med
strömförande delar eller om det tränger in fukt i
ljusjedjan när den rengörs. Om lamporna varit tända
ska du först låta dem svalna.
• Sedan kan du torka av ljuskedjan med en torr
trasa. Använd inte vätska för att rengöra den, då
kan det komma in fukt i sticksocklarna. Använd
inte heller några rengöringsmedel som förstör
plastytorna.
Skötsel
Ljuskedjan är helt underhållsfri och kräver ingen
som helst service av användaren.
• Kontrollera om ljuskedjan har några synliga
skador före varje användningstillfälle.
Importör
KOMPERNASS GMBH
BURGSTRASSE 21
D-44867 BOCHUM
www.kompernass.com
Service
Kompernass Service Sverige
EA Rosengrensgata 22
42131 Västra Frölunda
Tel.: 031-491080
Fax: 031-497490
e-mail: support.sv@kompernass.com
Kompernass Service Suomi
Petäjäksentie 19
FIN - 26100 Rauma
Tel.: 02 822 28 87
Fax: 010 293 02 63
e-mail: support.fi@kompernass.com
Kassering
Ljuskedjan får absolut inte kastas bland de
vanliga hushållssoporna.
Lämna in ljuskedjan till ett företag som har tillstånd
att ta hand om den här sortens avfall eller till din
kommunala avfallsanläggning.
Följ gällande föreskrifter.
Om du är tveksam ska du fråga den lokala avfallshanteringsmyndigheten.
Lämna in allt förpackningsmaterial till
miljövänlig återvinning.
- 12 -
 Loading...