

Page 1

3
ELECTRONIC
GARDEN WATERING CONSOLE
KH 4083
ELECTRONIC GARDEN WATERING CONSOLE
Operating instructions
AYTOMATO ΣYΣTHMA ΠOTIΣMATOΣ
Οδηγίες χρήσης
KOMPERNASS GMBH · BURGSTRASSE 21 · D-44867 BOCHUM
www
.kompernass.com
ID-Nr.: KH4083-10/07-V1
Page 2
KH 4083
A
q
(3/4“)
y
t
w
(3/4“)
e
r
B
u
d
i
s
a
o
Page 3

- 1 -
LIST OF CONTENTS PAGE
Safety instructions 2
Proper Use 3
Package Contents 4
Technical data 4
Description of the appliance 4
Preparations 5
Operate 7
Troubleshooting 14
Cleaning 14
Disposal 15
Warranty & Service 16
Importer 17
Read these operating instructions carefully before using the appliance for the
first time and preserve this manual for later reference. Pass this manual on to
whoever might acquire the appliance at a future date.
Page 4

WATERING COMPUTER
Safety instructions
Poison Hazard!
Keep batteries out of the reach of children.
Explosion Hazard!
Never throw used batteries into the fire.
Attention!
Failure to follow these safety instructions could damage the watering
computer and void your warranty.
• Only use alkaline batteries. Do not use rechargable batteries.
• Never recharge alkaline batteries.
• Ensure that water cannot permeate into the housing. This causes
damage to the appliance.
• Check the charge state of the batteries and renew them if you do
not use the watering computer for an extended period.
• Always replace both batteries and make certain the polarity is
correct.
• Replace empty batteries in a timely fashion. Leaking batteries can
destroy the watering computer.
- 2 -
Page 5

Never handle leaking batteries without protection! Battery
chemicals may not come into contact with your eyes or mouth.
This could lead to chemical burns. Use gloves to remove leaking
batteries.
• Check the watering computer and its connections at regular
intervals for watertightness and faultless function.
• Never press the buttons with your finger nails or with sharp
objects.
• Reprogramme the watering computer if the batteries have been
removed from the housing for an extended period.
• Always keep the lid closed when you are not programming the
watering computer. The lid protects the display from weather
effects!
Proper Use
The watering computer KH 4083 is intended exclusively for permitting
or preventing water flow at specific times. It is intended only for use in
private households and gardens. Any other use is considered improper,
in particular use in drinking water systems and for growing food.
- 3 -
Page 6

Package Contents
• Watering computer KH4083
• Instructions for use
Technical data
Minimum rate of flow: 15 l/min.
Operating water pressure: 1.379– 8.274 bar
Power supply: 2 x 1.5V, alkaline batteries
Keypad: Splash-proof
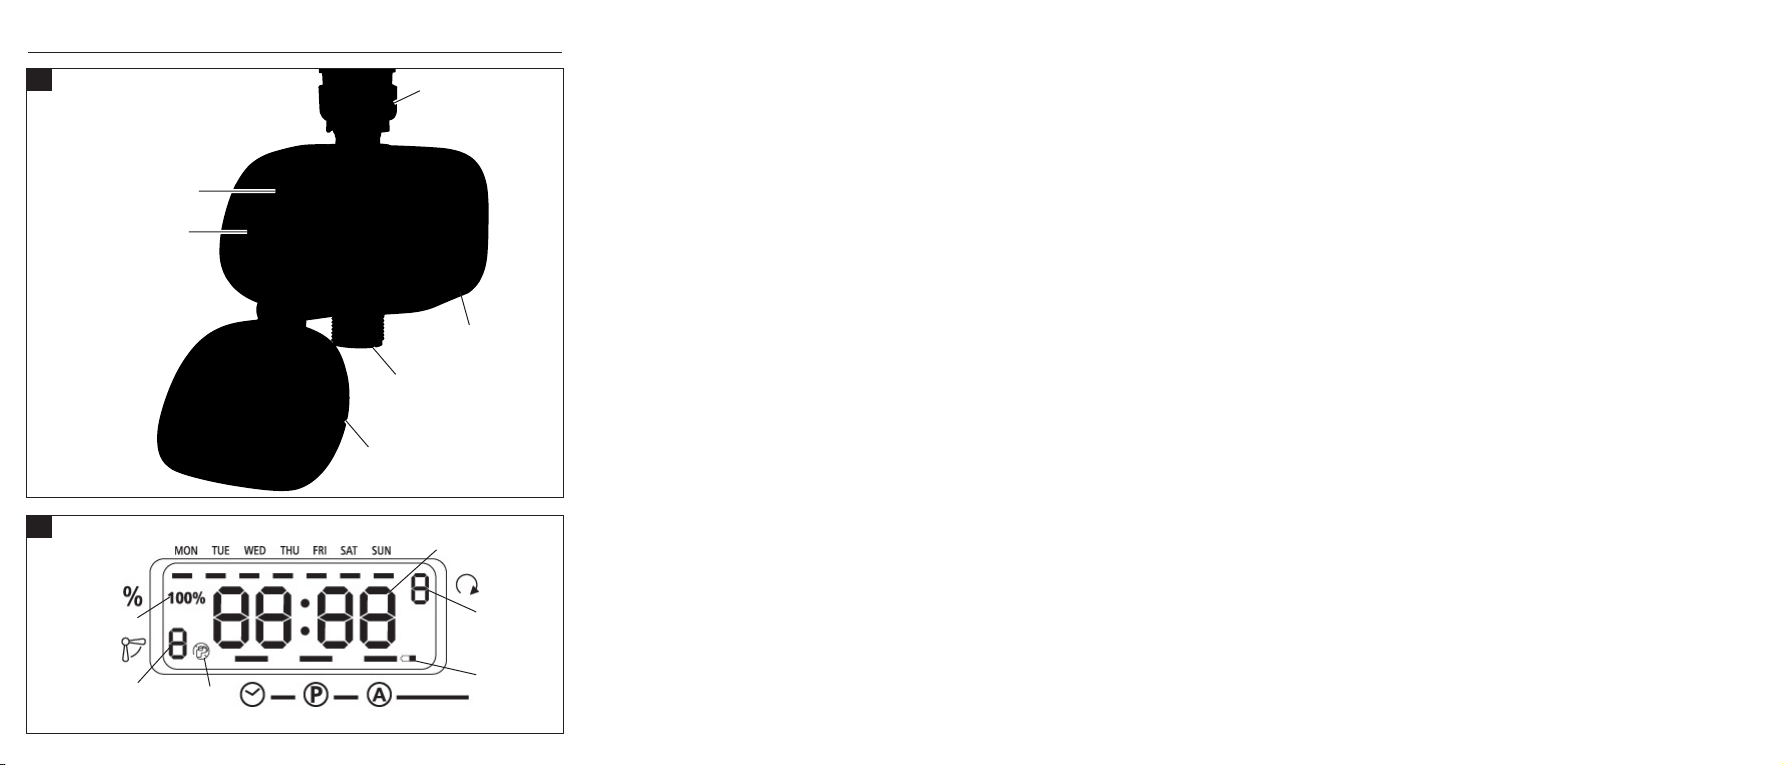
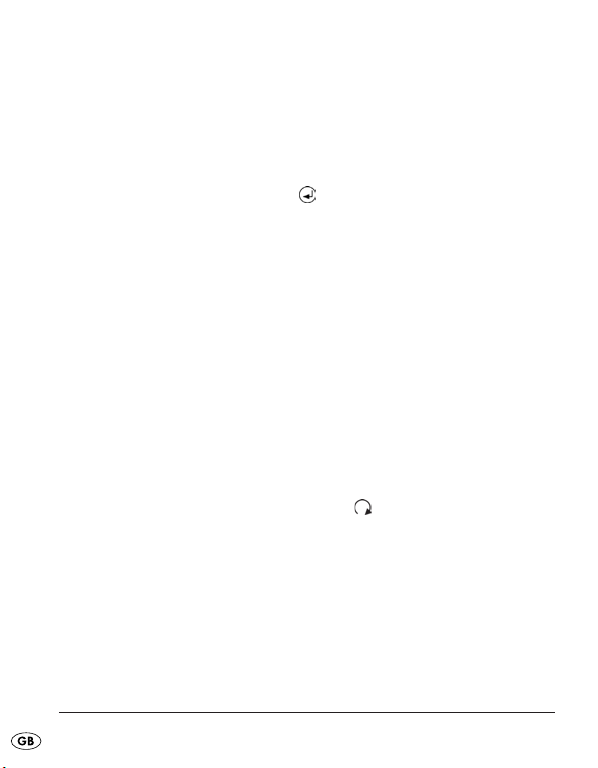
Description of the appliance
Figure A
q
Water-tap connection (3/4“)
w
Battery compartment
e
Connection for water-pipe (3/4“)
r
Cover
t
Keypad
y
Display
- 4 -
Page 7
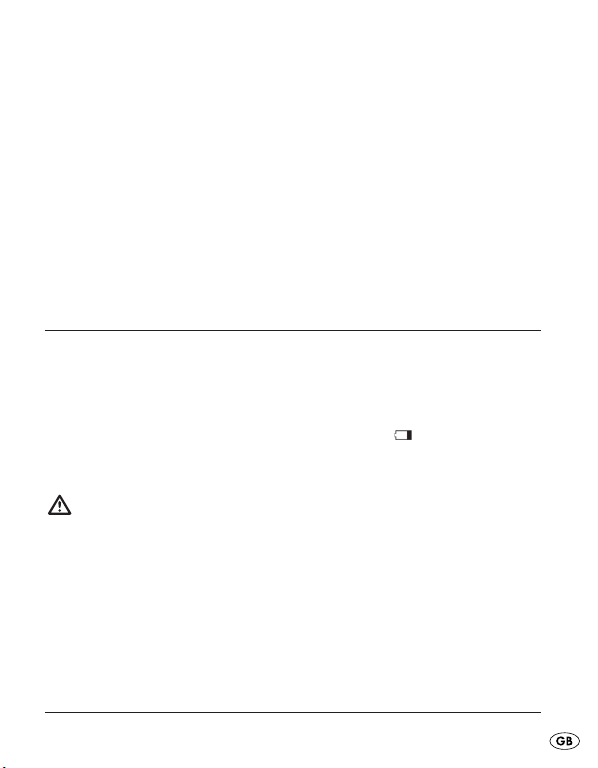
Display
Figure B
u
Time display
i
Display: watering frequency
o
Display: low battery indication
a
Watering on/off
s
Display: programme number
d
Display: watering budget
Preparations
Inserting Batteries
The battery compartment wis located on the underside of the
watering computer.
Replace the batteries regularly. When the display
o
appears, the
batteries are depleted.
Only use Alkaline batteries. Do not use rechargable batteries.
They do not provide enough output to operate the appliance.
➩ Pull the battery compartment wout of the housing.
➩ Insert two AA-Batteries, taking note of the polarities, in the battery
compartment
w
.
- 5 -
Page 8
➩ Push the battery compartment wback into the housing. The battery
compartment
w
must click in audibly.
➩ Whilst the batteries are being exchanged, „PO“ appears in the dis-
play
y
.
For as long as the PO display is blinking, the watering computer
will retain its programming. If the display goes blank, the programming has also been deleted.
Connecting to the water mains
➩ Screw the inflow connector on to a suitable 3/4“ water tap
(1“-external thread).
➩ Screw the outflow connector
e
on to a water hose.
Ensure that the outflow connector
e
is always pointed downwards.
Setting the Clock
➩ Open the cover r.
➩ Press the „M“ button until a bar
y
appears in the display above the
symbol and a bar blinks under „“MON“.
The watering computer is now in the clock setting mode.
➩ Press the „+“ or „–“ button to set the current day of the week.
➩ Confirm your selection with the button.
The hour value now blinks in the display
y
.
- 6 -
q
Page 9
➩ Press the „+“ button or the „–“ button to set the current hour.
➩ Confirm your selection with the button.
The minute value now blinks in the display y.
➩ Press the „+“ button or the „–“ button to set the minutes.
➩ Confirm your selection with the button.
The clock is now set.
➩ Press the „M“ button to return to automatic mode.
Operate
Programming
You can programme up to 8 switching sequences with different
amounts of water flow-through.
➩ Press the „M“ button until a bar is shown above the in the
display
y
.
The watering computer is now in the programming mode. Blinking in
the display y, to the right of the % symbol, is the notification 100%.
- 7 -
Page 10
Setting the amount of water through-flow.
You can set the amount of water through-flow from 10% to 200%.
➩ Press the „+“ button or the „–“ button to set the desired amount of
water through-flow.
➩ Confirm your selection with the button.
The amount of water through-flow is controlled by the period of
water flow.
Examples: You have programmed a 100% water through-flow amount
for 10 minutes: the watering computer permits through-flow for 10 minutes.
You have programmed a 50% water through-flow amount for 10 minutes:
the watering computer permits through-flow for 5 minutes.
You have programmed a 200% water through-flow amount for 10 minutes:
the irrigation computer permits through-flow for 20 minutes.
Programming the watering frequency
Blinking in the display y, to the left of the -Symbol, is a C or a
number from 1–7.
➩ Select the settings for watering frequency with the „+“ button or the
„–“ button.
- 8 -
Page 11
Programme:
C: For user-defined watering (e.g. Mon.,Wed. and Fri.) see chapter
„Programming irrigation for specific weekdays“
1: daily
2: every second day
3: every third day, etc.
➩ Confirm your selection with the button.
Programming the watering timings (1–8)
The number of the programme position is shown in the display ynext
to the symbol.
➩ Select a program number with the „+“ or „–“ button.
➩ Confirm your selection with the button.
➩ Press the „+“ button or the „–“ button to set the starting time (hour).
➩ Confirm your selection with the button.
➩ Press the „+“ button or the „–“ button to set the starting time (minutes).
➩ Confirm your selection with the button.
In the display
y
the period of watering in minutes is shown
(Start value 1).
- 9 -
Page 12
➩ Press the „+“ button or the „–“ button to set the period of watering.
You can set a period of watering from 1 minute to 300 minutes.
➩ Confirm your selection with the button.
In the display
y
, the number of the next programme place is shown.
Repeat the procedure should you wish to programme several watering
times.
➩ Press the „M“ button until a bar is shown over the in the
display
y
.
The watering computer is now in automatic mode and will execute the
configured programmes.
The watering computer automatically sorts all programmes
according to their starting times.
Programming watering for specific weekdays (C)
➩ Press the „M“ button until a bar is shown over in the display y.
➩ Press the „+“ button or the „–“ button to set the water budget.
➩ Confirm your selection with the button.
➩ Press the „+“ button until the watering frequency stands on C.
➩ Confirm your selection with the button.
- 10 -
Page 13

➩ Select with the „+“ button or the „–“ button the desired weekday.
is shown in the display
y
on the left. Watering does not take place
on the programmed day.
➩ Press once on the button.
In the display
y
is shown. Watering takes place on the program-
med day. The bar shows the programmed weekday.
➩ Confirm your selection with the button.
➩ Select a programme number with the „+“ or „–“ button.
The number of the programme position is shown in the display ynext
to the symbol.
➩ Confirm your selection with the button.
➩ Set the watering time as described under „Programming the
watering timings“.
➩ Press the „M“-Button until a bar is shown over in the
display
y
.
The watering computer is now in automatic mode and will execute the
configured programs.
- 11 -
Page 14

Checking the programmed data
➩ Press the „M“ button twice. The current programming is shown in the
display
y
.
➩ Press the button to switch through the programme.
➩ To leave the Programme-Mode, continue to press the „M“
button until a bar appears over in the display
y
.
The watering computer is once again operating in automatic
mode.
Deleting Programmed Data
➩ Press the „M“ button until a bar is shown over in the display y.
➩ Press the button until the number of the desired programme
blinks in the display
y
➩ Press the button.
The programme is deleted and the programmed time is no longer
shown in the display y.
➩ Continue to press the „M“ button until a bar appears over the
in the display y.
- 12 -
.
Page 15

The watering computer is once again operating in automatic mode.
Manual interruption of the programme
➩ Hold the button pressed down during a programme. The
programme will be interrupted and the watering computer ceases
to irrigate.
Using the manual or countdown modus
➩ Press the button once.
In the display
y
the watering period in minutes blinks (Start value 1).
➩ Press the „+“- or the „–“ button to set the watering period.
You can set a period of watering from 1 minute to 300 minutes.
➩ Confirm your selection with the button.
The watering computer starts watering. is shown in the display
y
on
the left. The watering time will be shown as a countdown. When the
watering time has elapsed, the watering computer switches back into
automatic mode.
- 13 -
Page 16

Troubleshooting
The display is blank
Check the batteries. Insert the batteries with their correct polarity or
exchange them for new ones.
Watering does not start at the programmed time
• Control the programming and, if necessary, make adjustments to it.
• Check the batteries. Insert the batteries with their correct polarity
or exchange them for new ones.
• The water tap is not open. Open the water tap.
If the watering computer still does not function correctly, please contact
the manufacturer.
Cleaning
• Clean the watering computer with a soft cloth moistened with
water and mild detergent.
• At regular intervals clean the sieve in the coupling nut.
➩ Remove the water hose from the watering computer.
➩ Unscrew the watering computer from the water tap.
➩ Remove the cone-shaped sieve from the water inlet in the
coupling nut.
- 14 -
Page 17

➩ Clean the sieve.
➩ Replace the sieve.
➩ Reconnect the watering computer and the water hose.
Disposal
Do not dispose of the device in normal domestic waste.
Dispose of the device over a registered waste disposal
firm or through your communal waste disposal facility.
Observe the currently valid regulations. In case of doubt, consult
your waste disposal facility.
Battery disposal!
Batteries may not be disposed of with normal domestic waste. All consumers are statutorily obliged to dispose of batteries at the collection
point in their community/district or with the original supplier.
The purpose of this obligation is to ensure that batteries can be
disposed of in an environmentally-friendly manner.
Only dispose of batteries when they are fully discharged.
- 15 -
Page 18

Warranty & Service
This appliance is guaranteed for 3 years from the date of purchase. It
as been carefully produced and meticulously checked before delivery.
lease keep your receipt as proof of purchase. Contact your service
centre by telephone in case of questions pertaining to the warranty.
Your goods can be transmitted free of cost only in this manner.
The warranty covers only material or manufacturing faults, not normal
wear or damage to fragile parts such as switches or rechargeable
batteries.
The appliance is intended solely for private, not commercial, use. If
this product has been subjected to improper or inappropriate handling,
abuse, or interventions not carried out by one of our authorised sales
and service outlets, the warranty will be considered void. This warranty
does not affect your statutory rights.
DES Ltd
Units 14–15
Bilston Industrial Estate
Oxford Street
Bilston
WV14 7EG
Tel.: 0870 787 6177
Fax: 0870 787 6168
e-mail: support.uk@kompernass.com
- 16 -
Page 19

Kompernass Service Ireland
c/o Irish Connection
41 Harbour view
Howth Co. Dublin
Tel: 087-99 62 077
Fax: 18398056
e-mail: support.ie@kompernass.com
Importer
KOMPERNASS GMBH
BURGSTRASSE 21
D-44867 BOCHUM
www.kompernass.com
- 17 -
Page 20

- 18 -
Page 21

- 19 -
Περιεχόμενα Σελίδα
Υποδείξεις ασφαλείας 20
Σκοπός χρήσης 21
Σύνολο αποστολής 22
Τεχνικά δεδομένα 22
Περιγραφή συσκευής 22
ροετοιμασίες 23
Χειρισμός 25
Διόρθωση βλαβών 32
Καθαρισμός 32
Απομάκρυνση 33
Εγγύηση & Σέρβις 34
Εισαγωγέας 35
Διαβάστε το εγχειρίδιο χειρισμού πριν από την πρώτη χρήση προσεκτικά και
φυλάξτε το για μια μελλοντική χρήση. Παραδώστε το εγχειρίδιο εάν η συσκευή
παραδοθεί σε τρίτους.
Page 22

Υπολογιστής άρδευσης
Υποδείξεις ασφαλείας
Κίνδυνος δηλητηρίασης!
Φυλάτε τις μπαταρίες μακριά από παιδιά.
Κίνδυνος έκρηξης!
Ποτέ μην πετάτε τις χρησιμοποιημένες μπαταρίες στη φωτιά.
Προσοχή!
Εάν δεν δοθεί προσοχή στις οδηγίες χρήσης ίσως προκληθεί βλάβη
στον υπολογιστή άρδευσης και οι απαιτήσεις εγγύησης ίσως ακυρωθούν.
• Χρησιμοποιείτε μόνο αλκαλικές μπαταρίες. Μην χρησιμοποιείτε
επαναφορτιζόμενες μπαταρίες.
• Ποτέ μην φορτίζετε τις αλκαλικές μπαταρίες.
• Μην επιτρέπετε να φτάνει νερό στην επικάλυψη. Αυτό οδηγεί
σε βλάβες στη συσκευή.
• Ελέγχετε την κατάσταση φόρτισης των μπαταριών και να τις
αντικαθιστάτε όταν δεν χρησιμοποιείτε για μεγάλο χρονικό
διάστημα τον υπολογιστή άρδευσης.
• Να αλλάζετε πάντα και τις δύο μπαταρίες και να προσέχετε για
την σωστή πολικότητα.
• Αντικαθιστάτε τις χρησιμοποιημένες μπαταρίες έγκαιρα. Οι
μπαταρίες με διαρροή μπορεί να καταστρέψουν τον υπολογιστή
άρδευσης.
- 20 -
Page 23

Μην πιάνετε ποτέ τις μπαταρίες με διαρροή χωρίς προστασία!
Τα χημικά μπαταριών δεν επιτρέπεται να φτάνουν ποτέ στα μάτια
ή το στόμα. Αυτό μπορεί να οδηγήσει σε καυστικότητα. Για την
απομάκρυνση των μπαταριών με διαρροή χρησιμοποιείτε γάντια.
• Ελέγχετε τον υπολογιστή άρδευσης και τους αγωγούς του σε
τακτικά διαστήματα για στεγανότητα και για την άψογη λειτουργία.
• Ποτέ μην πατάτε τα πλήκτρα με τα νύχια ή με αιχμηρά αντικείμενα.
• Προγραμματίστε τον υπολογιστή άρδευσης εκ νέου όταν έχετε
πάρει τις μπαταρίες για μεγάλο χρονικό διάστημα από την
επικάλυψη.
• Κλείνετε πάντα το κάλυμμα όταν δεν προγραμματίζετε τον
υπολογιστή άρδευσης! Το κάλυμμα προστατεύει την οθόνη από
καιρικές επιδράσεις!
Σκοπός χρήσης
Ο υπολογιστής άρδευσης KH4083 εξυπηρετεί αποκλειστικά στην
διευκόλυνση ή διακοπή για ένα καθορισμένο χρόνο, της ροής νερού.
Προορίζεται μόνο για τη χρήση σε ιδιωτικά οικιακά νοικοκυριά και
κήπους. Όλες οι άλλες χρήσεις ισχύουν ως μη σύμφωνες με τους
κανονισμούς, κυρίως η χρήση σε συστήματα αγωγών πόσιμου
νερού και η χρήση για τρόφιμα.
- 21 -
Page 24

Σύνολο αποστολής
• Υπολογιστής άρδευσης KH4083
• Οδηγία χρήσης (χωρίς εικόνα)
Τεχνικά δεδομένα
Ποσότητα ροής ελαχ.: 15l/Min.
Πίεση νερού λειτουργίας: 1,379–8,274 Bar
Παροχή ρεύματος: 2 x 1,5V, αλκαλικές μπαταρίες
Πληκτρολόγιο: Αντοχή στο ψεκαζόμενο νερό
Περιγραφή συσκευής
Απεικνιση A
q
Σύνδεση κρουνού νερού (3/4“)
w
Θήκη μπαταριών
e
Σύνδεση για ελαστικό σωλήνα (3/4“)
r
Κάλυμμα
t
Πεδίο χειρισμού
y
Οθόνη
- 22 -
Page 25

Οθνη
Εικόνα B
u
Ένδειξη χρόνου
h
Ένδειξη της συχνότητας άρδευσης
o
Ένδειξη της κατάστασης μπαταριών
a
Άρδευση On/Off
s
Ένδειξη του αριθμού θέσης προγράμματος
d
Ένδειξη της ποσότητας άρδευσης
ροετοιμασίες
Τοποθέτηση μπαταριών
Η θήκη μπαταριών wβρίσκεται στην κάτω πλευρά του υπολογιστή
άρδευσης.
Αντικαθιστάτε τακτικά τις μπαταρίες. Όταν εμφανίζεται η ένδειξη
o
,
οι μπαταρίες έχουν καταναλωθεί.
Χρησιμοποιείτε μόνο αλκαλικές μπαταρίες. Μην χρησιμοποιείτε
επαναφορτιζόμενες μπαταρίες. Δεν αποδεσμεύετε επαρκή ισχύ για
να λειτουργείτε τη συσκευή.
➩ Τραβήξτε έξω τη θήκη μπαταριών
w
από την επικάλυψη.
➩ Τοποθετείστε δύο μπαταρίες AA προσέχοντας την πολικότητα στη
θήκη μπαταριών
w
.
➩ Ωθείστε τη θήκη μπαταριών
w
πάλι στην επικάλυψη. Η θήκη
μπαταριών
w
πρέπει να κουμπώσει με έναν ήχο.
- 23 -
Page 26

➩ Όσο αλλάζετε τις μπαταρίες εμφανίζεται στην οθόνη y“PO“.
Όσο ανάβει η ένδειξη PO, ο υπολογιστής άρδευσης διατηρεί τον
προγραμματισμό του. Όταν η ένδειξη έχει σβήσει, διαγράφεται και
ο προγραμματισμός.
Σύνδεση στο δίκτυο νερού
➩ Περιστρέψτε τη σύνδεση τροφοδοσίας qσε έναν κατάλληλο κρουνό
νερού 3/4“ (1“-εξωτερική κοχλίωση).
➩ Περιστρέψτε στην σύνδεση ροής έναν ελαστικό σωλήνα
e
νερού.
Προσέξτε ώστε η σύνδεση ροής να έχει πάντα κατεύθυνση προς τα κάτω.
Ρύθμιση ρολογιού
➩ Κλείστε το κάλυμμα r.
➩ Πιέστε το πλήκτρο “M“ τόσες φορές έως ότου στην οθόνη
y
εμφανιστεί μια μπάρα πάνω από το σύμβολο και κάτω από το
“MON“ αναβοσβήνει μια μπάρα.
Ο υπολογιστής άρδευσης βρίσκεται τώρα στην λειτουργία ρύθμισης
ρολογιού.
➩ Πιέστε το πλήκτρο “+“ ή “–“ για να ρυθμίσετε την τρέχουσα ημέρα
της εβδομάδας.
➩ Επιβεβαιώστε την επιλογή σας με το πλήκτρο .
Στην οθόνη
y
αναβοσβήνει η ένδειξη ώρας.
- 24 -
Page 27

➩ Πιέστε το πλήκτρο “+“ ή “–“ για να ρυθμίσετε την τρέχουσα ώρα.
➩ Επιβεβαιώστε την επιλογή σας με το πλήκτρο .
Στην οθόνη yαναβοσβήνει η ένδειξη λεπτών.
➩ Πιέστε το πλήκτρο “+“ ή “–“ για να ρυθμίσετε τα λεπτά.
➩ Επιβεβαιώστε την επιλογή σας με το πλήκτρο .
Το ρολόι έχει ρυθμιστεί.
Χειρισμός
Προγραμματισμός
Μπορείτε να προγραμματίσετε έως και 8 λειτουργίες εκκίνησης με
διαφορετικές ποσότητες άρδευσης.
➩ Πιέστε το πλήκτρο “M“ έως ότου εμφανιστεί στην οθόνη yμια
μπάρα πάνω από το
.
Ο υπολογιστής άρδευσης βρίσκεται τώρα στην λειτουργία
προγραμματισμού. Στην οθόνη yαναβοσβήνει δεξιά δίπλα από
το σύμβολο % η ένδειξη 100%.
- 25 -
Page 28

Ρύθμιση ποσότητας άρδευσης
Μπορείτε να ρυθμίσετε την ποσότητα άρδευσης από 10% έως 200%.
➩ Επιλέξτε με το πλήκτρο “+“ ή “–“ την επιθυμητή ποσότητα άρδευσης.
➩ Επιβεβαιώστε την επιλογή σας με το πλήκτρο .
Η ποσότητα άρδευσης ελέγχεται μέσω της διάρκειας της ροής νερού.
Παράδειγμα: Έχετε ρυθμίσει 100% ποσότητα άρδευσης για 10 λεπτά:
ο υπολογιστής άρδευσης ποτίζει για 10 λεπτά.
Έχετε ρυθμίσει 50% ποσότητα άρδευσης για 10 λεπτά: ο υπολογιστής
άρδευσης ποτίζει για 5 λεπτά.
Έχετε ρυθμίσει 200% ποσότητα άρδευσης για 10 λεπτά: ο υπολογιστής
άρδευσης ποτίζει για 20 λεπτά.
Ρύθμιση συχνότητας άρδευσης
Στην οθόνη yαναβοσβήνει αριστερά δίπλα από το σύμβολο ένα C
ή ένας αριθμός από το 1–7.
➩ Επιλέξτε με το πλήκτρο “+“ ή “–“ την ρύθμιση συχνότητας άρδευσης.
- 26 -
Page 29

Προγράμματα:
C: άρδευση καθορισμένη από την χειριστή
(π. χ. Δευ., Τετ. και Παρ.) βλέπε Κεφάλαιο “Ρύθμιση άρδευσης
σε καθορισμένες ημέρες της εβδομάδας“
1: καθημερινά
2: κάθε δεύτερη ημέρα
3: κάθε τρίτη ημέρα, κλπ.
➩ Επιβεβαιώστε την επιλογή σας με το πλήκτρο .
Ρύθμιση χρόνου άρδευσης (1–8)
Ο αριθμός της θέσης προγράμματος εμφανίζεται στην οθόνη yδίπλα
από το σύμβολο .
➩ Επιλέξτε με το πλήκτρο “+“ ή “–“ μια θέση προγράμματος.
➩ Επιβεβαιώστε την επιλογή σας με το πλήκτρο .
➩ Πιέστε το πλήκτρο “+“ ή “–“ για να ρυθμίσετε την ώρα έναρξης.
➩ Επιβεβαιώστε την επιλογή σας με το πλήκτρο .
➩ Πιέστε το πλήκτρο “+“ ή “–“ για να ρυθμίσετε τον χρόνο έναρξης
(λεπτά).
➩ Επιβεβαιώστε την επιλογή σας με το πλήκτρο .
Στην οθόνη
y
εμφανίζεται η διάρκεια άρδευσης σε λεπτά (τιμή
εκκίνησης 1).
- 27 -
Page 30

➩ Πιέστε το πλήκτρο “+“ ή “–“ για να ρυθμίσετε την διάρκεια
άρδευσης.
Μπορείτε να ρυθμίσετε την διάρκεια άρδευσης από 1 λεπτό έως
300 λεπτά.
➩ Επιβεβαιώστε την επιλογή σας με το πλήκτρο .
Ο αριθμός της επόμενης θέσης
y
προγράμματος εμφανίζεται στην
οθόνη. Επαναλάβετε την διαδικασία όταν θέλετε να προγραμματίσετε
περισσότερους χρόνους άρδευσης.
➩ Πιέστε το πλήκτρο “M“ έως ότου εμφανιστεί στην οθόνη
y
μια
μπάρα πάνω από το .
Ο υπολογιστής άρδευσης βρίσκεται τώρα στην αυτόματη λειτουργία και
επεξεργάζεται τα δοθέντα προγράμματα.
Ο υπολογιστής άρδευσης ταξινομεί αυτόματα όλους τους
προγραμματισμούς σύμφωνα με τον χρόνο εκκίνησης τους.
Ρύθμιση άρδευσης σε καθορισμένες ημέρες της
εβδομάδας (C)
➩ Πιέστε το πλήκτρο “M“ έως ότου εμφανιστεί στην οθόνη yμια
μπάρα πάνω από το .
- 28 -
Page 31

➩ Επιλέξτε με το πλήκτρο “+“ ή “–“ την επιθυμητή ποσότητα άρδευσης.
➩ Επιβεβαιώστε την επιλογή σας με το πλήκτρο .
➩ Πιέστε το πλήκτρο +“ έως ότου η συχνότητα άρδευσης βρίσκεται στο C.
➩ Επιβεβαιώστε την επιλογή σας με το πλήκτρο .
➩ Επιλέξτε με το πλήκτρο “+“ ή “–“ την επιθυμητή ημέρα εβδομάδας.
Στην οθόνη
y
εμφανίζεται αριστερά . Η άρδευση δεν λαμβάνει χώρα
την ρυθμισμένη ημέρα.
➩ Πιέστε μια φορά το πλήκτρο -Στην οθόνη yεμφανίζεται .
Η άρδευση λαμβάνει χώρα την ρυθμισμένη ημέρα. Η μπάρα δείχνει την
προγραμματισμένη ημέρα εβδομάδας.
➩ Επιβεβαιώστε την επιλογή σας με το πλήκτρο .
➩ Επιλέξτε με το πλήκτρο “+“ ή “–“ μια θέση προγράμματος.
Ο αριθμός της θέσης προγράμματος εμφανίζεται στην οθόνη
y
δίπλα
στο σύμβολο .
➩ Επιβεβαιώστε την επιλογή σας με το πλήκτρο .
➩ Ρυθμίστε τον χρόνο άρδευσης όπως περιγράφεται στη “Ρύθμιση
χρόνου άρδευσης“.
➩ Πιέστε το πλήκτρο “M“ έως ότου εμφανιστεί στην οθόνη
y
μια
μπάρα πάνω από το .
- 29 -
Page 32

Ο υπολογιστής άρδευσης βρίσκεται τώρα στην αυτόματη λειτουργία και
επεξεργάζεται τα δοθέντα προγράμματα.
Κλήση προγραμματισμού
➩ Πιέστε το πλήκτρο “M“ δύο φορές. Στην οθόνη yεμφανίζεται ο
τρέχων προγραμματισμός.
➩ Πιέστε το πλήκτρο για εναλλαγή στα προγράμματα.
➩ Για να αφήσετε τη λειτουργία προγράμματος πιέστε το πλήκτρο “M“
τόσες φορές έως ότου στην οθόνη
y
εμφανιστεί μια μπάρα πάνω
από το .
Ο υπολογιστής άρδευσης δουλεύει τώρα στην αυτόματη λειτουργία.
Διαγραφή προγραμματισμού
➩ Πιέστε το πλήκτρο “M“ έως ότου εμφανιστεί στην οθόνη yμια
μπάρα πάνω από το .
➩ Πιέστε το πλήκτρο έως ότου στην οθόνη
y
αναβοσβήνει ο
αριθμός της επιθυμητής θέσης προγράμματος.
➩ Πιέστε το πλήκτρο .
Το πρόγραμμα διαγράφεται και ο προγραμματισμένος χρόνος δεν
εμφανίζεται πλέον στην οθόνη
y
.
➩ Πιέστε το πλήκτρο “M“ τόσες φορές, έως ότου εμφανιστεί στην
οθόνη yμια μπάρα πάνω από το .
Ο υπολογιστής άρδευσης δουλεύει τώρα στην αυτόματη λειτουργία.
- 30 -
Page 33

Χειροκίνητη διακοπή του προγράμματος
➩ Κρατήστε κατά τη διάρκεια ενός προγράμματος το πλήκτρο
πατημένο. Το πρόγραμμα διακόπτεται και ο υπολογιστής άρδευσης
σταματά την άρδευση.
Ρύθμιση χειροκίνητης λειτουργίας ή αντίστροφης
μέτρησης
➩ Πιέστε μια φορά το πλήκτρο .
Στην οθόνη
y
αναβοσβήνει η διάρκεια άρδευσης σε λεπτά
(τιμή εκκίνησης 1).
➩ Πιέστε το πλήκτρο “+“ ή “–“ για να ρυθμίσετε την διάρκεια
άρδευσης.
Μπορείτε να ρυθμίσετε την διάρκεια άρδευσης από 1 λεπτό έως
300 λεπτά.
➩ Επιβεβαιώστε την επιλογή σας με το πλήκτρο .
Ο υπολογιστής άρδευσης ξεκινά την άρδευση. Στην οθόνη
y
εμφανίζεται αριστερά . Ο χρόνος άρδευσης εμφανίζεται σαν
αντίστροφη μέτρηση. Όταν τελειώσει ο χρόνος άρδευσης, επιστρέφει
ο υπολογιστής άρδευσης στην αυτόματη λειτουργία.
- 31 -
Page 34

Διόρθωση βλαβών
Καμία ένδειξη στην οθόνη
Ελέγξτε τις μπαταρίες. Τοποθετείστε τις μπαταρίες με την σωστή
πολικότητα ή αντικαταστήστε τις με καινούργιες.
Η άρδευση δεν ξεκινά στον προγραμματισμένο χρόνο
• Ελέγξτε τον προγραμματισμό και επαναρυθμίστε τον εάν απαιτείται.
• Ελέγξτε τις μπαταρίες. Τοποθετείστε τις μπαταρίες με την σωστή
πολικότητα ή αντικαταστήστε τις με καινούργιες.
• Ο κρουνός νερού δεν έχει ανοιχτεί. Ανοίξτε τον κρουνό νερού.
Εάν ωστόσο ο υπολογιστής άρδευσης δεν λειτουργεί σωστά,
επικοινωνήστε παρακαλούμε με τον κατασκευαστή.
Καθαρισμός
• Καθαρίζετε τον υπολογιστή άρδευσης με ένα ελαφρά νωπό πανί σε
νερό με όχι δυνατό σαπούνι.
• Καθαρίζετε σε τακτικά διαστήματα τη σήτα στο περικόχλιο σύνδεσης.
➩ Αποσυναρμολογείστε τον ελαστικό σωλήνα από τον υπολογιστή
άρδευσης.
➩ Χαλαρώστε τον υπολογιστή άρδευσης από τον κρουνό νερού.
- 32 -
Page 35

➩ Απομακρύνετε την κωνική σήτα από την τροφοδοσία νερού στο
περικόχλιο σύνδεσης.
➩ Καθαρίστε τη σήτα.
➩ Τοποθετείστε πάλι τη σήτα.
➩ Συνδέστε πάλι τον υπολογιστή άρδευσης και τον ελαστικό σωλήνα
νερού.
Απομάκρυνση
Σε καμία περίπτωση μην πετάτε τη συσκευή στα κανονικά
οικιακά απορρίμματα.
Απομακρύνετε τη συσκευή μέσω μιας εγκεκριμένης επιχείρησης
απομάκρυνσης ή μέσω της κοινοτικής επιχείρησης απομάκρυνσης.
Προσέξτε τις τρέχουσες ισχύουσες προδιαγραφές. Σε περίπτωση
αμφιβολιών ελάτε σε επαφή με την επιχείρηση απομάκρυνσης.
Απομάκρυνση μπαταριών!
Οι μπαταρίες δεν επιτρέπεται να πετιώνται στα οικιακά απορρίμματα.
Κάθε καταναλωτής έχει την νομική υποχρέωση να παραδίδει τις
μπαταρίες/τους συσσωρευτές σε ένα σημείο συλλογής της κοινότητας
του/της περιοχής του ή να τις παραδίδει στο εμπορικό κατάστημα.
Αυτή η υποχρέωση εξυπηρετεί στο να μπορούν να απομακρύνονται οι
μπαταρίες με έναν φιλικό προς το περιβάλλον τρόπο.
Επιστρέφετε τις μπαταρίες/τους συσσωρευτές μόνο σε αποφορτισμένη
κατάσταση.
- 33 -
Page 36

Εγγύηση & Σέρβις
Έχετε για αυτή τη συσκευή 3 χρόνια εγγύηση από την ημερομηνία
αγοράς. Η συσκευή κατασκευάστηκε και ελέγχ θηκε προσεκτικά πριν
από την αποστολή. Παρακαλούμε φυλάξτε την απόδειξη ταμείου ως
απόδειξη για την αγορά. Σε περίπτωση εγγύησης ελάτε σε επικοινωνία
με το τμήμα του σέρβις τηλεφωνικά. Μόνο έτσι μπορεί να εξασφαλιστεί
μια δωρεάν αποστολή του εμπορεύματός σας.
Η απόδοση εγγύησης ισχύει μόνο για σφάλματα υλικού ή κατασκευής,
όχι όμως για εξαρτήματα φθοράς ή για βλάβες σε εύθραυστα
εξαρτήματα, π.χ. διακόπτες ή συσσωρευτές. Το προϊόν προορίζεται
μόνο για την ιδιωτική και όχι για την επαγγελματική χρήση.
Σε περίπτωση κακής μεταχείρισης και ακατάλληλης χρήσης, σε
χρήση βίας και σε παρεμβάσεις οι οποίες δεν διεξήχθησαν από το
εξουσιοδοτημένο μας τμήμα σέρβις, η εγγύηση παύει να ισχύει. Τα
νομικά σας δικαιώματα δεν περιορίζονται μέσω αυτής της εγγύησης.
Kompernass Service Eλλάδα
Kalothanassi G. Amalia
α 10-12 Thiatiron Str.
14231 N.Ionia Athens
Tel.: 210 2790865
Fax: 210 2796982
e-mail: support.gr@kompernass.com
- 34 -
Page 37

Εισαγωγέας
KOMPERNASS GMBH
BURGSTRASSE 21
D-44867 BOCHUM
www.kompernass.com
- 35 -
Page 38

- 36 -
 Loading...