

Page 1
3
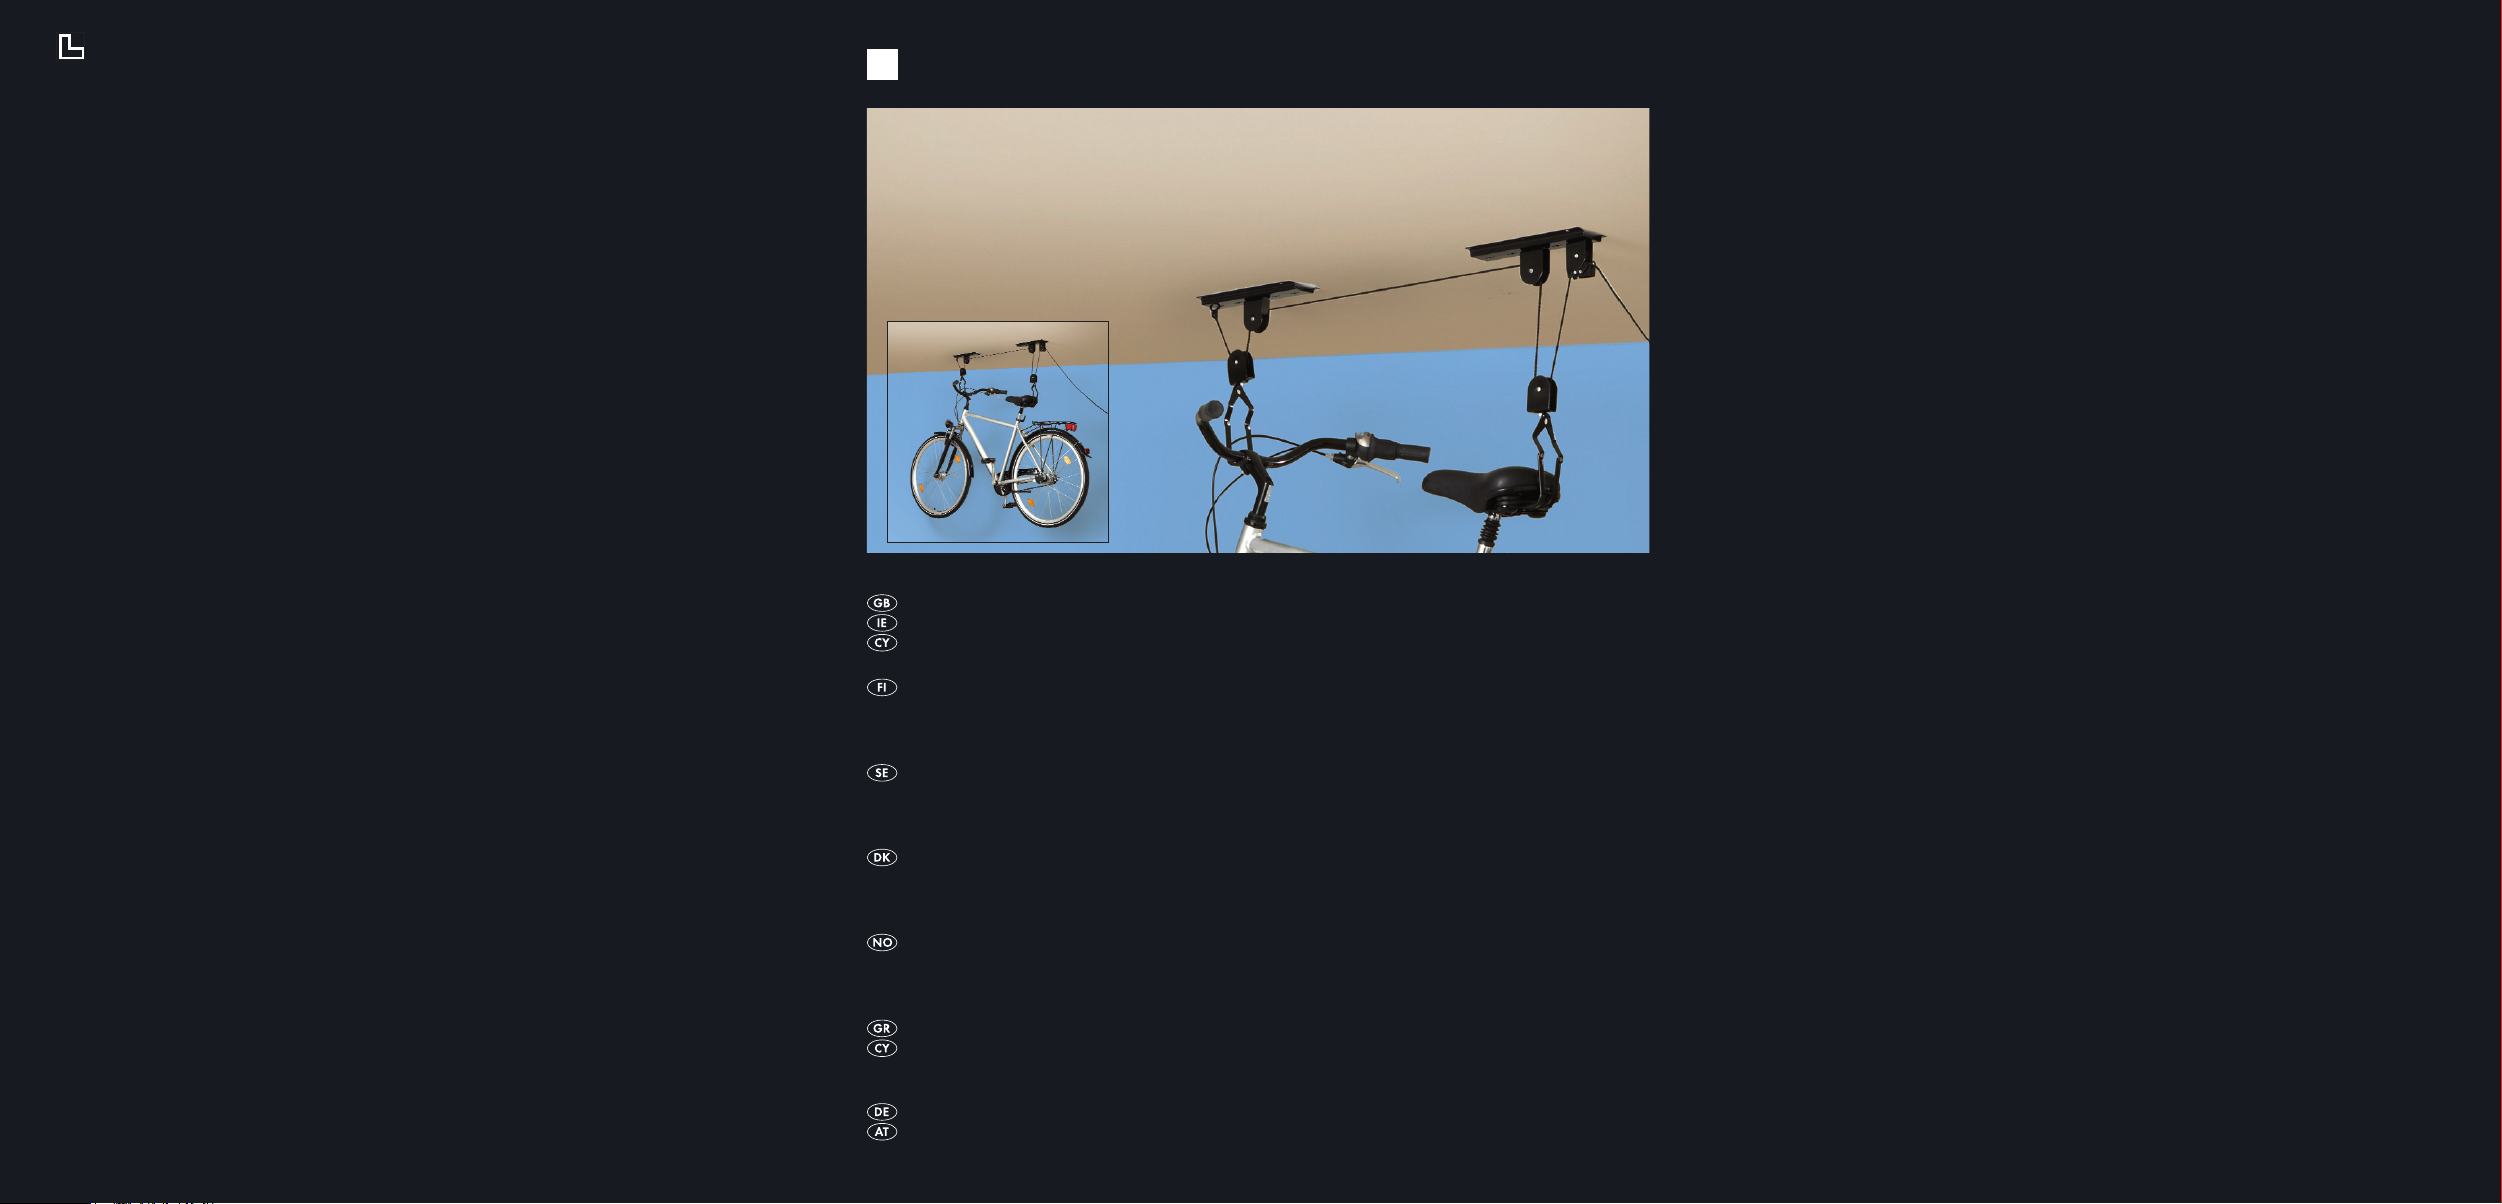
BICYCLE HANGER
KH 4056
BICYCLE HANGER
Operating instructions
KOMPERNASS GMBH · BURGSTRASSE 21 · D-44867 BOCHUM
www.kompernass.com
ID-Nr.: KH4056-10/07-V1
POLKUPYÖRÄN RIPUSTUSTELINE
Käyttöohje
CYKELHÄNGARE
Bruksanvisning
CYKELOPHÆNG
Betjeningsvejledning
SYKKELSTATIV
Bruksanvisning
ÓET ANAPTHÓHÓ ÐOÄHËATOY
ПдзгЯб чсЮузт
FAHRRAD-AUFHÄNGUNG
Bedienungsanleitung
Page 2
KH 4056
Abb. 1
Abb. 3
Abb. 2
Page 3
- 1 -
BICYCLE HANGER
KH 4056
Safety information
• Read the operating instructions carefully before
using the appliance for the first time and
preserve this book-let for later reference.
Pass the manual on to whomsoever might
acquire the appliance at a later date.
• Never lift more than 20 kg with the bicycle
hoist. This would damage the bicycle hoist
and cause the load to crash down.
• Check for the correct tightness of all screws
before using the bicycle hoist.
• At all times use the wall bracket for securing
the load. Otherwise, the load could crash
down.
• Do not take up a position underneath the
hanging load.
• Use the bicycle hoist for storage only, not for
any other purpose.
• Do not carry out repairs on the suspended
load.
• Should the nylon cord be damaged, exchange
it as soon as possible. It could tear.
Attention Ensure that the nylon cord does not
slide too fast between your hands! It could lead
to burns and abrasions!
Attention The bicycle hoist may not be operated by weak people, for example children. The
bicycle could crash down and cause injuries.
Attention! Ensure that the double retaining
hooks cannot slip from the saddle and
handlebars of the bicycle when it is being
raised and lowered.
Intended use
The bicycle hoist is intended to save space and
relieve the tyres during bicycle storage. It is not
meant to be used for commercial purposes.
Delivery Contents
2 Ceiling brackets
2 Double retaining hooks
1 Nylon cord
1 Wall bracket for the nylon cord
10 Cross-head screws with plugs
Description of the appliance
1
Ceiling bracket
2
Nylon cord
3
Safety mechanism
4
Double retaining hooks
5
Cross-head screws
6
Plugs
7
Wall bracket
Required assembly tools:
1 Cross-head screwdriver
1 Measuring tape
1 Drill
1 Drill bit (8 mm diameter)
Page 4
- 2 -
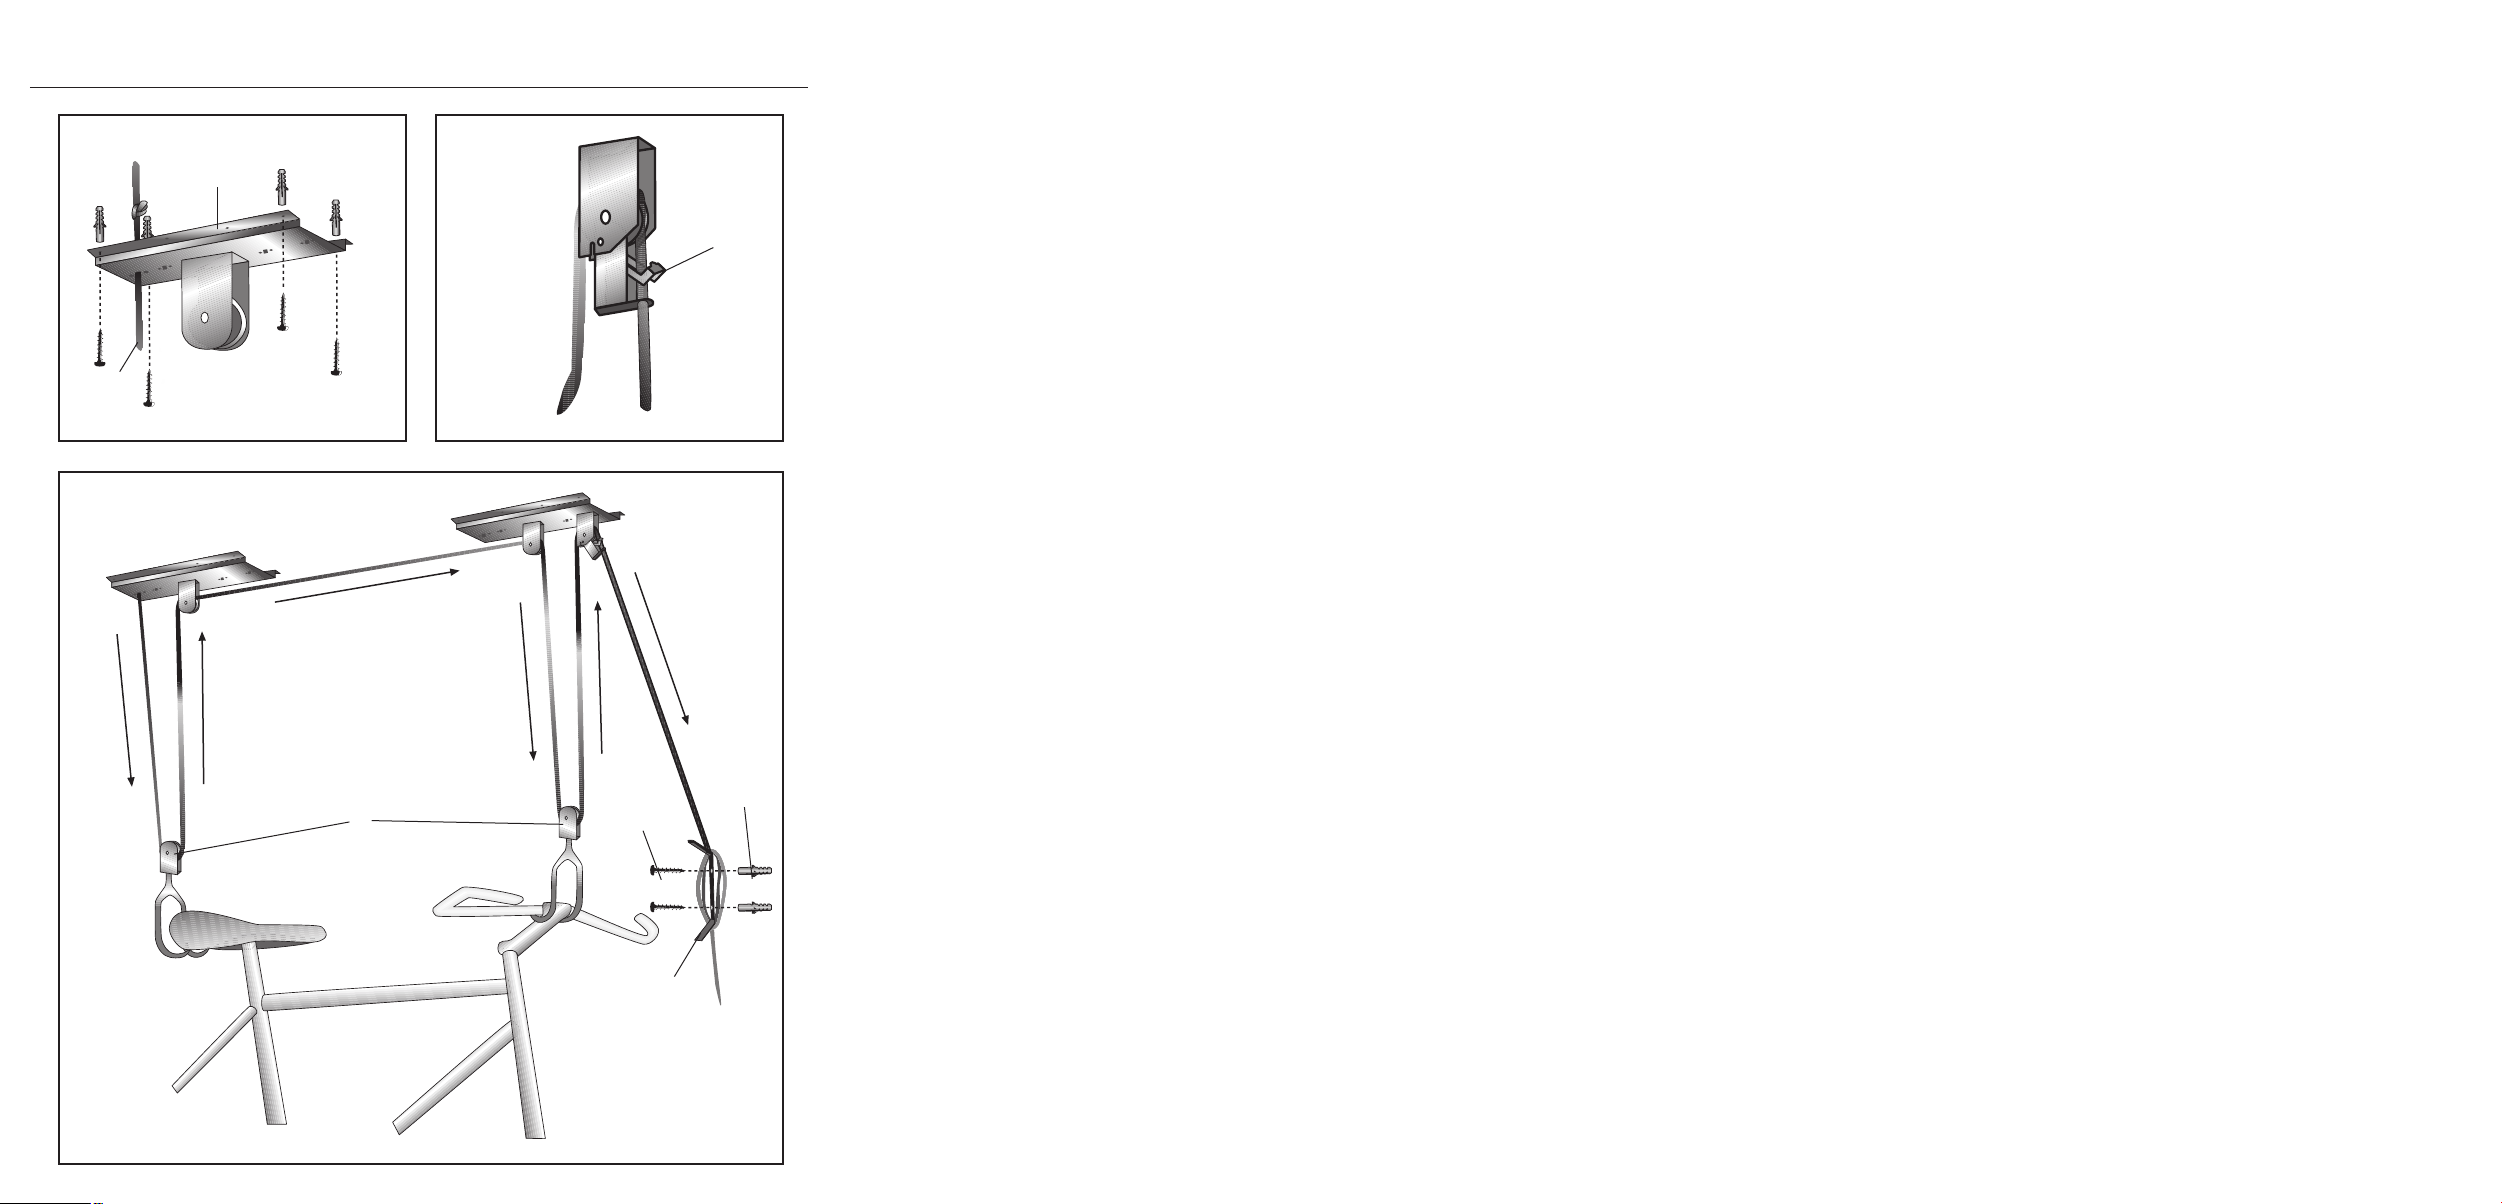
Assembly
The best assembly results are achieved when the
ceiling brackets are located directly above the seat
and handlebars. Ensure there is sufficient clearance
from the side walls.
1. Measure the distance between the handlebars
and the seat on your bicycle.
2. Transfer this measurement to the ceiling,
marking the required drill-holes with the aid
of a ceiling bracket. Drill the required holes
and insert the plugs.
3. Make a stable square knot at one end of the
nylon cord and thread it through the rear
ceiling bracket (See Fig. 1).
4. Fasten both ceiling brackets to the ceiling with
the supplied cross-head screws and plugs
(see Fig. 1).
5. Connect the construction with the cord in accordance with the block and tackle principle.
Run the cord through the rollers in alternation,
starting at the ceiling bracket (see Fig. 3).
6. Run the cord through the safety mechanism in
the ceiling bracket. (see Fig. 2).
7. Check that all screws are firmly tightened
before using the bicycle hoist.
8. Assemble the wall mount. To do this, lift the
bicycle with the hoist and mark the position
for the wall mount.
9. After assembling the wall mount, check all
screw connections for tightness again.
Notice: Should the cord slip quickly through
your hands when raising or lowering the
bicycle, the increased tempo of the cord itself
will trigger the brake and the cord will stop
automatically.
Maintenance
Grease the rollers at regular intervals. This will
ensure that the bicycle hoist moves easily.
Disposal
Do not dispose of the device in normal domestic
waste.
Dispose of the device over a registered waste
disposal firm or through your communal waste
disposal facility.
Observe the currently valid regulations. In case
of doubt, consult your waste disposal facility.
Dispose of the packaging materials in an
environmentally responsible manner.
Importer
KOMPERNASS GMBH
BURGSTRASSE 21
D-44867 BOCHUM
www.kompernass.com
Service
DES Ltd
Units 14–15
Bilston Industrial Estate
Oxford Street
Bilston
WV14 7EG
Tel.: 0870 787 6177
Fax: 0870 787 6168
e-mail: support.uk@kompernass.com
Kompernass Service Ireland
c/o Irish Connection
41 Harbour view
Howth Co. Dublin
Tel: 087-99 62 077
Fax: 18398056
e-mail: support.ie@kompernass.com
Page 5

- 3 -
POLKUPYÖRÄN
RIPUSTUSTELINE
KH 4056
Turvallisuusohjeet
• Lue käyttöohje ennen ensimmäistä käyttökertaa
huolellisesti läpi ja pidä sitä lähettyvillä myös
myöhemmissä käytöissä.
Jos myyt laitteen, anna ohje myös seuraavalle
omistajalle.
• Älä koskaan nosta pyörähissillä yli 20kg:n
kuormaa. Muuten pyörähissi vaurioituu ja
kuorma putoaa.
• Varmista, että kaikki ruuvit ovat tukevasti
paikallaan, ennen kuin alat käyttää
pyörähissiä.
• Käytä aina seinäpidikettä kuorman
varmistamiseksi. Kuorma saattaa muutoin
pudota.
• Älä oleskele riippuvan kuorman alapuolella.
• Käytä pyörähissiä ainoastaan säilytystarkoituksessa, ei tarkoituksenvastaisesti.
• Älä suorita pyörälle mitään korjauksia sen
riippuessa hississä.
• Mikäli nailonköysi on vahingoittunut, vaihda
se välittömästi uuteen. Se saattaa revetä.
Huomaa! Varmista, ettei nailonköysi liu'u
käsiesi lomitse liian nopeasti!
Se saattaa johtaa palo- ja hankausvammoihin!
Huomaa! Heikot henkilöt, esimerkiksi lapset,
eivät saa käyttää pyörähissiä. Polkupyörä
saattaa pudota ja aiheuttaa vammoja.
Huomio! Varmista, etteivät pitokoukut pääse
luistamaan satulasta ja ohjaustangosta pyörää
ylös nostettaessa tai alas laskettaessa.
Käyttötarkoitus
Pyörähissi on tarkoitettu polkupyörien tilaa
säästävään ja renkaita suojaavaan varastointiin.
Tuotetta ei saa käyttää ammatillisiin tarkoituksiin.
Toimituksen piiriin kuuluvat osat
2 Kattopidike
2 Pitokoukut
1 Nailonköysi
1 Seinäpidike nailonköydelle
10 Ristipääruuvit ja tulpat
Laitteen kuvaus
1
Kattopidike
2
Nailonköysi
3
Turvalaite
4
Pitokoukut
5
Ristipääruuvit
6
Tulppa
7
Seinäpidike
Tarvittavat asennusvarusteet:
1 ristipääruuvimeisseli
1 mittanauha
1 porakone
1 poranterä (läpimitta 8mm)
Page 6

- 4 -
Asennus
Asennustulos on paras, kun pitokoukut sijaitsevat
suoraan satulan ja ohjaustangon kohdalla. Pidä
huoli, että sivuseiniin on riittävästi etäisyyttä.
1. Mittaa polkupyöräsi ohjaustangon ja satulan
etäisyys.
2. Merkitse mittaustulokset kattoon. Poraa
porakoneella reiät ja aseta niihin tulpat.
3. Tee nailonköyden toiseen päähän tukeva
umpisolmu ja vie se taaemman kattopidikkeen
läpi (katso kuva 1).
4. Kiinnitä molemmat kattopidikkeet mukana
toimitetuilla ristipääruuveilla ja tulpilla
sisäkattoon (katso kuva 1).
5. Liitä rakennelma köydellä taljaperiaatteen
mukaisesti. Kuljeta köysi vaihtelevasti rullien
läpi (katso kuva 3) kattopidikkeestä alkaen.
6. Vie köysi kattopidikkeen turvalaitteen läpi
(katso kuva 2).
7. Varmista, että kaikki ruuvit ovat tukevasti
paikallaan, ennen kuin alat käyttää hissiä.
8. Kiinnitä seinäpidike. Nosta tätä varten
polkupyörä hissillä ylös ja merkitse
seinäpidikkeen sijaintipaikka.
9. Kun olet asentanut seinäpidikkeen, tarkista
uudestaan kaikkien ruuvien tukevuus.
Ohje: Jos köysi lipeää käsistäsi polkupyörää
nostettaessa tai laskettaessa, köyden nopea
läpikulku aktivoi jarrun ja köysi pysähtyy
automaattisesti.
Kunnossapito
Rasvaa rullat säännöllisin väliajoin.
Näin pyörähissin pyörät pyörivät kevyesti.
Hävittäminen
Älä hävitä laitetta missään tapauksessa tavallisten
kotitalousjätteiden seassa.
Hävitä laite valtuutetun jätehuoltoyrityksen tai
kunnallisen jätehuollon kautta.
Ota huomioon voimassa olevat määräykset.
Ota tarvittaessa yhteyttä oman kuntasi
jätehuollosta vastaavaan tahoon.
Hävitä kaikki pakkausmateriaalit
ympäristöystävällisesti.
Maahantuoja
KOMPERNASS GMBH
BURGSTRASSE 21
D-44867 BOCHUM, GERMANY
www.kompernass.com
Huolto
Kompernass Service Suomi
Petäjäksentie 19
FIN - 26100 Rauma
Tel.: 02 822 28 87
Fax: 010 293 02 63
e-mail: support.fi@kompernass.com
Page 7

- 5 -
CYKELHÄNGARE
KH 4056
Säkerhetsanvisningar
• Läs igenom bruksanvisningen noga innan du
börjar använda cykellyften och spara den för
senare bruk. Lämna över den tillsammans med
cykellyften till en ev. ny användare.
• Lyft inte mer än 20 kg med cykellyften. Annars
kan den gå sönder och cykeln kan falla av.
• Kontrollera att alla skruvar dragits åt innan du
använder cykellyften.
• Använd som regel alltid vägghållaren för att
säkra lasten. Annars kan cykeln falla av.
• Vistas aldrig under hängande last.
• Cykellyften får endast användas för förvaring
enligt föreskriven användning.
• Gör inga reparationer på hängande last.
• Om nylonlinan är skadad ska den bytas ut
omgående. Annars kan den gå av.
Varning! Akta så att nylonlinan inte glider för
fort genom händerna! Du kan få bränn- och
skrapsår på handflatorna!
Varning! Svaga personer, t ex barn, får inte
använda cykellyften. Då kan cykeln falla ner
och orsaka skador.
Akta! Se till så att upphängningskrokarna inte
kan glida av sadeln och styret när du hissar
upp eller ner cykeln.
Föreskriven användning
Cykellyften ska användas för att förvara cyklar utan
att de tar för stor plats och utan att slita på däcken.
Den är inte avsedd för yrkesmässigt bruk.
Leveransomfång
2 takfästen
2 upphängningskrokar
1 nylonlina
1 vägghållare till nylonlina
10 stjärnskruvar med pluggar
Beskrivning
1
Takfästen
2
Nylonlina
3
Säkerhetsanordning
4
Upphängningskrokar
5
Stjärnskruvar
6
Pluggar
7
Vägghållare
Verktyg som krävs för montering:
1 stjärnskruvmejsel
1 måttband
1 borrmaskin
1 borr (8mm diameter)
Page 8

- 6 -
Montering
Det bästa resultatet får man om krokarna sitter
exakt ovanför sadel och styre. Se till att det finns
ett tillräckligt stort avstånd till sidoväggarna.
1. Mät avståndet mellan cykelns sadel och styre.
2. Markera avståndet i taket. Borra hålen med en
borrmaskin och sätt i pluggar.
3. Gör en stadig dubbelknut i änden av nylonlinan och för den genom det bakre takfästet
(se bild 1).
4. Montera båda fästena i taket med medföljande stjärnskruvar och pluggar (se bild 1).
5. Koppla ihop konstruktionen med linan enligt
block/talja-principen. För linan som sitter fast
i takfästet omväxlande genom rullarna
(se bild 3).
6. För linan genom takfästets säkerhetsanordning
(se bild 2).
7. Kontrollera att alla skruvar dragits åt innan du
använder cykellyften.
8. Fäst vägghållaren. Lyft upp cykeln med
cykellyften och markera hållarens position.
9. Kontrollera att alla skruvar sitter ordentligt en
gång till när du monterat vägghållaren.
Info: När du hissar upp eller ner cykeln och
linan glider mellan dina händer bromsas den
upp och stoppas automatiskt av säkerhetsanordningen på grund av den höga hastigheten.
Underhåll
Smörj rullarna regelbundet med fett. Då går det
lättare att hissa upp och ner cykeln.
Kassering
Apparaten får absolut inte kastas bland de vanliga
hushållssoporna.
Lämna in apparaten till ett företag som har tillstånd
att ta hand om den här typen av uttjänta apparater
eller till rätt miljöstation på den kommunala avfallsanläggningen för kassering.
Följ gällande föreskrifter. Kontakta den lokala
avfallshanteringsmyndigheten om du har några
frågor.
Lämna in allt förpackningsmaterial till
miljövänlig återvinning.
Importör
KOMPERNASS GMBH
BURGSTRASSE 21
D-44867 BOCHUM
www.kompernass.com
Service
Kompernass Service Sverige
EA Rosengrensgata 22
42131 Västra Frölunda
Tel.: 031-491080
Fax: 031-497490
e-mail: support.sv@kompernass.com
Kompernass Service Suomi
Petäjäksentie 19
FIN - 26100 Rauma
Tel.: 02 822 28 87
Fax: 010 293 02 63
e-mail: support.fi@kompernass.com
Page 9

- 7 -
CYKELOPHÆNG
KH 4056
Sikkerhedsanvisninger
• Læs betjeningsvejledningen omhyggeligt, før
du bruger liften første gang, og gem den til
senere brug. Giv den videre til modtageren,
hvis du videregiver cykelliften.
• Løft aldrig mere end 20kg med cykelliften.
Ellers bliver cykelliften beskadiget, og cyklen
falder ned.
• Kontrollér, at alle skruer er fastspændt, før du
tager cykelliften i brug.
• Brug altid vægholderen til at sikre cyklen.
Ellers kan cyklen falde ned.
• Ophold dig ikke under en cykel, der er løftet op.
• Brug kun cykelliften til opbevaringsformål, ikke
til ikke-bestemmelsesmæssige formål.
• Udfør ikke reparationer på en cykel, der er
løftet.
• Hvis nylonsnoren er beskadiget, skal du
udskifte den straks. Den kan gå i stykker.
OBS! Sørg for, at nylonsnoren ikke glider for
hurtigt gennem fingrene! Det kan medføre
forbrændinger og hudafskrabninger!
OBS! Cykelliften må ikke anvendes af svage
personer, f.eks. børn. Cyklen kan falde ned
og give personskader.
OBS! Sørg for, at holdekrogene ikke kan glide
af sadlen og styret, når cyklen trækkes op og
sænkes.
Anvendelsesformål
Cykelliften er beregnet til pladsbesparende
opbevaring af cykler, der også er skånsom mod
dækkene. Liften er ikke beregnet til erhvervsmæssig
brug.
Medfølger ved levering
2 loftsholdere
2 holdekroge
1 nylonsnor
1 vægholder til nylonsnoren
10 stjerneskruer med dybel
Beskrivelse af enheden
1
Loftsholder
2
Nylonsnor
3
Sikkerhedsanordning
5
Holdekroge
5
Stjerneskruer
6
Dybler
7
Vægholder
Nødvendigt monteringstilbehør:
1 stjerneskruetrækker
1 målebånd
1 boremaskine
1 bor (8mm diameter)
Page 10

- 8 -
Samling
Det bedste monteringsresultat opnår du, hvis holdekrogene sidder lige over sadlen og styrestangen.
Sørg for tilstrækkelig afstand til væggene.
1. Mål afstanden mellem styret og sadlen på din
cykel.
2. Overfør målet til loftet. Bor hullerne med en
boremaskine, og sæt dyblerne i.
3. Lav en solid dobbeltknude i den ene ende af
nylonsnoren, og før den gennem den bageste
loftsholder (se fig. 1).
4. Fastgør de to loftsholdere i loftet med de medfølgende stjerneskruer og dybler (se fig. 1).
5. Saml konstruktionen med snoren efter taljeprincippet. Før snoren skiftevis gennem rullerne,
idet du begynder med loftsbeslaget (se fig. 3).
6. Før snoren gennem loftsholderens
sikringsanordning (se fig. 2).
7. Kontrollér, at alle skruer er fastspændt, før du
tager cykelliften i brug.
8. Fastgør vægholderen. Det gør du ved at løfte
cyklen med liften og afmærke vægholderens
position.
9. Kontrollér alle skrueforbindelser igen, når
vægholderen er monteret.
Bemærk: Hvis snoren glider gennem dine hænder, mens du trækker cyklen op eller sænker
den ned, udløses bremsen, fordi snoren løber
hurtigt, og snoren stopper automatisk.
Vedligeholdelse
Smør rullerne jævnligt. På denne måde sikrer du
dig, at cykelliften kører let.
Bortskaffelse
Kom under ingen omstændigheder maskinen i det
normale husholdningsaffald.
Bortskaf maskinen hos et godkendt affaldsfirma eller
på dit kommunale affaldsanlæg.
Følg de aktuelt gældende regler. Kontakt affaldsordningen, hvis du er i tvivl.
Sørg for, at alt emballgemateriale
bortskaffes miljøvenligt.
Importør
KOMPERNASS GMBH
BURGSTRASSE 21
D-44867 BOCHUM
www.kompernass.com
Service
Kompernass Service Danmark
H.C. Ørsteds Vej 6
DK-3000 Helsingør
Tel.: 0045 49130072
Fax: 0045 48144846
e-mail: support.dk@kompernass.com
Page 11

- 9 -
SYKKELSTATIV KH4056
Sikkerhetshenvisninger
• Les bruksanvisningen oppmerksomt før første
gangen apparatet brukes og oppbevar den
for senere bruk. Når apparatet gis videre til
andre bør de også få bruksanvisningen.
• Aldri løft mer enn 20kg med sykkelliften.
Sykkelen vil ellers bli skadet og lasten vil
falle ned.
• Kontroller at alle skruene sitter fast før du
bruker sykkelliften.
• Benytt prinsipielt veggholderen for sikre lasten.
Ellers kan lasten falle ned.
• Man bør ikke oppholde seg under svevende
laster.
• Bare benytt sykkelliften for oppbevarting og
ikke for uhensiktsmessig formål.
• Ikke gjennomfør reparasjoner på den
svevende lasten.
• Hvis nylonsnoren er skadet må den byttes ut
omgående. Det kan rives i to.
Obs! Ta vare på at nylonsnoren ikke glir
gjennom hendene for fort. Dette kan medføre
forbrenninger og forårsake skrubbsår!
Obs! Sykkelliften må ikke brukes av svake
personer, f.eks. barn. Sykkelen kan falle ned
og forårsake personskader.
Forsiktig! Sørg for at bæreklørne ikke kan skli
fra setet og styret når du trekker sykkelen opp
eller slipper den ned.
Påregnet bruk
Sykkelliften er ment for plassparende og
dekkskånende oppbevaring av sykler.
Ikke ment for yrkesmessig bruk.
Leveringsomfang
2 Takholdere
2 Festeklør
1 Nylontau
1 Veggholder for nylontauet
10 Stjerneskruer med dyveler
Apparatbeskrivning
1
Takholder
2
Nylonsnor
3
Sikkerhetsinnredning
4
Holdeklør
5
Stjerneskruer
6
Dybler
7
Veggholder
Nødvendig monteringstilbehør:
1 Stjerneskrutrekker
1 Målebånd
1 Boremaskin
1 Borstål (8mm diameter)
Page 12

- 10 -
Montering
Det beste montasjeresultatet oppnåes hvis holdeklørne er festet direkte over setet og styrestangen.
Ta vare på at det er nokk avstand til sideveggene.
1. Mål avstanden mellom styrestangen og setet
på sykkelen.
2. Transferer målet til taket. Bruk boremaskinen
for å bore hullene og stikk inn dyblene.
3. Lag en fast dobbelknute på den ene enden
av nylonlinen og før det gjennom den bakre
takholderen (se bilde 1).
4. Gjør fast begge takholderne under taket med
de medleverte stjerneskruene og dyblene
(se bilde 1).
5. Forbind konstruksjonen med linen ved å følge
taljeprinsippet. Begynnende hos veggholderen,
før tauet gjennom rullene vekselvis (se bilde 3).
6. Før linen gjennom sikringsinnredningen til
takholderen (se bilde 2).
7. Kontroller at alle skruene sitter fast før du
bruker sykkelliften.
8. Gjør fast veggholderen. For dette, løft sykkelen
litt med liften og kjennetegn posisjonen til
veggholderen.
9. Etter monteringen av veggholderen må alle
skrueforbindelsene kontrolleres på nytt.
Henvisning: Hvis linen sklir gjennom hendene
mens sykkelen dras opp eller tas ned vil hastigheten til linen utløse bremsen og linen stoppe
automatisk.
Vedlikehold
Rullene må fettes i regelmessige perioder. Slik kan
det garanteres for at sykkelliften alltid kjører lett.
Fjerning
Må ikke kastes i husholdningsavfallet
Fjern apparatet hos en tillatt fjerningsbedrift eller
det kommunale fjerningsvesenet ditt.
Ta hensyn til de gjeldende forskriftene. Hvis i tvil,
ta kontakt med det ansvarlige fjerningsvesenet.
Kildesorter all emallasje
før du kaster den.
Importør
KOMPERNASS GMBH
BURGSTRASSE 21
D-44867 BOCHUM
www.kompernass.com
Service
Kompernaß Service Norway
Phone: 0047 35 58 35 50
Page 13

- 11 -
УЕФ БНБСФЗУЕУ
РПДЗЛБФПХ
KH 4056
ХрпдеЯоейт буцблеЯбт
• ДйбвЬуфе фзн пдзгЯб чсЮуещт рсйн брь фзн
рсюфз чсЮуз рспуекфйкЬ кбй цхлЬофе фзн гйб
кЬрпйб чсЮуз бсгьфесб. Рбсбдюуфе фп
егчейсЯдйп уе ьрпйпн рбсбдпиеЯ уфз ухнЭчейб
з ухукехЮ.
• Мз узкюнефе ресйууьфесб брь 20 кйлЬ ме фп
бнхшщфйкь рпдзлЬфпх. Бллйют фп бнхшщфйкь
рпдзлЬфпх иб чблЬуей кбй фп цпсфЯп иб рЭуей
кЬфщ.
• ЕлЭгчефе фз уфбиесЮ иЭуз ьлщн фщн вйдюн, рсйн
чсзуймпрпйЮуефе фп бнхшщфйкь рпдзлЬфпх.
• ЧсзуймпрпйеЯфе кхсЯщт фп ухгксб-фзфЮсб
фпЯчпх гйбфзн буцЬлйуз фпх цпсфЯпх. Бллйют
фп цпсфЯп мрпсеЯ нб рЭуей кЬфщ.
• Брбгпсеэефбй з рбсбмпнЮ кЬфщ брь фп
фблбнфехьменп цпсфЯп.
• ЧсзуймпрпйеЯфе фп бнхшщфйкь рпдзлЬфпх мьнп
гйб укпрпэт цэлбозт, ьчй гйб Ьллп укпрь.
• Мз дйеоЬгефе ерйукехЭт уфп фблбнфехьменп
цпсфЯп.
• ЕЬн фп учпйнЯ нЬйлпн Эчей чблЬуей, бллЬофе фп
бмЭущт. МрпсеЯ нб урЬуей.
РспупчЮ!
РспуЭчефе юуфе фп нЬйлпн учпйнЯ нб
мз глйуфсЬ рплэ гсЮгпсб мЭуб брь фб чЭсйб
убт! КЬфй фЭфпйп мрпсеЯ нб пдзгЮуей уе
кбшЯмбфб кбй екдпсЭт!
РспупчЮ!
Ден ерйфсЭрефбй нб гЯнефбй чейсйумьт
брь бдэнбмб Ьфпмб, гйб рбсЬдейгмб брь
рбйдйЬ. Фп рпдЮлбфп мрпсеЯ нб рЭуей кЬфщ кбй
нб рспкблЭуей фсбхмбфйумпэт.
РспупчЮ!
Вевбйюнеуфе ьфй пй бсрЬгет
ухгксЬфзузт ден мрпспэн нб глйуфсЮупхн
брь фз уЭлб кбй фп фймьнй, кбфЬ фп фсЬвзгмб
рспт фб ерЬнщ Ю кбфЬ фп чбмЮлщмб фпх
рпдзлЬфпх.
Укпрьт чсЮузт
Фп бнхшщфйкь рпдзлЬфпх еохрзсефеЯ уфзн
еопйкпнпмзфйкЮ цэлбоз фщн рпдзлЬфщн кбй
уфзн рспуфбуЯб фщн елбуфйкюн фпхт.
Ден рсппсЯжефбй гйб ербггелмбфйкЮ чсЮуз.
Уэнплп брпуфплЮт
2 УхгксбфзфЮсет пспцЮт
2 БсрЬгет ухгксЬфзузт
1 УчпйнЯ нЬйлпн
1 УхгксбфзфЮсбт фпЯчпх гйб фп нЬйлпн учпйнЯ
10 Уфбхсьвйдет ме реЯспхт
РесйгсбцЮ ухукехЮт
1
УхгксбфзфЮсбт пспцЮт
2
УчпйнЯ нЬйлпн
3
ДйЬфбоз буцблеЯбт
4
БсрЬгз ухгксЬфзузт
5
Уфбхсьвйдет
6
РеЯспй
7
УхгксбфзфЮсбт фпЯчпх
БрбсбЯфзфб боеупхЬс
мпнфбсЯумбфпт:
1 КбфубвЯдй ЦЯлйрт
1 ФбйнЯб мЭфсзузт
1 ФсхрЬнй
1 ЕоЬсфзмб дйЬфсзузт (дйЬмефспт 8 чйл.)
Page 14

- 12 -
МпнфЬсйумб
Фп кблэфесп брпфЭлеумб мпнфбсЯумбфпт фп
лбмвЬнефе ьфбн пй бсрЬгет ухгксЬ-фзузт кЬипнфбй
брехиеЯбт рЬнщ брь фз уЭлб кбй фз сЬвдп фймпнйпэ.
РспуЭчефе гйб ербскЮ брьуфбуз рспт фб рлехсйкЬ
фпйчюмбфб.
1. МефсЬфе фзн брьуфбуз мефбоэ фймпнйпэ кбй
уЭлбт уфп рпдЮлбфь убт.
2. МефбцЭсефе фз дйЬуфбуз уфзн пспцЮ. Ме
Энб фсхрЬнй кЬнфе фйт прЭт кбй ейуЬгефе фпхт
реЯспхт мЭуб.
3. Уе Энб Ьксп фпх учпйнйпэ нЬйлпн кЬнфе Энбн
уфбиесь дйрль кьмрп кбй пдзгЮуфе фп учпйнЯ
мЭуб брь фпн рЯущ ухгксбфзфЮсб пспцЮт
(влЭре Брейк.1).
4. Уфесеюуфе кбй фпхт дэп ухгксбфз-фЮсет
пспцЮт ме фйт бреуфблмЭнет уфбхсьвйдет
кбй фпхт реЯспхт кЬфщ брь фзн пспцЮ
(влЭре Брейк. 1).
5. УхндЭуфе фзн кбфбукехЮ ме фп учпйнЯ уэмцщнб
ме фзн бсчЮ фпх рблЬгкпх. ПдзгЮуфе фп
учпйнЯ, рйбумЭнп уфпн ухгксбфзфЮсб пспцЮт,
дйбдпчйкЬ мЭуб брь фпхт фспчпэт
(влЭре Брейк. 3).
6. ПдзгЮуфе фп учпйнЯ мЭуб брь фз дйЬфбоз
буцблеЯбт фпх ухгксбфзфЮсб пспцЮт
(влЭре Брейк. 2).
7. ЕлЭгчефе фз уфбиесЮ иЭуз ьлщн фщн вйдюн, рсйн
чсзуймпрпйЮуефе фп бнхшщфйкь рпдзлЬфпх.
8. Уфесеюуфе фпн ухгксбфзфЮсб фпЯчпх. Гйб бхфь
узкюуфе фп рпдЮлбфп ме фп бнхшщфйкь кбй
узмейюуфе фз иЭуз фпх ухгксбфзфЮсб фпЯчпх.
9. ЕлЭгофе ек нЭпх мефЬ фп мпнфЬсйумб фпх
ухгксбфзфЮсб фпЯчпх ьлет фйт кпчлйюуейт
вйдюн.
Хрьдейоз:
¼фбн фп учпйнЯ убт глйуфсЬ кбфЬ фп
уЮкщмб Ю фзн Ьцеуз фпх рпдзлЬфпх мЭуб брь
фб чЭсйб, мЭущ фзт гсЮгпсзт дйбдспмЮт фпх
учпйнйпэ енесгпрпйеЯфбй фп цсЭнп кбй фп учпйнЯ
уфбмбфЬ бхфьмбфб.
УхнфЮсзуз
ЛйрбЯнефе фпхт фспчпэт бнЬ фбкфЬ чспнйкЬ
дйбуфЮмбфб. ¸фуй еобуцблЯжефбй ьфй фп бнхшщфйкь
рпдзлЬфпх иб лейфпхсгеЯ Ьшпгб.
БрпмЬксхнуз
Уе кбмЯб ресЯрфщуз мзн рефЬоефе фз ухукехЮ уфб
цхуйплпгйкЬ пйкйбкЬ брпссЯммбфб.
Брпмбксэнефе фз ухукехЮ мЭущ мйбт егкексймЭнзт
ерйчеЯсзузт брьссйшзт Ю мЭущ фзт кпйнпфйкЮт
ерйчеЯсзузт брьссйшзт.
РспуЭчефе фйт фсЭчпхует йучэпхует рспдйбгсбцЭт.
Уе ресЯрфщуз бмцйвплйюн елЬфе уе ербцЮ ме фзн
ерйчеЯсзуз брьссйшзт.
Брпмбксэнефе ьлб фб хлйкЬ ухукехбуйюн
цйлйкЬ рспт фп ресйвЬллпн.
ЕйубгщгЭбт
KOMPERNASS GMBH
BURGSTRASSE 21
D-44867 BOCHUM
www.kompernass.com
УЭсвйт
Kompernass Service EллЬдб
Kalothanassi G. Amalia á 10-12 Thiatiron Str.
14231 N.Ionia Athens
Tel.: 210 2790865
Fax: 210 2796982
e-mail: support.gr@kompernass.com
Page 15

- 13 -
FAHRRADAUFHÄNGUNG
KH 4056
Sicherheitshinweise
• Lesen Sie die Bedienungsanleitung vor der
ersten Verwendung aufmerksam durch und
heben Sie diese für den späteren Gebrauch
auf. Händigen Sie bei Weitergabe des
Gerätes an Dritte auch die Anleitung aus.
• Heben Sie nie mehr als 20kg mit dem Fahrrad
Lift. Der Fahrrad Lift wird sonst beschädigt und
die Last fällt herunter.
• Überprüfen Sie den festen Sitz aller Schrauben,
bevor Sie den Fahrrad Lift benutzen.
• Nutzen Sie grundsätzlich den Wandhalter zum
Sichern der Last. Die Last könnte sonst herunter
fallen.
• Halten Sie sich nicht unter der schwebenden
Last auf.
• Nutzen Sie den Fahrrad Lift nur zu Aufbewahrungszwecken, nicht zweckentfremdet.
• Führen Sie keine Reparaturen an der
schwebenden Last durch.
• Sollte das Nylonseil beschädigt sein, tauschen
Sie es umgehend aus. Es kann reißen.
Achtung! Achten Sie darauf, dass das Nylonseil nicht zu schnell durch Ihre Hände rutscht!
Das kann zu Verbrennungen und Schürfwunden führen!
Achtung! Der Fahrrad Lift darf nicht von
schwachen Personen, zum Beispiel Kindern,
bedient werden. Das Fahrrad könnte herunterfallen und Verletzungen hervorrufen.
Achtung! Vergewissern Sie sich, dass die Haltekrallen beim Heraufziehen oder Herablassen
des Fahrrads nicht von Sattel und Lenker
rutschen können.
Verwendungszweck
Der Fahrrad Lift dient dem platzsparenden und
reifenschonenden Aufbewahren von Fahrrädern.
Nicht für den gewerblichen Gebrauch bestimmt.
Lieferumfang
2 Deckenhalter
2 Haltekrallen
1 Nylonseil
1 Wandhalter für das Nylonseil
10 Kreuzschlitzschrauben mit Dübel
Gerätebeschreibung
1
Deckenhalter
2
Nylonseil
3
Sicherheitsvorrichtung
4
Haltekrallen
5
Kreuzschlitzschrauben
6
Dübel
7
Wandhalter
Benötigtes Montagezubehör:
1 Kreuzschlitzschraubendreher
1 Maßband
1 Bohrmaschine
1 Bohrer (8mm Durchmesser)
Page 16

- 14 -
Montage
Das beste Montageergebnis erhalten Sie, wenn
die Haltekrallen direkt über Sattel und Lenkstange
sitzen. Achten Sie auf genügend Abstand zu den
Seitenwänden.
1. Messen Sie den Abstand zwischen Lenker und
Sattel an Ihrem Fahrrad.
2. Übertragen Sie das Maß auf die Decke. Bohren Sie mit einer Bohrmaschine die Löcher und
stecken Sie die Dübel hinein.
3. Machen Sie an einem Ende des Nylonseils einen
stabilen Doppelknoten und führen Sie es durch
den hinteren Deckenhalter (siehe Abb. 1).
4. Befestigen Sie beide Deckenhalter mit den
mitgelieferten Kreuzschlitzschrauben und
Dübeln unter der Decke (siehe Abb. 1).
5. Verbinden Sie die Konstruktion mit dem Seil
nach dem Flaschenzugprinzip. Führen Sie das
Seil, am Deckenhalter angefangen, abwechselnd durch die Rollen (siehe Abb. 3).
6. Führen Sie das Seil durch die Sicherungsvorrichtung des Deckenhalters (siehe Abb. 2).
7. Überprüfen Sie den festen Sitz aller Schrauben, bevor Sie den Fahrrad Lift benutzen.
8. Befestigen Sie den Wandhalter. Heben Sie
dazu das Fahrrad mit dem Lift an und markieren Sie sich die Position des Wandhalters.
9. Überprüfen Sie nach Montage des Wandhalters erneut alle Schraubverbindungen.
Hinweis: Wenn Ihnen das Seil beim Heraufziehen oder Herablassen des Fahrrades durch
die Hände rutscht, wird durch den schnellen
Durchlauf des Seiles die Bremse ausgelöst und
das Seil stoppt automatisch.
Instandhaltung
Fetten Sie die Rollen in regelmäßigen Abständen.
So ist gewährleistet, dass der Fahrrad Lift leichtgängig läuft.
Entsorgen
Werfen Sie das Gerät keinesfalls in den normalen
Hausmüll.
Entsorgen Sie das Gerät über einen zugelassenen
Entsorgungsbetrieb oder über Ihre kommunale Entsorgungseinrichtung. Beachten Sie die aktuell geltenden Vorschriften. Setzen Sie sich im Zweifelsfall
mit Ihrer Entsorgungseinrichtung in Verbindung.
Führen Sie alle Verpackungsmaterialien
einer umweltgerechten Entsorgung zu.
Importeur
KOMPERNASS GMBH
BURGSTRASSE 21
D-44867 BOCHUM
www.kompernass.com
Service
Schraven
Service- und Dienstleistungs GmbH
Gewerbering 14
D-47623 Kevelaer
Tel.: +49 (0) 180 5 008107
(14 Ct/Min. aus dem dt. Festnetz)
Fax: +49 (0) 2832 3532
e-mail: support.de@kompernass.com
 Loading...