

Page 1

KOMPERNASS GMBH · BURGSTRASSE 21 · D-44867 BOCHUM
www.kompernass.com
ID-Nr.: KH1156-04/08-V1
DIGITAL BALANZA DE COCINA
Instrucciones de uso
BILANCIA DA CUCINA DIGITALE
Istruzioni per l'uso
DIGITAL KITCHEN SCALE
Operating instructions
5
DIGITAL BALANZA DE COCINA
BILANCIA DA CUCINA DIGITALE
DIGITALE KÜCHENWAAGE
Bedienungsanleitung
KH 1156
CV_KH1156_AV4136_LB5.qxd 14.04.2008 12:21 Uhr Seite 1
Page 2
KH 1156
q
w
e
r
t
y
u
CV_KH1156_AV4136_LB5.qxd 14.04.2008 12:21 Uhr Seite 4
Page 3
- 1 -
ÍNDICE PÁGINA
Uso previsto 2
Datos técnicos 2
Indicaciones de seguridad 2
Descripción 2
Elementos de mando 3
Volumen de suministro 3
Manejo 3
Introducir las pilas 3
Pesar 3
Adición al producto que se pesa (función de taraje) 4
Retirar el producto que se pesa 4
Ajustar el temporizador 4
Indicación de temperatura 4
Desconectar la balanza 4
Eliminación de fallos 4
Limpieza 5
Evacuación 5
Garantía y asistencia técnica 5
Importador 6
Lea atentamente este manual de instrucciones antes del primer uso y consérvelo para posteriores utilizaciones. Entréguelas en caso de traspasar el aparato a terceros.
Page 4
- 2 -
BALANZA DE COCINA
DIGITAL KH 1156
Uso previsto
La balanza de cocina Bifinett KH 1156 sirve para
pesar sustancias sólidas y líquidos no corrosivos,
agresivos o abrasivos, en servicios domésticos privados. No se considera conforme al previsto el
pesaje de medicamentos o sustancias no
autorizadas.
Datos técnicos
Rango de pesaje: 1g - 5000g, en pasos de 1
Indicación de
temperatura: 0°C - 40°C, en
pasos de 0,5°C; con ± 2°C
tolerancia
Alimentación de
corriente: 2 pilas de litio CR 2032
Indicaciones de seguridad
¡Atención!
Siga exactamente las siguientes indicaciones de seguridad. La no observancia de las mismas, puede
dañar la balanza y pueden anularse los derechos
de garantía.
• No permita utilizar el aparato a personas (inclui-
dos los niños) cuyas facultades físicas, sensoriales o mentales, así como su falta de conocimientos o de experiencia, les impida hacer un uso
seguro del mismo si no están bajo vigilancia o
han sido instruidos correctamente.
• Explique el aparato y los peligros derivados del
mismo a los niños para que no jueguen con él.
• Al introducir las pilas tenga en cuenta la polaridad correcta y no aplique demasiada fuerza al
hacerlo.
• Extraiga las pilas si no utiliza la balanza durante
mucho tiempo.
• Cambie a tiempo las pilas gastadas.
• No coloque más de 5 kg sobre la balanza.
• Asegúrese de que no entre ningún líquido en la
balanza.
• Evite el contacto con disolventes y con
productos de limpieza corrosivos o abrasivos.
• Coloque la balanza únicamente sobre una
superficie plana y sólida.
• No coloque nada sobre la pantalla.
• No presione las teclas con fuerza o con objetos
puntiagudos.
• No exponga la balanza a altas temperaturas o
a campos magnéticos.
• Evite carga o descarga electrostática. De otro
modo puede provocar indicaciones erróneas o
bien la desconexión repentina de la balanza.
Descripción
La balanza de cocina Bifinett KH 1156 va equipada con:
• Automatismo de desconexión,
• Funcionamiento de taraje
(posicionamiento o cero de la indicación),
• Indicación de sobrecarga,
• Indicación del estado de carga de la pila,
• Indicación de temperatura,
• Temporizador de cuenta atrás
(hasta 99 minutos)
• Conmutación gramos/onzas.
Page 5
- 3 -
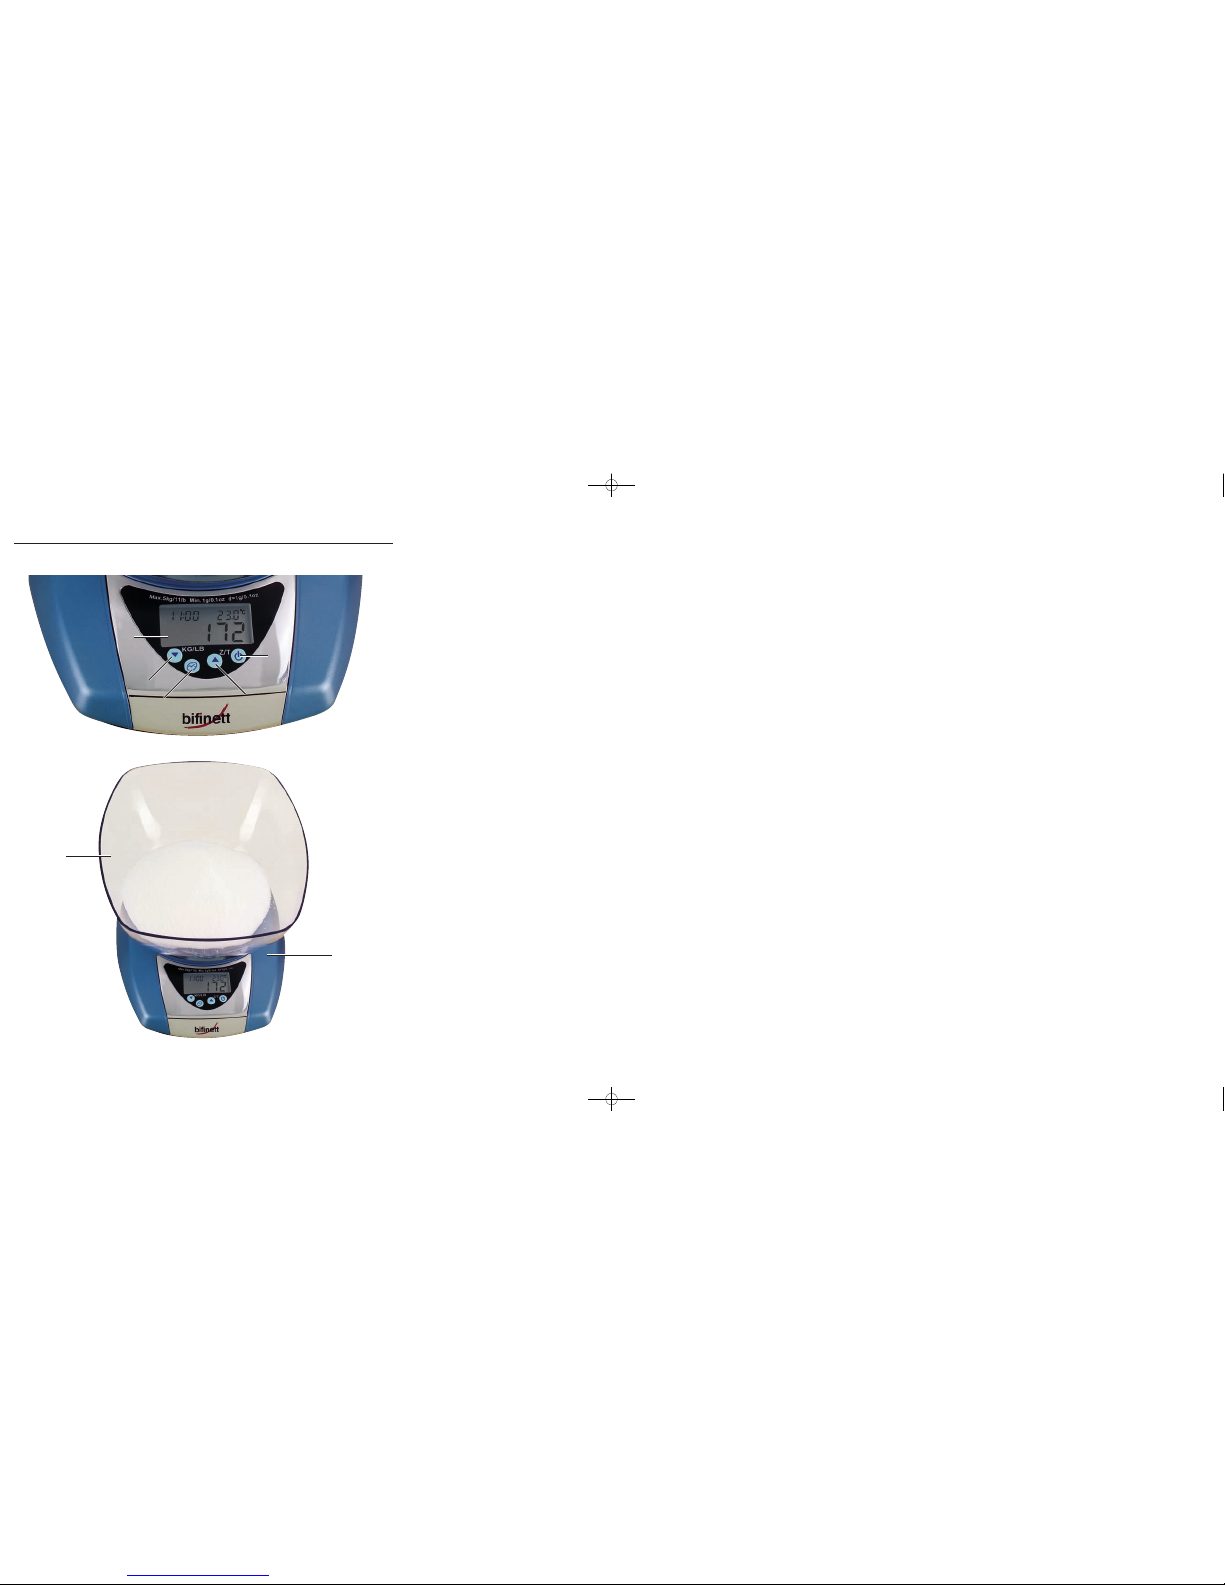
Elementos de mando
q
Tecla encendido/apagado
w
Tecla C/T (CERO/TARA)
e
Tecla reloj
r
Tecla KG/LB, (conmutador gramos/onzas)
t
Pantalla
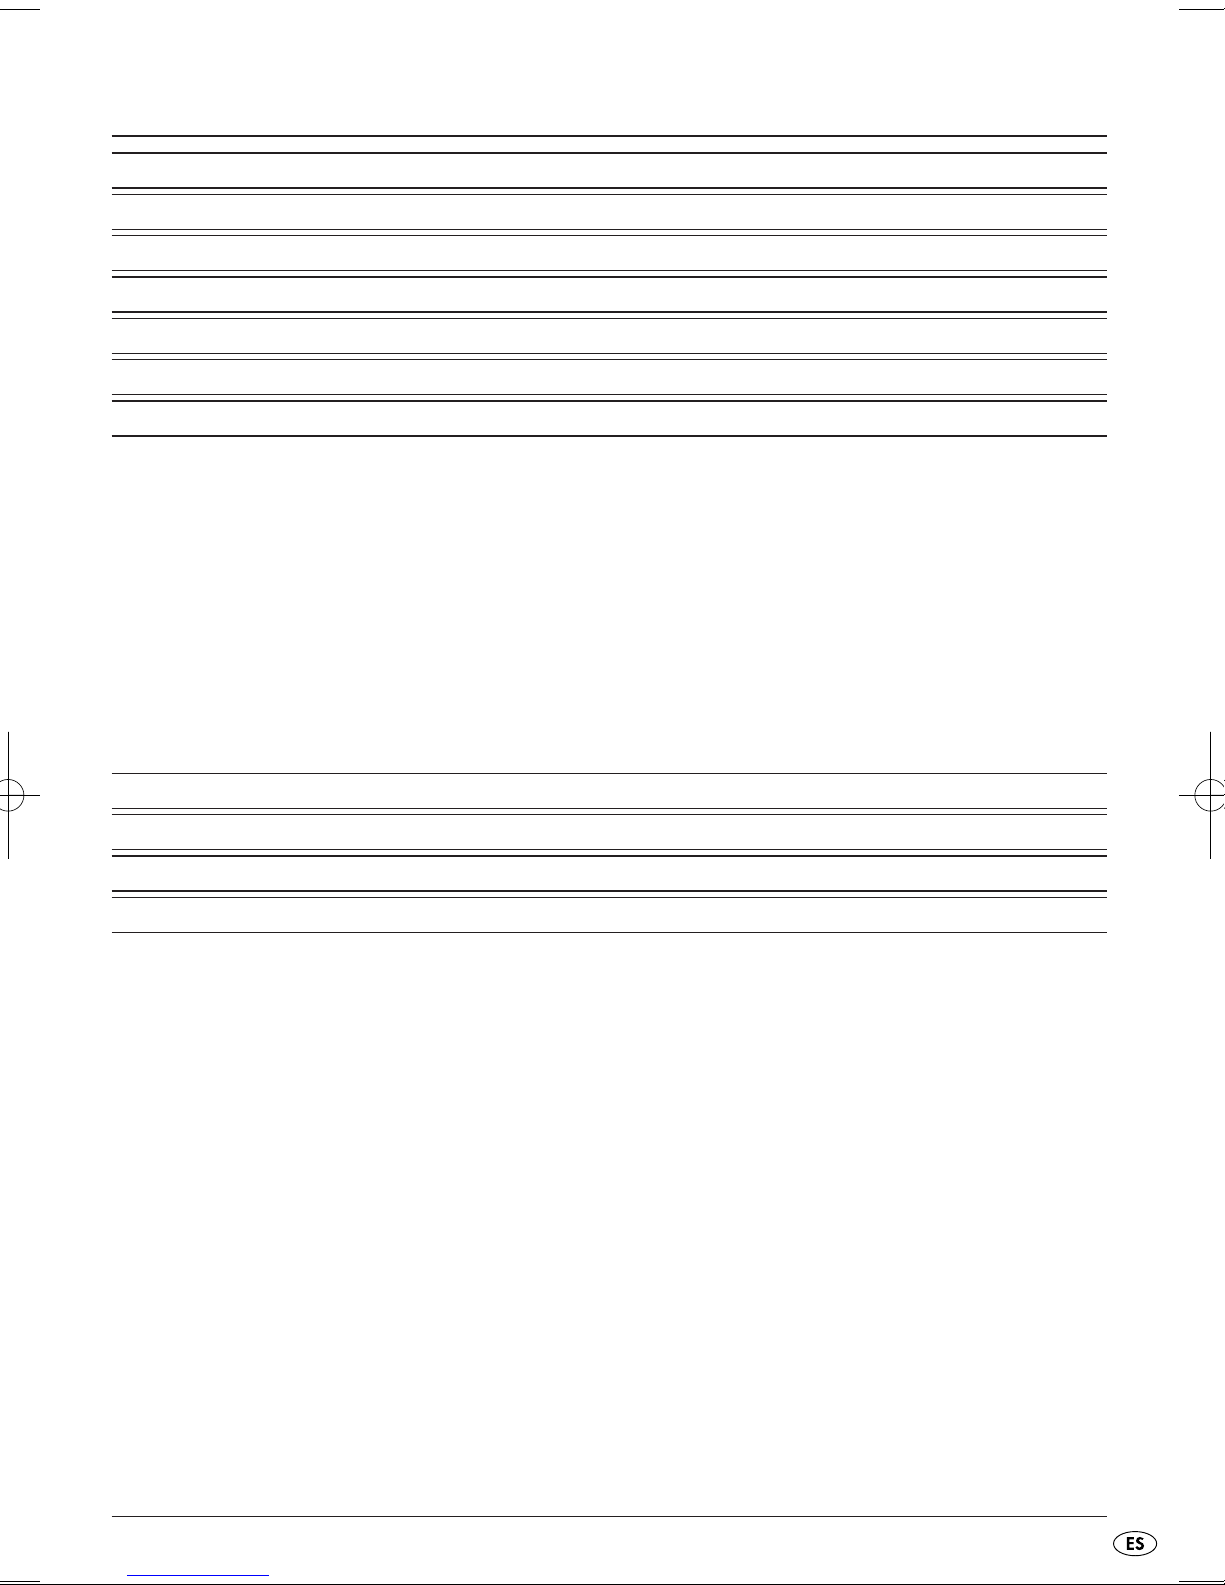
Volumen de suministro
• Balanza de cocina Bifinett KH 1156
y
• Fuente
u
• 2 pilas de litio CR 2032
• Instrucciones de uso
Manejo
Introducir las pilas
Las pilas ya vienen insertadas con el suministro.
Retire a continuación las tiras de plástico del soporte de las pilas en la tapa del compartimiento de
pilas. Si desea cambiar las pilas proceda del modo
siguiente:
• Abra la tapa de compartimiento de pilas del
lado inferior de la báscula.
• Retiere las pilas usadas del soporte de pilas en
la tapa de compartimiento de pilas.
• Inserte dos pilas de litio CR 2032 superpuestas
en el soporte de pilas. Asegurese de que los
lados marcados con + se encuentren en la parte
superior.
• Cierre la tapa del compartimiento de pilas hasta
que encastre.
Peligro de toxicidad!
Los niños pueden tragarse las pilas, provocando
perjuicios para su salud. Guarde las pilas fuera del
alcance de los niños.
¡Advertencia!
Al cambiar las pilas tenga en cuenta la polaridad
correcta. Si se cambian las pilas de forma
inadecuada existe peligro de explosión. Cambie
las pilas únicamente por otras de tipo idéntico o
equivalentes.
Pesar
Si enciende la balanza y luego coloca la
fuente
u
sobre el platillo de la balanza, se
indicará el peso de la fuente.
• Si coloca la fuente sobre la balanza y luego
enciende la balanza, no se indicará el peso de
la fuente.
• Si la pantalla
t
no indica automáticamente “0“
pulse una vez la tecla C/T
w
‚
³ Coloque la fuente sobre el platillo de la
balanza.
³ Pulse la tecla encendido/apagado
q
para
encender la balanza.
³ Ajuste la unidad deseada (gramos/onzas). Para
ello pulse la tecla KG/LB
r
.
Se puede elegir entre el sistema métrico y el
angloamericano. La unidad ajustada aparece
bajo la indicación de peso en la pantalla. De
0g a 999g se muestra la unidad en g/on y a
partir de 999g en KG/LB y g/on.
La balanza muestra el peso “0“.
³ Introduzca en la fuente el producto que quiere
pesar.
En la pantalla se muestra el peso.
Si quiere cambiar la indicación entre gramos y
onzas, pulse la tecla KG/LB
r
.
Page 6
- 4 -
Adición al producto que se pesa
(función de taraje)
Para la adición de otras cantidades parciales,
puede poner la balanza a 0.
³ Para ello pulse una vez la tecla C/T w.
La balanza muestra de nuevo 0.
³ Introduzca en la fuente el productor que quiere
pesar.
En la pantalla se indica el peso del producto
añadido.
Puede repetir varias veces este paso. Sin em-
bargo no deberá colocar sobre la balanza
ningún peso que supere los 5 kg.
Retirar el producto que se pesa
³ Pulse una vez la tecla C/T w. La balanza mue-
stra de nuevo 0 gramos.
³ Extraiga la cantidad del producto deseada.
La indicación de peso del producto a pesar retirado aparece como valor negativo en la pantalla.
Puede repetir varias veces este paso.
Ajustar el temporizador
El temporizador le permite ajustar un lapso de tiempo, después del cual suena una señal de aviso. El
tiempo ajustado transcurre como una cuenta atrás.
³ Pulse una vez la tecla reloj
e
. En la parte super-
ior izquierda de la pantalla
t
aparece una
campana junto al reloj.
³ Ajuste el tiempo deseado con las teclas C/T
w
o KG/LB r.
Puede ajustar el tiempo en pasos de 10 segundos.
Si mantiene pulsadas las teclas C/T wo KG/LB
r
los números pasan más rápido.
³ Pulse la tecla reloj
e
para iniciar la medición
de tiempo.
Usted puede detener el temporizador
³ Pulse una vez la tecla reloj
e
para detener el
temporizador.
Usted puede reposicionar el temporizador
³ Pulse dos veces la tecla reloj
e
para reposicio-
nar el temporizador.
Si ha transcurrido el tiempo ajustado, suena una señal de aviso durante 60 segundos. Puede desconectar esta señal de aviso pulsando la tecla encendido/apagado
q
.
Indicación de temperatura
Si la balanza está encendida, se muestra la temperatura en °C en la parte superior derecha de la
pantalla
t
.
Desconectar la balanza
Si durante 90 segundos aprox. no pesa nada, el
automatismo de apagado, desconecta la balanza.
³ Para apagarla manualmente pulse la tecla en-
cendido/apagado
q
.
Eliminación de fallos
³ Si la pantalla tmuestra “Err“, la balanza está
sobrecargada. Retire el producto a pesar. È No
coloque sobre la balanza ningún peso que
supere los 5 kg.
³ Si la pantalla muestra brevemente “Err“ y la
balanza no puede mantenerse encendida, la
balanza está sobrecargada. Retire el producto a
pesar de la balanza y conecte la balanza de
nuevo. Coloque menos de 5 kg sobre la balanza.
³ Si la balanza no funcionase como debe, cambie
las pilas. Si con ello no se ha solucionado la
función de fallos, contacte con el fabricante.
³ Si en la pantalla aparece “LO“ las pilas están
gastadas. Cambie las pilas.
Page 7
- 5 -
Limpieza
¡Atención!
Asegúrese de que no entre ningún líquido en la
balanza. Los líquidos que penetran pueden destruir
la balanza.
Limpie la balanza con un paño ligeramente húmedo en solución jabonosa suave. No utilice ningún
disolvente abrasivo. Puede limpiar la fuente en el
lavavajillas. La fuente es apta para lavavajillas.
Evacuación
En ningún caso deberá tirar el aparato
a la basura doméstica. Este producto
está sometido a la directiva europea
2002/96/EC.
Elimine el aparato a través de una empresa de
evacuación de basuras autorizada o por medio del
centro de evacuación de basuras municipal.
Tenga en cuenta las normativas actuales en vigor.
En caso de duda póngase en contacto con el
centro de evacuación de basuras.
¡Evacuación de las pilas!
Las pilas no deben evacuarse en la basura doméstica. Cada usuario está obligado por ley de evacuar
o entregar las/os pilas/acumuladores
en un centro de recogida de su ayuntamiento/
barrio o en el comercio. Esta obligación tiene el
objetivo de que las pilas puedan eliminarse de forma ecológica. Devuelva las pilas/acumula-dores
sólo en estado sin carga.
El material de embalaje debe desecharse
de forma respetuosa con el medio
ambiente.
Garantía y asistencia técnica
Con este aparato recibe usted 3 años de garantía
desde la fecha de compra. El aparato ha sido fabricado cuidadosamente y ha sido probado antes de
su entrega. Guarde el comprobante de caja como
justificante de compra. Si necesitara hacer uso de
la garantía, póngase en contacto por teléfono con
su punto de servicio habitual. Éste es el único modo
de garantizar un envío gratuito.
La garantía cubre los defectos de fabricación o del
material, pero no las piezas sujetas a desgaste y
los daños sufridos por las piezas frágiles (p. ej. el
inte-rruptor o las pilas). El producto ha sido diseñado únicamente para el uso privado y no para el
uso comercial. En caso de manipulación indebida e
incorrecta, uso de la fuerza y en caso de abrir el
aparato personas extrañas a nuestros centros de
asistencia técnica autorizados, la garantía pierde
su validez. Esta ga-rantía no reduce en forma alguna
sus derechos legales.
Kompernass Service España
C/Invención 7
Polígono Industrial Los Olivos
28906 Getafe – Madrid
Tel.: 902/430758
Fax: 91/6652551
e-mail: support.es@kompernass.com
Page 8

- 6 -
Importador
KOMPERNASS GMBH
BURGSTRASSE 21
D-44867 BOCHUM
www.kompernass.com
Page 9

- 7 -
INDICE PAGINA
Destinazione d'uso 8
Dati tecnici 8
Avvertenze di sicurezza 8
Descrizione 8
Elementi di comando 8
Fornitura 9
Funzionamento 9
Inserimento delle pile 9
Pesatura 9
Pesare il prodotto (funzione taratura) 9
Rimuovere il prodotto pesato 10
Impostazione Timer 10
Visualizzazione della temperatura 10
Disattivazione della bilancia 10
Soluzioni in caso di malfunzionamenti 10
Pulizia 10
Smaltimento 11
Garanzia e assistenza 11
Importatore 12
Leggere attentamente le istruzioni per l'uso prima del primo utilizzo e conservarle per il successivo impiego.
In caso di cessione dell'apparecchio a terzi, consegnare anche le istruzioni.
Page 10

- 8 -
BILANCIA DIGITALE DA
CUCINA KH 1156
Destinazione d'uso
La bilancia da cucina Bifinett KH 1156 serve per la
pesatura di sostanze liquide e solide non corrosive,
aggressive o abrasive in ambienti domestici privati.
La pesatura di medicinali e sostanze illegali non è
conforme alla destinazione d'uso.
Dati tecnici
Range di pesatura:1g - 5000g,
in passi da 1 grammo
Indicatore di
temperatura: 0°C - 40°C, in passi da 0,5°C;
con ± 2°C di tolleranza
Alimentazione : 2 x CR 2032 pile al litio
Avvertenze di sicurezza
Attenzione!
Seguire scrupolosamente le seguenti avvertenze di
sicurezza. La mancata osservanza può causare
danni alla bilancia e l'annullamento della garanzia.
• Impedire l'uso dell'apparecchio a persone (inclu-
si bambini) che per motivi di natura fisica, sensoriale o mentale, o a causa della scarsa esperienza e conoscenza non possono utilizzare
l'apparecchio in sicurezza senza controllo o senza essere stati prima istruiti in merito.
• Spiegare ai bambini il funzionamento dell'appa-
recchio e i suoi pericoli per impedire che lo usino come un giocattolo.
• Nell'inserire le pile, fare attenzione alla polarità
corretta e non esercitare una pressione eccessiva.
• Rimuovere le pile se si prevede di non utilizzare
la bilancia per un periodo di tempo prolungato.
• Sostituire per tempo le pile usate.
• Non collocare sulla bilancia più di 5 kg di peso.
• Impedire la penetrazione di liquidi nella
bilancia.
• Evitare il contatto con solventi e detergenti
corrosivi o abrasivi.
• Collocare la bilancia solo su un piano
orizzontale e stabile.
• Non collocare alcunché sul display.
• Non premere i tasti con violenza o con oggetti
acuminati.
• Non esporre la bilancia a temperature eccessive
o a campi magnetici.
• Evitare cariche elettrostatiche. Esse possono
dare luogo a indicazioni errate o a un
improvviso spegnimento della bilancia.
Descrizione
a bilancia da cucina Bifinett KH 1156 è dotata di:
• Spegnimento automatico,
• Funzione di taratura
(azzeramento dell'indicatore),
• Indicatore di peso eccessivo,
• Indicatore dello stato di carica delle pile,
• Indicatore di temperatura,
• Timer di conto alla rovescia (fino a 99 minuti)
• Conversione grammi/once.
Elementi di comando
q
Tasto on/off
w
Tasto Z/T (ZERO/TARA)
e
Tasto ora
r
Tasto KG/LB, (convertitore grammi/once)
t
Display
Page 11

- 9 -
Fornitura
• Bilancia da cucina Bifinett KH 1156
y
• Recipiente
u
• 2 x CR 2032 pile al litio
• Istruzioni per l'uso
Funzionamento
Inserimento delle pile
Le pile sono già inserite al momento della consegna. Rimuovere la striscia in plastica dal supporto
delle pile nel coperchio del vano pile. Se si devono
sostituire le pile, procedere come segue:
• aprire il coperchio del vano pile sul retro della
bilancia.
• rimuovere le pile usate dal supporto pile nel
coperchio del vano pile.
• collocare due pile al litio CR 2032 sovrapposte
nel supporto pile. Assicurarsi che il lato contrassegnato dal segno + sia rivolto verso l'alto.
• chiudere il coperchio del vano pile fino all'inserimento.
Pericolo di avvelenamento!
Le pile potrebbero essere ingoiate dai bambini, provocando danni alla salute. Tenere le pile fuori dalla
portata dei bambini.
Avvertenza!
Fare attenzione alla corretta polarità delle pile, all'atto della loro sostituzione. L'errata sostituzione delle pile implica il rischio di esplosione. Sostituire le
pile solo con altre pile identiche o dello stesso tipo.
Pesatura
Accendendo la bilancia e posizio-nando il reci-
piente
u
sul piatto della bilancia, viene visua-
lizzato il peso del recipiente.
• Posizionando il recipiente sul piatto della bilancia e accendendo quindi la bilancia, il peso del
recipiente non viene visualizzato.
• Se il display
t
non visualizza automaticamente
lo „0“, premere una volta il tasto Z/T
w
‚
³ Posizionare il recipiente sul piatto della bilancia.
³ Premere il tasto on/off q, per accendere la bi-
lancia.
³ Impostare l'unità desiderata (grammi/once).
Premere a tal fine il tasto KG/LB
r
.
Si può scegliere fra il sistema metrico e quello
angloamericano. L'unità impostata compare
nel display sotto la visualizzazione del peso.
Da 0 g-999 g l'unità viene visualizzata in g/oz
e da 999 g in KG/LB e g/oz.
La bilancia visualizza il peso „0“.
³ Collocare la merce da pesare nel recipiente.
Sul display viene visualizzato il peso.
Se si vuole passare dalla visualizzazione in
grammi a quella in once o viceversa, premere
il tasto KG/LB
r
.
Pesare il prodotto (funzione taratura)
Per pesare altre quantità parziali è possibile
posizionare la bilancia su 0.
³ A tal fine, premere una volta il tasto Z/T w. La
bilancia indica nuovamente 0 grammi.
³ Collocare la merce da pesare nel recipiente.
Nel display viene visualizzato il peso del prodotto.
Questa fase può essere ripetuta più volte. Non
collocare comunque mai più di 5 kg sulla bilancia.
Page 12

- 10 -
Rimuovere il prodotto pesato
³ Premere per una volta il tasto Z/T w.
La bilancia indica nuovamente 0 grammi.
³ Prelevare la quantità desiderata di prodotto da
pesare.
Il peso del prodotto pesato rimosso sarà visualizzato sul display come valore negativo.
Questa fase può essere ripetuta più volte.
Impostazione Timer
Il timer permette di impostare un periodo di tempo
allo scadere del quale viene emesso un segnale
acustico. Il tempo impostato scorre a ritroso.
³ Premere una volta il tasto dell'ora
e
.
Nel display
t
in alto a sinistra compare il
simbolo della campana accanto all'ora.
³ Con i tasti Z/T
w
o KG/LB rimpostare il
tempo desiderato.
Il tempo può essere impostato a passi da 10 secondi. Tenendo premuto il tasto Z/T
w
o KG/LB r, i
numeri scorrono più rapidamente.
³ Premere il tasto dell'ora e, per avviare la
misurazione del tempo.
Il timer può essere arrestato.
³ Premere una volta il tasto dell'ora
e
, per
arrestare il timer.
Il timer può essere azzerato.
³ Premere due volte il tasto dell'ora
e
, per
riavviare il timer.
Alla scadenza del tempo impostato, viene emesso
un segnale acustico per 60 secondi. Questo segnale acustico può essere disattivato tramite pressione
del tasto on/off
q
.
Visualizzazione della temperatura
Con la bilancia accesa, il display tmostra la temperatura in °C in alto a destra.
Disattivazione della bilancia
Se non viene pesato nulla per ca. 90 secondi, il dispositivo di arresto automatico spegne la bilancia.
³ Premere il tasto on/off q, per spe-gnere manu-
almente la bilancia.
Soluzioni in caso di malfunzionamenti
³ Se il display tmostra il messaggio „Err“, signifi-
ca che la bilancia è so-vraccarica. Rimuovere il
prodotto da pesare. Non pesare mai più di 5 kg
sulla bilancia.
³ Se il display mostra brevemente il messaggio
„Err“ e la bilancia non si accende, significa che
la bilancia è sovraccarica. Rimuovere il prodotto
da pesare dalla bilancia e riaccendere la bilancia. Posizionare meno di 5 kg sulla bilancia.
³ Se la bilancia non funziona come dovrebbe,
sostituire le pile. Se ciò nonostante la bilancia
continuasse a non funzionare perfettamente,
contattare il produttore.
³ Se il display visualizza il messaggo „LO“, signifi-
ca che le pile sono scariche. Sostituire le pile.
Pulizia
Attenzione!
Impedire la penetrazione di liquidi nella bilancia. I
liquidi infiltrati potrebbero danneggiare la bilancia.
Pulire la bilancia con un panno leggermente inumidito con soluzione detergente delicata. Non utilizzare abrasivi o solventi. È possibile lavare il recipiente in lavastoviglie. Il recipiente è idoneo
al lavaggio in lavastoviglie.
Page 13

- 11 -
Smaltimento
Non gettare per alcun motivo l’apparecchio insieme ai normali rifiuti
domestici. Questo prodotto sottostà
alla direttiva europea 2002/96/EC.
Smaltire l’apparecchio presso un’azienda autorizzata o presso l’ente comunale di smaltimento.
Rispettare le norme attualmente in vigore. In caso di
dubbi, contattare l’azienda di smaltimento
competente.
Pile
Non gettare assolutamente le pile insieme ai normali rifiuti domestici.
Le pile possono contenere sostanze tossiche dannose per l'ambiente. Smaltire pertanto le pile unicamente in conformità alle leggi vigenti.
Smaltire tutti i materiali d’imballo in conformità alle norme per il rispetto dell’ambiente
Garanzia e assistenza
Questo apparecchio è garantito per tre anni a partire dalla data di acquisto. L'apparecchio è stato
prodotto con cura e debitamente collaudato prima
della consegna. Conservare lo scontrino come prova
d'acquisto. Nei casi contemplati dalla garanzia, mettersi in comunicazione telefonicamente con il centro
di as-sistenza più vicino. Solo in questo modo è possibile garantire una spedizione gratuita della merce.
La prestazione della garanzia vale solo per difetti
del materiale o di fabbricazione. Il prodotto è destinato esclusivamente all'uso domestico e non a quello commerciale. La garanzia decade in caso di impiego improprio o manomissione, uso della forza e
interventi non eseguiti dalla nostra filiale di assistenza
autorizzata. Questa garanzia non costituisce alcun
limite ai diritti legali del consumatore.
Kompernass Service Italia
Corso Lino Zanussi 11
33080 Porcia (PN)
Tel.: 0434/550833
Fax: 0434/550833
e-mail: support.it@kompernass.com
Page 14

- 12 -
Importatore
KOMPERNASS GMBH
BURGSTRASSE 21
D-44867 BOCHUM
www.kompernass.com
Page 15

- 13 -
CONTENT PAGE
Intended use 14
Technical Data 14
Safety Instructions 14
Description 14
Operating Elements 14
Package Contents 15
Operation 15
Inserting the batteries 15
Weighing 15
Adding & Weighing (Tare Function) 15
Removing Weighed Items 16
Setting the Timer 16
Temperature Display 16
Switching the scale off 16
Troubleshooting 16
Cleaning 16
Disposal 17
Warranty & Service 17
Importer 18
Read the operating instructions carefully before using the appliance for the first time and preserve this booklet for later reference. Pass the manual on to whomsoever might acquire the scale at a later date.
Page 16

- 14 -
DIGITAL KITCHEN SCALE
KH 1156
Intended use
The kitchen scale Bifinett KH 1156 is intended for
use in private households to weigh fluids and solids
that are not corrosive, aggressive or abrasive. The
weighing of medications and non-permitted materials is considered to be improper use.
Technical Data
Weighing Range: 0,1 oz-11 lb,
in 0,1 oz steps
Temperature Display: 0°C - 40°C, in
0,5°C steps; with a
tolerance of ± 2°C
Power Supply: 2 x CR 2032 Lithium
batteries
Safety Instructions
Attention!
Observe the following safety instructions exactly.
Failure to comply with them can damage the scale
and possibly nullify your claims under the warranty
provisions.
• Do not allow individuals (including children) to
use the appliance whose physical, sensorial or
mental abilities or lack of experience and knowledge hinder their safe usage of it if they have
not previously been supervised or instructed in its
correct usage.
• Tell children about the appliance and its potential dangers so that they do not play with it.
• Ensure that the batteries are inserted with the
correct polarity and do not apply excessive force when inserting them.
• Remove the batteries if you do not use the scale
for an extended period.
• Replace used batteries in good time.
• Never place more than 11 lb on the scale.
• Ensure that no fluids can enter the scale.
• Avoid contact with solvents and with corrosive or
abrasive cleaning materials.
• Only use the scale on level and firm surfaces.
• Do not place anything on the display.
• Do not press on the buttons with excessive force
or sharp objects.
• Do not subject the scale to high temperatures or
powerful magnetic fields.
• Avoid electrostatic charging and discharging.
These can cause erroneous displays and/or the
sudden deactivation of the scales.
Description
The Bifinett KH 1156 is equipped with:
• Automatic switch-out,
• Tare function (returning the display to zero),
• Overload indicator,
• Battery charge indicator,
• Temperature display,
• Count-Down Timer (up to 99 minutes)
• Switching between grammes/ounces.
Operating Elements
q
On/Off Button
w
Z/T-Button (ZERO/TARA)
e
Time-Button
r
KG/LB-Button (gramme/ounces-switch)
t
Display
Page 17

- 15 -
Package Contents
• Bifinett KH 1156 kitchen scale
y
•Bowl
u
• 2 x CR 2032 Lithium batteries
• Instructions for use
Operation
Inserting the batteries
The batteries are already installed before delivery.
You only need to remove the plastic strip from the
battery holder in the lid of the battery compartment.
When you want to change the batteries proceed as
follows:
• Open the battery compartment lid on the bottom
of the scales.
• Remove the old batteries from the battery holder
in the battery compartment lid.
• Place two CR 2032 Lithium batteries on top of
each other into the battery holder. Make sure
that the side marked with a + sign is facing
upwards.
• Close the battery compartment lid so that it locks
into place.
Poison Hazard!
Batteries can be swallowed by children and cause
impairment of health. Keep batteries out of the reach of children.
Warning!
Pay attention to the correct polarity when exchanging batteries. Incorrect battery exchange could
lead to the danger of an explosion Only exchange
batteries for identical or equivalent types.
Weighing
If you switch the scale on and then place the
bowl
u
on the weighing plate, the weight of
the bowl will be shown.
• If you place the bowl on the scale and then
switch the scale on, the weight of the bowl is not
shown.
• If the display
t
does not automatically show
„0“, press once on the Z/T-Button
w
‚
³ Place the bowl on the weighing plate
³ Press the On/Off-Button q, to switch the scale
on.
³ Select the desired measurement units
(gramm/ounce). To do this, press the KG/LB-Button
r
.
You can choose between the metric and the
Anglo-American (Imperial) system. The selected unit appears under the weight-details in the
dis-play. From 0g-999g the unit is shown in
g/oz and from 999g in kg/lbs and g/oz.
The scale shows the weight "0".
³ Place the item(s) to be weighed into the bowl.
The weight is shown on the display.
If you would like to switch the display between
grammes and ounces, press the KG/LB-Button
r
.
Adding & Weighing (Tare Function)
You can repeatedly set the scale back to 0 in order
to weigh additional partial quantities.
³ To do this, press the Z/T-Button once w. The
scale shows 0 Gramm again.
³ Place the item(s) to be weighed in the bowl.
In the display, the weight of the newly placed
item(s) is shown.
You can repeat this procedure several times.
However, never place more than 11 lb on the
scale.
Page 18

- 16 -
Removing Weighed Items
³ Press the Z/T-Button once w. The scale shows 0
gramme again
³ Remove the desired amount of material.
The weight value of the removed material appears
in the display as a negative value.
You can repeat this procedure several times.
Setting the Timer
The Timer enables you to set the clock for a specific
period of time, at the end of which a signal tone
sounds. The preset time runs as in a countdown.
³ Press once on the Clock-Button
e
.
The bell symbol appears in the display
t
at the
top left, next to the clock.
³ Enter the desired time period with the Z/T
w
resp. the KG/LB-button r.
You can set the time in 10 second steps. If you hold
the Z/T wresp. the KG/LB-button rdown continuously, the figures run through faster.
³ Press the Clock-Button e, to start the count-
down.
You can stop the timer.
³ Press once on the Clock-Button
e
, to stop the
Timer.
You can reset the timer.
³ Press twice on the Clock-Button
e
, to reset the
Timer.
When the configured time has elapsed, a signal
tone sounds for 60 seconds.
This signal tone can be switched off by pressing the
On/Off-Button
q
.
Temperature Display
When the scale is switched on, the display
t
shows the temperature in °C at the top right.
Switching the scale off
If you do not weigh anything for ca. 90 seconds,
the automatic power off switches the scale off.
³ To switch the scale off manually, press the
On/Off-Button
q
.
Troubleshooting
³ If the display tshows „Err“, the scale is over-
burdened. Remove material from the scale. Never place more than 11 lb on the scale.
³ If the display shows „Err“ for a short time and
the scale cannot be switched on, the scale is
overburdened. Remove material from the scale
and switch the scale on again. Place less than
11 lb on the scale.
³ If your scale does not function as expected, re-
place the batteries. Should this not correct the
malfunctioning, please contact the manufacturer.
³ If the display shows „LO“, the batteries are de-
pleted. Replace the batteries.
Cleaning
Attention!
Ensure that liquids cannot enter the scale. Permeating liquids can damage the scale.
Wipe the scale with a soft cloth moistened with mild
soap suds. Do not use abrasive or solvent cleaners.
The bowl can be cleaned in the dishwasher. The
bowl is suitable for use in dishwashers.
Page 19

- 17 -
Disposal
Do not dispose of the appliance in your
normal domestic waste. This product is
subject to the European guideline
2002/96/EC.
Dispose of the appliance through an approved disposal centre or at your community waste facility.
Observe the currently applicable regulations.
In case of doubt, please contact your waste disposal
centre.
Battery disposal!
Batteries may not be disposed of with normal
domestic waste. All consumers are statutorily obliged to dispose of batteries at the collection point in
their community/district or with the original supplier.
The purpose of this obligation is to ensure that
batteries can be disposed of in an environmentally
friendly manner. Only dispose of batteries when
they are fully discharged.
Dispose of all packaging materials in an
environmentally friendly manner.
Warranty & Service
The warranty for this appliance is for 3 years from
the date of purchase. The appliance has been
manu-factured with care and meticulously examined
before delivery. Please retain your receipt as proof
of purchase. In the case of a warranty claim, please
make contact by telephone with our service department. Only in this way can a post-free despatch for
your goods be assured.
The warranty covers only claims for material and
maufacturing defects, not for wearing parts or for
damage to fragile components. This product is for
private use only and is not intended for commercial
use.
The warranty is void in the case of abusive and improper handling, use of force and internal tampering not carried out by our authorized service
branch. Your statutory rights are not restricted in
any way by this warranty.
DES Ltd
Units 14-15
Bilston Industrial Estate
Oxford Street
Bilston
WV14 7EG
Tel.: 0870/787-6177
Fax: 0870/787-6168
e-mail: support.uk@kompernass.com
Irish Connection
Harbour view
Howth
Co. Dublin
Tel: 00353 (0) 87 99 62 077
Fax: 00353 18398056
e-mail: support.ie@kompernass.com
Page 20

- 18 -
Importer
KOMPERNASS GMBH
BURGSTRASSE 21
D-44867 BOCHUM
www.kompernass.com
Page 21

- 19 -
INHALTSVERZEICHNIS SEITE
Verwendungszweck 20
Technische Daten 20
Sicherheitshinweise 20
Beschreibung 20
Bedienelemente 21
Lieferumfang 21
Bedienen 21
Einlegen der Batterien 21
Wiegen 21
Wiegegut zuwiegen (Tarierfunktion) 22
Wiegegut entnehmen 22
Timer einstellen 22
Temperaturanzeige 22
Waage ausschalten 22
Fehlfunktionen beseitigen 22
Reinigen 23
Entsorgen 23
Garantie & Service 23
Importeur 24
Lesen Sie die Bedienungsanleitung vor der ersten Verwendung aufmerksam durch und heben Sie diese für
den späteren Gebrauch auf. Händigen Sie bei Weitergabe des Gerätes an Dritte auch die Anleitung aus.
Page 22

- 20 -
DIGITALE
KÜCHENWAAGE
KH 1156
Verwendungszweck
Die Küchenwaage Bifinett KH 1156 dient zum
Wiegen von nicht ätzenden, aggressiven oder
scheuernden Flüssigkeiten und Feststoffen in privaten Haushalten. Das Wiegen von Medikamenten
und nicht zugelassenen Stoffen ist nicht bestimmungsgemäß.
Technische Daten
Wiegebereich: 1g - 5000g,
in 1 Gramm-Schritten
Temperaturanzeige: 0°C - 40°C, in
0,5°C- Schritten;
mit ± 2°C Toleranz
Stromversorgung: 2 x CR 2032 Lithium
Batterien
Sicherheitshinweise
Achtung!
Beachten Sie die folgenden Sicherheitshinweise genau. Bei Nichtbeachtung kann die Waage beschädigt werden und Ihre Gewährleistungsansprüche
können erlöschen.
• Dieses Gerät ist nicht dafür bestimmt, durch Personen (einschließlich Kinder) mit eingeschränkten, physischen, sensorischen oder geistigen Fähigkeiten oder mangels Erfahrung und/oder
mangels Wissen benutzt zu werden, es sei denn,
sie werden durch eine für ihre Sicherheit zuständige Person beaufsichtigt oder erhielten von ihr
Anweisungen, wie das Gerät zu benutzen ist.
• Kinder sollten beaufsichtigt werden, um sicherzustellen, dass sie nicht mit dem Gerät spielen.
• Achten Sie beim Einlegen der Batterie auf die
richtige Polarität und wenden Sie keine Gewalt
an, wenn Sie die Batterien einlegen.
• Entnehmen Sie die Batterien, wenn Sie die
Waage längere Zeit nicht benutzen.
• Ersetzen Sie rechtzeitig die verbrauchten
Batterien.
• Stellen Sie nie mehr als 5 kg auf die Waage.
• Stellen Sie sicher, dass keine Flüssigkeiten in die
Waage gelangen.
• Vermeiden Sie den Kontakt mit Lösungsmitteln
und mit ätzenden oder scheuernden Reinigungsmitteln.
• Stellen Sie die Waage nur auf ebenem und festem Untergrund auf.
• Stellen Sie nichts auf das Display.
• Drücken Sie nicht mit Gewalt oder mit spitzen
Gegenständen auf die Tasten.
• Setzen Sie die Waage nicht hohen Temperaturen oder Magnetfeldern aus.
• Vermeiden Sie Elektrostatische Auf- bzw.
Entladung. Anderenfalls kann es zu fehlerhaften
Anzeigen bzw. plötzlichem Ausschalten der
Waage kommen.
Beschreibung
Die Küchenwaage Bifinett KH 1156 ist ausgestattet
mit:
• Abschaltautomatik,
• Tarierfunktion (Nullstellung der Anzeige),
• Überlastanzeige,
• Batterie-Ladezustandsanzeige,
• Temperaturanzeige,
• Count-Down Timer (bis 99 Minuten)
• Umschaltung Gramm/Unzen
Page 23

- 21 -
Bedienelemente
q
Ein-/Aus-Taste
w
Z/T-Taste (ZERO/TARA)
e
Uhr-Taste
r
KG/LB-Taste,
(Gramm/Unzen-Umschalter)
t
Display
Lieferumfang
• Küchenwaage Bifinett KH 1156
y
• Schüssel
u
• 2 x CR 2032 Lithium Batterien
• Bedienungsanleitung
Bedienen
Einlegen der Batterien
Die Batterien sind bei Auslieferung bereits eingesetzt. Entfernen Sie nur den Plastikstreifen aus der
Batteriehalterung im Deckel des Batteriefaches.
Wenn Sie die Batterien wechseln wollen, gehen Sie
wie folgt vor:
• Öffnen Sie den Batteriefachdeckel auf der
Unterseite der Waage.
• Entfernen Sie die alten Batterien aus der Batteriehalterung im Batteriefachdeckel.
• Legen Sie zwei CR 2032 Lithium Batterien
übereinander in die Batteriehalterung ein.
Stellen Sie sicher, dass sich die mit + gekennzeichneten Seiten oben befinden.
• Schließen Sie den Batteriefachdeckel, bis er
einrastet.
Vergiftungsgefahr!
Batterien können von Kindern verschluckt werden
und zu gesundheitlicher Beeinträchtigung führen.
Bewahren Sie Batterien für Kinder unzugänglich
auf.
Warnung!
Beachten Sie beim Austauschen der Batterien die
korrekte Polarität. Bei unsachgemäßen Auswechseln
der Batterien besteht Explosionsgefahr. Tauschen
Sie die Batterien nur gegen einen identischen oder
gleichwertigen Typ aus.
Wiegen
Wenn Sie die Waage einschalten und dann
die Schüssel
u
auf den Wiegeteller stellen,
wird das Gewicht der Schüssel angezeigt.
• Wenn Sie die Schüssel auf die Waage stellen
und dann die Waage einschalten, wird das Gewicht der Schüssel nicht angezeigt.
• Wenn das Display
t
nicht automatisch „0“ an-
zeigt, drücken Sie einmal die Z/T-Taste
w
.
³ Stellen Sie die Schüssel auf den Wiegeteller.
³ Drücken Sie auf die Ein-/Aus-Taste q, um die
Waage einzuschalten.
³ Stellen Sie die gewünschte Einheit (Gramm/Un-
zen) ein. Drücken Sie dazu auf die KG/LB-Taste
r
.
Man kann zwischen dem metrischen- und dem
angloamerikanischen System wählen. Die eingestellte Einheit erscheint unter der Gewichtsangabe im Display. Von 0g-999g wird die Einheit in g/oz und ab 999g in KG/LB und g/oz
angezeigt.
Die Waage zeigt das Gewicht „0“ an.
³ Füllen Sie das zu wiegende Gut in die Schüssel.
Im Display wird das Gewicht angezeigt.
Wenn Sie die Anzeige zwischen Gramm und
Unzen umschalten möchten, drücken Sie die
KG/LB-Taste
r
.
Page 24

- 22 -
Wiegegut zuwiegen (Tarierfunktion)
Für das Zuwiegen weiterer Teilmengen können Sie
die Waage auf 0 stellen.
³ Drücken Sie dazu einmal die Z/T-Taste w.
Die Waage zeigt wieder 0 Gramm an.
³ Füllen Sie das zu wiegende Gut in die Schüssel.
Im Display wird das Gewicht des zugeschütteten
Wiegegutes angezeigt.
Diesen Schritt können Sie mehrmals wiederho-
len. Stellen Sie jedoch nie mehr als 5 kg auf
die Waage.
Wiegegut entnehmen
³ Drücken Sie einmal die Z/T-Taste w.
Die Waage zeigt wieder 0 Gramm an.
³ Entnehmen Sie die gewünschte Menge Wiege-
gut.
Die Gewichtsangabe des entnommenen Wiegegutes erscheint als negativer Wert im Display.
Diesen Schritt können Sie mehrmals wiederholen.
Timer einstellen
Der Timer ermöglicht es Ihnen eine Zeit-spanne einzustellen, nach deren Ablauf ein Signal ertönt. Die
eingestellte Zeit läuft wie ein Countdown ab.
³ Drücken Sie einmal die Uhr-Taste
e
.
Im Display
t
erscheint das Glocken-Symbol
links oben neben der Uhr.
³ Stellen Sie mit der Z/T-
w
bzw. KG/LB -Taste
r
die gewünschte Zeit ein.
Sie können die Zeit in 10 Sekunden-Schritten einstellen. Wenn Sie die Z/T- w bzw. KG/LB-Taste rgedrückt halten, laufen die Zahlen schneller durch.
³ Drücken Sie auf die Uhr-Taste e, um die Zeit-
messung zu starten.
Sie können den Timer anhalten.
³ Drücken Sie ein Mal die Uhr-Taste e, um den
Timer anzuhalten.
Sie können den Timer zurücksetzen.
³ Drücken Sie zwei Mal die Uhr-Taste
e
, um den
Timer zurückzusetzen.
Ist die eingestellte Zeit abgelaufen, ertönt ca. 60
Sekunden lang ein Signalton. Diesen Signalton können Sie durch Drücken der Ein-/Aus-Taste
q
ab-
schalten.
Temperaturanzeige
Wenn die Waage eingeschaltet ist, zeigt das
Display
t
rechts oben die Temperatur in °C an.
Waage ausschalten
Wenn Sie ca. 90 Sekunden nichts wiegen, schaltet
die Abschaltautomatik die Waage aus.
³ Um manuell auszuschalten, drücken Sie die Ein-
/Aus-Taste
q
.
Fehlfunktionen beseitigen
³ Wenn das Display t„Err“ anzeigt, ist die Waa-
ge überlastet. Entnehmen Sie Wiegegut. Stellen
Sie nie mehr als 5 kg auf die Waage.
³ Wenn das Display kurz „Err“ anzeigt und die
Waage nicht eingeschaltet werden kann, ist die
Waage überlastet. Nehmen Sie das Wiegegut
von der Waage und schalten Sie die Waage erneut ein. Stellen Sie weniger als 5 kg auf die
Waage.
³ Wenn Ihre Waage nicht wie erwartet funktionie-
ren sollte, erneuern Sie die Batterien. Sollte die
Fehlfunktion damit nicht beseitigt sein, wenden
Sie sich bitte an den Hersteller.
³ Wenn das Display „LO“ anzeigt, sind die Batte-
rien verbraucht. Erneuern Sie die Batterien.
Page 25

- 23 -
Reinigen
Achtung!
Stellen Sie sicher, dass keine Flüssigkeiten in die
Waage gelangen. Eindringende Flüssigkeiten können die Waage beschädigen.
Wischen Sie die Waage mit einem leicht mit milder
Seifenlauge befeuchteten Tuch ab. Benutzen Sie keine Scheuer- oder Lösungsmittel. Sie können die
Schüssel in der Spülmaschine reinigen.
Die Schüssel ist spülmaschinengeeignet.
Entsorgen
Werfen Sie das Gerät keinesfalls in den
normalen Hausmüll. Dieses Produkt
unterliegt der europäischen Richtlinie
2002/96/EG.
Entsorgen Sie das Gerät über einen zugelassenen
Entsorgungsbetrieb oder über Ihre kommunale
Entsorgungseinrichtung.
Beachten Sie die aktuell geltenden Vorschriften.
Setzen Sie sich im Zweifelsfall mit Ihrer Entsorgungseinrichtung in Verbindung.
Batterien entsorgen
Batterien dürfen nicht im Hausmüll entsorgt werden.
Jeder Verbraucher ist gesetzlich verpflichtet, Batterien/Akkus bei einer Sammelstelle seiner Gemeinde
/ seines Stadtteils oder im Handel abzugeben.
Diese Verpflichtung dient dazu, dass Batterien
einer umweltschonenden Entsorgung zugeführt
werden können. Geben Sie Batterien/Akkus nur
im entladenen Zustand zurück.
Führen Sie alle Verpackungsmaterialien
einer umweltgerechten Entsorgung zu.
Garantie & Service
Sie erhalten auf dieses Gerät 3 Jahre Garantie ab
Kaufdatum. Das Gerät wurde sorgfältig produziert
und vor Anlieferung gewissenhaft geprüft. Bitte
bewahren Sie den Kassenbon als Nachweis für
den Kauf auf. Bitte setzen Sie sich im Garantiefall
mit Ihrer Servicestelle telefonisch in Verbindung.
Nur so kann eine kostenlose Einsendung Ihrer Ware
gewährleistet werden.
Die Garantieleistung gilt nur für Material- oder
Fabrikationsfehler, nicht aber für Verschleißteile
oder für Beschädigungen an zerbrechlichen Teilen.
Das Produkt ist lediglich für den privaten und nicht
für den gewerblichen Gebrauch bestimmt.
Bei missbräuchlicher und unsachgemäßer Behandlung, Gewaltanwendung und bei Eingriffen, die
nicht von unserer autorisierten Service-Niederlassung vorgenommen wurden, erlischt die Garantie.
Ihre gesetzlichen Rechte werden durch diese
Garantie nicht eingeschränkt.
Schraven
Service- und Dienstleistungs GmbH
Gewerbering 14
47623 Kevelaer, Germany
Tel.: +49 (0) 180 5 008107
(14 Ct/Min. aus dem dt. Festnetz ggf. abweichende Preise
aus dem Mobilfunknetz)
Fax: +49 (0) 2832 3532
e-mail: support.de@kompernass.com
Kompernaß Service Österreich
Rittenschober KG
Gmundner Strasse 10
A-4816 Gschwandt
Tel.: +43 (0) 7612 6260516
Fax: +43 (0) 7612 626056
e-mail: support.at@kompernass.com
Page 26

- 24 -
Importeur
KOMPERNASS GMBH
BURGSTRASSE 21
D-44867 BOCHUM
www.kompernass.com
 Loading...