

Page 1

KOMPERNASS GMBH · BURGSTRASSE 21 · D-44867 BOCHUM
www.kompernass.com
ID-Nr.: KH1099-04/08-V2
WOK ELÉCTRICO
Instrucciones de uso
WOK ELETTRICO
Istruzioni per l'uso
ELECTRIC WOK
Operating instructions
5
WOK ELÉCTRICO
WOK ELETTRICO
ELEKTRISCHER WOK
Bedienungsanleitung
KH 1099
Page 2
KH 1099
q
e
w
t
y
u
i
o
a
r
r
dsf
Page 3

ÍNDICE PÁGINA
Uso conforme al previsto 2
Indicaciones de seguridad 2
Función 3
Datos técnicos 3
Volumen de suministro 4
Descripción 4
Lugar de montaje 4
Antes del primer uso 4
Montaje del asa de la tapa............................................................................................................4
Puesta en funcionamiento 5
Niveles de calor...............................................................................................................................5
Utilización de la sartén Wok para mantener caliente 5
Cuidado y limpieza 6
Almacenamiento 6
Anomalías de función 6
Evacuación 7
Garantía y servicio 7
Importador 7
Recetas 8
Pollo con leche de coco..................................................................................................................8
Tallarines con verduras ....................................................................................................................8
Arroz mixto tailandés.......................................................................................................................9
Filete de ternera con coliflor ...........................................................................................................9
Crepes de plátano.........................................................................................................................10
Consejos para las recetas 11
¡Guardar estas instrucciones para preguntas posteriores – e, igualmente entregar éstas, en caso de dar el
aparato a terceras personas!
- 1 -
Page 4

WOK ELÉCTRICO
KH 1099
Uso conforme al previsto
El wok eléctrico KH 1099 está sólo indicado
para…
• el uso como aparato de cocción
• el uso en estancias cerradas
• para uso no comercial en hogares privados
Indicación:
¡Los defectos en el wok eléctrico o en sus componentes, derivados del uso no conforme a lo previsto,
no están cubiertos por la responsabilidad/garantía!
Indicaciones de seguridad
Para evitar peligro de muerte
por descarga eléctrica:
• La tensión de la fuente de alimentación deberá
concordar con las indicaciones que aparecen
en la placa de características.
• No sumerja nunca la base térmica en agua.
Límpiela sólo con un paño húmedo. ¡Si penetra
agua en la base térmica, existe peligro de descarga eléctrica!
• En caso de una clavija de red dañada o cable
de red dañado, encomiende su sustitución a
personal técnico autorizado o al servicio de
posventa con el fin de evitar riesgos.
• Haga examinar y reparar inmediatamente en el
servicio técnico los aparatos que no funcionen
perfectamente o que se hayan dañado.
Para evitar que se genere riesgo
de incendio e impedir que se
produzcan lesiones:
• Nunca deje el aparato desatendido durante el
funcionamiento.
• No permita utilizar el aparato a personas (incluidos
los niños) cuyas facultades físicas, sensoriales o
mentales, así como su falta de conocimientos
o de experiencia, les impida hacer un uso seguro
del mismo si no están bajo vigilancia o han sido
instruidos correctamente. Vigile a los niños para
asegurarse de que no juegan con el aparato.
• Procure un asiento estable del aparato.
• Procure que la clavija de red esté fácilmente
accesible y que el cable no se convierta en una
trampa donde tropezar.
• No utilice el aparato nunca:
- si hay determinadas partes del aparato, el
cable de red o la clavija de red dañadas,
- en caso de mal funcionamiento, o si se ha
dañado de algún otro modo o bien por caída.
Lleve el aparato para su comprobación o bien
reparación a un Centro de asistencia técnica.
• No utilice ningún tipo de temporizador externo
o un sistema de control remoto para accionar el
aparato.
• Las bolsas de plástico pueden entrañar un riesgo.
Para evitar el peligro de asfixia, guarde las bolsas
de plástico fuera del alcance de bebés y niños
pequeños.
• No coloque otros instrumentos de cocina en lugar
del recipiente wok sobre la base térmica. Otro
instrumento de cocina podría volcarse durante
el funcionamiento, ya que la base térmica está
diseñada sólo para la colocación de los recipientes suministrados.
Para actuar de manera segura:
• En caso de peligro desenchufe inmediatamente
el aparato.
• No use el aparato para otros fines.
- 2 -
Page 5

• Extraiga la clavija de red así como el cable de
red del aparato cuando no esté en uso, si retira
piezas y antes de su limpieza.
Para evitar daños materiales:
• No utilice el recipiente wok como instrumento de
cocina sobre otras fuentes de calor (p. ej. sobre
placas de cocción), ya que de otro modo podría dañarse de modo irreparable.
• Utilice sólo cubiertos de madera para mezclar
y dar la vuelta a los alimentos en el recipiente
wok; si utiliza cubiertos de metal, arañará la capa
antiadherente del recipiente wok y quedará con
ello inutilizable.
• No utilice el recipiente wok para cortar en su
interior alimentos o sus ingredientes. De otro
modo se arañará la capa antiadherente del recipiente wok y quedará con ello inutilizable.
¡Peligro de quemaduras!
• Sujete el recipiente wok y la tapa de cristal durante la cocción y al servir sólo por las asas, ya
que ambas partes pueden estar muy calientes.
Para mayor seguridad, utilice siempre adicionalmente guantes de cocina.
• ¡Al levantar la tapa puede generarse vapor caliente! ¡Por lo tanto, no se incline nunca directamente sobre el recipiente wok al levantar la
tapa!
• No utilice el recipiente wok para preparar sopas!
¡El recipiente wok es demasiado llano para ello
y las sopas pueden desbordarse rápidamente!
• ¡La grasa y el aceite pueden iniciar un fuego
muy rápidamente en caso de sobrecalentamiento!
¡No intente bajo ningún concepto apagar la
grasa o aceite ardiendo con agua!
¡Con ello se genera una llama viva, cuyo fuego
puede extenderse a muebles, cortinas etc.! ¡Además
podrían causarse quemaduras muy graves a las
personas que se encuentren cerca del wok eléctrico!
Para apagar grasa o aceite ardiendo…
1. Retire inmediatamente la clavija de red de la
base de enchufe.
2. Ahogue las llamas colocando una tapa, una
bandeja metálica, una fuente metálica o una
manta ignífuga sobre el recipiente wok.
Función
Con el wok …
• puede preparar alimentos de forma sana con
alto nivel de calor según la preparación china
tradicional.
• las vitaminas y nutrientes de los ingredientes se
mantienen más tiempo gracias a los tiempos de
cocción reducidos a altas temperaturas.
• puede preparar alimentos sin añadir grasa o
con sólo un poco.
Datos técnicos
¡Cuidado!
• No vierta nunca agua sobre grasa o aceite caliente en el recipiente wok durante el cocinado!
Se generaría una llama viva y podría provocarse
un incendio! ¡Además podrían causarse quemaduras muy graves a las personas que se encuentren
cerca del wok eléctrico!
Tensión de red: 220 - 240 V ~50 Hz
Potencia de salida: 1.200 vatios
- 3 -
Page 6

Volumen de suministro
• recipiente wok con asas aisladas térmicamente
• base térmica con regulador de temperatura
• tapa de cristal
• asa de la tapa aislada térmicamente con material
de montaje
• rejilla de goteo desmontable
• 2 espátulas de madera, 1 cuchara de madera,
un par de palillos chinos
• Instrucciones de uso
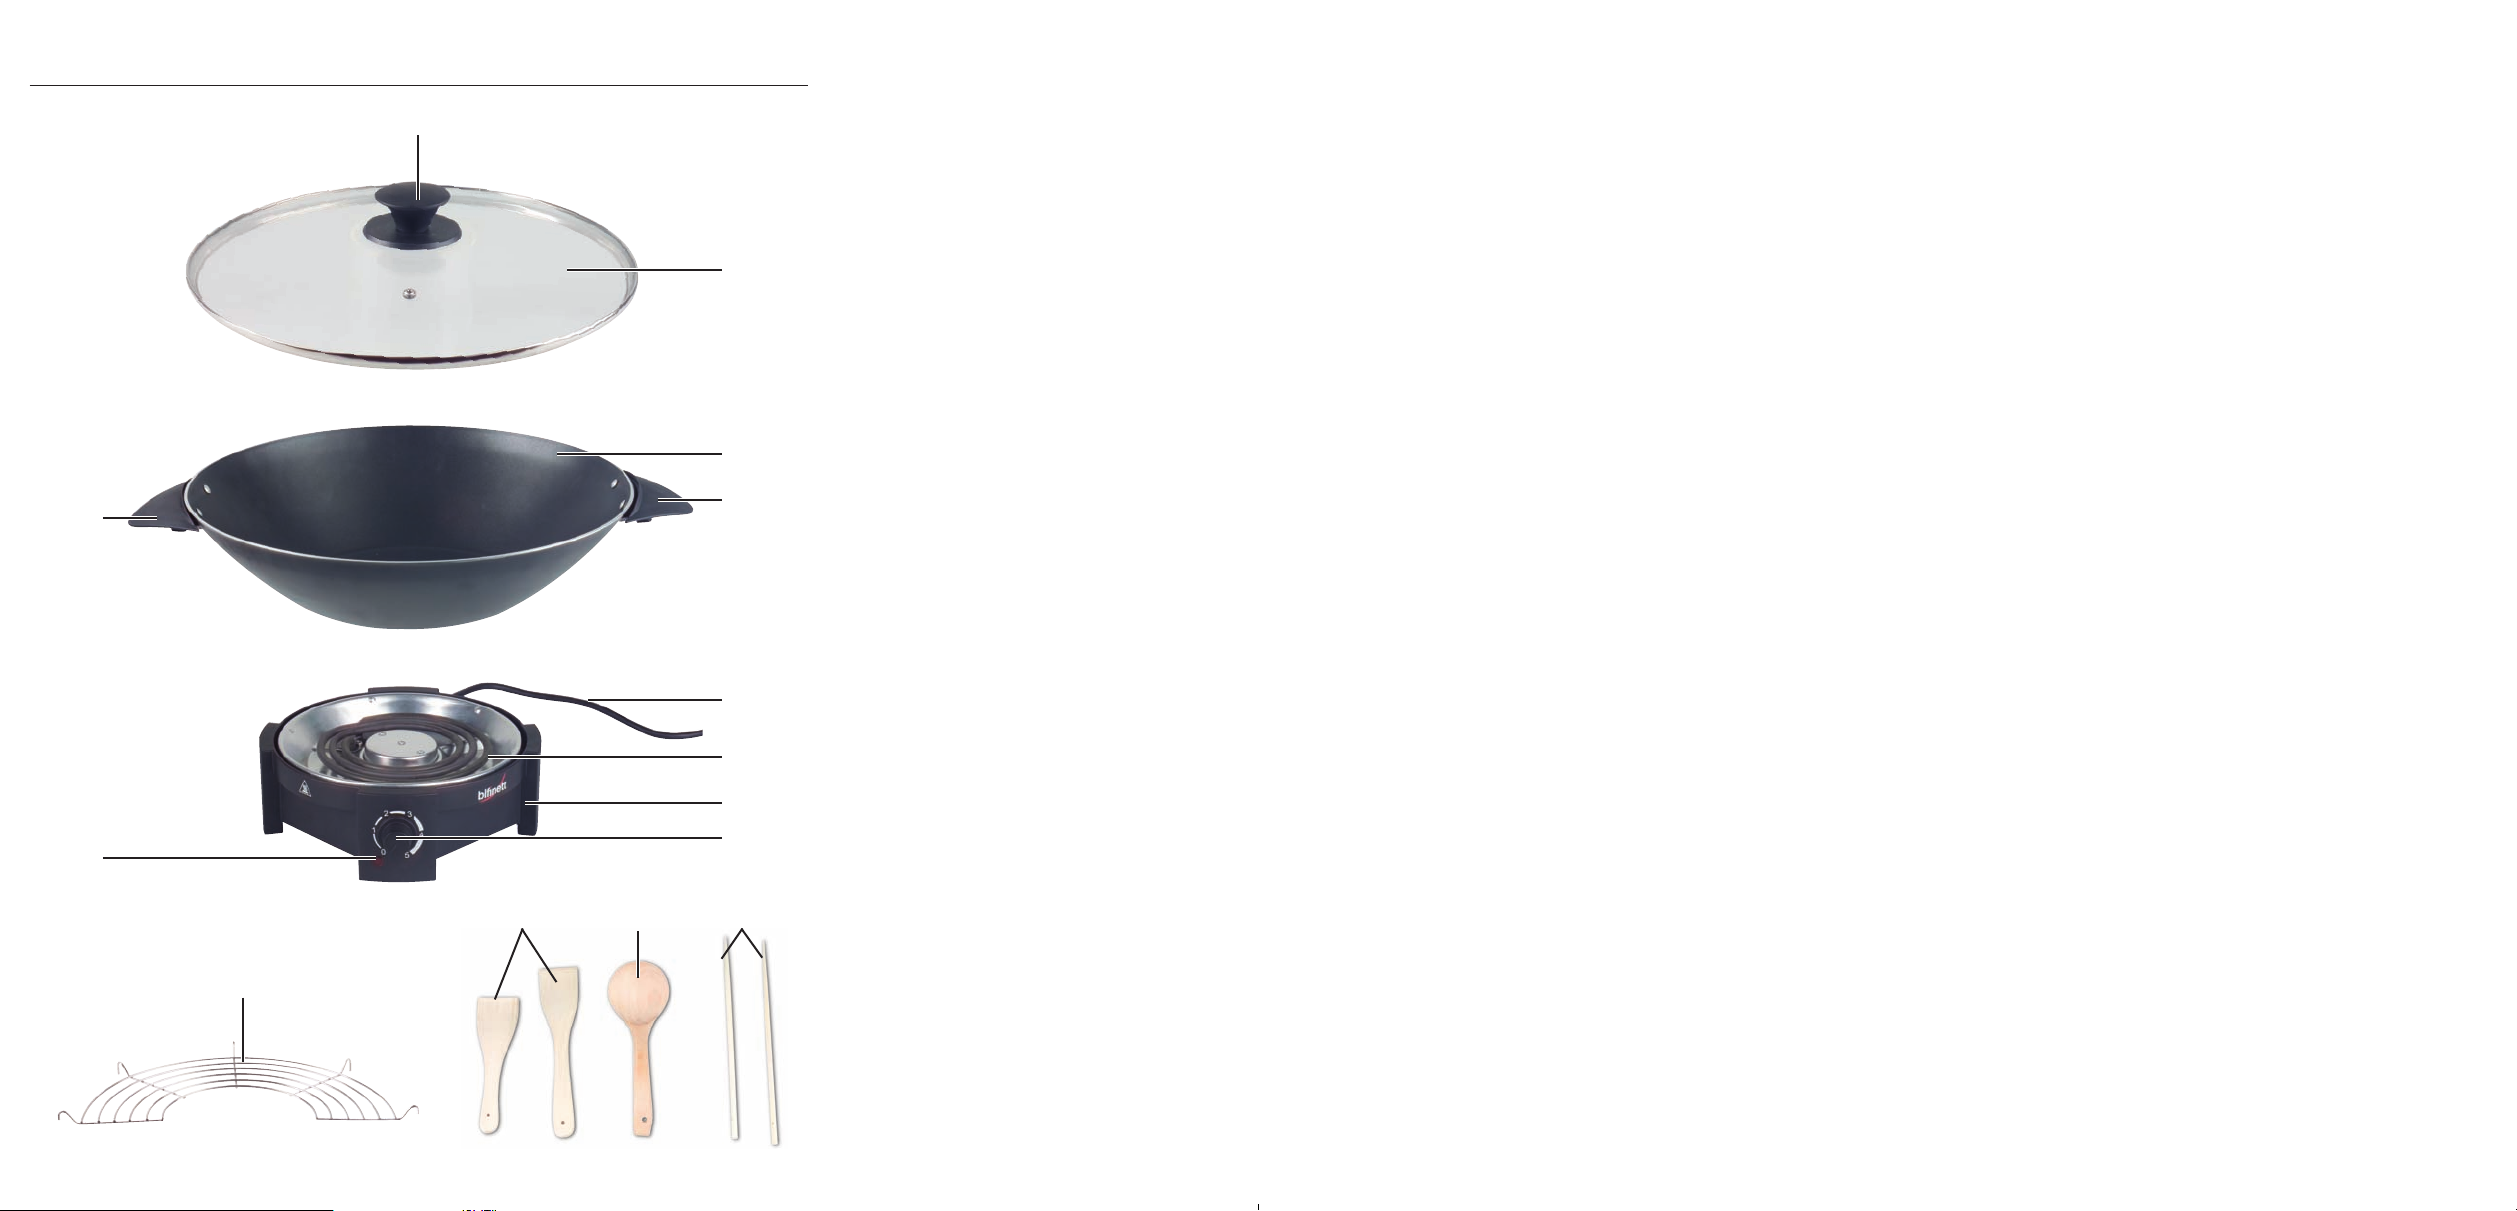
Descripción
1 asa
2 tapa de cristal
3 recipiente wok
4 asas aisladas térmicamente
5 cable de alimentación
6 resistencia
7 base térmica
8 regulador de temperatura
9 Piloto de control
Accesorios:
0 rejilla escurridora
q 2 espátulas de madera
w cuchara de madera
e palillos chinos
Lugar de montaje
Coloque el wok conectado sólo sobre una superficie
recta, sólida y resistente al calor y en una zona seca.
¡Cuidado!
Para evitar daños debido a la influencia del calor
y el riesgo de incendio entorno al wok conectado,
cuide que …
• entorno al wok conectado se mantenga una distancia de al menos 50 cm respecto a las paredes,
muebles y otros objetos.
• que no cuelguen objetos (p. ej. lámparas) sobre
el wok conectado.
• que no se encuentren cerca del wok conectado
materiales fácilmente inflamables (p. ej. paños/
telas).
• el cable de red 5 y la base térmica 7 no se
encuentren cerca de superficies calientes ni llamas abiertas.
• el cable de alimentación 5 no entre en contacto
con la base térmica 7.
• que no penetre humedad y/o líquidos en la
base térmica 7.
¡De otro modo existe peligro de
incendio y peligro de descarga eléctrica!
Antes del primer uso
Saque del embalaje todos los componentes del wok
eléctrico. Retire los posibles folios de protección y
limpie los restos de polvo del embalaje de las partes
que vayan a entrar en contacto con los alimentos.
¡No utilice productos abrasivos ni estropajos metálicos,
ya que de otro modo el recubrimiento antiadherente
del recipiente wok 3 puede rayarse y quedar inutilizable!
Montaje del asa de la tapa
1. Inserte el asa de la tapa 1 sobre el disco ais-
lante ancho, de manera que el bloqueo cuadrado
encaje en el asa de la tapa 1.
2. Coloque el disco aislante ancho con el asa de
la tapa 1 sobre la tapa de cristal 2 desde la
parte de arriba, de manera que los agujeros
queden superpuestos.
3. Introduzca primero la arandela metálica en el
tornillo. Luego inserte la arandela de goma en
el tornillo, de manera que la parte ancha repose
recta sobre la arandela metálica.
- 4 -
Page 7

4. Inserte desde abajo el tornillo con las dos arandelas a través de los agujeros y apriételo con un
destornillador de estrella.
Puesta en funcionamiento
¡Cuidado!
No coloque nunca folios de aluminio u otros objetos
entre la base térmica 7 y el recipiente wok 3, de
otro modo podrían provocarse daños irreparables
en el wok eléctrico. ¡Además existe peligro de incendio!
Durante la primera puesta en funcionamiento es
posible que se genere un ligero olor y se produzca
humo, debido a los restos de producción. Esto es
perfectamente normal e inofensivo. Procure que
haya suficiente ventilación, abra por ejemplo una
ventana.
Niveles de calor
Los diferentes niveles de calor del regulador de
temperatura 8 son orientativos:
Nivel de calor 1-2: Para mantener alimentos
calientes.
Nivel de calor 3-4: Para rehogar y cocer.
Nivel de calor 5: Para freír.
¡Cuidado!
No utilice nunca la base térmica 7 sin colocar el
recipiente wok 3. Existe peligro de sobrecalentamiento.
1. Inserte el cable de red 5 en la base térmica 7.
2. Inserte el cable de red 5 en una base de en-
chufe.
3. Coloque ahora el recipiente wok 3 sobre la
base térmica 7.
4. Ponga el regulador de temperatura 8 en el nivel
de calor deseado. El piloto 9 se enciende.
Tenga cuidado de que el recipiente wok 3 repose
de forma segura y recta sobre la base térmica 7.
¡Cuidado!
¡No llene el recipiente wok 3 en exceso! La canti-
dad de llenado máxima (líquidos) es de 1,5l.
5. Introduzca después los ingredientes deseados
en el recipiente wok 3. Si es necesario, añada
algo de aceite o grasa en el recipiente wok 3.
6. Cuelgue la rejilla escurridora 0 en el recipiente
wok 3 para colocar sobre ella los ingredientes
del recipiente wok 3 que se cocinan rápidamente, mientras deben permanecer en el recipiente wok 3 el resto de los ingredientes por
necesitar más tiempo de cocción.
7. Para estofar y cocer – según la receta aplicada
– coloque la tapa de cristal 2 sobre el recipiente
wok 3.
Utilización de la sartén Wok
para mantener caliente
Si desea utilizar el recipiente wok 3 para servir y
mantener alimentos calientes…
1. Gire en primer lugar el regulador de temperatura 8 hasta el nivel de calor 1.
2. Baje a continuación el recipiente wok 3 de la
base térmica 7 y colóquelo sobre una superficie
resistente al calor (p. ej. una placa de cocción
apagada, totalmente enfriada).
3. Retire primero el cable de red 5 de la base de
enchufe y luego de la base térmica 7.
4. Coloque la base térmica 7 en el lugar deseado.
Tenga cuidado de que la superficie del lugar de
colocación sea recta, firme y resistente al calor.
5. En primer lugar vuelva a introducir el cable de
red 5 en la base térmica 7 y a continuación
en una base de enchufe.
6. Vuelva a colocar el recipiente wok 3 con el
alimento que desea mantener caliente sobre la
base térmica 7.
- 5 -
Page 8

7. Para mantener caliente comidas líquidas, gire el
regulador de temperatura 8 a la graduación
de calentamiento 1. Gire el regulador de temperatura 8 para mantener calientes alimentos sólidos hasta el nivel de calor 2. Remueva de vez
en cuando los alimentos sólidos durante el mantenimiento de calor y añada algo de agua para
evitar que la comida se queme.
Cuidado y limpieza
Almacenamiento
• Retire el cable de red 5 de la base de enchufe
y de la base térmica 7 si no va a utilizar el
aparato.
• Deje que el wok y sus componentes se enfríen
completamente, antes de guardarlos.
• Guarde siempre el wok eléctrico fuera del alcance de los niños.
Anomalías de función
¡Cuidado!
¡Retire siempre primero el cable de red 5 de la base
de enchufe antes de limpiar el wok eléctrico y sus
componentes! ¡De otro modo existe peligro de descarga eléctrica!
¡Cuidado!
¡No sumerja nunca la base térmica 7 en agua para
su limpieza! ¡De otro modo el aparato se podría
dañar de forma irreparable!
¡Después del uso del wok eléctrico espere siempre
hasta que la base térmica 7 y el recipiente wok 3
se hayan enfriado completamente!
¡De lo contrario existe riesgo de
quemaduras!
Cuando haya retirado el cable de red 5 del wok
eléctrico de la base de enchufe y el recipiente wok 3
y la base térmica 7 se hayan enfriado …
1. Retire los restos de comida grandes del recipiente
wok 3 con la cuchara de madera w.
2. Lave a fondo el recipiente wok 3 en agua caliente y con un lavavajillas suave. ¡No utilice
productos abrasivos ni estropajos metálicos, ya
que de otro modo el recubrimiento antiadherente
del recipiente wok 3 puede rayarse y quedar
inutilizable!
3. Limpie la carcasa de la base térmica 7 con una
esponja humedecida.
Si el wok eléctrico no funciona correctamente…
1. Compruebe si el cable de red 5 está correctamente conectado a la base térmica 7.
2. Compruebe si el cable de red 5 está correctamente conectado a la base de enchufe.
3. Compruebe si la base de enchufe a la que el
wok eléctrico está conectado suministra corriente,
conectando a ella otro aparato.
Si la anomalía no se debe a una de estas causas…
4. Retire en primer lugar la clavija de red de la
base de enchufe y deje que la base térmica 7
se enfríe completamente.
5. Vuelva luego a insertar el cable de red 5 en
una base de enchufe.
Si la anomalía no se puede solucionar de la manera
descrita arriba, póngase en contacto con uno de
nuestros Centros de asistencia técnica asociados.
- 6 -
Page 9

Evacuación
Garantía y servicio
De ningún modo deberá tirar el aparato
en la basura doméstica. Este producto
está sujeto a la directiva europea
2002/96/CE.
Evacue el aparato en un centro de evacuación auto-rizado a través de las instalaciones de evacuación
comunitarias.
Preste atención a las normas en vigor.
En caso de dudas póngase en contacto con su
centro de evacuación.
El material de embalaje debe desecharse
de forma respetuosa con el medio ambiente.
Con este aparato recibe usted 3 años de garantía
desde la fecha de compra. El aparato ha sido fabricado cuidadosamente y ha sido probado antes de
su entrega. Guarde el comprobante de caja como
justificante de compra. Si necesitara hacer uso de
la garantía, póngase en contacto por teléfono con
su punto de servicio habitual. Éste es el único
modo de garantizar un envío gratuito.
La garantía cubre los defectos de fabricación o del
material, pero no las piezas sujetas a desgaste y
los daños sufridos por las piezas frágiles. Este producto ha sido diseñado exclusivamente para el uso
particular y no para el uso industrial.
En caso de manipulación indebida e incorrecta, uso
de la fuerza y en caso de abrir el aparato personas
extrañas a nuestros centros de asistencia técnica
autorizados, la garantía pierde su validez. Esta garantía no reduce en forma alguna sus derechos
legales.
Kompernass Service España
C/Invención 7
Polígono Industrial Los Olivos
28906 Getafe – Madrid
Tel.: 902/430758
Fax: 91/6652551
e-mail: support.es@kompernass.com
Importador
KOMPERNASS GMBH
BURGSTRASSE 21
44867 BOCHUM, GERMANY
www.kompernass.com
- 7 -
Page 10

Recetas
Tallarines con verduras
Para 4 personas
Pollo con leche de coco
Para 4 personas
400 g de pasta tipo orecchiette
sal
1 vaina de chili verde
1 puerro entero
1 jengibre (del tamaño aproximado de una nuez)
200 g de pechuga de pollo
Pimienta
100 g de maíz (de lata)
1 manojo de cebollino
4 cucharaditas de aceite de cacahuete o de colza
100 ml de leche de coco sin endulzar (de lata)
100 ml de caldo
Tiempo de preparación: 30 min.
Por porción aprox.: 470 kcal
1. Cocer la pasta al punto en agua con abundante
sal siguiendo las instrucciones del paquete. Cortar
la vaina de chili sin pepitas en finas tiras. Limpiar
el puerro, cortar longitudinalmente, lavar y cortar
en tiras. Pelar el jengibre y cortar en pedacitos.
Cortar la pechuga de pollo en tiras de 1 1/2 cm,
salpimentar. Dejar secar el maíz. Lavar el cebollino, cortar en rodajitas.
2. Calentar primero el wok, luego el aceite. Dorar
el pollo aprox. 4 min. Añadir el puerro en el centro
del wok y pochar 2 min. Añadir el chili, el jengibre
y el maíz, y freír 2 min. removiéndolo. Mezclarlo
todo.
3. Añadir el caldo y la leche de coco y dejar cocer
tapado 3 min. Calentar ahí la pasta y salpimentar.
Servir salpicado con rodajitas de cebollino.
200 g de tallarines de arroz
sal
150 g de judías verdes
1 pimiento rojo
1 cebolla roja
1 diente de ajo
1 jengibre (del tamaño aproximado de una nuez)
4 cucharadita de aceite de oliva
300 g de brécol
100 ml de caldo
5 cucharadas de salsa de soja
2 cucharadas de anacardos picados
Tiempo de preparación: 25 min.
Por porción aproximadamente: 400 kcal
1. Cocer la pasta al punto en agua con sal siguiendo
las instrucciones del paquete.
2. Limpiar y lavar las verduras. Cortar en pedacitos
las judías y el pimiento. Pelar la cebolla y cortarla
en tiras. Pelar el ajo y el jengibre y cortarlos en
trocitos.
3. Calentar el wok, luego el aceite. Freír el pimiento
1 min. moviendo el recipiente. Freír sucesivamente
las judías, el brécol y la cebolla.
4. Mezclar el ajo y el jengibre. Dejar cocer con el
caldo y la salsa de soja 1 min. Volcar sobre ello
la pasta. Espolvorear con nueces.
- 8 -
Page 11

Arroz mixto tailandés
Para 4 personas
Filete de ternera con coliflor
Para 4 personas
2 cebolletas
1 zanahoria
1 pimiento rojo
1 piña
30 g de anacardos
2 cucharaditas de aceite de cacahuete
1/4 l de caldo de verduras
sal
pimienta
1 pizca de azúcar
600 g de arroz cocido
1 cucharada de menta fresca picada o cilantro
Tiempo de preparación: 30 min.
Por porción aprox.: 320 kcal
1. Limpiar y lavar las verduras. Cortar la parte blanca
de la cebolla en tiras, la verde en trocitos. Cortar
las zanahorias en tacos del grosor de una cerilla.
Cortar el pimiento en tiras finas. Pelar la piña y
cortarla sin tronco en pedazos de 1 1/2 cm de
grosor.
2. Calentar el wok, dorar las nueces sin grasa.
3. Calentar primero el wok, luego el aceite. Pochar
la parte blanca de la cebolla. Dorar la zanahoria
y el pimiento en el centro del wok 4 min. al punto.
Dejar cocer con el caldo y condimentar con sal,
pimienta y azúcar. Remover ligeramente el arroz
y calentarlo. Añadir la parte verde de la cebolla.
4. Volver a unir la piña en rodajas. Repartir el arroz
sobre ella y decorar con especias y anacardos.
400 g de filete de ternera
3 cucharadas de mezcla de especias tandoori
(herbolarios, establecimientos asiáticos)
1 coliflor pequeña
2 tomates en rama
1 calabacín
1 cebolla roja pequeña
2 cebolletas
4 cucharaditas de aceite de girasol
100 ml de caldo
150 ml de leche de coco sin endulzar (de lata)
sal
Pimienta
Tiempo de preparación: 30 min.
Por porción aprox.: 190 kcal
1. Cortar el filete en tacos de aproximadamente
1 x 2 cm y especiar con tandoori. Partir la coliflor
en ramas, cortar los tallos en rodajas. Cortar los
tomates en daditos. Cortar el calabacín en tiras
de 2 cm de longitud.
Pelar la cebolla y cortarla en tiras finas. Cortar
la cebolleta por la mitad longitudinalmente, cortarla en pedazos junto con la parte verde.
2. Calentar primero el wok, luego 2 cucharaditas
de aceite. Freír la carne 2 min. y mantenerla
caliente. Volver a calentar el wok, pochar la
cebolla en le resto del aceite. Freír la coliflor
3 min. con la cebolla. Cocer con el calo y la
leche de coco y dejar hervir 5 min. Salpimentar.
Mezclar la parte blanca de la cebolleta, el calabacín y los tomates. Cocer a fuego lento 3 min.
Entremezclar la carne y la parte verde de la
cebolla y probar.
- 9 -
Page 12

Crepes de plátano
Para 4 personas
1 pellizco de sal
1 pizca de canela en polvo
150 g de harina (tipo 550)
250 ml de leche de coco sin endulzar (de lata)
2 cucharadas de miel
2 plátanos
2 huevos
4 cucharaditas de aceite de cacahuete
Zumo de 1/2 limón
Tiempo de preparación: 40 min.
Tiempo de reposo: 30 min.-1 h.
Por porción aprox.: 250 kcal
1. Para la masa de los crepes, mezclar la sal, la
canela, la harina, la leche de coco y la miel con
un pasapurés y dejar reposar 30 min. -1 h.
2. Pelar los plátanos. Cortar 1 plátano en trozos
muy pequeños y mezclar con la masa junto con
los huevos. Si la masa estuviese demasiado densa,
añadir un poco de agua mineral. Pelar el segundo
plátano en rodajas y mezclar con la masa.
3. Precalentar el horno a 70° para mantener caliente el alimento. Calentar primero el wok, luego
pintarlo con aceite. Cocer sucesivamente 8 crepes
por ambos lados a temperatura media. Mantener
calientes las crepes en el horno. Para cada crepe,
pintar el wok con aceite. Rociar los crepes con
zumo de limón y servir.
Acompañamiento: Macedonia
- 10 -
Page 13

Consejos para las recetas
El alimento se pega
constantemente al wok
➧ Calentar el wok, retirar todas
las impurezas con 3 cucharadas de sal y con la ayuda de
la espátula. Luego limpiar el
wok con un paño. Después
limpiarlo sólo con agua
caliente, no utilizar más limpiadores. Volver a empezar
con algo más de calor.
La verdura está demasia-
do cruda
➧ Saltear la verdura, a poder
ser en porciones, moviéndola
constantemente, hasta que
todo esté al punto.
El plato está demasiado
seco
➧ Regar con leche de coco,
crema de soja, caldo o salsa
de soja, hasta que se haya
formado suficiente salsa.
El aceite humea
➧ El aceite quemado es perjudi-
cial para la salud: Verterlo
en un recipiente resistente al
calor para que se enfríe y
luego desecharlo. Enfriar
el wok sobrecalentado con
agua templada, vaciarlo y
limpiarlo. Volver a empezar
con aceite fresco.
El plato es demasiado
picante
➧ Mezclar taquitos de piña,
mango o tomates y suavizar
con leche de coco o utilizar
yoghurt descremado batido y
sin grumos. No seguir hirviendo el plato.
Se ha formado demasiada
salsa
➧ Levantar los ingredientes sóli-
dos del wok, dejar reducir
la salsa rápidamente con el
nivel máximo de calor, mezclar los ingredientes y volver
a probar.
La verdura está blanda
y sobrecocida.
➧ Cortar un poco de verdura
fresca en taquitos pequeños
y mezclar en crudo.
El plato está insulso
➧ Añadir salsa de soja, jengibre
rayado, ajo machacado,
finas hierbas picadas y aceite
de sésamo u otro aceite
especiado.
Es poca cantidad
➧ Añadir 100- 200 g de brotes
de soja o 1 patata en taquitos
y escaldar con agua hirviendo
1 zanahoria, así como 100 g
de guisantes congelados y
entremezclarlos. Volver a probar.
- 11 -
Page 14

- 12 -
Page 15

INDICE PAGINA
Uso conforme 14
Avvertenze di sicurezza 14
Funzionamente 15
Dati tecnici 15
Volume della fornitura 16
Descrizione 16
Luogo d'installazione 16
Prima del primo impiego 16
Montaggio della maniglia del coperchio ...................................................................................16
Messa in funzione 17
Livelli di riscaldamento ..................................................................................................................17
Uso della padella wok per tenere i cibi caldi 17
Pulizia e cura 18
Conservazione 18
Guasti 18
Smaltimento 19
Garanzia & assistenza 19
Importatore 19
Ricette 20
Pollo con latte di cocco.................................................................................................................20
Linguine con verdure .....................................................................................................................20
Riso tailandese variopinto.............................................................................................................21
Filetto di manzo con cavolfiore....................................................................................................21
Frittata di banane...........................................................................................................................22
Consigli per le ricette 23
Conservare le presenti istruzioni per consultarle in futuro; in caso di cessione dell'apparecchio a terzi,
consegnare anche le istruzioni!
- 13 -
Page 16

WOK ELETTRICO
KH 1099
Uso conforme
Il wok elettrico KH 1099 è destinato esclusivamente …
• all'impiego come strumento di cottura
• all'impiego in ambienti chiusi
• per l'uso non commerciale in ambiente domestico
privato
Avvertenza:
Si esclude qualsiasi garanzia/responsabilità per
i guasti del wok elettrico o dei suoi componenti
riconducibili a un uso non conforme!
Avvertenze di sicurezza
Per evitare il pericolo di morte
per scossa elettrica:
• La tensione della sorgente di alimentazione deve
coincidere con i dati riportati sulla targhetta
dell'apparecchio.
• Non immergere mai la base termica in acqua.
Ripulirla esclusivamente con un panno umido.
La penetrazione di liquidi nella base termica
comporta il rischio di scossa elettrica!
• Fare sostituire immediatamente la spina o il cavo
di rete danneggiato da personale specializzato
autorizzato o dal centro di assistenza ai clienti,
per evitare possibili rischi.
• Gli apparecchi non perfettamente funzionanti
o danneggiati devono essere immediatamente
esaminati e riparati dal centro di assistenza.
Per evitare il pericolo di incendio
e lesioni:
• Non lasciare mai l'apparecchio incustodito
durante il funzionamento.
• Questo apparecchio non è indicato per l'uso da
parte di persone (inclusi bambini) con limitate
capacità fisiche, sensoriali o mentali o prive dell'esperienza e/o della conoscenza necessaria,
a meno che tali persone non vengano sorvegliate
da un responsabile per la sicurezza o abbiano
ricevuto indicazioni sull'impiego dell'apparecchio.
Sorvegliare i bambini per assicurarsi che non
giochino con l'apparecchio.
• Provvedere a un posizionamento sicuro dell'apparecchio.
• Rendere la presa di corrente facilmente accessibile in caso di pericolo e collocare il cavo in
modo che non costituisca un elemento di intralcio.
• Non utilizzare mai l'apparecchio:
- in presenza di danni ai singoli elementi, al
cavo di rete o alla spina di rete,
- in caso di malfunzionamenti o in presenza di
altri danni oppure a seguito di caduta dell'apparecchio stesso. Consegnare l'apparecchio per il
controllo e l'eventuale riparazione al centro di
assistenza.
• Non utilizzare un timer esterno né un sistema di
telecontrollo separato per azionare l'apparecchio.
• Le buste di plastica possono costituire un pericolo.
Per evitare il pericolo di soffocamento, tenere le
buste di plastica lontano dalla portata dei bambini.
• Non collocare mai altre stoviglie da cucina sulla
base termica, oltre alla padella del wok. Le altre
stoviglie da cucina possono ribaltarsi durante il
funzionamento, poiché la base termica è stata
progettata unicamente per l'impiego con i contenitori acclusi nella fornitura.
Per un utilizzo sicuro:
• In caso di pericolo staccare immediatamente la
spina dalla presa di corrente.
- 14 -
Page 17

• Non utilizzare mai l'apparecchio per scopi non
conformi alla destinazione d'uso.
• Prima della pulizia, in caso di inutilizzo e di
rimozione di componenti, staccare la spina di
rete e il cavo di rete dall'apparecchio.
Per evitare danni materiali:
• non utilizzare la padella del wok come stoviglia
da cucina su altre fonti di calore (ad es. sui fornelli), poiché potrebbe danneggiarsi irreparabilmente.
• Utilizzare solo posate di legno per girare e rivoltare gli alimenti nella padella del wok; l'impiego
di posate di metallo graffierà e renderà inutilizzabile il rivestimento antiaderente della padella
del wok.
• Non utilizzare la padella del wok per tagliare
vivande o ingredienti. In caso contrario, il rivestimento antiaderente della padella del wok si
graffierà e diverrà inutilizzabile.
Pericolo di ustioni!
• Nel cuocere e nel servire gli alimenti, afferrare
la padella del wok e il coperchio di vetro solo
dalle maniglie, per evitare ustioni dovute al forte
surriscaldamento. Utilizzare inoltre sempre una
presina, per motivi di maggiore sicurezza.
• Nel sollevare il coperchio potrebbe fuoriuscire
vapore bollente! Per tale motivo, non chinarsi
mai direttamente sulla padella del wok nel sollevare il coperchio!
• Non utilizzare la padella del wok per cuocere
minestre! La padella del wok è troppo poco
profonda, e le minestre potrebbero fuoriuscire
facilmente!
• Il grasso e l'olio possono infiammarsi rapidamente
in caso di surriscaldamento! Non cercare mai di
spegnere con l'acqua il grasso o l'olio in fiamme!
Ciò darebbe luogo a un getto di fiamma che potrebbe diffondere il fuoco su mobili, tendine, ecc.!
Inoltre, le persone nelle vicinanze del wok elettrico
potrebbero subire gravissime ustioni!
Per spegnere il grasso o l'olio in fiamme…
1. Staccare immediatamente la spina dalla presa
di corrente.
2. Soffocare le fiamme con un coperchio, un recipiente in metallo, un coperchio di metallo o una
coperta antincendio.
Funzionamente
Con il wok …
• si possono cuocere i cibi in modo salutare, con
l'impiego di alte temperature, secondo il tradizionale procedimento di cottura cinese.
• Le vitamine e le sostanze nutritive degli ingredienti
rimangono praticamente inalterate a causa dei
brevi tempi di cottura.
• Si possono cuocere gli alimenti senza grassi o
con una minima aggiunta degli stessi.
Dati tecnici
Tensione di rete: 220 - 240 V ~50 Hz
Potenza di uscita: 1.200 Watt
Attenzione!
• Durante la cottura non versare mai acqua nel
grasso o olio bollente! Ciò darebbe luogo a un
getto di fiamma che potrebbe provocare un
incendio! Inoltre, le persone nelle vicinanze del
wok elettrico potrebbero subire gravissime ustioni!
- 15 -
Page 18

Volume della fornitura
• Padella del wok con maniglie termoisolate
• Base termica con regolatore di temperatura
• Coperchio di vetro
• Maniglia del coperchio termoisolata con materiale
di montaggio
• Griglia estraibile
• 2 spatole di legno, 1 cucchiaio di legno,
un paio di bastoncini per alimenti
• Istruzioni per l'uso
Descrizione
1 Impugnatura dello sportello
2 Coperchio di vetro
3 Padella del wok
4 Maniglia termoisolata
5 Cavo di rete
6 Resistenza a spirale
7 Base termica
8 Regolatore di temperatura
9 Spia di controllo
Accessori:
0 Griglia
q 2 spatole di legno
w Cucchiaio di legno
e Bastoncini per alimenti
Luogo d'installazione
Collocare il wok acceso esclusivamente su una
superficie piana, solida e resistente al calore,
e in ambiente asciutto.
Attenzione!
Per evitare i danni dovuti al calore e il pericolo di
incendio nei dintorni del wok acceso, provvedere
a quanto segue:
• tenere il wok acceso a una distanza di almeno
50 cm da pareti, mobili e altri oggetti.
• non sospendere oggetti al di sopra del wok
acceso (ad es. lampade).
• non lasciare materiali facilmente infiammabili
(ad es. stoffe, tessuti) nelle vicinanze del wok
acceso.
• tenere il cavo di rete 5 e la base termica 7
lontano da superfici bollenti e fiamme libere.
• impedire che il cavo di rete 5 venga a contatto
con la base termica 7.
• impedire che l'umidità e/o i liquidi penetrino nella
base termica 7.
In caso contrario, sussiste il pericolo di incendio e il rischio di scossa elettrica!
Prima del primo impiego
Rimuovere tutti gli elementi del wok elettrico dalla
confezione. Rimuovere eventuali pellicole protettive
e pulire le parti che verranno in contatto con i cibi
dai resti di polvere dell'imballaggio.
Non utilizzare agenti abrasivi e spugnette metalliche,
poiché in tal caso si graffierebbe e renderebbe
inutilizzabile il rivestimento antiaderente della
padella del wok 3!
Montaggio della maniglia del
coperchio
1. Collocare la maniglia del coperchio 1 sul dischetto
isolante largo, in modo che il bloccaggio quadrato
sporga nella maniglia del coperchio 1.
2. Inserire il dischetto isolante largo con la maniglia
del coperchio 1 dall'alto sul coperchio di vetro
2, in modo che i fori siano sovrapposti.
3. Inserire prima la rondella metallica sulla vite.
Inserire quindi la rondella di gomma sulla vite in
modo tale che il lato largo poggi sulla rondella
metallica.
- 16 -
Page 19

4. Inserire le viti con entrambe le rondelle dal basso
attraverso i fori e avvitarle saldamente con un
cacciavite a croce.
Messa in funzione
Durante la prima messa in funzione può avere luogo
una leggera formazione di fumi e odori, dovuti ai
resti di lavorazione del prodotto. Si tratta di un
evento normale e innocuo. Provvedere a un'aerazione
sufficiente, aprendo ad esempio una finestra.
Livelli di riscaldamento
I diversi livelli di riscaldamento riportati sul regolatore
di temperatura 8 sono valori indicativi:
Livello di riscaldamento 1-2: per mantenere caldi
gli alimenti.
Livello di riscaldamento 3-4: per brasare e cuocere.
Livello di riscaldamento 5: per arrostire.
Attenzione!
Non azionare mai la base termica 7 senza la
padella del wok 3. Sussiste il rischio di surriscaldamento.
1. Inserire il cavo di rete 5 sulla base termica 7.
2. Inserire il cavo di rete 5 in una presa elettrica.
3. Collocare quindi la padella del wok 3 sulla
base termica 7.
4. Impostare il regolatore di temperatura 8 al livel-
lo di temperatura desiderato. La spia di controllo
9 si accende.
Accertarsi che la padella del wok 3 sia collocata
diritta e stabilmente sulla base termica 7.
Attenzione!
Non riempire troppo la padella del wok 3! La
quantità massima di riempimento (liquidi) è pari
a 1,5 l.
Attenzione!
Non collocare mai fogli di alluminio o altri oggetti
fra la base termica 7 e la padella del wok 3, poiché
ciò potrebbe arrecare danni irreparabili al wok
elettrico. Sussiste inoltre il rischio di incendio!
5. Inserire quindi gli ingredienti desiderati nella
padella del wok 3. Se necessario, aggiungere
un po' di olio o grasso nella padella del wok 3.
6. Sospendere la griglia 0 nella padella del wok 3,
per poggiare gli alimenti della padella del wok 3
che si sono cotti rapidamente, mentre gli altri alimenti che necessitano di maggiore tempo di cottura restano ancora nella padella del wok 3.
7. Per brasare e cuocere, a seconda della ricetta
utilizzata, collocare il coperchio di vetro 2 sulla
padella del wok 3.
Uso della padella wok per tenere i cibi caldi
Se si desidera utilizzare la padella del wok 3 per
servire e tenere caldi gli alimenti...
1. Ruotare prima il regolatore di temperatura 8 al
livello di riscaldamento 1.
2. Prelevare quindi la padella del wok 3 dalla
base termica 7 e collocarla su un piano resistente
al calore (ad es. un fornello spento e completamente raffreddato).
3. Estrarre il cavo di rete 5 prima dalla presa di
rete e quindi dalla base termica 7.
4. Collocare la base termica 7 sul luogo desiderato.
Accertarsi che il piano sia solido e resistente al
calore.
5. Reinserire il cavo di rete 5 prima nella base
termica 7 e quindi in una presa di corrente.
6. Ricollocare la padella del wok 3 con le vivande
da tenere calde sulla base termica 7.
- 17 -
Page 20

7. Ruotare il regolatore di temperatura 8 per tenere
caldi i cibi liquidi nuovamente al livello di riscaldamento 1. Ruotare il regolatore di temperatura 8
per tenere le vivande calde al livello di riscaldamento 2. Girare di tanto in tanto le vivande solide
durante il mantenimento di calore, e aggiungere
un po' d'acqua per impedire che brucino.
Pulizia e cura
Attenzione!
Estrarre sempre il cavo di rete 5 dalla spina di cor-
rente, prima di pulire il wok elettrico e i suoi componenti! Sussiste altrimenti il pericolo di scossa elettrica!
Attenzione!
Non immergere mai la base termica 7 in acqua
per la pulizia! In caso contrario, l'apparecchio
potrebbe danneggiarsi irreparabilmente!
Dopo la messa in funzione del wok elettrico, aspettare
sempre fino al completo raffreddamento della base
termica 7 e della padella del wok 3.
Sussiste altrimenti il pericolo di
ustioni!
Dopo aver scollegato il cavo di rete 5 del wok
elettrico dalla presa di corrente, atteso il raffreddamento della padella del wok 3 e della base
termica 7 …
1. Rimuovere i resti di cibo più grossolani con il
cucchiaio di legno w dalla padella del wok 3.
2. Lavare la padella del wok 3 accuratamente
con acqua calda e un detergente delicato per
stoviglie. Non utilizzare agenti abrasivi e spugnette metalliche, poiché in tal caso si graffierebbe
e renderebbe inutilizzabile il rivestimento antiaderente della padella del wok 3!
3. Pulire l'alloggiamento della base termica 7 con
una spugna umida.
Conservazione
• Staccare il cavo di rete 5 dalla presa di rete e
dalla base termica 7, qualora si decida di non
utilizzare l'apparecchio.
• Fare raffreddare completamente il wok e i suoi
componenti prima di riporlo.
• Riporre il wok elettrico sempre fuori dalla portata
dei bambini.
Guasti
Se il wok elettrico non funzionasse o presentasse
dei malfunzionamenti …
1. Controllare che il cavo di rete 5 sia collegato
correttamente alla base termica 7.
2. Controllare che il cavo di rete 5 sia collegato
correttamente alla presa di corrente.
3. Controllare che la presa di corrente a cui è collegato il wok elettrico sia funzionante, collegandovi un altro apparecchio.
Se il guasto non fosse riconducibile a una di queste
cause …
4. Estrarre prima la spina dalla presa di corrente e
fare raffreddare completamente la base termica 7.
5. Reinserire quindi il cavo di rete 5 nella presa di
corrente.
Qualora non si riuscisse a eliminare il guasto come
descritto, rivolgersi a uno dei nostri partner di assistenza.
- 18 -
Page 21

Smaltimento
Garanzia & assistenza
Non gettare per alcun motivo l'apparecchio insieme ai normali rifiuti domestici.
Il presente prodotto è conforme alla
direttiva europea 2002/96/CE.
Smaltire l'apparecchio presso un'azienda autorizzata
o presso l'ente comunale di smaltimento.
Rispettare le prescrizioni attualmente in vigore.
In caso di dubbio mettersi in contatto con l'ente di
smaltimento competente.
Smaltire tutti i materiali dell'imballaggio in
modo ecologicamente conforme.
Questo apparecchio è garantito per tre anni a partire dalla data di acquisto. L'apparecchio è stato
prodotto con cura e debitamente collaudato prima
della consegna. Conservare lo scontrino come prova d'acquisto. Nei casi contemplati dalla garanzia,
mettersi in comunicazione telefonicamente con il
centro di assis-tenza più vicino. Solo in questo
modo è possibile garantire una spedizione gratuita
della merce.
La prestazione della garanzia vale solo per difetti
del materiale o di fabbricazione. Il prodotto è destinato esclusivamente all'uso domestico e non a quello commerciale.
La garanzia decade in caso di impiego improprio o
manomissione, uso della forza e interventi non eseguiti dalla nostra filiale di assistenza autorizzata.
Kompernass Service Italia
Corso Lino Zanussi 11
33080 Porcia (PN)
Tel.: 0434/550833
Fax: 0434/550833
e-mail: support.it@kompernass.com
Importatore
KOMPERNASS GMBH
BURGSTRASSE 21
44867 BOCHUM, GERMANY
www.kompernass.com
- 19 -
Page 22

Ricette
Linguine con verdure
Per 4 persone
Pollo con latte di cocco
Per 4 persone
400 g di orecchiette
sale
1 peperoncino verde
1 porro
1 pezzo di zenzero
(della grandezza di una noce circa)
200 g di petto di pollo
Pepe
100 g mais (in scatola)
1 mazzetto di erba cipollina
4 cucchiaini di olio di arachidi o di colza
100 ml di latte di cocco non zuccherato (in scatola)
200 ml di brodo
Tempo di preparazione: 30 min.
Per porzione ca.: 470 kcal
1. Cuocere la pasta al dente in abbondante acqua
salata, seguendo le istruzioni riportate sulla
confezione. Tagliare in strisce sottili il peperoncino
privato dei semi. Pulire il porro, tagliarlo in lunghezza, lavarlo e tagliarlo a striscioline. Sbucciare
e sminuzzare lo zenzero. Tagliare il petto di pollo
a strisce di larghezza pari a 1 1/2 cm, salare e
pepare. Fare sgocciolare il mais. Lavare l'erba
cipollina e tagliarla a rotolini sottili.
2. Riscaldare prima il wok, poi l'olio. Soffriggere il
pollo per ca. 4 minuti, fino a ottenere un colore
dorato. Versare il porro nel centro del wok e farlo
dorare per 2 minuti, fino a quando diviene trasparente. Aggiungere il chili, lo zenzero e il mais e
soffriggere per 2 minuti, mescolando. Mescolare
il tutto.
3. Aggiungere il brodo e il latte di cocco, coprire
e fare sobbollire per 3 minuti. Farvi riscaldare la
pasta, salare e pepare. Cospargere di rotolini di
erba cipollina e servire.
200 g di linguine di riso
Sale
150 g di fagioli verdi
1 baccello di paprica rossa
1 cipolla rossa
1 spicchio d'aglio
1 pezzo di zenzero
(della grandezza di una noce circa)
4 cucchiaini di olio d'oliva
300 g di broccoli
100 ml di brodo
5 cucchiai di salsa di soia scura
2 cucchiai di anacardi tritati
Tempo di preparazione: 25 min.
Per porzione circa: 400 kcal
1. Cuocere la pasta al dente in abbondante acqua
salata, seguendo le istruzioni riportate sulla
confezione.
2. Lavare e pulire le verdure. Tagliuzzare fagioli
e paprika. Sbucciare le cipolle e tagliarle a strisce.
Sbucciare l'aglio e lo zenzero e tagliuzzarli.
3. Riscaldare prima il wok, poi l'olio. Soffriggere la
paprika per 1 minuto, girando in continuazione.
Aggiungere quindi un po' alla volta i fagioli,
i broccoli e le cipolle, soffriggendoli.
4. Aggiungere l'aglio e lo zenzero. Cuocere per un
minuto con brodo e salsa di soia. Mescolarvi la
pasta. Cospargere con noci.
- 20 -
Page 23

Riso tailandese variopinto
Per 4 persone
Filetto di manzo con cavolfiore
Per 4 persone
2 cipolline primavera
1 carota
1 baccello di paprika rossa
1 ananas
30 g di anacardi
2 cucchiaini di olio di arachidi
1/4 l di brodo di verdure
Sale
Pepe
1 pizzico di zucchero
600 g di riso già cotto
1 cucchiaio di menta o coriandolo verde fresco
e sminuzzato
Tempo di preparazione: 30 min.
Per porzione ca.: 320 kcal
1. Lavare e pulire le verdure. Tagliare la parte bianca
delle cipolle a strisce, sminuzzare la parte verde.
Tagliare la carota a fiammifero. Tagliare la
paprica a strisce sottili. Sbucciare l'ananas,
privarlo del centro e tagliarlo a pezzi spessi 1,5 cm.
2. Riscaldare il wok e fare indorare le noci senza
aggiungere olio.
3. Riscaldare prima il wok, poi l'olio. Cuocere la
parte bianca delle cipolle fino a quando diventa
trasparente. Cuocere al dente il peperone al
centro del wok per 4 minuti, mescolando continuamente. Fare cuocere insieme al brodo, insaporendo con sale, pepe e zucchero. Aggiungere
il riso e farlo riscaldare. Aggiungere la parte verde
delle cipolle.
4. Ricomporre i pezzi di ananas in fette. Cospargervi il
riso e guarnire con erbe aromatiche e anacardi.
400 g di filetto di manzo
3 cucchiai di spezie per tandoori
(negozi di spezie, negozi di alimenti orientali)
1 piccolo cavolfiore
2 pomodori tondi
1 zucchina
1 cipollina rossa
2 cipolline primavera
4 cucchiaini di olio di semi di girasole
100 ml di brodo
150 ml di latte di cocco non zuccherato (in scatola)
Sale
Pepe
Tempo di preparazione: 30 min
Per porzione ca.: 190 kcal
1. Tagliare il filetto a dadi di circa 1 x 2 cm di
grandezza e insaporire con le spezie tandoori.
Tagliare il cavolfiore a rosette, tagliare i gambi
a fette. Tagliare i pomodori a dadini. Tagliare
la zucchina a bastoncini sottili lunghi 2 cm.
Sbucciare le cipolle e tagliarle a strisce sottili.
Tagliare a metà la parte bianca delle cipolline
primavera, tagliare a pezzi la parte verde.
2. Riscaldare prima il wok, poi 2 cucchiaini di olio.
Arrostire la carne per 2 minuti e tenerla al caldo.
Riscaldare nuovamente il wok, cuocere le cipolle
nel resto dell'olio fino a quando diventano trasparenti. Cuocere per 3 minuti anche il cavolfiore.
Aggiungere il brodo e il latte di cocco e fare
sobbollire per 5 minuti. Salare e pepare.
Aggiungere la parte bianca delle cipolline
primavera, le zucchine e i pomodori. Cuocere
per 3 minuti. Aggiungere la carne e la parte
verde delle cipolle e assaggiare.
- 21 -
Page 24

Frittata di banane
Per 4 persone
1 pizzico di sale
1 pizzico di cannella in polvere
150 g di farina (tipo 550)
250 ml di latte di cocco non zuccherato (in scatola)
2 cucchiai di miele
2 banane
2 uova
4 cucchiaini di olio di arachidi
Il succo di mezzo limone
Tempo di preparazione: 40 min.
Tempo di riposo: 30 minuti - 1 ora
Per porzione ca.: 250 kcal
1. Per la frittata, mescolare il sale, la cannella, la
farina, il latte di cocco e il miele con il frullatore
fino a ottenere un impasto, che si farà riposare
per 30 minuti - 1 ora.
2. Sbucciare le banane. Tagliare una banana molto
finemente, e aggiungerla all'impasto insieme alle
uova. Se l'impasto risultasse troppo solido,
aggiungere un po' di acqua minerale. Tagliare
la seconda banana a fette e aggiungerla all'impasto.
3. Preriscaldare il forno a 70°. Riscaldare prima il
wok, poi cospargerlo di olio. Cuocere a calore
moderato 8 frittate da entrambi i lati, fino a ottenere un colore dorato. Mettere le frittate nel forno
riscaldato. Cospargere il wok di olio prima di
cuocere ogni frittata. Spruzzare un po' di succo
di limone sulla frittata e servire.
Contorno: macedonia
- 22 -
Page 25

Consigli per le ricette
Gli alimenti continuano
ad attaccarsi al wok
➧ Riscaldare il wok, e con
3 cucchiai di sale e la spatola
rimuovere tutte le impurità.
Passare quindi il wok con un
panno. Da ora in poi, pulire
solo con acqua bollente,
senza utilizzare alcun detergente. Ricominciare riscaldando un po' di più.
Le verdure sono
troppo crude
➧ Continuare a cuocere le ver-
dure, possibilmente un po'
alla volta, mescolando continuamente, fino a ottenere un
grado di cottura al dente.
Il piatto è troppo asciutto Si è formata troppa salsa Scarsa quantità
➧ Con il latte di cocco, aggiun-
gere la panna di soia, il
brodo o la salsa di soia, fino
a ottenere una quantità sufficiente di salsa.
➧ L'olio fumante è nocivo per la
Il piatto è troppo piccante Il piatto è insipido
➧ Aggiungere dadini di ana-
➧ Prelevare gli ingredienti solidi
L'olio fuma
salute: per farlo raffreddare,
versarlo in un recipiente
resistente alle temperature
elevate, quindi smaltirlo.
Raffreddare il wok surriscaldato con acqua calda, versare
via l'acqua e ripulire.
Ricominciare con olio fresco.
nas, mango o pomodori, e
temperare il sapore con latte
di cocco o yogurt magro
mescolato. Smettere di cuocere
l'alimento.
dal wok, fare cuocere rapidamente la salsa a temperatura
elevata, mescolare gli ingredienti e assaggiare nuovamente.
Le verdure sono molli
e troppo cotte
➧ Tagliare un po' di verdure
fresche a dadini e mescolarle
da crude.
➧ Aggiungere salsa di soia,
zenzero grattugiato, aglio
schiacciato, erbe sminuzzate
e olio di sesamo o altro olio
aromatico.
➧ Mescolare 100- 200 g di
germogli di soia o 1 patata
e 1 carota a cubetti e 100 g
di piselli surgelati, scottati
brevemente con acqua bollente. Assaggiare.
- 23 -
Page 26

- 24 -
Page 27

CONTENT PAGE
Intended usage 26
Safety instructions 26
Function 27
Technical data 27
Items supplied 28
Description 28
Placement 28
Before the first use 28
Mounting the lid handle................................................................................................................28
Commissioning 29
Heat levels......................................................................................................................................29
Using the Wok for keeping food warm 29
Cleaning and care 30
Storage 30
Troubleshooting 30
Disposal 31
Warranty & Service 31
Importer 31
Recipes 32
Chicken with coconut milk.............................................................................................................32
Tagliatelle with vegetables............................................................................................................32
Coloured Thai rice.........................................................................................................................33
Fillet of beef with cauliflower........................................................................................................33
Banana pancakes..........................................................................................................................34
Recipe tips 35
Read the operating instructions carefully before using the appliance for the first time and preserve this
booklet for later reference. Pass the manual on to whomsoever might acquire the appliance at a later date.
- 25 -
Page 28

ELECTRIC WOK
KH 1099
Intended usage
The Electrical Wok KH 1099 is intended exclusively …
• for use as a cooking implement
• for use in enclosed spaces
• for non-commercial use in domestic households
Note:
All warranties and liabilities are null and void in the
case of defects with the Electrical Wok and its components that may have been caused through improper
use of the appliance!
Safety instructions
To avoid potentially fatal
electric shocks:
• The electricity mains voltage being used must
comply with the details given on the identification plate of the appliance.
• Never submerse the thermo-plinth in water. Only
wipe it with a damp cloth. Should fluids penetrate
into the thermo-plinth, there is the risk of receiving
an electric shock!
• Arrange for defective power plugs and/or cables
to be replaced at once by qualified technicians
or our Customer Service Department.
• Arrange for damaged or malfunctioning appliances to be inspected and/or repaired by a qualified specialist or the Customer Service Department as soon as possible.
To avoid the risks of fire and
burn injuries
• Never leave the appliance unattended whilst in
use.
• This appliance is not intended for use by individuals (including children) with restricted physical,
physiological or intellectual abilities or deficiences
in experience and/or knowledge unless they are
supervised by a person responsible for their safety
or receive from this person instruction in how the
appliance is to be used. Children should be
supervised to ensure that they do not play with
the appliance.
• Select a safe and stable location to place the
appliance.
• Ensure that the power plug is at all times easily
accessible, and that there is no risk of anyone
tripping over the cable.
• Never use the appliance:
- if individual components, the power plug or the
power cable are damaged,
- if it appears to be malfunctioning, or if it has
otherwise been damaged or dropped. Arrange
for the appliance to be checked and/
or repaired at the Service Centre.
• Do not use an external timing switch or a
separate remote control system to operate the
appliance.
• Plastic bags can be deadly. To avoid the risk of
fatalities through suffocation, keep plastic bags
out of the reach of children.
• Never put other kitchen implements (e.g. cooking
pans) onto the thermo-plinth in place of the Wok.
Other cooking pans could tip during use, as the
thermo-plinth is designed for acceptance of the
supplied cooking implement only.
:
Always keep safety in mind:
• Immediately remove the electrical plug from the
socket in risk situations.
• Never use the appliance for purposes other than
those for which it was intended.
- 26 -
Page 29

• ALWAYS remove the power cable from the power
socket and the appliance when the Wok is not
in use, when removing components and before
cleaning it.
To avoid the risk of property
damage:
• Do not use the Wok as a cooking implement on
other heat sources (e.g. on hotplates), it could
be irreparably damaged.
• Use only wooden implements for stirring and
turning foods in the Wok; if you use metal implements the anti-stick coating on the Wok will be
scratched and become unusable.
• Do not use the Wok for cutting or slicing ingredients that might be in it. If you do, the anti-stick
coating on the Wok will be scratched and become unusable.
Risk of Burns!
• During use and when serving, grasp the Electrical
Wok and the glass lid with the handles only, as
both parts can become very hot. For the sake of
safety, always use an oven cloth as well.
• Hot steam can escape when lifting the lid! Never
lean closely over the Wok when lifting the lid!
• Do not use the Wok to cook soup! The Wok is
too flat for this, the soup could very quickly boil
over!
Important!
• When cooking, never pour water into heated fat or
oil in the Wok! This would cause a darting flame
and possibly start a fire! Additionally, people close
to the Electrical Wok may be seriously burned!
• Overheated fats and oils can quickly start to burn!
Under no circumstances should you try to extinguish burning fats or oils with water!
This would cause a dartflame which could also ignite
furniture and curtains etc! Additionally, people close
to the Electrical Wok may be seriously burned!
To extinguish burning fats and oils…
1. Immediately remove the power plug from the
wall socket.
2. Smother the flames by placing a lid, a dish, a
bowl or a fire blanket over the Wok.
Function
With the Wok …
• you can prepare foods in the traditional Chinese
style with high heat
• vitamins and nutrients are retained in the food
due to short cooking times and high heat
• the foods can be prepared without fat or with
very little of it
Technical data
Mains voltage: 220-240V ~50Hz
Output level: 1.200 Watt
- 27 -
Page 30

Items supplied
• Wok with heat insulated handles
• Thermo-plinth with temperature controller
• Glass lid
• Heat-insulated lid handle with mounting materials
• removable drip grill
• 2 wooden spatulas, 1 wooden spoon, a pair of
chopsticks
• Operating manual
Description
1 Lid handle
2 Glass lid
3 Wok
4 Heat insulated handles
5 Power cable
6 Heating coil
7 Thermo-plinth
8 Temperature regulator
9 Control lamp
Accessory:
0 Drip grill
q 2 wooden Spatulas
w Wooden spoon
e Chopsticks
Placement
Place the switched-on Wok exclusively on level, firm
and heat-resistant surfaces in a dry environment.
Important!
To avoid the risks of heat damage and fire in the
area adjacent to the switched on Wok, always
ensure that …
• the switched-on Wok is at all times located at a
minimum distance of 50 cm from walls, furniture
and other objects.
• no objects are suspended above the switched-on
Wok (e.g. lamps).
• there are no easily inflammable objects close to
the switched-on Wok (e.g. materials/textiles).
• the power cable 5 and the thermo-plinth 7 are
not located close to hot surfaces or open flames.
• the power cable 5 does not, and cannot, make
contact with the thermo-sockel 7.
• no moisture and/or fluids can permeate into the
thermo-sockel 7.
Non-compliance heightens the risk
of fire or of receiving an electrical
shock!
Before the first use
Remove all components of the Electrical Wok from
the packaging. Remove all remaining protective
foils and clean the packaging/dust residues from
all components that will come into contact with
foodstuffs.
Do not use any abrasive cleaners or scouring pads,
these will destroy the non-stick surfaces of the Wok
3 and impair their effectiveness!
Mounting the lid handle
1. Place the lid handle 1 onto the broad insulating
wafer so that the rectangular retainer protudes
into the lid handle 1.
2. From above, lay the broad insulating wafer with
the lid handle 1 on the glass lid 2, so that the
holes lie one above the other.
3. Firstly, place the metallic washers over the screws.
Then place the rubber washers onto the screws
so that the broad sides lie flat against the metallic
washers.
4. From below, insert the screws with both washers
through the holes and then screw them tight with
a cross-head screwdriver.
- 28 -
Page 31

Commissioning
On the first usage, the generation of light smoke
and a slight smell can occur, this is due to production residues. This is completely normal and is not
dangerous. Provide for sufficient ventilation, for
example, open a window.
Heat levels
The various heat levels of the temperature regulator 8
are guideline values:
Heating levels 1-2:For keeping foods warm.
Heating levels 3-4:For braising and boiling.
Heating level 5: For roasting.
Important!
NEVER operate the thermo-plinth 7 without the Wok
3 in position. There is a real risk of overheating.
Important!
NEVER lay aluminium foil or other materials between
the thermo-plinth 7 and the Wok 3, if you do, irreparable damage may be caused to the Electrical
Wok. Additionally, there would be an increased risk
of a fire!
5. Then place the desired ingredients into the Wok 3.
If necessary, add some oil or fat into the Wok 3.
6. Attach the drip grill 0 into the Wok 3, which is
used to collect items that are quickly cooked in
the Wok 3, whilst other items, those requiring
a somewhat longer cooking time, remain in the
Wok 3.
7. For steaming and boiling – depending on the
recipe being used – place the glass lid 2 onto
the Wok 3.
1. Insert the power cable 5 into the thermo-plinth 7.
2. Insert the power cable 5 into a wall power
socket.
3. Now place the Wok 3 onto the thermo plinth 7.
4. Adjust the temperature regulator 8 to the desired
heating level. The control lamp 9 glows.
Ensure that the Wok 3 stands safely and level on
the thermo-plinth 7.
Important!
Do not overfill the Wok 3! The maximum volume
(fluids) amounts to 1.5 l.
Using the Wok for keeping food
warm
If you wish to use the Wok 3 for serving and keeping
food warm …
1. Firstly, turn the temperature regulator 8 down to
heating level 1.
2. Remove the Wok 3 from the thermo-plinth 7
and place it on a non-heated surface (e.g. a
switched-off, completely cooled down hotplate).
3. Remove the power cable 5 first from the wall
socket and then from the thermo-plinth 7.
4. Place the thermo-plinth 7 at the desired location.
Ensure that the surface at the location is level,
firm and heat-resistant.
5. Insert the power cable 5 first back into the thermoplinth 7 and then into a wall socket.
6. Place the Wok 3 with the food to be kept warm
onto the thermo-plinth 7.
- 29 -
Page 32

7. Turn the temperature regulator 8 back to heating level 1 to keep liquid foods warm. Turn the
temperature regulator 8 to heating level 2 for
keeping solid foods warm. Occasionally stir solid foods while they are being kept warm and
mix a small amount of water into them to avoid a
possible spoiling or burning of the food.
Cleaning and care
Important!
First of all, ALWAYS remove the power cable 5
from the wall socket before cleaning the Electrical
Wok and its components! Otherwise, there is the
great risk of receiving an electric shock!
Important!
NEVER submerge the thermo-plinth 7 in water to
clean it! The appliance could become irreparably
damaged!
After using the Electrical Wok always wait until the
thermo-plinth 7 and the Wok 3 have cooled
down completely!
The risk of burns is ever present!
When you have removed the power cable 5 of the
Electrical Wok from the wall socket, and the Wok 3
and the thermo-plinth 7 have cooled down …
1. Using the wooden spoon w, remove the largest
pieces of food remnants from the Wok 3.
2. Wash the Wok 3 thoroughly in warm water
with a mild washing-up detergent. Do not use
any abrasive cleaners or scouring pads, these
will destroy the non-stick surfaces of the Wok 3
and impair their effectiveness!
3. Clean the housing of the themo-plinth 7 with a
moist sponge.
Storage
• Remove the power cable 5 from both the wall
socket and the thermo-plinth 7 when the app-
liance is not being used.
• Allow the Wok and its components to cool down
completely before storing them away.
• For the sake of safety, ALWAYS store the Electrical
Wok out of the reach of children.
Troubleshooting
Should the Electrical Wok not function or not function
correctly …
1. Check to ensure that the power cable 5 is correctly connected to the thermo-plinth 7.
2. Check to ensure that the power cable 5 is correctly connected to the wall socket.
3. Check to ensure that the wall power socket to
which the Electrical Wok is connected is "live",
do this by connecting another appliance to it.
If the malfunction cannot be traced back to one of
these causes …
4. Remove the power cable from the wall socket
and allow the thermo-plinth 7 to cool down
completely.
5. Re-insert the power cable 5 into a wall power
socket.
Should the malfunction not be corrected by the
measures described above, please make contact
with one of our service-partners in your locality.
- 30 -
Page 33

Disposal
Do not dispose of the appliance in your
normal domestic waste. This product is
subject to the European directive
2002/96/EG.
Dispose of the appliance through an approved disposal centre or at your community waste facility.
Observe the currently applicable regulations.
In case of doubt, please contact your waste disposal centre.
Dispose of all packaging materials in an
environmentally friendly manner.
Warranty & Service
DES Ltd
Units 14-15
Bilston Industrial Estate
Oxford Street
Bilston
WV14 7EG
Tel.: 0870/787-6177
Fax: 0870/787-6168
e-mail: support.uk@kompernass.com
Irish Connection
Harbour view
Howth
Co. Dublin
Tel: 00353 (0) 87 99 62 077
Fax: 00353 18398056
e-mail: support.ie@kompernass.com
The warranty for this appliance is for 3 years from
the date of purchase. The appliance has been
manu-factured with care and meticulously examined
before delivery. Please retain your receipt as proof
of purchase. In the case of a warranty claim, please
make contact by telephone with our service department. Only in this way can a post-free despatch for
your goods be assured.
The warranty covers only claims for material and
maufacturing defects, not for wearing parts or for
damage to fragile components. This product is for
private use only and is not intended for commercial
use.
The warranty is void in the case of abusive and improper handling, use of force and internal tampering not carried out by our authorized service
branch. Your statutory rights are not restricted in
any way by this warranty.
Importer
KOMPERNASS GMBH
BURGSTRASSE 21
44867 BOCHUM, GERMANY
www.kompernass.com
- 31 -
Page 34

Recipes
Tagliatelle with vegetables
For 4 people
Chicken with coconut milk
For 4 people
400 g Orecchiettes
Salt
1 green Chili pepper
1 stick Leek
1 piece Ginger (approx. walnut sized)
200 g Chicken breast
Pepper
100 g Maize (tinned)
1 bunch Chives
4 tsp Groundnut or canola oil
100 ml unsweetened Coconut milk (tinned)
100 ml Stock
Preparation time: 30 min.
Per Portion approx.: 470 kcal
1. Cook the orecchiettes as per the packaging instructions in salt water until al dente. Cut the chili
pepper into fine stripes without the seeds. Clean
the leek, slice it lengthways, wash it and slice it
into strips. Peel the ginger and cut it into small
pieces. Cut the chicken breast into 1 1/2 cm
wide strips, spice them with salt and pepper.
Drain the maize. Wash the chives and cut into
fine rolls.
2. First heat the wok, then the oil. Fry the chicken
for approx. 4 mins until gold-brown. Place the
chives in the middle of the Wok and steam for
approx. 2 mins until glassy. Add the chili, ginger
and maize, then cook for approx. 2 mins, stirring
constantly.
Mix everything together.
3. Pour in the stock and coconut milk, cook for approx. 3 mins whilst covered. Allow the orecchiettes
to become hot in the mix, add salt and pepper.
Serve sprinkled with the chive mini-rolls.
200 g Rice tagliatelle
Salt
150 g green Beans
1 red Paprika seed
1 red Onion
1 Garlic clove
1 piece Ginger (approx. walnut sized)
4 tsp. olive oil
300 g Broccoli sprigs
100 ml Stock
5 tbsp dark Soya sauce
2 tbsp chopped Cashew nuts
Preparation time: 25 min.
Per Portion approx.: 400 kcal
1. Cook the noodles as per the packaging instructions in salt water until al dente.
2. Wash and clean the vegetables. Slice the beans
and paprika until small. Peel the onion and slice
into strips. Peel the garlic and ginger and slice
until small.
3. First heat the wok, then the oil. Stir-fry the paprika
in it for 1 min. One after the other, saute the beans,
broccoli and onion.
4. Blend in the garlic and ginger. Allow it to cook
for 1 min. with stock and soya sauce. Turn the
noodles in it. Garnish with nuts.
- 32 -
Page 35

Coloured Thai rice
For 4 people
Fillet of beef with cauliflower
For 4 people
2 Spring onions
1 Carrot
1 red Paprika seed
1 Pineapple
30 g Cashew nuts
2 tbsp Peanut oil
1/4 l Vegetable broth
Salt
Pepper
1 pinch Sugar
600 g cooked Rice
1 tbsp fresh chopped Mint or green Coriander
Preparation time: 30 min.
Per Portion approx.: 320 kcal
1. Clean and wash the vegetables. Of the onions,
cut the white one into strips, the green one into
pieces. Slice the carrot into matchstick thin pieces.
Slice the paprika into thin strips. Peel the pineapple
and, without the stem, cut it into 1 1/2 cm thick
pieces.
2. Heat up the Wok, then roast the nuts in it, without fat, until golden-brown.
3. First heat the wok, then the oil. Fry the white
onion in it until glassy. Roast the carrot and paprika in the middle of the Wok for approx. 4 min.
stirring constantly, until cooked. Boil it up with
the stock and then spice it with salt, pepper and
sugar. Blend the rice in easily and allow it to become hot. Mix in the green onion.
4. Place the pineaple pieces back together as slices.
Spread the rice over them and garnish with
herbs and cashew nuts.
400 g Fillet of Beef
3 tbsp Tandoori spice (health-food shop, Asian shop)
1 small Cauliflower
2 Tomates on the vine
1 Zucchini
1 small red Onion
2 Spring onions
4 tsp Sunflower oil
100 ml Stock
150 ml unsweetened Coconut milk (tinned)
Salt
Pepper
Preparation time: 30 min
Per Portion approx.: 190 kcal
1. Slice the fillet into cubes of approx. 1 x 2 cm
and spice with Tandoori. Split the cauliflower
into sprigs, cut the stalks into slices. Dice the
tomatoes. Cut the zucchini into thin slices approx.
2 cm long.
Peel the onion and slice into strips. Half the white
of the spring onions lengthways, slice the green
into pieces.
2. First heat the wok, then add 2 tbsp. of oil. Fry
the meat in there for 2 min. and keep it warm.
Re-heat the Wok, fry the onion in the remaining
oil until glassy. Fry the cauliflower with it for 3
min. Boil it up with the stock and coconut milk,
let it cook for approx. 5 mins. Add salt and pepper.
Mix in the white of the spring onion, zucchini
and tomato. Cook for 3 min. Mix in the meat
and green onion, then check for taste.
- 33 -
Page 36

Banana pancakes
For 4 people
1 pinch salt
1 pinch Cinnamon powder
150 g plain flour
250 ml unsweetened Coconut milk (tinned)
2 tbsp. honey
2 Bananas
2 eggs
4 tbsp Peanut oil
Juice of 1/2 Lemon
Preparation time: 40 min.
Standing time: 30 min.-1 hr.
Per Portion approx.: 250 kcal
1. For the pancakes, mix the salt, cinnamon, flour,
coconut milk and honey to a pastry with an
immersion blender and then let it stand for
30 min -1 hr.
2. Peel the bananas. Slice 1 banana into very small
pieces and, with the eggs, mix it into the pastry.
Should the pastry be too thick, blend in some
mineral water. Cut the second banana into slices
and mix it into the pastry.
3. Preheat the oven to 70°. First heat the wok, then
smear it with oil. One after the other, and with
a medium heat setting, fry 8 pancakes on both
sides until golden brown. Keep the pancakes
warm in the oven. Re-coat the wok with the oil
for each pancake. Sprinkle the pancakes with
lemon juice and then serve.
Side dish: Fruit salad
- 34 -
Page 37

Recipe tips
Items to be cooked keep
sticking to the wok
➧ Heat up the wok, at the same
time use three tablespoons of
salt and the spatula to loosen
all impurities. Then wipe the
wok out with a towel. From
then on clean it only with hot
water, do not use any more
cleaners. Start again with
somewhat more heat.
The vegetables are still
raw
➧ Re-cook the vegetables, ideally
in small portions and with
constant stirring, until they
are al dente.
The cooked dish is too dry
➧ Add coconut milk, stock or
soya sauce until sufficient
sauce is created.
The oil is smoking
➧ Smoking oil is not beneficial
to health: Pour the oil into a
heat resistant container to
cool down and then dispose
of it. Cool the overheated
wok with warm water, pour
the water off then wipe the
wok out. Start again with
fresh oil.
The cooked dish is too
spicy
➧ Blend in small cubes of pine-
apple, mango or tomato and
attenuate with coconut milk
or use smoothly stirred low-fat
yoghurt. Do not re-heat the
cooked dish.
Too much sauce has
been created
➧ Lift the firm ingredients from
the wok, allow the sauce to
boil down quickly and under
high heat, mix the ingredients
back in and make another
taste check.
The vegetables are too soft
and overcooked
➧ Dice some fresh vegetables
and blend them in still raw.
The cooked dish tastes too
insipid
➧ Add in soya sauce, scraped
ginger, pressed garlic, chopped herbs and sesame oil or
another seasoning oil.
There is too little sauce
➧ Mix in 100- 200 g soyabean
shoots or boil up a smallcubed potato and carrot, as
well as 100 g frozen peas,
then blend them in. Make a
taste check.
- 35 -
Page 38

- 36 -
Page 39

INHALTSVERZEICHNIS SEITE
Bestimmungsgemäßer Gebrauch 38
Sicherheitshinweise 38
Funktion 39
Technische Daten 39
Lieferumfang 40
Beschreibung 40
Aufstellort 40
Vor dem ersten Gebrauch 40
Montieren des Deckelgriffs ...........................................................................................................40
Inbetriebnahme 41
Heizstufen .......................................................................................................................................41
Verwendung der Wok-Pfanne zum Warmhalten 41
Reinigen und Pflegen 42
Aufbewahren 42
Funktionsstörungen 42
Entsorgen 43
Garantie und Service 43
Importeur 43
Rezepte 44
Hähnchen mit Kokosmilch.............................................................................................................44
Bandnudeln mit Gemüse...............................................................................................................44
Bunter Thai-Reis ..............................................................................................................................45
Rinderfilet mit Blumenkohl .............................................................................................................45
Bananenpfannkuchen....................................................................................................................46
Rezepttipps 47
Lesen Sie die Bedienungsanleitung vor der ersten Verwendung aufmerksam durch und heben Sie diese für
den späteren Gebrauch auf. Händigen Sie bei Weitergabe des Gerätes an Dritte auch die Anleitung aus.
- 37 -
Page 40

ELEKTRISCHER WOK
KH 1099
Bestimmungsgemäßer
Gebrauch
Der elektrische Wok KH 1099 ist ausschließlich bestimmt …
• zur Verwendung als Kochgerät
• zur Verwendung in geschlossenen Räumen
• zum nicht-kommerziellen Gebrauch im privaten
Haushalt
Hinweis:
Für Defekte des elektrischen Woks bzw. seiner
Komponenten, die auf nicht bestimmungsgemäßen
Gebrauch zurückzuführen sind, wird jede
Haftung/Gewährleistung ausgeschlossen!
Sicherheitshinweise
Um Lebensgefahr durch
elektrischen Schlag zu vermeiden:
• Die Spannung der Stromquelle muss mit den
Angaben auf dem Typenschild des Gerätes
übereinstimmen.
• Tauchen Sie den Thermo-Sockel niemals in Wasser ein. Wischen Sie ihn nur mit einem feuchten
Tuch ab. Wenn Flüssigkeit in den Thermo-Sockel
gelangt, besteht die Gefahr eines elektrischen
Schlages!
• Lassen Sie beschädigte Netzstecker oder Netzkabel sofort von autorisiertem Fachpersonal
oder dem Kundenservice austauschen, um Gefährdungen zu vermeiden.
• Lassen Sie Geräte, die nicht einwandfrei funktionieren oder beschädigt wurden, sofort vom Kundendienst untersuchen und reparieren.
Um Brandgefahr und Verletzungen
zu vermeiden:
• Das Gerät während des Betriebs niemals unbeaufsichtigt lassen.
• Dieses Gerät ist nicht dafür bestimmt, durch Personen (einschließlich Kinder) mit eingeschränkten physischen, sensorischen oder geistigen Fähigkeiten oder mangels Erfahrung und/oder
mangels Wissen benutzt zu werden, es sei denn,
sie werden durch eine für ihre Sicherheit zuständige Person beaufsichtigt oder erhielten von ihr
Anweisungen, wie das Gerät zu benutzen ist.
Kinder sollten beaufsichtigt werden, um sicherzustellen, dass sie nicht mit dem Gerät spielen.
• Sorgen Sie für einen sicheren Stand des Gerätes.
• Sorgen Sie dafür, dass der Netzstecker bei Gefahr schnell erreichbar ist und das Kabel nicht
zur Stolperfalle werden kann.
• Benutzen Sie das Gerät niemals:
- wenn einzelne Geräteteile, das Netzkabel oder
der Netzstecker beschädigt sind,
- im Falle von Fehlfunktionen, oder wenn es in an-
derer Weise beschädigt wurde oder herunter
gefallen ist. Geben Sie das Gerät zur Überprüfung bzw. Reparatur an die Service-Stelle.
• Plastiktüten können eine Gefahr darstellen. Um
Erstickungsgefahr zu vermeiden, bewahren Sie
Plastiktüten außerhalb der Reichweite von Babys
und Kleinkindern auf.
• Betreiben Sie das Gerät nicht mit einer externen
Zeitschaltuhr oder einem separaten Fernwirksystem.
• Stellen Sie niemals anderes Kochgeschirr statt
der Wok-Pfanne auf den Thermo-Sockel. Anderes Kochgeschirr kann während des Betriebes
umkippen, da der Thermo-Sockel nur für die Aufnahme der mitgelieferten Behältnisse ausgelegt
ist.
So verhalten Sie sich sicher:
• Ziehen Sie bei Gefahr sofort den Netzstecker
aus der Steckdose.
- 38 -
Page 41

• Verwenden Sie das Gerät niemals zweckentfremdet.
• Ziehen Sie den Netzstecker sowie das Netzkabel vom Gerät, wenn das Gerät nicht benutzt
wird, wenn Sie Teile entfernen und vor dem Reinigen.
Um Sachschäden zu vermeiden:
• Benutzen Sie die Wok-Pfanne nicht als Kochgeschirr auf anderen Heizquellen (z. B. auf
Herdplatten), da sie sonst irreparabel
beschädigt werden kann.
• Benutzen Sie nur Holzbesteck zum Umrühren
und Wenden der Speisen in der Wok-Pfanne;
wenn Sie Besteck aus Metall benutzen, wird die
Antihaft-Beschichtung der Wok-Pfanne zerkratzt
und damit unbrauchbar.
• Benutzen Sie die Wok-Pfanne nicht, um darin
Speisen oder deren Zutaten zu schneiden. Anderenfalls wird die Antihaft-Beschichtung der WokPfanne zerkratzt und damit unbrauchbar.
Verbrennungsgefahr!
• Fassen Sie die Wok-Pfanne und den Glasdeckel
beim Kochen und Servieren nur an den Griffen
an, da beide sehr heiß werden können. Benutzen Sie sicherheitshalber zusätzlich immer einen
Topflappen.
• Beim Anheben des Deckels kann heißer Dampf
entweichen! Beugen Sie sich daher niemals
unmittelbar über die Wok-Pfanne, wenn Sie den
Deckel abheben!
• Verwenden Sie die Wok-Pfanne nicht, um Suppen zu kochen! Die Wok-Pfanne ist dafür zu
flach, daher können Suppen schnell überkochen!
Achtung!
• Gießen Sie während des Kochens niemals Wasser in erhitztes Fett bzw. Öl in der Wok-Pfanne!
Dabei entsteht eine Stichflamme und es kann zu
einem Brand kommen! Außerdem können sich
Personen in der Nähe des elektrischen Woks
schwerste Brandverletzungen zuziehen!
• Fett und Öl können bei Überhitzung schnell Feuer fangen! Versuchen Sie unter keinen Umständen, brennendes Fett bzw. Öl mit Wasser zu löschen!
Dabei entsteht eine Stichflamme, durch die das
Feuer auf Möbel, Gardinen etc. übergreifen kann!
Außerdem können sich Personen in der Nähe des
elektrischen Woks schwerste Brandverletzungen zuziehen!
Um brennendes Fett bzw. Öl zu löschen…
1. Ziehen Sie sofort den Netzstecker aus der
Steckdose heraus.
2. Ersticken Sie die Flammen, indem Sie einen
Deckel, eine Metallschale, eine Metallschüssel
oder eine Löschdecke auf die Wok-Pfanne legen.
Funktion
Mit dem Wok …
• können Sie Speisen nach traditioneller
chinesischer Zubereitungsart bei großer Hitze
schonend garen.
• bleiben durch kurze Garzeiten bei hohen Temperaturen Vitamine und Nährstoffe der Zutaten
weitestgehend erhalten.
• können Sie Speisen ohne oder mit nur geringer
Zugabe von Fett zubereiten.
Technische Daten
Netzspannung: 220 - 240 V ~50 Hz
Ausgangsleistung: 1.200 Watt
- 39 -
Page 42

Lieferumfang
• Wok-Pfanne mit wärmeisolierten Griffen
• Thermo-Sockel mit Temperaturregler
• Glasdeckel
• wärmeisoliertem Deckelgriff mit Montagematerial
• herausnehmbares Abtropfgitter
• 2 Holzspatel, 1 Holzlöffel, ein Paar Ess-Stäbchen
• Bedienungsanleitung
Beschreibung
1 Deckelgriff
2 Glasdeckel
3 Wok-Pfanne
4 wärmeisolierte Griffe
5 Netzkabel
6 Heizspirale
7 Thermo-Sockel
8 Temperaturregler
9 Kontrollleuchte
Zubehör:
0 Abtropfgitter
q 2 Holzspatel
w Holzlöffel
e Ess-Stäbchen
Aufstellort
Stellen Sie den eingeschalteten Wok ausschließlich
auf einen ebenen, festen und hitzebeständigen
Untergrund und in trockener Umgebung auf.
Achtung!
Um Schäden durch Hitzeeinwirkung und Brandgefahr in der Umgebung des eingeschalteten Woks zu
verhindern, sorgen Sie dafür, dass …
• der eingeschaltete Wok rundum stets einen
Abstand von mindestens 50 cm zu Wänden,
Möbelstücken und anderen Gegenständen hat.
• über dem eingeschalteten Wok keine Gegenstände hängen (z. B. Lampen).
• sich in der Nähe des eingeschalteten Woks
keine leicht entflammbaren Materialien (z. B.
Stoffe/Textilien) befinden.
• das Netzkabel 5 und der Thermo-Sockel 7
sich nicht in der Nähe von heißen Oberflächen
und offenen Flammen befinden.
• das Netzkabel 5 nicht mit dem Thermo-Sockel
7 in Berührung kommt.
• keine Feuchtigkeit und/oder Flüssigkeiten in den
Thermo-Sockel 7 gelangen.
Anderenfalls besteht Brandgefahr
und die Gefahr eines elektrischen
Schlages!
Vor dem ersten Gebrauch
Entnehmen Sie alle Bestandteile des elektrischen
Woks aus der Verpackung. Entfernen Sie eventuell
vorhandene Schutzfolien und reinigen Sie die mit
Lebensmittel in Berührung kommenden Teile von
Verpackungsstaubresten.
Verwenden Sie kein Scheuermittel und keine Metallschwämme, da ansonsten die Antihaftbeschichtung
der Wok-Pfanne 3 zerkratzt und unbrauchbar
wird!
Montieren des Deckelgriffs
1. Stecken Sie den Deckelgriff 1 auf die breite Isolierscheibe, so dass die quadratische Arretierung
in den Deckelgriff 1 ragt.
2. Legen Sie die breite Isolierscheibe mit dem
Deckelgriff 1 von oben auf den Glasdeckel 2,
so dass die Löcher übereinander liegen.
3. Stecken Sie zuerst die metallische Unterlegscheibe auf die Schraube. Schieben Sie danach die
Gummi-Unterlegscheibe so auf die Schraube,
dass die breite Seite flach an der metallischen
Unterlegscheibe liegt.
- 40 -
Page 43

4. Stecken Sie von unten die Schraube mit den beiden Unterlegscheiben durch die Löcher und
schrauben Sie sie mit einem Kreuzschlitzschraubendreher fest.
Inbetriebnahme
Während der ersten Inbetriebnahme kann es durch
fertigungsbedingte Rückstände zu leichter Rauchund Geruchsentwicklung kommen. Das ist völlig normal und ungefährlich. Sorgen Sie für ausreichend
Belüftung, öffnen Sie zum Beispiel ein Fenster.
Heizstufen
Die verschiedenen Heizstufen des Temperaturreglers 8 sind Richtwerte:
Heizstufe 1-2: Zum Warmhalten von Speisen.
Heizstufe 3-4: Zum Schmoren und Kochen.
Heizstufe 5: Zum Braten.
Achtung!
Betreiben Sie den Thermo-Sockel 7 nie ohne auf-
gesetzte Wok-Pfanne 3. Es besteht die Gefahr einer Überhitzung.
Achtung!
Legen Sie niemals Alufolie oder andere Gegenstände zwischen Thermo-Sockel 7 und Wok-Pfanne 3,
anderenfalls kann es zu irreparablen Schäden am
elektrischen Wok kommen. Außerdem besteht die
Gefahr eines Brandes!
5. Geben Sie dann die gewünschten Zutaten in die
Wok-Pfanne 3. Falls nötig, geben Sie etwas Öl
oder Fett in die Wok-Pfanne 3.
6. Hängen Sie das Abtropfgitter 0 in die WokPfanne 3 ein, um Zutaten aus der Wok-Pfanne
3 darauf abzulegen, die sehr schnell gar sind,
während andere Zutaten wegen längerer Garzeiten noch in der Wok-Pfanne 3 bleiben
7. Setzen Sie zum Dünsten und Kochen – je nach
verwendetem Kochrezept – den Glasdeckel 2
auf die Wok-Pfanne 3 auf.
Verwendung der Wok-Pfanne
zum Warmhalten
Wenn Sie die Wok-Pfanne 3 zum Warmhalten von
Speisen verwenden möchten …
1. Stecken Sie das Netzkabel 5 am Thermo-
Sockel 7 ein.
2. Stecken Sie das Netzkabel 5 in eine Steckdose
ein.
3. Setzen Sie nun die Wok-Pfanne 3 auf den Ther-
mo-Sockel 7 auf.
4. Stellen Sie den Temperaturregler 8 auf die ge-
wünschte Heizstufe. Die Kontrollleuchte 9 leuch-
tet auf.
Achten Sie darauf, dass die Wok-Pfanne 3 sicher
und gerade auf dem Thermo-Sockel 7 steht.
Achtung!
Überfüllen Sie die Wok-Pfanne 3 nicht! Die maximale Füllmenge (Flüssigkeiten) beträgt 1,5l.
1. Drehen Sie zunächst den Temperaturregler 8
auf die Heizstufe 1.
2. Nehmen Sie anschließend die Wok-Pfanne 3
vom Thermo-Sockel 7 herunter und stellen Sie
sie auf einem hitzefesten Untergrund (z. B. einer
ausgeschalteten, vollständig abgekühlten Herdplatte) ab.
3. Ziehen Sie das Netzkabel 5 erst aus der
Steckdose und dann aus dem Thermo-Sockel 7
heraus.
4. Stellen Sie den Thermo-Sockel 7 am gewünschten Ort auf. Achten Sie darauf, dass der Untergrund am Aufstellort eben, fest und hitzefest ist.
5. Stecken Sie das Netzkabel 5 zunächst wieder
am Thermo-Sockel 7 und anschließend in eine
Steckdose ein.
- 41 -
Page 44

6. Setzen Sie die Wok-Pfanne 3 mit den warmzu-
haltenden Speisen wieder auf den ThermoSockel 7 auf.
7. Drehen Sie den Temperaturregler 8 zum Warm-
halten flüssiger Speisen wieder auf Heizstufe 1.
Drehen Sie den Temperaturregler 8 zum Warm-
halten fester Speisen auf Heizstufe 2. Rühren Sie
feste Speisen während des Warmhaltens gelegentlich um und fügen Sie etwas Wasser hinzu,
um ein Anbrennen der Speisen zu verhindern.
Reinigen und Pflegen
3. Reinigen Sie das Gehäuse des Thermo-Sockels
7 mit einem feuchten Schwamm.
Aufbewahren
• Ziehen Sie das Netzkabel 5 aus der Steckdose
und aus dem Thermo-Sockel 7, wenn das Gerät
nicht benutzt wird.
• Lassen Sie den Wok und seine Komponenten
vollständig abkühlen, bevor Sie ihn verstauen.
• Bewahren Sie den elektrischen Wok stets außerhalb der Reichweite von Kindern auf.
Achtung!
Ziehen Sie immer zuerst das Netzkabel 5 aus der
Steckdose, bevor Sie den elektrischen Wok und seine Komponenten reinigen! Anderenfalls besteht die
Gefahr eines elektrischen Schlages!
Achtung!
Tauchen Sie den Thermo-Sockel 7 zur Reinigung
niemals in Wasser! Anderenfalls kann das Gerät irreparabel beschädigt werden!
Warten Sie nach dem Betrieb des elektrischen
Woks stets, bis der Thermo-Sockel 7 und die Wok-
Pfanne 3 vollständig abgekühlt sind!
Anderenfalls besteht die Gefahr
von Verbrennungen!
Wenn Sie das Netzkabel 5 des elektrischen Woks
aus der Steckdose gezogen haben, die Wok-Pfanne
3 und der Thermo-Sockel 7 abgekühlt sind …
1. Entfernen Sie grobe Essensreste mit dem Holzlöffel w aus der Wok-Pfanne 3.
2. Spülen Sie die Wok-Pfanne 3 gründlich in
warmem Wasser und mit einem milden GeschirrSpülmittel. Verwenden Sie kein Scheuermittel
und keine Metallschwämme, da ansonsten die
Antihaftbeschichtung der Wok-Pfanne 3 zer-
kratzt und unbrauchbar wird!
Funktionsstörungen
Sollte der elektrische Wok nicht oder nicht richtig
funktionieren …
1. Prüfen Sie, ob das Netzkabel 5 richtig am
Thermo-Sockel 7 angeschlossen ist.
2. Prüfen Sie, ob das Netzkabel 5 richtig in die
Steckdose eingesteckt ist.
3. Prüfen Sie, ob die Steckdose, an die der elektrische Wok angeschlossen ist, Strom führt, indem
Sie ein anderes Gerät an sie anschließen.
Wenn die Störung nicht auf eine dieser Ursachen
zurückzuführen ist …
4. Ziehen Sie zunächst den Netzstecker aus der
Steckdose heraus und lassen Sie den ThermoSockel 7 vollständig abkühlen.
5. Stecken Sie dann das Netzkabel 5 wieder in
eine Steckdose ein.
Falls sich die Störung nicht wie oben beschrieben
beheben lässt, wenden Sie sich bitte an einen
unserer Service-Partner.
- 42 -
Page 45

Entsorgen
Werfen Sie das Gerät keinesfalls in den
normalen Hausmüll. Dieses Produkt
unterliegt der europäischen Richtlinie
2002/96/EG.
Entsorgen Sie das Gerät über einen zugelassenen
Entsorgungsbetrieb oder über Ihre kommunale
Entsorgungseinrichtung.
Beachten Sie die aktuell geltenden Vorschriften.
Setzen Sie sich im Zweifelsfall mit Ihrer Entsorgungseinrichtung in Verbindung.
Führen Sie alle Verpackungsmaterialien
einer umweltgerechten Entsorgung zu.
Garantie und Service
Sie erhalten auf dieses Gerät 3 Jahre Garantie ab
Kaufdatum. Das Gerät wurde sorgfältig produziert
und vor Anlieferung gewissenhaft geprüft. Bitte bewahren Sie den Kassenbon als Nachweis für den
Kauf auf. Bitte setzen Sie sich im Garantiefall mit
Ihrer Servicestelle telefonisch in Verbindung. Nur so
kann eine kostenlose Einsendung Ihrer Ware
gewährleistet werden.
Die Garantieleistung gilt nur für Material- oder Fabrikationsfehler, nicht aber für Verschleißteile oder
für Beschädigungen an zerbrechlichen Teilen, z. B.
Schalter oder Akkus. Das Produkt ist lediglich für
den privaten und nicht für den gewerblichen
Gebrauch bestimmt.
Bei missbräuchlicher und unsachgemäßer Behandlung, Gewaltanwendung und bei Eingriffen, die
nicht von unserer autorisierten Service-Niederlassung vorgenommen wurden, erlischt die Garantie.
Ihre gesetzlichen Rechte werden durch diese Garantie nicht eingeschränkt.
Schraven
Service- und Dienstleistungs GmbH
Gewerbering 14
47623 Kevelaer, Germany
Tel.: +49 (0) 180 5 008107
(14 Ct/Min. aus dem dt. Festnetz ggf. abweichende Preise
aus dem Mobilfunknetz)
Fax: +49 (0) 2832 3532
e-mail: support.de@kompernass.com
Kompernaß Service Österreich
Rittenschober KG
Gmundner Strasse 10
A-4816 Gschwandt
Tel.: +43 (0) 7612 6260516
Fax: +43 (0) 7612 626056
e-mail: support.at@kompernass.com
Importeur
KOMPERNASS GMBH
BURGSTRASSE 21
44867 BOCHUM, GERMANY
www.kompernass.com
- 43 -
Page 46

Rezepte
Bandnudeln mit Gemüse
Für 4 Personen
Hähnchen mit Kokosmilch
Für 4 Personen
400 g Öhrchennudeln
Salz
1 grüne Chilischote
1 Stange Lauch
1 Stück Ingwer (etwa walnussgroß)
200 g Hähnchenbrust
Pfeffer
100 g Mais (aus der Dose)
1 Bund Schnittlauch
4 TL Erdnuss- oder Rapsöl
100 ml ungesüßte Kokosmilch (aus der Dose)
100 ml Brühe
Zubereitungszeit: 30 Min.
Pro Portion ca.: 470 kcal
1. Die Nudeln in reichlich Salzwasser nach
Packungsanweisung bissfest garen. Chilischote
ohne die Samen in feine Streifen schneiden.
Lauch putzen, längs aufschlitzen, waschen und
in Streifen schneiden. Ingwer schälen und klein
schneiden. Hähnchenbrust in 1 1/2 cm breite
Streifen schneiden, salzen und pfeffern. Mais
abtropfen lassen. Schnittlauch waschen, in feine
Röllchen schneiden.
2. Erst den Wok, dann das Öl erhitzen. Hähnchen
ca. in 4 Min. goldbraun braten. Lauch in die
Mitte des Woks geben und in 2 Min. glasig
dünsten. Chili, Ingwer und Mais dazugeben und
2 Min. unter Rühren anbraten. Alles vermischen.
3. Brühe und Kokosmilch zugießen und zugedeckt
3 Min. köcheln lassen. Die Nudeln darin heiß
werden lassen, salzen und pfeffern. Mit Schnittlauchröllchen bestreut servieren.
200 g Reisbandnudeln
Salz
150 g grüne Bohnen
1 rote Paprikaschote
1 rote Zwiebel
1 Knoblauchzehe
1 Stück Ingwer (etwa Walnussgroß)
4 TL Olivenöl
300 g Brokkoliröschen
100 ml Brühe
5 EL dunkle Sojasauce
2 EL gehackte Cashewnüsse
Zubereitungszeit: 25 Min.
Pro Portion etwa: 400 kcal
1. Die Nudeln in Salzwasser nach Packungsanweisung bissfest garen.
2. Gemüse waschen und putzen. Bohnen und Paprika klein schneiden. Die Zwiebel schälen und
in Streifen schneiden. Knoblauch und Ingwer
schälen und klein schneiden.
3. Den Wok, dann das Öl erhitzen. Die Paprika
darin 1 Min. pfannenrühren. Nach und nach
Bohnen, Brokkoli und Zwiebeln anbraten.
4. Knoblauch und Ingwer unterrühren. Mit Brühe
und Sojasauce 1 Min. kochen lassen. Die Nudeln darin wenden. Mit Nüssen bestreuen.
- 44 -
Page 47

Bunter Thai-Reis
Für 4 Personen
Rinderfilet mit Blumenkohl
Für 4 Personen
2 Frühlingszwiebeln
1 Möhre
1 rote Paprikaschote
1 Ananas
30 g Cashewnüsse
2 TL Erdnussöl
1/4 l Gemüsebrühe
Salz
Pfeffer
1 Prise Zucker
600 g gekochter Reis
1 EL frisch gehackte Minze oder Koriandergrün
Zubereitungszeit: 30 Min.
Pro Portion ca.: 320 kcal
1. Das Gemüse waschen und putzen. Von den
Zwiebeln das Weiße in Streifen, das Grün klein
schneiden. Die Möhre in streichholzdünne Stifte
schneiden. Die Paprika in dünne Streifen schneiden. Die Ananas schälen und ohne Strunk in
1 1/2 cm dicke Stücke schneiden.
2. Den Wok erhitzen, die Nüsse darin ohne Fett
goldbraun rösten.
3. Erst den Wok, dann das Öl darin erhitzen. Das
Weiße der Zwiebeln darin glasig braten. Möhre
und Paprika in der Mitte des Woks in 4 Min.
unter Rühren bissfest rösten. Mit Brühe aufkochen
lassen und mit Salz, Pfeffer und Zucker würzen.
Den Reis locker unterrühren und heiß werden
lassen. Zwiebelgrün untermischen.
4. Die Ananasstücke wieder zu Scheiben zusammenlegen. Den Reis darauf verteilen und mit
Kräutern und Cashewnüssen garnieren.
400 g Rinderfilet
3 EL Tandoori-Gewürz (Reformhaus, Asienladen)
1 kleiner Blumenkohl
2 Strauchtomaten
1 Zucchino
1 kleine rote Zwiebel
2 Frühlingszwiebeln
4 TL Sonnenblumenöl
100 ml Brühe
150 ml ungesüßte Kokosmilch (aus der Dose)
Salz
Pfeffer
Zubereitungszeit: 30 Min
Pro Portion ca.: 190 kcal
1. Das Filet in etwa 1 x 2 cm große Würfel schneiden und mit Tandoori würzen. Blumenkohl in
Röschen teilen, die Stiele in Scheiben schneiden.
Tomaten klein würfeln. Zucchino in 2 cm lange
dünne Stifte schneiden.
Zwiebel schälen und in dünne Streifen schneiden. Das Weiße der Frühlingszwiebeln längs
halbieren, mit dem Grün in Stücke schneiden.
2. Zuerst den Wok, dann 2 TL Öl erhitzen. Das
Fleisch darin 2 Min. braten und warm halten.
Wok erneut erhitzen, Zwiebel im restlichen Öl
glasig braten. Kohl 3 Min. mitbraten. Mit Brühe
und Kokosmilch aufkochen und 5 Min. köcheln
lassen. Salzen und pfeffern. Das Weiße der
Frühlingszwiebeln, Zucchini und Tomaten untermischen. 3 Min. garen. Fleisch und Zwiebelgrün
unterrühren und abschmecken.
- 45 -
Page 48

Bananenpfannkuchen
Für 4 Personen
1 Prise Salz
1 Prise Zimtpulver
150 g Mehl (Type 550)
250 ml Ungesüßte Kokosmilch (aus der Dose)
2 EL Honig
2 Bananen
2 Eier
4 TL Erdnussöl
Saft von 1/2 Zitrone
Zubereitungszeit: 40 Min.
Ruhezeit: 30 Min.-1 Std.
Pro Portion ca.: 250 kcal
1. Für die Pfannkuchen Salz, Zimt, Mehl, Kokosmilch und Honig mit dem Pürierstab zu einem
Teig vermischen und 30 Min. -1 Std. ruhen
lassen.
2. Die Bananen schälen. 1 Banane sehr klein
schneiden und mit den Eiern unter den Teig
mischen. Sollte der Teig zu dick sein, etwas
Mineralwasser untermischen. Die zweite Banane
in Scheiben schneiden und unter den Teig
mischen.
3. Den Backofen zum Warmhalten auf 70°
vorheizen. Zuerst den Wok erhitzen, dann mit Öl
bestreichen. Nacheinander bei mittlerer Hitze 8
Pfannkuchen von beiden Seiten goldbraun
backen. Pfannkuchen im Backofen warm stellen.
Den Wok für jeden Pfannkuchen neu mit Öl
bestreichen. Die Pfannkuchen mit Zitronensaft
beträufeln und servieren.
Beilage: Obstsalat
- 46 -
Page 49

Rezepttipps
Das Bratgut klebt ständig
am Wok fest
➧ Den Wok erhitzen, dabei mit
3 EL Salz und dem Spatel
alle Unreinheiten lösen.
Danach den Wok mit einem
Tuch auswischen. Von da ab
nur noch mit heißem Wasser
reinigen-keinen Reiniger mehr
verwenden. Neu starten mit
etwas mehr Hitze.
Das Gemüse ist zu roh Das Gericht ist zu scharf Das Gericht schmeckt fade
➧ Das Gemüse am besten por-
tionsweise unter ständigem
Rühren nachbraten, bis alles
bissfest gegart ist.
Das Gericht ist zu trocken
➧ Mit Kokosmilch, Sojasahne,
Brühe oder Sojasauce aufgießen, bis sich genug Sauce
gebildet hat.
Das Öl raucht
➧ Rauchendes Öl ist gesund-
heitsschädigend: Zum
Abkühlen in einen hitzefesten
Behälter gießen, dann entsorgen. Den überhitzten Wok mit
warmen Wasser abkühlen,
abgießen und auswischen.
Neu starten mit frischem Öl.
➧ Würfelchen von Ananas,
Mango oder Tomaten untermischen und mit Kokosmilch
abmildern oder fettarmen
glatt gerührten Joghurt verwenden. Gericht dann nicht
mehr aufkochen.
Es hat sich zu viel Sauce
gebildet
➧ Die festen Zutaten aus dem
Wok heben, die Sauce
schnell bei starker Hitze einkochen lassen, die Zutaten
untermischen und nochmals
abschmecken.
Das Gemüse ist schlapp
und übergart
➧ Etwas frisches Gemüse in klei-
ne Würfel schneiden und roh
untermengen.
➧ Zusätzlich mit Sojasauce,
geriebenem Ingwer, gepresstem Knoblauch, gehackten
Kräutern und Sesamöl oder
einem anderen Würzöl würzen.
Es ist zu wenig
➧ 100- 200 g
Sojabohnenkeimlinge unterrühren oder Würfelchen von
1 Kartoffel und 1 Möhre
sowie 100 g Tiefkühlerbsen
kurz mit kochendem Wasser
überbrühen und untermischen. Neu abschmecken.
- 47 -
Page 50

 Loading...