

Page 1

GB
IE
Quick installation guide
IP surveillance camera IUK 5 A1 (IAN 48807)
This guide shows you how to get your surveillance camera up and running in just a few steps using your smartphone or tablet. It also shows you how to connect to your Wi-Fi network.
LAN
WAN
Step 1 Step 2 Step 3 Step 4
■ Screw the Wi-Fi antenna onto the camera.
■ Connect the mains adapter to the camera and
a mains power socket.
■ Using the supplied network cable, connect the
camera to your network router or switch.
■ Ensure that your smartphone or tablet is con-
nected to your Wi-Fi network.
■ If you are using an Android smartphone or
tablet, install the app "IUK Viewer" from the
Google Play Store.
■ If you are using an iPhone or iPad, install the
app "IUK Viewer" from the Apple App Store.
■ Start the app and tap on "Add a new camera".
■ Select "Scan QR-Code" and scan the QR code
on the underside of the camera.
■ Once the QR code has been successfully
scanned, the corresponding camera ID
appears in the CAMERA INFO.
Then tap on "Done".
Visit our product support website on www.kompernass.com to download the latest version of the operating instructions, any firmware updates and additional control software.
Page 2

Step 5 Step 6 Step 7 Step 8
■ The camera image will appear in the overview.
Tap on the arrow to switch to the settings menu.
■ Tap on "Wi-Fi settings". ■ Then the software will search for available
Wi-Fi networks in the vicinity. After a short
while, the available networks will appear in
the overview.
■ Select your Wi-Fi network.
■ Enter your network key in the "Password" field.
Then tap on "Join".
► The camera will restart and you can discon-
nect the network cable. The camera is now
installed on your Wi-Fi network and you can
operate the camera via the app. You will find
further information in the camera’s full operating instructions.
Visit our product support website on www.kompernass.com to download the latest version of the operating instructions, any firmware updates and additional control software.
Page 3

FI
Pika-asennusopas
IP-valvontakamera IUK 5 A1 (IAN 48807)
Tässä oppaassa selitetään muutamassa vaiheessa, kuinka voit ottaa IP-valvontakamerasi käyttöön nopeasti älypuhelimesi tai taulutietokoneesi avulla ja integroida sen WLAN-verkkoosi.
LAN
WAN
Vaihe 1 Vaihe 2 Vaihe 3 Vaihe 4
■ Kierrä WLAN-antenni kiinni kameraan.
■ Liitä verkkoadapteri kameraan ja pistorasiaan.
■ Liitä kamera mukana tulevalla verkkokaapelilla
verkkoreitittimeen tai -kytkimeen.
■ Varmista, että älypuhelimesi tai taulutietoko-
neesi on yhdistetty WLAN-verkkoon.
■ Jos käytät Android-älypuhelinta tai -taulutieto-
konetta, asenna ”IUK viewer” -sovellus Google
Play -sovelluskaupasta.
■ Jos käytät Applen älypuhelinta (iPhone) tai
taulutietokonetta (iPad), asenna ”IUK viewer”
-sovellus Applen sovelluskaupasta (Apple Store).
■ Käynnistä sovellus ja napauta kohtaa
”Lisää kamera”.
■ Valitse ”Skannaa QR-koodi” ja skannaa
QR-koodi kameran alapuolella.
■ Kun QR-koodin skannaus on onnistunut, kameran
ID näkyy KAMERA INFO -kohdassa. Napauta
sen jälkeen kohtaa ”Valmis”.
Tuotetukisivultamme osoitteesta www.kompernass.com voit ladata käyttöohjeiden uusimmat versiot, laiteohjelmistopäivitykset ja käyttöohjelmistot.
Page 4

Vaihe 5 Vaihe 6 Vaihe 7 Vaihe 8
■ Kamerakuva ilmestyy yleisnäkymään.
Napauta nuolta siirtyäksesi asetusvalikkoon.
■ Napauta kohtaa ”WLAN-asetukset”. ■ Käytettävissä olevien WLAN-verkkojen haku
käynnistyy sen jälkeen automaattisesti. Vähän
ajan kuluttua käytettävissä olevat WLAN-verkot
ilmestyvät yleisnäkymään.
■ Valitse WLAN-verkkosi.
■ Syötä verkkoavain ”Salasana"-kenttään.
Napauta sen jälkeen painiketta ”Join”.
► Kamera käynnistetään nyt uudelleen ja voit
poistaa verkkokaapelin. Kamera on nyt asennettu WLAN-verkkoon ja sitä voidaan käyttää
sovelluksen kautta. Lisätietoja saat kameran
kattavasta käyttöohjeesta.
Tuotetukisivultamme osoitteesta www.kompernass.com voit ladata käyttöohjeiden uusimmat versiot, laiteohjelmistopäivitykset ja käyttöohjelmistot.
Page 5

SE
Snabbinstallationsguide
IP-övervakningskamera IUK 5 A1 (IAN 48807)
I den här instruktionen beskrivs hur IP-övervakningskameran tas i bruk med en smartphone eller platta och läggs in i ditt nätverk.
LAN
WAN
Steg 1 Steg 2 Steg 3 Steg 4
■ Skruva fast WLAN-antennen på kameran.
■ Koppla strömadaptern till kameran och till ett
eluttag.
■ Koppla kameran till din nätverksrouter eller
-switch med medföljande nätverkskabel.
■ Försäkra dig om att din smartphone eller platta
är ansluten till WLAN-nätverket.
■ Om du har en Android smartphone eller platta
installerar du IUK viewer från Google Play
Store.
■ Om du har en iPhone eller iPad installerar du
appen IUK viewer från Apple App-Store.
■ Starta appen och peka på "Lägg till kamera".
■ Välj Skanna QR-kod och skanna QR-koden på
kamerans undersida.
■ När QR-koden har skannats kommer kamerans
ID upp i KAMERA INFO. Peka sedan på "Klar".
Besök vår produktsupportsida på www.kompernass.com för att ladda ned den senaste versionen av bruksanvisningen, eventuella uppdateringar av den fasta programvaran och en extra användarmjukvara.
Page 6

Steg 5 Steg 6 Steg 7 Steg 8
■ Kamerabilden kommer upp i översikten.
Peka på pilen för att gå till inställningsmenyn.
■ Peka på WLAN-inställningar. ■ Därefter startar en sökning efter tillgängliga
WLAN-nätverk i närheten. Efter en liten stund
kommer de tillgängliga WLAN-nätverken upp
i översikten.
■ Välj ditt WLAN-nätverk.
■ Skriv in nätverksnyckeln i lösenordsfältet.
Peka sedan på "Join".
► Kameran startar om och du kan ta bort
nätverkskabeln. Kameran har nu installerats
i ditt nätverk och kan användas med appen.
Mer information finns i kamerans detaljerade
bruksanvisning.
Besök vår produktsupportsida på www.kompernass.com för att ladda ned den senaste versionen av bruksanvisningen, eventuella uppdateringar av den fasta programvaran och en extra användarmjukvara.
Page 7

DE
AT
CH
Schnellinstallationsanleitung
IP-Überwachungskamera IUK 5 A1 (IAN 48807)
Diese Anleitung zeigt Ihnen in wenigen Schritten, wie Sie die IP-Überwachungskamera mit Hilfe Ihres Smartphones oder Tablets in Betrieb nehmen und in Ihr WLAN-Netzwerk integrieren.
LAN
WAN
Schritt 1 Schritt 2 Schritt 3 Schritt 4
■ Schrauben Sie die WLAN-Antenne an die
Kamera.
■ Verbinden Sie den Netzadapter mit der
Kamera und einer Netzsteckdose.
■ Verbinden Sie die Kamera über das
mitgelieferte Netzwerkkabel mit Ihrem
Netzwerk-Router oder -switch.
■ Stellen Sie sicher, dass ihr Smartphone bzw.
Tablet mit Ihrem WLAN-Netzwerk verbunden ist.
■ Wenn Sie ein Android-Smartphone bzw.
Tablet verwenden, installieren Sie sich die App
„IUK viewer“ aus dem Google Play Store.
■ Wenn Sie ein iPhone bzw. iPad verwenden,
installieren Sie sich die App „IUK viewer“ aus
dem Apple App-Store.
■ Starten Sie die App und tippen Sie auf
„Kamera hinzufügen“.
■ Wählen Sie „QR-Code scannen“ und scannen
Sie den QR-Code auf der Unterseite der
Kamera.
■ Wenn der QR-Code erfolgreich gescannt
worden ist, erscheint in der KAMERA INFO
die entsprechende ID der Kamera. Tippen Sie
anschließend auf „Fertig“.
Besuchen Sie unsere Produktunterstützungs-Webseite unter www.kompernass.com, um die aktuellste Version der Bedienungsanleitung, eventuelle Firmware-Updates und zusätzliche Bediensoftware herunterzuladen.
Page 8

Schritt 5 Schritt 6 Schritt 7 Schritt 8
■ Das Kamerabild erscheint in der Übersicht.
Tippen Sie auf den Pfeil, um zum Einstellungsmenü zu wechseln.
■ Tippen Sie auf „WLAN Einstellungen“. ■ Anschließend wird automatisch nach verfüg-
baren WLAN-Netzwerken in der Umgebung
gesucht. Nach kurzer Zeit erscheinen die verfügbaren WLAN-Netzwerke in der Übersicht.
■ Wählen Sie Ihr WLAN-Netzwerk aus.
■ Geben Sie im Feld „Passwort“ Ihren Netzwerk-
schlüssel ein. Tippen Sie abschließend auf „Join“.
► Die Kamera wird jetzt neu gestartet und Sie
können das Netzwerkkabel entfernen. Die
Installation der Kamera in Ihr WLAN-Netzwerk ist jetzt abgeschlossen und Sie können
die Kamera über die App bedienen. Weitere
Informationen finden Sie in der ausführlichen
Bedienungsanleitung der Kamera.
Besuchen Sie unsere Produktunterstützungs-Webseite unter www.kompernass.com, um die aktuellste Version der Bedienungsanleitung, eventuelle Firmware-Updates und zusätzliche Bediensoftware herunterzuladen.
Page 9

IAN 48807
IP SURVEILLANCE CAMERA IUK 5 A1
IP-ÜBERWACHUNGSKAMERA
Bedienungsanleitung
IP SURVEILLANCE CAMERA
Operating instructions
IP-ÖVERVAKNINGSKAMERA
Bruksanvisning
IP-VALVONTAKAMERA
Käyttöohje
Page 10
GB Operating instructions Page 1
FI Käyttöohje Sivu 43
SE Bruksanvisning Sidan 85
DE / AT / CH Bedienungsanleitung Seite 127
Before reading, unfold both pages containing illustrations and familiarise yourself with all functions
of the device.
Käännä ennen lukemista molemmat kuvalliset sivut esiin ja tutustu seuraavaksi laitteen kaikkiin
toimintoihin.
Vik ut båda bildsidorna och ha den till hands när du läser igenom anvisningarna och gör dig
bekant med apparatens / maskinens funktioner.
Klappen Sie vor dem Lesen die beiden Seiten mit den Abbildungen aus und machen Sie sich
anschließend mit allen Funktionen des Gerätes vertraut.
Page 11
A
B
Page 12
C
D
Page 13

1IUK 5 A1
GB
Contents
Introduction ..................................................3
Information concerning these operating instructions ............................. 3
Copyright .............................................................. 3
Intended use ............................................................ 3
Warning notes .......................................................... 3
Safety .......................................................4
Basic safety guidelines .................................................... 4
Possible infringements of the rights of third parties ............................... 6
Operating components .........................................8
Setting up and connecting .......................................9
Package contents and transport inspection .................................... 9
Disposal of packaging materials ............................................ 9
Set-up location requirements. . . . . . . . . . . . . . . . . . . . . . . . . . . . . . . . . . . . . . . . . . . . . . . 10
Power supply ..........................................................11
Audio connection .......................................................11
LAN connection ........................................................11
Wi-Fi operation ......................................................... 11
Alarm connection .......................................................11
Handling and operation .......................................12
System requirements .....................................................12
Before use .............................................................13
Finding the camera in the network ..........................................13
Displaying the camera image in Internet Explorer 11 ...........................15
Meaning of the control buttons and fields .................................... 18
Configuration via the browser interface ......................................21
The "Basic settings" page .................................................21
The "Alarm settings" page ................................................23
The "Network" page ..................................................... 26
The "Pan & Tilt" page .................................................... 27
The "User settings" page .................................................. 28
Operating differences when using the smartphone preview ......................30
Displaying the camera image on a smartphone. . . . . . . . . . . . . . . . . . . . . . . . . . . . . . . . 30
Controlling the camera via smartphone ......................................31
Central monitoring via special software ...................................... 33
Page 14

2 IUK 5 A1
GB
Cleaning ....................................................38
Storage / Disposal ............................................38
Storage ............................................................... 38
Disposal of the device ...................................................38
Troubleshooting ..............................................38
Fault causes and rectification ..............................................39
Appendix ...................................................40
Notes on the Declaration of Conformity .....................................40
Technical data .........................................................40
Warranty .............................................................41
Service ............................................................... 42
Importer ..............................................................42
Page 15

3IUK 5 A1
GB
Introduction
Information concerning these operating instructions
Congratulations on the purchase of your new device.
You have selected a high-quality product. The operating instructions are part of this product.
They contain important information on safety, usage and disposal. Before using the product,
familiarise yourself with all handling and safety guidelines. Use the product only as described and
for the range of applications specified. Please pass on all documentation incl. these operating
instructions to any future owner(s) if you sell this product or give it away.
Copyright
This documentation is protected by copyright.
Any copying or reproduction, including in the form of extracts, or any reproduction of images
(even in a modified state), is permitted only with the written authorisation of the manufacturer.
Intended use
This device is an information technology device designed for recording audio and video data as
well as their transmission to computer-based monitors by cable or wirelessly. It is not intended for
any other or more extensive use. This device is not intended for use in commercial or industrial
environments.
The manufacturer accepts no responsibility for damage caused by failure to observe these instructions,
improper use or repairs, unauthorised modifications or the use of unapproved replacement parts.
The operator bears sole liability.
Warning notes
The following warning notice types are used in these operating instructions:
DANGER
A warning notice at this hazard level indicates an imminently hazardous
situation.
If the hazardous situation is not avoided, it could result in death or serious physical injury.
► Follow the instructions in this warning notice to avoid the risk of death or serious injury.
Page 16

4 IUK 5 A1
GB
WARNING
A warning notice at this hazard level indicates a potentially hazardous situation.
Failure to avoid this hazardous situation could result in injury.
► Follow the instructions in this warning notice to prevent injury.
CAUTION
A warning notice at this hazard level indicates a potential for property damage.
Failure to avoid this situation could result in property damage.
► Follow the instructions in this warning notice to prevent property damage.
NOTE
► A note provides additional information that will assist you in using the device.
Safety
In this section, you will find important safety instructions for using the device.
The device complies with statutory safety regulations. Improper use may result in personal injury and
property damage.
Basic safety guidelines
To ensure safe operation of the device, follow the safety guidelines set out below:
■ Check the device for visible external damage before use. Do not operate a device that has been
damaged or dropped.
■ If the cables or connections are damaged, have them replaced by an authorised specialist or the
Customer Service department.
■ People who, due to their physical, intellectual or motor abilities, are incapable of operating the
device safely may only use the device under the supervision or direction of a responsible person.
■
DANGER! Do not allow children to play with the packaging material! Keep all packaging
materials out of the reach of children. Risk of suffocation!
■ When mounting the device, ensure that it cannot fall and injure anyone.
Page 17

5IUK 5 A1
GB
■ Allow children to use the device only with supervision. Children are not always able to correctly
recognise potential dangers.
WARNING! Some of the supplied parts can be swallowed.
If a part is swallowed, seek medical advice as soon as possible.
■ All repairs must be carried out by authorised specialist companies or by the Customer Service
department. Failure to make proper repairs may put the user at risk. It will also invalidate any
warranty claims. Never open the housing of the camera or of the mains adapter. There is a risk
of fire and/or electrical shock.
■ Repairs to the device during the warranty period may only be carried out by a customer service
department authorised by the manufacturer. Otherwise, no warranty claims will be held for any
subsequent damages.
■ Defective components must always be replaced with original replacement parts. Compliance
with the safety requirements can only be guaranteed by using these replacement parts.
■ Always use only the supplied mains adapter to operate the device.
■ Do not place any objects on the device.
■ Protect the product from moisture. Use it only in dry interior rooms; do not it use outdoors or in
moist environments.
■ Never operate the device directly near open flames (e.g. candles) or in extreme environmental
conditions (e.g. in an explosive atmosphere).
■ The camera may not be used in areas in which there may be a build-up of explosive gases, this
includes petrol stations or similar.
■ Notes on disconnecting from the power supply:
Even when the device is not in operation, it still draws power. To prevent this, disconnect the device
from the mains by pulling the mains adapter from the socket. Therefore, you should use the device
in such a way so as to ensure unrestricted access to the mains socket, so that you can remove the
mains adapter immediately in the case of an emergency. To prevent any risk of fire or unintentional
switching on, and to save energy costs, you should always unplug the device from the socket
when it is not in use.
■ Grip the mains adapter directly whenever you want to pull it from the socket. Do not pull on the
cable itself and never touch the mains adapter with wet hands, as this could result in either a
short circuit or electric shock. Do not place any furniture or similar items on the mains adapter
cable and ensure that it cannot become trapped. Never tie knots in the cable and do not bind it
together with other cables. Lay the mains cable and, if applicable, the network, audio or alarm
cable so that they cannot be stepped on or tripped over. A damaged mains adapter can cause a
fire or electrical shock. Check the mains adapter regularly. If it is damaged, contact your nearest
authorised customer service centre or your dealer to have it replaced.
Page 18

6 IUK 5 A1
GB
■ Please remove the mains adapter from the mains before a storm and/or thunderstorm.
■ The power socket used must be easily accessible so that the mains adapter can be easily discon-
nected in an emergency.
■ If you notice any unusual noises, smoke or similar uncertain situations, immediately disconnect the
mains adapter from the power supply. Have the device checked by a qualified specialist before
using it again (see section "Service").
Electrostatic discharge
■ In some rare cases, it is possible that the camera may malfunction due to electrostatic discharge.
In the event of a malfunction due to electrostatic discharge, the product must be reset. To do this,
disconnect the mains adapter from the wall socket and then wait for about ten seconds before
plugging the device back in again.
Possible infringements of the rights of third parties
Please note the following when using the surveillance camera:
Copyright protection
Every person owns the rights to their own image. According to copyright law, pictures of people may
only be published without their permission if the affected person appears merely as an incidental
feature in a landscape or other location. The question as to whether a person is merely an incidental
feature must be ascertained on a case by case basis. To avoid any legal uncertainty, a warning
notice about the camera should be provided in all cases in which identifiable persons might be
recorded (see section "Duty of notification").
Protection of privacy
The privacy of others may not be infringed by any published images. Do not set up the camera so it
points to the garden or an entrance of a neighbouring residence, even if these locations are easily
visible from your own residence or to the general public. This does not a constitute a right to publish
these views.
Personal identifiability
Personal identifiability exists when it can be established that a specific person was at a certain location
at a given time. This identification can be also made by means of an identifier related to a specific
person, e.g. a car license plate. Personal identifiability must avoided under all circumstances.
Surveillance cameras at the workplace
Surveillance at the workplace is subject to particularly strict regulations in Germany. Employers should
not use surveillance cameras in the workplace in any cases where this could lead to a possible
infringement of legal rights.
Page 19

7IUK 5 A1
GB
Road traffic surveillance cameras
In the case of surveillance cameras directed at road traffic, it is advisable that the location of the
camera and the image frame be selected so that the road users cannot be identified by means of the
license plates. Inscriptions/logos on vehicles may also serve as a means of identifying a road user.
Duty of notification
If it is not possible to preclude the identification of persons, a notification informing of the presence
of the surveillance camera must be placed at clearly visible locations on all access routes to the
area within the filming range of the camera. Pedestrians must also be informed that by entering the
filming range of the camera they give their consent to be filmed/photographed and if they do not
consent then they should not access the affected area. The voluntary nature of this consent must be
considered. If the camera is located such that an affected person must pass by in order to reach a
destination (e.g. at the entrance to a place of interest) then the absence of voluntariness precludes
the granting of an effective consent.
The respective legal requirements of the country in which the camera is being used should always be
observed to avoid possible infringements of the rights of third parties.
Note on registered brand names and logos
The use of registered brand names and trade names as well as brand logos in these instructions
does not constitute an infringement of copyright, but rather merely serves as a reference. Even if
these are not specifically labelled as such in the respective passages of the text, the relevant legal
provisions apply.
The brand names and logos used are the property of their respective manufacturers and are subject
to their copyright provisions. Further information can be found in the respective publications of the
manufacturers.
Page 20

8 IUK 5 A1
GB
Operating components
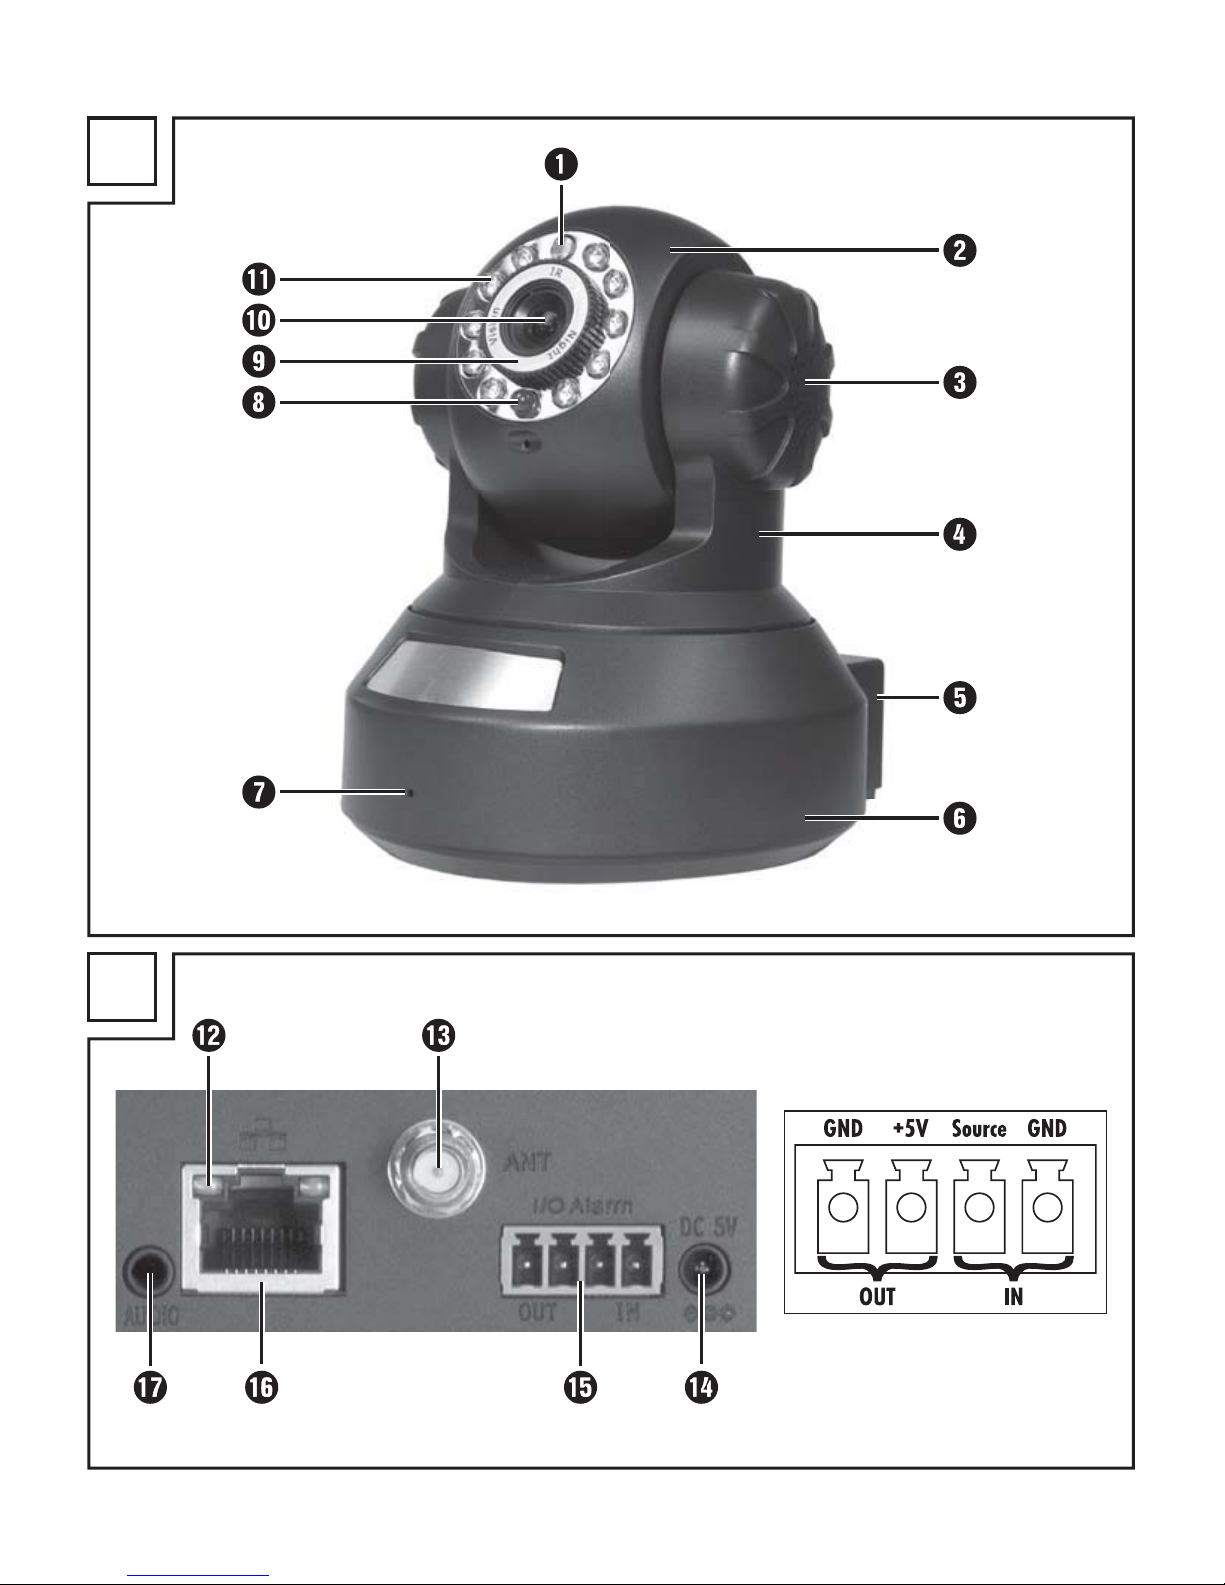
(For illustrations see fold-out pages)
Figure A:
Light sensor for controlling exposure
Camera head
Loudspeaker
Camera head mounting
Connection panel
Camera base
Microphone
Red operating LED
Focus ring for manual focusing
Camera lens
Infrared LEDs
Figure B:
Yellow control LED for the network connection
Threaded connection for the Wi-Fi antenna
Contact for power supply from the mains adapter
Alarm connection (IN/OUT)
LAN connection
AUDIO output
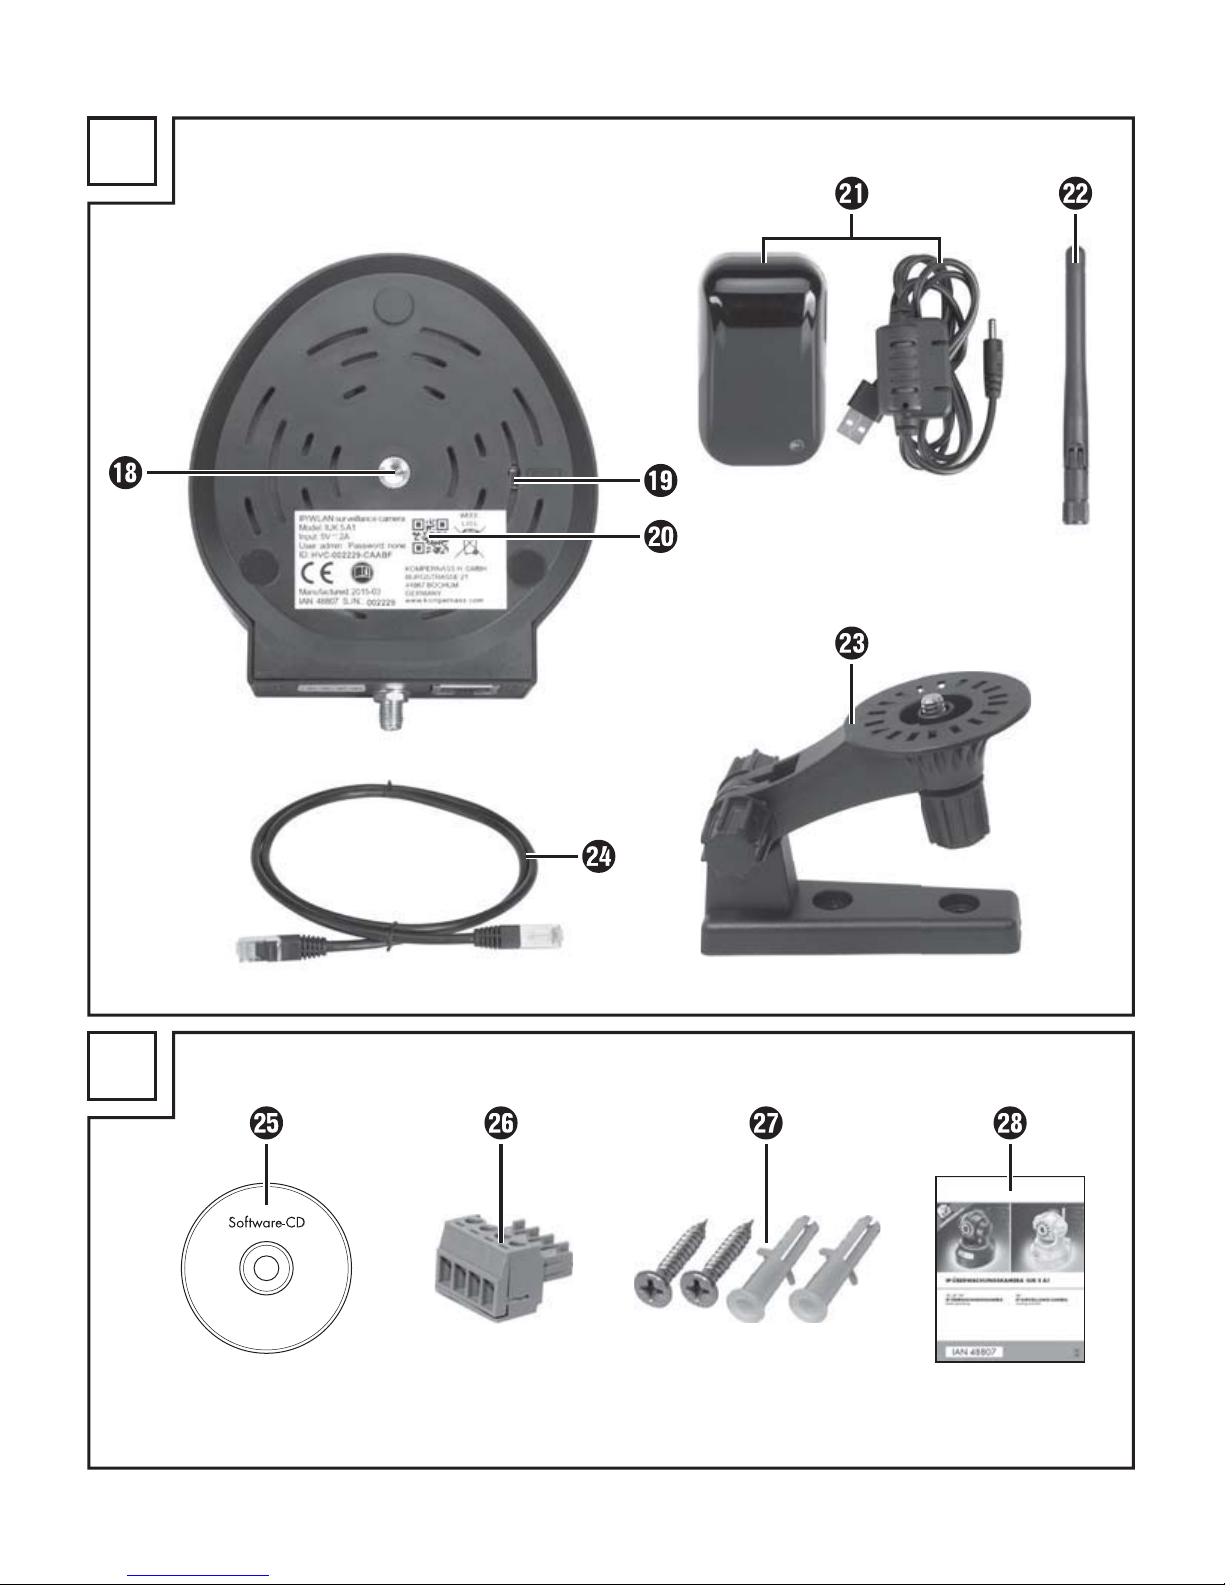
Figure C:
Thread for attaching the mounting arm
Reset switch
QR code for quick synchronisation with smartphone
Mains adapter
Wi-Fi antenna
Mounting arm
Network cable
Figure D:
Data CD
Plug adapter for alarm connection
Mounting material
Operating instructions
Page 21

9IUK 5 A1
GB
Setting up and connecting
DANGER
During the first use of the device there is a risk of injury and/or damage to
property!
To avoid risks, observe the following safety instructions:
► Please follow the instructions regarding the electrical connection of the device to avoid
damage to property.
Package contents and transport inspection
Please check the contents of the package (see fold-out pages).
The following components are included in delivery:
● Surveillance camera IUK5A1
● Mains adapter
● Removable Wi-Fi antenna
● Mounting arm
● Network cable
● Data CD
● Plug adapter for alarm connection
● Mounting material
● Operating instructions
NOTE
► Check the package for completeness and for signs of visible damage.
► If any items are missing or damaged as a result of defective packaging or insufficient care
during transportation, contact the Service hotline (see the section Service).
♦ Remove all parts of the device and the operating instructions from the box.
♦ Remove all packaging material.
Disposal of packaging materials
The packaging protects the device from damage during carriage. The packaging materials
have been selected for their environmental friendliness and ease of disposal, and are
therefore recyclable. Returning the packaging to the material cycle conserves raw materials
and reduces the amount of waste which is generated. Dispose of packaging materials
that are no longer needed in accordance with applicable local regulations.
Page 22
10 IUK 5 A1
GB
NOTE
► If possible, keep the original packaging of the device for the warranty period so that the device
can be packed properly for return shipment in the event of a warranty claim.
Set-up location requirements
For safe and trouble-free operation of the device, the set-up location must fulfi l the following requirements:
■ Set up the device on a fi rm, fl at and horizontal surface.
■ The surfaces of some items of furniture might contain components that can corrode and soften the
rubber pads of the device. If necessary, place a cover under the device’s pads.
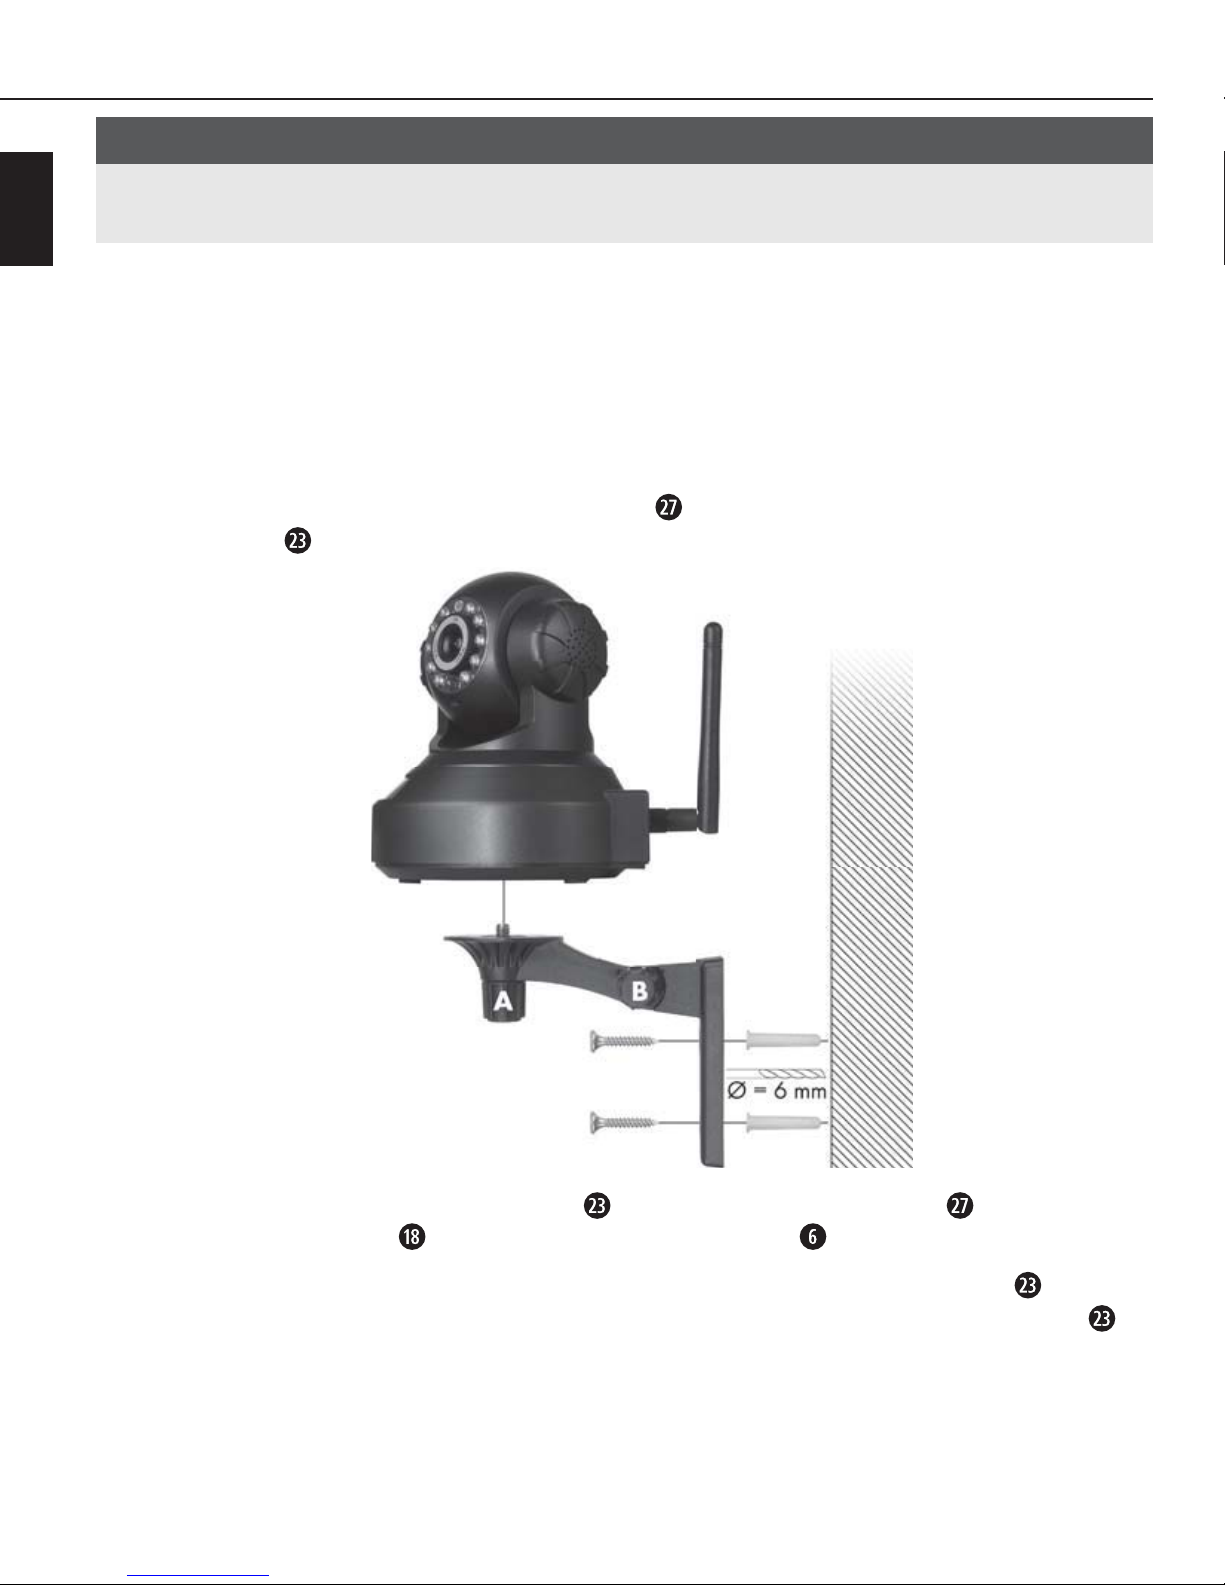
■ Or install the device using the mounting materials
that are included in the delivery to fi x the
mounting arm onto the wall as shown in the following diagram.
■ After you have attached the mounting arm with the screws and wall plugs , turn the hand
screw (A) into the thread on the bottom of the camera base .
■ If required, loosen the screw connection (B) to adjust the angle of the mounting arm
. Then
retighten the screw connection (B) so that the camera is held securely on the mounting arm .
■ Operate the device only in dry locations, never in a hot environment or anywhere near fl ammable
materials.
■ Operate the device only in locations with adequate ventilation.
Page 23
11IUK 5 A1
GB
Power supply
♦ Use only the supplied mains adapter to operate the device.
♦ Push the plug of the mains adapter cable into the power supply socket
. Then plug the mains
adapter into a properly connected power socket that supplies the voltage specified in the
technical data.
Audio connection
NOTE
► The audio signal, which can be transferred to the camera from a microphone connected to
the computer and played back via the integrated speaker, is supplied via the AUDIO output
socket
and can be transferred from there to an external amplifier.
♦ Connect a suitable 3.5 mm mini jack cable (not included in the delivery) to the AUDIO
output
if you want to amplify the audio signal. For this purpose, please also follow the
instructions of the connected playback device.
LAN connection
♦ To use the camera image on a wired network, connect the LAN connection to a network
router or switch using the supplied cable or other suitable cable.
Wi-Fi operation
♦ To use the camera image on a wireless network, screw the supplied Wi-Fi antenna into
the threaded connection .
Alarm connection
♦ You can connect the camera to an existing alarm system via the Alarm connection
(IN/OUT) .
♦ The alarm connection consists of a total of 4 contacts. You can connect alarm signals, e.g.
motion sensors or other alarm devices, to the two IN contacts. If the IN contacts are connected externally to each other, an alarm is triggered. The connection can take place via a
switch or relay.
♦ An external device such as an alarm, a siren or a door opener can be connected to the two
OUT contacts. Here, a signal is produced as soon as the output is manually activated or when
the output is selected for alarm signals and the surveillance camera recognises an alarm. The
maximum switching capacity of the OUT contacts is 5V/500mA.
♦ For more information, read the operating instructions of the components involved.
Page 24

12 IUK 5 A1
GB
Handling and operation
This section provides important information about proper handling and operation of the device.
The basic function of the surveillance camera is to provide video images via an IP network. High-
quality (VGA and QVGA) real-time video images are transmitted at a rate of up to 25 frames per
second via the LAN/Wi-Fi network. Compression technology using H.264/JPEG hardware is used.
The functions of the surveillance camera are based on the TCP/IP standard network protocol.
The integrated web server supports the browsers Internet Explorer 11, Mozilla Firefox, etc., various
smartphone browsers, as well as the core surveillance software that is included in the delivery. Therefore, you can easily set up and configure the device via the network, as well as install any available
firmware updates for your surveillance camera. This ensures the availability of your camera images
at any time and any place via the Internet at the click of a button. The prerequisite for Internet access
is, of course, a correct configuration of the network router.
NOTE
► Internet Explorer 11 is the only browser that allows access to all available operating options.
System requirements
NOTE
► The surveillance software can only be installed in Windows
®
operating systems. The video
display and configuration, however, are web-based and therefore function independently of
the platform.
Operating systems: Windows 2000
®
(SP4), Windows XP® (SP 2), Vista®, Win 7, Win 8
Processor: 2.0 GHz or higher
RAM: 512 MB or more
Network card: 10MBit/s or better
Graphics card memory: 512 MB or more
Supported web browsers: Internet Explorer 11, various others but with reduced functionality
Screen resolution: 1024 × 768 or higher
Page 25

13IUK 5 A1
GB
Before use
Around 30 seconds after the power supply is switched on, the camera carries out a self-test and
completes a movement covering its entire horizontal and vertical panning range. Afterwards, the
device is ready for use. If the device has recognised a wired network connection, the yellow control
LED fl ashes rapidly.
NOTE
► For the fi rst confi guration, the camera must be connected via the LAN connection.
Finding the camera in the network
Insert the supplied CD in the disk drive of the Windows® computer via which you want to operate
your camera. Open the drive in Explorer and double-click on the fi le "Search Tool". This will start the
program to search for your camera in the network (no fi les are installed on your computer).
1) Depending on your computer confi guration, a fi rewall warning will appear.
Click on "Allow access".
Page 26

14 IUK 5 A1
GB
2) The program fi nds the camera and when you click on the device name "IPCAM", the relevant
network information appears:
The network confi guration of the surveillance camera is carried out automatically if the "Auto"
option is activated and the router is in DHCP mode. If the camera does not appear on the list,
you can refresh the list by clicking on the "Find" button.
Here, we strongly recommend that you retain the suggested parameters. Otherwise, there is a
risk that the camera will not work correctly due to incorrect settings.
In case of problems, contact your network administrator.
NOTE
► In DHCP operation, your router will issue IP addresses automatically on demand.
You can also enter the network data manually, for instance, if the automatic confi guration does
not work.
To do this, select the option "Custom". This activates the input fi elds for the confi guration.
Now enter the network data for the surveillance camera manually. Generally, these data
include the network settings for your router. For further information, read the operating
instructions for your router.
Click "Apply" to accept the new settings.
Page 27

15IUK 5 A1
GB
3) Click "Others" to open the page for advanced options.
The number of the current camera fi rmware is displayed on the right. In the line below,
you can read the MAC address of the current network connection.
If you would like to update the software, click on "Upgrade" and, following authentication
(account: admin, password: no entry, OK) click on the folder symbol to fi nd the fi le with
which you want to update either the browser-based control software ( ) or the
fi rmware for your surveillance camera ( ). Then click on "Upgrade" to carry out the
required update.
Displaying the camera image in Internet Explorer 11
NOTE
► You only have access to all of the features of the IP surveillance camera when using the
Internet Explorer 11 browser.
Page 28
16 IUK 5 A1
GB
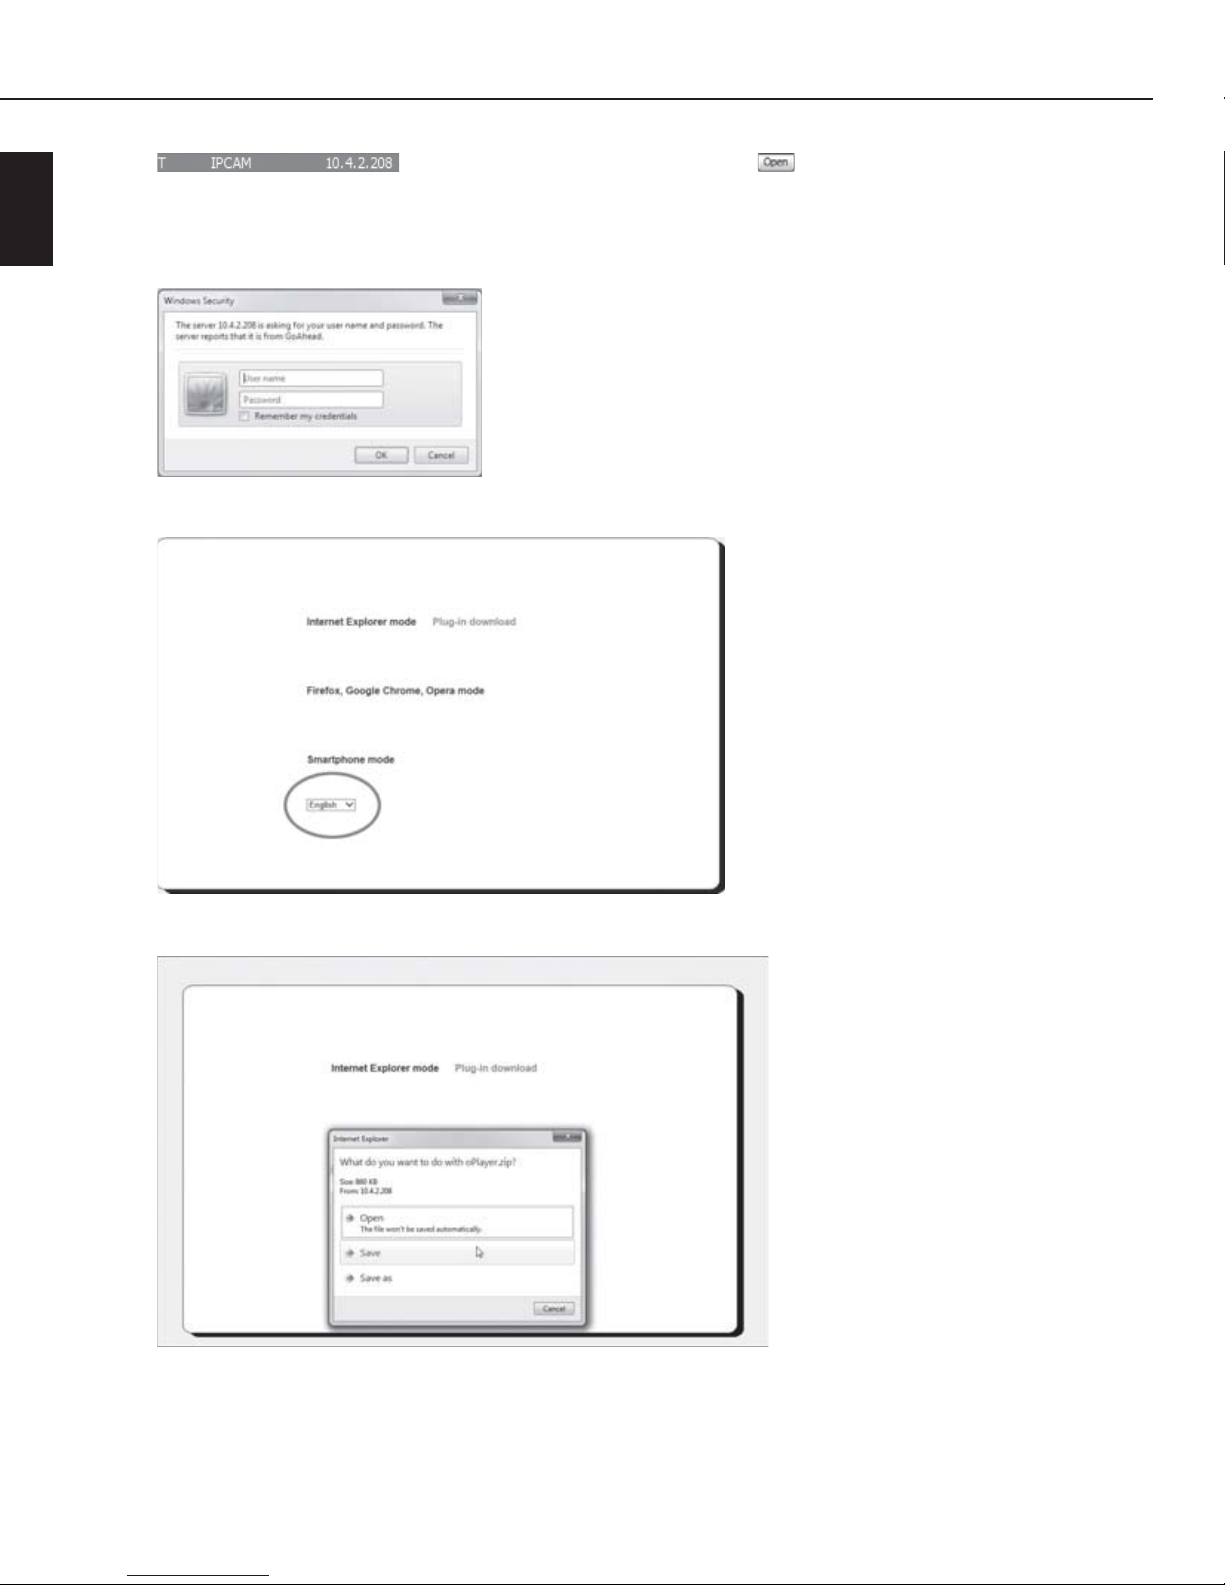
1) To display the camera image in the browser, double-click on the device name
in the list on the left or click on the button on the right in the camera
information page "General". Sign yourself into the browser for the address disclosure using
the user name "admin" without any password. If Internet Explorer 11 is set up as your default
browser, the following Windows query should appear:
2) Select the desired language:
3) Then click on "Plug-in download" to install a required plug-in.
Click on "Save". Shortly afterwards, the indicator bar appears on the lower edge of the screen.
Here, click on "Open". An Explorer window will open. Double-click on the fi le "oPlayer.msi"
and follow the on-screen instructions to install the plug-in.
Page 29

17IUK 5 A1
GB
4) If you want to save videos and stills on your computer via Internet Explorer 11, you must fi rst
confi gure the Internet options as follows:
Click on the settings symbol in the upper right-hand corner and then on "Internet Options".
5) Click on the "Security" tab, select "Trusted sites" and then click on the "Sites" button:
6) In the next window, you have the option to add the camera address to your trusted zone.
Uncheck the box "Server verifi cation", click on "Add", then on "Close" and fi nally "OK".
Page 30

18 IUK 5 A1
GB
7) To make the connection to your camera, click on "Internet Explorer mode".
The following browser window appears:
Meaning of the control buttons and fi elds
The following is a list of the meanings of the control buttons on the left side.
Horizontal ( / )/vertical ( / ) axis control and diagonal panning ( ).
Click briefl y on one of the buttons to make the camera pan in the corresponding
direction. If you hold down the mouse button while clicking on one of the buttons, the
camera will continue panning in the corresponding direction until you either let go of
the mouse button or the camera reaches the stop in the respective direction.
Click in the middle of the graphic to carry out a one-time horizontal and vertical test
run from one stop to the other. The camera returns to its starting position afterwards.
−> If you click on this button, the camera will execute a continuous horizontal pan from
one stop to the other. Click the button again to stop the pan or resume panning.
−> If you click on this button, the camera will execute a continuous vertical pan from one
stop to the other. Click the button again to stop the pan or resume panning.
If you activate horizontal and vertical panning, the camera executes a continuous
diagonal pan.
−> If it is dark, click on this button to switch the camera to infrared mode. The infrared
LEDs illuminate the immediate surroundings of the camera with infrared light, which
is not visible to the human eye.
−> Click this button to mirror the image vertically.
−> Click this button to mirror the image horizontally.
−> Click this button to switch on an external alarm connection .
−> Click this button to switch off an external alarm connection .
Page 31

19IUK 5 A1
GB
Mode
Here you can set the interlace frequency to reduce image fl icker. 50 or 60 Hz are
available.
Resolution
In this control fi eld, you can switch the image resolution between VGA (640 x 480 pixels)
and QVGA (320 x 240 pixels).
Frame rate
You can use this control fi eld to set the frame rate per second from 1–25 images.
The higher the number, the smoother the motion.
PT speed
This sets the speed with which the servomotors carry out the tilt and pan movements.
You can choose between "Slow", "Medium" or "Fast".
Brightness
Set the image brightness to the required setting within the range 0–255.
Contrast
Set the contrast to the required setting within the range 0–255.
Click on "Reset to default video settings" to return the brightness and contrast settings
to their original default values.
Save preset position
This function enables you to save a camera position of your choice.
To save a camera position, start by aligning the camera in the direction you want.
Then click on "Save preset position" and use the mouse to select the desired number
(1–16) for this setting from the number fi eld that appears then.
To move the camera to a previously saved position, click on "Choose preset position"
and use the mouse to select the number (1–16) of the desired position from the number
fi eld that appears then.
−> To display one camera image.
−> To simultaneously display 4 camera images as tiles.
−> To simultaneously display 9 camera images as tiles.
The activated option is marked orange.
Page 32

20 IUK 5 A1
GB
NOTE
► If you double-click on one of the tiles, this image will then be displayed by itself.
If you double-click on an image that is being displayed on its own, the image will
then be shown full-screen. You can return to the original display with a second
double-click.
−> If you click this button, the audio signals picked up by the microphone will be
played back via the computer’s speakers. When the "Audio" function is activated, this
button is shown in orange.
−> If you click this button, the audio signals captured by a microphone that is connected
to the computer, e.g. announcements, will be played back on the integrated speaker
in the camera. When the "Speak" function is activated, this button is shown in orange.
After a fi nished announcement, deactivate this function by clicking the button again to
prevent any potential feedback.
−> If you click this button, the images captured by the camera are saved as a video on
the computer. When the "Record video" function is activated, this button is shown in
orange.
NOTE
► Before these and the following functions can be executed as described, you must
adjust the Internet options as described in the section "Displaying the camera
image in Internet Explorer 11".
► To play locally saved videos, download the latest version of VLC player from
www.videolan.org.
−> Click on this button to save a snapshot of the current camera image as a bitmap on
your computer.
−> Click on this button to open the confi guration described below in the browser interface.
Page 33

21IUK 5 A1
GB
Configuration via the browser interface
NOTE
The following applies to all the menus described below:
► To apply the settings you have made to the camera, click on "Set". The screen content flashes
once as confirmation. To reload the data stored in the camera back on the browser page, click
"Refresh".
► After some entries, the camera will restart. A countdown appears on the screen showing the
number of seconds until the restart. Never disconnect the device from the power supply during
this time because otherwise it might be damaged irreparably.
► Click on "Back" to exit the settings and return to the display of the camera image in the browser.
The "Basic settings" page
Device information
Here you can call up the information shown above and can select the user language for the device
via the menu option "Language".
Device name
Here, you can give the device a different name so that you can identify it more easily in the network
if necessary. A maximum of 24 characters can be used. Spaces may not be used; otherwise, the new
name will not be accepted.
Page 34

22 IUK 5 A1
GB
Date & time settings
Under the menu item "NTP Server" you can set the time zone in which the camera is being operated.
If you have checked the box "Synchronise with NTP server time", you can select a time server under
the option "NTP server", which will set the current time. Click on "Synchronise with PC time" to synchronise the camera’s time setting with that of the computer.
Video saving-path
Click on "Browse" to set the location where you want to save the videos captured by the camera.
You cannot create a new folder in this dialogue. If you want to use a new folder for saving videos,
you need to have set this up beforehand.
Enter the maximum size (100 to 1000 MB) for the recorded videos in the field "Video size (MB)".
Enter the maximum length (5 to 120 minutes) for the recorded videos in the field "Video length
(minutes)".
NOTE
► To play locally saved videos, download the latest version of VLC player from
www.videolan.org.
To make sure that the drive of the path that you have selected has enough free memory, you can
specify how much memory should be reserved for video recordings, i.e. space that cannot be used
by other applications, in the field "Reserved disk space (MB)".
If you want previously saved videos to be overwritten when the allotted memory is full, check the box
"Overwrite existing video files". Otherwise, no more new videos will be saved.
Page 35

23IUK 5 A1
GB
The "Alarm settings" page
Alarm settings
If you check the box "Alarm triggered by motion detection", the content of the window will change.
Now you can adjust the motion detection sensitivity for the alarm ("High", "Medium" or "Low").
If you check the box "Alarm triggered by audio detector", the alarm can be triggered by an audio
signal recorded on the camera. Under the menu item "Alarm-audio detection sensitivity" you can set
which sensitivity level the device should use for this purpose: "High", "Medium" or "Low".
If you check the box "Alarm triggered by external detector", the device will react accordingly to an
alarm signal from an external alarm trigger connected to the alarm connection. Then you can set the
threshold in the line "Trigger level" to "High" or "Low".
If you want to see a specific "Preset position when alarm is triggered", choose the desired position
that was previously stored from the selection box under this menu item.
Page 36

24 IUK 5 A1
GB
If you check the box "Ring external siren on alarm", an additional line ("Output level") appears.
Here you can set the threshold to "High" or "Low" in the selection box.
Check the box "Alarm mail notification" if you want the device to send an e-mail when the alarm is
triggered.
If you check the box "Upload image when the alarm is triggered", an additional line appears
"Upload intervall (seconds)". Here you can set the intervals at which an image is to be uploaded.
You can set the interval between 0–255 seconds.
If you check the box "Scheduler", the following overview appears:
The weekdays are shown on the vertical axis, the times 0 to 23 hrs on the horizontal axis. Each field
represents a quarter of an hour in which the previously selected alarm functions can be activated.
Click the fields for the time frame within which the alarm is to be triggered if the device registers
motions or audio signals. An activated field is marked blue. Double-clicking on an activated field
selects all the fields of the affected hour.
NOTE
► The e-mail and upload functions are only available if the camera has a working Internet
connection.
Mail notification settings
If you have checked the box "Alarm mail notification" on the menu page "Alarm settings", you can
enter the e-mail address of the sender as well as the SMTP server and SMTP port to be used under
"Sender’s email". Note the corresponding parameters and settings of your e-mail provider.
Page 37

25IUK 5 A1
GB
If the e-mail is to be sent with authentication, check the box "Needs authentication". Then the additional
lines "Sender’s account" and "Account password" appear. Enter the required SMTP information of
your e-mail provider here.
Enter the required encryption method under "SSL": SSL, TLS or NONE an unencrypted e-mail connection.
Enter the e-mail addresses of up to four recipients in the fields "Receiver 1–4".
After you have made your entries, you can test the e-mail function by clicking the "Test" button.
FTP settings
Here you can enter the connection data of an FTP server to which the camera can upload images.
Under the setting "Upload interval (seconds)" you can enter the number of seconds that should
elapse between each image upload to the FTP server after the alarm has been triggered.
After you have made your entries, you can test the FTP connection by clicking the "Test" button.
Alarm logs
Here you can view the alarm log file.
Page 38

26 IUK 5 A1
GB
The "Network" page
Network settings
If you want the router to automatically assign the camera an IP number, check the box "Obtain IP
address from DHCP server" and then click on "Set". After this, the device will restart. A countdown
appears on the screen showing the time until the restart. Never disconnect the device from the power
supply during this time because otherwise, it might be damaged irreparably.
Select the option "Turn off" in the checkbox "Yellow back LED" to switch off the yellow control LED
on the LAN socket. Select "Turn on" to switch it on. The switching takes place instantly; you do not
need to click on "Set".
If you uncheck "Obtain IP address from DHCP server", you can enter the network parameters manually
in the following input screen:
IP address: Enter the IP address that you want to assign to the camera here.
Subnet mask: Enter the subnet mask of the network in which the camera is to operate here.
Gateway: Enter the IP address of the router gateway here.
DNS Server 1: Here the camera requires the entry of the first DNS server. DNS servers "trans-
late" the queried domain names into IP addresses.
DNS Server 2: Enter the name of the second DNS server here. This server will be used if the
first server is not available.
Http port: Enter the number 81 here. Otherwise, the transfer of the image to the computer
will not work.
Page 39

27IUK 5 A1
GB
WiFi settings
To link the surveillance camera to a wireless network, click on "Scan". All available Wi-Fi networks
within range will be shown in the field "Wi-Fi list". At the same time, the menu item "Use Wi-Fi" is
checked. Click on the name of the Wi-Fi network in the "SSID" column that you want to connect
to. On the right of the name, the MAC address and the reception strength of the Wi-Fi network is
displayed. The fields "SSID", "Network type" and "Wi-Fi encryption" are filled automatically with the
values transferred from the Wi-Fi access point. In closed networks, you must enter the Wi-Fi password
in the field "Network security key".
The "Pan & Tilt" page
Under the menu item "Red front LED", you can select whether the red operating LED should turn
on or turn off.
Under the menu item "Move camera to preset position when powered on", you can select to which
camera position that was previously set and stored the device should move when it is switched on.
If you select "None", the camera head
will move to a position with a 90° centred tilt.
Under "PT (pan & tilt) speed" you can set the speed with which the camera reacts to alignment commands. The available options are "Fast", "Medium" or "Slow".
Amount of patrols: Here you can set the number (1–10) of horizontal or vertical pans. These will be
executed if the corresponding function is activated in the main menu.
If the setting "Always" is selected, the camera pans continuously.
Page 40

28 IUK 5 A1
GB
The "User settings" page
Multi device settings
In this menu, you can rename individual cameras in the network and assign user access.
■ Start by clicking on the "Refresh" button at the top to display the list of available cameras.
■ Click on the word "Device" on the desired table entry in the lower device list and an additional
table pops up:
■ Then, in the upper device list, click on the name of the camera that you want to assign.
The required information is added automatically.
■ Enter the user name and the password and click on "Add".
Page 41

29IUK 5 A1
GB
User account settings
Here you can change the sign-in name of the administrator and assign a password (by default no
password is set). In addition, you can set up an account with name and password for another user,
who may view the camera images but who cannot control any functions. To log on with these new
data, you must restart the browser.
Maintenance
Click on "Maintenance" in the left navigation pane to open the "Maintenance" page.
If you click on "Reset to default settings" and click "OK" on the subsequent confirmation prompt, all
of your settings will be deleted irrecoverably and be reset to the factory settings.
To restart the surveillance camera, click on "Reboot device" and confirm the subsequent confirmation
prompt by clicking "OK". After this, the device will restart.
In the line "Update device firmware", click on "Browse" to locate the file with which you want to
update the surveillance camera’s firmware. Then click on "Update" to carry out the required update.
Never disconnect the device from the power supply during this time because otherwise, it might be
damaged irreparably.
In the line "Update web application", click on "Browse" to locate the file with which you want to
update the web interface installed on the surveillance camera. Then click on "Update" to carry out
the required update. Never disconnect the device from the power supply during this time because
otherwise, it might be damaged irreparably.
NOTE
► You may be able to display the camera image and make configuration settings in other browsers.
However, it is possible that not all of the options described for Internet Explorer 11 will be available.
Page 42

30 IUK 5 A1
GB
Operating diff erences when using the smartphone preview
If you click on "Smartphone mode" when you start the browser, the web interface is displayed in a
much simplifi ed form:
Click on one of the four direction buttons to move the camera head a little in the desired direction.
Displaying the camera image on a smartphone
You can control the surveillance camera via a smartphone and also display the camera image on
the smartphone if both devices are logged on to the same Wi-Fi network.
♦ If you are using an Android smartphone, install the app "IUK Viewer" from the Google Play Store.
♦ If you are using an iPhone, install the app "IUK Viewer" from the Apple App Store.
♦ Start the app and select "Add a new camera".
♦ Select "Scan QR-Code" and scan the QR code
on the bottom of the camera base and
then tap on "Done". The camera appears on the list.
♦ Tap on the entry to see the camera image on the smartphone display.
♦ Swipe over the screen to pan the camera head in the corresponding direction.
NOTE
► Using the smartphone to control the device has no eff ect on the web interface.
Page 43

31IUK 5 A1
GB
Controlling the camera via smartphone
NOTE
► The functions shown here are from the Android app. There may be slight diff erences compared
to the use of Apple devices.
If you touch the display while a camera image is being shown, the following control icons appear at
the top and bottom frame of the screen.
NOTE
► Depending on the size of the smartphone display, you may need to move the lower icon list
from side to side to access all of the control icons.
► Tap the
fi eld twice to show/hide the control icons.
−> Tap this icon to see the image mirrored horizontally. Tap the icon again to restore the
original image.
−> Tap this icon to to see the image mirrored vertically. Tap the icon again to restore the
original image.
−> If you tap on this icon, the camera will execute a continuous horizontal pan from one
stop to the other. Tap the icon again to stop the pan or resume panning.
−> If you tap on this icon, the camera will execute a continuous vertical pan from one
stop to the other. Tap the icon again to stop the pan or resume panning.
−> Tap this icon to rotate the display by 90°.
−> Tap this icon to switch the audio transmission between camera and mobile on or off .
−> Tap this icon to save a snapshot of the display.
Page 44

32 IUK 5 A1
GB
−> Tap this icon to save the stream from the camera as a video on the smartphone.
During the recording, "Recording" appears in the upper right of the display. When the
function is activated, the symbol lights up red. Tap the icon again to stop the recording.
NOTE
► If your default video player cannot play the fi les, you may install other players.
For example: „MX Player“.
−> Tap this icon to switch the yellow LAN LED on or off . When the function is activated, the symbol lights up red.
−> Tap this icon to choose from various settings for the data transmission. Tap the icon
again to stop the function.
−> Tap this icon to save or retrieve up to 16 camera positions. Tap the icon again to stop
the function.
−> Tap this icon to display a slider with which you can raise or lower the display brightness.
−> Tap this icon to display a slider with which you can raise or lower the display contrast.
−> Tap this icon to reset the brightness and contrast settings to the factory defaults.
−> Tap this icon to switch the camera’s infrared LEDs on or off .
−> Tap this icon to stop displaying the camera image.
Page 45

33IUK 5 A1
GB
Central monitoring via special software
You can install the supplied software "IUK Viewer" to view images from up to 64 cameras at the
same time.
Insert the supplied CD into the disk drive of the Windows
®
computer with which you want to operate
your camera. Open the drive in Explorer and double-click on the file "IUK Viewer_Setup". This starts
the installation program for the central monitoring software. Follow the on-screen instructions and
confirm the authorisation query from the operating system’s user account control.
Afterwards, start the program "IUK Viewer" and confirm the authorisation query from the operating
system’s firewall if applicable, when the program is started for the first time. On the bottom left in the
program window, you will see a list of the installed cameras.
Page 46

34 IUK 5 A1
GB
▯ Settings
System settings
If you click in the menu on "Settings" => "System settings", the following window opens:
NOTE
► The configuration options available via the software "IUK Viewer" correspond almost exactly
to those that have already been described for the web interface. Therefore, they will not be
described here again in detail.
Configure the displayed parameters as required. Afterwards, click on the "OK" button. You can also
open this window by clicking on "System settings" on the left of the main window.
Page 47

35IUK 5 A1
GB
Device settings
If you click in the menu on "Settings" => "Device settings", the following window opens:
All recognised cameras in the network are listed here. If you do not see all the cameras as expected,
click on "Searching Page" to carry out another search for cameras. The following sub-window appears.
Click on "Searching". The names and parameters of the available cameras in the network will appear
in the list.
You can also open this window by clicking on "Device settings" on the left of the main window.
Click on "Add" if you want to add a camera in the subsequent window by manually entering the
connection details.
After making your entries, click on "OK" to close the window.
Page 48

36 IUK 5 A1
GB
If you select an entry in the device list by mouse click and subsequently click on "Modify", you can
edit the parameters of the selected camera by manually entering the connection details.
After making your entries, click on "OK" to close the window.
Mark the entry in the device list with a mouse click and click on "Delete" if you want to delete the
selected camera from the device list.
Confirm the subsequent confirmation prompt by clicking on "OK" to close the window. The selected
camera will be deleted from the device list. Close the device list by clicking on the red field "×" in the
upper right-hand corner of the window.
The list shows all of the cameras identified by the "Search" function even if they are not currently online.
If new cameras are found by the "Search" function, they can be added to the list by double-clicking
on the camera. A camera can also be installed multiple times. You can also open this device list by
clicking on "Device settings" on the left of the main window.
Page 49

37IUK 5 A1
GB
Screen
If you click on "Screen" in the main window, a menu opens via which you can select the desired
number of the screen tiles. The maximum number of tiles that can be displayed is 64. You can assign
a separate camera image to each tile by dragging a camera from the camera list on the lower left of
the main window onto the desired tile. If you double-click on one of the tiles, this image will then be
displayed full screen.
If you click on "Screen" on the main window and select "Full screen", the tiles are shown full-screen.
Click on "Exit Full screen" to show the tiles back inside the main window.
On the top right above the camera image, 5 icons
appear. Their function is
displayed if you hover over them with the mouse pointer.
Listen: If the Listen function is activated, the audio signals captured by the camera
will be sent to the monitoring computer and played back via its connected
speakers or headphones.
Speak: If the Speak function is activated, audio signals that are captured by a
microphone connected to the monitoring computer will be transmitted to the
camera and played back via its integrated speaker .
Recording: If the Recording function is activated, the camera image is continuously
recorded.
Snapshot: If you click on the Snapshot icon, a snapshot of the current camera image is
captured and saved.
Close: Clicking on this icon will close the respective camera image on the main
window.
Log
If you click on "Log" on the main window and then on "Log window", a window will open in the right
of the head bar with the current event logs on the system connection status. Click on "Log" and then
"Log window" again to close the window.
About
If you click on "About" in the main window and then on "About", the version number of the program
will be displayed. Then click on "OK" to close the window.
The remaining camera controls using the buttons on the left-hand side of the main window correspond
exactly to the controls in the web browser already described. When using more than one camera,
you must start by clicking on the image of the camera that you want to control with the mouse.
The activated image will be bordered in red.
Page 50

38 IUK 5 A1
GB
Cleaning
CAUTION
Damage to the device!
► To avoid irreparable damage to the device, ensure that no moisture gets into it during cleaning.
■ Clean the surfaces of the device with a soft, dry cloth. Use a normal commercial detergent and
a little water to remove stubborn residue. Ensure that no water gets into the device.
Storage / Disposal
Storage
If you plan not to use the device for an extended period, store it in a clean, dry place away from
direct sunlight.
Disposal of the device
The adjacent symbol of a crossed-out wheelie bin means that this device is subject to
Directive 2012/19/EU. This directive states that this device may not be disposed of in
normal household waste at the end of its useful life, but must be brought to a specially
set-up collection point, recycling depot or disposal company.
This disposal is free of charge for the user. Protect the environment and dispose of this device properly.
You can obtain further information from your local disposal company or the city or local authority.
Troubleshooting
This section contains important information about fault identification and rectification. Follow the
instructions to avoid hazards and damage.
WARNING
Observe the following safety information to avoid hazards and property damage:
► Repairs to electrical devices should only be carried out by specialists trained by the manufac-
turer. Improper repairs can cause considerable risks to users and damage to the device.
Page 51

39IUK 5 A1
GB
Fault causes and rectification
The following table will help to identify and rectify minor malfunctions:
Malfunction Possible cause Remedy
The camera
does not work.
Power supply interrupted.
Plug the supplied mains adapter into a power outlet
and connect the plug of the adapter cable into the
power supply socket
.
Network connection
faulty.
Start the "Search Tool" software on the supplied CD
to set up the connection between the camera and the
computer.
The image is
too bright/dark.
The brightness needs
adjustment.
Connect to the camera via the web browser. Move
the "Brightness" slider to the right to make the image
brighter. Move the "Brightness" slider to the left to
make the image darker.
The image is
blurred.
The contrast needs
adjustment.
Connect to the camera via the web browser. Move the
"Contrast" slider to the right to set a higher contrast.
Move the "Contrast" slider to the left to set a lower
contrast.
Turn the focus ring
clockwise/anticlockwise to
focus the image manually.
The camera is
unresponsive.
Internal error. Use a small pointed object to carefully carefully push
the reset switch
through the opening on the under-
side of the device.
NOTE
► If you are unable to resolve the problem by taking any of the aforementioned steps, please
contact the Customer Service department.
Page 52

40 IUK 5 A1
GB
Appendix
Notes on the Declaration of Conformity
This device complies with the basic requirements and other relevant provisions of the
Electromagnetic Compatibility Directive 2004/108/EC and the RoHS Directive
2011/65/EU. The complete Declaration of Compliance, in its original form, is available
from the importer.
Technical data
IP surveillance camera
Operating voltage 5 V
via the supplied mains adapter
Current consumption 2 A
Sensor 0.3 MP
Resolution 640 x 480 pixels
Wi-Fi standard 802.11b/g/n
Working frequency 2400–2483.5 MHz
Max. video frame rate 25 fps
Movement radius Vertical: 105°, horizontal: 355°
Min. illumination 2.0 lux @ 500 nm
Operating temperature 5 to +40°C
Storage temperature −10 to +60°C
Humidity (no condensation) 5 to 75%
Dimensions approx. 11.8 x 10.3 x 12.9 cm
Weight approx. 300 g
Page 53

41IUK 5 A1
GB
Mains adapter
Type MW6FU21NGS
Manufacturer Minwa Electronics Co., Ltd.
Input voltage 100–240 V ~, 50/60 Hz
Current consumption 0.26 A
Output voltage 5 V
Output current 2100 mA |10.5 VA (max)
Protection class
II /
Warranty
You are granted a 3-year warranty on this device, valid from the date of purchase. This device has
been manufactured with care and inspected meticulously prior to delivery.
Please retain your receipt as proof of purchase. In the event of a warranty claim, please contact your
Customer Service unit by telephone. This is the only way to guarantee free return of your goods.
NOTE
► The warranty only covers claims for material and manufacturing defects, not for transport dam-
age, worn parts or damage to fragile components such as buttons or rechargeable batteries.
This product is intended solely for private use and not for commercial purposes. The warranty shall
be deemed void in cases of misuse or improper handling, use of force and modifications/repairs
which have not been carried out by one of our authorised Service centres.
Your statutory rights are not restricted by this warranty. The warranty period is not prolonged by
repairs effected under the warranty. This also applies to replaced and repaired components.
Any damage and defects present at the time of purchase must be reported immediately after
unpacking, but no later than two days after the date of purchase.
Repairs carried out after expiry of the warranty period shall be subject to charge.
Page 54

42 IUK 5 A1
GB
Service
Service Great Britain
Tel.: 0871 5000 720 (£ 0.10/Min.)
E-Mail: kompernass@lidl.co.uk
IAN 48807
Hotline availability: Monday to Friday 08:00 - 20:00 (CET)
Importer
KOMPERNASS HANDELS GMBH
BURGSTRASSE 21
44867 BOCHUM
GERMANY
www.kompernass.com
Page 55

43IUK 5 A1
FI
Sisällysluettelo
Johdanto ....................................................45
Tätä käyttöohjetta koskevia tietoja ..........................................45
Tekijänoikeus ..........................................................45
Määräystenmukainen käyttö ..............................................45
Varoitukset ............................................................ 45
Turvallisuus ..................................................46
Tärkeitä turvallisuusohjeita ................................................ 46
Mahdollinen kolmansien osapuolien oikeuksien loukkaaminen ....................48
Osat ........................................................50
Sijoitus ja kytkennät ..........................................51
Toimituslaajuus ja kuljetustarkastus .......................................... 51
Pakkauksen hävittäminen ................................................. 51
Sijoituspaikkaa koskevat vaatimukset ........................................52
Virtalähde .............................................................53
Audioliitäntä ...........................................................53
LAN-liitäntä ............................................................53
WLAN-käyttö .......................................................... 53
Hälytysliitäntä ..........................................................53
Käyttö ja toiminta ............................................54
Järjestelmäedellytykset ................................................... 54
Käyttöönotto ...........................................................55
Kameran etsiminen verkosta ...............................................55
Kamerakuvan näyttäminen "Internet Explorer 11" -selaimessa .....................57
Ohjauspainikkeiden ja -kenttien merkitykset ................................... 60
Konfigurointi selainkäyttöliittymän kautta .....................................63
Sivu "Basic settings" ..................................................... 63
Sivu "Alarm settings" .....................................................65
Sivu "Network" .........................................................68
Sivu "Pan & Tilt" ........................................................69
Sivu "User settings" ......................................................70
Poikkeava käyttö älypuhelimen esikatselua käytettäessä .........................72
Kamerakuvan esittäminen älypuhelimen näytöllä ...............................72
Kameran ohjaaminen älypuhelimen kautta ...................................73
Keskitetty valvonta lisäohjelmiston avulla ..................................... 75
Page 56

44 IUK 5 A1
FI
Puhdistaminen ...............................................80
Varastointi / Hävittäminen ......................................80
Varastointi .............................................................80
Laitteen hävittäminen .................................................... 80
Vian korjaus .................................................80
Vikojen syyt ja korjaus ...................................................81
Liite ........................................................82
Vaatimustenmukaisuusvakuutusta koskevia ohjeita .............................. 82
Tekniset tiedot ..........................................................82
Takuu ................................................................ 83
Huolto ................................................................ 84
Maahantuoja ..........................................................84
Page 57

45IUK 5 A1
FI
Johdanto
Tätä käyttöohjetta koskevia tietoja
Onnittelut uuden laitteen hankinnasta.
Olet valinnut laadukkaan tuotteen. Käyttöohje on osa tätä tuotetta. Se sisältää turvallisuutta, käyttöä
ja hävittämistä koskevia tärkeitä ohjeita. Tutustu ennen tuotteen käyttöä kaikkiin käyttö- ja turvallisuusohjeisiin. Käytä tuotetta vain kuvatulla tavalla ja vain mainittuihin käyttötarkoituksiin. Kun luovutat tai
myyt tuotteen edelleen, luovuta sen mukana myös kaikki asiakirjat tämä käyttöohje mukaan lukien.
Tekijänoikeus
Tämä asiakirja on tekijänoikeudellisesti suojattu.
Kaikenlainen monistaminen tai jälkipainatus, myös osittainen, sekä kuvien toistaminen, myös muute-
tussa tilassa, on sallittua ainoastaan valmistajan kirjallisella suostumuksella.
Määräystenmukainen käyttö
Tämä on informaatioteknologinen laite, joka on tarkoitettu digitaalisten ääni- ja videotietojen tallentamiseen sekä niiden siirtämiseen tietokoneeseen liitettyihin näyttöihin joko langallisesti tai langattomasti.
Muu tai tämän ylittävä käyttö katsotaan määräystenvastaiseksi. Laitetta ei saa käyttää kaupallisissa tai
teollisissa tarkoituksissa.
Emme vastaa mistään määräystenvastaisesta käytöstä, asiattomista korjauksista, luvattomasti suoritetuista muutoksista tai muiden kuin sallittujen varaosien käytöstä johtuvista vahingoista. Vastuu on
yksinomaan käyttäjällä.
Varoitukset
Tässä käyttöohjeessa käytetään seuraavia varoituksia:
VAARA
Tämän vaara-asteen varoitus on merkkinä uhkaavasta vaarallisesta tilanteesta.
Jos vaarallista tilannetta ei vältetä, se voi johtaa kuolemaan tai vakaviin vammoihin.
► Noudata tämän varoituksen ohjeita kuolemanvaaran tai vakavien henkilövahinkojen välttämiseksi.
Page 58

46 IUK 5 A1
FI
VAROITUS
Tämän vaara-asteen varoitus on merkkinä mahdollisesti vaarallisesta tilanteesta.
Jos vaarallista tilannetta ei vältetä, se voi johtaa loukkaantumisiin.
► Noudata tämän varoituksen ohjeita henkilövahinkojen välttämiseksi.
HUOMIO
Tämän vaara-asteen varoitus on merkkinä mahdollisista aineellisista vahingoista.
Jos tilannetta ei vältetä, se voi johtaa aineellisiin vahinkoihin.
► Noudata tämän varoituksen ohjeita aineellisten vahinkojen välttämiseksi.
OHJE
► Ohje on merkkinä lisätiedoista, jotka helpottavat laitteen käsittelyä.
Turvallisuus
Tässä luvussa annetaan tärkeitä laitteen käsittelyä koskevia ohjeet.
Tämä laite vastaa annettuja turvallisuusmääräyksiä. Asiaton käyttö voi johtaa henkilö- ja
esinevahinkoihin.
Tärkeitä turvallisuusohjeita
Huomioi seuraavat laitteen turvallista käyttöä koskevat ohjeet:
■ Tarkasta laite näkyvien vaurioiden varalta ennen laitteen käyttöönottoa. Älä käytä vaurioitunutta
tai maahan pudonnutta laitetta.
■ Jos johto tai liitännät ovat vaurioituneet, anna valtuutetun ammattihenkilöstön tai huoltopalvelun
vaihtaa ne uusiin.
■ Henkilöt, joilla ei ole riittäviä fyysisiä, psyykkisiä tai motorisia edellytyksiä laitteen turvalliseen
käyttöön, saavat käyttää laitetta vain valvonnan alaisena tai vastuullisen henkilön opastuksessa.
■
VAARA! Pakkausmateriaalit eivät sovellu lasten leikkeihin! Pidä kaikki pakkausmateriaalit
poissa lasten ulottuvilta. Tukehtumisvaara!
■ Varmista kiinnittäessäsi laitetta, että se on tukevasti kiinni, jottei se pääse putoamaan ja vahingoit-
tamaan ketään.
Page 59

47IUK 5 A1
FI
■ Lapset saavat käyttää laitetta vain valvonnan alaisena. Lapset eivät aina osaa tunnistaa mahdol-
lisia vaaroja oikein. VAROITUS! Toimitukseen sisältyy helposti nieltäviä pieniä osia. Jos jokin
osa on joutunut nieluun, ota heti yhteyttä lääkäriin.
■ Korjauta laite ainoastaan valtuutetussa alan liikkeessä tai huoltoliikkeessä. Epäasianmukaiset
korjaukset voivat aiheuttaa vaaroja käyttäjälle. Tällöin myös laitteen takuu raukeaa. Älä missään
nimessä avaa kameran tai verkkoadapterin koteloa. On olemassa tulipalon ja sähköiskun vaara!
■ Laitteen korjauksen saa takuuaikana suorittaa vain valmistajan valtuuttama huoltoliike, muussa
tapauksessa takuu ei enää korvaa seuraamusvahinkoja.
■ Laitteen vialliset osat saa vaihtaa vain alkuperäisvaraosiin. Vain nämä osat takaavat, että turva-
vaatimukset täyttyvät.
■ Käytä laitetta ainoastaan mukana tulevan verkkoadapterin kanssa.
■ Älä aseta laitteen päälle esineitä.
■ Suojaa laitetta kosteudelta. Käytä laitetta vain kuivissa sisätiloissa, älä ulkona tai nesteiden
lähettyvillä.
■ Älä käytä laitetta avotulen (esim. kynttilöiden) lähellä tai äärimmäisissä olosuhteissa (esim.
räjähdysvaarallisissa ympäristöissä).
■ Kameran käyttö ei ole sallittua ympäristöissä, joissa voi muodostua helposti räjähtäviä kaasuseok-
sia, esim. polttonestesäiliöiden lähellä.
■ Ohje laitteen irrottamiseen verkosta:
Laite kuluttaa sähköä silloinkin, kun se ei ole käytössä. Irrota laitteen verkkoadapteri pistorasiasta
tämän estämiseksi. Käytä siksi laitetta niin, että pistorasialle on aina esteetön pääsy, jotta verkkoadapteri voitaisiin irrottaa välittömästi myös hätätapauksessa. Tulipalovaaran välttämiseksi,
tahattoman käynnistämisen estämiseksi ja energiakustannusten säästämiseksi verkkoadapteri on
hyvä irrottaa verkkopistorasiasta aina, kun laite ei ole käytössä.
■ Irrota verkkoadapteri pistorasiasta ottamalla kiinni suoraan verkkoadapterista. Älä koskaan vedä
johdosta tai koske virtajohtoon märin käsin, sillä seurauksena voi olla oikosulku tai sähköisku.
Älä aseta huonekaluja tai vastaavia virtajohdon päälle ja varmista, ettei virtajohto jää puristuksiin.
Älä koskaan tee johtoon solmuja tai sido sitä muihin johtoihin. Vedä verkkoadapterin johto ja tarvittaessa verkkokaapeli, audio- ja hälytysjohto siten, ettei kukaan pääse astumaan niiden päälle
tai kompastumaan niihin. Vioittunut verkkoadapteri voi aiheuttaa tulipalon tai sähköiskun. Tarkista
verkkoadapteri aika ajoin. Jos verkkoadapteri on vaurioitunut, ota yhteyttä lähimpään valtuutettuun asiakaspalveluun tai myyjääsi saadaksesi sen tilalle uuden.
Page 60

48 IUK 5 A1
FI
■ Irrota verkkoadapteri pistorasiasta myrskyisellä säällä ja/tai ukonilmalla, jos on olemassa sala-
moinnin vaara.
■ Käytettävän pistorasian on oltava helppopääsyisessä paikassa, jotta verkkoadapteri voidaan
hätätapauksessa nopeasti irrottaa.
■ Jos laitteesta kuuluu epätavallisia ääniä, laite savuaa tai havaitset muuta normaalista poikkeavaa,
irrota verkkoadapteri välittömästi virtalähteestä. Anna pätevän alan ammattilaisen tarkistaa laite,
ennen kuin käytät sitä uudelleen (ks. luku "Huolto").
Sähköstaattiset purkaukset
■ Joissain harvoissa tapauksissa sähköstaattiset purkaukset voivat aiheuttaa kameran toimintahäi-
riöitä. Jos laitteessa ilmenee sähköstaattisen purkauksen aiheuttama toimintahäiriö, laite on poistettava käytöstä. Irrota verkkoadapteri pistorasiasta ja odota n. 10 sekuntia, ennen kuin työnnät
adapterin uudelleen pistorasiaan.
Mahdollinen kolmansien osapuolien oikeuksien loukkaaminen
Noudata IP-valvontakameran käytössä seuraavia ohjeita:
Tekijänoikeudet
Yleisesti jokaisella henkilöllä on oikeus omiin kuviinsa. Tekijänoikeuslainsäädännön mukaisesti kuvia
saa julkaista ilman niissä olevien henkilöiden suostumusta ainoastaan silloin, kun henkilöt eivät ole
kuvien pääasiallinen kuvauskohde, vaan esiintyvät sattumalta kuvatussa maisemassa tai muussa paikassa. Tämä on ratkaistava kussakin tapauksessa erikseen olosuhteiden mukaisesti. Kamerasta tulisi
oikeusturvasyistä ilmoittaa kaikissa sellaisissa tapauksissa, joissa henkilöiden tunnistaminen otoksista
saattaa olla mahdollista (katso myös kohta "Ilmoitusvelvollisuus").
Yksityisyyden suoja
Toisten yksityisyyttä ei saa loukata esitetyillä kuvilla. Älä suuntaa kameraa naapuriasunnon puutarhaan tai ulko-ovelle, vaikka näihin paikkoihin olisikin näkyvyys omasta asunnostasi tai julkisista
paikoista käsin. Se ei oikeuta näiden näkymien julkaisemiseen.
Henkilön määritettävyys
Henkilön määritettävyys on olemassa, jos voidaan todeta, että tietty henkilö on ollut tiettyyn aikaan
tietyssä paikassa. Tunnistus voi tällöin tapahtua myös henkilöön liittyvän tunnuksen, esim. auton rekisterinumeron, perusteella. Henkilöiden määritettävyyden mahdollisuutta tulee ehdottomasti välttää.
Page 61

49IUK 5 A1
FI
Valvontakamerat työpaikalla
Valvonnasta työpaikalla on annettu Saksassa erityisen tiukat määräykset. Työnantajien tulisi pidättäytyä valvontakameroiden käytöstä työpaikalla, jos oikeuksien loukkaamisen mahdollisuutta ei voida
täysin sulkea pois.
Valvontakamerat maantieliikenteessä
Maantieliikenteeseen suunnattujen valvontakameroiden kohdalla on suositeltavaa valita kameran
sijaintipaikka ja kuvakulma siten, ettei tienkäyttäjien tunnistaminen ole kuvissa näkyvien autojen rekisteritunnusten perusteella mahdollista. Myös ajoneuvojen mainostekstit saattavat johtaa tienkäyttäjien
tunnistukseen.
Ilmoitusvelvollisuus
Jos henkilöiden tunnistamista ei voida sulkea pois, valvontakamerasta on ilmoitettava selkeästi havaittavalla tavalla kaikilla kameralle johtavilla tuloreiteillä. Ohikulkijoille on tiedotettava, että kuvaus-alueelle
astumalla he antavat luvan kuvien ottamiseen ja mikäli he eivät halua tulla kuvatuiksi, heidän on
pysyttävä poissa kuvausalueelta. Tällöin on huomioitava luvan vapaaehtoisuus. Jos kamera on
paikassa, jonka ohi henkilöiden on kuljettava päästäkseen päämääräänsä (esim. nähtävyyden
sisääntulossa), ei voimassa olevaa lupaa ole, koska vapaaehtoisuus ei toteudu.
Huomioi kolmansien osapuolten oikeuksien loukkauskysymysten yhteydessä aina kunkin käyttömaan
lakisääteiset määräykset.
Suojattuja tavaramerkkejä ja logoja koskeva huomautus
Suojattujen tavaramerkkien ja kauppanimien sekä logojen käyttö tässä käyttöohjeessa ei loukkaa
tekijänoikeutta, vaan toimii huomautuksena. Vaikka kyseisiä kohtia ei aina ole mainittu sellaisiksi,
voimassa ovat vastaavat lakisääteiset määräykset.
Käytetyt tavaramerkit ja logot ovat valmistajan omaisuutta ja kulloisenkin valmistajan tekijänoikeusmääräysten alaisia. Lisätietoja saa valmistajan vastaavia aiheita käsittelevistä julkaisuista.
Page 62

50 IUK 5 A1
FI
Osat
(Kuvat, katso kääntösivut)
Kuva A:
Valoanturi valotuksen ohjausta varten
Kamerapää
Kaiuttimet
Kamerapään kannatin
Liitäntäpaneeli
Kameran jalusta
Mikrofoni
Punainen käyttövalmiuden LED-valo
Tarkennusrengas manuaaliseen tarkennussäätöön
Kameran linssi
Infrapunavalot
Kuva B:
Keltainen verkkoyhteyden LED-merkkivalo
Kierreliitäntä WLAN-antennille
Verkkoadapterin syöttöjännitteen liitäntä
Hälytysliitäntä (IN/OUT)
LAN-liitäntä
AUDIO-lähtö
Kuva C:
Kierre asennustelineen kiinnittämistä varten
Reset-painike
QR-koodi nopeaan synkronointiin älypuhelimen kanssa
Verkkoadapteri
WLAN-antenni
Asennusteline
Verkkokaapeli
Kuva D:
Tieto-CD
Pistokeadapteri hälytysliitännälle
Asennusmateriaali
Käyttöohje
Page 63

51IUK 5 A1
FI
Sijoitus ja kytkennät
VAARA
Laitteen käyttöönotossa voi esiintyä henkilövahinkoja ja aineellisia vahinkoja!
Noudata seuraavia turvaohjeita vaarojen välttämiseksi:
► Noudata laitteen sähköliitännästä annettuja ohjeita aineellisten vahinkojen välttämiseksi.
Toimituslaajuus ja kuljetustarkastus
Tarkasta toimituslaajuus (katso kääntösivut).
Toimitukseen sisältyvät seuraavat osat:
● IP-valvontakamera IUK5A1
● Verkkoadapteri
● Irrotettava WLAN-antenni
● Asennusteline
● Verkkokaapeli
● Ohjelmisto-CD
● Pistokeadapteri hälytysliitännälle
● Asennusmateriaali
● Käyttöohje
OHJE
► Tarkista, ettei toimituksesta puutu osia eikä tuotteessa ole näkyviä vaurioita.
► Jos havaitset toimituksessa puutteita tai vaurioita, jotka johtuvat puutteellisesta pakkauksesta
tai jotka ovat syntyneet kuljetuksen aikana, soita huollon palvelunumeroon (ks. luku Huolto).
♦ Ota kaikki laitteen osat ja käyttöohje pakkauksesta.
♦ Poista koko pakkausmateriaali.
Pakkauksen hävittäminen
Pakkaus suojaa laitetta kuljetusvaurioilta. Pakkausmateriaalit on valittu ympäristöystävälliset
ja jätehuoltotekniset näkökulmat huomioiden, ja ne voidaan kierrättää. Pakkauksen palauttaminen materiaalikiertoon säästää raaka-aineita ja vähentää jätteiden syntymistä.
Hävitä tarpeettomat pakkausmateriaalit paikallisten voimassa olevien määräysten mukaisesti.
Page 64

52 IUK 5 A1
FI
OHJE
► Säilytä alkuperäispakkaus mahdollisuuksien mukaan laitteen takuuajan, jotta voit takuutapauk-
sessa pakata tuotteen asianmukaisesti.
Sijoituspaikkaa koskevat vaatimukset
Jotta laitteen käyttö olisi turvallista ja laite toimisi moitteettomasti, laitteen sijoituspaikan on täytettävä
seuraavat edellytykset:
■ Aseta laite sijoitusta varten kiinteälle, tasaiselle ja vaakasuoralle alustalle.
■ Huonekalujen pinnoissa voi olla ainesosia, jotka syövyttävät ja pehmentävät laitteen kumijalkoja.
Aseta tarvittaessa alusta laitteen kumijalkojen alle.
■ Tai kiinnitä laite mukana tulevalla asennustelineellä
asennusmateriaalin avulla soveltuvaan
seinään tai kattoon seuraavan kuvan mukaisesti:
■ Kun olet kiinnittänyt asennustelineen ruuveilla ja tulpilla , pyöritä käsin pyöritettävä ruuvi (A)
kameran jalustan alla olevaan kierteeseen .
■ Avaa tarvittaessa ruuviliitos (B) muuttaaksesi asennustelineen
kulmaa. Kierrä sen jälkeen
ruuviliitos (B) jälleen tiukkaan niin, että kamera on tukevasti asennustelineessä .
■ Käytä laitetta vain kuivissa paikoissa, älä koskaan kuumassa ympäristössä tai syttyvien materiaalien
läheisyydessä.
■ Käytä laitetta ainoastaan paikoissa, joissa on riittävä ilmanvaihto.
Page 65

53IUK 5 A1
FI
Virtalähde
♦ Käytä laitetta vain mukana tulevalla verkkoadapterilla .
♦ Liitä verkkoadapterin johdon pistoke syöttöjänniteliitäntään
. Työnnä sitten verkkoadapteri
määräysten mukaisesti liitettyyn pistorasiaan, jonka jännite vastaa teknisissä tiedoissa ilmoitettua
jännitettä.
Audioliitäntä
OHJE
► Äänisignaali, joka siirretään tietokoneeseen liitetyltä mikrofonilta kameraan ja toistetaan sisäänra-
kennetun kaiuttimen kautta, sijaitsee AUDIO-lähdössä
ja voidaan siirtää sieltä vahvistimeen.
♦ Vahvista äänisignaalia liittämällä AUDIO-lähtöön soveltuva minijakkikaapeli 3,5 mm
(ei sisälly toimitukseen). Huomioi tässä myös liitetyn audiolaitteen käyttöohje.
LAN-liitäntä
♦ Jotta kamerakuvaa voitaisiin käyttää langallisessa verkossa, liitä LAN-liitäntä mukana
tulevalla tai muulla soveltuvalla verkkokaapelilla verkkoreitittimeen tai -kytkimeen.
WLAN-käyttö
♦ Ruuvaa mukana tuleva WLAN-antenni kierreliitäntään kamerakuvan käyttämiseksi
langattomasti verkossa.
Hälytysliitäntä
♦ Hälytysliitännällä (IN/OUT) kamera voidaan liittää jo olemassa olevaan hälytysjärjestel-
mään.
♦ Hälytysliitännässä on yhteensä 4 liitäntäpaikkaa. Molempiin oikealla oleviin IN-liitäntöihin
voidaan liittää hälytin, esim. liiketunnistin tai muu hälyttävä laite. Jos IN-liitännät yhdistetään
toisiinsa ulkoisesti, hälytys laukeaa. Liitännät voidaan yhdistää kytkimen tai releen kautta.
♦ Molempiin vasemmalla oleviin OUT-liitäntöihin voidaan liittää ulkoinen laite, esim. hälytin,
sireeni tai ovenavausjärjestelmä. Tällöin laite antaa merkkiäänen heti, jos lähtö kytketään
manuaalisesti päälle tai jos lähtö on valittu hälytysilmoituksille ja IP-valvontakamera tunnistaa
hälytyksen. OUT-liitäntöjen maksimaalinen kytkentäteho on 5V / 500mA.
♦ Lisätietoja saat kyseisten komponenttien käyttöohjeista.
Page 66

54 IUK 5 A1
FI
Käyttö ja toiminta
Tässä luvussa annetaan tärkeitä ohjeita laitteen käytöstä ja toiminnasta.
IP-valvontakameran perustoiminto on videokuvien saattaminen IP-verkkoon. Reaaliaikaiset korkea-
laatuiset videokuvat (VGA ja QVGA) siirretään jopa 25 kuvan sekuntivauhdilla LAN-/WLAN-verkon
kautta. Tässä käytetään H.264/JPEG-laitteistoon perustuvaa kompressiotekniikkaa.
IP-valvontakameran toiminta perustuu TCP/IP-vakiotietoverkkoprotokollaan. Sisäänrakennettu verkkopalvelin tukee muun muassa selaimia "Internet Explorer 11" ja "Mozilla Firefox", eri älypuhelimille
tarkoitettuja selaimia sekä mukana tulevaa keskeistä valvontaohjelmistoa. Siksi laitteen varustaminen
ja konfiguroiminen sekä IP-valvontakameran laiteohjelmiston mahdollinen päivitys voidaan tehdä
helposti verkon kautta. Näin kamerakuva voidaan siirtää verkkoon yhdellä napsautuksella milloin
ja missä tahansa. Internet-käytön edellytyksenä on tietysti verkkoreitittimen vastaava konfigurointi.
OHJE
► Vain "Internet Explorer 11" -selaimen käyttö mahdollistaa pääsyn kaikkiin käytettävissä oleviin
toimintoihin.
Järjestelmäedellytykset
OHJE
► Valvontaohjelmiston asentaminen on mahdollista vain Windows®-käyttöjärjestelmissä. Video-
esitys ja konfigurointi ovat kuitenkin verkkopohjaisia ja toimivat siksi alustasta riippumatta.
Käyttöjärjestelmät: Windows 2000
®
(SP4), Windows XP® (SP 2), Vista®, Win 7, Win 8
Prosessori: 2,0 GHz tai korkeampi
RAM: 512 MB tai enemmän
Verkkokortti: 10MBit/s tai nopeampi
Grafiikkakortin muisti: 512 MB tai enemmän
Tuetut verkkoselaimet: Internet Explorer 11, useat muut rajoitetuin toiminnoin
Näytön tarkkuus: 1024 × 768 tai suurempi
Page 67

55IUK 5 A1
FI
Käyttöönotto
Noin 30 sekuntia jännitteensyötön muodostamisen jälkeen kamera suorittaa automaattisen itsetestauksen ja ajaa silloin koko vaaka- ja pystysuuntaisen kääntöalueen. Tämän jälkeen laite on käyttövalmis.
Jos laite on tunnistanut langallisen verkkoyhteyden, keltainen LED-merkkivalo vilkkuu nopeasti.
OHJE
►
Ensimmäistä konfi gurointia varten kamera on liitettävä LAN-liitäntään.
Kameran etsiminen verkosta
Aseta mukana tuleva CD sen Windows®-tietokoneen levyasemaan, jolla haluat konfi guroida kameran.
Avaa levyasema resurssienhallinnassa ja kaksoisnapsauta tiedostoa "Search Tool". Tällöin ohjelma
kameran etsimiseksi verkosta käynnistyy (tiedostoja ei asenneta tietokoneellesi).
1) Tietokoneen konfi guroinnista riippuen näytölle ilmestyy palomuurivaroitus:
Napsauta "Allow access".
Page 68

56 IUK 5 A1
FI
2) Ohjelma löytää kameran, ja tiedostonimeä "IPCAM" napsauttamalla näkyviin saadaan verkkoa
koskevat tiedot:
IP-valvontakameran verkon asentaminen tapahtuu automaattisesti, kun asetus "Auto" on
aktivoitu ja reititin on DHCP-tilassa. Jos kamera ei ilmesty luetteloon, voit päivittää luettelon
"Find"-painikkeella.
Säilytä tällöin ehdottomasti ehdotetut parametrit. Muutoin on olemassa vaara, ettei kamera
toimi enää moitteettomasti väärien asetusten vuoksi.
Ota ongelmatilanteessa yhteyttä verkon pääkäyttäjään.
OHJE
► DHCP-käytössä reititin antaa pyydettäessä IP-osoitteet automaattisesti.
Voit antaa verkkoa koskevat tiedot myös manuaalisesti, esimerkiksi jos automaattinen konfi gurointi ei toimi.
Valitse tällöin vaihtoehto "Custom". Tällöin konfi guroinnin syöttökentät muuttuvat aktiivisiksi.
Syötä nyt IP-valvontakameran verkkotiedot manuaalisesti. Nämä tiedot löytyvät tavallisesti
reitittimen verkkoasetuksista. Lisätietoja saat reitittimesi käyttöohjeesta.
Ota muutetut asetukset käyttöön napsauttamalla "Apply".
Page 69

57IUK 5 A1
FI
3) Kun napsautat kohtaa "Others" saat näkyville lisää vaihtoehtoja:
Oikealla näkyy nyt senhetkisen kameraohjelmiston numero. Sen alapuolella näkyy juuri käytössä olevan verkkoyhteyden MAC-osoite.
Jos haluat päivittää ohjelmiston, napsauta "Update" ja paikanna varmennuksen jälkeen
(Account: admin, Password: tyhjä, OK) se tiedosto, jolla haluat päivittää joko ohjauksen
selaimen ( ) kautta mahdollistavan ohjelmiston tai IP-valvontakameran
( ) laiteohjelmiston napsauttamalla kansiokuvaketta . Suorita päivitys
napsauttamalla sen jälkeen "Update".
Kamerakuvan näyttäminen "Internet Explorer 11" -selaimessa
OHJE
► IP-valvontakameran kaikki toiminnot ovat käytettävissäsi vain "Internet Explorer 11" -selaimessa.
Page 70

58 IUK 5 A1
FI
1) Jos haluat näyttää kameran kuvaa selaimessa, kaksoisnapsauta kamerasta yleistä tietoa sisältävällä sivulla "General" vasemmalla olevasta luettelosta laitteen nimeä
tai oikealla -painiketta. Todenna itsesi käyttäjätunnuksella "admin" ilman salasanaa osoitteen välittämiseksi selaimelle. Jos "Internet Explorer 11" on asetettu oletusselaimeksi, näytölle
ilmestyy seuraava Windows-varmistusikkuna:
2) Valitse haluamasi kieli:
3) Asenna sitten tarvittava liitännäinen napsauttamalla ensin "Plug-in download":
Valitse "Save". Pian sen jälkeen kuvaruudun alalaitaan ilmestyy näyttöpalkki. Napsauta
tässä "Open". Explorer-sivu avautuu. Kaksoisnapsauta tiedostoa "oPlayer.msi" ja noudata
näytön ohjeita liitännäisen asentamiseen.
Page 71

59IUK 5 A1
FI
4) Jos haluat myöhemmin tallentaa videoita ja pysäytyskuvia tietokoneelle Internet Explorer 11
-selaimen kautta, sinun on ensin konfi guroitava Internet-asetukset:
Napsauta oikealla yläkulmassa Asetukset-kuvaketta ja sitten "Internet options":
5) Valitse sitten välilehti "Security", "Trusted sites" ja napsauta "Sites":
6) Seuraavassa ikkunassa sinulla on mahdollisuus lisätä kameran osoite luotettuihin sivustoihin:
Poista valinta "Server verifi cation" -valintaruudusta, valitse "Add", sitten "Close" ja sitten "OK".
Page 72

60 IUK 5 A1
FI
7) Yhdistä kameraan valitsemalla "Internet Explorer mode".
Tällöin avautuu seuraava selainikkuna:
Ohjauspainikkeiden ja -kenttien merkitykset
Tässä ohjauspainikkeiden merkitykset on lueteltu vasemmassa sivussa.
Vaaka- ( / ) /pystyakselin ohjaus ( / ) ja poikittaisliike ( ).
Napsauta lyhyesti yhtä painikkeista kääntääksesi kameraa hieman vastaavaan suuntaan. Pidä hiiren painiketta painettuna yhtä painikkeista painaessasi, käännä sitten
kameraa yhtäjaksoisesti vastaavaan suuntaan, kunnes joko vapautat hiiren painikkeen
tai kamerapää on kääntynyt kyseisen liikkeen vasteeseen asti.
Napsauta kuvan keskelle käynnistääksesi kertaluonteisen testikäytön vaaka- ja pystysuunnassa vasteesta toiseen. Kamera pysähtyy sen jälkeen lähtöasemaan.
−> Kun napsautat tätä painiketta, kamerapää liikkuu vaakasuunnassa yhtäjaksoisesti
vasteesta toiseen. Liike voidaan pysäyttää tai sitä voidaan jatkaa napsauttaumalla
painiketta uudelleen.
−> Kun napsautat tätä painiketta, kamerapää liikkuu pystysuunnassa yhtäjaksoisesti
vasteesta toiseen. Liike voidaan pysäyttää tai sitä voidaan jatkaa napsauttaumalla
painiketta uudelleen.
Jos aktivoidaan vaaka- ja pystyliike, kamera liikkuu yhtäjaksoisesti diagonaalisesti.
−> Napsauta tätä painiketta, jos haluat pimeässä kytkeä kameran infrapunatilaan.
Infrapuna-LEDit valaisevat tällöin kameran lähialueen ihmiselle näkymättömällä
infrapunavalolla.
Page 73

61IUK 5 A1
FI
−> Napsauttamalla tätä painiketta näet kuvan peilikuvan pystysuunnassa.
−> Napsauttamalla tätä painiketta näet kuvan peilikuvan vaakasuunnassa.
−> Napsauta tätä painiketta kytkeäksesi ulkoisen hälytysliitännän päälle.
−> Napsauta tätä painiketta kytkeäksesi ulkoisen hälytysliitännän pois päältä.
Mode
Tässä voidaan asettaa kuvan lomituksen taajuus (engl. Interlace) kuvan välkkymisen
vähentämiseksi. Valittavana ovat 50 tai 60 Hz.
Resolution
Tässä ohjauskentässä voidaan vaihtaa kuvan tarkkuutta kahden tarkkuuden, VGA
(640 x 480 pikseliä) ja QVGA (320 x 240 pikseliä) välillä.
Frame rate
Tässä ohjauskentässä voidaan valita yksittäisten kuvien määrä sekunnissa alueella
1–25 kuvaa. Mitä suurempi arvo, sitä sulavammat liikkeet.
PT speed
Säätää nopeuden, jolla kääntömoottorit reagoivat kääntämis- ja kallistuskäskyihin:
Valittavissa ovat asetukset "Slow", "Medium" tai "Fast".
Brightness
Säätää kuvan kirkkautta alueella 0–255.
Contrast
Säätää kuvan kontrastia alueella 0–255.
Palauta kirkkauden ("Brightness") ja kontrastin ("Contrast") asetukset tehdasasetuksiin
napsauttamalla "Reset to default video settings".
Save preset position
Tällä toiminnolla voidaan tallentaa itsevalittuja kamera-asentoja.
Jos haluat tallentaa kamera-asennon, suuntaa kamera ensin haluamaasi suuntaan.
Napsauta sitten "Save preset position" ja valitse ilmestyvästä numerokentästä hiirellä
tälle asetukselle haluamasi numero 1–16.
Käännä kamera aikaisemmin tallennettuihin asemiin napsauttamalla "Choose preset
position" ja valitsemalla sitten näyttöön ilmestyvästä numerokentästä hiirellä haluttua
asemaa vastaava numero 1–16.
Page 74

62 IUK 5 A1
FI
−> Yhden kamerakuvan esittäminen.
−> Neljän kamerakuvan samanaikainen esittäminen ruutuina.
−> Yhdeksän kamerakuvan samanaikainen esittäminen ruutuina.
Kulloinkin valittu vaihtoehto näkyy oranssina.
OHJE
► Kun yhtä ruuduista kaksoisnapsautetaan, vain kyseinen kuva näytetään. Jos kuvaa
kaksoisnapsautetaan yksittäiskuvanäytössä, kuva näytetään koko kuvaruudun
kokoisena. Uudesta kaksoisnapsautuksesta näyttö palaa takaisin alkuperäiseen
asetukseensa.
−> Tätä painiketta napsautettaessa mikrofonin vastaanottamat äänisignaalit toistetaan
tietokoneeseen liitettyjen kaiuttimien kautta. "Audio"-toiminnon ollessa päällä tämä
painike on oranssin värinen.
−> Tätä painiketta napsautettaessa tietokoneeseen liitetyn mikrofonin vastaanottamat
äänisignaalit, esim. kuulutukset, toistetaan kameran sisäisen kaiuttimen kautta.
"Puhe"-toiminnon ollessa päällä tämä painike on oranssin värinen. Kuulutuksen jälkeen
tämä toiminto voidaan kytkeä pois käytöstä napsauttamalla painiketta uudelleen, jotta
akustiselta kierrolta vältyttäisiin.
−> Tätä painiketta napsautettaessa kameran ottamat kuvat tallennetaan tietokoneelle
videona. "Kuvaa video" -toiminnon ollessa päällä tämä painike on oranssin värinen.
OHJE
► Ennen kuin tämä ja sitä seuraava toiminto voidaan suorittaa kuvatulla tavalla,
Internet-asetuksia on muutettava luvussa "Kamerakuvan näyttäminen "Internet
Explorer 11" -selaimessa" kuvatulla tavalla.
► Jos haluat toistaa paikallisesti tallennettuja videoita, lataa esim. VLC-soittimen
viimeisin versio osoitteesta www.videolan.org.
−> Napsauta tätä painiketta, jos haluat asentaa tallentaa senhetkisen kamerakuvan
tilannekuvan tietokoneelle .BMP-tiedostona.
−> Napsauta tätä painiketta, jos haluat asentaa avata seuraavassa kuvatun konfi guroinnin
selainkäyttöliittymän kautta.
Page 75

63IUK 5 A1
FI
Konfigurointi selainkäyttöliittymän kautta
OHJE
Kaikkia seuraavassa kuvattuja valikkoja koskevat seuraavat ohjeet:
► Tehdyt asetukset välitetään kameraan napsauttamalla "Set". Kuvan sisältö vilkkuu kerran vahvis-
tukseksi. Lataa kameralla tallennetut tiedot jälleen selainsivulle napsauttamalla "Refresh".
► Joidenkin tiedonsyöttöjen jälkeen laite käynnistyy uudelleen. Uudelleenkäynnistymiseen jäljellä
olevat sekunnit näkyvät kuvaruudulla. Älä missään nimessä irrota laitetta sähkönsyötöstä tänä
aikana, sillä laite saattaa vaurioitua korjauskelvottomaksi.
► Napsauta "Back" poistuaksesi asetuksista ja palataksesi takaisin selaimella näkyvään kamera-
kuvaan.
Sivu "Basic settings"
Device information
Täältä löytyvät yllä esitetyt tiedot ja valikkokohdassa "Language" voidaan valita laitteen käyttökieli.
Device name
Täällä laite voidaan nimetä uudelleen, jotta sen tunnistaminen verkossa olisi helpompaa. Voit käyttää
korkeintaan 24 merkkiä. Tyhjiä lyöntejä ei sallita, muuten uutta nimeä ei hyväksytä.
Page 76

64 IUK 5 A1
FI
Date & time settings
Valikkokohdassa "NTP Server" voidaan asettaa aikavyöhyke, jossa kameraa käytetään. Jos "Synchronise with NTP server time" -kohta on valittu, voidaan kohdassa "NTP server" valita aikapalvelin,
joka antaa vallitsevan kellonajan käyttöön. Voit synkronoida kameran aika-asetuksen tietokoneen
aika-asetuksen kanssa napsauttamalla kohtaa "Synchronise with PC time".
Video saving-path
Valitse polku, jonne haluat tallentaa kameran tallentamat videot, napsauttamalla "Browse". Tässä
valintaikkunassa ei voi luoda kansioita. Jos tallennus halutaan suorittaa tiettyyn uuteen kansioon,
kansio on luotava etukäteen.
Syötä kenttään "Video size (MB)" tallennettujen videoiden maksimikoko välillä 100–1000 MB.
Syötä kenttään "Video lenght (minutes)" tallennettujen videoiden maksimipituus 5–120 minuuttia.
OHJE
► Jos haluat toistaa paikallisesti tallennettuja videoita, lataa esim. VLC-soittimen viimeisin versio
osoitteesta www.videolan.org.
Varmista, että asemassa, jossa valittu polku sijaitsee, on riittävästi tallennustilaa määrittämällä
videotallenteille varattava tallennustila (eli muisti, joka ei ole muiden ohjelmien käytettävissä)
kentässä "Reserved disk space (MB)".
Jos haluat, että aikaisemmin tallennettuja videoita poistetaan muistitilan täytyttyä, merkitse hakanen
kohtaan "Overwrite existing video files". Muutoin uusia videoita ei enää tallenneta.
Page 77

65IUK 5 A1
FI
Sivu "Alarm settings"
Alarm settings
Jos hakanen merkitään kohtaan "Alarm triggered by motion detection", ikkunan sisältö muuttuu:
Nyt liikehälytyksen herkkyys voidaan säätää (Alarm-motion detection sensitivity) asetuksista "High",
"Medium" tai "Low".
Jos hakanen merkitään kohtaan "Alarm triggered by audio detector", kameran tallentama äänisignaali voi laukaista hälytyksen. Valikkokohdassa "Alarm-audio detection sensitivity" hälytyksen
laukaisuherkkyydeksi voidaan säätää: "High", "Medium" tai "Low".
Jos hakanen merkitään kohtaan "Alarm triggered by external detector", laite reagoi vastaavasti
hälytysliitäntään liitettyyn ulkoiseen hälyttimeen. Valintalaatikossa rivillä "Trigger level" voidaan
kynnykseksi määrittää "High" tai "Low".
Jos halutaan nähdä tietty aikaisemmin tallennettu asema, valitaan haluttu asema valikkokohdan
"Preset position when alarm is triggered" valintalaatikosta.
Page 78

66 IUK 5 A1
FI
Jos hakanen merkitään kohtaan "Ring external siren on alarm", näkyviin tulee rivi "Output level",
jonka valintalaatikossa voidaan määrittää äänenvoimakkuudeksi "High" tai "Low".
Jos laitteen halutaan lähettävän sähköpostiviesti hälytyksen lauetessa, hakanen asetetaan kohtaan
"Alarm mail notification".
Jos hakanen merkitään kohtaan "Upload image when the alarm is triggered", näkyviin tulee lisärivi
"Upload intervall (seconds)", jonka valintalaatikossa voidaan määrittää kuvan latausväli.
Aika voidaan valita väliltä 0–255 sekuntia.
Jos hakanen asetetaan kohtaan "Scheduler", näkyviin tulee seuraava näkymä:
Pystysuunnassa näkyvät viikonpäivät, vaakatasossa kellonajat välillä 0–23. Jokainen kenttä vastaa
neljännestuntia, jonka aikana valitut hälytystoiminnot voidaan aktivoida. Napsauta niitä ajanjaksoja
vastaavat kentät, joiden aikana hälytys halutaan laukaistavan, kun laite havaitsee liikettä tai äänisignaaleja. Aktiivinen kenttä näkyy sinisenä. Kaksoisnapsautus aktiiviseen kenttään valitsee kaikki
kyseisen tunnin kentät.
OHJE
► Sähköposti- ja lataustoiminnot ovat mahdollisia vain, kun kameralla on Internet-yhteys.
Mail notification settings
Jos hakanen on valikkosivulla ”Alarm settings” asetettu kohtaan "Alarm mail notification", voidaan
tässä kohdassa "Senders‘s email" syöttää lähettäjän sähköpostiosoite sekä käytetty SMTP-palvelin
ja -portti. Huomioi sähköpostipalvelusi tarjoajan vastaavat parametrit ja asetukset.
Page 79

67IUK 5 A1
FI
Jos sähköpostilähetykselle halutaan todennus, valitaan kohta "Need authentication". Tällöin näkyviin
tulevat lisärivit "Sender‘s account" ja "Account password". Syötä tähän tarvittavat sähköpostipalvelusi tarjoajan SMTP-tiedot.
Valitse suojaustapa kohdassa "SSL": SSL, TLS tai NONE (EI MITÄÄN), jos et halua suojata sähköpostiyhteyttä.
Kenttiin "Receiver 1–4" syötetään korkeintaan neljän hälytyssähköpostin vastaanottajan sähköpostiosoitteet.
Kun sähköpostiosoitteet on syötetty, sähköpostitoimintoa voidaan kokeilla napsauttamalla kohtaa "Test".
FTP settings
Tähän voidaan syöttää sen FTP-palvelimen tiedot, jolle kamera voi ladata kuvat. Kohdassa "Upload
intervall (seconds)" voidaan sitten määrittää sekunteina kuvien latausväli FTP-palvelimelle hälytyksen
lauetessa.
Kun kaikki asetukset on tehty, FTP-yhteyttä voidaan kokeilla napsauttamalla "Test".
Alarm logs
Tässä voidaan tarkastella hälytyslokitiedostoa.
Page 80

68 IUK 5 A1
FI
Sivu "Network"
Network settings
Jos haluat kameran hakevan reitittimen IP-numeron automaattisesti, merkitse hakanen kenttään
"Obtain IP adress from DHCP server” ja napsauta ”Set”. Tämän jälkeen laite käynnistyy uudelleen.
Uudelleenkäynnistymiseen jäljellä oleva aika näkyy kuvaruudulla. Älä missään nimessä irrota laitetta
sähkönsyötöstä tänä aikana, sillä laite saattaa vaurioitua korjauskelvottomaksi.
LAN-liitännän keltainen LED-merkkivalo
sammutetaan valitsemalla valintalaatikossa "Yellow back
LED" vaihtoehto "Turn off". Valo kytketään päälle valitsemalla "Turn on". Kytkentä tapahtuu välittömästi, eikä se edellytä painikkeen "Set" napsauttamista.
Jos hakanen poistetaan kohdasta "Obtain IP address from DHCP server", verkon tiedot voidaan
syöttää seuraavaan kuvaruudulla näkyvään taulukkoon:
IP address: Syötä tähän kenttään se IP-osoite, jonka haluat kameralle osoittaa.
Subnet mask: Syötä tähän verkon se aliverkko, jossa haluat kameran toimivan.
Gateway: Syötä tähän reitittimen yhdyskäytävän IP-osoite.
DNS Server 1: Syötä tähän ensimmäisen DNS-palvelimen IP-osoite.
DNS-palvelimet "muuntavat" verkkotunnuksen nimet IP-osoitteiksi.
DNS Server 2: Syötä tähän toisen DNS-palvelimen IP-osoite, jota käytetään, kun ensimmäinen
DNS-palvelin kaatuu tai siihen ei saada yhteyttä.
Http port: Syötä tässä luku 81. Muuten kamerakuvan siirtäminen tietokoneelle ei onnistu.
Page 81

69IUK 5 A1
FI
WiFi settings
IP-valvontakamera liitetään verkkoon langattomasti napsauttamalla "Scan". Nyt kaikki kattavuusalueella olevat WLAN-verkot näkyvät ja ne näytetään kentässä "WiFi list". Samanaikaisesti valitaan
valikkokohta "Use WiFi". Napsauta sarakkeessa "SSID" sen WLAN-verkon nimeä, johon haluat
yhdistää kameran. Nimen oikealla puolella näkyvät MAC-osoite sekä WLAN-verkon vastaanottovahvuus. Kentät "SSID", "Network type" ja "WiFi encryption" täytetään automaattisesti WLAN-tukiaseman välittämillä arvoilla. Verkkojen ollessa suojattuja WLAN-verkon salasana on syötettävä kenttään
"Network security key".
Sivu "Pan & Tilt"
Valikkokohdassa "Red front LED" voidaan määrittää, palaako punainen käyttövalmiuden LED-valo
(Turn on) vai ei (Turn off).
Valikkokohdassa "Move camera to preset position when powered on" voidaan valita, missä ennalta
asetetussa ja tallennetussa asemassa laite on käynnistettäessä. Jos valitaan "None", kamerapää
on 90 asteen kallistuskulmassa ja pyörii keskellä.
Kohdassa "PT (pan & tilt) speed" voidaan asettaa nopeus, jolla kamera reagoi ohjauskäskyihin.
Vaihtoehtoina ovat "Fast", "Medium" tai "Slow".
Amount of patrols: Tässä asetetaan vaaka- ja pystysuuntaisten kääntöliikkeiden lukumäärä (1–10).
Nämä suoritetaan, kun vastaava toiminto on aktivoitu kuvaruudulla.
Jos asetukseksi valitaan "Always", kamera kääntyy jatkuvasti.
Page 82

70 IUK 5 A1
FI
Sivu "User settings"
Multi device settings
Tässä valikossa voidaan verkossa olevia kameroita nimetä uudelleen ja niiden käyttö sallia tietyille
käyttäjille.
■ Napsauta ensin ylempää "Refresh"-painiketta saadaksesi näkyviin verkossa käytettävissä olevien
kameroiden luettelon.
■ Napsauta sitten sanaa "Device" alemman laiteluettelon haluamassasi kohdassa. Uusi taulukko
avautuu:
■ Napsauta sitten ylemmässä laiteluettelossa sitä kameran nimeä, jonka haluat kohdistaa.
Tarvitut tiedot otetaan automaattisesti käyttöön.
■ Syötä käyttäjänimi ja salasana ja napsauta sitten "Add".
Page 83

71IUK 5 A1
FI
User account settings
Täällä voidaan muuttaa pääkäyttäjän kirjautumistunnusta ja antaa tähän asti suojaamattomalle
käytölle salasana. Tämän lisäksi voidaan luoda tili käyttäjänimineen ja salasanoineen käyttäjälle,
joka saa nähdä kamerakuvan, mutta jolla ei ole muita kuvan ohjausoikeuksia. Jos haluat ilmoittautua
toisella käyttäjänimellä, käynnistä selain uudelleen.
Maintenance
Avaa "Maintenance"-sivu napsauttamalla vasemmassa navigointipalkissa kohtaa "Maintenance".
Napsauttamalla kohtaa "Reset to default settings" ja vahvistamalla varmistuskysymys painikkeella
"OK" kaikki tehdyt asetukset palautetaan lopullisesti tehdasasetuksiin.
IP-valvontakameran uudelleenkäynnistys suoritetaan valitsemalla "Reboot device" ja vahvistamalla
sitä seuraava varmistuskysymys napsauttamalla "OK". Tämän jälkeen laite käynnistyy uudelleen.
Paikanna se tiedosto, jolla haluat päivittää IP-valvontakameran laitteisto-ohjelmiston, napsauttamalla
kohtaa "Browse" rivillä "Update device firmware". Suorita päivitys napsauttamalla "Update". Älä
missään nimessä irrota laitetta sähkönsyötöstä päivityksen aikana, sillä laite saattaa vaurioitua
korjauskelvottomaksi.
Paikanna se tiedosto, jolla haluat päivittää IP-valvontakameraan asennetun verkkokäyttöliittymän,
napsauttamalla kohtaa "Browse" rivillä "Update web application". Suorita päivitys napsauttamalla
"Update". Älä missään nimessä irrota laitetta sähkönsyötöstä päivityksen aikana, sillä laite saattaa
vaurioitua korjauskelvottomaksi.
OHJE
► Kamerakuvan esittäminen ja laitteen konfigurointi on mahdollista myös muiden Internet-selainten
kautta, tosin kaikki Internet Explorer 11 -selaimella käytössä olevat vaihtoehdot eivät välttämättä ole käytettävissä.
Page 84

72 IUK 5 A1
FI
Poikkeava käyttö älypuhelimen esikatselua käytettäessä
Jos selaimen käynnistämisen jälkeen napsautetaan kohtaa "Smartphones modus", verkkokäyttöliittymä
näkyy huomattavan pelkistettynä:
Kun jotakin neljästä suuntapainikkeesta napsautetaan, kamerapää liikkuu tietyn matkan tähän
suuntaan.
Kamerakuvan esittäminen älypuhelimen näytöllä
IP-valvontakameraa voidaan ohjata älypuhelimella ja näyttää kamerakuvaa älypuhelimen näytöllä,
jos älypuhelin on kirjautuneena samaan WLAN-verkkoon kuin kamera.
♦ Asenna Android-älypuhelimen käyttöä varten "IUK Viewer" -sovellus Google Play -sovelluskau-
pasta.
♦ Jos käytät Applen älypuhelinta, asenna ”IUK Viewer” -sovellus Applen sovelluskaupasta (App Store).
♦ Käynnistä sovellus ja valitse "Add a new camera".
♦ Valitse "Scan QR-Code", skannaa QR-koodi
kamerajalustan pohjassa ja napauta
"Done". Kamera näkyy nyt luettelossa.
♦ Napauta luettelokohtaa näyttääksesi kamerakuvan älypuhelimen näytöllä.
♦ Voit kääntää kamerapäätä pyyhkäisemällä sormilla haluamaasi suuntaan älypuhelimen näytöllä.
OHJE
► Älypuhelimen kautta tehtävät ohjauskomennot eivät vaikuta verkkokäyttöliittymän kautta tehtä-
vään ohjaukseen.
Page 85

73IUK 5 A1
FI
Kameran ohjaaminen älypuhelimen kautta
OHJE
► Tässä näytetään sovelluksen toiminta Android-käyttöjärjestelmää käyttävissä älypuhelimissa,
Apple-laitteiden käytössä saattaa esiintyä eroja.
Kun näyttöä kosketetaan kamerakuvan ollessa näytöllä, kuvaruudun ylä- ja alareunaan ilmestyvät
seuraavat ohjauskuvakkeet:
OHJE
► Älypuhelin näytön koosta riippuen voit tarpeen mukaan liikuttaa alempaa kuvakepalkkia sivu-
suunnassa saadaksesi kaikki ohjauskuvakkeet näkyviin.
► Kosketa kahdesti
-kenttää tuodaksesi ohjauskuvakkeet näyttöön tai poistaaksesi ne näytöstä.
−> Kosketa tätä painiketta nähdäksesi kuvan vaakasuunnassa peilattuna. Kosketa painiketta uudelleen nähdäksesi kuvan jälleen oikeinpäin.
−> Kosketa tätä painiketta nähdäksesi kuvan pystysuunnassa peilattuna. Kosketa painiketta uudelleen nähdäksesi kuvan jälleen oikeinpäin.
−> Kun tätä painiketta kosketetaan, kamerapää liikkuu yhtäjaksoisesti vaakasuunnassa
vasteesta toiseen. Kosketa painiketta uudelleen pysäyttääksesi kääntöliikkeen tai
jatkaaksesi sitä uudelleen.
−> Kun kosketat tätä painiketta, kamerapää liikkuu yhtäjaksoisesti pystysuunnassa vasteesta
toiseen. Kosketa painiketta uudelleen pysäyttääksesi kääntöliikkeen tai jatkaaksesi sitä
uudelleen.
−> Kosketa tätä painiketta kääntääksesi näytöllä näkyvää näkymää 90 astetta.
−> Kosketa tätä painiketta kytkeäksesi kameran ja matkapuhelimen välisen äänensiirron
päälle tai pois päältä.
Page 86

74 IUK 5 A1
FI
−> Kosketa tätä painiketta tallentaaksesi näytöllä parhaillaan olevan näkymän.
−> Kosketa tätä painiketta tallentaaksesi kamerakuvaa videona matkapuhelimeesi.
Tallennuksen aikana näytön oikeassa yläreunassa näkyy "Recording". Kun toiminto
on aktivoitu, kuvake palaa punaisena. Kosketa tätä painiketta uudelleen lopettaaksesi
tallennuksen.
OHJE
►
Jos videosoittimesi ei tue tiedostomuodoa, voit ladata toisen soittimen
(esim. "MX Player").
−> Kosketa tätä painiketta kytkeäksesi keltaisen LAN-merkkivalon päälle tai pois päältä.
Kun toiminto on aktivoitu, kuvake palaa punaisena.
−> Kosketa tätä painiketta siirtyäksesi eri asetuksista tietojen siirtoon. Kosketa tätä painiketta uudelleen poistuaksesi tästä toiminnosta.
−> Kosketa tätä painiketta tallentaaksesi tai avataksesi enintään 16 kamera-asemaa.
Kosketa tätä painiketta uudelleen poistuaksesi tästä toiminnosta.
−> Kosketa tätä painiketta tuodaksesi näkyviin liukusäätimen, jolla voidaan joko lisätä tai
vähentää näytön kirkkautta.
−> Kosketa tätä painiketta tuodaksesi näkyviin liukusäätimen, jolla voidaan joko lisätä tai
vähentää näytön kontrastia.
−> Kosketa tätä painiketta palauttaaksesi kirkkauden ja kontrastin tehdasasetukset.
−> Kosketa tätä painiketta kytkeäksesi kameran infrapuna-LEDit päälle tai pois päältä.
−> Kosketa tätä painiketta lopettaaksesi kamerakuvan näyttämisen.
Page 87

75IUK 5 A1
FI
Keskitetty valvonta lisäohjelmiston avulla
Voit asentaa mukana tulevan "IUK Viewer" -ohjelmiston, jolla voidaan näyttää jopa 64 kameran
kuvaa yhtäaikaisesti.
Aseta mukana tuleva CD kameran valvontaan haluamasi Windows
®
-tietokoneen levyasemaan. Avaa
levyasema resurssienhallinnasta ja kaksoisnapsauta tiedostoa "IUK Viewer_Setup". Tämä käynnistää
ohjelman, joka asentaa keskeisen valvontaohjelmiston. Seuraa näytölle ilmestyviä ohjeita ja vahvista
käyttöjärjestelmän käyttäjätilien ohjauksen varmistuskysymys tarvittaessa.
Käynnistä sen jälkeen ohjelma "IUK Viewer" ja vahvista ensimmäisellä ohjelman käynnistyskerralla
tarvittaessa käyttöjärjestelmän palomuurin varmistuskysymys. Ohjelmaikkunan vasemmassa alareunassa näkyy asennettujen kameroiden luettelo.
Page 88

76 IUK 5 A1
FI
▯ Settings
System settings
Kun napsautat valikossa "Settings" => "System settings", seuraava ikkuna aukeaa:
OHJE
► Ohjelmiston "IUK Viewer" kautta käytössä olevat konfigurointimahdollisuudet vastaavat hyvin
pitkälti niitä, jotka kuvailtiin jo verkkokäyttöliittymän kohdalla. Siksi niitä ei toisteta tässä kohtaa.
Konfiguroi näytetyt parametrit halutulla tavalla ja napsauta sen jälkeen "OK"-painiketta. Tämä ikkuna
voidaan myös avata napsauttamalla kohtaa "System settings" pääikkunan vasemmassa reunassa.
Page 89

77IUK 5 A1
FI
Device settings
Kun napsautat valikossa "Settings" => "Device settings", näytölle avautuu seuraava ikkuna:
Tässä on lueteltu verkossa tunnistetut kamerat. Jos luettelossa ei näy kaikkia odotettuja kameroita,
käynnistä kameroiden haku uudelleen napsauttamalla kohtaa "Searching Page". Tällöin avautuu
seuraava ikkuna:
Kohtaa "Searching" napsauttamalla luetteloon ilmestyvät verkossa käytettävissä olevien kameroiden
nimet ja parametrit.
Tämä ikkuna voidaan myös avata napsauttamalla kohtaa "Device settings" pääikkunan vasemmassa
reunassa.
Napsauta kohtaa "Add", jos haluat seuraavassa ikkunassa lisätä uuden kameran syöttämällä liitäntätiedot manuaalisesti.
Kun kaikki tiedot on syötetty, sulje ikkuna napsauttamalla "OK".
Page 90

78 IUK 5 A1
FI
Kun hiirellä valitaan laiteluettelosta jokin laite ja napsautetaan sen jälkeen kohtaa "Modify", voidaan
sen jälkeen avautuvassa ikkunassa muuttaa valitun kameran tunnuslukuja syöttämällä liitäntätiedot
manuaalisesti.
Kun kaikki tiedot on syötetty, sulje ikkuna napsauttamalla "OK".
Jos haluat poistaa tietyn kameran laiteluettelosta, merkitse hiirellä kameraa koskevat tiedot ja nap-
sauta "Delete".
Sulje ikkuna vahvistamalla seuraava varmistuskysymys napsauttamalla "OK". Valittu kamera on nyt
poistettu laiteluettelosta. Sulje laiteluettelo napsauttamalla punaista kenttää "×" ikkunan oikeassa
ylälaidassa.
Luettelossa näytetään kaikki "Search"-toiminnolla löydetyt kamerat, vaikka ne eivät olisikaan juuri sillä
hetkellä verkossa käytettävissä. Jos "Search"-toiminnolla on löytynyt uusia kameroita, ne voidaan
lisätä laiteluetteloon kaksoisnapsauttamalla. Yksi kamera voidaan asentaa myös useamman kerran.
Laiteluettelo voidaan avata myös napsauttamalla kohtaa "Device settings" pääikkunan vasemmassa
reunassa.
Page 91

79IUK 5 A1
FI
Screen
Kun pääikkunassa napsautetaan kohtaa "Screen", näyttöön aukeaa valikko, jonka kautta voidaan
valita näytöllä näkyvien ruutujen määrä. Näytettävien ruutujen maksimimäärä on 64. Jokaiseen
ruutuun voidaan sitten kohdistaa eri kamerakuva vetämällä pääikkunan vasemmassa alareunassa
näkyvästä kameraluettelosta kamera haluttuun ruutuun. Kun yhtä kaakeleista kaksoisnapsautetaan,
kyseisessä kaakelissa olevan kameran kuva näkyy ikkunan kokoisena.
Kun pääikkunassa napsautetaan kohtaa "Screen" ja valitaan "Full screen", ruudut näytetään koko
kuvaruudun kokoisena. Ruudut näytetään jälleen ohjelman pääikkunan sisällä napsauttamalla
"Exit Full screen".
Oikealla kamerakuvan yläpuolella näkyy 5 kuvaketta
, joiden toiminta nähdään
liikuttamalla hiiren osoitinta niiden päältä.
Listen: Kun Kuuntelu-toiminto on aktivoitu, kameran tallentamat äänisignaalit lähe-
tetään valvovalle tietokoneelle ja toistetaan siihen liitettyjen kaiuttimien tai
kuulokkeiden kautta.
Speak: Kun Puhe-toiminto on aktivoitu, valvovaan tietokoneeseen liitetyn mikrofonin
vastaanottamat äänisignaalit siirretään kameraan ja toistetaan sisäänrakenne-
tun kaiuttimen kautta.
Recording: Kun Tallennus-toiminto on aktivoitu, kamerakuva tallentuu koko ajan.
Snapshot: Kun Tilannekuva-kuvaketta napsautetaan, senhetkisestä kamerakuvasta tallen-
netaan tilannekuva.
Close: Tämän kuvakkeen napsauttaminen poistaa kyseisen kamerakuvan pääikkunasta.
Log
Kun pääikkunassa napsautetaan kohtaa "Log" ja sen jälkeen "Log window", oikealla otsikkopalkissa
aukeaa ikkuna, jossa näkyvät järjestelmän yhteystilan ajankohtaiset tapahtumailmoitukset. Ikkuna
suljetaan napsauttamalla uudelleen kohtaa "Log" ja sen jälkeen "Log window".
About
Ohjelman versionumero saadaan näkyviin napsauttamalla pääikkunassa kohtaa "About" ja sen
jälkeen "About". Ikkuna suljetaan sitten napsauttamalla "OK".
Kameran muu ohjaus pääikkunan vasemmassa reunassa olevilla painikkeilla vastaa jo kuvattua verkkoselaimen kautta käytössä olevaa ohjausta. Jos käytössä on useampia kameroita, napsauta ensin
hiirellä sen kameran kuvaa, jota haluat ohjata. Näin aktivoidun kuvan reunat näkyvät punaisina.
Page 92

80 IUK 5 A1
FI
Puhdistaminen
HUOMIO
Laitevauriot!
► Varmista, ettei laitteeseen pääse puhdistuksen aikana kosteutta, sillä kosteus voi vaurioittaa
laitteen korjauskelvottomaksi.
■ Puhdista laitteen pinnat pehmeällä, kuivalla liinalla. Jos lika on pinttynyttä, käytä tavanomaista
astianpesuainetta ja vähän vettä. Varmista, ettei laitteeseen pääse vettä.
Varastointi / Hävittäminen
Varastointi
Jos laite on pidempiä aikoja käyttämättä, varastoi laite puhtaassa ja kuivassa paikassa suojassa
suoralta auringonvalolta, mielellään alkuperäispakkauksessa.
Laitteen hävittäminen
Viereinen kuvake yliviivatusta pyörien päällä seisovasta jäteastiasta osoittaa, että tämä
laite on direktiivin 2012/19/EU alainen. Tämän direktiivin mukaan laitetta ei saa sen
käyttöiän päätyttyä hävittää tavallisen kotitalousjätteen seassa, vaan se on toimitettava
erityisiin keräys- tai kierrätyspisteisiin tai annettava jätehuoltoyrityksen hävitettäväksi.
Hävittäminen on sinulle maksutonta. Suojele luontoa ja hävitä laite asianmukaisesti.
Lisätietoja saat paikalliselta jätehuoltoyritykseltä tai kaupungin tai kunnan jätehuollosta vastaavalta
taholta.
Vian korjaus
Tässä luvussa annetaan tärkeitä ohjeita häiriöiden paikallistamiseen ja poistamiseen. Huomioi ohjeet
vaarojen ja vaurioiden välttämiseksi.
VAROITUS
Noudata seuraavia turvaohjeita vaarojen ja aineellisten vahinkojen välttämiseksi:
► Sähkölaitteiden korjauksia saavat suorittaa ainoastaan ammattilaiset, joilla on valmistajan
antama koulutus. Virheelliset korjaukset voivat aiheuttaa huomattavia vaaroja käyttäjälle ja
vaurioittaa laitetta.
Page 93

81IUK 5 A1
FI
Vikojen syyt ja korjaus
Seuraava taulukko auttaa pienempien häiriöiden paikallistamisessa ja korjaamisessa:
Vika Mahdollinen syy Korjaus
Kamera ei toimi. Sähkönsyöttö on
katkennut.
Työnnä mukana tuleva verkkoadapteri pistorasiaan
ja liitä adapterikaapelin pistoke syöttöjännitteen
liitäntään
.
Verkkoyhteydessä on
ongelma.
Muodosta yhteys kameran ja tietokoneen välille
käynnistämällä mukana tulevalta CD:ltä
"Search Tool" -ohjelmisto.
Kuva on
liian kirkas/liian
tumma.
Kuvan kirkkaus ei ole
säädetty optimaalisesti.
Muodosta yhteys kameraan verkkoselaimen kautta.
Lisää kuvan kirkkautta liikuttamalla "Brightness"-liukusäädintä oikealle. Lisää kuvan tummuutta liikuttamalla
"Brightness"-liukusäädintä vasemmalle.
Kuva on
epäselvä.
Kuvan kontrasti ei ole
säädetty optimaalisesti.
Muodosta yhteys kameraan verkkoselaimen kautta.
Lisää kontrastia liikuttamalla "Contrast"-liukusäädintä
oikealle. Vähennä kontrastia liikuttamalla "Contrast"liukusäädintä vasemmalle.
Säädä tarkkuutta manuaalisesti pyörittämällä tarkennusrengasta
myötä- tai vastapäivään.
Kamera ei
reagoi.
Sisäinen toimintahäiriö.
Paina kapealla, terävällä esineellä Reset-painiketta
laitteen pohjassa olevan aukon läpi.
OHJE
► Jos et onnistu poistamaan ongelmaa edellä mainituilla ohjeilla, ota yhteys asiakaspalveluun.
Page 94

82 IUK 5 A1
FI
Liite
Vaatimustenmukaisuusvakuutusta koskevia ohjeita
Tämä laite vastaa eurooppalaisen sähkömagneettista yhteensopivuutta koskevan
direktiivin 2004/108/EC sekä RoHS-direktiivin 2011/65/EU perustavanlaatuisia
vaatimuksia ja muita asiaankuuluvia määräyksiä.
Täydellinen alkuperäinen vaatimustenmukaisuusvakuutus on saatavana maahantuojalta.
Tekniset tiedot
IP-valvontakamera
Käyttöjännite
5 V
, mukana toimitettavalla
verkkoadapterilla
Virranotto 2 A
Anturi 0,3 MP
Erottelutarkkuus 640 x 480 pikseliä
WLAN-standardi 802.11b/g/n
Työskentelytaajuus 2400–2483,5 MHz
Videon maks. kuvataajuus 25 fps
Liikeradan säde Pysty: 105°, vaaka: 355°
Min. valaistus 2,0 luksia @ 500 nm
Käyttölämpötila 5...+40 °C
Varastointilämpötila −10...+60 °C
Kosteus (ei kondensoitumista) 5–75 %
Mitat n. 11,8 x 10,3 x 12,9 cm
Paino n. 300 g
Page 95

83IUK 5 A1
FI
Verkkoadapteri
Tyyppi MW6FU21NGS
Valmistaja Minwa Electronics Co., Ltd.
Tulojännite 100–240 V ~, 50/60 Hz
Virranotto 0,26 A
Lähtöjännite 5 V
Lähtövirta 2100 mA |10,5 VA (max)
Suojausluokka
II /
Takuu
Laitteen takuu on 3 vuotta ostopäivästä. Laite on valmistettu huolella ja tarkastettu perusteellisesti
ennen toimitusta.
Säilytä ostokuitti todisteeksi ostosta. Ota takuutapauksessa puhelimitse yhteyttä lähimpään huoltopisteeseen. Vain näin voimme taata, että tuotteesi toimittaminen huoltoon on maksutonta.
OHJE
► Takuu koskee ainoastaan materiaali- ja valmistusvirheitä, ei kuitenkaan kuljetusvaurioita, kuluvia
osia tai herkästi vaurioituvien osien, esim. kytkinten tai akkujen vaurioita.
Tuote on tarkoitettu ainoastaan yksityiskäyttöön, sitä ei saa käyttää kaupallisissa tarkoituksissa.
Laitteen vääränlainen tai asiaton käsittely, väkivallan käyttö ja muut kuin valtuutetun huoltopisteen
suorittamat korjaukset aiheuttavat takuun raukeamisen.
Tämä takuu ei rajoita kuluttajan lakisääteisiä oikeuksia. Takuukorjaus ei pidennä takuuaikaa. Tämä
koskee myös vaihdettuja ja korjattuja osia.
Mahdollisesti jo ostettaessa olemassa olevista vaurioista ja puutteista on ilmoitettava välittömästi
pakkauksen avaamisen jälkeen, viimeistään kuitenkin kahden päivän sisällä ostopäiväyksestä.
Takuuajan päättymisen jälkeen suoritettavat korjaukset ovat maksullisia.
Page 96

84 IUK 5 A1
FI
Huolto
Huolto Suomi
Tel.: 010309 3582
E-Mail: kompernass@lidl.fi
IAN 48807
Palvelupuhelin: Maanantaista perjantaihin klo 8:00–20:00 (CET)
Maahantuoja
KOMPERNASS HANDELS GMBH
BURGSTRASSE 21
44867 BOCHUM
GERMANY
www.kompernass.com
Page 97

85IUK 5 A1
SE
Innehållsförteckning
Inledning ....................................................87
Information om den här bruksanvisningen ....................................87
Upphovsrätt ...........................................................87
Föreskriven användning ..................................................87
Varningar .............................................................87
Säkerhet ....................................................88
Grundläggande säkerhetsanvisningar ....................................... 88
Möjliga brott mot tredje persons rättigheter ...................................90
Komponenter ................................................92
Uppställning och anslutning ....................................93
Leveransens innehåll och transportinspektion ..................................93
Kassera förpackningen ................................................... 93
Krav på uppställningsplatsen ..............................................94
Strömförsörjning ........................................................ 95
Audioanslutning ........................................................ 95
LAN-anslutning ......................................................... 95
WLAN-drift ............................................................ 95
Larmanslutning .........................................................95
Användning och bruk. . . . . . . . . . . . . . . . . . . . . . . . . . . . . . . . . . . . . . . . . .96
Systemkrav ............................................................96
Ta produkten i bruk ......................................................97
Söka kameran i nätverket .................................................97
Visa kamerabild i webbläsaren Internet Explorer 11 ............................99
Kontrollknapparnas och -fältens betydelse ...................................102
Konfiguration genom webbläsargränssnitt ...................................105
Sidan Basic settings ....................................................105
Sidan Alarm Settings ...................................................107
Sidan Network ........................................................110
Sidan Pan & Tilt .......................................................111
Sidan User settings .....................................................112
Andra användningssätt för Smartphones ....................................114
Visa kamerabilden på en smartphone ......................................114
Styra kameran med en smartphone ........................................115
Central övervakning med speciell mjukvara ..................................117
Page 98

86 IUK 5 A1
SE
Rengöring ................................................. 122
Förvaring/Kassering ........................................ 122
Förvaring ............................................................122
Återvinning av produkten ................................................122
Åtgärda fel ................................................ 122
Orsaker till fel och åtgärder ..............................................123
Bilaga .................................................... 124
Information om försäkran om överensstämmelse ..............................124
Tekniska data .........................................................124
Garanti ..............................................................125
Service ..............................................................126
Importör .............................................................126
Page 99

87IUK 5 A1
SE
Inledning
Information om den här bruksanvisningen
Ett stort grattis till din nyinköpta produkt.
Du har valt en produkt med hög kvalitet. Bruksanvisningen ingår som en del av leveransen.
Den innehåller viktig information om säkerhet, användning och återvinning. Läs noga igenom alla
användar- och säkerhetsanvisningar innan du börjar använda produkten. Använd endast produkten
enligt beskrivningarna och i de syften som anges här. Om du överlåter eller säljer produkten ska du
lämna över all dokumentation inklusive bruksanvisningen till den nye ägaren.
Upphovsrätt
Det här dokumentet skyddas av upphovsrätt.
För all form av mångfaldigande eller eftertryck, även delvis, samt återgivning av bilderna, även i
förändrat skick, krävs tillverkarens skriftliga tillstånd.
Föreskriven användning
Det här är en informationsteknisk produkt som bara ska användas till digitala audio- och videoinspelningar och överföra dem trådlöst eller via kabel till dataskärmar. All annan eller utökad form av
användning strider mot föreskrifterna. Produkten ska inte användas yrkesmässigt eller industriellt.
Det finns inga möjligheter att ställa krav på ersättning för skador som är ett resultat av felaktig
användning, felaktigt utförda reparationer, otillåtna ändringar på produkten eller för att reservdelar
som inte är godkända använts. Allt ansvar vilar på användaren.
Varningar
I den här bruksanvisningen används följande varningar:
FARA
En varning på den här nivån innebär en akut farlig situation.
Om ingenting görs för att undvika situationen finns risk för dödsolyckor och svåra personskador.
► Följ anvisningarna i varningstexten för att undvika dödsolyckor och svåra personskador.
Page 100

88 IUK 5 A1
SE
VARNING
En varning på den här nivån innebär att en farlig situation kan uppstå.
Om ingenting görs för att åtgärda situationen kan resultatet bli personskador.
► Följ anvisningarna i varningstexten för att undvika personskador.
AKTA
En varning på den här nivån innebär risk för sakskador.
Om ingenting görs för att undvika situationen kan resultatet bli sakskador.
► Följ anvisningarna i varningstexten för att undvika sakskador.
OBSERVERA
► Under Observera finns extra information som ska hjälpa dig att handskas med produkten.
Säkerhet
Det här kapitlet innehåller viktig information för säker hantering av produkten.
Den här produkten motsvarar gällande säkerhetsbestämmelser. Om den används på fel sätt kan den
orsaka person- och sakskador.
Grundläggande säkerhetsanvisningar
Observera följande anvisningar för säker hantering av produkten:
■ Kontrollera om produkten har några synliga skador innan du använder den. Om produkten är
skadad eller har fallit i golvet får den inte användas.
■ Om kablarna eller anslutningarna är skadade ska du låta en auktoriserad fackverkstad eller vår
kundtjänst byta ut dem.
■ Personer som av fysiska, mentala eller motoriska skäl inte är kapabla att hantera produkten på ett
säkert sätt får endast använda den om någon ansvarig håller uppsikt eller visat och talat om hur
det går till.
■
FARA! Förpackningsmaterial är inga leksaker. Håll allt förpackningsmaterial på avstånd från barn.
Risk för kvävning!
■ Se till så att produkten sitter stadigt när du fäster den så att den inte kan falla ned och skada
någon.
 Loading...