

Komando KIM606 User Manual

KIM606
USER MANUAL
www.KOMANDO.com


Introduction................................................................................
Notices For Use..........................................................................
Controls & Parts Diagram............................................................
Product Overview....................................................................
Charging..............................................................................
The microSD card...............................................................
Rotating lenses......................................................................
Installing in-vehicle bracket..................................................
Basic Operation......................................................................
Powering ON/OFF the Dash Cam..........................................
Switching between modes.....................................................
System settings....................................................................
Video mode..........................................................................
Operation of the emergency storage function..................
Muting function..............................................................
Application of G-sensor.........................................................
Using the GPS tracking function............................................
Video playback....................................................................
Playback setting options.......................................................
Using the custom video player...............................................
Minimum system requirements..............................................
Player interface and use.......................................................
Video output.............................................................................
Resetting the system...............................................................
Accessories..............................................................................
1
1
2
3-4
3
3
4
4
5-8
5
6
6
7
7
7
7
8
8
8
9-17
9
9
18
18
18
CONTENTS


Thank you for choosing the Komando™ Dual Lens Dash Cam.
We continually makes updates and improvements to our devices,
thus some functions of your device may vary slightly from what is
contained within this manual. We shall be entitled to modify the
content or software without prior notice and the manufacturer
shall be entitled to modify technical specifications without prior
notice. The accessories included with your device may differ with
what is outlined in this manual.
NOTICES FOR USE
Do not charge in extreme temperatures or high-humidity environments. Do not leave outdoors or exposed in direct sunlight for a
long period of time.
Charge the u
nit fully prior to first use. An initial charge time of 6
hours is recommended.
Do not make adjustment to the Dash Cam in any way while driving.
Be sure to make any necessary adjustments to the camera’s
settings before driving.
Please keep the lens clean and clear; do not use foreign objects,
oils, or cleaners to clean the lens. If necessary use a certified
microfiber cloth to clean the lens without scratching.
When using a new microSD card, format the card in the camera to
be sure it is set to the correct settings.
Please use a correct microSD/SDHC card (suggested minimum
4GB card with a class
of 6 or above).
It is recommended that you perform a format of the microSD card
once a week to ensure it is in proper working order.
If you will be out of the vehicle for a long period of time in direct
sunlight, it is recommended that the Dash Cam is removed and
placed in a cooler area.
•
•
•
•
•
•
•
•
INTRODUCTION
1
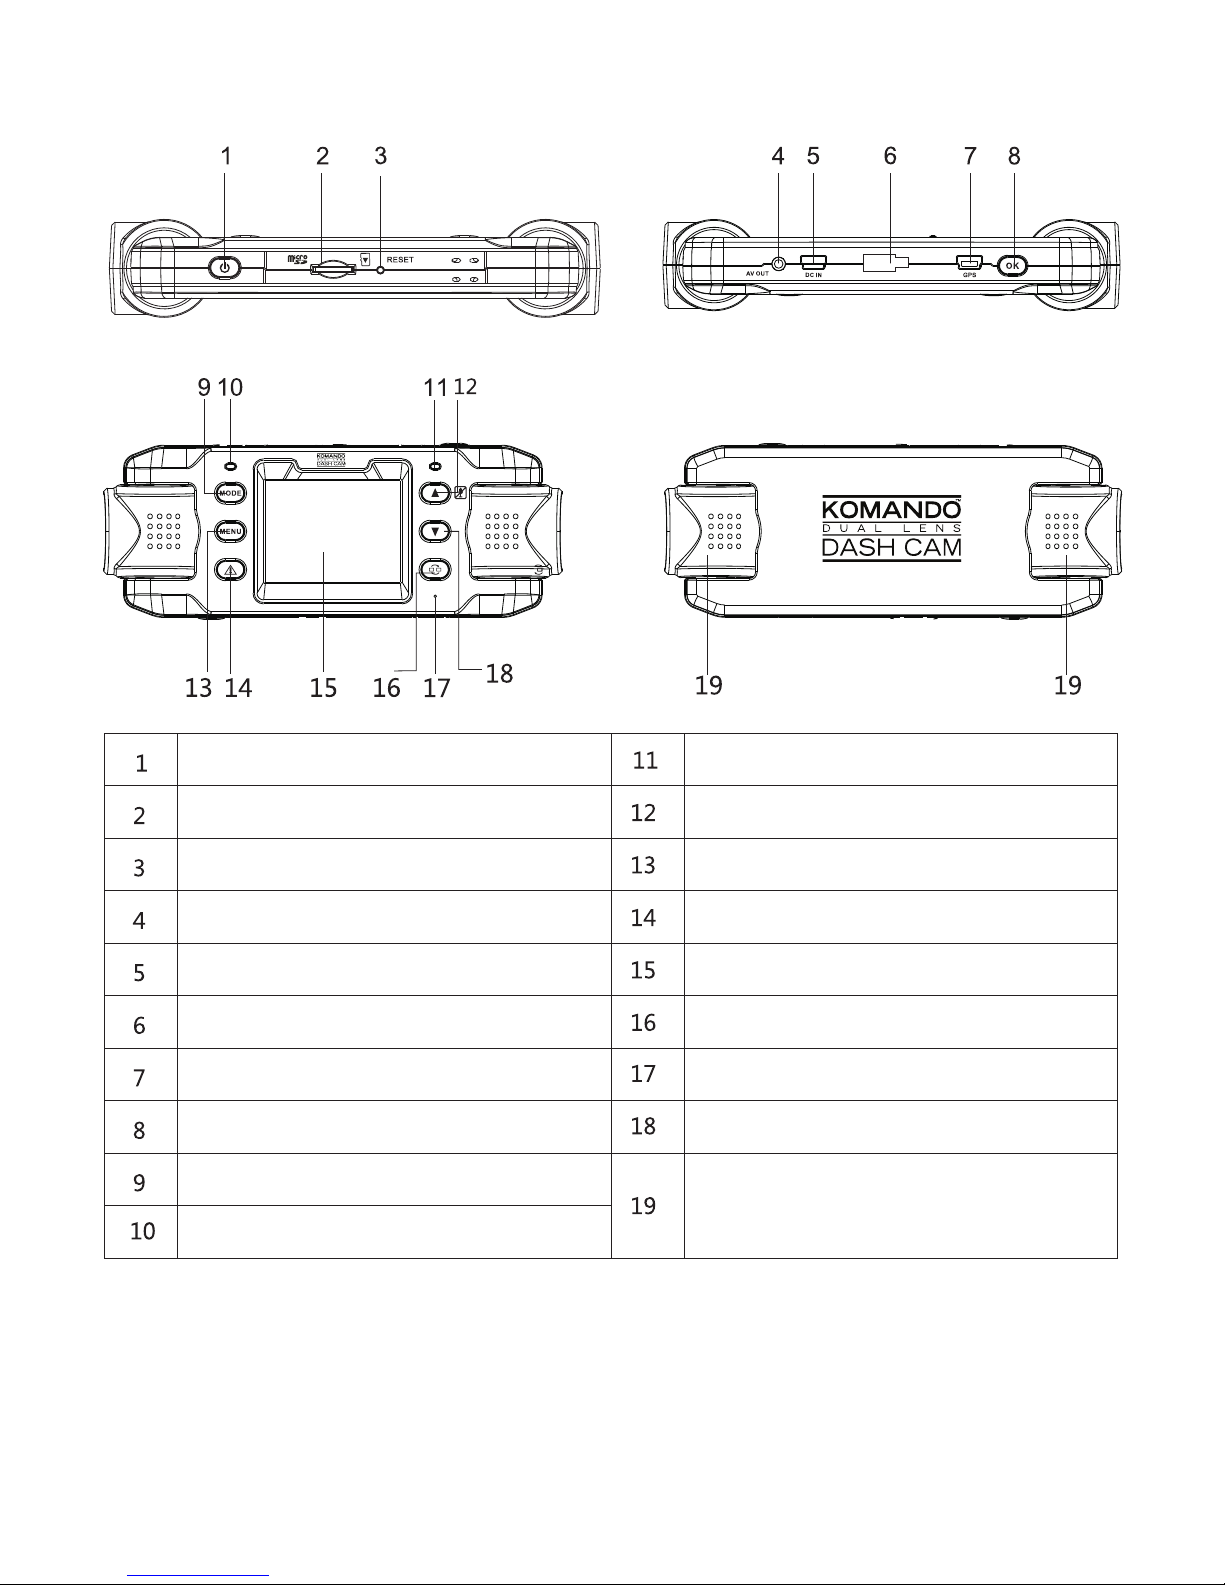
Power button
UP button
microSD card slot
Menu button
AV out
DC in
Bracket slide
GPS connector
Confirm button (OK key)
Mode button
GPS indicator
Charge indicator
Emergency event button
LCD display
Screen switch button
Microphone
Down button
Lenses
RESET button
*
**
***
CONTROLS & PARTS DIAGRAM
While recording, pressing the UP button will mute the camera’s microphone. Pressing the UP
button again will reactivate the microphone.
Pressing the emergency event button while recording will store the currently recorded video
immediately, and a protection mark will appear on the screen. The recorded video files will then
be locked, stored, and not deleted as to ensure the completeness of your video.
The screen switch button can only be used when both lenses are in use simultaneously. The
user can switch between displaying only lens 1, only lens 2, or displaying both simultaneously.
The switch screen button is us
eless when only one lens is being used to record.
*
**
***
2
An initial charge of 6 hours is recommended.
Leaving the Dash Cam constantly connected to the car charger
will not harm the battery.
To charge the Dash Cam, connect the 12v car charger to your
car’s 12v port and connect the other end to the Dash Cam. You
can also connect the USB connector to your computer’s USB port
and the other end to the Dash Cam.
The Dash Cam is designed to automatically power on and
record when plugged in.
The Dash Cam is designed to automatically power off and save
your video when unplugged
When the unit is powered off and charging, the red indicator light
will illuminate. When charging is complete, the red light will go
off. While the unit is powered on, charging
is indicated by the
appearance of a power cord in the top right of the screen.
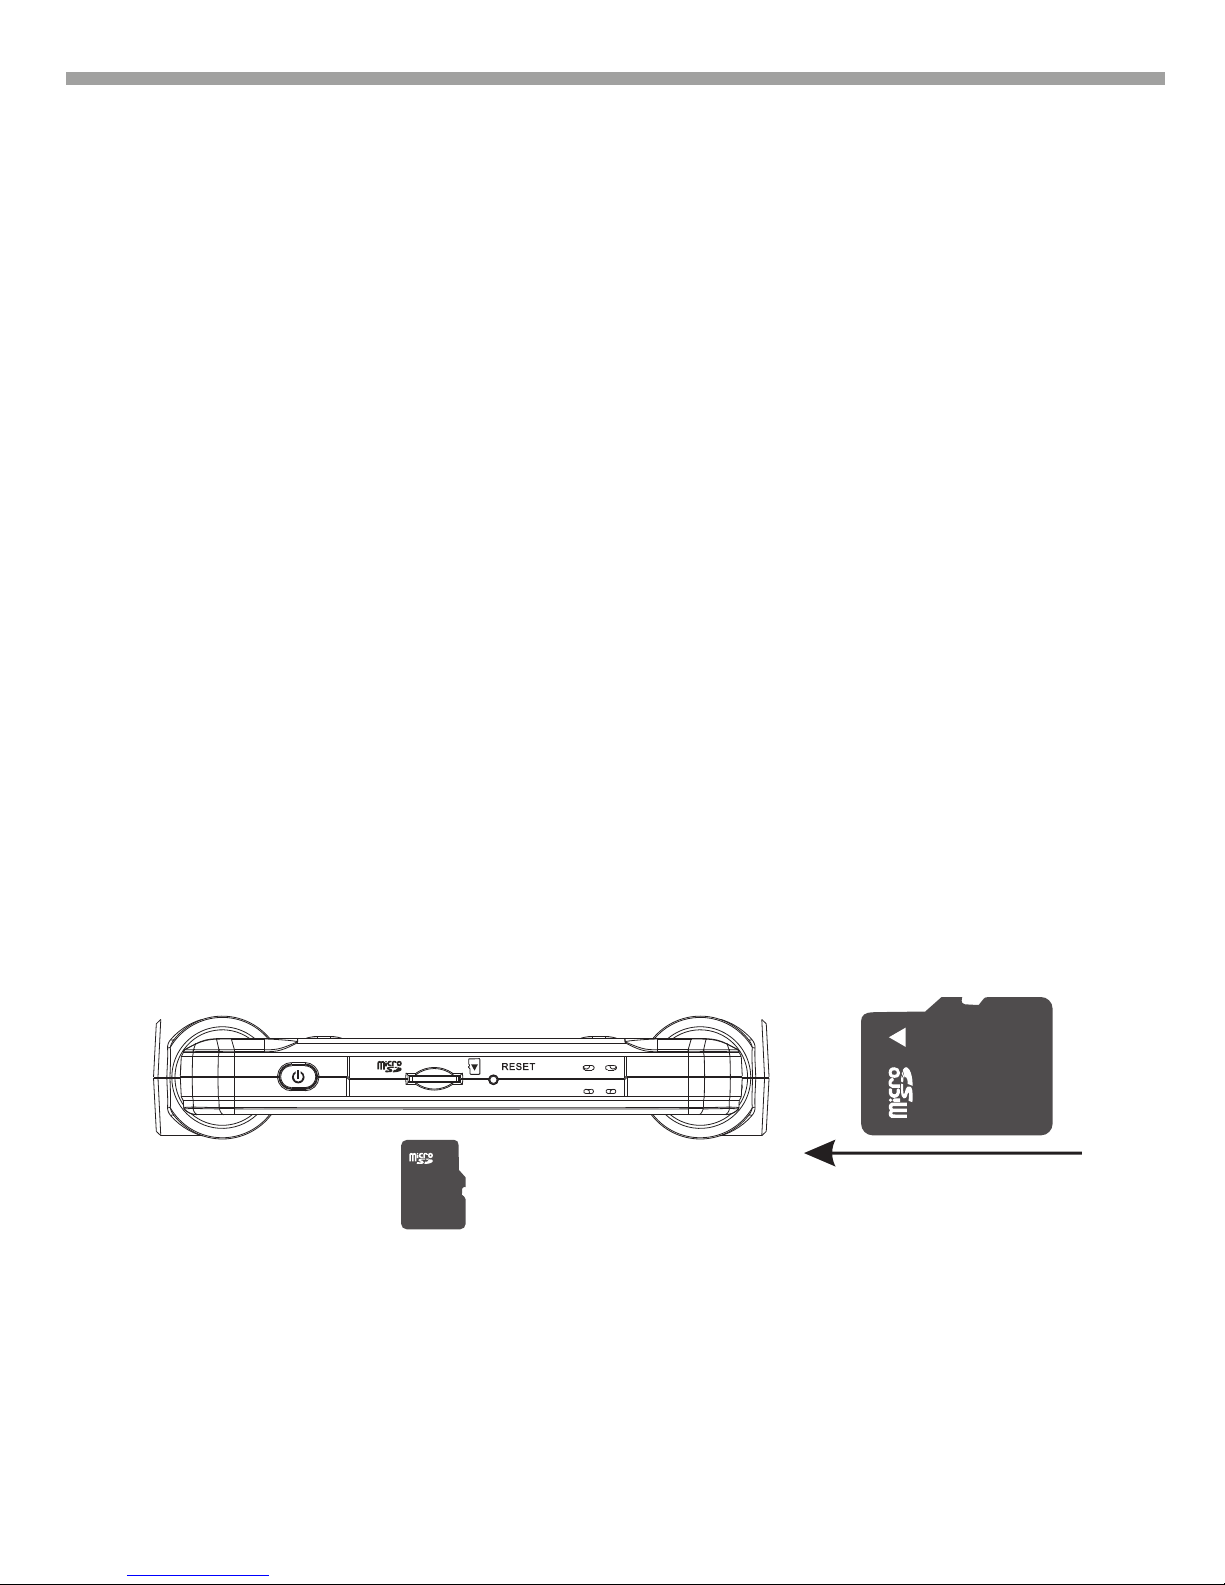
THE MICRO SD CARD
Insert the microSD card into the microSD card slot until you hear
a click; the drawing outlined on the camera indicates the correct
direction.
Removing the microSD card: Push the card in until you hear a
click and the card bounces out.
Note: You will be prompted to format the SD card when using the unit for the
first time; perform this step. It is recommended that you format the SD card
every time inserting a new card. Once the SD card has been formatted in this
camera, it must be formatted in a computer for use wit
h any other camera.
•
•
•
•
•
SD card insert
CHARGING
Product Overview
3
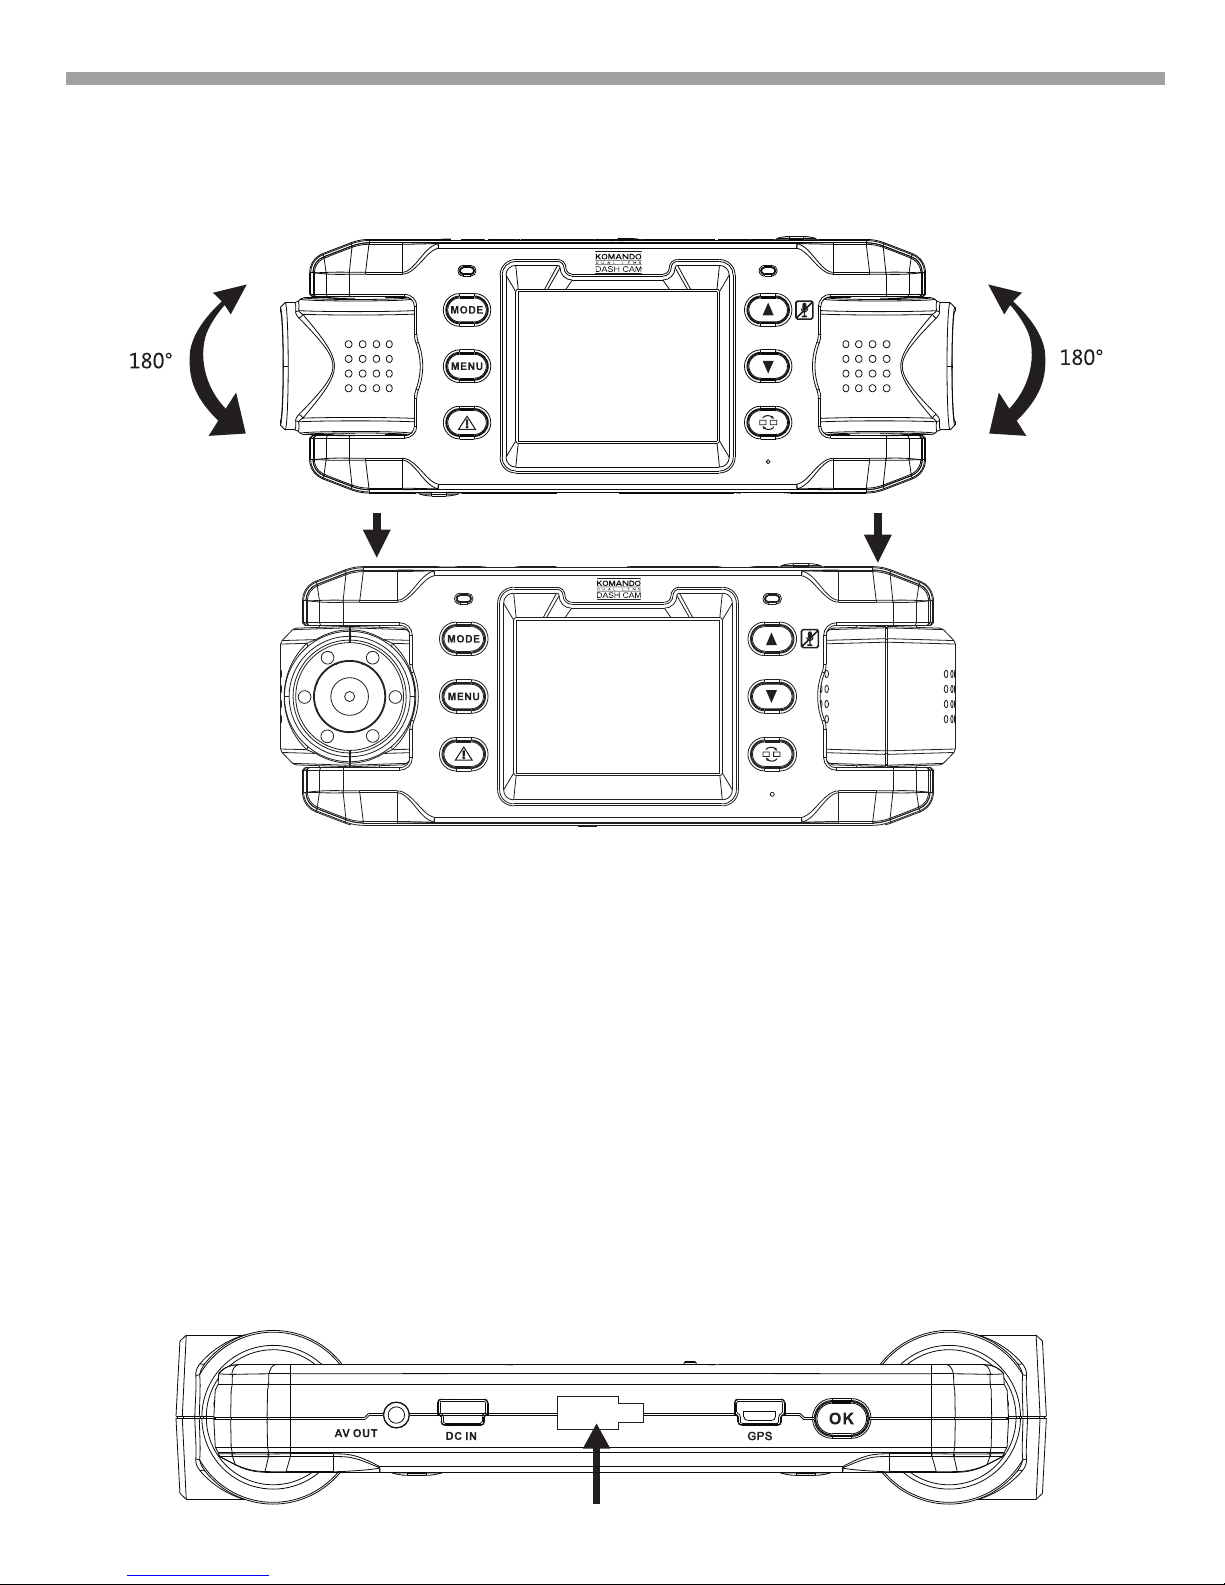
ROTATING LENSES
The lenses can rotate up to 180 degrees as shown in the
picture.
INSTALLING IN-VEHICLE BRACKET
The included suction cup bracket can be affixed to the windshield
to securely place the Dash Cam. Please follow these steps to
mount the Dash Cam effectively:
Insert the sliding bracket into the port on the top of the Dash
Cam and slide them together until they are locked into place.
After locking the camera and mount, apply slight moisture to
the rubber suction cup and place the camera in your desired
location.
Press down the plastic locking rod and the mount will lock into
place.
A.
B.
C.
Product Overview
4
 Loading...