

Page 1
TORQUE TESTER
mini K1/S
mini K5/S
mini K20/S
mini Ke/S
OPERATOR’S HANDBOOK
KOLVER S.r.l - Via Corner, 19/21 - 36016 THIENE - ITALY - tel. +39 0445 371068 fax. +39 0445 371069
kolver@kolver.it - www.kolver.it
Page 2
1. APPLICATIONS
Recommended for all hand screwdrivers, wrenches, or power tools.
2. FEATURES
Model
Torque range Nm
Accuracy
miniK1/S
0,05 – 1
± 1 cNm
miniK5/S
0,3 – 5
± 2 cNm
miniK20/S
0,5 – 20
± 3 cNm
minike/5/S
0,5 - 5
± 3 cNm
minike/25/S
2 - 25
± 10 cNm
minike/50/S
5 - 50
± 10 cNm
Built-in transducer to measure on joint simulator.
External transducer (miniKe/S).
Three units of torque measurements: Nm, Kgf.cm, lbf.in.
Battery powered (9V) and AC adapter cord. 9V batteries provide 20 hours of continuous operation.
Manual and auto reset functions to clear displayed values.
Automatic shut down.
Better performances on hard joint
Correction factor (FATC): to connect more ext. transducers on the same tester.
RS232C serial port as option with date and hour.
Certificate of calibration.
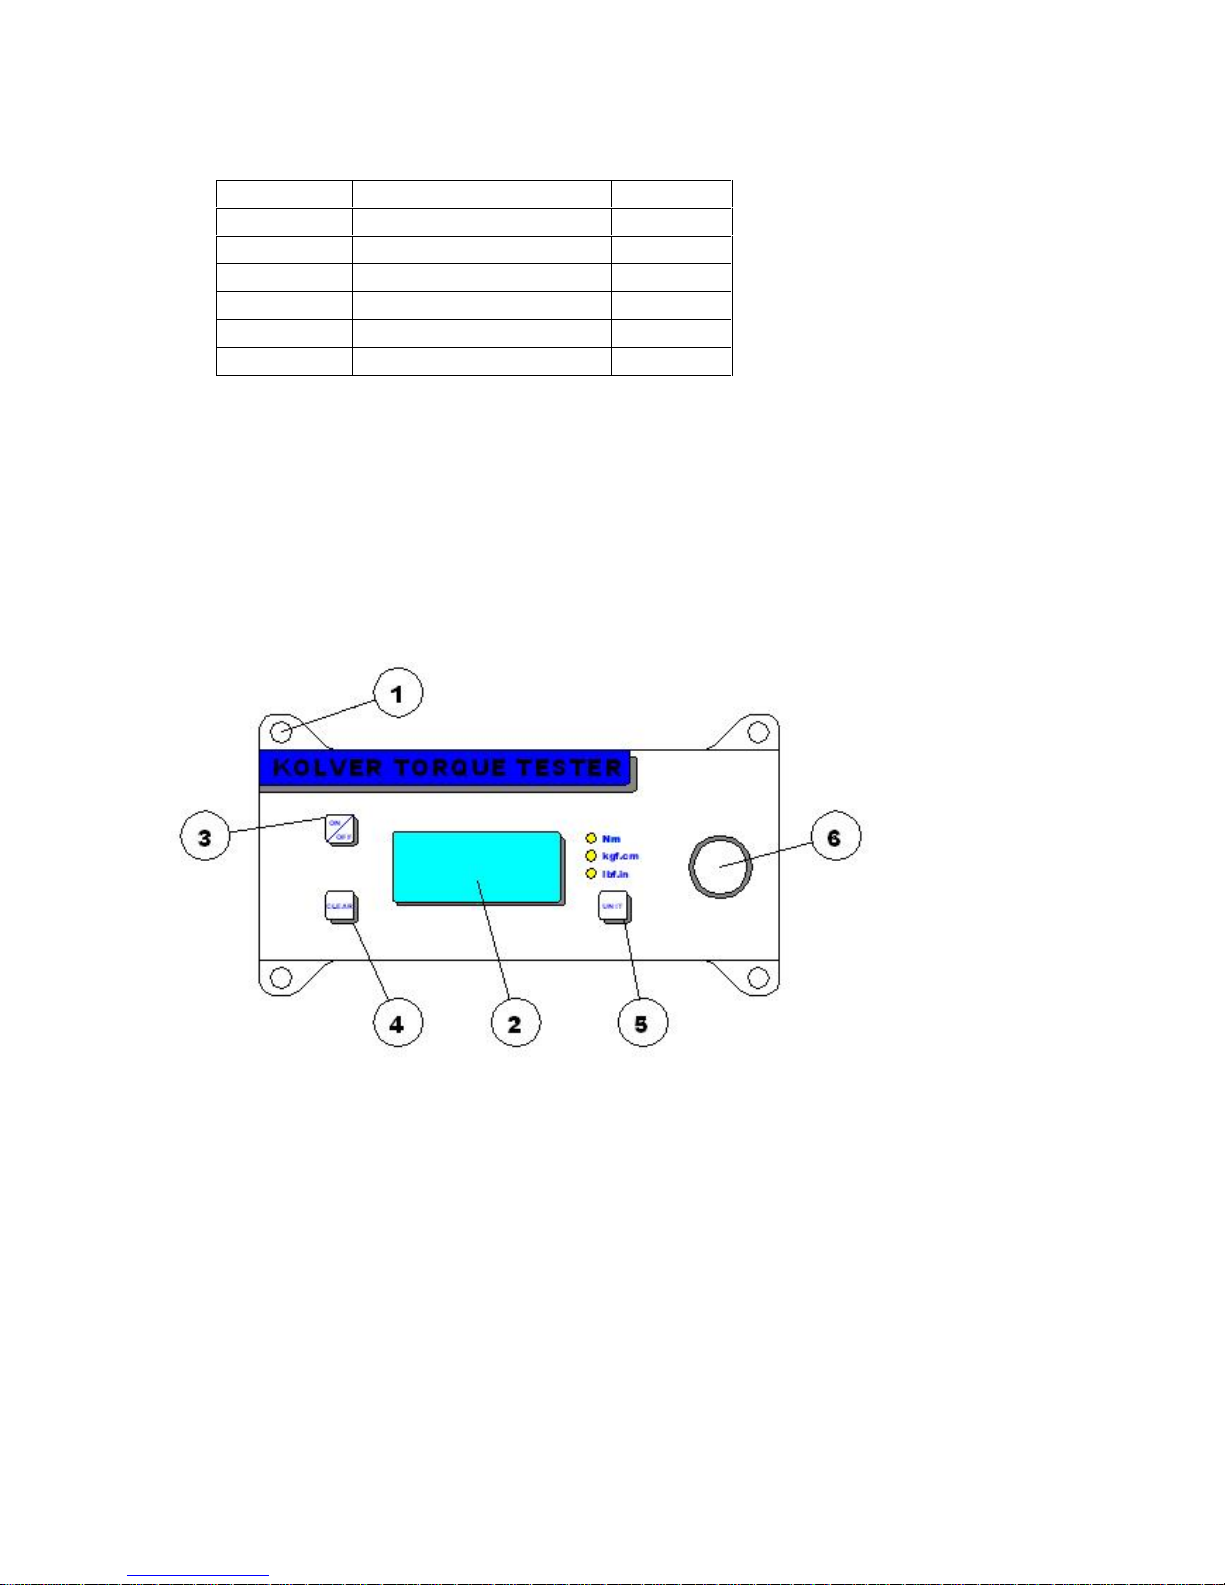
3. DESCRIPTION
1. Mounting holes
2. Display 4 digit / 8 lines
3. “ON/OFF” key : press for 3 seconds to switch tester on or off
4. “CLEAR” key : press to reset the displayed value
5. “UNIT” key : press to select the unit of torque measurements
6. Internal transducer or port for external transducer
4. MOUNTING
It is strongly recommended securing the tester through slots “1” to a workbench before operating.
Immobilizing the tester when checking torque values over 1 Nm is critical for the safety the operator as well
as for the accuracy of torque measurements during operation.
5. JOINT SIMULATOR
The Joint Simulator (JS) consists of a screw compressing a series of washers. The way the washers are
mounted can simulate soft or hard joint. The screw comes with a ¼” hex male head for proper fit to any ¼”
hex female screwdriver drive. Hardened thread components increase accuracy and life. Since a joint
simulator cannot duplicate actual joints, the torque values displayed on the minik may vary from the actual
torque that a screwdriver will apply to the actual assembly.
Page 3

When critical applications are involved, we recommend to verify the torque output of the power tool being
used on the actual assembly through an external transducer.
Minik1 is supplied with a built-in joint simulator.
NB. We recommend to grease the JS each 1000 cycles.
6. STARTING AND OPERATING THE TESTER
1. Immobilize the tester when checking torque values over 1 Nm. This is critical for the safety the operator as
well as for the accuracy of torque measurements during operation.
2. Switch the tester on pushing the ON/OFF key.
If used only with battery check its status. If the tester does not switch on or the display is not clear enough,
please replace the battery. When used it the AC adapter, this will disable the battery. The battery is not
rechargeable. The display will show the main screen:
3. Insert the joint simulator into its 13mm hex seat and make sure the screw is in its upper position (if not run
the driver anticlockwise to unscrew it). The tester is ready for a measuring cycle.
In minik1, only unscrew before measuring.
4. Run the joint simulator screw all the way down until it stops and read the torque value on the display. Run
the screw up to be ready for the next cycle.
5. Press the “ON/ESC” key for 3 seconds to switch the tester off. The tester features a built-in auto shut off
mode function to save power when not in use. If there is no activity for 3 minutes, such as key press or no
torque input, the tester will shut down. To restore power press the “ON/ESC” key for 3 seconds
NB. Before starting, always check that the screen displays 0.000. Instead push CLEAR.
7. SELECTING THE UNIT
MEASURING UNIT: Nm, kgf.cm and lbf.in
To change unit: press Unit key until the desired unit has been selected.
Each unit is indicated by a LED of different color: red for Nm, green for kgf.cm and yellow for lbf.in .
8. SELECTING MANUAL OR AUTO RESET
The flow chart below shows how to select Manual or Auto Reset.
Sens, Cal and Fatc functions (sensitivity, calibration and correction factor) can be modified only by
authorized personnel.
When you select Manual Reset “Coff”: you need to push “CLEAR” to remove readings from the display
and reset all values to zero.
When you select Auto reset “Con”: any new measure will replace the previous one without resetting the
value to zero.
Page 4
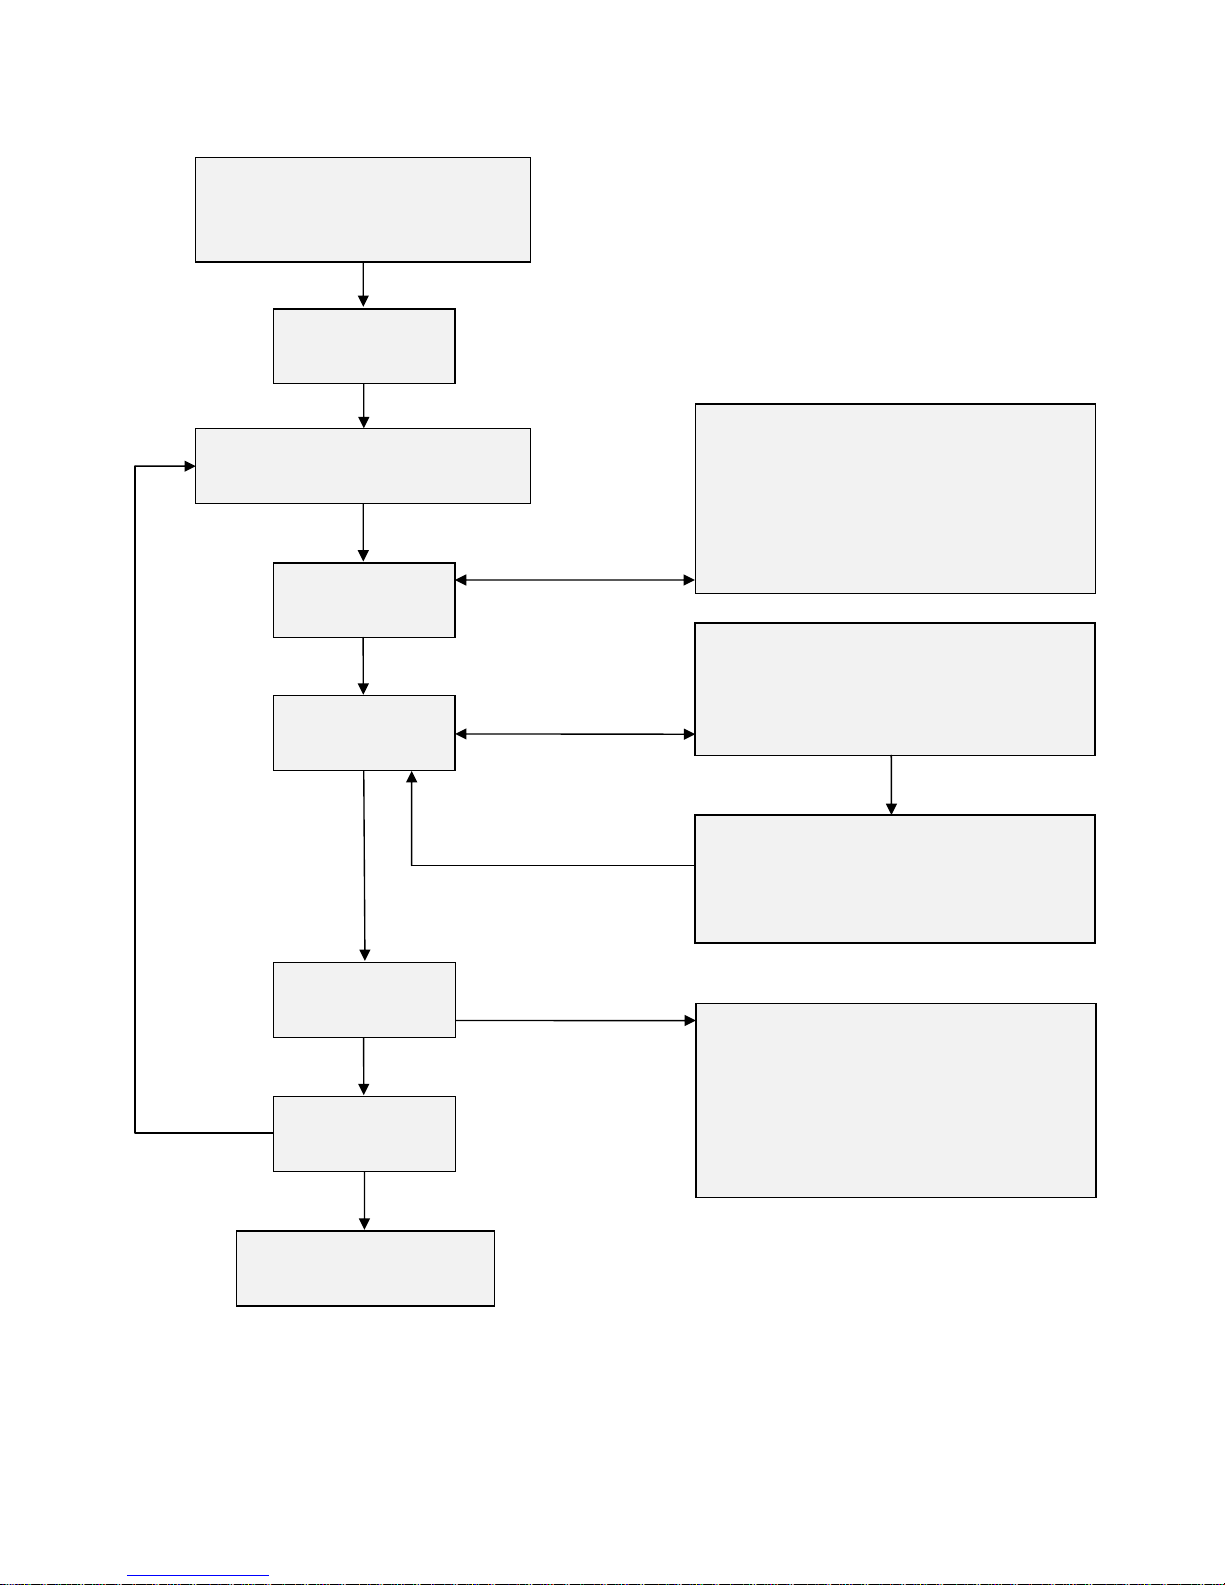
Push ON/OFF
Push UNIT
Pr Push emere
Push at the same time
CLEAR+UNIT for 5 sec.
See
“Prg”
Push “UNIT” per scorrere la lista.
-TRACK: Track Mode active.
-OFF : Automatic reset off.
-ON : Automatic reset on .
Push “ON/OFF” to save or “CLEAR” to
exit
After 3 sec. see
“SEnS”
Push UNIT
Push ON/OFF
See
“rST”
Automatic detection of FATC.
Once finished, remove the weight and push
“ON/OFF” to save or “UNIT” to go to
Manual Mode to improve the calibration.
Push UNIT
See
“CAL”
Push UNIT
MANUAL Mode:
Push on “UNIT” and “CLEAR” to modify
the FATC.
Remove the weight and push “ON/OFF” to
save.
See
“DATE”
Set date and hour:
Push “UNIT” to set hour.min
(24hours, day.month.year.
At each digit push “ON/OFF” to save or
“CLEAR” to exit.
Push ON/OFF
Push UNIT
See
“FATC”
Return to the main
screen
Push UNIT
Push ON/OFF
Page 5

9. EXTERNAL TRANSDUCER for miniKe
The minike readouts support an external rotary or non rotary transducer. The minike can read torque up to
500 Nm. The external transducer must be calibrated together with the minike here at Kolver before shipment.
The following transducers are always available ex stock:
Model
Torque range Nm
KTE5
0.5 – 5.0
KTE25
2.0 – 25.0
Rotary and non rotary transducers for lower or higher torque ranges available on request.
10. SERIAL PRINT
It is possible to print the results through the serial port placed near the power supplyconnector.
The serial print has the following settings:
VALUE - UNIT OF MEASUREMENT
Example of serial print:
0,247 Nm
0,249 Nm
0,255 Nm
0,254 Nm
0,249 Nm
0,255 Nm
0,247 Nm
11. MAINTENANCE
The minike testers are maintenance free. The electronics and the internal transducers have no wearing parts
except the battery once its charge is over. The internal transducer should be calibrated every 12 to 30 months,
depending on the frequency of use.
WARNING: The overload protection of the internal transducer is limited to 125% of nominal value. Damages
due to overloading will result in inaccurate readings and will not be covered by our warranty.
PIN
FUNCTION
2
TX
Serial transmission
5
GND
0Vdc
Page 6

12. WARRANTY
1. This KOLVER product is guaranteed against defective workmanship or materials, for a maximum
period of 12 months following the date of purchase from KOLVER, provided that its usage is limited
to single shift operation throughout that period. If the usage rate exceeds of single shift operation, the
guarantee period shall be reduced on a prorata basis.
2. If, during the guarantee period, the product appears to be defective in workmanship or materials, it
should be returned to KOLVER or its distributors, transport prepaied, together with a short
description of the alleged defect. KOLVER shall, at its sole discretion, arrange to repair or replace
free of charge such items.
3. This guarantee does not cover repair or replacement required as a consequence of products which
have been abused, misused or modified, or which have been repaired using not original KOLVER
spare parts or by not authorized service personnel.
4. KOLVER accepts no claim for labour or other expenditure made upon defective products.
5. Any direct, incidental or consequential damages whatsoever arising from any defect are expressly
excluded.
6. This guarantee replaces all other guarantees, or conditions, expressed or implied, regarding the
quality, the marketability or the fitness for any particular purpose.
7. No one, whether an agent, servant or employee of KOLVER, is authorized to add to or modify the
terms of this limited guarantee in any way. However it’s possible to extend the warranty with an
extra cost. Further information at kolver@kolver.it
Page 7
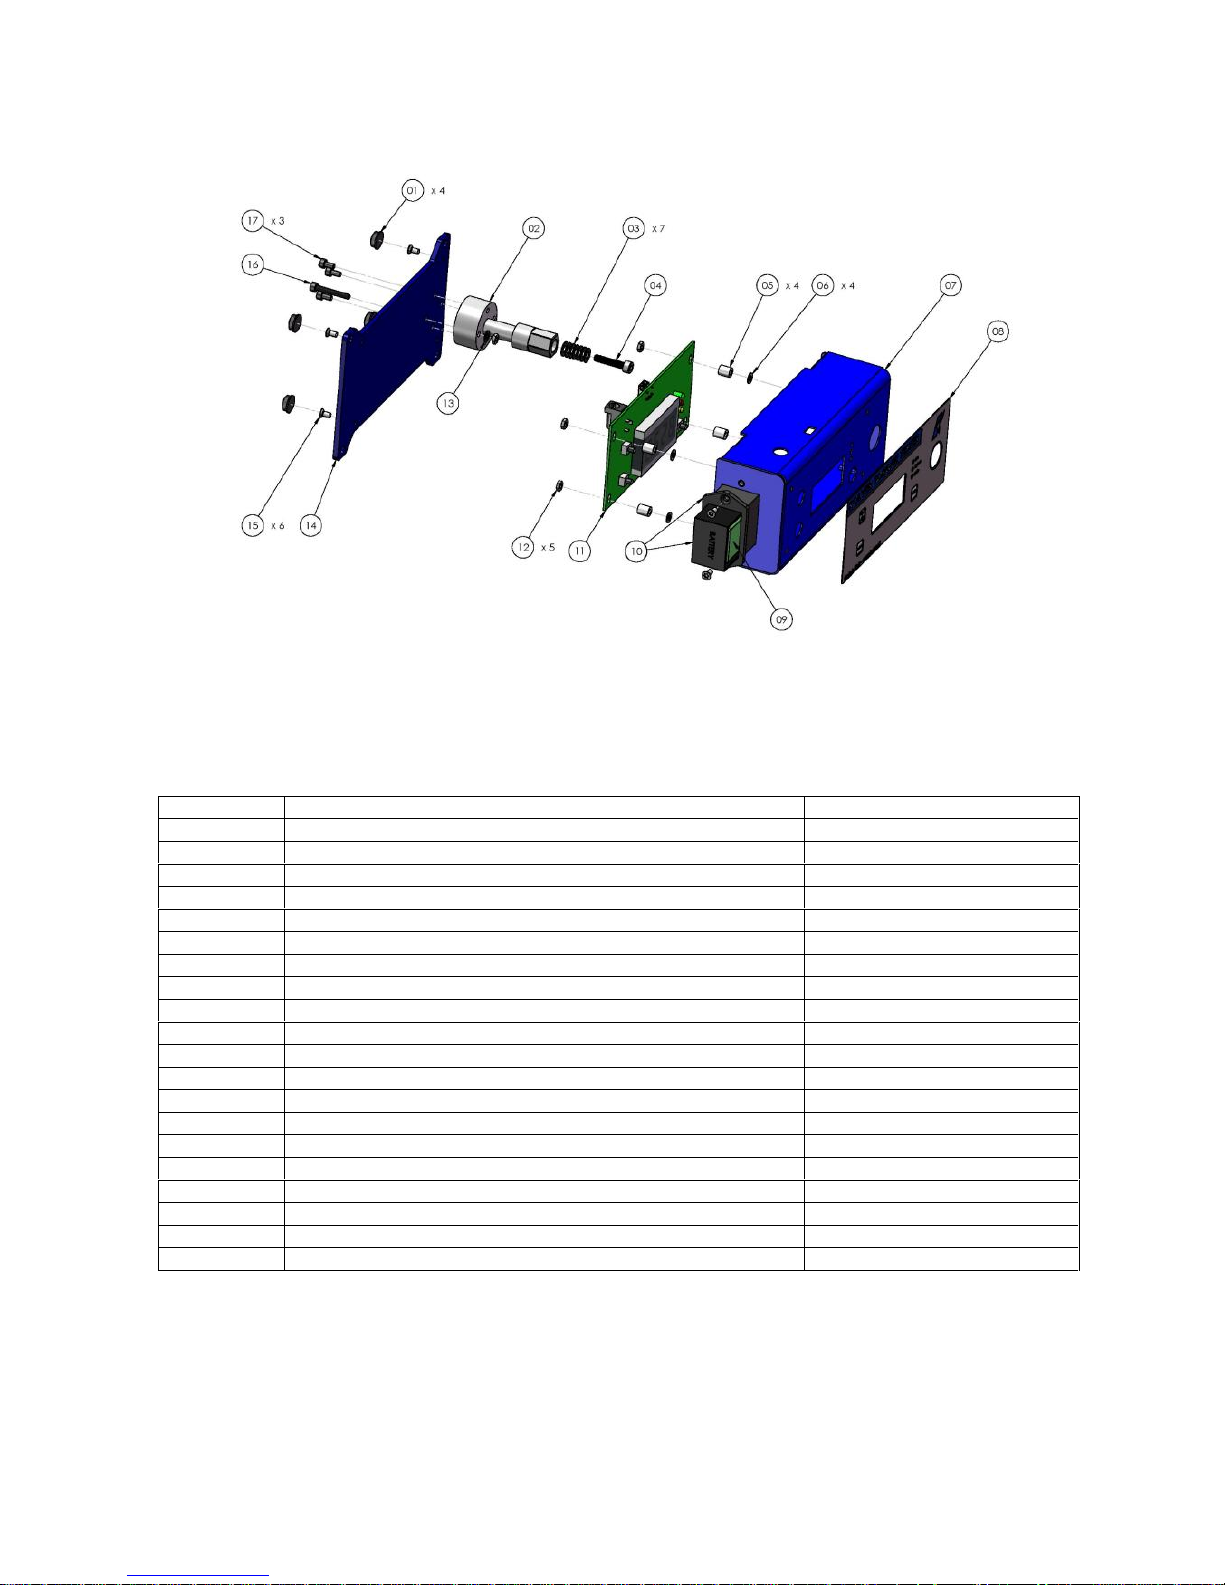
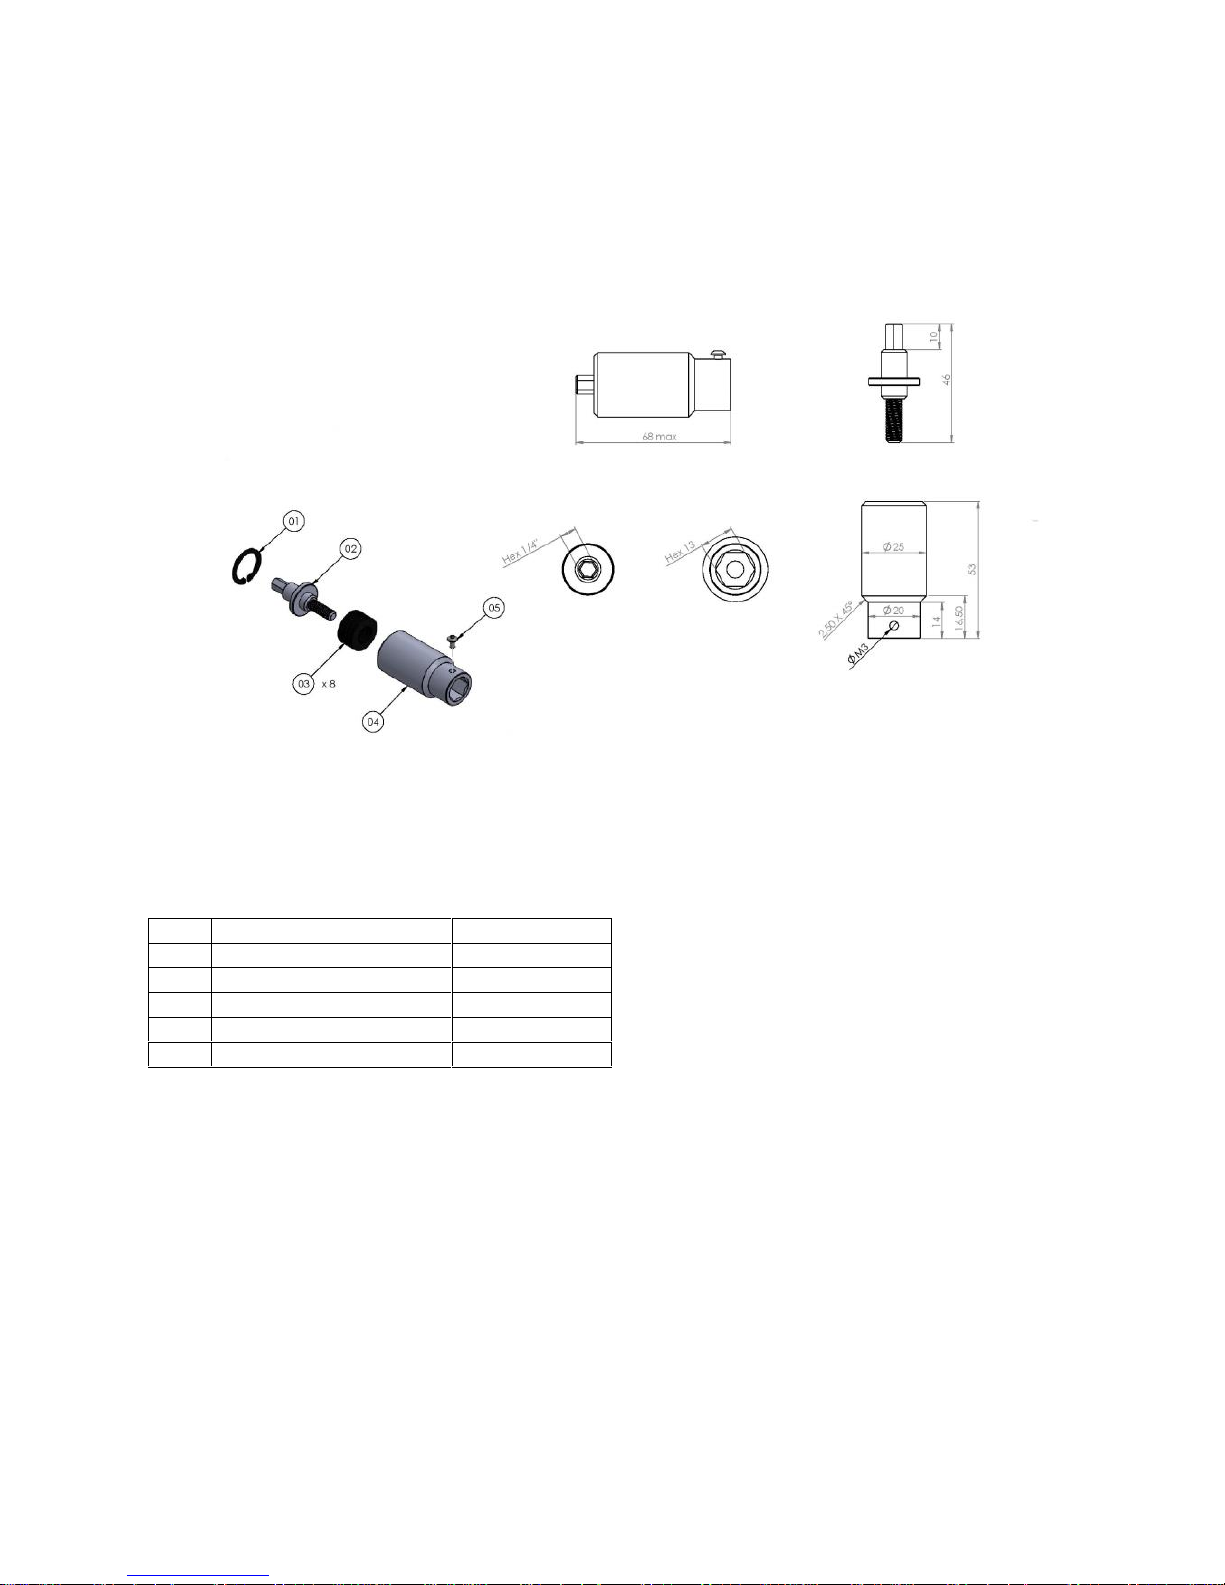
EXPLODED VIEWS AND PART LISTS
Minik1/S
REF
DESCRIPTION
CODE
1
Plastic support (4 pcs)
800016
2
Internal transducer 1Nm (miniK1)
240505
3
Washer M4 (7 pcs)
241015
4
Screw M4 x 20
241014
5
Flat washer M3 (4 pcs)
800042
6
Nut 6,3 mm (4 pcs)
241003
7
Metal housing miniK../S
240001/BCU
8
Membrane miniK
241008
9
Battery 9V not rechargeable
241010
10
Battery seat miniK
241005
11
Board miniK + display
241002/N
12
Screw M3 (5 pcs)
800056
13
Washer M3
800041
14
Base miniKe
240001/BF2
15
Screw M3 x 6 TSP (6 pcs)
210068
16
Screw M3 x 22
241012
17
Screw M4 x 8 (3 pcs)
241011
Bit - hex 1/4", L=50 mm, diam. 4 mm
FE-13040
Case
241000
Power supply 12V
241009/N
Page 8

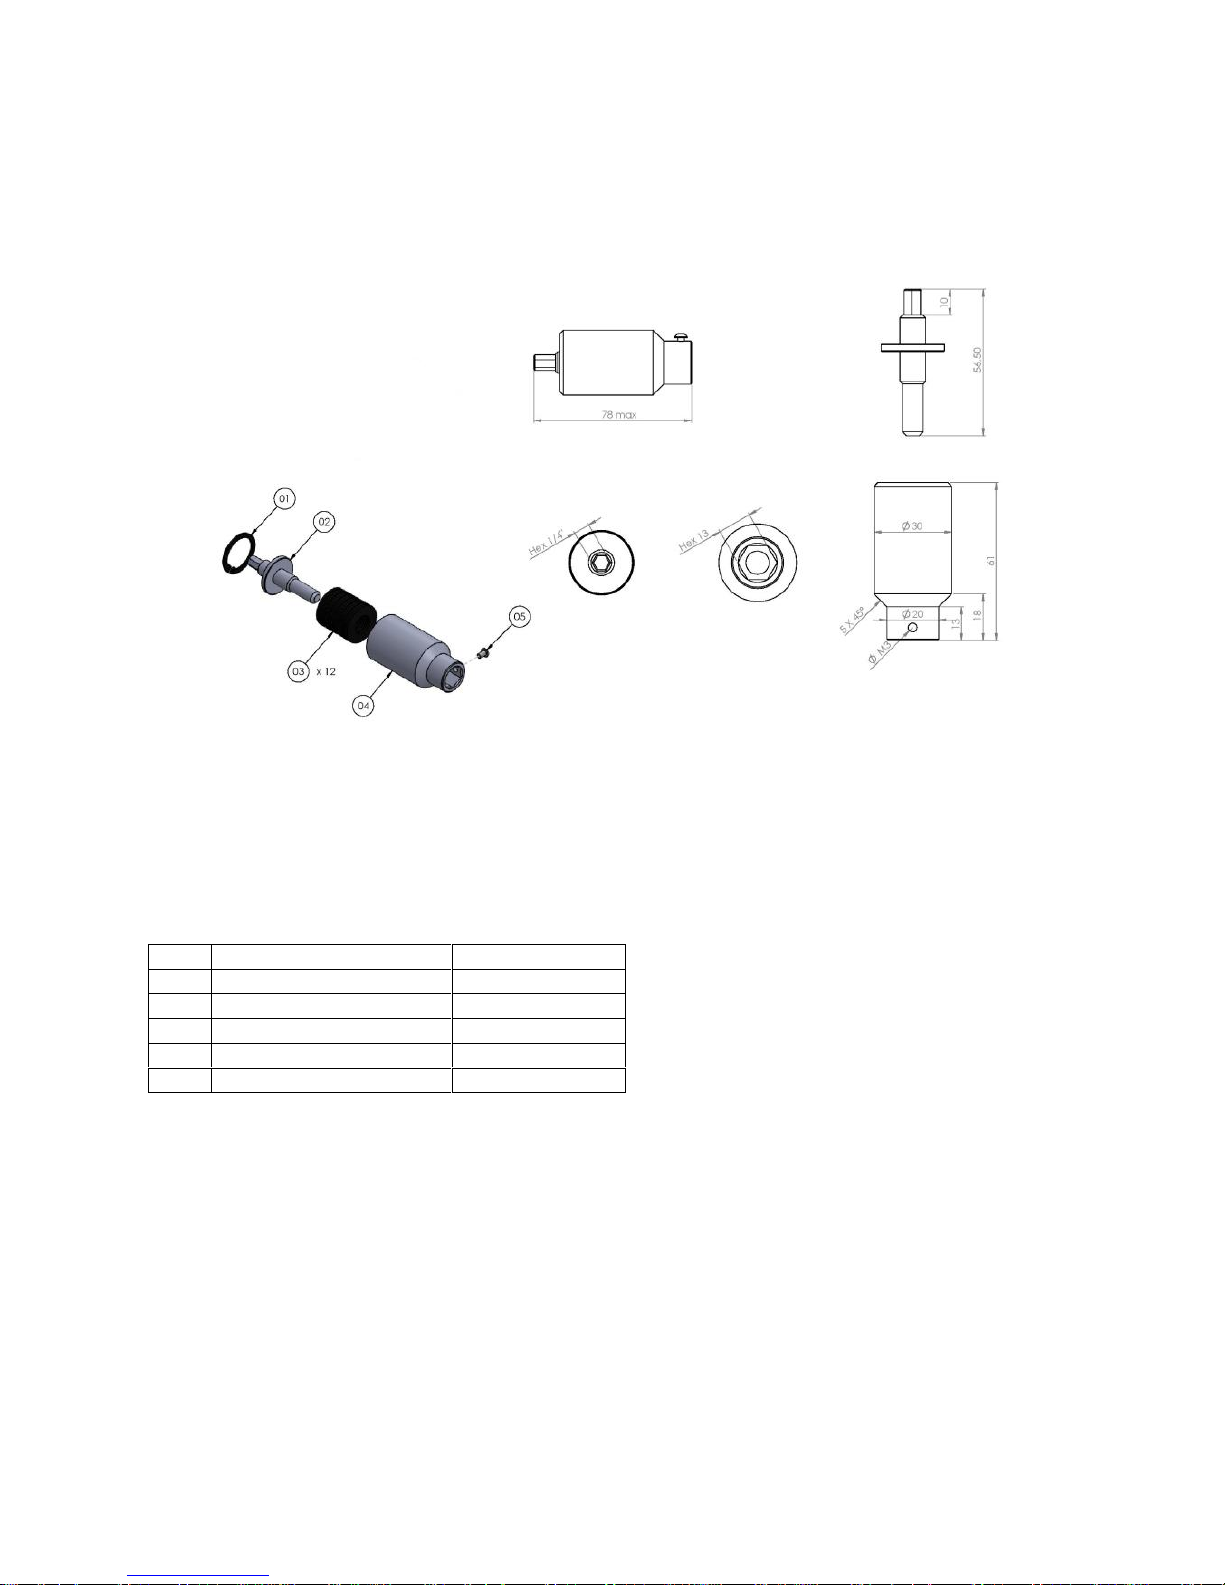
minik5/S – minik20/S
REF
DESCRIPTION
CODE
1
Plastic support (4 pcs)
800016
2
Internal transducer 5Nm (miniK5/s)
240503
Internal transducer 20Nm (miniK20/s)
240504
3
Washer M3 (5 pcs)
800041
4
Flat washer M3 (4 pcs)
800042
5
Nut 6,3 mm (4 pcs)
241003
6
Metal housing miniK../S
240001/BCU
7
Membrane miniK
241008
8
Battery 9V not rechargeable
241010
9
Battery seat miniK
241005
10
Board miniK + display
241002/N
11
Screw M3 (5 pcs)
800056
12
Base miniKe
240001/BF2
13
Screw M3 x 6 TSP (6 pcs)
210068
14
Screw M3 x 22
241012
15
Screw M4 x 8 (3 pcs)
241011
Joint simulator M6 (miniK5)
240600
Joint simulator M8 (miniK20)
240800
Case
241000
Power supply 12V
241009/N
Page 9

Minike/xx/S
REF
DESCRIPTION
CODE
1
Plastic support (4 pcs)
800016
2
Washer M3 (3 pcs)
800041
3
Flat washer M3 (4 pcs)
800042
4
Nut 6,3 mm (4 pcs)
241003
5
Metal housing miniK../S
240001/BCU
6
Membrane miniK
241008
7
Connector M 5 pin
231666
8
Battery 9V not rechargeable
241010
9
Battery seat miniK
241005
10
Board miniK + display
241002/N
11
Screw M3 (5 pcs)
800056
12
Base miniKe
240001/BF2
13
Screw M3 x 6 TSP (6 pcs)
210068
14
Screw M3 x 22
241012
15
Screw M4 x 8 (3 pcs)
241011
Case
241000
Power supply 12V
241009/N
Page 10
M6 (code 240600)
Pos.
Description
Code
01
Seiger
240601
02
Joint shaft
240602
03
Washer spring (8)
240603
04
Joint housing
240604
05
Screw M3x5
872443/ZN
Page 11
M8 (code 240800)
Pos.
Description
Code
01
Seiger
240801
02
Joint shaft
240802
03
Washer spring (12)
240803
04
Joint housing
240804
05
Screw M3x5
872443/ZN
Page 12

DECLARATION OF CONFORMITY
KOLVER S.r.l.
VIA MARCO CORNER, 19/21
36016 THIENE (VI) ITALIA
Declare that the new tool here described: Torque tester:
mini K1/S
021402/S
Mini KE/5/S
021405/5/S
Mini K5/S
021403/S
Mini KE/25/S
021405/25/S
Mini K20/S
021404/S
Mini KE/50/S
021405/50/S
Is in conformity with the following standards and other normative documents: 2006/42/CE, 2006/95/CE,
2004/108/CE, EN 60745-1, EN 60204-1, EN 61000-6-1, EN 61000-6-3.
It is also in conformity with RoHS II normative.
Name: Giovanni Colasante
Position: General Manager
Person authorized to compile the technical file in Kolver
Thiene, July 1st2017 Giovanni Colasante
Page 13

KOLVER TORQUE ANALYZER
Torque Analyzer software allows for communication between our mini k/s and mini ke/s series torque testers
and your PC. Torque Analyzer software allows the capture of torque measurements directly from the torque
tester including track mode, graphic display readings, and the real-time calculation of the machine capacity
represented by Cm and Cmk dat0061.
1. INSTALLATION
Torque Analyzer is a plug-and-play software.
Just launch the “Kolver_Torque_Analyzer_ver_X_X_X.exe” (X_X_X is the version of the
software).
1: Kolver_Torque_Analyzer_ver1_0_1 software main screen
The home page is made of three sections:
1- “Control Panel”: to display results, graphics, tables, setting and info of the tester.
2- “Report”: to display values (max, min, cm, cmk, in total, in real time...etc.)
3- “Interface”: connection, modification and export of data.
2. CONNECTION TO MINIK/S
Connect the minik/s to your pc through the usb port. Then push the Connect button.
The software will display the correct connection (see Picture 2).
Unless it will show the error and how to proceed.
2 :Output of correct connection.
Page 14

3. TORQUE VALUE CAPTURE
How to capture the torque values:
1- Track Mode: it allows to capture and display the trend of the torque signal given by the minik/s.
2- Max Value Mode: it allows to capture and display the max torque value given by the minik/s.
The mode must be set on the minik/s: on the main screen flag or not the Track option.
However, Torque Analyzer has been designed to automatically align the receipt of the first measure
by detecting the capture mode set in mini k.
Picture 3: To flag Track mode.
4. DISPLAY AND SETUP
“Control Panel” area has 4 sections:
A. GRAPHIC: This section allows to display the graphics of the values (See picture 3).
There is also the possibility to zoom on specific areas.
Two types of visualizations:
1- ‘X-Y Plot’ : temporal visualization of values.
2- ‘Bar Plot’ : bar visualization of values.
Type of visualization can be set from the menu:
Edit Modify Chart.
Page 15

B. TABLE: in this section all the values are displayed (max and min, average, date,…).
Picture 4 : “TABLE” section; 10 values.
C. STATISTICS
In this section, In questa sezione è possibile visualizzare informazioni descrittive di carattere
statistico sulla base di criteri di rilevazione, classificazione, sintesi e rappresentazione dei dati
appresi (Fig.5).
Other features:
a. PROPRIETIES: it allows to choose how to visualize the curve to plot and any
graphics shake if needed.
b. PLOT: Print/ Update statistics graphics.
c. REPORT: to export the data in pdf file.
d. LOAD: to upload data previously sampled and saved.
e. SAVE: Salva l’intero set di dati, relativo alle misurazioni fatte e presenti in tabella, con
la possibilità di recupero successivo.
Page 16

D. SETTINGS: Setting section (reports, graphics, date, torque tester info).
Picture 6 : “SETUP”Section
1- REPORT
- Path: path to search the image file to enter in the head of the report.
We suggest to upload images not bigger than 240x240 pixels.
- Dimension X: Value of adaptation along the X axis of the uploaded image.
- Dimension Y: Value of adaptation along the Y axis of the uploaded image.
-Torque range: the value should be included in the rpre-set torque range to be defined as
correct.
Page 17

2- GRAPHIC FEATURE
-Diamond pattern chart: in Track mode, it allows the visualization of points of
interpolation of captured values.
-X: width in pixels of the uploaded image.
-Y: height in pixels of the uploaded image
-Min value accepted: Min value captured and accepted by the software.
3- UNIT AND TOLERANCE
-Unit: it allows to choose between the following units of measurements: Nm, lbf.in and
kgf.cm
-Tolerance Ck, Cmk: it allows to set the tolerance to check the machine capacity.
It’s also possible to save the set up data pushing Save and keep the same setting for the next
sessions.
E. TORQUE TESTER: in this section it is allowed to enter all the data of the mini k.
Picture 7 : “TESTER” section.
Page 18

F. BACKUP: Data are automatically saved in a backup file.
Available a section of the software to restore the data with filters on day, month, year and delete
date.
5. RESULTS: MODIFICATION AND EXPORT
Picture 9 : Connection, data capture, export.
A- MODIFICATION
It’s possible to modify or delete one or more captured data (see picture 7).
- Removal: in the “TABLE” section of the Control Panel, select one or more rows to be
deleted. Then push “Delete” to confirm.
To delete all the data, push the basket icon, then confirm.
- Modify: in the “TABLE” section of the Control Panel, position the cursor on the cell to
modify, double click, enter the data and puch Apply to confirm.
In case of any error, they won’t be considered and the value will remain the same. In
case of typing error, in the Menu File Go back.
Page 19

B- EXPORT
While pushing “Export”, it will be displayed a window to select how to export the results (see
Picture 10).
Picture 10 : To select how to export
-Standard Report: it allows to export a standard report (.xls file) including 30 values max, Cm,
Cmk and all the feature of the tester used.
Page 20

Picture 11 : Standard Report
Page 21

-Complete set of values: it allows to export all the captured values (.xls file) and the graphics of
the results.
-Export current graphic: it allows to export any value in Graphic section of the Control Panel
(.pgn file). For the resolution of the image see SETTING chapter.
- Export last measure: it allows to export (.xls file) the set of data referring to the last measure
done. The table will show on X: time and on Y: torque value.
6. REPORT AREA
In this section, it will be displayed the statistics results of all the values including the instantaneous
data. In particular:
-Max value: max value of torque acquired
-Min value: min value of torque acquired (only in Track mode).
-Average value: average value of torque acquired (only in Track mode).
-Cm: value that indicates the machine capacity or process within the tolerance range.
-Cmk: value that indicates the machine capacity or process within the tolerance range of the nominal
torque value. A high Cmk indicated the the machine or the has a low dispersion, and is well centered
in the middle of the range of tolerance.
-Capacity: it indicates if the process f measurement is suitable or not.
Cm, Cmk≥ 1.33 SUITABLE
Cm, Cmk < 1.33 NOT SUITABLE
There is the possibility to modify the index of tolerance to check the capacity
(default=1.33): in “SETTINGS”, set the desired value in “TOLERANCE
Cm,Cmk”.
-Nominal Torque (Cn): average torque value
-Max torque: Cn+Tolerance(Cn)%
-Min torque: Cn-Tolerance(Cn)%
- Sensor value: torque value given from the mini k.
-Current values: values referred to the last one acquired.
7. LANGUAGE
Four languages available: English, French, Spanish and Italian.
To change the language, in the menu push on Edit Language.
8. SYSTEM REQUIREMENTS
It’s necesary to install the following software:
- Java (64-bit) (https://www.java.com/it/download/)
 Loading...