

Kolpin POLARIS RANGER Installation Instructions Manual
.
INSTALLATION INSTRUCTIONS
POLARIS RANGER
400 H.O.

POLARIS RANGER
400H.O.
2
Kolpin Outdoors Inc.
205 N. Depot St.
Fox Lake, WI 53933
Tel: (920) 928-3118
www.kolpin.com
E-mail: customerservice@kolpin.com
SAFETY INSTRUCTIONS
Warning: Failure to heed all safety and operating instructions and
warnings regarding use of this product can result in serious bodily
injury.
READ PROPERLY COMPLETE ASSEMBLY INSTRUCTIONS BEFORE
STARTING OF ASSEMBLY
Install all parts indicated in assembly instructions. Failure to fully assemble
product before use could result in personal injury.
Assembly of product requires use of hand or power tools.
If you are not experienced in using these types of tools,
have product dealer do the install for you.
Some parts contain sharp edges, wear protective gloves if necessary.
Always keep your assembly area clean, uncluttered and well lit.
Keep visitors and children a safe distance away from the assembly area. Visitors should wear
the same safety equipment described above.
Never operate your UTV with the cab doors open. Failure to properly latch the
doors before moving the vehicle could result in serious injury.
Dress for safety. DO NOT wear loose clothing, gloves, neckties or jewelry if
using power tools to assemble this product.
Tight the front glass holders screws with attention, if you tight these screws too hard the front
glass may by crackle.
Insert all nut covers after you finish installation.

POLARIS RANGER
400H.O.
3
Kolpin Outdoors Inc.
205 N. Depot St.
Fox Lake, WI 53933
Tel: (920) 928-3118
www.kolpin.com
E-mail: customerservice@kolpin.com
MAINTENANCE AND CLEANING
To clean polycarbonate surface use soapy water solution or other subtle means.
Dirt and dust wash by gently water stream and swipe only with wet or damp
means in the direction from top to bottom.
The recommended frequency of cleaning of polycarbonate part
is about 1 time per month or according to the actual degree of pollution.
Do not use detergents that could scratch the surface plates.
(abrasives, harsh fabrics, etc.)
Do not use solvents or alkaline detergents or cleaners with ammonia
(ammonium hydroxide).
Do not remove the impurities from the surface of the razor blades or other sharp
items.
Do not clean cabine, when the polycarbonate plates are heated by the sun.
Do not use the squeegee, it could be scratched surface plates.
Do not clean the water current strength greater than 50 bar (WAP)
The manufacturer is not responsible for scratching the surface in case of failure to
comply with the above instructions.
All bolted connections of cab must be by user at regular intervals checked and
tightened.
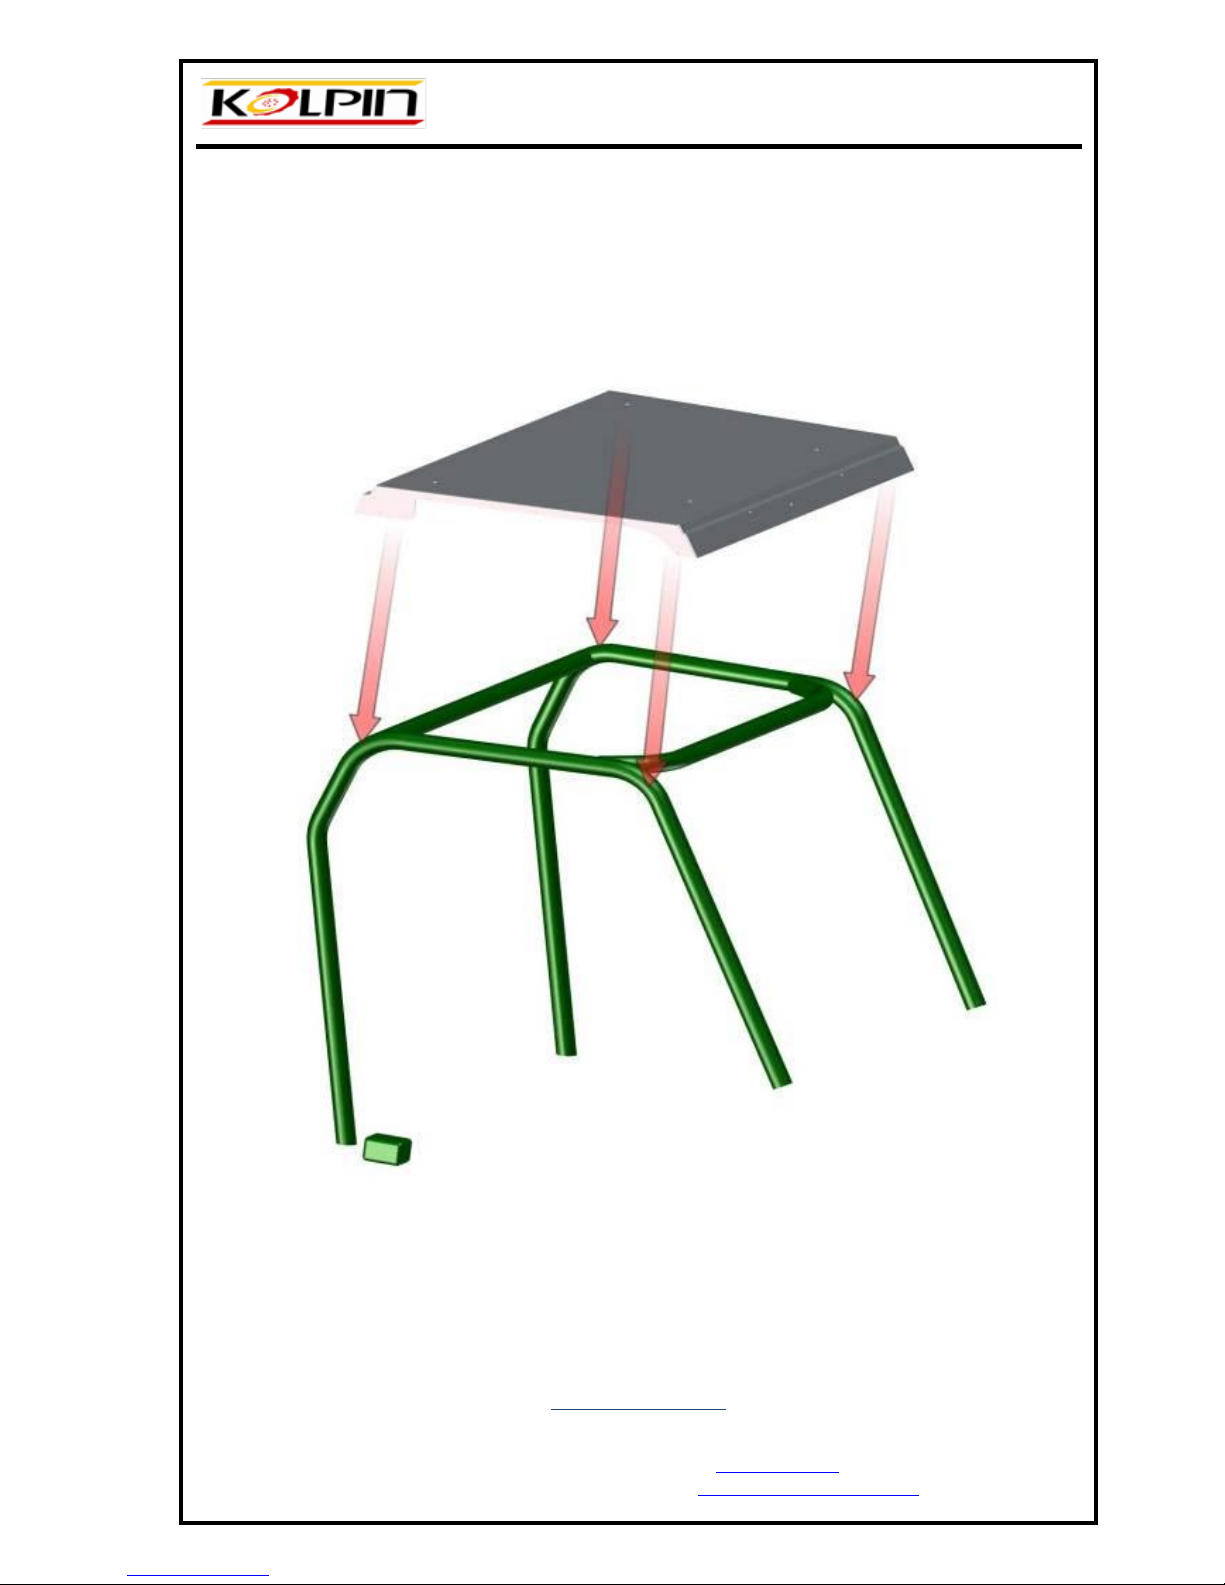
ROOF PANEL 1.
POLARIS RANGER
400H.O.
4
Kolpin Outdoors Inc.
205 N. Depot St.
Fox Lake, WI 53933
Tel: (920) 928-3118
www.kolpin.com
E-mail: customerservice@kolpin.com
Place the roof panel on to the roller cage from above and don´t fix it.
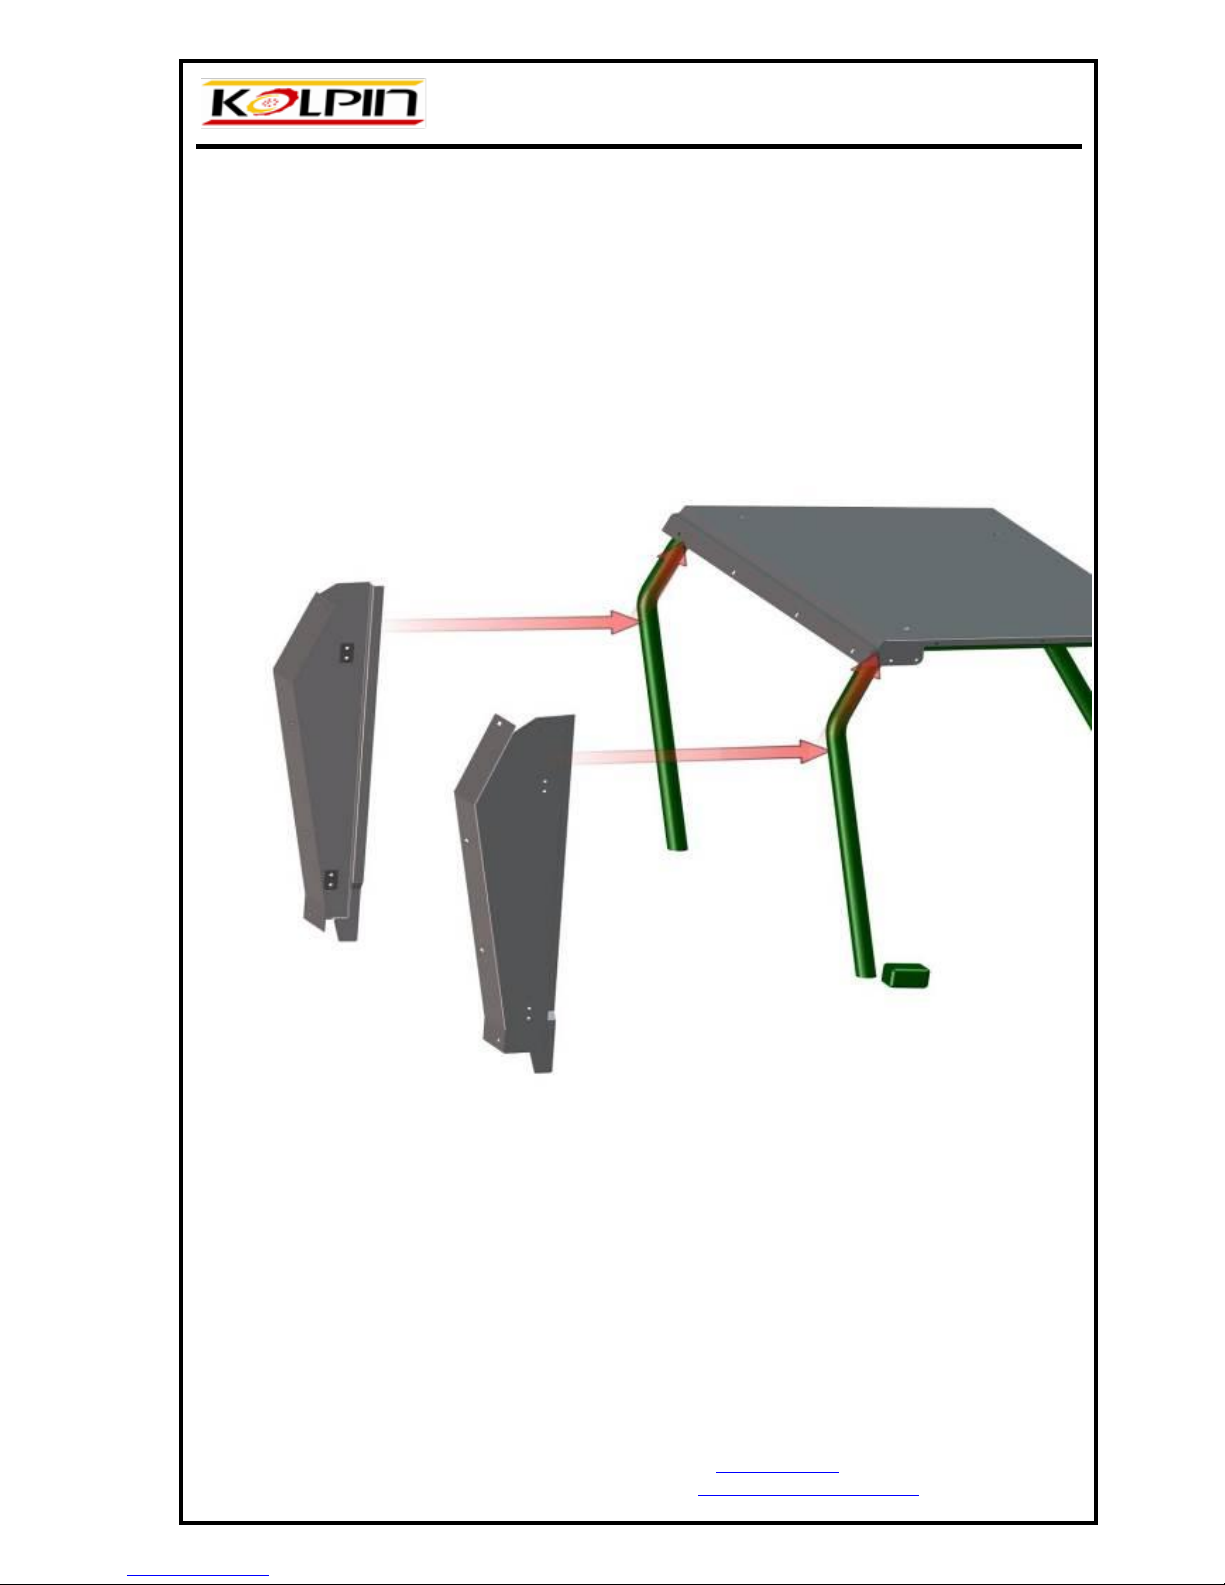
METAL DOOR BASES
POLARIS RANGER
400H.O.
5
Kolpin Outdoors Inc.
205 N. Depot St.
Fox Lake, WI 53933
Tel: (920) 928-3118
www.kolpin.com
E-mail: customerservice@kolpin.com
Place the metal door bases on to the roller cage from both sides. The upper end of the door bases belongs
under the roof panel.
Press gently the door bases onto the roller cage. Screw together the door bases with the roof panel
using the prepared holes. Fix it by screw M6x20 with washer.
POLARIS RANGER
400H.O.
6
Kolpin Outdoors Inc.
205 N. Depot St.
Fox Lake, WI 53933
Tel: (920) 928-3118
www.kolpin.com
E-mail: customerservice@kolpin.com
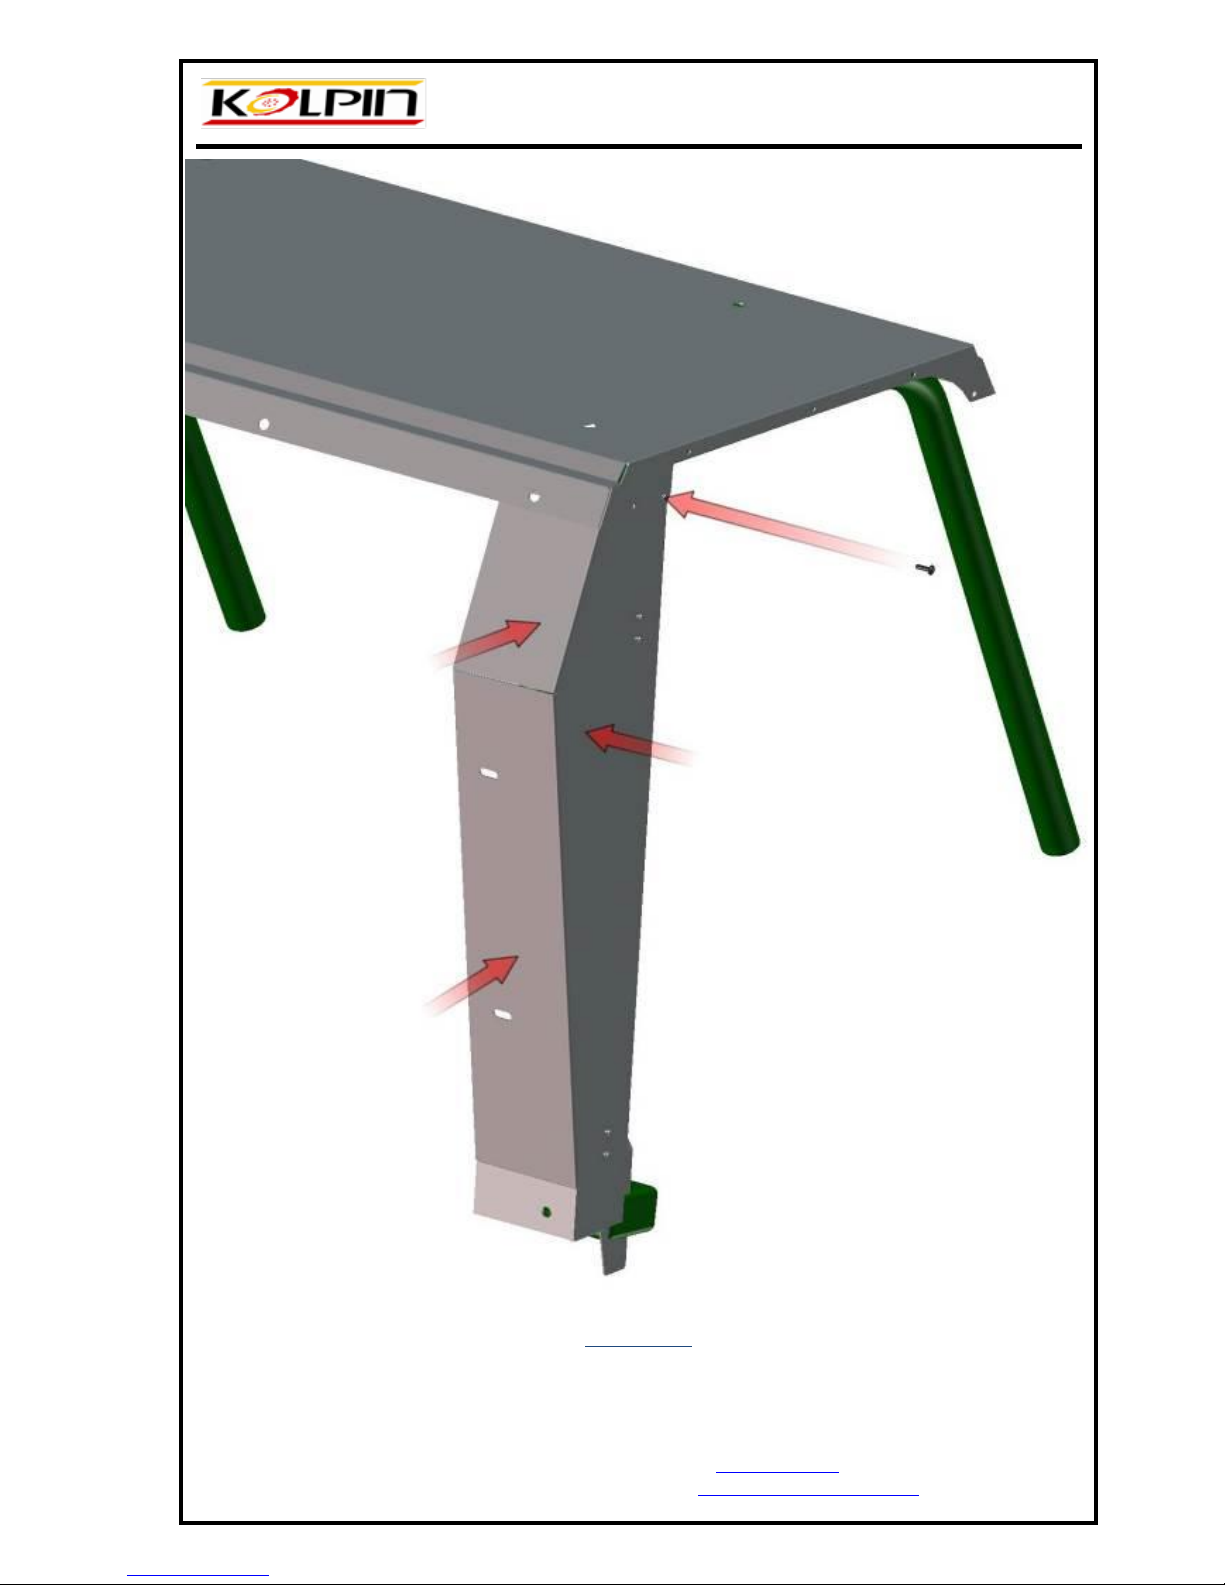
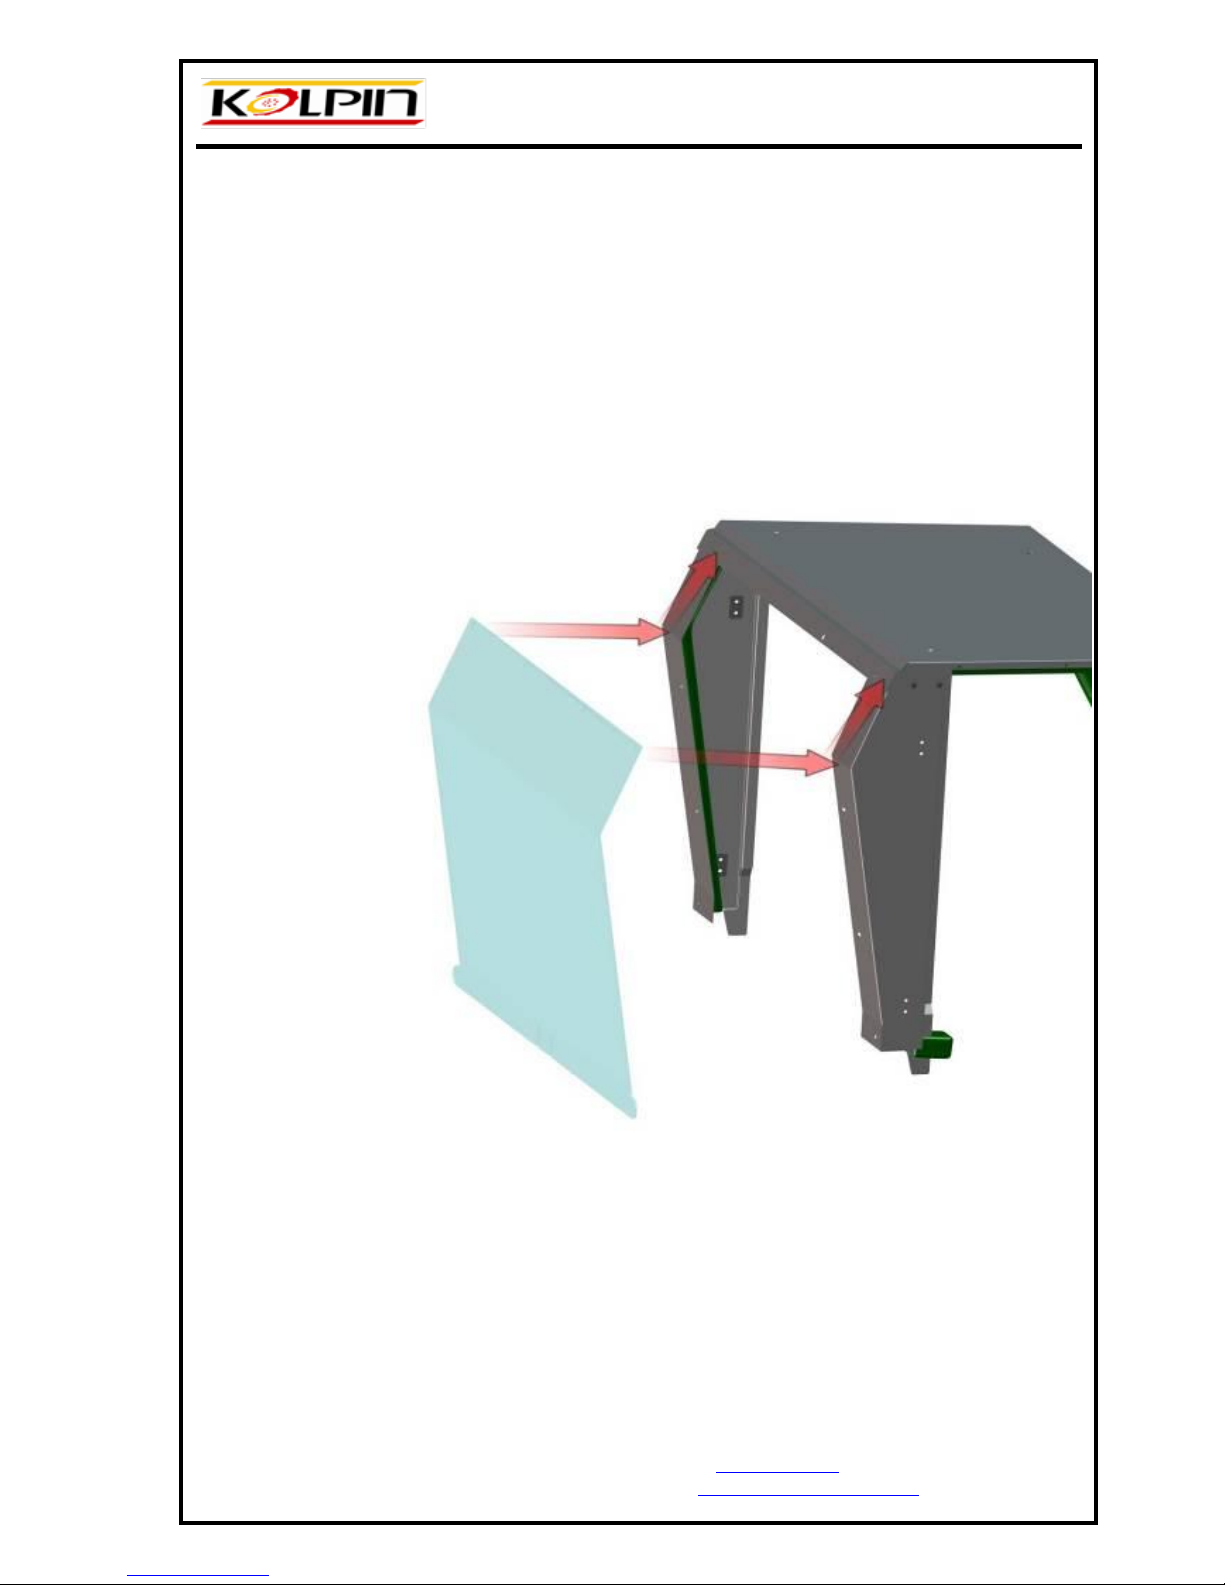
REAR PANEL
Place the polycarbonate rear panel on to the metal door bases from behind. The upper end of the rear
panel belongs under the roof panel.
POLARIS RANGER
400H.O.
7
Kolpin Outdoors Inc.
205 N. Depot St.
Fox Lake, WI 53933
Tel: (920) 928-3118
www.kolpin.com
E-mail: customerservice@kolpin.com
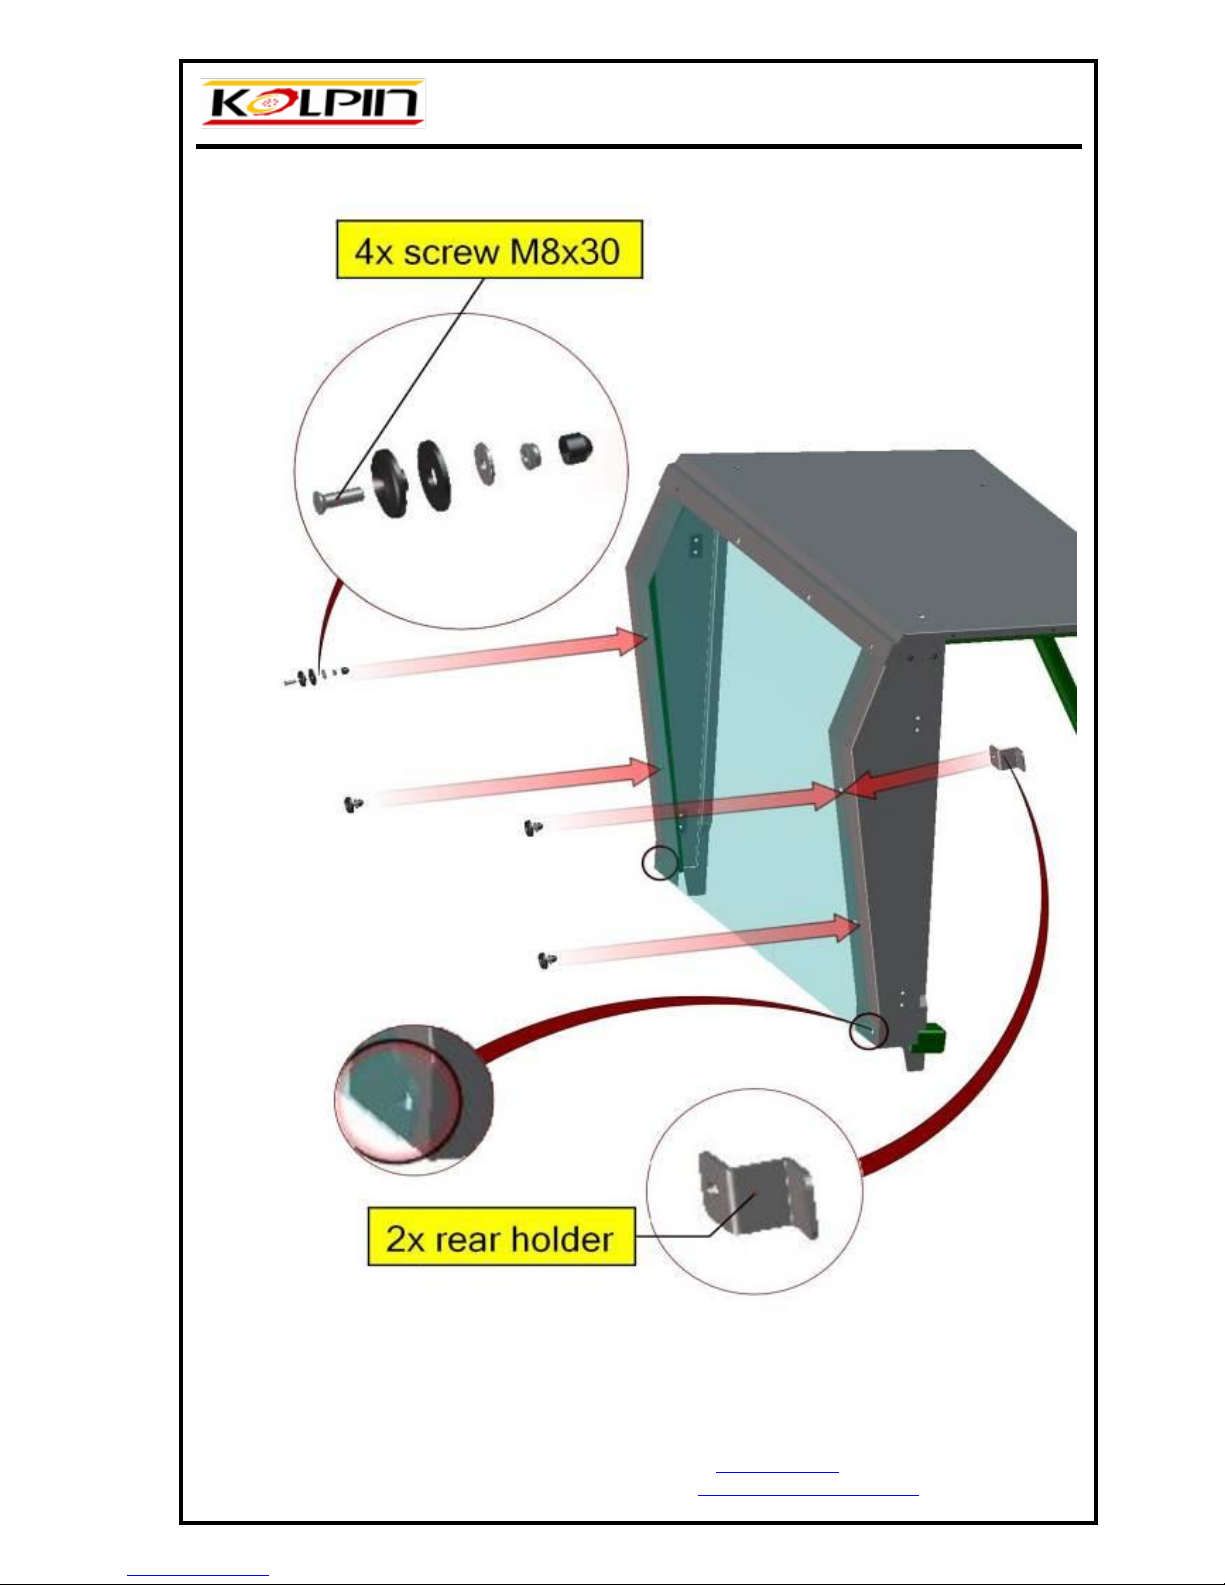
Screw the bottom part of the rear panel to the roller cage in the bottom corners on both sides with bolts
M8x80 and nut M8 (see the red circles).Place the rear holder onto the door bases.
Fix the panel with bolts M8x30 and nuts M8 and place the plastic covers on the nuts from inside.
POLARIS RANGER
400H.O.
8
Kolpin Outdoors Inc.
205 N. Depot St.
Fox Lake, WI 53933
Tel: (920) 928-3118
www.kolpin.com
E-mail: customerservice@kolpin.com
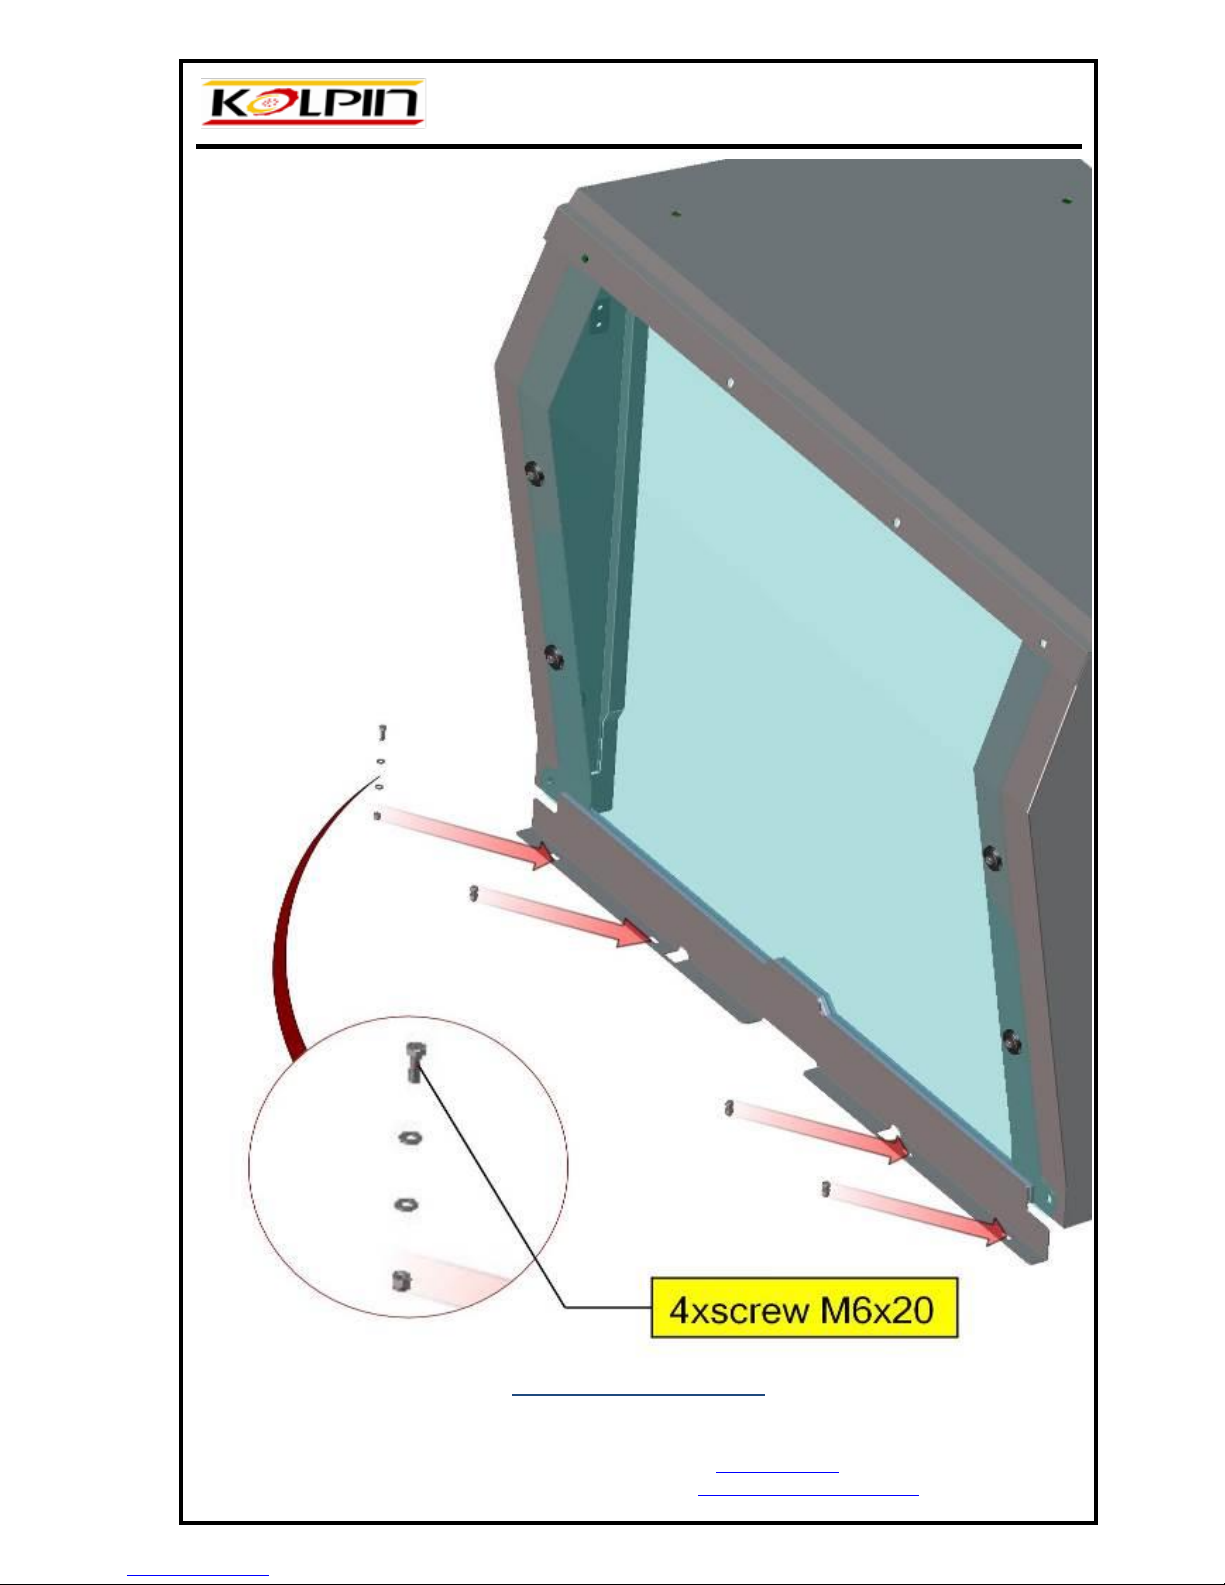
Place the bottom metal rear ledge on to the body from behind.

POLARIS RANGER
400H.O.
9
Kolpin Outdoors Inc.
205 N. Depot St.
Fox Lake, WI 53933
Tel: (920) 928-3118
www.kolpin.com
E-mail: customerservice@kolpin.com
Fix the ledge with bolts M6x20 and nuts M6 and two washers.
POLARIS RANGER
400H.O.
10
Kolpin Outdoors Inc.
205 N. Depot St.
Fox Lake, WI 53933
Tel: (920) 928-3118
www.kolpin.com
E-mail: customerservice@kolpin.com
FRONT PANEL MOVABLE 1.
POLARIS RANGER
400H.O.
11
Kolpin Outdoors Inc.
205 N. Depot St.
Fox Lake, WI 53933
Tel: (920) 928-3118
www.kolpin.com
E-mail: customerservice@kolpin.com
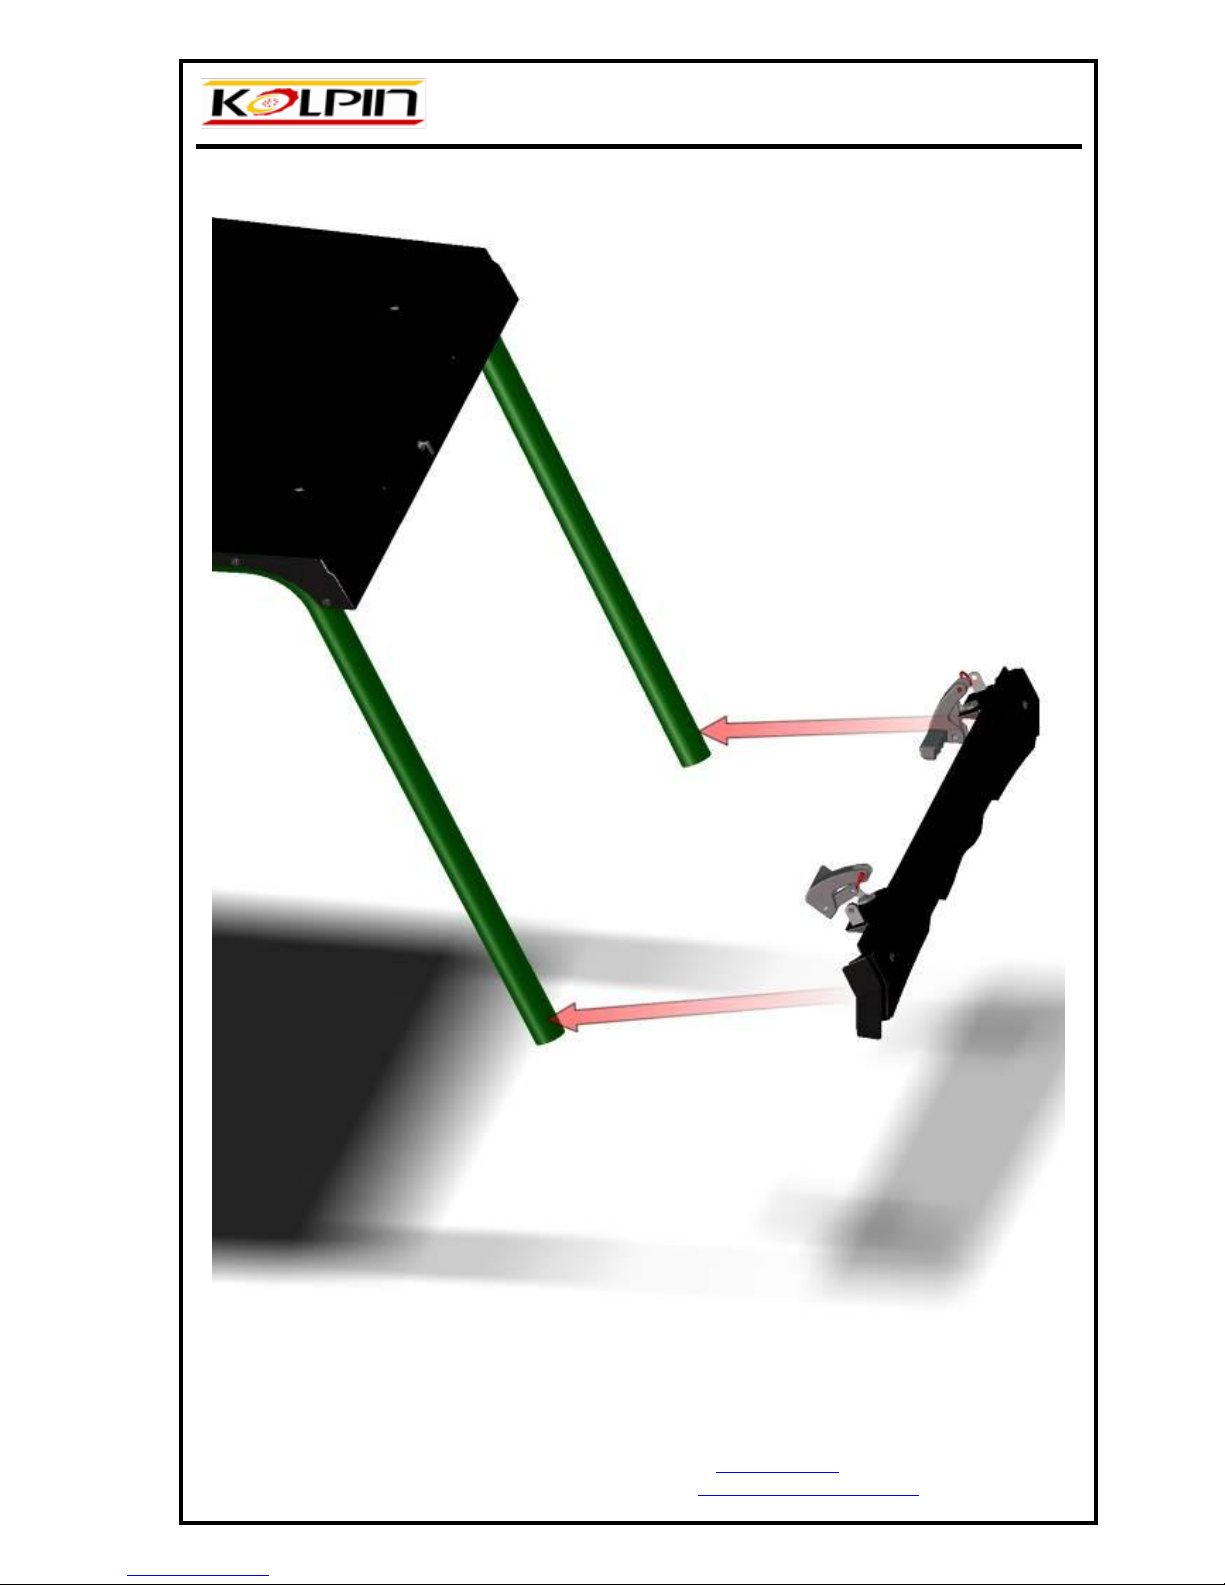
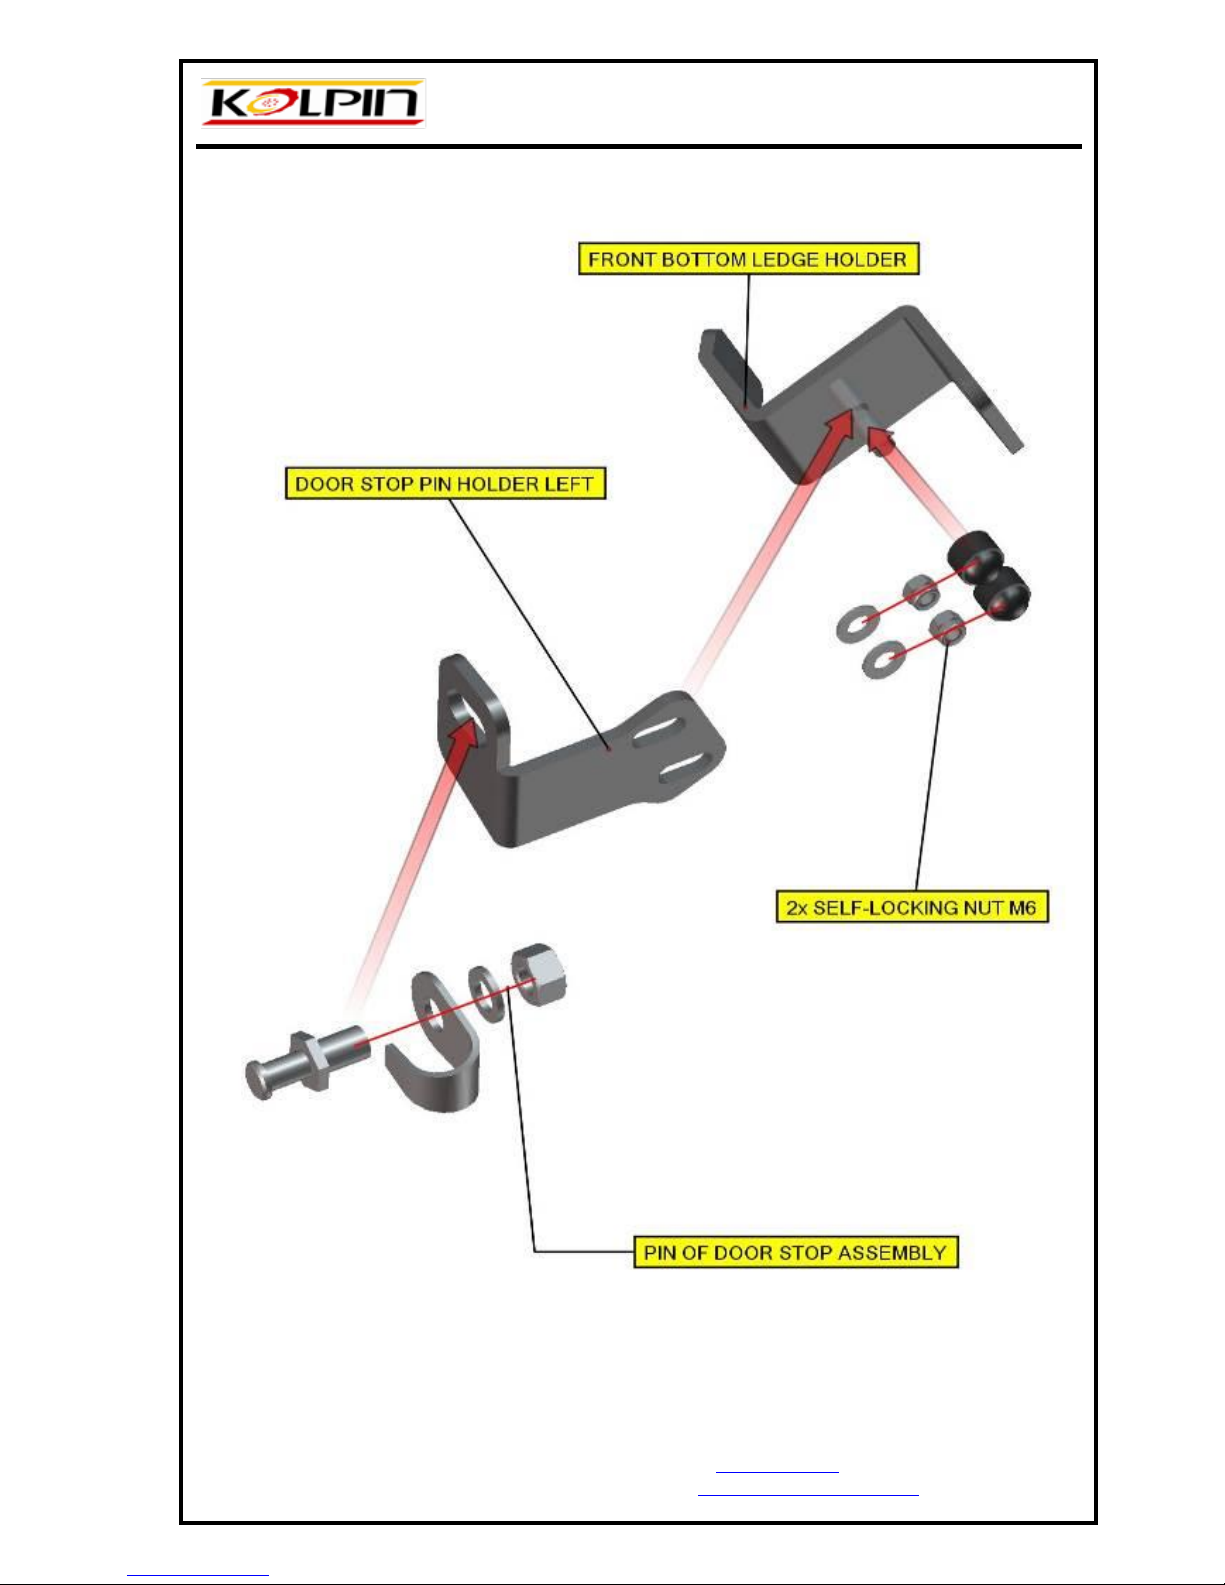
Place the bottom metal windshield ledge onto the body from the front side of the dashboard. This ledge
should lay on the body on the rubber foam sealing.
Install the pin of door stop assembly into the door stop pin holder.
Place pin holder onto ledge holder and fix these by washers, nuts and nut covers.
POLARIS RANGER
400H.O.
12
Kolpin Outdoors Inc.
205 N. Depot St.
Fox Lake, WI 53933
Tel: (920) 928-3118
www.kolpin.com
E-mail: customerservice@kolpin.com
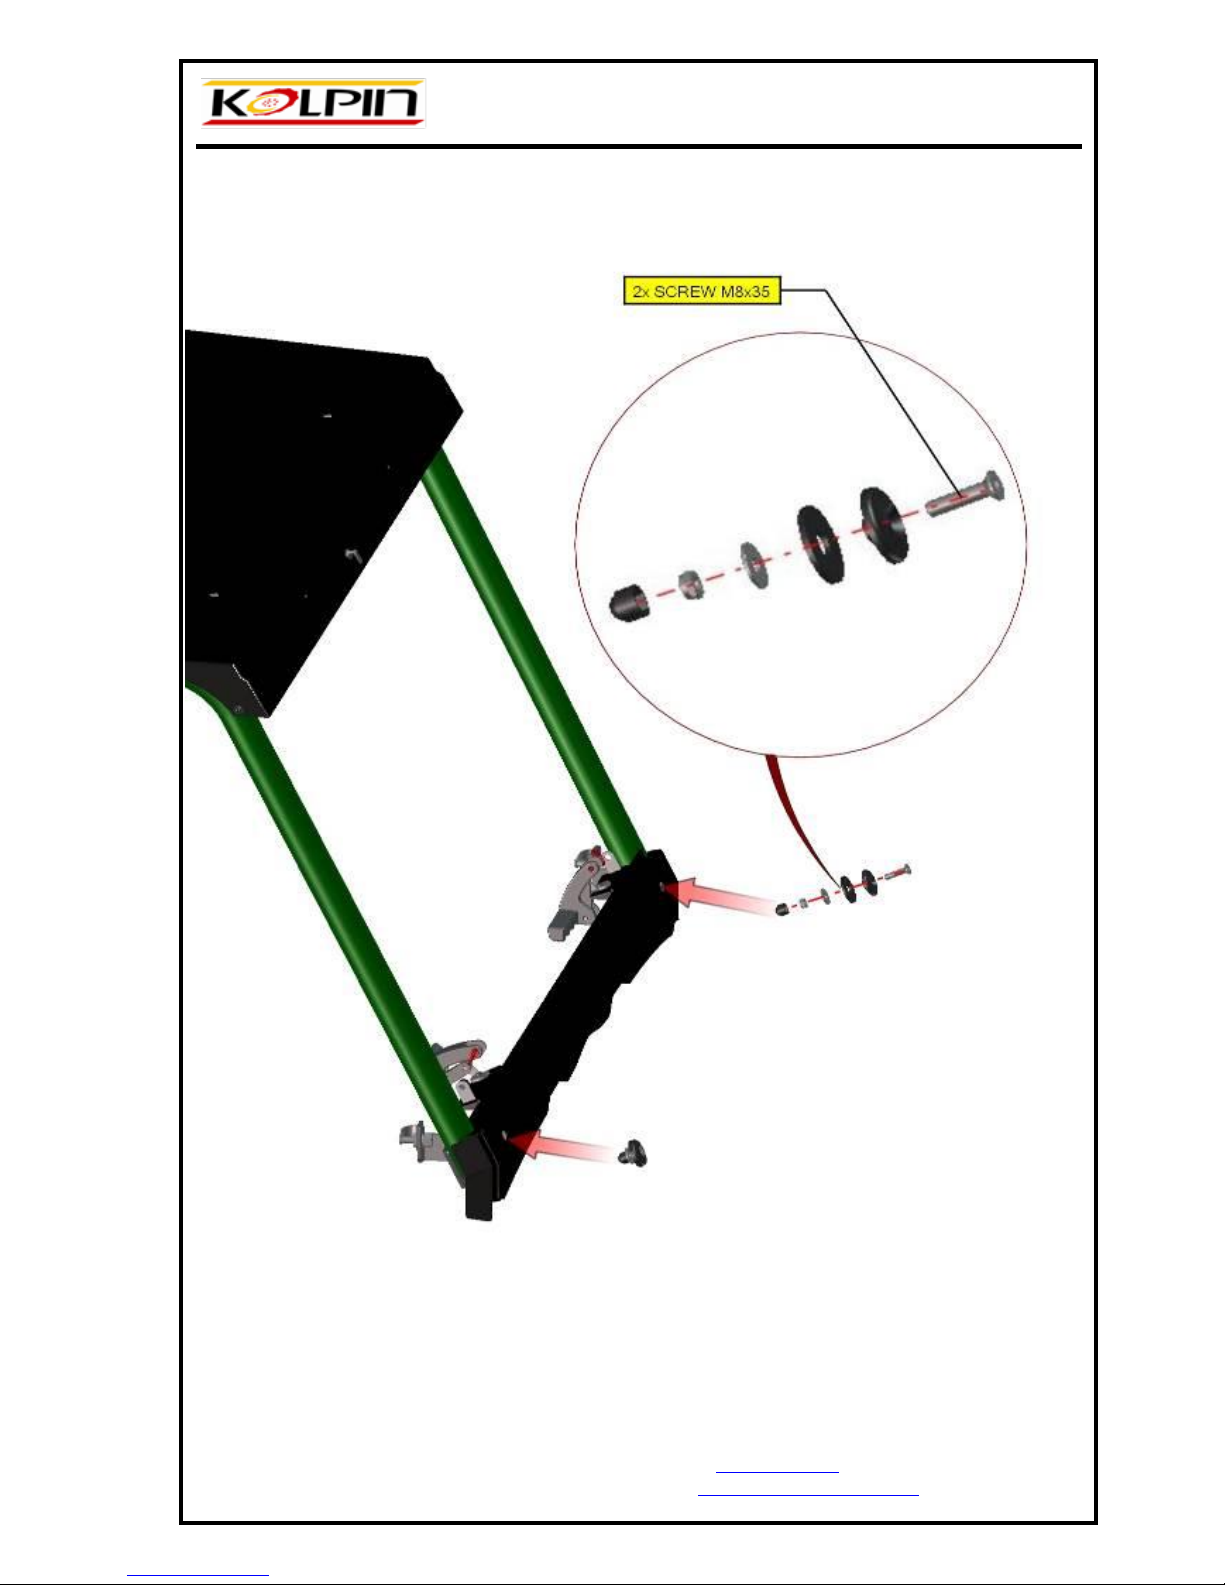
(Door stop pin holder left is the same with right just opposite bend.)
The ledge should be fixed to the roller cage with the holders on both sides.
These holders contain the door lock stoppers.

POLARIS RANGER
400H.O.
13
Kolpin Outdoors Inc.
205 N. Depot St.
Fox Lake, WI 53933
Tel: (920) 928-3118
www.kolpin.com
E-mail: customerservice@kolpin.com
Fix the ledge with bolts M8x35 and nuts M8 and place the plastic covers on the nuts from
inside.
POLARIS RANGER
400H.O.
14
Kolpin Outdoors Inc.
205 N. Depot St.
Fox Lake, WI 53933
Tel: (920) 928-3118
www.kolpin.com
E-mail: customerservice@kolpin.com
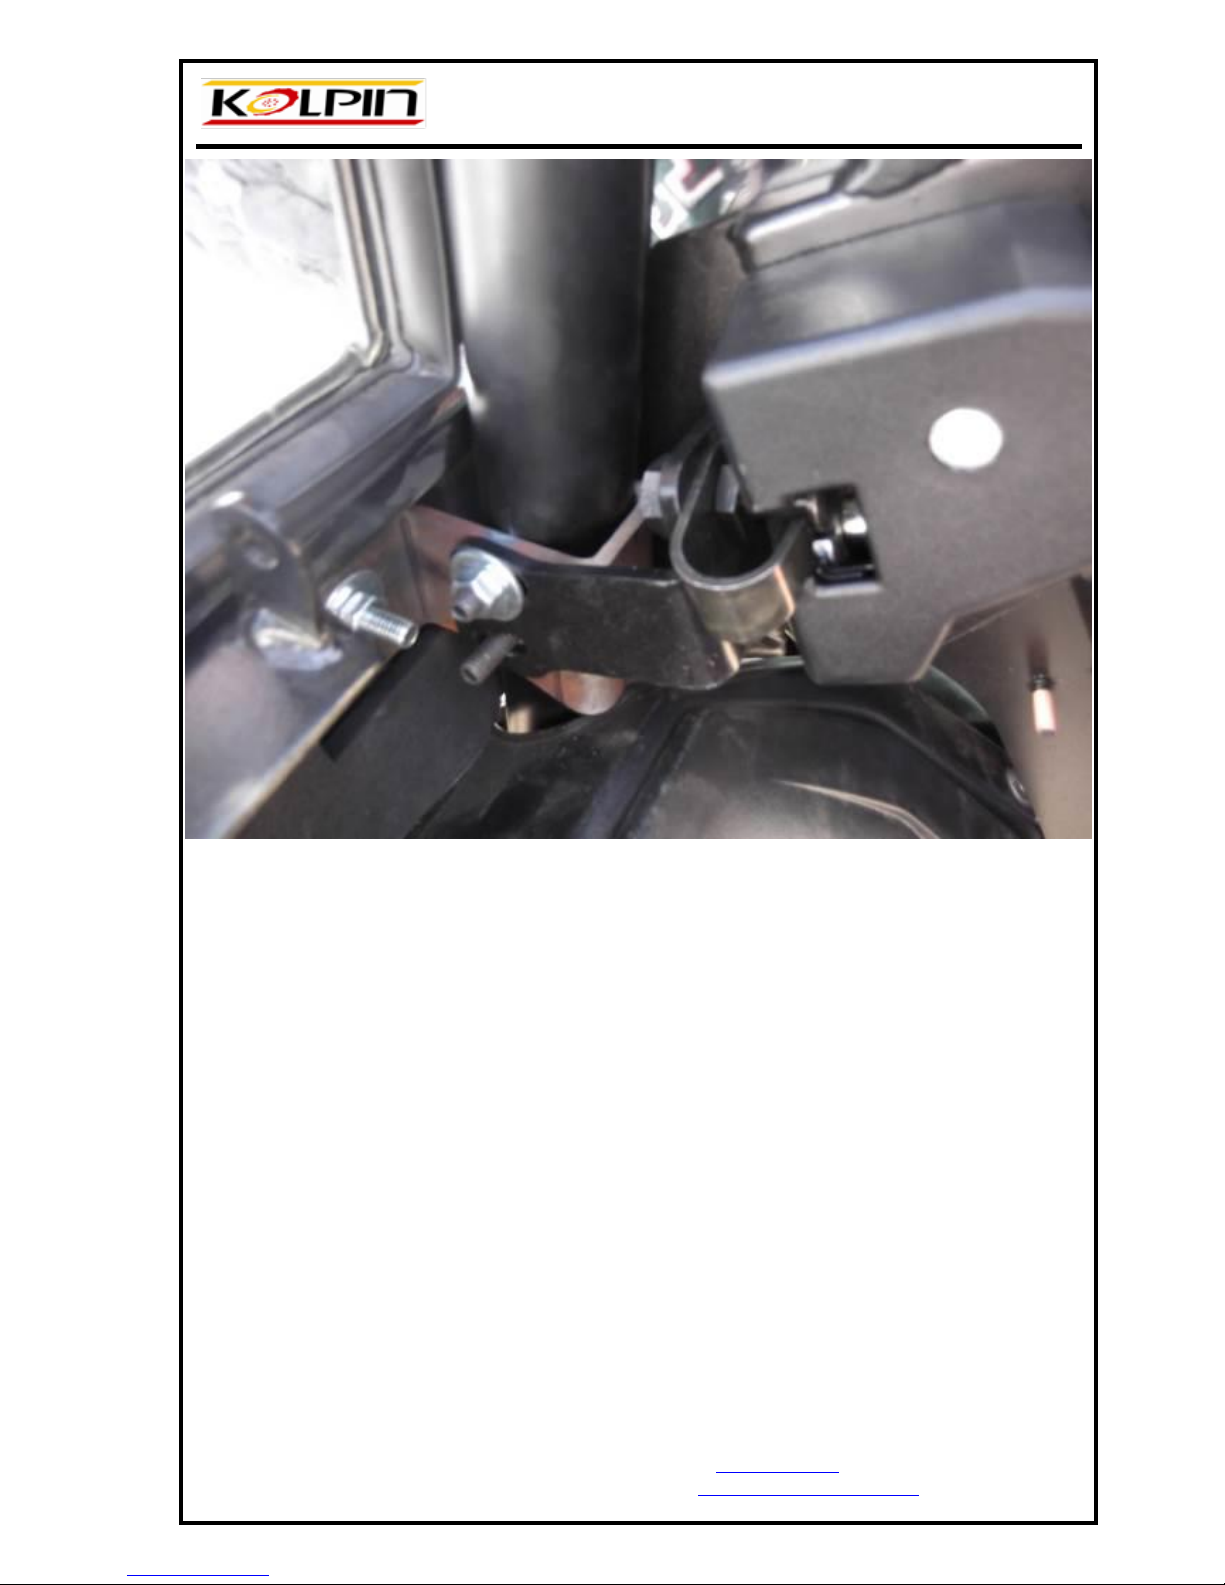
Detail view to the right door stop.
POLARIS RANGER
400H.O.
15
Kolpin Outdoors Inc.
205 N. Depot St.
Fox Lake, WI 53933
Tel: (920) 928-3118
www.kolpin.com
E-mail: customerservice@kolpin.com
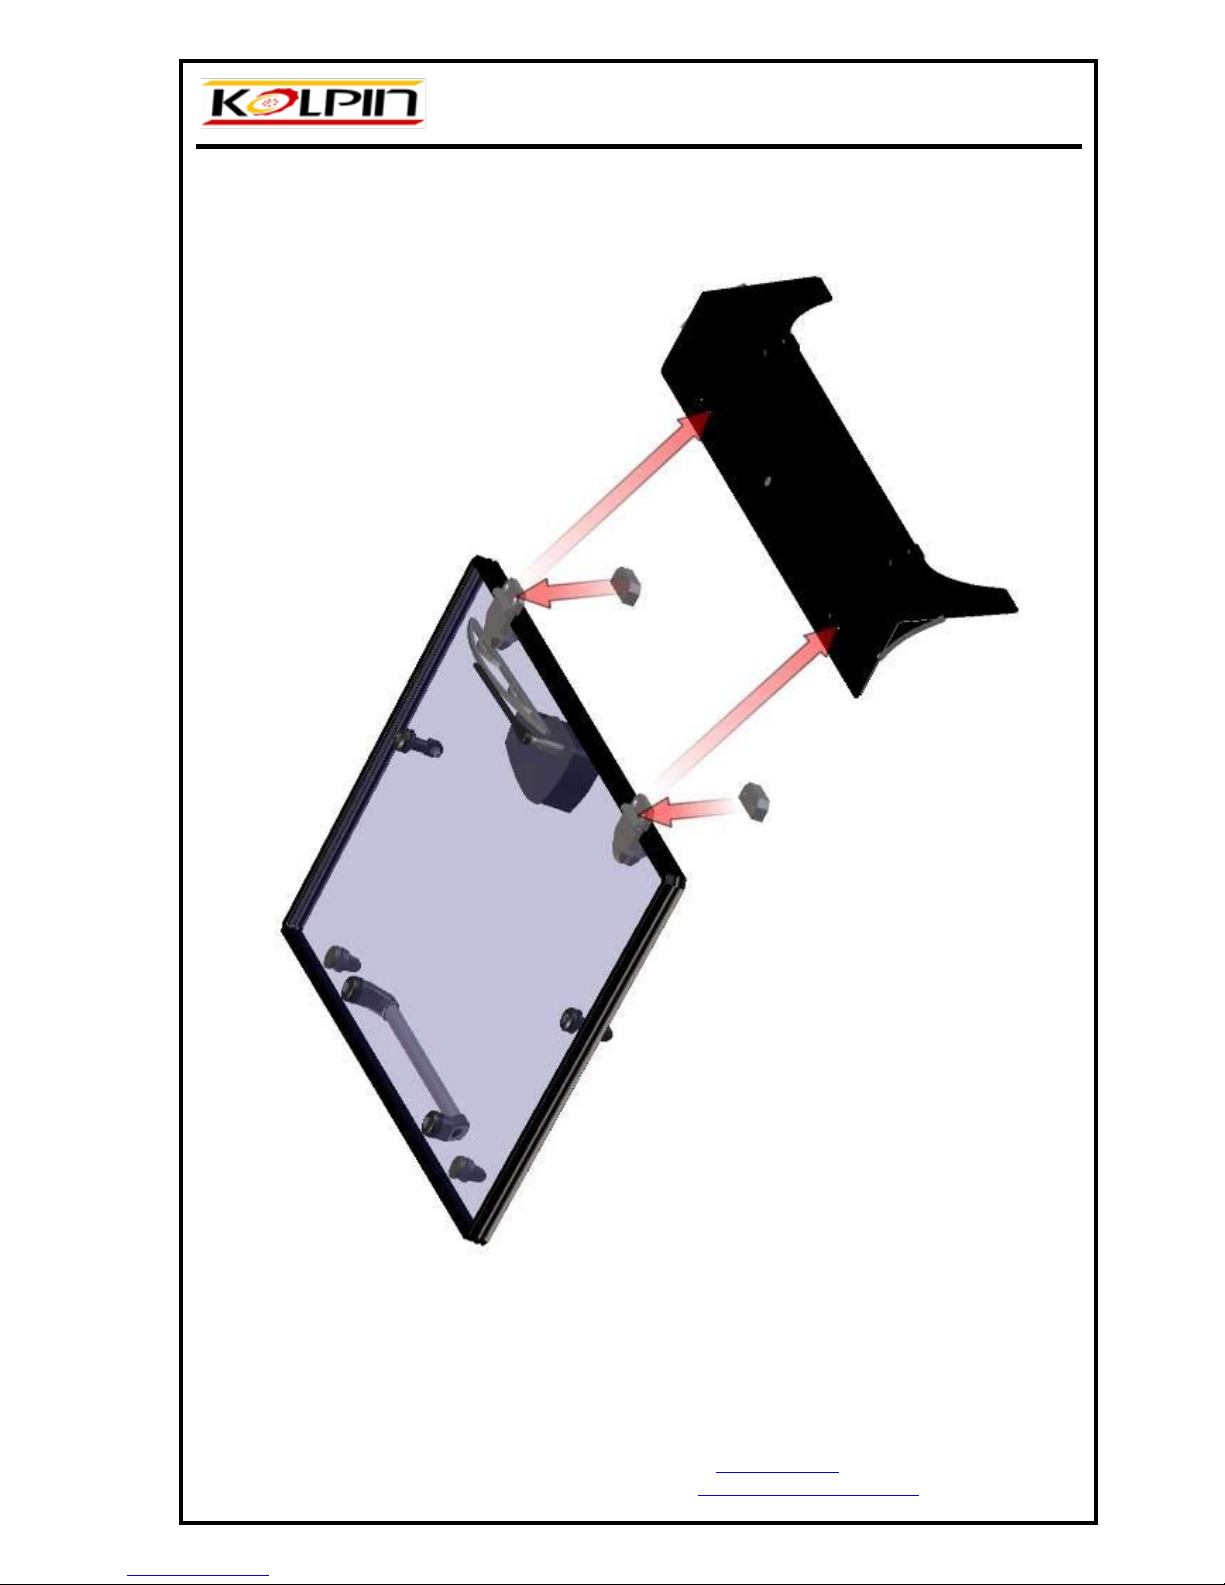
Cut the tightening straps in the hinges and place the hinge washers onto the front window hinges
and place the upper front ledge onto the hinge washers.
POLARIS RANGER
400H.O.
16
Kolpin Outdoors Inc.
205 N. Depot St.
Fox Lake, WI 53933
Tel: (920) 928-3118
www.kolpin.com
E-mail: customerservice@kolpin.com
POLARIS RANGER
400H.O.
17
Kolpin Outdoors Inc.
205 N. Depot St.
Fox Lake, WI 53933
Tel: (920) 928-3118
www.kolpin.com
E-mail: customerservice@kolpin.com
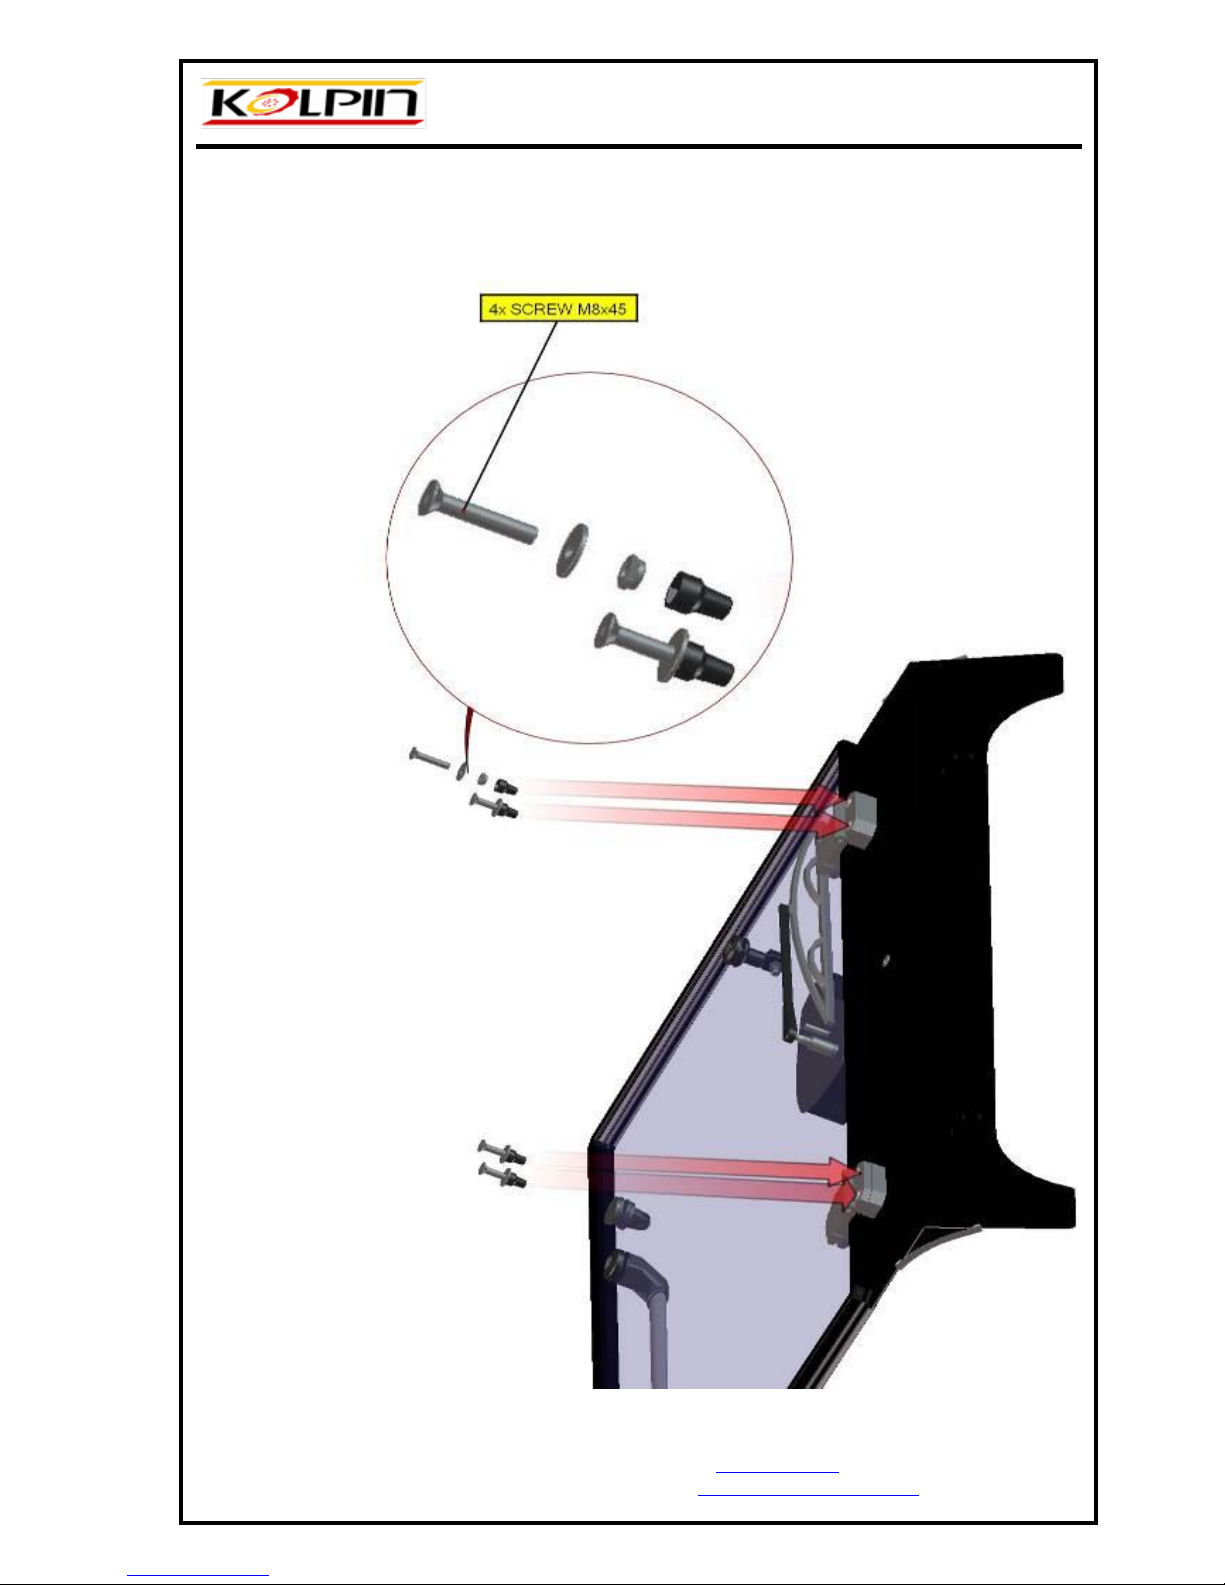
Fix the hinges with the front upper ledge by screws, washers, nuts and nut
covers.
 Loading...