

Kolpin ATV-180 Owner's Manual

1

2
FOREWORD
Thank you for choosing the Kolpin Powersports 180 as your all-terrain vehicle (ATV). This user manual
was prepared with the comfort and safety of the rider in mind. It provides all the details necessary to safely
operate and maintain your vehicle. Carefully read the manual before operating your Kolpin Powersports
180cc. If you have any questions regarding your ATV, contact your local Kolpin Powersports dealer for
assistance. Keep the following information in mind while operating the ATV.
PROTECT YOUR SPORT
Know all local and state riding laws;
Respect your vehicle;
Respect the environment; and
You will gain the respect of others.
You should strictly follow the maintenance program as outlined in this manual (see page 95). This
preventive maintenance program is designed to ensure that your ATV is inspected on a regular schedule
that will keep it operating at peak performance.
Illustrations and photos in this manual are general representations of parts having similar functions.
Your model may differ so be sure to contact your dealer with questions.

3
TA BLE OF CONTENTS
SECTION
PAGE
SECTION
PAGE
Introductory Safety Message
5-11
FEATURES & OPERATION (cont.)
RIDER’S SECTION
12
Seat
36
Know Y our Machine
12
Exhaust Pipe/Muffler/Heat Shields
37
Overview Photo
13
Battery/Tool Set
38-41
Engine Stop Switch /Engine Start Switch
14
Kick Starter
42
Throttle Lever
15
Adjusting the Throttle Cable
43
Kick Starter
16
Spark Plugs
43
Brake Levers
16
Drive Chain
44
Ignition Switch / Lights
17
Gear Assembly
44
Pre-Ride Check
18-19
Suspension
45
RIDING RULES
20
Braking Li gh t
46
FEATURES & OPERATION
21-46
RIDING & OPERATION INSTRUCTIONS
47-62
Ignition Switch
21
Section Table of Contents
47
Engine Stop Switch
22
Riding Gear
50
Engine Start Lever
22
Starting the Engine
51
Engine Throttle
23
ATV Break-in Period
52
Horn
24
Riding
53
Brakes
(Front, Rear, Auxiliary, Parking, Free Play)
24-28
Making Turns
53
Transmission Gear Shift Lever
28
Hauling Cargo
54
CVT System
30
Riding on Slippery Surfaces
56
Engine Air Filter
31
Traveling Uphill
57
Engine Fuel & Oil Systems
32-35

4
TA BLE OF CONTENTS (cont.)
SECTION
PAGE
SECTION
PAGE
RIDING & OPERATION
INSTRUCTIONS (cont.)
47-62
VEHICLE MAINTENANCE (cont.)
95-126
Side Hill Riding
58
Brake Adjustment
108-110
Traveling Downhill
59
Throttle Cable Adjustment
111
Turning Around on a Hill
60
Spark Plug
112
Crossing Streams
61
ATV Storage (long-term)
114
Trail Obstacles
62
Transmission Oil Change
115
Parking
62
Engine Oil Change
116
OPERATION WARNING DECALS &
WARNINGS PRINTED IN MANUAL
63-94
Tire/Tire Pressure/Wheel Installation
117
Operation W arning Decals
63-68
Drive Chain Inspection & Adjustment
119
Operation Warnings Printed in Manual
69-94
Brake Light Lamp Replacement
121
VEHICLE MAINTENANCE
95-126
Cleaning your A TV
122
Vehicle Identification Numbers (VIN)
95
Transporting your ATV
123
Periodic Maintenance Schedule
96-99
Carburetor Adjustment
123
Lubrication Recommendations
100
Kolpin Powersports 180 Specifications
124
Periodic Maintenance Record
101
Troubleshooting
125
Axle Wheel & Torque Specifications
103
Rear Spring Adjustment
104
Engine Air Filter
105
Throttle Stop System
106
Steering Inspection
107

5
!!! INTRODUCTORY SAFETY MESSAGE TO OWNERS !!!
PARENTS & ADULTS MUST READ BEFORE OPERATION
AN ATV IS NOT A TOY AND CAN BE HAZARDOUS TO OPERA TE. An ATV handles differently
from other vehicles including motorcycles and cars. A collision or rollover can occur quickly, even during
routine maneuvers such as turning and driving on hills or over obstacles. YOU MUST TAKE PROPER
PRECAUTIONS!
You should read the owner’s manual and warning labels. Review this information on a regular basis.
Riders differ in skills, physical abilities, and judgment. Some riders may not be able to operate an
ATV safely. Never allow anyone to operate an ATV without first reading the Owner’s Manual,
watching the instructional video, and attending a certified A TV Safety Training course. Never allow
others to use your ATV if he or she does not have the abilities to operate it safely. MAKE CER TAIN
THE OPERATOR(S) UNDERSTAND ALL WARNINGS AND THE OWNER’S MANUAL
BEFORE OPERATION.

6
PA Y ATTENTION WHEN YOU SEE THE SYMBOLS BELOW
This is the safety alert symbol. When you see this symbol on your machine or in this
manual, be alert to the potential for personal injury.
This symbol indicates a potential h azard that could result in severe injury or death.
When you see th is symbol on your machine or in this manual is means PAY
ATTENTION! If you don’t, you could get hurt very badly or even killed. Your
safety is involved!

7
ATTENTION OPERATOR!
This vehicle is designed and manufactured for off-road use only. Carrying passengers is prohibited.
Always wear a helmet while operating ATVs.
Read the Owner’s Manual and all warning labels on the ATV carefully. Follow the operating
procedures described.
• Training: Kolpin Powersports strongly suggests new owners call the A TV Safety Institute (ASI –
a division of SVIA) to enroll in safety training or, visit their website www.ATVSAFETY.org.
• Never operate an ATV without first reviewing this manual, watching the instructional video and
taking a certified ATV Safety Training course.
• Youth ATVs are designed and intended for use by children in the following age groups:
• ATVs with engine sizes less than 50cc should be used only by persons ages 6 and older;
• ATVs with engine sizes 51cc up to and including 90cc should be used only by persons age 12
and older;
• ATVs with engine sizes greater than 90 cc should be used only by those persons age 16 and
older.
• No children under the age of 16 should operate any ATV designed and sold for an adult.
• Do not allow children to ride this ATV.
Failure to follow the warnings contained in this manual can result in SERIOUS INJURY OR
DEATH

8
• Always inspect your ATV before you ride to make sure it is in safe operating condition. Follow the
inspection and maintenance procedures and schedules as described in this manual.
• Always wear an approved helmet that fits properly. You should also wear eye protection (goggles or
face shield), gloves, boots, long-sleeved shirt or jacket, and long pants.
• Never exceed your riding capabilit ies .
• Never consume alcohol, drugs or any medications that affect alertness before or while operating this
ATV.
• Always keep both hands on the handlebars and both feet on the footrests of y our ATV during operation.
• Never carry a passenger on an ATV.
• Always go slowly; be extra careful when operating on unfamiliar terrain. Be alert for changes in terrain,
weather, and ATV operating conditions.
• Never operate on excessively rough, slippery or loose terrain.
• Avoid operating ATV on paved surfaces, including sidewalks, driveways, parking lots and streets.
• Avoid operating ATV on any public street, road or highway, even dirt or gravel ones.
• Avoid excessive speeds, sharp turns, and uneven terrain. Travel at speeds proper for the terrain,
visibility and operating conditions, and your experience.
• Never ride during low light conditions.
• Never attempt wheelies, jumps or other stunts.
• Always follow proper procedures for turning as described in this manual. Practice turning at low
speeds before attempting to turn at faster speeds. Do not turn at excessive speeds.
• Never operate the ATV on hills too steep for the ATV or for your abilities. Practice on smaller hills
before attempting larger hills.

9
• Always follow proper procedures for climbing hills as described in this manual. Check the terrain
carefully before you start up any hill. Never climb hills with excessively slippery or loose surfaces.
Shift your weight forward. Never open the throttle suddenly. Never go over the top of any hill at high
speed.
• Always follows proper procedures for going down hills and for braking on hills as described in this
manual. Check the terrain carefully before you start down any hill. Shift your weight backward. Never
go down a hill at high speed. Avoid going down a hill at an angle that would cause the vehicle to lean
sharply. Go straight down the hill wherever possible.
• Always follows proper procedures for crossing the side of a hill as described in this manual. A void hills
with excessively slippery or loose surfaces. Shift your weight to the uphill side of the ATV. Never
attempt to turn the ATV around on any hill until you have mastered the turning technique described in
this manual on level ground. Avoid crossing the side of a steep hill if possible.
• Always use proper procedures, as described in this manual, if you stall or roll backwards when
climbing a hill. To avoid stalling, maintain a steady speed when c limbing a hill. If you lose all forward
speed: Keep weight uphill. Apply the brakes. Lock the parking brake after you are stopped. Dismount
on uphill side, or to either side of pointed straight uphill.
• Always check for obstacles before operating in a new area. Never attempt to operate over large
obstacles, such as large rocks or fallen trees. If you cannot avoid large obstacles, use extreme caution
when proceeding. The proper procedure for operating over obstacles is described later in this manual.
• Always be careful of skidding or sliding. Learn to safely control skidding or sliding by practicing at low
speeds and on level, smooth terrain. On extremely slippery surfaces, such as ice, go slowly and be very
cautious in order to reduce the chance of skidding or sliding out of control.

10
• A void operating the ATV through deep or fast flowing water. If you cannot avoid water which exceeds
the height of the bottom of the footrest, go slowly, balance your weight carefully avoiding sudden
movements, maintain a slow and steady forward motion, do not make sudden turns or stops, and do not
make sudden throttle changes. Remember that your brakes may be wet.
• Wet brakes have reduced stopping ability . T est your brakes after leaving water. If necessary, apply them
several times to let friction dry out the pads.
• Always use size and type tires specified in this manual. Always maintain proper tire pressure as
described in this manual. (See page 97).
• Never modify an ATV through improper installation of and/or use of accessories.
• Never exceed the stated load capacity for an ATV. Cargo should be properly distributed and securely
attached. Reduce speed and follow instructions outlined in this manual. Allow greater distance for
braking.
• DRIVE SAFELY & RESPONSIVELY!
FOR MORE INFORMATION ABOUT ATV SAFETY .

11
Additional Imp ortant Information. . .
The safety of our customers and the general public is the first priority at Kolpin Powersports. It is strongly
recommended that consumers not install any non-Original Equipment Manufacturer (OEM) supplied
equipment intended to increase speed or power on any Kolpin Powersports ATV. Do not make any other
modifications intended for these purposes. Any modifications to the original equipment of the ATV
substantially increase the risk of serious injury or death. Because these modifications may create a
substantial safety hazard, Kolpin Powersports hereby informs you that the warranty on your ATV is
terminated if any non-OEM equipment has been added, or modifications have been made, to the original
ATV which increase(s) speed or power.
It is also advised that ATV owners strictly follow the recommended maintenance program described in this
manual. The preventive maintenance program is designed to insure that all critical components on the ATV
are inspected by your dealer on a regular schedule (hourly intervals).
BE FURTHER ADVISED; the addition of certain accessories may change the handling characteristics of
your ATV. Any accessories to be added to your ATV must be approved by your local Kolpin Powersports
dealer before installation.
The following information identifies a potential safety hazard that could result in severe injury
or death.

12
RIDER’S SECTION
KNOW YOUR MACHINE
Owners: Review the information in this manual with any person who may be operating this ATV. It is up
to you to instruct other riders in the proper and safe way to operate an ATV. Set boundaries and adhere to
them, keeping everyone’s safety foremost in your mind. Never allow your child to operate this ATV.
Riders: Before you ride your new Kolpin Powersports ATV , you need to know information about how the
ATV operates and most important of all, you need to know how to keep safe while operating the ATV.
Remember, YOUR SAFETY IS THE MOST IMPORTANT THING. You must learn what will keep you
safe and also keep your friends and other people around you safe while you are riding.
Pay attention when you see this symbol:
This is the safety alert symbol. When you see this symbol on your machine or in this manual is
mean
s PAY ATTENTION! If you don’t, you could get hurt very badly or even killed. Your safety is
involved!
13
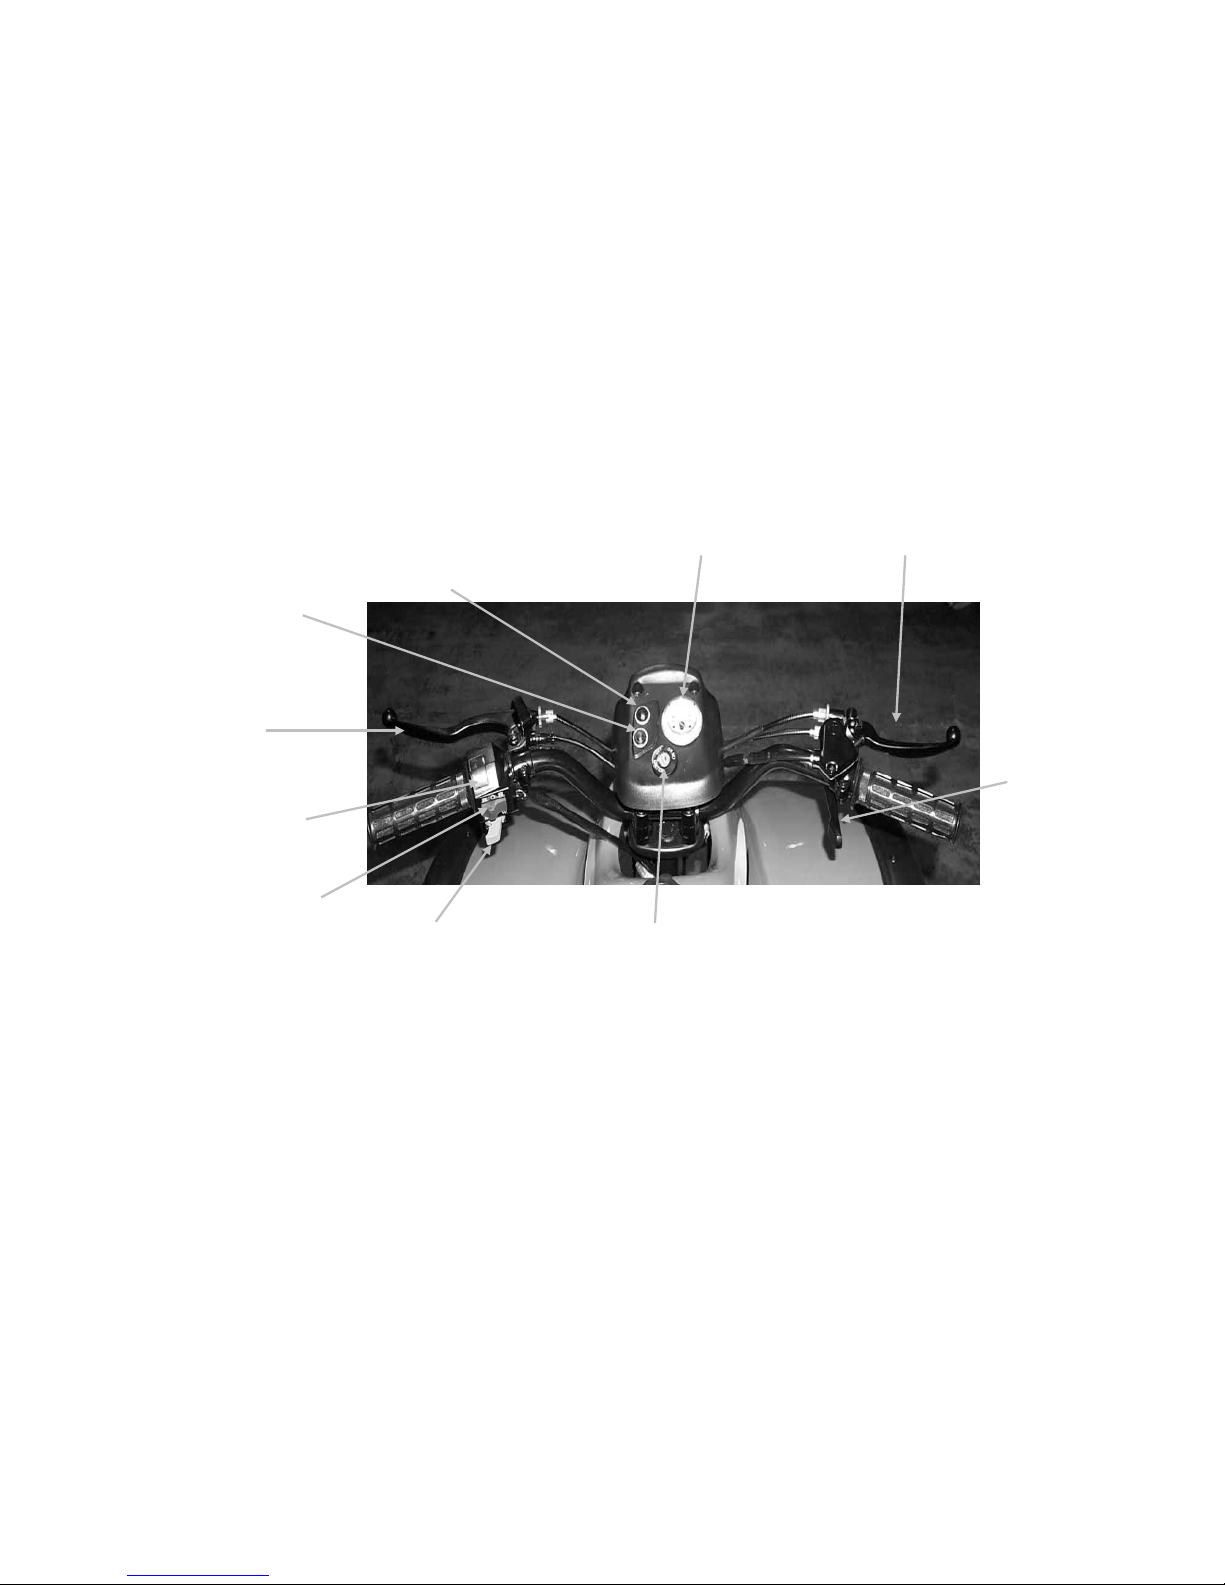
OVERVIEW OF Kolpin Powersports 180
Rear Brake
Lever
Reverse
Indicator
Neutral Indicator
Fuel Gauge
Front Brake
Lever
Throttle
Lever
Ignition Switch
Light Switch
Engine Stop Switch
Engine Start Switch / Horn
14
RIDER’S SECTION
KNOW YOUR MACHINE (cont.)
Before you start the engine for the first time, you need to learn about the
controls on your new ATV.
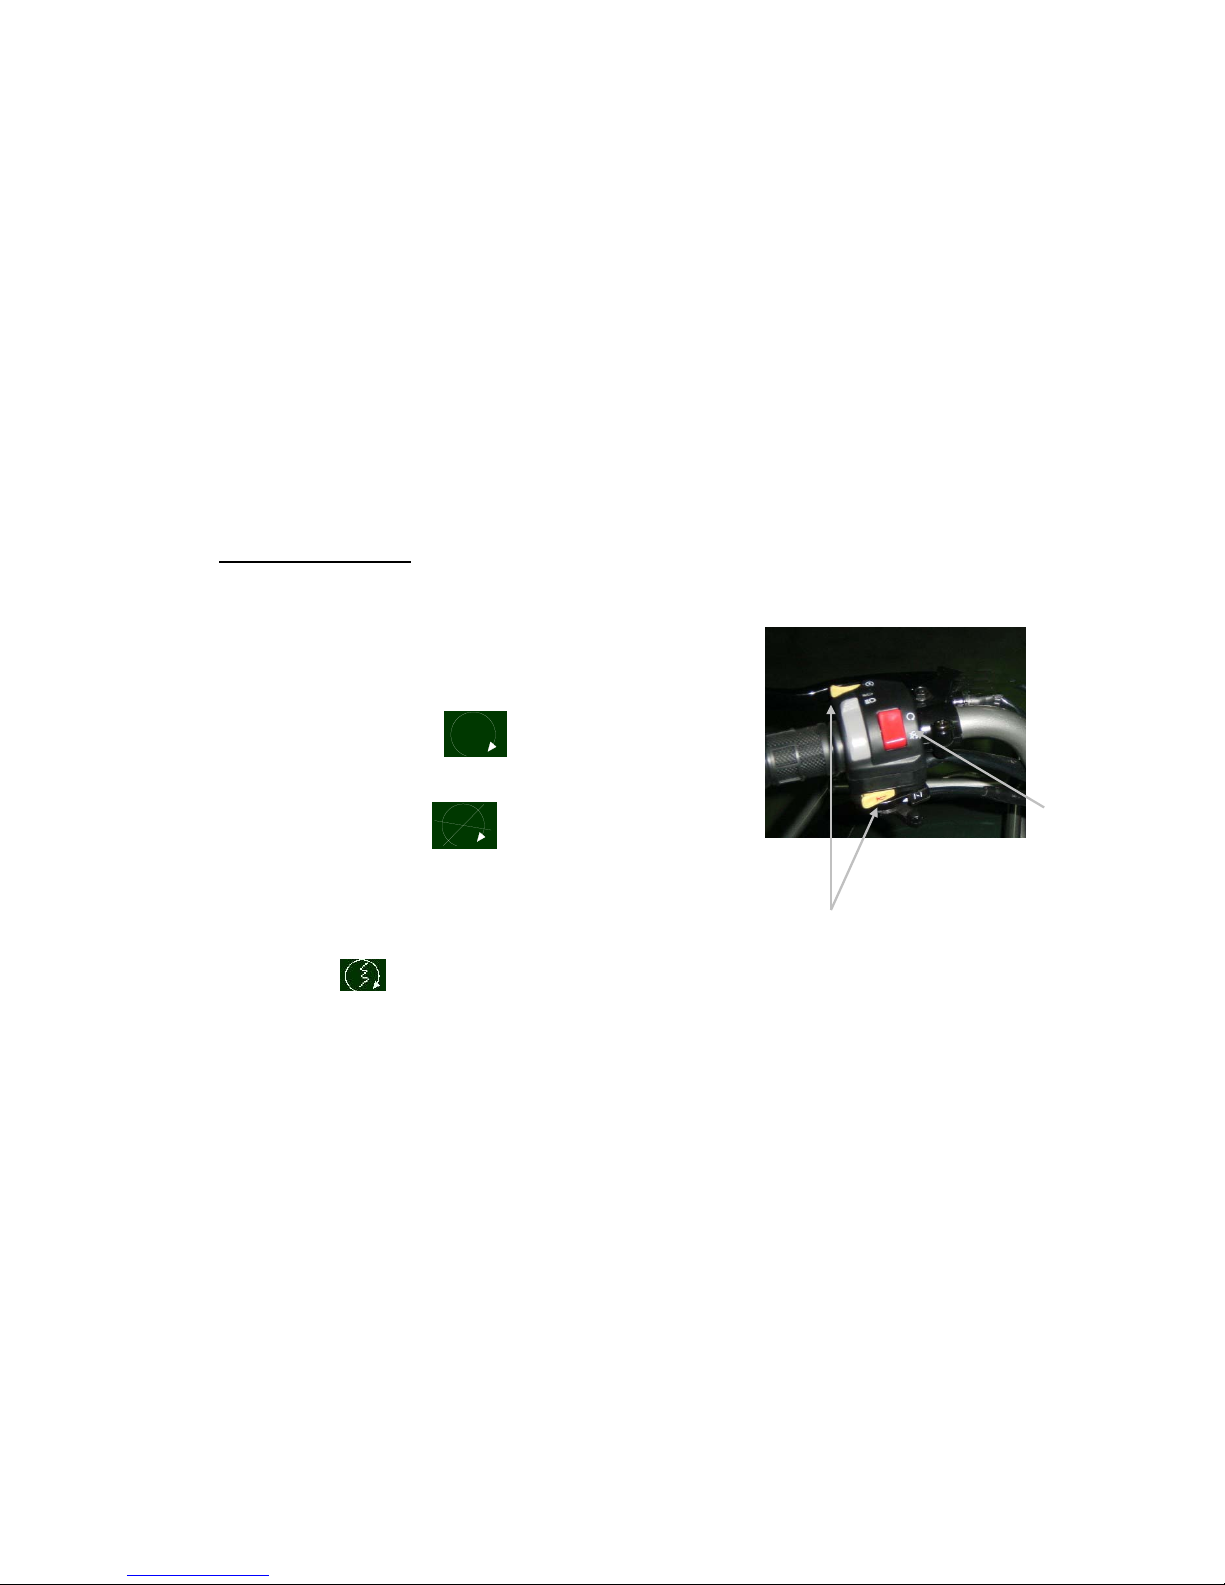
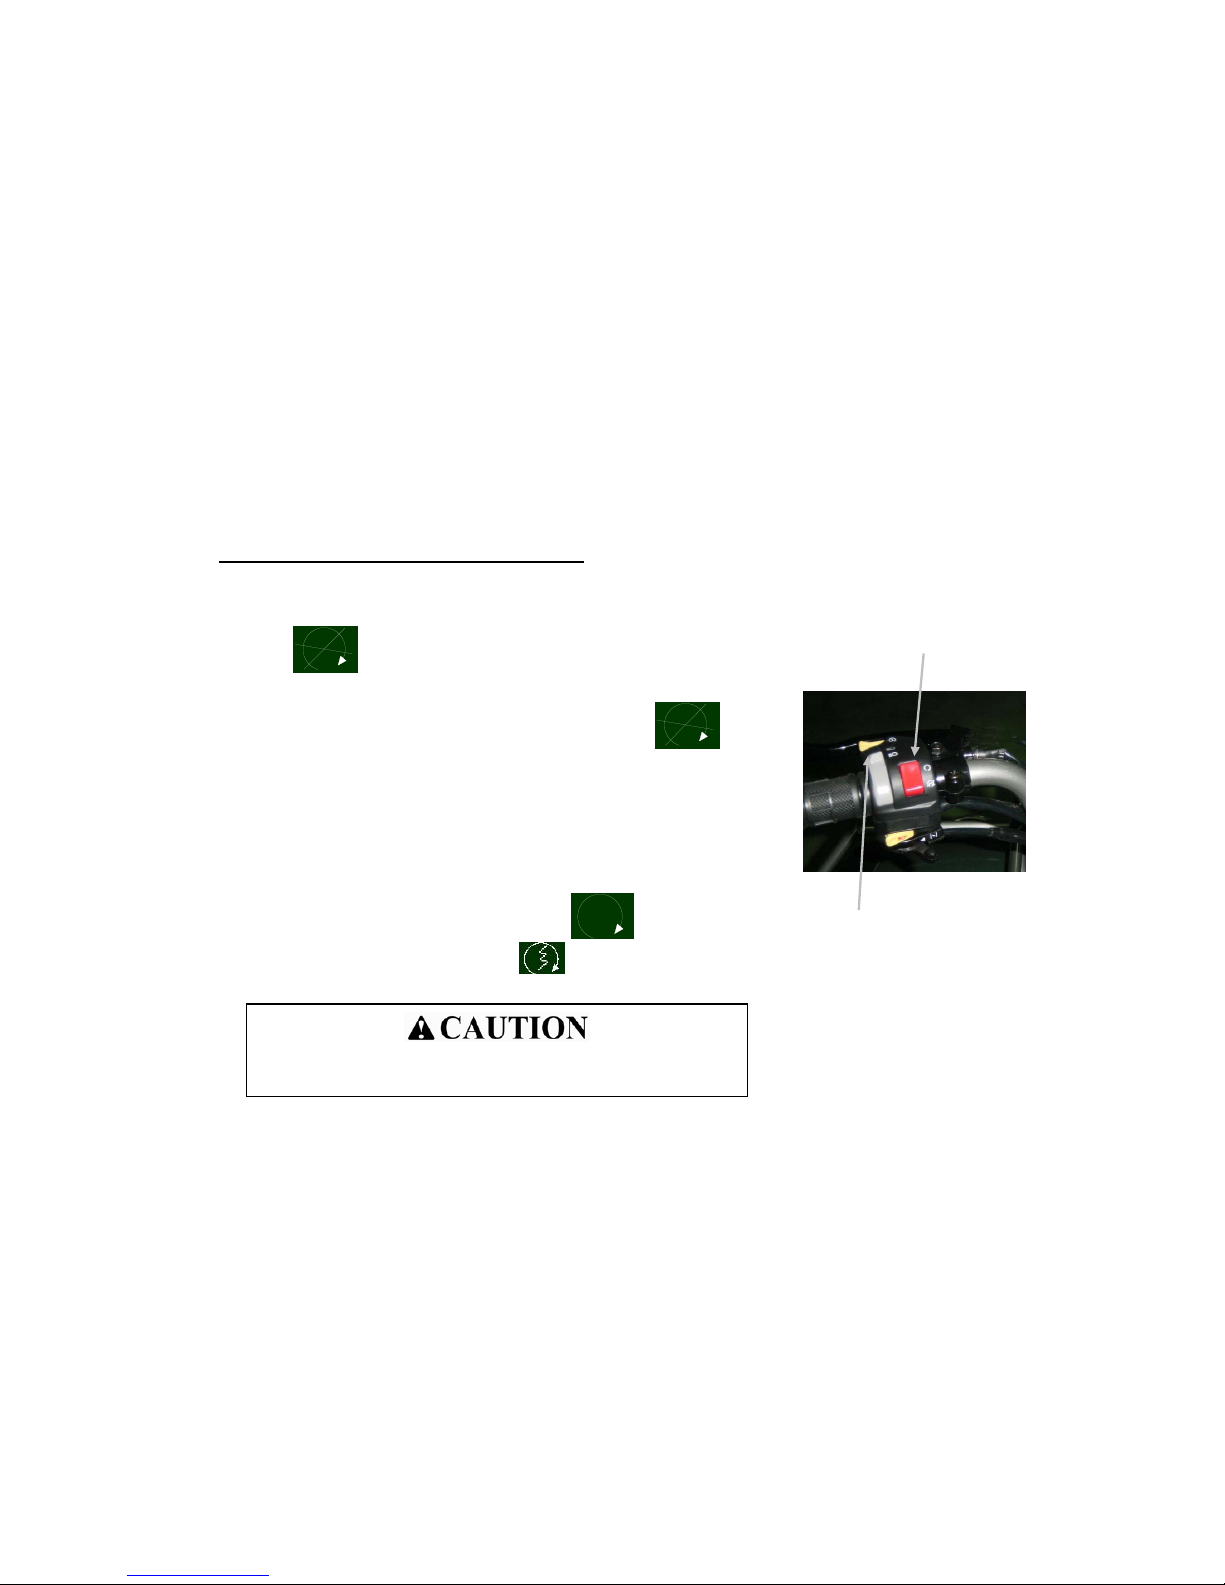
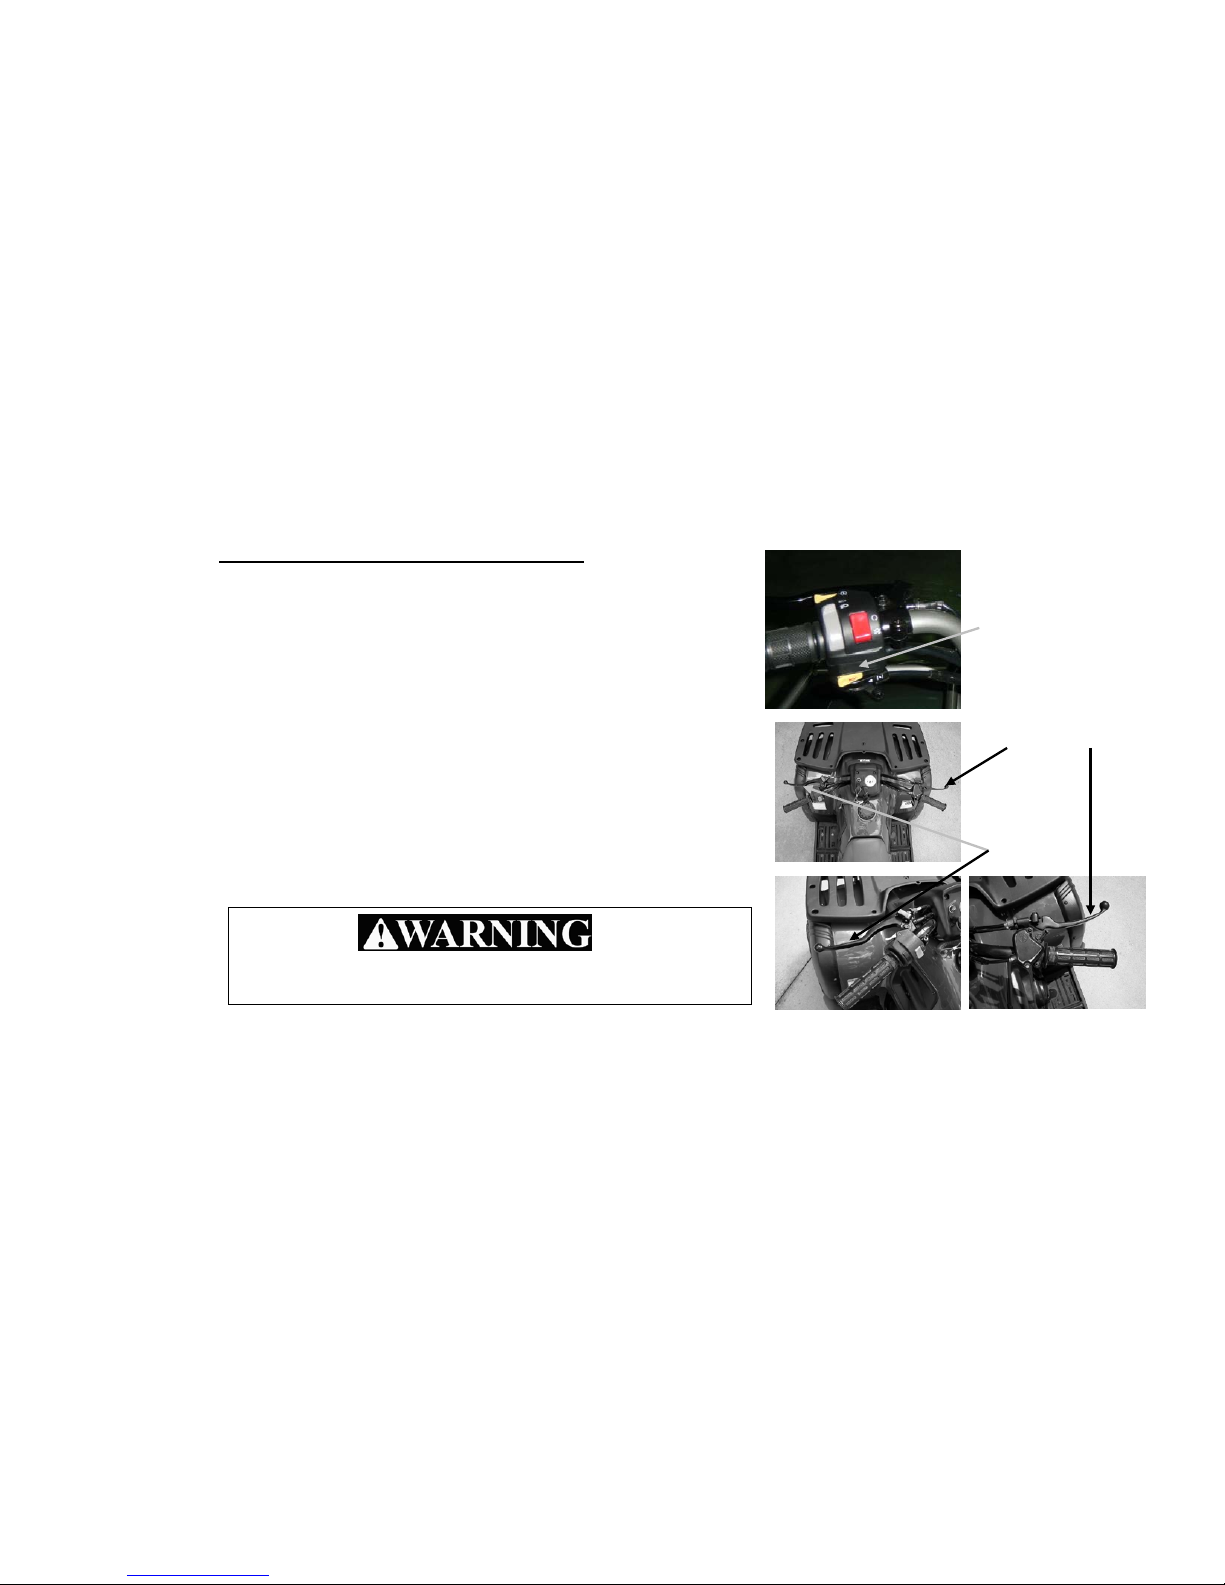
1. Engine Stop Sw itc h
• The switch has to be in the position before you can start the
engine.
• When the engine is running you can stop it by sliding the Engine Stop
Switch left or right to the position,
2. Engine Start Switch / Horn
• The Engine Start Switch / Horn switch is the grey switch just below
the Engine Stop Switch.
• The Engine Start Switch is used to start the engine by pushing the
switch to the position.
Engine Stop
Switch
Engine Start Switch /
Horn
15
RIDER’S SECTION
KNOW YOUR MACHINE (cont.)
3. Throttle Lever
• The throttle lever is located on the right-side handlebar. It makes
your ATV go forward when you press it with your thumb.
• You must always make sure the throttle control does not stick before
you operate your ATV. Read more about it on page 43.
4. Transmission Neutral Indicator–Green
• The Neutral Indicator (green) will light when the ATV is in Neutral.
• The ATV cannot move forward nor will it reverse when the ATV is
in Neutral.
5. Transmission Reverse Indicator–Orange
• The Reverse Indicator (orange) will light when the ATV is in
Reverse.
• The ATV will move in reverse only.
Throttle
Lever
16
RIDER’S SECTION
KNOW YOUR MACHINE (cont.)
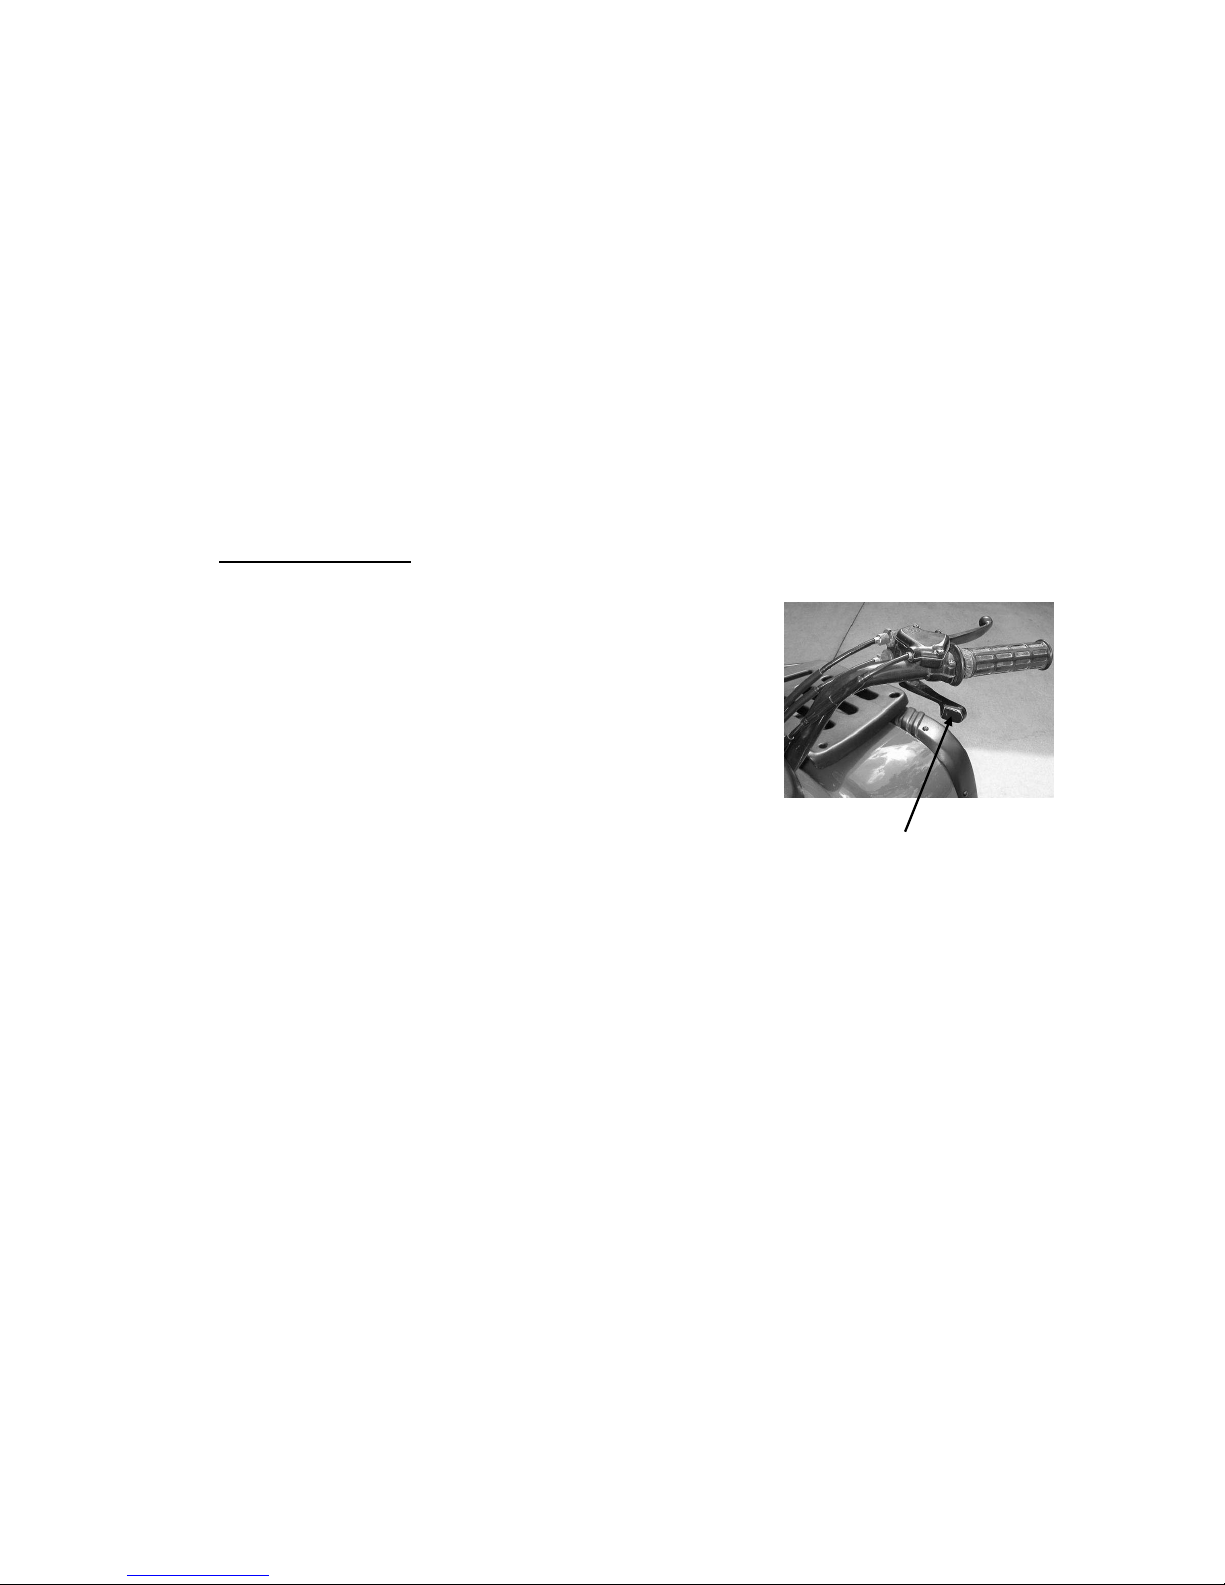
6. Kick Starter
• If your battery is too weak to start your ATV, you can push on the
kick starter with your left foot to start the engine. Review page 42
for more information on how to use the kick starter.
7. Brake Levers
• Squeeze these levers towards the handle bar to slow down or stop
your ATV. The right-hand lever controls the front brakes. The
left-hand lever or the auxiliary foot pedal controls the rear brake. To
slow down or stop squeeze both brake handles at the same time.
• Always apply both brakes at the same time or you may lose
control of your ATV resulting in serious injury or death.
• Always take your thumb off the throttle control when you
pull the brake lever.
Kick-Starter
Rear Brake
Lever
Auxiliary
Foot Pedal
Front
Brake
Lever
17
RIDER’S SECTION
KNOW YOUR MACHINE (cont.)
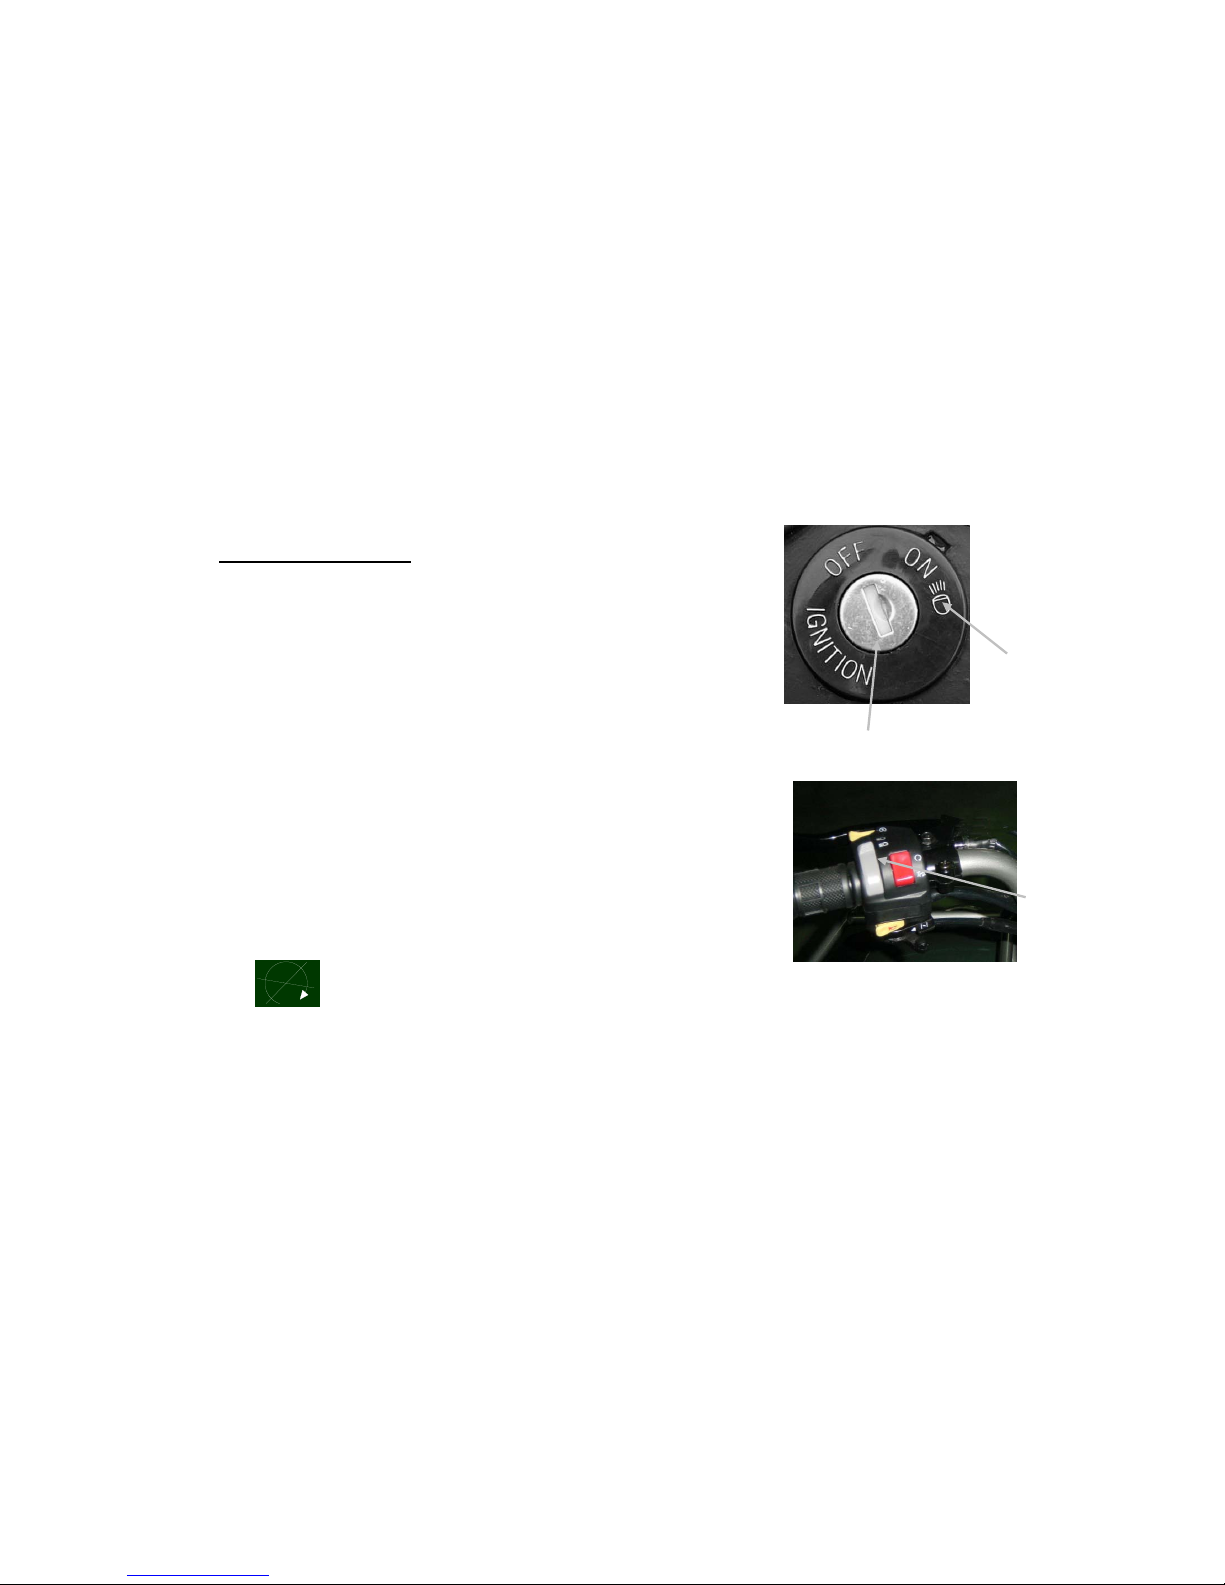
8. Ignition Switch
• The key must be turned to the ON position before you push the
starter button or use kick starter.
• You should use this key to turn the engine OFF.
9. Lights
Your ATV is equipped with high and low beam headlights. The light
will not function unless the engine is running.
• Turn the key to the headlight position to turn on headlights.
• Select High / Low beam by pressing toggle switch on left
handlebar.
Let’s review the two (2) ways to stop your ATV:
1. Sliding the Engine Stop Switch left or right to the
position.
2. Turning the ignition key to OFF
.
Ignition Switch
Headlight
Position
High/Low
Beams
18
RIDER’S SECTION
PRE-RIDE CHECK
Before the ATV is started you must always perform a PRE-RIDE CHECK.
Make sure the throttle doesn’t stick. Check this by pushing the lever toward the handleba r and the n let
it go. If it comes right back to where it was before you pushed it then it’s okay. If it comes back slowly
or stays forward, you have a sticky throttle. This means that something is wrong or broken.
Make sure the brakes don’t stick. Check the brake levers by squeezing them toward the handlebar and
then letting go. The brake levers should come right back to where they were before you squeezed them.
If they go back slowly or stay on, your brakes are sticking.
If you have a sticky throttle, do not start the engine. You could get hurt if you ride when you have a
sticky throttle. Have an adult or your local Kolpin Powersports dealer fix the throttle.
If you have sticky brakes, do not start the engine. You could get hurt if you ride when you have sticky
brakes. Have an adult or your Kolpin Powersports dealer fix the sticky brakes.
This ATV must be inspected each time before riding to insure it is in proper working order. If proper
inspection is not performed, severe injury or death could result.

19
RIDER’S SECTION –PRE-RIDE CHECK (cont.)
Make sure the seat is locked back in place.
Check the gas level. Before adding gasoline to your ATV read the instructions and warnings on page 33 of this
Owners Manual.
Check the engine oil level when the eng ine is cold. The engine is very hot after it h as been running. I t could burn
you.
Check the tires; check condition and pressures.
Brakelight – check for proper operation.
Engine Stop Switch – check for proper function.
Wheels – check for tightness of wheel nuts and axle nuts; check that axle nuts are secured by cotter pins.
Drive chain - check the drive chain slack.
Air cleaner – check for dirt. If the filter is dirty or clogged, clean or replace it.
Steering – check to be sure the steering operates freely. Look for any unusual looseness in any area.
Check free-play and operation of brakes levers.
Check throttle lever making sure you do not have sticky throttle lever (see pg. 43).
Loose parts – inspect ATV for any damaged parts or loose nuts/bolts or fasteners.
Operator’s helmet, goggles and proper clothing (long pants, long sleeves or jacket).
This last check is done with the engine running. You must check to make certain that the two ways to stop your
ATV are working the way they should:
1. Sliding the Engine Stop Switch left or write to the position
2. Turning the Ignition Key to OFF.

20
RIDER’S SECTION– RIDING RULES
Now you are ready to ride your new A TV. Remember that safety while you ride is the most important thing.
Let’s ride!
Your ATV is made for one person. Never carry a passenger. A passenger will make the ATV harder to
drive. You may lose control and hurt yourself and your passenger.
Make sure you know where you are going to ride when your ATV is started. Make sure the area around
you and your ATV is safe.
Never ride alone. Always drive within the sight of another rider.
Always drive your ATV while sitting down. Keep both hands on the handlebars and keep both feet on
the running boards.
Don’t ride your ATV on roads or over railroad tracks. Your ATV makes noise that will keep you from
hearing cars, trucks or trains that may be coming towards you.
Don’t ride at night.
Learn where there are lakes, rivers, ponds and ditches in your driving area. Stay away from them.
Never ride on frozen water. The ice could cause an accident resulting in severe injury or death. All ice
can be dangerous!
Always be alert and pay attention to where you are driving. Pay attention to other drivers and be even
more careful around them because you don’t know what they’re going to do.
Never follow another ATV too closely. Always allow lots of time and space to stop your ATV.
You must always follow the safe riding rules found on this page. If you do not, an accident could
occur resulting in severe injury or death.

21
FEA TURES AND OPERATION
1. IGNITION SWITCH
• The Ignition Switch is operated with a key and must be turned to the
ON position before you start the engine.
• For Headlight: turn the key from the ON position to the headlight
position. The headlight will not function unless the engine is
running.
• Once the engine is running, the key cannot be taken out.
• You should use this key to stop the engine by turning it to the OFF
position.
• DO NOT turn the ignition switch to OFF while riding. Ignition
switch should not be turned off unless the vehicle is completely
stopped
Ignition Switch
Headlight
Position
22
FEATURES AND OPERATION (cont.)
2. ENGINE STOP SWITCH
• The engine will not start or run when the Engine Stop Switch is in
either position. It provides the operator with a quick way to
shutdown the engine in case of stuck throttle or other emergency.
• When you push the Engine Stop Switch left or right to
position, the engine cuts off.
3. ENGINE START LEVER
• Set the parking brake. (See page 27)(Remember to release the park
brake before driving forward.)
• Turn the ignition key to the ON position.
• Make sure the Engine Stop Switch is in the position.
• Push the grey Engine Start button to
Engine damage could occur if the ATV is driven without the park
brake released.
Engine Stop Sw itc h
Engine Start Lever
23
FEATURES AND OPERATION (cont.)
4
. ENGINE THROTTLE
• The throttle lever is located on the right-side
handlebar.
• Pressing the throttle lever forward controls
engine speed and vehicle movements.
• The throttle lever is spring loaded. The engine
speed returns to idle when the lever is released.
• Do not start or operate an ATV with a
sticky or improperly operating throttle. A
sticky or improperly operating throttle
could cause an accident resulting in
severe injury or death.
• Always contact your dealer for service
repairs whenever throttle problems arise.
• Failure to check or maintain proper
operation of the throttle system can result
in the throttle lever sticking during riding
and cause an accident.
• Always check the lever for free
movement and return before starting the
engine. Check occasionally during riding.
Throttle Lever
Throttle Lever
Accelerate
24
FEATURES AND OPERATION (cont.)
5. HORN SWITCH
To sound the horn, turn on the ignition switch and pull the horn switch
(grey Engine On / Horn switch).
To sound the horn, turn on the ignition switch and pull the horn switch
(grey Engine On / Horn switch).
6. BRAKES
• The left-hand brake activates the rear brakes; the right-hand brake
activates the front brakes
• To activate the rear brakes, squeeze the left-hand lever toward the
handlebar
• To activate the front brakes, squeeze the right-hand lever toward the
handlebar.
Always apply both brakes at the same time or loss of control of ATV
can occur resulting in serious injury or death.
Left Brake
(Rear)
Horn Button
Right Brake
(Front)

25
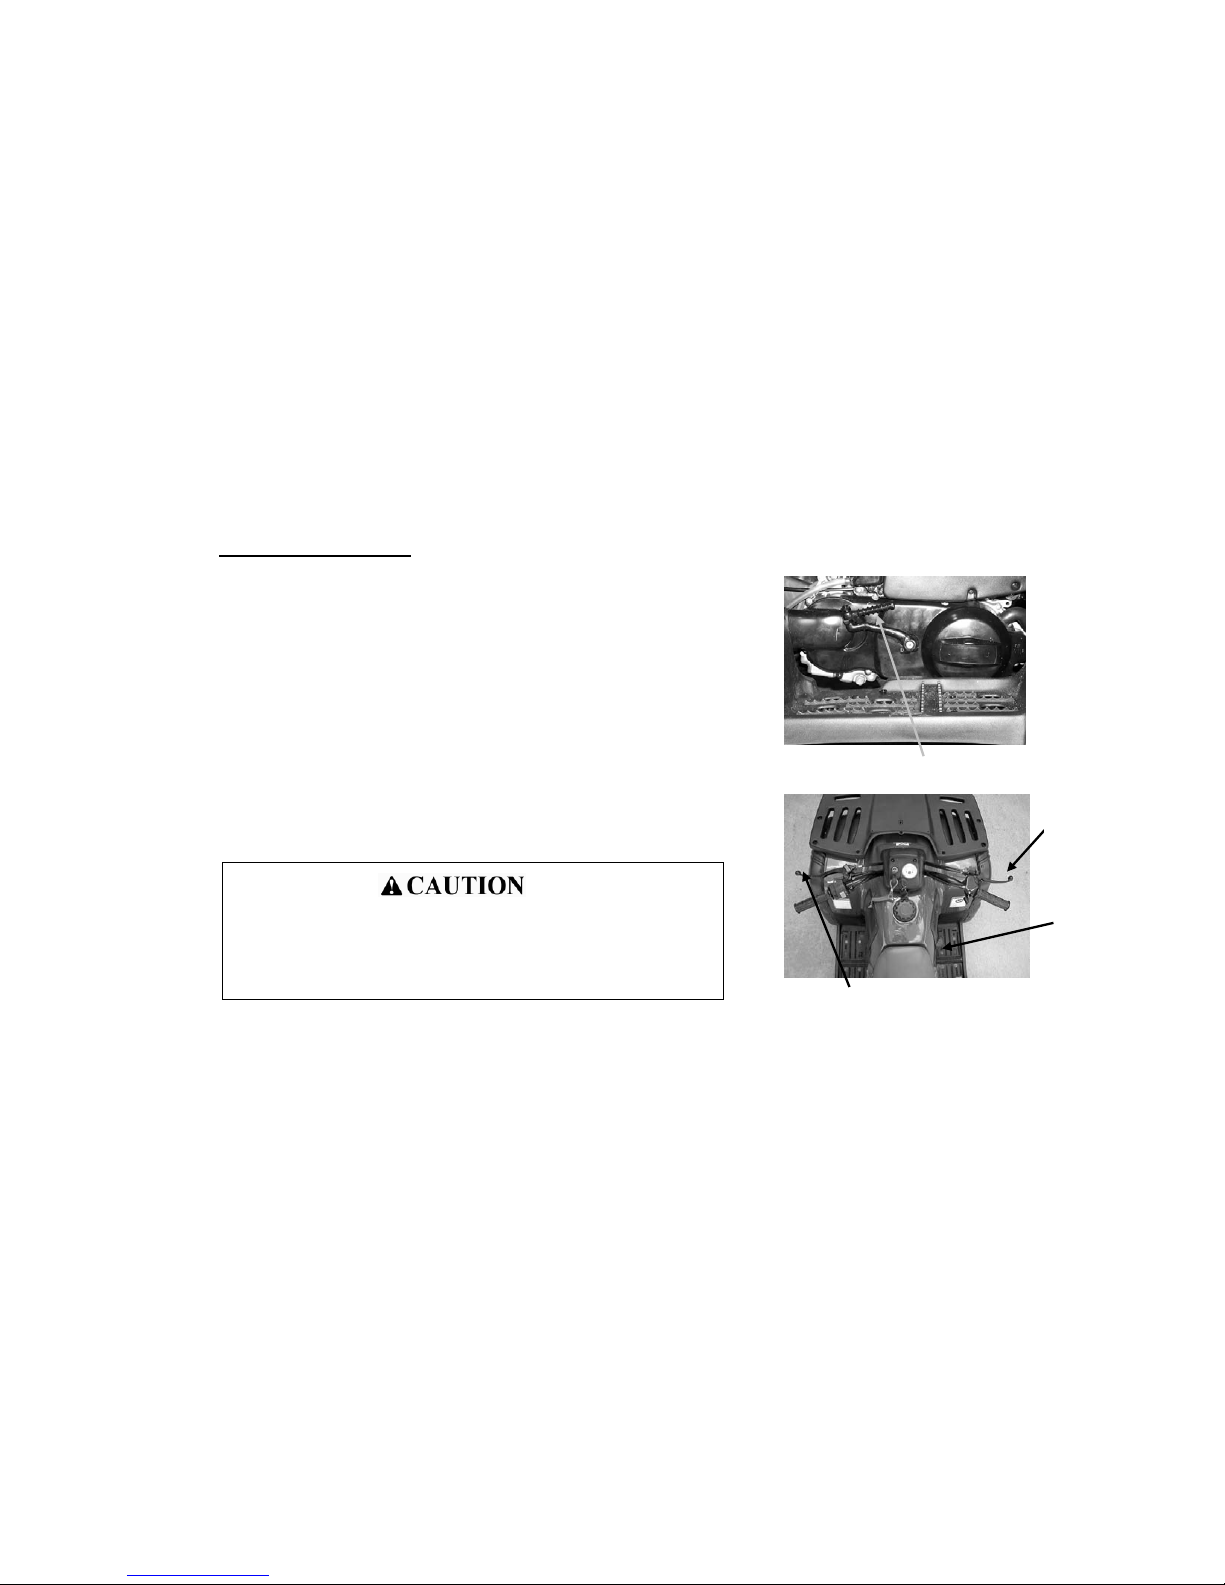
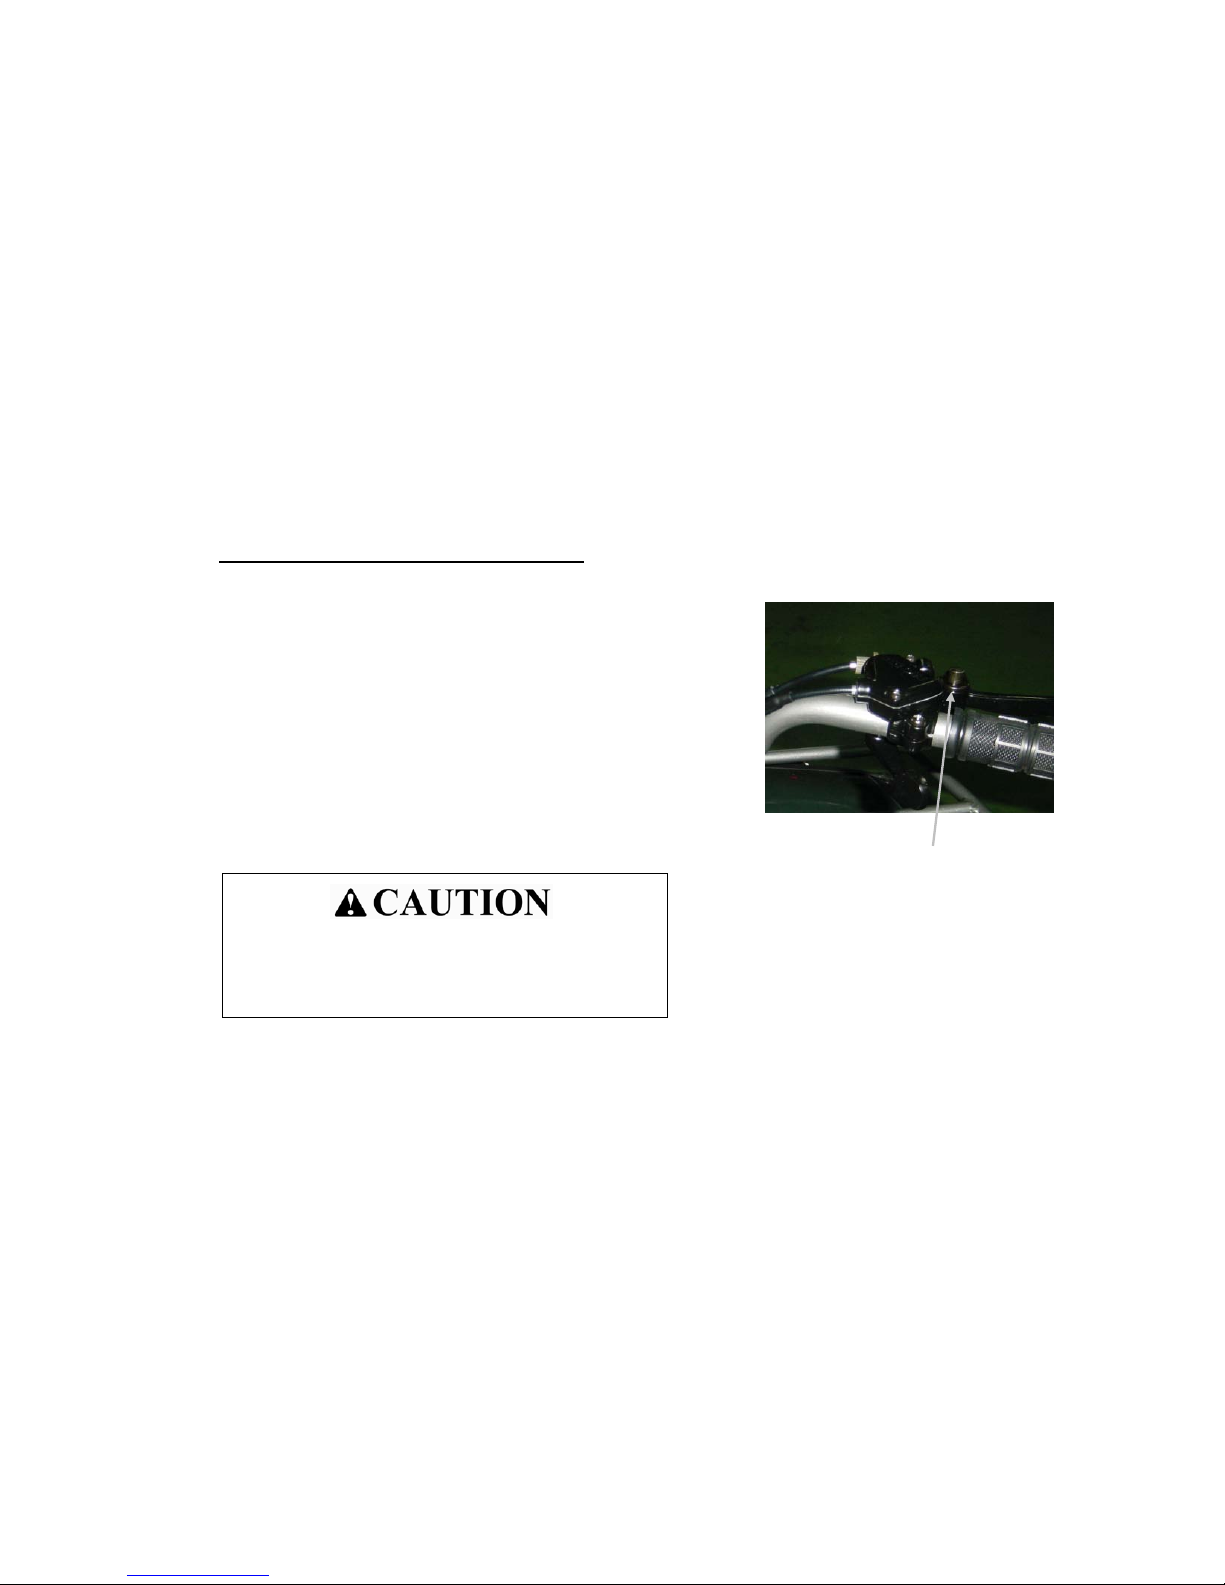
Rear Brake Adjuster
FEATURES AND OPERATION (cont.)
6. BRAKES (cont.)
Brake Lever Free Play
• Check the free play of front and rear brake levers.
• Use the adjustment knobs to change free play. Check the free play by
measuring the travel of the front and rear brake levers from their rest
position to their position when you first feel tension on the cables.
The free-play should fall between 3/8” ~ ¾ in. (10 ~ 20 mm).
• For the front R /L brakes: the adjusters are located on the brake lever .
Turn the adjuster to obtain the proper position.
• For the rear brake: you can adjust the brake adjuster wing nut to the
proper free play and brake setting.
Front R/L Brake Adjuster
26
FEATURES AND OPERATION (cont.)
6. BRAKES (cont.)
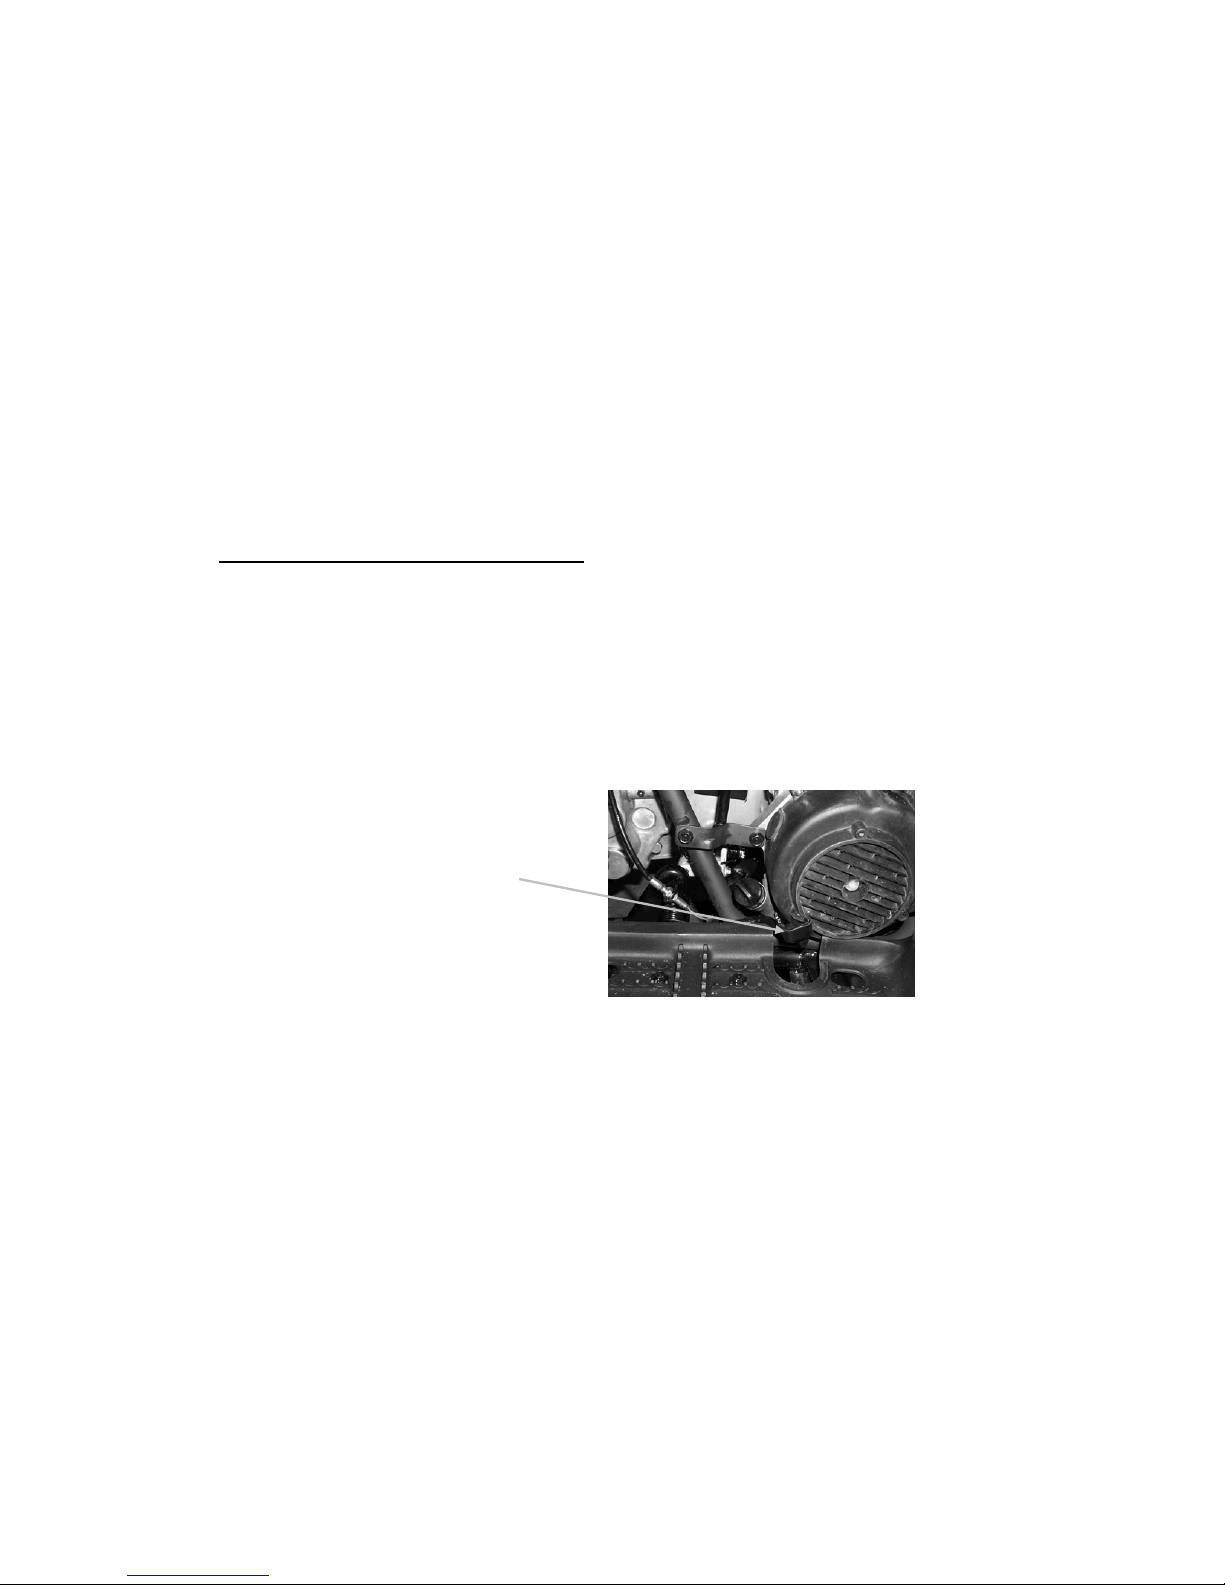
Auxiliary Brake
Your ATV has an auxiliary brake for an added safety feature. It is
located on the inside of the right floorboard (beneath the oil plug) and is
operated by the right foot. Use the auxiliary brakes as a backup to the
main brake system.
Auxiliary Brake
27
FEATURES AND OPERATION (cont.)
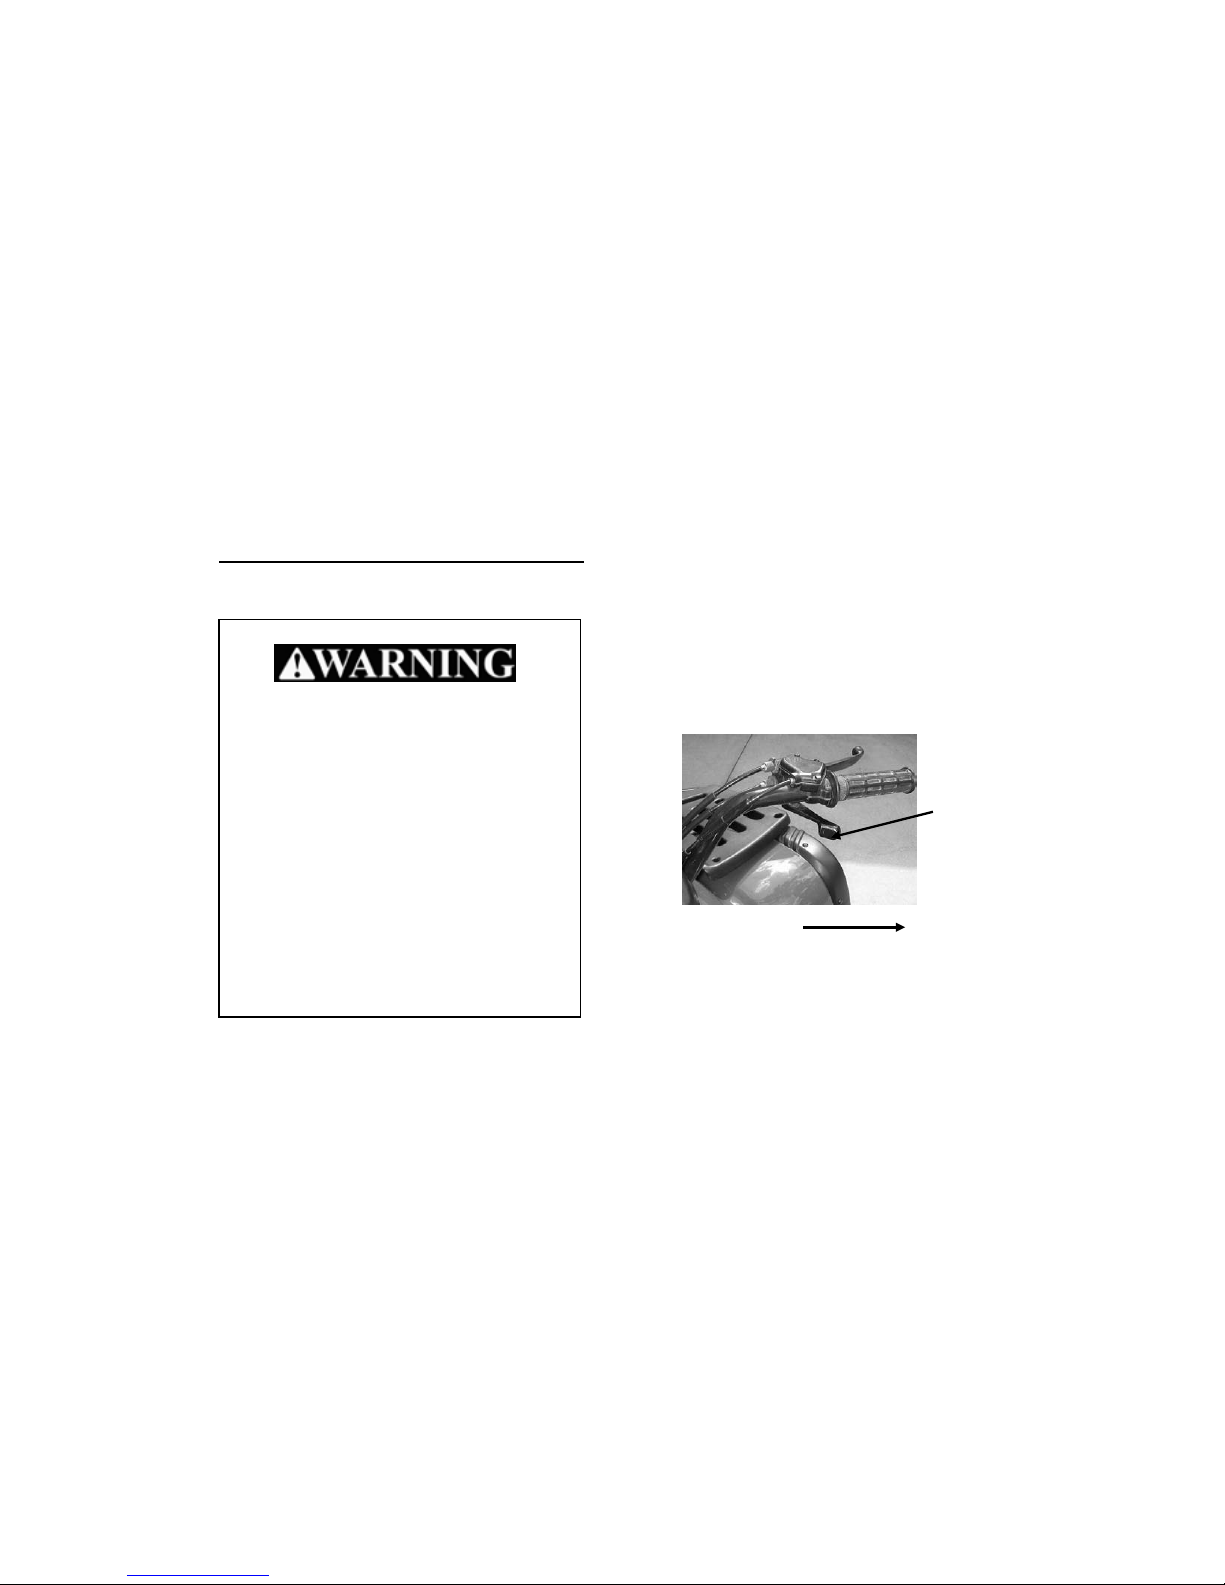
7. PARKING BRAKE
The parking brake is a safety device to lock the rear brake and limit ATV
movement
Setting the Parking Brake
• Squeeze the left-hand brake lever.
• Press the parking brake lock to hold the brake lever in place.
Releasing the Parking Brake
• Squeeze the brake lever and the park lever will release automatically
Always check to be sure that the parking brake has been
released before operating the ATV. An accident could
result causing severe injury if the parking brake is left on
while the ATV is operated.
Parking Brake Lock
28
FEATURES AND OPERATION (cont.)
7. PARKING BRAKE (cont.)
IMPORTANT SAFEGUARDS:
• Always lock the parking brake before starting
the engine.
• Once the engine has warmed enough for
operation, release the parking brake and
gently apply the throttle to go forward.
• Always lock the parking brake whenever the
ATV is left unattended.
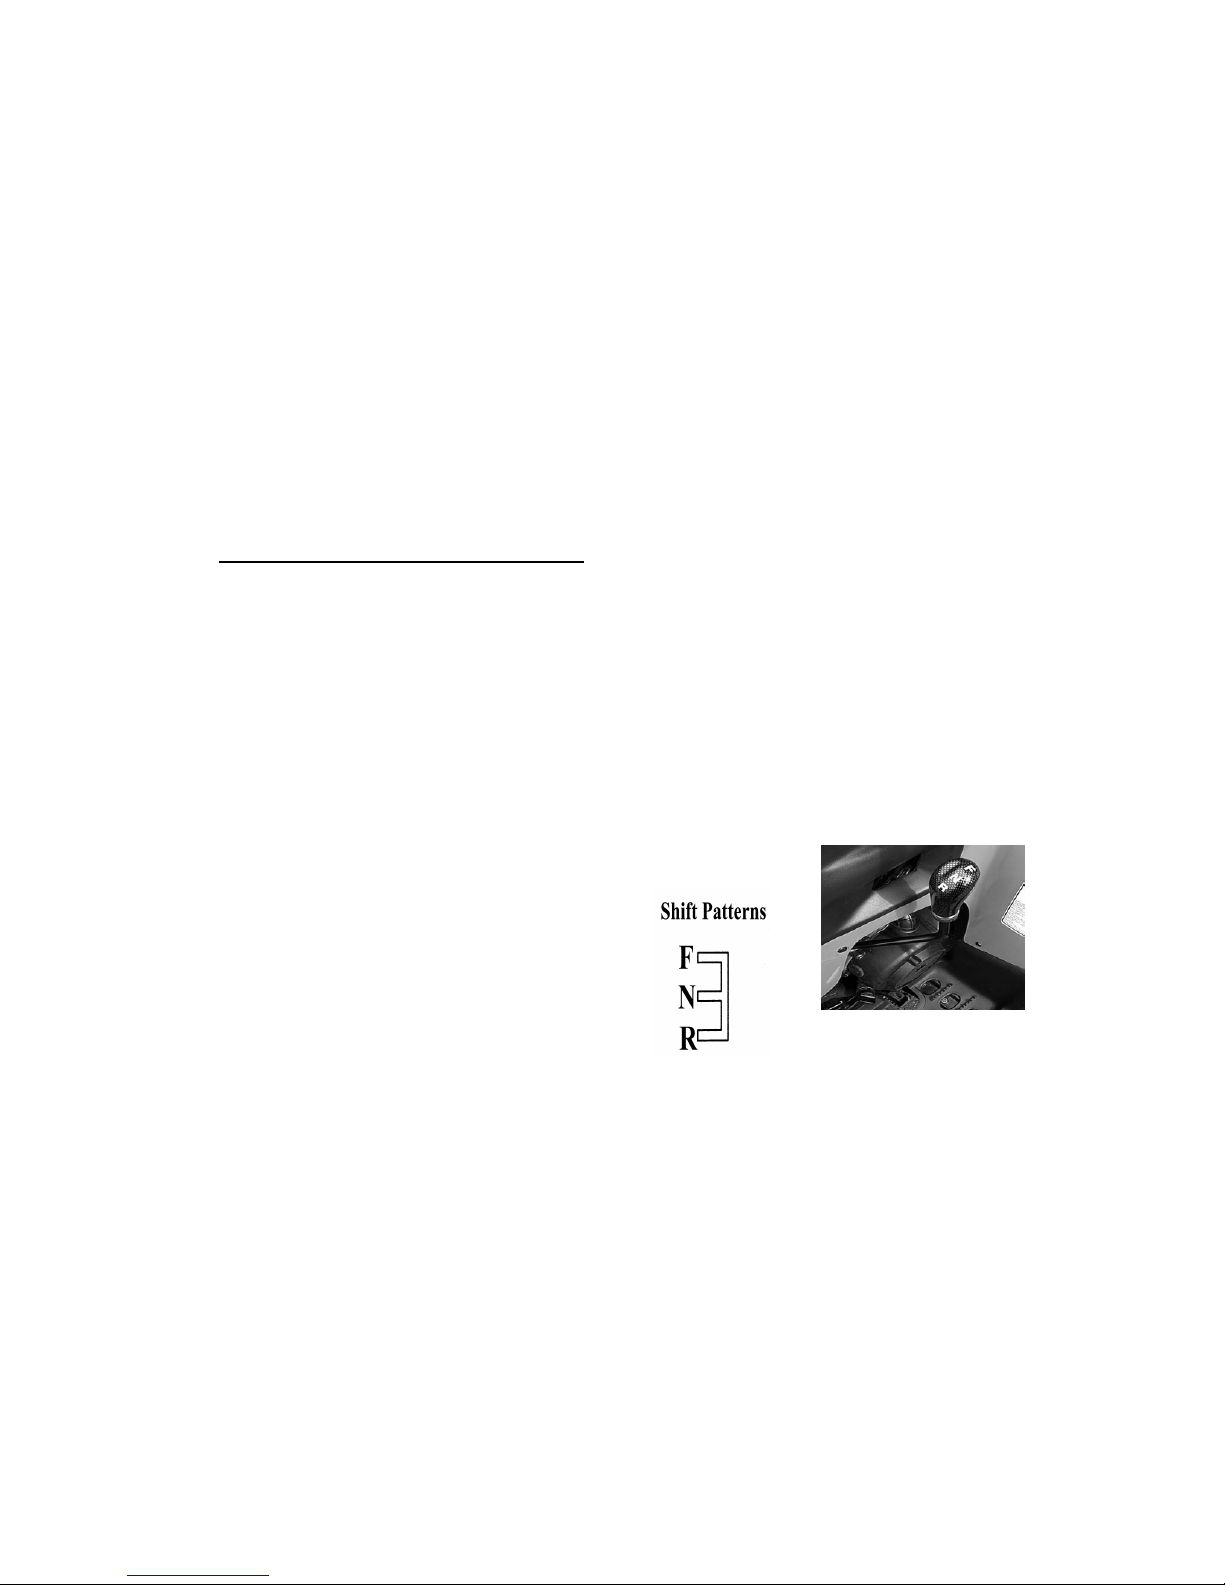
8. TRANSMISSION GEAR SHIFT LEVER
• The transmission gear shift leve r is located o n
the right side of the ATV.
• The gear shift lever has three (3) positions:
Forward, Neutral, and Reverse.
To Change Gears:
• Stop ATV and hold the rear break lever,
keeping the engine idling.
• Move the lever to the desired gear.
• DO NOT attempt to shift gears with engine
speed above idle or while the vehicle is
moving.
• Always place the transmission in gear with
the parking brake locked whenever the
vehicle is left unattended.
Maintaining shift linkage adjust is important to
assure proper transmission function. Should you
experience any shifting problem, see you local
Kolpin Powersports
dealer.

29
FEATURES AND OPERATION (cont.)
8. TRANSMISSION GEAR SHIFT LEVER (cont.)
• Be sure the ATV is in the Neutral position before you start the engine.
• If you cannot change gears, do not force gear shift lever into gear. Instead, try to change to the Neutral
position first, press the throttle and then try to change gears.
• The white back-up lights will be illuminated when the transmission is shifted fully into Reverse.
!
Do not attempt to shift the transmission while the vehicle is moving or while operating on hilly terrain.
!
Always place the transmission in gear with the parking brake locked whenever the vehicle is left
unattended.
!
For your safety, apply the rear brake lever when you shift to Reverse. It you do not, the engine will stop
immediately. To restart the engine shift back to Neutral and use normal start procedure.

30
9. THE CVT SYSTEM
• The CVT system rotates at high speeds, creating large amounts of force on clutch components.
Extensive engineering and testing has been conducted to insure the safety of this product. However, as
the owner you have the following responsibilities to make sure this system remains safe:
• Do not modify any component of the CVT system. Doing so may reduce its strength so that a failure
may occur at high speeds. This system has been precision balanced. Any modification will cause the
system to be out of balance, creating vibration and additional loads on components.
• Routine maintenance is the responsibility of the owner. Always follow recommended maintenance
procedures. See your Kolpin Powersports dealer for questions or maintenance.
• The CVT housing must be securely in place during operation.
F AILURE TO COMPLY WITH THIS WARNING CAN RESULT IN SEVERE INJURY OR DEATH.
 Loading...