

Kolpin 89185 User Manual
Rev. 5
Kolpin Outdoors, Inc., 205 N. Depot Street, Fox Lake, WI Phone #: (877) 9KOLPIN or (920) 928-3118 www.kolpin.com customerservice@kolpin.com
89135/89185 - KOLPIN FUEL PACK/ FUEL PACK JR.
NOTE: THE SPOUT ASSEMBLY CONTAINS A SPOUT, COLLAR, AND DUST COVER.
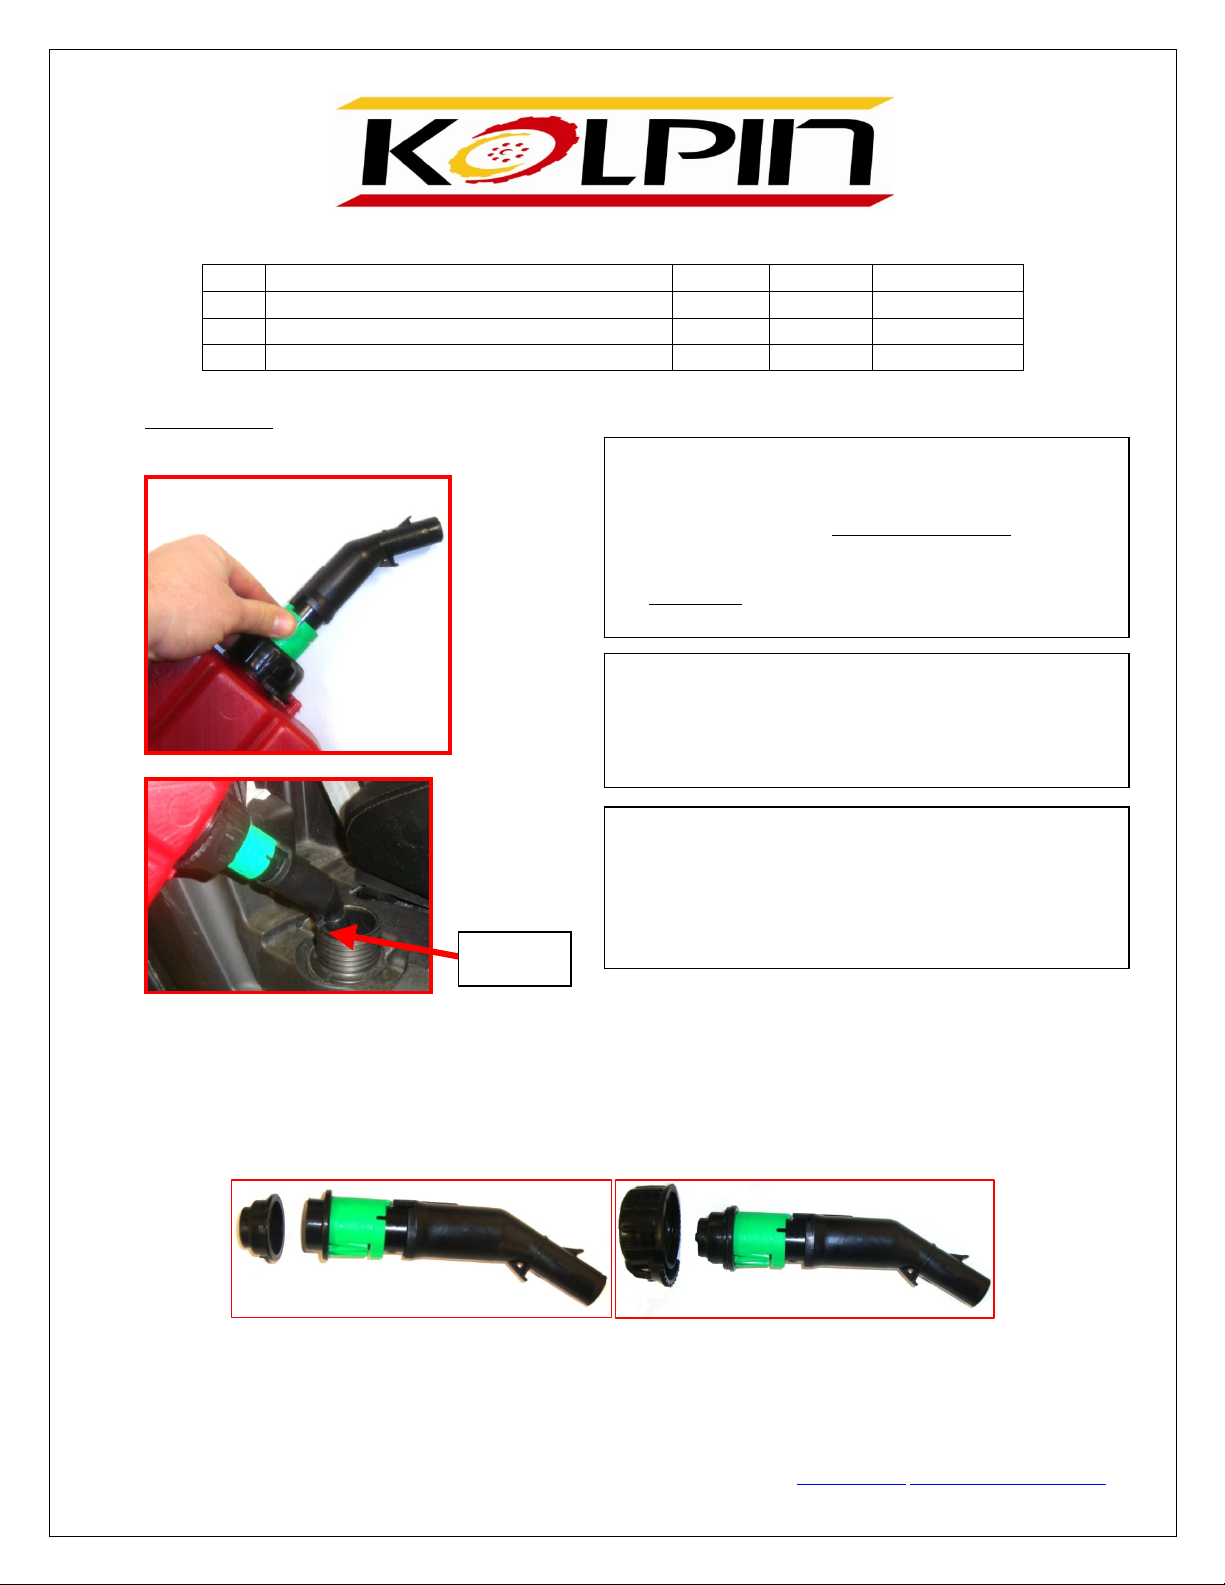
Nozzle Usage –
When dispensing fuel, please follow these guidelines.
When done fueling your machine simply release your downward pressure and the spout will snap closed and return
to the lock position. Let the remaining fuel in the nozzle drain and then you can remount your fuel pack on your
vehicle. You will notice that there are two tabs. The first one is for fueling smaller tank items, such as chainsaws,
lawn mowers, etc. The second one, as shown in the photo, is designed to get the spout lower into bigger tanks like
that of ATV’s and UTV’s as shown in the photo to the left. For storage purposes, reverse the spout, place the dust
cover over the opening and store inside the tank. The spout may need to be twisted in order to fully seat with to flat
surface on the filler neck. Make sure the U-shaped gasket is seated properly on the flange of the spout!
When mounting a full size Fuel/Water Pack (#89135 or #89235) on an ATV, you will need to use either two (2)
Pack Brackets (#89475) or the supplied Velcro straps. When mounting the Fuel/Water Pack Junior on an ATV, only
one Pack Bracket is required. The same quantity is used when using the Pack Mount (#89435) for wall mount
applications. For great gas storage solutions and ideas around your home, cabin, boat house, etc. be sure to check
out the Kolpin Website for more information. Kolpin has revolutionized the way fuel containers can be safely and
securely stored!
Item
Description
Material
Quantity
Spare P/N
A
MOLDED TANK
Plastic
1
N/A
B
VELCRO STRAPS (89135/89235 ONLY)
-
4
87048
C
SPOUT ASSY
Plastic
1
89080
TAB
2. Now, set the tab of the spout on the edge of your gas tank.
Applying down pressure will open the valve in the spout and
allow fuel to dispense. Be sure to not push excessively or
twist the spout, as the tab could fail. Here you will see a
number “2” molded on this section, to remind you it is the
second step to dispensing fuel.
1. First, rotate the GREEN collar until you hear a click. This
will unlock the spout, without fuel being able to dispense.
You will see the number 1 molded on this section with
arrows showing which direction to rotate. This is to remind
you which order is needed to activate the spout.
NOTE: It is common for the tank to distort/expand due to
fuel pressure caused by direct sunlight or heat. Fuel Vapor
can only reach a maximum pressure of 6PSI, and Kolpin
tanks are tested to 20PSI. BEFORE FUELING, it is crucial
that you first release the pressure in the tank by either
loosening the blind cap or compressing the spout, while in
the UPRIGHT position. Failure to do so will result in
unwanted fuel dispensing, which could lead to serious injury!
1
2
 Loading...